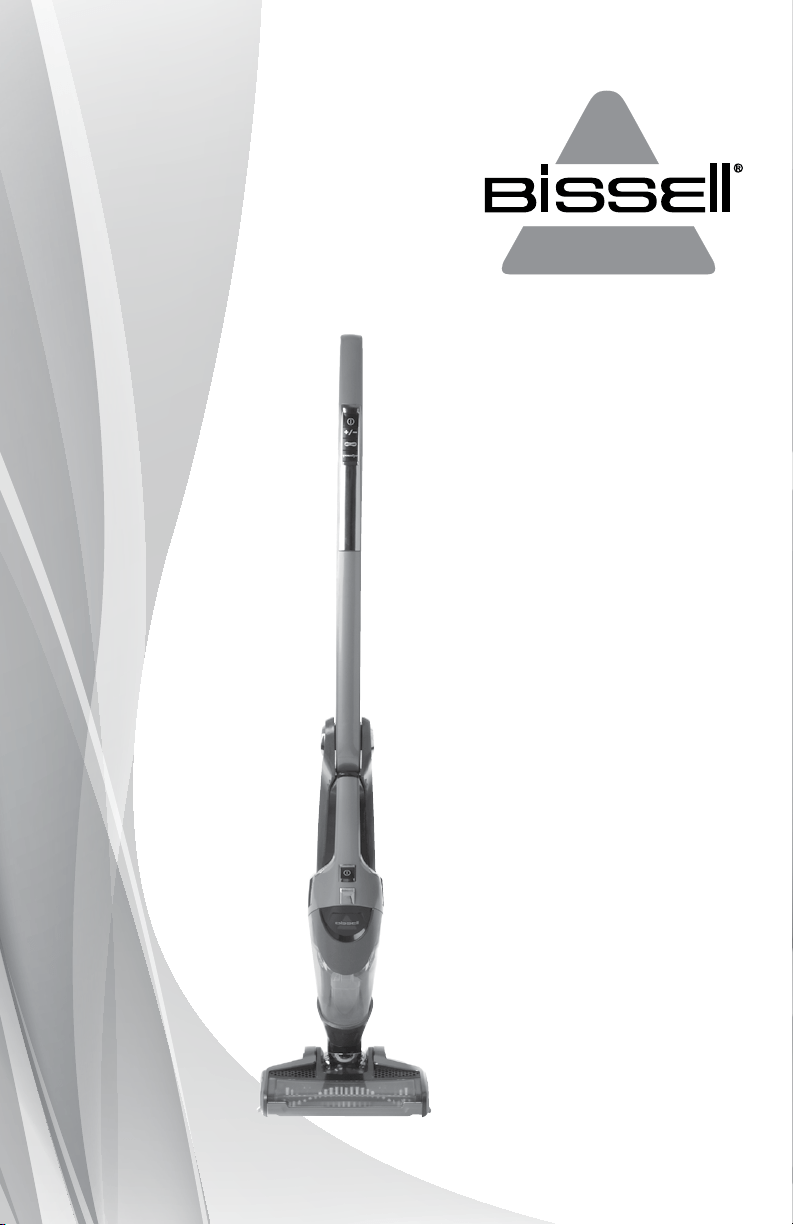
BOLT
™
ION
2-IN-1 CORDLESS VACUUM
USER GUIDE
1311, 1312 SERIES

IMPORTANT SAFETY INSTRUCTIONS
READ ALL INSTRUCTIONS BEFORE
USING YOUR VACUUM.
When using an electrical appliance, basic precautions should be observed, including the following:
www.BISSELL.com
2
This model is for household use only.
SAVE THESE INSTRUCTIONS
FOR FUTURE USE
WARNING
TO REDUCE
THE RISK
OF FIRE,
ELECTRIC
SHOCK, OR
INJURY:
» This appliance can be used by
children aged from 8 years and
above and persons with reduced
physical, sensory or mental capa
-
bilities or lack of experience and
knowledge if they have been given
supervision or instruction concern
-
ing use of the appliance in a safe
way and understand the hazards
involved. Children shall not play
with the appliance. Cleaning and
user maintenance shall not be made
by children without supervision.
» Do not use outdoors or on
wet surfaces.
» Do not allow to be used as a toy.
» Close attention is necessary
when used by or near children.
» Do not use for any purpose
other than described in this
User’s Guide.
» Use only manufacturer’s
recommended attachments.
» Do not use with damaged cord
or plug.
» If appliance is not working as
it should, has been dropped,
damaged, left outdoors, or
dropped into water, have it
repaired at an authorized
service center.
» Do not pull or carry by cord, use
cord as a handle, close a door on
cord, or pull cord around sharp
edges or corners. Do not run
appliance over cord. Keep cord
away from heated surfaces.
» Do not unplug by pulling on cord.
To unplug, grasp the plug, not
the cord.
» Do not handle charging base,
including plug and charging base
terminal with wet hands.
» Do not charge the unit outdoors.
» Use only the charger supplied by
the manufacturer to recharge.
» Do not incinerate the appliance
even if it severely damaged. The
batteries can explode in a fire.
» Do not put any object into
opening.
» Do not use with any opening
blocked.
» Keep openings free of dust, lint,
hair and anything that may
reduce airflow.
» Keep hair, loose clothing, fingers,
and all parts of body away from
openings and moving parts.
» Use extra care when cleaning
stairs.
» Do not pick up flammable
materials (lighter fluid, gasoline,
kerosene, etc.) or use in the pres
-
ence of explosive liquids
or vapors.
» Always turn off this appliance
before connecting or
disconnecting the motorized
nozzle.
» Do not pick up toxic material
(chlorine bleach, ammonia,
drain cleaner, etc.).
» Do not use vacuum cleaner in an
enclosed space filled with vapors
given off by oil base paint, paint
thinner, some moth proofing
substances, flammable dust, or
other explosive or toxic vapors.
» Do not pick up hard or sharp
objects such as glass, nails,
screws, coins, etc.
» Do not pick up anything that
is burning or smoking, such as
cigarettes, matches, or hot ashes.
» Do not use without dust cup or
filters in place.
» Use only on dry, indoor surfaces.
» Keep appliance on a level surface.
www.BISSELL.com
3
Th for buying a BISSELL vacuum
We’re glad you purchased a BISSELL
vacuum. Everything we know about
floor care went into the design and
construction of this complete,
high-tech home cleaning system.
Your BISSELL vacuum is well made,
and we back it with a limited
two-year warranty. We also stand
behind it with a knowledgeable,
dedicated Consumer Care
department, so, should you ever
have a problem, you’ll receive fast,
considerate assistance.
My great-grandfather invented the
floor sweeper in 1876. Today, BISSELL
is a global leader in the design,
manufacture, and service of high
quality homecare products like your
BISSELL vacuum.
Thanks again, from all of us
at BISSELL.
Mark J. Bissell
Chairman & CEO
Safety Instructions...........2
Product View ................4
Assembly ...................5
Operations ................5-6
Maintenance & Care .......6-8
Troubleshooting .............9
Replacement Parts .........10
Warranty ....................11
Service ......................11
Consumer Care .............12
Product Registration........12
WARNING
AN ACTION OR ATTENTION IS NEEDED TO THIS AREA IN ORDER
TO REDUCE THE RISK OF ELECTRIC SHOCK, FIRE, OR INJURY
GUIDE
READ USER GUIDE FOR COMPLETE SAFETY AND USER
INSTRUCTIONS
WEEE
DO NOT THROW THE APPLIANCE AWAY WITH THE NORMAL
HOUSHOLD WASTE AT THE END OF ITS LIFE, BUT HAND IT IN AT
AN OFFICIAL COLLECTION POINT FOR RECYCLING. BY DOING
THIS YOU WILL HELP TO PRESERVE THE ENVIRONMENT.
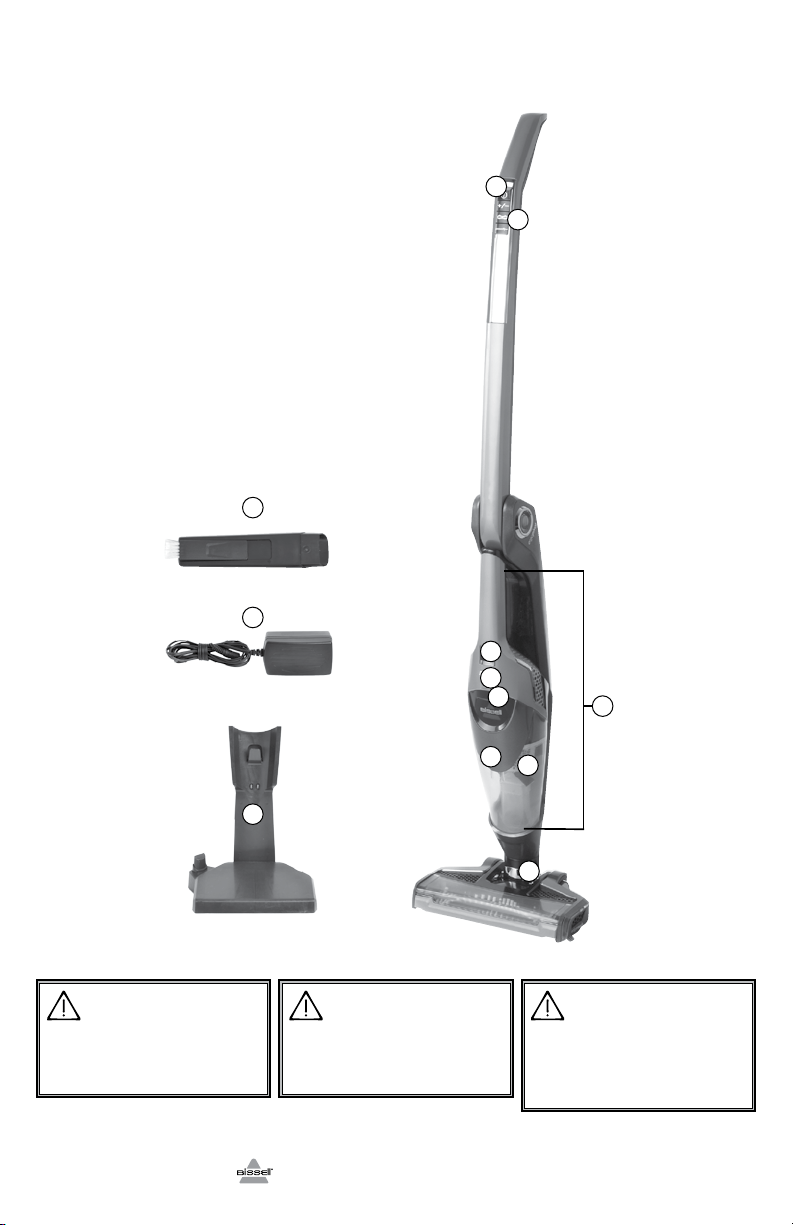
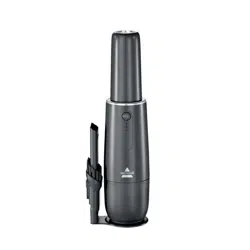
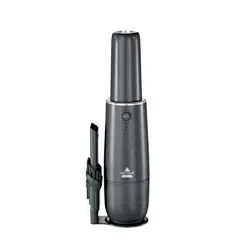
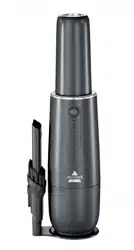
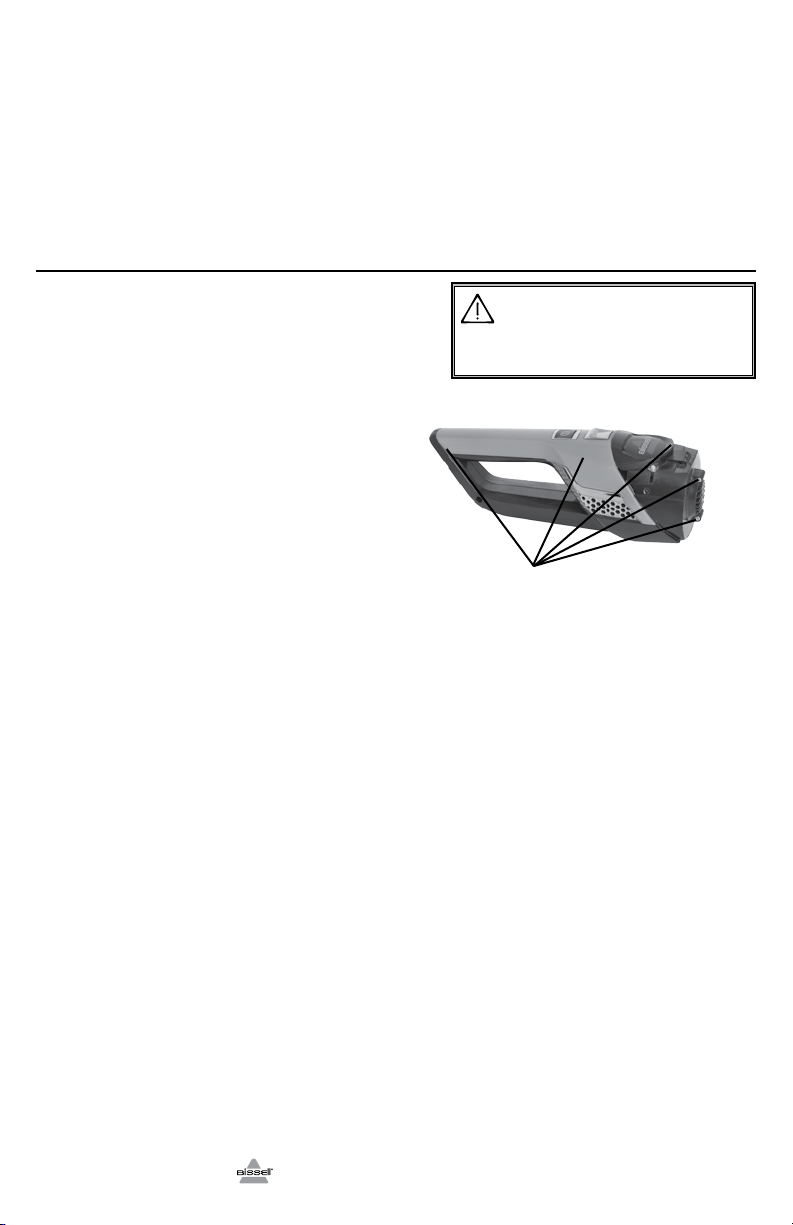
1 Power/Brush Roll On/Off/Suction
Power Control/EdgeReach
2 2-Way Folding Handle Release
3 Hand Vacuum Power Button
4 Dirt Cup Release
5 Charging Light Indicator
6 Detachable Hand Vacuum
7 Dirt Cup
8 Washable Filter Cup
9 Swivel Head
10 Crevice Tool with Dusting Brush
11 Charging Adapter Plug
12 Charging Base
Product View
WARNING
Do not plug in your vacuum cleaner until
you are familiar with all instructions and
operating procedures.
WARNING
Plastic film can be dangerous. To avoid
danger of suocation, keep away from
babies and children.
11
10
12
www.BISSELL.com
4
WARNING
To reduce the risk of electric shock, turn
power switch o and disconnect polarized
plug from electrical outlet before performing
maintenance or troubleshooting checks.
5
4
3
8
7
9
6
1
2
5
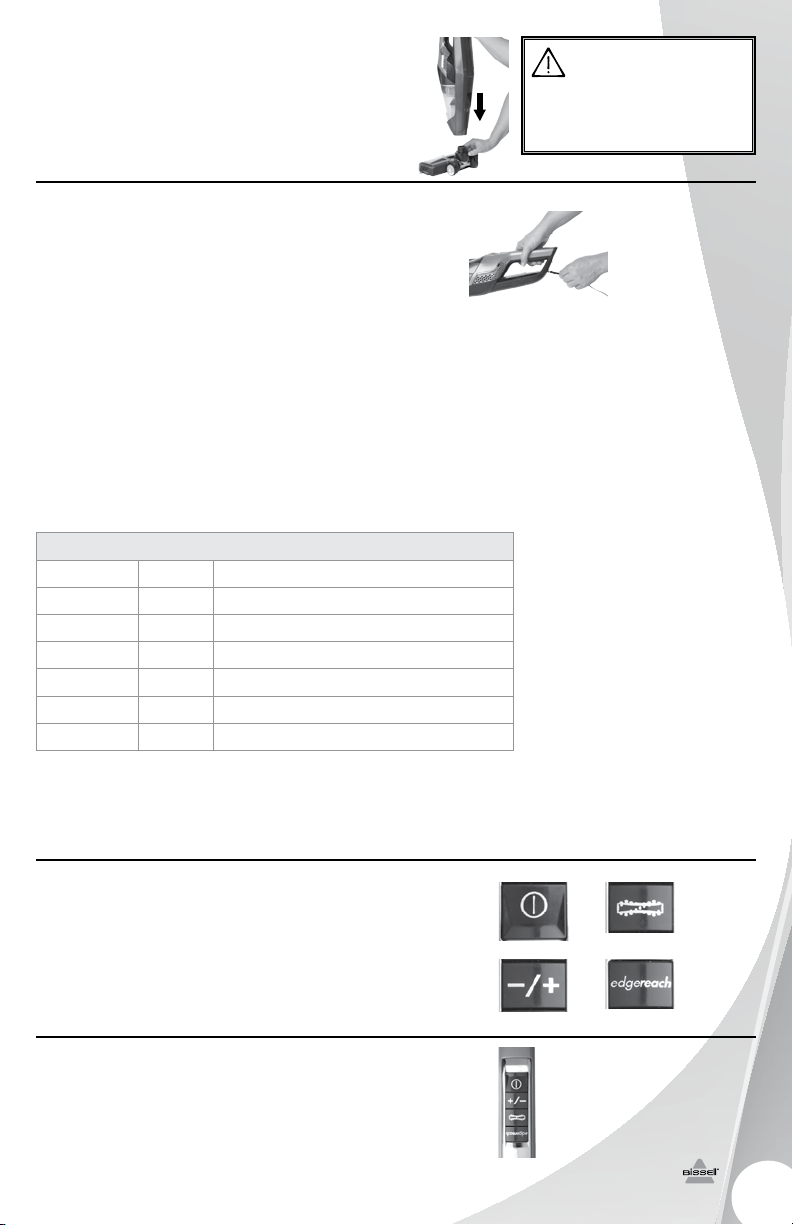
Asmbly
Operatis
No tools are required for assembly; simply insert
foot into body of unit until you hear a click.
Charging
Before charging make sure unit is in the OFF
position.
1. Insert the charging adapter plug into the
charging port on the bottom of the charging
base. The unit can also be charged from the
hand vacuum by inserting the charging adapter
plug into the charging port on the back of
the unit.
2. Plug the adapter into the wall outlet. If using
the charging base, place unit onto base. The
power LED lights will illuminate when charging.
Charge the unit completely for 4 hours prior to
first use.
NOTE: The adapter may become warm during
charging – this is normal.
3. When the unit is fully discharged,
approximately 4 hours of charging is required
for the battery to regain full capacity.
Control buttons
The power button is located on the top
of the handle. Settings include:
a. Power Icon = On/Off
b. Brush Icon = Brush On/Off
c. Suction Icon = Normal/High
d. EdgeReach = On/Off
Using your cordless vacuum
1. Push power button ON.
2. Push brush button on to easily clean
hard floors, low pile carpet, and area rugs.
3. Use suction button to control power
of suction.
WARNING
Do not plug in your vacuum cleaner until
you are familiar with all instructions and
operating procedures.
1.
a. b.
c. d.
Charging
Battery Status LED Color Light Behavior
100% Blue 3 Lights On, for 10 minutes
99% to 66% Blue
2 Lights On, 1 Light Blinking, 2 Second Fade In & Out
65% to 33% Blue
1 Light On, 1 Light Blinking, 2 Second Fade In & Out
32% to 10% Blue 1 Light Blinking, 2 Second Fade In & Out
9% to 1% Red 1 Light Blinking, 1 Second Fade In & Out
0% Red 1 Light Blinking, 1 Second Fade In & Out
www.BISSELL.com
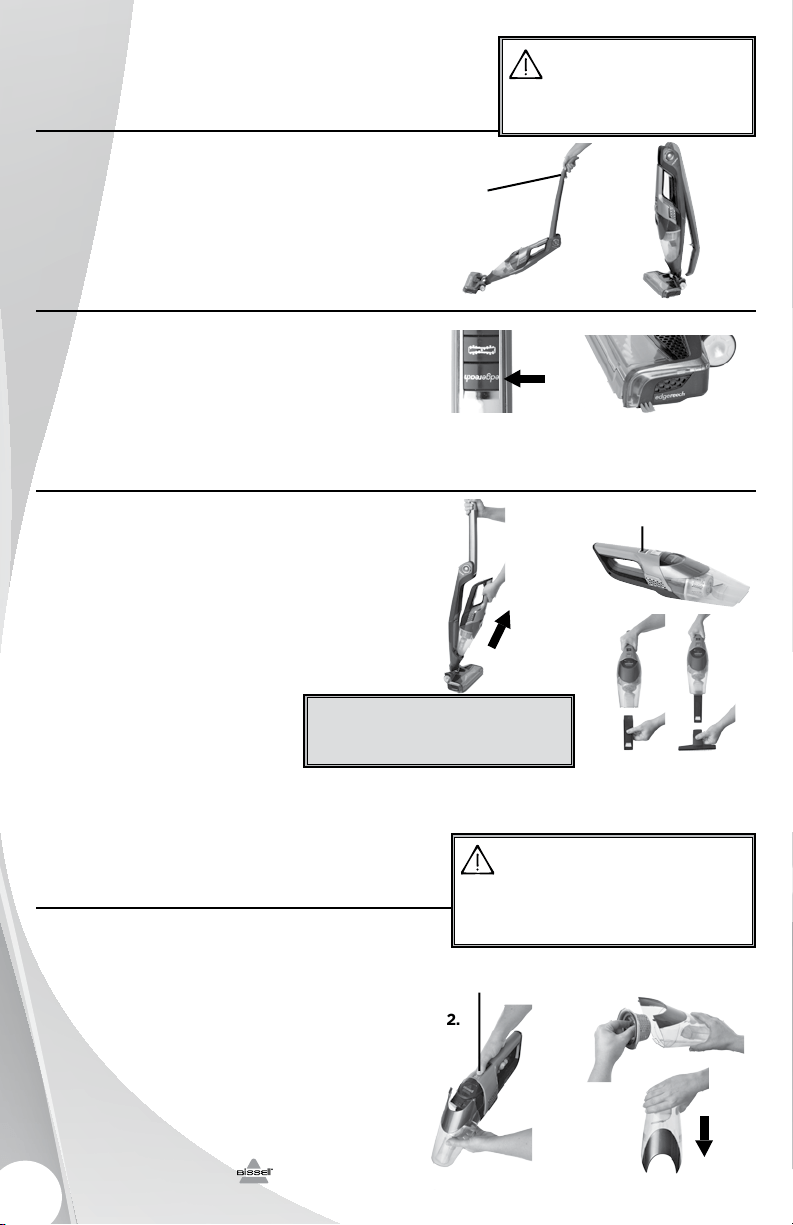
2-way folding handle
This feature is great for cleaning under couches,
beds and other hard to reach areas.
1. To release, pull trigger located on the back of
the handle to bend handle forward for cleaning
under furniture.
2. For space saving storage, pull trigger to bend
handle backward.
Operating edgeReach™
This feature is a great way to clean along edges
and into corners and along your baseboard.
1. To activate, press the edgeReach™ button
on the handle.
2. Glide cordless vacuum along edges and
corners to allow the focused suction to do
its work.
Cleaning with the removable hand vacuum
1. Remove hand vacuum by pulling the hand
vacuum directly out of the unit.
2. The power button is located on top of the grip
area. Push ON to start cleaning.
3. Easily clean messes on furniture, stairs,
and other hard to reach areas.
4. To use hand vacuum accessories, insert the
end of the tool into the end of the hand vacuum
prior to turning hand vacuum ON.
5. When done cleaning, turn
power OFF and remove hand
vacuum accessory
and place back in unit.
Operatis
Mainnce & Care
To maintain maximum cleaning performance, the
following maintenance steps must be performed:
Emptying the dirt cup
Dirt cup should be emptied before debris
reaches the FULL line on cup.
1. Turn power OFF and remove hand vacuum
from unit, by pulling the hand vacuum directly
out of the unit.
2. Hold hand vacuum vertically and depress the
release button to release dirt cup.
3. Grasp filter tabs and pull vertically to remove
filter cup and empty dirt into waste container.
4. Replace filter back into the dirt cup and
attach dirt cup to hand vacuum until it snaps
securely in place.
www.BISSELL.com
6
WARNING
Do not operate cleaner with damp or wet filters
or without vacuum bags and all filters in place.
4.
2.
3.
Power Switch
2.
Release Button
WARNING
To reduce the risk of electric shock, turn power switch o
and disconnect polarized plug from electrical outlet before
performing maintenance or troubleshooting checks.
1. 2.
1.
1. 2.
2-Way
Folding
Handle
Release
» Accessories can be combined
together or used individually.
Tip
Cleaning or replacing the filter
The key to maximum performance is having a
clean filter. Cleaning the filter after each use will
help your vacuum operate at peak efficiency.
Use only genuine BISSELL model number 1311 &
1312 replacement filters in your BISSELL vacuum.
To purchase visit www.BISSELL.com or call
1-800-811-183 for Australian inquiries or 0800-
247-735 for New Zealand inquiries.
To clean filter:
1. Turn power OFF.
2. Remove the dirt cup from the hand vacuum,
as directed in step 1 “Emptying the dirt cup”
on page 6.
3a. To remove filter from the filter cup, grasp
filter tabs, turn counterclockwise and
lift up. Tap firmly against the inside of a waste
container, removing any visible dirt.
b. To remove filter cup from the dirt cup, or
grasp filter tabs and lift up to remove the
washable filter cup from the dirt cup. Grip tabs,
turn counterclockwise and lift up to remove filter
from filter cup.
4. Replace filter back into the washable filter cup
then turn clockwise to lock into place.
5. Attach washable filter cup back into the dirt
cup and attach to hand vacuum until it snaps
securely in place.
NOTE: After heavy usage, you may clean the
filter and filter cup by washing it gently by
hand in warm water and mild dish detergent.
Rinse thoroughly and make certain it is
completely dry before replacing it.
Brush roll and brush roll belt maintenance
The brush roll may accumulate debris such as
strings, hair and fibers. This type of debris can
wrap around the brush and diminish its ability
to clean effectively.
To remove brush roll for cleaning:
1. Turn power OFF. Turn unit over to access the
brush roll.
2. Slide down the lock tab and pull up the brush
roll gate.
3. To remove brush roll, simply lift the brush out
of the brush chamber. Clean off hair or other
debris from brush roll.
4. Place cleaned brush roll back into foot of unit
by aligning the brush roll end to the brush driver.
5. Replace the lock tab by pushing brush roll
gate into place and slide up the lock tab to
secure it.
7
Mainnce & Care
2.
1.
3.
WARNING
To reduce the risk of electric shock, turn power switch o
and disconnect polarized plug from electrical outlet before
performing maintenance or troubleshooting checks.
3b.
3a.
www.BISSELL.com
www.BISSELL.com
Mainnce & Care
Brush roll reset:
If larger debris becomes lodged in the foot of
the unit and the brush roll shuts off, turn the unit
off and remove the obstruction. Wait approxi-
mately 15 seconds for the motor to cool down
before turning back on. Brush will function again
after allowing time to cool down.
Disposal of Batteries
If your Bolt Ion Series is to be disposed of, the
batteries should be removed and disposed of
properly.
1. IMPORTANT: Unplug Charger and discharge
the unit completely.
2. Remove hand vac from unit and remove
dirt cup from handle.
3. Remove (2) Phillips head screws and
remove the lens from the hand vacuum.
4. Remove (2) Phillips head screws from
the hand vacuum cover.
5. Lift off the hand vacuum cover.
6. Take out push rod.
7. Remove (5) Phillips head screws from
the side of the hand vacuum.
8. Remove the entire battery assembly from
the cover.
9. Cut wires from the PCB and wrap the
wire ends with insulation tape.
10. Keep Battery Pack together – DO NOT
separate individual batteries. For specific
disposal instructions of batteries, please
follow local regulations.
11. Hand in remainder of product at an official
collection point for recycling.
CAUTION
Disconnecting the battery will destroy the appliance and
invalidate the warranty.
8
7.
5 screws
Trbleshting
WARNING
To reduce the risk of electric shock, turn power switch o
and disconnect polarized plug from electrical outlet before
performing maintenance or troubleshooting checks.
Problem Possible causes Remedies
Vacuum
won’t turn on
Battery isn’t fully charged Charge battery. Follow charging
battery instructions on page 5
Wrong charger being used Be sure to use only the charger
supplied with your product. The label
on the detachable hand vacuum will
list which charger can be used.
Brush roll
not turning
Brush roll is jammed Remove obstruction.
Follow instructions on page 7
Brush roll needs to be reset Follow instructions on page 7
Broken brush roll belt
Visit www.bissell.com or call 1-800-811-
183 for Australian inquiries or 0800-
247-735 for New Zealand inquiries.
Vacuum
cleaner
has low
suction
Dirt container is full Empty dirt container
Dirt container is not installed
properly
Position container correctly and
snap firmly into place
Foot is loose Make sure foot is fully inserted into
body of unit
Filters need cleaning Follow filter instructions on page 7
Filters need replacing
Visit www.bissell.com or call 1-800-811-
183 for Australian inquiries or 0800-
247-735 for New Zealand inquiries.
Clog or obstruction in foot area Detach foot from main body and
examine and remove clog from ports
Visible dirt
escaping from
cleaner
Dirt container is full of debris Empty dirt container
Filter is missing or installed
incorrectly
Check filter for correct installation
Dirt container installed incorrectly Position container correctly and
snap firmly into place
Vacuum won’t
charge
Machine is in the ON position Set the machine in the OFF position
Not the correct charger Use only the charger that comes with
the machine
Other maintenance or service not included in the manual should be
performed by an authorized service representative.
Thank you for selecting a BISSELL product.
For any questions or concerns, BISSELL is happy to be of
service. Contact us directly at 1-800-811-183 for Australian
inquiries or 0800-247-735 for New Zealand inquiries.
Please do
not return
this product
t o t h e s t o r e .
9
www.BISSELL.com
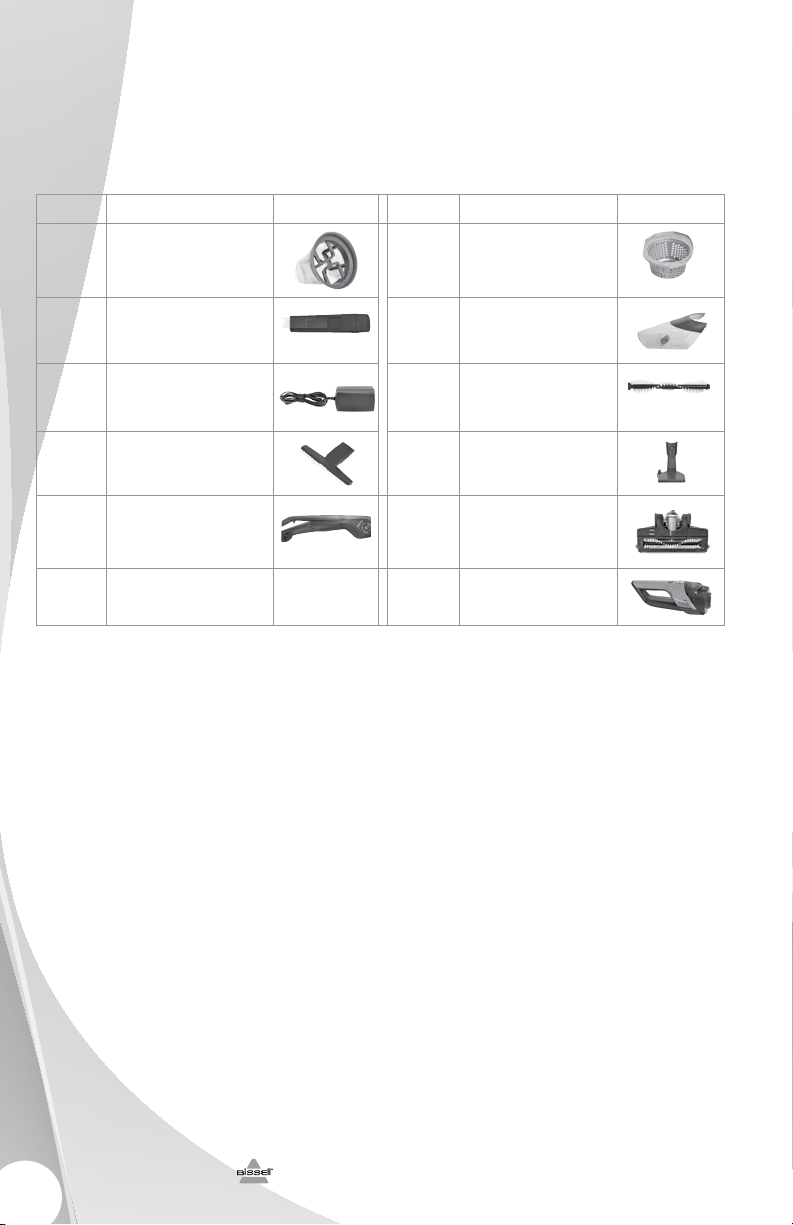
Replacement Parts
These items are available for your BISSELL Bolt Ion. Call 1-800-811-183 for Australian inquiries
or 0800-247-735 for New Zealand inquiries, or visit www.bissell.com.
1311 Series
www.BISSELL.com
PART # PART NAME PART # PART NAME
1604734 Filter
1604481 Washable Filter Cup
1604272 Crevice Tool with Dusting Brush 1604480 Dirt Cup Assembly
1605212 Charging Adapter Plug 1604487 Brush Roll
1604257 Stair & Upholstery Tool 1605426 Charging Base
1605206 Handle & Body Assembly 1605211 Foot Assembly Picture
1605216 Hand Vac
10
Replacement Parts
These items are available for your BISSELL Bolt Ion. Call 1-800-811-183 for Australian inquiries
or 0800-247-735 for New Zealand inquiries, or visit www.bissell.com.
1312 Series
PART # PART NAME PART # PART NAME
1604734 Filter
1604481 Washable Filter Cup
1604272 Crevice Tool with Dusting Brush 1604480 Dirt Cup Assembly
1605221 Charging Adapter Plug 1604487 Brush Roll
1604257 Stair & Upholstery Tool 1605425 Charging Base
1605204 Handle & Body Assembly (Blue) 1605214 Hand Vac (Blue)
1605205 Handle & Body Assembly
(Orange)
1605215 Hand Vac (Orange)
1605210 Foot Assembly (Orange) 1605209 Foot Assembly (Blue)
11
www.BISSELL.com

©2
014 BISSELL Homecare, Inc
Grand Rapids, Michigan
All rights reserved. Printed in China
Part Number 160-5848 Rev 09/14
RevA Visit our website at:
www.BISSELL.com
12
Csumer Guare
This Guarantee only applies outside of the USA and Canada. It is
provided by BISSELL International Trading Company BV (“BISSELL”).
This Guarantee is provided by BISSELL. It gives you specific rights.
It is offered as an additional benefit to your rights under law. You
also have other rights under law which may vary from country
to country. You can find out about your legal rights and remedies
by contacting your local consumer advice service. Nothing in this
Guarantee will replace or lessen any of your legal rights or remedies.
If you need additional instruction regarding this Guarantee or have
questions regarding what it may cover, please contact BISSELL
Consumer Care or contact your local distributor.
This Guarantee is given to the original purchaser of the product from
new and is not transferable. You must be able to evidence the date
of purchase in order to claim under this Guarantee.
Limited Two-Year Guarantee
Subject to the *EXCEPTIONS AND EXCLUSIONS identified below,
BISSELL will for two years from the date of purchase by the
original purchaser repair or replace (with new or remanufactured
components or products), at BISSELL’s option, free of charge, any
defective or malfunctioning part or product.
BISSELL recommends that the original packaging and evidence
of the date of purchase be kept for the duration of the Guarantee
period in case the need arises within the period to claim on the
Guarantee. Keeping the original packaging will assist with any
necessary re-packaging and transportation but is not a condition of
the Guarantee.
If for your product is replaced by BISSELL under this Guarantee,
the new item will benefit from the remainder of the term of this
Guarantee (calculated from the date of the original purchase). The
period of this Guarantee shall not be extended whether or not
your product is repaired or replaced.
*EXCEPTIONS AND EXCLUSIONS FROM
THE TERMS OF THE GUARANTEE
This Guarantee applies to products used for personal domestic use and
not commercial or hire purposes. Consumable components such as
filters, belts and mop pads, which must be replaced or serviced by the
user from time to time, are not covered by this Guarantee.
This Guarantee does not apply to any defect arising from fair wear
and tear. Damage or malfunction caused by the user or any third
party whether as a result of accident, negligence, abuse, neglect, or
any other use not in accordance with the User Guide is not covered
by this Guarantee.
An unauthorised repair (or attempted repair) will void this Guarantee
whether or not damage has been caused by that repair/attempt.
Removing or tampering with the Product Rating Label on the
product or rendering it illegible will void this Guarantee.
SAVE AS SET OUT BELOW BISSELL AND ITS DISTRIBUTORS ARE NOT
LIABLE FOR ANY LOSS OR DAMAGE THAT IS NOT FORESEEABLE
OR FOR INCIDENTAL OR CONSEQUENTIAL DAMAGES OF ANY
NATURE ASSOCIATED WITH THE USE OF THIS PRODUCT INCLUDING
WITHOUT LIMITATION LOSS OF PROFIT, LOSS OF BUSINESS, BUSINESS
INTERRUPTION, LOSS OF OPPORTUNITY, DISTRESS, INCONVENIENCE OR
DISAPPOINTMENT. SAVE AS SET OUT BELOW BISSELL’S LIABILITY WILL
NOT EXCEED THE PURCHASE PRICE OF THE PRODUCT.
BISSELL DOES NOT EXCLUDE OR LIMIT IN ANY WAY ITS LIABILITY FOR
(A) DEATH OR PERSONAL INJURY CAUSED BY OUR NEGLIGENCE OR THE
NEGLIGENCE OF OUR EMPLOYEES, AGENTS OR SUBCONTRACTORS; (B)
FRAUD OR FRAUDULENT MISREPRESENTATION; (C) OR FOR ANY OTHER
MATTER WHICH CANNOT BE EXCLUDED OR LIMITED UNDER LAW.
Csumer Care
If your BISSELL product should require
service or to claim under our Limited
Two-Year Guarantee, please visit:
Website or E-mail:
www.BISSELL.com.au
For Australian inquiries:
Monday – Friday 9am - 5pm
BISSELL AUSTRALIA PTY LIMITED
42 Rocco Dr.
Scoresby 3179
Victoria
Australia
Telephone: 1-800-811-183
For New Zealand inquiries:
Monday – Friday 9 am — 5 pm
Parex Industries Ltd.
5 Tolich Place
Henderson 0610
Auckland
New Zealand
Telephone: 0800-247-73
Replacement parts and accessories are
available for purchase. To purchase visit
www.BISSELL.com
Visit the BISSELL website: www.BISSELL.com.au
When contacting BISSELL, have model number of cleaner available.
Please record your Model Number: _____________ Please record your Purchase Date: _____________
NOTE: Please keep your original sales receipt. It provides proof of the date
of purchase in the event of a Guarantee claim. See Guarantee for details.