A newly-installed refrigerator may take 12-24 hours to begin making ice.
The icemaker will produce seven cubes per cycle-approximately 15 cycles in a 24-hour period, depending on freezer compartment temperature, room temperature, number of door openings and other use conditions.
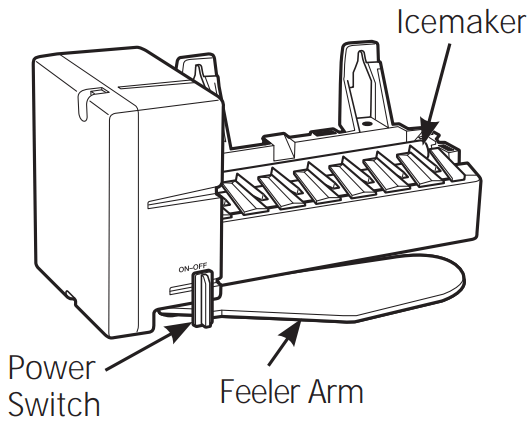
If the refrigerator is operated before the water connection is made to the icemaker, set the power switch to OFF.
When the refrigerator has been connected to the water supply, set the power switch to ON.
Throw away the first full bucket of ice.
Be sure nothing interferes with the sweep of the feeler arm.
When the bin fills to the level of the feeler arm, the icemaker will stop producing ice.
It is normal for several cubes to be joined together.
If ice is not used frequently, old ice cubes will become cloudy, taste stale and shrink.
After the icemaker has been turned on again, there will be a delay of about 45 minutes before the icemaker resumes operations.
NOTE: In homes with lower-than-average water pressure, you may hear the icemaker water valve cycle on several times when making one batch of ice.
NOTE: Icemaker works best between and 120 PSI home water pressure.
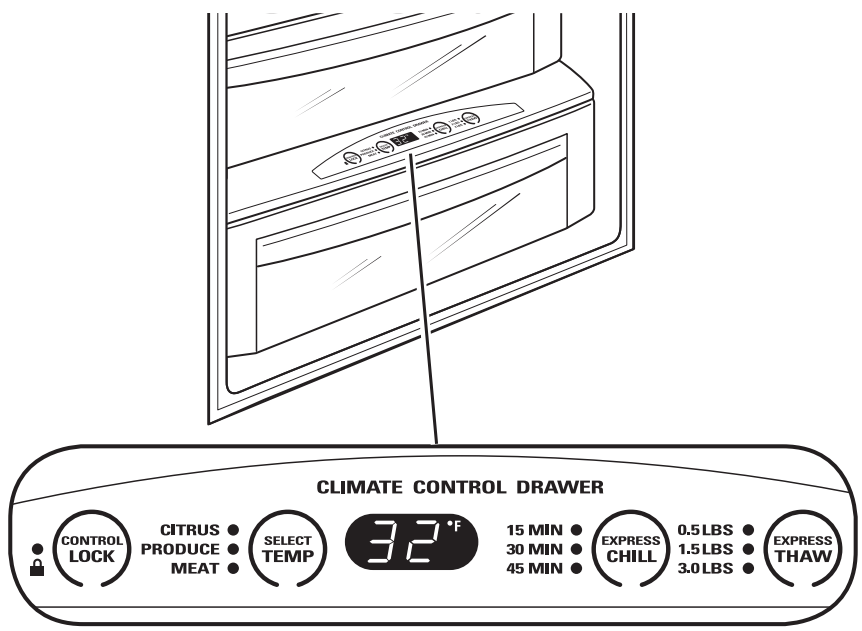
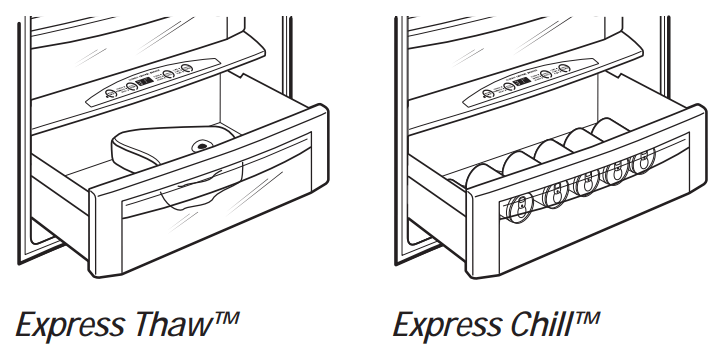
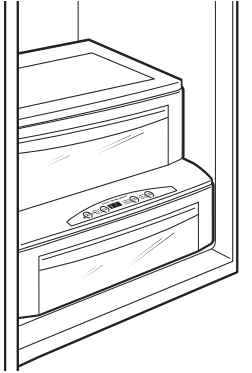
Climate Control Drawer
How it Works
The Climate Control feature is a system of dampers, a fan, a temperature thermistor, and a heater. The Climate Control drawer can be used to chill items quickly, thaw foods quickly or store items at their optimum temperatures.
The drawer is tightly sealed to prevent the drawer’s temperature from causing temperature fluctuations in the rest of the refrigerator.
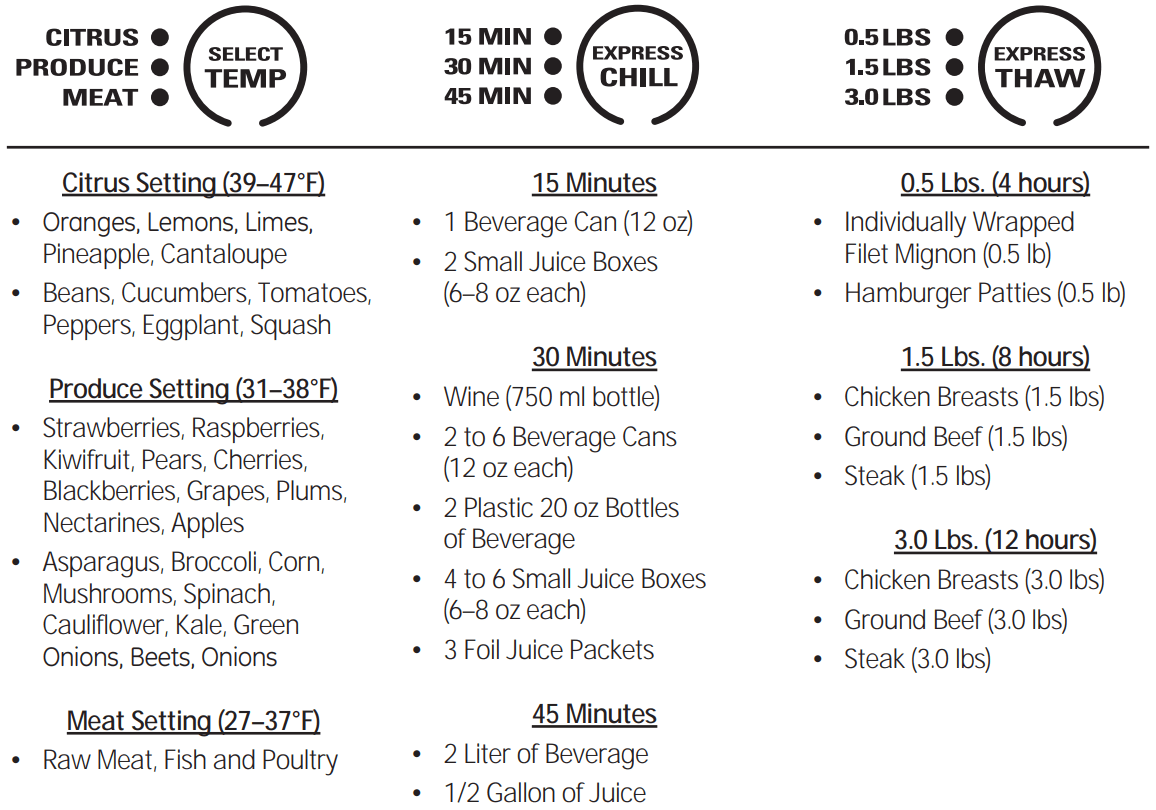
SELECT TEMP - Use this feature to store items at their optimum temperatures. The CITRUS setting will maintain a drawer temperature of 39-47°F by cycling a small heater off and on as needed. The PRODUCE setting will maintain the drawer temperature at 31–38°F by drawing in additional cold air as needed. The MEAT setting will maintain the drawer temperature at 27–37°F by drawing in additional cold air as needed.
EXPRESS CHILL - This feature can be used to cool items in minutes, rather than hours. Extra cool air is circulated throughout the drawer. Once the cycle is complete, the drawer will revert to the pre-set fresh food temperature.
EXPRESS THAW - This feature thaws items in hours rather than days. Food is gently thawed in a cool environment by circulating air throughout the drawer. Temperature is maintained in the drawer by cycling a small heater off and on as needed. Once the thaw cycle is complete, the pan will automatically adjust to a temperature of 27–37°F to store the food at its optimum temperature.
NOTE: By turning the controls on the Climate Control drawer off, the drawer can be used as a standard sealed produce pan.
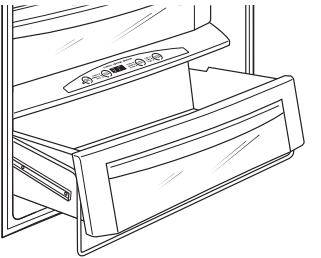
How to Use
Empty the drawer. Place the items in the drawer.
Select the Express Thaw,™ Express Chill™ or Select Temp™ pad. The display will come on. Press the pad until the light appears next to the desired setting. Use the chart on the next page to determine the best setting.
To stop a feature before it is finished, press that feature’s pad until no options are selected and the display is off.
During Express Thaw™ and Express Chill,™ the display on the controls will count down the time remaining in the cycle.
After the Express Thaw™ cycle is complete, the drawer will reset to the MEAT setting (27-37°F) to help preserve thawed items until they are used.
The displayed actual temperature of the Climate Control drawer may vary slightly from the SET temperature based on usage and operation environment.
NOTE: For food safety reasons, it is recommended that foods be wrapped in plastic wrap when using Express Thaw.™ This will help contain meat juices and improve thawing performance.
Climate Control chart
NOTE: Results may vary depending on packaging, starting temperature and other food traits.
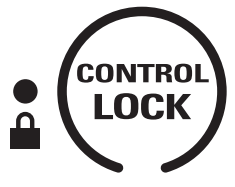
Control Lock
Press and hold this pad for 3 seconds to lock the settings for the Climate Control drawer. To unlock, press and hold for another 3 seconds.
Ice and Water Dispenser
Shelves and Bins
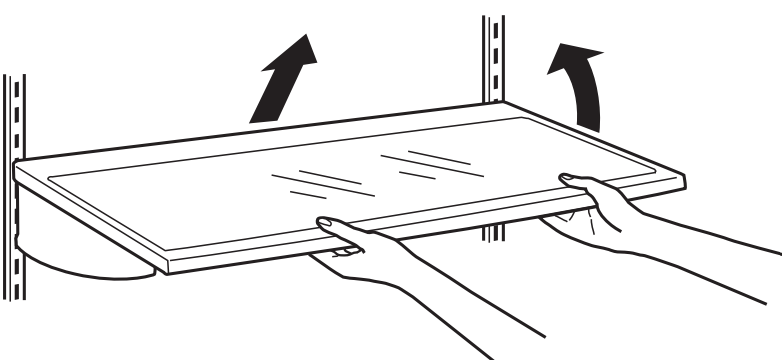
How to rearrange your shelves
Tempered glass shelves in the fresh food compartment and wire shelves in the freezer compartment are adjustable, enabling you to make efficient shelf arrangements to fit your family’s food storage needs.
To remove shelves:
Tilt shelf up at front, then lift it up and out of tracks on rear wall of refrigerator.
To replace shelves:
Select desired shelf height. With shelf front raised slightly, engage top lugs in tracks at rear of cabinet. Then lower front of shelf until it locks into position.
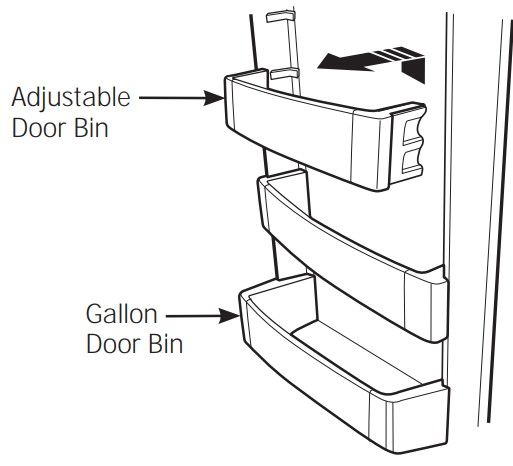
Door bins
All door bins, except for the deep gallon door bin, are adjustable using one of 2 tabs on each end of the bin. They can be moved up and down to many different positions to meet your storage needs. The deep gallon door bin can be removed for cleaning.
To remove any bin:
Lift the bin up and slide it toward you.
Storage Pans
Sealed deli pan
Use the Sealed Deli Pan for the convenient storage of lunch meats and cheese, hors d’oeuvres, spreads and snacks. The pan and shelf to which it is attached can be adjusted to any height.
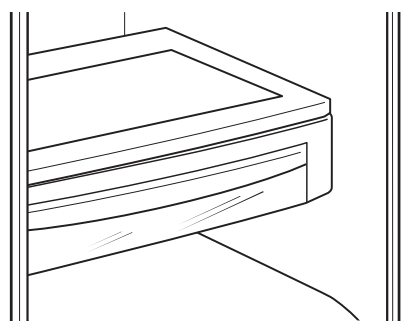
Sealed produce pans
The top pan is designed to provide constant high humidity levels.
Make sure the drawers are closed completely to maintain the correct humidity level.
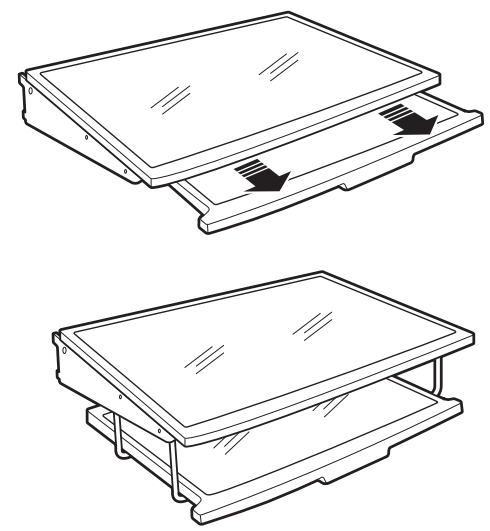
Drawer and pan removal
To remove a drawer or pan:
Pull the pan out to the stop position.
Lift the front of the pan up and out of the wire holder.
Lift the back of the pan up and out.
To replace a pan:
Place the back of the pan in the wire holder, making sure the wire holder fits into the grooves on the back of the pan.
Lower the front of the pan into the wire holder.
Press firmly on the top of the pan to snap it into the wire holder.
Drop down shelf
The drop-down shelf gives you the use of another full-size shelf when you need extra storage. It conveniently folds back out of the way when not in use, giving you room for storage of larger items.
To use drop down shelf:
Pull forward and down to drop the shelf into place.
Pull forward while lifting up to place the shelf out of the way
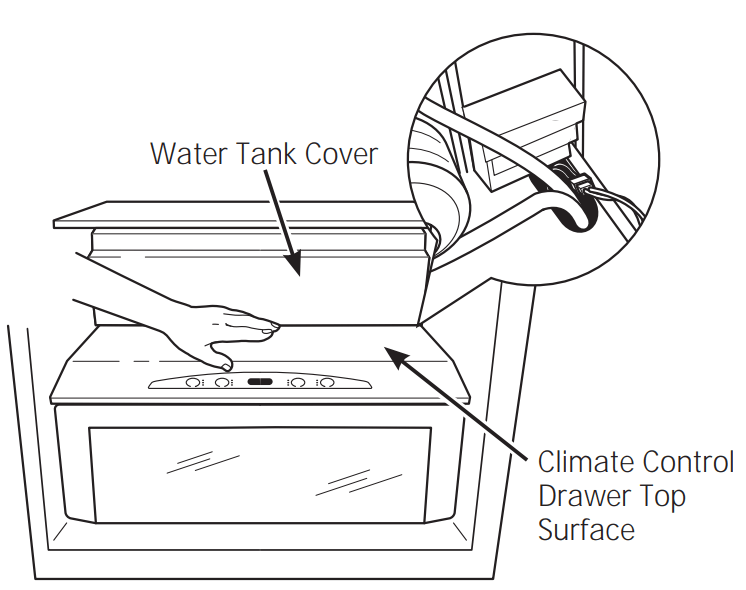
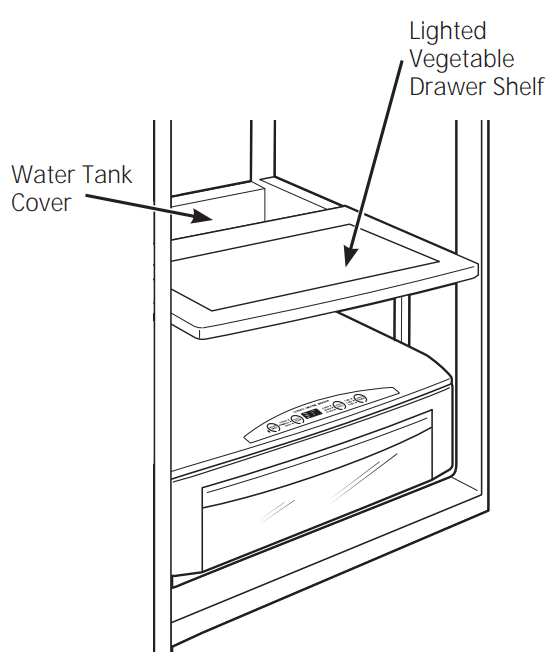
Lighted vegetable drawer shelf
The lighted vegetable drawer shelf provides lighting for the lower compartments. The lights are recessed into the shelf to illuminate the drawers below.
To remove shelf:
Remove the top drawer (see Drawer and pan removal section).
Push down gently on the back center of the climate control drawer top surface to release the bottom of the water tank cover. Pull out and down to remove the water tank cover and expose the wire harness.
Lift the shelf and carefully pull forward to expose the wires.
Unplug the shelf and carefully remove it from the refrigerator.
To replace shelf:
Carefully set the shelf onto the side rails, leaving the plug exposed.
Plug the shelf into the refrigerator.
Carefully slide the shelf into place.
Insert the water tank cover top first so that it goes up behind the gasket hanging down from the vegetable drawer shelf. Gently push the bottom of the water tank cover until the bottom snaps into the the top of the Climate Control Drawer cover.
Replace the drawer (see Drawer and pan removal section)
Temperature Controls
The temperature display shows the actual temperature of the freezer and fresh food compartments. The actual temperature will vary from the set temperature based on factors such as door opening, amount of food, defrost cycling and room temperature.
NOTE: Frequent door openings or door left open for periods of time may increase the internal temperature of the freezer and fresh food compartments temporarily.
To turn off the cooling system in both the freezer and fresh food compartments, press either pad until both displays show OFF.
To turn the cooling system on, press either pad. The preset temperatures of 0°F and 37°F will appear in the display.
To check the current temperature setting for the fresh food or freezer compartment, press the or pad once. After 5 seconds, the display will return to the actual temperature.
To change the temperature settings, press the or pad to desired temperature set point for fresh food and freezer separately.
Allow 24 hours for the refrigerator to reach the temperature you have set.
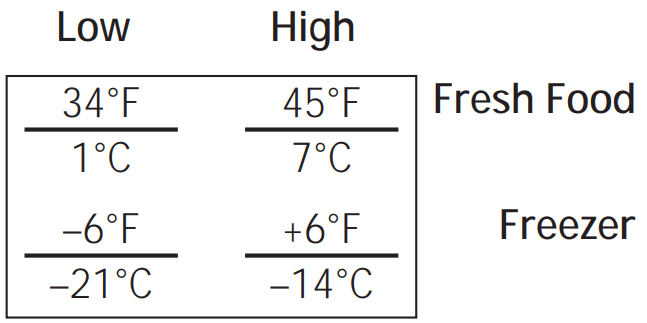
Temperature Ranges
NOTE: Setting the controls to OFF stops cooling, but does not shut off electrical power to the refrigerator.
Changing display temperatures from °F to °C
To change the temperature display between Fahrenheit and Celsius, press Temp Display °C/°F.
Door alarm
To turn the Door Alarm feature on, press DOOR ALARM once. The ACTIVE light will come on. To turn it off, press it again. On models with a dispenser, the Door Alarm feature is located on the dispenser panel on the front of the freezer door.
When the DOOR ALARM is active, the alarm will flash and beep if you keep the door open for more than 2 minutes.
Water Filter Cartridge
The water filter cartridge is located in the back upper right corner of the refrigerator compartment.
When to replace the filter on models with a replacement indicator light
There is a replacement indicator light for the water filter cartridge on the dispenser. This light will turn orange to tell you that you need to replace the filter soon.
The filter cartridge should be replaced when the replacement indicator light turns red or if the flow of water to the dispenser or icemaker decreases.
When to replace the filter on models without a replacement indicator light
The filter cartridge should be replaced every six months or earlier if the flow of water to the dispenser or icemaker decreases.
Removing the filter cartridge
If you are replacing the cartridge, first remove the old one by slowly turning it to the left. Do not pull down on the cartridge. A small amount of water may drip down.
CAUTION: To reduce the risk associated with property damage due to water leakage, read and follow instructions before installation and use of this system. Installation and use MUST comply with all state and local plumbing codes.
Installing the filter cartridge
Fill the replacement cartridge with water from the tap to allow for better flow from the dispenser immediately after installation.
Line up the arrow on the cartridge and the cartridge holder. Place the top of the new cartridge up inside the holder. Do not push it up into the holder.
Slowly turn it to the right until the filter cartridge stops. DO NOT OVERTIGHTEN. As you turn the cartridge, it will automatically raise itself into position. The cartridge will move about a ½ turn.
Run water from the dispenser for 1-1/2 gallons (about three minutes) to clear the system and prevent sputtering.
Press and hold the RESET WATER FILTER pad (on some models) on the dispenser for three seconds.
NOTE: A newly installed water filter cartridge may cause water to spurt from the dispenser
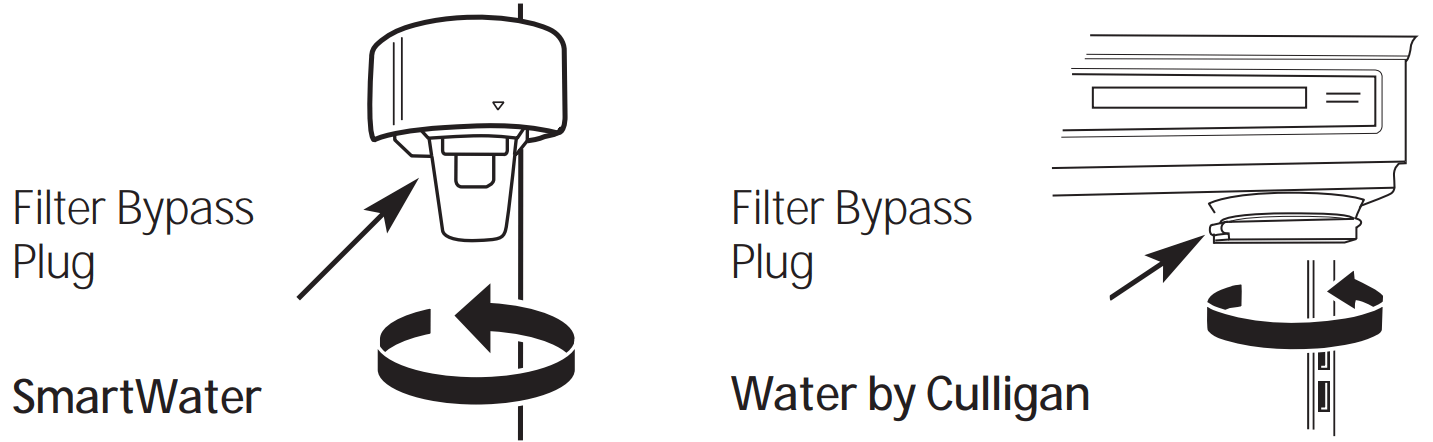
Filter bypass plug
You must use the filter bypass plug when a replacement filter cartridge is not available. The dispenser and the icemaker will not operate without the filter or filter bypass plug.
To use the filter bypass plug on Water by Culligan™ models, you must first remove the filter adaptor from the cartridge holder by turning it to the left.
WARNING
To reduce the risk associated with choking, do not allow children under 3 years of age to have access to small parts during the installation of this product. The disposable filter cartridge should be replaced every months at the rated capacity, or sooner if a noticeable reduction in flow rate occurs.
For the maximum benefit of your filtration system, GE recommends the use of GE-branded filters only. Using GE-branded filters in GE and Hotpoint® refrigerators provides optimal performance and reliability. GE filters meet rigorous industry NSF standards for safety and quality that are important for products that are filtering your water. GE has not qualified non-GE-branded filters for use in GE and Hotpoint refrigerators and there is no assurance that non-GE-branded filters meet GE's standards for quality, performance and reliability.
If you have questions, or to order additional filter cartridges, visit our website at www.gewaterfilters.com or call GE Parts and Accessories, 800.626.2002. Customers in Canada should consult the yellow pages for the nearest Camco Service Center.
Sabbath Mode Product Kit, ZSAB
The Sabbath Mode Product Kit was designed for use on the Jewish Sabbath and Holidays. The Sabbath Mode feature makes it possible for observant Jews to refrigerate and freeze food during the duration of the holiday.
The Sabbath Mode feature can be set to override typical reactions to actions in your refrigerator. While in the Sabbath Mode, your refrigerator will still operate normally. However, the refrigerator will not respond to your actions.
While in the Sabbath Mode, you may notice the fan running when the door is opened; however, this is not a result of your actions. The fan will operate at random times.
The defrost heater will continue to defrost the refrigerator and freezer and will be activated on a timer. The defrost heater will not defrost as a result of door openings or any consumer actions.
ON/OFF - To activate, raise the top grille panel and set the Sabbath Mode switch to the ON position. A green LED light will be visible below the Sabbath Mode Kit switch. The light will be visible when the grille is closed between the grille door and compartment doors.
DISPLAY, ALARMS and LIGHTS - The main temperature control and Express Chill displays will be deactivated; therefore they will not be lit, sound a tone or operate when touched. Door alarms and lights will be disabled.
ICE and WATER DISPENSER - The proximity sensor and dispenser touch sensor icons will not operate. Ice or water cannot be retrieved from the dispenser.
ICEMAKER - The icemaker will continue to operate. The icemaker can be disabled by opening the freezer, opening the ice storage bin door and setting the icemaker power switch to the OFF position (see Automatic Icemaker).
To obtain ice, open the freezer door and remove the cubed ice from the ice bin.
This Sabbath Mode Product Kit can be purchased from your local appliance dealer. The ZSAB1 Kit is designed for use with all Monogram Built-In Refrigerators manufactured after 2008.
To locate your nearest dealer, visit our web site monogram.com or call 1.800.626.2000. In Canada, call 1.800.561.3344. Order Kit #ZSAB1.
NOTE: The Sabbath Mode Product Kit must be installed by a qualified service technician.
CARE & CLEANING
Cleaning outside
The dispenser spill shelf and the area beneath it should be cleaned periodically with a mild liquid dish detergent.
Dispenser cradle - Before cleaning, lock the dispenser by touching CONTROL LOCK for seconds to prevent activating the dispenser. Clean with warm water and a mild liquid dish detergent. Rinse thoroughly and wipe dry. Unlock the dispenser by touching CONTROL LOCK for 3 seconds.
Do not use chemical cleaners to clean the dispenser or any part of the dispenser.
Do handles and trim - Clean with a cloth dampened with soapy water. Dry with a soft cloth.
Keep the outside clean. Wipe with a clean cloth lightly dampened with mild liquid dish detergent. Dry with a clean, soft cloth.
Do not wipe the refrigerator with a soiled dish cloth or wet towel. These may leave a residue that can damage the finish. Do not use scouring pads, powdered cleaners, bleach or cleaners containing bleach because these products can scratch and damage the finish.
Stainless steel - Regularly clean and polish the stainless steel door panels and handles on some models) with a commercially available stainless steel cleaner such as Stainless Steel Magic™ to preserve and protect the fine finish. Stainless Steel Magic and the Monogram polishing cloth are available through GE Parts and Accessories, 800.626.2002, or monogram.com.
For Stainless Steel Magic, order part number WX10X15. For Monogram polishing cloth, order part number WX72X10001.
Do not use appliance wax or polish on the stainless steel.
Cleaning inside
Turn off power at the circuit breaker or fuse box before cleaning. If this is not practical, wring excess moisture out of sponge or cloth when cleaning around switches, lights or controls.
Use warm water and baking soda solution - about a tablespoon (15 ml) of baking soda to a quart (1 liter) of water. This both cleans and neutralizes odors. Thoroughly rinse and wipe dry.
Other parts of the refrigerator- including door gaskets, meat and vegetable drawers, ice storage bin and all plastic parts - can be cleaned the same way.
Do not wash any plastic refrigerator parts in the dishwasher.
Avoid cleaning cold glass shelves with hot water because the extreme temperature difference may cause them to break. Handle glass shelves carefully. Rough handling of tempered glass can cause it to shatter.
NOTE: Interior lights may get too hot and turn off automatically if the refrigerator door is left open too long. This is normal and they will turn back on when they cool down.
Light bulb replacement
WARNING – Halogen lights generate intense heat. Be certain power is off and lamps have sufficient time to cool before attempting to replace.
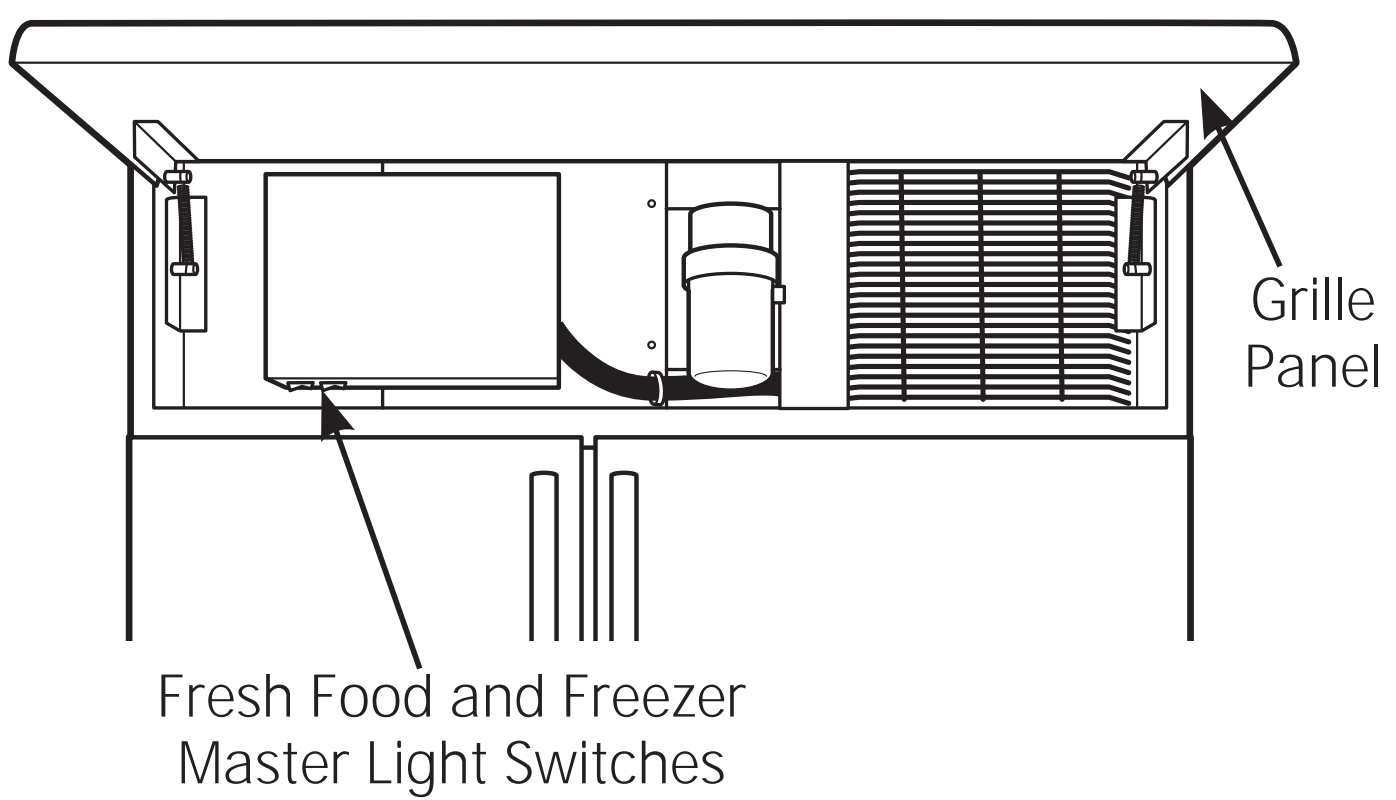
Power to the lamps can be turned off at the Master Light switch located behind the grille panel at the top of the refrigerator.
There is a switch for the freezer and a switch for the fresh food compartment.
Turning the temperature control to OFF does NOT remove power to the light circuits.
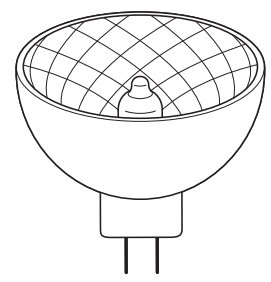
The refrigerator uses a halogen bulb:
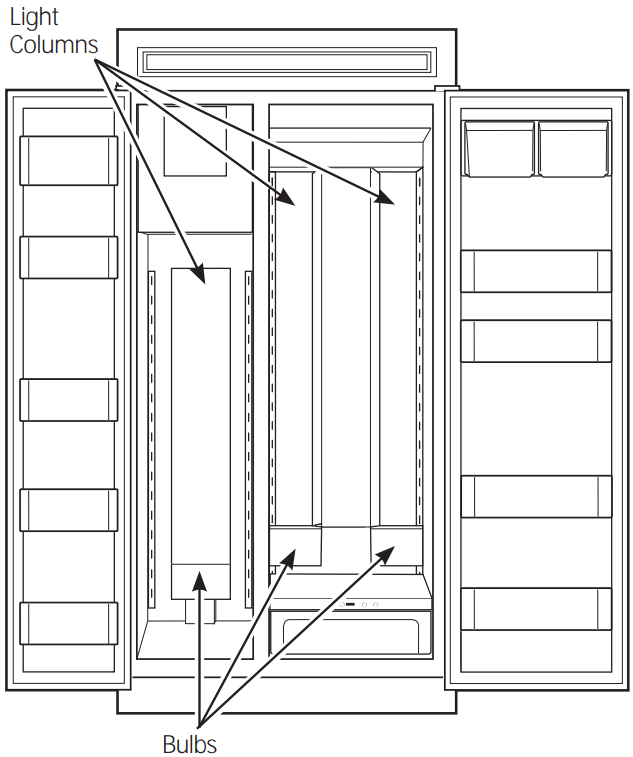
The columns along the back wall of the fresh food and freezer compartments are lit up by lamps located behind the top pan in the fresh food compartment and the bottom basket in the freezer compartment.
These bulbs have a life expectancy of about 2000 hours. However, if the bulbs do need to be replaced, they can be purchased at hardware, general retail and home improvement stores or through GE Parts and Accessories, 800.626.2002.
This is a 35 watt, 12 volt, Type MR11 bulb. If ordering through GE Parts and Accessories, order part WR02X11183.
Using the Master Light switches
This feature turns off the lights in the fresh food and freezer compartments.
The switches are located behind the grille panel at the top of the refrigerator. Lift up the panel to access the switches.
Halogen bulb replacement
NOTE: Before replacing the bulbs, review the light bulb information and WARNING.
Replacing bulbs located in lamps behind the top pan in the fresh food compartment and the bottom freezer basket in the freezer compartment:
1. Set the Master Light switches to the OFF position (see Using the Master Light switches) and allow the lamps to cool.
2. To access the lamps in the fresh food compartment, remove the vegetable drawer, water tank cover and lighted vegetable drawer cover. See Drawer and Pan Removal and Lighted Vegetable Drawer Cover sections.
To access the lamps in the freezer compartment, remove the bottom freezer basket. See Freezer Baskets section.
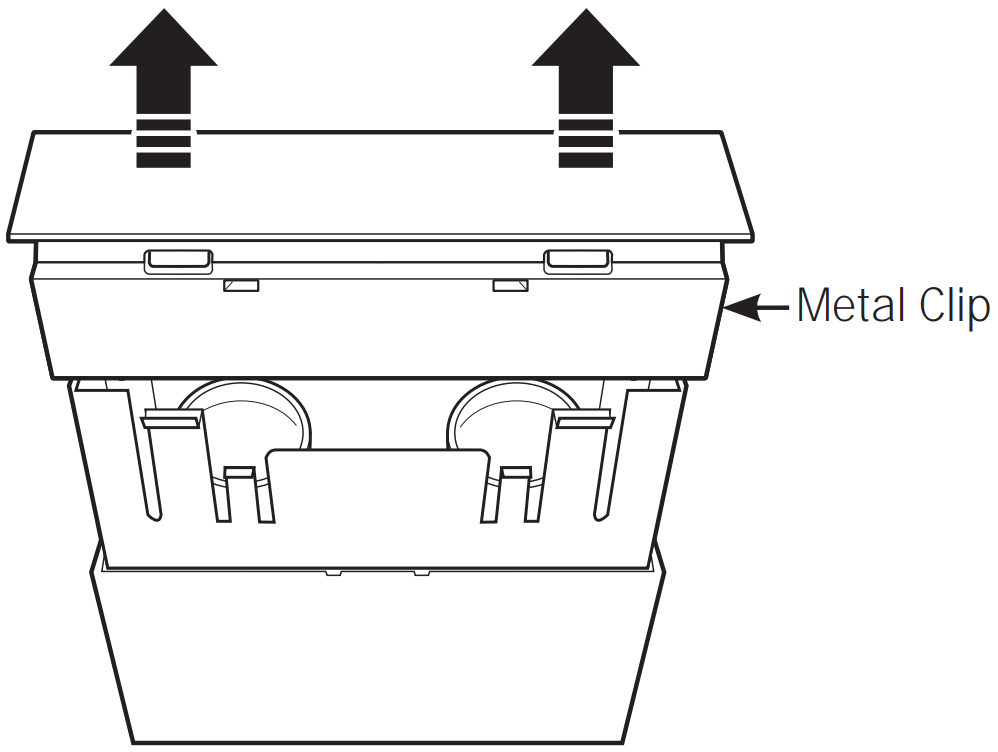
3. The lamps are hidden by a metal clip. Grasp the clip and pull toward you to expose the bulbs.
NOTE: Always follow bulb manufacturer’s directions for handling and replacing bulbs.
4. Remove the bulb by holding the base and pulling straight up. Replace with a new bulb.
5. Replace the metal clip by inserting the clip behind the front smaller tabs, with the larger tabs behind the clip. Press down gently on the shield until the tops of the larger tabs slip into the slots on the shield.
6. Replace the lighted vegetable drawer cover and water tank cover (see Lighted Vegetable Drawer Cover section). Replace the vegetable drawer (see Drawer and Pan Removal section).
7. Reset the Master Light switches to the ON position.
WARNING – The metal clip must be replaced or the heat from the bulb could damage the refrigerator.
Preparing for vacation
For long vacations or absences, remove food and shut off power to the refrigerator at the fuse box or circuit breaker. Clean the interior (see Cleaning Inside). Leave doors open.
For shorter vacations, remove perishable foods and leave controls at regular settings. However, if the room temperature is expected to drop below 60°F (16°C), follow the same instructions as for long vacations.
Set the icemaker power switch to the OFF position and be sure to shut off the water supply to the refrigerator.
TROUBLESHOOTING
PROBLEM
POSSIBLE CAUSE
REFRIGERATOR DOES NOT OPERATE
• May be in defrost cycle when compressor does not operate for about 30 minutes.
• Temperature control set at OFF.
• If interior light is not on, refrigerator may not be plugged in at wall outlet.
• The fuse is blown/circuit breaker is tripped. Replace fuse or reset the breaker.
MOTOR OPERATES FOR LONG PERIODS OR CYCLES ON AND OFF FREQUENTLY (Modern refrigerators with more storage space and a larger freezer require more operating time. They start and stop often to maintain even temperatures.)
• Normal when refrigerator is first plugged in. Wait 24 hours for the refrigerator to completely cool down.
• The new variable speed compressor is designed to run for longer periods of time to optimize efficiency and noise. You may notice the compressor and/or fan speeds accelerate based upon door openings and/or increased food loads.
• You may hear the fans spinning at high speeds. This happens when the refrigerator is first plugged in, when the doors are opened frequently or when a large amount of food is added to the refrigerator or freezer compartments. The fans are helping to maintain the correct temperatures.
• Door left open or package holding door open.
• If either door is open for over 3 minutes, you may hear the fans
come on in order to cool the light.
• Hot weather or frequent door openings. This is normal.
• Temperature controls set at the coldest setting. See Temperature Controls.
OPERATING SOUNDS
• Refrigerator is so quiet, that most of the time you will hear low or no operating noise.
• Normal fan air flow-one fan blows cold air through the fresh food and freezer compartments—another fan cools the compressor motor.
• The fans change speeds in order to provide optimal cooling and energy savings.
• These NORMAL sounds will also be heard from time to time:
- You may hear a whooshing or gurgling sound when the doors close. This is due to pressure equalizing within the refrigerator.
- A water dripping noise may occur during the defrost cycle as ice melts from the evaporator and flows into the drain pan.
- The flow of refrigerant through the freezer cooling coils may make a gurgling noise like boiling water.
- Water dropping on the defrost heater can cause a sizzling, popping or buzzing sound during the defrost cycle.
- You may hear cracking or popping sounds when the refrigerator
is first plugged in or during/after the defrost cycle. This happens as the refrigerator cools to the correct temperature.
- Electronic dampers click open and closed to provide optimal cooling and energy savings.
- The compressor may cause a clicking or chirping sound when attempting to restart (this could take up to 5 minutes).
- The electronic control board may cause a clicking sound when relays activate to control refrigerator components.
- Ice cubes dropping into the bin and water running in pipes as icemaker refills.
- The icemaker water valve will buzz when the icemaker fills with water.
DOOR NOT CLOSING PROPERLY
• Package may be holding door open.
• Check the door gasket; it may be out of position.
• Refrigerator is not level. See Installation Instructions.
ACTUAL TEMPERATURE NOT EQUAL TO SET TEMPERATURE
• Refrigerator just plugged in. Allow 24 hours for system to stabilize.
• Door open for too long. Allow 24 hours for system to stabilize.
• Warm food added to refrigerator. Allow 24 hours for system to stabilize.
• Defrost cycle is in process. Allow 24 hours for system to stabilize.
VIBRATION OR RATTLING (Slight vibration is normal.)
• Refrigerator may not be properly installed.
FRESH FOOD OR FREEZER COMPARTMENT TOO WARM
• Temperature controls not set cold enough. See Temperature Controls.
• Warm weather or frequent door openings.
• Door left open for long time.
• Package may be holding door open.
FROST OR ICE CRYSTALS ON FROZEN FOOD (Frost within package is normal.)
• Door left open or package holding door open.
• Too frequent or too long door openings.
SLOW ICE CUBE FREEZING
• Door may have been left open.
• Freezer compartment is too warm. Set the freezer to a colder temperature.
ICE HAS ODOR/TASTE
• Old cubes need to be discarded.
• Ice storage bin needs to be emptied and washed.
• Unsealed packages in freezer compartment may be transmitting odor/taste to ice.
• Keep open box of baking soda in refrigerator; replace every 3 months.
• Poor-tasting incoming water. Replace water filter.
AUTOMATIC ICEMAKER DOES NOT WORK
• Icemaker power switch is in the OFF position.
• Water supply turned off or not connected.
• Freezer compartment too warm.
• Piled up cubes in storage bin may cause icemaker to shut off too soon. Level cubes in bin.
MOISTURE FORMS ON CABINET SURFACE BETWEEN THE DOORS
• Not unusual during periods of high humidity. Wipe surface dry.
• Controlling humidity and temperature in the kitchen with air conditioning will eliminate this condition.
MOISTURE COLLECTS INSIDE
• Too frequent or long door openings.
• In humid weather, air carries moisture into refrigerator when doors are opened.
• Controlling humidity and temperature in the kitchen with air conditioning will eliminate this condition.
REFRIGERATOR HAS ODOR
• Foods with strong odors should be tightly covered.
• Check for spoiled food.
• Interior needs cleaning. See Care and Cleaning.
• Keep open box of baking soda in refrigerator; replace every 3 months.
INTERIOR LIGHT DOES NOT WORK
• No power at outlet.
• Light bulb needs replacing. See Care and Cleaning.
• Master Light switch is in the OFF position.
• The refrigerator is equipped with a safety feature that turns off the refrigerator lights when the doors have been opened for an extended period. Once the refrigerator doors are closed and the lights have had time to cool, they will again come on automatically when the doors are opened.
SMALL OR HOLLOW CUBES
• Water filter clogged. Replace the filter or use the filter bypass plug.
• Check for a connection to a Reverse Osmosis water system.
If an RO is connected, remove the water filter and install the original bypass plug that came with the unit.
WATER ON THE FLOOR
• If you use an extra tall glass or pitcher, or overfill a glass or pitcher, you may be jamming the cubes in the funnel chute. They can fuse inside the chute and drop out later, leaving water or ice on the floor.
UNEVEN SPACING OR GAPS BETWEEN DOORS AND KITCHEN CABINET
• Kitchen cabinets are not level or square. Call the installer or cabinetmaker.
POOR DOOR ALIGNMENT OR ONE DOOR HIGHER THAN THE OTHER
• Fresh food door needs adjusting. See Installation Instructions.
• Refrigerator is not level. See Attention Installer Instructions.
WATER HAS POOR TASTE OR ODOR
• Water dispenser has not been used for a long time. Dispense water until all water in system is replenished.
WATER IN FIRST GLASS IS WARM
• Normal when refrigerator is first installed. Wait 24 hours for the refrigerator to completely cool down.
• Water dispenser has not been used for a long time. Dispense water until all water in system is replenished.
• Water system has been drained. Allow several hours for replenished supply to chill.
WATER DISPENSER DOES NOT WORK
• Water supply line turned off, restricted or not connected. Call your installer for proper water supply line connection.
• Water filter clogged. Replace the filter or use the filter bypass plug.
• The CONTROL LOCK on the dispenser has been activated.
To unlock the dispenser, touch CONTROL LOCK for 3 seconds.
• Air may be trapped in system. Press the dispenser arm for at least 2 minutes.
ICE DISPENSER DOES NOT WORK
• Ice bin improperly installed. See Ice storage bin.
• Icemaker turned off or water supply turned off. Turn on icemaker or water supply.
• Ice cubes are frozen to the icemaker feeler arm. Remove cubes.
• Irregular ice clumps in storage bin. Break up with fingertip pressure and discard remaining clumps.
• Freezer may be too warm. Adjust freezer control to a colder setting, one position at a time, until clumps do not form.
• Water filter clogged. Replace the filter or use the filter bypass plug.
• The CONTROL LOCK on the dispenser has been activated.
To unlock the dispenser, touch CONTROL LOCK for 3 seconds.
WATER SPURTING FROM DISPENSER
• Newly installed filter cartridge. Run water from the dispenser for 1 1/2 gallons (3 mins) .
NO WATER OR ICE PRODUCTION
• Water supply line turned off, restricted or not connected. Call your installer for proper water supply line connection.
• Water filter clogged. Replace the filter or use the filter bypass plug.
CUBED ICE WAS SELECTED BUT CRUSHED ICE WAS DISPENS ED
• Last setting was CRUSHED ICE. A few cubes were left in the crusher from the previous setting. This is normal.
• If continual crushed ice is dispensed while cubed ice is selected, adjust ice bin. See Ice storage bin.
FOOD IS NOT THAWING/CHILLING IN CLIMATE CONTROL DRAWER
• Packaging. Increase time or re-package in plastic.
• Wrong weight selected. Select a larger weight.
• Item with high fat content. Select a larger weight.
SELECT TEMP FEATURE ON CLIMATE CONTROL DRAWER IS NOT WORKING
• Fresh Food temperature control is set at warmest setting.
This is normal. In order to minimize energy usage, the Select Temp feature is disabled when the Fresh Food control is set at the warmest setting.
CLIMATE CONTROL DRAWER CONTROLS DO NOT WORK
• Control Lock feature is active. Press and hold the CONTROL LOCK pad on the Climate Control drawer for 3 seconds.

 pad until both displays show OFF.
 pad. The preset temperatures of 0°F and 37°F will appear in the display.