W11159192A
DOOR-WITHIN-DOOR
FRENCH DOOR REFRIGERATOR
USE AND CARE GUIDE
门内门法式多门冰箱
使用和维护指南

中文 冰箱用户说明 ....................................................................................................... 3
English REFRIGERATOR USER INSTRUCTIONS .......................................................... 53

目录
门内门法式多门冰箱使用和维护指南
冰箱安全须知.............................................4
正确处置您的旧冰箱 .....................................4
零部件和功能.............................................7
门后有什么新增内容? ...................................8
入门指南................................................10
冰箱连接功能(适用于某些型号).........................12
连接设置
(适用于某些型号)......................................13
手动设置说明(首次使用)接入点方法......................15
安装说明................................................16
拆开冰箱包装 ..........................................16
位置要求 ..............................................16
电气要求 ..............................................17
拆下并更换冰箱门 ......................................18
拆下并更换冷冻室抽屉门面。 ............................21
供水要求 ..............................................22
连接水源 ..............................................22
把手安装和拆卸 ........................................23
冰箱位置水平并且门关闭 ................................25
过滤器和附件...........................................26
滤水系统 ..............................................26
安装空气过滤器 ........................................27
附件 ..................................................27
帮助或维修 ............................................27
冰箱用途................................................27
打开和关闭门 ..........................................27
打开和关闭门内门和冰箱门 ..............................28
使用控制器 ............................................29
外部分配器控制 ........................................30
冷藏室照明 ............................................31
配水机和配冰机 ........................................31
制冰机和储冰盒 .......................................33
架子、盒子和抽屉 ......................................35
冷冻室抽屉 ............................................37
音频参考 ..............................................37
冰箱维护................................................38
清洁 ..................................................38
灯 ....................................................39
假期和移动注意事项 ....................................39
故障排除-连接的型号...................................40
故障排除................................................42
性能数据表..............................................49
相关的电器法规通告......................................50
4
如果不立即遵守说明,可能导致死亡或重伤。
如果不遵守说明,可能导致死亡或重伤。
所有安全信息都将指出潜在危险是什么,如何降低受伤的几率,以及不遵守说明将会发生什么。
您的安全和其他人的安全非常重要。
我们已在本手册以及您的家电上提供了许多重要的安全信息。请务必阅读并遵循所有安全消息。
这是安全警示符号。
此符号警示您可能导致您和他人伤亡的潜在危险。
所有安全信息都有安全警示符号和警示语“危险”或“警告”。
这些词的含义是:
警告
危险
冰箱安全须知
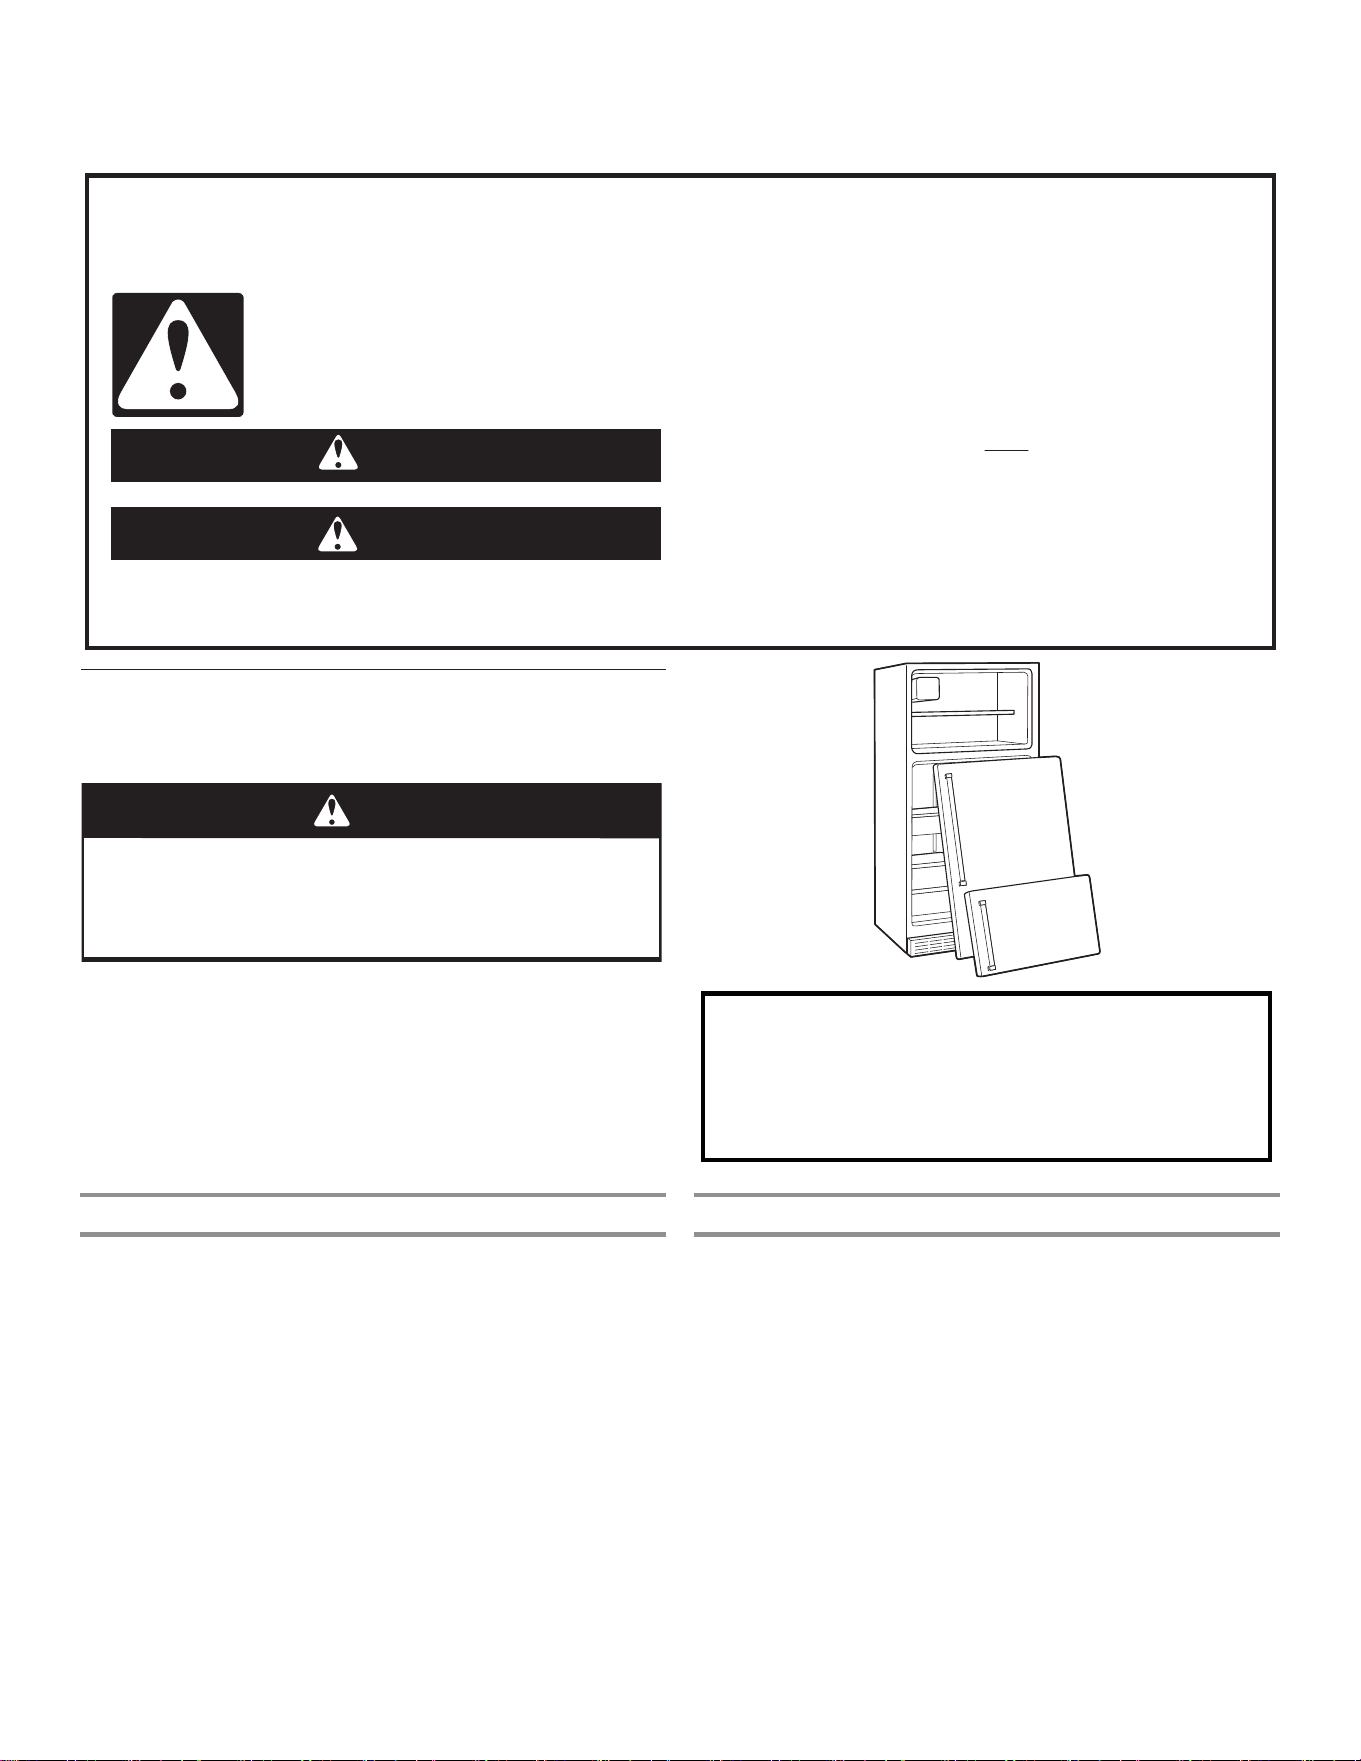
正确处置您的旧冰箱
警告
窒息危险
请从您的旧冰箱上将门拆下。
否则可能导致死亡或大脑损伤。
重要信息:儿童受困和窒息事件并非只发生在过去。报废和废弃的
冰箱仍然存在危险 - 即使只是将它们“放置几天”。如果您丢弃
旧冰箱,请遵照这些说明,防止发生意外。
在您丢弃自己的旧冰箱或冰柜之前:
■ 将门拆下。
■ 将架子留在原位,这样儿童无法轻易爬入冰箱内。
关于制冷剂处置需要了解的重要信息:
根据联邦和本地的法规处置制冷剂。制冷剂必须由得到
许可的 EPA 认证的制冷剂技术人员依据已制定的程序排
放。
废弃和处置
重要信息:遵照本地有关废物处置的法规废弃冰箱,将其送至特殊
的回收中心;不要让冰箱处于数天无人看护的状态,因为这对于儿
童来说是一个潜在的危险。
■ 本电器是使用可回收的材料制造。本电器是根据有关废物、电
气和电子设备 (WEEE) 的欧洲指令 2002/96/EC 进行标记。确
保正确处置本电器,有助于防止对环境和人员的健康造成潜在
不良后果。
■ 本电器或随附文档上的该符号表示本电器不应当作为生活垃圾
处理,必须送至回收电气和电子设备的特殊回收中心。
■ 有关处理、回收和重新利用本产品的更多信息,请联系有资质
的本地办事处、家庭垃圾收集服务机构或您购买电器的商店。
■ 本电器不含 CFC。制冷剂回路包含 R134a (HFC) 或 R600a
(HC)(请参见电器内部的铭牌)。
■ 含异丁烷的电器 (R600a):异丁烷是一种天然气体,对环境没
有影响,但是易燃。因此请确保制冷剂回路管道没有损坏。
■ 本产品可能包含在 Kyoto 协议涵盖范围内的氟化温室气体;制
冷剂气体位于不透气密封的系统内。制冷剂气体:R134a 具有
(GWP) 1300 的全球升温潜能值。
符合性声明
■ 制造商 Whirlpool NAR 声明本家用电器的 FDBM 型号(带无线
电设备 GEN 4 Wi-Fi 模块)符合 2014/53/UE 指令。符合性声
明的完整文字内容位于以下网站:
https://www.whirlpool.eu。无线电设备在 2.4 GHz ISM 频带
内工作,发射的最大射频功率不超过 20 dBm (e.i.r.p.)。
■ 本电器专为保存食物而设计,并且是依照规定 (CE) 编号
1935/ 2004 制造。
■ 本电器遵照以下方面设计、制造和营销:
■ “低电压”指令 2006/95/CE(取代了 73/23/CEE 及后续修
正案)的安全目标。
■ 指令“EMC” 2004/108/EC 的保护要求。
■ 本产品包含由第三方开发的特定开源软件。涉及这些软件部分
的开源许可证使用声明在《使用和维护指南》中,可以通过以
下链接访问:https://www.whirlpool.eu。
5
安全说明
请务必阅读并遵守
使用本家电前,请阅读以下安全说明,并将这些说放在附近
以便日后参考。这些说明和家电本身都提供了重要的安全警
告,任何时候都必须遵守。对于不遵守这些安全说明、不当
使用本家电或错误设置控制,制造商概不承担任何责任。
非常年幼的儿童(0-3岁)应远离本家电。除非持续监
督,否则,幼儿(3-8岁)也应远离本家电。8岁和以上的儿
童,以及身体行动不便、感官或智力障碍或缺乏相关经验和
知识者,只有在受到监督或已经接受安全使用指导并了解所
涉危险的情况下才能使用本家电。儿童不得玩耍本家电。儿
童只有在受到监督的情况下才可执行清洁和用户维护操作。
批准用途
小心!本家电不适合通过外部开关设备(例如计时器)
或个别的遥控系统进行操作。
本家电设计为家用和类似用途,例如:商店、办公室和
其他工作环境中的员工厨房区域;农舍;由酒店、汽车旅
馆、民宿和其他住宅环境中的顾客使用。
本家电不适合用于商业用途。请勿在户外使用本家电。
本家电内使用的灯泡专为家电设计,不适合用于房屋内
的一般室内照明(EC 法规 244/2009)。
根据铭牌上示出的气候类别,本家电适用于环境温度在
以下范围内的场所。如果将本家电长时间置于指定范围以外
的温度,可能无法正常工作。
气候类别环境温度 (°C)
SN:10 至 32°C;N:16 至 32°C
ST:16 至 38°C;T:16 至 43°C
本家电不含 CFC。制冷剂回路含 R600a (HC)。本家电
含异丁烷 (R600a):异丁烷是一种天然气体,对环境没有影
响,但是易燃。因此,确保制冷剂回路管路没有损坏,尤其
是在排空制冷剂回路时。
警告:请勿损坏制冷剂回路管路。
警告:保持通风设备打开。清除家电外壳或内置结构中
的障碍物。
警告:请勿使用非制造商推荐的机械、电动或化学方式
来加快除霜过程。
警告:请勿在本家电的间格内使用或放置非制造商明确
许可的电气设备。
警告:不直接连接到供水系统的制冰机和/或饮水机只能
加注饮用水。
警告:自动制冰机和/或饮水机必须连接到仅供应饮用水
的供水系统,供水压力在 0.17 和 0.81 Mpa(1.7 和 8.1 巴)
之间。
请勿存储气溶胶罐等爆炸性物质,也不要在本家电内或
附近放置或使用汽油或其他易燃材料。
请勿吞食(某些型号随附的)冰袋的内容物(无毒)。
请勿立即食用刚从冷冻格取出的冰块或冰棍,因为它们可能
导致冻伤。
对于设计为在可触及的风扇罩内使用空气过滤器的产品,
当冰箱运转时,过滤器必须始终处于适当的位置。
请勿将含有液体的玻璃容器存储在冷冻格中,否则可能
会破裂。
避免食物阻塞风扇(如果配有)。放好食物后,检查格门是
否关好,尤其是冷冻格门。
损坏的垫圈必须尽快更换。
冷藏格只能用来储存新鲜食物,冷冻格只能用来储存冷
冻食物、冷冻新鲜食物和制作冰块。
存储未包装的食物时,避免直接接触冷藏格或冷冻格的
内表面。
本家电可配有特殊间格(新鲜食品格、零度盒等)。除非特
定的产品手册中有规定,否则可以将其拆下,并保持相同的
性能。
安装
警告:放置本家电时,确保电源线没有被卡住或损坏。
本家电必须由两个或更多人搬运和安装 - 受伤危险。
拆箱和安装时请戴上防护手套 - 割伤危险。
安装,包括供水系统(如有)和电气连接,以及维修必
须由合格的技术人员进行。除非用户手册中有规定,否则,
请勿维修或更换本家电的任何部分。让儿童远离安装地点。
拆开本家电的包装后,确保它在运输过程中没有损坏。如有
问题,请联系经销商或离您最近的售后服务中心。
安装完毕后,必须将包装废弃物(塑料、泡沫塑料部件等)
存放在儿童拿不到的地方 - 窒息危险。进行任何安装操作之
前,必须先将本家电从电源线断开 - 触电危险。在安装过程
中,请确保本家电不会损坏电源线 - 火灾或触电危险。只有
在安装完成后才能激活本家电。
6
安全说明
请务必阅读并遵守
移动本家电时,请小心避免损坏地板(如镶木地板)。
将本家电安装在地面或可支撑其重量的坚固支架上,以及适
合其尺寸和使用的地方。确保本家电不在热源附近,四脚稳
定并平放在地面上,根据需要进行调整,并使用水平仪检查
本家电是否完全水平。开启本家电之前,至少等待两个小
时,确保制冷剂回路完全有效。
为保证充分通风,请在本家电的两侧和上方留出空间。
本家电的背部与其后面的墙壁之间的距离应为 50mm,避免
接触高温表面。缩小该空间将会增加产品的能耗。
警告:为避免因不稳定而造成的危险,请务必按照制造商
的说明放置和固定本家电。禁止将冰箱放置在燃气灶、金属
气或水管等金属软管或电线会接触冰箱后壁(冷凝器盘管)
的地方。
如果需要更换门,请联系技术支持中心
电气警告
必须可以通过拔下电源插头,或通过按照接线规则安装
在插座上游的多极开关,来断开本家电与电源的连接,并且
必须按照国家电气安全标准对本家电进行接地。
请勿使用延长线,复式插座或适配器。安装后,用户不
得接触电气组件。当您潮湿或赤脚时,请勿使用本家电。
如果电源线或插头损坏,运行不正常或者损坏或掉落,请勿
操作本家电。
如果电源线损坏,必须让制造商、其服务代理或类似合格
人员用相同的电源线进行更换以避免发生危险 - 触电危险。
警告:请勿在本家电的后面放置多个便携式插座或便携
式电源装置。
清洁和维护
警告:执行任何维护操作之前,确保本家电已关闭并断
开电源连接;切勿使用团队清洁设备 - 触电危险。
请不要在塑料零件、内部和门内衬或垫圈上使用研磨性
或粗糙的清洁剂,例如窗户喷雾、餐具冲洗剂、易燃液体、
蜡清洁剂、浓缩洗涤剂、漂白剂或含有石油产品的清洁剂。
请勿使用纸巾、钢丝球或其他粗糙的清洁工具。
包装材料的处置
包装材料 100% 可回收利用,并标有回收标志 。
因此,必须负责任的处理包装的各个部分,并完全符合地方
当局关于废物处理的规定。
家电的处置
本家电采用可回收或可重复使用的材料制造。请按照当地的
废弃物处理规定进行处置。有关处理、回收和重新利用本家
电的更多信息,请联系您的地方当局、家庭垃圾收集服务机
构或您购买本家电的商店。本家电标有符合有关废物、电气
和电子设备 (WEEE) 的欧洲指令 2012/19/EC 认证。通过确
保正确处理本产品,您将有助于防止对环境和人类健康造成
不良影响。
本产品或随附文档上的 符号表示不应将本产品作为生活
垃圾处理,而是必须送至回收电气和电子设备的适当回收中
心。
节能提示
将本家电安装在远离热源(例如散热器、炊具等)的干燥、
通风良好的室内,以及不会直接暴露在阳光下的地方。如果
需要,可使用绝缘板。
为保证充分通风,请遵循安装说明。产品背面通风不足会增
加能耗并降低冷却效率。
频繁开门可能会导致能耗增加。本家电的内部温度和能耗也
可能受环境温度以及本家电位置的影响。温度设定应考虑到
这些因素。
尽量减少开门。
在冰箱内解冻冷冻食物。冷冻产品的低温可以冷却冰箱内的
食物。放入本家电之前,让温热的食物和饮料冷却。
冰箱内的搁架位置不会影响能源的有效使用。食物应放置在
搁架上,确保适当的空气流通(食物不应相互接触,食物与
后壁之间的距离应保持不变)。
您可以通过取下篮子(若有)、停止冰霜架来增加冷冻食品
的存储容量。
压缩机产生的噪音是正常运行的噪音,无需担心。
7
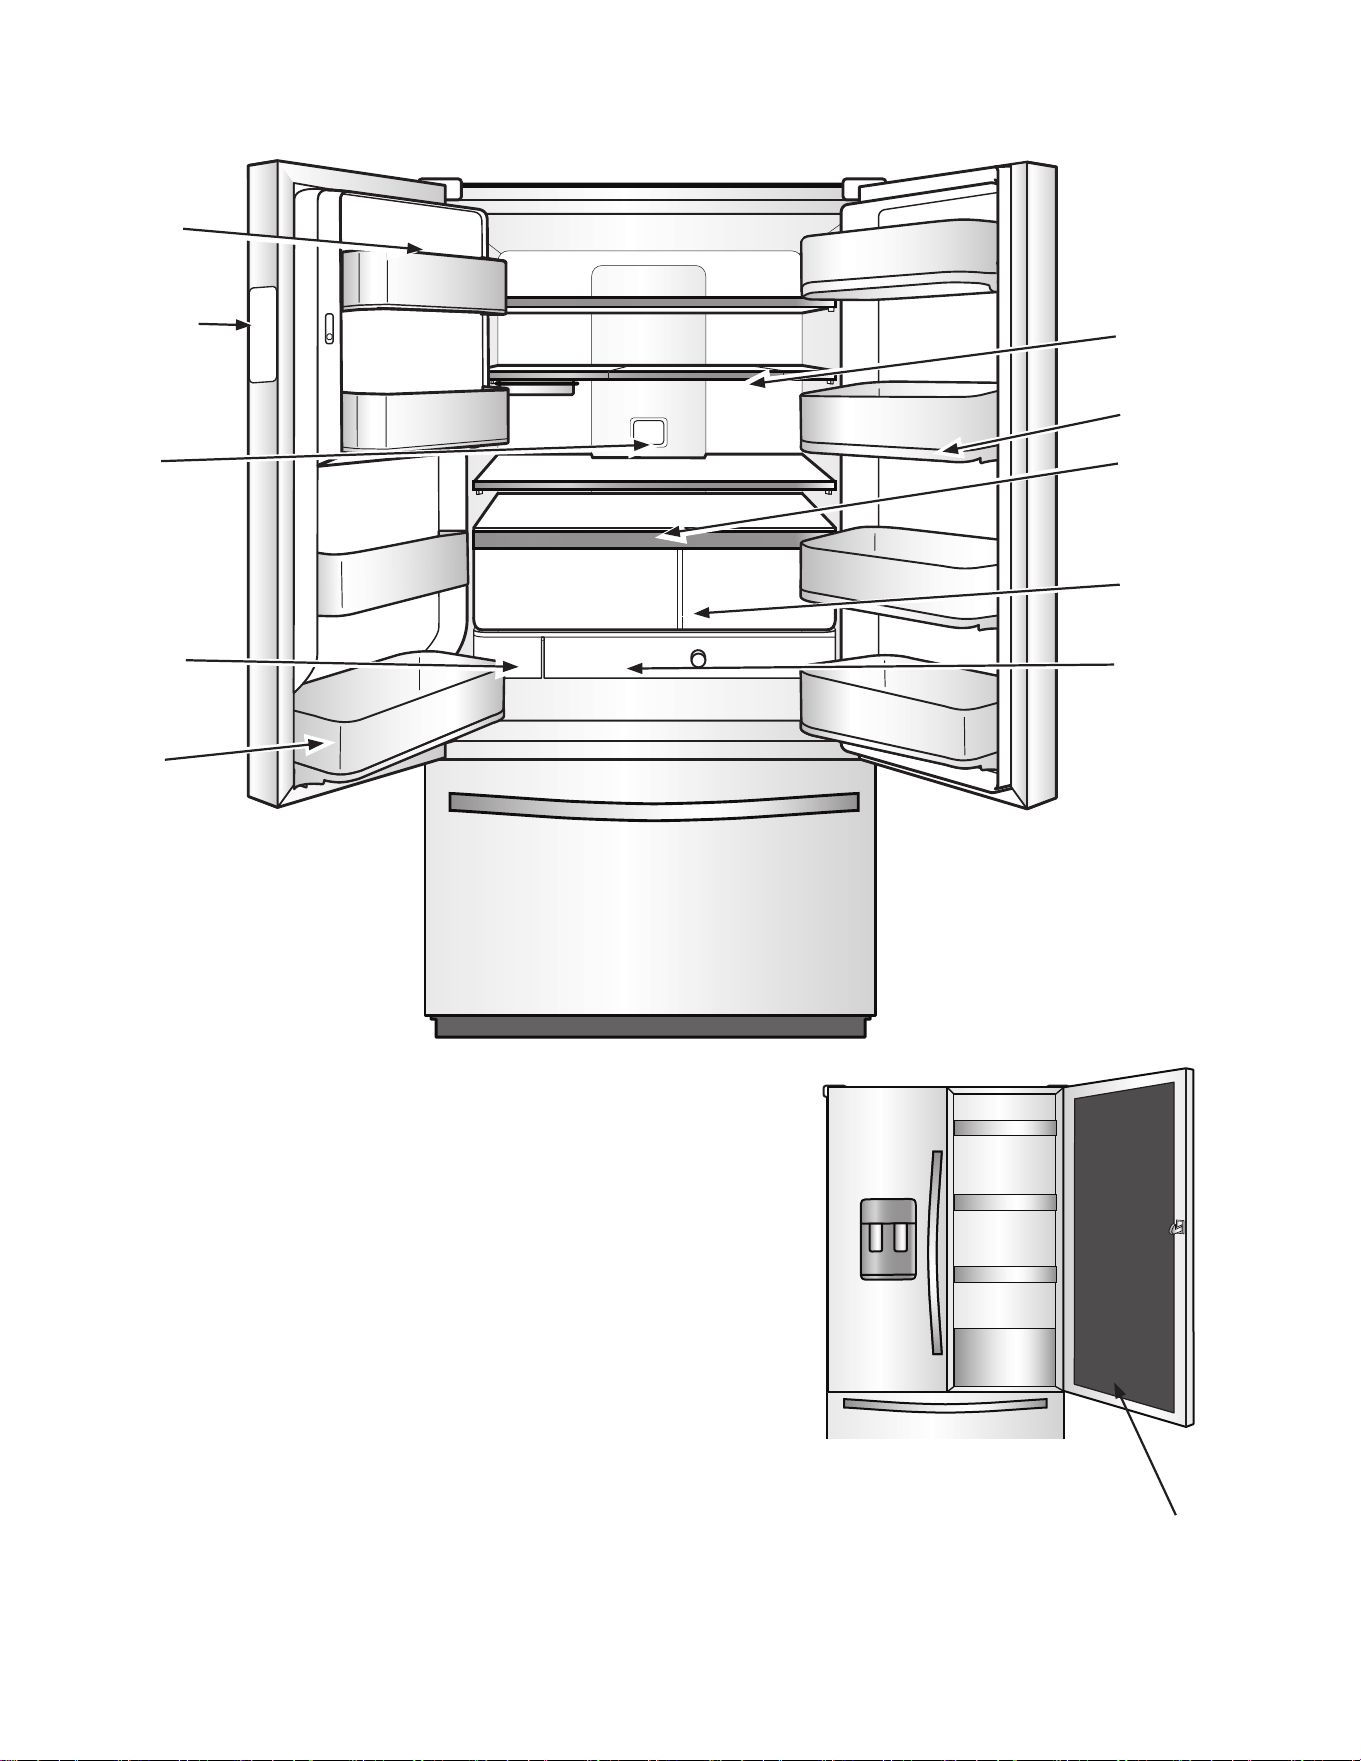
零部件和功能
空气过滤器
滤水器
自动湿度保鲜
储藏格
控温抽屉
大浅盘盒
门-内-冰储冰装置
U 型架
可拆卸盒
温度控制 UI
展示盒
门内门

8
您的Whirlpool门内门法式多门冰箱配备有各种创新的储藏和节能功能。
能效和常规工作声音
您的全新门内门法式多门冰箱采用线性压缩机设计,可实现最佳的
节能效果,并能够更好地根据制冷需求调节温度。您可能会注意
到,它的工作方式与旧冰箱相比有所不同。这是高效压缩机的正常
表现,因为变速运行能工作更长的时间,这样使用尽可能低的能耗
就能实现最佳的效率。此外,在冷却循环的各个阶段,您可能会听
到不熟悉但正常的操作声音。
In-Door-Ice冰分配系统
制冰机和储冰盒位于门中,这里便于取用过滤过的冰,还能够腾出
宝贵的内架空间。
双蒸发器
冷藏室和冷冻室拥有独立的蒸发器,能够为新鲜食物和冷冻食物提
供最佳的储存环境:新鲜食品存放在低温潮湿的环境中;冷冻食物
存放在冷冻干燥的环境中。两个储藏室之间不存在空气流通,从而
减少冷藏室中食物气味及味道扩散,并能确保冷冻室中的空气保持
干燥,减少结霜和冻斑。
空气过滤器
空气过滤器减少冰箱内常见食物气味的功效是小苏打的 15 倍。每
隔 6 个月更换空气过滤器以最大程度减少异味。
EveryDrop滤水器
EveryDrop 滤水器经过数个机构认证,可减少大多数污物,包括
氯的味道、异味、铅、农药和残留农药。EveryDrop 牌滤水器是
冰箱系统唯一可用的经过测试和认证的滤水器。请每隔 6 个月更
换 EveryDrop 滤水器。有关证书的列表,请参阅“滤水器性能数
据表”一节。
带定量加注功能的配水机
定量加注功能方便您根据需要定量分配 236,6、473,2 或 709,8
mL(8、16 或 24 oz)的过滤水。
带收藏加注功能的配水机
收藏加注功能允许保存两个自定义预设,可收藏两个常用加水(例
如咖啡壶或水壶)预设。
U型架
新型 U 型架(某些型号上有多个)的设计能够以最便利的方式来
取用各种形状和大小的物品。小物品可完美地放置在架的周边,随
手可及;当玻璃回推时,较高的物品则刚好处于中心位置。有了 U
型架,现在不需要占用半个架的空间来存放较高物品,只需将玻璃
尽量回推到所需位置来契合较高物品的位置 - 实现无限可调。
大浅盘盒
这种全宽拉出式架夹在保鲜储藏格和最低的架之间,非常适合存放
吃不完的焙盘菜、披萨盒以及大型聚会用浅盘。
控温抽屉
在内部控制器上有四个温度预设可用,帮助保持物品处于最佳温
度。肉、熟食/奶酪、什锦和饮品四种可供选择。抽屉带柔和的自
关闭滑动装置,即便已经装满也可轻松拉出,并在独立式制冷中具
有最佳的拉出度。
带延长冷冻设置的3层冷冻室抽屉
抽屉分三层存放物品,让存放和查找变得更加方便。下方抽屉包括
一个隔板。在拉出式抽屉下方还有一个金属架,用于存放小物品;
第三层玻璃架用来存放小而平的物品。当冷冻室整体设置调整为最
低温度时,将启动“延长冷冻”设置。这将有助于减少冻斑,并延
长冷冻物品的保质期。
外表面清洁简单易行
能避免污渍和指纹残留。特殊的不锈钢涂层便于清洁,使用水和软
布即可搞定。
LED照明
明亮的 LED 照明条可提供最大亮度。
LED 灯不需要更换。
门报警
冰箱门或冷冻室抽屉半开时报警提醒。
断电指示器
如果不在家时冰箱断电,该指示器会让您知道冰箱曾经断电。
Wi-Fi连接(适用某些型号)
本冰箱可连接家里的 Wi-Fi 通过应用程序遥控控制,应用程序可
下载用于 iOS 或 Android 设备。
门内门
这是专为饮品准备的制冷区域,您可将自己最爱的食物和饮品存放
于此,取用方便,无需开启整个冰箱。拉动隐藏的闩锁即可打开门
内门,酷爽饮品触手可及。
门后有什么新增内容?
†WRAS、KIWA、ACS 和 KTW 是 WRAS、KIWA、ACS 和 KTW International 的商标。
9
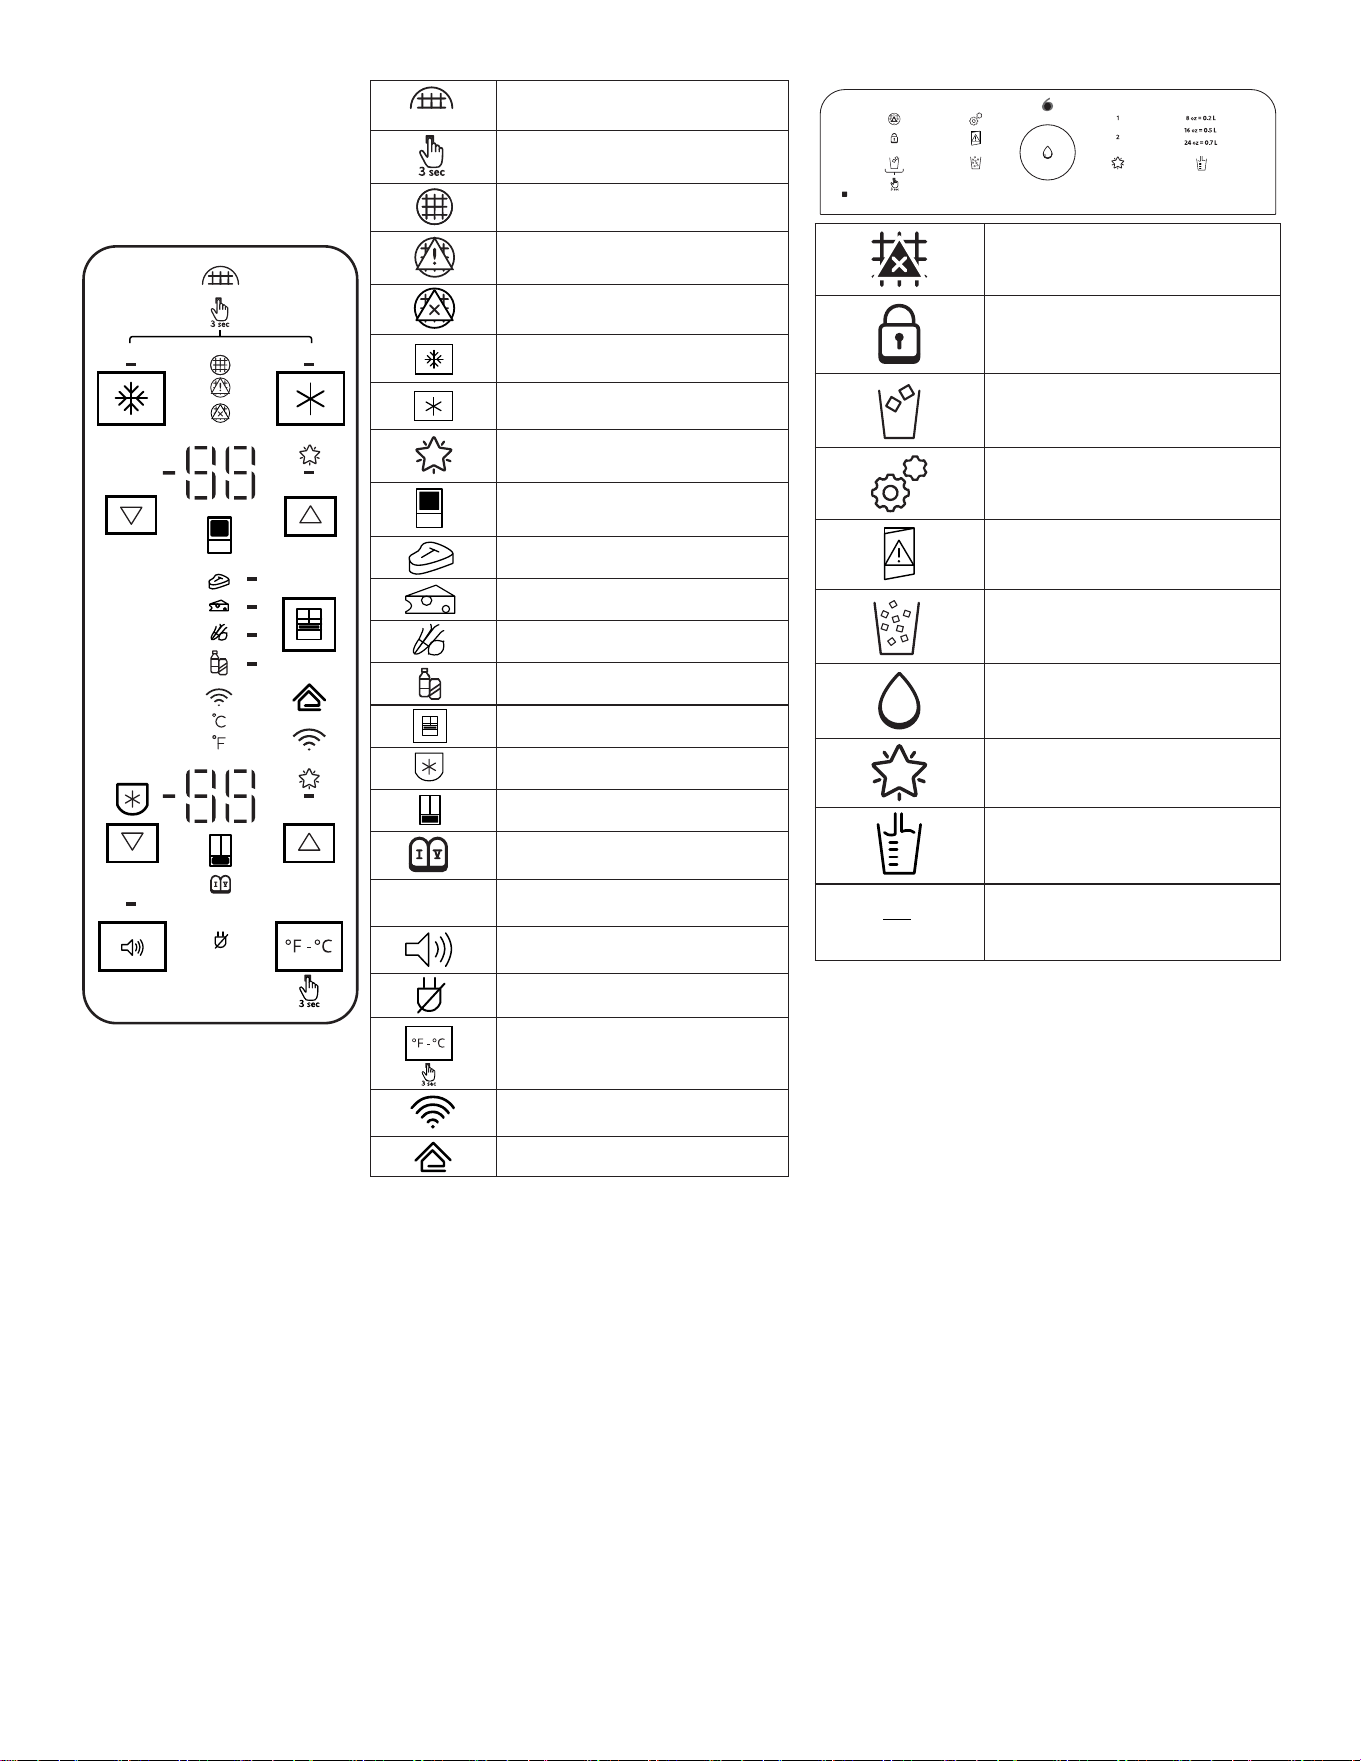
DEMO
H2O
H2O
滤水器重置
按住 3 秒
良好
正常
更换
最强冷冻
最强冷藏
建议温度
冰箱
肉
熟食/奶酪
什锦
饮料
抽屉
防冻结
冷冻室
安息日模式
DEMO
展厅模式
声音打开或关闭
断电
华氏度/摄氏度
Wi-Fi
智能格栅
th
sense
更换过滤器
锁定
冰块
校准模式
门半开
碎冰
加注
收藏加注
定量加注
1
2
加注
10
入门指南
安装清单
✔ 电源
■ 将冰箱插头插入接地(触地)插座。
✔ 冰箱门
■ 如果在安装过程中需要拆下冰箱门,请参阅“拆卸和装回冰箱
门”以及“拆卸和装回冷冻室门面”小节。
■ 检查以确保把手牢固,并按照说明进行安装。
■ 冰箱门密封完整。
■ 冰箱水平放置。(拆下底部格栅并调整调平脚,使其紧贴在地
面上。)
■ 冰箱门顶部平整。(如有必要,使用门对齐功能。)
■ 底部格栅正确安装到冰箱。
✔ 冰和水系统(适用某些型号)
■ 按照说明,将冰箱连接到水压为 20-120 psi (138-827 kPa)
的冷水水源。
■ 确保已连接并打开家庭供水。
■ 检查以确保冰箱背后的供水管线未扭结。
■ 只能使用推荐的供水管(铜或 PEX),如说明书中所述。
■ 按照说明安装滤水器。
■ 使用 11.4 L(3 加仑)水冲洗水系统,如说明书中所述。
■ 检查所有接头是否漏水。
■ 如果冰箱已连接到水源,打开制冰机。(如果未连接到水源,
关闭制冰机。)
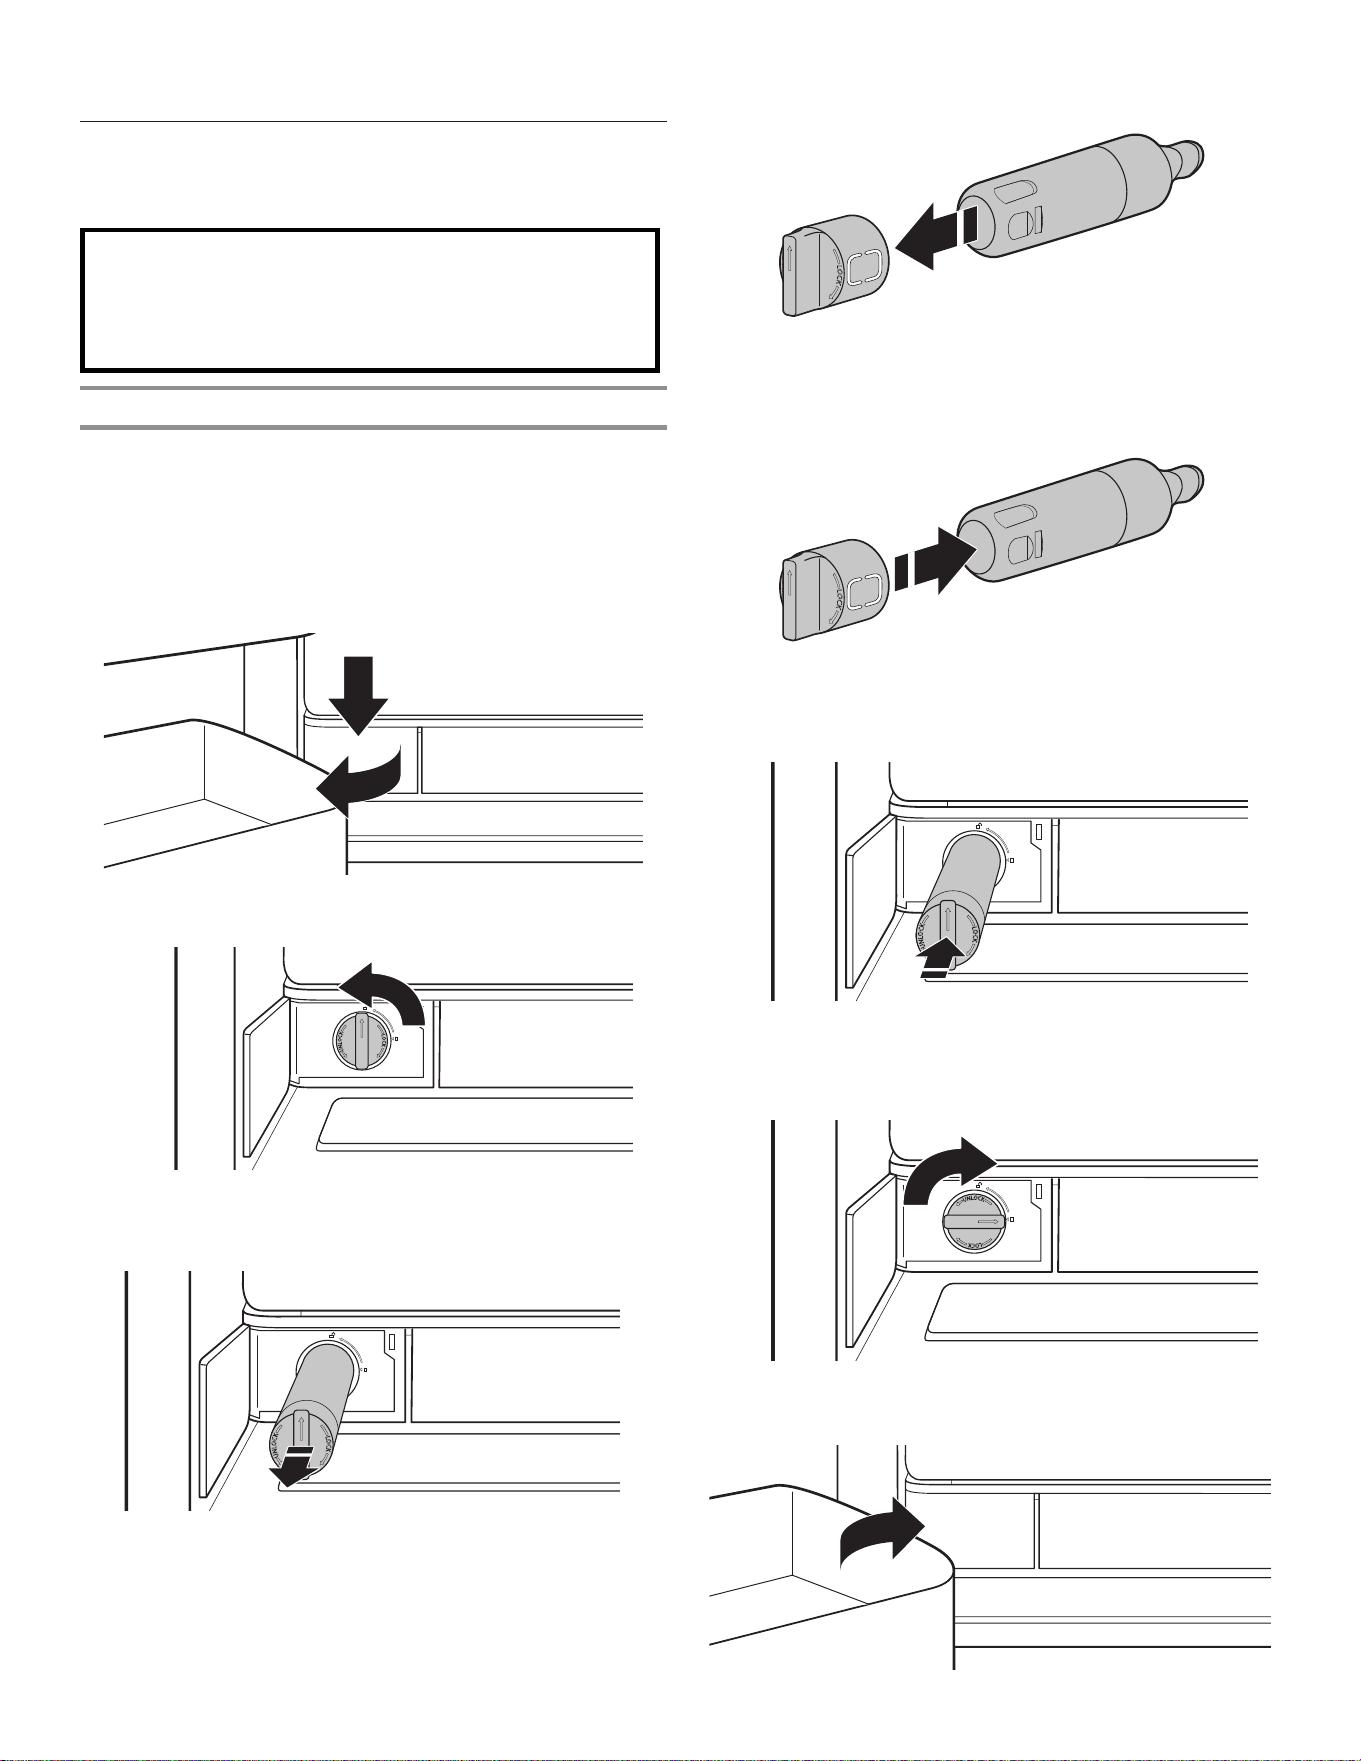
滤水器安装
■ 找到冷藏室左下角的滤水器隔间。推动滤水器门的右侧以将其
打开。
■ 将滤水器盖上的箭头与滤水器外壳中的切口凹槽对齐并插入滤
水器。
■ 插入滤水器后,顺时针转动 90°(1/4 圈),直到其锁入外壳
中。
■ 推动滤水器门,将其关上并锁定。
■ 使用 11.4 L(2.5 加仑)水冲洗水系统以清除水管线中的空
气,并使配水机不会滴水和/或避免配水机流量减小。
注意:如果滤水器安装不正确,供水流速可能会较低,并且制
冰会较慢。滤水器安装不当还可能导致滤水器外壳漏水。
✔ 最终检查
■ 按照相应包装中的说明安装空气过滤器。
■ 拆除所有运输材料。
■ 将温控装置设置为推荐的设置。
■ 保存说明和其他文件。
■ 寄出注册卡或在线注册产品。
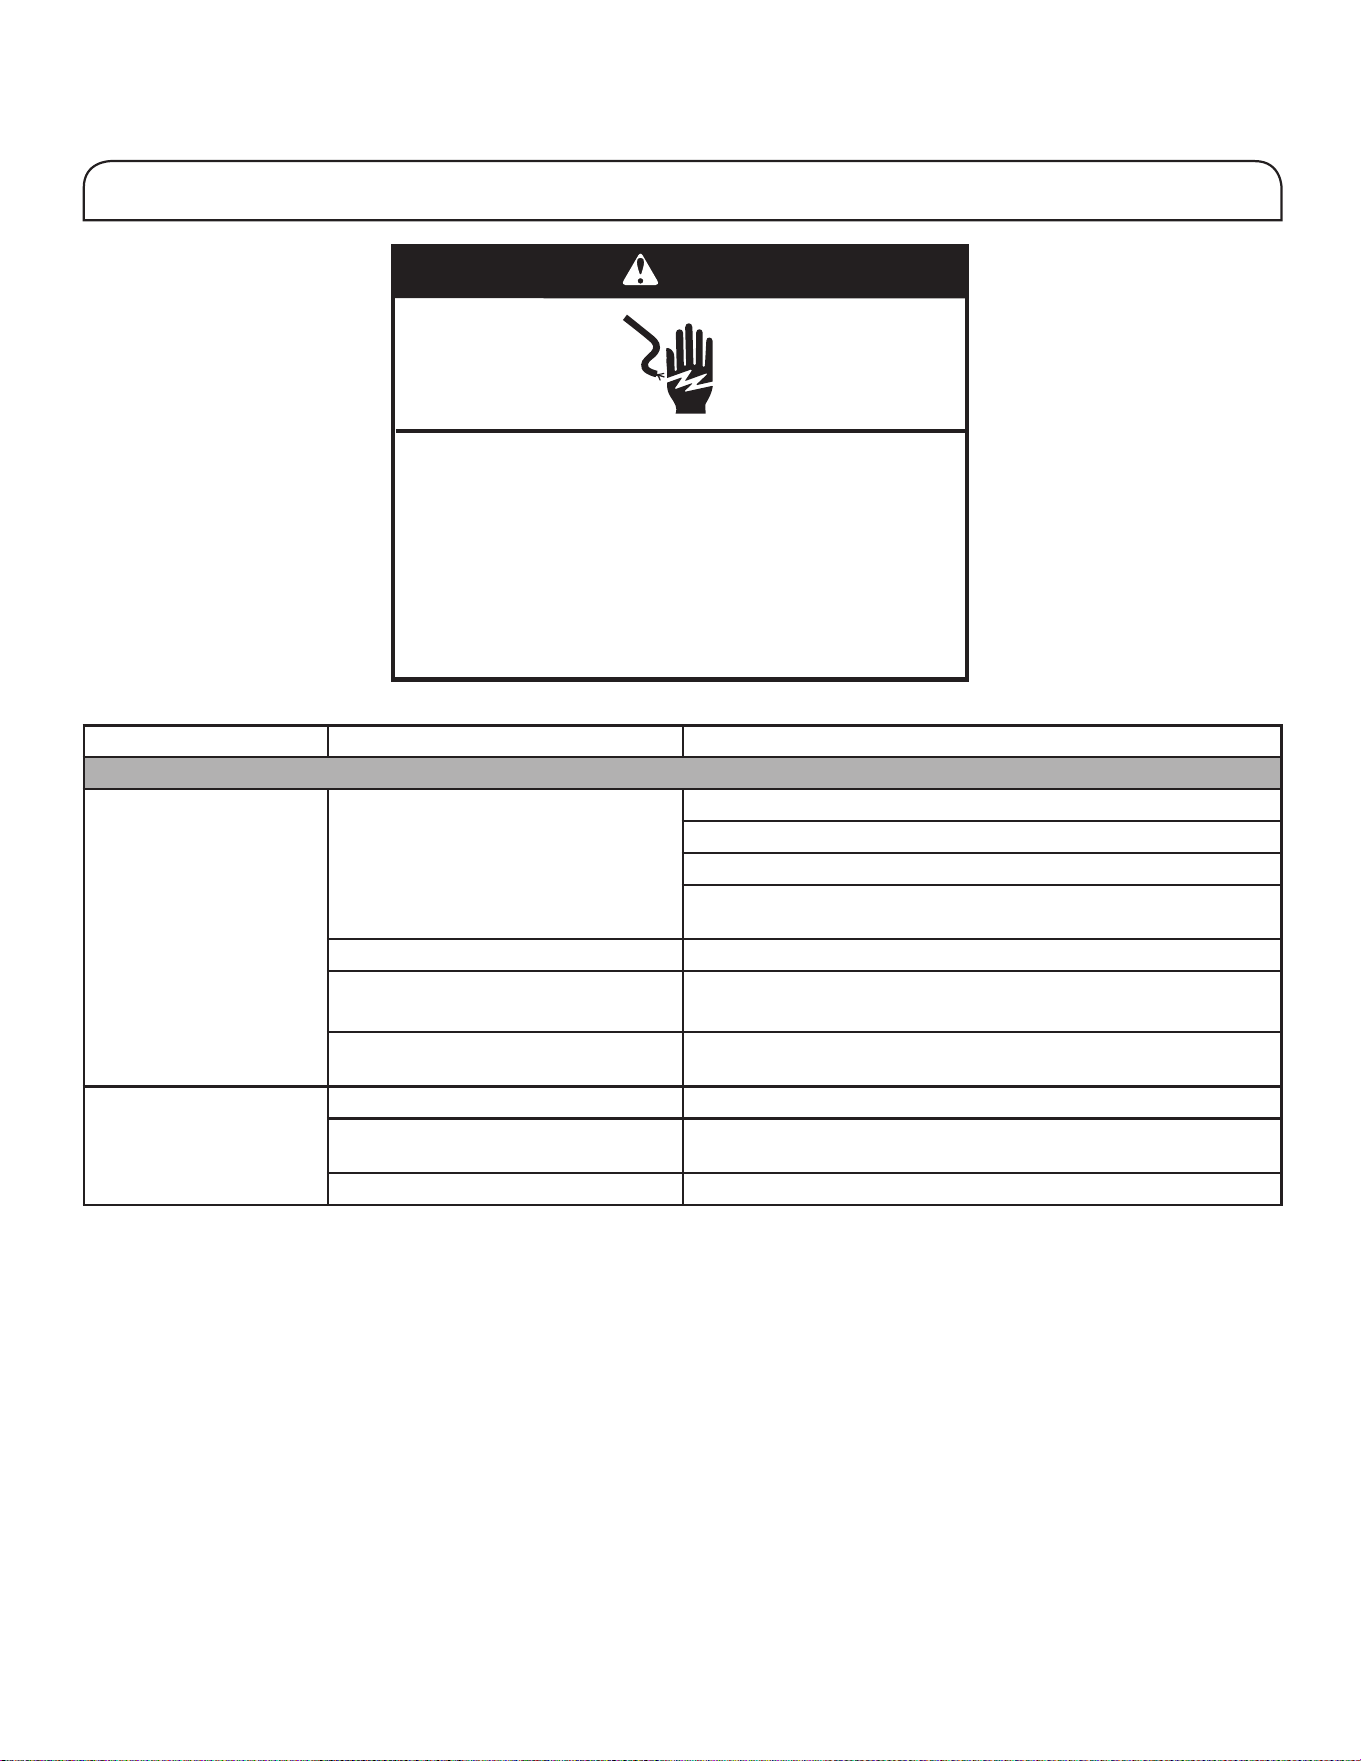
警告
䀖⭥ড䲙
䈧ᨂޕ᧕ൠ˄䀖ൠ˅ᨂᓗDŽ
н㾱〫䲔ൠ㓯ㄟDŽ
н㾱֯⭘䘲䝽ಘDŽ
н㾱֯⭘ᔦ䮯㓯DŽ
н䚥ᆸ䘉Ӌ䈤᰾ሬ㠤↫ӑǃ⚛⚮ᡆ䀖⭥DŽ
11
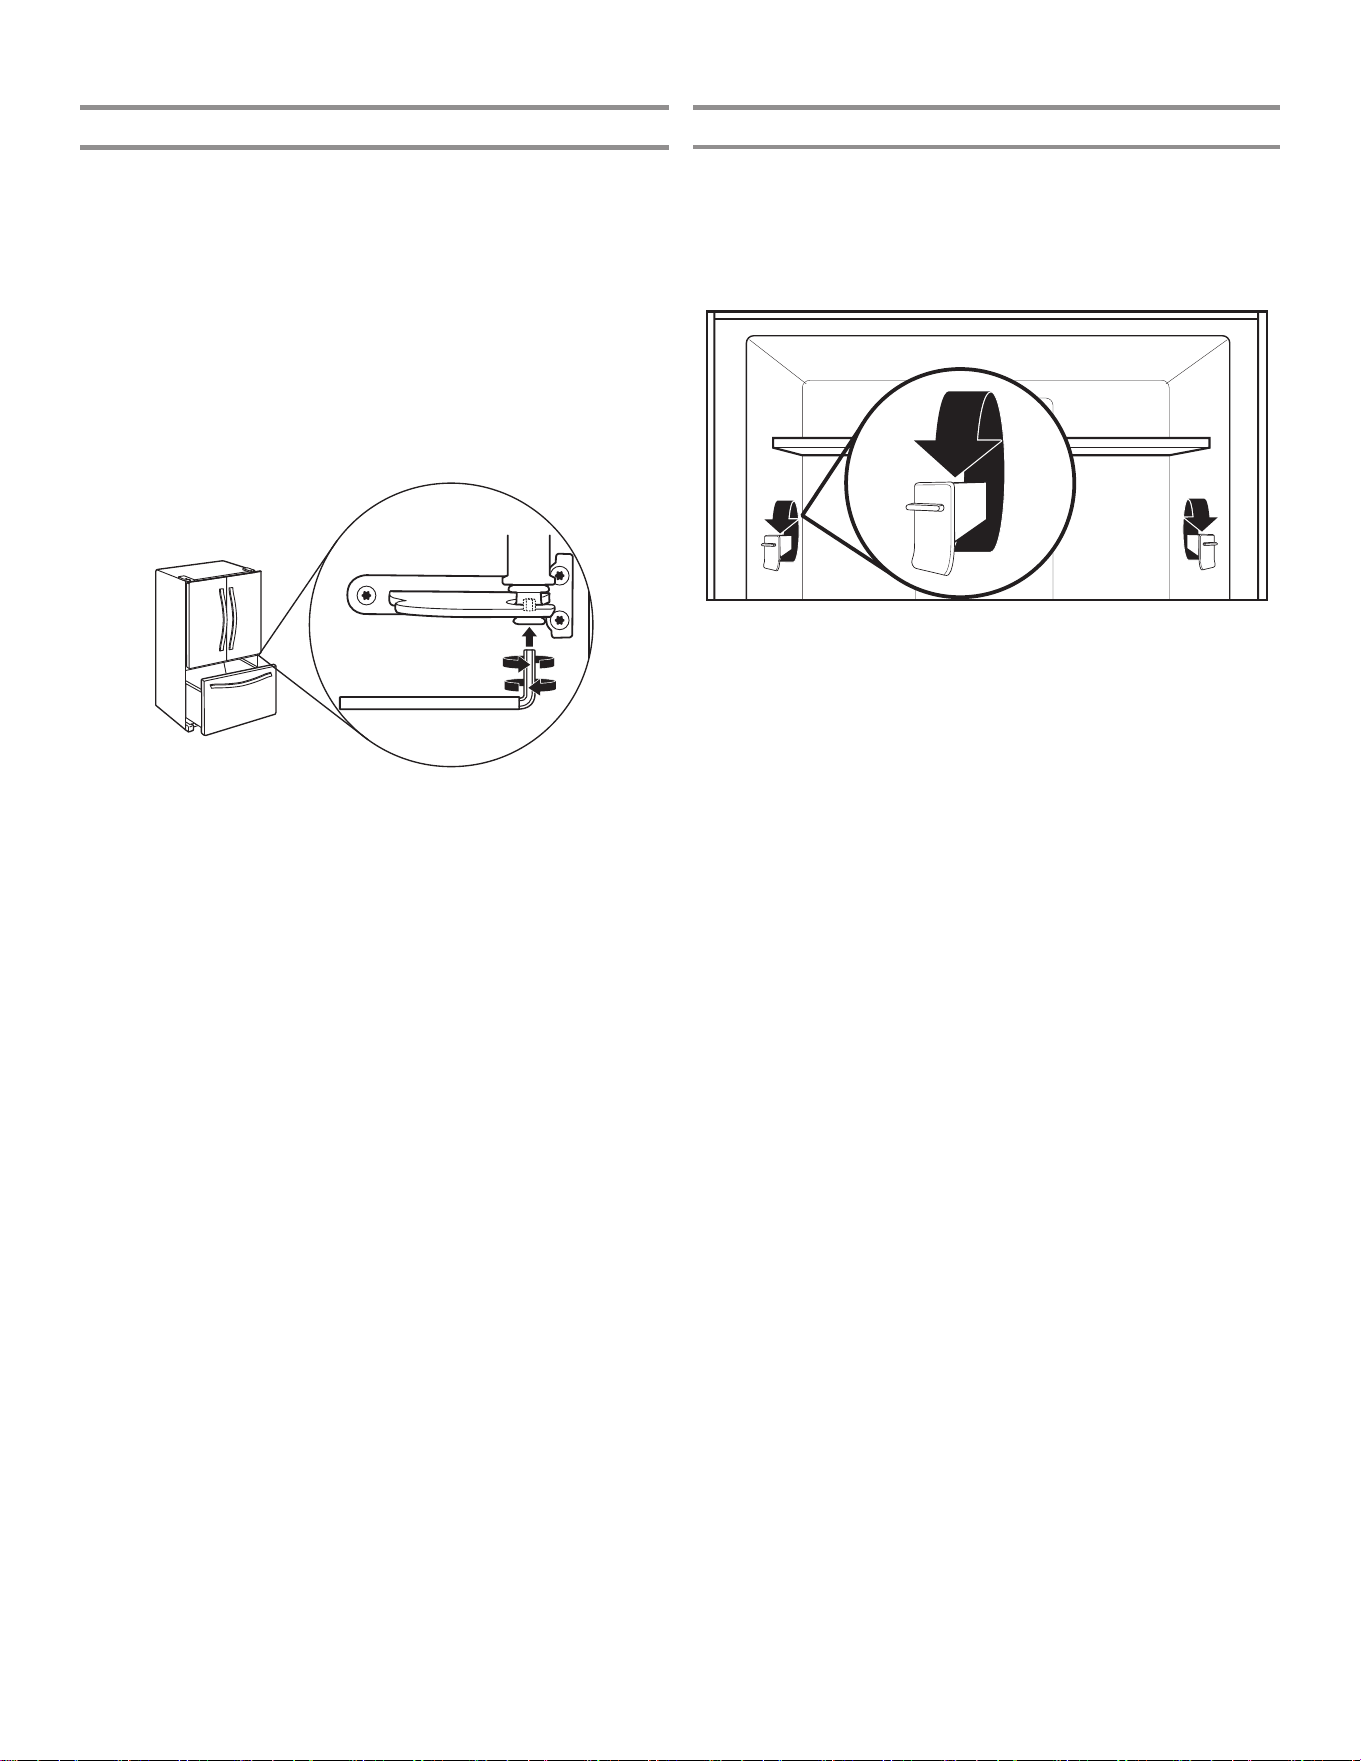
冰箱门对齐
对齐冰箱门
✔如果门不平整:
■ 确保冰箱水平放置。
■ 保持冰箱门关闭,拉出冷冻室抽屉。找到右侧冰箱门底部铰链
销。对齐螺丝在底部铰链销内部。
■ 将 1/8" 内六角扳手(与冰箱门把手安装说明装在一起)的短
端插入底部铰链销,直到其与对齐螺丝完全接合。
■ 要抬高冰箱门,向右转动内六角扳手。
■ 要降低冰箱门,向左转动内六角扳手。
■ 持续转动对齐螺丝,直到门顶部对齐。
搁架高度调整
搁架高度可通过改变可调节搁架支架的垂直和水平位置来调整。
■ 小心地将搁架从搁架支架上抬起,并将导条转到所需的方向。
■ 对其余的搁架支架重复上述步骤。
■ 确保搁架正确安装在搁架支架上。
12
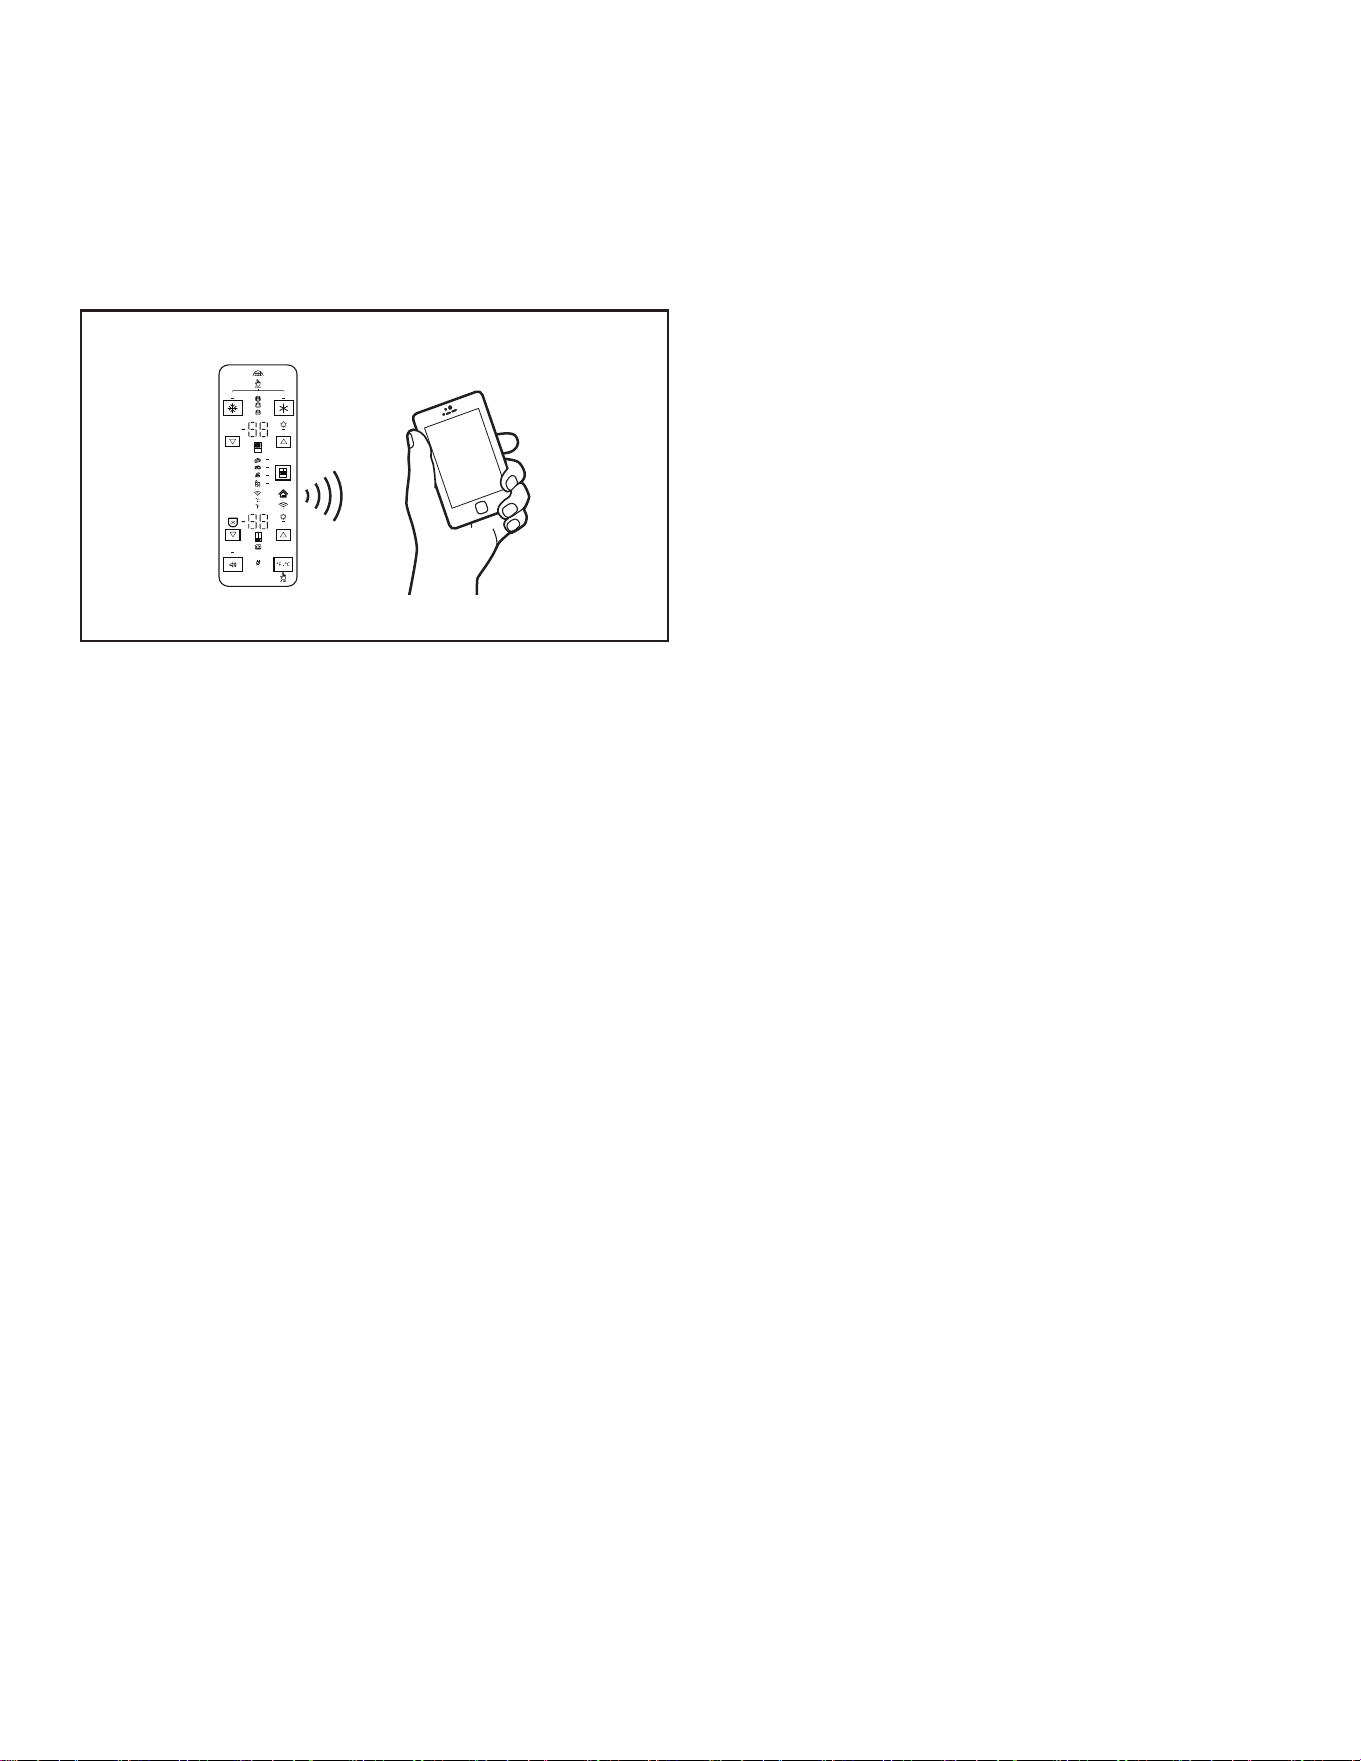
冰箱连接功能
(适用于某些型号)
移动应用程序服务并非在所有国家/地区可用。
Wi-Fi 连接可让智能冰箱连接至互联网并通过智能手机或移动设备与 Whirlpool 应用程序交互。请参阅“故障排除 - 连接型号”一节。
注意:Whirlpool 应用程序特性和功能可能会发生变更。
DEMO
H2O
智能功能
智能功能帮助您提高每日操作效率,可让您远程监控、管理和维护
冰箱。
远程温控
作用:借助 Whirlpool 应用程序,在移动设备上远程控制冰箱温
度。
具体作用:远程控制冰箱、冷冻室以及控温抽屉中的温度,无需在
冰箱上操作。
滤水器和空气过滤器状态
作用:查看空气和滤水器在需要更换之前剩余的使用寿命。
具体作用:有助于更有效地安排
过滤器的订购和更换。
AutoReorder应用程序
作用:通过 Whirlpool 应用程序订购更换用过滤器、耗材和配
件,可直接邮寄到家中。
具体作用:简化滤水器和空气过滤器的订购过程,无需前往商店搜
寻购买。
超温
作用:当冷藏室和冷冻室温度达到并超过指定值时发送通知。
具体作用:发出超温警报,提供冷藏室/冷冻室内物品的处理建
议。
最强冷藏
作用:借助 Whirlpool 应用程序,在移动设备上远程控制冷藏
室。
具体作用:远程打开/关闭“最强冷藏”选项,让冷藏室中的温度
更低以备装入新购物品。持续 24 小时降低内部温度。
最强冷冻
作用:借助 Whirlpool 应用程序,在移动设备上远程控制冷冻
室。
具体作用:远程打开/关闭最强冷冻,提高制冰效率。将设定的温
度降低至可用的最低值达 24 小时,以最大化制冰效率。
防冻结模式控制
作用:借助 Whirlpool 应用,可以在移动设备上远程查看冰箱的
状态信息。
具体作用:告知您冰箱的防冻模式是否激活,从而减少冻斑并帮助
冷冻物品保持外观和口味。
安息日模式
作用:可让冷藏室或冷冻室的门在安息日期间或其他宗教假日期
间打开或关闭,而不用激活内部灯或控制器。借助 Whirlpool 应
用,可以在移动设备上远程开关该模式。
具体作用:远程开/关安息日模式选项。
分配器灯亮度控制
作用:借助 Whirlpool 应用程序,在移动设备上远程控制冷藏
室。
具体作用:远程开/关分配器灯。
收藏加注控制
作用:借助 Whirlpool 应用程序,在移动设备上远程更改冰箱上
的收藏加注值。
具体作用:让您远程设置和保存收藏加注值。
开门警报
作用:冰箱的一扇门打开时发送通知。
具体作用:发送门半开警报,提醒关门或给家里打电话,通知家人
关闭冰箱门,防止发生超温情况。
断电
作用:冰箱断电、重新供电或者冷藏室和冷冻室达到最高温度时发
送通知。
具体作用:发出电源状态和停电持续时间警报,提供冷藏室/冷冻
室内物品的处理建议。
13
连接设置
(适用于某些型号)
重要信息:您自己要负责正确安装冰箱,然后方可使用。务必阅读并遵守冰箱附带的用户说明。
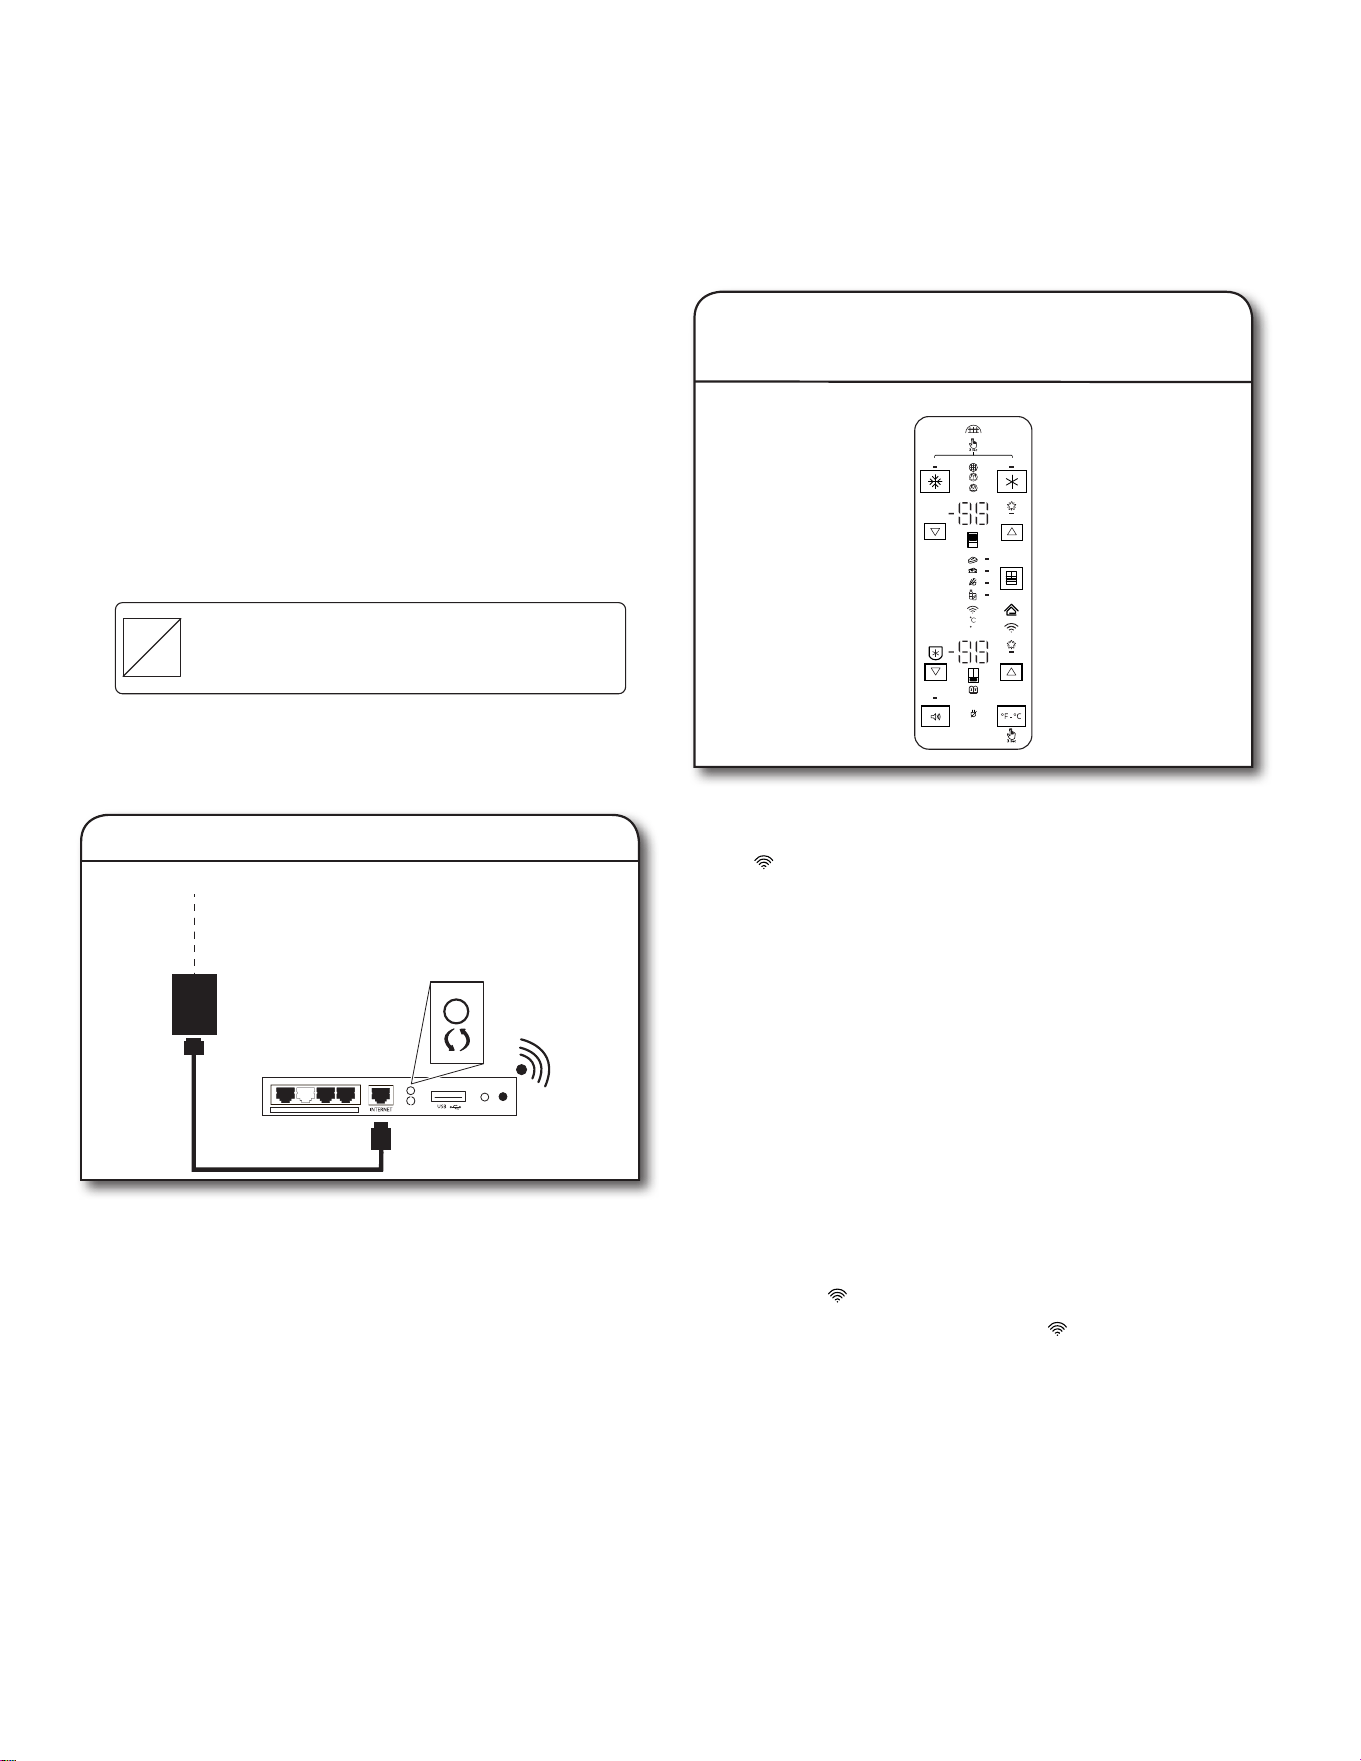
自动设置说明-Wi-Fi安全设置(WPS)
按下路由器上的 WPS 按钮。指示灯将会开始闪烁。
小贴士:路由器上的 WPS 功能将激活 2 分钟。在该时间范围内完
成后续步骤,或者需要重新启动 WPS。
互联网
WI-FI 安全设置
(WPS)
家用无线路由器
1.设置路由器
DEMO
H2O
按住 Wi-Fi 按钮 3 秒。
在冰箱和路由器尝试连接之时,冰箱控制面板上的 Wi-Fi 状态指
示灯 ( ) 将会快速闪烁。
如果连接成功,Wi-Fi 状态指示灯将会点亮,并持续亮起。
如果冰箱没有连接:
如果冰箱和路由器在 2 分钟之后没有连接,Wi-Fi 状态指示灯将
快速闪烁,然后熄灭。请参阅本《使用和维护指南》的“故障排
除 - 连接的型号”小节,查看您特定路由器的任何连接说明,而
如果需要备选说明,请访问 www.whirlpool.eu。
注意:如果首次使用智能家电,则需要下载 Whirlpool 应用程序
并创建在线用户帐户。
如果已经拥有应用程序和用户帐户,请跳过该步骤,前往步骤
4“在用户帐户中注册冰箱”。
关闭及开启Wi-Fi无线信号
■ 要关闭 Wi-Fi,可按住 Wi-Fi 按钮 7 秒。Wi-Fi 图标将会
熄灭,指示您禁用了 Wi-Fi。
■ 要重新连接 Wi-Fi,可按住 Wi-Fi 按钮 7 秒。
■ 在冰箱和路由器尝试连接之时,冰箱控制面板上的 Wi-Fi 状
态指示灯 ( ) 将会缓慢闪烁。
■ 如果连接成功,Wi-Fi 状态指示灯 ( ) 将会点亮,并持续
亮起。
2.设置冰箱(时间敏感型步骤)
您将需要:
■ 具备 WPS 功能的家用无线路由器。路由器应当开启,并且具备
有效互联网连接。
■ 要使用该功能,您需要具备:
■ 屏幕分辨率达到 1280x720 或更高的运行 Android 4.3(
或更高版本)的智能手机,或运行 iOS 8 或更高版本的平
板电脑或智能手机;
■ 接入互联网的无线路由器 2.4Ghz Wi-Fi b/g/n(使用智能
设备检查确定电器附近的家用无线网络的信号强度良好)。
■ 冰箱上的智能电器标识号 (SAID)。这个号码位于冰箱右侧铰链
盖的正面标签上。
SAID:
0123456789
Contains FCC ID:
A5UWICHIN01
Contains IC:
10248A-WICHIN01
MAC ID:
88:E7:12:XX:YY:ZZ
注意:如果家用无线路由器没有配备 WPS 按钮,请查看路由器的
用户手册,确认是否支持 WPS。如果不支持,请参阅以下网址上的
备选设置说明 www.whirlpool.eu。
14
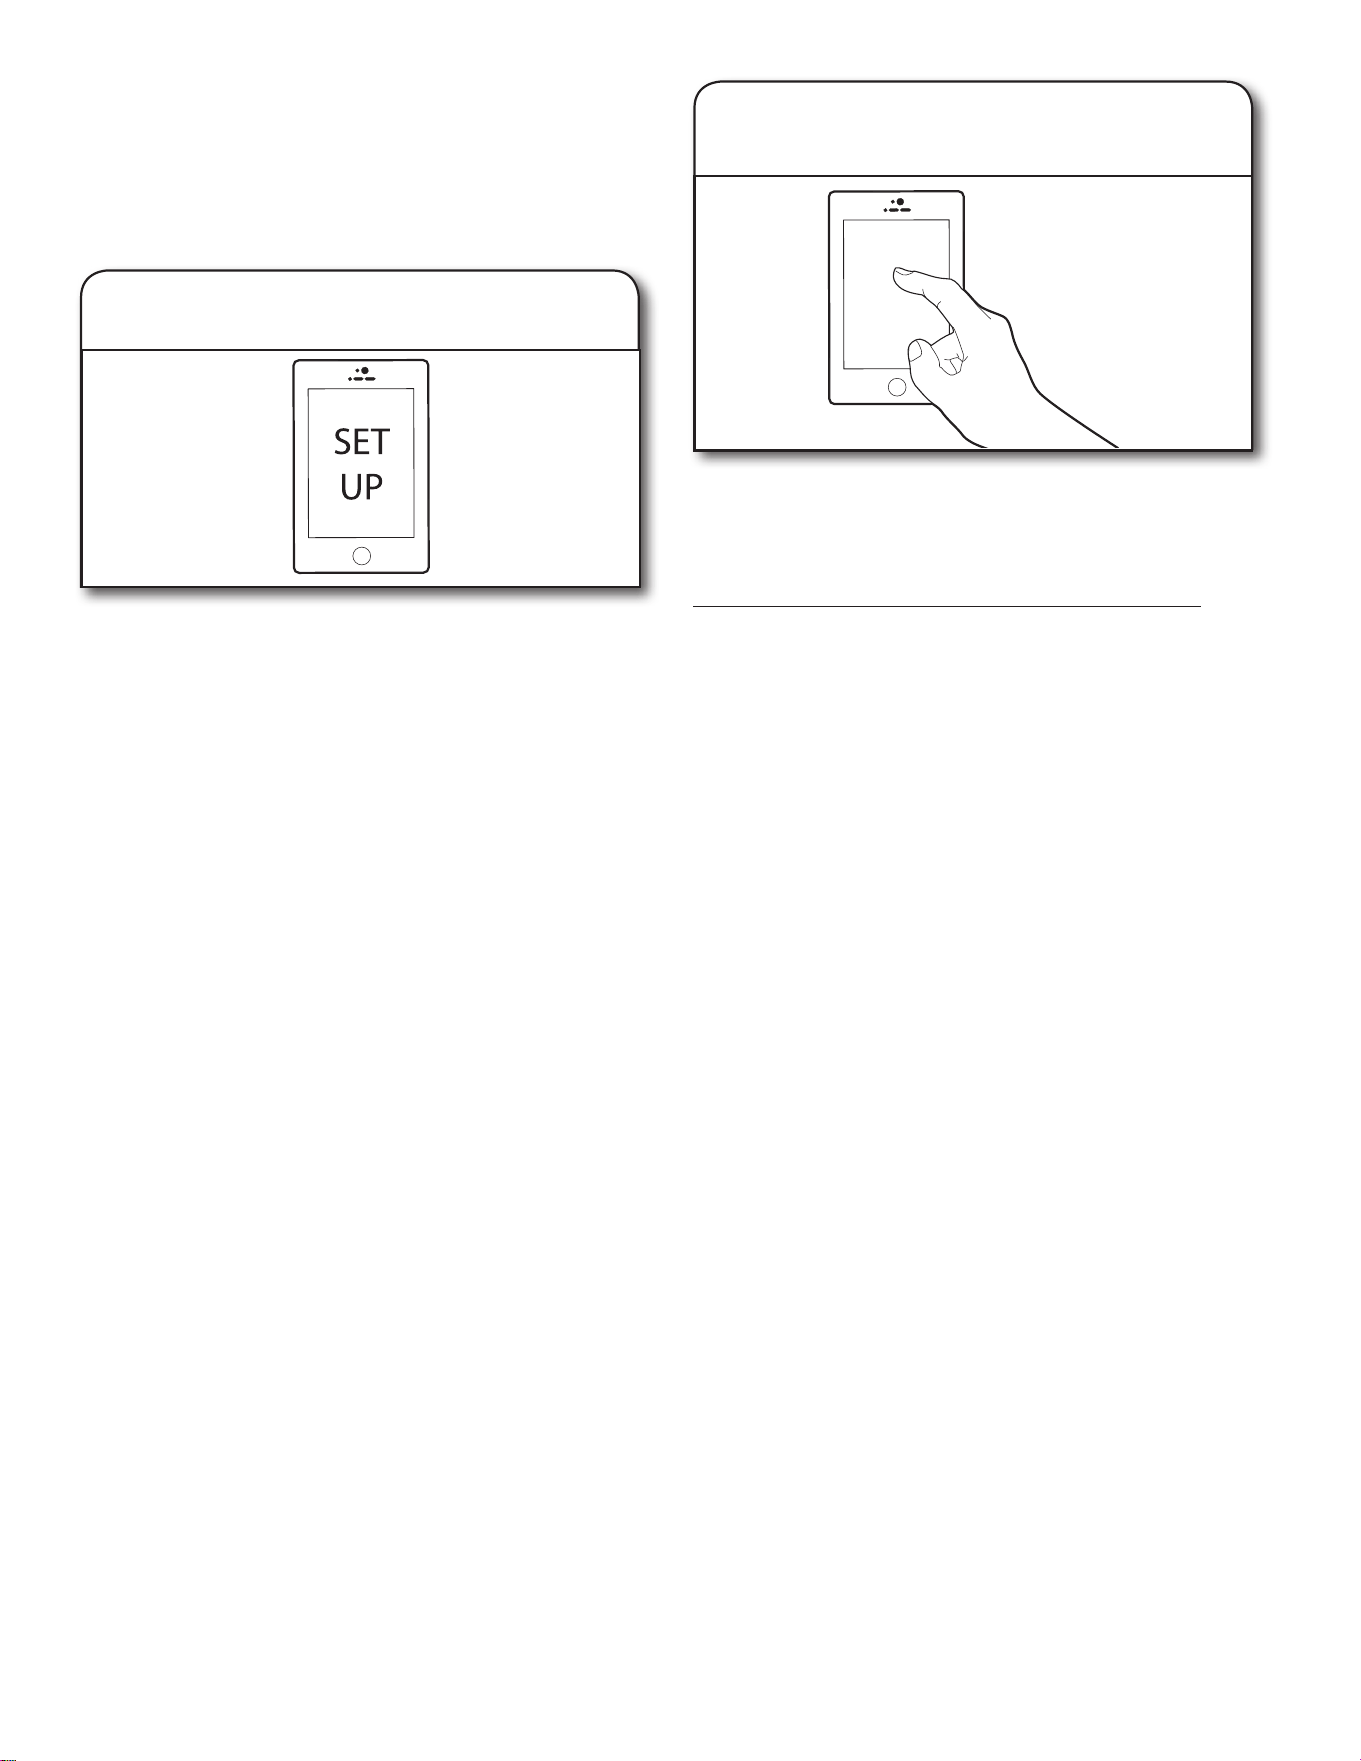
通过移动设备、智能手机或平板电脑,前往 www.whirlpool.eu
并遵照说明下载和安装 Whirlpool 应用程序。
安装之后,点击 Whirlpool 应用程序图标以打开应用程序。应用
程序将指导您完成用户帐户的设置步骤。应用程序将确保获取必要
的个人和家庭信息以及有关能源公司的信息。
3.下载Whirlpool应用程序并设置用户
帐户
在帐户中注册冰箱是一个必要步骤,供您全面利用智能功能。如果
收到应用程序提示,请输入 SAID(区分大小写),这个号码可在
冰箱右侧铰链盖正面的贴纸上找到。
我的智能家电ID#是:
■ 在冰箱和路由器尝试连接之时,冰箱控制面板上的 Wi-Fi 状态
指示灯将会闪烁。
■ 一旦将冰箱连接至家中的 Wi-Fi 网络,即使断电、电器移动或
暂时搁置不用,也会保持连接。
■ 如果更换无线路由器(或获得一个不同的智能冰箱),将需要
重复该连接设置过程。
4.在用户帐户中注册冰箱。
断开和重新连接Wi-Fi
■ 要将冰箱和路由器断开,请按住 Wi-Fi 7 至 15 秒之间。
Wi-Fi 和房屋图标将会熄灭,指示冰箱与 Wi-Fi 和路由器完全
断开连接。
■ 要将冰箱重新连接至路由器并重新连接 Wi-Fi,请重复上述自
动设置程序。
15
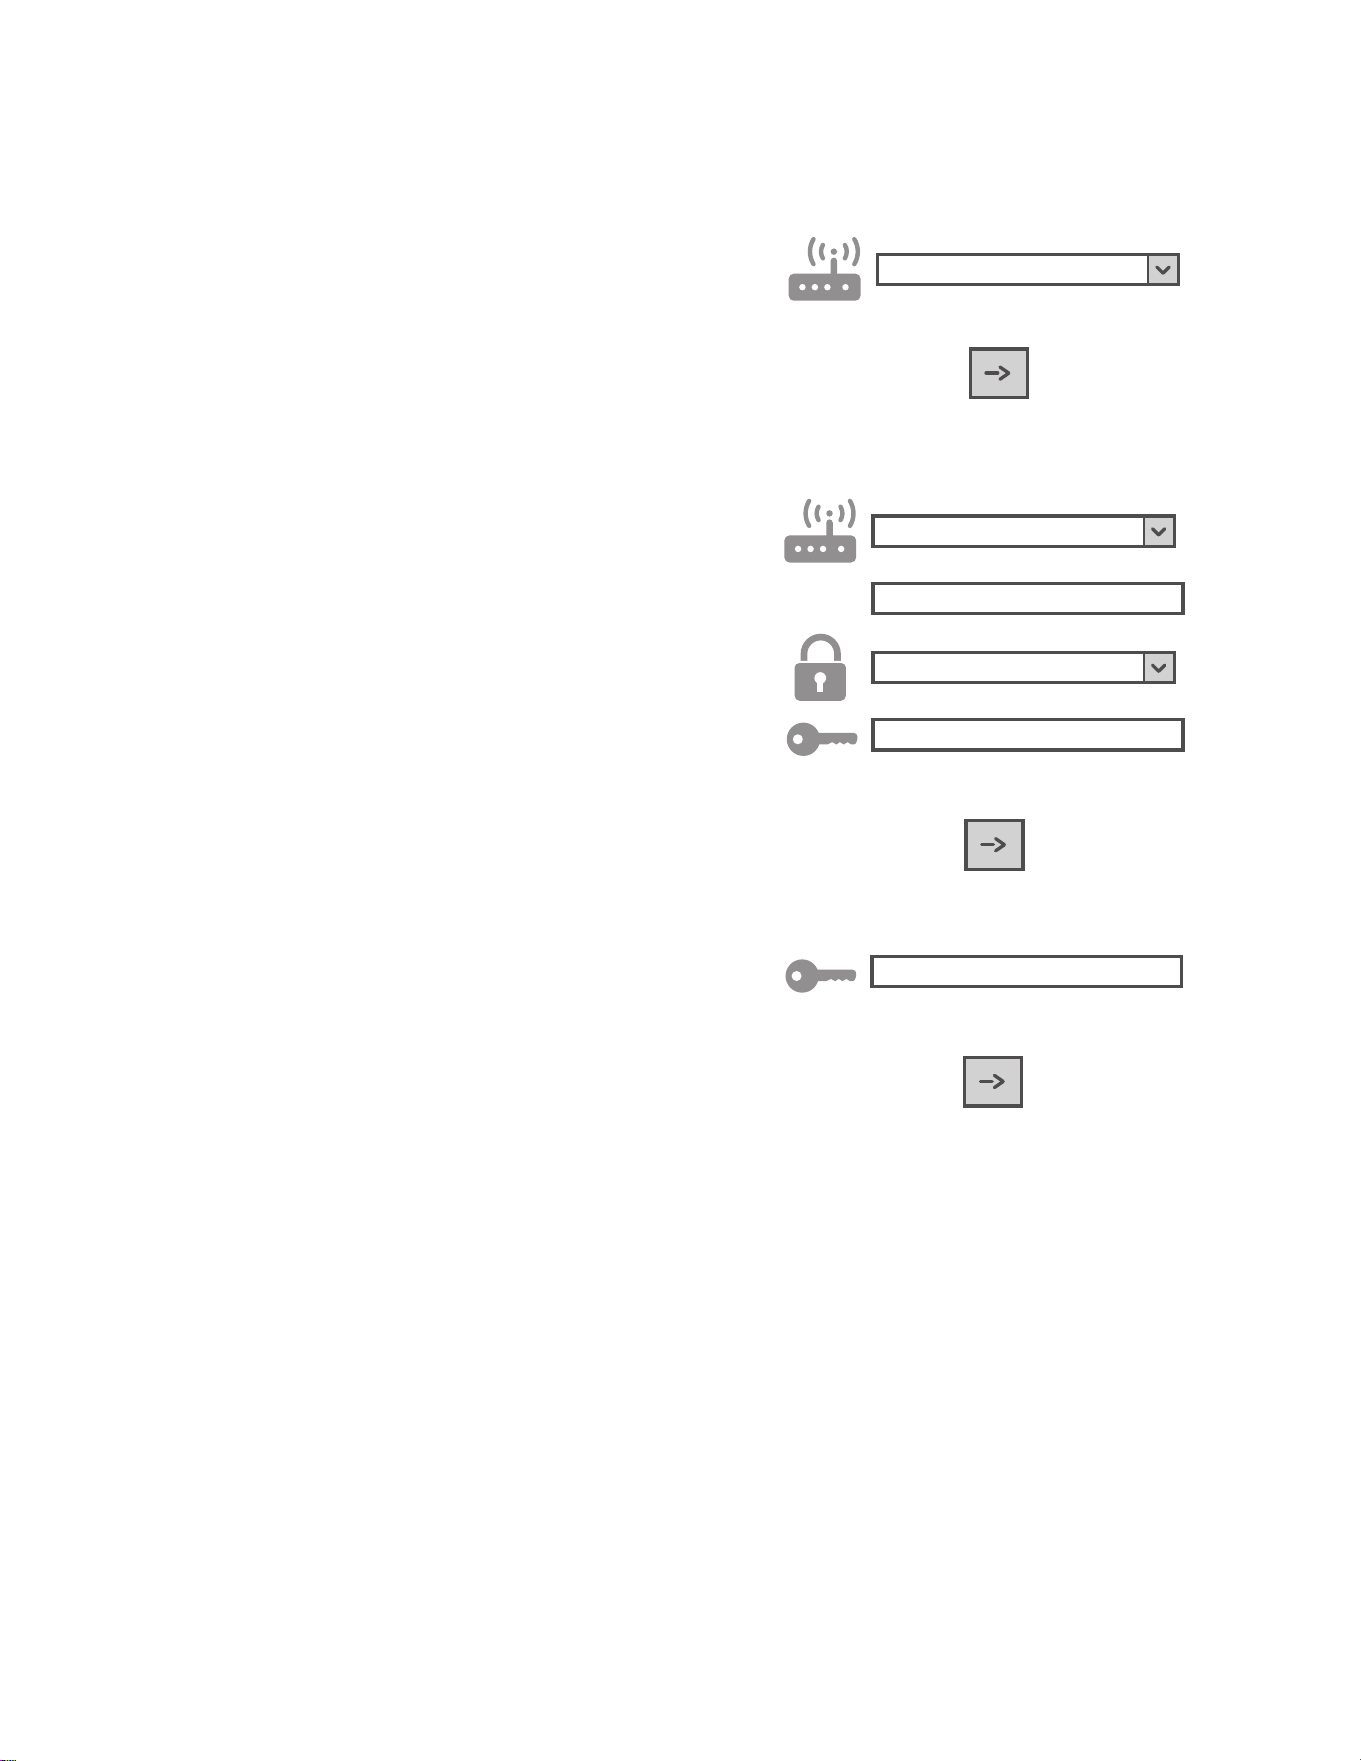
手动设置说明(首次使用)接入点方法
该程序使用微型接入点技术,并且在路由器不支持 WPS 时适用。
1. 在开始设置程序之前,请记录下家中无线网络名称 (SSID)、其
密码以及电器的 SAID。安装期间需要用到这些信息。
2. 打开路由器,确保互联网连接有效。
3. 在电器上,激活接入点的配置过程,方法是按下 Wi-Fi 按钮。
您应当看见 Wi-Fi 图标缓慢闪烁。
4. 打开智能设备(手机或平板电脑),并在设置菜单中访问可用
的无线网络列表。
5. 电器具有无线网络 (SSID)。从可用无线网络列表中选择它。网
络名称由您电器类型(洗衣机、干衣机等)前缀后接 MAC 地址
(即 REFRID_88_E7_12_B3_66_ C3)组成。如果您没有看到,
则可能需要刷新网络列表,或者检查 Wi-Fi 图标是否位于产品
显示屏上。
6. 一旦选择了 SSID,将需要密码。使用 SAID(请参阅“在开始
设置程序之前”一节)作为密码(即 444441ABCD)。
注意:该密码区分大小写。
7. 连接至网络。
8. 等待直到设备确认已连接至电器 Wi-Fi 网络。
9. 打开 Web 浏览器。如果没有出现内容,在地址栏 (URL) 键
入“192.168.10.1”并按下 Enter。浏览器将显示 SMART 网
页。这是您电器的 Wi-Fi 配置页面。
10. 在可用网络的下拉列表中,选择家用无线网络的名称。
11. 如果家用无线网络隐藏,则选择“其他”(➔) 并手动输入其名
称 (SSID) 和安全协议。
12.
WPA2
根据需要为家用无线网络输入密码,并提交。密码区分大小
写。
13. 单击“➔”按钮并等待数秒。
14. 电器上的 Wi-Fi 图标应当停止闪烁并在连接之后永久亮起。否
则断开电器并重新连接至主电源并重复上述程序。
15. 设置过程完成。
16
安装说明
拆开冰箱包装
警告
过重危险
在移动和安装冰箱时,应由两个或更多人执行。
否则可能导致背部或其他部位受伤。
拆除包装
■ 打开冰箱之前,去除表面的胶带和胶水残留。用手指蘸取餐具
洗涤剂,在胶水上擦拭。用温水清洁并擦干。
■ 在去除胶带或胶水时,请勿使用尖锐工具,勿用酒精、易燃液
体或研磨性清洁剂擦拭。这些产品可能会损坏冰箱表面。
■ 处置/回收所有包装材料。
使用前清洁
去除所有包装材料之后,先清洁冰箱的内部后再开始使用。请参
阅“冰箱维护”一节中的清洁说明。
需要了解的有关玻璃架和盖子的重要信息:
当玻璃架或盖子处于冰冷状态时,请勿用温水进行清
洁。如果突然遭遇温度变化或冲击(例如碰撞),架
子和盖子可能会断裂。
钢化玻璃采用可粉碎为许多小型卵石大小块段的设计。
这属于正常现象。玻璃架和盖子较重。在拆卸它们时
请使用双手,防止掉落。
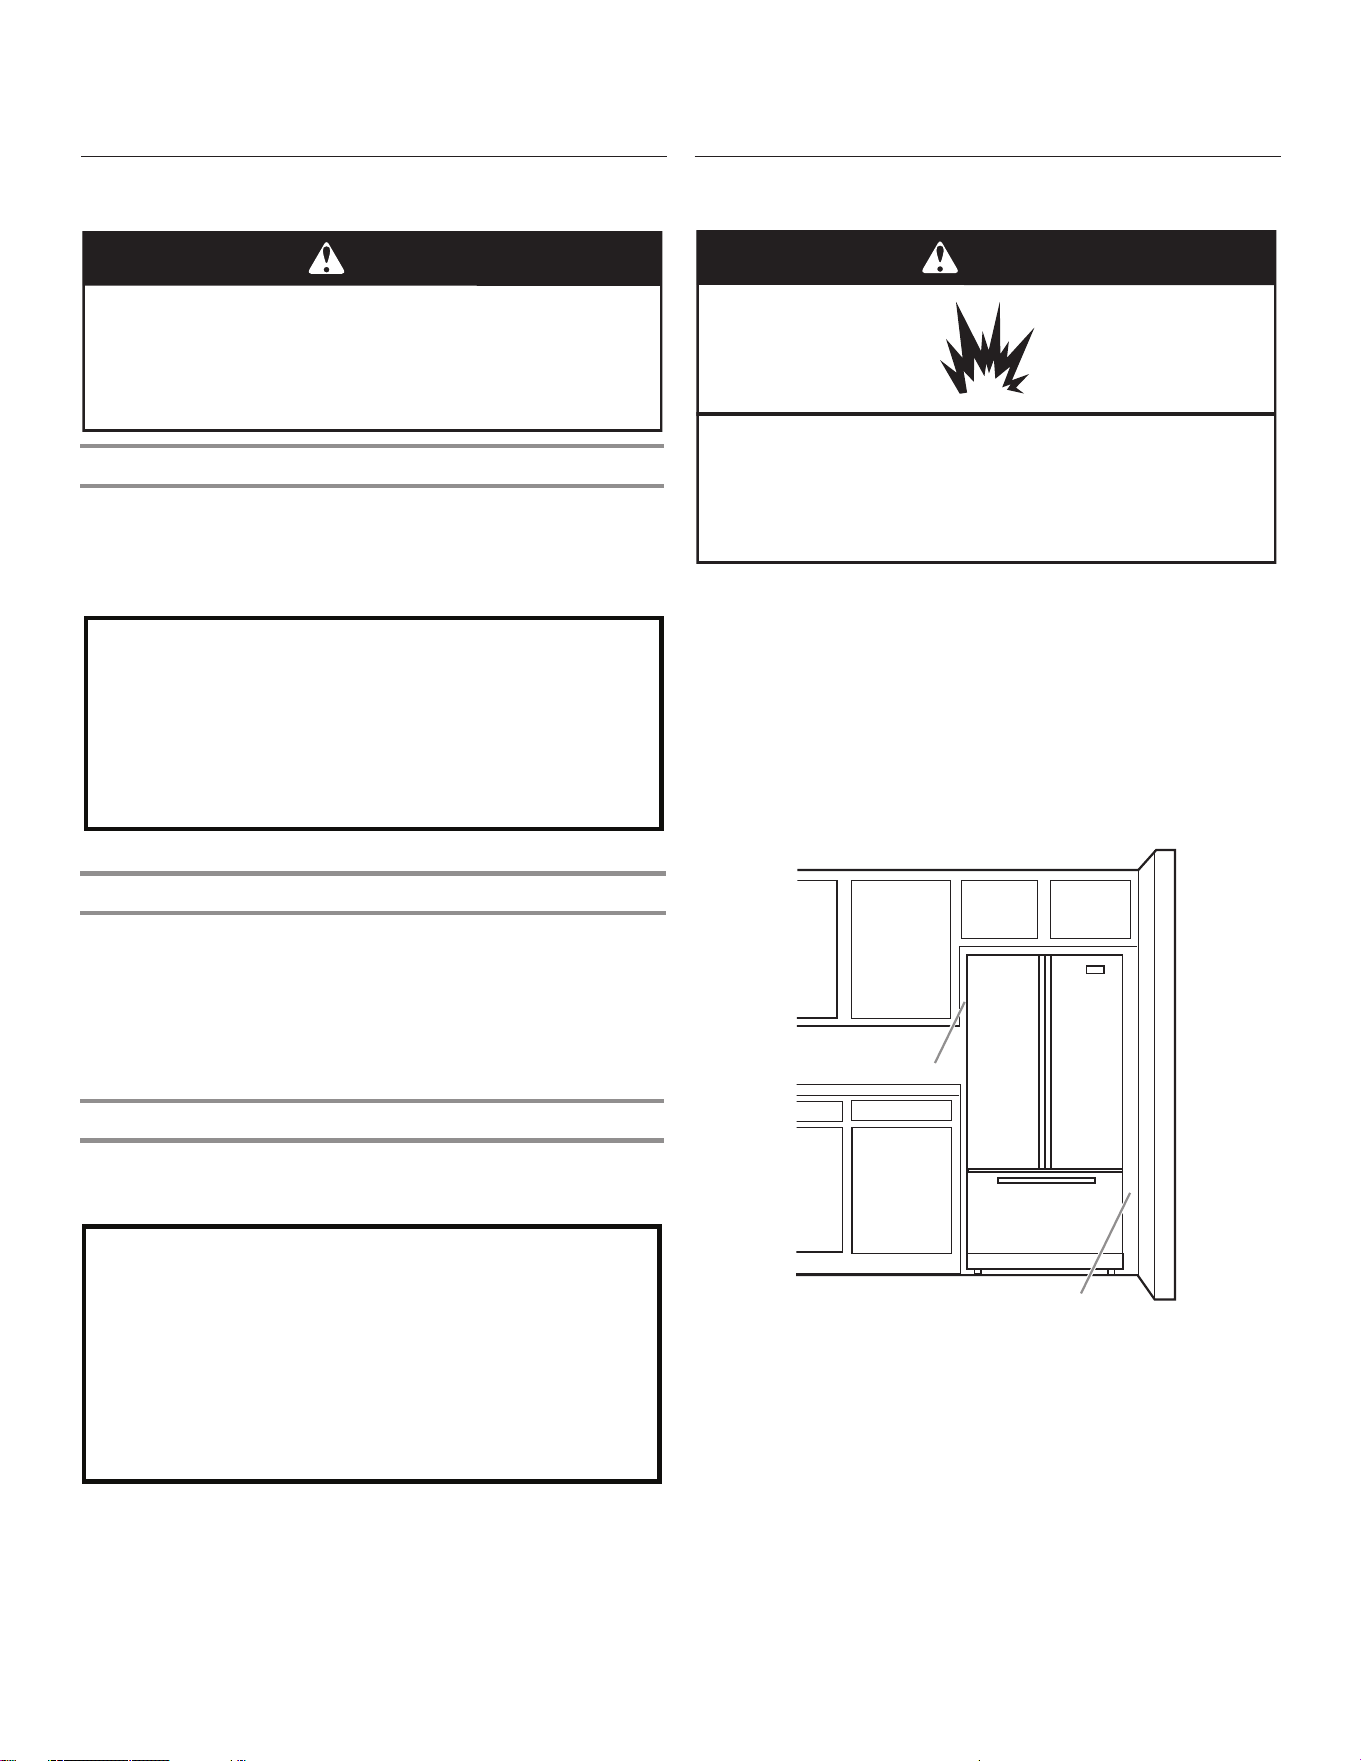
位置要求
警告
爆炸危险
确保易燃材料和蒸汽(例如汽油)远离冰箱。
否则可能导致死亡、爆炸或火灾。
重要信息:本冰箱仅设计用于室内家用。
为了确保冰箱的正确通风,请在侧面和顶部留出 1,25 cm (1/2”)
的空间。请在冰箱背部留出 2,54 cm (1”) 空间。如果冰箱有制冰
机,请在背部留出额外的空间以连接水管。在靠近固定的墙安装冰
箱时,请在冰箱和墙壁之间留出 9,5 cm (3³⁄
4
”) 的最小空间,以
让门能够旋转打开。
注意:这个冰箱专供温度范围在 13°C (55°F) 到 43°C
(110°F) 的位置使用。要实现最优能耗和制冷效果,优选室温范
围介于 15°C (60°F) 至 32°C (90°F) 之间。建议冰箱远离热
源,如烤箱或散热器。
9,5 cm (3³⁄
4
")
1,25 cm (1/2")
冰箱运输
■ 住宅房门至少宽 838 mm (33")。如果门宽为 914 mm (36") 或
更小,则需要拆下冰箱门、抽屉和铰链。
■ 对于所有房门,从侧面用推车运输冰箱。
在移动冰箱时:
您的冰箱较重。在移动冰箱以进行清洁或维修时,务必
在地板上覆盖硬纸板或硬质纤维板以避免损坏地板。
在移动冰箱时务必将冰箱直接拉出。不要以扭动或
“走动”的方式移动冰箱,可能会损坏地板。
17
电气要求
重要信息:安装和电气连接必须由合格的技术人员根据制造商的说
明以及本地安全规定执行。
■ 冰箱设计为在单独的 220-240 伏特、10 安培、50/60 Hz 循环
时间下工作。
■ 确保家中电压为铭牌上指定的电压。
■ 必须要能够通过拔下插头或安装在插座上游的双极主开关将电
器与电源断开。
■ 电源线改造或更换只能由合格人员或售后服务人员执行。
在将冰箱移动至其最终位置之前,确保拥有正确的电气连接很重
要:
建议的接地方法
需要的电源为 115 伏特 60 Hz.(插头 1),220/240 伏特 50
Hz.(插头 2 或 3),
220 伏特 60 Hz。(插头 3),或者 230/240 伏特 50 Hz.(插头
4),仅限交流电,10 安培熔断电流,并接地(触地)。
7
Location Requirements
IMPORTANT: This refrigerator is designed for indoor household
use only.
To ensure proper ventilation for your refrigerator, allow for ¹⁄₂"
(1.27 cm) of space on each side and at the top. Allow for 2"
(5.08 cm) of space behind the refrigerator. If your refrigerator has
an ice maker, allow extra space at the back for the water line
connections. When installing your refrigerator next to a fixed wall,
leave a 2" (5.08 cm) minimum space on each side (depending on
your model) to allow the doors to swing open.
NOTES:
n This refrigerator is intended for use in a location where the
temperature ranges from a minimum of 55°F (13°C) to a
maximum of 110°F (43°C). The preferred room temperature
range for optimum performance, which reduces electricity
usage and provides superior cooling, is between 60°F (15°C)
and 90°F (32°C). It is recommended that you do not install the
refrigerator near a heat source, such as an oven or radiator.
n Normal minimum cabinet cut-out width required for product
installation is 36" (91.44 cm). However, if the product is placed
against an extended wall and the ability to remove the crisper
pans is desired, an additional 18" (45.72 cm) of cabinet width
is required, so a total cabinet opening width of 54"
(137.16 cm) is recommended.
Electrical Requirements
Before you move your refrigerator into its final location, it is
important to make sure you have the proper electrical connection:
Recommended Grounding Method
A 115 Volt 60 Hz. (Plug 1), 220/240 Volt 50 Hz. (Plugs 2 or 3),
220 Volt 60 Hz. (Plug 3), or 230/240 Volt 50 Hz. (Plug 4) AC only
10-amp fused and grounded (earthed) electrical supply is
required.
For Australia and New Zealand:
Your new appliance has been especially manufactured to
meet all Australian Standards and Conditions.
Some notations in the installation instructions may refer to
electrical requirements in other countries, so we draw your
particular attention to these specific notes.
Your appliance needs to be plugged into a 230/240 Volt
50 Hz. AC only 10-amp (Plug 4) earthed outlet.
WARNING
Explosion Hazard
Keep flammable materials and vapors, such as
gasoline, away from refrigerator.
Failure to do so can result in death, explosion, or fire.
1
/
2" (1.27 cm)
2" (5.08 cm)
WARNING
Electrical Shock Hazard
Plug into a grounded (earthed) outlet.
Do not remove ground prong.
Do not use an adapter.
Do not use an extension cord.
Failure to follow these instructions can result in death,
fire, or electrical shock.
Plug 1
Plug 2
Plug 3
Plug 4
插头 1 插头 2 插头 3 插头 4
对于澳大利亚和新西兰:
新电器为特别制造,符合所有澳大利亚标准和条件
安装说明中的一些符号可能是指其他国家/地区的电气要求,所以
我们让您特别注意这些特殊符号。
电器需要插入 230/240 Volt 50 Hz 电源。仅限交流电 10
安培(插头 4)接地插座。
温度
根据铭牌上示出的气候类别,该冰箱专为在温度在以下范围的位置
工作设计。如果冰箱长期搁置在温度在指定范围之外的地方,可能
不会正常工作。
注意:建议冰箱远离热源,如烤箱或散热器。
气候类别 环境温度(°C) 环境温度(°F)
SN
从 10 到 32 从 50 到 90
N
从 16 到 32 从 61 到 90
ST
从 16 到 38 从 61 到 100
T
从 16 到 43 从 61 到 110
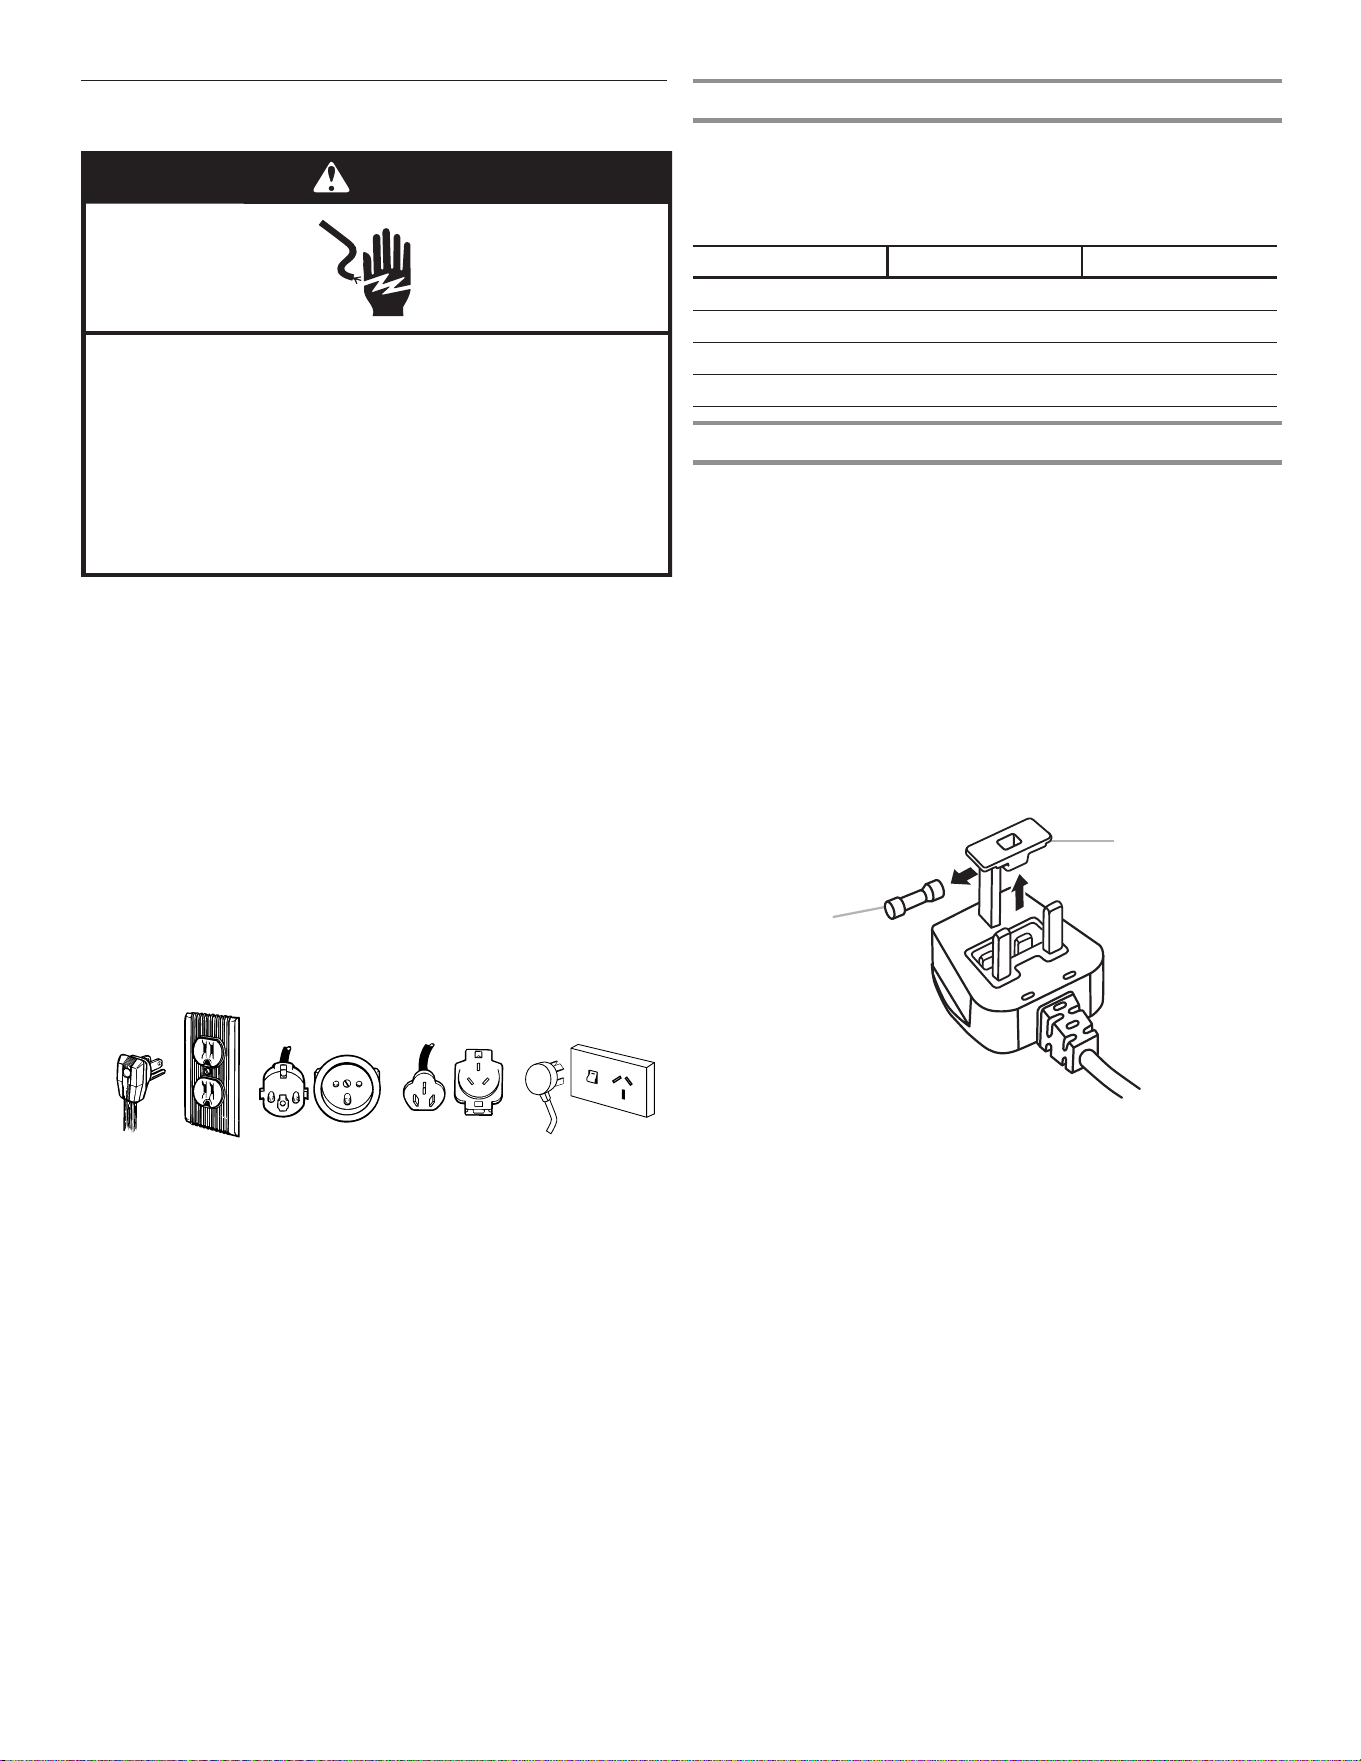
电气要求(仅限英国和爱尔兰)
重要信息:本冰箱必须接地。
保险丝更换
如果本冰箱的主电源线安装的是 BS1363A,13 安培熔断电流插头。
要更换该类型插头中的保险丝,请使用 BS 1362 型 A.S.T.A.批准
的保险丝并如下继续操作:
1. 拆下保险丝盖 (A) 和保险丝 (B)。
2. 将替换用 13 安培保险丝装入保险丝盖。
3. 将保险丝和盖重新插入插头。
重要信息:在更换保险丝时,必须重新安装保险丝盖。如果保险丝
盖丢失,则在安装正确的替换盖之前不得使用插头。正确的更换件
通过插头底部的彩色插入件或彩色浮雕文字标识。更换用保险丝盖
可从本地五金店购买。
6
Electrical Requirements (Great Britain and Ireland only)
IMPORTANT: This refrigerator must be earthed.
Fuse Replacement
If the main lead of this refrigerator is fitted with a BS1363A,
13-amp fused plug, to replace a fuse in this type plug use an
A.S.T.A. approved fuse to BS 1362 type and proceed as follows:
1. Remove the fuse cover (A) and fuse (B).
2. Fit replacement 13-amp fuse into the fuse cover.
3. Reinsert both the fuse and its cover into the plug.
IMPORTANT: The fuse cover must be refitted when changing a
fuse. If the fuse cover is lost, the plug must not be used until a
correct replacement cover is fitted. A correct replacement is
identified by the colour insert or the colour “word” embossed on
the base of the plug. Replacement fuse covers are available from
your local electrical store.
For the Republic of Ireland (only):
The information given in respect of Great Britain will frequently
apply, but a third type of plug and socket is also used, the 2-pin,
side earth type.
Socket Outlet/Plug (valid for both countries)
If the fitted plug is not suitable for your socket outlet, please
contact After-sales Service for further instruction. Please do not
attempt to change the plug yourself. This procedure needs to be
carried out by a qualified technician in compliance with the
manufacturer’s instructions and current standard safety
regulations.
Clean Before Using
After you remove all of the packaging materials, clean the inside of
your refrigerator before using it. See the cleaning instructions in
“Refrigerator Care.”
Food Storage
■ Use the refrigerator compartment only for storing fresh food
and the freezer compartment only for storing frozen food,
freezing fresh food and making ice cubes.
■ Do not store glass containers with liquids in the freezer
compartment because they may break.
■ Avoid storing unwrapped food in direct contact with internal
surfaces of the refrigerator or freezer compartments.
Location Requirements
Install and level the refrigerator on a floor strong enough to hold its
weight and in a place suitable for its size and use.
IMPORTANT: This refrigerator is designed for indoor, household
and similar applications such as:
■ Staff kitchen areas in shops, offices and other working
environments.
■ Farmhouses and by clients in hotels, motels and other
residential type environments.
■ Bed and breakfast type environments.
■ Catering and similar non-retail applications.
Ventilation
Install the refrigerator in a dry and well-ventilated place.
To ensure proper ventilation for your refrigerator, allow for a ¹⁄₂"
(1.25 cm) space at the top of the refrigerator, and a 1" (2.54 cm)
space behind the refrigerator. If your refrigerator has an ice maker,
allow extra space at the back for the water line connections.
When installing your refrigerator next to a fixed wall, leave a 2¹⁄₂"
(6.3 cm) minimum space between the refrigerator and wall to
allow the door to swing open.
NOTE: Keep the refrigerator ventilation openings clear.
A. Fuse cover
B. Fuse
A
B
Important information to know about glass shelves
and covers:
Do not clean glass shelves or covers with warm water when
they are cold. Shelves and covers may break if exposed to
sudden temperature changes or impact, such as bumping.
Tempered glass is designed to shatter into many small,
pebble-size pieces. This is normal. Glass shelves and covers
are heavy. Use both hands when removing them to avoid
dropping.
WARNING
Explosion Hazard
Keep flammable materials and vapors, such as
gasoline, away from refrigerator.
Failure to do so can result in death, explosion, or fire.
2¹⁄₂" (6.3 cm)
¹⁄₂" (1.25 cm)
A. 保险丝盖
B. 保险丝
仅针对爱尔兰共和国:
针对英国提供的信息通常适用,但是也可能会用到第三类插头和插
座,其为 2 针侧面接地型。
插座/插头(对两个国家/地区均适用)
如果安装的插头不适合插座,请联系售后部门接受进一步指导。请
不要尝试自行更改插头。本程序需要由合格的技术人员根据制造商
的说明以及当前的标准安全规定来执行。
䄺
㾺⬉䰽
䇋ᦦܹഄ˄㾺ഄ˅ᦦᑻDŽ
ϡ㽕⿏䰸ഄ㒓ッDŽ
ϡ㽕Փ⫼䗖䜡఼DŽ
ϡ㽕Փ⫼ᓊ䭓㒓DŽ
ϡ䙉ᅜ䖭ѯ䇈ᯢৃᇐ㟈⅏ѵǃ☿♒㾺⬉DŽ
18
拆下并更换冰箱门
注意:测量房门宽度,确定是否需要拆下冰箱门以将冰箱移动到屋内。如果必须拆下门,请参阅以下说明。
重要信息:如果冰箱之前已安装在屋内,之后又将冰箱移出房屋,那么请在拆卸冰箱门之前关闭冰箱控制器。拔下冰箱插头或断开电
源。从冰箱门上取下食物和可调节门或储盒。
在拆门之前,备齐必要的工具并阅读所有说明。
所需工具:TORX T25
†
螺丝刀以及 #2 十字螺丝刀
警告
触电危险
在拆下门之前断开电源。
否则可能导致触电或死亡。
†TORX 和 T25 是 Acument Intellectual Properties, LLC. 的商标。
配水机管道连接
线路插头
右上铰链
左上铰链
A
A. 外环
C
B
A
A. TORX T25 螺丝
B. 地线(请勿拆卸。)
C. 请勿拆下螺丝。
90°
和柜体成90°角的门°
A. TORX T25 螺丝
B. 铰链盖螺丝
C. 顶部铰链盖
D. 顶部铰链
A
B
C
D

19
底部门铰链
为了便于使用,冰箱门具有带闭门器的底部铰链。通过这些闭合装
置,只需轻轻一推便可让门完全闭合。
重要信息:要让闭合装置正常工作,门只能在打开到和柜体的正面
成 90° 的位置时拆卸。如果在拆卸时有一个或两个门不在 90°
角,则必须重置底部门铰链。
警告
过重危险
在移动和安装冰箱时,应由两个或更多人执行。
否则可能导致背部或其他部位受伤。
90°
重置门铰链
1. 从底部铰链销提起门,并将其放置在平坦表面上。
2. 使用 TORX T25 螺丝刀,连同套管将底部铰链从柜体上拆下。
3. 将底部铰链和套管插入门底部的相应插槽。
注意:确保铰链的底部和门的底部平行。
4. 转动铰链,直至铰链座和门的底部边缘成 90° 角。
5. 从门上拆下铰链。使用带 #2 方头的螺丝刀,将底部铰链重新
附接至冰箱柜体。
6. 铰链现在已重新设置好,并准备好进行门更换。请参阅本节稍
后部分的“更换冰箱门”。
拆下冰箱门
警告
触电危险
在拆下门之前断开电源。
否则可能导致触电或死亡。
拆下右侧门
1. 拔下冰箱插头或断开电源。
2. 让冰箱门保持关闭,直至您准备将它们从柜体上提起。
注意:在拆卸铰链时,为冰箱门提供额外的支撑。在您操作
时,请勿通过门封磁体握住门。
3. 使用十字螺丝刀将盖从顶部铰链上拆下。
4. 使用 TORX T25 螺丝刀将三颗螺丝从顶部铰链上拆下并放置到
一旁。
A. 套管
B. 铰链座
A
B
A. 和门的底部边缘平行的铰链座。
A
A. 铰链座转动至和门的底部边缘成 90° 角
90°
A

20
5. 打开门,直至其和柜体正面成 90° 角。
6. 从底部铰链销提起冰箱门。顶部铰链将和门一起脱离。
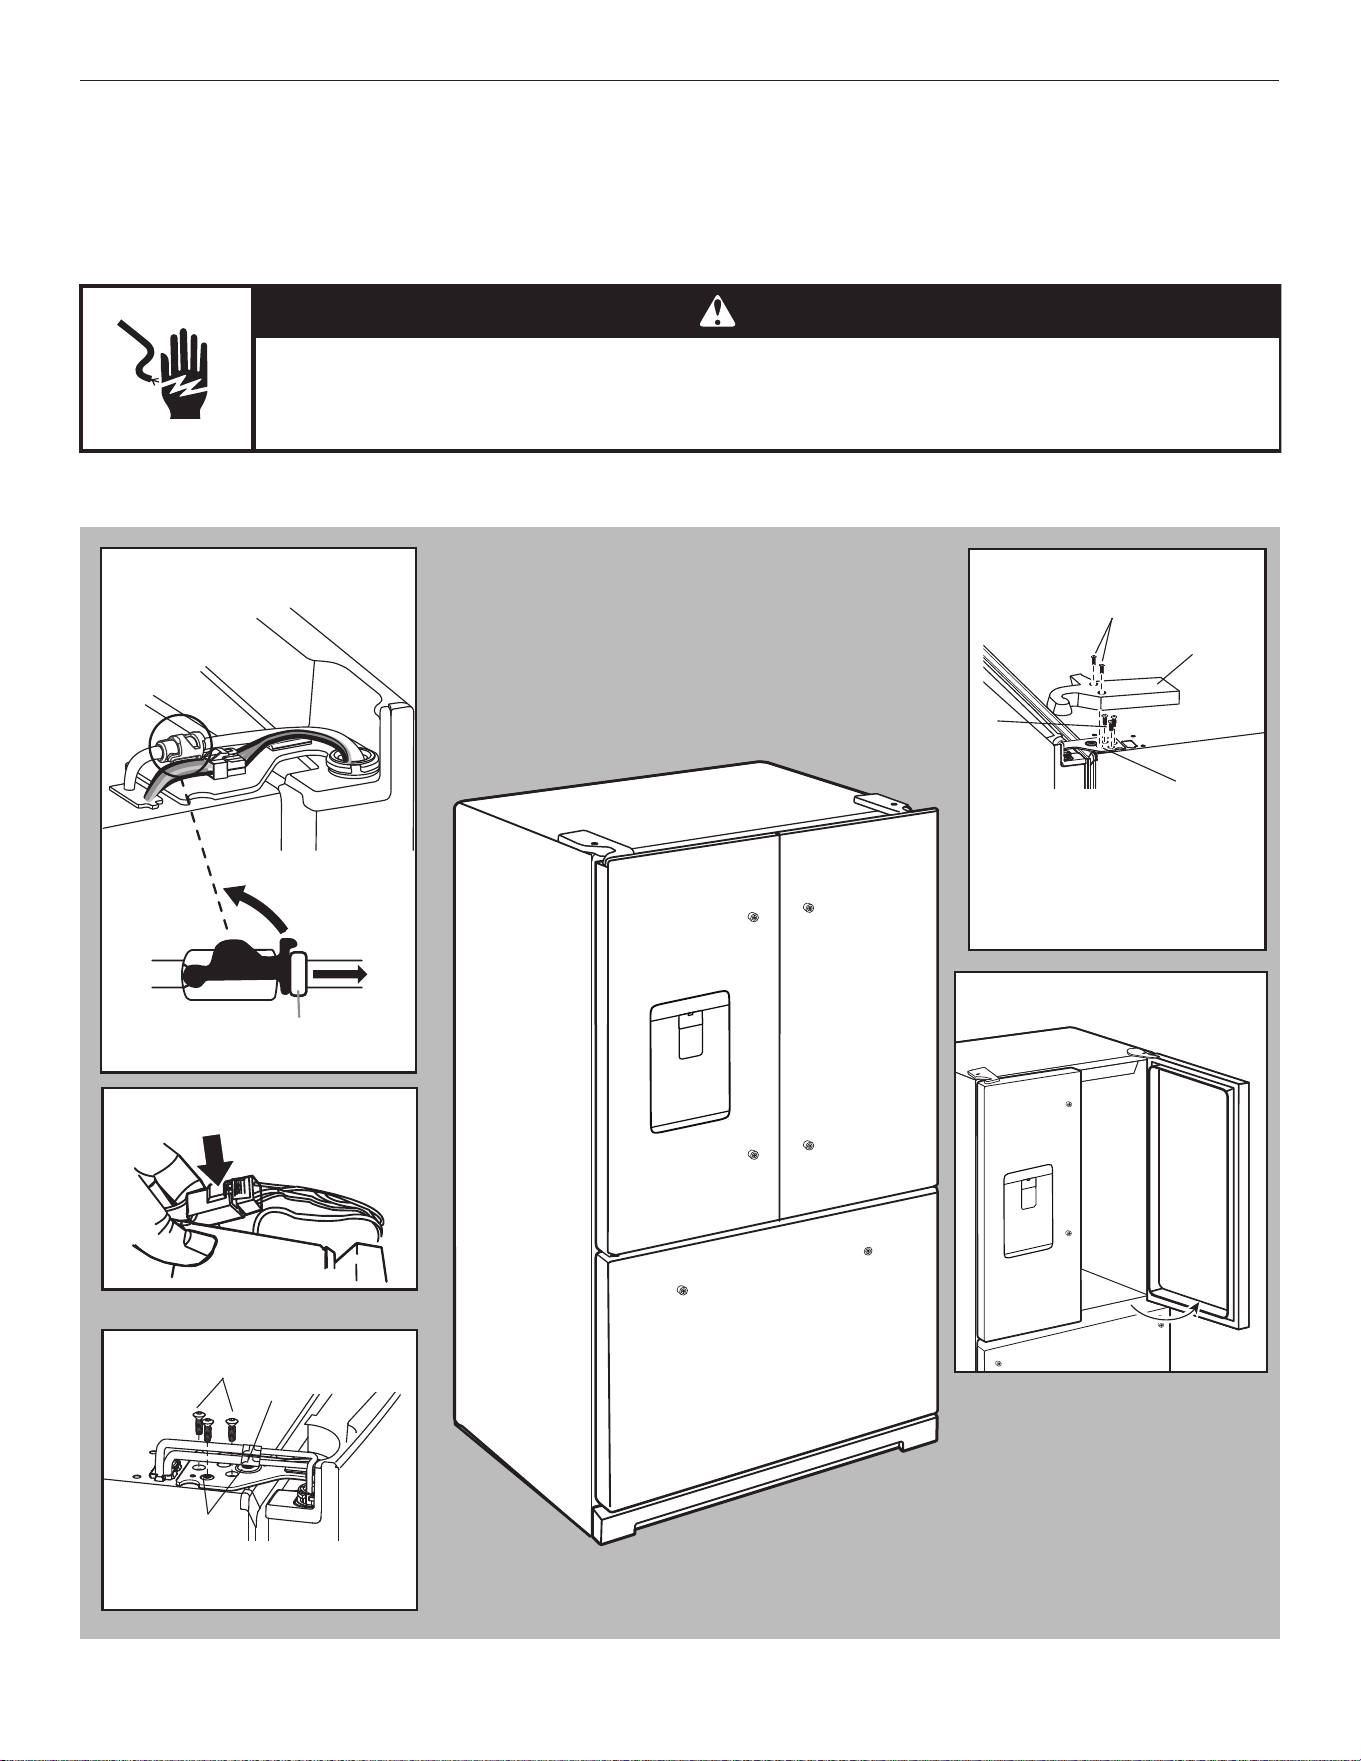
拆下左侧门
重要信息:左侧门铰链有配水机的管道和接线穿过,因此在拆下门
之前必须将它们断开。
1. 使用十字螺丝刀将盖从顶部铰链上拆下。
2. 将位于门铰链顶部的配水机管道断开。在扣子上用力上拉。然
后将管道从装配件上拉出。
注意:配水机管道仍然连接至左侧冰箱门上。
3. 断开位于门铰链顶部的接线插头。
■ 握住接线插头的每一端。左拇指下按,释放闩锁,并将插
头部分拉开。
注意:请勿拆下绿色接地线。它应当保持附接至门铰链的状
态。
4. 使用 TORX T25 螺丝刀将三颗内部螺丝从顶部铰链上拆下并放
置到一旁。
注意:在拆卸铰链时,为冰箱门提供额外的支撑。在您操作
时,请勿通过门封磁体握住门。
5. 从底部铰链销提起冰箱门。顶部铰链将和门一起脱离。
注意:要移动冰箱经过门口,不必将底部铰链和制动脚组件拆
下。
■ 仅在必要时,使用 TORX T25 螺丝刀将底部铰链和制动脚
螺丝拆下。
A. 顶部铰链盖螺丝
B. 顶部铰链盖
C. TORX T25 螺丝
D. 顶部铰链
A
B
C
D
A. 顶部铰链盖螺丝 B. 顶部铰链盖
A
B
A. TORX T25 螺丝
B. 地线(不要拆除。)
A
B
21
更换右侧冰箱门
1. 将右侧门设置到底部铰链销上。
2. 将顶部铰链销插入冰箱门顶部的开孔。
3. 使用三颗 TORX T25 螺丝,将铰链紧固到柜体上。请勿完全拧
紧螺丝。
更换左侧冰箱门
重要信息:请勿在重新连接水管和线束时让它们缠结。
1. 将左侧门设置到底部铰链销上。
2. 使用三颗 TORX T25 螺丝,将铰链紧固到柜体上。请勿完全拧
紧螺丝。
3. 重新连接配水机管道。
将管道牢固地插入装配件,直至停止。 闭合围绕管道的夹
子。 夹子在装配件和颈圈之间卡扣到位。 将蓝色凹陷端和
蓝色凸起端以及夹子连接。对灰色凹陷端以及灰色凸起端重复
操作。
4. 重新连接电线。
■ 将接线插头的两个部分推动到一起。
最终步骤
1.完全拧紧五个内部 TORX T25 螺丝(三个位于右侧门铰链上,
两个位于左侧门铰链上)。
2.装回两个顶部铰链盖。
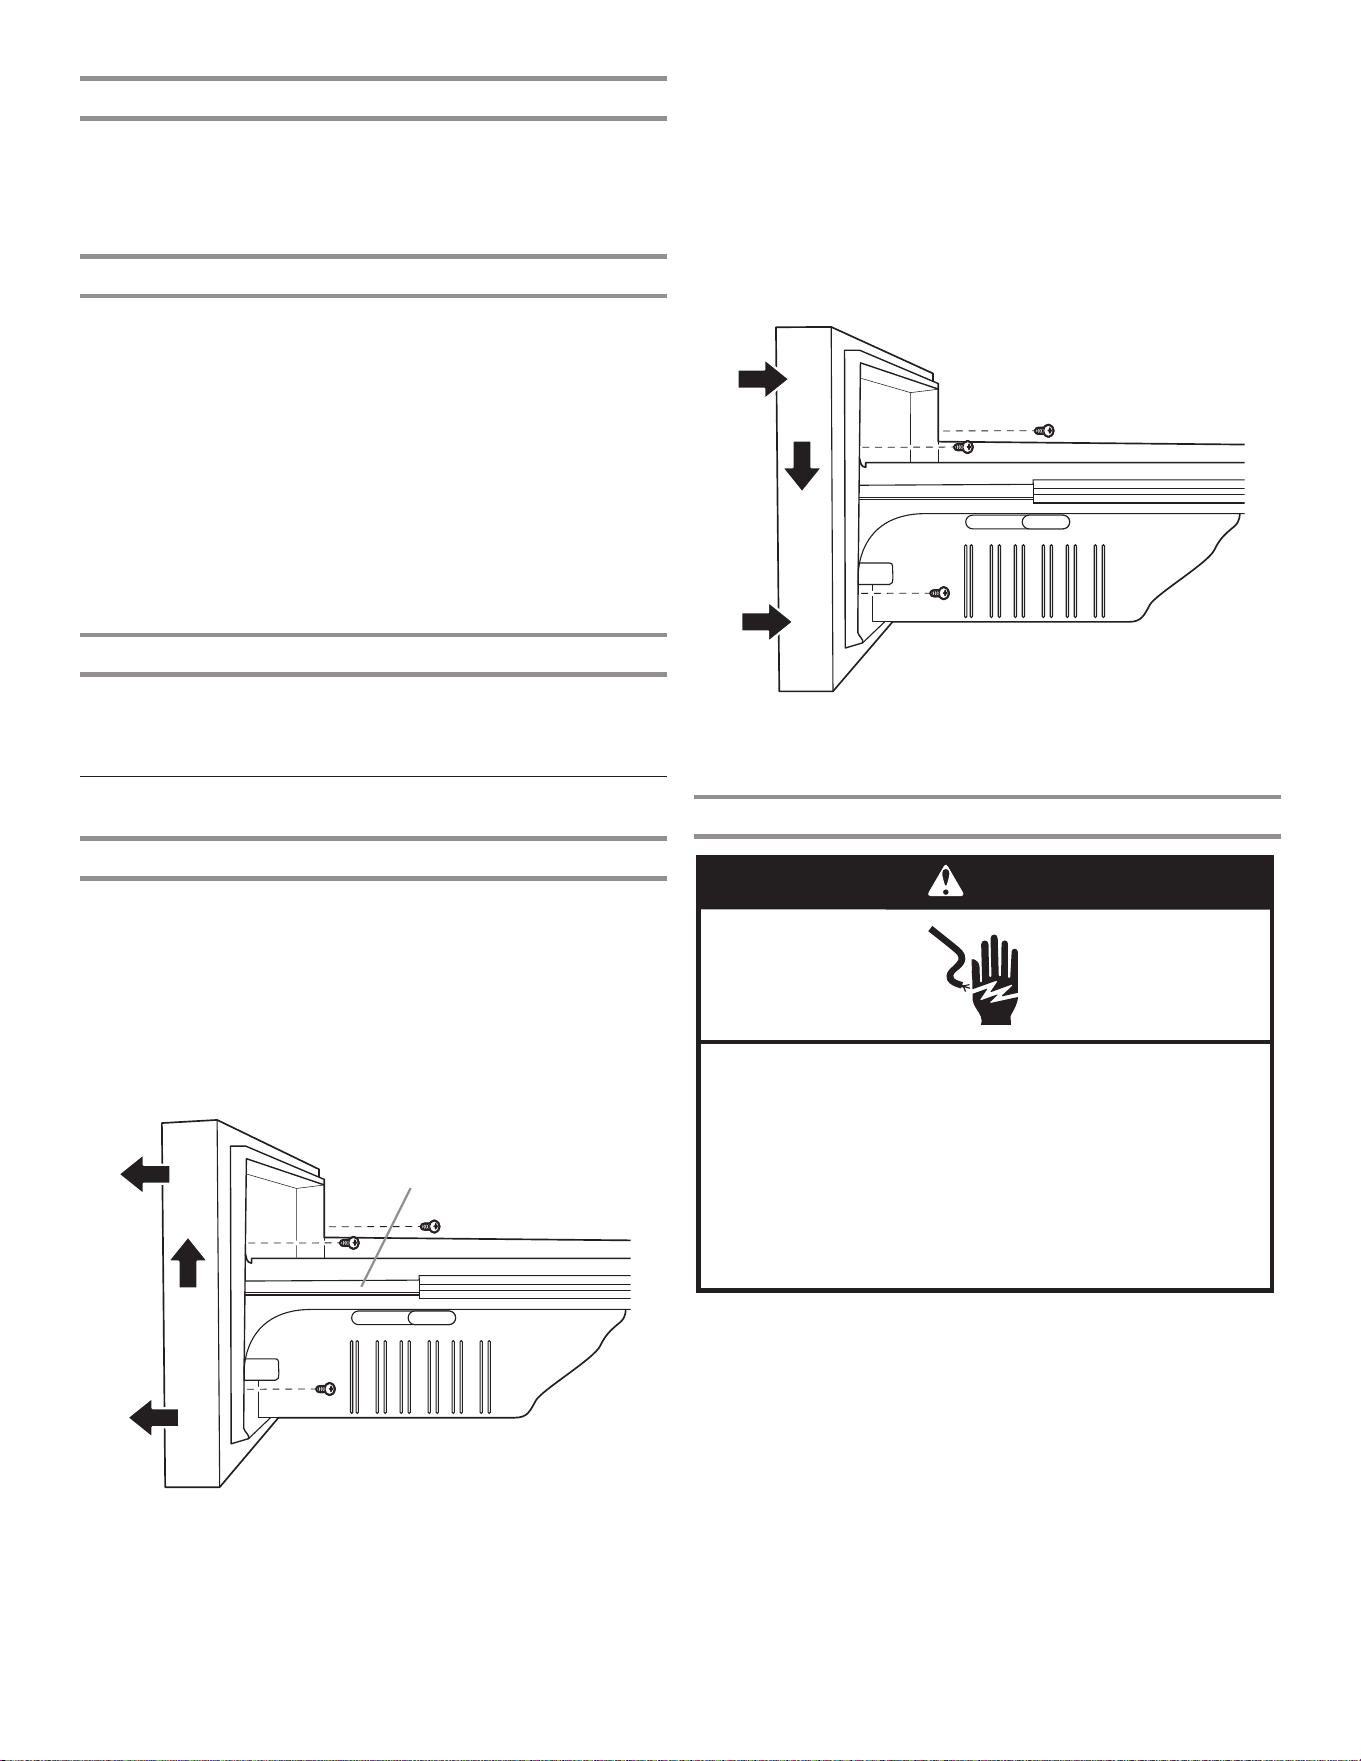
拆下并更换冷冻室抽屉门面。
冷冻室抽屉
拆下抽屉门面
1. 将冷冻室抽屉完全拉出。
2. 松开将抽屉门面紧固到抽屉滑动装置的两颗顶部螺丝。两颗螺
丝(一颗位于左侧,一颗位于右侧)位于抽屉门面内侧。
3. 拆下将抽屉门面固定到抽屉滑动装置的两颗底部螺丝(位于抽
屉门面内侧)。
4. 向上提抽屉门面,将螺丝从抽屉滑动支架槽拆下。
更换抽屉门面
1. 将冷冻室抽屉滑动装置完全拉出。
2. 握住抽屉门面侧面,将位于抽屉门面内侧的顶部螺丝和抽屉滑
动装置支架插槽对齐。
注意:最好让一个人握住抽屉滑动装置,另一人将抽屉门面对
齐并将螺丝插入插槽。
3. 拧紧抽屉门面的两颗顶部螺丝,然后重新安装两颗底部螺丝。
最终步骤
警告
䀖⭥ড䲙
䈧ᨂޕ᧕ൠ˄䀖ൠ˅ᨂᓗDŽ
н㾱〫䲔ൠ㓯ㄟDŽ
н㾱֯⭘䘲䝽ಘDŽ
н㾱֯⭘ᔦ䮯㓯DŽ
н䚥ᆸ䘉Ӌ䈤᰾ሬ㠤↫ӑǃ⚛⚮ᡆ䀖⭥DŽ
1. 请插入接地(触地)插座。
2. 重置控制器请参阅“使用控制器”一节。
3. 放回所有可拆卸零件,并将食物放回抽屉。
A. 抽屉门面螺丝
A
A. 抽屉滑动支架槽
A
22
供水要求
操作配水机和制冰机需要水压在 241 到 827 kPa(35 到
120 psi)之间的冷水源。如果您对水压有疑问,请联系有许可证
的合格水管工。
注意:如果水压低于所需水压,配水机中的水流速度可能减小或者
冰块可能为中空或不规则形状。
反渗透供水
重要信息:从反渗透系统到冰箱的进水阀门的供水压力需要介于
241 和 827 kPa(35 和 120 psi)之间。
如果将反渗透滤水系统连接至冷水源,反渗透系统的水压至少需要
276 至 414 kPa(40 至 60 psi)。
■ 请检查反渗透系统中的沉淀物过滤器是否阻塞。根据需要更换
过滤器。
■ 让反渗透系统上的储水箱在大量用水后重新加注。箱容量过小
可能就无法满足冰箱的要求。
注意:不推荐水龙头安装的反渗透系统。
■ 如果冰箱配备滤水器,如果再与反渗透系统搭配使用,会进一
步降低水压。拆下滤水器。请参阅“滤水系统”一节。
如果您对水压有疑问,请联系有许可证的合格水管工。
连接水源
在开始之前阅读所有指导。
重要信息:
■ 必须根据国际水管装置法规和任何本地法规和法令安装水管装
置。
■ 住宅水管到冰箱之间的管道可以采用铜和 PEX 管,能够避免冰
或水出现异味。检查是否存在泄漏。
■ 如果使用了 PEX 管而非铜管,我们建议采用以下零件编
号:W10505928RP(2,14 m [7 ft] 有套 PEX)、8212547RP
(1,52 m [5 ft] PEX) 或 W10267701RP (7,62 m [25 ft] PEX)。
■ 只在温度保持在冻结温度以上的区域安装管道。
■ 对于澳大利亚和新西兰:如果水压超出 599 kPa (87 psi),则
必须求助持有许可证的水管工安装压力限制设备。
所需工具:
在安装之前备齐所需的工具和零件。
■ 一字螺丝刀
■ 7/16" 和 1/2" 开口扳手或两个活动扳手
■ 1/4" 螺母起子
注意:请勿使用会降低水流速度并更容易阻塞的冲孔型或 4,76 mm
(3/16") 鞍型阀。
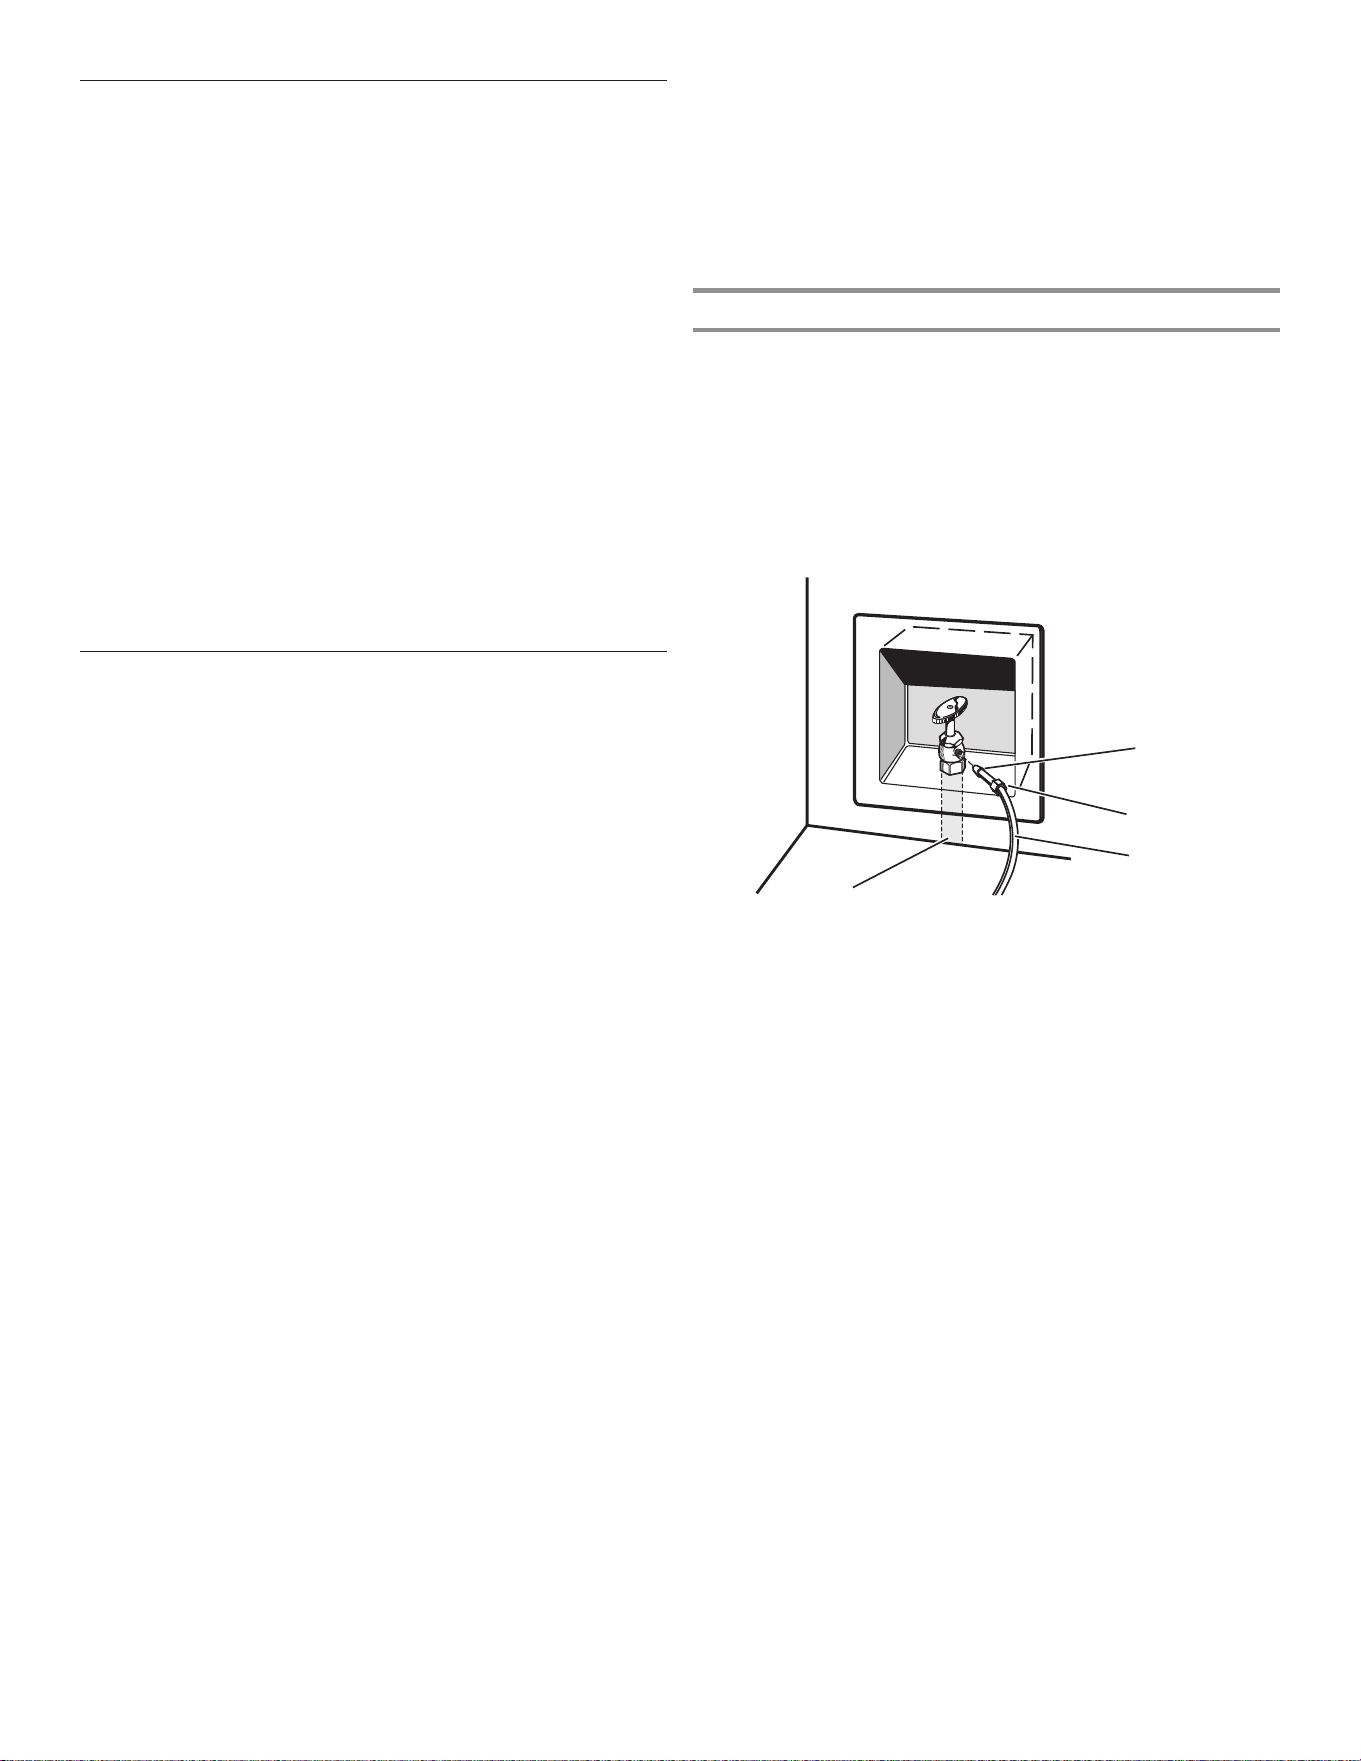
连接至水管
重要信息:如果在通水前打开冰箱,请关闭制冰机。
1. 拔下冰箱插头或断开电源。
2. 关闭主水源。拧开最近的水龙头,直至水不再流出。
3. 使用四分之一圈关断阀或类似阀门,通过
12,7 mm (1/2”)
住
宅供应管路供水。
注意:为了让充足的水流到冰箱,推荐使用最小 12,7 mm (1/2")
尺寸的住宅供应管路。
A. 套筒
B. 螺母
C. 铜管(通向冰箱)
D. 住宅供应管路(最小 12,7 mm [1/2"])
A
B
C
D
23
4. 现在可以将铜管连接至关断阀。使用 6,35 mm (1/4")
外径(外部直径)软铜管来连接关断阀和冰箱。
■ 确保铜管长度正确。
确保铜管两端都切割齐整。
■ 如图所示滑动压紧套筒和压紧螺母到铜管上。将管道末端齐整
插入出口端直到停止不动。使用活动扳手将压紧螺母旋到出口
末端。请勿过度拧紧。
5. 将管道的自由端放入容器或水槽并打开主水源,对管道进行冲
洗,直至水变清。关闭水管上的关断阀。
注意:在最终连接到水阀入口之前务必排空水管,以免水阀发
生故障。
6. 弯曲铜管以和水管入口相接,该入口如图所示位于冰箱柜体背
面。留下一卷铜管,以让冰箱可从柜体拉出或拉离墙壁进行维
修。
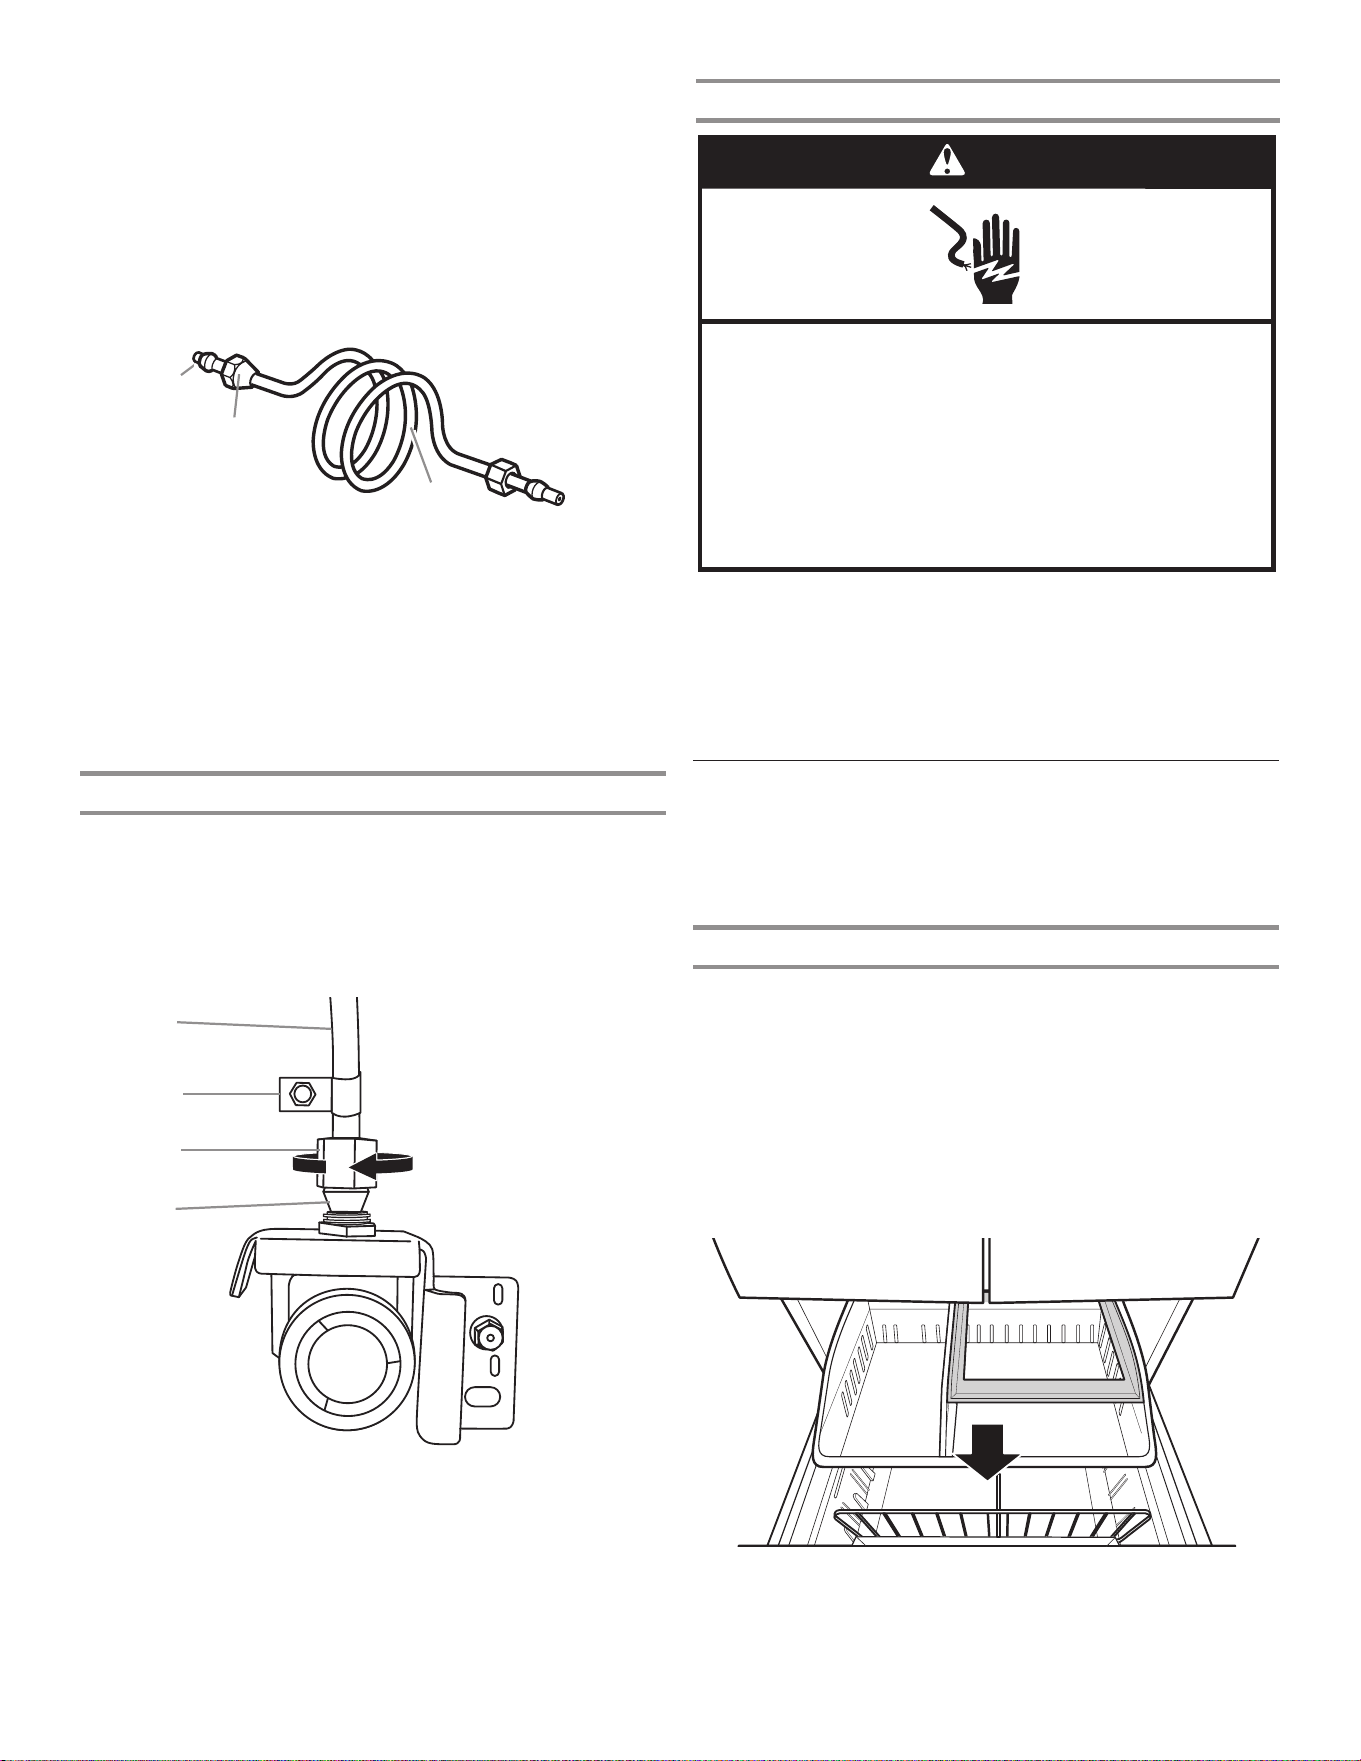
连接至冰箱
请参考所用型号的连接说明。
1. 从水阀入口拆下塑料盖。使用压紧螺母和套筒,如图所示将铜
管附接到阀门入口。紧固压紧螺母。请勿过度拧紧。通过拉动
铜管来确认铜管已固定好。
2. 通过铜管来形成工作回路。在卷绕铜管时,避免扭结。用“P”
型夹将铜管固定到冰箱柜体。
完成安装
警告
䀖⭥ড䲙
䈧ᨂޕ᧕ൠ˄䀖ൠ˅ᨂᓗDŽ
н㾱〫䲔ൠ㓯ㄟDŽ
н㾱֯⭘䘲䝽ಘDŽ
н㾱֯⭘ᔦ䮯㓯DŽ
н䚥ᆸ䘉Ӌ䈤᰾ሬ㠤↫ӑǃ⚛⚮ᡆ䀖⭥DŽ
1. 请插入接地(触地)插座。
2. 冲洗水系统。请参阅“配水机和配冰机”一节。
注意:用 24 小时制备第一批冰。废弃制作的头三批冰。用三天时
间完全充满储冰盒。
3. 打开冰箱水源检查是否漏水。修理漏水情况。
把手安装和拆卸
部件包括:冰箱门把手 (2)、冷冻室抽屉把手 (1)、1/8” 和
3/32”六角扳手、备用固定螺丝
注意:冷冻室抽屉把手比冰箱门把手更短。把手样式可能因型号不
同而异。
安装把手
手柄组件
重要信息:在组装把手之前,请确保将手柄组合在一起。
1. 将把手和手柄组件从冰箱内的包装中取出,放在柔软的表面
上。
2. 将手柄组件与门中部的安装杆对齐。
3. 使手柄组件与安装杆完全接合。
4. 握住手柄组件,将 3/32” 内六角扳手的短端插入孔中并轻轻
转动扳手,直到扳手与固定螺丝接合。
5. 顺时针转动扳手,将固定螺丝刚好拧紧至开始接触安装杆。完
全拧紧。
A. 压紧套筒
B. 压紧螺母
C. 铜管
A
C
B
A. 铜管
B.“P”型夹
C. 压紧螺母
D. 压紧套筒
A
B
C
D

24
冰箱门
注意:把手安装固定螺丝已预先安装在把手内。
1. 将把手从冰箱内的包装中取出,放在柔软的表面上。
2. 打开冷藏室门。在关闭的门上,将把手放在带肩螺丝上,使固
定螺丝朝向相邻的门。
3. 用力向门推动把手,直到把手底部与门齐平。
4. 握住把手,将内六角扳手的短端插入上部孔并轻轻转动扳手,
直到扳手与固定螺丝接合。
5. 顺时针转动扳手,将固定螺丝刚好拧紧至开始接触带肩螺丝。
请勿完全拧紧。
6. 重复第 4 步和第 5 步,拧紧下部螺丝。
7. 按照上述步骤的说明,部分拧紧两个固定螺丝后,完全拧紧两
个固定螺丝。
重要信息:当感觉螺丝拧紧时,再拧紧四分之一圈。如果未再
拧紧四分之一圈,则把手安装不当。
8. 重复第 2 步到第 7 步,将另一个把手安装到相邻的冰箱门
上。
冷冻室抽屉
1. 在抽屉关闭的情况下,将把手放到带肩螺丝上,使固定螺丝朝
向地面。
2. 用力向抽屉推动把手,直到把手底部与抽屉齐平。
3. 将内六角扳手的短端插入左侧孔并轻轻转动扳手,直到扳手与
固定螺丝接合。
4. 从左至右转动扳手,一次拧紧固定螺丝四分之一圈,直至固定
螺丝刚好开始接触带肩螺丝。请勿完全拧紧。
5. 重复第 3 步和第 4 步,将右侧固定螺丝拧到带肩螺丝上。
6. 按照上述步骤的说明,部分拧紧两个固定螺丝后,完全拧紧两
个固定螺丝。
重要信息:当感觉螺丝拧紧时,再拧紧四分之一圈。如果未再
拧紧四分之一圈,则把手安装不当。
7. 请保存内六角扳手和所有说明。
拆卸把手
1. 握住把手,将内六角扳手的短端插入固定螺丝孔并轻轻转动扳
手,直到其与固定螺丝接合。
2. 从右向左转动扳手,一次松开固定螺丝四分之一圈。
3. 重复第 1 步和第 2 步,松开另一个螺丝。慢慢将把手从门或
抽屉上拉下。
4. 如有必要,使用十字螺丝刀将带肩螺丝从门上拆下。
A
A
B
A. 有肩螺丝
B. 把手内部的固定螺丝
A. 带肩螺丝
B. 把手内部的固定螺丝
B
A
25
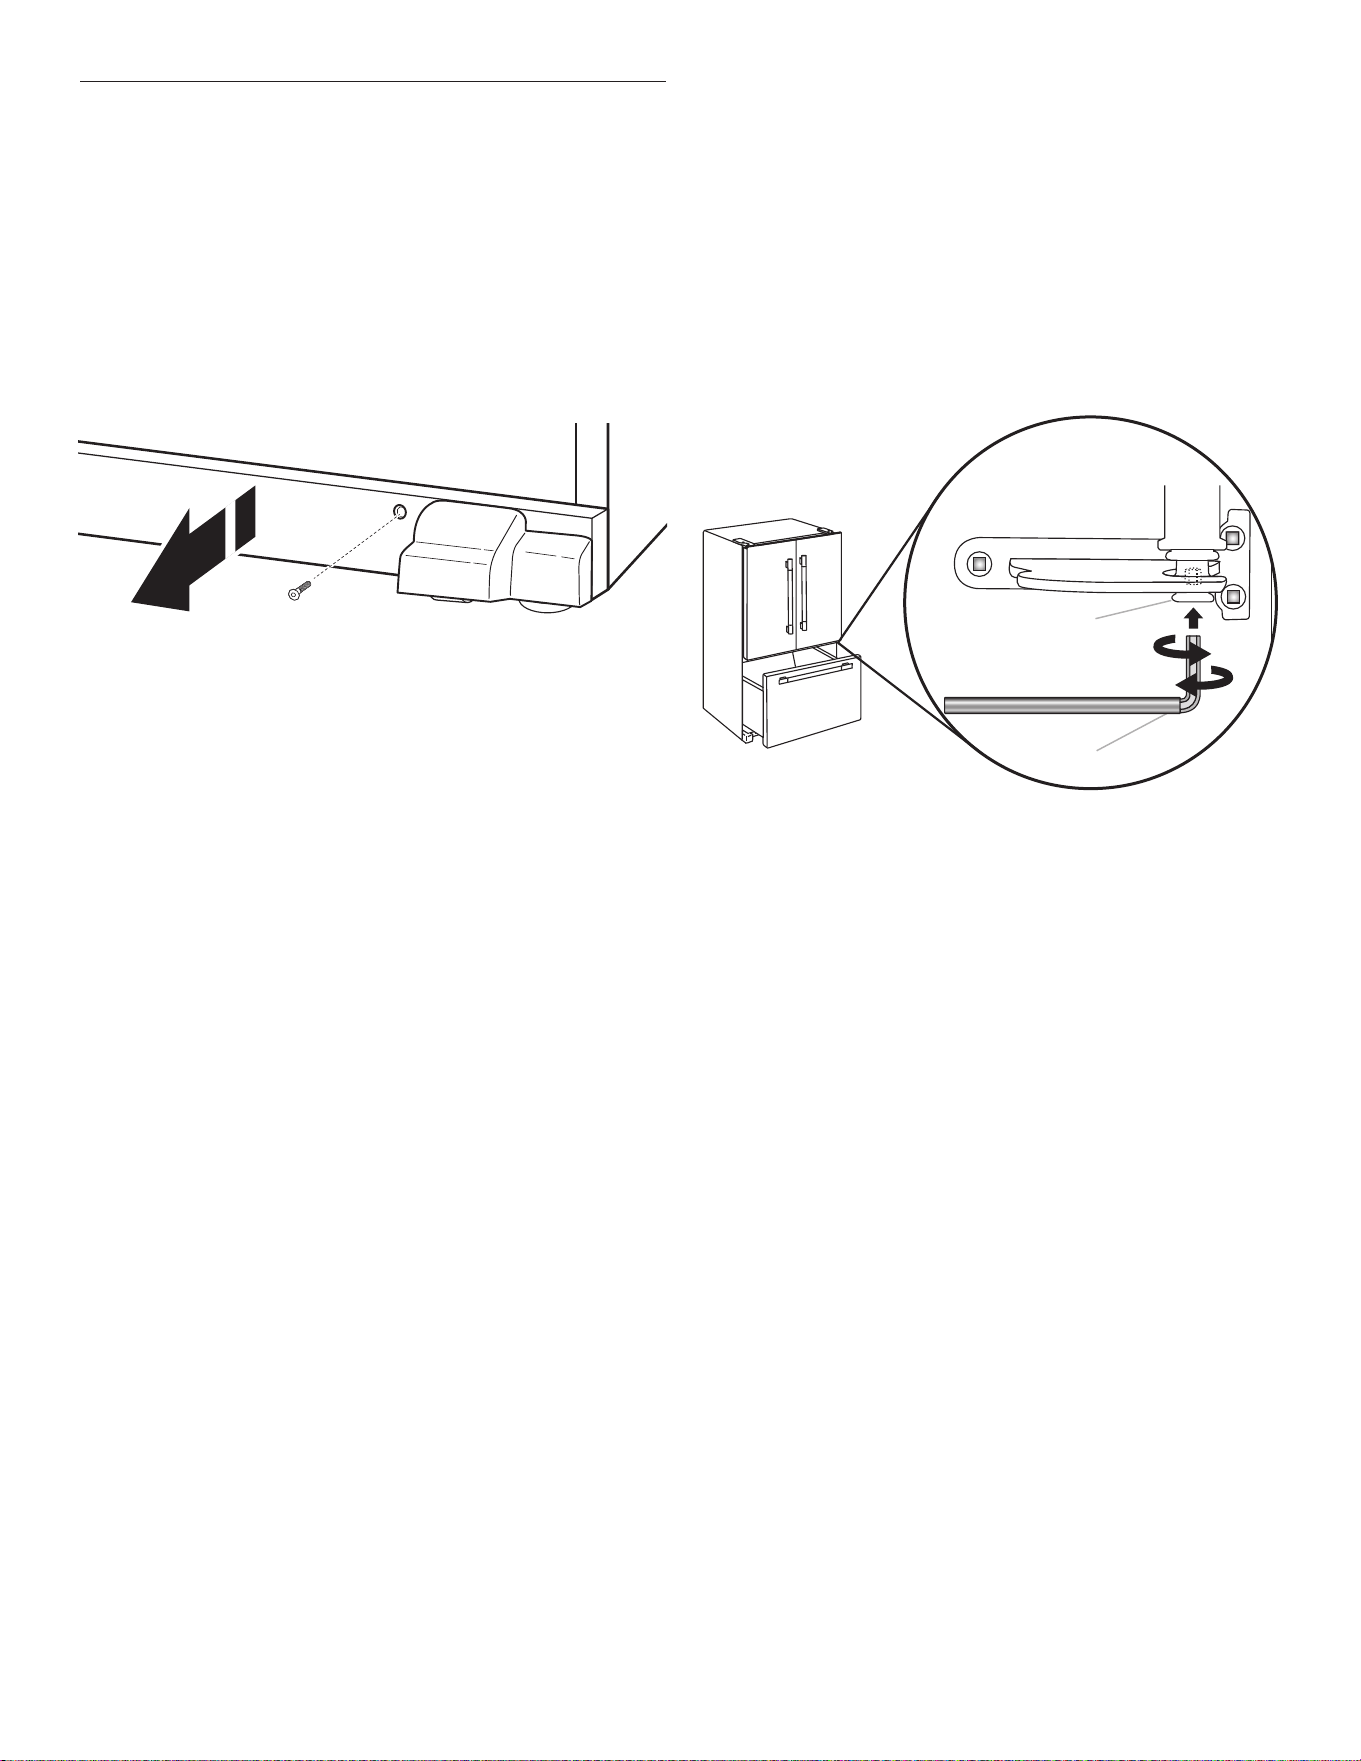
冰箱位置水平并且门关闭
底部格栅用于覆盖可调制动脚和辊组件,它们位于冷冻室抽屉下方
的冰箱底部。在进行任何调节之前,拆下底部格栅并将冰箱移动至
最终位置。
所需工具:1/4” 六角螺母起子
提供的工具:1/4" 内六角扳手
1. 使用 1/4" 六角螺母起子拆下底部格栅中的两个螺丝。
2. 拆下底部格栅。使用双手,牢牢握住底部格栅并向外拉出。打
开冷冻室抽屉以找到制动脚。
注意:为了让冰箱更易于滚动,通过逆时针转动它们来将制动
脚升起。前辊将接触地板。
7. 确保冰箱稳定。当拉开门或抽屉时,如果冰箱看上去不稳定或
者向前滚动,请调节制动脚。
稳固冰箱:
■ 打开冷冻室抽屉。使用 1/4" 六角螺母起子将两个制动脚顺时
针转动相同量,直到它们紧贴到地面上。再次检查。将螺丝转
动半圈,继续调节制动脚,直至在打开抽屉时冰箱不再向前滚
动。
注意:让人推冰箱的顶部可从制动脚上卸下一些重量。这让螺
丝更加容易转动。
8. 通过将格栅的各端与每一侧的调平组件对齐并将格栅卡扣到位
来重新放回底部格栅。使用 1/4" 六角螺母起子来重新安装螺
丝。
3. 将冰箱移动至其最终位置。
4. 使用 1/4" 螺母起子,将制动脚降低。顺时针转动它们,直至
辊离开底板,并且两个制动脚都牢固扣在地板上。这样可在打
开冰箱门或冷冻室抽屉时,防止冰箱向前滚动。
重要信息:如果您需要就制动脚进一步调节,必须将两个制动
脚转动相同的量,保持冰箱水平。
5. 使用水平仪确保冰箱前后左右都是水平的。
6. 确保门在顶部齐平并且冰箱门底部和冷冻室抽屉顶部之间的空
间均匀。如果必要,请将门对齐。
对齐门的步骤:
■ 保持冰箱门关闭,拉出冷冻室抽屉。找到右侧冰箱门底部铰链
销。对齐螺丝在底部铰链销内部。
■ 将 1/8" 内六角扳手(与冰箱门把手安装说明装在一起)的短
端插入底部铰链销,直到其与对齐螺丝完全接合。
■ 要抬高冰箱门,向右转动内六角扳手。
■ 要降低冰箱门,向左转动内六角扳手。
■ 继续转动对齐螺丝,直至门对准。
A. 底部铰链销
B. 1/8" 内六角扳手
A
B
26
䈧൘ᵜ㌫㔏ѻࡽᡆѻ֯⭘ᴹнᆹޘⲴᗞ⭏
⢙ᡆᵚ㓿ݵ࠶⎸∂ǃ≤䍘н᰾Ⲵ≤DŽԕ֯⭘㓿
䗷䇔䇱㜭ཏ߿ቁᆒᆀⲴ㌫㔏ᶕ䗷└㜭ᴹ└
䲔ᆒᆀⲴ⚝㧼≤DŽ
更换并安装滤水器
应当根据流动速率 1,89—2,27 Lpm (0,50 gpm—0,60 gpm),每隔
6 个月更换滤水器(过滤的水量达 757 L(200 加仑))。
要订购替换用过滤器,请联系您从其购买冰箱的经销商。
注意:如果滤水器安装不正确,供水流速可能会较低,并且制冰会
较慢。滤水器安装不当还可能导致滤水器外壳漏水。
1. 要打开滤水器门,推动它即可,该门位于冷藏室左下角。
2. 扭动滤水器并逆时针转动 90° 来解锁。
3. 将滤水器拉出壳体。
4. 从滤水器上拆下滤水器盖。
5. 将滤水器盖安装到新滤水器上。务必将箭头对齐,让滤水器中
的凹槽和滤水器盖上的凸条对齐。
6. 将滤水器插入壳体。
7. 扭动滤水器并顺时针转动 90°,直至其锁定到位并且箭头对
齐。
8. 推动滤水器门,使其关闭。
过滤器和附件
滤水系统
27
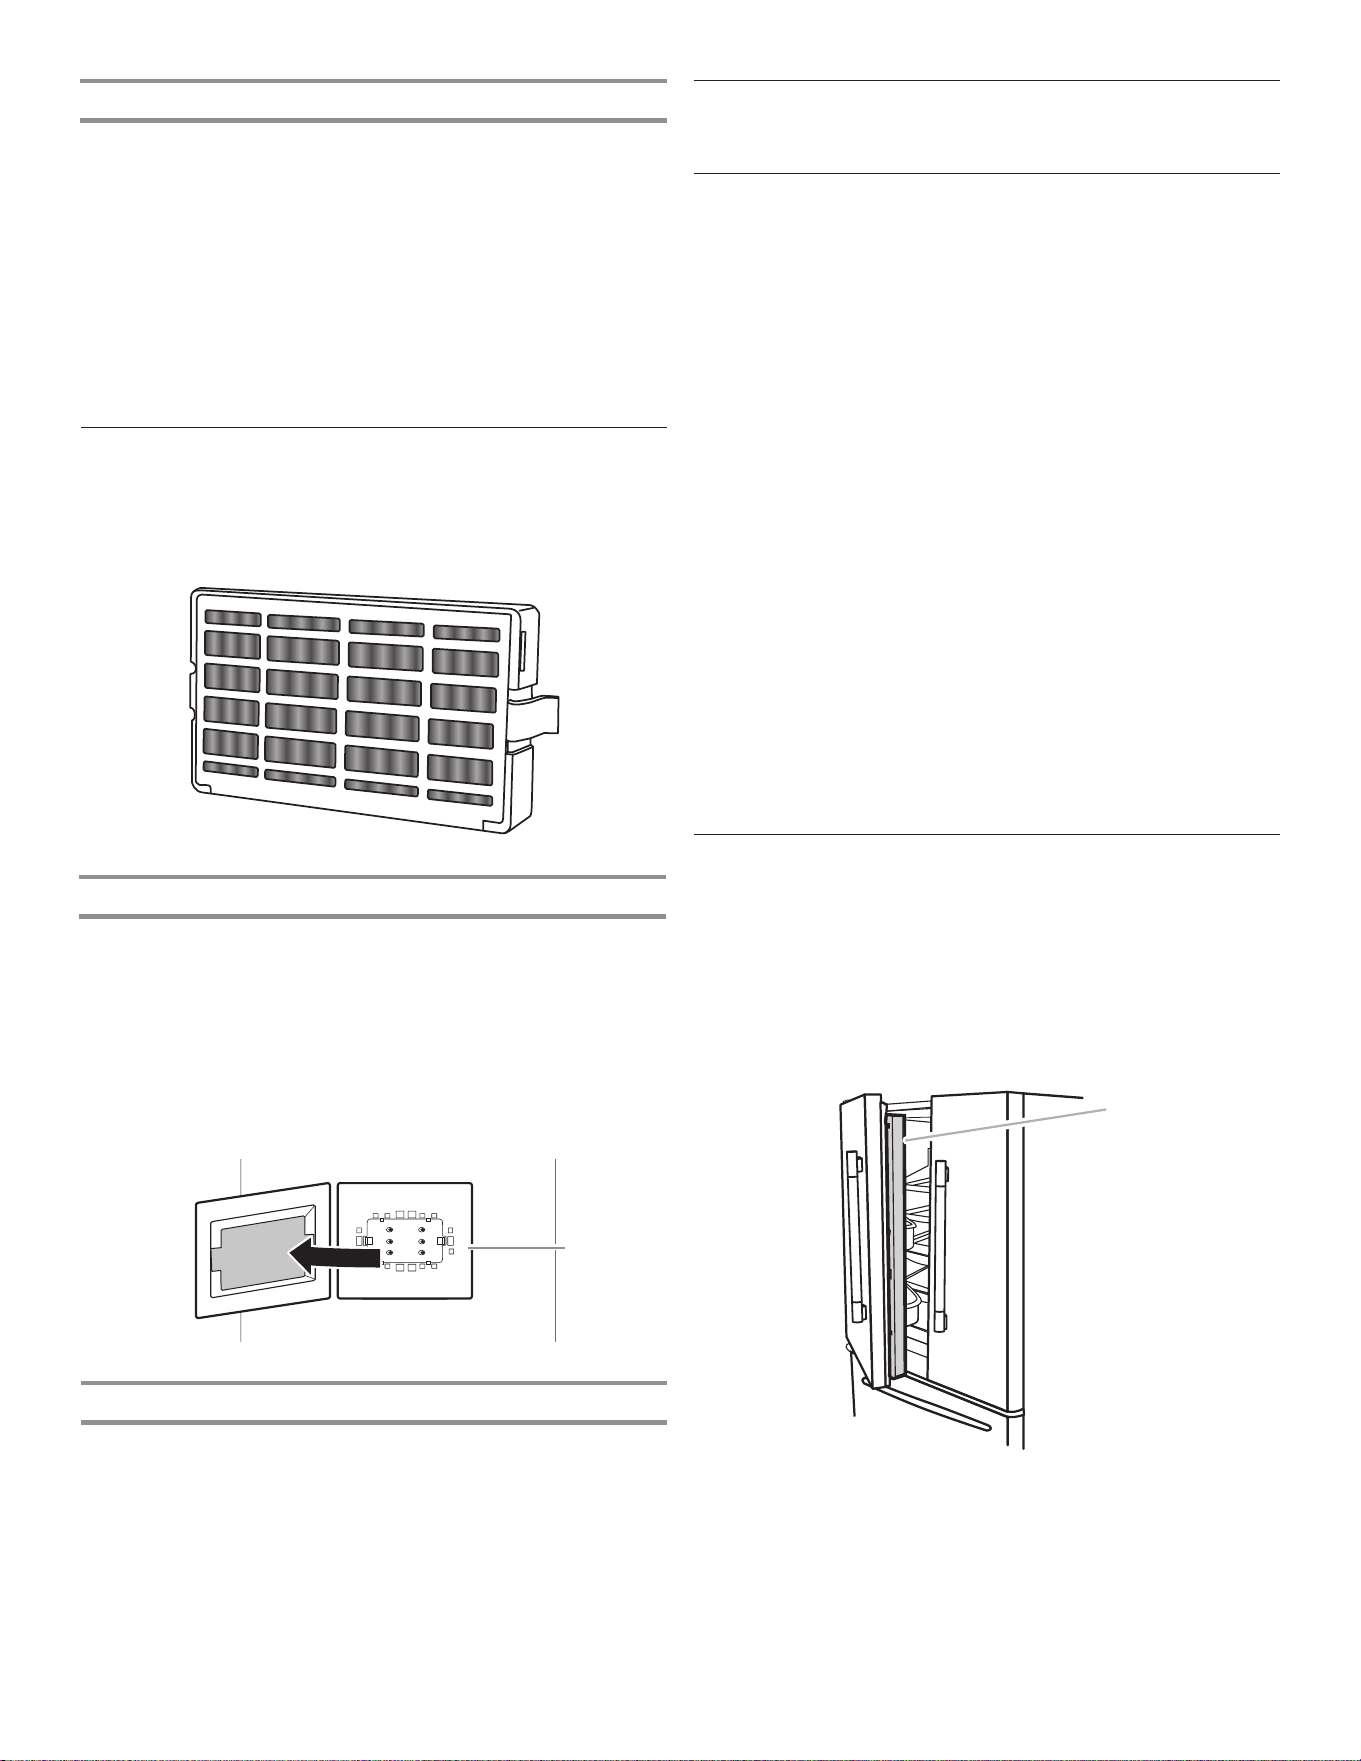
安装空气过滤器
空气过滤器减少冰箱内常见食物气味的功效是小苏打的 15 倍。
在一些型号上,冰箱附件套装包括空气过滤器,在使用冰箱之前必
须安装它。
安装空气过滤器
将空气过滤器安装在通风盖(位于靠近冰箱中部的后壁上)背面。
1. 将空气过滤器从其包装中取出。
2. 拉开通风盖上的塑料盖。
注意:当首次拆下盖时,需要废弃尺寸为滤水器大小的小型泡沫零
件。
3.将滤水器卡入到位。
更换空气过滤器
应当每隔 6 个月更换一次性空气过滤器。
要订购替换用空气过滤器,请联系您从其购买冰箱的经销商。
1. 通过挤压侧耳片,取下原有空气过滤器。
2. 按照前面的说明,安装新空气过滤器。
滤水器状态灯
滤水器状态灯有助于了解何时更换滤水器。
■ 订购滤水器(黄色):差不多到了更换滤水器的时间。除非处
于展厅模式或安息日模式,订购滤水器图标将始终亮起。
■ 更换滤水器(红色):更换滤水器。当您分配水时,更换滤水
器图标将从开始分配到分配结束持续闪烁。如果在 14 天后仍
然未更换滤水器,更换滤水器图标将会闪烁七次并且在分配结
束时会发出三次警报声。
■ 重置滤水器:同时按住“最强冷藏”和“最强冷冻” 3 秒可重
置滤水器。 显示屏将进行 3 秒的倒计时,然后闪烁“良好”
滤水器图标,并发出声音。
A. 空气过滤器
A
附件
要订购附件,请联系您从其购买冰箱的经销商。
帮助或维修
在要求提供帮助或维修之前,请查看“故障排除”一节。这可节省
上门维修成本。如果您仍然需要帮助,请遵照下面的说明。
如果需要替换零件
要找到您所在区域工厂指定的替换零件,请联系您从其购买冰箱的
经销商。
保修
请联系您从其购买冰箱的经销商来获取保修信息。
将本书以及发票保存在一起,以供将来参考。您必须提供购买或安
装日期证明方可享受保修服务。
记录下关于您电器的以下信息,帮助您在需要时获得帮助或维修。
您将需要知道自己完整的型号以及序列号。您可在型号和序列号标
签上找到该信息,该信息位于冷藏室的内壁。
经销商名称_______________________________________________
序列号___________________________________________________
地址_____________________________________________________
电话号码_________________________________________________
型号_____________________________________________________
购买日期_________________________________________________
冰箱用途
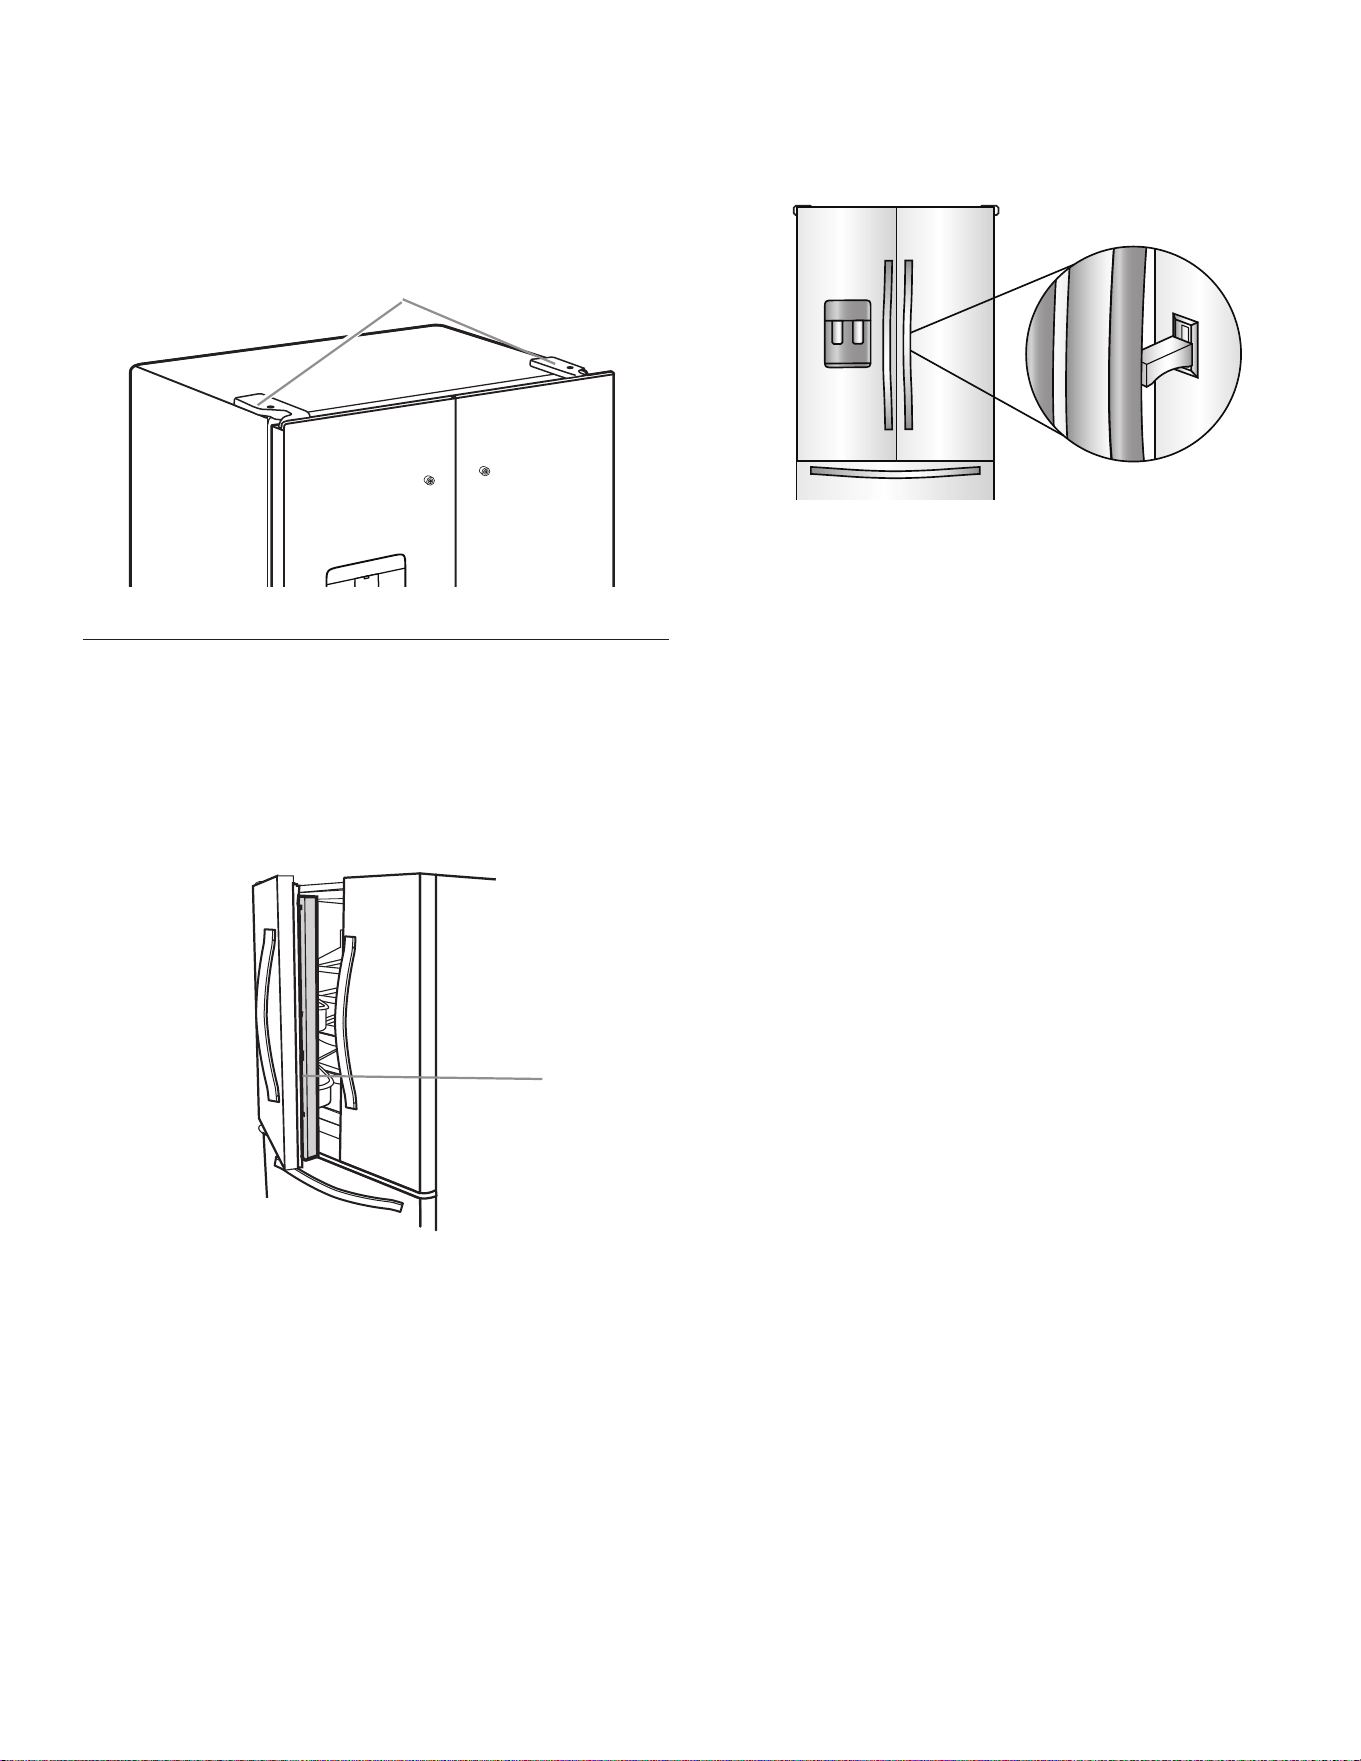
打开和关闭门
有两扇冷藏室门。可单独或一起打开和关闭两扇门。在左侧冰箱门
上有垂直带铰链密封件。
■ 当左侧门打开时,铰链密封件会自动向内折叠,这样就不会挡
住门。
■ 在两扇门都关闭之后,带铰链的密封件自动在两扇门之间形成
密封。
A
A. 带铰链的密封件
28
冷藏室门有两个开关,一个在顶部左侧,一个在顶部右侧。
■ 门开关使用磁体来感应门的打开/闭合。
■ 确保在铰链盖的 7,62 cm (3") 以内不存在磁体或电子装
置(扬声器、CoolVox 等)。
注意:如果没有检测到门打开,灯和内部用户界面 (UI) 将不会
开启。
A
A. 铰链盖
打开和关闭门内门和冰箱门
冷藏室有三扇门。可单独或一起打开和关闭两扇门。在左侧冰箱门
上有垂直带铰链密封件。
■ 当左侧门打开时,铰链密封件会自动向内折叠,这样就不会挡
住门。
■ 在两扇门都关闭之后,带铰链的密封件自动在两扇门之间形成
密封。
A. 带铰链的密封件
A
门内门
拉动隐藏的闩锁并向上提即可打开门内门,进入饮品储藏室,酷爽
饮品触手可及。
重要信息:请勿在外门打开时打开内门。在打开内门前关闭外门。
29
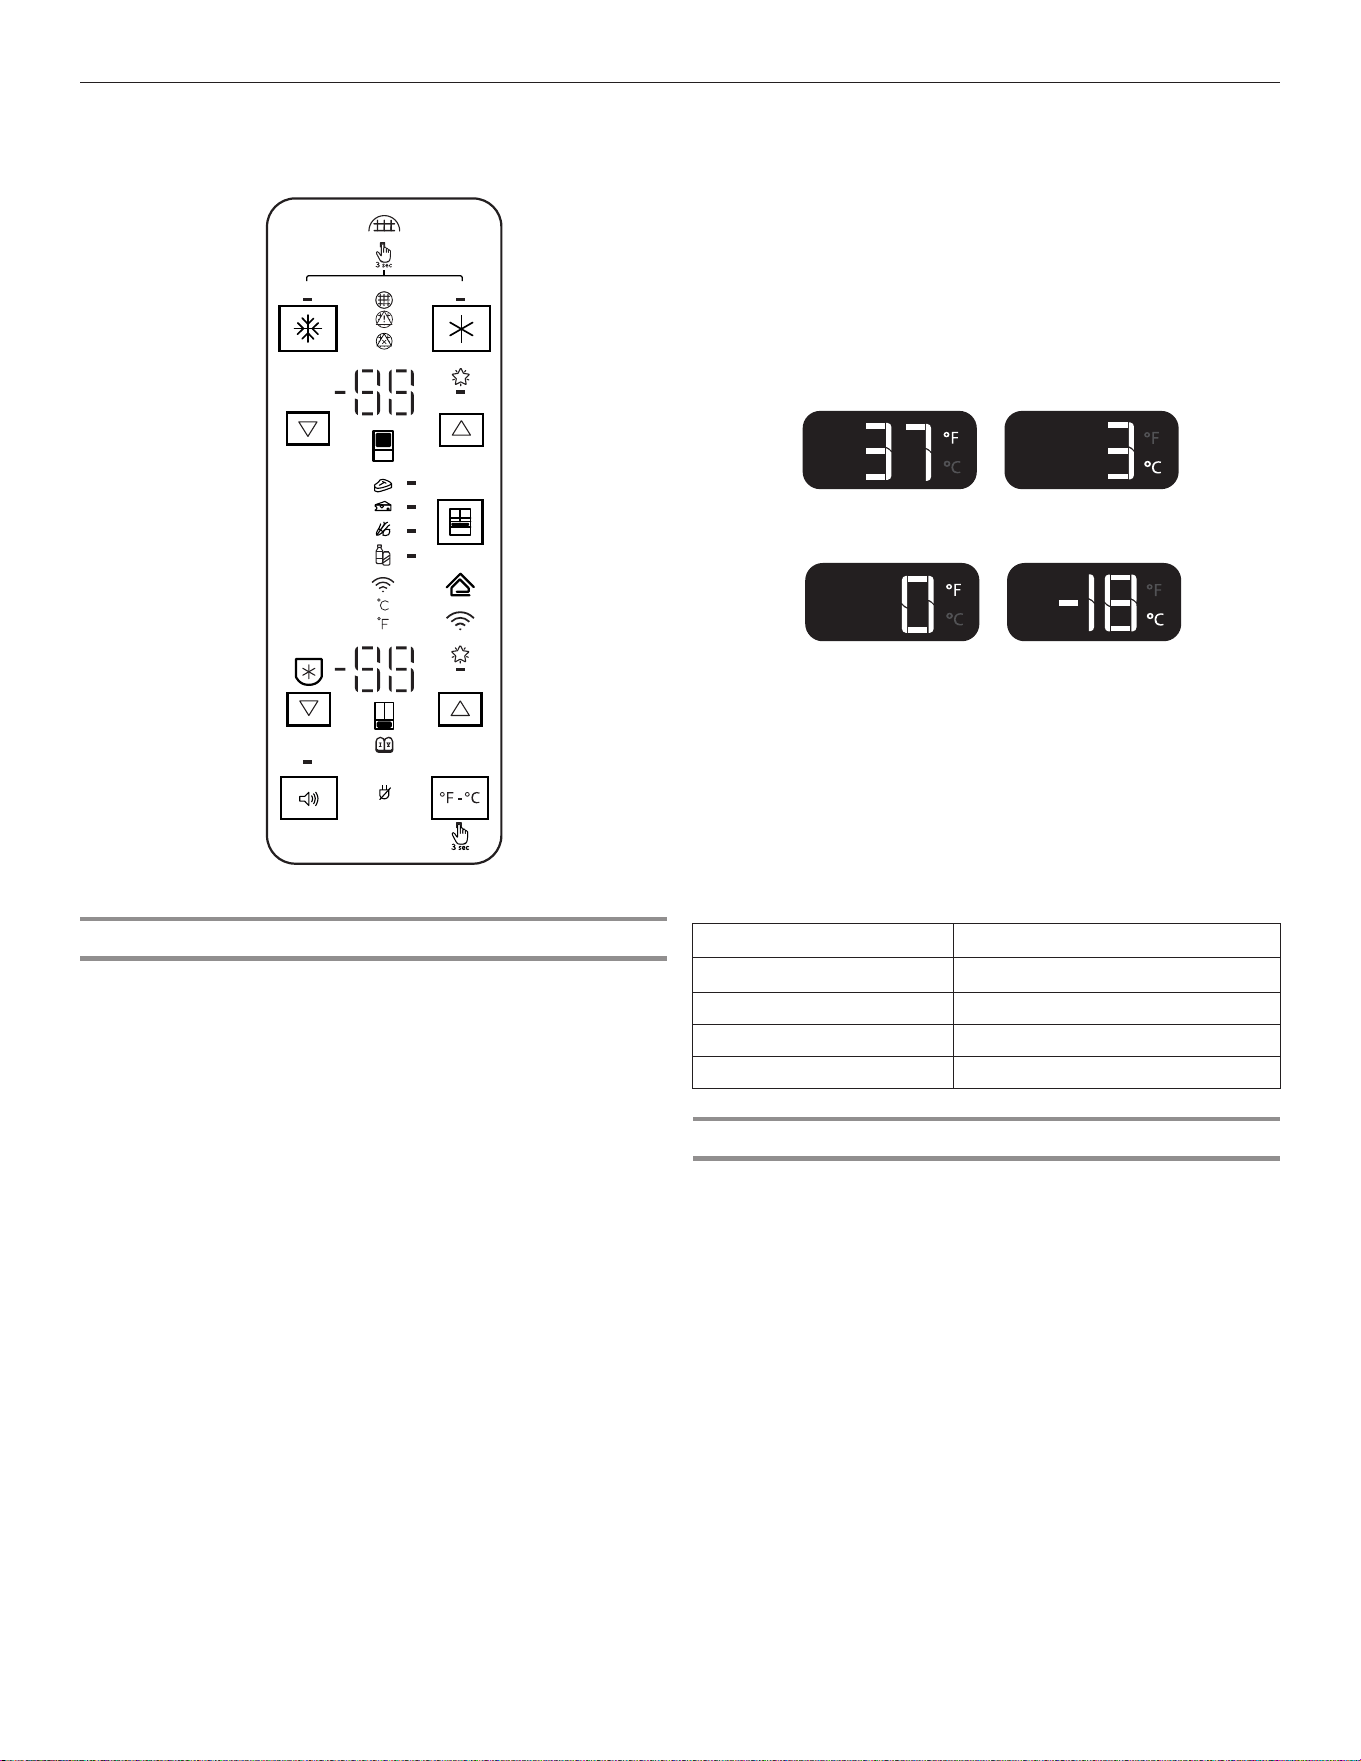
使用控制器
查看并调节温度设定点
为了便于使用,冷藏室和冷冻室控制器在出厂时已预设好。
在首次安装自己的冰箱时,确保控制器仍然设置为推荐的设定
点。工厂推荐的设定点为冷藏室 3°C (37°F),冷冻室 -18°C
(0°F)。
重要信息:
■ 请等待 24 小时后再将食物放入冰箱。如果在冰箱达到设定温
度之前放入食物,食物可能变质。
注意:将设定点调节至比推荐设定更低的值并不能让冰箱更快
地降温。
■ 如果冷藏室或冷冻室内温度过高或过低,先检查空气通风装
置,确保它们没有阻塞,然后再调节控制器。
■ 推荐设定对于常规家庭用途应当是正确的。当牛奶或果汁和您
所期望达到的温度一致,并且冰淇淋保持坚硬时,则表明控制
器设定正确。
注意:车库、地下室或门廊区域可能需要更高的湿度或极限温
度。您可能需要调节温度至推荐设置之外的值,以适应这些条
件。
■ 在两次调节之间至少等待 24 小时。在进行其他调节之前,重
新检查温度。
查看温度设定点
1. 触碰冷藏室的 ▼/▲ 或冷冻室的 ▼/▲ 可切换温度设定点。
注意:要以摄氏度为单位查看温度,按住 °F/°C 按钮 3
秒,温度显示将会更改。要恢复为华氏度,按住 °F/°C 按钮
3 秒,温度显示将会更改。
■ 要激活抽屉的温度模式,触碰抽屉键盘并在四个可选温度设定
之间切换:肉、熟食/奶酪、什锦和饮品。显示屏将显示抽屉所
选设定的温度设定点。
推荐的冷藏室温度
推荐的冷冻室温度
调节温度设定点
冰箱设定点范围:1°C 至 7°C(33°F 至 45°F)
冷冻室设定点范围:-22°C 至 -15°C(-6°F 至 5°F)
1. 触碰 ▼/▲ 调节冰箱区域。显示屏将如图所示显示所选隔间的
温度设定点。
2. 如果温度在延长冷冻的范围内,显示屏将亮起。延长冷冻在最
低的冷冻室设定点激活。
在调节温度设定点时,请使用以下图表作为指导:
条件: 温度调节:
冷藏室温度过低 冷藏室设定高出了 1°
冷藏室温度过高 冷藏室设定低了 1°
冷冻室温度过低 冷冻室设定高出了 1°
冷冻室温度过高/冰太少 冷冻室设定低了 1°
延长冷冻
此功能可避免长时间保存的肉类食物和冰淇淋上产生冻斑。
要打开“延长冷冻”功能,切换至最低的冷冻室温度设定点。
要关闭“延长冷冻”功能,从最低冷冻室设定点切换到任何其他温
度。
温控 UI 位于外部分配器上方并且在左侧冰箱门侧。
DEMO
H2O
30
最强冷藏
“最强冷藏”功能适合冷藏室高频使用、塞满物品或房间温度暂时
较高的情况。
■ 要打开“最强冷藏”功能,按下“最强冷藏”按钮。在按下按
钮之后,图标将闪烁三次,并出现在显示屏上。
■ 要手动关闭“最强冷藏”功能,按下“最强冷藏”按钮,显示
屏将闪烁三次然后熄灭。除非手动关闭,否则“最强冷藏”功
能将保持开启 24 小时。调节冷藏室温度将自动关闭“最强冷
藏”功能。
最强冷冻
“最强冷冻”功能有助于更迅速地冷冻食物,并最大化冷冻能力。
■ 要打开“最强冷冻”功能,按下“最强冷冻”按钮。在按下按
钮以开启功能之后,图标将闪烁三次,并出现在显示屏上。
■ 要手动关闭“最强冷冻”功能,按下“最强冷冻”按钮,显示
屏将闪烁三次然后熄灭。除非手动关闭,否则“最强冷冻”功
能将保持开启 48 小时。调节冷冻室温度将自动关闭“最强冷
冻”功能。
注意:将冷冻室设定为较低的温度将会让某些食物(例如冰淇
淋)变得更硬。
■ 为了达到最佳冷冻速度,应当在装入食物 16 小时之前激活
“最强冷冻”功能,并让功能保持开启,直至其自动超时。
滤水器
显示屏会显示滤水器的状态。要重置滤水器,按下“最强冷冻”
和“最强冷藏”按钮 3 秒时间。在倒计时之后,“良好”滤水器
图标将闪烁三次并保持亮起。
注意:内部控制器上的滤水器状态灯可让您了解何时更换滤水器。
■ 订购滤水器(黄色):订购更换用滤水器。
■ 更换滤水器(红色):更换滤水器。当分配水时,“更换”滤
水器图标将从开始分配到分配结束持续闪烁。如果在 14 天后
仍然未更换滤水器,“更换”滤水器图标将会闪烁七次并且在
分配结束时会发出三次警报声。请参阅“滤水系统”一节。
注意:如果没有完成滤水器重置,“更换”滤水器图标将保持亮
起。
■ 重置滤水器:在温控显示屏上同时触碰“最强冷冻”和“最强
冷藏”按钮 3 秒可重置滤水器。显示屏将进行 3 秒的倒计
时,然后闪烁“良好”滤水器,并发出声音。
声音打开或关闭
“声音打开或关闭”按钮可让用户打开和关闭声音。
■ 要打开声音功能,按下“声音打开或关闭”。在按下按钮之
后,“声音打开或关闭”图标将闪烁三次,并出现在显示屏
上。
■ 要手动关闭声音功能,按下“声音打开或关闭”按钮,显示屏
将闪烁三次然后熄灭。
断电
断电指示灯让您了解冰箱电源是否曾经断开,以及冷冻室温度是否
曾经升高。
“断电”图标将亮起并且警报声将响起三次。触碰任何按钮将声音
停止,并关闭“断电”图标。
一旦确认了断电,“断电”图标将会消失。
展厅模式
如果冰箱在零售商店作为展示柜,或者希望关闭制冷并停用其他所
有功能(除了内部照明),请使用该模式。展厅模式可在度假时使
用。请参阅“假期和移动维护”一节,了解让冰箱长期保持该模式
的正确步骤。
如果打开“展厅”模式,“展厅”模式图标将在显示屏上亮起。同
时按住 °F/°C 和抽屉按钮 3 秒进入或退出“展厅”模式
注意:如果要长期搁置冰箱不用,请将制冰机清空。
安息日模式
“安息日”模式设计用于实现进一步的节能功效,同时仍然保持食
物新鲜。在该模式下时,冷冻室和冷藏室用户设定点保持不变。如
果无意中打开“安息日”模式,“安息日”模式图标将在显示屏上
亮起。通过同时按住 °F/°C 和“声音打开或关闭”按钮 3 秒进
入或退出“安息日”模式
注意:在“安息日”模式下,将无法分配或更改温度设定点。在
“安息日”模式下,内部照明和控制面板都将停用。
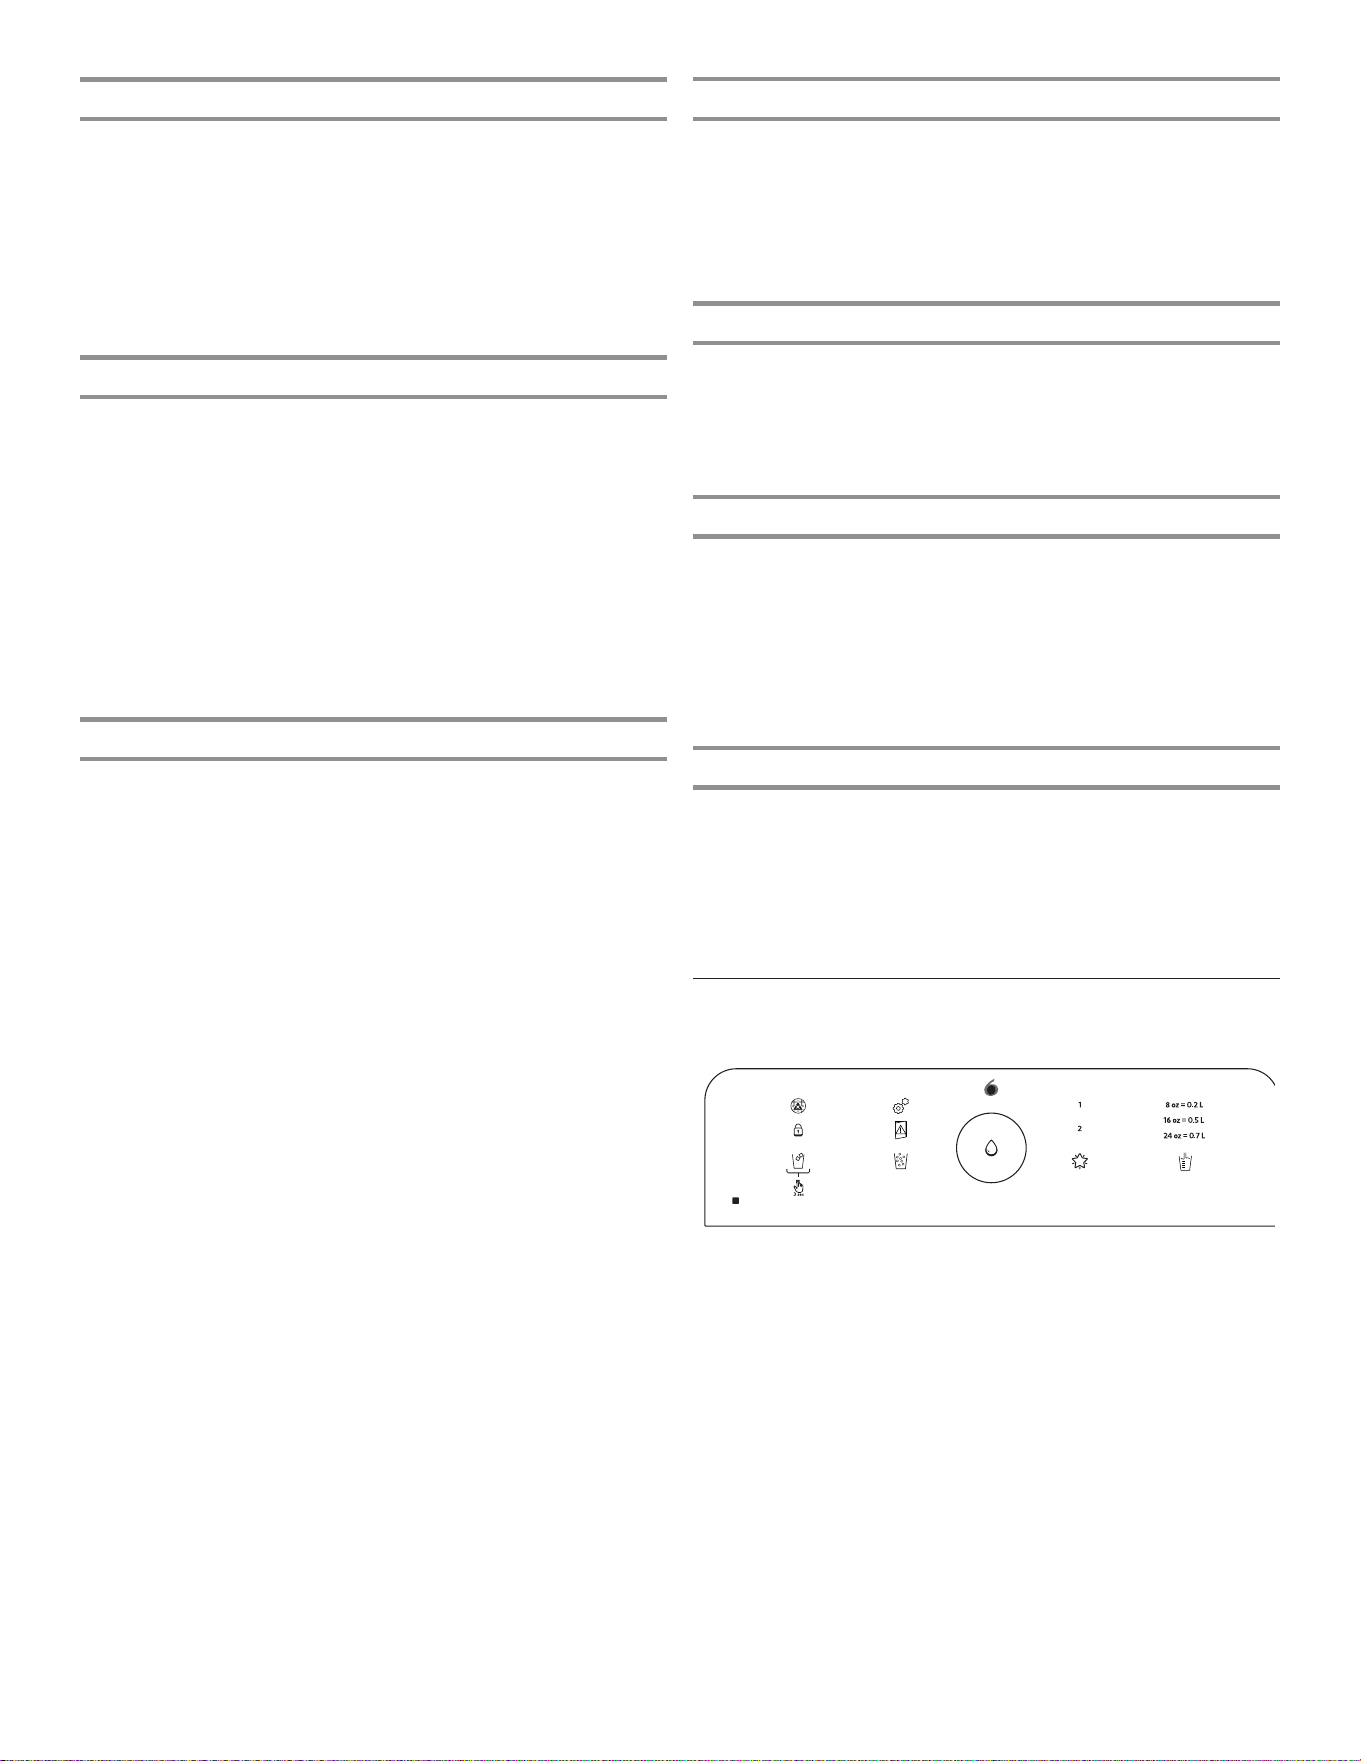
外部分配器控制
分配器 UI 位于冰箱的外部分配器的上方。
th
sense
重要信息:如果控制按钮和分配器扳钮停用时间超过 2 分钟或以
上,分配器控制面板上的显示屏将自动熄灭并进入“休眠”模式。
触碰任何控制按钮可重新激活显示屏。
31
其他功能
门半开警报
“门半开警报”功能在冷藏室门或冷冻室抽屉打开 5 分钟并且打
开了制冷时发出警报声。警报将每隔 2 分钟重复一次。关闭所有
门和抽屉,将其关闭。
注意:要在门保持打开的同时让声音警报静音(例如清洁冰箱内部
时),触碰控制面板上的任何按钮。警报声将暂时关闭,但是“门
半开”图标将仍然显示在分配器控制面板上。
配水机和配冰机
重要信息:
■ 让冰箱降温并将水制冷 3 小时。
■ 用 24 小时制备第一批冰。废弃制作的头三批冰。
■ 分配系统在左侧冰箱门打开时不会工作。
冲洗水系统
饮水系统中的空气可导致配水机滴水。在将冰箱连接至水源或更换
滤水器之后,请冲洗水系统。
冲洗配水系统可将空气冲离水管和滤水器,并让滤水器做好准备以
供使用。在一些住宅中可能需要额外冲洗。
注意:在从系统中去除空气之后,水可能会从分配器喷出。
1. 使用牢固的容器,按住配水机扳钮 5 秒。
2. 松开分配器扳钮 5 秒。重复步骤 1 和 2,直至水开始流动。
3. 一旦水开始流动,继续按下和松开分配器板(按下 5 秒后开
启,再按下 5 秒后关闭)直至配水量总共达到 11.4 L(3 加
仑)。
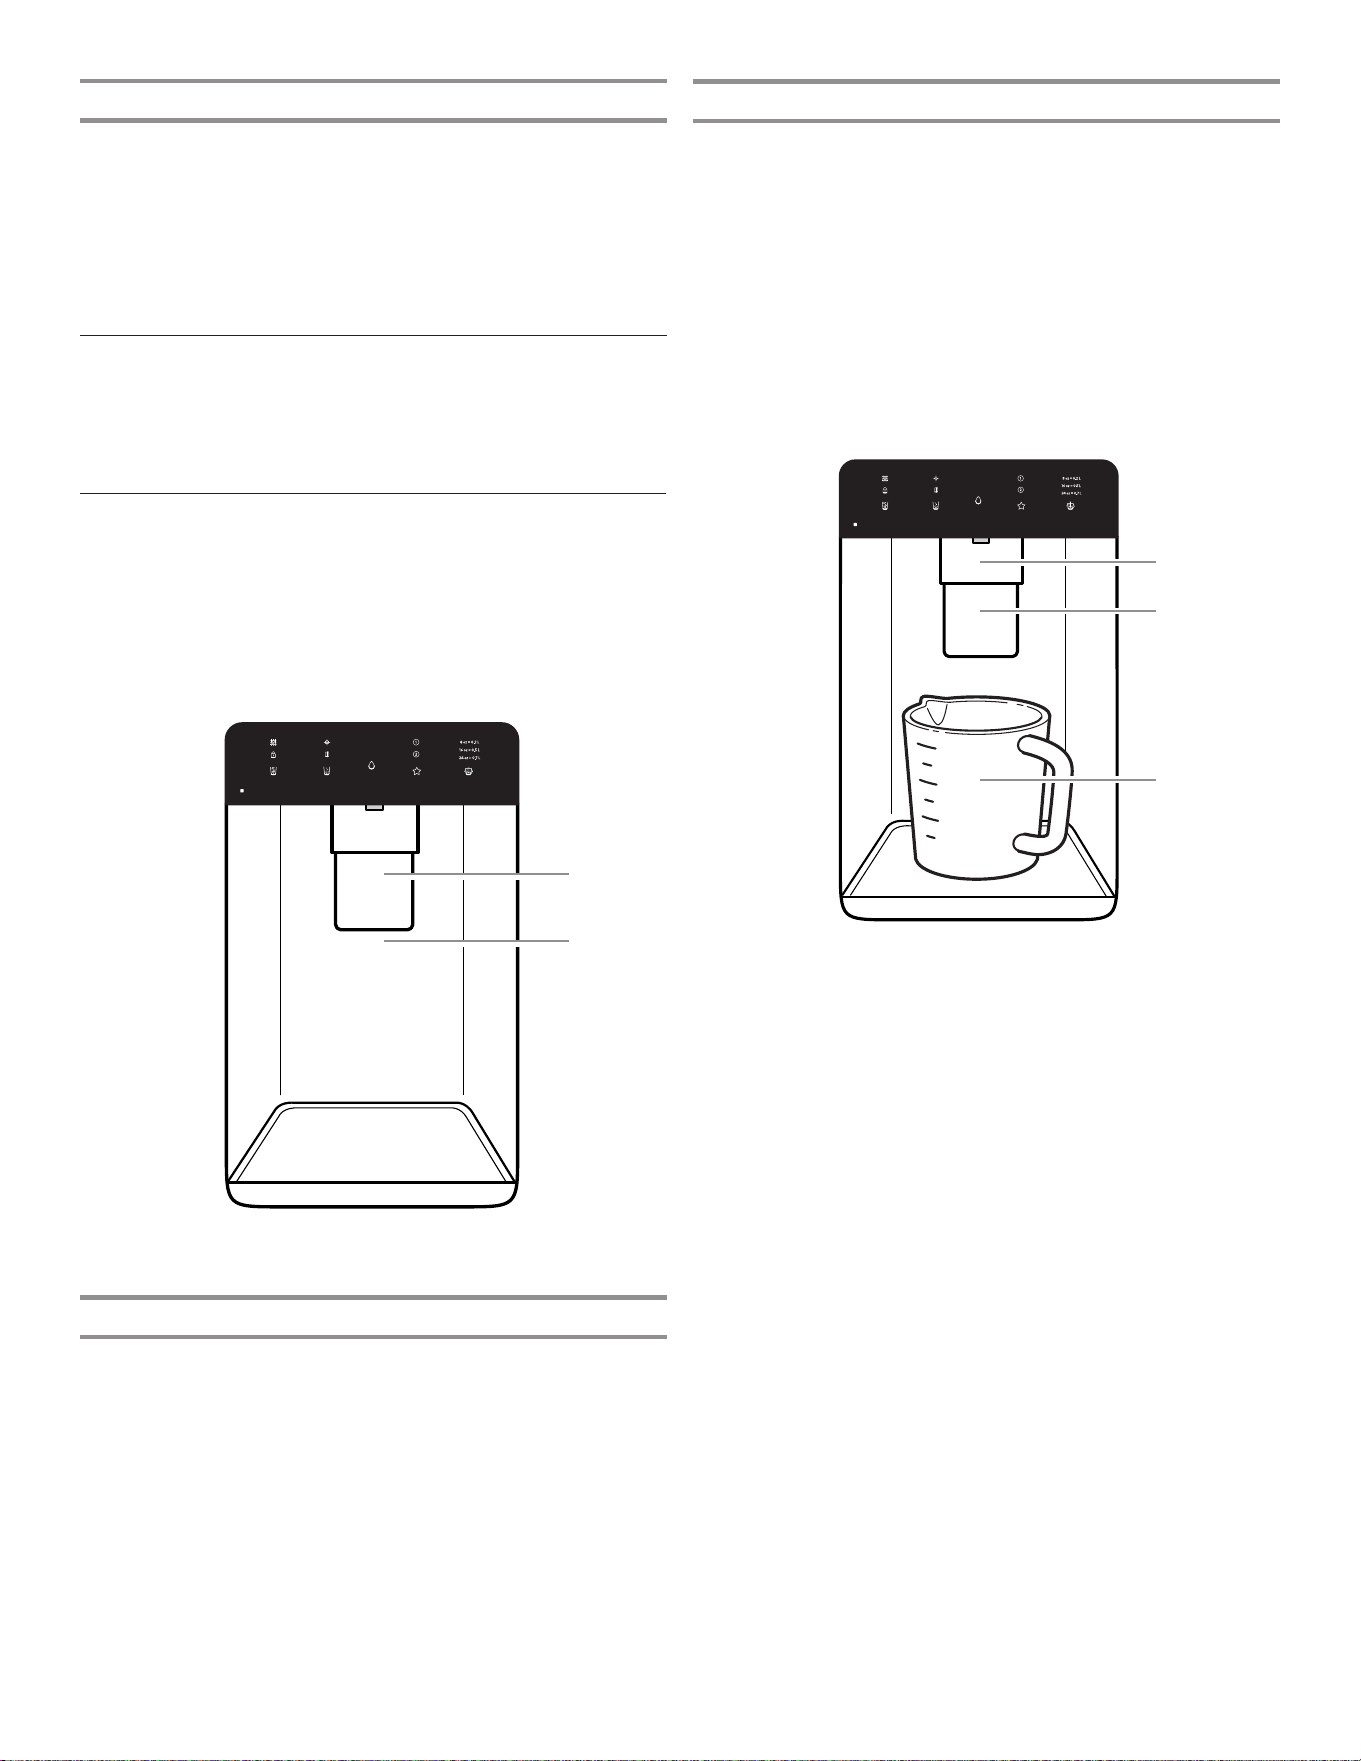
校准定量加注
住宅水压可能影响定量加注功能的准确性。因此,为了让配水机性
能达到最佳,必须先校准定量加注。
重要信息:
■ 冲洗水系统然后再校准定量加注
■ 为达到最佳效果,校准应当在屋内没有用水的情况下执行。
1. 将稳固的测量杯(尺寸 237 mL [1 杯])放置在位于配冰机/配
水机扳钮前方中心的分配器托盘上。
注意:测量杯根据型号提供。
确保没有选择任何定量加注预设。
2. 按住“定量加注”3 秒以进入校准模式。在校准“定量加注”
功能时,“校准”和“定量加注”图标将点亮并保持亮起。
注意:触碰“定量加注”按钮可随时退出“校准”模式。“校
准”模式图标将消失,显示屏恢复为主屏幕。
3. 根据需要按住配水机扳钮,将水分配至测量杯中的
237 mL(1 杯)刻度线位置。
注意:如果过度注水或者水溢出,将水倒掉并重新开始校准程
序。
4. 如果加注水量刚好到达 237 mL(1 杯)刻度线,触碰“定量加
注”按钮以确认校准。
5. 如果确认了“定量加注”,“校准”图标将会消失并且显示屏
将恢复为主屏幕。
冷藏室照明
冷藏室具有内部灯,在门打开时自动亮起。
注意:该灯为 LED,无需更换。
如果 LED 在门打开时不亮起,请致电维修部进行更换。
A. 配水机扳钮
B. 配冰机扳钮
C. 测量杯 237 mL(1 杯)
B
A
C
B
A
A. 配水机扳钮
B. 配冰机扳钮
32
保存收藏加注
住宅水压可能影响测量的“收藏加注”功能的准确性。因此,为了
让配水机性能达到最佳,必须先校准定量加注。(请参阅“校准定
量加注”部分)。
注意:除非先保存首选的“收藏加注”,否则将不会使用“收藏加
注”来分配水。
重要信息:
■ 冲洗水系统然后再使用收藏加注功能
■ 为达到最佳效果,校准应当在屋内没有用水的情况下执行。
1. 将首选尺寸的杯子放置在位于配冰机/配水机扳钮前方中心的分
配器托盘上。
2. 选择“收藏加注 1”或“收藏加注 2”,然后按住“收藏加
注”按钮 3 秒时间,进入“保存”模式。在保存“收藏加注”
功能之后,“收藏加注”图标将点亮,并保持亮起。
注意:触碰“收藏加注”按钮可以随时退出“保存”模式,显
示屏将恢复为主屏幕。
3. 根据需要按住配水机扳钮,将水分配至首选尺寸的杯子。
注意:如果过度注水或者水溢出,将水倒掉并重新开始保存程
序。
4. 如果首选数量的水正确分配至杯中,触碰“收藏加注”按钮确
认收藏水量。
5. 如果确认了“收藏加注”,显示屏将恢复为主屏幕。
分配
触碰冰选项的“冰块”或“碎冰”按钮。
注:
■ 对于碎冰,在分配之前会将冰块压碎。这可导致碎冰分配存在
延迟。碎冰机发出噪声属于正常现象,并且冰粒的大小可能不
均匀。
■ 在从碎冰更改为冰块时,会将数盎司的碎冰连同第一批冰块一
起分配。
分配水
重要信息:
■ 每周至少分配 1 L (1 qt) 水以保持供水新鲜。
■ 如果来自分配器的水速降低,可能因为水压低。
■ 在拆下滤水器的情况下,分配 237 mL(1 杯)水。如果
237 mL(1 杯)水在 8 秒或更短时间流出,则冰箱水压达
到了最低要求。
■ 如果分配 237 mL(1 杯)的水的时间超出 8 秒,则冰箱
水压低于推荐值。请参阅“供水要求”和“故障排除”一
节了解建议。
分配水-标准:
1. 将稳固的玻璃杯靠在配水机扳钮上,然后按压。
2. 移开玻璃杯即停止配水。
注意:“加注”按钮(中心按钮)不会启用标准分配。它仅在“定
量加注”模式下有效。
分配水-定量加注:
“定量加注”只需触碰几下按钮便可分配指定水量。
1. 将一个稳固的玻璃杯放在出水口下。触碰“定量加注”按钮激
活。
注意:配水量是您所选择的水量。确保容器够装。如果容器中
有冰,可能需要调节水量。
2. 触碰“定量加注”将其打开,然后触碰选择 0,2 L (8 oz)
、0,5 L (16 oz) 或 0,7 L (24 oz)。触碰第四次以退出“定
量加注”显示。
3. 触碰“加注”按钮或按下扳钮,配水机将加注所选的水量。
注:
■ “定量加注”分配器将在 1 分钟不活动的时间后自动超时。
■ 您可不断触碰“加注”按钮(中心按钮)来以相同的水量加注
数个玻璃杯。
“定量加注”选项列在以下图表中:
单位
盎司 8 16 24
杯数* 1 2 3
升 0,2 0,5 0,7
注意:大多数咖啡杯(通常为 118 至 177 mL [4 至 6 oz] 每
杯)尺寸都和量杯 (237 mL [8 oz]) 不同。您可能需要重新校
准“定量加注”以减少加注量或避免无意中过度加注咖啡杯。
4. 分配水。
注意:在分配水时,一旦分配了所需数量的水,水的流动会自
动停止。
■ 将稳固的玻璃杯靠在出水口下方的扳钮上。
或者
■ 将玻璃杯放置在出水口下方并触碰“加注”按钮以进行免
手动分配。
5. 要在分配所选的水量之前暂停配水,第二次触碰“加注”按
钮,或触碰配水机扳钮。再次触碰“加注”按钮或扳钮以配完
剩余水量。
注意:如果在达到所需的水量之前停止分配,显示屏将在 1 分
钟之后熄灭。如果到那时没有恢复配水,冰箱会将其重置为初
始量。
6. 要选择新的水量或开始再次分配相同的水量,必须先完成分配
所选的水量或关闭“定量加注”功能(等待 1 分钟,从而其将
自动关闭,或者触碰“冰块”或“碎冰”按钮手动将其关闭)
,然后再次选择“定量加注”。
分配水-收藏加注:
“收藏加注”只需触碰几下按钮便可分配首选的水量。
1. 将一个稳固的玻璃杯放在出水口下。触碰“收藏加注”按钮激
活。
注意:配水量是您所选择的水量。确保容器够装。如果容器中
有冰,可能需要调节水量。
2. 触碰“收藏加注”按钮将其打开,然后触碰选择“收藏 1”
或“收藏 2”。触碰第三次以退出“收藏加注”显示。
3. 触碰“加注”按钮或按下扳钮,配水机将加注所选的水量。
注:
■ “收藏加注”分配器将在 1 分钟不活动时间后
自动超时。
■ 您可不断触碰“加注”按钮来以相同的水量加注数个玻璃杯。
33
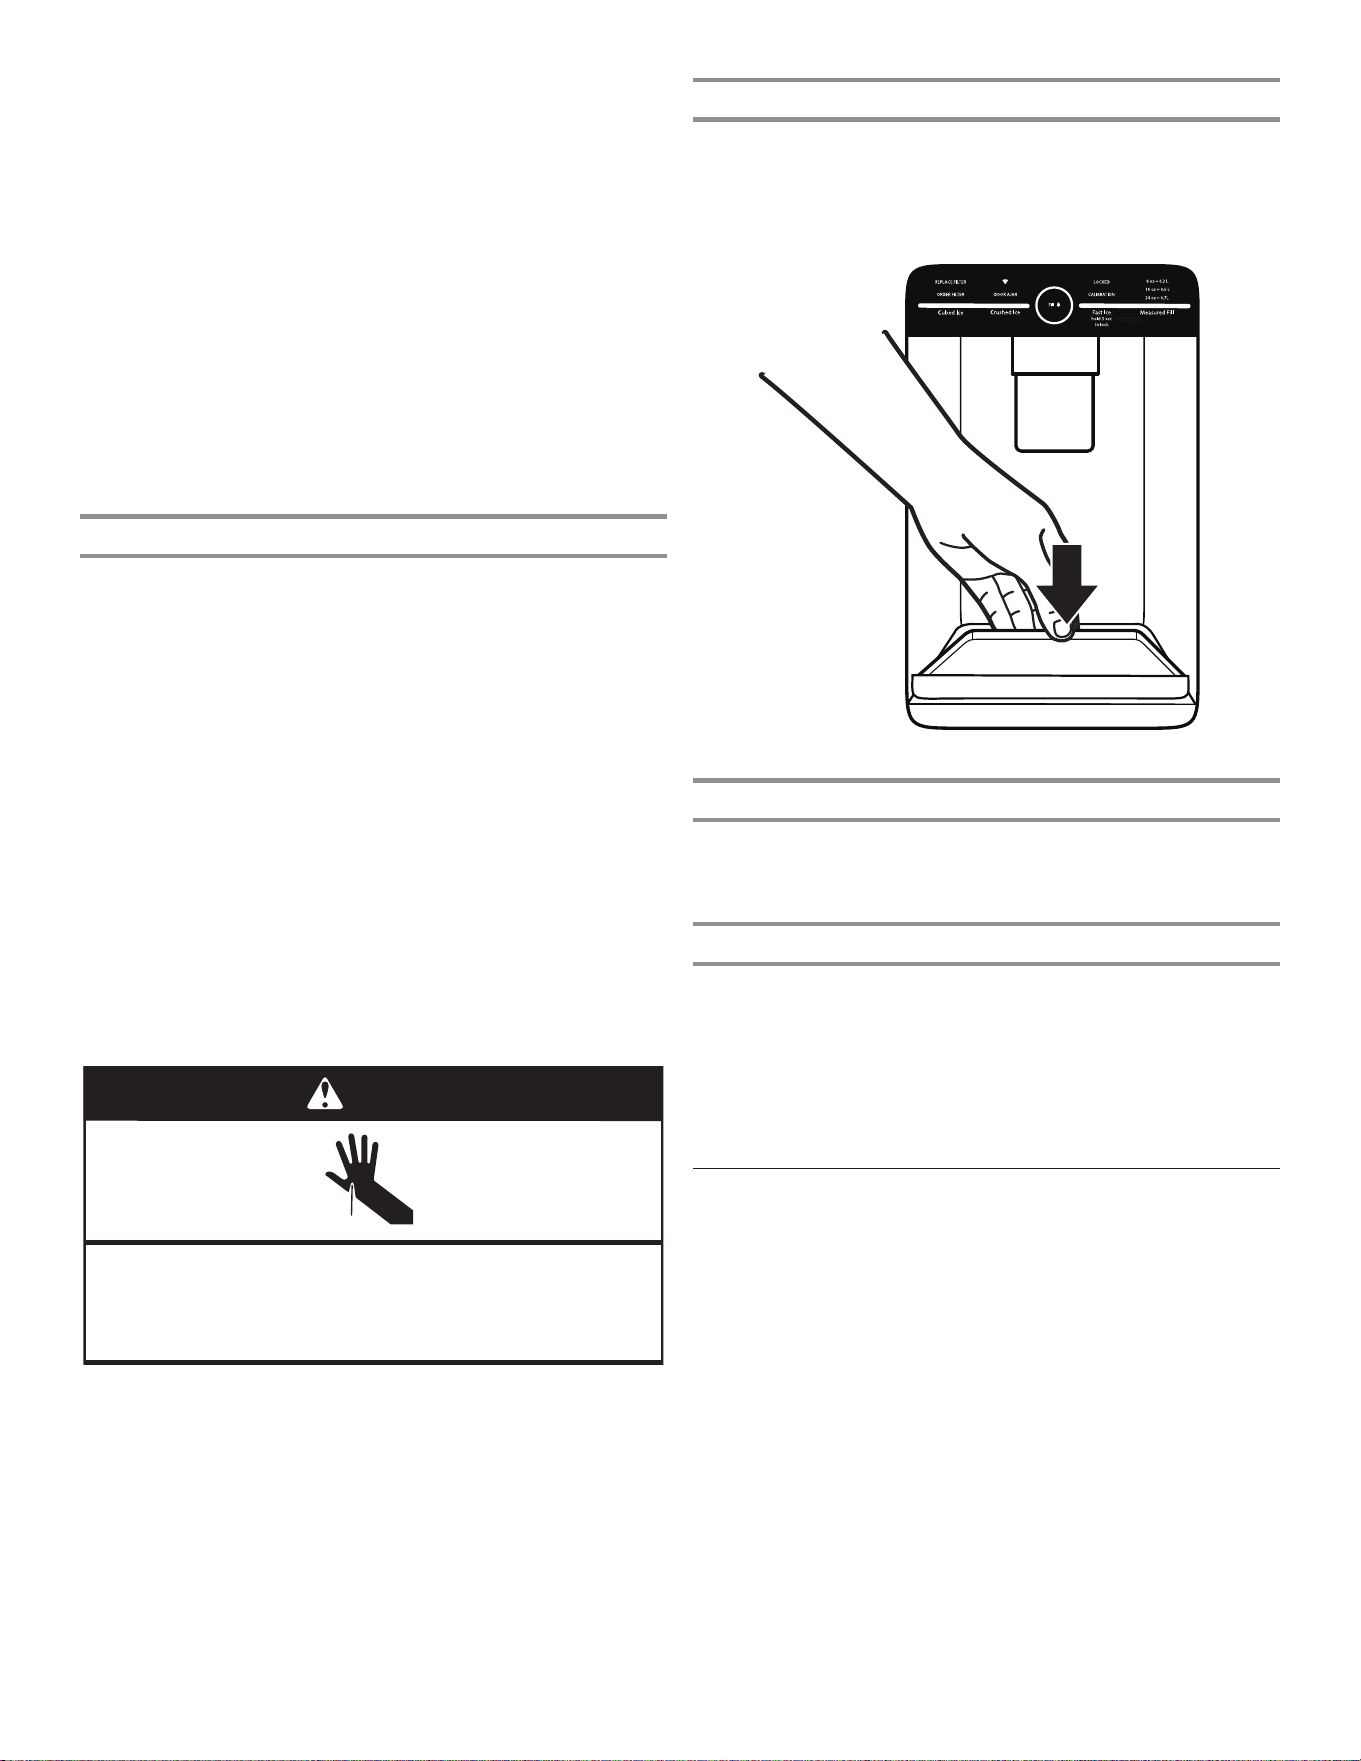
分配器滴水盘
可将滴水盘取下,送至水槽进行清空或清洁。
■ 在滴水盘的前缘上提起并向前拉动将其拆卸下来。
■ 也可在定量加注/收藏加注功能的执行期间将滴水盘滑出。
!
Calibration
!
Door
Ajar
!
Replace
Filter
!
"#$#!
!
%&#'#(')!"#$#!
!
Order Filter
!
a1 oz = b1 L
!
a2 oz = b2 L
!
a3 oz = b3 L
!
Dispense
!
分配器灯
1. 在使用分配器时,灯将自动亮起。
2. 分配器灯还用作自动夜间灯。一旦房间中的环境光减弱,自动
传感器将让分配器灯亮起。
分配器锁
可将分配器锁定以便于清洁或避免小孩和宠物意外触动。
注意:锁定功能不会关断冰箱或分配器灯的电源。它只会停用控制
器和分配器杆。要关闭制冰机,请参阅“制冰机和储冰盒”一节。
■ 按住“冰块”按钮 3 秒以锁定分配器。
■ 按住“冰块”按钮 3 秒以解锁分配器。
■ 显示屏指示分配器何时锁定。
制冰机和储冰盒
重要信息:要避免制冰量不足和质量不佳,请在打开制冰机之前冲
洗水系统。请参阅“配水机”一节。
■ 在安装后,用 24 小时时间制备第一批冰。废弃制作的头三批
冰。用 2 至 3 天时间加注储冰盒。
■ 冰的质量与供应至制冰机的水的质量对应。避免将制冰机连接
至软化的水源。水软化剂化学品(例如盐)会损坏制冰机零件
并导致冰质不佳。如果无法避免使用软化水源,确保水软化剂
正常作用并且得到良好维护。
■ 如果储冰盒中的冰粘在一起,则使用塑料用具将冰打碎并弃
用。请勿使用任何尖锐物体来碎冰。这可导致冰盒以及分配器
机构受损。
■ 请勿在储冰盒中存放任何东西。
4. 分配水。
注意:在分配水时,一旦分配了所需数量的水,水的流动会自
动停止。
■ 将稳固的玻璃杯靠在出水口下方的扳钮上。
或者
■ 将玻璃杯放置在出水口下方并触碰“加注”按钮以进行免
手动分配。
5.要在分配所选的水量之前暂停配水,第二次触碰“加注”按
钮,或触碰配水机扳钮。再次触碰“加注”按钮或扳钮以配完
剩余水量。
注意:如果在达到所需的水量之前停止分配,显示屏将在 1 分
钟之后熄灭。如果到那时没有恢复配水,冰箱会将其重置为初
始量。
6. 要选择新的量或开始再次分配相同的量,必须先完成分配所选
的量或关闭“收藏加注”功能(等待 1 分钟,从而其将自动关
闭,或者触碰“冰块”或“碎冰”手动将其关闭),然后再次
选择“收藏加注”。
配冰机
重要信息:
■ 如果冰块中空或者形状不规则,则可能是因为水压较低。请参
阅“供水要求”一节。
■ 冰从储冰盒经过分配器槽行经分配器并从中排出。要关闭制冰
机,请参阅“制冰机和储冰盒”一节。
■ 在松开分配器按钮或扳钮之后,分配器可能持续发出噪声并且
冰可能持续分配数秒。
清洁配冰机槽:
湿气通常会使冰粘在一起。冰颗粒会累积,直至配冰机槽阻塞。
如果不能有规律地分配冰,可能必须每隔两周将储冰盒清空,并清
洁冰输送槽、储冰盒以及储冰盒下方的区域。
■ 如果需要,使用塑料用具去除阻塞储冰盒的冰和输送槽。
■ 使用温暖、湿润的布清洁冰输送槽和储冰盒的底部,然后彻底
干燥。
分配冰:
扳钮分配
1. 通过按下“冰块”或“碎冰”选择所需冰类型。
割伤危险
在分配冰时,请使用坚固的玻璃。
否则可能导致割伤。
警告
2. 将稳固的玻璃杯靠在配冰机扳钮上,然后按压。握住玻璃杯,
靠近分配器开口,让冰不会从玻璃杯掉出。
重要信息:您不需要将大量压力应用至扳钮来激活配冰机。用
力按压不会提升配冰速度或者数量。
3. 移开玻璃杯即停止配水。
注意:在从分配器扳钮上取下玻璃杯之后,冰可能继续分配数秒。
配冰之后,分配器可能会继续发出噪声数秒。
34
冰箱中的制冰机
制冰机位于盒子背后的左侧门上。冰块会弹入位于左侧冰箱门上的
储冰盒内。
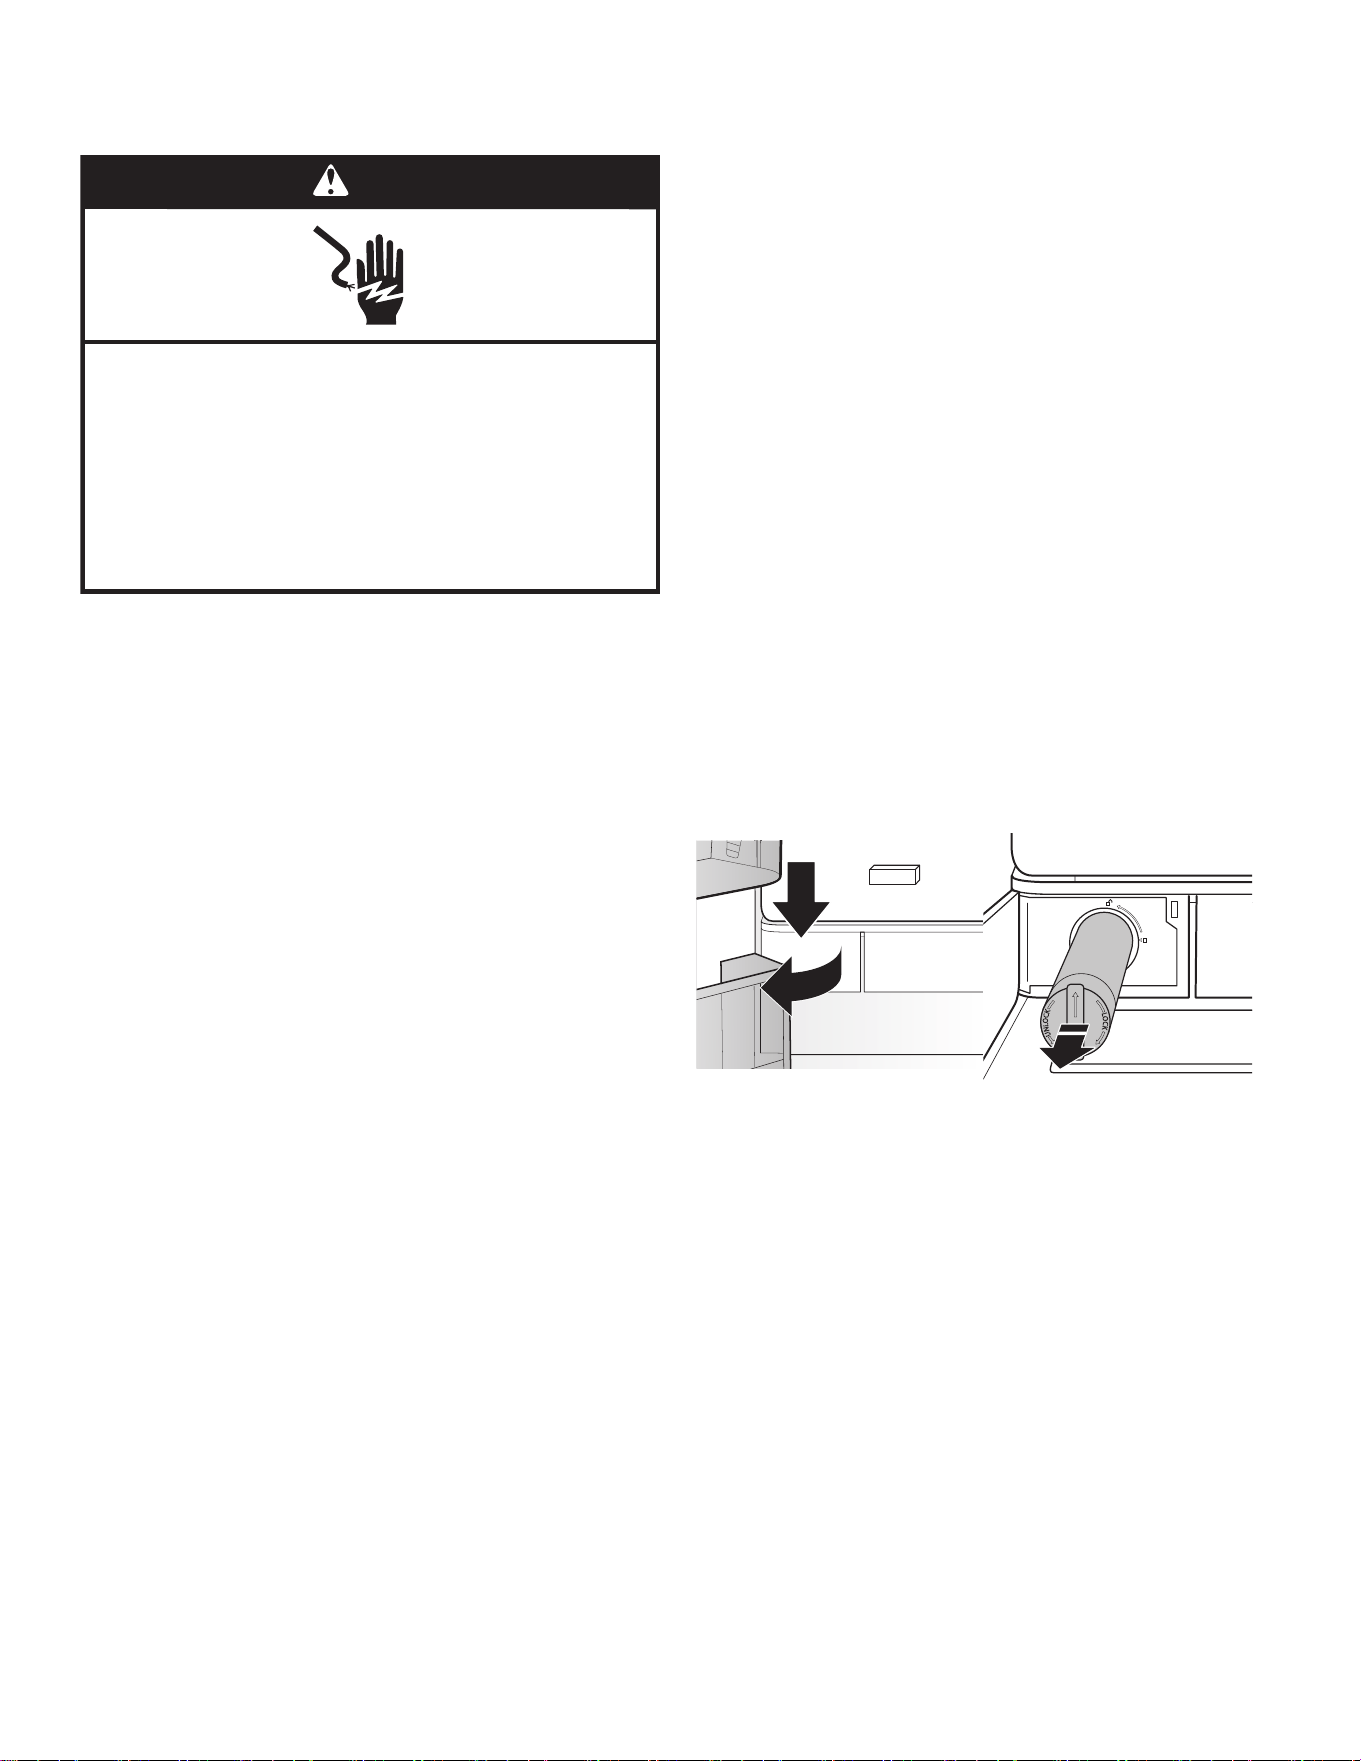
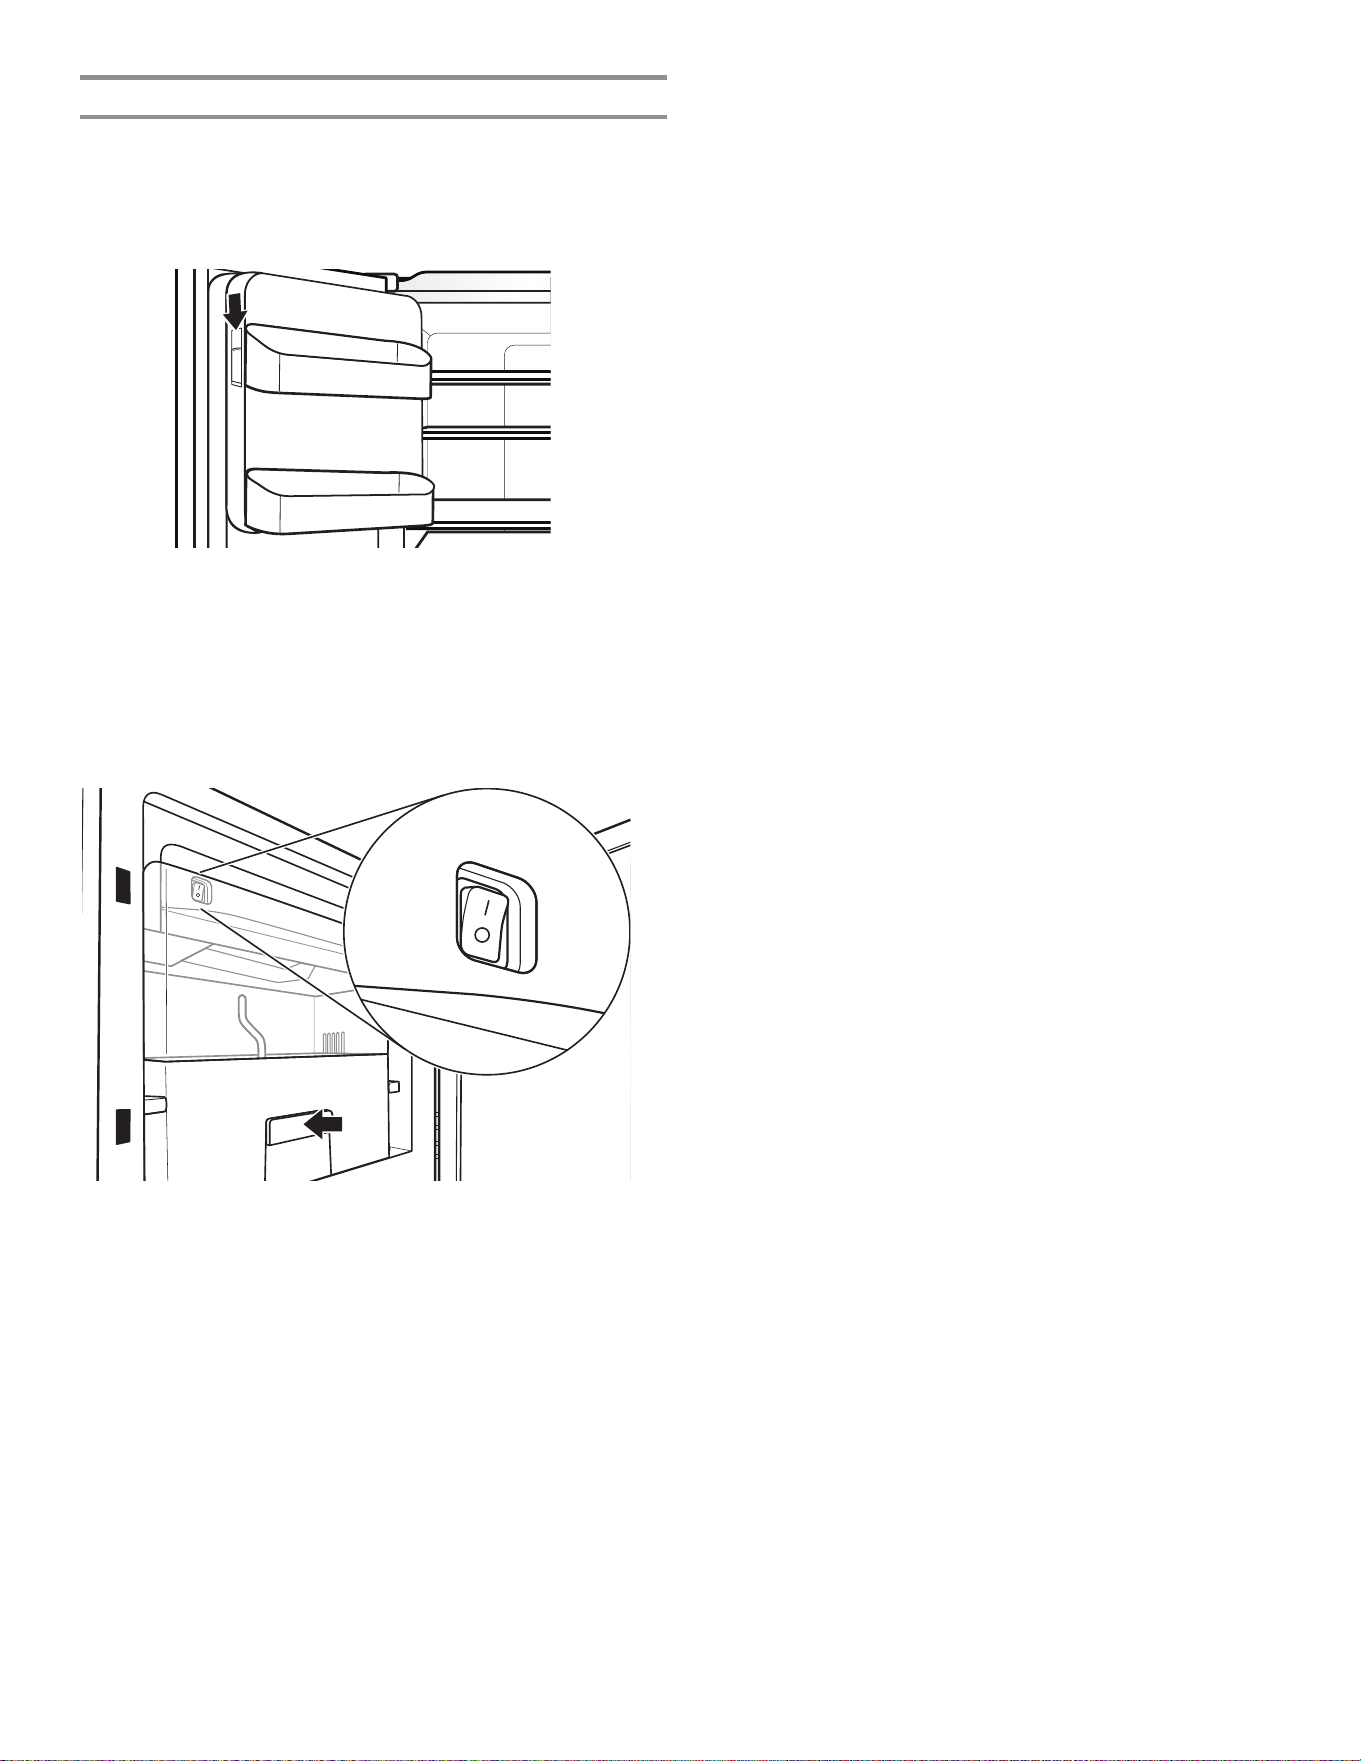
打开/关闭制冰机
1. 将冰隔间左侧的闩锁向下推,将门打开。
2. 通过将开关移动至“开”(I) 位置打开制冰机。
注:
■ 手动关闭制冰机,将控制开关移动至“关”(O)位置。
■ 制冰机有自动关闭功能。如果储冰盒已满,门已打开,或
者拆下了储冰盒,传感器将自动停止制冰。控制开关将保
持在“开”(I) 位置。
3. 关闭冰隔间门。
拆下并更换储冰盒
■ 通过将手指插入盒子底部的孔并拉动闩锁从隔间上松动盒子,
将储冰盒拆下。向上提起储冰盒并直接将其拉出。
■ 更换冰隔间中的储冰盒,并向下推动,确保其牢固就位。
制冰速度
■ 在正常工作条件下,制冰机每天应当制备大约 1,4 kg (3 lb)
的冰。
35
架子和架框
冰箱中的架子是可调的,从而满足各种存放需求。
在冰箱中将相似的食物存放到一起并调节架子以适合不同的物品高
度,由此便可更方便地找到自己需要的物品。这能够减少冰箱门开
启时间,节省了能源。
搁架高度调整
搁架高度可通过改变可调节搁架支架的垂直和水平位置来调整。
1. 小心地将搁架从搁架支架上抬起,并将导条转到所需的方向。
2. 对其余的搁架支架重复上述步骤。
3. 按压架子的顶部,以确保架子正确安放在架支座上。
需要了解的有关玻璃架和盖子的重要信息:
当玻璃架或盖子处于冰冷状态时,请勿用温水进行清
洁。如果突然遭遇温度变化或冲击(例如碰撞),架
子和盖子可能会断裂。
钢化玻璃采用可粉碎为许多小型卵石大小块段的设计。
这属于正常现象。玻璃架和盖子较重。在拆卸它们时
请使用双手,防止掉落。
拆下和更换架子:
1. 在拆下架子之前,确保可调节的架支座位于较低的位置。冰箱
门也需要打开 90˚ 度。如果打开角度更大,会很难以拆下架
子。
2. 拆下中间架子或顶部架子,方法是将其提起,或从架支架上将
其取走。然后向前拉动架子,并向下倾斜至垂直位置。将架子
转动一个角度,然后从冰箱拉出。
注意:在拆下顶部架子之前,先拆下中间的架子。在向上倾斜
时,应当将 U 型架推回,确保玻璃件不会滑动至前方。
3. 拆下底部架子,方法是将其提起,然后从架支架上将其取走。
然后向前拉动架子,并向上倾斜至垂直位置。将架子转动一个
角度,然后从冰箱拉出。
4. 装回中间和顶部架子,方法是以架子前部向下的角度将架子放
回冰箱中。 将架子的前部向上提起并滑入,直至架子的后部
落入架支架中。将架子的前部降下,并确保架子就位。
5. 装回底部架子,方法是以架子前部向上的角度将架子置于冰箱
中。 将架子的前部向上提起并滑入,直至架子的后部落入架
子支架中。 将架子的前部降下,并确保架子就位。
具有架下照明的架子(适用某些型号)
LED 照明灯移至架下的一处新位置,这一领先的技术改善了冰箱内
部照明并有助于查找存放的物品。
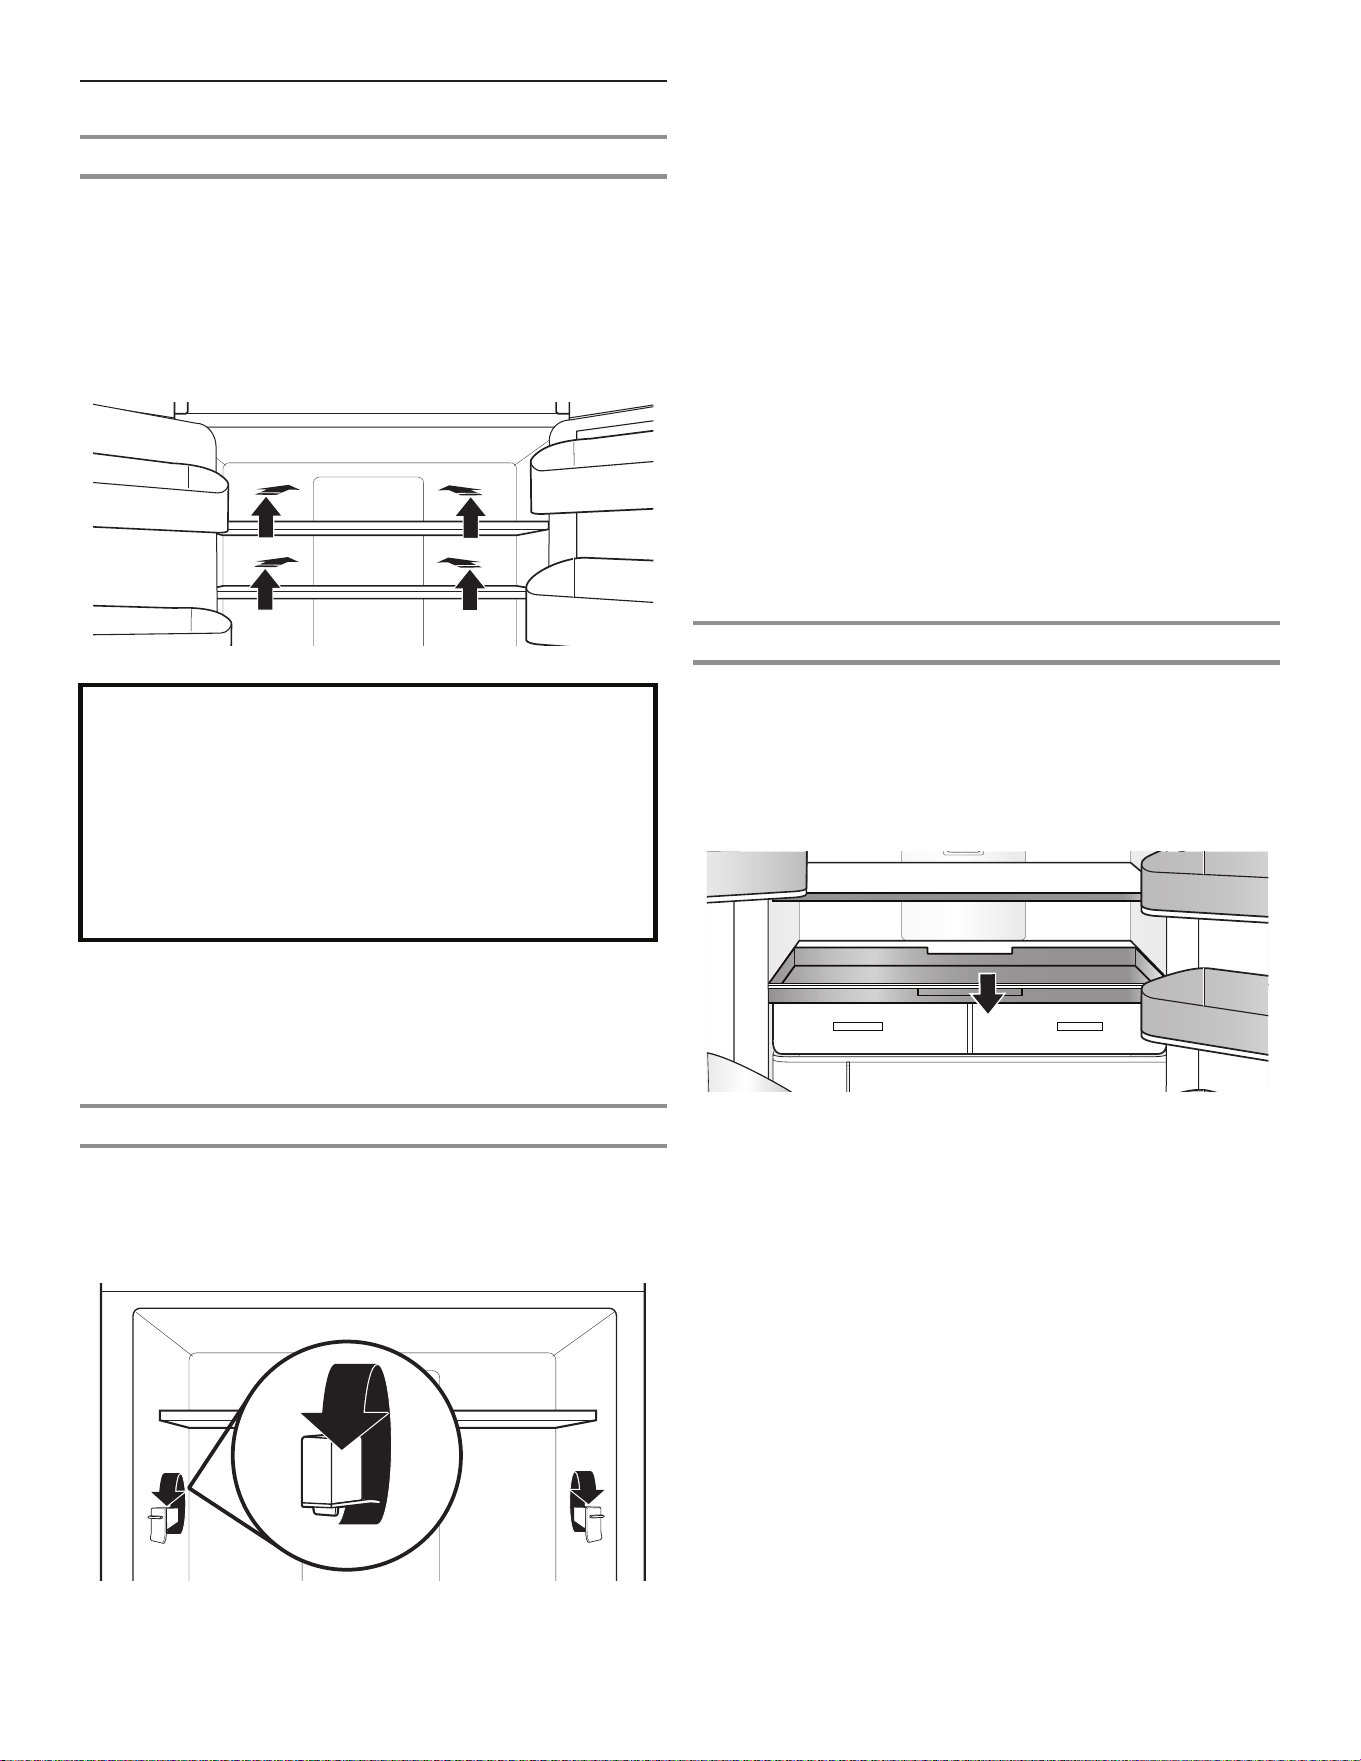
大浅盘盒
拆卸和装回大浅盘盒:
1. 拉动托盘至全开或停止位置。
2. 朝向冰箱前部提起并滑出助滑器。
3. 装回托盘,方法是将其放置在底部托盘导向装置上并推动它,
直至到位停止。
架子、盒子和抽屉
U型架
有些架子可以收起,以便腾出空间放置更高的物品。
1. 要收回架子的前部,朝向冰箱的后部向后根据需要推动架子的
可调节部分。
2. 向外拉动架子收起的部分直至其完全伸出,将架子的前方玻璃
件和前镶边伸出。

36
自动湿度保鲜储藏格
这些升级型的保鲜储藏格抽屉使用垫片密封来保持理想的温度和湿
度水平,以更长久的保鲜。这些抽屉还配备先进的柔软闭合助滑装
置,能最大限度地拉出抽屉,便于取用物品以及尽可能让物品一览
无余。
拆卸和装回抽屉:
1. 在抽屉的底部握住把手,并将抽屉直接滑出,直至停止。将抽
屉从底部导向装置上提走。
2. 装回抽屉,方法是将其放置在底部抽屉导向装置上并推动它,
直至到位停止。
要拆卸保鲜储藏格盖(只能在先拆卸了大浅盘盒后拆卸):
1. 先拆卸大浅盘盒。
2. 用一只手用力握住玻璃插件,在玻璃插件的中心向上按,直至
其上升到塑料框架以上。轻轻向前滑动玻璃插件,将其拆下。
装回保鲜储藏格盖:
1. 在拆下保鲜储藏格之前,先拆下保鲜储藏格盘、大浅盘盒以及
保鲜储藏格玻璃件。
2. 将盖架装回冰箱侧壁上的支撑处,并将盖架的前部下降到位。
3. 将玻璃插件的后部滑动到盖框架中,并将前部下降到位。
装回门内门上的盒子
关闭内门,开启外门,将盒子安装在冰箱右侧。
1. 将盒子的一侧与较大的侧耳片前端接合,并向下倾斜。
2. 按下后侧,并卡入到位。
3. 盒子应对齐并与门齐平。
冰箱门上的盒子
您冰箱门上的盒子是可调节的,以便满足您个人的存放需求。
37
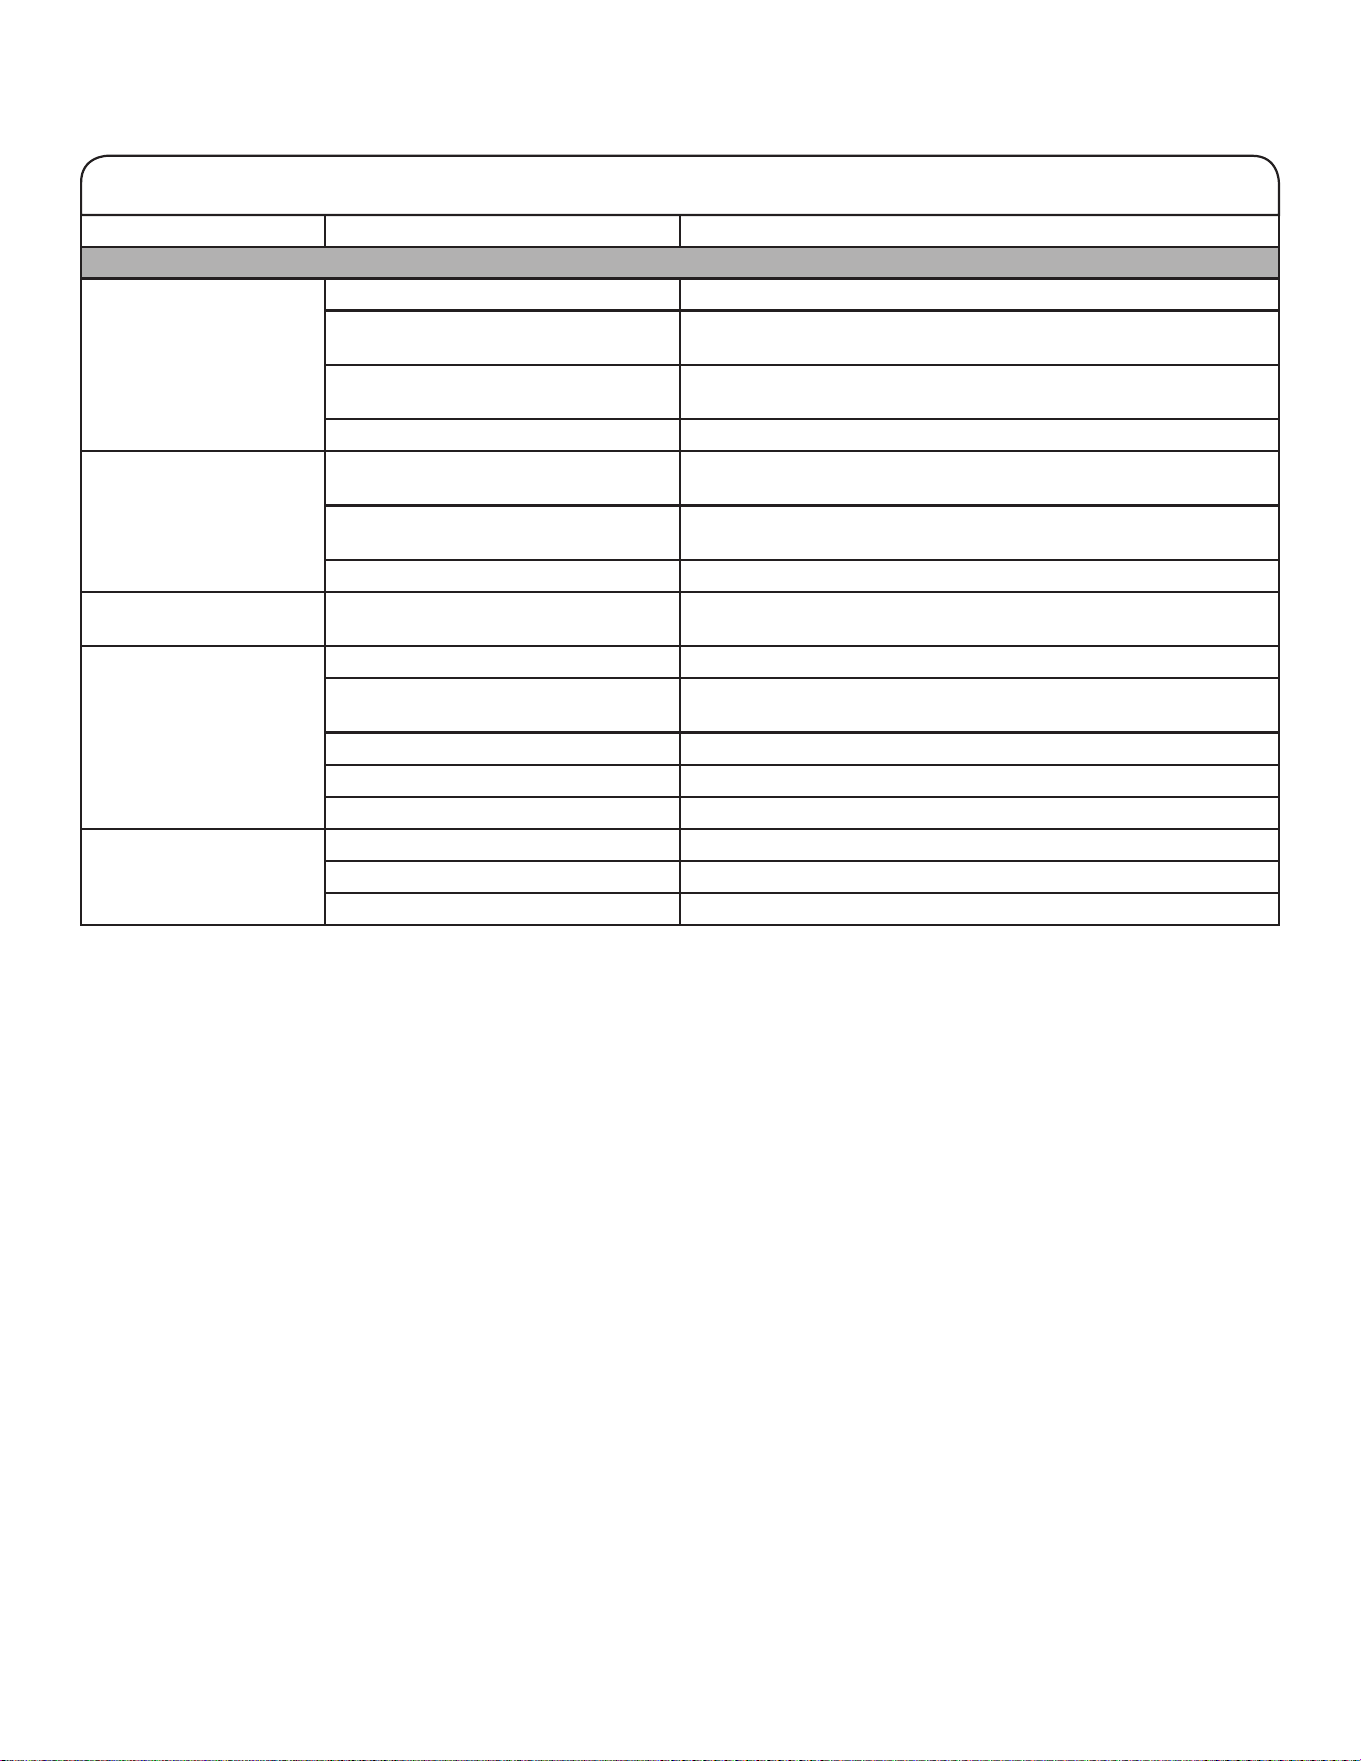
音频参考
音调指定
音调名称 使用示例
通电 每次产品通电时,制冷系统都会开启。
断电 制冷系统关闭。
按下按键 用户按下有效的按钮。
无效(错误) 用户同时按下两个或更多有效的按钮。按住
按钮的倒计时中断。在不允许分配时,用户
按下按板。
接合 确认进入任何模式或完成分配。
脱离 确认从任何模式中退出
警报 停电警报、门半开警报
该表格仅供快速参考。有关详细信息,请参阅相应小节。如果出现
不一致,则以小节的详细信息为准。
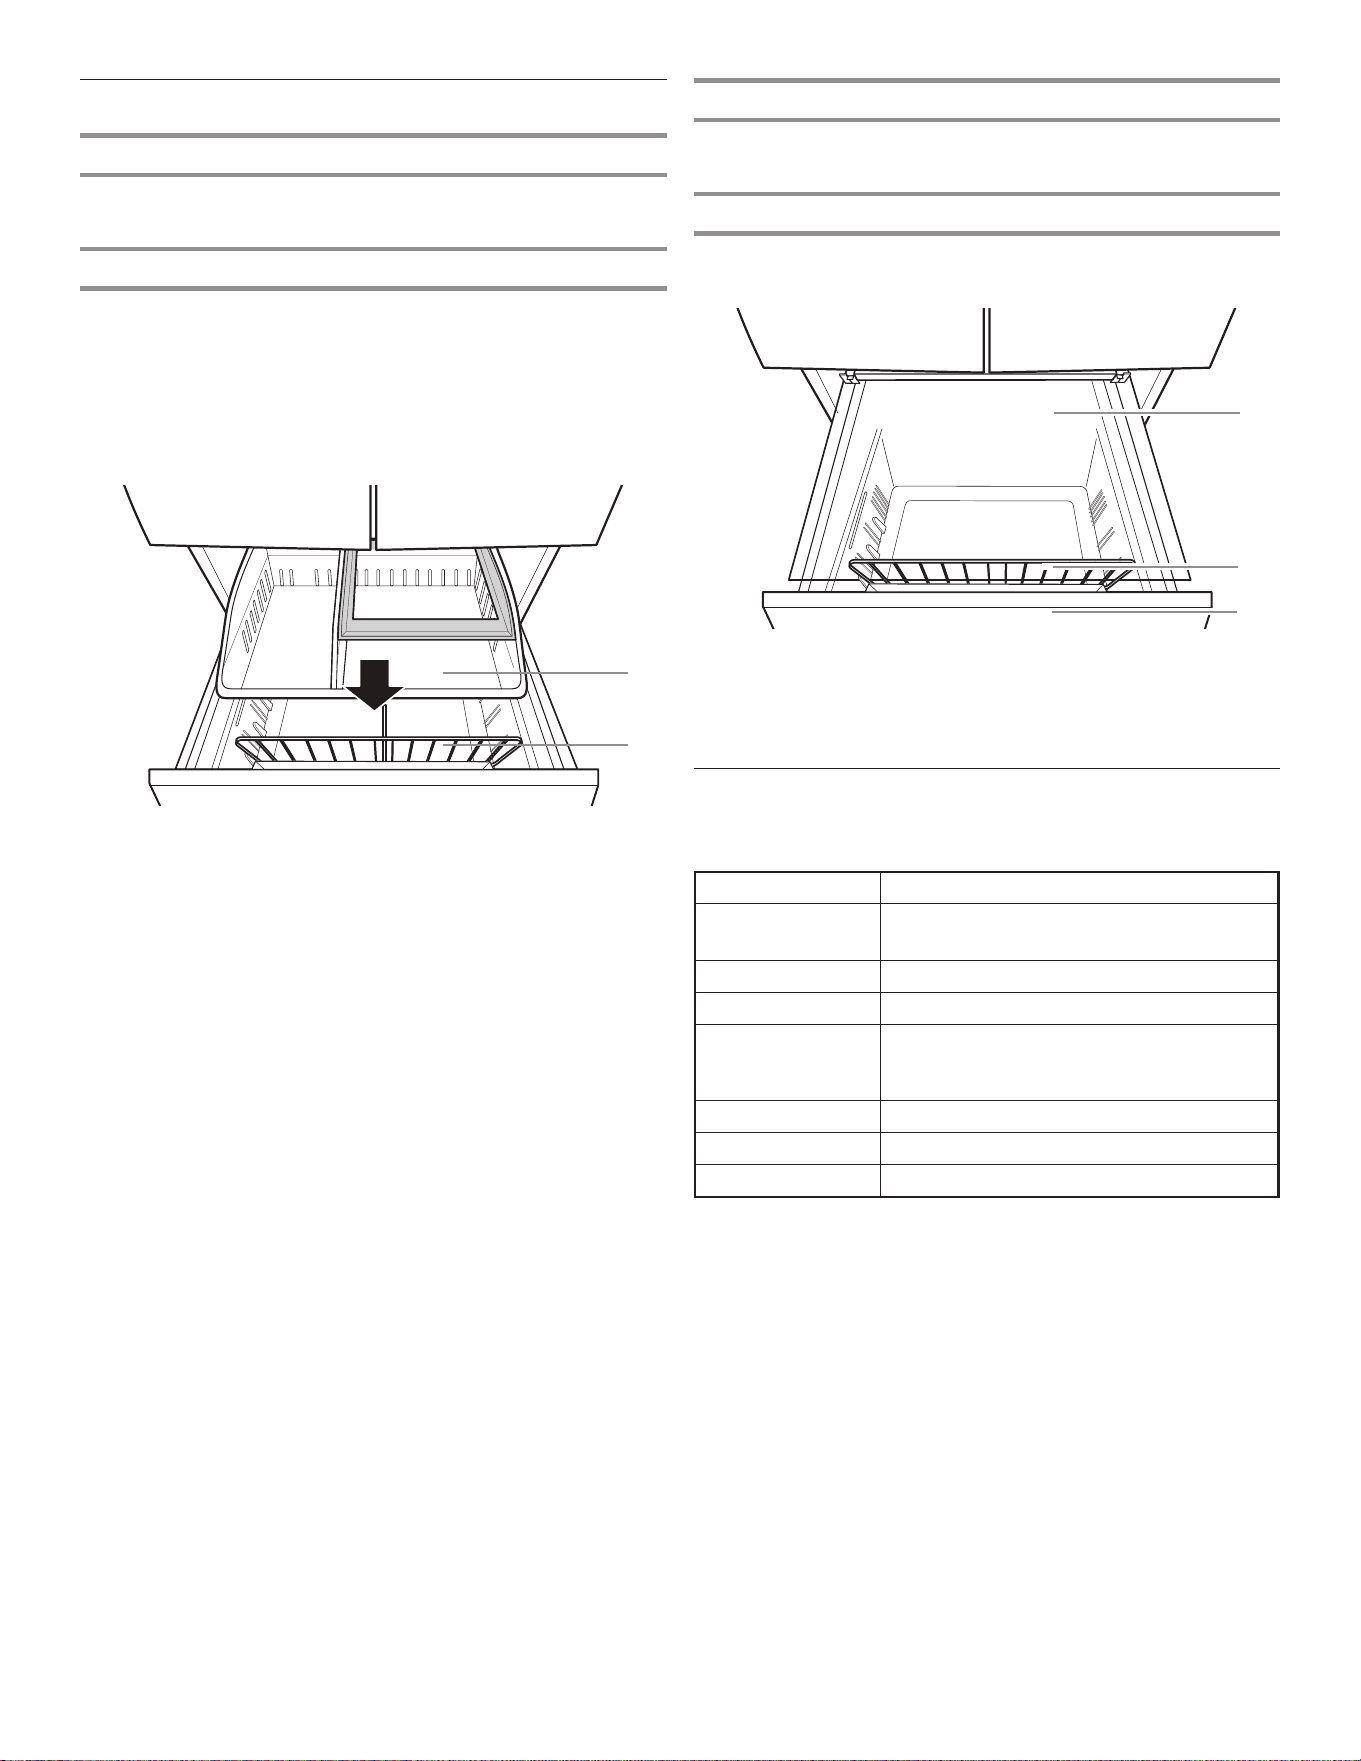
冷冻室架
为了最大化冷冻室容量,您可将上方盘拆下以露出下面的冷冻室架
子。然后,可以将上方盘存放起来,直接将食物放置在架子上。
金属丝分隔件
对下方盘进行分隔和整理。
C. 冷冻室架子
D. 下方盘
E. 金属丝分隔件
C
E
D
冷冻室抽屉
第三层
除非您拆卸了上方的盘,否则这个架子是无法拆卸的。第三层能够
向后移动,以便取用下面区域中的物品。
上方盘
为了最大化冷冻室容量,您可将上方盘拆下以露出冷冻室架子。
拆卸上方盘:
1. 向前拉动上方盘。
2. 向上提并将盘移动到左侧以使其脱离。
3. 向前拉动上方盘的右侧边角,提起盘然后将其从冷冻室取出。
A. 第三层
B. 上方盘
B
A
38
冰箱维护
清洁
警告
爆炸危险
请使用非易燃清洁剂。
否则可能导致死亡、爆炸或火灾。
冷藏室和冷冻室部分都是自动除霜。但是也需要每隔一个月清洁两
个部分,以避免异味累积。立即擦拭掉溅出物。
外部清洁
请参阅特定于所用型号的外部清洁信息。
样式1-光滑的门
重要信息:如果不当地使用清洁产品或使用不推荐的清洁产品而造
成外漆损坏,将不能享受保修。尖锐工具或钝器会给外漆留下痕
迹。
可以使用 禁止使用
✔ 柔软、洁净的布 ✘ 研磨性的布料
✘ 纸巾或新闻用纸
✘ 钢丝绒垫
✔ 含中性清洁剂的温热肥皂水 ✘ 研磨性粉末或液体
✘ 窗户喷雾剂
✘ 氨
✘ 酸类或醋类清洁剂
✘ 烤箱清洁剂
✘ 易燃液体
注意:纸巾会带来擦痕,可能会让带外漆的门的透明层变暗。要避
免可能带来的损害,只能使用柔软、洁净的布来擦拭清洁门。
样式2-不锈钢
重要信息:
■ 只能使用推荐的不锈钢清洁剂和布。如果不当地使用清洁产品
或使用不推荐的清洁产品而造成不锈钢外层损坏,将不能享受
保修。
■ 不要让不锈钢电器接触碱性或腐蚀性因素,例如高盐含量、高
水分含量或高湿度的环境。由于接触这些因素导致的损害不能
享受保修。
可以使用 禁止使用
✔ 柔软、洁净的布 ✘ 研磨性的布料
✘ 纸巾或新闻用纸
✘ 钢丝绒垫
✔ 含中性清洁剂的温热肥皂水 ✘ 研磨性粉末或液体
✘ 氨
✘ 柑橘成分清洁剂
✘ 酸类或醋类清洁剂
✘ 烤箱清洁剂
✔ 对于严重的污垢,只能使用
专为电器设计的不锈钢清洁
剂。要订购清洁剂,请联系
您从其购买冰箱的经销商。
✘ 不锈钢清洁剂仅用于不锈
钢零件。请勿让不锈钢清洁
剂和抛光剂接触任何塑料零
件,例如装饰片、分配器盖
或门封条。
样式3—防指纹不锈钢
重要信息:
■ 不要让不锈钢电器接触碱性或腐蚀性因素,例如高盐含量、高
水分含量或高湿度的环境。由于接触这些因素导致的损害不能
享受保修。
可以使用 禁止使用
✔ 柔软、洁净的布 ✘ 研磨性的布料
✘ 纸巾或新闻用纸
✘ 钢丝绒垫
✔ 含中性清洁剂的温热肥皂水 ✘ 研磨性粉末或液体
✘ 窗户喷雾剂
✘ 氨
✘ 酸类或醋类清洁剂
✘ 烤箱清洁剂
✘ 易燃液体
注:
■ 如果无意中接触,请用海绵和温的中性溶剂清洁塑料零件。用
软布彻底擦干。
■ 清洁剂是液体并不意味着它没有研磨性。许多对瓷砖和光滑表
面温和
的液体清洁剂对于不锈钢还是有损害的。
■ 柠檬酸会让不锈钢永久性变色。要避免损坏不锈钢冰箱的外
层:
不要让以下物质残留在外层上:
✘ 芥末 ✘ 含柑橘成分的汁液
✘ 番茄汁 ✘ 含柑橘成分的产品
✘ 纯番茄酱
39
假期和移动注意事项
假期
如果您选择在离开时让冰箱保持开启:
1. 用光容易腐烂的食物并冷冻其他物品。
2. 如果冰箱有自动制冰机并且该制冰机连接至住宅水源,请关闭
通向冰箱的水源。如果没有关闭水源,可能会发生财产损失。
3. 如果您有自动制冰机,关闭制冰机。
■ 将门式制冰机的开关按至“关”(O)。
4. 清空储冰盒。
如果您选择在离开之前关闭冰箱:
注意:在度假时将冰箱置于展厅模式。
请参阅“使用控制器”一节。
1. 将冰箱中的所有食物取出。
2. 如果冰箱具有自动制冰机:
■ 至少提前一天关闭通向制冰机的水源。
■ 在清空冰之后,将开关按至“关”(O),让冰箱内顶部的显
示屏熄灭,具体取决于所用型号。
3. 清空储冰盒。
4. 关闭温控器。请参阅“使用控制器”一节。
5. 清洁冰箱,进行擦拭,充分干燥。
6. 在两个门的顶部使用胶带或木块,将它们充分撑开,以让空气
进入。这可阻止异味和霉累积。
移动
如果将冰箱移动至新住宅,请做好以下移机准备。
1. 如果冰箱具有自动制冰机:
■ 至少提前一天关闭通向制冰机的水源。
■ 从冰箱背部断开水管。
■ 在清除完冰之后,将制冰机或控制器上的开关按至“
关”(O),具体取决于所用型号。
2. 将所有食物从冰箱取出,并将所有冷冻食物包裹在干冰中。
3. 清空储冰盒。
4. 拔下冰箱插头。
5. 彻底地进行清洁、擦拭和干燥。
6. 将所有可拆卸的零件取出,将它们包好并用胶带缠在一起,从
而在移动期间不会移动和响动。
7. 根据型号,升起冰箱的前部,从而其更容易滚动,或者升起调
平螺丝,使它们不会刮擦到地板。请参阅小节“调节门”或“
冰箱调平和门闭合”。
8. 用胶带将门封上,并用胶带将电源线粘到冰箱背部。
在抵达新住宅之后,将一切归位并参阅“安装说明”一节,了解有
关准备工作的说明。此外,如果冰箱有自动制冰机,请记住将水源
重新连接至冰箱。
内部清洁
重要信息:带有下方架子、LED 灯的冰箱架子不适合使用洗碗机。
1. 拔下冰箱插头或断开电源。
2. 用手彻底地清洗、冲洗和干燥可拆卸的零件以及内部表面。使
用洁净的海绵或柔软的布以及温的中中性清洁剂。
注意:请不要在塑料零件、内部和门内衬或垫圈上使用研磨性
或粗糙的清洁剂,例如窗户喷雾、餐具冲洗剂、易燃液体、蜡
清洁剂、浓缩洗涤剂、漂白剂或含有石油产品的清洁剂。
3. 插入冰箱插头或重新连接电源。
冷凝器清洁
在普通的家用环境,无需定期清洁冷凝器。如果环境特别油腻或者
多尘,或者在家中有宠物活动频繁,则应当每隔六个月清洁冷凝
器,确保最大效率。
如果需要清洁冷凝器,请致电维修部。
灯
冷藏室和冷冻室中的灯都是无需更换的 LED。如果在门或抽屉打开
时灯没有亮起,请联系您从其购买冰箱的经销商。

40
故障排除-连接的型号
请先尝试这里建议的解决方案。如果您需要进一步帮助,请联系您从其购买冰箱的经销商。
使用Android系统和使用iOS系统的智能手机(或平板电脑)之
间有什么不同?
没有什么不同。
支持哪些Wi-Fi协议?
Wi-Fi 无线接收装置支持欧洲国家/地区的 Wi-Fi b/g/n。
支持哪个版本的WPS?
电器支持 WPS 2.0 或更高版本。请查看路由器手册。
在路由器软件上必须设置什么设置/配置?
必须进行主要的路由器设置,包括:启用 2.4 GHz,激活 Wi-Fi
b/g/n、DHCP 和 NAT。
是否可使用移动3G网络上的网络共享来替代路由器?
可以,但是云服务是为设备上的持续连接而设计。
我如何验证自己家中的互联网连接有效,并且无线功能已开启?
您可用自己的平板电脑或智能手机搜索自己的网络。在尝试之前,
请记住禁用任何其他数据连接(即您手机的数据连接)。
我如何确定自己的无线网络名称和密码?
请参阅路由器手册。建议:有时,使用“http://路由器 IP”,客
户可通过连接的设备访问路由器设置页面。路由器标签通常会报告
登录信息,用于通过连接的设备(iPad 或平板电脑)访问设备设
置页面。
如果电器使用了邻居的Wi-Fi会发生什么?
路由器能够确定家中 Wi-Fi 的通道(参见路由器手册)。请确保
路由器连接至所需的通道。
如何验证电器上的无线功能已开启?
确认状态灯是否持续亮起,没有闪烁。使用智能设备,检查应用程
序,确定电器网络是否可见并连接至云。
电器和路由器的距离应该有多远?
一般情况下,覆盖范围可达数个房间,但是 Wi-Fi 信号的强度取
决于墙壁材料。如果电器 Wi-Fi 关闭,客户可通过 iPad、平板电
脑或其他靠近电器的无线 HAN 设备检查连接强度。特定软件工具
可从网上下载,用于检查信号强度。
在让我的装置保持连接的时候,如何更改我的Whirlpool帐户。
您可创建新的帐户,但是要记得在将它们移动至新帐户之前,从旧
帐户中删除它们。
是否有什么可以防止信号抵达电器?
检查连接的设备没有占用所有互联网带宽,并确保连接的设备数目
没有超过路由器的最大设备数限制。
如果无线信号无法抵达电器,我该做些什么?
您可使用特定的设备来扩展家用 Wi-Fi 的覆盖范围,例如
uAccess Point、Wi-Fi 中继器以及电源线桥接器。这些物品电器
都未附带。
我更换了路由器,接下来必须做什么?
您可保持相同的设置属性(网络名称和密码)或擦除电器中之前的
设置(重置过程)并再次执行设置(请参见“连接设置”小节)。
如何确认电器已连接至家用无线网络?
请参阅路由器手册。进入路由器配置,进行检查,确认电器 MAC
是否列在无线连接的设备页面上。
在哪里能找到电器的MAC地址?
在智能电器上,存在一个带 SAID 和 MAC 地址的贴纸标
签。MAC 地址由六个数字和字母的组合构成。例如,“Dryer_88_
E7_12_00_28_3C”。
如果Wi-Fi状态指示灯持续迅速闪烁而不是持续亮起,我应该做
什么?
如果 Wi-Fi 状态指示灯没有持续亮起,则表明电器已经成功连接
至路由器,但是无法连接互联网。为了让电器连接至互联网,您必
须检查路由器和/或路由器载体设置。要让路由器正确工作,必须
开启 NAT,并且必须正确设置防火墙和 DHCP。支持 WEP、WPA 和
WPA2 密码加密法。请参阅路由器手册。
载体设置:如果互联网服务提供商已确定能够连接互联网的 MAC
地址数字,您可能无法将电器与云连接。MAC 地址是设备的唯一标
识符,就和计算机一样。有关将计算机之外的新设备(即干衣机、
洗衣机等)连接互联网的程序,请咨询互联网服务提供商。
如何在我的电器上设置无线连接?
请参阅智能手机上详细的说明和应用程序向导。每种电器上有备选
的方法:
1. 使用 WPS(Wi-Fi 安全设置)连接过程。
2. 如果在头 20 分钟内没有配置电器,则可能出现一个电器生
成的活动网页,可以通过网络访问配置。例如 appliance_
type_"MAC address" 或 "Dryer_88_E7_12_00_28_3C"。
如何检查数据是否在传输?
在网络设置之后:
1. 关闭电器。
2. 等待 20 秒,然后接通电器电源。
3. 检查应用程序是否显示电器的 UI 状态。
4. 设置循环或其他选项并验证应用程序上的状态。
注意:一些设置可能需要数秒时间才能显示在应用程序上。
41
故障排除-连接的型号
请先尝试这里建议的解决方案。如果您需要进一步帮助,请联系您从其购买冰箱的经销商。
请尝试这里建议的解决方案,这样可能就无需致电维修部门。
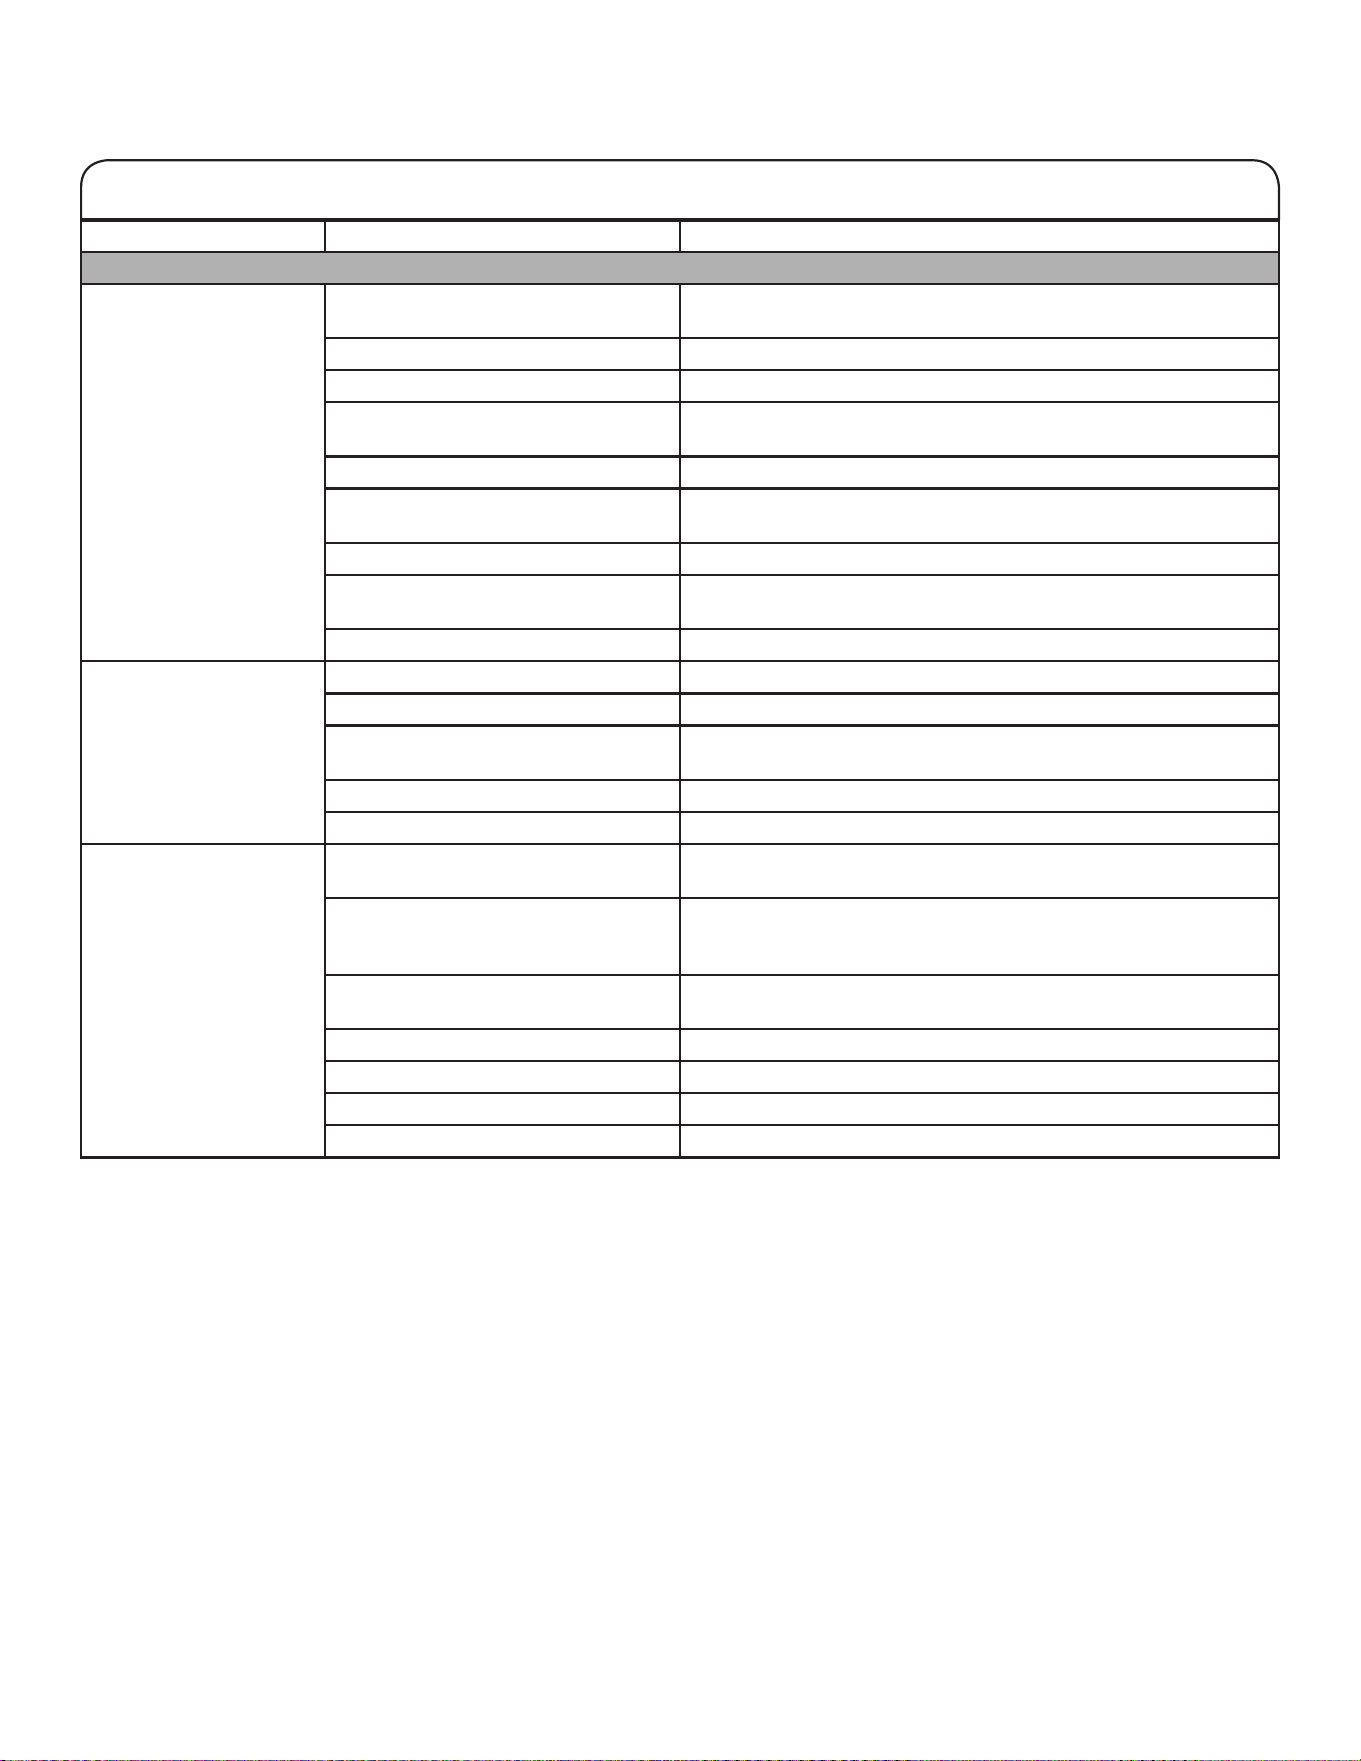
如果您遇到以下情况 可能的原因 解决方案
冰箱未连接至家用 Wi-Fi
路由器。(Wi-Fi 图标为
关闭状态。)
冰箱可能处于“待机”模式。 按住 Wi-Fi 按钮 3 秒,看到 Wi-Fi 图标闪烁,然后常亮。 在
处于“待机”模式时,所有指示灯都熄灭。
冰箱从未连接至家用 Wi-Fi 路由器。 请参阅“连接设置”一节。
丢失与家用 Wi-Fi 路由器之间的连
接。
检查路由器是否开启并且正用于家中的其他计算机或设备,且能够
访问互联网。
冰箱和路由器之间的信号强度较弱或
存在信号干扰。
尝试更靠近冰箱放置无线路由器。
可能必须安装 Wi-Fi 范围扩展器。
在按住 Wi-Fi 后,Wi-Fi
图标完全不亮起。
冰箱可能出现故障。 拔下冰箱电源插头或断开电源连接 30 秒。
重新通电。重复 Wi-Fi 连接过程。
除了不能连接之外,检查冰箱是否正常工作。如果有其他故障需要
排除,请致电求助。
冰箱已连接至家用 Wi-Fi
路由器,但是 Whirlpool
应用程序不工作。
Whirlpool 应用程序的连接可能不可
用。
检查互联网。
没有正确设置用户帐户,或者冰箱尚
未在帐户中注册。
请参阅“连接设置”小节或直接查看 Whirlpool 应用程序,了解
帐户设置和冰箱注册说明。
检查冰箱是否与应用程序中的帐户同步。
检查电子邮件地址、手机号码和通知首选项是否正确。
路由器没有连接互联网。 检查是否有其他设备通过同一路由器连接至互联网。
在数次尝试之后,没有建
立冰箱连接。
Wi-Fi 断开。 按住“连接”按钮 3 秒以启用 Wi-Fi。
连接状态 控制面板指示灯
冰箱未连接。 Wi-Fi 图标为关闭状态。
冰箱尝试连接至家用 Wi-Fi 路由器。 Wi-Fi 图标缓慢闪烁。
冰箱已连接至家用 Wi-Fi 路由器,但是 Whirlpool 应用程序或
Smart Grid 功能不工作。
Wi-Fi 图标为开启状态。
冰箱已连接至家用 Wi-Fi 路由器,并且 Whirlpool 应用程序工
作。
Wi-Fi 图标为开启状态。
42
请尝试这里建议的解决方案,这样可能就无需致电维修部门。
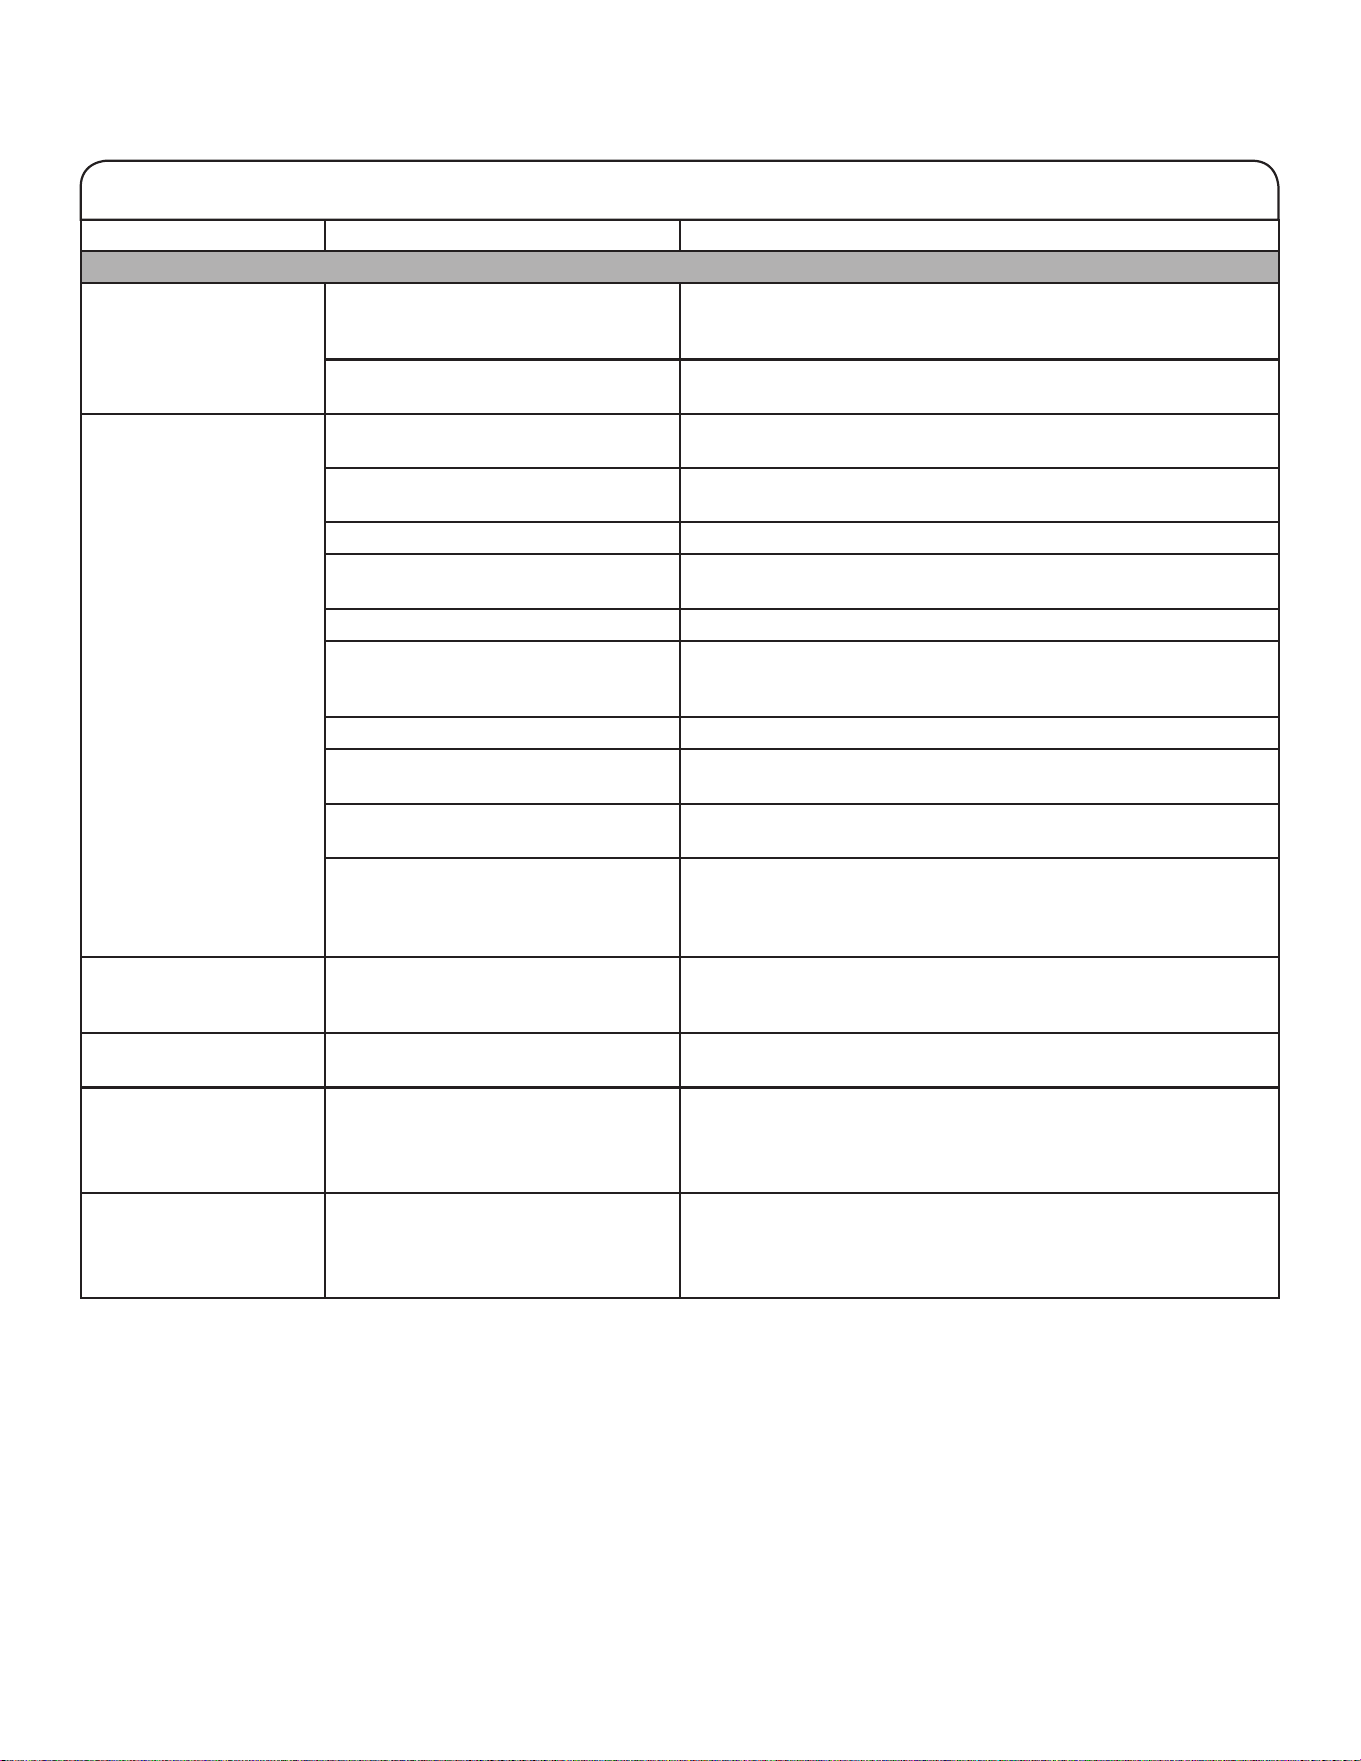
如果您遇到以下情况 可能的原因 解决方案
冰箱工作
冰箱不工作。 检查电源。 将电源线插入接地(触地)插座。
不要使用延长线。
确保插座有电。将灯插入,看看插座是否正常工作。
重置跳闸的断路器。更换任何熔断的保险丝。
注意:如果问题仍然存在,请联系电工。
检查控制器。 确保控制器打开。请参阅“使用控制器”一节。
新安装。 在安装之后让冰箱有 24 小时时间进行完全冷却。
注意:调节温控器至最低温度设置不会加快隔间的冷却速度。
冰箱控制器处于“展厅”模式(适用
某些型号)。
如果冰箱处于“展厅”模式,制冷将关闭,并且“展厅”图标将在
控制面板上亮起。有关更多信息,请参阅“使用控制器”一节。
电机似乎运转过度。 高效率压缩机和风扇 更大、更高效的冰箱能够以更低、更具能效的速度运行得更久。
室内或室外温度较高。 在这些条件下冰箱工作更长时间是正常现象。为了达到最佳性能,
请将冰箱放在室内温度受控制的环境。请参阅“位置要求”一节。
最近放入了大量热食。 热食将导致冰箱运行更长时间,直至空气冷却到所需温度。
警告
䀖⭥ড䲙
䈧ᨂޕ᧕ൠ˄䀖ൠ˅ᨂᓗDŽ
н㾱〫䲔ൠ㓯ㄟDŽ
н㾱֯⭘䘲䝽ಘDŽ
н㾱֯⭘ᔦ䮯㓯DŽ
н䚥ᆸ䘉Ӌ䈤᰾ሬ㠤↫ӑǃ⚛⚮ᡆ䀖⭥DŽ
故障排除
43
冰箱工作(续)
电机似乎运转过度。
(续)
门打开过于频繁或过长时间。 温暖的空气进入冰箱会导致其运行更长时间。请勿过于频繁地打
开门。
冰箱门或冷冻室抽屉半开。 确保冰箱水平。请参阅“冰箱调平和门闭合”小节。防止食物和容
器阻塞门。
冰箱控制器温度设置得过低。 将冰箱控制器调节至较高的设置,直至达到所需冰箱温度。
门或抽屉垫处于脏污、破损或有裂纹
的状态。
清洁或更换垫子。门封不密将导致冰箱运行更长时间,这样才能维
持所需的温度。
灯不工作。 冰箱配备有 LED 灯,无需更换。 如果在门或抽屉打开时,冰箱已通电但是灯不亮起,请致电维修部
门寻求帮助。
门打开的时间超过 10 分钟。 关闭门和抽屉以进行重置,然后再打开恢复灯工作状态。
门开关没有感应到门打开。 确保在铰链盖的 7,6 cm (3") 以内不存在磁体或电子装置。
温控 UI 没有开启。 门开关没有感应到门打开。 确保在铰链盖的 7,6 cm (3") 以内不存在磁体或电子装置。
异常噪声
要听取正常冰箱声音,可转到品牌网站的产品帮助/常见问题部分,并搜索“正常声音”。以下列出了一些正常声音及相关说明。
冰箱听起来有噪声。 新冰箱中的压缩机可以使用更少的能
源以更静音的方式更有效率地调节温
度。
由于工作噪声的减少,您可能会注意到属于正常现象的不熟悉的
噪声。
运行时间超出预期时间的
压缩机声音。
高效率压缩机和风扇。 更大、更高效的冰箱能够以更低、更具能效的速度运行得更久。
脉动声/呼呼声 风扇/压缩机进行调节,在正常压缩机
工作期间优化性能。
这属于正常现象。
爆音 内壁收缩/膨胀,尤其是在初始冷却
期间。
这属于正常现象。
嘶嘶声/滴落声 压缩机中制冷剂流动,或者油流动。 这属于正常现象。
振荡 冰箱可能不稳定。 调节调平螺丝并降下调平脚,使其紧扣地板。请参阅“冰箱调平和
门闭合”小节。
卡嗒声/咚咚声 靠着冰箱柜体的水管移动,或者放置
在冰箱柜体顶部的物品移动。
将过长的水管从冰箱柜体上移开,或者将过长的管道紧固至柜体。
请参阅“连接水源”小节或从冰箱顶部取下物品。
咝咝声 除霜循环期间水滴落在加热器上。 这属于正常现象。
水流声/汩汩声 在除霜循环期间当冰融化并且水流入
排水盆时可听到。
这属于正常现象。
嗡嗡声和滴答声 在水阀打开并关闭以排放水和/或加注
制冰机时会听到。
如果冰箱连接了水管,这属于正常现象。如果冰箱未连接至水管,
请将制冰机关闭。
重复滴答声 双蒸发器阀门调节制冷操作。 在装置从制冷一个隔间切换到制冷另一个隔间时,您可能会听到快
速重复的滴答声。该声音属于正常声音。
嘎吱声/破裂声/吱嘎声 在冰从制冰机模具中弹出时可能听
到。
这属于正常现象。
哗啦声 在冰掉入储冰盒时可能听到。 这属于正常现象。
请尝试这里建议的解决方案,这样可能就无需致电维修部门。
故障排除
44
如果您遇到以下情况 可能的原因 解决方案
温度和湿度
温度过高。 冰箱刚安装好。 在安装之后让冰箱有 24 小时时间进行完全冷却。
没有针对周边条件正确设置控制器。 将控制器温度调低。在 24 小时内检查温度。请参阅“使用控制
器”一节。
门经常打开或者没有完全关闭。有温
暖空气进入了冰箱。
尽量减少开门次数并让门保持完全关闭。
最近刚放入了大量食物。 冰箱可能需要几个小时的时间恢复到正常温度。
冰箱/保鲜储藏格中的温
度过低。
冰箱通风受阻。 如果位于冰箱隔间中后部的空气通风装置被直接置于其前方的物品
阻挡,冰箱将变得过冷。将物品从通风装置上移开。
没有针对周边条件正确设置控制器。 将控制器温度调高。在 24 小时内检查温度。请参阅“使用控制
器”一节。
储冰盒没有在正确的位置。 请参阅“制冰机和储冰盒”一节。
控温抽屉中的温度过低。 没有为存放在抽屉中的物品正确设置
控制器。
调节温度设置。请参阅“冰箱使用”小节中的“使用控制器”。
存在内部湿气累积的情
况。
注意:一些湿气累积属于
正常情况。
房间太潮湿。 潮湿的环境可造成湿气累积。
门经常打开或者没有完全关闭。允许
潮湿空气进入冰箱。
尽量减少开门次数并让门保持完全关闭。
门被异物阻挡而打开。 将食物包装从门边移走。
盒子或架子挡道。 将盒子或架子推回到正确位置。
将液体存放在开口容器中。 这会升高冰箱内部的湿度。让所有容器保持紧闭。
在冷冻室隔间存在霜/冰
累积。
抽屉经常打开或保持打开。 尽量减少打开抽屉的次数并在使用后完全关闭抽屉。
门密封不良。 确保门的密封件完全接触冰箱柜体以实现充分密封。
没有正确设置温控器。 有关建议的温度设置,请参阅“使用控制器”。
请尝试这里建议的解决方案,这样可能就无需致电维修部门。
故障排除
45
请尝试这里建议的解决方案,这样可能就无需致电维修部门。
如果您遇到以下情况 可能的原因 解决方案
冰和水
制冰机不制冰或者所制的
冰不足。
冰箱未连接至水源或者水源关断阀没
有开启。
将冰箱连接至水源并将水关断阀完全打开。
在水管存在扭结。 水管扭结可降低水的流动速度。将水管弄直。
制冰机没有开启。 确保制冰机开启。请参阅“制冰机和储冰盒”一节。
冰箱刚安装好。 在安装制冰机之后等待 24 小时,以让制冰开始。要全面开始制
冰,请等待 3 天。
冰箱门没有完全关闭。 将门关牢。如果没有关牢,请参阅本表格中的“门没有完全关闭”。
最近去除了大量冰。 留出足够时间,让制冰机制备更多冰。有关制冰速度,请参阅“制
冰机和储冰盒”一节。
冰块阻塞在制冰机中。 使用塑料用具将冰从制冰机中移除。
滤水器安装在冰箱上。 拆下滤水器并操作制冰机。如果冰量未改善,则滤水器可能阻塞或
安装不当。更换过滤器或者重新正确安装它。
有反向渗透滤水系统连接至冷水源。 这可能会减小水压。请参阅“供水要求”一节。
冰块中空或较小。
注意:说明水压过低。
水关断阀没有全开。 打开水关断阀至全开状态。
在水管存在扭结。 水管扭结可降低水的流动速度。将水管弄直。
滤水器安装在冰箱上。 拆下过滤器并操作制冰机。如果冰质量未改善,则滤水器可能阻塞
或安装不当。更换过滤器或者重新正确安装它。
有反向渗透滤水系统连接至冷水源。 这可能会减小水压。请参阅“供水要求”一节。
仍然存在水压问题。 致电持有许可证的合格水管工。
在冰或水中有气味、异味
或灰色
新安装的冰箱需要冲洗水系统。 冲洗水系统。有关水系统冲洗说明,请参阅“配水机和配冰机”
一节。
最近安装或更换了水管装置连接件。
新的水管装置连接件可导致脱色或冰
和水有异味。
将冰弃用并清洗储冰盒。用 11.4 L(2.5 加仑)水冲洗水系统。
给制冰机留出 24 小时时间来制备新的冰,并废弃头三批制备的
冰。
使用非推荐的水源连接件类型。 建议使用铜管或 Whirlpool 供水管,零件号 8212547RP。请参
阅“连接至水管”一节。
冰的存放时间过长。 废弃冰并清洗储冰盒。为制冰机留出 24 小时以制备新冰。
水的存放时间过长。 每周至少取用 1 L (1 qt) 水以保持供水新鲜。
来自冰箱食物的异味已散布到冰中。 使用气密防湿气的包装来存放食物。
水中存在矿物(例如硫磺)。 可能需要安装滤水器来去除矿物。
故障排除
46
如果您遇到以下情况 可能的原因 解决方案
冰和水(续)
在冰或水中有气味、异味
或灰色(续)
冰箱安装了滤水器。
冰中的灰色或暗色变色可能表明滤水系统需要额外冲洗。安装新滤
水器之后,使用之前冲洗水系统。有关滤水器冲洗说明,请参阅“
配水机和配冰机”一节。
需要更换滤水器。 至少每隔 6 个月或在有相关指示时更换用完即弃的滤水器。请参
阅“滤水系统”一节。
配水机和配冰机没有正常
工作。
冰箱未连接至水源或者水源关断阀没
有开启。
将冰箱连接至水源并将水关断阀完全打开。
在水管存在扭结。 水管扭结会减少配水量,导致出现中空或不规则形状的冰。将水
管弄直。
冰箱刚安装好。 冲洗和充满水系统。请参阅“配水机和配冰机”一节。
住宅的水压并非等于或大于 35 psi
(241 kPa)。
住宅水压决定了配水流速。请参阅“供水要求”一节。
有反向渗透滤水系统连接至冷水源。 反向渗透滤水系统可减小水压。请参阅“供水要求”一节。
滤水器可能阻塞。 拆下滤水器并操作分配器。如果水的流速增加,那么就是滤水器阻
塞,需要更换。
请参阅“滤水系统”一节。
滤水器安装不当。 拆下滤水器并重新安装。请参阅“滤水系统”一节。
冰箱门或冷冻室抽屉没有完全关闭。 将门或抽屉关牢。如果没有关牢,请参阅“门没有完全关闭”一
节。
最近拆卸了冰箱门。 确保配水机的线/管路组件在冰箱门顶部正确重新连接。请参阅“
冰箱调平和门闭合”。
冰在储冰盒中阻塞或者冰阻塞冰输送
槽。
如果需要,使用塑料用具去除阻塞储冰盒和输送槽的冰。使用温
暖、湿润的布清洁冰输送槽和储冰盒的底部,然后彻底干燥二者。
要避免阻塞并维持新鲜的冰块供应,请清空储冰盒。每两周清空一
次储冰盒及输送槽。
储冰盒难以从门上拆下。 和正常的制冰以及移动制冰相比,储
冰盒中的冰含量可能较高并且不均
匀。
取用 2-3 玻璃杯的冰,然后尝试拆下储冰盒。
在分配碎冰时配冰机阻
塞。
碎冰阻塞了冰输送槽。 从碎冰切换为冰块以清理配冰机。然后切换回碎冰。
水从分配器系统泄漏或
滴落。
注意:在分配后有数滴水
滴落属于正常现象。
玻璃杯没有在分配器下方保持足够长
时间。
在松开分配器杆后,将玻璃杯放置在分配器下方 2 至 3 秒。
冰将继续从分配器流出。
注意:松开分配器杆之后
再分配少量冰块属于正常
现象。
玻璃杯没有在分配器下方保持足够长
时间。
在松开分配器杆后,将玻璃杯放置在分配器下方 2 至 3 秒。
请尝试这里建议的解决方案,这样可能就无需致电维修部门。
故障排除

47
请尝试这里建议的解决方案,这样可能就无需致电维修部门。
故障排除
如果您遇到以下情况 可能的原因 解决方案
冰和水(续)
除了最初的数滴之外,水
继续从分配器滴落。
冰箱刚安装好。 冲洗水系统,将管路中的空气清除,空气会导致配水机滴水。冲洗
水系统。
请参阅“配水机和配冰机”一节。
滤水器为刚安装或刚更换。 冲洗水系统,将管路中的空气清除,空气会导致配水机滴水。冲洗
水系统。
请参阅“配水机和配冰机”一节。
可能存在松动的水连接件。 检查冷藏室底部、铰链区域或产品背部与住宅间的连接件是否有
水。
水从冰箱的背部漏出。 水管连接件没有完全拧紧。 请参阅“接水”一节。
最近拆下了门并且没有完全拧紧水管
连接件。
请参阅“冰箱调平和门闭合”小节。
在分配冰时,碎冰或冰块
没有落到玻璃杯中。
玻璃杯没有放置在落冰位置。 握住玻璃杯,靠近落冰位置。
来自分配器的水是温热
的。
来自分配器的水是制冷到 10°C
(50°F)。
这属于正常现象。
冰箱刚安装好。 在安装之后让水源有 24 小时时间进行完全冷却。
最近分配了大量冰。 让水源有 3 小时时间完全冷却。
最近没有分配水。 第一杯水可能没有那么冷。弃用分配的第一杯水。
冰箱没有连接至冷水管。 确保冰箱连接至冷水管。
请参阅“供水要求”一节。
48
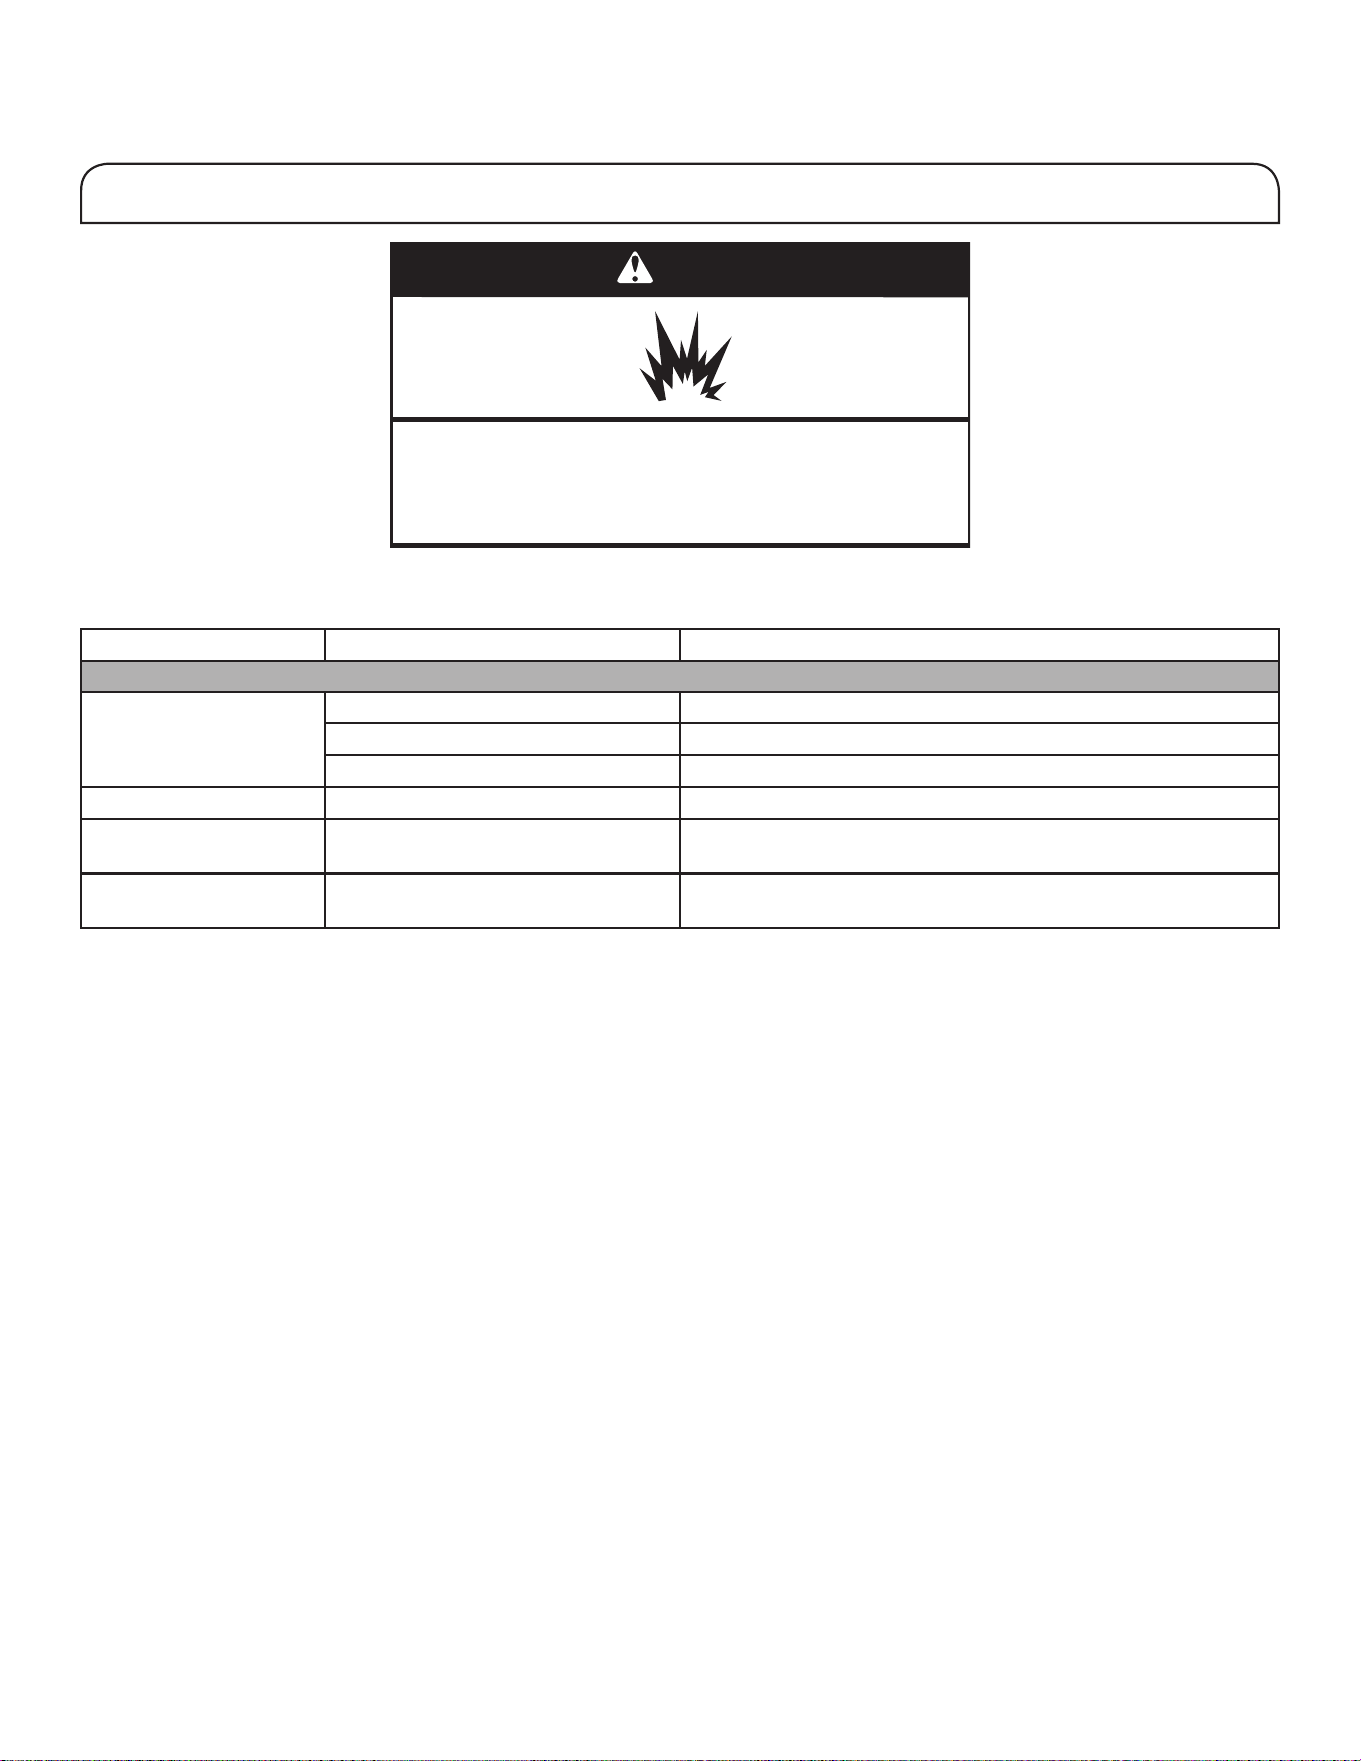
门没有完全关闭。 门打开受阻。 将食物包装从门边移走。
盒子或架子挡道。 将盒子或架子推回到正确位置。
最近刚安装。 拆下所有包装材料。
门难以打开。 门封条脏污或粘手。 用中性温热肥皂水清洁封条和接触表面。冲洗并用干布擦干。
门看上去不平。 需要将门对齐,或者需要将冰箱调
平。
请参阅“冰箱调平和门闭合”小节。
冰箱不稳定,或者在打开
和关闭门时会向前滚动。
冰箱制动脚没有卡扣在地板上。 拆下底部格栅。顺时针转动两个制动脚(每侧一个)达相同量,直
至它们卡扣在地板上。请参阅“冰箱调平和门闭合”小节。
要查看如何调节和对齐门的动画,请参阅品牌网站的产品帮助/常见问题部分,并搜索“门闭合以及门对齐”。
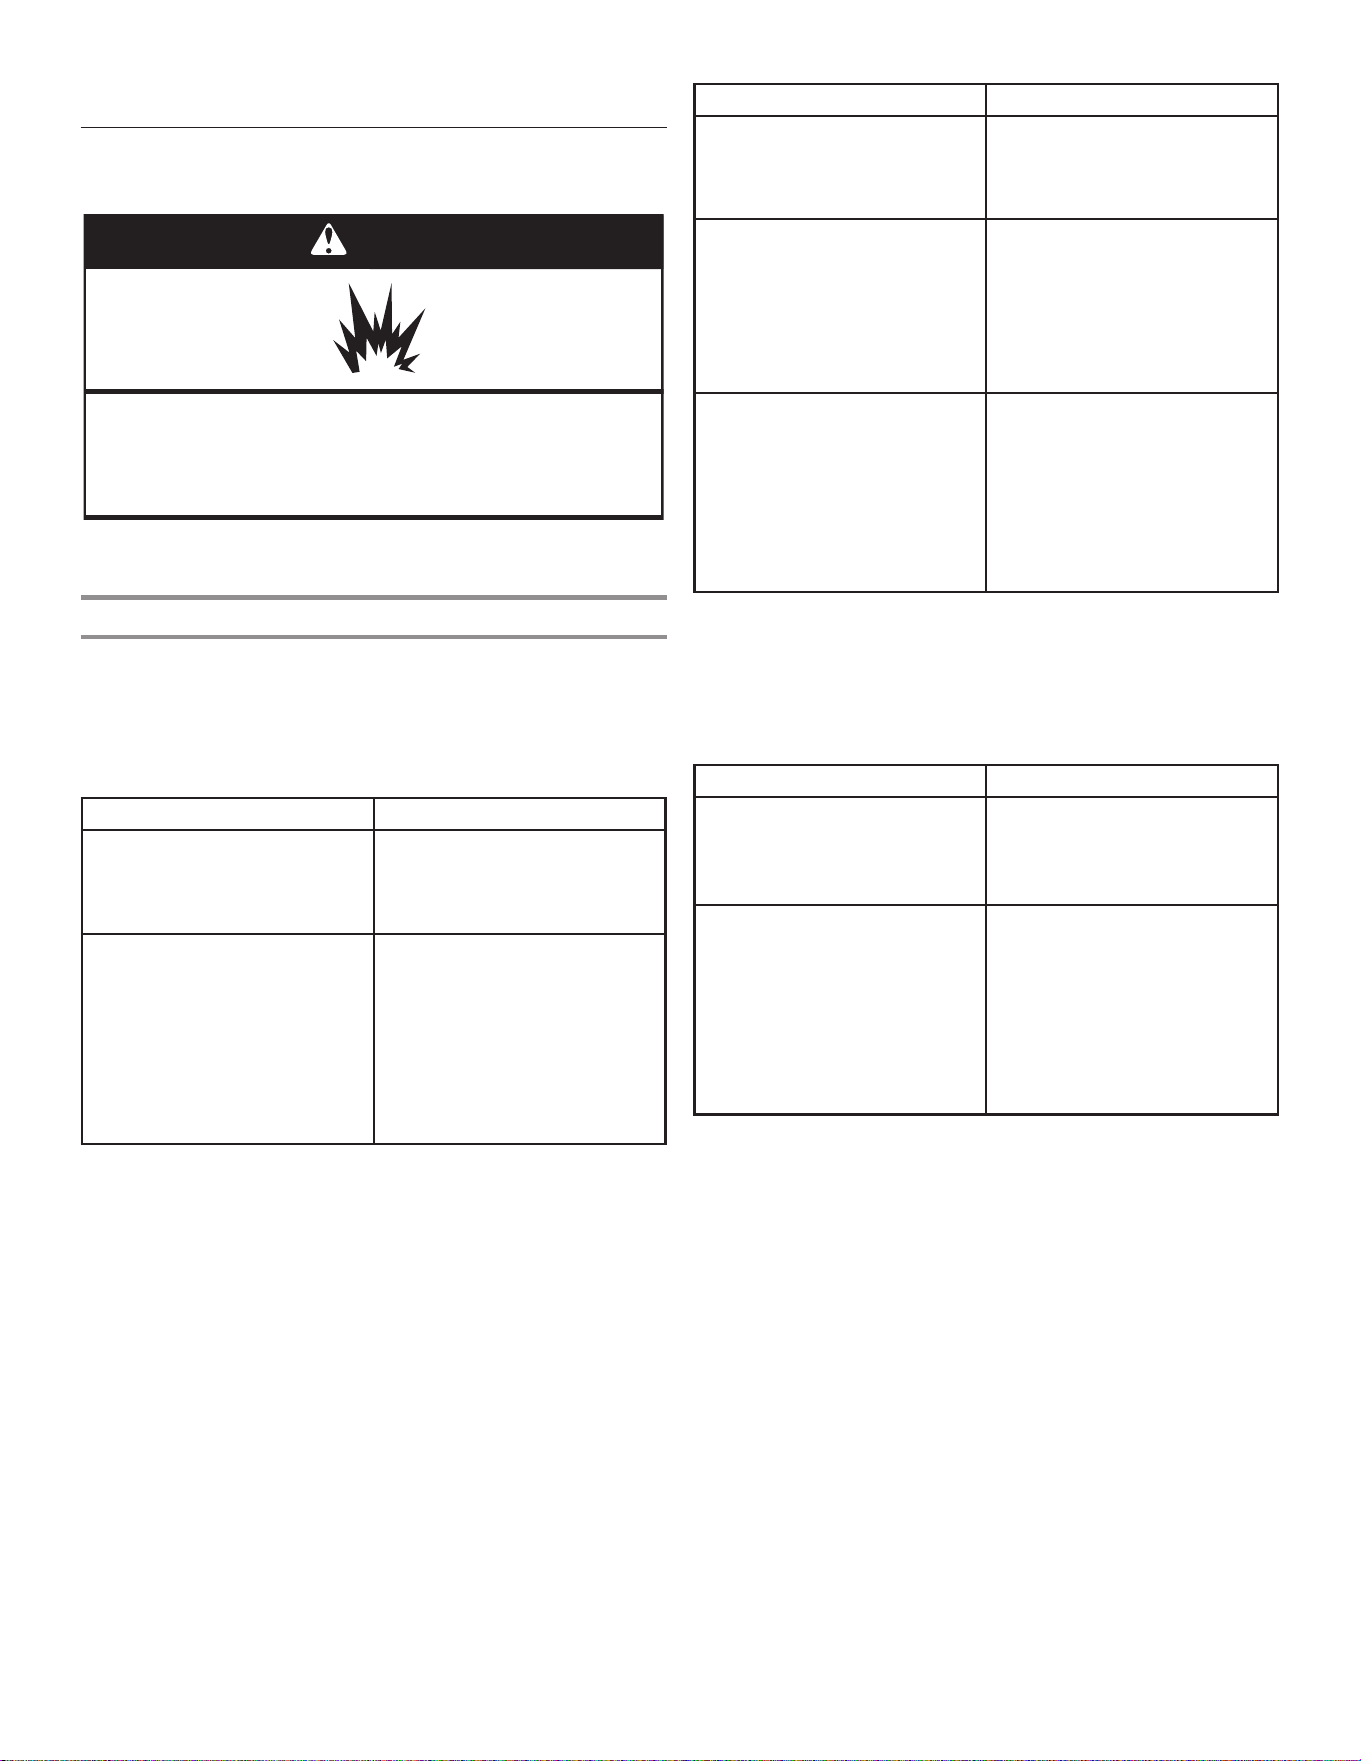
警告
爆炸危险
请使用非易燃清洁剂。
否则可能导致死亡、爆炸或火灾。
如果您遇到以下情况 可能的原因 解决方案
冰箱门
请尝试这里建议的解决方案,这样可能就无需致电维修部门。
故障排除

49
1
PERFORMANCE DATA SHEET
Water Filtration System
Model P9WB2L/P9RFWB2L Capacity 200 Gallons (757 Liters)
This system has been tested according to NSF/ANSI Standards 42, 53 and 401 for the reduction of the substances listed below. The concentration
of the indicated substances in water entering the system was reduced to a concentration less than or equal to the permissible limit for water leaving
the system, as specified in NSF/ANSI Standards 42, 53, and 401.
Test Parameters: pH = 7.5 ± 0.5 unless otherwise noted. Flow = 0.6 gpm (2.27 lpm). Pressure = 60 psig (413.7 kPa). Temp. = 68°F to 71.6°F (20°C to
22°C). Rated service capacity = 200 gallons (757 liters).
The compounds certified under NSF 401 have been deemed as “emerging compounds/incidental contaminants.” Emerging compounds/incidental
contaminants are those compounds that have been detected in drinking water supplies at trace levels. While occurring at only trace levels, these
compounds can affect the public acceptance/perception of drinking water quality.
■
It is important that operational, maintenance, and filter replacement
requirements be carried out for the product to perform as advertised.
Property damage can occur if all instructions are not followed.
■
The disposable cartridge must be changed at least every 6 months.
■
Use replacement filter P9RFWB2L, part #EDR2RXD1/EDR2RXD1B.
2015 suggested retail price of $49.99 U.S.A./$49.99 Canada. Prices
are subject to change without notice.
■
The filter monitor system measures the amount of water that passes
through the filter and alerts you when it is time to replace the filter.
Refer to the “Using the Controls” or “Water Filtration System” section
(in the User Instructions or User Guide) to learn how to check the
water filter status.
■
After changing the water filter, flush the water system. See “Water
and Ice Dispensers” or “Water Dispenser” in the User Instructions or
User Guide.
■
These contaminants are not necessarily in your water supply. While
testing was performed under standard laboratory conditions, actual
performance may vary.
■
The product is for cold water use only.
■
The water system must be installed in compliance with state and
local laws and regulations.
■
Do not use with water that is microbiologically unsafe or of unknown
quality without adequate disinfection before or after the system.
Systems certified for cyst reduction may be used on disinfected
waters that may contain filterable cysts.
EPA Est. No. 082047-TWN-001
■
Refer to the “Warranty” section (in the User Instructions or User
Guide) for the Manufacturer’s limited warranty, name and telephone
number.
Application Guidelines/Water Supply Parameters
System tested and certified by NSF International against
NSF/ANSI Standard 42, Standard 53, and Standard 401 for
the reduction of contaminants specified on the Performance
Data Sheet.
Substance Reduction Aesthetic Effects Influent Challenge Concentration Maximum Permissible
Product Water Concentration
Average% Reduction
Chlorine Taste/Odor
Particulate Class I
*
2.0 mg/L ± 10%
At least 10,000 particles/mL
50% reduction
85% reduction
97.0%
>99.9%
Contaminant Reduction Influent Challenge Concentration Maximum Permissible
Product Water Concentration
Average%Reduction
Lead: @ pH 6.5 / @ pH 8.5 0.15 mg/L± 10% 0.010 mg/L >99.3% / 98.6%
Benzene 0.015 mg/L ± 10% 0.005 mg/L 93.8%
p-Dichlorobenzene 0.225 mg/L ± 10% 0.075 mg/L 99.8%
Carbofuran 0.08 mg/L ± 10% 0.040 mg/L 81.9%
Toxaphene 0.015 ± 10% 0.003 mg/L >95%
Atrazine 0.009 mg/L ± 10% 0.003 mg/L 87.0%
Asbestos 10
7
to 10
8
fibers/L
††
99% >99%
Live Cysts
†
50,000/L min. 99.95% >99.99%
Turbidity 11 NTU ± 10% 0.5 NTU 96.9%
Lindane 0.002 ± 10% 0.0002 mg/L >99.2%
Tetrachloroethylene 0.015 mg/L ± 10% 0.005 mg/L 96.6%
O-Dichlorobenzene 1.8 mg/L ± 10% 0.60 mg/L 92.3%
Ethylbenzene 2.1 mg/L ± 10% 0.70 mg/L 86.9%
1,2,4-Trichlorobenzene 0.210 mg/L ± 10% 0.07 mg/L >99.8%
2,4 - D 0.210 mg/L ± 10% 0.07 mg/L 88.5%
Styrene 2.0 mg/L ± 10% 0.1 mg/L 99.6%
Toluene 3.0 mg/L ± 10% 1.0 mg/L 93.5%
Endrin 0.006 mg/L ± 10% 0.002 mg/L 81.7%
Atenolol 200 ± 20%
30 ng/L 95.7%
Trimethoprim 140 ± 20% 20 ng/L 96.1%
Linuron 140 ± 20% 20 ng/L 96.3%
Estrone 140 ± 20% 20 ng/L 95.3%
Nonylphenol 1400 ± 20% 200 ng/L 95.5%
Water Supply
Water Pressure
Water Temperature
Service Flow Rate
City or Well
30 - 120 psi (207 - 827 kPa)
33° - 100°F (0.6° - 37.8°C)
0.6 gpm (2.27 lpm) @ 60 psi
*
†
††
Class I particle size: >0.5 to <1 um
Based on the use of Cryptosporidium parvum oocysts
Fibers greater than 10 um in length
® NSF is a registered trademark of NSF International.
Carbamazepine
1400 ± 20% 200 ng/L
97.94%
Phenytoin 200 ± 20% 30 ng/L 93.58%
Naproxen 140 ± 20% 20 ng/L 96.04%
Bisphenol A 2000 ± 20% 300 ng/L 99.20%
性能数据表
滤水系统
型号P9WB2L/P9RFWB2L容量200加仑(757升)
针对减少下面所列物质方面,该系统已经根据 NSF/ANSI 标准 42、53 和 401 进行了测试和认证。进入系统的水中指示的物质的浓度减小至低于或等
于对于离开系统的水允许的限值的浓度,该限值在 NSF/ANSI 标准 42、53 和 401 中进行了指定。
针对性能数据表上指定的污物减少方面,系统由 NSF
International 根据
NSF/ANSI 标准 42、标准 53 和标准 401 进行了测试和认
证。
测试参数:pH = 7.5 ± 0.5(除非另外指明)。流速 = 0.6 gpm (2.27 lpm)。压力 = 60 psig (413.7 kPa)。温度= 68°F 至 71.6°F(20°C 至
22°C)。额定工作容量 = 200 加仑(757 升)。
根据 NSF 401 认证的化合物已被视为“新兴化合物/附带污染物”。新兴化合物/附带污染物是已经在饮用水源中检测到的达到痕迹量级的化合物。尽
管仅为痕迹量级,这些化合物可影响水源质量的公众接受度/认知度。
■ 对于要制备的产品,遵照建议的操作、维护和过滤器更换要求很重要。
如果不遵照说明操作,可能造成财产损害。
■ 一次性滤芯必须至少每 6 个月更换一次。
■ 使用更换用过滤器 P9RFWB2L,零件号 EDR2RXD1/EDR2RXD1B。2015 年建
议的零售价为 $49.99(美国)/$49.99(加拿大)。价格
如有更改,恕不另行通知。
■ 过滤器监控系统用于测量通过过滤器的水量,并在需要更换过滤器时给
您发送警报。
请参阅“使用控制器”或“滤水系统”小节(在用户说明或用户指南
中)了解检查滤水器状态的方法。
■ 在更换滤水器后,冲洗水系统。请参阅用户说明或用户指南中的“配水
机和配冰机”或“配水机”。
■ 这些污染物不一定存在于您的水源中。测试是在标准实验室条件下执
行,实际情况可能会变化。
■ 本产品仅供使用冷水。
■ 必须根据州和当地法律和法规安装水系统。
■ 请勿在本系统之前或之后使用含有不安全的微生物或未经充分消毒、水
质不明的水。可以使用经过认证能够减少孢子的系统来过滤可能含有可
滤除孢子的灭菌水。EPA 仪器号 082047-TWN-001。
■ 有关制造商的有限担保、名称和电话号码,请参阅“担保”部分(在用
户说明或用户指南中)。
应用指导准则/供水参数
供水
水压
水温
工作流速
适饮城市用水或井水
30 - 120 psi (207 - 827 kPa)
33° - 100°F (0.6° - 37.8°C)
0.6 gpm (2.27 lpm) @ 60 psi
*I 类微粒大小:>0.5 至 <1 um
†
基于微小隐孢子虫卵囊的使用
††
长度大于 10 um 的纤维
®NSF 是 NSF International 的注册商标。
07/17
流入物问题浓度
2.0 mg/L ± 10%
至少 10,000 个微粒/mL
流入物问题浓度
0.15 mg/L± 10%
0.015 mg/L ± 10%
0.225 mg/L ± 10%
0.08 mg/L ± 10%
0.015 ± 10%
0.009 mg/L ± 10%
10 至 10
78
根纤维/L ††
50,000/L min.
11 NTU ± 10%
0.002 ± 10%
0.015 mg/L ± 10%
1.8 mg/L ± 10%
2.1 mg/L ± 10%
0.210 mg/L ± 10%
0.210 mg/L ± 10%
2.0 mg/L ± 10%
3.0 mg/L ± 10%
0.006 mg/L ± 10%
200 ± 20%
140 ± 20%
140 ± 20%
140 ± 20%
1400 ± 20%
1400 ± 20%
200 ± 20%
140 ± 20%
2000 ± 20%
物质减少美学效果
氯味/异味
颗粒物类别 I*
污染物减少
铅:@ pH 6.5 / @ pH 8.5
苯
对二氯苯
卡巴呋喃
毒杀芬
阿特拉津
石棉
活的寄生虫孢子
浊度
林丹
四氯乙烯
邻二氯苯
乙苯
1,2,4-三氯苯
2,4 - D
苯乙烯
甲苯
异狄氏剂
阿替洛尔
甲氧苄氨嘧啶
利谷隆
雌激素酮
壬基酚
卡马西平
苯妥英
甲氧萘丙酸
双酚 A
允许的最大成品水浓度
减少 50%
减少 85%
允许的最大成品水浓度
0.010 mg/L
0.005 mg/L
0.075 mg/L
0.040 mg/L
0.003 mg/L
0.003 mg/L
99%
99.95%
0.5 NTU
0.0002 mg/L
0.005 mg/L
0.60 mg/L
0.70 mg/L
0.07 mg/L
0.07 mg/L
0.1 mg/L
1.0 mg/L
0.002 mg/L
30 ng/L
20 ng/L
20 ng/L
20 ng/L
200 ng/L
200 ng/L
30 ng/L
20 ng/L
300 ng/L
平均减少百分比
97.0%
>99.9%
平均减少百分比
>99.3% / 98.6%
93.8%
99.8%
81.9%
>95%
87.0%
>99%
>99.99%
96.9%
>99.2%
96.6%
92.3%
86.9%
>99.8%
88.5%
99.6%
93.5%
81.7%
95.7%
96.1%
96.3%
95.3%
95.5%
97.94%
93.58%
96.04%
99.20%

50
相关的电器法规通告
开源许可证使用
以下声明涉及本软件部分基于 FreeRTOS v7.0.2 (http://www.
freertos.org) 的部分。
本软件的使用受 GNU 通用公共许可证版本 2 的条款约束,该通用
公共许可证位于 http://www.gnu.org/licenses/gpl-2.0.html。
源代码副本可通过以下方式获取:按名称连同收件地址将软件的书
面请求提供给 [email protected]。
以下声明涉及有版权的软件部分,该版权持有者为 Eclipse
Foundation, Inc.
(版权所有 (c) 2007,Eclipse Foundation, Inc.)及其许可
方。
保留所有权利。
允许在有或没有修改的情况下以源代码和二进制形式分发和使用,
前提是满足以下条件:
• 源代码的分发必须保留以上版权声明、该条件列表以及以下免责
声明。
• 以二进制形式分发必须在随分发提供的文档和/或其他材料中再
现以上版权声明、该条件列表以及以下免责声明。
• 如果没有特定事先书面许可,Eclipse Foundation, Inc. 的名
称或其贡献者的名称均不得用于背书或宣传通过本软件衍生的产
品。
本软件由版权持有者和贡献者“按原样”提供,没有任何明示或暗
示的担保,包括但不限于适销性、特定用途的适用性的暗示担保。
在任何情况下,对于使用本软件引起的任何直接、间接、偶然、特
殊、惩戒性或后果性损害(包括但不限于采购替代商品或服务、使
用权的丧失、数据或利润损失、业务中断),无论是因任何原因导
致,并且基于任何责任理论,无论是否规定在合同中,是否为严格
责任或侵权行为(包括疏忽或其他形式),即便已经被告知该类损
害的可能性,版权持有者或贡献者概不负责。
本软件的一部分为:版权所有 (c) Sawtooth Consulting Ltd.
2006-2015 保留所有权利。
本软件的一部分为:版权所有 (c) Arrayent, Inc. 2015 保留所
有权利。
以下声明涉及软件中 Swedish Institute of Computer Science
拥有版权的那些部分。
版权所有 (c) 2001-2004 Swedish Institute of Computer
Science。
保留所有权利。
允许在有或没有修改的情况下以源代码和二进制形式分发和使用,
前提是满足以下条件:
1. 源代码的分发必须保留以上版权声明、该条件列表以及以下免
责声明。
2. 以二进制形式分发必须在随分发提供的文档和/或其他材料中再
现以上版权声明、该条件列表以及以下免责声明。
3. 如果没有特定事先书面许可,作者的名称不得用于背书或宣传
通过本软件衍生的产品。
本软件由作者“按原样”提供,没有任何明示或暗示的担保,包括
但不限于适销性、特定用途的适用性的暗示担保。在任何情况下,
对于使用本软件引起的任何直接、间接、偶然、特殊、惩戒性或后
果性损害(包括但不限于采购替代商品或服务、使用权的丧失、数
据或利润损失、业务中断),无论是因任何原因导致,并且基于任
何责任理论,无论是否规定在合同中,是否为严格责任或侵权行为
(包括疏忽或其他形式),即便已经被告知该类损害的可能性,作
者概不负责。
以下声明涉及软件中 Marvell International Ltd. 有版权的那些
部分。
版权所有 (c) Marvell International Ltd.
保留所有权利。
免责声明。本软件由版权持有者和贡献者“按原样”提供,没有任
何明示或暗示的担保,包括但不限于适销性、特定用途的适用性的
暗示担保。在任何情况下,对于使用本软件引起的任何直接、间
接、偶然、特殊、惩戒性或后果性损害(包括但不限于采购替代商
品或服务、使用权的丧失、数据或利润损失、业务中断),无论是
因任何原因导致,并且基于任何责任理论,无论是否规定在合同
中,是否为严格责任或侵权行为(包括疏忽或其他形式),即便已
经被告知该类损害的可能性,版权持有者或贡献者概不负责。
以下声明涉及软件中 jQuery, jsmn 有版权的那些部分。版权
所有 (c) 2011 John Resig,http://jquery.com/,版权所
有 2011,The Dojo Foundation,版权所有 (c) 2010 Serge A.
Zaitsev。
据此将权限免费授予给任何获得本软件副本或相关文档文件(“软
件”)的人,从而其可没有限制地在软件中进行处理,包括但不限
于使用、复制、修改、合并、发布、分发、转授和/或销售软件副
本,以及允许被提供本软件的人这样做,前提是遵守以下条件:
以上版权声明以及本权限声明将包含在本软件的所有副本或实质部
分中。
本软件“按原样”提供,没有任何明示或暗示的担保,包括但不限
于适销性、特定用途的适用性和不侵权担保。在任何情况下,对于
由软件引起或与软件相关或与软件中的使用或其他处理相关的损害
或其他责任,无论是否列在合同规定中,是否为侵权行为或其他形
式,作者或版权持有者概不负责。
以下声明涉及软件中 Adam Dunkels 有版权的那些部分。
版权所有 (c) 2004, Adam Dunkels。
保留所有权利。
1. 源代码的分发必须保留以上版权声明、该条件列表以及以下免
责声明。
2. 以二进制形式分发必须在随分发提供的文档和/或其他材料中再
现以上版权声明、该条件列表以及以下免责声明。
3. 如果没有特定事先书面许可,机构的名称或其贡献者的名称均
不得用于背书或宣传通过本软件衍生的产品。
本软件由机构和贡献者“按原样”提供,没有任何明示或暗示的担
保,包括但不限于适销性、特定用途的适用性的暗示担保。在任何
情况下,对于使用本软件引起的任何直接、间接、偶然、特殊、惩
戒性或后果性损害(包括但不限于采购替代商品或服务、使用权的
丧失、数据或利润损失、业务中断),无论是因任何原因导致,并
且基于任何责任理论,无论是否规定在合同中,是否为严格责任或
侵权行为(包括疏忽或其他形式),即便已经被告知该类损害的可
能性,机构或贡献者概不负责。
以下声明涉及软件中 Jouni Malinen 有版权的那些部分。
版权所有 (c) 2002-2008,Jouni Malinen <[email protected]> 及贡献者。
保留所有权利。
1. 源代码的分发必须保留以上版权声明、该条件列表以及以下免
责声明。
2. 以二进制形式分发必须在随分发提供的文档和/或其他材料中再
现以上版权声明、该条件列表以及以下免责声明。
3. 如果没有特定事先书面许可,以上所列版权持有者的名称或其
贡献者的名称均不得用于背书或宣传通过本软件衍生的产品。
本软件由版权持有者和贡献者“按原样”提供,没有任何明示或暗
示的担保,包括但不限于适销性、特定用途的适用性的暗示担保。
在任何情况下,对于使用本软件引起的任何直接、间接、偶然、特
殊、惩戒性或后果性损害(包括但不限于采购替代商品或服务、使
用权的丧失、数据或利润损失、业务中断),无论是因任何原因导
致,并且基于任何责任理论,无论是否规定在合同中,是否为严格
责任或侵权行为(包括疏忽或其他形式),即便已经被告知该类损
害的可能性,版权持有者或贡献者概不负责。

51
相关的电器法规通告(续)
以下声明涉及软件中加州大学董事会拥有版权的那些部分。
版权所有 (c) 1991、1993 加州大学董事会。保留所有权利。
1. 源代码的分发必须保留以上版权声明、该条件列表以及以下免
责声明。
2. 以二进制形式分发必须在随分发提供的文档和/或其他材料中再
现以上版权声明、该条件列表以及以下免责声明。
3. 如果没有特定事先书面许可,该大学的名称或其贡献者的名称
均不得用于背书或宣传通过本软件衍生的产品。
本软件由董事会和贡献者“按原样”提供,没有任何明示或暗示的
担保,包括但不限于适销性、特定用途的适用性的暗示担保。在任
何情况下,对于使用本软件引起的任何直接、间接、偶然、特殊、
惩戒性或后果性损害(包括但不限于采购替代商品或服务、使用权
的丧失、数据或利润损失、业务中断),无论是因任何原因导致,
并且基于任何责任理论,无论是否规定在合同中,是否为严格责任
或侵权行为(包括疏忽或其他形式),即便已经被告知该类损害的
可能性,该董事会或贡献者概不负责。

52
注

Table of Contents
REFRIGERATOR SAFETY ............................................................ 54
SAFETY INSTRUCTIONS .............................................................55
PARTS AND FEATURES ..............................................................57
What’s New Behind the Doors? ................................................. 58
GETTING STARTED .....................................................................60
REFRIGERATOR CONNECTIVITY FEATURES ..................62
CONNECTIVITY SETUP ..............................................63
MANUAL SETUP INSTRUCTION ................................................65
INSTALLATION INSTRUCTIONS ................................................. 66
Unpack the Refrigerator .............................................................66
Location Requirements ..............................................................66
Electrical Requirements .............................................................67
Remove and Replace Refrigerator Doors ..................................68
Remove and Replace
Freezer Drawer Fronts ................................................................ 71
Water Supply Requirements ......................................................72
Connect the Water Supply ......................................................... 72
Handle Installation and Removal ...............................................73
Refrigerator Leveling
and Door Closing .......................................................................75
FILTERS AND ACCESSORIES ...................................................76
Water Filtration System ..............................................................76
Install Air Filter ............................................................................77
Accessories ................................................................................77
Assistance or Service .................................................................77
REFRIGERATOR USE ..................................................................77
Opening and Closing Doors .......................................................77
Opening and Closing
Door-within-Door and Doors ...................................................... 78
Using the Controls .....................................................................79
External Dispenser Controls ......................................................80
Lighting the Refrigerator ............................................................81
Water and Ice Dispensers ..........................................................81
Ice Maker and Storage Bin .......................................................84
Shelves, Bins, and Drawers .......................................................85
Freezer Drawers .........................................................................87
Audio Reference .........................................................................87
REFRIGERATOR CARE ...............................................................88
Cleaning .....................................................................................88
Lights ..........................................................................................89
Vacation and Moving Care .........................................................89
TROUBLESHOOTING—CONNECTED MODELS ......................90
TROUBLESHOOTING ..................................................................92
PERFORMANCE DATA SHEET ...................................................99
CONNECTED APPLIANCE REGULATORY NOTICES .............100
DOOR-WITHIN-DOOR
FRENCH DOOR REFRIGERATOR
USE AND CARE GUIDE
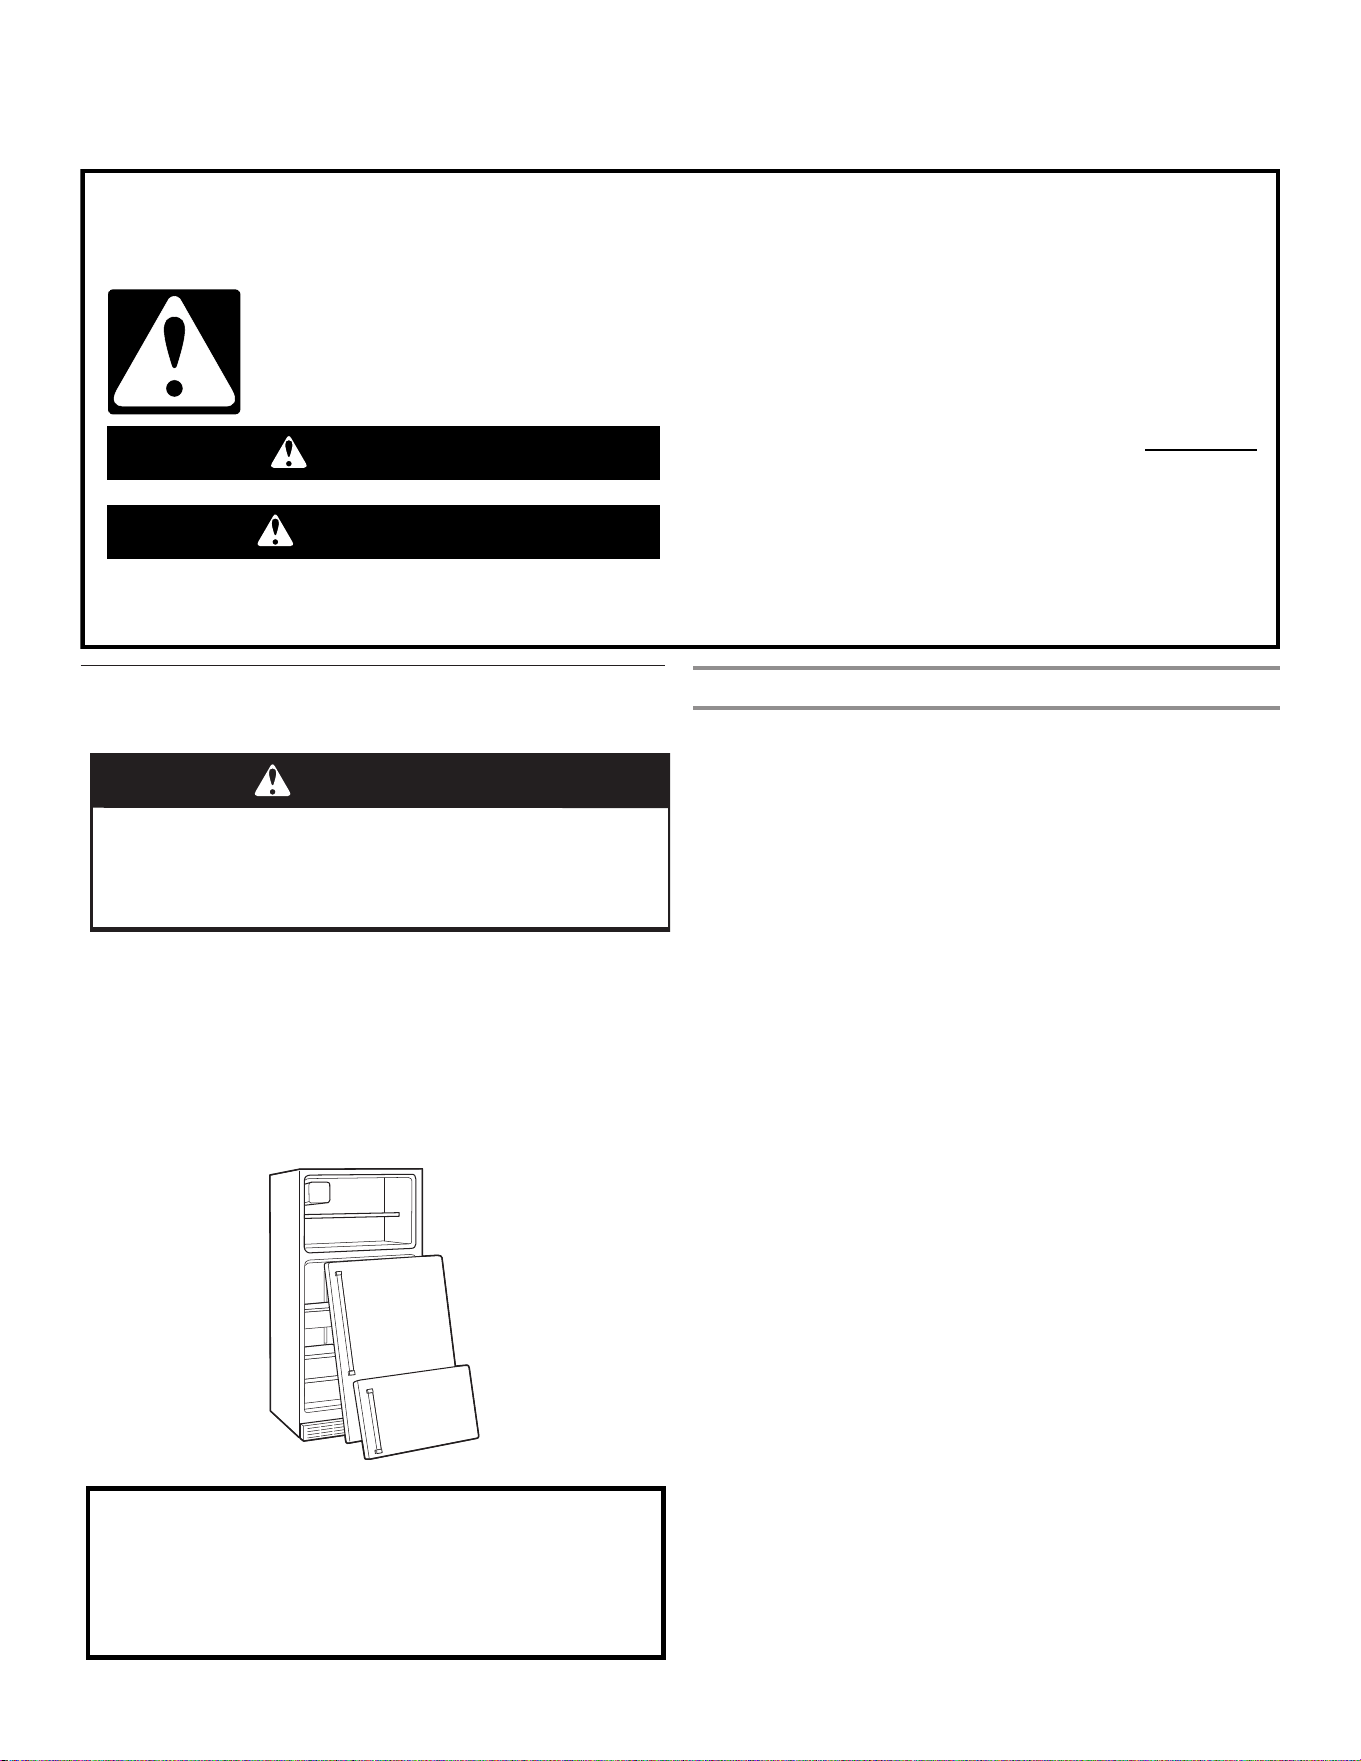
54
You can be killed or seriously injured if you don't immediately
You
can be killed or seriously injured if you don't
follow
All safety messages will tell you what the potential hazard is, tell you how to reduce the chance of injury, and tell you what can
happen if the instructions are not followed.
Your safety and the safety of others are very important.
We have provided many important safety messages in this manual and on your appliance. Always read and obey all safety
messages.
This is the safety alert symbol.
This symbol alerts you to potential hazards that can kill or hurt you and others.
All safety messages will follow the safety alert symbol and either the word “DANGER” or “WARNING.”
These words mean:
follow instructions.
instructions.
DANGER
WARNING
REFRIGERATOR SAFETY
Proper Disposal of Your Old
Refrigerator
WARNING
Suffocation Hazard
Remove doors from your old refrigerator.
Failure to do so can result in death or brain damage.
IMPORTANT: Child entrapment and suffocation are not
problems of the past. Junked or abandoned refrigerators are
still dangerous—even if they will sit for “just a few days.” If
you are getting rid of your old refrigerator, please follow these
instructions to help prevent accidents.
Before You Throw Away Your Old Refrigerator or Freezer:
■ Take off the doors.
■ Leave the shelves in place so that children may not easily
climb inside.
Important information to know about disposal of
refrigerants:
Dispose of refrigerator in accordance with Federal and Local
regulations. Refrigerants must be evacuated by a licensed,
EPA certified refrigerant technician in accordance with
established procedures.
Declaration of Conformity
■ The Manufacturer, Whirlpool NAR, declares that this FDBM
model of household appliance with radio equipment GEN 4
Wi-Fi Module is compliant with directive 2014/53/UE. The
complete text of the declaration of conformity is present at
the following website: https://www.whirlpool.eu. The radio
equipment operates in the 2.4 GHz ISM frequency band,
the maximum radio-frequency power transmitted does not
exceed 20 dBm (e.i.r.p.).
■ This appliance has been designed for preserving food and is
manufactured in compliance with Regulation (CE) No. 1935/
2004.
■ This product includes certain open source software
developed by third parties. The open source license
usage statements referred to the these portions of the
software are provided in the Use and Care Guide available
at the following links: https://www.whirlpool.eu.
55
Before using the appliance, read these safety instructions.
Keep them nearby for future reference. These instructions
and the appliance itself provide important safety warnings,
to be observed at all times. The manufacturer declines any
liability for failure to observe these safety instructions, for
inappropriate use of the appliance or incorrect setting of
controls.
Very young children (0-3 years) should be kept away
from the appliance. Young children (3-8 years) should
be kept away from the appliance unless constantly
supervised. Children from 8 years old and above and
persons with reduced physical, sensory, or mental
capabilities or lack of experience and knowledge can use
this appliance only if they are supervised or have been
given instructions on safe use and understand the hazards
involved. Children must not play with the appliance.
Cleaning and user maintenance must not be carried out by
children without supervision.
PERMITTED USE
CAUTION: The appliance is not intended to be
operated by means of an external switching device, such
as a timer, or separate remote controlled system.
This appliance is intended to be used in household and
similar applications such as: staff kitchen areas in shops,
ofces and other working environments; farm houses;
by clients in hotels, motels, bed & breakfast and other
residential environments.
This appliance is not for professional use. Do not use
the appliance outdoors.
The bulb used inside the appliance is specically
designed for domestic appliances and is not suitable for
general room lighting within the house (EC Regulation
244/2009).
The appliance is designed for operation in places
where the ambient temperature comes within the following
ranges, according to the climatic class given on the rating
plate. The appliance may not work properly if it is left for a
long time at a temperature outside the specified range.
Climatic Class Amb. T. (°C)
SN: From 10 to 32°C; N: From 16 to 32°C
ST: From 16 to 38°C; T: From 16 to 43°C
This appliance does not contain CFCs. The refrigerant
circuit contains R600a (HC). Appliances with Isobutane
(R600a): isobutane is a natural gas without environmental
impact, but is ammable. Therefore, make sure the
refrigerant circuit pipes are not damaged, especially when
emptying the refrigerant circuit.
WARNING: Do not damage the appliance refrigerant
circuit pipes.
WARNING: Keep ventilation openings. In the appliance
enclosure or in the built-in structure, clear of obstructions.
WARNING: Do not use mechanical, electric or
chemical means other than those recommended by the
Manufacturer to speed up the defrost process.
WARNING: Do not use or place electrical devices inside
the appliance compartments if they are not of the type
expressly authorized by the Manufacturer.
WARNING: Ice makers and/or water dispensers not
directly connected to the water supply must be lled with
potable water only.
WARNING: Automatic ice makers and/or water
dispensers must be connected to a water supply that
delivers potable water only, with mains water pressure
between 0.17 and 0.81 MPa
(1.7 and 8.1 bar).
Do not store explosive substances such as aerosol
cans and do not place or use gasoline or other ammable
materials in or near the appliance.
Do not swallow the contents (non-toxic) of the ice
packs (provided with some models). Do not eat ice cubes
or ice lollies immediately after taking them out of the
freezer since they may cause cold burns.
For products designed to use an air lter inside an
accessible fan cover, the lter must always be in position
when the refrigerator is in function.
Do not store glass containers with liquids in the freezer
compartments as they may break.
Do not obstruct the fan (if included) with food items. After
placing the food check that the door of the compartments
closes properly, especially the freezer door.
Damaged gaskets must be replaced as soon as
possible.
Use the refrigerator compartment only for storing fresh
food and the freezer compartment only for storing frozen
food, freezing fresh food, and making ice cubes.
Avoid storing unwrapped food in direct contact
with internal surfaces of the refrigerator or freezer
compartments.
Appliances could have special compartments (Fresh food
compartment, zero degree box, etc.) Unless specified
in the specific booklet of product, they can be removed,
maintaining equivalent performances.
INSTALLATION
WARNING: When positioning the appliance, ensure the
supply cord is not trapped or damaged.
The appliance must be handled and installed by two
or more persons - risk of injury. Use protective gloves to
unpack and install - risk of cuts.
Installation, including water supply (if any) and electrical
connections, and repairs must be carried out by a qualified
technician. Do not repair or replace any part of the
appliance unless specified stated in the user manual. Keep
children away from the installation site. After unpacking the
appliance,make sure that is has not been damaged during
transport. In the event of problems, contact the dealer or
your nearest After sales service.
Once installed, packaging waste (plastic, Styrofoam parts,
etc.) must be stored out of reach of children - risk of
suffocation. The appliance must be disconnected from the
power supply line before any installation operation - risk of
electric shock. During installation, make sure the appliance
does not damage the power cable - risk of fire or electric
shock. Only activate the appliance when the installation
has been completed.
SAFETY INSTRUCTIONS
IMPORTANT TO BE READ AND OBSERVED
56
Be careful not to damage the floors (e.g. parquet) when
moving the appliance. Install the appliance on a floor or
support strong enough to take its weight and in a place
suitable for its size and use. Make sure the appliance is
not near a heat source and that the four feet are stable and
resting on the floor, adjusting them as required, and check
that the appliance is perfectly level using a spirit level.
Wait at least two hours before switching the application on,
to ensure that the refrigerant circuit is fully efficient.
To guarantee adequate ventilation, leave a space
on both sides and above the appliance. The distance
between the rear of the appliance and the wall behind
the appliance should be 50mm, to avoid access to hot
surfaces. A reduction of this space will increase the Energy
consumption of product.
WARNING: To avoid a hazard due to instability,
positioning or fixing of the appliance must be done
in accordance with the manufacture instructions. It is
forbidden to place the refrigerator in such as way that
the metal hose of gas stove, metal gas or water pipes, or
electrical wires are in contact with the refrigerator back
wall (condenser coil).
If it is necessary to replace the doors, please contact
the Technical Assistance Center.
ELECTRICAL WARNINGS
It must be possible to disconnect the appliance from
the power supply by unplugging it if the plug is accessible,
or by a multi-pole switch installed upstream of the socket
in accordance with the wiring rules and the appliance must
be earthed in conformity with national electrical safety
standards.
Do not use extension leads, multiple sockets or
adapters. The electrical components must not be
accessible to the user after installation. Do not use the
appliance when you are wet or barefoot. Do not operate
this appliance if it has a damaged power cable or plug,
if it is not working properly, or if it has been damaged or
dropped.
If the supply cord is damaged, it must be replaced with
an identical one by the manufacturer, its service agent or
similarly qualified persons in order to avoid a hazard - risk
of electric shock.
WARNING: Do not locate multiple portable socket-
outlets or portable power supplies at the rear of the
appliance.
CLEANING AND MAINTENANCE
WARNING: Ensure that the appliance is switched
off and disconnected from the power supply before
performing any maintenance operation; never use team
cleaning equipment - risk of electric shock.
Do not use abrasive or harsh cleaners such as window
sprays, scouring cleansers, flammable fluids, cleaning
waxes, concentrated detergents, bleaches or cleaners
containing petroleum products on plastic parts, interior
and door liners or gaskets. Do not use paper towels,
scouring pads, or other harsh cleaning tools.
DISPOSAL OF PACKAGING MATERIALS
The packaging material is 100% recyclable and is marked
with the recycle symbol .
The various parts of the packaging must therefore be
disposed of responsibly and in full compliance with local
authority regulations governing waste disposal.
DISPOSAL OF HOUSEHOLD APPLIANCES
This appliance is manufactured with recyclable or reusable
materials. Dispose of it in accordance with local waste
disposal regulations. For further information on the
treatment, recovery, and recycling of household electrical
appliances, contact your local authority, the collection
service for household waste or the store where you
purchased the appliance. This appliance is marked in
compliance with European Directive 2012/19/EU, Waste
Electrical and Electronic Equipment (WEEE). By ensuring
this product is disposed of correctly, you will help prevent
negative consequences for the environment and human
health.
The symbol on the product or on the accompanying
documentation indicates that it should not be treated
as domestic waste but must be taken to an appropriate
collection center for the recycling of electrical and
electronic equipment.
ENERGY SAVING TIPS
Install the appliance in a dry, well ventilated room far away
from a heat source (eg. Radiator, cooker, etc.) and in a
place not exposed directly to the sun. If required, use an
insulating plate.
To guarantee adequate ventilation follow installation
instructions. Insufficient ventilation at the back of the
product increases energy consumption and decreases
cooling efficiency.
Frequent door opening might cause an increase in Energy
Consumption. The internal temperature of the appliance
and the Energy Consumption may be affected also by the
ambient temperature, as well as location of the appliance.
Temperature setting should take into consideration these
factors.
Reduce door opening to a minimum.
When thawing frozen food, place in the refrigerator. The
low temperature of the frozen products cools food in the
refrigerator. Allow warm food and drinks to cool down
before placing in the appliance.
Positioning of the shelves in the refrigerator has no impact
on the efficient usage of energy. Food should be placed
on the shelves in such way to ensure proper air circulation
(food should not touch each other and distance between
food and rear wall should be kept).
You can increase storage capacity of frozen food by
removing baskets and, if present, Stop Frost shelf.
Do not worry about noises coming from the compressor
which are normal operation noises.
SAFETY INSTRUCTIONS
IMPORTANT TO BE READ AND OBSERVED

57
PARTS AND FEATURES
Air filter
Water filter
Auto-humidity
crispers
Temperature-
controlled
drawer
Platter pocket
In-Door-Ice
ice storage
U-shaped shelf
Removable
bin
Temperature
Control UI
Balcony display
Door-within Door

58
Your Whirlpool Door-within-Door French door refrigerator comes equipped
with various innovative storage and energy efficient features.
Energy and Normal Operating Sounds
Your new Door-within-Door French door refrigerator has been
designed with a linear compressor to optimize energy efficiency
and better regulate temperatures to match cooling demand. You
may notice that it operates differently than your previously owned
refrigerator. It is normal for the high-efficiency compressor to
run for extended periods of time at varying speeds in order to
consume only the energy necessary for optimum efficiency. In
addition, during various stages of the cooling cycle, you may
hear normal operating sounds that are unfamiliar to you.
In-Door-Ice Ice Dispensing System
The ice maker and ice storage bin are located in the door for easy
access to filtered ice while freeing up valuable shelf space inside.
Dual Evaporator
The refrigerator and freezer compartments have separate
evaporators to provide fresh food and frozen food with optimal
storage climates: cool and humid in the fresh food, cold
and dry in the freezer. There is no mixing of air between the
compartments to reduce the transfer of food odors and tastes
from refrigerator, and allows freezer air to remain dry to control
frost and reduce freezer burn.
Air Filter
An air filter is 15 times more powerful than baking soda at
reducing common food odors inside the refrigerator. Replace
your air filter every 6 months for maximum odor reduction.
EveryDrop Water Filter
EveryDrop water filters are certified by several agencies to reduce
most contaminants, including chlorine taste and odor, lead,
pesticides, and trace amounts of pharmaceuticals. EveryDrop
brand filters are the only filters tested and certified for your
refrigerator system. Replace your EveryDrop filter every 6
months. See the water filter Performance Data Sheet section for
the list of certifications.
Water Dispenser with Measured Fill
The Measured Fill feature allows you to dispense a desired
amount of filtered water in handy increments of 236.6, 473.2, or
709.8 mL (8, 16, or 24 oz).
Water Dispenser with Favorite Fill
The Favorite Fill feature allows you to save two custom presets
that can be programmed for favorite items that are frequently
filled like a coffee pot or a water bottle.
U-Shaped Shelf
Your new U-shaped shelf or shelves (on some models) is
designed to maximize accessibility to items of all shapes and
sizes. Small items fit perfectly around the shelf perimeter and
remain accessible, while tall items nestle perfectly in the center
when the glass is pushed back. And, with the U-shaped shelf,
you don’t lose an entire half shelf to tall item storage—just push
the glass portion back as far as you need to accommodate your
tall items—infinite adjustability.
Platter Pocket
This full-width slide-out shelf tucked between the crispers and
the lowest shelf is perfect for leftover family-sized casserole
dishes, pizza boxes, and large party platters.
Temperature-Controlled Drawer
Four temperature presets are available on the interior control to
keep items at the optimal temperature. You can choose from
meats, deli/cheese, assorted, and drinks. Drawer slides open
effortlessly, even when fully loaded, with soft, self-close glides
and features the best extension in freestanding refrigeration.
3-Tier Freezer Drawer with Extend-Freeze Setting
A drawer system that organizes items on three levels making
them easier to store and find. The lower drawer includes a divider.
There’s also a metal shelf under the pull-out drawer for smaller
items and third level glass shelf for small, flat items. The Extend-
Freeze setting is activated when the entire freezer is adjusted to
the coldest setting. This helps to reduce freezer burn, and extend
the life of frozen items.
Easy to Clean Finish
Resists smudges and fingerprints. The specialized coating for
stainless steel is easy to clean with just water and a soft cloth.
LED Lighting
There is bright LED strip lighting for maximum illumination.
LED lights do not require replacement.
Door Alarm
A helpful alarm sounds when the refrigerator door or freezer
drawer is left ajar.
Power Outage Indicator
If the power should go out while you are away from home, this
indicator will let you know that the refrigerator has been without
power.
Wi-Fi Connectivity (on some models)
This refrigerator can connect with in-home Wi-Fi to provide
remote control through an app, available to download for use
with either iOS or Android devices.
Door-within-Door
Featuring a designated cool area for drinks, this feature lets you
have instant access to your favorite foods and drinks without
having to open the entire refrigerator. Use the hidden latch to
open the door-within-door and get instant access to the gallon
door bin and your cold beverages.
What’s New Behind the Doors?
†WRAS, KIWA, ACS, and KTW is a trademark of WRAS, KIWA, ACS, and KTW International.
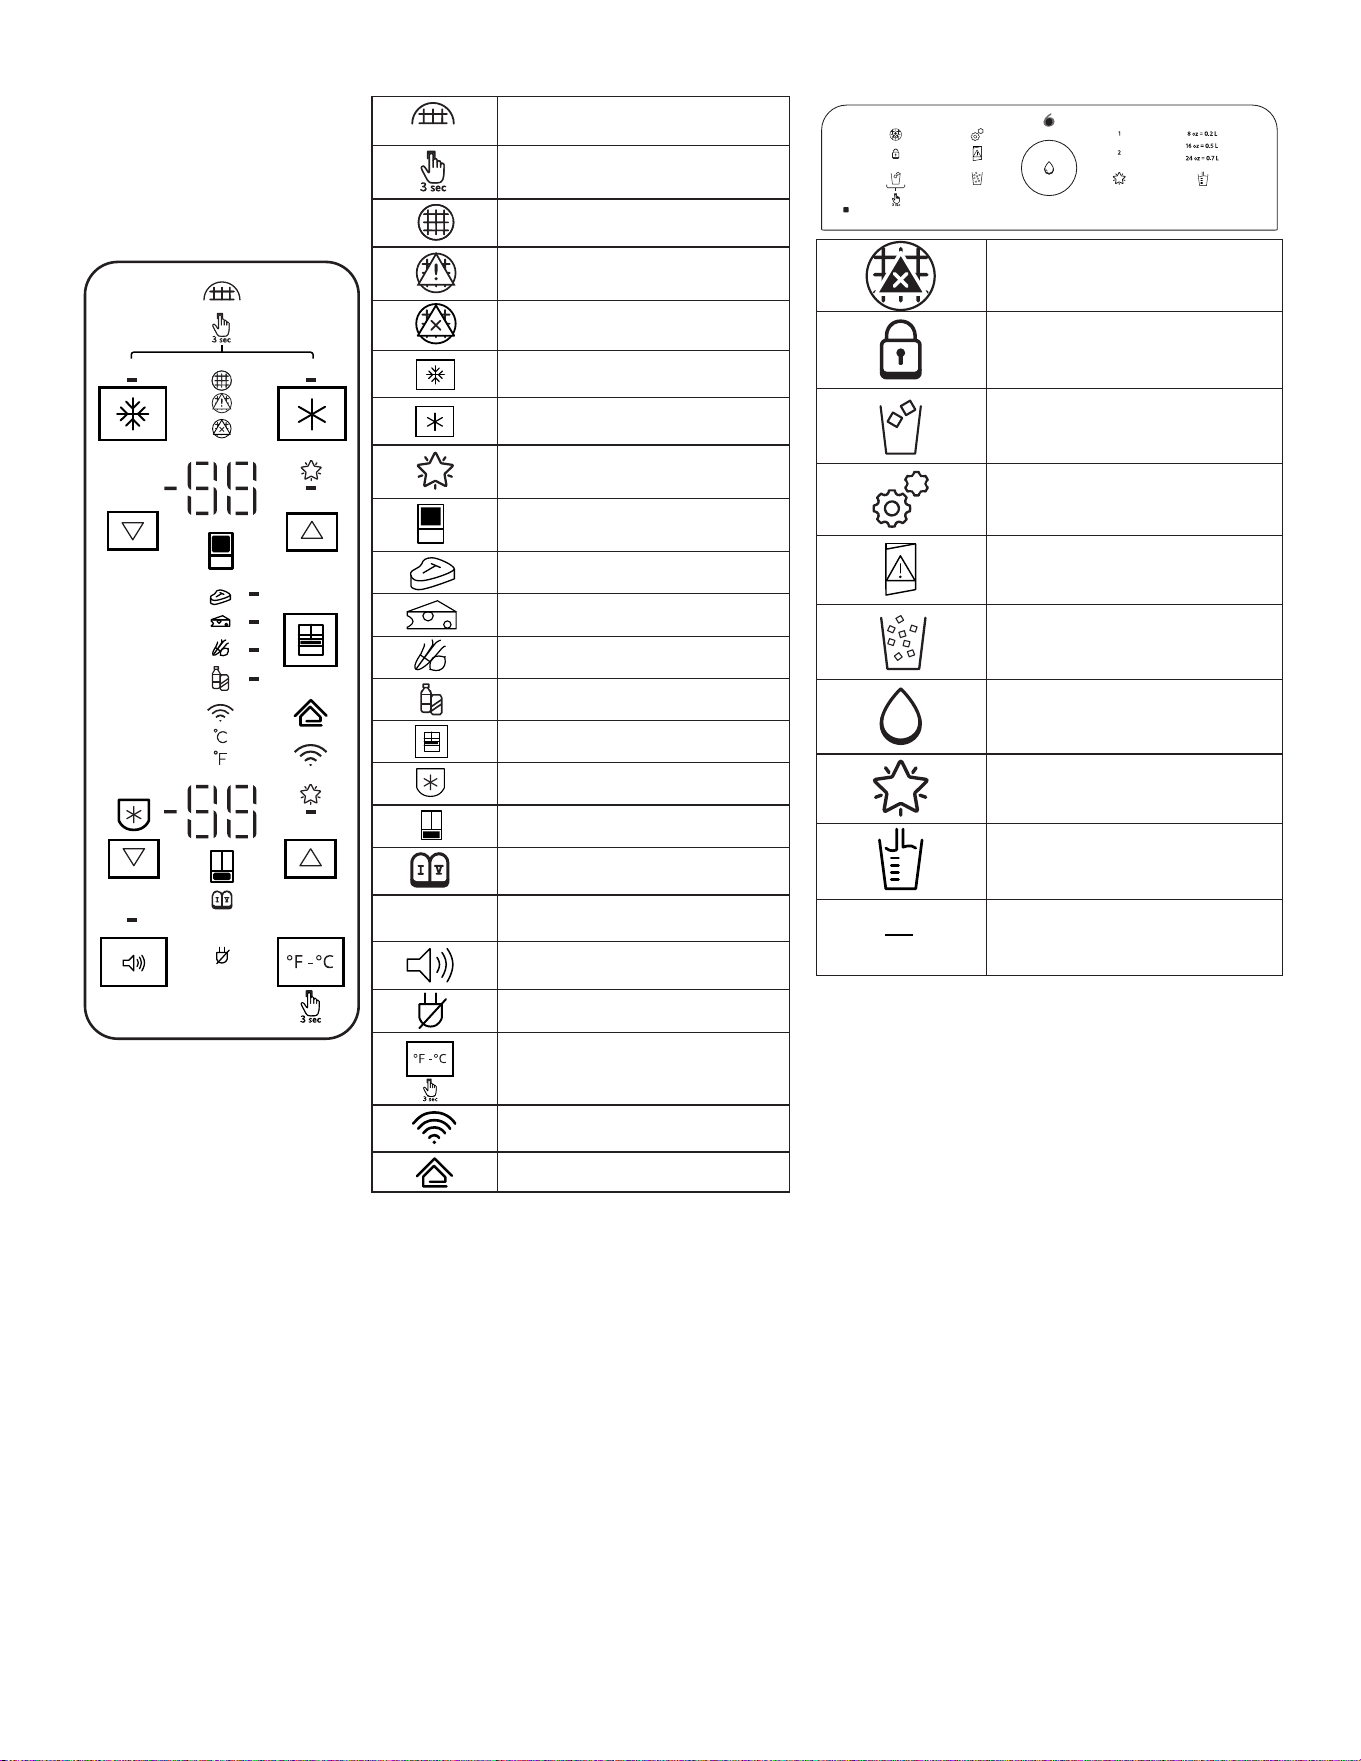
59
DEMO
H2O
H2O
Water Filter Reset
Hold 3 seconds
Good
Order
Replace
Max Freeze
Max Cool
Suggested Temperature
Refrigerator
Meats
Deli/Cheese
Assorted
Drinks
Drawer
Freeze Shield
Freezer
Sabbath Mode
DEMO
Demo
Sound on or off
Power Outage
Fahrenheit/Celcius
Wi-Fi
Smart Grid
th
sense
Replace Filter
Locked
Cubed Ice
Calibration Mode
Door Ajar
Crushed Ice
Fill
Favorite Fill
Measured Fill
1
2
Fill
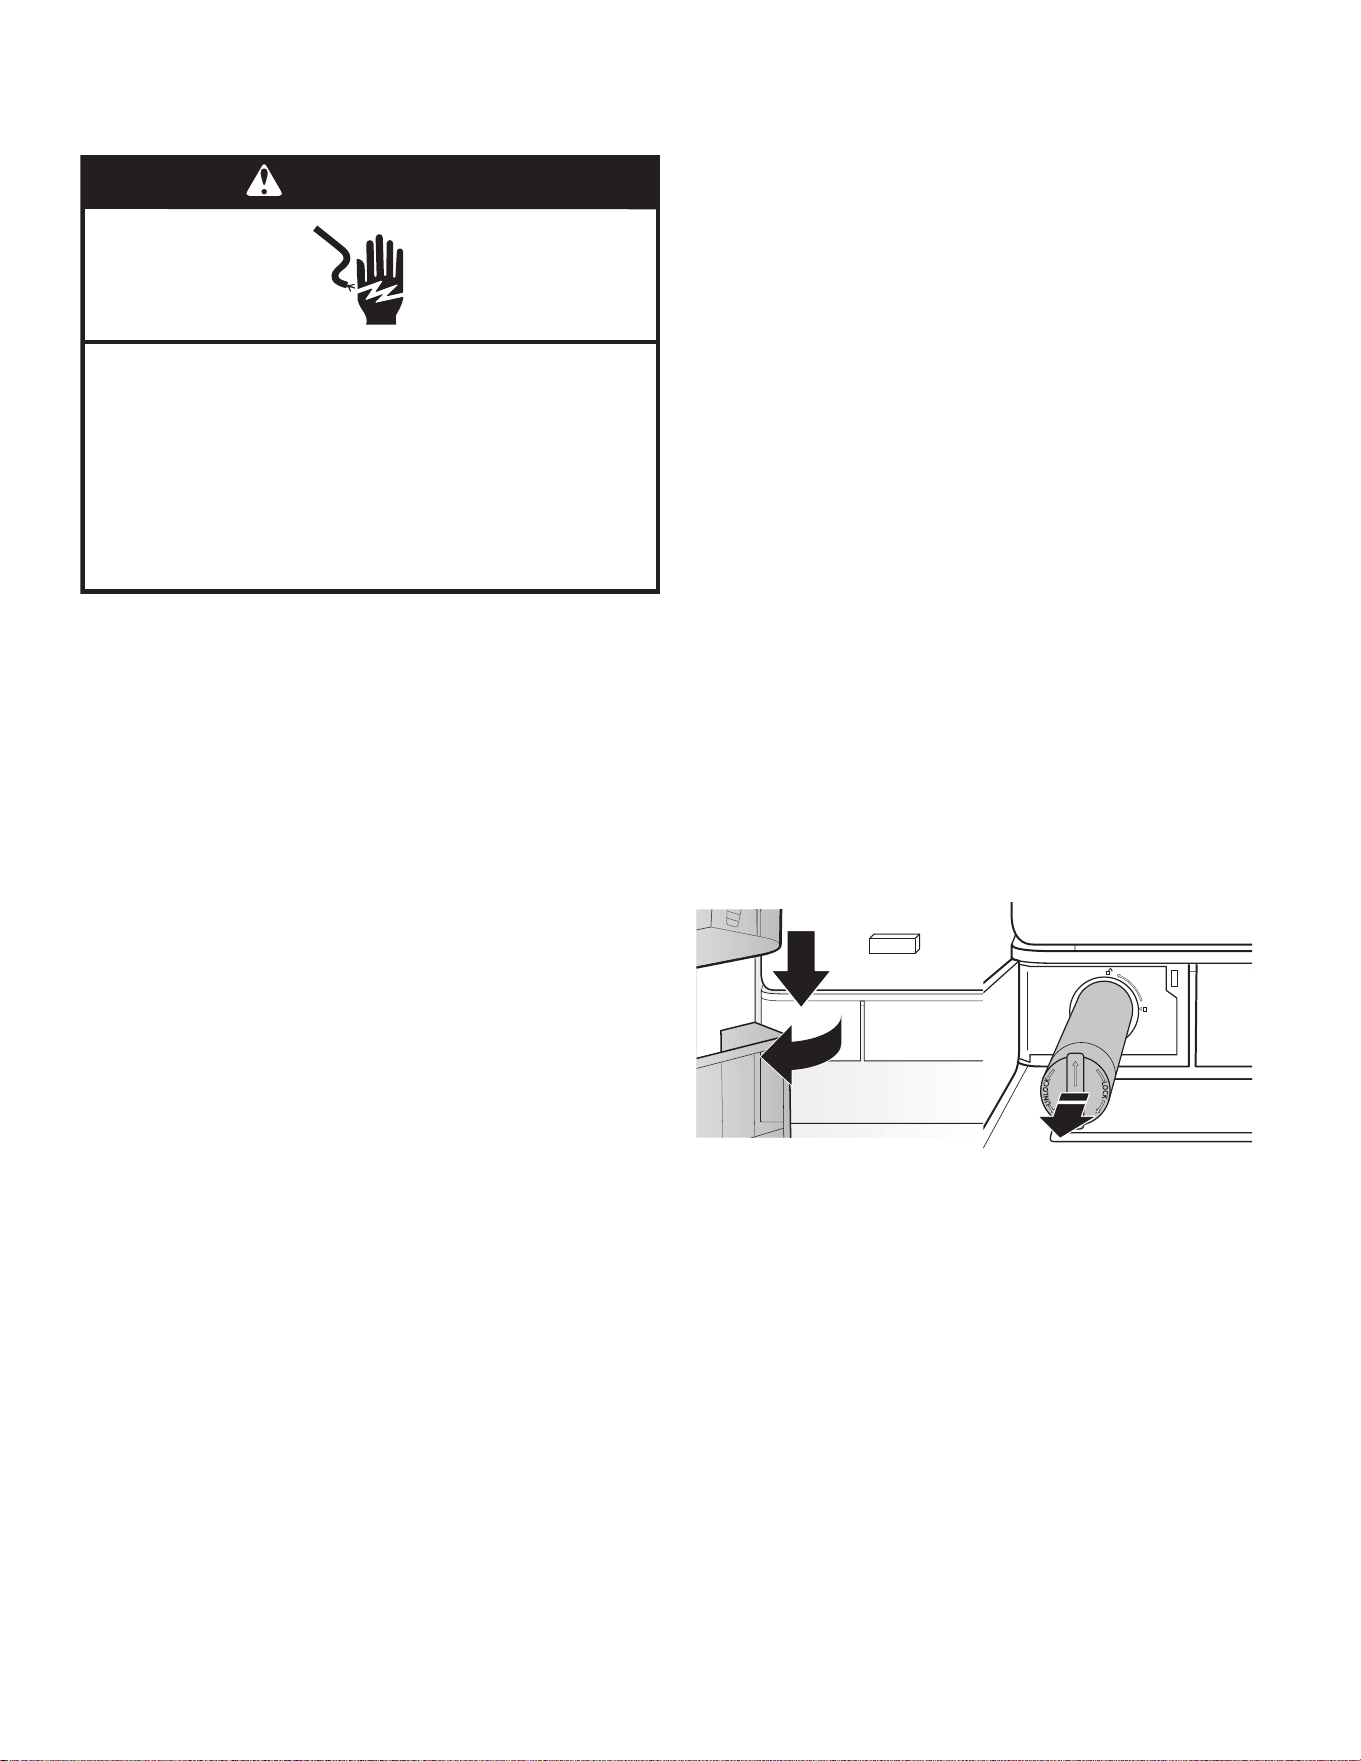
60
GETTING STARTED
INSTALLATION CHECKLIST
✔ Electrical Power
■ Plug refrigerator into a grounded (earthed) outlet.
✔ Doors
■ If doors need to be removed during installation, see the
“Remove and Replace Refrigerator Doors” and “Remove and
Replace Freezer Door Fronts” sections.
■ Check that handles are secure and installed according to the
instructions.
■ Doors seal completely.
■ Refrigerator is level. (Remove base grille and adjust leveling
feet so they are snug against the floor.)
■ Doors are even across the top. (Use door alignment feature if
necessary.)
■ Base grille is properly attached to the refrigerator.
✔ Ice and Water System (on some models)
■ Connect refrigerator to a cold water supply with 20-120 psi
(138-827 kPa) water pressure, as specified in the instructions.
■ Make sure the household water supply is connected and
turned on.
■ Check that the water supply line behind refrigerator is not
kinked.
■ Only use recommended water supply tubing, copper, or PEX,
as specified in the instructions.
■ Install water filter according to the instructions.
■ Flush water system with 11.4 L (3 gallons) of water, as
specified in the instructions.
■ Check for water leaks at all connections.
■ Turn on ice maker if refrigerator is connected to water supply.
(If not connected to water supply, turn off ice maker.)
WATER FILTER INSTALLATION
■ Locate the water filter compartment in the lower left-hand
side of the refrigerator compartment. Push on the right side of
the filter door to open.
■ Align the arrow on the water filter cap with the cutout notch in
the filter housing and insert filter.
■ Once the filter is inserted, turn the filter clockwise 90°
(1/4 turn) until it locks into the housing.
■ Push water filter door closed to latch.
■ Flush 11.4 L (3 gallons) of water through the water system to
clear air from the water line and to keep the dispenser from
dripping and/or avoiding decreased dispenser flow.
NOTE: If the filter is not installed correctly, water may
dispense at a lower flow rate and there will be slower ice
production. Improper filter installation may also cause the
water filter housing to leak.
✔ Final Checks
■ Install air filter according to instructions in corresponding
packaging.
■ Remove all shipping material.
■ Set temperature controls to the recommended setting.
■ Save instructions and other literature.
■ In order to receive a more complete assistance, please
register your product on www.whirlpool.eu/register
WARNING
Electrical Shock Hazard
Plug into an earthed socket.
Do not remove the earth pin.
Do not use an adapter.
Do not use an extension cable.
Failure to follow these instructions can result in
death, re, or electrical shock.
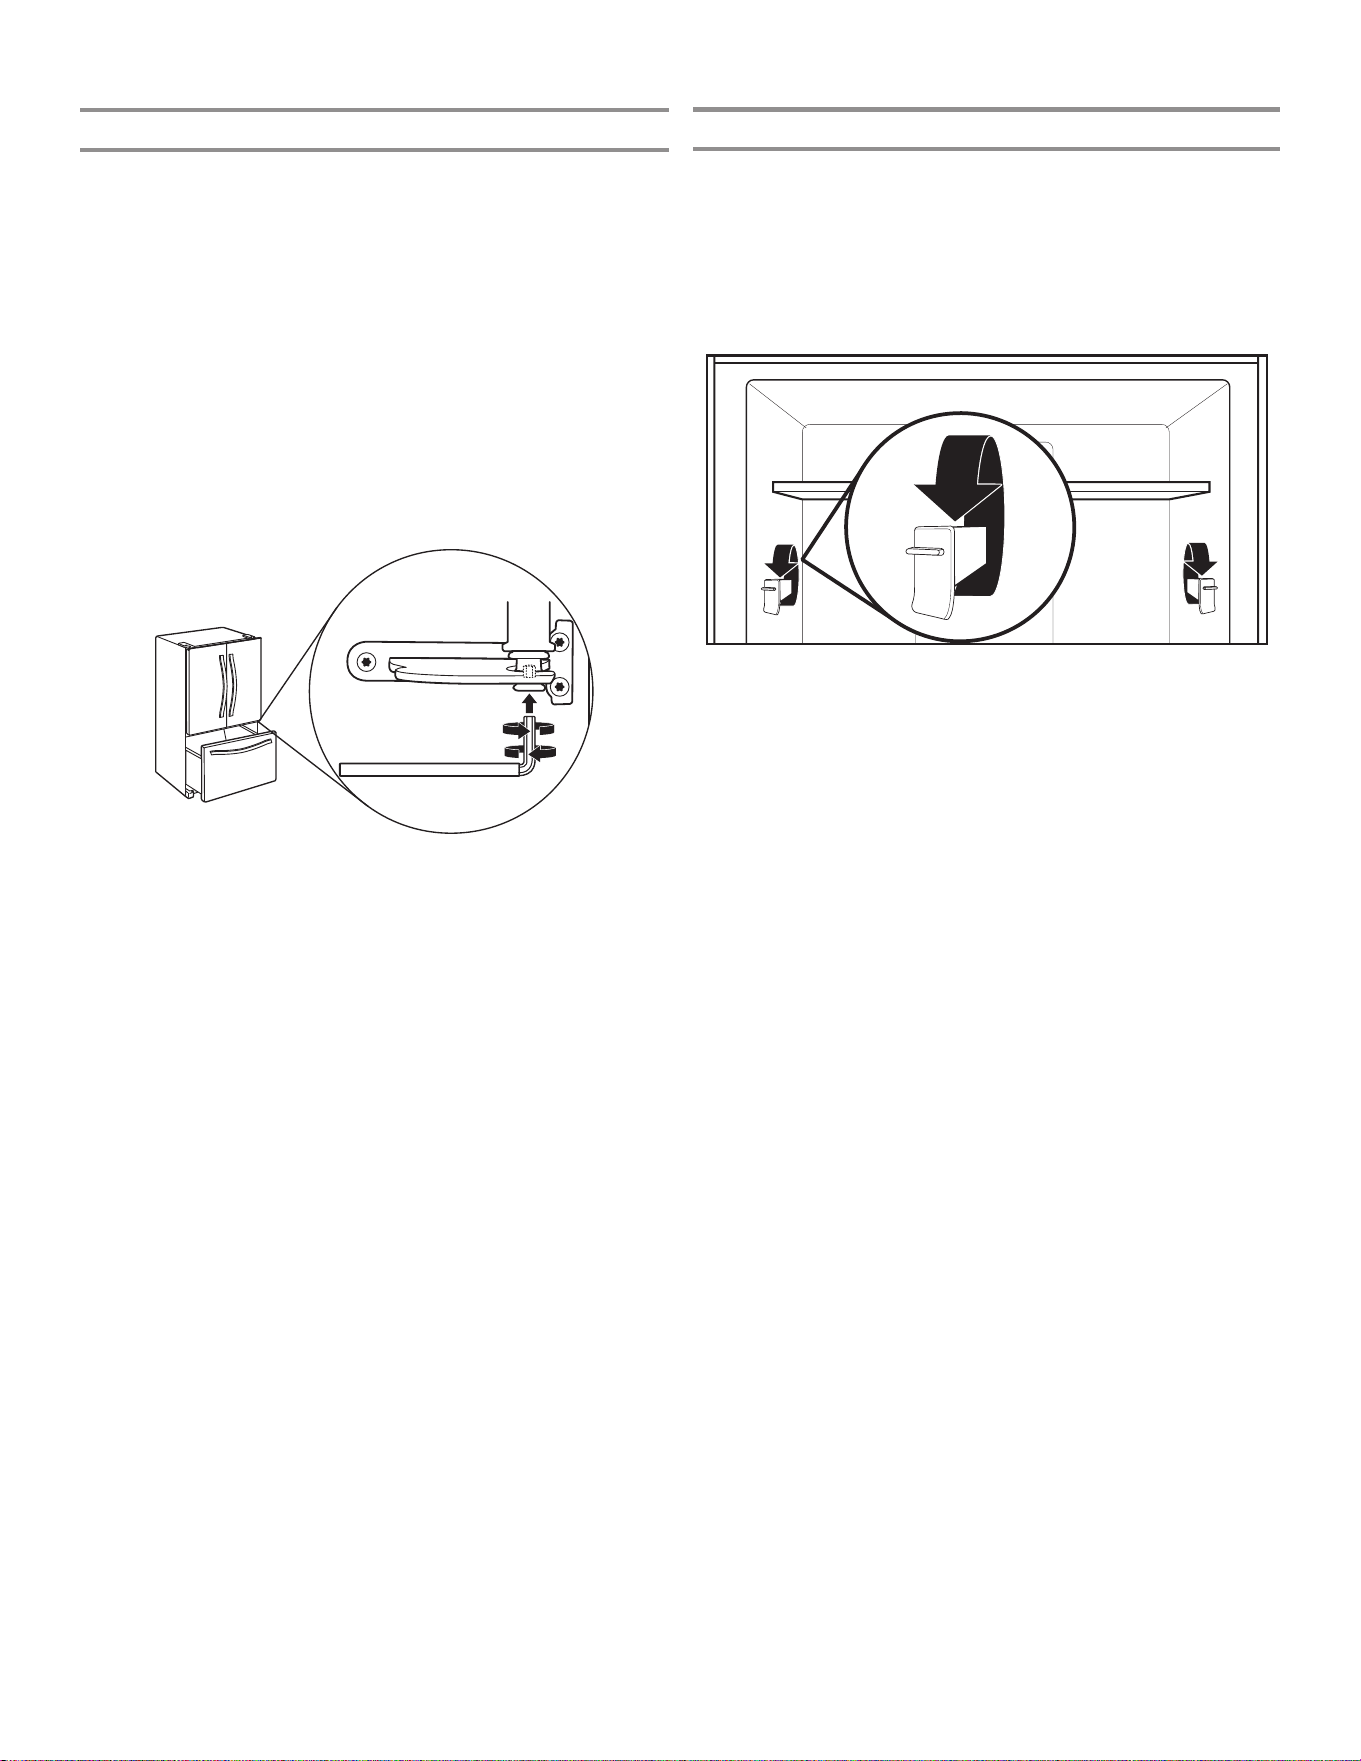
61
DOOR ALIGNMENT
Align Refrigerator Doors
✔ If doors are uneven:
■ Ensure the refrigerator is level.
■ Keeping both refrigerator doors closed, pull out the freezer
drawer. Locate the bottom hinge pin of the right-hand
refrigerator door. The alignment screw is inside the bottom
hinge pin.
■ Insert the short end of the 1/8" hex key wrench (packed with
the Door Handle Installation Instructions) into the bottom
hinge pin until it is fully engaged in the alignment screw.
■ To raise the refrigerator door, turn the hex key to the right.
■ To lower the door, turn the hex key to the left.
■ Continue to turn the alignment screw until the tops of the
doors are aligned.
Shelf Height Adjustment
Shelf height can be adjusted by changing the adjustable shelf
mounts between their vertical and horizontal positions.
■ Carefully lift the shelf off the shelf mounts and turn the flipper
to the desired orientation.
■ Repeat for remaining shelf mounts.
■ Ensure the shelf is properly seated on the shelf mounts.
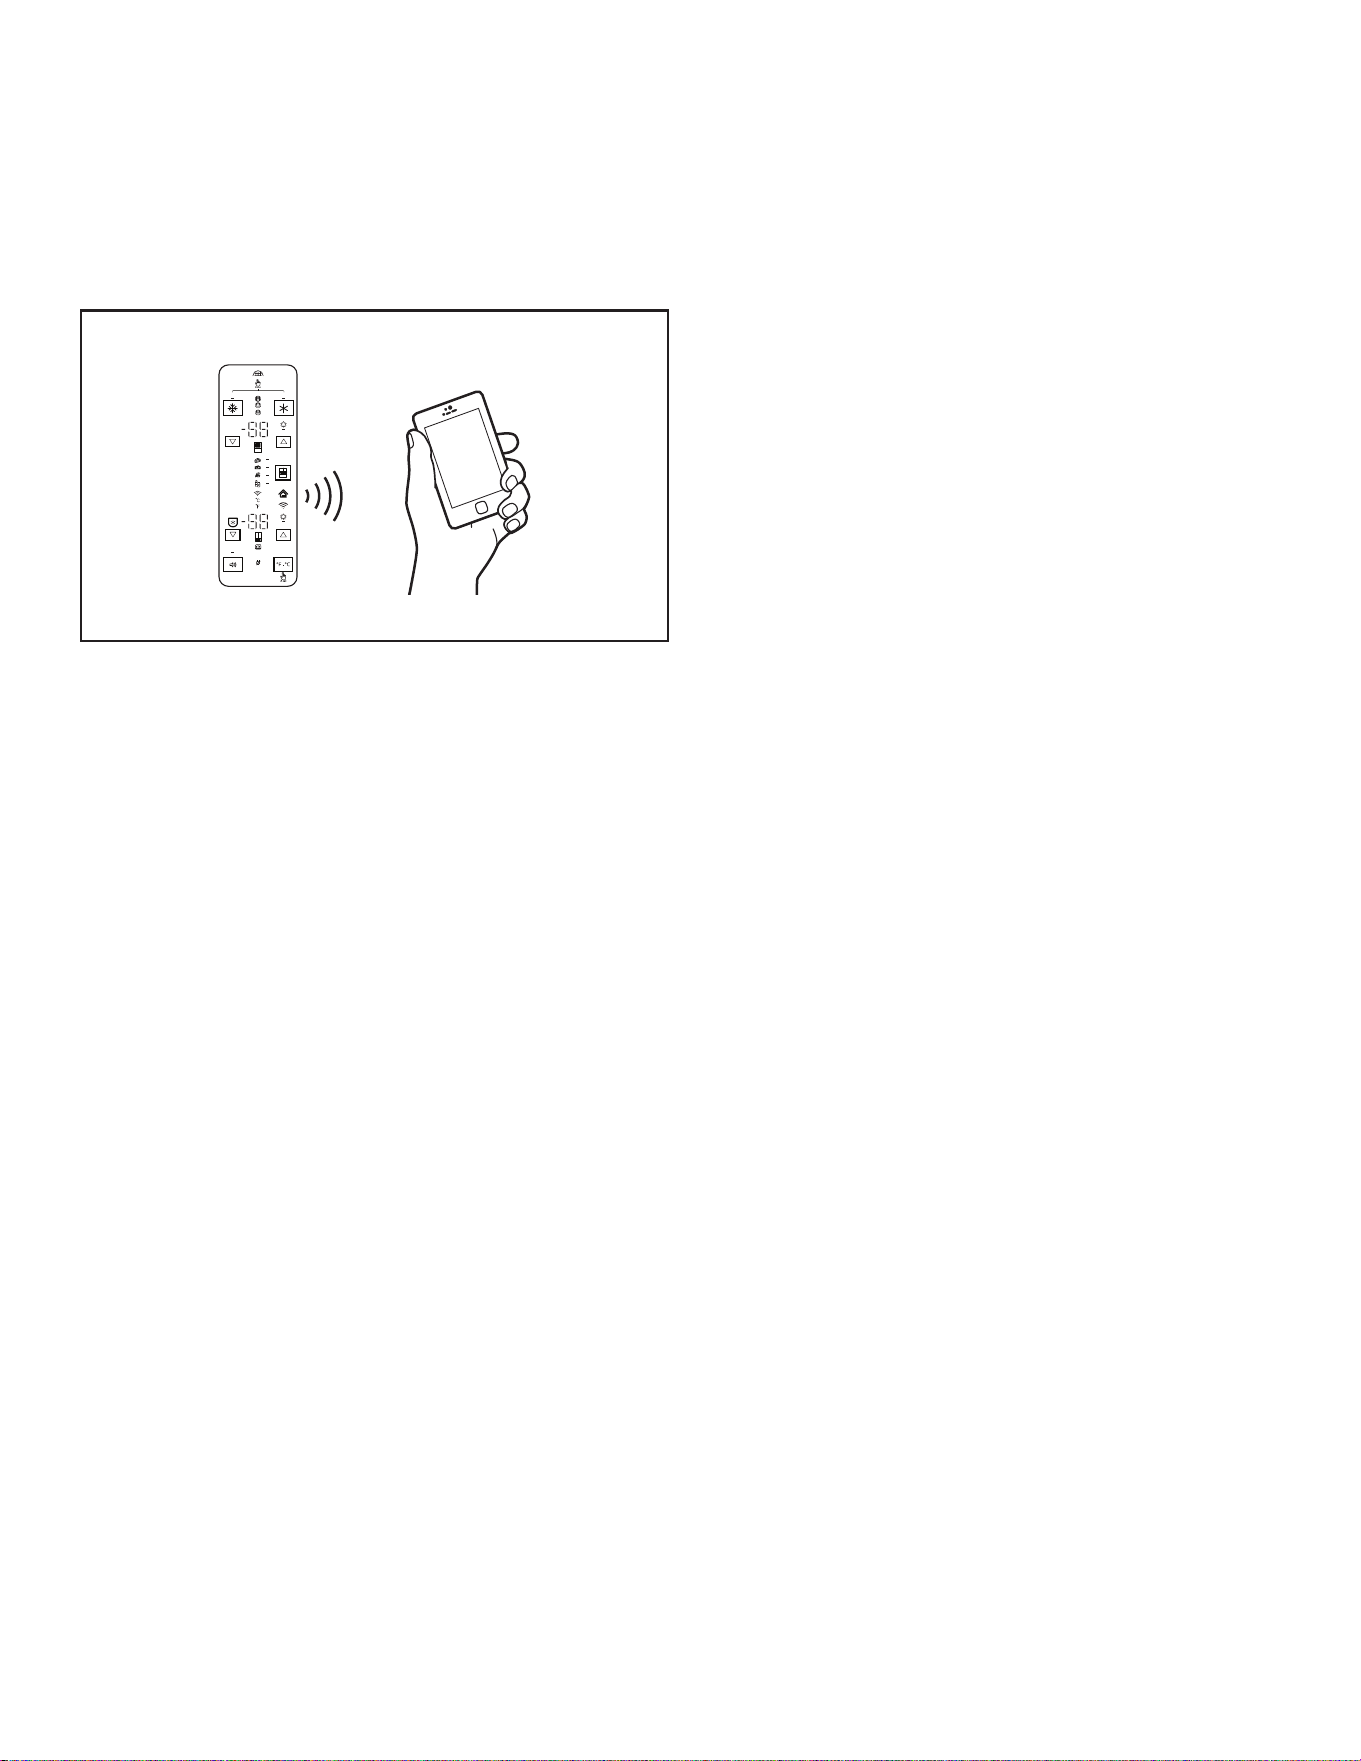
62
REFRIGERATOR CONNECTIVITY FEATURES
(ON SOME MODELS)
Mobile application services are not available in all countries.
Wi-Fi connectivity allows your Smart Refrigerator to connect to the internet and interact with the Whirlpool App from your smartphone
or mobile device. Refer to the “Troubleshooting - Connected Models” section.
NOTE: Whirlpool App features and functions are subject to change.
DEMO
H2O
SMART FEATURES
Smart Features help make your everyday a little more efficient
by letting you remotely monitor, manage, and maintain your
refrigerator.
Remote Temperature Control
What it does: Allows you to control the temperature of
your refrigerator remotely from your mobile device via the
Whirlpool App.
What it does for you: Lets you control temperatures in your
refrigerator, freezer, and temp-controlled drawer remotely—not
just when you are standing in front of it.
Water and Air Filter Status
What it does: Gives you a look at the life remaining for your air
and water filters before replacement is needed.
What it does for you: Helps you be more efficient in planning
for ordering and replacing filters.
Auto Reorder App
What it does: Allows you to order replacement filters,
consumables, and accessories via the Whirlpool app for delivery
directly to your home.
What it does for you: Simplifies ordering correct water and air
filters—no trips to the store searching for the correct filters.
Over Temperature
What it does: Sends you a notification when the temperature in
your refrigerator reaches and rises above a specified value in the
refrigerator and freezer compartments.
What it does for you: Alerts you to over-temperature status
to provide input regarding disposition of refrigerator/freezer
contents.
Max Cool
What it does: Allows you to control your refrigerator remotely
from your mobile device via the Whirlpool app.
What it does for you: Lets you turn on/off Max Cool options
remotely to make temperatures colder in the refrigerator in
anticipation of loading newly purchased grocery items. Lowers
internal temperatures for 24 hours.
Max Freeze
What it does: Allows you to control your freezer remotely from
your mobile device via the Whirlpool app.
What it does for you: Lets you turn on/off Max Freezer remotely
to increase ice production. Reduces the set temperature to the
lowest possible setting for 24 hours to maximize ice production.
Freeze Shield Mode Control
What it does: Allows you to view status of your refrigerator
remotely to your mobile device via the Whirlpool app.
What it does for you: Informs you whether Freeze Shield mode
is active in your refrigerator to reduce freezer burn and help
frozen items maintain their appearance and taste.
Sabbath Mode
What it does: Allows the door of the refrigerator or freezer to be
opened or closed during the Sabbath or other religious holidays
without activating the interior lights or controls. Allows you to turn
the mode on and off remotely from your mobile device via the
Whirlpool app.
What it does for you: Lets you turn on/off Sabbath mode
options remotely.
Dispenser Light Brightness Control
What it does: Allows you to control your refrigerator remotely to
your mobile device via the Whirlpool app.
What it does for you: Lets you turn on/off the dispenser lighting
remotely.
Favorite Fill Control
What it does: Allows you to change your Favorite Fill values
on your refrigerator remotely using your mobile device via the
Whirlpool app.
What it does for you: Lets you set and save Favorite Fill values
remotely.
Door Open Alert
What it does: Sends you a notification when one of the doors
of the refrigerator has been left open.
What it does for you: Alerts you to Door Ajar status so you can
close the door(s) or call home to ask someone else to close the
door before an over-temp situation arises.
Power Outage
What it does: Sends you a notification when power to your
refrigerator goes out, returns, or the highest temperature is
reached in the refrigerator and freezer compartments.
What it does for you: Alerts you to power status and duration
of outage to provide input regarding disposition of refrigerator/
freezer contents.
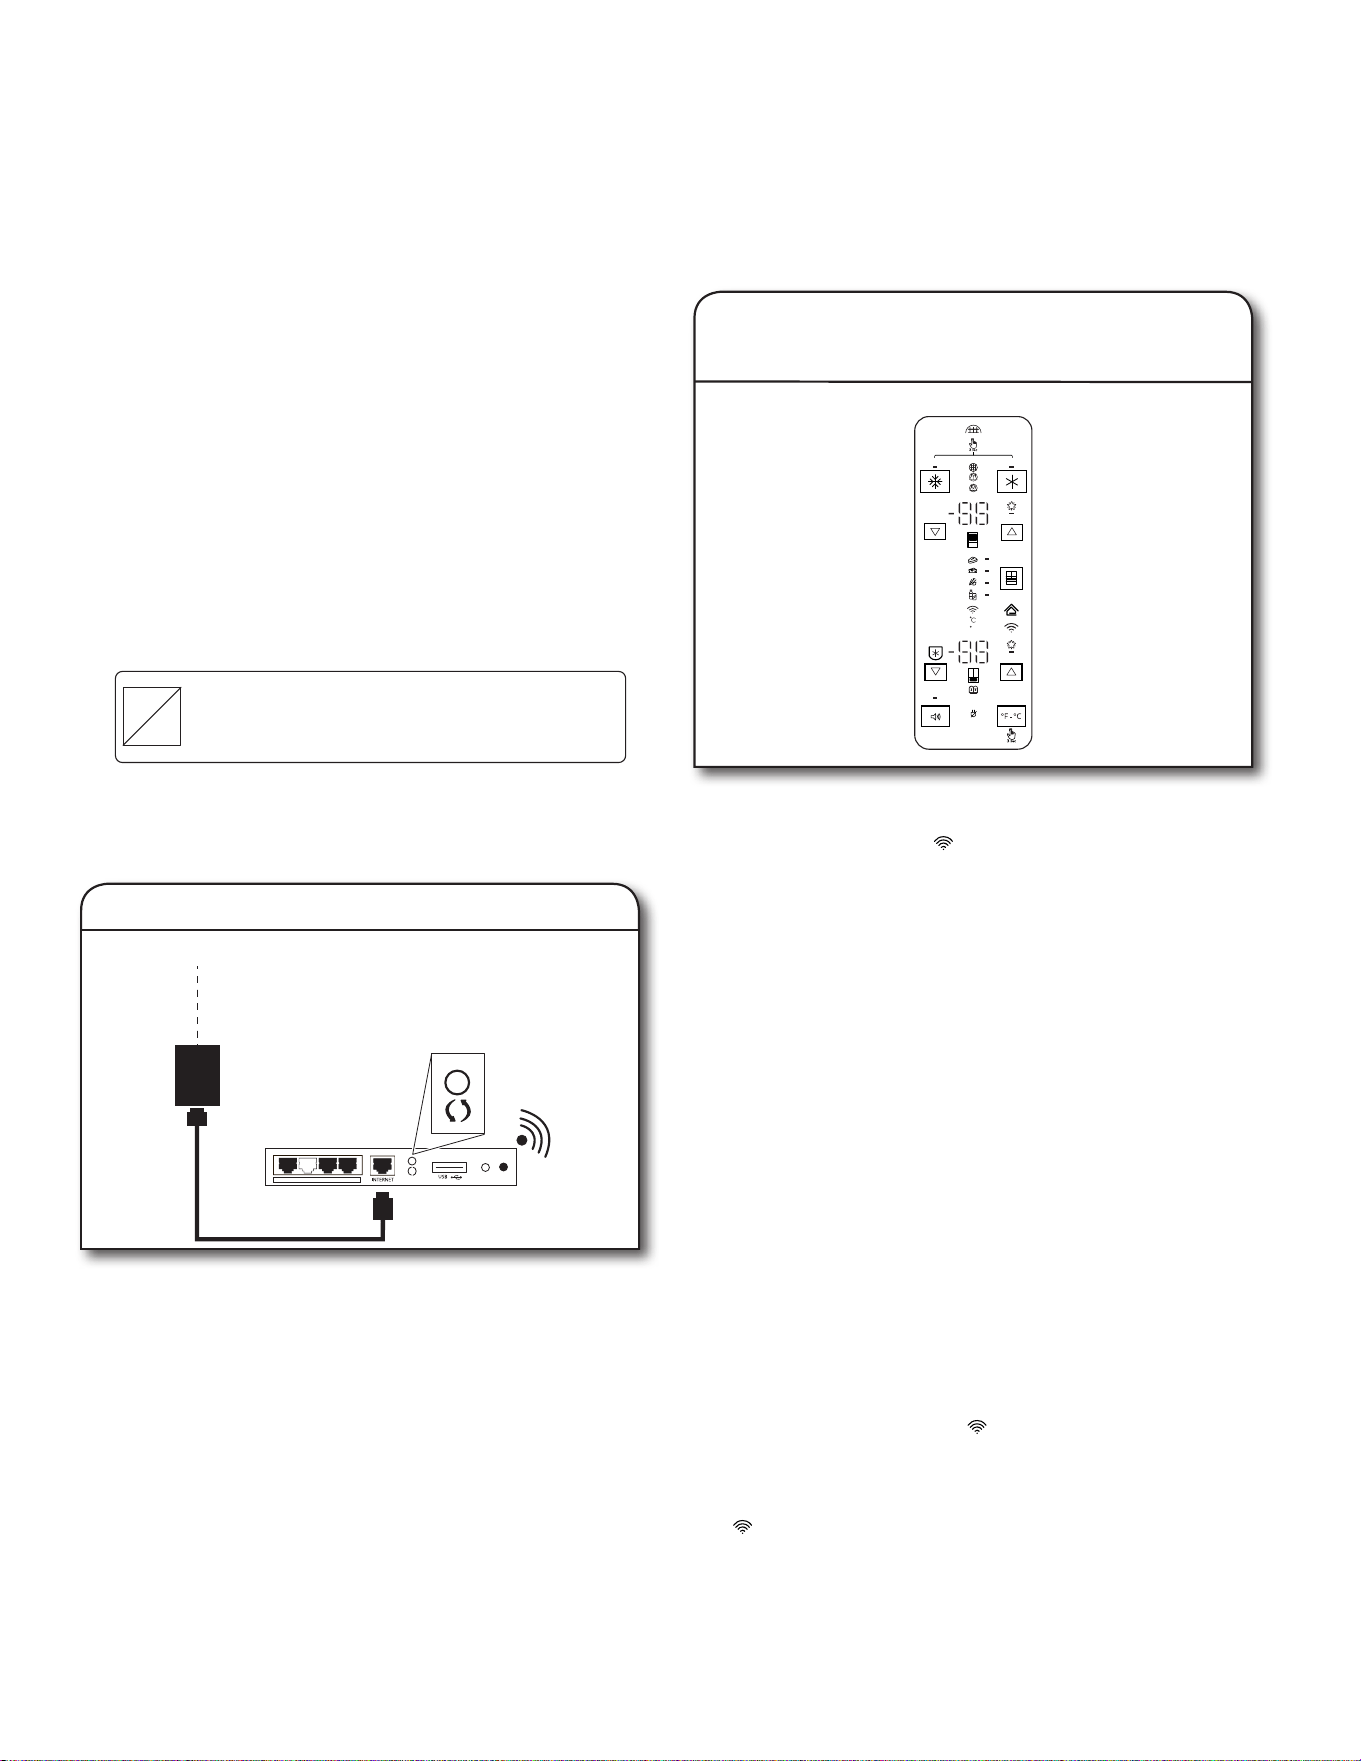
63
CONNECTIVITY SETUP
(ON SOME MODELS)
IMPORTANT: Proper installation of your refrigerator prior to use is your responsibility. Be sure to read and follow the User Instructions
that came with your refrigerator.
Automatic Set-Up Instructions—Wi-Fi Protected Setup (WPS)
Press the WPS button on the router. An indicator light will
begin blinking.
HELPFUL TIP: The WPS function on your router is active
for 2 minutes. Complete the next step within that timeframe
or you will need to reinitiate WPS.
INTERNET
WI-FI PROTECTED
SETUP (WPS)
HOME WIRELESS
ROUTER
1. Setup router
DEMO
H2O
Press and hold Wi-Fi button for 3 seconds.
The Wi-Fi status indicator ( ) on the refrigerator control panel
will blink quickly while your refrigerator and router attempt to
connect.
If the connection is successful, the Wi-Fi status indicator will
come on and remain lit.
If Your Refrigerator Doesn’t Connect:
If your refrigerator and router fail to connect after 2 minutes,
the Wi-Fi status indicator will blink rapidly and then turn off.
Refer to the “Troubleshooting—Connected Models” section of
this Use and Care Guide, check any connection instructions for
your specific router, and refer to www.whirlpool.eu if you need
alternate instructions.
NOTE: If this is your first Smart Appliance, you will need to
download the Whirlpool app and create an online user account.
If you already have the app and a user account, please skip
ahead to Step 4, “Register your refrigerator in your user
account.”
Power-Off and Power-On Wi-Fi Radio
■ To power off Wi-Fi, press and hold the Wi-Fi button for
7 seconds. The Wi-Fi icon will turn off, indicating that you
have disabled the Wi-Fi radio.
■ To reconnect Wi-Fi, press and hold the W-Fi button for
7 seconds.
■ The Wi-Fi status indicator ( ) on the refrigerator control
panel will blink slowly while your refrigerator and router
attempt to connect.
■ If the connection is successful, the Wi-Fi status indicator
( ) will come on and remain lit.
2. Setup refrigerator
(time-sensitive step)
You will need:
■ A home wireless router capable of WPS. The router should
be on and have a live internet connection.
■ To use this feature, you need to own:
■ A smartphone running Android 4.3 (or higher) with a
1280x720 (or higher) screen, or a tablet or smartphone
running iOS 8 (or higher);
■ A wireless router 2.4Ghz Wi-Fi b/g/n connected to
internet (verify with your smart device that the signal
strength of a home wireless network that is close to the
appliance is good).
■ The Smart Appliance Identification Number (SAID) from your
refrigerator. This is located on a sticker on the front side of
the right-hand hinge cover of the refrigerator.
SAID:
0123456789
Contains FCC ID:
A5UWICHIN01
Contains IC:
10248A-WICHIN01
MAC ID:
88:E7:12:XX:YY:ZZ
NOTE: If your home wireless router is not equipped with a WPS
button, please check the user manual of your router to confirm
if it is WPS-capable. If not, alternate set-up instructions are at
www.whirlpool.eu.
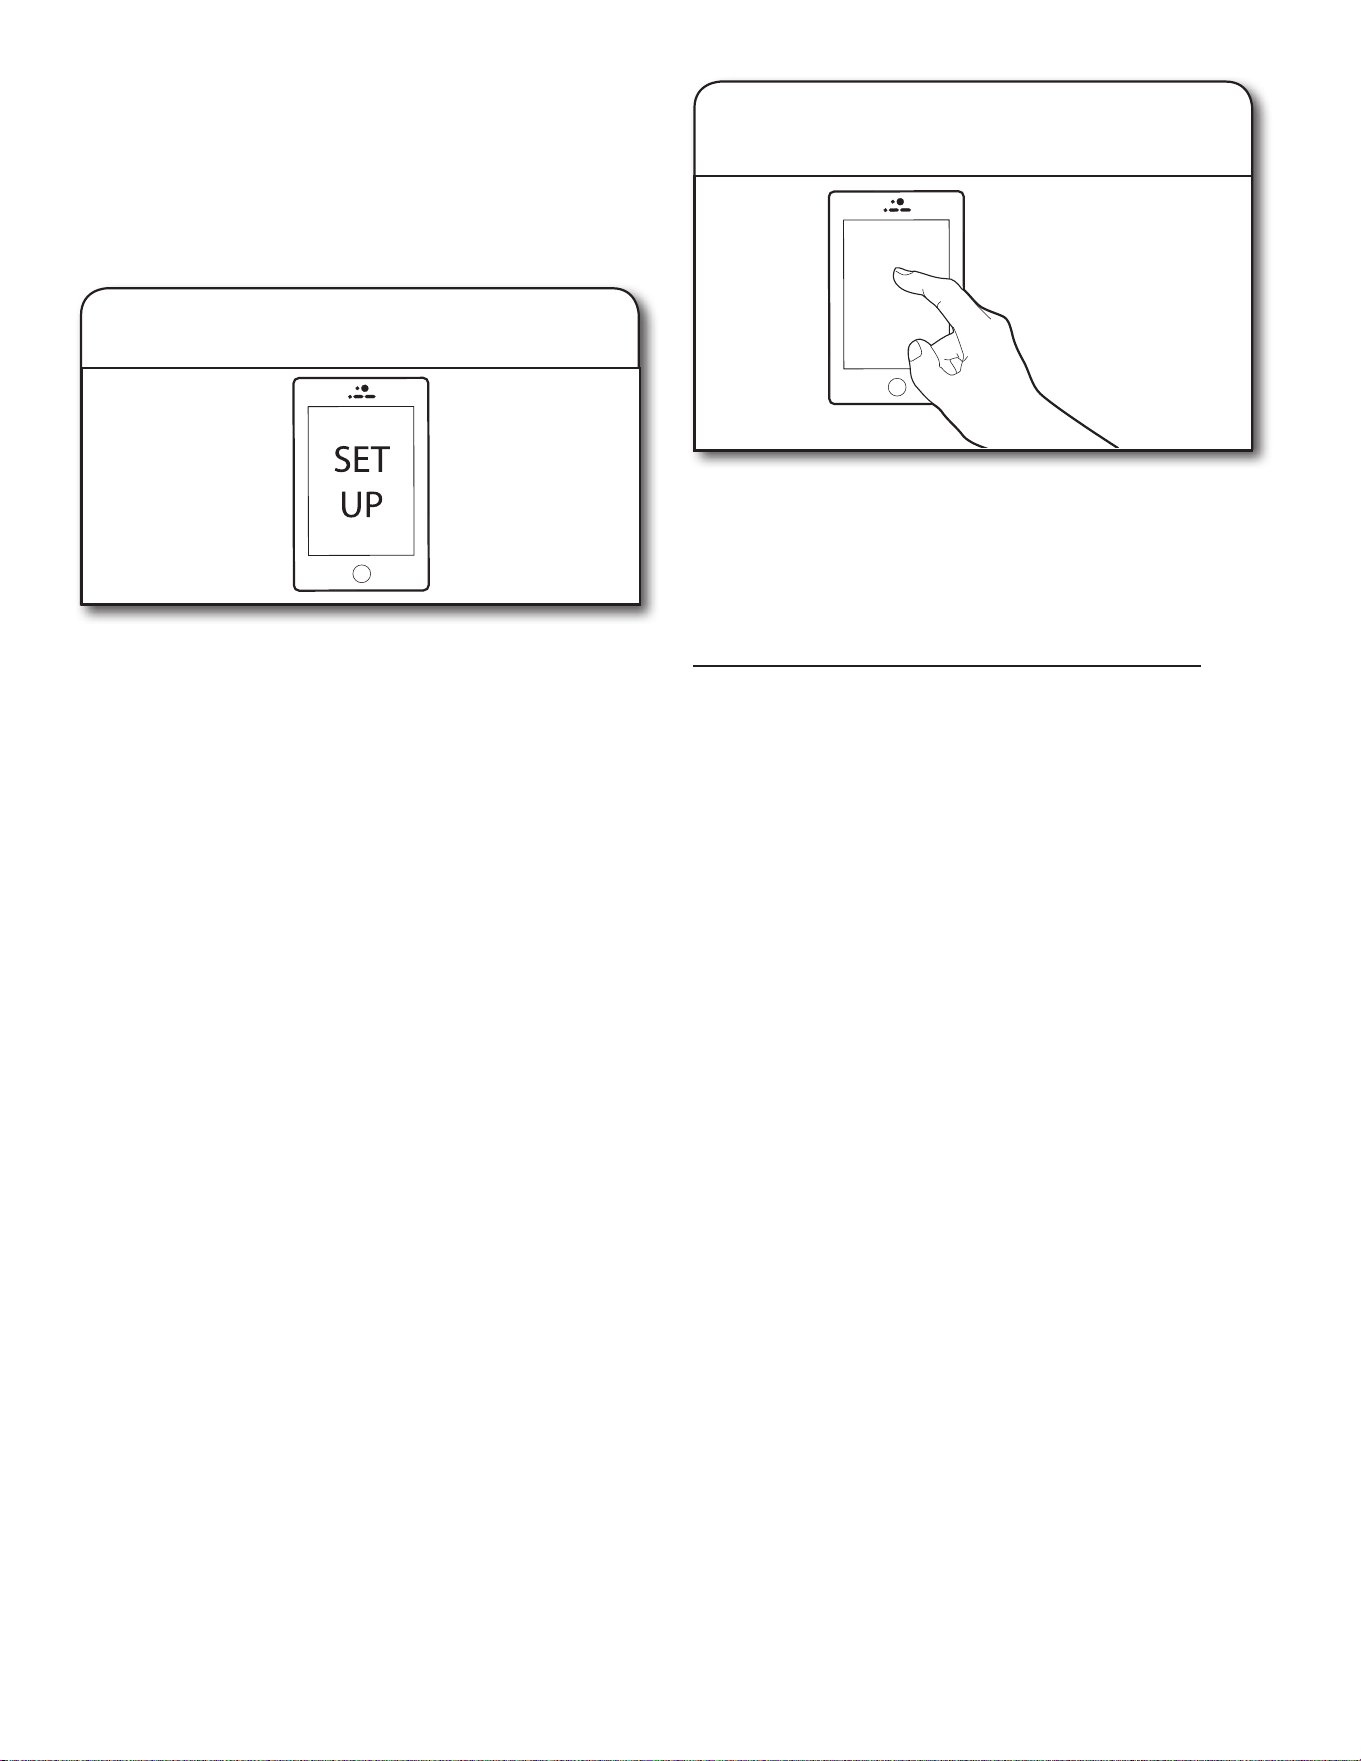
64
From your mobile device, smartphone, or tablet, go to
www.whirlpool.eu and follow the instructions to download and
install the Whirlpool app.
Once installed, tap the Whirlpool app icon to open the app. You
will be guided through the steps to set up a user account. The
app will make sure to get the necessary personal and home
information as well as information about your energy company.
3. Download Whirlpool app and
set up user account
Registering your refrigerator in your account is a necessary step
in order for you to take full advantage of the Smart features. When
prompted by the app, enter the SAID (case sensitive), which can
be found on a sticker on the front side of the right-hand hinge
cover of the refrigerator.
My Smart Appliance ID# is:
■ The Wi-Fi status indicator on the refrigerator control panel will
blink while your refrigerator and router attempt to connect.
■ Once you’ve connected your refrigerator to your home
Wi-Fi network, it will remain linked even if the power goes out,
you move the appliance, or if you put it in storage for
a while.
■ If you replace your wireless router (or get a different
Smart refrigerator), you will need to repeat this connectivity
set-up process.
4. Register your refrigerator in your
user account
Disconnect and Reconnect Wi-Fi
■ To disconnect your refrigerator from your router, press and
hold Wi-Fi between 7 seconds and 15 seconds. The Wi-Fi
and house icon will turn off, indicating that your refrigerator is
completely disconnected from Wi-Fi and your router.
■ To reconnect the refrigerator to your router and reconnect
Wi-Fi, repeat the Automatic Setup procedure described
above.
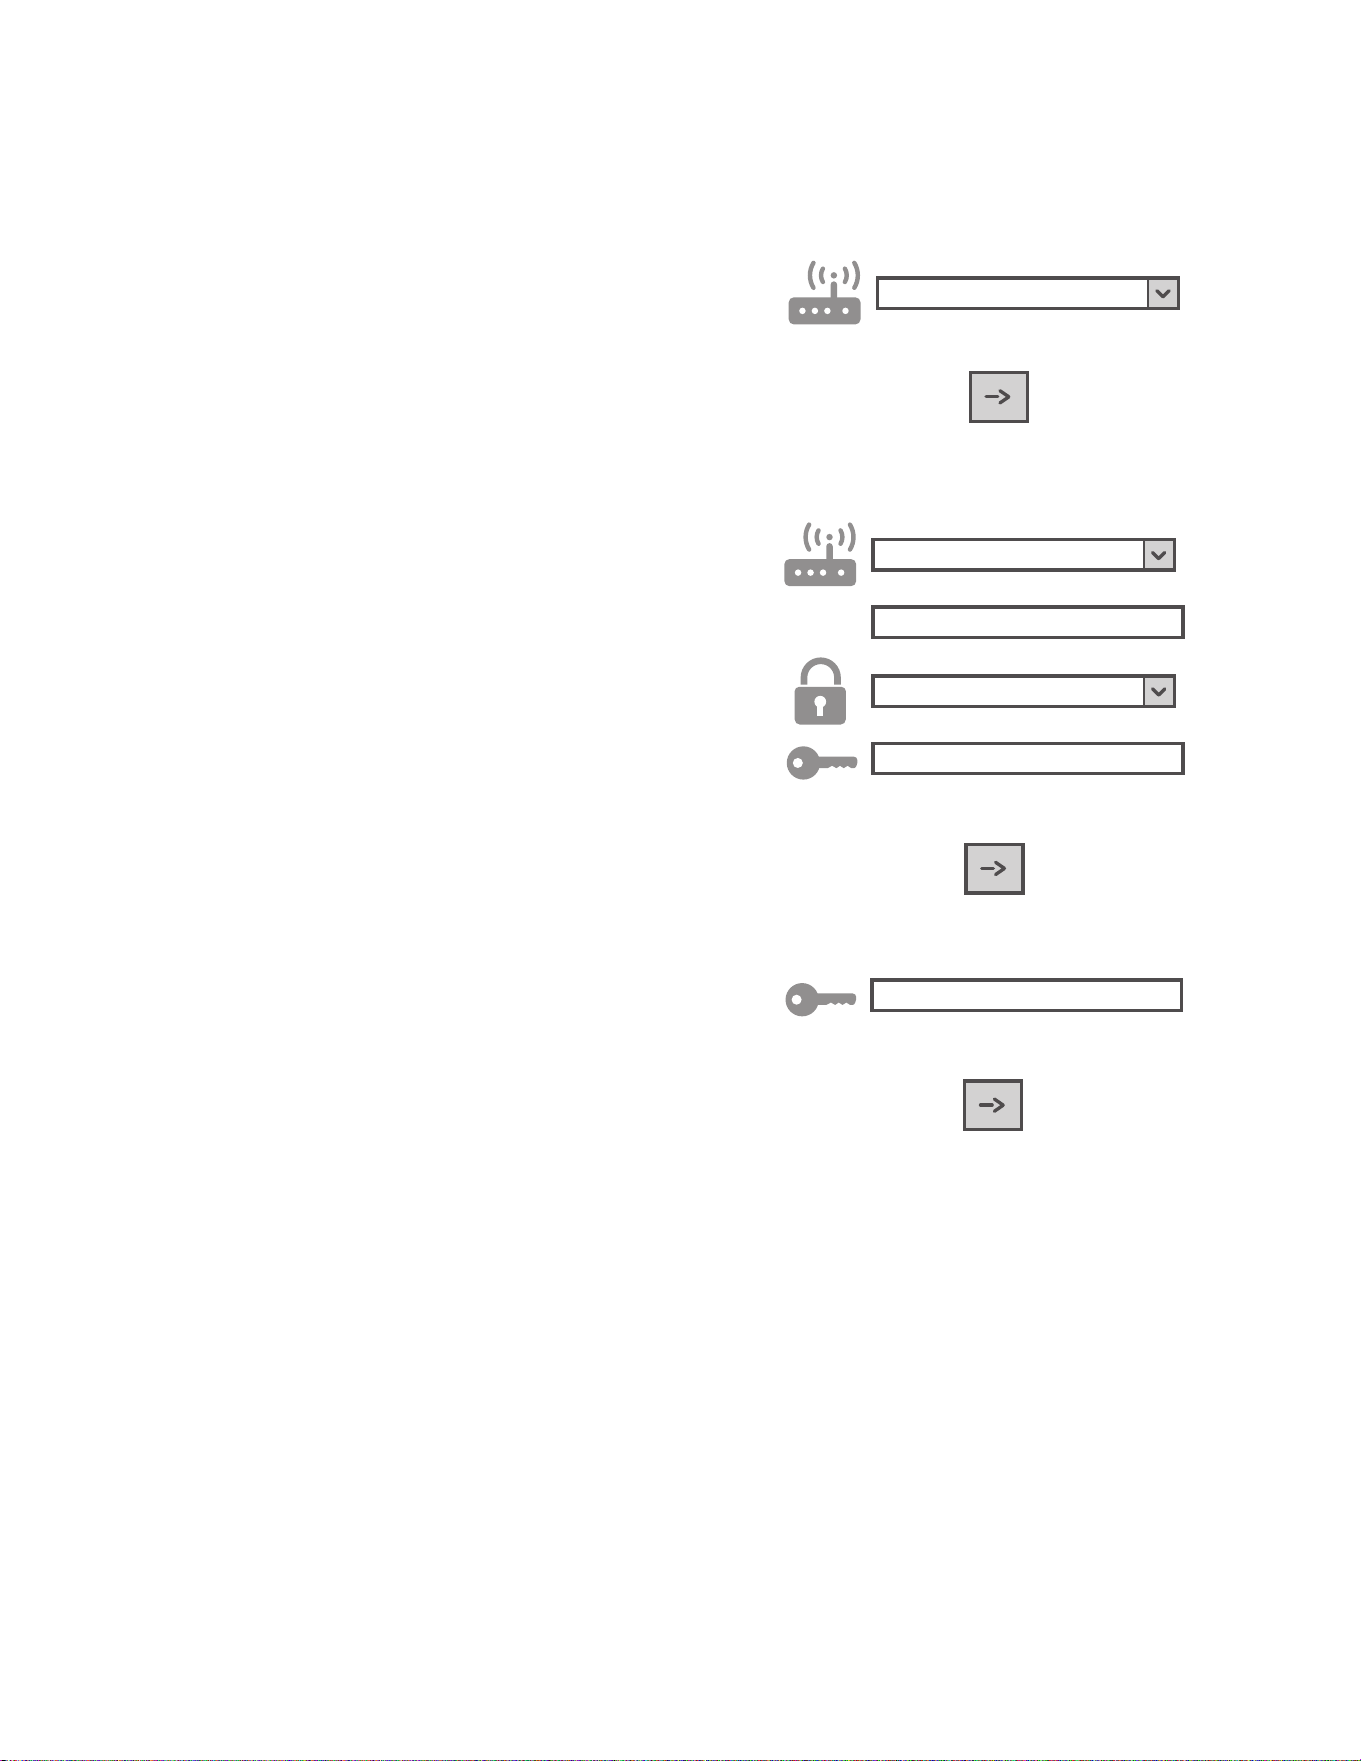
65
MANUAL SETUP INSTRUCTION (FIRST-TIME USE)
ACCESS POINT METHOD
This procedure uses the Micro Access Point technology and is
applicable if your router does not support WPS.
1. Before starting the setup procedure, please take note of
the home wireless network name (SSID), its password, and
the SAID of appliance. These will be required during the
installation process.
2. Turn on your router and make sure the internet connection is
working.
3. On your appliance, activate the provisioning process with the
Access Point by pressing the Wi-Fi button. You should see
the Wi-Fi icon blinking slowly.
4. Turn on your smart device (phone or tablet), and access your
list of available wireless networks in the settings menu.
5. The appliance has a wireless network (SSID). Select it from
the list of available wireless networks. The network name is
made up of the prefix from your appliance type (washer, dryer,
etc.) followed by the MAC address (i.e., REFRID_88_E7_12_
B3_66_ C3). If you don’t see it, you may need to refresh the
list of networks or verify the Wi-Fi icon is on the product
display.
6. Once you have selected the SSID, a password will be
required. Use the SAID (see the “Before starting the setup
procedure” section) as a password (i.e., 444441ABCD).
NOTE: This password is case sensitive.
7. Connect to the network.
8. Wait until your device is confirmed to be connected to the
appliance Wi-Fi network.
9. Open a web browser. If nothing appears, type “192.168.10.1”
in the address bar (URL) and press Enter. The browser
displays a SMART web page. It is the configuration page of
the Wi-Fi radio of your appliance.
10. In the drop-down list of available networks, select the name
of your home wireless network.
11. If the home wireless network is hidden, select “Other” (➔) and
manually enter its name (SSID) and security protocol.
12.
WPA2
Enter the password for your home wireless network, if
required, and submit. The password is case sensitive.
13. Click the “➔” button and wait for few seconds.
14. The Wi-Fi icon on the appliance should stop blinking and
turn on permanently once connected. Otherwise, disconnect
and reconnect the appliance to main power and repeat the
procedure.
15. The setup process is complete.
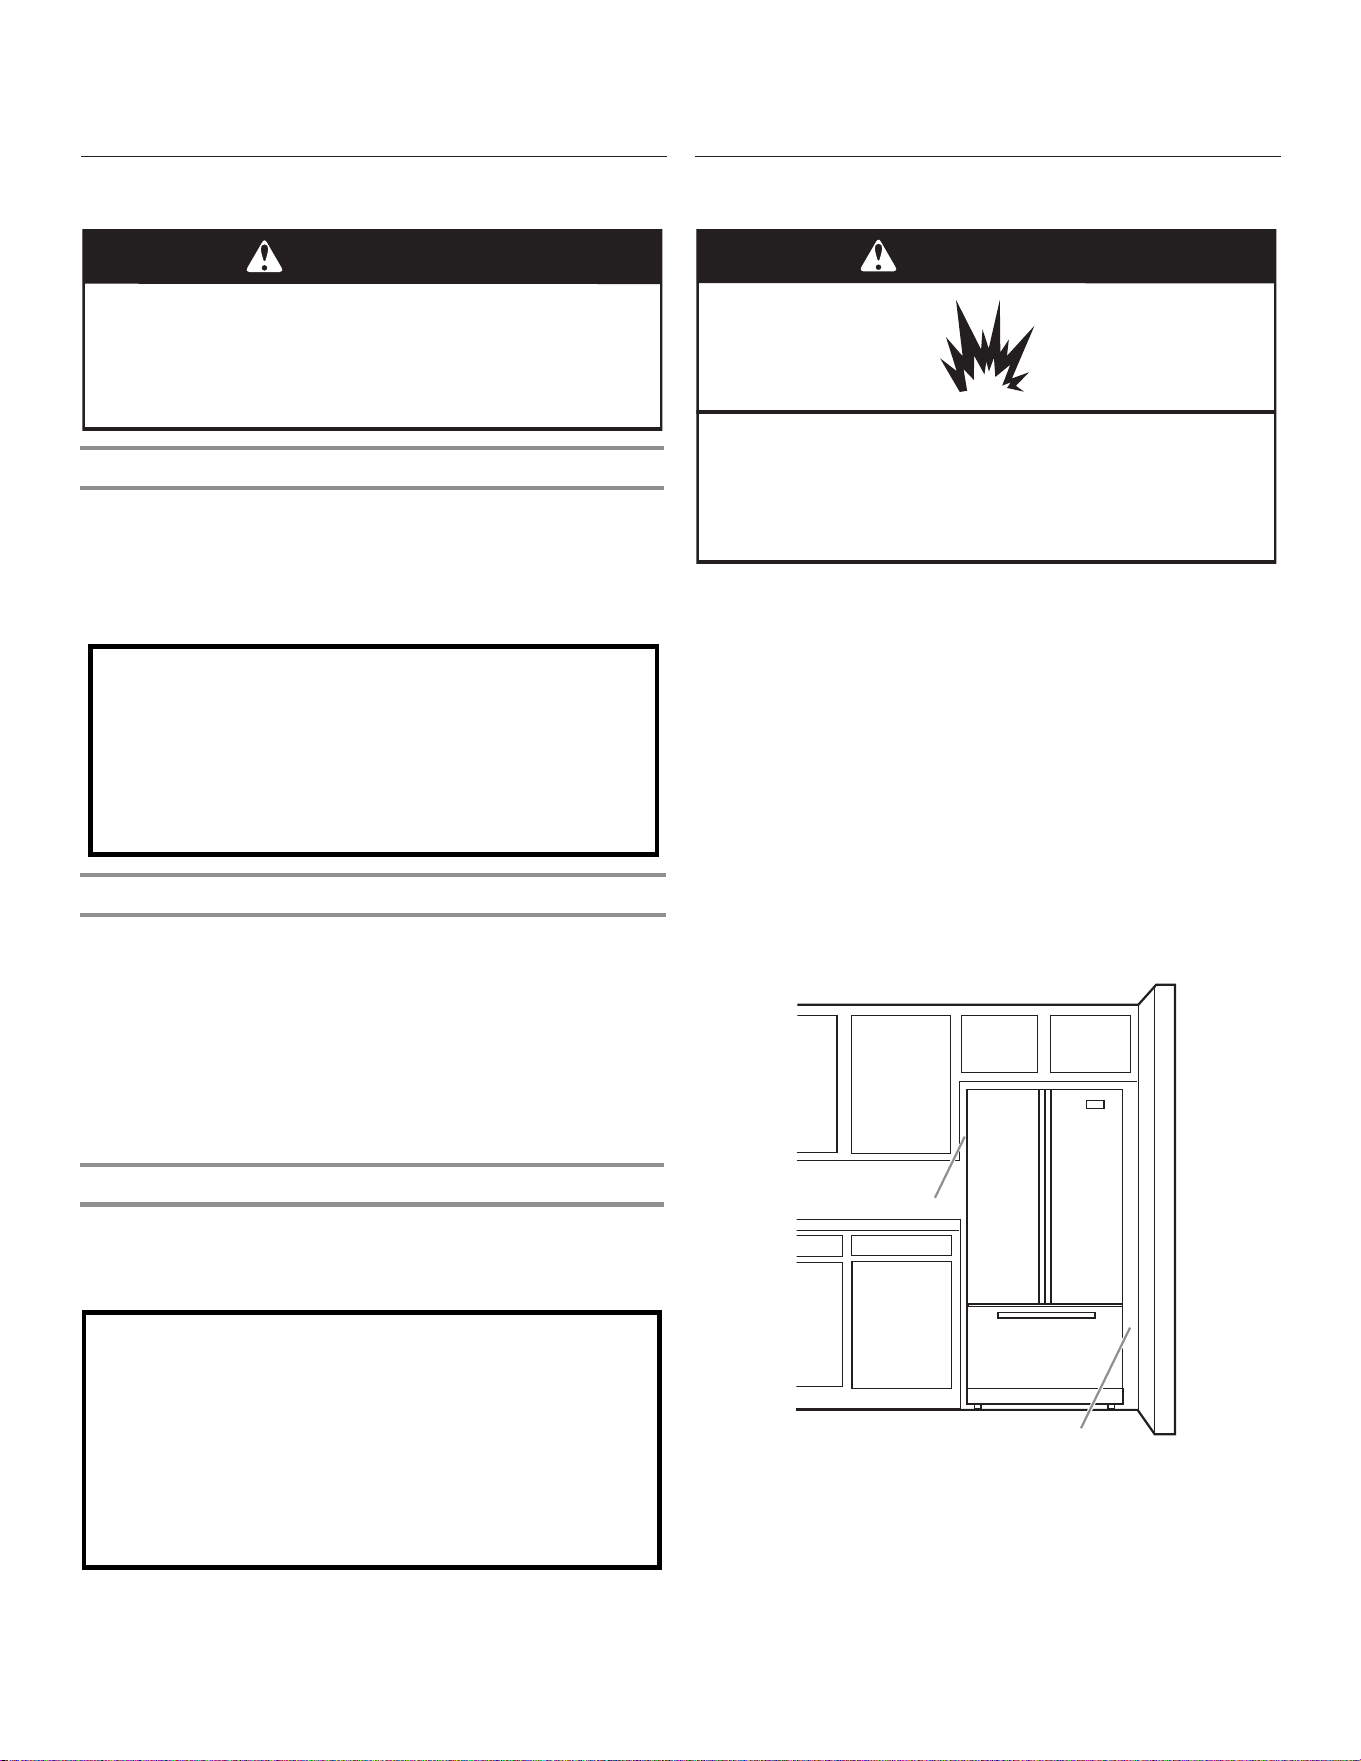
66
INSTALLATION INSTRUCTIONS
Unpack the Refrigerator
WARNING
Excessive Weight Hazard
Use two or more people to move and install
refrigerator.
Failure to do so can result in back or other injury.
Remove the Packaging
■ Remove tape and glue residue from surfaces before turning
on the refrigerator. Rub a small amount of liquid dish soap
over the adhesive with your fingers. Wipe with warm water
and dry.
■ Do not use sharp instruments, rubbing alcohol, flammable
fluids, or abrasive cleaners to remove tape or glue. These
products can damage the surface of your refrigerator.
■ Dispose of/recycle all packaging materials.
Clean Before Using
After you remove all of the packaging materials, clean the inside
of your refrigerator before using it. See the cleaning instructions
in the “Refrigerator Care” section.
Important information to know about glass shelves
and covers:
Do not clean glass shelves or covers with warm water when
they are cold. Shelves and covers may break if exposed to
sudden temperature changes or impact, such as bumping.
Tempered glass is designed to shatter into many small,
pebble-size pieces. This is normal. Glass shelves and covers
are heavy. Use both hands when removing them to avoid
dropping.
Location Requirements
WARNING
Explosion Hazard
Keep ammable materials and vapours, such as petrol,
away from refrigerator.
Failure to do so can result in death, explosion, or re.
IMPORTANT: This refrigerator is designed for indoor, household
use only.
To ensure proper ventilation for your refrigerator, allow for a
1.25 cm (1/2") space on each side and at the top. Allow for a
2.54 cm (1") space behind the refrigerator. If your refrigerator has
an ice maker, allow extra space at the back for the water line
connections. When installing your refrigerator next to a fixed wall,
leave a 9.5 cm (3³⁄
4
") minimum space between the refrigerator
and wall to allow the door to swing open.
NOTE: This refrigerator is intended for use in a location where
the temperature ranges from a minimum of 13°C (55°F) to a
maximum of 43°C (110°F). The preferred room temperature range
for optimum performance, which reduces electricity usage and
provides superior cooling, is between 15°C (60°F) and 32°C
(90°F). It is recommended that you do not install the refrigerator
near a heat source, such as an oven or radiator.
9.5 cm (3³⁄
4
")
1.25 cm (1/2")
Refrigerator Delivery
■ A minimum door opening of 838 mm (33") is required. If
door opening is 914 mm (36") or less, then removal of doors,
drawer, and hinges is required.
■ Cart the refrigerator from the side for all door openings.
When Moving Your Refrigerator:
Your refrigerator is heavy. When moving the refrigerator for
cleaning or service, be sure to cover the oor with
cardboard or hardboard to avoid oor damage. Always pull
the refrigerator straight out when moving it. Do not wiggle or
“walk” the refrigerator when trying to move it, as oor
damage could occur.
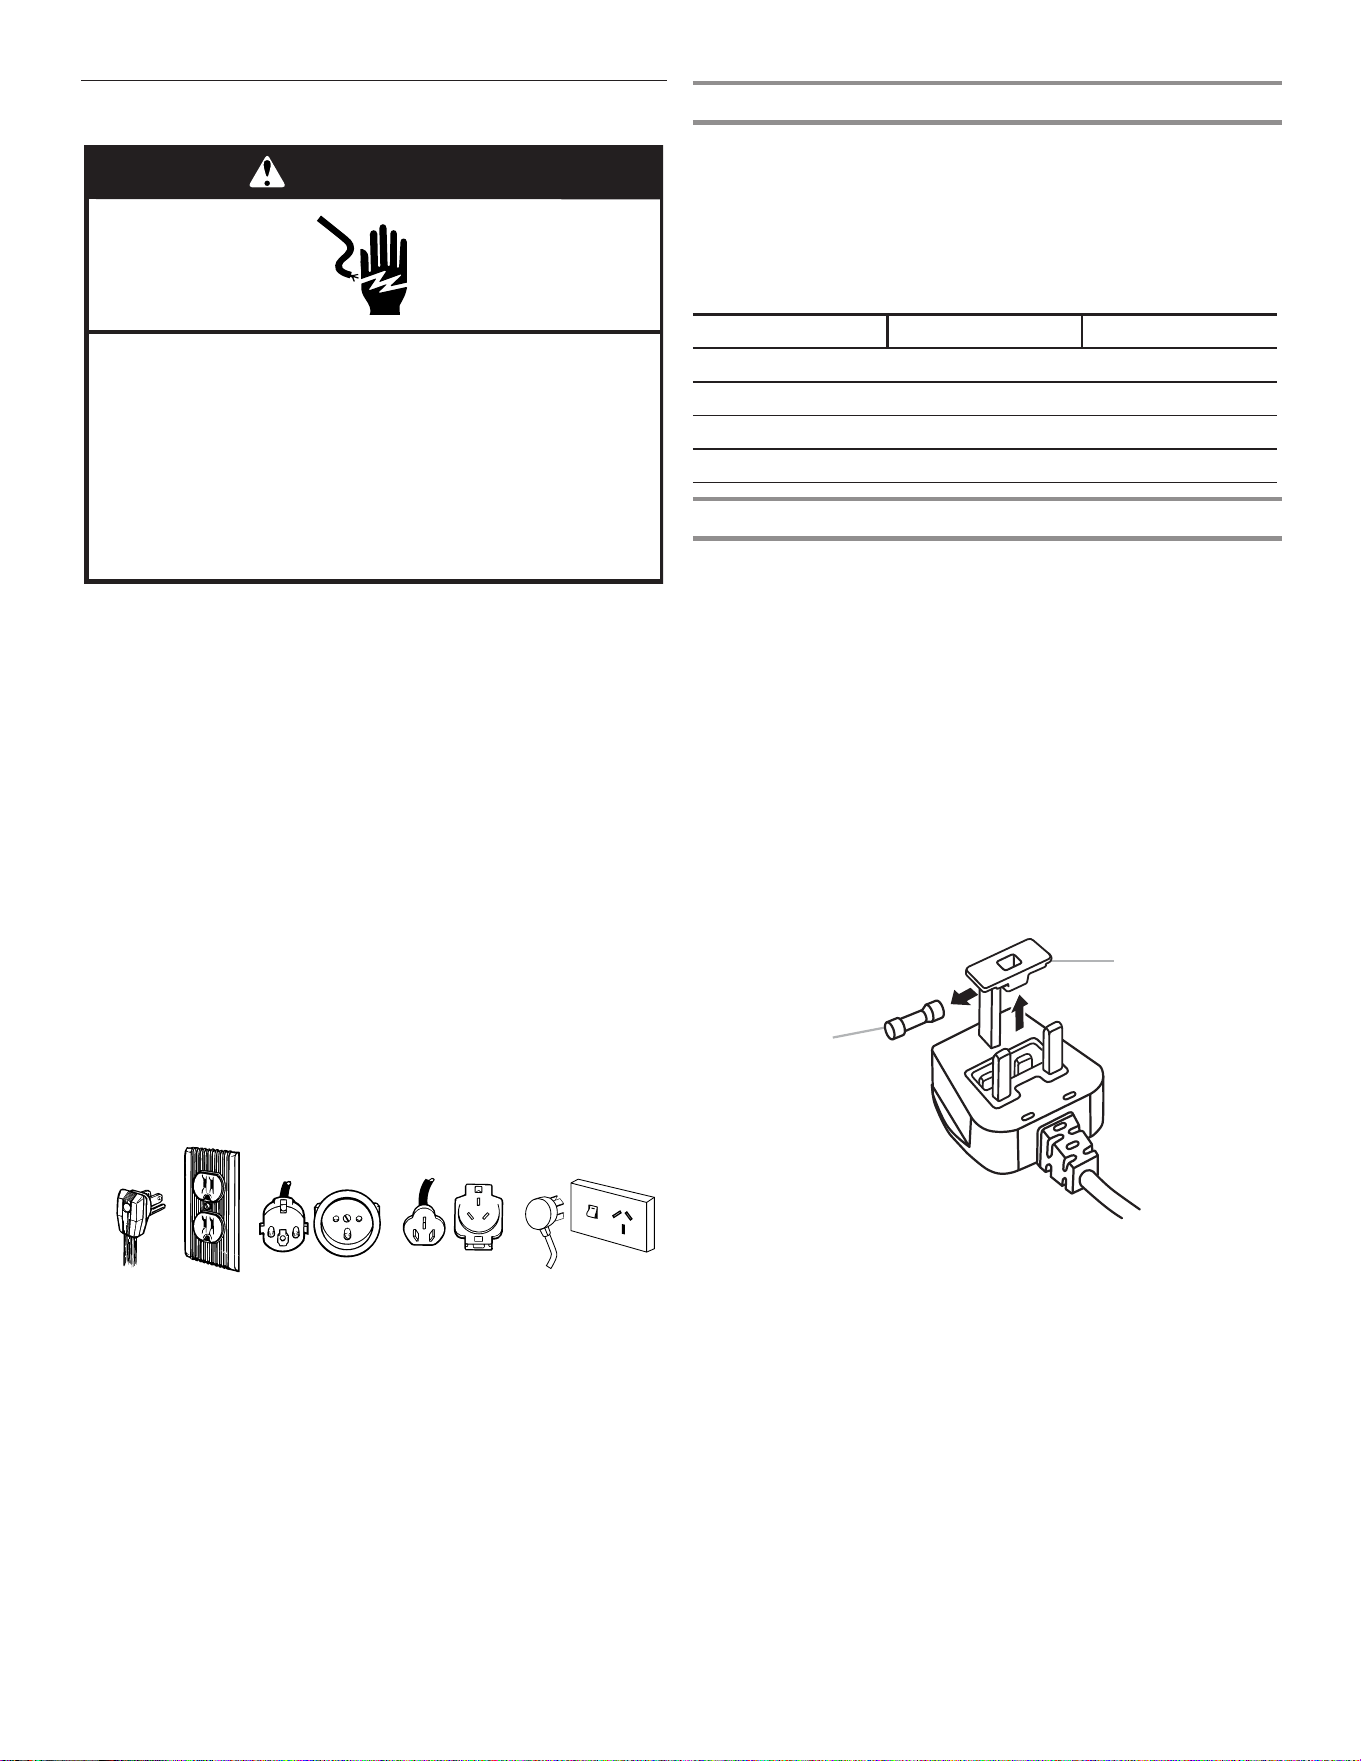
67
Electrical Requirements
IMPORTANT: Installation and the electrical connection must
be carried out by a qualified technician according to the
manufacturers’ instructions and in compliance with the local
safety regulations.
■ The refrigerator is designed to operate on a separate
220-240 volt, 10 amp, 50/60 Hz cycle time.
■ Make sure the voltage specified on the rating plate
corresponds to that of your home.
■ It must be possible to disconnect the appliance from the
power supply by unplugging it or by means of a main
two-pole switch installed upstream of the socket.
■ Power cable modification or replacement must be carried out
only by qualified personnel or by After-sales Service.
Before you move your refrigerator into its final location, it
is important to make sure you have the proper electrical
connection:
Recommended Grounding Method
A 115 Volt 60 Hz. (Plug 1), 220/240 Volt 50 Hz. (Plugs 2 or 3),
220 Volt 60 Hz. (Plug 3), or 230/240 Volt 50 Hz. (Plug 4) AC
only 10 amp fused and grounded (earthed) electrical supply is
required.
7
Location Requirements
IMPORTANT: This refrigerator is designed for indoor household
use only.
To ensure proper ventilation for your refrigerator, allow for ¹⁄₂"
(1.27 cm) of space on each side and at the top. Allow for 2"
(5.08 cm) of space behind the refrigerator. If your refrigerator has
an ice maker, allow extra space at the back for the water line
connections. When installing your refrigerator next to a fixed wall,
leave a 2" (5.08 cm) minimum space on each side (depending on
your model) to allow the doors to swing open.
NOTES:
n This refrigerator is intended for use in a location where the
temperature ranges from a minimum of 55°F (13°C) to a
maximum of 110°F (43°C). The preferred room temperature
range for optimum performance, which reduces electricity
usage and provides superior cooling, is between 60°F (15°C)
and 90°F (32°C). It is recommended that you do not install the
refrigerator near a heat source, such as an oven or radiator.
n Normal minimum cabinet cut-out width required for product
installation is 36" (91.44 cm). However, if the product is placed
against an extended wall and the ability to remove the crisper
pans is desired, an additional 18" (45.72 cm) of cabinet width
is required, so a total cabinet opening width of 54"
(137.16 cm) is recommended.
Electrical Requirements
Before you move your refrigerator into its final location, it is
important to make sure you have the proper electrical connection:
Recommended Grounding Method
A 115 Volt 60 Hz. (Plug 1), 220/240 Volt 50 Hz. (Plugs 2 or 3),
220 Volt 60 Hz. (Plug 3), or 230/240 Volt 50 Hz. (Plug 4) AC only
10-amp fused and grounded (earthed) electrical supply is
required.
For Australia and New Zealand:
Your new appliance has been especially manufactured to
meet all Australian Standards and Conditions.
Some notations in the installation instructions may refer to
electrical requirements in other countries, so we draw your
particular attention to these specific notes.
Your appliance needs to be plugged into a 230/240 Volt
50 Hz. AC only 10-amp (Plug 4) earthed outlet.
WARNING
Explosion Hazard
Keep flammable materials and vapors, such as
gasoline, away from refrigerator.
Failure to do so can result in death, explosion, or fire.
1
/
2" (1.27 cm)
2" (5.08 cm)
WARNING
Electrical Shock Hazard
Plug into a grounded (earthed) outlet.
Do not remove ground prong.
Do not use an adapter.
Do not use an extension cord.
Failure to follow these instructions can result in death,
fire, or electrical shock.
Plug 1
Plug 2
Plug 3
Plug 4
Plug 1 Plug 2 Plug 3 Plug 4
For Australia and New Zealand:
Your new appliance has been especially manufactured to meet all
Australian Standards and Conditions.
Some notations in the installation instructions may refer to
electrical requirements in other countries, so we draw your
particular attention to these specific notes.
Your appliance needs to be plugged into a 230/240 Volt 50 Hz.
AC only 10 amp (Plug 4) earthed outlet.
Temperature
This refrigerator is designed for operation in places where the
temperature comes within the following ranges, according to the
climatic class shown on the rating plate. The refrigerator may not
work properly if it is left for a long time at a temperature outside
the specified range.
NOTE: It is recommended that you do not install the refrigerator
near a heat source, such as an oven or radiator.
Climatic Class Amb. T. (°C) Amb. T. (°F)
SN
From 10 to 32 From 50 to 90
N
From 16 to 32 From 61 to 90
ST
From 16 to 38 From 61 to 100
T
From 16 to 43 From 61 to 110
Electrical Requirements (Great Britain and Ireland only)
IMPORTANT: This refrigerator must be earthed.
Fuse Replacement
If the main lead of this refrigerator is fitted with a BS1363A,
13 amp fused plug. To replace a fuse in this type of plug, use an
A.S.T.A.-approved fuse to BS 1362 type and proceed as follows:
1. Remove the fuse cover (A) and fuse (B).
2. Fit replacement 13 amp fuse into the fuse cover.
3. Reinsert both the fuse and its cover into the plug.
IMPORTANT: The fuse cover must be refitted when changing
a fuse. If the fuse cover is lost, the plug must not be used until
a correct replacement cover is fitted. A correct replacement is
identified by the colour insert or a coloured word embossed on
the base of the plug. Replacement fuse covers are available from
your local electrical store.
6
Electrical Requirements (Great Britain and Ireland only)
IMPORTANT: This refrigerator must be earthed.
Fuse Replacement
If the main lead of this refrigerator is fitted with a BS1363A,
13-amp fused plug, to replace a fuse in this type plug use an
A.S.T.A. approved fuse to BS 1362 type and proceed as follows:
1. Remove the fuse cover (A) and fuse (B).
2. Fit replacement 13-amp fuse into the fuse cover.
3. Reinsert both the fuse and its cover into the plug.
IMPORTANT: The fuse cover must be refitted when changing a
fuse. If the fuse cover is lost, the plug must not be used until a
correct replacement cover is fitted. A correct replacement is
identified by the colour insert or the colour “word” embossed on
the base of the plug. Replacement fuse covers are available from
your local electrical store.
For the Republic of Ireland (only):
The information given in respect of Great Britain will frequently
apply, but a third type of plug and socket is also used, the 2-pin,
side earth type.
Socket Outlet/Plug (valid for both countries)
If the fitted plug is not suitable for your socket outlet, please
contact After-sales Service for further instruction. Please do not
attempt to change the plug yourself. This procedure needs to be
carried out by a qualified technician in compliance with the
manufacturer’s instructions and current standard safety
regulations.
Clean Before Using
After you remove all of the packaging materials, clean the inside of
your refrigerator before using it. See the cleaning instructions in
“Refrigerator Care.”
Food Storage
■ Use the refrigerator compartment only for storing fresh food
and the freezer compartment only for storing frozen food,
freezing fresh food and making ice cubes.
■ Do not store glass containers with liquids in the freezer
compartment because they may break.
■ Avoid storing unwrapped food in direct contact with internal
surfaces of the refrigerator or freezer compartments.
Location Requirements
Install and level the refrigerator on a floor strong enough to hold its
weight and in a place suitable for its size and use.
IMPORTANT: This refrigerator is designed for indoor, household
and similar applications such as:
■ Staff kitchen areas in shops, offices and other working
environments.
■ Farmhouses and by clients in hotels, motels and other
residential type environments.
■ Bed and breakfast type environments.
■ Catering and similar non-retail applications.
Ventilation
Install the refrigerator in a dry and well-ventilated place.
To ensure proper ventilation for your refrigerator, allow for a ¹⁄₂"
(1.25 cm) space at the top of the refrigerator, and a 1" (2.54 cm)
space behind the refrigerator. If your refrigerator has an ice maker,
allow extra space at the back for the water line connections.
When installing your refrigerator next to a fixed wall, leave a 2¹⁄₂"
(6.3 cm) minimum space between the refrigerator and wall to
allow the door to swing open.
NOTE: Keep the refrigerator ventilation openings clear.
A. Fuse cover
B. Fuse
A
B
Important information to know about glass shelves
and covers:
Do not clean glass shelves or covers with warm water when
they are cold. Shelves and covers may break if exposed to
sudden temperature changes or impact, such as bumping.
Tempered glass is designed to shatter into many small,
pebble-size pieces. This is normal. Glass shelves and covers
are heavy. Use both hands when removing them to avoid
dropping.
WARNING
Explosion Hazard
Keep flammable materials and vapors, such as
gasoline, away from refrigerator.
Failure to do so can result in death, explosion, or fire.
2¹⁄₂" (6.3 cm)
¹⁄₂" (1.25 cm)
A. Fuse cover
B. Fuse
For the Republic of Ireland (only):
The information given in respect of Great Britain will frequently
apply, but a third type of plug and socket is also used, the 2-pin,
side earth type.
Socket Outlet/Plug (valid for both countries)
If the fitted plug is not suitable for your socket outlet, please
contact After-sales Service for further instruction. Please do
not attempt to change the plug yourself. This procedure needs
to be carried out by a qualified technician in compliance with
the manufacturer’s instructions and current standard safety
regulations.
7
Location Requirements
IMPORTANT: This refrigerator is designed for indoor household
use only.
To ensure proper ventilation for your refrigerator, allow for ¹⁄₂"
(1.27 cm) of space on each side and at the top. Allow for 2"
(5.08 cm) of space behind the refrigerator. If your refrigerator has
an ice maker, allow extra space at the back for the water line
connections. When installing your refrigerator next to a fixed wall,
leave a 2" (5.08 cm) minimum space on each side (depending on
your model) to allow the doors to swing open.
NOTES:
n This refrigerator is intended for use in a location where the
temperature ranges from a minimum of 55°F (13°C) to a
maximum of 110°F (43°C). The preferred room temperature
range for optimum performance, which reduces electricity
usage and provides superior cooling, is between 60°F (15°C)
and 90°F (32°C). It is recommended that you do not install the
refrigerator near a heat source, such as an oven or radiator.
n Normal minimum cabinet cut-out width required for product
installation is 36" (91.44 cm). However, if the product is placed
against an extended wall and the ability to remove the crisper
pans is desired, an additional 18" (45.72 cm) of cabinet width
is required, so a total cabinet opening width of 54"
(137.16 cm) is recommended.
Electrical Requirements
Before you move your refrigerator into its final location, it is
important to make sure you have the proper electrical connection:
Recommended Grounding Method
A 115 Volt 60 Hz. (Plug 1), 220/240 Volt 50 Hz. (Plugs 2 or 3),
220 Volt 60 Hz. (Plug 3), or 230/240 Volt 50 Hz. (Plug 4) AC only
10-amp fused and grounded (earthed) electrical supply is
required.
For Australia and New Zealand:
Your new appliance has been especially manufactured to
meet all Australian Standards and Conditions.
Some notations in the installation instructions may refer to
electrical requirements in other countries, so we draw your
particular attention to these specific notes.
Your appliance needs to be plugged into a 230/240 Volt
50 Hz. AC only 10-amp (Plug 4) earthed outlet.
WARNING
Explosion Hazard
Keep flammable materials and vapors, such as
gasoline, away from refrigerator.
Failure to do so can result in death, explosion, or fire.
1
/
2" (1.27 cm)
2" (5.08 cm)
WARNING
Electrical Shock Hazard
Plug into a grounded (earthed) outlet.
Do not remove ground prong.
Do not use an adapter.
Do not use an extension cord.
Failure to follow these instructions can result in death,
fire, or electrical shock.
Plug 1
Plug 2
Plug 3
Plug 4
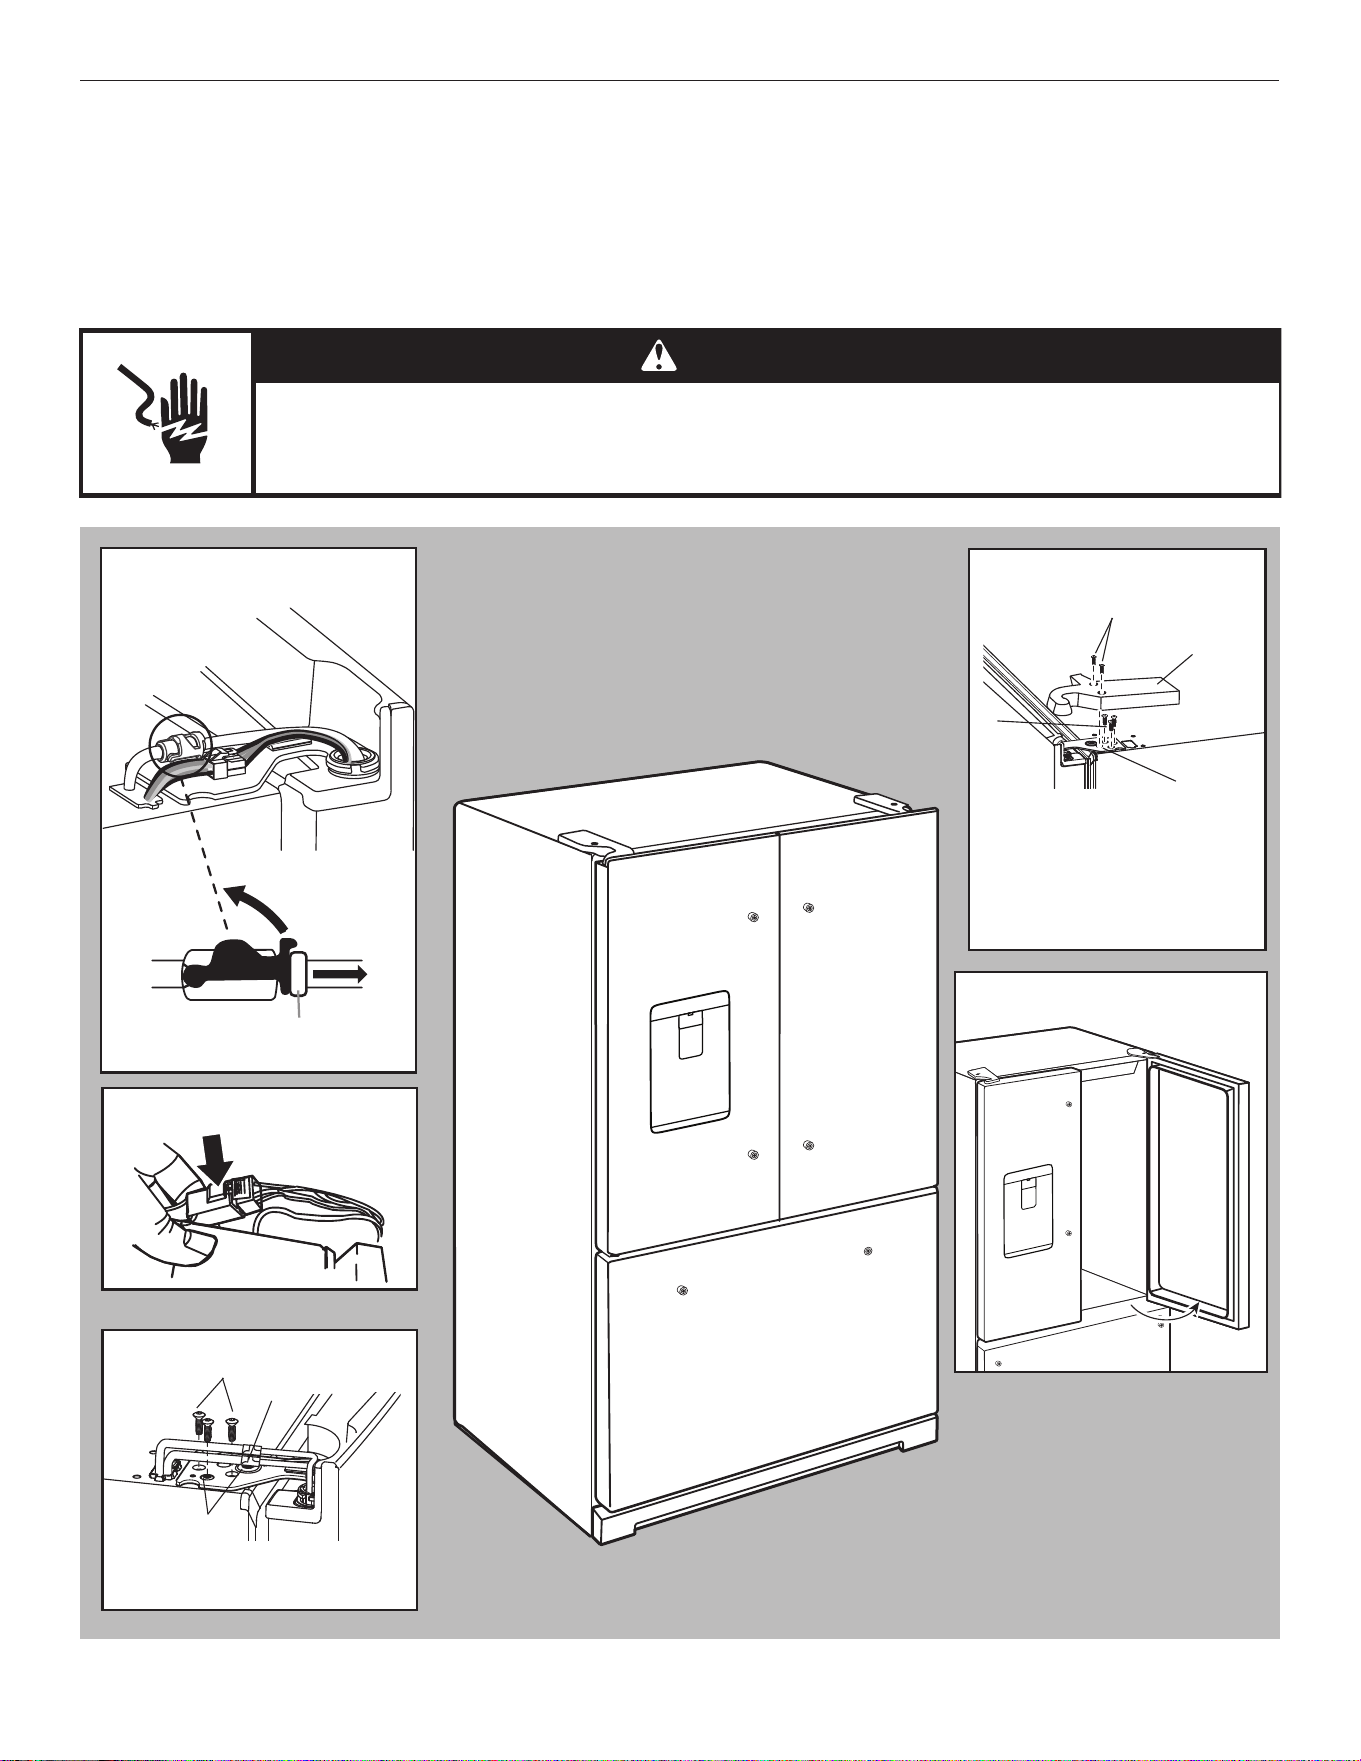
68
Remove and Replace Refrigerator Doors
NOTE: Measure the width of your door opening to see whether or not you need to remove the refrigerator doors to move the
refrigerator into your home. If door removal is necessary, see the following instructions.
IMPORTANT: If the refrigerator was previously installed and you are moving it out of the home, turn the refrigerator control off before
you begin removing the doors. Unplug the refrigerator or disconnect power. Remove food and adjustable door or utility bins from
doors.
Gather the required tools and read all instructions before removing doors.
TOOLS NEEDED: TORX
T25
†
screwdriver and a #2 Phillips screwdriver
WARNING
Electrical Shock Hazard
Disconnect power before removing doors.
Failure to do so can result in death or electrical shock.
†TORX and T25 are trademarks of Acument Intellectual Properties, LLC.
Water Dispenser
Tubing Connection
Wiring Plug
Top Right Hinge
Top Left Hinge
A
A. Outer ring
C
B
A
A. TORX
T25 screws
B. Ground wire (Do not remove.)
C. Do not remove screws.
90°
Door at 90° Angle
to Cabinet°
A. TORX
T25 screws
B. Hinge cover screws
C. Top hinge cover
D. Top hinge
A
B
C
D
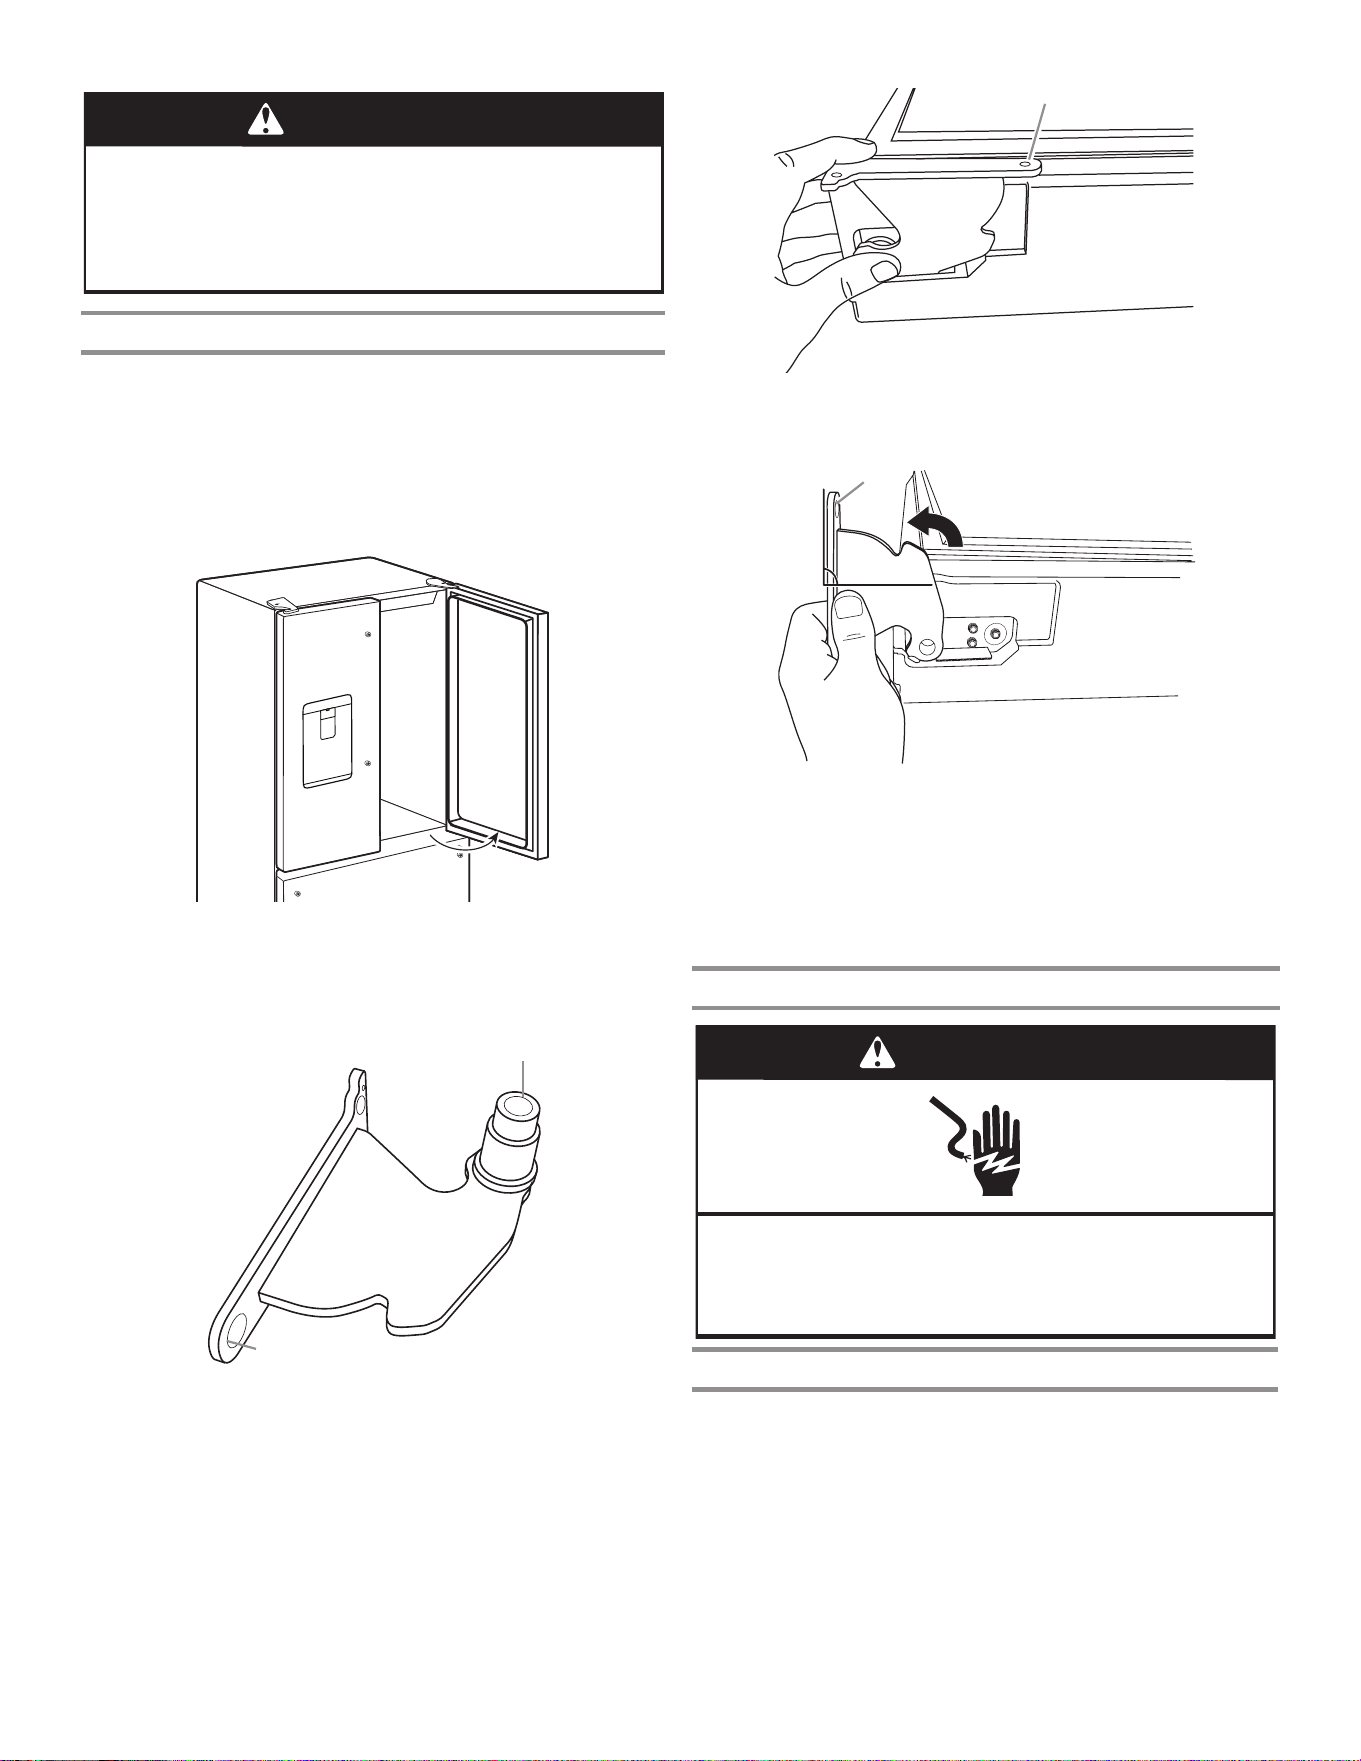
69
Bottom Door Hinge
For your convenience, the refrigerator doors have bottom hinges
with door closers. These closers allow the doors to swing fully
closed with just a gentle push.
IMPORTANT: So that the closers feature will operate properly,
the doors must be removed only when open to a 90° angle to the
front of the cabinet. If one or both doors were not at a 90° angle
when removed, the bottom door hinge must be reset.
WARNING
Excessive Weight Hazard
Use two or more people to move and install
refrigerator.
Failure to do so can result in back or other injury.
90°
Reset the Door Hinge
1. Lift the door from the bottom hinge pin and place it on a flat
surface.
2. Using a TORX
T25 screwdriver, remove the bottom hinge with
the bushing from the cabinet.
3. Insert the bottom hinge and bushing into the corresponding
slot in the bottom of the door.
NOTE: Make sure that the base of the hinge is parallel to the
bottom of the door.
4. Turn the hinge until the hinge base is at a 90° angle to the
bottom edge of the door.
5. Remove the hinge from the door. Using a driver with a
#2 square bit, reattach the bottom hinge to the refrigerator
cabinet.
6. The hinge is now reset and prepared for the door to be
replaced. See the “Replace Refrigerator Doors” sections later
in this section.
Remove Refrigerator Doors
WARNING
Electrical Shock Hazard
Disconnect power before removing doors.
Failure to do so can result in death or electrical shock.
Remove Right-Hand Door
1. Unplug refrigerator or disconnect power.
2. Keep the refrigerator doors closed until you are ready to lift
them free from the cabinet.
NOTE: Provide additional support for the refrigerator door
while the hinges are being removed. Do not depend on the
door gasket magnets to hold the door in place while you are
working.
3. Using a Phillips screwdriver, remove the cover from the top
hinge.
4. Using the TORX
T25 screwdriver, remove the three screws
from the top hinge and set aside.
A. Bushing
B. Hinge base
A
B
A. Hinge base parallel to the bottom edge of the door
A
A. Hinge base turned to a 90° angle
with the bottom edge of the door
90°
A
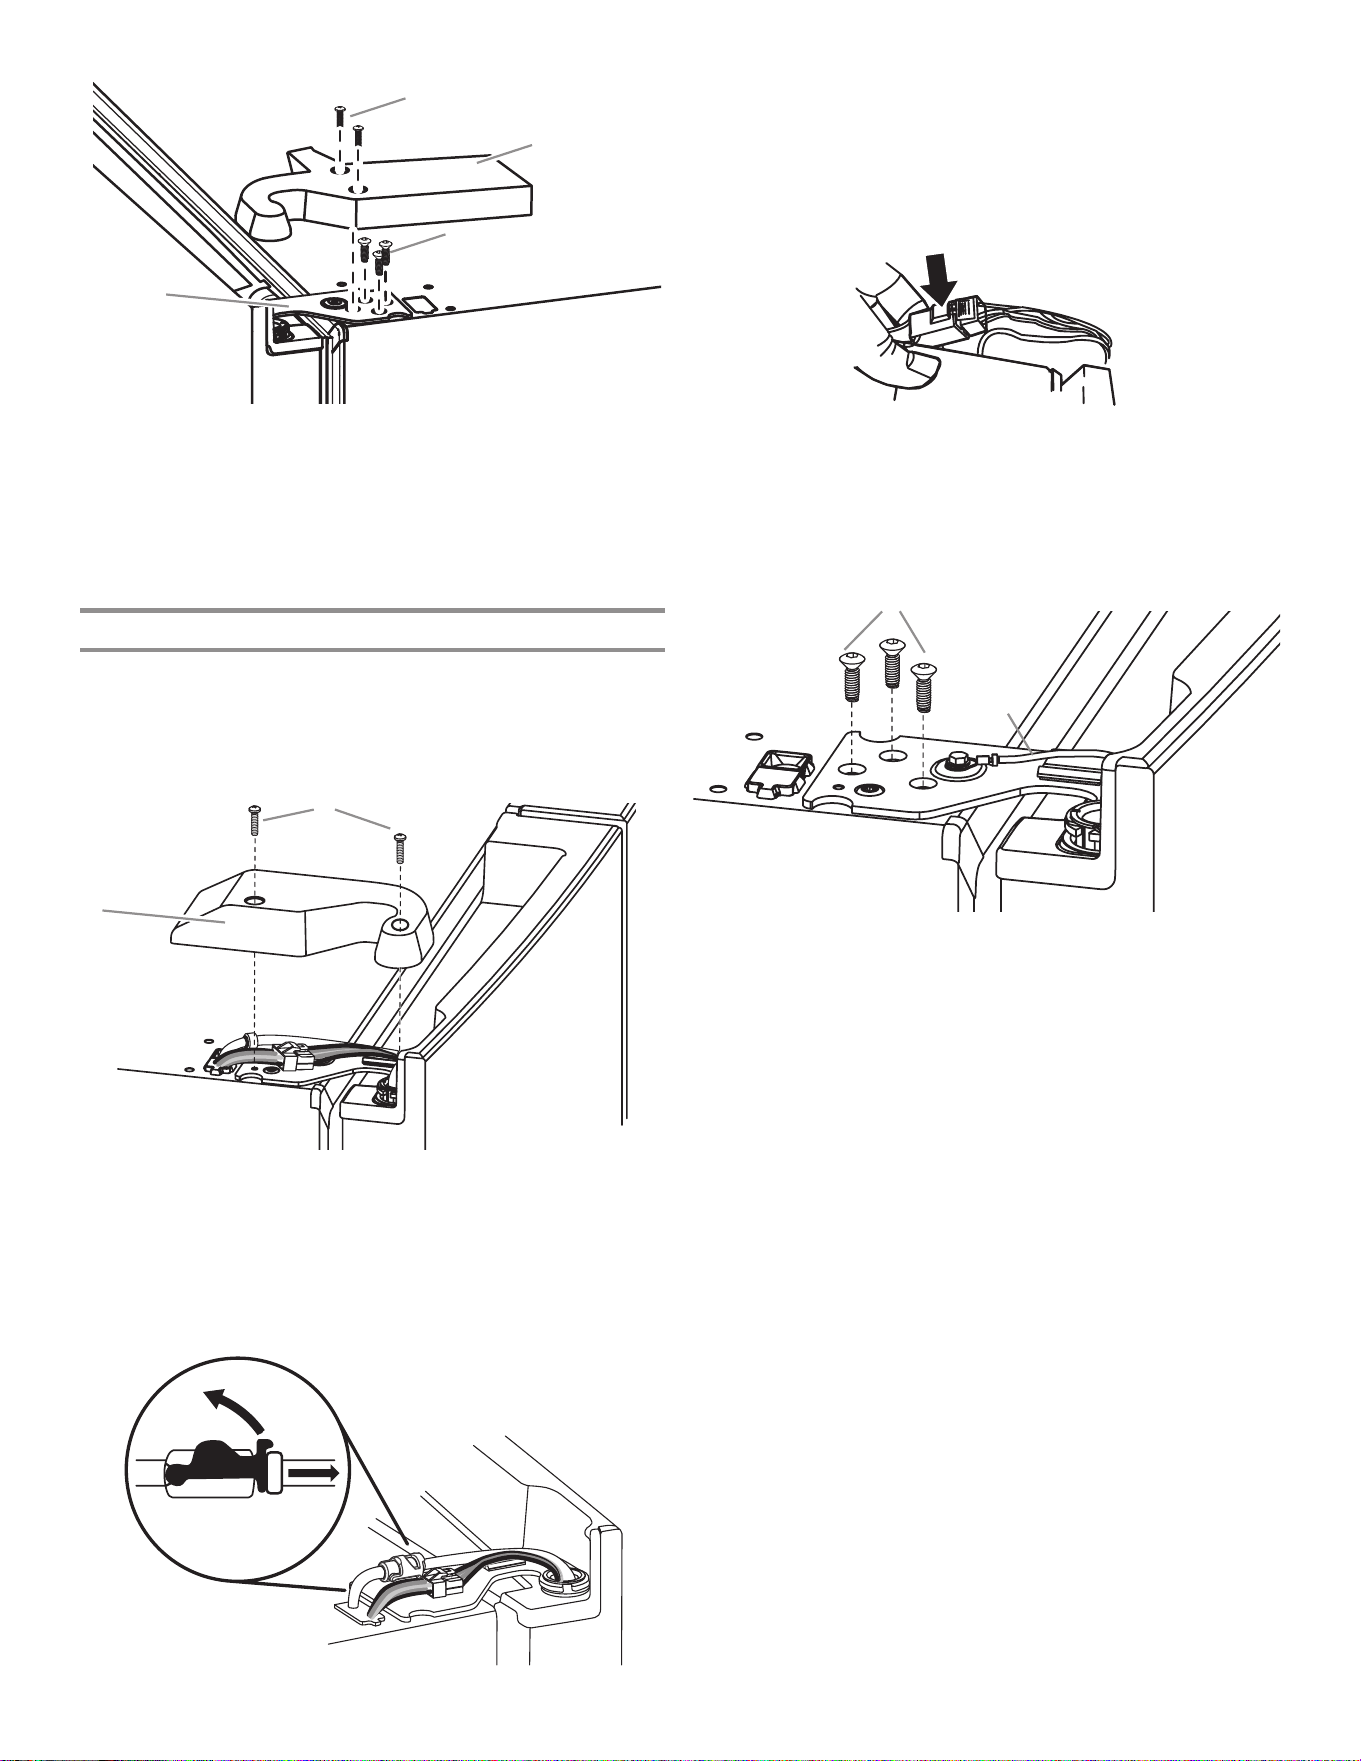
70
5. Open the door until it is at a 90° angle to the front of the
cabinet.
6. Lift the refrigerator door from the bottom hinge pin. The top
hinge will come away with the door.
Remove Left-Hand Door
IMPORTANT: The tubing and wiring for the water dispenser run
through the left-hand door hinge, so they must be disconnected
before removing the door.
1. Using a Phillips screwdriver, remove the cover from the top
hinge.
2. Disconnect the water dispenser tubing located on top of the
door hinge. Firmly pull up on the clasp. Then, pull the tubing
out of the fitting.
NOTE: The water dispenser tubing remains attached to the
left-hand refrigerator door.
3. Disconnect the wiring plug located on top of the door hinge.
■ Grasp each side of the wiring plug. With your left thumb,
press down to release the catch and pull the sections of
the plug apart.
NOTE: Do not remove the green ground wire. It should
remain attached to the door hinge.
4. Using the TORX
T25 screwdriver, remove the three internal
screws from the top hinge and set aside.
NOTE: Provide additional support for the refrigerator door
while the hinges are being removed. Do not depend on the
door gasket magnets to hold the door in place while you are
working.
5. Lift the refrigerator door from the bottom hinge pin. The top
hinge will come away with the door.
NOTE: It may not be necessary to remove the bottom hinges
and brake feet assemblies to move the refrigerator through a
doorway.
■ Only if necessary, use a TORX
T25 screwdriver to remove
the bottom hinges and brake feet screws.
A. Top hinge cover screw
B. Top hinge cover
C. TORX
T25 screws
D. Top hinge
A
B
C
D
A. Top hinge cover screw B. Top hinge cover
A
B
A. TORX
T25 screws
B. Ground wire (Do not remove.)
A
B
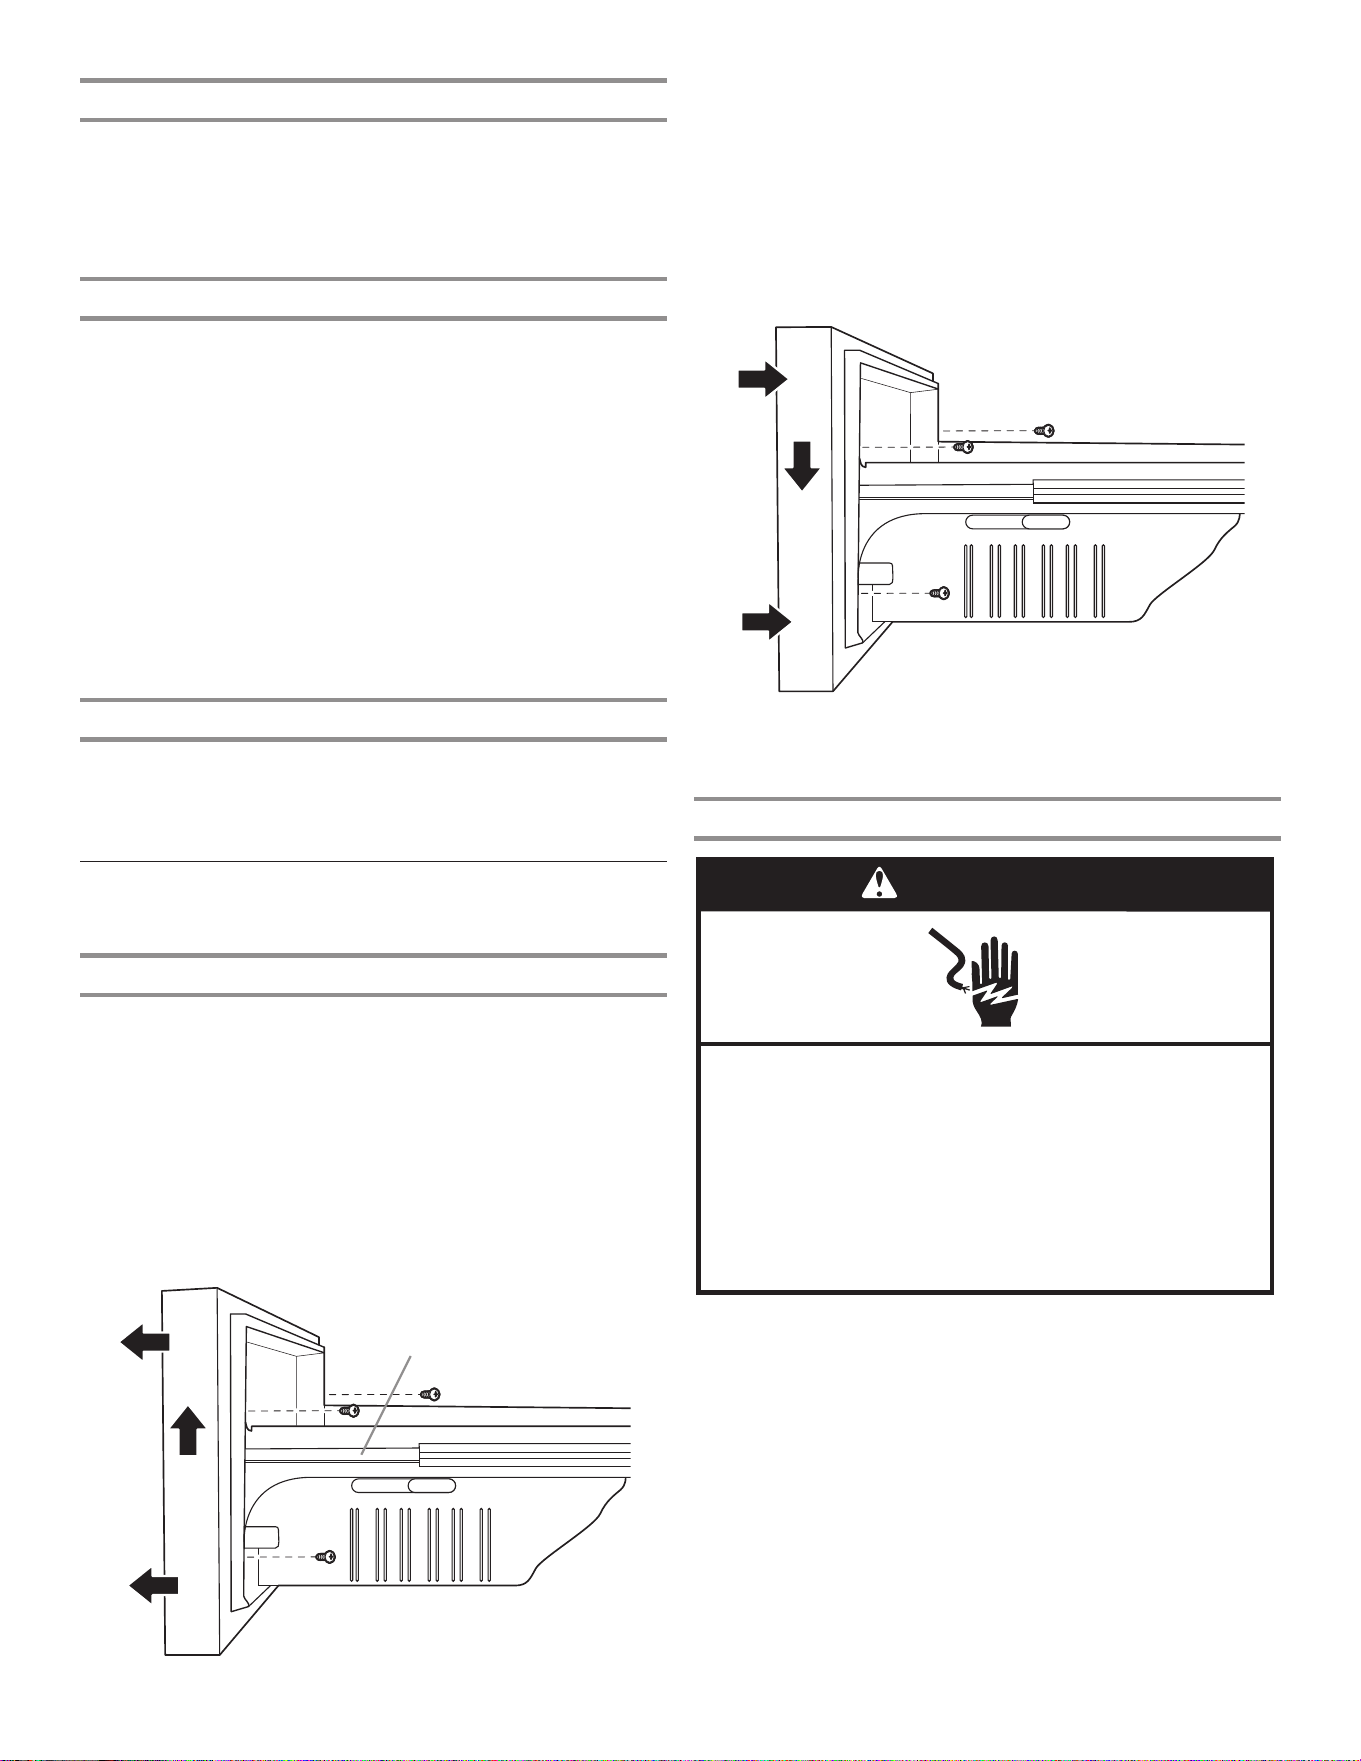
71
Replace Right-Hand Refrigerator Door
1. Set the right-hand door onto the bottom hinge pin.
2. Insert the top hinge pin into the open hole in the top of the
refrigerator door.
3. Using the three TORX
T25 screws, fasten the hinge to the
cabinet. Do not tighten the screws completely.
Replace Left-Hand Refrigerator Door
IMPORTANT: Do not intertwine the water tubing and wiring
bundles when reconnecting them.
1. Set the left-hand door onto the bottom hinge pin.
2. Using the three TORX
T25 screws, fasten the hinge to the
cabinet. Do not tighten the screws completely.
3. Reconnect the water dispenser tubing.
Insert the tubing firmly into the fitting until it stops. Close
the clamp around the tubing. The clamp locks into place
between the fitting and the collar. Connect blue female side
with blue male side and clamp. Repeat with gray female and
gray male sides.
4. Reconnect the electrical wiring.
■ Push together the two sections of the wiring plug.
Final Steps
1. Completely tighten the five internal TORX
T25 screws (three
on the right-hand door hinge and two on the left-hand door
hinge).
2. Replace both top hinge covers.
Remove and Replace
Freezer Drawer Fronts
Freezer Drawer
Remove Drawer Front
1. Open the freezer drawer to its full extension.
2. Loosen the two top screws that fasten the drawer front to
the drawer glides. The two screws (one on the left-hand side
and one on the right-hand side) are located inside the drawer
front.
3. Remove the two screws at the bottom, inside the drawer front
that fasten the drawer front to the drawer glides.
4. Lift up on the drawer front to release the screws from the
drawer glide bracket slot.
Replace Drawer Front
1. Pull out the freezer drawer glides to their full extension.
2. Holding the drawer front by its sides, align the top screws on
the inside of the drawer front with the bracket slots on the
drawer glide.
NOTE: It helps if one person holds the drawer glides steady
while another person aligns the drawer front and inserts the
screws into the slots.
3. Tighten the top two screws of the drawer front and then
reinstall the bottom two screws.
Final Steps
WARNING
Electrical Shock Hazard
Plug into an earthed socket.
Do not remove the earth pin.
Do not use an adapter.
Do not use an extension cable.
Failure to follow these instructions can result in
death, re, or electrical shock.
1. Plug into a grounded (earthed) outlet.
2. Reset the controls. See the “Using the Controls” section.
3. Return all removable parts and food to the drawers.
A. Drawer front screws
A
A. Drawer glide bracket slots
A
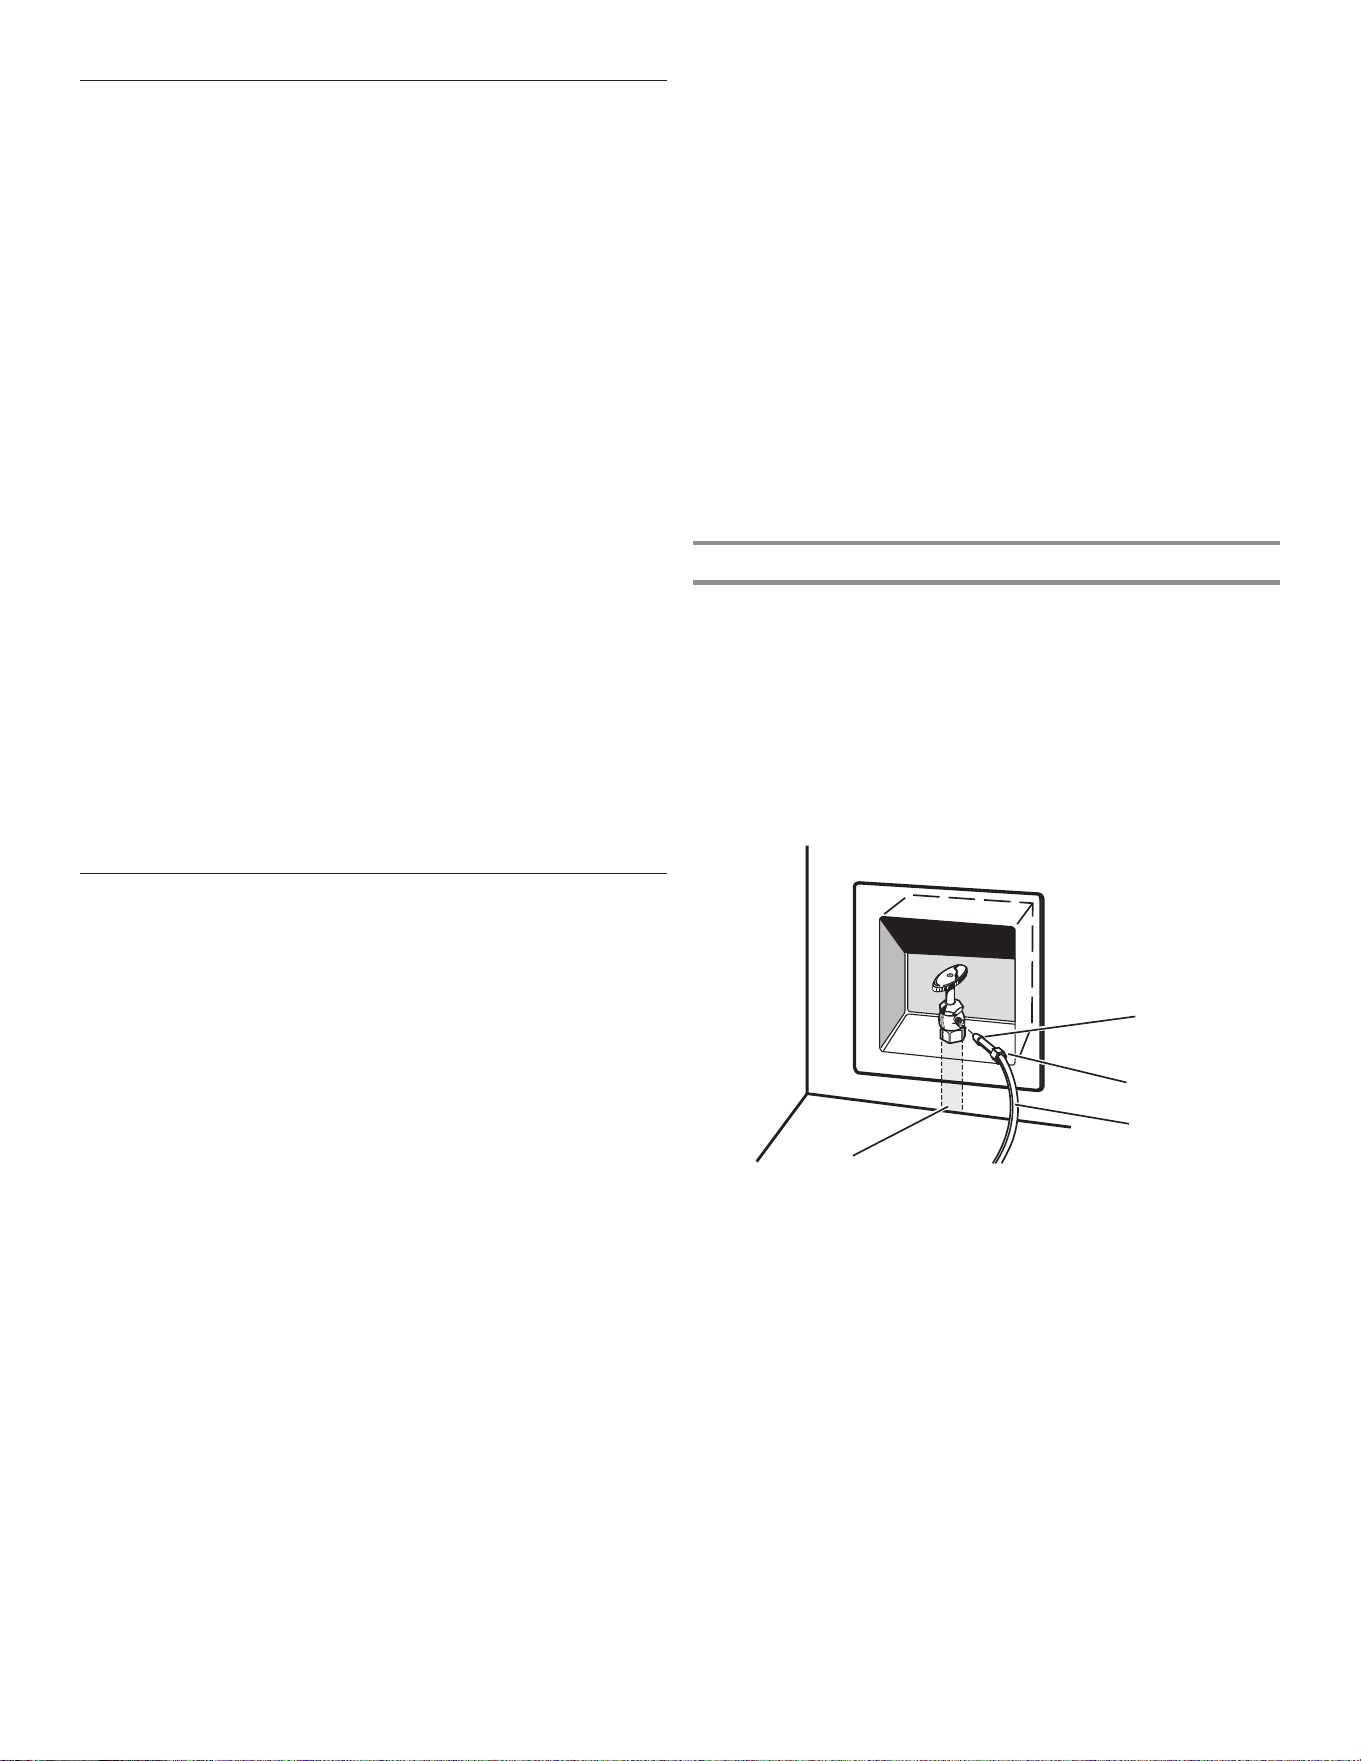
72
Water Supply Requirements
A cold water supply with water pressure between 241 and 827
kPa (35 and 120 psi) is required to operate the water dispenser
and ice maker. If you have questions about your water pressure,
call a licensed, qualified plumber.
NOTE: If the water pressure is less than what is required, the flow
of water from the water dispenser could decrease or ice cubes
could be hollow or irregular-shaped.
Reverse Osmosis Water Supply
IMPORTANT: The pressure of the water supply coming out
of a reverse osmosis system going to the water inlet valve of
the refrigerator needs to be between 241 and 827 kPa (35 and
120 psi).
If a reverse osmosis water filtration system is connected to your
cold water supply, the water pressure to the reverse osmosis
system needs to be a minimum of 276 to 414 kPa (40 to 60 psi).
■ Check to see whether the sediment filter in the reverse
osmosis system is blocked. Replace the filter if necessary.
■ Allow the storage tank on the reverse osmosis system to refill
after heavy use. The tank capacity could be too small to keep
up with the requirements of the refrigerator.
NOTE: Faucet-mounted reverse osmosis systems are
not recommended.
■ If your refrigerator has a water filter, it may further reduce
the water pressure when used in conjunction with a reverse
osmosis system. Remove the water filter. See the “Water
Filtration System” section.
If you have questions about your water pressure, call a licensed,
qualified plumber.
Connect the Water Supply
Read all directions before you begin.
IMPORTANT:
■ Plumbing must be installed in accordance with the
International Plumbing Code and any local codes and
ordinances.
■ Copper and PEX tubing connections from the household
water line to the refrigerator are acceptable and will help
avoid off-taste or odor in your ice or water. Check for leaks.
■ If PEX tubing is used instead of copper, we recommend the
following Part Numbers: W10505928RP (2.14 m [7 ft] jacketed
PEX), 8212547RP (1.52 m [5 ft] PEX), or W10267701RP
(7.62 m [25 ft] PEX).
■ Install tubing only in areas where temperatures will remain
above freezing.
■ For Australia and New Zealand: If water pressure exceeds
599 kPa (87 psi), a pressure-limiting device must be fitted by
a licensed plumber.
Tools Needed:
Gather the required tools and parts before starting installation.
■ Flat-blade screwdriver
■ 7/16" and 1/2" open-end wrenches or two adjustable
wrenches
■ 1/4" nut driver
NOTE: Do not use a piercing-type or 4.76 mm (3/16") saddle
valve which reduces water flow and clogs easier.
Connect to Water Line
IMPORTANT: If you turn the refrigerator on before the water is
connected, turn off the ice maker.
1. Unplug refrigerator or disconnect power.
2. Turn off main water supply. Turn on the nearest faucet until
the water stops flowing.
3. Use a quarter-turn shut-off valve or the equivalent, served by
a
12.7 mm (1/2")
household supply line.
NOTE: To allow sufficient water flow to the refrigerator, a minimum
12.7 mm (1/2") size household supply line is recommended.
A. Sleeve
B. Nut
C. Copper tubing (to refrigerator)
D. Household supply line (12.7 mm [1/2"] minimum)
A
B
C
D
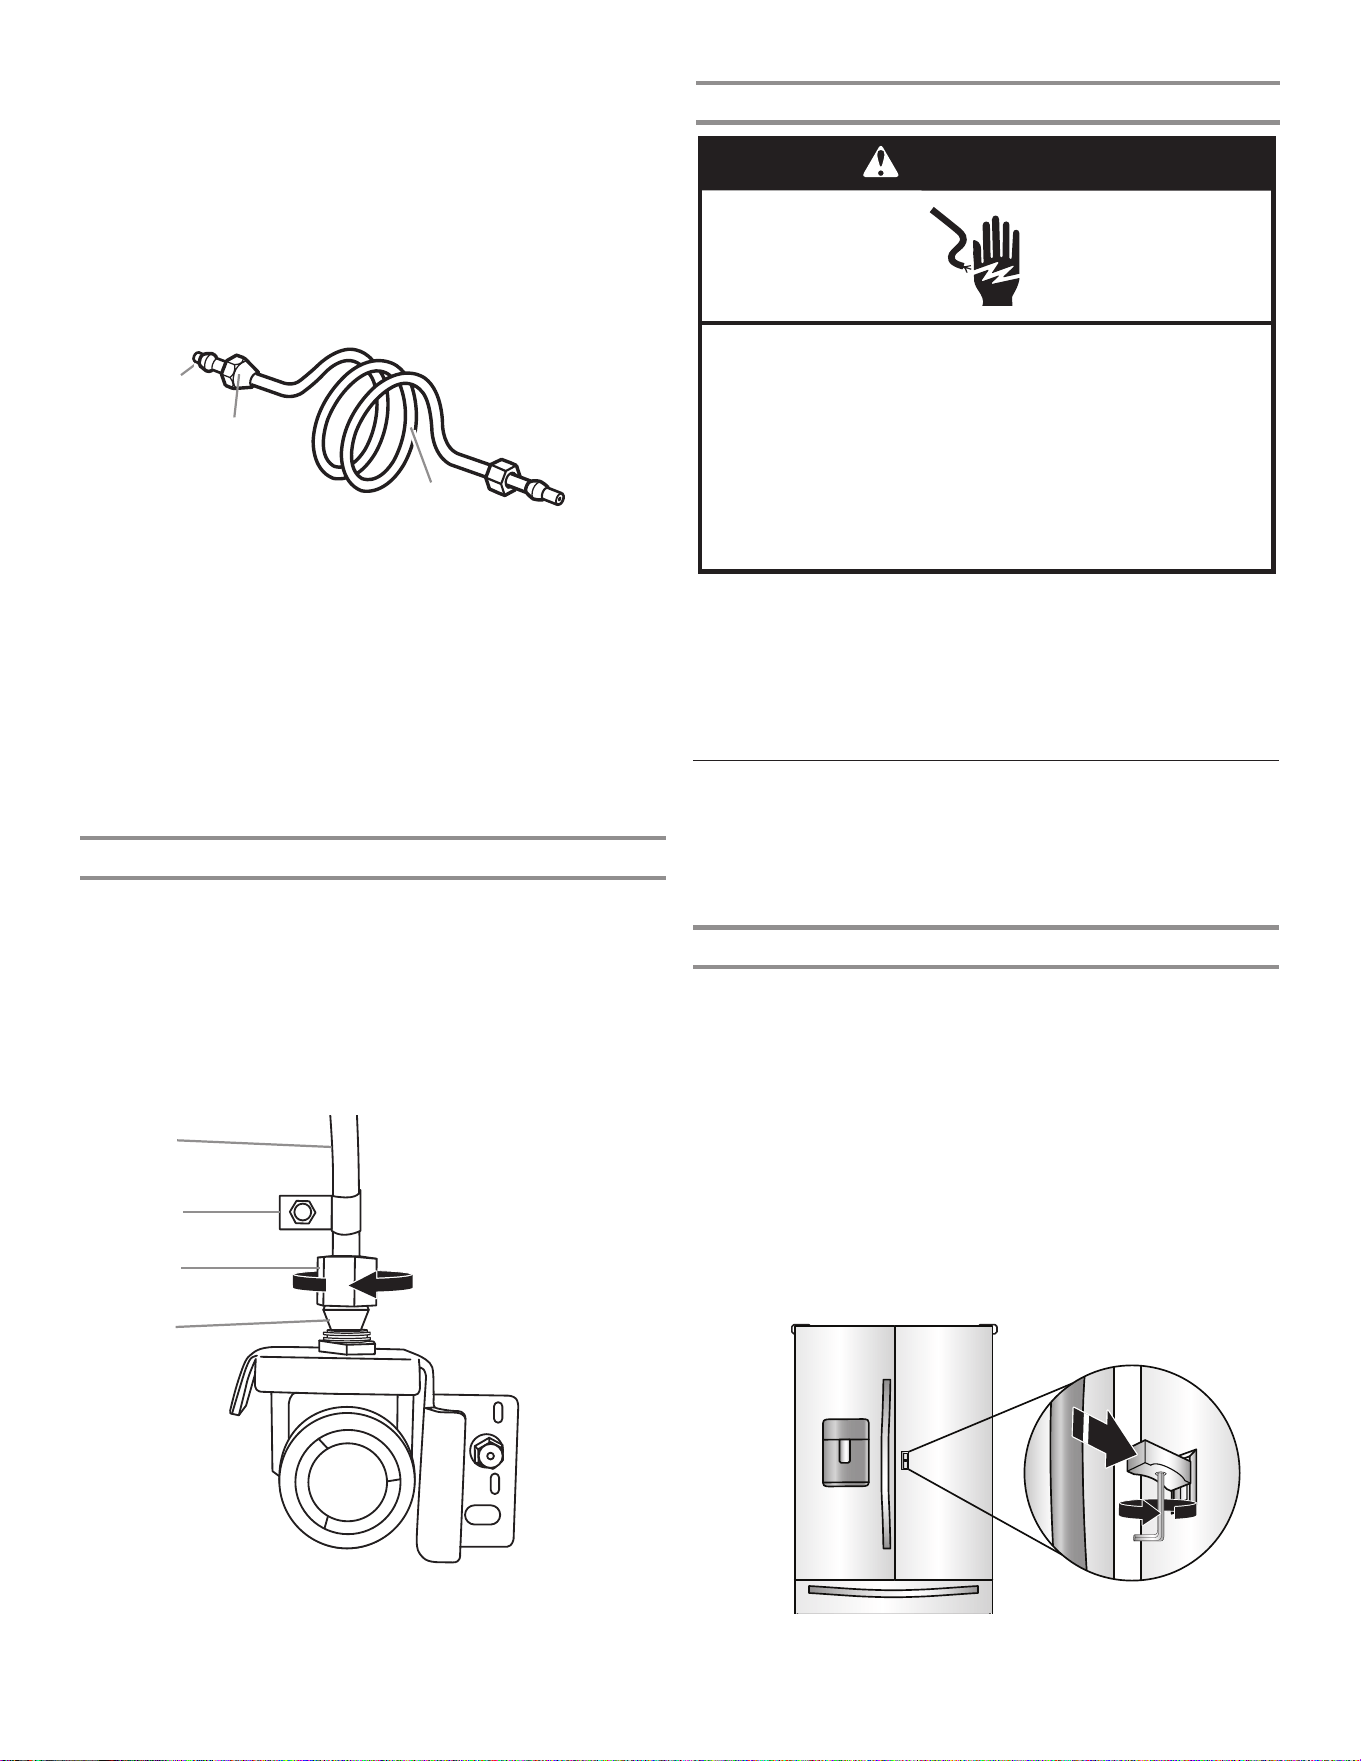
73
4. Now you are ready to connect the copper tubing to the
shut-off valve. Use 6.35 mm (1/4") O.D. (outside diameter)
soft copper tubing to connect the shut-off valve and the
refrigerator.
■ Ensure that you have the proper length needed for the job.
Be sure both ends of the copper tubing are cut square.
■ Slip compression sleeve and compression nut onto copper
tubing as shown. Insert end of tubing into outlet end squarely
as far as it will go. Screw compression nut onto outlet end
with adjustable wrench. Do not overtighten.
5. Place the free end of the tubing into a container or sink and
turn on main water supply to flush out tubing until water is
clear. Turn off shut-off valve on the water pipe.
NOTE: Always drain the water line before making the final
connection to the inlet of the water valve to avoid possible
water valve malfunction.
6. Bend the copper tubing to meet the water line inlet which
is located on the back of the refrigerator cabinet as shown.
Leave a coil of copper tubing to allow the refrigerator to be
pulled out of the cabinet or away from the wall for service.
Connect to Refrigerator
Follow the connection instructions specific to your model.
1. Remove plastic cap from water valve inlet port. Attach the
copper tubing to the valve inlet using a compression nut
and sleeve as shown. Tighten the compression nut. Do not
overtighten. Confirm copper tubing is secure by pulling on
copper tubing.
2. Create a service loop with the copper tubing. Avoid kinks
when coiling the copper tubing. Secure copper tubing to
refrigerator cabinet with a “P” clamp.
Complete the Installation
WARNING
Electrical Shock Hazard
Plug into an earthed socket.
Do not remove the earth pin.
Do not use an adapter.
Do not use an extension cable.
Failure to follow these instructions can result in
death, re, or electrical shock.
1. Plug into a grounded (earthed) outlet.
2. Flush the water system. See the “Water and Ice Dispensers”
section.
NOTE: Allow 24 hours to produce the first batch of ice. Discard
the first three batches of ice produced. Allow three days to
completely fill the ice storage bin.
3. Turn on water supply to refrigerator and check for leaks.
Correct any leaks.
Handle Installation and Removal
Parts Included: refrigerator door handles (2), freezer drawer
handle (1), 1/8" and 3/32" hex keys, spare setscrew(s)
NOTE: The freezer drawer handle is shorter than the refrigerator
door handles. Handle style may vary by model.
Install Handles
Knob Assembly
IMPORTANT: Make sure to put together the knob assembly prior
to assembling the handle.
1. Remove the handles and knob assembly from the packaging
inside the refrigerator and place them on a soft surface.
2. Align the knob assembly with the lever at the middle of the
door.
3. Fully engage the knob assembly onto the lever.
4. While holding the knob assembly, insert the short end of the
3/32" hex key into the hole and slightly rotate the hex key
until the key is engaged in the setscrew.
5. Using a clockwise motion, tighten the setscrew just until the
setscrew begins to contact the lever. Fully tighten.
A. Compression sleeve
B. Compression nut
C. Copper tubing
A
C
B
A. Copper tubing
B. “P” clamp
C. Compression nut
D. Compression sleeve
A
B
C
D
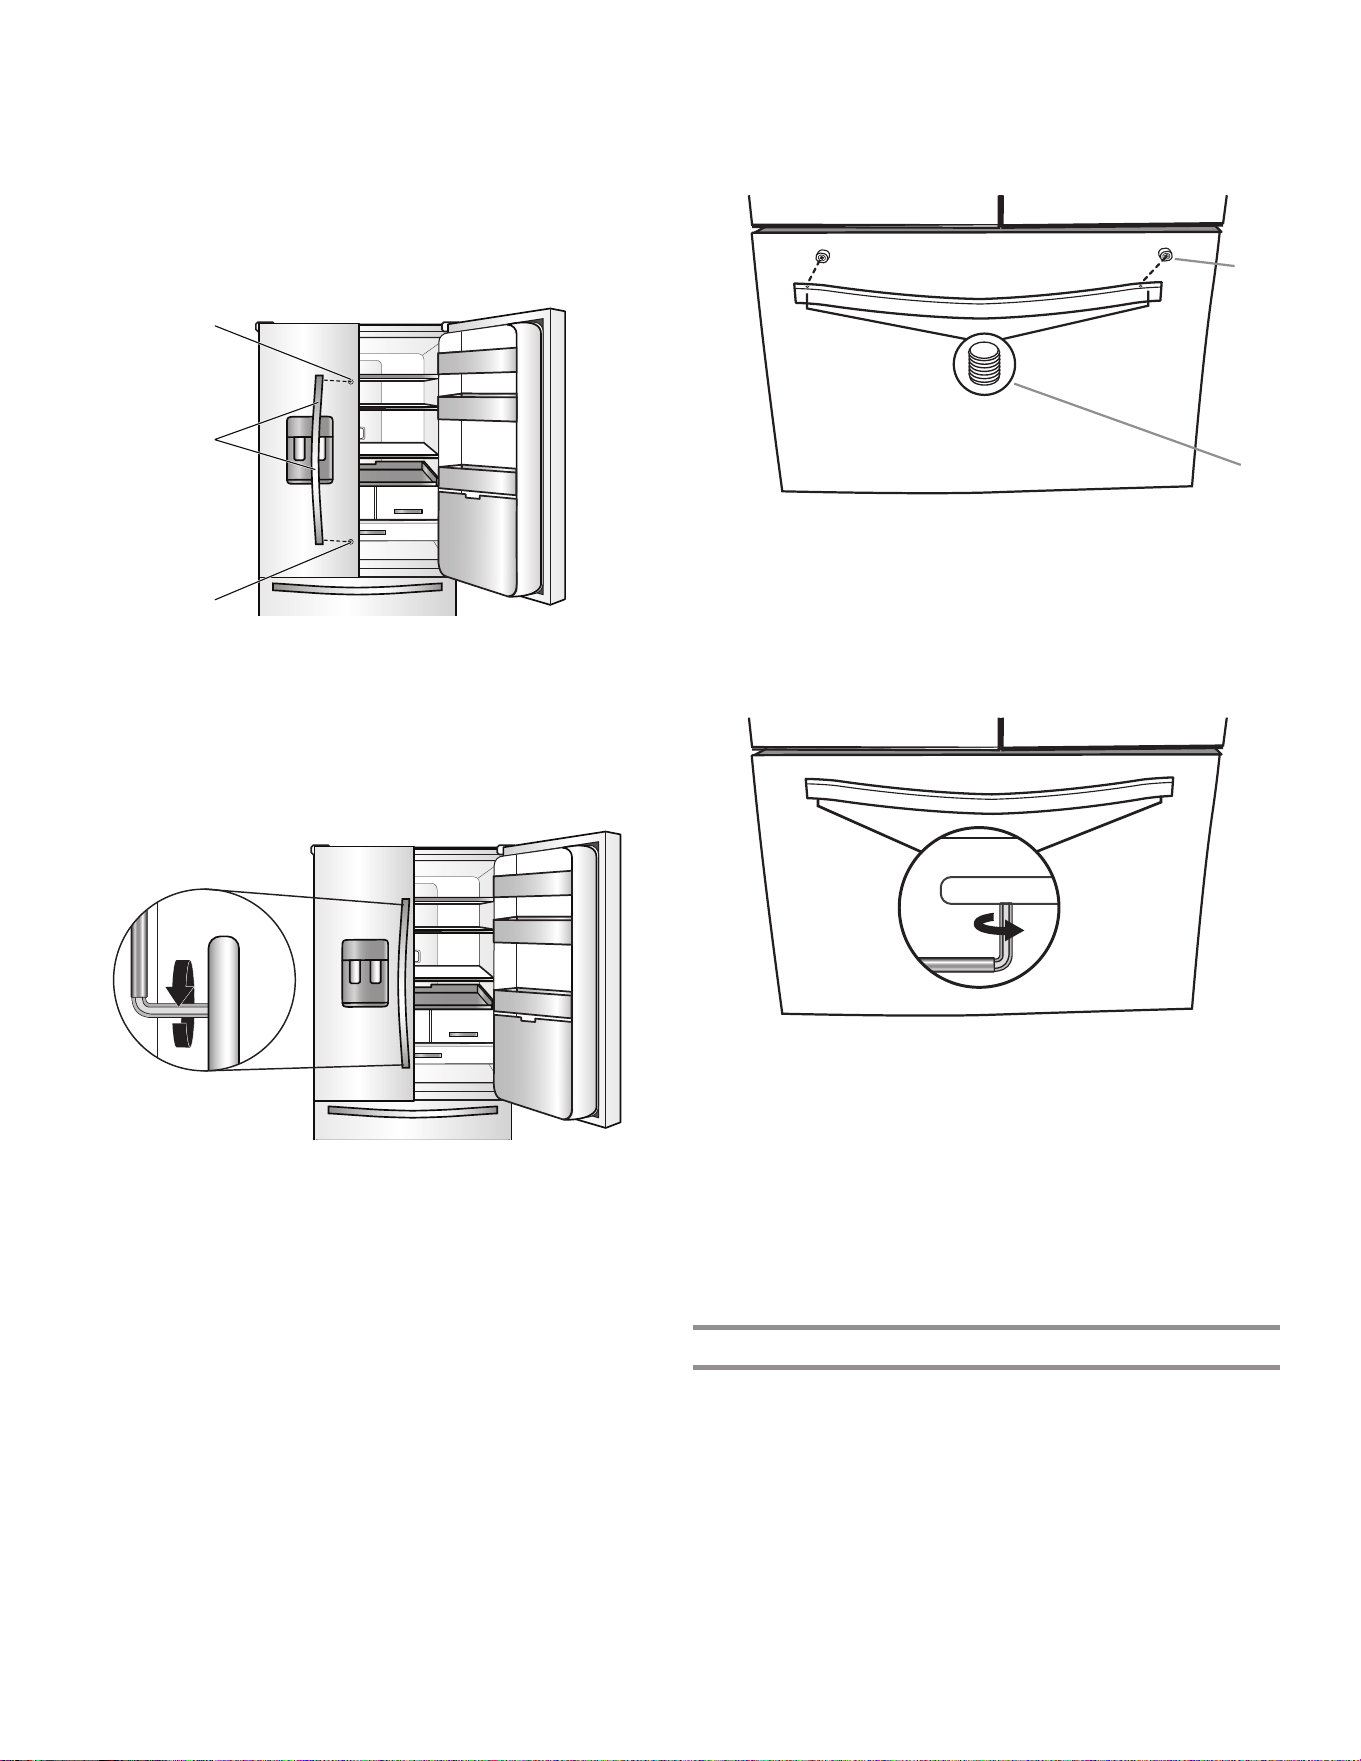
74
Refrigerator Doors
NOTE: Handle-mounting setscrews are preinstalled inside
the handle.
1. Remove the handles from the packaging inside the
refrigerator and place them on a soft surface.
2. Open a refrigerator compartment door. On the closed door,
place a handle onto the shoulder screws so that the
setscrews are facing the adjacent door.
3. Firmly push the handle toward the door until the handle base
is flush against the door.
4. While holding the handle, insert the short end of the hex key
into the upper hole and slightly rotate the hex key until key is
engaged in the setscrew.
5. Using a clockwise motion, tighten the setscrew just until
set screw begins to contact the shoulder screw. Do not
fully tighten.
6. Repeat steps 4 and 5 to fasten the lower setscrew.
7. Once both setscrews have been partially tightened as
instructed in the previous steps, fully tighten both setscrews.
IMPORTANT: When the screws feel tight, tighten them an
additional quarter turn. The handle is not properly installed
without this extra tightening.
8. Repeat steps 2 through 7 to install the other handle onto
the adjacent refrigerator door.
Freezer Drawer
1. With the drawer closed, place the handle onto the shoulder
screws so that the setscrews are facing down toward the
floor.
2. Firmly push the handle toward the drawer until the handle
base is flush against the drawer.
3. Insert the short end of the hex key into the left-hand hole and
slightly rotate the hex key until key is engaged in the
setscrew.
4. Using a left-to-right motion, tighten the setscrew a quarter
turn at a time just until setscrew begins to contact the
shoulder screw. Do not fully tighten.
5. Repeat steps 3 and 4 to fasten the right-hand setscrew to
the shoulder screw.
6. Once both setscrews have been partially tightened as
instructed in the previous steps, fully tighten both setscrews.
IMPORTANT: When the screws feel tight, tighten them an
additional quarter turn. The handle is not properly installed
without this extra tightening.
7. Save the hex key and all instructions.
Remove the Handles
1. While holding the handle, insert the short end of the hex key
into a setscrew hole and slightly rotate the hex key until it is
engaged in the setscrew.
2. Using a right-to-left motion, loosen the setscrew a quarter
turn at a time.
3. Repeat steps 1 and 2 for the other setscrew. Slowly pull the
handle away from the door or drawer.
4. If necessary, use a Phillips screwdriver to remove the
shoulder screws from the door.
A
A
B
A. Shoulder screws
B. Setscrews inside the handle
A. Shoulder screw
B. Setscrews inside the handle
B
A
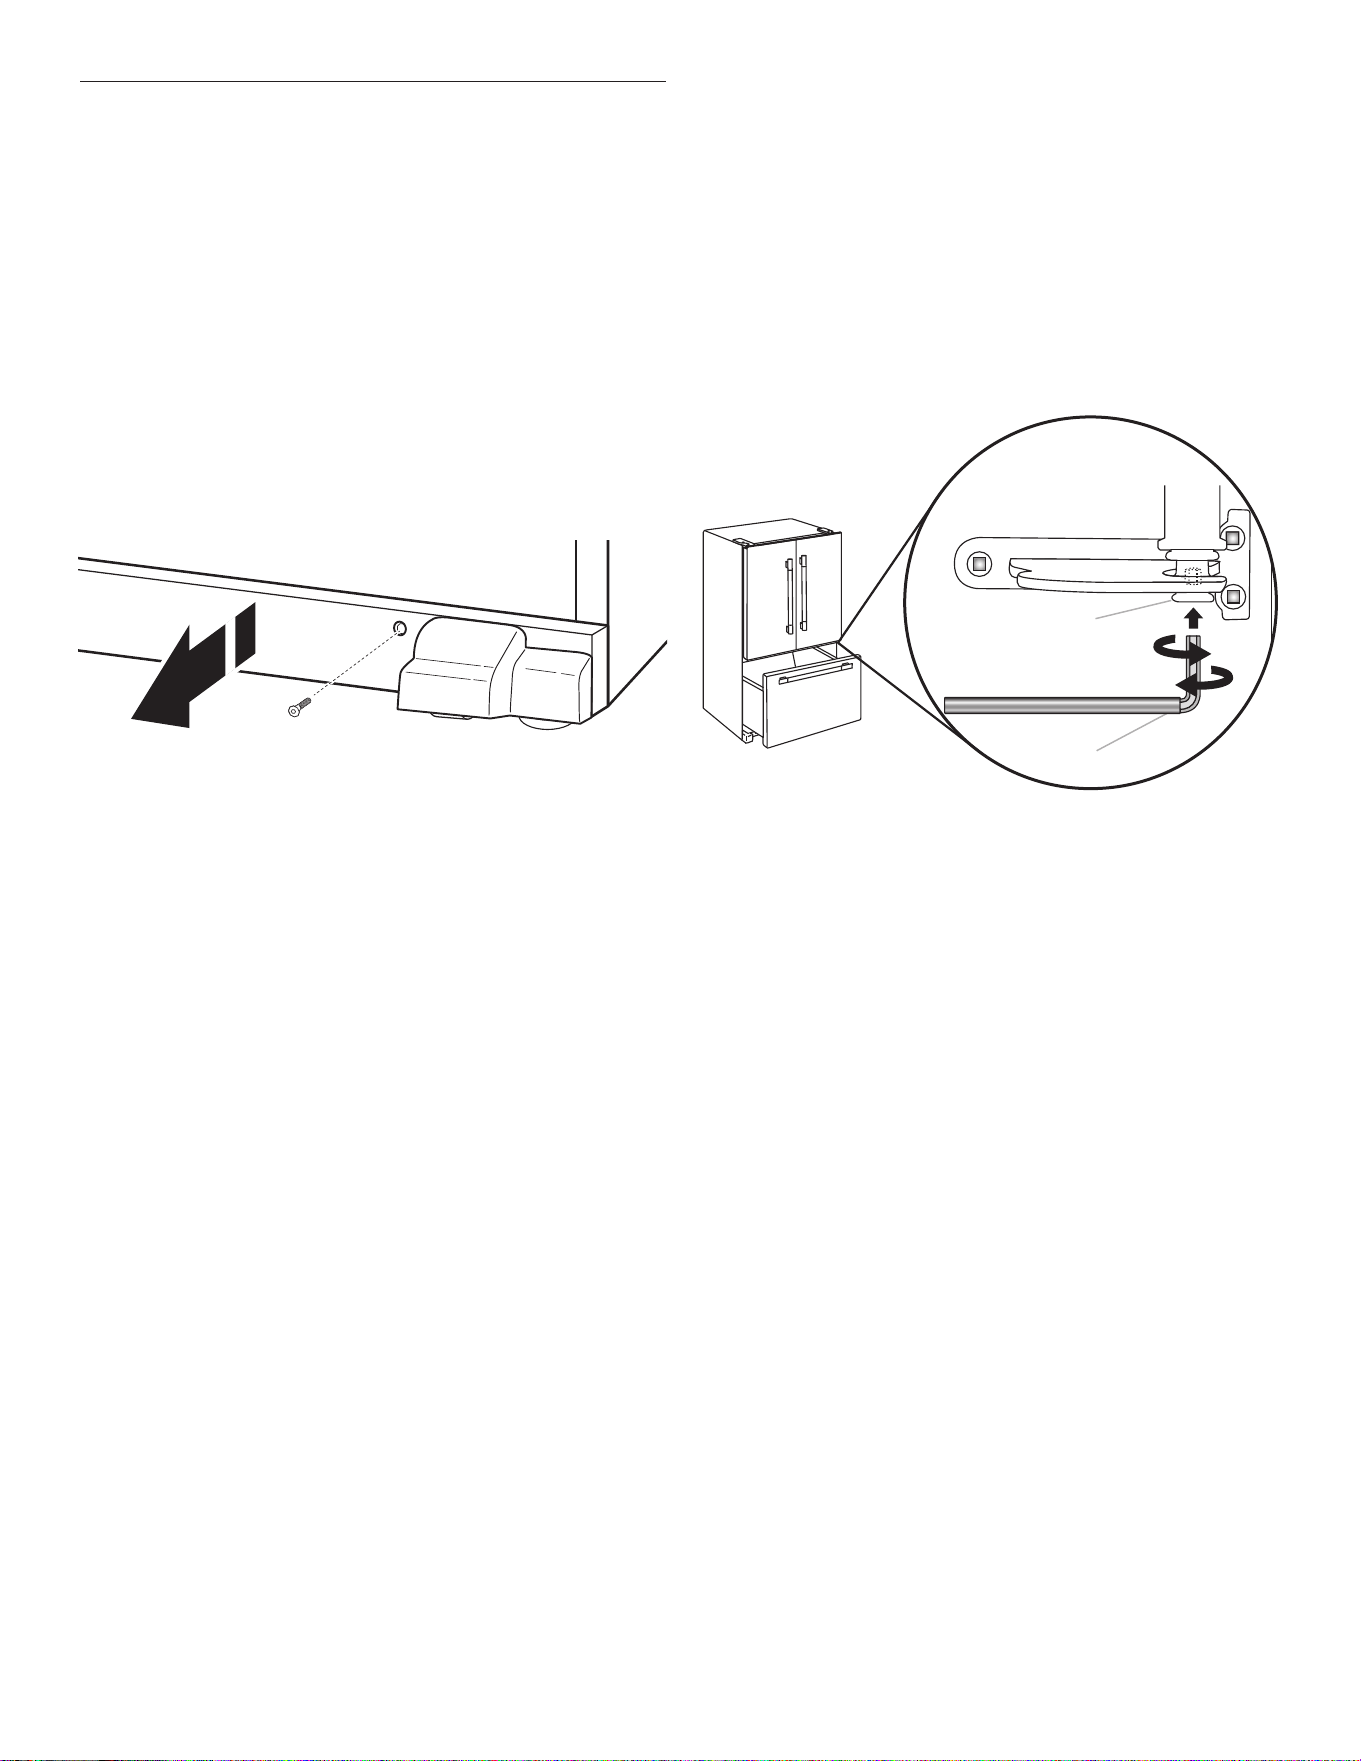
75
Refrigerator Leveling
and Door Closing
The base grille covers the adjustable brake feet and roller
assemblies located at the bottom of the refrigerator below the
freezer drawer. Before making any adjustments, remove the base
grille and move the refrigerator to its final location.
Tools Needed: 1/4" hex driver
Tools Provided: 1/4" hex key
1. Use a 1/4" hex nut driver to remove both screws in base
grille.
2. Remove the base grille. Using both hands, grasp the grille
firmly and pull it toward you. Open the freezer drawer to
access the brake feet.
NOTE: To allow the refrigerator to roll easier, raise the brake
feet by turning them counterclockwise. The front rollers will
be touching the floor.
7. Make sure the refrigerator is steady. If the refrigerator seems
unsteady or rolls forward when a door or drawer is pulled
open, adjust the brake feet.
To Steady the Refrigerator:
■ Open the freezer drawer. Using a 1/4" hex driver, turn both
brake feet clockwise the same amount until the brake feet
are snug against the floor. Check again. Continue to adjust
the brake feet by half-turns of the screw until the refrigerator
does not roll forward when the drawer is opened.
NOTE: Having someone push against the top of the
refrigerator takes some weight off the brake feet. This makes
it easier to turn the screws.
8. Replace the base grille by aligning the ends of the grille with
the leveling assemblies on each side and snapping the grille
back into place. Use a 1/4" hex nut driver to reinstall screws.
3. Move the refrigerator to its final location.
4. Using the 1/4" hex driver, lower the brake feet. Turn them
clockwise until the rollers are off the floor and both brake feet
are snug against the floor. This keeps the refrigerator from
rolling forward when opening the refrigerator doors or freezer
drawer.
IMPORTANT: If you need to make further adjustments
involving the brake feet, you must turn both brake feet the
same amount to keep the refrigerator level.
5. Use a level to make sure the refrigerator is level from side to
side and front to back.
6. Make sure the doors are even at the top and that the space
between the bottom of the refrigerator doors and the top of
the freezer drawer is even. If necessary, align the doors.
To Align the Doors:
■ Keeping both refrigerator doors closed, pull out the freezer
drawer. Locate the bottom hinge pin of the right-hand
refrigerator door. The alignment screw is inside the bottom
hinge pin.
■ Insert the short end of the 1/8" hex key wrench (packed with
the Door Handle Installation Instructions) into the bottom
hinge pin until it is fully engaged in the alignment screw.
■ To raise the refrigerator door, turn the hex key to the right.
■ To lower the door, turn the hex key to the left.
■ Continue to turn the alignment screw until the doors are
aligned.
A. Bottom hinge pin
B. 1/8" hex key wrench
A
B
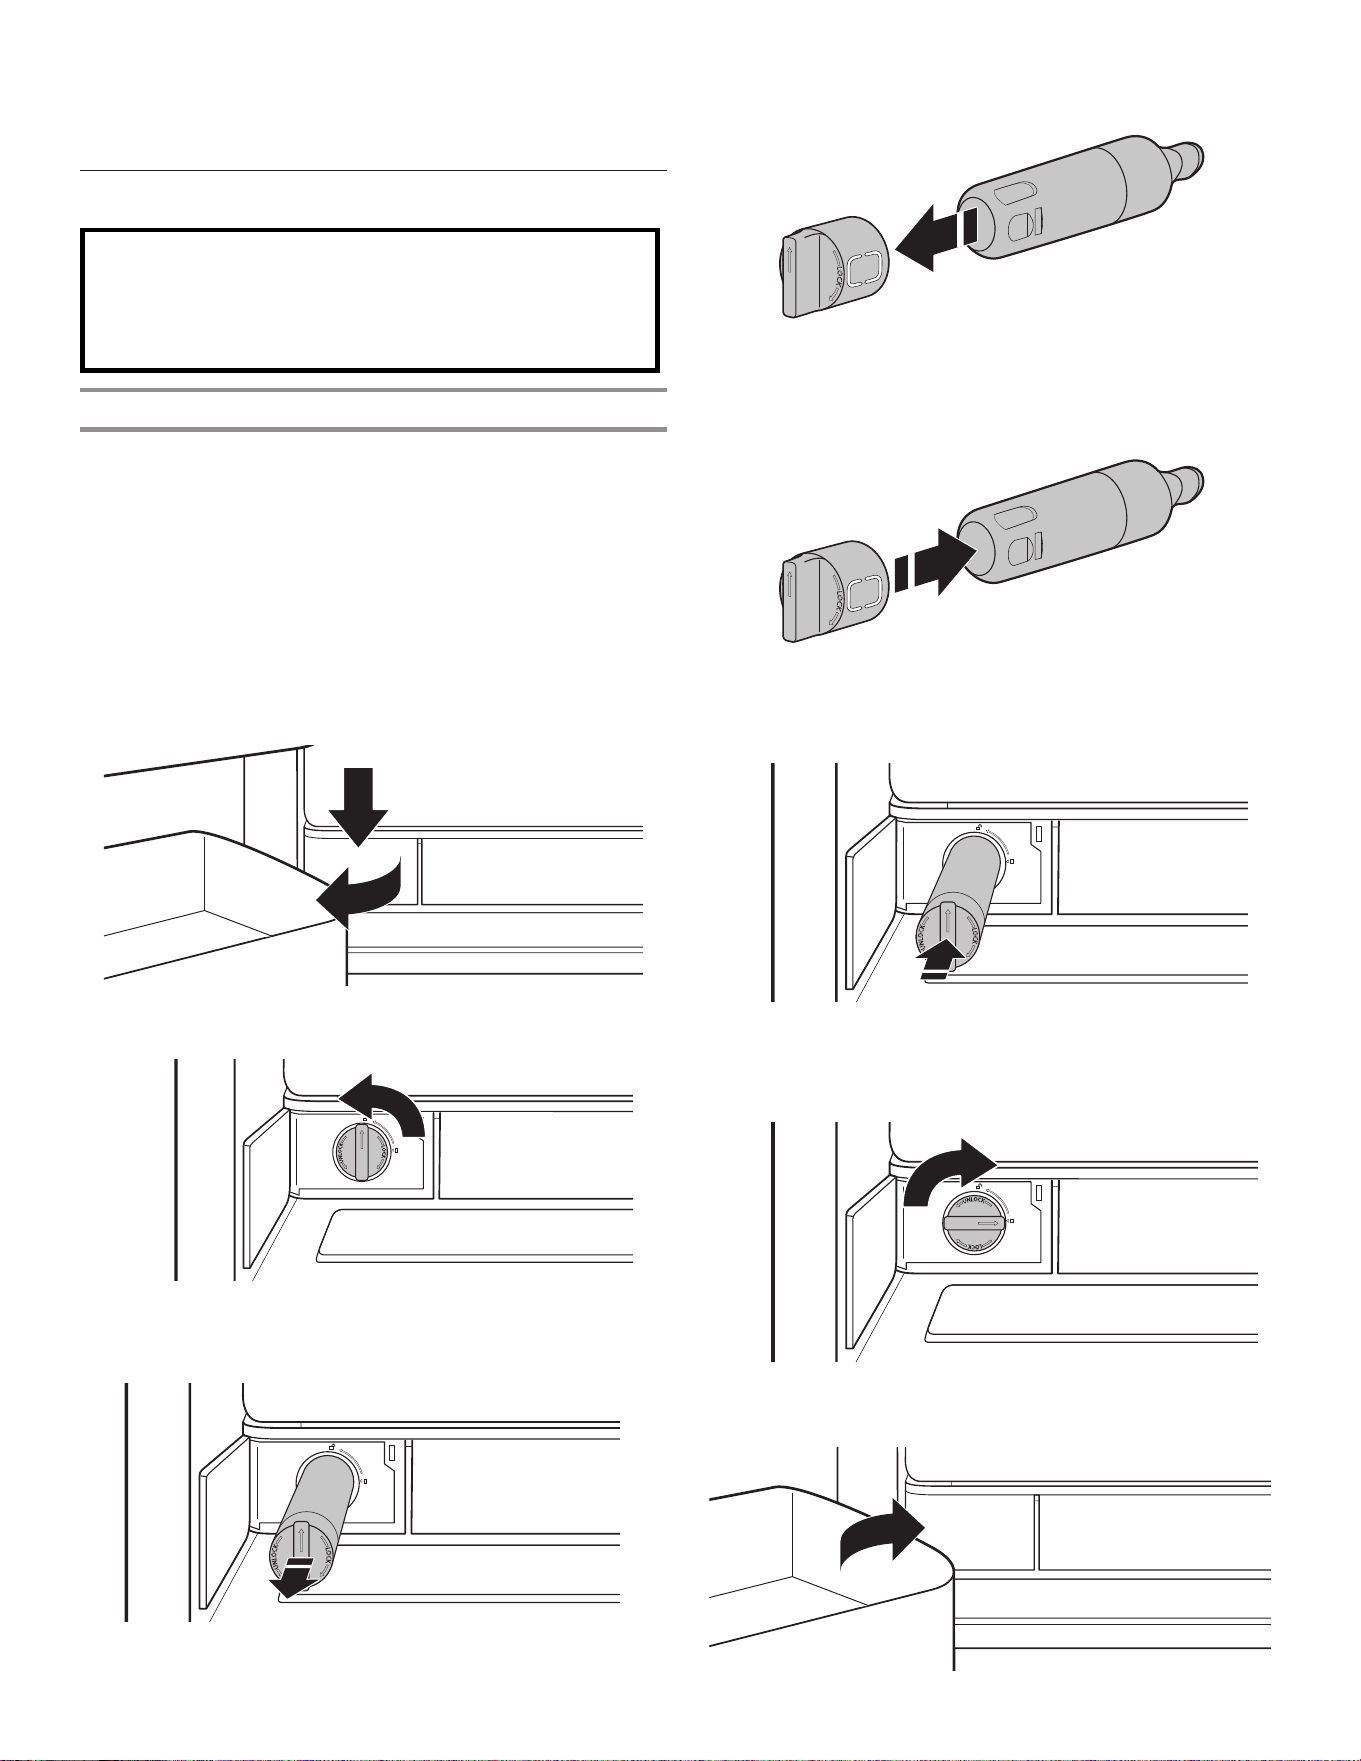
76
Do not use with water that is microbiologically unsafe or
of unknown quality without adequate disinfection before
or after the system. Systems certified for cyst reduction
may be used on disinfected waters that may contain
filterable cysts.
Replace and Install the Water Filter
The water filter should be replaced every 6 months based on a
flow rate of 1.89—2.27 Lpm (0.50 gpm—0.60 gpm) that filters
757 L (200 gallons) of water.
To order a replacement filter, contact the dealer from whom you
purchased your refrigerator.
NOTE: If the filter is not installed correctly, water may dispense
at a lower flow rate and there will be slower ice production.
Improper filter installation may also cause the water filter housing
to leak.
1. To open, push the water filter door, which is located at the
bottom left of the refrigerator compartment.
2. Twist the water filter and turn 90° counterclockwise to unlock.
3. Pull the filter out of the housing.
4. Remove the water filter cap from the water filter.
5. Install the water filter cap onto the new filter. Be sure to align
the arrows so the groves in filter align with ribs in filter cap.
6. Insert the filter into the housing.
7. Twist the water filter and turn 90° clockwise until it locks into
place and that arrows are aligned.
8. Push the water filter door closed.
FILTERS AND
ACCESSORIES
Water Filtration System
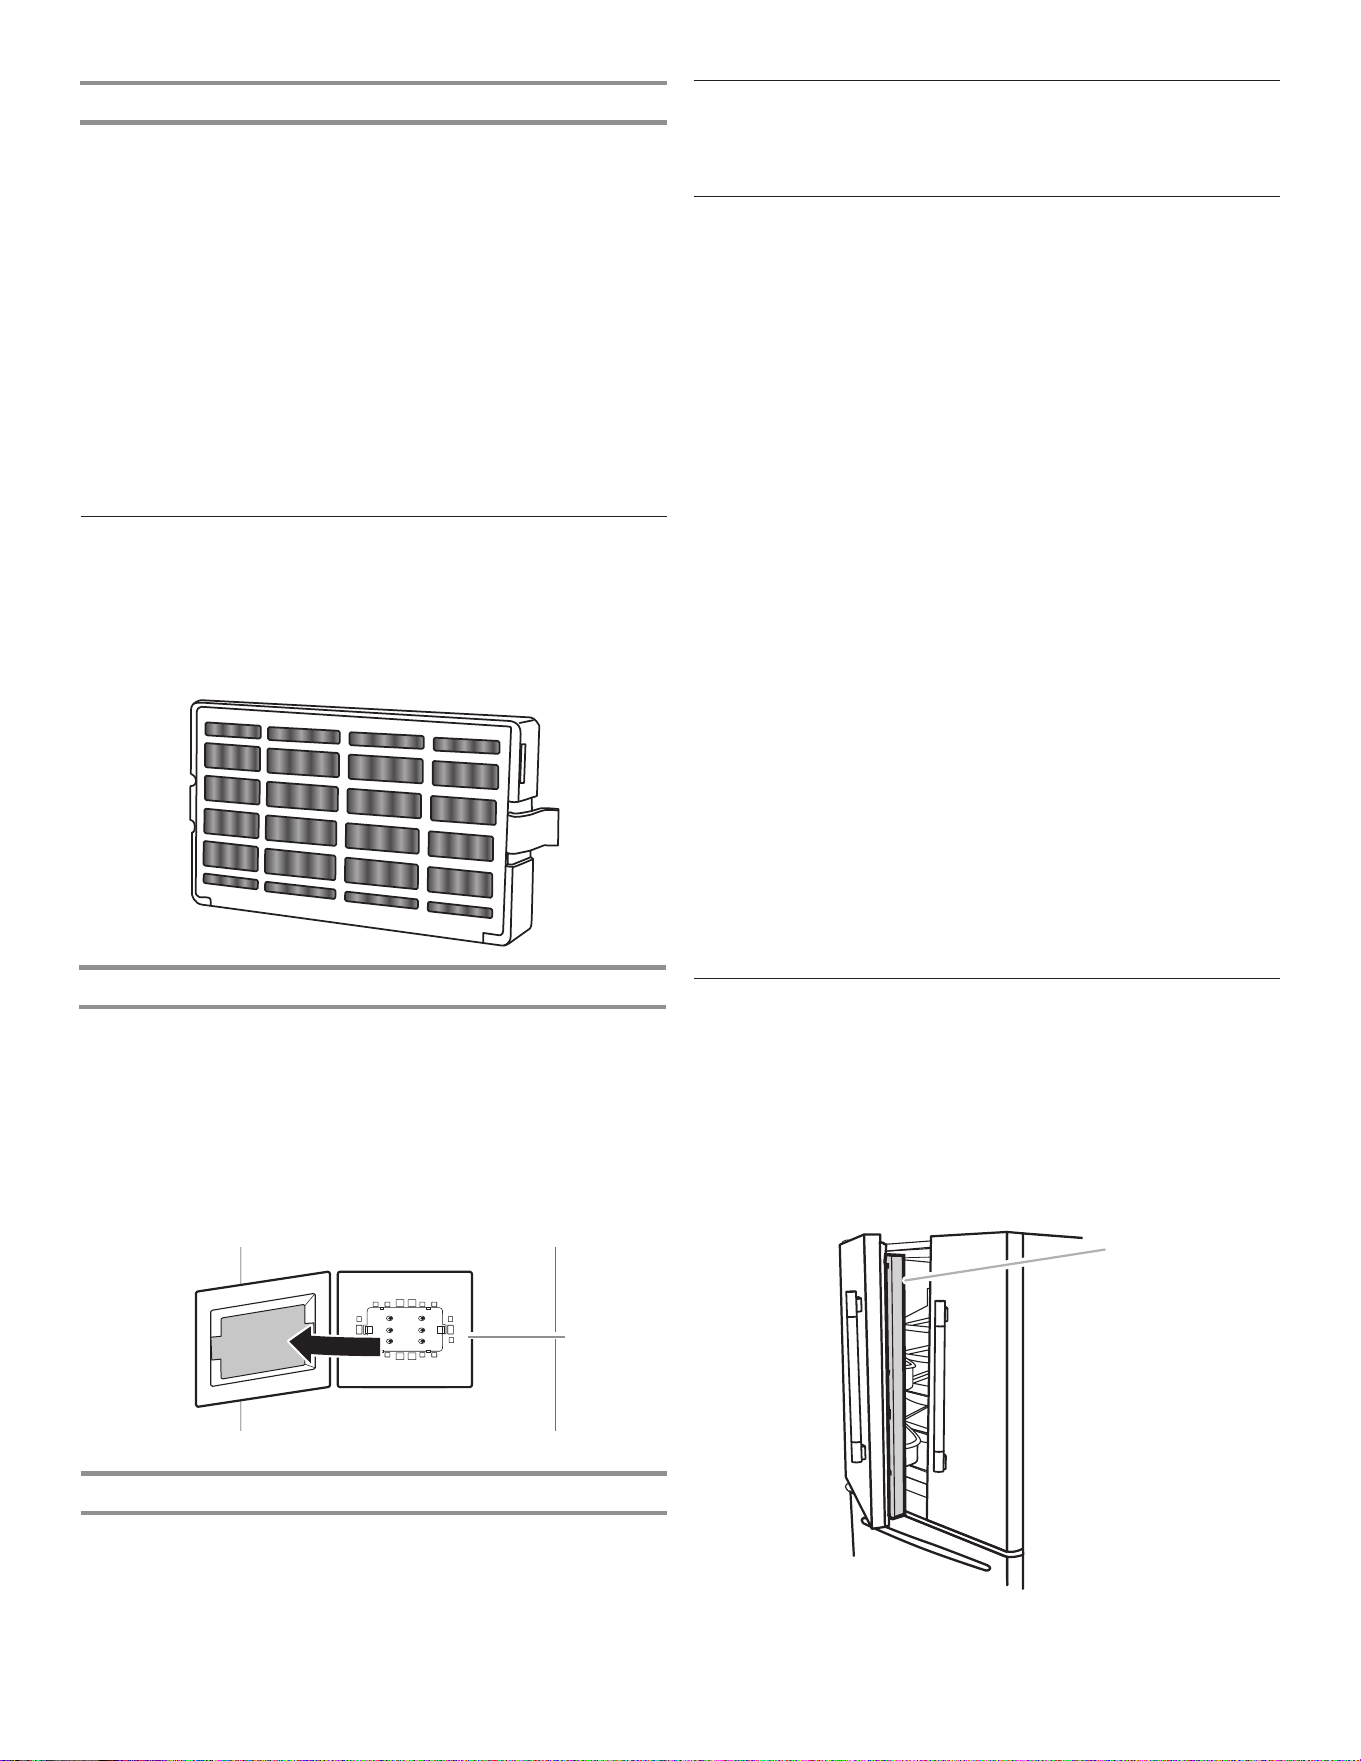
77
Install Air Filter
An air filter is 15 times more powerful than baking soda at
reducing common food odors inside the refrigerator.
On some models, your refrigerator’s accessory packet includes
an air filter which must be installed prior to use.
Installing the Air Filter
Install the air filter behind the vent cover, located on the rear wall
near the middle of the refrigerator.
1. Remove the air filter from its packaging.
2. Pull out plastic cover over the vented cover.
NOTE: When cover is removed for the first time, a small foam
part that is the size of the filter will need to be discarded.
3. Snap the filter into place.
Replacing the Air Filter
The disposable air filter should be replaced every 6 months.
To order a replacement air filter, contact the dealer from whom
you purchased your refrigerator.
1. Remove the used air filter by squeezing in on the side tabs.
2. Install the new air filter following the instructions in the
previous sections.
The Water Filter Status Light
The water filter status lights will help you know when to change
your water filter.
■ Order Filter (yellow): It is almost time to change the water
filter. Order filter icon is on all the time except when in
showroom mode or sabbath mode.
■ Replace Filter (red): Replace the water filter. While you are
dispensing water, Replace filter icon will flash constantly from
the beginning to the end of dispensing. After 14 days without
replacing the Water Filter, the Replace filter icon will blink
seven times and an alert tone will sound three times at the
end of dispensing.
■ Reset Filter: Touch Max Cool and Max Freeze together for
3 seconds to reset the water filter. The display will do a
3-second countdown, then flash the Good filter icon and play
a tone.
A. Air filter
A
Accessories
To order accessories, contact the dealer from whom you
purchased your refrigerator.
Assistance or Service
Before calling for assistance or service, please check the
“Troubleshooting” section. It may save you the cost of a service
call. If you still need help, follow the instructions below.
If you need replacement parts
To locate factory-specified replacement parts in your area,
contact the dealer from whom you purchased your refrigerator.
Warranty
Contact the dealer from whom you purchased the refrigerator for
warranty information.
Keep this book and your sales slip together for future
reference. You must provide proof of purchase or installation
date for in-warranty service.
Write down the following information about your appliance to
help you obtain assistance or service if you ever need it. You will
need to know your complete model number and serial number.
You can find this information on the model and serial number
label, located on the inside wall of the refrigerator compartment.
Dealer name _____________________________________________
Serial number ____________________________________________
Address _________________________________________________
Phone number ___________________________________________
Model number____________________________________________
Purchase date ____________________________________________
REFRIGERATOR USE
Opening and Closing Doors
There are two refrigerator compartment doors. The doors can
be opened and closed either separately or together. There is a
vertically hinged seal on the left refrigerator door.
■ When the left-side door is opened, the hinged seal
automatically folds inward so that it is out of the way.
■ When both doors are closed, the hinged seal automatically
forms a seal between the two doors.
A
A. Hinged seal
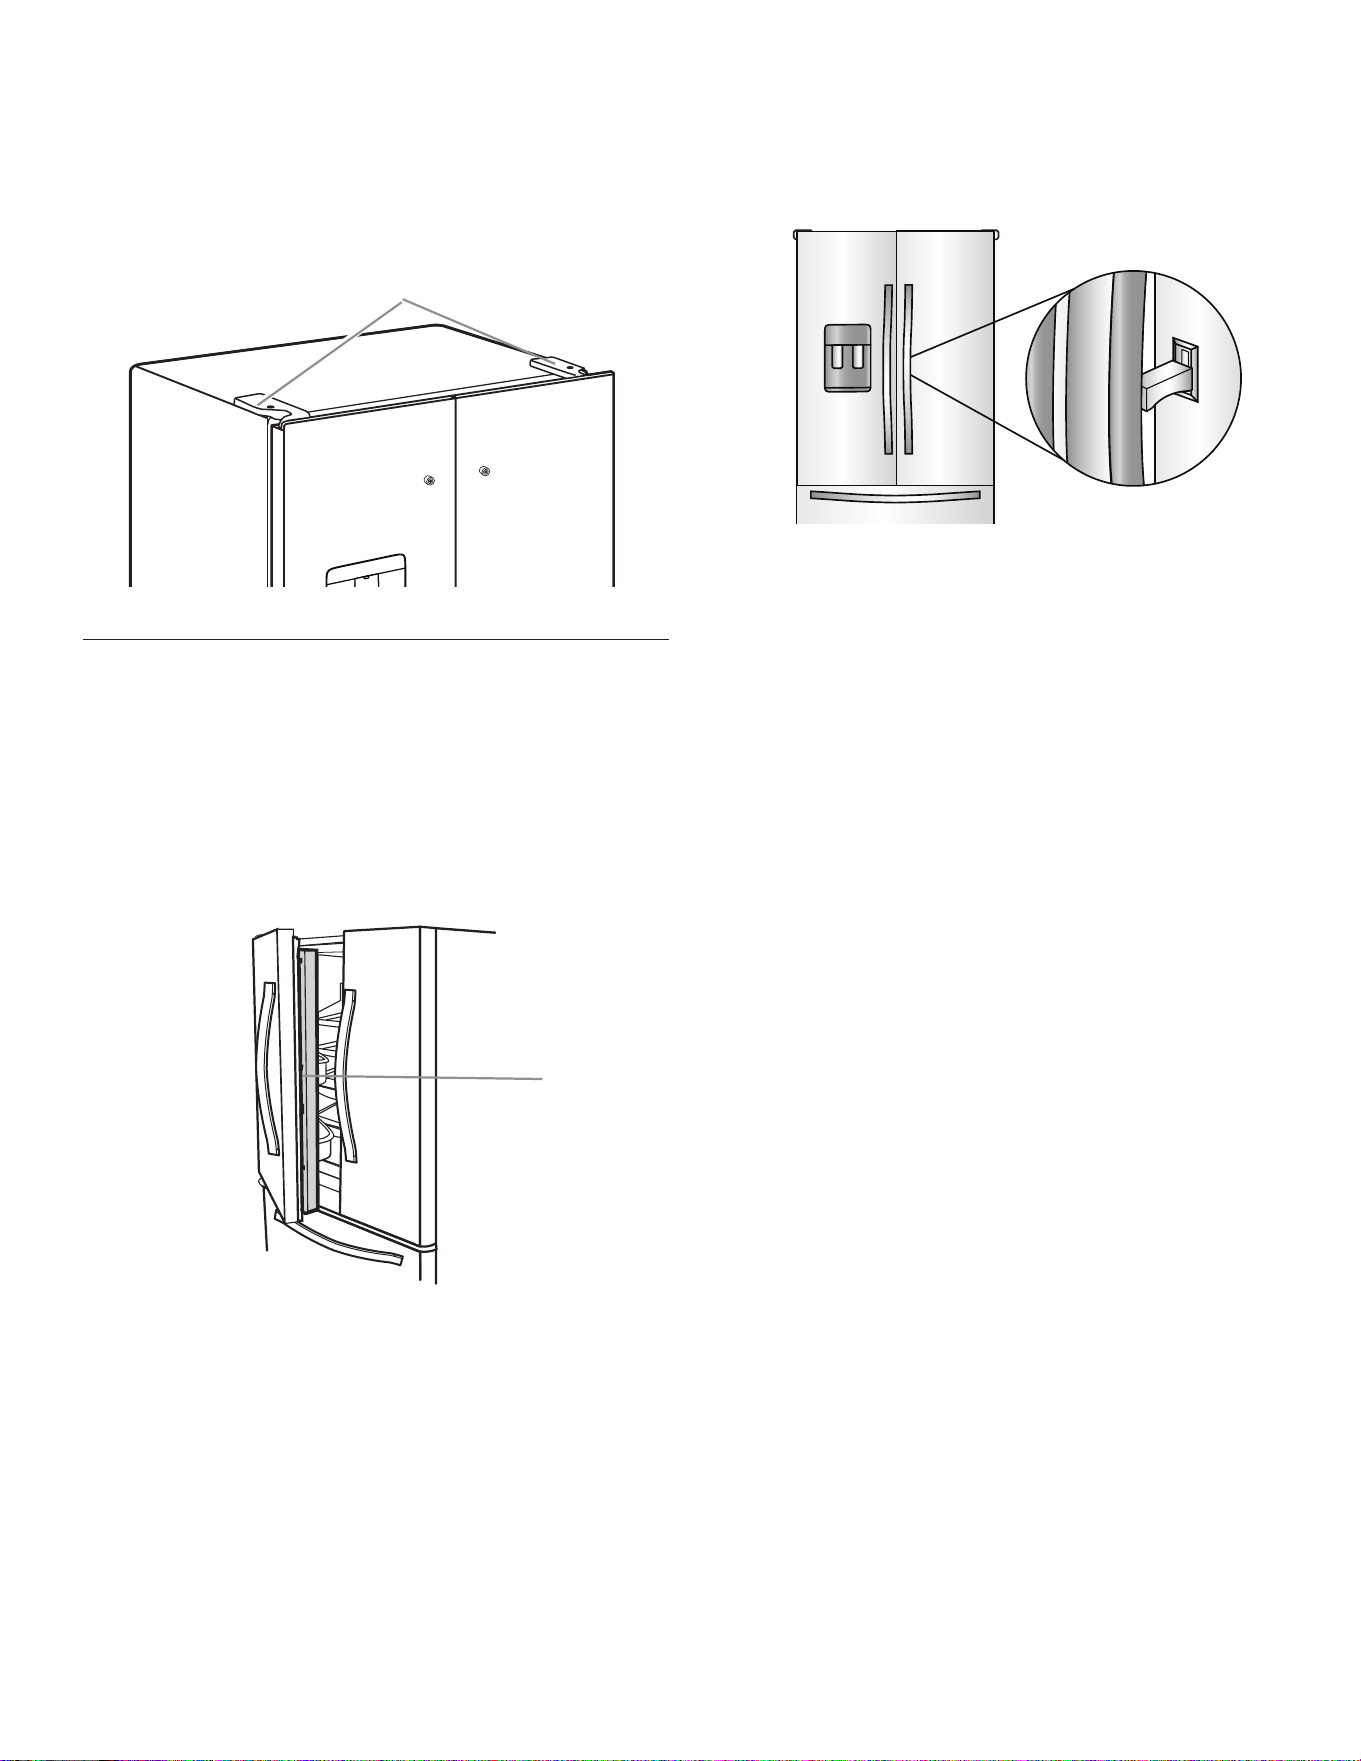
78
The refrigerator compartment door has two switches, one on the
top left side and one on the top right side.
■ The door switch use magnets to sense door opening/closing.
■ Ensure there are no magnetic or electronic devices (Speaker,
CoolVox, etc) within 7.62 cm (3") of the hinge cap.
NOTE: The light and internal user interface (UI) will not turn on if
the door opening is not detected.
A
A. Hinge cover
Opening and Closing
Door-within-Door and Doors
There are three refrigerator compartment doors. The doors can
be opened and closed either separately or together. There is a
vertically hinged seal on the left refrigerator door.
■ When the left-side door is opened, the hinged seal
automatically folds inward so that it is out of the way.
■ When both doors are closed, the hinged seal automatically
forms a seal between the two doors.
A. Hinged seal
A
Door-within-Door
Use the hidden latch and lift up to open the door-within-door
and get instant access to the gallon door bin and your cold
beverages.
IMPORTANT: Do not open inner door when outer door is open.
Close outer door before opening inner door.
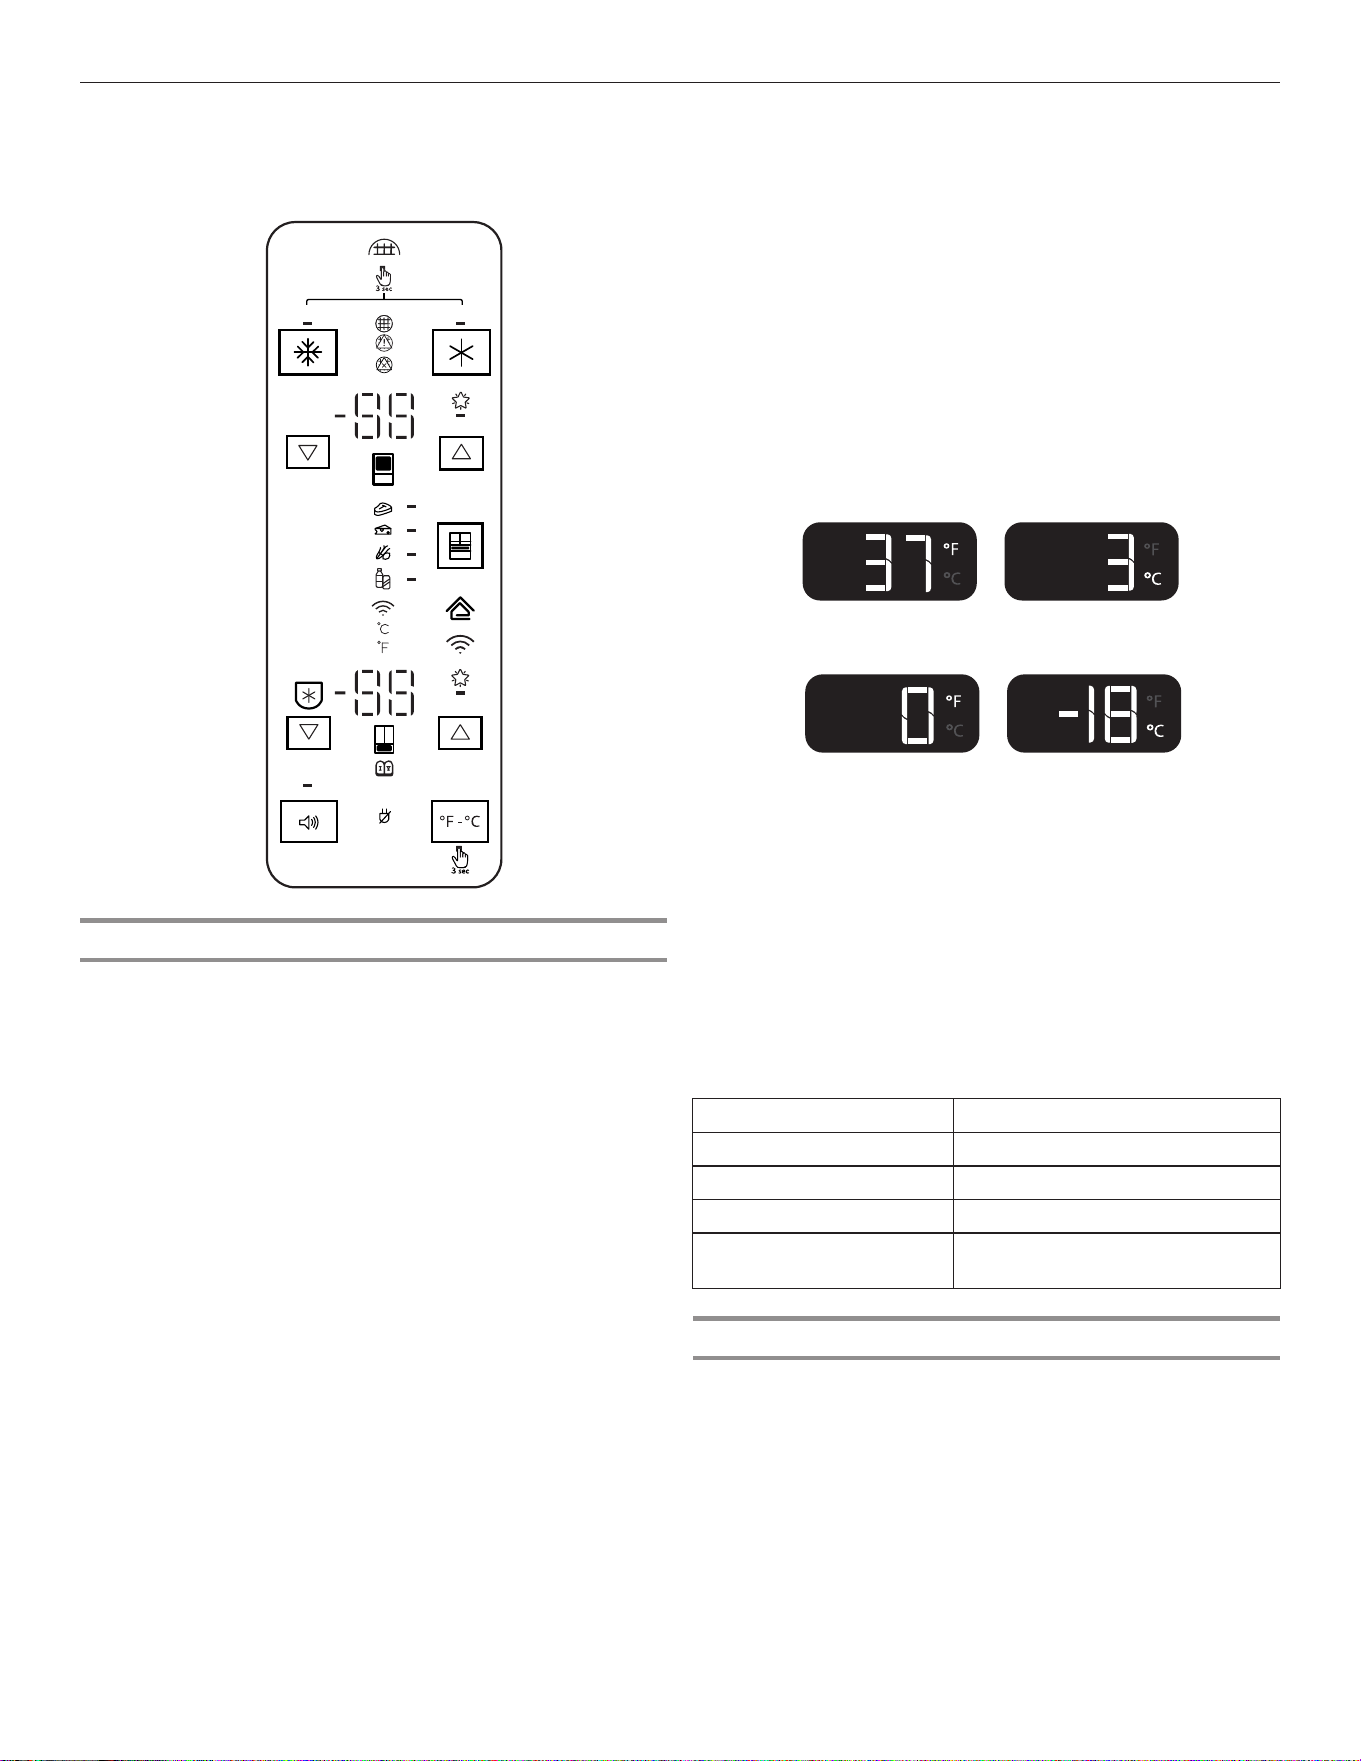
79
Using the Controls
Viewing and Adjusting Temperature Set Points
For your convenience, your refrigerator and freezer controls are
preset at the factory.
When you first install your refrigerator, make sure that the
controls are still set to the recommended set points. The factory
recommended set points are 3°C (37°F) for the refrigerator and
-18°C (0°F) for the freezer.
IMPORTANT:
■ Wait 24 hours before you put food into the refrigerator. If you
add food before the refrigerator has cooled completely, your
food may spoil.
NOTE: Adjusting the set points to a colder-than-
recommended setting will not cool the compartments any
faster.
■ If the temperature is too warm or too cold in the refrigerator
or freezer, first check the air vents to be sure they are not
blocked before adjusting the controls.
■ The recommended settings should be correct for normal
household use. The controls are set correctly when milk or
juice is as cold as you like and when ice cream is firm.
NOTE: Areas such as a garage, basement, or porch may have
higher humidity or extreme temperatures. You may need to
adjust the temperature away from the recommended settings
to accommodate for these conditions.
■ Wait at least 24 hours between adjustments. Recheck the
temperatures before other adjustments are made.
View Temperature Set Points
1. Touch Refrigerator ▼/▲ or Freezer ▼/▲ to toggle through the
temperature set points.
NOTE: To view temperature in degrees Celsius, touch and
hold the °F/°C button for 3 seconds and the temperature
display will change. To return to Fahrenheit, touch and hold
the °F/°C for 3 seconds and the temperature display will
change.
■ To activate Temperature mode for Drawer, touch the Drawer
keypad and toggle through four optional temperature
settings: Meats, Deli/Cheese, Assorted, and Drinks. The
display will show the temperature set point of the selected
setting for the drawer.
Recommended Refrigerator Temperature
Recommended Freezer Temperature
Adjust Temperature Set Points
Refrigerator set point range: 1°C to 7°C (33°F to 45°F)
Freezer set point range: -22°C to -15°C (-6°F to 5°F)
1. Touch ▼/▲ to adjust the Refrigerator zone. The display will
show the temperature set point of the selected compartment
as shown.
2. When the temperature is in the range of Extend-Freeze, the
display will light up. Extend-Freeze is activated at the coldest
freezer set point.
When adjusting temperature set points,
use the following chart as a guide:
CONDITION: TEMPERATURE ADJUSTMENT:
Refrigerator too cold Refrigerator setting 1° higher
Refrigerator too warm Refrigerator setting 1° lower
Freezer too cold Freezer setting 1° higher
Freezer too warm/
too little ice
Freezer setting 1° lower
Extend-Freeze
This feature avoids freezer burn on meats and ice cream that are
kept for long periods of time.
To turn on the Extend-Freeze feature, toggle to the coldest
Freezer temperature set point.
To turn off the Extend-Freeze feature, toggle from the coldest
freezer set point to any other temperature.
The Temperature Control UI is located above the external
dispenser and on the side of the left refrigerator door.
DEMO
H2O
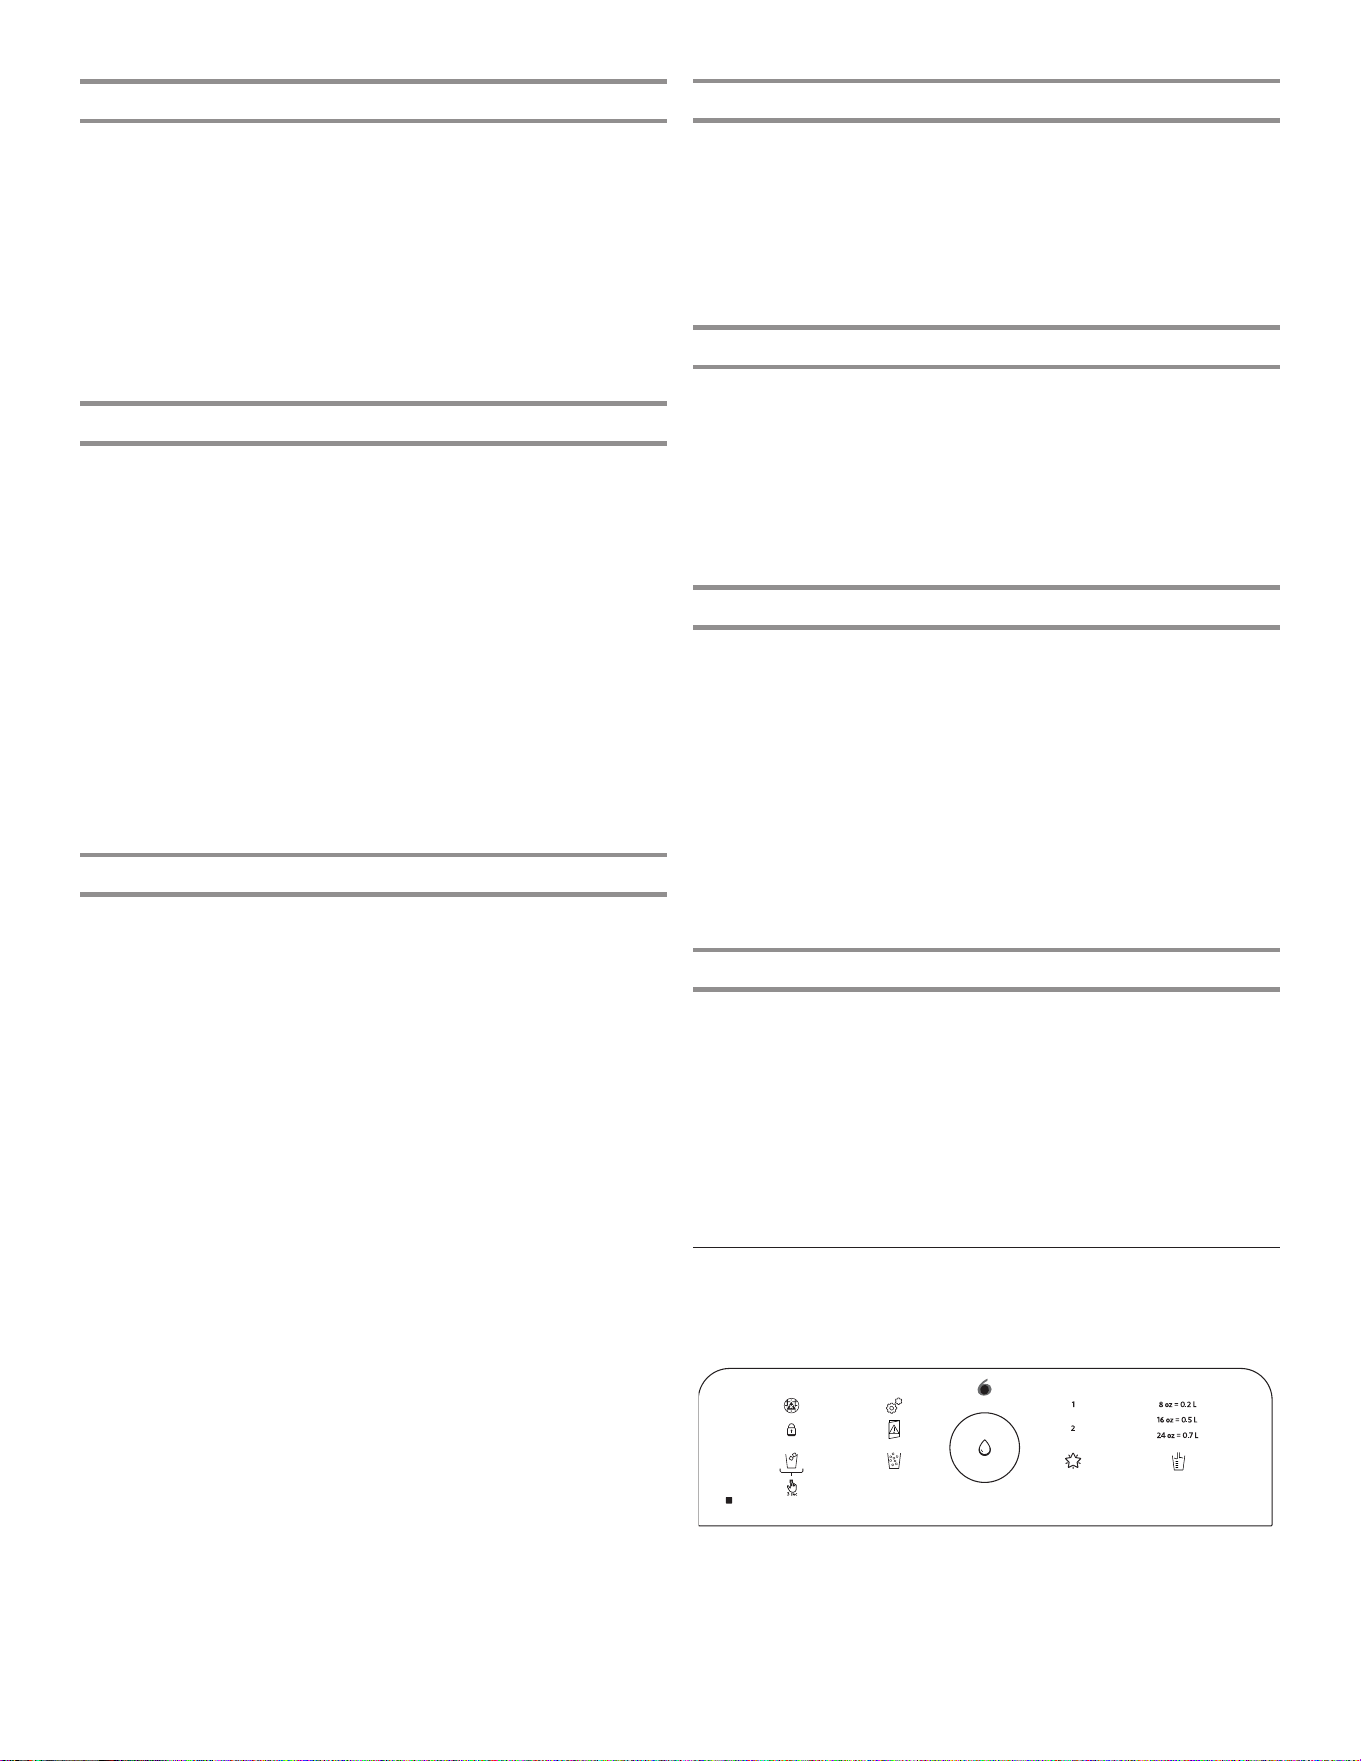
80
Max Cool
The Max Cool feature assists with periods of high refrigerator
use, full grocery loads, or temporarily warm room temperatures.
■ To turn on the Max Cool feature, press the Max Cool button.
When the button is pressed, the icon will blink three times
and appear on the display screen.
■ To manually turn off the Max Cool feature, press the Max
Cool button and the display will blink three times and turn
off. The Max Cool feature will remain on for 24 hours unless
manually turned off. Adjusting the refrigerator temperature will
automatically turn off the Max Cool feature.
Max Freeze
The Max Freeze feature assists in freezing food faster and
maximizing freezing capacity.
■ To turn on the Max Freeze feature, press the Max Freeze
button. When the button is pressed to turn the feature on, the
icon will blink three times and appear on the display screen.
■ To manually turn off the Max Freeze feature, press the Max
Freeze button and the display will blink three times and turn
off. The Max Freeze feature will remain on for 48 hours unless
manually turned off. Adjusting the freezer temperature will
automatically turn off the Max Freeze feature.
NOTE: Setting the freezer to a colder temperature may make
some foods, such as ice cream, harder.
■ For best freezing speed, Max Freeze feature should be
activated 16 hours before loading food and leave feature on
until it automatically times out.
Water Filter
The displays indicate the status of the water filter. To reset the
water filter, press the Max Freeze and Max Cool buttons for 3
seconds. After countdown, the Good filter icon will blink three
times and remain lit.
NOTE: The water filter status lights on the internal controls will
let you know when to change your water filter.
■ Order Filter (yellow): Order a replacement water filter.
■ Replace Filter (red): Replace the water filter. While you are
dispensing water, Replace filter icon will flash constantly from
beginning to the end of dispensing. After 14 days without
replacing the Water Filter, the Replace filter icon will blink
seven times and an alert tone will sound three times, at the
end of dispensing. See the “Water Filtration System” section.
NOTE: The Replace filter icon will remain illuminated if a filter
reset is not done.
■ Reset Filter: Touch the Max Freeze and Max Cool buttons
at the same time on the temperature control display for 3
seconds to reset water filter. The display will do a 3-second
countdown and then flash the Good filter icon and play a
tone.
Sound On or Off
The Sound On or Off button allows the user to turn the sound on
and off.
■ To turn on the sound feature, press the Sound On or Off
button. When the button is pressed, the Sound On or Off icon
will blink three times and appear on the display screen.
■ To manually turn off the sound feature, press the Sound On or
Off button and the display will blink three times and turn off.
Power Outage
The Power Outage indicator lets you know if the power supply
to the refrigerator has gone off and the freezer temperature has
risen.
The Power Outage icon will light up and an alert tone will sound
three times. Touch any button to stop the tone and turn off the
Power Outage icon.
Once the power outage has been confirmed, the Power Outage
icon will disappear.
Showroom Mode
This mode is used when the refrigerator is on display in a retail
store or if you want to turn the cooling off and deactivates all
other functions (except interior lighting). Showroom mode can
be used when going on vacation. See the “Vacation and Moving
Care” section for proper steps on leaving your refrigerator in this
mode for long periods of time.
If you turn on Showroom mode, the Showroom mode icon will
light up on the display. Enter or exit Showroom mode by pressing
and holding °F/°C and Drawer buttons at the same time for 3
seconds.
NOTE: Empty ice maker if refrigerator is going to be turned off for
an extended period of time.
Sabbath Mode
Sabbath mode is designed to have all the benefits of saving even
more energy, yet maintaining food freshness. The freezer and
refrigerator user set points remain unchanged while in this mode.
If you unintentionally turn on Sabbath mode, the Sabbath mode
icon will light up on the display. Enter and exit Sabbath Mode by
pressing and holding °F/°C and the Sound On or Off buttons at
the same time for 3 seconds.
NOTE: You will be unable to dispense or change temperature set
points in Sabbath mode. Your interior lighting and control panels
will all be inactive in Sabbath mode.
External Dispenser Controls
The dispenser UI is located above the external dispenser of the
refrigerator.
th
sense
IMPORTANT: The display screen on the dispenser control panel
will turn off automatically and enter Sleep mode when the control
buttons and dispenser paddles have not been used for 2 minutes
or more. Touch any control button to reactivate the display
screen.
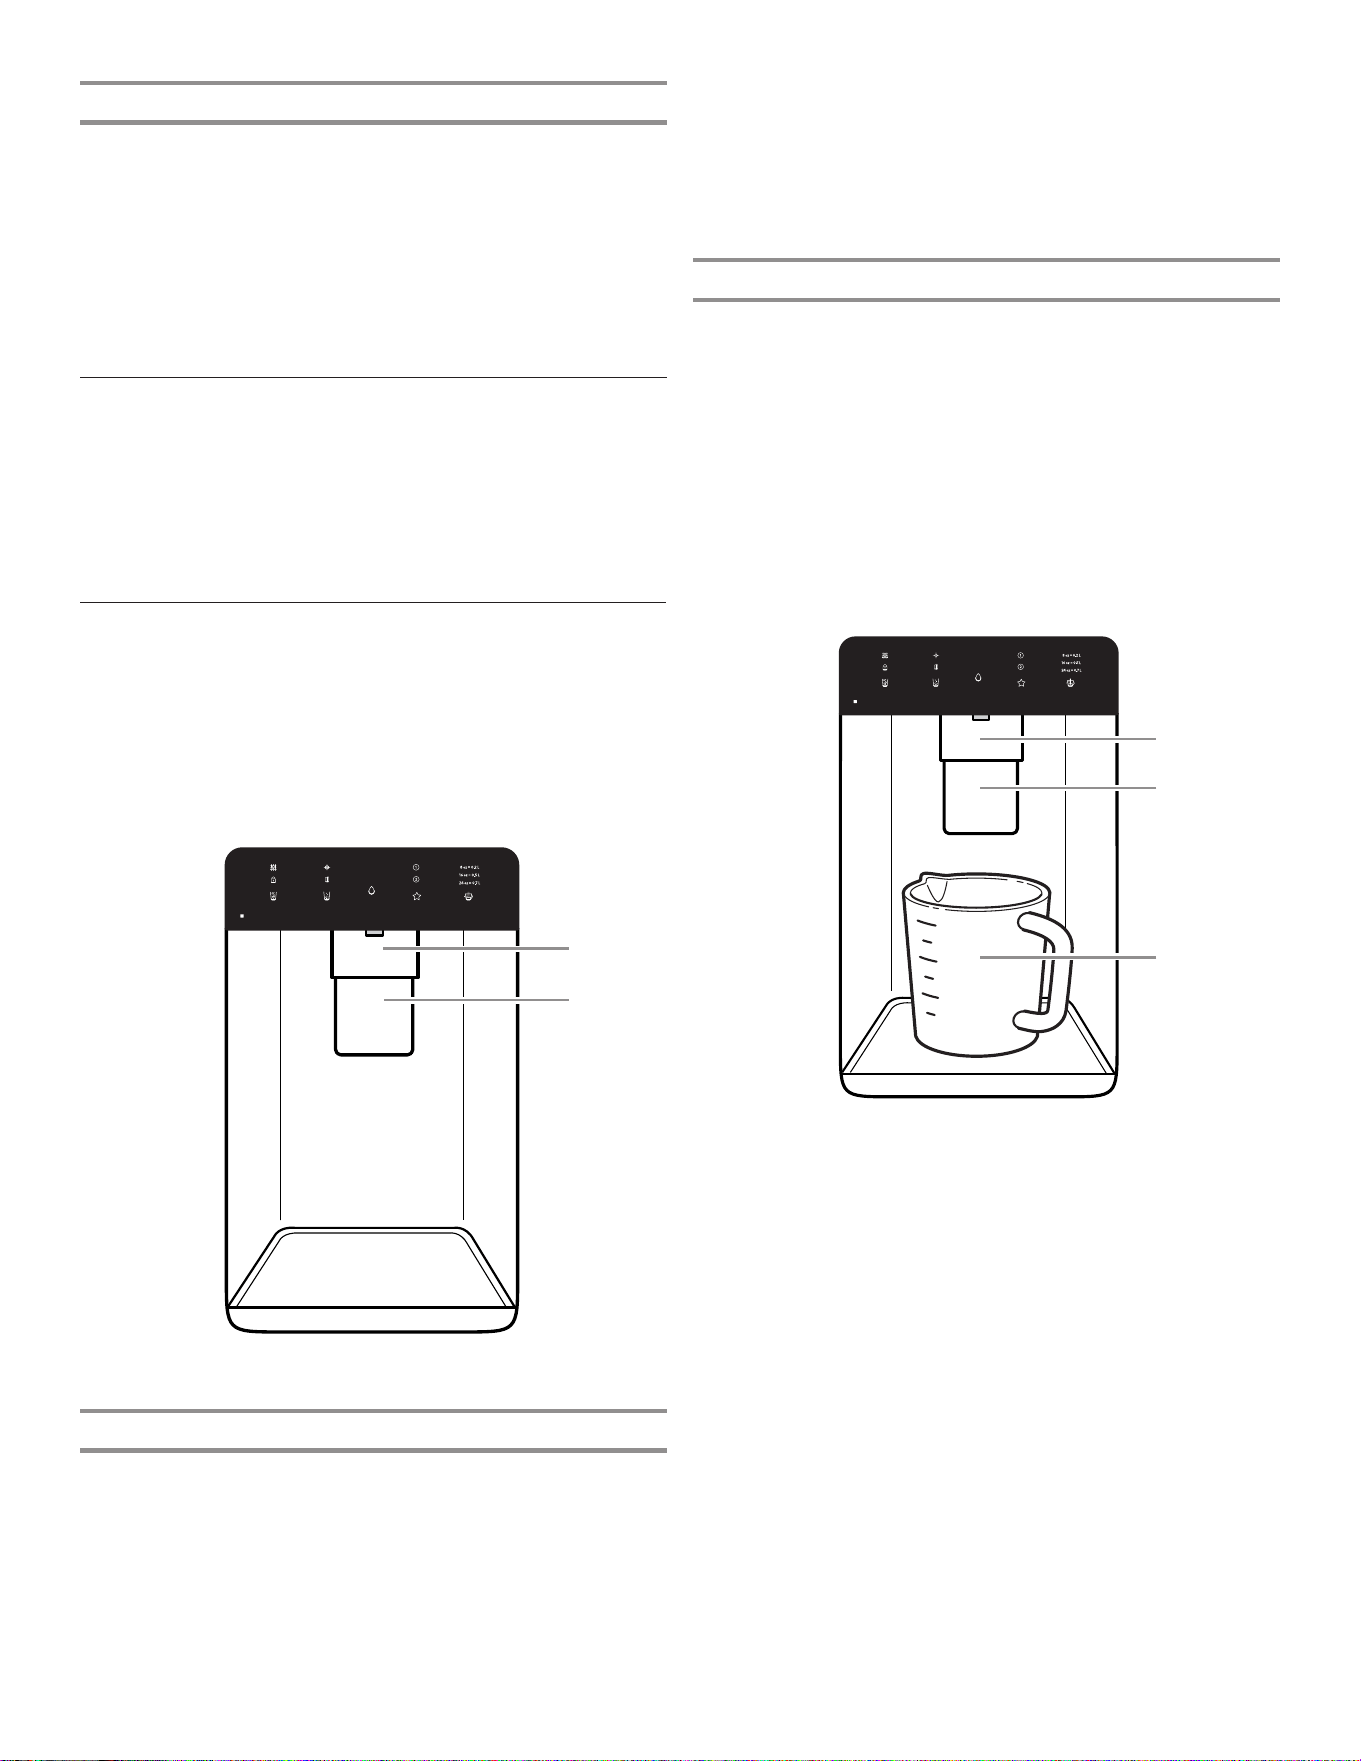
81
Additional Features
Door Ajar Alarm
The Door Ajar Alarm feature sounds an alarm when the
refrigerator door(s) or freezer drawer is open for 5 minutes and
cooling is turned on. The alarm will repeat every 2 minutes. Close
all doors and drawer to turn it off.
NOTE: To mute the audible alarm while keeping the doors open,
such as while cleaning the inside of the refrigerator, touch any
button on the control panel. The alarm sound will be temporarily
turned off, but the Door Ajar icon will still be displayed on the
dispenser control panel.
Water and Ice Dispensers
IMPORTANT:
■ Allow 3 hours for the refrigerator to cool down and chill water.
■ Allow 24 hours to produce the first batch of ice. Discard the
first three batches of ice produced.
■ The dispensing system will not operate if the left-hand
refrigerator door is open.
Flush the Water System
Air in the water dispensing system can cause the water dispenser
to drip. After connecting the refrigerator to a water source or
replacing the water filter, flush the water system.
Flushing the water dispensing system forces air from the water
line and filter and prepares the water filter for use. Additional
flushing may be required in some households.
NOTE: As air is cleared from the system, water may spurt out of
the dispenser.
Calibrate Measured Fill
Household water pressure may affect the accuracy of the
Measured Fill feature. So, for optimum performance of your
water dispenser, you must first calibrate Measured Fill.
IMPORTANT:
■ Flush the water system before calibrating Measured Fill.
■ For best results, calibration should be performed when water
is not being used in the house.
1. Place a sturdy measuring cup (237 mL [1 cup] size) on the
dispenser tray centered in front of the ice/water dispenser
paddle.
NOTE: Depending on your model, a measuring cup may be
provided.
Ensure that you do not have any Measured Fill preset
selected.
2. Touch and hold the Measured Fill button for 3 seconds to
enter into Calibration mode. The Calibration and Measured
Fill icons will illuminate and remain lit while the Measured Fill
feature is being calibrated.
NOTE: You may touch the Measured Fill button to exit at
any time in Calibration mode. The Calibration mode icon will
disappear and the display will return to the Home screen.
3. Press and hold the water dispenser paddle, as needed, to
dispense water to the 237 mL (1 cup) fill line in the measuring
cup.
NOTE: If overfilling or spilling occurs, discard the water and
restart the calibration process.
4. When 237 mL (1 cup) of water has been correctly dispensed
into the measuring cup, touch the Measured Fill button to
confirm the calibration.
5. When Measured Fill calibration has been confirmed, the
Calibration icon will disappear and the display will return
to the home screen.
Lighting the Refrigerator
The refrigerator has an interior light that comes on any time the
door is opened.
NOTE: The light is an LED which does not need to be replaced.
If the LED does not illuminate when the door is opened, call
service to replace the light.
1. Using a sturdy container, press and hold the water dispenser
paddle for 5 seconds.
2. Release the dispenser paddle for 5 seconds. Repeat steps
1 and 2 until water begins to flow.
3. Once water begins to flow, continue depressing and releasing
the dispenser pad (5 seconds on, 5 seconds off) until a total
of 11.4 L (3 gal) has been dispensed.
A. Water dispenser paddle
B. Ice dispenser paddle
C. Measuring cup 237 mL (1 cup)
B
A
C
B
A
A. Water dispenser paddle
B. Ice dispenser paddle
82
Save Favorite Fill
Household water pressure may affect the accuracy of the
Favorite Fill feature. So, for optimum performance of your
water dispenser, you must first calibrate Measured Fill. (See the
“Calibrate Measured Fill” section).
NOTE: Water will not be dispensed using the Favorite Fill feature
unless your preferred Favorite Fill amount is saved first.
IMPORTANT:
■ Flush the water system before Favorite Fill.
■ For best results, calibration should be performed when water
is not being used in the house.
1. Place a preferred-size cup on the dispenser tray centered in
front of the ice/water dispenser paddle.
2. Select either Favorite Fill 1 or 2, and then touch and hold the
Favorite Fill button for 3 seconds to enter into Saving mode.
The Favorite Fill icon will illuminate and remain lit while the
Favorite Fill feature is being saved.
NOTE: You may touch the Favorite Fill button to exit at any
time in Saving mode and the display will return to the Home
screen.
3. Press and hold the water dispenser paddle, as needed, to
dispense water to the preferred-size cup.
NOTE: If overfilling or spilling occurs, discard the water and
restart the saving process.
4. When the preferred amount of water has been correctly
dispensed into the cup, touch the Favorite Fill button to
confirm the favorite amount.
5. When Favorite Fill amount has been confirmed, the display
will return to the home screen.
Dispensing
Touch the Cubed Ice or Crushed Ice button for your ice selection.
NOTES:
■ For crushed ice, cubes are crushed before being dispensed.
This may cause a slight delay when dispensing crushed ice.
Noise from the ice crusher is normal and pieces of ice may
vary in size.
■ When changing from crushed to cubed, a few ounces of
crushed ice will be dispensed along with the first cubes.
Dispensing Water
IMPORTANT:
■ Dispense at least 1 L (1 qt) of water every week to maintain a
fresh supply.
■ If the flow of water from the dispenser decreases, it could be
caused by low water pressure.
■ With the water filter removed, dispense 237 mL (1 cup) of
water. If 237 mL (1 cup) of water is dispensed in
8 seconds or less, the water pressure to the refrigerator
meets the minimum requirement.
■ If it takes longer than 8 seconds to dispense 237 mL
(1 cup) of water, the water pressure to the refrigerator
is lower than recommended. See the “Water Supply
Requirements” and “Troubleshooting” sections for
suggestions.
To Dispense Water — Standard:
1. Press a sturdy glass against the water dispenser paddle.
2. Remove the glass to stop dispensing.
NOTE: The Fill button (center button) does not enable standard
dispensing. It only functions in Measured Fill mode.
To Dispense Water — Measured Fill:
Measured Fill allows you to dispense a specified amount of water
with the touch of a few buttons.
1. Put a sturdy glass under waterspout. Touch the Measured Fill
button to activate.
NOTE: The amount of water you select will be dispensed.
Make sure the container can hold the entire volume. If ice
is in the container, you may need to adjust your selection.
2. Touch the Measured Fill button to turn on, then touch to
select 0.2 L (8 oz), 0.5 L (16 oz), or 0.7 L (24 oz). Touch a
fourth time to exit Measured Fill display.
3. Touch the Fill button or press paddle and the selected
amount of water will be dispensed.
NOTES:
■ The Measured Fill dispenser will automatically time out after
1 minute of inactivity.
■ You can refill several glasses with the same measurement
by continuing to touch the Fill button (center button) after
each glass fill.
Measured Fill options are listed in the following chart:
Units
Ounces 8 16 24
Cups 1 2 3
Liters 0,2 0,5 0,7
NOTE: Most coffee cups (commonly 118 to 177 mL [4 to 6 oz]
per cup) are not the same size as a measuring cup
(237 mL [8 oz]). You may need to recalibrate Measured Fill to
underfill or to avoid unintentionally overfilling coffee cups.
4. Dispense water.
NOTE: While dispensing water, the flow of water will
automatically stop once the desired volume has been
dispensed.
■ Press a sturdy glass against the dispenser paddle below
the waterspout.
OR
■ Place the glass below the waterspout and touch the Fill
button for hands-free dispensing.
5. To pause dispensing before the selected volume has been
dispensed, touch the Fill button a second time or touch the
water dispenser paddle. Touch the Fill button or paddle again
to resume dispensing remaining amount.
NOTE: If you stop dispensing before the desired volume has
been dispensed, the display will turn off after 1 minute. If you
have not resumed by then, it will reset back to the original
amount.
6. To select a new volume or start dispensing the same volume
again, you must first finish dispensing the selected volume or
turn off the Measured Fill feature (either by waiting 1 minute
so it will automatically turn off or by touching the Cubed Ice
or Crushed Ice button to manually turn it off), and then select
Measured Fill again.
To Dispense Water — Favorite Fill:
Favorite Fill allows you to dispense a preferred amount of water
with the touch of a few buttons.
1. Put a sturdy glass under waterspout. Touch the Favorite Fill
button to activate.
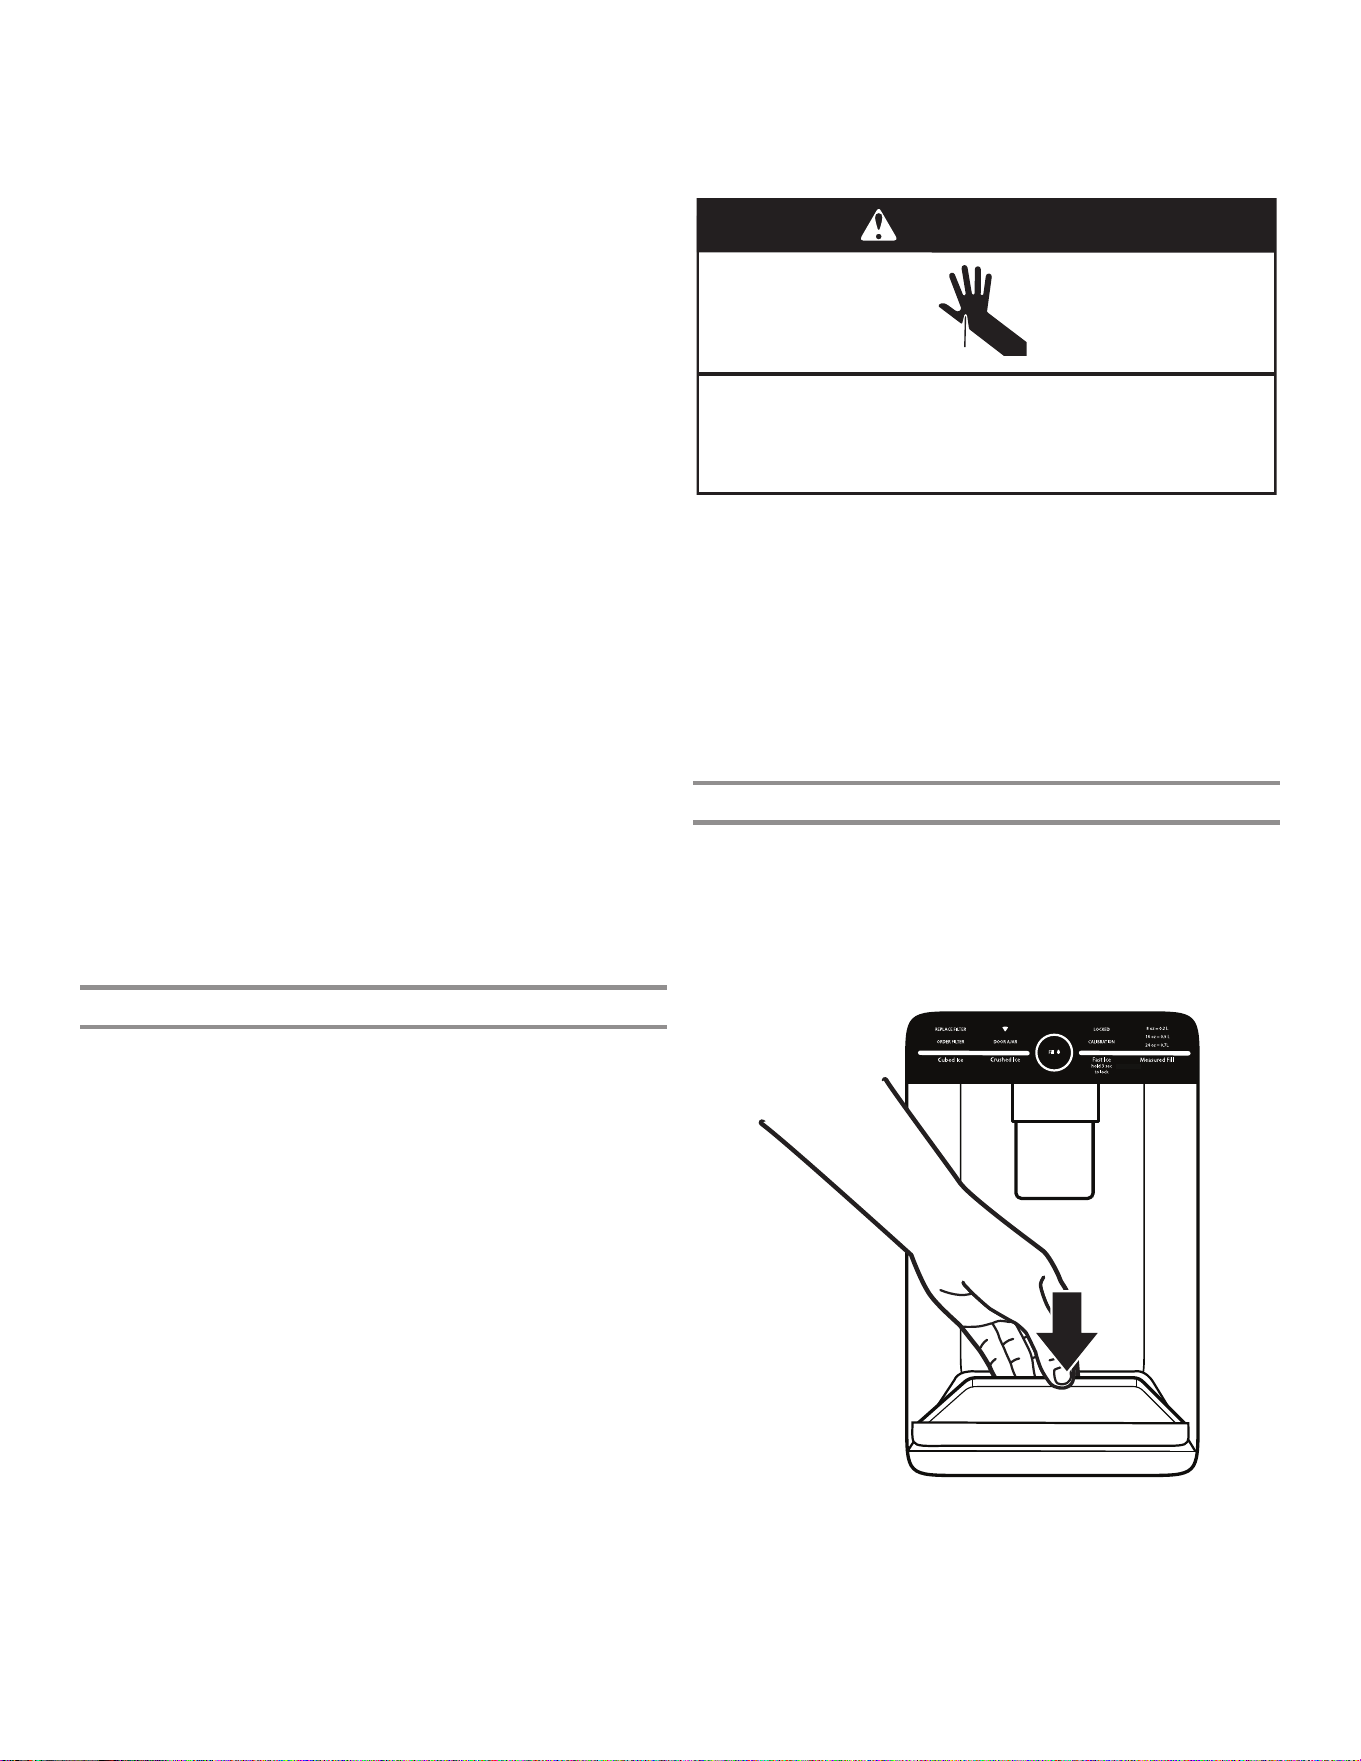
83
To Dispense Ice:
Paddle Dispensing
1. Select the desired type of ice by pressing Cubed Ice or
Crushed Ice.
Cut Hazard
Use a sturdy glass when dispensing ice.
Failure to do so can result in cuts.
WARNING
2. Press a sturdy glass against the dispenser paddle. Hold the
glass close to the dispenser opening so ice does not fall
outside of the glass.
IMPORTANT: You do not need to apply a lot of pressure to
the paddle to activate the ice dispenser. Pressing hard will not
make the ice dispense faster or in greater quantities.
3. Remove the glass to stop dispensing.
NOTE: Ice may continue to dispense for several seconds after
removing the glass from the dispenser paddle. The dispenser
may continue to make noise for a few seconds after dispensing.
The Dispenser Drip Tray
The drip tray can be removed to carry to the sink to empty or
clean.
■ Lift up on the front edge of the tray and pull forward to
remove.
■ The drip tray can also slide out during Measured/Favorite Fill.
!
Calibration
!
Door
Ajar
!
Replace
Filter
!
"#$#!
!
%&#'#(')!"#$#!
!
Order Filter
!
a1 oz = b1 L
!
a2 oz = b2 L
!
a3 oz = b3 L
!
Dispense
!
NOTE: The amount of water you select will be dispensed.
Make sure the container can hold the entire volume. If ice
is in the container, you may need to adjust your selection.
2. Touch the Favorite Fill button to turn on, then touch to select
Favorite 1 or Favorite 2. Touch a third time to exit Favorite Fill
display.
3. Touch the Fill button or press paddle and the selected
amount of water will be dispensed.
NOTES:
■ The Favorite Fill dispenser will automatically time out after
1 minute of inactivity.
■ You can refill several glasses with the same measurement by
continuing to touch the Fill button after each glass fill.
4. Dispense water.
NOTE: While dispensing water, the flow of water will
automatically stop once the desired volume has been
dispensed.
■ Press a sturdy glass against the dispenser paddle below
the waterspout.
OR
■ Place the glass below the waterspout and touch the Fill
button for hands-free dispensing.
5. To pause dispensing before the selected volume has been
dispensed, touch the Fill button a second time or touch the
water dispenser paddle. Touch the Fill button or paddle again
to resume dispensing remaining amount.
NOTE: If you stop dispensing before the desired volume has
been dispensed, the display will turn off after 1 minute. If you
have not resumed by then, it will reset back to the original
amount.
6. To select a new volume or start dispensing the same volume
again, you must first finish dispensing the selected volume
or turn off the Favorite Fill feature (either by waiting 1 minute
so it will automatically turn off, or by touching Cubed Ice or
Crushed Ice to manually turn it off), and then select Favorite
Fill again.
The Ice Dispenser
IMPORTANT:
■ If the ice cubes are hollow or irregular-shaped, it could be
because of low water pressure. See the “Water Supply
Requirements” section.
■ Ice travels from the ice storage bin through the dispenser
chute through and out the dispenser. To turn off the ice
maker, see the “Ice Maker and Storage Bin” section.
■ The dispenser may continue to make noise and ice may
continue to dispense for several seconds after releasing
the dispenser button or paddle.
To Clean the Ice Dispenser Chute:
Humidity naturally causes ice to clump together. Ice particles
can build up until the ice dispenser chute becomes blocked.
If ice is not dispensed regularly, it may be necessary to empty the
ice storage bin and clean the ice delivery chute, the ice storage
bin, and the area beneath the storage bin every 2 weeks.
■ If necessary, remove the ice clogging the storage bin and
delivery chute using a plastic utensil.
■ Clean the ice delivery chute and the bottom of the ice storage
bin using a warm, damp cloth, and then dry thoroughly.

84
2. Turn on the ice maker by moving the switch to the On (I)
position.
NOTES:
■ To manually turn off the ice maker, move the control to the
Off (O) position.
■ Your ice maker has an automatic shutoff. The sensor will
automatically stop ice production if the storage bin is full,
if the door is open, or the storage bin is removed. The
control will remain in the On (I) position.
3. Close the ice compartment door.
Remove and Replace the Ice Storage Bin
■ Remove the ice storage bin by inserting your fingers into the
hole at the base of the bin and pulling the latch to release the
bin from the compartment. Lift the storage bin up and pull it
straight out.
■ Replace the storage bin inside the ice compartment and push
down to make sure it is firmly in place.
Ice Production Rate
■ The ice maker should produce approximately 1.4 kg (3 lbs)
of ice per day under normal operation.
The Dispenser Light
1. When you use the dispenser, the light will automatically
turn on.
2. The dispenser light also serves as an automatic nightlight.
Once the ambient light in the room is reduced, the auto
sensor will cause the dispenser light to illuminate.
The Dispenser Lock
The dispenser can be locked for easy cleaning or to avoid
unintentional dispensing by small children and pets.
NOTE: The lock feature does not shut off power to the
refrigerator or the dispenser light. It simply deactivates the
controls and dispenser levers. To turn off the ice maker, see the
“Ice Maker and Storage Bin” section.
■ Touch and hold the Cubed Ice button for 3 seconds to lock
the dispenser.
■ Touch and hold the Cubed Ice button for 3 seconds to unlock
the dispenser.
■ The display screen indicates when the dispenser is locked.
Ice Maker and Storage Bin
IMPORTANT: To avoid low ice production and poor quality ice,
flush the water system before turning on the ice maker. See the
“Water Dispenser” section.
■ Following installation, allow 24 hours to produce the first
batch of ice. Discard the first three batches of ice produced.
Allow 2 to 3 days to fill the ice storage bin.
■ The quality of your ice will be only as good as the quality
of the water supplied to your ice maker. Avoid connecting
the ice maker to a softened water supply. Water softener
chemicals (such as salt) can damage parts of the ice maker
and lead to poor quality ice. If a softened water supply
cannot be avoided, make sure the water softener is operating
properly and is well-maintained.
■ If the ice in the storage bin clumps together, break up ice
using a plastic utensil and discard ice. Do not use anything
sharp to break up the ice. This can cause damage to the ice
bin and the dispenser mechanism.
■ Do not store anything in the ice storage bin.
Ice Maker in the Refrigerator
The ice maker is located on the left door behind the bins. Ice
cubes are ejected into the ice storage bin located on the left-
hand refrigerator door.
Turn the Ice Maker On/Off
1. Push down on the latch on the left-hand side of the ice
compartment to open the door.
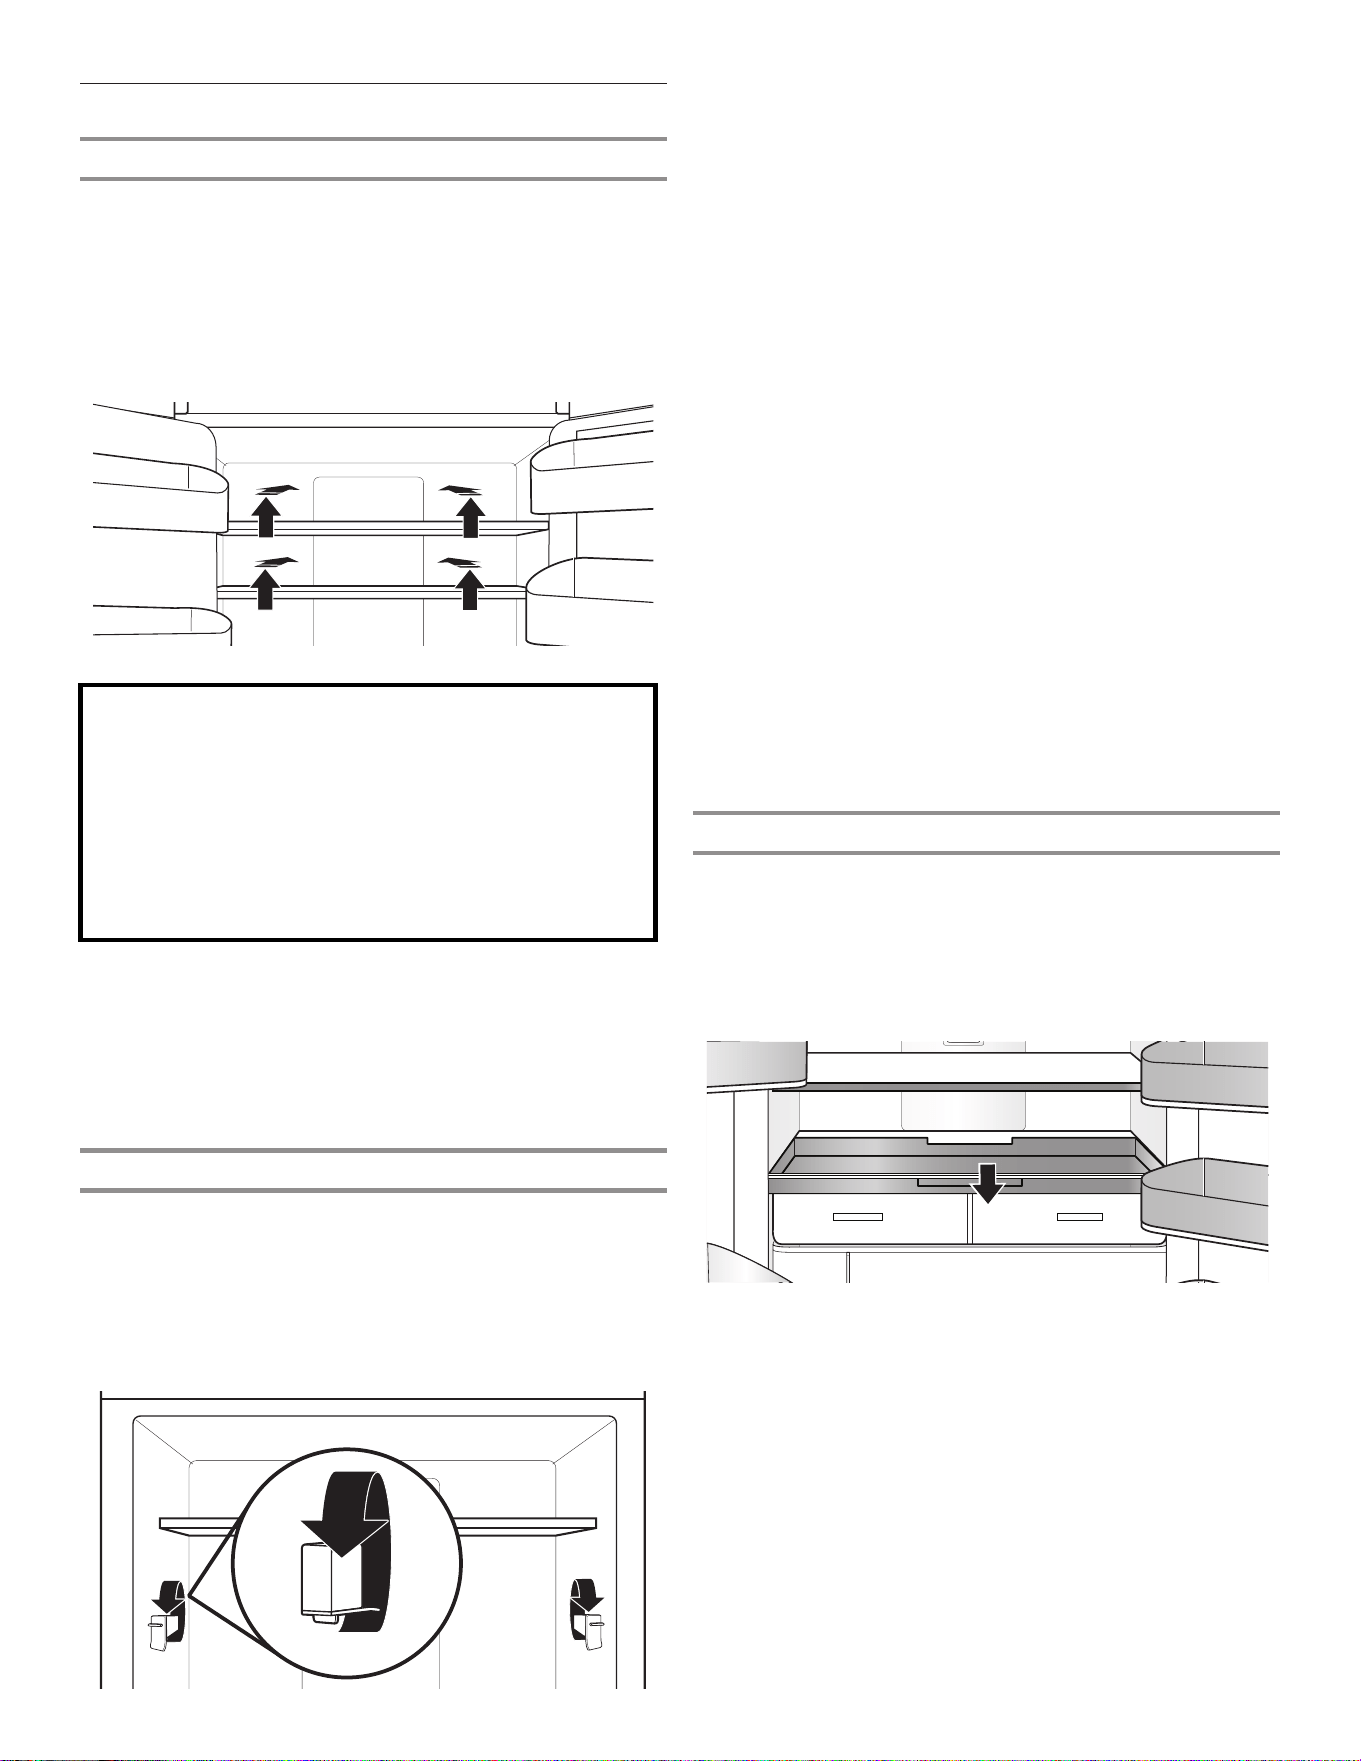
85
Shelves and Shelf Frames
The shelves in your refrigerator are adjustable to meet your
individual storage needs.
Storing similar food items together in your refrigerator and
adjusting the shelves to fit different heights of items will make
finding the exact item you want easier. It will also reduce the
amount of time the refrigerator door is open and save energy.
Shelf Height Adjustment
Shelf height can be adjusted by changing the adjustable shelf
mounts between their vertical and horizontal positions.
1. Carefully lift the shelf off the shelf mounts and turn the flipper
to the desired orientation.
2. Repeat for remaining shelf mounts.
3. Apply pressure to the top of the shelf to ensure the shelf is
properly seated on the shelf mounts.
Important information to know about glass shelves
and covers:
Do not clean glass shelves or covers with warm water when
they are cold. Shelves and covers may break if exposed to
sudden temperature changes or impact, such as bumping.
Tempered glass is designed to shatter into many small,
pebble-size pieces. This is normal. Glass shelves and covers
are heavy. Use both hands when removing them to avoid
dropping.
To remove and replace shelves:
1. Make sure adjustable shelf mounts are in the lower position
before removing shelves. Also doors will need to be open at
a 90˚ angle. If open wider, it will make it harder to remove the
shelves.
2. Remove the middle shelf or top shelf by lifting it up and out
of the shelf supports. Then pull the shelf forward and tilt down
to a vertical position. Turn the shelf at an angle and pull out of
the refrigerator.
NOTE: Remove middle shelf first before removing top shelf.
The U-shaped shelf should be pushed back in. When tilted
up, make sure glass does not slide to front.
3. Remove the bottom shelf by lifting it up and out of the
shelf supports. Then pull the shelf forward and tilt up to
a vertical position. Turn the shelf at an angle and pull out
of the refrigerator.
4. Replace the middle and top shelves by putting the shelf in the
refrigerator at an angle with the front of the shelf down. Lift
the front of the shelf up and slide in until the rear of the shelf
drops into the shelf supports. Lower the front of the shelf and
make sure that the shelf is in position.
5. Replace the bottom shelf by putting the shelf in the
refrigerator at an angle with the front of the shelf up. Lift the
front of the shelf and slide in until the rear of the shelf drops
into the shelf supports. Lower the front of the shelf and make
sure that the shelf is in position.
Shelves with under-shelf lighting (on some models)
By moving LED lighting to a new spot under the shelves, this
leading-edge technology improves interior refrigerator lighting
and aids in locating storage items.
Platter Pocket
To remove and replace the platter pocket:
1. Pull the tray to the fully open position or when it stops.
2. Lift up and out of gliders toward the front of the refrigerator.
3. Replace the tray by placing it on the bottom tray guide and
pushing it past the tray stop into position.
Shelves, Bins, and Drawers
U-Shaped Shelf
Some shelves will tuck away to create room for taller objects.
1. To retract the front section of the shelf, push the adjustable
portion of the shelf as far back as needed toward the rear of
the refrigerator.
2. Extend the front glass and front trim of the shelf by pulling the
retracted portion of the shelf outward until it is fully extended.
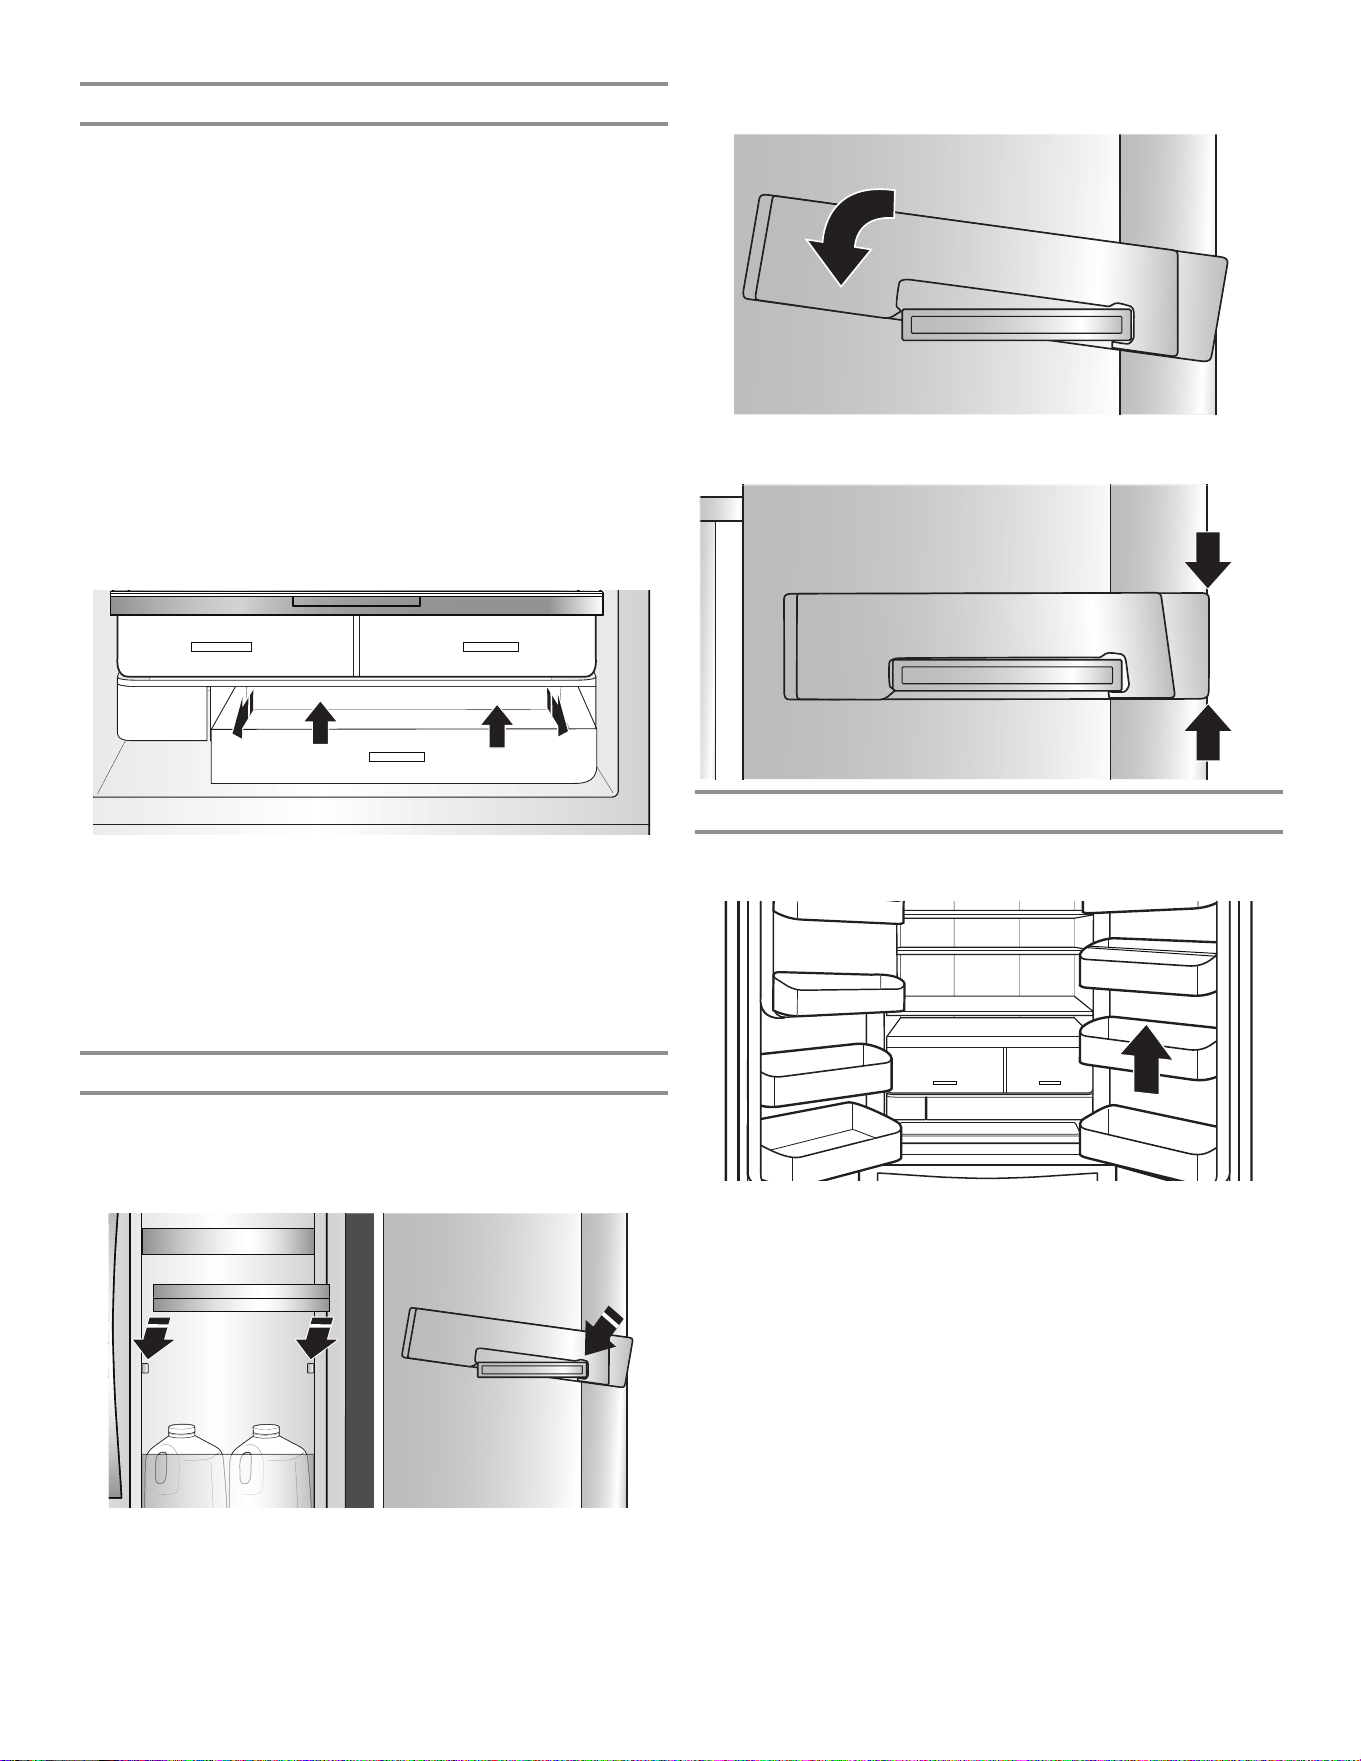
86
Auto-Humidity Crispers
These upgraded crisper drawers use a gasket seal to maintain
the ideal temperature and humidity levels to keep produce fresh
longer. These drawers also feature premium soft-close glides
that provide the best extension for easy access and maximum
visibility to your produce items.
To remove and replace the drawers:
1. Grasp the handle at the bottom of the drawer and slide the
drawer straight out to the stop. Lift the drawer off the bottom
guide.
2. Replace the drawer by placing it on the bottom drawer guide
and pushing it past the drawer stop into position.
To remove the crispers cover (can remove only if platter
pocket is removed first):
1. Remove the platter pocket first.
2. Holding the glass insert firmly with one hand, press up in
center of glass insert until it rises above the plastic frame.
Gently slide the glass insert forward to remove.
To replace crisper(s) cover(s):
1. Remove the crisper pan, platter pocket, and crisper glass
before removing the crisper.
2. Fit back of cover frame into supports on side walls of the
refrigerator and lower the front of the cover frame into place.
3. Slide rear of glass insert into cover frame and lower front into
place.
Replace Door-within-Door Bins
Install bins with the inner door closed and the outer door open on
the right side of the refrigerator.
1. Engage the side of the bin with the bigger tab to the front
and tilt it down.
2. Press the back side down and snap into place.
3. Bins need to be aligned and flush with the door.
Refrigerator Door Bins
The bins on your refrigerator door are adjustable to meet your
individual storage needs.
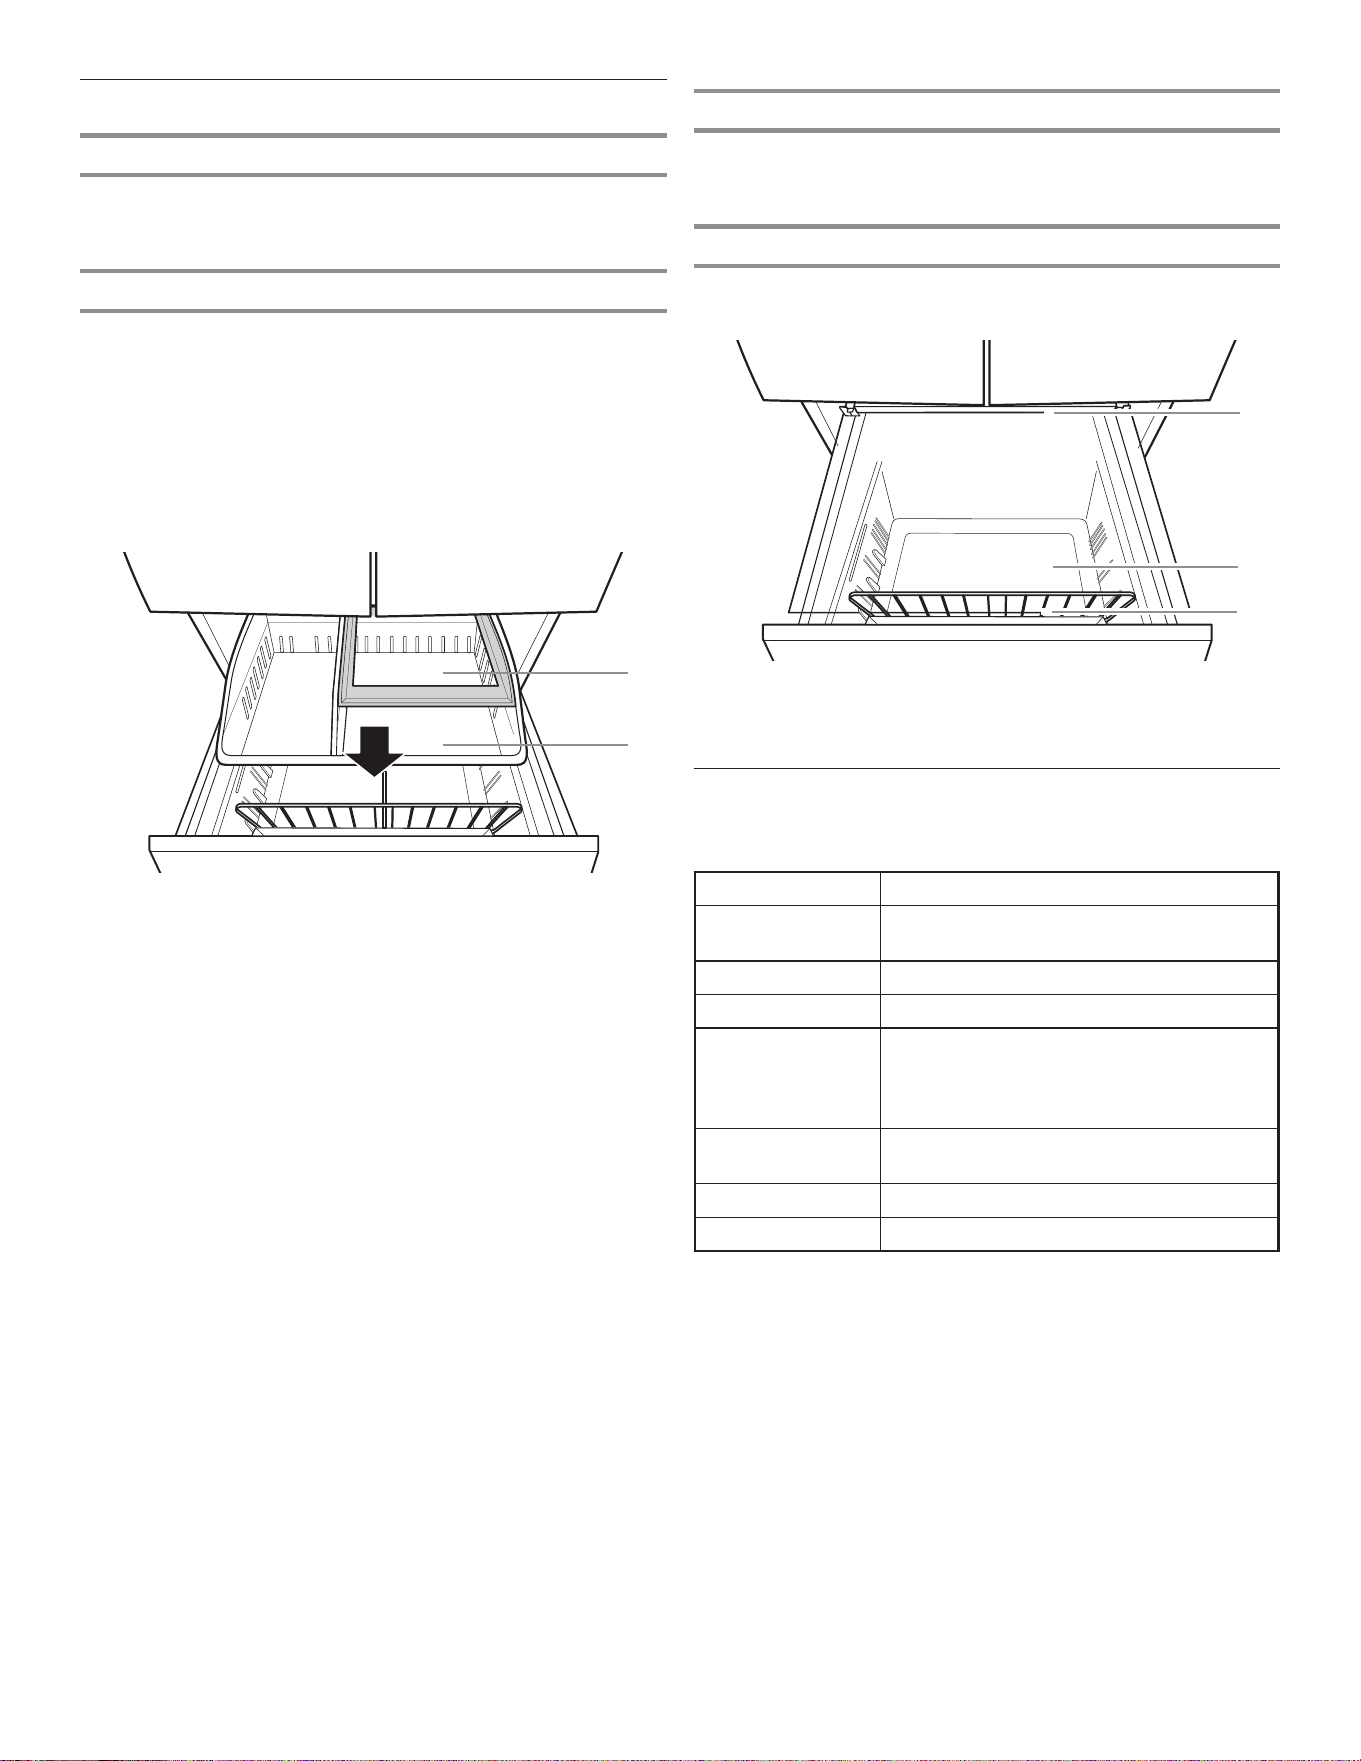
87
Audio Reference
Tone Assignment
Tone Name Usage Examples
Power On Cooling system is turned on every time
the product is powered on.
Power Off Cooling system is turned off.
Key Press User presses a valid button.
Invalid (Error) User presses two or more valid buttons at
the same time. Countdown interruption for
press-and-hold buttons. User presses pad
when dispensing is not allowed.
Engage Acknowledgment of entry into any mode
or completion of dispensing.
Disengage Acknowledgment of exit from any mode
Alert Power Outage alert, Door Ajar alert
This table is for quick reference only. See corresponding sections
for details. In case of inconsistency, section details will prevail.
Freezer Shelf
To maximize freezer capacity, you may remove the upper pan to
expose the freezer shelf beneath. You can then store the upper
pan and load food directly on top of the shelf.
Wire Divider
Divides and organizes the lower pan.
C. Freezer shelf
D. Lower pan
E. Wire divider
C
E
D
Freezer Drawers
Third Tier
This shelf is not removable unless you remove the upper pan. The
third tier is able to move backward, allowing access to items in
the area below.
Upper Pan
For maximum freezer capacity, you may remove the upper pan to
expose the freezer shelf.
To remove the upper pan:
1. Pull upper pan forward.
2. Lift up and shift pan to the left side to disengage.
3. Pull the right side corner of the upper pan forward and lift pan
up and out of freezer.
A. Third tier
B. Upper pan
B
A
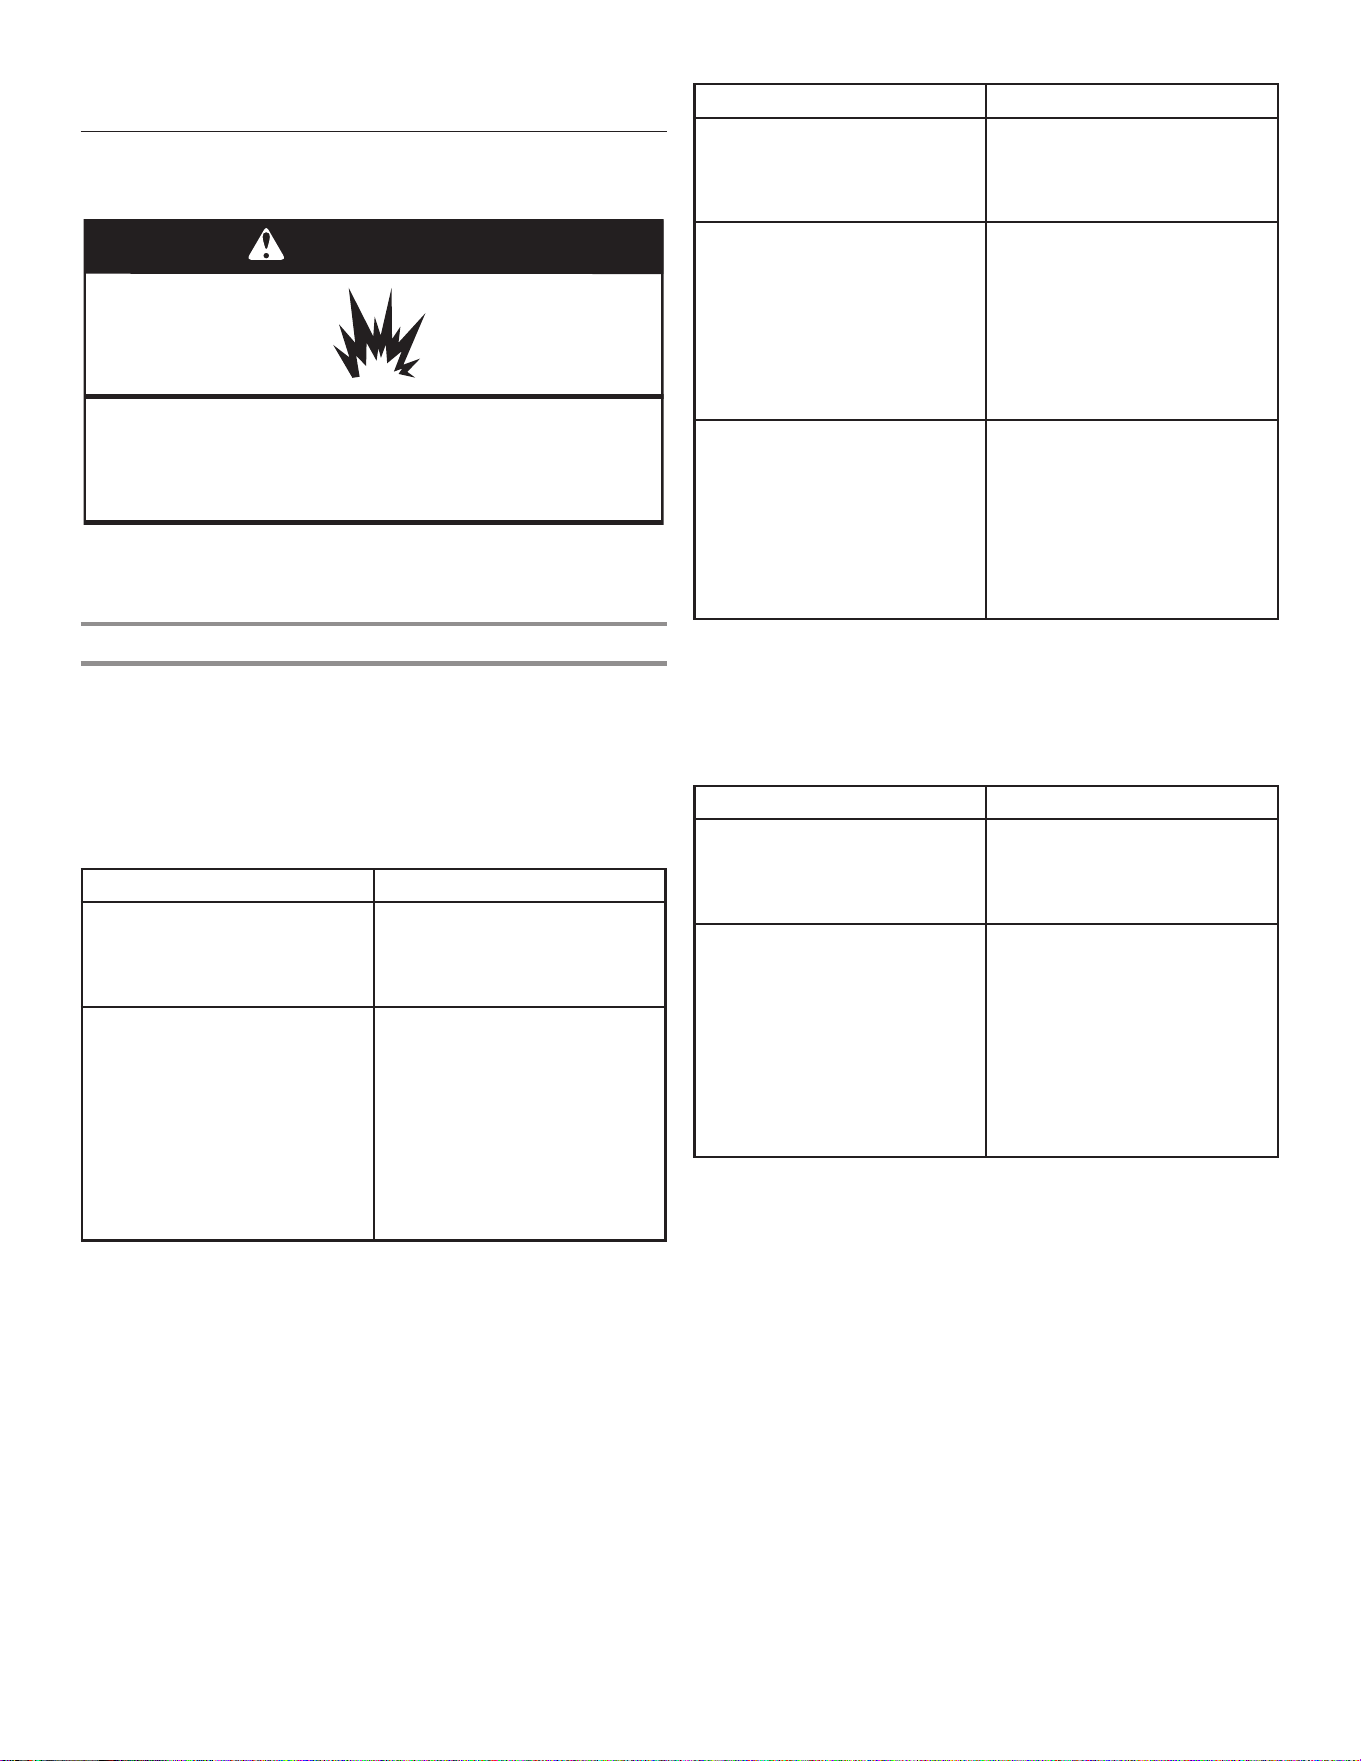
88
REFRIGERATOR CARE
Cleaning
WARNING
Explosion Hazard
Use non-ammable cleaner.
Failure to do so can result in death, explosion, or re.
Both the refrigerator and freezer sections defrost automatically.
However, clean both sections about once a month to avoid
buildup of odors. Wipe up spills immediately.
Exterior Cleaning
Please see the exterior cleaning information specific to your
model.
Style 1 — Smooth Door
IMPORTANT: Damage to smooth finish due to improper use of
cleaning products or using non-recommended cleaning products
is not covered under the warranty. Sharp or blunt instruments will
mark the finish.
DO USE DO NOT USE
✔ Soft, clean cloth ✘ Abrasive cloths
✘ Paper towels or newsprint
✘ Steel-wool pads
✔ Warm, soapy water with a
mild detergent
✘ Abrasive powders or liquids
✘ Window sprays
✘ Ammonia
✘ Acidic or vinegar-based
cleaners
✘ Oven cleaners
✘ Flammable fluids
NOTE: Paper towels scratch and may dull the clear coat of the
painted door. To avoid possible damage, use only soft, clean
clothes to polish and wipe the doors.
Style 2 — Stainless Steel
IMPORTANT:
■ Use recommended stainless steel cleaners and cloths
only. Damage to stainless steel finish due to improper use
of cleaning products or using non-recommended cleaning
products is not covered under the warranty.
■ Avoid exposing stainless steel appliances to caustic or
corrosive elements such as high-salt, high-moisture, or
high-humidity environments. Damage due to exposure to
these elements is not covered under the warranty.
DO USE DO NOT USE
✔ Soft, clean cloth ✘ Abrasive cloths
✘ Paper towels or newsprint
✘ Steel-wool pads
✔ Warm, soapy water with a
mild detergent
✘ Abrasive powders or liquids
✘ Ammonia
✘ Citrus-based cleaners
✘ Acidic or vinegar-based
cleaners
✘ Oven cleaners
✔ For heavy soil, use only
a stainless steel cleaner
designed for appliances. To
order the cleaner, contact
the dealer from whom you
purchased your refrigerator.
✘ Stainless steel cleaner is for
stainless steel parts only. Do
not allow the stainless steel
cleaner and polish to come
into contact with any plastic
parts such as the trim
pieces, dispenser covers, or
door gaskets.
Style 3 — Fingerprint-Resistant Stainless
IMPORTANT:
■ Avoid exposing stainless steel appliances to caustic or
corrosive elements such as high-salt, high-moisture, or
high-humidity environments. Damage due to exposure to
these elements is not covered under the warranty.
DO USE DO NOT USE
✔ Soft, clean cloth ✘ Abrasive cloths
✘ Paper towels or newsprint
✘ Steel-wool pads
✔ Warm, soapy water with a
mild detergent
✘ Abrasive powders or liquids
✘ Window sprays
✘ Ammonia
✘ Acidic or vinegar-based
cleaners
✘ Oven cleaners
✘ Flammable fluids
NOTES:
■ If unintentional contact does occur, clean plastic part with
a sponge and mild detergent in warm water. Dry thoroughly
with a soft cloth.
■ Just because a cleaner is a liquid does not mean it is
nonabrasive. Many liquid cleansers formulated to be gentle
on tile and smooth surfaces still damage stainless steel.
■ Citric acid permanently discolors stainless steel. To avoid
damaging the finish of your stainless steel refrigerator:
Do not allow these substances to remain on the finish:
✘ Mustard ✘ Citrus-based sauces
✘ Tomato juice ✘ Citrus-based products
✘ Marinara sauce
89
Lights
The lights in both the refrigerator and freezer compartments
are LEDs which do not need to be replaced. If the lights do not
illuminate when the door or drawer is opened, contact the dealer
from whom you purchased your refrigerator.
Vacation and Moving Care
Vacations
If You Choose to Leave the Refrigerator On While You’re
Away:
1. Use up any perishables and freeze other items.
2. If your refrigerator has an automatic ice maker and is
connected to the household water supply, turn off the water
supply to the refrigerator. Property damage can occur if the
water supply is not turned off.
3. If you have an automatic ice maker, turn off the ice maker.
■ Press the switch to Off (O) for the door ice maker.
4. Empty the ice bin.
If You Choose to Turn Off the Refrigerator Before You Leave:
NOTE: Put refrigerator in Showroom Mode while on Vacation.
See the “Using the Controls” section.
1. Remove all food from the refrigerator.
2. If your refrigerator has an automatic ice maker:
■ Turn off the water supply to the ice maker at least 1 day
ahead of time.
■ When the last load of ice drops, press the switch to
Off (O) for display to be unlit on the top inside of the
refrigerator, depending on your model.
3. Empty the ice bin.
4. Turn off the temperature controls. See the “Using the
Controls” section.
5. Clean refrigerator, wipe it, and dry well.
6. Tape rubber or wood blocks to the tops of both doors to prop
them open far enough for air to get in. This stops odor and
mold from building up.
Moving
When you are moving your refrigerator to a new home, follow
these steps to prepare it for the move.
1. If your refrigerator has an automatic ice maker:
■ Turn off the water supply to the ice maker at least 1 day
ahead of time.
■ Disconnect the water line from the back of the refrigerator.
■ When the last load of ice drops, press the switch to
Off (O) either on the ice maker or the control, depending
on your model.
2. Remove all food from the refrigerator and pack all frozen food
in dry ice.
3. Empty the ice bin.
4. Unplug refrigerator.
5. Clean, wipe, and dry thoroughly.
6. Take out all removable parts, wrap them well, and tape them
together so they don’t shift and rattle during the move.
7. Depending on the model, raise the front of the refrigerator so
it rolls more easily or raise the leveling screws so they don’t
scrape the floor. See the “Adjust the Doors” or “Refrigerator
Leveling and Door Closing” sections.
8. Tape the doors closed and tape the power cord to the back of
the refrigerator.
When you get to your new home, put everything back and refer to
the “Installation Instructions” section for preparation instructions.
Also, if your refrigerator has an automatic ice maker, remember to
reconnect the water supply to the refrigerator.
Interior Cleaning
IMPORTANT: Refrigerator shelves with under-shelf, LED lighting
are not dishwasher safe.
1. Unplug refrigerator or disconnect power.
2. Hand-wash, rinse, and dry removable parts and interior
surfaces thoroughly. Use a clean sponge or soft cloth and a
mild detergent in warm water.
NOTE: Do not use abrasive or harsh cleaners such as window
sprays, scouring cleansers, flammable fluids, cleaning waxes,
concentrated detergents, bleaches, or cleansers containing
petroleum products on plastic parts, interior and door liners,
or gaskets.
3. Plug in refrigerator or reconnect power.
Condenser Cleaning
There is no need for routine condenser cleaning in normal
home operating environments. If the environment is particularly
greasy or dusty or there is significant pet traffic in the home,
the condenser should be cleaned every 6 months to ensure
maximum efficiency.
If you need to clean the condenser, please call for service.

90
TROUBLESHOOTING—CONNECTED MODELS
First try the solutions suggested here. If you need further assistance contact the dealer from whom you purchased the refrigerator.
Are there any differences between using a smartphone
(or a tablet) with Android or iOS?
There are no differences.
Which Wi-Fi protocols are supported?
Wi-Fi radio supports Wi-Fi b/g/n for European countries.
Which version of WPS is supported?
Appliance supports WPS 2.0 or greater. Please check the router
manual.
What settings/configurations have to be set on router
software?
Main router settings are required: 2.4 GHz enabled, Wi-Fi b/g/n,
DHCP, and NAT are activated.
Is it possible to use tethering over a mobile 3G network
instead of a router?
Yes, however cloud services are designed for continuous
connection on devices.
How can I verify that my home internet connection works
and that wireless functionality is on?
You can search for your network either with your tablet or
with your smartphone. Remember to disable any other data
connections (i.e., the one of your mobile phone) before trying.
How can I find out my wireless network name and password?
See your router manual. Suggestions: Sometimes, while using
“http://IP number of the router,” the customer can gain access to
the router setup from a connected device. A router label usually
reports login information to reach the device setup page using a
connected device (iPad or tablet).
What if the appliance picks up my neighbor's Wi-Fi?
The router determines the channel used for home Wi-Fi (see the
router manual). Make sure the router is connected to the desired
channel.
How do I verify that wireless functionality on the appliance is
on?
Verify the status light is solid and not blinking. Using your smart
device, check the app to see if the appliance network is visible
and connected to the cloud.
How far can the appliance be from the router?
Normally, coverage extends through a few rooms, but the
strength of the Wi-Fi signal depends on wall materials. If the
appliance Wi-Fi is off, the customer may check the connection
strength with an iPad, tablet, or other wireless HAN device
close to the appliance. Specific software tools are available to
download from the internet to check signal strength.
How can I change my Whirlpool account while keeping my
appliances connected?
You can create a new account, but remember to remove your
appliances from your old account prior to moving them to the
new one.
Is there anything that can prevent the signal from reaching
the appliance?
Verify that connected devices are not using all of the internet
bandwidth, and make sure that there are not more devices
connected than the maximum device limit of the router.
What can I do if my wireless signal does not reach the
appliance?
You may use specific devices to extend the home Wi-Fi
coverage, such as uAccess Point, Wi-Fi repeaters, and
Power line bridge. None of these are provided with the appliance.
I changed my router, what do I have to do?
You can either maintain the same set up properties (network
name and password) or erase the previous set up from the
appliance (reset process) and carry out the setup again (see the
“Connectivity Set-up” section).
How can I verify that my appliance is connected to my home
wireless network?
Please refer to the router manual. Enter the router configuration,
and check to see if the appliance MAC is listed on the wireless
connected devices page.
Where do I find the MAC address of the appliance?
On your Smart Appliance there is sticker label with SAID and the
MAC address. The MAC address is made by a combination of six
numbers and letters. For example, “Dryer_88_E7_12_00_28_3C.”
What should I do if the Wi-Fi Status indicator continues to
blink quickly instead of staying on?
If the Wi-Fi Status inicator indicator doesn’t light up solidly, the
appliance has been successfully connected to the router but it
is not able to connect the internet. In order to get the appliance
connected to the internet, you have to check the router and/or
the bearer settings. For the router to work correctly, NAT must be
on and the firewall and DHCP must be properly set. WEP, WPA,
and WPA2 password cryptography is supported. Please refer to
the router manual.
Bearer settings: If your internet service provider has established
the numbers of the MAC address are able to connect to the
internet, you may not be able to connect the appliance to the
cloud. The MAC address is the unique identifier of device, like the
one on your computer. Please ask your internet service provider
about the procedures to connect a new device other than a
computer (i.e., a dryer, washer, etc.) to the internet.
How do I set up the wireless connection on my appliance?
See detailed literature and application wizard on your Smart
device. There are alternative approaches on each appliance:
1. Use the WPS (Wi-Fi Protected Setup) connection process.
2. If the appliance is not provisioned in the first 20 minutes,
there may be an active web page generated by the appliance
for configuration accessible through the network. For
example, appliance_type_"MAC address," or "Dryer_88_
E7_12_00_28_3C".
How do I check if data is being transmitted?
After network setup:
1. Turn the appliance off.
2. Wait 20 seconds and then power on the appliance.
3. Verify that the app shows the UI status of the appliance.
4. Set a cycle or another option and verify the status on the app.
NOTE: Some settings take several seconds before they show
up on the app.
91
TROUBLESHOOTING—CONNECTED MODELS
First try the solutions suggested here. If you need further assistance contact the dealer from whom you purchased the refrigerator.
First try the solutions suggested here to possibly avoid a service call.
If you experience Possible Causes Solution
Refrigerator is not
connected to home
Wi-Fi router. (Wi-Fi icon
is off.)
The refrigerator may be in Standby
mode.
Touch and hold Wi-Fi button for 3 seconds to see the Wi-Fi icon
blinking, then lights are on solid. All indicator lights are off when
in Standby mode.
The refrigerator has never been
connected to the home Wi-Fi router.
See the “Connectivity Setup” section.
Lost connection to home Wi-Fi router. Check whether the router is on and working with other
computers or devices in the home and they are able to access
the internet.
Weak signal strength or signal
interference between the refrigerator
and router.
Try to place the wireless router closer to the refrigerator.
It may be necessary to install a Wi-Fi range extender.
Wi-Fi icon does not light
at all after touching and
holding Wi-Fi.
Something may be wrong with the
refrigerator.
Unplug or disconnect refrigerator power for 30 seconds.
Return power. Repeat Wi-Fi connecting process.
Verify that the refrigerator operates correctly, except for
not being able to connect. Call for possible additional
troubleshooting.
Refrigerator is connected
to home Wi-Fi router, but
Whirlpool app does not
work.
Connection to the Whirlpool app may
be unavailable.
Check internet.
User account has not been properly
set up or the refrigerator has not
been registered in an account.
See the “Connectivity Setup” section or the Whirlpool
app directly for account setup and refrigerator registration
instructions.
Verify that the refrigerator is synced with your account in the
app.
Verify correct email address, mobile number, and notification
preferences.
Router is not connected to internet. Check other devices connected to internet through same router.
No connection of
refrigerator after
several attempts.
Wi-Fi disconnected. Touch and hold Connect button for 3 seconds to enable Wi-Fi.
Connection Status Control Panel Indicator Lights
Refrigerator is not connected. Wi-Fi icon is off.
Refrigerator is attempting to connect to home Wi-Fi icon is blinking slowly.
Wi-Fi router.
Refrigerator is connected to home Wi-Fi router, but Wi-Fi icon is on.
Whirlpool app or Smart Grid functions do not work.
Refrigerator is connected to home Wi-Fi router and the Wi-Fi icon is on.
Whirlpool app works.
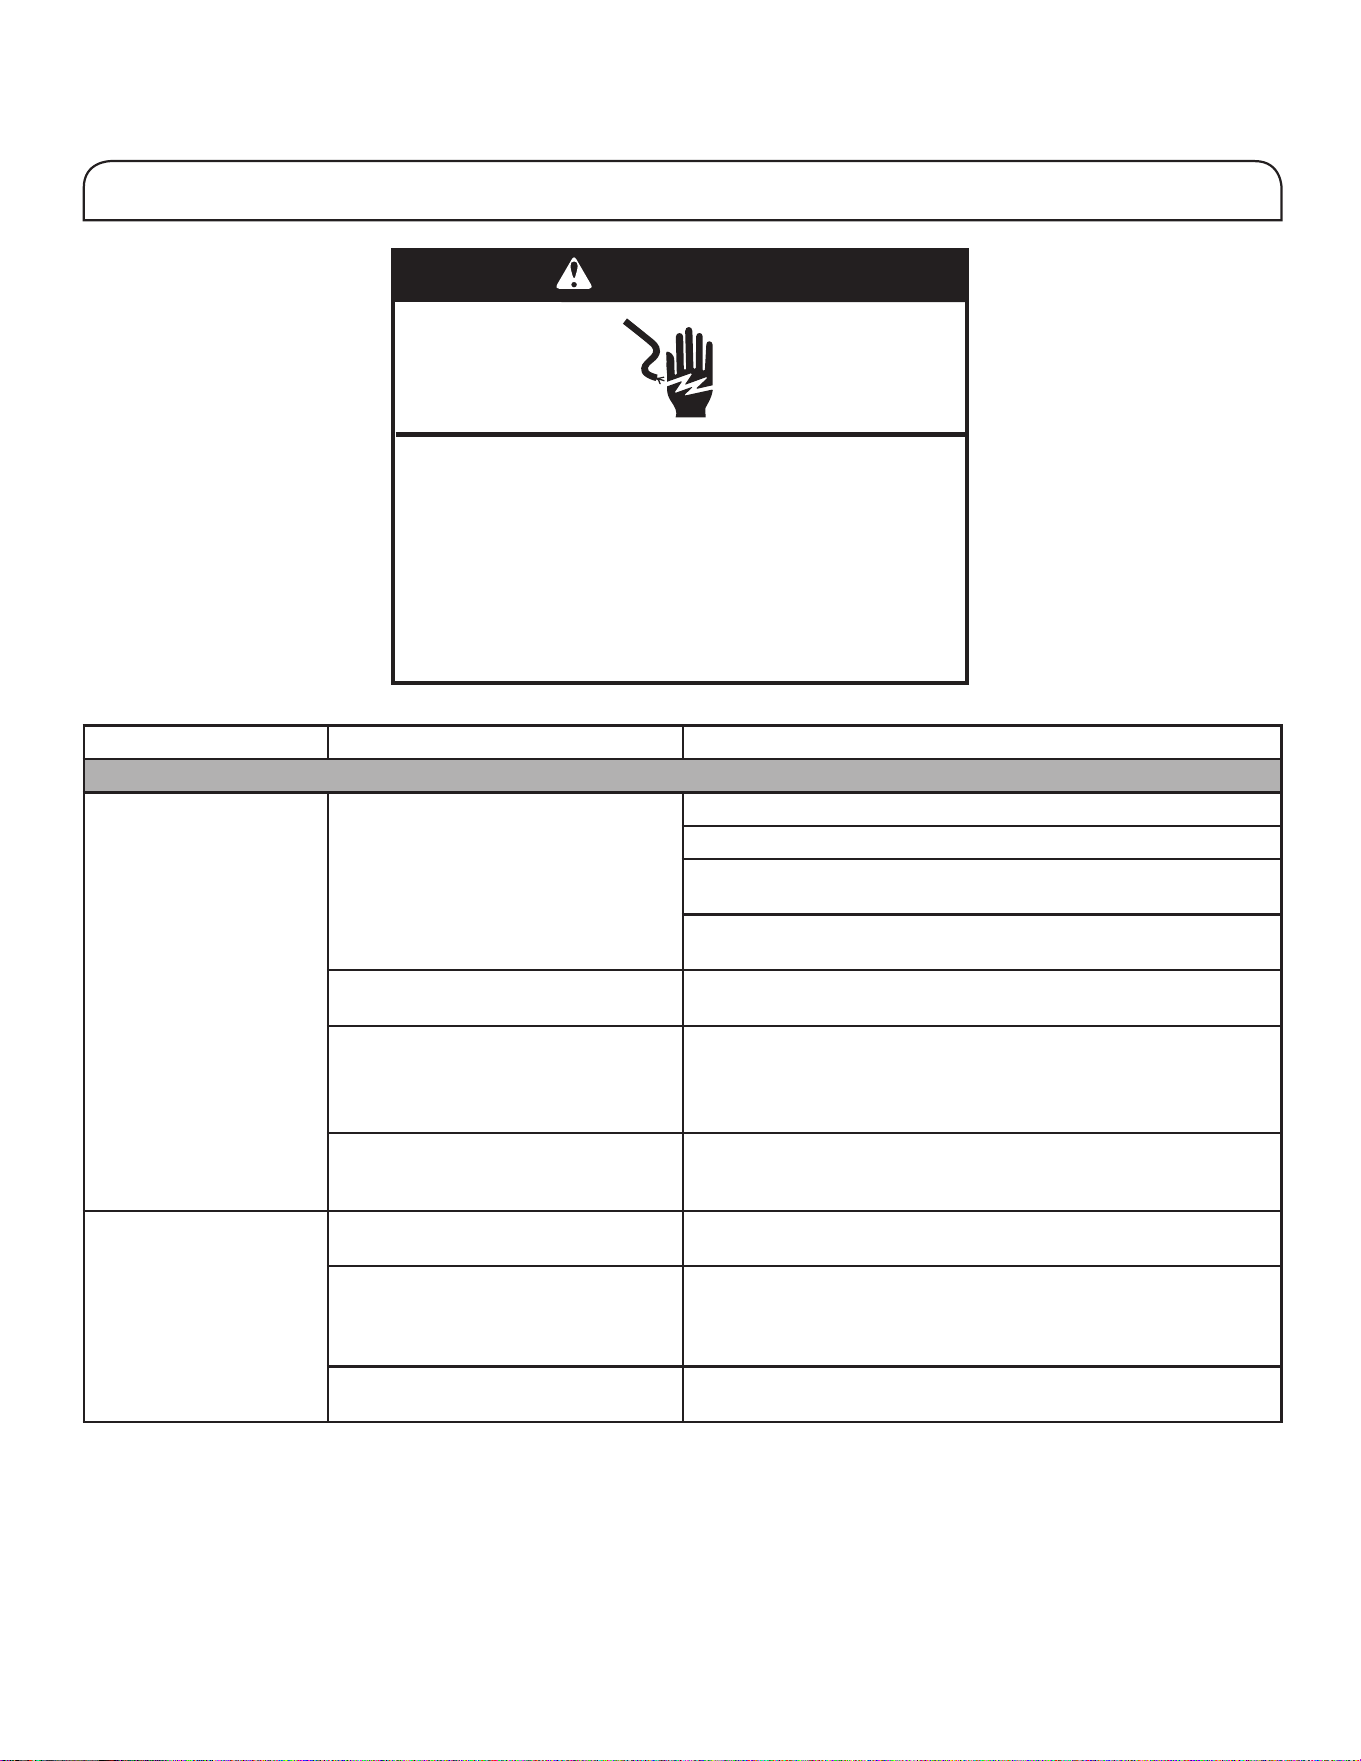
92
First try the solutions suggested here to possibly avoid a service call.
If you experience Possible Causes Solution
Refrigerator Operation
The refrigerator will not
operate.
Check electrical supply. Plug the power cord into a grounded (earthed) outlet.
Do not use an extension cord.
Make sure there is power to the outlet. Plug in a lamp to see if
the outlet is working.
Reset a tripped circuit breaker. Replace any blown fuses.
NOTE: If problems continue, contact an electrician.
Check controls. Make sure the controls are turned on. See the “Using the
Controls” section.
New installation. Allow 24 hours following installation for the refrigerator to cool
completely.
NOTE: Adjusting the temperature controls to the coldest setting
will not cool either compartment more quickly.
Refrigerator control is in Showroom
mode (on some models).
If the refrigerator is in Showroom mode, cooling is turned off and
the Showroom icon will be illuminated on the control panel. See
the “Using the Controls” section for more information.
The motor seems to run
too much.
High-efficiency compressor and fans Larger, more efficient refrigerators run longer at lower, more
energy-efficient speeds.
The room or outdoor temperature
is hot.
It is normal for the refrigerator to work longer under these
conditions. For optimum performance, place the refrigerator
in an indoor, temperature-controlled environment. See the
“Location Requirements” section.
A large amount of warm food has
been recently added.
Warm food will cause the refrigerator to run longer until the air
cools to the desired temperature.
WARNING
Electrical Shock Hazard
Plug into an earthed socket.
Do not remove the earth pin.
Do not use an adapter.
Do not use an extension cable.
Failure to follow these instructions can result in
death, re, or electrical shock.
TROUBLESHOOTING
93
Refrigerator Operation (cont.)
The motor seems to run
too much. (cont.)
The door(s) are opened too frequently
or for too long.
Warm air entering the refrigerator causes it to run more. Open
the door less often.
The refrigerator door or freezer
drawer is ajar.
Make sure the refrigerator is level. See the “Refrigerator Leveling
and Door Closing” section. Keep food and containers from
blocking the door.
The refrigerator control is set too
cold.
Adjust the refrigerator control to a less-cold setting until the
refrigerator temperature is as desired.
The door or drawer gasket is dirty,
worn, or cracked.
Clean or change the gasket. Leaks in the door seal will cause
the refrigerator to run longer in order to maintain desired
temperatures.
The lights do not work. Your refrigerator is equipped with
LED lighting which does not need
to be replaced.
If there is power to the refrigerator and the lights do not
illuminate when a door or drawer is opened, call for service
or assistance.
Doors have been open longer than
10 minutes.
Close the doors and drawer to reset and open to resume
lighted task.
The door switch is not sensing the
door opening.
Ensure there are no magnets or electronic devices within
7.6 cm (3") of the hinge cover.
The Temperature Control
UI does not turn on.
The door switch is not sensing the
door opening.
Ensure there are no magnets or electronic devices within
7.6 cm (3") of the hinge cover.
Unusual Noise
To listen to normal refrigerator sounds, go to the Product Help/FAQ section of the brand website and search for “normal sounds.”
Below are listed some normal sounds with explanations.
The refrigerator seems
noisy.
The compressor in your new
refrigerator regulates temperature
more efficiently while using less
energy and operates quietly.
Due to this reduction in operating noise, you may notice
unfamiliar noises that are normal.
Sound of the compressor
running longer than
expected.
High-efficiency compressor and fans. Larger, more-efficient refrigerators run longer at lower, more
energy-efficient speeds.
Pulsating/Whirring Fans/compressor adjusting to
optimize performance during normal
compressor operation.
This is normal.
Popping Contraction/expansion of inside
walls, especially during initial
cooldown.
This is normal.
Hissing/Dripping Flow of refrigerant or flow of oil in the
compressor.
This is normal.
Vibration The refrigerator may not be steady. Adjust the leveling screws and lower the leveling foot firmly
against the floor. See the “Refrigerator Leveling and Door
Closing” section.
Rattling/Banging Movement of the water lines against
the refrigerator cabinet or of items
placed on top of the refrigerator
cabinet.
Move excess water line away from the refrigerator cabinet or
fasten excess tubing to the cabinet. See the “Connect the Water
Supply” section or remove items from the top of the refrigerator.
Sizzling Water dripping on the heater during
Defrost cycle.
This is normal.
Water running/Gurgling May be heard when ice melts during
the Defrost cycle and water runs into
the drain pan.
This is normal.
Buzzing and clicking Heard when the water valve opens
and closes to dispense water and/or
fill the ice maker.
If the refrigerator is connected to a water line, this is normal. If
the refrigerator is not connected to a water line, turn off the ice
maker.
First try the solutions suggested here to possibly avoid a service call.
TROUBLESHOOTING
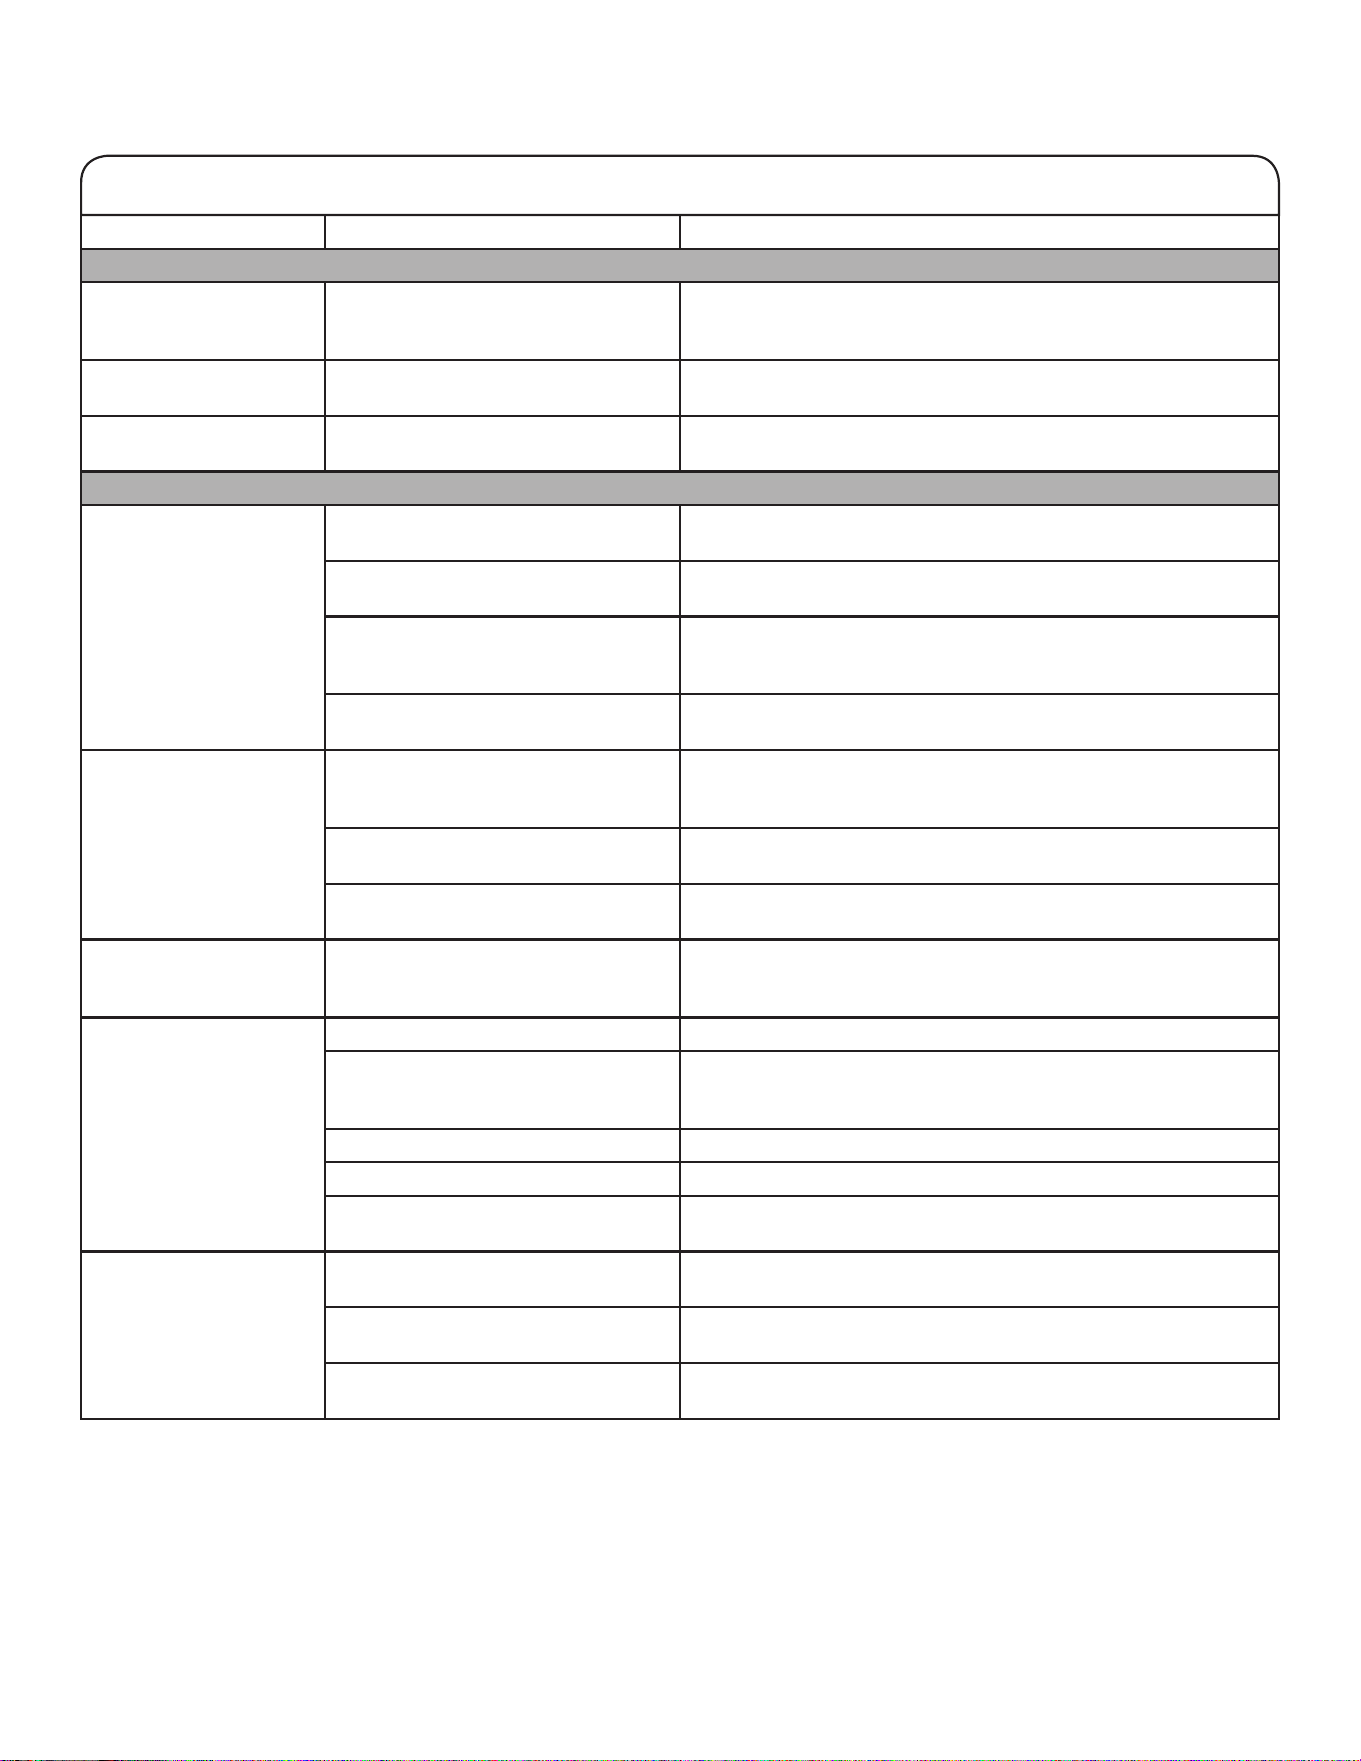
94
If you experience Possible Causes Solution
Unusual Noise (cont.)
Repetitive clicking Dual evaporator valve regulating the
cooling operation.
You may hear rapid repetitive clicking sounds as the unit
switches from cooling one compartment to cooling the other.
This sound is normal.
Creaking/Cracking/
Grinding
May be heard as ice is being ejected
from the ice maker mold.
This is normal.
Clatter May be heard when the ice falls into
the ice storage bin.
This is normal.
Temperature and Moisture
Temperature is too warm. The refrigerator has just been
installed.
Allow 24 hours following installation for the refrigerator to cool
completely.
The controls are not set correctly for
the surrounding conditions.
Adjust the controls a setting colder. Check the temperature in
24 hours. See the “Using the Controls” section.
The door(s) are opened often or not
closed completely. Allows warm air to
enter refrigerator.
Minimize door openings and keep doors fully closed.
A large load of food was recently
added.
Allow several hours for refrigerator to return to normal
temperature.
Temperature is too cold
in the refrigerator/crisper.
The refrigerator air vent(s) are
blocked.
If the air vent located in the middle rear of the refrigerator
compartment is blocked by items placed directly in front of it, the
refrigerator will get too cold. Move items away from the air vent.
The controls are not set correctly for
the surrounding conditions.
Adjust the controls a setting warmer. Check the temperature in
24 hours. See the “Using the Controls” section.
The ice storage bin is not in the
correct position.
See the “Ice Maker and Ice Storage Bin” section.
Temperature is too
cold in the temperature
controlled drawer.
The control is not set correctly for the
items stored in drawer.
Adjust the temperature setting. See the “Using the Controls” in
the “Refrigerator Use” section.
There is interior moisture
buildup.
NOTE: Some moisture
buildup is normal.
The room is humid. A humid environment contributes to moisture buildup.
The door(s) are opened often or not
closed completely. Allows humid air
to enter the refrigerator.
Minimize door openings and close doors completely.
The door(s) are blocked open. Move food packages away from door.
A bin or shelf is in the way. Push bin or shelf back into the correct position.
Storing liquid in open containers. This adds humidity to the refrigerator interior. Keep all containers
tightly covered.
There is frost/ice
buildup in the freezer
compartment.
The drawer is opened often or left
open.
Minimize drawer openings and close drawer completely
after use.
The door has poor door seal. Ensure door seals are making full contact with the refrigerator
cabinet to allow for an adequate seal.
Temperature controls are not set
correctly.
See the “Using the Controls” section for recommended
temperature settings.
First try the solutions suggested here to possibly avoid a service call.
TROUBLESHOOTING
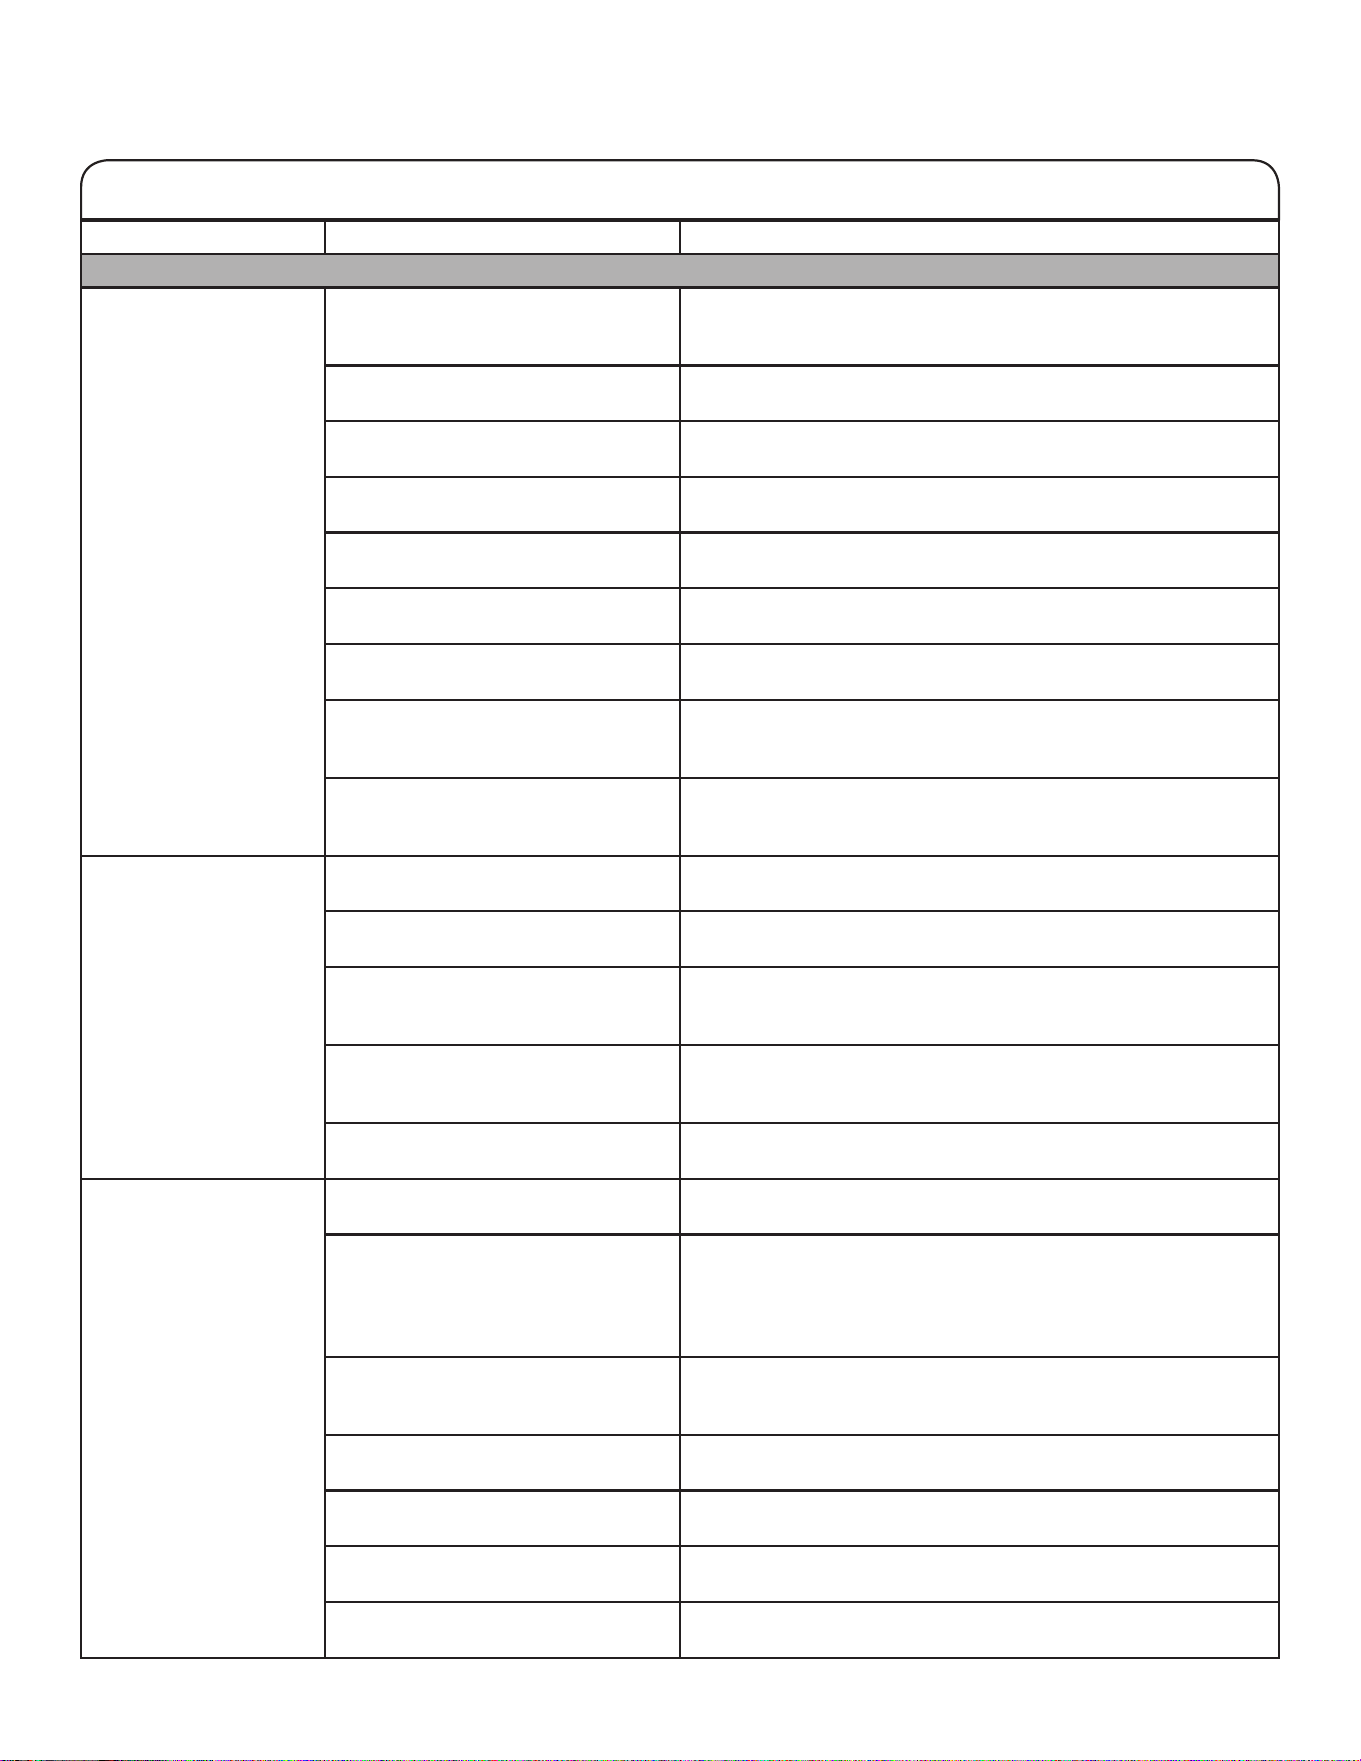
95
First try the solutions suggested here to possibly avoid a service call.
If you experience Possible Causes Solution
Ice and Water
The ice maker is not
producing ice or is not
producing enough ice.
The refrigerator is not connected to
a water supply or the water supply
shut-off valve is not turned on.
Connect refrigerator to water supply and turn water shut-off
valve fully open.
There is a kink in the water source
line.
A kink in the line can reduce water flow. Straighten the water
source line.
The ice maker is not turned on. Make sure the ice maker is on. See the “Ice Maker and Ice
Storage Bin” section.
The refrigerator has just been
installed.
Wait 24 hours after ice maker installation for ice production to
begin. Wait 3 days for full ice production.
The refrigerator door is not closed
completely.
Close the door firmly. If it does not close completely, see “The
doors will not close completely” in this table.
A large amount of ice was recently
removed.
Allow sufficient time for ice maker to produce more ice. See the
“Ice Maker and Ice Storage Bin” section for ice production rates.
An ice cube is jammed in the ice
maker.
Remove ice from ice maker with a plastic utensil.
A water filter is installed on the
refrigerator.
Remove the water filter and operate the ice maker. If ice volume
does not improve, then the filter may be clogged or incorrectly
installed. Replace filter or reinstall it correctly.
A reverse osmosis water filtration
system is connected to the cold
water supply.
This can decrease water pressure. See the “Water Supply
Requirements” section.
The ice cubes are hollow
or small.
NOTE: This is an
indication of low water
pressure.
The water shut-off valve is not fully
open.
Turn the water shut-off valve to fully open.
There is a kink in the water source
line.
A kink in the line can reduce water flow. Straighten the water
source line.
A water filter is installed on the
refrigerator.
Remove filter and operate ice maker. If ice quality does not
improve, then the filter may be clogged or incorrectly installed.
Replace filter or reinstall it correctly.
A reverse osmosis water filtration
system is connected to the cold
water supply.
This can decrease water pressure. See the “Water Supply
Requirements” section.
Questions remain regarding water
pressure.
Call a licensed, qualified plumber.
Off-taste, odor, or gray
color in the ice or water
Newly installed refrigerator requires
flush of water system.
Flush the water system. See the “Water and Ice Dispensers”
section for water system flushing instructions.
Recently installed or replaced
plumbing connections. New
plumbing connections can cause
discolored or off-flavored ice and
water.
Discard the ice and wash the ice storage bin. Flush the water
system with 11.4 L (3 gal.) of water. Allow 24 hours for the ice
maker to make new ice and discard the first three batches of ice
produced.
Using a water supply connection type
other than recommended.
It is recommended to use copper tubing or Whirlpool supply
line, Part Number 8212547RP. See the “Connect to Water Line”
section.
The ice has been stored too long. Discard ice and wash ice storage bin. Allow 24 hours for ice
maker to make new ice.
The water has been stored too long. Dispense at least 1 L (1 qt) of water per week to maintain a fresh
supply.
Odor from stored food has
transferred to the ice.
Use airtight, moisture-proof packaging to store food.
There are minerals (such as sulfur)
in the water.
A water filter may need to be installed to remove the minerals.
TROUBLESHOOTING
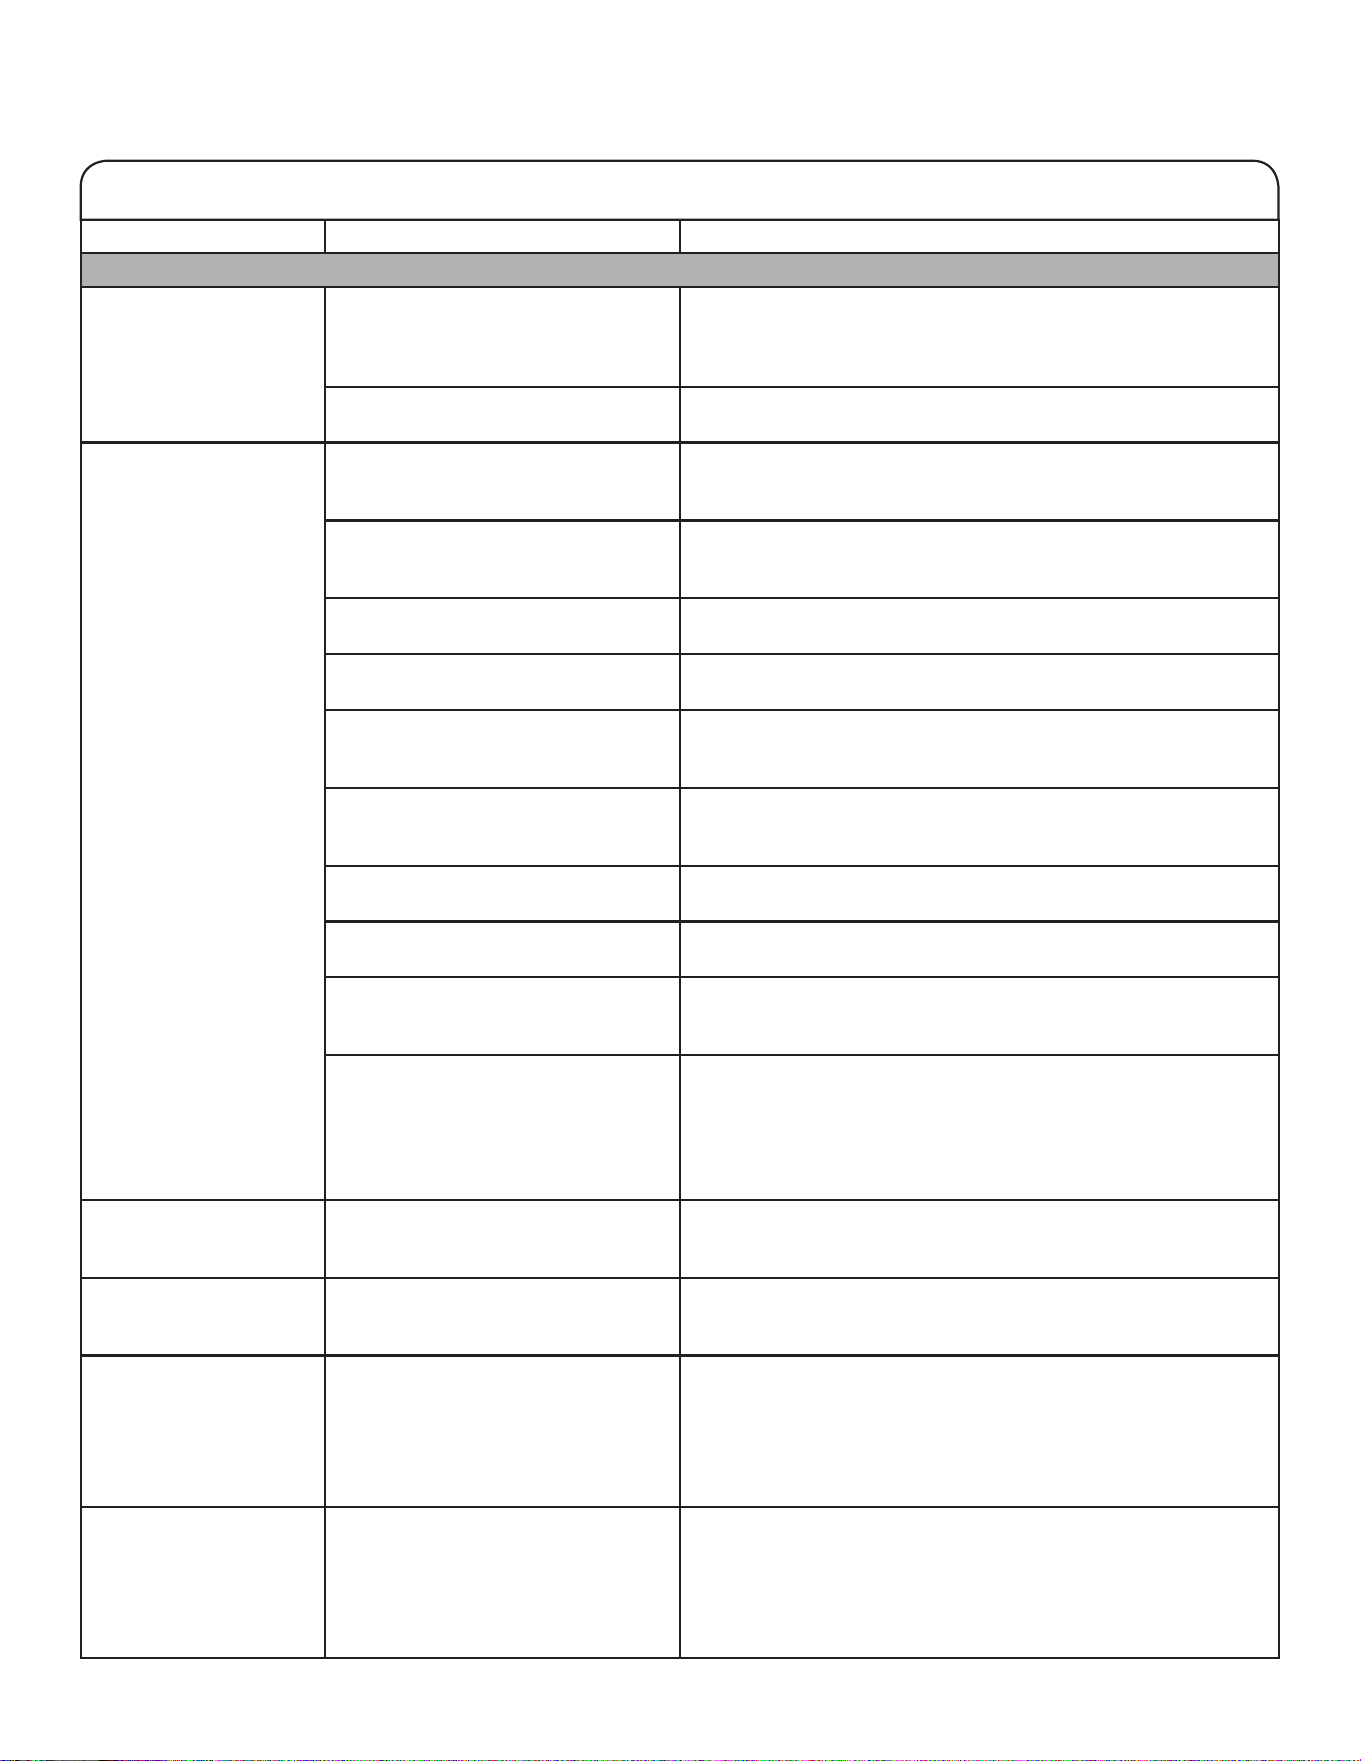
96
If you experience Possible Causes Solution
Ice and Water (cont.)
Off-taste, odor, or gray
color in the ice or water
(cont.)
There is a water filter installed on the
refrigerator.
Gray or dark discoloration in ice may indicate that the water
filtration system needs additional flushing. Flush the water system
after installing and before using a new water filter. See the “Water
and Ice Dispensers” section for water filter flushing instructions.
The water filter needs to be replaced. Replace the disposable water filter at least every 6 months or
when indicated. See the “Water Filtration System” section.
The water and ice
dispenser will not
operate properly.
The refrigerator is not connected to
a water supply or the water supply
shut-off valve is not turned on.
Connect the refrigerator to the water supply and turn the water
shut-off valve fully open.
There is a kink in the water source
line.
A kink in the water line can reduce water flow from the water
dispenser and result in hollow or irregular shaped ice. Straighten
the water source line.
The refrigerator has just been
installed.
Flush and fill the water system. See the “Water and Ice
Dispensers” section.
The water pressure to the house is
not at or above 35 psi (241 kPa).
The water pressure to the house determines the flow from the
dispenser. See the “Water Supply Requirements” section.
A reverse osmosis water filtration
system is connected to the cold
water supply.
A reverse osmosis water filtration system can decrease water
pressure. See the “Water Supply Requirements” section.
The water filter may be clogged. Remove the water filter and operate dispenser. If water flow
increases, your filter is clogged and needs to be replaced.
See the “Water Filtration System” section.
The water filter is installed incorrectly. Remove the water filter and reinstall. See the “Water Filtration
System” section.
The refrigerator door or freezer
drawer is not closed completely.
Close the door or drawer firmly. If it does not close completely,
see the “The doors will not close completely” section.
The refrigerator doors were recently
removed.
Make sure the water dispenser wire/tube assembly has been
properly reconnected at the top of the refrigerator door. See the
“Refrigerator Leveling and Door Closing.”
Ice is clogged in the ice storage bin
or ice is blocking the ice delivery
chute.
Remove the ice clogging the storage bin and delivery chute
using a plastic utensil if necessary. Clean the ice delivery chute
and the bottom of the ice storage bin using a warm, damp cloth,
then dry both thoroughly. To avoid clogging and to maintain
a fresh supply of ice, empty the storage bin. Clean both the
storage bin and delivery chute every 2 weeks.
Ice bin is difficult to
remove from door.
Ice level in bin may be high and
uneven from normal ice production
and shifting of ice during dispensing.
Dispense 2-3 glasses of ice, then try removing the ice bin.
The ice dispenser
jams while dispensing
crushed ice.
Crushed ice is blocking the ice
delivery chute.
Switch from crushed ice to cubed ice to clear the ice dispenser.
Then switch back to crushed ice.
Water is leaking or
dripping from the
dispenser system.
NOTE: A few drops of
water after dispensing
are normal.
The glass was not held under the
dispenser long enough.
Hold the glass under the dispenser 2 to 3 seconds after releasing
the dispenser lever.
Ice continues to flow
from the dispenser.
NOTE: A few cubes
dispensed after releasing
the dispenser lever is
normal.
The glass was not held under the
dispenser long enough.
Hold the glass under the dispenser 2 to 3 seconds after releasing
the dispenser lever.
First try the solutions suggested here to possibly avoid a service call.
TROUBLESHOOTING
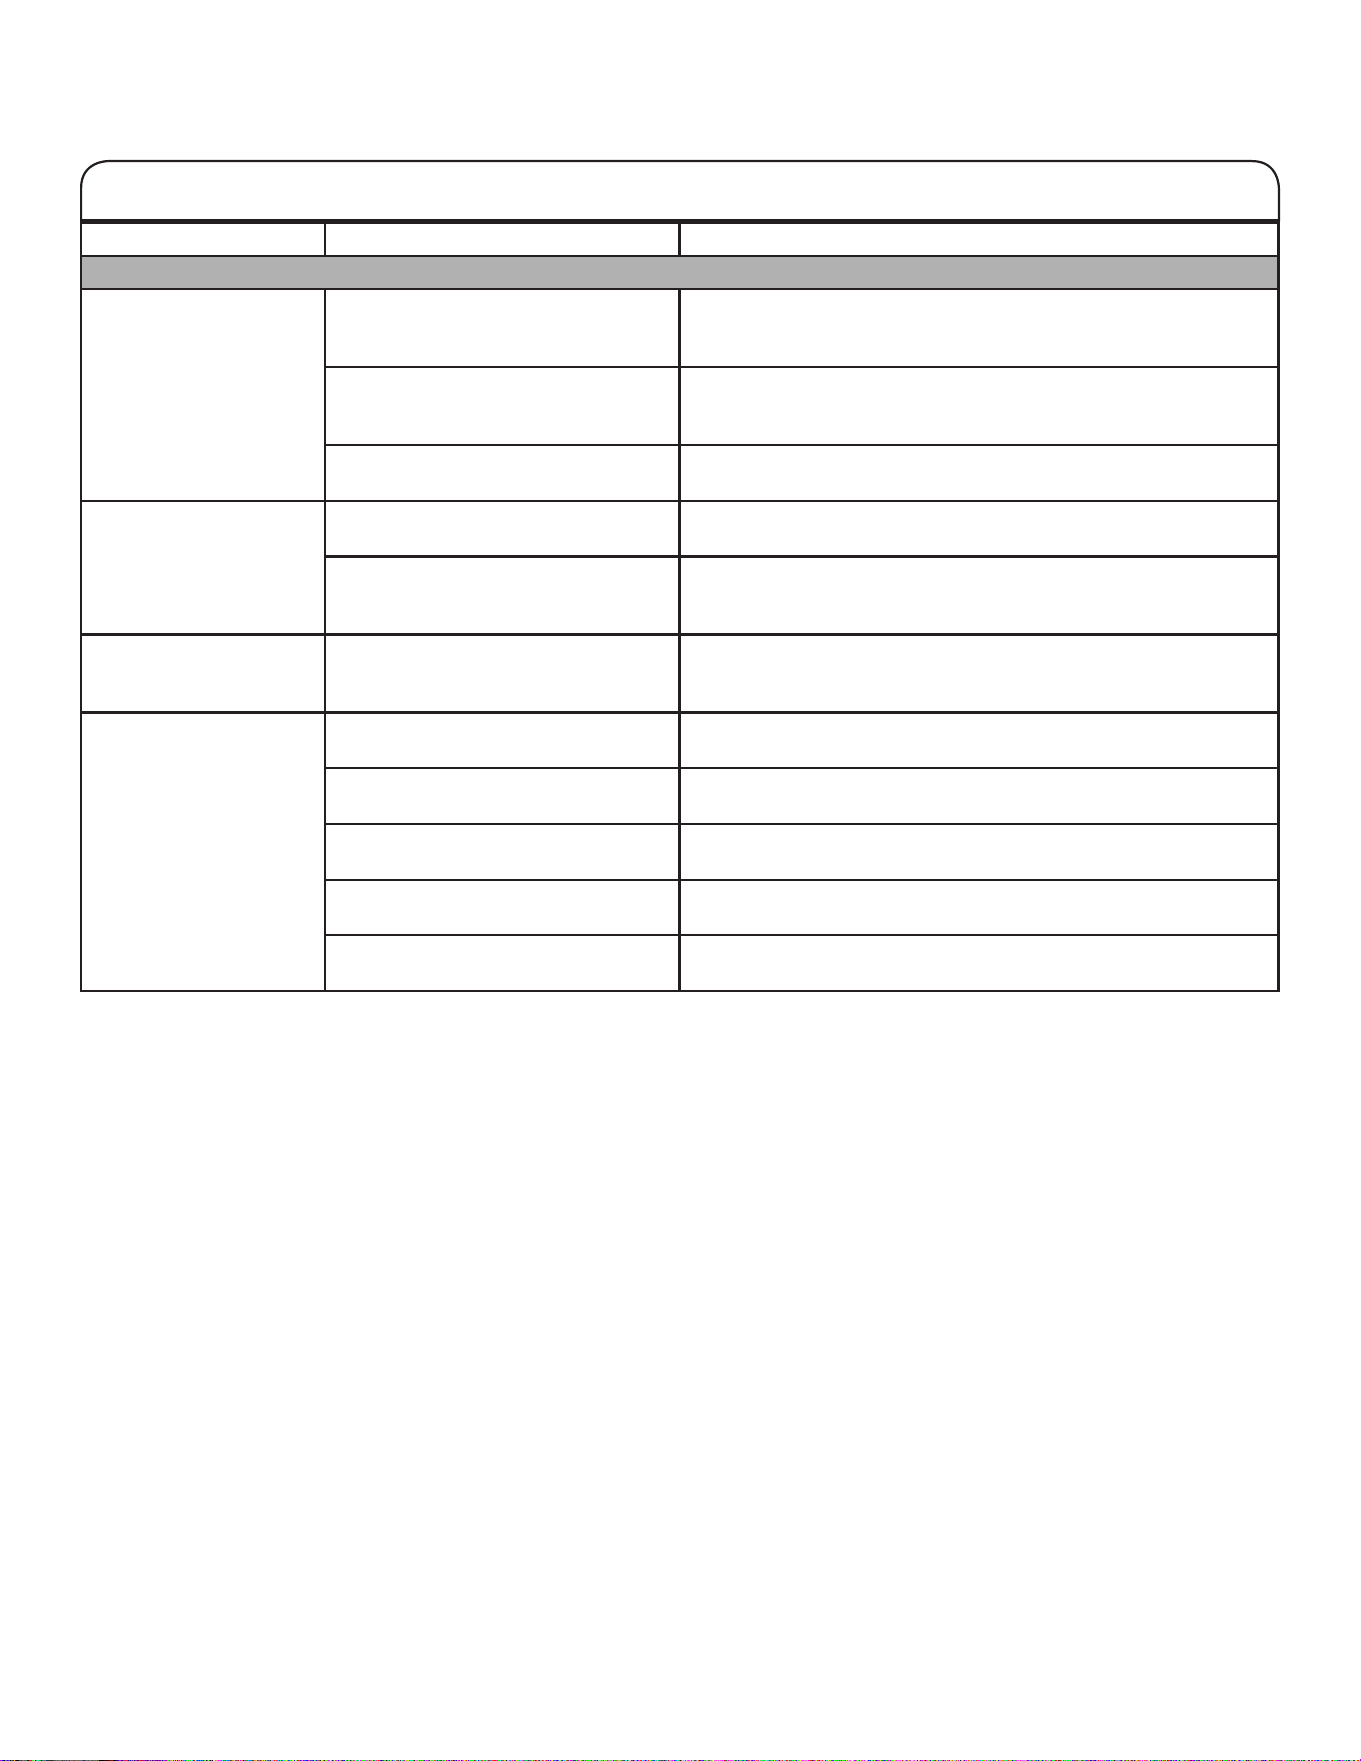
97
First try the solutions suggested here to possibly avoid a service call.
TROUBLESHOOTING
If you experience Possible Causes Solution
Ice and Water (cont.)
Water continues to
drip from the dispenser
beyond the first few
drops.
The refrigerator has just been
installed.
Flushing the water system removes air from the lines which
causes the water dispenser to drip. Flush the water system.
See the “Water and Ice Dispensers” section.
The water filter was recently installed
or replaced.
Flushing the water system removes air from the lines which
causes the water dispenser to drip. Flush the water system.
See the “Water and Ice Dispensers” section.
There may be a loose water
connection.
Check for water in bottom of refrigerator compartment, hinge
area, or by household connection in back of product.
Water is leaking from the
back of the refrigerator.
The water line connections were not
fully tightened.
See the “Connecting the Water” section.
Recently removed the doors and
did not fully tighten water line
connection.
See the “Refrigerator Leveling and Door Closing” section.
Crushed or cubed ice
misses the glass when
dispensing ice.
The glass is not held close enough to
where the ice exits the chute.
Hold the glass close to where the ice exits the chute.
Water from the dispenser
is warm.
Water from the dispenser is chilled to
10°C (50°F).
This is normal.
The refrigerator has just been
installed.
Allow 24 hours after installation for the water supply to cool
completely.
A large amount of water was recently
dispensed.
Allow 3 hours for the water supply to cool completely.
Water has not been recently
dispensed.
The first glass of water may not be cool. Discard the first glass
of water dispensed.
The refrigerator is not connected to
a cold water pipe.
Make sure the refrigerator is connected to a cold water pipe.
See the “Water Supply Requirements” section.
98
The doors will not close
completely.
The door is blocked open. Move food packages away from door.
A bin or shelf is in the way. Push bin or shelf back into the correct position.
Recently installed. Remove all packaging materials.
The doors are difficult to
open.
The door gaskets are dirty or sticky. Clean gaskets and contact surfaces with mild soap and warm
water. Rinse and dry with soft cloth.
The doors appear to be
uneven.
The doors need to be aligned or the
refrigerator needs to be leveled.
See the “Refrigerator Leveling and Door Closing” section.
The refrigerator is
unsteady or it rolls
forward when opening
and closing doors.
The refrigerator brake feet are not
snug against the floor.
Remove the base grille. Turn both brake feet (one on each side)
clockwise, the same amount, until they are snug against the
floor. See the “Refrigerator Leveling and Door Closing” section.
To view an animation showing how to adjust and align the doors, refer to the Product Help/FAQ section of the brand website and
search for “Door Closing and Door Alignment.”
WARNING
Explosion Hazard
Use non-ammable cleaner.
Failure to do so can result in death, explosion, or re.
If you experience Possible Causes Solution
Doors
First try the solutions suggested here to possibly avoid a service call.
TROUBLESHOOTING
99
1
PERFORMANCE DATA SHEET
Water Filtration System
Model P9WB2L/P9RFWB2L Capacity 200 Gallons (757 Liters)
This system has been tested according to NSF/ANSI Standards 42, 53 and 401 for the reduction of the substances listed below. The concentration
of the indicated substances in water entering the system was reduced to a concentration less than or equal to the permissible limit for water leaving
the system, as specified in NSF/ANSI Standards 42, 53, and 401.
Test Parameters: pH = 7.5 ± 0.5 unless otherwise noted. Flow = 0.6 gpm (2.27 lpm). Pressure = 60 psig (413.7 kPa). Temp. = 68°F to 71.6°F (20°C to
22°C). Rated service capacity = 200 gallons (757 liters).
The compounds certified under NSF 401 have been deemed as “emerging compounds/incidental contaminants.” Emerging compounds/incidental
contaminants are those compounds that have been detected in drinking water supplies at trace levels. While occurring at only trace levels, these
compounds can affect the public acceptance/perception of drinking water quality.
■
It is important that operational, maintenance, and filter replacement
requirements be carried out for the product to perform as advertised.
Property damage can occur if all instructions are not followed.
■
The disposable cartridge must be changed at least every 6 months.
■
Use replacement filter P9RFWB2L, part #EDR2RXD1/EDR2RXD1B.
2015 suggested retail price of $49.99 U.S.A./$49.99 Canada. Prices
are subject to change without notice.
■
The filter monitor system measures the amount of water that passes
through the filter and alerts you when it is time to replace the filter.
Refer to the “Using the Controls” or “Water Filtration System” section
(in the User Instructions or User Guide) to learn how to check the
water filter status.
■
After changing the water filter, flush the water system. See “Water
and Ice Dispensers” or “Water Dispenser” in the User Instructions or
User Guide.
■
These contaminants are not necessarily in your water supply. While
testing was performed under standard laboratory conditions, actual
performance may vary.
■
The product is for cold water use only.
■
The water system must be installed in compliance with state and
local laws and regulations.
■
Do not use with water that is microbiologically unsafe or of unknown
quality without adequate disinfection before or after the system.
Systems certified for cyst reduction may be used on disinfected
waters that may contain filterable cysts.
EPA Est. No. 082047-TWN-001
■
Refer to the “Warranty” section (in the User Instructions or User
Guide) for the Manufacturer’s limited warranty, name and telephone
number.
Application Guidelines/Water Supply Parameters
System tested and certified by NSF International against
NSF/ANSI Standard 42, Standard 53, and Standard 401 for
the reduction of contaminants specified on the Performance
Data Sheet.
Substance Reduction Aesthetic Effects Influent Challenge Concentration Maximum Permissible
Product Water Concentration
Average% Reduction
Chlorine Taste/Odor
Particulate Class I
*
2.0 mg/L ± 10%
At least 10,000 particles/mL
50% reduction
85% reduction
97.0%
>99.9%
Contaminant Reduction Influent Challenge Concentration Maximum Permissible
Product Water Concentration
Average%Reduction
Lead: @ pH 6.5 / @ pH 8.5 0.15 mg/L± 10% 0.010 mg/L >99.3% / 98.6%
Benzene 0.015 mg/L ± 10% 0.005 mg/L 93.8%
p-Dichlorobenzene 0.225 mg/L ± 10% 0.075 mg/L 99.8%
Carbofuran 0.08 mg/L ± 10% 0.040 mg/L 81.9%
Toxaphene 0.015 ± 10% 0.003 mg/L >95%
Atrazine 0.009 mg/L ± 10% 0.003 mg/L 87.0%
Asbestos 10
7
to 10
8
fibers/L
††
99% >99%
Live Cysts
†
50,000/L min. 99.95% >99.99%
Turbidity 11 NTU ± 10% 0.5 NTU 96.9%
Lindane 0.002 ± 10% 0.0002 mg/L >99.2%
Tetrachloroethylene 0.015 mg/L ± 10% 0.005 mg/L 96.6%
O-Dichlorobenzene 1.8 mg/L ± 10% 0.60 mg/L 92.3%
Ethylbenzene 2.1 mg/L ± 10% 0.70 mg/L 86.9%
1,2,4-Trichlorobenzene 0.210 mg/L ± 10% 0.07 mg/L >99.8%
2,4 - D 0.210 mg/L ± 10% 0.07 mg/L 88.5%
Styrene 2.0 mg/L ± 10% 0.1 mg/L 99.6%
Toluene 3.0 mg/L ± 10% 1.0 mg/L 93.5%
Endrin 0.006 mg/L ± 10% 0.002 mg/L 81.7%
Atenolol 200 ± 20%
30 ng/L 95.7%
Trimethoprim 140 ± 20% 20 ng/L 96.1%
Linuron 140 ± 20% 20 ng/L 96.3%
Estrone 140 ± 20% 20 ng/L 95.3%
Nonylphenol 1400 ± 20% 200 ng/L 95.5%
Water Supply
Water Pressure
Water Temperature
Service Flow Rate
City or Well
30 - 120 psi (207 - 827 kPa)
33° - 100°F (0.6° - 37.8°C)
0.6 gpm (2.27 lpm) @ 60 psi
*
†
††
Class I particle size: >0.5 to <1 um
Based on the use of Cryptosporidium parvum oocysts
Fibers greater than 10 um in length
® NSF is a registered trademark of NSF International.
Carbamazepine
1400 ± 20% 200 ng/L
97.94%
Phenytoin 200 ± 20% 30 ng/L 93.58%
Naproxen 140 ± 20% 20 ng/L 96.04%
Bisphenol A 2000 ± 20% 300 ng/L 99.20%
PERFORMANCE DATA SHEET
Water Filtration System
Model P9WB2L/P9RFWB2L Capacity 200 Gallons (757 Liters)
This system has been tested according to NSF/ANSI Standards 42, 53 and 401 for the reduction of the substances listed below. The concentration
of the indicated substances in water entering the system was reduced to a concentration less than or equal to the permissible limit for water leaving
the system, as specified in NSF/ANSI Standards 42, 53, and 401.
System tested and certified by NSF International against
NSF/ANSI Standard 42, Standard 53, and Standard 401 for
the reduction of contaminants specified on the Performance
Data Sheet.
Test Parameters: pH = 7.5 ± 0.5 unless otherwise noted. Flow = 0.6 gpm (2.27 lpm). Pressure = 60 psig (413.7 kPa). Temp. = 68°F to 71.6°F (20°C to
22°C). Rated service capacity = 200 gallons (757 liters).
The compounds certified under NSF 401 have been deemed as “emerging compounds/incidental contaminants.” Emerging compounds/incidental
contaminants are those compounds that have been detected in drinking water supplies at trace levels. While occurring at only trace levels, these
compounds can affect the public acceptance/perception of drinking water quality.
■ It is important that operational, maintenance, and filter replacement
requirements be carried out for the product to perform as advertised.
Property damage can occur if all instructions are not followed.
■ The disposable cartridge must be changed at least every 6 months.
■ Use replacement filter P9RFWB2L, part #EDR2RXD1/EDR2RXD1B.
2015 suggested retail price of $49.99 U.S.A./$49.99 Canada. Prices
are subject to change without notice.
■ The filter monitor system measures the amount of water that passes
through the filter and alerts you when it is time to replace the filter.
Refer to the “Using the Controls” or “Water Filtration System” section
(in the User Instructions or User Guide) to learn how to check the
water filter status.
■ After changing the water filter, flush the water system. See “Water and
Ice Dispensers” or “Water Dispenser” in the User Instructions or User
Guide.
■ These contaminants are not necessarily in your water supply. While
testing was performed under standard laboratory conditions, actual
performance may vary.
■ The product is for cold water use only.
■ The water system must be installed in compliance with state and local
laws and regulations.
■ Do not use with water that is microbiologically unsafe or of unknown
quality without adequate disinfection before or after the system.
Systems certified for cyst reduction may be used on disinfected waters
that may contain filterable cysts. EPA Est. No. 082047-TWN-001.
■ Refer to the “Warranty” section (in the User Instructions or User Guide)
for the Manufacturer’s limited warranty, name and telephone number.
Application Guidelines/Water Supply Parameters
Water Supply
Water Pressure
Water Temperature
Service Flow Rate
Potable City or Well
30 - 120 psi (207 - 827 kPa)
33° - 100°F (0.6° - 37.8°C)
0.6 gpm (2.27 lpm) @ 60 psi
*Class I particle size: >0.5 to <1 um
†
Based on the use of Cryptosporidium parvum oocysts
††
Fibers greater than 10 um in length
®NSF is a registered trademark of NSF International.
07/17
Influent Challenge
Concentration
2.0 mg/L ± 10%
At least 10,000 particles/mL
Influent Challenge
Concentration
0.15 mg/L± 10%
0.015 mg/L ± 10%
0.225 mg/L ± 10%
0.08 mg/L ± 10%
0.015 ± 10%
0.009 mg/L ± 10%
10 to 10 fibers/L
50,000/L min.
11 NTU ± 10%
0.002 ± 10%
0.015 mg/L ± 10%
1.8 mg/L ± 10%
2.1 mg/L ± 10%
0.210 mg/L ± 10%
0.210 mg/L ± 10%
2.0 mg/L ± 10%
3.0 mg/L ± 10%
0.006 mg/L ± 10%
200 ± 20%
140 ± 20%
140 ± 20%
140 ± 20%
1400 ± 20%
1400 ± 20%
200 ± 20%
140 ± 20%
2000 ± 20%
Substance Reduction Aesthetic
Effects
Chlorine Taste/Odor
Particulate Class I*
Contaminant Reduction
Lead: @ pH 6.5 / @ pH 8.5
Benzene
p-Dichlorobenzene
Carbofuran
Toxaphene
Atrazine
Asbestos
Live Cysts
Turbidity
Lindane
Tetrachloroethylene
o-Dichlorobenzene
Ethylbenzene
1,2,4-Trichlorobenzene
2,4 - D
Styrene
Toluene
Endrin
Atenolol
Trimethoprim
Linuron
Estrone
Nonylphenol
Carbamazepine
Phenytoin
Naproxen
Bisphenol A
Maximum Permissable Product
Water Concentration
50% reduction
85% reduction
Maximum Permissable
Product Water Concentration
0.010 mg/L
0.005 mg/L
0.075 mg/L
0.040 mg/L
0.003 mg/L
0.003 mg/L
99%
99.95%
0.5 NTU
0.0002 mg/L
0.005 mg/L
0.60 mg/L
0.70 mg/L
0.07 mg/L
0.07 mg/L
0.1 mg/L
1.0 mg/L
0.002 mg/L
30 ng/L
20 ng/L
20 ng/L
20 ng/L
200 ng/L
200 ng/L
30 ng/L
20 ng/L
300 ng/L
Average% Reduction
97.0%
>99.9%
Average% Reduction
>99.3% / 98.6%
93.8%
99.8%
81.9%
>95%
87.0%
>99%
>99.99%
96.9%
>99.2%
96.6%
92.3%
86.9%
>99.8%
88.5%
99.6%
93.5%
81.7%
95.7%
96.1%
96.3%
95.3%
95.5%
97.94%
93.58%
96.04%
99.20%
††78

100
CONNECTED APPLIANCE REGULATORY NOTICES
Open Source License Usage
The following statements refer to the portions of this software
based in part on FreeRTOS v7.0.2, http://www.freertos.org.
The use of this software is governed by the terms of GNU
General Public License v. 2, which is available at:
http://www.gnu.org/licenses/gpl-2.0.html. A copy of the source
code may be obtained by written request for the software by
name to [email protected], along with the address
for delivery.
The following statements refer to those portions
of the software copyrighted by Eclipse Foundation, Inc.
Copyright (c) 2007, Eclipse Foundation, Inc. and its licensors.
All rights reserved.
Redistribution and use in source and binary forms, with or
without modification, are permitted provided that the following
conditions are met:
• Redistributions of source code must retain the above
copyright notice, this list of conditions, and the following
disclaimer.
• Redistributions in binary form must reproduce the above
copyright notice, this list of conditions, and the following
disclaimer in the documentation and/or other materials
provided with the distribution.
• Neither the name of the Eclipse Foundation, Inc. nor the
names of its contributors may be used to endorse or promote
products derived from this software without specific prior
written permission.
THIS SOFTWARE IS PROVIDED BY THE COPYRIGHT
HOLDERS AND CONTRIBUTORS “AS IS” AND ANY EXPRESS
OR IMPLIED WARRANTIES, INCLUDING, BUT NOT LIMITED
TO, THE IMPLIED WARRANTIES OF MERCHANTABILITY AND
FITNESS FOR A PARTICULAR PURPOSE ARE DISCLAIMED.
IN NO EVENT SHALL THE COPYRIGHT OWNER OR
CONTRIBUTORS BE LIABLE FOR ANY DIRECT, INDIRECT,
INCIDENTAL, SPECIAL, EXEMPLARY, OR CONSEQUENTIAL
DAMAGES (INCLUDING, BUT NOT LIMITED TO,
PROCUREMENT OF SUBSTITUTE GOODS OR SERVICES;
LOSS OF USE, DATA, OR PROFITS; OR BUSINESS
INTERRUPTION) HOWEVER CAUSED AND ON ANY THEORY
OF LIABILITY, WHETHER IN CONTRACT, STRICT LIABILITY,
OR TORT (INCLUDING NEGLIGENCE OR OTHERWISE)
ARISING IN ANY WAY OUT OF THE USE OF THIS SOFTWARE,
EVEN IF ADVISED OF THE POSSIBILITY OF SUCH DAMAGE.
Portions of this software are copyright (c) Sawtooth Consulting
Ltd. 2006-2015 All rights reserved.
Portions of this software are copyright (c) Arrayent, Inc.
2015 All rights reserved.
The following statements refer to those portions of the software
copyrighted by Swedish Institute of Computer Science.
Copyright (c) 2001-2004 Swedish Institute of Computer Science.
All rights reserved.
Redistribution and use in source and binary forms, with or
without modification, are permitted provided that the following
conditions are met:
1. Redistributions of source code must retain the above
copyright notice, this list of conditions, and the following
disclaimer.
2. Redistributions in binary form must reproduce the above
copyright notice, this list of conditions, and the following
disclaimer in the documentation and/or other materials
provided with the distribution.
3. The name of the author may not be used to endorse or
promote products derived from this software without specific
prior written permission.
THIS SOFTWARE IS PROVIDED BY THE AUTHOR “AS IS”’
AND ANY EXPRESS OR IMPLIED WARRANTIES, INCLUDING,
BUT NOT LIMITED TO, THE IMPLIED WARRANTIES OF
MERCHANTABILITY AND FITNESS FOR A PARTICULAR
PURPOSE ARE DISCLAIMED. IN NO EVENT SHALL THE
AUTHOR BE LIABLE FOR ANY DIRECT, INDIRECT, INCIDENTAL,
SPECIAL, EXEMPLARY, OR CONSEQUENTIAL DAMAGES
(INCLUDING, BUT NOT LIMITED TO, PROCUREMENT OF
SUBSTITUTE GOODS OR SERVICES; LOSS OF USE, DATA, OR
PROFITS; OR BUSINESS INTERRUPTION) HOWEVER CAUSED
AND ON ANY THEORY OF LIABILITY, WHETHER IN CONTRACT,
STRICT LIABILITY, OR TORT (INCLUDING NEGLIGENCE OR
OTHERWISE) ARISING IN ANY WAY OUT OF THE USE OF THIS
SOFTWARE, EVEN IF ADVISED OF THE POSSIBILITY OF SUCH
DAMAGE.
The following statements refer to those portions
of the software copyrighted by Marvell International Ltd.
Copyright (c) Marvell International Ltd.
All rights reserved.
DISCLAIMER. THIS SOFTWARE IS PROVIDED BY THE
COPYRIGHT HOLDERS AND CONTRIBUTORS “AS IS”
AND ANY EXPRESS OR IMPLIED WARRANTIES, INCLUDING,
BUT NOT LIMITED TO, THE IMPLIED WARRANTIES OF
MERCHANTABILITY AND FITNESS FOR A PARTICULAR
PURPOSE ARE DISCLAIMED. IN NO EVENT SHALL THE
COPYRIGHT OWNER OR CONTRIBUTORS BE LIABLE FOR
ANY DIRECT, INDIRECT, INCIDENTAL, SPECIAL, EXEMPLARY,
OR CONSEQUENTIAL DAMAGES (INCLUDING, BUT NOT
LIMITED TO, PROCUREMENT OF SUBSTITUTE GOODS OR
SERVICES; LOSS OF USE, DATA, OR PROFITS; OR BUSINESS
INTERRUPTION) HOWEVER CAUSED AND ON ANY THEORY
OF LIABILITY, WHETHER IN CONTRACT, STRICT LIABILITY,
OR TORT (INCLUDING NEGLIGENCE OR OTHERWISE)
ARISING IN ANY WAY OUT OF THE USE OF THIS SOFTWARE,
EVEN IF ADVISED OF THE POSSIBILITY OF SUCH DAMAGE.
The following statements refer to those portions of the software
based on jQuery, jsmn. Copyright (c) 2011 John Resig, http://
jquery.com/, copyright 2011, The Dojo Foundation, Copyright (c)
2010 Serge A. Zaitsev.
Permission is hereby granted, free of charge, to any person
obtaining a copy of this software and associated documentation
files (the "Software"), to deal in the Software without restriction,
including without limitation the rights to use, copy, modify, merge,
publish, distribute, sublicense, and/or sell copies of the Software,
and to permit persons to whom the Software is furnished to do
so, subject to the following conditions:
The above copyright notice and this permission notice shall be
included in all copies or substantial portions of the Software.
THE SOFTWARE IS PROVIDED "AS IS", WITHOUT
WARRANTY OF ANY KIND, EXPRESS OR IMPLIED,
INCLUDING BUT NOT LIMITED TO THE WARRANTIES OF
MERCHANTABILITY, FITNESS FOR A PARTICULAR PURPOSE
AND NONINFRINGEMENT. IN NO EVENT SHALL THE AUTHORS
OR COPYRIGHT HOLDERS BE LIABLE FOR ANY CLAIM,
DAMAGES OR OTHER LIABILITY, WHETHER IN AN ACTION OF
CONTRACT, TORT OR OTHERWISE, ARISING FROM, OUT OF
OR IN CONNECTION WITH THE SOFTWARE OR THE USE OR
OTHER DEALINGS IN THE SOFTWARE.
The following statements refer to those portions of the software
copyrighted by Adam Dunkels.
Copyright (c) 2004, Adam Dunkels.

101
CONNECTED APPLIANCE REGULATORY NOTICES
(CONT.)
All rights reserved.
1. Redistributions of source code must retain the above
copyright notice, this list of conditions and the following
disclaimer.
2. Redistributions in binary form must reproduce the above
copyright notice, this list of conditions and the following
disclaimer in the documentation and/or other materials
provided with the distribution.
3. Neither the name of the Institute nor the names of its
contributors may be used to endorse or promote products
derived from this software without specific prior written
permission.
THIS SOFTWARE IS PROVIDED BY THE INSTITUTE AND
CONTRIBUTORS ``AS IS'' AND ANY EXPRESS OR IMPLIED
WARRANTIES, INCLUDING, BUT NOT LIMITED TO, THE
IMPLIED WARRANTIES OF MERCHANTABILITY AND FITNESS
FOR A PARTICULAR PURPOSE ARE DISCLAIMED. IN NO
EVENT SHALL THE INSTITUTE OR CONTRIBUTORS BE
LIABLE FOR ANY DIRECT, INDIRECT, INCIDENTAL, SPECIAL,
EXEMPLARY, OR CONSEQUENTIAL DAMAGES (INCLUDING,
BUT NOT LIMITED TO, PROCUREMENT OF SUBSTITUTE
GOODS OR SERVICES; LOSS OF USE, DATA, OR PROFITS;
OR BUSINESS INTERRUPTION) HOWEVER CAUSED AND
ON ANY THEORY OF LIABILITY, WHETHER IN CONTRACT,
STRICT LIABILITY, OR TORT (INCLUDING NEGLIGENCE OR
OTHERWISE) ARISING IN ANY WAY OUT OF THE USE OF THIS
SOFTWARE, EVEN IF ADVISED OF THE POSSIBILITY OF SUCH
DAMAGE.
The following statements refer to those portions of the software
copyrighted by Jouni Malinen.
Copyright (c) 2002-2008, Jouni Malinen <j@w1.fi> and
contributors
All Rights Reserved.
1. Redistributions of source code must retain the above
copyright notice, this list of conditions and the following
disclaimer.
2. Redistributions in binary form must reproduce the above
copyright notice, this list of conditions and the following
disclaimer in the documentation and/or other materials
provided with the distribution.
3. Neither the name(s) of the above-listed copyright holder(s)
nor the names of its contributors may be used to endorse or
promote products derived from this software without specific
prior written permission.
THIS SOFTWARE IS PROVIDED BY THE COPYRIGHT HOLDERS
AND CONTRIBUTORS “AS IS” AND ANY EXPRESS OR IMPLIED
WARRANTIES, INCLUDING, BUT NOT LIMITED TO, THE
IMPLIED WARRANTIES OF MERCHANTABILITY AND FITNESS
FOR A PARTICULAR PURPOSE ARE DISCLAIMED. IN NO
EVENT SHALL THE COPYRIGHT OWNER OR CONTRIBUTORS
BE LIABLE FOR ANY DIRECT, INDIRECT, INCIDENTAL, SPECIAL,
EXEMPLARY, OR CONSEQUENTIAL DAMAGES (INCLUDING,
BUT NOT LIMITED TO, PROCUREMENT OF SUBSTITUTE
GOODS OR SERVICES; LOSS OF USE, DATA, OR PROFITS;
OR BUSINESS INTERRUPTION) HOWEVER CAUSED AND
ON ANY THEORY OF LIABILITY, WHETHER IN CONTRACT,
STRICT LIABILITY, OR TORT (INCLUDING NEGLIGENCE OR
OTHERWISE) ARISING IN ANY WAY OUT OF THE USE OF THIS
SOFTWARE, EVEN IF ADVISED OF THE POSSIBILITY OF SUCH
DAMAGE.
The following statements refer to those portions of the software
copyrighted by The Regents of the University of California.
Copyright (c) 1991, 1993 The Regents of the University of
California. All rights reserved.
1. Redistributions of source code must retain the above
copyright notice, this list of conditions and the following
disclaimer.
2. Redistributions in binary form must reproduce the above
copyright notice, this list of conditions and the following
disclaimer in the documentation and/or other materials
provided with the distribution.
3. Neither the name of the University nor the names of its
contributors may be used to endorse or promote products
derived from this software without specific prior written
permission.
THIS SOFTWARE IS PROVIDED BY THE REGENTS AND
CONTRIBUTORS “AS IS” AND ANY EXPRESS OR IMPLIED
WARRANTIES, INCLUDING, BUT NOT LIMITED TO, THE
IMPLIED WARRANTIES OF MERCHANTABILITY AND FITNESS
FOR A PARTICULAR PURPOSE ARE DISCLAIMED. IN NO
EVENT SHALL THE REGENTS OR CONTRIBUTORS BE
LIABLE FOR ANY DIRECT, INDIRECT, INCIDENTAL, SPECIAL,
EXEMPLARY, OR CONSEQUENTIAL DAMAGES (INCLUDING,
BUT NOT LIMITED TO, PROCUREMENT OF SUBSTITUTE
GOODS OR SERVICES; LOSS OF USE, DATA, OR PROFITS;
OR BUSINESS INTERRUPTION) HOWEVER CAUSED AND
ON ANY THEORY OF LIABILITY, WHETHER IN CONTRACT,
STRICT LIABILITY, OR TORT (INCLUDING NEGLIGENCE OR
OTHERWISE) ARISING IN ANY WAY OUT OF THE USE OF THIS
SOFTWARE, EVEN IF ADVISED OF THE POSSIBILITY OF SUCH
DAMAGE.

102
Notes

103
Notes

W11159192A
©2017 All rights reserved.
保留所有权利。
04/18