The following information will help you to use your appliance in an ecological way, and to save energy:
Use dark colored or enamel coated cookware in the oven since the heat transmission will be better.
While cooking your dishes, perform a preheating operation if it is advised in the user manual or cooking instructions.
Do not open the door of the oven frequently during cooking.
Try to cook more than one dish in the oven at the same time whenever possible. You can cook by placing two cooking vessels onto the wire shelf.
Defrost frozen dishes before cooking them.
You can save energy by switching off your oven a few minutes before the end of the cooking time (The oven door should not be opened).
Use pots/pans with cover for cooking. If there is no cover, energy consumption may increase 4 times.
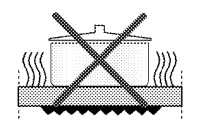
Select the burner which is suitable for the bottom size of the pot to be used. Always select the correct pot size for your dishes. Larger pots require more energy.
Take care to use flat base saucepans while cooking on electrical cookers.
Pots with an even and thick bottom provide better thermal conduction. You can save up to 1/3 of electricity.
Pots and pans should match the size of plates. The bottom of the pot or pan should not be smaller than the plate.
Keep plates and pan bottoms clean. Dirt will reduce the heat transmission between plate and pan bottoms.
In case of longer cooking times, switch off the plate 5 to 10 minutes before the end of the cooking time. When you use the residual heat, you can save up to 20 % of electricity.
Initial use
Time setting
While making any adjustment, related symbols will flash on the display.
Press keys to set the time of the day after the oven is energized for the first time. Confirm the setting by touching symbol and wait for 4 seconds without touching any keys to confirm.
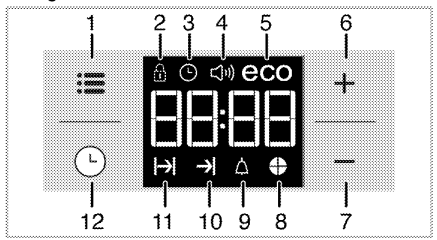
Adjustment key
Keylock symbol
Clock symbol
Alarm volume symbol
Eco mode symbol
Plus key
Minus key
Time pie symbol
Alarm symbol
End of Cooking Time symbol
Cooking Time symbol
Program key
First cleaning of the appliance
Do not use harsh abrasive cleaners or sharp metal scrapers to clean the oven door glass since they can scratch the surface, which may result in shattering of the glass.
Remove all packaging materials.
Wipe the surfaces of the appliance with a damp cloth or sponge and dry with a cloth.
Initial heating
IMPORTANT:Smoke and smell may emit for a couple of hours during the initial operation. This is quite normal. Ensure that the room is well ventilated to remove the smoke and smell. Avoid directly inhaling the smoke and the smell that emits.
Heat up the product for about 30 minutes and then switch it off. Thus, any production residues or layers will be burnt off and removed.
Product may be hot when it is in use. Never touch the hot burners, inner sections of the oven, heaters and etc. Keep children away. Always use heat resistant oven gloves when putting in or removing dishes into/from the hot oven.
Electric oven
Take all baking trays and racks from the oven.
Close the oven door.
Select top and bottom heat with the function knob.
Select the highest temperature with the thermostat knob; see How to use the electric oven.
Heat approximately 30 minutes.
Switch off oven.
Broil
Take all baking trays and wire shelf from the oven.
Close oven door.
Select highest power of the broil.
Heat approximately 30 minutes.
Switch off broil.
Smoke and smell may emit for a couple of hours during the initial operation. This is quite normal. Ensure that the room is well ventilated to remove the smoke and smell. Avoid directly inhaling the smoke and the smell that emits.
How to use the hob
General information about cooking
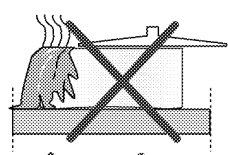
DANGER Risk of fire over by overheated oil!
WARNING Never try to extinguish the fire with water! When oil has caught fire, immediately cover the pot or pan with a lid. Switch off the burner/plate if safe to do so and phone the fire service.
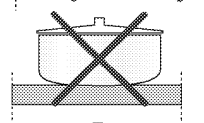
Only use flat bottomed pots or pans.
Use pans which have sufficient capacity for the amount of food being cooked so they don’t boil over and cause unnecessary cleaning.
Do not place lids on the burners.
Always position pans centrally over the burners. When transferring pans from one burner to another always lift the pans do not slide them.
This appliance is equipped with one or more surface units of different size. Select utensils having flat bottoms large enough to cover the surface unit heating element. The use of undersized utensils will expose a portion of the heating element to direct contact and may result in ignition of clothing. Proper relationship of utensil to heating element will also improve efficiency.
Never leave surface units unattended at high heat settings. Boilover causes smoking and greasy spillovers that may ignite.
Make sure reflector pans or drip bowls are in place. Absence of these pans or bowls during cooking may subject wiring or components underneath to damage.
WARNING Never leave surface units unattended at high .heat settings. Boil over causes smoking and greasy spillovers that may ignite.
Make sure reflector pans or drip bowls are in place. Absence of these pans or bowls during cooking may subject wiring or components underneath to damage.
Tips for glass ceramic plate
The glass ceramic surface is heat- resistant and insensitive to large temperature deviations.
Do not use the glass ceramic plate for keeping objects or as cutting surface.
WARNING Do not cook popcorn in prepackaged jglum|njm containers on the cooktop. They could leave aluminum marks that cannot be removed completely.
Use pot and pans with ground bottoms. Sharp edges cause scratches on the surface.
Do not use aluminum pots and pans. Aluminum damages the glass ceramic surface.
Do not cook foods directly on the cook-top.
For foods containing sugar in any form, clean up all spills and soils as soon as possible. Allow the cook- top to cool down slightly. Then, while wearing oven mitts, remove the spills while the surface is still warm. If sugary spills are allowed to cool down, they can adhere to the cook-top and can cause pitting and permanent marks.
WARNING If a wet sponge or cloth is used to wipe spills !on a hot cooking area, be careful to avoid steam burn. Some cleaners can produce noxious fumes if applied to a hot surface. Utensil handles should be turned inward and not extend over adjacent Face units. To reduce the risk of burns, ignition of flammable materials, and spillage due to unintentional contact with the utensil, the handle of a utensil should be positioned so that it is turned inward, and does not extend over adjacent surface units.
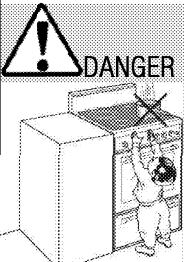
WARNING Do not store items of interest to children in 'cabinets above a range or on the back guard of a range - children climbing on the range to reach items could be seriously injured.
Splashes may damage the ceramic surface and can cause fire.
Do not use pots that have concave or convex bottoms.
Use pot and pans with smooth bottoms. They ensure a good heat transfer.
If the pan is too small energy is wasted
Tipping of pan
Make sure that the handles of cookware do not stick out over the edge of the appliance, to avoid them being knocked over by accident. This also makes it more difficult for children to reach the cooking pans.
Ensure handles of pans cannot accidentally be caught or knocked and do not get hot by adjacent heating zones. Avoid pans that are unstable and easily tipped. Pans that are too heavy to move easily when filled can also be a hazard.
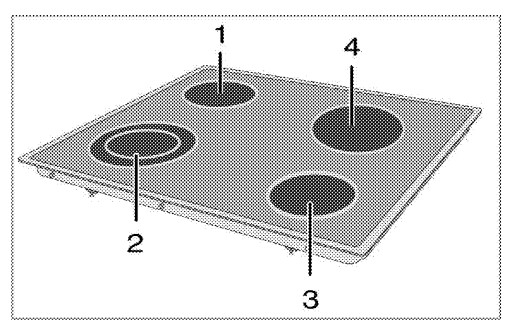
Using the burners/plates
Single-circuit cooking plate 6. - 7
Dual-circuit cooking plate 4. - 8.
Single-circuit cooking plate 5. - 6.
Single-circuit cooking plate 7-8 inches is list of advised diameter of pots to be used on related burners.
DANGER: Avoid scratching or impacting glass doors. cook tops or control panels. Doing so may lead to glass breakage. Do not cook on a product with broken glass. Shock. fire or cuts may occur.
Do not let any objects fall onto the plate. Even small objects (e.g. salt shaker) may damage the burner/ plate._
Do not use glass ceramic plates with cracks. Water may enter into the cracks and cause a short circuit.
If the surface is damaged in any way (e. g. visible cracks), switch off the device immediately to reduce the risk of an electric shock.
If cooktop should break, cleaning solutions and spillovers may penetrate the broken cook-top and create a risk of electric shock. Contact a qualified technician immediately.
WARNING
The glass ceramic burner/plate is equipped with an operating lamp and a residual heat indicator.
The residual heat indicator indicates the position of the switched on plate and remains illuminated after switching off. (When the temperature of the plate falls below touchable temperature the indicator light will go off).
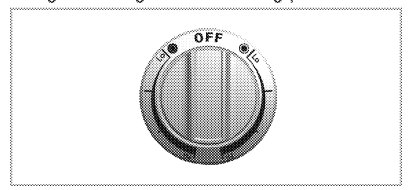
Switching the plate on
The burner/plate control knobs are used for operating the plates. To obtain the desired cooking power, turn the burner/ plate control knobs to the corresponding level.
Switching the plate off
Turn plate control knob to off position (top).
Using multi-segmented cooking plates
Multi-segmented cooking plates allows to cook with different size of saucepans on the same cooking plate.
It can be used with two different ways:
Turn the related hob knob to counterclockwise to operate only inner segment of the multi-segmented cooking plate.
Turn the related hob knob to clockwise to operate the both segmentss of the multi-segmented cooking plate.
Turning oft multi-segment cooking plates
Turn the knob counter clockwise to OFF (upper) position. All segments of the cooking plate are turned off.
How to operate the oven
General information on baking, roasting and broiling
WARNING Hot surfaces cause burns!
Product may be hot when it is in use. Never touch the hot burners, inner sections of the oven, heaters and etc. Keep children away. Always use heat resistant oven gloves when putting in or removing dishes into/from the hot oven.
Tips for baking
Use non-sticky coated appropriate metal plates or aluminum vessels or heat-resistant silicone moulds.
Make best use of the space on the rack.
Place the baking mould in the middle of the shelf.
Select the correct rack position before turning the oven or Broil on. Do not change the rack position when the oven is hot.
Always place oven racks in desired location while oven is cool. If rack must be moved while oven is hot, do not let potholder contact hot heating element in oven.
Keep the oven door closed.
Tips for roasting
Seasoning with lemon juice and black pepper will improve the cooking performance when cooking a whole chicken, turkey or a large piece of meat.
Meat with bones takes about 15 to 30 minutes longer before it is cooked than a roast of the same size without bones.
You should calculate about 4 to 5 minutes cooking time per centimeter height of the meat.
Let meat rest in the oven for about 10 minutes after the cooking time. The juice is better distributed all over the roast and does not run out when the meat is cut.
Fish in a fire-resistant dish should be placed on the rack at the medium or lower level.
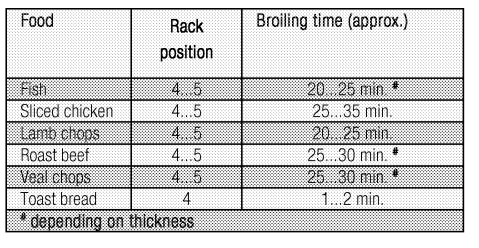
Tips for broiling
Broiling is ideal for cooking meat, fish and poultry and will achieve a nice brown surface without it drying out to much. Flat pieces, meat skewers and sausages are particularly suited for broiling as are vegetables with a high water content such as tomatoes and onions.
Distribute the pieces to be broiled on the wire shelf.
If the broiling is on the wire shelf, locate a dripping pan under it in order to collect the fat.
Add some water in dripping pan for easy cleaning.
How to use the electric oven
Food Poisoning Hazard
Do not let food sit in oven more than one hour before or after cooking.
Doing so can result in food poisoning or sickness.
WARNING Never cover any slots, holes or passages in the oven bottom or cover an entire rack with materials such as aluminium foil. Doing so blocks airflow through the oven and may cause carbon monoxide poisoning. Aluminium foil linings may also trap heat, causing a fire hazard.
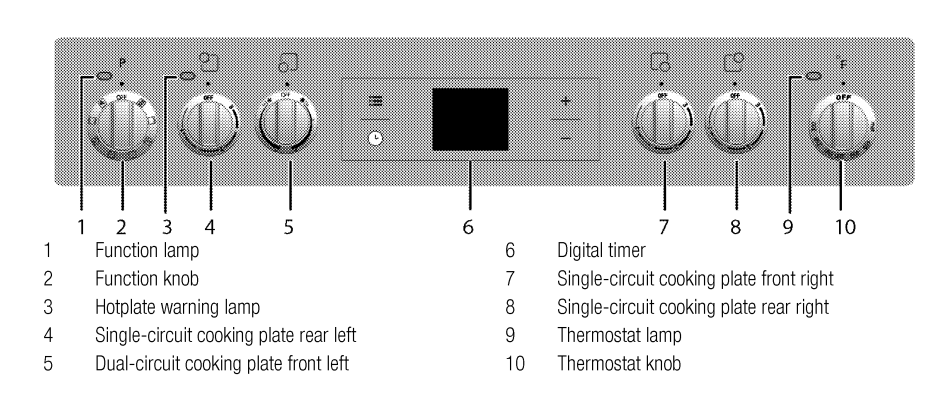
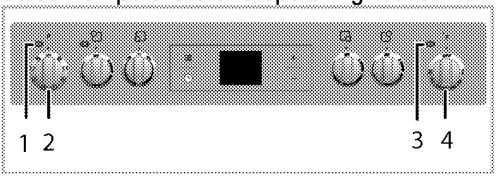
Select temperature and operating mode
Function lamp
Function knob
Thermostat lamp
Thermostat knob
The operating modes of the electric oven are selected with the function knob. The temperature is adjusted with the thermostat knob.
All oven functions are turned off by turning the relevant knob to off (upper) position.
Set thermostat knob to the desired temperature.
Set function knob to the required operating mode.
>>The oven heats up to the adjusted temperature and maintains it. During heating, temperature lamp stays on.
Switch off electric oven
Turn function knob and thermostat knob to off position (top).
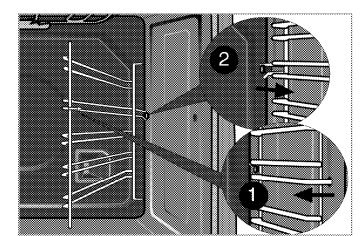
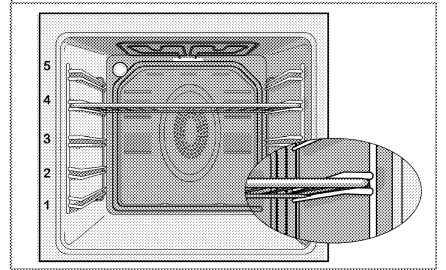
Rack positions (For models with wire shelf)
It is important to place the wire shelf onto the side rack correctly. Wire shelf must be inserted between the side racks as illustrated in the figure. Do not let the wire shelf stand against the rear wall of the oven. Slide your wire shelf to the front section of the rack and settle it with the help of the door in order to obtain a good broil performance.
Operating modes
The order of operating modes shown here may be different from the arrangement on your product.
Top and bottom heating
Top and bottom heating are in operation. Food is heated simultaneously from the top and bottom. For example, it is suitable for cakes, pastries, or cakes and casseroles in baking moulds. Cook with one tray only.
Bottom heating
Only bottom heating is in operation. It is suitable for pizza and for subsequent browning of food from the bottom.
Fan supported bottom/top heating
Top heating, bottom heating plus fan in the rear wall) are in operation. Hot air is evenly distributed throughout the oven rapidly by means of the fan. Cook with one tray only.
Operating with fan
The oven is not heated. Only the fan (in the rear wall) is in operation. Suitable for thawing frozen granular food slowly at room temperature and cooling down the cooked food.
Fan Heating
Warm air heated by the rear heater is evenly distributed throughout the oven rapidly by means of the fan. It is suitable for cooking your meals in different rack levels and preheating is not required in most cases. Suitable for cooking with multi trays.
“3D” function
Top heating, bottom heating and fan assisted heating (in the rear wall) are in operation. Food is cooked evenly and quickly all around. Cook with one tray only.
Broil
Large broil at the ceiling of the oven is in operation. It is suitable for broiling large amount of meat.
Put big or medium-sized portions in correct rack position under the broil heater for broiling.
Set the temperature to maximum level.
Turn the food after half of the broiling time.
Broil with convection air
Broiling effect is not as strong as in Full Broil
Put small or medium-sized portions in correct shelf position under the broil heater for broiling.
Set the desired temperature.
Turn the food after half of the broiling time.
Using the oven clock
Adjustment key
Keylock symbol
Clock symbol
Alarm volume symbol
Eco mode symbol
Plus key
Minus key
Time pie symbol
Alarm symbol
End of Cooking Time symbol
Cooking Time symbol
Program key
Maximum time that can be set for end of cooking is 5 hours 59 minutes. Program will be cancelled in case of power failure. You must reprogram the oven.
While making any setting, related symbols will flash on the display. You must wait for a short time for the settings to take effect.
If no cooking setting is made, time of the day cannot be set.
Remaining time will be displayed if cooking time is set when the cooking starts.
Cooking by setting the cooking time;
You can set the oven so that it will stop at the end of the specified time by setting the cooking time on the timer.
Select the function for cooking.
Touch until symbol appears on display for cooking time.
Set the cooking time with keys. >>After the cooking time is set, HI symbol and the time slice will appear on display continuously.
Place the dish into the oven and set the temperature with temperature knob. Cooking will start.
>>Cooking time starts to count down on display when cooking starts and all parts of time slice symbol is lit. The set cooking time is divided into 4 equal parts and when the time of each parts ends, the symbol of that parts turns off. So you can understand the ratio of remaining cooking time to total cooking time easily.
Setting the the end of cooking time to a later time;
After setting the cooking time on the timer, you can set the end of cooking time to a later time.
Select the function for cooking.
Touch until symbol appears on display for cooking time.
Set the cooking time with keys. >>Once the Cooking Time is set, symbol will appear on display continuously.
Touch until symbol appears on display for the end of cooking time.
Press lam keys to set the end of cooking time. »After the cooking time is set, symbol plus symbol and the time slice will appear on display continuously. Once the cooking starts, - symbol disappears.
Place the dish into the oven and set the temperature with temperature knob. Cooking will start. »Oven timer calculates the startup time by deducting the cooking time from the end of cooking time you have set. Selected operating mode is activated when the startup time of cooking has come and the oven is heated up to the set temperature. It maintains this temperature until the end of cooking time. » Cooking time starts to count down on display when cooking starts and all parts of time slice symbol is lit. The set cooking time is divided into 4 equal parts and when the time of each parts ends, the symbol of that parts turns off. So you can understand the ratio of remaining cooking time to total cooking time easily.
After the cooking process is completed, "End" appears on the displayed and the timer gives an audio warning.
Audio warning sounds for 2 minutes. To stop the audio warning, just press any key. Audio warning will be silenced and current time will be displayed.
lf you press any key at the end of the audio warning, the oven will restart operating. Turn the temperature knob and function knob to "0" (off) position to switch off the oven in order to prevent re-operation of the oven at the end of warning.
Activating the keylock
You can prevent oven from being intervened with by activating the key lock function.
Touch until symbol appears on display. »"OFF" will appear on the display.
Press to activate the key lock. » Once the key lock is activated, "On" appears on the display and the symbol remains lit.
Oven keys are not functional when the key lock is activated. Key lock will not be cancelled in case of power failure.
To deactivate the keylock
Touch until symbol appears on display. »"On" will appear on the display.
Disable the key lock by pressing the key. »"OFF" will be displayed once the keylock is deactivated.
Setting the alarm clock
You can use the timer of the product for any warning or reminder apart from the cooking program.
The alarm clock has no influence on the functions of the oven. It is only used as a warning. For example, this is useful when you want to turn food in the oven at a certain point of time. Timer will give an audio warning at the end of the set time.
Touch until symbol appears on display. Maximum alarm time can be 23 hours and 59 minutes.
Set the alarm duration by using keys. Function keys for alarm tone, time of day, display brightness and temperature keys should be at 0 (OFF) position. symbol will remain lit and the alarm time i appear on the display once the alarm time is set.
At the end of the alarm time, b symbol starts flashing and the audio warning is heard.
Turning off the alarm
Audio warning sounds for 2 minutes. To stop the audio warning, just press any key.
Audio warning will be silenced and current time will be displayed.
Cancelling the alarm;
Touch until symbol appears on display in order to cancel the alarm.
Press and hold key until "00:00" isdisplayed.
Alarm time will be displayed. If the alarm time and cooking time are set concurrently, shortest time will be displayed.
Changing alarm tone
Touch until symbol appears on display.
Adjust the desired alarm tone with keys.
The tone you have set will be activated in a short time.
>>Selected alarm tone will appear as "b-01", "b-02" or "b-03" on the display.
Changing the time of the day
To change the time of the day you have previously set:
Touch until symbol appears on display.
Set the time of the day with keys.
The time you have set will be activated in a short time.
Economy mode
You can save energy with economy mode while cooking by setting cooking time in the oven.
This mode completes the cooking with the inner temperature of the oven by switching off the heaters before the end of cooking time.
Setting the economy mode
Touch ymbol until eco symbol appears on display. »"OFF" will appear on the display.
Enable economy mode by touching key.
>>Once the economy mode is activated, "On" appears on the display and the eco symbol remains lit.
Disabling economy mode
Touch symbol until eco symbol appears on display. >>"On" will appear on the display.
Disable economy mode by touching key.>>Off" will be displayed once the eco mode is deactivated.
Setting the screen brightness
Touch until d-01 or d-02 or d-03 appears on display for display brightness.
Set the desired brightness with keys. »The time you have set will be activated in a short time.
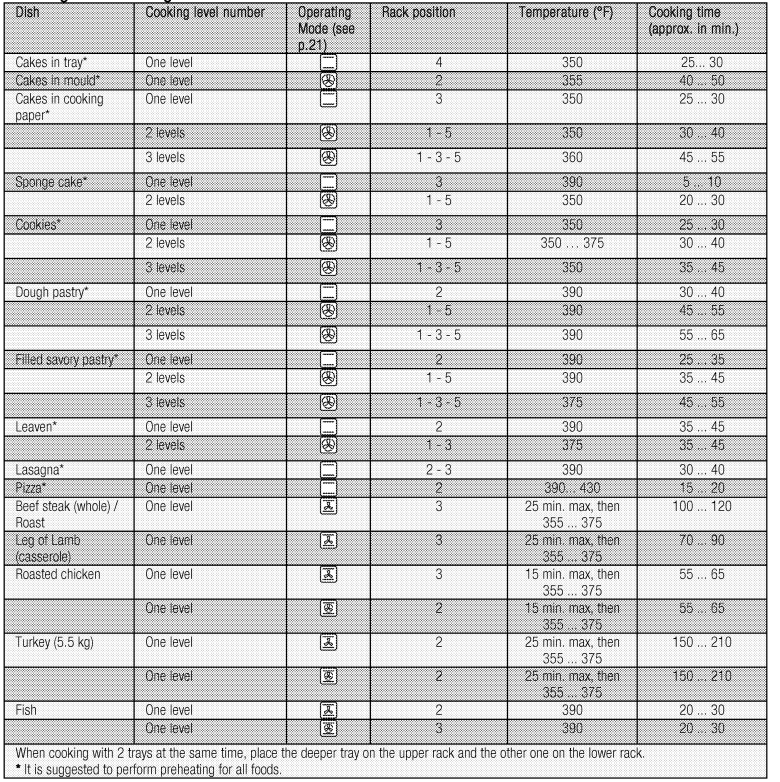
Cooking times table
1st rack of the oven is the bottom rack.
Maximum load capacity of oven tray: 4 kg
The timings in this chart are meant as a guide.
Baking and roasting
Tips for baking cake
If the cake is too dry, increase the temperature by 50°F (10°C) and decrease the cooking time.
If the cake is wet, use less liquid or lower the temperature by 50°F (10°C).
If the cake is too dark on top, place it on a lower rack, lower the temperature and increase the cooking time.
If cooked well on the inside but sticky on the outside, use less liquid, lower the temperature and increase the cooking time.
Tips for baking pastry
If the pastry is too dry, increase the temperature by 50°F (10°C) and decrease the cooking time. Dampen the layers of dough with a sauce composed of milk, oil, egg and yoghurt.
If the pastry takes too long to bake, pay care that the thickness of the pastry you have prepared does not exceed the depth of the tray.
If the upper side of the pastry gets browned, but the lower part is not cooked, make sure that the amount of sauce you have used for the pastry is not too much at the bottom of the pastry. Try to scatter the sauce equally between the dough layers and on the top of pastry for an even browning.
Cook the pastry in accordance with the mode ind temperature given in the cooking table. If the bottom part is still not browned enough, rlace it on one lower rack next time.
Tips for cooking vegetables
If the vegetable dish runs out of juice and gets too dry, cook it in a pan with a lid instead of a tray. Closed vessels will preserve the juice of the dish.
If a vegetable dish does not get cooked, boil the vegetables beforehand or prepare them like canned food and put in the oven.
How to operate the broil
Before using the oven the clock time must be set. If the clock time is not set, the main oven will not work.
Switching on Broil
Set the function knob onto the broil symbol.
Set broil temperature.
Preheat for approximately 5 minutes, if it is necessary.
>>The thermostat lamp is switched on.
Switch off broil
Turn the function and thermostat knobs to off (upper) position.
Maintenance and care
General information
Service life of the product will extend and the possibility of problems will decrease if the product is cleaned at regular intervals._
Clean the product thoroughly after each use. In this way it will be possible to remove cooking residues more easily, thus avoiding these from burning the next time the appliance is used.
No special cleaning agents are required for cleaning the product. Use warm water with washing liquid, a soft cloth or sponge to clean the product and wipe it with a dry cloth.
Do not use any abrasive cleaning materialsl
Do not use cleaning agents that contain acid or chloride to clean the stainless or inox surfaces and the handle. Use a soft cloth with a liquid detergent (not abrasive) to wipe those parts clean, paying attention to sweep in one direction. he surface might get damaged by some detergents or cleaning materials.
Do not use aggressive detergents, cleaning powders/creams or any sharp objects during cleaning.
Do not use harsh abrasive cleaners or sharp metal scrapers to clean the oven door glass since they can scratch the surface, which may result in shattering of the glass.
Cleaning the burner/plate
Ceramic hobs
Always rinse off fully with a clean cloth wrung out in clean water (as residue could damage the ceramic glass surface next time the hob is used). In no case should crusts be scratched off with serrated edge knives, steel wool or the like. Remove calcium stains (yellow staining) with small amounts of decalcifying agents such as Durgol, vinegar or lemon juice.
Do not allow vinegar, coffee, milk, saltwater, lemon or tomato juice to remain in contact with enamel parts (i.e. inside the oven).
Apply agent with a sponge and, in the event of heavier soiling, let it work in for a longer period of time. Afterwards, wash off hob with water.
WARNING:Sugar-based food such as custard and syrup should immediately be scraped off without waiting for the surface to cool down. Otherwise the burner/plate may be permanently damaged.
Cleaning the control panel
Clean the control panel and knobs with a damp cloth and wipe them dry.
Cleaning the oven
No oven cleaner or any other special cleaning agent is required for cleaning the oven. It is recommended to wipe the oven with a damp cloth while it is still warm.
Do not allow fat or oils to build up in the oven base, or oven accessories.
To clean the side wall
Remove the front section of the side rack by pulling it in the opposite direction of the side wall.
Remove the side rack completely by pulling it towards you.
Clean oven door
To clean the oven door, use warm water with washing liquid, a soft cloth or sponge to clean the product and wipe it with a dry cloth.
Don't use any harsh abrasive cleaners or sharp metal scrapers for cleaning the oven door. They could scratch the surface and destroy the glass.
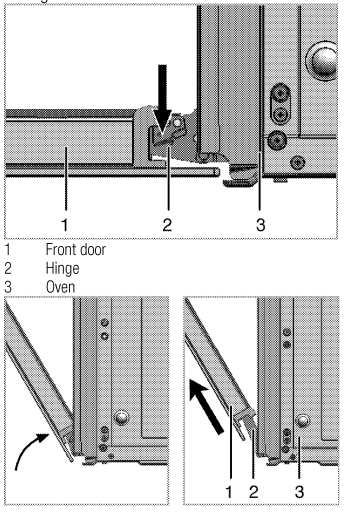
Removing the oven door
Open the front door (1).
Open the clips at the hinge housing (2) on the right and left hand sides of the front door by pressing them down as illustrated in the figure.
Move the front door to half-way.
Remove the front door by pulling it upwards
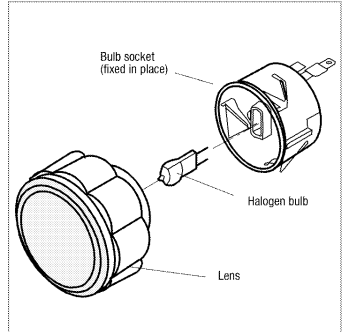
Replacing the oven lamp
Each oven is equipped with one halogen lights located in the back wall of the oven. The lights are switched on when the door is opened or when the oven is in a cooking cycle. The oven lights are not illuminated during self clean. Each light assembly consist of a removable lens, a light bulb as well as a light socket housing that is fixed in place. Light bulb replacement is considered to be a routine maintenance item.
To replave a light bulb:
Read warning on this page.
Turn off power at the main power supply (your fuse or breaker box).
General information
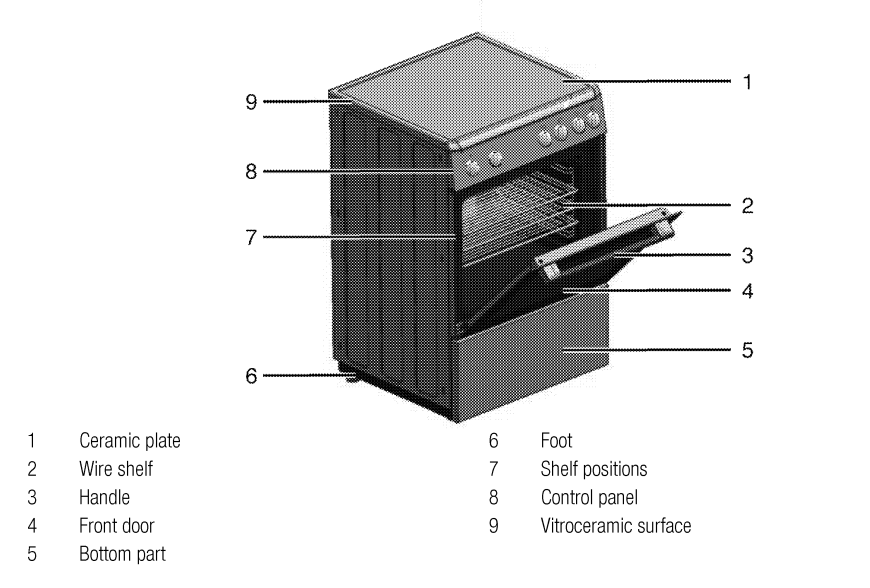
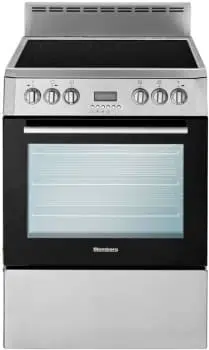
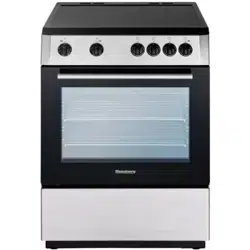
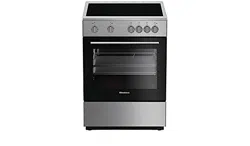
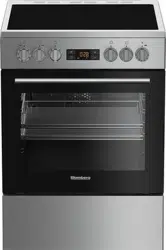
Overview
Package contents
Accessories supplied can vary depending on re product model. Not every accessory escribed in the user manual may exist on our product.
User manual
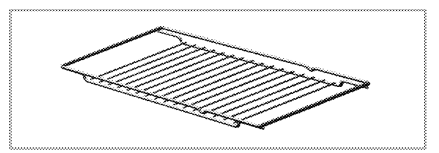
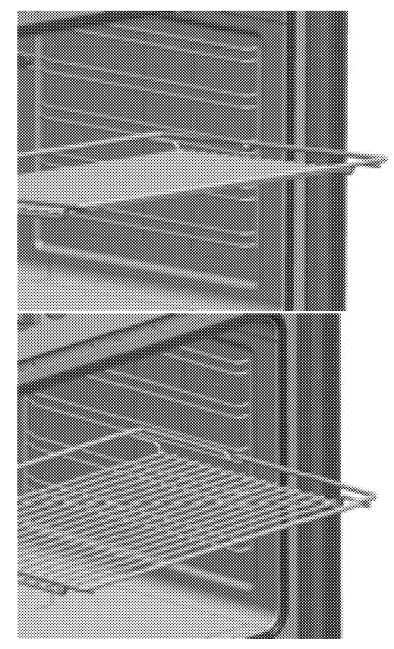
Wire Shelf Used for roasting and for placing the food to be baked, roasted or cooked in casserole dishes to the desired rack.
Proper positioning of the wire shelf on sliding shelves It is important to position the broil and/or dripping pan on the wire shelves correctly. Slide the broil or the dripping pan completely between the 2 rails and make sure it is stable before putting a dish on it (Please see the following figure).
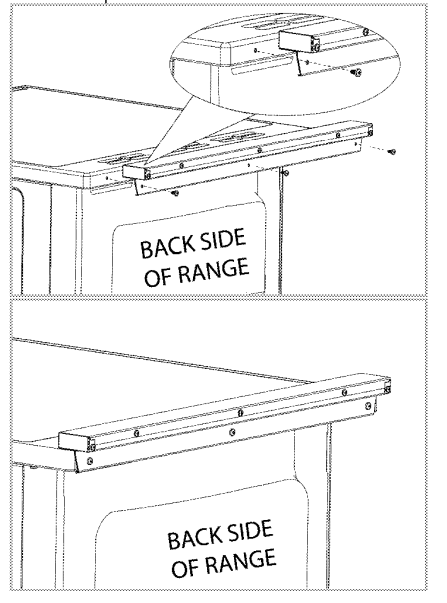
Island trim Remove the island trim assembly from the packaging taking care to retain the screws required for fixing the island trim to the product. Remove the protective films (if supplied) from the island trim before assembly. Position the island trim assembly as indicated. Secure the island trim assembly to the appliance with the screws provided. Do not over tighten in order to avoid any damages to the product or island trim.
Troubleshooting
Oven emits steam when it is in use.
It is normal that steam escapes during operation. >>> This is not a fault.
Product emits metal noises while heating and cooling.
When the metal parts are heated, they may expand and cause noise. >>> This is not a fault
Product does not operate.
The mains fuse is defective or has tripped. >>> Check fuses in the fuse box. If necessary, replace or reset them.
Product is not plugged into the (grounded) socket. >>> Check the plug connection.
Oven light does not work.
Oven lamp is defective. >>> Replace oven lamp.
Power is cut. >>> Check if there is power. Check the fuses in the fuse box. If necessary, replace or reset the fuses.
Oven does not heat.
Function and/or Temperature are not set. >>> Set the function and the temperature with the Function and/or Temperature knob/key.
In models equipped with a timer, the timer is not adjusted. >>> Adjust the time. (In products with microwave oven, timer controls only microwave oven.)
Power is cut. >>> Check if there is power. Check the fuses in the fuse box. If necessary, replace or reset the fuses.
(In models with timer) Clock display is blinking or clock symbol is on.
A previous power outage has occurred. >>> Adjust the time/Switch of the product and switch it on again.
Consult the Authorised Service Agent or technician with licence or the dealer where you have purchased the product if you can not remedy the trouble although you have implemented the instructions in this section. Never attempt to repair a defective product yourself.
 While making any adjustment, related symbols will flash on the display.
 keys to set the time of the day after the oven is energized for the first time. Confirm the setting by touching
  symbol and wait for 4 seconds without touching any keys to confirm.
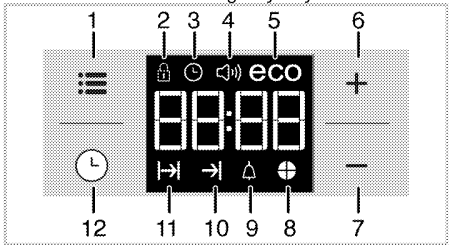

 DANGER:
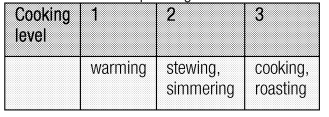


 until
until  symbol appears on display for cooking time.
 keys.
keys. symbol appears on display for the end of cooking time.
 until
until  symbol appears on display. »"OFF" will appear on the display.
 to activate the key lock. » Once the key lock is activated, "On" appears on the display and the
  symbol remains lit.
 key. »"OFF" will be displayed once the keylock is deactivated.
 until
until  symbol appears on display.
 keys.
keys. symbol appears on display.