
. 2,.3
Controls. 4–6
Air.Filter . 6
Outdoor.Coils. 6
. 7–12
. 13
Normal.Operating.Sounds. 13
Consumer.Support. Back.Cover
Warranty.for.Customers.
in.the.USA. 15
..0010536027. 49-7698 12-11 GE
AHH18*
AHM18*
Owner’s Manual and
Installation Instructions
Write the model and serial numbers here:
Model # _________________________
Serial # __________________________
Find.these.numbers.on.a.label.on.the.side.of.
the.air.conditioner
GEAppliances.com
As an EnErgy Star
®
partner, GE has
determined that this product meets
the EnErgy Star
®
guidelines for
energy efficiency.
*EnErgy Star
®
labeled product
2
IMPORTANT SAFETY INFORMATION.
READ ALL INSTRUCTIONS BEFORE USING
WARNING!
n Use.this.appliance.only.for.its.intended.
purpose.as.described.in.this.Owner’s.
Manual.
n This.air.conditioner.must.be.properly.
installed.in.accordance.with.the.Installation.
Instructions.before.it.is.used.
n Never.unplug.your.air.conditioner.by.pulling.
on.the.power.cord.Always.grip.plug.firmly.
and.pull.straight.out.from.the.receptacle.
n Replace.immediately.all.electric.service.
cords.that.have.become.frayed.or.otherwise.
damaged.A.damaged.power.supply.cord.
must.be.replaced.with.a.new.power.supply.
cord.obtained.from.the.manufacturer.and.
not.repaired.Do.not.use.a.cord.that.shows.
cracks.or.abrasion.damage.along.its.length..
or.at.either.the.plug.or.connector.end.
n Turn.the.unit.OFF.and.unplug.your.air.
conditioner.before.cleaning.
n GE.does.not.support.any.servicing.of.the.
air.conditioner.We.strongly.recommend.
that.you.do.not.attempt.to.service.the.air.
conditioner.yourself
n For.your.safety…do.not.store.or.use.
combustible.materials,.gasoline.or.other.
flammable.vapors.or.liquids.in.the.vicinity..
of.this.or.any.other.appliance
n All.air.conditioners.contain.refrigerants,.
which.under.federal.law.must.be.removed.
prior.to.product.disposal.If.you.are.getting.
rid.of.an.old.product.with.refrigerants,.check.
with.the.company.handling.disposal.about.
what.to.do
n If.the.receptacle.does.not.match.the.plug,.
the.receptacle.must.be.changed.out.by.a.
qualified.electrician
n These.R410A.air.conditioning.systems.
require.contractors.and.technicians.to..
use.tools,.equipment.and.safety.standards.
approved.for.use.with.this.refrigerant..
DO.NOT.use.equipment.certified.for..
R22.refrigerant.only
Do.not,.under.any.circumstances,.cut.or.remove.
the.third.(ground).prong.from.the.power.cord..
For.personal.safety,.this.appliance.must.be.
properly.grounded
DO NOT use an adapter plug with this appliance.
The.power.cord.of.this.appliance.is.equipped.
with.a.3-prong.(grounding).plug.which.mates.
with.a.standard.3-prong.(grounding).wall.outlet.
to.minimize.the.possibility.of.electric..
shock.hazard.from.this.appliance
Power.cord.includes.a.current.interrupter.device.
A.test.and.reset.button.is.provided.on.the.plug.
case.The.device.should.be.tested.on.a.periodic.
basis.by.first.pressing.the.TEST.button.and.
then.the.RESET.button.while.plugged.into.the.
outlet.If.the.TEST.button.does.not.trip..or.if.the.
RESET.button.will.not.stay.engaged,.discontinue.
use.of.the.air.conditioner.and.contact.a.qualified.
service.technician
Have.the.wall.outlet.and.circuit.checked.by..
a.qualified.electrician.to.make.sure.the.outlet..
is.properly.grounded
Where.a.2-prong.wall.outlet.is.encountered,..
it.is.your.personal.responsibility.and.obligation.to.
have.it.replaced.with.a.properly.grounded..
3-prong.wall.outlet
The.air.conditioner.should.always.be.plugged.
into.its.own.individual.electrical.outlet.which.has.
a.voltage.rating.that.matches.the.rating.plate
This.provides.the.best.performance.and.also.
prevents.overloading.house.wiring.circuits.which.
could.cause.a.fire.hazard.from.overheated.wires
See.the.Installation.Instructions,.Electrical
Requirements section.for.specific.electrical.
connection.requirements.
3
. GEAppliances.com
.
SAVE THESE INSTRUCTIONS
WARNING!
RISK OF FIRE. Could cause serious injury or
death.
•..use.an.extension.cord.with.this.
Window.Air.Conditioner
•..use.surge.protectors.or.multi-outlet.
adaptors.with.this.WIndow.Air.Conditioner

4
About the controls on the air conditioner
Temp / Delay
The.display.always.shows.
the.room.temperature.except.when.
setting.the.Set.temperature.or.the.
Delay.timer
Air Conditioner Controls
Remote Control
.Unit.power..
on/off
Mode.select
Fan.speed
.....Delay.1–24hr
Temperature..
set/Delay.
Timer.Increase.
and.Decrease
.
Power Pad
Turns.air.conditioner.on.and.off.When.turned.
on,.the.display.will.show.the.room.temperature
.
Display
Shows.the.room.temperature.or.time.remaining.
on.the.Delay.timer.Shows.the Set temperature.
while.setting.the.temperature.in.Cool or.Energy
Saver modes.The Set.light.will.turn.on.while.
setting
Temp and Delay Increase ▲ /Decrease ▼
Pads
Use.to.set.temperature.or.delay.time..
Temperature.can.be.set.in.Cool and.Energy
Saving and mode
Mode Pad
Use.to.set.the.air.conditioner.to Fan Only.or.
Cool, Energy Saver.mode
.
Fan Speed Pads
In Cool, Energy Saving.mode:
Use.to.set.the.fan.speed.to Auto, High, Med or
Low on.the.unit
In.Fan Only mode:
Use.to.set.the.fan.speed.to High, Med, or Low
on.the.unit
.
Delay Pad
Delay ON—When.the.air.conditioner.is.off,.it.can.
be.set.to.automatically.come.on.in.1.to.24.hours.
at.its.previous.mode.and.fan.settings.
Delay OFF—When.the.air.conditioner.is.on,.
it.can.be.set.to.automatically.turn.off.in.1.to..
24.hours.
How to set:
Press.the.Delay 1–24hr.pad.on.the.unit.or.the.
remote.control.Each.touch.of.the.Increase.▲./.
Decrease ▼.pads.on.the.unit.or.the.Increase +
/.Decrease –.pads.on.the.remote.control.will.set.
the.timer.in.1-hour.intervals.
To.review.the.remaining.time.on.the.Delay
1–24hr.timer,.press.the.Delay 1–24hr.pad.on.the.
unit.or.the.remote.control.Use.the.Increase.▲./.
Decrease.▼.pads.on.the.unit.or.the.Increase +.
/.Decrease –.pads.on.the.remote.control.to.set.
a.new.time.if.desired
To cancel the timer, press.Decrease.▼.pad.on.
the.unit.or.the.remote.control.until.the.set.time.
is.zero..After.3.seconds.the.light.on.the.Delay
1-24.hour.pad.goes.off.

5
n To.ensure.proper.operation,.aim.the.remote.
control.at.the.signal.receiver.on.the.air.
conditioner
n The.remote.control.signal.has.a.range.of.
up.to.20.feet
n Make.sure.nothing.is.between.the.air.conditioner.
and.the.remote.control.that.could.block.the.
signal
n Make.sure.battery.is.fresh.and.installed.correctly.
as.indicated.on.the.remote.control
Remote Control
. GEAppliances.com
Cool Mode
Use.the.Cool.mode.at.Low, Med, High or.Auto
Speed.for.cooling.Use.the.Temperature Increase.▲.
/.Decrease.▼.pads.to.set.the.desired.temperature.
between.61°F.and.86°F.in.1°F.increments.
An.electronic.thermostat.is.used.to.maintain.the.room.
temperature.The.compressor.will.cycle.on..
and.off.to.keep.the.room.at.the.set.level.of.comfort.
Set.the.thermostat.at.a.lower.number.and.the.indoor.
air.will.become.cooler.Set.the.thermostat.at.a.higher.
number.and.the.indoor.air.will.become.warmer
NOTE:
Cool
Cool
Cooling Descriptions
For Normal Cooling—Select.the.Cool mode.and.
High.or.Med fan.with.a.middle.set.temperature
For Maximum Cooling—Select.the Cool mode.
and.High.fan.with.a.lower.set.temperature
For Quieter and Nighttime Cooling—Select.the.
Cool.mode.and.Low.fan.with.a.middle.set.
temperature
Fan Only Mode
Use.the.Fan.Only.Mode.at.Low,.Med.or.High.fan.
speed.to.provide.air.circulation.and.filtering.without.
cooling.Since.fan-only.settings.do.not.provide.
cooling,.a.Set.temperature.cannot.be.entered.The.
room.temperature.will.appear..
in.the.display
Energy Saver Mode
Controls.the.fan
ON—The.fan.will.cycle.on.and.off.with.the.
compressor.This.results.in.wider.variations.of.room.
temperature.and.humidity.Normally.used.when.the.
room.is.unoccupied NOTE:
OFF—The.fan.runs.all.the.time,.while.the.compressor.
cycles.on.and.off
Set.to Auto.for.the.fan.speed.to.automatically.set.
to.the.speed.needed.to.provide.optimum.comfort.
settings.with.the.set.temperature...
If.the.room.needs.more.cooling,.the.fan.speed..
will.automatically.increase.If.the.room.needs.less.
cooling,.the.fan.speed.will.automatically.decrease.
Auto Fan
Do Not Operate in Freezing Outdoor Conditions
This.cool-only.air.conditioner.was.not.designed.for.
freezing.outdoor.conditions.It.must.not.be.used.in.
freezing.outdoor.conditions
6
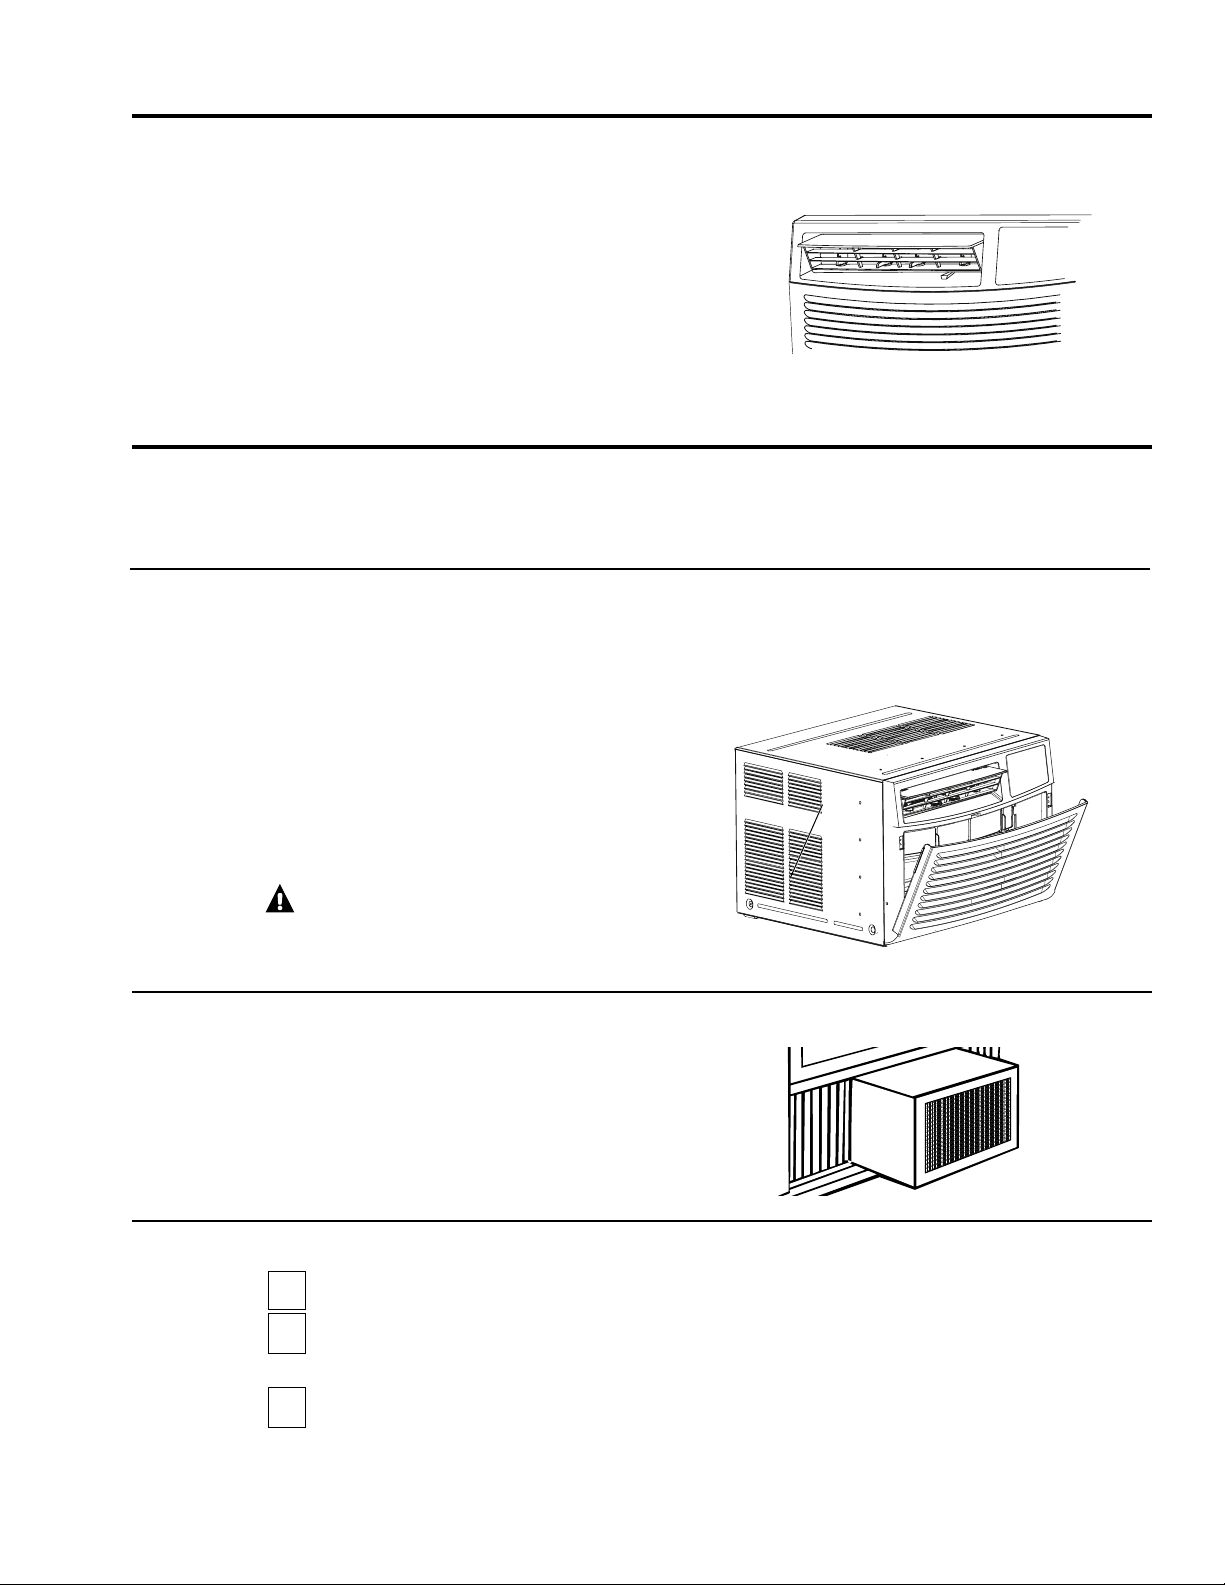
Air Direction
Use.the.lever.to.adjust.the.air.direction.left,.right,.up.
and.down
About the controls on the air conditioner.
Turn.the.air.conditioner.off.and.remove.the.plug.from.
the.wall.outlet.before.cleaning.
To.clean,.use.water.and.a.mild.detergent.Do.not.use.
bleach.or.abrasives
Grille and Case
Care and cleaning of the air conditioner.
Outdoor Coils
The.coils.on.the.outdoor.side.of.the.air.conditioner.
should.be.checked.regularly.If.they.are.clogged.with.
dirt.or.soot,.they.may.be.professionally.cleaned
Air Filter
The.air.filter.behind.the.front.grille.should.be.checked.
and.cleaned.at.least.every.30.days.or..
more.often.if.necessary
To remove:
Open.the.inlet.grille.by.pulling.downward.on.the.tabs.
at.the.top.upper.corners.of.the.inlet.grille.until.the.
grille.is.in.a.45º.position.Remove.the.filter
Clean.the.filter.with.warm,.soapy.water.Rinse.and.let.
the.filter.dry.before.replacing.it.Do.not.clean.the.filter.
in.a.dishwasher
CAUTION:
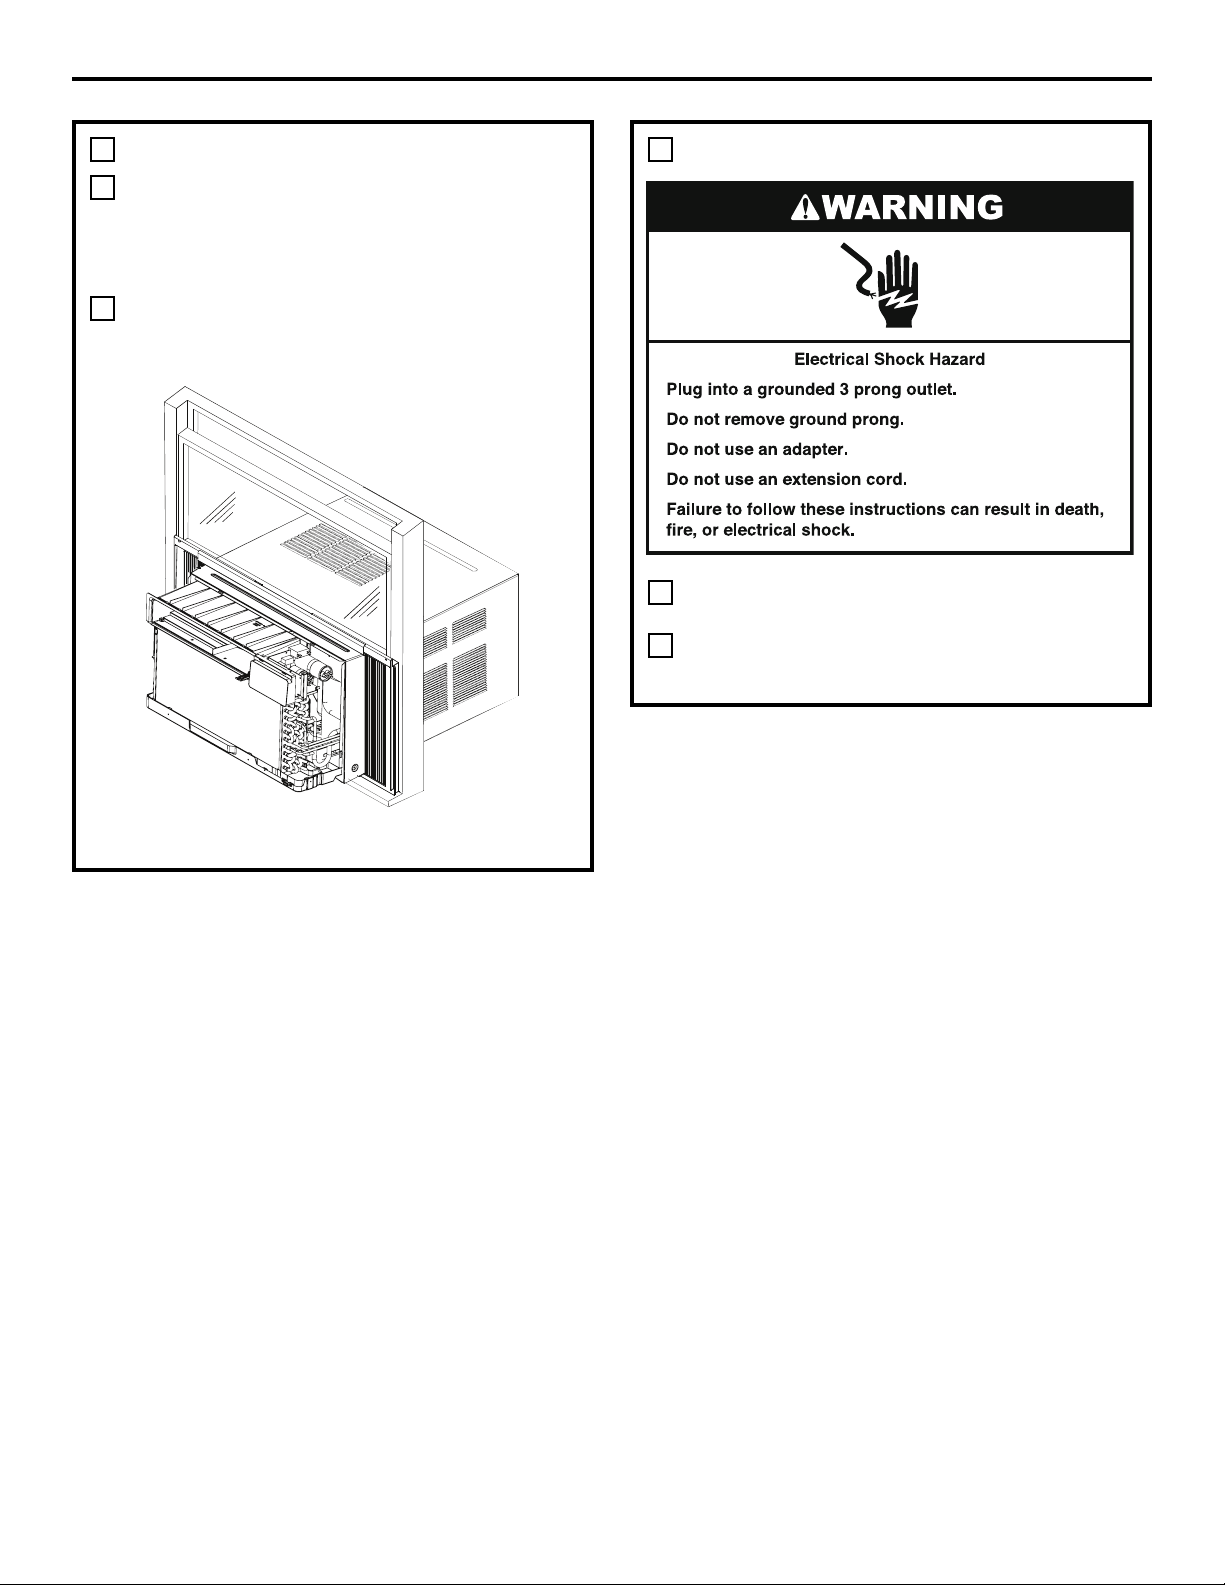
1
...Remove.the.battery.cover.by.twisting.it.
according.to.the.arrow.direction..A.coin.can.be.
used.to.twist.the.cover
2
...Insert.new.battery,.making.sure.that.the.(+).and.
(–).of.battery.are.installed.correctly
3
...Reattach.the.cover.by.twisting.it.back.
into.position
NOTES:
n Use.one.CR.2025.(3V).Lithium.battery
n Remove.the.battery.from.the.remote.control.if.the.
system.is.not.going.to.be.used.for.a.long.time
How to Insert the Battery in the Remote Control
Read.these.instructions.completely..
and.carefully
•
. .—.Save.these.instructions.
for.local.inspector’s.use
•
.
.—.Observe.all.governing.
codes.and.ordinances
•.
–.Be.sure.to.leave.these.
instructions.with.the.Consumer
•. .–.Keep.these.instructions.for.
future.reference
•. .–.Installation.of.this.appliance.requires.
basic.mechanical.skills
•. .–.
.Approximately.1.hour
•. .We.recommend.that.two.people.install..
this.product
•. .Proper.installation.is.the.responsibility..
of.the.installer
•. .Product.failure.due.to.improper.installation.is.not.
covered.under.the.Warranty
•. .You.MUST.use.all.supplied.parts.and.use.proper.
installation.procedures.as.described.in.these.
instructions.when.installing.this.air.conditioner
. . ..
..Some.models.require.a.115/120-volt.AC,
60-Hz.grounded.outlet.protected.with.a.
15-amp.time-delay.fuse.or.circuit.breaker
The.3-prong.grounding.plug.minimizes.the.
possibility.of.electric.shock.hazard.If.the.wall.outlet.
you.plan.to.use.is.only.a.2-prong.outlet,.it.is.your.
responsibility.to.have.it.replaced.with.a.properly.
grounded.3-prong.wall.outlet
..Some.models.require.230/208-volt.AC,.
protected.with.a.time-delay.fuse.or.circuit.
breaker.These.models.should.be.installed.on.
their.own.single.branch.circuit.for.best.
performance.and.to.prevent.overloading.
house.or.apartment.wiring.circuits,.which.
could.cause.a.possible.fire.hazard.from.
overheating.wires
Do.not,.under.any.circumstances,.cut.or.remove.
the.third.(ground).prong.from.the.power.cord
Do.not.change.the.plug.on.the.power.cord..
of.this.air.conditioner
Aluminum.house.wiring.may.present.special.
problems—consult.a.qualified.electrician
7
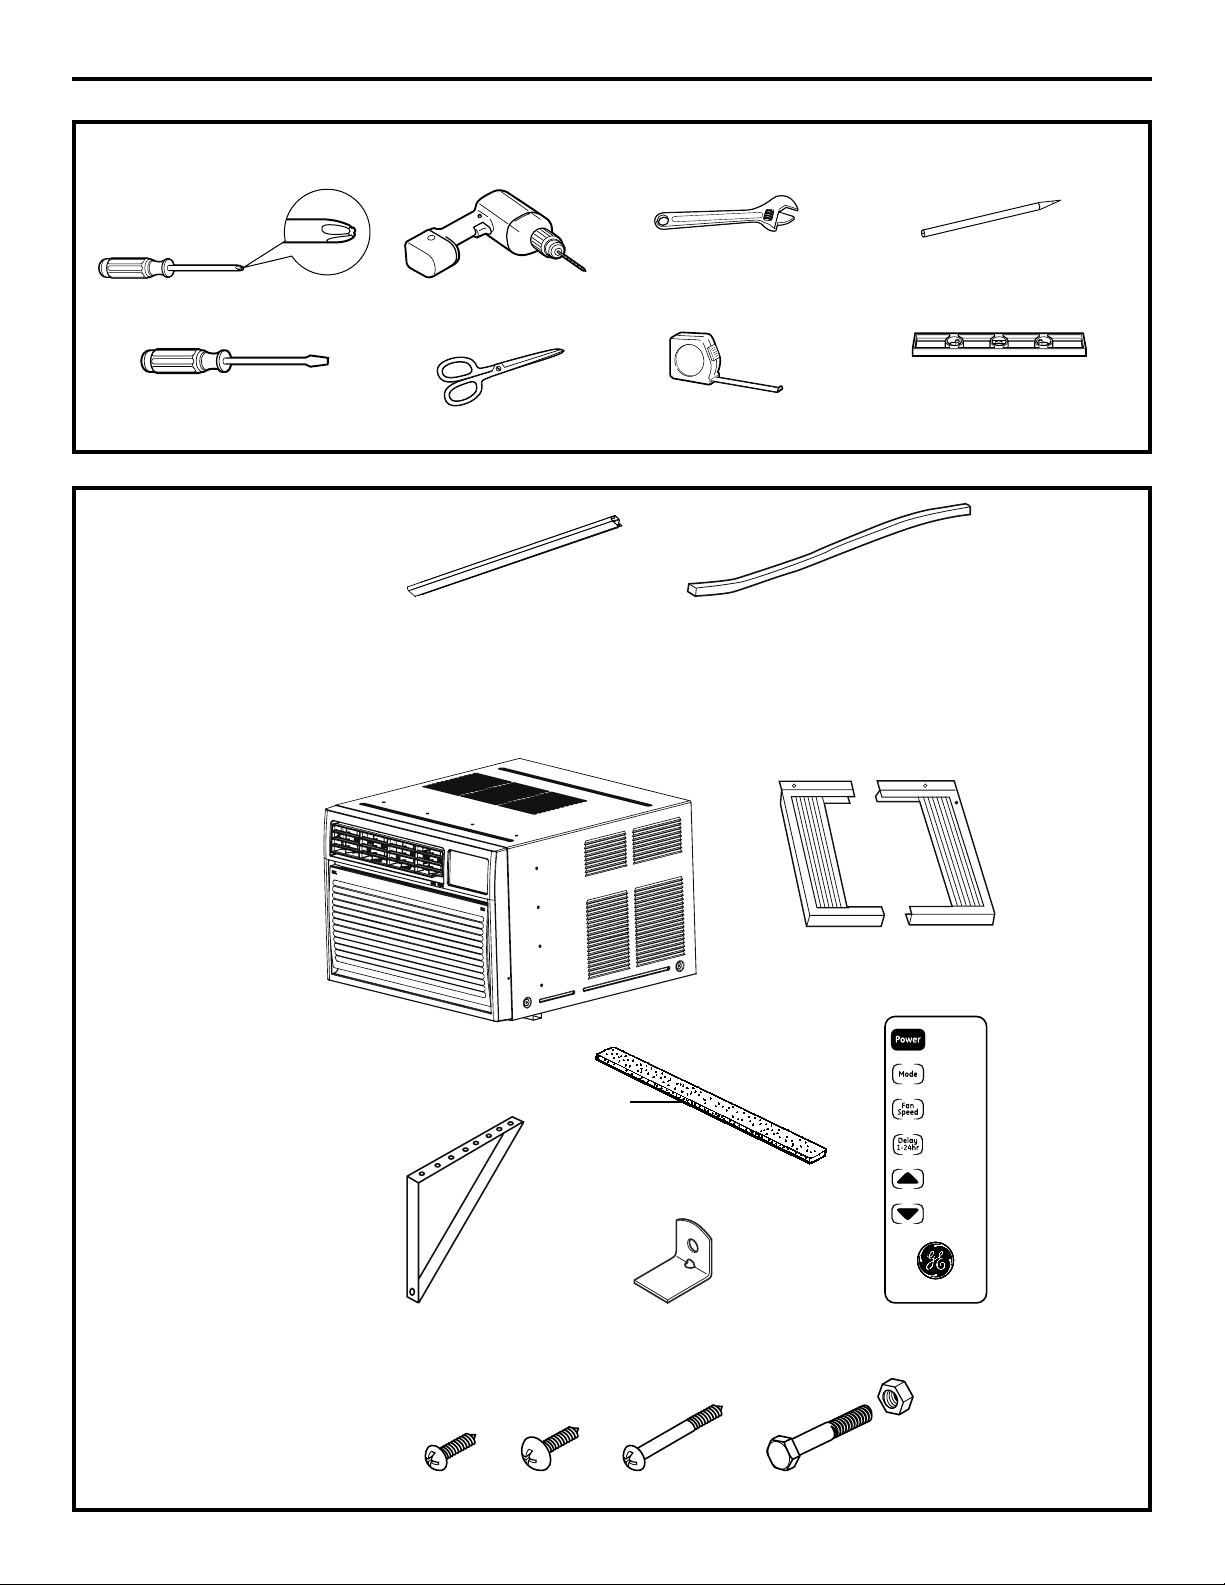
Ruler.or.tape.measurePencil
Level
Scissors.or.knife
..Power.cord.includes.a.current.interrupter.device.A.
test.and.reset.button.is.provided.on.the.plug.case.The.
device.should.be.tested.on.a.periodic.basis.by.first.
pressing.the.TEST.button.and.then.the.RESET.button.
while.plugged.into.the.outlet.If.the.TEST.button.does.
not.trip.or.if.the.RESET.button.will.not.stay.engaged,.
discontinue.use.of.the.air.conditioner.and.contact.a.
qualified.service.technician
Phillips.head.screwdriver
Flat-blade.screwdriver
Drill.with.1/8”.bit
Adjustable.Wrench
8
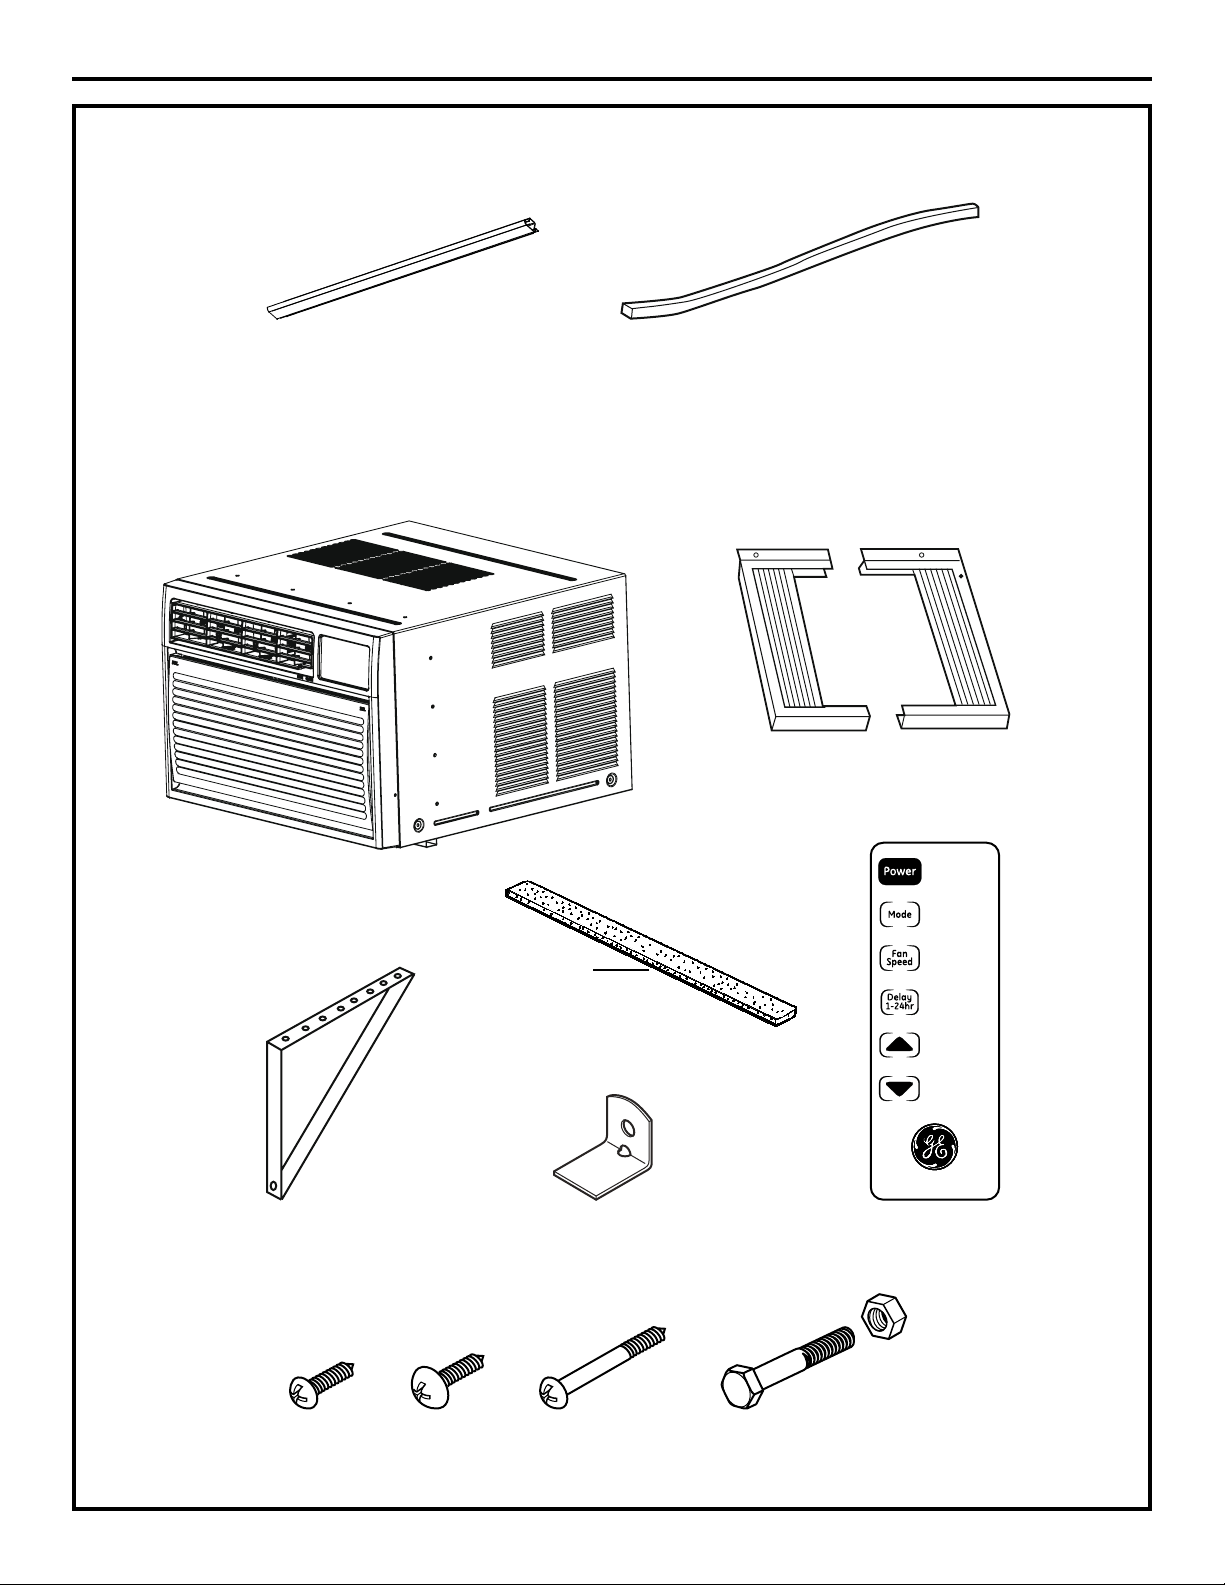
13/32”.
Screws.(12)
Installation.Bracket.(2) Window.Lock.Bracket Remote.Control
Top.Mounting.Rail
Left.and.Right.Side.
Curtains
Foam.Seal
13/32”.
Screws.(6)
31/32”.
Screws.(8)
2-1/2”.Flat.Head.Bolt.
and.Lock.Nut.(2)
A B C D
Temp / Delay
Bottom.Seal
..
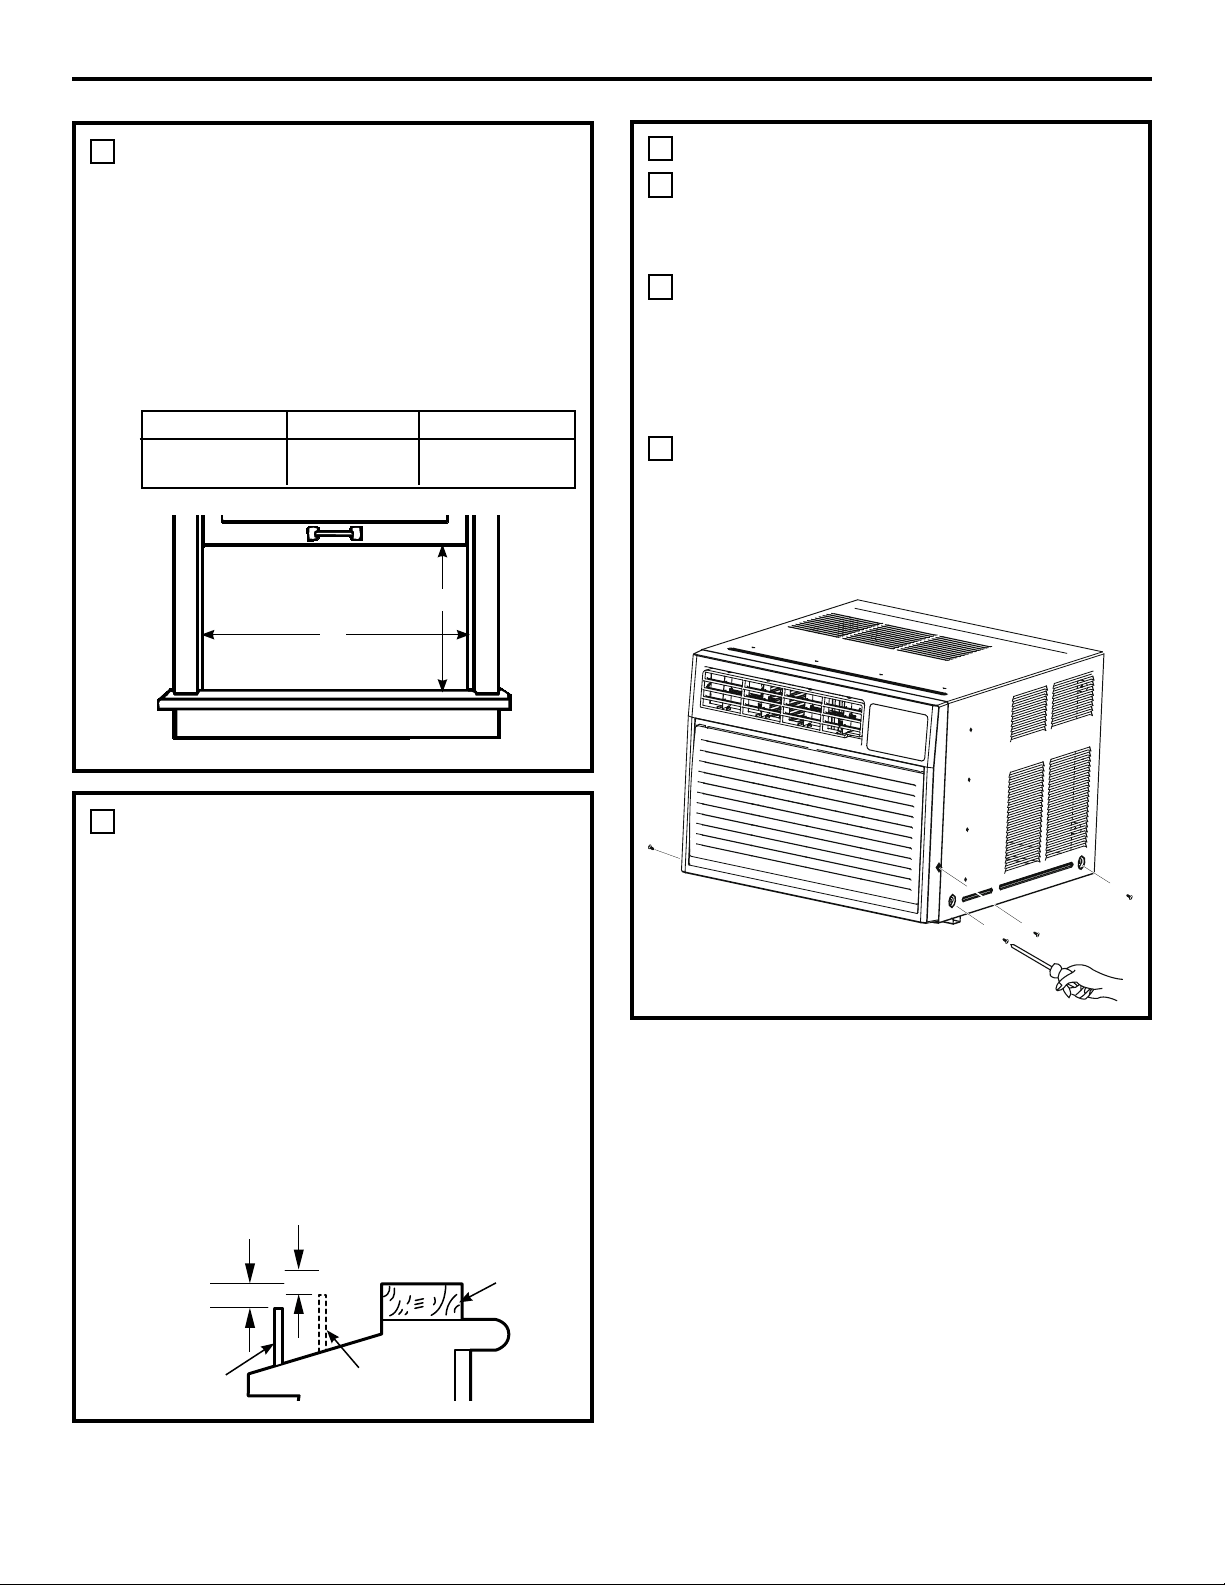
Remove.three.screws.on.each.side.of.the.case.
Save.the.screws.for.use.later
Insert.a.flat.head.screw.driver.between.the.
front.grille.and.the.metal.case.along.the.sides.
Gently.pry.the.grille.from.the.case.NOTE:.Cover.
the.flat.head.screw.driver.with.tape.to.prevent.
scratching.the.case
Using.the.handle.on.the.bottom.front.of.the.air.
conditioner,.pull.the.air.conditioner.out.of.the.
case.The.air.conditioner.is.very.heavy.so.make.
sure.that.it.will.be.resting.on.a.sturdy.surface
3
A
B
C
•..These.instructions.are.for.a.standard.double-hung.
window.You.will.need.to.modify.them.for.other.types.
of.windows
•..The.air.conditioner.can.be.installed.without.the.
side.curtain.panels.if.needed.to.fit.in.a.narrow.
window.See.the.window.opening.dimensions
•..All.supporting.parts.must.be.secured.
to.firm.wood,.masonry.or.metal
•..The.electrical.outlet.must.be.within.reach.of.the.
power.cord
•..Follow.the.dimensions.in.the.table.and.illustration.
for.your.model
AHH18DP. 17.13/8″ min. 28.3/8″–.38″
AHM18DP.
A.storm.window.frame.will.not.allow.the.air.
conditioner.to.tilt.toward.the.outside,.and.will.keep.it.
from.draining.properly..
To.adjust.for.this,.attach.a.piece.of.wood.to.the.sill
″
Long.enough.to.fit.inside.the.window.
frame
To.determine.the.thickness,.place.a.
piece.of.wood.on.the.sill.to.make.it.1/2″.higher.
than.the.top.of.the.storm.window.frame.or.the.vinyl.
frame
Attach.securely.with.nails.or.screws.provided.by.the.
installer
(With.side.curtain.panels)
1/2″ higher
than.storm.
window.
frame
Storm.window.
frame
Wood
Sill
1/2″ higher
than.vinyl.frame..
(on.some.windows)
Vinyl.frame
9
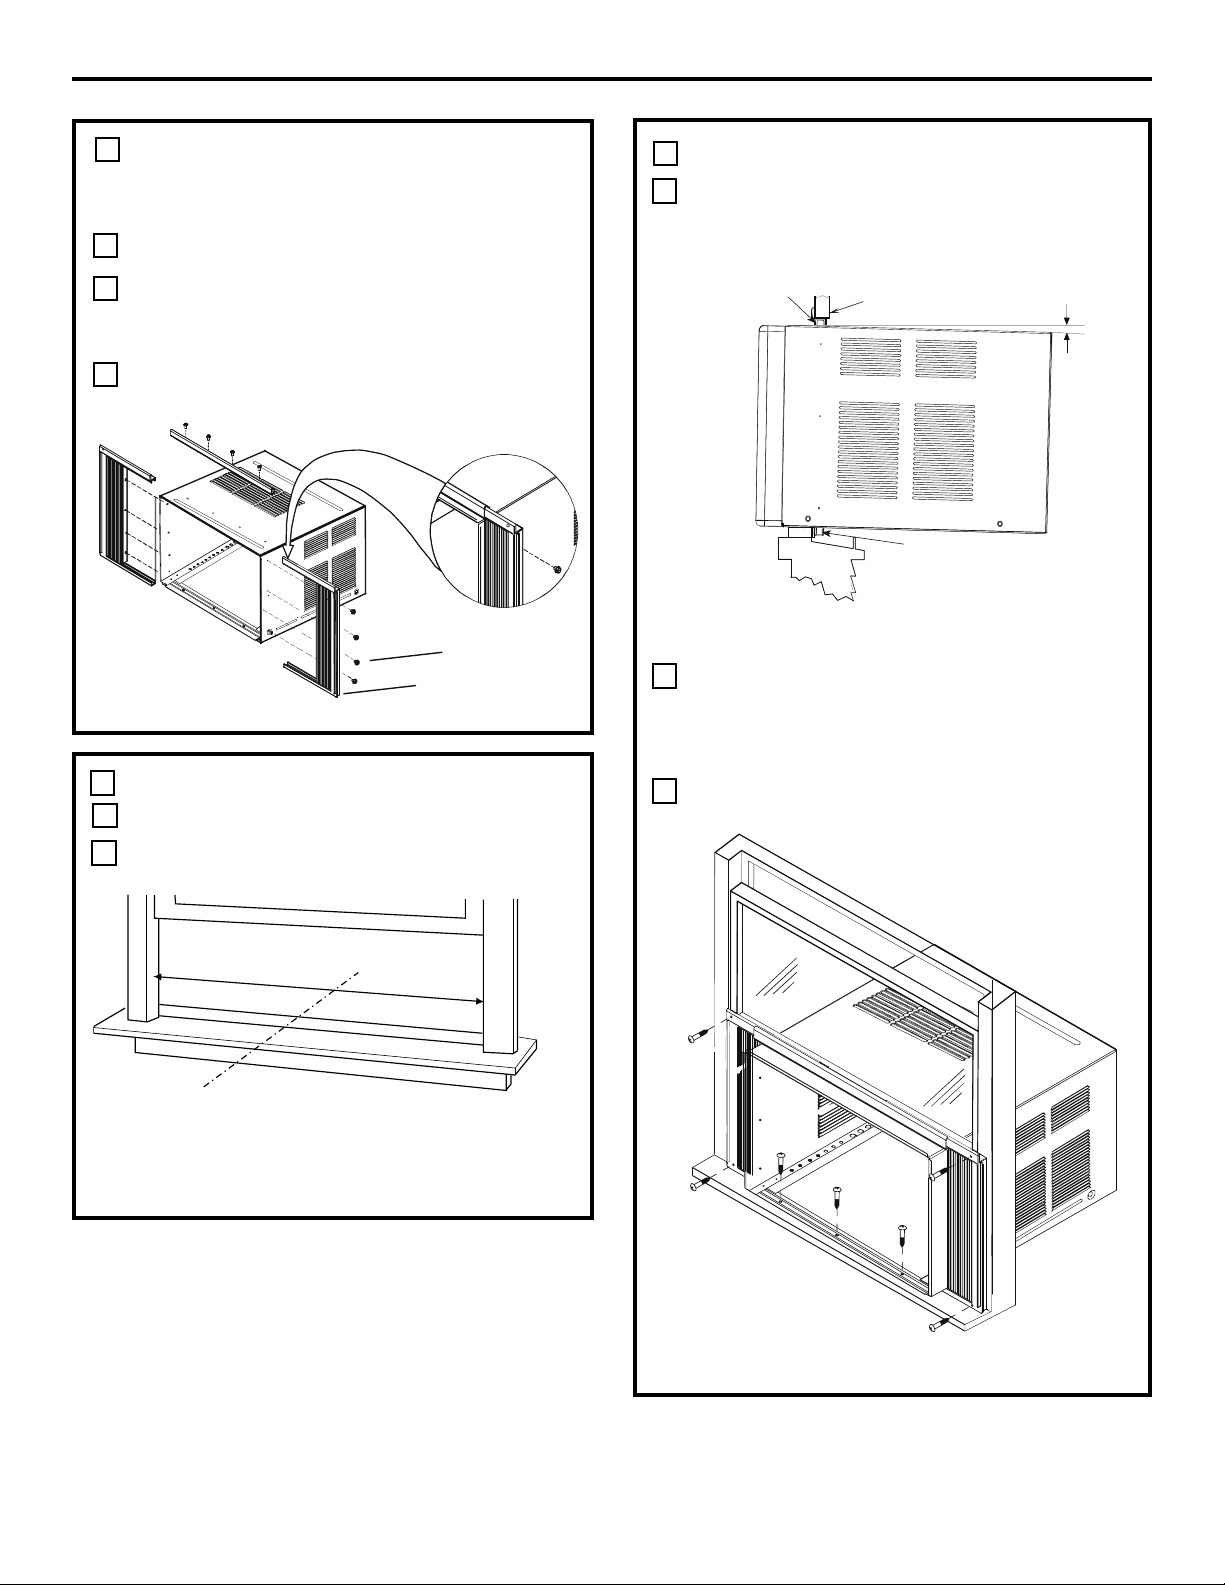
10
..
NOTE:.Attach.curtains.to.the.air.conditioner.before.
placing.the.air.conditioner.in.the.window
Install.top.mounting.rail.with.four.type.A.screws
Slide.left-hand.curtain.assembly.into.left.end.of.
top.and.bottom.mounting.rail.Repeat.for.right.
hand.curtain.assembly
Fasten.curtain.retainer.strips.to.the.sides.of.the.
outer.case.with.four.type.A.screws.on.each.side
4
A
C
B
C
D
..
Measure.the.width.of.the.window.opening.
Mark.the.center.line.on.the.inside.windowsill
5
B
A
B
A
A. Width of window opening
B. Center line
.....
Place.outer.case.in.window.Lower.sash.until.it.
rests.behind.front.flange.of.top.mounting.rail.
Bottom.mounting.rail.must.rest.behind.window.
sill
Expand.the.curtain.panels.to.fill.the.window.
Secure.with.type.C.wood.screw.in.top.and.bottom.
corners.If.needed,.use.drill.and.1/8”.bit.to.drill.pilot.
holes.for.the.screws
Use.three.type.C.screws.to.secure.the.case.to.the.
window.sill.Drill.pilot.holes.if.necessary
B
C
A
Bottom rail
Top rail
Window sash
SILL
About
5˚
5
11
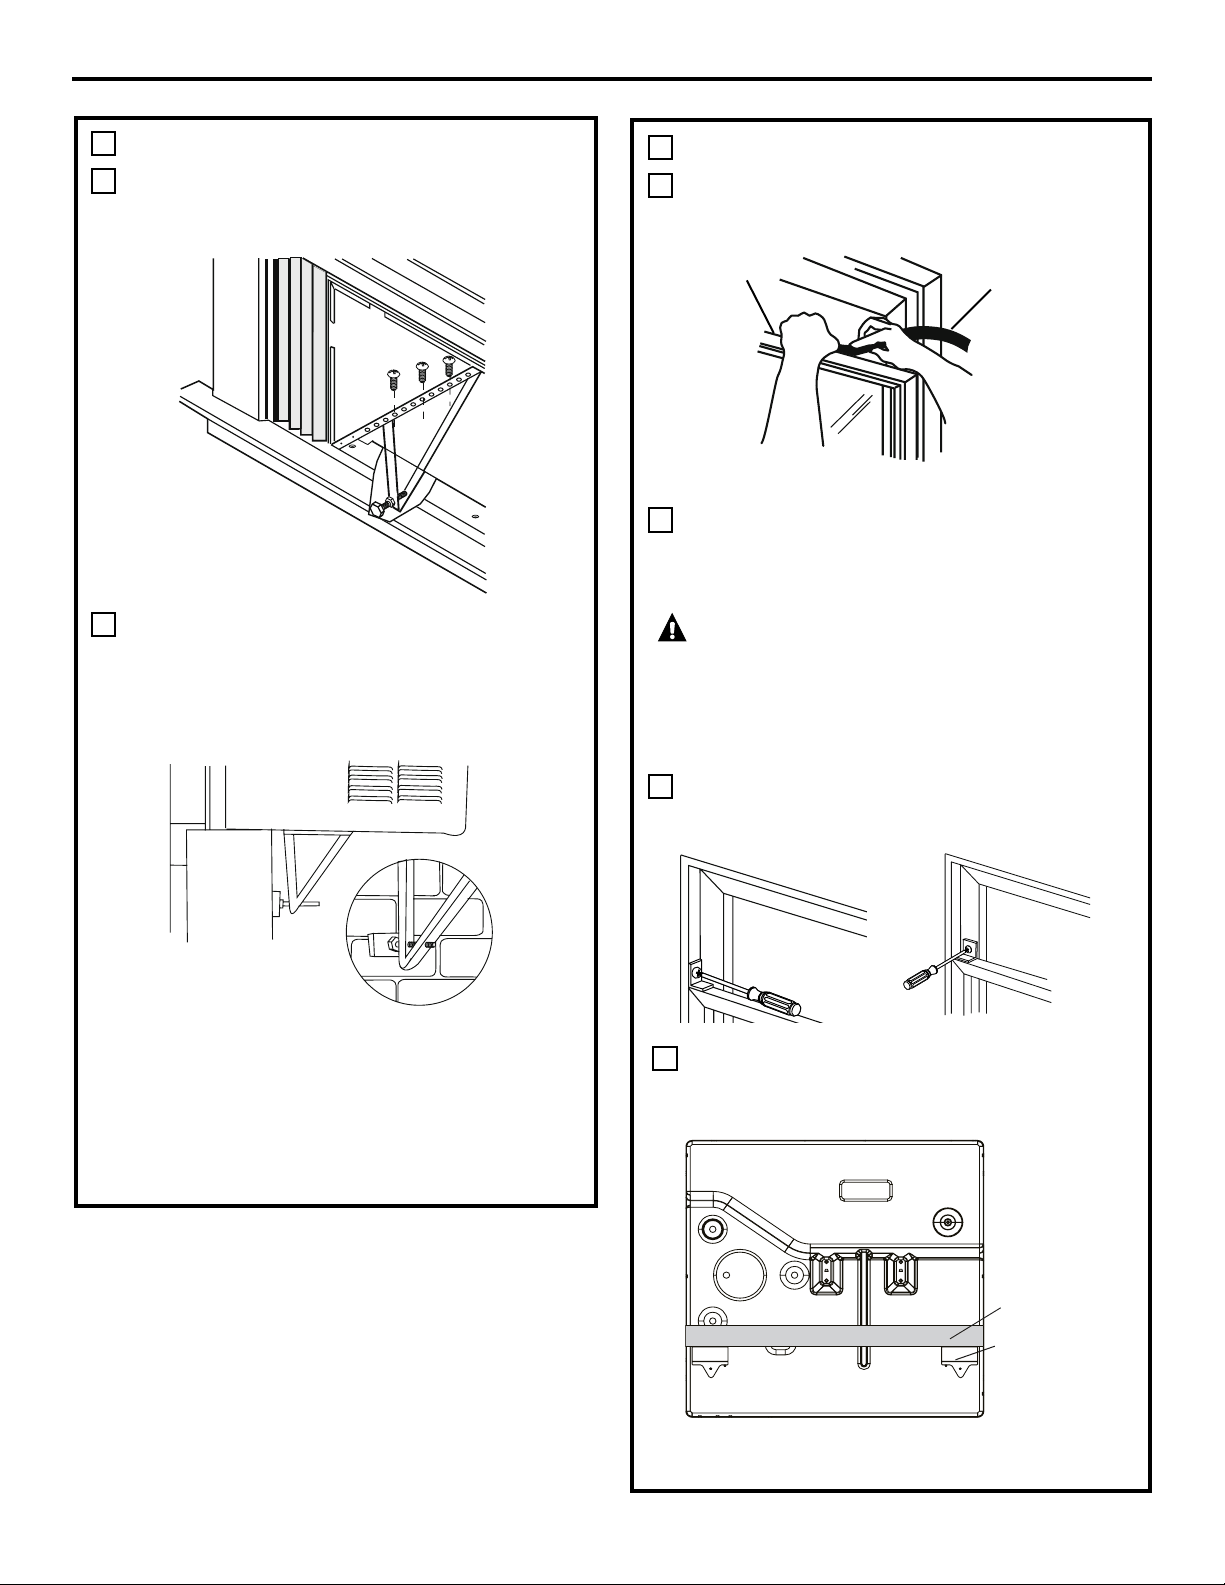
..
Thread.nut.onto.bolt,.then.thread.the.bolt.into.
the.triangle.bracket.as.shown.in.the.figure.
below.
Attach.triangle.bracket.onto.bottom.of.case.
using.three.type.B.screws.for.each.bracket.
Make.sure.that.the.bracket.is.close.enough.to.
the.outside.wall.that.the.bolt.can.touch.Adjust.
bolt.so.that.it.is.snug.against.the.outside.wall
NOTE:..A.block.of.wood.can.be.placed.between.
the.bolt..and.the.outside.wall.if.the.bolt.rests.
between.studs
D
E
5
6
..
Insert.the.foam.seal.behind.the.top.of.the.lower.
window.sash.and.against.the.glass.of.the.upper.
window.
Place.the.window.lock.bracket.as.shown.Use.
a.1/8”.drill.bit.to.drill.a.starter.hole.through.the.
hole.in.the.window.lock.bracket.and.into.the.
upper.window
Attach.the.window.lock.bracket.to.the.upper.
window.with.a.type.C.screw.to.secure.the.
window.in.place
Remove.backing.on.bottom.seal..Place.seal,.
adhesive.side.down,.on.the.bottom.of.the.air.
conditioner.behind.the.bottom.mounting.rail
.
To.prevent.broken.glass.or.damage.to.windows,.
on.vinyl.or.other.similarly.constructed.windows,.
attach.the.window.locking.bracket.to.the.
window.side.jamb.with.one.type.B.screw
A
B
C
Vinyl
Wood
A
B
A.Top.of.lower.window.sash
B.Foam.seal
D
Front
Bottom.Seal
Bottom.mounting.
rail
12
7
..
Once.the.case.is.securely.attached.to.the.
window,.reinstall.the.air.conditioner.Have.two.
people.lift.the.air.conditioner.and.slide.it.into.the.
case
Snap.the.front.grille..back.onto.the.air.
conditioner.Use.the.screws.removed.at.the.
beginning.of.the.installation.to.secure.the.grille
7
..
Plug.into.a.grounded.3-prong.outlet
Press.RESET.on.the.power.supply.cord.See.
A
C
D
B
13
.
Troubleshooting Tips..
Problem Possible Causes What To Do
Air conditioner . •.Make.sure.the.air.conditioner.plug.is.pushed
does not start . . completely.into.the.outlet
. . •.Check.the.house.fuse/circuit.breaker.box.and.replace
. . . the.fuse.or.reset.the.breaker
. . •The.unit.will.automatically.restart.in.the.settings.last.
. . . used.after.the.power.is.restored
. . •There.is.a.protective.time.delay.(approximately... .
. . . 3.minutes).to.prevent.tripping.of.the.compressor.. .
. . . overload.For.this.reason,.the.unit.may.not.start.. .
. . . normal.cooling.for.3.minutes.after.it.is.turned.... .
. . . back.on
. . •Press.the.RESET.button.located.on.the.power.cord.plug
.
. •If.the.RESET.button.will.not.stay.engaged,.discontinue.
. . . use.of.the.air.conditioner.and.contact.a.qualified..
. . . service.technician
. •.Make.sure.there.are.no.curtains,.blinds.or.furniture
. . . blocking.the.front.of.the.air.conditioner
. . •.In.the.Cool.mode,.press.the.Decrease.pad
.
. . •.Clean.the.filter.at.least.every.30.days
. . . See.the..section
. . •.When.the.air.conditioner.is.first.turned.on,.you.need.
. . . to.allow.time.for.the.room.to.cool.down
. . •.Check.for.open.furnace.registers.and.cold.air.returns
. . •See.“Air.conditioner.freezing.up”.below
. •.Set.the.controls.at.High Fan.or.High Cool and.set.the.
. . thermostat.to.a.higher.temperature
.
. •.Check.the.position.of.the.battery.They.should.be.
. . inserted.in.the.opposite.(+).and.(–).direction
. . •.Replace.the.battery
. •.This.is.normal
. •.For.proper.water.disposal,.make.sure.the.air.conditioner
. . . slants.slightly.from.the.case.front.to.the.rear
. •.This.is.normal.for.a.short.period.in.areas.with.little
. . humidity;.normal.for.a.longer.period.in.very.humid.areas
Normal Operating Sounds
n You.may.hear.a.pinging.noise.caused.by.
water.being.picked.up.and.thrown.against.the.
condenser.on.rainy.days.or.when.the.humidity..
is.high.This.design.feature.helps.remove.
moisture.and.improve.efficiency
n You.may.hear.the.thermostat.click.when.the.
compressor.cycles.on.and.off
n Water.will.collect.in.the.base.pan.during
high.humidity.or.on.rainy.days.The.water.
may.overflow.and.drip.from.the.outdoor.side.
of.the.unit
n The.fan.may.run.even.when.the.compressor.
does.not

14
Note
15
GE Air Conditioner—One-Year Limited Warranty.
(For customers in the U.S.A.)
For The Period Of: GE Will Replace:
One Year Any part.of.the.air.conditioner.which.fails.due.to.a.defect.in.materials.or.workmanship.
From.the.date.of.the. During.this.limited one-year warranty,.GE.will.also.provide,.free of charge,.all.labor.and.related
original.purchase. service.to.replace.the.defective.part
n
n
n
n
n
n
n
n
n
What Is Not Covered:
Warrantor: General Electric Company. Louisville, KY 40225
EXCLUSION OF IMPLIED WARRANTIES—Your sole and exclusive remedy is product repair as provided in
this Limited Warranty. Any implied warranties, including the implied warranties of merchantability or
fitness for a particular purpose, are limited to one year or the shortest period allowed by law.
16
Consumer Support.
GE Appliances Website
In the U.S.A.: GEAppliances.com
Have.a.question.or.need.assistance.with.your.appliance?.Try.the.GE.Appliances.Website.24.hours.a.day,..
any.day.of.the.year!.For.greater.convenience.and.faster.service,.you.can.now.download.Owner’s.Manuals,..
or.even.order.parts.on-line.
Real Life Design Studio In the U.S.A.: GEAppliances.com
GE.supports.the.Universal.Design.concept—products,.services.and.environments.that.can.be.used.by..
people.of.all.ages,.sizes.and.capabilities.We.recognize.the.need.to.design.for.a.wide.range.of.physical..
and.mental.abilities.and.impairments.For.details.of.GE’s.Universal.Design.applications,.including.kitchen.design.
ideas.for.people.with.disabilities,.check.out.our.Website.today.For.the.hearing.impaired,.please.call.800TDD
GEAC.(8008334322).
contact:. .Manager,.Consumer.Relations,.Mabe.Canada.Inc.
Suite.310,.1.Factory.Lane.
Moncton,.NB.E1C.9M3
Parts and Accessories In the U.S.A.: GEAppliances.com
Individuals.qualified.to.service.their.own.appliances.can.have.parts.or.accessories.sent.directly.to.their.homes.
(VISA,.MasterCard.and.Discover.cards.are.accepted).Order.on-line.today,.24.hours.every.day.or..
by.phone.at.8006262002.during.normal.business.hours
Instructions contained in this manual cover procedures to be performed by any user. GE does not support
any servicing of the air conditioner. We strongly recommend that you do not attempt to service the air
conditioner yourself.
Customers.in..should.consult.the.yellow.pages.for.the.nearest.Mabe.service.center,.
or.call.18005613344
Contact Us In the U.S.A.: GEAppliances.com
If.you.are.not.satisfied.with.the.service.you.receive.from.GE,.contact.us.on.our.Website.with.all.the.details.
including.your.phone.number,.or.write.to:.. .General.Manager,.Customer.Relations.
GE.Appliances,.Appliance.Park.
Louisville,.KY.40225
.or.write.to:. .Director,.Consumer.Relations,.Mabe.Canada.Inc
Suite.310,.1.Factory.Lane.
Moncton,.NB.E1C.9M3
. 2,.3
Controles. 4
Bobinas.Exteriores. 5
Filtro.de.Aire. 5
. 6–10
. 11
Sonidos.Normales.de.
Funcionamiento.. 11
Garantía.para.Clientes.en.EEUU. 13
Soporte.al.Cliente. 14
Manual del Propietario e
Instrucciones de Instalación
Escriba los números de modelo y de serie
aquí:
Nº de Modelo _____________________
Nº de Serie _______________________
Estos.números.se.encuentran.en.una.
etiqueta.al.costado.del.acondicionador.de.
aire
GEAppliances.com
..0010536027. 49-7698 12-11 GE
AHH18*
AHM18*
Como socio de EnErgy Star
GE ha confirmado que este
producto cumple las directrices
de EnErgy Star
relativas al
rendimiento energético.
Producto.etiquetado.EnErgy Star

2
INFORMACIÓN IMPORTANTE DE SEGURIDAD.
LEA TODAS LAS INSTRUCCIONES ANTES DE USAR.
¡ADVERTENCIA!
Por.su.seguridad,.se.debe.seguir.la.información.en.este.manual.para.minimizar.el.riesgo.de.
incendios,.descargas.eléctricas.o.lesiones.personales
n Use.este.electrodoméstico.solamente.para.
el.propósito.determinado.según.se.describe.
en.el.Manual.del.propietario
n Este.acondicionador.de.aire.debe.instalarse.
correctamente.de.acuerdo.con.las.
Instrucciones.de.instalación.antes.de.su.uso.
n Nunca.desenchufe.su.acondicionador.de.
aire.tirando.del.cable.eléctrico.Siempre.
agarre.firmemente.el.enchufe.y.tire.de..
él.directamente.hacia.afuera
n Reemplace.inmediatamente.todos.los.
cables.eléctricos.que.se.hayan.pelado.o.que.
se.hayan.dañado.de.alguna.otra.manera..
Un.cable.de.corriente.dañado.no.debe.
repararse,.sino.que.debe.ser.sustituido.por.
uno.nuevo.que.se.adquiera.del.fabricante.
No.use.un.cable.eléctrico.que.muestre.
evidencias.de.deterioro,.o.daños.de.
abrasión.en.su.superficie.en.alguno.de.sus.
extremos
n Apague.la.unidad.y.desenchufe.su.
acondicionador.de.aire.antes.de.limpiar
n GE.no.está.no.apoya.que.se.le.proporcione.
ningún.servicio.al.acondicionador.de.aire.
Vehementemente.recomendamos.que..
usted.no.intente.proporcionar.servicio.al.
acondicionador.de.aire.usted.mismo.
n Por.su.seguridad…no.almacene.ni.use.
materiales.combustibles,.gasolina.u.
otros.vapores.o.líquidos.inflamables.
en.la.proximidad.de.éste.o.algún.otro.
electrodoméstico
n Todos.los.acondicionadores.de.aire.
contiene.refrigerantes,.los.que.por.Ley.
Federal.deben.ser.removidos.antes.de.
desecharlos.Si.usted.planea.deshacerse.de.
algún.producto.que.contenga.refrigerantes,.
póngase.en.contacto.con.la.compañía.que..
se.encarga.de.recoger.su.basura.para.que..
le.indiquen.qué.hacer
n Si.el.receptáculo.no.coincide.con.el.enchufe,.
un.electricista.calificado.debe.reemplazar.el.
receptáculo
n Estos.sistemas.de.acondicionadores.de.
aire.R410A.requieren.que.los.contratistas.
y.técnicos.usen.herramientas,.equipos.y.
estándares.de.seguridad.aprobados.para..
su.uso.con.este.refrigerante.NO.use.
equipamiento.certificado.sólo.para.
refrigerante.R22
PRECAUCIONES DE SEGURIDAD
Bajo.ninguna.circunstancia,.corte.o.remueva.la.
tercera.púa.(tierra).del.cable.eléctrico.En.pos..
de.la.seguridad.personal,.este.electrodoméstico..
debe.siempre.conectarse.a.tierra
NO use un enchufe adaptador con este
electrodoméstico.
El.cable.eléctrico.de.este.electrodoméstico.está.
equipado.con.un.enchufe.de.tres.púas.(tierra).
que.combina.con.un.tomacorriente.estándar.
de.tres.tomas.de.pared.para.minimizar.la.
posibilidad.de.una.descarga.eléctrica
El.cable.de.alimentación.incluye.un..
dispositivo.para.interrupción.de.corriente..
Se.incluye.un.botón.de.prueba.y.de.reinicio..
en.el.dispositivo.El.dispositivo.debe.ponerse..
a.prueba.periódicamente:.primero.se.presiona.
el.botón.de.TEST (prueba) y.luego.RESET
(reinicio).mientras.se.encuentra.enchufado.al.
tomacorriente.Si.el.botón TEST.no.se.dispara.
o.si.el.botón.RESET.no.queda.enganchado,.
deje.de.utilizar.el.acondicionador.de.aire.y.
comuníquese.con.un.técnico.calificado
Pida.a.un.técnico.que.inspeccione.el.
tomacorriente.y.el.circuito.para.cerciorarse..
de.que.el.tomacorriente.está.conectado.a..
tierra.de.la.manera.apropiada
Donde.exista.un.tomacorriente.de.dos..
tomas,.es.su.responsabilidad.y.obligación.
personal.hacer.que.dicho.tomacorriente..
sea.reemplazado.por.uno.de.tres.tomas..
con.conexión.a.tierra
El.acondicionador.de.aire.debería.siempre.estar.
conectado.a.un.tomacorriente.individual.con.su.
circuito.de.voltaje.correspondiente
Esto.proporciona.el.mayor.rendimiento.y.
además.evita.que.los.circuitos.del.resto.de..
la.casa.se.sobrecarguen,.lo.cual.podría.causar.
incendios.por.el.sobrecalentamiento.del.
cableado
Ver.las.Instrucciones.de.instalación,.en.la.
sección.Requisitos Eléctricos.para.los.requisitos.
específicos.de.conexión
CÓMO CONECTAR LA ELECTRICIDAD

3
GEAppliances.com
¡ADVERTENCIA!
USO DE PROLONGADORES
LEA Y SIGA ESTA INFORMACIÓN DE SEGURIDAD CUIDADOSAMENTE.
GUARDE ESTAS INSTRUCCIONES
RIESGO DE INCENDIO. Podría ocasionar
lesiones graves o la muerte.
•..NO use un prolongador con este
Acondicionador de Aire de Ventana.
•..NO use protectores contra picos de corriente ni
adaptadores para múltiples tomacorrientes con
este Acondicionador de Aire de Ventana.
4
.Tecla de Encendido
Enciende.y.apaga.el.acondicionador.de.aire.
Al.ser.encendido,.la.pantalla.mostrará.la.
temperatura.ambiente
.Pantalla
Muestra.la.temperatura.ambiente.o.el.tiempo.
restante.en.el.Temporizador.de.Retraso.
Muestra.la.temperatura.Configurada.mientras.
configura.la.temperatura.en.los.modos.Cool.
(Fresco).o.Energy.Saver.(Ahorro.de.Energía).La.
luz.de.Configuración.se.encenderá.mientras.se.
esté.realizando.la.configuración
Teclas de Incremento
▲.
/Reducción
▼
de Temperatura y Retraso
Usado.para.ajustar.la.temperatura.cuando..
se.encuentre.en.el.modo.Cool (Frío) o.Energy
Saver (Ahorro de energía).La.luz.de.Ajuste.se.
encenderá.durante.la.configuración
Tecla de Modo
Usado.para.ajustar.el.acondicionador.de.aire..
al.modo.Cool (Frío) o Energy Saver (Ahorro de
energía).
Teclas de Velocidad del Ventilador
En.modo.Cool (Frío) o.Energy Saver (Ahorro de
energía):
Use.las.mismas.para.configurar.la.velocidad.del.
ventilador.en..,.o.
.en.la.unidad
En.modo.Teclas de Fan Speed (Velocidad del
ventilador):
Use.las.mismas.para.configurar.la.velocidad.del.
ventilador.en..,.o.
.en.la.unidad
.Tecla de Retraso
Delay ON (Retraso Encendido)—Cuando.el.
acondicionador.de.aire.se.encuentre.apagado,.
se.podrá.configurar.para.que.se.encienda.
automáticamente.en.un.período.de.entre.1.
y.24.horas.en.el.modo.y.configuraciones.del.
ventilador.previas
Delay OFF (Retraso del Apagado)—Cuando.el.
acondicionador.de.aire.se.encuentre.encendido,.
se.podrá.configurar.automáticamente.para.que.
se.apague.en.un.período.de.entre.1.y.24.horas
Cómo configurar:
Presione.la.tecla.Delay.1–24hr.(Retraso.entre.1.
y.24.hrs).en.la.unidad.o.en.el.control.remoto.
Cada.vez.que.presione.las.teclas.Increase.
(Incrementar).▲./.Decrease.(Reducir)▼.de.la.
unidad.o.las.teclas.Increase.(Incrementar).+.
/.Decrease.(Reducir).–.del.control.remoto.se.
ajustará.el.temporizador.por.intervalos.de.1.
hora
Para.revisar.el.tiempo.restante.en.el.
temporizador.de.Delay.1–24hr.(Retraso.entre.1.
y.24.hrs),.presione.la.tecla.Delay.1–24hr.(Retraso.
entre.1.y.24.hrs).de.la.unidad.o.del.control.
remoto.Use.las.teclas.Increase.(Incrementar).▲/.
Decrease.(Reducir).▼.de.la.unidad.o.las.teclas.
Increase.(Incrementar).+./.Decrease.(Reducir).–.
del.control.remoto.para.configurar.un.tiempo.
nuevo.si.así.lo.desea
Para cancelar el temporizador,.presione.la.tecla.
reducir ▼.en.la.unidad.o.en.el.control.remoto,.
hasta.que.el.tiempo.configurado.sea.cero.Luego.
de.3.segundos,.la.luz.de.la.tecla.Delay 1-24 hour
(Retraso de 1 a 24 horas) se.apaga
Acerca de los controles en el acondicionador de aire
Controles
Las funciones y la apariencia podrán variar.
Las luces junto a las teclas táctiles del panel de control del acondicionador de aire indican las configuraciones
seleccionadas.
Temp / Delay
La.pantalla.siempre.muestra.la.
temperatura.del.ambiente,.excepto.al.
ajustar.las.funciones.de.Temperatura.
Configurada.o.el.Temporizador.de.
Retraso
Controles del Acondicionador de Aire
Control Remoto
Encendido/.
apagado.de.la.
Unidad
Selección.de.
modo
Velocidad.del.
ventilador
Retraso.de.1.a.
24.hrs
Incremento.
y.Reducción.
de..la.
Configuración.
de.
Temperatura/.
Temporizador.
de.Retraso
5
GEAppliances.com
n Para.garantizar.una.operación.apropiada,.oriente.
el.control.remoto.hacia.el.receptor.de.señal.del.
acondicionador.de.aire
n El.receptor.de.señal.tiene.un.rango.máximo.de.20.
pies
n Cerciórese.de.que.no.haya.nada.entre.el.
acondicionador.de.aire.y.el.control.remoto.que.
pueda.bloquear.la.señal
n Cerciórese.de.que.las.baterías.sean.frescas.y.se.
instalen.correctamente.según.se.indica.en.el.
control.remoto
Control remoto
Modo Cool (Frío)
Use.el.modo Cool (Frío) a.Low (Bajo), Med (Medio),
High (Alto) o Auto Fan Speed (Velocidad de
ventilador automática) para.enfriar.Use.las.teclas.
de Temperature (Temperatura) Aumento ▲ (+)
/ Reducción ▼ (–) para.ajustar.a.la.temperatura.
deseada.entre.64ºF.y.86ºF.en.incrementos.de.1ºF
Se.usa.un.termostato.electrónico.para.mantener..
la.temperatura.ambiente.El.compresor.hará..
ciclo.entre.apagado.y.encendido.para.mantener..
la.habitación.a.la.temperatura.deseada.Ajuste.el.
termostato.a.un.número.menor.y.el.aire.interno..
se.enfriará.más.Si.lo.ajusta.a.un.número.mayor,..
la.temperatura.del.aire.interno.se.calentará.más
NOTA:.si.el.acondicionador.de.aire.está.apagado.
y.se.enciende.mientras.está.configurado.en.un.
ajuste.Cool (Frío) o.si.se.cambia.de.un.ajuste.de.
ventilador.a.uno.de.Cool (Frío), puede.que.pasen.
aproximadamente.unos.3.minutos.hasta.que.el.
compresor.arranque.y.comience.el.enfriamiento.
Descripciones de enfriamiento
Para enfriamiento normal—Seleccione.el.modo.
Cool (Frío).y.ventilador.High (Alto) o.Med (Medio)
con.una.temperatura.de.ajuste.media
Para enfriamiento máximo—Seleccione.el.modo.
Cool (Frío) y.ventilador.High (Alto).con.una.
temperatura.de.ajuste.menor
Para enfriamiento silencioso y enfriamiento
nocturno—Seleccione.el.modo.Cool (Frío) y.ventilador.
Low (Bajo).con.una.temperatura.de.ajuste.media
Modo de Fan Only (Solo ventilador)
Use.el.modo.Fan.only.(Solo.ventilador).a.velocidad.
Low.(Baja),.Med.(Media).o.High.(Alta).para.
proporcionar.circulación.de.aire.y.filtración..
sin.enfriamiento.Debido.a.que.los.niveles..
de.ventilador.únicamente.no.proporcionan.
enfriamiento,.no.se.puede.introducir.una.
temperatura.Definida.Aparecerá.en..
pantalla.la.temperatura.ambiente
NOTA: la.Velocidad.de.ventilador.automática.no.
puede.utilizarse.en.el.modo.Fan only (Solo ventilador)
.
Energy Saver Mode (Modo de ahorro de energía)
Controla.el.ventilador
ON (ENCENDIDO)—El.ventilador.hará.un.ciclo.
de.encendido.y.apagado.con.el.compresor.Este.
resulta.en.variaciones.mayores.en.la.temperatura..
de.la.habitación.y.en.la.humedad.Normalmente.
usado.cuando.la.habitación.no.está.ocupada.
NOTA: puede.que.el.ventilador.siga.funcionando.
durante.un.corto.tiempo.después.de.desactivarse.el.
ciclo.del.compresor
OFF (APAGADO)—El.ventilador.funciona.todo.el.
tiempo,.mientras.que.el.compresor.pasa.por.los.
ciclos.de.encendido.y.apagado
Indique.la.opción.en.Velocidad.de.ventilador.
automática.para.definir.automáticamente.la.
velocidad.necesaria.para.proporcionar.una.
configuración.de.comodidad.óptima.con.la.
temperatura.elegida
Si.la.habitación.necesita.más.enfriamiento,..
la.velocidad.del.ventilador.aumentará.
automáticamente.Si.la.habitación.necesita..
menos.enfriamiento,.la.velocidad.del.ventilador.
descenderá.automáticamente
NOTA: la.Velocidad.de.ventilador.automática.
no.puede.utilizarse.en.el.modo.Fan only (Solo
ventilador).
Velocidad de ventilador automática
No use en las condiciones externas debajo
el punto de congelación
Este.acondicionador.de.aire.no.es.diseñado.para.
usar.en.temperaturas.externas.debajo.el.punto.de.
congelación.No.use.en.las.condiciones.externas.
debajo.el.punto.de.congelación
6
Cuidado y limpieza del acondicionador de aire.
Dirección del aire
Use.la.palanca.para.ajustar.la.dirección.del.aire.hacia.
la.izquierda,.derecha,.arriba.y.abajo
Información importante adicionale.
Bobinas para exteriores
Se.deben.inspeccionar.con.frecuencia.las.bobinas.
en.el.lado.exterior.del.acondicionador.de.aire.Si.
las.mismas.están.obstruidas.con.suciedad.u.hollín,.
podrían.limpiarse.profesionalmente
Acerca de los controles en el acondicionador de aire.
Apague.el.acondicionador.de.aire.y.retire.el.enchufe.
del.tomacorriente.de.la.pared.antes..
de.limpiar.
Para.limpiar,.use.agua.y.un.detergente.suave..
No.use.cloro.o.materiales.abrasivos
Rejilla y caja
1
...Retire.la.cubierta.de.la.pila.deslizándola.
de.acuerdo.con.la.dirección.de.la.flecha
2
...Inserte.pilas.nuevas.cerciorándose.de.que.los.
polos.positivos.(+).y.negativos.(–).están.
orientados.correctamente
3
...Coloque.la.cubierta.otra.vez.deslizándola.
en.su.lugar
NOTAS:
n..Use.2.pilas.alcalinas.“AAA”.de.1,5.voltios.
No.use.pilas.recargables
n..Retire.las.pilas.del.control.remoto.si.no.va.
a.usar.el.sistema.por.un.período.prolongado
Cómo insertar las pilas en el control remoto
Filtro de aire
El.filtro.de.aire.detrás.de.la.rejilla.frontal.debe.
inspeccionarse.y.limpiarse.por.lo.menos.cada..
30.días.o.más.a.menudo.si.fuese.necesario
Para retirarlo:
Abra.la.rejilla.de.entrada.empujando.hacia.abajo..
las.lengüetas.en.las.esquinas.superiores.de.la.rejilla.
de.entrada,.hasta.que.la.rejilla.se.encuentre.en.una.
posición.de.45º.Retire.el.filtro
Limpie.el.filtro.con.agua.tibia.y.jabón.Enjuáguelo.y.
permita.que.se.seque.antes.de.colocarlo.otra.vez.en.
su.lugar.No.lave.el.filtro.en.un.lavavajillas
PRECAUCIÓN:.NO.OPERE.el.
acondicionador.de.aire.sin.el.filtro.debido.a.que.la.
suciedad.y.las.pelusas.lo.obstruirán.y.reducirán.su.
rendimiento

7
.
..Algunos.modelos.requieren.tomacorrientes.de.
115/120.voltios.de.corriente.alterna.y.60.Hz.
conectados.a.tierra,.protegidos.con.un.fusible.
de.dilatación.de.tiempo.de.15.amperios..
o.un.cortacircuitos
El.enchufe.de.tres.púas.con.conexión.a.tierra.
minimiza.la.posibilidad.de.descargas.eléctricas.Si.
el.tomacorriente.de.la.pared.que.usted.planea.usar.
solamente.tiene.2.tomas,.es.su.responsabilidad.hacer.
que.un.técnico.lo.reemplace.por.uno.de.tres.tomas.
con.conexión.a.tierra
..Algunos.modelos.requieren.230/208.voltios,.
de.corriente.alterna,.protegidos.por.un.fusible.
de.dilatación.de.tiempo..
o.un.cortacircuitos.Estos.modelos.deberían.
instalarse.en.un.ramal.exclusivo.del.circuito.
para.un.rendimiento.más.notable.y.para.
prevenir.sobrecargas.en.los.circuitos.de.
cableados.de.su.casa.o.apartamento,..
lo.cual.podría.representar.un.riesgo..
de.incendio.por.el.sobrecalentamiento.de.los.
alambres
Bajo.ninguna.circunstancia.corte.o.remueva.la.
tercera.púa.(conexión.a.tierra).del.cable.eléctrico
No.cambie.el.enchufe.en.el.cable.eléctrico..
de.este.acondicionador.de.aire
Los.cables.caseros.de.aluminio.podrían.presentar.
problemas.especiales.Consulte..
a.un.técnico.electricista.calificado
Lea.estas.instrucciones.completa.y.
cuidadosamente
.—.Guarde.estas.
instrucciones.para.uso.del.inspector.local
.—.Observe.todos.los.
códigos.y.órdenes.de.ley
.–.Asegúrese.de.dejar.estas.
instrucciones.con.el.consumidor
..–.Conserve.estas.
instrucciones.para.referencia.futura
..–.La.instalación.de.este.
aparato.requiere.de.destrezas.mecánicas.
básicas
.–.
.Aprox.1.hora
.Recomendamos.dos.personas.para.
la.instalación.de.este.producto
.La.instalación.apropiada.es.la.responsabilidad.
del.instalador
.La.falla.del.producto.debido.a.una.instalación.
inadecuada.no.está.cubierta..
por.la.garantía
.Cuando.instale.este.acondicionador.
de.aire,.DEBE.usar.todas.las.piezas.
suministradas.y.usar.procedimientos.adecuados.
de.instalación
El.cable.de.alimentación.incluye.un.dispositivo.para.
interrupción.de.corriente.Se.incluye.un.botón.de.prueba.
y.de.reinicio.en.el.dispositivo.El.dispositivo.debe.ponerse.
a.prueba.periódicamente:.primero.se.presiona.el.botón.
de..y.luego..mientras.se.
encuentra.enchufado.al.tomacorriente.Si.el.botón.
no.se.dispara.o.si.el.botón.no.queda.enganchado,.
deje.de.utilizar.el.acondicionador.de.aire.y.comuníquese.
con.un.técnico.calificado
Un.destornillador.de.estrella
Una.regla.o.cinta.métrica
. Lápiz
Nivel
Tijeras.o.cuchilla
Un.destornillador..
con.hoja.plana
8
Temp / Delay
Taladro.y.broca.de.1/8”
Llave.francesa
Riel.de.montaje.superior Sellador.de.Gomaespuma
Cortinas.Izquierda.y.Derecha
Soporte.de.Instalación.(2)
Soporte.de.Bloqueo.para.Ventana
Control.Remoto
A.Tornillos.de.
13/32”.(12)
B.Tornillos.de.
13/32”.(6)
C.Tornillos.de.
31/32”.(8)
D.Tornillo.de.Cabeza.Plana.
de.2-1/2”.y.Tuerca.de.
Bloqueo.(2)
Sellado.
inferior
..
Un.marco.de.ventana.de.tormentas.no.permitirá.que.
el.acondicionador.de.aire.se.incline.hacia.el.exterior.y.
evitará.que.drene.apropiadamente.Para.solucionar.este.
problema,.adhiera.un.pedazo.de.madera.a.el.umbral
.2″
.Lo.suficientemente.largo.como.para.
ajustar.en.el.interior.del.marco.de.la.ventana
.Para.determinar.el.grueso,.coloque.un.pedazo.
de.madera.en.el.umbral.para.hacerla.1/2″.más.alta.que.
la.parte.superior.del.marco.de.la.ventana.de.tormentas.
o.del.marco.vinilo
Péguelo.firmemente.con.clavos.o.con.tornillos.
proporcionados.por.el.instalador
1/2″ más.alto.
que.el.marco.
de.ventana.de.
tormentas
Marco.de.
ventana.de.
tormentas
Umbral
1/2″ mas.alto.que.el.marco.
vinilo.(en.algunas.ventanas)
Marco.vinilo
Madera
9
Estas.instrucciones.son.para.una.
ventana.estándar.de.dos.pliegues..
Usted.necesitará.modificar.el.proceso.para.otros.
tipos.de.ventanas
Todas.las.partes.de.apoyo.deben.quedar.totalmente.
aseguradas.a.algún.metal,.mampostería.o.a.la.
madera
El.tomacorriente.eléctrico.debe.estar.al.alcance.del.cable.
eléctrico.del.acondicionador.de.aire
Siga.las.dimensiones.de.la.tabla.y.la.ilustración.según.su.
modelo
AHH18DP. 17.13/8″ min. 28.3/8″–.38″
AHM18DP.
(Con.paneles.de.cortina.lateral)
..
Retire.los.tres.tornillos.que.se.encuentran.a.
cada.lado.de.la.caja.Guarde.los.mismos.para.
su.uso.posterior
Inserte.un.tornillo.de.cabeza.plana.entre.la.
parrilla.frontal.y.la.caja.de.metal.sobre.los.
costados.Suavemente.levante.la.parrilla.de.la.
caja.NOTA:.Cubra.el.destornillador.de.cabeza.
plana.con.cinta,.a.fin.de.evitar.rayones.sobre.la.
caja
Utilizando.la.manija.en.la.parte.frontal.
inferior.del.acondicionador.de.aire,.empuje.el.
acondicionador.de.aire.hacia.afuera.de.la.caja.
El.acondicionador.de.aire.es.muy.pesado;.por.
lo.tanto,.asegúrese.de.que.sea.apoyado.sobre.
una.superficie.sólida
3
A
B
C

10
..
NOTA:.Coloque.las.cortinas.en.el.acondicionador.
de.aire.antes.de.colocar.el.acondicionador.de.aire.
en.la.ventana
Instale.el.riel.de.montaje.superior.con.cuatro.
tornillos.tipo.A
Deslice.la.junta.de.la.cortina.del.lado.izquierdo.
en.el.extremo.izquierdo.de.los.rieles.de.montaje.
superior.e.inferior.
Coloque.las.tiras.de.retención.de.la.cortina.sobre.
los.costados.de.la.caja.externa.con.cuatro.tornillos.
tipo.A.en.cada.lado
4
A
C
B
C
D
..
Mida.el.ancho.de.apertura.de.la.ventana.
Marque.la.línea.central.en.la.parte.inferior.del.
alféizar.de.la.ventana
5
B
A
B
A
A. Width of window opening
B. Center line
.....
Coloque.la.caja.exterior.en.la.ventana.Baje.
el.marco.hasta.que.se.apoye.detrás.de.la.
pestaña.frontal.del.riel.de.montaje.superior.El.
riel.de.montaje.inferior.se.deberá.apoyar.detrás.
del.alféizar.de.la.ventana
Expanda.los.paneles.de.la.cortina.hasta.cubrir.la.
ventana.Asegure.estos.con.un.tornillo.de.madera.
tipo.C.en.los.ángulos.superior.e.inferior.Si.es.
necesario,.use.un.taladro.y.una.broca.de.1/8”.
para.taladrar.agujeros.piloto.para.los.tornillos
Use.tornillos.tipo.C.para.asegurar.la.caja.sobre.el.
alféizar.Taladre.agujeros.piloto.si.es.necesario
B
C
A
Bottom rail
Top rail
Window sash
SILL
About
5˚
5
A.Ancho.de.apertura.de.la.ventana.
B.Línea.central
Riel.superior
Marco.de.la.ventana
Aproximad-
amente.5º
Riel.inferior
ALFÉIZAR
..
Enrosque.la.tuerca.en.el.tornillo;.luego.enrosque.
el.tornillo.en.el.soporte.triangular,.como.se.
muestra.en.la.figura.más.abajo.
Adhiera.el.soporte.triangular.a.la.parte.inferior.
de.la.caja,.usando.tres.tornillos.tipo.B.para.
cada.soporte.Asegúrese.de.que.el.soporte.se.
encuentre.lo.suficientemente.cerca.de.la.pared.
exterior.de.modo.que.tenga.contacto.con.el.
tornillo.Ajuste.el.tornillo.de.manera.que.se.
ajuste.contra.la.pared.exterior
NOTA:.Se.puede.colocar.un.bloque.de.madera.
entre.el.tornillo.y.la.pared.exterior,.si.el.tornillo.se.
encuentra.entre.montajes
D
E
5
6
..
Inserte.el.sello.de.gomaespuma.detrás.de.la.
parte.superior.del.marco.de.la.ventana.y.contra.
el.vidrio.de.la.ventana.superior
Coloque.el.soporte.de.bloqueo.de.la.ventana.
como.se.muestra.Use.una.broca.de.1/8”.para.
taladrar.un.agujero.inicial.a.través.del.agujero.
del.soporte.de.bloqueo.de.la.ventana.y.en.la.
ventana.superior
Adhiera.el.soporte.de.bloqueo.de.la.ventana.a.
la.ventana.superior.con.un.tornillo.tipo.C,.a.fin.
de.asegurar.la.ventana.en.su.posición
Retire.el.apoyo.del.sellado.indrior..Coloque.el.
lado.adhesivo.del.sellador.hacia.abajo,.en.la.
parte.inferior.del.acondicionador.de.aire,.detrás.
del.riel.de.montaje.inferior
.
Para.evitar.la.rotura.de.vidrios.o.daños.sobre.las.
ventanas,.en.ventanas.de.vinilo.u.otras.
ventanas.construidas.de.forma.similar,.adhiera.
el.soporte.de.bloqueo.de.la.ventana.a.la.jamba.
lateral.de.la.ventana.con.un.tornillo.tipo.B
A
B
C
Vinilol
Madera
A
B
A.Parte.superior.del.marco.inferior.de.la.ventana
B.Sellador.de.gomaespuma
D
Frente
Sellado.inferior
Riel.de.montaje.
inferior
11

12
7
..
Una.vez.que.la.caja.se.haya.asegurado.a.la.
ventana,.vuelva.a.instalar.el.acondicionador.de.
aire.Asegúrese.de.que.dos.personas.levanten.
el.acondicionador.de.aire.y.que.lo.deslicen.en.la.
caja
Presione.la.parrilla.frontal.nuevamente.sobre.el.
acondicionador.de.aire.Use.los.tornillos.retirados.
al.comenzar.la.instalación,.para.asegurar.la.
parrilla
7
..
Enchufe.en.un.tomacorriente.de.3.patas.con.
conexión.a.tierra
Presione.RESET.(Reiniciar).en.el.cable.de.
suministro.de.corriente.Consulte.Requisitos.
Eléctricos
A
C
D
B
.
Solucionar problemas..
Problema Causas posibles Qué hacer
El.acondicionador.de.aire. El.acondicionador.de.aire.. •..Cerciórese.de.que.el.acondicionador.de.aire.está..
no.enciende. está.desconectado. . .enchufado.totalmente.en.el.tomacorriente
. El.fusible.se.disparó./... •..Inspeccione.los.fusibles./.caja.de.interruptores.de.la.casa..
. el.cortacircuitos.se.disparó. . .y.reemplace.cualquier.fusible.o.reajuste.el.interruptor
. Interrupción.en.el.. •..La.unidad.se.reiniciará.automáticamente.con.la.configuración..
. suministro.eléctrico. . .utilizada.por.última.vez.luego.de.reestablecer.la.electricidad.
. . •..Existe.un.retraso.de.tiempo.por.protección.(de.aproximadamente... .
. . . .3.minutos).para.evitar.la.desconexión.por.sobrecarga.del.compresor...
. . Por.esta.razón,.es.posible.que.la.unidad.no.comience.a.enfriar.de.. .
. . . .forma.normal.hasta.transcurridos.3.minutos.desde.que.volvió.a.. .
. . . .encenderse
. El.dispositivo.de.interrupción. •..Presione.el.botón.RESET.ubicado.en.el.cable.de.alimentación
.
de.corriente.se.ha.activado
. •..Si.el.botón.RESET.no.se.mantiene.en.su.lugar,.no.utilice.más.
. . . .el.acondicionador.de.aire.y.comuníquese.con.un.técnico.calificado
El.acondicionador.de.aire. El.flujo.de.aire.está.restringido. •..Cerciórese.de.que.no.existe.ninguna.cortina,.persiana.o..
no.enfría.como.debería. . . .mueble.bloqueando.el.frente.del.acondicionador.de.aire
. El.filtro.de.aire.está.sucio. •..Limpie.el.filtro.cada.30.días.por.lo.menos.Ver.la.sección..
. . . .de.
Cuidado.y.limpieza
. La.habitación.podría.haber.. •..Cuando.el.acondicionador.de.aire.se.enciende,.usted..
. estado.caliente. . .necesita.darle.tiempo.para.que.enfrié.la.habitación
. El.aire.frío.se.está.escapando. •..Cerciórese.de.que.los.registros.de.la.calefacción.no.están..
. . . .abiertos.y.se.encuentran.retornando.el.aire.frío
. Las.bobinas.de.enfriamiento. •..Ver.“El.acondicionador.de.aire.se.está.congelando”.más.adelante.
. se.congelaron
El.acondicionador.de.aire. El.hielo.bloquea.el.flujo.. •..Colo.que.los.controles.en.High.Fan.(Ventilador.Alto).ó.High.Cool.(Frío..
se.está.congelando. de.aire.hacia.el.acondicionador.. . .Alto).y.ajuste.el.termostato.a.una.temperature.más.alta.
. de.aire.evitando.que.se.enfríe. . ..
. la.habitación
Hay.agua.goteando.afuera. Tiempo.húmedo.y.caliente.. •..Esto.es.normal
Hay.agua.goteando.en.el. El.acondicionador.de.aire.. •..Para.drenar.el.agua.apropiadamente,.cercíorese.de.que..
interior.de.la.habitación. no.está.inclinado.hacia.afuera. . .el.acondicionador.de.aire.está.inclinado.ligeramente..
. . . .desde.el.frente.hacia.atrás
Se.acumula.agua.en.. La.humedad.removida.del.aire.. •..Esto.es.normal.por.un.corto.período.en.áreas.con.poca..
la.bandeja. y.se.drena.hasta.la.bandeja. . .humedad;.normal.por.un.período.de.tiempo.más.postergado..
. . . .en.áreas.más.húmedas
Sonidos de operación normales
n Quizás.escuche.un.sonido.metálico.causado.por.
el.agua.tomada.y.tirada.contra.el.condensador..
en.los.días.lluviosos.o.cuando.la.humedad.
es.alta.Esta.característica.de.diseño.ayuda.a.
remover..
la.humedad.y.mejora.la.eficiencia
n Quizás.escuche.que.el.termostato.hace.clic.
cuando.el.compresor.hace.ciclo.entre.encendido.
y.apagado
n El.agua.se.acumula.en.la.bandeja.durante.días.
lluviosos.o.con.mucha.humedad.El.agua.podría.
derramarse.y.gotear.desde.el.lado.externo.de..
la.unidad
n El.ventilador.podría.funcionar.aun.si.el.compresor.
no.lo.hace
13
14
Garantía de su acondicionador de aire—garantía limitada de un año.
.Por el período de: GE reemplazará:
Un año Cualquier parte del.acondicionador.de.aire.que.falle.debido.a.defectos.en.los.materiales.o.en.
A.partir.de.la.fecha.. la.fabricación.Durante.esta.garantía.limitada.de.un.año,.GE.también.proporcionará,.sin.costo..
de.la.compra.original. alguno,.toda.la.mano.de.obra.y.el.servicio.relacionado—para.reemplazar.partes.defectuosas
n
n
n
n
n
n
n
n
n
Lo que no está cubierto:
Esta garantía se extiende al comprador original y cualquier comprador posterior de productos comprados para uso
residencial dentro de Estados Unidos. Si el producto está situado en un área que no dispone de servicio por parte
de un proveedor de servicio autorizado de GE, podría tener que hacerse cargo de los costes de envío o bien
podría solicitársele que lleve el producto a una centro de servicio de GE autorizado para realizar la reparación.
En Alaska, la garantía excluye el costo de envío o las visitas de servicio a su casa.
Algunos estados no permiten la exclusión o las limitaciones de daños incidentales o consecuenciales. Esta garantía
da derechos legales específicos, y usted podría tener otros derechos que variarán de estado a estado. Para saber
cuáles son sus derechos legales, consulte a la oficina de asuntos del consumidor local o la oficina del Attorney General
en su localidad.
Garante: General Electric Company. Louisville, KY 40225
Todos los servicios de garantía los proporcionan nuestros
Centros de Reparación de Fábrica o nuestros técnicos Customer
Care
®
autorizados. Para concertar una cita de reparación,
en línea, 24 horas al día, visítenos al ge.com, o llame al 800.
GE.CARES (800.432.2737). Cuando llame para solicitar servicio,
por favor tenga a mano el número de serie y el número de
modelo.
Grape aquí su recibo.
Se requiere facilitar prueba
de la fecha de compra original
para obtener un servicio
bajo la garantía.
EXCLUSIÓN DE GARANTÍAS IMPLÍCITAS—Su único y exclusivo derecho es la reparación del producto,
tal y como se indica en esta Garantía limitada. Cualquier garantía implícita, incluyendo las garantías
implícitas de comerciabilidad o adecuación para un fin determinado, están limitadas a un año o el
período de tiempo más breve permitido por la ley.
15
Apoyo al consumidor.
Página.Web.de.GE.Appliances
. GEAppliancescom
¿Tiene.alguna.pregunta.sobre.su.electrodoméstico?.¡Pruebe.la.página.Web.de.GE.Appliances.24.horas.al.día,.
cualquier.día.del.año!.Para.mayor.conveniencia.y.servicio.más.rápido,.ya.puede.descargar.los.Manuales.de.los.
Propietarios,.pedir.piezas.o.incluso.hacer.una.cita.en.línea.para.que.vengan.a.realizar.una.reparación
Real.Life.Design.Studio.(Estudio.de.diseño.para.la.vida.real)
.GEAppliancescom
GE.apoya.el.concepto.de.Diseño.Universal—productos,.servicios.y.ambientes.que.pueden.usar.gente.de.todas.
las.edades,.tamaños.y.capacidades.Reconocemos.la.necesidad.de.diseñar.para.una.gran.gama.de.habilidades.
y.dificultades.físicas.y.mentales.Para.más.detalles.cobre.las.aplicaciones.de.GE.Diseño.Universal,.incluyendo.
ideas.de.diseño.para.la.cocina.para.personas.con.discapacidades,.mire.nuestra.página.Web.hoy.mismo.Para.
personas.con.dificultades.auditivas,.favor.de.llamar.al.800TDDGEAC.(8008334322)
Piezas.y.accesorios
. GEAppliancescom
Aquellos.individuos.con.la.calificación.necesaria.para.reparar.sus.propios.electrodomésticos.pueden..
pedir.que.se.les.manden.las.piezas.o.accesorios.directamente.a.sus.hogares.(aceptamos.las.tarjetas..
VISA,.MasterCard.y.Discover).Haga.su.pedido.en.línea.hoy,.24.horas.cada.día.o.llamar.por.teléfono..
al.8006262002.durante.horas.normales.de.oficina
Las.instrucciones.descritas.en.este.manual.cubren.los.procedimientos.a.seguir.por.cualquier.usuario.
GE.no.está.no.apoya.que.se.le.proporcione.ningún.servicio.al.acondicionador.de.aire.Vehementemente.
recomendamos.que.usted.no.intente.proporcionar.servicio.al.acondicionador.de.aire.usted.mismo.
Póngase.en.contacto.con.nosotros
. GEAppliancescom
Si.no.está.satisfecho.con.el.servicio.que.recibe.de.GE,.póngase.en.contacto.con.nosotros.en.nuestra.página.
Web.indicando.todos.los.detalles.así.como.su.número.de.teléfono.o.escríbanos.a:.
.General.Manager,.Customer.Relations.
GE.Appliances,.Appliance.Park..
Louisville,.KY.40225
Printed.in.China
Consumer Support..
GE.Appliances.Website.
In.the.USA:.GEAppliancescom
Have.a.question.or.need.assistance.with.your.appliance?.Try.the.GE.Appliances.Website.24.hours.a.day,..
any.day.of.the.year!.For.greater.convenience.and.faster.service,.you.can.now.download.Owner’s.Manuals,..
or.even.order.parts.on-line.In.Canada:.wwwGEAppliancesca
Real.Life.Design.Studio. In.the.USA:.GEAppliancescom
GE.supports.the.Universal.Design.concept—products,.services.and.environments.that.can.be.used.by..
people.of.all.ages,.sizes.and.capabilities.We.recognize.the.need.to.design.for.a.wide.range.of.physical..
and.mental.abilities.and.impairments.For.details.of.GE’s.Universal.Design.applications,.including.kitchen.design.
ideas.for.people.with.disabilities,.check.out.our.Website.today.For.the.hearing.impaired,.please.call.800TDD
GEAC.(8008334322).
In.Canada,.contact:. .Manager,.Consumer.Relations,.Mabe.Canada.Inc..
Suite.310,.1.Factory.Lane.
Moncton,.NB.E1C.9M3
Parts.and.Accessories.. In.the.USA:.GEAppliancescom
Individuals.qualified.to.service.their.own.appliances.can.have.parts.or.accessories.sent.directly.to.their.homes.
(VISA,.MasterCard.and.Discover.cards.are.accepted).Order.on-line.today,.24.hours.every.day.or..
by.phone.at.8006262002.during.normal.business.hours
Instructions.contained.in.this.manual.cover.procedures.to.be.performed.by.any.user.GE.does.not.support.any.
servicing.of.the.air.conditioner.We.strongly.recommend.that.you.do.not.attempt.to.service.the.air.conditioner.
yourself
Customers.in.Canada.should.consult.the.yellow.pages.for.the.nearest.Mabe.service.center,..
or.call.18005613344
Contact.Us. . In.the.USA:.GEAppliancescom
If.you.are.not.satisfied.with.the.service.you.receive.from.GE,.contact.us.on.our.Website.with.all.the.details.
including.your.phone.number,.or.write.to:.. .General.Manager,.Customer.Relations.
GE.Appliances,.Appliance.Park.
Louisville,.KY.40225
In.Canada:.wwwGEAppliancesca,.or.write.to:. .Director,.Consumer.Relations,.Mabe.Canada.Inc
Suite.310,.1.Factory.Lane.
Moncton,.NB.E1C.9M3

