User Manual
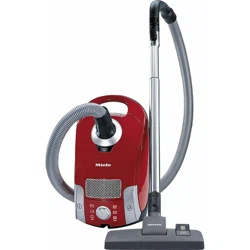
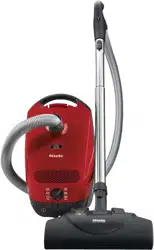
Appliance description
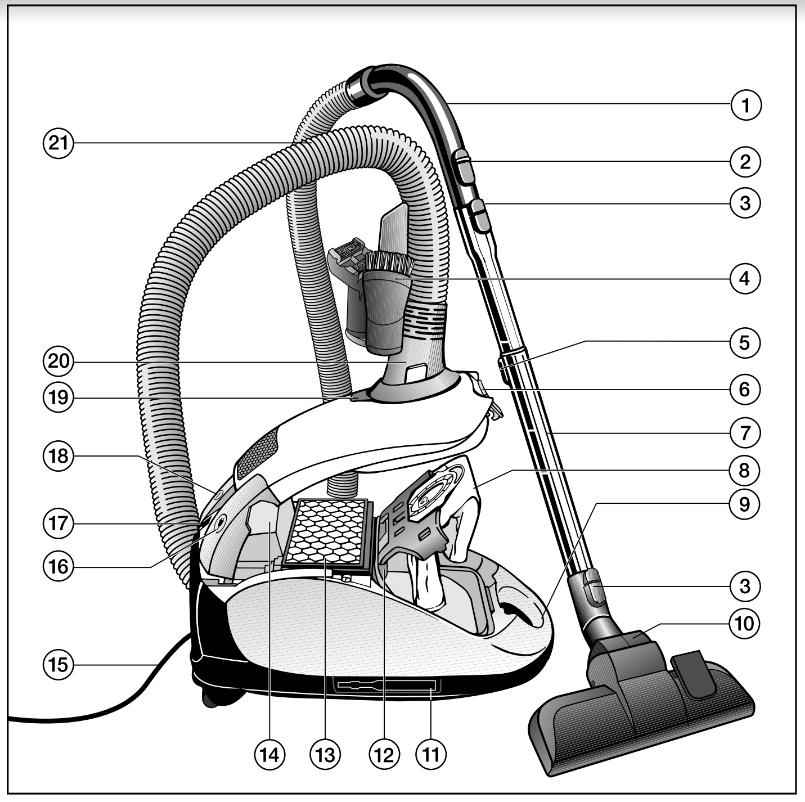
- Handle
- Air inlet valve
- Release buttons
- Accessories holder
- Telescopic suction wand release button
- Dust compartment lid release button
- Telescopic suction wand
- Original Miele filter bag
- Carrying handle
- Floorhead *
- Park system for storage
- Motor protection filter
- Original Miele exhaust filter
- Rotary selector
- Power cord
- Foot switch for automatic cord rewind
- Park system for pauses during vacuuming
- On/off
 foot switch
- Filter bag change indicator
- Connection socket
- Suction hose
*These features are model-specific and may vary or may not be available on your vacuum cleaner.
Preparing for use
Attaching the suction hose (Fig. 01)
- Insert the hose connector into the suction socket on the vacuum cleaner until it clicks into position.
Disconnecting the suction hose (Fig. 02)
- Press the release buttons at the side of the hose connector, and lift the hose from the socket.
Connect the suction hose to the han- dle (Fig. 03)
- Fit the connector at the other end of the suction hose into the handle until it clicks into position.
Connecting the handle to the wand (Fig. 04)
- Insert the handle into the wand until it clicks into position. To do this, line up the guides on the two pieces.
- To release the handle from the wand, press the release button and pull the handle out of the wand, twisting it slightly as you do so.
Adjusting the telescopic suction wand (Fig. 05)
One part of the telescopic suction wand is packed inside the other and it can be adjusted to suit your height for comfort- able vacuuming.
- Press the release button and adjust the telescopic suction wand to the re- quired length.
Connect the suction wand to the floorhead (Fig. 06)
- Push the suction wand into the floor- head and turn it clockwise or coun- terclockwise until it clicks into posi- tion.
- To separate the suction wand from the floorhead, press the release but- ton and pull the suction wand away from the floorhead, twisting it slightly as you do so.
Adjusting the floorhead (Fig. 07 + 08)
(only for models with a reversible floor- head included in the standard version)
This vacuum cleaner can be used for the everyday cleaning of carpets, rugs and hard flooring.
Miele offers a range of other floorheads, brushes and accessories for other types of flooring and special applications (see "Optional accessories").
Please always follow the flooring manufacturer's cleaning and care in- structions.
Vacuum carpets and rugs with the brush retracted:
- Press the foot switch
 .
.
Clean hard flooring which is not sus- ceptible to scratching, and flooring with gaps or deep crevices in it with the brush protruding:
- Press the foot switch
 .
.
If the suction power of the floorhead seems too high, reduce the suction until the head is easier to maneuver (see "Use - Regulating the suction power").
Activating the TimeStrip® exhaust fil- ter change indicator on the exhaust filter
Depending on the model, your vacuum cleaner will be fitted as standard with one of the following exhaust filters (Fig.09)
a AirClean
b AirClean Plus 50 (light blue)
c Active AirClean 50 (black)
d HEPA AirClean 50 (white)
If your vacuum cleaner is fitted with ex- haust filter c or d, you need to activate the TimeStrip® exhaust filter change in- dicator.
- Press the release button on the re- cessed grip and raise the dust com- partment lid as far as it will go (Fig.
- Remove the indicator strip (Fig. 11).
- Press the TimeStrip® exhaust filter change indicator (Fig. 12).
After approx. 10–15 seconds a thin red line will appear in the left-hand side of the display (Fig. 13).
- Close the dust compartment lid se- curely, making sure it clicks into posi- tion. Take care not to trap the filter bag when doing so.
How the TimeStrip® exhaust filter change indicator works
The TimeStrip® exhaust filter change indicator shows the remaining func- tional life of the exhaust filter. After ap- prox. 50 operating hours, or approx. one year of average use, the display will be completely filled with red (Fig. 14).
Using the accessories supplied (Fig. 15 + 16)
- Dusting brush
- Upholstery nozzle
- Crevice nozzle
- Accessory holder for the three accessories supplied
Symbols on the holder show where to attach the different accessories.
- Attach the accessories holder to the top or bottom of the suction wand when required (Fig. 16).
Some models are supplied as standard with one of the following accessories which are not illustrated.
- AllergoTeQ floorhead
- Turbobrush
These vacuum cleaners are supplied with separate operating instructions for the relevant accessory part.
Reversible floorhead (Fig. 17)
(included as standard depending on model)
For general use and also for vacuuming the stairs.
WARNING: For safety reasons when vacu- uming stairs, it is best to start at the bottom of the stairs and move up- wards.
Parquet floorbrush (SBB Parquet-3)
(included as standard depending on model)
This brush has natural bristles and is designed for use on smooth floors that are susceptible to scratching.
Use
Unwinding the cord (Fig. 18)
- Pull the power cord out to the re- quired length (max. cord length ap- prox. 18" (5.5 m).
- Insert the plug into the socket.
WARNING: If vacuuming for longer than 30 minutes, the cord must be pulled out all the way. Danger of overheating and damage.
Rewinding the power cord (Fig. 19)
- Turn off at the wall socket and un- plug.
- Press the rewind foot control. The cord will rewind automatically.
Turning the vacuum cleaner on and off (Fig. 20)
Press the On/Off foot control .
Regulating the suction power (Fig. 21)
The suction power can be regulated to suit the type of flooring being cleaned. Reducing the suction power reduces the amount of effort required to maneu- ver the floorhead.
The vacuum cleaner has symbols on the controls which indicate the type of use the settings are suitable for.
 Curtains, fabrics
 Upholstery, cushions
 Deep pile carpets, rugs and run- ners
 Energy-saving normal vacuuming with low noise
 Low pile carpet and rugs
 Hard flooring and heavily soiled carpets and rugs
When using the adjustable floorhead, if the suction seems too high, reduce the suction until the floorhead is eas- ier to maneuver.
- Turn the suction power selector man- ually to the suction power setting you require.
Opening the air inlet valve (Fig. 22)
It is easy to reduce the suction power for a short time, e.g., to prevent rugs or other objects being sucked into the vacuum cleaner.
- Open the air inlet valve on the handle far enough to reduce the suction power. This reduces the suction on the respec- tive nozzle used.
During vacuuming
- When vacuuming, pull the vacuum cleaner behind you on its wheels. You can stand it upright for vacuuming stairs and curtains, etc.
WARNING: When vacuuming, in particular fine dust, e.g. dust, sand, plaster, flour, etc., electrostatic charges build up naturally. Under certain conditions these charges will be released. To avoid the unpleasant effects of these discharges, a metal inlay has been incorporated into the underside of the handle. Please make sure that you keep your hand in constant con- tact with this metal strip during vacu- uming (Fig. 23).
Parking, transport and storage
Park system for pauses during vacu- uming (Fig. 24)
The Park system allows you to conve- niently park the wand and floorhead during short pauses in vacuuming.
- Slot the floorhead into the parking at- tachment on the vacuum cleaner.
If your vacuum cleaner is on a slop- ing surface such as a ramp, fully re- tract the telescopic wand fully.
Park system for storage (Fig. 25)
WARNIG: Always disconnect the vacuum cleaner from the power supply when you have finished using it. Remove the plug from the socket.
- Stand the vacuum cleaner upright.
It is a good idea to retract the tele- scopic suction wand fully.
- Slot the floorhead downwards into one of the parking attachments on ei- ther side of the vacuum cleaner (the parking attachments cannot be used with Electrobrushes SEB 217 and SEB 228).
This makes the vacuum cleaner easier to carry or store.
Maintenance
WARNING: Always switch off the vacuum cleaner for maintenance work and remove the plug from the outlet.
The Miele filtration system consists of three components:
- Original Miele FilterBag
- Motor protection filter
- Original Miele exhaust filter
These will need to be replaced from time to time to ensure that your vacuum cleaner performs efficiently.
We recommend only using genuine FilterBags, filters, and accessories with the "Original Miele" logo on them. This will ensure that the suc- tion power of the vacuum cleaner is maintained, giving the best possible cleaning results.
FilterBags with the "Original Miele" logo on them are not made from pa- per or paper-based materials and nor do they have a cardboard collar. This is why our FilterBags are particularly long-lasting and reliable.
Please note that appliance faults and damage originating from the use of accessories which do not carry the "Original Miele" logo will not be cov- ered by the appliance guarantee.
Purchasing new FilterBags and filters
Original Miele FilterBags and filters are available from the Miele web store,Miele Technical Service, and your Miele dealer.
Ordering the correct FilterBags and filters
Only use original Miele FJM FilterBags with a red collar and original Miele fil- ters. These are identified by the "ORIGI-NAL Miele" logo on the packaging.

Every packet of original Miele FilterBags contains four bags, one AirClean ex- haust filter and one motor protection fil- ter. Original Miele multipacks contain 16 FilterBags, four AirClean exhaust filters and four motor protection filters.
Original Miele exhaust filters can also be purchased separately from your Miele dealer or Miele Technical Service. Please quote the model number of your vacuum cleaner when ordering to make sure you get the correct filter. You can also order all accessories via the Miele web store.
When to change the FilterBag (Fig. 26)
Change the FilterBag when the color marker in the FilterBag change indicator turns red.
FilterBags are disposable and in- tended to be used only once. Dis- pose of the entire FilterBag. Do not attempt to re-use. Blocked pores re- duce the efficiency of the vacuum cleaner.
Checking the FilterBag change indi- cator
- Attach the standard adjustable floor- head to the vacuum cleaner.
- Switch the vacuum cleaner on and select the highest power setting.
- Lift the floorbrush off the floor a little.
How the FilterBag change indicator works
The FilterBag change indicator is set for normal household dust. This generally contains a mixture of dust, hair, threads, carpet lint, grit, etc.
However, if the cleaner has been used to vacuum up fine dust, such as plaster, brick dust, cement or flour, the pores of the FilterBag will become blocked very quickly. This affects the air permeability of the bag, and the marker will indicate that the bag is "full" even when it is not. If this happens you must still change the FilterBag because suction power will be greatly reduced by blocked pores in the FilterBag.
If, on the other hand, a large amount of hair and carpet lint which typically con- tains a lot of air is vacuumed up, the in- dicator may fail to react even though the bag is full. You should still change it. Both these extremes can occur.
How to replace the FilterBag (Fig. 27 + 28)
- Press the release catches at the side of the hose connector, and remove the hose from the socket (Fig. 02).
- Press the release button on the re- cessed grip and raise the dust com- partment lid as far as it will go (Fig.
The FilterBag has a flap which closes automatically when the dust compart- ment lid is raised to prevent any dust escaping.
- Pull the FilterBag out by the grip on the collar.
- Fit the new FilterBag into the holder as far as it will go. Leave it folded up when you take it out of the box.
- Close the dust compartment lid se- curely, making sure it clicks into posi- tion. Take care not to trap the Fil- terBag when doing so.
An empty operation lock prevents the dust compartment lid from clos- ing without a FilterBag in place. Do not use force!
- Insert the hose connector into the suction socket on the vacuum cleaner until it clicks into position (Fig. 01).
When to change the motor protection filter
Replace this filter every time you start a new packet of filter bags. Every packet of original Miele filter bags contains a motor protection filter. Multi- packs contain four motor protection fil- ters.
How to change the motor protection filter (Fig. 29)
- Open the dust compartment lid.
- Pull the filter bag out by the grip on the collar.
- Lift up the filter frame until it clicks and remove the old motor protection filter. Hold by the clean, unsoiled sec- tion to remove it.
- Replace with a new motor protection filter.
- Close the filter frame.
- Fit the filter bag into the holder as far as it will go.
- Close the dust compartment lid se- curely, making sure it clicks into posi- tion. Take care not to trap the filter bag when doing so.
When to replace the exhaust filter
Depending on the model, your vacuum cleaner will be fitted as standard with one of the following exhaust filters (Fig.09)
a AirClean
Replace this filter every time you start a new packet of filter bags. Every packet of original Miele filter bags contains one AirClean exhaust filter. Multipacks con- tain four AirClean filters.
b AirClean Plus 50 (light blue) Replace this filter after approx. one year. Make a note of the date on the ex- haust filter.
c Active AirClean 50 (black)
d HEPA AirClean 50 (white)
Replace this filter when the TimeStrip® exhaust filter change indicator is com- pletely red (Fig. 14). The indicator lights up after approximately 50 operating hours, which is equivalent to about a year of average use. You can continue vacuuming when the light comes on. However, the suction power will be re- duced as will the effectiveness of the fil- ter.
How to replace the AirClean exhaust filter (Fig. 30 + 31)
Do not use more than one exhaust fil- ter at a time.
- Open the dust compartment lid.
- Open the filter grille.
- Grasp the used AirClean exhaust filter by the clean, unsoiled section and take it out.
- Replace it with a new AirClean ex- haust filter.
If you wish to fit an AirClean Plus 50, Active AirClean 50, or HEPA AirClean exhaust filter, see "Replacing one type of exhaust filter with another".
- Close the filter grille.
- Close the dust compartment lid.
Replacing the AirClean Plus 50, Active AirClean 50, and HEPA AirClean 50 exhaust filters (Fig. 32 + 33)
Do not use more than one exhaust fil- ter at a time.
- Open the dust compartment lid.
- Lift the exhaust filter and remove it.
- Insert a new exhaust filter, making sure it goes in properly, then push it down into position.
- If you are using exhaust filter c or d, press the TimeStrip® exhaust filter change indicator (Fig. 12).
- After approx. 10–15 seconds, a thin red line will appear in the left hand side of the display for both exhaust filters (Fig.
If you wish to fit the AirClean exhaust filter, see "Replacing one type of ex- haust filter with another".
- Close the dust compartment lid.
Replacing one type of exhaust filter with another (Fig. 09)
Depending on model, your vacuum cleaner will be fitted as standard with one of the following exhaust filters:
a AirClean
b AirClean Plus 50 (light blue)
c Active AirClean 50 (black)
d HEPA AirClean 50 (white)
Do not use more than one exhaust fil- ter at a time.
When changing the filter please note
- If you wish to replace exhaust filter a with filter b, c, or d, it is essential that you remove the filter grille before you fit the new exhaust filter. If you are using exhaust filter c or d, you must also activate the TimeStrip® exhaust filter change in- dicator (Fig. 12).
- If you wish to replace exhaust filter b, c, or d with filter a, it is essential that you also fit the filter grille * (Fig. 31).
*Filter grille – see "Optional acces- sories"
When to change the thread catchers?
(only possible for models with a re- versible floorhead included as standard)
The thread catchers on the suction inlet of the reversible floorhead can be re- placed. Check them from time to time and replace them if the pile has worn down.
How to replace the thread lifters (Fig. 34 + 35)
- Use a suitable screwdriver to remove the thread lifters from the slots.
- Fit new thread lifters.
Cleaning the roller on the AllTeQ floorhead (Fig. 36)
Clean the roller on the floorhead if re- quired.
- Release the bearing using a coin.
- Press the bearing out, and remove.
- Remove the roller.
- Remove any threads and hair, replace the roller and refit the bearing, locking it back into position.
Replacement parts are available from your Miele dealer or through Miele Technical Service.
Cleaning and care
WARNING: Always disconnect the vacuum cleaner from the electrical supply be- fore cleaning it. Turn off and unplug it.
Vacuum cleaner and accessories
The vacuum cleaner and all plastic ac- cessories can be cleaned with a propri- etary cleaner suitable for plastic.
WARNING: Do not use abrasive cleaning agents, glass cleaning agents, all- purpose cleaners or oil-based condi- tioning agents!
Dust compartment
The dust compartment can, if neces- sary, be cleaned using a dry duster, brush or, if available, a second vacuum cleaner to vacuum the dust out.
Monitor the filter bag change indicator and inspect all filters regularly. Clean or replace them when necessary accord- ing to these Operating Instructions.
WARNING: Do not let the vacuum cleaner get wet. If moisture gets into the ap- pliance, there is a risk of electric shock.
Frequently Asked Questions
With the help of the following guide minor faults in the performance of the ma- chine, some of which may result from incorrect operation, can be remedied with- out contacting the Service Department. Time and money will be saved because a service call will not be needed.
This guide may help you to find the reason for the fault, and how to correct it.
The vacuum cleaner turns off automatically.
A temperature limiter turns the vacuum cleaner off au- tomatically if it gets too hot.
This can occur if, for instance, large articles block the wand or when the FilterBag is full or contains parti- cles of fine dust. A heavily soiled exhaust or dust compartment filter can also be the cause of overheat- ing.
- Turn the vacuum cleaner off immediately using the On/Off foot switch , and unplug it.
After removing the cause, wait for approximately 20 - 30 minutes to allow the vacuum cleaner to cool down. It can then be turned on again.
Technical Service
Contact in case of fault
In the event of a fault which you cannot remedy yourself, please contact your Miele dealer or Miele Technical Service.
Contact information for Miele Techni- cal Service can be found at the end of this document.
Warranty
For more information about warranty conditions, please contact Miele Tech- nical Service.
Optional accessories
Certain models are supplied as stan- dard with one or more of the following accessories.
Please observe the flooring manu- facturer's cleaning and care instruc- tions.
These and many other products can be ordered from the Miele web store, Miele Technical Service or from your Miele dealer.
Floor tools / Brushes
AllergoTeQ floorhead (BDH 285-3)
This floor brush is suitable for daily hy- gienic cleaning of all floor surfaces. The level of cleanliness of the floor shows in a color "traffic light" display when vacu- uming.
TurboTeQ (STB 305-3) / Turbobrush (STB 205-3)
This brush is ideal for removing lint and hair from short-pile carpet.
Floor brush Parquet Twister with swiveling head (SBB 300-3)
This brush is suitable for a variety of hard floor surfaces and has a swivel joint enabling it to get into awkward corners.
Parquet Twister floorbrush with swiveling head (SBB 300-3)
With natural bristle for vacuuming smooth hard floors and small gaps.
Floorbrush Parquet Twister XL with swiveling head (SBB 400-3)
With natural bristles for quickly vacu- uming smooth hard floors and small gaps.
Other accessories
MicroSet accessory case (SMC 20)
This set is specially designed for clean- ing small objects and difficult to reach areas (such as PC keyboards, stereo equipment, intricately carved furniture and ornaments, models, etc).
Turbo XS hand turbo brush (STB 20)
For vacuuming upholstery, mattresses or car seats, etc.
Universal brush (SUB 20)
For dusting books, shelves, etc.
Radiator brush (SHB 30)
For dusting radiators, narrow shelves and crevices.
Mattress tool (SMD 10)
For vacuuming upholstery, mattresses, cushions, curtains, covers, etc.
Crevice nozzle, 12" (300 mm) (SFD 10)
Extra long crevice nozzle for cleaning in folds, crevices and corners.
Crevice nozzle, 22" (560 mm) (SFD 20)
Flexible crevice nozzle for vacuuming hard to reach places.
Upholstery nozzle, 7 1/2" (190 mm) (SPD 10)
Extra wide upholstery nozzle for clean- ing upholstered furniture, mattresses and pillows.
Flexible hose extension (SFS 10)
For extending the suction hose by ap- proximately 59" (1.5 m).
Comfort handle with lighting (SGC 20)
Lights up the area being vacuumed.
Filters
AirClean Plus 50 exhaust filter (SF-AP 50)
Effective filtration for particularly clean room air.
Active AirClean 50 exhaust filter (SF-AA 50)
For a significant reduction of unpleasant odors. Ideal for households with pets or smokers.
HEPA AirClean 50 exhaust filter (SF-HA 50)
Effectively filters fine dust and allergens. Ideal for people allergic to house dust.
Filter grille
The filter grille is required if you wish to use an AirClean exhaust filter instead of an AirClean Plus exhaust filter 50, an Active AirClean exhaust filter 50 or a HEPA AirClean 50 exhaust filter.