Use the sensor fields to operate the appliance. The displays, indicators and sounds tell which functions operate.
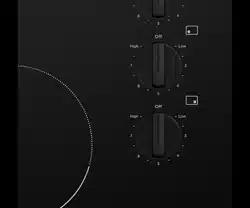
Heat setting displays
OptiHeat control (3 step residual heat indicator)
WARNING
Risk of burns from residual heat!
OptiHeat Control shows the level of the residual heat. The induction cooking zones make the heat necessary for cooking directly in the bottom of the cookware. The glass ceramic is hot from the heat of the cookware.
OPERATING INSTRUCTIONS
Switching the appliance on and off
IMPORTANT
After switching on, within approx. 10 seconds a heat setting or a function must be set, otherwise the appliance automatically switches itself off.
Setting the heat setting
*Function not available for WHC934BA
IMPORTANT
The keep warm settinglies betweenand . It is used to keep food warm.
Switching the outside ring on and off
By switching the outside rings on or off, the effective heating surface can be matched to the size of the cookware.
IMPORTANT
Before an outside ring can be switched on, the inside ring must be switched on.
Locking/unlocking the control panel
The control panel, with the exception of the “On/Off” sensor field, can be locked at any time in order to prevent the settings being changed e.g. by wiping over the panel with a cloth.
IMPORTANT
When you switch the appliance off, the locking function is automatically switched off.
Using the automatic warm-up function
All cooking zones are equipped with an automatic warm up function When setting a heat setting using , when starting from , the cooking zone switches to full power for a certain amount of time and then automatically switches back to the heat setting set.
IMPORTANT
If during the automatic warm up a higher heat setting is selected, e.g. from to , the automatic warm up is adjusted.
The child safety device
The child safety device prevents unintentional use of the appliance.
Switching on the child safety device:
• Start the hob with . Do not set the heat settings.
• Touch for 4 seconds. The symbol comes on.
• The child safety device is switched on.
Switching off the child safety device:
• Start the hob with . Do not set the heat settings. Touch for 4 seconds. The symbol comes on.
• Stop the hob with .
• The child safety device is switched off.
IMPORTANT
The child safety device can only be switched on and off, if no heat setting is set.
Overriding the child safety device:
The child safety device can be switched off in this way for a single cooking session; it remains activated afterwards.
• Start the hob with . The symbol comes on.
• Touch for 4 seconds. The symbol comes on.
Until the appliance is next switched off, it can used as normal. After switching off the appliance, the child safety device is active again.
IMPORTANT
After overriding the child safety device, a heat setting or a function must be set within approx. 10 seconds, otherwise the appliance automatically switches itself off.
Using the timer
FUNCTION
CONDITION
OUTCOME AFTER THE TIME HAS ELAPSED
Automatic cut-out
A heat setting is set
Acoustic signal flashes Cooking zone switches off
Countdown timer
Cooking zones not in use
Acoustic signal flashes
IMPORTANT
If a heat setting is set on this cooking zone in addition to a countdown timer, the cooking zone is switched off after the time set has elapsed.
STEP
CONTROL PANEL
DISPLAY
1
Touch once
Pilot light of the first cooking zone flashes
2
Touch once
Pilot light of the second cooking zone flashes
3
Touch once
Pilot light of the third cooking zone flashes
4
Touch once
Pilot light of the fourth cooking zone flashes (if applicable)
IMPORTANT
If a cooking zone is switched off, the timer function set is also switched off.
IMPORTANT
If the pilot light is flashing more slowly, the heat setting can be set or modified.
IMPORTANT
If other timer functions are set, after a few seconds the shortest remaining time of all the timer functions is displayed and the corresponding pilot light flashes.
Setting the time
STEP
CONTROL PANEL
INDICATOR
1
Select cooking zone
Pilot light for the cooking zone selected flashes
2
Touch or
to minutes
After a few seconds the pilot light flashes more slowly.
The time is set.
The time counts down.
Switching off the timer function
STEP
CONTROL PANEL
INDICATOR
1
Select cooking zone
Pilot light for the cooking zone selected flashes
2
Touch
The time remaining counts backwards to
After a few seconds the pilot light flashes more slowly.
The time is set.
The time counts down.
Changing the time
STEP
CONTROL PANEL
INDICATOR
1
Select cooking zone
Pilot light of the selected cooking zone flashes faster. Time remaining is displayed
2
Touch or
to minutes
After a few seconds the pilot light flashes more slowly.
The time is set.
The time counts down.
Displaying the time remaining for a cooking zone
CONTROL PANEL FIELD
DISPLAY
Selectcooking zone
Pilot light of the cooking zone selected flashes faster The time remaining is displayed
After a few seconds the pilot light flashes more slowly.
Switching off the acoustic signal
CONTROL PANEL FIELD
DISPLAY
Touch
The acoustic signal to acknowledge.
The acoustic signal stops.
Automatic switch off
Cooking surface
• If after switching on the cooking surface, a heat setting is not set for a cooking zone within approx. 10 seconds, the cooking surface automatically switches itself off.
• If one or more sensor fields are covered by objects (a pan, cloths, etc.) for longer than approx. 10 seconds, a signal sounds and the cooking surface switches off automatically.
• If all cooking zones are switched off, the cooking surface automatically switches it- self off after approx. 10 seconds.
Control panel
When the appliance is switched off, if one or more of the sensor fields on the control panel are covered for more that 10 seconds, an acoustic signal sounds. The acoustic signal switches itself off automatically when the sensor fields are no longer covered.
Cooking zones
If one of the cooking zones is not switched off after a certain time, or if the heat setting is not modified, the relevant cooking zone switches off automatically. is displayed. Before being used again, the cooking zone must be set to .
HELPFUL HINTS AND TIPS
Cookware
• You can recognise good cookware from the bottoms of the pans. The bottom should be as thick and flat as possible.
• Cookware made of enamelled steel or with aluminium or copper bottoms can leave discolourations on the glass ceramic surface which are difficult or impossible to remove.
ENVIRONMENTAL
Energy saving
• Always place cookware on the cooking zone before it is switched on.
• Switch cooking zones off before the end of the cooking time, to take advantage of residual heat.
• If possible, always place lids on the pans.
• Bottom of pans and cooking zones should be the same size.
CARE AND CLEANING
WARNING
Watch out! Risk of burns from residual heat.
WARNING
Sharp objects and abrasive cleaning materials will damage the appliance. Clean with water and washing up liquid.
WARNING
Sharp cleaning agents will damage the appliance. Remove residues with water and washing up liquid.
Cleaning the appliance after each use
1. Wipe the appliance with a damp cloth and a little washing up liquid.
2. Rub the appliance dry using a clean cloth.
Removing deposits
REMOVE AT ONCE
WHEN THE APPLIANCE HAS COOLED DOWN
USING
Sugar, food containing sugar
Yes
---
A scraper1)
Plastics, tin foil
Yes
---
A scraper1)
Limescale and water rings
---
Yes
Cleaner for glass ceramic or stainless steel1)
Fat splashes
---
Yes
Cleaner for glass ceramic or stainless steel1)
Shiny metallic discolouration
---
Yes
Cleaner for glass ceramic or stainless steel1)
1) *Scrapers and cleaners for glass ceramic and stainless steel can be purchased in specialised shops.
1. Place a scraper on the glass ceramic surface at an angle.
2. Remove residues by sliding the blade over the surface.
3. Wipe the appliance with a damp cloth and a little washing up liquid.
4. Rub the appliance dry using a clean cloth.
IMPORTANT
Remove stubborn residues with a cleaner for glass ceramic or stainless steel.
IMPORTANT
Scratches or dark stains on the glass ceramic that cannot be re- moved do not however affect the functioning of the appliance.
WARNING
Residues from cleaning agents will damage the appliance. Remove residues with water and washing up liquid.
TROUBLESHOOTING
PROBLEM
POSSIBLE CAUSE
REMEDY
Red rings, limescale or water rings, shiny metallic or other discolouration, scratches/ shadows, bubbles or other miscellaneous marks or stains on ceramic glass cooktop surface.
• Cooktop surface has not been cleaned correctly. Cleaning/ maintenance of the cooktop surface is not covered under warranty. If a service call is placed to clean the cooktop you will be charged for the visit.
• Use a ceramic glass cleaner such as Cerapol.
Pitting of ceramic glass surface.
• Spillovers of liquid with high sugar content.
• These types of spills must be removed immediately with a special scraper for the glass. If not permanent damage to the cooktop glass can occur which is not covered under warranty.
The cooking zones will not switch on or are not functioning.
• More than 10 seconds have passed since the appliance was switched on.
• The child safety device is switched on .
• Several sensor fields were touched at the same time.
• Automatic switch off has been triggered.
• The lock is switched on
• Switch the appliance on again.
• Deactivate the child safety device (See the section “Child safety device”).
• Only touch one sensor field.
• Remove any objects (pan, cloths, etc.) that are lying on the control panel. Switch the appliance on again.
• Switch off the lock (See the section “Locking/unlocking the control panel”).
Acoustic signal sounds when appliance is switched off.
• The control panel is wholly or partly covered by objects.
• Remove objects.
The residual heat indicator is not displaying anything.
• The cooking zone was only on for a short time and is therefore not hot.
• If the cooking zone is supposed to be hot, call the Customer Service Department.
The automatic warm up function is not switching itself on.
• There is still residual heat on the cooking zone .
• Let the cooking zone cool down.
• The highest heat setting is set
• The highest heat setting has the same power as the automatic warm up function.
• The heat setting was set using the sensor field .
1. Switch off the cooking zone
2. Set the cooking zone using the sensor field .
Acoustic signal sounds and appliance switches itself on and then off again; after 5 seconds another acoustic signal sounds.
• The On/Off sensor field has been covered up, e.g. by a cloth.
• Do not place any objects on the control panel.
is lit.
• Overheating protection for the cooking zone has been triggered.
• Automatic switch off has been triggered.
• Switch off the cooking zone. Switch the cooking zone on again.
• Switch off the cooking zone. Switch the cooking zone on again.
and number are displayed.
• Electronics fault.
• Disconnect the appliance from the electrical supply for a few minutes (Take the fuse out of the house’s wiring system) If after switching on again, is displayed again, call the customer service department.
If you are unable to remedy the problem by following the above suggestions, please contact your dealer or the Customer Care Department.
WARNING
Repairs to the appliance are only to be carried out by qualified service engineers. Considerable danger to the user may result from improper repairs.
IMPORTANT
If the appliance has been wrongly operated, the visit from the customer service technician or dealer may not take place free of charge, even during the warranty period.
INSTALLATION INSTRUCTIONS
WARNING
This must be read! The laws, ordinances, directives and standards in force in the country of use are to be followed (safety regulations, proper recycling in accordance with the regulations, etc.)
IMPORTANT
Installation may only be carried out by a qualified electrician. The minimum distances to other appliances and units are to be observed.
Anti-shock protection must be provided by the installation, for example drawers may only be installed with a protective floor directly underneath the appliance.
The cut surfaces of the worktop are to be protected against moisture using a suitable sealant. The sealant seals the appliance to the work top with no gap. Do not use silicon sealant between the appliance and the work top. Avoid installing the appliance next to doors and under windows. Otherwise hot cookware may be knocked off the rings when doors and windows are opened.
WARNING
Risk of injury from electrical current.
• The electrical mains terminal is live.
• Make electrical mains terminal free of voltage.
• Follow connection schematic.
• Observe electrical safety rules.
• Ensure anti-shock protection by installing correctly.
• The appliance must be connected to the electrical supply by a qualified electrician.
• Loose and inappropriate plug and socket connections can make the terminal overheat.
• Have the clamping connections correctly installed by a qualified electrician.
• Use strain relief clamp on cable.
WARNING
The surface temperature exceeds 95°C. To avoid a hazard, underbench access must be restricted.
Electrical Connection
Before connecting, check that the nominal voltage of the appliance, that is the voltage stated on the rating plate, corresponds to the available supply voltage. Also check the power rating of the appliance and ensure that the wire is suitably sized in accordance with local wiring rules to suit the appliance power rating. The rating plate is located on the lower casing of the hob. Means for disconnection must be incorporated in the fixed wiring in accordance with local wiring rules. The hob is to be connected to the mains using a device that allows the appliance to be disconnected from the mains at all poles with a contact opening width of at least 3 mm, eg. automatic line protecting cut-out, earth leakage trips or fuse. If this appliance’s mains cable is damaged, it must be replaced by a special cable (type H05BB-F Tmax 90°C; or higher). The connection must be carried out as shown in the diagram. The connecting links should be fitted according to the appropriate connection diagram. The earth lead is connected to terminal. The earth lead must be longer than leads carrying electric current. The cable connections must be made in accordance with regulations and the terminal screws tightened securely. Finally, the connecting cable is to be secured with the mains cable cleat and the covering closed by pressing firmly (lock into place). Before switching on for the first time, any protective foil or stickers must be removed from the glass ceramic surface.
Connection cable
• Use the correct mains cable of type H05BB-F Tmax 90°C (or higher) for a single phase or two phase connection.
• Replace the damaged mains cable with a special cable (type H05BB-F Tmax 90°C or higher) 3 x 2.5mm2 with an all-pole 25A breaker. Speak to your local Service Centre.
• The earth cord (green/yellow cable) must be 2cm longer than phase and neutral cable (blue and brown cables).
• The cable conditions must be in accordance with regulations and the terminal screws tightened securely.
• The connecting cable is to be secured with the mains cable cleat and the covering closed by pressing firmly (lock into place).
• Before switching on for the first time, any protective foil or stickers must be removed from the glass ceramic surface.
WARNING
Once connected to the mains supply check that all cooking zones are ready for use by briefly switching each on in turn at the maximum setting.
• A duplicate rating label is supplied with this unit. For easy identification of this unit after installation, stick it to a readily available surface adjacent to the cooktop.
Sticking on the seal
• Clean the worktop around the cutout area.
• Stick the single-sided adhesive sealing tape provided on the underside of the hob around the outside edge ensuring that it is not stretched. The two ends of the tape should join in the middle of one side. After trimming the tape (allow it to overlap by 2-3 mm), press the two ends together.
Q: When you press the + button for the heat settings, does it show 2 or 3 etc. Is there a slide process in there somewhere or just press the + or - buttons Reply
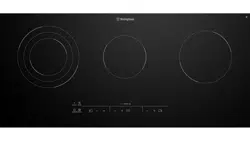

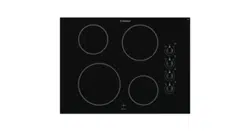
 Single cooking zone 1200W
 Single cooking zone 1800W
 Single cooking zone 1200W
 Control panel
 Triple cooking zone 2300/1600/800W

 OptiHeat control (3 step residual heat indicator)
 Risk of burns from residual heat!

 lies between
 and
and  . It is used to keep food warm.

 , when starting from
 a higher heat setting is selected, e.g. from
 to
to  , the automatic warm up is adjusted.
 . Do not set the heat settings.
 for 4 seconds. The symbol
 comes on.
 comes on.
 flashes Cooking zone switches off
 once
once


 minutes
 to
to is displayed. Before being used again, the cooking zone must be set to


 and number are displayed.