The air which is drawn in is cleaned by the grease filters and conveyed to the exterior by a pipe system.
Note: The exhaust air must not be conveyed into a functioning smoke or exhaust gas flue or into a shaft which is used to ventilate installation rooms which contain heat-producing appliances.
Before conveying the exhaust air into a non-functioning smoke or exhaust gas flue, obtain the consent of the heating engineer responsible.
If the exhaust air is conveyed through the outer wall, a telescopic wall box should be used.
Circulating-air mode
The air which is drawn in is cleaned by the grease filters and an activated carbon filter and conveyed back into the kitchen.
Note: To bind odours in circulating-air mode, you must install an activated carbon filter. The different options for operating the appliance in circulating-air mode can be found in the brochure. Alternatively, ask your dealer. The required accessories are available from specialist outlets, from customer service or from the Online Shop. The accessory numbers can be found at the end of the instructions for use.
Operating the appliance
Note: Switch on the extractor hood when you start cooking and switch it off again several minutes after you have finished cooking. This is the most effective way of removing the kitchen fumes.
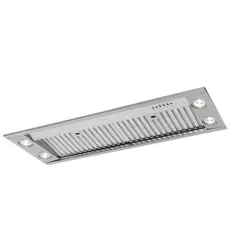
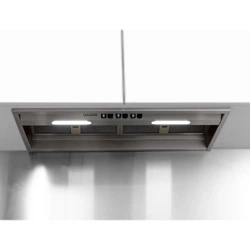
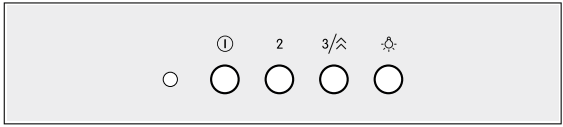
Control panel
Fan off/fan level 1
Fan level 2
Fan level 3/intensive mode
Light on/off
Setting the fan
Switching on
Press the , 2 or button.
Note: The LED indicates which fan level is currently set:
Level 1: LED lights up green.
Level 2: LED lights up orange.
Level 3: LED lights up red.
Switching off
Press the button.
Note: If fan level 2 or 3 is switched on, press the button twice.
Intensive setting
You can use the intensive setting if there is a large build-up of odours and fumes/vapours.
Press and hold the button.
Intensive mode is activated. The LED flashes red.
Notes
The intensive mode run time is limited to 6 minutes.
Once 6 minutes has elapsed, the appliance switches back to the fan level that was previously selected.
Intensive mode can be activated when the appliance is switched off; once 6 minutes has elapsed, the appliance switches itself off again.
Lighting
Press the button.
Note: The lighting can be switched on and off independently of the ventilation system.
Cleaning and maintenance
WARNING:
Risk of burns!
The appliance will become hot during operation, especially near the bulbs. Allow the appliance to cool down before cleaning.
Risk of electric shock!
Penetrating moisture may result in an electric shock. Clean the appliance using a damp cloth only. Before cleaning, pull out the mains plug or switch off the circuit breaker in the fuse box.
Risk of electric shock!
Do not use any high-pressure cleaners or steam cleaners, which can result in an electric shock.
Risk of injury!
Components inside the appliance may have sharp edges. Wear protective gloves.
Cleaning agents
To ensure that the different surfaces are not damaged by using the wrong cleaning agent, observe the information in the table. Do not use any of the following:
Harsh or abrasive cleaning agents,
Cleaning agents with a high alcohol content,
Hard scouring pads or cleaning sponges,
High-pressure cleaners or steam cleaners.
Wash new sponge cloths thoroughly before use.
Follow all instructions and warnings included with the cleaning agents.
Area
Cleaning agent
Stainless steel
Hot soapy water:
Clean with a dish cloth and then dry with a soft cloth.
Clean stainless steel surfaces in the grind direction only.
Special stainless steel cleaning products are available from our after-sales service or from specialist retailers.
Apply a very thin layer of the cleaning product with a soft cloth.
Painted surfaces
Hot soapy water:
Clean using a damp dish cloth and dry with a soft cloth/towel.
Do not use any stainless steel cleaners.
Aluminium and plastic
Glass cleaner:
Clean with a soft cloth.
Glass
Glass cleaner:
Clean with a soft cloth. Do not use a glass scraper.
Controls
Hot soapy water:
Clean using a damp dish cloth and dry with a soft cloth/towel.
Risk of electric shock caused by penetrating moisture.
Risk of damage to the electronics from penetrating moisture. Never clean operating controls with a wet cloth.
Do not use any stainless steel cleaners.
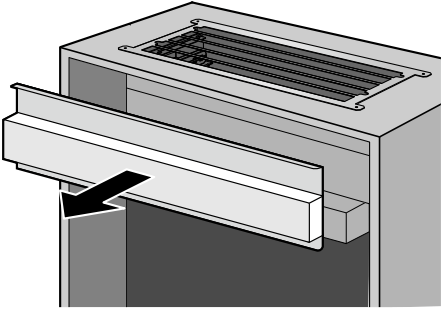
Removing metal grease filter
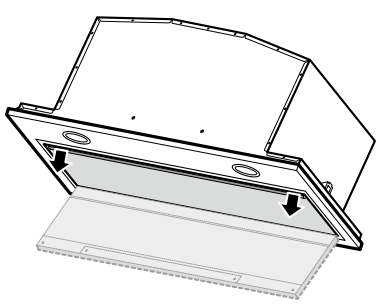
1. Open the filter cover.
Note: Grasp the front corners of the filter cover and pull it down in a single, swift motion.
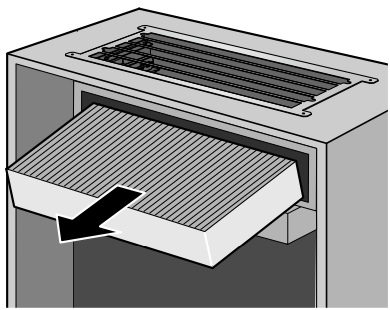
2.Open the lock and fold down the metal grease filter.
Note: To avoid causing damage, do not bend the metal grease filter.
3. Take the metal grease filter out of the holder.
Note: Fat may accumulate in the bottom of the metal grease filter. Hold the metal grease filter level to prevent fat from dripping out.
4. Clean the appliance from the inside.
5. Clean the metal grease filter and let it dry before re-fitting.
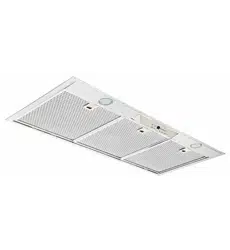
Cleaning the metal mesh grease filters
These instructions apply to several appliance variants. It is possible that individual features are described which do not apply to your appliance.
WARNING: Risk of fire! Grease deposits in the grease filter may catch fire.
Clean the grease filter at least every 2 months.
Never operate the appliance without the grease filter.
Notes
Do not use any aggressive, acidic or alkaline cleaning agents.
When cleaning the metal mesh grease filters, also clean the holder for the metal mesh grease filters in the appliance using a damp cloth.
The metal mesh grease filters can be cleaned in the dishwasher or by hand.
By hand:
Note: You can use a special grease solvent for stubborn dirt. It can be ordered via the Online Shop.
Soak the metal mesh grease filters in a hot soapy solution.
Clean the filters with a brush and then rinse them thoroughly.
Leave the metal mesh grease filters to drain.
In the dishwasher:
Note: If the metal mesh grease filters are cleaned in the dishwasher, slight discolouration may occur. This has no effect on the function of the metal mesh grease filters.
Do not clean heavily soiled metal mesh grease filters together with utensils.
Place the metal mesh grease filters loosely in the dishwasher. The metal mesh grease filters must not be wedged in.
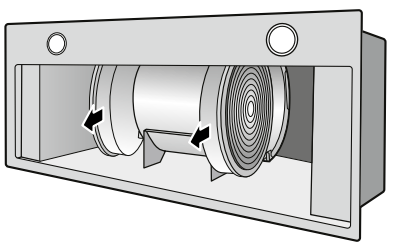
Removing the activated charcoal filter (only in circulating-air mode)
In order to guarantee efficient odour filtration, the filter must be serviced regularly.
The activated charcoal filters must be replaced at least every 4 months.
Notes
The activated charcoal filters are not included in the delivery.
The activated charcoal filters cannot be cleaned or reactivated.
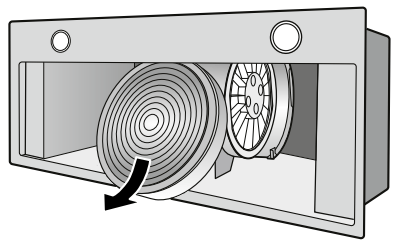
1. Remove the metal grease filters.
2. Remove the activated charcoal filter from the retainer.
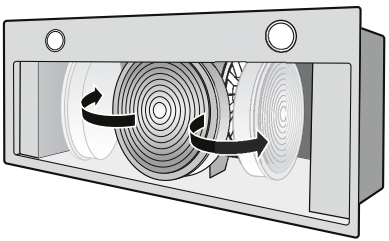
3. Guide the activated charcoal filter around the motor.
4. Take out the activated charcoal filter
5. Clean the appliance.
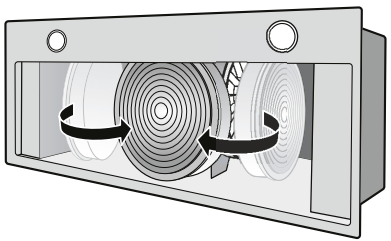
Fitting the activated charcoal filter (only in circulating-air mode)
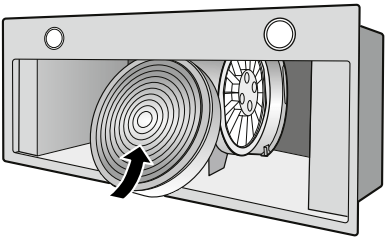
1. Insert the activated charcoal filter into the extractor hood.
2. Guide the activated charcoal filter around the motor.
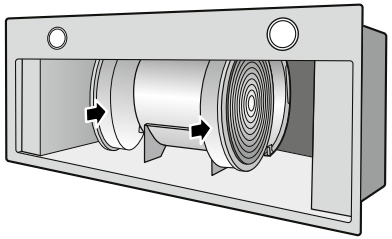
3. Carefully slide the new activated charcoal filter into the retainer.
4. Install the metal grease filters.
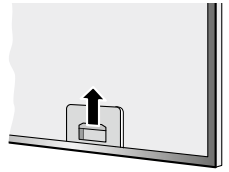
Installing the metal mesh grease filter
1. Insert the metal mesh grease filter. While doing this, place the other hand under the metal mesh grease filter.
2. Fold the metal mesh grease filter upwards, locking it in place.
Removing the activated charcoal filter (only in circulating-air mode)
In order to ensure adequate odour removal, you must replace the activated charcoal filter regularly.
With normal levels of use (1 to 2 hours a day), the activated charcoal filter must be replaced at least every 12 months.
Notes
The activated charcoal filter is not included with the appliance.The activated charcoal filter is available from specialist retailers, from our after-sales service or from our online shop.
The activated charcoal filter cannot be cleaned or reactivated.
Activated charcoal filters do not contain any harmful substances and can be disposed of with your normal household waste.
1. Remove the magnetic panel.
2. Take out the activated charcoal filter.
Fitting the activated charcoal filter (only in circulating-air mode)
1. Take the new activated charcoal filter out of its packaging and insert it in the air recirculation module.
2. Fit the panel such that it is held firmly in place by the magnets.
Trouble shooting
Malfunctions often have simple explanations. Please read the following notes before calling the after-sales service.
WARNING: Risk of electric shock! Incorrect repairs are dangerous. Repairs may only be carried out and damaged power cables replaced by one of our trained after-sales technicians. If the appliance is defective, unplug the appliance from the mains or switch off the circuit breaker in the fuse box. Contact the after-sales service.
LED lights
Defective LED lights must only be replaced by the manufacturer, their customer service department or a licensed technician (electrician).
Malfunction table
Fault
Possible cause
Solution
The appliance does not work
The plug is not plugged into the mains
Connect the appliance to the power supply
Power cut
Check whether other kitchen appliances are working
The fuse is faulty
Check in the fuse box to make sure that the fuse for the appliance is in working order
#1 Can you please confirm do i need a recirculation kit if I am not ducting this product?
Yes, you will need to purchase the recirculation kit as it comes with 2 charcoal filters, charcoal filter support, deflector, flexible hose 150mm and 1500mm long, 2 clamps, mounting material.
#2 could you please confirm where this range is made.
this answer is listed on our website listed under country of origin.
#3 What are the details of the recirculation kit / carbon filters? How are they installed and where does the recirculated air exhaust?
Top recirculating kit consists of a wall vent and 400mm length of ducting. In regards to carbon filters these are generally an optional extra when you order your rangehood. Carbon filters will reduce the amount of odours they do not remove all the smells, they will not reduce heat or smoke, replaced every 6 months, cost of these carbon filters about $99.00, this will be an on going cost with these filters if you are unable to duct.


 Fan off/fan level 1
 Fan level 2
 Fan level 3/intensive mode
 Light on/off
 , 2 or
  button.