Lights next to the touch pads on the air conditioner control panel indicate the selected settings.
NOTE: When the bucket is full or removed, the controls cannot be set.
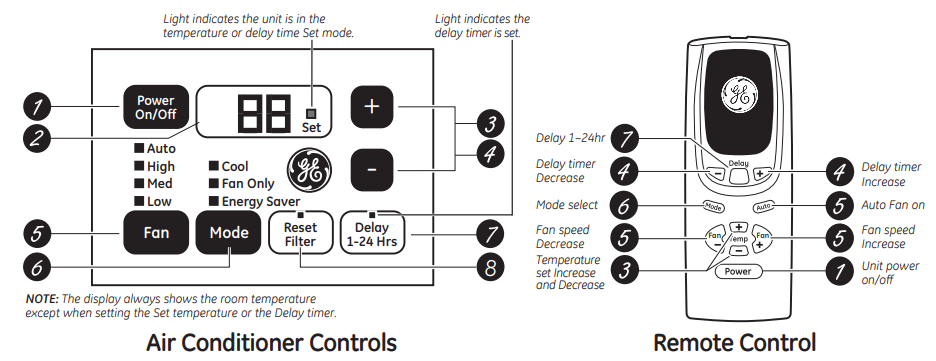
1. Power Pad
Turns air conditioner on and off. When turned on, the display will show the room temperature.
2. Display
Shows the room temperature. Shows the Set temperature while setting the temperature in Cool or ECO modes. The Set light will turn on while setting.
3. Temp Increase /Decrease Pads
Use to set temperature when in Cool or Energy Saver mode. The Set light will turn on while setting.
4. Delay Timer Increase (+) /Decrease (–) Pads
Each touch of the Increase / Decreasepads on the unit or the Increase + / Decrease – pads on the remote control will set the delay time when using the Delay 1–24hr timer. The Set light will turn on while setting
5. Fan Speed Pads
Use to set the fan speed to Low, Med, High or Auto on the unit. NOTE: On the remote control, use the fan speed Increase + / Decrease – pads to set the fan speeds to Low, Med or High. Use the Auto pad to turn Auto fan on.
6. Mode Pad
Use to set the air conditioner to Cool, ECO or Fan Only mode.
7. Delay Pads/Delay 1-24hr Pad
Delay ON-When the air conditioner is off, it can be set to automatically come on in 1 to 24 hours at its previous mode and fan settings.
Delay OFF-When the air conditioner is on, it can be set to automatically turn off in 1 to 24 hours.
How to set:
Press the Delay 1–24hr pad on the unit or the Delay pad on the remote control. Each touch of the Increase / Decrease pads on the unit or the Increase + / Decrease – pads on the remote control will set the timer in 1-hour intervals. The Set light will turn on while setting.
To review the remaining time on the Delay 1–24hr timer, press the Delay 1–24hr pad on the unit or the Delay pad on the remote control. Use the Increase / Decreasepads on the unit or the Increase + / Decrease – pads on the remote control to set a new time if desired.
To cancel the timer, press the Delay 1–24hr pad until the light on the Delay 1–24hr pad goes off.
8. Reset Filter
LED will turn on when fan has accumulated 250 hours of run time as a reminder to clean filter. Press Reset Filter to turn off the LED and reset the accumulated run time.
Note: The default temperature reading on the display is degree Fahrenheit ( °F). To change the display to degree Celcius (°C), press the Temp Increase and Temp Decrease buttons together and hold for 3 seconds. Repeat the process to change back to degree Fahrenheit (°F)
Do Not Operate in Freezing Outdoor Conditions
This cool-only air conditioner was not designed for freezing outdoor conditions. It must not be used in freezing outdoor conditions.
Remote Control
To ensure proper operation, aim the remote control at the signal receiver on the air conditioner.
Make sure nothing is between the air conditioner and the remote control that could block the signal.
The remote control signal has a range of up to 20 feet.
Make sure batteries are fresh and installed correctly as indicated on the remote control.
Remote contains a magnet allowing it to attach to metal surfaces
Cool Mode
Use the Cool mode at Low, Med, High or Auto Fan
Speed for cooling. Use the Temperature Increase / Decrease pads to set the desired temperature between 64°F and 86°F in 1°F increments.
An electronic thermostat is used to maintain the room temperature. The compressor will cycle on and off to keep the room at the set level of comfort. Set the thermostat at a lower number and the indoor air will become cooler. Set the thermostat at a higher number and the indoor air will become warmer.
NOTE: If the air conditioner is off and is then turned on while set to a Cool setting or if turned from a fan setting to a Cool setting, it may take approximately 3 minutes for the compressor to start and cooling to begin.
Cooling Descriptions
For Normal Cooling—Select the Cool mode and High or Med fan with a middle set temperature.
For Maximum Cooling—Select the Cool mode and High fan with a lower set temperature.
For Quieter and Nighttime Cooling—Select the Cool mode and Low fan with a middle set temperature.
Energy Saver Mode
This mode optimizes the cooling power of your air conditioner, thereby saving you energy. Once the set point temperature has been reached, the fan will cycle off to save energy. The fan will cycle back on periodically to insure all cooling capacity in the system is used. This mode is the default mode for the unit. Each time the unit is powered off, it will restart in Energy Saver mode ON. This includes Delay timer mode. The first time the unit is turned on, the settings will be 70° and Low fan. You can adjust the fan speed and temperature to your personal comfort.
Energy Saver ON-Helps minimize electricity use. It is normal for the fan to cycle off and then back on in this mode. This on/off cycle can repeat multiple times. Because the fan will cycle off, you may notice a variation in room temperature and humidity
Energy Saver OFF-When this mode is not engaged, the fan will run continuously, and in Cool mode the compressor will cycle on and off to maintain room temperature.
Fan Only Mode
Use the Fan Only Mode at Low, Med or High fan speed to provide air circulation and filtering without cooling. Since fan-only settings do not provide cooling, a Set temperature cannot be entered. The room temperature will appear in the display.
NOTE: Auto Fan Speed cannot be used when in the Fan Only Mode.
Auto Fan Speed
Set to Auto fan speed for the fan speed to automatically set to the speed needed to provide optimum comfort settings with the set temperature.
If the room needs more cooling, the fan speed will automatically increase. If the room needs less cooling, the fan speed will automatically decrease.
NOTE: Auto Fan Speed cannot be used when in the Fan Only Mode.
Power Outage Recovery Feature
In the case of a power outage or interruption, the unit will automatically restart in the settings last used after the power is restored.
Air Direction
Use the lever to adjust the air direction left and right only.
Care and Cleaning
Grille and Case
Turn the air conditioner off and remove the plug from the wall outlet before cleaning.
To clean, use water and a mild detergent. Do not use bleach or abrasives.
Air Filter
The air filter behind the front grille should be checked and cleaned at least every 30 days or more often if necessary.
To remove:
Pull the tab on the right side of the unit until the filter is out.
To remove:
Open the inlet grille by pulling downward on the tabs at the top upper corners of the inlet grille until the grille is in a 45º position. Remove the filter.
Clean the filter with warm, soapy water. Rinse and let the filter dry before replacing it. Do not clean the filter in a dishwasher.
CAUTION DO NOT operate the air conditioner without a filter because dirt and lint will clog it and reduce performance.
Outdoor Coils
The coils on the outdoor side of the air conditioner should be checked regularly. If they are clogged with dirt or soot, they may be professionally cleaned.
How to Insert the Batteries in the Remote Control
Remove the battery cover by sliding it according to the arrow direction.
Insert new batteries, making sure that the (+) and (–) of battery are installed correctly.
Reattach the cover by sliding it back into position.
NOTES:
Use 2 “AAA” (1.5 volt) batteries. Do not use rechargeable batteries.
Remove the batteries from the remote control if the system is not going to be used for a long time.
Do not mix old and new batteries. Do not mix standard (carbon-zinc) or rechargeable (ni-cad, ni-mh, etc) batteries.
INSTALLATION INSTRUCTIONS
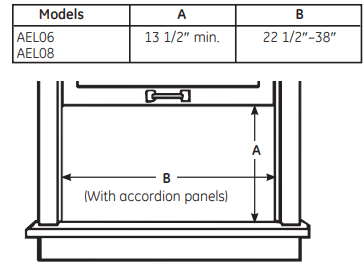
1 WINDOW REQUIREMENTS
These instructions are for a standard double-hung window. You will need to modify them for other types of windows.
The air conditioner can be installed without the accordion panels if needed to fit in a narrow window. See the window opening dimensions.
All supporting parts must be secured to firm wood, masonry or metal.
The electrical outlet must be within reach of the power cord.
Follow the dimensions in the table and illustration for your model.
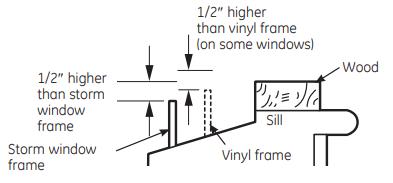
2 STORM WINDOW REQUIREMENTS
A storm window frame will not allow the air conditioner to tilt toward the outside, and will keep it from draining properly. To adjust for this, attach a piece of wood to the sill.
WOOD PIECES
WIDTH: 2”
LENGTH: Long enough to fit inside the window frame.
THICKNESS: To determine the thickness, place a piece of wood on the sill to make it 1/2” higher than the top of the storm window frame or the vinyl frame. Attach securely with nails or screws provided by the installer.
3 ATTACH THE TOP MOUNTING RAIL SEAL STRIP
(Some models may have the seal strip already attached to the top mounting rail. If applicable, skip this step.)
Remove the backing from the top mounting rail seal strip and attach the seal strip to the bottom of the top mounting rail, along the front edge.
4 PREPARE THE AIR CONDITIONER
A Install the top mounting rail with 4 Type A screws from the outside of the case. Some models may have the top mounting rail already installed.
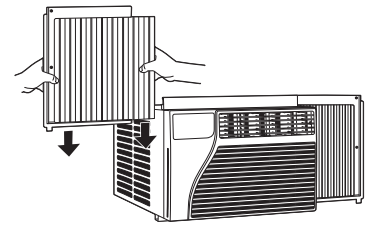
B Hold the accordion panel in one hand and gently pull back to free the open end.
C Slide the free end of the accordion panel into the side panel rails. Slide the panel down. Be sure to leave enough space to slip the top and bottom of the frame into the rails on the cabinet.
NOTE: There is a right and a left accordion panel. Be sure to use the proper panel for each side
D Slide the left and right accordion panels into the top and bottom mounting rails.
5 PREPARE THE WINDOW
Cut the window sash seal to the proper length. Peel off the backing and attach the seal to the underside of the window sash
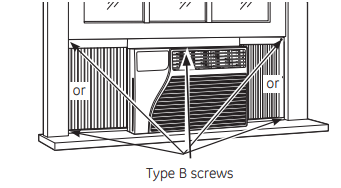
6 INSTALL THE AIR CONDITIONER IN THE WINDOW
A Place the air conditioner on the sill with the bottom mounting rail against its back edge. Center it and close the window securely behind the top mounting rail. It should be level or slightly tilted to the outside. Use a level; about a 1/3 bubble will be the correct case slant to the outside.
B Extend the left and right accordion panels to the vertical window sashes and attach, through the holes in the panels, with 5 Type B screws, as appropriate.
7 INSTALL SUPPORT BRACKET AND FOAM TOP WINDOW GASKET
A CAUTION To prevent broken glass or damage to windows, on vinyl or other similarly constructed windows, attach the window locking bracket to the window side jamb with one screw.
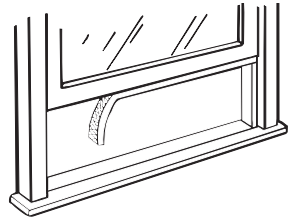
B Cut the foam top window gasket to the window width.
C Stuff the foam between the glass and the window to prevent air and insects from getting into the room.
NOTE: If the gasket supplied does not fit your window, obtain appropriate material locally to provide a proper installation seal.
TROUBLESHOOTING TIPS
Air conditioner does not start
The air conditioner is unplugged.
Make sure the air conditioner plug is pushed completely into the outlet.
The fuse is blown/circuit breaker is tripped.
Check the house fuse/circuit breaker box and replace the fuse or reset the breaker.
Power failure
The unit will automatically re-start in the settings last used after the power is restored.
There is a protective time delay (approximately 3 minutes) to prevent tripping of the compressor overload. For this reason, the unit may not start normal cooling for 3 minutes after it is turned back on.
The current interrupter device is tripped.
Press the RESET button located on the power cord plug.
If the RESET button will not stay engaged, discontinue use of the air conditioner and contact a qualified service technician.
Air conditioner does not cool as it should
Airflow is restricted.
Make sure there are no curtains, blinds or furniture blocking the front of the air conditioner.
The temp control may not be set correctly.
On models with touch pads: In the Cool mode, press the Decrease ▼ pad.
On models with control knobs, turn the temperature knob to a higher number.
The air filter is dirty.
Clean the filter at least every 30 days. See the Care and Cleaning section.
The room may have been hot.
When the air conditioner is first turned on, you need to allow time for the room to cool down.
Cold air is escaping.
Check for open furnace registers and cold air returns.
Cooling coils have iced up.
See “Air conditioner freezing up” below.
Air conditioner freezing up
Ice blocks the air flow and stops the air conditioner from cooling the room.
On models with control knobs, set the mode control at High Fan or High Cool with the Temp at 1 or 2.
On models with touch pads, set the controls at High Fan or High Cool and set the thermostat to a higher temperature.
The remote control is not working
The batteries are inserted incorrectly.
Check the position of the batteries. They should be inserted in the opposite (+) and (–) direction.
The batteries may be dead.
Replace the batteries.
Water drips outside
Hot, humid weather
This is normal.
Water drips indoors
The air conditioner is not tilted to the outside.
For proper water disposal, make sure the air conditioner slants slightly from the case front to the rear.
Water collects in base pan
Moisture removed from air and drains into base pan.
This is normal for a short period in areas with little humidity; normal for a longer period in very humid areas
Normal Operating Sounds
You may hear a pinging noise caused by water being picked up and thrown against the condenser on rainy days or when the humidity is high. This design feature helps remove moisture and improve efficiency.
You may hear the thermostat click when the compressor cycles on and off.
Water will collect in the base pan during high humidity or on rainy days. The water may overflow and drip from the outdoor side of the unit.
The fan may run even when the compressor does not.
 /Decrease
  Pads
Pads