
49-85211-6 09-15 GE
Safety Information ...........2
Warranty .......................8
Assistance / Accessories .....9
Using The Cooktop
Surface Burners ..................10
Griddle ...........................12
Using The Oven
Oven Controls ....................14
Special Features .................16
Oven Racks ......................17
Oven Air Vents ...................17
Cookware ........................18
Cooking Modes ..................18
Probe ............................19
Cooking Guide ...................20
Warming Drawer Guide ..........21
Aluminum Foil and Oven Liners . . .21
Care and Cleaning
Cleaning the Oven ...............22
Cleaning The Cooktop ............24
Cleaning The Door and Drawer . . .27
Maintenance .....................28
Troubleshooting Tips ........29
Ranges
Self-Cleaning Gas
Write the model and serial
numbers here:
Model # __________________
Serial # ___________________
You can find the rating label on the
front behind the range drawer.
For a Spanish version of this
manual, visit our website at
GEAppliances.com.
Para consultar una version
en español de este manual
de instrucciones, visite
nuestro sitio de internet
GEAppliances.com.
Owner’s Manual
2
49-85211-6
- Do not store or use gasoline or other flammable vapors and liquids in the vicinity of this or any other
appliance.
- WHAT TO DO IF YOU SMELL GAS
Ŷ Do not try to light any appliance.
Ŷ Do not touch any electrical switch; do not use any phone in your building.
Ŷ Immediately call your gas supplier from a neighbor’s phone. Follow the gas supplier’s instructions.
Ŷ If you cannot reach your gas supplier, call the fire department.
- Installation and service must be performed by a qualified installer, service agency or the gas supplier.
WARNING
If the information in this manual is not followed exactly, a fire or explosion may
result, causing property damage, personal injury or death.
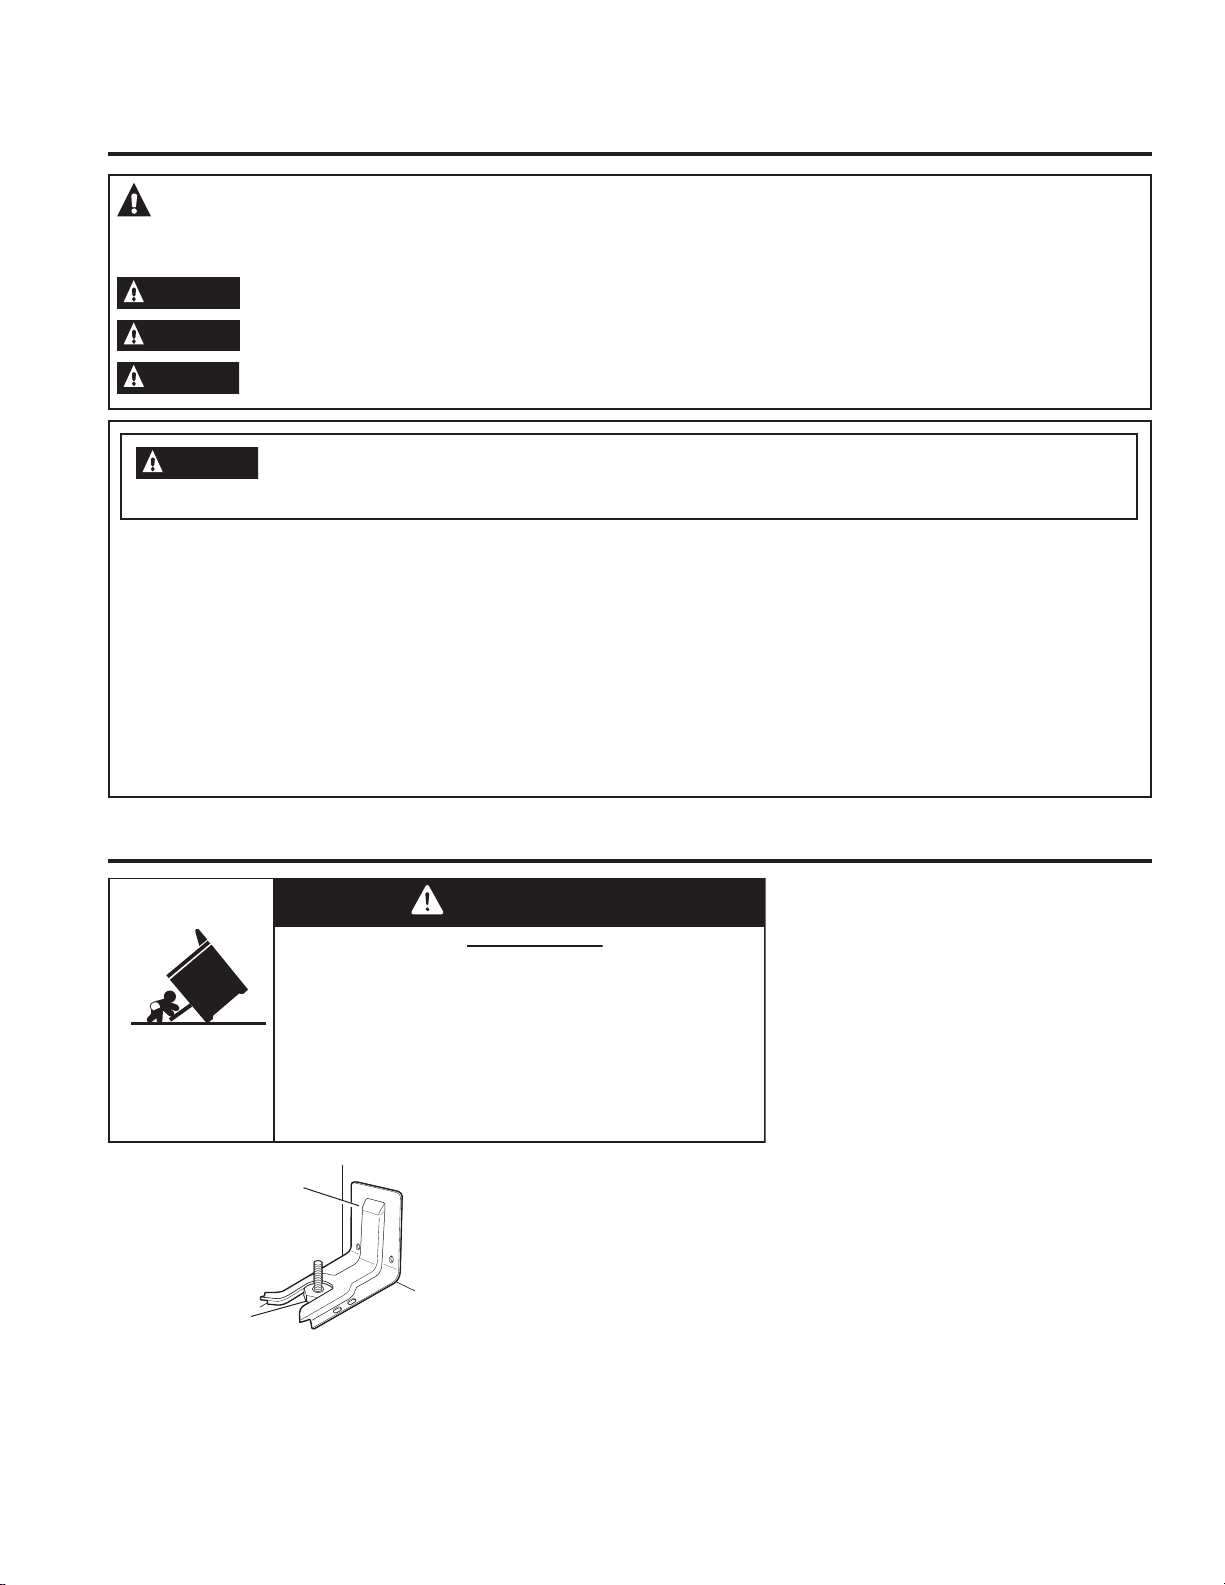
To reduce the risk of tipping the
range, the range must be secured by
a properly installed anti-tip bracket.
See installation instructions shipped
with the bracket for complete details
before attempting to install.
For Freestanding and Slide-In
Ranges
To check if the bracket is installed
and engaged properly, look
underneath the range to see that
the rear leveling leg is engaged in the bracket. On some models, the
storage drawer or kick panel can be removed for easy inspection. If
visual inspection is not possible, slide the range forward, confirm the
anti-tip bracket is securely attached to the floor or wall, and slide the
range back so the rear leveling leg is under the anti-tip bracket.
If the range is pulled from the wall for any reason, always repeat
this procedure to verify the range is properly secured by the anti-tip
bracket.
Never completely remove the leveling legs or the range will not be
secured to the anti-tip device properly.
Freestanding and Slide-In Ranges
Anti-Tip
Bracket
Leveling Leg
A child or adult can tip the range and be killed.
Verify the anti-tip bracket has been properly installed
and engaged.
Ensure the anti-tip bracket is re-engaged when the range
is moved.
Do not operate the range without the anti-tip bracket in
place and engaged.
Failure to follow these instructions can result in death or
serious burns to children or adults.
Tip-Over Hazard
WARNING
SAVE THESE INSTRUCTIONS
IMPORTANT SAFETY INFORMATION.
READ ALL INSTRUCTIONS BEFORE USING.
ANTI-TIP DEVICE
SAFETY INFORMATION
This is the safety alert symbol. This symbol alerts you to potential hazards that can kill or hurt you and others.
All safety messages will follow the safety alert symbol and the word “DANGER”, “WARNING”, or “CAUTION”. These
words are defined as:
DANGER
Indicates a hazardous situation which, if not avoided, will result in death or serious injury.
WARNING
Indicates a hazardous situation which, if not avoided, could result in death or serious injury.
CAUTION
Indicates a hazardous situation which, if not avoided, could result in minor or moderate injury.
49-85211-6
3
WARNING
GENERAL SAFETY INSTRUCTIONS
STATE OF CALIFORNIA PROPOSITION 65 WARNING
The California Safe Drinking Water and Toxic Enforcement Act requires the Governor of California to
publish a list of substances known to the state to cause cancer, birth defects or other reproductive harm,
and requires businesses to warn customers of potential exposure to such substances.
WARNING
This product contains one or more chemical known to the State of California to cause
cancer, birth defects or other reproductive harm.
Self-clean ovens can cause low-level exposure to some of these substances, including carbon monoxide,
during the cleaning cycle. Exposure can be minimized by venting with an open window or using a
ventilation fan or hood.
SAFETY INFORMATION
SAVE THESE INSTRUCTIONS
WARNING
NEVER use this appliance as a
space heater to heat or warm the room. Doing
so may result in carbon monoxide poisoning
and overheating of the oven.
Ŷ 8VHWKLVDSSOLDQFHIRULWVLQWHQGHGSXUSRVHDV
described in this owner’s manual.
Ŷ +DYH\RXUUDQJHLQVWDOOHGDQGSURSHUO\
grounded by a qualified installer in accordance
with the provided installation instructions. Any
adjustment and service should be performed
only by a qualified gas range installers or service
technicians. Do not attempt to repair or replace
any part of your range unless it is specifically
recommended in this manual.
Ŷ <RXUUDQJHLVVKLSSHGIURPWKHIDFWRU\VHWIRU
use with natural gas. It can be converted for use
with LP gas. If required, these adjustments must
be made by a qualified technician in accordance
with the installation instructions and local codes.
The agency performing this work assumes
responsibility for the conversion.
Ŷ +DYHWKHLQVWDOOHUVKRZ\RXWKHORFDWLRQRIWKH
range gas shut-off valve and how to turn it off if
necessary.
Ŷ 3OXJ\RXUUDQJHLQWRDYROWJURXQGHGRXWOHW
only. Do not remove the round grounding
prong from the plug. If in doubt about the
grounding of the home electrical system, it is
your responsibility and obligation to have an
ungrounded outlet replaced with a properly
grounded, three prong outlet in accordance with
the National Electrical Code. Do not use on
extension cord with this appliance.
Ŷ %HIRUHSHUIRUPLQJDQ\VHUYLFHXQSOXJWKHUDQJH
or disconnect the power supply at the household
distribution panel by removing the fuse or
switching off the circuit breaker.
Ŷ %HVXUHDOOSDFNLQJPDWHULDOVDUHUHPRYHGIURP
the range before operating to prevent ignition of
these materials
Ŷ $YRLGVFUDWFKLQJRULPSDFWLQJJODVVGRRUV
cooktops or control panels. Doing so may lead to
glass breakage. Do not cook on a product with
broken glass. Shock, fire or cuts may occur.
Ŷ 'RQRWOHDYHFKLOGUHQDORQH²FKLOGUHQVKRXOG
not be left alone or unattended in an area where
an appliance is in use. They should never be
allowed to climb, sit or stand on any part of the
appliance.
Ŷ
CAUTION
Do not store items of interest to
children in cabinets above an oven - children
climbing on the oven to reach items could be
seriously injured.
Ŷ 'RQRWDOORZDQ\RQHWRFOLPEVWDQGRUKDQJRQ
the oven door, drawer or cooktop. They could
damage the range or tip it over causing severe
injury or death.
4
49-85211-6
Ŷ 'RQRWVWRUHRUXVHIODPPDEOHPDWHULDOVLQ
an oven or near the cooktop, including paper,
plastic, pot holders, linens, wall coverings,
curtains, drapes and gasoline or other
flammable vapors and liquids.
Ŷ 1HYHUZHDUORRVHILWWLQJRUKDQJLQJJDUPHQWV
while using the appliance. Avoid storing
commonly used items in cabinets above the
range and be careful when reaching over the
range. Clothing in close proximity to burners or
hot surfaces may ignite causing severe burns.
Ŷ 'RQRWOHWFRRNLQJJUHDVHRURWKHUIODPPDEOH
materials accumulate in or near the range.
Grease in the oven or on the cooktop may ignite.
Ŷ &OHDQYHQWLODWLQJKRRGVIUHTXHQWO\*UHDVH
should not be allowed to accumulate on the
hood or filter.
IMPORTANT SAFETY INFORMATION.
READ ALL INSTRUCTIONS BEFORE USING.
SAFETY INFORMATION
SAVE THESE INSTRUCTIONS
WARNING
GENERAL SAFETY INSTRUCTIONS (CONT.)
WARNING
KEEP FLAMMABLE MATERIALS AWAY FROM THE OVEN
Failure to do so may result in fire or personal injury.
Ŷ 1HYHUEORFNWKHYHQWVDLURSHQLQJVRIWKH
range. They provide the air inlets and outlets
that are necessary for the range to operate
properly with correct combustion. Air openings
are located at the rear of the cooktop, at the top
and bottom of the oven door, and at the bottom
of the range under the warming drawer, lower
oven drawer or kick panel.
Ŷ 8VHRQO\GU\SRWKROGHUV²PRLVWRUGDPSSRW
holders on hot surfaces may result in burns
from steam. Do not let pot holders touch surface
burners, burner grate, or oven heating element.
Do not use a towel or other bulky cloth in place
of pot holders.
Ŷ 'RQRWWRXFKWKHKHDWLQJHOHPHQWVRUWKH
interior surface of the oven. These surfaces
may be hot enough to burn even though they
are dark in color. During and after use, do
not touch, or let clothing or other flammable
materials contact any interior area of the oven;
allow sufficient time for cooling first. Other
surfaces of the appliance may become hot
enough to cause burns. Potentially hot surfaces
include the burners, grates, oven vent opening,
surfaces near the opening and crevices around
the oven door.
Ŷ 'RQRWKHDWXQRSHQHGIRRGFRQWDLQHUV
Pressure could build up and the container could
burst, causing an injury.
Ŷ &RRNPHDWDQGSRXOWU\WKRURXJKO\²PHDWWR
DWOHDVWDQLQWHUQDOWHPSHUDWXUHRI)DQG
poultry to at least an internal temperature of
)&RRNLQJWRWKHVHWHPSHUDWXUHVXVXDOO\
protects against foodborne illness.
Ŷ 'RQRWXVHDQ\W\SHRIIRLORUOLQHUWRFRYHU
the oven bottom, drip pans or anywhere in the
oven, except as described in this manual. Oven
liners can trap heat or melt, resulting in damage
to the product and risk of shock, smoke or fire.
49-85211-6
5
SAFETY INFORMATION
SAVE THESE INSTRUCTIONS
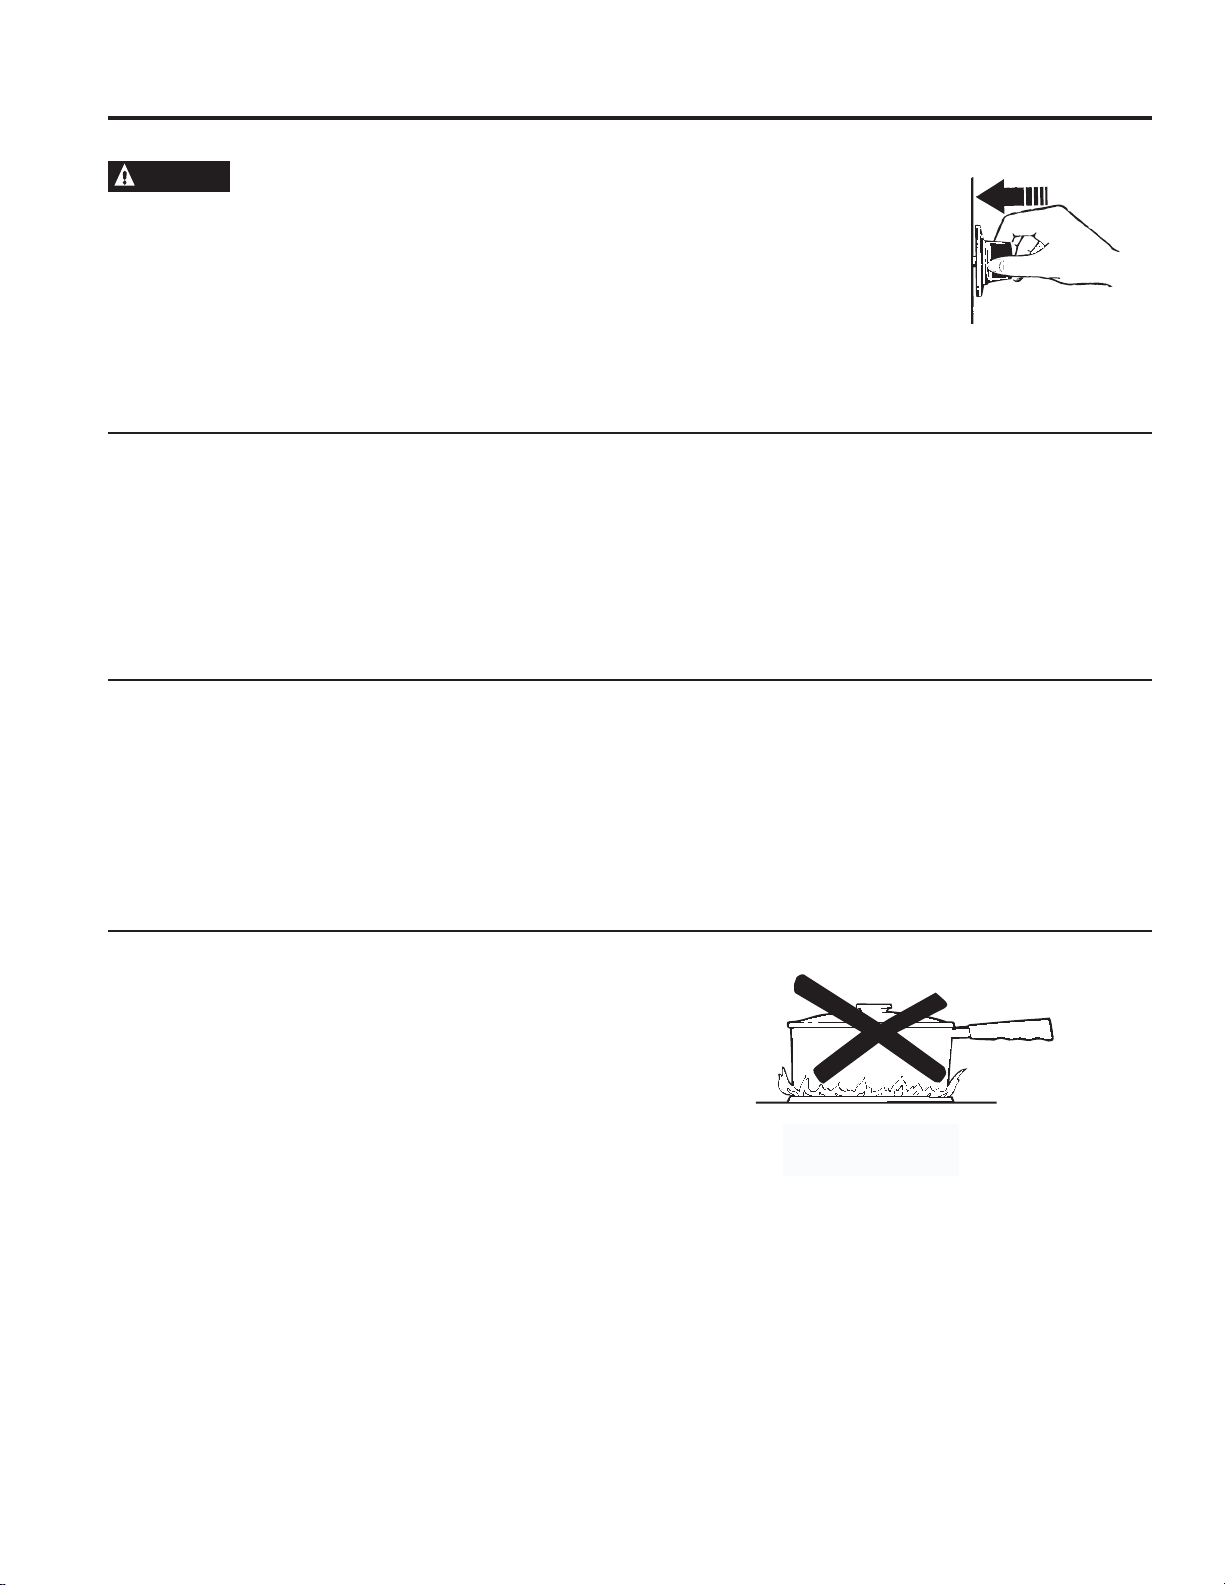
Ŷ 'RQRWXVHZDWHURQJUHDVHILUHV1HYHUSLFNXS
a flaming pan. Turn the controls off. Smother a
flaming pan on a surface burner by covering the
pan completely with a well-fitting lid, cookie sheet
or flat tray. If necessary, use a multi-purpose dry
chemical or foam-type fire extinguisher.
Ŷ ,IWKHUHLVDILUHLQWKHRYHQGXULQJEDNLQJWXUQ
the oven off and keep the door closed until the
fire goes out. If necessary, use a multi-purpose
dry chemical or foam type fire extinguisher.
Ŷ ,IWKHUHLVDILUHLQWKHRYHQGXULQJVHOIFOHDQWXUQ
the oven off and wait for the fire to go out. Do
not force the door open. Introduction of fresh air
at self-clean temperatures may lead to a burst
of flame from the oven. Failure to follow this
instruction may result in severe burns.
Ŷ 1HYHUOHDYHWKHVXUIDFHEXUQHUVXQDWWHQGHGDW
medium or high heat settings. Foods, especially
oily foods, may ignite resulting in fire that could
spread to surrounding cabinets.
Ŷ 1HYHUOHDYHRLOXQDWWHQGHGZKLOHIU\LQJ,I
allowed to heat beyond its smoking point, oil
may ignite resulting in fire that may spread
to surrounding cabinets. Use a deep fat
thermometer whenever possible to monitor oil
temperature.
Ŷ 7RDYRLGRLOVSLOORYHUDQGILUHXVHDPLQLPXP
amount of oil when shallow pan-frying and
avoid cooking frozen foods with excessive
amounts of ice.
Ŷ 8VHSURSHUSDQVL]HDQGDYRLGSDQVWKDWDUH
unstable or easily tipped. Select cookware that is
PDWFKHGWRWKHVL]HRIWKHEXUQHU%XUQHUIODPHV
should be adjusted so that they do not extend
beyond the bottom of the pan. Excessive flame
may be hazardous.
Ŷ $OZD\VXVHWKH/,7(SRVLWLRQZKHQLJQLWLQJWKHWRS
burners and make sure the burners have ignited.
Ŷ :KHQXVLQJJODVVFHUDPLFFRRNZDUHPDNHVXUH
it is suitable for cooktop service; others may
break because of sudden change in temperature.
Ŷ 7RPLQLPL]HWKHSRVVLELOLW\RIEXUQVLJQLWLRQRI
flammable materials and spillage, the handle of a
container should be turned toward the center of
the range without extending over nearby burners.
Ŷ :KHQSUHSDULQJIODPLQJIRRGVXQGHUDKRRGWXUQ
the fan on.
Ŷ 'RQRWXVHDZRNZLWKDURXQGPHWDOVXSSRUW
ring. The ring may trap heat and block air to the
burner resulting in a carbon monoxide hazard.
Ŷ 'RQRWDWWHPSWWROLIWWKHFRRNWRS'RLQJVRPD\
damage the gas tubing to the surface burners
resulting in a gas leak and risk of fire.
Ŷ :KHQGLVDEOLQJ/RFN&RQWURORQVRPHPRGHOV
make sure the surface controls are set to the
OFF position. This will prevent unintended gas
flow from the burners.
Ŷ 'RQRWXVHDOXPLQXPIRLOWRFRYHUWKHJUDWHVRU
line any part of the cooktop. Doing so may result
in carbon monoxide poisoning, overheating of the
cooktop surfaces, or a potential fire hazard.
WARNING
IN THE EVENT OF A FIRE, TAKE THE FOLLOWING
STEPS TO PREVENT INJURY AND FIRE SPREADING
WARNING
COOKTOP SAFETY INSTRUCTIONS

6
49-85211-6
IMPORTANT SAFETY INFORMATION.
READ ALL INSTRUCTIONS BEFORE USING.
SAFETY INFORMATION
SAVE THESE INSTRUCTIONS
WARNING
OVEN SAFETY INSTRUCTIONS
WARNING
SELF-CLEANING OVEN SAFETY INSTRUCTIONS
WARNING
NEVER cover any slots, holes,
or passages in the oven bottom or cover an
entire rack with materials such as aluminum
foil or oven liners. Doing so blocks air flow
through the oven and may cause carbon
monoxide poisoning. Never place foil or oven
liners on the oven bottom. They can trap
heat causing risk of smoke or fire.
Ŷ Use this appliance for its intended purpose as
described in this owner’s manual.
Ŷ Stand away from the range when opening the
RYHQGRRU+RWDLURUVWHDPZKLFKHVFDSHVFDQ
FDXVHEXUQVWRKDQGVIDFHDQGRUH\HV
Ŷ Keep the oven free from grease buildup. Grease
in the oven may ignite.
Ŷ Place oven racks in desired location while oven
is cool. If rack must be moved while oven is hot,
be careful to avoid touching hot surfaces.
Ŷ Pull the oven rack to the stop-lock position when
loading and unloading food from the oven. This
helps prevent burns from touching hot surfaces
of the door and oven walls.
Ŷ Do not leave items such as paper, cooking
utensils or food in the oven when not in use.
Items stored in an oven can ignite.
Ŷ Do not leave items on the cooktop near the oven
vent which is in the center of the backguard.
Items may overheat resulting in a risk of fire or
burns.
Ŷ When using cooking or roasting bags in the
oven, follow the manufacturer’s directions.
Ŷ Never broil with door open. Open-door broiling
is not permitted due to overheating of control
knobs.
The self-cleaning feature operates the oven at temperatures high enough to burn away food soils in the
oven. Follow these instructions for safe operation.
Ŷ Do not touch oven surfaces during self-clean
operation. Keep children away from the oven
during self-cleaning. Failure to follow these
instructions may cause burns.
Ŷ%HIRUHRSHUDWLQJWKHVHOIFOHDQF\FOHUHPRYH
pans, shiny metal oven racks and other utensils
from the oven. Only porcelain-coated oven racks
may be left in the oven. Do not use self-clean to
clean other parts, such as grates.
Ŷ%HIRUHRSHUDWLQJWKHVHOIFOHDQF\FOHZLSH
grease and food soils from the oven. Excessive
amount of grease may ignite leading to smoke
damage to your home.
Ŷ If the self-cleaning mode malfunctions, turn the
RYHQRIIDQGGLVFRQQHFWWKHSRZHUVXSSO\+DYH
it serviced by a qualified technician.
Ŷ Do not use oven cleaners. No commercial oven
cleaner or oven liner protective coating of any
kind should be used in or around any part of the
oven.

49-85211-6
7
SAFETY INFORMATION
SAVE THESE INSTRUCTIONS
WARNING
WARMING DRAWER SAFETY INSTRUCTIONS (Some models)
Ŷ The purpose of the warming drawer is to hold hot
FRRNHGIRRGVDWVHUYLQJWHPSHUDWXUH%DFWHULD
ZLOOJURZYHU\UDSLGO\LQIRRGWKDWLVEHWZHHQ
DQG)'RQRWSXWFROGIRRGLQZDUPLQJ
drawer. Do not keep food in the warming drawer
IRUPRUHWKDQKRXUV)DLOXUHWRIROORZWKHVH
instructions may result in foodborne illness.
Ŷ Do not leave paper products, plastics, canned
food or combustible materials in the drawer. They
may ignite.
Ŷ Do not touch the heating element or the interior
surface of the drawer. These surfaces may be
hot enough to cause burns.
Ŷ Use care when opening the drawer. Open the
drawer a crack and let hot air or steam escape
EHIRUHUHPRYLQJRUUHSODFLQJIRRG+RWDLURU
steam that escapes can cause burns to hands,
IDFHDQGRUH\HV
Ŷ Do not use aluminum foil to line the warming
drawer. Foil is an excellent heat insulator and
will trap heat beneath it. This will upset the
performance of the drawer and potentially cause
a fire hazard.
WARNING
REMOTE ENABLE EQUIPMENT (Some models)
The remote enable equipment installed on this oven
has been tested and found to comply with the limits
IRUD&ODVV%GLJLWDOGHYLFHSXUVXDQWWRSDUWRI
the FCC Rules. These limits are designed to:
(a) provide reasonable protection against harmful
interference in a residential installation. This
equipment generates, uses and can radiate radio
frequency energy and, if not installed and used
in accordance with the instructions, may cause
harmful interference to radio communications.
+RZHYHUWKHUHLVQRJXDUDQWHHWKDWLQWHUIHUHQFH
will not occur in a particular installation. If this
equipment does cause harmful interference to radio
or television reception, which can be determined
by turning the equipment off and on, the user is
encouraged to try to correct the interference by one
or more of the following measures:
Ŷ5HRULHQWRUUHORFDWHWKHUHFHLYLQJDQWHQQD
Ŷ,QFUHDVHWKHVHSDUDWLRQEHWZHHQWKHHTXLSPHQW
and receiver.
Ŷ&RQQHFWWKHHTXLSPHQWLQWRDQRXWOHWRQD
circuit different from that to which the receiver is
connected.
Ŷ&RQVXOWWKHGHDOHURUDQH[SHULHQFHGUDGLR79
technician for help.
(b) accept any interference received, including
interference that may cause undesired operation of
the device.
Note that any changes or modifications to the
wireless communication device installed on this
oven that are not expressly approved by the
manufacturer could void the user's authority to
operate the equipment.

8
49-85211-6
Thank You! ... for your purchase of a GE Brand appliance.
WARRANTY
GE Gas Range Warranty
GEAppliances.com
All warranty service is provided by our Factory Service Centers, or an authorized Customer Care
®
technician.
7RVFKHGXOHVHUYLFHRQOLQHYLVLWXVDWZZZJHDSSOLDQFHVFRPVHUYLFHBDQGBVXSSRUWRUFDOO*(&$5(6
3OHDVHKDYHVHULDOQXPEHUDQGPRGHOQXPEHUDYDLODEOHZKHQFDOOLQJIRUVHUYLFH
Servicing your appliance may require the use of the onboard data port for diagnostics. This gives a GE factory
service technician the ability to quickly diagnose any issues with your appliance and helps GE improve its products
by providing GE with information on your appliance. If you do not want your appliance data to be sent to GE, please
advise your technician not to submit the data to GE at the time of service.
For the period of one year from the date of the original purchase. GE will provide any part of the range which fails due
to a defect in materials or workmanship. During this limited one-year warranty, GE will also provide, free of charge, all
labor and in-home service to replace the defective part.
What GE will not cover:
Ŷ Service trips to your home to teach you how to use
the product.
Ŷ Improper installation, delivery or maintenance.
Ŷ Failure of the product if it is abused, misused,
modified or used for other than the intended purpose
or used commercially.
Ŷ Replacement of house fuses or resetting of circuit
breakers.
Ŷ Damage to the product caused by accident, fire,
floods or acts of God.
Ŷ Damage to finish, such as surface rust, tarnish, or
VPDOOEOHPLVKHVQRWUHSRUWHGZLWKLQKRXUVRI
delivery.
Ŷ Incidental or consequential damage caused by
possible defects with this appliance.
Ŷ Damage caused after delivery.
Ŷ Product not accessible to provide required service.
Ŷ 6HUYLFHWRUHSDLURUUHSODFHOLJKWEXOEVH[FHSWIRU/('
lamps.
EXCLUSION OF IMPLIED WARRANTIES
<RXUVROHDQGH[FOXVLYHUHPHG\LVSURGXFWUHSDLUDVSURYLGHGLQWKLV/LPLWHG:DUUDQW\$Q\LPSOLHGZDUUDQWLHV
including the implied warranties of merchantability or fitness for a particular purpose, are limited to one year or the
shortest period allowed by law.
This warranty is extended to the original purchaser and any succeeding owner for products purchased for home use
within the USA. If the product is located in an area where service by a GE Authorized Servicer is not available, you
may be responsible for a trip charge or you may be required to bring the product to an Authorized GE Service location
for service. In Alaska, the warranty excludes the cost of shipping or service calls to your home.
Some states do not allow the exclusion or limitation of incidental or consequential damages. This warranty gives you
specific legal rights, and you may also have other rights which vary from state to state. To know what your legal rights
are, consult your local or state consumer affairs office or your state’s Attorney General.
Warrantor: General Electric Company. Louisville, KY 40225
Extended Warranties: Purchase a GE extended warranty and learn about special discounts that are available while
\RXUZDUUDQW\LVVWLOOLQHIIHFW<RXFDQSXUFKDVHLWRQOLQHDQ\WLPH
ZZZJHDSSOLDQFHVFRPVHUYLFHBDQGBVXSSRUWVKRSIRUH[WHQGHGVHUYLFHSODQVKWP
RUFDOOGXULQJQRUPDOEXVLQHVVKRXUV*(&RQVXPHU+RPH6HUYLFHVZLOOVWLOOEHWKHUHDIWHU\RXU
warranty expires.
Register Your Appliance: Register your new appliance on-line at your convenience!
ZZZJHDSSOLDQFHVFRPVHUYLFHBDQGBVXSSRUWUHJLVWHU
Timely product registration will allow for enhanced communication and prompt service under the terms of your warranty,
VKRXOGWKHQHHGDULVH<RXPD\DOVRPDLOLQWKHSUHSULQWHGUHJLVWUDWLRQFDUGLQFOXGHGLQWKHSDFNLQJPDWHULDO
Staple your receipt here. Proof of the original purchase
date is needed to obtain service under the warranty.

49-85211-6
9
Schedule Service: Expert GE repair service is only one
step away from your door. Get on-line and schedule your
VHUYLFHDWZZZJHDSSOLDQFHVFRPVHUYLFHBDQGBVXSSRUW
2UFDOO*(&$5(6GXULQJQRUPDO
business hours.
Remote Connectivity: For assistance with oven wireless
QHWZRUNFRQQHFWLYLW\SOHDVHFDOO
Parts and Accessories: Individuals qualified to service
their own appliances can have parts or accessories sent
GLUHFWO\WRWKHLUKRPHV9,6$0DVWHU&DUGDQG'LVFRYHU
FDUGVDUHDFFHSWHG2UGHURQOLQHWRGD\KRXUV
HYHU\GD\RUE\SKRQHDWGXULQJQRUPDO
business hours.
Instructions contained in this manual cover procedures
to be performed by any user. Other servicing generally
should be referred to qualified service personnel. Caution
must be exercised, since improper servicing may cause
unsafe operation.
Real Life Design Studio: GE supports the Universal
Design concept of products, services and environments
that can be used by people of all ages, sizes and
capabilities. We recognize the need to design for a wide
range of physical and mental abilities and impairments.
For details of GE’s Universal Design applications,
including kitchen design ideas for people with disabilities,
check out our Website today. For the hearing impaired,
SOHDVHFDOO7''*($&
Contact Us: If you are not satisfied with the service you
receive from GE, contact us on our Website with all the
details including your phone number, or write to:
General Manager, Customer Relations
GE Appliances, Appliance Park Louisville, KY 40225
ASSISTANCE / ACCESSORIES
7U\WKH*($SSOLDQFHV:HEVLWHwww.geappliances.com/service_and_support/KRXUVDGD\DQ\GD\RIWKH
\HDU)RUJUHDWHUFRQYHQLHQFHDQGIDVWHUVHUYLFH\RXFDQQRZGRZQORDG2ZQHU¶V0DQXDOVRUGHUSDUWVRUHYHQ
schedule service on-line.
Have a question or need assistance with your appliance?
Accessories
Looking For Something More?
GE offers a variety of accessories to improve your cooking and maintenance experiences!
To place an order visit us online at:
www.GEApplianceParts.com86RUwww.GEAppliances.ca&DQDGD
or call 800.626.200286800.661.1616&DQDGD
The following products and more are available:
Accessories
6PDOO%URLOHU3DQô´[ó´[ò³ :%;86'*&DQDGD
/DUJH%URLOHU3DQô´[ó´[ò³ :%;86'*&DQDGD
;/%URLOHU3DQ´[ó´[³ :%;861RWDYDLODEOHLQ&DQDGD
Parts
Oven racks Part numbers vary by model
Oven burners Part numbers vary by model
Light bulbs Part numbers vary by model
Cleaning Supplies
&LWUX6KLQH6WDLQOHVV6WHHO:LSHV :;;
&HUDPD%U\WH6WDLQOHVV6WHHO$SSOLDQFH&OHDQHU 30;
How to Remove Protective Shipping Film and Packaging Tape
Carefully grasp a corner of the protective shipping film
with your fingers and slowly peel it from the appliance
surface. Do not use any sharp items to remove the film.
Remove all of the film before using the appliance for the
first time.
To assure no damage is done to the finish of the
product, the safest way to remove the adhesive from
packaging tape on new appliances is an application of
a household liquid dishwashing detergent. Apply with a
soft cloth and allow to soak.
NOTE: The adhesive must be removed from all parts. It
cannot be removed if it is baked on.
10
49-85211-6
These flames are too
large for the pot
Surface Burners
USING THE COOKTOP: Surface Burners
After Lighting a Burner
Ŷ 'RQRWRSHUDWHWKHEXUQHUIRUDQH[WHQGHGSHULRGRI
time without cookware on the grate. The finish on the
grate may discolor or chip without cookware to absorb
the heat.
Ŷ 'RQRWDWWHPSWWRGLVDVVHPEOHDQ\EXUQHUZKLOH
another burner is on. An electric shock may result,
which could cause you to knock over hot cookware.
Ŷ %HVXUHWKHEXUQHUVDQGJUDWHVDUHFRROEHIRUH\RX
place your hand, a pot holder or cleaning materials on
them.
How to Light a Surface Burner
WARNING
Burners should be operated only
when covered by cookware. Burner flames not
covered by cookware present a risk of fire or
clothing ignition. Never let flames extend beyond
the sides of the cookware. Failure to comply may
result in serious injury.
0DNHVXUHDOOEXUQHUVDUHLQWKHLUFRUUHFWORFDWLRQVDQG
fully assembled before attempting to operate any burner.
Select a burner and find its control knob. Push the knob
in and turn it to the LITE position.
<RXZLOOKHDUDFOLFNLQJQRLVH²
the sound of the electric spark
igniting the burner. When one
burner is turned to LITE, all
burners will spark. Sparking will
continue as long as the knob
remains at LITE. Once gas is
ignited, turn the knob to adjust
the flame size.
Use of the Surface Burners
<RXUJDVUDQJHWRSKDVVHDOHGJDVEXUQHUV7KH\RIIHU
convenience, cleanability and flexibility for a wide range
of cooking applications.
The smallest burner is the simmer burner. On some
models, the center burner of the triple flame burner
provides an additional simmer burner. A simmer burner
turned down to LO provides precise cooking performance
for foods such as delicate sauces that require low heat
for a long cooking time.
The extra-large burner
is designed to quickly bring large
amounts of liquid to a boil. Some models have a POWER
BOIL™ setting especially designed for use with cookware
ZLWKDGLDPHWHURILQFKHVRUODUJHU
How to Select Flame Size
Watch the flame, not the knob, as you adjust heat. When
rapid heating is desired, the flame size on a burner
should match the size of the cookware you are using.
Flames larger than the bottom of the cookware will not
heat faster and may be hazardous.
Push the control knob in and
turn it to the LITE position.

49-85211-6
11
Do not use stove top grills
Surface Burners (Cont.)
USING THE COOKTOP: Surface Burners
Top-of-Range Cookware
Aluminum:0HGLXPZHLJKWFRRNZDUHLVUHFRPPHQGHG
EHFDXVHLWKHDWVTXLFNO\DQGHYHQO\0RVWIRRGVEURZQ
evenly in an aluminum skillet. Use saucepans with tight-
fitting lids when cooking with minimum amounts of water.
Stainless Steel: This metal alone has poor heating
properties and is usually combined with copper,
aluminum or other metals for improved heat distribution.
Combination metal skillets usually work satisfactorily if
they are used with medium heat as the manufacturer
recommends.
Cast-Iron: If heated slowly, most skillets will give
satisfactory results.
Enamelware: Under some conditions, the enamel of some
cookware may melt. Follow cookware manufacturer’s
recommendations for cooking methods.
Glass:7KHUHDUHWZRW\SHVRIJODVVFRRNZDUH²WKRVH
for oven use only and those for top-of-range cooking
VDXFHSDQVFRIIHHDQGWHDSRWV*ODVVFRQGXFWVKHDW
very slowly.
Heatproof Glass Ceramic: Can be used for either surface
or oven cooking. It conducts heat very slowly and cools very
slowly. Check cookware manufacturer’s directions to be
sure it can be used on gas ranges.
Stove Top Grills
Do not use an after-market stove top grill on your
gas surface burners. A stove top grill will cause
incomplete combustion resulting in carbon monoxide
levels above allowable standards. This could be
hazardous to your health.
Using a Wok
8VHRQO\DIODWERWWRPHGZRNZLWKDGLDPHWHURILQFKHV
RUOHVV0DNHVXUHWKHZRNERWWRPVLWVIODWRQWKHJUDWH
Do not use a wok support ring. Placing the ring over the
burner or grate may cause the burner to work improperly,
resulting in carbon monoxide levels above allowable
standards. This could be hazardous to your health.
In Case of a Power Failure
In case of a power failure, you can light the surface
EXUQHUVRQ\RXUUDQJHZLWKDPDWFK+ROGDOLWPDWFK
to the burner ports, then slowly turn the control knob to
the LITE position. Use extreme caution when lighting
burners this way.
Surface burners in use when an electrical power failure
occurs will continue to operate normally.
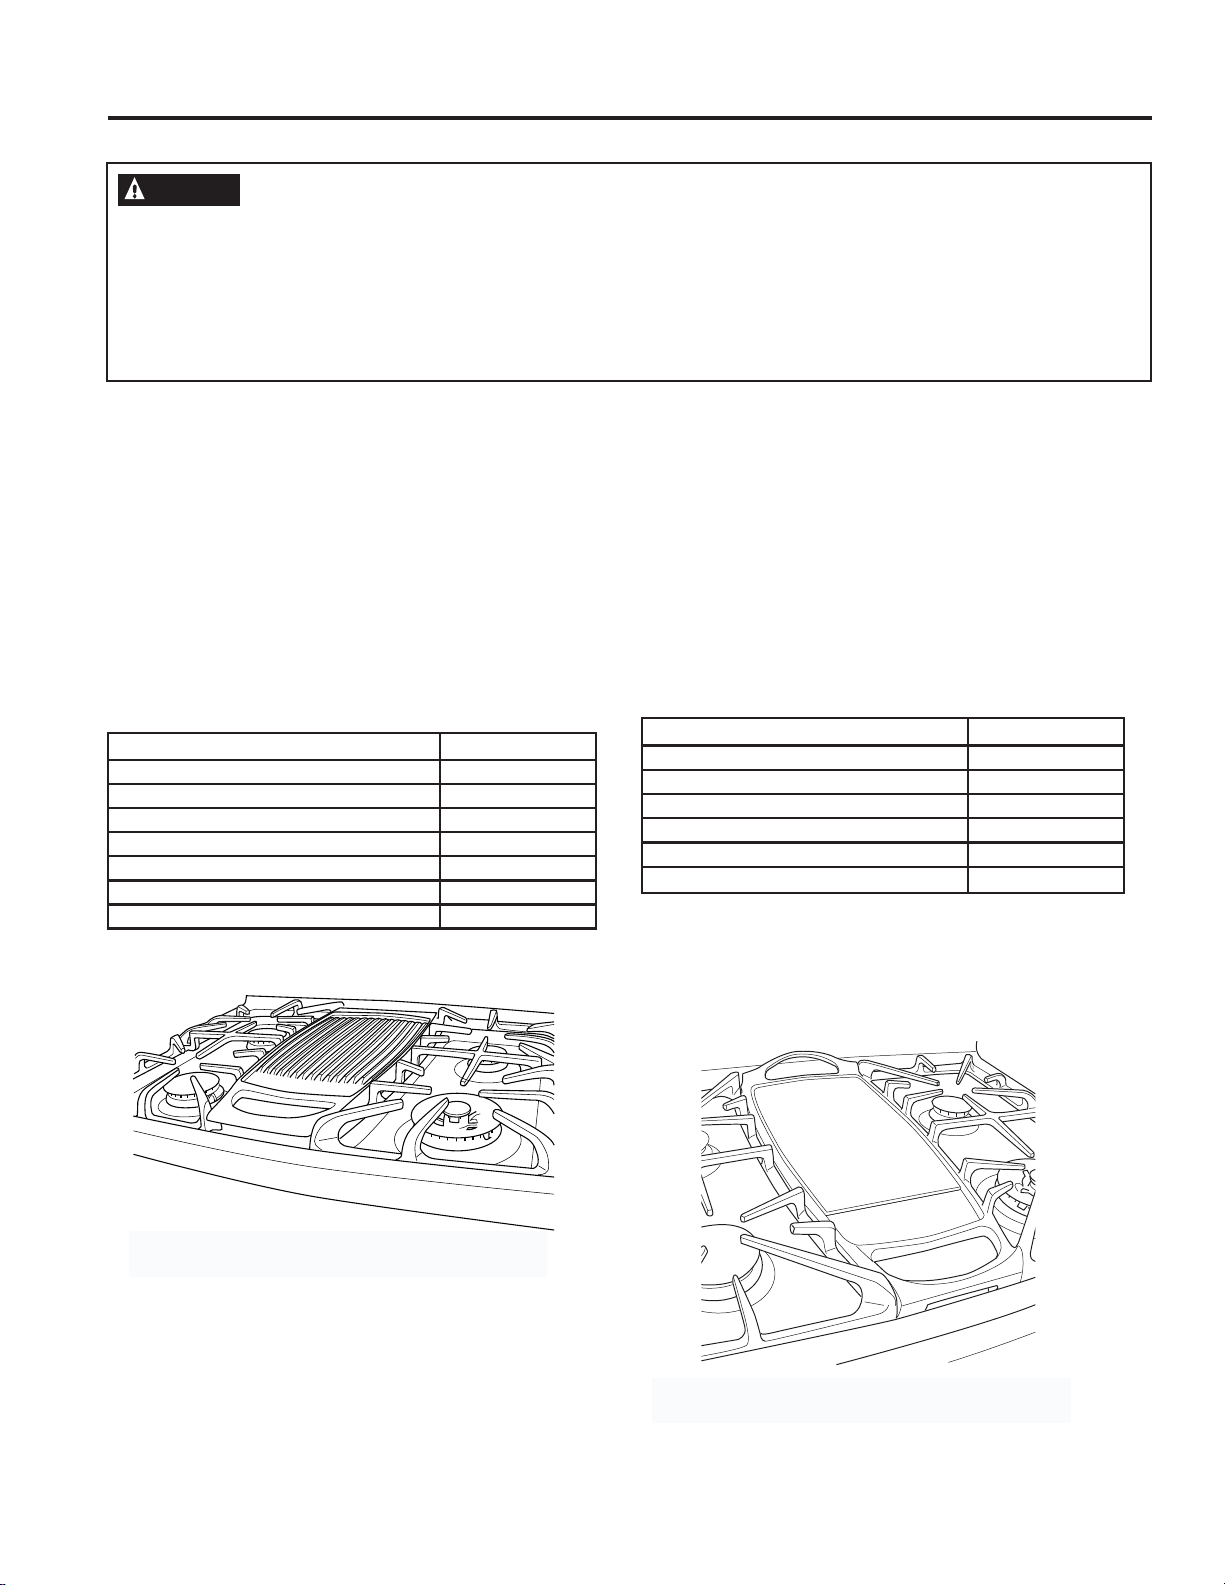
How to Light the Bridge Burner (on some models)
WARNING
Burner flames not covered by
cookware present a risk of fire or clothing ignition.
The bridge burner should be
used only with the griddle in
place. Failure to do so may
result in serious injury.
Ŷ 7KHIURQWDQGUHDUURXQG
burners of the bridge burner
can be operated individually
for cooking. Operation of the
bridge burner to heat your
Preseasoned Chef’s Griddle
requires use of both front and rear burner knobs.
To Light the Bridge Burner:
Ŷ 3RVLWLRQWKHJULGGOHRYHUWKHOHIWJUDWHREVHUYLQJWKH
µ)5217¶DQGµ%$&.¶LQGLFDWLRQVRQWKHJULGGOH
Ŷ /LJKWWKHUHDUEXUQHUE\WXUQLQJWKHNQREWRWKHLITE
position. Continue turning the knob to the Griddle
Burner HI setting to light the bridge burner.
Ŷ /LJKWWKHIURQWEXUQHUE\WXUQLQJWKHNQREWRWKHLITE
position. Once lit, turn the knob further to the Griddle
Burner HI setting.
Ŷ $GMXVWNQREVHWWLQJVDQGSUHKHDWWKHJULGGOHDFFRUGLQJ
to the table for the Preseasoned Chef’s Griddle.
Ŷ )RUXQLIRUPJULGGOHWHPSHUDWXUHVEHVXUHWKHIURQW
and rear knob settings are the same.
Use a flat-bottomed wok.
Bridge
Burner
12
49-85211-6
Type of Food Cook Setting
Warming Tortillas Lo
Pancakes 0HG/R
+DPEXUJHUV 0HG/R
%UHDNIDVW6DXVDJH/LQNV 0HG
Grilled Cheese 0HG/R
%DFRQ 0HG
Eggs Lo
Type of Food Cook Setting
Warming Tortillas 0HG/R
Pancakes 0HG/R
+DPEXUJHUV 0HG
Fried Eggs
0HG/R
%UHDNIDVW6DXVDJH/LQNV 0HG
+RW6DQGZLFKHVVXFKDV*ULOOHG&KHHVH 0HG/R
Griddle (on some models)
USING THE COOKTOP: Griddle
Using the Griddle (on some models)
WARNING
Fire Hazard
Ŷ The PREHEAT setting (on some models) is provided to quickly heat your griddle. Turn heat down
before placing food on the griddle. Cooking at the PREHEAT setting may result in fire.
Ŷ Use care when cooking greasy foods. Spilled grease may result in fire.
Ŷ Never place any items on the griddle when it is not in use. Heat from surrounding burners can heat the
griddle and may result in fire.
Ŷ Place and remove the griddle only when griddle is cool and all surface burners are turned OFF.
7KHULEEHGVLGHRIWKHUHYHUVLEOHJULGGOHRQVRPH
PRGHOVFDQEHXVHGIRUIRRGQRUPDOO\JULOOHG
<RXUJULGGOHSURYLGHVDQH[WUDODUJHFRRNLQJVXUIDFHIRU
meats, pancakes and other foods usually prepared in
DVNLOOHW%HIRUHILUVWXVHULQVHZLWKKRWZDWHUDQGGU\
thoroughly. Prepare the surface with cooking spray or
vegetable oil.
NOTE: Do not place the griddle in a microwave oven.
NOTE: Do not clean the griddle in the self-cleaning
oven. Doing so will remove the seasoned finish. For
instructions on how to clean the griddle, see Care and
Cleaning section.
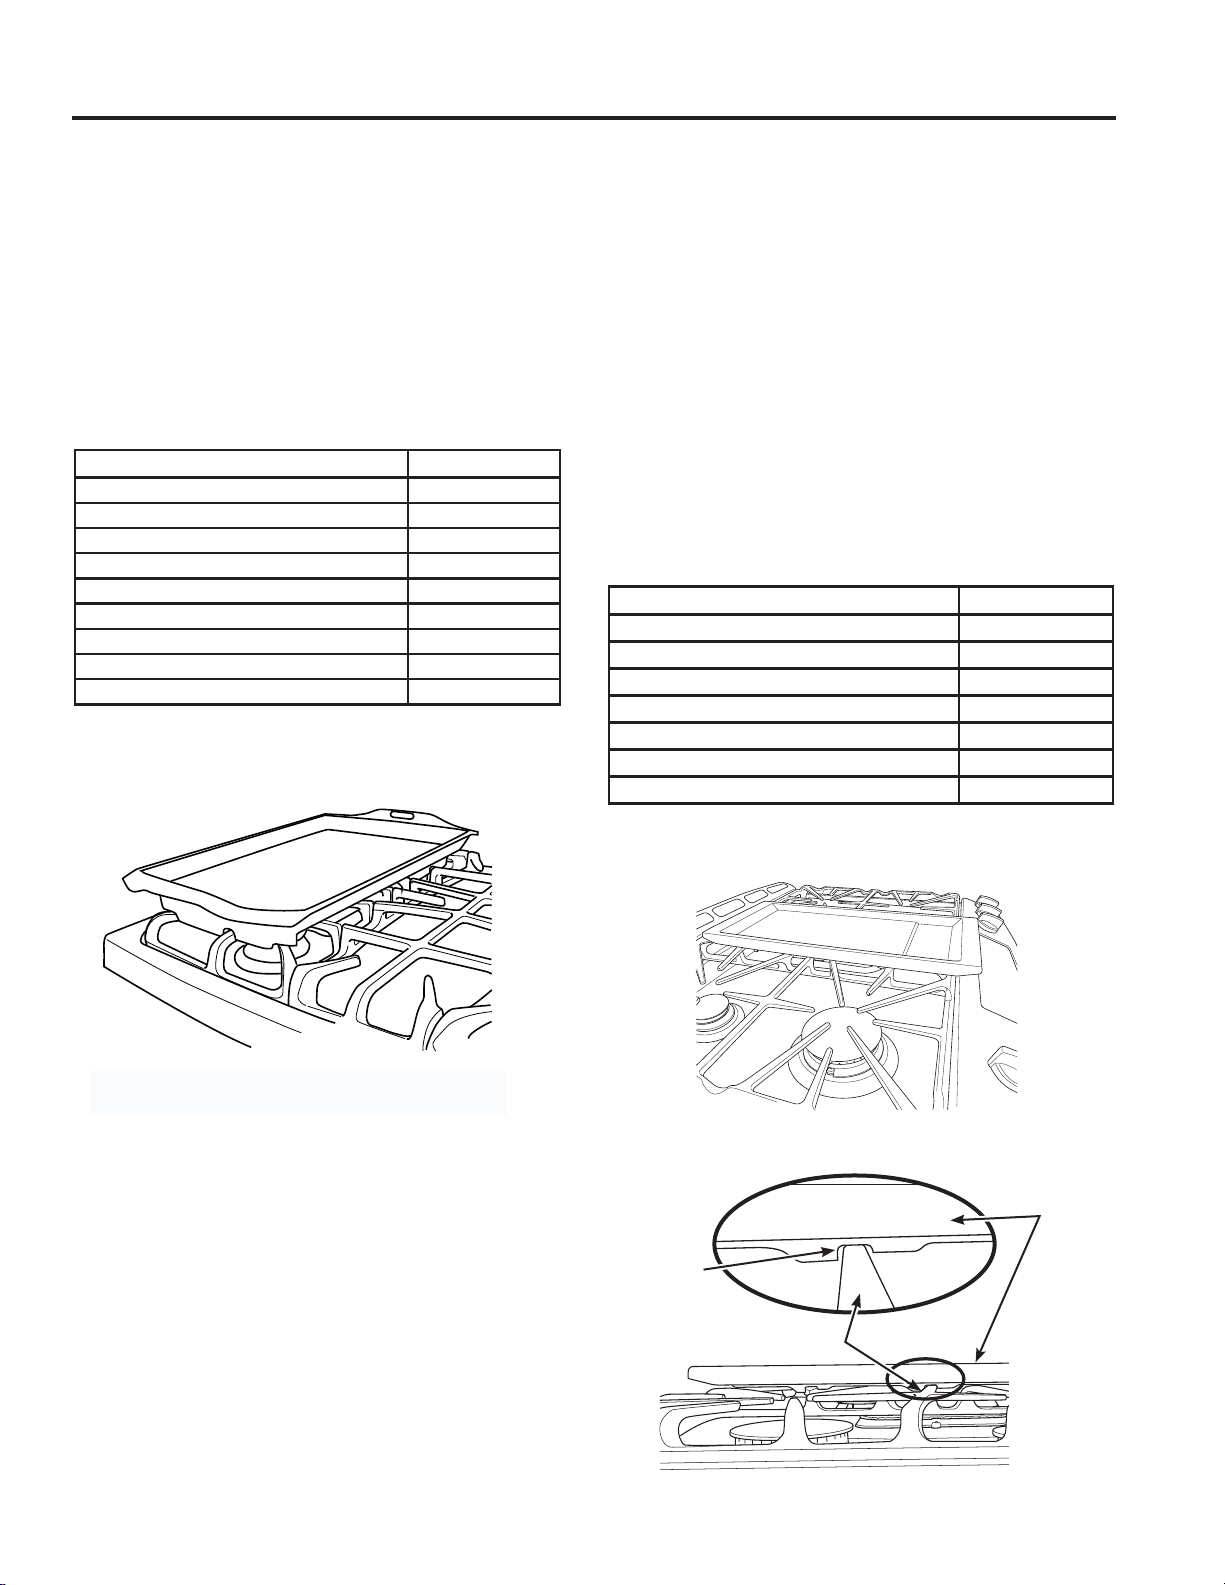
Placement of the Preseasoned Reversible
Cast-Iron Griddle or the Nonstick Aluminum
Griddle on the Cooktop
These griddles can only be used over the oval burner
in the center of the rangetop. To position the griddle,
remove the center grate and replace it with the griddle.
Do not turn on the oval burner until you are certain the
griddle has been positioned correctly.
Preheating the griddle3UHKHDWIRUPLQXWHV
before placing food on griddle and then turn heat down
to cook setting.
Cook settings may need to be reduced if the griddle is used for an
extended time.
Do not overheat the griddle. Leaving the griddle burner on at
+,IRUDQH[WHQGHGDPRXQWRIWLPHZLWKRXWIRRGFDQGDPDJHWKH
nonstick coating.
Avoid using metal utensils with sharp points or rough sharp edges
which might damage the griddle surface.
Preseasoned Reversible Cast-Iron Griddle
Nonstick Aluminum Griddle
Replace the center grate with the
Preseasoned Cast-Iron Reversible Griddle
Replace the center grate with the
Nonstick Aluminum Griddle
49-85211-6
13
Griddle (on some models) (Cont.)
USING THE COOKTOP: Griddle
Using the Griddle (on some models) (Cont.)
Placement of the Preseasoned Lodge Chef’s Griddle
over Left Grate
The Chef’s griddle can only be used resting on top of
the left grate. Position the griddle over the left grate
REVHUYLQJWKH³)URQW´DQG³%DFN´LQGLFDWRUVVWDPSHGLQ
the griddle. The bottom of the griddle should interlock
securely with the fingers of the left grate. Do not turn on
the bridge burner until you are certain the griddle has
been positioned correctly.
Placement of the Removable Nonstick Griddle on the
Cooktop (on some models)
The griddle can only be used resting on top of the grates
over the center burner. Position the griddle over the
center burner with the GE logo at the front. The bottom
of the griddle should securely interlock with the fingers of
the grate as seen in the pictures below. When correctly
positioned, the front edge of the griddle will overhang the
IURQWHGJHRIWKHJUDWHE\DERXWó´DQGWKHFRRNLQJ
surface of the griddle will be centered above the center
oval burner. Do not turn on the burner until you are
certain the griddle has been positioned correctly.
Preheating the griddle3UHKHDWIRUPLQXWHVRQ
KLJKWKHQWXUQGRZQWRWKHFRRNVHWWLQJLQWKHWDEOH
EHORZEHIRUHSODFLQJIRRGRQWKHJULGGOH
Type of Food Cook Setting
Warming Tortillas Lo
Pancakes 0HG
+DPEXUJHUV 0HG
%UHDNIDVW6DXVDJH/LQNV 0HG
+RW6DQGZLFKHVVXFKDV*ULOOHG&KHHVH 0HG
Steak +L
9HJJLH0HGOH\ 0HG
Asparagus 0HG
Fish 0HG
Type of Food Cook Setting
%DFRQ +L
%UHDNIDVW6DXVDJH/LQNV 0HG+L
(JJVIULHG 0HG/R
Grilled Sandwiches 0HG
+DPEXUJHUV 0HG+L
Pancakes 0HG+L
Warming Tortillas 0HG/R
Cook settings may need to be reduced if the griddle is used for an
H[WHQGHGWLPH%HVXUHWKHSUHKHDWFRQGLWLRQVDQGFRRNVHWWLQJVDUH
WKHVDPHIRUERWKWKHIURQWDQGUHDU*ULGGOH%XUQHUV
Do not overheat the griddle. Leaving the burners on at high settings
for an extended period of time without food on the surface can damage
the nonstick coating.
Preseasoned Lodge Chef’s Griddle
Removable Nonstick Griddle
Locate the Preseasoned Lodge Chef’s Griddle
on top of the left grate
Position the Removable Nonstick Griddle
on top of the grates over the center burner
Side View:
Properly positioned Removable Nonstick Griddle.
Griddle
Interlocking
Feature
Griddle
Grate

14
49-85211-6
Oven Controls
USING THE OVEN: Oven Controls
Convection
24965
17783
101211 13
Convection and Remote Enable
Non Convection
24695
378
1211
24965
1783
141210 11 13

49-85211-6
15
1. Convection Cooking Modes:
Convection
cooking modes use increased air circulation to
improve performance. The type of benefit depends
RQWKHPRGH<RXURYHQKDVWKHIROORZLQJFRQYHFWLRQ
FRRNLQJPRGHV%DNH0XOWL5DFNDQG5RDVW6HHWKH
&RRNLQJ0RGHVVHFWLRQIRUPRUHLQIRUPDWLRQ
2. Traditional Cooking Modes: <RXURYHQKDV
WKHIROORZLQJWUDGLWLRQDOFRRNLQJPRGHV%DNH%URLO
+L%URLO/RDQG:DUP6HHWKH&RRNLQJ0RGHV
section for more information.
3. Clean: <RXURYHQPD\KDYHWZRFOHDQLQJPRGHV
6HOI&OHDQDQG6WHDP&OHDQFRQYHFWLRQPRGHOV
RQO\6HHWKH&OHDQLQJWKH2YHQVHFWLRQIRU
important information about using these modes.
4. Start: 0XVWEHSUHVVHGWRVWDUWDQ\FRRNLQJ
cleaning, or timed function.
5. Cancel/Off: Cancels ALL oven operations except
the clock and timer.
6. Cook Time: Counts down cooking time and turns
off the oven when the cooking time is complete.
Press the Cook Time pad, use the number pads to
program a cooking time in hours and minutes, then
press Start. This can only be used with Traditional
%DNH&RQYHFWLRQ%DNH&RQYHFWLRQ%DNH0XOWLDQG
Convection Roast.
7. Clock: Sets the oven clock time. Press the 9 and
0SDGVDQGKROGIRUVHFRQGVRUSUHVVSet Clock
SDGRQVRPHPRGHOV8VHWKHQXPEHUSDGVWR
program the clock. Press Start to save the time.
8. Timer: Works as a countdown timer. Press the
Timer pad and the number pads to program the
time in hours and minutes. Press the Start pad.
The oven will continue to operate when the timer
countdown is complete. To turn the timer off press
the Timer pad.
9. Delay Time: Delays when the oven will turn
on. Use this to set a time when you want the oven
to start. Press the Delay Time pad and use the
number pads to program the time of day for the
oven to turn on then press Start. Press the desired
cooking mode and temperature then press Start. A
cook time may also be programmed if desired. This
FDQRQO\EHXVHGZLWK7UDGLWLRQDO%DNH&RQYHFWLRQ
%DNH0XOWL5DFN&RQYHFWLRQ5RDVWDQG6HOI&OHDQ
NOTE: When using the delay time feature, foods
WKDWVSRLOHDVLO\²VXFKDVPLONHJJVILVKVWXIILQJV
SRXOWU\DQGSRUN²VKRXOGQRWEHDOORZHGWRVLWIRU
PRUHWKDQKRXUEHIRUHRUDIWHUFRRNLQJ5RRP
temperature promotes the growth of harmful bacteria.
%HVXUHWKDWWKHRYHQOLJKWLVRIIEHFDXVHKHDWIURP
the bulb will speed harmful bacteria growth.
10. Probe: 0RQLWRUVLQWHUQDOIRRGWHPSHUDWXUH
and turns the oven off when the food reaches
the programmed temperature. Insert the probe,
program the cooking mode, and program the probe
WHPSHUDWXUH6HHWKH&RRNLQJ0RGHVVHFWLRQIRU
more information. The probe can only be used with
7UDGLWLRQDO%DNHDQG&RQYHFWLRQ5RDVW
11. Oven Light(s): 7XUQVWKHRYHQOLJKWVRQRURII
12. Lock Controls: Locks out the control so that
pressing the pads does not activate the controls.
Press and hold the Lock Controls pad for three
seconds to lock or unlock the control. Cancel/Off is
always active, even when the control is locked.
13. Warming Drawer: Will keep hot, cooked foods
at serving temperature. Press the Warming Drawer
pad. Use the number pad to select the temperature
setting. Press 1 for Low, 2IRU0HGLXPRU3IRU+LJK
then press Start. Push Warming Drawer RQRIIWR
turn off warming drawer.
14. Remote Enable:
CONNECTING YOUR OVEN
Off - Oven is not connected. Open the app then
press and hold Remote EnableSDGIRUVHFRQGV
to begin the connecting process.
Slow flash - Oven is in discovery mode and looking
for a network.
Rapid flash - An error occurred during the
connecting process.
Solid -%RWKRYHQVDUHFRQQHFWHGWRWKHQHWZRUN
and can be remotely controlled by a connected
mobile device when in operation, but cannot be
started remotely
REMOTE STARTING YOUR OVEN
To be able to start the oven remotely, press the
Remote Enable pad and the light above the
Remote Enable pad will turn on. Either oven can
now be remotely started with a connected device.
Opening any oven door or turning off either oven
will turn off the light above the Remote Enable pad.
The light above the Remote Enable pad must be
lit to start the oven remotely. The light above the
Remote Enable pad is not required to change the
oven settings or to turn either oven off.
After using the oven, remember to verify that the
light above the Remote Enable pad is on if you
wish to start an oven remotely in the future.
Oven Controls (Cont.)
USING THE OVEN: Oven Controls

16
49-85211-6
There are several different special features on your oven. To change the settings of these special features, press the Bake
and Broil pads at the same time and hold for three seconds. "SF" will appear in the display. Select the feature you want to
change. When the change has been made, press the Start key to save the change and return to the time of day.
Adjust the Oven Temperature
This feature allows the oven baking temperature to be
DGMXVWHGXSWR)KRWWHURUGRZQWR)FRROHU8VH
this feature if you believe your oven temperature is too hot
or too cold and wish to change it.
Press the Bake pad to enter the temperature adjustment
PRGH$QXPEHUEHWZHHQDQGZLOOGLVSOD\8VHWKH
number pads to set the desired temperature adjustment and
use the Bake pad to change between negative and positive.
Press the Start pad to save the temperature adjustment.
End of Timer Signals
This is the tone that signals the end of a timer. The tone
FDQEHHLWKHUFRQWLQXRXV&RQE((SRUVLQJOHE((S7KH
FRQWLQXRXVVHWWLQJ&RQE((SZLOOUHSHDWHGO\VRXQGDWRQH
every few seconds until a button on the control is pressed.
$VLQJOHVHWWLQJE((SZLOOVRXQGMXVWDVLQJOHWRQHDWWKH
end of the timer. Press the Broil pad to view the current
setting and then to change the setting.
Fahrenheit or Celsius Temperature Display
The oven control is set to use Fahrenheit temperatures
)EXW\RXFDQFKDQJHLWWRXVH&HOVLXVWHPSHUDWXUHV&
Press the Broil and Cook Time pads at the same time to
view the current setting, press again to change the setting.
Clock Display
This feature specifies how the time of day will be displayed
RULIQRWLPHRIGD\ZLOOEHGLVSOD\HG<RXFDQVHOHFWD
VWDQGDUGKRXUFORFN+KRXUPLOLWDU\WLPHGLVSOD\
+RUQRFORFNGLVSOD\HGR))3UHVVWKHClock pad to
view the current setting, press again to change the setting.
Sound Volume
This feature allows the oven tone volume to be adjusted
EHWZHHQKLJK+,E((3+,PHGLXP6WGE((36WGORZ
/RE((3/RDQGRIIR))E((3R))3UHVVWKHCook
Time pad to view the current setting or to change the
setting. The control will sound the oven tone at the new
volume level each time the sound level is changed.
Auto Recipe Conversion
7KLVIHDWXUH2Q2IIDXWRPDWLFDOO\DGMXVWVWKHSURJUDPPHG
UHFLSHWHPSHUDWXUHLQ&RQYHFWLRQ0XOWL%DNHPRGH
Note: This option does not convert baking time, only
temperatures. This option does not adjust temperatures for
Convection Roast mode. Press either Bake Multi Rack or
Roast to view the current setting. Press again to change
the setting.
Preheat Notification Lighting (on some models)
This feature will turn on the oven light when the oven has
reached the set temperature. The oven light will remain
on until the oven is turned off or if the Oven Light pad
is pushed. Press the Oven Light pad to view the current
setting, press again to change the setting.
12-hour auto shut-off and Sabbath
KRXUDXWRVKXWRIIWXUQVRIIWKHRYHQDIWHUKRXUVRI
continuous operations.
2SWLRQVIRUWKLVIHDWXUHDUH³6KGQ´³QR6KGQ´DQG
³6$EE$W+´3UHVVWKHDelay Time pad to view the current
setting and then to change the setting.
Sabbath mode disables the oven lights, all sounds,
convection, broil, warm, proof, and all time functions.
6DEEDWKPRGHFDQRQO\EHXVHGZLWK%DNH7KLVIHDWXUH
conforms to the Star-K Jewish Sabbath requirements.
Enter the Sabbath Mode
Press Bake and Broil pads at the same time and hold for
three seconds. “SF” will appear in the display. Press the Delay
TimeSDGXQWLO³6$EE$W+´DSSHDUVRQWKHGLVSOD\WKHQSUHVV
Start. The ] icon will appear in the display to signify that the
XQLWLVLQ6DEEDWK0RGH7KHFORFNZLOOQRWEHGLVSOD\HG
Start a Sabbath Bake
Press Bake, use the number pads to enter a temperature
EHWZHHQ)DQG)DQGSUHVVStart. No sound
will be given when the keys are pressed. At a random time
EHWZHHQVHFRQGVDQGPLQXWHWKH][ icon will appear in
the display indicating the oven is running. To turn the oven
off, press Cancel/Off at any time. At a random time between
VHFRQGVDQGPLQXWHWKH][ icon will change to the ]
icon, indicating that the oven has turned off.
Adjust the Temperature During a Sabbath Bake
Press Bake, use the number pads to enter a new
WHPSHUDWXUHEHWZHHQ)DQG)DQGSUHVVStart.
No sound will be given when the keys are pressed. Since
no feedback is given during temperature change, an oven
thermometer can be used to confirm temperature changes.
Timed Bake During Sabbath
%HIRUHSXWWLQJWKHRYHQLQ6DEEDWKPRGHSUHVVCook
Time, use the number pads to enter the amount of time
to cook in hours and minutes, and press Start. Follow the
LQVWUXFWLRQVDERYHWRHQWHUWKH6DEEDWK0RGH3UHVVBake,
use the number pads to enter a temperature between
)DQG)DQGSUHVVStart. No sound will be given
when the keys are pressed. The oven will turn off once the
programmed cook time is expired.
Exit the Sabbath Mode
Press Bake and Broil pads at the same time and hold for
three seconds. “SF” will appear in the display. Press the
Delay TimeSDGXQWLO³6KGQ´DSSHDUVRQWKHGLVSOD\
then press Start. The clock will not be displayed again
LQGLFDWLQJWKHRYHQLVRXWRI6DEEDWK0RGH
Sabbath Mode Power Outage Note
,IDSRZHURXWDJHRFFXUVZKLOHWKHRYHQLVLQ6DEEDWK0RGH
WKHXQLWZLOOUHWXUQWR6DEEDWK0RGHZKHQSRZHULVUHVWRUHG
however the oven will return to the off state even if it was in
the middle of a bake cycle when the power outage occurred.
Special Features
USING THE OVEN: Special Features
49-85211-6
17
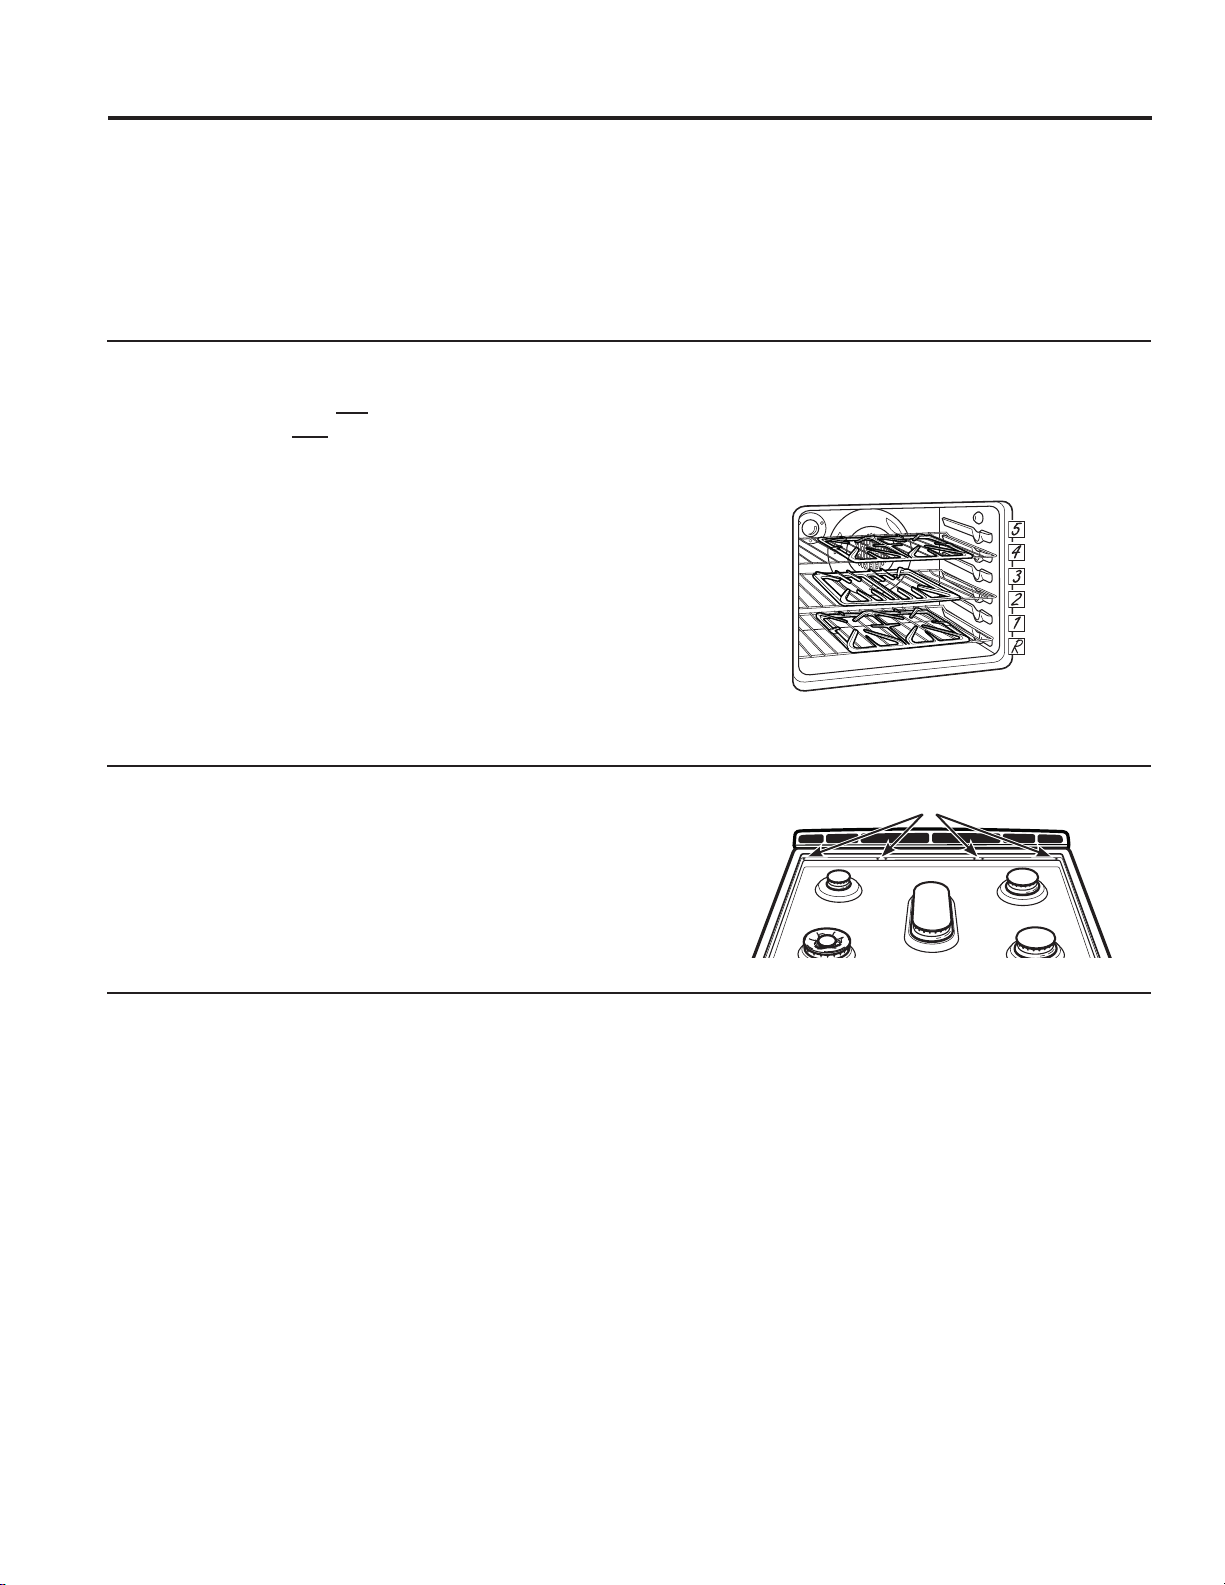
Oven Racks
USING THE OVEN: Oven Racks / Oven Air Vents
<RXURYHQKDVVL[UDFNSRVLWLRQV5HFRPPHQGHGUDFN
positions for various types of foods are provided in the
Cooking Guide. Adjusting rack position is one way to
impact cooking results. For example, if you would prefer
darker tops on cakes, muffins, or cookies, try moving
food one rack position higher. If you find foods are too
brown on top try moving them down next time.
When baking with multiple pans and on multiple racks,
ensure there is sufficient space between pans to allow
air to flow.
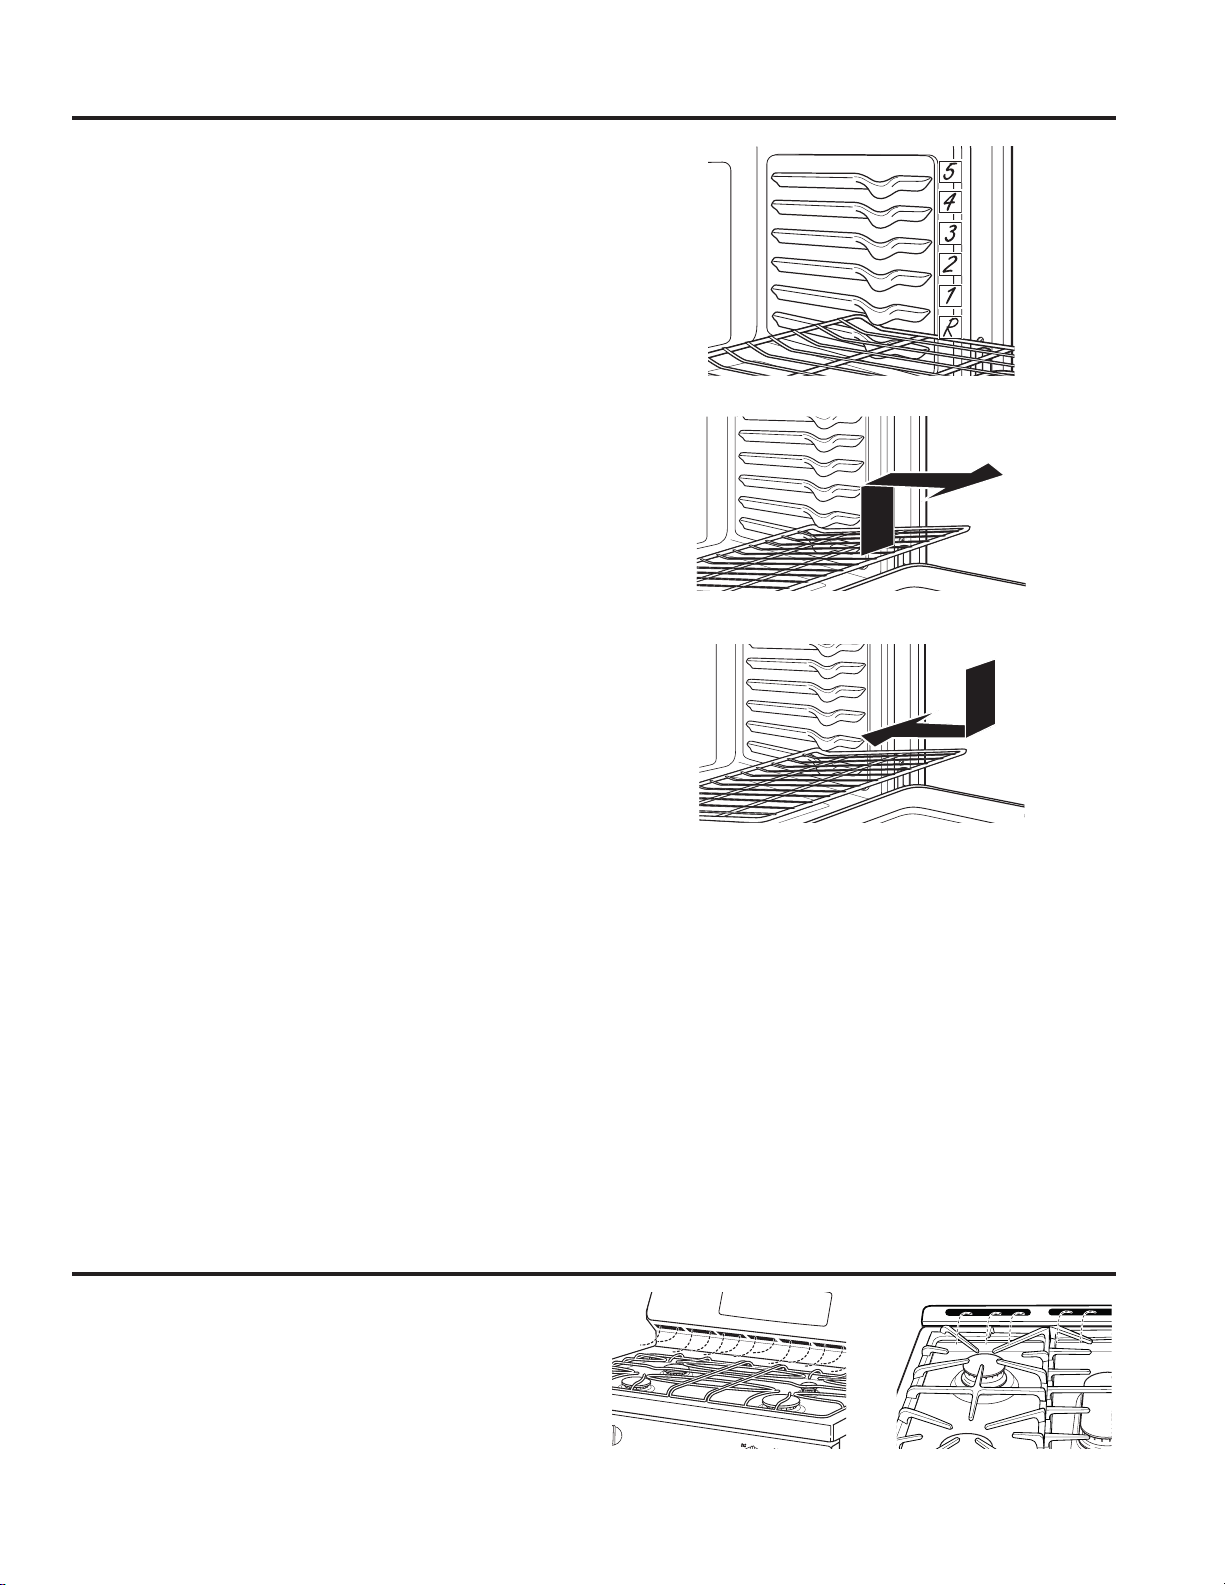
Flat Racks
When placing and removing cookware, pull the rack out
WRWKHEXPSVWRSSRVLWLRQRQWKHUDFNVXSSRUW
To remove a rack, pull it toward you, tilt the front end up
and pull it out.
7RUHSODFHSODFHWKHFXUYHGHQGRIWKHUDFNVWRSORFNV
onto the oven supports, tilt up the front of the rack and
push the rack in.
Racks may become difficult to slide, especially after a
self-clean. Put some vegetable oil on a soft cloth or
paper towel and rub onto the left and right edges.
Extension Racks (on some models)
Extension racks have a frame that locks into the rack
supports on both sides. Once the frame is locked into
place, always pull the rack out, by its upper front rail, to
its full extension stop position, when placing or removing
cookware.
If extension racks are difficult to extend, lubricate the
racks with the graphite lubricant provided with your
oven. Remove the rack from the oven, remove debris in
the slide tracks with a paper towel, shake the graphite
lubricant and place 4 small drops on the two bottom
tracks of the left and right sides. Open and close the
rack several times to distribute the lubricant.
To order additional graphite lubricant, read the
Assistance and Accessories section at the beginning of
this manual.
To Remove An Extension Rack:
0DNHVXUHWKHUDFNLVSXVKHGDOOWKHZD\LQWRWKH
oven.
)LUPO\KROGLQJRQWRERWKWKHXSSHUDQGORZHUIURQW
rails, pull the rack toward you, tilt the front end up and
pull the rack out
To Replace An Extension Rack:
3ODFHWKHFXUYHGHQGRIWKHUDFNRQWRWKHUDFN
supports.
7LOWWKHIURQWRIWKHUDFNXSDQGSXVKWKHUDFNLQ
If extension racks are difficult to replace or remove, wipe
the oven rack supports with cooking oil. Do not wipe oil
on the rack slides.
Oven Air Vents
1HYHUEORFNWKHYHQWVDLURSHQLQJVRIWKHUDQJH7KH\
provide the air inlet and outlet that are necessary for the
range to keep cool and operate properly with correct
combustion.
Air openings are located at the rear of the cooktop, at
the top and bottom of the oven door, and at the bottom
of the range.
Vent appearance and location vary.

18
49-85211-6
<RXUQHZRYHQKDVDYDULHW\RIFRRNLQJPRGHVWRKHOS\RXJHWWKHEHVWUHVXOWV7KHVHPRGHVDUHGHVFULEHGEHORZ
Refer to the Cooking Guide section for recommendations for specific foods. Remember, your new oven may perform
differently than the oven it is replacing.
Bake
The bake mode is for baking and roasting. This mode
uses heat primarily from the lower burner but also from
the upper burner to cook food. When preparing baked
goods such as cakes, cookies, and pastries always
preheat the oven first. Follow recipe recommendations
for food placement. If no guidelines are provided center
IRRGLQWKHRYHQ7RXVHWKLVPRGHSUHVVWKH%DNHSDG
enter a temperature, and then press Start.
Warm/Warming Drawer (on some models)
Warm mode is designed to keep hot foods hot for up to
KRXUV7RXVHWKLVPRGHSUHVVWKHWarm or Warming
Drawer pad then press Start. Cover foods that need
to remain moist and do not cover foods that should be
crisp. Preheating is not required. Do not use warm to
heat cold food other than crisping crackers, chips or dry
cereal. It is also recommended that food not be kept
ZDUPIRUPRUHWKDQKRXUV
Broiling Modes
$OZD\VEURLOZLWKWKHGRRUFORVHG0RQLWRUIRRGFORVHO\
while broiling. Use caution when broiling on upper rack
positions as placing food closer to the broil burner
increases smoking, spattering, and the possibility of
fats igniting.
Try broiling foods that you would normally grill. Adjust
rack positions to adjust the intensity of the heat to the
food. Place foods closer to the broil burner when a
seared surface and rare interior is desired. Thicker foods
and foods that need to be cooked through should be
broiled on a rack position farther from the burner or by
XVLQJ%URLO/R
Broil Hi
7KH%URLO+LPRGHXVHVLQWHQVHKHDWIURPWKHXSSHU
EXUQHUWRVHDUIRRGV8VH%URLO+LIRUWKLQQHUFXWVRIPHDW
DQGRUIRRGV\RXSUHIHUOHVVGRQHRQWKHLQWHULRU7RXVH
this mode press the Broil pad once and then press Start.
It is not necessary to preheat when using this mode.
Broil Lo
7KH%URLO/RPRGHXVHVOHVVLQWHQVHKHDWIURPWKHXSSHU
burner to cook food thoroughly while also browning the
VXUIDFH8VH%URLO/RIRUWKLFNHUFXWVRIPHDWDQGRUIRRGV
that you would like cooked all the way through. To use
this mode press the Broil pad twice and then press Start.
It is not necessary to preheat when using this mode.
Convection Bake Multi Rack
7KH&RQYHFWLRQ%DNH0XOWL5DFNPRGHLVLQWHQGHGIRU
baking on multiple racks at the same time. This mode
may use heat from the upper and lower burners, along
with air movement from the convection fan to enhance
FRRNLQJHYHQQHVV<RXURYHQLVHTXLSSHGZLWK$XWR
Recipe Conversion, so it is not necessary to convert the
temperature when using this mode. To use this mode
press the Bake Multi Rack pad under Convection,
enter a temperature, and then press Start. Always
preheat when using this mode.
Convection Roast
The Convection Roast mode is intended for roasting
whole cuts of meat on a single rack. This mode may use
heat from the upper and lower bake burner along with
air movement to improve browning and reduce cooking
time. It is not necessary to convert temperature. Check
food earlier than the recipe suggested time when using
WKLVPRGHRUXVHWKHSUREHRQVRPHPRGHOV7RXVH
this mode press the Roast pad under Convection, enter
a temperature, and then press Start. It is not necessary
to preheat when using this mode.
Cookware
Cookware Guidelines
The material, finish, and size of cookware affect baking
performance.
Dark, coated and dull pans absorb heat more readily
than light, shiny pans. Pans that absorb heat more
readily can result in a browner, crisper, and thicker crust.
If using dark and coated cookware check food earlier
than minimum cook time. If undesirable results are
obtained with this type of cookware consider reducing
RYHQWHPSHUDWXUHE\)QH[WWLPH
Shiny pans can produce more evenly cooked baked
goods such as cakes and cookies.
Glass and ceramic pans heat slowly but retain heat well.
These types of pans work well for dishes such as pies
and custards.
Air insulated pans heat slowly and can reduce bottom
browning.
Keep cookware clean to promote even heating.
Cooking Modes
USING THE OVEN: Cookware / Cooking Modes
49-85211-6
19
Probe
USING THE OVEN: Probe
WARNING
Consuming undercooked food can result in foodborne illness. Use probe according to
the following instructions to ensure all portions of the food reach minimum safe cooking temperatures.
Recommendations for minimum safe food temperatures can be found at
www.foodsafety.gov or www.IsItDoneYet.gov.
Internal food temperature is frequently used as an indicator of doneness, especially for roasts and poultry.
The Probe mode monitors the internal food temperature and turns the oven off when the internal food
temperature reaches the programmed temperature.
Always check the temperature at multiple locations in the food with a food thermometer after cooking to
ensure that all portions of the food have reached the minimum safe internal temperature for that food.
Proper Probe Placement
After preparing the meat and placing it on the cooking
pan follow these instructions for proper probe placement.
Ŷ ,QVHUWWKHSUREHLQWRWKHIRRGVRWKDWWKHWLSRIWKH
probe will rest in the center of the thickest part of
the food. For best performance the probe should
be fully inserted into the food. If the probe is not
located properly, it may not accurately measure the
temperature of the coolest portion of the food. Some
foods, particularly small items, are not well suited for
cooking with the probe due to their shape or size.
Ŷ 7KHSUREHVKRXOGQRWWRXFKERQHIDWRUJULVWOH
Ŷ )RUZKROHSRXOWU\LQVHUWWKHSUREHLQWRWKHWKLFNHVW
part of the breast.
Ŷ )RUERQHOHVVURDVWVLQVHUWWKHSUREHLQWRWKHFHQWHU
of the roast.
Ŷ )RUERQHLQKDPRUODPELQVHUWWKHSUREHLQWRWKH
center of the lowest large muscle or joint.
Ŷ )RUFDVVHUROHVRUGLVKHVVXFKDVPHDWORDILQVHUWWKH
probe into the center of the dish.
Ŷ )RUILVKLQVHUWWKHSUREHIURPMXVWDERYHWKHJLOOLQWR
the meatiest area, parallel to the backbone.
Probe Usage
To use the probe with preheating:
3UHVVWKHGHVLUHGFRRNPRGH(Traditional Bake,
Convection Bake, or Convection Roast) pad and
enter the desired cooking temperature.
,QVHUWWKHSUREHLQWRWKHIRRGVHH3URSHU3UREH
3ODFHPHQW
2QFHWKHRYHQLVSUHKHDWHGSODFHWKHIRRGLQWKH
oven and connect the probe to the probe outlet,
making sure it is fully inserted. Use caution, the oven
walls and probe outlet are hot.
4. Program the probe temperature by pressing
the Probe pad and entering the desired food
temperature. The maximum internal food temperature
WKDW\RXFDQVHWLV)
To use the probe without preheating:
,QVHUWWKHSUREHLQWRWKHIRRGVHH3URSHU3UREH
3ODFHPHQW
3ODFHWKHIRRGLQWKHRYHQDQGFRQQHFWWKHSUREHLQWR
the probe outlet in the oven.
3URJUDPWKHGHVLUHGSUREHDQGFRRNLQJPRGH
settings by pressing the Probe pad and entering the
desired food temperature, then pressing the cook
PRGHSDGTraditional Bake, Convection Bake, or
Convection RoastDQGHQWHULQJWKHGHVLUHGFRRNLQJ
temperature and press Start.
Probe Care Guidelines
NOTE: some double oven models have a probe in the
upper oven only.
Ŷ 8VHRISUREHVRWKHUWKDQWKHRQHSURYLGHGZLWKWKLV
product may result in damage to the probe.
Ŷ 8VHWKHKDQGOHVRIWKHSUREHDQGSOXJZKHQLQVHUWLQJ
and removing them from the meat and outlet
Ŷ 7RDYRLGGDPDJLQJ\RXUSUREHGRQRWXVHWRQJVWR
pull on the cable when removing it.
Ŷ 7RDYRLGEUHDNLQJWKHSUREHPDNHVXUHIRRGLV
completely defrosted before inserting the probe.
Ŷ 7RSUHYHQWSRVVLEOHEXUQVGRQRWXQSOXJWKHSUREH
from the outlet until the oven has cooled.
Ŷ 1HYHUOHDYHWKHSUREHLQVLGHWKHRYHQGXULQJDVHOIRU
steam clean cycle.
Ŷ 'RQRWVWRUHWKHSUREHLQWKHRYHQ
20
49-85211-6
Cooking Guide
USING THE OVEN: Cooking Guide
FOOD TYPE
RECOMMENDED
MODE(S)
RECOMMENDED
RACK POSITION(S) ADDITIONAL SUGGESTIONS
Baked Goods
Layer cakes, sheet cakes,
bundt cakes, muffins, quick
breads on a Single Rack
%DNH RU Use shiny cookware.
/D\HUFDNHVRQ0XOWLSOH
Racks
%DNH
&RQYHFWLRQ0XOWL%DNH
DQG
Ensure adequate airflow
VHHLOOXVWUDWLRQEHORZ
8VHH[WHQVLRQUDFNLQSRVLWLRQV
&KLIIRQFDNHVDQJHOIRRG %DNH Use shiny cookware.
Cookies, biscuits, scones on
a Single Rack
%DNH RU Use shiny cookware.
Cookies, biscuits, scones on
0XOWLSOH5DFNV
&RQYHFWLRQ0XOWL%DNH
%DNH
5DFNVDQG
5DFNVDQG
Ensure adequate airflow. Switch food location
partially through cooking for more even cooking
results. Use extension rack in lower position.
Beef & Pork
+DPEXUJHUV %URLO+L
Use flat rack. Use a broil pan; move food down
IRUPRUHGRQHQHVVOHVVVHDULQJ:DWFKIRRG
closely when broiling. Center food under burner.
Steaks & Chops %URLO+L
Use flat rack. Use a broil pan; move food down
IRUPRUHGRQHQHVVOHVVVHDULQJ:DWFKIRRG
closely when broiling. Center food under burner.
Roasts
Convection Roast
%DNH
RU
Leave uncovered, use a low sided pan such
as a broil pan. Preheating is not necessary.
Poultry
Whole chicken
Convection Roast
%DNH
RU
Leave uncovered, use a low sided pan
such as a broil pan.
%RQHLQFKLFNHQEUHDVWV
legs, thighs
%URLO/R
%DNH
RU
,IEUHDGHGRUFRDWHGLQVDXFHDYRLG%URLO
+LPRGHV%URLOVNLQVLGHGRZQILUVW
Watch food closely when broiling.
%RQHOHVVFKLFNHQEUHDVWV
%URLO/R
%DNH
0RYHIRRGGRZQIRUPRUHGRQHQHVVOHVV
VHDULQJDQGXSIRUJUHDWHUVHDULQJEURZQLQJ
when broiling.
Whole turkey
Convection Roast
%DNH
5RU
Leave uncovered, use a low sided pan
such as a broil pan.
7XUNH\%UHDVW %DNH RU
Leave uncovered, use a low sided pan
such as a broil pan.
Fish %URLO/R
WKLFNRUOHVV
!LQFK
Watch food closely when broiling. Use flat rack if
XVLQJSRVLWLRQ
Casseroles %DNH RU
Frozen Convenience Foods
Pizza, french fries, tator tots,
chicken nuggets, appetizers
on a Single Rack
%DNH Use shiny cookware.
Pizza, french fries, tator tots,
chicken nuggets, appetizers
RQ0XOWLSOH5DFNV
%DNH
&RQYHFWLRQ0XOWL%DNH
DQG
DQG
Use shiny cookware.
Switch food location partially through
cooking for more even cooking results.
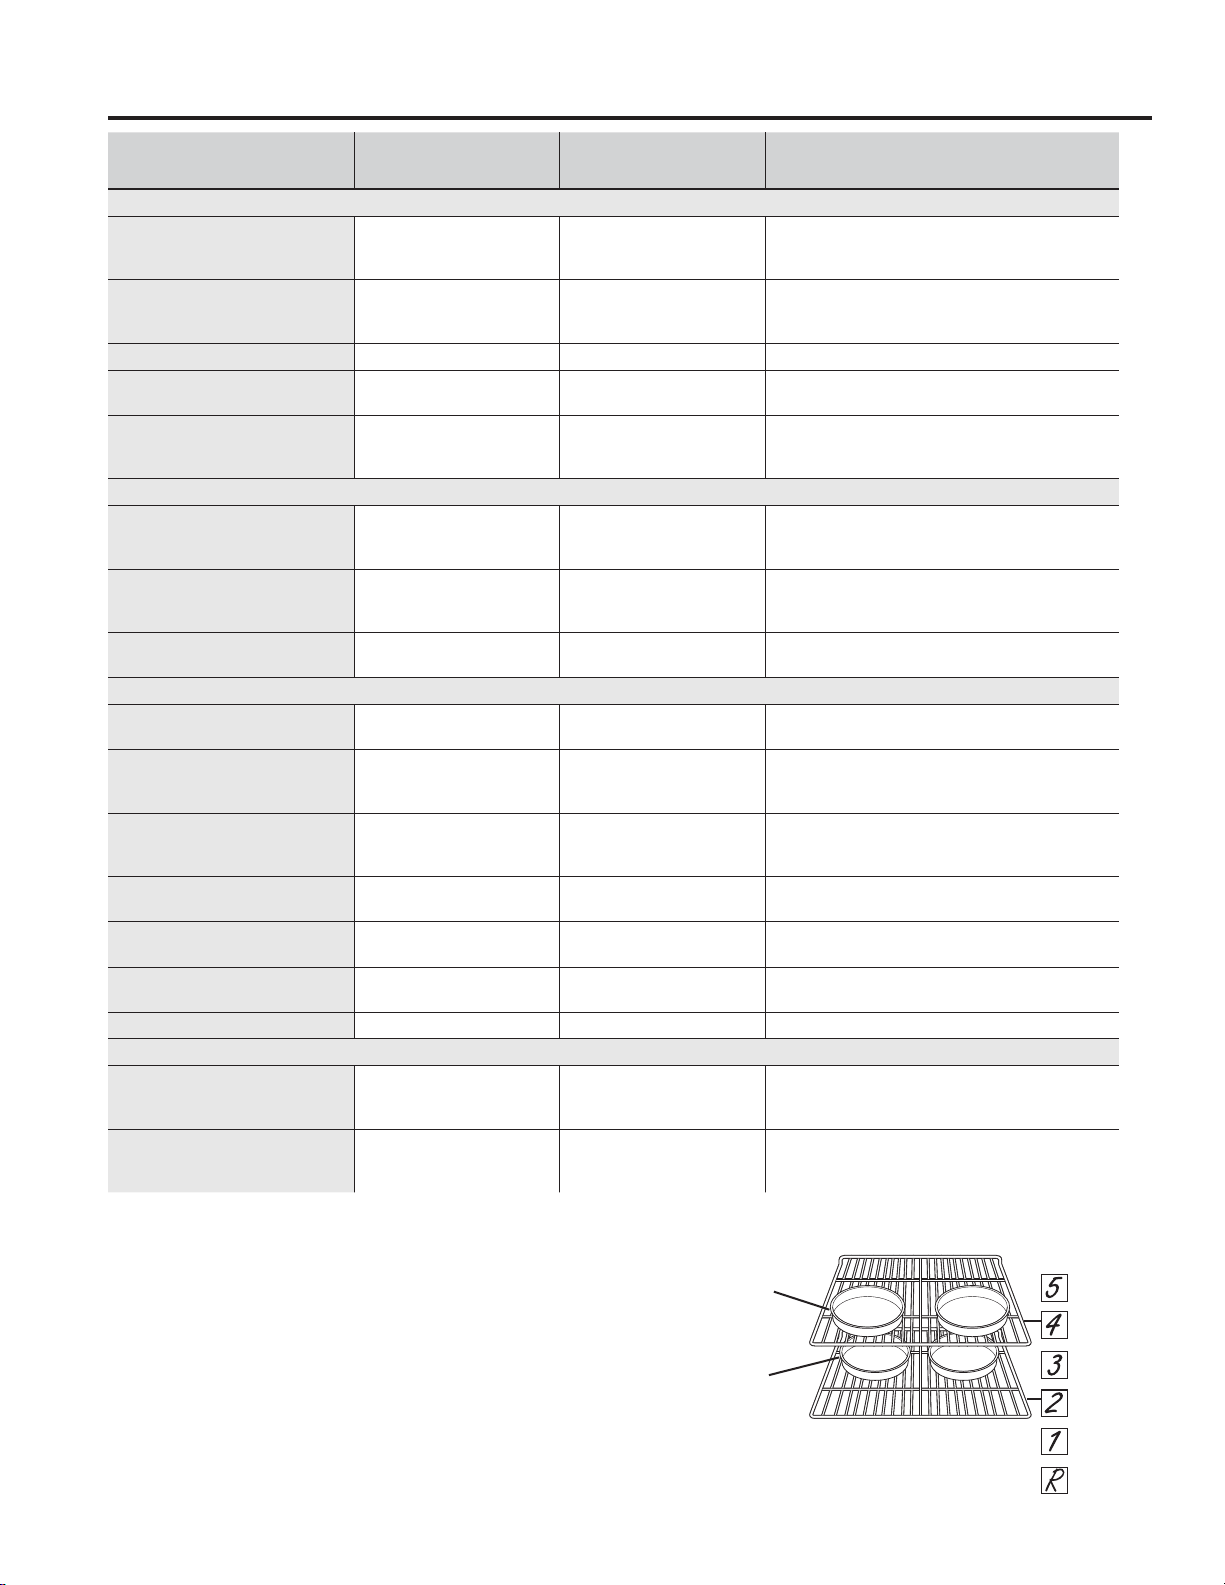
*When baking four cake layers at a time, stagger the
pans as shown so that one pan is not directly above
another.
Cook food thoroughly to help protect against food
ERUQHLOOQHVV0LQLPXPVDIHIRRGWHPSHUDWXUH
recommendations for food safety can be found at
www.IsItDoneYet.gov0DNHVXUHWRXVHDIRRG
thermometer to take food temperatures.
Front
Placement
Rear
Placement
49-85211-6
21
ITEM SETTING ADDITIONAL INFORMATION
Breads, pies, pastries /2
Cover with a lid or aluminum foil.
9HQWFRYHUWRDOORZPRLVWXUHWRHVFDSH
Casseroles 0('
Cover with a lid or aluminum foil
Chili/Stews +,
Meats +,
Pancakes /2
Pizza 0('
Potatoes, baked +,
Waffles /2
Stale items, to crisp
(tortilla chips, crackers, dry cereal)
/2
8VHDORZVLGHGGLVKSDQ3UHKHDWRQ/2VHWWLQJ
PLQXWHV&KHFNDIWHUPLQXWHVDGGWLPHDVQHHGHG
Serving dishes (plates, bowls) /2
Use only heat safe dishes. Check manufacturers
information for maximum heat tolerance for fine china.
CAUTION
Dishes will be hot. Use pot holders or mitts when removing hot dishes.
Warming Drawer Guide (on some models)
USING THE OVEN: Warming Drawer Guide / Aluminum Foil and Oven Liners
CAUTION
Do not use any type of foil or oven liner to cover the oven bottom. These items can block air-
flow or melt, resulting in damage to the product and risk of carbon monoxide poisoning, smoke or fire. Dam-
age from improper use of these items is not covered by the product warranty.
Foil may be used to catch spills by placing a sheet on a lower rack, several inches below the food. Do not use more
IRLOWKDQQHFHVVDU\DQGQHYHUHQWLUHO\FRYHUDQRYHQUDFNZLWKDOXPLQXPIRLO.HHSIRLODWOHDVW´IURPRYHQZDOOV
to prevent poor heat circulation.
Aluminum Foil and Oven Liners
22
49-85211-6
Cleaning The Oven
CARE AND CLEANING: Cleaning The Oven
%HVXUHHOHFWULFDOSRZHULVRIIDQGDOOVXUIDFHVDUHFRROEHIRUHFOHDQLQJDQ\SDUWRIWKHUDQJH
Control Panel and Knobs
Wipe the control panel after each use of the oven with
a damp cloth. For cleaning, use mild soap and water or
DVROXWLRQRIYLQHJDUDQGZDWHU5LQVHZLWKFOHDQ
water. Polish dry with a soft cloth.
Do not use abrasive cleansers, strong liquid cleansers,
plastic scouring pads or oven cleaners on the control
SDQHO²WKH\ZLOOGDPDJHWKHILQLVK
Do not try to bend knobs by pulling them up or down
or by hanging a towel or other such loads. This can
damage the gas valve shaft.
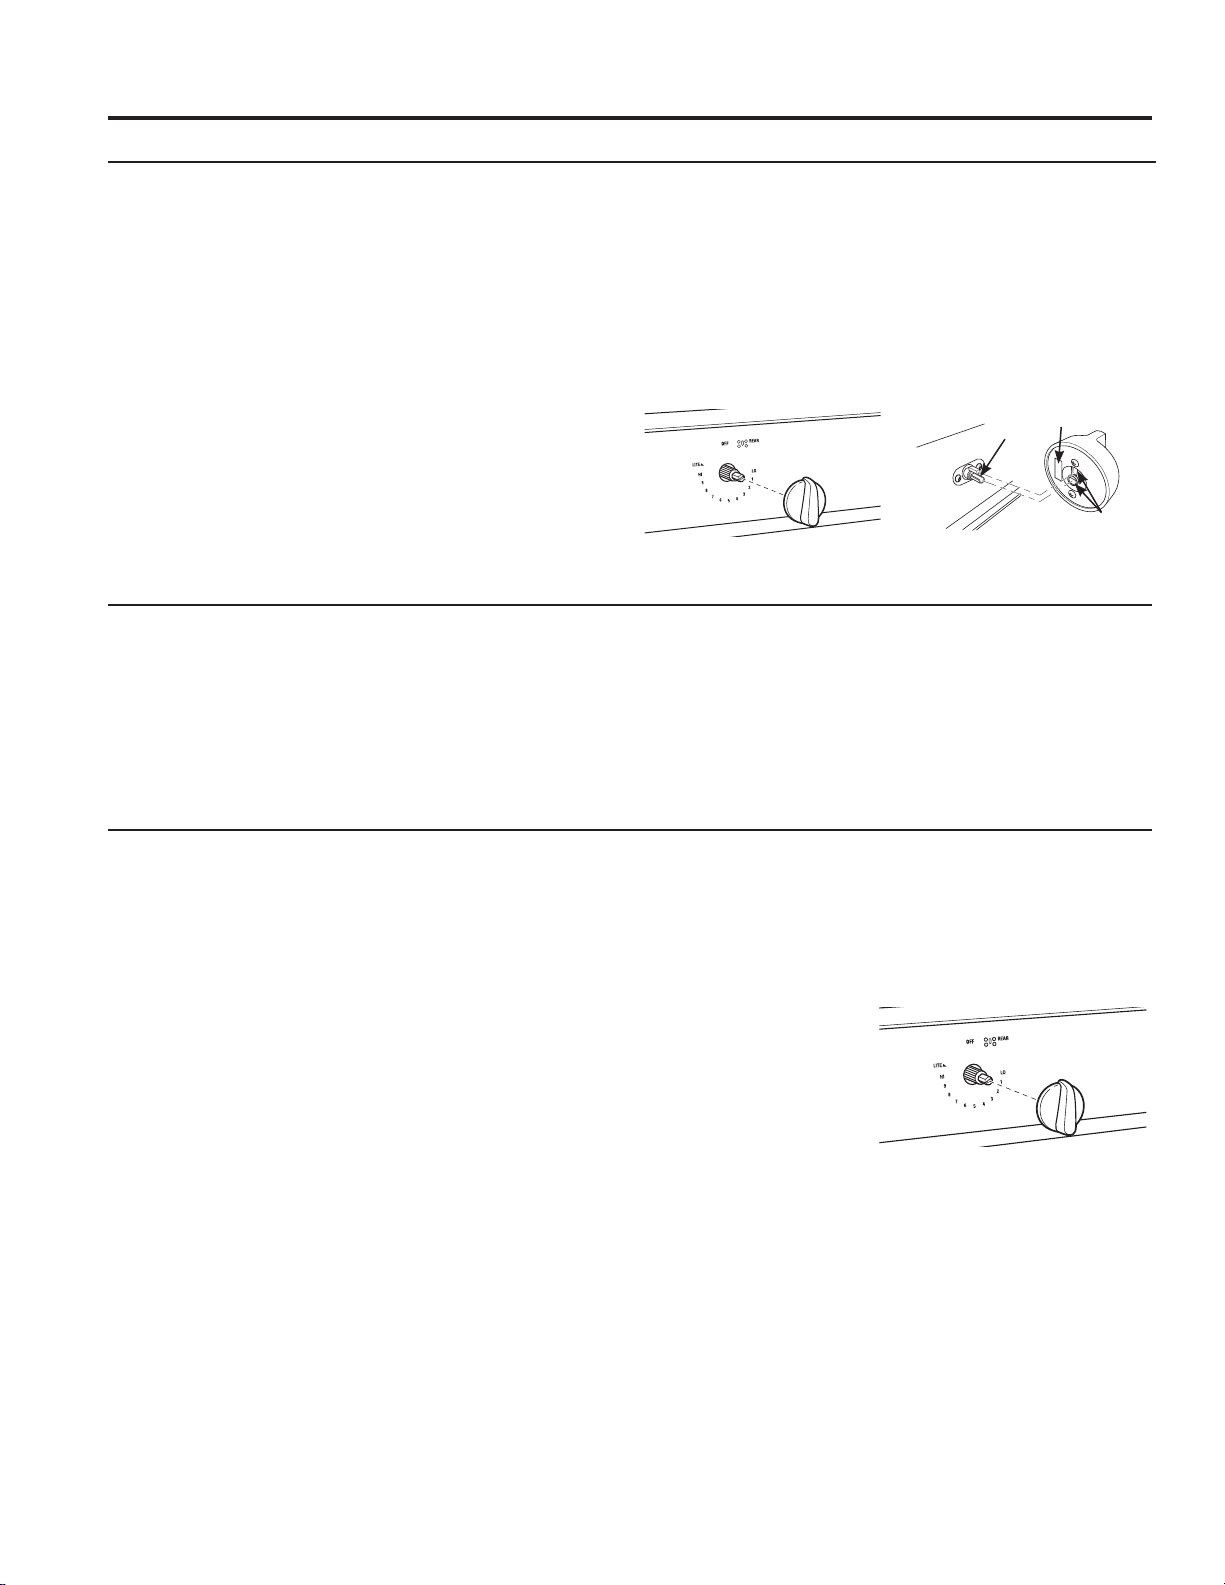
The control knobs may be removed for easier cleaning.
With knobs in the OFF position pull them straight off the
stems.
The knobs can be washed by hand with soap and water
or in a dishwasher.
Not all knobs are interchangeable. To determine the
correct location of a particular knob, examine the back of
the knob. A knob with a label or two stem holes should
be replaced on the front panel first by matching the
shape of the knob holes to the shape of the control panel
stems. The remainder of the knobs having no labels and
only one stem hole can then be replaced on the front
panel anywhere there is a single stem.
Oven Exterior and Cooktop Surface
Do not use oven cleaners, abrasive cleansers, strong
liquid cleansers, steel wool, plastic scouring pads, or
cleaning powders on the interior or exterior of the oven.
&OHDQZLWKDPLOGVRDSDQGZDWHURUDVROXWLRQRI
vinegar and water. Rinse with clean water and dry with a
soft cloth. When cleaning surfaces, make sure that they
are at room temperature and not in direct sunlight.
If a stain on the door vent trim is persistent, use a mild
abrasive cleaner and a sponge-scrubber for best results.
Spillage of marinades, fruit juices, tomato sauces and
basting liquids containing acids may cause discoloration
and should be wiped up immediately. Let hot surfaces
cool, then clean and rinse.
Stem
Label
Stem
holes
Surface burner knob Knobs with two stem holes have
special locations
Stainless Steel Surfaces (on some models)
Do not use a steel wool pad; it will scratch the surface.
To clean the stainless steel surface, use warm sudsy
water or a stainless steel cleaner or polish. Always wipe
the surface in the direction of the grain. Follow the cleaner
instructions for cleaning the stainless steel surface.
&OHDQHUVZLWKR[DOLFDFLGVXFKDV%DU.HHSHUV)ULHQG6RIW
Cleanser™ will remove surface rust, tarnish and small
blemishes. Use only a liquid cleanser free of grit and rub in
the direction of the brush lines with a damp, soft sponge.
To inquire about purchasing cleaning products including
stainless steel appliance cleaner or polish, read the
$VVLVWDQFH$FFHVVRULHVVHFWLRQVDWWKHEHJLQQLQJRIWKLV
manual.
For easier cleaning, the control knobs may be removed
by pulling them directly outwards once the knobs are in
the OFF position. Do not pull knobs up or down or hang
objects on them. This can damage the gas valve shaft.
The knobs can be washed by hand with soap and water or
in a dishwasher.
To replace knobs after
cleaning, align the hole on
the knob backside with the
gas valve shaft and push
inward until the knob is
securely fastened.
Surface burner knob

49-85211-6
23
Oven Interior (Cont.)
Self Clean Mode
Read Self-Cleaning Oven Safety Instructions at the
EHJLQQLQJRIWKLVPDQXDOEHIRUHXVLQJ6HOI&OHDQ0RGH
Self clean uses very high temperatures to clean the
oven interior. The oven door will lock when using this
IHDWXUH%HIRUHRSHUDWLQJWKHVHOIFOHDQF\FOHSUHZDVK
inner door and inside window before self-cleaning. Wipe
inner black door before self clean. Remove all items from
WKHRYHQRWKHUWKDQHQDPHOHGGDUNFRORUUDFNV6KLQ\
or silver racks, the meat probe, and any cookware or
other items should all be removed from the oven before
initiating a self-clean cycle. The surface burners must
be turned off prior to the self-clean start time. Cooktop
burners will not start during self clean cycle. Close the
door. Press the Clean pad once and a default self-clean
time is displayed. Press the Start pad or use the number
SDGVWRHQWHUDQ\FOHDQWLPHEHWZHHQDQGKRXUV
and press Start)RUKHDYLO\VRLOHGRYHQVKRXUVLV
recommended. The oven will turn off automatically
when the self-clean cycle is complete. The door will stay
locked until the oven has cooled down. After the oven
has cooled down wipe any ash out of the oven.
IMPORTANT: The health of some birds is extremely
sensitive to the fumes given off during the self-cleaning
F\FOHRIDQ\UDQJH0RYHELUGVWRDQRWKHUZHOOYHQWLODWHG
room.
Oven Racks
All oven racks may be cleaned by hand with an abrasive
FOHDQHURUVWHHOZRRO%ODFNSRUFHODLQFRDWHGRYHQUDFNV
may remain in the oven during the self-cleaning cycle
without being damaged. If nickel-plated oven racks
remain in the oven during the self-cleaning cycle, they
will lose their luster and become hard to slide. It will be
necessary to grease all oven rack side edges with a light
coating of vegetable oil after cleaning them by hand or in
the oven. This will help maintain the ease of sliding the
racks in and out of the oven.
Cleaning The Oven (Cont.)
CARE AND CLEANING: Cleaning The Oven
Oven Interior
The interior of your new oven can be cleaned manually
or by using the Steam Clean or Self Clean modes.
Spillage of marinades, fruit juices, tomato sauces and
basting liquids containing acids may cause discoloration
and should be wiped up as soon as hot surfaces cool,
then clean and rinse.
Manual Cleaning
Do not use oven cleaners, abrasive cleaners, strong
liquid cleansers, steel wool, scouring pads, or cleaning
powders on the interior of the oven. Clean with a mild
VRDSDQGZDWHURUVROXWLRQRIYLQHJDUDQGZDWHU
Rinse with clean water and dry with a soft cloth. When
cleaning surfaces, make sure that they are at room
temperature and not in direct sunlight.
Steam Clean Mode (on some models)
The Steam Clean feature is intended to use water to
clean light soil from your oven at a lower temperature
than Self Clean.
To use the Steam Clean feature:
6WDUWZLWKWKHRYHQDWURRPWHPSHUDWXUH
:LSHH[FHVVJUHDVHDQGVRLOVIURPWKHRYHQ
3RXURQHFXSRIZDWHURQWRWKHERWWRPRIWKHRYHQ
4. Close the door
3UHVVWKHSteam Clean pad and then press Start.
7KHRYHQGRRUZLOOORFN<RXFDQQRWRSHQWKHGRRU
GXULQJWKHPLQXWH6WHDP&OHDQF\FOHDVWKLVZLOO
decrease the cleaning performance. At the end of the
Steam Clean cycle the door will unlock. With a sponge,
soak up remaining water and wipe the moisture-softened
soil from the oven walls and door.
Probe
The temperature probe may be cleaned with soap and
water or a soap-filled scouring pad. Cool the temperature
probe before cleaning. Scour stubborn spots with a
soap-filled scouring pad, rinse and dry.
To order additional temperature probes read the
Assistance and Accessories sections at the beginning of
this manual.
Ŷ Do not immerse the temperature probe in water.
Ŷ Do not store the temperature probe in the oven.
Ŷ Do not leave the temperature probe inside the oven
during a self or steam clean cycle.
24
49-85211-6
Cleaning The Cooktop
CARE AND CLEANING: Cleaning The Cooktop
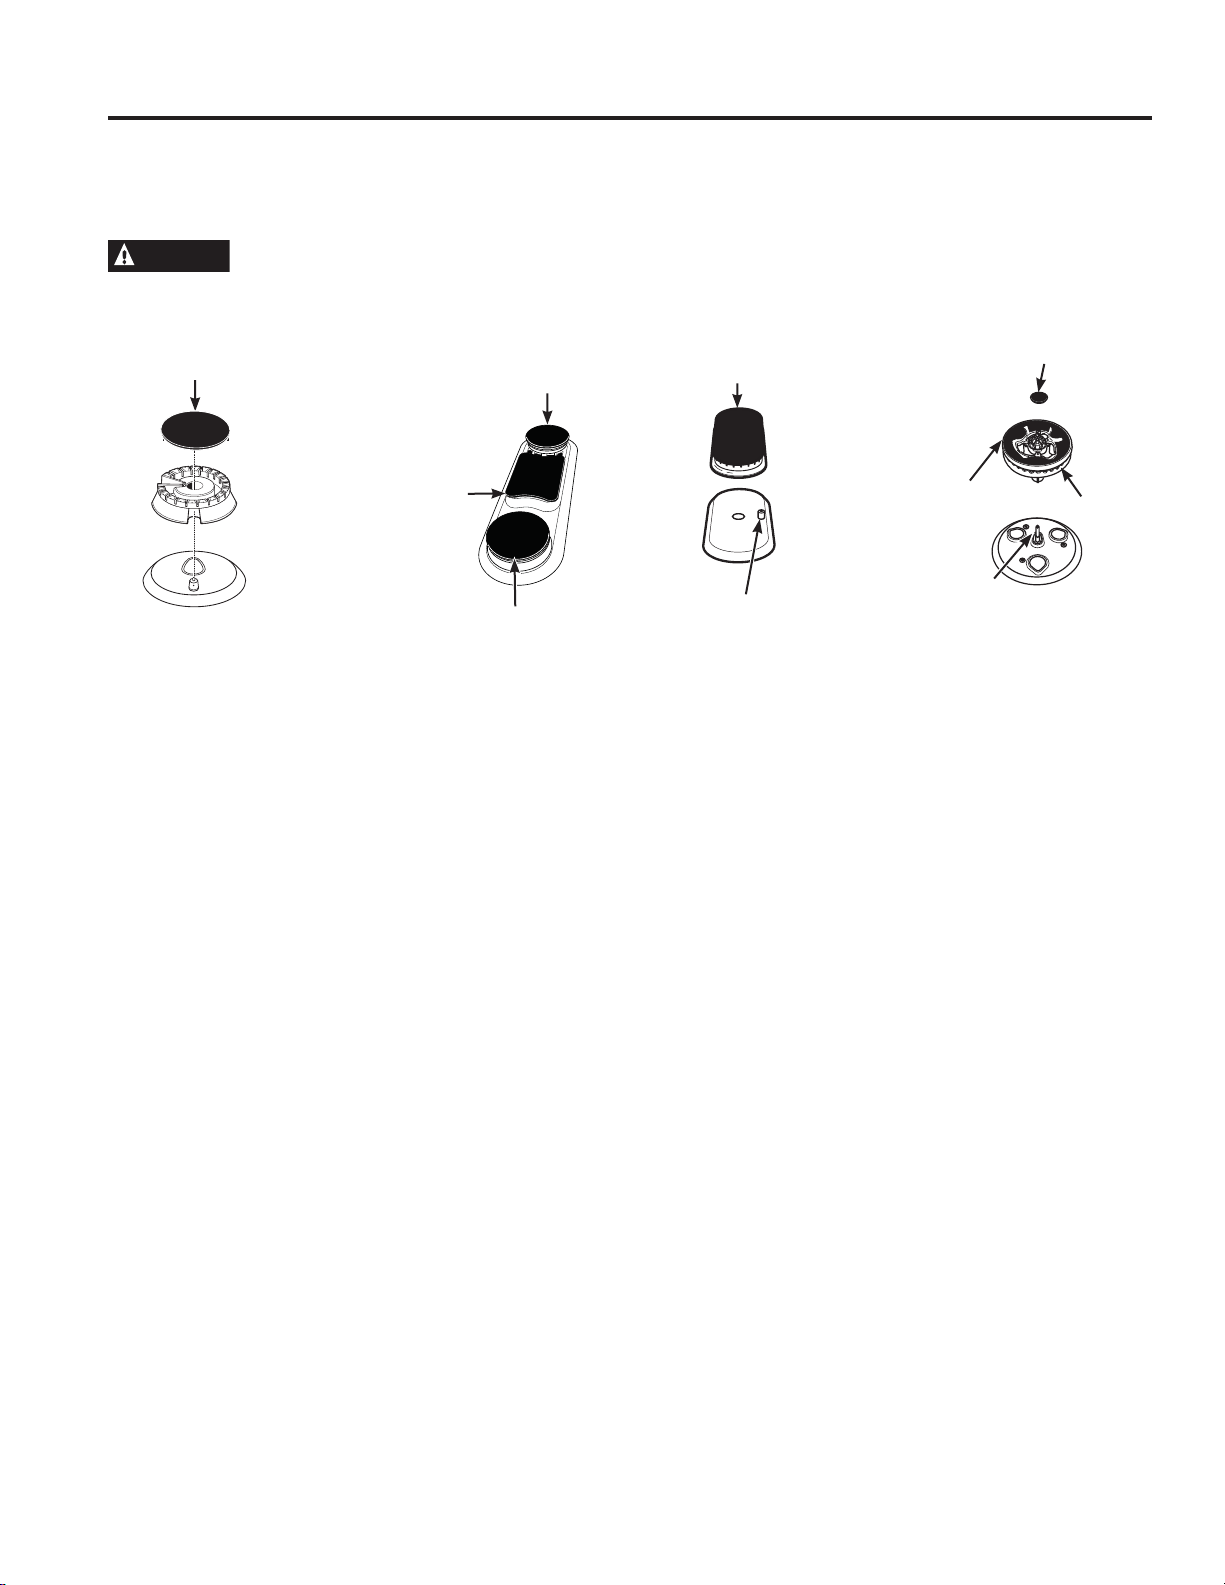
Removal of Surface Burners for Cleaning
Turn all controls OFF. Allow cooktop to cool before removing grates and burner parts. When removing the burner caps
and heads, remember their size and location. Replace them in the same location after cleaning.
CAUTION
Do not attempt to remove bridge burner, oval burner or tri-ring burner caps from burner heads.
Round Burner
The burner caps and
burner heads can be lifted
off the cooktop.
Bridge Burner
(on some models)
The bridge burner cap is
permanently attached to
the burner head assembly.
The burner assembly can
be lifted off the cooktop as
one piece. The burner caps
and burner heads can be
lifted off the cooktop.
Oval Burner
(on some models)
Cap is permanently
attached to the burner
head.
Tri-Ring Burner
(on some models)
The small tri-ring burner
cap can be lifted off for
cleaning. The outer cap is
permanently attached to
the burner head assembly.
Lift the burner head
assembly off the cooktop
as one piece.
Permanent
Bridge
Burner Cap
(Non-Removable)
Round Burner Cap
(Removable)
Round Burner Cap
(Removable)
Round Burner Cap
(Removable)
Inner Burner Cap
(Removable)
Outer Burner Cap
(Non-Removable)
Burner
Head
Electrode
(Non-Removable)
Oval Burner Head
and Cap Assembly
(Non-Removable)
Electrode
(Non-Removable)
49-85211-6
25
Cleaning The Cooktop (Cont.)
CARE AND CLEANING: Cleaning The Cooktop
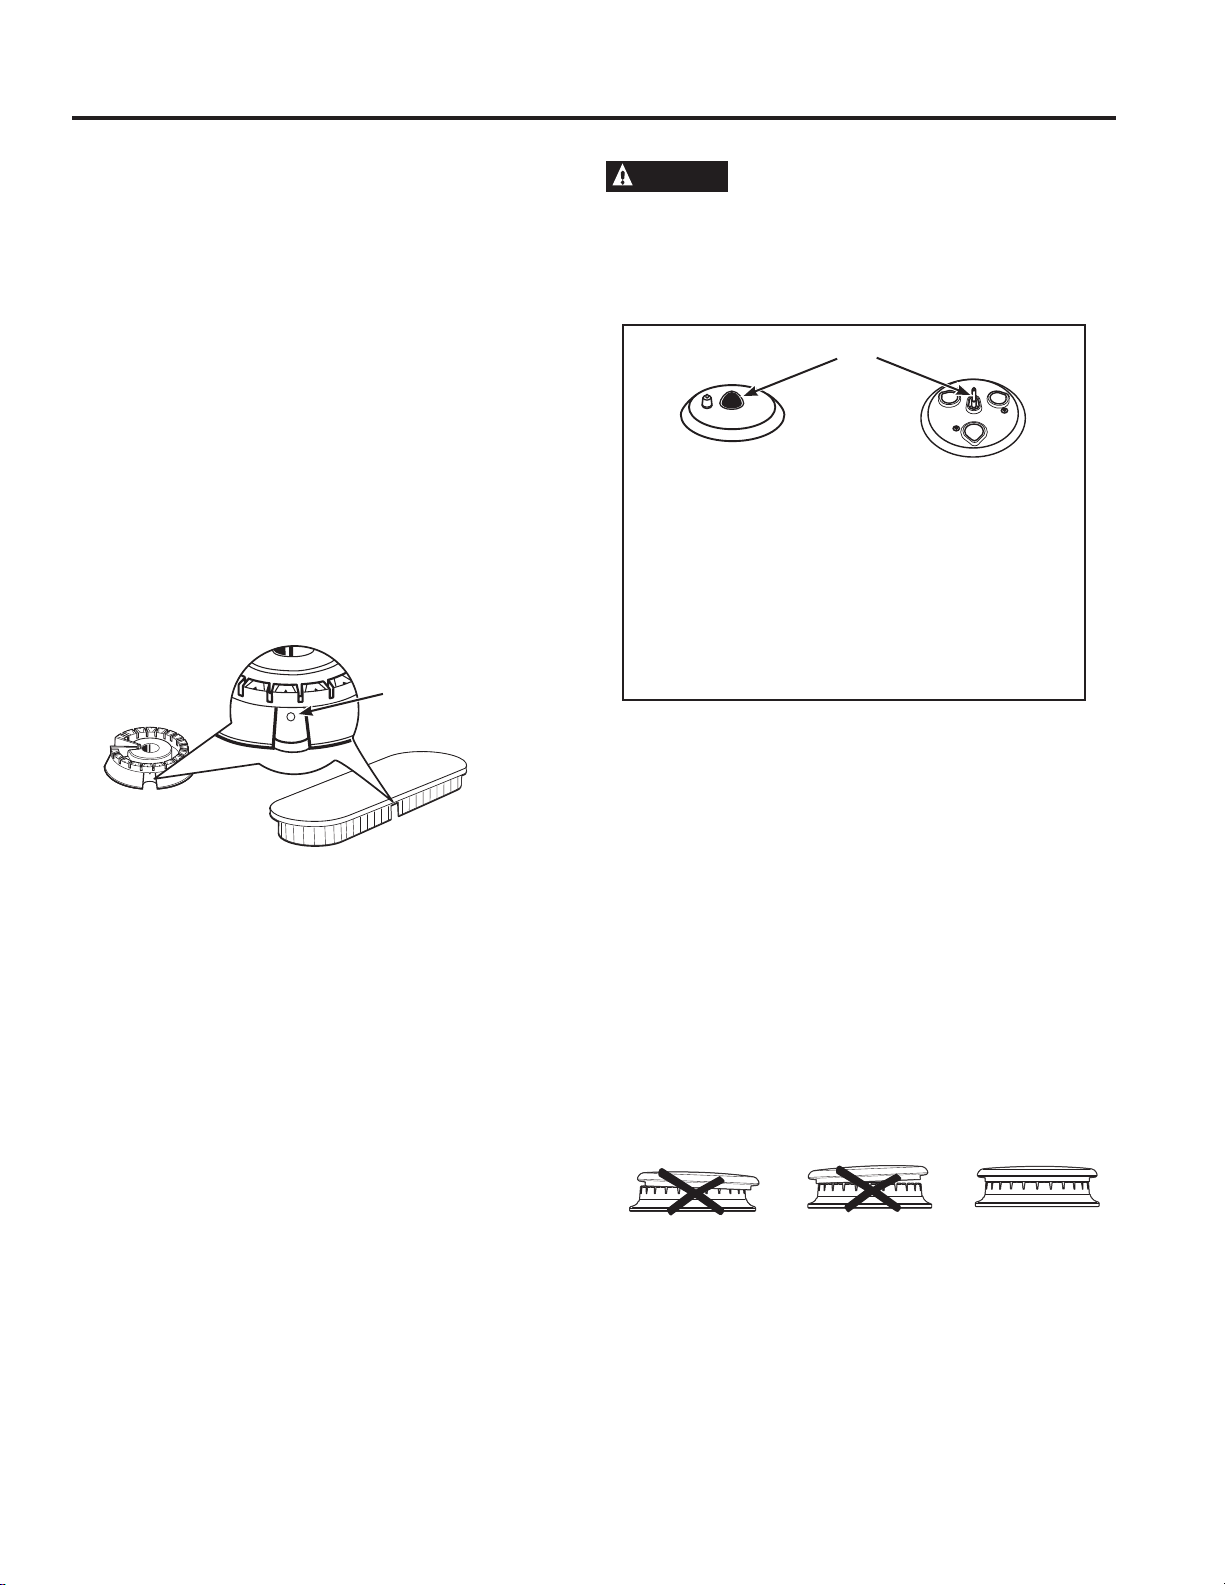
Replacing Burner Heads
Replace burner heads in the correct locations according
to size.
Burner Caps
5HSODFHEXUQHUFDSVRQEXUQHUKHDGV0DNHVXUHHDFK
cap fits securely and sits flat on its corresponding burner
head.
Burner cap is
properly seated.
Burner cap is
NOT properly seated.
Burner cap is
NOT properly seated.
Cleaning The Burners
Burner Caps
Wash burner caps in hot, soapy water and rinse with
FOHDQZDWHU<RXPD\VFRXUZLWKDSODVWLFVFRXULQJSDG
to remove burned-on food particles. The round caps may
also be cleaned in your dishwasher.
Burner Heads
Wash the burner heads routinely, especially after bad
spillovers, which could clog the openings. Lift burners off
when cool. Use hot, soapy water. Rinse with clean water.
For more stubborn stains, use a brush with plastic bristles.
NOTE: Do not use steel wool or scouring powders to
clean the burner parts as these may clog the parts.
Never wash burner heads in your dishwasher as
dishwasher detergents will discolor your burners.
The ports in the burner heads must be kept clean at all
times for an even, unhampered flame.
Clogged or dirty burner ports or electrodes will not allow
the burner to operate properly.
For proper ignition, make sure the small hole in the notch
that fits over the electrode is kept open. A sewing needle
or wire twist-tie works well to unclog it.
After cleaning
%HIRUHSXWWLQJWKHEXUQHUFDSVKHDGVRQVRPHPRGHOV
DQGRYDOKHDGFDSDVVHPEO\EDFNVKDNHRXWH[FHVV
water and allow them to dry thoroughly.
CAUTION
Do not operate the cooktop without all
burner parts and grates in place.
Any spill on or around an electrode must be carefully
cleaned. Take care to not hit an electrode with anything
hard or it could be damaged.
Electrode
Tri-ring base
(on some models)
The electrode of the spark igniter is exposed
when the burner head is removed. When one
burner is turned to LITE, all the burners spark.
Do not attempt to disassemble or clean around
any burner while another burner is on. An electric
shock may result, which could cause you to
knock over hot cookware.
or
Round hole in
burner head must
be kept clear
26
49-85211-6
Cleaning The Cooktop (Cont.)
CARE AND CLEANING: Cleaning The Cooktop
Burner Grates
Grates should be washed in hot, soapy water and
rinsed with clean water. To soften burned-on food,
SODFHJUDWHVLQDSODVWLFEDJFRQWDLQLQJóFXSRI
household ammonia for several hours. Afterward, scrub
grates with a plastic scouring pad soaked in hot, soapy
water. Rinse well and dry.
When replacing the grates, be sure to locate them
correctly on the cooktop. Grates are identified by the
words LEFT and RIGHT on their bottom surfaces. Grate
should fit securely into the cooktop.
Grates will gradually lose their shine due to their
continual exposure to high temperatures.
Griddles (on some models)
Non-Stick Aluminum Griddle: Avoid scraping the
griddle surface with metal utensils. Wash your griddle
with dish detergent and hot water. If necessary, scrub
with a non-abrasive plastic pad.
Cast-Iron Reversible or Chef’s Griddle: clean your
cast-iron reversible or chef’s griddle with a stiff brush
and hot water. Using soap is not recommended, and
harsh detergents should never be used as they will
remove the seasoning. Rinse with hot water and dry
thoroughly. Apply a light coat of cooking oil to the
griddle surface. Wipe off excess oil with a paper towel.
Store in a cool, dry place.
Griddle Precautions:
If something has spilled under the griddle, it should be
cleaned up as soon as possible to prevent the spill from
getting baked onto the cooktop.
Do not allow grease to accumulate under the griddle as
it can be a fire hazard. Clean under the griddle with hot
soapy water as soon as it is cool.
Do not wash your griddle in the dishwasher.
Do not place your griddle in a microwave oven.
Grate Support Bumpers
If any of the rubber grate support bumpers in the cooktop
are missing or damaged, replacement parts can be
REWDLQHGE\FDOOLQJ*(&$5(6
To insert the new bumpers, simply place the
cone-shaped end of the bumper into the hole in the
cooktop and push down while gently twisting the bumper.
Cleaning the Grates in the Self-Clean Oven (on some models)
If your cooktop grates do not have rubber bumpers on
their bottom surface and your oven racks are coated
with black porcelain, your grates may be cleaned in
the oven using the self-clean cycle. If your grates have
rubber bumpers, do not attempt to clean your grates in
the oven. Doing so will destroy the rubber bumpers and
may affect the function of your surface burners.
Place oven racks in the positions labeled “R”, “2” and
“4” in the illustration. Place a single grate on each
rack. Follow instructions for the self-clean mode in the
Cleaning the Oven section of this manual.
NOTE: Use caution when removing the grates from the
oven after the self-clean cycle has ended. The grates
may still be hot.
After cleaning, you may notice a white residue on the
grates. Wipe it off with a damp sponge. If white spots
SHUVLVWZHWWKHVSRQJHZLWKDVROXWLRQRIYLQHJDU
and water.
The oven has 6 rack positions. Place the gray porcelain-coated racks
in positions “R”, “2” and “4” for self-cleaning the grates.
Grate Support Bumpers

49-85211-6
27
Cleaning The Door and Drawer
CARE AND CLEANING: Cleaning The Door and Drawer
The gasket is designed with a gap at the bottom to
allow for proper air circulation.
'RQRWUXERUFOHDQWKHGRRUJDVNHW³LWKDVDQ
extremely low resistance to abrasion.
If you notice the gasket becoming worn, frayed or
damaged in any way or if it has become displaced on
the door, you should have it replaced.
To clean the inside of the door
Do not allow excess water to run into any holes or slots
in the door .
Wipe dishwashing detergent over any baked-on spatters
on the glass. Use a single sided safety razor blade to
clean it off. Then wipe over the glass with a soapy cloth
to remove any residue and dry off.
The area outside the gasket can be cleaned with a
soap-filled plastic scouring pad.
Removable Storage Drawer (on some models)
The storage drawer is a good place to store cookware
and bakeware. Do not store plastics and flammable
material in the drawer.
The storage drawer may be removed for cleaning under
the range. Clean the storage drawer with a damp cloth or
sponge. Never use harsh abrasives or scouring pads.
To remove storage drawer:
1. Pull drawer straight out until it stops.
2. Tilt the front of the drawer up and free of the range.
To replace storage drawer:
1. Set the stops on the back of the drawer over the stops
in the range.
2. Slide drawer evenly and straight back, so that the rails
in the range are engaged.
Removable Drawer (Warming Drawer Models only)
NOTE: For models with an electric warming drawer,
before performing any adjustments, cleaning or
service, disconnect the range electrical power supply
at the household distribution panel by removing the
IXVHRUVZLWFKLQJRIIWKHFLUFXLWEUHDNHU0DNHVXUHWKH
warming drawer heating element is cool.
0RVWFOHDQLQJFDQEHGRQHZLWKWKHGUDZHULQSODFH
+RZHYHUWKHGUDZHUPD\EHUHPRYHGLIIXUWKHUFOHDQLQJ
is needed. Use soap and warm water to thoroughly clean.
To remove the drawer:
1. Pull drawer straight out
until it stops.
2. Press the left rail release
up and press the right
rail release down, while
pulling the drawer
forward and free.
To replace the drawer:
1. Place the left drawer rail around the inner left rail guide
and slide it in slightly to hook it.
2. Place the right drawer rail around the inner right rail
guide and slide it in slightly to hook it.
3. Slide the drawer all the way in.
The storage drawer may be removed for cleaning
under the range.
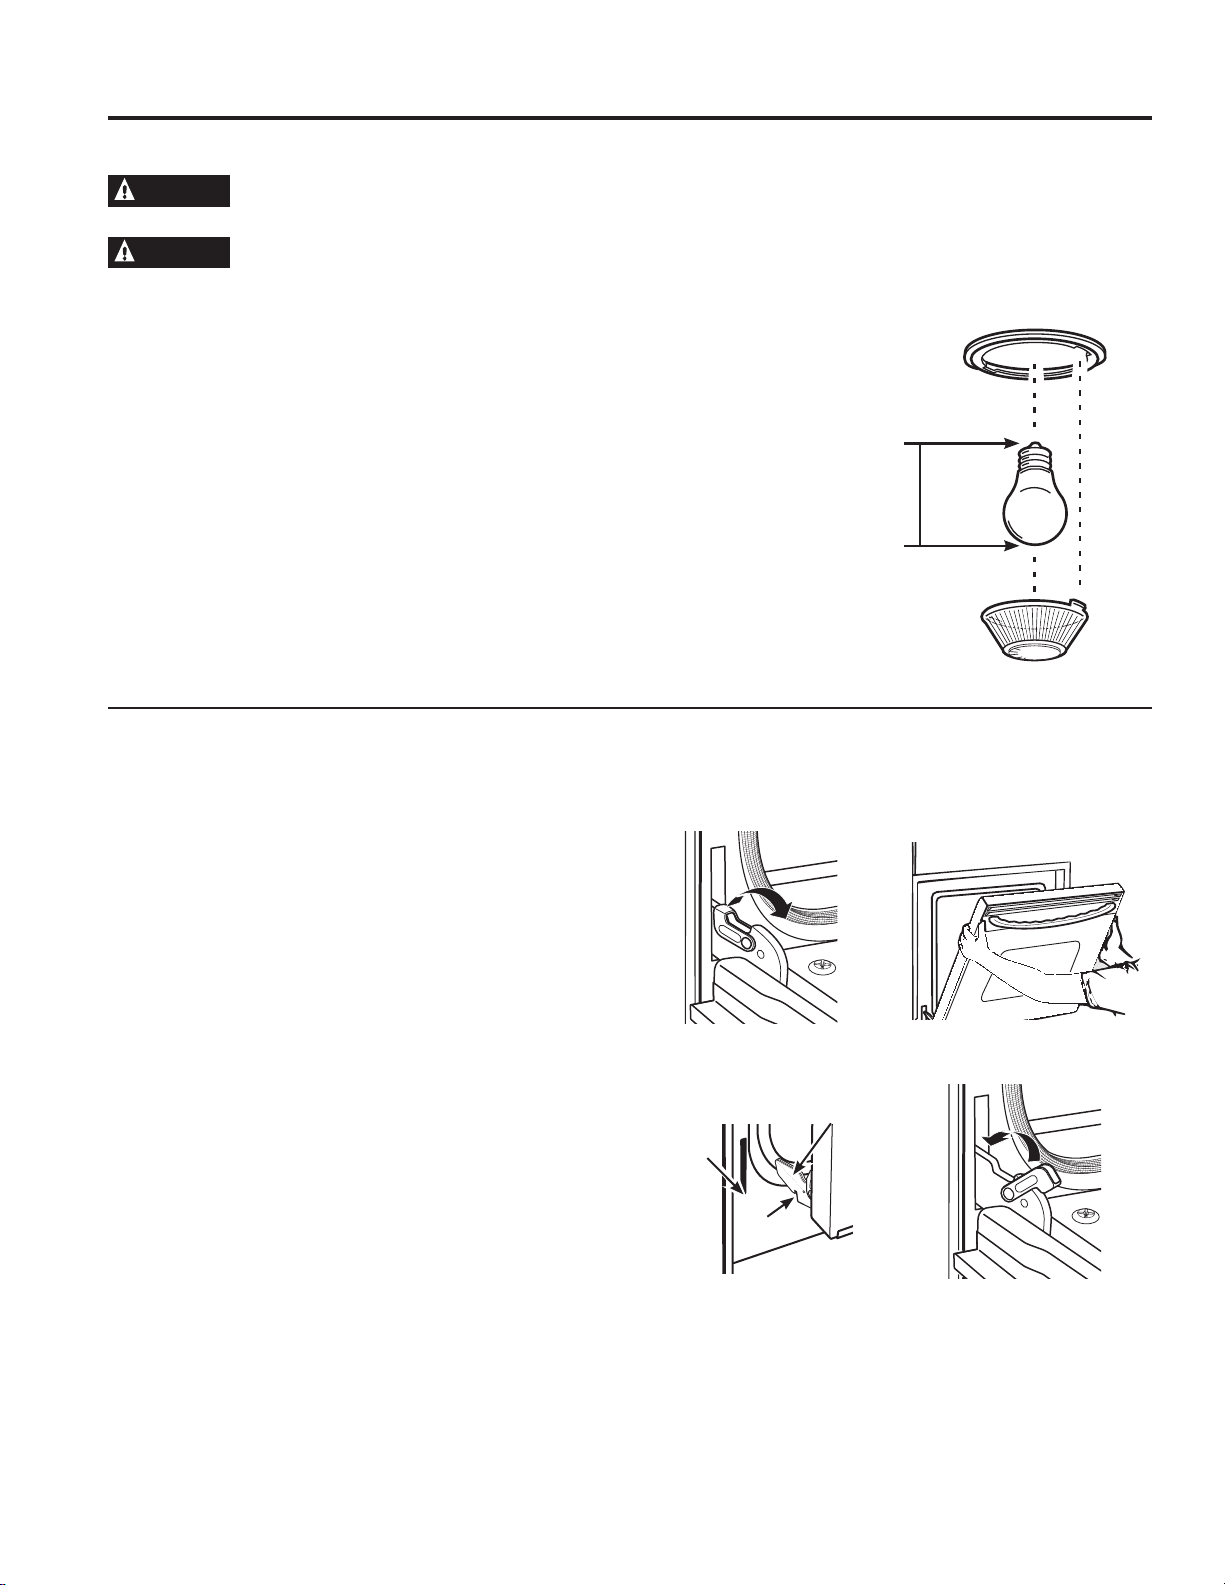
28
49-85211-6
Maintenance
CARE AND CLEANING: Maintenance
WARNING
SHOCK OR BURN HAZARD:%HIRUHUHSODFLQJRYHQOLJKWEXOEGLVFRQQHFWWKHHOHFWULFDOSRZHUWRWKH
oven at the main fuse or circuit breaker panel. Failure to do so may result in electric shock or burn.
CAUTION
BURN HAZARD: The glass cover and bulb should be removed when cool. Touching hot glass with
bare hands or a damp cloth can cause burns.
Oven Light Replacement
NOTE: The glass cover should be removed only when
cold. Wearing latex gloves may offer a better grip.
%HIRUHUHSODFLQJWKHEXOEGLVFRQQHFWHOHFWULFDOSRZHUWR
the oven at the main fuse or circuit breaker panel. Let
the bulb cool completely before removing it. For your
safety do not touch a hot bulb with a damp cloth. If you
do the bulb may break.
To remove:
7XUQWKHJODVVFRYHUFRXQWHUFORFNZLVHWXUQXQWLOWKH
tabs of the glass cover clear the grooves of the socket.
Remove the bulb.
To replace:
3XWLQDQHZZDWWDSSOLDQFHEXOE3ODFHWKHWDEVRI
the glass cover into the grooves of the socket. Turn the
JODVVFRYHUFORFNZLVHWXUQ
NOTE:
Ŷ $ZDWWDSSOLDQFHEXOE
is smaller than a standard
ZDWWKRXVHKROGEXOE
Ŷ Reconnect electrical power
to the oven once the new
bulb is installed.
Ŷ For improved lighting inside
the oven, clean the glass
cover frequently using a
wet cloth. This should be
done when the oven is
completely cool.
Bulb
Socket
Tab
3
1
ø2”
Max
length
Glass cover
Lift-Off Oven Door
7KHGRRULVYHU\KHDY\%HFDUHIXOZKHQUHPRYLQJDQGOLIWLQJWKHGRRU'RQRWOLIWGRRUE\WKHKDQGOH
To Remove the Door:
)XOO\RSHQWKHGRRU
3XOOWKHKLQJHORFNVXSDQGDZD\IURPWKHUDQJH
frame to the unlocked position.
)LUPO\JUDVSERWKVLGHVRIWKHGRRUQHDUWKHWRS
4. Close door until the top of the door is approximately
´IURPWKHUDQJHIUDPH
/LIWGRRUXSDQGDZD\IURPWKHUDQJHXQWLOERWKKLQJH
arms are clear of the slots in the range frame.
To Replace the Door:
)LUPO\JUDVSERWKVLGHVRIWKHGRRUQHDUWKHWRS
:LWKWKHGRRUDWWKHVDPHDQJOHDVWKHUHPRYDO
position, rest the notch on the underside of the left
hinge arm on the bottom edge of the left hinge slot.
The notch in the hinge arm must be fully seated into
the bottom of the slot. Repeat for the right side.
)XOO\RSHQWKHGRRU,IWKHGRRUZLOOQRWIXOO\ RSHQWKH
notches in the bottoms of the hinge arms have not
seated correctly in the bottom edge of the slot. Lift the
door off the range and repeat previous step.
4. Push the hinge locks toward the range cavity and
down to the locked position.
&ORVHWKHRYHQGRRU
Removal positionPull hinge locks up to unlock
Push hinge locks down to lockRest notch on bottom edge
of hinge slot
Notch
Bottom
edge of
slot
Hinge arm
49-85211-6
29
Save time and money! Review the charts on the following pages first and you may not need to call for service.
Problem Possible Cause What To Do
My new oven doesn't
cook like my old one.
Is something wrong
with the temperature
settings?
Your new oven has a different cooking
system from your old oven and therefore
may cook differently than your old oven.
For the first few uses, follow your recipe
times and temperatures carefully. If you still
think your new oven is too hot or too cold,
you can adjust the temperature yourself to
meet your specific cooking preference.
Food does not bake
properly
Oven controls improperly set. 6HHWKH&RRNLQJ0RGHVVHFWLRQ
Rack position is incorrect or rack is not
level.
6HHWKH&RRNLQJ0RGHVVHFWLRQDQG&RRNLQJ
Guide.
Incorrect cookware or cookware of improper
size being used.
See the Cookware section.
Oven temperature needs adjustment. See the Special Features section.
Ingredient substitution Substituting ingredients can change the
recipe outcome.
Food does not broil
properly
Oven controls improperly set. 0DNHVXUH\RXVHOHFWWKHDSSURSULDWHEURLO
mode.
Improper rack position being used. See Cooking Guide for rack location
suggestions.
Food being cooked in a hot pan. 0DNHVXUHFRRNZDUHLVFRRO
Cookware not suited for broiling. Use a pan specifically designed for broiling.
Aluminum foil used on the broiling pan and
grid has not been fitted properly and
slit as recommended.
If using aluminum foil conform to pan slits.
In some areas the power (voltage) may be
low.
3UHKHDWWKHEURLOHOHPHQWIRUPLQXWHV
Oven temperature too
hot or too cold
Oven temperature needs adjustment. See the Special Features section.
Oven does not work or
appears not to work
A fuse in your home may be blown or the
circuit breaker tripped.
Replace the fuse or reset the circuit breaker.
Oven controls improperly set. See the Using the Oven section.
Oven is in Sabbath Mode. 9HULI\WKDWWKHRYHQLVQRWLQ6DEEDWK0RGH
See the Special Features section.
“Crackling” or
“popping” sound
This is the sound of the metal heating
and cooling during both the cooking and
cleaning functions.
This is normal.
Why is my range
making a "clicking"
noise when using my
oven?
Your range has been designed to maintain
a tighter control over your oven's
temperature. You may hear your oven's
heating elements "click" on and off more
frequently than in older ovens to achieve
better results during baking, broiling, and
self-clean cycles.
This is normal.
Clock and timer do not
work
A fuse in your home may be blown or the
circuit breaker tripped.
Replace the fuse or reset the circuit breaker.
Sometimes the
oven takes longer to
preheat to the same
temperature
Cookware or food in oven The cookware or food in the oven will cause
the oven to take longer to preheat. Remove
items to reduce preheat time.
Number of racks in oven Adding more racks to the oven will cause
the oven to take longer to preheat. Remove
some racks.
Troubleshooting tips ... Before you call for service
TROUBLESHOOTING TIPS

30
49-85211-6
Problem Possible Cause What To Do
Oven light does not
work
Light bulb is loose or defective. Tighten or replace bulb.
Pad operating light is broken. Call for service.
Oven will not
self-clean
The temperature is too high to set a
self-clean operation.
Allow the oven to cool and reset the controls.
Oven controls improperly set. See the Cleaning the Oven section.
Excessive smoking
during clean cycle
Excessive soil or grease.. Press the Cancel/Off pad. Open the windows to rid
the room of smoke. Wait until the LOCKED light goes
off. Wipe up the excess soil and reset the clean cycle.
Excessive smoking
during broiling
Food too close to burner element. Lower the rack position of the food.
Oven door will not
open after a clean
cycle
Oven too hot. Allow the oven to cool below locking temperature.
Oven not clean after
a clean cycle
Oven controls improperly set. See the Cleaning the Oven section.
Oven was heavily soiled. Clean up heavy spillovers before starting the clean
F\FOH+HDYLO\VRLOHGRYHQVPD\QHHGWRVHOIFOHDQ
again or for a longer period of time.
"DOOR
” flashes in
the display
The self-clean cycle has been selected
but the door is not closed.
Close the oven door.
LOCKED light is on
when you want to
cook
The oven door is locked because
the temperature inside the oven
has not dropped below the locking
temperature.
Press the Cancel/Off pad. Allow the oven to cool.
“F— and a number
or letter” flash in
the display
You have a function error code. Press the Cancel/Off pad. Allow the oven to cool for one
hour. Put the oven back into operation.
If the function code repeats. 'LVFRQQHFWDOOSRZHUWRWKHRYHQIRUDWOHDVW
seconds and then reconnect power. If the function
error code repeats, call for service.
Display goes blank A fuse in your home may be blown or the
circuit breaker tripped.
Replace the fuse or reset the circuit breaker.
The clock is turned off. See the Special features section.
Oven is in Sabbath Mode. 9HULI\WKDWWKHRYHQLVQRWLQ6DEEDWK0RGH
See the Special Features section.
Power outage,
clock flashes
Power outage or surge Reset the clock. If the oven was in use, you must
reset it by pressing the Cancel/Off pad, setting the
clock and resetting any cooking function.
“Burning” or “oily”
odor emitting from
the vent
This is normal in a new oven and will
disappear in time.
To speed the process, set a self-clean cycle for a
PLQLPXPRIKRXUV6HHWKH&OHDQLQJWKH2YHQ
section. This is temporary.
Strong odor An odor from the oven insulation is
normal for the first few times the oven
is used.
This is temporary and will go away after several uses
or a self-clean cycle.
My oven door glass
appears to be
"tinted" or have a
"rainbow" color. Is
this defective?
No. The inner oven glass is coated with
a heat barrier to reflect the heat back
into the oven to prevent heat loss and
keep the outer door cool while baking.
This is normal. Under certain light or angles, you may
see this tint or rainbow color.
“Shut Door” flashes
in the display
The oven door has been left open. Close door and normal mode will resume
Cooking mode
shuts off when
door left open
Door left open after “Shut Door”
flashed in display.
Close door and normal mode will resume
Troubleshooting tips ... Before you call for service
TROUBLESHOOTING TIPS
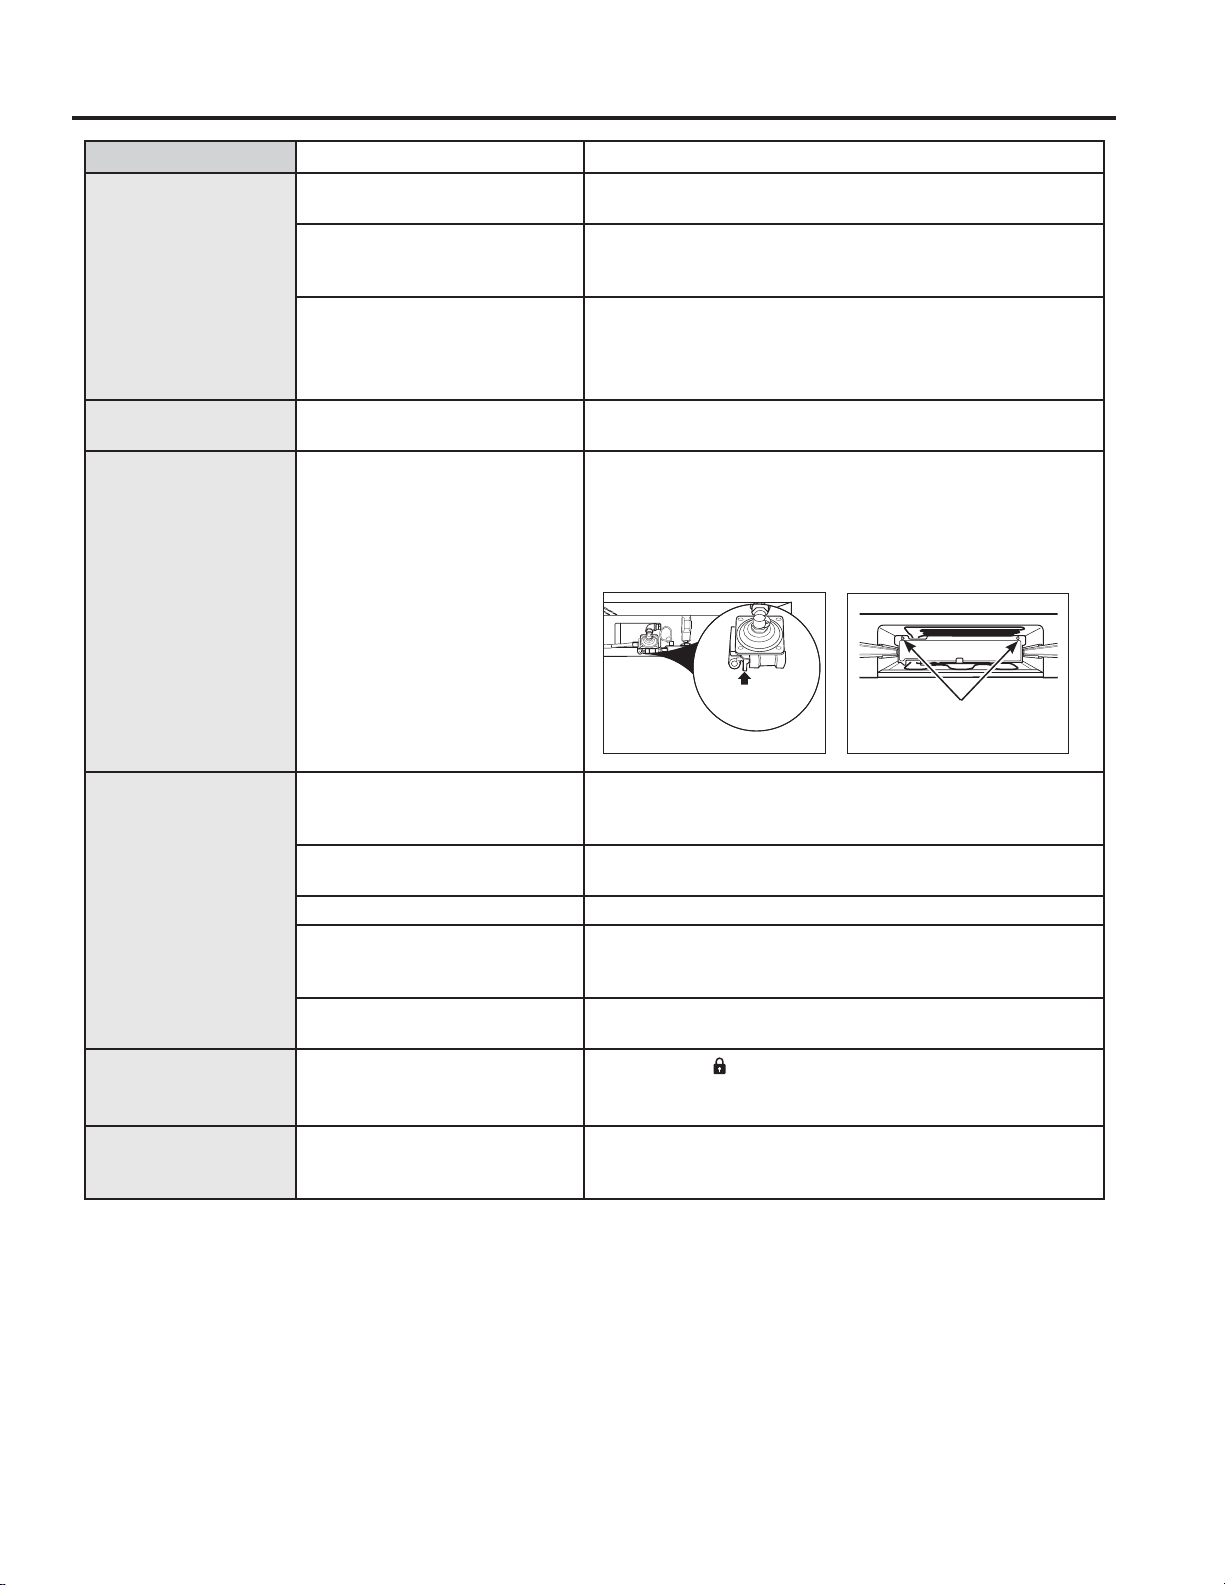
49-85211-6
31
Problem Possible Cause What To Do
Top burners do not
light or do not burn
evenly. (The front right
burner is designed to
have slightly smaller
flames between
the 6 and 9 o’clock
positions. This is
normal.)
Plug on range is not completely
inserted in the electrical outlet.
0DNHVXUHHOHFWULFDOSOXJLVSOXJJHGLQWRDOLYHSURSHUO\JURXQGHG
outlet.
Burner slits on the side of the
burner may be clogged.
Remove the burners and clean them. Check the electrode area
for burned-on food or grease. See the Care and cleaning of the
range section.
Improper burner assembly. 0DNHVXUHWKHEXUQHUSDUWVDUHLQVWDOOHGFRUUHFWO\6HHWKH&DUH
and cleaning of the range section.
Burner flames very
large or yellow
Improper air to gas ratio. If range is connected to LP gas, contact the person who
installed your range or made the conversion.
Surface burners light
but oven does not
The oven gas shut-off valve
may have accidentally been
moved during cleaning or
moving.
7RFKHFNWKHRYHQJDVVKXWRIIYDOYHUHPRYHWKHGUDZHUVHH
WKH&DUHDQGFOHDQLQJRIWKHUDQJHVHFWLRQ)RUORZHURYHQ
drawer models, remove the rear access panel by unscrewing
the thumb screws in the upper left and right corners. Look for
the gas shut-off lever at the back of the range.
Burners do not light Plug on range is not
completely inserted in the
electrical outlet.
0DNHVXUHHOHFWULFDOSOXJLVSOXJJHGLQWRDOLYHSURSHUO\
grounded outlet.
Gas supply not connected or
turned on.
See the Installation Instructions that came with your range.
Bridge burner won’t light 6HH+RZWR/LJKW%ULGJH%XUQHUVHFWLRQ
A fuse in your home may be
blown or the circuit breaker
tripped.
Replace the fuse or reset the circuit breaker.
Burner parts not replaced
correctly.
See the Care and Cleaning of the range section.
Lock Controls or
Control Lockout
feature is activated
If “CONTROL
” appears in the display, the range control is
locked. Turn this feature off to use the range. See the Lock
Control feature in the Oven Controls section.
“TURN BURNERS
OFF” flashes in the
display
A cooktop burner was on
when the range was going into
or out of self-clean modes.
Turn all burners off.
Lever is
shown closed.
PULL TO OPEN.
Sealed burner models
Thumb screws
Lower oven drawer models
Troubleshooting tips ... Before you call for service
TROUBLESHOOTING TIPS
32
49-85211-6
Problem Possible Cause What To Do
Drawer does not slide
smoothly or drags
The drawer is out of alignment. Fully extend the drawer and push it all the way in. See
the Care and cleaning of the range section.
Drawer is over-loaded or load is
unbalanced.
Reduce weight. Redistribute drawer contents.
Lower oven drawer or
warming drawer will
not work
A fuse in your home may be blown or
the circuit breaker tripped.
Replace the fuse or reset the circuit breaker.
The oven is self-cleaning. Wait for the self-clean cycle to finish and the oven to
cool.
Controls improperly set. See the Electric warming drawer or Lower oven rawer
section.
Excessive
condensation in the
drawer
Liquid in drawer. Remove liquid.
Uncovered foods. Cover food with lid or aluminum foil.
Temperature setting too high. Reduce temperature setting.
Food dries out in the
lower oven drawer or
warming drawer
Moisture escaping. Cover food with lid or aluminum foil.
Drawer not fully closed. Push drawer in until latch engages.
Oven will not work
remotely
Router issues, no wireless signal, etc. For assistance with oven wireless network
FRQQHFWLYLW\SOHDVHFDOO
Oven is not connected.
Troubleshooting tips ... Before you call for service
TROUBLESHOOTING TIPS

49-85211-6 09-15 GE
Información de Seguridad ...2
Garantía ........................8
Asistencia / Accesorios .......9
Uso de la Placa de Cocción
Quemadores .....................10
Plancha ..........................12
Uso del Horno
Controles del Horno ..............14
Funciones Especiales .............16
Estantes del Horno ...............17
Ventilaciones de Aire del Horno . . .17
Utensilios ........................18
Modos de Cocción ...............18
Probe (Sonda) ....................19
Guía de Cocción ..................20
Guía del Cajón para Calentar .....21
Papel de Aluminio y
Cobertores del Horno ...........21
Cuidado y Limpieza
Limpieza del Horno ...............22
Limpieza de la Placa de Cocción . .24
Limpieza de la Puerta y el Cajón . .27
Mantenimiento ...................28
Consejos para la
Solución de Problemas ......29
Cocinas
a Gas con Función de Auto Limpieza
Escriba los números de modelo y de
serie aquí:
Nº de Modelo ______________
Nº de Serie ________________
Encontrará la etiqueta de calificación en
el frente, detrás del cajón de la cocina.
Manual del Propietario
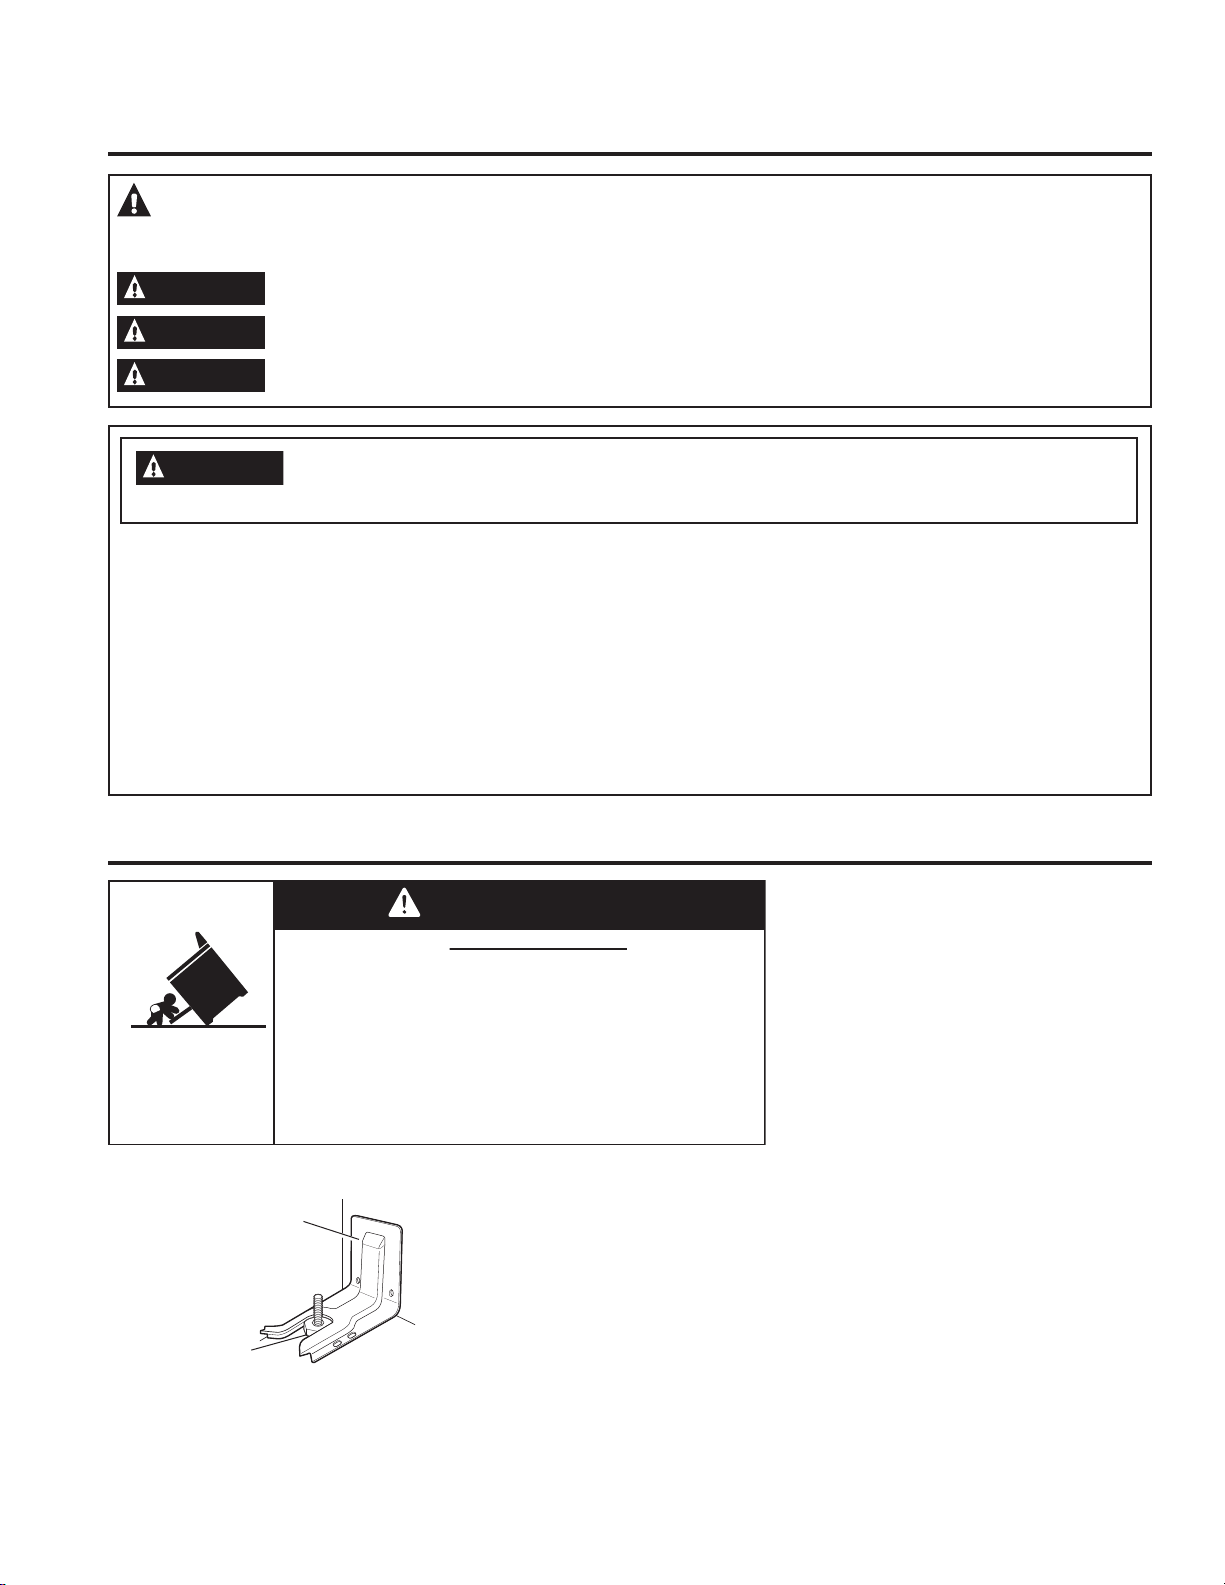
2
49-85211-6
- No guarde ni use gasolina u otros vapores inflamables y líquidos cerca de este ni de otros electrodomésticos.
- QUÉ DEBE HACER SI HUELE GAS
Ŷ 1RLQWHQWHLOXPLQDUQLQJ~QHOHFWURGRPpVWLFR
Ŷ 1RWRTXHQLQJ~QLQWHUUXSWRUHOpFWULFRQRXVHWHOpIRQRVHQVXHGLILFLR
Ŷ 'HLQPHGLDWROODPHDVXSURYHHGRUGHJDVGHVGHHOWHOpIRQRGHXQYHFLQR
Ŷ 6LQRVHSXHGHFRPXQLFDUFRQVXSURYHHGRUGHJDVOODPHDOGHSDUWDPHQWRGHERPEHURV
/DLQVWDODFLyQ\ODVUHSDUDFLRQHVGHEHUiQVHUUHDOL]DGDVSRUXQLQVWDODGRUFDOLILFDGRDJHQFLDGHVHUYLFLRVRHO
proveedor de gas.
ADVERTENCIA
Si la información de este manual no se sigue exactamente, se podrá producir un
incendio o explosión, ocasionando daños sobre la propiedad, lesiones o la muerte.
A fin de reducir el riesgo de caída de la
FRFLQDpVWDGHEHUiHVWDUDVHJXUDGDSRU
un soporte anti-volcaduras correctamente
instalado. Consulte las instrucciones de
LQVWDODFLyQSURYLVWDVFRQHOVRSRUWHSDUD
acceder a detalles completos antes de
intentar realizar la instalación.
Para Cocinas Sin Apoyo y Deslizables
Para controlar si el soporte es instalado
\DMXVWDGRGHIRUPDDSURSLDGDPLUH
que debajo de la cocina la pata
QLYHODGRUDWUDVHUDHVWpDMXVWDGDDOVRSRUWH(QDOJXQRVPRGHORVHOFDMyQ
de almacenamiento o el panel de protección se pueden retirar para una fácil
LQVSHFFLyQ6LQRHVSRVLEOHUHDOL]DUXQDLQVSHFFLyQYLVXDOGHVOLFHODFRFLQD
KDFLDDGHODQWHFRQILUPHTXHHOVRSRUWHDQWLYROFDGXUDVHVWpDMXVWDGRGH
IRUPDVHJXUDDOSLVRRODSDUHG\GHVOLFHODFRFLQDKDFLDDWUiVGHPRGRTXH
la pata niveladora trasera se encuentre debajo del soporte anti-volcaduras.
(QFDVRGHTXHODFRFLQDVHDHPSXMDGDGHODSDUHGSRUDOJXQDUD]yQ
siempre repita este procedimiento para verificar que la cocina esté
correctamente asegurada por el soporte anti-volcaduras.
1XQFDUHWLUHFRPSOHWDPHQWHODVSDWDVQLYHODGRUDV\DTXHODFRFLQDQR
estará asegurada de forma adecuada al dispositivo antivolcaduras.
Cocinas Sin Apoyo y Deslizables
Soporte Anti-
volcaduras
Pata Niveladora
Un niño o adulto pueden volcar la cocina y morir.
Verifique que el soporte anti-volcaduras se haya
instalado y ajustado correctamente.
Asegurese de que el soporte anti volcaduras sea
reinstalado cuando se mueva la cocina.
No utilice la cocina sin que el soporte anti-volcaduras
esté colocado y ajustado.
Si estas instrucciones no se siguen, como resultado se podrá
producir la muerte o quemaduras graves de niños y adultos.
Riesgo de Volcaduras
ADVERTENCIA
INFORMACIÓN IMPORTANTE DE SEGURIDAD
LEA TODAS LAS INSTRUCCIONES ANTES DE USAR
DISPOSITIVO ANTI-VOLCADURAS
INFORMACIÓN DE SEGURIDAD
GUARDE ESTAS INSTRUCCIONES
Éste es el símbolo de alerta de seguridad. El mismo alerta sobre potenciales riesgos que le pueden producir la muerte o
lesiones tanto a usted como a otras personas. Todos los mensajes de seguridad estarán a continuación del símbolo de alerta de
VHJXULGDG\FRQODSDODEUD³3(/,*52´³$'9(57(1&,$´R³35(&$8&,Ï1´(VWDVSDODEUDVVHGHILQHQFRPR
PELIGRO
,QGLFDXQDVLWXDFLyQGHULHVJRTXHVLQRVHHYLWDproducirá la muerte o lesiones graves.
ADVERTENCIA
,QGLFDXQDVLWXDFLyQGHULHVJRTXHVLQRVHHYLWDpodría producir la muerte o lesiones graves.
PRECAUCIÓN
,QGLFDXQDVLWXDFLyQGHULHVJRTXHVLQRVHHYLWDpodría resultar en lesiones menores o moderadas.
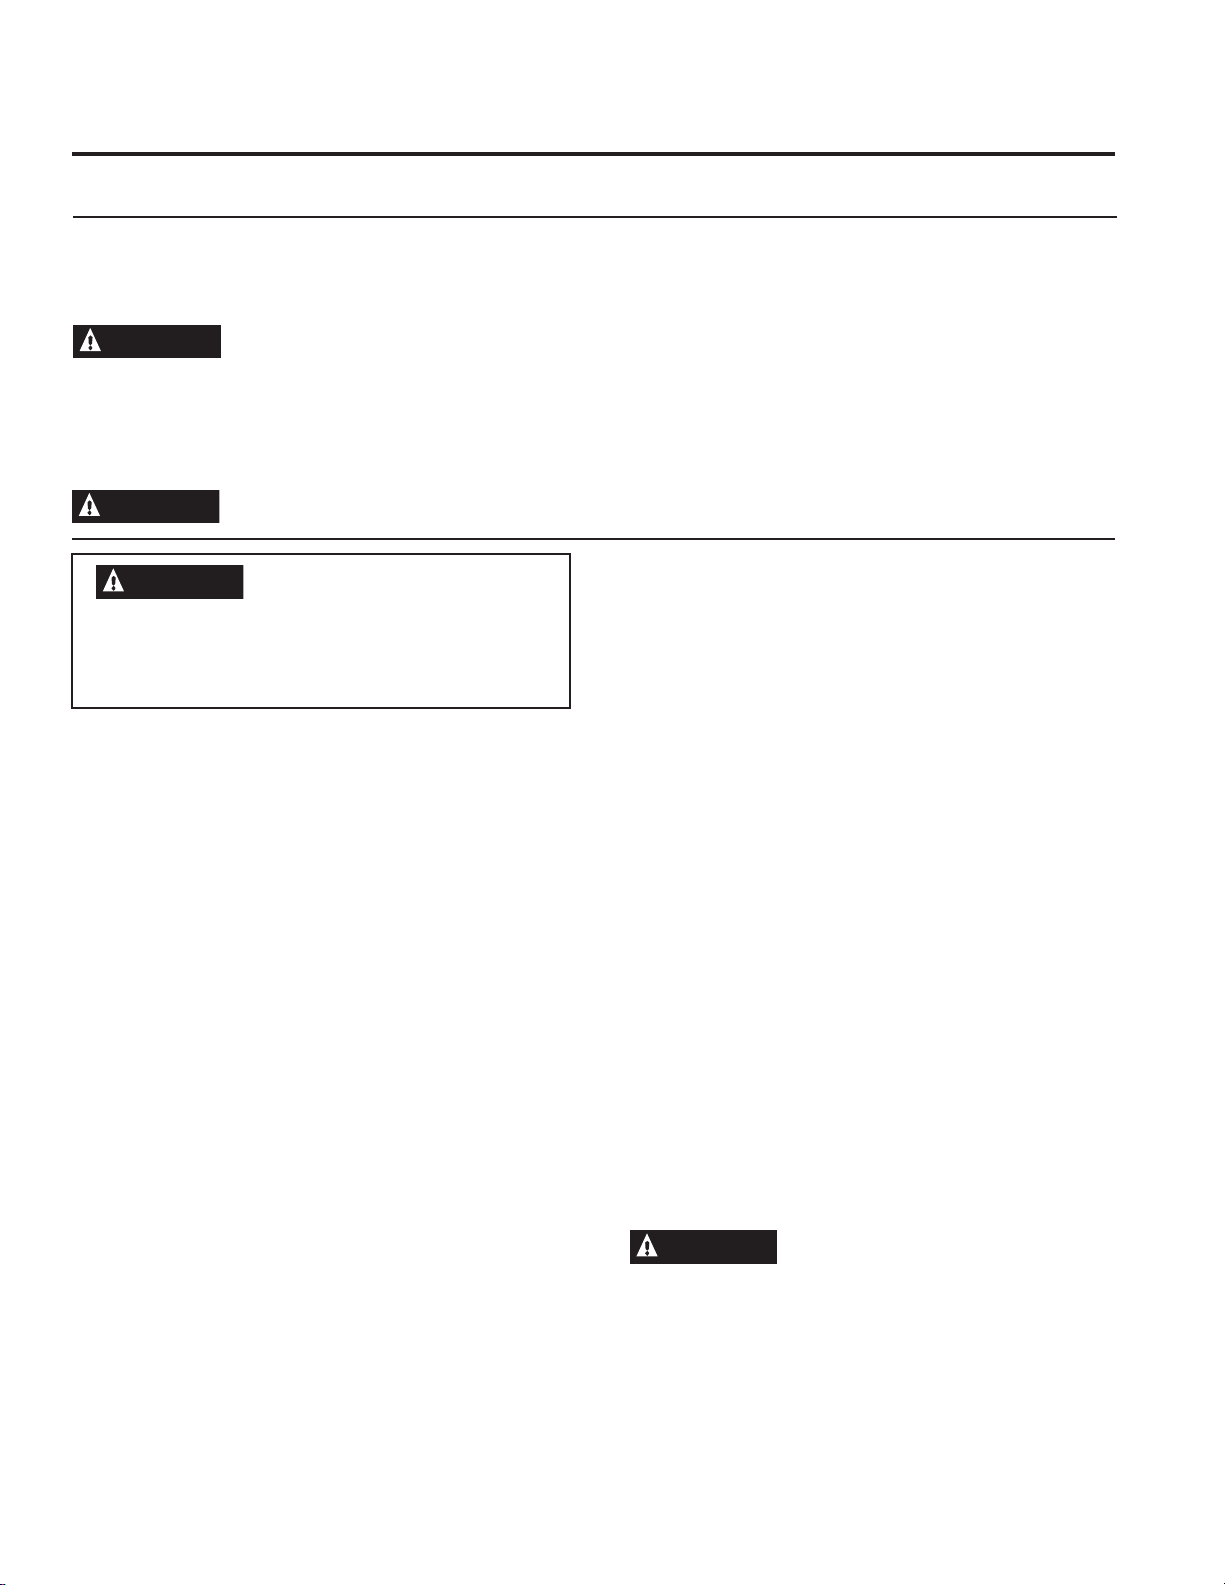
49-85211-6
3
INFORMACIÓN DE SEGURIDAD
ADVERTENCIA
NUNCA use este
electrodoméstico para calentar el ambiente.
Como consecuencia de esto, se podrá
producir envenenamiento con monóxido de
carbono y el sobrecalentamiento del horno.
Ŷ 8VHHVWHHOHFWURGRPpVWLFRVyORSDUDVXSURSyVLWR
RULJLQDOFRPRVHGHVFULEHHQHOPDQXDOGHO
propietario.
Ŷ 6ROLFLWHTXHXQLQVWDODGRUFDOLILFDGRLQVWDOHVXFRFLQD
\TXHHVWpFRUUHFWDPHQWHFRQHFWDGDDWLHUUDGH
acuerdo con las instrucciones de instalación provistas.
Cualquier ajuste y trabajo de servicio técnico
GHEHUiVHUUHDOL]DGR~QLFDPHQWHSRULQVWDODGRUHV
de cocinas a gas calificados o por técnicos del
servicio. No intente reparar o reemplazar ninguna
SDUWHGHODFRFLQDDPHQRVTXHHVWRVHUHFRPLHQGH
específicamente en este manual.
Ŷ 6XFRFLQDHVHQYLDGDGHVGHODIiEULFDSDUDXVR
con gas natural. Puede ser convertida para uso con
JDV/36LVHUHTXLHUHQHVWRVDMXVWHVGHEHQVHU
realizados por un técnico calificado de acuerdo con
las instrucciones de instalación y códigos locales.
La agencia que realiza este trabajo asume la
responsabilidad de la conversión.
Ŷ 6ROLFLWHTXHHOLQVWDODGRUOHPXHVWUHODXELFDFLyQGHOD
válvula de cierre de la cocina a gas y cómo apagarla
en caso de ser necesario.
Ŷ (QFKXIHODFRFLQDHQXQWRPDFRUULHQWHFRQFRQH[LyQ
DWLHUUDGHYROWLRV~QLFDPHQWH1RUHWLUHODSDWD
UHGRQGDGHFRQH[LyQDWLHUUDGHOHQFKXIH6LWLHQH
GXGDVVREUHODFRQH[LyQDWLHUUDGHOVLVWHPDHOpFWULFR
SDUDKRJDUHVVXUHVSRQVDELOLGDG\REOLJDFLyQ
contar con el reemplazo de un tomacorriente sin
FRQH[LyQDWLHUUDSRUXQWRPDFRUULHQWHGHWUHV
SDWDVFRUUHFWDPHQWHFRQHFWDGRDWLHUUDGHDFXHUGR
con el Código Nacional de Electricidad. No use
prolongadores con este electrodoméstico.
Ŷ $QWHVGHUHDOL]DUFXDOTXLHUVHUYLFLRWpFQLFR
desenchufe la cocina o desconecte el suministro de
FRUULHQWHGHVGHHOSDQHOGHGLVWULEXFLyQGHOKRJDU
retirando el fusible o desconectando el disyuntor.
Ŷ $VHJ~UHVHGHTXHWRGRVORVPDWHULDOHVGHHPEDODMH
VHDQUHWLUDGRVGHODFRFLQDDQWHVGHVXXVRDILQGH
evitar que estos materiales se incendien.
Ŷ (YLWHUDOODGXUDVRLPSDFWRVVREUHODVSXHUWDVGH
PHWDOFRFLQDVRSDQHOHVGHFRQWURO+DFHUHVWRSRGUi
producir la rotura de vidrios. No cocine un producto
con un vidrio roto. Es posible que se produzcan
GHVFDUJDVLQFHQGLRRFRUWHV
Ŷ 1RGHMHDORVQLxRVVRORV±QRVHGHEHUiGHMDUD
ORVQLxRVVRORVRIXHUDGHVXUDGLRGHDWHQFLyQHQ
el área donde el electrodoméstico se encuentre en
XVR1XQFDVHOHVGHEHUiSHUPLWLUWUHSDUVHQWDUVHR
pararse sobre ninguna parte del electrodoméstico.
Ŷ
PRECAUCIÓN
No coloque artículos de interés para
ORVQLxRVVREUHORVJDELQHWHVTXHHVWiQVREUHXQ
KRUQR±VLORVQLxRVVHWUHSDQVREUHHOKRUQRSDUD
llegar a estos artículos podrían sufrir lesiones graves.
ADVERTENCIA
INSTRUCCIONES GENERALES DE SEGURIDAD
ADVERTENCIA DE LA PROPOSICIÓN 65 DEL ESTADO DE CALIFORNIA
/D/H\VREUH$JXD3RWDEOH,QRFXD\7UDWDPLHQWRGH5HVLGXRV7y[LFRVGH&DOLIRUQLD&DOLIRUQLD6DIH'ULQNLQJ:DWHU
DQG7R[LF(QIRUFHPHQW$FWVROLFLWDDO*REHUQDGRUGH&DOLIRUQLDTXHSXEOLTXHXQDOLVWDGHVXVWDQFLDVTXHHOHVWDGR
UHFRQRFHTXHSURGXFHQFiQFHUGHIHFWRVGHQDFLPLHQWRXRWURVGDxRVUHSURGXFWLYRV\VROLFLWDDORVHPSUHVDULRVTXH
DGYLHUWDQDVXVFOLHQWHVVREUHODSRVLEOHH[SRVLFLyQDWDOHVVXVWDQFLDV
ADVERTENCIA
Este producto contiene uno o más químicos que el Estado de California entiende que producen
FiQFHUGHIHFWRVHQHOQDFLPLHQWRXRWURVGDxRVUHSURGXFWLYRV
/RVKRUQRVFRQOLPSLH]DDXWRPiWLFDSXHGHQRFDVLRQDUH[SRVLFLRQHVGHEDMRQLYHODDOJXQDVGHHVWDVVXVWDQFLDV
LQFOX\HQGRPRQy[LGRGHFDUERQRGXUDQWHHOFLFORGHOLPSLH]D/DH[SRVLFLyQSXHGHVHUPLQLPL]DGDVLVHYHQWLODFRQ
una ventana abierta o si se usa un ventilador o campana.
GUARDE ESTAS INSTRUCCIONES

4
49-85211-6
Ŷ 1RJXDUGHQLXVHPDWHULDOHVLQIODPDEOHVHQXQKRUQR
RFHUFDGHODSDUWHVXSHULRUGHODFRFLQDLQFOX\HQGR
SDSHOSOiVWLFRVRVWHQHGRUHVGHROODVWUDSRV
FREHUWRUHVGHSDUHGFRUWLQDVSDxRV\JDVROLQDX
otros vapores y líquidos inflamables.
Ŷ1XQFDXVHSUHQGDVKROJDGDVRTXHFXHOJXHQPLHQWUDV
usa el electrodoméstico. Evite acumular artículos
FRP~QPHQWHXVDGRVHQJDELQHWHVVREUHODFRFLQD\
WHQJDFXLGDGRDOH[WHQGHUODPDQRVREUHODFRFLQD
La ropa que se encuentre cerca de los quemadores o
VXSHUILFLHVFDOLHQWHVVHSRGUiHQFHQGHURFDVLRQDQGR
quemaduras graves.
Ŷ1RSHUPLWDTXHODJUDVDGHODFRFFLyQXRWURV
materiales inflamables se acumulen en o cerca de la
cocina. La grasa del horno o sobre la cocina se podrá
incendiar.
Ŷ/LPSLHODVFDPSDQDVGHYHQWLODFLyQGHIRUPD
frecuente. No se debe permitir la acumulación de
grasa en la campana o el filtro.
INFORMACIÓN IMPORTANTE DE SEGURIDAD
LEA TODAS LAS INSTRUCCIONES ANTES DE USAR
INFORMACIÓN DE SEGURIDAD
ADVERTENCIA
INSTRUCCIONES GENERALES DE SEGURIDAD (CONT.)
ADVERTENCIA
MANTENGA LOS MATERIALES INFLAMABLES ALEJADOS DE LA COCINA
Si esto no se cumple, se podrán sufrir lesiones personales graves o incendios.
GUARDE ESTAS INSTRUCCIONES
Ŷ 1RSHUPLWDTXHQDGLHVHWUHSHVHSDUHRVHFXHOJXH
GHODSXHUWDGHOKRUQRGHOFDMyQRGHODSDUWHVXSHULRU
GHODFRFLQD6HSRGUiGDxDUODFRFLQDRSURYRFDUVX
FDtGDRFDVLRQDQGROHVLRQHVJUDYHVRODPXHUWH
Ŷ 1XQFDEORTXHHODVYHQWLODFLRQHVDEHUWXUDVGHDLUH
de la cocina. Las mismas brindan las entradas y
salidas de aire que son necesarias para que la cocina
opere de forma correcta con la combustión adecuada.
Las aberturas de aire están ubicadas en la parte
WUDVHUDGHODFRFLQDHQODSDUWHVXSHULRUHLQIHULRUGH
ODSXHUWDGHOKRUQR\HQODSDUWHLQIHULRUGHODFRFLQD
GHEDMRGHOFDMyQFDOHQWDGRUGHOFDMyQGHOKRUQR
inferior o del panel de protección.
Ŷ 8VHVyORVRVWHQHGRUHVGHROODVVHFRV±ORV
VRVWHQHGRUHVK~PHGRVVREUHVXSHUILFLHVFDOLHQWHV
pueden producir quemaduras debido al vapor.
No permita que los sostenedores de ollas tengan
FRQWDFWRFRQORVTXHPDGRUHVVXSHUILFLDOHVODSDUULOOD
GHORVTXHPDGRUHVRHOHOHPHQWRGHFDOHIDFFLyQGHO
horno. No use una toalla u otra tela voluminosa para
reemplazar el mango de las cacerolas.
Ŷ 1RWRTXHHOHOHPHQWRFDOHQWDGRUQLODVXSHUILFLH
interior del horno. Es posible que estas superficies
HVWpQGHPDVLDGRFDOLHQWHVFRPRSDUDTXHPDU
DXQTXHVXFRORUVHDRVFXUR'XUDQWH\GHVSXpVGHO
XVRQRWRTXHQLSHUPLWDTXHWHODVXRWURVPDWHULDOHV
LQIODPDEOHVWRTXHQFXDOTXLHUiUHDLQWHULRUGHOKRUQR
espere a que haya pasado un tiempo suficiente para
que se enfríen. Otras superficies del electrodoméstico
se podrán calentar lo suficiente como para ocasionar
lesiones. Las superficies potencialmente calientes
LQFOX\HQODDEHUWXUDGHODYHQWLODFLyQGHOKRUQR
superficies cercanas a la abertura y grietas alrededor
de la puerta del horno.
Ŷ 1RFDOLHQWHHQYDVHVGHFRPLGDTXHQRKD\DQVLGR
DELHUWRV6HSRGUtDDFXPXODUSUHVLyQ\HOHQYDVH
SRGUtDH[SORWDURFDVLRQDQGRXQDOHVLyQ
Ŷ &RFLQHFDUQHV\FDUQHVGHDYHHQIRUPDFRPSOHWD
±ODFDUQHSRUORPHQRVDXQDWHPSHUDWXUDLQWHUQD
de 160° F y la carne de ave por lo menos a una
temperatura interna de 180° F. Normalmente la
cocción a estas temperaturas es una protección
contra las enfermedades transmitidas por la comida.
Ŷ
1RXVHQLQJ~QWLSRGHDOXPLQLRRFREHUWRUSDUDFXEULU
HOIRQGRGHOKRUQRFXEHWDVGHJRWHRRFXDOTXLHUSDUWH
GHOKRUQRH[FHSWRFRPRVHGHVFULEHHQHVWHPDQXDO
Los cobertores de horno pueden atrapar el calor o
GHUUHWLUVHRFDVLRQDQGRGDxRVVREUHHOSURGXFWR\HO
ULHVJRGHGHVFDUJDVKXPRRLQFHQGLRV

49-85211-6
5
Ŷ 1RXVHDJXDVREUHHOIXHJRGHODJUDVD1XQFD
tome una olla que se esté incendiando. Apague los
FRQWUROHV([WLQJDODROODTXHVHHVWpLQFHQGLDQGR
VREUHXQTXHPDGRUVXSHUILFLDOFXEULHQGRODROOD
FRPSOHWDPHQWHFRQVXWDSDFRUUHVSRQGLHQWHXQD
KRMDPHWiOLFDGHJDOOHWDVRXQDEDQGHMDSODQD6LHV
QHFHVDULRXVHXQTXtPLFRVHFRPXOWLXVRRXQH[WLQWRU
de chorro de espuma.
Ŷ(QFDVRGHTXHKD\DIXHJRHQHOKRUQRGXUDQWH
ODFRFFLyQDSDJXHHOKRUQR\PDQWHQJDODSXHUWD
FHUUDGDKDVWDTXHHOIXHJRVHH[WLQJD6LHV
QHFHVDULRXVHXQTXtPLFRVHFRPXOWLXVRRXQH[WLQWRU
de chorro de espuma.
Ŷ(QFDVRGHTXHKD\DIXHJRHQHOKRUQRGXUDQWHHO
SHUtRGRGHDXWROLPSLH]DDSDJXHHOKRUQR\HVSHUH
DTXHHOIXHJRVHH[WLQJD1RIXHUFHODSXHUWD
para abrirla. La entrada de aire fresco sobre las
temperaturas de auto limpieza podrá conducir a la
SURGXFFLyQGHOODPDVHQHOKRUQR6LQRVHVLJXHQ
HVWDVLQVWUXFFLRQHVVHSRGUiQSURGXFLUTXHPDGXUDV
graves.
Ŷ 1XQFDSLHUGDGHYLVWDORVTXHPDGRUHVFXDQGRVH
encuentren en las configuraciones de calor media
RDOWD/DVFRPLGDVHVSHFLDOPHQWHODVTXHVH
SUHSDUDQFRQDFHLWHVHSXHGHQLQFHQGLDUORFXDO
puede ocasionar un incendio que se propague a los
JDELQHWHVSUy[LPRV
Ŷ1XQFDSLHUGDGHYLVWDHODFHLWHFXDQGRHVWpIULHQGR
6LVHFDOLHQWDPiVDOOiGHVXSXQWRGHFRFFLyQHO
aceite se puede quemar y provocar un incendio que
VHSXHGHSURSDJDUDORVJDELQHWHVSUy[LPRV8VHXQ
termómetro para grasas profundas siempre que sea
SRVLEOHDILQGHPRQLWRUHDUODWHPSHUDWXUDGHODFHLWH
Ŷ3DUDHYLWDUGHUUDPHVHLQFHQGLRVXVHXQDFDQWLGDG
mínima de aceite cuando esté friendo en una olla que
no sea profunda y evite cocinar comidas congeladas
FRQFDQWLGDGHVH[FHVLYDVGHKLHOR
Ŷ8VHHOWDPDxRGHROODDGHFXDGRSDUDHYLWDUTXHVHDQ
LQHVWDEOHVRTXHVXIUDQFDtGDVIiFLOPHQWH6HOHFFLRQH
XWHQVLOLRVTXHFRLQFLGDQFRQHOWDPDxRGHOTXHPDGRU
Las llamas del quemador se deberán ajustar de modo
TXHQRVHH[WLHQGDQPiVDOOiGHODSDUWHLQIHULRU
GHODROOD8QDFDQWLGDGH[FHVLYDGHOODPDSXHGH
representar un riesgo.
Ŷ6LHPSUHXVHODSRVLFLyQ/,7(DOHQFHQGHUORV
TXHPDGRUHVVXSHULRUHV\DVHJ~UHVHGHTXHHVWRVVH
hayan encendido.
Ŷ$OXVDUXWHQVLOLRVGHYLGULRFHUiPLFDDVHJ~UHVHGH
TXHVHDQDGHFXDGRVSDUDHOVHUYLFLRGHFRFLQDRWURV
se podrán romper debido a un cambio repentino de
temperatura.
Ŷ$ILQGHPLQLPL]DUSRVLEOHVTXHPDGXUDVLQFHQGLR
GHPDWHULDOHVLQIODPDEOHV\GHUUDPHVODPDQLMDGH
un envase deberá ser inclinada hacia el centro de
ODFRFLQDVLQTXHVHH[WLHQGDVREUHORVTXHPDGRUHV
cercanos.
Ŷ$OSUHSDUDUFRPLGDVOODPHDQWHVGHEDMRGHXQD
FDPSDQDHQFLHQGDHOYHQWLODGRU
Ŷ1RXVHXQZRNFRQXQDQLOORFRQVRSRUWHGHPHWDO
redondo. El anillo podrá atrapar calor y bloquear el
DLUHKDFLDHOTXHPDGRUSURGXFLHQGRHOULHVJRGH
HPLVLyQGHPRQy[LGRGHFDUERQR
Ŷ1RLQWHQWHHOHYDUODFRFLQD+DFHUHVWRSRGUtDGDxDU
ODWXEHUtDGHJDVKDVWDORVTXHPDGRUHVVXSHUILFLDOHV
ocasionando una pérdida de gas y riesgo de incendio.
Ŷ$OLQKDELOLWDUHO%ORTXHRGHO&RQWUROGH*DVHQ
DOJXQRVPRGHORVDVHJ~UHVHGHTXHORVFRQWUROHV
de superficie se encuentren en la posición OFF
$SDJDGR(VWRHYLWDUiTXHKD\DXQIOXMRGHJDVQR
intencional desde los quemadores.
Ŷ1RXVHSDSHOGHDOXPLQLRSDUDFXEULUUHMLOODVFXDOTXLHU
SDUWHGHODFRFLQD6LVHKDFHHVWRVHSRGUi
SURGXFLUHQYHQHQDPLHQWRFRQPRQy[LGRGHFDUERQR
sobrecalentamiento de las superficies de la cocina o
un posible riesgo de incendio.
INFORMACIÓN DE SEGURIDAD
ADVERTENCIA
EN CASO DE INCENDIO, SIGA LOS SIGUIENTES PASOS
PARA EVITAR LESIONES O LA PROPAGACIÓN DEL FUEGO
ADVERTENCIA
INSTRUCCIONES DE SEGURIDAD DE LA PARTE SUPERIOR DE LA COCINA
GUARDE ESTAS INSTRUCCIONES
6
49-85211-6
ADVERTENCIA
NUNCA cubra ninguna
ranura, agujeros o pasajes en el fondo
del horno ni cubra un estante entero con
materiales tales como papel de aluminio o
cobertores de horno. Hacer esto bloquea
el flujo de aire a través del horno y puede
ocasionar envenenamiento con monóxido
de carbono. Nunca coloque papel de
aluminio o cobertores de horno en el
fondo del horno. Podrán atrapar el calor,
ocasionando riesgos de humo o incendio.
Ŷ 8VHHVWHHOHFWURGRPpVWLFRVyORSDUDVXSURSyVLWR
RULJLQDOFRPRVHGHVFULEHHQHOPDQXDOGHO
propietario.
Ŷ0DQWpQJDVHDOHMDGRGHODFRFLQDDODEULUODSXHUWD
del horno. El aire caliente o el vapor que sale puede
FDXVDUTXHPDGXUDVHQODVPDQRVURVWUR\XRMRV
Ŷ0DQWHQJDHOKRUQROLEUHGHDFXPXODFLyQGHJUDVD/D
grasa en el horno se puede incendiar.
Ŷ&RORTXHORVHVWDQWHVGHOKRUQRHQODXELFDFLyQ
FRUUHVSRQGLHQWHPLHQWUDVpVWHVHHQFXHQWUDIUtR6L
es necesario retirar el estante mientras el horno se
HQFXHQWUDFDOLHQWHHYLWHWRFDUODVVXSHUILFLHVFDOLHQWHV
Ŷ&RORTXHHOHVWDQWHGHOKRUQRHQODSRVLFLyQGH
EORTXHRDOLQWURGXFLU\UHWLUDUFRPLGDGHOKRUQR(VWR
ayuda a evitar quemaduras por tocar superficies
calientes de la puerta y las paredes del horno.
Ŷ1RGHMHSURGXFWRVWDOHVFRPRSDSHOXWHQVLOLRVGH
cocina ni comida en el horno cuando no esté en
uso. Los artículos guardados en el horno se pueden
incendiar.
Ŷ1RGHMHDUWtFXORVHQODSDUWHVXSHULRUGHODFRFLQD
FHUFDGHODYHQWLODFLyQGHOKRUQRTXHHVWiHQHO
centro de la parte trasera. Los artículos se pueden
VREUHFDOHQWDU\H[LVWHULHVJRGHLQFHQGLRR
quemaduras.
Ŷ$OXVDUODVEROVDVSDUDFRFLQDURGRUDUHQHOKRUQR
siga las instrucciones del fabricante.
Ŷ1XQFDDVHFRQODSXHUWDDELHUWD6HSURKtEHDVDUFRQ
la puerta abierta debido al sobrecalentamiento de las
perillas de control.
La función de auto limpieza usa el horno en temperaturas lo suficientemente altas como para consumir restos de
FRPLGDTXHKD\DGHQWURGHOPLVPR3DUDXQIXQFLRQDPLHQWRVHJXURVLJDHVWDVLQVWUXFFLRQHV
Ŷ1RWRTXHODVVXSHUILFLHVGHOKRUQRGXUDQWHHOFLFORGH
OLPSLH]DDXWRPiWLFD0DQWHQJDDORVQLxRVDOHMDGRV
GHOKRUQRGXUDQWHODOLPSLH]DDXWRPiWLFD6LQR
VHVLJXHQHVWDVLQVWUXFFLRQHVVHSRGUiQSURGXFLU
quemaduras.
Ŷ$QWHVGHXWLOL]DUHOFLFORGHDXWROLPSLH]DUHWLUHODV
ROODVHVWDQWHVGHPHWDOEULOODQWHGHOKRUQR\RWURV
XWHQVLOLRVTXHKD\DGHQWURGHOPLVPR6yORVHSXHGHQ
dejar dentro del horno los estantes para horno con
recubrimiento de porcelana. No use la función de auto
OLPSLH]DSDUDOLPSLDURWUDVSDUWHVWDOHVFRPRSDUULOODV
Ŷ$QWHVGHXWLOL]DUHOFLFORGHDXWROLPSLH]DOLPSLHOD
JUDVD\UHVWRVGHFRPLGDTXHKD\DHQHOKRUQR8QD
FDQWLGDGH[FHVLYDGHJUDVDVHSXHGHLQFHQGLDUORFXDO
SXHGHSURGXFLUGDxRVFRQKXPRHQVXKRJDU
Ŷ6LHOPRGRGHDXWROLPSLH]DIXQFLRQDGHIRUPD
LQFRUUHFWDDSDJXHHOKRUQR\GHVFRQHFWHHOVXPLQLVWUR
GHFRUULHQWH6ROLFLWHHOVHUYLFLRGHXQWpFQLFR
calificado.
Ŷ1RXVHOLPSLDGRUHVSDUDKRUQR1RVHGHEHUiXVDU
limpiador para hornos comerciales ni revestimientos de
SURWHFFLyQSDUDKRUQRVGHQLQJ~QWLSRHQRDOUHGHGRU
de cualquier parte del horno.
GUARDE ESTAS INSTRUCCIONES
INFORMACIÓN IMPORTANTE DE SEGURIDAD
LEA TODAS LAS INSTRUCCIONES ANTES DE USAR
INFORMACIÓN DE SEGURIDAD
ADVERTENCIA
INSTRUCCIONES DE SEGURIDAD
ADVERTENCIA
INSTRUCCIONES DE SEGURIDAD DEL HORNO
CON FUNCIÓN DE AUTO LIMPIEZ
49-85211-6
7
GUARDE ESTAS INSTRUCCIONES
INFORMACIÓN DE SEGURIDAD
Ŷ (OSURSyVLWRGHOFDMyQFDOHQWDGRUHVPDQWHQHUODV
comidas cocinadas a temperatura para servir. Las
bacterias crecen de forma muy rápida en las comidas
con temperaturas entre 40° F y 140°F. No coloque
comida fría en el cajón calentador. No guarde comida
HQHOFDMyQFDOHQWDGRUSRUPiVGHKRUDV6LQR
VHVLJXHQHVWDVLQVWUXFFLRQHVVHSRGUiQSURGXFLU
enfermedades generadas en la comida.
Ŷ1RGHMHSURGXFWRVGHSDSHOSOiVWLFRVFRPLGD
HQODWDGDRPDWHULDOHVFRPEXVWLEOHVHQHOFDMyQ6H
pueden incendiar.
Ŷ1RWRTXHHOHOHPHQWRFDOHQWDGRUQLODVXSHUILFLH
interior del cajón. Es posible que las superficies estén
lo suficientemente calientes como para provocar
quemaduras.
Ŷ7HQJDFXLGDGRDODEULUHOFDMyQ$EUDXQSRFRHOFDMyQ
y deje que salga aire caliente o vapor antes de retirar
o reemplazar la comida. El aire caliente o el vapor que
VDOHSXHGHFDXVDUTXHPDGXUDVHQODVPDQRVURVWUR
\XRMRV
Ŷ1RXVHSDSHOGHDOXPLQLRSDUDUHYHVWLUHOFDMyQ
FDOHQWDGRU(ODOXPLQLRHVXQH[FHOHQWHDLVODQWHGHO
calor y atrapará el calor debajo de éste. Esto alterará
HOIXQFLRQDPLHQWRGHOFDMyQ\H[LVWHHOULHVJRGHTXH
se produzca un incendio.
ADVERTENCIA
INSTRUCCIONES DE SEGURIDAD DEL CAJÓN CALENTADOR/ CAJÓN
DEL HORNO INFERIOR (Algunos modelos)
ADVERTENCIA
EQUIPO DE ACCESO REMOTO INSTALADO (Algunos modelos)
El equipo de acceso remoto instalado en este horno fue
probado y cumple con los límites establecidos para un
GLVSRVLWLYRGLJLWDOGHFODVH%VHJ~QODSDUWHGHOD
1RUPDWLYDGHOD)&&(VWRVOtPLWHVIXHURQGLVHxDGRVSDUD
(a) brindar una protección razonable contra interferencias
nocivas en una instalación residencial. Este equipo
JHQHUDXVD\SXHGHHPLWLUHQHUJtDGHUDGLRIUHFXHQFLD\
VLQRVHLQVWDOD\XWLOL]DGHDFXHUGRFRQODVLQVWUXFFLRQHV
puede ocasionar interferencias perjudiciales en las
FRPXQLFDFLRQHVGHUDGLR6LQHPEDUJRQRVHJDUDQWL]D
que no se presenten interferencias en una instalación en
SDUWLFXODU6LHOHTXLSRSURYRFDLQWHUIHUHQFLDVSHUMXGLFLDOHV
SDUDODUHFHSFLyQGHUDGLRRWHOHYLVLyQORFXDOSXHGH
FRPSUREDUHQFHQGLHQGR\DSDJDQGRHOHTXLSRVHDFRQVHMD
al usuario que intente corregir la interferencia con una de
ODVVLJXLHQWHVPHGLGDV
Ŷ
Reoriente o reubique la antena receptora.
Ŷ
Aumente la separación entre el equipo y el receptor.
Ŷ
Conecte el equipo a un tomacorriente de un circuito
diferente del tomacorriente al que se encuentra
conectado el receptor.
Ŷ
3DUDVROLFLWDUD\XGDFRQVXOWHFRQHOSURYHHGRUPLQRULVWD
RDXQWpFQLFRH[SHULPHQWDGRGHUDGLR79
(b) WROHUDUFXDOTXLHULQWHUIHUHQFLDUHFLELGDLQFOX\HQGRODV
interferencias que puedan provocar un funcionamiento no
deseado del dispositivo.
Observe que todos los cambios o modificaciones sobre
el dispositivo de comunicación inalámbrico instalado en
HVWHKRUQRTXHQRHVWpQH[SUHVDPHQWHDSUREDGRVSRU
el fabricante podrían anular la autoridad del usuario para
operar el equipamiento.

8
49-85211-6
¡Gracias! ... por su compra de un electrodoméstico de la Marca GE
GARANTÍA
Garantía de la Cocina Eléctrica de GE
GEAppliances.com
7RGRHOVHUYLFLRGHJDUDQWtDHVSURYLVWRSRUQXHVWURV&HQWURVGH6HUYLFLRGH)DEULFDFLyQRXQWpFQLFRDXWRUL]DGRGH6HUYLFLRDO
&OLHQWH&XVWRPHU&DUH3DUDSURJUDPDUXQDYLVLWDGHOVHUYLFLRWpFQLFRDWUDYpVGH,QWHUQHWYLVtWHQRVHQZZZJHDSSOLDQFHV
FRPVHUYLFHBDQGBVXSSRUWROODPHDO*(&$5(6&XDQGROODPHSDUDVROLFLWDUHOVHUYLFLRWHQJDORVQ~PHURV
de serie y de modelo disponibles.
Para realizar el servicio técnico de su electrodoméstico se podrá requerir el uso de datos del puerto de abordaje para su
diagnóstico. Esto da al técnico del servicio de fábrica de GE la habilidad de diagnosticar de forma rápida cualquier problema con
VXHOHFWURGRPpVWLFR\GHD\XGDUD*(DPHMRUDUVXVSURGXFWRVDOEULQGDUOHD*(ODLQIRUPDFLyQVREUHVXHOHFWURGRPpVWLFR6LQR
GHVHDTXHORVGDWRVGHVXHOHFWURGRPpVWLFRVHDQHQYLDGRVD*(VROLFLWDPRVTXHOHLQGLTXHDVXWpFQLFRQRHQWUHJDUORVGDWRVD
GE en el momento del servicio.
'XUDQWHHOSHUtRGRGHXQDxRGHVGHODIHFKDRULJLQDOGHFRPSUD*(OHEULQGDUiFXDOTXLHUSDUWHGHODFRFLQDTXHIDOOHGHELGRD
XQGHIHFWRHQORVPDWHULDOHVRODIDEULFDFLyQ'XUDQWHHVWDJDUDQWtDOLPLWDGDGHXQDxR*(WDPELpQSURYHHUiVLQFRVWRWRGRHO
trabajo y el servicio en el hogar relacionado con el reemplazo de la parte que presente defectos.
Qué no cubrirá GE:
Ŷ9LDMHVGHOWpFQLFRGHOVHUYLFLRDVXKRJDUSDUDHQVHxDUOH
sobre cómo usar el producto.
Ŷ,QVWDODFLyQHQWUHJDRPDQWHQLPLHQWRLQDGHFXDGRV
Ŷ)DOODVGHOSURGXFWRHQFDVRGHDEXVRPDOXVRPRGLILFDFLyQ
o uso para propósitos diferentes al original o uso comercial.
Ŷ Reemplazo de fusibles de la casa o reinicio de disyuntores.
Ŷ'DxRVRFDVLRQDGRVVREUHHOSURGXFWRSRUDFFLGHQWH
LQFHQGLRLQXQGDFLRQHVRFDWiVWURIHVQDWXUDOHV
Ŷ'DxRVLQFLGHQWDOHVRFRQVHFXHQWHVFDXVDGRVSRUSRVLEOHV
defectos sobre este producto.
Ŷ'DxRVVREUHHODFDEDGRWDOHVFRPRy[LGRVREUHOD
VXSHUILFLHGHVOXVWUHVRPDQFKDVSHTXHxDVQRLQIRUPDGDV
dentro de las 48 horas luego de la entrega.
Ŷ'DxRFDXVDGRGHVSXpVGHODHQWUHJD
Ŷ Producto no accesible para brindar el servicio requerido.
Ŷ6ROLFLWHHOVHUYLFLRWpFQLFRSDUDUHSDUDURUHHPSOD]DUODV
OiPSDUDVH[FHSWRODVOiPSDUDV/('
EXCLUSIÓN DE GARANTÍAS IMPLÍCITAS
6X~QLFD\H[FOXVLYDDOWHUQDWLYDHVODUHSDUDFLyQGHOSURGXFWRFRPRVHLQGLFDHQOD*DUDQWtD/LPLWDGD/DVJDUDQWtDVLPSOtFLWDV
LQFOX\HQGRJDUDQWtDVLPSOtFLWDVGHFRPHUFLDELOLGDGRFRQYHQLHQFLDVREUHXQSURSyVLWRSDUWLFXODUVHOLPLWDQDXQDxRRDOSHUtRGR
más corto permitido por la ley.
(VWDJDUDQWtDVHH[WLHQGHDOFRPSUDGRURULJLQDO\DFXDOTXLHUGXHxRVXEVLJXLHQWHGHSURGXFWRVFRPSUDGRVSDUDXVRKRJDUHxR
GHQWURGH((886LHOSURGXFWRHVWiHQXQiUHDGRQGHQRVHHQFXHQWUDGLVSRQLEOHXQ3URYHHGRU$XWRUL]DGRGHO6HUYLFLR7pFQLFR
GH*(XVWHGVHUiUHVSRQVDEOHSRUHOFRVWRGHXQYLDMHRVHSRGUiUHTXHULUTXHWUDLJDHOSURGXFWRDXQDXELFDFLyQGHO6HUYLFLR
7pFQLFRGH*($XWRUL]DGRSDUDUHFLELUHOVHUYLFLR(Q$ODVNDODJDUDQWtDH[FOX\HHOFRVWRGHHQYtRROODPDGDVGHOVHUYLFLRDVX
hogar.
$OJXQRVHVWDGRVQRSHUPLWHQODH[FOXVLyQROLPLWDFLyQGHGDxRVIRUWXLWRVRFRQVHFXHQWHV(VWDJDUDQWtDOHGDGHUHFKRVOHJDOHV
específicos y es posible que tenga otros derechos legales que varían entre un estado y otro. Para conocer cuáles son sus
GHUHFKRVOHJDOHVFRQVXOWHDODRILFLQDGHDVXQWRVGHOFRQVXPLGRUORFDORHVWDWDORDO)LVFDOGHVXHVWDGR
Garante: General Electric Company. Louisville, KY 40225
Garantías Extendidas:$GTXLHUDXQDJDUDQWtDH[WHQGLGDGH*(\DSUHQGDVREUHGHVFXHQWRVHVSHFLDOHVTXHHVWiQGLVSRQLEOHV
PLHQWUDVVXJDUDQWtDD~QHVWiYLJHQWH/DSXHGHDGTXLULUHQFXDOTXLHUPRPHQWRDWUDYpVGH,QWHUQHWHQ
ZZZJHDSSOLDQFHVFRPVHUYLFHBDQGBVXSSRUWVKRSIRUH[WHQGHGVHUYLFHSODQVKWP
ROODPDQGRDOGXUDQWHHOKRUDULRFRPHUFLDOKDELWXDO/RV6HUYLFLRVSDUDHO&RQVXPLGRU+RJDUHxRGH*(D~QHVWDUiQ
allí cuando su garantía caduque.
Registre su Electrodoméstico: £5HJLVWUHVXHOHFWURGRPpVWLFRQXHYRDWUDYpVGH,QWHUQHWVHJ~QVXFRQYHQLHQFLD
ZZZJHDSSOLDQFHVFRPVHUYLFHBDQGBVXSSRUWUHJLVWHU
8QUHJLVWURSXQWXDOGHVXSURGXFWRSHUPLWLUiXQDPHMRUFRPXQLFDFLyQ\XQVHUYLFLRPiVSXQWXDOGHDFXHUGRFRQORVWpUPLQRVGHVX
JDUDQWtDHQFDVRGHVXUJLUODQHFHVLGDG7DPELpQSXHGHHQYLDUXQDFDUWDHQODWDUMHWDGHLQVFULSFLyQSUHLPSUHVDTXHVHLQFOX\HFRQ
el material embalado.
Abroche su recibo aquí. Para acceder al servicio técnico de acuerdo con
la garantía deberá contar con la prueba de la fecha original de compra.

49-85211-6
9
Servicio Programado: (OVHUYLFLRGHUHSDUDFLyQGHH[SHUWRV
de GE está a sólo un paso de su puerta. Entre a Internet y
SURJUDPHVXVHUYLFLRHQZZZJHDSSOLDQFHVFRPVHUYLFHBDQGB
VXSSRUWROODPHDO*(&$5(6GXUDQWHHO
horario de atención comercial.
Conectividad Remota: Para solicitar asistencia para la
FRQHFWLYLGDGGHUHGLQDOiPEULFDGHOKRUQRSDUDPRGHORVFRQ
DFFHVRUHPRWRSRUIDYRUFRPXQtTXHVHDO
Piezas y Accesorios: Aquellas personas calificadas para
realizar el servicio técnico sobre sus propios electrodomésticos
podrán solicitar el envío de piezas o accesorios directamente
DVXVKRJDUHVVHDFHSWDQODVWDUMHWDV9,6$0DVWHU&DUG\
'LVFRYHU2UGHQHDWUDYpVGH,QWHUQHWKR\GXUDQWHODV
horas o en forma telefónica al 800.626.2002 durante el horario
de atención comercial.
Las instrucciones que figuran en este manual cubren los
procedimientos que serán realizados por cualquier usuario.
Otros servicios técnicos generalmente deberían ser
GHULYDGRVDSHUVRQDOFDOLILFDGRGHOVHUYLFLR6HGHEHUiWHQHU
FXLGDGR\DTXHXQDUHSDUDFLyQLQGHELGDSRGUiKDFHUTXHHO
funcionamiento no sea seguro.
Estudio de Diseño de la Vida Real: GE apoya el concepto
GH'LVHxR8QLYHUVDOHQSURGXFWRVVHUYLFLRV\DPELHQWHVTXH
SXHGHQVHUXVDGRVSRUSHUVRQDVGHWRGDVODVHGDGHVWDPDxRV
\FDSDFLGDGHV5HFRQRFHPRVODQHFHVLGDGGHUHDOL]DUGLVHxRV
para una amplia gama de habilidades e incapacidades físicas y
PHQWDOHV3DUDPiVGHWDOOHVVREUHODVDSOLFDFLRQHVGH'LVHxR
8QLYHUVDOGH*(LQFOX\HQGRLGHDVGHGLVHxRGHFRFLQDVSDUD
SHUVRQDVFRQLQFDSDFLGDGHVYLVLWHQXHVWURVLWLRZHEKR\6REUH
FDVRVGHLQFDSDFLGDGDXGLWLYDFRPXQtTXHVHDO7''*($&
Contáctenos: 6LQRVHHQFXHQWUDVDWLVIHFKRFRQHOVHUYLFLR
TXHUHFLELyGH*(FRPXQtTXHVHFRQQRVRWURVDWUDYpVGH
QXHVWURVLWLRZHEFRQWRGRVORVGHWDOOHVLQFOX\HQGRVXQ~PHUR
WHOHIyQLFRRHVFULEDD
General Manager, Customer Relations
GE Appliances, Appliance Park Louisville, KY 40225
ASISTENCIA / ACCESORIOS
£&RQVXOWHHO6LWLR:HEGH(OHFWURGRPpVWLFRVGH*(www.geappliances.com/service_and_support/GXUDQWHODVKRUDVFXDO-
TXLHUGtDGHODxR3DUDPD\RUFRQYHQLHQFLD\XQVHUYLFLRPiVUiSLGRDKRUDSXHGHGHVFDUJDUHO0DQXDOGHO3URSLHWDULRRUGHQDU
piezas o incluso programar el servicio técnico a través de Internet.
¿Desea realizar una consulta o necesita ayuda con su electrodoméstico?
Accesorios
¿Busca Algo Más?
¡GE ofrece una variedad de accesorios para mejorar sus experiencias de cocción y mantenimiento!
3DUDUHDOL]DUXQDRUGHQYLVtWHQRVDWUDYpVGH,QWHUQHWHQ
www.GEApplianceParts.com((88RHQwww.GEAppliances.ca&DQDGi
o llame al 800.626.2002((88800.661.1616&DQDGi
(VWRV\RWURVSURGXFWRVHVWiQGLVSRQLEOHV
Cómo Retirar la Película Protectora de Envío y la Cinta de Embalaje
&RQFXLGDGRWRPHXQH[WUHPRGHODSHOtFXODSURWHFWRUDGHHQYtR
con los dedos y lentamente retire la misma de la superficie del
electrodoméstico.
1RXWLOLFHQLQJ~QSURGXFWRILORVRSDUDUHWLUDUODSHOtFXOD5HWLUHWRGD
la película antes de usar el electrodoméstico por primera vez.
3DUDDVHJXUDUTXHQRKD\DGDxRVVREUHHODFDEDGRGHO
SURGXFWRODIRUPDPiVVHJXUDGHUHWLUDUHODGKHVLYRGHODFLQWD
de embalaje en electrodomésticos nuevos es aplicando un
GHWHUJHQWHOtTXLGRKRJDUHxRSDUDODYDUSODWRV$SOLTXHFRQXQD
tela suave y deje que se seque.
NOTA: El adhesivo deberá ser eliminado de todas las partes.
No se puede retirar si se hornea con éste dentro.
Accesorios
2OODSDUD$VDU3HTXHxDô´[ó´[ò³ :%;((88'*&DQDGi
2OODSDUD$VDU*UDQGHô´[ó´[ò³ :%;((88'*&DQDGi
2OODSDUD$VDU([WUD*UDQGHô´[ó´[ò³ :%;((881RGLVSRQLEOHHQ&DQDGi
Piezas
(VWDQWHVGHOKRUQR /RVQ~PHURVGHSLH]DYDUtDQVHJ~QHOPRGHOR
(OHPHQWRVGHOKRUQR /RVQ~PHURVGHSLH]DYDUtDQVHJ~QHOPRGHOR
/iPSDUDVGHOX] /RVQ~PHURVGHSLH]DYDUtDQVHJ~QHOPRGHOR
Suministros de Limpieza
/LPSLDGRUHVGH$FHUR,QR[LGDEOH&LWUL6KLQH :;;
/LPSLDGRUGH(OHFWURGRPpVWLFRVGH$FHUR,QR[LGDEOH&HUDPD%U\WH 30;
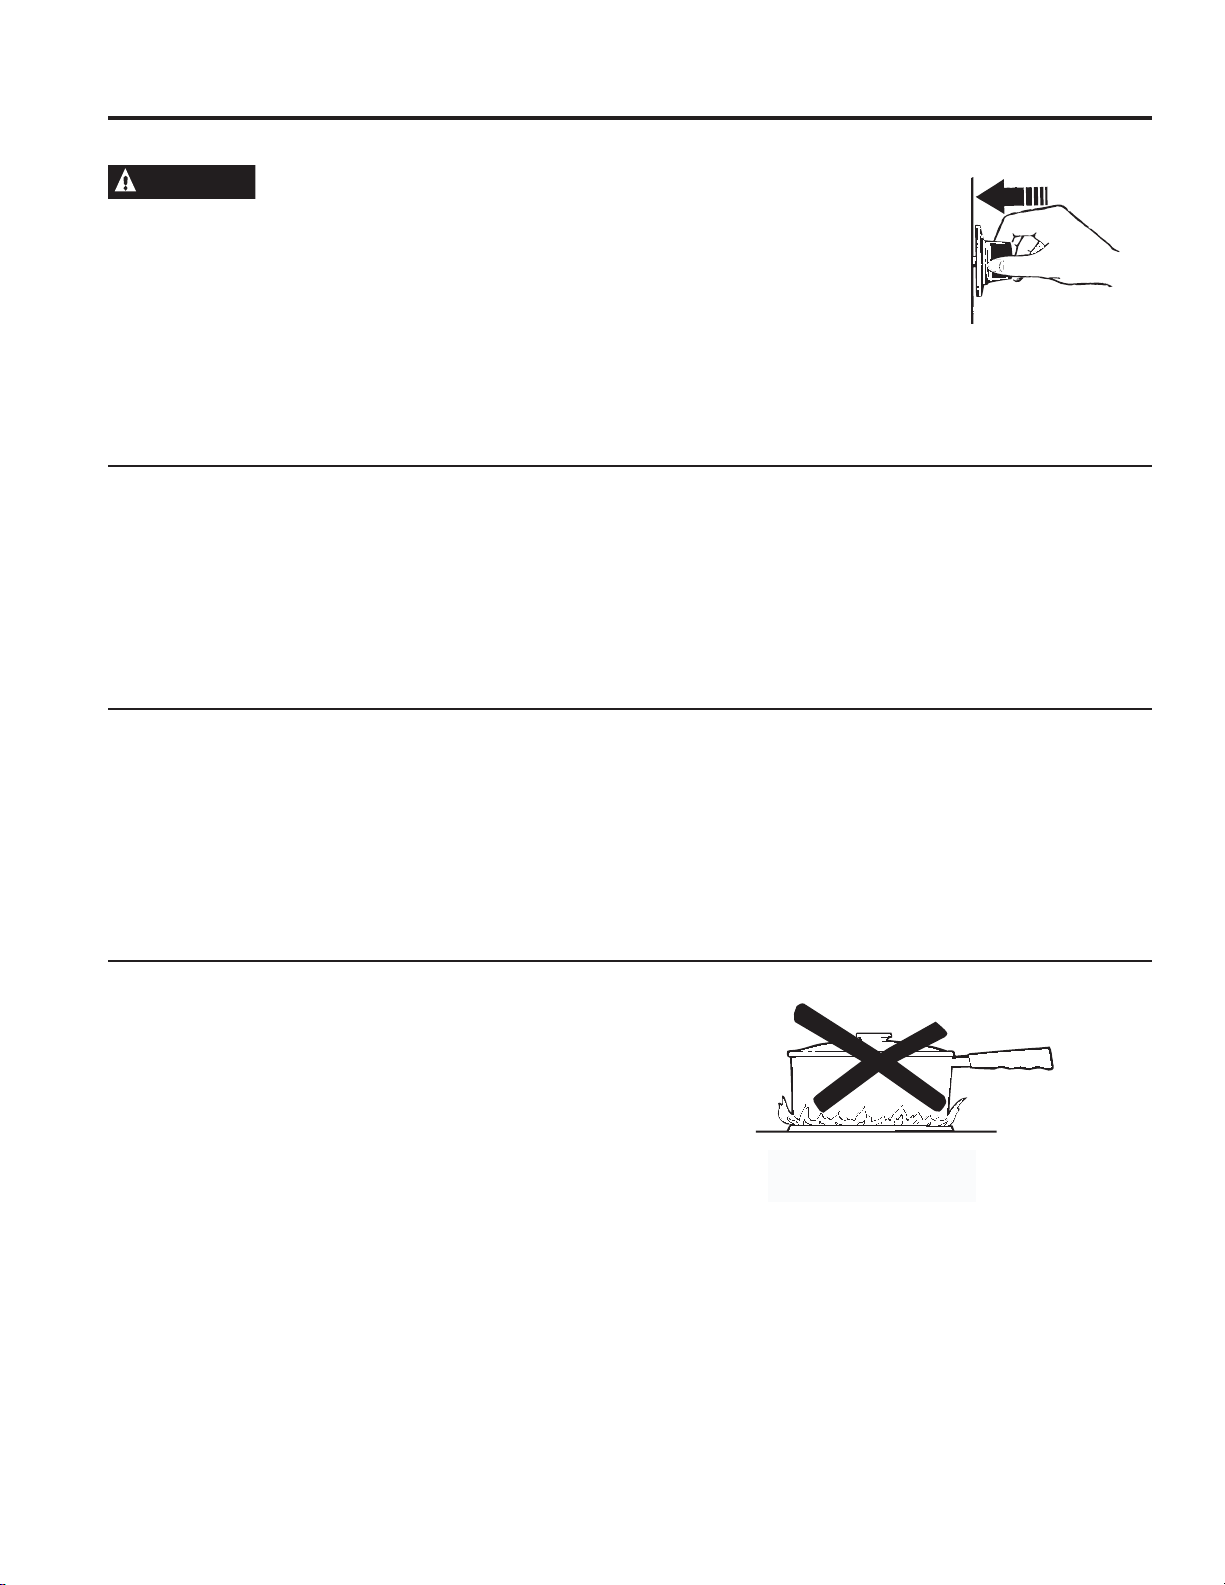
10
49-85211-6
Estas llamas son demasiado
grandes para la olla.
Quemadores
USO DE LA PLACA DE COCCIÓN: Quemadores
Luego de Encender un Quemador de Gas
Ŷ No utilice el quemador durante un período de tiempo
prolongado sin un utensilio de cocina sobre la parrilla. El
acabado de la parrilla se puede resquebrajar si no hay un
utensilio de cocina que absorba el calor.
Ŷ No intente desensamblar un quemador mientras otro
quemador está encendido. Es posible que se produzca una
GHVFDUJDHOpFWULFDORFXDOSRGUtDKDFHUTXHYXHOTXHXQ
utensilio de cocina caliente.
Ŷ $VHJ~UHVHGHTXHORVTXHPDGRUHV\ODVSDUULOODVHVWpQ
IUtRVDQWHVGHFRORFDUODPDQRWRPDUHOPDQJRGHXQDROOD
trapos de limpieza u otros materiales sobre estos.
Cómo Encender un Quemador Superficial de Gas
ADVERTENCIA
Los quemadores sólo deben ser usados
cuando estén cubiertos por los utensilios. Las llamas de
los quemadores que no estén cubiertas por el utensilio
presentan un riesgo de incendio o incendio de telas.
Nunca permita que las llamas se extiendan más allá de los
costados del utensilio. Si esto no se cumple, se podrán
producir lesiones graves.
$VHJ~UHVHGHTXHWRGRVORVTXHPDGRUHVHVWpQHQVXV
ubicaciones correspondientes y que estén totalmente
ensamblados antes de usar cualquiera de estos.
6HOHFFLRQHXQTXHPDGRU\EXVTXHVXSHULOODGHFRQWURO
Empuje y gire la perilla hasta la posición LITE.
(VFXFKDUiXQUXLGRGHFOLF±HO
sonido de la chispa eléctrica que
enciende el quemador. Cuando un
TXHPDGRUVHJLUHD/,7(WRGRVORV
quemadores generarán chispas.
El chispeo continuará mientras la
SHULOODSHUPDQH]FDHQ/,7(8QD
YH]HQFHQGLGRHOJDVJLUHODSHULOOD
SDUDDMXVWDUHOWDPDxRGHODOODPD
Uso de los Quemadores
La parte superior de su cocina a gas cuenta con quemadores
GHJDVVHOODGRV/HRIUHFHQFRQYHQLHQFLDIDFLOLGDGGHOLPSLH]D
\IOH[LELOLGDGSDUDVHUXVDGRVHQXQDDPSOLDYDULHGDGGH
aplicaciones de cocina.
El quemador más pequeño es para fuego lento. En algunos
PRGHORVHOTXHPDGRUFHQWUDOGHOTXHPDGRUGHWULSOHOODPD
EULQGDXQTXHPDGRUGHIXHJROHQWRDGLFLRQDO8QTXHPDGRUGH
fuego lento que se coloque en LO%DMREULQGDXQDFRFFLyQ
precisa para comidas tales como salsas delicadas que requieren
poco calor durante un tiempo de cocción prolongado.
El quemador extra grandeHVWiGLVHxDGRSDUDOOHYDU
rápidamente grandes cantidades de líquido a punto de hervor.
Algunos modelos cuentan con una configuración de POWER
BOIL™HVSHFLDOPHQWHGLVHxDGDSDUDXVDUFRQXWHQVLOLRVGHXQ
diámetro de 11 pulgadas o más.
Cómo Seleccionar el Tamaño de la Llama
2EVHUYHODOODPDQRODSHULOODDPHGLGDTXHUHGXFHHOFDORU
&XDQGRVHGHVHHFDOHQWDUGHIRUPDUiSLGDHOWDPDxRGH
la llama de un quemador de gas deberá ser equivalente al
utensilio de cocina que esté usando. Cuando las llamas sean
PiVJUDQGHVTXHODSDUWHLQIHULRUGHOXWHQVLOLRGHFRFLQDQR
calentarán el utensilio más rápido y podrían ser riesgosas.
Empuje el mango de control
y gire el mismo hasta la
posición LITE.
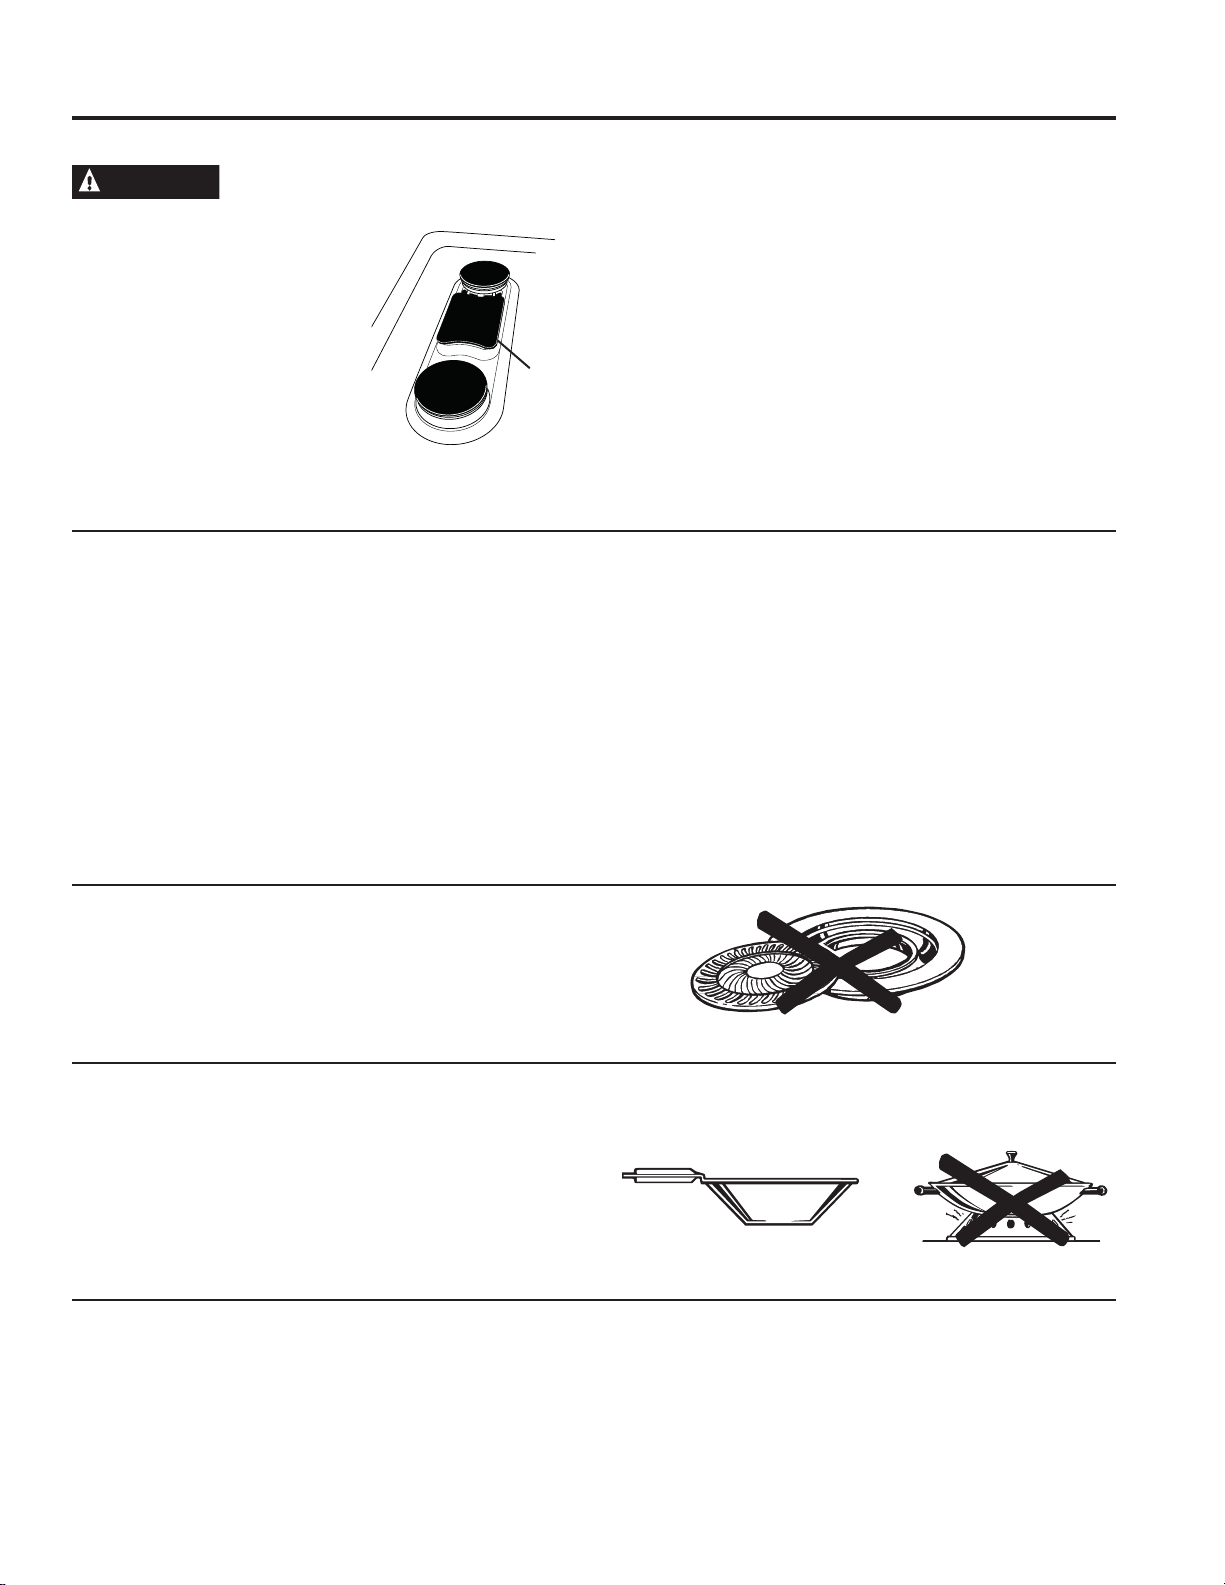
49-85211-6
11
No use rejillas para la parte superior de la cocina.
Quemadores (Cont.)
USO DE LA PLACA DE COCCIÓN: Quemadores
Utensilio sobre la Cocina
Aluminio:6HUHFRPLHQGDXQXWHQVLOLRGHSHVRPHGLDQR
ya que calienta de forma rápida y pareja. La mayoría de las
comidas se doran de forma pareja en un sartén de aluminio.
8VHFDFHURODVFRQWDSDKHUPpWLFDFXDQGRFRFLQHFRQ
cantidades mínimas de agua.
Acero Inoxidable: Este metal posee propiedades de
FDOHQWDPLHQWROLPLWDGDV\QRUPDOPHQWHVHFRPELQDFRQFREUH
aluminio u otros materiales para una mejor distribución del
calor. Los sartenes con combinación de metales normalmente
IXQFLRQDQGHIRUPDVDWLVIDFWRULDVLVHXVDQFRQFDORUPHGLR
como lo recomienda el fabricante.
Hierro Forjado:6LFRFLQDUiGHIRUPDOHQWDODPD\RUtDGHORV
sartenes le darán resultados satisfactorios.
Utensilios de esmalte:%DMRFLHUWDVFRQGLFLRQHVHOHVPDOWH
GHDOJXQRVXWHQVLOLRVGHFRFLQDVHSXHGHQGHUUHWLU6LJDODV
recomendaciones sobre métodos de cocción del fabricante de
utensilios de cocina.
Vidrio:([LVWHQGRVWLSRVGHXWHQVLOLRVGHFRFLQDGHYLGULR±
DTXHOORVSDUDXVRFRQHOKRUQR~QLFDPHQWH\DTXHOORVSDUD
ODFRFFLyQHQODSDUWHVXSHULRUGHODFRFLQDFDFHURODVFDIp\
WHWHUDV/RVFRQGXFWRUHVGHYLGULRFDOLHQWDQGHIRUPDPX\OHQWD
Cerámica de Vidrio Resistente al Calor:6HSXHGHQXVDUSDUD
cualquier superficie o para cocción en el horno. Conduce el calor
de forma muy lenta y se enfría de forma muy rápida. Consulte las
instrucciones del fabricante de utensilios de cocina para saber con
seguridad si se puede usar con cocinas a gas.
Parrillas para la Parte Superior de la Cocina
No use cualquier repuesto de rejilla para la parte superior de
ODFRFLQDFRQVXVTXHPDGRUHVGHJDV\DTXHUHDOL]DUiXQD
FRPEXVWLyQLQFRPSOHWDJHQHUDQGRQLYHOHVGHPRQy[LGRGH
carbono superiores a los estándares permitidos. Esto puede
ser peligroso para su salud.
Cómo Usar un Wok
8VHVyORZRNVFRQEDVHSODQDGHXQGLiPHWURGHSXOJDGDV
RPHQRV$VHJ~UHVHGHTXHHOIRQGRGHOZRNVHDSR\HGH
forma plana sobre la rejilla.
No use un anillo de soporte para wok. Colocar el anillo sobre el
quemador o parrilla podrá hacer que el quemador funcione de
forma inadecuada, produciendo niveles de monóxido de carbono
que superan los estándares permitidos. Esto puede ser peligroso
para su salud.
En Caso de Corte de Corriente
(QFDVRGHFRUWHGHFRUULHQWHSXHGHHQFHQGHUORV
quemadores de gas superficiales de la cocina con un fósforo.
$FHUTXHXQIyVIRURSUHQGLGRDOTXHPDGRU\OXHJRSUHVLRQH\
gire la perilla de control hasta la posición LITE. Tenga especial
cuidado al encender los quemadores de esta manera.
Los quemadores que se estén usando cuando se produzca
un corte de corriente eléctrica continuarán funcionando
normalmente.
Cómo Iluminar el Quemador del Puente (en algunos modelos)
ADVERTENCIA
Las llamas de los quemadores que no
estén cubiertas por el utensilio presentan un riesgo de
incendio o incendio de telas. El
quemador del puente se deberá
usar sólo cuando se coloque la
plancha. Si esto no se cumple, se
pueden sufrir lesiones graves.
Ŷ /RVTXHPDGRUHVUHGRQGRV
frontal y trasero del quemador
del puente pueden ser usados
de forma individual para cocinar.
El uso del quemador del puente
para calentar la Plancha del Chef
Precurada requiere el uso de las perillas de los quemadores
frontales y traseros.
Cómo Iluminar el Quemador del Puente:
Ŷ 3RVLFLRQHODSODQFKDVREUHODUHMLOODL]TXLHUGDREVHUYDQGRODV
LQGLFDFLRQHVGH³)5217$/´\³75$6(52´HQODSODQFKD
Ŷ ,OXPLQHHOTXHPDGRUWUDVHURJLUDQGRODSHULOODKDVWD
la posición LITE&RQWLQ~HJLUDQGRODSHULOODKDVWDOD
configuración Griddle Burner HI (Quemador de la Plancha
ALTO) para iluminar el quemador del puente.
Ŷ ,OXPLQHHOTXHPDGRUWUDVHURJLUDQGRODSHULOODKDVWDODSRVLFLyQ
LITE8QDYH]HQFHQGLGRJLUHODSHULOODKDFLDODFRQILJXUDFLyQ
Griddle Burner HI (Quemador de la Plancha ALTO).
Ŷ $MXVWHODVFRQILJXUDFLRQHVGHODSHULOOD\SUHFDOLHQWHODSODQFKD
de acuerdo con la tabla para la Plancha del Chef Precurada.
Ŷ 3DUDFRQWDUFRQWHPSHUDWXUDVXQLIRUPHVHQODSODQFKD
DVHJ~UHVHGHTXHORVDMXVWHVGHODVSHULOODVIURQWDO\WUDVHUD
sean los mismos.
Use un wok con fondo plano
Bridge
Burner
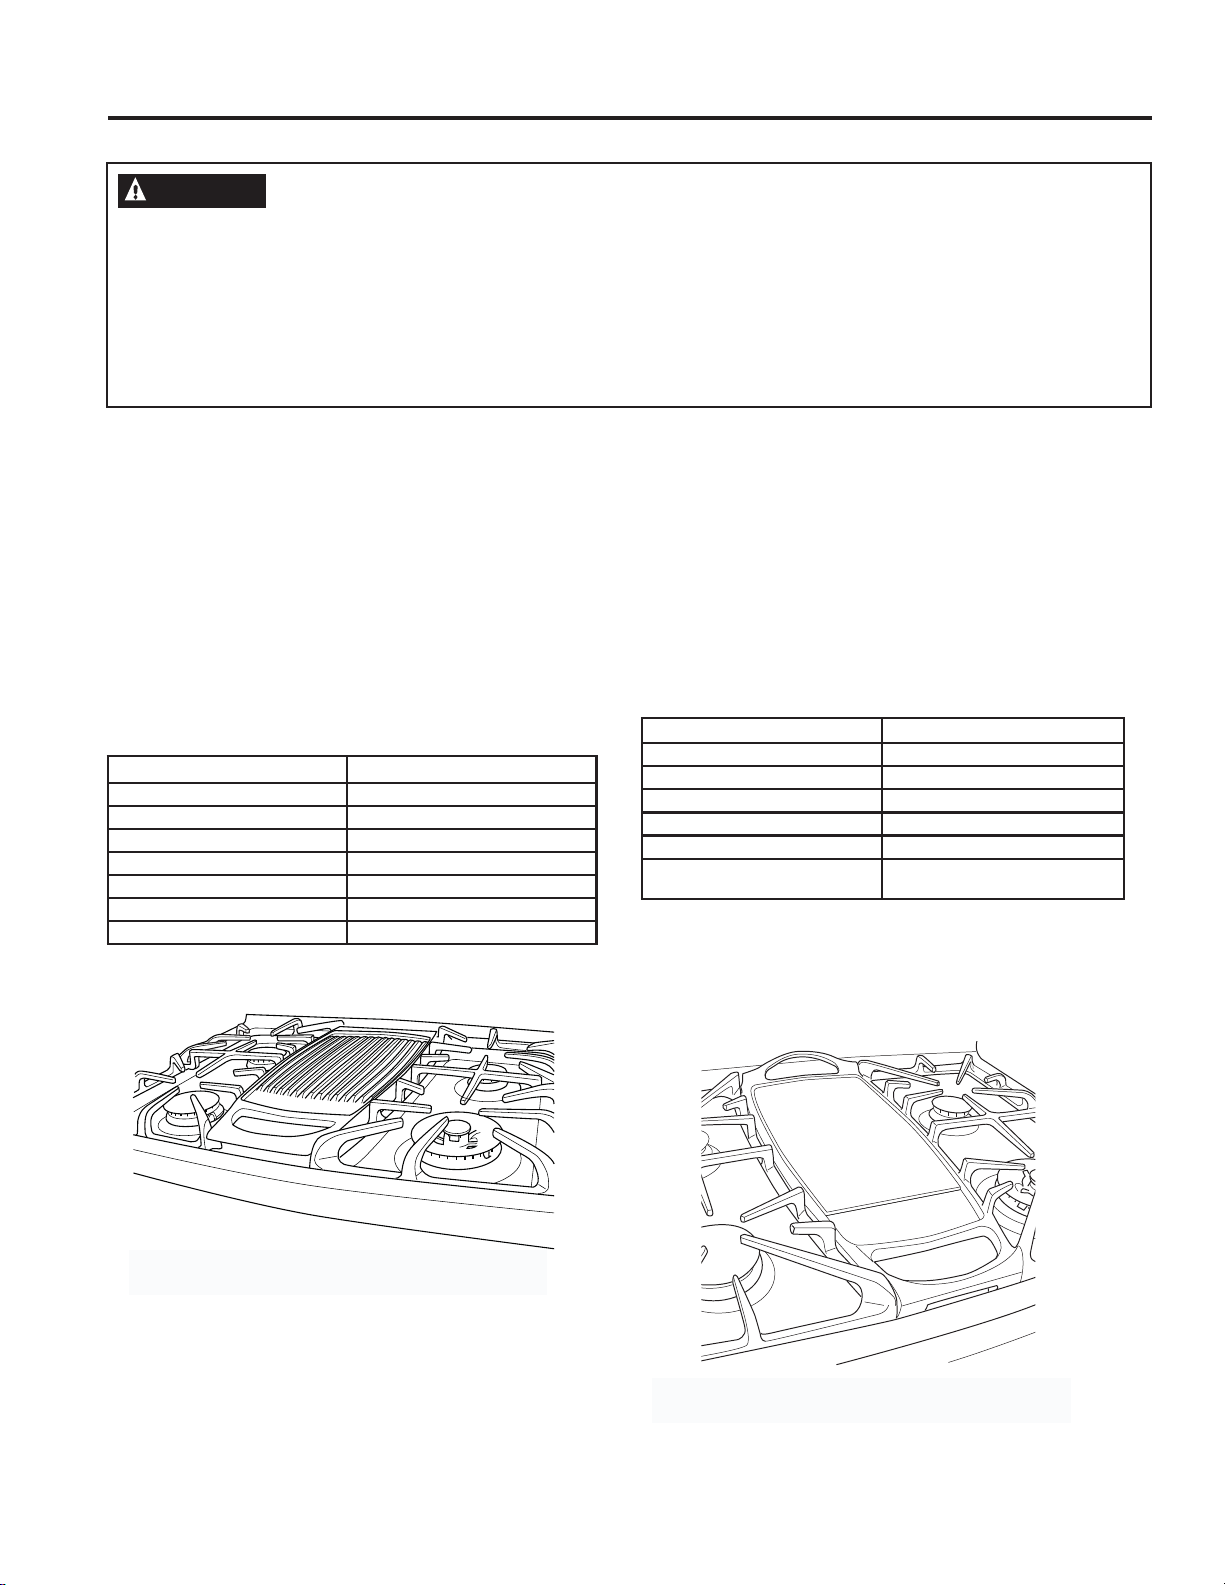
12
49-85211-6
Tipo de Comida Configuración de Cocción
Cómo Calentar Tortillas %DMR/R
Panqueques 0HG%DMR0HG/R
+DPEXUJXHVDV 0HG%DMR0HG/R
(PEXWLGRVSDUDHO'HVD\XQR 0HG
Queso a la Plancha 0HG%DMR0HG/R
Panceta 0HG
+XHYRV %DMR/R
Tipo de Comida Configuración de Cocción
Cómo Calentar Tortillas 0HG%DMR0HG/R
Panqueques 0HG%DMR0HG/R
+DPEXUJXHVDV 0HG
+XHYRV)ULWRV
0HG%DMR0HG/R
(PEXWLGRVSDUDHO'HVD\XQR 0HG
6iQGZLFKHV&DOLHQWHV7DOHV
FRPRFRQ4XHVRDOD3ODQFKD
0HG%DMR0HG/R
Plancha (en algunos modelos)
USO DE LA PLACA DE COCCIÓN: Plancha
Es posible que sea necesario ajustar las configuraciones de la
plancha si se usará por un período prolongado.
Plancha Precurada de Hierro Fundido Reversible
Reemplace la rejilla central por la Plancha
Precurada de Hierro Fundido Reversible
Uso de la plancha (en algunos modelos)
ADVERTENCIA
Riesgo de Incendio
Ŷ La configuración PREHEAT (Precalentar) (en algunos modelos) se brinda para precalentar la plancha de forma
rápida. Apague el control antes de colocar comida en la plancha. La cocción en la configuración PREHEAT
(Precalentar) puede ocasionar un incendio.
Ŷ Tenga cuidado al cocinar comidas con grasa. La grasa esparcida puede provocar un incendio.
Ŷ Nunca coloque ni guarde un artículo en la plancha, incluso cuando no esté en uso. El calor de los demás
quemadores puede calentar la plancha y provocar un incendio.
ŶColoque y retire la plancha sólo cuando todas las parrillas y la plancha estén frías y todas las unidades
superficiales estén en OFF (Apagado).
(OODGRDFDQDODGRGHODSODQFKDUHYHUVLEOHHQDOJXQRV
PRGHORVSXHGHVHUXVDGRSDUDFRPLGDVQRUPDOPHQWH
cocinadas a la plancha.
6XSODQFKDOHEULQGDXQDVXSHUILFLHGHFRFFLyQH[WUDJUDQGH
SDUDFDUQHVSDQTXHTXHV\RWUDVFRPLGDVQRUPDOPHQWH
SUHSDUDGDVHQXQDVDUWpQ$QWHVGHOSULPHUXVRHQMXDJXHOD
misma con agua caliente y séquela completamente. Prepare la
superficie con espray de cocina o aceite vegetal.
NOTA: No coloque la plancha en un horno microondas.
NOTA: No limpie la plancha en el horno de limpieza
DXWRPiWLFD+DFHUHVWRHOLPLQDUiHODFDEDGR3DUDDFFHGHU
DLQVWUXFFLRQHVVREUHFyPROLPSLDUODSODQFKDFRQVXOWHOD
sección de Cuidado y Limpieza.
Cómo Colocar la Plancha Precurada de Hierro Fundido
Reversible o la Plancha de Aluminio No Adherente sobre
la Placa de Cocción
Estas planchas sólo pueden ser usadas sobre el quemador
oval en el centro de la parte superior de la cocina. Para
SRVLFLRQDUODSODQFKDUHWLUHODUHMLOODFHQWUDO\UHHPSODFHOD
misma por la plancha. No gire el quemador oval hasta que
esté seguro de que la plancha se posicionó correctamente.
Cómo precalentar la plancha3UHFDOLHQWHHQWUH\
minutos antes de colocar comida sobre la plancha y luego baje
el nivel de fuego a la configuración de cocción.
No sobrecaliente la plancha.6LHOTXHPDGRUGHODSODQFKDVH
GHMDHQ+L$OWRSRUXQSHUtRGRGHWLHPSRSURORQJDGRVLQFRPLGD
HVWRSRGUiGDxDUODFREHUWXUDDQWLDGKHUHQWH
Evite el uso de utensilios de metal con puntas pronunciadas o
H[WUHPRVPX\ILORVRVTXHSRGUtDQGDxDUODVXSHUILFLHGHODSODQFKD
Plancha de Aluminio No Adherente
Reemplace la rejilla central por la Plancha
de Aluminio No Adherente
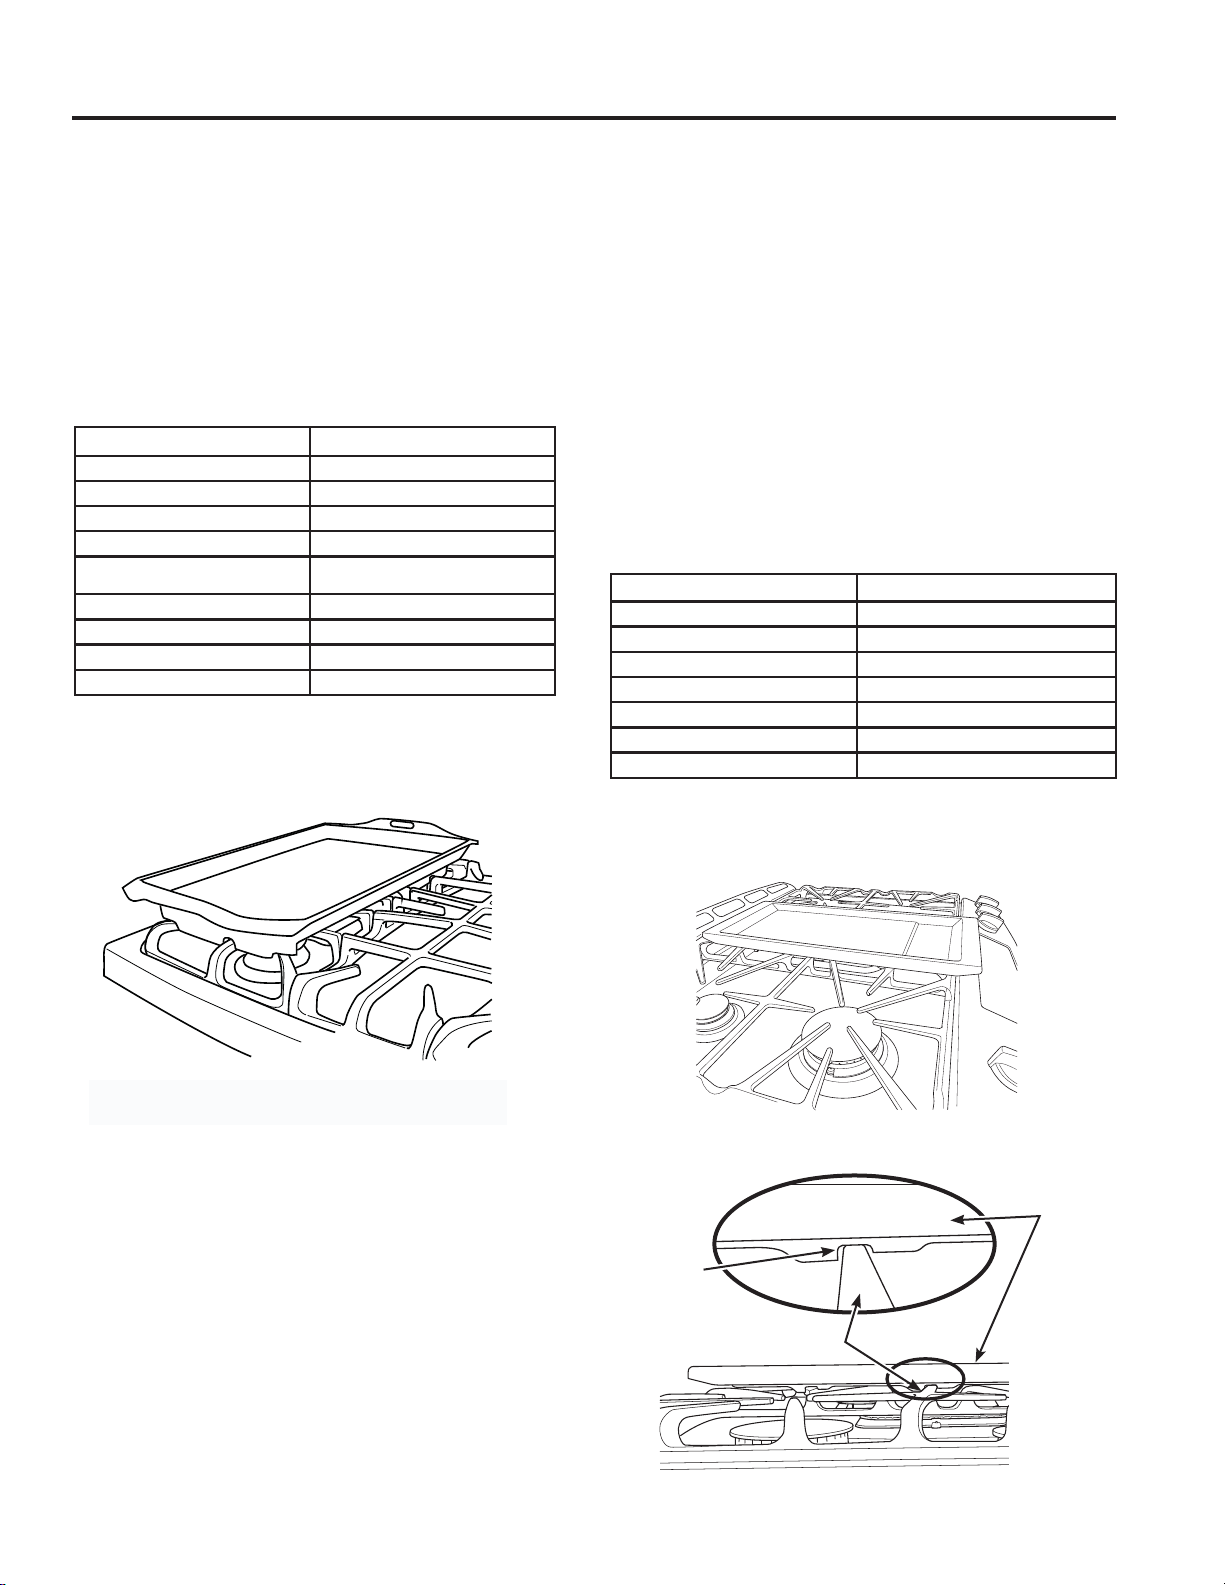
49-85211-6
13
Tipo de Comida Configuración de Cocción
Cómo Calentar Tortillas %DMR/R
Panqueques 0HG
+DPEXUJXHVDV 0HG
(PEXWLGRVSDUDHO'HVD\XQR 0HG
6iQGZLFKHV&DOLHQWHV7DOHV
FRPRFRQ4XHVRDOD3ODQFKD
0HG
%LVWHF $OWR+L
0H]FODGH9HUGXUDV 0HG
Espárrago 0HG
Pescado 0HG
Plancha (en algunos modelos) (Cont.)
USO DE LA PLACA DE COCCIÓN: Plancha
Uso de la plancha (en algunos modelos) (Cont.)
Cómo Colocar la Plancha Precurada con Tapa del Chef
sobre la rejilla izquierda.
La plancha del Chef sólo se puede usar apoyándola sobre la
UHMLOODL]TXLHUGD3RVLFLRQHODSODQFKDVREUHODUHMLOODL]TXLHUGD
REVHUYDQGRODVLQGLFDFLRQHVGH³)5217$/´\³75$6(52´
colocadas en la plancha. La parte inferior de la plancha se
debería ajustar de forma segura con los dedos de la rejilla
izquierda. No gire el quemador del puente hasta que esté
seguro de que la plancha se posicionó correctamente.
Colocación de la Plancha Antiadherente Extraíble en la
Placa de Cocción (en algunos modelos)
/DSODQFKDVyORSXHGHVHUXVDGDDSR\DGDVREUHODVUHMLOODV
encima del quemador central. Posicione la plancha sobre
el quemador central con el logo de GE orientado hacia el
frente. La parte inferior de la plancha se debe bloquear de
IRUPDVHJXUDFRQORVGHGRVGHODUHMLOODFRPRVHREVHUYDHQ
ODVVLJXLHQWHVILJXUDV8QDYH]FRORFDGDFRUUHFWDPHQWHHO
H[WUHPRIURQWDOGHODSODQFKDVREUHVDOGUiGHOH[WUHPRIURQWDO
GHODUHMLOODDSUR[LPDGDPHQWHó´\ODVXSHUILFLHGHFRFFLyQ
de la plancha quedará centrada sobre el quemador central
oval. No gire el quemador hasta que esté seguro de que la
plancha se posicionó correctamente.
Cómo precalentar la plancha3UHFDOLHQWHHQWUH\
PLQXWRVHQDOWROXHJRDSDJXHODFRQILJXUDFLyQGHODFRFFLyQ
HQODVLJXLHQWHWDEODDQWHVGHFRORFDUFRPLGDHQODSODQFKD
6LODSODQFKDVHXVDSRUXQSHUtRGRGHWLHPSRSURORQJDGRHV
posible que sea necesario ajustar las configuraciones de cocción.
$VHJ~UHVHGHTXHODVFRQGLFLRQHVGHSUHFDOHQWDPLHQWR\ODV
configuraciones de cocción sean las mismas para los Quemadores
de la Plancha frontal y trasero.
Plancha Precurada con Tapa del Chef
Ubique la Plancha Precurada con Tapa del Chef
sobre la rejilla izquierda.
Tipo de Comida Configuración de Cocción
Panceta $OWR+L
(PEXWLGRVSDUDHO'HVD\XQR 0HGLR$OWR0HG+L
+XHYRV)ULWR 0HGLR%DMR0HG/R
6iQGZLFKHVDOD3DUULOOD 0HGLR0HG
+DPEXUJXHVDV 0HGLR$OWR0HG+L
Panqueques 0HGLR$OWR0HG+L
Cómo Calentar Tortillas 0HGLR%DMR0HG/R
Plancha Extraíble y no Adherente
No sobrecaliente la plancha.6LVHGHMDHOTXHPDGRUGHODSODQFKDHQ
la configuración alta por un período de tiempo prolongado sin comida
VREUHODVXSHUILFLHHVWRSRGUiGDxDUODFREHUWXUDDQWLDGKHUHQWH
Posicione la Plancha Extraíble y Antiadherente
sobre las rejillas del quemador central.
Vista Lateral: Plancha Extraíble y Antiadherente posicionada Correctamente
Función de
Bloqueo de
la Plancha
Plancha
Rejilla
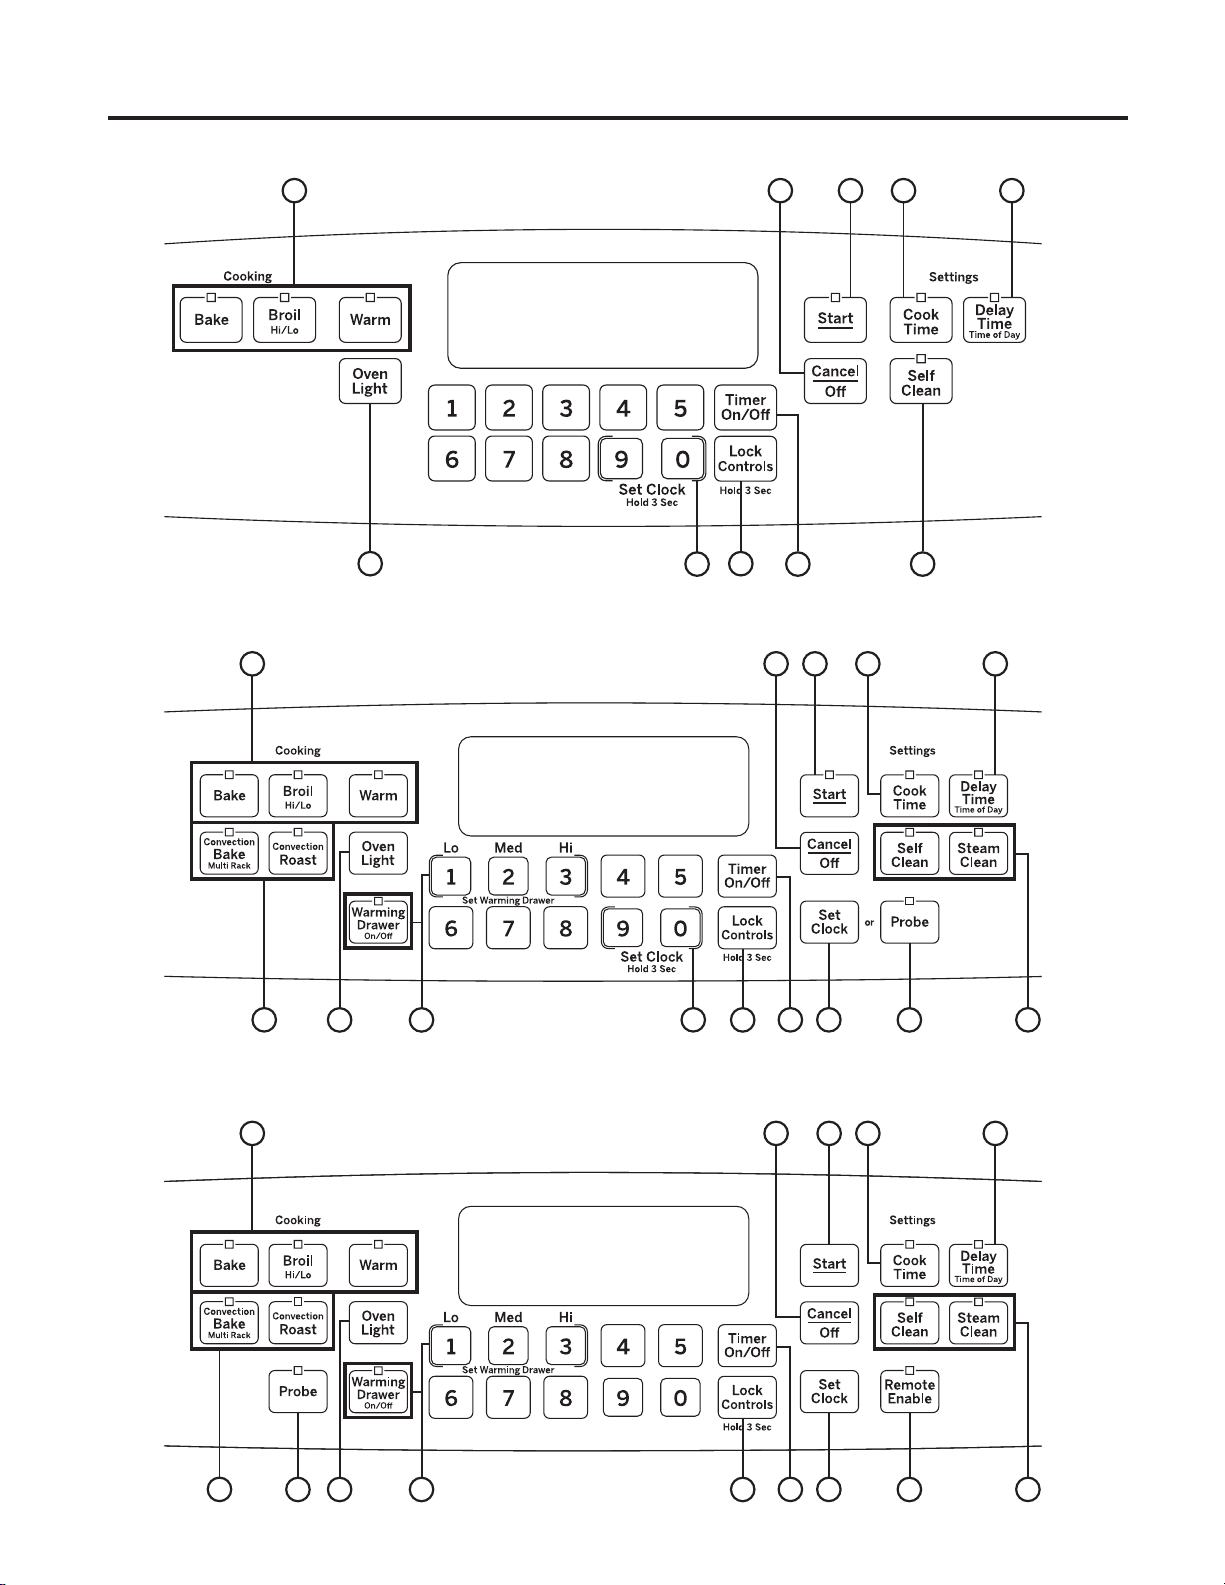
14
49-85211-6
Convection (Convección)
24965
17783
101211 13
Convección y Acceso Remoto
24965
1783
141210 11 13
Non Convection (Sin Convección)
24695
378
1211
Controles del Horno
USO DEL HORNO: Controles del Horno

49-85211-6
15
1. Convection Cooking Modes (Modos de Cocción
por Convección): Los modos de cocción por convección
utilizan una circulación de aire incrementada para mejorar el
UHQGLPLHQWR(OWLSRGHEHQHILFLRGHSHQGHGHOPRGR6XKRUQR
FXHQWDFRQORVVLJXLHQWHVPRGRVGHFRFFLyQSRUFRQYHFFLyQ
%DNH0XOWL5DFN+RQHDUHQ(VWDQWHV0~OWLSOHV\5RDVW'RUDU
3DUDPiVLQIRUPDFLyQFRQVXOWHODVHFFLyQGH0RGRVGH&RFFLyQ
2. Traditional Cooking Modes (Modos de Cocción
Tradicionales): 6XKRUQRFXHQWDFRQORVVLJXLHQWHVPRGRV
GHFRFFLyQWUDGLFLRQDOHV%DNH+RUQHDU%URLO+L$VDU$OWR
%URLO/R$VDU%DMR\:DUP&DOHQWDU3DUDPiVLQIRUPDFLyQ
FRQVXOWHODVHFFLyQGH0RGRVGH&RFFLyQ
3. Clean (Limpieza): El horno podrá contar con dos modos
GHOLPSLH]D6HOI&OHDQ/LPSLH]D$XWRPiWLFD\6WHDP&OHDQ
/LPSLH]DFRQ9DSRUVyORORVPRGHORVGHFRQYHFFLyQ
Para acceder a información importante sobre el uso de estos
PRGRVFRQVXOWHODVHFFLyQGH/LPSLH]DGHO+RUQR
4. Start (Iniciar): 6HGHEHUiSUHVLRQDUSDUDFRPHQ]DU
FXDOTXLHUIXQFLyQGHFRFFLyQOLPSLH]DRSRUWLHPSR
5. Cancel/Off (Cancelar/ Apagar): &DQFHODU72'$6
ODVRSHUDFLRQHVGHOKRUQRH[FHSWRHOUHORM\HOWHPSRUL]DGRU
6. Cook Time (Tiempo de Cocción): Cuenta el tiempo
de cocción y apaga el horno cuando el tiempo de cocción
está completo. Presione la tecla Cook Time (Tiempo de
Cocción)XVHODVWHFODVQXPpULFDVSDUDSURJUDPDUXQ
WLHPSRGHFRFFLyQHQKRUDV\PLQXWRV\OXHJRSUHVLRQH
Start (Iniciar). Esto sólo puede ser usado con Traditional
%DNH+RUQHDGR7UDGLFLRQDO&RQYHFWLRQ%DNH+RUQHDU
SRU&RQYHFFLyQ&RQYHFWLRQ%DNH0XOWL+RUQHDUSRU0XOWL
&RQYHFFLyQ\&RQYHFWLRQ5RDVW'RUDUSRU&RQYHFFLyQ
7. Clock (Reloj): &RQILJXUHODKRUDGHOUHORMGHOKRUQR0DQWHQJD
presionadas las teclas 9 y 0GXUDQWHVHJXQGRVRSUHVLRQHOD
tecla Set Clock (Configuración del Reloj)HQDOJXQRVPRGHORV
8VHODVWHFODVQXPpULFDVSDUDSURJUDPDUHOUHORM3UHVLRQH
Start (Iniciar) para guardar la configuración de la hora.
8. Timer (Temporizador): Funciona como un
WHPSRUL]DGRUFRQFXHQWDUHJUHVLYD3UHVLRQHODWHFODTimer
(Temporizador) y las teclas numéricas para programar el
tiempo en horas y minutos. Presione la tecla Start (Iniciar).
El horno continuará funcionando cuando la cuenta regresiva
del temporizador se haya completado. Para apagar el
WHPSRUL]DGRUSUHVLRQHODWHFODTimer (Temporizador).
9. Delay Time (Tiempo de Retraso): Genera un
UHWUDVRFXDQGRHOKRUQRHVHQFHQGLGR8VHHVWDWHFOD
para configurar el momento en que desea que el horno se
inicie. Presione la tecla Delay Time (Tiempo de Retraso)
y use las teclas numéricas para programar la hora del día
en que desea que el horno se encienda y luego presione
Start (Iniciar). Presione el modo de cocción deseado y la
temperatura y luego presione Start (Iniciar)6LORGHVHD
también puede ser programado un tiempo de cocción. Esto
VyORSXHGHVHUXVDGRFRQ7UDGLWLRQDO%DNH+RUQHDGR
7UDGLFLRQDO&RQYHFWLRQ%DNH0XOWL+RUQHDUSRU0XOWL
&RQYHFFLyQ&RQYHFWLRQ5RDVW'RUDUSRU&RQYHFFLyQ\
6HOI&OHDQ/LPSLH]D$XWRPiWLFD
NOTA: $OXVDUODIXQFLyQGHWLHPSRGHUHWUDVRODVFRPLGDV
TXHVHHFKDQDSHUGHUUiSLGDPHQWHWDOHVFRPROHFKHKXHYRV
SHVFDGRUHOOHQRVDYH\FHUGRQRVHGHEHUiQGHMDUUHSRVDUSRU
más de 1 hora antes y después de la cocción. La temperatura
DPELHQWHHVWLPXODHOGHVDUUROORGHEDFWHULDVQRFLYDV$VHJ~UHVH
GHTXHODOX]GHOKRUQRHVWpDSDJDGD\DTXHHOFDORUGHOD
lámpara acelerará el crecimiento de bacterias nocivas.
10. Probe (Sonda): 0RQLWRUHDODWHPSHUDWXUDLQWHUQDGH
la comida y apaga el horno cuando la comida alcanza la
WHPSHUDWXUDSURJUDPDGD,QVHUWHODVRQGDSURJUDPHHO
PRGRGHFRFFLyQ\SURJUDPHODWHPSHUDWXUDGHODVRQGD
3DUDPiVLQIRUPDFLyQFRQVXOWHODVHFFLyQGH0RGRVGH
Cocción. La sonda sólo puede ser usada con las funciones
7UDGLWLRQDO%DNH+RUQHDGR7UDGLFLRQDO\&RQYHFWLRQ5RDVW
'RUDUSRU&RQYHFFLyQ
11. Oven Light(s) (Luz(es) del Horno): Enciende o
DSDJDODOX]HVGHOKRUQR
12. Lock Controls (Controles de Bloqueo): %ORTXHDQ
el control de modo que al presionar las teclas no se activen
ORVFRQWUROHV0DQWHQJDSUHVLRQDGDODWHFODLock Controls
(Controles de Bloqueo) durante tres segundos para
bloquear o desbloquear el control. La función Cancel/Off
(Cancelar/ Apagar)VLHPSUHHVWiDFWLYDLQFOXVRFXDQGRHO
control está bloqueado.
13. Warming Drawer (Cajón para Calentar):
0DQWLHQHODVFRPLGDVFDOLHQWHV\FRFLQDGDVHQOD
temperatura para servir. Presione la tecla Warming
Drawer (Cajón para Calentar)8VHODWHFODQXPpULFDSDUD
seleccionar la configuración de temperatura. Presione 1 para
/RZ%DMR2SDUD0HGLXP0HGLRR3SDUD+LJK$OWR\
luego presione Start (Iniciar). Empuje el Warming Drawer
(Cajón para Calentar) a fin de apagar el mismo.
14. Remote Enable (Acceso Remoto):
CÓMO CONECTAR EL HORNO
Off (Apagado) - El horno no está conectado. Abra la
aplicación y luego mantenga presionada la tecla Remote
Enable (Acceso Remoto)GXUDQWHVHJXQGRVSDUDLQLFLDUHO
SURFHVRGHFRQH[LyQ
Slow flash (parpadeo lento) - El horno está en modo de
E~VTXHGD\HVWiEXVFDQGRXQDUHG
Rapid flash (parpadeo rápido) -6HSURGXMRXQHUURU
GXUDQWHHOSURFHVRGHFRQH[LyQ
Solid (Sólido) - Ambos hornos están conectados a la red
y pueden ser controlados en forma remota a través de un
GLVSRVLWLYRPyYLOFRQHFWDGRFXDQGRHVWiQHQIXQFLRQDPLHQWR
pero no pueden ser iniciados en forma remota.
INICIO DEL HORNO EN FORMA REMOTA
3DUDSRGHULQLFLDUHOKRUQRHQIRUPDUHPRWDSUHVLRQHOD
tecla Remote Enable (Acceso Remoto) y la luz que está
arriba de la tecla Remote Enable (Acceso Remoto) se
encenderá. Cualquiera de los hornos puede ser iniciado
ahora en forma remota con un dispositivo conectado. Abrir
cualquiera de las puertas de los hornos o apagar cualquiera
de los hornos hará que se apague la luz que está arriba de
la tecla Remote Enable (Acceso Remoto). La luz que está
arriba de la tecla Remote Enable (Acceso Remoto) deberá
estar iluminada para iniciar el horno de forma remota. No se
requiere la luz que está arriba de la tecla Remote Enable
(Acceso Remoto) para cambiar las configuraciones del
cualquiera de los hornos o para apagar el mismo.
/XHJRGHXVDUHOKRUQRUHFXHUGHYHULILFDUTXHODOX]TXHHVWi
arriba de Remote Enable (Acceso Remoto)HVWpHQFHQGLGD
si desea iniciar un horno de forma remota en el futuro.
Controles del Horno (Cont.)
USO DEL HORNO: Controles del Horno

16
49-85211-6
([LVWHQYDULDVIXQFLRQHVHVSHFLDOHVHQVXKRUQR3DUDPRGLILFDUODVFRQILJXUDFLRQHVGHHVWDVIXQFLRQHVHVSHFLDOHVPDQWHQJDSUHVLRQDGDV
las teclas Bake (Hornear) y Broil (Asar)DOPLVPRWLHPSRGXUDQWHWUHVVHJXQGRV6)DSDUHFHUiHQODSDQWDOOD6HOHFFLRQHODIXQFLyQTXH
GHVHHPRGLILFDU8QDYH]UHDOL]DGRHOFDPELRSUHVLRQHODWHFODStart (Iniciar) para guardar dicho cambio y regrese a la hora del día.
Ajuste de la Temperatura del Horno
Esta función permite que la temperatura de horneado del horno
VHDDMXVWDGDKDVWD)PiVFDOLHQWHR)PiVIUtD8VHHVWD
función si piensa que la temperatura de su horno es demasiado
caliente o demasiado fría y desea modificarla.
Presione la tecla Bake (Hornear) nuevamente para ingresar el
modo de ajuste de temperatura. Presione la tecla Bake (Hornear)
QXHYDPHQWHSDUDLQJUHVDUHOPRGRGHDMXVWHGHWHPSHUDWXUD6H
H[KLELUiXQQ~PHURHQWUH\±8VHODVWHFODVQXPpULFDVSDUD
configurar el ajuste de temperatura deseado y use la tecla Bake
(Hornear) para realizar cambios en forma descendente y ascendente.
Presione la tecla Start (Iniciar) para guardar el ajuste de temperatura.
Sonido de Finalización del Temporizador
6HWUDWDGHXQWRQRTXHLQGLFDODILQDOL]DFLyQGHXQWHPSRUL]DGRU(O
WRQRSXHGHVHUFRQWLQXR&RQE((SRVLPSOHE((S/DFRQILJXUDFLyQ
FRQWLQXD&RQE((SKDUiVRQDUGHIRUPDUHSHWLGDXQWRQRFDGD
SRFRVVHJXQGRVKDVWDTXHHOERWyQGHOFRQWUROVHDSUHVLRQDGR8QD
FRQILJXUDFLyQVLPSOHE((SKDUiVRQDUVyORXQWRQRVLPSOHFXDQGRHO
temporizador finalice. Presione la tecla Broil (Asar) para visualizar la
configuración actual y luego modifique la configuración.
Selección de Temperatura Fahrenheit o Celsius
El control del horno está configurado para su uso con temperaturas
)DKUHQKHLW)SHURORSXHGHPRGLILFDUDWHPSHUDWXUDV&HOVLXV
&3UHVLRQHODVWHFODVBroil (Asar) y Cook Time (Tiempo de
Cocción)DOPLVPRWLHPSRSDUDYLVXDOL]DUODFRQILJXUDFLyQDFWXDO
presione nuevamente para modificar la configuración.
Pantalla del Reloj
(VWDIXQFLyQHVSHFLILFDFyPRODKRUDGHOGtDVHUiH[KLELGDRVLQR
VHH[KLELUiODKRUDGHOGtD3XHGHVHOHFFLRQDUHOUHORMFRQKRUD
HVWiQGDUGHKRUDV+ODKRUDPLOLWDUGHKRUDV+R
TXHQRVHH[KLEDQLQJ~QUHORMR))$SDJDGR3UHVLRQHODWHFOD
Clock (Reloj)SDUDYLVXDOL]DUODFRQILJXUDFLyQDFWXDO\YXHOYDD
presionar la misma para modificar la configuración.
Volumen del Sonido
Esta función permite que el volumen del tono del horno sea
DMXVWDGRHQWUHDOWR+,E((3+,3LWLGR$OWRPHGLR6WGE((36WG
3LWLGR(VWiQGDU\DSDJDGRR))E((3R))3LWLGR$SDJDGR
Presione la tecla Cook Time (Tiempo de Cocción) para visualizar
la configuración actual o para cambiar la configuración. El control
hará que el tono del horno suene en el nuevo nivel de volumen
cada vez que el nivel de sonido sea modificado.
Conversión de Auto Recipe
(VWDIXQFLyQ(QFHQGHU$SDJDUGHIRUPDDXWRPiWLFDDMXVWDOD
temperatura programada de la receta en el modo Convection
0XOWL%DNH+RUQHDGR0~OWLSOHSRU&RQYHFFLyQ
NOTA:(VWDRSFLyQQRFRQYLHUWHHOWLHPSRGHKRUQHDGRVyORODV
temperaturas. Esta opción no ajusta las temperatura del modo
&RQYHFWLRQ5RDVW'RUDUSRU&RQYHFFLyQ3UHVLRQHODWHFODBake Multi
(Horneado Múltiple) o Roast (Dorar) para visualizar la configuración
actual. Presione nuevamente para cambiar la configuración.
Luz de Notificación de Precalentamiento
(en algunos modelos)
Esta función encenderá la luz del horno cuando éste haya
alcanzado la temperatura configurada. La luz del horno
permanecerá encendida hasta que éste sea apagado o si la tecla
Oven Light (Luz del Horno) es presionada. Presione la tecla
Oven Light (Luz del Horno)SDUDYLVXDOL]DUODFRQILJXUDFLyQDFWXDO
y vuelva a presionar la misma para modificar la configuración.
Apagado automático de 12 horas y Modo
Sabático
El apagado automático de 12 horas apaga el horno luego de 12
horas de operaciones continuas.
/DVRSFLRQHVGHHVWDIXQFLyQVRQ³6+GQ´DSDJDU/XHJRGH
KRUDV³QR6+GQ´QRDSDJDU\³6$EE$W+´6DEiWLco3UHVLRQH
la tecla Delay Time (Tiempo de Retraso) para visualizar la
configuración actual y luego para cambiar la configuración.
Ingrese Sabbath Mode (Modo Sabático)
0DQWHQJDSUHVLRQDGDVODVWHFODVBake (Hornear) y Broil (Asar)
DOPLVPRWLHPSRGXUDQWHWUHVVHJXQGRV³6)´DSDUHFHUiHQOD
pantalla. Presione la tecla Delay Time (Tiempo de Retraso) hasta
TXH³6$E$W+´6DEiWLFRDSDUH]FDHQODSDQWDOOD\OXHJRSUHVLRQH
6WDUW,QLFLDU(OtFRQR]DSDUHFHUiHQODSDQWDOODLQGLFDQGRTXHOD
XQLGDGVHHQFXHQWUDHQ6DEEDWK0RGH0RGR6DEiWLFR(OUHORM
no aparecerá.
Inicie Sabbath Bake (Horneado Sabático)
Presione Bake (Hornear)XVHODVWHFODVQXPpULFDVSDUDLQJUHVDU
XQDWHPSHUDWXUDHQWUH)\)\SUHVLRQHStart (Iniciar).
1RVHHPLWLUiQLQJ~QVRQLGRFXDQGRODVWHFODVVHDQSUHVLRQDGDV
(QXQPRPHQWRDOD]DUHQWUHORVVHJXQGRV\PLQXWRHO
ícono ][ aparecerá en la pantalla indicando que el horno está
HQIXQFLRQDPLHQWR3DUDDSDJDUHOKRUQRSUHVLRQHCancel/Off
(Cancelar/ Apagar) en cualquier momento. En un momento al
D]DUHQWUHORVVHJXQGRV\PLQXWRVHOtFRQR][ cambiará a ]
indicando que el horno fue apagado.
Ajuste la Temperatura Durante el Horneado Sabático
Presione Bake (Hornear)XVHODVWHFODVQXPpULFDVSDUDLQJUHVDU
XQDQXHYDWHPSHUDWXUDHQWUH)\)\SUHVLRQHStart
(Iniciar)1RVHHPLWLUiQLQJ~QVRQLGRFXDQGRODVWHFODVVHDQ
SUHVLRQDGDV'HELGRDTXHQRKD\QLQJXQDLQGLFDFLyQGXUDQWHHO
FDPELRGHWHPSHUDWXUDVHSXHGHXVDUXQWHUPyPHWURSDUDKRUQR
para confirmar cambios de temperatura.
Horneado con Temporizador Durante el Modo Sabático
$QWHVGHFRQILJXUDUHOKRUQRHQ6DEEDWK0RGH0RGR6DEiWLFR
SUHVLRQH&RRN7LPH7LHPSRGH&RFFLyQXVHODVWHFODV
numéricas para ingresar una cantidad de tiempo para cocinar
HQKRUDV\PLQXWRV\OXHJRSUHVLRQHStart (Iniciar)6LJDODV
LQVWUXFFLRQHVDQWHULRUHVSDUDLQJUHVDU6DEEDWK0RGH0RGR
6DEiWLFR3UHVLRQHBake (Hornear)XVHODVWHFODVQXPpULFDV
SDUDLQJUHVDUXQDWHPSHUDWXUDHQWUH)\)\SUHVLRQH
Start (Iniciar)1RVHHPLWLUiQLQJ~QVRQLGRFXDQGRODVWHFODV
sean presionadas. El horno se apagará una vez que el tiempo de
cocción programado haya concluido.
Salga del Modo Sabático
0DQWHQJDSUHVLRQDGDVODVWHFODVBake (Hornear) y Broil (Asar) al
PLVPRWLHPSRGXUDQWHWUHVVHJXQGRV³6)´DSDUHFHUiHQODSDQWDOOD
Presione la tecla Delay Time (Tiempo de Retraso) hasta que “12
6KGQ´DSDJDUOXHJRGHKRUDVDSDUH]FDHQODSDQWDOOD\OXHJR
SUHVLRQH6WDUW,QLFLDU(OUHORMQRDSDUHFHUiQXHYDPHQWHLQGLFDQGR
TXHHOKRUQR\DQRHVWiHQ6DEEDWK0RGH0RGR6DEiWLFR
Aviso de Corte de Corriente durante el Modo Sabático
6LVHSURGXFHXQFRUWHGHFRUULHQWHPLHQWUDVHOKRUQRVHHQFXHQWUD
HQ6DEEDWK0RGH0RGR6DEiWLFRODXQLGDGUHJUHVDUiD6DEEDWK
0RGH0RGR6DEiWLFRFXDQGRHOVXPLQLVWURVHDUHHVWDEOHFLGRVLQ
HPEDUJRHOKRUQRUHJUHVDUiDOHVWDGRGHDSDJDGRLQFOXVRFXDQGR
esté en un ciclo de horneado en el momento del corte de corriente.
Funciones especiales
USO DEL HORNO: Funciones especiales
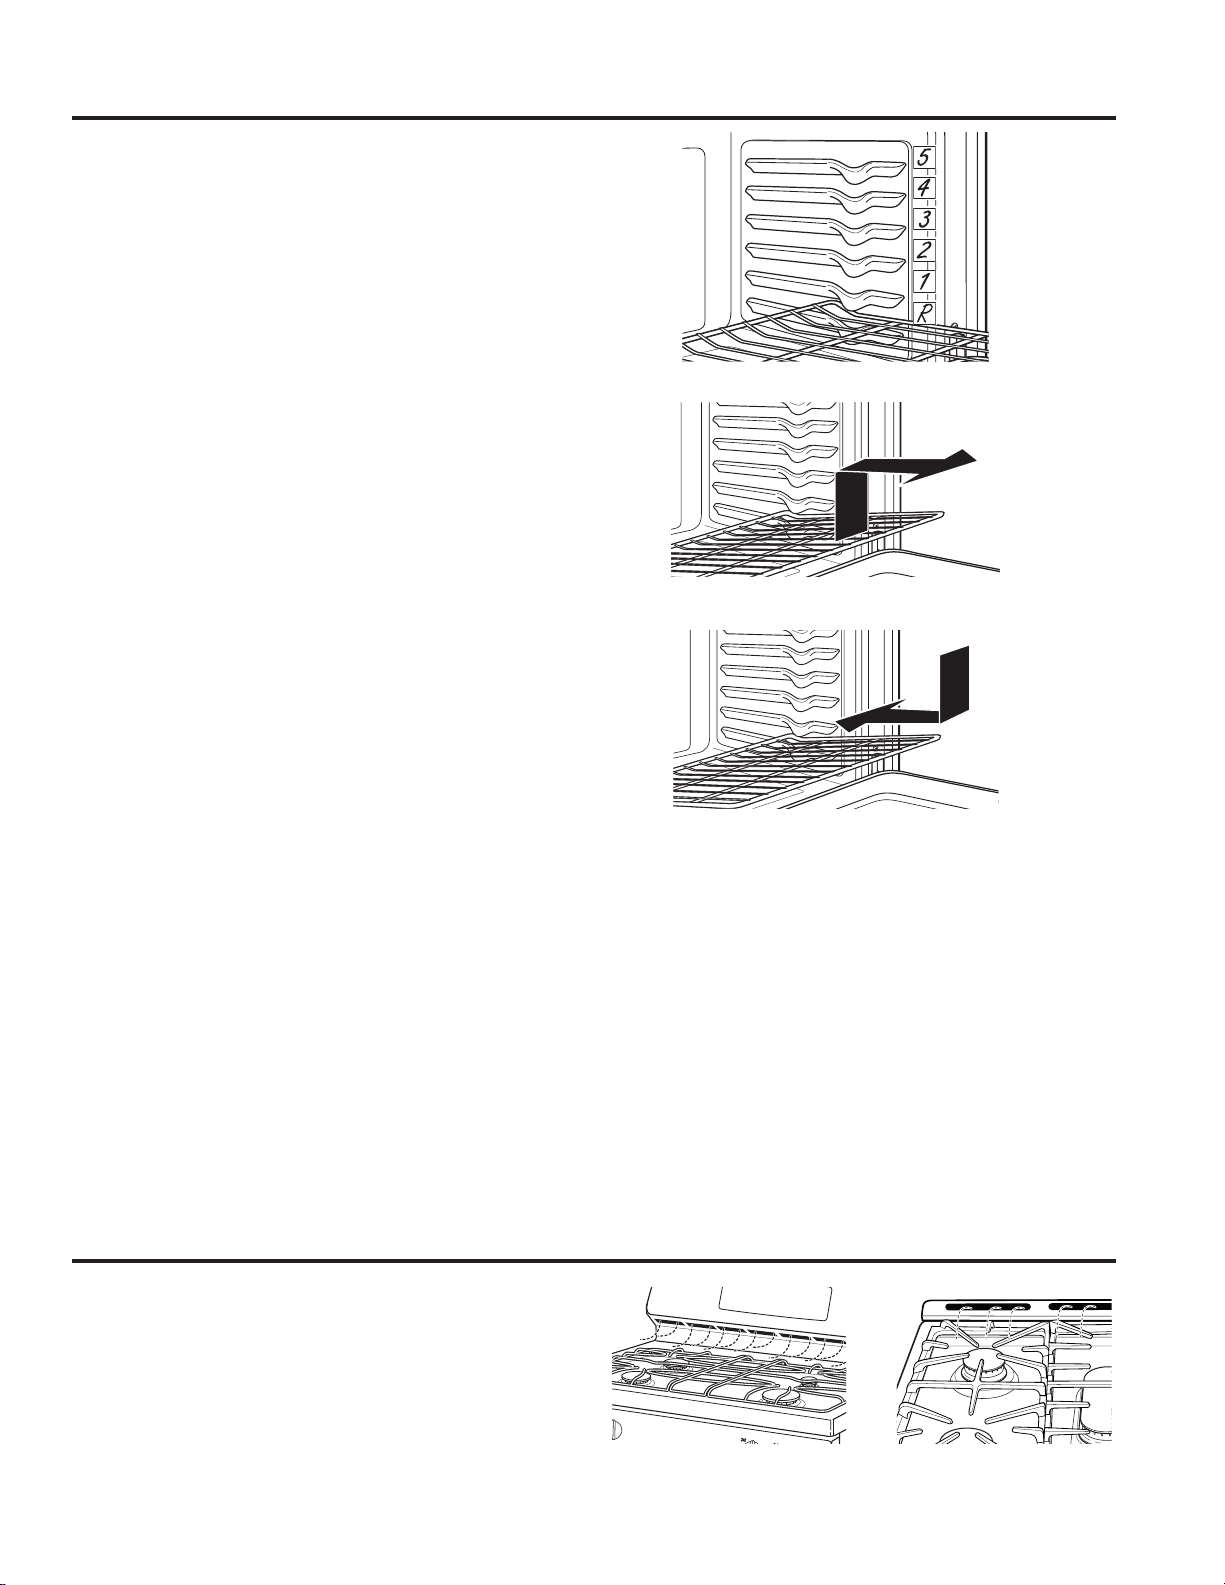
49-85211-6
17
Estantes del Horno
USO DEL HORNO: Estantes del Horno / Ventilaciones de Aire del Horno
El horno cuenta con seis posiciones de estantes. En la Guía
GH&RFFLyQVHEULQGDQUHFRPHQGDFLRQHVGHSRVLFLRQHVGH
ORVHVWDQWHVSDUDGLIHUHQWHVWLSRVGHFRPLGDV6HDMXVWD
un estante en una dirección para afectar los resultados de
FRFFLyQ3RUHMHPSORVLVHSUHILHUHQSDUWHVVXSHULRUHVPiV
RVFXUDVHQWDUWDVSDQHFLOORVRJDOOHWDVSUXHEHPRYLHQGR
la comida a un estante que se encuentre una posición más
DUULED6LHQFXHQWUDTXHODVFRPLGDVHVWiQGHPDVLDGRGRUDGDV
HQODSDUWHVXSHULRUSUXHEHPRYLHQGRODVPLVPDVPiVDEDMR
ODSUy[LPDYH]
$OKRUQHDUFRQP~OWLSOHVROODV\HQP~OWLSOHVHVWDQWHV
DVHJ~UHVHGHTXHKD\DVXILFLHQWHHVSDFLRHQWUHODVROODVSDUD
que fluya el aire.
Estantes Planos
$OFRORFDU\UHWLUDUXWHQVLOLRVGHFRFLQDHPSXMHHOHVWDQWH
KDFLDDIXHUDGHOWRSHSRVLFLyQGHGHWHQFLyQVREUHHOVRSRUWH
del estante.
3DUDUHWLUDUHOHVWDQWHHPSXMHHOPLVPRKDFLDXVWHGLQFOLQHHO
H[WUHPRIURQWDOKDFLDDUULED\HPSXMHKDFLDDIXHUD
3DUDKDFHUXQUHHPSOD]RFRORTXHHOH[WUHPRFXUYRGHO
HVWDQWHEORTXHDGRUHVHQORVVRSRUWHVGHOKRUQRLQFOLQHKDFLD
arriba el frente y empuje el estante hacia adentro.
(VSRVLEOHTXHUHVXOWHGLItFLOGHVOL]DUORVHVWDQWHV
especialmente luego de la limpieza automática. Coloque aceite
YHJHWDOHQXQDWHODK~PHGDRWRDOODGHSDSHO\IURWHHOPLVPR
VREUHORVH[WUHPRVL]TXLHUGR\GHUHFKR
Estantes Extensibles (en algunos modelos)
/RVHVWDQWHVH[WHQVLEOHVFXHQWDQFRQXQDHVWUXFWXUDTXHVH
EORTXHDHQORVVRSRUWHVGHORVHVWDQWHVDDPERVODGRV8QD
YH]TXHODHVWUXFWXUDHVWiEORTXHDGDHQVXOXJDUVLHPSUH
empuje hacia afuera el estante desde el riel frontal superior
KDVWDODSRVLFLyQGHGHWHQFLyQHQVXPi[LPDH[WHQVLyQDO
colocar o retirar utensilios.
6LUHVXOWDGLItFLOH[WHQGHUHVWRVHVWDQWHVOXEULTXHORVPLVPRV
FRQOXEULFDQWHGHJUDILWRSURYLVWRFRQHOKRUQR5HWLUHHO
HVWDQWHGHOKRUQRUHWLUHFXDOTXLHUREVWUXFFLyQHQHOUHFRUULGR
GHVOL]DEOHFRQXQDWRDOODGHSDSHODJLWHHOOXEULFDQWHGHJUDILWR
y coloque 4 gotitas en los dos recorridos inferiores de los lados
izquierdo y derecho. Abra y cierre el estante varias veces para
distribuir el lubricante.
3DUDRUGHQDUPiVOXEULFDQWHGHJUDILWROHDODVHFFLyQGH
Asistencia y Accesorios en el comienzo de este manual.
Para Retirar un Estante Extensible:
$VHJ~UHVHGHTXHHOHVWDQWHVHDHPSXMDGRWRWDOPHQWH
dentro del horno.
6RVWHQLHQGRGHPDQHUDILUPHVREUHORVULHOHVIURQWDOHV
VXSHULRUHLQIHULRUHPSXMHHOHVWDQWHKDFLDXVWHGLQFOLQHHO
H[WUHPRIURQWDOKDFLDDUULED\HPSXMHKDFLDDIXHUD
Para Reemplazar un Estante Extensible:
&RORTXHORVEORTXHRVGHORVHVWDQWHVWUDVHURVVREUH\HQ
los soportes de los estantes
2. Incline el frente del estante hacia arriba y empuje hacia
adentro.
6LUHVXOWDGLItFLOUHHPSOD]DURUHWLUDUORVHVWDQWHVH[WHQVLEOHV
limpie los soportes de los estantes del horno con aceite
de cocina. No quite el aceite de cocina del espacio de
deslizamiento.
Ventilaciones de Aire del Horno
La apariencia y la ubicación de la ventilación varían.
1XQFDEORTXHHODVYHQWLODFLRQHVDEHUWXUDVGHDLUHGHOD
cocina. Las mismas brindan las entradas y salidas de aire
que son necesarias para que la cocina se mantenga fresca y
funcione de forma correcta con la combustión adecuada.
Las aberturas de aire se encuentran ubicadas en la parte
WUDVHUDGHODFRFLQDHQODSDUWHVXSHULRUHLQIHULRUGHODSXHUWD
GHOKRUQR\HQODSDUWHLQIHULRUGHODFRFLQD

18
49-85211-6
6XQXHYRKRUQRSRVHHXQDYDULHGDGGHPRGRVGHFRFFLyQSDUDTXHSXHGDREWHQHUORVPHMRUHVUHVXOWDGRV(VWRVPRGRV
VHGHVFULEHQDFRQWLQXDFLyQ3DUDDFFHGHUDUHFRPHQGDFLRQHVSDUDFRPLGDVHVSHFtILFDVFRQVXOWHODVHFFLyQGHOD*XtDGH
Cocción. Recuerde que es posible que su nuevo horno funcione de manera diferente que aquel que está reemplazando.
Bake (Hornear)
El modo de horneado es utilizado para hornear y dorar. Este
PRGRXVDHOFDORUSULQFLSDOPHQWHGHVGHHOTXHPDGRULQIHULRU
pero también desde el quemador superior para cocinar la
FRPLGD$OSUHSDUDUFRPLGDVKRUQHDGDVWDOHVFRPRWDUWDV
JDOOHWDV\PDVDVVLHPSUHSUHFDOLHQWHHOKRUQRSULPHUR6LJD
las recomendaciones de la receta sobre la colocación de
ODFRPLGD6LQRVHEULQGDQSDXWDVFHQWUHODFRPLGDHQHO
KRUQR3DUDXVDUHVWHPRGRSUHVLRQHODWHFODBake (Hornear)
LQJUHVHXQDWHPSHUDWXUD\OXHJRSUHVLRQHStart (Iniciar).
Warm/Warming Drawer (Calentar/ Cajón para
Calentar) (en algunos modelos)
(OPRGR:DUP&DOHQWDUHVWiGLVHxDGRSDUDPDQWHQHUFRPLGDV
FDOLHQWHVKDVWDGXUDQWHKRUDV3DUDXVDUHVWHPRGRSUHVLRQH
la tecla Warm (Calentar) o Warming Drawer (Cajón para
Calentar) y luego presione Start (Iniciar). Cubra las comidas
que necesitan mantener la humedad y no cubra aquellas
comidas que deberían quedar crocantes. No se requiere
SUHFDOHQWDUODVPLVPDV1RXVHODIXQFLyQ:DUP&DOHQWDUSDUD
FDOHQWDUFRPLGDIUtDH[FHSWRJDOOHWDVFUXMLHQWHVSDSDVIULWDVR
cereales secos. También se recomienda que la comida no se
mantenga caliente por más de dos horas.
Broiling Modes (Modo para Asar)
6LHPSUHDVHFRQODSXHUWDFHUUDGD0RQLWRUHHODFRPLGDGH
cerca al asar. Tenga cuidado al asar en estantes de posiciones
VXSHULRUHV\DTXHFRORFDUODFRPLGDPiVFHUFDGHOTXHPDGRU
SDUDDVDULQFUHPHQWDHOKXPRVDOSLFDGXUDV\ODSRVLELOLGDGGH
que se incendien las grasas.
Intente asar las comidas que normalmente haría a la parrilla.
Ajuste las posiciones de los estantes para ajustar la intensidad
del calor a la comida. Coloque las comidas más cerca del
TXHPDGRUSDUDDVDUFXDQGRVHGHVHHXQDVXSHUILFLHPiV
cocinada y un interior poco cocido. Las comidas más anchas
y aquellas que se deben cocinar completamente se deberían
asar en un estante con la posición más alejada del quemador y
XVDQGR%URLO/R$VDU%DMR
Broil Hi (Asar Alto)
(OPRGR%URLO+L$VDU$OWRXVDFDORULQWHQVRGHOTXHPDGRU
VXSHULRUSDUDVRDVDUODVFRPLGDV8VHODIXQFLyQ%URLO+L
$VDGR$OWRSDUDFRUWHVPiVGHOJDGRVGHFDUQH\RFRPLGDV
que prefiera que quedan menos cocinadas en su interior.
3DUDXVDUHVWHPRGRSUHVLRQHODWHFODBroil (Asar) una vez
y luego presione Start (Iniciar). No es necesario realizar el
precalentamiento al usar este modo.
Broil Lo (Asar Bajo)
(OPRGR%URLO/R$VDU%DMRXVDPHQRVFDORULQWHQVRGHO
quemador superior para cocinar la comida completamente
PLHQWUDVWDPELpQVHGRUDODVXSHUILFLH8VHODIXQFLyQ%URLO/R
$VDGR%DMRSDUDFRUWHVGHFDUQHPiVJUXHVRV\RFRPLGDV
que desee que queden completamente cocinadas. Para
XVDUHVWHPRGRSUHVLRQHODWHFODBroil (Asar) dos veces y
luego presione Start (Iniciar). No es necesario realizar el
precalentamiento al usar este modo.
Convection Bake Multi Rack (Honeado por
Convección en Estantes Múltiples)
(OPRGR&RQYHFWLRQ%DNH0XOWL5DFN+RQHDGRSRU&RQYHFFLyQ
HQ(VWDQWHV0~OWLSOHVHVWiSHQVDGRSDUDKRQHDUHQP~OWLSOHV
estantes al mismo tiempo. Este modo puede usar calor de los
TXHPDGRUHVVXSHULRUHLQIHULRUMXQWRFRQHOPRYLPLHQWRGHDLUH
del ventilador de convección para una cocción más pareja. El
horno está equipado con la función Auto Recipe Conversion
&RQYHUVLyQGH5HFHWD$XWRPiWLFDGHPRGRTXHQRHV
necesario convertir la temperatura al usar este modo. Para usar
HVWHPRGRSUHVLRQHODWHFODBake Multi Rack (Horneado en
Estantes Múltiples) en Convection (Convección)LQJUHVH
XQDWHPSHUDWXUD\OXHJRSUHVLRQHStart (Iniciar)6LHPSUH
realice el precalentamiento al usar este modo.
Convection Roast (Dorar por Convección)
(OPRGR&RQYHFWLRQ5RDVW'RUDGRSRU&RQYHFFLyQHVWi
pensado para dorar cortes enteros de carne en un solo
estante. Este modo puede usar calor del quemador para
KRUQHDUVXSHULRUHLQIHULRUMXQWRFRQHOPRYLPLHQWRGHDLUH
para mejorar el dorado y reducir el tiempo de cocción. No es
QHFHVDULRFRQYHUWLUODWHPSHUDWXUD&&XDQGRXVHHVWHPRGRR
VLXVDODVRQGDHQDOJXQRVPRGHORVFRQWUROHODFRPLGDDQWHV
TXHHOWLHPSRVXJHULGRHQODUHFHWD3DUDXVDUHVWHPRGR
presione la tecla Roast (Dorar) en Convection (Convección)
LQJUHVHXQDWHPSHUDWXUD\OXHJRSUHVLRQHStart (Iniciar). No
es necesario realizar el precalentamiento al usar este modo.
Modos de Cocción
USO DEL HORNO: Utensilios / Modos de Cocción
Utensilios
Pautas de Uso de Utensilios
(OPDWHULDOHODFDEDGR\HOWDPDxRGHORVXWHQVLOLRVDIHFWDQHO
horneado.
/DVROODVRVFXUDVUHYHVWLGDV\RSDFDVDEVRUEHQHOFDORUPiV
rápidamente que las ollas claras y brillantes. Al usar ollas
TXHDEVRUEHQHOFDORUPiVUiSLGDPHQWHODVFRPLGDVSRGUiQ
UHVXOWDUPiVGRUDGDVFURFDQWHV\FRQXQDFDSDPiVJUXHVD
6LXWLOL]DXWHQVLOLRVRVFXURV\UHYHVWLGRVFRQWUROHODFRPLGDDQWHV
GHOWLHPSRPtQLPRGHFRFFLyQ6LVHREWLHQHQUHVXOWDGRVQR
GHVHDGRVFRQHVWHWLSRGHXWHQVLOLRVFRQVLGHUHODSRVLELOLGDGGH
UHGXFLUODWHPSHUDWXUDGHOKRUQRHQ)ODSUy[LPDYH]
Las ollas brillantes pueden producir resultados de horneado
más parejos en tortas y galletas.
/DVROODVGHYLGULR\FHUiPLFDFDOLHQWDQFRQOHQWLWXGSHUR
retienen bien el calor.
Estos tipos de ollas funcionan bien con platos tales como
tartas y postres con natilla.
Las ollas con aislante de aire calientan lentamente y pueden
producir fondos dorados.
0DQWHQJDORVXWHQVLOLRVOLPSLRVSDUDXQDFRFFLyQPiVSDUHMD
49-85211-6
19
Probe (Sonda)
USO DEL HORNO: Probe (Sonda)
ADVERTENCIA
El consumo de comida semicruda puede hacer que se contraigan enfermedades producidas por la
comida. Use la sonda de acuerdo con las siguientes instrucciones, a fin de asegurar que todas las partes de la comida
alcancen temperaturas de cocción mínimamente seguras. Puede encontrar recomendaciones de temperaturas de
cocción mínimamente seguras en www.foodsafety.gov o en www.IsItDoneYet.gov.
La temperatura interna de la comida con frecuencia se usa como indicador de que está lista, especialmente al dorar o
preparar carne de ave. El modo Probe (Sonda) monitorea la temperatura interna de la comida y apaga el horno cuando
esta última alcanza la temperatura programada.
Controle siempre la temperatura en múltiples partes de la comida, utilizando un termómetro de comidas luego de
realizar la cocción, a fin de asegurar que todas las partes de la misma hayan alcanzado una temperatura interna
mínimamente segura en dicha comida.
Ubicación Correcta de la Sonda
/XHJRGHSUHSDUDUODFRPLGD\GHFRORFDUODHQODROODVLJD
estas instrucciones para una ubicación correcta de la sonda.
Ŷ ,QVHUWHODVRQGDHQODFRPLGDGHPRGRTXHODSXQWDGH
la sonda se apoye en el centro de la parte más gruesa de
ODFRPLGD3DUDXQPHMRUUHQGLPLHQWRODVRQGDGHEHUtD
VHUFRPSOHWDPHQWHLQVHUWDGDHQODFRPLGD6LODVRQGD
QRHVXELFDGDFRUUHFWDPHQWHHVSRVLEOHTXHQRPLGDFRQ
precisión la temperatura de la parte más fría de la comida.
$OJXQDVFRPLGDVSDUWLFXODUPHQWHODVPiVSHTXHxDVQR
VRQDGHFXDGDVSDUDODFRFFLyQFRQHOXVRGHXQDVRQGD
GHELGRDVXVIRUPDVRWDPDxRV
Ŷ 1RGHEHUtDWRFDUHOKXHVRODJUDVDQLHOFDUWtODJR
Ŷ 3DUDFRFLQDUXQDYHHQWHUDLQVHUWHODVRQGDHQODSDUWH
más gruesa de la pechuga.
Ŷ 3DUDGRUDUVLQKXHVRVLQVHUWHODVRQGDHQHOFHQWURGHO
dorado.
Ŷ 3DUDFRFLQDUMDPyQRFRUGHURFRQKXHVRVLQVHUWHODVRQGD
HQHOFHQWURGHODDUWLFXODFLyQRGHOP~VFXORPiVEDMR\
largo.
Ŷ 3DUDSUHSDUDUFD]XHODVRSODWRVWDOHVFRPRSDVWHOGH
FDUQHLQVHUWHODVRQGDHQHOFHQWURGHOSODWR
Ŷ 3DUDFRFLQDUSHVFDGRLQVHUWHODVRQGDMXVWRDUULEDGHOD
agalla en la zona más carnosa paralela a columna.
Uso de la Sonda
Para usar la sonda con precalentamiento:
1. Presione la tecla del modo de cocción deseado (Horneado
Tradicional, Horneado por Convección, o Dorado por
Convección) e ingrese la temperatura de cocción deseada.
2. Inserte la sonda en la comidaFRQVXOWHVREUHOD8ELFDFLyQ
&RUUHFWDGHOD6RQGD
8QDYH]TXHHOKRUQRIXHSUHFDOHQWDGRFRORTXHODFRPLGD
en el mismo y conecte la sonda en su correspondiente
WRPDFRUULHQWHDVHJXUiQGRVHGHTXHHVWpFRPSOHWDPHQWH
LQVHUWDGD7HQJDFXLGDGR\DTXHODVSDUHGHVGHOKRUQR\
el tomacorriente de la sonda están calientes.
4. Programe la temperatura de la sonda presionando la tecla
Probe (Sonda) e ingresando la temperatura deseada para
ODFRPLGD/DWHPSHUDWXUDLQWHUQDPi[LPDGHODFRPLGD
que se puede configurar es 200° F..
Para usar la sonda sin precalentamiento:
,QVHUWHODVRQGDHQODFRPLGDFRQVXOWHVREUHOD8ELFDFLyQ
&RUUHFWDGHOD6RQGD
2. Coloque la comida en el horno y conecte la sonda en su
correspondiente tomacorriente en el horno.
3URJUDPHODFRQILJXUDFLyQGHVHDGDSDUDODVRQGD\HO
PRGRGHFRFFLyQSUHVLRQDQGRODWHFODProbe (Sonda)
HLQJUHVDQGRODWHPSHUDWXUDGHVHDGDSDUDODFRPLGD
OXHJRSUHVLRQHODWHFODGHPRGRGHFRFFLyQHorneado
TradicionalHorneado por ConvecciónRDorado por
ConvecciónHLQJUHVHODWHPSHUDWXUDGHFRFFLyQGHVHDGD
y presione Start (Iniciar).
Pautas para el Cuidado de la Sonda
NOTA: algunos modelos con horno doble cuentan con una
sonda sólo en el horno superior.
Ŷ 6LVHXVDXQDVRQGDTXHQRVHDODSURYLVWDFRQHVWH
SURGXFWRVHSRGUiQSURGXFLUGDxRVVREUHODVRQGD
Ŷ 8VHODVPDQLMDVGHODVRQGDDOHQFKXIDU\GHVHQFKXIDUOD
PLVPDOXHJRGHLQVHUWDURGHUHWLUDUODVRQGDGHODFDUQHR
del tomacorriente.
Ŷ 3DUDHYLWDUGDxRVVREUHODVRQGDQRXVHDJDUUDGHUDVSDUD
empujar el cable al retirarlo.
Ŷ 3DUDHYLWDUURPSHUODVRQGDDVHJ~UHVHGHTXHOD
comida haya sido completamente descongelada antes de
insertarla.
Ŷ 3DUDHYLWDUSRVLEOHVTXHPDGXUDVQRGHVHQFKXIHODVRQGD
GHOWRPDFRUULHQWHGHOKRUQRKDVWDTXHHVWH~OWLPRVHKD\D
enfriado.
Ŷ 1XQFDGHMHODVRQGDGHQWURGHOKRUQRGXUDQWHXQFLFORGH
limpieza automática o de limpieza con vapor.
Ŷ 1RJXDUGHODVRQGDGHQWURGHOKRUQR
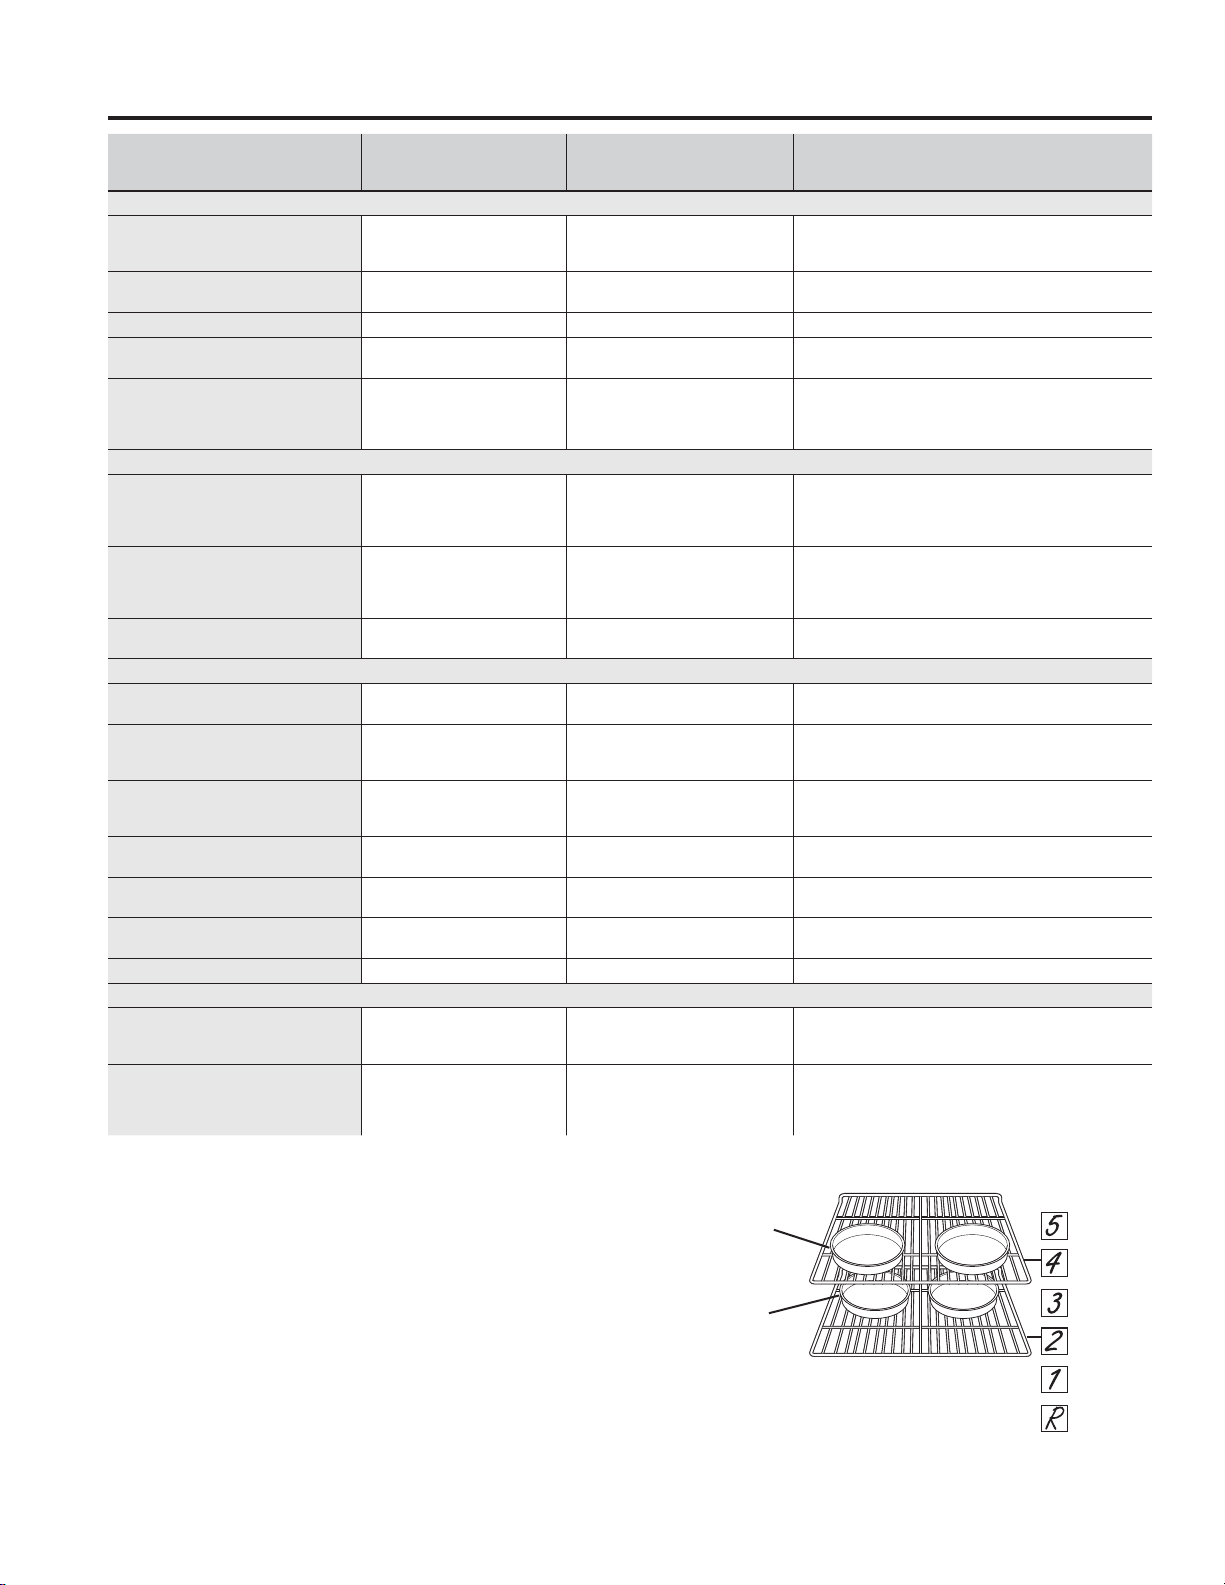
20
49-85211-6
$OKRUQHDUFXDWURFDSDVGHWRUWDDODYH]PXHYDODV
EDQGHMDVFRPRVHPXHVWUDGHPRGRTXHQRTXHGHXQD
encima de la otra.
Cocine la comida completamente para evitar que se
produzcan enfermedades a partir de la comida. Puede
encontrar recomendaciones sobre temperatura mínima
para cocinar de forma segura en www.IsItDoneYet.gov.
$VHJ~UHVHGHXVDUXQWHUPyPHWURGHFRPLGDVSDUDPHGLUOD
temperatura de las mismas.
Ubicación
Frontal
Ubicación
Trasera
TIPO DE COMIDA
MODO(S) RECOMENDA-
DO(S)
POSICIÓN(ES) DE ESTAN-
TES RECOMENDADA SUGERENCIAS ADICIONALES
Productos Horneados
7RUWDVFRQFDSDVWRUWDVUHFWDQ-
JXODUHVURVFDVSDQHFLOORVSDQ
UiSLGRHQXQ6ROR(VWDQWH
Hornear
R 8VHXWHQVLOLRVEULOODQWHV
7RUWDVFRQFDSDVHQ0~OWLSOHV
Estantes
Hornear
Horneado Múltiple por Convección
2 y 4
$VHJ~UHVHGHTXHKD\DXQIOXMRGHDLUHDGHFXDGR9HDOD
LOXVWUDFLyQ8VHHOHVWDQWHH[WHQVLEOHHQODVSRVLFLRQHV
7RUWDVGHJUDVDSDVWHOGHiQJHO
Hornear
1 8VHXWHQVLOLRVEULOODQWHV
*DOOHWDVJDOOHWLWDVEL]FRFKLWRVHQ
XQ6ROR(VWDQWH
Hornear
R 8VHXWHQVLOLRVEULOODQWHV
*DOOHWDVJDOOHWLWDVEL]FRFKLWRVHQ
0~OWLSOHV(VWDQWHV
Horneado Múltiple por Convección
Hornear
(VWDQWHV±\
(VWDQWHV±\
$VHJ~UHVHGHTXHKD\DXQIOXMRGHDLUHDGHFXDGR&DPELH
ODXELFDFLyQGHODFRPLGDSDUFLDOPHQWHGXUDQWHODFRFFLyQ
a fin de obtener resultados de cocción más parejos.
8VHHOHVWDQWHH[WHQVLEOHHQODSRVLFLyQEDMD
Bife y Cerdo
+DPEXUJXHVDV Asar Alto
8VHHOHVWDQWHSODQR8VHXQDEDQGHMDSDUDDVDUPXHYD
la comida más abajo para que quede más preparada y me-
nos soasada. Preste atención a la comida al asarla. Centre
la comida debajo del quemador.
%LIHV\&KXOHWDV Asar Alto
8VHHOHVWDQWHSODQR8VHXQDEDQGHMDSDUDDVDUPXHYD
la comida más abajo para que quede más preparada y me-
nos soasada. Preste atención a la comida al asarla. Centre
la comida debajo del quemador.
'RUDGRV
Dorado por Convección
Hornear
1 o 2
'HMHVLQFXEULUuse una olla chata tal como una olla para
asar. No se requiere precalentarla.
Ave
Pollo entero
Dorado por Convección
Hornear
1 o 2
'HMHVLQFXEULUXVHXQDROODFKDWDWDOFRPRXQD
olla para asar.
3HFKXJDVSDWDVPXVORVFRQ
huesos
$VDGR%DMR
+RUQHDU
R
6LVHHPSDQyRFXEULyFRQVDOVDHYLWHORVPRGRV%URLO+L
$VDU$OWR$VHGHOODGRGHODSLHOKDFLDDEDMRSULPHUR
Preste atención a la comida al asarla.
Pechugas de pollo deshuesadas
$VDGR%DMR
+RUQHDU
0XHYDODFRPLGDPiVDEDMRSDUDTXHTXHGHPiVSUHSD-
UDGD\PHQRVVRDVDGD\PiVDUULEDSDUDVRDVDUGRUDUDO
asar.
Pavo entero
'RUDGRSRU&RQYHFFLyQ
+RUQHDU
R o 1
'HMHVLQFXEULUXVHXQDROODFKDWDWDOFRPRXQD
olla para asar.
Pechuga de Pavo +RUQHDU 1 o 2
'HMHVLQFXEULUXVHXQDROODFKDWDWDOFRPRXQD
olla para asar.
Pescado $VDGR%DMR
PLWDGGHOJURVRURPHQRV
!SXOJDGD
3UHVWHDWHQFLyQDODFRPLGDDODVDUOD8VHHOHVWDQWH
SODQRVLXVDUiODSRVLFLyQ
Cazuelas
+RUQHDU
Comidas Congeladas a Conveniencia
3L]]DSDSDVIULWDVWDWRUWRWV
SDWLWDVGHSROORIULWDVDSHULWLYRVHQ
XQ6ROR(VWDQWH
+RUQHDU 8VHXWHQVLOLRVEULOODQWHV
3L]]DSDSDVIULWDVWDWRUWRWV
SDWLWDVGHSROORIULWDVDSHULWLYRVHQ
0~OWLSOHV(VWDQWHV
+RUQHDU
+RUQHDGR0~OWLSOHSRU&RQYHFFLyQ
2 y 4
\
8VHXWHQVLOLRVEULOODQWHV
Cambie la ubicación de la comida parcialmente durante
ODFRFFLyQDILQGHREWHQHUUHVXOWDGRVGHFRFFLyQPiV
parejos.
Guía de Cocción
USO DEL HORNO: Guía de Cocción
49-85211-6
21
ARTÍCULO CONFIGURACIÓN INFORMACIÓN ADICIONAL
Panes, tartas, masas %$-2
Cubra con una tapa o papel de aluminio. Tapa de
ventilación para permitir que la humedad salga.
Cazuelas 0(',2
Cubra con una tapa o papel de aluminio.
Chiles/ Estofado $/72
Carnes $/72
Panqueques %$-2
Pizza 0(',2
Papas, horneadas $/72
Barquillos (waffles) %$-2
Comidas duras, para que queden
crocantes (tortilla de papas,
galletas, cereales secos)
%$-2
8VHXQSODWREDQGHMDSRFRSURIXQGRV3UHFDOLHQWH
HQODFRQILJXUDFLyQ/2%DMRHQWUH\PLQXWRV
&RQWUROHOXHJRGHPLQXWRV\DJUHJXHWLHPSRGHVHU
necesario.
Platos para servir (platos,
recipientes)
%$-2
8VHVyORSODWRVUHVLVWHQWHVDOFDORU&RQWUROHODLQIRUPD-
FLyQGHOIDEULFDQWHHQUHODFLyQDODPi[LPDWROHUDQFLDDO
calor de la porcelana fina.
Guía del Cajón para Calentar (en algunos modelos)
USO DEL HORNO: Guía del Cajón para Calentar / Papel de Aluminio y Cobertores del Horno
PRECAUCIÓN
Los platos estarán calientes. Use sostenedores de ollas o guantes al retirar platos calientes.
PRECAUCIÓN
No use ningún tipo de aluminio o cobertor de horno para cubrir el fondo del horno. Este ítems pueden
bloquear el flujo de aire o derretirse, ocasionando daños sobre el producto y el riesgo de envenenamiento con monóxi-
do de carbono, humo o incendios. Los daños por uso inadecuado de estos ítems no están cubiertos por la garantía del
producto.
6HSRGUiXVDUDOXPLQLRSDUDHYLWDUGHUUDPHVFRORFDQGRXQDKRMDVREUHXQHVWDQWHLQIHULRUYDULDVSXOJDGDVGHEDMRGHODFRPLGD
1RXVHPiVDOXPLQLRTXHHOQHFHVDULR\QXQFDFXEUDWRWDOPHQWHHOHVWDQWHGHXQKRUQRFRQSDSHOGHDOXPLQLR0DQWHQJDHO
DOXPLQLRDSRUORPHQRV´GHODVSDUHGHVGHOKRUQRSDUDHYLWDUXQDFLUFXODFLyQGHILFLHQWHGHOFDORU
Papel de Aluminio y Cobertores del Horno
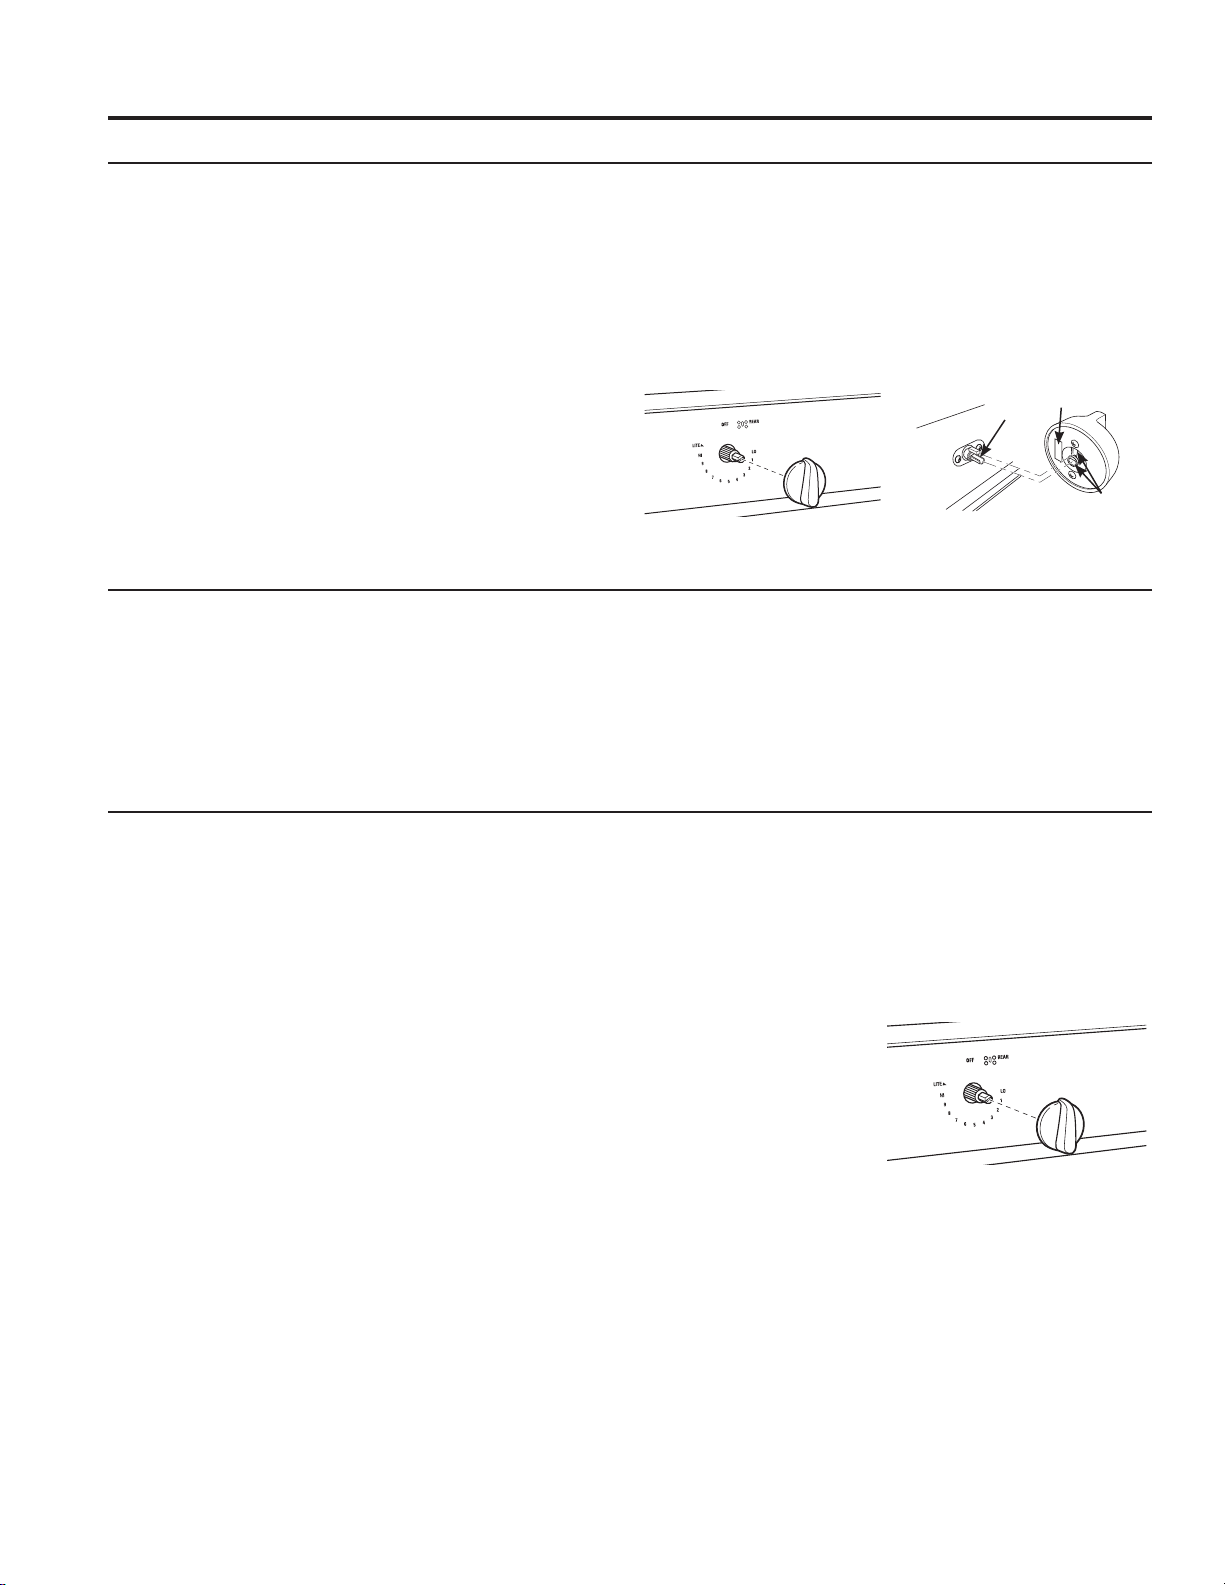
22
49-85211-6
Limpieza del Horno
CUIDADO Y LIMPIEZA: Limpieza del Horno
$VHJ~UHVHGHTXHODFRUULHQWHHOpFWULFDHVWpDSDJDGD\TXHWRGDVODVVXSHUILFLHVHVWpQIUtDVDQWHVGHOLPSLDUFXDOTXLHUSDUWHGHODFRFLQD
Panel de Control y Perillas
Limpie el panel de control luego de cada uso del horno con
XQDWHODK~PHGD3DUDOLPSLDUXVHMDEyQVXDYH\DJXDRXQD
solución que sea mitad de vinagre y mitad de agua. Enjuague
con agua limpia. Pula en seco con una tela suave.
1RXVHOLPSLDGRUHVDEUDVLYRVOLPSLDGRUHVOtTXLGRVIXHUWHV
almohadillas para fregar de plástico y limpiadores de horno en
HOSDQHOGHFRQWUROGDxDUiQHODFDEDGR
No intente inclinar las perillas empujando las mismas hacia
arriba o hacia abajo o colgando una toalla u otras cargas de
HVWHWLSR(VWRSXHGHGDxDUHOHMHGHODYiOYXODGHJDV
Las perillas de control se pueden retirar para facilitar la
limpieza.
Con las perillas en la posición OFF (Apagado)UHWtUHODVGH
sus respectivos ejes. Las perillas se podrán lavar a mano con
agua y jabón o en un lavavajillas.
No todas las perillas son intercambiables. Para determinar
ODXELFDFLyQFRUUHFWDGHXQDSHULOODHQSDUWLFXODUH[DPLQHVX
SDUWHWUDVHUD8QDSHULOODFRQXQDHWLTXHWDRGRVDJXMHURVSDUD
HOHMHGHEHUiVHUUHHPSOD]DGDSULPHURHQHOSDQHOIURQWDO
haciendo coincidir la forma de los agujeros de la perilla con la
forma de los ejes del panel de control. Las demás perillas que
no posean etiquetas y sólo un agujero para el eje se podrán
colocar en el panel frontal en cualquier lugar con un solo eje.
Exterior del Horno y Superficie de la Placa de Cocción
1RXVHOLPSLDGRUHVGHKRUQROLPSLDGRUHVDEUDVLYRV
OLPSLDGRUHVOtTXLGRVIXHUWHVHVWURSDMRVGHDFHURDOPRKDGLOODV
SDUDIUHJDUGHSOiVWLFRQLSROYRVOLPSLDGRUHVHQHOLQWHULRU
RHOH[WHULRUGHOKRUQR/LPSLHHOPLVPRFRQDJXD\MDEyQR
una solución de vinagre y agua. Enjuague con agua limpia y
VHTXHFRQXQDWHODVHFD$OOLPSLDUVXSHILFLHVDVHJ~UHVHGH
que estén a temperatura ambiente y fuera del contacto con
ODOX]VRODU6LODVPDQFKDVHQHOERUGHGHODYHQWDQDGHOD
SXHUWDVRQSHUVLVWHQWHVXVHXQOLPSLDGRUDEUDVLYRVXDYHRXQD
esponja con estropajo para obtener un mejor resultado.
(OGHUUDPHGHDGRERMXJRVGHIUXWDVDOVDVGHWRPDWH\OtTXLGRV
para humedecer que contengan ácidos pueden ocasionar
GHVFRORUDFLyQ\VHGHEHUiQOLPSLDUGHLQPHGLDWR'HMHTXHODV
VXSHUILFLHVFDOLHQWHVVHHQIUtHQ\OXHJROLPSLH\HQMXDJXH
Caña
Etiqueta
Agujeros
de las cañas
Perilla del quemador superficial Las perillas con dos agujeros para el
eje tienen ubicaciones especiales.
Superficies de Acero Inoxidable (en algunos modelos)
1RXVHYLUXWDVGHDFHURpVWDVGDxDUiQODVXSHUILFLH
3DUDOLPSLDUODVXSHUILFLHGHDFHURLQR[LGDEOHXVHDJXDWLELD
FRQMDEyQRXQOLPSLDGRURSXOLGRUSDUDDFHURLQR[LGDEOH
6LHPSUHOLPSLHODVXSHUILFLHHQODGLUHFFLyQGHOYHWHDGR6LJD
las instrucciones del limpiador para limpiar la superficie de
DFHURLQR[LGDEOH
/RVOLPSLDGRUHVFRQiFLGRR[iOLFRWDOHVFRPR%DU.HHSHUV
)ULHQG6RIW&OHDQVHUHOLPLQDUiQHOy[LGRGHVOXVWUHV\
SHTXHxDVPDQFKDVVREUHODVXSHUILFLH8VHVyORXQOLPSLDGRU
líquido libre de material abrasivo y frote en la dirección de las
OtQHDVGHOFHSLOORFRQXQDHVSRQMDVXDYH\K~PHGD
3DUDUHDOL]DUFRQVXOWDVVREUHODDGTXLVLFLyQGHSURGXFWRV
incluyendo limpiadores o pulidores para electrodomésticos de
DFHURLQR[LGDEOHOHDODVVHFFLRQHVGH$VLVWHQFLD\$FFHVRULRV
en el comienzo de este manual.
3DUDXQDOLPSLH]DPiVIiFLOODVSHULOODVGHOFRQWUROSXHGHQVHU
retiradas empujando las mismas directamente hacia fuera una
YH]TXHODVPLVPDVHVWpQHQODSRVLFLyQ2))$SDJDGR1R
empuje las perillas hacia arriba o abajo ni sostenga objetos
VREUHODVPLVPDV(VWRSXHGHGDxDUHOHMHGHODYiOYXODGH
gas. Las perillas se podrán lavar a mano con agua y jabón o
en un lavavajillas.
Para reemplazar las perillas
OXHJRGHODOLPSLH]DDOLQHH
el agujero de la perilla de la
parte trasera con el eje de
la válvula de gas y empuje
hacia adentro hasta que
la perilla esté ajustada de
forma segura.
Perilla del quemador superficial

49-85211-6
23
Interior del Horno (Cont.)
Modo de Limpieza Automática
/HDODV,QVWUXFFLRQHVGH6HJXULGDGGHO+RUQRFRQ/LPSLH]D
$XWRPiWLFDHQHOFRPLHQ]RGHHVWHPDQXDODQWHVGHXVDU
HOPRGR6HOI&OHDQ/LPSLH]D$XWRPiWLFD(VWHPRGRXVD
temperaturas muy altas para limpiar el interior del horno.
&XDQGRXVHHVWDIXQFLyQODSXHUWDGHOKRUQRVHWUDEDUi
$QWHVGHXWLOL]DUHOFLFORGHOLPSLH]DDXWRPiWLFDUHDOLFHXQD
limpieza previa de la parte interna de la puerta y de la ventana
interna. Limpie la puerta interna de color negro antes de
realizar la limpieza automática. Retire todos los artículos del
KRUQRH[FHSWRORVHVWDQWHVHVPDOWDGRVFRORURVFXUR/RV
HVWDQWHVEULOODQWHVRGHSODWDODVRQGDGHFDUQHV\FXDOTXLHU
utensilio u otros artículos deberían ser retirados del horno antes
de iniciar un ciclo de limpieza automática. Los quemadores
superficiales se deberán apagar antes de la hora de inicio
de la limpieza automática. Los quemadores de la placa de
cocción no se iniciarán durante el ciclo de limpieza automática.
Cierre la puerta. Presione la tecla Clean (Limpieza) una vez
\VHH[KLELUiXQWLHPSRGHOLPSLH]DDXWRPiWLFDSRURPLVLyQ
Presione la tecla START (Iniciar) o use las teclas numéricas
SDUDLQJUHVDUFXDOTXLHUWLHPSRGHOLPSLH]DHQWUH\KRUDV
\SUHVLRQHODWHFOD6WDUW,QLFLDU6LHOKRUQRSRVHHPXFKD
VXFLHGDGVHUHFRPLHQGDQKRUDV(OKRUQRVHDSDJDUiGH
forma automática cuando el ciclo de limpieza automática sea
completado. La puerta permanecerá bloqueada hasta que el
KRUQRVHKD\DHQIULDGR8QDYH]TXHHOKRUQRVHKD\DHQIULDGR
limpie cualquier ceniza que haya quedado en el horno.
IMPORTANTE: Las emanaciones producidas por el ciclo de
autolimpieza de cualquier horno afectan la salud de algunas
aves de manera notoria. Procure llevar sus aves a otra
habitación bien ventilada.
Estantes del Horno
odas las parrillas del horno se podrán limpiar a mano con un
limpiador abrasivo o viruta. Los estantes del horno negros y
cubiertos de porcelana podrán permanecer en el horno durante
HOFLFORGHOLPSLH]DDXWRPiWLFDVLQVXIULUQLQJ~QWLSRGHGDxRV
6LODVSDUULOODVGHOKRUQRGHQtTXHOSHUPDQHFHQHQHOKRUQR
GXUDQWHHOFLFORGHDXWROLPSLH]DSHUGHUiQVXOXVWUH\VHUi
GLItFLOGHVOL]DUODV6HUiQHFHVDULRHQJUDVDUWRGRVORVFRVWDGRV
de la parrilla del horno con una capa suave de aceite vegetal
luego de limpiarlas a mano o en el horno. Esto ayudará a que
las parrillas se puedan deslizar con facilidad fuera de horno.
Limpieza del Horno (Cont.)
CUIDADO Y LIMPIEZA: Limpieza del Horno
Interior del Horno
El interior de su nuevo horno puede ser limpiado de forma
PDQXDORXWLOL]DQGRORVPRGRV6WHDP&OHDQ/LPSLH]DFRQ
9DSRUR6HOI&OHDQ/LPSLH]D$XWRPiWLFD
(OGHUUDPHGHDGRERMXJRVGHIUXWDVDOVDVGHWRPDWH\
líquidos para humedecer que contengan ácidos pueden
ocasionar descoloración y se deberán limpiar en cuanto las
VXSHUILFLHVFDOLHQWHVVHHQIUtHQ\OXHJRVHGHEHUiQHQMXDJDU
Limpieza Manual
1RXVHOLPSLDGRUHVGHKRUQROLPSLDGRUHVDEUDVLYRV
OLPSLDGRUHVOtTXLGRVIXHUWHVHVWURSDMRVGHDFHURDOPRKDGLOODV
SDUDIUHJDUQLSROYRVOLPSLDGRUHVHQHOLQWHULRUGHOKRUQR
Limpie el mismo con agua y jabón o una solución de vinagre
y agua. Enjuague con agua limpia y seque con una tela seca.
$OOLPSLDUVXSHILFLHVDVHJ~UHVHGHTXHHVWpQDWHPSHUDWXUD
ambiente y fuera del contacto con la luz solar.
Modo de Limpieza con Vapor (en algunos modelos)
/DILQDOLGDGGHODIXQFLyQ6WHDP&OHDQ/LPSLH]DFRQ9DSRU
es usar agua para limpiar la suciedad leve de su horno en una
WHPSHUDWXUDLQIHULRUDODGH6HOI&OHDQ/LPSLH]D$XWRPiWLFD
3DUDXVDUODIXQFLyQ6WHDP&OHDQ/LPSLH]DFRQ9DSRU
1. Comience con el horno a temperatura ambiente.
/LPSLHODJUDVDH[FHVLYD\ODVXFLHGDGGHOKRUQR
9LHUWDXQDWD]DGHDJXDHQODSDUWHLQIHULRUGHOKRUQR
4. Cierre la puerta.
3UHVLRQHODWHFODSteam Clean (Limpieza con Vapor) y
luego presione Start (Iniciar).
La puerta del horno se trabará. No podrá abrir la puerta durante
ORVPLQXWRVGHOFLFOR6WHDP&OHDQ/LPSLH]DFRQ9DSRU
ya que esto reducirá su rendimiento. Al finalizar el ciclo de
6WHDP&OHDQ/LPSLH]DFRQ9DSRUODSXHUWDVHGHVWUDEDUi
&RQXQDHVSRQMDDEVRUEDHODJXDUHVWDQWH\OLPSLHODVXFLHGDG
ablandada con la humedad sobre las paredes y la puerta.
Sonda
La sonda de temperatura se puede limpiar con agua y jabón
o con una almohadilla de estropajo llena de jabón. Enfríe la
sonda de temperatura antes de su limpieza. Fregue las manchas
GLItFLOHVFRQXQDDOPRKDGLOODGHHVWURSDMROOHQDGHMDEyQ
enjuague y seque.
3DUDRUGHQDUPiVVRQGDVGHWHPSHUDWXUDOHDODVHFFLyQGH
Asistencia y Accesorios en el comienzo de este manual.
Ŷ No sumerja la sonda de temperatura en agua.
Ŷ 1RJXDUGHODVRQGDGHWHPSHUDWXUDGHQWURGHOKRUQR
Ŷ 1XQFDGHMHODVRQGDGHWHPSHUDWXUDGHQWURGHOKRUQRGXUDQWH
un ciclo de limpieza automática o de limpieza con vapor.
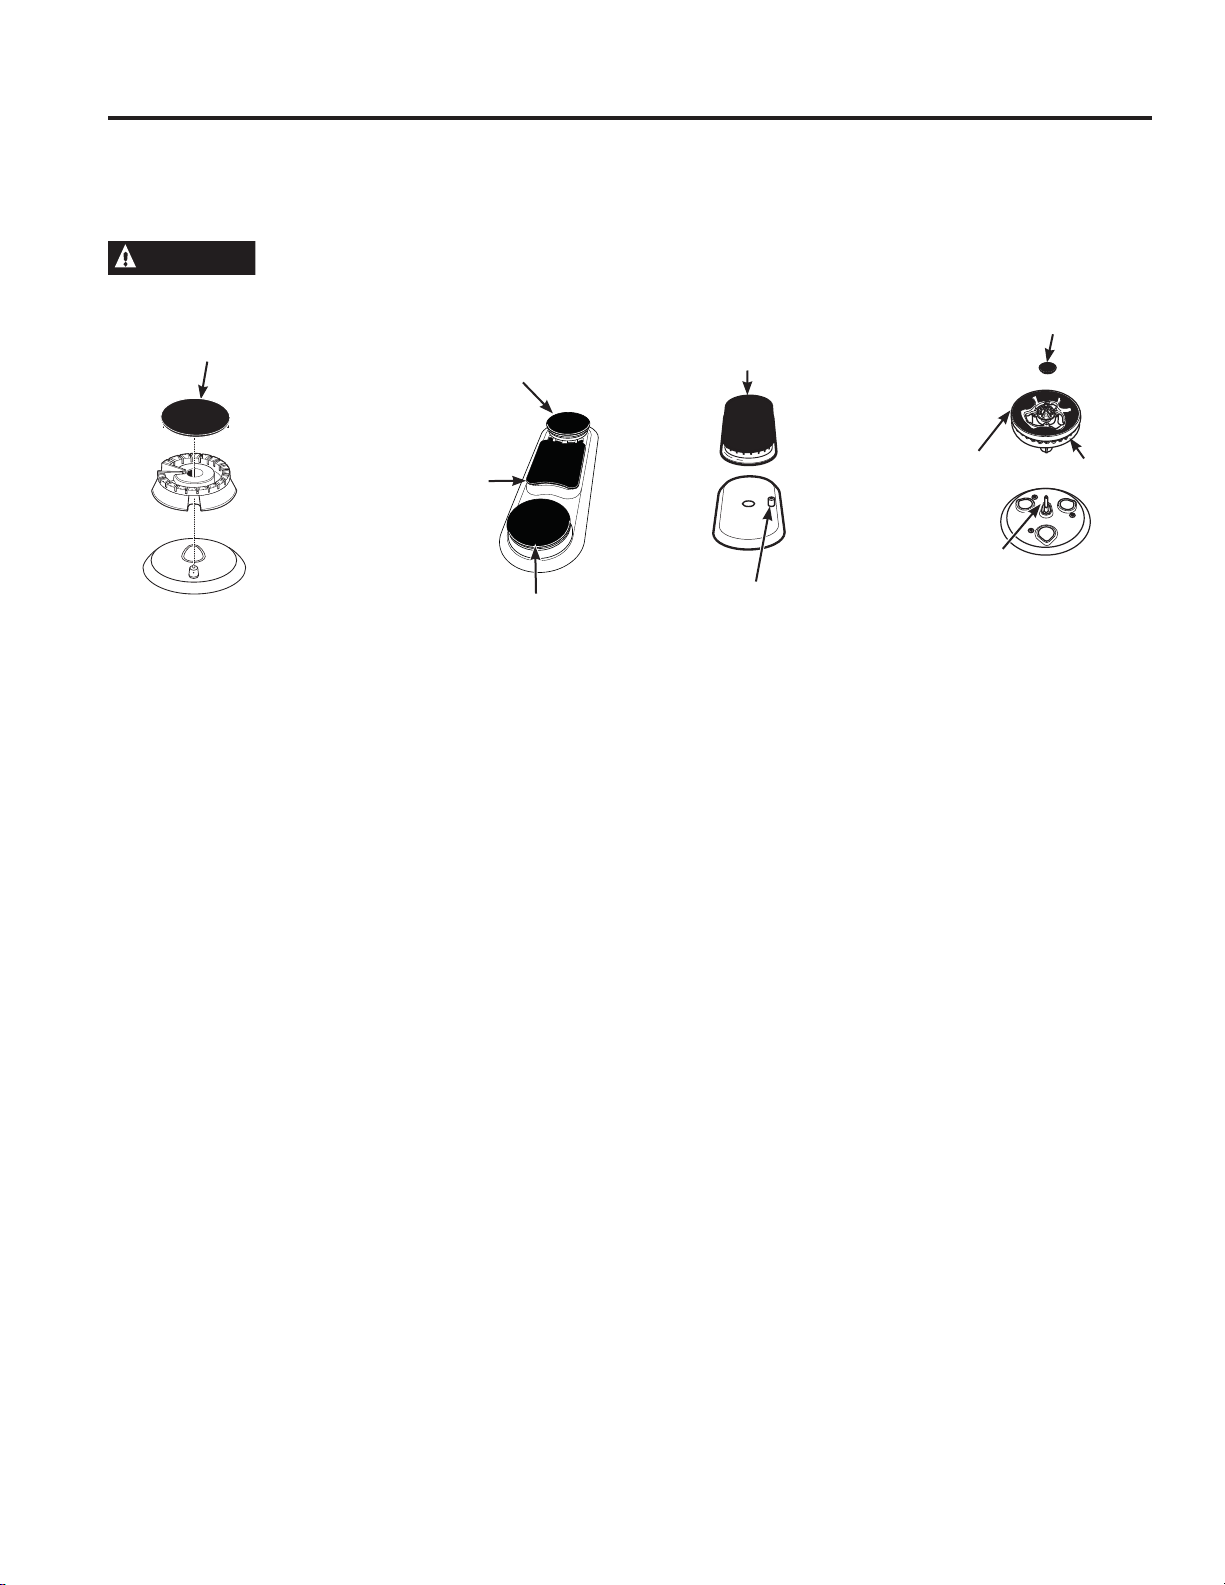
24
49-85211-6
Limpieza de la Placa de Cocción
CUIDADO Y LIMPIEZA: Limpieza de la Placa de Cocción
Retiro de los Quemadores para su Limpieza
APAGUE todos los controles. Espere a que la placa de cocción se enfríe antes de retirar las rejillas y las partes del quemador. Al
UHWLUDUODVWDSDV\FDEH]DVGHORVTXHPDGRUHVUHFXHUGHVXWDPDxR\XELFDFLyQ9XHOYDDFRORFDUORVHQVXVPLVPDVXELFDFLRQHV
luego de la limpieza.
Quemador Redondo
Las tapas y las cabezas de
los quemadores se pueden
retirar de la placa de cocción.
Quemador del Puente
(en algunos modelos)
La tapa del quemador
del puente está adherida
de forma permanente al
ensamble de la cabeza del
quemador. El ensamble
del quemador sólo puede
ser retirado de la placa de
cocción en una sola pieza.
Las tapas y las cabezas de
los quemadores se pueden
retirar de la placa de cocción.
Quemador Oval
(en algunos modelos)
La tapa está adherida de
forma permanente a la
cabeza del quemador.
Quemador de Tres Anillos
(en algunos modelos)
/DWDSDSHTXHxDGHO
quemador de tres anillos
se puede levantar para su
OLPSLH]D/DWDSDH[WHUQD
está adherida de forma
permanente al ensamble
de la cabeza del quemador.
Retire el ensamble de la
cabeza del quemador de la
placa de cocción en una sola
pieza.
Tapa Permanente
del Quemador del
Puente
(No Extraíble)
Tapa del Quemador Redondo
(Extraíble)
Tapa del Quemador Redondo
(Extraíble)
Tapa del Quemador Redondo
(Extraíble)
Tapa del Quemador Interno
(Extraíble)
Tapa del Quemador Externo
(No Extraíble)
Cabeza del
Quemador
Ensamble de la Cabeza y de
la Tapa del Quemador Oval
(No Extraíble)
Electrodo
(No Extraíble)
PRECAUCIÓN
No intente retirar las tapas del quemador del puente, del quemador oval o del quemador
de tres anillos de las cabezas de los quemadores.
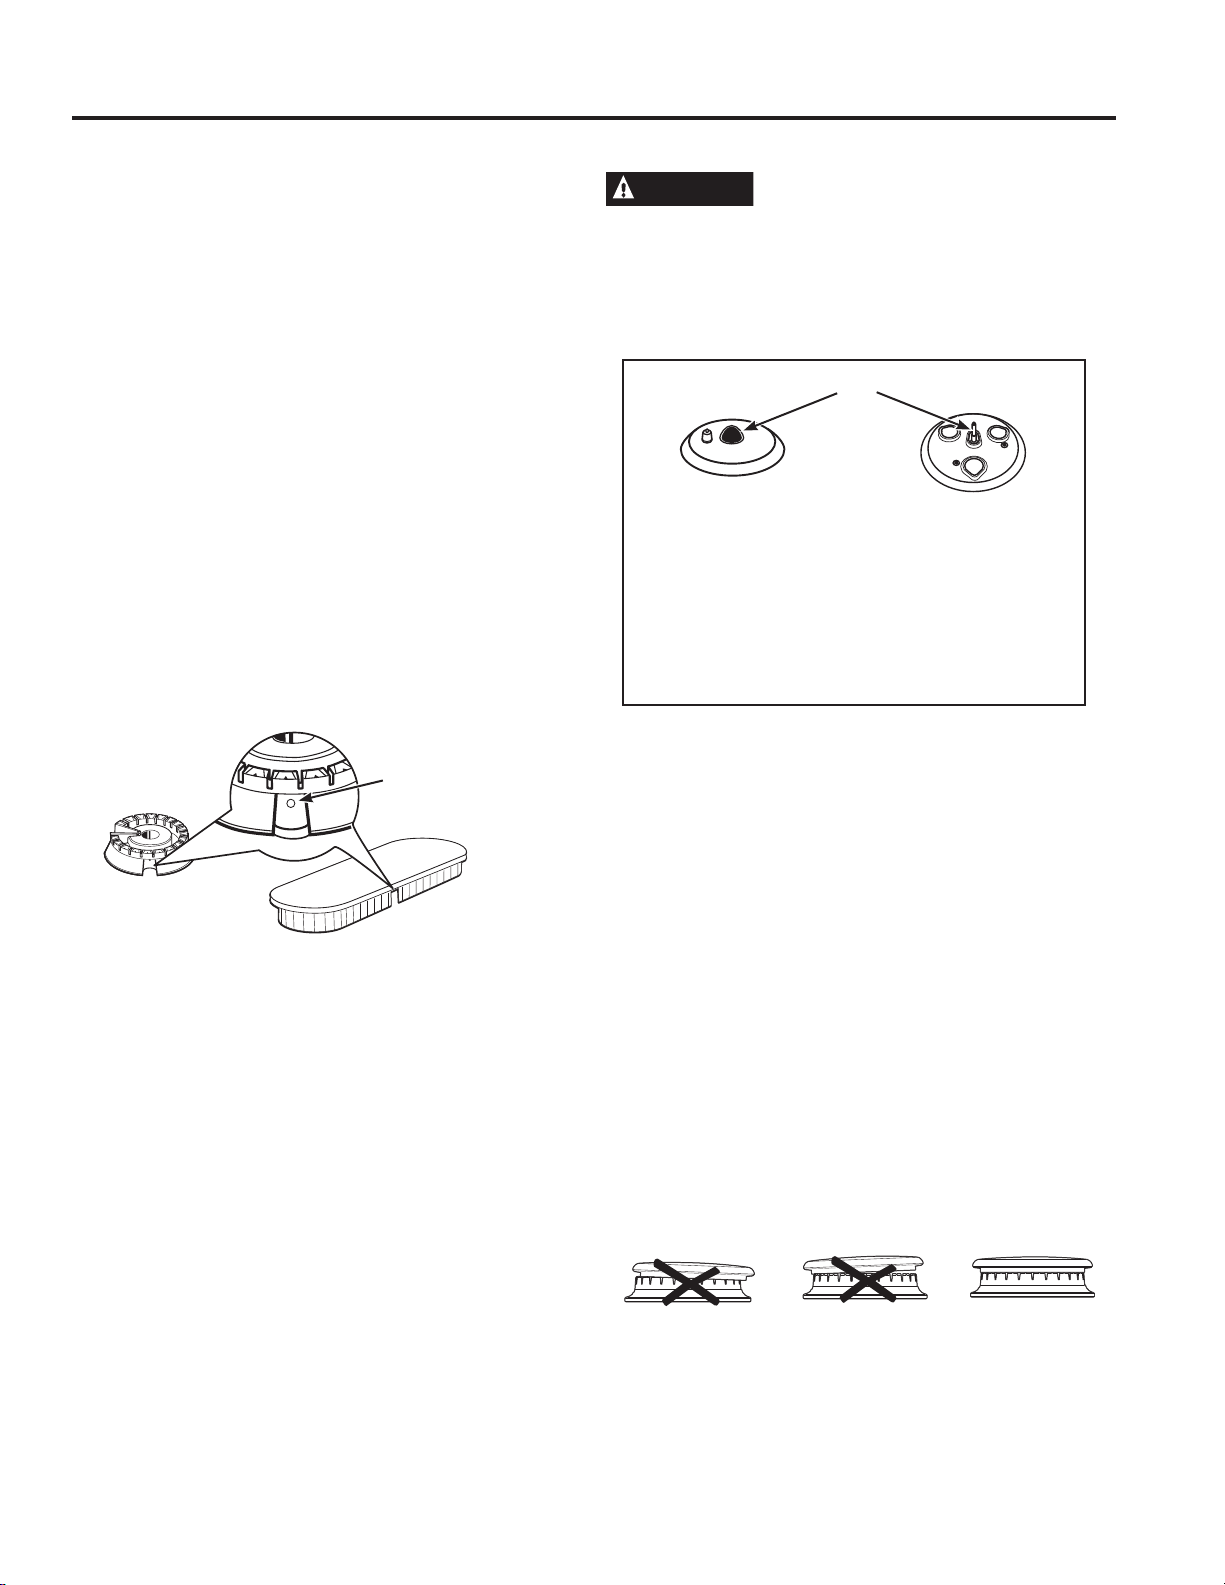
49-85211-6
25
Limpieza de la Placa de Cocción (Cont.)
CUIDADO Y LIMPIEZA: Limpieza de la Placa de Cocción
Reemplazo de las Cabezas de los Quemadores
9XHOYDDFRORFDUODVFDEH]DVGHORVTXHPDGRUHVHQODV
XELFDFLRQHVFRUUHFWDVGHDFXHUGRFRQVXVWDPDxRV
Tapas de los Quemadores
9XHOYDDFRORFDUODVWDSDVGHORVTXHPDGRUHVHQODVFDEH]DV
GHORVPLVPRV$VHJ~UHVHGHTXHFDGDWDSDVHDMXVWHGH
forma segura y quede perfectamente apoyada en la cabeza del
quemador correspondiente.
La tapa del
quemador está
correctamente
colocada.
La tapa del
quemador NO está
correctamente
colocada.
La tapa del
quemador NO está
correctamente
colocada.
Limpieza de los Quemadores
Tapas de los Quemadores
Lave las tapas de los quemadores en agua caliente con
jabón y enjuague con agua limpia. Puede fregar con una
base de fregado plástica para eliminar partículas de comida
quemadas. Las tapas redondas también se pueden limpiar en
un lavavajillas.
Cabezas de los Quemadores
/LPSLHODVFDEH]DVGHORVTXHPDGRUHVGHIRUPDUXWLQDULD
HVSHFLDOPHQWHOXHJRGHGHUUDPHVLPSRUWDQWHVTXHSRGUtDQ
bloquear las aberturas. Retire los quemadores cuando estén
IUtRV8VHDJXDFDOLHQWH\MDEyQ(QMXDJXHFRQDJXDOLPSLD
3DUDHOLPLQDUODVPDQFKDVPiVUHEHOGHVXVHXQFHSLOORFRQ
cerda plástica.
NOTA: No use estropajos ni polvos para fregar para limpiar
ODVSDUWHVGHOTXHPDGRU\DTXHSRGUiQEORTXHDUVXVSDUWHV
1XQFDOLPSLHODVFDEH]DVGHORVTXHPDGRUHVHQHOODYDYDMLOODV
ya que los detergentes usados en lavavajillas descolorarán los
quemadores.
Las hendiduras de las cabezas de los quemadores se deben
mantener limpias en todo momento para obtener una llama
pareja y sin obstrucción.
Las partes bloqueadas o sucias de los quemadores o los
electrodos no permitirán que el quemador funcione de forma
correcta.
3DUDXQHQFHQGLGRDGHFXDGRDVHJ~UHVHGHTXHHODJXMHURSH-
TXHxRHQODVHFFLyQTXHFRLQFLGHFRQHOHOHFWURGRVHPDQWHQJD
abierto. Puede usar una aguja de coser o un precinto para
desbloquearlo.
Luego de la limpieza
Antes de colocar las tapas y cabezas de los quemadores
HQDOJXQRVPRGHORV\HOHQVDPEOHGHODFDEH]DWDSD
QXHYDPHQWHHVFXUUDHOH[FHVRGHDJXD\OXHJRVHTXHODV
mismas totalmente
PRECAUCIÓN
No use la parte superior de la cocina
sin que todas las partes de los quemadores y las parrillas
estén en sus respectivos lugares.
Cualquier derrame en o alrededor de un electrodo se deberá
limpiar de forma cuidadosa. Tenga cuidado de no golpear un
HOHFWURGRFRQQDGDGXUR\DTXHVHSRGUiGDxDU
Electrodo
Base de tres anillos
(en algunos modelos)
(OHOHFWURGRGHOHQFHQGHGRUGHODFKLVSDHVH[SXHVWR
cuando la cabeza del quemador es retirada. Cuando un
quemador se gira a LITEWRGRVORVTXHPDGRUHVKDFHQ
chispa. No intente desensamblar ni limpiar un quemador
mientras otro quemador está encendido. Es posible que
VHSURGX]FDXQDGHVFDUJDHOpFWULFDORFXDOSRGUtDKDFHU
que vuelque un utensilio de cocina caliente.
o
El agujero redondo
en la cabeza del
quemador se deberá
mantener limpio.
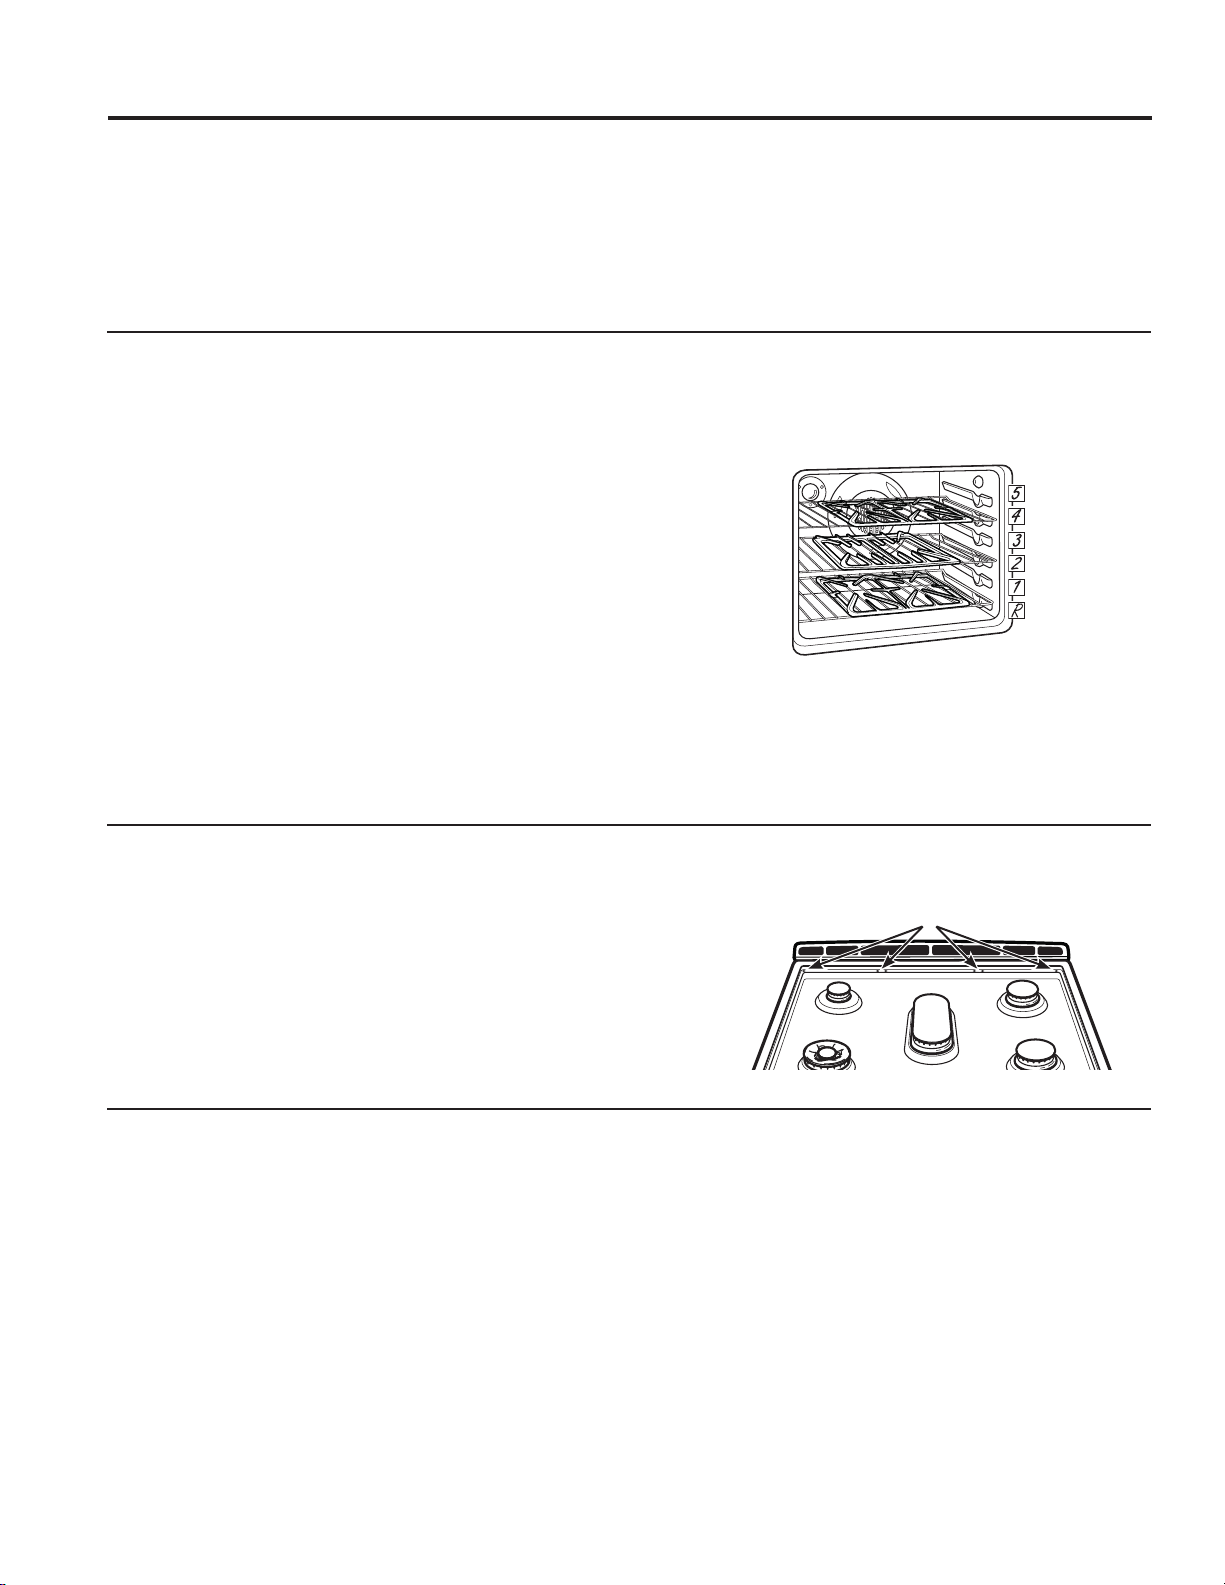
26
49-85211-6
Limpieza de la Placa de Cocción (Cont.)
CUIDADO Y LIMPIEZA: Limpieza de la Placa de Cocción
Parrillas de Quemadores
Las rejillas se deberán lavar con agua caliente y jabón y
deberán ser enjuagadas con agua limpia. Para ablandar la
FRPLGDTXHPDGDFRORTXHODVUHMLOODVHQXQDEROVDSOiVWLFD
TXHFRQWHQJDóGHWD]DGHDPRQtDFRKRJDUHxRGXUDQWHYDULDV
KRUDV/XHJRIULHJXHODVUHMLOODVFRQXQHVWURSDMRGHSOiVWLFR
con agua caliente y jabón. Enjuague a fondo y seque.
$OUHHPSOD]DUODVUHMLOODVDVHJ~UHVHGHXELFDUODVGHIRUPD
correcta en la placa de cocción. Las rejillas están identificadas
SRUODVSDODEUDV/()7,]TXLHUGD\5,*+7'HUHFKDHQVXV
superficies inferiores. La rejilla se debería poder posicionar de
forma segura en la placa de cocción.
/DVUHMLOODVSHUGHUiQJUDGXDOPHQWHVXEULOORGHELGRDVX
FRQWLQXDH[SRVLFLyQDDOWDVWHPSHUDWXUDV
Plancha (en algunos modelos)
Plancha de Aluminio No Adherente: Evite rayas sobre la
superficie de la plancha con utensilios metálicos. Lave la
SODQFKDFRQGHWHUJHQWHSDUDSODWRV\DJXDFDOLHQWH'HVHU
QHFHVDULRIURWHFRQXQDDOPRKDGLOODSOiVWLFDQRDEUDVLYD
Plancha de Hierro Fundido Reversible o del Chef: limpie su
plancha de hierro fundido reversible o del chef con un cepillo
GXUR\DJXDFDOLHQWH1RVHUHFRPLHQGDHOXVRGHMDEyQ\
QXQFDVHGHEHQXVDUGHWHUJHQWHVSRWHQWHV\DTXHHOLPLQDUiQ
el curado. Enjuague la misma con agua caliente y séquela
cuidadosamente. Aplique una capa mínima de aceite de cocina
VREUHODVXSHUILFLHGHODSODQFKD/LPSLHHOH[FHVRGHDFHLWH
con una toalla de papel. Guarde en un lugar frío y seco.
6WRUHLQDFRROGU\SODFH
Precauciones de la Plancha:
6LDOJRVHGHUUDPyGHEDMRGHODSODQFKDVHGHEHUiOLPSLDUWDQ
pronto como sea posible para evitar que sea horneado en la
placa de cocción.
1RSHUPLWDTXHVHDFXPXOHJUDVDGHEDMRGHODSODQFKD\DTXH
puede haber riesgo de incendio. Limpie debajo de la plancha
FRQDJXDFDOLHQWH\MDEyQWDQSURQWRFRPRVHDSRVLEOH
No lave la plancha en el lavavajillas.
No coloque la plancha en un horno microondas.
Protectores de Soportes de Rejillas
6LXQRGHORVSURWHFWRUHVGHJRPDGHODUHMLOODGHOD
SODFDGHFRFFLyQVHSLHUGHRGDxDVHSRGUiQREWHQHU
SLH]DVGHUHSXHVWROODPDQGRDO*(&$5(6
3DUDLQVHUWDUORVQXHYRVSURWHFWRUHVVLPSOHPHQWH
FRORTXHHOH[WUHPRGHOSURWHFWRUFRQIRUPDFyQLFDHQHO
agujero de la placa de cocción y empuje hacia abajo de
IRUPDVXDYHGREODQGRHOSURWHFWRU
Cómo Limpiar las Rejillas en el Horno con Limpieza Automática (en algunos modelos)
6LODVUHMLOODVGHODSODFDGHFRFFLyQQRFXHQWDQFRQSURWHFWRUHV
GHJRPDHQODVXSHUILFLHLQIHULRU\ORVHVWDQWHVGHOKRUQRHVWiQ
FXELHUWRVFRQSRUFHODQDQHJUDODVUHMLOODVVHSRGUiQOLPSLDUHQ
HOKRUQRXVDQGRHOFLFORGHOLPSLH]DDXWRPiWLFD6LODVUHMLOODV
FXHQWDQFRQSURWHFWRUHVGHJRPDQRLQWHQWHOLPSLDUODVUHMLOODV
HQHOKRUQR+DFHUHVWRGHVWUXLUiORVSURWHFWRUHVGHJRPD
afectando el funcionamiento de los quemadores.
Coloque los estantes del horno en las posiciones con las
HWLTXHWDV³5´³´\³´HQODLOXVWUDFLyQ&RORTXHXQDUHMLOOD
VLPSOHHQFDGDHVWDQWH6LJDODVLQVWUXFFLRQHVGHOPRGRGH
OLPSLH]DDXWRPiWLFDHQODVHFFLyQ&OHDQLQJWKH2YHQ&yPR
/LPSLDUHO+RUQRGHHVWHPDQXDO
NOTA: Tenga cuidado al retirar las parrillas del horno superior
una vez que el ciclo de auto limpieza haya finalizado. Es
SRVLEOHTXHODVSDUULOODVD~QHVWpQFDOLHQWHV
/XHJRGHODOLPSLH]DHVSRVLEOHTXHREVHUYHXQUHVLGXREODQFR
HQODVUHMLOODV/LPSLHHOPLVPRFRQXQDHVSRQMDK~PHGD6LODV
PDQFKDVEODQFDVSHUVLVWHQPRMHODHVSRQMDFRQXQDVROXFLyQ
que posea una mitad de vinagre y una mitad de agua.
El horno cuenta con 6 posiciones de estantes. Coloque los estantes
grises recubiertos de porcelana en las posiciones “R”, “2” y “4” para la
auto limpieza de las parrillas.
Protectores para Soportes de Rejillas
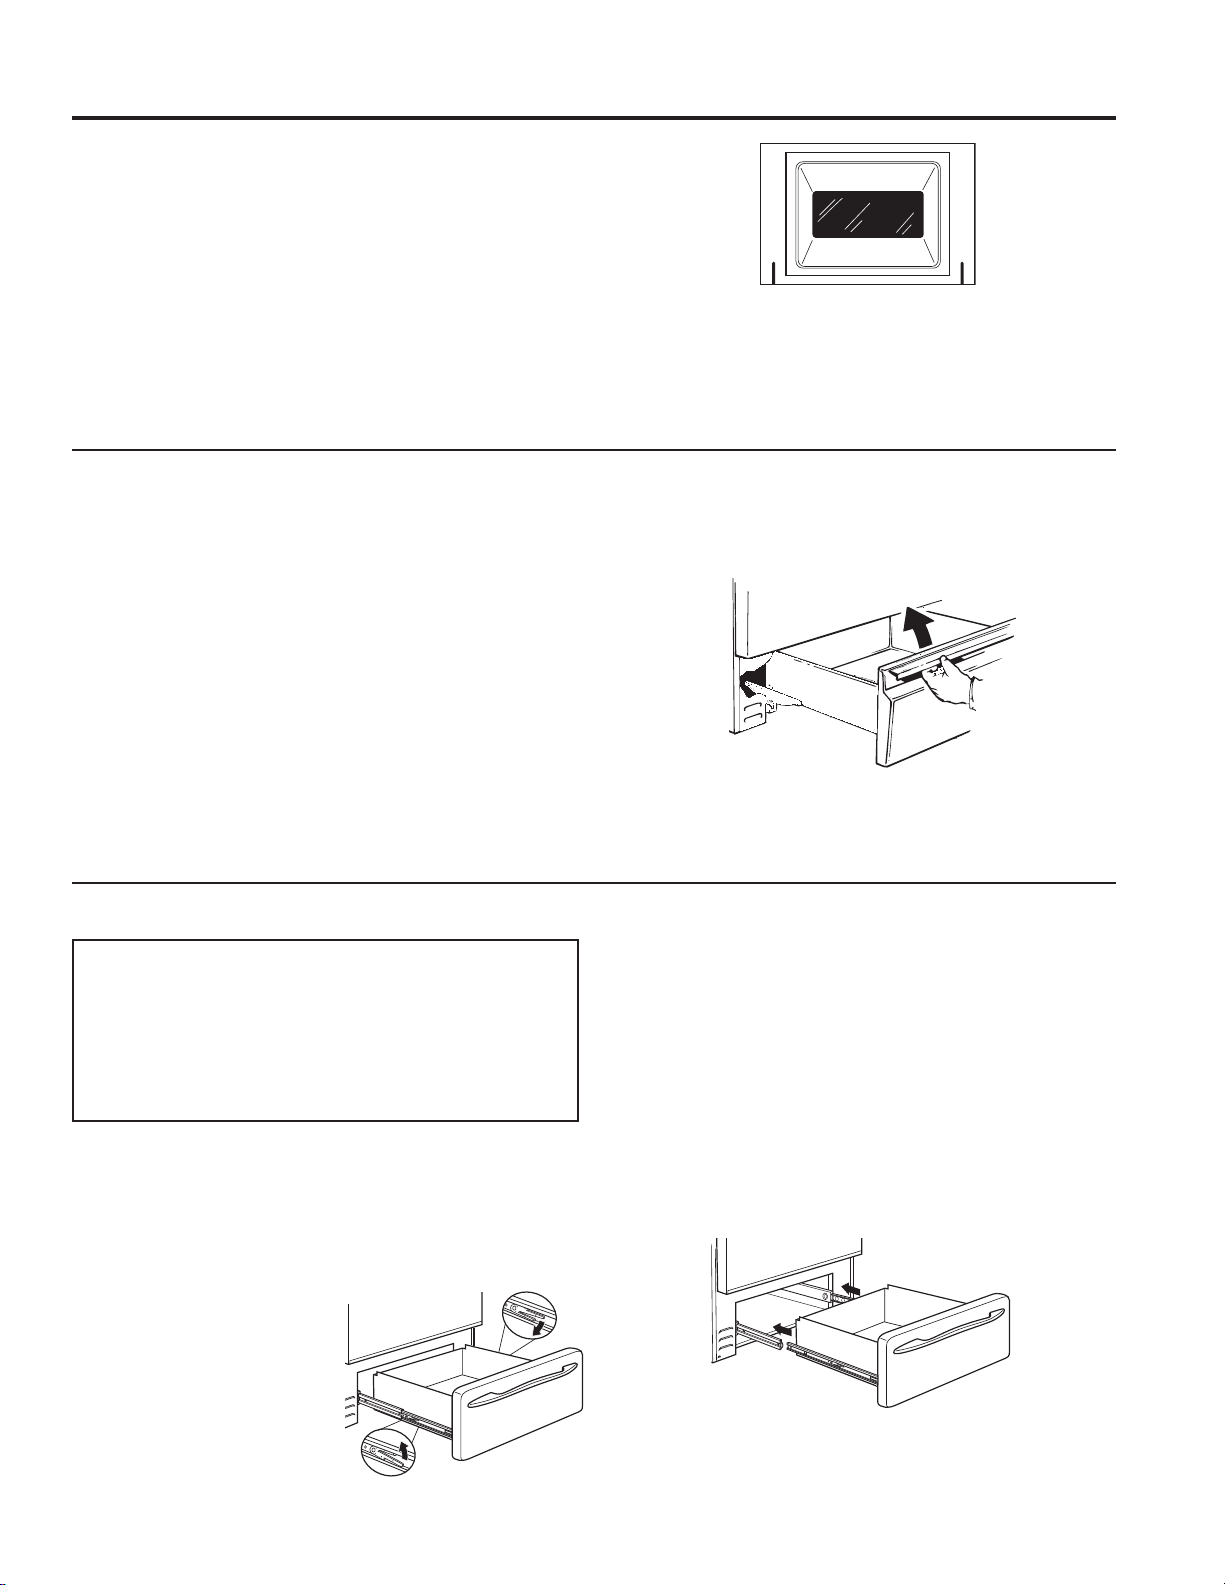
49-85211-6
27
Limpieza de la Puerta y el Cajón
CUIDADO Y LIMPIEZA: Limpieza de la Puerta y el Cajón
La junta está diseñada con un espacio en la parte
inferior para permitir la circulación de aire adecuada.
No frote ni limpie la junta de la puerta; posee una
resistencia extremadamente baja a la abrasión.
Si observa que la junta se vuelve caliente, se
deshilacha o daña de cualquier forma y si quedó fuera
de la puerta, deberá reemplazar la misma.
Para limpiar el interior de la puerta
1RSHUPLWDTXHHOH[FHGHQWHGHDJXDHQWUHDQLQJ~QDJXMHURR
ranuras de la puerta.
Aplique detergente para lavar platos sobre cualquier
VDOSLFDGXUDTXHKD\DVREUHHOYLGULRGHELGRDOKRUQHDGR8VH
el filo de una navaja del lado seguro para despejarlo. Luego
limpie el vidrio con una tela con jabón para eliminar cualquier
residuo y seque.
El área fuera de la junta se puede limpiar con una almohadilla
para fregar de plástico con jabón.
Cajón de Almacenamiento Extraíble (en algunos modelos)
El cajón de almacenamiento es un buen lugar para guardar
utensilios de cocina y panadería. No guarde plásticos ni
materiales inflamables en el cajón.
El cajón de almacenamiento se podrá retirar para limpiar
debajo de la cocina. Limpie el cajón de almacenamiento con
XQDWHODRHVSRQMDK~PHGD1XQFDXVHDEUDVLYRVGXURVQL
almohadillas para fregar.
Para retirar el cajón de almacenamiento:
1. Empuje el cajón hacia afuera hasta que se detenga.
2. Incline el frente del cajón hacia arriba y afuera de la cocina.
Para retirar el cajón de almacenamiento:
1. Configure los puntos de detención en la parte trasera del
cajón sobre las detenciones en la cocina.
2. Deslice el cajón de forma pareja y derecho hacia atrás, de
modo que los rieles de la cocina queden ajustados.
Cajón Extraíble (Sólo Modelos con Cajón Calentador)
NOTA: Para modelos con un cajón de calentamiento
HOpFWULFRDQWHVGHUHDOL]DUFXDOTXLHUDMXVWHOLPSLH]D
RVHUYLFLRWpFQLFRGHVFRQHFWHHOVXPLQLVWURGH
corriente eléctrica de la cocina desde el panel de
GLVWULEXFLyQGHOKRJDUUHWLUDQGRHOIXVLEOHRDSDJDQGR
HOGLV\XQWRU$VHJ~UHVHGHTXHHOHOHPHQWRGH
calefacción del cajón calentador esté frío.
La mayor parte de la limpieza se puede realizar con
HOFDMyQHQVXOXJDU6LQHPEDUJRHOFDMyQSXHGHVHU
UHWLUDGRVLHVQHFHVDULRFRQWLQXDUFRQODOLPSLH]D8VH
agua caliente y jabón para limpiar a fondo.
Para retirar el cajón:
1. Empuje el cajón hacia
afuera hasta que se
detenga.
2. Presione el liberador del
riel izquierdo hacia arriba
y presione el derecho
hacia abajo, mientras
empuja el cajón hacia
adelante y lo libera.
Para reemplazar el cajón:
1. Coloque el riel del cajón izquierdo alrededor de la guía
del riel interior izquierdo y deslice el mismo lentamente
para engancharlo.
2. Coloque el riel del cajón derecho alrededor de la guía
del riel interior derecho y deslice el mismo lentamente
para engancharlo.
3. Deslice el cajón totalmente hasta adentro.
El cajón de almacenamiento se podrá retirar para
limpiar debajo de la cocina.
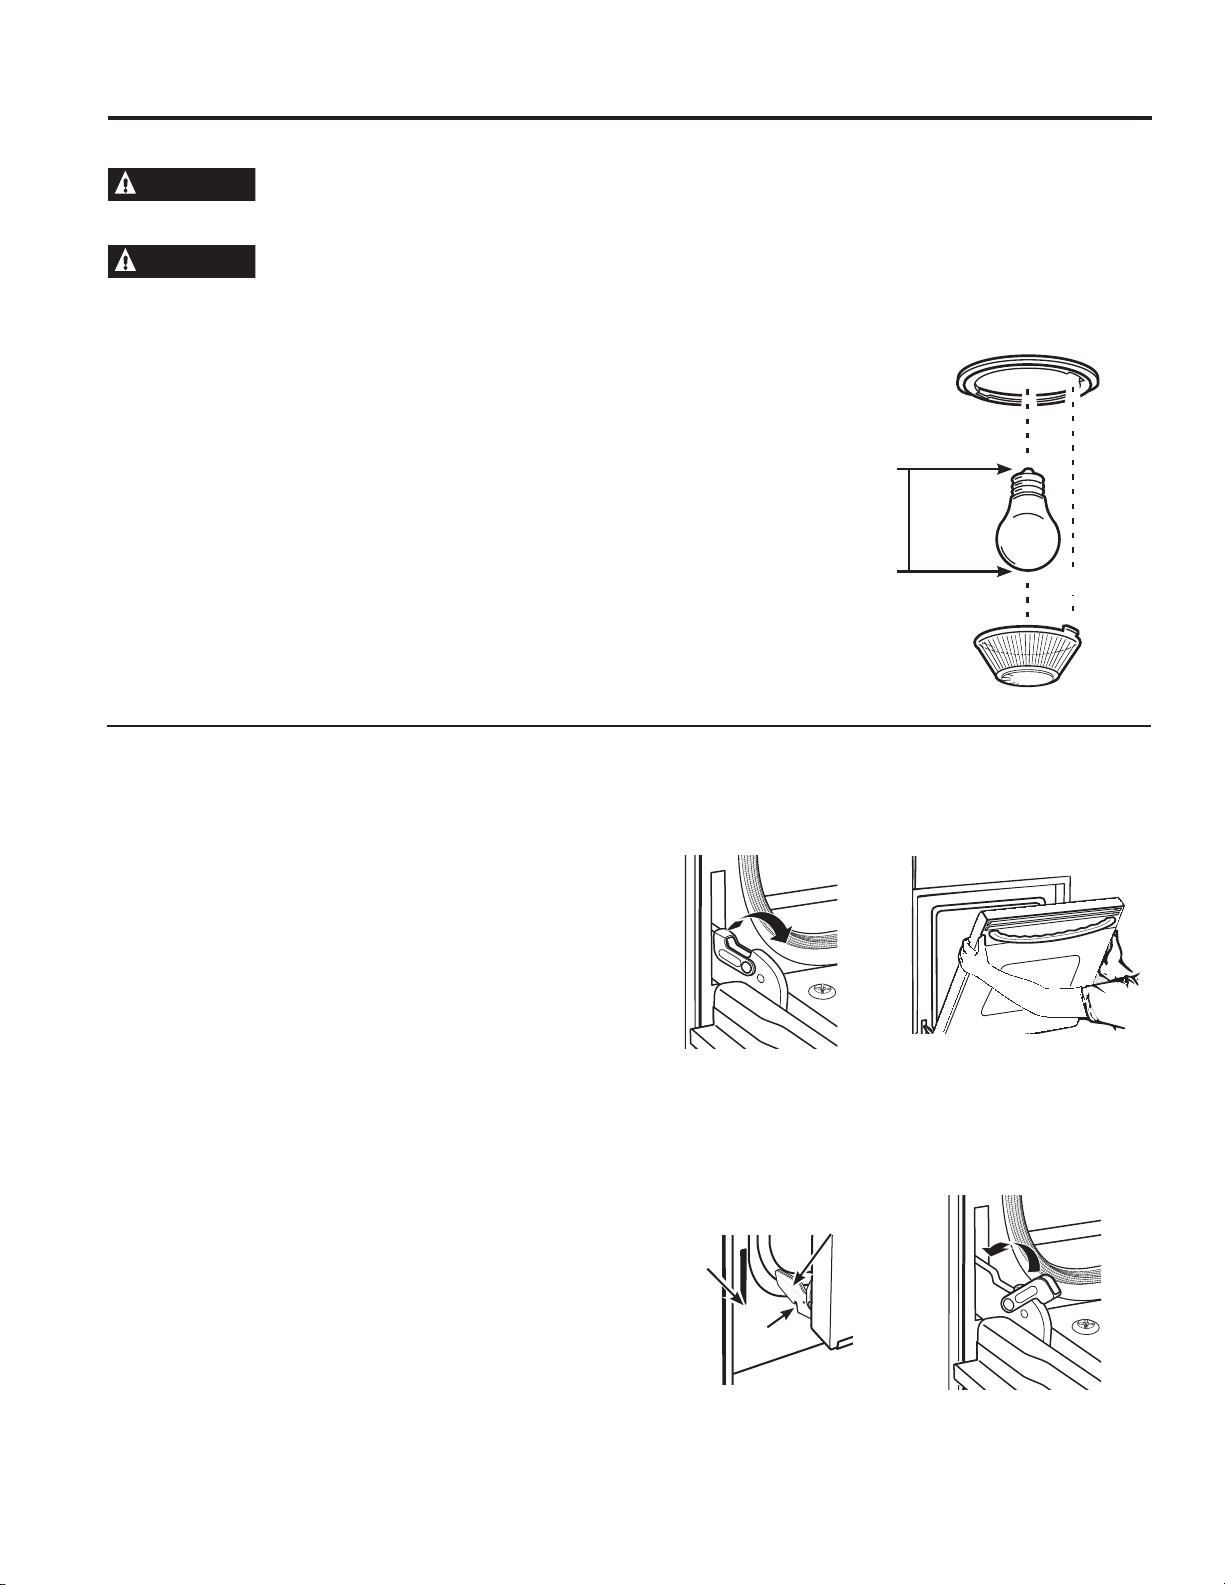
28
49-85211-6
Mantenimiento
CUIDADO Y LIMPIEZA: Mantenimiento
NOTA: La tapa de vidrio deberá ser retirada sólo cuando esté
IUtD6LXVDJXDQWHVGHOiWH[WHQGUiXQPHMRUDJDUUH
$QWHVGHUHHPSOD]DUODOiPSDUDGHVFRQHFWHODFRQH[LyQ
eléctrica del horno del fusible principal o del panel del disyuntor.
'HMHTXHODOiPSDUDVHHQIUtHFRPSOHWDPHQWHDQWHVGHUHWLUDUOD
PLVPD3DUDVXVHJXULGDGQRWRTXHXQDOiPSDUDFDOLHQWHFRQ
XQDWHODK~PHGD6LORKDFHODOiPSDUDVHSRGUiURPSHU
Para retirar:
'pDODWDSDGHYLGULRHQFRQWUDGHODVDJXMDVGHOUHORMXQ
cuarto de giro hasta que las lengüetas de la tapa de vidrio
queden fuera de las ranuras de la ficha. Retire la lámpara.
Para reemplazar:
&RORTXHXQDOiPSDUDQXHYDGHZDWWVSDUD
electrodomésticos. Coloque las lengüetas de la tapa de vidrio
HQODVUDQXUDVGHODILFKD'pDODWDSDGHYLGULRXQFXDUWRGH
giro en dirección de las agujas del reloj.
NOTA:
Ŷ /DVOiPSDUDVSDUD
electrodoméstico de 40
ZDWWVVRQPiVSHTXHxDV
que las lámparas
KRJDUHxDVGHZDWWV
Ŷ 9XHOYDDFRQHFWDUHOKRUQR
una vez que la lámpara
nueva esté instalada.
Ŷ 3DUDXQDPHMRU
iluminación dentro del
KRUQROLPSLHODWDSDGHO
vidrio en forma frecuente
utilizando una tela
K~PHGD(VWRVHGHEHUi
hacer cuando el horno
esté completamente frío.
Puerta del Horno Desmontable
La puerta es muy pesada. Tenga cuidado al retirar y levantar la puerta. No levante la puerta usando la manija.
Para retirar la puerta:
1. Abra la puerta totalmente.
2. Empuje los bloqueos de la bisagra hacia arriba y afuera de
ODHVWUXFWXUDGHODFRFLQDKDVWDODSRVLFLyQGHGHVEORTXHR
)LUPHPHQWHWRPHDPERVODGRVGHODSXHUWDSRUODSDUWH
superior.
4. Cierre la puerta hasta que la parte superior de la misma
TXHGHDDSUR[LPDGDPHQWH´GHODHVWUXFWXUDGHODFRFLQD
/HYDQWHODSXHUWDKDFLDDUULED\DIXHUDGHODFRFLQDKDVWD
que ambos brazos de las bisagras estén fuera de las
ranuras de la estructura de la cocina.
Para reemplazar la puerta:
1. Firmemente tome ambos lados de la puerta por la parte
superior.
2. Con la puerta en el mismo ángulo que en la posición de
UHWLURDSR\HODDEHUWXUDVREUHHOIRQGRGHOEUD]RGHOD
ELVDJUDL]TXLHUGDHQHOH[WUHPRLQIHULRUGHODUDQXUDGHOD
bisagra izquierda. La abertura en el brazo de la bisagra
deberá estar totalmente apoyada en la parte inferior de la
ranura. Repita el procedimiento del lado derecho.
$EUDODSXHUWDWRWDOPHQWH6LODSXHUWDQRVHDEUH
FRPSOHWDPHQWHODVDEHUWXUDVHQODVSDUWHVLQIHULRUHVGHORV
brazos de las bisagras no se apoyaron de forma correcta
VREUHHOH[WUHPRLQIHULRUGHODUDQXUD5HWLUHODSXHUWDGHOD
cocina y repita el paso anterior.
4. Empuje los bloqueos de las bisagras hacia la cavidad de la
cocina y hacia abajo hasta la posición de bloqueo.
&LHUUHODSXHUWDGHOKRUQR
Posición de retiroEmpuje los bloqueos de las
bisagras hacia arriba para
desbloquearlos
Empuje trabas de la bisagra
hacia abajo para bloquear.
Apoye la abertura en el extremo
inferior de la ranura de la bisagra
Abertura
Empuje el
bloqueo de
la bisagra
hacia arriba
hasta que
quede
bloqueado
Brazo de la bisagra
ADVERTENCIA
PELIGRO DE DESCARGA O QUEMADURAS:$QWHVGHUHHPSOD]DUODOiPSDUDGHOX]GHOKRUQRGHVFRQHFWH
ODFRQH[LyQHOpFWULFDGHOKRUQRGHOIXVLEOHSULQFLSDORGHOSDQHOGHOGLV\XQWRU6LHVWRQRVHFXPSOHVHSRGUi
producir una descarga eléctrica o un incendio.
PRECAUCIÓN
RIESGO DE INCENDIO: La tapa de vidrio y la lámpara de luz se deberán retirar cuando estén frías. Tocar el
YLGULRFDOLHQWHVLQSURWHFFLyQHQODVPDQRVRFRQXQWUDSRK~PHGRSXHGHRFDVLRQDUTXHPDGXUDV
Reemplazo de la Lámpara del Horno
Lámpara
Ficha
Lengüeta
Longitud
Pi[LPD
de
1
»2”
Tapa de vidrio

49-85211-6
29
¡Ahorre tiempo y dinero! Primero revise los cuadros que aparecen en las siguientes páginas y es posible que no necesite
solicitar reparaciones.
Consejos para la Solución de Problemas... Antes de solicitar el servicio técnico
CONSEJOS PARA LA SOLUCIÓN DE PROBLEMAS
Problema Causa Posible Qué Hacer
Mi horno nuevo no
cocina como el anterior.
¿Hay algún problema con
las configuraciones de
temperatura?
Su horno nuevo cuenta con un sistema de cocción
diferente con relación al anterior y, por lo tanto, es
posible que cocine de forma diferente.
(QORVSULPHURVXVRVXVHORVWLHPSRV\WHPSHUDWXUDV
GHVXUHFHWDFRQFXLGDGR6LD~QSLHQVDTXHVXKRUQR
QXHYRFRFLQDFRQGHPDVLDGRFDORURGHPDVLDGRIUtR
podrá ajustar el termostato usted mismo para aplicar
su preferencia de cocción específica.
La comida no se hornea
de forma apropiada
Controles del horno configurados de forma incorrecta.
&RQVXOWHODVHFFLyQ0RGRVGH&RFFLyQ
La posición del estante es incorrecta o el estante
no está nivelado.
6H&RQVXOWHODVHFFLyQ0RGRVGH&RFFLyQ\OD*XtD
de Cocción.
Uso de una cacerola incorrecta o de una cacerola
de tamaño incorrecto.
&RQVXOWHODVHFFLyQ8WHQVLOLRV
La temperatura del horno debe ser ajustada. Consulte la sección Funciones Especiales.
Sustitución de ingredientes 6XVWLWXLULQJUHGLHQWHVSXHGHPRGLILFDUHOUHVXOWDGRGH
la receta.
La comida no asa de
forma apropiada
Controles del horno configurados de forma
incorrecta.
$VHJ~UHVHGHVHOHFFLRQDUHOPRGRFRUUHFWRSDUD
asar.
Se usó una posición incorrecta del estante. Para acceder a sugerencias de ubicación de
HVWDQWHVFRQVXOWHOD*XtDGH&RFFLyQ
Se cocinó comida en una olla caliente. $VHJ~UHVHGHTXHHOXWHQVLOLRHVWpIUtR
Utensilio de cocina inadecuado para asar. 8VHXQDROODHVSHFtILFDPHQWHGLVHxDGDSDUDDVDU
El papel de aluminio usado para la olla y la rejilla
para asar no se ajustó ni cortó de forma apropiada,
según lo recomendado.
6LXVDUiSDSHOGHDOXPLQLRGHEHUiXVDUVHFRQIRUPH
con las aberturas de la olla.
En algunas áreas, es posible que el nivel de
corriente (voltaje) sea bajo.
Precaliente el elemento para asar durante 10
minutos.
La temperatura del horno
es demasiado caliente o
demasiado fría
La temperatura del horno debe ser ajustada. Consulte la sección Funciones Especiales.
El horno no funciona o
parece no funcionar
Es posible que un fusible de su hogar se haya
quemado o que el disyuntor se haya desconectado.
Reemplace el fusible o reinicie el disyuntor.
Controles del horno configurados de forma
incorrecta.
&RQVXOWHODVHFFLyQ8VRGHO+RUQR
El horno se encuentra en Sabbath Mode (Modo
Sabático)
9HULILTXHTXHHOKRUQRQRHVWpHQ6DEEDWK0RGH
0RGR6DEiWLFR&RQVXOWHODVHFFLyQ)XQFLRQHV
Especiales.
Sonido de “chisporroteo”
o “traqueo”
Éste es el sonido de metal calentándose o enfriándose
durante las funciones de cocción y limpieza..
Esto es normal.
¿Por qué la estufa hace
un sonido de “clic”
cuando uso el horno?
Su estufa fue diseñada para mantener un control
más ajustado sobre la temperatura del horno.
Es posible que escuche que los elementos de
calentamiento del horno hagan sonidos de “clic”
con mayor frecuencia que con hornos más antiguos
para lograr mejores resultados durante los ciclos de
horneado, asado, convección y limpieza automática.
Esto es normal.
El reloj y el temporizador
no funcionan
Es posible que un fusible de su hogar se haya
quemado o que el disyuntor se haya desconectado.
Reemplace el fusible o reinicie el disyuntor.
A veces el horno tarda
más en precalentarse a la
misma temperatura
Utensilio o comida en el horno El utensilio o la comida en el horno hará que éste
tarde más en precalentarse. Retire estos artículos para
reducir el tiempo de precalentamiento.
Número de estantes en el horno Agregar más estantes al horno hará que éste tarde
más en precalentarse. Retire algunos estantes.
30
49-85211-6
Consejos para la Solución de Problemas... Antes de solicitar el servicio técnico
CONSEJOS PARA LA SOLUCIÓN DE PROBLEMAS
Problema Causa Posible Qué Hacer
La luz del horno no
funciona
La lámpara está floja o presenta defectos. Ajuste o reemplace la lámpara.
La luz de funcionamiento del interruptor está rota. Llame al servicio técnico.
El modo de limpieza
automática del horno
no funciona
La temperatura del horno es demasiado caliente
como para configurar la limpieza automática.
Espere a que el horno se enfríe y reinicie los controles.
Los controles del horno están configurados de
forma incorrecta.
&RQVXOWHODVHFFLyQGH/LPSLH]DGHO+RUQR
Exceso de humo
durante un ciclo de
limpieza
Suciedad o grasa excesiva. Presione la tecla Cancel/Off (Cancelar/ Apagar) Abra
las ventanas para liberar el humo en la habitación.
Espere hasta que la luz de la función LOCKED
(Bloqueado)GHVDSDUH]FD/LPSLHHOH[FHVRGH
suciedad y reinicie el ciclo de limpieza.
Humo excesivo al asar La comida está demasiado cerca del quemador. %DMHODSRVLFLyQGHOHVWDQWHFRQFRPLGD
La puerta del horno
no se abrirá luego de
un ciclo de limpieza
El horno está demasiado caliente. Espere a que el horno se enfríe por debajo de la
temperatura de bloqueo.
El horno no limpia
luego de un ciclo de
limpieza
Los controles del horno están configurados de
forma incorrecta.
&RQVXOWHODVHFFLyQGH/LPSLH]DGHO+RUQR
El horno estaba demasiado sucio. /LPSLHGHUUDPHVH[FHVLYRVDQWHVGHLQLFLDUHOFLFORGH
OLPSLH]D(VSRVLEOHTXHHQKRUQRVFRQPXFKDVXFLHGDG
sea necesario usar la limpieza automática nuevamente o
usarla durante un período de tiempo más prolongado.
“DOOR
” (Puerta)
titila en la pantalla.
El ciclo de limpieza automática fue seleccionado
pero la puerta no está cerrada.
Cierre la puerta del horno.
La luz de LOCKED
(Bloqueado) está
encendida cuando
desea cocinar
La puerta del horno está bloqueada debido a que
la temperatura interior del horno no descendió por
debajo de la temperatura de bloqueo.
Presione la tecla Cancel/Off (Cancelar/ Apagar)'HMH
que el horno se enfríe.
“F – y un número
o letra” titila en la
pantalla
Tiene un código de error de función. Presione la tecla Cancel/Off (Cancelar/ Apagar)
3HUPLWDTXHHOKRUQRVHHQIUtHGXUDQWHXQDKRUD9XHOYD
a poner el horno en funcionamiento.
Si el código de función se repite. 'HVFRQHFWHWRWDOPHQWHODFRUULHQWHGHODFRFLQDGXUDQWH
SRUORPHQRVPLQXWRV\YXHOYDDFRQHFWDUODPLVPD
6LHOFyGLJRGHHUURUGHIXQFLyQVHUHSLWHOODPHDO
servicio técnico.
La pantalla queda en
blanco
Es posible que un fusible de su hogar se haya
quemado o que el disyuntor se haya desconectado.
Reemplace el fusible o reinicie el disyuntor.
El reloj está apagado. Consulte la sección Funciones Especiales.
El horno se encuentra en Sabbath Mode (Modo
Sabático)..
9HULILTXHTXHHOKRUQRQRHVWpHQ6DEEDWK0RGH0RGR
6DEiWLFR&RQVXOWHODVHFFLyQ)XQFLRQHV(VSHFLDOHV
Corte de corriente, el
reloj titila
Corte o exceso de corriente 5HLQLFLHHOUHORM6LHOKRUQRHVWXYRHQXVRGHEHUi
reiniciar el mismo presionando la tecla Cancel/ Off
(Cancelar/ Apagar) configurando el reloj y reiniciando
cualquier función de cocción.
Olor a “quemado”
o “aceite” desde la
ventilación
Esto es normal en un horno nuevo y desaparecerá
con el tiempo.
3DUDDFHOHUDUHOSURFHVRFRQILJXUHXQFLFORGHOLPSLH]D
DXWRPiWLFDSRUXQPtQLPRGHKRUDV&RQVXOWHOD
VHFFLyQGH/LPSLH]DGHO+RUQR
Olor fuerte Un olor en la aislación del horno es normal durante
las primeras veces en que el horno es usado.
Esto es temporario y desaparecerá luego de varios usos
o de un ciclo de limpieza automática.
La puerta de vidrio del
horno parece estar
“teñida” o tener un
color “arcoíris”. ¿Es
esto un defecto?
No. El vidrio del horno interno está cubierto con una
barrera de calor que refleja este último nuevamente
hacia el horno, a fin de evitar la pérdida de calor y de
mantener fría la puerta externa mientras se hornea.
(VWRHVQRUPDO%DMRFLHUWDVOXFHV\iQJXORVHVSRVLEOH
que visualice esta tinta o arcoíris.
“Shut Door” (Cerrar
la Puerta) titila en la
pantalla.
La puerta del horno se dejó abierta. Cierre la puerta y el modo normal se reiniciará.
El modo de cocción
se anula cuando la
puerta se deja abierta
Se dejó la puerta abierta luego de que “Shut Door”
(Cerrar la Puerta) titiló en la pantalla.
Cierre la puerta y el modo normal se reiniciará.
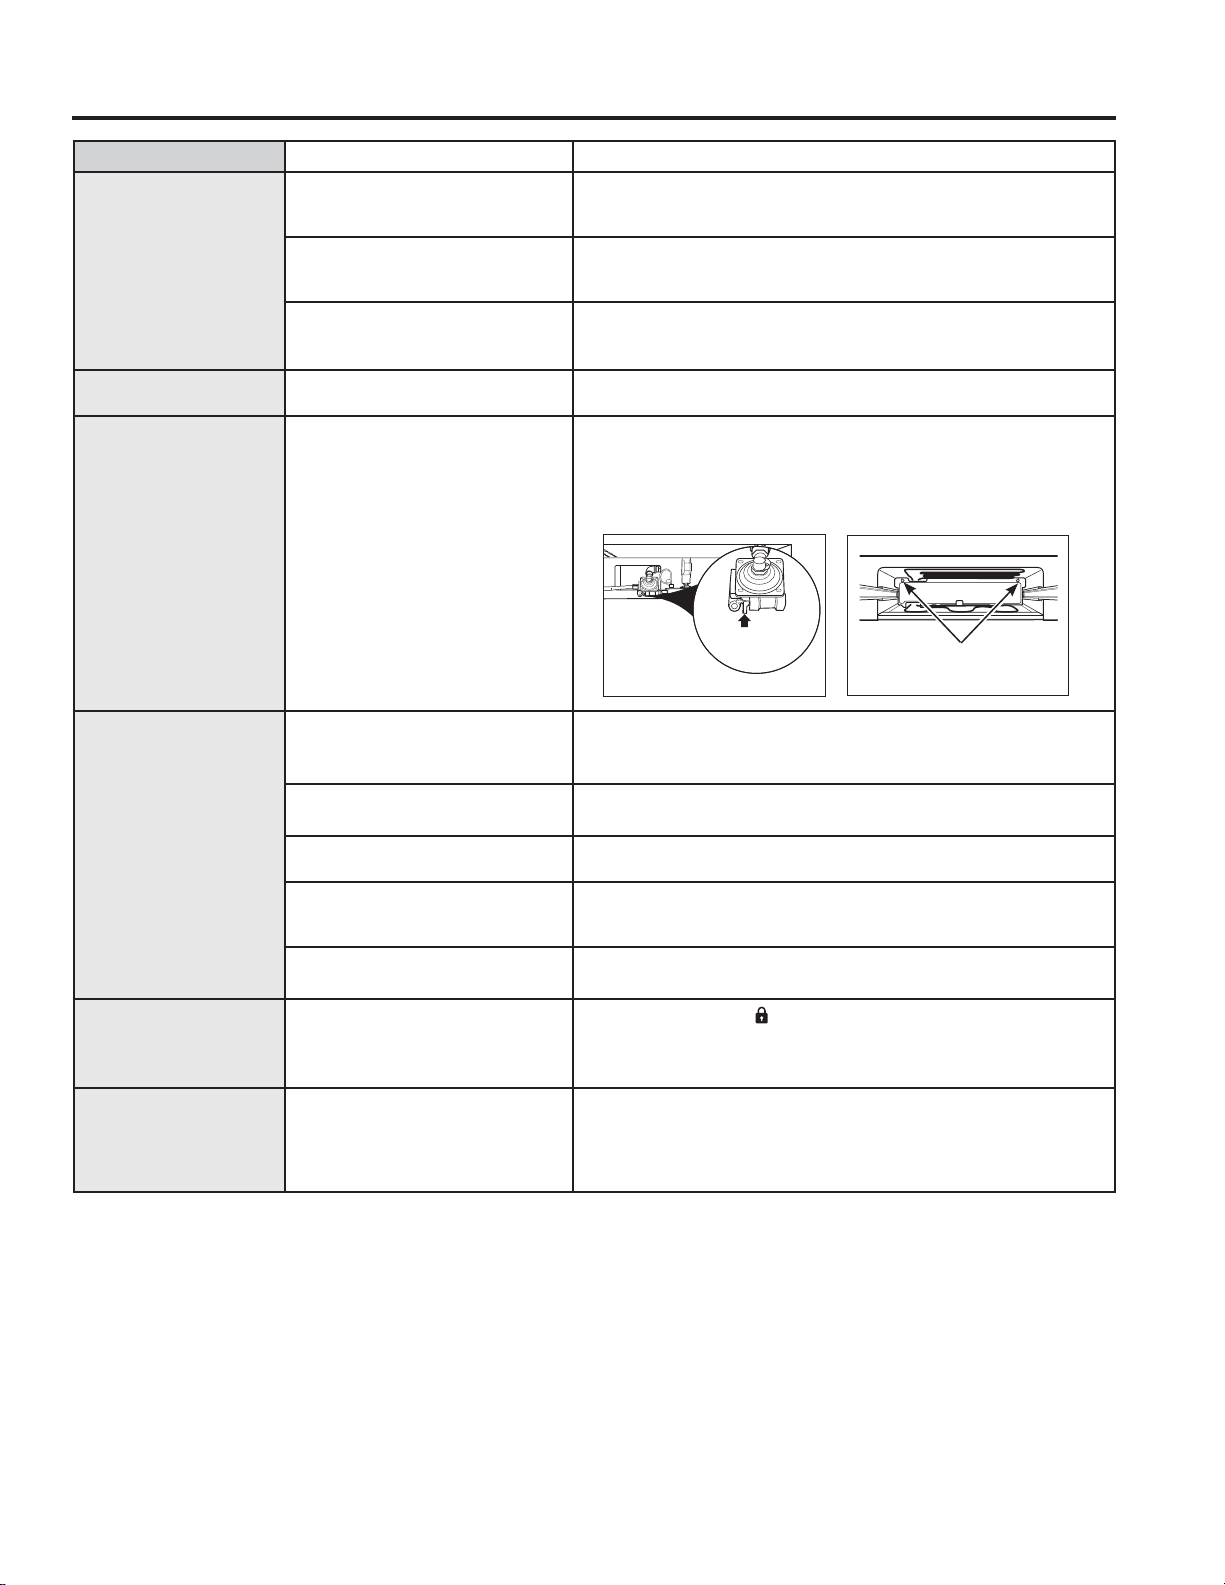
49-85211-6
31
Problema Causa Posible Qué Hacer
Los quemadores no
se encienden o no
queman de forma pareja.
(El quemador frontal
derecho está diseñado
para que sus llamas sean
un poco más pequeñas
entre las posiciones de
las 6 y las 9 en punto.
Esto es normal).
El enchufe en la cocina no está
completamente insertado en el
tomacorriente eléctrico.
$VHJ~UHVHGHTXHHOFDEOHGHHOHFWULFLGDGHVWpHQFKXIDGRHQXQ
tomacorriente correctamente conectado a tierra.
Las hendiduras al costado del
quemador se podrán atascar.
Retire los quemadores o limpie los mismos. Controle que no haya
comida quemada ni grasa en el área del electrodo. Consulte la sección
de Cuidado y limpieza de la cocina.
Ensamble del quemador
inapropiado.
$VHJ~UHVHGHTXHODVSDUWHVGHOTXHPDGRUHVWpQLQVWDODGDV
correctamente. Consulte Cuidado y limpieza en la sección de la cocina.
Llamas del quemador
muy grandes o amarillas
Improper air to gas ratio. 6LODFRFLQDHVFRQHFWDGDDJDV/3FRQWDFWHDODSHUVRQDTXHLQVWDOyOD
cocina o que hizo la conversión.
Los quemadores
superficiales se
encienden pero el
horno no
Se pudo haber movido la válvula
de cierre del horno de forma
accidental durante la limpieza o al
moverlo.
3DUDFRQWURODUODYiOYXODGHFLHUUHGHJDVGHOKRUQRUHWLUHHOFDMyQOHD
&XLGDGR\OLPSLH]DGHODVHFFLyQGHOKRUQR3DUDPRGHORVGHOFDMyQ
GHOKRUQRLQIHULRUUHWLUHHOSDQHOGHDFFHVRWUDVHURGHVHQURVFDQGRORV
WRUQLOORVGHSXOJDUHQODVHVTXLQDVVXSHULRUL]TXLHUGD\GHUHFKD%XVTXH
la palanca de cierre del gas en la parte trasera de la cocina.
El quemador no se
enciende
El enchufe en la cocina no está
completamente insertado en el
tomacorriente eléctrico.
$VHJ~UHVHGHTXHHOFDEOHGHHOHFWULFLGDGHVWpHQFKXIDGRHQXQ
tomacorriente correctamente conectado a tierra.et.
El suministro de gas no fue
conectado o encendido.
Consulte las Instrucciones de Instalación provistas con su cocina.
El quemador del puente no se
enciende.
Consulte la sección Cómo Iluminar el Quemador del Puente.
Es posible que un fusible de su
hogar se haya quemado o que el
disyuntor se haya desconectado.
Reemplace el fusible o reinicie el disyuntor.
Las piezas del quemador no
fueron reemplazadas correctamen.
Lea la sección Cuidado y limpieza de la cocina.
Controles de Bloqueo
o Control La función de
bloqueo está activada.
6LDSDUHFH³CONTROL
”&RQWUROHQODSDQWDOODHOFRQWUROGHODFRFLQD
está bloqueado. Apague esta función para usar la cocina. Consulte la
IXQFLyQ/RFN&RQWURO&RQWUROGH%ORTXHRHQODVHFFLyQGH&RQWUROHVGHO
+RUQR
“TURN BURNERS OFF”
(Apagar Quemadores)
titila en la pantalla.
Un quemador de la placa de
cocción estaba encendido cuando
se estaban iniciando o finalizando
los modos de limpieza automática
de la cocina.
Apague todos los quemadores.
Consejos para la Solución de Problemas... Antes de solicitar el servicio técnico
CONSEJOS PARA LA SOLUCIÓN DE PROBLEMAS
La palanca
se muestra
cerrada.
EMPUJE PARA ABRIR.
Modelos con quemador sellado
Tornillos de pulgar
Modelos con cajón del
horno inferior
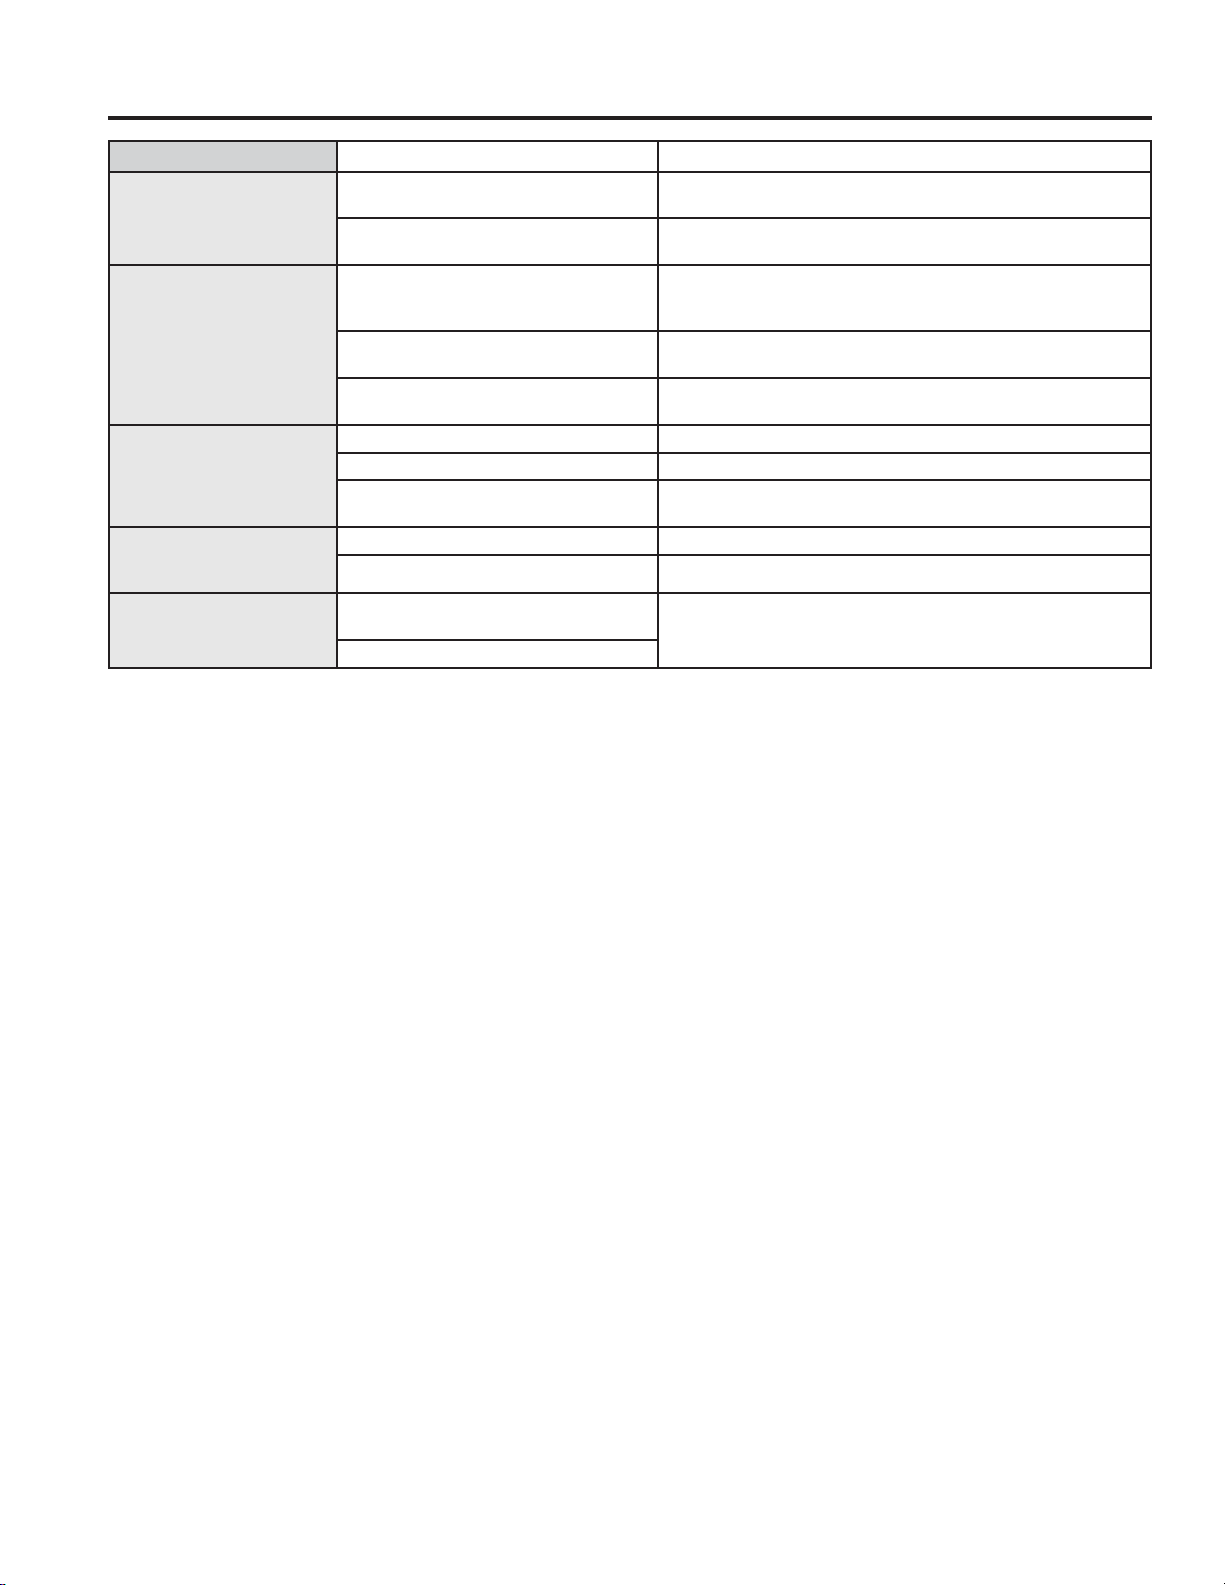
32
49-85211-6
Problema Causa Posible Qué Hacer
El cajón no se desliza de
forma pareja o se arrastra
El cajón está desalineado. ([WLHQGDWRWDOPHQWHHOFDMyQ\HPSXMHHOPLVPRWRWDOPHQWHKDFLD
adentro. Consulte la sección Cuidado y limpieza de la cocina.
El cajón está sobrecargado o la carga
está desbalanceada.
Reduzca el peso. Redistribuya los contenidos del cajón.
El cajón del horno inferior
o el cajón calentador no
funciona
Es posible que un fusible de su hogar
se haya quemado o que el disyuntor
se haya desconectado.
Reemplace el fusible o reinicie el disyuntor.
El horno está realizando la función de
auto limpieza.
Espere a que el ciclo de auto limpieza finalice y que el horno se
enfríe.
Los controles están configurados de
forma incorrecta.
Consulte la sección del cajón calentador o la sección del horno
inferior.
Condensación excesiva en
el cajón
Líquido en el cajón. Retire el líquido.
Comidas no cubiertas. Cubra la comida con una tapa o papel de aluminio.
La configuración de temperatura es
demasiado alta.
Reduzca la configuración de temperatura.
La comida se seca en el
cajón del horno inferior o
en el cajón calentador
Escape de humedad. Cubra la comida con una tapa o papel de aluminio.
Cajón no está completamente cerrada. Empuje el cajón hacia adentro hasta que la traba que ajuste.
El horno no funciona en
forma remota
Problemas en el enrutador, no hay
señal inalámbrica, etc.
3DUDVROLFLWDUDVLVWHQFLDFRQODFRQHFWLYLGDGGHUHGLQDOiPEULFD
FRPXQtTXHVHDO
El horno no está conectado.
Consejos para la Solución de Problemas... Antes de solicitar el servicio técnico
CONSEJOS PARA LA SOLUCIÓN DE PROBLEMAS

