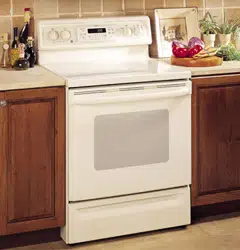
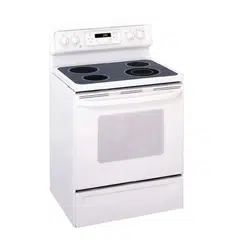
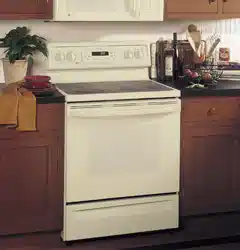
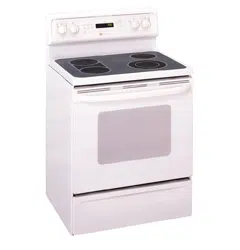
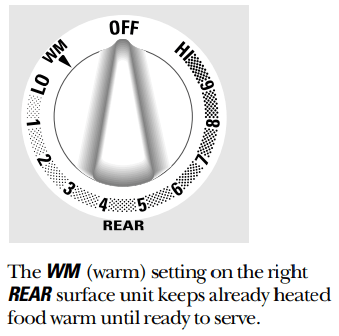
Throughout this manual, features and appearance may vary from your model.
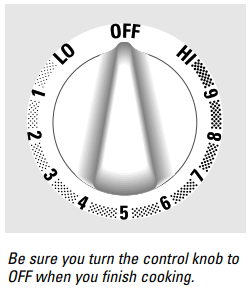
How to Set
Push the knob in and turn in either direction to the setting you want.
At both OFF and HI the control clicks into position. You may hear slight clicking sounds during cooking, indicating the control is keeping the power level you set.
A HOT COOKTOP indicator light will glow when any radiant element is turned on, and will remain on until the surface is cooled to approximately 150°F.
Indicator light will:
■ come on when the unit is hot to the touch.
■ stay on even after the unit is turned off.
■ glow until the unit is cooled to approximately 150° F
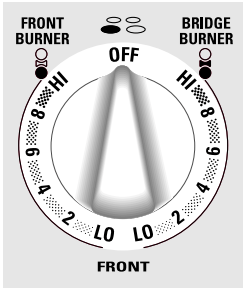
Using the Bridge Burner
To use the bridge burner, turn the control knob to the BRIDGE BURNER settings.
For full bridge burner operation, turn on the rear burner.
To use only the front burner, turn the control knob to the FRONT BURNER settings.
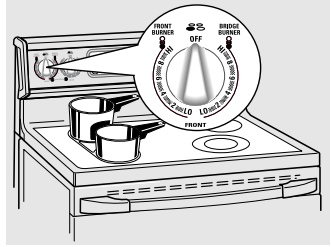
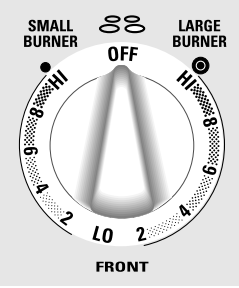
Dual Surface Unit Control Knob
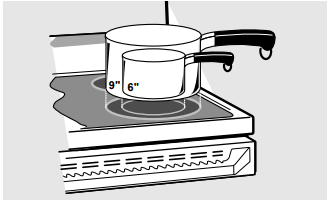
The right front surface unit has 2 cooking sizes to select from so you can match the size of the unit to the size of the cookware you are using.
To use the small (6 inch) surface unit, turn the control knob to the SMALL BURNER settings.
To use the large (9 inch) surface unit, turn the control knob to the LARGE BURNER settings.
Using the oven controls.
Throughout this manual, features and appearance may vary from your model.
Oven Control, Clock and Timer Features and Settings
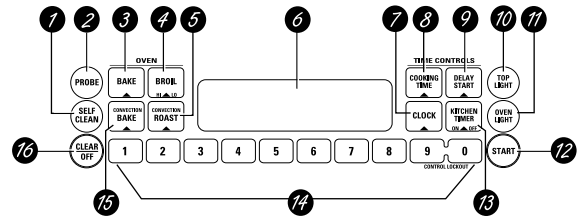
SELF CLEAN Pad
Touch this pad to select the self-cleaning function. See the Using the self-cleaning oven section.
PROBE Pad (on some models)
Touch this pad when using the probe to cook food to the desired internal temperature.
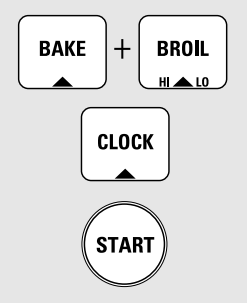
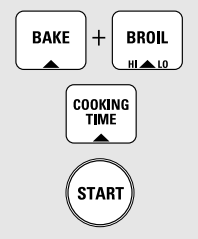
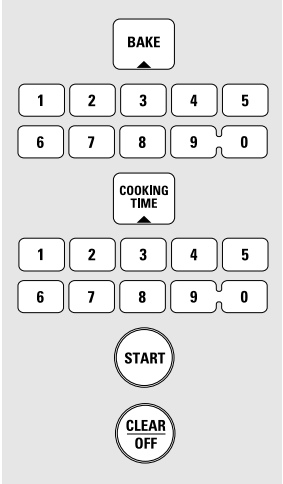
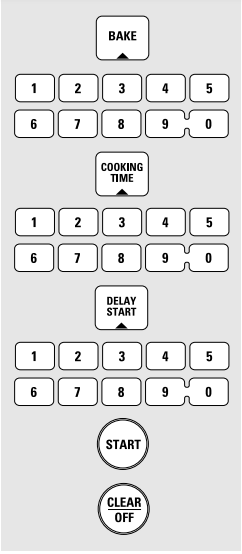
BAKE Pad
Touch this pad to select the bake function.
BROIL HI/LO Pad
Touch this pad to select the broil function.
CONVECTION ROAST Pad
Touch this pad to select roasting with the convection function.
Display
Shows the time of day, oven temperature, whether the oven is in the bake, broil or selfcleaning mode and the times set for the timer or automatic oven operations.
If “F– and a number or letter” flash in the display and the oven control signals, this indicates a function error code.
If your oven was set for a timed oven operation and a power outage occurred, the clock and all programmed functions must be reset.
The time of day will flash in the display when there has been a power outage.
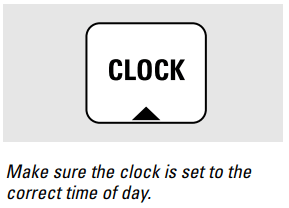
CLOCK Pad
Touch this pad before setting the clock.
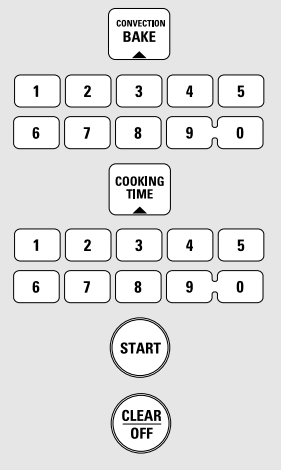
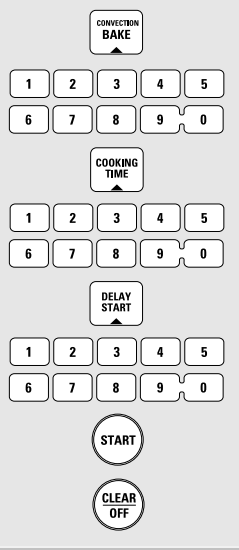
COOKING TIME Pad
Touch this pad and then touch the number pads to set the amount of time you want your food to cook. The oven will shut off when the cooking time has run out.
DELAY START Pad
Use along with COOKING TIME or SELF
CLEAN pads to set the oven to start and stop automatically at a time you set.
TOP LIGHT Pad
Touch this pad to turn the surface light on or off.
OVEN LIGHT Pad
Touch this pad to turn the oven light on or off.
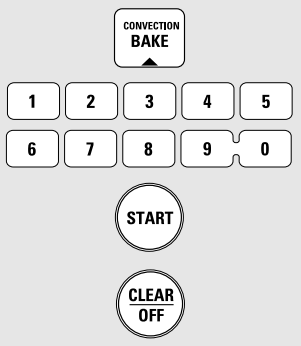
START Pad
Must be touched to start any cooking or cleaning function.
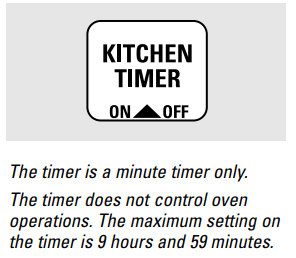
KITCHEN TIMER ON/OFF Pad
Touch this pad to select the timer feature.
Number Pads
Use to set any function requiring numbers such as the time of day on the clock, the timer, the oven temperature, the internal food temperature, the start time and length of operation for timed baking and self-cleaning.
CONVECTION BAKE Pad
Touch this pad to select baking with the convection function.
CLEAR/OFF Pad
Touch this pad to cancel ALL oven operations except the clock and timer.
Special features of your oven control.
Your new touch pad control has additional features that you may choose to use. The following are the features and how you may activate them.
The special feature modes can only be activated while the display is showing the time of day. They remain in the control’s memory until the steps are repeated.
When the display shows your choice, touch the START pad. The special features will remain in memory after a power failure
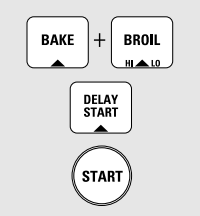
12 Hour Shut-Off
With this feature, should you forget and leave the oven on, the control will automatically turn off the oven after 12 hours during baking functions or after 3 hours during a broil function.
If you wish to turn OFF this feature, follow the steps below.
Touch the BAKE and BROIL HI/LO pads at the same time for 3 seconds until the display shows SF.
Touch the DELAY START pad. The display will show 12 shdn (12 hour shut-off). Touch the DELAY START pad again and the display will show no shdn (no shut-off).
Touch the START pad to activate the no shut-off and leave the control set in this special features mode.
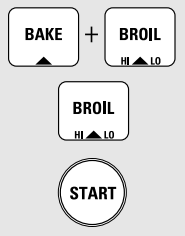
Fahrenheit or Celsius Temperature Selection
Your oven control is set to use the Fahrenheit temperature selections but you may change this to use the Celsius selections.
Touch the BAKE and BROIL HI/LO pads at the same time for 3 seconds until the display shows SF.
Touch the BROIL HI/LO pad. The display will show F (Fahrenheit).
Touch the BROIL HI/LO pad again. The display will show C (Celsius).
Touch the START pad.
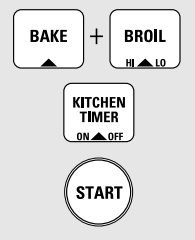
Tones at the End of a Timed Cycle
At the end of a timed cycle, 3 short beeps will sound followed by one beep every 6 seconds until the CLEAR/OFF pad is touched. This continual 6 second beep may be canceled.
To cancel the 6 second beep:
Touch the BAKE and BROIL HI/LO pads at the same time for 3 seconds until the display shows SF.
Touch the KITCHEN TIMER ON/OFF pad. The display shows CON BEEP (continual beep). Touch the KITCHEN TIMER ON/OFF pad again. The display shows BEEP. (This cancels the one beep every 6 seconds.)
Touch the START pad.
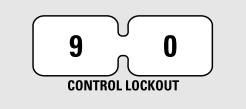
Control Lockout (on some models)
Your control will allow you to lock out the touch pads so they cannot be activated when touched or cleaning the glass panel.
To activate this feature:
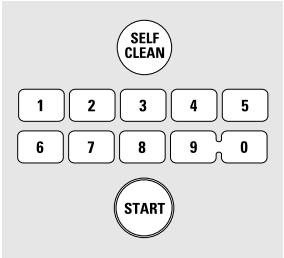
1. Touch the 9 and 0 touch pads at the same time for 3 seconds until the control beeps twice. The display will show LOC continuously and the time of day if not blacked out.
NOTE: All cooking and timing functions will be cancelled when locking out the control.
2. To unlock the control, touch the 9 and 0 touch pads at the same time for 3 seconds until the control beeps twice, and LOC will be removed from the display
12 Hour, 24 Hour or Clock Black-Out
Your control is set to use a 12 hour clock.
If you would prefer to have a 24 hour military time clock or black-out the clock display, follow the steps below.
Touch the BAKE and BROIL HI/LO pads at the same time for 3 seconds until the display shows SF.
Touch the CLOCK pad once. The display will show 12 hr. If this is the choice you want, touch the START pad.
Touch the CLOCK pad again to change to the 24 hour military time clock. The display will show 24 hr. If this is the choice you want, touch the START pad.
Touch the CLOCK pad again to black-out the clock display. The display will show OFF. If this is the choice you want, touch the START pad.
NOTE: If the clock is in the black-out mode you will not be able to use the Delay Start function.
Cook and Hold
Your new control has a cook and hold feature that keeps cooked foods warm for up to 3 hours after the cooking function is finished.
To activate this feature, follow the steps below.
1. Touch the BAKE and BROIL HI/LO pads at the same time for 3 seconds until the display shows SF.
2. Touch the COOKING TIME pad. The display will show Hld OFF.
Touch the COOKING TIME pad again to activate the feature. The display will show Hld ON.
3. Touch the START pad to activate the cook and hold feature and leave the control set in this special features mode.
Using Convection Conversion
By using the Convection Conversion feature you can automatically convert the oven temperature from regular baking to Convection Bake temperatures.
To convert the oven temperature for convection baking, follow the steps below.
1. Touch and hold the CONVECTION BAKE pad for 4 to 5 seconds.
2. Using the number pads, enter the temperature recommended in the recipe.
3. Touch the START pad.
The display shows the converted (reduced) temperature. For example, if you entered a recipe temperature of 350°F., the display will show 325°F. when it is converted.
4. Touch the CLEAR/OFF pad when baking is finished.
NOTE: Conversion must be set each time you want to use it. It is not held in memory
Using the oven.
To avoid possible burns, place the shelves in the desired position before you turn the oven on.
Before you begin…
The shelves have stops, so that when placed correctly on the supports, they will stop before coming completely out, and will not tilt.
When placing and removing cookware, pull the shelf out until it stops.
On some models, the bake heating element is under the oven floor.
Do not place foods on the oven bottom for cooking.
To remove a shelf, pull it toward you, tilt the front end up and pull it out.
To replace, place the end of the shelf (stop-locks) on the support, tilt up the front and push the shelf in.
CAUTION: When you are using the shelf in the lowest position (A), you will need to use caution when pulling the shelf out. We recommend that you pull the shelf out several inches and then, using two pot holders, pull the shelf out by holding the sides of it. The shelf is low and you could be burned if you place your hand in the middle of the shelf and pull all the way out. Be very careful not to burn your hand on the door when using the shelf in the lowest position (A).
How to Set the Oven for Baking or Roasting
Touch the BAKE pad.
Touch the number pads to set the desired temperature.
Touch the START pad.
Check food for doneness at minimum time on recipe. Cook longer if necessary.
Touch the CLEAR/OFF pad when cooking is complete.
Preheating and Pan Placement
Preheat the oven if the recipe calls for it. Preheating is necessary for good results when baking cakes, cookies, pastry and breads.
To preheat, set the oven at the correct temperature. The control will beep when the oven is preheated and the display will show your set temperature. This will take approximately 15–20 minutes.
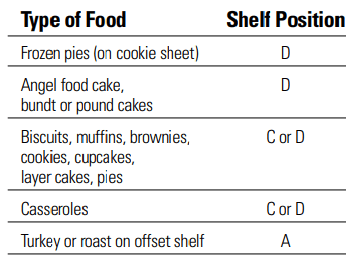
Baking results will be better if baking pans are centered in the oven as much as possible. If baking with more than one pan, place the pans so each has at least 1” to 1 1⁄2” of air space around it. If baking four cake layers at the same time, place two layers on rack B and two layers on rack D. Stagger pans on the rack so one is not directly above the other.
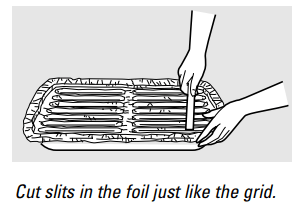
Aluminum Foil
You can use aluminum foil to line the broiler pan and broiler grid. However, you must mold the foil tightly to the grid and cut slits in it just like the grid.
Without the slits, the foil will prevent fat and meat juices from draining into the broiler pan. The juices could become hot enough to catch on fire. If you do not cut the slits, you are essentially frying, not broiling.
Do not use aluminum foil on the bottom of the oven.
Never entirely cover a shelf with aluminum foil. This will disturb the heat circulation and result in poor baking.
A smaller sheet of foil may be used to catch a spillover by placing it on a lower shelf several inches below the food.
Using the clock and timer.
To Set the Clock
The clock must be set to the correct time of day for the automatic oven timing functions to work properly. The time of day cannot be changed during a timed baking or self-cleaning cycle.
Touch the CLOCK pad.
Touch the number pads.
Touch the START pad until the time of day shows in the display.
To Set the Timer
Touch the KITCHEN TIMER ON/OFF pad.
Touch the number pads until the amount of time you want shows in the display. For example, to set 2 hours and 45 minutes, touch 2, 4 and 5 in that order. If you make a mistake touch the KITCHEN TIMER ON/OFF pad and begin again.
Touch the START pad.
When the timer reaches :00, the control will beep 3 times followed by one beep every 6 seconds until the KITCHEN TIMER ON/OFF pad is touched.
The 6 second tone can be canceled by following the steps in the Special features of your oven control section under Tones at the End of a Timed Cycle.
To Reset the Timer
If the display is still showing the time remaining, you may change it by touching the KITCHEN TIMER ON/OFF pad, then touch the number pads until the time you want appears in the display.
If the remaining time is not in the display (clock, delay start or cooking time are in the display), recall the remaining time by touching the KITCHEN TIMER ON/OFF pad and then touching the number pads to enter the new time you want.
To Cancel the Timer
Touch the KITCHEN TIMER ON/OFF pad twice.
Using the timed baking and roasting features.
NOTE: Foods that spoil easily–such as milk, eggs, fish, stuffings, poultry and pork–should not be allowed to sit for more than 1 hour before or after cooking. Room temperature promotes the growth of harmful bacteria. Be sure that the oven light is off because heat from the bulb will speed harmful bacteria growth.
How to Set an Immediate Start and Automatic Stop
The oven will turn on immediately and cook for a selected length of time. At the end of the cooking time the oven will turn off automatically.
1. Touch the BAKE pad.
2. Using the number pads, enter the desired temperature.
Touch the COOKING TIME pad.
NOTE: If your recipe requires preheating, you may need to add additional time to the length of the cooking time.
4. Using the number pads, enter the desired baking time. The oven temperature and the cooking time that you entered will be displayed.
5. Touch the START pad.
The word ON and 100° will be displayed. The cook time will begin to count down. As the oven heats up, the display will show the changing temperature. When the oven reaches the temperature you set, 3 beeps will sound.
At the end of timed baking, the oven will turn off. The end of cycle tone will sound.
Touch the CLEAR/OFF pad to clear the display
How to Set a Delayed Start and Automatic Stop
You can set the oven control to delay-start the oven, cook for a specific length of time and then turn off automatically.
Make sure the clock shows the correct time of day.
1. Touch the BAKE pad.
2. Using the number pads, enter the desired temperature.
3. Touch the COOKING TIME pad.
NOTE: If your recipe requires preheating, you may need to add additional time to the length of the cooking time.
4. Using the number pads, enter the desired baking time.
5. Touch the DELAY START pad.
6. Using the number pads, enter the time of day you want the oven to turn on and start cooking.
7. Touch the START pad.
NOTE: An attention tone will sound if you are using timed baking and do not touch the START pad after entering the baking temperature.
If you would like to check the times you have set, touch the DELAY START pad to check the start time you have set or touch the COOKING TIME pad to check the length of cooking time you have set.
The oven will turn on automatically. The word ON and 100° will be displayed. The cook time will begin to count down.
As the oven heats up, the display will show the changing temperature. The oven will cook for the programmed cooking time and shut off automatically.
At the end of timed baking, the oven will turn off. The end of cycle tone will sound.
Touch the CLEAR/OFF pad to clear the display
Using the timed features for convection baking.
You will hear a fan while cooking with this feature. The fan will stop when the door is opened but the heat will not turn off.
NOTE: Foods that spoil easily–such as milk, eggs, fish, stuffings, poultry and pork–should not be allowed to sit for more than 1 hour before or after cooking. Room temperature promotes the growth of harmful bacteria. Be sure that the oven light is off because heat from the bulb will speed harmful bacteria growth.
How to Set an Immediate Start and Automatic Stop
The oven will turn on immediately and cook for a selected length of time. At the end of the cooking time the oven will turn off automatically.
1. Touch the CONVECTION BAKE pad.
2. Touch the number pads to set the desired oven temperature.
3. Touch the COOKING TIME pad.
NOTE: If your recipe requires preheating, you may need to add additional time to the length of the cooking time.
4. Touch the number pads to set the desired length of cooking time. The minimum cooking time you can set is 1 minute.
The oven temperature that you set and the cooking time that you entered will be in the display.
5. Touch the START pad.
The display shows the oven temperature that you set and the cooking time countdown. The display starts changing once the temperature reaches 100°F.
6. At the end of timed convection bake the oven will turn off. The end of cycle tone will sound. Touch the CLEAR/OFF pad to clear the display if necessary.
7. Remove the food from the oven. Remember, foods that are left in the oven continue cooking after the controls are off.
How to Set a Delayed Start and Automatic Stop
You can set the oven control to delay-start the oven, cook for a specific length of time and then turn off automatically.
Make sure the clock shows the correct time of day.
1. Touch the CONVECTION BAKE pad.
2. Touch the number pads to set the desired oven temperature.
3. Touch the COOKING TIME pad.
NOTE: If your recipe requires preheating, you may need to add additional time to the length of the cooking time.
4. Touch the number pads to set the desired cooking time.
5. Touch the DELAY START pad.
6. Touch the number pads to set the time of day you want the oven to turn on and start cooking.
If you would like to check the times you have set, touch the DELAY START pad to check the start time you have set or touch the COOKING TIME pad to check the length of cooking time you have set.
7. Touch the START pad.
NOTE: An attention tone will sound if you are using timed baking and do not touch the START pad after entering the baking temperature.
When the oven turns on at the time of day you have set, the display will show the changing temperature (starting at 100°F.) and the cooking time countdown.
At the end of timed convection bake the oven will turn off. The end of cycle tone will sound.
8. Touch the CLEAR/OFF pad to clear the display if necessary. When baking is finished, remove the food from the oven. Remember, even though the oven shuts off automatically, foods continue cooking after the controls are off.
Using the self-cleaning oven.
The oven door must be closed and all controls set correctly for the cycle to work properly.
Before a Clean Cycle
We recommend venting your kitchen with an open window or using a ventilation fan or hood during the first self-clean cycle.
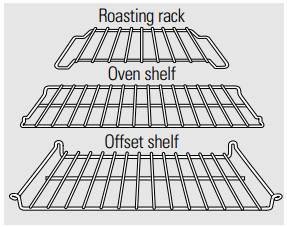
Remove the shelves, broiler pan, broiler grid, probe, all cookware and any aluminum foil from the oven.
The oven shelves and convection roasting rack can be self-cleaned, but they will darken, lose their luster and become hard to slide.
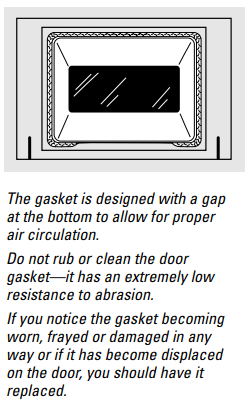
Soil on the front frame of the range and outside the gasket on the door will need to be cleaned by hand. Clean these areas with hot water, soap-filled steel-wool pads or cleansers such as Soft Scrub®. Rinse well with clean water and dry.
Do not clean the gasket. The fiberglass material of the oven door gasket cannot withstand abrasion. It is essential for the gasket to remain intact. If you notice it becoming worn or frayed, replace it.
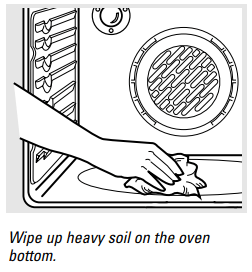
Wipe up any heavy spillovers on the oven bottom.
Make sure the oven light bulb cover is in place and the oven light is off.
IMPORTANT: The health of some birds is extremely sensitive to the fumes given off during the self-cleaning cycle of any range. Move birds to another well ventilated room.
How to Set the Oven for Cleaning
1. Touch the SELF CLEAN pad.
2. Using the number pads, enter the desired clean time, if a time other than 4 hours, 30 minutes is needed.
Clean cycle time is normally 4 hours, 30 minutes. You can change the clean time to any time between 3 hours and 5 hours, depending on how dirty your oven is.
3. Touch the START pad.
The door locks automatically. The display will show the clean time remaining. It will not be possible to open the oven door until the temperature drops below the lock temperature and the LOCKED DOOR light goes off.
When the LOCKED DOOR light is off, open the door.
The oven shuts off automatically when the clean cycle is complete.
The words LOCK DOOR will flash and the oven control will signal if you set the clean cycle and forget to close the oven door.
To stop a clean cycle, touch the CLEAR/OFF pad. When the LOCKED DOOR light goes off indicating the oven has cooled below the locking temperature, open the door.
Care and Cleaning
Be sure all controls are off and all surfaces are cool before cleaning any part of the range.
If your range is removed for cleaning, servicing or any reason, be sure the anti-tip device is re-engaged properly when the range is replaced. Failure to take this precaution could result in tipping of the range and cause injury
How to Remove Packaging Tape
To assure no damage is done to the finish of the product, the safest way to remove the adhesive left from packaging tape on new appliances is an application of a household liquid dishwashing detergent, mineral oil or cooking oil.
Apply with a soft cloth and allow to soak. Wipe dry and then apply an appliance polish to thoroughly clean and protect the surface.
NOTE: The plastic tape (on some models) must be removed from all chrome trim. It cannot be removed if it is baked on.
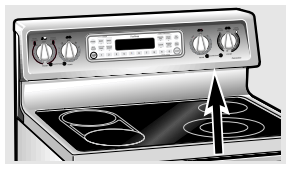
Control Knobs
To Remove:
1. Be sure the knob is in the OFFposition.
2. Pull straight off the stem. Using a piece of string can make removing the knob easier. Slip the string under and around the knob, pull straight out.
Wash the knob thoroughly with warm soapy water. Dry completely with a soft cloth. DO NOT let the knob soak.
To Replace:
Check the back of the knob.
The molded rib of the knob is designed to fit perfectly onto the knob stem.
Align the molded rib to the clear groove in the knob stem. Push the knob back as far as it will go.
Oven Vent
The oven vent is located behind the right rear surface unit.
This area could become hot during oven use.
It is normal for steam to come out of the vent and moisture may collect underneath it when the oven is in use.
The vent is important for proper air circulation. Never block this vent
Control Panel
Deactivate the touch pads before cleaning.
See the Cooking/Self-Clean lockout information in the Special features of your oven control section in this manual.
Clean up splatters with a damp cloth.
You may also use a glass cleaner.
Remove heavier soil with warm soapy water. Do not use abrasives of any kind.
Reactivate the touch pads after cleaning.
See the Cooking/Self-Clean lockout information in the Special features of your oven control section in this manual.
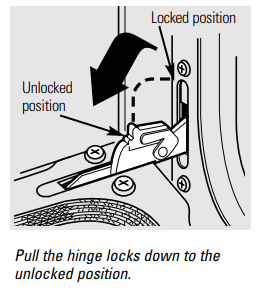
Lift-Off Oven Door
The oven door is removable for easier access to the light bulb.
Do not lift the door by the handle.
To remove the door:
Fully open the door.
Each hinge has a hinge lock. Using a tool, pull the hinge locks down against the door frame.
Firmly grasp the door at the top sides.
Close the door to the stop position.
Lift the door up and pull straight out.
To replace the door:
1. Firmly grasp the door at the top sides. This is critical.
2. Approach the range with the door angled in a vertical position.
3. Guide the hinges into the slots.
4. Push door in firmly while opening
5. Once in position, open the door completely. Push the hinge locks back in towards the front frame.
To clean the inside of the door:
Because the area inside the gasket is cleaned during the self-clean cycle, you do not need to clean this by hand.
The area outside the gasket and the door liner can be cleaned with a soapfilled steel wool or plastic pad, hot water and detergent. Rinse well with a vinegar and water solution.
To clean the outside of the door:
Use soap and water to thoroughly clean the top, sides and front of the oven door. Rinse well. You may also use a glass cleaner to clean the glass on the outside of the door. Do not let water drip into the vent openings.
If any stain on the door vent trim is persistent, use a soft abrasive cleaner and a sponge-scrubber for best results.
Spillage of marinades, fruit juices, tomato sauces and basting materials containing acids may cause discoloration and should be wiped up immediately. When surface is cool, clean and rinse.
Do not use oven cleaners, cleaning powders or harsh abrasives on the outside of the door.
Oven Shelves and Convection Roasting Rack
Clean the oven shelves and the convection roasting rack with an abrasive cleanser or steel wool. After cleaning, rinse the shelves and rack with clean water and dry with a clean cloth.
NOTE: The oven shelves and convection roasting rack may be cleaned in the selfcleaning oven. However, the shelves will darken in color, lose their luster and become hard to slide if cleaned during the self-cleaning cycle.
To make the shelves slide more easily apply a small amount of vegetable oil or cooking oil to a paper towel and wipe the edges of the oven shelves with the paper towel.
Oven Light Replacement
CAUTION: Before replacing your oven light bulb, disconnect the electrical power to the range at the main fuse or circuit breaker panel.
Be sure to let the light cover and bulb cool completely.
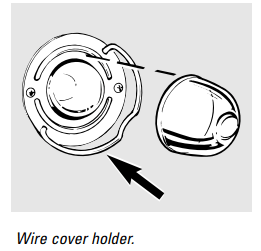
To remove the cover:
1. Hold a hand under the cover so it doesn’t fall when released. With fingers of the same hand, firmly push back the wire cover holder. Lift off the cover.
Do not remove any screws to remove the cover.
2. Replace bulb with a 40-watt appliance bulb.
To replace the cover:
Place it into groove of the light receptacle. Pull wire forward to the center of the cover until it snaps into place.
Connect electrical power to the range.
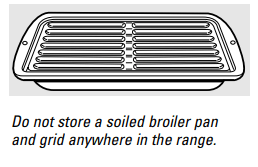
Broiler Pan & Grid
Do not clean the broiler pan or grid in a selfcleaning oven.
After broiling, remove the broiler pan from the oven. Remove the grid from the pan. Carefully pour out the grease from the pan into a proper container.
Wash and rinse the broiler pan and grid in hot water with a soap-filled or plastic scouring pad.
If food has burned on, sprinkle the grid with detergent while hot and cover with wet paper towels or a dishcloth. Soaking the pan will remove burned-on foods.
Both the broiler pan and grid may be cleaned with a commercial oven cleaner.
Both the broiler pan and grid can also be cleaned in a dishwasher.
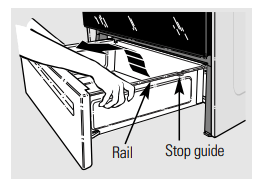
Storage Drawer Removal
To remove the drawer:
Pull the drawer out until it stops.
Lift the front of the drawer until the stops clear the guides.
Remove the drawer.
To replace the drawer:
Place the drawer rails on the guides.
Push the drawer back until it stops.
Lift the front of the drawer and push back until the stops clear the guides.
Lower the front of the drawer and push back until it closes.
Oven Heating Elements
Do not clean the broil element. Any soil will burn off when the element is heated. To clean the oven floor, gently lift the bake element. Clean with warm, soapy water.
On some models, the bake element is not exposed and is under the oven floor. If spillovers, residue or ash accumulate on the oven floor, wipe up before self-cleaning.
Painted Surfaces
Painted surfaces include the sides of the range and the door, top of control panel and the drawer front. Clean these with soap and water or a vinegar and water solution.
Do not use commercial oven cleaners, cleaning powders, steel wool or harsh abrasives on any painted surface.
Troubleshooting Tips
Before You Call For Service…
Troubleshooting Tips
Save time and money! Review the charts on the following pages first and you may not need to call for service.
Problem
Possible Causes
What To Do
Surface units will not maintain a rolling boil or cooking is not fast enough
Improper cookware being used.
• Use pans which are flat and match the diameter of the surface unit selected.
Surface units do not work properly
A fuse in your home may be blown or the circuit breaker tripped.
• Replace the fuse or reset the circuit breaker.
Cooktop controls improperly set.
• Check to see the correct control is set for the surface unit you are using.
Tiny scratches (may appear as cracks) or abrasions on radiant cooktop glass surface
Incorrect cleaning methods being used.
• Use recommended cleaning procedures.
Cookware with rough bottoms being used or coarse particles (salt or sand) were between the cookware and the surface of the cooktop.
• Be sure cookware bottoms and cookware are clean before use. Use cookware with smooth bottoms. Tiny scratches are not removable but will become less visible in time as a result of cleaning.
Cookware has been slid across the cooktop surface.
Areas of discoloration on the cooktop
Improper cookware being used.
• Marks from aluminum and copper pans as well as mineral deposits from water or food can be removed with the cleaning cream.
Hot surface on a model with a white glass cooktop.
• This is normal. The surface may appear discolored when it is hot. This is temporary and will disappear as the glass cools.
Plastic melted to the surface
Hot cooktop came into contact with plastic placed on the hot cooktop.
• See the Special Care information in the Cleaning the glass cooktop section.
Pitting of the cooktop
Hot sugar mixture spilled on the cooktop.
• Call a qualified technician for replacement.
Frequent cycling off and on of surface units
Improper cookware being used.
• Use only flat cookware to minimize cycling.
Oven light does not work
Light bulb is loose or defective.
• Tighten or replace the bulb.
Switch operating light is broken.
• Call for service.
Oven will not work
Plug on range is not completely inserted in the electrical outlet.
• Make sure electrical plug is plugged into a live, properly grounded outlet.
A fuse in your home may be blown or the circuit breaker tripped.
• Replace the fuse or reset the circuit breaker.
Oven controls improperly set.
• See the Using the oven section.
Problem
Possible Causes
What To Do
Food does not bake or roast properly
Oven controls improperly set.
• See the Using the oven section.
Shelf position is incorrect or the shelf is not level.
• See the Using the oven section.
Incorrect cookware or cookware of improper size being used.
• See the Using the oven section.
Oven thermostat needs adjustment.
• See the Adjust the oven thermostat—Do it yourself! section.
Food does not broil properly
Oven controls improperly set.
• Make sure you touch the BROIL H/LO pad.
Door not open to the broil stop position as recommended.
• See the Using the oven section.
Improper shelf position being used.
• See the Broiling Guide.
Cookware not suited for broiling.
• Use the broiling pan and grid that came with your range.
The probe is plugged into the outlet in the oven.
(on some models)
• Unplug and remove the probe from the oven.
Aluminum foil used on the the broiling pan and grid has not been fitted properly and slit as recommended.
• See the Using the oven section.
In some areas the power (voltage) may be low.
• Preheat the broil element for 10 minutes.
• Broil for the longest period of time recommended in the Broiling Guide.
Oven temperature too hot or too cold
Oven thermostat needs adjustment.
• See the Adjust the oven thermostat—Do it yourself! section.
Storage drawer is crooked
Rear drawer support is on top of the guide rail.
• Reposition the drawer. See the Storage Drawer Removal instructions in the Care and cleaning of your range section.
Storage drawer won't close
Power cord may be obstructing drawer in the lower back of the range.
• Reposition the drawer and power cord. See the Storage Drawer Removal instructions in the Care and cleaning of your range section.
Rear drawer support is on top of the guide rail.
Reposition the drawer. See the Storage Drawer Removal instructions in the Care and cleaning of your range section.
Problem
Possible Causes
What To Do
Clock and timer do not work
Plug on range is not completely inserted in the electrical outlet.
• Make sure electrical plug is plugged into a live, properly grounded outlet.
A fuse in your home may be blown or the circuit breaker tripped.
• Replace the fuse or reset the circuit breaker.
Oven controls improperly set.
• See the Using the clock and timer section.
Oven will not self-clean
The oven temperature is too high to set a self-cleanoperation.
• Allow the range to cool to room temperature and reset the controls.
Oven controls improperly set.
• See the Using the self-cleaning oven section.
The probe is plugged into the outlet in the oven. (on some models)
• Remove the probe from the oven.
“Crackling” or “popping” sound
This is the sound of the metal heating and cooling during both the cooking and cleaning functions.
• This is normal.
Excessive smoking during a clean cycle
Excessive soil.
• Touch the CLEAR/OFF pad. Open the windows to rid the room of smoke. Wait until the LOCKED DOOR light goes off. Wipe up the excess soil and reset the clean cycle.
Oven door will not open after a clean cycle
Oven too hot.
• Allow the oven to cool below locking temperature.
Oven not clean after a clean cycle
Oven controls not properly set.
• See the Using the self-cleaning oven section.
Oven was heavily soiled.
• Clean up heavy spillovers before starting the clean cycle. Heavily soiled ovens may need to self-clean again or for a longer period of time.
“LOCK DOOR” flashes in the display
The self-clean cycle has been selected but the door is not closed.
• Close the oven door.
LOCKED DOOR light is on when you want to cook
The oven door is locked because the temperature inside the oven has not dropped below the locking temperature.
• Touch the CLEAR/OFF pad. Allow the oven to cool.
“F—and a number or letter” flash in the display
You have a function error code.
• Touch the CLEAR/OFF pad. Put the oven back into operation.
If the function code repeats.
• Disconnect all power to the range for at least 30 seconds and then reconnect power. If the function error code repeats, call for service.
Problem
Possible Causes
What To Do
Control signals after entering cooking time or start time
You forgot to enter a bake temperature or cleaning time.
• Touch the BAKE pad and desired temperature or the SELF CLEAN pad and desired clean time.
Display goes blank
A fuse in your home may be blown or the circuit breaker tripped.
• Replace the fuse or reset the circuit breaker.
The clock is in the black-out mode.
• See the Special features of your oven control section.
Display flashes
Power failure.
• Reset the clock.
Unable to get the display to show “SF"
Oven control pads were not touched properly.
• The BAKE and BROIL HI/LO pads must be touched at the same time and held for 3 seconds.
"Probe"appears in the display (on some models)
This is reminding you to enter a probe temperature after plugging in the probe.
• Enter a probe temperature.
Power outage, clock flashes
Power outage or surge.
• Reset the clock. If the oven was in use, you must reset it by touching the CLEAR/OFF pad, setting the clock and resetting any cooking function.
Steam from the vent
When using the convection feature, it is normal to see steam coming out of the oven vent. As the number of shelves or amount of food being cooked increases, the amount of visible steam will increase.
• This is normal.
“Burning" or “oily" odor emitting from the vent
This is normal in a new oven and will disappear in time.
• To speed the process, set a self-clean cycle for a minimum of 3 hours. See the Using the selfcleaning oven section.
Strong odor
An odor from the insulation around the inside of the oven is normal for the first few times the oven is used.
• This is temporary.
Fan noise
A cooling fan or a convection fan (depending on the function you are using) may automatically turn on and off to cool internal parts.
• This is normal. The cooling fan will turn off and on. The convection fan will run until the function is over or the door is opened.
Q: Tightening an oven handle, I have tried the two screws on the door and they will not tighten any further. The handle is still loose. How do I repair? Reply
 SELF CLEAN Pad
 PROBE Pad (on some models)
 BAKE Pad
 BROIL HI/LO Pad
 CONVECTION ROAST Pad
 Display
 CLOCK Pad
 COOKING TIME Pad
 DELAY START Pad
 TOP LIGHT Pad
 OVEN LIGHT Pad
 START Pad
 KITCHEN TIMER ON/OFF Pad
 Number Pads
 CONVECTION BAKE Pad
 CLEAR/OFF Pad