
2
En
How to read this manual
Thank you for choosing this Pioneer DJ product.
Be sure to read this manual, the “Quick Start Guide” and the
“Precautions for use” which are also included with this product. These
documents include important information that you should understand
before using the unit. In particular, be sure to read the IMPORTANT
SAFETY INSTRUCTIONS.
• In this manual the names of buttons, knobs and terminals that appear
on the product, and the names of buttons, menus etc. in the software
on your PC/Mac or smartphone, are indicated within square brackets
([ ]). (e.g. [File], [CUE] button)
• Please note that the software screens and their specifications, as
well as the external appearance and specifications of the hardware,
were still under development at the time this manual was created and
may differ from the final specifications.
• Please note that depending on the operating system version, web
browser settings, etc. operation may differ from the ways described
in this manual.
• Please note that the language on the screens of the software
described in this manual may differ from the language on your
screen.
This manual mainly focuses on explaining the hardware functions
of the unit.
For detailed instructions on using WeDJ for iPhone and WeDJ for
Android, see the tutorial in the application.
For detailed instructions on using rekordbox
TM
, see the
rekordbox Operating Instructions.
• You can download the rekordbox Operating Instructions from
rekordbox.com.
rekordbox.com/manual

3
En
Contents
How to read this manual............................................................... 2
Before you start......................................................................... 5
What’s in the box .......................................................................... 5
WeDJ for iPhone........................................................................ 6
Part names and functions (WeDJ for iPhone) .............................. 7
Connections (for iOS devices).................................................... 13
Basic use (WeDJ for iPhone)...................................................... 18
Advanced use (WeDJ for iPhone) .............................................. 23
Changing the settings in WeDJ for iPhone ................................. 39
WeDJ for Android.................................................................... 41
Part names and functions (WeDJ for Android) ........................... 42
Connections (for Android devices).............................................. 48
Basic use (WeDJ for Android) .................................................... 53
Advanced use (WeDJ for Android) ............................................. 59
Changing the settings in WeDJ for Android................................ 76
djay ........................................................................................... 78
Part names and functions (djay) ................................................. 79
Connections (for iOS devices).................................................... 85
Basic use (djay) .......................................................................... 90
Advanced use (djay) ................................................................... 95
edjing Mix for iOS.................................................................... 98
Part names and functions (edjing Mix) ....................................... 99
Connections (for iOS devices).................................................. 105
Basic use (edjing Mix)............................................................... 110
Advanced use (edjing Mix) ....................................................... 115

Contents
4
En
edjing Mix for Android .......................................................... 117
Part names and functions (edjing Mix) ..................................... 118
Connections (for Android devices)............................................ 124
Basic use (edjing Mix)............................................................... 129
Advanced use (edjing Mix) ....................................................... 135
rekordbox............................................................................... 137
Installing rekordbox................................................................... 139
Part names and functions (rekordbox)...................................... 142
Connections (for PC/Mac) ........................................................ 149
Basic use (rekordbox dj) ........................................................... 153
Advanced use (rekordbox dj).................................................... 158
Changing the settings in rekordbox dj ...................................... 166
Settings on the unit............................................................... 168
Changing the Demo mode setting in Utilities mode.................. 168
Changing the BLUETOOTH
®
MIDI device name ..................... 170
Additional information.......................................................... 172
Troubleshooting ........................................................................ 172
Using the unit as a controller for other DJ applications ............ 178
About trademarks and registered trademarks .......................... 179
Cautions on copyrights ............................................................. 181

5
En
Before you start
What’s in the box
• USB cable
• Split cable
• Warranty (for some regions)
1
• Quick Start Guide (WeDJ/rekordbox)
• Quick Start Guide (djay)
• Quick Start Guide (edjing Mix)
• Precautions for use
1
Only products in Europe.
Products in North America and Japan include warranty information in
the “Precautions for use.”

6
En
WeDJ for iPhone
WeDJ for iPhone is a DJ performance app you can download from the
App Store. When you’re using the app with the unit, you won’t need to
make in-app purchases.
• If you already have WeDJ for iPhone installed, update it to the latest
version.
System requirements
iOS: iOS 12, 11, 10
Compatible models: iPhone X
R, iPhone Xs, iPhone Xs Max, iPhone X,
iPhone 8, iPhone 8 Plus, iPhone 7, iPhone 7 Plus, iPhone SE, iPhone
6s, iPhone 6s Plus, iPhone 6, iPhone 6 Plus, iPhone 5s, and iPod
touch (6th generation)
• To check the latest information on system requirements, compatibility
and supported operating systems, visit the Pioneer DJ support page
below and click on the [DDJ-200] option in the [DJ CONTROLLER]
section.
pioneerdj.com/en/support/software-information/
• Operation is not guaranteed on all iOS devices, even if the system
requirements are met.
• Depending on power-saving settings and other conditions of the iOS
device, WeDJ may perform poorly.
• Problems may occur with operation depending on the other software
you use.
• For the latest system requirements for WeDJ for iPhone, check the
App Store.
• You’ll need an internet connection to access the App Store.

WeDJ for iPhone
8
En
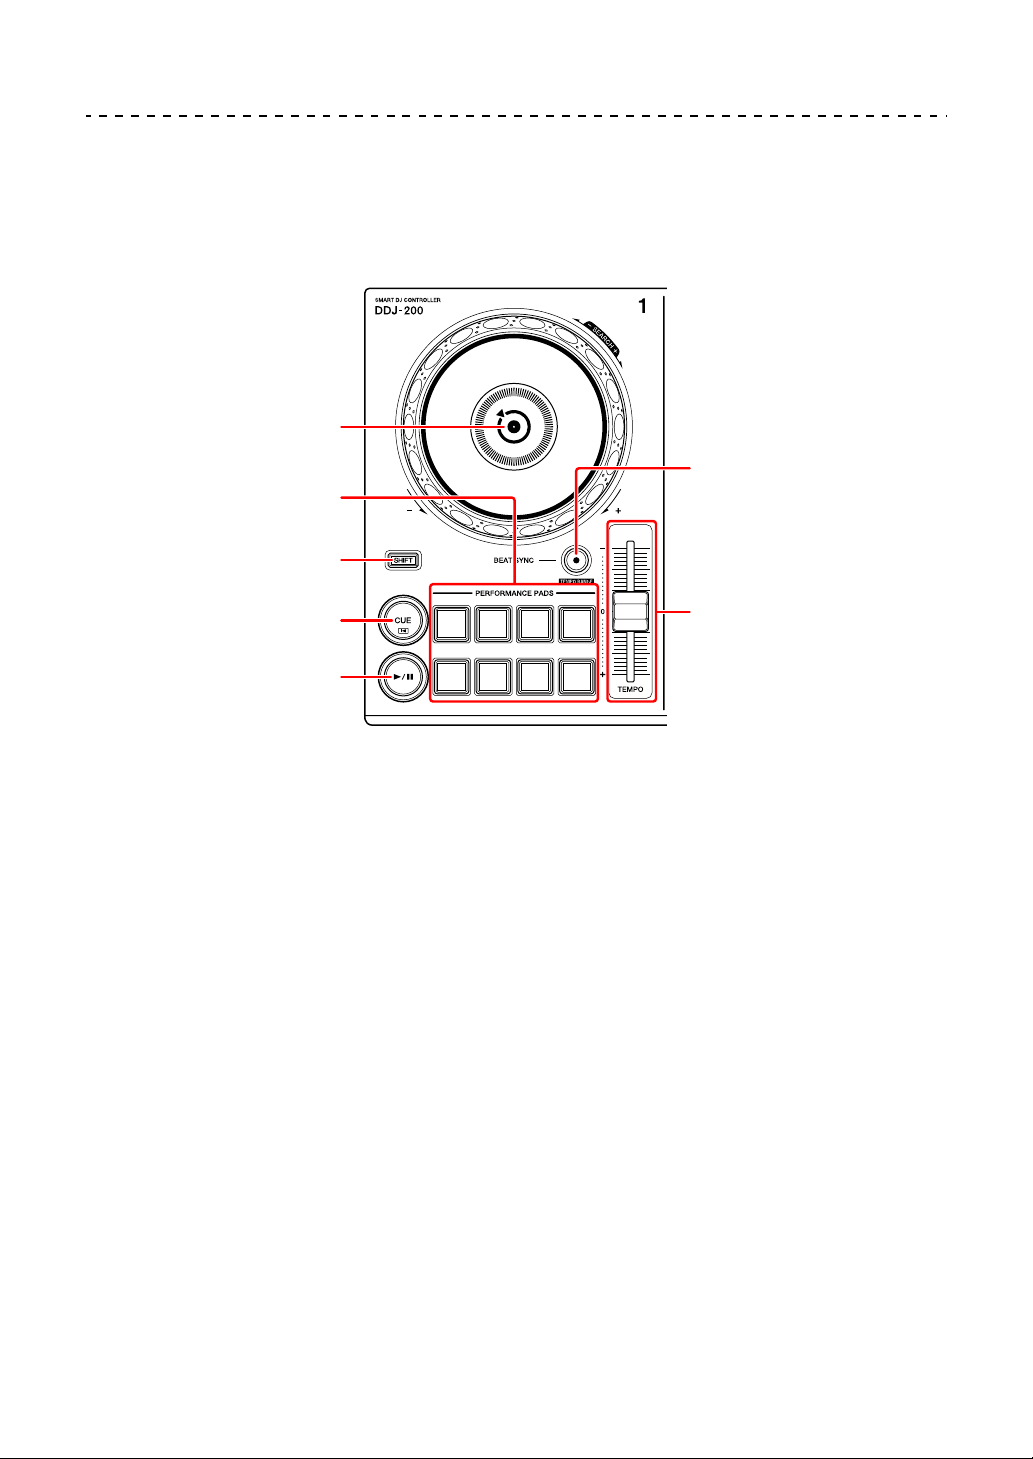
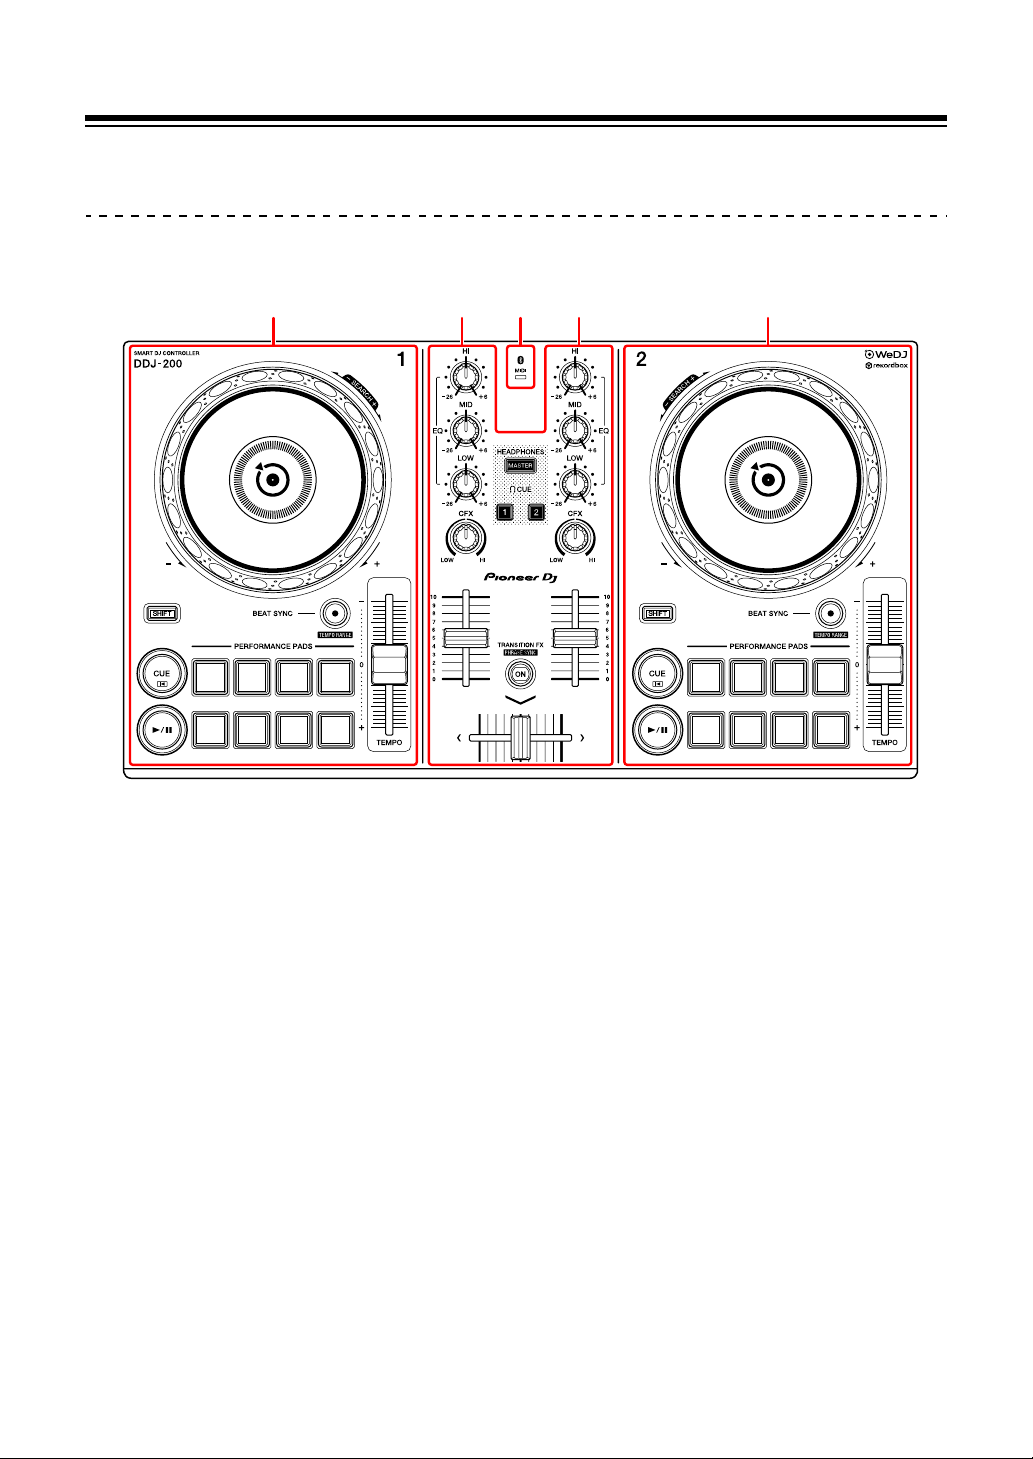
Deck section
You can control two decks with the unit. There are knobs and buttons
on the left side to control deck 1 and on the right side to control deck 2.
1 Jog wheel
Turn the top:
‘Scratches’ the track.
Turn the outer section:
Bends the pitch or ‘Pitch Bend’ (slows down or speeds up the track).
[SHIFT] + turn the top:
Fast forwards or fast reverses the track (turn clockwise or counter-clockwise).
2 Performance Pads
You can use Performance Pads to trigger various features.
Read more: Using the Performance Pads (page 23)
3 SHIFT button
2
1
6
7
3
4
5

WeDJ for iPhone
9
En
Press another button while holding the [SHIFT] button to use a different feature
assigned to the button.
4 CUE button
Press:
Sets, plays and calls up a cue point.
• Press the button when the track is paused to set the cue point.
• Press the button when the track is playing to return to the cue point and
pause. (Back Cue)
• Press the button and hold it after the track returns to the cue point and
playback will continue until you release the button. (Cue Point Sampler)
[SHIFT] + press:
Returns the playback position to the beginning of the track.
5 PLAY/PAUSE button
Plays/pauses a track.
6 BEAT SYNC button
Press:
Automatically synchronizes the tempos (BPM) and beatgrids with the other
deck.
[SHIFT] + press:
Switches the range of [TEMPO] slider each time the button is pressed while
holding the [SHIFT] button.
Switch between [±6%] [±10%] [±16%] [WIDE] [±6%].
Hold down the [BEAT SYNC] buttons on deck 1 and deck 2 for at least one
second at the same time:
The Bluetooth connection of the iOS device is canceled.
7 TEMPO slider
Adjusts the playing speed of the track.
WeDJ for iPhone
10
En
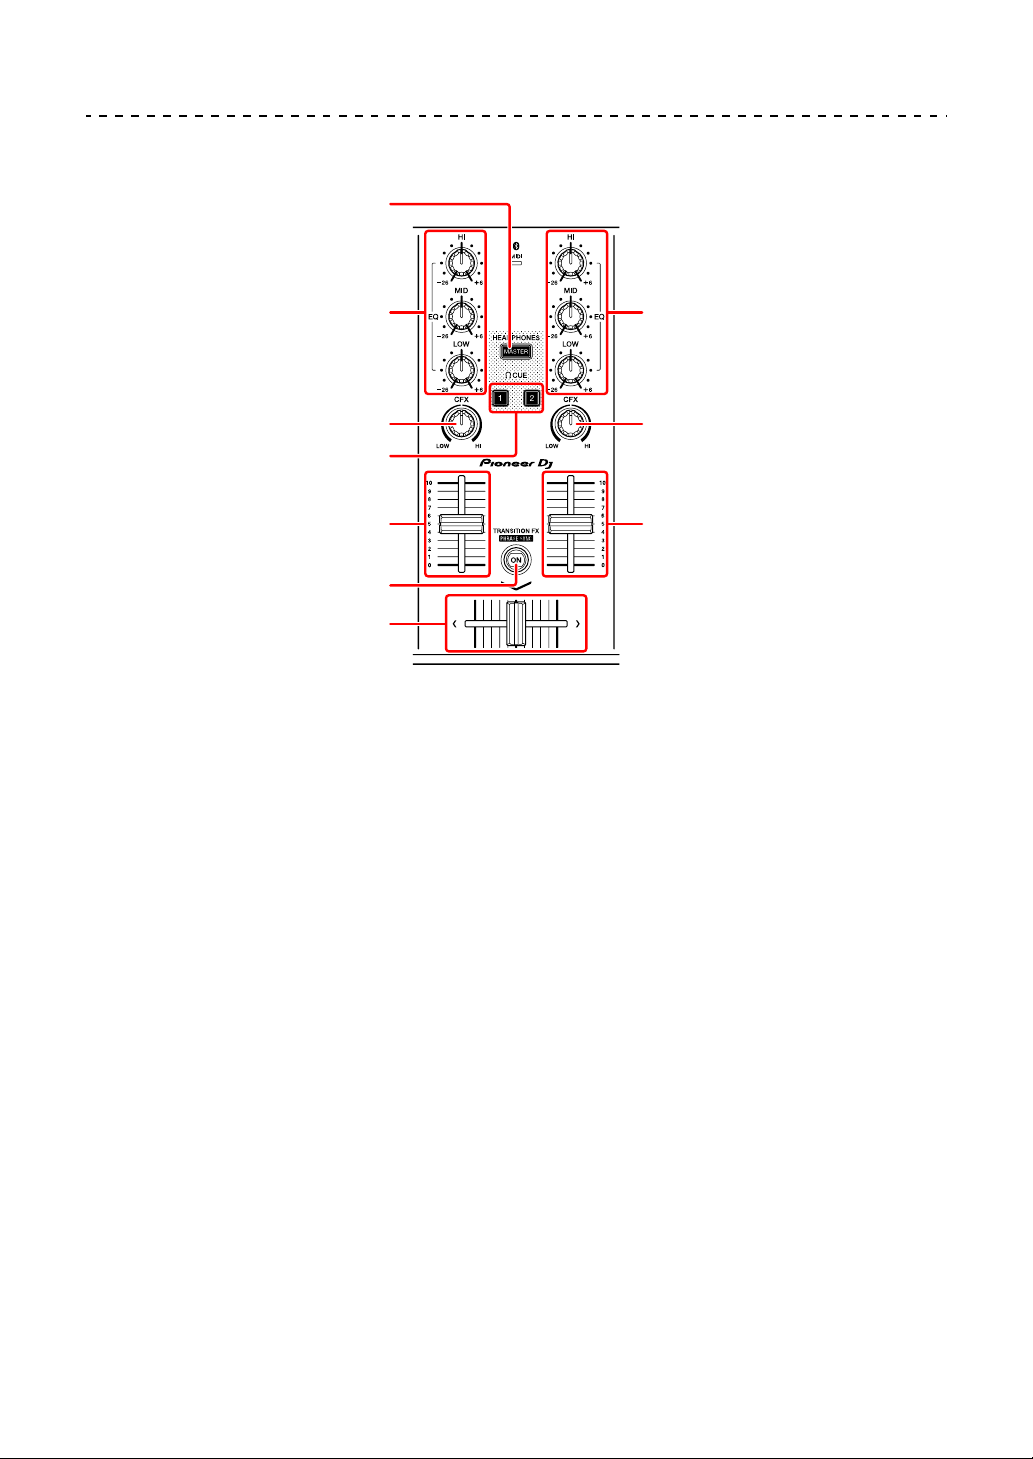
Mixer section
1 MASTER CUE button
Press:
Plays the master sound through your headphones when they’re connected to
the supplied split cable, which is plugged into the headphones output of your
iOS device.
• Connect the headphones to the white plug of the split cable.
Read more: Monitoring with headphones (page 21)
2 EQ (HI, MID, LOW) knobs
Boosts or reduces the relevant frequency for the selected channel.
3 CFX knob
Turns on the selected effect and changes the sound for the relevant channel.
When the knob is set to the center position, the sound is unchanged.
4 Headphone CUE button
Press:
1
2
3
4
6
5
5
3
2
7

WeDJ for iPhone
11
En
Plays the sound of the relevant channel (1 or 2) through your headphones
when they’re connected to the supplied split cable, which is plugged into the
headphones output of your iOS device.
• Connect the headphones to the white plug of the split cable.
Read more: Monitoring with headphones (page 21)
5 Channel fader
Adjusts the volume of the sound for each channel.
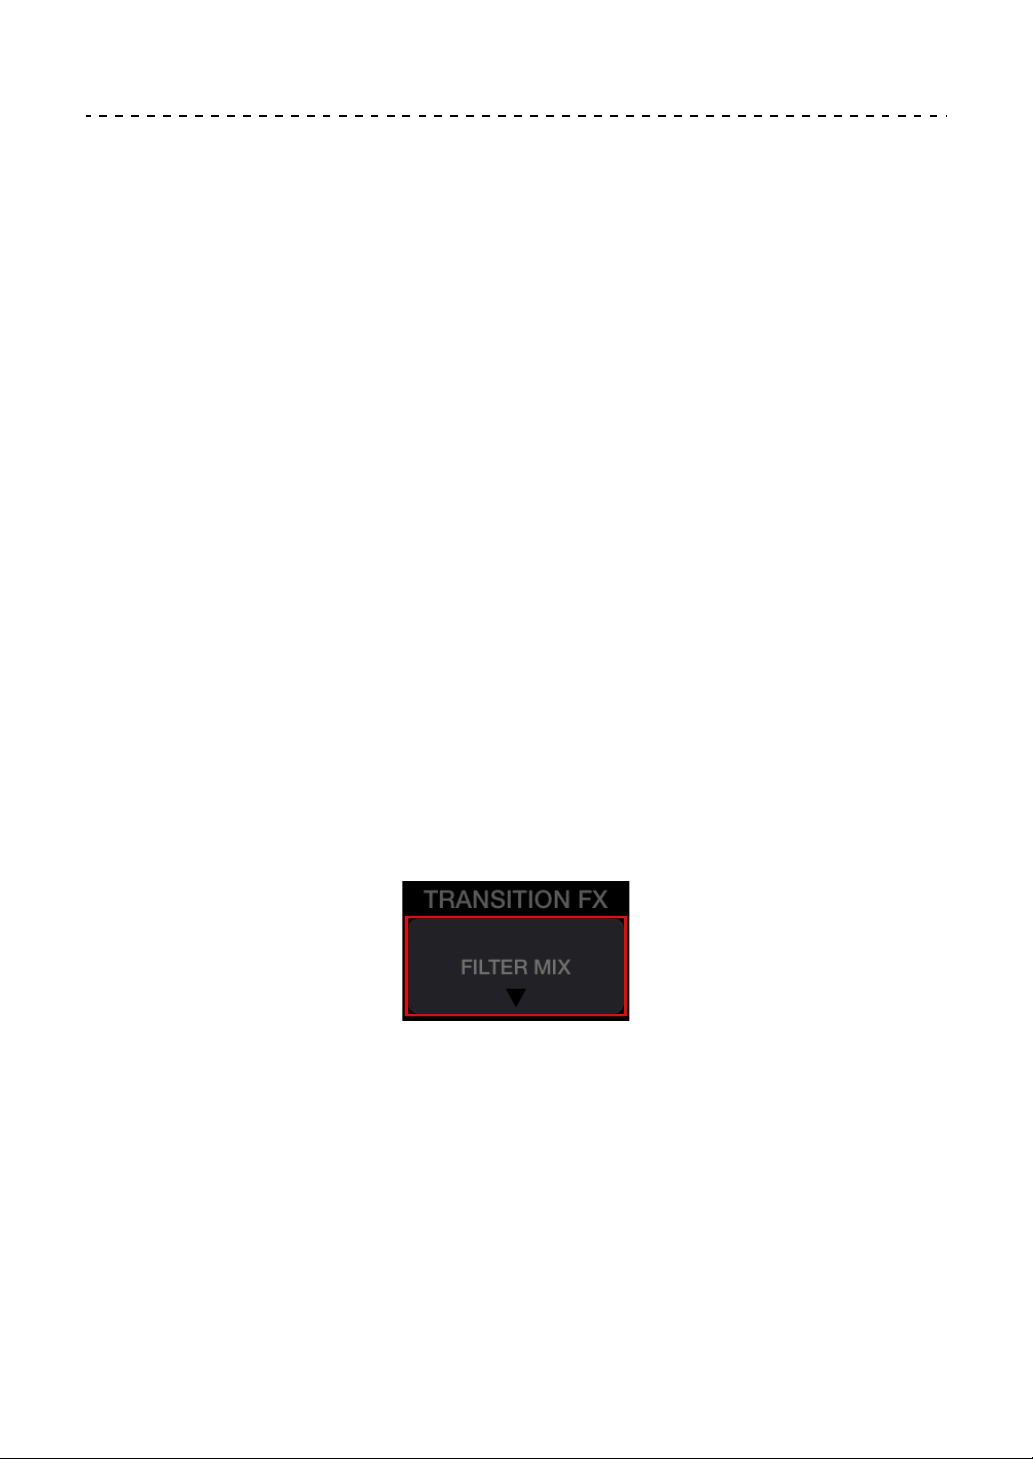
6 TRANSITION FX button
Press:
Turns on Transition FX.
Read more: Using Transition FX (page 34)
[SHIFT] + press:
Turns on Phrase Sync.
Read more: Using Phrase Sync (page 35)
7 Crossfader
Adjusts the sound balance between the left channel (deck 1) and right channel
(deck 2).
Bluetooth MIDI indicator
Flashes: The iOS device is not connected via Bluetooth.
Lights up: The iOS device is connected via Bluetooth.
Turns off: The unit has recognized the connection with rekordbox using
the USB cable.
• When using WeDJ for iPhone with the unit being powered via the
USB port of your PC/Mac, do not start rekordbox on your PC/Mac.

WeDJ for iPhone
12
En
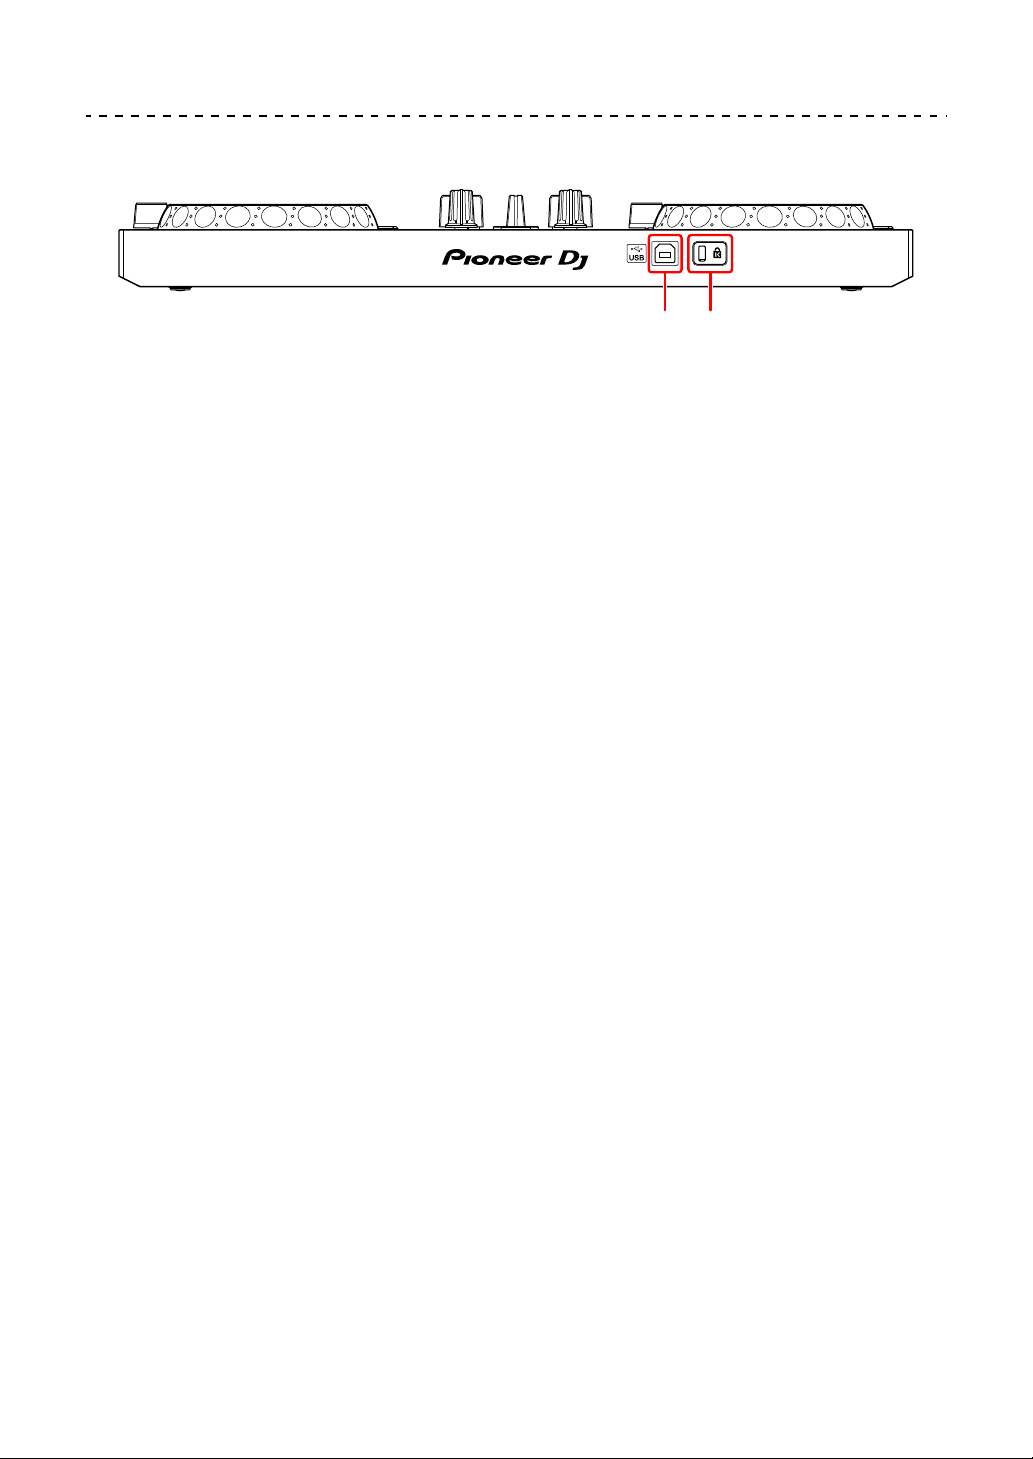
Rear panel
1USB port
Connects to a USB power adapter (not supplied) or mobile battery (not
supplied) via the supplied USB cable.
Also, you can connect to a USB port on your PC/Mac with the supplied USB
cable to power the unit.
• Use a USB power adapter or mobile battery with DC +5 V and 500 mA or
more.
• When powering the unit from a USB port on your PC/Mac, do not start
rekordbox on your PC/Mac.
• Use a mobile battery which does not have a power-saving function. If you
use a mobile battery with a power-saving function, it may cut power to the
unit.
2 Kensington security slot
Connects a cable lock for security.
1 2

WeDJ for iPhone
13
En
Connections (for iOS devices)
Power comes through the USB port. You can connect to the USB port
on your PC/Mac or connect a USB power adapter or mobile battery to
power the unit.
Use a USB power adapter or mobile battery with DC +5 V and 500 mA
or more.
Use a mobile battery which does not have a power-saving function.
Use the USB cable supplied with this unit.
Connect the cable correctly after checking the position of the port on
this unit.
Refer to the instruction manuals for components to be connected.
• Once connected with the unit, connect your PC/Mac to an AC power
supply. (This applies when power is supplied to the unit through the
USB port on your PC/Mac.)
• The unit can’t be powered via your PC/Mac in the following
situations:
– Power supply capacity of the USB port on your PC/Mac is too low.
– Your PC/Mac is connected with other USB devices.

WeDJ for iPhone
14
En
Connecting to the USB port
Rear panel
(1) USB cable (supplied), (2) PC/Mac*
1
, (3) USB power adapter (not
supplied), (4) mobile battery (not supplied)
*1
If you want to power the unit via the USB port on your PC/Mac, turn
on your PC/Mac.
*2
To maintain performance, use the supplied USB cable.

WeDJ for iPhone
15
En
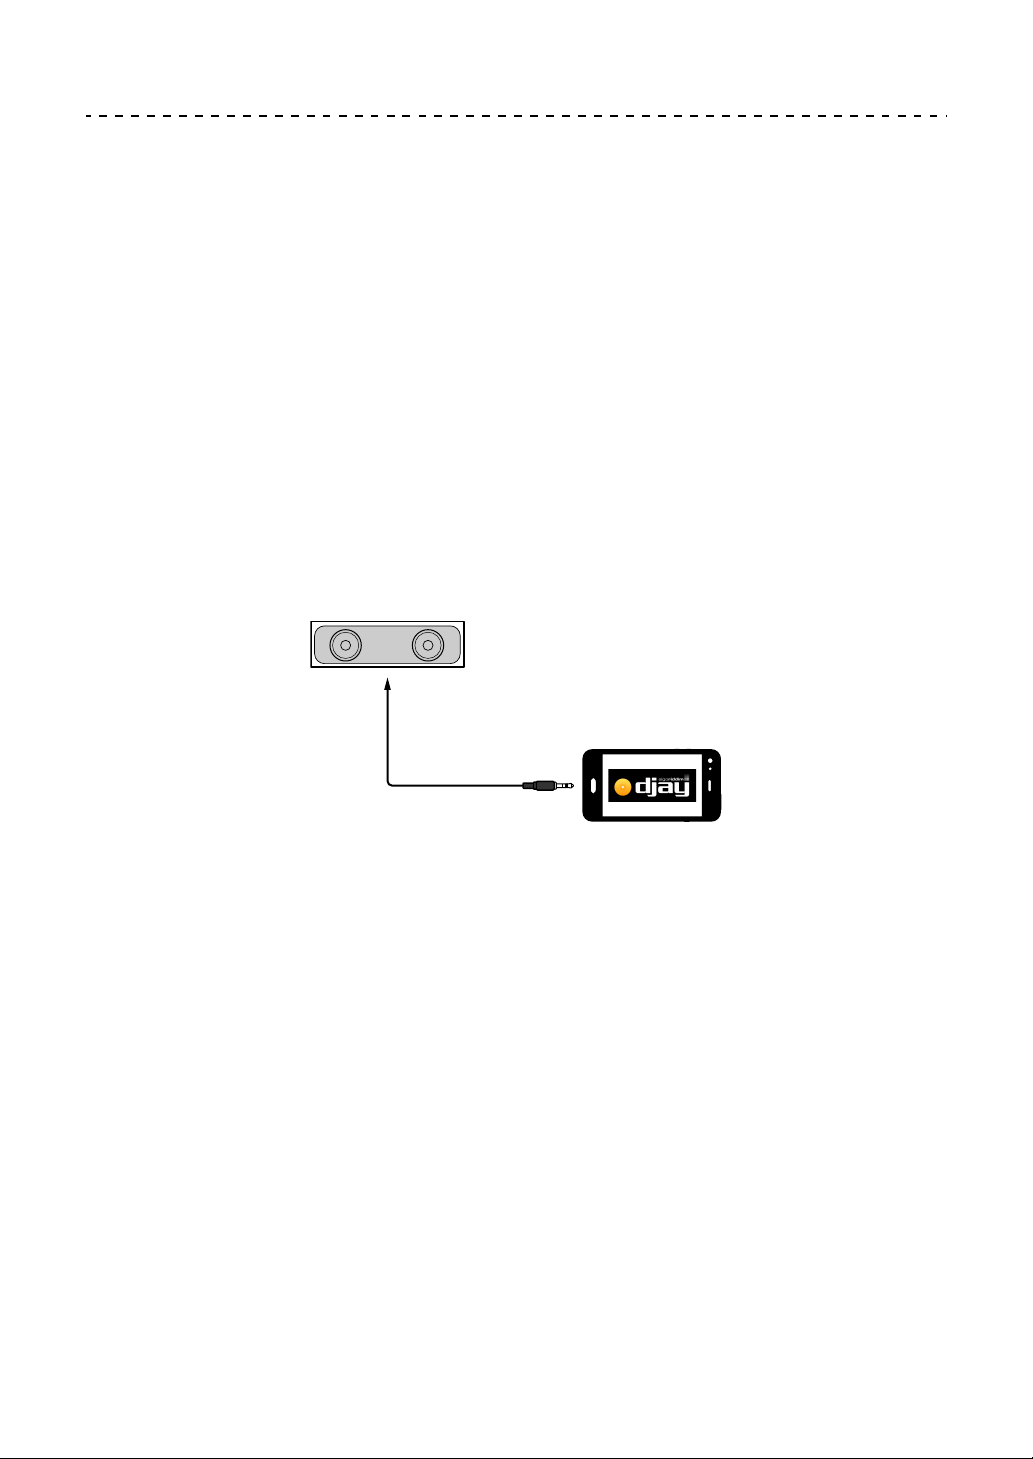
Connecting an audio device (speaker) to the
headphones jack of your iOS device
You can DJ with an iOS device and listen to your performance via its
built-in speakers. However, if you use the supplied split cable, you can
create an authentic DJ set-up with an external speaker(s) and
headphones.
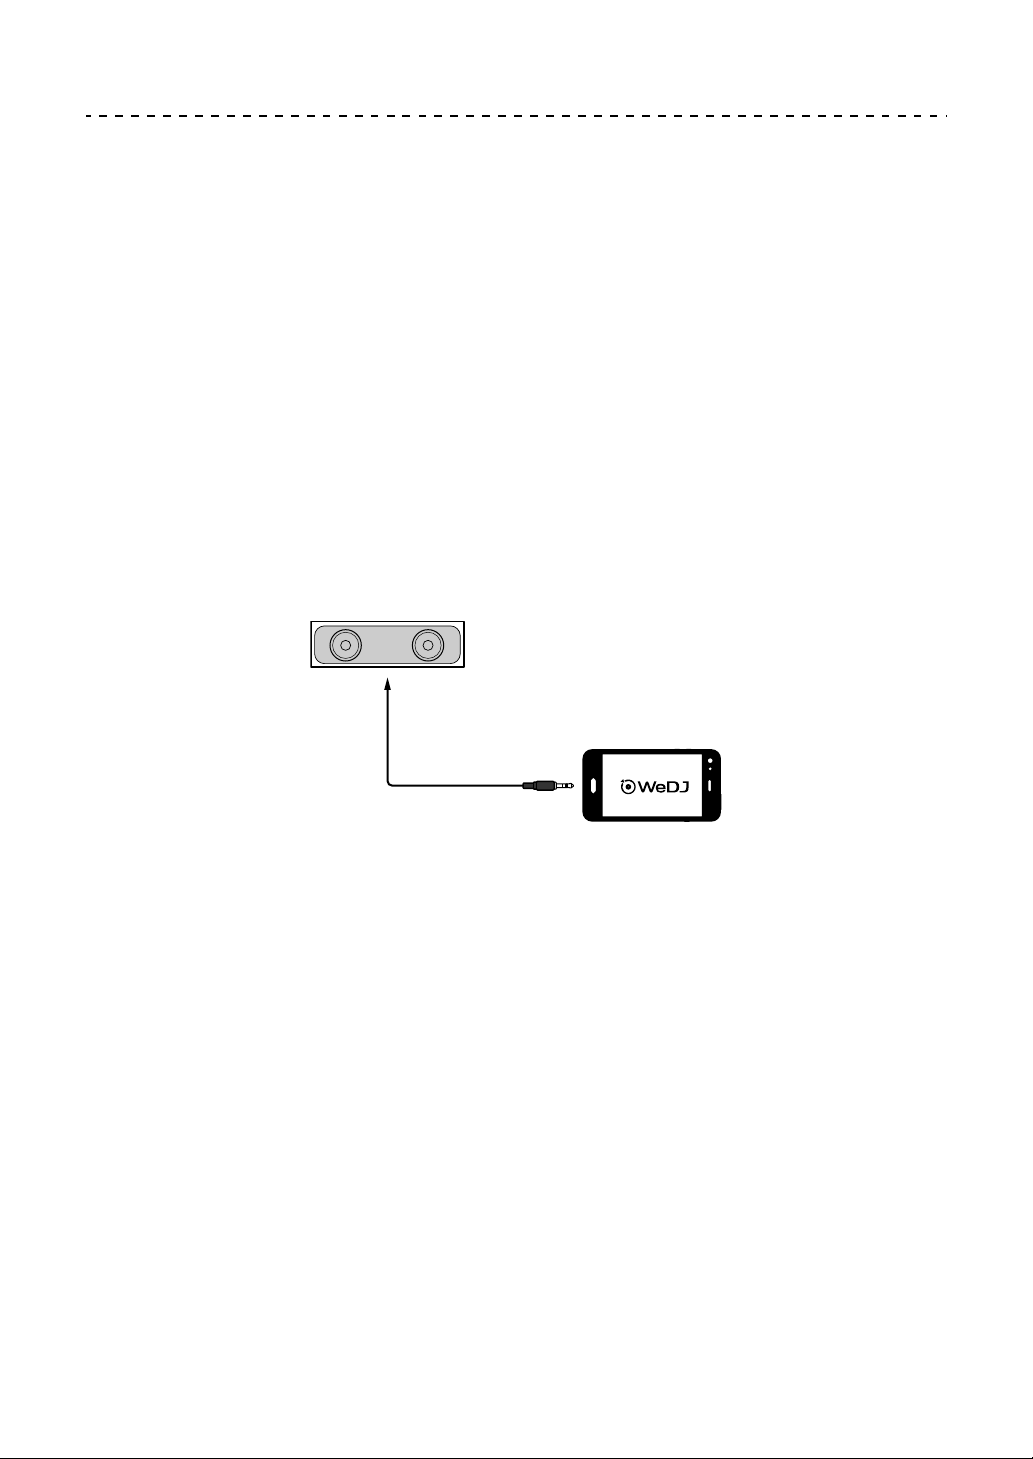
Connection example 1 (if the iOS device has a headphones
output)
In this example, the master sound plays in stereo and there is no sound
output to the headphones.
Read more: Checking audio setup (page 19)
(1) Speaker with built-in amplifier, etc.*
* The audio cable is not supplied with the unit.
(1)

WeDJ for iPhone
16
En
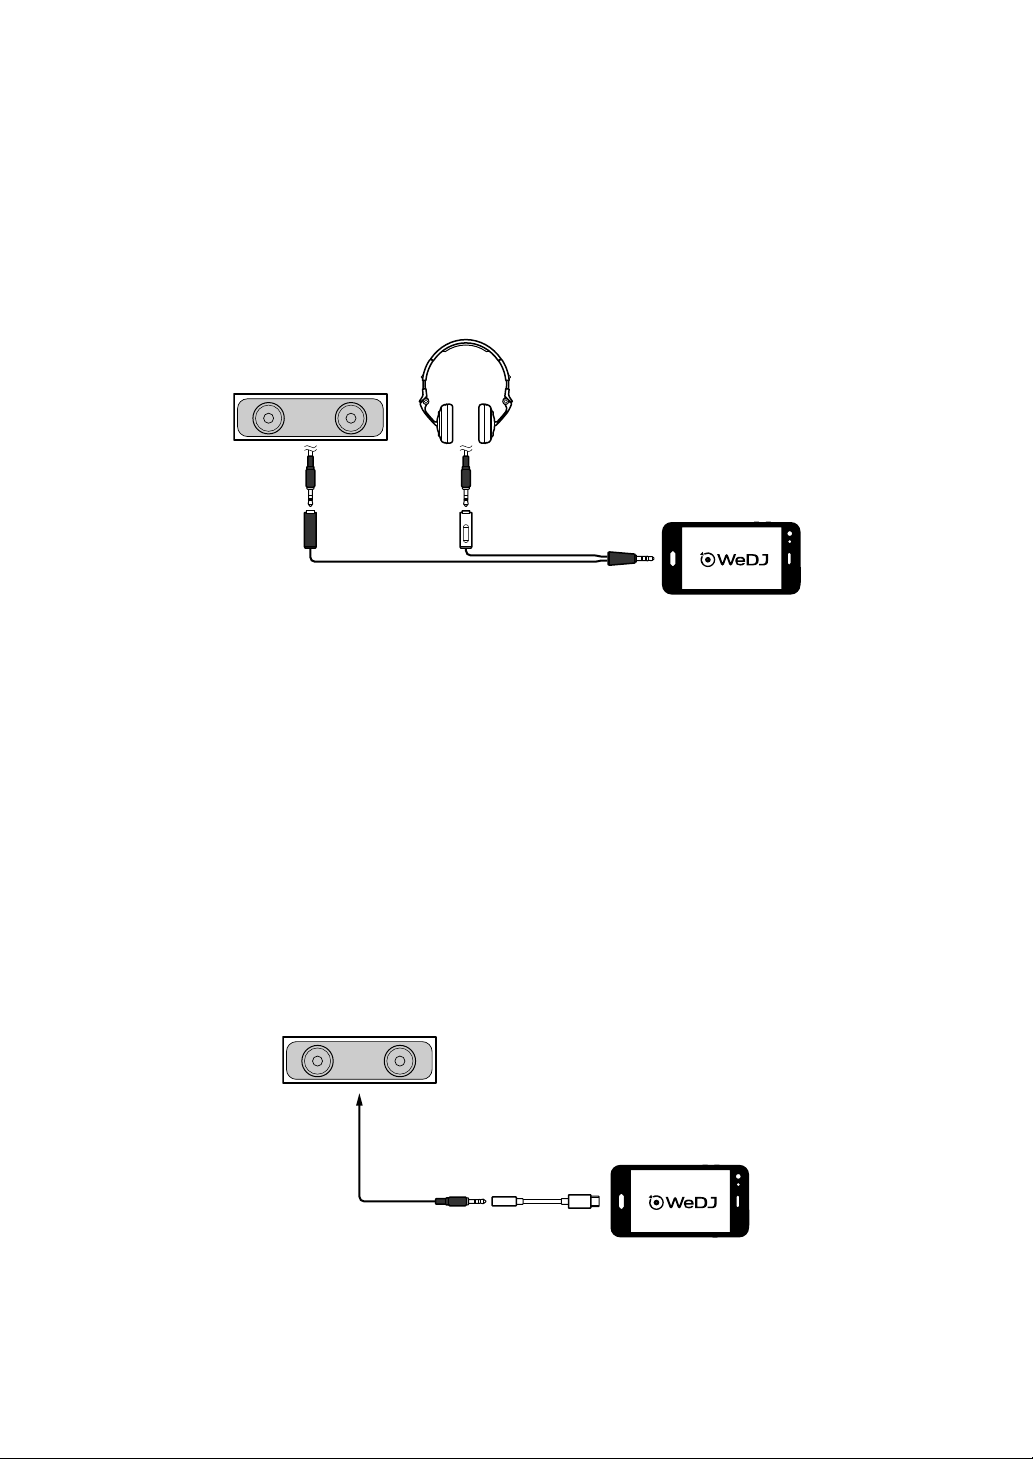
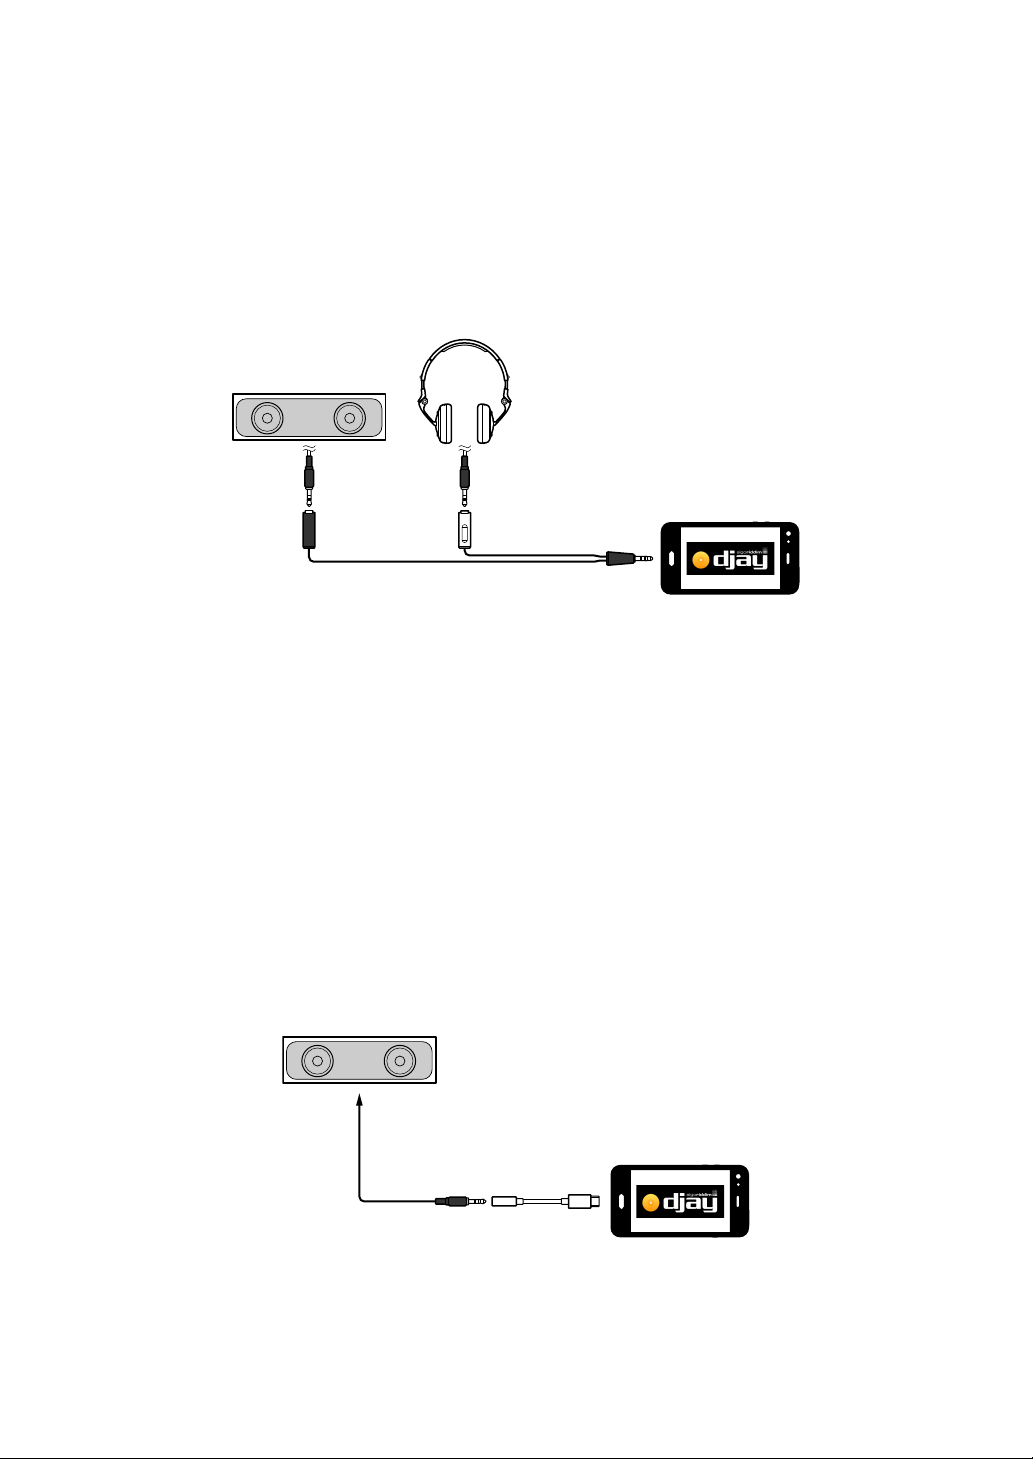
Connection example 2 (if the iOS device has a headphones
output)
In this example, the master sound and the headphones monitor sound
both play in mono.
Read more: Checking audio setup (page 19)
(1) Speaker with built-in amplifier, etc.*, (2) Headphones,
(3) Plug for the speaker with built-in amplifier, etc. (black),
(4) Plug for the headphones (white), (5) Split cable (supplied)
* The audio cable is not supplied with this unit.
Connection example 3 (if the iOS device does not have a
headphones output, such as iPhone Xs)
In this example, the master sound plays in stereo and there is no sound
output to the headphones.
Read more: Checking audio setup (page 19)
(1) Speaker with built-in amplifier, etc.*,
(2) Lightning - 3.5 mm headphones jack adapter (not supplied)
(2)
(1)
(3) (4)
(5)
(1)
(2)

WeDJ for iPhone
17
En
* The audio cable is not supplied with the unit.
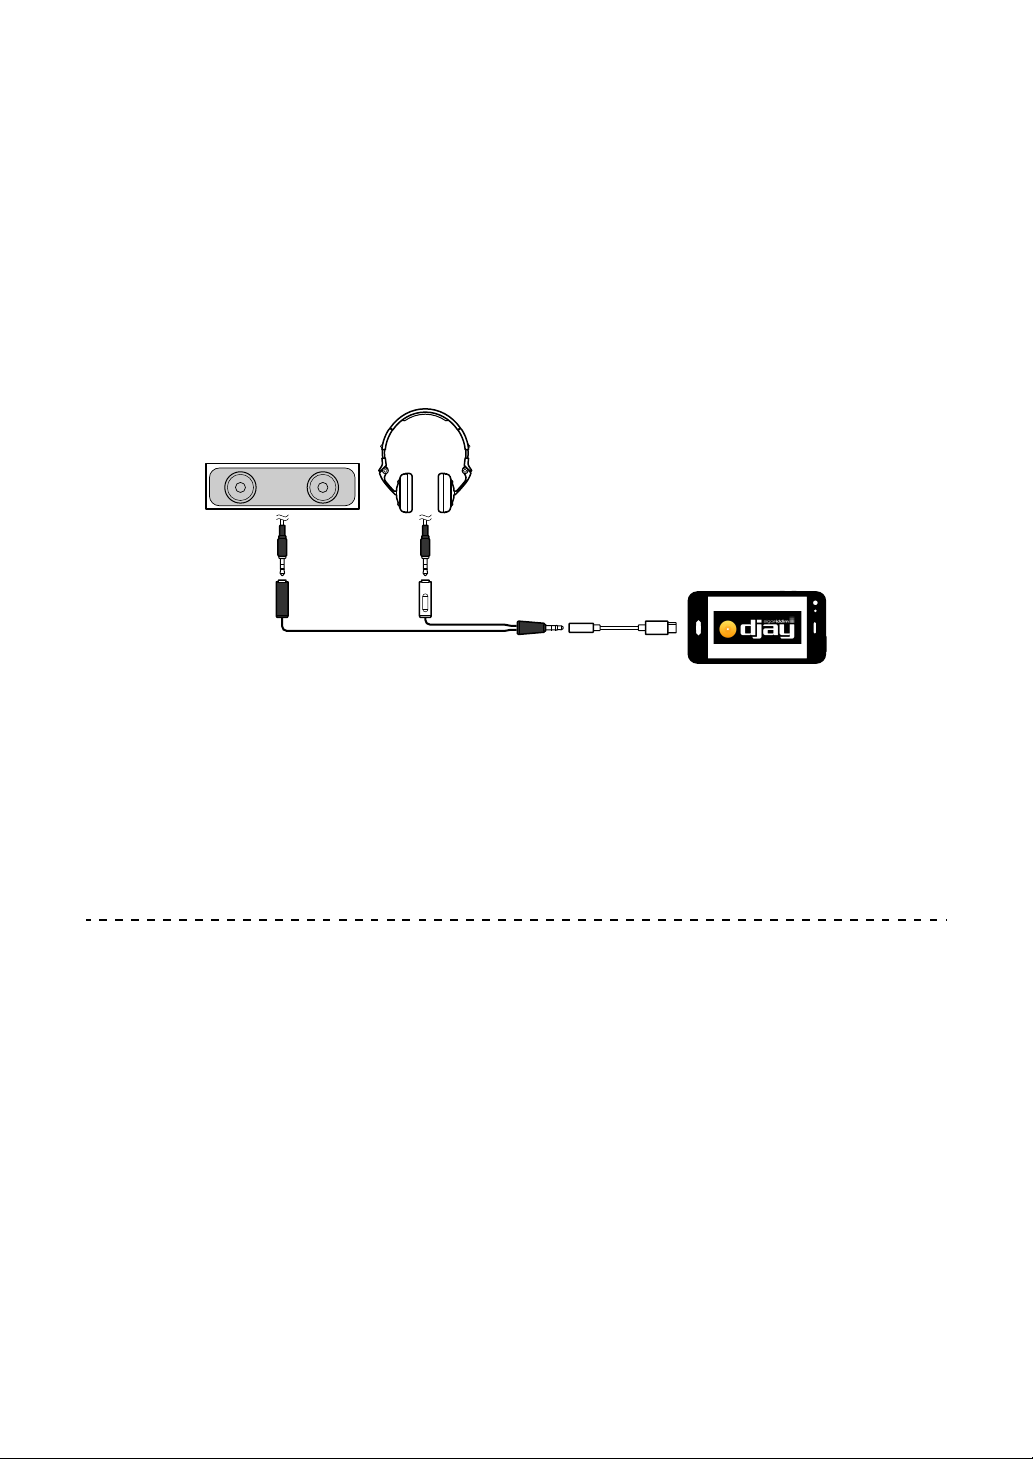
Connection example 4 (if the iOS device does not have a
headphones output, such as iPhone Xs)
In this example, the master sound and the headphones monitor sound
both play in mono.
Read more: Checking audio setup (page 19)
(1) Speaker with built-in amplifier, etc.*, (2) Headphones,
(3) Plug for the speaker with built-in amplifier, etc. (black),
(4) Plug for the headphones (white), (5) Split cable (supplied),
(6) Lightning - 3.5 mm headphones jack adapter (not supplied)
* The audio cable is not supplied with this unit.
Turning on the iOS device, etc.
1 Turn on the iOS device.
2 Turn on the device(s) connected to the iOS device (speaker with
built-in amplifier, etc.).
(6)
(2)
(1)
(3) (4)
(5)

WeDJ for iPhone
18
En
Basic use (WeDJ for iPhone)
Starting WeDJ for iPhone and connecting it to the unit
1 Tap on your iOS device to start WeDJ for iPhone.
The tutorial screen may show.
The following steps may be different if you run the tutorial.
2 Tap on the main screen of WeDJ for iPhone.
The [Settings] screen is displayed.
3Tap [Connect the DDJ-200].
4Tap [DDJ-200].
The unit connects to your iOS device via Bluetooth.
When the connection is complete, the WeDJ logo and the unit’s logo are
displayed and the light of the Bluetooth MIDI indicator changes from being lit
to flashing.
• On the [Connect the DDJ-200] screen, [DDJ-200_X] may be displayed (X
is a number from1 to 16).
Read more: Changing the BLUETOOTH
®
MIDI device name
(page 170)
WeDJ for iPhone
19
En
Checking audio setup
1 Tap on the main screen of WeDJ for iPhone.
2Tap [Audio] on the [Settings] screen.
To play both master sound and headphones monitor sound via the supplied
split cable, turn on [Split Output].
To play the master sound via your iOS device’s built-in speaker, or to play it in
stereo via a speaker with a built-in amplifier connected to your iOS device,
without using the split cable, turn off [Split Output].
Read more: Connecting an audio device (speaker) to the headphones jack
of your iOS device (page 15)
Read more: Monitoring with headphones (page 21)
3 Go to the [Settings] screen, then tap [Done].
The main screen of WeDJ for iPhone is displayed.
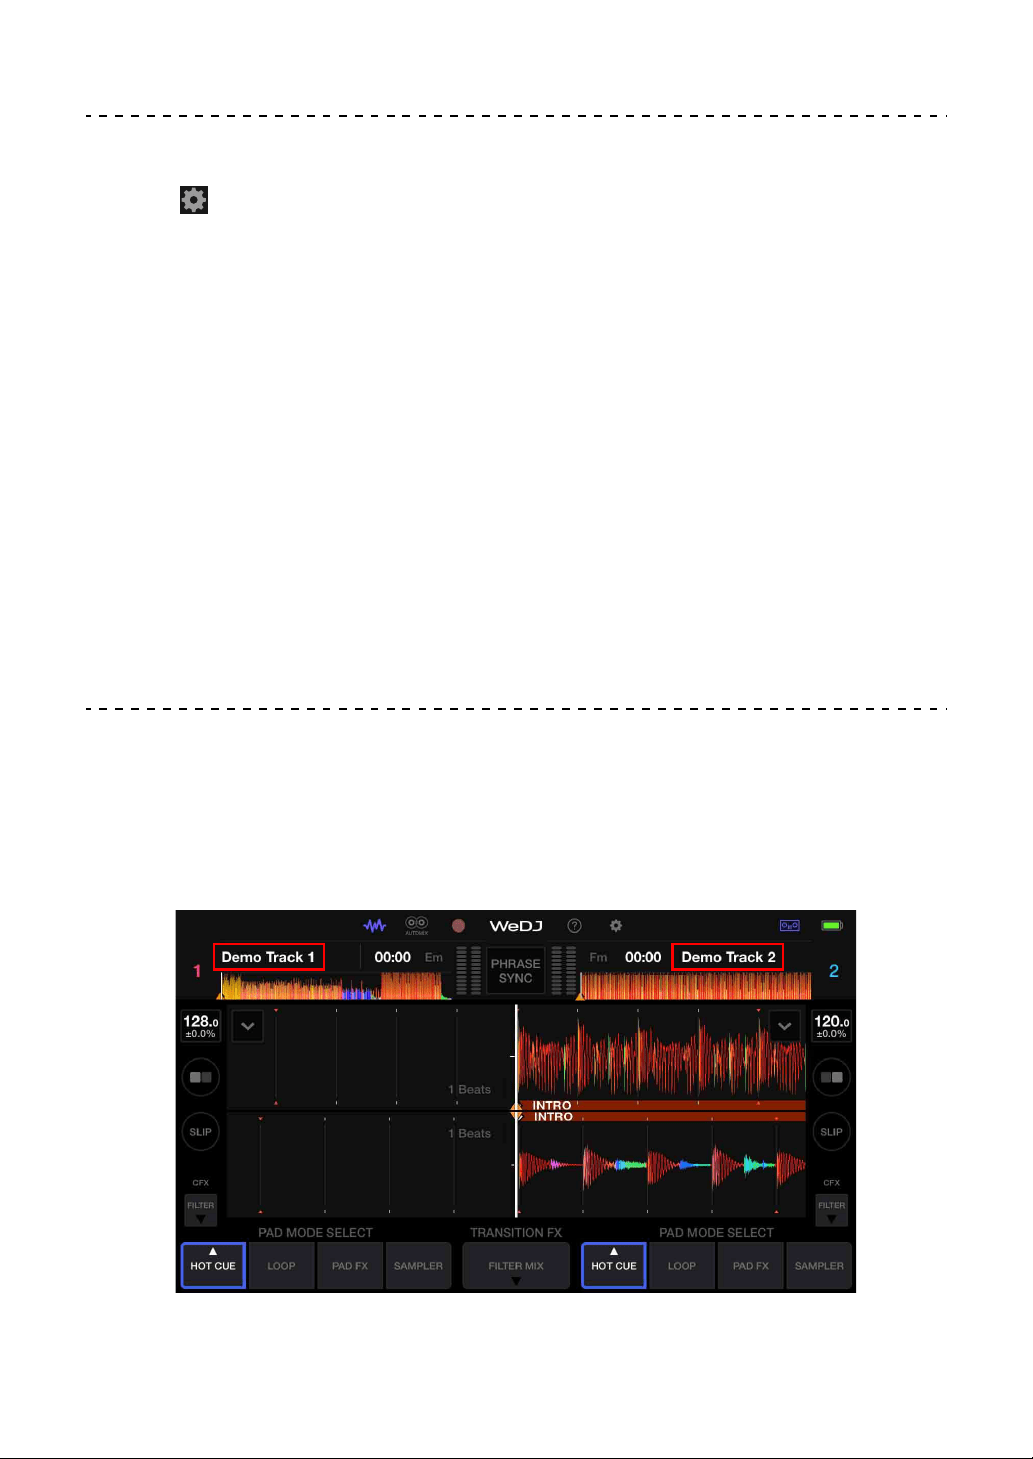
Loading a song or audio track onto a deck
1 Tap the area that shows the track title, near the top of the main
screen of WeDJ for iPhone.
This opens the browse screen.
WeDJ for iPhone
20
En
2 Tap the track you want to load.
This loads the track onto the deck.
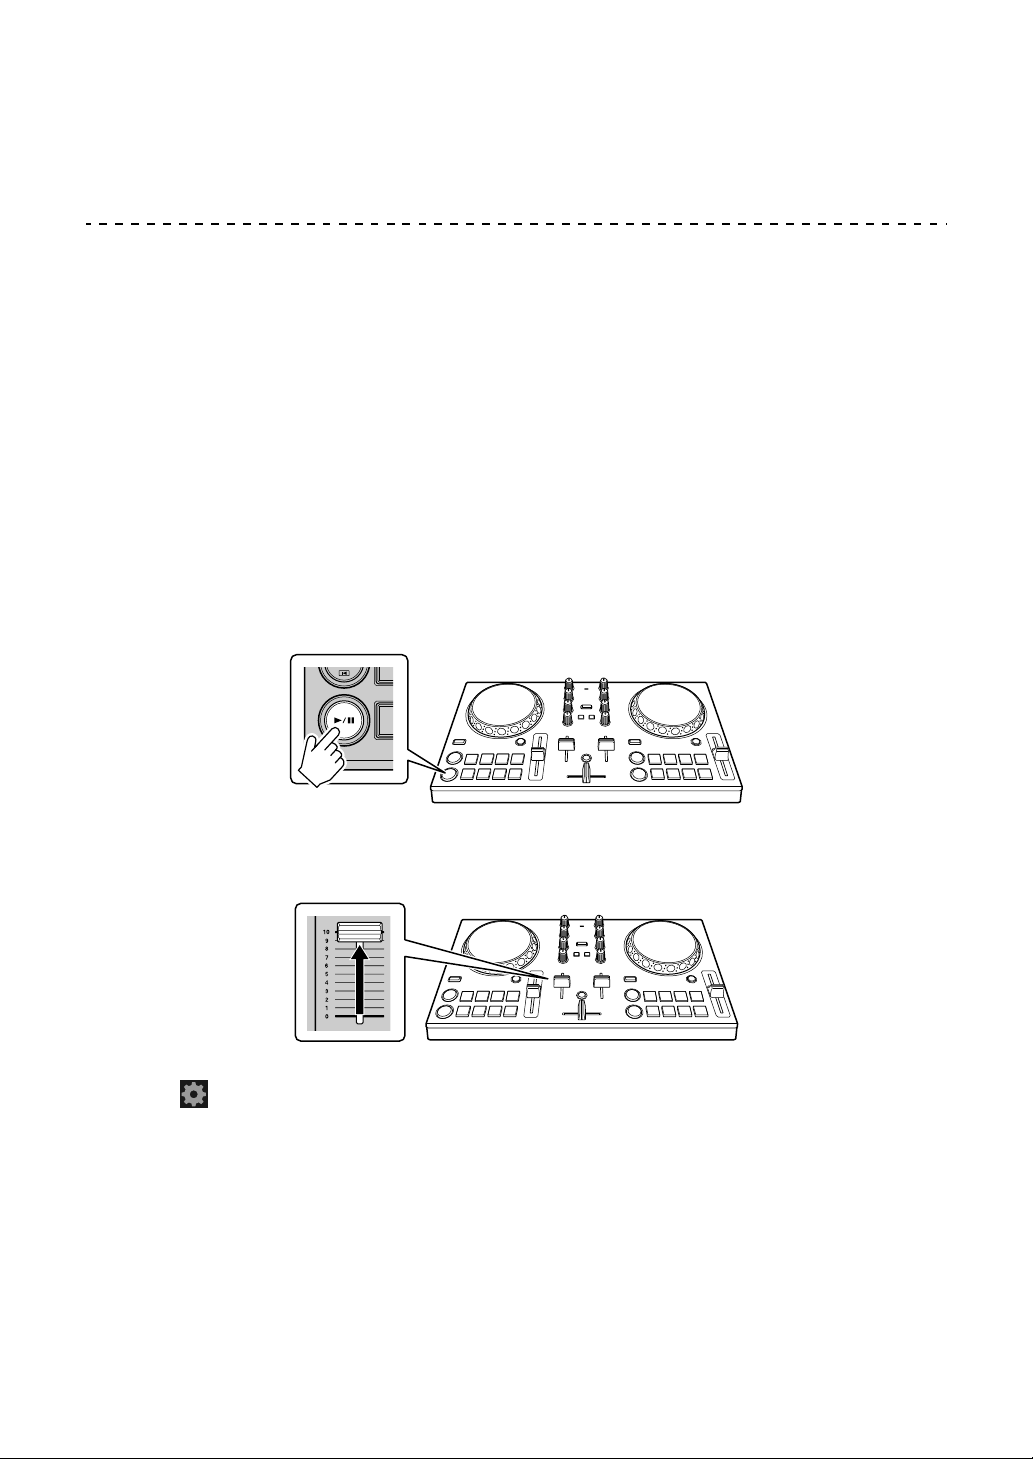
Playing a track
This section explains how to play sound from deck 1 (left) as an
example.
1 Set the positions of the knobs as follows:
• [EQ (HI/MID/LOW)] knobs: center position (12 o’clock)
•[CFX] knob: center position
• Channel fader: bottom position
• Crossfader: center position
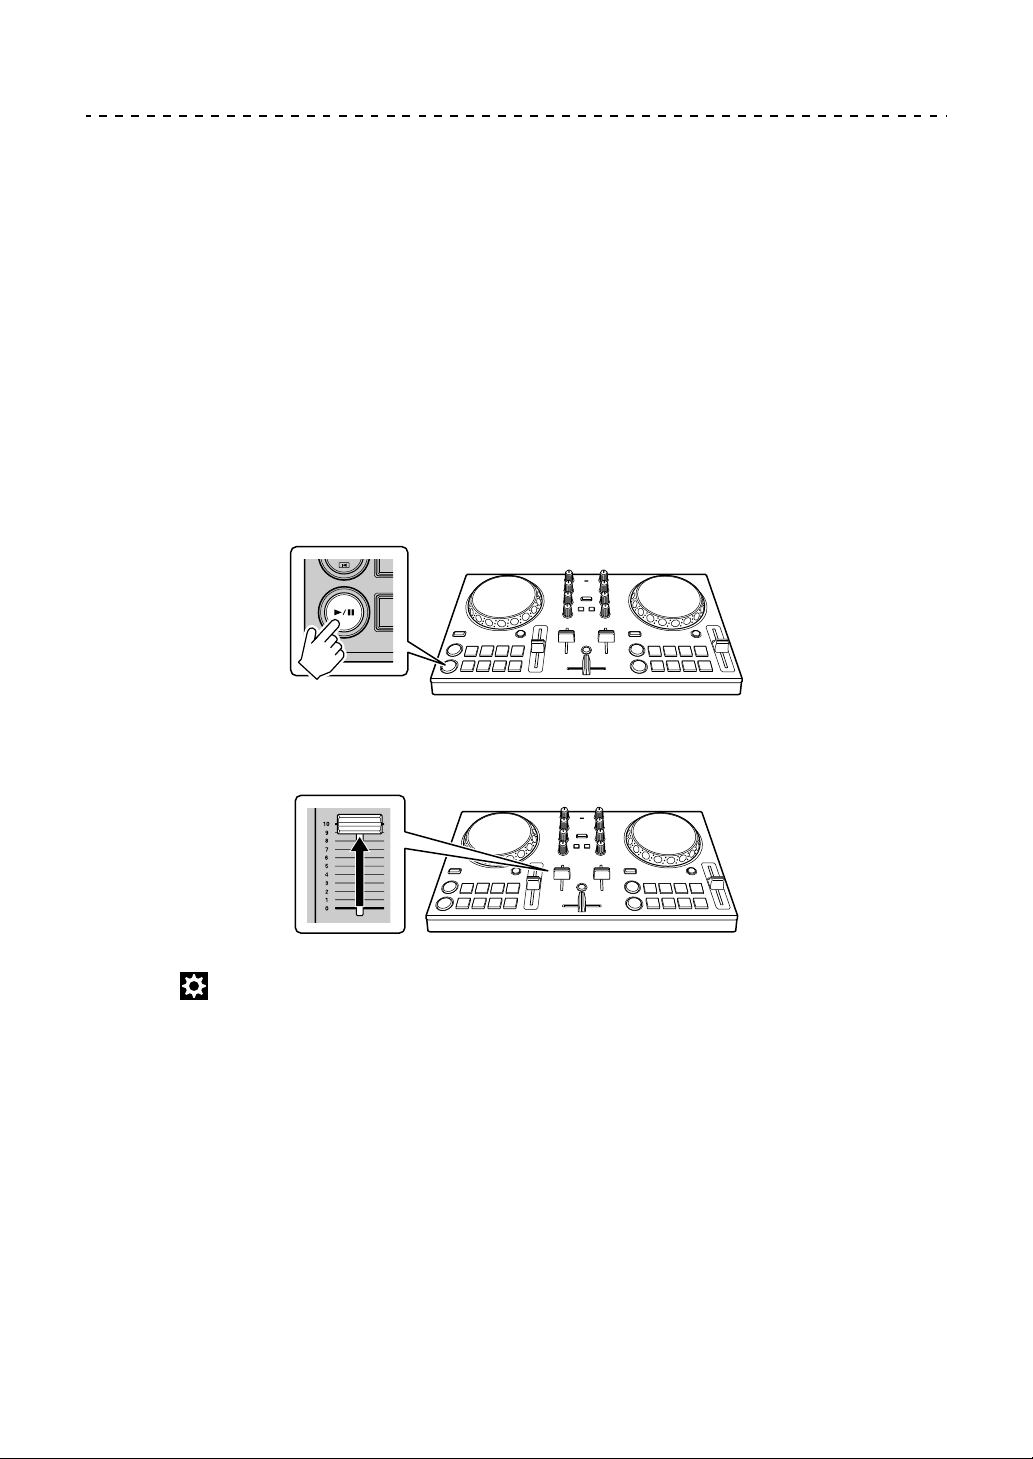
2 Press the [PLAY/PAUSE ] button to play the track.
3 Move the channel fader to the top.
4 Tap on the main screen of WeDJ for iPhone.
5Tap [Audio] on the [Settings] screen.
6 Move the [MASTER VOLUME] slider on the [Audio] screen.
Adjust the volume for your iOS device’s speaker, or the speaker connected to
your iOS device, until you have a volume level you’re happy with.
WeDJ for iPhone
21
En
Monitoring with headphones
To monitor sound with your headphones, you need to use the supplied
split cable.
Read more: Connecting an audio device (speaker) to the
headphones jack of your iOS device (page 15)
Also, you need to turn on [Split Output] in WeDJ for iPhone.
Read more: Checking audio setup (page 19)
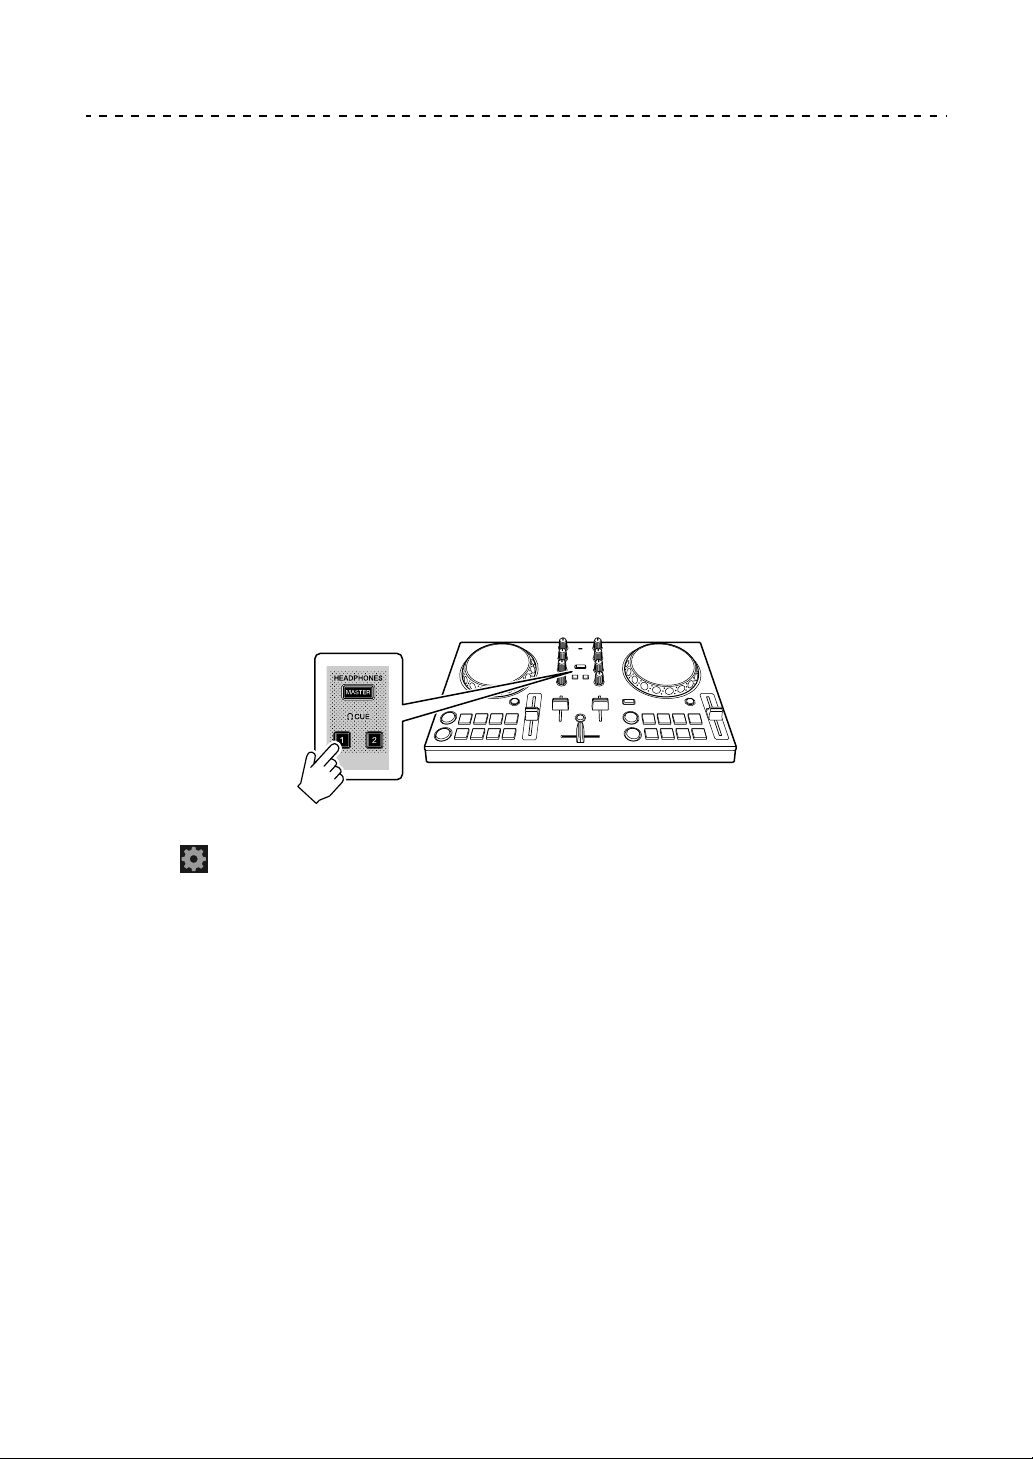
Monitoring sound from a channel via headphones
The following example explains how to monitor sound from deck 1
(left).
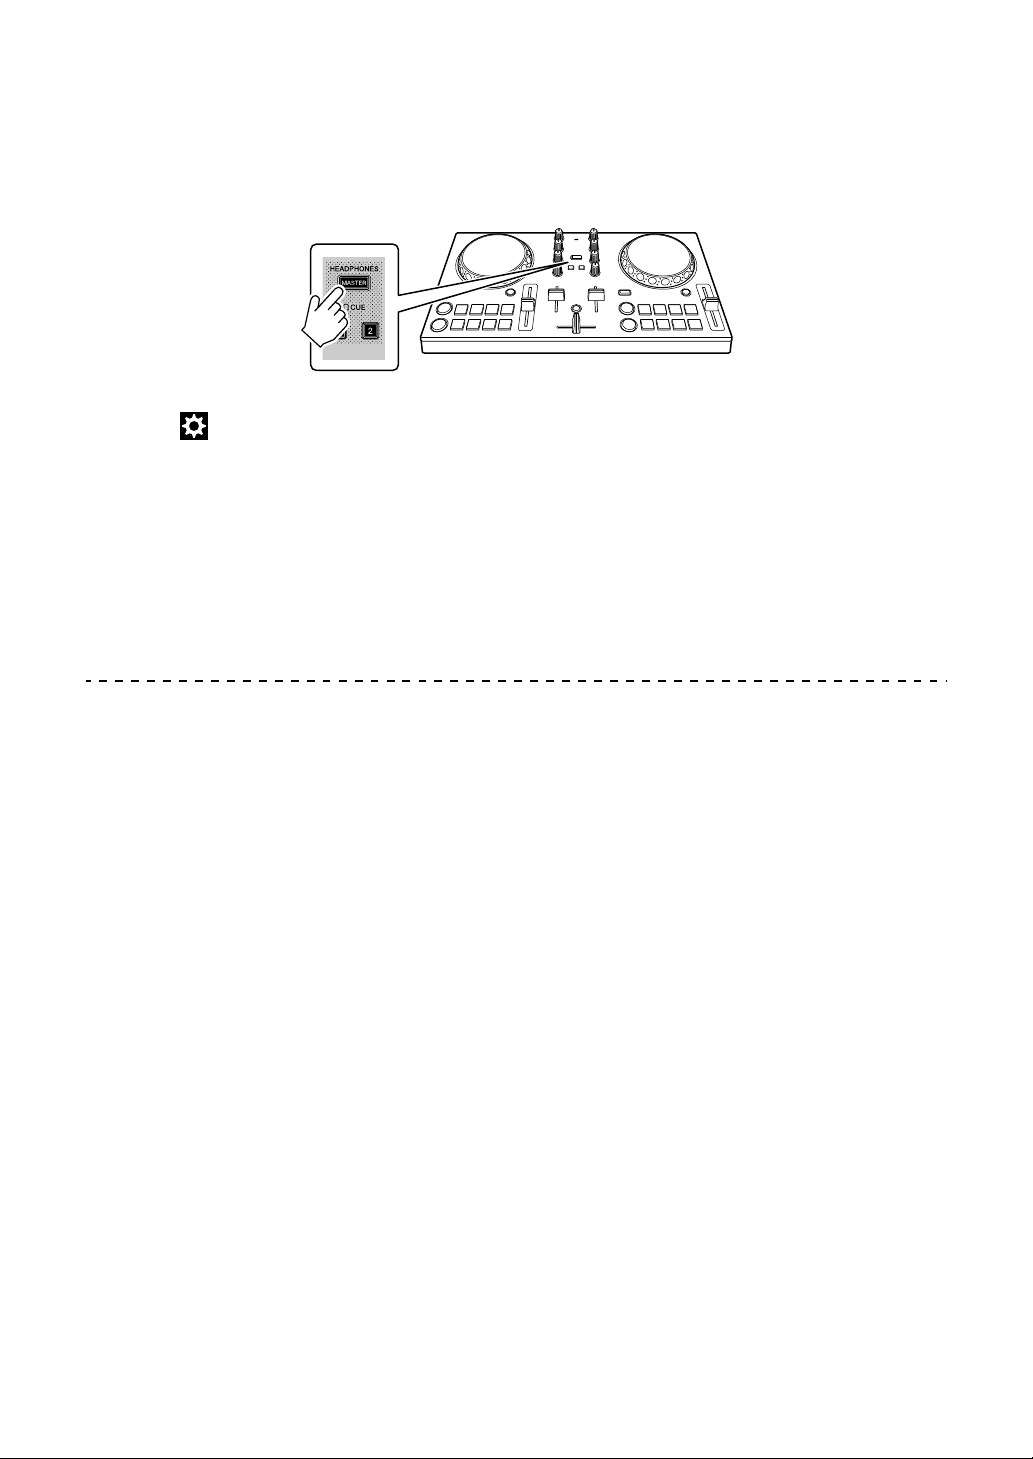
1 Press the Headphone [CUE] button on channel 1.
2 Tap on the main screen of WeDJ for iPhone.
3Tap [Audio] on the [Settings] screen.
4 Move the [MIN] / [MAX] slider under [Split Output] on the [Audio]
screen.
Adjust the volume of the headphones monitoring sound until you have a level
you’re happy with.

WeDJ for iPhone
22
En
Monitoring the master sound with headphones
1 Press the [MASTER CUE] button.
2 Tap on the main screen of WeDJ for iPhone.
3Tap [Audio] on the [Settings] screen.
4 Move the [MIN] / [MAX] slider under [Split Output] on the [Audio]
screen.
Adjust the volume of the headphones monitoring sound until you have a level
you’re happy with.
Quitting the system
1 Quit WeDJ for iPhone.
2 Disconnect the USB cable to turn off the unit.

WeDJ for iPhone
23
En
Advanced use (WeDJ for iPhone)
Using the Performance Pads
Using Hot Cues
You can start playback instantly from the position where a Hot Cue is
set. Loops can also be set and called up instantly.
• Up to 8 Hot Cue points can be set and saved for each track.
Setting and calling up a Hot Cue
1Tap [HOT CUE] on the main screen of WeDJ for iPhone.
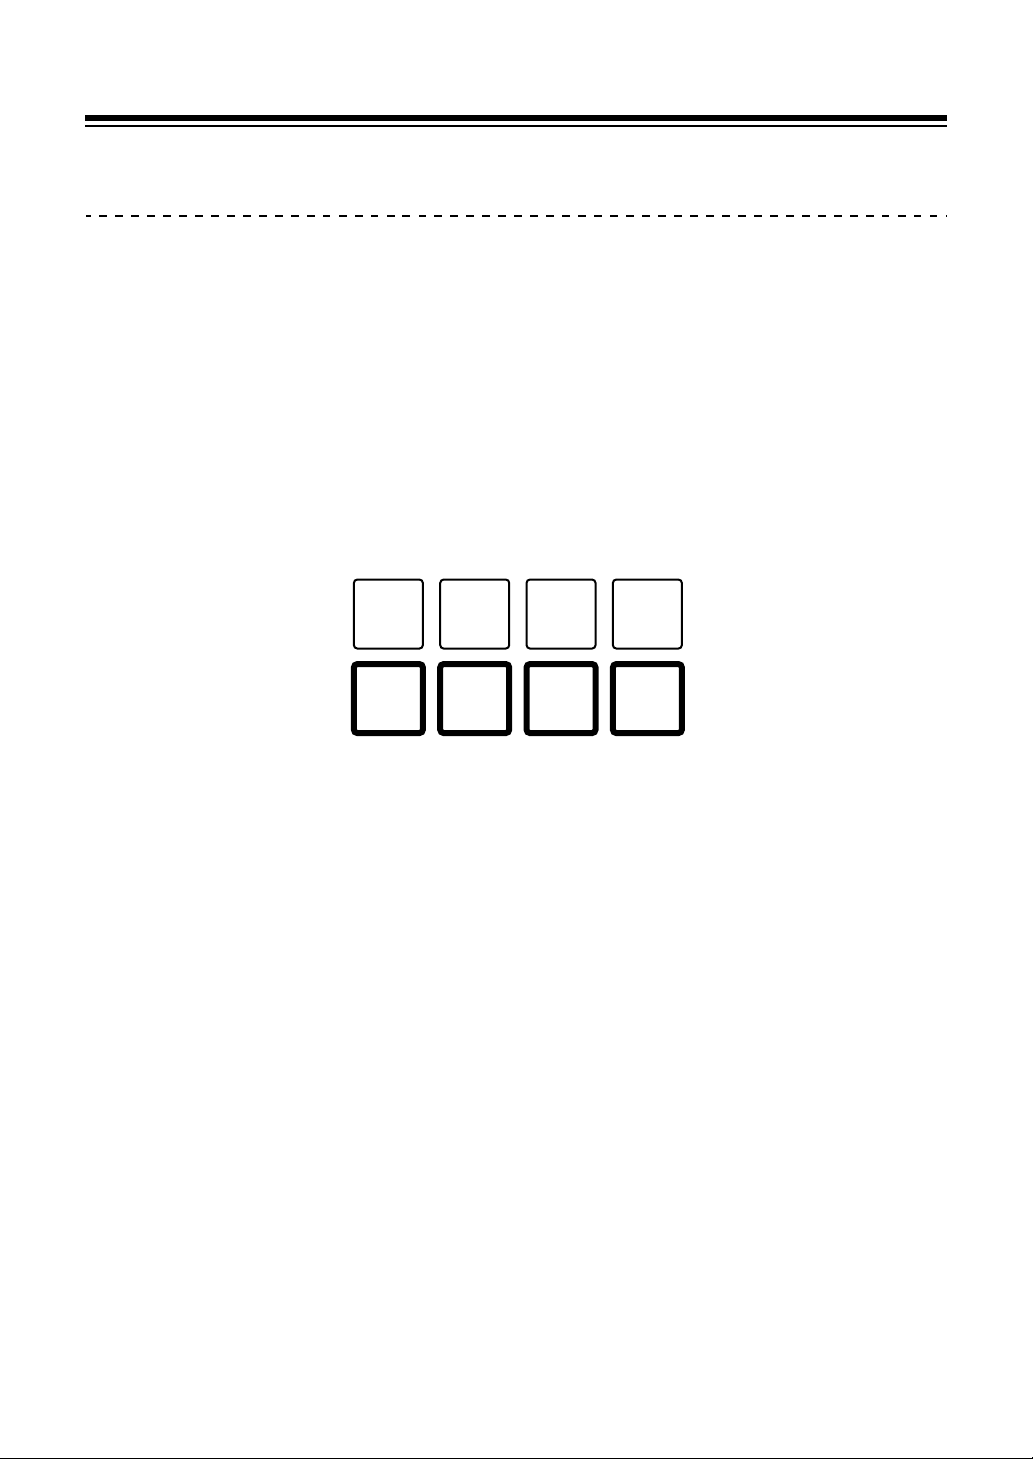
2 If the track is playing or paused, press a Performance Pad to set the
Hot Cue point.
The Hot Cue points are set to Performance Pads as follows:
1: Hot Cue A, 2: Hot Cue B, 3: Hot Cue C, 4: Hot Cue D,
5: Hot Cue E, 6: Hot Cue F, 7: Hot Cue G, 8: Hot Cue H
3 Press a Performance Pad you’ve set a Hot Cue for.
Playback starts from the Hot Cue point.
1234
5678
WeDJ for iPhone
24
En
• You can clear Hot Cue points by pressing a Performance Pad while holding
the [SHIFT] button.
Setting and calling up Beat Loop
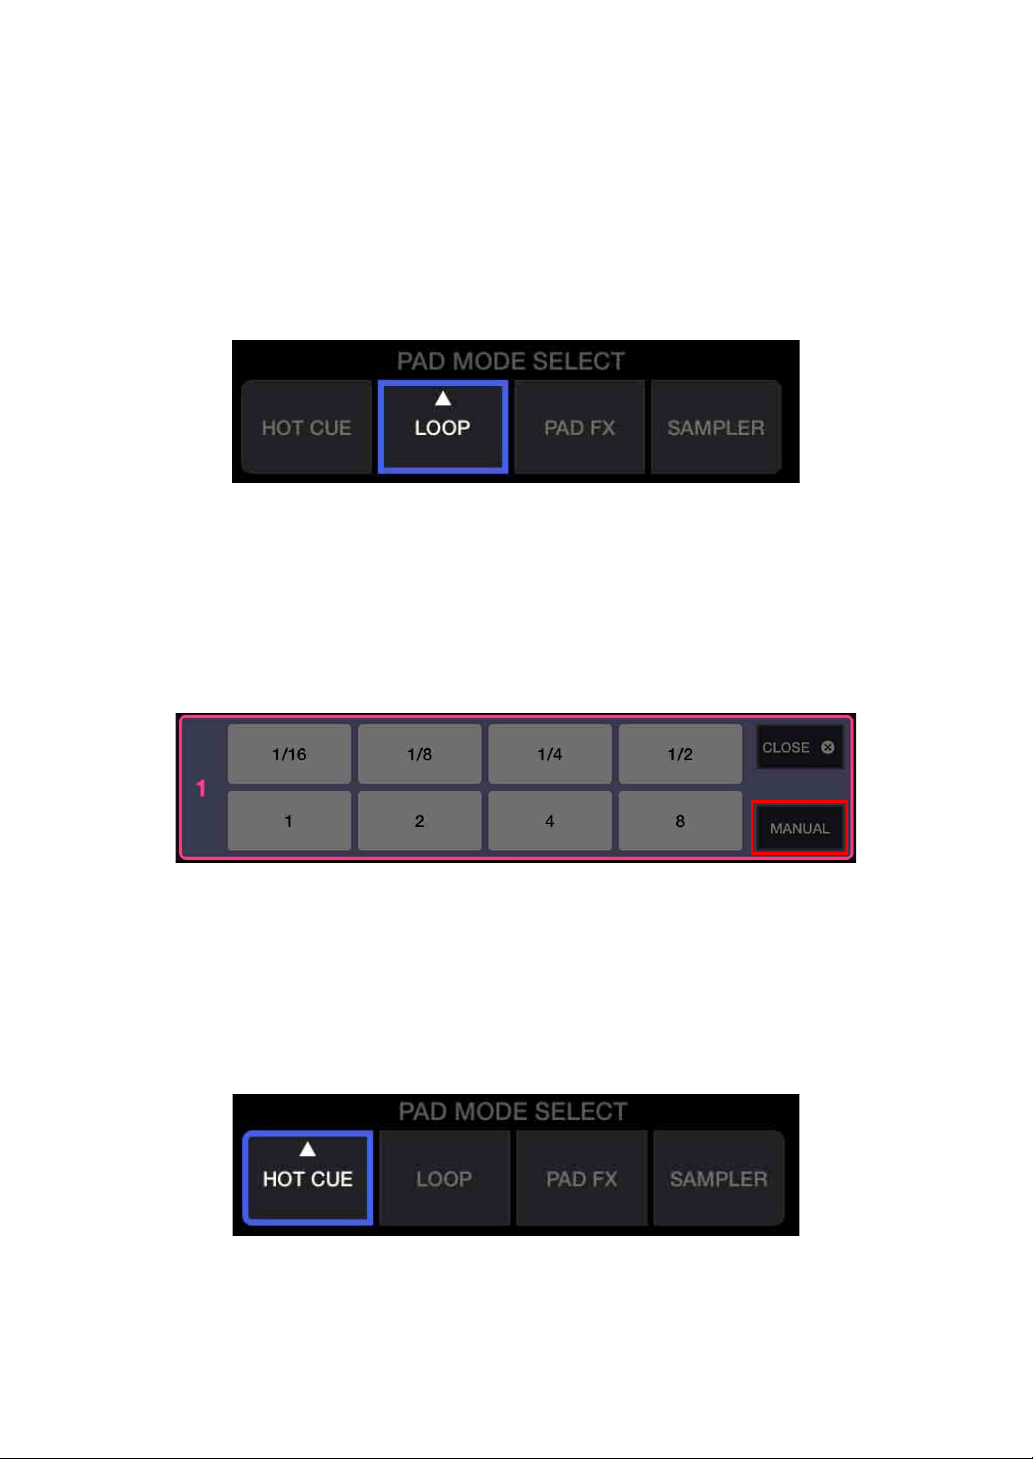
1Tap [LOOP] on the main screen of WeDJ for iPhone.
2Tap [LOOP] again to display the [LOOP] panel.
3 Turn on Beat Loop mode.
When [AUTO] shows instead of [MANUAL] as it does in the following picture,
tap [AUTO] to switch to Beat Loop mode.
4 Press a Performance Pad during playback.
Loop playback starts with the number of beats set on the pad you pressed.
Read more: Using Beat Loop (page 26)
5Tap [HOT CUE] on the main screen of WeDJ for iPhone.
6 Press a Performance Pad to set a loop during loop playback.
WeDJ for iPhone
25
En
7 Press the Performance Pad.
Loop playback starts from the Loop In point.
• You can clear the loop by pressing the Performance Pad while holding the
[SHIFT] button.
Setting and calling up Manual Loop
1Tap [LOOP] on the main screen of WeDJ for iPhone.
2Tap [LOOP] again to display the [LOOP] panel.
3 Turn on Manual Loop mode.
When [MANUAL] shows instead of [AUTO] as it does in the following picture,
tap [MANUAL] to switch to Manual Loop mode.
4 Press Performance Pad 1, then press Performance Pad 2.
Loop playback starts.
Read more: Using Manual Loop (page 28)
5Tap [HOT CUE] on the main screen of WeDJ for iPhone.
WeDJ for iPhone
26
En
6 Press the Performance Pad to set a loop during loop playback.
7 Press the Performance Pad you’ve set a loop on.
Loop playback starts from the Loop In point.
• You can clear the loop by pressing the Performance Pad while holding the
[SHIFT] button.
Using Beat Loop
Press a Performance Pad while in Beat Loop mode to loop a set
number of beats. The loop keeps playing after you remove your finger
from the pad.
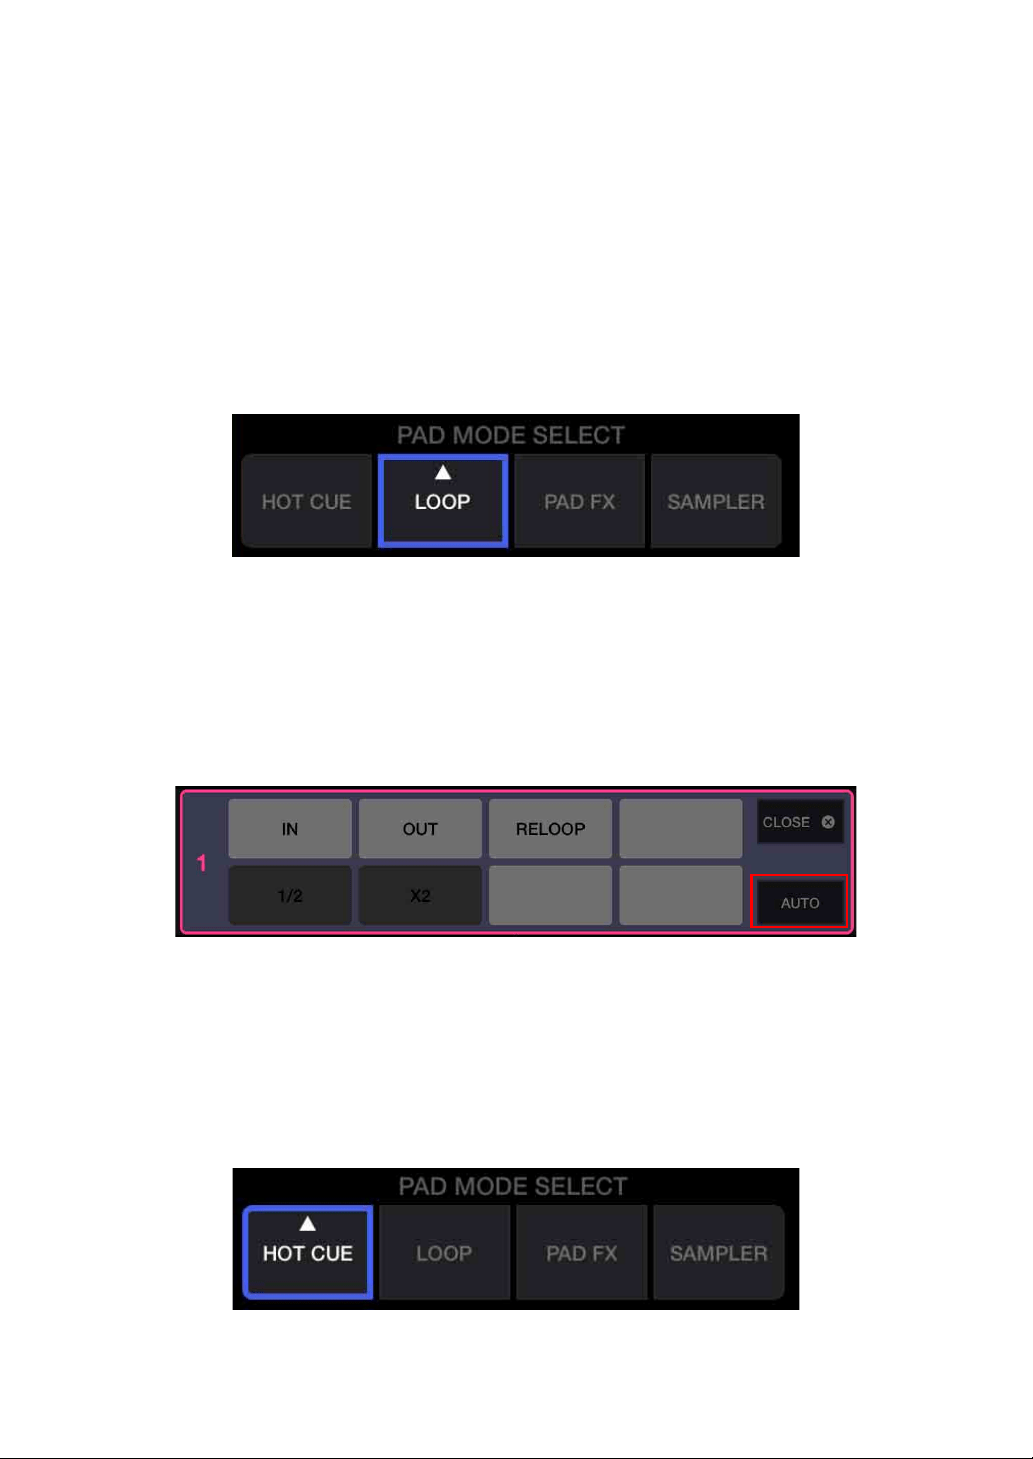
1Tap [LOOP] on the main screen of WeDJ for iPhone.
2Tap [LOOP] again to display the [LOOP] panel.
3 Turn on Beat Loop mode.
When [AUTO] shows instead of [MANUAL] as it does in the following picture,
tap [AUTO] to switch to Beat Loop mode.

WeDJ for iPhone
27
En
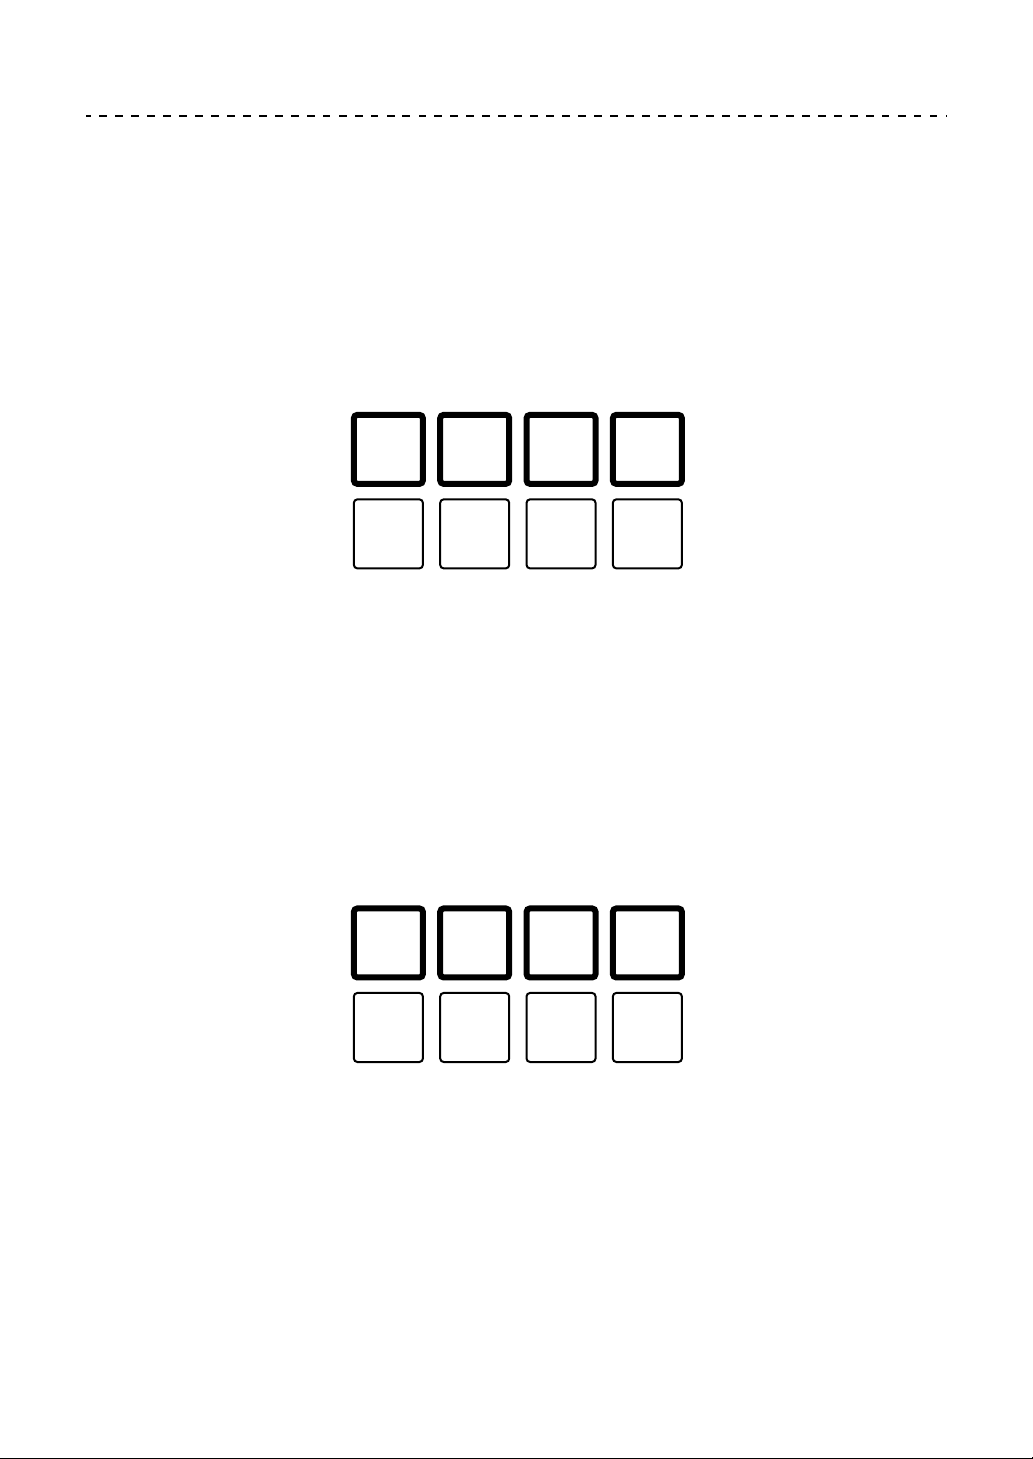
The number of beats set to the Performance Pads are as follows:
1: Beat Loop 1/16 beat, 2: Beat Loop 1/8 beat, 3: Beat Loop 1/4 beat,
4: Beat Loop 1/2 beat, 5: Beat Loop 1 beat, 6: Beat Loop 2 beats,
7: Beat Loop 4 beats, 8: Beat Loop 8 beats
4 Press a Performance Pad.
The loop plays with the number of beats set on that pad.
5 Press the same Performance Pad again.
Loop playback is canceled and the rest of the track continues to play.
1234
5678

WeDJ for iPhone
28
En
Using Manual Loop
You can choose the section you want to loop.
• When the Quantize function is turned on, you might notice a slight
delay as the loop synchronizes to the beat.
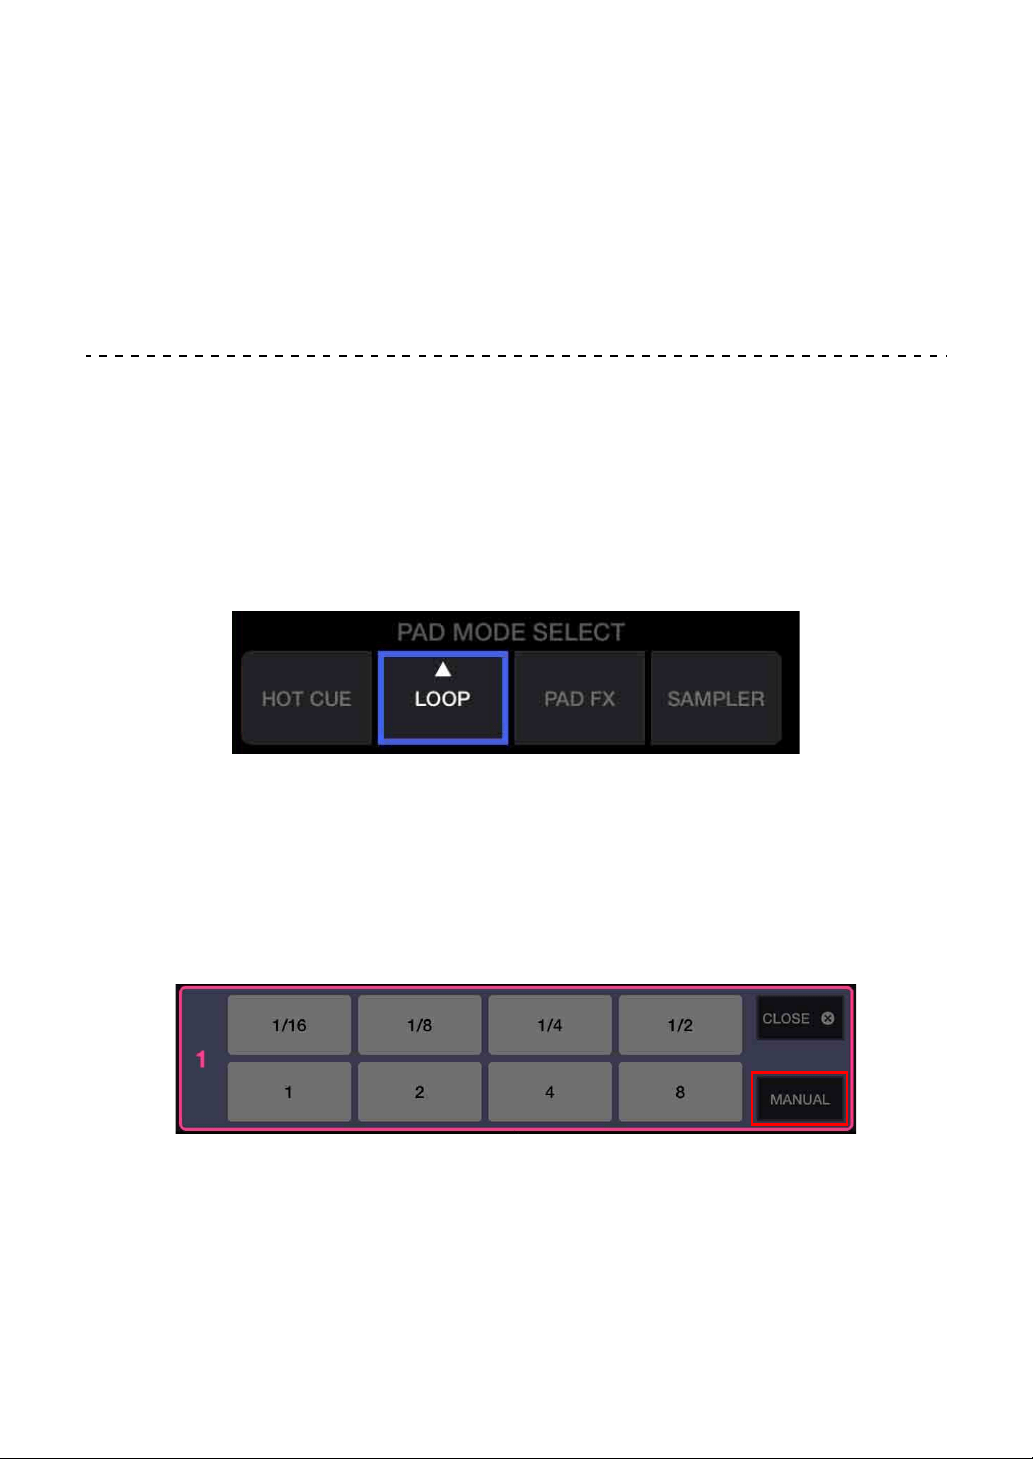
1Tap [LOOP] on the main screen of WeDJ for iPhone.
2Tap [LOOP] again to display the [LOOP] panel.
3 Turn on Manual Loop mode on WeDJ for iPhone.
When [MANUAL] shows instead of [AUTO] as it does in the following picture,
tap [MANUAL] to switch to Manual Loop mode.
Functions for Manual Loop are set to Performance Pads as follows:
1: Setting Loop In point, 2: Setting Loop Out point, 3: Loop Exit / Reloop,
4: not used, 5: Loop Cutter, 6: Loop Double, 7: not used, 8: not used
1234
5678

WeDJ for iPhone
29
En
4 Press Performance Pad 1 at the point you want to start looping (the
Loop In Point).
5 Press Performance Pad 2 at the point you want the loop to end (the
Loop Out Point).
Dividing the loop
Press Performance Pad 5 while the loop is playing.
Each time you press the pad, the loop cuts in half.
Extending the loop
Press Performance Pad 6 while the loop is playing.
Each time you press the pad, the loop doubles in length.
Canceling a loop
Press Performance Pad 3 while the loop is playing.
When the Loop Out point is reached, the rest of the track plays without
returning to the Loop In point.
• If you press Performance Pad 3 again, playback position returns to
the Loop In point and the loop starts playing again.
WeDJ for iPhone
30
En
Using Pad FX
You can add a wide range of effects to your performances simply by
pressing and releasing the Performance Pads.
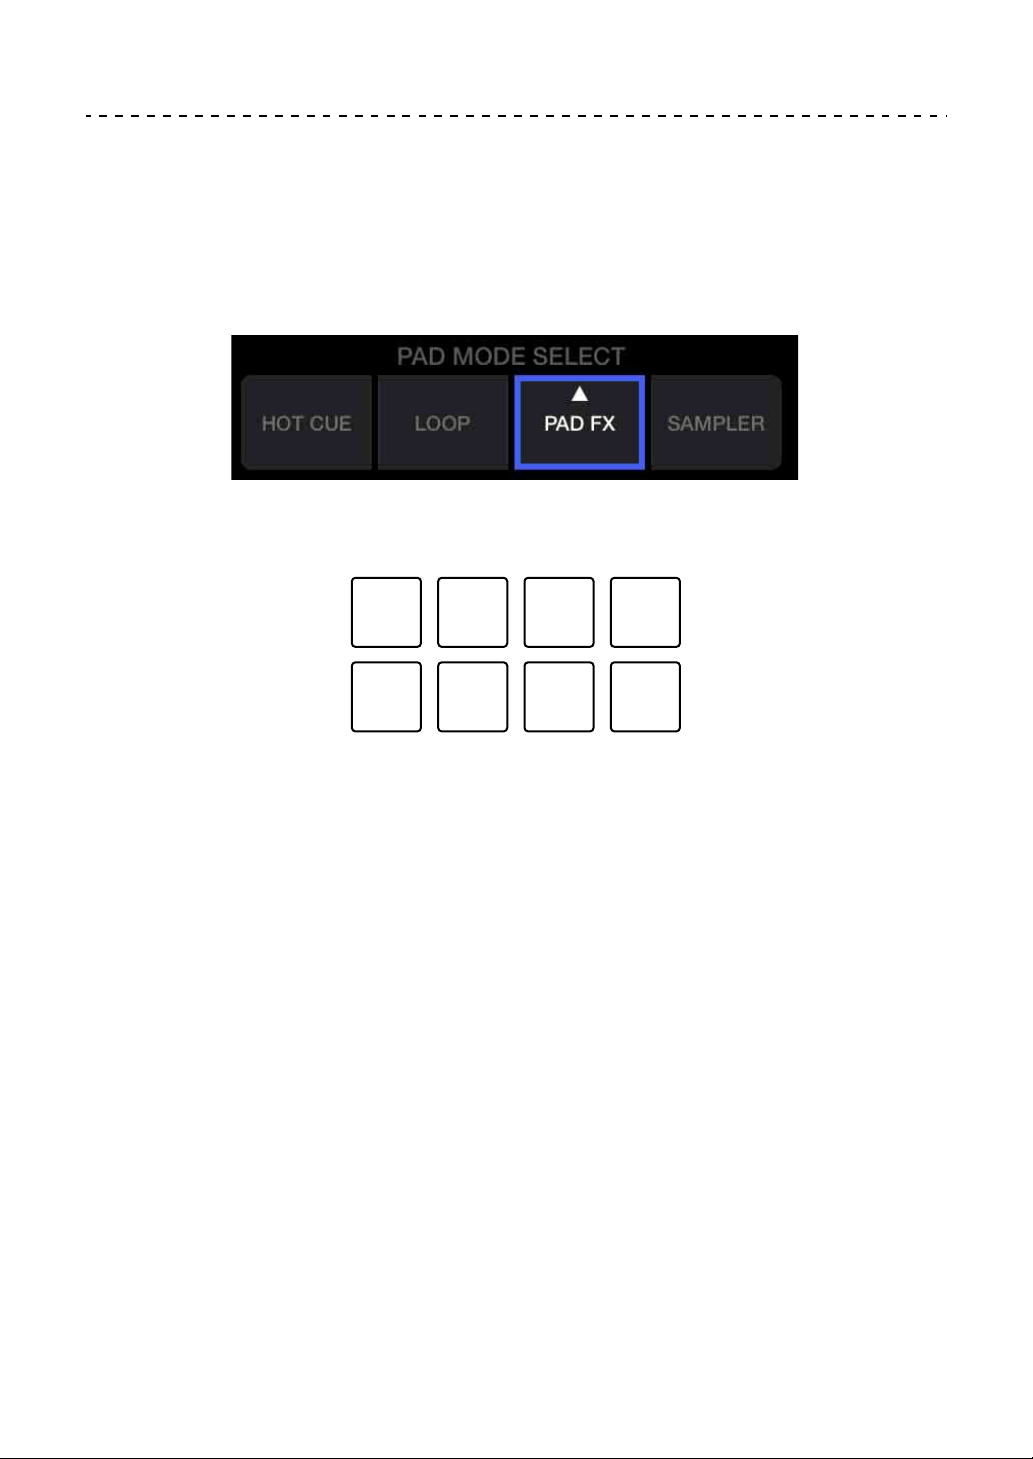
1Tap [PAD FX] on the main screen of WeDJ for iPhone.
Effects are set to the Performance Pads as follows.
1: Effect 1, 2: Effect 2, 3: Effect 3, 4: Effect 4,
5: Effect 5, 6: Effect 6, 7: Effect 7, 8: Effect 8
2 Press and hold down a Performance Pad.
The effect turns on. The sound changes according to the type of effect and the
number of beats in the settings assigned to that pad.
3 Release the Performance Pad.
The effect turns off.
1234
5678

WeDJ for iPhone
31
En
Using Release FX of Pad FX
You need to assign one of the Release FX to a Performance Pad in
advance.
1 Press and hold down a Performance Pad that has an effect other
than Release FX assigned to it.
The effect turns on.
2 Press the Performance Pad that has a Release FX assigned to it.
The effect turns off, and the Release FX is added.

WeDJ for iPhone
32
En
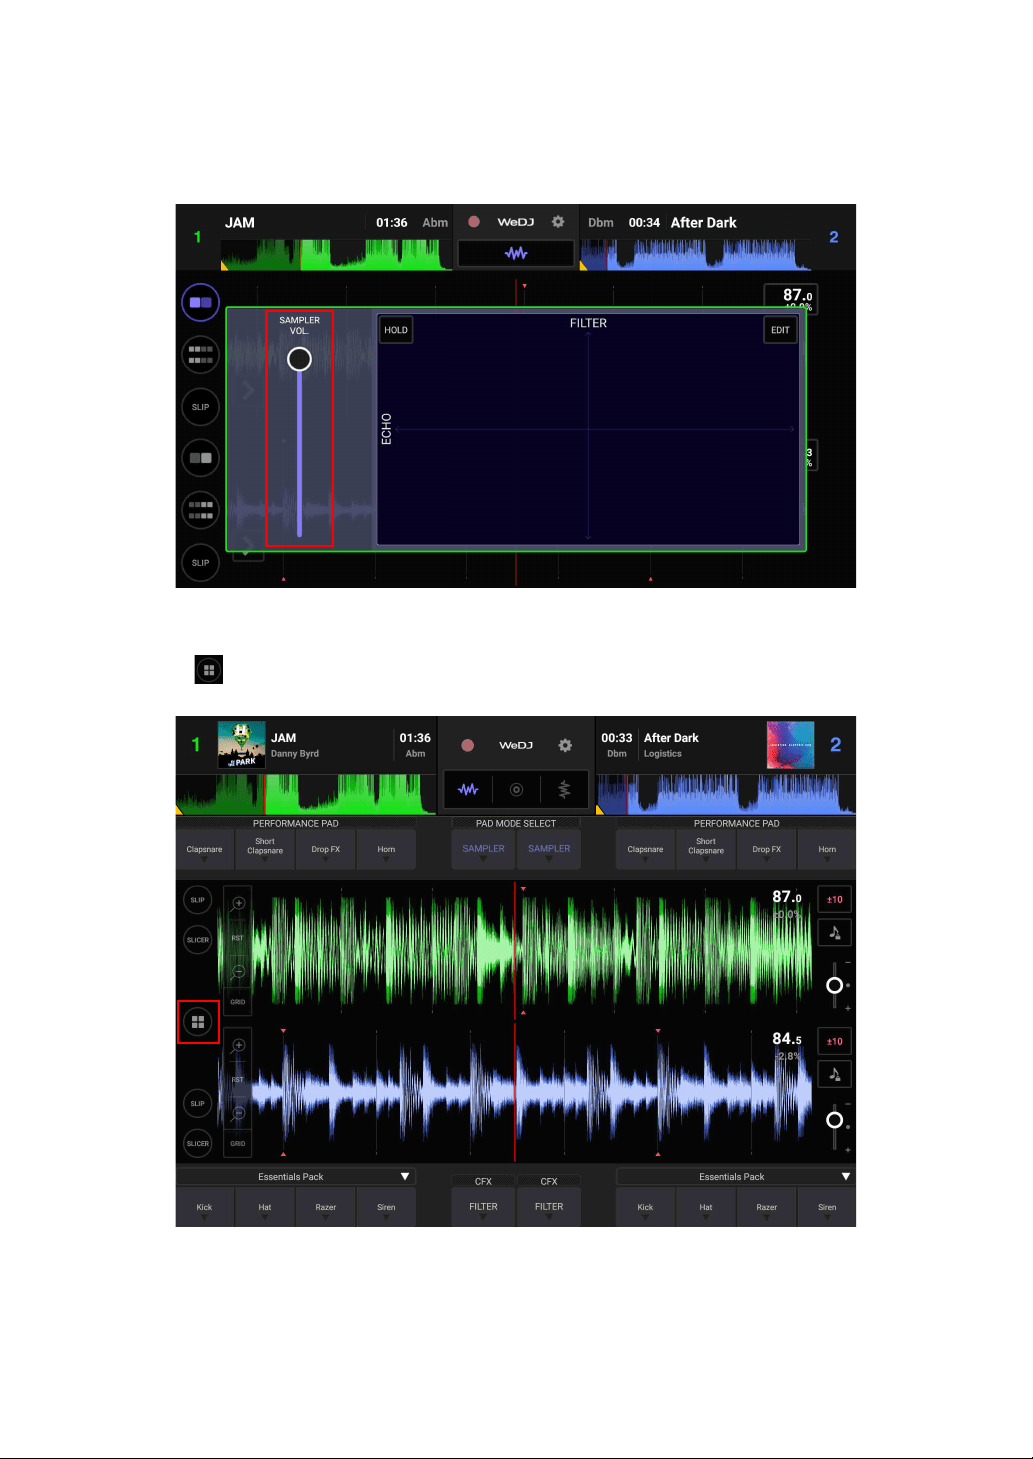
Using the Sampler
You can use the Performance Pads to play sounds assigned to the
Sampler slots.
1Tap [SAMPLER] on the main screen of WeDJ for iPhone.
2Tap [SAMPLER] again to display the [SAMPLER] panel.
3 Move the [VOL.] slider on the screen of WeDJ for iPhone to adjust
the sampler volume to a level you’re happy with.

WeDJ for iPhone
33
En
4 Press a Performance Pad.
The sound assigned to the relevant slot plays.
• Sampler slots are triggered by the Performance Pads as follows:
1: Slot 1, 2: Slot 2, 3: Slot 3, 4: Slot 4, 5: Slot 5, 6: Slot 6, 7: Slot 7, 8: Slot 8
5 Press the Performance Pad again while the Sampler is playing a
sound.
The sound plays from the beginning again.
1234
5678
WeDJ for iPhone
34
En
Using Transition FX
You can easily mix like a professional DJ with effects and scratches,
simply by using the crossfader.
The following example explains how to transition from a track on deck
1 to a track on deck 2.
1 Set the positions of the knobs as follows:
• [EQ (HI/MID/LOW)] knobs: center position (12 o’clock)
•[CFX] knob: center position
• Channel fader: top position
• Crossfader: left position
2 Load tracks onto deck 1 and deck 2, then play both.
You’ll hear the sound of the track on deck 1.
3 Press the [BEAT SYNC] button on the right side.
The tempo and beatgrid of the track on deck 2 are automatically matched to
deck 1.
4 Tap the [TRANSITION FX] selection button on the screen of WeDJ
for iPhone to select a Transition FX type.
5 Press the [TRANSITION FX] button to turn on Transition FX.
6 Move the crossfader to the right.
As the sound of deck 1 fades out, the sound of deck 2 fades in. The Transition
FX is added while this is happening.

WeDJ for iPhone
35
En
Using Phrase Sync
By matching the phrase start points of tracks on deck 1 and deck 2, you
can perform a smooth mix.
Hold down the [SHIFT] button and press the [TRANSITION FX] button
to match the closest phrase start points from the current playback
position.
The countdown for the next phrase is displayed in the center of the
screen.
The following example explains how to match the track playing on deck
1 to the track loaded on deck 2.
1 Set the positions of the knobs as follows:
• [EQ (HI/MID/LOW)] knobs: center position (12 o’clock)
•[CFX] knob: center position
• Channel fader of deck 1: top position
• Channel fader of deck 2: bottom position
• Crossfader: center position
Load tracks onto deck 1 and deck 2, then play them both.
You’ll hear the sound of the track on deck 1.
2 Press the [BEAT SYNC] button on the right side.
The tempo and beatgrid of the track on deck 2 are automatically changed to
match deck 1.
3 Hold down the [SHIFT] button and press the [TRANSITION FX]
button.
The playback position on deck 2 jumps so that the countdown value matches
for deck 1 and deck 2.
4 To match the next phrase start point, move the channel fader of
deck 2 to the top position and move the channel fader of deck 1 to
the bottom position.

WeDJ for iPhone
36
En
Recording
WeDJ for iPhone has a Recording feature that can record mixed
sound.
To start recording, tap at the top of the main screen of WeDJ for
iPhone.
• Tap again to stop recording.
• When recording has ended, the file is saved automatically.
WeDJ for iPhone
37
En
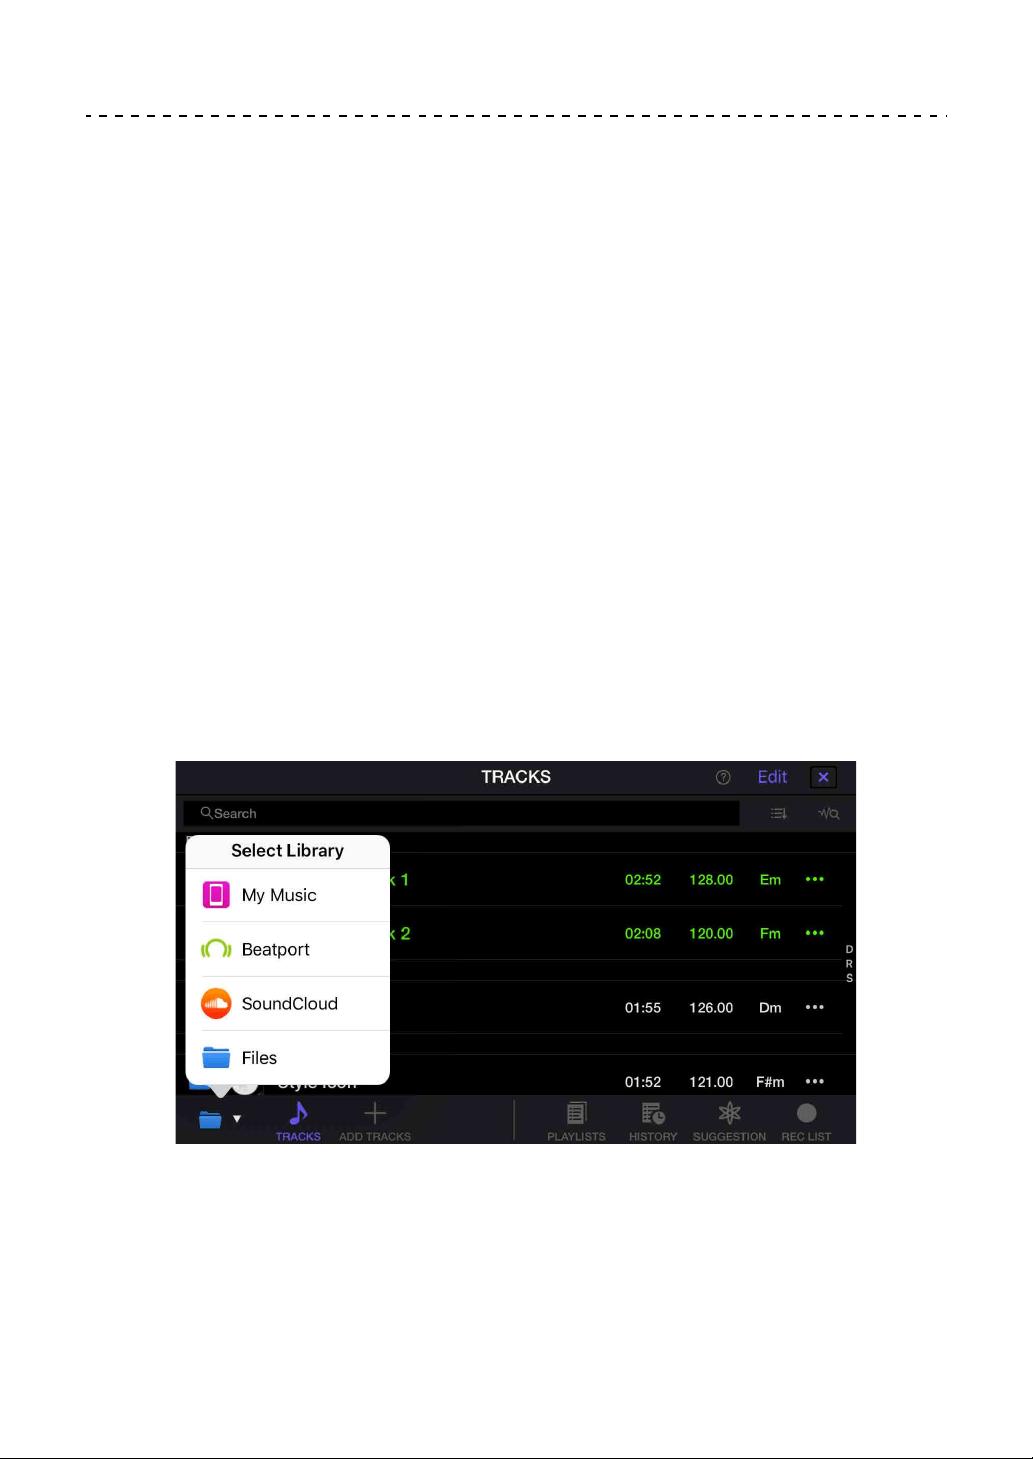
Using streaming services
When you’re using WeDJ for iPhone, you can play music from
streaming services such as Beatport and SoundCloud.
Beatport
To use the Beatport streaming service with WeDJ for iPhone, you need
to register to Beatport Link. Visit the Beatport website for more details.
https://www.beatport.com/
SoundCloud
To use the SoundCloud streaming service with WeDJ for iPhone, you
need to register to SoundCloud Go+. Visit the SoundCloud website for
more details.
https://soundcloud.com/
1 Tap the bottom left of the browse screen.
The library menu is displayed.
2 Select the streaming service you want to use.
The login screen is displayed. When you’ve successfully logged in, tracks from
the streaming service are displayed on the browse screen.

WeDJ for iPhone
38
En
* When you’re playing a track from Beatport or SoundCloud, you can’t
use the Recording feature of WeDJ for iPhone.

WeDJ for iPhone
39
En
Changing the settings in WeDJ for iPhone
You can change the unit’s settings in WeDJ for iPhone.
Changing the Demo mode setting
In normal conditions, if you don’t use any of the features for a specified
amount of time, this unit will enter Demo mode.
The amount of time can be set to 1 minute, 5 minutes or 10 minutes.
Demo mode can also be turned off.
• By default, Demo mode starts when you don’t use any features for 10
minutes.
• When any knob or button on the unit is used during Demo mode,
Demo mode is canceled.
1 Tap on the main screen of WeDJ for iPhone.
2 Select [Controller] on the [Settings] screen.
3 Select [Demo mode] on the [Settings] screen to set Demo mode.
• If the unit is not connected via Bluetooth, the unit’s settings won’t be
displayed.

WeDJ for iPhone
40
En
Changing the Back Spin Length setting
When using the unit’s jog wheel to perform a Back Spin, you can make
the Back Spin longer than the amount you rotate the jog wheel.
The Back Spin length can be set to [Short], [Normal] or [Long].
1 Tap on the main screen of WeDJ for iPhone.
2 Select [Controller] on the [Settings] screen.
3Tap [BACK SPIN LENGTH] on the [Controller] screen to set the
Back Spin Length.
• If the unit is not connected via Bluetooth, the unit’s settings won’t be
displayed.

41
En
WeDJ for Android
WeDJ for Android is a DJ performance app you can download from the
Google Play. When you’re using the app with the unit, you won’t need
to make in-app purchases.
• If you already have WeDJ for Android installed, update it to the latest
version.
System requirements
Compatible OS: Android 5.0 or later
Supported wireless system: Bluetooth Low Energy
• To check the latest information on system requirements, compatibility
and supported operating systems, visit the Pioneer DJ support page
below and click on the [DDJ-200] option in the [DJ CONTROLLER]
section.
pioneerdj.com/en/support/software-information/
• Operation is not guaranteed on all Android devices, even if the
system requirements are met.
• Depending on power-saving settings and other conditions of the
Android device, WeDJ may perform poorly.
• Problems may occur with operation depending on the other software
you use.
• For the latest system requirements for WeDJ for Android, check the
Google Play.
• You’ll need an internet connection to access the Google Play.


WeDJ for Android
43
En
Deck section
You can control two decks with the unit. There are knobs and buttons
on the left side to control deck 1 and on the right side to control deck 2.
1 Jog wheel
Turn the top:
‘Scratches’ the track.
Turn the outer section:
Bends the pitch or ‘Pitch Bend’ (slows down or speeds up the track).
[SHIFT] + turn the top:
Fast forwards or fast reverses the track (turn clockwise or counter-clockwise).
2 Performance Pads
You can use Performance Pads to trigger various features.
Read more: Using the Performance Pads (page 59)
3 SHIFT button
2
1
6
7
3
4
5

WeDJ for Android
44
En
Press another button while holding the [SHIFT] button to use a different feature
assigned to the button.
4 CUE button
Press:
Sets, plays and calls up a cue point.
• Press the button when the track is paused to set the cue point.
• Press the button when the track is playing to return to the cue point and
pause. (Back Cue)
• Press the button and hold it after the track returns to the cue point and
playback will continue until you release the button. (Cue Point Sampler)
[SHIFT] + press:
Returns the playback position to the beginning of the track.
5 PLAY/PAUSE button
Plays/pauses a track.
6 BEAT SYNC button
Press:
Automatically synchronizes the tempos (BPM) and beatgrids with the other
deck.
[SHIFT] + press:
Switches the range of [TEMPO] slider each time the button is pressed while
holding the [SHIFT] button.
Switch between [±6%] [±10%] [±16%] [WIDE] [±6%].
Hold down the [BEAT SYNC] buttons on deck 1 and deck 2 for at least one
second at the same time:
The Bluetooth connection of the Android device is canceled.
7 TEMPO slider
Adjusts the playing speed of the track.

WeDJ for Android
45
En
Mixer section
1 MASTER CUE button
Press:
Plays the master sound through your headphones when they’re connected to
the supplied split cable, which is plugged into the headphones output of your
Android device.
• Connect the headphones to the white plug of the split cable.
Read more: Monitoring with headphones (page 57)
2 EQ (HI, MID, LOW) knobs
Boosts or reduces the relevant frequency for the selected channel.
3 CFX knob
Turns on the selected effect and changes the sound for the relevant channel.
When the knob is set to the center position, the sound is unchanged.
4 Headphone CUE button
Press:
1
2
3
4
6
5
5
3
2
7

WeDJ for Android
46
En
Plays the sound of the relevant channel (1 or 2) through your headphones
when they’re connected to the supplied split cable, which is plugged into the
headphones output of your Android device.
• Connect the headphones to the white plug of the split cable.
Read more: Monitoring with headphones (page 57)
5 Channel fader
Adjusts the volume of the sound for each channel.
6 TRANSITION FX button
This button is not used for WeDJ for Android.
7 Crossfader
Adjusts the sound balance between the left channel (deck 1) and right channel
(deck 2).
Bluetooth MIDI indicator
Flashes: The Android device is not connected via Bluetooth.
Lights up: The Android device is connected via Bluetooth.
Turns off: The unit has recognized the connection with rekordbox using
the USB cable.
• When using WeDJ for Android with the unit being powered via the
USB port of your PC/Mac, do not start rekordbox on your PC/Mac.

WeDJ for Android
47
En
Rear panel
1USB port
Connects to a USB power adapter (not supplied) or mobile battery (not
supplied) via the supplied USB cable.
Also, you can connect to a USB port on your PC/Mac with the supplied USB
cable to power the unit.
• Use a USB power adapter or mobile battery with DC +5 V and 500 mA or
more.
• When powering the unit from a USB port on your PC/Mac, do not start
rekordbox on your PC/Mac.
• Use a mobile battery which does not have a power-saving function. If you
use a mobile battery with a power-saving function, it may cut power to the
unit.
2 Kensington security slot
Connects a cable lock for security.
1 2

WeDJ for Android
48
En
Connections (for Android devices)
Power comes through the USB port. You can connect to the USB port
on your PC/Mac or connect a USB power adapter or mobile battery to
power the unit.
Use a USB power adapter or mobile battery with DC +5 V and 500 mA
or more.
Use a mobile battery which does not have a power-saving function.
Use the USB cable supplied with this unit.
Connect the cable correctly after checking the position of the port on
this unit.
Refer to the instruction manuals for components to be connected.
• Once connected with the unit, connect your PC/Mac to an AC power
supply. (This applies when power is supplied to the unit through the
USB port on your PC/Mac.)
• The unit can’t be powered via your PC/Mac in the following
situations:
– Power supply capacity of the USB port on your PC/Mac is too low.
– Your PC/Mac is connected with other USB devices.

WeDJ for Android
49
En
Connecting to the USB port
Rear panel
(1) USB cable (supplied), (2) PC/Mac*
1
, (3) USB power adapter (not
supplied), (4) mobile battery (not supplied)
*1
If you want to power the unit via the USB port on your PC/Mac, turn
on your PC/Mac.
*2
To maintain performance, use the supplied USB cable.
WeDJ for Android
50
En
Connecting an audio device (speaker) to the
headphones jack of your Android device
You can DJ with an Android device and listen to your performance via
its built-in speakers. However, if you use the supplied split cable, you
can create an authentic DJ set-up with an external speaker(s) and
headphones.
Connection example 1 (if the Android device has a headphones
output)
In this example, the master sound plays in stereo and there is no sound
output to the headphones.
Read more: Checking audio setup (page 54)
(1) Speaker with built-in amplifier, etc.*
* The audio cable is not supplied with the unit.
(1)
WeDJ for Android
51
En
Connection example 2 (if the Android device has a headphones
output)
In this example, the master sound and the headphones monitor sound
both play in mono.
Read more: Checking audio setup (page 54)
(1) Speaker with built-in amplifier, etc.*, (2) Headphones,
(3) Plug for the speaker with built-in amplifier, etc. (black),
(4) Plug for the headphones (white), (5) Split cable (supplied)
* The audio cable is not supplied with this unit.
Connection example 3 (if the Android device does not have a
headphones output)
In this example, the master sound plays in stereo and there is no sound
output to the headphones.
Read more: Checking audio setup (page 54)
(1) Speaker with built-in amplifier, etc.*,
(2) USB Type-C male - 3.5 mm headphones jack female (not supplied)
(2)
(1)
(3) (4)
(5)
(1)
(2)

WeDJ for Android
52
En
* The audio cable is not supplied with the unit.
Connection example 4 (if the Android device does not have a
headphones output)
In this example, the master sound and the headphones monitor sound
both play in mono.
Read more: Checking audio setup (page 54)
(1) Speaker with built-in amplifier, etc.*, (2) Headphones,
(3) Plug for the speaker with built-in amplifier, etc. (black),
(4) Plug for the headphones (white), (5) Split cable (supplied),
(6) USB Type-C male - 3.5 mm headphones jack female (not supplied)
* The audio cable is not supplied with this unit.
Turning on the Android device, etc.
1 Turn on the Android device.
2 Turn on the device(s) connected to the Android device (speaker
with built-in amplifier, etc.).
(6)
(2)
(1)
(3) (4)
(5)

WeDJ for Android
53
En
Basic use (WeDJ for Android)
Starting WeDJ for Android and connecting it to the unit
1 Tap on your Android device to start WeDJ for Android.
2 Tap on the main screen of WeDJ for Android.
The [Settings] screen is displayed.
3Tap [Connect the DDJ-200].
4Tap [DDJ-200].
The unit connects to your Android device via Bluetooth.
When the connection is complete, the WeDJ logo and the unit’s logo are
displayed and the light of the Bluetooth MIDI indicator changes from being lit
to flashing.
• On the [Connect the DDJ-200] screen, [DDJ-200_X] may be displayed (X
is a number from1 to 16).
Read more: Changing the BLUETOOTH
®
MIDI device name
(page 170)
WeDJ for Android
54
En
Checking audio setup
1 Tap on the main screen of WeDJ for Android.
2Tap [Audio] on the [Settings] screen.
To play both master sound and headphones monitor sound via the supplied
split cable, turn on [Split Output].
To play the master sound via your Android device’s built-in speaker, or to play
it in stereo via a speaker with a built-in amplifier connected to your Android
device, without using the split cable, turn off [Split Output].
Read more: Connecting an audio device (speaker) to the headphones jack
of your Android device (page 50)
Read more: Monitoring with headphones (page 57)
3 Go to the [Settings] screen, then tap .
The main screen of WeDJ for Android is displayed.
WeDJ for Android
55
En
Loading a song or audio track onto a deck
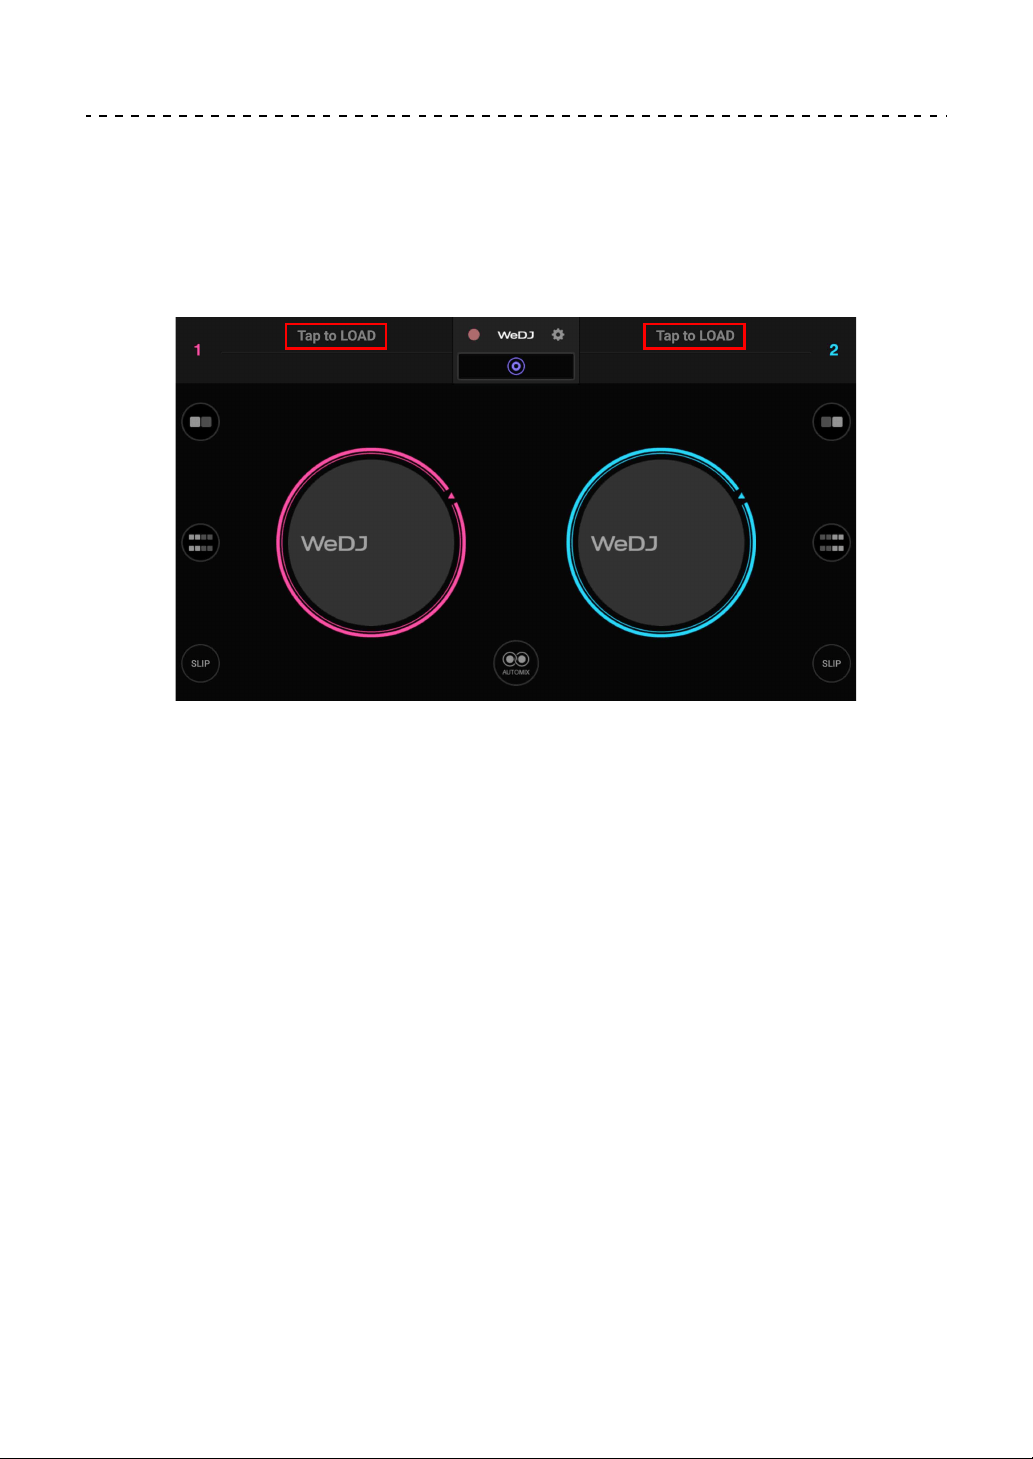
1Tap [Tap to LOAD] on the main screen of WeDJ for Android.
This opens the browse screen.
Below is the smartphone screen.
2 Tap the track you want to load.
This loads the track onto the deck.

WeDJ for Android
56
En
Playing a track
This section explains how to play sound from deck 1 (left) as an
example.
1 Set the positions of the knobs as follows:
• [EQ (HI/MID/LOW)] knobs: center position (12 o’clock)
•[CFX] knob: center position
• Channel fader: bottom position
• Crossfader: center position
2 Press the [PLAY/PAUSE ] button to play the track.
3 Move the channel fader to the top.
4 Tap on the main screen of WeDJ for Android.
5Tap [Audio] on the [Settings] screen.
6 Move the [MASTER VOLUME] slider on the [Audio] screen.
Adjust the volume for your Android device’s speaker, or the speaker connected
to your Android device, until you have a volume level you’re happy with.

WeDJ for Android
57
En
Monitoring with headphones
To monitor sound with your headphones, you need to use the supplied
split cable.
Read more: Connecting an audio device (speaker) to the
headphones jack of your Android device (page 50)
Also, you need to turn on [Split Output] in WeDJ for Android.
Read more: Checking audio setup (page 54)
Monitoring sound from a channel via headphones
The following example explains how to monitor sound from deck 1
(left).
1 Press the Headphone [CUE] button on channel 1.
2 Tap on the main screen of WeDJ for Android.
3Tap [Audio] on the [Settings] screen.
4 Move the [MIN] / [MAX] slider under [Split Output] on the [Audio]
screen.
Adjust the volume of the headphones monitoring sound until you have a level
you’re happy with.

WeDJ for Android
58
En
Monitoring the master sound with headphones
1 Press the [MASTER CUE] button.
2 Tap on the main screen of WeDJ for Android.
3Tap [Audio] on the [Settings] screen.
4 Move the [MIN] / [MAX] slider under [Split Output] on the [Audio]
screen.
Adjust the volume of the headphones monitoring sound until you have a level
you’re happy with.
Quitting the system
1 Quit WeDJ for Android.
2 Disconnect the USB cable to turn off the unit.
WeDJ for Android
59
En
Advanced use (WeDJ for Android)
Using the Performance Pads
Using Hot Cues
You can start playback instantly from the position where a Hot Cue is
set. Loops can also be set and called up instantly.
• Up to 4 Hot Cue points can be set and saved for each track.
Setting and calling up a Hot Cue
1 Set Pad mode to [HOT CUE] on the screen of WeDJ for Android.
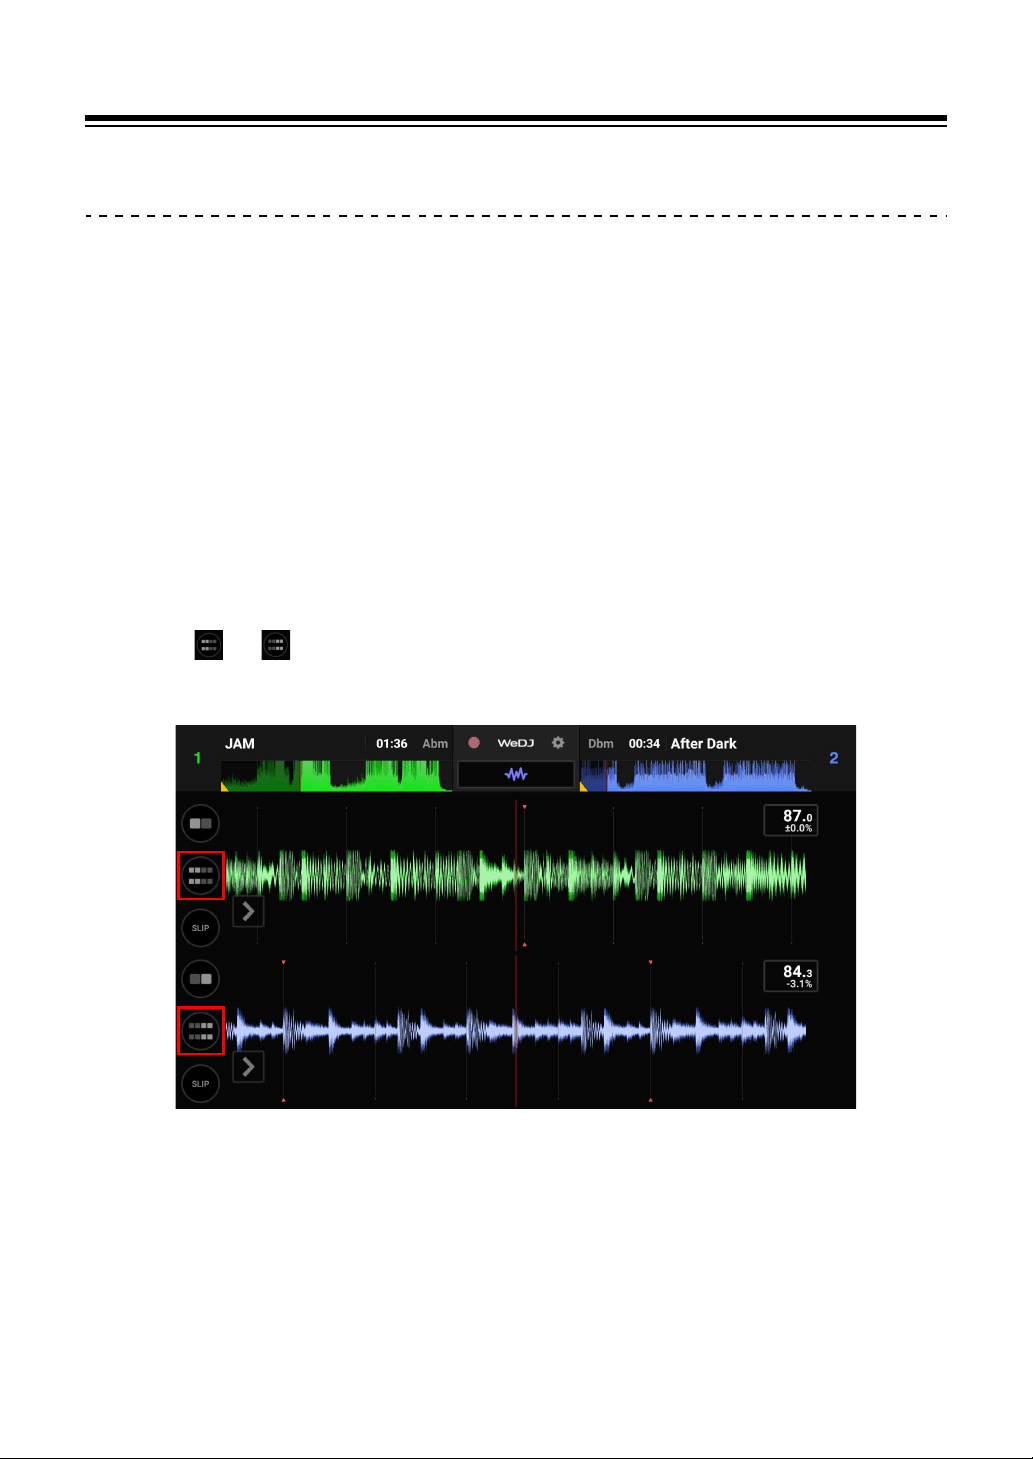
For an Android smartphone
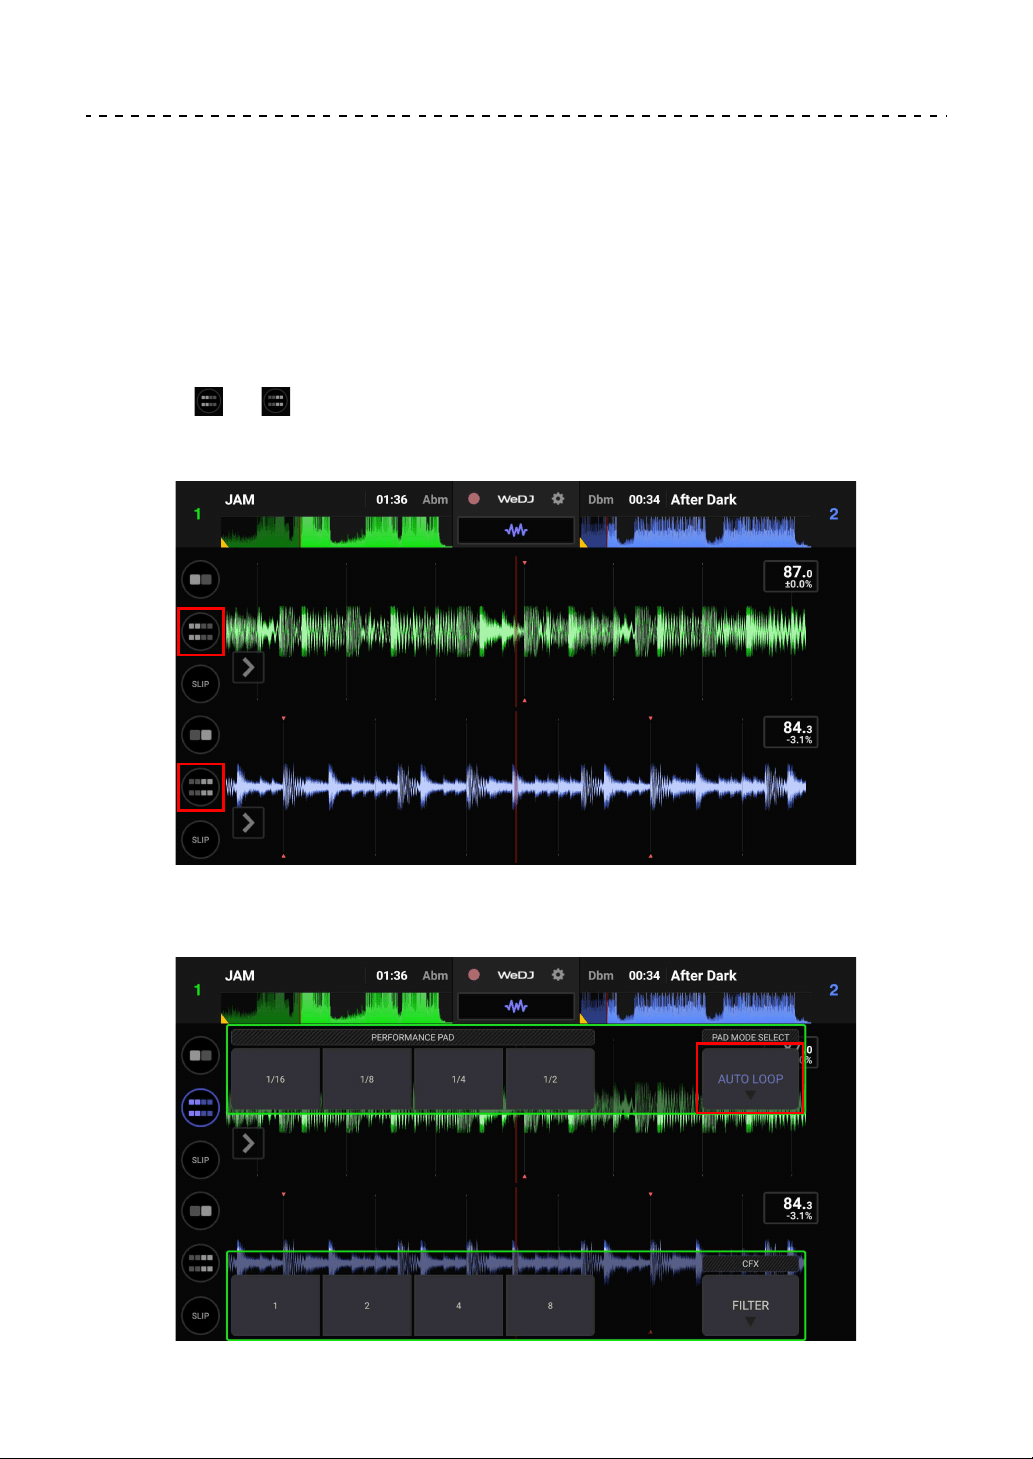
• Tap or on the main screen of WeDJ for Android to display the
performance panel.
WeDJ for Android
60
En
• Tap the [PAD MODE SELECT] button to select [HOT CUE].
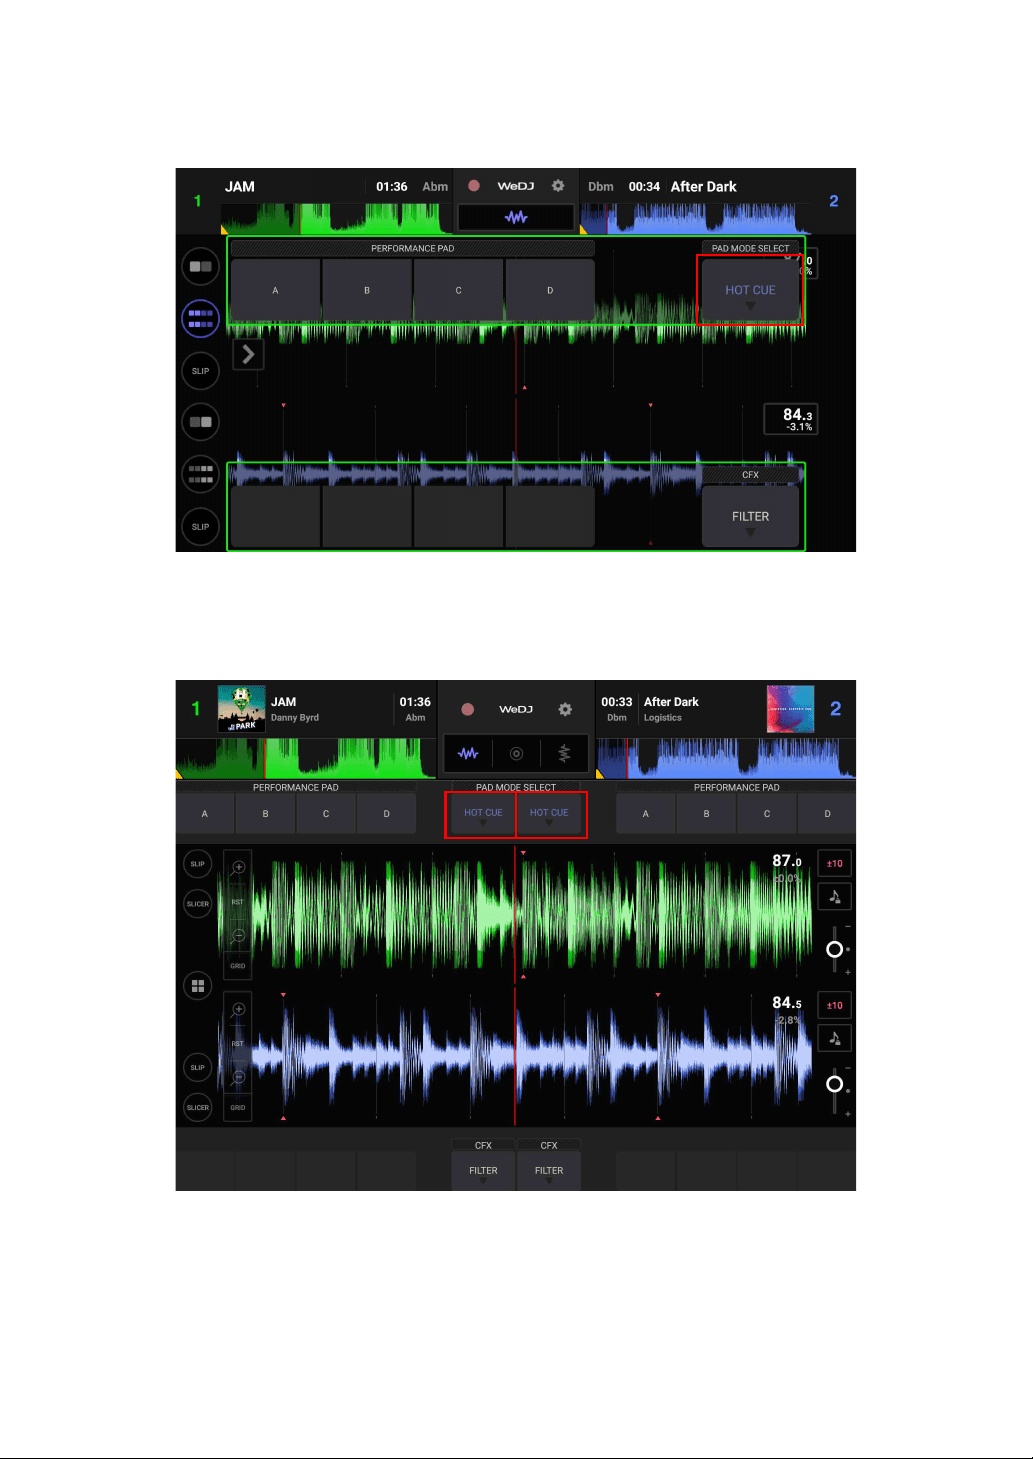
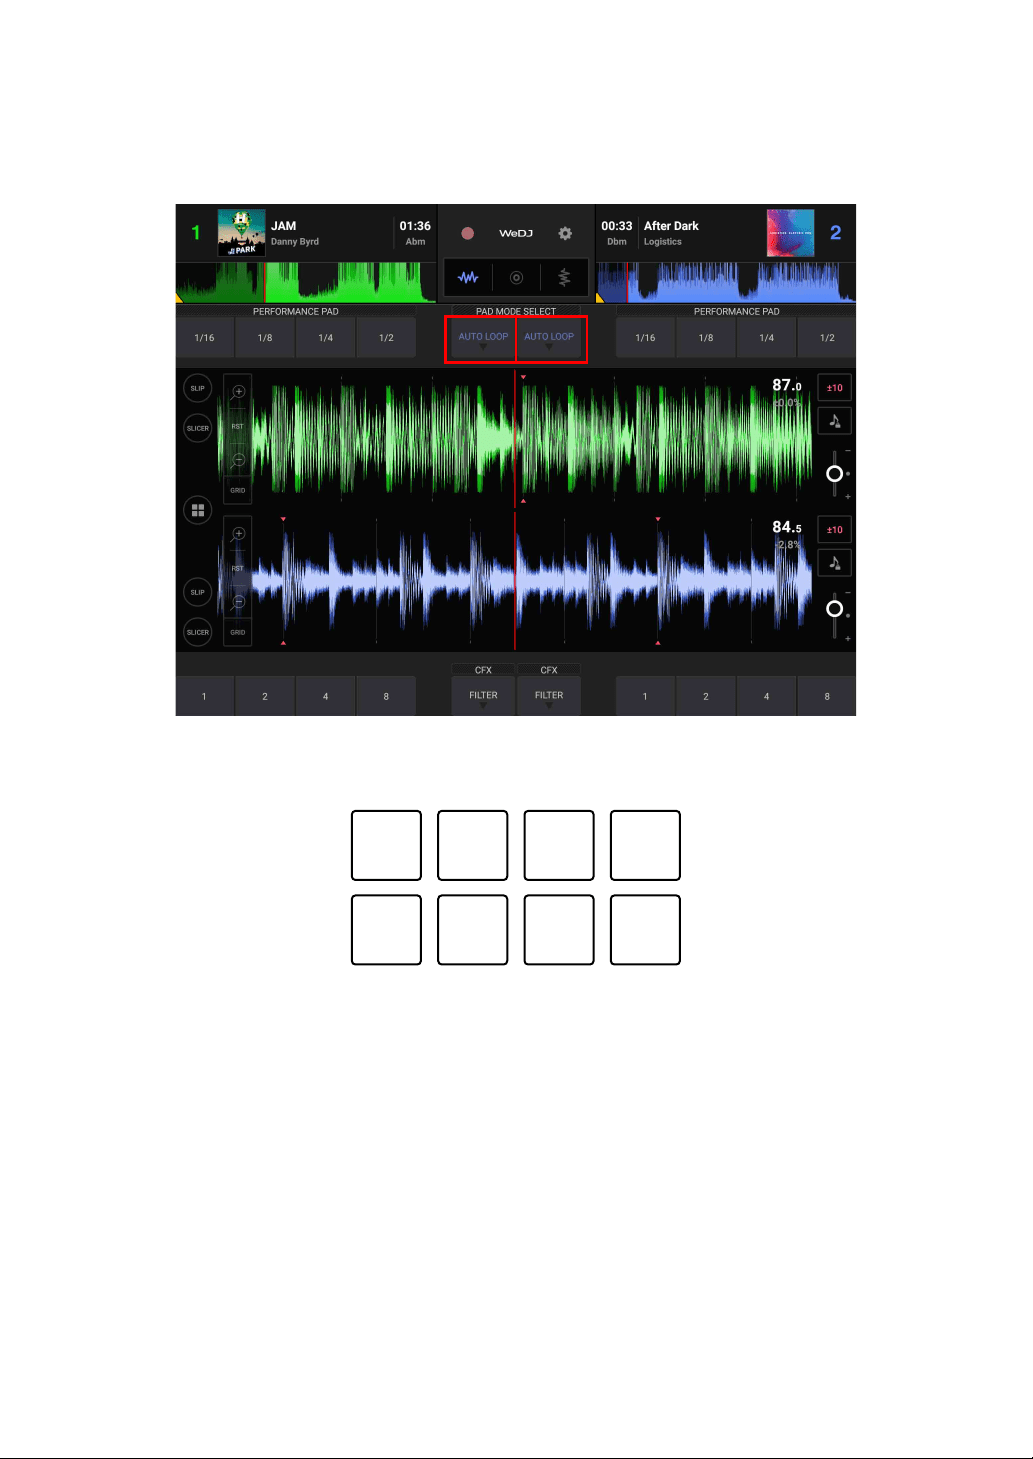
For an Android tablet
• Tap the [PAD MODE SELECT] button to select [HOT CUE].

WeDJ for Android
61
En
2 If the track is playing or paused, press a Performance Pad to set the
Hot Cue point.
The Hot Cue points are set to Performance Pads as follows:
1: Hot Cue A, 2: Hot Cue B, 3: Hot Cue C, 4: Hot Cue D,
5: not used, 6: not used, 7: not used, 8: not used
3 Press a Performance Pad you’ve set a Hot Cue for.
Playback starts from the Hot Cue point.
• You can clear Hot Cue points by pressing a Performance Pad while holding
the [SHIFT] button.
Setting and calling up Beat Loop
1 Set Pad mode to [AUTO LOOP] on the screen of WeDJ for Android.
Read more: Using Beat Loop (page 63)
2 Press a Performance Pad during playback.
Loop playback starts with the number of beats set on the pad you pressed.
3 Set Pad mode to [HOT CUE].
Read more: Setting and calling up a Hot Cue (page 59)
4 Press a Performance Pad to set a loop during loop playback.
5 Press the Performance Pad.
Loop playback starts from the Loop In point.
• You can clear the loop by pressing the Performance Pad while holding the
[SHIFT] button.
1234
5678

WeDJ for Android
62
En
Setting and calling up Manual Loop
1 Set Pad mode to [MANUAL LOOP] on the screen of WeDJ for
Android.
Read more: Using Manual Loop (page 65)
2 Press Performance Pad 1, then press Performance Pad 2.
Loop playback starts.
3 Set Pad mode to [HOT CUE].
Read more: Setting and calling up a Hot Cue (page 59)
4 Press the Performance Pad to set a loop during loop playback.
5 Press the Performance Pad you’ve set a loop on.
Loop playback starts from the Loop In point.
• You can clear the loop by pressing the Performance Pad while holding the
[SHIFT] button.
WeDJ for Android
63
En
Using Beat Loop
Press a Performance Pad while in Beat Loop mode to loop a set
number of beats. The loop keeps playing after you remove your finger
from the pad.
1 Set Pad mode to [AUTO LOOP] on the screen of WeDJ for Android.
For an Android smartphone
• Tap or on the main screen of WeDJ for Android to display the
performance panel.
• Tap the [PAD MODE SELECT] button to select [AUTO LOOP].
WeDJ for Android
64
En
For an Android tablet
• Tap the [PAD MODE SELECT] button to select [AUTO LOOP].
The number of beats set to the Performance Pads are as follows:
1: Beat Loop 1/16 beat, 2: Beat Loop 1/8 beat, 3: Beat Loop 1/4 beat,
4: Beat Loop 1/2 beat, 5: Beat Loop 1 beat, 6: Beat Loop 2 beats,
7: Beat Loop 4 beats, 8: Beat Loop 8 beats
2 Press a Performance Pad.
The loop plays with the number of beats set on that pad.
3 Press the same Performance Pad again.
Loop playback is canceled and the rest of the track continues to play.
1234
5678
WeDJ for Android
65
En
Using Manual Loop
You can choose the section you want to loop.
• When the Quantize function is turned on, you might notice a slight
delay as the loop synchronizes to the beat.
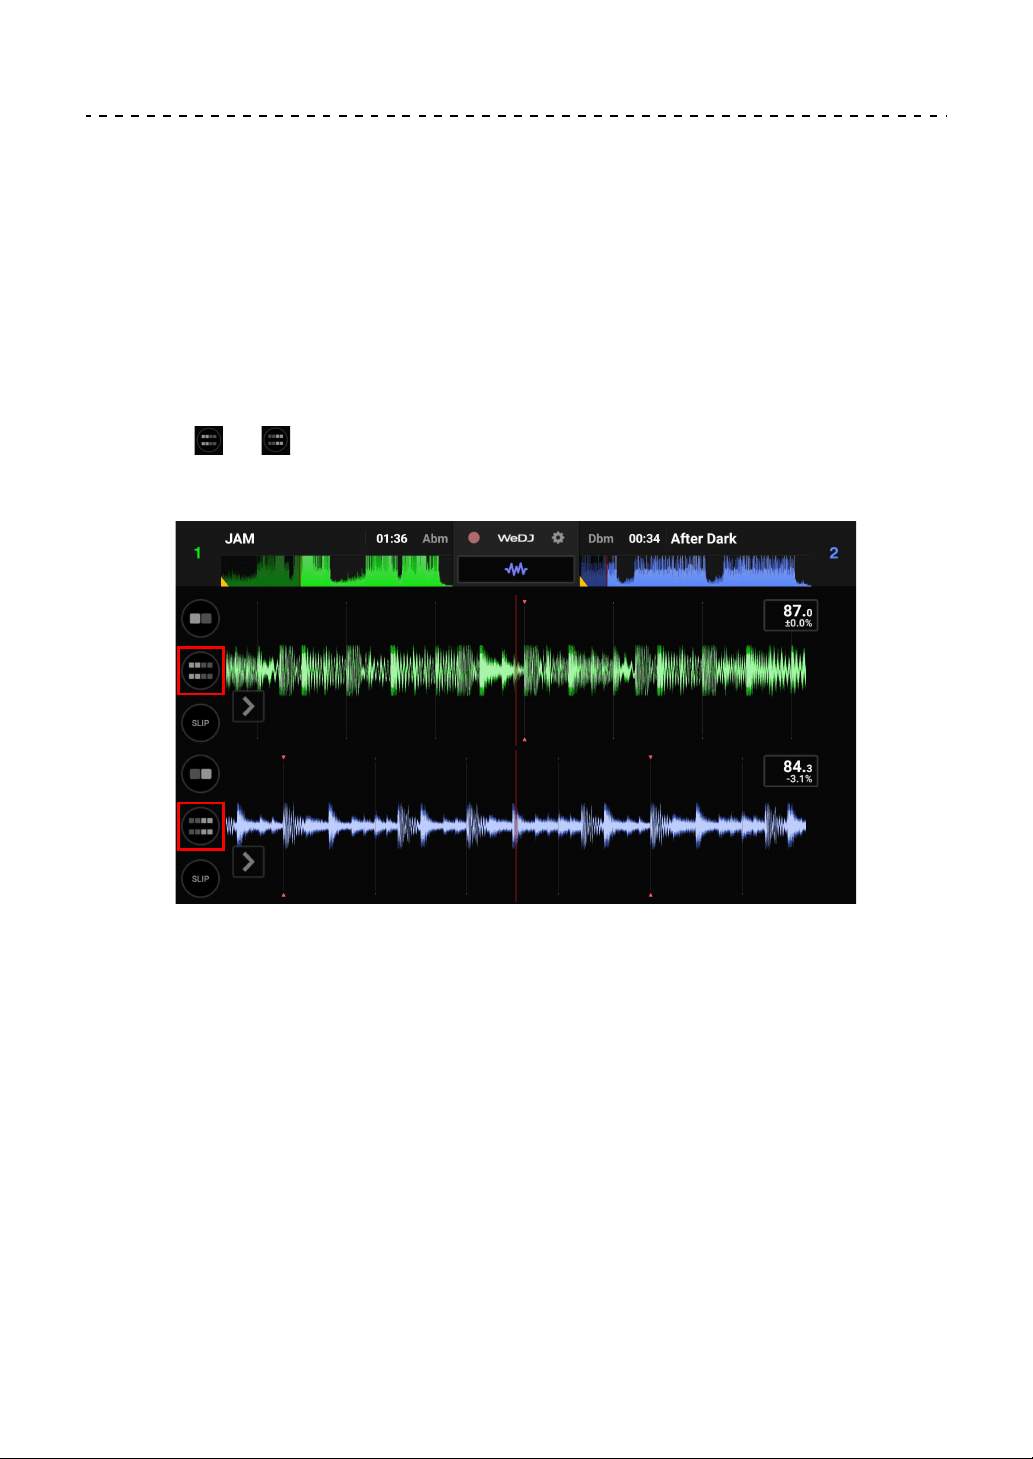
1 Set Pad mode to [MANUAL LOOP] on the screen of WeDJ for
Android.
For an Android smartphone
• Tap or on the main screen of WeDJ for Android to display the
performance panel.
WeDJ for Android
66
En
• Tap the [PAD MODE SELECT] button to select [MANUAL LOOP].
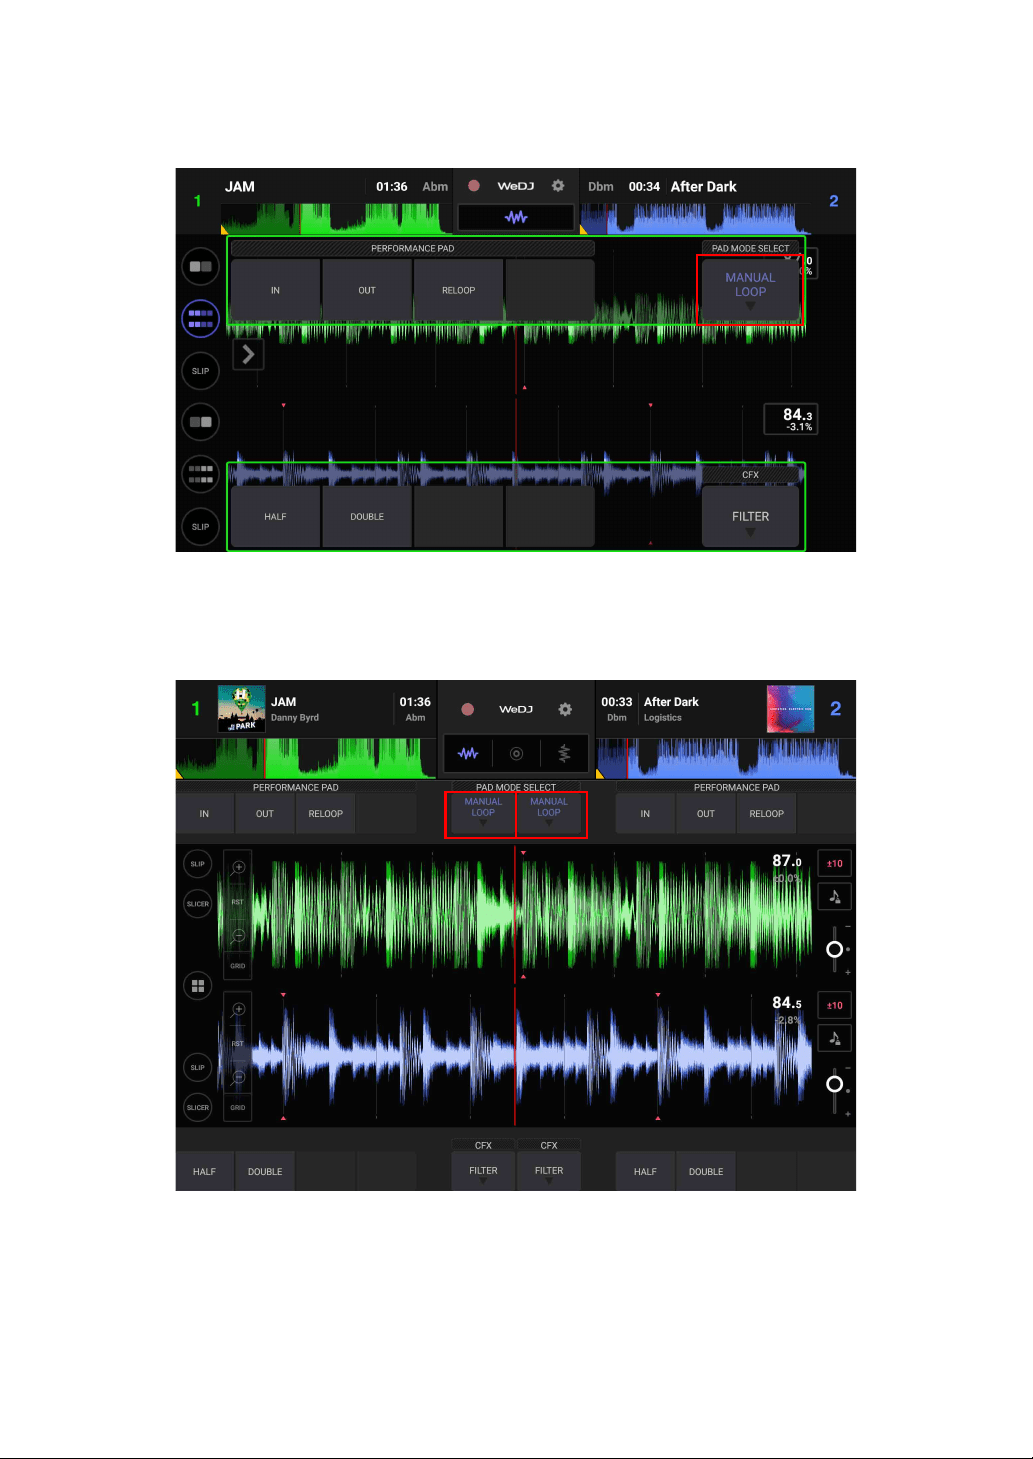
For an Android tablet
• Tap the [PAD MODE SELECT] button to select [MANUAL LOOP].

WeDJ for Android
67
En
Functions for Manual Loop are set to Performance Pads as follows:
1: Setting Loop In point, 2: Setting Loop Out point, 3: Loop Exit / Reloop,
4: not used, 5: Loop Cutter, 6: Loop Double, 7: not used, 8: not used
2 Press Performance Pad 1 at the point you want to start looping (the
Loop In Point).
3 Press Performance Pad 2 at the point you want the loop to end (the
Loop Out Point).
Dividing the loop
Press Performance Pad 5 while the loop is playing.
Each time you press the pad, the loop cuts in half.
Extending the loop
Press Performance Pad 6 while the loop is playing.
Each time you press the pad, the loop doubles in length.
Canceling a loop
Press Performance Pad 3 while the loop is playing.
When the Loop Out point is reached, the rest of the track plays without
returning to the Loop In point.
• If you press Performance Pad 3 again, playback position returns to
the Loop In point and the loop starts playing again.
1234
5678
WeDJ for Android
68
En
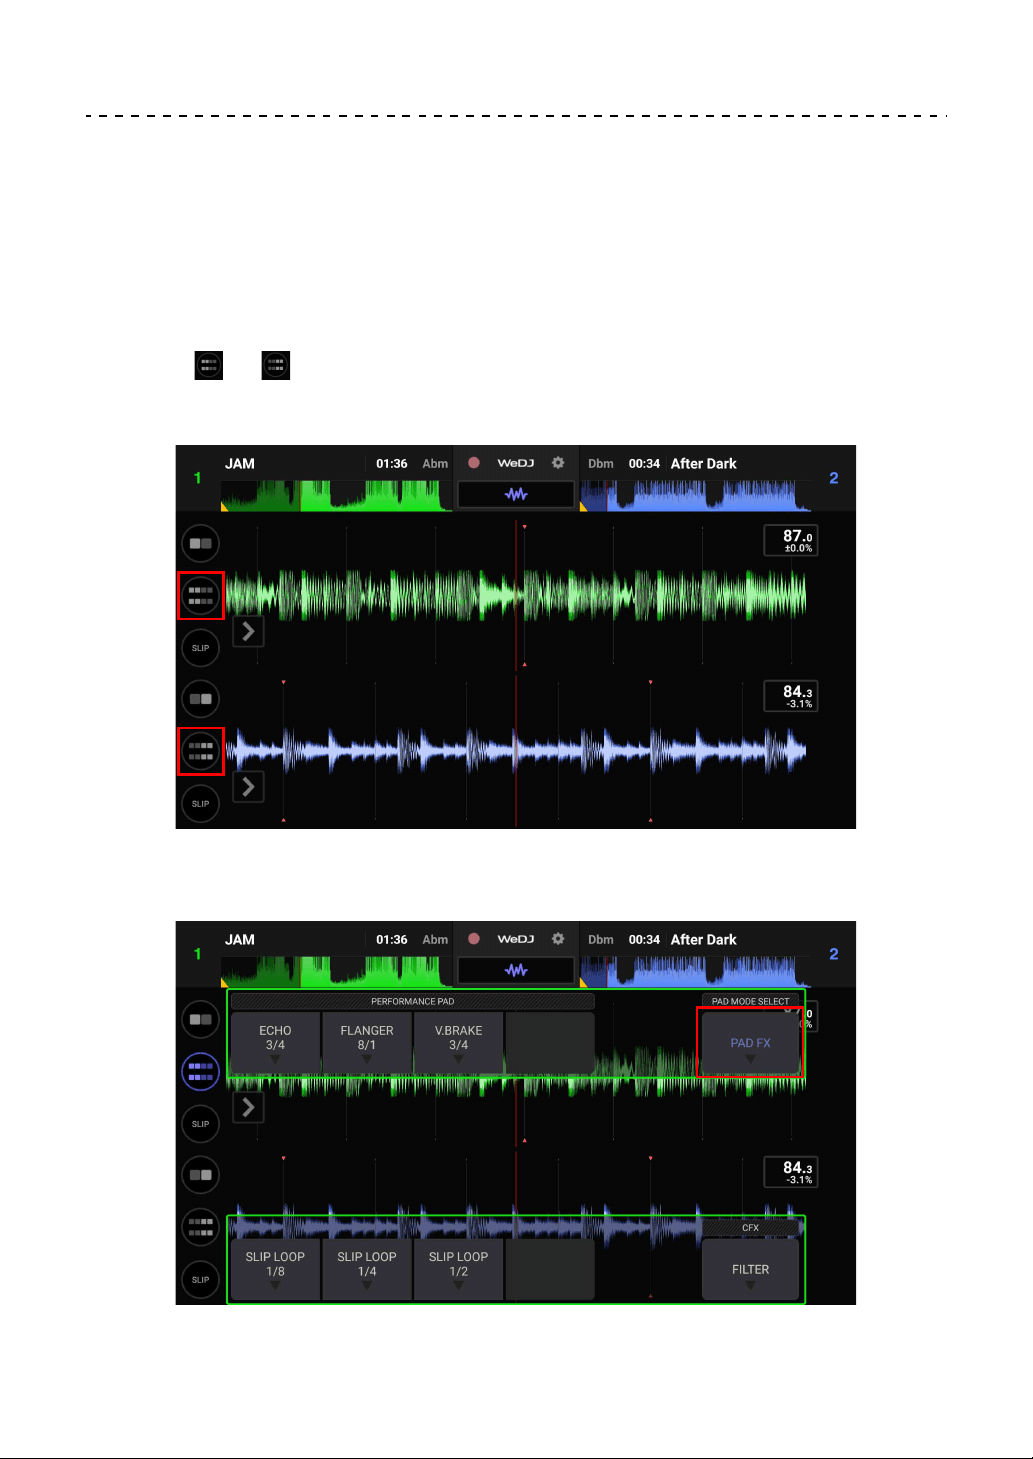
Using Pad FX
You can add a wide range of effects to your performances simply by
pressing and releasing the Performance Pads.
1 Set Pad mode to [PAD FX] on the screen of WeDJ for Android.
For an Android smartphone
• Tap or on the main screen of WeDJ for Android to display the
performance panel.
• Tap the [PAD MODE SELECT] button to select [PAD FX].
WeDJ for Android
69
En
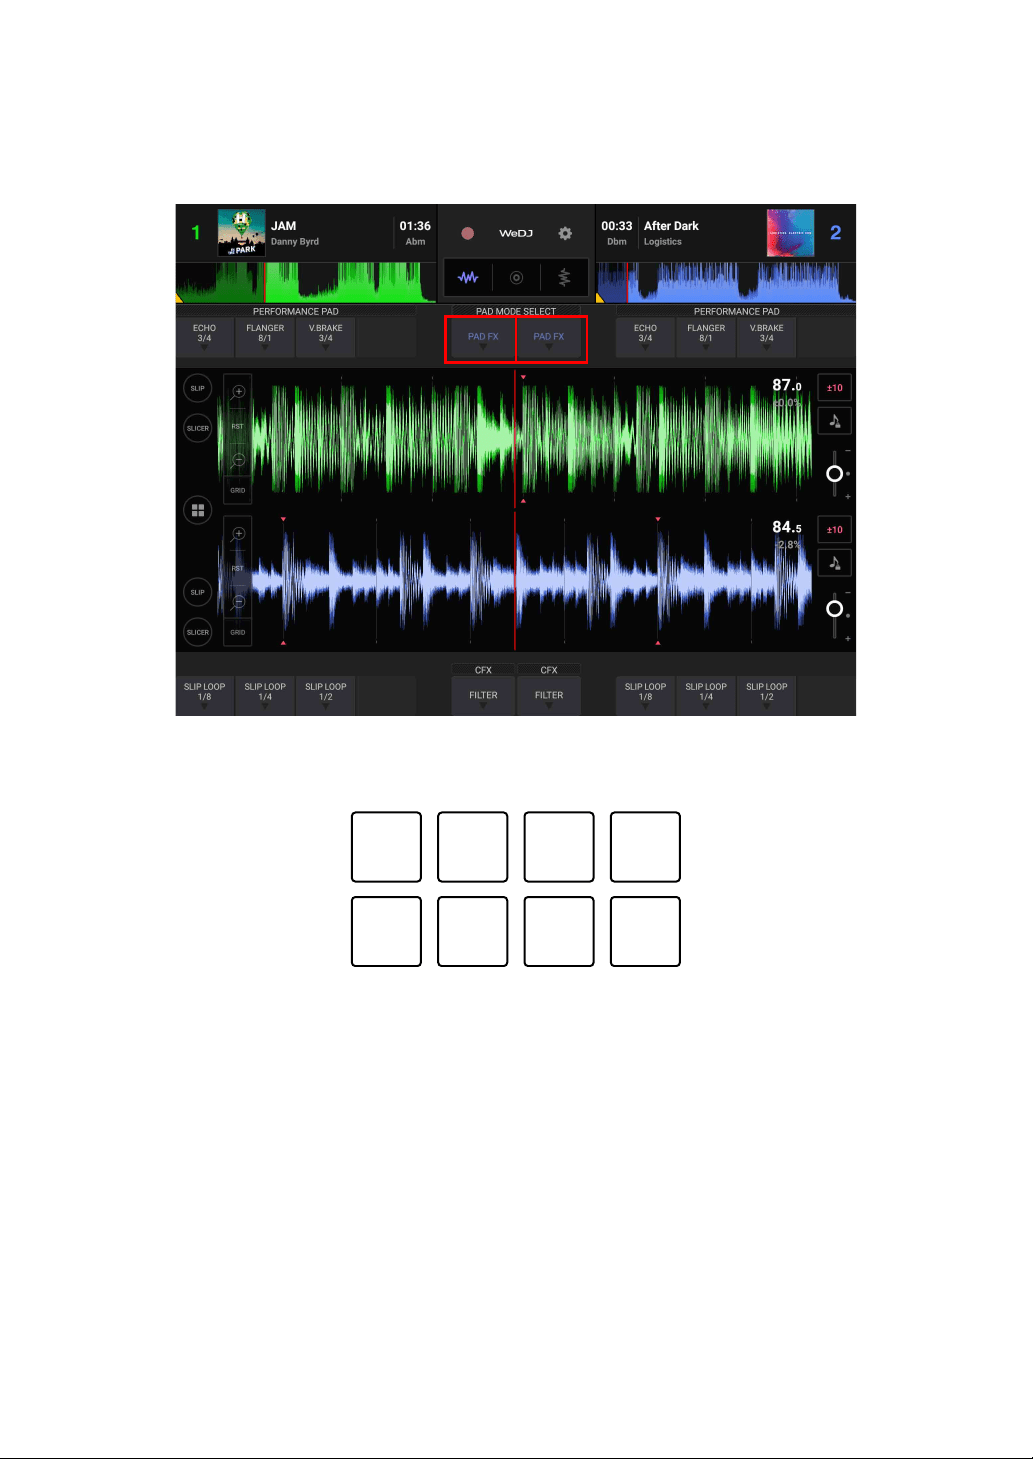
For an Android tablet
• Tap the [PAD MODE SELECT] button to select [PAD FX].
Effects are set to the Performance Pads as follows.
1: Effect 1, 2: Effect 2, 3: Effect 3, 4: not used,
5: Effect 4, 6: Effect 5, 7: Effect 6, 8: not used
2 Press and hold down a Performance Pad.
The effect turns on. The sound changes according to the type of effect and the
number of beats in the settings assigned to that pad.
3 Release the Performance Pad.
The effect turns off.
1234
5678

WeDJ for Android
70
En
Using Release FX of Pad FX
You need to assign one of the Release FX to a Performance Pad in
advance.
1 Press and hold down a Performance Pad that has an effect other
than Release FX assigned to it.
The effect turns on.
2 Press the Performance Pad that has a Release FX assigned to it.
The effect turns off, and the Release FX is added.
WeDJ for Android
71
En
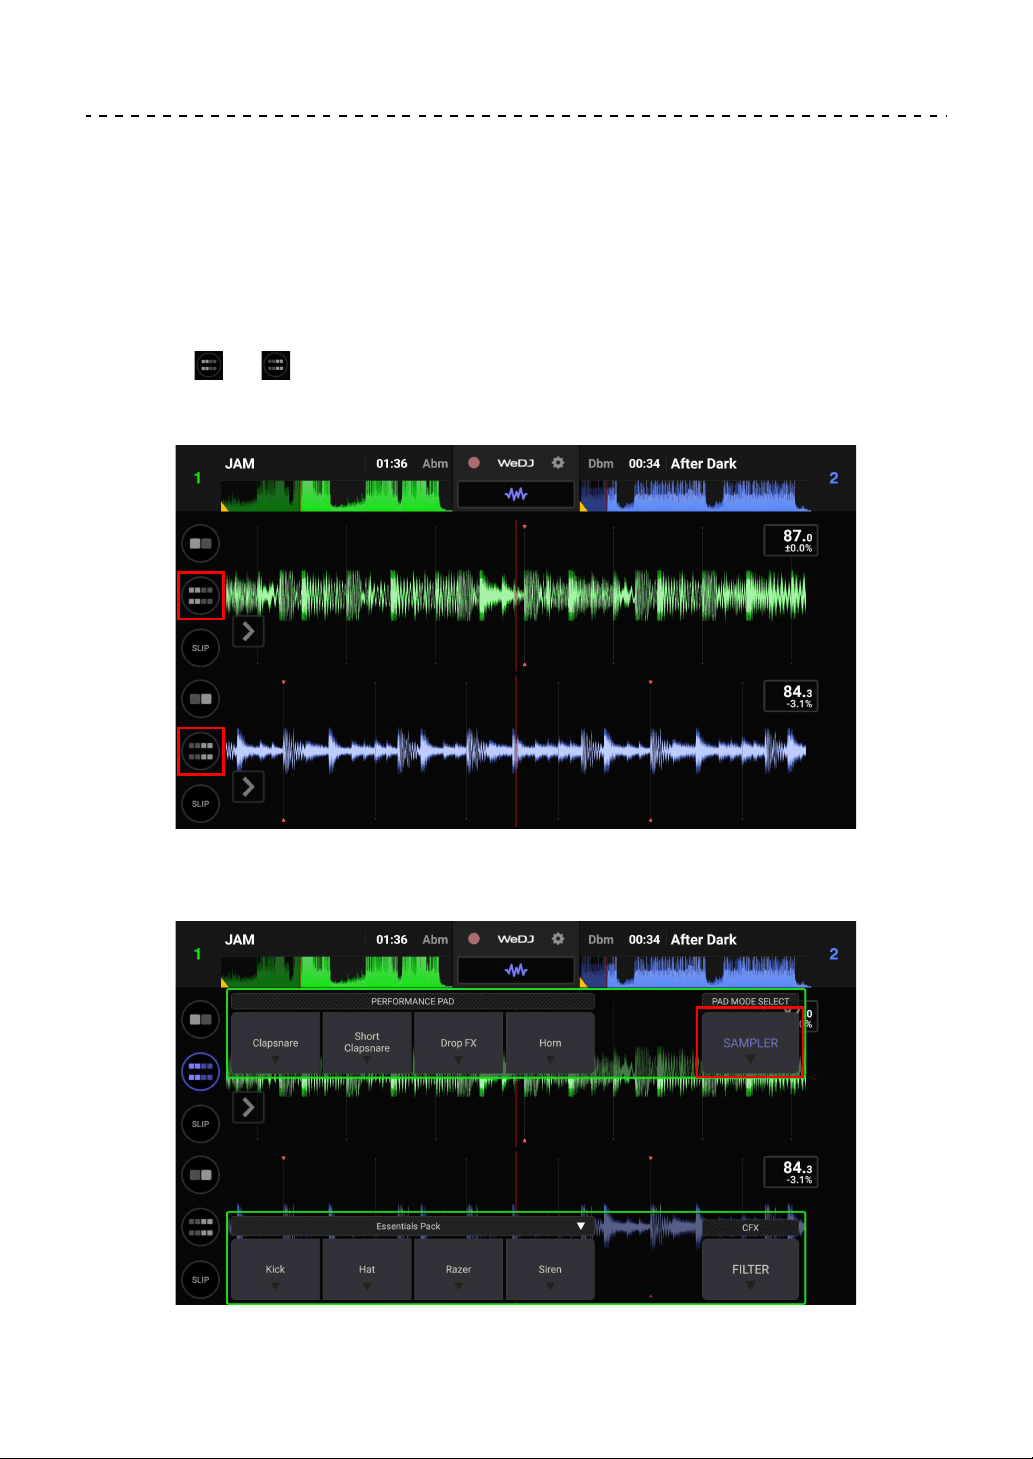
Using the Sampler
You can use the Performance Pads to play sounds assigned to the
Sampler slots.
1 Set Pad mode to [SAMPLER] on the screen of WeDJ for Android.
For an Android smartphone
• Tap or on the main screen of WeDJ for Android to display the
performance panel.
• Tap the [PAD MODE SELECT] button to select [SAMPLER].
WeDJ for Android
72
En
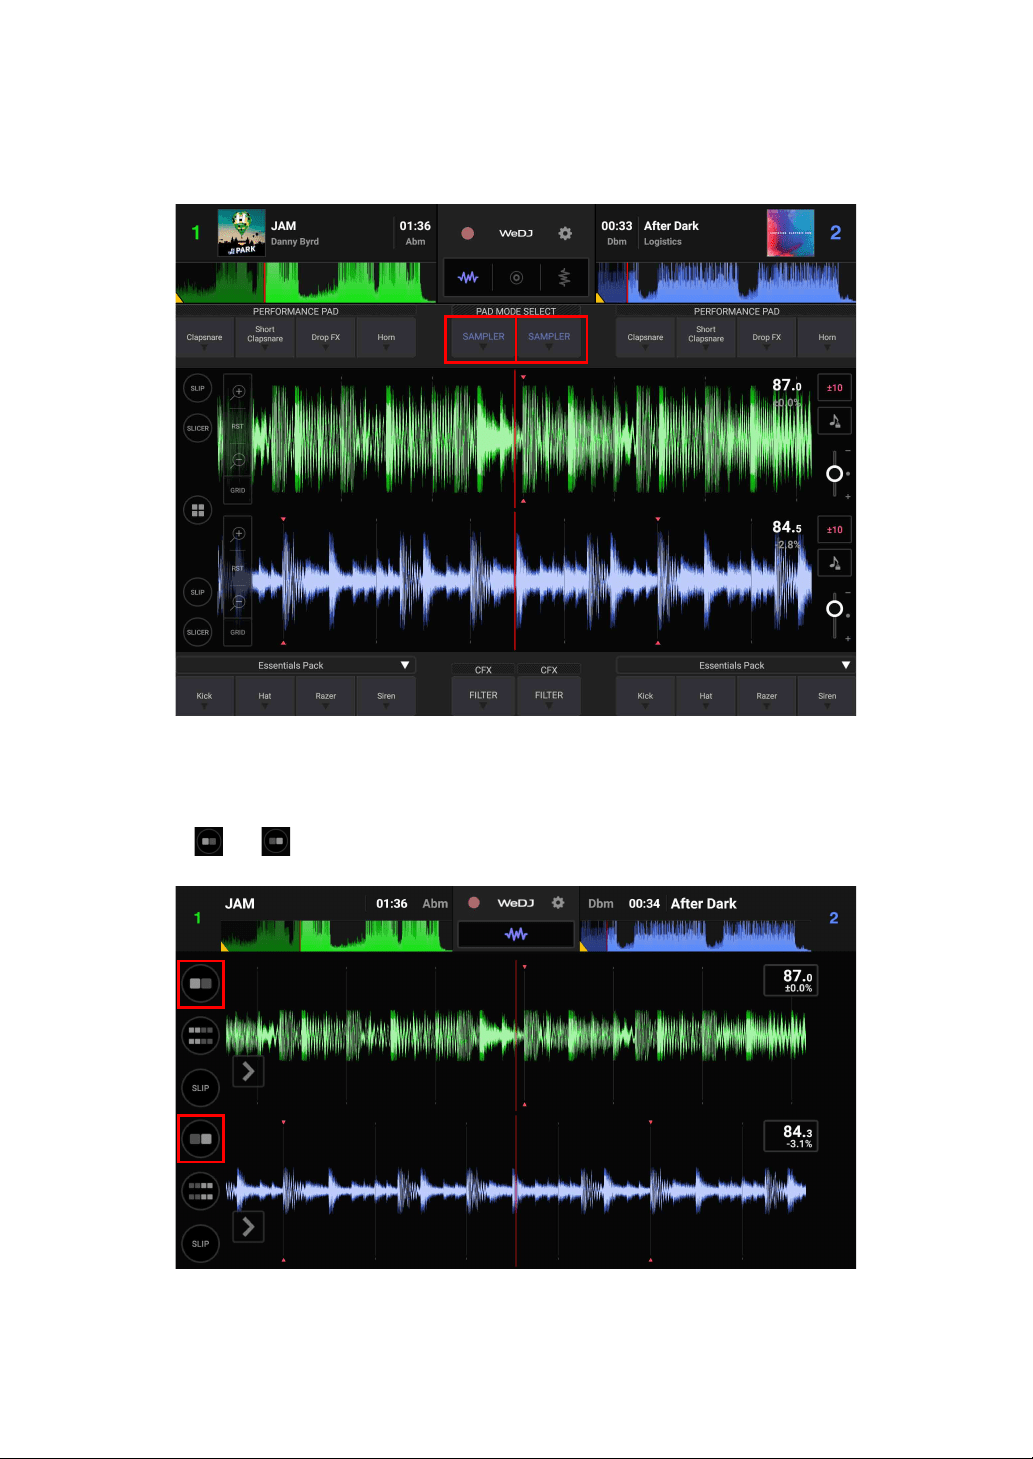
For an Android tablet
• Tap the [PAD MODE SELECT] button to select [SAMPLER].
2 Adjust the sampler volume on the screen of WeDJ for Android.
For an Android smartphone
• Tap or on the main screen of WeDJ for Android to display the panel.
WeDJ for Android
73
En
• Move the [SAMPLER VOL.] slider on the panel to adjust the sampler
volume.
For an Android tablet
• Tap on the main screen of WeDJ for Android to display the panel.
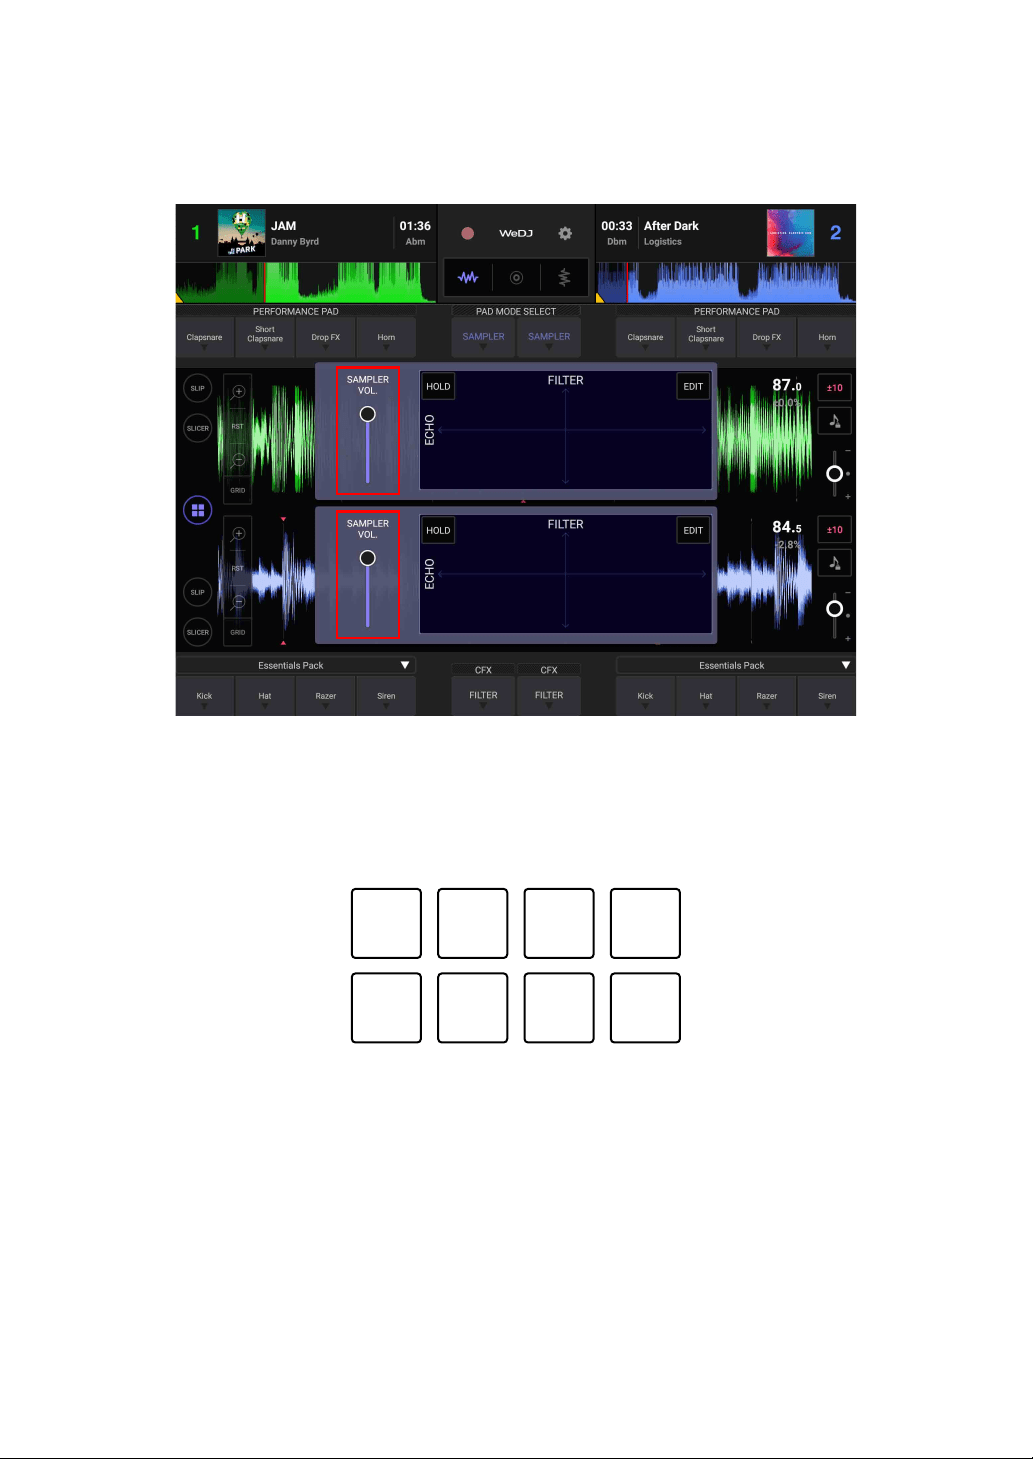
WeDJ for Android
74
En
• Move the [SAMPLER VOL.] slider on the panel to adjust the sampler
volume.
3 Press a Performance Pad.
The sound assigned to the relevant slot plays.
• Sampler slots are triggered by the Performance Pads as follows:
1: Slot 1, 2: Slot 2, 3: Slot 3, 4: Slot 4, 5: Slot 5, 6: Slot 6, 7: Slot 7, 8: Slot 8
4 Press the Performance Pad again while the Sampler is playing a
sound.
The sound plays from the beginning again.
1234
5678

WeDJ for Android
75
En
Recording
WeDJ for Android has a Recording feature that can record mixed
sound.
To start recording, tap at the top of the main screen of WeDJ for
Android.
• Tap again to stop recording.
• When recording has ended, the file is saved automatically.

WeDJ for Android
76
En
Changing the settings in WeDJ for Android
You can change the unit’s settings in WeDJ for Android.
Changing the Demo mode setting
In normal conditions, if you don’t use any of the features for a specified
amount of time, this unit will enter Demo mode.
The amount of time can be set to 1 minute, 5 minutes or 10 minutes.
Demo mode can also be turned off.
• By default, Demo mode starts when you don’t use any features for 10
minutes.
• When any knob or button on the unit is used during Demo mode,
Demo mode is canceled.
1 Tap on the main screen of WeDJ for Android.
2 Select [Controller] on the [Settings] screen.
3 Select [Demo mode] on the [Settings] screen to set Demo mode.
• If the unit is not connected via Bluetooth, the unit’s settings won’t be
displayed.

WeDJ for Android
77
En
Changing the Back Spin Length setting
When using the unit’s jog wheel to perform a Back Spin, you can make
the Back Spin longer than the amount you rotate the jog wheel.
The Back Spin length can be set to [Short], [Normal] or [Long].
1 Tap on the main screen of WeDJ for Android.
2 Select [Controller] on the [Settings] screen.
3Tap [BACK SPIN LENGTH] on the [Controller] screen to set the
Back Spin Length.
• If the unit is not connected via Bluetooth, the unit’s settings won’t be
displayed.

78
En
djay
djay is a DJ performance app you can download from the App Store.
• If you already have djay installed, update it to the latest version.
System requirements
iOS: iOS 11.2 or later
• To check the latest information on system requirements, compatibility
and supported operating systems, visit the Pioneer DJ support page
below and click on the [DDJ-200] option in the [DJ CONTROLLER]
section.
pioneerdj.com/en/support/software-information/
• Operation is not guaranteed on all iOS devices, even if the system
requirements are met.
• Depending on power-saving settings and other conditions of the iOS
device, djay may perform poorly.
• Problems may occur with operation depending on the other software
you use.
• For the latest system requirements for djay, check the App Store.
• You’ll need an internet connection to access the App Store.

djay
80
En
Deck section
You can control two decks with the unit. There are knobs and buttons
on the left side to control deck 1 and on the right side to control deck 2.
1 Jog wheel
Turn the top:
‘Scratches’ the track.
Turn the outer section:
Bends the pitch or ‘Pitch Bend’ (slows down or speeds up the track).
[SHIFT] + turn the top:
Fast forwards or fast reverses the track (turn clockwise or counter-clockwise).
2 Performance Pads
You can use Performance Pads to trigger features.
Read more: Using the Performance Pads (page 95)
3 SHIFT button
2
1
6
7
3
4
5

djay
81
En
Press another button while holding the [SHIFT] button to use a different feature
assigned to the button.
4 CUE button
Press:
Sets, plays and calls up a cue point.
• Press the button when the track is paused to set the cue point.
• Press the button when the track is playing to return to the cue point and
pause. (Back Cue)
• Press the button and hold it after the track returns to the cue point and
playback will continue until you release the button. (Cue Point Sampler)
[SHIFT] + press:
Returns the playback position to the beginning of the track.
5 PLAY/PAUSE button
Plays/pauses a track.
6 BEAT SYNC button
Press:
Automatically synchronizes the tempos (BPM) and beatgrids with the other
deck.
[SHIFT] + press:
Switches the range of [TEMPO] slider each time the button is pressed while
holding the [SHIFT] button.
Switch between [±8%] [±10%] [±25%] [±50%] [±75%] [±8%].
Hold down the [BEAT SYNC] buttons on deck 1 and deck 2 for at least one
second at the same time:
The Bluetooth connection of the iOS device is canceled.
7 TEMPO slider
Adjusts the playing speed of the track.

djay
82
En
Mixer section
1 MASTER CUE button
Press:
Plays the master sound through your headphones when they’re connected to
the supplied split cable, which is plugged into the headphones output of your
iOS device.
• Connect the headphones to the white plug of the split cable.
Read more: Monitoring with headphones (page 93)
2 EQ (HI, MID, LOW) knobs
Boosts or reduces the relevant frequency for the selected channel.
3 CFX knob
Turns on the Filter effect and changes the sound for the relevant channel.
When the knob is set to the center position, the sound is unchanged.
1
2
3
4
6
5
5
3
2
7

djay
83
En
4 Headphone CUE button
Press:
Plays the sound of the relevant channel (1 or 2) through your headphones
when they’re connected to the supplied split cable, which is plugged into the
headphones output of your iOS device.
• Connect the headphones to the white plug of the split cable.
Read more: Monitoring with headphones (page 93)
5 Channel fader
Adjusts the volume of the sound for each channel.
6 TRANSITION FX button
Press:
Turns on Transition FX.
Read more: Using Transition FX (page 97)
7 Crossfader
Adjusts the sound balance between the left channel (deck 1) and right channel
(deck 2).
Bluetooth MIDI indicator
Flashes: The iOS device is not connected via Bluetooth.
Lights up: The iOS device is connected via Bluetooth.
Turns off: The unit has recognized the connection with rekordbox using
the USB cable.
• When using djay with the unit being powered via the USB port of your
PC/Mac, do not start rekordbox on your PC/Mac.
djay
84
En
Rear panel
1USB port
Connects to a USB power adapter (not supplied) or mobile battery (not
supplied) via the supplied USB cable.
Also, you can connect to a USB port on your PC/Mac with the supplied USB
cable to power the unit.
• Use a USB power adapter or mobile battery with DC +5 V and 500 mA or
more.
• When powering the unit from a USB port on your PC/Mac, do not start
rekordbox on your PC/Mac.
• Use a mobile battery which does not have a power-saving function. If you
use a mobile battery with a power-saving function, it may cut power to the
unit.
2 Kensington security slot
Connects a cable lock for security.
1 2

djay
85
En
Connections (for iOS devices)
Power comes through the USB port. You can connect to the USB port
on your PC/Mac or connect a USB power adapter or mobile battery to
power the unit.
Use a USB power adapter or mobile battery with DC +5 V and 500 mA
or more.
Use a mobile battery which does not have a power-saving function.
Use the USB cable supplied with this unit.
Connect the cable correctly after checking the position of the port on
this unit.
Refer to the instruction manuals for components to be connected.
• Once connected with the unit, connect your PC/Mac to an AC power
supply. (This applies when power is supplied to the unit through the
USB port on your PC/Mac.)
• The unit can’t be powered via your PC/Mac in the following
situations:
– Power supply capacity of the USB port on your PC/Mac is too low.
– Your PC/Mac is connected with other USB devices.

djay
86
En
Connecting to the USB port
Rear panel
(1) USB cable (supplied), (2) PC/Mac*
1
, (3) USB power adapter (not
supplied), (4) mobile battery (not supplied)
*1
If you want to power the unit via the USB port on your PC/Mac, turn
on your PC/Mac.
*2
To maintain performance, use the supplied USB cable.
djay
87
En
Connecting an audio device (speaker) to the
headphones jack of your iOS device
You can DJ with an iOS device and listen to your performance via its
built-in speakers. However, if you use the supplied split cable, you can
create an authentic DJ set-up with an external speaker(s) and
headphones.
Connection example 1 (if the iOS device has a headphones
output)
In this example, the master sound plays in stereo and there is no sound
output to the headphones.
Read more: Checking audio setup (page 91)
(1) Speaker with built-in amplifier, etc.*
* The audio cable is not supplied with the unit.
(1)
djay
88
En
Connection example 2 (if the iOS device has a headphones
output)
In this example, the master sound and the headphones monitor sound
both play in mono.
Read more: Checking audio setup (page 91)
(1) Speaker with built-in amplifier, etc.*, (2) Headphones,
(3) Plug for the speaker with built-in amplifier, etc. (black),
(4) Plug for the headphones (white), (5) Split cable (supplied)
* The audio cable is not supplied with this unit.
Connection example 3 (if the iOS device does not have a
headphones output, such as iPhone Xs)
In this example, the master sound plays in stereo and there is no sound
output to the headphones.
Read more: Checking audio setup (page 91)
(1) Speaker with built-in amplifier, etc.*,
(2) Lightning - 3.5 mm headphones jack adapter (not supplied)
(2)
(1)
(3) (4)
(5)
(1)
(2)
djay
89
En
* The audio cable is not supplied with the unit.
Connection example 4 (if the iOS device does not have a
headphones output, such as iPhone Xs)
In this example, the master sound and the headphones monitor sound
both play in mono.
Read more: Checking audio setup (page 91)
(1) Speaker with built-in amplifier, etc.*, (2) Headphones,
(3) Plug for the speaker with built-in amplifier, etc. (black),
(4) Plug for the headphones (white), (5) Split cable (supplied),
(6) Lightning - 3.5 mm headphones jack adapter (not supplied)
* The audio cable is not supplied with this unit.
Turning on the iOS device, etc.
1 Turn on the iOS device.
2 Turn on the device(s) connected to the iOS device (speaker with
built-in amplifier, etc.).
(6)
(2)
(1)
(3) (4)
(5)

djay
90
En
Basic use (djay)
Starting djay and connecting it to the unit
1 Tap on your iOS device to start djay.
2 Tap on the main screen of djay.
The [Settings] screen is displayed.
3Tap [MIDI Devices].
4Tap [Bluetooth MIDI Devices].
5Tap [DDJ-200].
The unit connects to your iOS device via Bluetooth.
When the connection is complete, the light of the Bluetooth MIDI indicator
changes from being lit to flashing.
• On the [Bluetooth MIDI Devices] screen, [DDJ-200_X] may be displayed
(X is a number from1 to 16).
Read more: Changing the BLUETOOTH
®
MIDI device name
(page 170)
djay
91
En
Checking audio setup
1 Tap on the main screen of djay.
2Check [Split Output] on the [Settings] screen.
To play both master sound and headphones monitor sound via the supplied
split cable, turn on [Split Output].
To play the master sound via your iOS device’s built-in speaker, or to play it in
stereo via a speaker with a built-in amplifier connected to your iOS device,
without using the split cable, turn off [Settings].
Read more: Connecting an audio device (speaker) to the headphones jack
of your iOS device (page 87)
Read more: Monitoring with headphones (page 93)
3 Go to the [Settings] screen, then tap [Done].
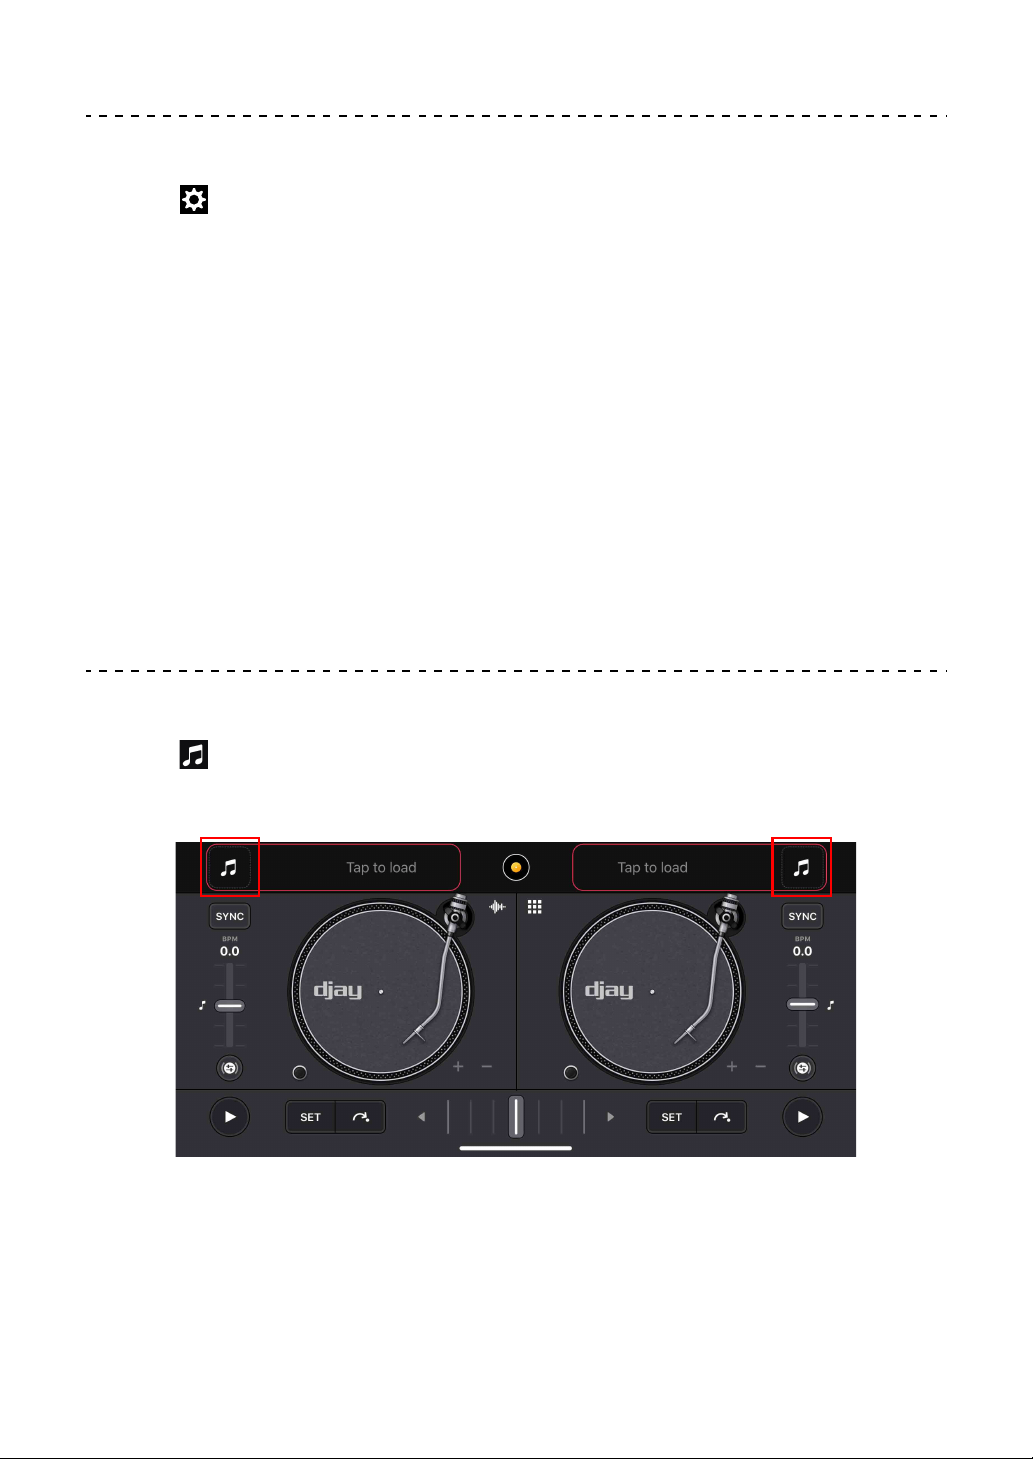
Loading a song or audio track onto a deck
1 Tap at the top of the main screen of djay.
This opens the browse screen.
2 Tap the track you want to load.
This loads the track onto the deck.
djay
92
En
Playing a track
This section explains how to play sound from deck 1 (left) as an
example.
1 Set the positions of the knobs as follows:
• [EQ (HI/MID/LOW)] knobs: center position (12 o’clock)
•[CFX] knob: center position
• Channel fader: bottom position
• Crossfader: center position
2 Press the [PLAY/PAUSE ] button to play the track.
3 Move the channel fader to the top.
4 Tap on the main screen of djay.
5 Move the [MASTER VOLUME] slider on the [Settings] screen.
Adjust the volume for your iOS device’s speaker, or the speaker connected to
your iOS device, until you have a volume level you’re happy with.

djay
93
En
Monitoring with headphones
To monitor sound with your headphones, you need to use the supplied
split cable.
Read more: Connecting an audio device (speaker) to the
headphones jack of your iOS device (page 87)
Also, you need to turn on [Split Output] in djay.
Read more: Checking audio setup (page 91)
Monitoring sound from a channel via headphones
The following example explains how to monitor sound from deck 1
(left).
1 Press the Headphone [CUE] button on channel 1.
2 Tap on the main screen of djay.
3Set [Split Output] to ON on the [Settings] screen.
4 Move the slider under [Split Output] on the [Settings] screen.
Adjust the volume of the headphones monitoring sound until you have a level
you’re happy with.
djay
94
En
Monitoring the master sound with headphones
1 Press the [MASTER CUE] button.
2 Tap on the main screen of djay.
3Set [Split Output] to ON on the [Settings] screen.
4 Move the slider under [Split Output] on the [Settings] screen.
Adjust the volume of the headphones monitoring sound until you have a level
you’re happy with.
Quitting the system
1 Quit djay.
2 Disconnect the USB cable to turn off the unit.
djay
95
En
Advanced use (djay)
Using the Performance Pads
Using Hot Cues
Playback can be moved to the Hot Cue point instantly.
Setting and calling up a Hot Cue
1 If the track is playing or paused, press Performance Pad 5 to 8 to
set the Hot Cue point.
2 Press a Performance Pad you’ve set a Hot Cue for.
Playback can be moved to the Hot Cue point instantly.
• You can clear Hot Cue points by pressing a Performance Pad while holding
the [SHIFT] button.
1234
5678
djay
96
En
Using Beat Loop
Press a Performance Pad while in Beat Loop mode to loop a set
number of beats. The loop keeps playing after you remove your finger
from the pad.
1 Press Performance Pad 1 to 4.
The loop plays with the number of beats set on that pad.
1: Beat Loop 1 beat, 2: Beat Loop 2 beats, 3: Beat Loop 4 beats,
4: Beat Loop 8 beats
2 Press the same Performance Pad again.
Loop playback is canceled and the rest of the track continues to play.
• Press and hold down the [SHIFT] button and a Performance Pad to loop
playback with the beat in the settings assigned to that pad while holding the
Performance Pad.
1:Beat Loop 1/16 beat, 2: Beat Loop 1/8 beat, 3: Beat Loop 1/4 beat,
4: Beat Loop 1/2 beat
1234
5678
1234
5678

djay
97
En
Using Transition FX
You can easily mix like a professional DJ with effects and scratches,
simply by using the crossfader.
The following example explains how to transition from a track on deck
1 to a track on deck 2.
1 Set the positions of the knobs as follows:
• [EQ (HI/MID/LOW)] knobs: center position (12 o’clock)
•[CFX] knob: center position
• Channel fader: top position
• Crossfader: left position
2 Load tracks onto deck 1 and deck 2, then play both.
You’ll hear the sound of the track on deck 1.
3 Press the [BEAT SYNC] button on the right side.
The tempo and beatgrid of the track on deck 2 are automatically matched to
deck 1.
4 Press the [TRANSITION FX] button to turn on Transition FX.
5 Move the crossfader to the right.
The Transition FX is added.

98
En
edjing Mix for iOS
edjing Mix is a DJ performance app you can download from the App
Store.
• If you already have edjing Mix installed, update it to the latest version.
System requirements
iOS: iOS 12, 11, 10
• To check the latest information on system requirements, compatibility
and supported operating systems, visit the Pioneer DJ support page
below and click on the [DDJ-200] option in the [DJ CONTROLLER]
section.
pioneerdj.com/en/support/software-information/
• Operation is not guaranteed on all iOS devices, even if the system
requirements are met.
• Depending on power-saving settings and other conditions of the iOS
device, edjing Mix may perform poorly.
• Problems may occur with operation depending on the other software
you use.
• For the latest system requirements for edjing Mix, check the App
Store.
• You’ll need an internet connection to access the App Store.


edjing Mix for iOS
100
En
Deck section
You can control two decks with the unit. There are knobs and buttons
on the left side to control deck 1 and on the right side to control deck 2.
1 Jog wheel
Turn the top:
‘Scratches’ the track.
Turn the outer section:
Bends the pitch or ‘Pitch Bend’ (slows down or speeds up the track).
[SHIFT] + turn the top:
Fast forwards or fast reverses the track (turn clockwise or counter-clockwise).
2 Performance Pads
You can use Performance Pads to trigger features.
Read more: Using the Performance Pads (page 115)
3 SHIFT button
2
1
6
7
3
4
5

edjing Mix for iOS
101
En
Press another button while holding the [SHIFT] button to use a different feature
assigned to the button.
4 CUE button
Press:
Sets, plays and calls up a cue point.
• Press the button when the track is paused to set the cue point.
• Press the button when the track is playing to return to the cue point and
pause. (Back Cue)
• Press the button and hold it after the track returns to the cue point and
playback will continue until you release the button. (Cue Point Sampler)
[SHIFT] + press:
Returns the playback position to the beginning of the track.
5 PLAY/PAUSE button
Plays/pauses a track.
6 BEAT SYNC button
Press:
Automatically synchronizes the tempos (BPM) and beatgrids with the other
deck.
[SHIFT] + press:
Switches the range of [TEMPO] slider each time the button is pressed while
holding the [SHIFT] button.
Hold down the [BEAT SYNC] buttons on deck 1 and deck 2 for at least one
second at the same time:
The Bluetooth connection of the iOS device is canceled.
7 TEMPO slider
Adjusts the playing speed of the track.

edjing Mix for iOS
102
En
Mixer section
1 MASTER CUE button
Press:
Plays the master sound through your headphones when they’re connected to
the supplied split cable, which is plugged into the headphones output of your
iOS device.
• Connect the headphones to the white plug of the split cable.
Read more: Monitoring with headphones (page 113)
2 EQ (HI, MID, LOW) knobs
Boosts or reduces the relevant frequency for the selected channel.
3 CFX knob
Turns on the Filter effect and changes the sound for the relevant channel.
When the knob is set to the center position, the sound is unchanged.
1
2
3
4
6
5
5
3
2
7

edjing Mix for iOS
103
En
4 Headphone CUE button
Press:
Plays the sound of the relevant channel (1 or 2) through your headphones
when they’re connected to the supplied split cable, which is plugged into the
headphones output of your iOS device.
• Connect the headphones to the white plug of the split cable.
Read more: Monitoring with headphones (page 113)
5 Channel fader
Adjusts the volume of the sound for each channel.
6 TRANSITION FX button
Press:
Turns on Transition FX.
Read more: Using Transition FX (page 116)
7 Crossfader
Adjusts the sound balance between the left channel (deck 1) and right channel
(deck 2).
Bluetooth MIDI indicator
Flashes: The iOS device is not connected via Bluetooth.
Lights up: The iOS device is connected via Bluetooth.
Turns off: The unit has recognized the connection with rekordbox using
the USB cable.
• When using edjing Mix with the unit being powered via the USB port
of your PC/Mac, do not start rekordbox on your PC/Mac.

edjing Mix for iOS
104
En
Rear panel
1USB port
Connects to a USB power adapter (not supplied) or mobile battery (not
supplied) via the supplied USB cable.
Also, you can connect to a USB port on your PC/Mac with the supplied USB
cable to power the unit.
• Use a USB power adapter or mobile battery with DC +5 V and 500 mA or
more.
• When powering the unit from a USB port on your PC/Mac, do not start
rekordbox on your PC/Mac.
• Use a mobile battery which does not have a power-saving function. If you
use a mobile battery with a power-saving function, it may cut power to the
unit.
2 Kensington security slot
Connects a cable lock for security.
1 2

edjing Mix for iOS
105
En
Connections (for iOS devices)
Power comes through the USB port. You can connect to the USB port
on your PC/Mac or connect a USB power adapter or mobile battery to
power the unit.
Use a USB power adapter or mobile battery with DC +5 V and 500 mA
or more.
Use a mobile battery which does not have a power-saving function.
Use the USB cable supplied with this unit.
Connect the cable correctly after checking the position of the port on
this unit.
Refer to the instruction manuals for components to be connected.
• Once connected with the unit, connect your PC/Mac to an AC power
supply. (This applies when power is supplied to the unit through the
USB port on your PC/Mac.)
• The unit can’t be powered via your PC/Mac in the following
situations:
– Power supply capacity of the USB port on your PC/Mac is too low.
– Your PC/Mac is connected with other USB devices.

edjing Mix for iOS
106
En
Connecting to the USB port
Rear panel
(1) USB cable (supplied), (2) PC/Mac*
1
, (3) USB power adapter (not
supplied), (4) mobile battery (not supplied)
*1
If you want to power the unit via the USB port on your PC/Mac, turn
on your PC/Mac.
*2
To maintain performance, use the supplied USB cable.
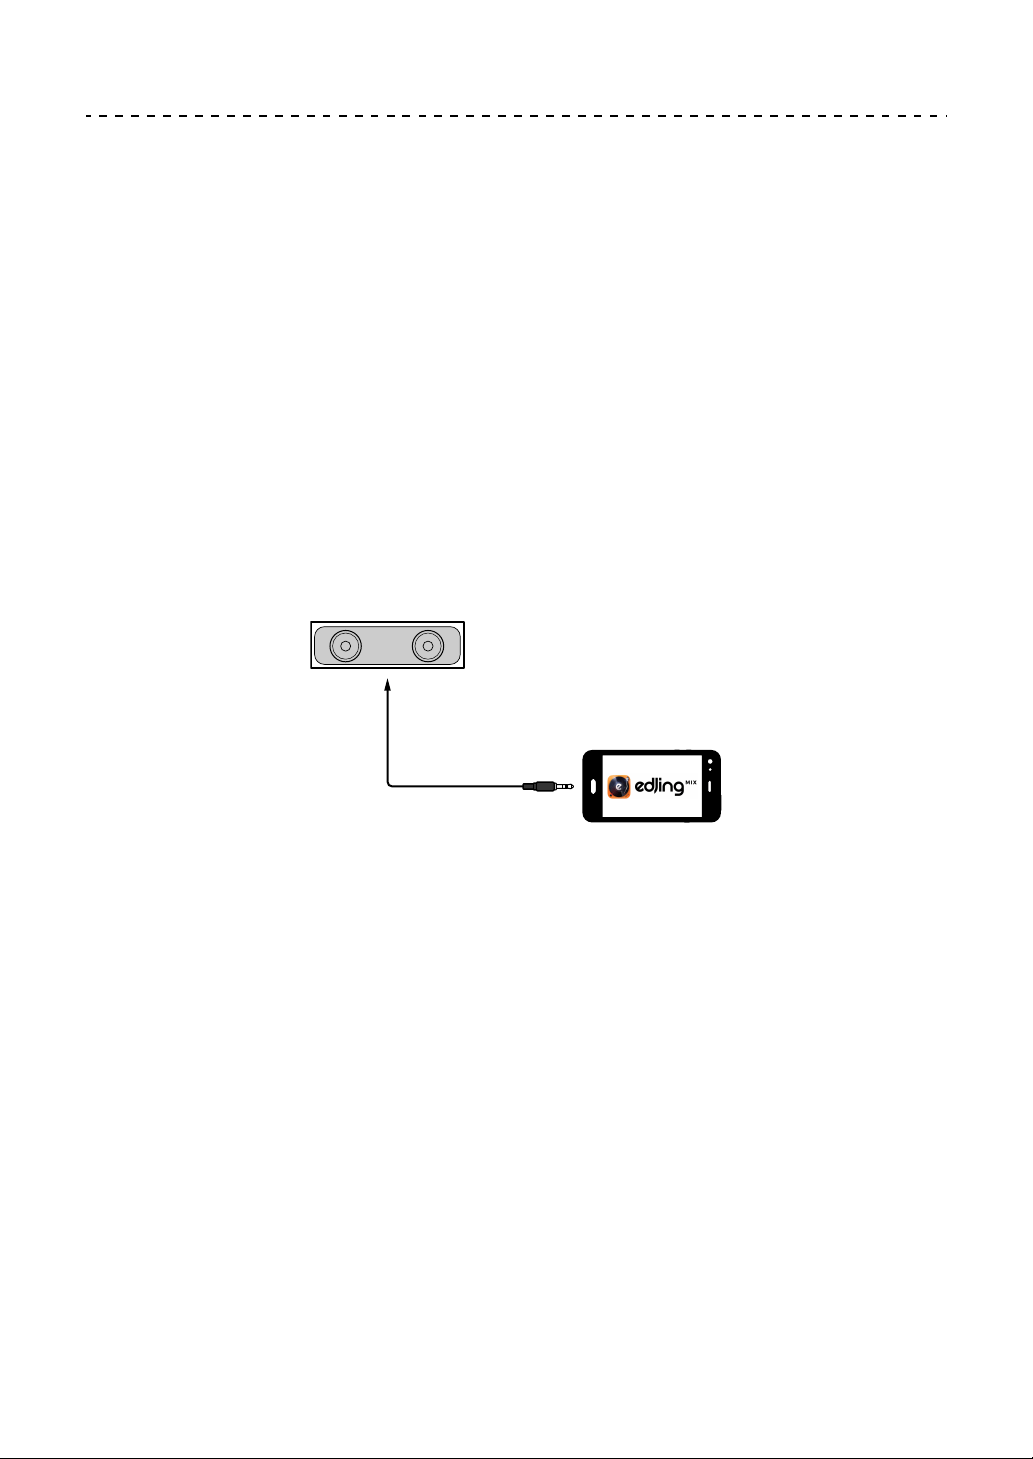
edjing Mix for iOS
107
En
Connecting an audio device (speaker) to the
headphones jack of your iOS device
You can DJ with an iOS device and listen to your performance via its
built-in speakers. However, if you use the supplied split cable, you can
create an authentic DJ set-up with an external speaker(s) and
headphones.
Connection example 1 (if the iOS device has a headphones
output)
In this example, the master sound plays in stereo and there is no sound
output to the headphones.
Read more: Checking audio setup (page 111)
(1) Speaker with built-in amplifier, etc.*
* The audio cable is not supplied with the unit.
(1)
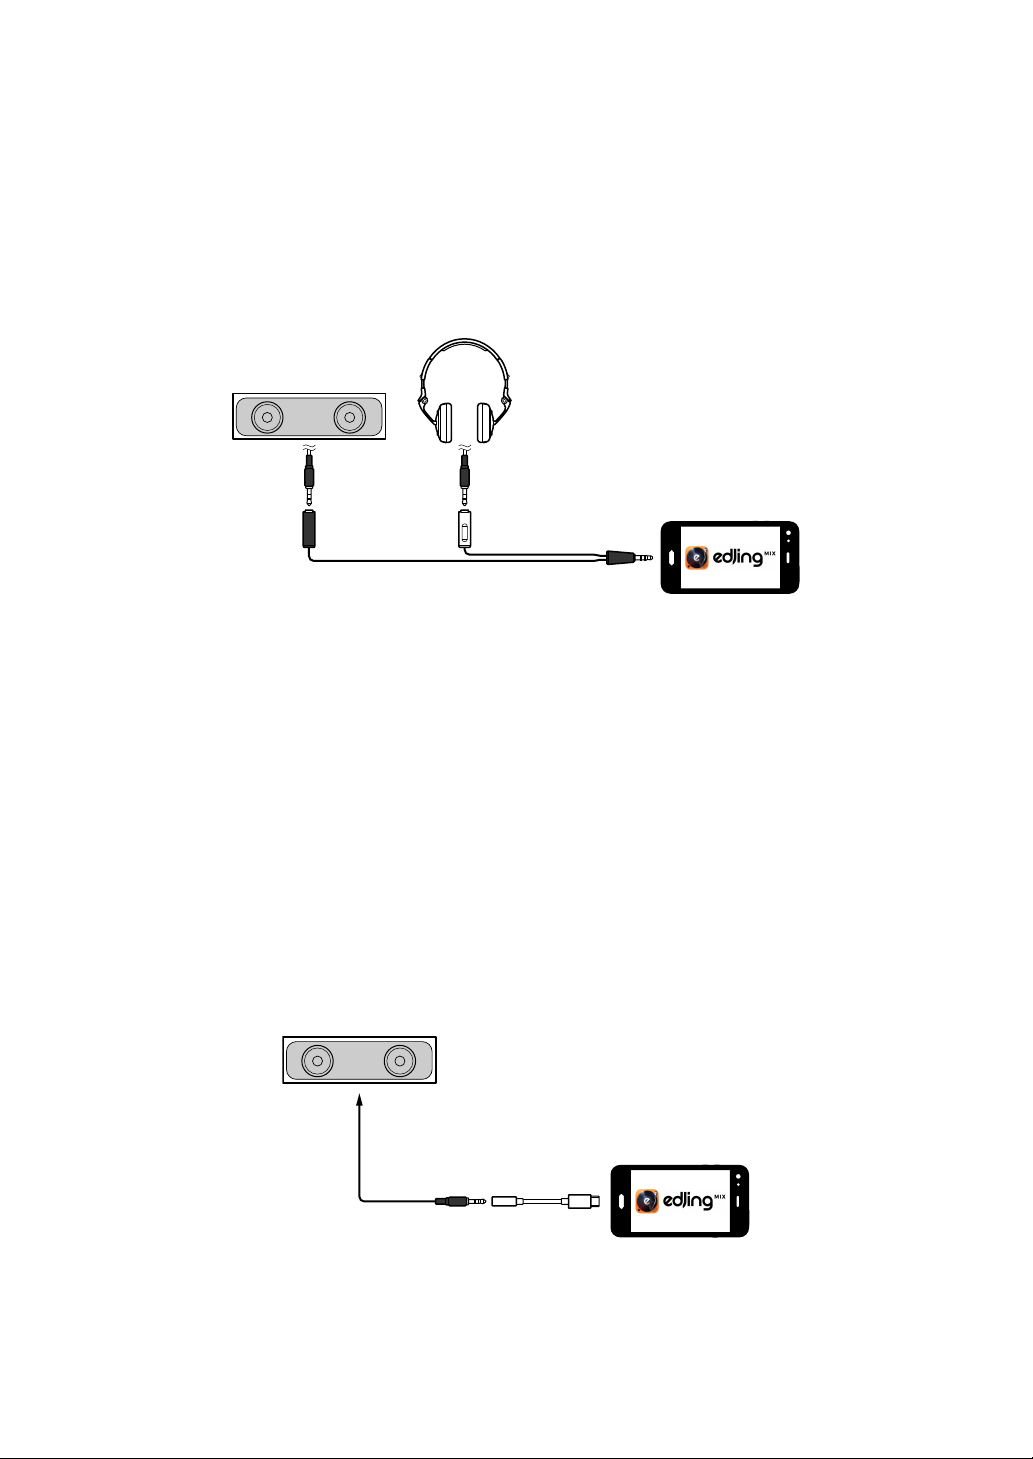
edjing Mix for iOS
108
En
Connection example 2 (if the iOS device has a headphones
output)
In this example, the master sound and the headphones monitor sound
both play in mono.
Read more: Checking audio setup (page 111)
(1) Speaker with built-in amplifier, etc.*, (2) Headphones,
(3) Plug for the speaker with built-in amplifier, etc. (black),
(4) Plug for the headphones (white), (5) Split cable (supplied)
* The audio cable is not supplied with this unit.
Connection example 3 (if the iOS device does not have a
headphones output, such as iPhone Xs)
In this example, the master sound plays in stereo and there is no sound
output to the headphones.
Read more: Checking audio setup (page 111)
(1) Speaker with built-in amplifier, etc.*,
(2) Lightning - 3.5 mm headphones jack adapter (not supplied)
(2)
(1)
(3) (4)
(5)
(1)
(2)

edjing Mix for iOS
109
En
* The audio cable is not supplied with the unit.
Connection example 4 (if the iOS device does not have a
headphones output, such as iPhone Xs)
In this example, the master sound and the headphones monitor sound
both play in mono.
Read more: Checking audio setup (page 111)
(1) Speaker with built-in amplifier, etc.*, (2) Headphones,
(3) Plug for the speaker with built-in amplifier, etc. (black),
(4) Plug for the headphones (white), (5) Split cable (supplied),
(6) Lightning - 3.5 mm headphones jack adapter (not supplied)
* The audio cable is not supplied with this unit.
Turning on the iOS device, etc.
1 Turn on the iOS device.
2 Turn on the device(s) connected to the iOS device (speaker with
built-in amplifier, etc.).
(6)
(2)
(1)
(3) (4)
(5)

edjing Mix for iOS
110
En
Basic use (edjing Mix)
Starting edjing Mix and connecting it to the unit
1 Tap on your iOS device to start edjing Mix.
2 Tap on the main screen of edjing Mix.
The [Settings] screen is displayed.
3Tap [Connect the DDJ-200].
4Tap [DDJ-200].
The unit connects to your iOS device via Bluetooth.
When the connection is complete, the light of the Bluetooth MIDI indicator
changes from being lit to flashing.
• On the [Connect the DDJ-200] screen, [DDJ-200_X] may be displayed (X
is a number from1 to 16).
Read more: Changing the BLUETOOTH
®
MIDI device name
(page 170)
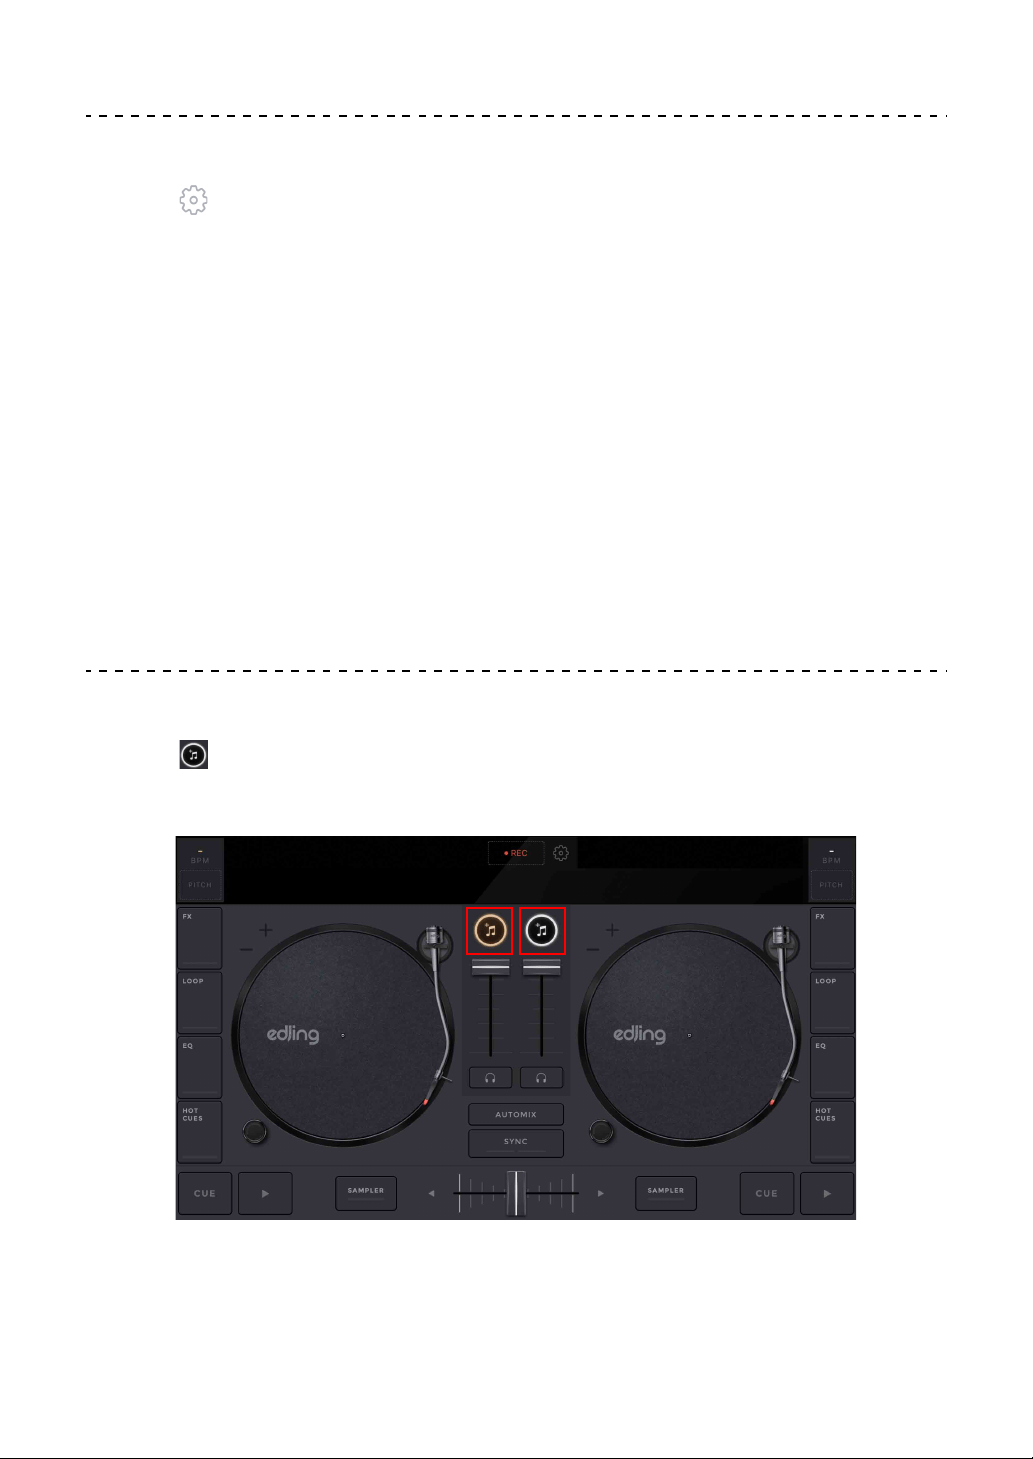
edjing Mix for iOS
111
En
Checking audio setup
1 Tap on the main screen of edjing Mix.
2Tap [Audio settings] on the [Settings] screen.
To play both master sound and headphones monitor sound via the supplied
split cable, turn on [Split audio output].
To play the master sound via your iOS device’s built-in speaker, or to play it in
stereo via a speaker with a built-in amplifier connected to your iOS device,
without using the split cable, turn off [Split audio output].
Read more: Connecting an audio device (speaker) to the headphones jack
of your iOS device (page 107)
Read more: Monitoring with headphones (page 113)
3 Go to the [Settings] screen, then tap [Done].
Loading a song or audio track onto a deck
1 Tap at the top of the main screen of edjing Mix.
This opens the browse screen.
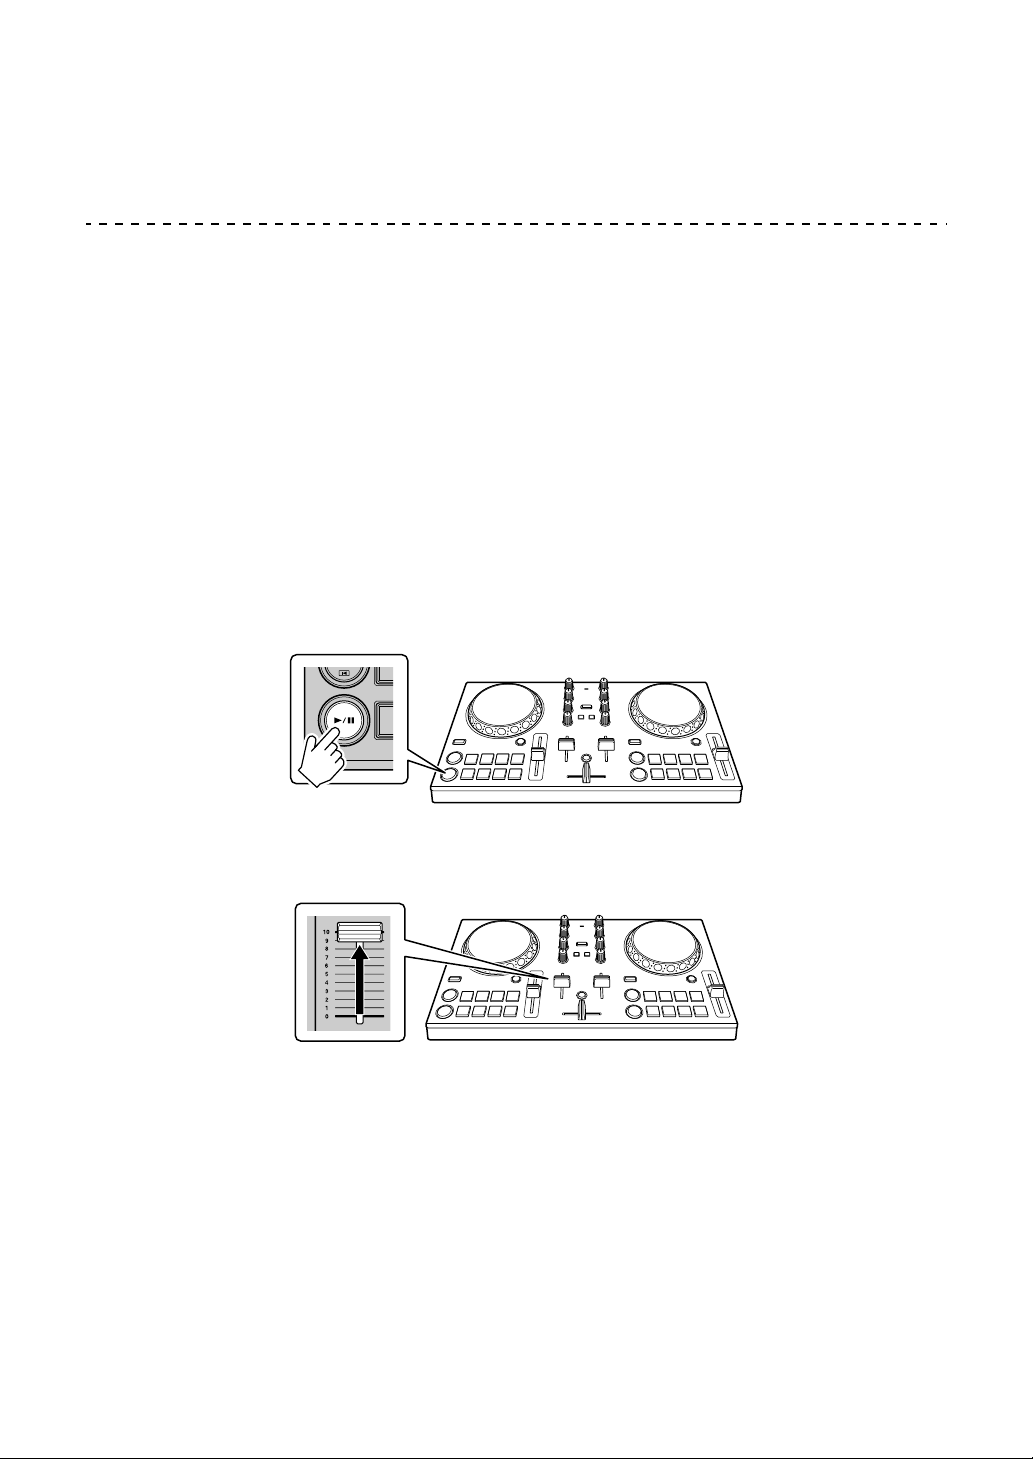
edjing Mix for iOS
112
En
2 Tap the track you want to load.
This loads the track onto the deck.
Playing a track
This section explains how to play sound from deck 1 (left) as an
example.
1 Set the positions of the knobs as follows:
• [EQ (HI/MID/LOW)] knobs: center position (12 o’clock)
•[CFX] knob: center position
• Channel fader: bottom position
• Crossfader: center position
2 Press the [PLAY/PAUSE ] button to play the track.
3 Move the channel fader to the top.
4 Adjust the volume on your iOS device.
Adjust the volume for your iOS device’s speaker, or the speaker connected to
your iOS device, until you have a volume level you’re happy with.

edjing Mix for iOS
113
En
Monitoring with headphones
To monitor sound with your headphones, you need to use the supplied
split cable.
Read more: Connecting an audio device (speaker) to the
headphones jack of your iOS device (page 107)
Also, you need to turn on [Split audio output] in edjing Mix.
Read more: Checking audio setup (page 111)
Monitoring sound from a channel via headphones
The following example explains how to monitor sound from deck 1
(left).
1 Press the Headphone [CUE] button on channel 1.
2 Tap on the main screen of edjing Mix.
3Tap [Audio settings] on the [Settings] screen.
4Tap [Pre-cueing] on the [Audio settings] screen.
5 Move the slider under [Volume] on the [Pre-cueing] screen.
Adjust the volume of the headphones monitoring sound until you have a level
you’re happy with.
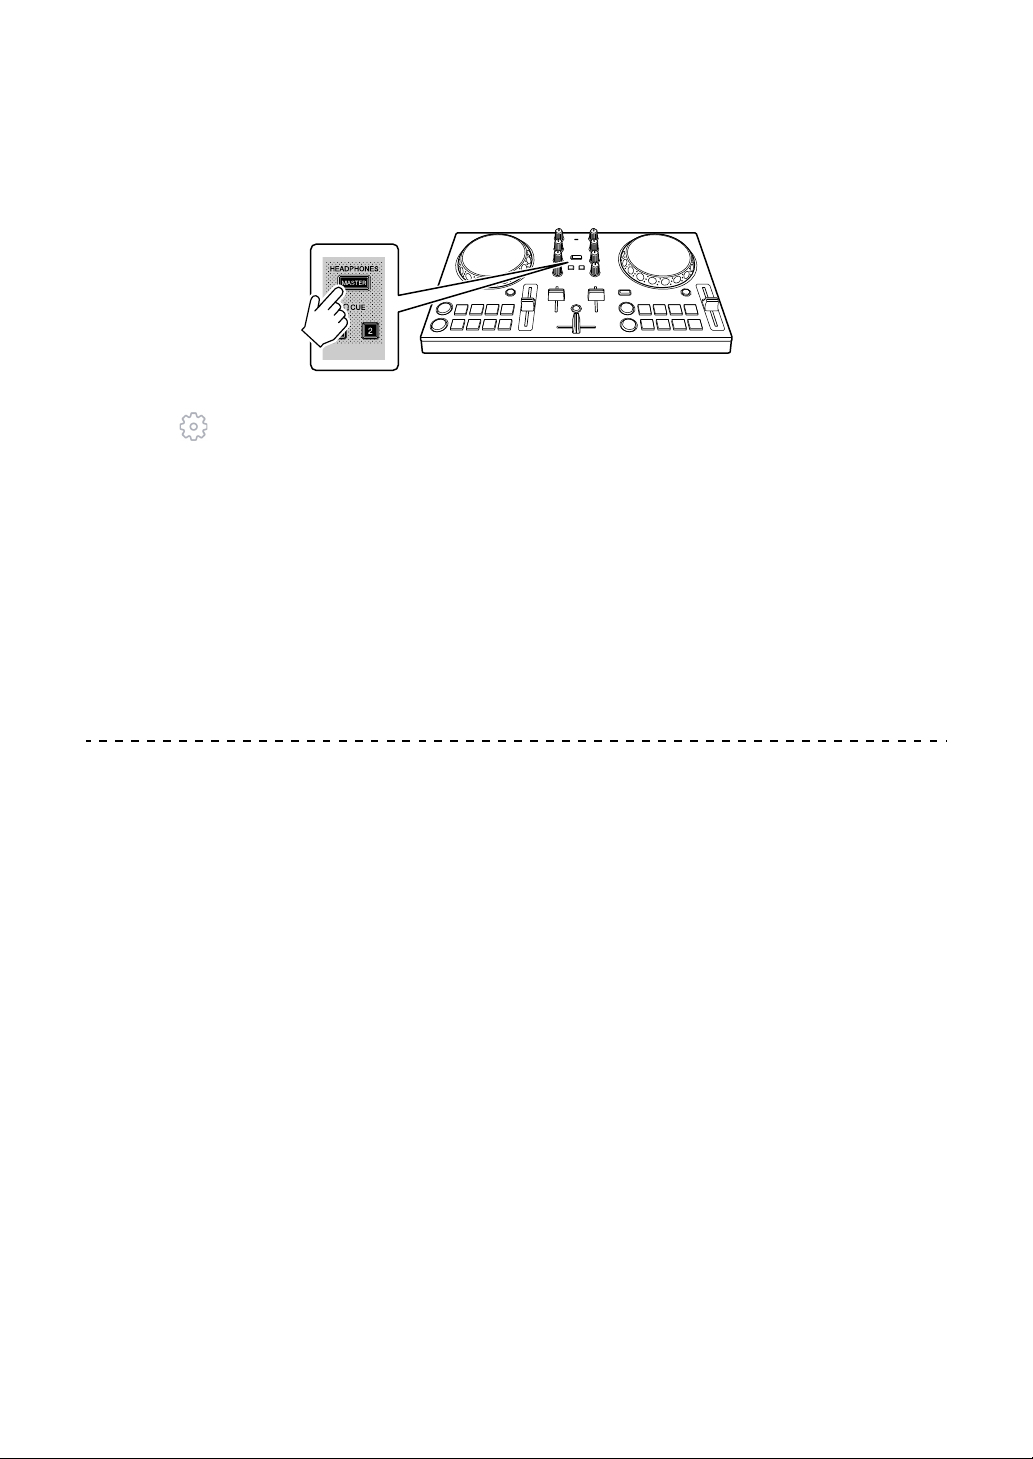
edjing Mix for iOS
114
En
Monitoring the master sound with headphones
1 Press the [MASTER CUE] button.
2 Tap on the main screen of edjing Mix.
3Tap [Audio settings] on the [Settings] screen.
4Tap [Pre-cueing] on the [Audio settings] screen.
5 Move the slider under [Volume] on the [Pre-cueing] screen.
Adjust the volume of the headphones monitoring sound until you have a level
you’re happy with.
Quitting the system
1 Quit edjing Mix.
2 Disconnect the USB cable to turn off the unit.

edjing Mix for iOS
115
En
Advanced use (edjing Mix)
Using the Performance Pads
Using Hot Cues
Playback can be moved to the Hot Cue point instantly.
Setting and calling up a Hot Cue
1 If the track is playing or paused, press a Performance Pad to set the
Hot Cue point.
The Hot Cue points are set to Performance Pads as follows:
1: Hot Cue A, 2: Hot Cue B, 3: Hot Cue C, 4: Hot Cue D,
5: Hot Cue E, 6: Hot Cue F, 7: Hot Cue G, 8: Hot Cue H
2 Press a Performance Pad you’ve set a Hot Cue for.
Playback can be moved to the Hot Cue point instantly.
• You can clear Hot Cue points by pressing a Performance Pad while holding
the [SHIFT] button.
1234
5678

edjing Mix for iOS
116
En
Using Transition FX
You can easily mix like a professional DJ with effects and scratches,
simply by using the crossfader.
The following example explains how to transition from a track on deck
1 to a track on deck 2.
1 Set the positions of the knobs as follows:
• [EQ (HI/MID/LOW)] knobs: center position (12 o’clock)
•[CFX] knob: center position
• Channel fader: top position
• Crossfader: left position
2 Load tracks onto deck 1 and deck 2, then play both.
You’ll hear the sound of the track on deck 1.
3 Press the [BEAT SYNC] button on the right side.
The tempo and beatgrid of the track on deck 2 are automatically matched to
deck 1.
4 Press the [TRANSITION FX] button to turn on Transition FX.
5 Move the crossfader to the right.
The Transition FX is added.

117
En
edjing Mix for Android
edjing Mix is a DJ performance app you can download from the Google
Play.
• If you already have edjing Mix installed, update it to the latest version.
System requirements
Compatible OS: Android 6.0 or later
Supported wireless system: Bluetooth Low Energy (MIDI standard
compliant)
• To check the latest information on system requirements, compatibility
and supported operating systems, visit the Pioneer DJ support page
below and click on the [DDJ-200] option in the [DJ CONTROLLER]
section.
pioneerdj.com/en/support/software-information/
• Operation is not guaranteed on all Android devices, even if the
system requirements are met.
• Depending on power-saving settings and other conditions of the
Android device, edjing Mix may perform poorly.
• Problems may occur with operation depending on the other software
you use.
• For the latest system requirements for edjing Mix, check the Google
Play.
• You’ll need an internet connection to access the Google Play.


edjing Mix for Android
119
En
Deck section
You can control two decks with the unit. There are knobs and buttons
on the left side to control deck 1 and on the right side to control deck 2.
1 Jog wheel
Turn the top:
‘Scratches’ the track.
Turn the outer section:
Bends the pitch or ‘Pitch Bend’ (slows down or speeds up the track).
[SHIFT] + turn the top:
Fast forwards or fast reverses the track (turn clockwise or counter-clockwise).
2 Performance Pads
You can use Performance Pads to trigger features.
Read more: Using the Performance Pads (page 135)
3 SHIFT button
2
1
6
7
3
4
5

edjing Mix for Android
120
En
Press another button while holding the [SHIFT] button to use a different feature
assigned to the button.
4 CUE button
Press:
Sets, plays and calls up a cue point.
• Press the button when the track is paused to set the cue point.
• Press the button when the track is playing to return to the cue point and
pause. (Back Cue)
• Press the button and hold it after the track returns to the cue point and
playback will continue until you release the button. (Cue Point Sampler)
[SHIFT] + press:
Returns the playback position to the beginning of the track.
5 PLAY/PAUSE button
Plays/pauses a track.
6 BEAT SYNC button
Press:
Automatically synchronizes the tempos (BPM) and beatgrids with the other
deck.
[SHIFT] + press:
Switches the range of [TEMPO] slider each time the button is pressed while
holding the [SHIFT] button.
Hold down the [BEAT SYNC] buttons on deck 1 and deck 2 for at least one
second at the same time:
The Bluetooth connection of the Android device is canceled.
7 TEMPO slider
Adjusts the playing speed of the track.

edjing Mix for Android
121
En
Mixer section
1 MASTER CUE button
Press:
Plays the master sound through your headphones when they’re connected to
the supplied split cable, which is plugged into the headphones output of your
Android device.
• Connect the headphones to the white plug of the split cable.
Read more: Monitoring with headphones (page 133)
2 EQ (HI, MID, LOW) knobs
Boosts or reduces the relevant frequency for the selected channel.
3 CFX knob
Turns on the Filter effect and changes the sound for the relevant channel.
When the knob is set to the center position, the sound is unchanged.
4 Headphone CUE button
Press:
1
2
3
4
6
5
5
3
2
7

edjing Mix for Android
122
En
Plays the sound of the relevant channel (1 or 2) through your headphones
when they’re connected to the supplied split cable, which is plugged into the
headphones output of your Android device.
• Connect the headphones to the white plug of the split cable.
Read more: Monitoring with headphones (page 133)
5 Channel fader
Adjusts the volume of the sound for each channel.
6 TRANSITION FX button
Press:
Turns on Transition FX.
Read more: Using Transition FX (page 136)
7 Crossfader
Adjusts the sound balance between the left channel (deck 1) and right channel
(deck 2).
Bluetooth MIDI indicator
Flashes: The Android device is not connected via Bluetooth.
Lights up: The Android device is connected via Bluetooth.
Turns off: The unit has recognized the connection with rekordbox using
the USB cable.
• When using edjing Mix with the unit being powered via the USB port
of your PC/Mac, do not start rekordbox on your PC/Mac.

edjing Mix for Android
123
En
Rear panel
1USB port
Connects to a USB power adapter (not supplied) or mobile battery (not
supplied) via the supplied USB cable.
Also, you can connect to a USB port on your PC/Mac with the supplied USB
cable to power the unit.
• Use a USB power adapter or mobile battery with DC +5 V and 500 mA or
more.
• When powering the unit from a USB port on your PC/Mac, do not start
rekordbox on your PC/Mac.
• Use a mobile battery which does not have a power-saving function. If you
use a mobile battery with a power-saving function, it may cut power to the
unit.
2 Kensington security slot
Connects a cable lock for security.
1 2

edjing Mix for Android
124
En
Connections (for Android devices)
Power comes through the USB port. You can connect to the USB port
on your PC/Mac or connect a USB power adapter or mobile battery to
power the unit.
Use a USB power adapter or mobile battery with DC +5 V and 500 mA
or more.
Use a mobile battery which does not have a power-saving function.
Use the USB cable supplied with this unit.
Connect the cable correctly after checking the position of the port on
this unit.
Refer to the instruction manuals for components to be connected.
• Once connected with the unit, connect your PC/Mac to an AC power
supply. (This applies when power is supplied to the unit through the
USB port on your PC/Mac.)
• The unit can’t be powered via your PC/Mac in the following
situations:
– Power supply capacity of the USB port on your PC/Mac is too low.
– Your PC/Mac is connected with other USB devices.
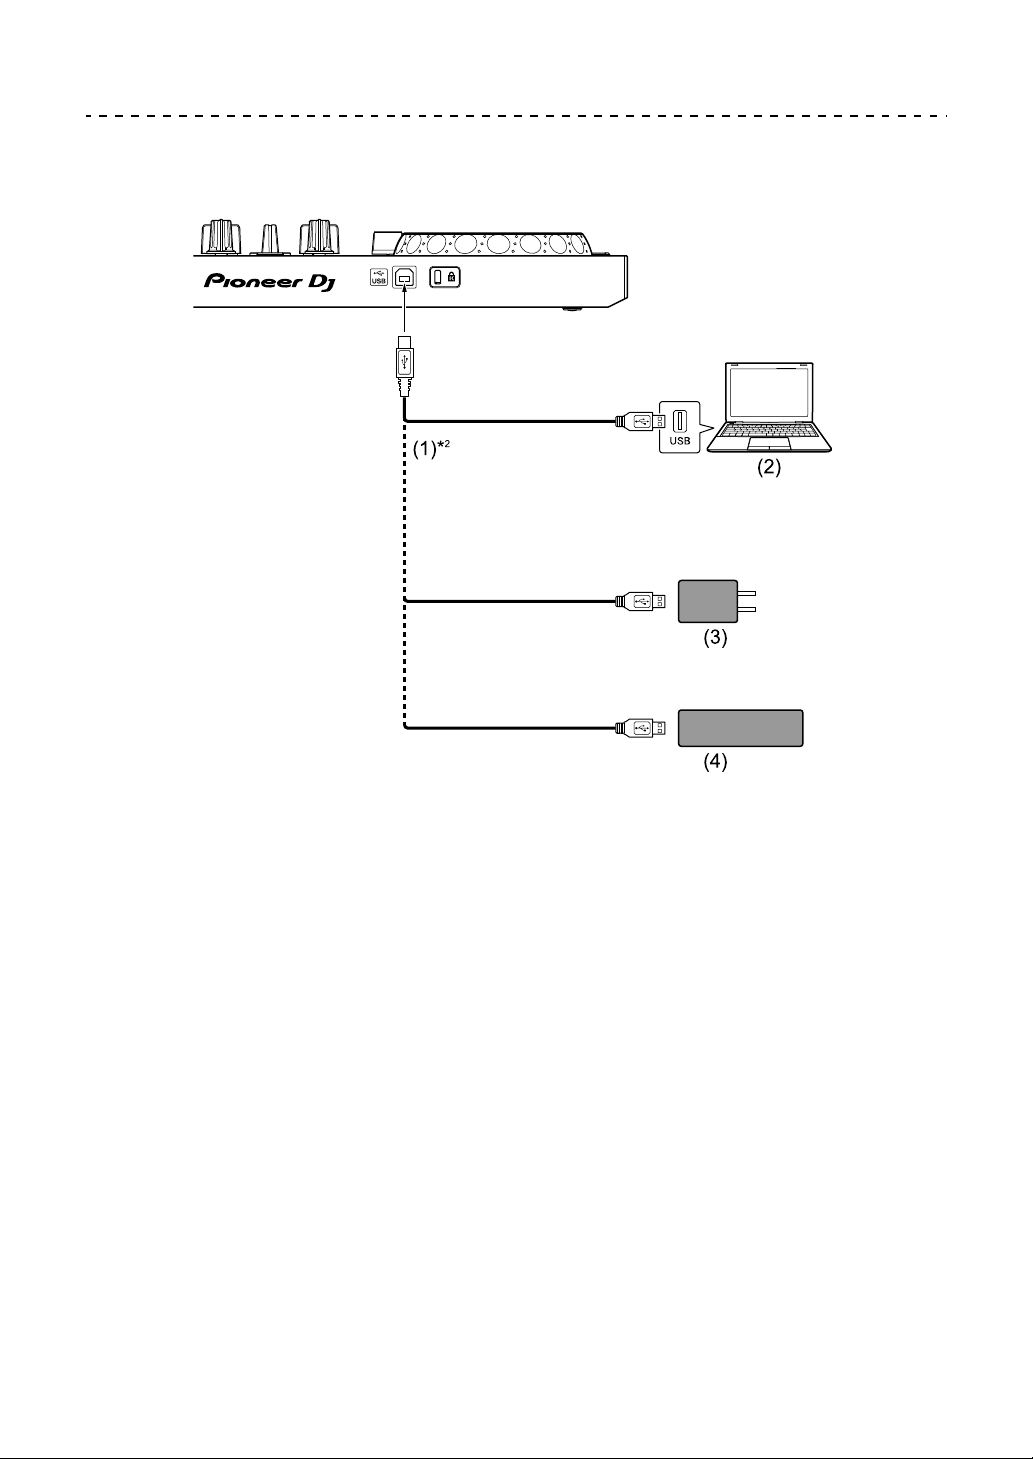
edjing Mix for Android
125
En
Connecting to the USB port
Rear panel
(1) USB cable (supplied), (2) PC/Mac*
1
, (3) USB power adapter (not
supplied), (4) mobile battery (not supplied)
*1
If you want to power the unit via the USB port on your PC/Mac, turn
on your PC/Mac.
*2
To maintain performance, use the supplied USB cable.

edjing Mix for Android
126
En
Connecting an audio device (speaker) to the
headphones jack of your Android device
You can DJ with an Android device and listen to your performance via
its built-in speakers. However, if you use the supplied split cable, you
can create an authentic DJ set-up with an external speaker(s) and
headphones.
Connection example 1 (if the Android device has a headphones
output)
In this example, the master sound plays in stereo and there is no sound
output to the headphones.
Read more: Checking audio setup (page 130)
(1) Speaker with built-in amplifier, etc.*
* The audio cable is not supplied with the unit.
(1)

edjing Mix for Android
127
En
Connection example 2 (if the Android device has a headphones
output)
In this example, the master sound and the headphones monitor sound
both play in mono.
Read more: Checking audio setup (page 130)
(1) Speaker with built-in amplifier, etc.*, (2) Headphones,
(3) Plug for the speaker with built-in amplifier, etc. (black),
(4) Plug for the headphones (white), (5) Split cable (supplied)
* The audio cable is not supplied with this unit.
Connection example 3 (if the Android device does not have a
headphones output)
In this example, the master sound plays in stereo and there is no sound
output to the headphones.
Read more: Checking audio setup (page 130)
(1) Speaker with built-in amplifier, etc.*,
(2) USB Type-C male - 3.5 mm headphones jack female (not supplied)
(2)
(1)
(3) (4)
(5)
(1)
(2)

edjing Mix for Android
128
En
* The audio cable is not supplied with the unit.
Connection example 4 (if the Android device does not have a
headphones output)
In this example, the master sound and the headphones monitor sound
both play in mono.
Read more: Checking audio setup (page 130)
(1) Speaker with built-in amplifier, etc.*, (2) Headphones,
(3) Plug for the speaker with built-in amplifier, etc. (black),
(4) Plug for the headphones (white), (5) Split cable (supplied),
(6) USB Type-C male - 3.5 mm headphones jack female (not supplied)
* The audio cable is not supplied with this unit.
Turning on the Android device, etc.
1 Turn on the Android device.
2 Turn on the device(s) connected to the Android device (speaker
with built-in amplifier, etc.).
(6)
(2)
(1)
(3) (4)
(5)

edjing Mix for Android
129
En
Basic use (edjing Mix)
Starting edjing Mix and connecting it to the unit
1 Tap on your Android device to start edjing Mix.
2 Tap on the main screen of edjing Mix.
The [Settings] screen is displayed.
3Tap [Connect the DDJ-200].
4Tap [DDJ-200].
The unit connects to your Android device via Bluetooth.
When the connection is complete, the light of the Bluetooth MIDI indicator
changes from being lit to flashing.
• On the [Connect the DDJ-200] screen, [DDJ-200_X] may be displayed (X
is a number from1 to 16).
Read more: Changing the BLUETOOTH
®
MIDI device name
(page 170)

edjing Mix for Android
130
En
Checking audio setup
1 Tap on the main screen of edjing Mix.
2Tap [Audio settings] on the [Settings] screen.
To play both master sound and headphones monitor sound via the supplied
split cable, turn on [Split audio output].
To play the master sound via your Android device’s built-in speaker, or to play
it in stereo via a speaker with a built-in amplifier connected to your Android
device, without using the split cable, turn off [Split audio output].
Read more: Connecting an audio device (speaker) to the headphones jack
of your Android device (page 126)
Read more: Monitoring with headphones (page 133)
3 Go to the [Settings] screen, then tap .
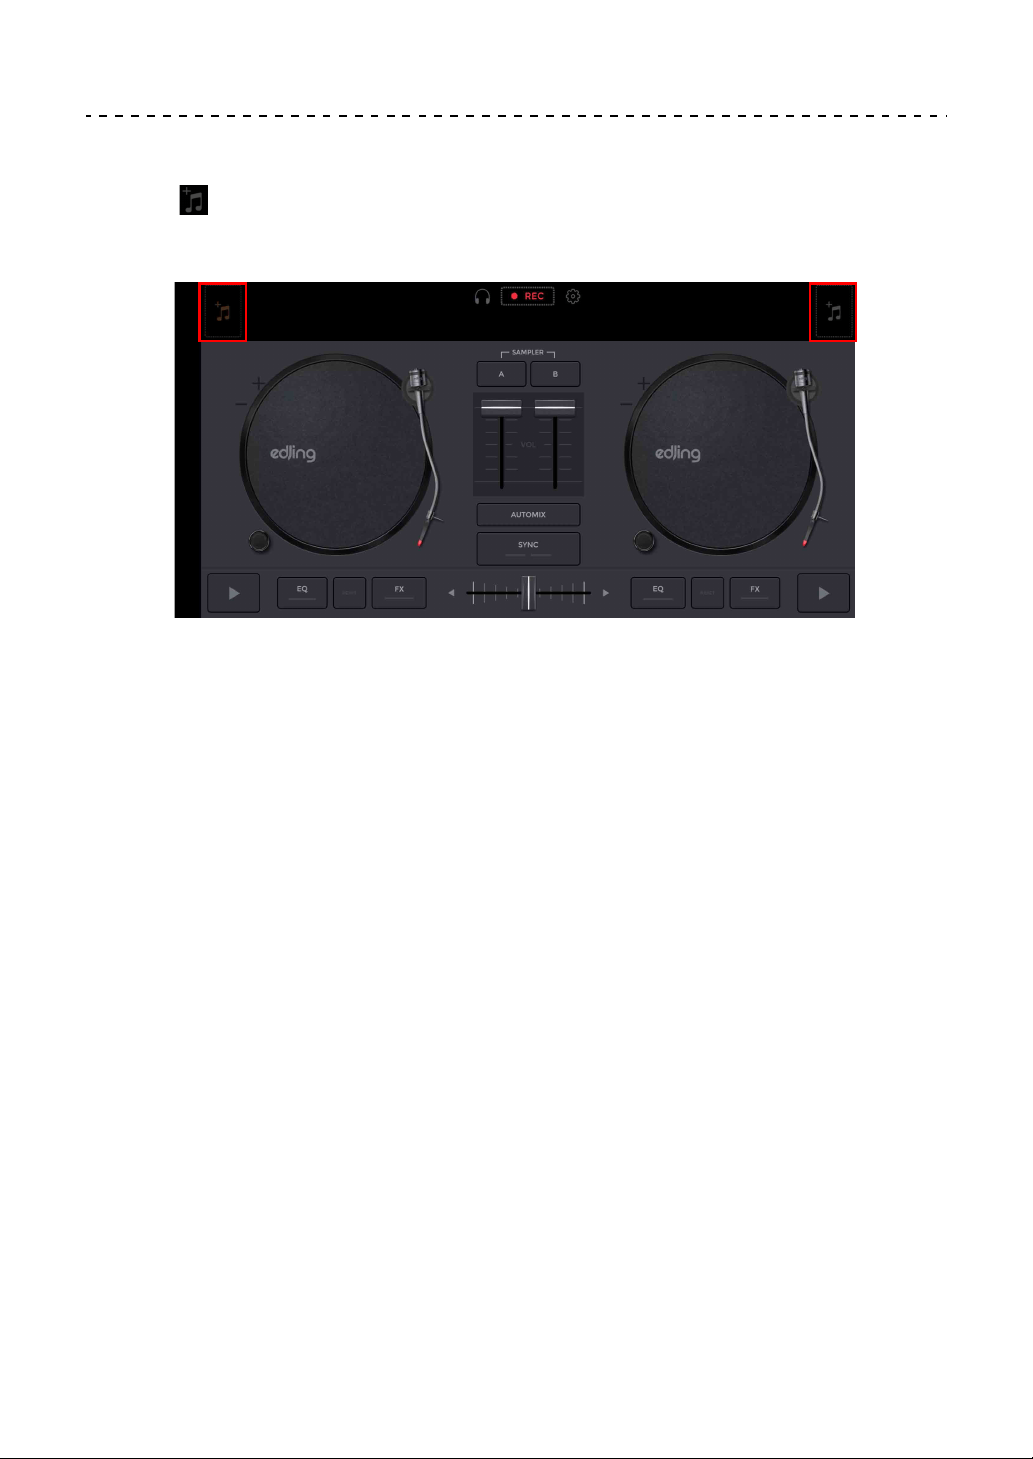
edjing Mix for Android
131
En
Loading a song or audio track onto a deck
1 Tap at the top of the main screen of edjing Mix.
This opens the browse screen.
2 Tap the track you want to load.
This loads the track onto the deck.
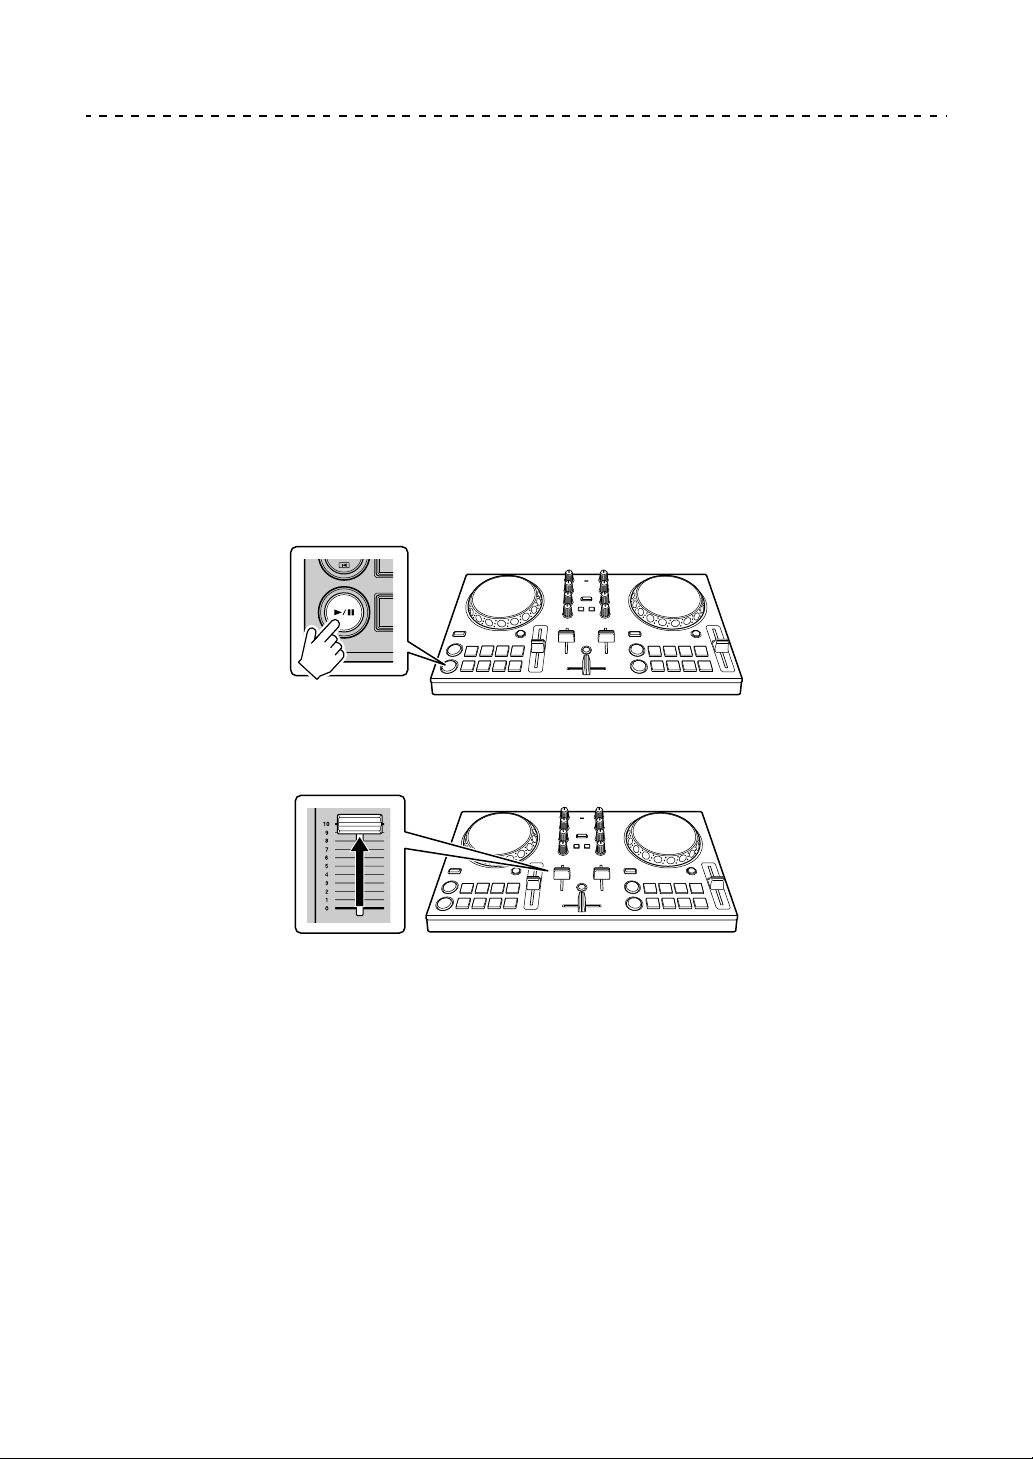
edjing Mix for Android
132
En
Playing a track
This section explains how to play sound from deck 1 (left) as an
example.
1 Set the positions of the knobs as follows:
• [EQ (HI/MID/LOW)] knobs: center position (12 o’clock)
•[CFX] knob: center position
• Channel fader: bottom position
• Crossfader: center position
2 Press the [PLAY/PAUSE ] button to play the track.
3 Move the channel fader to the top.
4 Adjust the volume on your Android device.
Adjust the volume for your Android device’s speaker, or the speaker connected
to your Android device, until you have a volume level you’re happy with.

edjing Mix for Android
133
En
Monitoring with headphones
To monitor sound with your headphones, you need to use the supplied
split cable.
Read more: Connecting an audio device (speaker) to the
headphones jack of your Android device (page 126)
Also, you need to turn on [Split audio output] in edjing Mix.
Read more: Checking audio setup (page 130)
Monitoring sound from a channel via headphones
The following example explains how to monitor sound from deck 1
(left).
1 Press the Headphone [CUE] button on channel 1.
2 Tap on the main screen of edjing Mix.
3Tap [Audio settings] on the [Settings] screen.
4Tap [Volume] under [Split audio output] on the [Audio settings]
screen.
5 Move the [Volume] slider.
Adjust the volume of the headphones monitoring sound until you have a level
you’re happy with.
6Tap [OK].
7 Go to the [Settings] screen, then tap .
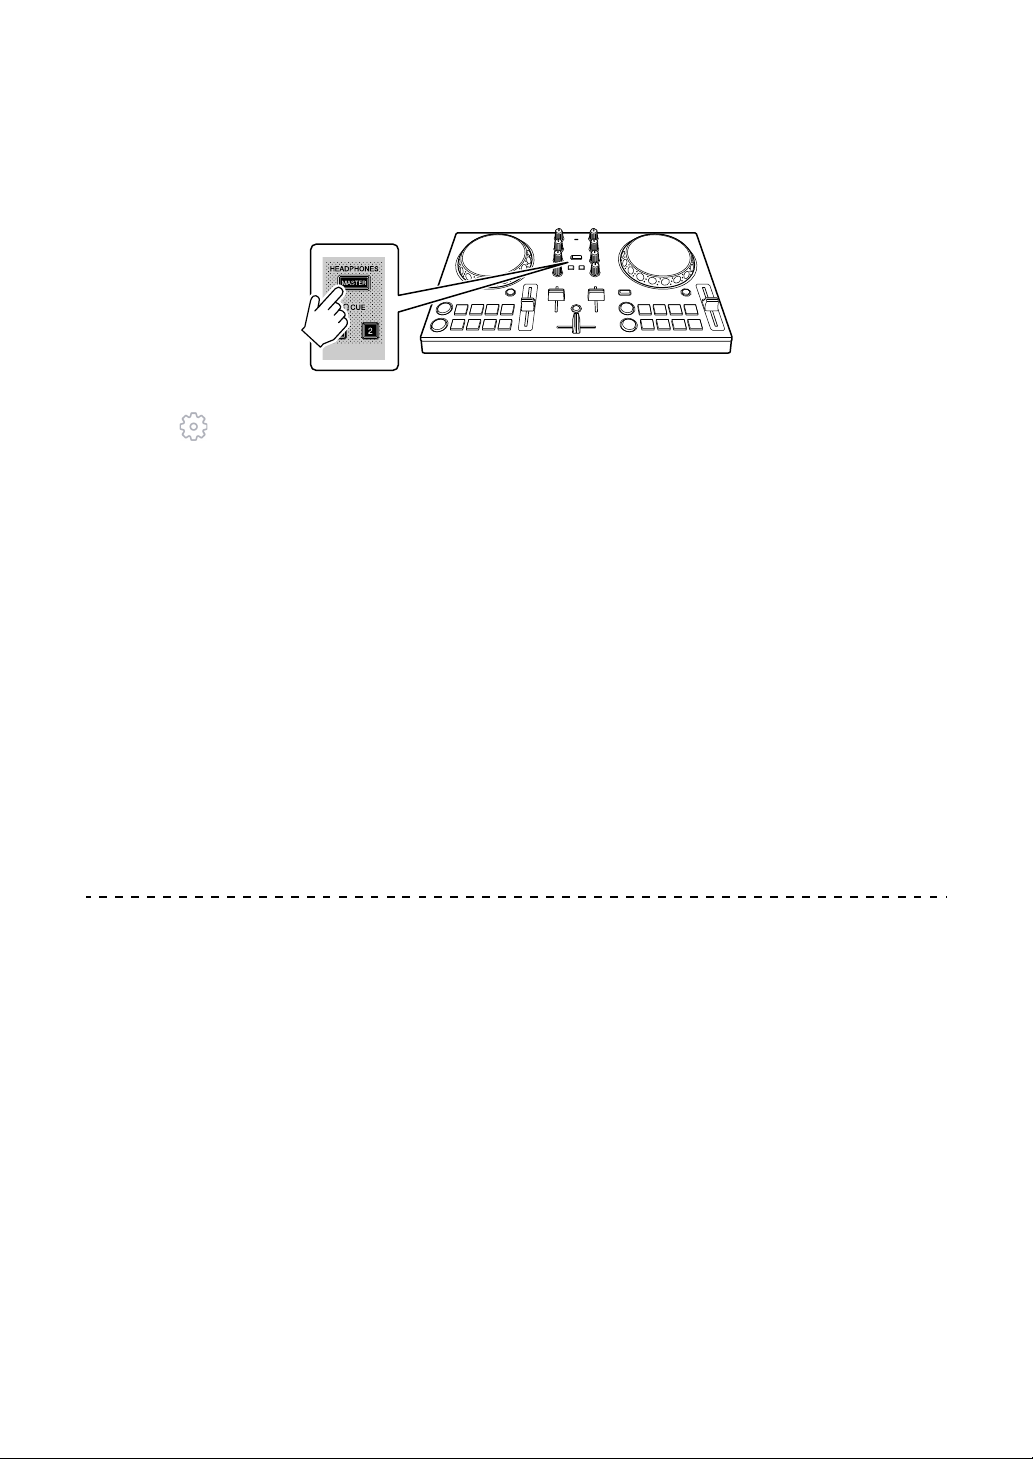
edjing Mix for Android
134
En
Monitoring the master sound with headphones
1 Press the [MASTER CUE] button.
2 Tap on the main screen of edjing Mix.
3Tap [Audio settings] on the [Settings] screen.
4Tap [Volume] under [Split audio output] on the [Audio settings]
screen.
5 Move the [Volume] slider.
Adjust the volume of the headphones monitoring sound until you have a level
you’re happy with.
6Tap [OK].
7 Go to the [Settings] screen, then tap .
Quitting the system
1 Quit edjing Mix.
2 Disconnect the USB cable to turn off the unit.

edjing Mix for Android
135
En
Advanced use (edjing Mix)
Using the Performance Pads
Using Hot Cues
Playback can be moved to the Hot Cue point instantly.
Setting and calling up a Hot Cue
1 If the track is playing or paused, press a Performance Pad to set the
Hot Cue point.
The Hot Cue points are set to Performance Pads as follows:
1: Hot Cue A, 2: Hot Cue B, 3: Hot Cue C, 4: Hot Cue D,
5: Hot Cue E, 6: Hot Cue F, 7: Hot Cue G, 8: Hot Cue H
2 Press a Performance Pad you’ve set a Hot Cue for.
Playback can be moved to the Hot Cue point instantly.
• You can clear Hot Cue points by pressing a Performance Pad while holding
the [SHIFT] button.
1234
5678

edjing Mix for Android
136
En
Using Transition FX
You can easily mix like a professional DJ with effects and scratches,
simply by using the crossfader.
The following example explains how to transition from a track on deck
1 to a track on deck 2.
1 Set the positions of the knobs as follows:
• [EQ (HI/MID/LOW)] knobs: center position (12 o’clock)
•[CFX] knob: center position
• Channel fader: top position
• Crossfader: left position
2 Load tracks onto deck 1 and deck 2, then play both.
You’ll hear the sound of the track on deck 1.
3 Press the [BEAT SYNC] button on the right side.
The tempo and beatgrid of the track on deck 2 are automatically matched to
deck 1.
4 Press the [TRANSITION FX] button to turn on Transition FX.
5 Move the crossfader to the right.
The Transition FX is added.

137
En
rekordbox
• rekordbox
rekordbox is comprehensive music management software designed
for DJs.
• rekordbox dj
rekordbox dj is the professional performance application for
rekordbox.
You can use rekordbox dj by connecting the unit to your PC/Mac
using the supplied USB cable. You don’t need to buy a rekordbox dj
license key.
To use rekordbox dj without connecting the unit, obtain a rekordbox
dj license key via one of the methods below and enter it in the
software.
– Buy a rekordbox dj license key at rekordbox.com.
– Start a subscription plan (monthly plan) at rekordbox.com.
For the latest information including download and rekordbox Operating
Instructions, see the rekordbox website.
rekordbox.com
Minimum computer requirements
Supported operating systems CPU and memory required
Mac: macOS Mojave 10.14 /
macOS High Sierra 10.13 /
macOS Sierra 10.12
(updated to the latest version)
Intel
®
processor Core™ i7, i5, i3
4 GB or more of RAM
Windows: Windows
®
10 /
Windows
®
8.1 / Windows
®
7
(latest service pack)
Intel
®
processor Core™ i7, i5, i3
4 GB or more of RAM

rekordbox
138
En
• Operation is not guaranteed on all PC/Mac models, even if the
system requirements are met.
• Depending on power-saving settings and other conditions of the PC/
Mac, the CPU and hard disk may not provide sufficient processing
capabilities. For laptops in particular, make sure the PC/Mac is in the
best condition to provide constant high-level performance when
using rekordbox (for example by keeping the AC power connected).
• To use the internet, you need a separate contract with an internet
service provider, which you may have to pay for.
• Operating system support always assumes you’re using the latest
point release for that version.
• Check the latest information on system requirements and
compatibility in [System requirements] under [Support] at
rekordbox.com.
Others
USB port Your PC/Mac must have a USB 2.0 port to
connect with the unit.
Display resolution Resolution of 1280 × 768 or greater
Internet connection You’ll need an internet connection to
register your rekordbox user account and
download the software.

rekordbox
139
En
Installing rekordbox
Getting started with rekordbox
If you’re using rekordbox for the first time, or if you’re currently using
rekordbox Ver. 4.x or lower, download the latest version from
rekordbox.com and install it in the following way.
If you already have rekordbox Ver. 5.x installed, update to the latest
version using the Update Manager which shows when you start
rekordbox.
• You are responsible for preparing your PC/Mac, network devices and
other elements needed to connect to the internet.
Installing rekordbox
Procedures may differ depending on the operating system (OS) of your
PC/Mac.
Installing (Mac)
Do not connect the unit to your Mac using the USB cable until the
installation is complete.
• Close all programs on your Mac.
1 Unzip the downloaded rekordbox software file.
2 Double-click the unzipped software file and start the installer.
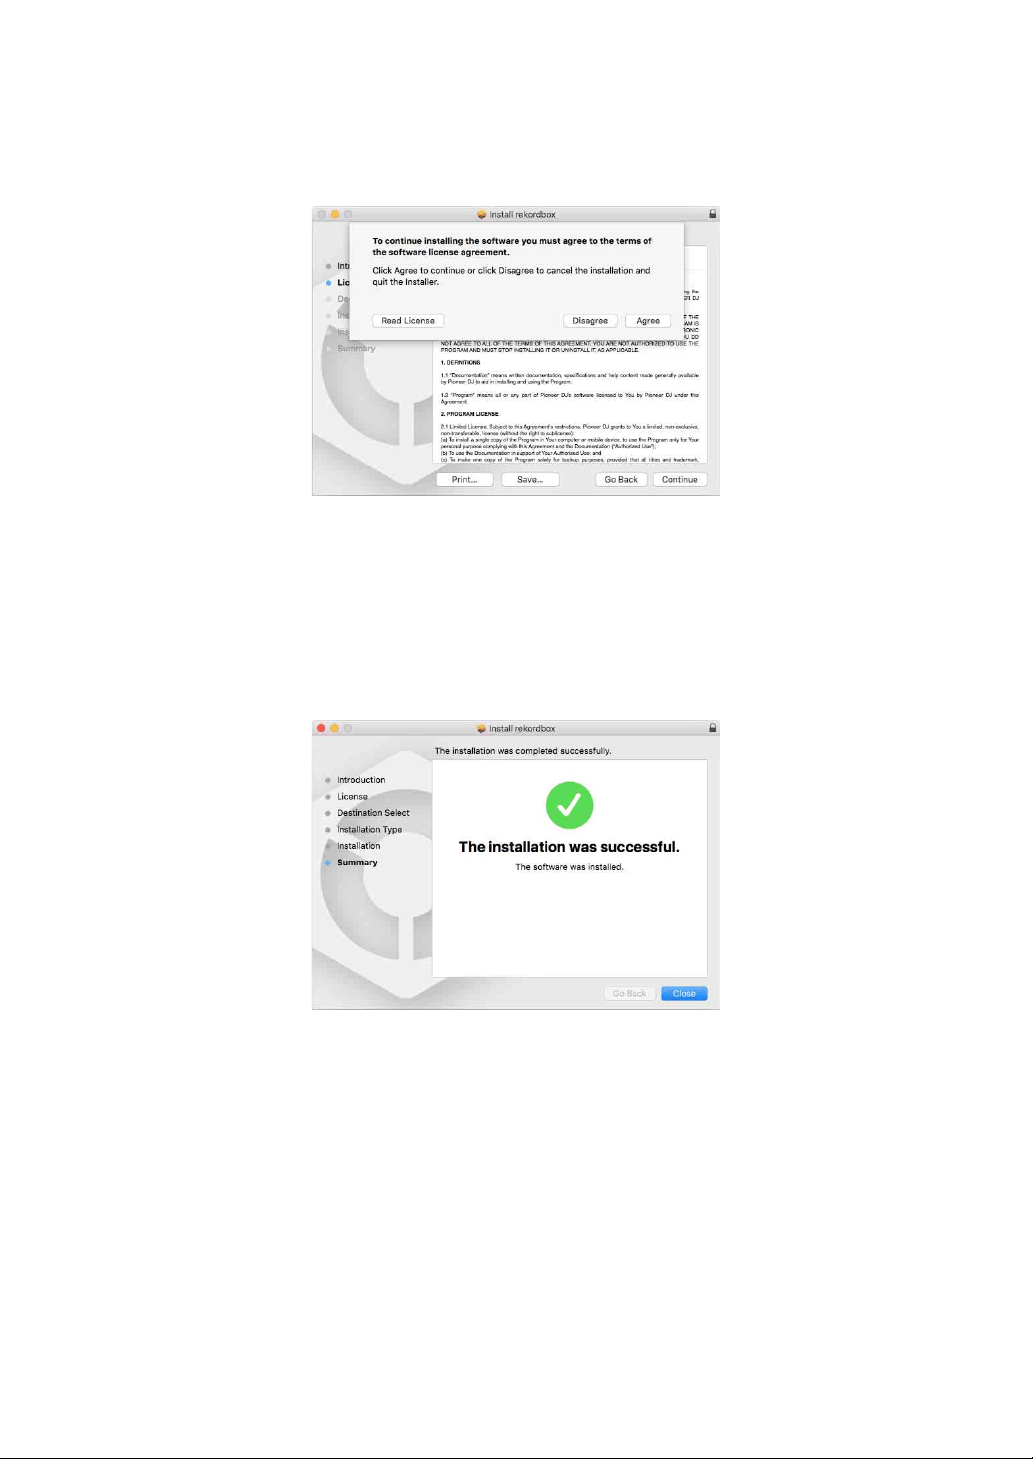
rekordbox
140
En
3 Read the terms of the License Agreement carefully, then click
[Agree] to continue.
• If you do not agree to the contents of the License Agreement, click
[Disagree] to cancel the installation.
4 When the screen for completing the installation appears, click
[Close] to end the installation.
Installing (Windows)
Do not connect the unit to your PC using the USB cable until the
installation is complete.
• Log into your PC as administrator before starting the installation.
• Close all programs on your PC.
1 Unzip the downloaded rekordbox software file.
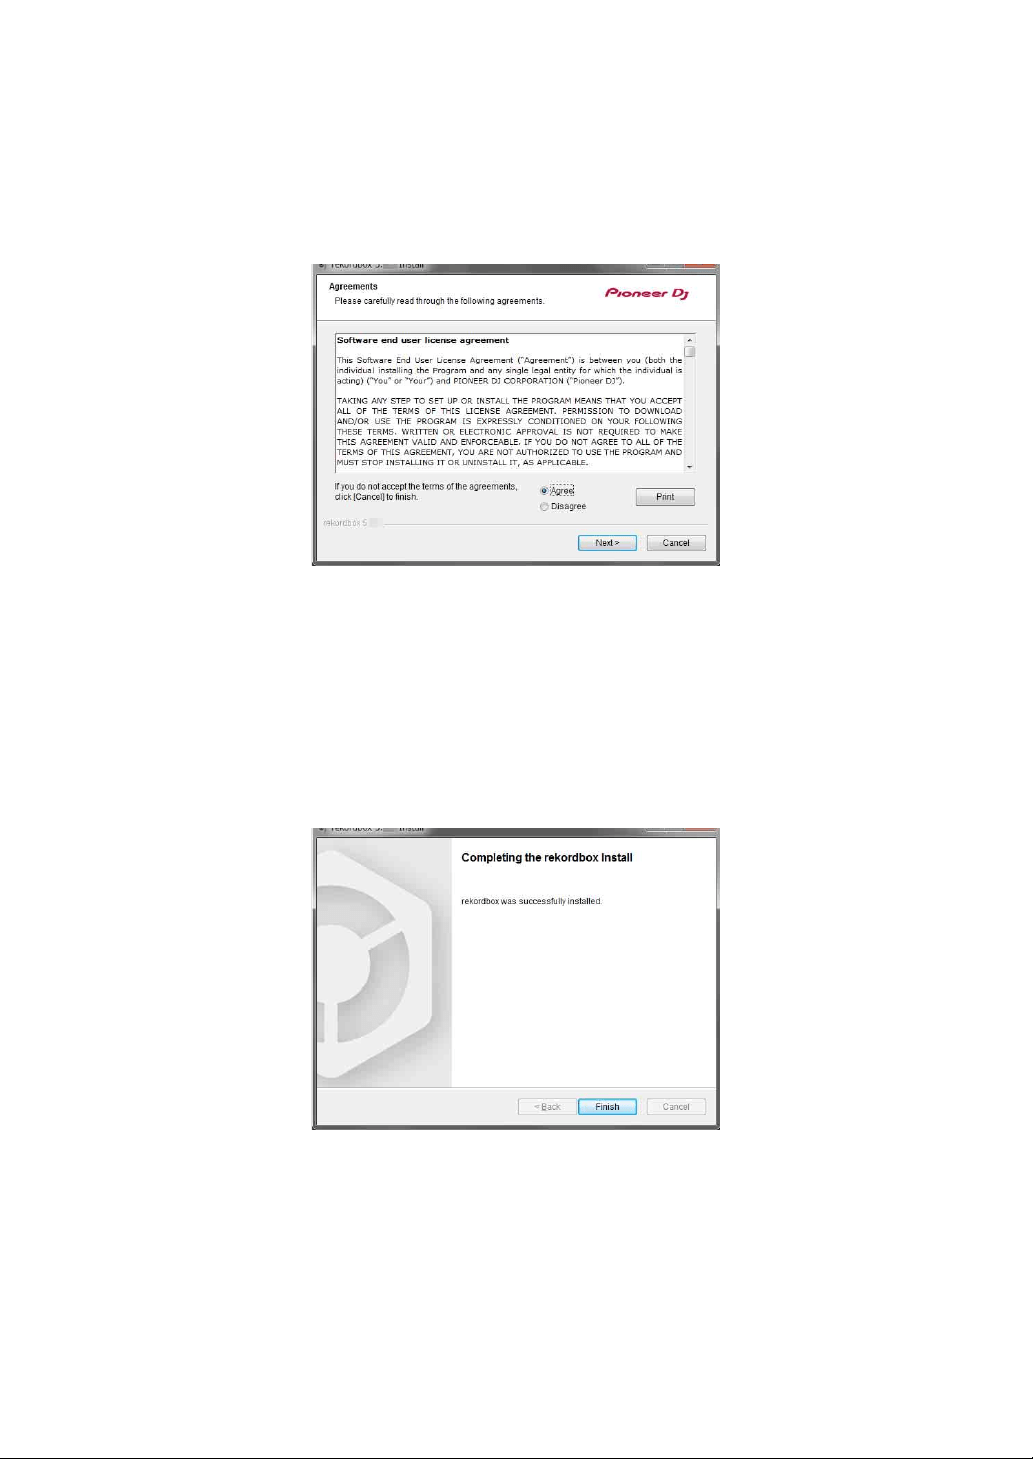
rekordbox
141
En
2 Double-click the unzipped software file and start the installer.
3 Read the terms of the License Agreement carefully and if you
agree, select [Agree], then click [Next].
• If you do not agree to the contents of the license agreement, click [Cancel]
to cancel the installation.
• After specifying the destination, the installation will start.
When the installation is finished, a completion message will be displayed.
4Click [Finish] to complete the installation.
Installation is completed.


rekordbox
143
En
Deck section
You can control two decks with the unit. There are knobs and buttons
on the left side to control deck 1 and on the right side to control deck 2.
1 Jog wheel
Turn the top when VINYL mode is on:
‘Scratches’ the track.
Turn the outer section or turn the top when VINYL mode is off:
Bends the pitch or ‘Pitch Bend’ (slows down or speeds up the track).
• You can turn VINYL mode on and off using shortcut keys in rekordbox dj.
[SHIFT] + turn the top:
Fast forwards or fast reverses the track (turn clockwise or counter-clockwise).
2 Performance Pads
You can use Performance Pads to trigger various features.
Read more: Using the Performance Pads (page 158)
2
1
6
7
3
4
5

rekordbox
144
En
3 SHIFT button
Press another button while holding the [SHIFT] button to use a different feature
assigned to the button.
4 CUE button
Press:
Sets, plays and calls up a cue point.
• Press the button when the track is paused to set the cue point.
• Press the button when the track is playing to return to the cue point and
pause. (Back Cue)
• Press the button and hold it after the track returns to the cue point and
playback will continue until you release the button. (Cue Point Sampler)
[SHIFT] + press:
Returns the playback position to the beginning of the track.
5 PLAY/PAUSE button
Plays/pauses a track.
6 BEAT SYNC button
Press:
Automatically synchronizes the tempos (BPM) and beatgrids with the deck set
as the master.
[SHIFT] + press:
Switches the range of the [TEMPO] slider each time the button is pressed
while holding the [SHIFT] button.
Switch between [±6%] [±10%] [±16%] [WIDE] [±6%].
Hold down for at least one second:
Sets the deck as the master for synchronization.
7 TEMPO slider
Adjusts the playing speed of the track.

rekordbox
145
En
Mixer section
1 MASTER CUE button
Press:
Plays the master sound through your headphones when they’re connected to
the supplied split cable, which is plugged into the headphones output of your
PC/Mac.
• Connect your headphones to the white plug of the split cable.
Read more: Monitoring with headphones (page 156)
[SHIFT] + press:
Change the panel of rekordbox dj.
No panel [FX] panel [SAMPLER] panel [MIXER] panel [REC]
panel No panel
2 EQ (HI, MID, LOW) knobs
Boosts or reduces the relevant frequency for the selected channel.
3 CFX knob
Turns on the selected effect and changes the sound for the relevant channel.
1
2
3
4
6
5
5
3
2
7

rekordbox
146
En
When the knob is set to the center position, the sound is unchanged. For
rekordbox, Filter is set as the default.
Turn counterclockwise: A cut-off frequency for the low-pass filter decreases
gradually.
Turn clockwise: A cut-off frequency for the high-pass filter increases gradually.
4 Headphone CUE button
Press:
Plays the sound of the relevant channel through your headphones when
they’re connected to the supplied split cable, which is plugged into the
headphones output of your PC/Mac.
• Connect the headphones to the white plug of the split cable.
Read more: Monitoring with headphones (page 156)
[SHIFT] + press:
Hold the [SHIFT] button and tap the button to set the tempo of the respective
deck in time with your tapping. (Tapping function)
5 Channel fader
Adjusts the volume of the sound for each channel.
6 TRANSITION FX button
This button is not used for rekordbox dj.
7 Crossfader
Adjusts the sound balance between the left channel (deck 1) and right channel
(deck 2) depending on the crossfader curve setting.

rekordbox
147
En
Bluetooth MIDI indicator
Flashes: The smartphone is not connected via Bluetooth.
Lights up: The smartphone is connected via Bluetooth.
Turns off: This unit has recognized the connection with rekordbox via
the USB cable.
• When using rekordbox dj, connect your PC/Mac to the unit via the
supplied USB cable (see page 151). Do not connect your PC/Mac or
smartphone to the unit via Bluetooth.

rekordbox
148
En
Rear panel
1USB port
Connects to a PC/Mac.
• Connect this unit directly to your PC/Mac using the supplied USB cable.
• A USB hub can’t be used.
• If your PC/Mac has only a USB Type-C port, you’ll need to use a USB Type-
C male to USB-A female cable.
2 Kensington security slot
Connect a cable lock for security.
1 2

rekordbox
149
En
Connections (for PC/Mac)
Power is supplied by via USB bus power. You can use the unit with a
single connection to your PC/Mac.
Connect the cable correctly after checking the position of the port on
this unit.
• Connect the unit and your PC/Mac directly using the supplied USB
cable.
• A USB hub can’t be used.
• Once connected with this unit, connect your PC/Mac to an AC power
supply.
• This unit can’t be used with USB bus power in the following
situations:
– The power supply capacity of the USB port on your PC/Mac is too
low.
– Your PC/Mac is connected with other devices.
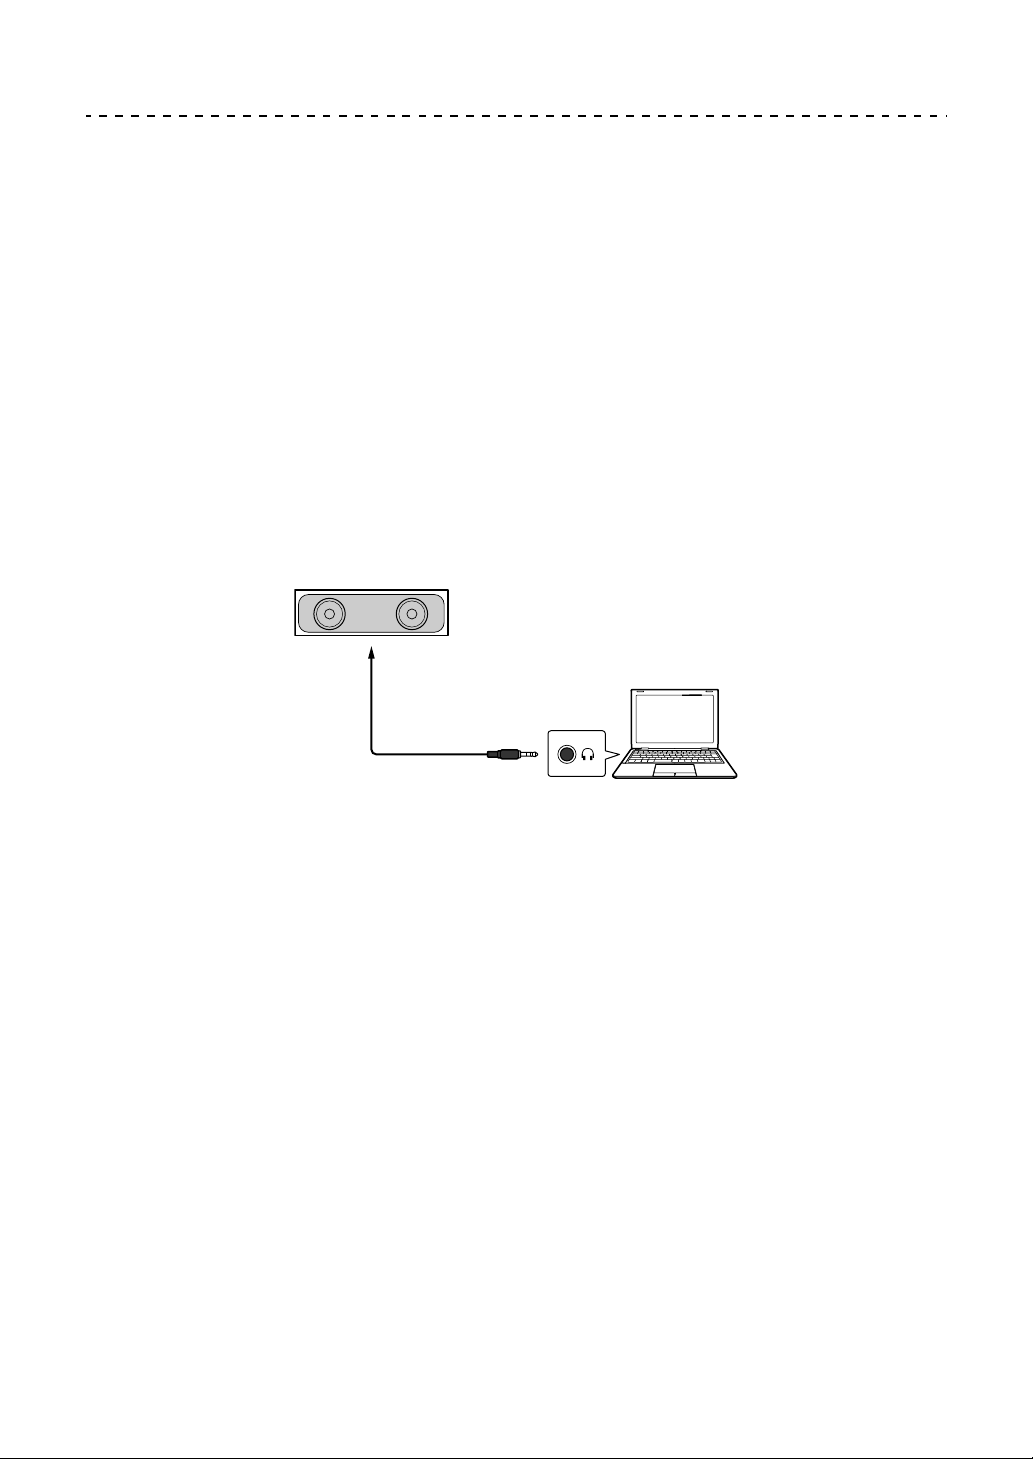
rekordbox
150
En
Connecting an audio device (speaker) to the
headphones jack of your PC/Mac
You can DJ and listen to your performance via the built-in speakers of
your PC/Mac. However, if you use the supplied split cable, you can
create an authentic DJ set-up with an external speaker(s) and
headphones.
Connection example 1
In this example, the master sound plays in stereo and there is no sound
output to the headphones.
Read more: Checking audio setup (page 154)
(1) Speaker with built-in amplifier, etc., (2) PC/Mac
* The audio cable is not supplied with the unit.
Connection example 2
In this example, the master sound and the headphones monitor sound
both play in mono.
(1)
(2)
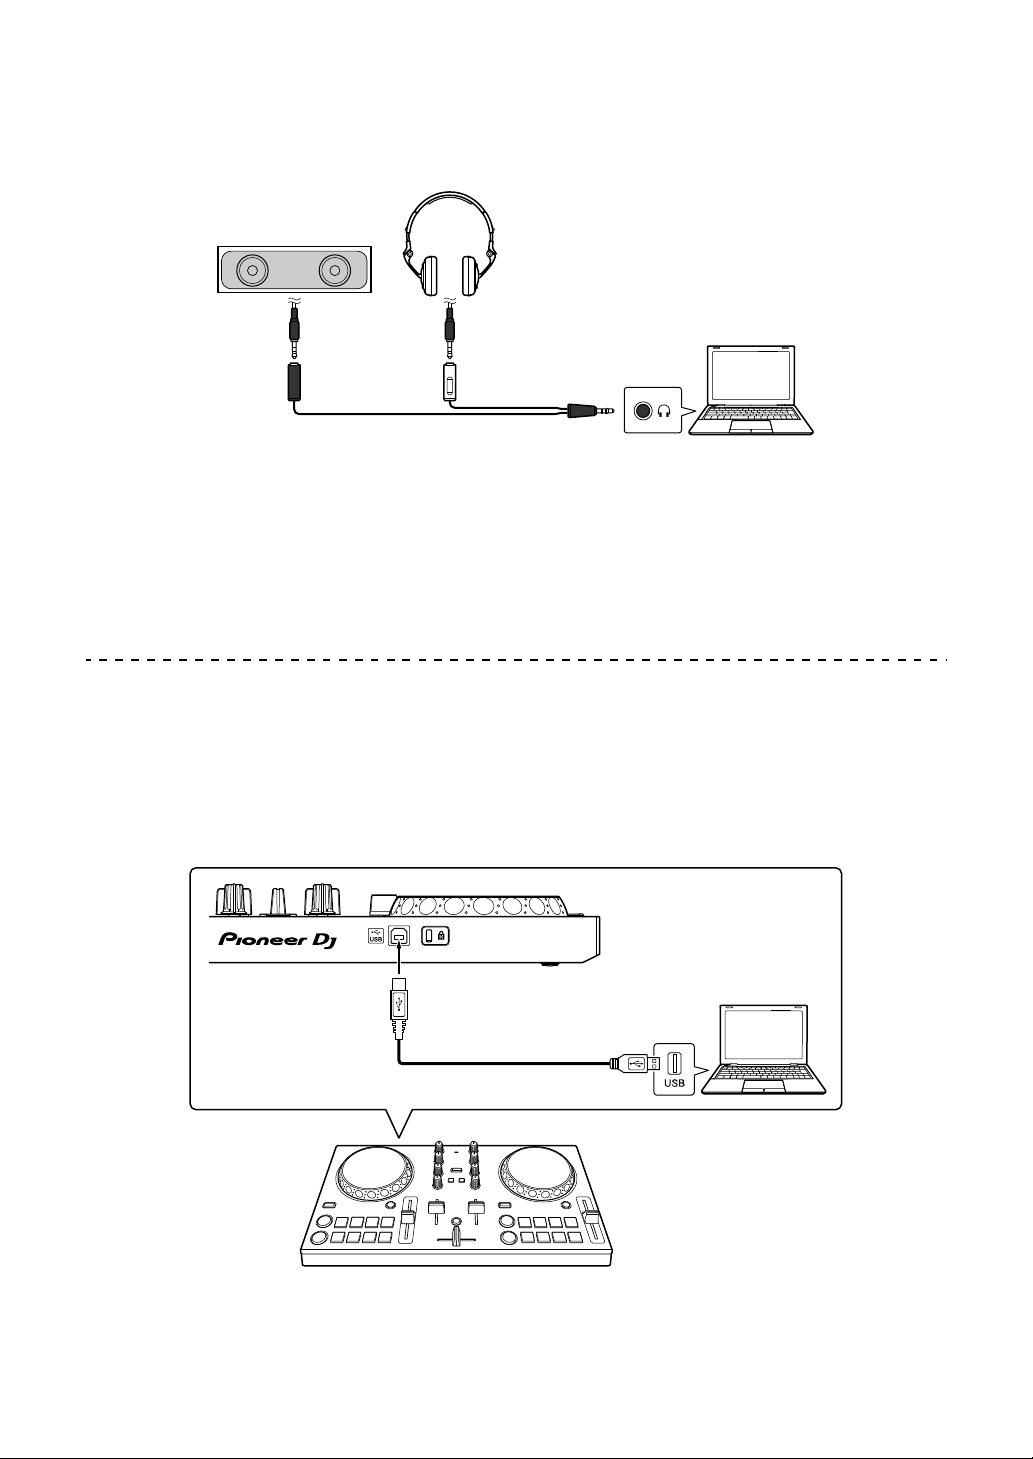
rekordbox
151
En
Read more: Checking audio setup (page 154)
(1) Speaker with built-in amplifier, etc.*, (2) Headphones,
(3) Plug for the speaker with built-in amplifier, etc. (black),
(4) Plug for headphones (white), (5) Split cable (supplied), (6) PC/Mac
* The audio cable is not supplied with the unit.
Connecting your PC/Mac to the unit
1 Connect your PC/Mac to the unit via the USB cable.
Make a direct connection with the supplied USB cable for optimum
performance. A USB hub can't be used.
(1) USB cable (supplied), (2) PC/Mac
(6)
(2)
(1)
(3) (4)
(5)
(2)
(1)

rekordbox
152
En
2 Turn on your PC/Mac.
3 Turn on the device(s) (speakers with built-in amplifier, etc.)
connected to your PC/Mac.

rekordbox
153
En
Basic use (rekordbox dj)
Starting rekordbox
You need to register an account to use rekordbox.
For details about account registration, click [Manual] under [Support]
on the rekordbox website, then read: rekordbox Introduction.
rekordbox.com
For Mac
In Finder, open the [Applications] folder, then double-click the
[rekordbox 5] > [rekordbox.app] icon.
For Windows 10
In the [Start] menu, click the [rekordbox] icon under [Pioneer].
For Windows 8.1
In [Apps view], click the [rekordbox] icon.
For Windows 7
In the Windows [Start] menu, click the [rekordbox] icon under [All
Programs] > [Pioneer] > [rekordbox X.X.X].
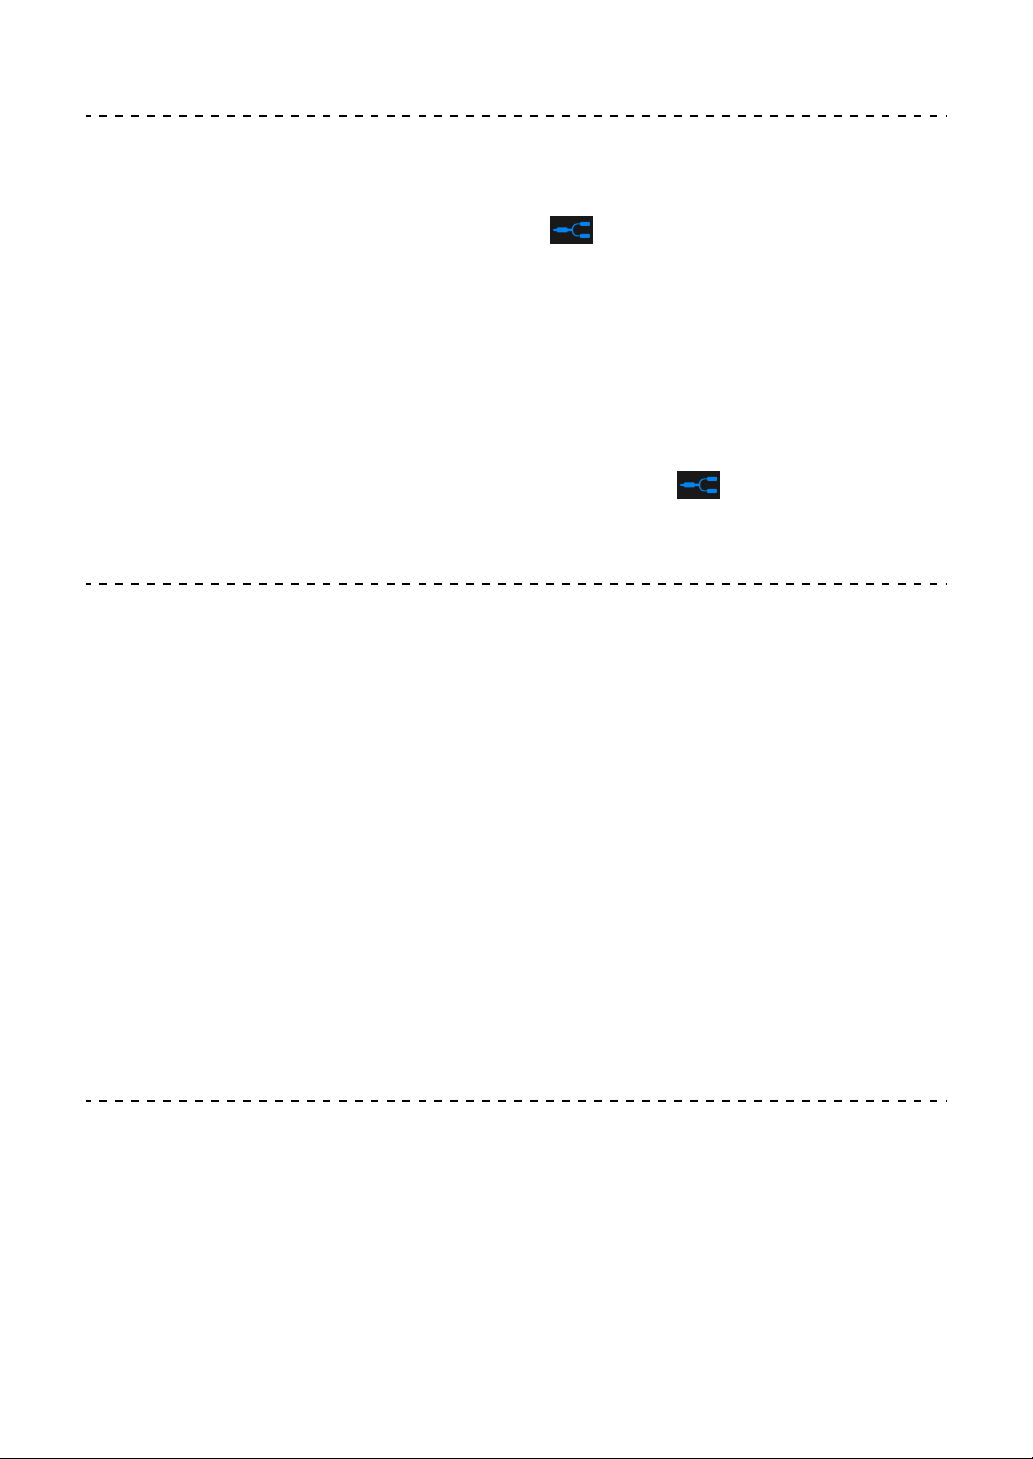
rekordbox
154
En
Checking audio setup
• To output the master sound and headphones monitor sound using
the supplied split cable, turn on the [MONO SPLIT ON/OFF]
button at the top right of the rekordbox dj screen.
Read more: Connecting an audio device (speaker) to the
headphones jack of your PC/Mac (page 150)
Read more: Monitoring with headphones (page 156)
• To play the master sound via your PC/Mac’s built-in speaker, or to
play it via a speaker with a built-in amplifier connected to your PC/
Mac, without using the split cable, turn off the [MONO SPLIT
ON/OFF] button.
Adding music files into your Collection
The [Collection] screen contains a list of music files managed by
rekordbox.
Add music files on your PC/Mac to your Collection so the software can
analyze them and they can be used in rekordbox.
1Click [Collection] on the tree view.
A list of tracks in your [Collection] is displayed.
2 Open Finder (Mac) or Explorer (Windows) and drag music files, or
folders containing music files, into the track list.
Music files are added into [Collection] and analysis of waveform information
for music files begins. Wait until analysis of all music files is complete.
Loading an audio track onto a deck
Select a track in [Collection] and drag it into the track information
panel of a deck.
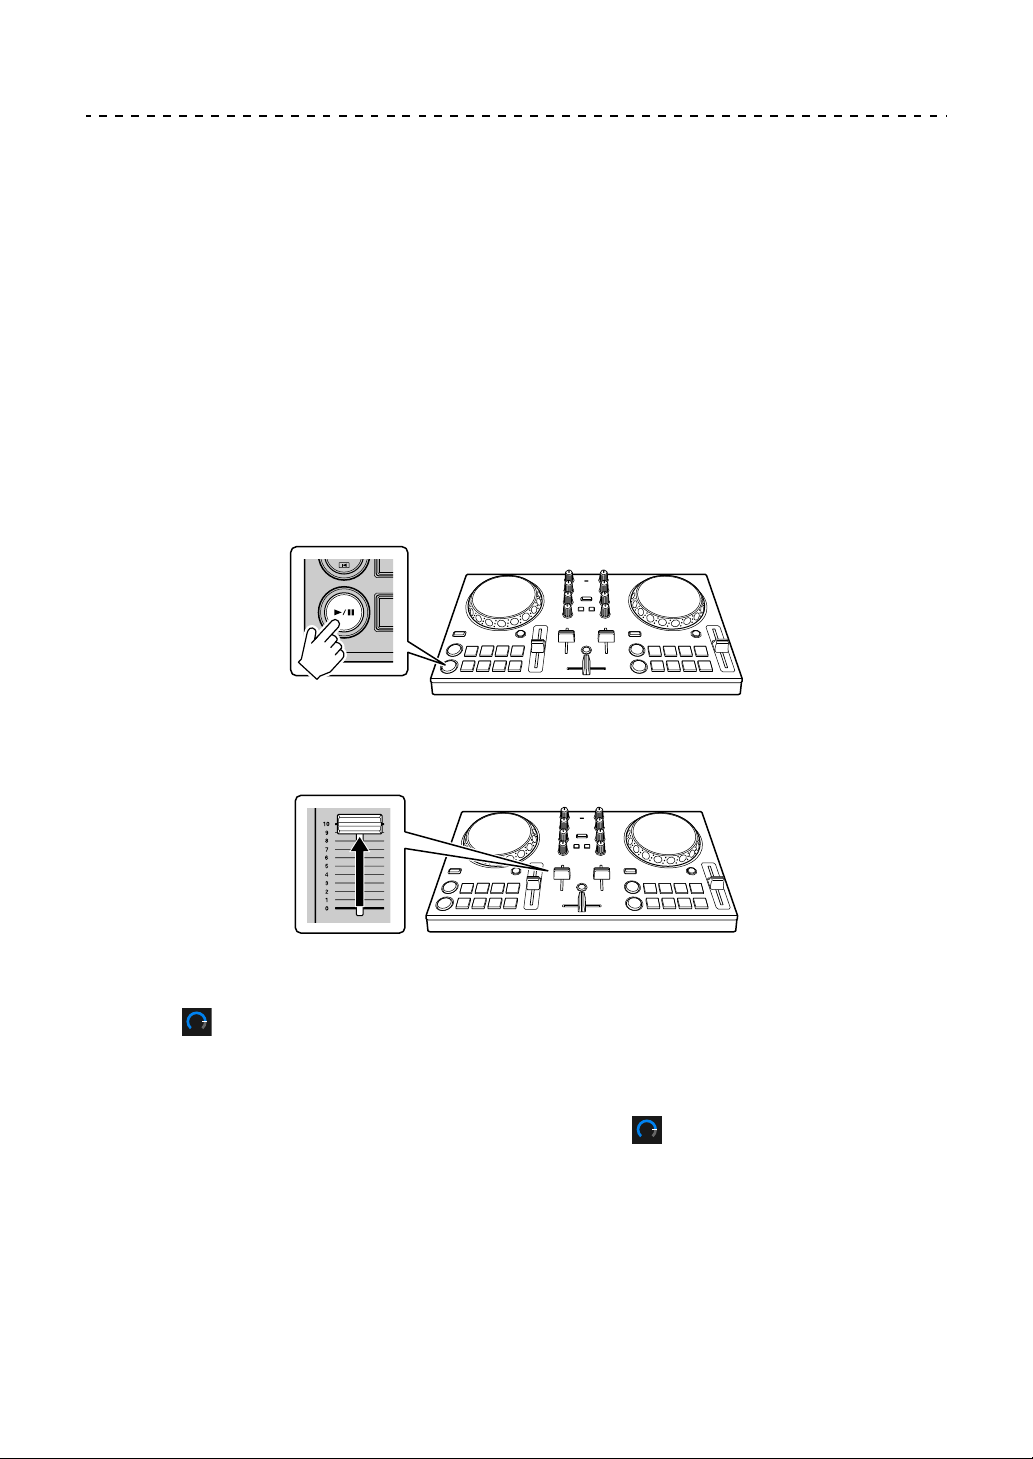
rekordbox
155
En
Playing a track
This section explains how to play sound from deck 1 (left) as an
example.
1 Set the positions of the knobs as follows:
• [EQ (HI/MID/LOW)] knobs: center position (12 o’clock)
•[CFX] knob: center position
• Channel fader: bottom position
• Crossfader: center position
2 Press the [PLAY/PAUSE ] button to play the track.
3 Move the channel fader to the top.
4 Adjust the volume on your PC/Mac.
Turn [Master Volume] in rekordbox dj and adjust the volume of your PC/
Mac’s built-in speakers, or your connected speaker with a built-in amplifier,
until you find a volume level you’re happy with.
• If the volume doesn’t increase when you turn [Master Volume], adjust
the volume of your PC/Mac’s built-in speaker.
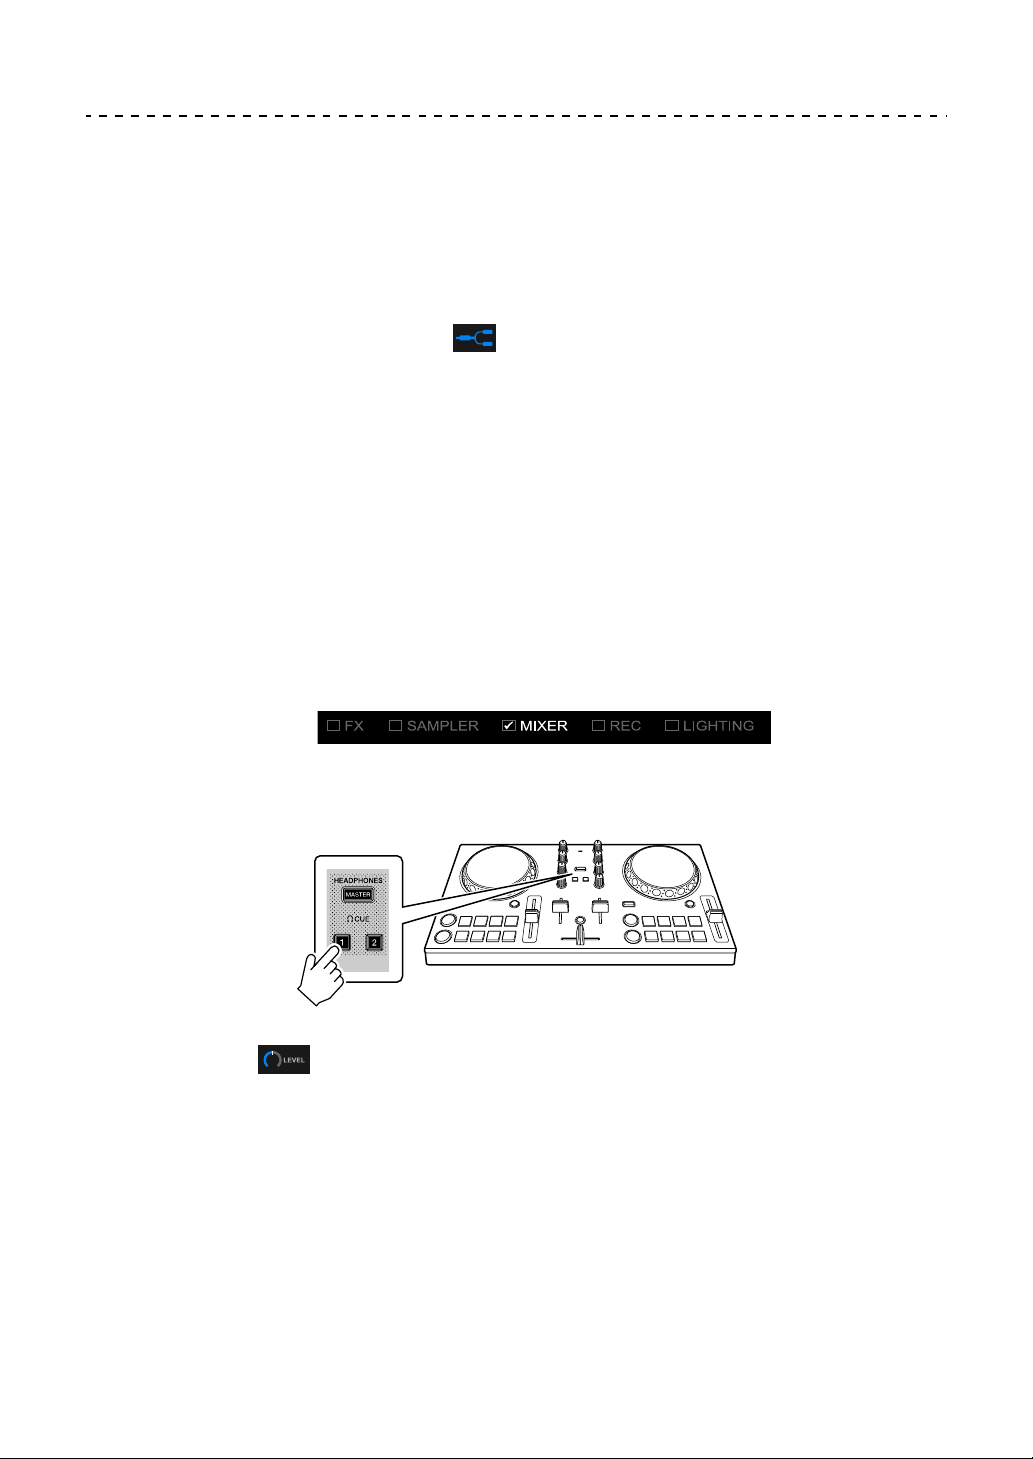
rekordbox
156
En
Monitoring with headphones
To monitor sound with your headphones, you need to use the supplied
split cable.
Read more: Connecting an audio device (speaker) to the headphones
jack of your PC/Mac (page 150)
Also, you need to turn on the [MONO SPLIT ON/OFF] button in
rekordbox dj.
Read more: Checking audio setup (page 154)
Monitoring sound from a channel via headphones
The following example explains how to monitor sound from deck 1
(left).
1 Mark the [MIXER] check box at the top of the rekordbox dj screen.
The [MIXER] panel is displayed.
2 Press the Headphone [CUE] button on channel 1.
3 Adjust the
[HEADPHONES LEVEL] knob on the [MIXER]
panel to adjust the volume for monitoring with headphones.
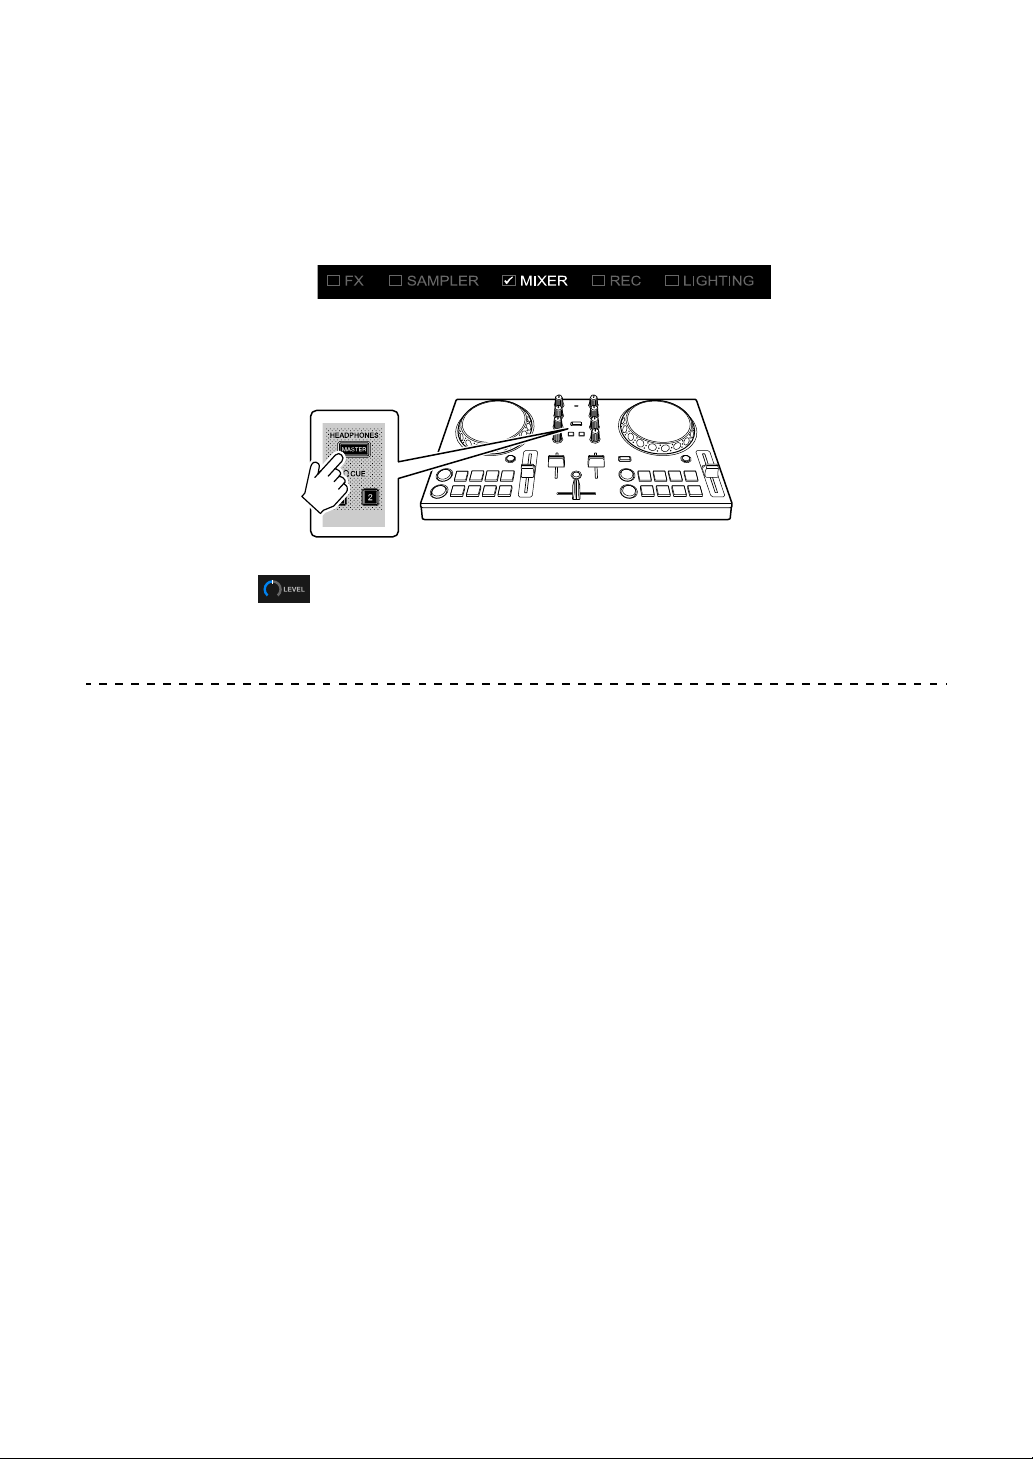
rekordbox
157
En
Monitoring the master sound with the headphones
1 Mark the [MIXER] check box at the top of the rekordbox dj screen.
The [MIXER] panel is displayed.
2 Press the [MASTER CUE] button.
3 Adjust the
[HEADPHONES LEVEL] knob on the [MIXER]
panel to adjust the volume for monitoring with headphones.
Quitting the system
1 Quit rekordbox.
2 Disconnect the USB cable to turn off the unit.
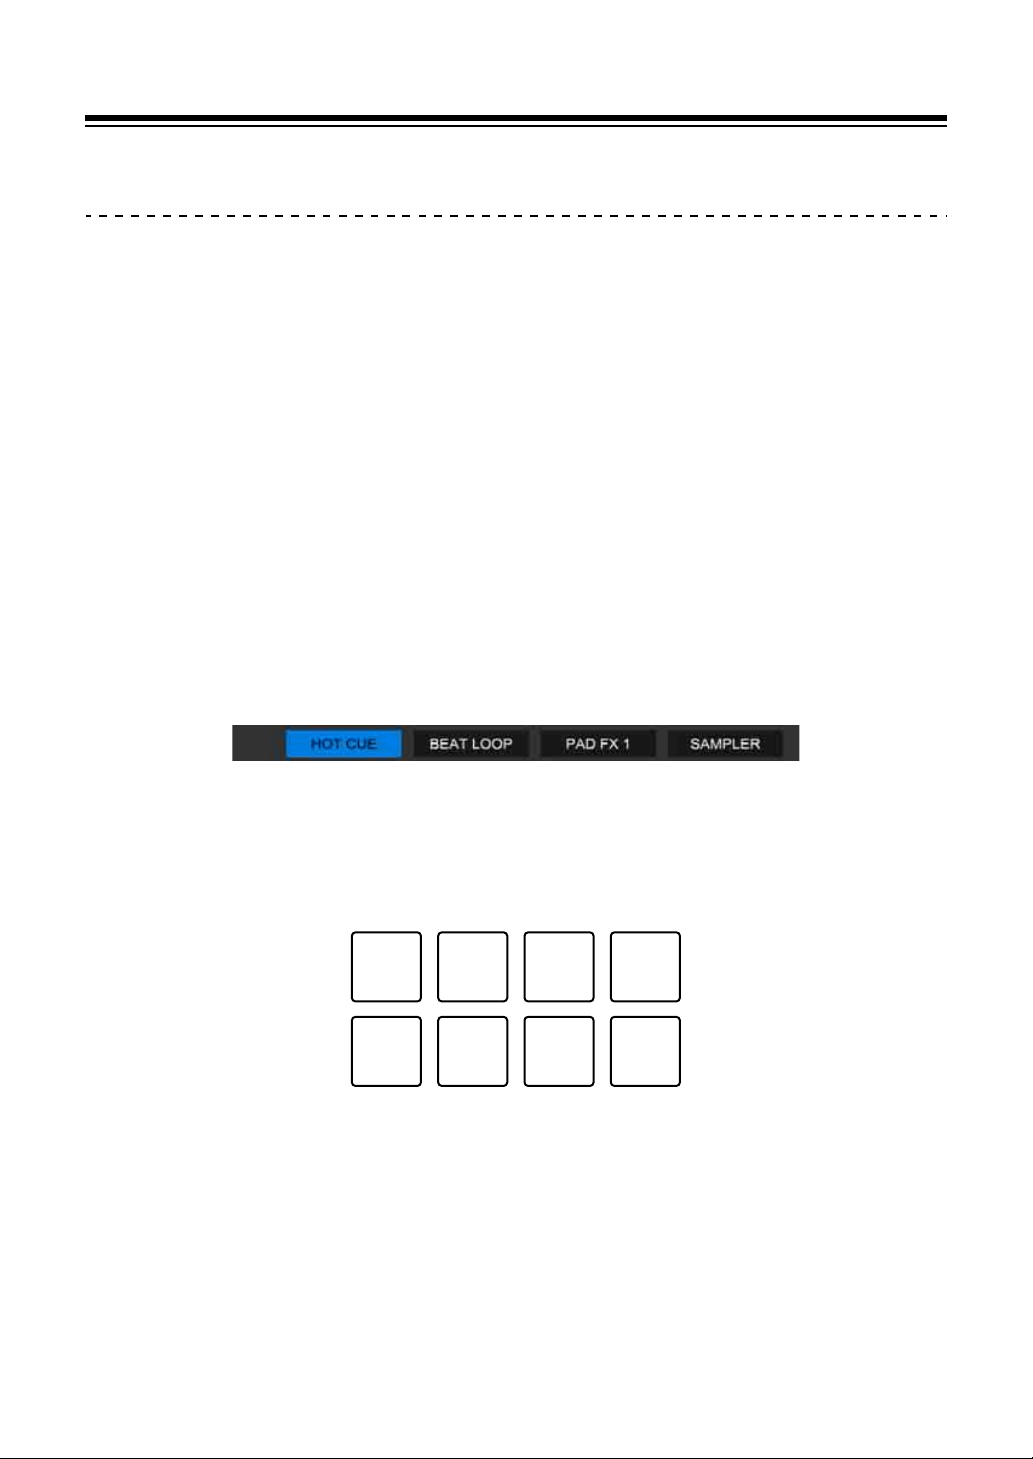
rekordbox
158
En
Advanced use (rekordbox dj)
Using the Performance Pads
Using Hot Cues
You can start playback instantly from the position where a Hot Cue is
set. Beat Loops can also be set and called up instantly.
• Up to 16 Hot Cue points can be set and saved for each track in
rekordbox dj. On the unit, up to 8 hot cue points can be set and saved
per track.
Setting and calling up a Hot Cue
1Click [HOT CUE] at the bottom of the rekordbox dj screen to enter
[HOT CUE] mode.
2 If the track is playing or paused, press a Performance Pad to set the
Hot Cue point.
The Hot Cue points are set to Performance Pads as follows:
1: Hot Cue A, 2: Hot Cue B, 3: Hot Cue C, 4: Hot Cue D,
5: Hot Cue E, 6: Hot Cue F, 7: Hot Cue G, 8: Hot Cue H
3 Press a Performance Pad you’ve set a Hot Cue for.
Playback starts from the Hot Cue point.
1234
5678
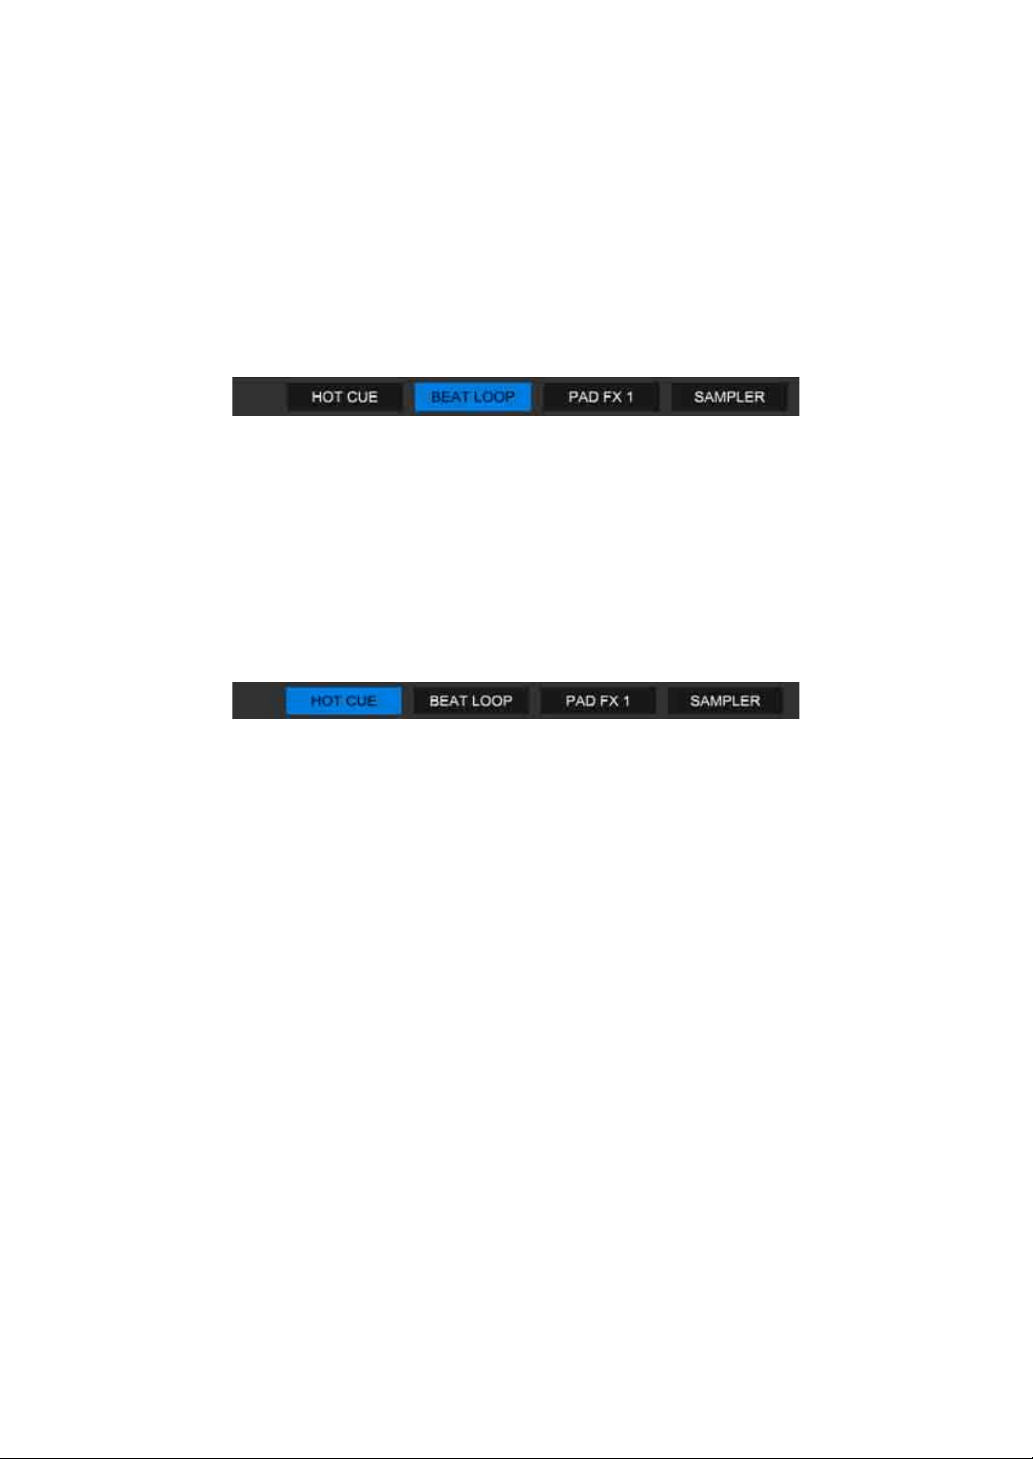
rekordbox
159
En
• You can clear Hot Cue points by pressing a Performance Pad while holding
the [SHIFT] button.
Setting and calling up Beat Loop
1Click [BEAT LOOP] at the bottom of the rekordbox dj screen to
enter [BEAT LOOP] mode.
2 Press a Performance Pad during playback.
Loop playback starts with the number of beats set on the pad you pressed.
Read more: Using Beat Loop (page 160)
3Click [HOT CUE] at the bottom of the rekordbox dj screen to enter
[HOT CUE] mode.
4 Press a Performance Pad to set a loop during loop playback.
5 Press the Performance Pad.
Loop playback starts from the Loop In point.
• You can clear the loop by pressing the Performance Pad while holding the
[SHIFT] button.
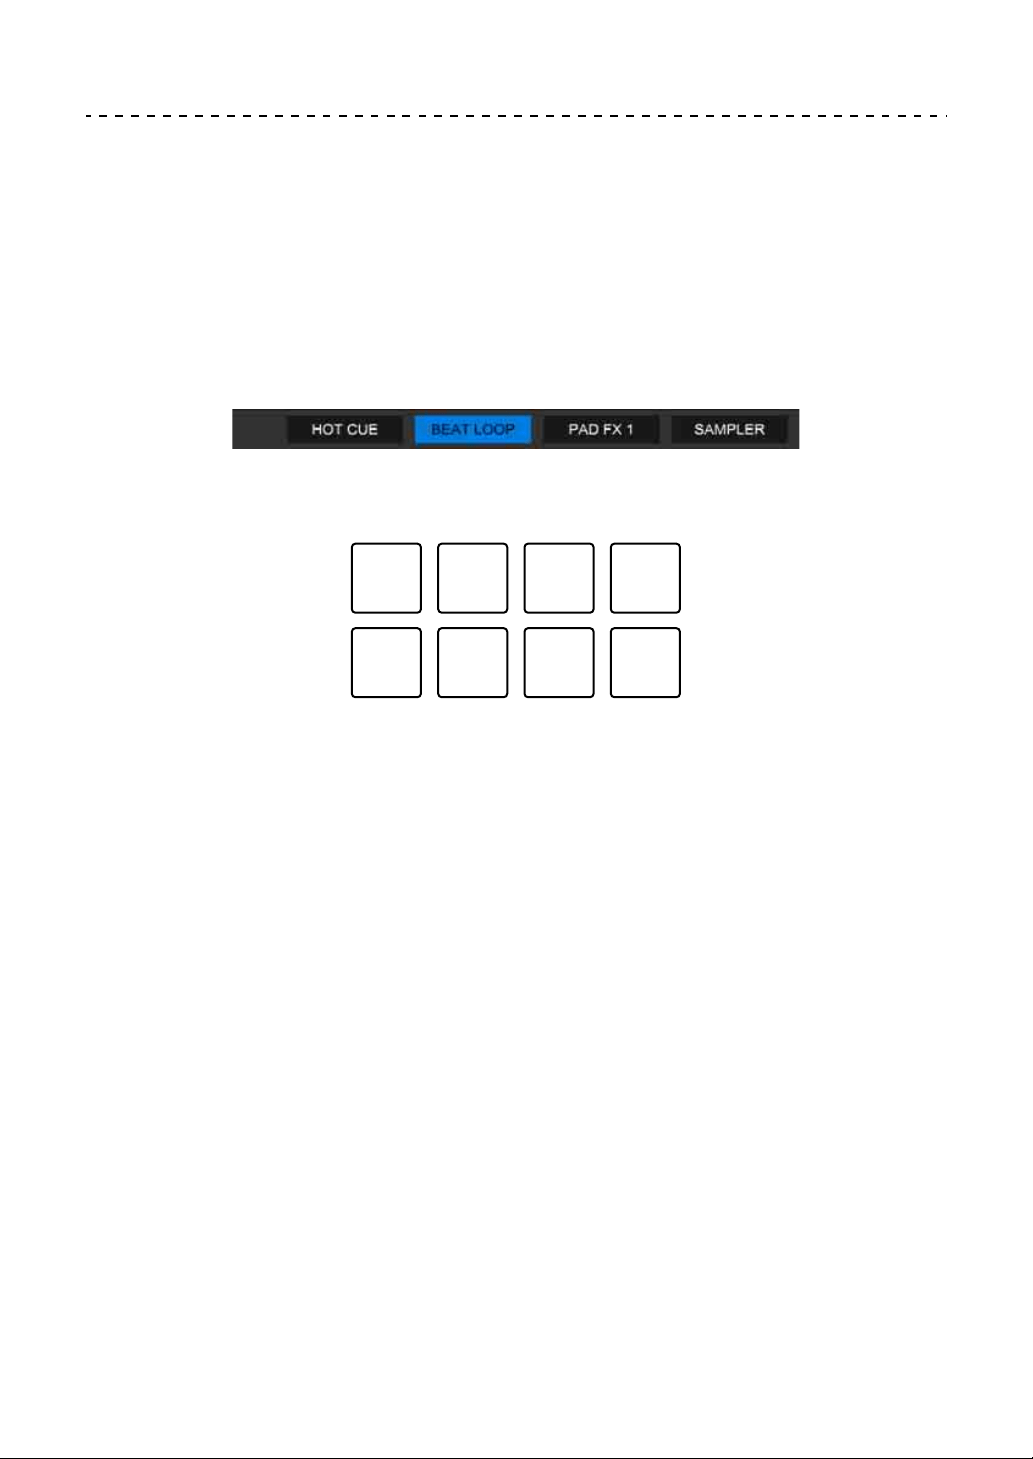
rekordbox
160
En
Using Beat Loop
Press a Performance Pad while in Beat Loop mode to loop a set
number of beats. The loop keeps playing after you remove your finger
from the pad.
1Click [BEAT LOOP] at the bottom of the rekordbox dj screen to
enter [BEAT LOOP] mode.
The number of beats set to the Performance Pads are as follows:
1: Beat Loop 1/4 beat, 2: Beat Loop 1/2 beat, 3: Beat Loop 1 beat,
4: Beat Loop 2 beats, 5: Beat Loop 4 beats, 6: Beat Loop 8 beats,
7: Beat Loop 16 beats, 8: Beat Loop 32 beats
2 Press a Performance Pad.
The loop plays with the number of beats set on that pad.
3 Press the same Performance Pad again.
Loop playback is canceled and the rest of the track continues to play.
1234
5678
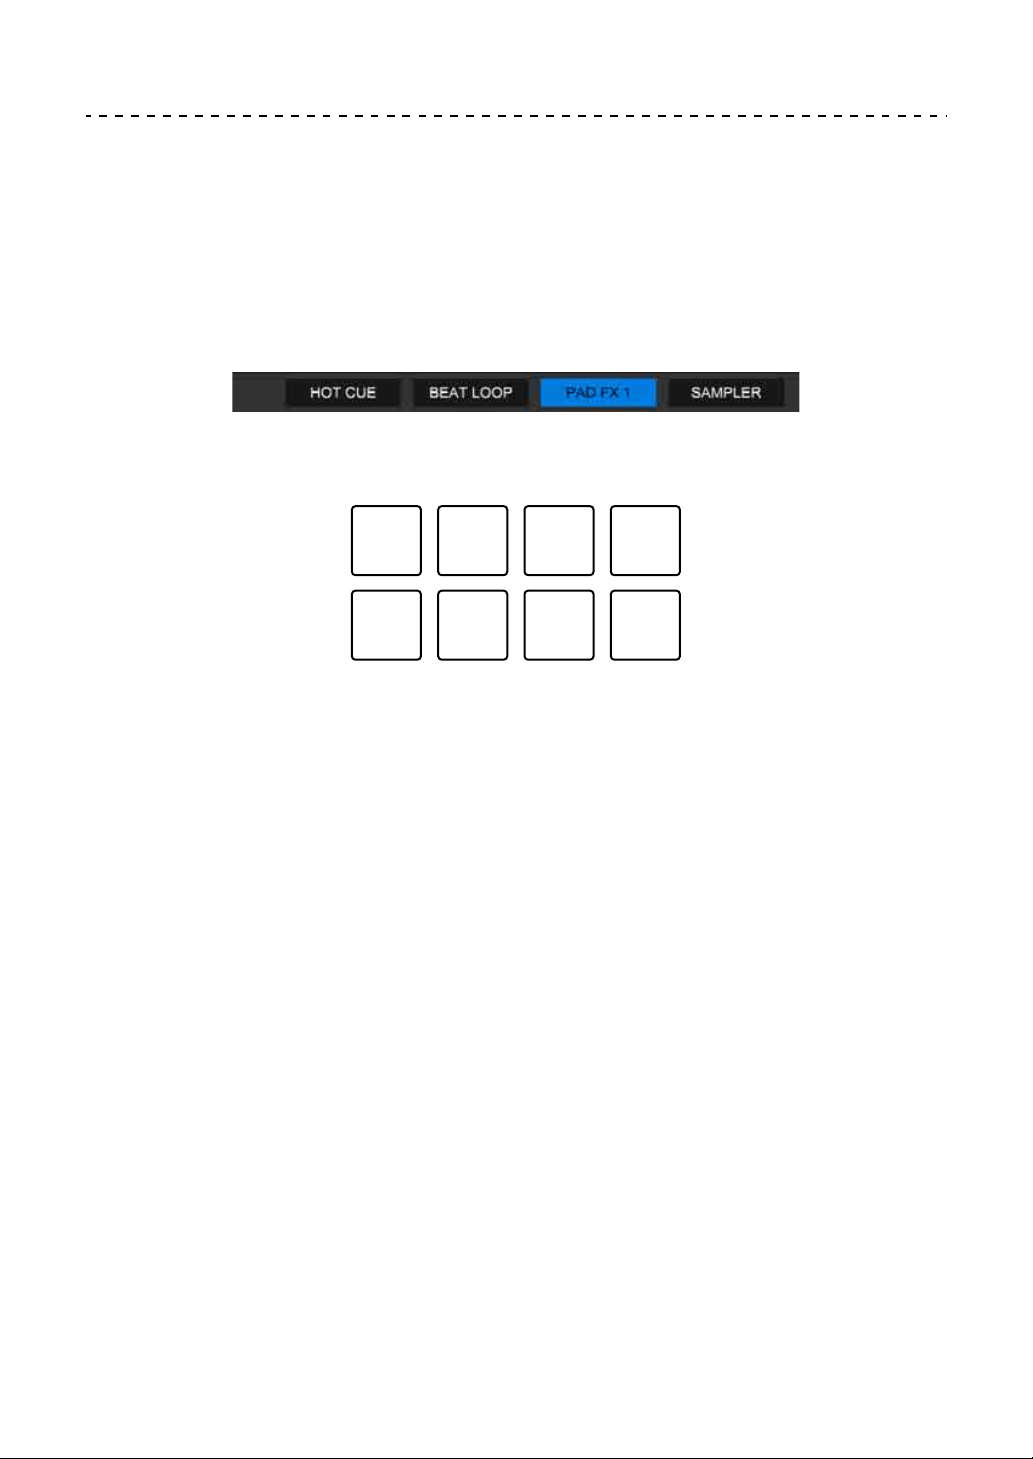
rekordbox
161
En
Using Pad FX
You can add a wide range of effects to your performances simply by
pressing and releasing the Performance Pads.
1Click [PAD FX 1] at the bottom of the rekordbox dj screen to enter
[PAD FX 1] mode.
Effects are set to Performance Pads as follows.
1: Effect A, 2: Effect B, 3: Effect C, 4: Effect D, 5: Effect E, 6: Effect F,
7: Effect G, 8: Effect H
2 Press and hold down a Performance Pad.
The effect turns on. The sound changes according to the type of effect and the
number of beats in the settings assigned to that pad.
3 Release the Performance Pad.
The effect turns off.
Using Release FX of Pad FX
You need to assign the Release FX to a Performance Pad in advance.
1 Press and hold down a Performance Pad that has an effect other
than Release FX assigned to it.
The effect turns on.
1234
5678
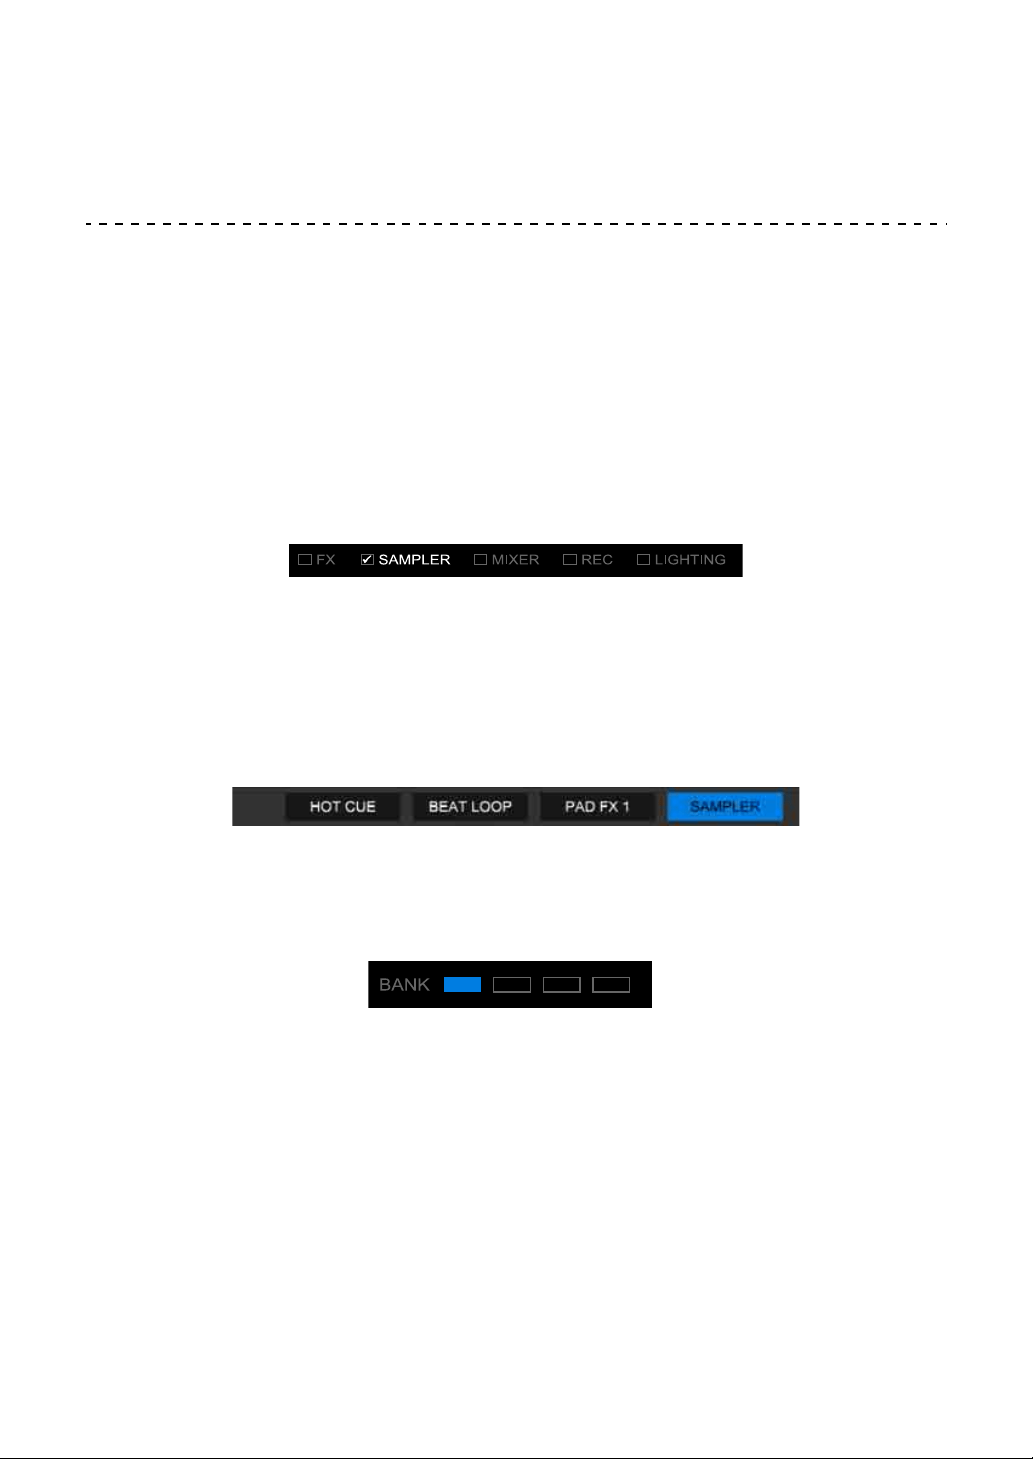
rekordbox
162
En
2 Press the Performance Pad that has a Release FX assigned to it.
The effect turns off, and the Release FX is added.
Using the Sampler
You can use the Performance Pads to play tracks or sounds assigned
to the Sampler slots.
Preparing to use the Sampler
Mark the [SAMPLER] check box at the top of the rekordbox dj screen.
• The [SAMPLER] panel is displayed.
Loading a track into a Sampler slot
1Click [SAMPLER] at the bottom of the rekordbox dj screen to enter
[SAMPLER] mode.
2 Click the button at the right of [BANK] on the [SAMPLER] panel to
change the Sampler bank.
In rekordbox dj, the sampler has 4 banks, and each bank has 16 slots.
3 Select a track from the track list to load into the Sampler slot.
4 Press a Performance Pad while holding the [SHIFT] button.
The selected track is loaded into the Sampler slot.
• Loading by overwriting a Sampler slot that’s already loaded may not be
possible depending on the [Preferences] settings in rekordbox.
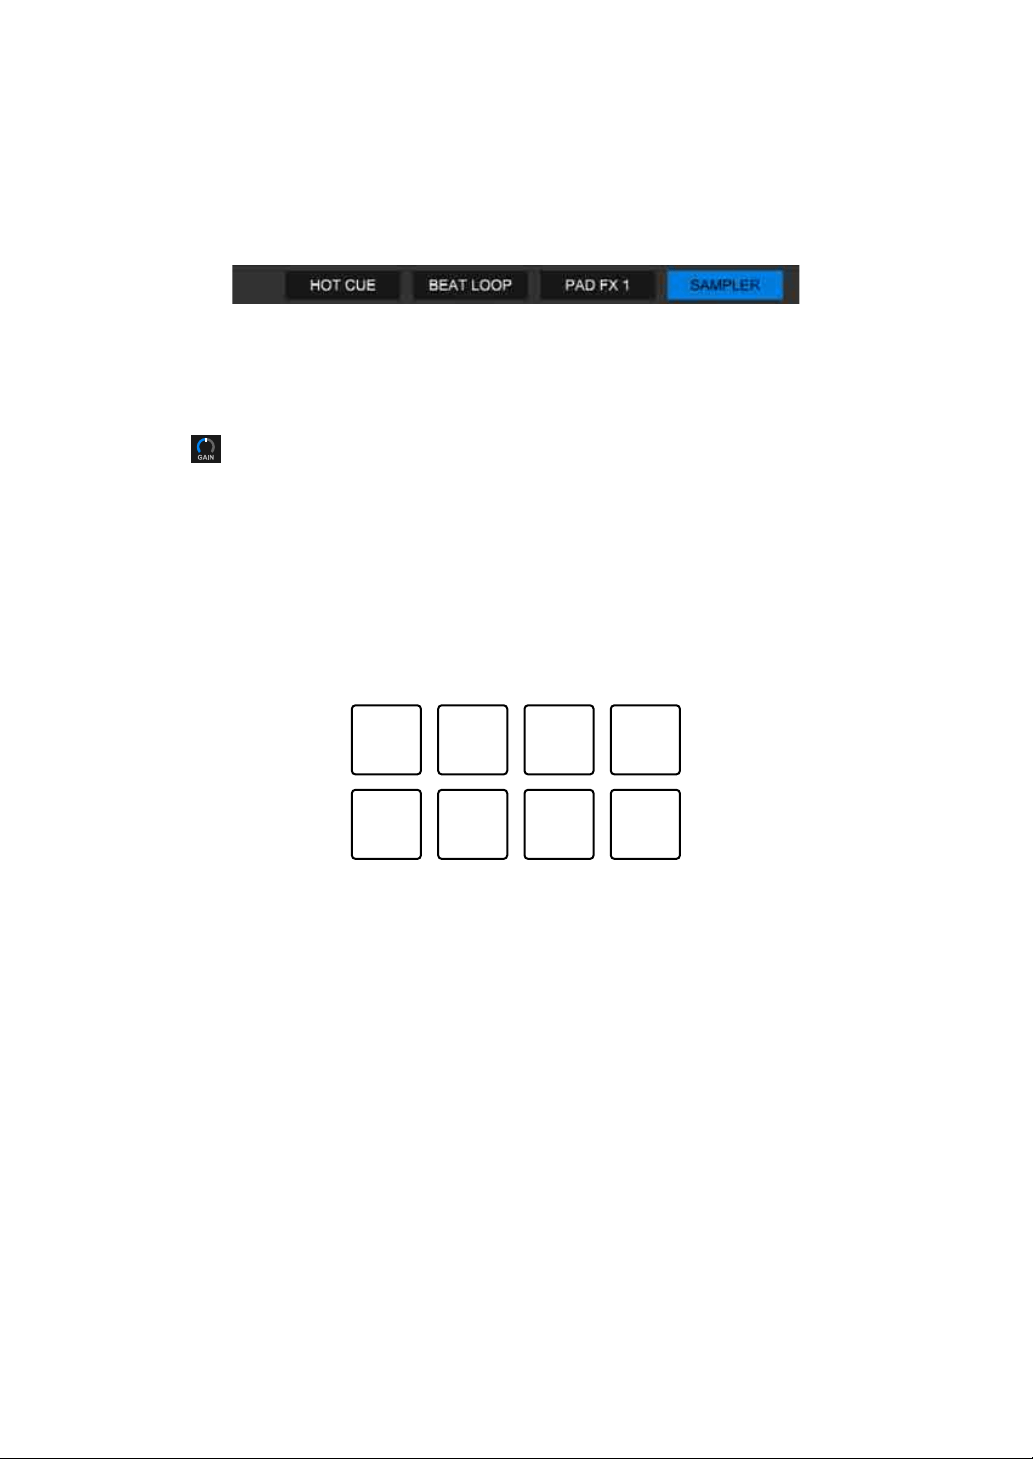
rekordbox
163
En
Playing Sampler tracks with Performance Pads
1Click [SAMPLER] at the bottom of the rekordbox dj screen to enter
[SAMPLER] mode.
2 Click the button at the right of [BANK] on the [SAMPLER] panel to
change the Sampler bank.
3 Turn [GAIN] on the [SAMPLER] panel to adjust the Sampler
volume.
4 Press a Performance Pad.
The track or sound assigned to the relevant slot is played.
• Sampler slots are set to Performance Pads as follows. (The slots in brackets
are for when Pad mode of deck 2 is set to Sampler mode.)
1: Slot 1 (slot 9), 2: Slot 2 (slot 10), 3: Slot 3 (slot 11), 4: Slot 4 (slot 12),
5: Slot 5 (slot 13), 6: Slot 6 (slot 14), 7: Slot 7 (slot 15), 8: Slot 8 (slot 16)
5 During Sampler playback, press the Performance Pad again.
The sound plays from the beginning again.
6 Press a Performance Pad while holding the [SHIFT] button during
Sampler playback.
The sound of the slot that is currently playing stops.
1234
5678

rekordbox
164
En
Using Fader Start
Using Channel Fader Start
1 Set the cue point.
Pause the track at the position you want to start playback from, then press the
[CUE] button on that deck.
2 While holding the [SHIFT] button, move the channel fader from the
bottom to the top.
Playback starts from the cue point.
• If you move the channel fader back to the bottom while holding the [SHIFT]
button during playback, the track instantly jumps back to the cue point and
playback pauses. (Back Cue)
When no cue point is set, playback starts from the beginning of the track.
Using Crossfader Start
1 Set the cue point.
Pause the track at the position you want to start playback from, then press the
[CUE] button on that deck.
2 Move the crossfader to the left edge or right edge.
If you want to use Crossfader Start to trigger playback on channel 2, set the
crossfader to the left edge, and vice versa.
3 Hold the [SHIFT] button and move the crossfader towards the
opposite edge from where it’s set.
Playback of the track starts from the cue point.
• If you hold the [SHIFT] button during playback and move the crossfader back
to the edge where you started from, the playback position instantly jumps
back to the cue point and pauses. (Back Cue)
When no cue point is set, playback starts from the beginning of the track.
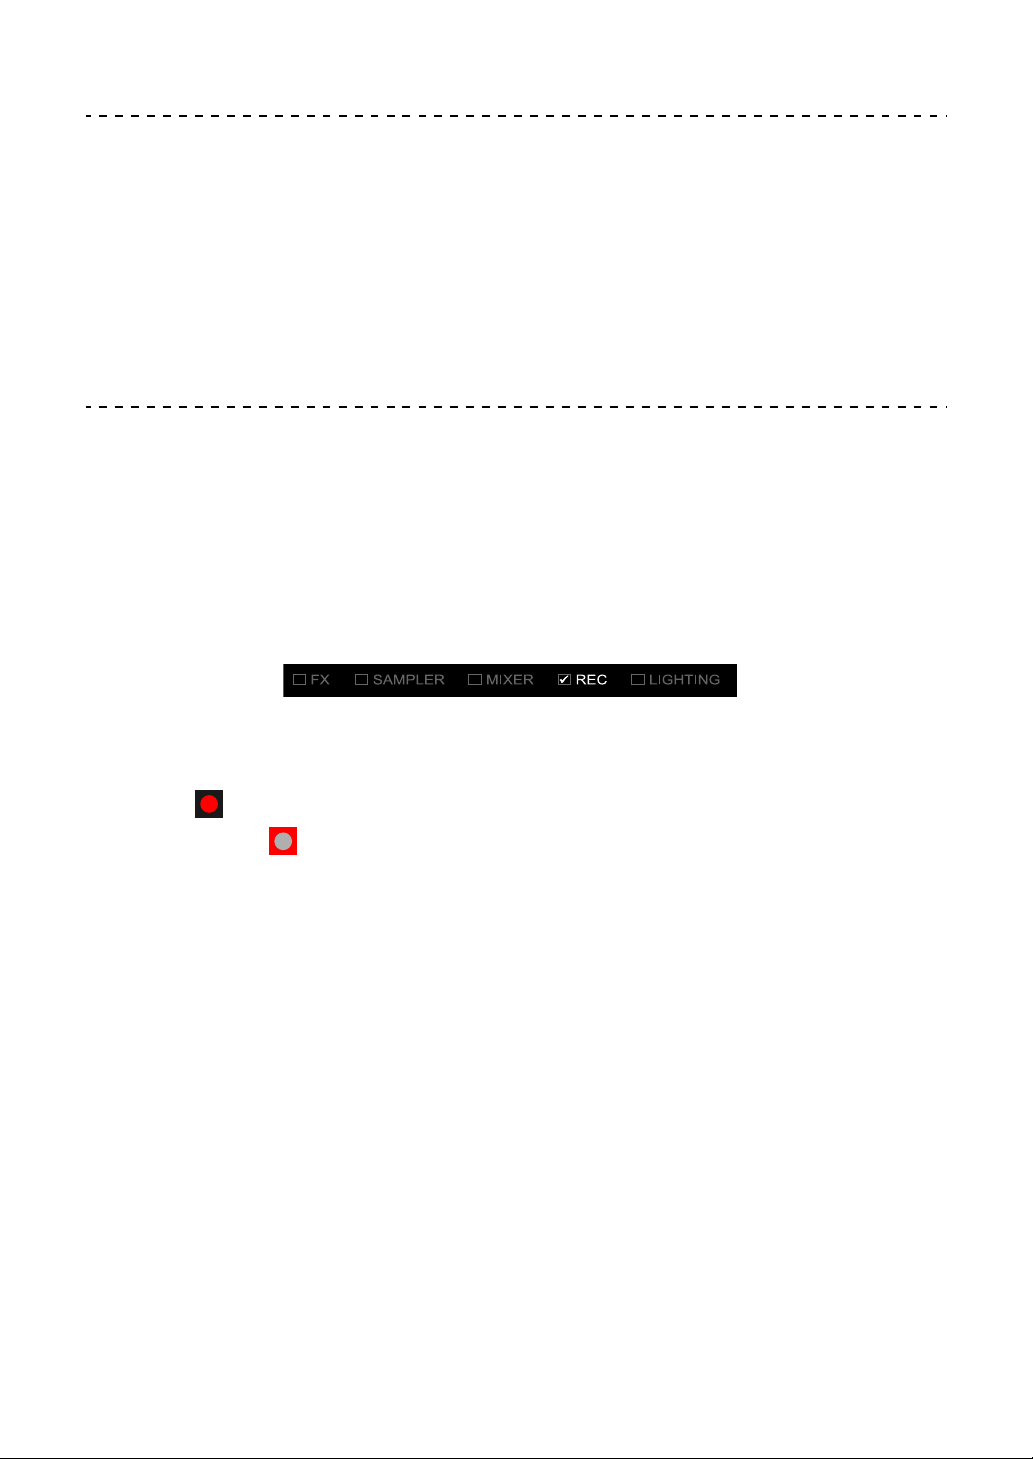
rekordbox
165
En
Analyzing tracks
Track analysis starts when you drag and drop a music file, or a folder
containing music files, to the Track List in rekordbox.
• If a track is loaded to a deck before analysis is complete, it may take
some time to display BPM and waveform.
• Depending on the number of tracks, analysis may take some time.
Recording
rekordbox has a Recording feature that can record mixed sound. For
detailed instructions on recording, see: “rekordbox Operating
Instructions.”
1 Mark the [REC] check box at the top of the rekordbox dj screen.
The [REC] panel is displayed.
2 Click on the [REC] panel in rekordbox dj to start recording.
• If you click again, recording stops.
• When recording is completed, the file is automatically saved.
• You can change the saving destination of the file in the [Preferences] >
[Controller] > [Recordings] tab of rekordbox.

rekordbox
166
En
Changing the settings in rekordbox dj
You can change the settings of the unit in rekordbox dj.
Changing the Demo mode setting
In normal conditions, if you don’t use any of the features for a specified
amount of time, the unit will enter Demo mode.
The amount of time can be set to 1 minute, 5 minutes or 10 minutes.
Demo mode can also be turned off.
• By default, Demo mode starts when you don’t use any features for 10
minutes.
• When any knob or button on the unit is used during Demo mode,
Demo mode is canceled.
1 Click on the rekordbox dj screen.
2 Select [Controller] on the [Preferences] screen, then select the
[DDJ-200] tab.
3 Set Demo mode in [Demo/Screen saver].
• If the unit is not connected via the USB cable, the unit’s settings won’t be
displayed.
rekordbox
167
En
Changing the Back Spin Length setting
When using the unit’s jog wheel to perform a Back Spin, you can make
the Back Spin longer than the amount you rotate the jog wheel.
The Back Spin length can be set to [Short], [Normal] or [Long].
1 Click on the rekordbox dj screen.
2 Select [Controller] on the [Preferences] screen, then select the
[Deck] tab.
3 Set the Back Spin length on [Back Spin Length].
• If the unit is not connected via the USB cable, the unit’s settings won’t be
displayed.
Changing the setting of Fader Start
When Fader Start is switched on, you can automatically start playback
or move to a cue point (Back Cue) by moving a channel fader or the
crossfader. Fader Start can also be switched off.
1 Click on the rekordbox dj screen.
2 Select [Controller] on the [Preferences] screen, then select the
[Mixer] tab.
3Set [Activate the fader start when moving a channel fader or
the cross fader while pressing the SHIFT button] to use Fader
Start.
• If the unit is not connected via the USB cable, the unit’s settings won’t be
displayed.

168
En
Settings on the unit
Changing the Demo mode setting in Utilities mode
You can change the Demo mode setting in Utilities mode of the unit.
• The Demo mode setting is also available on WeDJ and rekordbox dj.
Read more: Changing the settings in WeDJ for iPhone (page 39)
Read more: Changing the settings in WeDJ for Android (page 76)
Read more: Changing the settings in rekordbox dj (page 166)
If you launch Utilities mode while a DJ application is open, the set
status may not display properly.
1 Disconnect the USB cable from the device supplying power to the
unit (USB power adapter, PC/Mac, etc.).
2 Hold both the [SHIFT] and [PLAY/PAUSE ] buttons on the left
deck and connect the USB cable to the device supplying the power
to the unit.
Utilities mode launches.
3 Change the Demo mode setting.
In normal conditions, if you don’t use any of the features for a specified amount
of time, the unit will enter Demo mode.
The amount of time can be set to 1 minute, 5 minutes or 10 minutes.
Demo mode can also be turned off.
• By default, Demo mode starts when you don’t use any features for 10
minutes.
• When any knob or button on the unit is used during Demo mode, Demo
mode is canceled.

Settings on the unit
169
En
Press the Performance Pads on deck 1 (left) to change the
Demo mode setting.
The set value is indicated by which pad is lit.
1: Demo mode is switched off.
2: Demo mode starts when you don’t use the unit for 1 minute.
3: Demo mode starts when you don’t use the unit for 5 minutes.
4: Demo mode starts when you don’t use the unit for 10 minutes.
• After changing the setting, the setting is saved. While saving the setting, the
bottom row of Performance Pads on the left deck flashes. In this case, wait
until these pads change from flashing to lit. If the USB cable is disconnected
while the pads are flashing, the setting may not be saved.
4 Disconnect the USB cable from the device supplying power to this
unit.
Utilities mode is exited.

Settings on the unit
170
En
Changing the BLUETOOTH
®
MIDI device name
Before you potentially use other units, you can set the unit to be
identified by your smartphone.
You can change the Bluetooth MIDI device name displayed for the
Bluetooth connection between the unit and your smartphone.
• The Bluetooth MIDI device name setting can’t be saved.
1 Disconnect the USB cable from the device supplying power to the
unit (USB power adapter, PC/Mac, etc.).
2 Hold down the relevant pad on the left or right deck and connect the
USB cable to the device supplying power to the unit.
The relationship between Bluetooth MIDI device names and Performance
Pads is as follows.
For deck 1
1: DDJ-200_1, 2: DDJ-200_2, 3: DDJ-200_3, 4: DDJ-200_4,
5: DDJ-200_5, 6: DDJ-200_6, 7: DDJ-200_7, 8: DDJ-200_8
For deck 2
1: DDJ-200_9, 2: DDJ-200_10, 3: DDJ-200_11, 4: DDJ-200_12,
5: DDJ-200_13, 6: DDJ-200_14, 7: DDJ-200_15, 8: DDJ-200_16
1234
5678
1234
5678


172
En
Additional information
Troubleshooting
If you think something is wrong with the unit, check the information
below and refer to the [FAQ] for the DDJ-200 on the Pioneer DJ
website.
pioneerdj.com/support/
Additionally, check [Support] > [FAQ] on rekordbox.com.
Sometimes, the problem may be caused by another component.
Inspect the other components and electrical appliances you’re using
and refer to their manuals and FAQ if necessary. If you can’t solve the
problem, ask your nearest Pioneer DJ authorized service center, or
your dealer, to carry out repair work.
• The unit may not work properly if it’s subjected to static electricity or
other external influences. In this case, turn off the unit and on again
to restore proper operation.

Additional information
173
En
Power
The unit does not power up.
• When using WeDJ for iPhone, see: page 13, 85, 105.
• When using an Android device, see: page 48, 124.
• When using rekordbox on a PC/Mac, see: Connections (for PC/Mac)
(page 149).
The unit powers down arbitrarily.
• Use a mobile battery which does not have a power-saving function.
The mobile battery should be DC +5 V and 500 mA or more.

Additional information
174
En
Connection
The unit is not recognized by a smartphone.
• When using an iOS device, see: Starting WeDJ for iPhone and
connecting it to the unit (page 18), Starting djay and connecting it to
the unit (page 90), Starting edjing Mix and connecting it to the unit
(page 110).
• When using an Android device, see: Starting WeDJ for Android and
connecting it to the unit (page 53), Starting edjing Mix and connecting
it to the unit (page 129).
• When this unit is connected to your PC/Mac using the USB cable and
rekordbox is started on it, close rekordbox.
Bluetooth connection cannot be established. / Bluetooth
connection is interrupted.
• If devices generating electromagnetic waves in the 2.4 GHz band
(such as a microwave oven, wireless LAN or another Bluetooth
device) are located nearby, move them away from the unit or stop
using them.
• If your smartphone is far away, move it closer to the unit. If there is a
wall, obstacle, etc. which may be interrupting the connection, move
your smartphone or the unit.
Sound outputs from only one channel of the headphones or
the speaker with built-in amplifier, etc. connected to the
headphones jack of your smartphone.
• When using an iOS device, see: page 19, 91, 111.
• When using an Android device, see: page 54, 130.

Additional information
175
En
The volume is low for the headphones, or speaker with built-in
amplifier, etc. connected to the headphones jack of your
smartphone.
• Adjust the volume on your smartphone.
• Check the external input setting and volume on the powered
amplifier or speaker with built-in amplifier, etc.
• Check your smartphone is correctly connected to the headphones/
speaker with built-in amplifier, etc. If you’re using a mono cable and
sound is not output, use a stereo cable.
• When using an iOS device, see: page 20, 92, 112.
• When using an Android device, see: page 56, 132.
Monitoring with headphones is disabled even when using the
split cable to connect the headphones to your PC/Mac.
• See: Connecting an audio device (speaker) to the headphones jack
of your PC/Mac (page 150).
• See: Checking audio setup (page 154).
• See: Monitoring with headphones (page 156).
The volume is low/sound is not output via the headphones
while using rekordbox on a PC/Mac.
• See: Monitoring with headphones (page 156).

Additional information
176
En
rekordbox dj
rekordbox dj becomes unstable.
• Update the rekordbox to the latest version. See: Installing rekordbox
(page 139).
• Quit any other open applications on your PC/Mac. If operation
remains unstable, try disabling the wireless network or other wireless
connections, antivirus software, screen saver, low power mode, etc.
• If another USB device is connected to your PC/Mac, disconnect it.
• If you’re using battery power for your laptop, connect the laptop to an
AC power supply.

Additional information
177
En
Others
The jog wheel doesn’t respond to touch.
• An electrostatic system is used for touch detection in the jog wheels
of the unit. If the jog wheel is dirty or you have hand cream on your
hands, the jog wheel might not detect touch properly. When cleaning
the jog wheel, dry-wipe it with a soft cloth. If it’s very dirty, prepare a
5:1 or 6:1 solution of water and neutral detergent, soak a soft cloth in
the solution and wring it out well, then clean the jog wheel and wipe
it with a dry cloth.
• If touching the jog wheel while touching another metal part of the unit
makes the jog wheel work, it’s possible that the unit is being affected
by another device connected to the unit. Review the connection
environment (location, ground connection status, etc.) of the devices
(PC/Mac, etc.) connected to the unit.
The indicator flashes and operation is strange.
• If the unit behaves unusually or doesn’t turn on, disconnect the USB
cable, wait a while, then reconnect the USB cable to turn on the unit.

Additional information
178
En
Using the unit as a controller for other DJ
applications
The unit also outputs operating data for the buttons and knobs in MIDI
format. If you connect a PC/Mac with a built-in MIDI compatible DJ
application via the USB cable, you can control the DJ application with
the unit. (You need to set MIDI details in the DJ application.)
• For details, see your DJ application’s user guide.
About MIDI messages
For details on this unit’s MIDI messages, see: “List of MIDI Messages”.
• You can find the List of MIDI Messages from the Pioneer DJ website:
pioneerdj.com/
About the driver software
This unit works with the operating system’s standard driver.

Additional information
179
En
About trademarks and registered trademarks
• Pioneer DJ is a trademark of PIONEER CORPORATION and is used
under license.
• rekordbox
TM
and WeDJ are trademarks or registered trademarks of
Pioneer DJ Corporation.
• iPhone, iPod touch, Mac, macOS, Lightning and Finder are
trademarks of Apple Inc., registered in the U.S. and other countries.
• App Store is a service mark of Apple Inc.
• iOS is a trademark or registered trademark of Cisco Systems, Inc. in
the U.S and other countries, and is used under license.
• Windows is a registered trademark of Microsoft Corporation in the
United States and other countries.
• Intel and Intel Core are trademarks of Intel Corporation in the U.S.
and other countries.
• The Bluetooth
®
word mark and logos are registered trademarks
owned by Bluetooth SIG, Inc. and any use of such marks by Pioneer
DJ Corporation is under license. Other trademarks and trade names
are those of their respective owners.
• Beatport and the Beatport logo are trademarks or registered
trademarks of Beatport, LLC.
• SoundCloud and the SoundCloud logo are registered trademarks of
SoundCloud Ltd.
• djay and the djay logo are trademarks or registered trademarks of
Algoriddim GmbH.
• edjing Mix and edjing Mix logo are trademarks or registered
trademarks of MWM SAS.
• Google Play, the Google Play logo and Android are trademarks or
registered trademarks of Google LLC.
The names of companies and products mentioned herein are
trademarks or registered trademarks of their respective owners.

Additional information
180
En
This product has been licensed for nonprofit use. This product has not
been licensed for commercial purposes (for profit-making use), such
as broadcasting (terrestrial, satellite, cable or other types of
broadcasting), streaming on the Internet, Intranet (a corporate
network) or other types of networks or distributing of electronic
information (online digital music distribution service). You need to
acquire the corresponding licenses for such uses. For details, refer to
http://www.mp3licensing.com.

Additional information
181
En
Cautions on copyrights
rekordbox and WeDJ restrict playback and duplication of copyright-
protected music contents.
• When coded data, etc., for protecting the copyright is embedded in
the music contents, it may not be possible to operate the program
normally.
• When rekordbox and WeDJ detect that coded data, etc., for
protecting the copyright is embedded in the music contents,
processing (playback, reading, etc.) may stop.
Recordings you have made are for your personal enjoyment and
according to copyright laws may not be used without the consent of the
copyright holder.
• Music recorded from CDs, etc., is protected by the copyright laws of
individual countries and by international treaties. It is the full
responsibility of the person who has recorded the music to ensure
that it is used legally.
• When handling music downloaded from the Internet, etc., it is the full
responsibility of the person who has downloaded the music to ensure
that it is used in accordance with the contract concluded with the
download site.
The specifications and design of this product are subject to change
without notice.
© 2019 Pioneer DJ Corporation.
All rights reserved.
<DRI1596-B>