User Manual Coffeemaker
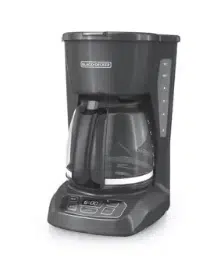
GETTING TO KNOW YOUR COFFEEMAKER
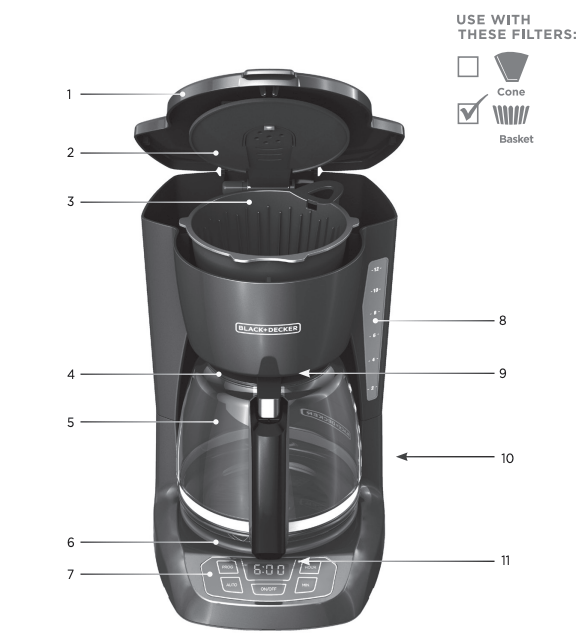
1. One-piece cover
2. Showerhead
3. Removable brew basket (Part # CM1100B-01)
4. Brew-thru lid
5. Duralife™ glass carafe (Part # CM1100B-02)
6. “Keep Hot” carafe plate
7. Control panel
8. Water reservoir with cup level markings
9. Sneak-A-Cup™ feature
10. Cord storage (inside of unit)
11. Brew indicator light
HOW TO USE
GETTING STARTED
- Remove all packing material, any stickers, and the plastic band around the power plug.
- Wash removable parts as instructed in CARE AND CLEANING.
- Pour fresh cold water up to 12 MAX mark.
- Place basket-style paper filter into removable brew basket. Place basket into brew basket holder.
- Plug cord into standard electrical outlet.
- Brew water through appliance without adding coffee grounds. This removes any dust or residue that may remain in the system during the manufacturing process.
- Discard water and paper filter.
- Turn off appliance, unplug and allow to cool down.
SETTING THE CLOCK
- Plug appliance into standard electrical outlet.
- The digital clock display flashes 12:00 A.M.
- To set the time: Press HOUR button until correct time appears on display. Small dot in top left corner of digital display indicates P.M.
- Press MIN button to select minutes.
Note: If unit is unplugged or power is interrupted even momentarily, the time will need to be reset.
BREWING COFFEE
- 1. Open one-piece cover. Fill water reservoir with cold tap water. Use lines on side of reservoir as a guide. Do not fill past “MAX/12” line.
Important: If too much water is added it will leak from the back of the coffeemaker.
- 2. Place paper filter into brew basket. Add ground coffee (we suggest 1 heaping tablespoon per cup). Place brew basket in place.
- 3. Close one-piece cover securely.
- 4. Place brew-thru lid on empty carafe, making sure it is in the down position. Then set carafe on carafe plate.
Note: Coffee may overflow if brew-thru lid is not properly aligned.
- 5. Plug cord into an outlet. Press ON/OFF button (indicator light to the left of the HOUR button will illuminate) and brewing begins. The “Keep Hot” carafe plate will keep the coffee warm for two hours or until the ON/Off button is pressed.
- 6. When coffee grounds are cool, carefully remove and discard used grounds and filter.
- 7. To turn off coffeemaker at any time press ON/OFF button (indicator light to the left of the HOUR button will turn off).
- 8. Unplug appliance when not in use.
- 9. Press tab on carafe lid to pour coffee.
SNEAK-A-CUPTM FEATURE
Remove the carafe and brewing is paused. The carafe must be placed back on the carafe plate in 30 seconds to prevent overflow. Brewing begins again.
SETTING AUTO BREW TIME
- Press PROG button. The AUTO light (small dot in bottom left corner of digital display) flashes several times. Digital clock displays 12:00.
- Quickly press HOUR button then MIN button to select the time you would like automatic brewing to begin (for example, 7:15 A.M. Make sure the P.M. light is not on.)
- Press AUTO button, holding it down until the AUTO light stops flashing. The digital display changes to time of day.
- To check preset auto time, press PROG button and preset auto time is displayed. Press AUTO button to reactivate the timer. The AUTO light will turn on.
- To cancel Auto Brew function, press the AUTO button. The AUTO light will turn off.
CARE AND CLEANING
This product contains no user serviceable parts. Refer service to qualified service personnel.
CLEANING
Make sure your coffeemaker is unplugged and cool.
- Remove brew basket. Discard used paper filter and coffee grounds.
- Wash brew basket and carafe in dishwasher (top-rack) or by hand in hot, soapy water.
- Wipe outside of coffeemaker, control panel and carafe plate with a soft, damp cloth. Note: Do not use abrasive cleansers or scouring pads. Never immerse the coffeemaker in water.
- To clean the inside of the cover, open the cover and leave in the open position; wipe with a damp cloth.
COFFEEMAKER PART
- Housing
- Carafe Plate
- Power Cord
CLEANING INSTRUCTIONS
- Wipe with a soft, damp cloth.
COFFEEMAKER PART
- Carafe Lid
- Brew Basket
- Glass Carafe
CLEANING INSTRUCTIONS
- Wash by hand in warm soapy water, or in the dishwasher (top rack only).
CLEANING WITH VINEGAR
Note: With regular use, minerals and hard water can clog your coffeemaker. A full cleaning with vinegar is recommended once a month.
- Pour white vinegar into water reservoir up to the 6-cup mark on the water window. Add cold water up to the 10-cup mark.
- Put a paper filter in brew basket and close cover. Set empty carafe on the carafe plate.
- Turn on coffeemaker. Let half the cleaning mixture brew into carafe (until level is around 5). Turn off coffeemaker and let it soak for at least 15 minutes
- Turn on coffeemaker again and brew remaining cleaning mixture into carafe. Turn off coffeemaker; empty carafe and discard paper filter.
- Fill reservoir with cold water to 11-cup line; replace carafe on carafe plate and then turn on coffeemaker for a complete brewing cycle to flush out remaining cleaning mixture. You may want to repeat this step to completely remove the vinegar smell/taste.
- Wash brew basket and carafe as instructed in CLEANING.
TROUBLESHOOTING
Coffeemaker does not turn on.
Coffeemaker is not plugged in.
- Make sure appliance is plugged into a working outlet.
Coffeemaker is leaking.
Water reservoir may be overfilled.
- Make sure water reservoir has not been filled beyond the 12-cup line.
Cover may not be correctly placed on carafe.
- Make sure cover is correctly placed and tightened on carafe
Carafe may not be correctly placed on the carafe plate.
- Make sure carafe is placed securely onto the carafe plate.
The brew basket overflows.
The carafe has been removed for longer than 30 seconds when using the Sneak-ACup™ feature.
- Make sure to replace the carafe within 30 seconds during the brewing cycle.
Excessive amount of coffee is used.
- Reduce the amount of coffee used.
Coffee sediment in brewed cup of coffee.
The paper filter and/or the brew basket are not properly placed.
- Insert basket-shaped paper filter into brew basket and insert basket properly into holder.
The coffeemaker brews slowly.
The coffeemaker needs cleaning.
- Follow the instructions in the “Cleaning with Vinegar” section.
IMPORTANT SAFEGUARDS.
When using electrical appliances, basic safety precautions should always be followed to reduce the risk of fire, electric shock, and/or injury, including the following:
- Read all instructions.
- Do not touch hot surfaces. Use handles or knobs.
- To protect against fire, electric shock and injury to persons do not immerse cord, plugs or appliance in water or other liquid.
- Close supervision is necessary when any appliance is used by or near children.
- Unplug from outlet when not in use and before cleaning.
- Allow to cool before putting on or taking off parts, and before cleaning the appliance.
- Do not operate any appliance with a damaged cord or plug, or after the appliance malfunctions or has been damaged in any manner. Contact Consumer Support at the number listed in this manual.
- The use of accessory attachments not recommended by the appliance manufacturer may result in fire, electric shock or injury to persons.
- Do not use outdoors.
- Do not let cord hang over edge of table or counter, or touch hot surfaces.
- Do not place on or near a hot gas or electric burner, or in a heated oven.
- To disconnect, make sure brew indicator light is off by pressing ON/OFF button, then remove plug from wall outlet.
- Do not use this appliance for other than intended use.
- Keep lid on the carafe when in use.
- Scalding may occur if the lid is removed during the brewing cycles.
- The carafe is designed for use with this appliance.
- It must never be used on a range top.
- Do not set a hot carafe on a wet or cold surface.
- Do not use a cracked carafe or a carafe having a loose or weakened handle.
- Do not clean carafe with cleansers, steel wool pads or other abrasive material.
- This appliance is not intended for use by persons including children) with reduced physical, sensory or mental capabilities, or lack of experience and knowledge, unless they have been given supervision or instruction concerning use of the appliance by a person responsible for their safety.
- Children should be supervised to ensure that they do not play with the appliance.
POLARIZED PLUG (120V models only)
This appliance has a polarized plug (one blade is wider than the other). To reduce the risk of electric shock, this plug is intended to fit into a polarized outlet only one way. If the plug does not fit fully into the outlet, reverse the plug. If it still does not fit, contact a qualified electrician. Do not attempt to modify the plug in any way
TAMPER-RESISTANT SCREW
Warning: This appliance is equipped with a tamper-resistant screw to prevent removal of the outer cover. To reduce the risk of fire or electric shock, do not attempt to remove the outer cover. There are no user-serviceable parts inside. Repair should be done only by authorized service personnel.
ELECTRICAL CORD
1. A short power-supply cord is provided to reduce the risk resulting from becoming entangled in or tripping over a longer cord.
2. Extension cords may be used if care is exercised in their use.
3. If an extension cord is used:
a) The marked electrical rating of the extension cord should be at least as great as the electrical rating of the appliance.
b) If the appliance is of the grounded type, the extension cord should be a grounding-type 3-wire cord.
c) The cord should be arranged so that it will not drape over the countertop or tabletop where it can be pulled on by children or tripped over.
Note: If the power cord is damaged, please call our Customer Service line listed in these instructions.