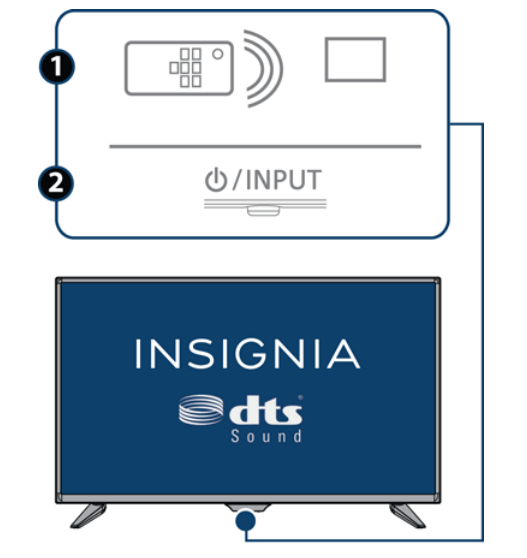
Receives signals from the remote control. Do not block.
2
/INPUT button
—Press to turn on your TV when your TV is off (in standby mode). Press and hold to turn off your TV when TV is on.
Warning: When your TV is off, power still flows through it. To completely disconnect power, unplug the power cord.
INPUT—Quickly press and release to open the INPUT SOURCE list, press one or more times to select a video input source, then wait a few seconds. Your TV switches to the source you selected. For more information, see Selecting the video input source on page 38.
Side (32")
#
Item
Description
1
/ AUDIO OUT
Connect headphones, a sound bar, analog speaker system, or a home theater system to this jack to listen to TV audio through external speakers. For more information, see Analog audio on page 30.
2
DIGITAL OUTPUT (OPTICAL)
Connect a sound bar, digital speaker system, or home theater system to this jack to listen to TV audio through external speakers. For more information, see Digital audio on page 29.
3
HDMI1/ARC
Connect an HDMI device to this jack. For more information, see HDMI (best) on page 18, 22, or 24, or Connecting a computer on page 26.
OR
Connect an ARC-enabled home theater receiver to this jack.
4
HDMI2
Connect an HDMI device to this jack. For more information, see HDMI (best) on page 18, 22, or 24, or Connecting a computer on page 26.
5
USB .
Connect a USB flash drive to this jack to view compatible JPEG picture files. For more information, see Connecting a USB flash drive on page 27 and Using a USB flash drive on page 44
Back
#
Item
Description
1
VIDEO and L and R AUDIO
Connect the video and audio for an AV device to these jacks. For more information, see AV (good) on page 19, 23, or 25.
2
ANT/CABLE IN
Connect an antenna or cable TV to this jack. For more information, see Coaxial (good) on page 20 or Connecting an antenna or cable TV (no box) on page 21.
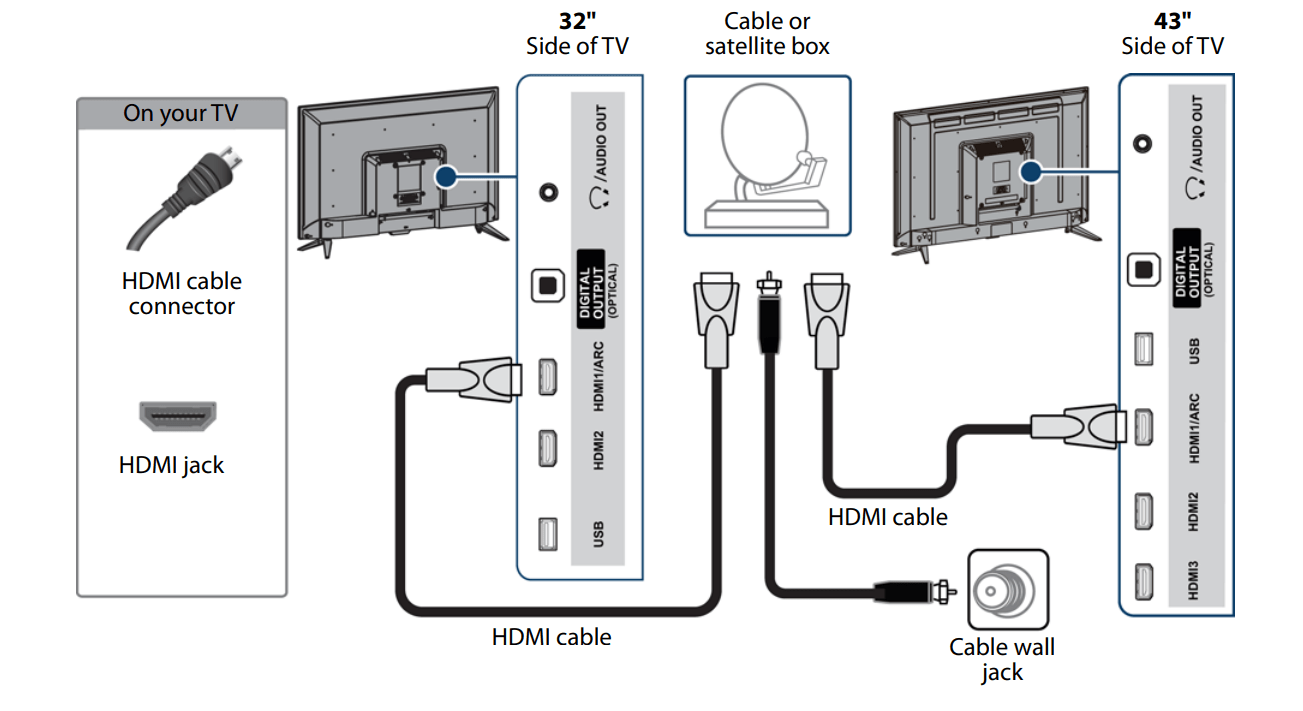
Connecting a cable or satellite box
HDMI (best)
Make sure that your TV’s power cord is unplugged and all connected equipment is turned off.
Connect the incoming cable from the cable wall jack to the cable-in jack on the cable or satellite box.
Connect an HDMI cable (not provided) to one of the HDMI jacks on the side of your TV and to the HDMI OUT jack on the cable or satellite box.
Plug your TV’s power cord into a power outlet, turn on your TV, then turn on the cable or satellite box.
Press INPUT to open the INPUT SOURCE list. 6
Press or to highlight HDMI1, HDMI2, or HDMI3, then press ENTER.
AV (good)
Make sure that your TV’s power cord is unplugged and all connected equipment is turned off.
Connect the incoming cable from the cable wall jack to the cable-in jack on the cable or satellite box.
Connect an AV cable (not provided) to the VIDEO jack and L and R AUDIO jacks on the back of your TV and to the AV and audio out jacks on the cable or satellite box.
Plug your TV’s power cord into a power outlet, turn on your TV, then turn on the cable or satellite box.
Press INPUT to open the INPUT SOURCE list.
Press or to highlight AV, then press ENTER.
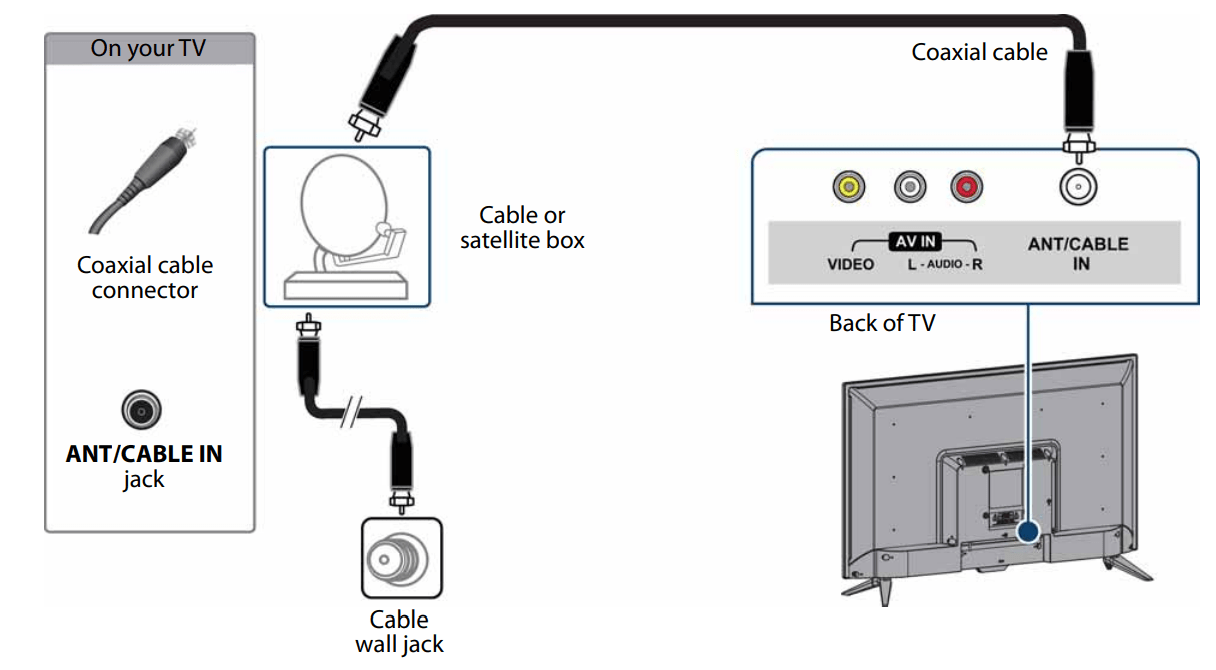
Coaxial (good)
Make sure that your TV’s power cord is unplugged and all connected equipment is turned off.
Connect the incoming cable from the cable wall jack to the cable-in jack on the cable or satellite box.
Connect a coaxial cable (not provided) to the ANT/CABLE IN jack on the back of your TV and to the coaxial out jack on the cable or satellite box.
Plug your TV’s power cord into a power outlet, turn on your TV, then turn on the cable or satellite box.
Press INPUT to open the INPUT SOURCE list.
Press or to highlight TV, then press ENTER
If you cannot tune to channels you know exist, scan for channels. See Automatically scanning for channels on page 50.
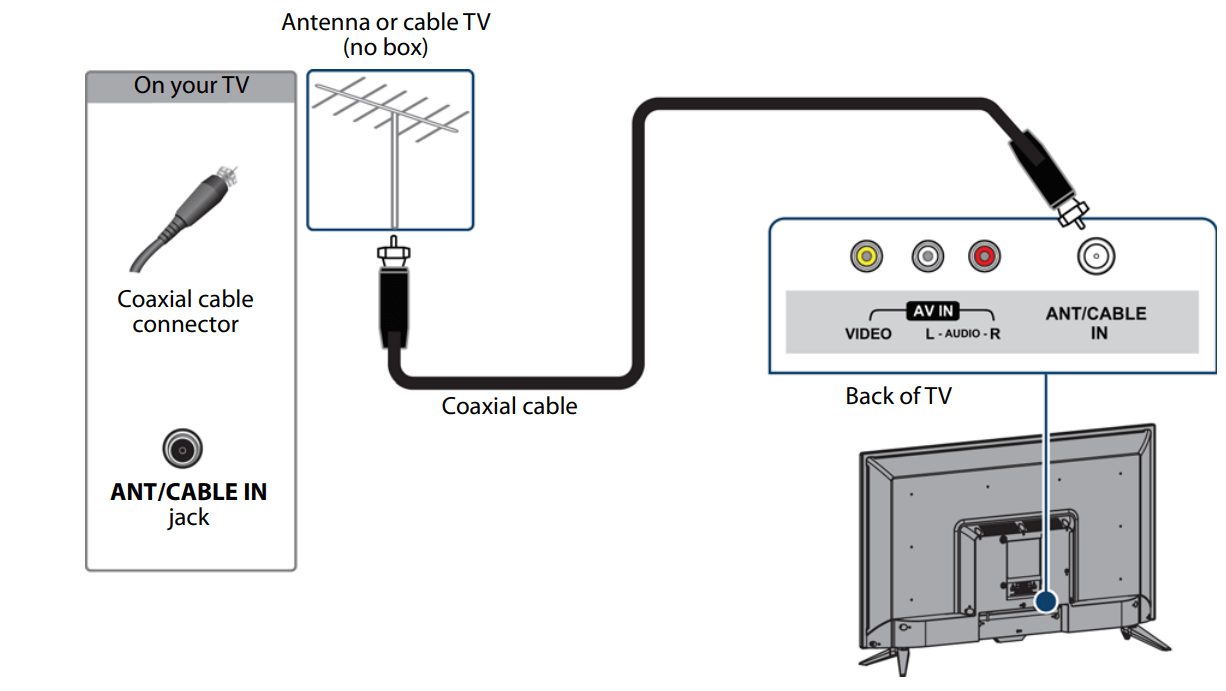
Connecting an antenna or cable TV (no box)
Make sure that your TV’s power cord is unplugged and all connected equipment is turned off.
Connect a coaxial cable (not provided) to the ANT/CABLE IN jack on the back of your TV and to the antenna or cable TV wall jack.
Plug your TV’s power cord into a power outlet, then turn on your TV.
Press INPUT to open the INPUT SOURCE list.
Press or to highlight TV, then press ENTER.
If you cannot tune to channels you know exist, scan for channels. See Automatically scanning for channels on page 50.
Troubleshooting
Viewing system information
You may need to view system information during troubleshooting.
1. Press MENU.
2. Press or to highlight HELP, then press or ENTER.
3. Press or to highlight System Info, then press ENTER or .
4. If your TV uses open source code, press ENTER to display the open source code information.
5. Press MENU to return to the previous menu, or press EXIT to close the menu.
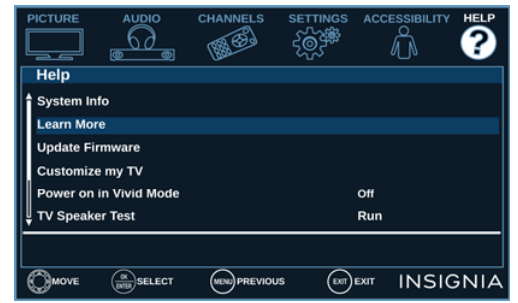
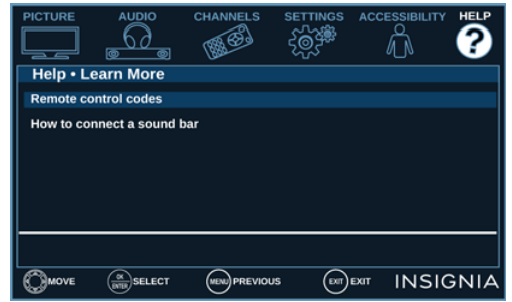
Learning more about your TV
You can learn more about remote control codes and connecting a soundbar.
1. Press MENU.
2. Press or to highlight HELP, then press or ENTER.
3. Press or to highlight Learn More, then press ENTER or .
4. Press or to highlight a topic, then press ENTER. Your TV displays information about the topic you selected.
5. Press MENU to return to the previous menu, or press EXIT to close the menu.
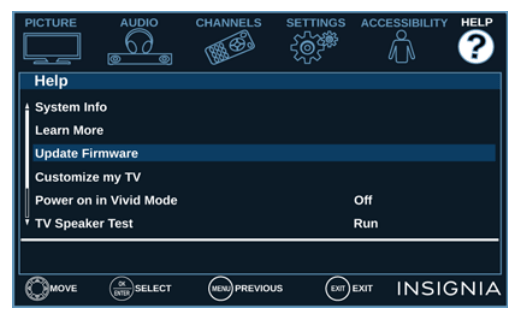
Updating the TV firmware
If your TV is behaving oddly and you have tried all the solutions in the troubleshooting pages, you may need to update the TV firmware.
On the Help menu, select System Info, then write down your model, revision, and firmware information. See Viewing system information on page 65.
On a computer, go to www.insigniaproducts.com, then under Support & Service, click Product Support.
Under Product Information, enter your model number, then press ENTER.
Click the picture of your model, then next to Features, click Support & Downloads. The support page for your TV opens.
Follow the instructions in the Firmware Installation Guide on the Insignia website to download the firmware update and copy it to a USB flash drive.
Plug the USB flash drive into the USB port on your TV.
Press MENU.
Press or to highlight HELP, then press or ENTER.
On the Help menu, press or to highlight Update Firmware, then press ENTER or . A message asks if you want to update the TV firmware.
Highlight OK, then press ENTER. While your TV installs the firmware update, your TV displays a status screen. Do not turn off your TV until the update is complete.
When the update is complete, unplug the USB flash drive, then press ENTER. Your TV turns off then on to complete the update.
If the channel list has been deleted, you need to scan for channels. For more information, see Automatically scanning for channels on page 50.
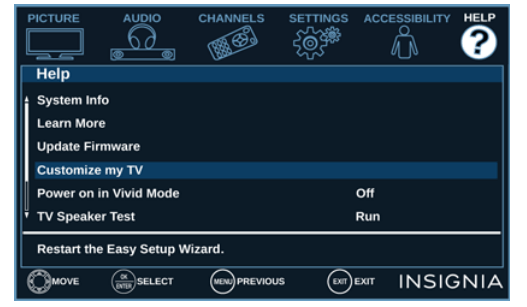
Customizing TV settings
If you did not complete the customization part of the Easy Setup wizard the first time you turned on your TV, you can run the wizard again to customize settings.
Press MENU.
Press or to highlight HELP, then press or ENTER.
Press or to highlight Customize my TV, then press ENTER or . A message asks if you want to run the Easy Setup wizard.
Press or to select OK (to reset) or Cancel (to not reset), then press ENTER. If you select OK, your TV turns off, then turns on again. Go through the Easy Setup wizard. For more information, see Turning on your TV for the first time on page 35.
OR
If you select Cancel or press MENU, your TV returns to the Help menu without making any changes.
OR
If you press EXIT, the on-screen menu closes without making any changes.
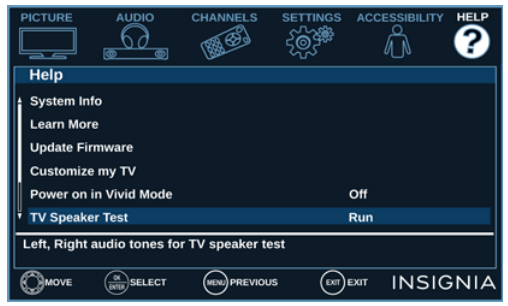
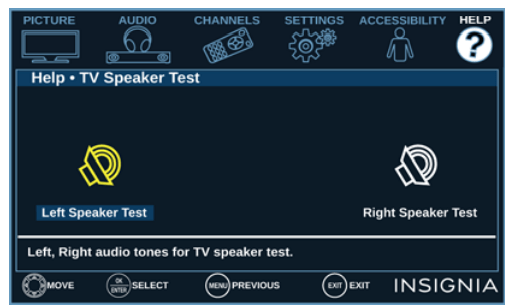
Testing the TV speakers
You can test your TV’s speakers to make sure that they are working correctly.
Press MENU.
Press or to highlight HELP, then press or ENTER.
Press or to highlight TV Speaker Test, then press ENTER or .
Press ENTER. Your TV tests the left speaker, then the right speaker. You hear a tone, and as each speaker is tested, its icon turns yellow. If one or both of the speakers fail the test, see Video and audio on page 68.
Restoring settings to the defaults
When you restore default settings, all the settings you have customized (except parental controls) are reset.
Press MENU.
Press or to highlight HELP, then press or ENTER
Press or highlight Reset to Default, then press ENTER or.
Press or to select OK (to reset) or Cancel (to not reset), then press ENTER. If you select OK, your TV turns off, then turns on again. Go through the Easy Setup wizard. For more information, see Turning on your TV for the first time on page 35.
OR
If you select Cancel or press MENU, your TV returns to the Help menu without making any changes.
OR
If you press EXIT, the on-screen menu closes without making any changes.
Video and audio
Problem
Solution
Picture does not fill the screen. There are black bars around the picture.
• Change the aspect ratio. See the Aspect Ratio option in Adjusting the TV picture on page 46.
No picture (screen is not lit) and no sound.
• Press on the TV or the remote control.
• Make sure that the Audio Only option is set to Off. See Playing TV audio only on page 50.
• Make sure that the video cables are connected correctly and securely to your TV.
• Adjust the contrast and brightness. See Adjusting the TV picture on page 46.
• Make sure that the power cord is plugged into a working outlet.
• Press INPUT and make sure that the correct video input source is selected. See Selecting the video input source on page 38.
• Try another channel. The station may be experiencing problems.
• Make sure that the incoming signal is compatible.
• Make sure that the antenna or cable TV is connected correctly and securely. See Connecting a cable or satellite box on page 18 or Connecting an antenna or cable TV (no box) on page 21.
• Check the closed caption settings. Some TEXT modes can block the screen. See Using closed captioning on page 59.
Dark, poor, or no picture (screen is lit), but sound is good.
• Try another channel. The station may be experiencing problems.
• Make sure that the antenna or cable TV is connected correctly and securely. See Connecting a cable or satellite box on page 18 or Connecting an antenna or cable TV (no box) on page 21.
• Adjust the brightness. See Adjusting the TV picture on page 46.
• Press PICTURE to change to a different picture mode. See Adjusting the TV picture on page 46.
• If you are using an antenna, the digital channel signal may be low. To check the digital channel signal strength, see Checking the digital signal strength on page 54.
• If you are using an antenna and the signal strength is low, adjust the antenna or use a highly directional outdoor antenna or set-top antenna with a built-in amplifier.
• Make sure that the video cables are connected correctly and securely to your TV.
• The video cable(s) you are using may be bad. Try a new set.
No color, dark picture, or color is not correct.
• Try another channel. The station may be experiencing problems.
• Adjust the color settings. See Adjusting the TV picture on page 46.
• Make sure that the video cables are connected correctly and securely to your TV.
• Make sure that the antenna or cable TV is connected correctly and securely. See Connecting a cable or satellite box on page 18 or Connecting an antenna or cable TV (no box) on page 21.
• If you are using an antenna, the digital channel signal may be low. To check the digital channel signal strength, see Checking the digital signal strength on page 54.
• If you are using an antenna and the signal strength is low, adjust the antenna or use a highly directional outdoor antenna or set-top antenna with a built-in amplifier.
Only snow (noise) appears on the screen.
• Try another channel. The station may be experiencing problems.
• Make sure that the antenna or cable TV is connected correctly and securely. See Connecting a cable or satellite box on page 18 or Connecting an antenna or cable TV (no box) on page 21.
• If you are using an antenna, the digital channel signal may be low. To check the digital channel signal strength, see Checking the digital signal strength on page 54.
• If you are using an antenna and the signal strength is low, adjust the antenna or use a highly directional outdoor antenna or set-top antenna with a built-in amplifier.
Picture quality is good on some channels and poor on others. Sound is good.
• The problem may be caused by a poor or weak signal from the broadcaster or cable TV provider.
• If you connect to cable TV without a set-top box and experience poor picture quality, you may need to install a set-top box to improve signal reception and picture quality. Contact your cable TV provider about upgrading to a set-top box.
Dotted lines or stripes appear on the screen.
• Make sure that the antenna or cable TV is connected correctly and securely. See Connecting a cable or satellite box on page 18 or Connecting an antenna or cable TV (no box) on page 21.
• If you are using an antenna, the digital channel signal may be low. To check the digital channel signal strength, see Checking the digital signal strength on page 54.
• If you are using an antenna and the signal strength is low, adjust the antenna or use a highly directional outdoor antenna or set-top antenna with a built-in amplifier.
• Make sure that the video cables are connected correctly and securely to your TV.
• The video cable(s) you are using may be bad. Try a new set.
• Other devices (for example, a surround sound receiver, external speakers, fans, or hair dryers) may be interfering with your TV. Try turning off one device at a time to determine which device is causing interference. After you have determined which device is causing interference, move it further from the TV to eliminate the interference.
Double images.
• Use a highly directional outdoor antenna or use a cable or satellite box.
The picture has a few bright or dark spots.
• A few bright or dark spots on an LCD screen is normal. It does not affect the operation of your TV.
Video description or voice guide does not work.
• Make sure that your TV is not muted and the volume is turned up.
• Make sure that the options listed under the Accessibility menu are turned on. See Adjusting accessibility settings on page 64.
• Video descriptions are not available on all broadcasts.
• Some remote functions are not narrated.
Good picture, but no sound.
• Increase the volume.
• Make sure that the sound is not muted.
• Make sure that you do not have headphones connected. When headphones are connected, no sound comes from the TV speakers.
• Change to a different audio mode. See the Audio Mode option in Adjusting sound settings on page 48.
• If you are using a home theater system, soundbar, or external speaker system, make sure that it is turned on and is not muted.
• If you are using a home theater system, soundbar, or external speaker system, make sure that you have selected the correct output mode.
• If you are using a home theater system, soundbar, or external speaker system and have connected it with a digital audio cable, select Digital Audio Format/Audio Delay on the Audio menu, then set Audio Format to PCM. See the Digital Audio Format/Audio Delay option in Adjusting sound settings on page 48.
• Make sure that the audio cables are connected correctly and securely to your TV.
• Make sure that the antenna or cable TV is connected correctly and securely. See Connecting a cable or satellite box on page 18 or Connecting an antenna or cable TV (no box) on page 21.
• If you are using an antenna, the digital channel signal may be low. To check the digital channel signal strength, see Checking the digital signal strength on page 54.
• If you are using an antenna and the signal strength is low, adjust the antenna or use a highly directional outdoor antenna or set-top antenna with a built-in amplifier.
• The audio cables you are using may be bad. Try a new set.
Poor picture.
• Make sure that the room is not too bright. Light reflecting off the screen can make the picture difficult to see.
• If an S-VHS camera or a camcorder is connected while another connected device is turned on, the picture may be poor. Turn off one or more devices.
Good sound, but poor color.
• Adjust the contrast, color, and brightness settings. See Adjusting the TV picture on page 46.
Audio noise.
• Other devices (for example, a surround sound receiver, external speakers, fans, or hair dryers) may be interfering with your TV. Try turning off one device at a time to determine which device is causing interference. After you have determined which device is causing interference, move it further from the TV to eliminate the interference.
No output from one of the speakers.
• Adjust the audio balance. See Adjusting sound settings on page 48.
• Test the TV’s speakers. See Testing the TV speakers on page 67. If one or both of the speakers fails, try one of the following solutions:
• Make sure that the audio cables are connected correctly and securely to your TV.
• Make sure that the audio cables are connected to the AUDIO OUT jacks on the connected device.
• Try a different set of audio cables.
• Make sure that the sound on the connected device is not muted.
• Try connecting the device to a different TV. If you do not hear sound, the problem is with the device.
After images appear.
• Do not display a still image, such as a logo, game, or computer image, for an extended period of time. This can cause a permanent after-image to be burned into the screen. This type of damage is not covered by your warranty
Remote control
Problem
Solution
Remote control does not work.
• Make sure that the power cord is plugged into a working outlet.
• Make sure that there are no obstructions between the remote control and the remote control sensor on the front of the TV.
• Point the remote control directly at the remote control sensor on your TV. See Aiming the remote control on page 33.
• The supplied batteries are wrapped tightly in clear plastic. Make sure that you have removed this plastic from the batteries.
• Make sure that the batteries are installed correctly. See Installing remote control batteries on page 33.
• Replace dead batteries with new batteries. See Installing remote control batteries on page 33.
Trouble programming your existing universal remote control.
• See instructions in Programming universal remote controls on page 34.
• Codes are subject to change. For up-to-date codes, go to Viewing universal remote control codes on page 34 or visit insigniaproducts/remotecodes website
• Replace dead batteries with new batteries.
• Refer to the User Guide that accompanied your universal remote control and contact the manufacturer if problems persist.
General
Problem
Solution
No power.
• Make sure that the power cord is plugged into a working outlet.
• Unplug the power cord, wait 60 seconds, then plug the cord back in and turn on your TV.
• Other devices (for example, a surround sound receiver, external speakers, fans, or hair dryers) may be interfering with your TV. Try turning off one device at a time to determine which device is causing interference. After you have determined which device is causing interference, move it further from the TV to eliminate the interference.
“No signal” error message is displayed.
• Press INPUT and make sure that you have selected the correct input for the device or service you are trying to use.
• If you are using a cable or satellite box, use the remote that came with that box to change channels.
After Auto Channel Search, there are no channels.
• Reception can vary by channel depending on the broadcast power level of a given station. Contact your cable or satellite TV provider.
• Make sure that the antenna or cable/satellite TV is connected securely to your TV.
• Try replacing the cable between the antenna/cable or cable/satellite box and your TV.
When I press INPUT, I cannot select my device (it is grayed out).
• Turn on the device. Your TV automatically detects and displays which video jacks have devices connected to them when the devices are turned on.
• Turn off Auto Input Sensing. See Turning Input Sensor on or off on page 63.
One or more channels do not display.
• Make sure that the channels are not blocked. See Setting parental control levels on page 56.
• Make sure that the channels are not hidden. The channel may have been deleted from the channel list. You can tune to the channel by pressing the number buttons or you can add the channel back to the channel list. See Hiding channels on page 52.
• If you are using a cable or satellite box, use the remote that came with that box to change channels.
• Press INPUT and make sure that you have selected the correct input for the device or service you are trying to use.
• If you are using an antenna, the digital channel signal may be low. To check the digital channel signal strength, see Checking the digital signal strength on page 54.
Password is lost.
• Enter 9999 to access parental controls, then set a new password. See Setting or changing the password on page 54.
Some settings cannot be accessed.
• If a setting is grayed, the setting is not available in the current video input mode (for example TV mode). Change to a different video input source. See Selecting the video input source on page 38.
TV cabinet creaks.
• When the TV is in use, the temperature rises naturally and may cause the cabinet to expand or contract which can cause a creaking noise. This is not a malfunction.
does not work.
• Make sure that the Button Lock option is set to Off. See Locking the power button on your TV on page 58.
• Unplug the power cord, wait a few seconds, then plug the cord back in and turn on your TV.
TV keeps turning off.
• Make sure that the sleep timer is not turned on. See Setting the sleep timer on page 62.
A retail banner is displayed.
• You selected Store Display Mode when you ran the Easy Setup wizard. Run the Easy Setup wizard and select Home User Mode on the Viewing Environment screen. See Customizing TV settings on page 67.
INlink (CEC-compatible) device
Problem
Solution
My TV is not displaying the video from the connected CEC device.
• Make sure that the HDMI cable is connected securely to your TV and the device.
• Make sure that the device is connected to your TV with an HDMI cable.
• Make sure that the device is a CEC device. See the documentation that came with the device for more information.
• Press INPUT and make sure that the correct video input source is selected. See Selecting the video input source on page 38.
• Make sure that the INlink feature is turned on. See Turning INlink on or off on page 40.
• Try adjusting the TV picture. See Adjusting the TV picture on page 46.
My TV is not playing the audio from the connected CEC device.
• Make sure that the HDMI cable is connected securely to your TV and the device.
• Make sure that the device is connected to your TV with an HDMI cable.
• Make sure that the device is a CEC device. See the documentation that came with the device.
• Make sure that the TV volume is turned up and not muted.
• Try adjusting the TV sound. See Adjusting sound settings on page 48.
• Make sure that the TV speakers are turned on and not muted. See Adjusting sound settings on page 48.
• Make sure that the INlink feature is turned on. See Turning INlink on or off on page 40.
• If you have connected an HDMI CEC audio receiver, adjust the volume on the receiver. When your TV detects an audio receiver, the TV speakers turn off and sound plays through receiver speakers only.
• If you are using a home theater system, soundbar, or external speaker system, make sure that it is turned on and is not muted.
• If you are using a home theater system, soundbar, or external speaker system, make sure that you have selected the correct output mode.
• If you are using a home theater system, soundbar, or external speaker system and have connected it with a digital audio cable, select Digital Audio Format/Audio Delay on the Audio menu, then set Audio Format to PCM. See the Digital Audio Format/Audio Delay option in Adjusting sound settings on page 48.
My TV’s remote control does not control the device.
• Make sure that there are no obstructions between the remote control and the remote control sensors on your TV and the device.
• Depending on the device, all the buttons may not work.
• After you switch to an INlink device, use the remote control that came with the device to control playback.
• Make sure that the INlink feature is turned on. See Turning INlink on or off on page 40.
• If you are trying to control the volume on an HDMI CEC audio receiver using your TV remote control, make sure that the TV Speakers option on the Audio menu is set to On. See Adjusting sound settings on page 48.
• If you are trying to control the volume on an HDMI CEC audio receiver using your TV remote control, make sure that the Audio Receiver option on the INlink menu is set to On. See Turning Audio Receiver on or off on page 42.
• The device may not support this feature. See the documentation that came with the device for more information.
The device does not show up in the INlink Device list.
• Make sure that the device is turned on.
• Make sure that the HDMI cable is connected securely to your TV and the device.
• Make sure that the device is connected to your TV with an HDMI cable.
• Make sure that the INlink feature is turned on. See Turning INlink on or off on page 40.
• Make sure that the device is a CEC device. See the documentation that came with the device.
My device does not turn off when I turn off my TV.
• Make sure that the INlink feature is turned on. See Turning INlink on or off on page 40.
• Make sure that Device Auto Power Off is set to On on the INlink menu. See Turning Device Auto Power Off on or off on page 41.
• The device may not support this feature. See the documentation that came with the device for more information.
My TV does not turn on when I turn on my device.
• Make sure that the INlink feature is turned on. See Turning INlink on or off on page 40.
• Make sure that TV Auto Power On is set to On on the INlink menu. See Turning TV Auto Power On on or off on page 41.
• The device may not support this feature. See the documentation that came with the device for more information.
The Audio Receiver setting on the INlink menu keeps turning back on after it is turned off.
• When Audio Receiver is set to Off and INlink Control is set to On and you make an adjustment to the audio receiver (for example, turn the volume knob or press a button), Audio Receiver is automatically set to On. To prevent this from happening, turn off the INlink feature. See Turning INlink on or off on page 40.
Two volume bars appear when adjusting the volume.
• When you adjust the volume on the audio receiver or with the TV remote control, a double volume bar appears, one for the TV volume and one for the audio receiver volume.
I cannot select the Root Menu option on the INlink menu.
OR
The device’s root menu does not open when I select Root Menu on the INlink menu.
• The device may not support this feature. See the documentation that came with the device for more information.
 /INPUT button
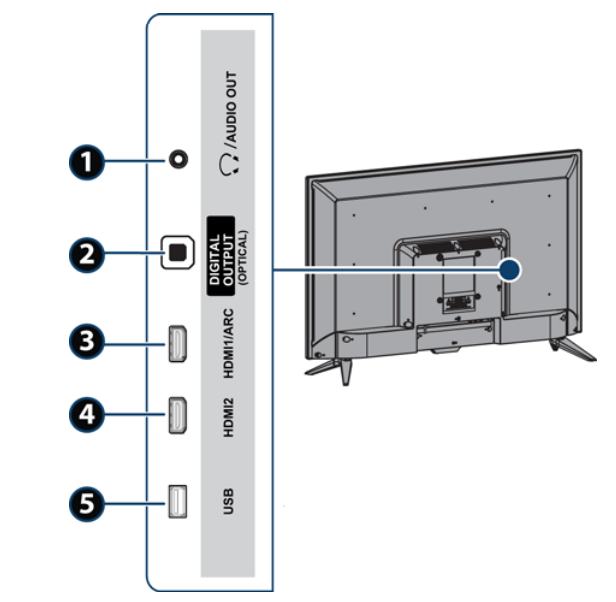
 / AUDIO OUT
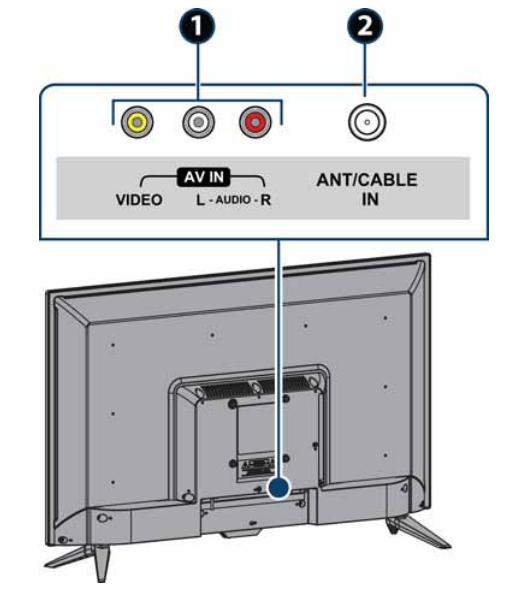
 or
or  to highlight HDMI1, HDMI2, or HDMI3, then press ENTER.
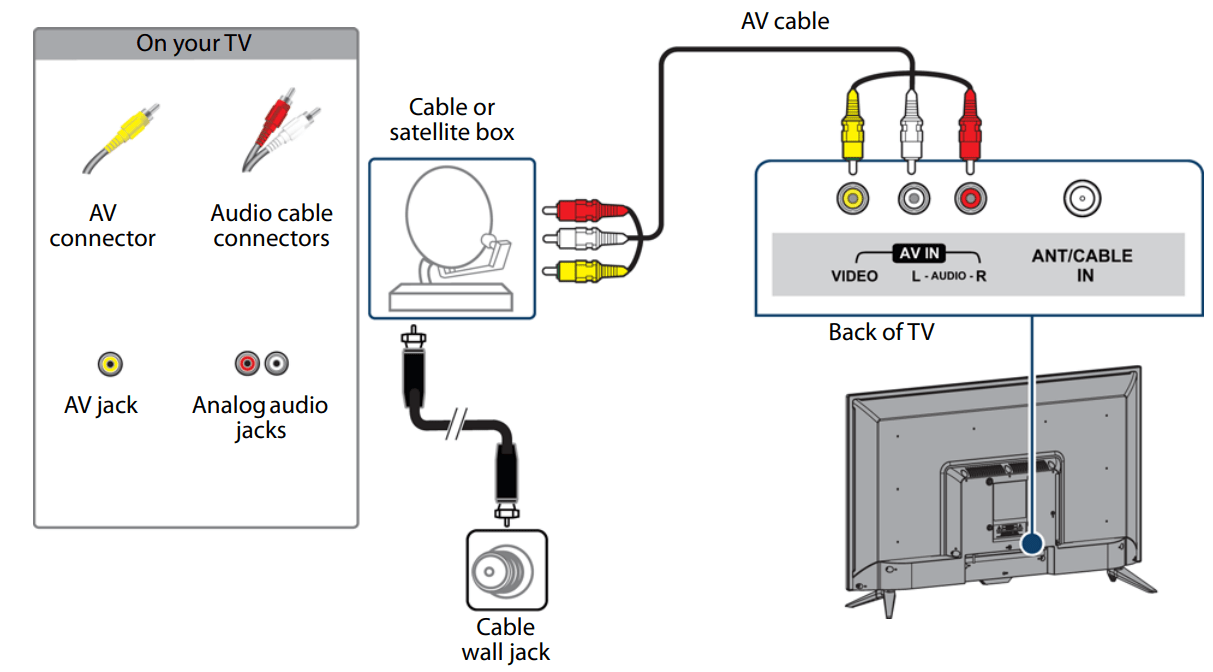
 or
or  to highlight HELP, then press
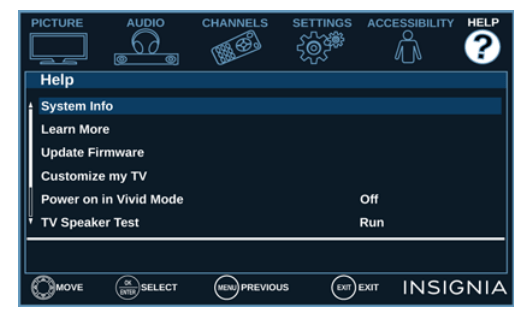

 on the TV or the remote control.