Documents: Go to download!
User Manual
- User Manual - (English, French)
- Installation Instructions - (English)
- Quick Specs - (English)
- IMPORTANT SAFETY INSTRUCTIONS
- HOW TO CONNECT ELECTRICITY
- EXTENSION CORDS
- REFRIGERANTS
- CONTROLS AND FEATURES
- OPERATING INSTRUCTIONS
- CARE AND CLEANING
- THE PROBLEM SOLVER
Table of contents
User Manual Icemaker
IMPORTANT SAFETY INSTRUCTIONS
• Never allow children to operate, play with or crawl inside the icemaker.
• Never clean icemaker parts with flammable fluids. The fumes can create a fire hazard or explosion.
• Do not store or use gasoline or other flammable vapors and liquids in the vicinity of this or any other appliance. The fumes can create a fire hazard or explosion.
• Be sure your icemaker is properly installed and grounded by a qualified technician in accordance with the Installation Instructions.
• Do not attempt to repair or replace any part of your icemaker unless it is specifically recommended in this manual. All other servicing should be referred to a qualified technician.
• Unplug the icemaker or disconnect power before cleaning, servicing or changing the light bulb. Failure to do so can result in death or electrical shock.
• It is your responsibility to be sure your icemaker:
– has been installed where it is protected from the elements.
– is located so that the front is not blocked to restrict incoming or discharge air flow.
– is connected only to the proper kind of outlet, with the correct electric supply and grounding. A 115 volt, 60 Hz., 15 amp fused electrical supply is required. NOTE: Time delay fuse or circuit breaker is recommended.
– is not used by anyone unable to operate it properly.
– is used only to do what icemakers are designed to do.
– is properly maintained.
HOW TO CONNECT ELECTRICITY
Do not, under any circumstances, cut or remove the third (ground) prong from the power cord. For personal safety, this appliance must be properly grounded.
The power cord of this appliance is equipped with a 3-prong (grounding) plug which mates with a standard 3-prong (grounding) wall outlet to minimize the possibility of electric shock hazard from this appliance.
Have the wall outlet and circuit checked by a qualified electrician to make sure the outlet is properly grounded.
Where a standard 2-prong wall outlet is encountered, it is your personal responsibility and obligation to have it replaced with a properly grounded 3-prong wall outlet.
The icemaker should always be plugged into its own individual electrical outlet which has a voltage rating that matches the rating plate. This provides the best performance and also prevents overloading house wiring circuits which could cause a fire hazard from overheated wires.
Never unplug your icemaker by pulling on the power cord. Always grip plug firmly and pull straight out from the outlet.
Repair or replace immediately all power cords that have become frayed or otherwise damaged. Do not use a cord that shows cracks or abrasion damage along its length or at either end.
When moving the icemaker, be careful not to roll over or damage the power cord.
EXTENSION CORDS
Do not use an extension cord with this appliance.
REFRIGERANTS
All refrigeration products contain refrigerants, which under federal law must be removed prior to product disposal. If you are getting rid of an old refrigeration product, check with the company handling the disposal about what to do.
CONTROLS AND FEATURES
Clean before using
After you remove all of the packaging materials, clean the inside of your icemaker before using it.
See the cleaning instructions in Care and Cleaning.
Set controls
1. To start the normal ice making cycle, select ON.
2. To stop icemaker operation, select OFF.
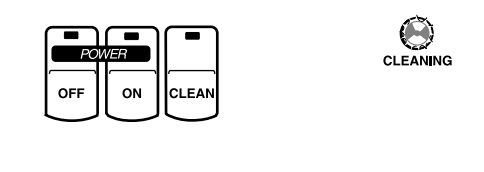
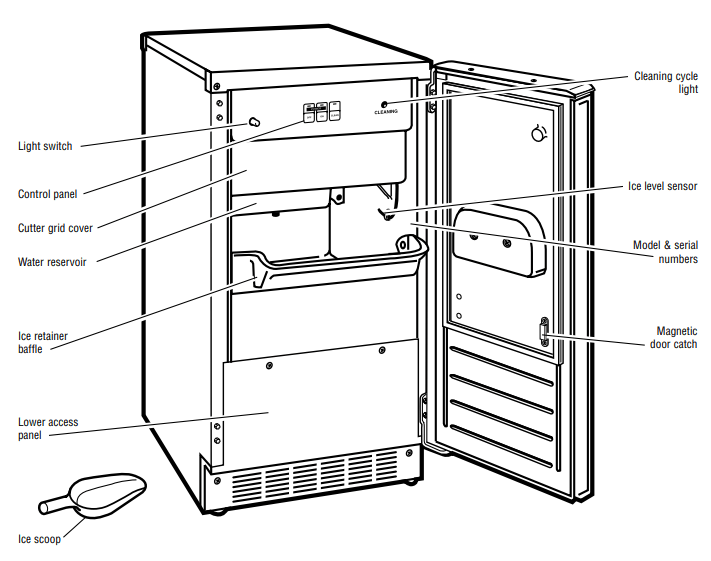
Features of your icemaker
OPERATING INSTRUCTIONS
How your icemaker works
When you first start your icemaker, the water reservoir will fill and the system will rinse itself before starting to make ice. The rinsing process takes about five minutes.
Under normal operating conditions, the icemaker will cycle at preset temperatures. The ice level sensor located in the ice storage bin will monitor the ice levels.
Making Ice
1. Water is constantly circulated over a freezing plate. As the water freezes into ice, the minerals in the water are rejected. This produces a clear sheet of ice with a low mineral content.
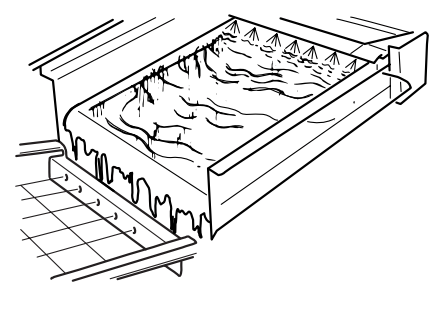
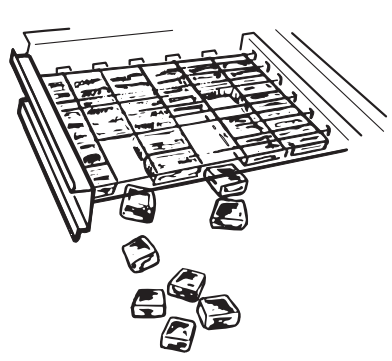
2. When the desired thickness is reached, the ice sheet is released and slides onto a cutter grid. The grid divides the sheet into individual cubes.
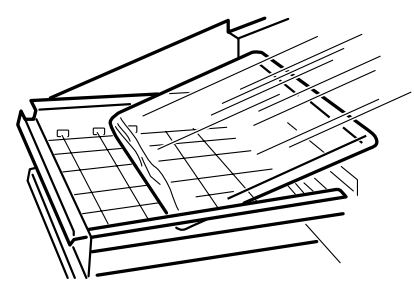
3. The water containing the rejected minerals is drained after each freezing cycle.
4. Fresh water enters the machine for the next ice making cycle.
5. Cubes fall into the storage bin. When the bin is full, the icemaker shuts off automatically and restarts when more ice is needed. The ice bin is not refrigerated and some melting will occur. The amount of melting varies with room temperature.
CARE AND CLEANING
Caring for your icemaker
The icemaker MUST be regularly inspected and cleaned to keep it operating at peak efficiency. Every time the icemaker is turned off, you MUST clean the icemaker system with Nickel Safe Ice Machine Cleaner. Nickel Safe Ice Machine Cleaner by Nu Calgon is available at appliance repair shops, or through GE Parts and Accessories. Order part number WX08X42870. In the U.S.A., call 800.626.2002 or visit ge.com. In Canada, call 1.888.880.3030.
Both the ice making system and the air cooled condenser need to be cleaned regularly. The minerals rejected from the circulating water during the freezing cycle will eventually form a hard scaly deposit in the water system which prevents a rapid release of the ice from the freezing plate.
Clean the ice and water system periodically to remove mineral scale buildup. Frequency of cleaning depends on water hardness. With hard water (15 to 20 grains/gal. [4 to 5 grains/liter]), cleaning may be required as frequently as every 6 months.
Exterior surfaces
Door handles and trim—Clean with a cloth dampened with soapy water. Dry with a soft cloth.
Keep the outside clean. Wipe with a clean cloth lightly dampened with mild liquid dish detergent. Dry with a clean, soft cloth. Do not wipe the icemaker with a soiled dish cloth or wet towel. These may leave a residue that can damage the finish. Do not use scouring pads, powdered cleaners, bleach or cleaners containing bleach because these products can scratch and damage the finish.
Stainless steel—Regularly clean and polish the stainless steel door panels and handles (on some models) with a commercially available stainless steel cleaner such as Stainless Steel Magic™ to preserve and protect the fine finish. Stainless Steel Magic is available through GE Parts and Accessories, 800.626.2002, or ge.com. Order part number WX10X15.
Do not use appliance wax or polish on the stainless steel.
Icemaker system
1. Push the selector switch to OFF.
2. Wait 5 to 10 minutes for the ice to fall into the storage bin. Remove all ice from the storage bin.
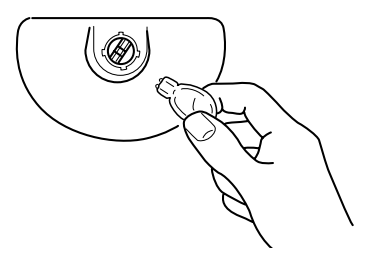
3. Unscrew the drain cap from the bottom of the water reservoir located inside the storage bin as shown. Allow the water to drain completely.
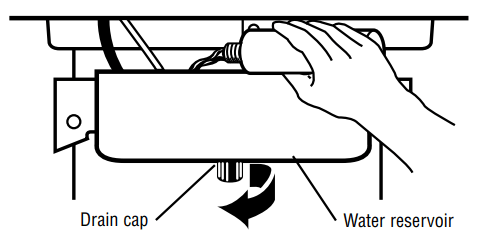
4. Replace the drain cap.
5. Use the entire 16 oz. bottle of Nickel Safe Ice Machine Cleaner rather than the amount suggested on the bottle. Follow all safety precautions on the bottle. Pour one bottle of solution into the water reservoir. Fill the bottle twice with tap water and pour it into the water reservoir.
Nickel Safe Ice Machine Cleaner by Nu Calgon is available at appliance repair shops, or through GE Parts and Accessories. Order part number WX08X42870. In the U.S.A., call 800.626.2002 or visit ge.com. In Canada, call 1.888.880.3030.
6. Push the selector switch to CLEAN. The light will turn on, indicating that the cleaning cycle is in process.

7. When the indicator light turns off (approximately 45 minutes), the cleaning cycle is complete. During the cleaning cycle, the system will both clean and rinse itself.
8. After the cleaning cycle is complete, remove the drain cap from the water reservoir to see if any cleaning solution, green in color, is left in the water reservoir. If cleaning solution drains from the water reservoir, you should run the clean cycle again
9. Push the selector switch to ON to resume ice production.
Condenser
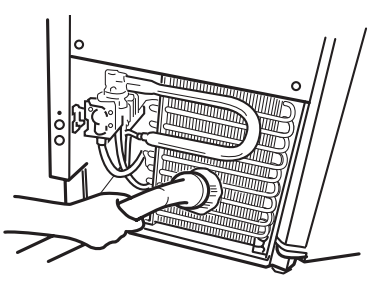
For best performance, brush or vacuum lint and dirt from the condenser once a year.
A dirty or clogged condenser:
• Prevents proper airflow.
• Reduces ice making capacity.
• Causes higher than recommended operating temperatures which may lead to component failure.
1. Unplug the icemaker or disconnect power.
2. Remove the 2 screws in the lower access panel and the 2 screws from the base grille area of the front panel support. Pull forward to remove the lower access panel.
3. Pull the bottom forward and then pull down to remove the lower access panel.
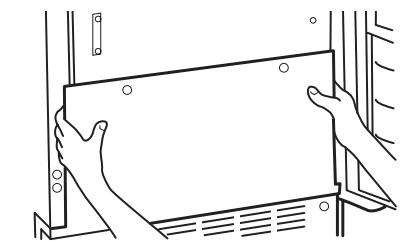
4. Remove dirt and lint from the condenser fins and the unit compartment with a brush attachment attached to a vacuum cleaner.
5. Replace the lower access panel using the 4 screws.
6. Plug in the icemaker or reconnect power.
Light bulb replacement
The icemaker has a light bulb in the top of the storage bin. To replace it, open the bin door and follow these instructions:
1. Unplug the icemaker or disconnect power.
2. Remove the 3 screws that hold the cutter grid cover in place. Reach behind the control panel and pull the light bulb down.
3. Replace with a 12-volt wedge base-type bulb (automotive #917). Locate the light bulb receptacle at the top behind the control panel. Align the flat edge of the light bulb with the receptacle and snap the bulb into place.
4. Replace the cutter grid cover with the 3 screws.
5. Plug in the icemaker or reconnect power.
Vacation and moving
To shut down the icemaker:
1. Unplug the icemaker or disconnect power.
2. Remove all ice from the storage bin.
3. Shut off the water supply.
4. Remove the 2 screws in the lower access panel and the 2 screws from the base grille area of the front panel support. Pull forward to remove the lower access panel.
5. Disconnect the inlet and outlet lines to water valve. Allow these lines to drain and then reconnect to the valve.
6. Replace the lower access panel and screws. Drain water from water reservoir by removing the drain cap. Also, remove water from drain line. Leave the door open to allow the icemaker and water reservoir to dry out completely.
7. Before using again, clean the icemaker and storage bin.
8. Plug in the icemaker or reconnect power.
Reverse Osmosis system
IMPORTANT: The performance of the icemaker may be affected when connected to a Reverse Osmosis system. An RO system may also reduce water pressure and affect the fill cycle, which is dependent on time and flow. The reduced water pressure (less than 20 psi) may cause the reservoir not to fill and flush properly during the ice making cycle.
Do not use copper tubing when the icemaker is connected to a Reverse Osmosis water system.
THE PROBLEM SOLVER
PROBLEM | POSSIBLE CAUSE |
| ICEMAKER DOES NOT OPERATE | • Power cord is not plugged into a live outlet. • The control is set at OFF. • The fuse is blown/circuit breaker is tripped. Replace fuse or reset the breaker. |
| ICE CUBES HAVE ODOR/TASTE | • High mineral content in the water supply. Water may need to be filtered or treated. • Food items stored in ice bin. Do not store any foods in the ice bin. • Packaging materials were not removed. Make sure that all packaging materials were removed at the time of installation. • Ice storage bin needs cleaning. • Scale has built up in the icemaker. If there is white scale buildup in the icemaker’s water or freezing system, you should clean the icemaker. See Care and Cleaning---Icemaker System. |
| ICEMAKER IS ON, BUT DOESN’T PRODUCE ICE | • The control is set at OFF. • Water supply is not connected. • Condenser is dirty. Dirt or lint may be blocking the airflow through the condenser. See Care and Cleaning---Condenser. • Scale has built up in the icemaker. If there is white scale buildup in the icemaker’s water or freezing system, you should clean the icemaker. See Care and Cleaning---Icemaker System. • Check for a kink in the drain hose from the ZPK1 Drain Pump Kit to the house drain. • Water supply has been interrupted. • Have a plumber check for a clogged water valve. • Room temperature is colder than normal. Room temperature must be above 55˚F (13˚C). Otherwise, bin thermostat may sense cold room temperature and shut off even though the bin is not full of ice. Also, unit may not restart once it does shut off. |
| ICEMAKER IS ON, BUT PRODUCES LITTLE OR NO ICE | • Condenser is dirty. Dirt or lint may be blocking the airflow through the condenser. See Care and Cleaning---Condenser. • Scale has built up in the icemaker. If there is white scale buildup in the icemaker’s water or freezing system, you should clean the icemaker. See Care and Cleaning---Icemaker System. • Water is leaking from the water reservoir because the drain cap is not secure. Make sure the drain cap is securely tightened. Refer to illustration in Care and Cleaning—Icemaker System section. • Room temperature is too hot. Room temperatures of more than 90˚F (32˚C) will reduce ice production. |
| ICEMAKER PUMPS CONTINUOUSLY, BUT PRODUCES NO ICE | • The ice sheet is trapped on the cutter grid. Unplug the icemaker or disconnect power. Remove the cutter grid cover and move the ice sheet to the cutter grid. Refer to illustration in Features of your icemaker section. Reinstall the cutter grid cover and reconnect power. Turn on the icemaker. The icemaker will reset itself and start a new cycle after flushing water through the system. NOTE: Follow the directions in the Care and Cleaning—Icemaker System section to clean with the Nickel Safe Ice Machine Cleaner. |
See other models: ZICS360NMRH ZV681YSS ZIC36NARH ZBD6800NBB ZDT870SIFII
