Your dishwasher has the latest technology in dishwasher filtration. This triple filtration system minimizes sound and optimizes water and energy consumption while providing superior cleaning performance. Throughout the life of your dishwasher, the filter will require maintenance to sustain peak cleaning performance.
The triple filter system consists of 2 parts, an upper filter assembly and a lower filter.
The upper filter assembly keeps oversized items and foreign objects, along with very fine food particles out of the pump.
The lower filter keeps food from being recirculated onto your dishware.
In order to provide optimum cleaning performance we suggest a monthly filter maintenance by removing and inspecting both the upper and the lower filter for any soils. Based on your dishwashing habits, cleaning of the filters may be required more or less often than what is indicated in the chart below.
The filters may need to be cleaned when:
Visible objects or soils are on the Upper Filter Assembly.
There is degradation in cleaning performance (that is, soils still present on dishes).
Dishes feel gritty to the touch.
Removing and maintaining the filters is very easy. The chart below shows the recommended cleaning frequency.
Recommended time intervals to clean your filter
*Manufacturer's recommendation: This practice will eliminate the water and energy that you use preparing your dishes for loading. This will also save you time and effort.
Very Hard Water
If you have hard water (above 15 grains), clean your filter at least once per month. Building up of white residue on your dishwasher indicates hard water. You may bring your water samples to Sears to check hardness level. For tips on removing spots and stains, see “Troubleshooting” section.
Filter Removal
Turn the Upper Filter Assembly ¼ turn counterclockwise and lift out.
Grasp the Lower Filter in the circular opening, lift slightly, and pull forward to remove.
Clean the filters as shown below
To remove Upper Filter Assembly
Cleaning
IMPORTANT: Do not use wire brush, scouring pad, etc., as they may damage the filters.
Rinse filter under running water until most soils are removed. If you have hard-to-remove soils or calcium deposits from hard water, a soft brush may be required.
Filter Reinstallation
To replace Upper Filter Assembly
Noting the previous illustrations, place the Lower Filter under the Locating Tabs in the bottom of the dishwasher so the round opening for the Upper Filter Assembly lines up with the round opening in the bottom of the tub.
Insert the Upper Filter Assembly into the circular opening in the Lower Filter.
Slowly rotate the filter clockwise until it drops into place. Continue to rotate until the filter is locked into place. If the filter is not fully seated (still turns freely), continue to turn the filter clockwise until it drops and locks into place.
NOTE: The Upper Filter Assembly arrow does not have to align with the arrow in the Lower Filter as long as the filter is locked.
DISHWASHER EFFICIENCY TIPS
Hot water dissolves and activates the dishwasher detergent. Hot water also dissolves grease on dishes and helps glasses dry spotfree. For best dishwashing results, water should be 120°F (49°C) as it enters the dishwasher. Loads may not wash as well if the water temperature is too low.
Additional efficiency tips
To save water, energy and time, only scrape dishes. Do not rinse dishes before putting them into the dishwasher.
Use a delay feature to run your dishwasher during off-peak hours. Local utility providers recommend avoiding heavy usage of energy at certain times of day.
During the summer, run your dishwasher at night. This reduces daytime heat buildup in the kitchen.
Use a rinse aid to improve drying.
DETERGENT AND RINSE AID
Detergent
IMPORTANT: Use only automatic dishwashing detergent. Hand dishwashing detergent will produce excessive suds and overflow out of the dishwasher.
Recommended Detergent Amount
Add recommended amount of detergent to each compartment as shown and close the detergent lid.
Powders and Gels
*Full pre-wash compartment contains 7 tsp (35 mL), and full main wash cup contains 9 tsp (45 mL).
Premeasured Detergents
Many detergents now come in premeasured forms (gel packs, tablets, or powder packs). These forms are suitable for all hardness and soil levels. Always place premeasured detergents in the main compartment and close the lid.
Using dishwasher detergent tablets and packs have been proven better than powder, liquid or gel detergents to reduce filming on your dishes. By using these tablets and packs, over time this will start to reduce or eliminate white film. Also, by using a rinse aid you can minimize repeat buildup of white film.
IMPORTANT: Extremely hard water mineral deposits (15 grains per U.S. gallon or more) can cause damage to your dishwasher and make it difficult to achieve good results. A water softener is recommended to avoid damage and achieve good results. You may bring your water samples to Sears to check hardness level.
Rinse Aid
IMPORTANT: Your dishwasher is designed to use a liquid rinse aid. The use of rinse aids greatly improves drying by allowing water to drain from the dishes after the final rinse. They also keep water from forming droplets that can dry as spots or streaks.
Filling the dispenser
The dispenser holds 5 oz (150 mL) of rinse aid. Under most conditions this will last 1 to 3 months.
Turn the knob ¼ turn counterclockwise and remove.
Pour rinse aid into the opening until the indicator points to FULL. Do not overfill.
Clean up any spilled rinse aid. Spilled rinse aid can create excessive suds.
Replace the knob and turn to the LOCK position.
NOTE: Indicator reads correct fill level when door is completely opened.
Rinse Aid Setting
Your rinse aid dispenser is adjustable. For most water conditions, the factory setting of 2 will give good results. If you have hard water and notice calcium buildup on your dishware, you may want to try a higher setting. If you notice foam in your dishwasher, use a lower setting.
To adjust the setting
Turn the knob ¼ turn counterclockwise and remove.
Turn the arrow inside the dispenser to the desired setting.
Replace the knob and turn to the LOCK position.
DISHWASHER USE
Cycles and Options Information
Cycles
Estimated
WashTime*
Displayed:
H:MM
Range of Water Usage Gallons (Liters)
SmartWash ® He cycle
The most advanced and versatile cycle. This cycle senses the load size, soil amount, and toughness of soil. This cycle is optimized to achieve outstanding cleaning with minimal water and energy.
2:30
3.4 to 74 (12.8 to 28.0)
Pots & Pans
Works best on your toughest items such as casseroles with baked-on food residue.
3.23
74
(28.0)
Normal Wash
This cycle with only the Heated Dry option selected, and without other options selected, is recommended to completely wash and dry a full load of normally soiled dishes. The energy usage label is based on this cycle and option combination.
2:21
2.4 to 74 (9.09 to 28.0)
China Gentle (on some models)
Provides a light wash and gentle dry for delicate items such as china and crystal with varying soil levels
2:21
2.4 to 7.4 (9.09 to 28.0)
1 Hour Wash
For fast results, the 1 Hour Wash will clean your normally soiled dishes using more water and energy. For improved drying select the Heated Dry option.
1:00
79
(29.8)
Quick Rinse
Use for rinsing dishes, glasses, and silverware that will not be washed right away. Do not use detergent.
0:18
2.0
(76)
*The maximum additional water used for any combination of options is 4.8 gal. (18.2 L).
**There is no intention, either directly or indirectly, that all cycles on a certified dishwasher meet the NSF/ANSI 184 performance standard.
Dishwasher Control Section
Delay Hours (on some models)
Use this option to run your dishwasher during off-peak hours. Local utility providers recommend using energy during off-peak hours when possible. Delay displays how many hours Before the cycle will begin.
To delay the start
Select a wash cycle and options.
Press the delay button. Each time you press the DELAY button it will display the next available delay time.
Press START/RESUME to begin the delay countdown.
NOTE: Anytime the door is opened (such as, to add a dish), the START/RESUME button must be pressed again to resume the delay countdown.
Control Lock Option
Use the Control Lock option to avoid unintended use of the dishwasher between cycles. When the Lock indicator is lit, all buttons are disabled. The dishwasher door can still be opened or closed while the controls are locked.
To turn on the Lock
Press and hold SANI RINSE for 3 seconds. The Lock indicator will light up. If you press any pad while your dishwasher is locked, the light flashes 3 times.
NOTE: The dishwasher cannot start if the control is locked.
To turn off the Lock
Press and hold SANI RINSE for 3 seconds. The light turns off
Status Indicator Lights
The full lit display will glow for wash, drying, sanitized, and complete. It will also display the estimated remaining time for the cycle in hours and minutes.
The indicator light (on some models) is green when running and off when the cycle is complete.
Selecting Cycles and Options
Select the desired cycle. If you want to run the last cycle that was completed, you can simply press START once to show which options you used, then press START again to start the cycle.
Select the desired options. Not all options are available for every cycle. If an invalid option is selected for a given cycle, the lights will flash.
Turning OFF/ON the Sound
Press and hold HIGH TEMP for 3 seconds to toggle sound ON and OFF. The sound will not be deactivated for cycle interruption.
Canceling A Cycle
Open the door slightly to stop the cycle. Wait for the spraying action to stop before completely opening the door.
To cancel selections and/or drain press and hold the START/RESUME button for 3 seconds. If you drain the dishwasher by selecting CANCEL/DRAIN the word drain will turn on and the time display will show minutes of drain remaining. The drain will not begin until the door is closed.
Close the door within 3 seconds. The dishwasher starts a drain cycle (if water remains in bottom of dishwasher). Let the dishwasher drain completely. The Cancel/Drain light turns off after 2 minutes.
Changing A Cycle After Dishwasher Is Started
You can interrupt a cycle and restart your dishwasher from the beginning using the following procedure.
See steps in the previous “Canceling A Cycle” section for canceling the current cycle.
Check that detergent dispenser cover is still closed. If cover is open, you will need to refill the detergent dispenser before restarting your new cycle.
Select new cycles and options.
Press START/RESUME.
WASHING SPECIAL ITEMS
Material
Dishwasher Safe?
Comments
Aluminum
Yes
High water temperature and detergents can affect finish of anodized aluminum.
Disposable Aluminum
No
Do not wash disposable aluminum pans in the dishwasher. These might shift during washing and transfer black marks to dishes and other items.
Bottles and Cans
No
Wash bottles and cans by hand. Labels attached with glue can loosen and clog the wash system and reduce washing performance.
Cast Iron
No
Seasoning will be removed and then cast iron will rust.
China/Stoneware
Yes
Always check manufacturer’s recommendations before washing. Antique, hand-painted, or over-the-glaze patterns may fade. Gold leaf can discolor or fade.
Crystal
Yes
Always check manufacturer’s recommendations before washing. Some types of leaded crystal can etch with repeated washing.
Gold
No
Gold-colored flatware will discolor.
Glass
Yes
Milk glass material yellows with repeated dishwasher washing.
Hollow-Handle Knives
No
Handles of some knives are attached to the blade with adhesives which can loosen if washed in the dishwasher.
Pewter, Brass, Bronze, and Copper
No
High water temperatures and detergent can discolor or pit the finish.
Disposable Plastics
No
Cannot withstand high water temperatures and detergents.
Plastics
Yes
Always check manufacturer’s recommendations before washing. Plastic items may vary in their ability to withstand high temperatures and detergents. It is recommended that lightweight items such as lids and butter dishes be placed in the upper rack only. Sturdy items such as coolers and high-chair trays may be placed in the lower rack. When washing plastic items in the lower rack, it is recommended not to use the Heated Dry option.
Stainless Steel
Yes
Run a rinse cycle if not washing immediately. Prolonged contact with food containing salt, vinegar, milk products, or fruit juice can damage finish.
Sterling Silver or Silver Plate
Yes
Run a rinse cycle if not washing immediately. Prolonged contact with food containing salt, acid, or sulfide (eggs, mayonnaise, and seafood) can damage finish.
Tin
No
Not recommended.
Wooden Ware
No
Wash by hand. Always check manufacturer’s instructions before washing. Untreated wood can warp, crack, or lose its finish.
DISHWASHER CARE
Cleaning
Cleaning the exterior
In most cases, regular use of a soft, damp cloth or sponge and a mild detergent is all that is necessary to keep the outside of your dishwasher looking nice and clean. If your dishwasher has a stainless steel exterior, a stainless steel cleaner is recommended.
Cleaning the interior
Hard water minerals can cause a white film to build up on the inside surfaces, especially just beneath the door area.
Do not clean the dishwasher interior until it has cooled. You may want to wear rubber gloves. Do not use any type of cleanser other than dishwasher detergent because it may cause foaming or sudsing.
To clean interior
Make a paste with powdered dishwasher detergent on a damp sponge and clean.
OR
Use liquid automatic dishwasher detergent and clean with a damp sponge.
OR
See the vinegar rinse procedure in “Cloudy or spotted dishware” in “Troubleshooting” section.
NOTE: Run a normal cycle with dishwasher detergent after cleaning the interior.
Drain Air Gap
Some state or local plumbing codes require the addition of a drain air gap between a built-in dishwasher and the home drain system. Check the drain air gap when your dishwasher is not draining well.
The drain air gap is usually located on top of the sink or countertop near the dishwasher. To order a drain air gap, please call 1-844-553-6667 Ask for Part Number 300096.
NOTE: The drain air gap is an external plumbing device that is not part of your dishwasher. The warranty provided with your dishwasher does not cover service costs directly associated with the cleaning or repair of the external drain air gap.
To clean the drain air gap: Clean the drain air gap periodically to ensure proper drainage of your dishwasher. With most types, you lift off the chrome cover. Unscrew the plastic cap. Then check for any soil buildup. Clean if necessary.
Vacation or Extended Time Without Use
To reduce the risk of property damage
If you will not be using the dishwasher during the summer months, turn off the water and power supply to the dishwasher.
Make sure the water supply lines are protected against freezing conditions. Ice formations in the supply lines can increase water pressure and damage your dishwasher or home. Damage from freezing is not covered by the warranty.
When storing your dishwasher in the winter, avoid water damage by having your dishwasher winterized by authorized service personnel.
TROUBLESHOOTING
PROBLEM
SOLUTION
DISHWASHER DOES NOT RUN
NOTE: It is normal for the dishwasher to repeatedly pause several times during a cycle.
If the Start/Resume light is blinking, close the door and press START/RESUME or press START/ RESUME and close the door within 3 seconds.
Be sure the door is closed and latched.
Check that there is not an interference with large casserole dishes and the wash system at the back of the dishwasher. Adjust loading as necessary to ensure door is closed and latched.
Be sure the Control/Lock feature is not on. (Control/Lock indicator will be lit.)
Be sure you have selected a cycle. (See “Cycles and Options Information.”)
Be sure there is power to the dishwasher. A circuit breaker or fuse may have tripped.
If lights other than Start/Resume blink and the unit will not run, you will need to call for service.
DETERGENT REMAINS IN THE DISPENSER OR TABLET IS ON BOTTOM OF TUB
Check for dishware such as cookie sheets, cutting boards, or large containers, etc., that may be blocking the detergent dispenser from opening properly.
Be sure your detergent is fresh and lump free.
Be sure the cycle has completed. The Complete indicator will be on in the display and the front status light (on some models) will be off. If it has not completed, you will need to resume the cycle. Close the door and press START/RESUME or press START/RESUME and close the door within 3 seconds.
CYCLE RUNS TOO LONG
NOTES:
■ To use less water and reduce energy consumption you will encounter cycles that typically run for up to 3 hours. To wash dishes with less water the dishwasher must run longer. The dishwasher uses less energy to run than your water heater does to heat the water that the dishwasher is using.
■ A water heater setting of 120°F (49°C) is best. The dishwasher will delay longer while heating cooler water.
■ Some options will add time to the cycle. (See “Cycles and Options Information” section.)
Try the 1 Hour Wash cycle. The 1 Hour Wash uses more energy and water to clean the dishes in
less time.
Run the hot water at a faucet close to the dishwasher before selecting and starting the cycle.
DISHWASHER NOT DRYING
NOTE: Plastic and items with nonstick surfaces are difficult to dry because they have a porous surface which tends to collect water droplets. Towel drying may be necessary.
Use of rinse aid along with the Heated Dry option is needed for proper drying.
Proper loading of items can affect drying. (See specific loading instructions within this guide.) Glasses and cups with concave bottoms hold water. This water may spill onto other items when unloading.
■ Unload the bottom rack first.
■ Locate these items on the more slanted side of the rack for improved results.
WILL NOT FILL
Be sure the water is turned on to the dishwasher.
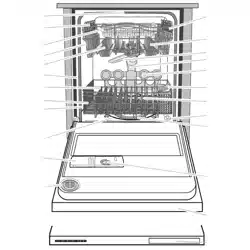
Check that the float is free from obstructions. (See “Parts and Features.”)
Check for suds in the dishwasher. If foam or suds are detected, the dishwasher may not operate properly or may not fill with water.
WATER REMAINS IN THE TUB/ WILL NOT DRAIN
Be sure the cycle has completed. The Complete indicator will be turned on in the display and the front status light (on some models) will be off. If it has not completed, you will need to resume the cycle by closing the door and pressing START/RESUME or press START/RESUME and close the door within 3 seconds.
If dishwasher is connected to a food waste disposer, be sure the knockout plug has been removed from the disposer inlet.
Check for kinks in the drain hose.
Check for food obstructions in the drain or disposer.
Check your house fuse or circuit breaker.
Remove and clean the ULTRA WASH® filters and check for any food buildup underneath.
HARD WATER (WHITE RESIDUE ON DISHWASHER INTERIOR OR GLASSWARE)
NOTE: Extremely hard water mineral deposits can cause damage to your dishwasher and make it difficult to achieve good cleaning. You may bring water samples to Sears to check your water hardness level. A water softener is strongly recommended if your hardness is 15 grains or more. If a water softener is not installed, the following steps may help:
Use a commercial cleaner designed for dishwashers once per month.
Clean the ULTRA WASH ® HE filters at least once per month.
Always use a rinse aid.
Always use fresh high quality tablets or packs of detergent for improved performance.
Use a detergent booster/water softener additive designed for dishwashers.
ODORS
NOTE: If the dishwasher is not used daily, you can run a rinse cycle with a partial load until a full load is ready to run.
Run a vinegar rinse through the dishwasher by putting 2 cups (500 mL) of white vinegar in an upright glass measuring cup in the lower rack. Run a Normal Wash cycle with the Heated Dry option turned OFF. Do not use detergent.
The dishwasher may not be draining properly, see “WATER REMAINS IN THE TUB/WILL NOT DRAIN” in “Troubleshooting.”
NOISY
NOTES:
■ Surging sounds can occur periodically throughout the cycle while the dishwasher is draining.
■ Normal water valve hissing may be heard periodically.
■ A normal snap sound may be heard when the detergent dispenser opens during the cycle and when the door is opened at the end of the cycle.
■ Improper installation will affect noise levels.
Be sure the filters are properly installed.
A thumping sound may be heard if items extend beyond the racks and interfere with the wash arms. Readjust the dishware and resume the cycle.
FOOD SOILS REMAIN ON DISHES
Be sure the dishwasher is loaded correctly. Improper loading can greatly decrease the washing performance (see “Loading for Best Cleaning and Drying Performance”).
Check filter to ensure it is properly installed. Clean it if needed. (See “Cleaning Instructions” in “ULTRA WASH® HE Filtration System” for details.)
Select the proper cycle and option for the type of soils. The Pots & Pans cycle can be used for tougher loads.
Be sure the incoming water temperature is at least 120°F (49°C).
Use the proper amount of fresh detergent. More detergent is needed for heavier-soiled loads and hard water conditions.
Scrape food from dishes prior to loading (do not prerinse).
DID NOT SANITIZE
If Sanitized is blinking, the load is NOTsanitized. The cycle was interrupted in the final rinse, or your water heater is set too low. Set your water heater to 120°F (49°C).
DAMAGE TO DISHWARE
Improper loading can cause dishes to become chipped or damaged. (See specific loading instructions within this guide.)
BLINKING LIGHTS
If Start/Resume or any status lights are blinking and the dishwasher will not run, close the door and push START/RESUME or press START/RESUME and close the door within 3 seconds. If the dishwasher still will not run, call service.
CLOUDY OR SPOTTED DISHWARE (AND HARD WATER SOLUTION)
NOTES:
■ Liquid rinse aid, in addition to all in one tablets or packs, is necessary for drying and to reduce spotting.
■ Use the correct amount of detergent.
Confirm that the cloudiness is removable by soaking the item in white vinegar for 5 minutes. If the cloudiness disappears, it is due to hard water. Adjust the amount of detergent and rinse aid. See “Hard water (white residue on dishwasher interior or glassware)” in “Troubleshooting.” If it does not come clear, it is due to etching (see below).
Be sure the incoming water temperature is set at 120°F (49°C).
Try using the High Temp and Sani Rinse options.
To remove spotting, run a vinegar rinse through the dishwasher.
■ Wash and rinse the affected dishware and load into dishwasher. Remove all silverware and metal items. Put 2 cups (500 mL) of white vinegar in a glass measuring cup in the lower rack. Run a Normal Wash cycle with the Heated Dry option turned OFF. No detergent is needed.
ETCHING (PERMANENT CLOUDINESS)
This is an erosion of the surface of the glassware and can be caused by a combination of: water that is too hot, from using too much detergent with soft water or by pre-washing. Detergent needs food soil to act upon. If etching has occurred, the glassware is permanently damaged. To avoid further etching, adjust the detergent amount to match the water hardness, stop pre-washing, and use water heating options only when incoming water temperature is below 120°F (49°C).
LEAKING WATER
Be sure dishwasher has been installed properly and is level.
Suds can cause the dishwasher to overflow. Measure the detergent accurately and use only detergents designed for use in a dishwasher. Less detergent is needed in soft water. Try another brand of detergent if sudsing continues.
To avoid rinse aid leaking from the dispenser, be sure the lid is securely attached and avoid overfilling.
TUB IS DISCOLORED
NOTES:
■ High iron content in the water can discolor the tub.
■ Tomato-based foods can discolor the tub or dishware.