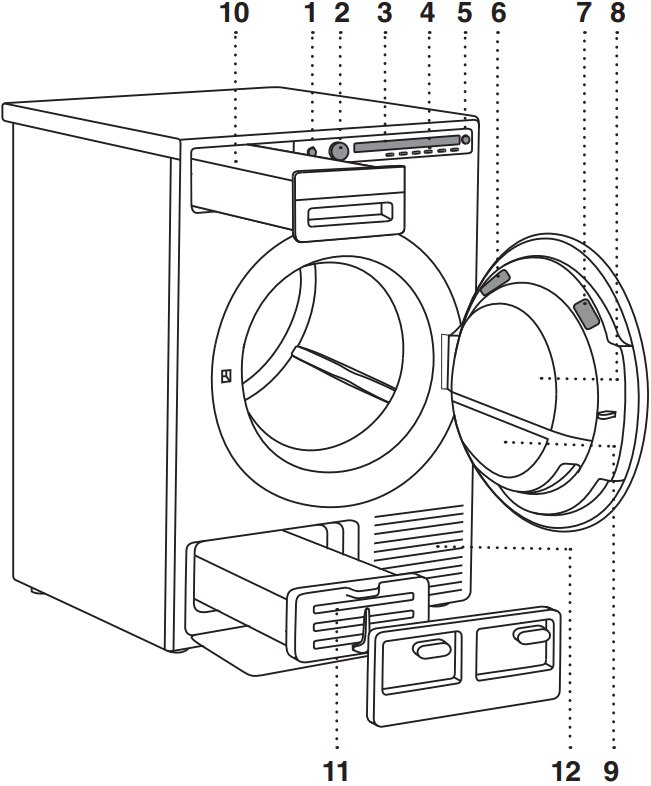
Rating plate with information about the dryer (on the inside of the dryer door)
QR and AUID code (on the inside of the dryer door)
Dryer door
Door net filter
Condensate tank (depending on the model)
Condenser unit
Air vents
DRYING PROCESS
TIPS BEFORE DRYING
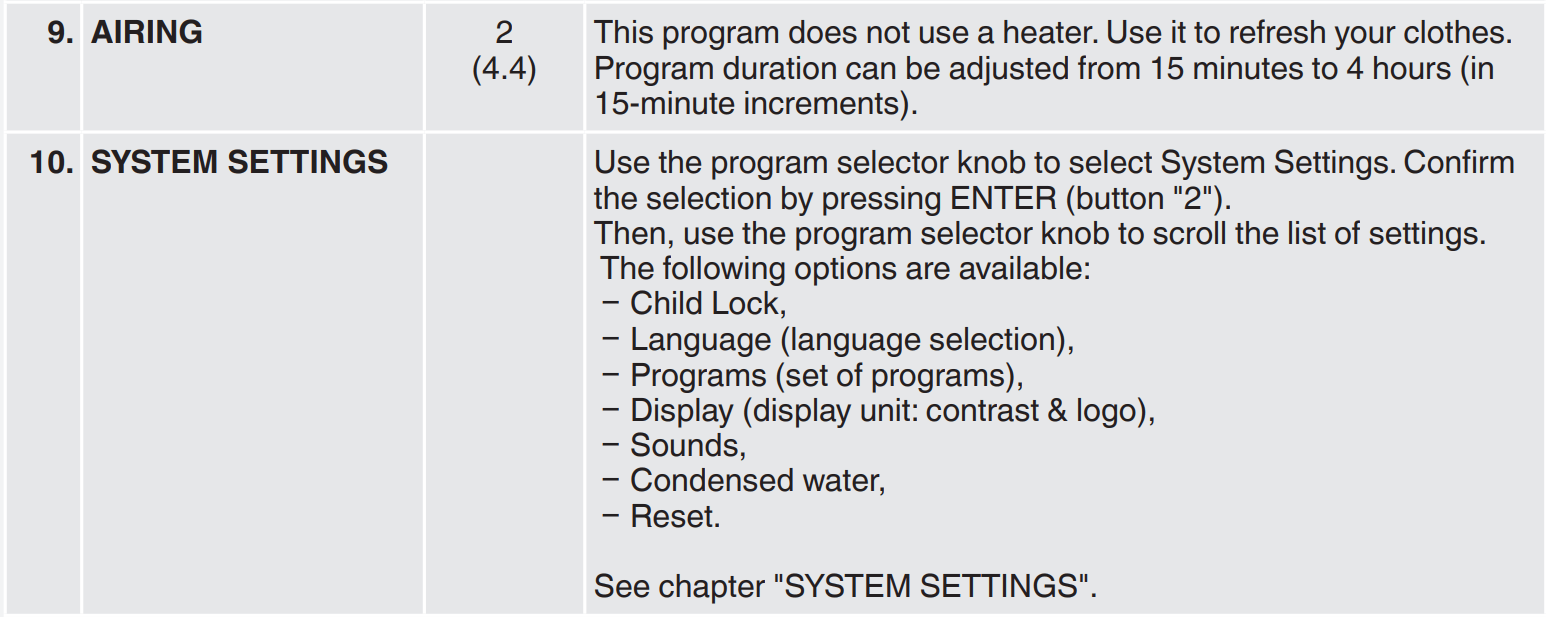
LAUNDRY SORTING Sort the laundry according to:
type,
fabric thickness.
For the most even drying, make sure the laundry is made of a similar material. CLOTHING
Close the buttons, zips, and hook-and-loop fasteners, so that they do not damage the fabric.
Turn the pockets inside out.
Place very sensitive clothes in a special-purpose laundry washing bag.
Laundry to be dried in the dryer should be spun at a minimum of 1000 rpm. Higher spinning speeds will save energy and cut drying time.
If you decide to dry only one large item, we recommend drying it separately from smaller items of laundry
STEP 1: SORT THE FABRICS
STEP 2: TURN ON THE MAIN SWITCH
Turning on Press the on/off button.
Turning off Press the on/off button.
STEP 3: OPEN THE DRYER DOOR AND INSERT THE LAUNDRY
Open the dryer door towards you.
Place the laundry into the empty dryer drum. Make sure there aren't any other objects among the laundry.
Such objects could melt and cause damage to the dryer or your laundry.
Do not overload the drum! (See the program table on the rating plate and adjust the load accordingly.)
If the dryer drum is overloaded, the laundry will be more wrinkled and not dried as thoroughly
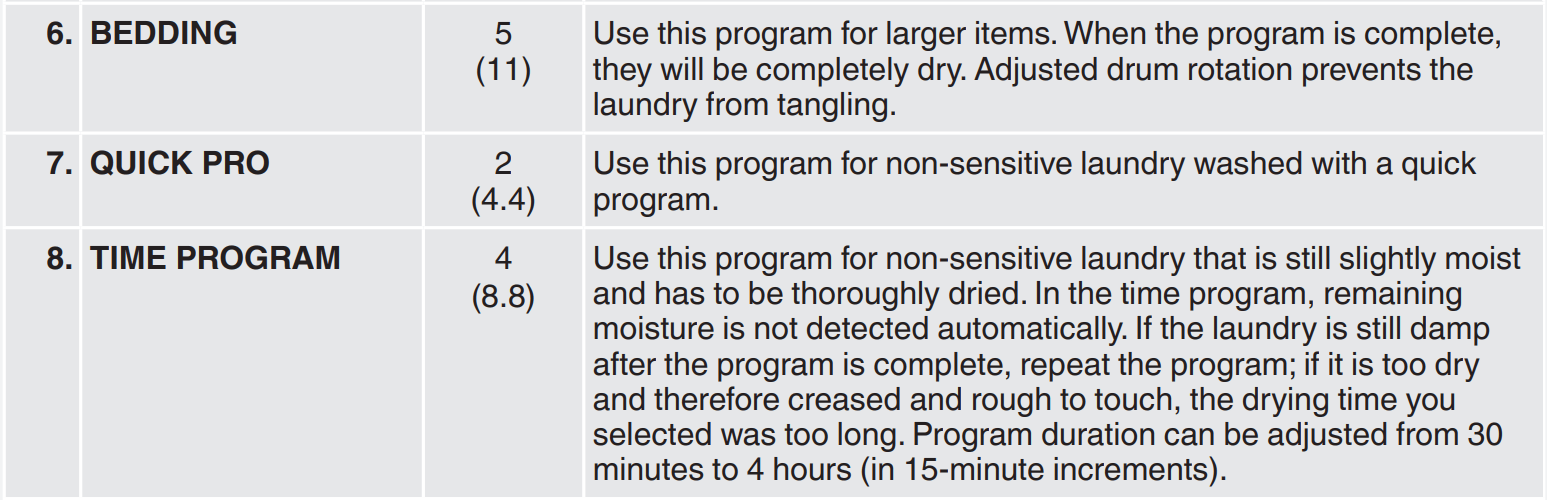
STEP 4: CHOOSE THE DRYING PROGRAM.
Choose the program by rotating the program selector knob in either direction.
The program selector knob can be used when arrows appear on the display. Select the program based on the type and remaining moisture of the laundry. Anticipated program duration is indicated on the display. Extra program settings can also be selected for each program. See STEP 5.
STEP 5: CHOOSING THE PROGRAM SETTINGS
Using the program settings, the drying programs can be further adjusted to your preferences. Some program settings may not be available for your selected program. Selected program settings will remain stored after the end of the drying cycle and may be changed subsequently (except for delayed start which is not stored after the drying is complete).
Dryness level (extra dry)
Anti-crease
Load
Lower drying temperature (gentle dry)
Time (timed drying)
Delay Start
Choose the program settings before pressing the START button. When the drying program is in progress, program settings cannot be changed.
Press and hold the button under a program setting to display the information (INFO) about it.
Following are the program settings that may be selected using the buttons 1 to 6
1. Dryness level (extra dry) By pressing the button 1, you can choose between extra dryness levels (+, ++, +++). Each time the button is pressed, the final level of laundry dryness and drying time will change
2. Anti-crease This function pertains to what happens after the drying cycle. By pressing the button 2 you can choose the duration of the anti-crease program from 0 hours to 4 hours , in 1-hour increments.
3. Load By pressing the button 3, you can choose between loads of the dryer.
4. Lower drying temperature (gentle dry) Press the button 4 to switch the gentle dry function on (ON) or off (OFF)
5. Timed drying First, use the program selector knob to select the Timed program. Press the button 5 to select a drying time from 30 minutes to 4 hours, in 15-minute increments.
Use the button 6 (OK) to confirm the selected drying time. Press the Start/ Pause button to start the drying process.
6. Delay Start Press the button 6 to choose the Delayed Start when you wish the drying program to start after a certain period of time.
Press the button 6 for to appear. Use the program selector knob or the button 6 to set the delay from 30 minutes to 6 hours in 30-minute increments, and then from 6 hours to 24 hours in 1-hour increments.
Press the button 5 (OK) to confirm the selected start delay time. Press the Start button to start. When the countdown reaches zero, the selected drying program will start automatically
To cancel the delay and start the drying process immediately, press the button 5 . When Start delay time is once set, it is not possible to change it; the only possibility is to »Skip it « with pressing on button and immediately continue with chosen program.
STEP 6: CLOSE THE DOOR AND START THE DRYING PROCESS.
Close the dryer door and press the Start/Pause button.
Pause (pressed briefly – drying temporarily suspended) Cancel (press and hold the button for 3 seconds)
STEP 7: END OF PROGRAM
After the end of the drying program, the display will indicate that the program has been successfully completed ("Cycle completed successfully").
If you have selected the "Anti-crease" option, the dryer will continue to operate after the end of the drying cycle for the amount of time specified upon selection of this program setting.
After the drying cycle, you have the possibility to save the program as a favorite program (see "Favourite programs").
Clean the net filter in the door (see chapter "CLEANING AND MAINTENANCE").
5 minutes after the end of the program or last activation, the display will switch off to standby mode in order to save power. The display will light up again if you press the ON/OFF button or open the dryer door.
A clogged net filter and heat pump filter may result in activation of the automatic overheating switch-off device. Clean the filter, wait for the machine to cool down, and try running it again. If the dryer still fails to start, call a service technician.
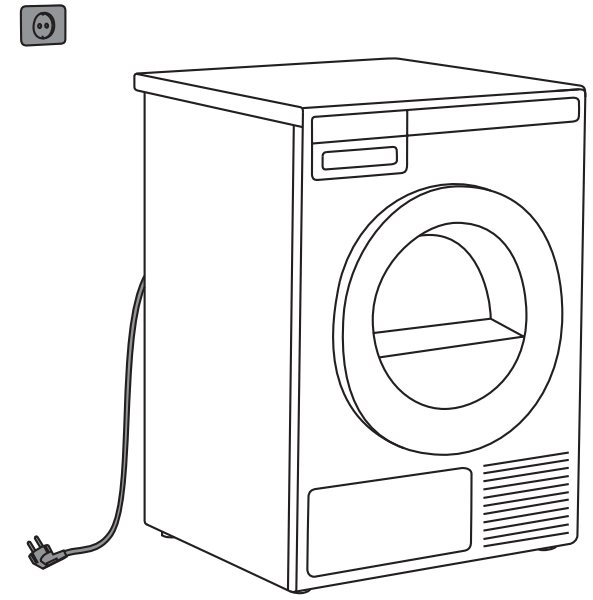
After the drying process, unplug the dryer power cord from the power outlet.
SYSTEM SETTINGS
In the main menu, use the program selector knob to select "System Settings".
Confirm the selection by pressing the button 2.
Then, use the program selector knob to scroll the list of settings that can be changed.
Child Lock
Language
Programs
Display (display unit: contrast & logo)
Sounds
Condensed water
Reset
Use the button 6 (BACK) to return to System Settings or to the main menu.
Press the INFO button to display brief information about the setting.
CHILD LOCK
Child lock can be activated by pressing the button 1 . This will prevent children from switching on the machine.
Press the button 1 to deactivate the child lock. When the child lock is activated, no other function can be selected.
To temporarily (for 3 minutes) switch off the child lock, press the 1 and 4 buttons simultaneously for 3 seconds.
LANGUAGE
You can choose between 24 languages. Press the button 3 for to appear. Use the program selector knob or the button 3 to scroll the list of languages. Use the button 6 (OK) to confirm the selected language.
Use the button 6 to return to "System Settings"..
PROGRAMS
The main menu includes the entire set of programs that you can choose using the program selector knob. This setting allows only displaying the selected program in the main menu.
Press the button 1 for to appear. Use the program selector knob or the button 1 to select a program. Use the button 3 to set whether this program is to be displayed or not: On / Off .
Use the button 6 to return to "System Settings".
DISPLAY UNIT
Set the Contrast and Logo display.
Use the buttons 1 to 5 to set the Contrast.
Use the button 1 to toggle Logo display on or off . The symbol means that logo will appear on the display when the machine is turned on.
Use the button 6 to return to "System Settings".
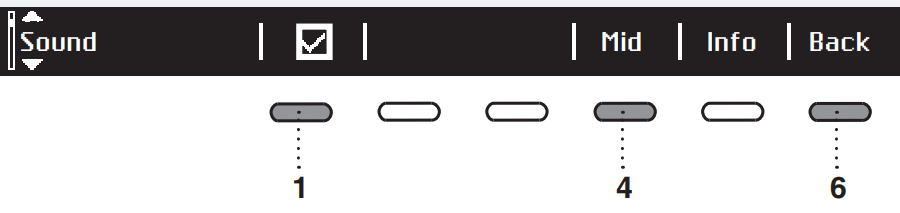
SOUNDS
Choose whether audible signals are switched on or off.
Use the button 1 to toggle Logo display on or off .
Use the button 4 to choose between the following settings: low, mid, and high. As you scroll through the options, a sample audible signal will be sounded.
Use the button 6 to return to "System Settings".
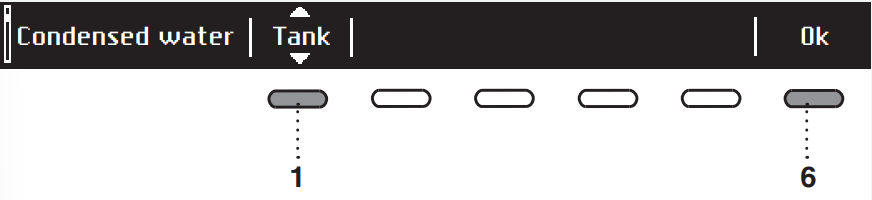
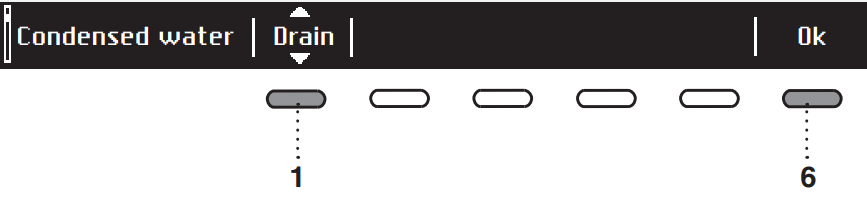
CONDENSED WATER
You can choose between draining condensed water into a condensate tank or directly into the drain.
Press the button 1 for to appear. Use the program selector knob or the button 1 to choose between following:
"Tank" – run condensate water into a condensate tank
"Drain" – run condensate water into a drain
If you decide to choose option "Drain", it is necessary to observe how to connect drain hose
Press the button 6 to return to "System Settings".
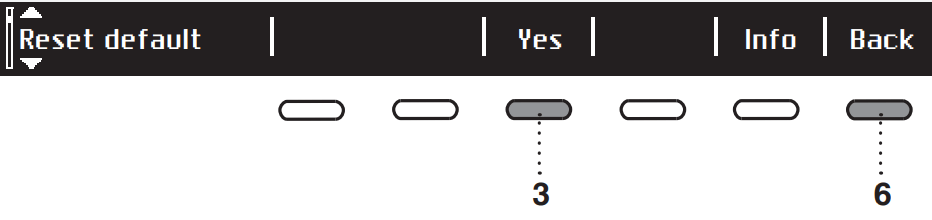
RESET
This means that all settings will return to the default settings and your own settings will be deleted.
Confirm the selection by pressing the button 3 (YES).
Press the button 6 to return to “System Settings”.
SOUNDS
In the initial stage of drying or during drying, the compressor and the pump may cause noise which, however, does not affect the dryer operation.
Humming sound: this is the sound of the compressor unit. The level of noise depends on the program and the drying stage.
Whirring sound: from time to time, the compressor unit is ventilated.
Pumping sound: the pump is pumping the condensate into the condensate tank.
Clicking sound: clicking noise is caused by automatic cleaning of the heat exchanger (compressor).
Swishing water sound: can be heard during automatic cleaning.
Rattling sound: can be heard during drying if laundry has any hard parts (buttons, zippers etc.
CLEANING AND MAINTENANCE
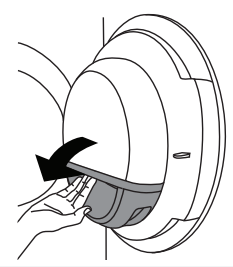
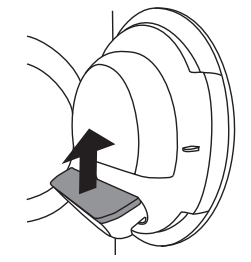
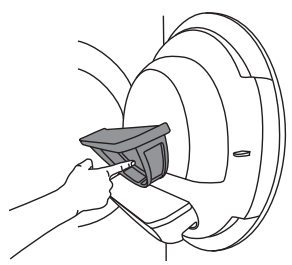
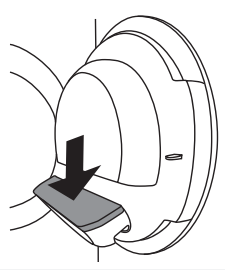
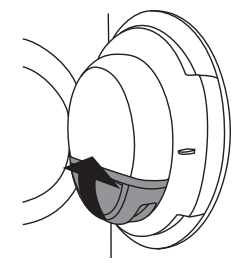
CLEANING THE DOOR NET FILTER IN THE DOOR
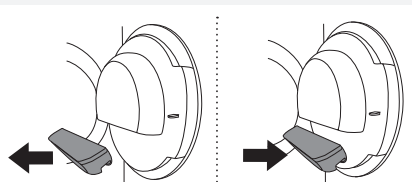
1. Open the filter housing.
2. Pull out the net filter.
3. Gently scrape the filter to remove the lint lining (fibres and threads).
4. Reinstall the net filter.
5. Close the filter housing.
Clean the door net filter after each drying cycle.
Never operate without a door net filter or if the door net filter is damaged
EMPTYING THE CONDENSATE TANK
After each drying cycle, empty the condensate tank.
If the condensate tank is overflowing the drying program will be paused automatically. A warning will appear on the display unit that the condensate tank has to be emptied. (Disregard this warning if you fed the condensate discharge hose into a drain, siphon, or a sink.)
1. Pull out the condensate tank from the dryer, then turn it upside down over a washbasin, sink, or any suitably sized vessel.
2. Discharge the water through the condensate drain opening. To make draining the tank easier, pull out the nozzle at the condensate drain.
3. Replace the condensate tank into the dryer housing
Water from the condensate tank is not potable. If thoroughly filtered, it can be used for ironing.
Never add chemicals or fragrances into the condensate tank.
Condensate tank does not require draining if the drain hose is connected directly to a washbasin or a bathroom floor drain
Before moving the dryer or before storing it in a non-heated room during the winter, the condensate tank has to be emptied.
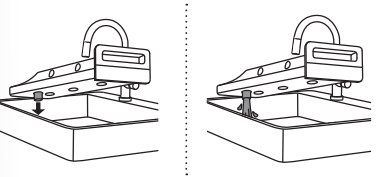
CLEANING OF WATER CONDENSER
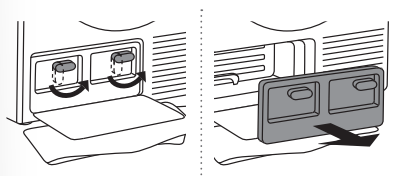
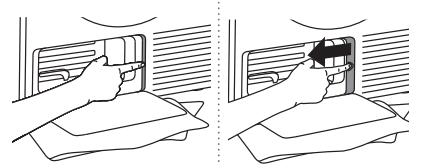
1. During cleaning, some water may be spilled. It is therefore recommended to place an absorbent cloth on the floor. Open the outer cover.
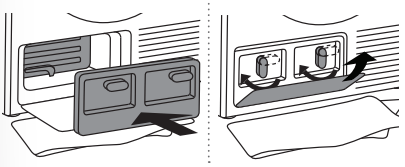
2. Hold the levers on the inside cover and rotate them upwards. Remove the inside cover.
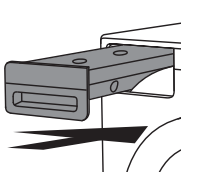
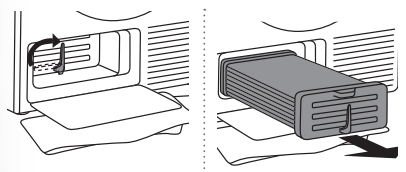
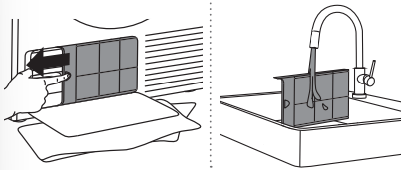
3. Rotate the condenser unit lever up. Use the handle to pull out the condenser unit
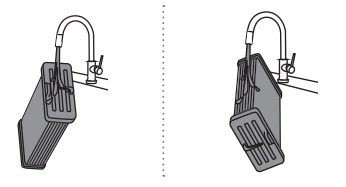
4. Rinse the condenser unit with a jet of lukewarm water on both sides, and drain well.
Do not poke into the openings between the condenser unit ribs as this may damage the condenser unit.
Do not wash the condenser unit in a dishwasher.
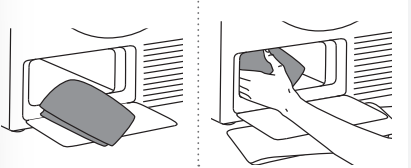
5. Use a soft damp cloth to clean:
the area in front of the condenser unit where water usually accumulates,
the area behind the water condenser unit (reach deep into the opening all the way to the rear wall),
condenser unit housing,
all gaskets and sealing areas on the condenser unit housing and door.
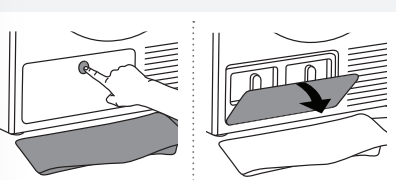
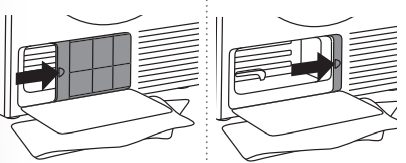
6. Press on the edge of the filter and pull it out.
7. Rinse the filter under running water; then, dry it.
8. Replace the filter.
Replace the condenser unit into the housing. Rotate the condenser unit lever down. Replace the inside cover and rotate the levers downwards. Close the outer cover.
ADDITIONAL INFORMATION REGARDING CLEANING
If you have inadvertently removed the entire net filter housing in the dryer door, replace it in the same position.
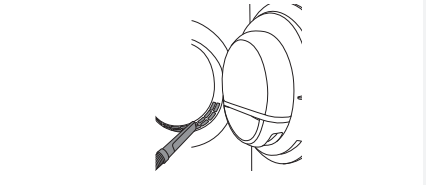
Opening on the lower side of the door should occasionally be cleaned with a vacuum cleaner.
If necessary, clean the filter housing and door gasket as well.
CLEANING THE APPLIANCE EXTERIOR
Clean the appliance exterior and the display unit using a soft damp cotton cloth and water. Do not use solvents or abrasive cleaners that could damage the appliance (please observe the recommendations and warnings provided by the manufacturers of the cleaning agents). Wipe all parts of the dryer with a soft cloth until dry.
Keep the area around the dryer clean and cool. Dust, heat, and humidity will extend the drying time.
Always disconnect the dryer from the power mains before cleaning.
ERROR AND TROUBLESHOOTING
Disturbances from the environment (e.g. the power grid) may result in various error reports. In such case:
Switch off the appliance, wait for 1 minute, switch the appliance back on, and repeat the drying program.
If the error persists, call an authorized service center.
You will be able to solve most of the problems in dryer operation by yourself (see troubleshooting table below).
Repairs may only be carried out by an adequately trained person.
Repair or any warranty claim resulting from incorrect connection or use of the dryer shall not be covered by the warranty. In such cases, the costs of repair shall be charged to the user.
The warranty does not cover the errors or failures resulting from disturbances from the environment lightning strike, power grid failures, natural disasters etc.).
Problem/error
Cause
What to do?
The machine will not start.
• The main switch is not switched on.
• Check whether the main switch is on.
• There is no voltage in the power outlet.
• Check the fuse.
• Check if the power cord plug is correctly inserted into the power outlet.
There is voltage in the outlet, but the drum does not spin
The dryer does not work.
• Program was not started in accordance with the instructions.
• Re-read the instructions for use again.
• Door might be open.
• Check if the door is closed properly.
• The condensate tank is full (only applies to condensation dryer and the dryer with a heat pump).
• Empty the condensate tank (see section "Cleaning and Maintenance") (only applies to condensation dryer and the dryer with a heat pump).
• Delayed start might be activated.
• To cancel the Delayed Start option, press 5 the Skip button.
The machine stops operating completely during a program.
• The door net filter may be clogged. As a result, the temperature in the dryer rises, which in turn causes overheating, and the dryer switches off.
• Clean the door net filter (see chapter "CLEANING AND MAINTENANCE").
• Wait for the machine to cool down, and try running it again. If the dryer still fails to start, call service centre.
Laundry not dried or drying takes too long.
• Filters are not clean.
• Clean the filters (see chapter "CLEANING AND MAINTENANCE").
• Dryer is placed in a closed
• Make sure there is adequate supply of fresh air room; room that is too cold; or to the dryer; for example, open the door and/or room that is too small and the window. air overheats as a result.
• Check if the temperature in the room where the dryer is installed is too high or too low.
• Laundry was not sufficiently
• If the load is still wet after completed drying cycle, wrung or spun. an appropriate drying program should be run again (after cleaning filters).
• Amount of laundry dried in
• Use a suitable program or extra functions. the appliance is too large or insufficient.
• Laundry (such as bedding)
• Close the buttons or zippers on the laundry before gets tangled. drying. Select a suitable program (e.g. the bedding program).
• After the drying process, loosen the laundry and select an additional drying program (e.g. timed drying program).
Unevenly dried laundry.
• Laundry of varying types and
• Make sure you have sorted the laundry by type thickness, and excessive and thickness, whether you have added a suitable amount of laundry. amount of laundry to the drum, and whether you have selected a suitable program.
A slight hitting noise appears.
• If the dryer is out of use for
• The noise will subside without any intervention. a long period of time, the same points of load-bearing elements or components are under stress for a long time, causing temporary deformation.
The door opens during drying.
• Excessive load on the door
• Reduce the amount of laundry, (too much laundry in the drum).
FAILURE DISPLAY
In case of a failure while a program is in progress, the relevant Error X is indicated on the display unit.
Press and hold the INFO button to display the error description. Press the 6 EXIT button to return to Main Menu. Switch off the dryer and turn it back on.
Errors indicated on the display unit (depending on the model) may include the following:
Problem/ error
Error indication on the display
What to do?
Error 0
E0 - Please check user manuals or call service.
Control unit failure. Call service centre.
Error 1
E1 - Themistor fault. Please check user manuals or call service.
Temperature sensor failure. Call service centre.
Error 2
E2 - Please check user manuals or call service.
Communication error. Call service centre.
Error 3
E3 - Pump failure. Please check user manuals or call service.
Failure on the pump for pumping the condensate into the condensate tank Call service centre.
Error 4
E4 - Please clean filters or call service.
Control unit failure. Clean the filters. See chapter "CLEANING AND MAINTENANCE" or call service centre.
Error 6
E6 - Relay failure. Please check user manuals or call service.
Control unit failure. Call service centre.
Error 7
E7 - Door failure. Please check user manuals or call service.
Control unit failure. Call service centre.
Error 8
E8 - Button failure. Please check user manuals or call service.
Control unit failure. Call service centre.
Error 9
E9 - PB/UI software versions are not compatible.
Call service centre
INFORMATION before, during, and after the program (depending on the model)
Error indication on the display
What to do?
EN: Steam tank is empty. Please fill water.
Fill the steam tank with distilled water or condensate.
Pour the water through the steam tank filter located in the condensate tank housing. See chapter "BEFORE USING THE APPLIANCE FOR THE FIRST TIME".
EN: Steam tank full.
Stop adding condensate or distilled water.
EN: Please close the door before pressing start.
Close the dryer door before starting or resuming the program.
EN: Option not available at this phase of cycle.
This option is not available. Select an option that is still available.
EN: Cycle was interrupted by power failure. Please resume.
Press the Start/Pause button to restart or resume the program.
EN: Please empty the tank before resuming a cycle.
See chapter "CLEANING AND MAINTENANCE".
EN: Clean door filter.
See chapter "CLEANING AND MAINTENANCE".
EN: Clean the condenser unit.
See chapter "CLEANING AND MAINTENANCE".
EN: Please empty the water tank and clean door filter.
See chapter "CLEANING AND MAINTENANCE".
EN: Child lock is on. Press buttons for 3 sec to unlock.

 on/off button.
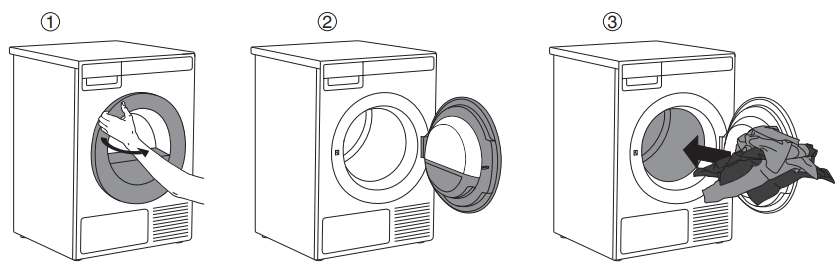

 appear on the display. Select the program based on the type and remaining moisture of the laundry. Anticipated program duration is indicated on the display. Extra program settings can also be selected for each program. See STEP 5.
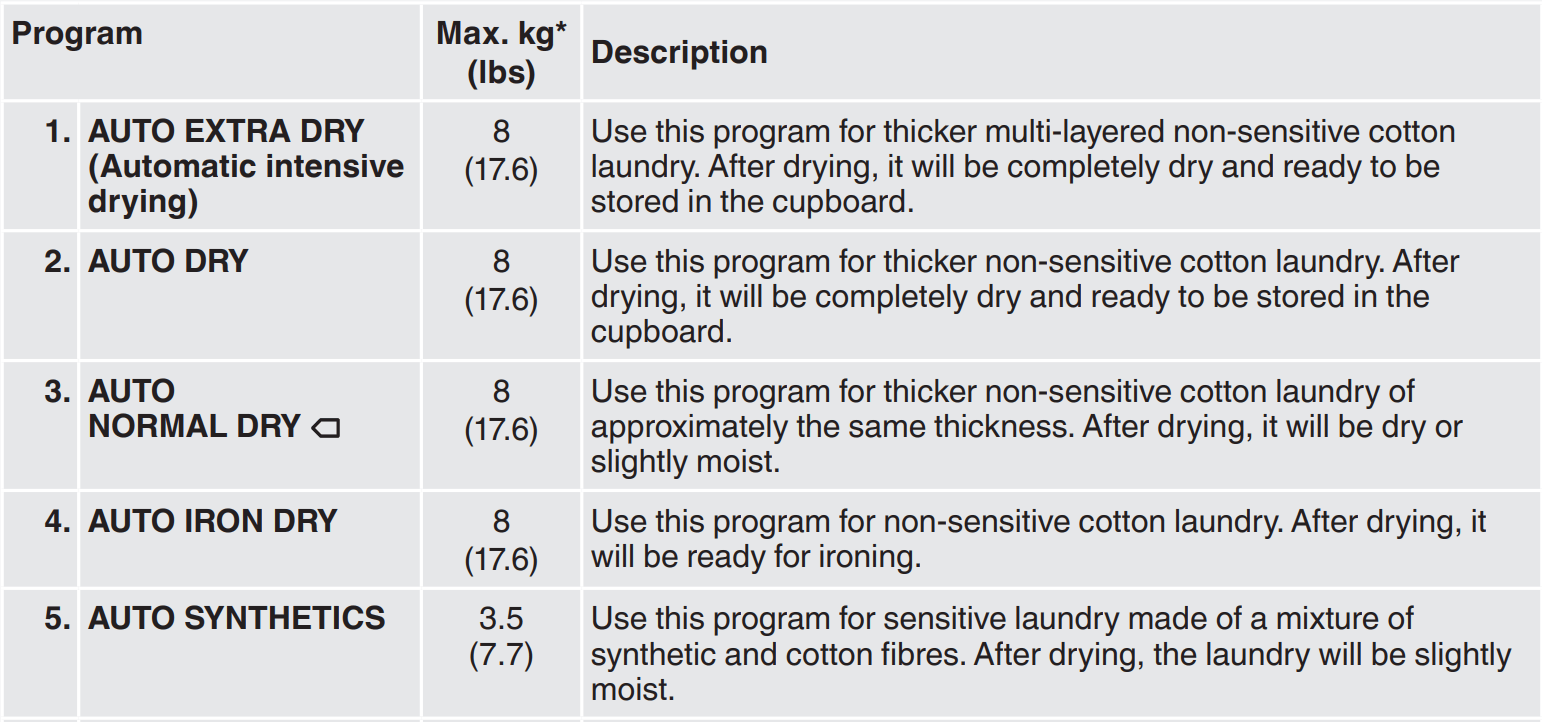

 to 4 hours
  , in 1-hour increments.
 to select a drying time from 30 minutes to 4 hours, in 15-minute increments.
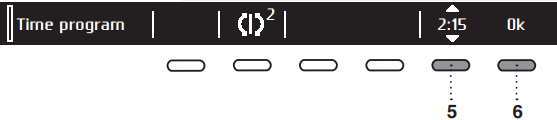
 button to start the drying process.
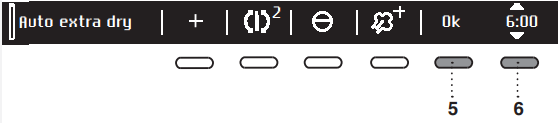
 to appear. Use the program selector knob or the button 6 to set the delay from 30 minutes to 6 hours in 30-minute increments, and then from 6 hours to 24 hours in 1-hour increments.
 button to start. When the countdown reaches zero, the selected drying program will start automatically
 . When Start delay time is once set, it is not possible to change it; the only possibility is to »Skip it « with pressing on button
 briefly specified filter Start (pressed briefly specified filter – start/resume)
 Pause (pressed briefly – drying temporarily suspended) Cancel (press and hold the button for 3 seconds)


 . This will prevent children from switching on the machine.
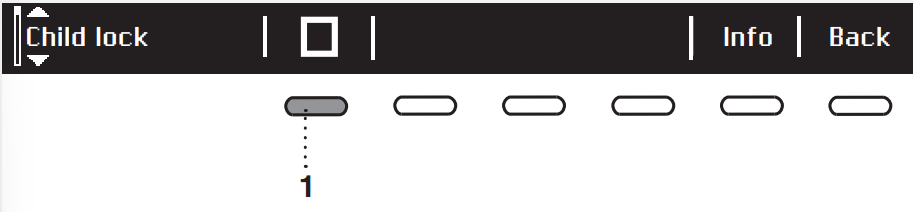
 to deactivate the child lock. When the child lock is activated, no other function can be selected.
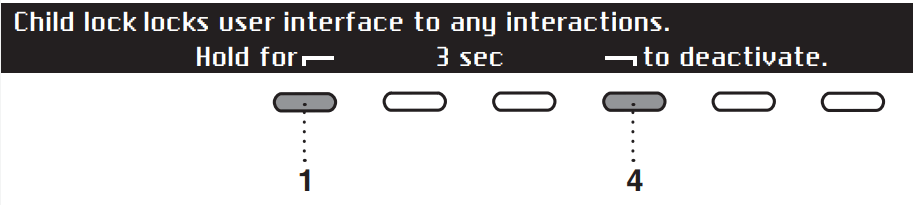


 to appear. Use the program selector knob or the button 1 to select a program. Use the button 3 to set whether this program is to be displayed or not: On