Owners' Guide Refrigeration
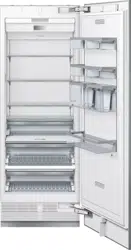
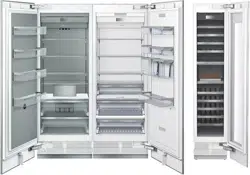
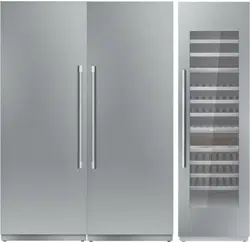
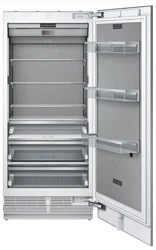
Getting to know your appliance
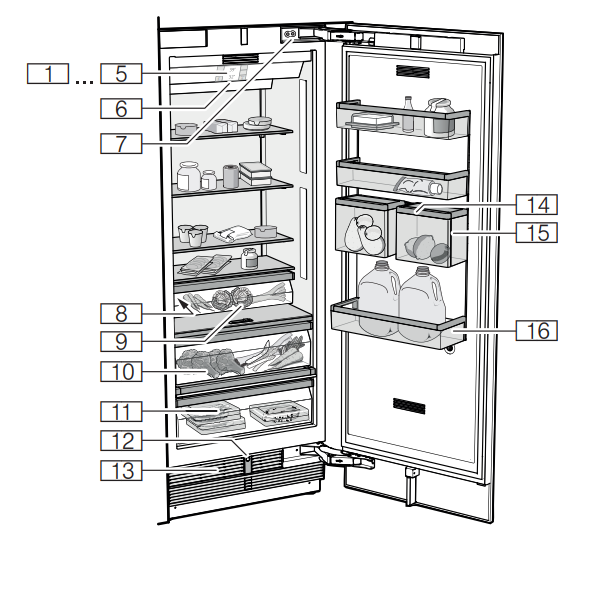
Appliance
- Operating controls
- Operating controls
- Operating controls
- Operating controls
- Operating controls
- Main On/Off switch
- Door damper
- Rating plate
- Vegetable container
- Vegetable container with humidity controller
- Cool-fresh bin
- Automatic door opening
- Ventilation opening
- Rail for suspending the Produce Bin
- Produce Bin
- Storage compartment for large bottles
Operating controls
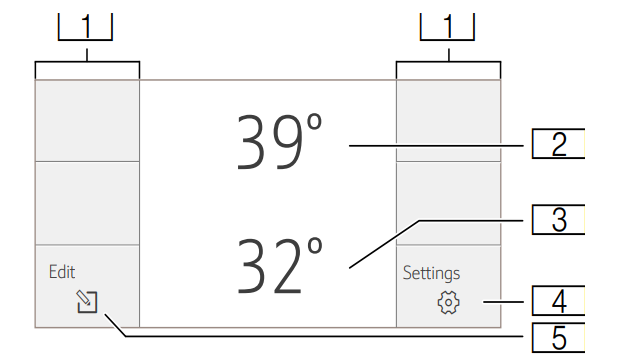
- Touch fields
There are sensors under the touch fields.
Touching the symbol calls up the respective function.
- Refrigerator compartment temperature display
Indicates the set temperature in °C/°F.
- Cool-fresh compartment temperature display
Indicates the set temperature in °C/°F.
 button
Opens the Settings menu.
-> "Settings menu" on page 9 button
Opens the menu for changing the temperature.
Settings menu
Press  button to open the menu.
In the Settings menu you will find:
- Appliance settings
- Cleaning mode
- Eco mode
- Self-test
- Sabbath mode (if activated)
-> "Operating the appliance" on page 11
Appliance settings menu
This is how to navigate to the Appliance settings menu:
- Press
 button.
- Use
 button to move to the Appliance settings menu.
- Open the menu using
 button.
In the Appliance settings menu you will find the following sub-menus and setting options:
- Brightness
- Key press sound
- Key volume
- Signal tone volume
- Automatic clean lock
- Automatic door opening
- Theater mode
- Temperature unit
- Language
- Factory settings
- Demo mode
- Sabbath mode
-> "Operating the appliance" on page 11
Equipment (not all models)
Storage compartment
You can remove and adjust the height of the storage compartments:
- Lift up the storage compartment and remove.
- When re-inserting, insert hooks on back of storage compartment at same height to make it level.
Note: Insert the storage compartment carefully to avoid scratching the appliance.
Shelf
You can remove and adjust the shelf:
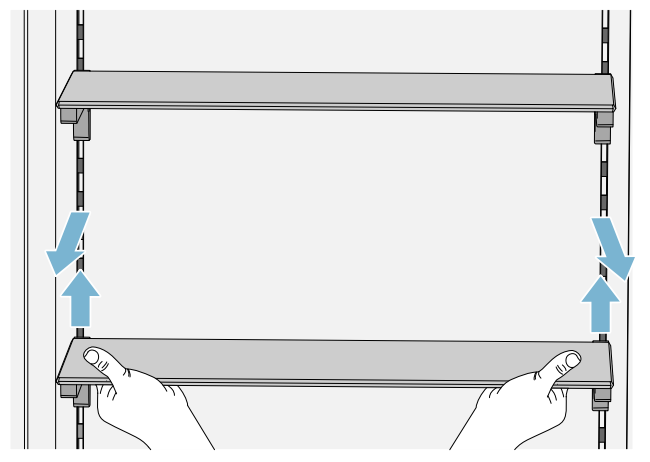
- Lift shelf and remove.
- When re-inserting, insert hooks on back of shelf at same height to make it level.
Note: Insert shelf carefully to avoid scratching the appliance.
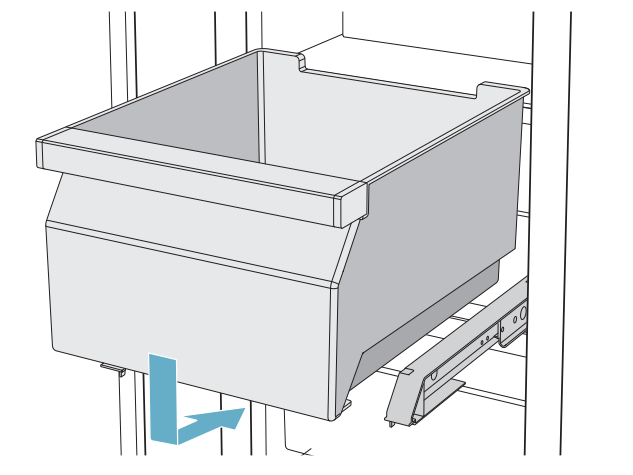
Container
You can remove the container:
- Press container to the rear,
- lift the container at the rear and remove.
You can insert the bin:
- Pull out the telescopic rails all the way
- Place the bin on the telescopic rails and push into the appliance until it engages
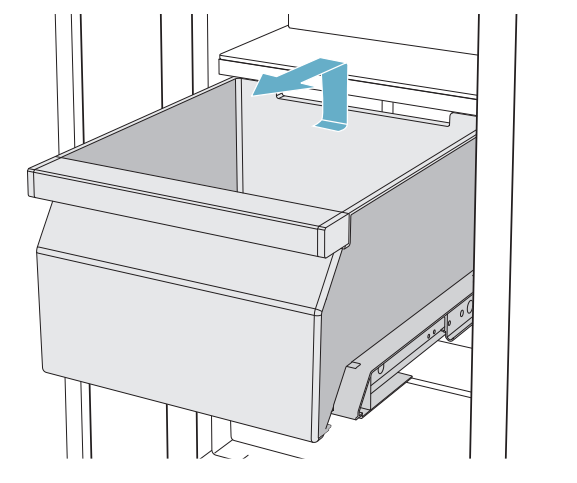
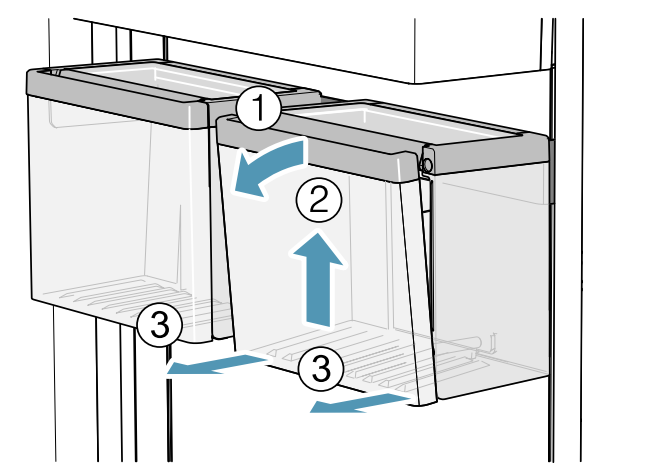
Produce Bin You can remove the inner container:
- Open the inner container just a gap.
- Lift the inner container and remove it.
You can insert the inner container:
- Guide the suspension of the inner container into the openings of the outer container.
- Fold the inner container shut.

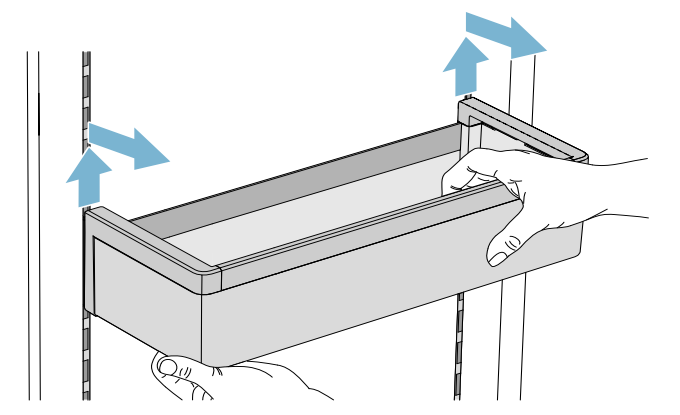
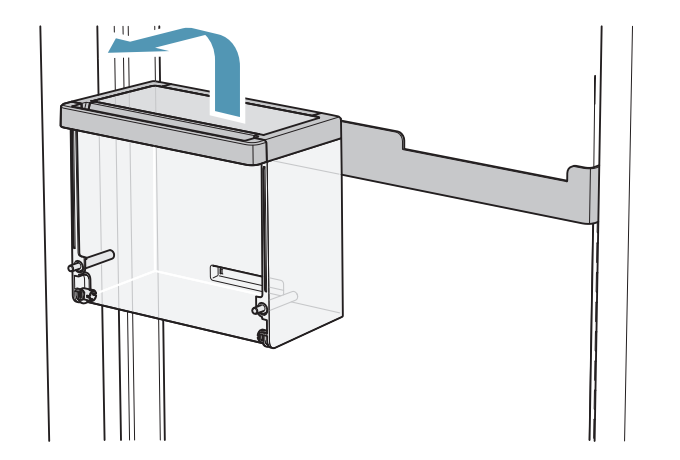
You can remove the Produce Bin:
- Lift the Produce Bin.
- Lift the rail for suspending the Produce Bin and remove it.
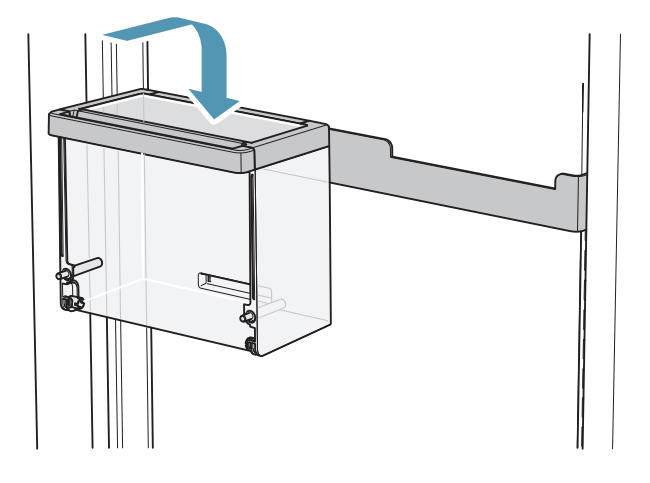
You can insert the Produce Bin:
- Insert the rail for suspending the Produce Bin in the desired position.
Note: Insert the rail carefully to avoid scratches to the appliance.
- Insert the Produce Bin into the rail recesses provided for this purpose.
Operating the appliance
Switching the appliance on
- Press the main On/Off switch. The appliance starts cooling and the light is switched on when the door is open.
- Set the required temperature.
-> "Setting the temperature" on page 11
Operating tips
- After the appliance has been switched on, it may take several hours until the set temperature has been reached. Do not put in any food until the selected temperature has been reached.
- The front sides of the housing are partly heated slightly. This prevents condensation in the area of the door seal.
Switching off and disconnecting the appliance
Switching off the appliance
- Press the main On/Off switch. The appliance is no longer cooling.
Disconnecting the appliance
If you do not use the appliance for a prolonged period:
- Remove groceries.
- Press main On/Off switch. The appliance is no longer cooling.
- Pull out mains plug or switch off fuse.
- Leave appliance open.
Setting the language
- Press
 button to open the Settings menu.
- Use
 button to move to the menu item Appliance settings.
- Press
 button.
- Press
 button to move to the menu item Language.
- Press
 button.
- Use
 buttons to move to the required language.
- Press
 button. The display restarts, and the start screen is displayed.
Setting the temperature unit
You can choose between the unit °C and °F.
1 ° means 1 °F
1 °C means 1 °C
- Press
 button to open the Settings menu.
- Use
 button to move to the menu item Appliance settings.
- Press
 button.
- Use
 button to move to the menu item Temperature unit.
- Press
 button.
- Use
 buttons to move to the required unit.
- Press
 button. The unit will be changed.
- Press
 button to exit the menu.
Setting the temperature
Recommended temperature

Refrigerator compartment
- To open the menu for setting the temperature, press the button
 .
.
- Use the
 button to select the required compartment.
- Keep pressing the button +/- until the display indicates the required temperature.
- Confirm the selection by pressing the
 button. If the button is not pressed, the appliance stores the setting and automatically returns to the main screen after a few seconds.
Cool-fresh container
- To open the menu for setting the temperature, press the
 button.
- Use the
 button to select the desired compartment.
- Keep pressing the +/- button until the display indicates the required temperature.
- Confirm the selection by pressing the
 button. If the button is not pressed, the appliance stores the setting and automatically returns to the main screen after a few seconds.
Super cooling
Super cooling cools the refrigerator compartment as cold as possible.
Switch on super cooling, e.g.:
- Before placing large quantities of food into the compartment
- For cooling drinks quickly
Note: When super cooling is switched on, increased operating noises may occur.
After approx. 6 hours, the appliance switches to normal operation.
Switch on super cooling:
- To open the menu for setting the temperature, press
 button.
- Press
 button. When super cooling is switched on, the symbol
  appears on the display.
- Confirm the selection by pressing
 button. If the button is not pressed, the appliance stores the setting and automatically returns to the main screen after a few seconds.
Switch off super cooling:
- To open the menu for setting the temperature, press
 button.
- Press
 button. When super cooling is switched off, the symbol
  disappears from the display.
- Confirm the selection by pressing
 button. If the button is not pressed, the appliance stores the setting and automatically returns to the main screen after a few seconds.
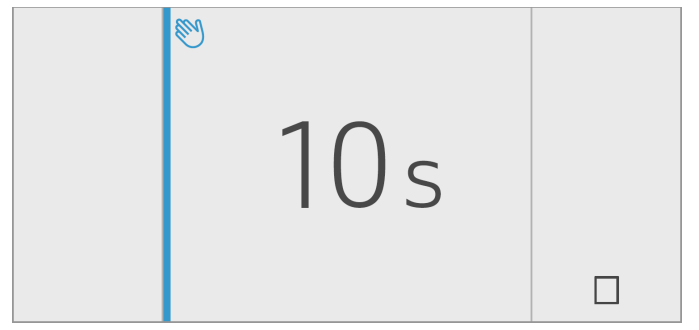
Clean lock
You can use this function to switch off the touch function of the controls for 10 seconds. During this time you can clean the display.
-> "Cleaning the display" on page 16
- Press
 button to open the Settings menu.
- Press
 button.
The cleaning display appears, and the countdown starts.
Automatic clean lock
You can use this function to select whether the automatic clean lock is switched on automatically when the door is opened.
- Press
 button to open the Settings menu.
- Use
 button to move to the menu item Appliance settings.
- Press
 button.
- Press
 button to move to the menu item Automatic clean lock.
- To change the setting, press
 button.
Eco mode
Eco mode switches the appliance to energy-saving operation.
The appliance automatically sets the following temperatures:
- Refrigerator compartment: +43° F (6° C)
- Cool-fresh container: +35° F (2° C)
Switching Eco mode on or off
- Press the
 button to open the Settings menu.
- Use
 button to move to the menu item Eco mode.
- Press
 button.
The temperature is changed,and the display shows the new temperature.When Eco mode is switched off,the recommended temperature is set.
Note:You can also switch Eco mode on or off by adjusting the temperature with the +/-buttons.
Self-test
This function can be used to start fault analysis on your appliance.
→Appliance self-test on page 19
Setting the brightness of the control panel
- Press
 button to open the Settings menu.
- Use
 button to move to the menu item Appliance settings.
- Press
 button.
- Press
 button to open the menu item Brightness.
- Press
 buttons to set the required brightness.
- Press
 button.
The setting is saved.
- Press
 button to exit the menu.
Switching key press sound on or off
You can switch the sounds generated when pressing keys off and back on again.
- Press
 button to open the Settings menu.
- Use
 button to move to the menu item Appliance settings.
- Press
 button to open the menu item.
- Press
 button to move to the menu item Key press sound.
- Press
 button to open the menu item.
- Use
 buttons to select the required setting.
- Press
 button. The setting is saved.
- Press
 button to exit the menu.
Setting the key volume
You can adjust the volume level of the sounds generated when pressing keys.
- Press
 button to open the Settings menu.
- Use
 button to move to the menu item Appliance settings.
- Press
 button to open the menu item.
- Use
 button to move to the menu item Key volume.
- Press
 button to open the menu item.
- Use
 buttons to select the required setting.
- Press
 button. The setting is saved.
- Press
 button to exit the menu.
Setting the signal tone volume
You can adjust the volume level of the signal tones generated e.g. with alarms.
- Press
 button to open the Settings menu.
- Use
 button to move to the menu item Appliance settings.
- Press
 button to open the menu item.
- Use
 button to move to the menu item Signal tone volume.
- Press
 button to open the menu item.
- Use
 buttons to select the required setting.
- Press
 button. The setting is saved.
- Press
 button to exit the menu.
Automatic clean lock
You can use this function to select whether the automatic clean lock is switched on automatically when the door is opened.
- Press
 button to open the Settings menu.
- Use
 button to move to the menu item Appliance settings.
- Press
 button.
- Press
 button to move to the menu item Automatic clean lock.
- To change the setting, press
 button.
Automatic door opening
The automatic door opening function supports you in opening the door. As soon as you activate this function, automatic door opening moves out and supports you in opening the door.
CAUTION
Repeatedly closing the door too early will cause automatic door opening to fail or wear out. Do not close the door as long as automatic door opening is still moved out. If you have nevertheless closed the door, leave it closed for 5 minutes. Automatic door opening will re-adjust itself.
Open menu item Auto door opening:
- Press
 button to open the main menu.
- Use
 button to move to the Appliance settings menu.
- Press
 button to open the menu.
- Press
 button to move the menu item Auto door opening.
- To change the setting, press
 button.
Switching on Push-to-open system
In an installation situation without handles you can select the Push-to-open system. Your appliance will then open a crack if you press lightly on the door.
Note: Please note that automatic door opening is disabled if Sabbath mode is activated.
- Open menu item Auto door opening.
- Select menu item Push-to-open system.
- Press
 button to open the menu item.
- Select Opening force.Here you can select the level of force required to activate automatic door opening.
- Select Opening duration.Here you can select how long the door should remain open a crack before it closes again automatically.
Note: If the door only remains open a crack, the appliance checks once a second whether the door is still ajar.After the selected opening duration elapses, the appliance will close the door automatically.
Switching on Pull-to-open system
In an installation situation with handles you can select the Pull-to-open system. Your appliance will support you in opening the door as soon as you pull on the handle.
- Open menu item Auto door opening.
- Select menu item Pull-to-open system.
- Press
 button to open the menu item.
- Select Opening force.Here you can select the level of force required to activate automatic door opening.
Switching off automatic door opening
- Open menu item Auto door opening.
- Select menu item Off.
Theater mode
If Theater mode is switched on, the light will slowly become brighter when the appliance is opened, and then slowly darker when it is closed.
Switching Theater mode on or off
- Press
 button to open the Settings menu.
- Use
 button to move to the menu item Appliance settings.
- Press
 button to open the menu item.
- Use
 button to move to the menu item Theater mode.
- Press
 button to open the menu item.
- Use
 button to move to the menu item On or Off.
- Press
 button. The setting is saved.
- Press
 button to exit the menu.
Resetting to the factory settings
- Press
 button to open the Settings menu.
- Use
 button to move to the menu item Appliance settings.
- Press
 button.
- Use
 button to move to the menu item Factory settings.
- Press
 button. A signal tone sounds, and a prompt to confirm reset appears.
- Press
 button. All settings are reset to the factory settings.
- Press
 button to exit the menu.
Switching demo mode on or off
The cooling function of the appliance is switched off. All other functions can be used.
Note: Do not store any food items in demo mode as the appliance remains at room temperature.
- Press
 button to open the Settings menu.
- Use
 button to move to the menu item Appliance settings.
- Press
 button.
- Use
 button to move to the menu item Demo mode.
- Press
 button.
- Use
 buttons to select the setting On or Off
- Press
 button. The setting is saved.
- Press
 button to exit the menu.
Sabbath mode
All non-essential functions are switched off so you can also use the appliance on the Sabbath.
The appliance switches off the following:
- Automatic door opening
Note: With handle-free installation, please note that you will not be supported when opening the door during this time. To open the door in this case, reach from below under the bottom panel of the unit.
- Ice maker
- Audible signals
- Interior light
- Messages on the display
- Background illumination of display is reduced
Switching Sabbath mode on or off
Displaying Sabbath mode in the Settings menu
To use Sabbath mode, you first have to display the function in the Settings menu:
- Press
 button to open the Settings menu.
- Use
 button to move to the Appliance settings menu.
- Press
 button.
- Use
 button to move to the menu item Sabbath mode.Press
  button.
- Use
 button to move to the menu item Available.Confirm by pressing
  button.
- Press
 button to exit the menu.
The function is added to the Settings menu.
Switching on Sabbath mode
- Press
 button to open the Settings menu.
- Press
 button to open the view Duration Sabbath mode.
- Select one of the presettings, or change the duration with +/- buttons.
- Press
 button to start. The appliance switches all listed functions off.
Switching Sabbath mode off
- After the selected time elapses, the appliance switches over to normal operation.
- To end Sabbath mode before the selected time elapses, press
 button.
Alarm
Door alarm
If the appliance door is open for a long time, the door alarm (continuous audible signal) switches on.
- Close door. The audible warning signal is switched off.
Refrigerator compartment
The refrigerator compartment is suitable for storing meat, sausages, fish, dairy products, eggs, ready meals and pastries.
The temperature can be set from +36 °F (+2 °C)... +46 °F (+8 °C).
The refrigerator compartment can also be used to store highly perishable groceries in the short to medium term. The lower the selected temperature, the slower the enzymatic and chemical processes and deterioration by microorganisms. A temperature of +39 °F (+4 °C) or lower ensures optimum freshness and safety of the stored groceries.
Note when storing food
Note: Avoid contact between food and the back panel.
Otherwise, the air circulation will be impaired and food or packaging may freeze to the back panel.
- Store fresh, undamaged food. The quality and freshness will then be retained for longer.
- In the case of ready products and bottled goods, do not exceed the minimum sell-by date or useby date indicated by the manufacturer.
- To retain aroma, color and freshness, pack or cover food well before placing it into the appliance. This will prevent flavors being transferred between foods and the plastic parts from becoming discolored.
- Leave warm food and drinks to cool down before placing them into the refrigerator compartment.
Note the chill zones in the refrigerator compartment
The air circulation in the refrigerator compartment creates different chill zones.
Coldest zone
The coldest zone is in the interior at the back panel and in the chill compartment.
Note: Store delicate food (e.g. fish, sausages and meat) in the coldest zone.
Warmest zone
The warmest zone is at the very top of the door.
Note: Store e.g. hard cheese and butter in the warmest zone. Cheese can continue to release its aroma and the butter will still be easy to spread.
Vegetable container
The vegetable container is the optimum storage location for fresh fruit and vegetables.A high air humidity keeps leafy vegetables fresh for longer. Fruit and vegetables should be stored at a slightly lower air humidity.
Notes
- Fruit sensitive to cold (e.g. pineapple, banana, papaya and citrus fruit) and vegetables sensitive to cold (e.g. eggplant, cucumbers, zucchini, peppers, tomatoes and potatoes) should be stored outside of the appliance at temperatures of approx. +8 °C/+36 °F ... +12 °C/+46 °F for optimum preservation of quality and aroma.
- Condensation may form in the vegetable container depending on the type and quantity of products stored. Remove condensation with a dry cloth.
Vegetable container with humidity controller
The vegetable container is the optimum storage location for fresh fruit and vegetables.You can adjust the humidity in the vegetable container via the humidity controller and a special seal. This allows fresh fruit and vegetables to be stored up to twice as long as with conventional storage.
The humidity in the vegetable container can be set according to the type and quantity of products to be stored:
- Mainly fruit as well as for a large load – set lower humidity with controller position FRUIT
- Mainly vegetables as well as for a mixed or small load – set higher humidity with controller position VEGETABLES
Notes
- For optimum preservation of quality and flavor store fruit sensitive to cold (e.g. pineapple, banana, papaya and citrus fruit) and vegetables sensitive to cold (e.g. eggplant, cucumbers, zucchini, peppers, tomatoes and potatoes) outside of the appliance at temperatures of approx. +46 °F (+8 °C) ... +54 °F (+12 °C).
- Condensation may form in the vegetable container depending on the type and quantity of products stored. Remove condensation with a dry cloth and adjust the humidity in the vegetable container with the humidity controller.
Chill compartment
The chill compartment has lower temperatures than the refrigerator compartment. Temperatures below +32 °F (0 °C) may occur.
Ideal for storing fish, meat and sausage. Not suitable for salads, vegetables and groceries sensitive to cold.
The temperature in the chill compartment can be adjusted.
Cleaning
CAUTION
AVOID DAMAGING THE APPLIANCE AND THE EQUIPMENT.
- Do not use abrasive, chloride-based or acidic cleaning agents or solvents.
- Do not use scouring or abrasive sponges. The metallic surfaces may corrode.
- Never clean the shelves or bins in the dishwasher. The parts may become deformed.
Cleaning the display
The change in temperature and humidity can cause the controls to steam up.
Switch the clean lock on before cleaning.
-> "Clean lock" on page 12
Use a clean micro-fiber cloth for cleaning.
Cleaning the appliance interior
Proceed as follows:
- Press the main On/Off switch.
- Take out food and store in a cool location. Place ice pack (if available) on the food.
- Clean the appliance with a soft cloth, lukewarm water and a little pH-neutral washing-up liquid.
CAUTION
The rinsing water must not run into the light or through the drainage hole into the evaporation area.
- Wipe door seal with clear water and dry thoroughly with a cloth.
- Switch appliance back on and put in food.
Cleaning the fittings
To clean, take the variable parts out of the appliance.
-> "Equipment" on page 9
Care instructions for stainless steel surfaces
When taking care of and cleaning stainless steel surfaces, use only cleaning agents suitable for stainless steel and a stainless steel cleaning cloth.
You can purchase a suitable stainless steel cleaning cloth from customer service.
To prevent visible scratches, clean the stainless steel surface in the direction of the structure.
Odors
If you experience unpleasant odors:
- Pull out mains plug or switch off fuse.
- Take all food out of the appliance.
- Clean the inside.
-> "Cleaning" on page 16
- Clean all packaging.
- Seal strong-smelling food in order to prevent odors from forming.
- Switch the appliance on again.
- Arrange food in the appliance.
- After 24 hours, check whether odors are building up again.
- Change the odor filter.
-> "Changing the odor filter" on page 17
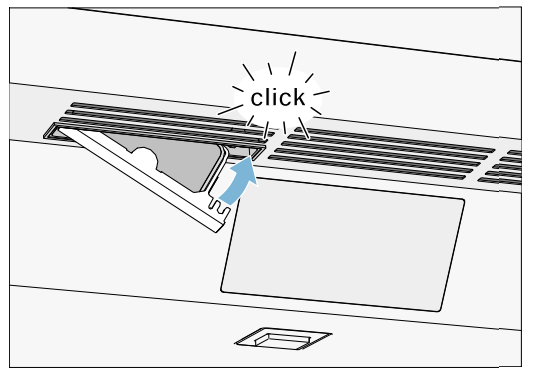
Changing the odor filter
Replacement filters are available from your customer service.
- Open the filter holder with a slotted screwdriver.
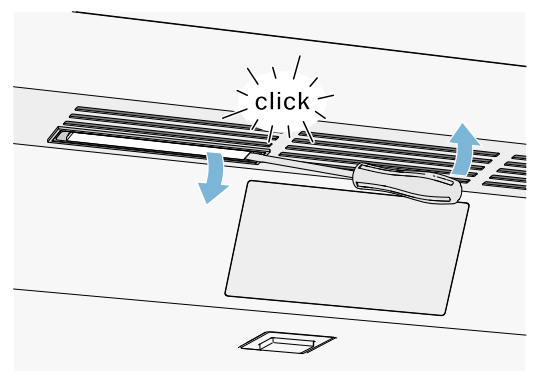
- Remove the used odor filter and replace with a new odor filter.

- Close the filter holder
Noises
Normal noises
Droning: A motor is running, e.g. refrigerating unit, ventilator.
Bubbling, buzzing or gurgling: Refrigerant is flowing through the tubes.
Clicking: Motor, switches or solenoid valves are switching on or off.
Cracking: Automatic defrosting is running.
Preventing noises
Appliance is not level: Align appliance using a water level. If required, place a little packing underneath.
Bins, shelves or storage compartments wobble or stick: Check the removable fittings and re-insert if required.
Lighting
Your appliance features a maintenance-free LED light.
Only customer service or authorized technicians may repair the light.
Faults – what to do?
Before you call customer service, use this table to check whether you can rectify the fault yourself.
Appliance
Temperature differs greatly from the set value.
| |
Switch off appliance for 5 minutes.
-> "Switching off and disconnecting the appliance" on page 11
If the temperature is too warm, check temperature again after a couple of hours.
If the temperature is too cold, check temperature again on the following day
|
Displays do not light up.
| The power plug has not been inserted properly. |
Connect the power plug |
| The fuse has tripped. |
Check the fuses. |
| The power has failed. |
Check whether the power is on. |
The refrigeration unit is switching on more frequently and for longer.
| The appliance was opened frequently |
Do not open the appliance unnecessarily. |
| The ventilation openings are covered up. |
Remove obstacles. |
| Large quantities of fresh food have been put in. |
Switch on super cooling promptly in advance. |
Appliance is not cooling, display and lighting are lit.
| Demo mode is switched on. |
Switch demo mode off.
-> "Switching demo mode on or off" on page 14
|
The door does not open when pressed.
| A special mode has switched off automatic door opening. |
To open the door, reach from below underneath the bottom panel of the unit or switch off special mode.
-> "Switching Sabbath mode on or off" on page 14
|
| Pull-to-open is switched on. |
Switch the appliance to Push-to-open.
-> "Automatic door opening" on page 13
|
| The opening force is set too high. |
Select a lower setting for the opening force.
-> "Automatic door opening" on page 13
|
| The fuse has tripped. |
Check the fuses. |
| The power has failed. |
Check whether the power is on. |