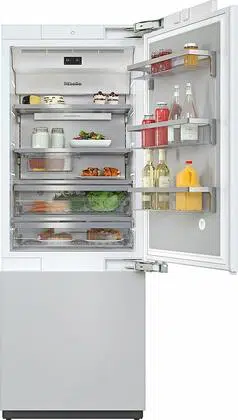
Sensor buttons for the refrigerator section settings area
For turning the ice cube maker on and off
For turning the Automatic SuperCool function on and off
For turning the refrigerator section on and off
For setting the temperature (∧ for warmer)
For setting the temperature (∨ for colder)
Display LEDs (see "Display LEDs" table for explanation)
Display with temperatures and symbols (symbols only visible during use; see "Symbols on the display" table for explanation)
Sensor buttons for the freezer section settings area
8. For setting the temperature (∧ for warmer)
9. For setting the temperature (∨ for colder)
10. For turning the machine on and off
11. For turning the SuperFrost function on and off
12. For turning the door or temperature alarm off
Display LEDs and symbols on the display
Control panel with display
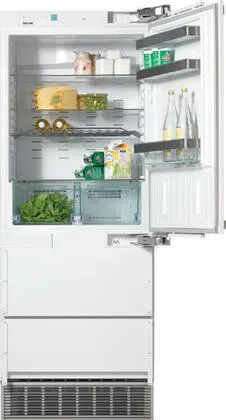
Fan
Interior lighting
Bottle rack
Egg tray/door shelf
Holder with carbon filter (Active AirClean)
Adjustable shelf
Fruit and vegetable drawers
Bottle shelf with bottle holder
NoFrost module
Ice cube drawer with automatic ice cube maker
Freezer drawers
For easier installation, there are transport handles on the back at the top of the machine and transport wheels underneath.
Selecting additional settings
Selecting additional settings
In Settings mode, certain settings can be adjusted and functions selected, allowing you to adjust the machine to suit your requirements.
See the following pages for more information on these settings.
Settings overview
Sabbath mode
The appliance offers a Sabbath mode for the purposes of religious observance.
The following are turned off:
– the interior lighting when the appliance door is opened,
– all audio and visual signals,
– temperature displays,
– DynaCool, Automatic SuperCool, and SuperFrost (if previously turned on)
To activate Settings mode, the SuperFrost button can continue to be selected.
The Sabbath mode function will turn off automatically after approx. 120 hours.
Changing the temperature unit (°F/°C)
The temperature can be displayed in either Fahrenheit (°F) or Celsius (°C).
Touch the SuperFrost button to the right-hand side of the display for approx. 5 seconds.
MENU lights up on the display and flashes.
Settings mode has now been activated.
Touch one of the sensor buttons for setting the temperature (∧ and ∨) repeatedly until appears on the display.
Touch the SuperFrost button to confirm the selection.
Available settings:
– : degrees Celsius
– : degrees Fahrenheit
If was previously set, will now be offered.
If was previously set, will now be offered.
Touch the SuperFrost button to confirm the setting.
MENU lights up on the display and flashes
Touch the On/Off button to exit Settings mode.
The desired temperature unit will be set.
Cleaning and care
Cleaning agents
To avoid damaging the surfaces of your machine, do not use the following for cleaning any of them:
– cleaning agents containing soda, ammonia, acid, or chloride,
– cleaning agents containing lime scale remover,
– abrasive cleaning agents, such as scouring powder, scouring liquid, or pumice stones,
– cleaning agents containing solvents,
– stainless steel cleaning agents,
– dishwasher detergent,
– oven sprays,
– glass cleaners,
– hard, abrasive sponges and brushes, such as pot scrubbers,
– eraser sponges,
– sharp metal scrapers.
Preparing the machine for cleaning
Turn the machine off. appears on the display and the cooling function is turned off.
Unplug the machine or trip the fuse.
Take any food out of the machine and store it in a cool place.
Remove the door shelves/bottle shelves from the machine door.
Remove the freezer drawers and glass plates.
Take out all other removable parts for cleaning.
Dismantling an adjustable shelf
Before cleaning the adjustable shelf, remove the white protective strip at the back of the shelf. Proceed as follows:
Place the shelf on a worktop covered with a soft material (e.g., a tea towel).
Then pull the protective strip off.
After cleaning the shelf, reattach the protective strip
Cleaning the interior and accessories
Clean the interior with a clean sponge, lukewarm water and a little liquid dish soap.
After cleaning, wipe with clean water and dry with a soft cloth.
The following parts cannot be cleaned in a dishwasher:
– the stainless steel trims or strips
– the protective strips at the back of the adjustable shelves
– all drawers and drawer lids (depending on model)
– the bottle rack
– the roller plates under the fruit and vegetable drawers – the cool pack
Clean these accessories by hand.
The following parts can be cleaned in the dishwasher:
– the bottle holder, butter dish, egg tray (depending on model)
– the bottle shelves and door shelves on the inside of the door (without stainless steel trim)
– the adjustable shelves (without white protective strips)
– the holder for the carbon filter (available as an optional accessory)
Remove any soiling on stainless steel trims and strips. We recommend using the Miele stainless steel conditioning agent for this.
Tip: It is important to use the Miele stainless steel conditioning agent for maintenance too, as this will protect the stainless steel surface and prevent it from rapidly getting dirty again.
Leave the door open to air the machine sufficiently for a short while and to prevent odor buildup.
Cleaning the machine front and the side panels
Clean the surfaces with a clean sponge and a solution of warm water and washing-up liquid. A clean, damp microfiber cloth without cleaning agent can also be used for cleaning.
After cleaning, wipe with clean water and dry with a soft cloth.
Appliance front
The appliance front has a special highquality finish (Clean Touch Steel) which is resistant to soiling and is very easy to clean.
Cleaning the door seal
The door seal should be cleaned regularly with clean water and then wiped thoroughly dry with a cloth.
Starting up the appliance after cleaning
Replace all shelves and accessories in the appliance.
Reconnect to the mains and switch the appliance back on.
Switch on the automatic SuperFreeze function for a while so that the freezer section can cool down quickly.
Switch on the automatic SuperCool function for a while so that the refrigerator section can cool down quickly.
Put the food back in the appliance and close the door.
Push the freezer drawers with the frozen food back into the freezer section and close the door.
Switch off the automatic SuperFreeze function as soon as the temperature in the freezer section is a constant 0 °F (-18 °C) or colder.
Replacing the carbon filters
Replace the carbon filters in the holder around every 6 months
Tip: The carbon filter holder is dishwasher safe.
Pull the carbon filter holder upward to remove it from the adjustable shelf.
Remove both carbon filters and place the new filters with the surrounding edge pointing downward in the holder.
Place the holder in the middle of the raised edge at the back of any of the adjustable shelves, so that it clicks into position.
Frequently Asked Questions
With the help of the following guide minor faults in the performance of the machine, some of which may result from incorrect operation, can be remedied without contacting the Service Department. Time and money will be saved because a service call will not be needed.
This guide may help you to find the reason for the fault, and how to correct it.
To prevent cold from escaping, open the appliance doors as little as possible until the fault has been corrected.
Problem
Possible cause and solution
The machine is not getting cold and the interior lighting does not come on when the machine door is opened.
The machine has not been turned on.
• Turn the machine on.
The plug is not inserted in the socket correctly or the plug connector is not inserted into the socket at the back of the machine correctly.
• Insert the plug into the socket and the plug connector into the machine socket.
The fuse has tripped. There could be a fault with the machine, the household electrical wiring, or another machine.
• Contact a technician or the Service department.
The compressor runs continuously
This is not a fault. To save energy, the compressor runs at a lower speed, but for longer, when less cooling is required. In this way, the running time of the compressor is extended.
The compressor is turning on more frequently and for longer periods of time; the temperature in the machine is too low.
The ventilation grille is obstructed or dusty.
• Do not block the ventilation grille.
• Clean the ventilation grille on a regular basis to remove any dust.
The machine doors have been opened too frequently or a large amount of fresh food has been put in at once for storage or freezing.
• Only open the machine doors when necessary and for as short a time as possible.
After a while, the temperature will return to normal by itself.
The machine doors are not closed properly. A thick layer of ice may have already formed in the freezer section.
• Close the machine doors.
After a while, the temperature will return to normal by itself.
If a thick layer of ice has already formed, this will affect cooling and increase energy consumption.
• Defrost the machine and clean it.
The ambient temperature is too high. The higher the ambient temperature, the longer the compressor has to run.
• See the information in the section on "Installation – Installation location".
The temperature setting is too low.
• Correct the temperature setting.
A large amount of food was put in for freezing at once.
• See the information in the section on "Freezing and storing food".
The Automatic SuperCool function is still turned on.
• To save energy, you can turn Automatic SuperCool off early yourself.
The SuperFrost function is still turned on.
• To save energy, you can turn SuperFrost off early yourself.
The compressor comes on less and less often and for shorter periods of time. The temperature in the appliance rises.
This is not a fault. The set temperature is too high.
• Correct the temperature setting.
• Check the temperature again after 24 hours.
The food begins to defrost.
The room temperature is lower than the ambient temperature for which the appliance is designed. Operating in a room which is too cold will cause the compressor to switch off for too long, causing the freezer to become too warm.
• See "Installation location".
• Increase the room temperature.
The door seal is damaged and needs to be replaced.
No tools are required to change the door seal.
• Change the door seal. It is available from your Miele dealer or Miele Service.
Ice or condensation has built up inside the appliance.
The door seal has come out of its groove.
• Check that the door seal is correctly positioned in the groove.
The door seal is damaged.
• Check whether the door seal is damaged.
Messages in the display
Message
Possible cause and solution
DEMO is shown on the display. The machine does not get cold, but the machine controls are working.
Demo mode is activated. This allows the machine to be presented in the showroom without the cooling system being turned on. Do not activate this setting for domestic use.
• Contact the Service department.
The temperature display is out and is shown on the display
Sabbath mode is turned on: The interior lighting is turned off and the machine is cooling down.
• You can turn Sabbath mode off at any time (see "Selecting additional settings – Turning Sabbath mode on and off").
The display LED is lit up and the machine cannot be used.
The safety lock has been activated.
• Completely deactivate the safety lock (see "Selecting additional settings – Activating and deactivating the safety lock").
An alarm is sounding.
The door alarm has been activated (see also "Temperature and door alarm").
• Close the relevant appliance door.
The alarm will be silenced.
The display LED is lit up and an alarm is also sounding.
The temperature alarm has been activated (see also "Temperature and door alarm"). The temperature in the freezer section has risen above or fallen below the temperature set.
This could be due to, e.g.:
– the freezer section door being opened too often or being left open
– a large quantity of fresh food being placed in the freezer at once without the SuperFrost function being turned on
– a power failure having occurred
– the machine having a fault
• Rectify the cause of the alarm.
The display LED goes out and the alarm is silenced.
The temperature display will stop flashing as soon as the temperature has dropped to the correct level.
• Depending on the temperature displayed, you should check whether food in the freezer has started to thaw or has defrosted. If it has, cook it before freezing it again.
The display LED is lit up and an alarm is also sounding. The temperature display for the freezer section is flashing.
There is a power failure: The temperature in the appliance over the last few days or hours has risen too high because of a power failure or interruption to the power supply.
The appliance will go back to the last temperature setting when the power is back on.
• Touch the sensor button.
The warmest temperature recorded in the freezer section will flash for about 1 minute on the temperature display for the freezer section.
• Touch the sensor button.
The warmest temperature displayed will disappear. The display will then revert to showing the current temperature in the freezer section.
• Depending on the temperature displayed, you should check whether food in the freezer has started to thaw or has defrosted. If it has, cook it before freezing it again.
"F0 to F9" appears on the display.
There is a fault.
• Contact the Service department.
There is a machine fault: This display always has immediate priority over any settings which have just been selected.
A machine fault has priority over any current door and/or temperature alarms displayed.
Problems with the ice cube maker
Problem
Possible cause and solution
You cannot turn the ice cube maker on.
The appliance is not connected to the power supply or is not switched on.
• Reconnect to the power supply and switch the appliance back on.
The ice cube maker is not producing any ice cubes.
The machine and/or the ice cube maker is not turned on.
• Turn on the machine and/or the ice cube maker.
The drawer of the ice cube maker is not closed properly.
• Push the drawer all the way in.
The temperature in the freezer section is too high.
• Select a lower temperature.
The machine door and/or freezer drawers have been opened too frequently causing the compressor to turn on more often and the ice cube maker has iced up.
• Only open the machine door and freezer drawers when necessary and for as short a time as possible.
The water supply line is not open.
• Open the water inlet.
The water line has not been vented.
• Have a qualified professional check that the water line has been properly vented before calling the Service department.
The water supply to the ice cube maker has been interrupted.
• Check the water connection and the hose.
The filter in the end of the water inlet hose or the filter in the connection at the machine is blocked.
• Clean the filters.
Remember it can take up to 24 hours to produce the first ice cubes after initial commissioning.
The ice cube maker is producing only small ice cubes.
Several household appliances connected to the fresh water supply are in operation, which has reduced the amount of water being taken in.
• Avoid using the dishwasher, washing machine, etc. at the same time.
The size of the ice cubes depends on the quantity of water being taken in. You are able to set this quantity according to your wishes.
• To make larger ice cubes, increase the amount of water being taken in by the ice cube maker.
The ice cubes have an unpleasant odor or flavor.
The ice cube maker is seldom used. If you do not use it very often, ice cubes that are stored for a long period can absorb the taste and smell of other items.
• Empty the ice cube container if you are not going to use the ice cube maker for a long time.
• Clean the ice cube container
There are unsealed packages in the freezer section. Ice can absorb the taste and smell of unsealed food.
• Store only sealed food in the freezer section.
The ice cube container is dirty.
• Clean the ice cube container.
The interior lighting is not working.
Problem
Possible cause and solution
The interior lighting is not working.
The machine has not been turned on.
• Turn the machine on.
Sabbath mode is turned on: The temperature display is out and is shown on the display.
• You can turn Sabbath mode off at any time (see "Selecting additional settings – Turning Sabbath mode on and off").
To avoid overheating, the interior lighting turns itself off automatically after approx. 15 minutes if the machine door is left open. If this is not the case, there is a fault.
• Contact the Service department.
Other problems
Problem
Possible cause and solution
Food has frozen together or to the wall.
The food packaging was not dry when loaded in the freezer.
• Use a blunt instrument (such as a spoon handle) to carefully pry them apart.
The external walls of the appliance feel warm.
This is not a fault. The warmth created by the evaporator is used to prevent condensation.
Causes of noises
Normal noises
Cause
Brrrrr...
A humming noise is made by the motor (compressor). This noise can get louder for brief periods when the motor switches on.
Blub, blub...
A gurgling noise can be heard when the coolant circulates through the pipes.
Click...
Clicking sounds occur whenever the thermostat switches the motor on or off.
Sssrrrrr...
You can sometimes just hear the sound of the fan inside the appliance.
Crack...
A cracking sound can be heard when materials expand inside the appliance.
Please bear in mind that a certain amount of noise is unavoidable (from the compressor and the coolant circulating through the system).
Noises
Possible cause and solution
Rattling, clinking
The appliance is uneven. Realign the appliance using a spirit level, by raising or lowering the screw feet underneath the appliance or place something underneath it.
The appliance is touching another appliance or piece of furniture. Move it away.
Drawers, baskets or shelves are unstable or sticking. Check all removable items and refit them correctly
Bottles or containers are touching each other. Separate them.
The transport cable clips are hanging loose at the back of the appliance. Remove the cable clips.


 SuperFrost button to the right-hand side of the display for approx. 5 seconds.
 flashes.
  appears on the display.
  : degrees Celsius
  : degrees Fahrenheit
 On/Off button to exit Settings mode.


 is shown on the display
 display LED is lit up and the machine cannot be used.
 display LED is lit up and an alarm is also sounding.
 display LED is lit up and an alarm is also sounding. The temperature display for the freezer section is flashing.
 sensor button.
 is shown on the display.