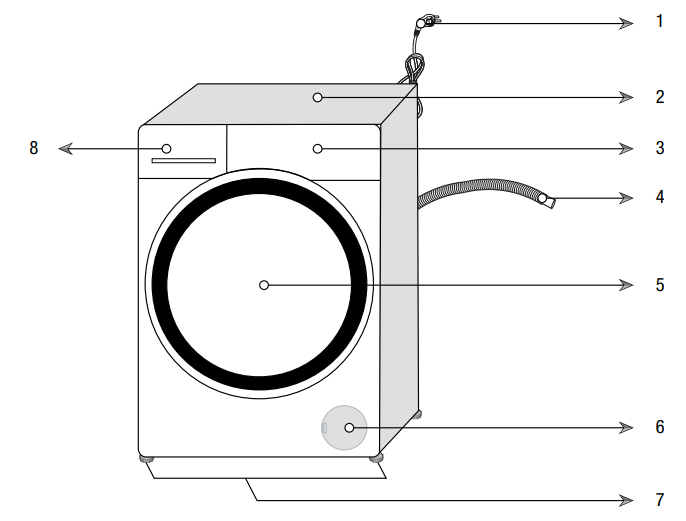
1- Power cable 2- Top panel 3- Control panel 4- Drain hose 5- Loading door 6- Filter cap 7- Adjustable feet 8- Detergent drawer
Installation Instructions
The Right Location of Installation
You can install your washer in a basement, closet or in a laundry room if the location has proper drainage, plumbing and power supply system. Always follow these instructions for installation:
Do not install or store this appliance where it will be exposed to the weather, rain, damp places, water and direct sunlight. The ambient temperature must be higher than 60°F (15.6°C) for proper operation. Installation location must have the proper ventilation.
Do not store and use any flammable and combustible substances such as lint, paper, curtains, gasoline, coal and liquid or vapor chemicals near the appliance.
Install and operate the washer on a strong solid concrete floor to prevent vibration, noise or movement in case of load unbalance. The floor must have sufficient load carrying capacity and the washer must be leveled properly before the operation.
It is not recommended to install and operate the washer on a wooden floor or soft floor. If you have to install your washer on a wooden or frame construction floor, the floor must be reinforced properly and the washer must be located in the corner of the room if possible.
Never place your washer on a carpet. This prevents air circulation. The electrical components of the machine may overheat and cause damage.
Do not stand appliance on the power cable.
Do not install and operate your washer in ambient temperatures lower than 32˚F (0˚C). Controls may stop working properly in such condition.
If there is danger of frost, drain all remaining water in pump and hoses since it may freeze and cause damage by bursting them (see “Cleaning the drain pump filter”)
Installation Clearances
CAUTION
The installation location must be large enough for the washer door to be fully opened for loading.
The installation location must be large enough for ease of operation, maintenance and service.
Ensure there is min 1/2” of clearance on each side of the washer to allow slight sideways movement during washing and spin drying.
Allowable Clearances for Undercounter Installation
The dimensions are for the recommended spacing. Counter depth should be 23.5-24.5”(60-62 cm).
Custom undercounter installation – Washer only
Minimum counter width should be 50” (127 cm) for a pair of Blomberg washer & dryer.
Custom undercounter installation – Washer & Dryer
Allowable Clearances for Closet Installation
When installed in closet (washer only/washer dryer stacked) : Sides, Rear, Front 1/2 in. (1.27 cm), Top= 1 in. (2.54 cm) Closet door ventilation requirement: A louver having minimum 23 in2 (148 cm2) air opening located at 3 in (7.62 cm) from the bottom of closet door.
Stacked Installation
You can stack your Blomberg washer and dryer by using a special stacking kit. If necessary, consult your dealer or technical service for supplying the stack kit. In stacked closet installation, following configuration is necessary:
A louver having minimum 23 in2 (148 cm2) air opening located at 3 in (7.62 cm) height from the bottom of closet door (for washer) & A louver of minimum 46 in2 (297 cm2) air opening located at 3 in (7.62 cm) distance from the top of closet door (for dryer).
Removing packaging reinforcement
Tilt the washer to remove the packaging reinforcement. Remove the packaging reinforcement by pulling the ribbon.
Removing shipping bolts
1.Loosen all the bolts with a spanner wrench until they rotate freely
2.Remove the shipping bolts by turning them gently.
3.Bolt hole covers (supplied in the bag with the owner’s guide) are fitted into the holes on the rear panel with a special lock mechanism. To fit the cover, first insert it into the hole and then rotate it counterclockwise with a screwdriver until it is locked. To unlock, apply the procedure in reverse.
CAUTION
• Keep the shipping bolts in a safe place to reuse when the clothes washer needs to be moved again in the future.
• Never move the appliance without shipping bolts properly fixed in place!
Leveling the washer
1.Manually (by hand) loosen the lock nuts on the feet.
2.Adjust them until the washer stands level and firmly.
3.Important: Tighten all lock nuts up again.
Electrical Connection
Grounding Instructions
This appliance must be grounded. In the event of malfunction or breakdown, grounding will reduce the risk of electric shock by providing a path of least resistance for electric current. This appliance is equipped with a cord having an equipment-grounding conductor and a grounding plug. The plug must be plugged into an appropriate outlet that is properly installed and grounded in accordance with all local codes and ordinances and the latest edition of the National Electrical Code, ANSI/NFPA 70.
Power supply and circuit
Connect the clothes washer to an earthed outlet protected by a fuse of suitable capacity.
Important:
Wall power connection should comply with national regulations.
The wiring for the electrical outlet circuit must be sufficient to meet the appliance requirements. Use of a Groud Fault Circuit Interrupter (GFCI) is recommended.
The voltage and maximum total current are specified in the section “Specifications”.
The appliance must be connected to the wall power.
Connection via extension cords or multi-plugs should not be made.
10 Amp. Fuse or circuit breaker, 120 volt, 60 Hz, grounded, alternating current
Water Supply Connection
Your washer comes with both cold and hot water connections. Connect the blue marked cold water supply hose to the cold water inlet valve/faucet and the red marked hot water intake hose to the hot water inlet valve/faucet. Screw the connecting bolts by hand and tighten the connection properly using a plier. Over tightening may cause damage on bolted connection.
WARNING
• Be sure that the water connection of this washer is handled by a qualified service technician or a plumber.
The washer has two bolted ½’’ water supply hoses and ¾’’ female hose connections that can be connected to ¾’’ hot and cold water faucets.
WARNING
• Be sure that there are rubber seals located on the hose connections. These seals and adjustable bolts ensure a safe connection without leaking. After the water connection is done, turn on both water faucets slowly and completely to check any water leaks.
• Be sure that water supply hoses are not crushed and they have no kinking, bulges or cuts before the water connection.
The water pressure must be between 15-145 psi (1-10 bar) for the proper operation of this washer. 1 bar corresponds to more than 2.1 gallons (8 liters) per minute flow rate with a fully open faucet. Water inlet hoses and valves should withstand a water pressure of 145 psi (10 bar) at maximum. If the pressure is higher than 145 psi, a pressure-reducing valve must be installed before the water inlet. If the water pressure is lower than 15 psi (1 bar), water fill time may extend or water inlet valve may shut off completely.
Hot water supply temperature must not exceed 140˚F (60˚C). (Ideally 120˚F (48˚C))
Do not connect the washer to an unpressurized water boiler since water pressure may not be adequate for proper operation.
Do not remove the filters located on the water supply hoses (on faucet/hose and hose/inlet valve connections).
Always use genuine “Blomberg” water supply hoses when connecting with this washer. Old or worn-out hoses must not be reused. It is not advised to extend inlet or drain hoses, if necessary consult your dealer or technical service about hose extensions.
Hot and cold water faucets must always be easily accessible to the user.
At the end of a washing day, turn off water faucets to prevent any leakage or water damage that may occur due to a faulty condition of the appliance.
Check the appliance and inlet hose connections for water leakage after each use. If there is leakage, turn off the appliance and water faucets and call service.
Check the water inlet and drain hose connections regularly for any leakage. Hoses should be replaced every 5 years.
If there is no hot water supply, hot water valve must be connected to a cold water faucet nevertheless. Both water valves should be connected to water supply for proper operation of your washer.
Drainage
WARNING
• Drain hose should not be bent. Be sure that there are no kinks or cuts on it.
• Drain hose outlet must not contact the drained water.
Drain hose may be connected into a sink, into the drain of a sink, to a standpipe and floor drain.
When connecting into a sink, the drain hose should be placed at the edge of the sink and secured with the hose guide supplied by the manufacturer. Additionally, the guided hose may be tied to the water faucet with a strap for extra security.
Drain hose may be connected into the drain of a sink . Be sure that the connection is safe and not leaking. An additional clip etc can be used for safe connection.
Drain hose may also be connected to a minimum 1.26 in (32 mm) diameter stand pipe.
Be sure to secure the drain hose tightly to the pipe (stand pipe, drain pipe/edge of the sink) with a strap etc.
The hose should be placed between 16 and 39 in. (40 and 100 cm) from the floor level
If you have floor drain system, you can place the drain hose in the hole located on the floor.
Installation Checklist
Water inlet hoses and accessory bags must be removed from the wash drum.
Transportation/shipping bolts must be removed.
Washer must be properly leveled by using the adjustable feet.
Water inlet hoses are connected to the water faucets, secured and checked for any leaks by turning on both faucets.
Drain installation is done properly and drain hose is checked and secured to prevent any flooding.
Washer is connected to a properly grounded live wall power outlet.
Be sure that power outlet, water faucets and drain outlet must be always accessible to the user.
Transportation
Before you transport the washer, you should carry out the following:
1.Turn off both water faucets.
2.Before you disconnect the water inlet hoses, decrease the pressure inside hoses by turning on the washer choosing any wash program. As soon as the Start/Pause/Cancel led starts blinking, turn off the appliance. You may securely disconnect inlet hoses without any water gush.
3.Disconnect the drain hose and hang it on the back plate by inserting into the holder plastic brackets.
4.Unplug the power cord and hang it on the back plate by inserting into the holder plastic brackets.
5.Remove bolt hole covers and reinstall shipping bolts to their places. You can apply the procedure in chapter “Removing shipping bolts” in reverse to accomplish this.
6.Be sure that rubber bushes are properly located in holes and bolts are screwed back tightly for secure transportation of the appliance.
Disposal Information
Packing Disposal
WARNING
• Packing materials of the appliance are potentially dangerous for children. Materials such as plastic bags, films or wrappings must be kept away from children or disposed properly to prevent the danger of suffocation.
CAUTION
• Packing materials are made of biodegradable and recyclable substances. You should consult your local authority or dealer about the environmental-friendly disposal of the packaging of your appliance.
Appliance Disposal
WARNING
• Be sure to unplug the power cable, cut off the plug and disable the door lock before you dispose your old appliance. Otherwise there is a risk of injury for children and pets.
CAUTION
• Old appliances contain many recyclable parts. You should consult your local environmental authority about a proper disposal. A proper disposal enables recycling therefore protects the environment.
Operating Instructions
First Use
WARNING
• To reduce the risk of fire, electric shock, or injury to persons, read the IMPORTANT SAFETY INSTRUCTIONS before operating this appliance.
Before the first use,
Be sure that the washer is installed properly by a qualified installer or service technician in accordance with all national and local codes and requirements.
Read all instructions carefully before using the washer.
Check that shipping bolts are completely removed.
Be sure that the location of installation has proper electrical supply voltage (120V 60Hz) and plumbing system needed for the operation of the appliance.
Turn on both water faucets and be sure that there are no leaks on hose-faucet connection points or on hoses themselves.
Check that the wash drum is empty.
Turn on the washer, choose “"Tub Sanitize"” cycle on the program selector knob and start the washer as empty and without any laundry additives. When the cycle is finished, your washer is ready for subsequent uses.
WARNING
• Be sure that siiica gel package, which is located inside the drum, has been removed from the washer before the first use. Granules in this package do not contain poisonous or harmful materials. It is not a detergent and it is not adible. Do not swallow. Do not use for any purpose. Throw into the recycle bin together with this package before the first usage of the washing machine.
Laundry Tips
Sorting the laundry
CAUTION
• Always follow the fabric care instructions of garment manufacturers. These instructions would give you proper guidance on suitable wash cycles, wash temperatures and bleach usage.
CAUTION
• Wash the items which are care labeled as “machine-washable”. Do not machine wash items that are having symbol on fabric care label.
• Sort the laundry according to the following fabric types, color groups and wash them separately:
Woolens (only wash woolens that are labeled “machine washable” or “hand washable”
Hand knits (They should be placed inside out in the washer)
CAUTION
• Do not wash dark colors with light colors and whites. Color items may bleed and white and light colored items may be discolored. Avoid extended contact of damp clothes before or after washing to prevent dye transfer.
• Wash heavily and lightly soiled items separately.
• Lint producers (towels, linen etc) and lint collectors (easy care, permanent press) should be washed separately. Lint producers should be washed inside-out.
Preparing the laundry
Items of laundry with metal parts (e.g. underwire bras, belt buckles, metal buttons) will damage the washer. Remove metal parts of place the items in a cloth bag, pillow case, or something similar.
Remove any non-washable items and accessories from laundry before washing.
Empty pockets, remove all foreign objects (e.g. coins, pens, paper clips). If possible: Turn pockets inside out and brush.
Place small items of laundry (e.g. tights) in a cloth bag, pillow case or something similar. This can also help you to avoid searching for lost socks.
Handle curtains special care. Remove non-stainless curtain runners and lead tape. Place runners that can’t be removed in a cloth bag, pillow case or something similar.
Heavy stains should be pretreated with soapy water appropriately before washing (Do not rub or scratch the stained area). If in doubt, check with a pharmacist or dry-cleaner.
Use only dyes/discoloring and anti-scaling agents suitable for machine wash. Make sure to follow the instructions on the package.
Loading the washer
Maximum load capacity depends on the fabric type of laundry, soiling amount of laundry and program cycle you wish to use.
CAUTION
• Do not exceed the maximum load capacity of the selected program cycle. Washing results are adversely affected by an overloaded drum. Overloading may also cause wrinkling and abrasion on clothes.
Make sure power button is off before loading the washer. To load the washer,
Pull the door handle.
Place laundry items loosely in the drum.
Mix small and large items for an even load distribution. Large items should be loaded first. Large items should not be more than half of the total wash load.
If you put a wash bag or net which is filled with small items in the drum, put an additional wash bag to prevent load unbalance. Both wash bags should have the same amount of items to provide an even load distribution.
Before washing a single or a few items such as a pillow, a teddy bear, a single or a pair of shirts, sweat shirts etc, put some additional items in the drum for better load distribution and spinning.
Make sure that there is no clothing obstructing the door or caught between the door and rubber seal.
Push the loading door firmly and make sure that the door has been closed properly (especially if you load the washer with full load or big items).
In case the door is not locked, door led remains off. In that case, door should be opened and closed again firmly until the door led lights up.
If the door is not closed completely, the machine will not start. This is a safety precaution. The front door is locked until end of the washing program and it can not be opened untill the door led on the panel is off following the end of the program.
Unload the washed items just after the program cycle has finished. Delay of unloading may cause wrinkling and unwanted odor on laundry.
Check to see any small metal items such as pins, coins etc left in rubber seal while unloading the washer. Any residual metal items may cause rusting on the rubber seal.
If there is any water left in rubber seal, remove with a soft cloth.
Detergent Use
About Detergent
CAUTION
• Your washer is designed to use only HE (high efficiency) detergents. You should always look for the following symbol on the label of detergents:
If you use a non-HE detergent with this washer, high sudsing will occur. High sudsing will decrease tumble action effectiveness, washing and rinsing performance worsen. Suds may flow out of detergent dispenser giving damage to your washer.
CAUTION
• The detergents labeled as “HE compatible” may also lead to high sudsing and inefficient tumble action. Don’t use such detergents.
Always follow the instructions and information given by laundry detergent manufacturers when using these products.
Detergent Quantity
The amount of washing detergent to use depends on the amount of laundry, the degree of soiling and water hardness.
For small amounts of laundry or only slight soiling use accordingly less detergent.
Too much detergent causes an excessive amount of foaming, bad washing and rinsing results and a strain on water resources.
Too little washing detergent causes laundry to turn grey and calcification of the machine. Recommended amount of powder detergent is max. 1/3 cup (80 ml). Recommended amount of liquid detergent is max. 1/4 cup (60 ml).
Light soiling
No visible stains or soiling
Normal soiling
A few visible light stains or soiling
Heavy soiling
Highly visible stains or soiling
Detergent Dispenser
Detergent dispenser of your washer has three separate compartments for main wash detergent, fabric softener and liquid bleach. Each of these laundry additives are automatically dispensed at appropriate time during wash program.
CAUTION
• Do not put laundry additives directly in the wash drum. Always use the detergent dispenser.
• After adding laundry additives do not close the drawer too quickly. This may cause early dispensing of the additives thus poor wash results and fabric damage.
• Do not open the drawer during wash program (except for addition of liquid main wash detergent at the beginning of main wash water intake).
Dispenser compartments are as follows:
-left compartment numbered as “II” (main wash compartment)
-middle compartment marked as (liquid fabric softener compartment)
-right compartment numbered as “I” (liquid chlorine bleach compartment)
(II) Main Wash Detergent Compartment
Add HE (High efficiency) powder detergent to this compartment numbered as “II” before starting the wash program.
Use the detergent manufacturer’s dosing cup and follow the instructions on the package.
If you use a liquid detergent, be sure to use a HE (High efficiency) detergent and add detergent directly to main wash compartment before operating your washer. If you observe liquid detergent stains on washed items, it is recommended for subsequent wash cycles that you should add liquid detergent during first water intake.
Color-safe bleach in powder or liquid form may be added into main wash detergent compartment with main wash detergent. Be sure to use main wash detergent and color-safe bleach in same form (either powder or liquid) when adding into main wash compartment.
Liquid Fabric Softener Compartment
Add the recommended amount of liquid fabric softener to the middle compartment marked as “” and dilute it with warm water to the maximum fill line.
CAUTION
• Especially concentrated fabric softeners must be diluted with warm water otherwise siphon may be clogged in time.
Do not fill the fabric softener above the maximum fill line as any excess amount will mix into the wash water and you will have to re-fill the compartment. Do not pour the softener directly onto laundry, it may cause stains.
Liquid fabric softener is automatically dispensed during the final rinse of wash program.
Using liquid detergents
If the product contains a liquid detergent cup:
Make sure that you have placed the liquid detergent cup in compartment no. “2”.
If the liquid detergent has lost its fluidity, dilute it with water before putting in the detergent cup.
If the product does not contain a liquid detergent cup:
Do not use liquid detergent for the prewash in a program with prewash.
Liquid detergent stains your clothes when used with Delayed Start function. If you are going to use the Delayed Start function, do not use liquid detergent.
(I) Liquid Chlorine Bleach Compartment
Add liquid chlorine bleach to the right compartment numbered as “I”. Measure 1/3 cup (80 ml) of bleach and pour it into the special container located in the right compartment of the dispenser. This container ensures dispensing and dilution of bleach during the first rinse of wash cycle. There is a maximum fill line on the container. Do not exceed the maximum fill line to prevent early dispensing. Early dispensing may damage your clothes.
CAUTION
• Be sure that bleach container is present in the right compartment of dispenser before you add liquid bleaching agent. You may remove bleach container if you would not use bleach. However do not put any other laundry additives to the empty compartment.
• Be sure to choose extra rinse option if you are using bleach in wash program. Bleach must be rinsed from laundry properly otherwise it may cause skin irritation.
Bleach is automatically dispensed and diluted during the first rinse of wash program
WARNING
• Don’t use bleach with delicates, hand washables or wools, it will lead to clothes damage.
• The liquid bleach cup insert must be removed if not using liquid bleach to avoid water leaking from the dispenser.
Water Consumption
Your clothes washer automatically adjusts the water consumption according to load amount. This feature ensures high wash performance results with efficient water and energy consumption.
Selecting a Program and Operating Your Washer
Control panel
1 - Program selection knob (Uppermost position On / Off) 2 - Duration information display 3 - End Time Setting button 4 - Program Follow-up indicator lights 5 - Start / Pause button 6 - Auxiliary function buttons 7 - Spin speed adjustment button 8 - Temperature adjustment button
Programs
Heavy Duty
Use to wash your heavily soiled, durable cotton and linen laundry. Heavy Soil option is automatically selected for a perfect cleansing. Heavy Soil option prolongs heating step.
Cottons / Normal
You can wash your durable white and colorfast items with this cycle. Washes with vigorous tumbling movements. It is recommended for your cotton or linen items (such as bed sheets, pillowcases,jeans,towels, bathrobes,garments, T-shirts,sweat-shirts , etc.). You can select wash temperature according to care label of items.
Perm Press
You can wash your easy care items on this cycle. Washes with gentler tumbling movements and in shorter washing cycles. It is recommended for your cotton,synthetic or blended items (such as shirts, pants, wrinkle-free items, etc.). You can select wash temperature according to care label of items.
Hand Wash / Wool
You can wash your machine-washable wool items on this program. It is recommended to use appropriate detergents and laundry additives for wools.
Allergen
Applying a steam step at the beginning of the programme allows to soften the dirt easily.
Use this programme for your laundry (baby clothes, bed sheets, bedlinen, underwear, etc. cotton items) that requires an anti-allergic and hygienic washing at high temperature with intensive and long washing cycle. The high level of hygiene is ensured thanks to the steam application before the programme, long heating duration and additional rinsing step.
Spin&Drain
This program is used to discharge the water and spin dry the load with selected spin speed.
Spin&Drain may be selected as one program in this model.
Rinse
This cycle is used when you want to rinse separately.
Organic Wash
You can use organic detergent to wash your durable white and colorfast items with this cycle. Washes with vigorous tumbling movements in a longer washing cycle to give a superior washing performance with organic detergents.
Quick Wash
Use to wash your lightly soiled and unstained cotton laundry quickly.
Delicates & Dark
You can wash your delicate easy-care and dark coloured items on this program. It has more sensitive tumbling movements. and does not do intermediate spinning compared to the permanent program. It must be used for cotton, synthetic or blended clothes for which sensitive washing is recommended.
Sports Wear
You can use this programme to wash sports and outdoors garments that contain cotton/synthetics mix and water repellent covers such as gore-tex etc. It makes sure your garments are washed gently thanks to special rotating movements.
Mixed Fabric
Use to wash your cotton and synthetic clothes together without sorting them.
Cool Clean
Use to wash your moderately soiled and durable cotton/synthetic laundry. An effective and energy efficient washing is provided thanks to the intense washing action.
Down Wear
Use this programme to wash your coats, vest, jackets etc. containing feathers with a “machine-washable” label on them. Thanks to special spinning profiles, it is ensured that the water reaches the air gaps amongst the feathers.
Tub Sanitize
Use regularly (once in every 1-2 months) to clean the drum and provide the required hygiene. Steam is applied before the programme to soften the residues in the drum. Operate the programme while the machine is completely empty. To obtain better results, put powder lime-scale remover for washing machines into the detergent compartment no. „2“. When the programme is over, leave the loading door ajar so that the inside of the machine gets dry.
Program selection
1 Determine the program suitable for the type, quantity and soiling level of the laundry in accordance with the “Program and consumption table”.
CAUTION
• Programmes are limited with the highest spin speed appropriate for that particular type of fabric.
• When selecting a programme, always consider the type of fabric, colour, degree of soiling and permissible water temperature. Always select the relevant lowest required temperature.
• A higher temperature means higher power consumption
2 Select the desired program with the Program Selection knob.
User maintenance instructions
Cleaning detergent dispenser
Remove any powder/liquid residue buildup in the dispenser drawer. To do this;
1.Press the dotted point on the siphon of the softener compartment and pull towards yourself until the it is removed from the dispenser.
CAUTION
• If more than a normal amount of water and softener/bleach mixture starts to gather in the dispenser compartments, dispenser must be cleaned.
2.Wash the dispenser drawer, liquid chlorine bleach container and siphon of softener under running warm water in a sink etc. Wear protective gloves or use an appropriate brush or sponge to avoid touching the detergent residues in the drawer when cleaning.
3.Replace the drawer into its housing after cleaning. Check if the siphon and container are in their original locations.
Cleaning the door seal
Be sure to check the rubber door seal after unloading your washer. Pull the seal back to search for any foreign objects. Residual metal objects such as pins and coins may form rust stains on rubber seal, and cause the seal to leak.
Wipe the stained areas with soapy water using a damp cloth. Then wipe with a dry cloth properly. Do not use an abrasive scrubbing agent when cleaning rubber seal.
Cleaning the drum
Check the wash drum for any foreign objects after unloading your washer. Residual metal objects such as pins and coins may form rust stains on drum surface and your clothes. Do not use abrasive materials while cleaning the inner surface of the drum. Use soapy water with a damp cloth to wipe the inner surface, then dry it and leave the door open to let inside dry properly. "Tub Sanitize" cycle with extra rinse option should be used for monthly cleaning of drum. To carry out this procedure select "Tub Sanitize" Program.
Cleaning the outer cabinet and control panel
When necessary:
Wipe the exterior panels of your washer with soapy water or mild detergent. Dry it with a soft cloth.
Use only a soft and damp cloth to clean the control panel.
CAUTION
• Never use a sponge or scrubbing material. These will damage the painted and plastic parts.
Cleaning the water inlet strainers
There is a strainer at the end of each water inlet valve at the back side of the washer and also at the end of each water inlet hose where they are connected to the faucets. These strainers prevent the foreign substances and dirt in the water to enter into the washer. Strainers should be cleaned from time to time.
Close the water faucets.
Remove the nuts of the water inlet hoses to clean the surfaces of the strainers on the water inlet valves with an appropriate brush.
If the strainers are very dirty, you can pull them out by means of pliers and clean them.
Take out the strainers on the flat ends of the water inlet hoses together with the rubber seals and clean thoroughly under running water.
Replace the rubber seals and strainers carefully and tighten the hose nuts by hand.
Cleaning the drain pump filter
Filter system in your washer prevents solid items such as buttons, coins and fabric fibers clogging the pump impeller during discharging of the washing water. Thus, a good water discharge is achieved and the pump life is extended.
If your washer fails to drain the water, the pump filter may be clogged. You may have to clean it occasionally to prevent any clogging. Water must be drained completely to clean the pump filter.
In addition, water may have to be drained off completely in the following cases:
before transporting the appliance (e.g. when moving )
when there is a danger of frost
In order to clean the dirty filter and discharge the water:
1. Disconnect or unplug the washer from the power supply
WARNING
• There may be water at 158F (70°C) in the drum. Therefore, the filter must be cleaned only after the inside water is cooled down to avoid hazard of scalding.
2.Open the filter cover.
3. Follow the below procedures in order to drain water.
Product has an emergency water draining hose, in order to drain the water:
a Pull the emergency draining hose out from its seat
b Place a large container at the end of the hose. Drain the water into the container by pulling out the plug at the end of the hose. When the container is full, block the inlet of the hose by replacing the plug. After the container is emptied, repeat the above procedure to drain the water in the product completely.
c When draining the water is finished, close the end by the plug again and fix the hose in place.
d Turn and remove the pump filter.
4. Clean any residues inside the filter as well as fibers, if any, around the pump impeller region.
5.Replace the filter.
6. If the filter cap is composed of two pieces, close the filter cap by pressing on the tab. If it is one piece, seat the tabs in the lower part into place first, and then press the upper part to close.
Descaling the washer
Hard water can cause scale build-up inside the drum and other parts of your washer in time. Scaling may lead to some serious problems such as clogging in hoses, heater or pump failure eventually.
To prevent scaling, wash drum should be cleaned frequently. Do not use abrasive materials such as metal wool while cleaning the drum.
Take the manufacturer’s instructions into account if you are using a descaling agent. Descaling agents may contain materials that are hazardous for washer components. Use descaling agents compatible for use in clothes washers.
When using a powder descaling agent, add 1 cup to the main wash compartment of the dispenser and run a regular hot cycle (with extra rinse) without any clothes and detergents.
Troubleshooting
Problem
Reason
Solution
A program cannot be started or selected.
The product may have switched to self protection mode due to a supply problem (line voltage, water pressure, etc.).
* To cancel the programme, turn the Programme Selection knob to select another programme.
Previous programme will be canceled. (See "Canceling the program")
There is water inside the product.
Some water might have remained in the product due to the quality control processes in the production.
* This is not a failure; water is not harmful to the product.
Washer does not fill with water or wash after the program was selected and the “Start/Pause/ Cancel” button was pressed.
Faucets may be turned off.
* Open the water faucets fully.
Water inlet hose may be folded.
* Check the water inlet hose and straighten if necessary.
Water inlet strainers might be clogged.
* Clean the water inlet strainers.
Is there power at the outlet?
* Call an electrician and have the power outlet / circuit breaker / fuse checked.
Washer might be unplugged.
* Plug the power cord to a live electrical outlet.
Drain hose may be folded.
* Check the drain hose and straighten if necessary.
Washer may be in handwash, wools or soak cycle.
* Wait for a short time and tumbling will start.
Drain pump filter or drain itself may be clogged.
* Clean the drain pump filter (See “User maintenance instructions” ). If the house drain pipes are clogged, call a plumber for assistance.
Door may not be closed properly.
* Close the loading door.
Washer does not drain water
/ Washer drains water slowly.
Drain hose may be folded.
* Check the drain hose and straighten if necessary.
Drain pump filter or drain itself may be clogged.
* Clean the drain pump filter (See “User maintenance instructions” ). If the house drain pipes are clogged, call a plumber for assistance.
Product vibrates or makes noise.
Product might be standing unbalanced.
* Stablize the product by adjusting the feet.
A hard substance might have entered into the pump filter.
* Clean the pump filter.
Transportation safety bolts are not removed.
* Remove the transportation safety bolts.
Laundry quantity in the product might be too little.
* Add more laundry to the product.
Excessive laundry might be loaded in the product.
* Take out some of the laundry from the product or distribute the load by hand to balance it evenly in the product.
Product might be leaning on a rigid item.
* Make sure that the product is not leaning on anything.
There is water leaking from the bottom of the washer.
Inlet hose connections may be leaking.
* Be sure the strainers and rubber seals of the water inlet hoses are solid and securely fitted.
End of the drain hose may be loosely inserted into the waste pipe or sink.
* Tightly attach the drain hose to the waste pipe or sink (See “Installation Instructions, Drainage”).
House drain may be clogged.
* If the house drain pipes are clogged, call a plumber for assistance.
Filter cap of the drain pump may not be properly fitted.
* Make sure that the pump filter cap is tightly closed.
Hose connections inside the washer may be leaking.
* Internal hose connections (e.g. dispenser hoses, drain system) should be checked by a service technician.
Product stopped shortly after
the programme started.
The machine might have stopped temporarily due to low voltage.
* Product will resume running when the voltage is restored to a normal level.
Product directly discharges the water it takes in.
Draining hose might not be at an adequate height.
* Connect the water draining hose as described in the operation manual.
No water can be seen in the drum during washing.
Water is inside the invisible part of the product.
* This is not a failure.
Loading door cannot be opened.
The cover lock is activated due to the water level inside the product.
* Drain the water by running the Pump or Spin programme.
Washer might be heating up the water or it may be at the spinning cycle.
* Wait until the process is over.
Due to electrical safety mechanism, the door can only be opened a few minutes after the program has stopped.
* Wait until the process is over.
Child lock is engaged. Door lock will be deactivated a couple of minutes after the programme has come to an end.
* Wait for a couple of minutes for deactivation of the door lock.
If the door can not be opened after minimum ten minutes the program has stopped ,
washer should be switched off pressing on/off button.
* If the situation remains, call the qualified service technician.
Washing takes longer than specified in the manual.(*)
Water pressure is low.
* Product waits until taking in an adequate amount of water to prevent poor
washing quality due to the decreased amount of water. Therefore, the washing time extends.
Supply voltage might be low.
* Washing time is prolonged to avoid poor washing results when the supply voltage is low.
Input temperature of the water might be low.
* Required time to heat up the water extends in cold seasons. Also, washing time can be lengthened to avoid poor washing results.
Number of rinse cycles and/ or amount of rinse water might have increased.
* Product increases the amount of rinse water when good rinsing is needed and adds an extra rinsing step if necessary.
Excessive foam might have occurred and the automatic foam absorption system might have been activated due to too much detergent.
* Use the recommended amount of detergent.
There may be an imbalance of load in the drum.
* The automatic spin correction system might have been activated due to the unbalanced distribution of the laundry in the drum.
Programme time does not countdown. (On models with display) (*)
Timer may stop during water intake.
* Timer indicator will not countdown until the product takes in an adequate amount of water. The product will wait until there is a sufficient amount of water to avoid poor washing results due to lack of water. Timer indicator will resume countdown after this.
Timer may stop during the heating step.
* Timer indicator will not countdown until the product reaches the selected temperature.
Timer may stop during spinning step.
* The automatic unbalanced load detection system might be activated due to the unbalanced distribution of laundry in the product.
Product does not switch to spinning step. (*)
There might be an unbalanced load in the product.
* The automatic unbalanced load detection system might be activated due to the unbalanced distribution of laundry in the product.
The product will not spin if water is not drained completely.
* Check the filter and the draining hose.
Excessive foam might have occurred and automatic foam absorption system might have been activated due to too much detergent.
* Use recommended amount of detergent.
“No spin” setting may be adjusted.
* See “Spin Speed Selection”.
Drain pump filter or drain itself may be clogged.
* Clean the drain pump filter (See “User maintenance instructions” ). If the house drain pipes are clogged, call a plumber for assistance.
Washing performance is poor: Laundry turns
Grey. (**)
Insufficient amount of detergent has been used over a long period of time.
* Use the recommended amount of detergent appropriate for water hardness and type of laundry.
Washing was made at low temperatures for a long time.
* Select the proper temperature for the type of laundry to be washed.
Insufficient amount of detergent is used with hard water.
* Using insufficient amount of detergent with hard water causes the soil to stick on the cloth and this turns the cloth grey over time. It is difficult to eliminate greying once it happens. Use the recommended amount of detergent appropriate for water hardness and the type of laundry.
Excessive amount of detergent was used.
* Use the recommended amount of detergent appropriate for water hardness and type of laundry.
Washing performance is poor: Stains persist or the laundry is not whitened. (**)
Insufficient amount of detergent is used.
* Use the recommended amount of detergent appropriate for water hardness and the type of laundry.
Excessive laundry was loaded in.
* Do not load the product to excess. Load with amounts recommended in the "Program and consumption table".
Wrong programme and temperature were selected.
* Select the proper programme and temperature for the laundry to be washed.
Wrong type of detergent is used.
* Use detergent appropriate for the product.
Excessive amount of detergent was used.
* Put the detergent in the correct compartment. Do not mix the bleaching agent and the detergent.
Washing performance is poor: Stains could not
be removed. Laundry could not be whitened.
Wrong program cycle and temperature might have been selected.
* Select the proper program cycle and temperature for the laundry to be washed (See “Laundry Tips” & “Program Cycle Selection”).
Using insufficient amount of detergent.
* Use the recommended amount of HE detergent appropriate for water hardness and soil level of laundry.
Using wrong type of detergent.
* Use liquid detergent for cold wash cycle for good wash results. Use proper
detergents recommended for wools, handwashable and delicate items.
Mixing different sorts of items.
* Sort the laundry according to care labels and user manual (See “Laundry Tips”).
Mixing different types of laundry additives.
* Put the detergent in the correct compartment of dispenser (See “Detergent Dispenser”).
* Do not mix detergent with bleaching agent or fabric softener.
Excessive laundry may be loaded into washer.
* Do not load the washer in excess.
Detergent residue left on the laundry.
Excessive laundry might have been loaded in.
* Do not load the washer in excess.
Wrong program cycle and temperature might have been selected.
* Select the proper program cycle and temperature for the laundry to be washed (See “Laundry Tips” & “Program Cycle Selection”).
Using powder or granular detergents in cold water washing may leave residue on wash load.
* Use a liquid detergent when washing in cold water.
Use proper detergents recommended for wools, handwashable and delicate items.
Washing performance is poor: Oily
stains appear on laundry.
Oily accumulations of prior wash cycles on the drum may have stuck to the laundry.
* Washer must be operated empty at “Tub Sanitize” cycle with detergent.
The detergent may have been placed into the wrong compartment; the detergent may be mixed with the softener.
* Softener should not come into contact with detergent when being added.
Washing performance is poor:
Clothes smell unpleasant. (**)
Odours and bacteria layers are formed on the drum as a result of continuous washing at lower temperatures and/or in short programmes.
* Leave the detergent drawer as well as the loading door of the product ajar after each washing. Thus, a humid environment favorable for bacteria cannot develop in the machine.
Color of the clothes is faded. (**)
Excessive laundry was loaded in.
* Do not load the product to excess.
Detergent in use is damp.
* Keep detergents closed in an environment free of humidity and do not
expose them to excessive temperatures.
Exposure of laundry to undiluted liquid chlorine bleach.
* Do not pour undiluted liquid bleach onto laundry. Always pour it into bleach compartment of the
dispenser prior to beginning of the wash cycle .
* Do not overfill the bleach compartment. Fill up to max line at the most.
A higher temperature is selected.
* Select the proper programme and temperature according to the type and soiling degree of the laundry.
Rinsing performance is poor.
Intermediate spins may be skipped.
* There may be an imbalance of laundry in the machine. The laundry in the drum may be tangled up too much. Laundry should be rearranged and re-spun. No spinning is performed when the laundry is not evenly distributed in the drum to prevent any damage to
the appliance and to its environment.
The amount and storage conditions of the detergent used might not be appropriate.
* Store detergents in a cool and dry place. Do not keep them under high temperatures.
Not using HE detergent
* Use HE detergent.
Using excessive amount of detergent
* Reduce the amount of detergent.
Drain hose may be folded.
* Check the drain hose and straighten if necessary.
Drain pump filter or drain itself may be clogged.
* Clean the drain pump filter (See “User maintenance instructions” ). If the house drain pipes are clogged, call a plumber for assistance.
Laundry became stiff after washing. (**)
Insufficient amount of detergent is used.
* Using an insufficient amount of detergent for the water hardness can cause the laundry to become stiff
over time. Use appropriate amount of detergent according to the water hardness.
Detergent is put in the wrong compartment.
* If detergent is put in the prewash compartment when the prewash cycle is not selected, the product can take this detergent during the rinsing or softener step. Put the detergent in the correct compartment.
Detergent might be mixed with the softener.
* Do not mix the softener with detergent. Wash and clean the dispenser with hot water.
Laundry does not smell like the softener. (**)
Detergent is put in the wrong compartment.
* If detergent is put in the prewash compartment when the prewash cycle is not selected, the product can take this detergent during the rinsing or softener step. Wash and clean the
dispenser with hot water. Put the detergent in the correct compartment.
Detergent might be mixed with the softener.
* Do not mix the softener with detergent. Wash and clean the dispenser with hot water.
Softener might have been released early.
* You may have added too much softener beyond max fill line.
* The detergent dispenser might be problematic. Water may be siphoned (pulling the softener into the washer early) during the fill or rinse cycles.
* There might be problems with the water inlet valves.
Detergent residue in the detergent drawer. (**)
Detergent is put in a wet drawer.
* Dry the detergent drawer before putting in detergent.
Detergent has gotten damp.
* Keep detergents closed in an environment free of humidity and do not expose them to excessive temperatures.
Water pressure is low.
* Check the water pressure.
The detergent in the main wash compartment got wet while taking in the prewash water. Holes of the detergent compartment are blocked.
* Check the holes and clean if they are clogged.
There is a problem with the detergent drawer valves.
* Call the Authorized Service Agent.
Detergent might be mixed with the softener.
* Do not mix the softener with detergent. Wash and clean the dispenser with hot water.
Regular drum cleaning is not performed.
* Clean the drum regularly. For this procedure, please see "Cleaning the loading door and the drum".
Too much foam forms inside the product. (**)
Not using HE detergent
* Use HE detergent.
Excessive amount of detergent is used.
* Use only a sufficient amount of detergent.
Detergent was stored under improper conditions.
* Store detergent in a closed and dry location. Do not store in excessively hot places.
Some meshed laundry such as tulle may cause too much foam because of their texture.
* Use smaller amounts of detergent for this type of item.
Detergent is put in the wrong compartment.
* Put the detergent in the correct compartment.
Softener is being taken early by the product.
* There may be problem in the valves or detergent dispenser. Call the Authorized Service Agent.
Foam is overflowing from the detergent drawer / Washer is completely full of suds.
Not using HE detergent / Using excessive amount of detergent
* Push “Start/Pause/Cancel” button. Mix 2 cups of water with 1-2 tablespoon of fabric softener and pour it into detergent dispenser.
Push “Start/Pause/ Cancel” button again.
Use proper amount of HE detergent next time you operate the washer.
* Use detergent suitable for the programs and maximum loads indicated in the “Program and consumption table”. When you use additional chemicals (stain removers, bleaches, etc.), reduce the amount of detergent.
Load is still too soapy / Washer is full of suds at the end of program.
Not using HE detergent / Using excessive amount of detergent
* Do not unload the washer. Operate a quick wash cycle (e.g. Delicates, Wools) without any detergent.
Add 1-2 tablespoon of fabric softener into main wash compartment of detergent dispenser during water intake.
Use proper amount of HE detergent next time you operate the washer.
Laundry remains wet at the end of the programme. (*)
Excessive foam might have occurred and automatic foam absorption system might have been activated due to too much detergent.
* Use the recommended amount of detergent.
Unbalance detection due to small amount of laundry inside the drum and/or uneven load distribution.
* Add more laundry (e.g. a few additional towels) to the drum and start a “Spin” or “Spin&Drain” cycle.
Poor spinning results due to not using HE detergent / using excessive amount of detergent
* Use proper amount of HE detergent.
Washer fills with water when
a process is cancelled.
There may be hot water inside washer.
* For safety reasons, water should be cycled in and out a couple times.
Time delay function does not work.
Door may not be closed properly.
* Close the loading door.
The door will not lock/door led remains OFF.
Door is not properly closed/ Door hinge is not aligned with lock switch.
* Check for excessive laundry avoiding the door to be closed. Push and/or shut the loading door firmly until it is properly closed.
Clothes get tangled up too much in the drum when washing.
Excessive laundry might have been loaded in.
* Do not load the washer in excess.
Washing many items of the same type or size of clothes together.
* Load the wash drum with items of different sizes.
Load is wrinkled.
Delay in unloading the washer.
* Unload the washer as soon as the wash cycle ends.
Wrong program cycle might have been selected.
* Select the proper program cycle for the laundry to
be washed (See “Laundry Tips” & “Program Cycle Selection”).
Excessive laundry might have been loaded in.
* Do not load the washer in excess.
Washer does work. Nothing is displayed on the screen.
The plug might not be plugged in the wall power outlet.
* Check the plug.
Fuse may have blown.
* Check the fuse / circuit breaker.
Power may be cut off.
* Check the supply power.
(*) The product does not switch to the spinning step when the laundry is not evenly distributed in the drum to prevent any damage to the product and to its surroundings. Laundry should be rearranged and re-spun.
(**) Regular drum cleaning is not performed. Clean the drum regularly. See “Cleaning the loading door and the drum”
-82419.png)
-648883.png)
-489067.png)
-882306.png)
-114837.png)
-601694.png)
-4990.png)
-771935.png)
-39613.png)
-404473.png) (liquid fabric softener compartment)
(liquid fabric softener compartment)-824577.png)
-311600.png)
-248229.png)
-636101.png)
-58719.png)
-798086.png)
-104626.png)
-964346.png)
-905343.png)