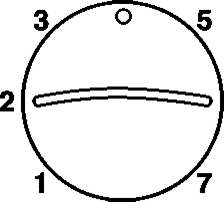
Turn the freezer temperature control to 4 (align circle on knob with desired number), as shown below. This setting is designed to maintain the temperature at or near 0°F (-17.8°C) under normal operating conditions.
Allow the freezer to cool 6 to 8 hours before filling with frozen food.
NOTES:
■ When the freezer is first started, the compressor will run constantly until the cabinet is cooled. It may take 6 to 8 hours (or longer), depending on room temperature and the number of times the freezer lid is opened.
■ After the cabinet is cooled, the compressor will turn on and off as needed to keep the freezer at the proper temperature.
■ The outside of your freezer may feel warm. This is normal. The freezer's design and main function is to remove heat from the contents and air inside the freezer. The heat is transferred to the room air, making the outside of the freezer feel warm.
Adjusting the Control
Turn control to a higher number for colder temperatures. “7” is the coldest setting.
Turn control to a lower number for less cold temperatures. “0” is off or defrost mode.
Indicator Light (on some models)
The indicator light assures you that your freezer is running. If the indicator light is not glowing, immediately check for:
Power interruption.
An unplugged power cord.
An open circuit breaker or blown fuse.
A burned out indicator light. If light is burned out, contact service for a replacement.
Temperature Alarm (on some models)
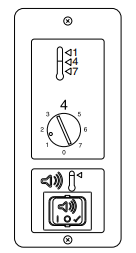
The temperature alarm is located below the temperature control and sounds an audible buzzing alarm if the freezer temperature reaches 10°F (-12°C) or more above the normal for your selected temperature setting. The alarm is controlled by a 3-position switch.
0 Turns off alarm. Keeps the alarm from sounding when the freezer is warm, such as during start up or after defrosting.
✓ Tests the alarm, regardless of temperature.
1 Turns on alarm. The proper setting for normal freezer use.
To change the temperature alarm setting, press the switch on the right for Test, left for On or center for Off.
Key Eject Lock (on some models)
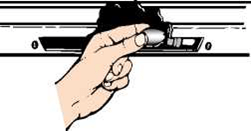
To lock or unlock the freezer, you must hold the key in the lock while turning. The lock is spring loaded, so the key cannot be left in the lock.
If the key is lost, contact your dealer for a replacement. Always give the model and serial number of your freezer when requesting a replacement key.
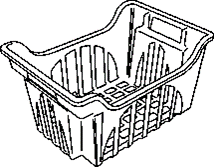
Sliding Basket
Store small packages in the upper baskets to avoid losing them in the bottom of the freezer. Baskets can then be moved from side to side or it can be removed when loading or unloading the food below it.
To remove basket, lift it straight up and out. To replace basket, lower basket back into place.
CARING FOR YOUR FREEZER
Defrosting and Cleaning Your Freezer
Defrost and clean your freezer when frost has built up to about Vi" (0.6 cm) thickness, and thoroughly defrost and clean your freezer at least once a year. In high humidity areas, a freezer may need more frequent defrosting and cleaning.
Do not use abrasive cleaners on your freezer. Do not use cleaning waxes, concentrated detergents, bleaches, or cleaners containing petroleum on plastic parts. Damage can occur.
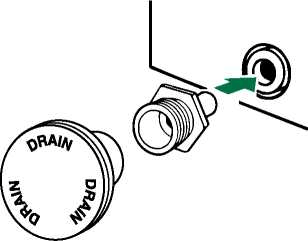
NOTE: The drain cap must be removed before defrosting the freezer and replaced securely afterward.
1. Unplug freezer or disconnect power.
2. Remove all frozen food. Wrap frozen food in several layers of newspaper and cover with a blanket. Food will stay frozen for several hours. You may also store frozen food in a cooler, additional refrigerator-freezer, or in a cool area.
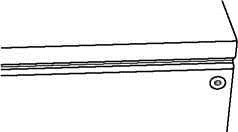
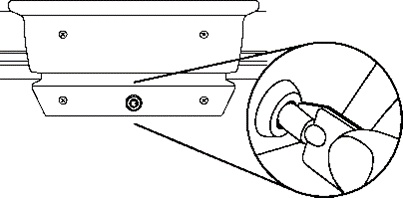
3. Remove the drain cover by pulling it straight out. Then insert the hose adapter (provided) into the drain outlet. Remove the plastic cap from inside the bottom of the freezer. Place a pan under the drain, or attach a hose to the threaded end of the hose adapter and direct the water into a separate drain.
NOTE: Check the drain pan frequently to avoid water overflow. Have a second pan handy for easier emptying.
4. Place pans of hot water in freezer with lid open to speed melting. Directing air from an electric fan into freezer will also help. Do not place fan or any electrical device in freezer.
5. Use a plastic scraper to remove frost.
NOTE: Do not use an ice pick, knife, or other sharp-pointed tool to defrost freezer. Damage can occur.
6. Wipe water from walls with a towel or sponge.
7. Wash the inside walls with a solution of mild detergent in warm water or 2 tbs (26 mg) baking soda to 1 qt (0.95 L) warm water. Do not use abrasive or harsh cleaners.
8. Rinse well and wipe dry with a clean soft cloth.
9. Use a clean sponge or soft cloth and mild detergent in warm water to clean outside of freezer, door liner, and gasket.
10. Rinse well and wipe dry with a clean, soft cloth.
11. Wax painted metal surfaces on the outside of freezer to avoid rust. NOTE: Do not use wax on plastic parts. Wax may damage them.
12. Remove the hose adapter and replace the drain cover and the plastic cap in the bottom of the freezer.
13. Replace all frozen food.
14. If your freezer is equipped with a temperature alarm, turn off alarm for 24 hours after defrosting.
15. Plug in freezer or reconnect power. See “Using the Control.”
Changing the Light Bulbs (on some models)
NOTE: Not all appliance bulbs will fit your freezer. Be sure to replace
the bulb with one of the same size, shape, and wattage.
To Replace Interior Light:
1. Unplug freezer or disconnect power.
2. Reach behind the light lens to remove bulb.
3. Replace bulb with a 40-watt maximum appliance bulb.
4. Plug in freezer or reconnect power.
Power Interruptions
If the power will be out for 24 hours or less, keep the door closed to help food stay cold and frozen.
If the power will be out for more than 24 hours, do one of the following:
Remove all frozen food and store it in a frozen food locker.
If a food locker is not available, consume or can perishable food at once.
REMEMBER: A full freezer stays cold longer than a partially filled one. A freezer full of meat stays cold longer than a freezer full of baked goods. If you see that food contains ice crystals, it may be refrozen, although the quality and flavor may be affected. If the condition of the food is poor, dispose of it.
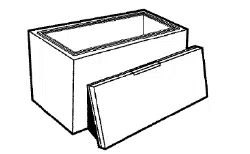
Moving Care
When you are moving your freezer to a new home, follow these steps to prepare it for the move.
Remove all frozen food.
Unplug the freezer.
Take out all removable parts, wrap them well, and tape them together so they don't shift and rattle during the move.
Clean the freezer thoroughly.
Tape the freezer shut and tape the electrical cord to the cabinet.
When you get to your new home, refer to the “Installing Your Freezer” and “Operating Your Freezer” sections for information on installation and setting the controls.
PROBLEM SOLVER
Freezer Operation
PROBLEM
RECOMMENDED SOLUTIONS
Freezer Will Not Operate
Check that it is plugged into a grounded 3 prong outlet. Check that the temperature control is turned on. Replace the fuse or reset the circuit breaker.
NOTE: If problems continue, contact an electrician.
Lights Do Not Work
Check that it is plugged into a grounded 3 prong outlet.
Check that the light bulb is tight in the socket and is not burned out.
Motor Seems To Run Too Much
Check that lid closes properly.
Defrost and clean the freezer to remove excessive frost.
Adding a large amount of food warms the freezer causing the freezer to run longer to cool back down. If this is the situation, wait approximately 6 to 8 hours to allow the freezer to reach the correct temperature.
Get all items out at one time, keep food organized and close door as soon as possible.
Check that the lid gasket is sealed all the way around. If not, contact a qualified person or technician.
Check that space around freezer meets air circulation requirements. See “Location Requirements.”
NOTE: If none of the above, your new freezer will run longer than your old one due to its high-efficiency motor.
Temperature Is Too Warm
Get all items out at one time, keep food organized and close door as soon as possible.
Adding a large amount of food warms the freezer causing the freezer to run longer to cool back down. Check that the temperature control is set correctly for surrounding conditions.
The Lid Will Not Close Completely or Is Difficult To Open
Check that there are no food packages blocking the door.
On some models, check that the shelves and basket are in the correct position. Check that gaskets are clean. See “Caring for Your Freezer.”
Check that the freezer is stable. See “Location Requirements.”
Freezer Makes Loud Buzzing/ Clicking Sound
If the freezer has recently been plugged in or turned on following a defrost or product move, or if there has been an extended power failure, turn off the temperature alarm for the next 24 hours.
Adding a large amount of food warms the freezer. It can take several hours for the freezer to return to normal temperature. Turn the temperature alarm off for the next 24 hours.
#1 Can this freezer be used outside or on a screen in porch?
Most refrigeration or freezer units can be used outside, but the temperatures cannot go above 90'F, nor lower than 60'F. Anything outside of this range could mean that the unit will not cool properly. If this is not an issue with your weather, then a covered area would work well.
#2 What outlet/voltage does this unit require 120v or 240v?
120Volt Here is an extra tip to save on electric, fill plastic milk containers, OJ containers, etc., and place in your free open spaces around the inside of the freezer. This will help keep electric use lower, and will keep your food frozen longer, if you lose your power for any length of time. We have 2 freezers, and we love this one, it is quiet, and runs very little.
#3 The cord is too short to reach a receptacle. What's the solution? Directions say do not use an extension cord.
You will need to move your freezer to a location with a closer power outlet.