User manual Induction Hob
Operating the appliance
This chapter explains how to set a hotplate. The table shows heat settings and cooking times for various meals.
Switching the hob on and off
The main switch is used to switch the hob on and off.
To switch on: Touch the  symbol. An audible signal sounds. The indicator next to the main switch and the hotplate indicators
  light up. The hob is ready to use.
To switch off: Touch the symbol until the indicator goes out. All hotplates are switched off. The residual heat indicator remains lit until the hotplates have cooled down sufficiently.
Notes
- The hob switches off automatically if all hotplates have been switched off for more than 20 seconds.
- The selected settings are stored for four seconds after the hob has been switched off. If you switch it on again during this time, the hob will operate using the previously stored settings.
Setting a hotplate
Use the + and - symbols to select the required heat setting.
Heat setting  = lowest setting.
Heat setting  = highest setting.
Every heat setting has an intermediate setting. This is marked with a dot.
Notes
- To protect the fragile parts of your appliance from overheating and electrical overloading, the hob may temporarily reduce the power.
- In order to prevent the appliance from producing excess noise, the hob may temporarily reduce the power.
Selecting a hotplate and heat setting
The hob must be switched on.
1. Select the hotplate using the  symbol for the relevant hotplate.
2. Touch the + or - symbol within 10 seconds. The following basic setting appears:
+ symbol: heat setting
- symbol:  heat setting
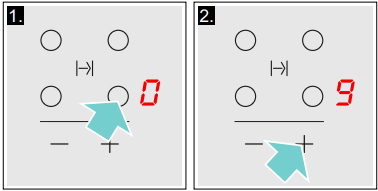
The heat setting is set.
Changing the heat setting
Select the hotplate and touch the + or - symbol until the required heat setting appears.
Switching off the hotplate
Select the hotplate and then touch the + or - symbol until appears.
The hotplate switches itself off and the residual heat indicator appears.
Notes
- If no pan has been placed on the hotplate, the selected power level flashes. After a certain time has elapsed, the hotplate switches off.
- If a pan has been placed on the hotplate before switching on the hob, it will be detected within 20 seconds of pressing the main switch and the hotplate will be selected automatically. Once detected, select the power level within the next 20 seconds or the hotplate will switch off. If more than one pan is placed on the hob, only one will be detected when switching it on.
Chef's recommendations
Recommendations
- When heating up puree, cream soups and thick sauces, stir occasionally.
- Set heat setting 8 to 9 for preheating.
- When cooking with the lid on, turn the heat setting down as soon as steam escapes between the lid and the cookware. Steam does not need to escape for a good cooking result.
- After cooking, keep the lid on the cookware until you serve the food.
- To cook with the pressure cooker, observe the manufacturer's instructions.
- Do not cook food for too long, otherwise the nutrients will be lost. The kitchen clock can be used to set the optimum cooking time.
- For a more healthy cooking result, smoking oil should be avoided.
- To brown food, fry small portions in succession.
- Cookware may reach high temperatures while the food is cooking. We recommend that you use oven gloves.
- You can find recommendations for energy-efficient cooking in section -> "Environmental protection"
 Time-setting options
Your hob has two timer functions:
- Programming the cooking time
- Kitchen timer
Programming the cooking time
The hotplate automatically switches off after the time that is set has elapsed.
Setting procedure:
- Select the hotplate and the required heat setting.
- Touch the
 symbol.
  lights up in the display for the hotplate.
  appears in the timer display.
- Touch the + or - symbol. The basic setting appears:
+ symbol: 30 minutes.
- symbol: 10 minutes.
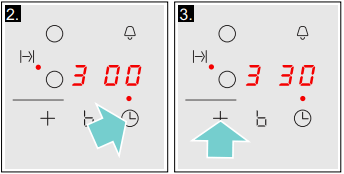
4. Use the + or - symbol to select the required cooking time.
After a few seconds, the time begins to elapse.
Note: The same cooking time can be set automatically for all hotplates. The set time for each of the hotplates counts down independently.
You can find information on automatically programming the cooking time in section -> "Basic settings"
Changing or deleting the time
Select a hotplate. Touch the symbol and use the + or - symbols to change the cooking time, or set the time to .
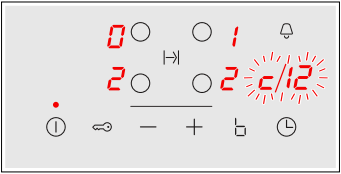
Once the time has elapsed
The hotplate switches off. A beep sounds and in the time program function display appears for 10 seconds. The indicator on the hotplate lights up. Pressing the symbol turns off the indicators and stops the beeping.
Notes
- If a cooking time was programmed for several hotplates, the time information for the selected hotplate is shown in the timer display.
- You can set a cooking time of up to 99 minutes.
The kitchen timer
You can use the kitchen timer to set a time of up to 99 minutes.
This functions independently from the hotplates and from other settings. This function does not automatically switch off a hotplate.
Setting procedure:
1. The kitchen timer can be set in two different ways:
– If a hotplate has been selected, touch the symbol twice.
– If no hotplate is selected, touch the symbol. The display beside the  symbol lights up. appears in the timer display.
2. Touch the + or - symbol. The basic setting appears.
+ symbol: 10 minutes.
- symbol: 05 minutes.
3. Use the + or - symbol to set the required time. After a few seconds, the time begins to elapse.
Changing or deleting the time
Touch the symbol repeatedly until the display lights up beside the symbol . Change the time or use the symbols + or - to set the time to .
Once the time has elapsed
A warning signal sounds. is displayed on the time program function display. After 10 seconds the indicators turn off.
Pressing the symbol turns off the indicators and stops the beeping.
 PowerBoost function
The PowerBoost function enables you to heat up large quantities of water faster than when using heat setting .
The function can be used by any hotplate provided that no other hotplates are switched on. Otherwise  and will flash in the heat setting display
To activate
1. Select a hotplate.
2. Press the symbol. The indicator lights up.
The function should be activated.
Note: If a hotplate is switched on while the PowerBoost function is active, and will flash on the heat setting display; heat setting will then be applied automatically. The PowerBoost function will now be deactivated.
Deactivating
1. Select a hotplate.
2. Touch the symbol. The display goes out and the hotplate switches back to the heat setting.
The function was deactivated.
Note: In certain circumstances, the PowerBoost function can switch itself off automatically in order to protect the electronic elements inside the hob.
 Childproof lock
You can use the childproof lock to prevent children from switching on the hob.
Activating and deactivating the childproof lock
The hob must be switched off.
To activate: Touch the  symbol for approx. 4 seconds. The indicator next to the symbol lights up for 10 seconds. The hob is locked.
To deactivate: Touch the symbol for approx. 4 seconds. The lock is released.
Childproof lock
With this function, the childproof lock automatically activates when a hob is switched off.
Switching on and off
You can find out how to switch the automatic childproof lock on in the -> "Basic settings" section
 Automatic safety cut-out
Automat i c saf et y cut - outIf a hotplate operates for an extended period and no settings are changed, the automatic safety shut-off is activated.
The hotplate stops heating.  and the residual heat indicator
  or
or  flash alternately in the hotplate display.
When you touch any symbol, the display switches off. The hotplate can now be set again.
The point at which the safety shut-off becomes active depends on which heat setting has been set (after 1 to 10 hours).
 Cookware check
This function can be used to check the speed and quality of the cooking process depending on the cookware.
The result is a reference value and depends on the properties of the cookware and the hotplate being used.
- Place a cold saucepan containing approx. 200 ml of water in the centre of the hotplate the diameter of which matches the base of the pan most closely.
- Go to the basic settings and select the
 setting.
- Touch the + or - symbol. - will flash on the hotplate display.
The function has now been enabled.
After 20 seconds, the quality and speed of the cooking process will appear in the hotplate display.
Check the result using the following table:
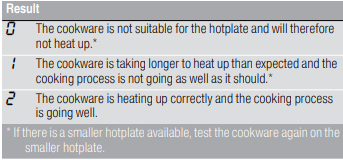
To activate the function again, select the @ or A symbol.
Notes
- If the diameter of the hotplate used is much smaller than the diameter of the cookware, only the middle of the cookware can be expected to heat up. This may result in the cooking results not being as good as expected or being less than satisfactory.
- You can find information on this function in the section on -> "Basic settings".
- You can find information on the type, size and positioning of the cookware in the section on -> "Induction cooking".
 Power manager
You can use the power manager function to set the total power of the hob.
The hob settings are preconfigured at the factory. Its maximum performance is specified on the rating plate.
You can use the power manager function to change the value to meet the requirements of the specific electrical installation.
In order not to exceed this set value, the hob automatically distributes the power available according to need between the cooking zones that are switched on.
While the power manager function is activated, the output of a cooking zone may temporarily fall below the nominal value. If a cooking zone is switched on and the power limit is reached, _ appears in the power level display for a short time. The appliance automatically regulates and selects the highest possible power level.
Note: If automatic power limitation has been activated, the appliance self-regulates but continues to display the selected power level unchanged.
For more information about how the total power of the hob is changed, see the section entitled -> "Basic settings"
Cleaning
Suitable maintenance and cleaning products can be purchased from the after-sales service or in our e-Shop.
Hob
Cleaning
Always clean the hob after cooking. This will prevent food deposits from becoming burned on. Only clean the hob after the residual heat indicator has gone out.
Clean the hob with a damp dish cloth and dry it with a cloth or towel to prevent limescale build-up.
Only use cleaning agents that are suitable for this type of hob. Observe the manufacturer's instructions on the product packaging.
Never use:
- Undiluted washing-up liquid
- Cleaning agents designed for dishwashers
- Abrasive cleaners
- Harsh cleaning agents, such as oven spray and limescale remover
- Scouring pads
- High-pressure cleaners or steam jet cleaners
Stubborn dirt is best removed with a glass scraper, available from retailers. Observe the manufacturer's instructions.
You can obtain a suitable glass scraper from customer services or through our online shop.
Using a special sponge for cleaning glass-ceramic hobs achieves a great cleaning result.
| Potential marks |
| Limescale and water marks |
Clean the hob as soon as it has cooled down. You can use a cleaning agent suitable for glass-ceramic hobs.* |
| Sugar, rice starch or plastic |
Clean immediately. Use a glass scraper. Caution: Risk of burns.* |
* Then clean with a damp dish cloth and dry with a cloth or towel.
Note: Do not use any cleaning agents while the hob is still hot. This may mark the surface. Make sure that any residue left by cleaning agents is removed.
Hob surround
To prevent damage to the hob surround, observe the following instructions:
- Only use warm soapy water
- Wash new dish cloths thoroughly before use.
- Do not use harsh or abrasive cleaning agents.
- Do not use a glass scraper or sharp objects.
Frequently Asked Questions (FAQ)
Using the appliance
Why can't I switch on the hob and why is the childproof lock symbol lit?
The childproof lock is activated.
You can find information on this function in the section on -> "Childproof lock"
Why are the displays flashing and why can I hear an audible signal?
Remove any liquid or food remains from the control panel. Remove any objects from the control panel.
You can find instructions on how to deactivate the audible signal in the section on -> "Basic settings"
Noises
Why I can hear noises while I'm cooking?
Noises may be generated while using the hob depending on the characteristics of the base of the cookware. These noises are a normal part of induction technology. They do not indicate a defect.
Possible noises:
A low humming noise like the one a transformer makes:
Occurs when cooking at a high heat setting. The noise disappears or becomes quieter when the heat setting is reduced.
Low whistling noise:
Occurs when the cookware is empty. The noise disappears when water or food is added to the cookware.
Crackling:
Occurs when using cookware made from layers of different material or when using cookware of different sizes and different materials at the same time.The volume of the noise may vary depending on the quantity of food being cooked and the cooking method.
High-pitched whistling noises:
May occur if two hotplates are used at the highest heat setting at the same time. The whistling noises disappear or become quieter when the heat setting is reduced.
Fan noise:
The hob is equipped with a fan that automatically switches on at high temperatures. The fan may continue to run even after you have switched off the hob if the temperature detected is still too high.
Rhythmical tones like the ticking of a clock:
This noise only occurs when three or more hotplates are on. The noise disappears or becomes quieter when one of the hotplates is switched off.
Cookware
Which types of cookware can be used with an induction hob?
You can find information on which types of cookware can be used with an induction hob in the section on -> "Induction cooking"
Why is the hotplate not heating up and why is the heat setting flashing?
The hotplate on which the cookware is standing is not switched on.
Check that you have switched on the correct hotplate.
The cookware is too small for the hotplate that is switched on or it is not suitable for induction cooking.
You can find information on the type, size and positioning of the cookware in the section on -> "Induction cooking"
Why is it taking so long for the cookware to heat up or why is it not heating up sufficiently despite being on a high heat setting?
The cookware is too small for the hotplate that is switched on or it is not suitable for induction cooking.
You can find information on the type, size and positioning of the cookware in the section on -> "Induction cooking"
Cleaning
How do I clean the hob?
Using a special glass-ceramic cleaning agent produces the best results. We advise against using harsh or abrasive cleaning agents, dishwater detergent (concentrated) or scouring pads.
You can find more information on cleaning and caring for your hob in the section on -> "Cleaning
Trouble shooting
Usually, faults are small matters that are easy to eliminate. Please read the information in the table before calling the after-sales service.
Do not place hot pans on the control panel.
Notes
- If
 appears on the display, press and hold the button for the relevant cooking zone in order to read the fault code.
- If the fault code is not listed in the table, disconnect the hob from the mains power supply and wait 30 seconds before reconnecting it. If this code is displayed again, contact the technical after-sales service and specify which fault code has appeared.
- If a fault occurs, the appliance will not switch to standby mode.


 + heat setting and acoustic signal