User manual Dishwasher
Dishwasher Setup
Detergent
Use only detergent specifically designed for dishwashers. For best results, use fresh powdered dishwashing detergent or detergent tabs.
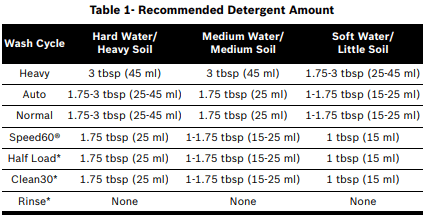
The dishwasher uses less water than most, therefore, less detergent is required. With soft water, 1 tablespoon (15 ml) of detergent will clean most loads. The detergent dispenser cup has lines that measure detergent (Figure 1) to 1 tablespoon (15 ml) and 2 tablespoons (25 ml). 3 tablespoons (45 ml) of detergent will completely fill the detergent dispenser.
NOTE: If you do not know the hardness of your water supply, use 15 ml (1 tbsp) of detergent. Increase the amount if necessary to the least amount required to get your kitchenware clean.
Use the measuring lines in the detergent dispenser cup as a guide to measure the amount of detergent recommended in Table 1.

* Model dependent
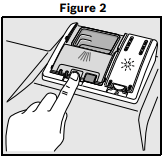
To Close:
- Place finger as shown in Figure 2.
- Slide door closed and press down firmly until it clicks.
To Open:
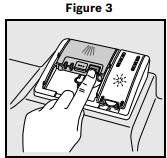
- To open the cover, push the button as shown in Figure 3.
- Cover will slide open.
Rinse Aid
To achieve proper drying, always use a liquid rinse aid, even if your detergent contains a rinse aid or drying additive.
NOTE: The dishwasher indicates low rinse aid by turning on the “Refill Rinse Aid” LED in the display. If this light is on, you need to refill the rinse aid dispenser by following the directions below.
Adding Rinse Aid
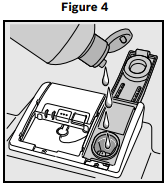
1 Add liquid rinse aid to the dispenser until it is full (see Figure 4). Do not overfill.
2 Close the lid. Lid must be fully closed until it clicks in order to seal.
3 Wipe up any excess rinse aid that may have puddled when the dispenser reservoir is full.
The indicator light will go out a few moments after the dishwasher door is shut. See page 16 for instructions on how to adjust the amount of rinse aid dispensed.
Dishware Materials
NOTE: Before using your dishwasher for the first time, check the information in this section. Some items are not dishwasher safe and should be hand washed; others require special loading.
Recommended:
- Aluminum: Colored anodized aluminum may fade over time. Minerals in your water may cause the aluminum to darken or spot. This can usually be removed with a soap-filled steel wool pad.
- China, Crystal, Stoneware: Some hand-painted utensils may discolor, fade or spot. Hand wash these utensils. Position fragile glassware so that it will not fall over or come in contact with other utensils during the wash cycle.
- Glass: Milk glasses may discolor or become yellow.
- Non-stick Coatings: Apply a light coating of vegetable oil to non-stick surfaces after drying.
- Plastics: Make sure the plasticware is dishwasher safe.
- Stainless Steel, Sterling Silver and Silver Plates: Load these so they do not come in contact with other metals.
Not Recommended:
- Acrylic: Crazing, small cracks throughout the acrylic, may occur.
- Adhesive-Joined Pieces: Adhesives that join materials such as plastic, wood, bone, steel, copper, tin, etc. may loosen.
- Bone-Handled Utensils: Handles may separate.
- Iron: Iron will rust. Hand wash and dry immediately.
- Non-Dishware Items: Your dishwasher is intended for use in cleaning ONLY standard household dishware and kitchenware.
- Pewter, Brass, Bronze: These items will tarnish. Hand wash and dry immediately.
- Tin: Tin will stain. Hand wash and dry immediately.
- Wood: Wooden bowls, wooden utensils and utensils with wooden handles can crack, warp and lose their finish.
Loading the Dishwasher
Do not pre-wash items with loosely attached soiling. Remove all food particles, bones, toothpicks and excessive grease. Items having burned-on, baked-on or starchy soils may require some pretreatment. Refer to the Dishware Materials section for more information about dishware suitability.
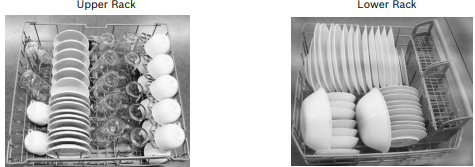
Load only dishwasher safe items into the dishwasher. Load dishes in the dishwasher racks so the insides of bowls, pots and pans are facing the spray arms as shown. Avoid nesting and contact points between dishes. Separate items of dissimilar metals. Use care to not block movement of the spray arms.
Loading the Upper Rack
Ensure items do not protrude through the bottom of the racks and block the spray arms.
NOTE: When pushing the upper rack into the dishwasher, push it until it stops against the back of the tub so the upper rack spray arm connects to the water supply at the back of the tub. Do not push racks in using the door.
Loading the Lower Rack
Place large items in the lower rack. Load pots, pans and bowls upside down. Do not block vent with tall baking sheets. Load these items on the right side of the dishwasher.
Unloading the Dishwasher
When unloading the dishwasher, it is recommended to unload the lower rack first. Next, unload the silverware basket followed by the upper rack. This prevents water from dripping down onto dishware.
NOTE: Dishes are more likely to chip when unloading before cooling.
Suggested Loading Pattern
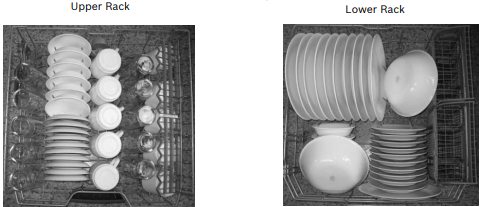
Additional Loading Pattern
Loading the Silverware Basket
Place knives and sharp utensils with their HANDLES UP and forks and spoons with their handles down. If large or oddly-shaped items are loaded in the silverware basket, be sure they do not nest together.
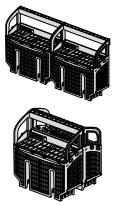
The Double-Flex™ Silverware Basket (model dependent)
This basket splits along its length, resulting in two halves that may be placed in a variety of positions in the lower rack, greatly increasing the lower rack’s loading versatility. The basket snaps together either back to back or end to end as shown.
To split the silverware basket:
Grasp the basket and slide the two halves in opposite directions as shown at right and then pull the two halves apart.
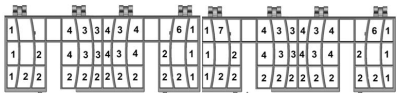
Loading pattern for Double-Flex™ Silverware Basket
The Long Silverware Basket (model dependent)
The long silverware basket fits along the side of the lower rack.
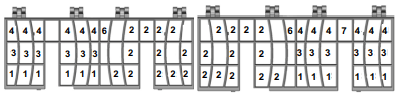
Loading pattern for Long Silverware Basket
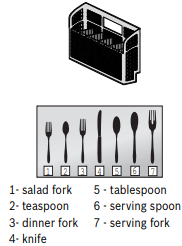
The basket lid may also be snapped to the handle in order to leave the basket open.
Rack Features
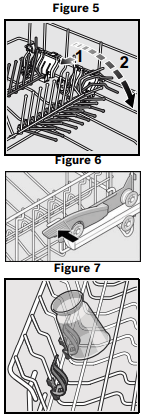
Flip Tines
The upper rack consists of two tines that can be folded down depending on what you may need to load in the rack. To fold down, grasp the folding tine and release from notch. Push folding tine downward to desired position as shown in Figure 5.
RackMatic® Adjustable Upper Rack
The upper rack can be raised or lowered to accommodate large items in either rack (see Figure 6).
NOTE: Before pushing the upper rack into the dishwasher, ensure the rack height is the same on both sides. If the height is not the same on both sides, the dishwasher door will not shut and the upper rack spray arm will not connect to the water inlet.
To lower the upper rack:
1 Pull the upper rack out of the dishwasher until it stops.
2 Press the RackMatic® adjustable upper rack handles inward and let the rack drop gently.
To raise the upper rack:
1 Pull the upper rack out of the dishwasher until it stops.
2 Grasp the top of the rack above the RackMatic® handles and pull it upward until the handles lock the rack into position (you do not need to press the handles in order to raise the rack).
Plastic Item Clips
Light-weight plastic accessories (cups, lids, etc.) can be held securely by the plastic item clips (see Figure 7).
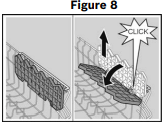
Cup Shelves
The shelf and the space underneath can be used for cups or for larger serving utensils (see Figure 8).
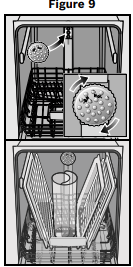
Extra Tall Item Sprinkler (model dependent)
If an item is too tall to be placed in the lower rack even with the upper rack in the raised position, remove the empty upper rack by pulling it out of the dishwasher until it stops. Pull the front of the rack upward and outward until the rollers are completely free of the roller guides.
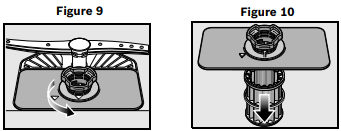
Set the upper rack aside and push the roller guides back into the dishwasher. Insert the Extra Tall Item Sprinkler into the upper rack spray outlet and turn the sprinkler clockwise to lock into position. See Figure 9.
NOTE: Keep the vent on the tub’s left side clear by placing tall items such as plastic cutting boards and tall baking sheets on the lower rack’s right side or center.
NOTICE To avoid dishwasher damage, do not reinstall the upper rack without removing the Extra Tall Item Sprinkler.
Dishwasher Cycles and Options
Wash Cycles
NOTE: In order to save energy, itis recommended to set the “Auto Power Off” feature to “P:01” (see manual section titled “Auto Power Off”).
- Heavy: Best for cleaning items with baked-on food or grease. These dishes would normally require soaking.
- Auto: This is the most flexible cycle. With our most complex soil sensing capability, this cycle is perfect for use with mixed loads of dishware with varying amounts of food soil.
- Normal: The Normal cycle is recommended for daily, regular, or typical use to completely wash a full load of normally soiled dishes.
In order to obtain optimal performance with minimum energy consumption, it is recommended to disable all available options and settings, except “Auto Power Off” as noted at the start of this section.
NOTE 1: See footnote for additional energy test setup instructions.
- Speed60®*: Cleans freshly soiled dishes with easy to remove soils. This cycle reduces cycle time while still including drying.
- Half Load*: Can reduce water consumption when washing small, lightly soiled loads that fill approximately half of the dishwasher’s capacity.
- Clean30*: For lightly soiled items with easy to remove food soils. Reduces overall wash time.
- Rinse*: If you need to pre-rinse dishes to avoid odors, let the dishwasher do the work for you! Place unrinsed dishes inside the dishwasher and select the “Rinse” cycle. Uses less water than hand rinsing and very low energy.
Wash Cycle Options
- Delay Start: Allows you to delay the start time of your dishwasher in one hour increments up to 24 hours.
- Half Load*: Can reduce water consumption when washing small, lightly soiled loads that fill approximately half of the dishwasher’s capacity.
- Sanitize*: Available only in the Heavy, Auto and Normal cycles. The sanitize LED will light when sanitation requirements are met. The technical sanitation measures may also improve the drying results.
NOTE: The dishwasher automatically defaults to Auto Wash when turned off and back on. If you used the sanitize option in your last cycle, the dishwasher will default to Auto Wash with the Sanitize option selected when you turn it on.
- ExtraDry*: Used in combination with a wash cycle, the Extra Dry option raises the temperature and extends the drying time to further enhance drying results and provides a brilliant shine.
- ExtraScrub*: This option increases pressure and temperature in the lower rack for intensive cleaning.
- ExtraShine®*: Used in combination with a wash cycle (except Rinse),the ExtraShine® option helps dishes and glassware come out exceptionally clean with perfect shine by raising the temperature and extending the drying time.
- Delicate*: Available only in the Heavy, Auto, and Normal cycles. This option’s lower temperature will reduce the risk of cloudy glasses.
* model dependent
NOTE 1: The Energy Guide label was based on the Normal or Regular soil sensing cycle as follows: The unit was tested without any Rinse Aid (liquid) in the Rinse Aid chamber. A single dose of detergent was inserted into the Detergent Dispenser, with no detergent being used in the prewash. The unit was not subjected to truncated testing per the definitions in the test procedure. We recommend that dish loads such as the one in the energy certification test have the rack position set in the highest position.
Operating the Dishwasher
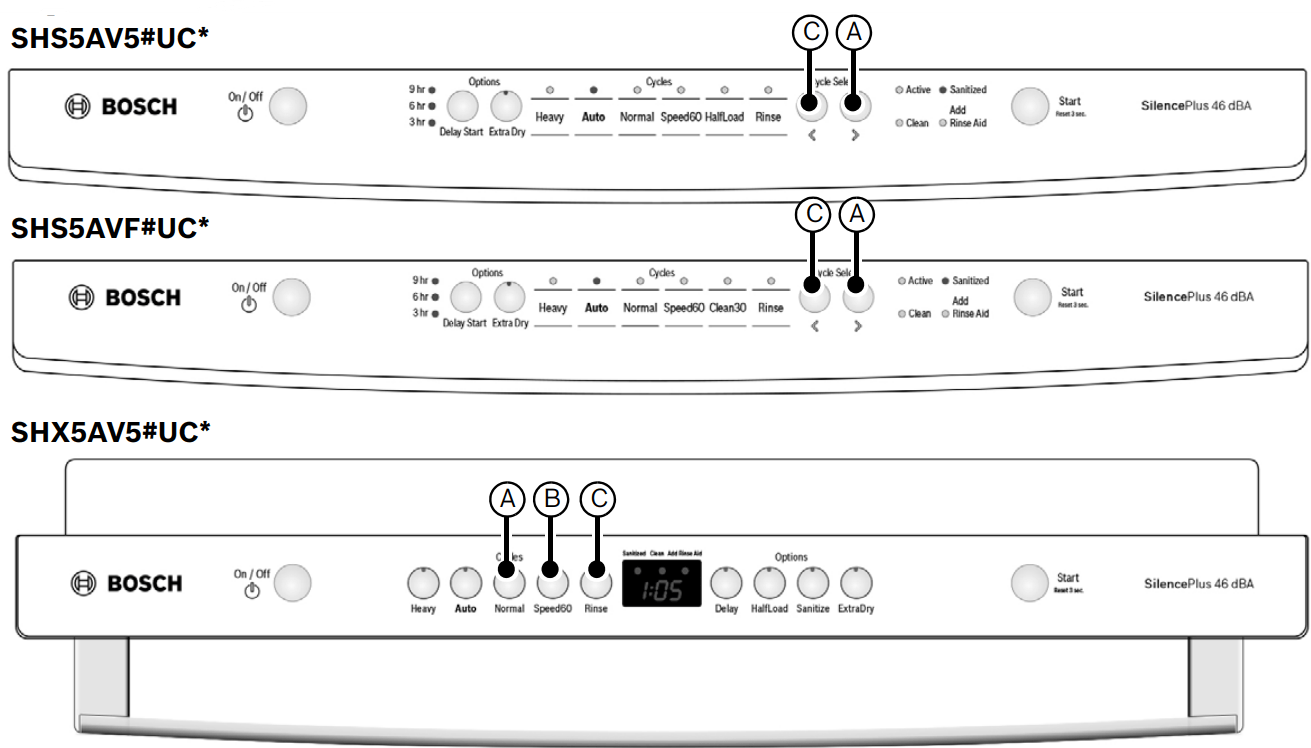
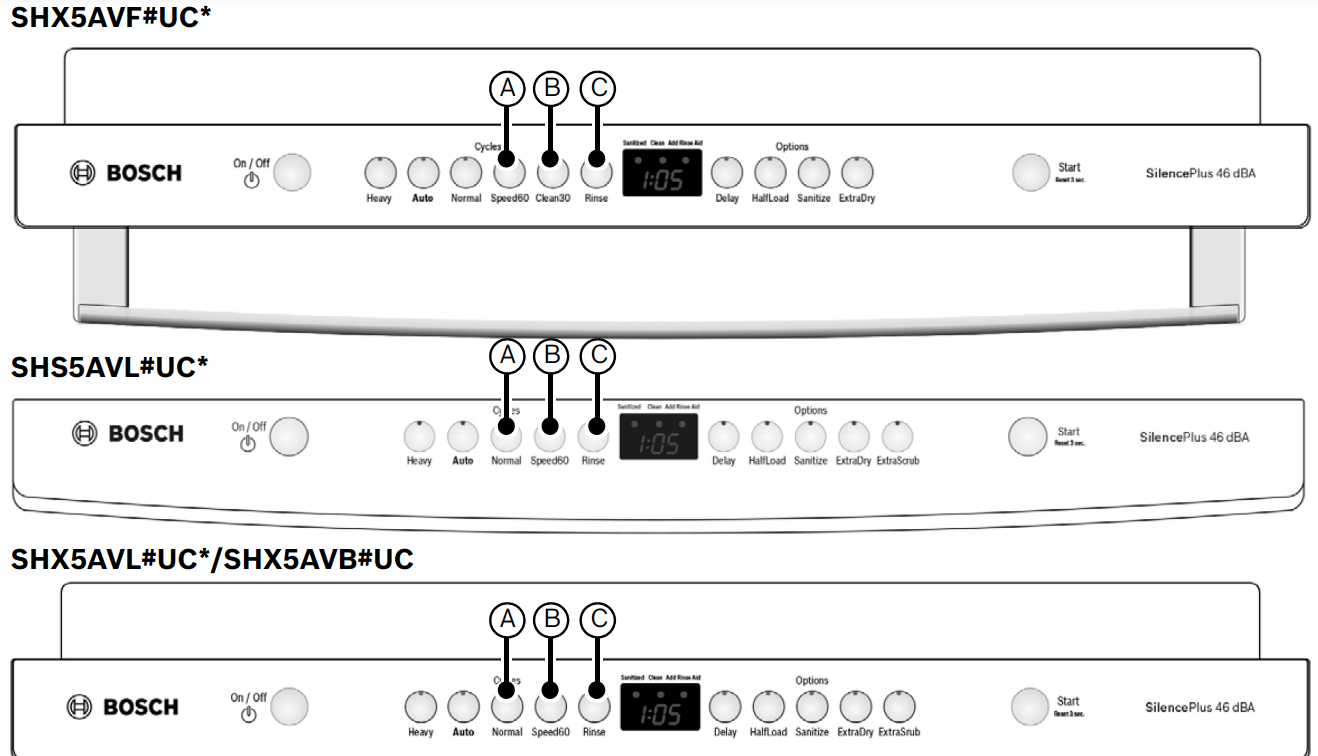
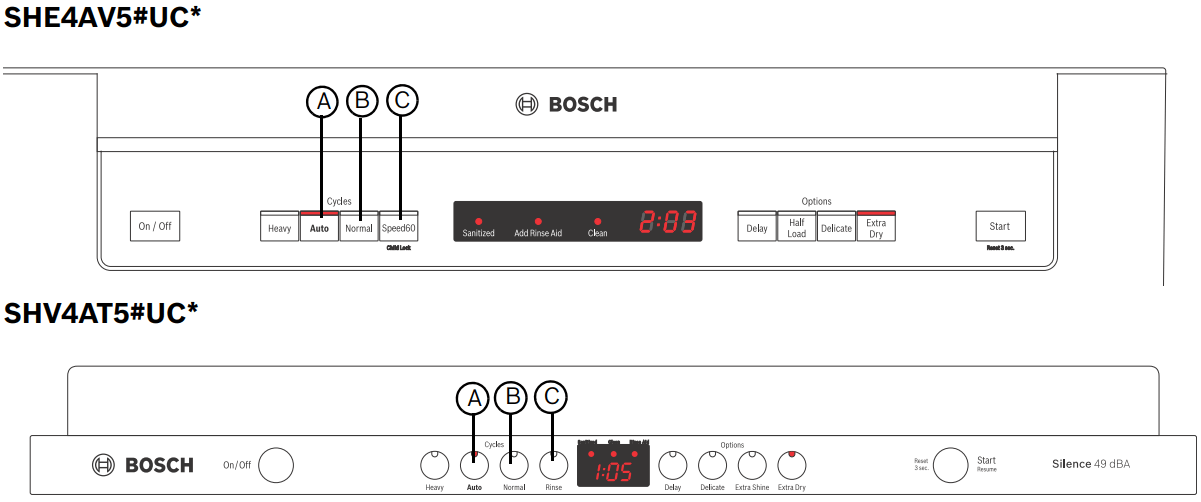
* # can be any number
NOTICE: Buttons are sensitive and should be touched gently. Avoid any grease or food particles resting on the buttons as they could activate the dishwasher. Wiping and cleaning can also activate the dishwasher. For best results, use bare, clean hands when touching the buttons.
WARNING To avoid risk of injury (“burns”), always use caution when opening the door during or following a wash cycle as hot water or steam may escape. Do not fully open the door until water noises have stopped and steam has subsided.
Start the Dishwasher
1 Press the [On/Off] button.
2 Select a cycle and desired options and press [Start].
NOTE: Your dishwasher is protected against unintentional operation. If the appliance door remains open for more than 4 seconds after pressing the [Start/Resume] button, the operation will be paused. Press the [Start/Resume] button again and close the appliance door
Cancel a Cycle
1 Press and hold the [Start] button for approximately 3 seconds until the display reads “0:01”.
2 Wait about 1 minute while the dishwasher drains.
3 Press the [On/Off] button.
NOTE: Your dishwasher is protected against unintentional operation. If the appliance door remains open for more than 4 seconds after pressing the [Start/Resume] button, the operation will be paused. Press the [Start/Resume] button again and close the appliance door.
Interrupt a Cycle
1 Press the [On/Off] button to turn the unit off.
2 To resume the cycle, press the [On/Off] button.
NOTE: Your dishwasher is protected against unintentional operation. If the appliance door remains open for more than 4 seconds after pressing the [Start/Resume] button, the operation will be paused. Press the [Start/Resume] button again and close the appliance door.
Setting the Amount of Rinse Aid
The amount of rinse aid dispensed can be set from “r:00” to “r:06”.
To change the setting:
1 Press the [On/Off] button.
2 Hold down the “A” button (see page 15) and press [Start] until the display indicates “d:00” (x can be any number).
3 Release both buttons.
4 Press the “A” button until the display shows “r:05”. NOTE: For models without a display, press the “A” button until the LEDs for “Clean” and “Add Rinse Aid” are blinking.
5 Press the “C” button to select the desired setting.
“r:00” or 0 LEDs blinking = dispenser is OFF
“r:01” or 1 LED blinking = lowest setting
“r:02” = low setting
“r:03” or 2 LEDs blinking = medium setting
“r:04” = medium/high setting
“r:05” = high setting
“r:06” or 3 LEDs blinking = highest setting
6 Press [Start] to save the setting.
Child Lock
NOTE; Only front-control models have Child Lock.
1 After starting a cycle you can activate the Child Lock.
2 Press and hold the C button until the display reads “CL” (models with display) or the “Child Lock” LED illuminates (models without display). NOTE: “CL” disappears from screen when button is released.
3 Child Lock is now active and buttons will not function, except On/Off.
4 To deactivate, press and hold the C button until the “Child Lock” LED turns off or “CL” disappears from the display.
Delay Start
For models with a display, you can delay the start of the cycle in one hour increments up to 24 hours. For models without a display, you can delay the start of the cycle in three hour increments up to 9 hours.
To set delay start:
1 Press the [On/Off] button.
2 Press the [Delay] button until the display jumps to “h:01” or the corresponding LED blinks.
3 Press the [Delay] button until the delay time corresponds with your requirements. For models with a display, the display can be interpreted as follows:
h:01 = 1 hour delay
h:24 = 24 hour delay
4 Press [Start] to activate delay start.
NOTE: Your dishwasher is protected against unintentional operation. If the appliance door remains open for more than 4 seconds after pressing the [Start/Resume] button, the operation will be paused. Press the [Start/Resume] button again and close the appliance door
To cancel delay start:
1 For models with a display, press the [Delay] button until “h:00” is indicated on the digital display. For models without a display, press the [Delay] button until no LEDs are blinking.
2 Press and hold [Start] for 3 seconds to cancel the cycle. You may now start a new cycle.
NOTE: Your dishwasher is protected against unintentional operation. If the appliance door remains open for more than 4 seconds after pressing the [Start/Resume] button, the operation will be paused. Press the [Start/Resume] button again and close the appliance door.
Cycle Completion Signal
1 Press the [On/Off] button.
2 Hold down the “A” button (see page 15) and press [Start] until the display indicates “d:00”. Release both buttons.
3 Press the “A” button until the display shows “b:02” for models with a display. For models without a display, the “Clean”, “Sanitized”, and “Add Rinse Aid” LEDs are all blinking.
4 Press the “C” button to increase or decrease the tone. See settings below:
“b:00” or 0 LEDs blinking = Cycle Completion Signal OFF
“b:01” or 1 LED blinking = Low tone volume
“b:02” or 2 LEDs blinking = Medium tone volume
“b:03” or 3 LEDs blinking = High tone volume
5 Press [Start] to save setting.
Infolight®
NOTE: Setting can only be changed for models with a display.
An LED illuminates the floor to indicate the unit is running. If the appliance is installed at eye-level, the LED is not visible.
To change the setting:
1 Press the [On/Off] button.
2 Hold down the “A” button (see page 15) and press [Start] until the display indicates “d:00”.
3 Release both buttons.
4 Press the “A” button until the display shows “1:01”.
5 Press the “C” button to switch between “1:01” = ON and “1:00” = OFF and press [Start] to save.
Auto Power Off
NOTE: Setting can only be changed for models with a display. For models without a display, the default setting is P:00
To save energy, the dishwasher is turned off 1 minute after the wash cycle ends. This setting can be adjusted from P:00 to P:02.
To change the setting:
1 Open the door and press the [On/Off] button.
2 Hold down the “A” button (see page 17)and press [Start] until the display indicates “d:0x” (x can be any number). Release both buttons.
3 Press the “A” button until the display indicates “P:0x”.
4 Press the “C” button until the display corresponds with your requirements.
P:00 = dishwasher does not turn off automatically
P:01 = dishwasher turns off automatically after 1 minute
P:02 = dishwasher turns off automatically after 120 minutes (2 hours)
5 Press [Start] to save the setting.
Care and Maintenance
A regular inspection and maintenance of your machine will help to prevent faults. This saves time and prevents possible future problems.
Overall condition of the machine
Never use a steam cleaner to clean your dishwasher. The manufacturer is not responsible for any consequential damage.
Regularly wipe the front of the appliance with a damp cloth - water and a small amount of liquid soap is adequate. Do not use sponges with a rough surface or abrasive detergents, as these could scratch the surfaces.
Stainless steel appliances: To prevent corrosion, avoid using sponge cloths or chlorine based cleaners. Use a stainless steel polish to seal and protect the surface.
Clean the outer edges of the inside door panel regularly to remove debris that may collect from normal loading. If spots begin to appear on the stainless steel, make sure the rinse agent is full and functioning properly.
Filters
The filter system consists of a coarse filter, a flat fine filter and a micro filter. The filters keep large foreign objects in the rinsing water away from the pump. Foreign objects may occasionally block the filters.
Check the filters for residue by:
- Unscrew the filter cylinder as illustrated in Figures 9-10 and take out the filter system.
- Remove any residue and clean filters under running water.
- Reinstall filter system in reverse sequence and ensure that the arrow marks are facing each other after locking it into place.
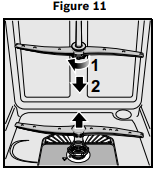
Spray Arms
Check spray arms for grease and limescale deposits.
If you find such deposits:
- Fill detergent dispenser with detergent and start the appliance without utensils in the cycle with the highest rinsing temperature (see wash cycle information table).
- Clean the appliance with detergents/appliance cleaners which are particularly suitable for use with dishwashers.
- Unscrew the spray arms and inspect as shown in Figure 11.
Drain Pump
Large food remnants in the rinsing water not retained by the filters may block the drain pump. The rinsing water does not get pumped out and covers the filters.
In this case:
- Disconnect the appliance from the power supply.
- Remove the filters.
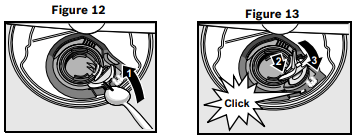
- Scoop out standing water - use a sponge if necessary.
- Using a spoon, pry off the pump cover (see Figures 12-13) until it clicks, then grip the cover and pull upward until it resists and then pull forward.
- Check inner compartment and remove any foreign objects.
- Place cover in the original position, press down and engage.
- Reinstall filters.
NOTICE
Preparing your Dishwasher for Vacation
Before leaving for vacation during warmer weather, besides turning off the main valve, also turn off water supply at the nearest point to the dishwasher. During colder weather, please follow the instructions for winterizing your unit below.
Winterizing your Dishwasher
If your dishwasher will be unused for an extended period of time in a location that experiences freezing temperatures (holiday home or through a vacation period), have your dishwasher winterized by a professional servicer.
Troubleshooting Guide
Dishwashers may occasionally exhibit problems that are unrelated to a malfunction of the dishwasher itself. The following information may help you with a dishwasher problem without involving a repair professional.
| Problem |
Cause |
Action |
| Cycle does not resume after door is opened and closed during cycle. |
1. Door is opened longer than 4 seconds after a cycle has started. |
1. Press [START/RESUME] button again to resume cycle. |
| Self-latching door not closing properly |
1. Self-latching feature will not work properly if dishwasher is not installed correctly. |
1. Ensure the alignment of the dishwasher frame is accurate and level. |
| Dishwasher does not start |
1. Door may not be properly latched.
2. Unit may not be turned on.
3. Unit not reset or previous cycle not completed.
4. Delay start engaged.
5. Interruption of electrical power supply to dishwasher or blown fuse.
6. The door may have been closed without first selecting a cycle.
7. Water supply may not be turned on.
|
1. Shut the door completely.
2. Press the main power switch to turn unit on.
3. To reset, refer to “Operating the Dishwasher” in this manual.
4. To reset, refer to “Delay Start” section in this manual.
5. Check circuit breaker.
6. Select a cycle and press start.
7. Check and turn on water supply.
|
| Dishwasher beeping (end of cycle signal |
r beeping (end of cycle signal) 1. Default factory settings alert the customer that the cycle is complete by beeping. This feature can be deactivated if so desired.
2. Water connection is lost.
|
1. To adjust the volume or deactivate, refer to the “Cycle Completion Signal” section in this manual.
2. Check and turn on water supply.
|
| Display does not illuminate or console lights are not on |
1. A fuse may have been blown or circuit breaker tripped.
2. Door not closed or latched.
|
1. Check the fuse or circuit breaker box and replace the fuse or reset the breaker if necessary.
2. Ensure door is properly latched and completely closed.
|
| Dishwasher seems to run a long time |
1. Incoming water is not warm enough.
2. Cycle time can vary due to soil and water conditions.
3. Rinse aid dispenser is empty.
4. Dishwasher connected to cold water supply.
NOTE: Refer to “Wash Cycle Information” section in this manual for typical cycle lengths.
|
1. Before starting a cycle, run hot water faucet at the sink closest to the dishwasher.
2. Sensors in the dishwasher automatically increase the cycle time to ensure a good wash when heavy soil is detected.
3. Add rinse aid.
4. Verify dishwasher is connected to hot water supply plumbing.
|
| Dishes are not getting clean enough |
1. Spray arm movement obstructed.
2. Spray arm nozzles clogged.
3. Improper use of detergents.
4. Filters could be clogged.
5. Dishes are nested or loaded too close together.
6. Selected wash cycle is not suitable for food soil conditions.
|
1. Ensure that spray arm movement is not blocked by hand rotating spray arms before starting cycle.
2. Remove the spray arms and clean according to the “Care and Maintenance” section of the manual.
3. Increase or decrease detergent depending on the water hardness (refer to Table 1).
4. Clean the filters according to the “Care and Maintenance” section of the manual.
5. Rearrange load such that water spray can reach all items in the dishwasher - see “Loading the Dishwasher” section of the manual.
6. Refer to “Wash Cycle Information” section of the manual.
|
| Dishes are not getting dry enough |
1. Rinse aid dispenser is empty.
2. Improper loading of dishes.
3. Selected cycle does not include drying.
NOTE: Plastic or Teflon do not typically dry as well as other items due to their inherent properties.
|
1. Add rinse aid - the use of rinse aid improves drying.
2. Rearrange load to ensure items are not nesting (see “Loading the Dishwasher” section of the manual).
3. Rinse and Hold setting does not include drying.
NOTE: Sanitize option and Intensive Drying feature also improve drying performance.
|
| Odor NOTE: Water testing is done in the factory. Occasionally water may still appear in the dishwasher at purchase which may create an odor |
1. Food debris is present at the bottom of the dishwasher.
2. Food particles are present near the door seal.
3. Dishes left in unit too long before running a cycle.
4. Residual water is present at the bottom of the dishwasher.
5. Drain hose is obstructed.
|
1. Remove the filters and clean according to the “Care and Maintenance” section of the manual.
2. Refer to “Care and Maintenance” section of the manual.
3. Run a Rinse cycle if you do not intend to immediately wash the dishes.
4. Ensure the unit has completely drained from the last cycle.
5. Remove any obstructions from the drain hose by calling qualified personnel.
NOTE: If odor still persists, run the Normal cycle until it flushes and interrupt the cycle and place an 8 oz. cup of distilled white vinegar solution on the upper rack and then finish the cycle.
|
| Dishwasher not filling with water |
1. Restriction in the water supply system.
2. Previous wash cycle was not completed.
3. Delay start is active.
|
1. Ensure that the water supply valve (typically located under kitchen sink) is open and check that the water supply line has no kinks or clogs.
2. Refer to the “Operating the Dishwasher” section of the manual.
3. Cancel the delay start or wait until delay start time completes.
|
| Water leaks |
1. Suds.
2. Door seal could be pulled away from track.
3. Condensation vent is blocked.
4. Improper installation.
|
1. Wrong type of detergent results in suds and leaks - use only dishwasher detergents. If suds still persist, add one tablespoon of vegetable oil at the bottom of the dishwasher and run the desired cycle.
2. Ensure the door seal is in the track.
3. Ensure that condensation vent is not blocked.
4. Have proper installation verified by qualified personnel (water supply, drain system, leveling, plumbing).
|
| Tub stains |
1. Stains on the dishwasher interior are due to water hardness.
2. Silverware in contact with tub.
|
1. Concentrated lemon juice can reduce the build up of hard water stains. Run a Normal cycle until it flushes and interrupt the cycle and then place an 8 oz. cup of the concentrated lemon solution on the upper rack and finish the cycle. This can be done periodically to avoid build up.
2. Ensure that silverware does not make contact with the tub while running a cycle.
|
| Streaks on glassware or residue on the dishes |
1. Incorrect rinse agent setting. |
1. Depending on the hardness of water, adjust the rinse agent dispenser. Refer to “Dishwasher Setup” section in the manual. |
| Fascia panel discolored or marked |
1. Abrasive cleaner used. |
1. Use mild detergents with soft damp cloth. |
| Noise during wash cycle |
1. Dishes may not be arranged properly. |
1. Water circulation sound is normal, but if you suspect items are banging into each other or into the spray arms, refer to the “Loading the Dishwasher” section of the manual for optimal arrangement. |
| Detergent dispenser cover will not shut |
1. Improper operation of detergent cover.
2. Previous cycle has not finished and should be interrupted or cancelled.
|
1. Refer to “Detergent” section of the manual for instructions on opening and closing the dispenser.
2. Refer to the “Operating the Dishwasher” section of the manual.
|
| Unable to select desired cycle |
1. Previous cycle has not finished. |
1. Refer to the “Operating the Dishwasher” section of the manual. |