B073787QMY, B073HG8M86, B073HF9BB4
USB 3.0 Universal Laptop Docking Station
Estación Base Universal Para Laptop USB 3.0
Station d’Accueil Universelle USB 3.0 Pour Ordinateur Portable
USB 3.0 ユニバーサルラップトップドッキングステーション
USB 3.0 通用型便携式电脑扩展坞
English ..................................... 3
Español .................................. 27
Français ................................. 51
日本語 ..................................... 75
中文 ........................................ 99
3
USB 3.0 Universal Laptop Docking
Station
Safety and Compliance
Before attempting to connect, operate or adjust this product, please save and read the user
manual completely.
• Always read the safety instructions carefully.
• Keep this user manual for future reference.
• Keep this equipment away from humidity.
• If any of the following situation arises, get the equipment checked by a service technician:
- The equipment has been exposed to moisture.
- The equipment has been dropped and damaged.
- The equipment has obvious sign of breakage.
- The equipment has not been working well or you cannot get it to work according to the
user manual.
Copyright
• This document contains proprietary information protected by copyright. All right are reserved.
No part of this manual may be reproduced by any mechanical, electronic or other means, in
any form, without prior written permission of the manufacturer.
Trademarks
• All trademarks and registered trademarks are the property of their respective owners or
companies.
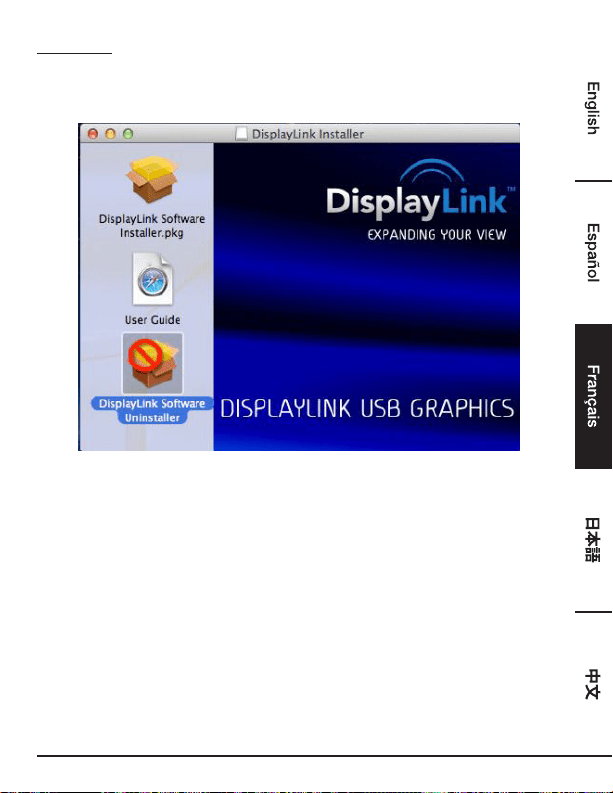
Welcome Guide
•
English
4
Disclaimer
• Information in this document is subject to change without notice. The manufacturer does not
make any representations or warranties (implied or otherwise) regarding the accuracy and
completeness of this document and shall in no event be liable for any loss of profit or any
commercial damage, including but not limited to special, incidental, consequential, or other
damage.
FCC Conditions
This equipment has been tested and found to comply with Part 15 Class B of the FCC Rules.
Operation is subject to the following two conditions:
1. This device may not cause harmful interference.
2. This device must accept any interference received and include interference that may cause
undesired operation.
FCC Caution: Any changes or modifications not expressly approved by the party responsible for
compliance could void the user’s authority to operate this equipment.
CE
This equipment is in compliance with the requirements of the following standard: EN 55032/EN
55024: CLASS B
WEEE Information
For EU (European Union) member users: According to the WEEE (Waste electrical and electronic
equipment) Directive, do not dispose of this product as household waste or commercial waste. Waste
electrical and electronic equipment should be appropriately collected and recycled as required by
practices established for your country. For information on recycling of this product, please contact
your local authorities, your household waste disposal service or the shop where you purchased the
product.

5
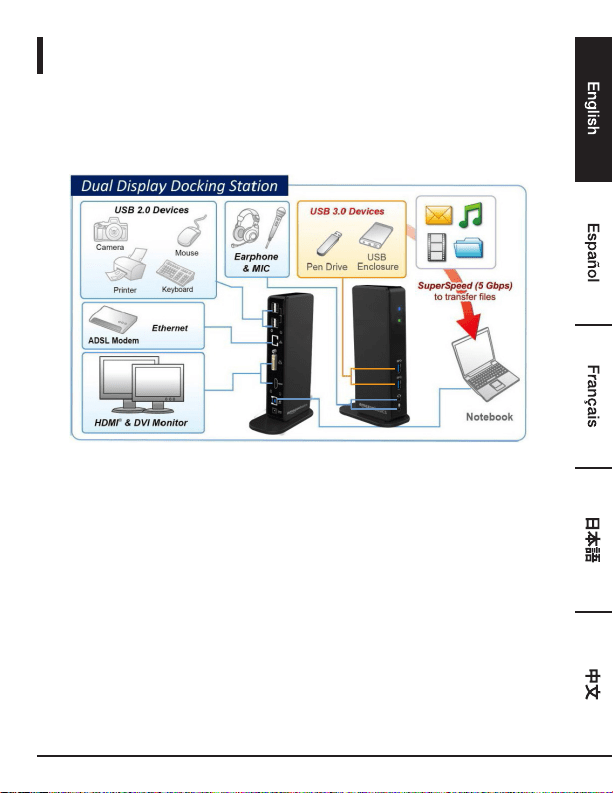
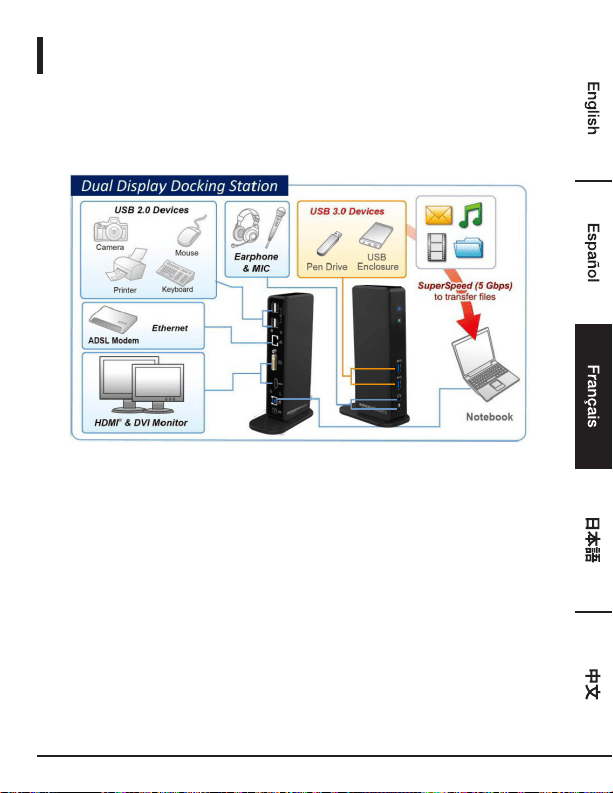
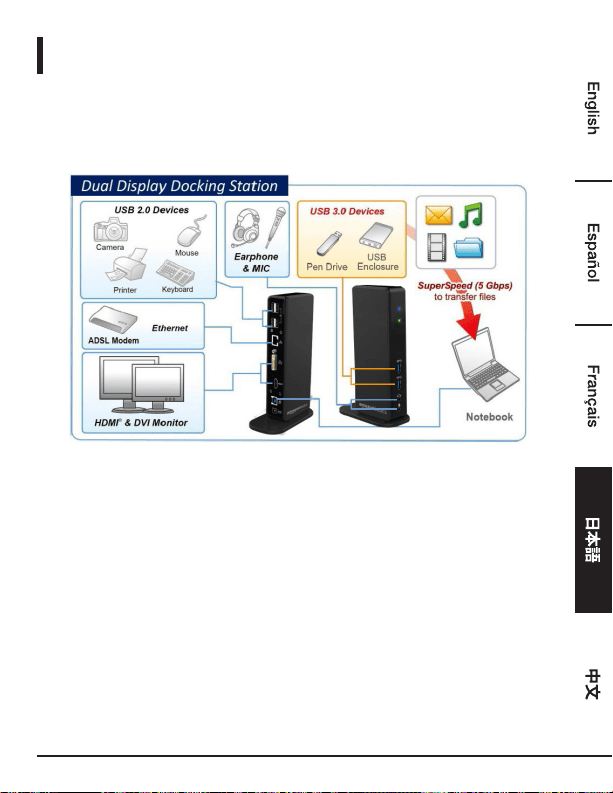
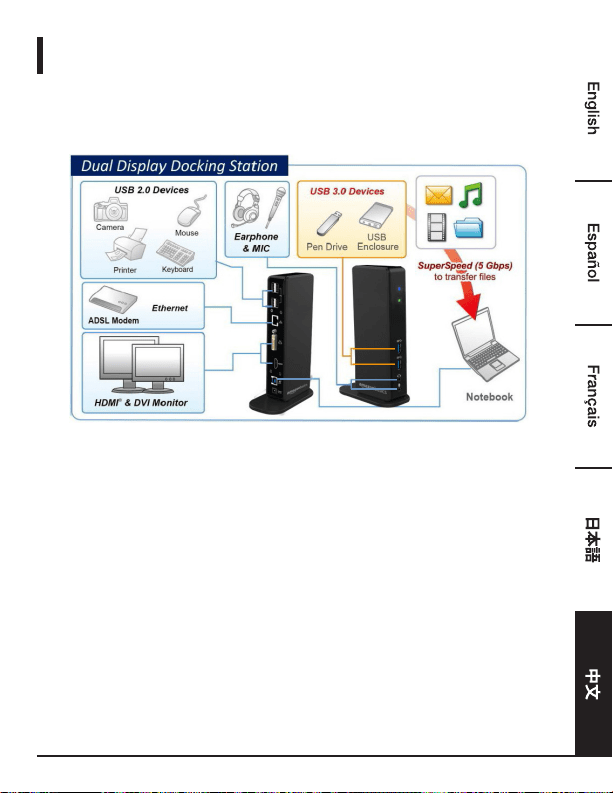
Introduction
• The USB 3.0 dual display docking station is designed for extra connectivity demands. With the
docking station, you can extend the connection of a computer to more USB peripherals, Ethernet
network, the speaker and the microphone through one single USB cable.
• With the built-in USB 3.0 ports, the docking station enables you to enjoy the super speed data
transmission between USB peripherals. Aside from USB 3.0, this product is compliant with USB
1.1/2.0 specification. You will be able to keep and use your USB 1.1/2.0 devices as usual.
• In addition, the docking station is equipped with video output. With the DVI and HDMI ports,
you can mirror your primary screen, or extend the Window desktop allowing visibility of more
applications at the same time. Enhanced expansion capability plus the stylish appearance, this
docking station with video is the most versatile accessory that also complements your home or
office space.
Incorporates HDMI
®
technology.
Features
• Compatible with USB 3.0/2.0/1.1 specification
• Resolution up to 2048x1152
• Support audio 2.1 channel
• Support Gigabit Ethernet
• Support HDMI / DVI Video Output
• Support BC1.2 charging (Front x1)
Package Contents
• Docking Station x1
• USB 3.0 Cable x1
• Power Adapter x1
• CD (Driver and User’s Manual) x1
• Quick Installation Guide x1
6
System Requirements
The minimum requirements for the PC are:
• CPU: 1.6GHz single core or higher processor clock.
- Intel Pentium/Celeron family
- AMD K6/Athlon/Duron family, or compatible processor
• RAM: 1GB or greater
• USB port: 2.0/3.0
• 30MB of available disk space
• Operating Systems:
- Microsoft: Windows
®
7 SP1 or later/ Windows
®
8/
- Windows
®
8.1/ Windows
®
10
- Apple: Mac OS
®
10.9 or later
To play DVD on the extra connected monitor through docking station, in addition to the requirements
above, the following requirements should also be met:
• With dual core CPU at 2.0 GHz processor clock
7
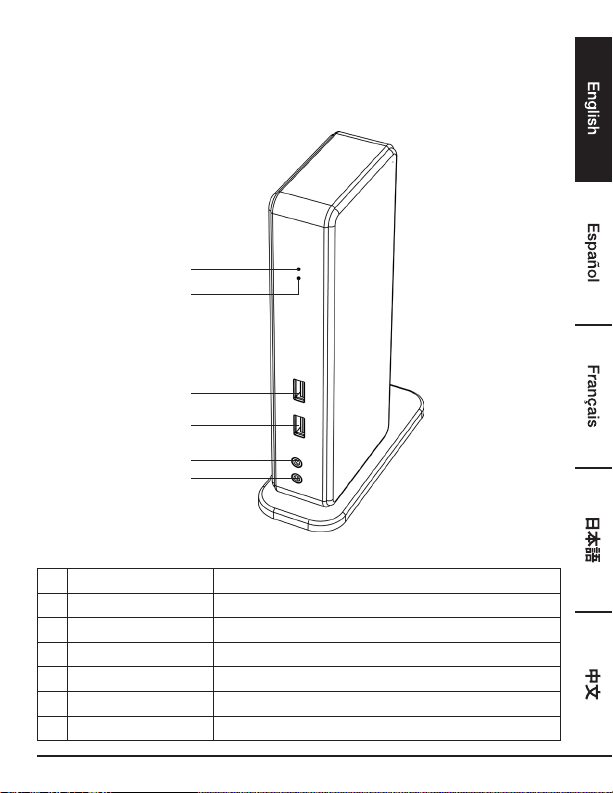
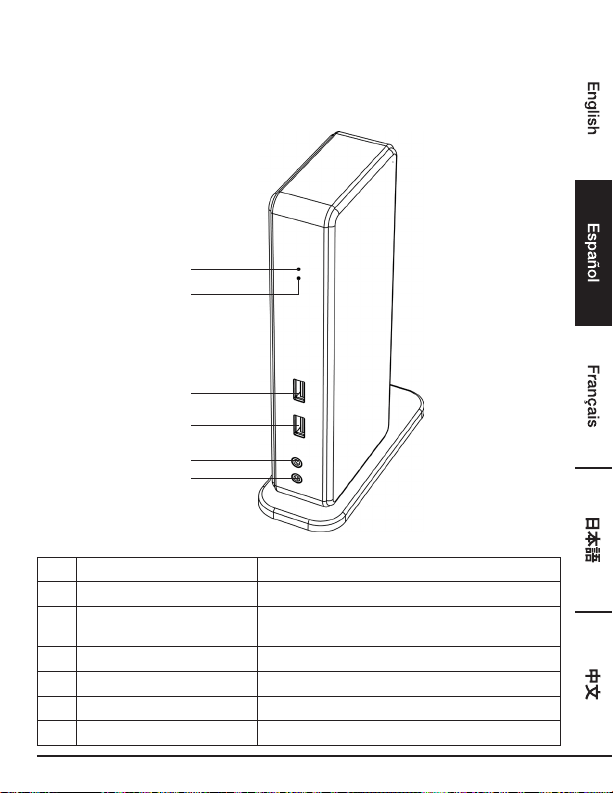
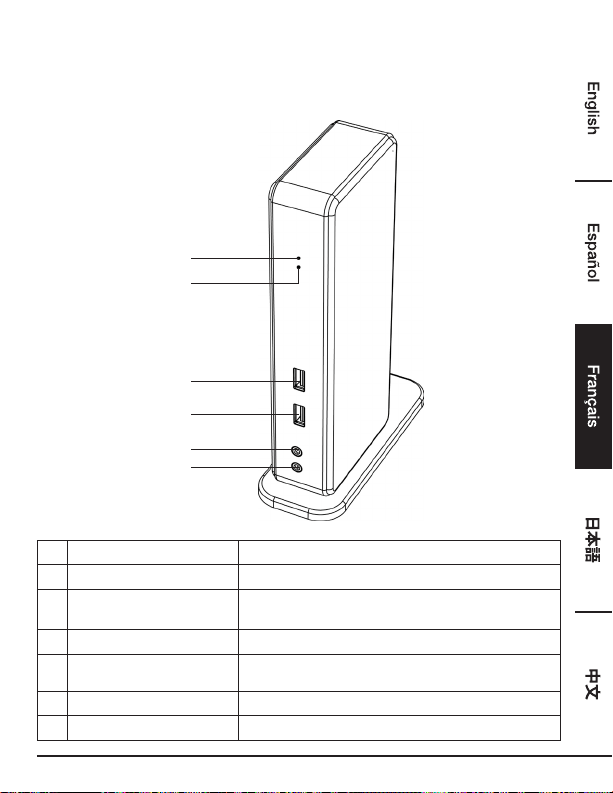
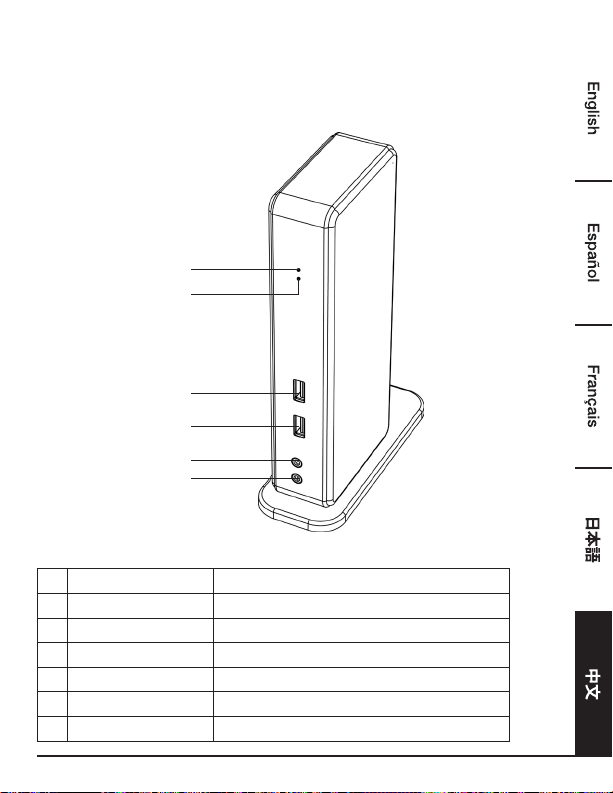
Product Overview
Front
3
1
4
2
5
6
# Item Description
1 Power indicator (Blue) Lights up when the power is on
2 USB indicator (Green) Lights up when a USB device is plugged into the unit
3 USB 3.0 Port Connect to USB 3.0 devices
4 USB 3.0 Port Connect to USB 3.0 devices / With BC 1.2 charging
5 Speaker jack Connect to a speaker or earphone
6 MIC jack Connect to a microphone
8
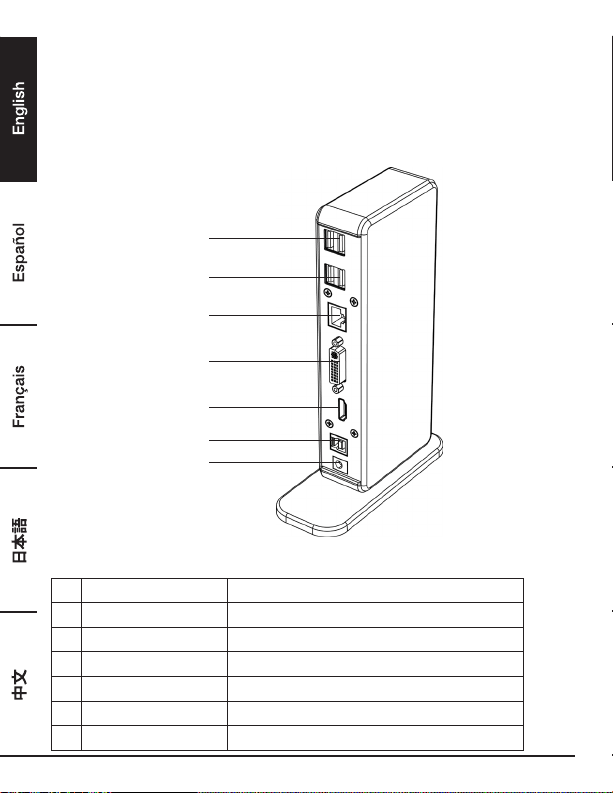
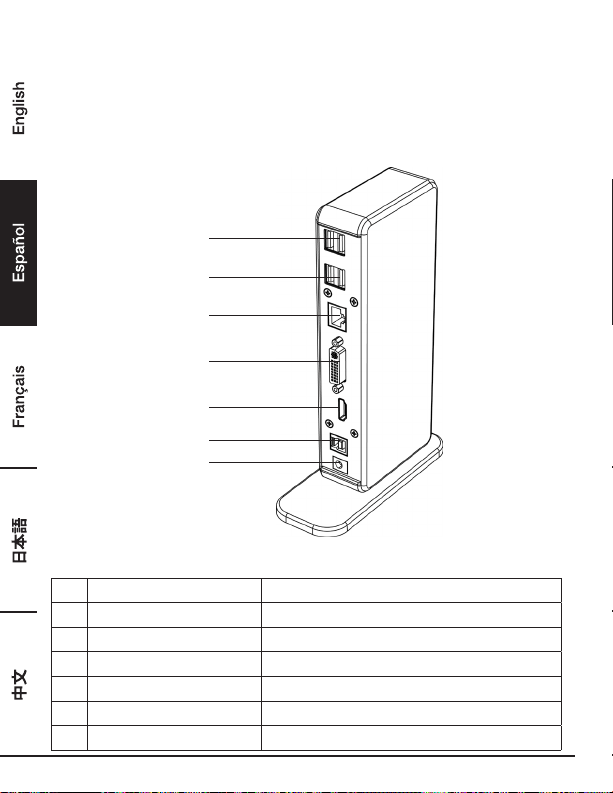
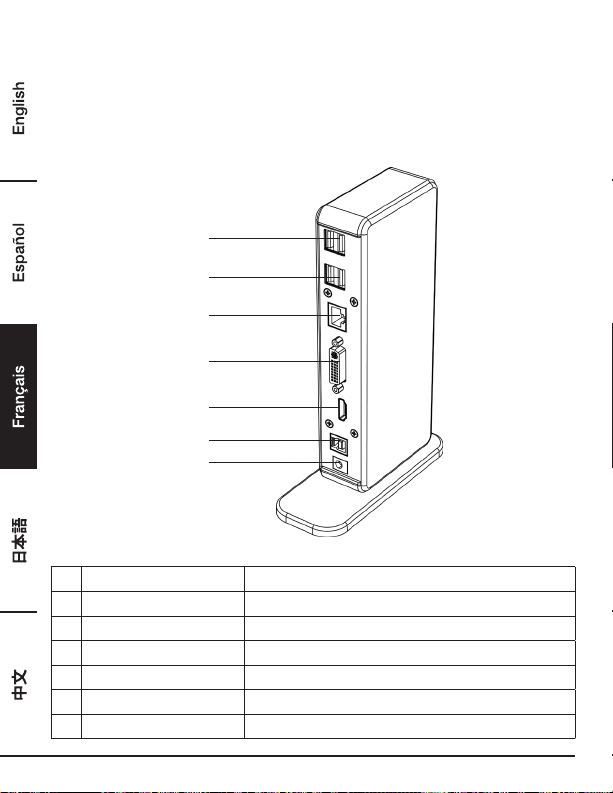
Product Overview
Back
Dual Display Docking Station
7
7
8
9
10
11
12
# Item Description
7 USB 2.0 port Connect to USB 2.0 devices
8 RJ45 port Connect to an Ethernet.
9 DVI connector Connect to a DVI monitor or projector
10 HDMI connector Connect to a HDMI monitor or projector
11 USB 3.0 port (Type B) Connect to a computer
12 Power jack Connect to the power adapter
9
Connection
To connect the USB peripherals, Ethernet, speaker and microphone, follow the illustrations below to
connect the corresponding connectors.

10
Installation
Caution: DO NOT connect the docking to a computer before installing the provided driver.
Note that the following strings and screenshots shown on this user’s manual may vary slightly with the
operating system
Windows
®
OS
1. Insert the provided CD into your CD-ROM drive.
2. Click Run Setup.exe to execute the installer program. Wait for the program to install the drivers.
3. Click Finish to complete the installation.
NOTE:
a. If the AutoPlay does not start automatically, locate and double-click on the Setup.exe file in
the driver folder to launch the setup.
b. Enter the administrator password and then click Yes to start the installation if a User Account
Control dialog box pops up.
c. For some Windows Operating Systems, the driver will automatically be installed. If the driver
installation doesn’t start automatically, please install the provided driver as instructed above.
4. Connect the docking station to a computer after the driver installation is completed. For
connection details, refer to the chapter of Connection.
5. When the operating system detects the docking station, the reminder message will appear on the
system tray.
11
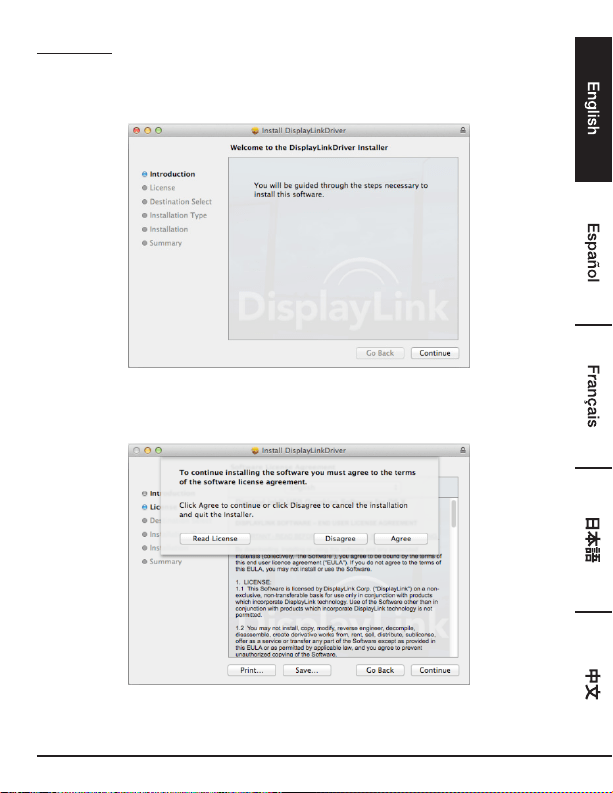
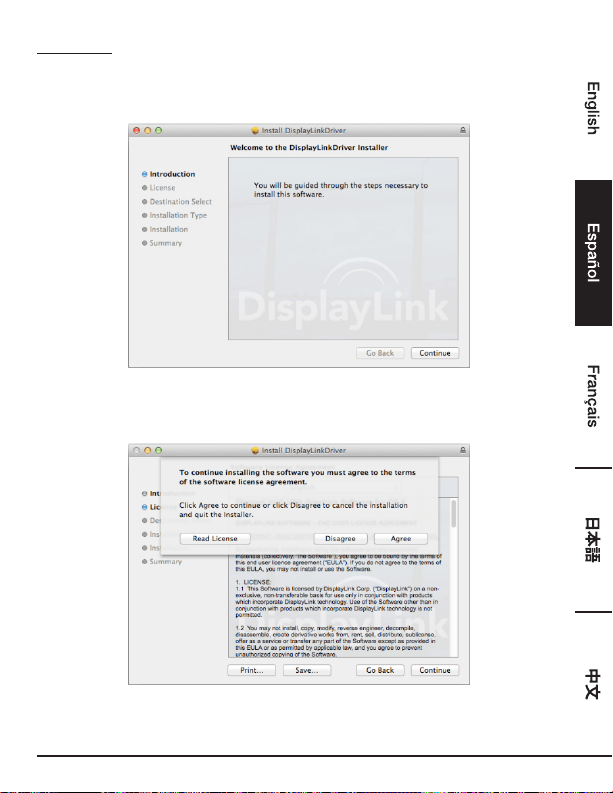
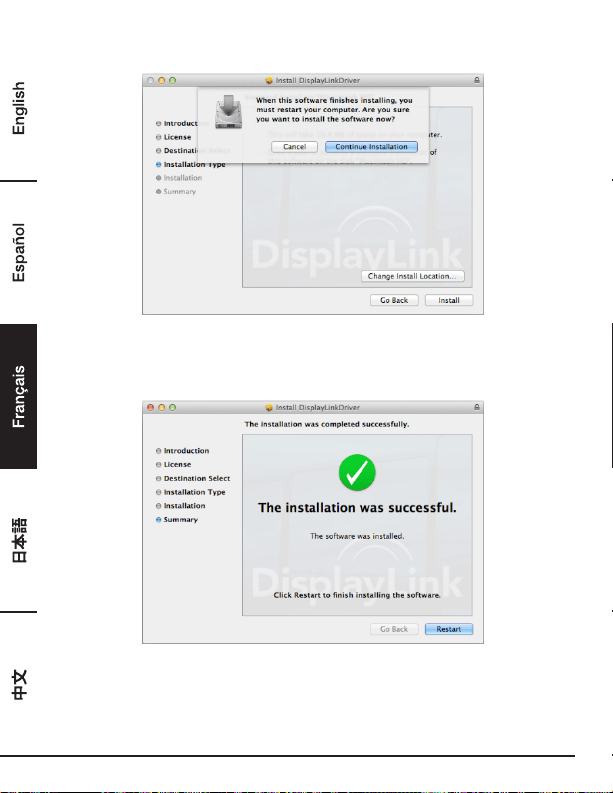
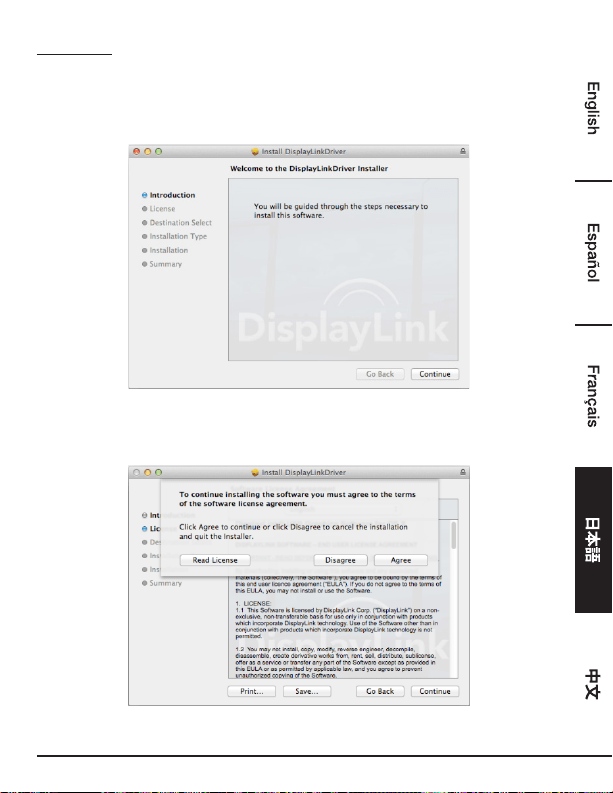
Mac OS
®
1. Insert the provided CD into your CD-ROM drive.
2. Locate and double-click the .dmg file to start the installation, and click Continue.
3. Click Continue > Agree.
12
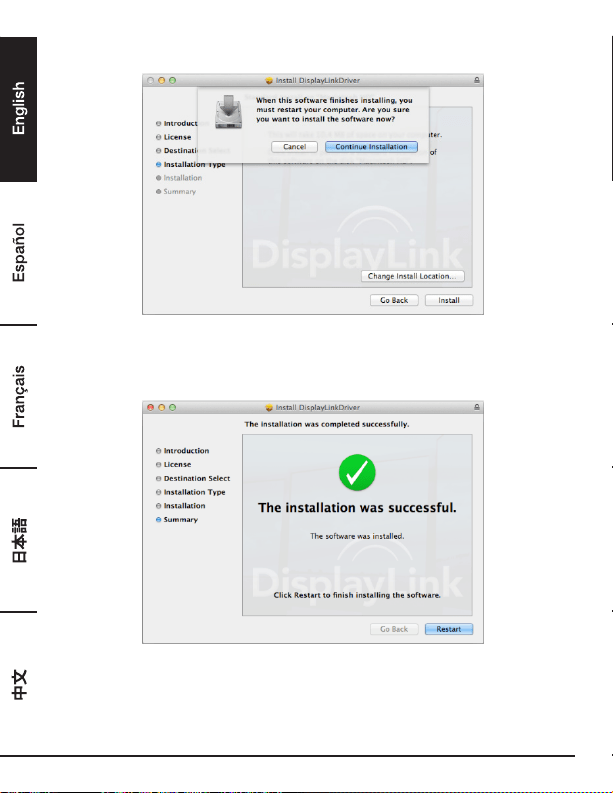
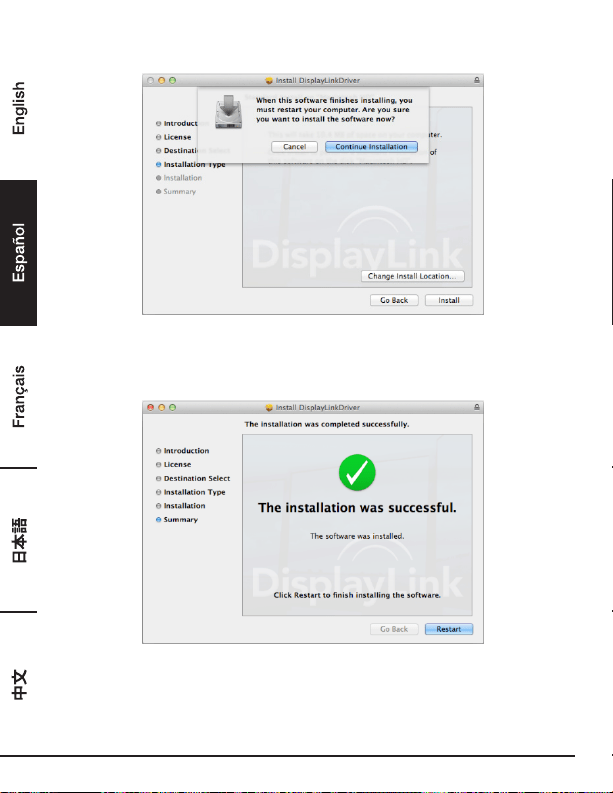
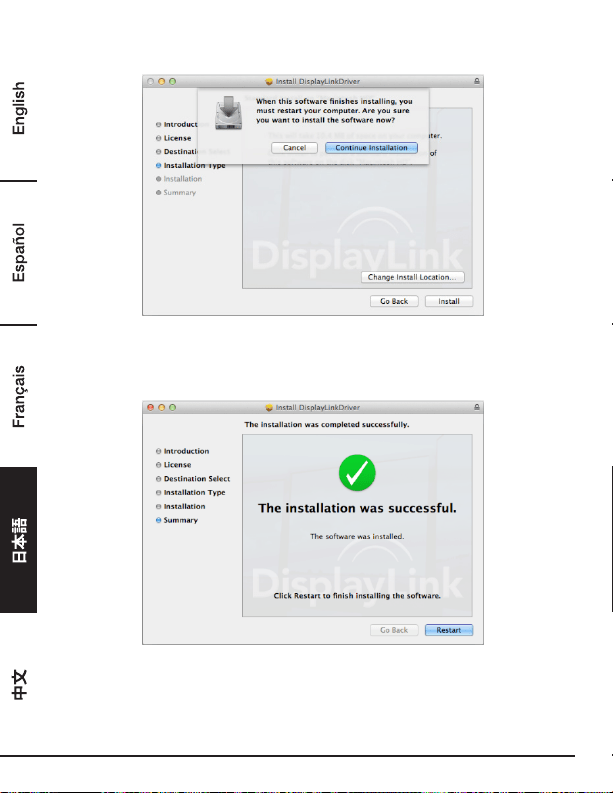
4. Click Install > Continue Installation.
5. Please wait while the installation is in process.
6. Click Restart to complete the installation.
13
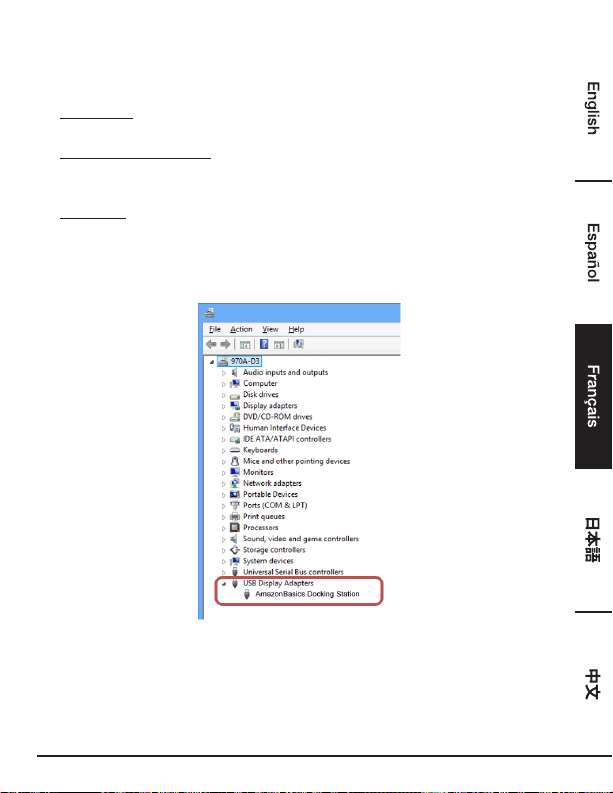
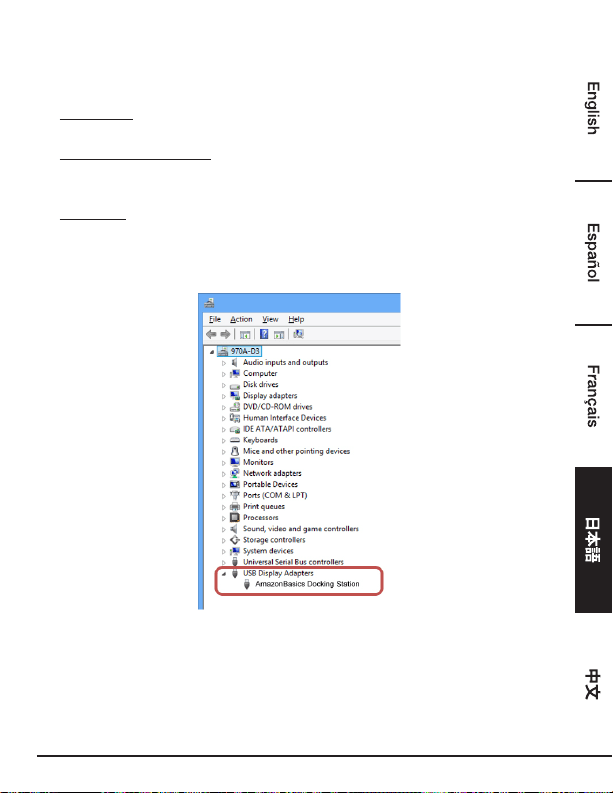
Verifying The Installation
To verify the driver of the adapter, follow the step below.
1. Following the path to open the device manager.
Windows
®
10
Settings\Devices\Connected devices
Windows
®
8/ Windows
®
8.1
Settings\ Control Panel\ System and Security\System\ Device manager
Windows
®
7
Control Panel\ System and Security\ Systems\ Device manager
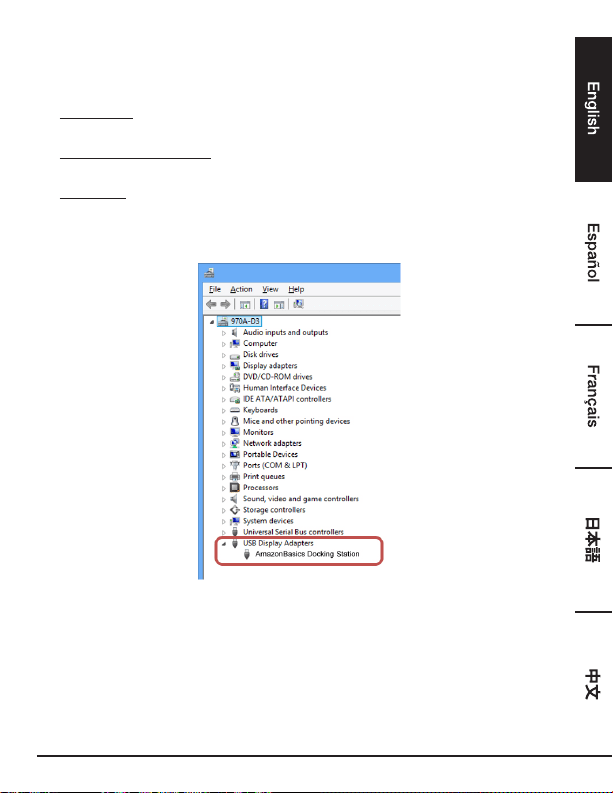
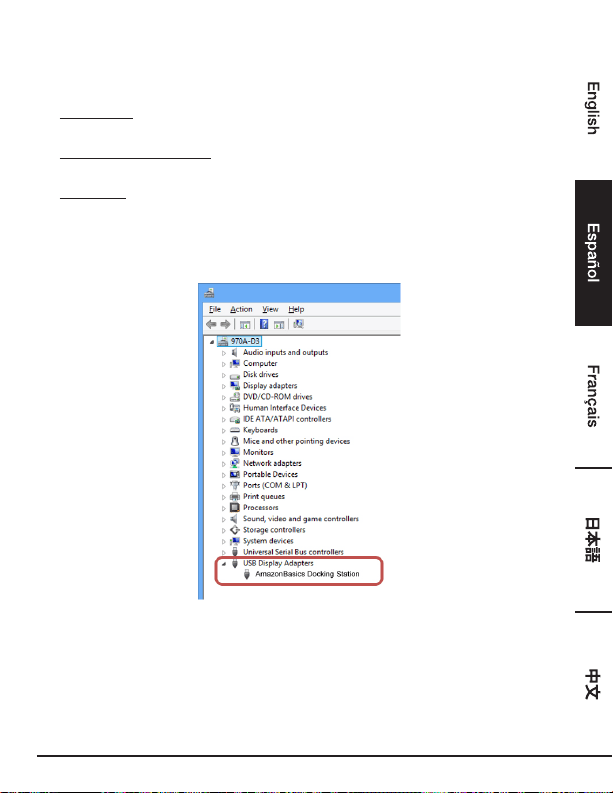
2. You will find AmazonBasics Docking Station device listed as below.
*The strings of the driver and the screenshots are from Windows
®
8 and might vary slightly with the
operating system.
NOTE:
If you cannot find the driver in the list, the driver may not be properly installed. Please delete the item,
unplug the adapter and repeat the installation steps.
14
Mac OS
®
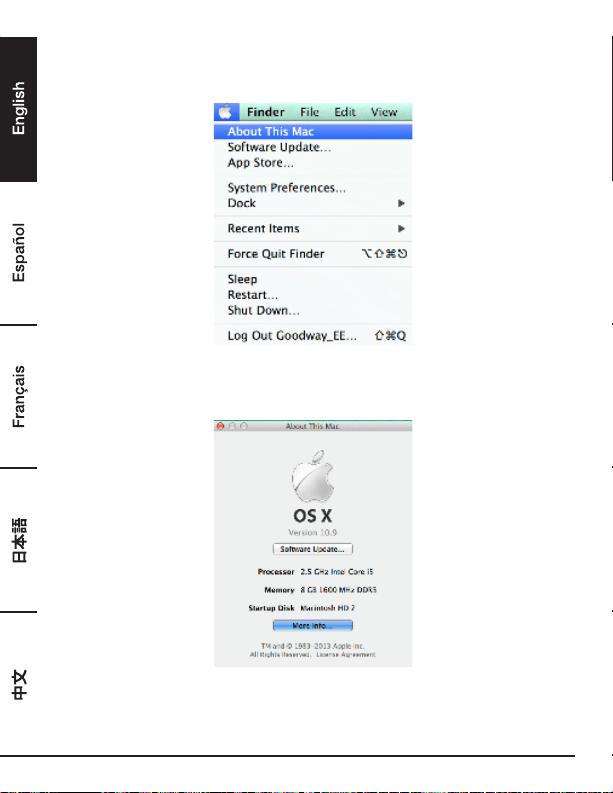
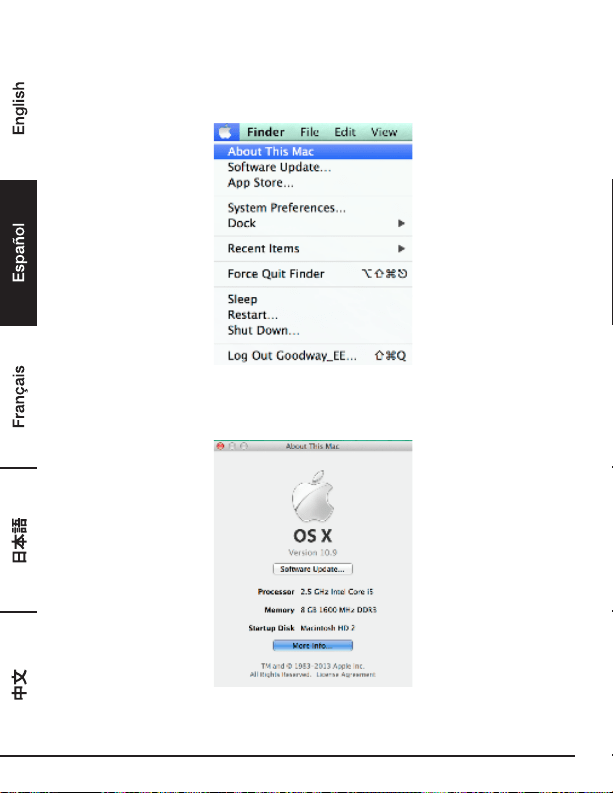
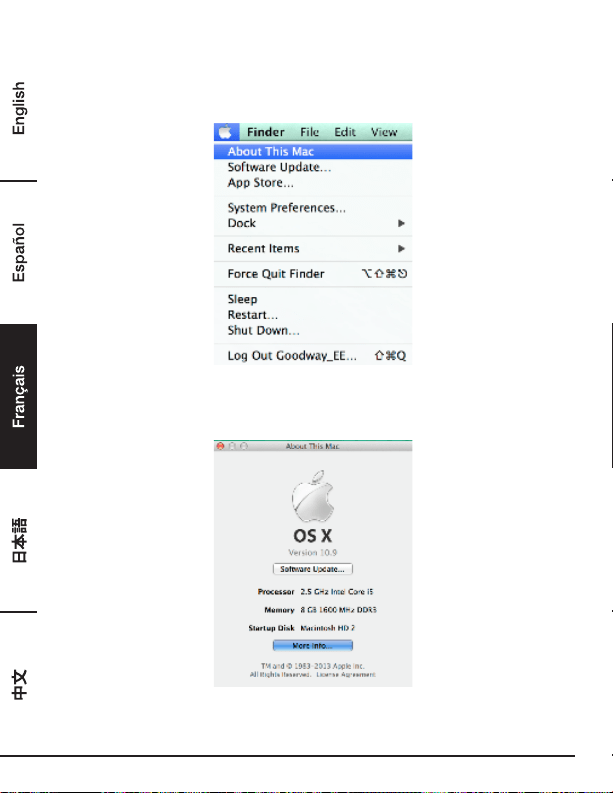
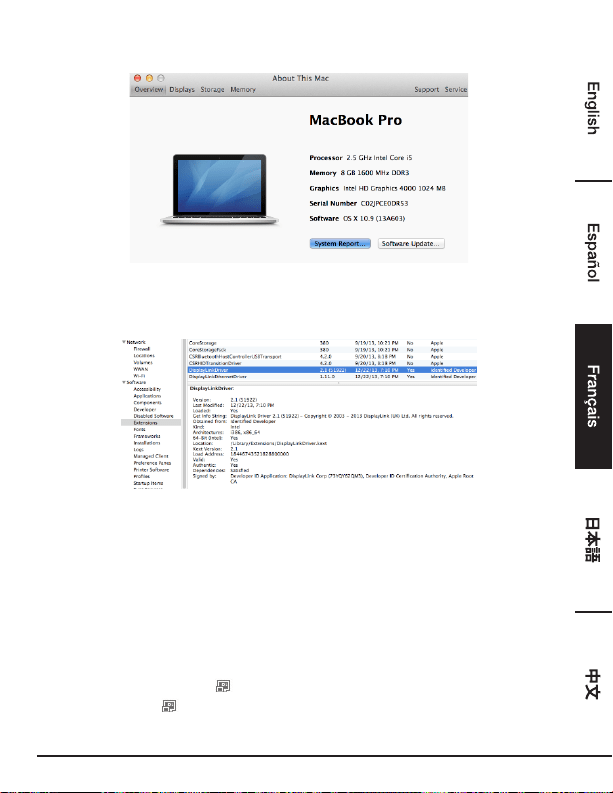
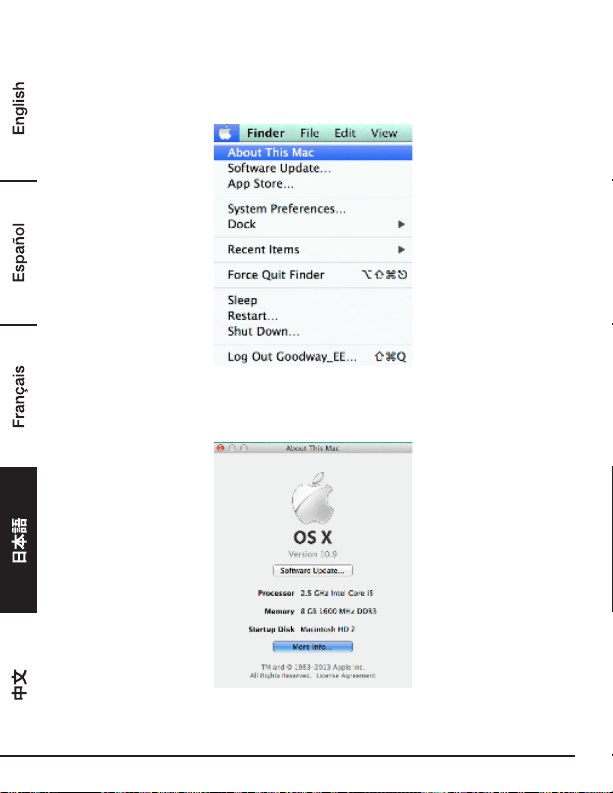
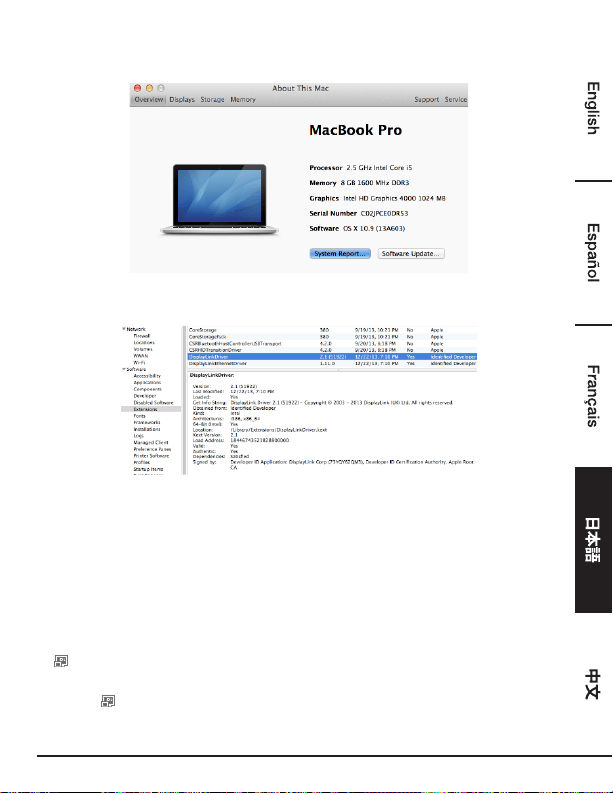
1. Click on the Apple sign on the top left corner of the screen to open About This Mac on Mac
®
.
2. When the screen below appears, click More Info….
15
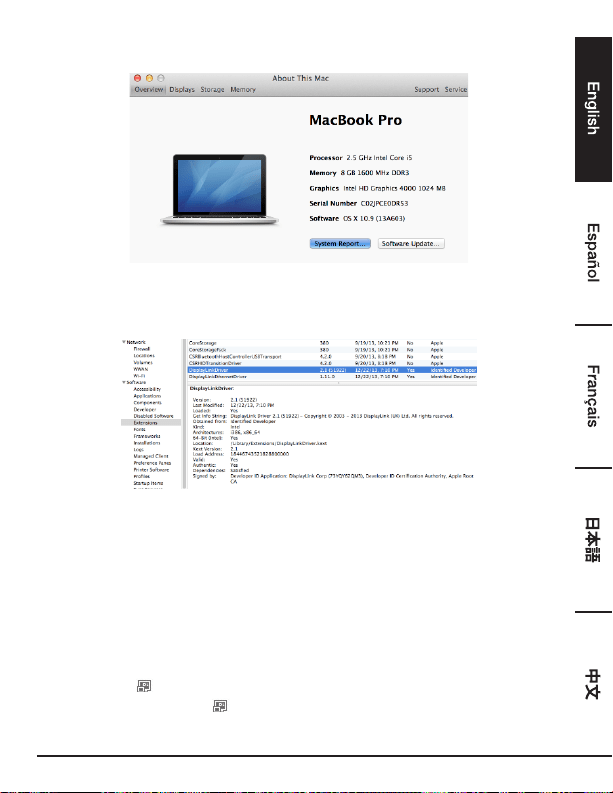
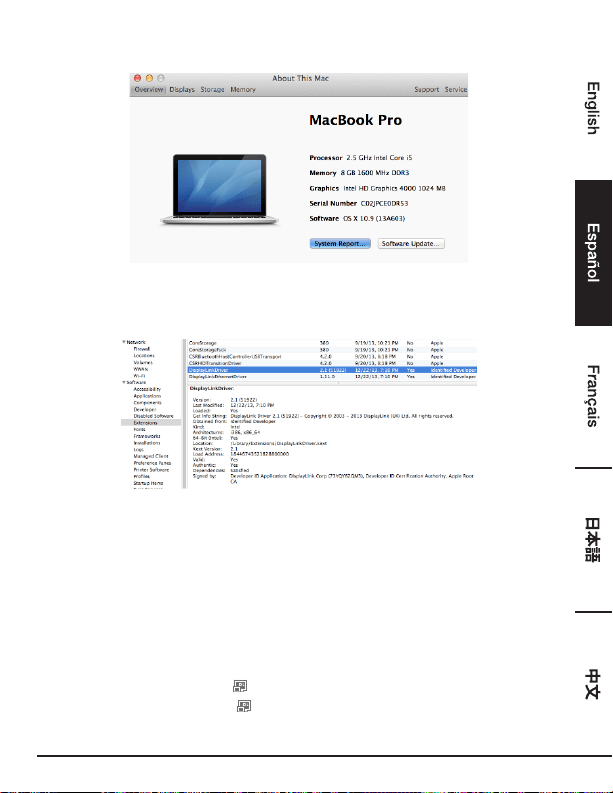
3. When the screen below appears, please click System Report….
4. You will find DisplayLink Driver listed as below.
Display Conguration
NOTE: The following screenshots in this section are from Windows
®
7 and might vary slightly with the
operating system.
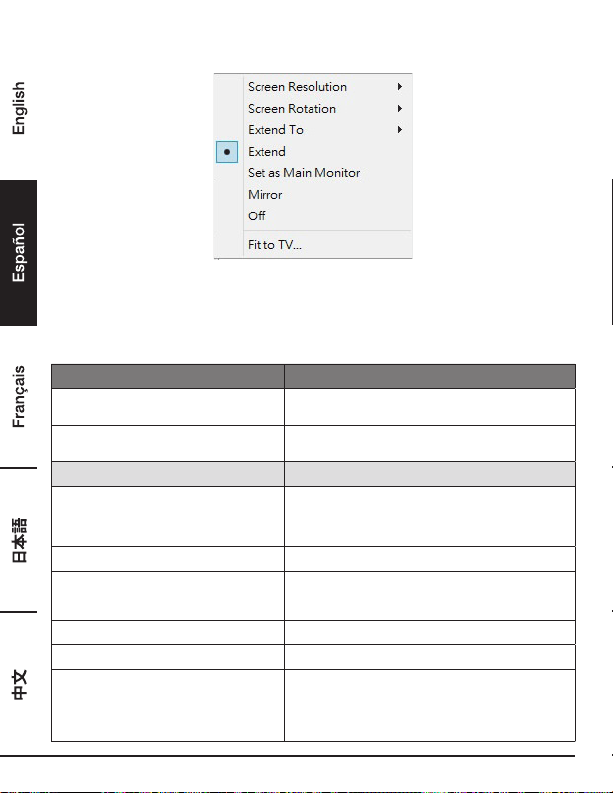
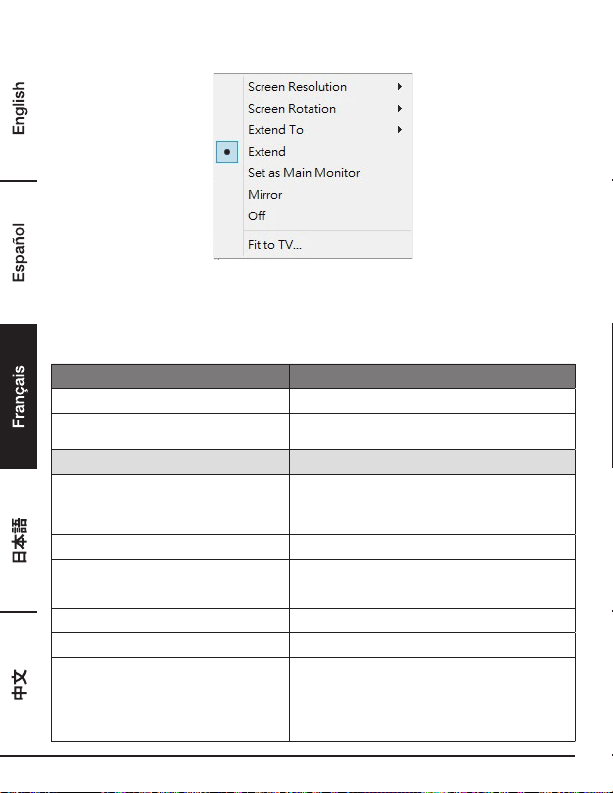
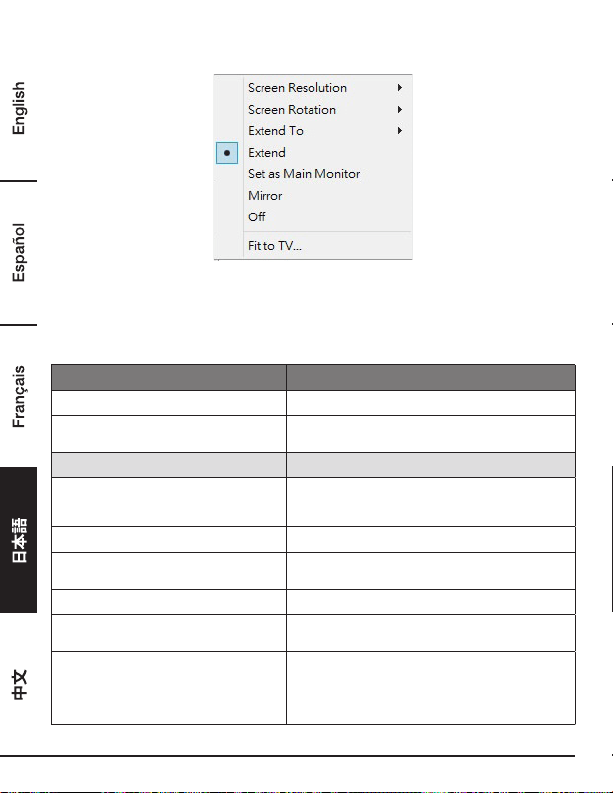
Utility Settings
The supplied utility allows configuring the display mode, screen rotation, screen resolution, and
physical arrangement of your monitors.
1. Click utility icon in Windows System Tray.
NOTE: If you cannot find the icon in Windows System Tray, click arrow icon to bring up icon list
to find it.
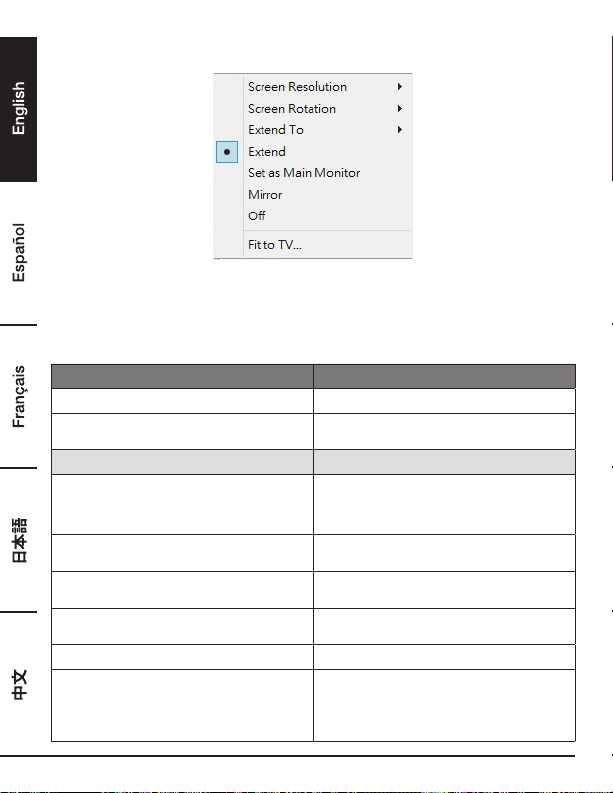
16
2. Select a preferred option, and then click it using mouse.
Description Of The Settings
Options Description
DisplayLink Manager Enable the Windows screen resolution page
Check for updates… Check the latest driver and download if
available
Display Setting Submenu
Screen Resolution Click to select an available resolution. Note that
this function is invalid in mirror mode, as the
resolution is defined as the resolution of the
primary monitor
Screen Rotation Rotate the screen according to the desired
orientation
Extend To The cursor can extend to desired screen via
left/right/above/below way moving
Extend Extend the screen according to the desired
orientation
Set as Main Monitor Set this screen to the main screen
Notebook Monitor Off Switch the add-on monitor to the main display
and turn off the screen of the laptop. NOTE:
This function works only when one add-on
monitor is connected. This option will also only
appear on laptop.

17
Mirror Duplicate the primary monitor to the monitor
which connects with the adapter
Off Turn off the monitor
Fit to TV Adjust the size of Windows Desktop on the TV
NOTE: This function works only when one add-
on monitor is connected. Besides, this option
will also only work in extended mode. The add-
on monitor will change to the extended mode if
selecting this option while in mirror mode
Audio Setup Enable the Windows audio configuration page.
This function works only in specific models
Video Setup Enable the Windows screen resolution page
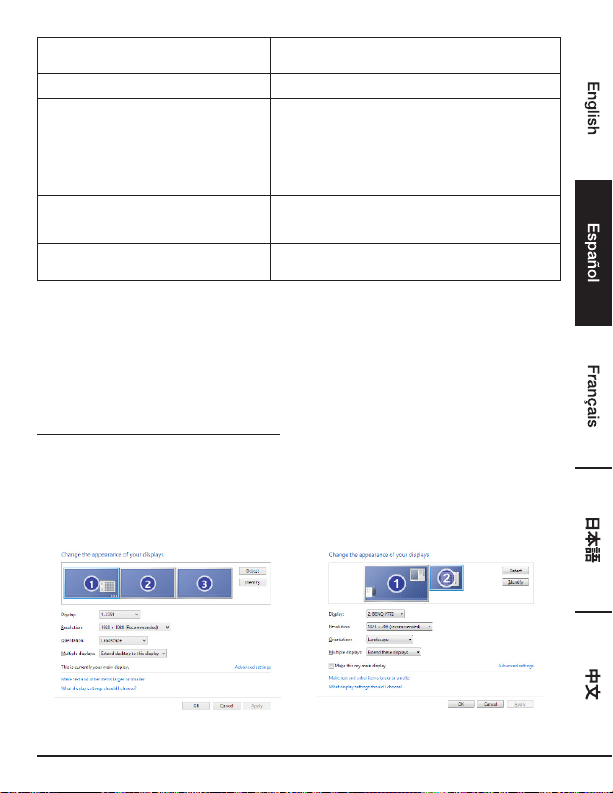
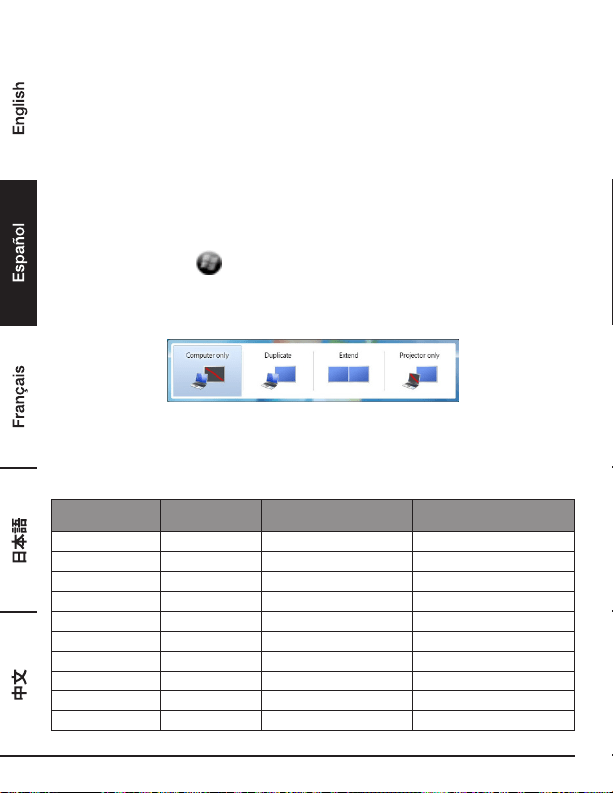
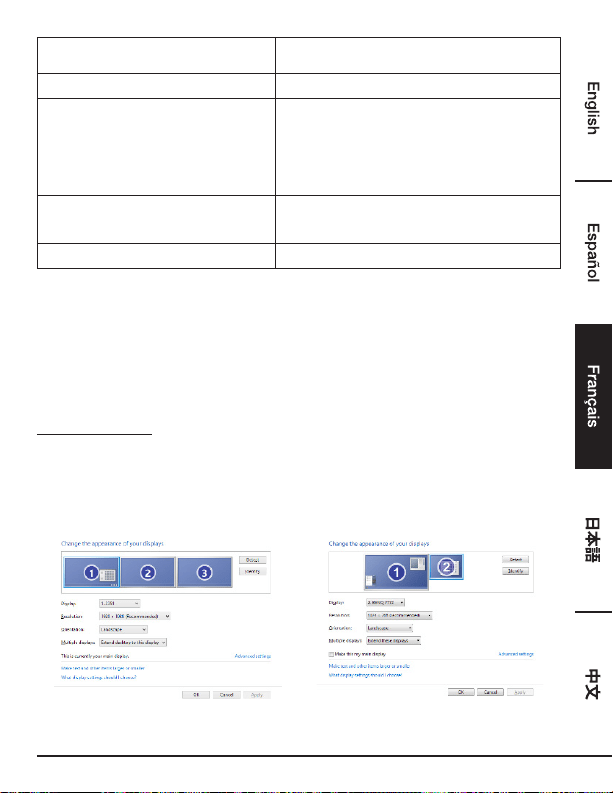
Multi-Monitor Configuration
Extra DVI and HDMI monitors can be connected through the Docking Station, if one monitor is
already connected to the PC directly. Once the extra monitors are connected, it can be configured to
use either “Mirror Mode”, “Extended Mode” or be the Primary display.
Windows
®
OS
Position the mouse anywhere on the Windows Desktop,
Right-click and select Screen Resolution.
Single Display Dual Display
18
Alternatively, click utility icon in the Windows System Tray, and then select DisplayLink
Manager or Video Setup.
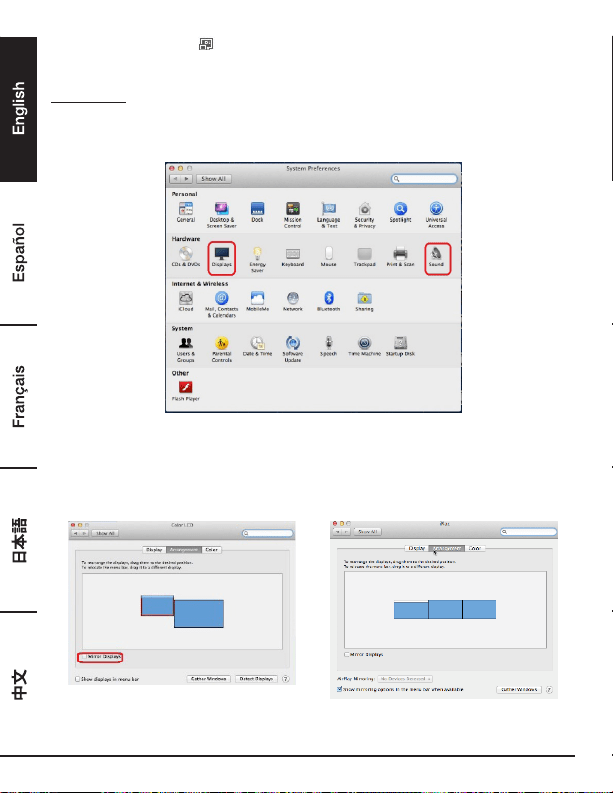
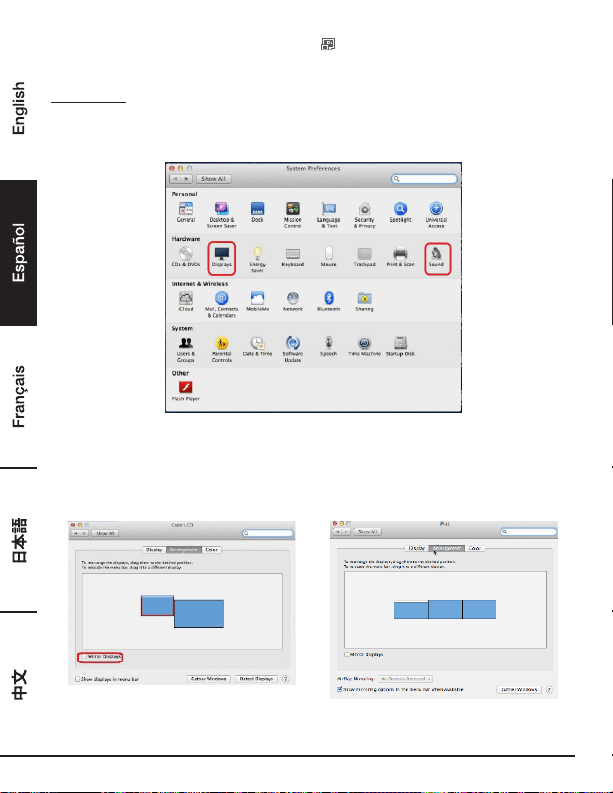
Mac OS
®
1. Click Apple icon of the upper left icon in screen and select System Preferences… on the drop-
down list.
2. Click Displays turn to multi-monitor mode and the extended monitor with model number will be
shown in the Desktop.
Single Display Docking Station Dual Display Docking Station
NOTE: Switch to Tick the box in front of Mirror Displays turns to Mirror Mode.

19
Extended Mode
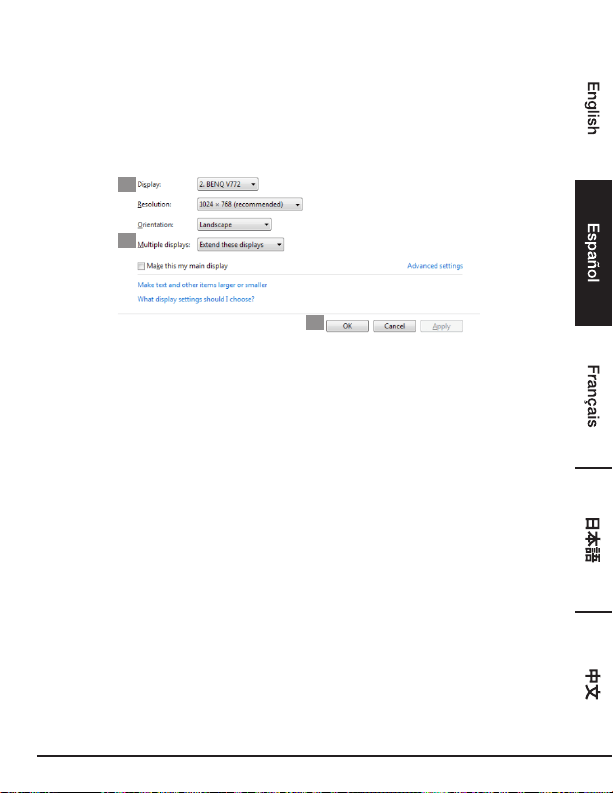
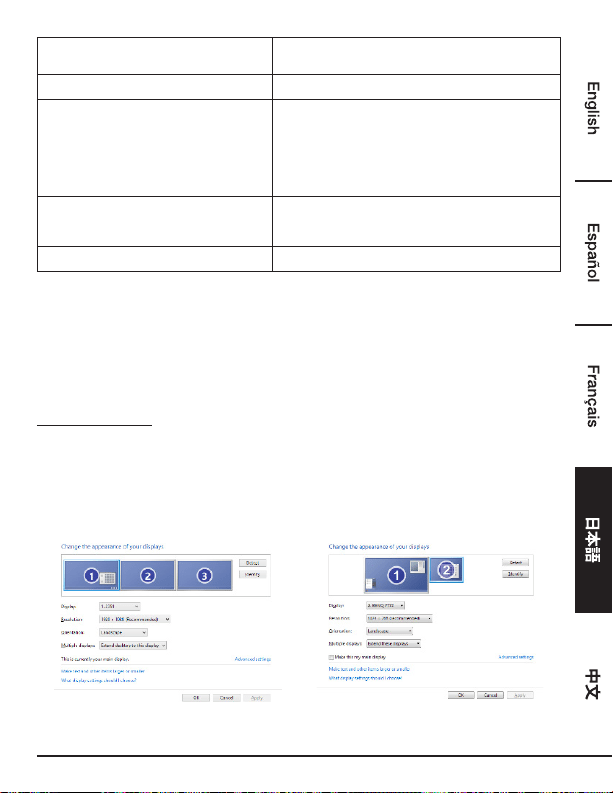
1. Refer to the Multi-monitor configuration section to bring up the configuration window.
2. In the Display drop-down menu, select the preferred monitor.
3. Select Multiple Displays > Extend these displays.
4. Click OK to confirm and exit
2
3
4
5. Once the setting is completed, simply drag and drop the application icons or the opened windows
to the add-on monitor. However, some applications may not support to display on the extended
desktop.
Cursor Disappeared
If the status remains in the extended mode but the adapter is disconnected, the desktop will still be
panned to the add-on monitor. The cursor may not be found on the primary monitor in such a case. If
it happens, connect the add-on monitor through the adapter again or keep moving the mouse.
Video Playback In Extended Mode
If the video or DVD playback quality is poor or low performance in extended mode, please playback it
on the primary monitor instead of the add-on monitor.
Mirror Mode
1. Refer to the Multi-monitor configuration section to bring up the configuration window.
2. In the Display drop-down menu, select the preferred monitor.
3. Select Multiple Displays > Duplicate these displays.
4. Click OK to confirm and exit.
20
Set The Primary Monitor
1. Refer to the Multi-monitor configuration section to bring up the configuration window.
2. In the Display drop-down menu, select the preferred monitor.
3. Check the box of Make this my main display.
NOTE: For some computers, you may need to disable the main display by unchecking the box
of Extend the desktop onto this monitor or Extend my Windows desktop onto this monitor.
4. Click OK to confirm and exit.
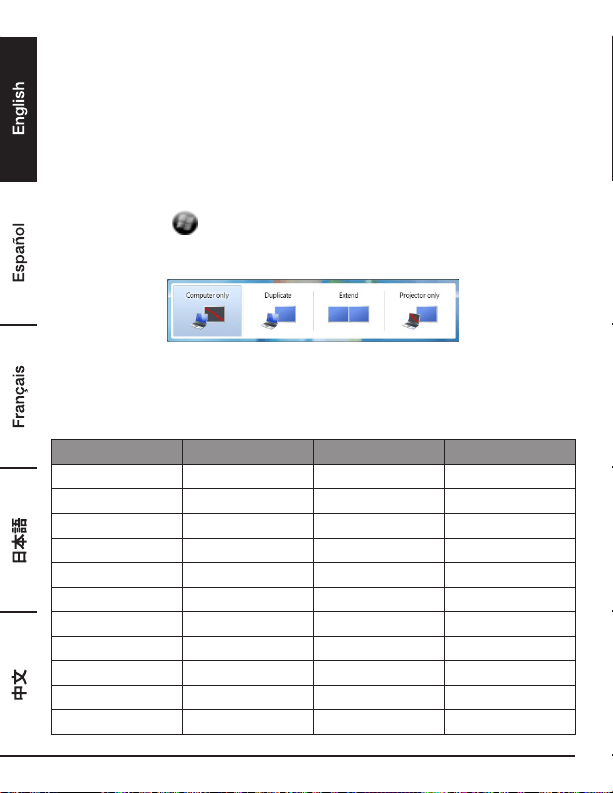
Windows Shortcut
Press Windows button
+ P to bring up the menu as below, and then select a desired option.
This function is available for Windows
®
7 or later
Supported Resolution
Before adjusting the resolution, refer to the table below for the supported resolution.
Name Refresh rate 16 bit Refresh rate 32 bit
640x480 VGA 60 72 75 85 60 72 75 85
800x600 SVGA 56 60 72 75 56 60 72 75 85
1024x768 XGA 60 70 75 85 60 70 75 85
1280x720 720p 60 60
1280x768 WXGA+ 60 70 75 85 60 70 75 85
1280x800 WXGA 60 60
1280x1024 SXGA 60 75 85 60 75
1366x768 WXGA+ 60 60
1400x1050 SXGA+ 60 75 85 60 75 85
1600x1200 UXGA 60 60
1680x1050 WSXGA+ 60 60
21
1920x1080 1080p 60 60
1920x1200 WUXGA 60 60
2048x1152 QXGA 60 60
* Note that interlaced modes and reduced blanking modes are not supported.
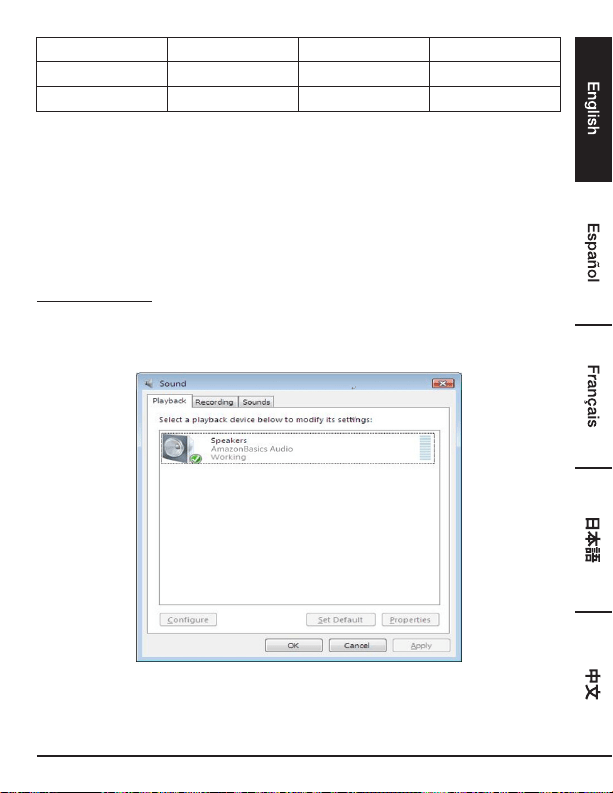
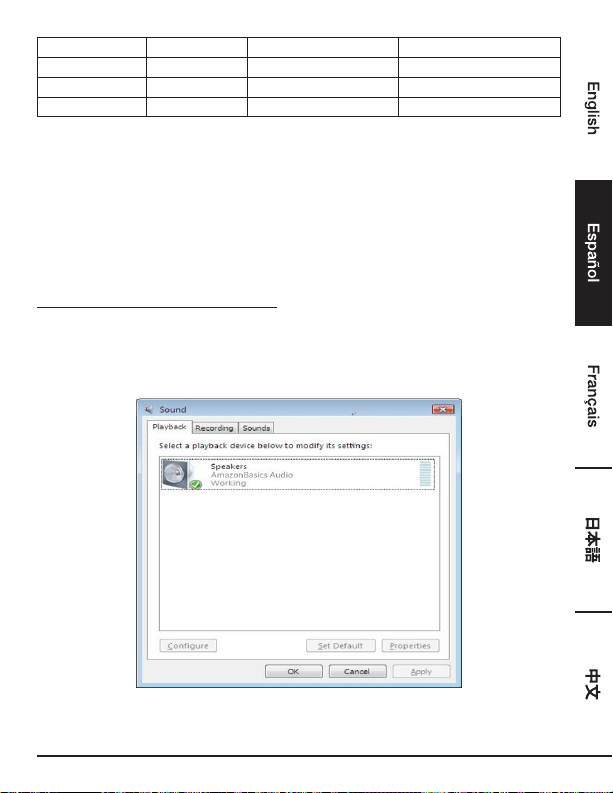
Audio Conguration
By default, when the docking station is connected to a computer, the audio configuration may be
changed to USB (Multimedia) Audio Device automatically (this setting depends on models). If it
does not work, follow the steps below to setup.
Windows
®
OS
1. Open Control Panel and then select the hardware and sound icon.
2. Click Sound > Manage audio devices and then select AmazonBasics Audio.
22
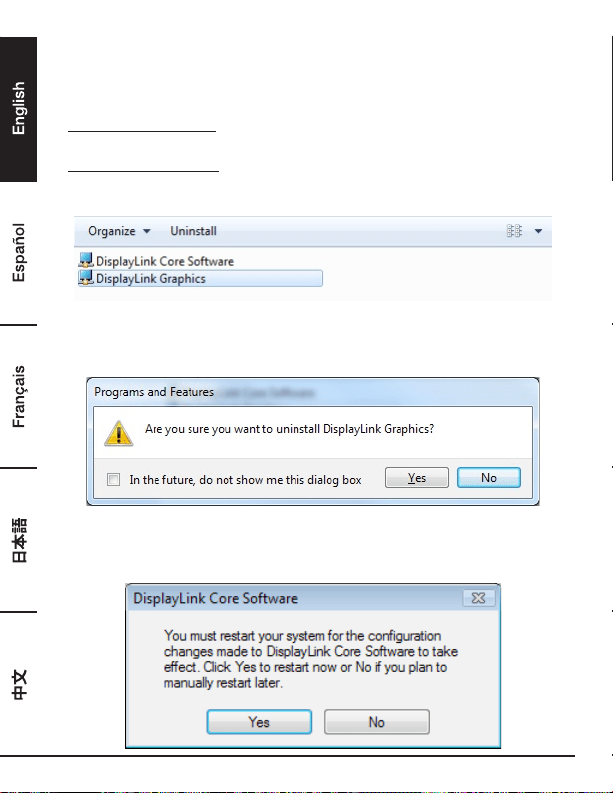
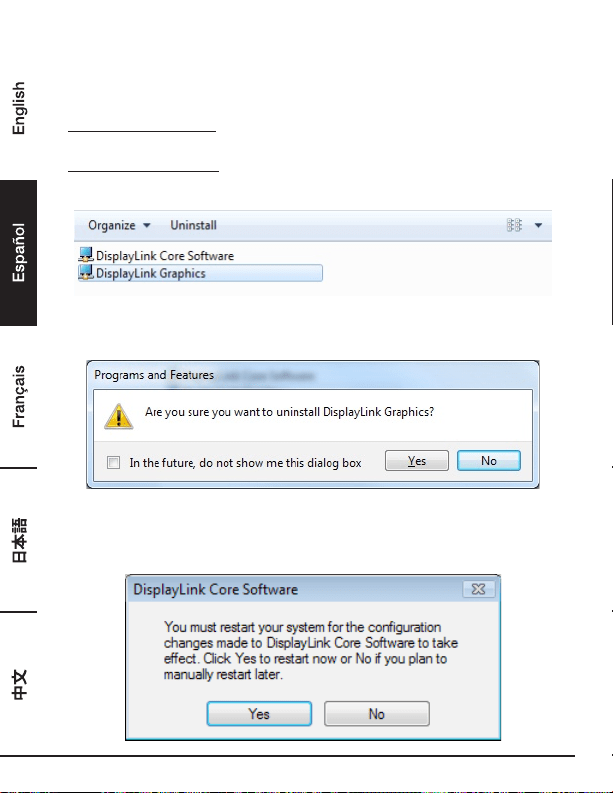
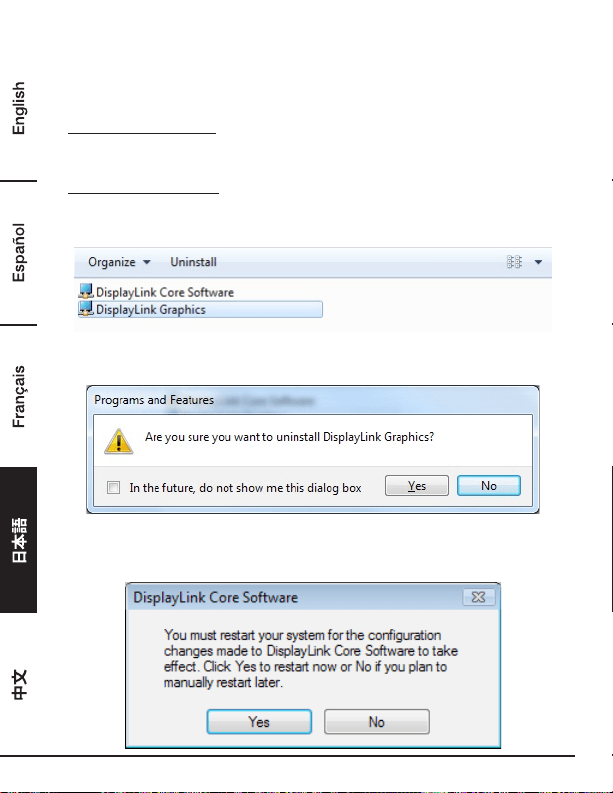
Uninstall The Driver
1. Follow the instructions to find the driver path, and then right-click on DisplayLink Graphics to
uninstall the driver.
Windows
®
7/ Windows
®
10
Control Panel > Programs > Programs and Features > Uninstall or change the program
Windows
®
8/ Windows
®
8.1
Settings > Control Panel > Programs > Uninstall a program
2. Click Yes to confirm the uninstallation.
3. Click Yes to restart your computer. You can also disconnect the video connection now.
23
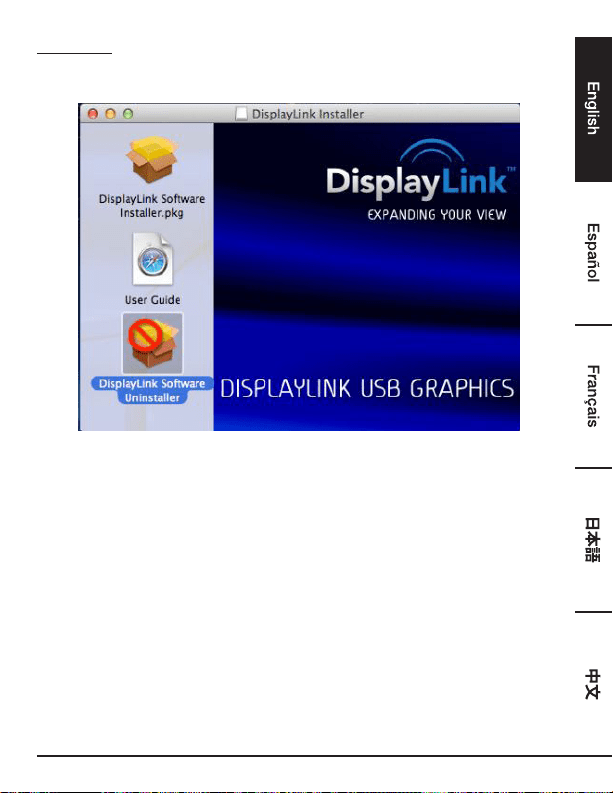
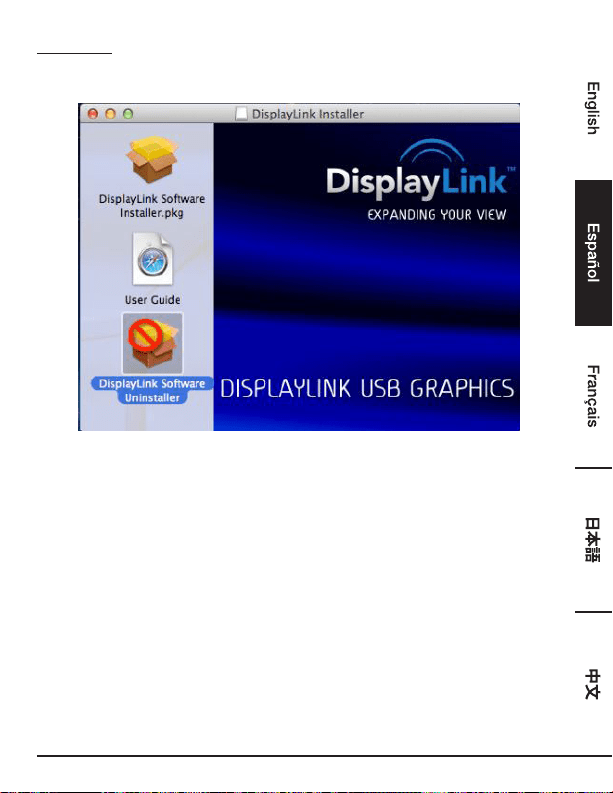
Mac OS
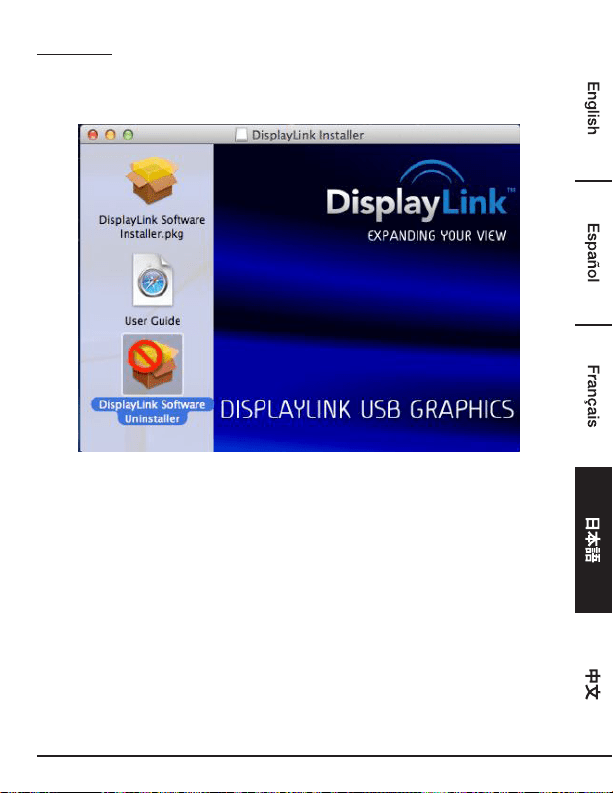
®
1. Open driver and click DisplayLink Software Uninstaller.

24
Specications
Host Interface USB 3.0
Connector Video output - HDMI Connector
- DVI Female Connector
Host upstream link USB B Type Female Connector
HUB downstream link USB A Type Female Connector
Audio Port 3.5mm stereo mini-jack 2.1ch
Ethernet Port RJ45 Connector
Power DC power jack
Video resolution HDMI 2048x1152
DVI 2048x1152
Supported colors 16 Bits and 32 Bits
Audio 2.1Ch
Ethernet 10/100/1000
Power Power Mode Self-powered
Power Adapter - Input: AC 100-240V
- Output: DC 5V/4A
Power Consumption - Operating Power: 14.43W
Suspend Mode Power: 1.95W
Physical
Properties
Housing ABS (Plastic)
Weight 365g approx.
Working Environment Operation Temperature 0~40 degree
Storage Temperature -20~70 degree
Compliance CE, FCC
*Specifications are subject to change without prior notice.
25
Power Adaptor
Manufacturer’s name or trade mark,
commercial registration number and address
DEE VAN ENTERPRISE CO., LTD.
#11491382
NO.5, PAO-KAO ROAD, HSIN-TIEN, TAIPEI,
231 TAIWAN, R.O.C.
Model DSA-24CB-05 050400
Input voltage AC 100 - 240 V
Input AC frequency 50 / 60 Hz
Output voltage DC 5.0 V
Output current 4.0 A
Output power 20.0 W
Average active efficiency 84.845 %
Efficiency at low load (10 %) 81.24 %
No-load power consumption
0.0608 W
Above information have free access websites
http://www.deevan.com.tw/ of manufacturers, importers or authorised representatives
Warranty Information
To obtain a copy of the warranty for this product:
Visit amazon.com/AmazonBasics/Warranty
— or —
Contact Customer Service at 1-866-216-1072
26
Feedback
Love it? Hate it?
Let us know with a customer review.
AmazonBasics is committed to delivering customer-driven products that live up to your high
standards. We encourage you to write a review sharing your experiences with the product.
Please visit: amazon.com/review/review-your-purchases#
For further services:
Visit amazon.com/gp/help/customer/contact-us
— or —
Contact Customer Service at 1-866-216-1072
27
Estación Base Universal Para Laptop
USB 3.0
Seguridad y Cumplimiento
Guarde y lea el manual del usuario completamente antes intentar conectar, operar o ajustar este
producto.
• Siempre lea cuidadosamente las instrucciones de seguridad.
• Conserve este manual del usuario para referencia futura.
• Mantenga este equipo alejado de la humedad.
• Si surge alguna de las situaciones siguientes, haga que un técnico de servicio revise el
equipo:
- El equipo ha sido expuesto a la humedad.
- El equipo se ha caído o está dañado.
- El equipo tiene señales obvias de rotura.
- El equipo no ha estado funcionando bien o no logra hacerlo funcionar conforme al manual
del usuario.
Derechos Reservados
• Este documento contiene información reservada protegida por los derechos de autor. Todos
los derechos reservados. Ninguna porción de este manual puede ser reproducida por ningún
medio mecánico, electrónico u otro medio, de ninguna forma, sin la autorización previa por
escrito del fabricante.
Marcas
• Todas las marcas y marcas registradas son propiedad de sus propietarios o compañías
respectivas.
Guía De Bienvenida
•
Español
28
Aviso Legal
• La información en este documento está sujeta a modificaciones sin previo aviso. El fabricante
no realiza ninguna declaración o garantía (implícita u otra) respecto a la exactitud e integridad
de este documento y en ningún evento deberá ser responsable de la pérdida de beneficios o
cualquier perjuicio comercial, incluyendo no sólo perjuicios especiales sino también incidentales,
consecuenciales u otros perjuicios.
Condiciones FCC
El equipo ha sido probado y como resultado cumple con la Parte 15 Clase B del Reglamento de la
FCC. Su uso está sujeto a las siguientes dos condiciones:
1. Este dispositivo puede provocar interferencia dañina.
2. Este dispositivo debe aceptar cualquier interferencia recibida e incluye interferencia que puede
provocar operación no deseada.
Precaución de la FCC: Cualquier cambio o modificación no aprobada expresamente por la parte
responsable del cumplimiento podría anular la autoridad del usuario para operar este equipo
CE
Este equipo cumple con los requisitos de las siguientes normativas: EN 55032/EN 55024: CLASE B
Información Sobre El WEEE
Para usuarios miembros de la UE (Unión Europea): De conformidad con la directiva de WEEE (Equipo
eléctrico y electrónico de desecho), no elimine este producto como basura doméstica o basura
comercial. El equipo eléctrico o electrónico de desecho deberá ser recolectado adecuadamente y
reciclado según lo requieran las prácticas establecidas por su país. Para información sobre el reciclaje
de este producto, contacte a sus autoridades locales, su servicio de eliminación de desechos
domésticos o a la tienda donde compró el producto.
29
Introducción
• La estación base de pantalla dual USB 3.0 está diseñada para demandas de conectividad
adicionales. Con la estación base, puede extender la conexión de una computadora a más
periféricos USB, red Ethernet, el altavoz y el micrófono a través de un único cable USB.
• Con los puertos USB 3.0 integrados, la estación base le posibilita disfrutar la transmisión de
datos de súper velocidad entre periféricos USB. Además de USB 3.0, este producto cumple con
la especificación USB 1.1/2.0. Usted podrá ser capaz de conservar y usar sus dispositivos USB
1.1/2.0 como de costumbre.
• Además, la estación base está equipada con salida de video. Con los puertos DVI y HDMI, puede
replicar su pantalla principal o extender su escritorio de Windows lo que permite visibilidad de
más aplicaciones al mismo tiempo. Con capacidad de expansión mejorada más la apariencia
estilizada, esta estación base con video es el accesorio más versátil que además complementa su
espacio en casa u oficina.
Incorpora tecnología HDMI
®
.
Características
• Compatible con la especificación USB 3.0/2.0/1.1
• Resolución de hasta 2048 x 1152
• Soporta audio de 2.1 canales
• Soporta Gigabit Ethernet
• Soporta salida de video HDMI / DVI
• Soporta carga BC1.2 (1 frontal)
Contenido Del Empaque
• Estación base 1 pieza
• Cable USB 3.0 1 pieza
• Adaptador de alimentación 1 pieza
• CD (controlador y manual del usuario) 1 pieza
• Guía de instalación rápida 1 pieza
30
Requisitos De Sistema
Los requisitos mínimos para la PC son:
• CPU: 1,6 GHz núcleo único o reloj de procesador superior.
- Familia Intel Pentium/Celeron
- Familia AMD K6/Athlon/Duron o procesador compatible
• RAM: 1 GB o superior
• Puerto USB: 2.0/3.0
• 30 MB de espacio disponible en disco
• Sistemas operativos:
- Microsoft: Windows
®
7 SP1 o posterior/ Windows
®
8/
- Windows
®
8.1/ Windows
®
10
- Apple: Mac OS
®
10.9 o posterior
Para reproducir DVD en el monitor extra conectado a través de la estación base, además de los
requisitos anteriores, se deben cumplir también los requisitos siguientes:
• CPU con doble núcleo con reloj de procesador de 2,0 GHz
31
Resumen Del Producto
Delante
3
1
4
2
5
6
N.º. Artículo Descripción
1 Indicador de encendido (azul) Se ilumina cuando está encendido
2 Indicador USB (verde) Se ilumina cuando hay un dispositivo USB conectado
en la unidad
3 Puerto USB 3.0 Se conecta a dispositivos USB 3.0
4 Puerto USB 3.0 Se conecta a dispositivos USB 3.0 / con carga BC 1.2
5 Entrada para altavoz Se conecta a un altavoz o audífono
6 Entrada para MIC Se conecta a un micrófono
32
Resumen Del Producto
Posterior
Estación Base De Pantalla Dual
7
7
8
9
10
11
12
N.º.
Artículo Descripción
7 Puerto USB 2.0 Se conecta a dispositivos USB 2.0
8 Puerto RJ45 Se conecta a una Ethernet.
9 Conector DVI Se conecta a un monitor o proyector DVI
10 Conector HDMI Se conecta a un monitor o proyector HDMI
11 Puerto USB 3.0 (Tipo B) Se conecta a una computadora
12 Entrada de alimentación Se conecta al adaptador de alimentación

33
Conexión
Para conectar los periféricos USB, Ethernet, altavoz y micrófono, siga las ilustraciones para conectar
los conectores correspondientes.
34
Instalación
Precaución: NO conecte la estación base a una computadora antes de instalar el controlados
suministrado.
Note que las secuencias y capturas de pantalla mostradas en este manual del usuario pueden variar
ligeramente con el sistema operativo
Sistema Operativo Windows
®
1. Inserte el CD suministrado en su unidad de CD-ROM.
2. Haga clic en Ejecutar Setup.exe para ejecutar el programa del instalador. Espere a que el
programa instale los controladores.
3. Haga clic en Terminar para completar la instalación.
NOTA:
a. Si la Reproducción automática no inicia automáticamente, localice y haga doble clic en el
archivo Setup.exe en la carpeta del controlador para iniciar la instalación.
b. Ingrese la contraseña del administrador y luego haga clic en Sí para comenzar la instalación si
se abre un cuadro de diálogo Control de cuentas de usuario.
c. Para algunos sistemas operativos Windows, el controlador se instalará automáticamente. Si
la instalación de controlador no inicia automáticamente, instale el controlador suministrado
como se indica arriba.
4. Conecte la estación base a una computadora después de que esté completa la instalación del
controlador. Para detalles de conexión, consulte el capítulo de Conexión.
5. Cuando el sistema operativo detecta la estación base, el resto del mensaje aparecerá en la
bandeja del sistema.
35
Mac OS
®
1. Inserte el CD suministrado en su unidad de CD-ROM.
2. Localice y haga doble clic en el archivo .dmg para iniciar la instalación y haga clic en Continuar.
3. Haga clic en Continuar > Aceptar.
36
4. Haga clic en Instalar > Continuar instalación.
5. Espere mientras la instalación está en proceso.
6. Haga clic en Reiniciar para completar la instalación.
37
Verificación De La Instalación
Para verificar el controlador del adaptador, siga el paso siguiente.
1. Seguimiento de la ruta para abrir el administrador de dispositivos.
Windows
®
10
Configuración\Dispositivos\Dispositivos conectados
Windows
®
8/ Windows
®
8.1
Configuración\ Panel de control\ Sistema y seguridad\Sistema\ Administrador de dispositivos
Windows
®
7
Panel de control\ Sistema y seguridad\Sistemas\ Administrador de dispositivos
2. Encontrará el dispositivo Estación base de AmazonBasics listado como se muestra a
continuación.
*Las secuencias y capturas de pantalla son de Windows
®
8 y pudieran variar ligeramente con el
sistema operativo.
NOTA:
Si no puede encontrar el controlador en la lista, puede que dicho controlador no esté instalado
adecuadamente. Borre el artículo, desconecte el adaptador y repita los pasos de instalación.
38
Mac OS
®
1. Haga clic en el símbolo de Apple en la esquina superior izquierda de la pantalla para abrir Acerca
de esta Mac en Mac
®
.
2. Cuando la pantalla a continuación aparezca, haga clic en Más información….
39
3. Cuando la pantalla a continuación aparezca, haga clic en Informe de sistema….
4. Encontrará el Controlador DisplayLink listado como se muestra a continuación.
Conguración De La Pantalla
NOTA: Las siguientes capturas de pantalla son de Windows
®
7 y pudieran variar ligeramente con el
sistema operativo.
Configuración De Utilidades
La utilidad suministrada permite la configuración del modo de pantalla, rotación de pantalla y
disposición física de sus monitores.
1. Haga clic en el icono de utilidades en la Bandeja del sistema de Windows.
NOTA: Si no puede encontrar el icono en la Bandeja del sistema de Windows, haga clic en el
icono de flecha para mostrar la lista de iconos para buscarlo.
40
2. Seleccione una opción preferida y luego haga clic en ella usando el ratón.
Descripción De La Conguración
Opciones Descripción
Administrador DisplayLink Habilita la página de resolución de pantalla de
Windows
Comprobar actualizaciones… Busca el controlador más reciente y lo descarga si
está disponible
Submenú de configuración de pantalla
Resolución de pantalla Haga clic para seleccionar la resolución disponible.
Note que esta función no es válida en el modo
espejo, ya que la resolución está definida como la
resolución del monitor principal
Rotación de pantalla Rota la pantalla conforme a la orientación deseada
Extender hasta El cursor puede extenderse hasta la pantalla
deseada vía movimiento hacia la izquierda/derecha/
arriba/abajo
Extender
Extiende la pantalla conforme a la orientación deseada
Establecer como monitor principal Establece esta pantalla como la pantalla principal
Monitor de notebook apagado Cambia el monitor adicional a la pantalla principal y
apaga la pantalla de la laptop. NOTA: Esta función
trabaja únicamente cuando un monitor adicional
está conectado. Además, esta opción aparece
únicamente en la laptop.
41
Espejo Duplica el monitor principal al monitor que se
conecta con el adaptador
Off (Apagado) Apaga el monitor
Ajustar a TV Ajusta el tamaño del escritorio Windows en la TV
NOTA: Esta función trabaja únicamente cuando un
monitor adicional está conectado. Además, esta
opción también trabajará únicamente en el modo
extendido. El monitor adicional cambiará al modo
extendido si se selecciona esta opción durante el
modo espejo
Configuración de audio Habilita la página de resolución de audio de
Windows. Esta función trabaja exclusivamente en
modelos específicos
Configuración de video Habilita la página de resolución de pantalla de
Windows
Configuración De Monitores Múltiples
Se pueden conectar monitores DVI y HDMI adicionales a través de la estación base, si un monitor ya
está conectado directamente a la PC. Una vez que los monitores extra están conectados, se puede
configurar para usar el “Modo espejo”, “Modo extendido” o para ser la pantalla Principal.
Sistema Operativo Windows
®
Posicione el ratón en cualquier parte del Escritorio Windows,
Haga clic con el botón derecho y seleccione Resolución de pantalla.
Pantalla única Pantalla dual
42
Alternativamente, haga clic en el icono de utilidades en la Bandeja del sistema Windows , y
luego seleccione Administrador DisplayLink o Configuración de video.
Mac OS
®
1. Haga clic en el Icono Apple del icono superior izquierdo en la pantalla y seleccione Preferencias
de sistema… en la lista desplegable.
2. Haga clic en Pantallas para cambiar al modo de monitores múltiples y se mostrará el monitor
extendido con número de modelo en el escritorio.
Estación base de pantalla única Estación base de pantalla dual
NOTA: Cambio para marcar la casilla en frente de Pantallas en espejo cambia a Modo espejo.
43
Modo Extendido
1. Consulte la sección Configuración de monitores múltiples para mostrar la ventana de
configuración.
2. En el menú desplegable Pantalla, seleccione el monitor preferido.
3. Seleccione Pantallas múltiples > Extender estas pantallas.
4. Haga clic en OK para confirmar y salir
2
3
4
5. Una vez que se ha completado la configuración, simplemente arrastre y suelte los iconos de
aplicación o la ventana abierta al monitor adicional. Sin embargo, algunas aplicaciones pueden no
ser compatibles con el monitor en el escritorio extendido.
Cursor Desaparecido
Si el estado continúa en el modo extendido pero el adaptador está desconectado, el escritorio
todavía estará en modo panorámico en el monitor adicional. En tal caso, el cursor puede no
encontrarse en el monitor principal. Si esto pasa, conecte el monitor adicional a través del adaptador
una vez más o siga moviendo el ratón.
Reproducción De Video En Modo Extendido
Si la calidad de reproducción de video o DVD es mala o de bajo desempeño en modo extendido,
reprodúzcalo en el monitor principal en lugar del monitor adicional.
Modo Espejo
1.
Consulte la sección Configuración de monitores múltiples para mostrar la ventana de configuración.
2. En el menú desplegable Pantalla, seleccione el monitor preferido.
3. Seleccione Pantallas múltiples > Duplicar estas pantallas.
4. Haga clic en OK para confirmar y salir.
44
Establecer El Monitor Principal
1. Consulte la sección Configuración de monitores múltiples para mostrar la ventana de
configuración.
2. En el menú desplegable Pantalla, seleccione el monitor preferido.
3. Marque la casilla de Establecer como mi pantalla principal.
NOTA: Para algunas computadoras, puede que necesite desactivar la pantalla principal al
quitar la marca a la casilla de Extender el escritorio en este monitor o Extender mi escritorio
Windows en este monitor.
4. Haga clic en OK para confirmar y salir.
Acceso Directo Windows
Presione el botón Windows + P para mostrar el menú como se ilustra a continuación y luego
seleccione una opción deseada.
Esta función está disponible para Windows
®
7 o posterior
Resolución Soportada
Antes de ajustar la resolución, consulte la tabla a continuación para ver la resolución soportada.
Nombre Velocidad de
actualización de 16 bits
Velocidad de
actualización de 32 bits
640x480 VGA 60 72 75 85 60 72 75 85
800x600 SVGA 56 60 72 75 56 60 72 75 85
1024x768 XGA 60 70 75 85 60 70 75 85
1280x720 720p 60 60
1280x768 WXGA+ 60 70 75 85 60 70 75 85
1280x800 WXGA 60 60
1280x1024 SXGA 60 75 85 60 75
1366x768 WXGA+ 60 60
1400x1050 SXGA+ 60 75 85 60 75 85
1600x1200 UXGA 60 60
45
1680x1050 WSXGA+ 60 60
1920x1080 1080p 60 60
1920x1200 WUXGA 60 60
2048x1152 QXGA 60 60
* Note que los modos entrelazados y modos de borrado reducidos no son soportados.
Conguración De Audio
Por defecto, si la estación base está conectada a una computadora, la configuración de audio puede
ser cambiada a Dispositivo de audio USB (Multimedia) automáticamente (esta configuración
depende de los modelos). Si no funciona, siga los pasos a continuación para configurar.
Sistema operativo Windows
®
1. Abra el Panel de control y luego seleccione el hardware y el icono de sonido.
2. Haga clic en Sonido > Administrar dispositivos de audio y luego seleccione Audio
AmazonBasics.
46
Desinstale El Controlador
1. Siga las instrucciones para encontrar la ruta del controlador y luego haga clic con el botón
derecho en Gráficos DisplayLink para desinstalar el controlador.
Windows
®
7/ Windows
®
10
Panel de control > Programas > Programas y características > Desinstalar o cambiar un programa
Windows
®
8/ Windows
®
8.1
Configuración > Panel de control > Programas > Desinstalar un programa
2. Haga clic en Sí para confirmar la desinstalación.
3. Haga clic en Sí para reiniciar su computadora. También puede desconectar la conexión de video
ahora.
47
Mac OS
®
1. Abra el controlador y haga clic en Desinstalador de software de DisplayLink.
48
Especicaciones
Interfaz de anfitrión USB 3.0
Conector Salida de video - Conector HDMI
- Conector hembra DVI
Enlace de subida de anfitrión Conector hembra tipo USB B
Enlace de bajada HUB Conector hembra tipo USB A
Puerto de audio Mini-conector estéreo de 3.5 mm de
2.1 canales
Puerto Ethernet Conector RJ45
Energía Entrada de alimentación de CD
Resolución de video HDMI 2048x1152
DVI 2048x1152
Colores soportados 16 Bits y 32 Bits
Audio 2.1 Canales
Ethernet 10/100/1000
Energía Modo de energía Autoalimentada
Adaptador de alimentación - Entrada: CA 100-240 V
- Salida: CD 5 V/4 A
Consumo de energía - Energía operacional: 14,43 W
Energía en modo de suspensión: 1,95 W
Propiedades
físicas
Carcasa ABS (plástico)
Peso 365 g aprox.
Ambiente de trabajo Temperatura de operación 0~40 grados
Temperatura de almacenamiento -20~70 grados
Cumplimiento CE, FCC
*Especificaciones sujetas a cambios sin previo aviso.
49
Adaptador de Corriente
Nombre o marca, número del registro
mercantil y dirección del fabricante
DEE VAN ENTERPRISE CO., LTD.
#11491382
NO. 5, PAO-KAO ROAD, HSIN-TIEN, TAIPEI,
231 TAIWAN, R.O.C.
Modelo DSA-24CB-05 050400
Tensión de entrada CA 100 – 240 V
Frecuencia de la CA de entrada 50 / 60 Hz
Tensión de salida CC 5,0 V
Intensidad de salida 4,0 A
Potencia de salida 20,0 W
Eficiencia media en activo 84,845 %
Eficiencia a baja carga (10 %) 81,24 %
Consumo eléctrico en vacío
0,0608 W
La información mencionada está disponible en sitios web de acceso libre
http://www.deevan.com.tw/ de fabricantes, importadores y representantes autorizados
Información Sobre La Garantía
Para obtener una copia de la garantía de este producto:
Visite amazon.com/AmazonBasics/Warranty
— o —
Contacte al centro de atención al cliente al 1-866-216-1072
50
Comentarios
¿Le encantó? ¿No le gustó?
Háganoslo saber con un comentario del cliente.
AmazonBasics estamos comprometidos con entregar a nuestros clientes productos que cumplan
con sus altos estándares. Lo animamos a escribir un comentario donde comparta sus experiencias
con el producto.
Visite: amazon.com/review/review-your-purchases#
Para servicios adicionales:
Visite amazon.com/gp/help/customer/contact-us
— o —
Contacte al centro de atención al cliente al 1-866-216-1072
51
Station d’Accueil Universelle USB
3.0 Pour Ordinateur Portable
Sécurité Et Conformité
Avant de tenter de brancher, d'utiliser ou de régler ce produit, veuillez sauvegarder et lire
l’intégralité du manuel d’utilisation.
• Toujours lire attentivement les consignes de sécurité.
• Conservez le présent manuel pour pouvoir vous y référer ultérieurement.
• Gardez cet équipement à l’abri de l'humidité.
• Si l'une des situations suivantes se présente, faites vérifier l'équipement par un technicien
d’entretien:
- L'équipement a été exposé à l'humidité.
- L'équipement est tombé ou a été endommagé.
- L'équipement présente des signes évidents de casse.
- L'équipement ne fonctionne pas correctement ou vous ne parvenez pas à le faire
fonctionner conformément aux indications du manuel d'utilisation.
Droits D'auteur
• Le présent document contient des informations exclusives protégées par des droits d'auteur.
Tous droits réservés. La reproduction intégrale ou partielle du présent manuel est interdite
sous quelque forme ou moyen que ce soit, électronique ou mécanique, sans l'autorisation
écrite préalable du fabricant.
Marques Commerciales
• Toutes les marques commerciales et marques déposées constituent la propriété de leurs
propriétaires ou sociétés respectifs.
Guide De Bienvenue
•
Français
52
Clause De Non-Responsabilité
• Les informations contenues dans le présent document sont sujettes à modification sans préavis.
Le fabricant ne fait aucune déclaration et n’offre aucune garantie (implicite ou non) concernant
l’exactitude et l’exhaustivité du présent document et ne doit en aucun cas être tenu pour
responsable de toute perte de bénéfice ou de tout dommage commercial, y compris, mais
sans pour autant s’y limiter, les dommages spéciaux, accessoires ou consécutifs, ou tout autre
dommage.
Conditions FCC
Ce produit a été testé et reconnu conforme aux exigences de la partie 15, classe B des règlements
FCC. Son utilisation est soumise aux deux conditions suivantes:
1. Cet appareil ne doit pas causer d'interférences nuisibles.
2. Cet appareil doit accepter toute interférence reçue, y compris les interférences pouvant entraîner
un fonctionnement indésirable.
Avertissement FCC: Tout changement ou modification non approuvé expressément par la partie
responsable de la conformité est susceptible d'annuler l’autorisation de l’utilisateur d’utiliser l’équipement.
CE
Cet équipement est conforme aux exigences des normes suivantes: EN 55032/EN 55024: CLASSE B
Informations Relatives Aux Deee (Déchets d'Équipements
Électriques et Électroniques)
Pour les utilisateurs membres de l'UE (Union européenne): Conformément à la directive sur les
DEEE (déchets d’équipements électriques et électroniques), ne mettez pas ce produit au rebut avec
les ordures ménagères ou les déchets commerciaux. Les déchets d’équipements électriques et
électroniques doivent être collectés et recyclés de façon appropriée, conformément aux pratiques
établies dans votre pays. Pour de plus amples informations concernant le recyclage de ce produit,
veuillez contacter vos autorités municipales, le service de traitement des ordures ménagères de votre
localité ou la boutique où vous avez acheté le produit.

53
Introduction
• La station d'accueil USB 3.0 à double affichage est conçue pour répondre à des besoins de
connectivité supplémentaires. Grâce à la station d'accueil, vous pouvez étendre le branchement
d'un ordinateur à plus de périphériques USB, au réseau Ethernet, au haut-parleur et au
microphone via un seul câble USB.
• Grâce aux ports USB 3.0 intégrés, la station d'accueil vous permet de bénéficier de la
transmission de données à très haut débit entre périphériques USB. Outre la spécification USB
3.0, ce produit est également conforme aux spécifications USB 1.1 / 2.0. Vous pourrez continuer
à utiliser vos périphériques USB 1.1 / 2.0 comme d'habitude.
• En outre, la station d'accueil est équipée d'une sortie vidéo. Grâce aux ports DVI et HDMI, vous
pouvez refléter votre écran principal ou étendre le bureau Windows, vous permettant ainsi de voir
plus d'applications à la fois. En raison de sa capacité d'extension améliorée ajoutée à son aspect
élégant, cette station d'accueil dotée de la fonction vidéo est l'accessoire le plus polyvalent qui
complète également votre espace au bureau ou à domicile.
Intègre la technologie HDMI
®
.
Caractéristiques
• Compatible avec les spécifications USB 3.0/2.0/1.1
• Résolution: jusqu’à 2048 x 1152 pixels
• Prend en charge le canal audio 2.1
• Prend en charge Gigabit Ethernet
• Prend en charge la sortie vidéo HDMI/DVI
• Prend en charge le chargement BC1.2 (Avant x 1)
Contenu De L'emballage
• Station d'accueil x 1
• Câble USB 3.0 x 1
• Adaptateur secteur x 1
• CD (Pilote et Manuel d’utilisation) x 1
• Guide d’Installation Rapide x 1
54
Configuration Requise
Exigences minimales requises pour le PC:
• UCT: Horloge de processeur simple cœur ou multi-cœurs de 1,6 GHz.
- Gamme Intel Pentium/Celeron
- Gamme AMD K6/Athlon/Duron ou processeur compatible
• Mémoire RAM: 1 Go ou plus
• Port USB: 2.0/3.0
• 30 Mo d'espace disque libre
• Système d’exploitation:
- Microsoft: Windows
®
7 SP1 ou une version ultérieure/Windows
®
8/
- Windows
®
8.1/Windows
®
10
- Apple: Mac OS
®
10.9 ou une version ultérieure
Pour lire un DVD sur le moniteur supplémentaire branché via la station d'accueil, en plus des
exigences ci-dessus, les exigences suivantes doivent également être respectées:
• Horloge de processeur double cœur de 2,0 GHz
55
Vue D'ensemble Du Produit
Avant
3
1
4
2
5
6
# Article Description
1 Voyant d’alimentation (Bleu) S’allume lorsque le système est sous tension
2 Voyant USB (Vert) S’allume lorsqu’un périphérique USB est branché sur
l’appareil
3 Port USB3.0 Permet le branchement de périphériques USB 3.0
4 Port USB3.0 Permet le branchement de périphériques USB 3.0/Avec
chargement BC 1.2
5 Prise jack de haut-parleur Permet le branchement d’un haut-parleur ou d’un casque
6 Prise MIC Permet le branchement d’un microphone
56
Vue D'ensemble Du Produit
Arrière
Station d’Accueil à Affichage Double
7
7
8
9
10
11
12
# Article Description
7 Port USB2.0 Permet le branchement de périphériques USB 2.0
8 Port RJ45 Permet la connexion à un réseau Ethernet.
9 Port DVI Permet le branchement d’un moniteur ou d’un projecteur DVI
10 Port HDMI
Permet le branchement d’un moniteur ou d’un projecteur HDMI
11 Port USB 3.0 (Type B) Permet le branchement d’un ordinateur
12 Prise jack d’alimentation Permet le branchement de l’adaptateur secteur
57
Branchements
Pour brancher les périphériques USB, Ethernet, le haut-parleur et le microphone, suivez les
illustrations ci-dessous pour les brancher aux connecteurs correspondants.
58
Installation
Attention: NE PAS brancher la station d’accueil à un ordinateur avant d'avoir installé le pilote
fourni.
Remarque: les chaînes et captures d'écran suivantes figurant dans le présent manuel d'utilisation
peuvent être légèrement différentes selon le système d'exploitation
Windows
®
OS
1. Insérez le CD fourni dans le lecteur CD-ROM de votre PC.
2. Cliquez sur Run Setup.exe pour exécuter le programme d'installation. Patientez jusqu’à ce que le
programme installe les pilotes.
3. Cliquez sur Terminer pour terminer l’installation.
REMARQUE:
a. Si la fonction AutoPlay ne démarre pas automatiquement, localisez le fichier Setup.exe dans
le dossier du pilote, puis double-cliquez dessus pour lancer l’installation.
b. Saisissez le mot de passe de l’administrateur, puis cliquez sur Oui pour lancer l’installation si
une boîte de dialogue Contrôle de compte d’utilisateur s’ouvre.
c. Pour certains systèmes d'exploitation Windows, le pilote s’installe automatiquement. Si
l'installation du pilote ne démarre pas automatiquement, veuillez installer le pilote fourni
comme indiqué ci-dessus.
4. Branchez la station d'accueil à un ordinateur une fois l'installation du pilote terminée. Pour
retrouver les détails concernant les branchements, veuillez consulter le chapitre consacré aux
Branchements.
5. Lorsque le système d’exploitation détecte la station d’accueil, le message de rappel s’affiche dans
la barre d’état système.

59
Mac OS
®
1. Insérez le CD fourni dans votre lecteur CD-ROM.
2. Localisez le fichier .dmg et double-cliquez dessus pour lancer l’installation, puis cliquez sur
Continuer.
3. Cliquez sur Continuer > Accepter.
60
4. Cliquez sur Installer > Continuer l’installation.
5. Veuillez patienter pendant que l’installation est en cours.
6. Cliquez sur Redémarrer pour terminer l’installation.
61
Vérification De L’installation
Pour vérifier le pilote de l’adaptateur, suivez l’étape ci-dessous.
1. Suivez le chemin pour ouvrir le gestionnaire de périphériques.
Windows
®
10
Paramètres\Périphériques\Périphériques connectés
Windows
®
8/ Windows
®
8.1
Paramètres\Panneau de configuration\Système et sécurité\Système\Gestionnaire de
périphériques
Windows
®
7
Panneau de configuration\Système et sécurité\Systèmes\Gestionnaire de périphériques
2. Vous trouverez le périphérique AmazonBasics Docking Station (Station d’accueil
AmazonBasics) répertorié comme suit.
* Les chaînes du pilote et les captures d’écran relèvent de Windows
®
8 et peuvent être légèrement
différentes selon le système d’exploitation.
REMARQUE:
Si vous ne trouvez pas le pilote dans la liste, il se peut que le pilote ne soit pas correctement installé.
Veuillez supprimer l'élément, débrancher l'adaptateur, puis répéter l’exécution des étapes d'installation.
62
Mac OS
®
1. Cliquez sur le signe Apple dans le coin supérieur gauche de l’écran pour ouvrir À Propos de ce
Mac sur Mac
®
.
2. Lorsque l’écran ci-dessous s’affiche, cliquez sur Plus d’infos….
63
3. Lorsque l’écran ci-dessous s’affiche, veuillez cliquer sur Rapport système….
4. Vous trouverez le pilote DisplayLink Driver répertorié comme suit.
Conguration De L’afchage
REMARQUE: Les captures d’écran suivantes figurant dans cette section relèvent de Windows
®
7 et
peuvent être légèrement différentes selon le système d’exploitation.
Paramètres De L'utilitaire
L'utilitaire fourni permet de configurer le mode d'affichage, la rotation de l'écran, la résolution de
l'écran et la disposition physique de vos moniteurs.
1. Cliquez sur l’icône de l’utilitaire dans la barre d’état système de Windows.
REMARQUE: Si l’icône est introuvable dans la barre d’état système de Windows, cliquez sur
l’icône en forme de flèche pour afficher la liste des icônes afin de la trouver.
64
2. Sélectionnez l'option souhaitée, puis cliquez dessus à l’aide de la souris.
Description Des Paramètres
Options Description
Gestionnaire DisplayLink Active la page de résolution de l'écran Windows
Rechercher les mises à jour... Recherche le dernier pilote et le télécharge s'il est
disponible
Sous-menu des Paramètres d'affichage
Résolution d’écran Cliquez pour sélectionner une résolution disponible.
Remarque: cette fonction est non valide en mode
Miroir, car la résolution est définie comme la
résolution du moniteur principal
Rotation de l'écran Tournez l'écran selon l'orientation souhaitée
Étendre à Le curseur peut s'étendre jusqu'à l'écran souhaité
grâce au déplacement vers la gauche/la droite/le
haut/le bas
Étendre Étend l'écran selon l'orientation souhaitée
Définir comme moniteur principal Définit cet écran comme l'écran principal
Moniteur de l'ordinateur portable éteint Définit le moniteur supplémentaire comme l'écran
principal, puis éteint l'écran de l'ordinateur portable.
REMARQUE: Cette fonction n'est disponible que
lorsqu'un moniteur supplémentaire est branché.
En outre, cette option s’affiche uniquement sur un
ordinateur portable.
65
Miroir Duplique le moniteur principal sur le moniteur
branché à l'adaptateur
Éteindre Éteint le moniteur
Ajuster à la taille du téléviseur Ajuste la taille du Bureau Windows à la taille du
téléviseur REMARQUE: Cette fonction n'est
disponible que lorsqu'un moniteur supplémentaire
est branché. En outre, cette option fonctionne
uniquement en mode étendu. Le moniteur
supplémentaire passe en mode étendu en cas de
sélection de cette option en mode Miroir
Configuration audio Active la page de configuration audio de Windows.
Cette fonction fonctionne uniquement avec des
modèles spécifiques
Configuration vidéo Active la page de résolution de l'écran Windows
Configuration De Plusieurs Moniteurs
Les moniteurs DVI et HDMI supplémentaires peuvent être branchés via la station d'accueil si un
moniteur est déjà branché directement au PC. Une fois les moniteurs supplémentaires branchés,
leur configuration est possible pour utiliser le «Mode Miroir», le «Mode étendu» ou pour en faire
l’écran principal.
Windows
®
OS
Positionnez le curseur de la souris sur n’importe quel point du Bureau Windows.
Cliquez-droit dessus, puis sélectionnez Résolution d’écran.
Affichage unique Affichage double

66
Vous pouvez également cliquer sur l’icône de l’utilitaire dans la barre d’état système de
Windows, puis sélectionner Gestionnaire DisplayLink ou Configuration vidéo.
Mac OS
®
1. Cliquez sur l’icône Apple située dans le coin supérieur gauche de l'écran, puis sélectionnez
Préférences système… dans le menu déroulant.
2. Cliquez sur Affichages pour accéder au mode «Plusieurs moniteurs» et le moniteur étendu
s’affiche sur le bureau avec le numéro de modèle.
Station d’Accueil à Affichage Unique Station d’Accueil à Affichage Double
REMARQUE: Cochez la case en regard de Affichages miroir pour accéder au Mode Miroir.
67
Mode Étendu
1. Consultez la section Configuration de plusieurs moniteurs pour afficher la fenêtre de
configuration.
2. Dans le menu déroulant Affichage, sélectionnez le moniteur souhaité.
3. Sélectionnez Plusieurs affichages > Étendre ces affichages.
4. Cliquez sur OK pour confirmer et quitter
2
3
4
5. Une fois le paramétrage terminé, faites simplement glisser et déposez les icônes des applications
ou les fenêtres ouvertes sur le moniteur complémentaire. Cependant, certaines applications sont
susceptibles de ne pas être prises en charge par l'affichage sur le bureau étendu.
Disparition Du Curseur
Si l’état reste en mode étendu, mais que l'adaptateur est débranché, le bureau sera toujours en
panoramique sur le moniteur supplémentaire. Dans ce cas, le curseur peut être introuvable sur le
moniteur principal. Si ce phénomène se produit, branchez à nouveau le moniteur supplémentaire via
l'adaptateur ou continuez à déplacer la souris.
Lecture Vidéo En Mode Étendu
Si la qualité de lecture de la vidéo ou du DVD est médiocre ou présente des performances faibles en
mode étendu, veuillez la/le lire sur le moniteur principal plutôt que sur le moniteur supplémentaire.
Mode Miroir
1. Consultez la section Configuration de plusieurs moniteurs pour afficher la fenêtre de
configuration.
2. Dans le menu déroulant Affichage, sélectionnez le moniteur souhaité.
3. Sélectionnez Plusieurs affichages > Dupliquer ces affichages.
4. Cliquez sur OK pour confirmer et quitter.
68
Définir Le Moniteur Principal
1. Consultez la section Configuration de plusieurs moniteurs pour afficher la fenêtre de
configuration.
2. Dans le menu déroulant Affichage, sélectionnez le moniteur souhaité.
3. Sélectionnez la case Faire de cet écran l’écran principal.
REMARQUE: Pour certains ordinateurs, vous devrez peut-être désactiver l'affichage principal
en décochant la case Étendre le bureau à ce moniteur ou Étendre le bureau Windows à ce
moniteur.
4. Cliquez sur OK pour confirmer et quitter.
Raccourci Windows
Appuyez sur la touche Windows + P pour afficher le menu ci-dessous, puis sélectionnez
l'option souhaitée.
Cette fonction est disponible pour Windows® 7 et les versions ultérieures
Résolution Prise En Charge
Avant d'ajuster la résolution, reportez-vous au tableau ci-dessous pour trouver la résolution prise en
charge.
Nom Fréquence de
rafraîchissement: 16 bits
Fréquence de
rafraîchissement: 32 bits
640 x 480 VGA 60 72 75 85 60 72 75 85
800 x 600 SVGA 56 60 72 75 56 60 72 75 85
1024 x 768 XGA 60 70 75 85 60 70 75 85
1280 x 720 720 p 60 60
1280 x 768 WXGA+ 60 70 75 85 60 70 75 85
1280 x 800 WXGA 60 60
1280 x 1024 SXGA 60 75 85 60 75
1366 x 768 WXGA+ 60 60
1400 x 1050 SXGA+ 60 75 85 60 75 85
69
1600 x 1200 UXGA 60 60
1680 x 1050 WSXGA+ 60 60
1920 x 1080 1080p 60 60
1920 x 1200 WUXGA 60 60
2048 x1152 QXGA 60 60
* Remarque: les modes entrelacés et les modes d'effacement réduit ne sont pas pris en charge.
Conguration Audio
Par défaut, lorsque la station d’accueil est branchée à un ordinateur, la configuration audio peut
être modifiée en USB (Multimedia) Audio Device (Périphérique audio (Multimédia) USB)
automatiquement (ce paramètre dépend des modèles). Si cela ne fonctionne pas, suivez les étapes
ci-dessous pour effectuer la configuration.
Windows
®
OS
1. Ouvrez le Panneau de configuration, puis sélectionnez le matériel et l’icône d'audio.
2. Cliquez sur Son > Gérer les périphériques audio, puis sélectionnez AmazonBasics Audio
(Audio AmazonBasics).
70
Désinstallation Du Pilote
1. Suivez les instructions pour trouver le chemin du pilote, puis cliquez-droit sur DisplayLink
Graphics (Graphiques DisplayLink) pour désinstaller le pilote.
Windows
®
7/Windows
®
10
Panneau de configuration > Programmes > Programmes et fonctionnalités > Désinstaller ou
modifier un programme
Windows
®
8/Windows
®
8.1
Paramètres > Panneau de configuration > Programmes > Désinstaller un programme
2. Cliquez sur Oui pour confirmer la désinstallation.
3. Cliquez sur Oui pour redémarrer l’ordinateur. Vous pouvez également couper la connexion vidéo
maintenant.
71
Mac OS
®
1. Ouvrez le pilote, puis cliquez sur DisplayLink Software Uninstaller (Gestionnaire de
désinstallation de logiciels DisplayLink).
72
Caractéristiques
Interface hôte USB 3.0
Connecteur Sortie vidéo - Port HDMI
- Connecteur femelle DVI
Connexion amont vers l’hôte Port USB femelle de type B
Connexion aval vers le HUB Port USB femelle de type A
Port Audio Mini-prise stéréo jack canal 2.1
(3,5 mm)
Port Ethernet Port RJ45
Alimentation Prise jack d’alimentation DC
Résolution vidéo HDMI 2048 x 1152
DVI 2048 x 1152
Couleurs prises en
charge
16bits et 32bits
Audio Canal 2.1
Ethernet 10/100/1000
Alimentation Mode d'alimentation Auto-alimenté
Adaptateur secteur - Entrée: 100 à 240 V AC
- Sortie: 5 V/4 A DC
Consommation d’énergie - Puissance de fonctionnement:
14,43 W
Alimentation en mode de
suspension:
1,95 W
Physique
Propriétés
Boîtier de l'appareil ABS (Plastique)
Poids Env. 365 g
Environnement de
fonctionnement
Température de fonctionnement 0 à 40 degrés
Température de rangement -20 à 70 degrés
Conformité CE, FCC
*Les caractéristiques techniques sont susceptibles d'être modifiées sans préavis.

73
Adaptateur Secteur
Raison sociale ou marque déposée, numéro
d’enregistrement au registre du commerce
et adresse du fabricant
DEE VAN ENTERPRISE CO., LTD.
#11491382
NO. 5, PAO-KAO ROAD, HSIN-TIEN, TAIPEI,
231 TAIWAN, R.O.C.
Modèle DSA-24CB-05 050400
Tension d’entrée 100 – 240 V CA
Fréquence du CA d’entrée 50 / 60 Hz
Tension de sortie 5,0 V CC
Courant de sortie 4,0 A
Puissance de sortie 20,0 W
Rendement moyen en mode actif 84,845 %
Rendement à faible charge (10 %) 81,24 %
Consommation électrique hors charge
0,0608 W
Les informations ci-dessus sont publiées sur les sites Web en libre accès
http://www.deevan.com.tw/ des fabricants, importateurs ou représentants agréés
Informations Relatives à La Garantie
Pour obtenir une copie de la garantie couvrant ce produit:
Veuillez vous rendre sur amazon.com/AmazonBasics/Warranty
— ou —
Contactez le service à la clientèle en composant le: 1-866-216-1072

74
Rétroaction
L’appréciez-vous? Le détestez-vous?
Faites-le nous savoir grâce à votre témoignage.
AmazonBasics est déterminé à proposer des produits répondant aux attentes des clients et à vos
normes les plus élevées. Nous vous encourageons à rédiger un témoignage afin de partager vos
expériences avec le produit.
Veuillez vous rendre sur: amazon.com/review/review-your-purchases#
Pour plus de services:
Veuillez vous rendre sur amazon.com/gp/help/customer/contact-us
— ou —
Contactez le service à la clientèle en composant le: 1-866-216-1072
75
USB 3.0 ユニバーサルラップトップ
ドッキングステーション
安全および守るべきこと
接続を試みる前に、この製品を操作または調整してください、使用者マニュアルを熟読し、
保存してください。
• 安全指示は常に注意深く読んでください。
• 今後のご使用のためにこの使用者マニュアルを保管してください。
• この装置は湿度の高いところに置かないでください。
• 以下の状態が生じた場合は、サービス技術者による装置のチェックを行ってください:
- 装置が水分にさらされたとき。
- 装置を落とした、または装置にダメージが生じた場合。
- 装置に明らかな損傷が認められた場合。
- ここしばらく装置がうまく作動していないまたは使用者マニュアルに述べられている
ように作動しない。
著作権
• この文書は著作権により保護されている専有情報を含んでいます。本書の無断複写・転写
を禁じます。メーカーの書面による事前の承諾がない限り、このマニュアルのどの部分に
ついても機械的、電子的または他の手段による複製を禁じます。
商標
• 全ての商標および登録商標は各所有者または会社の所有物です。
ウェルカムガイド
•
日本語
76
免責条項
• この書類の情報は予告なく変更されることがあります。メーカーはこの文書の精度や完成度
についての表示や保証(含まれる、含まれないに関わらず)はせず、特別、予想外、重大ま
たは他のダメージを含むダメージによる収入や営業へのロスに対する責任を負うことはあり
ません。
FCC 条件
この装置はテスト済みで、FCC 規制パート 15 クラス B に準拠していることが確認されていま
す。操作は以下の 2 項目の条件の対象となります:
1. このデバイスが有害な電波障害を引き起こす可能性がないこと。
2. このデバイスが、好ましくない操作結果を引き起こす可能性のある電波障害を含め、あらゆる
電波障害を許容しなければならないこと。
FCC 注意:適合性に責任のある者が明示的に許可していない変更や改良を行った場合、本装置を
操作することはできなくなる可能性があります。
CE
この装置は以下の規制に適合しています:EN 55032/EN 55024: クラス B
WEEE 情報
EU メンバー使用者のために:WEEE(廃電気、電子製品)規制に従い、この製品は過程廃棄物ま
たは産業廃棄物として破棄しないでください。廃電気、電子製品はそれぞれの国で制定されてい
るやり方で正しく回収され、リサイクルされるべきです。この製品にリサイクルについては、地
方自治体、過程廃棄物廃棄サービスまたはご購入いただいた店にご連絡ください。
77
はじめに
• USB 3.0 デュアルディスプレードッキングステーションはより大量の廉潔性への要求に合わせ
るべくデザインされています。ドッキングステーションがあれば、1本の USB ケーブルでコン
ピューターの接続をより多くの USB 周辺機器、イーサネットネットワーク、スピーカーおよ
びマイクロホンに広げることが可能となります。
• 内蔵の USB ポートにより、ドッキングステーションがあれば USB 周辺機器間の超高速デー
タ伝送をお楽しみいただけます。USB 3.0 のほかに、この製品は USB 1.1/2.0 仕様にも対応
できます。お手持ちの USB 1.1/2.0 デバイスもそのままお使いいただけます。
• 加えて、ドッキングステーションにはビデオアウトプットも装備されています。DVI および
HDMI ポートにより、最初の画面を映し出すこともできる上、 Window デスクトップを延長し
て同時により多くのアプリケーションを見ることも可能です。強化された拡張性能とスタイリ
ッシュな外見により、このビデオ付きドッキングステーションは皆様のご自宅またはオフィス
を完全な物にするための最も用途の広いアクセサリーとなります。
HDMI
®
技術編入。
特徴
• USB 3.0/2.0/1.1 仕様にも対応
• レゾリューション細大 2048x1152
• サポートオーディオ 2.1 チャンネル
• サポートギガビットイーサネット
• サポート HDMI / DVI ビデオアウトプット
• サポート BC1.2 充電(前面 x1)
パッケージ内容
• ドッキングステーション x1
• USB 3.0 データケーブ x1
• 電源アダプター x1
• CD (ドライバーおよび使用者マニュアル) x1
• クイックインストールガイド x1
78
作動環境
PC に要求される最低限のことは:
• CPU:1.6GHz シングルコアまたはそれ以上のプロセッサークロック。
- Intel Pentium/Celeron ファミリー
- AMD K6/Athlon /Duron ファミリーまたは互換性のあるプロセッサー
• RAM:1GB または以上
• USB ポート:2.0/3.0
• 使用可能なディスク容量 30MB
• 操作システム:
- Microsoft:Windows
®
7 SP1 またはそれ以降のもの/ Windows
®
8/
- Windows
®
8.1/ Windows
®
10
- Apple:Mac OS
®
10.9 またはそれ以降のもの
ドッキングステーションを通じて別に接続したモニターで DVD を再生するには、上記の必要条件
以外に以下の条件を満たす必要があります:
• 2.0 GHz プロセッサークロックのついたデュアルコア CPU
79
製品概要
表面
3
1
4
2
5
6
# アイテム 説明
1
パワーインジケーター(ブルー)
電源が入ると点灯
2
USB インジケーター(グリーン)
USB デバイスがユニットに差し込まれると点灯
3
USB 3.0 ポート
USB 3.0 デバイスに接続
4
USB 3.0 ポート
USB 3.0 デバイス / BC 1.2 充電付きに接続
5
スピーカージャック
スピーカーまたはイヤホンに接続
6
MIC ジャック
マイクに接続
80
製品概要
背面
デュアルディスプレードッキングステーション
7
7
8
9
10
11
12
# アイテム 説明
7
USB 2.0 ポート
USB 2.0 デバイスに接続
8
RJ45 ポート
イーサネットに接続
9 DVI コネクター
DVI モニターまたはプロジェクターに接続
10
HDMI コネクター
HDMI モニターまたはプロジェクターに接続
11
USB 3.0 ポート(タイプ B)
コンピューターに接続
12
パワージャック
パワーアダプターに接続
81
接続
USB 周辺機器、イーサネットやマイクロホンに接続するには、以下のイラストに従って対応する
コネクターに接続します。

82
設置
注意:含まれているドライバーをインストールする前にコンピューターにドッキングを接続する
ことはおやめください。
この使用者マニュアルで表示される以下の文字列とスクリーンショットは操作システムとは多少
異なることがあることをご了承ください。
Windows
®
OS
1. 含まれている CD をお手持ちの CD-ROM ドライブに挿入します。
2. Run Setup.exe をクリックしてインストーラープログラムを開始します。プログラムがドライ
バーをインストールするまで待ちます。
3. Finish (終了) をクリックしてインストールを完了します。
注意:
a. AutoPlay(オートプレー) が自動的にスタートしない場合は、ドライバーフォルダーの
Setup.exe ファイルをダブルクリック起します。
b. 管理者パスワードを入力し、 使用者アカウントコントロール ダイアログボックスがポッ
プアップすれば Yes をクリックしてインストールを開始します。
c. Windows オペレーティングシステムによっては、ドライバーが自動的にインストールされ
ます。ドライバーインストールが自動的にスタートしない場合は、含まれているドライバ
ーを、上記に従ってインストールしてください。
4. インストールが完了したら、ドッキングステーションをコンピューターに接続してください。
詳しい接続については。 接続の項をご参照ください。
5. 操作システムがドッキングステーションを検出すると、メモメッセージがシステムトレイに
あらわれます。
83
Mac OS
®
1. 含まれている CD をお手持ちの CD-ROM ドライブに挿入します。
2. .dmg ファイルを見つけてダブルクリックし、インストールを開始します、その後 Continue
(継続)をクリックします。
3. Continue > Agree(継続>合意)の順にクリックします。
84
4. Install > Continue Installation (インストール>インストールを継続)をクリックします。
5. インストール進行中はお待ちください。
6. Restart (再起動) をクリックしてインストールを完了します。
85
インストールの検証
アダプターのドライバーの検証には以下の手順に従います。
1. デバイスマネージャーを開くための手順。
Windows
®
10
Settings\Devices\Connected devices(設定\デバイス\接続したデバイス)
Windows
®
8/ Windows
®
8.1
Settings\ Control Panel\ System and Security\System\ Device manager (設定\コントロール
パネル\システムおよび安全\システム\デバイスマネージャー)
Windows
®
7
Control Panel\ System and Security\ Systems\ Device manager (コントロールパネル\システ
ムおよび安全\システム\デバイスマネージャー)
2. 下図のように AmazonBasics ドッキングステーション がリストアップされています。
*ドライバーの文字列およびスクリーンショットは Windows
®
8 のもので、操作システムとは多
少異なるかもしれません。
注意:
リストの中にドライバーが見当たらない場合は、ドライバーが正しくインストールされていない
場合があります。アイテムを除去、アダプターの電源を抜き、インストールのステップを繰り返
してください。
86
Mac OS
®
1. 画面左上の端にある Apple サインをクリックし、 Mac
®
のAbout This Mac (この Mac につ
いて) を開きます。
2. 下図のスクリーンがあらわれたら、 More Info… (詳細)をクリックします。
87
3. 下図のスクリーンがあらわれたら、 System Report… (システムレポート)をクリックし
ます。
4. 以下のようにディスプレーリンクドライバーがリストされているのを見つけてください。
ディスプレー設定
注意:以下のドライバーの文字列およびスクリーンショットは Windows
®
7 のもので、操作シス
テムとは多少異なるかもしれません。
ユーユーティリティー設定
含まれているユーティリティーはディスプレーモード、画面の回転、画面の解像度や物理的配列
の設定をします。
1. のアイコンが Windows System Tray (Windows システムトレイ)にあるのでクリックし
ます。
注意:この アイコンが Windows System Tray (Windows システムトレイ)内に見当たらな
いときは、矢印アイコンをクリックしてアイコンリストを出して見つけてください。
88
2. 望むオプションを選択し、マウスを使ってクリックします。
設定の説明
オプション 説明
ディスプレーリンクマネージャー Windows 画面解像度ページを有効にします
更新プログラムのチェック 利用可能な最新のドライバーやダウンロードを
チェック
ディスプレーセッティングサブメニュー
画面の解像度 利用可能な解決方法をクリック。「解決」は一次
モニターの解決限定されるため、この機能はミラ
ーモードでは無効であることをご理解ください
画面の向き 画面を希望する向きに回転させます
~まで延長 カーソルを上下左右の動きに伊より希望する画面
まで延長することができます
拡張 画面を希望する環境に延長させます
メインモニターとして設定 このスクリーンをメインスクリーンとして設定
します
ノートブックモニターオフ アドオンモニターをメインディスプレーにし、ラ
ップトップのスクリーンを切ります。注意:この
機能はアドオンモニターが接続されたときのみ有
効となります。このオプションはラップトップに
対してのみ有効です。
89
ミラー 一次モニターをアダプターに接続するモニターに
複写します。
オフ モニターの電源を切ります。
TVにフィット Windows デスクトップのサイズをテレビに合わ
せます
注意:この機能はアドオンモニターが接続された
ときのみ有効となります。さらに、このオプショ
ンは延長モードのときのみ有効です。ミラーモー
ドにあるときにこのオプションを選択すると、ア
ドオンモニターが延長モードにかわります
オーディオ設定 Windows オーディオコンフィギュレーションペ
ージを有効にします。この機能は特定のモデルに
のみ有効です
ビデオ設定 Windows 画面解像度ページを有効にします
マルチモニターで考慮すべきこと
モニターが既に1つ PC に直接接続されていれば、トッキングステーションを通じて余分な DVI
や HDMI モニターを接続することができます。余分なモニターが接続されたら、 「ミラーモー
ド」、「延長モード」 または一次ディスプレーのどれを使うかを設定することができます。
Windows
®
OS
マウスを Windows デスクトップ のどこか(どこでもよい)に位置させます。
画面解像度 を選択し、右クリックします。
シングルディスプレー デュアルディスプレー
90
代わりにユーティリティーアイコン (これは Windows システムトレイ にあります)クリッ
クし、次にディスプレイリンクマネージャーまたは ビデオ設定 を選択します。
Mac OS
®
1. スクリーンの左上アイコンの Apple アイコン をクリックし、ドロップダウンリストの中から
システム環境設定... を選択します。
2. ディスプレー をクリック、マルチモニターモードにすると、延長モニターモデル番号がデス
クトップに表示されます。
シングルディスプレードッキングステーション デュアルディスプレードッキングステーション
注意:スイッチしてモニターディスプレー の前にあるボックスをティックすると ミラーモード
にかわります。
91
延長モード
1. コンフィギュレーションウィンドーを出すには マルチモニターコンフィギュレーション のセ
クションを参照にしてください。
2. ディスプレー ドロップダウンメニューで。希望のモニターを選択します。
3. Multiple Displays(複数ディスプレー) > Extend these displays(ディスプレーを延長する)
の順に選択します。
4. OK をクリックしてプログラムを抜けることを確認してください。
2
3
4
5. 設定が完了したら、アプリケーションアイコンをドラッグ+ドロップするか、既に開いている
ウィンドーをアドオンモニターにドラッグします。しかしながら、アプリケーションによって
は延長デスクトップでのディスプレーをサポートしないことがあります。
カーソルの消滅
延長モードにある状態でアダプターが外れていると、デスクトップはアドオンモニターのままに
なります。そのようなケースでは一次モニターでカーソルが見つからないことがあります。この
ようなケースではアダプターでアドオンモニターを接続するか、マウスを動かし続けてください。
延長モードでのビデオ再生
ビデオまたは DVD の再生の質が良くないまたは延長モードでのパフォーマンスが良くない場合
は、アドオンモニターではなく一次モニターで再生してください。
ミラーモード
1. コンフィギュレーションウィンドーを出すには マルチモニターコンフィギュレーション のセ
クションを参照にしてください。
2. ディスプレー ドロップダウンメニューで。希望のモニターを選択します。
3. Multiple Displays(複数ディスプレー) > Duplicate these displays(これらのディスプレー
を複製)の順に選択します。
4. OK をクリックしてプログラムを抜けることを確認してください。
92
一次モニターの設定
1. コンフィギュレーションウィンドーを出すには マルチモニターコンフィギュレーション のセ
クションを参照にしてください。
2. ディスプレー ドロップダウンメニューで。希望のモニターを選択します。
3. これをメインディスプレーにするをクリックします。
注意:コンピューターによっては、デスクトップをこのモニターに延長または Windows デスク
トップをこのモニターに延長のボックスのチェックを外すことによりメインディスプレーを無効
にする必要があるかも知れません。
4. OK をクリックしてプログラムを抜けることを確認してください。
Windows ショートカット
Windows ボタン + P を押して、以下のメニューを出し、希望するオプションを選択しま
す。
この機能は Windows
®
7 またはそれ以降の物に有効です
サポートされる解像度
解像度を調整する前に、以下の表でサポートされる解像度を参照してください。
名称: リフレッシュ速度 16
ビット
リフレッシュ速度 32
ビット
640x480 VGA
60 72 75 85 60 72 75 85
800x600 SVGA
56 60 72 75 56 60 72 75 85
1024x768 XGA
60 70 75 85 60 70 75 85
1280x720 720p 60 60
1280x768
WXGA+ 60 70 75 85 60 70 75 85
1280x800 WXGA 60 60
1280x1024 SXGA
60 75 85 60 75
1366x768
WXGA+
60 60
1400x1050
SXGA+ 60 75 85 60 75 85
1600x1200 UXGA 60 60
93
1680x1050
WSXGA+
60 60
1920x1080 1080p 60 60
1920x1200 WUXGA 60 60
2048x1152 QXGA 60 60
*インターレースモデルや減少ブランキングモデルはサポートされていないことにご注意くださ
い。
オーディオ設定
規定ではドッキングステーションがコンピューターに接続されると、オーディオ設定は自動的に
USB (マルチメディア)オーディオデバイスに変更されることがあります(モデルによります)
。うまく行かないときは以下の手順で起してください。
Windows
®
OS
1. コントロールパネル を開き、次にハードウェアおよびサウンドアイコンを選択します。
2. サウンド > オーディオデバイスの管理 をクリックし、 Amazonベーシックオーディオを選択
します。
94
ドライバーのアンインストール
1. 説明書に従ってドライバーパスを見つけ、 DisplayLink Graphics(ディスプレーリンクグラフ
ィックス)を右クリックしてドライバーをアンインストールします。
Windows
®
7/ Windows
®
10
Control Panel > Programs > Programs and Features > Uninstall or change the program(コン
トロールパネル > プログラム > プログラムと機能 > プログラムのアンインストールと変更)
Windows
®
8/ Windows
®
8.1
Settings > Control Panel > Programs > Uninstall a program(設定 > コントロールパネル > プロ
グラム > プログラムのアンインストール)
2. Yes をクリックしてアンインストールを確認します。
3. Yes をクリックしてコンピューターを再起動します。このタイミングでビデオ接続を外すこ
ともできます。
95
Mac OS
®
1. ドライバーを開き、DisplayLink Software Uninstaller(ディスプレリンクアンインストーラ
ー)をクリックします。
96
規格
ホストインターフ
ェース
USB 3.0 ポート
コネクタ ビデオアウトプット - HDMI コネクター
- DVI メスコネクター
ホストアップストリームリンク USB B タイプメスコネクター
HUB ダウンストリームリンク USB A タイプメスコネクター
オーディオポート 3.5mm ステレオ見にジャック 2.1
チャンネル
イーサネットポート RJ45コネクター
電源 DC 電源ジャック
ビデオ解像度
HDMI 2048x1152
DVI 2048x1152
サポートされる色 16 ビットおよび 32 ビット
オーディオ 2.1 チャンネル
イーサネット 10/100/1000
電源 電源モード 自己発電型
電源アダプター - 入力:AC 100-240V
- 出力:DC 5V/4A
消費電力 - 操作電力:14.43W
サスペンドモード電力: 1.95W
物理 プ
ロパティ
外側 ABS (プラスチック)
重さ 約 365g
作業環境 操作温度 0~40 度
保管温度 -20~70 度
法令遵守 CE、FCC
*規格は予告なく変更されることがあります。
97
電源アダプター
製造者名または商標、
商業登録番号および住所
DEE VAN ENTERPRISE CO., LTD.
#11491382
NO.5, PAO-KAO ROAD, HSIN-TIEN, TAIPEI,
231 TAIWAN, R.O.C.
モデル DSA-24CB-05 050400
入力電圧 AC 100 - 240 V
入力交流周波数 50 / 60 Hz
出力電圧 DC 5.0 V
出力電流 4.0 A
出力 20.0 W
平均能動効率 84.845 %
低負荷時の効率(10%) 81.24 %
無負荷消費電力
0.0608 W
上記の情報は、フリーアクセスのウェブサイトからもご覧になれます。
製造業者、輸入業者、または正規代理店のhttp://www.deevan.com.tw/
保証について
この製品の保証書のコピーを入手するには:
ホームページ: amazon.jp/AmazonBasics/Warranty
- または -
カスタマーサービス 0120-899-276 にご連絡ください。
98
フィードバック
気に入っていただけましたか?お気に召しませんでしたか?
カスタマーレビューでお知らせください。
Amazonベーシック は、皆様の高い水準に答えることのできるような消費者志向型の製品をお届
けするのを旨としています。この製品についてのレビューで製品についてのご意見をお聞かせく
ださい。
レビューはこちらへ: amazon.jp/review/review-your-purchases#
更なるサービスについては:
こちらのリンクへ amazon.jp/gp/help/customer/contact-us
- または -
カスタマーサービス 0120-899-276 にご連絡ください。
99
USB 3.0 通用型便携式电脑扩展坞
安全和注意事项
在尝试连接、运行或调节本产品前,请完全保存和阅读此用户手册。
• 请认真阅读本安全说明。
• 保存本用户手册以备将来参考。
• 不要让此设备受潮。
• 如有以下情况发生,邀请专业技术服务人员对本设备进行检查:
- 设备受潮。
- 设备跌落和损坏。
- 设备有明显破损迹象。
- 此设备不能良好运行,或者根据用户手册,您不能使设备运行。
版权
• 本手册包含受版权保护的专有信息。版权所有。未经厂商事先书面许可,不可通过机械、电
子或其它途径,以任何形式对本手册的任何部分进行复制。
商标
• 所有商标和注册商标均归其各自的所有者和公司拥有。
欢迎指南
•
中文

100
免责声明
• 本文件中的信息如有变更,恕不另行通知。制造商不对本文件的精确性和完全性承担责任或做出
保证(也无暗示或其它);在任何情况下,也不应对任何利润受损或商业损失承担责任,这里的
损失包括但不限于特殊的、附带的、后续的或其它损失。
FCC 标准
本设备已被检测,符合 FCC 标准 B 等级第 15 部分的规定。设备操作应符合下列两项条件:
1. 本设备不可对周围环境造成有害干扰。
2. 本设备必须可接受和抵抗任何收到的干扰,包括有可能影响运行的干扰。
FCC 警告:任何未经合规负责方明确批准的改动或修改有可能导致用户对本设备的操作权限无效。
CE
本设备符合如下标准要求:EN 55032/EN 55024:B 等级
WEEE 规定
EU(欧盟)成员用户:根据 WEEE(报废电子电气设备)指令,不可将本产品按照生活垃圾或商业
垃圾弃置。废弃的电气和电子设备应按您所在国家/地区法律法规的要求妥当收集和回收。有关本产
品的回收信息,请联系您当地的授权机构、生活垃圾弃置服务部门或者您购买本产品的商店。

101
介绍
• 此 USB 3.0 双显示屏扩展坞适用于额外连接需求。利用扩展坞,您可通过一根 USB 数据线把与
计算机的连接扩展到更多的 USB 外围设备、以太网络、扬声器以及麦克风。
• 通过内置 USB 3.0 端口,此扩展坞可使您乐享 USB 外围设备之间的超快数据传输。除 USB 3.0
以外,此产品还兼容 USB 1.1/2.0 规格。您将可以照常使用 USB 1.1/2.0 设备。
• 另外,此扩展坞还装有视频输出。通过 DVI 和 HDMI 端口,您可以镜像主屏幕,或者延伸显示窗
口,从而允许了多个应用程序同时显示。增强的扩展能力加上时尚的外观,此带视频接口扩展坞
是最为多功能的配件,并且可完美搭配您家居和办公室空间。
包含
HDMI
®
技术。
特点
• 与 USB 3.0/2.0/1.1 规格兼容
• 分辨率最大可达 2048 x 1152
• 支持音频 2.1 声道
• 支持千兆以太网
• 支持 HDMI / DVI 视频输出
• 支持 BC1.2 充电(前端 x1)
套装包括
• 扩展坞 x1
• USB 3.0 数据线 x1
• 电源适配器 x1
• Cd(驱动程序和用户手册) x1
• 快速安装指南 x1

102
系统要求
对计算机的最低要求为:
• CPU:1.6GHz 单核或者更高的处理器时钟频率。
- 英特尔奔腾/赛扬系列
- AMD K6/速龙/毒龙系列,或者其它兼容处理器
• RAM:1GB 或更高
• USB端口:2.0/3.0
• 30MB 磁盘可用空间
• 操作系统:
- 微软:Windows
®
7 SP1 或更高/ Windows
®
8/
- Windows
®
8.1/ Windows
®
10
- 苹果:Mac OS
®
10.9 或更高
如要通过扩展坞在额外连接的显示器上播放 DVD,除了上述要求外,还需达到如下要求:
• 具有 2.0 Ghz 处理器时钟频率的双核 CPU
103
产品概览
前部
3
1
4
2
5
6
# 项目 描述
1
电源指示灯(蓝色) 接通电源开启时亮起
2
USB 指示灯(绿色) USB 设备被插入到本设备时亮起
3
USB 3.0 端口 连接 USB 3.0 设备
4
USB 3.0 端口 连接 USB 3.0 设备/支持 BC 1.2 充电
5
扬声器插孔 连接扬声器或者耳机
6
MIC 插孔 连接麦克风

104
产品概览
后部
双显示器扩展坞
7
7
8
9
10
11
12
# 项目 描述
7
USB 2.0 端口 连接 USB 2.0 设备
8
RJ45 端口 连接以太网。
9 DVI 接口 连接 DVI 显示器或者投影仪
10
HDMI 接口 连接 HDMI 显示器或者投影仪
11
USB 3.0 端口(B 型) 连接计算机
12
电源插孔 连接电源适配器
105
连接
如要连接 USB 外围设备、以太网、扬声器和麦克风,按如下指示连接对应接口。
106
安装
注意:切勿在安装所提供的驱动之前,把扩展坞与计算机连接。
请知悉,如下显示于此用户手册的系列指示和截图有可能根据不同操作系统略有出入。
Windows
®
操作系统
1. 把随附 CD 插入到 CD-ROM 驱动器中。
2. 点击 Run Setup.exe 文件进入安装程序。等待程序安装驱动。
3. 点击完成结束安装。
注意:
a. 如果自动运行(AutoPlay)不能自动启动,选择并双击驱动文件夹内的 Setup.exe 文件来
启动安装。
b. 如果用户帐户控制对话框弹出,输入管理员密码并点击是开始安装。
c. 对于一些 Windows 操作系统,驱动将被自动安装。如果驱动安装进程没有自动启动,请按
上述指示安装随附驱动。
4. 驱动安装完成后,把扩展坞与计算机相连。针对连接细节,请参看连接章节。
5. 当操作系统检测到扩展坞时,任务栏会出现提醒信息。
107
Mac OS
®
1. 把随附 CD 插入到 CD-ROM 驱动器中。
2. 选择并双击 .dmg 文件开始安装,点击继续。
3. 点击继续 > 同意。
108
4. 点击安装 > 继续安装。
5. 安装进程进行时,请等待。
6. 点击重启结束安装。
109
检验安装
检验适配器驱动,请跟随如下步骤。
1. 按如下路径打开设备管理器。
Windows
®
10
设置\设备\连接的设备
Windows
®
8/ Windows
®
8.1
设置\控制面板\系统和安全\系统\设备管理器
Windows
®
7
控制面板\系统和安全\系统\设备管理器
2. 您将会找到 AmazonBasics 扩展坞(AmazonBasics Docking Station)设备,如下图列所示。
* 驱动串列和截图来源于 Windows
®
8,有可能会根据不同操作系统略有变化。
注意:
如果您不能在列表里找到驱动,则驱动可能未被正确安装。请删除安装文件,拔掉适配器,并重复
安装步骤。

110
Mac OS
®
1. 点击屏幕左上角的苹果标志,在 Mac
®
上打开关于本机。
2. 出现如下界面后,点击更多信息….
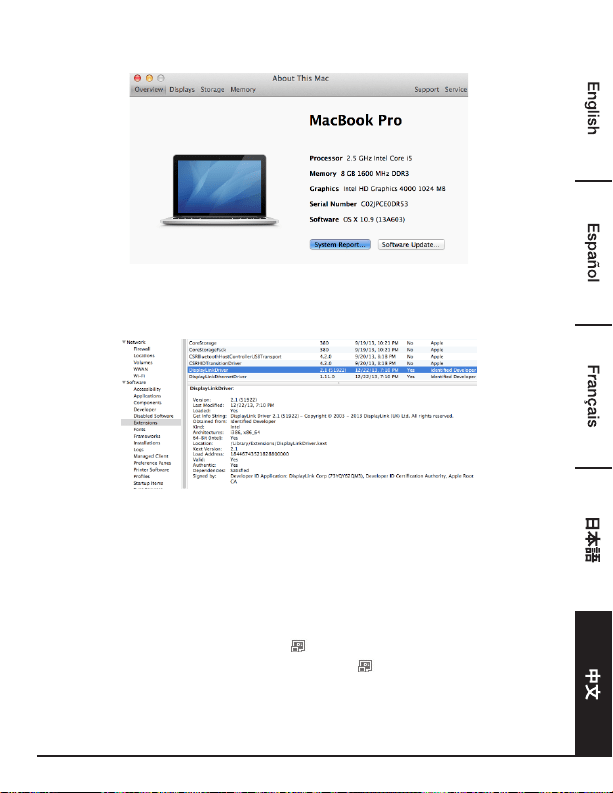
111
3. 出现如下界面后,请点击系统报告….
4. 您会发现如下列出的 DisplayLink 驱动。
显示屏配置
注意:本节如下截图来源于 Windows
®
7,不同操作系统有可能会略有变动。
实用程序设置
提供的实用程序允许配置显示屏模式、屏幕旋转、屏幕分辨率以及显示器的物理布局。
1. 从 Windows 系统任务栏里点击实用程序图标 。
注意:如果您在 Windows 系统任务栏里找不到实用程序图标 ,点击箭头图标,引出图标列表寻
找实用程序图标。
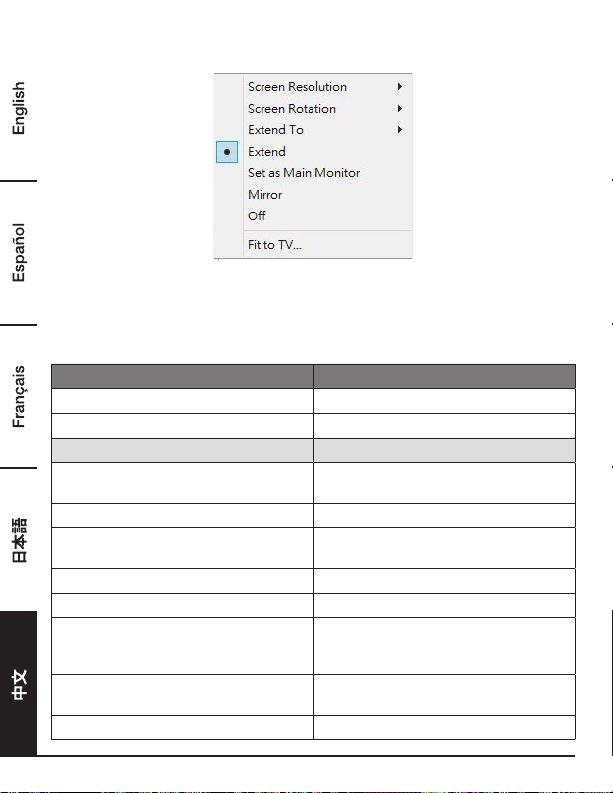
112
2. 选择一偏好选项,然后用鼠标点击它。
有关设置的描述
选项 描述
DisplayLink 管理器 进入 Windows 屏幕分辨率页面
检查更新... 检测最新驱动,如果可用,进行下载
显示屏设置下拉菜单
屏幕分辨率 点选一个可用的分辨率。注意此功能在镜像模
式时无效,因为分辨率由源显示器定义。
屏幕旋转 按照需求方向旋转屏幕
扩展至 可通过左/右/上/下移动光标,使其扩展
至指定屏幕
扩展 根据需要的方向扩展屏幕
设置为主显示器 设置此屏幕为主显示器
关闭笔记本显示屏 把附加显示器设置为主显示屏,并关闭便携式
电脑屏幕。注意:此功能仅在附加显示器被连
接时有效。此选项也仅出现于便携式电脑上。
镜像 将主显示器的显示内容复制至与适配器相连
的显示器上
关闭 关闭显示器
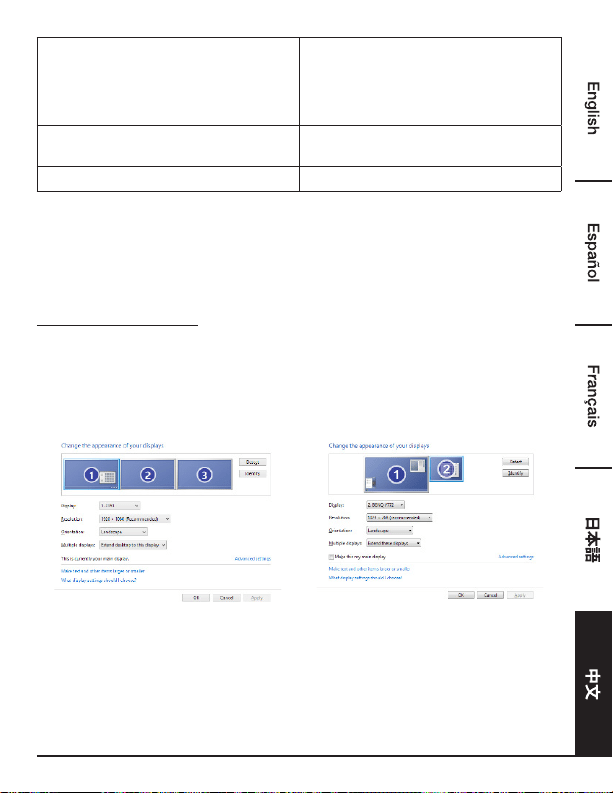
113
配置到电视 在电视上调试 Windows 桌面尺寸
注意:此功能仅在附加显示器被连接时有效。
此外,此选项也仅在扩展模式时有效。在镜像
模式里,如果选择此模式,附加显示器将会变
为扩展模式
音频设置 进入 Windows 音频配置页面。此功能仅在特
定模式有效
视频设置 进入 Windows 屏幕分辨率页面
多显示器配置
如果一个显示器已经被直接连接至台式计算机,通过扩展坞,额外的 DVI 和 HDMI 显示器可被连
接。当外加显示器被连接后,其可被配置为使用“镜像模式”、“扩展模式”,或者也可作为主显示器。
Windows
®
操作系统
在 Windows 桌面上任意位置定位鼠标。
点击鼠标右键并选择屏幕分辨率。
单显示屏 双显示屏

114
或者,在 Windows 系统任务栏里点击实用程序图标 ,然后选择 DisplayLink 管理器或者视频
设置。
Mac OS
®
1. 点击屏幕左上角的苹果标志,并在下拉列表里选择系统偏好设置。
2. 点击显示器转换为多显示器模式,带型号的扩展显示器将会显示在桌面上。
单显示器扩展坞 双显示器扩展坞
注意:转为勾选镜像显示器前面的选框,进入镜像模式。
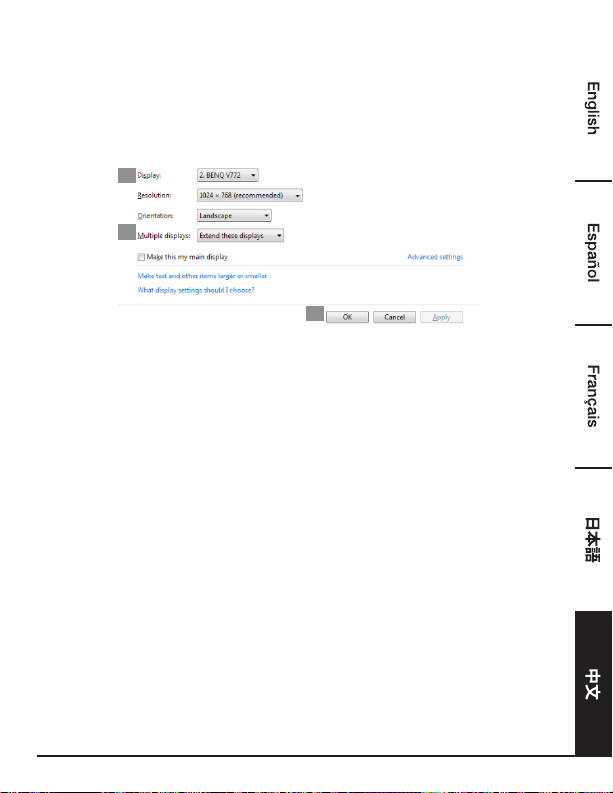
115
扩展模式
1. 参考多显示器配置小节,带出配置窗口。
2. 在显示器下拉菜单里,选择偏好的显示器。
3. 选择多显示器 > 扩展这些显示器。
4. 点击确定确认并退出
2
3
4
5. 一旦设置完成,即可简单地拖拽应用程序图标或者被打开的窗口至附加显示器。不过,一些应用
程序有可能不支持被显示于扩展桌面。
光标消失
如果状态还停留于扩展模式,但是适配器已断开连接,桌面将依旧被显示于附加显示器上。此种状
态下,有可能在主显示器上不能找到光标。如果出现此问题,通过适配器重新连接附加显示器或者
持续挪动鼠标。
扩展模式的视频播放
如果在扩展模式里视频或 DVD 播放质量很差或表现低下,请在主显示器上播放,而不是使用附加
显示器。
镜像模式
1. 参考多显示器配置小节,带出配置窗口。
2. 在显示器下拉菜单里,选择偏好的显示器。
3. 选择多显示器 > 复制这些显示器。
4. 点击确定确认并退出。
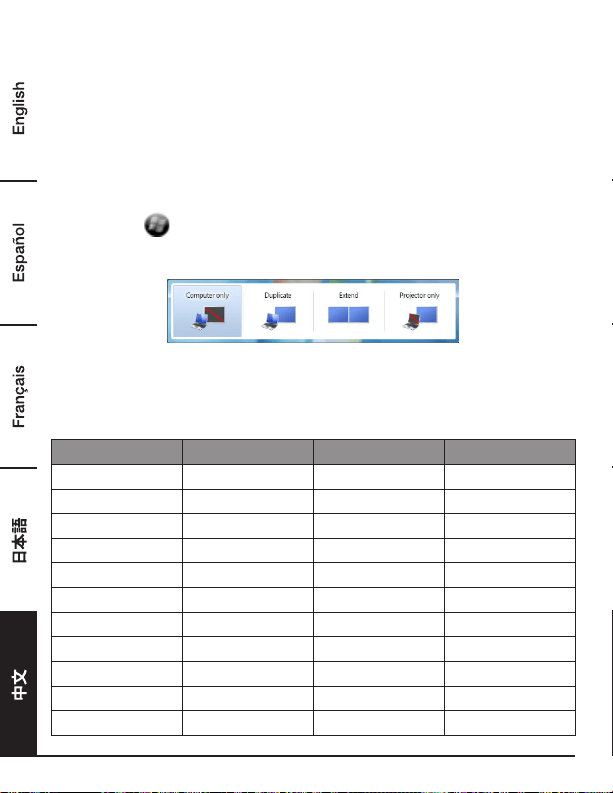
116
设定主显示器
1. 参考多显示器配置小节,带出配置窗口。
2. 在显示器下拉菜单里,选择偏好的显示器。
3. 勾选使它成为我的主显示器的选框。
注意:对于一些计算机而言,您有可能需要通过勾掉“将桌面扩展到该显示器上”或者“将 Windows
桌面扩展到该监视器上”来取消主显示器。
4. 点击确定确认并退出。
Windows 快捷键
按 Windows 按钮
+
P,引出如下菜单,然后选择所需要的选项。
此功能可用于 Windows
®
7 或更高
支持的分辨率
调试分辨率前,请参考下表了解可支持的分辨率。
名称 刷新率 16 位 刷新率 32 位
640x480 VGA
60 72 75 85 60 72 75 85
800x600 SVGA
56 60 72 75 56 60 72 75 85
1024x768 XGA
60 70 75 85 60 70 75 85
1280x720 720p 60 60
1280x768
WXGA+ 60 70 75 85 60 70 75 85
1280x800 WXGA 60 60
1280x1024 SXGA
60 75 85 60 75
1366x768
WXGA+
60 60
1400x1050
SXGA+ 60 75 85 60 75 85
1600x1200 UXGA 60 60
1680x1050
WSXGA+
60 60
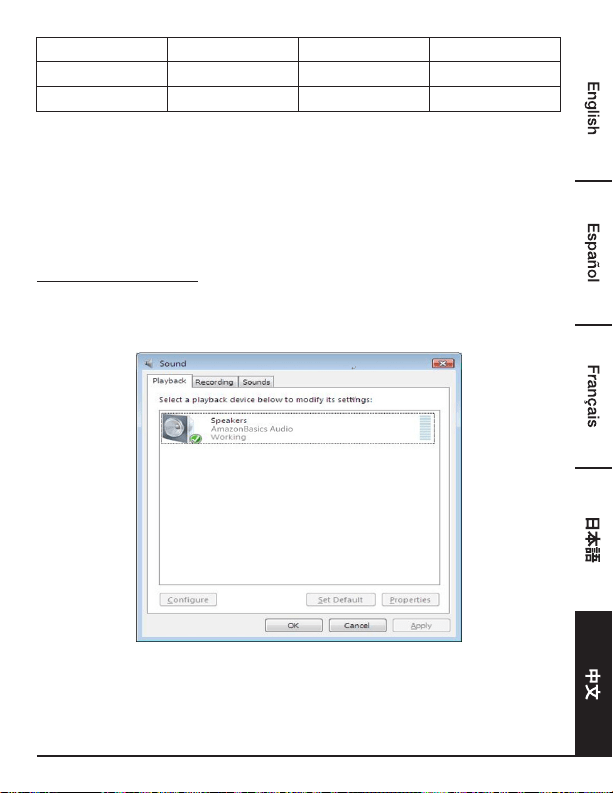
117
1920x1080 1080p 60 60
1920x1200 WUXGA 60 60
2048x1152 QXGA 60 60
* 请注意,不支持交错模式和降低消隐模式(Reduced Blanking)。
音频配置
在默认情况下,当扩展坞与计算机连接后,音频配置有可能会自动转变为USB(多媒体)音频设备
(此设置基于不同型号)。如果不运行,跟随如下步骤进行设置。
Windows
®
操作系统
1. 点开控制面板,然后选择硬件和声音图标。
2. 点击声音 > 管理音频设备,然后选择AmazonBasics 音频。
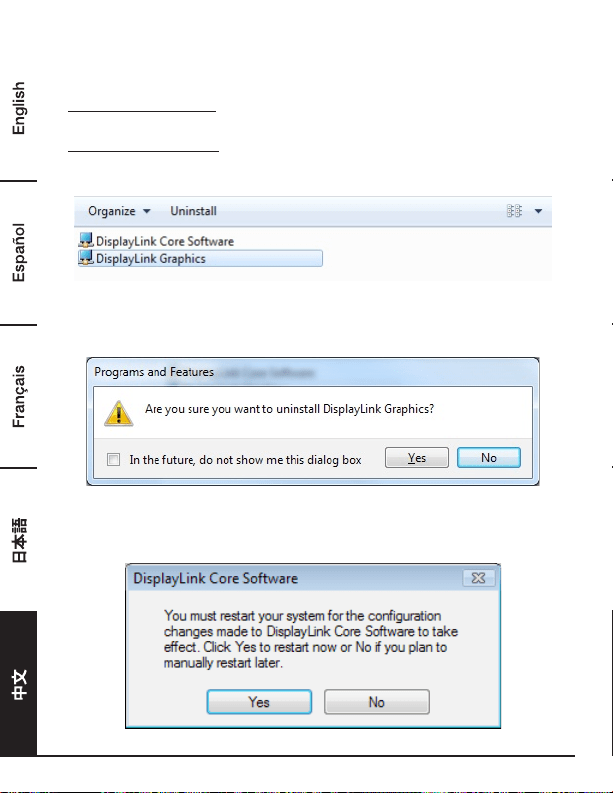
118
卸载驱动
1. 跟随指示找到驱动路径,然后右键点击 DisplayLink Graphics 卸载驱动。
Windows
®
7/ Windows
®
10
控制面板 > 程序 > 程序和功能 > 卸载或更改程序
Windows
®
8/ Windows
®
8.1
设置 > 控制面板 > 程序 > 卸载程序
2. 点击是确认卸载。
3. 点击是重启计算机。现在您也可断开视频连接。
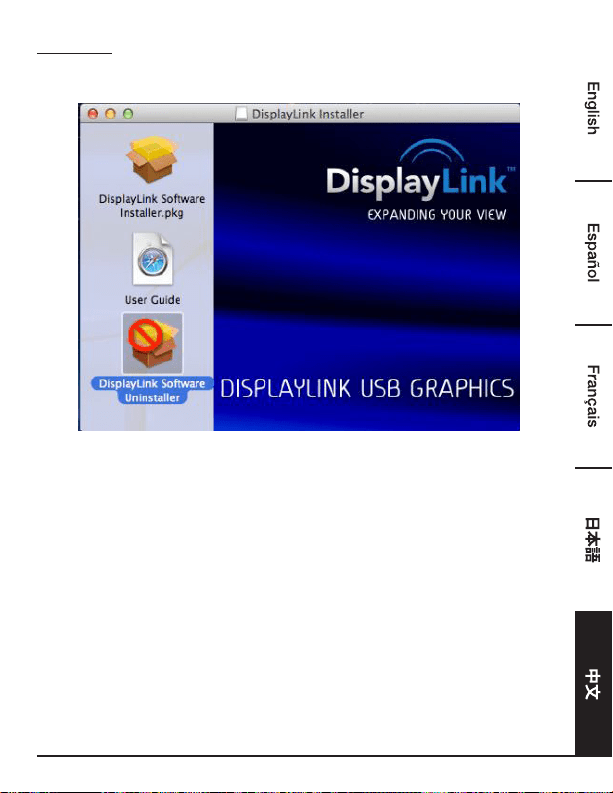
119
Mac OS
®
1. 启动驱动并点击 DisplayLink 软件卸载。
120
规格
主机接口 USB 3.0
连接器 视频输出 - HDMI 接口
- DVI 母口
主机上行(upstream)链路 USB B 型母口
HUB下行(downstream)链路 USB A 型母口
音频端口 3.5mm 立体声迷你插孔 2.1 声道
以太网端口 RJ45 端口
电源 DC 直流电源插孔
视频分辨率
HDMI 2048x1152
DVI 2048x1152
支持的颜色 16 位和 32 位
音频 2.1 声道
以太网 10/100/1000
电源 电源模式 自供电
电源适配器 - 输入:AC 交流电 100-240V
- 输出:DC 直流电 5V/ 4A
功率 - 负载功率:14.43W
暂停模式功率: 1.95W
物理属性 外壳 ABS(塑料)
重量 约 365 g
工作环境 工作温度 0~40 摄氏度
存储温度 -20~70 摄氏度
合规性 CE、FCC
* 规格如有改变,恕不另行通知。
121
电源适配器
Manufacturer’s name or trade mark,
commercial registration number and address
DEE VAN ENTERPRISE CO., LTD.
#11491382
NO.5, PAO-KAO ROAD, HSIN-TIEN, TAIPEI,
231 TAIWAN, R.O.C.
Model DSA-24CB-05 050400
Input voltage AC 100 - 240 V
Input AC frequency 50 / 60 Hz
Output voltage DC 5.0 V
Output current 4.0 A
Output power 20.0 W
Average active eiciency 84.845 %
Eiciency at low load (10 %) 81.24 %
No-load power consumption
0.0608 W
Above information have free access websites
http://www.deevan.com.tw/ of manufacturers, importers or authorised representatives
保修信息
如需获得此产品的保修信息:
访问 amazon.cn/AmazonBasics/Warranty
— 或 —
拨打 400-810-5666 联系客服人员
122
反馈
喜欢这款产品?不喜欢这款产品?
让我们通过客户评论了解您的想法和意见。
亚马逊倍思以客户为导向,致力于供应满足客户高标准的产品。我们邀请您填写评论,分享您使用
产品的体验。
请访问:amazon.cn/review/review-your-purchases
如需更多服务:
访问 amazon.cn/gp/help/customer/contact-us
— 或 —
拨打 400-810-5666 联系客服人员

MADE IN CHINA
amazon.com/AmazonBasics