Control graphics are representative; your oven may have alternate graphic appearances.
Upper Oven and Lower Oven
When using a double oven you can set separate modes in each oven. The selected oven will appear above the cooking modes.
Bake
This option allows the user to access traditional the traditional bake mode.
Broil
Broil can be selected to access Broil Low and Broil High.See the Cooking Modes section for more information.
Convect
This option allows you to utilize the convection system to cook in a variety of modes. See the Cooking Modes section for more information.
More
Select this option to access the Proof. Probe. Warm. Self Clean. and Steam Clean options.
Precision Cooking
Precision Cooking is a suite of customized cooking cycles that have been designed for specific foods. The display will guide you through setting the oven and food appropriately for the cycle selected. Precision cooking cycles vary based on food type; see the Cooking Modes section for more detailed information.
Recipes
This option allows you to access pre-loaded recipes for certain foods. New recipes can be loaded and followed through the GE Appliances Kitchen App once your phone is connected. See the Wi-Fi Connect section for instructions on connecting your phone.
Oven Light
To turn on or off the oven cavity lights. press the . Both cavity lights will be illuminated if using a double oven.
Settings
Press the to access the Settings. See the Settings section for more information.
Favorite
This option allows the user to save their favorite cycles for easy access in the future. After selecting a cooking mode and setting the temperature and any timers, press the to save it as a favorite for future use. After saving a cycle, press the on the main menu to quickly access the saved mode.
Kitchen Timer
This feature works as a countdown timer. Press the , select the amount of time for the timer to operate, and press Set. The oven will continue to operate once the timer countdown is complete. To turn off the timer, select the and press Cancel.
Cook Time
This function counts down cooking time and turns off the oven when the cooking time is complete. Press the during a cycle, select the amount of cooking time, and press Start.
Delay Time
This feature delays the start time for an oven cycle. Use this feature to set a time when you want the oven to start. Select a cycle. then press the . Select Delay Time to set the time of day for the oven to turn on and press Set. A cook time can also be programmed if desired.
Wi-Fi & Remote Enable
Press GET CONNECTED to connect your oven to Wi-Fi. This option allows you to download content to your oven and control it remotely. The oven must be connected to Wi-Fi before Remote Enable can be activated. For instructions on how to connect your oven, see the Wi-Fi Connect/Remote Enable section under Settings in this manual.
Double Oven
When using both cavities to cook, the control will allow you to switch back and forth between the upper and lower oven to review the cycle selection for each. When viewing the cooking mode screen you can access the alternate cavity by pressing on the banner at the top or bottom of the screen.
Cooking Modes
Your new oven has a variety of cooking modes to help you get the best results. These modes are described below.
Refer to the Cooking Guide section for recommendations for specific foods. Remember, your new oven may perform differently than the oven it is replacing.
Baking and Roasting Modes
Select a mode for baking and roasting based on the type and quantity of food you are preparing. When preparing baked goods such as cakes. cookies. and pastries always preheat the oven first. Follow recipe recommendations for food placement. If no guidelines are provided. center food in the oven.
Traditional Bake
The traditional bake mode is intended for single rack cooking. This mode uses heat primarily from the lower element but also from the upper element to cook food. To use this mode press the Bake pad under Traditional, enter a temperature, and then press Start. Preheating is generally recommended when using this mode.
Convection Bake with Direct Air
The Convection Bake mode is intended for single rack cooking. This mode uses heat from the lower element and also the upper and rear elements. along with air movement directly down from the top of the oven to enhance evenness. Your oven is equipped with Auto Recipe Conversion. so it is not necessary to convert the temperature when using this mode. To use this mode press the Bake pad under Convection. enter a temperature. and then press Start. Preheating is generally recommended when using this mode.
Convection Bake Multi Rack
The Convection Bake Multi Rack mode is intended for baking on multiple racks at the same time. This mode uses heat primarily from the rear element but also heat from the upper and lower elements. along with air movement from the convection fan to enhance cooking evenness. Your oven is equipped with Auto Recipe Conversion. so it is not necessary to convert the temperature when using this mode. Baking time might be slightly longer for multiple racks than what would be expected for a single rack. To use this mode press the Bake Multi Rack pad under Convection. enter a temperature. and then press Start. Always preheat when using this mode.
Convection Roast with Direct Air
The Convection Roast mode is intended for roasting whole cuts of meat on a single rack. This mode uses heat from the lower. upper. and rear elements along with air movement directly down from the top of the oven to improve browning and reduce cooking time. It is not necessary to convert temperature. Check food earlier than the recipe suggested time when using this mode. or use the probe. To use this mode press the Roast pad under Convection. enter a temperature. and then press Start. It is not necessary to preheat when using this mode.
Broiling Modes
Always broil with the door closed. The broil element in this oven is very powerful. Monitor food closely while broiling. Use caution when broiling on upper rack positions as placing food closer to the broil element increases smoking. spattering. and the possibility of fats igniting. Broiling on rack position 6 is not recommended.
Try broiling foods that you would normally grill. Adjust rack positions to adjust the intensity of the heat to the food. Place foods closer to the broil element when a seared surface and rare interior is desired. Thicker foods and foods that need to be cooked through should be broiled on a rack position farther from the broiler or by using Traditional Broil Lo or Convection Broil Lo. For best performance. center food below the broil heating element.
Air Fry
This mode is a special convection mode that is designed to produce foods with a crispier exterior than traditional oven cooking. The Air Fry mode uses hot, fast-moving air directed from above the food and is intended for single rack baking only. Select More, then Air Fry, then input the desired set temperature and press Start. The temperature can be set between 300°F and 500°F. Preheating is not necessary for this mode. Follow recipe or package guidelines for set temperatures and cook times; adjust cook time to achieve your desired crispness. Additional guidelines for using this mode can be found in the Cooking Guide.
Probe
Proper Probe Placement
After preparing the meat and placing it on the cooking pan follow these instructions for proper probe placement.
Insert the probe into the food. so that the tip of the probe will rest in the center of the thickest part of the food. For best performance the probe should be fully inserted into the food. If the probe is not located properly. it may not accurately measure the temperature of the coolest portion of the food. Some foods. particularly small items. are not well suited for cooking with the probe due to their shape or size
The probe should not touch bone. fat or gristle
For whole poultry insert the probe into the thickest part of the breast.
For boneless roasts. insert the probe into the center of the roast
For bone-in ham or lamb. insert the probe into the center of the lowest large muscle or joint
For casseroles or dishes such as meatloaf. insert the probe into the center of the dish.
For fish. insert the probe from just above the gill into the meatiest area. parallel to the backbone.
Probe Usage
To use the probe without preheating:
1. Insert the probe into the food (see Proper Probe Placement).
2. Place the food in the oven and connect the probe into the probe outlet in the oven.
3. Select the desired cooking mode and temperature. Before pressing start. press the Probe icon at the bottom right of the screen. The probe setting screen will be displayed. Enter the desired internal food temperature and press Start. The probe temperature can be set between 100°F and 200°F.
To use the probe with preheating:
1. Press the desired cook mode (Traditional Bake. Convection Bake. or Convection Roast) pad and enter the desired cooking temperature.
2. Insert the probe into the food (see Proper Probe Placement).
3. Once the oven is preheated. place the food in the oven and connect the probe to the probe outlet. making sure it is fully inserted. Use caution. the oven walls and probe outlet are hot.
4. The oven will detect that the probe has been inserted and the probe setting screen will be displayed. Enter the desired internal food temperature and press Start. The probe temperature can be set between 100°F and 200°F.
CARE AND CLEANING
Cleaning The Oven - Exterior
Control Panel
To lock the controls. press in the bottom left comer and follow instructions on the display. Instructions for unlocking are visible when the display is locked. It's a good idea to wipe the control panel after each use. Clean with mild soap and water or vinegar and water, rinse with clean water and polish dry with a soft cloth. Do not use abrasive cleansers. strong liquid cleansers. plastic scouring pads or oven cleaners on the control panel—they will damage the finish.
Oven Exterior
Do not use oven cleaners. abrasive cleansers. strong liquid cleansers. steel wool. plastic scouring pads. or cleaning powders on the interior or exterior of the oven. Clean with a mild soap and water or vinegar and water solution. Rinse with clean water and dry with a soft cloth. When cleaning surfaces. make sure that they are at room temperature and not in direct sunlight.
If stain on the door vent trim is persistent. use a mild abrasive cleaner and a sponge-scrubber for best results.
Spillage of marinades. fruit juices. tomato sauces and basting liquids containing acids may cause discoloration and should be wiped up immediately. Let hot surfaces cool. then clean and rinse.
Cleaning The Oven - Interior
Manual Cleaning
Donot use oven cleaners, strong liquid cleansers, steel wool, or scouring pads on the interior of the oven. Clean with a mild soap and water, or vinegar and water solution. Rinse with clean water and dry with a soft cloth. When cleaning surfaces, make sure that they are at room temperature.
Steam Clean Mode
Steam clean is intended to clean small spills using water and a lower cleaning temperature than Self-Clean.
To use the Steam Clean feature, wipe grease and soils from the oven. Pour one cup of water into the bottom of the oven. Close the door. Press the More option, then select Steam Clean, and press Start to the right of the screen. The oven door will lock. You cannot open the door during the 30 minute steam clean as this will decrease the steam clean performance. At the end of the steam clean cycle the door will unlock. Wipe out any excess water and any remaining soil. NOTE: Water in the bottom of the oven may be hot right after finishing the cycle.
Oven Light
BURN HAZARD: The glass cover and bulb should be removed when cool. Touching hot glass with bare hands or a damp cloth can cause burns.
1. Disconnect power at the main fuse or circuit breaker panel.
2. Remove oven racks.
3. Slide a flat blade screwdriver or butter knife between the metal housing and the glass light cover.
NOTE: on some models there is a metal clip visibly holding the glass. The tool needs inserted between the metal housing and the clip holding the glass.
4. Support the glass light cover with two fingers to prevent the cover from falling to the bottom of the oven.
5. Gently twist the screwdriver blade or butter knife to loosen the glass light cover. Be careful not to chip the oven coating.
6. Remove the glass light cover.
7. Remove the bulb by firmly grasping and sliding the bulb straight out until the two prongs have cleared the ceramic holder.
8. Do not touch the glass of the new replacement bulb with your fingers. It will cause the bulb to fail when it lights. Grasp the replacement bulb with a clean towel or facial tissue with the prongs facing down. Align the two prongs in the ceramic holder. pressing gently until the bulb is securely in the ceramic socket.
9. Slide the protective lens into the holder and push until the clips snap into the housing.
10. Reconnect power.
Oven Door
The door is very heavy. Be careful when removing and lifting the door. Do not lift door by the handle.
Before removing the door, disconnect the camera harness by unhooking the connector that is snapped into the bottom of the door.
Oven Door Removal
NOTE: Door removal is not a requirement for installation of the product but is an added convenience.
To remove the door:
1. Open the oven door as far as it will go.
2. Push both hinge locks down toward the door frame to the unlocked position. This may require a flat-blade screwdriver. DO NOT LIFT THE DOOR BY THE HANDLE!
3. Place hands on both sides of the door and close the oven door to the removal position (approximately 1”-2” [2.5 cm-5.1 cm] from the closed position).
4. Lift the door up and out until the hinge arms clear the slots. NOTE: The oven door is very heavy. Be sure you have a firm grip before lifting the oven door off the Hinge Clears Slot hinges. Use caution once the door is removed. Do not lay the door on its handle. This could cause dents or scratches.
Replacing the Oven Door
NOTE: The oven door is heavy. You may need help lifting the door high enough to slide it into the hinge slots. Do not lift the door by the handle.
1. Lift the oven door by grasping each side.
2. With the door at the same angle as the removal position (approximately 1”-2” [2.5 cm-5.1 cm] from the closed position), seat the notch of the hinge arm into the bottom edge of the hinge slot. The notch of the hinge arm must be fully seated into the bottom of the slot.
3. Fully open the door. If the door will not fully open, the indentation is not seated correctly in the bottom edge of the slot.
4. Push the hinge locks up Hinge Slot against the front frame of the oven cavity, to the locked position.
5. Close the oven door.
TROUBLESHOOTING TIPS
Problem
Possible Cause
What To Do
My new oven doesn't cook like my old one. Is something wrong with the temperature settings?
Your new oven has a different cooking system from your old oven and therefore may cook differently than your old oven.
For the first few uses. follow your recipe times and temperatures carefully. If you still think your new oven is too hot or too cold. you can adjust the temperature yourself to meet your specific cooking preference. See the Special Features Section to adjust the oven temperature. NOTE: This adjustment affects Traditional Bake. Convection Bake and Convection Bake Multi temperatures; it will not affect Convection Roast. Traditional Broil. Convection Broil or Clean.
Food does not bake properly
Oven controls improperly set.
See the Cooking Modes section.
Rack position is incorrect or rack is not level.
See the Cooking Modes section and Cooking Guide.
Incorrect cookware or cookware of improper size being used.
See the Cookware section.
Oven temperature needs adjustment.
See the Cooking option under the Settings section.
Ingredients substitution
Substituting ingredients can change the recipe outcome.
Food does not broil properly
Oven controls improperly set.
Make sure you select the appropriate broil mode.
Improper rack position being used
See the Cooking Guide for rack location suggestions
Food being cooked in a hot pan.
Make sure cookware is cool
Cookware not suited for broiling.
Use a pan specifically designed for broiling
Aluminum foil used on the broiling pan and grid has not been fitted properly and slit as recommended.
If using aluminum foil conform to pan slits
In some areas the power ( voltage ) may be low
Preheat the broil element for 10 minutes.
Oven temperature too hot or too cold
Oven temperature needs adjustment.
See the Cooking option under the Settings section.
Oven does not work or appears not to work
A fuse in your home may be blown or the circuit breaker tripped.
Replace the fuse or reset the circuit breaker.
Oven controls improperly set.
See using the Oven section
Oven is in Sabbath Mode
Verrify, that the oven is not in Sabbath mode. See the Sabbath option under the Settings section.
“Crackling” or “popping” sound
This is the sound of the metal heating and cooling during both the cooking and cleaning functions.
This is normal.
Why is my range making a "clicking" noise when using my oven?
Your range has been designed to maintain a tighter control over your oven's temperature. You may hear your oven's heating elements "click" on and off more frequently than in older ovens to achieve better results during baking, broiling, convection, and self-clean cycles.
This is normal.
Clock and timer do not work
A fuse in your home may be blown or the circuit breaker tripped
Replace the fuse or reset the circuit breaker.
Oven light does not work
Light bulb is loose or defective
Tighten or replace bulb.
Oven will not self-clean
The temperature is too high to set a self-clean operation
Allow the oven to cool and reset the controls.
Oven controls improperly set.
See the Cleaning the Oven section.
Excessive smoking during clean cycle
Excessive soil or grease.
Press Cancel on the pad to the right of the screen to stop the cycle. Open the windows to rid the room of smoke. Wait until the door unlocks. Wipe up the excess soil and reset the clean cycle.
Excessive smoking during broiling
Food too close to burner element.
Lower the rack position of the food
Oven door will not open after a clean cycle
Oven too hot.
Allow the oven to cool below locking temperature.
Oven not clean after a clean cycle
Oven controls improperly set.
See the Cleaning the Oven section.
Oven was heavily soiled.
Clean up heavy spillovers before starting the clean cycle. Heavily soiled ovens may need to self-clean again or for a longer period of time.
“F— and a number or letter” are displayed on LCD screen
You have a function error code.
Press Dismiss on the LCD screen. Allow the oven to cool for one hour. Put the oven back into operation.
If the function code repeats
Disconnect all power to the oven for at least 30 seconds and then reconnect power. If the function error code repeats. call for service.
LCD is not functioning properly
A fuse in your home may be blown or the circuit breaker tripped.
Replace the fuse or reset the circuit breaker.
Oven controls improperly set.
See the Cooking Modes or Settings section to ensure proper use. Ensure unit is updated to the most recent software update.
LCD screen is locked
Unlooked the screen by pressing the Unlocked icon. If this does not correct the issue, cycle power at the circuit breaker and ensure unit is updated to the most recent software update.
LCD is faulty
Cycle power at the circuit breaker and ensure unit is updated to the most recent software update. If issue persists, call service to assess the issue.
Power outage, clock resets
Power outage or surge
Reset the clock. If the oven was in use, you must reset it by pressing Cancel, setting the clock and resetting any cooking function.
“Burning” or “oily” odor emitting from the vent
This is normal in a new oven and will disappear in time.
To speed the process, set a self-clean cycle for a minimum of 3 hours. See the Cleaning the Oven section.
Strong odor
An odor from the insulation around the inside of the oven is normal for the first few times the oven is used.
This is temporary and will go away after several uses or a self-clean cycle.
Fan noise
A cooling fan may automatically turn on.
This is normal. The cooling fan will turn on to cool internals parts. If may run for up to 1-1/2 hours after the oven is turned off.
My oven door glass appears to be "tinted" or have a "rainbow" color. Is this defective?
No. The inner oven glass is coated with a heat barrier to reflect the heat back into the oven to prevent heat loss and keep the outer door cool while baking.
This is normal. Under certain light or angles, you may see this tint or rainbow color.
Sometimes the oven takes longer to preheat to the same temperature
Cookware or food in oven
The cookware or food in the oven will cause the oven to take longer to preheat. Remove items to reduce preheat time.
Number of racks in oven
Adding more racks to the oven will cause the oven to take longer to preheat. Remove some racks.
Different cooking modes
The different cooking modes use different preheat methods to heat the oven for the specific cooking mode. Some modes will take longer than others (i.e. convection bake multi).
Oven will not work remotely
Router issues, no wireless signal, etc.
For assistance with oven wireless network connectivity, please call 1-800-220-6899.
Oven is not connected.
Oven camera image is not clear
Oven door glass is dirty
Follow directions in Cleaning the Oven section to properly clean oven door glass.
No image on oven camera app
Camera cable unplugged
Check to make sure camera cable is plugged into bottom of door.


 GET CONNECTED to connect your oven to Wi-Fi. This option allows you to download content to your oven and control it remotely. The oven must be connected to Wi-Fi before Remote Enable can be activated. For instructions on how to connect your oven, see the Wi-Fi Connect/Remote Enable section under Settings in this manual.
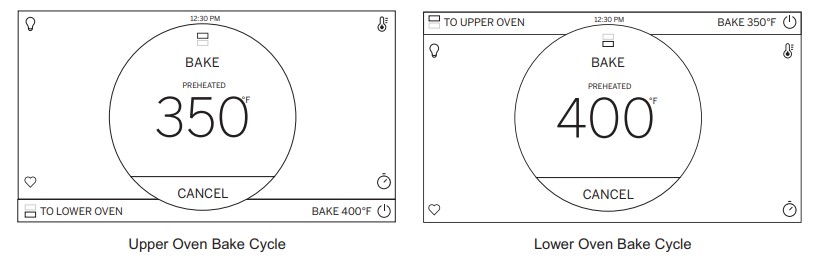
 in the bottom left comer and follow instructions on the display. Instructions for unlocking are visible when the display is locked. It's a good idea to wipe the control panel after each use. Clean with mild soap and water or vinegar and water, rinse with clean water and polish dry with a soft cloth. Do not use abrasive cleansers. strong liquid cleansers. plastic scouring pads or oven cleaners on the control panel—they will damage the finish.