OWNER’S MANUAL
Using The Washer
Getting started
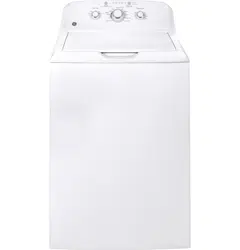
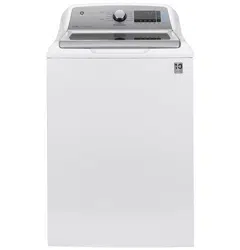
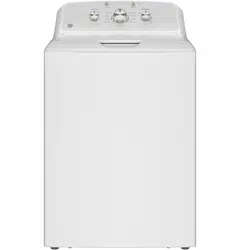
Throughout this manual, features and appearance may vary from your model.
-
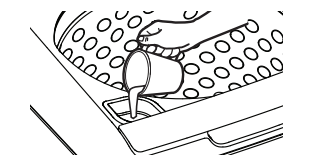
Add fabric softener to the fabric softener dispenser (on some models); see page 14.
-
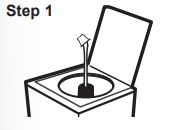
If using detergent packets, add to the bottom of the wash basket before adding clothes.
-
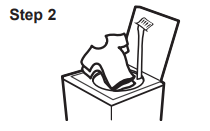
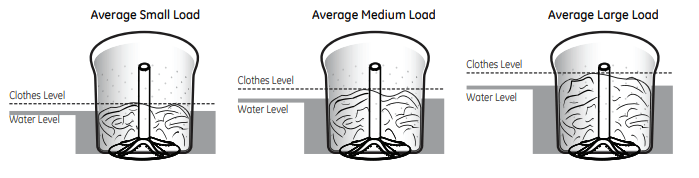
Loosely add items around agitator or Infusor. Overloading may negatively impact wash performance. See page 15 for suggested loading examples.
-
Add the manufacturer’s recommended amount of detergent to the top of the load after adding clothes. We recommend the use of High Efficiency detergents such as in your energy efficient washer.
-
Close lid.
-
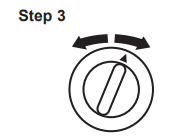
Select wash cycle.
-
Select wash options, including Deep Rinse option (on some models) when using fabric softener.
-
Select options.
-
Select load size (on some models)

Controls
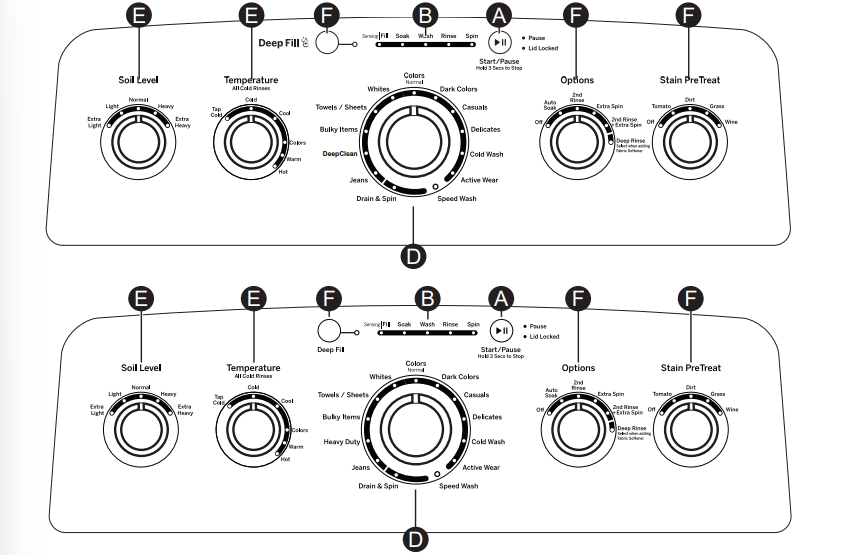
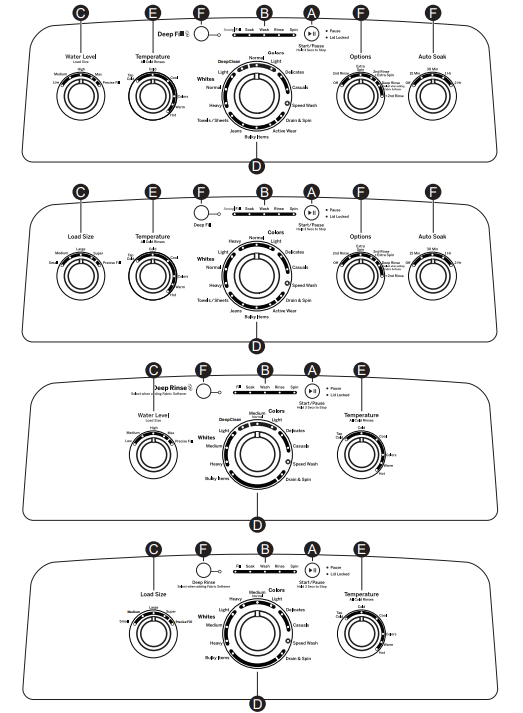
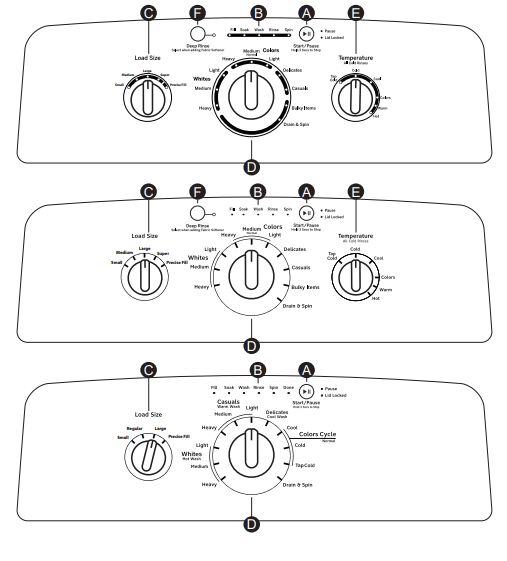
A Start/Pause
Press Start to begin the cycle. NOTE: If the lid is closed, the lid will lock only during the load sensing portion of the cycle (when the Precise Fill selection is made or models which do not have a load size selection) and during spin portions of the cycle. Lid will unlock after load sensing and spin. Pressing Pause will unlock the lid (if locked at that time), pause the cycle and the Pause indicator light will blink.
To continue the cycle, press Start again. If water remains in the machine, select the Drain & Spin cycle to drain basket and spin water out of the washer basket. NOTE: Machine will automatically cancel and drain when water is present and the lid is left open for 15 minutes or the unit is left in a paused state for 24 hours with the lid closed. Select cycle and press Start to begin new cycle
B Cycle Status Lights
Shows whether the washer is in the Fill, Soak, Wash, Rinse or Spin portion of the cycle.
If an out-of-balance condition is detected by the washer, the Spin light will blink during the remaining portion of the cycle and will stay illuminated for a short time after cycle completion. When this occurs, the washer is taking actions to correct the out-of-balance condition and complete the cycle normally. In some cases, the washer may not be able to balance the load and spin up to full speed. If you notice the load is more wet than normal at the end of the cycle, redistribute the load evenly in the wash basket and run a Drain & Spin cycle.
C Load Size (on some models)
Add  detergent to the bottom of the basket and fabric softener to the dispenser (on some models) prior to loading clothes. Loosely load items in the washer basket. Overloading may negatively impact wash performance. Adjust the load size accordingly.
Make the load selection:
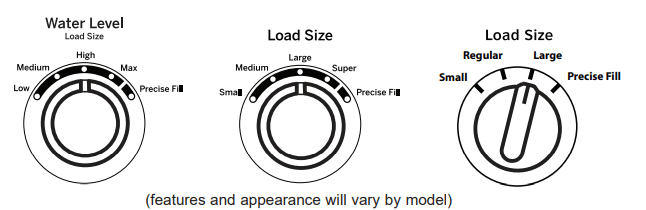
Precise Fill (on some models)
-
For convenience, best performance and optimal efficiency, select Precise Fill for models so equipped. This selection automatically provides the correct amount of water suited to the size and type of load placed in the unit. Lid will be locked for the duration of the load sensing process, which includes a brief spin period and a portion of the water fill.
-
If you prefer to manually select the water level, select Low/Small through Max/Super (or Large on some models). While Precise Fill is best for most loads and general washing, you may want to manually select the load size for specialty items such as bulky, lightweight comforters or pillows, where you want to ensure a larger water level is applied. Manual load size selections should be made for wet items placed in the washer, such as soaked towels or garments.
-
The washer will not fill with water when Precise Fill is selected if the lid is opened. When the lid is closed the machine is able to begin filling with water in order to sense the load size.
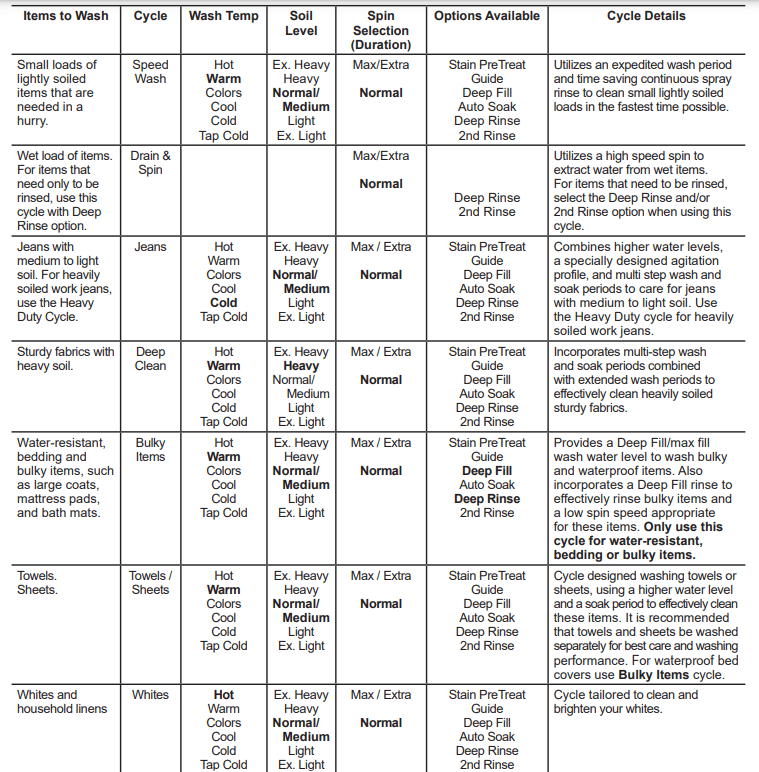
D Wash Cycles-Cycle Selector Knob - For models GTW500, GTW490, GTW485, GTW465, GTW460, GTW335, GTW330, GTW220 & HTW240 only.
The wash cycle controls the type of washing process. The cycle selector knob can be turned in either direction. Turning the knob after starting a cycle will stop the washer and change the cycle/options to the new selection. Press Start to begin the new cycle selection.
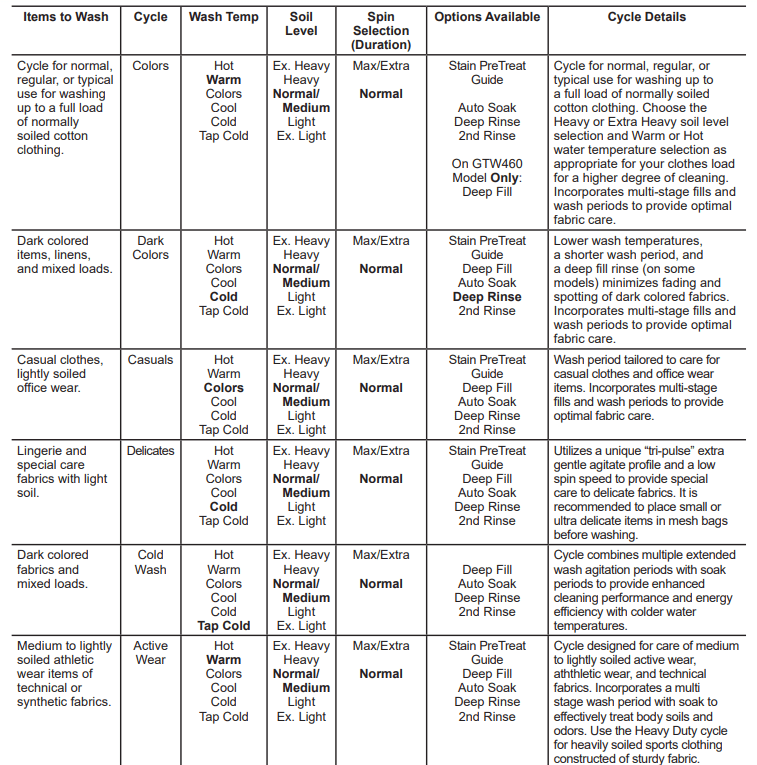
The chart below will help you match the items to be washed with the best wash cycle settings. For optimal performance, select the cycle that most closely matches the items being washed.
Selections and options shown in bold are the recommended settings for that cycle.
Some cycles and options may not be available on some models
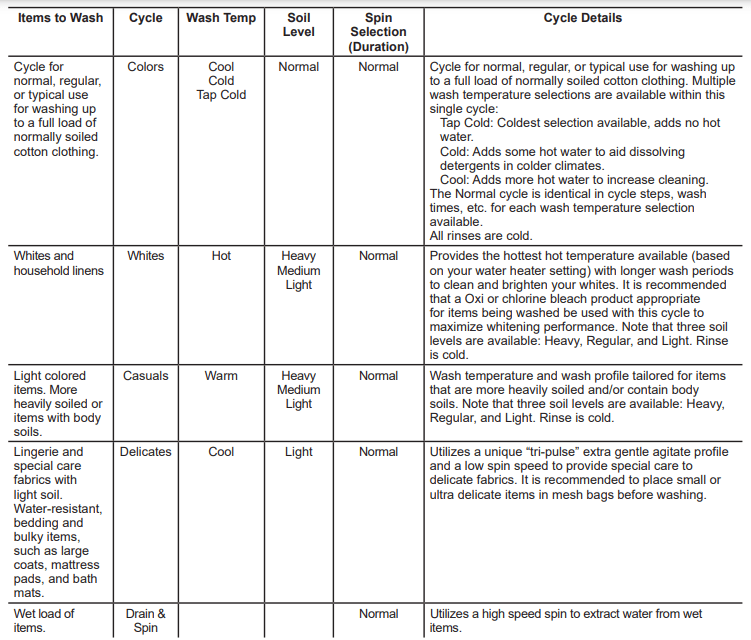
D Wash Cycles-Cycle Selector Knob - For model HTW200 only.
The wash cycle controls the type of washing process. The cycle selector knob can be turned in either direction. Turning the knob after starting a cycle will stop the washer and change the cycle options to the new selection. Press Start to begin the new cycle selection.
The chart below will help you match the items to be washed with the best wash cycle settings. For optimal performance, select the cycle that most closely matches the items being washed.
E Settings
Select settings for agitation (Soil) and water temperature (Temp). NOTE: Longer Spin times typically reduce dryer time/energy usage (i.e. reduces total energy when using both a washer and a dryer).
F Cycle Options (on some models)
Stain PreTreat
The Stain PreTreat feature allows you to indicate what stains are on the garments in your load. An initial water fill is performed at a temperature tailored to the stain type selected and to an amount which enables a concentrated cleaning step. A stain scrubbing period, followed by an active soak, is conducted to effectively treat the stain. Then additional water is added to the selected temperature and the wash phase is conducted for the cycle selected. For washing normally soiled cotton clothing the Stain PreTreat option should be in the Off position. This feature can be applied to most wash cycles as described in the cycle guide.
To use Stain PreTreat:
1. Select the desired wash cycle.
2. Select the stain to be treated under the Stain PreTreat options.

Stain PreTreat Guide
Tomato
-
Recommended Temperatures Treatment/Wash: Cool/Warm
-
Stain: Sauce/Catsup/Salsa
-
For best results, before placing in washer: Pretreat with liquid detergent or stain remover product; rinse with cool water.
Dirt
-
Recommended Temperatures Treatment/Wash: Cool/Warm
-
Stain: Dirt/Clay/Mud
-
For best results, before placing in washer: Allow dirt to dry; remove loose dirt using a brush. Rinse with cool water.
Grass
-
Recommended Temperatures Treatment/Wash: Cold/Warm
-
Stain: Grass/Lipstick/Chocolate/Gravy/Mayonnaise/BBQ Sauce
-
For best results, before placing in washer: Pretreat with liquid detergent or stain remover product. Brush lightly; rinse with cold water.
Wine
-
Recommended Temperatures Treatment/Wash: Cool/Warm
-
Stain: Wine/Soda/Kool-Aid/Tea Coffee/Juice Beer
-
For best results, before placing in washer: Pretreat with mixture of Oxi product and cool water. Add Oxi product along with detergent in the washer.
Recommended temperatures are optimal for stain removal performance; adjust temperature selection to suit load being washed.
Ensure stain is completely removed after wash cycle and before placing in dryer; very tough stains may require a second treatment.
F Cycle Options - Continued
Deep Fill
Select the Deep Fill feature for loads where extra water is needed. The Deep Fill feature is recommended for special case loads only, not for typical use.
Press the Deep Fill button once before starting the cycle to add an incremental amount of water to the wash load. Holding the Deep Fill button for 3 seconds will provide the deepest fill level possible; this will increase cycle time due to the additional time it takes to fill the washer.
To cancel the option if desired, press the Deep Fill button again.
NOTE: The Deep Fill button can also be pressed after the washer has completed filling and is in the wash phase if additional water is desired. To stop the extra fill, press the Deep Fill button again and the water will stop.
Auto Soak
This option begins with a brief agitation, soaks for a specified period of time, then moves through the rest of the cycle automatically. 2nd Rinse When you use extra detergent or bleach to clean heavily soiled clothes, use the
2nd Rinse
option to better remove additional residues.
Extra Spin
Select to provide additional spin time, increasing energy efficiency through reducing drying times.
2nd Rinse + Extra Spin
Provides both a second rinse and an extra spin.
Deep Rinse
Set this option to provide a deep rinse or when using fabric softener. This option may change other settings (e.g. Spin may go to a higher setting) to maximize performance.
Automatic Load Sensing
This determines the correct agitate profile, agitate duration and amount of water suited to the size and type of load placed in the washer. The washer will not start the wash cycle or fill with water if the lid is open. When the lid is closed the machine is able to begin filling with water in order to sense the load size.
Liquid Fabric Softener Dispenser (on some models)
The agitator cap fits into the top of the agitator. If it accidentally comes off, simply put it back on.
The fabric softener dispenser automatically releases liquid fabric softener at the proper time during the cycle.
Do not stop the washer or raise the lid during the first spin. This will cause the dispenser to empty too soon.
To use, follow these steps
1 Make sure dispenser is securely attached to agitator
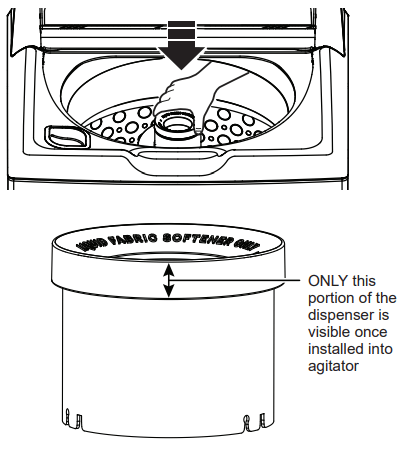
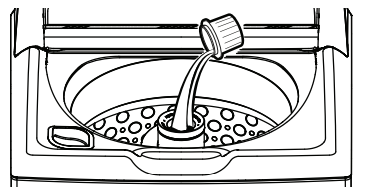
2 Use only liquid diluted fabric softener. Pour into dispenser, using amount recommended on package.
Never pour fabric softener directly on clothes. It may stain them.
3 Add water to dispenser until it reaches the maximum fill line.

4 Select Deep Rinse option

Liquid Bleach
Liquid chlorine bleach should be added through the bleach dispenser in the front left corner. Follow bleach manufacturer’s recommendations for the correct amount of liquid chlorine bleach based on load size, taking care to not apply or spill it directly on clothing.
Pretreatment
Place laundry pretreatments, such as an Oxi product, directly in the bottom of the wash basket before loading clothes.
Loading
Always follow fabric manufacturer’s care label when laundering.
Proper Use of Detergent
Using too little or too much detergent is a common cause of laundry problems.
Use less detergent if you have soft water, a smaller load or a lightly soiled load.
For spots, apply pre-treatment to items as recommended on the product label. Application should be made in the basket to prevent overspray which may cause the coloring on the lid or graphics to fade.
Place detergent packets in the bottom of the wash basket before adding clothes.
GE Appliances recommends the use of High Efficiency detergents such as  in your energy efficient washer. HE detergents are formulated to work with low water wash and rinse systems. HE detergents reduce the oversudsing problems commonly associated with regular detergents.
When using high efficiency or concentrated detergents, consult the product label to determine amount required for optimum performance. Excessive detergent will negatively impact wash performance.
Sorting Wash Loads
Sort by color (whites, lights, colors), soil level, fabric type (sturdy cottons, easy care, delicates) and whether the fabric produces lint (terry cloth, chenille) or collects lint (velveteen, corduroy). Wash lint product
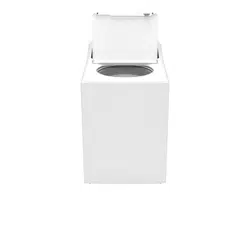
Loading the Washer
Load dry items loosely in the washer basket. For best results, load items evenly and loosely around the outside of the basket, filling in towards the center on larger loads. To add items after washer has started, press Start/Pause if the lid is locked; wait until the Lid Lock indicator on the display is no longer illuminated before attempting to open the lid. Lift the lid and submerge additional items around the outside of the basket. Close the lid and press Start to resume. Adjust load size selection and/or use Deep Fill option if necessary.
-
On Infusor models, do not place large items such as sheets, blankets and towels across the Infusor. Load them around the outside of the basket.
-
Do not put lawn or sofa cushions into the washer as they are too big to move. Remove outer covers and ONLY wash them.
Care and cleaning
Exterior of the Washer
Immediately wipe off any spills with a damp cloth.
Interior of the Washer
Leave the lid open after washing to allow moisture to evaporate. If you want to clean the basket, use a clean soft cloth dampened with liquid detergent; then rinse. (Do not use harsh or gritty cleaners.)
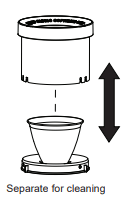
Cleaning the Fabric Softener Dispenser (on some models)
1 Remove the dispenser from the top of the agitator.
2 Separate the dispenser cup from the cover by grasping the top and pushing down on the inside of the cup with your fingers. Dispenser cup will pop free from the cover.
3 To clean the dispenser, soak both the dispenser cup and the dispenser cover in the following solution:
4 If necessary, loosen buildup with a clean, soft cloth after soaking. Do not use a stiff brush; you may roughen the surface of the dispenser.
5 Rinse and reassemble dispenser. Place dispenser back on the agitator.
Water Supply Hoses
Hoses connecting washer to faucet should be replaced every 5 years.
Moving and Storage
Ask the service technician to remove water from drain pump and hoses. Do not store the washer where it will be exposed to the weather.
Long Vacations
Be sure water supply is shut off at faucets. Drain all water from hoses and water filter pump area if weather will be below freezing.
Installation Instructions
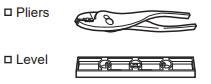
TOOLS REQUIRED FOR WASHER INSTALLATION
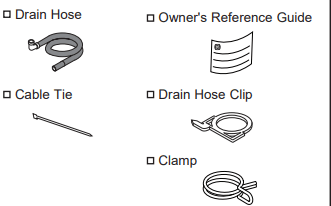
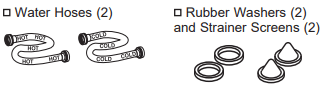
PARTS SUPPLIED
PARTS REQUIRED (Sold separately)
GE Appliances Parts and Accessories
Order on-line at GEApplianceparts.com today, 24 hours a day or by phone at 800.626.2002 during normal business hours.
Part Number/Accessory
Or
-
PM14X10005: 4 ft Braided Metal Water Supply Hoses
-
WH1X2267: Rubber Washer (1) and Screen (1)
-
WH49X301: Drain Hose Extension (For discharge heights from 60" - 96")
LOCATION OF YOUR WASHER DO NOT Install the Washer:
- In an area exposed to dripping water or outside weather conditions. The ambient temperature should never be below 60°F (15.6°C) for proper washer operation.
- In an area where it will come in contact with curtains or drapes.
- On carpet. The floor MUST be a hard surface with a maximum slope of 1/2" per foot (1.27cm per 30 cm ) . To make sure the washer does not vibrate or move, you may have to reinforce the floor.
WATER SUPPLY REQUIREMENTS
WATER SUPPLY LINES - Purge Hot and Cold water supply lines for 30 seconds prior to installation of hoses and washing machine. Ensure inlet hose screens are also clean and free of debris.
WATER PRESSURE - Must be 20 psi minimum to 120 psi maximum.
WATER TEMPERATURE - Household water heater should be set to deliver water at 120° to 150°F (50° to 66°C) TO THE
WASHER when hot wash is selected.
SHUTOFF VALVES - Both hot and cold shutoff valves (faucets) should be supplied.
DRAIN - Water should be drained into standpipe. Discharge height MUST NOT BE LESS THAN 30 INCHES, and no more than 8 feet above the base of the washer. Standpipe must be 1-1/2 inches minimum inside diameter and must be open to atmosphere.
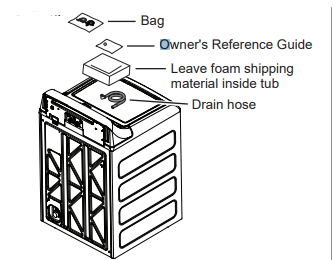
1 UNPACKING THE WASHER
After the machine is in the home, remove outside packing material/carton from washer.
Remove bag (containing clamp, cable tie and drain hose clip), drain hose and Owner's Reference Guide from tub..
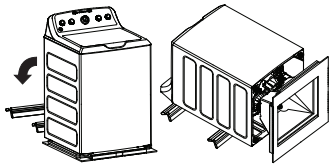
2 REMOVE THE BASE
Remove base from unit by placing foot on side of base and tipping unit back on corner post. Remove base and bring the washer back upright.
3 CONNECT DRAIN HOSE TO WASHER
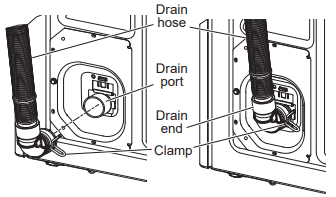
Remove the cap from the drain port, if present, before installing the drain hose.
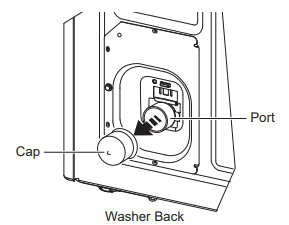
Connect drain hose to drain port on back of washer. Open clamp with pliers and slide onto hose end. Holding clamp open, push hose end onto drain port until fully seated. Release clamp between locating ribs on hose end. Outlet of hose end should be oriented vertically.
4 CONNECT WATER HOSES TO WASHER
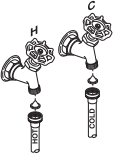
Unplug electrical cord before installing water hoses. If not installed, install rubber washer in one end of hot water hose. Thread hot water hose onto connection labeled H at top rear of washer. Hand tighten and use pliers to tighten hoses between 1/8 and 1/4 turn beyond hand-tight.
If not installed, install rubber washer in one end of cold water hose C. Thread cold water hose onto connection labeled C at top rear of washer. Hand tighten and use pliers to tighten hoses between 1/8 and 1/4 turn beyond hand-tight.
Move washer as close to final location as possible leaving room for you to make water, drain, and electrical connections to your home

5 CONNECT WATER HOSES TO OUTLET VALVES
Determine which is HOT water line before attaching water hoses to faucets. Traditionally, HOT faucet is on left.
(If screen washers are not installed) With protruding part of screen toward you, install strainer screen/rubber washer into each of the free ends of two water hoses.
Connect hot water hose to hot water outlet valve of your home. Hand tighten and use pliers to tighten hoses between 1/4 and 1/2 turn beyond hand-tight. Open hot water valve.
Connect cold water hose to cold water outlet valve of your home. Hand tighten and use pliers to tighten hoses between 1/4 and 1/2 turn beyond hand-tight. Open cold water valve.
Check for leaks and drips at the hose couplings. Tighten as necessary.
6 CONNECT TO DRAIN
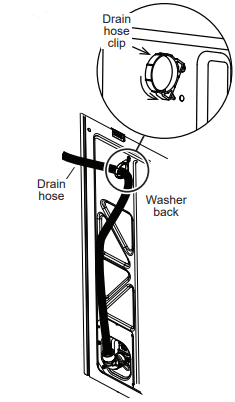
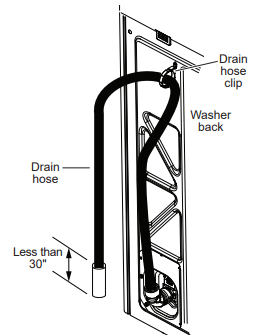
Install drain hose clip on rear panel of washer. Route drain hose through clip and insert free end into drain opening of your home.
If water valves and drain are built into wall, fasten drain hose to one of the water hoses with cable tie provided.
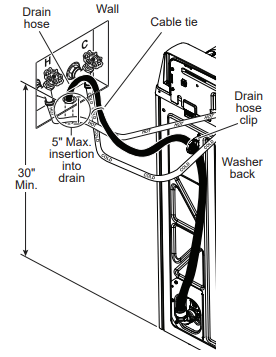
If your drain is a standpipe, fasten drain hose to standpipe with cable tie provided.
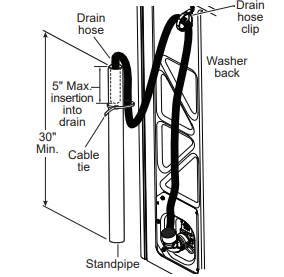
If drain discharge height does not meet 30" minimum height requirement, end of drain hose must be secured in drain opening of home by installer and have an air gap around hose to prevent siphoning.
ELECTRICAL REQUIREMENTS
CIRCUIT – Individual, properly polarized and grounded 15 or 20 amp circuit breaker or time-delay fuse.
POWER SUPPLY – 2 wire plus ground, 120 Volt, single phase, 60 Hz, alternating current.
Outlet Receptacle – Properly grounded 3-prong receptacle to be located so the power cord is accessible when the washer is in an installed position. If a 2-prong receptacle is present, it is the owner’s responsibility to have a licensed electrician replace it with a properly grounded 3-prong grounding type receptacle.
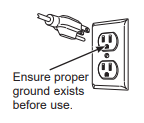
Washer must be electrically grounded in accordance with local codes and ordinances, or in the absence of local codes, with latest edition of the NATIONAL ELECTRICAL CODE, ANSI/NFPA NO. 70 or CANADIAN ELECTRICAL CODE, CSA C22.1. Check with a licensed electrician if you are not sure that the washer is properly grounded.
7 CONNECT POWER AND INSTALL
Make sure large dial control (on some models) on washer is pushed in to the OFF position.
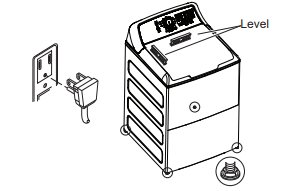
Insert plug of electrical cord into a 115V, 15- or 20-amp wall receptacle. Move washer into final position. Place level on flat top side edges of washer. Adjust all four leveling legs until washer is level left-to-right and front-to-back. Remove level.
Open tub lid. Remove and discard tub shipping material (see Step 1).
Remove plastic protector sheet from control panel face
GROUNDING INSTRUCTIONS
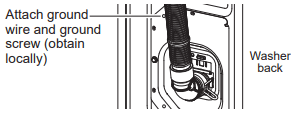
This appliance must be grounded. In the event of malfunction or breakdown, grounding will reduce the risk of electric shock by providing a path of least resistance for electric current. This appliance is equipped with a cord having an equipment- grounding conductor and a grounding plug. The plug must be plugged into an appropriate outlet that is properly installed and grounded in accordance with all local codes and ordinances.
If required by local codes, an external 18 gauge or larger copper ground wire (not provided) may be added. Attach to washer cabinet with a #10-16 x 1/2” sheet metal screw (available at any hardware store) to rear of washer as illustrated.
Mobile Home Installation:
Installation must conform to Standard for Mobile Homes, ANSI A119.1 and National Mobile Home Construction and Safety Standards Act of 1974 (PL93-383).
FINAL CHECKLIST
Before starting the washer, check to make sure:
-
Main power is turned on.
-
The washer is plugged in.
-
The water faucets are turned on.
-
The unit is level and all four leveling legs are firmly on the floor.
-
The shipping foam and cardboard are removed.
-
The drain hose is properly tied up.
-
There are no leaks at the faucet, drain line or washer.
-
Remove the cap from the drain port, if present, before installing the drain hose.
Run the washer through a complete cycle.
Troubleshooting Tips
Before you call for service
Short spray and delay after pushing the Start button
Water level seems low
Low water flow
Water siphoning out of washer
Too many suds
-
Soft water
-
Too much detergent
-
Type of detergent
Water leaks
-
Type of detergent
-
Using too much detergent in washer
-
Fill hoses or drain hose is improperly connected
-
Household drain clogged
-
Drain hose rubs on wall
-
Constant water pressure to fill hoses at water source
Water temperature seems incorrect
-
Cooler water temperatures provide improved energy efficiency
-
Water supply is turned off or improperly connected
-
Water valve screens are stopped up
-
Cool/Cold Water when selecting Hot
-
House water heater is not set properly
Water pumped out before cycle is complete
Water won’t drain
Washer spins and pauses at the beginning of cycles
Washer pauses during wash cycle
Laundry additives dispensing too soon (Dispensers on some models)
Washer pauses during spin cycle
Washer won’t operate
-
Washer is unplugged
-
Water supply is turned off
-
Lid is open—safety feature prevents agitation and spinning when lid is up
-
Circuit breaker/fuse is tripped/blown
-
Electronics need to be reset
-
Start was not pressed
Detergent packets not dissolving
Unexplained time and/or settings changes
Basket seems loose
Agitator seems loose (on some models)
Colored spots Incorrect use of fabric softener
Grayed or yellowed clothes
-
Detergent amount
-
Hard water
-
Water is not hot enough
-
Washer is overloaded
-
Dye transfer
Lint or residue on clothes
Clothes too wet
-
Incorrect cycle selected
-
Wash load out of balance
Blinking Spin light or Spin light on at end of cycle
Pilling
Snags, holes, tears, rips or excessive wear
-
Pins, snaps, hooks, sharp buttons, belt buckles, zippers and sharp objects left in pockets
-
Fasten snaps, hooks, buttons and zippers. Remove loose items like pins, objects in pockets and sharp buttons. Turn knits (which snag easily) inside out.
-
Undiluted chlorine bleach
-
Chemicals like hair bleach or dye, permanent wave solution
Wrinkling
“Clicking”
Back and forth “swoosh”
“Clicking” behind Control during fill
Water flow changes during fill
Motor sounds during spin
“Humming” Water drain pump
-
The drain pump
-
Drive motor
“Gurgling”
Water “swishing”
Washer rocking/ moving
“Squeaking” sound