USER MANUAL GAS COOKTOP
OPERATING INSTRUCTIONS
USING THE SURFACE BURNERS
Throughout this manual, features and appearance may vary from your model.
• Make sure all grates on the cooktop are properly placed before using any burner.
• Be sure the burners and grates are cool before you place your hand, a pot holder, cleaning cloths or other materials on them.
• Make sure all burners are in place.
• Do not operate the burner for an extended period of time without cookware on the grate. The finish on the grate may chip without cookware to absorb the heat.
LIGHTING A GAS SURFACE BURNER
• Be sure all the surface burners are placed in their respective positions. • Push the control knob in and turn it to the LITE position. • The clicking noise you hear is the sound of the electric spark ighiting the burners. • To control the flame size, turn the knob. lf the knob stays at LITE, it will continue to click. • When one burner knob is turned to LITE, all the burners spark. Do not attempt to disassemble or clean around any burner while another burner is on. An electric shock may result, which could cause you to knock over hot cookware. |  |
IN CASE OF POWER FAILURE
In case of a power failure, you can light the gas surface burners on your cooktop with a match. Hold a lit match to the burner, then push in and turn the control knob to the LITE position.
Use extreme caution when lighting burners this way. Surface burners in use when an electrical power failure occurs will continue to operate normally
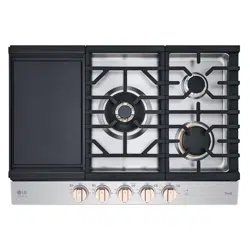
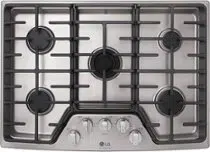
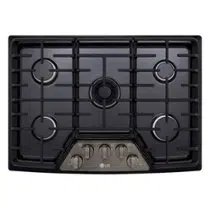
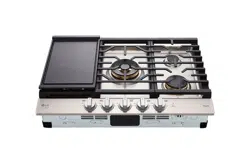
SEALED GAS BURNERS
The cooktop has five sealed gas burners for convenience and easy cleaning.
The medium and large burners are the primary burners for most cooking.
The temperature range on these burners can handle a wide range of cooking tasks.
The extra large burner (center) is the maximum output burner. Like the other burners, it can be used for most everyday cooking tasks.
This burner is also designed to quickly bring large amounts of liquid to a boil. The special UltraHeat setting is designed for use with cookware 10 inches or larger in diameter. The extra large dual burner can also be used on LO to simmer. |  |
The smallest burner offers a very low simmer setting and is best for delicate foods such as sauces that require long simmer times over low heat. |  |
SETTING THE FLAME SIZE
NEVER let the flames extend up the sides of the cookware for safe handling of cookware.
Watch the flame, not the knob, as you reduce heat. When fast heating is desired, the flame size on a gas burner should match the cookware you are using.
Flames larger than the bottom of the cookware will not result in faster heating of the cookware and could be hazardous |  |
COOKWARE
Aluminum: Medium-weight cookware is recommended because it heats quickly and evenly. Most foods brown evenly in an aluminum skillet. Use sauce pans with tight fitting lids when cooking with minimum amounts of water.
Cast Iron: If heated slowly, most skillets will give satisfactory results.
Stainless Steel: This metal alone has poor heating properties and is usually combined with copper, aluminum or other metals for improved heat distribution. Combination metal skillets usually work satisfactorily if they are used with medium heat as the manufacturer recommends.
Enamelware: Under some conditions, the enamel of some cookware may melt. Follow cookware manufacturer’s recommendations for cooking methods.
Glass: There are two types of glass cookware—those for oven use only and those for top of the range cooking (saucepans, coffee and teapots). Glass conducts heat very slowly.
Heatproof Glass Ceramic: Can be used for either surface or oven cooking. It conducts heat very slowly and cools very slowly. Check cookware manufacturer’s directions to be sure it can be used on gas ranges.
USING A WOK
Do not use a wok support ring. Placing the ring over the burner or grate may cause the burner to work improperly, resulting in carbon monoxide levels above allowable standards.
This can be hazardous to your health.
Use a 14 inch or smaller flat bottom wok. Make sure the wok bottom sits flat on the grate. Woks are available at your local retail store. Only a flat-bottomed wok should be used. |  |
STOVE-TOP GRILLS
Do not use stove top grills on your surface burners. If you use a stove top grill on the surface burner, it will cause incomplete combustion and can result in exposure to carbon monoxide levels above allowable current standards. This can be hazardous to your health. |  |
USING THE GRIDDLE

Your non-stick coated griddle provides an extra - large cooking surface for meats, pancakes or other food usually prepared in a frying pan or skillet.
NOTE: Your griddle will discolor over time as it becomes seasoned with use.
Placing the Griddle: The griddle can only be used on the left side grate.
The griddle must be properly placed on the center grate.
NOTE: Do not remove the left side grate when using the griddle.
IMPORTANT NOTES:
• To prevent spills, avoid cooking extremely greasy foods on the griddle.
• The griddle can become hot when surrounding burners are in use.
• Do not overheat the griddle. This can damage the nonstick coating.
• Do not use metal utensils that can damage the griddle surface. Do not cut foods on the griddle.
• Do not place or store items on the griddle.
CARE AND CLEANING
CARE AND CLEANING
Make sure electrical power is off and all surfaces are cool before cleaning any part of the cooktop.
SEALED BURNER ASSEMBLIES
Turn all controls OFF before removing the burner parts.
The burner grates, caps, and burner heads can be lifted off, making them easy to clean.
The electrodes are not removable.

DUAL EXTRA BURNER ASSEMBLY
The burner head, the outer cap and the inner cap can be lifted off, making it easy to clean.
The burner electrode is not removable.

BURNER CAPS AND HEADS
BURNER CAPS
Lift burner caps off when they are cool.
Wash burner caps in hot, soapy water and rinse with clean water. Use a plastic scouring pad to remove burned-on food particles.

To place the dual extra large burner outer cap properly, make sure the slit in the burner cap is positioned over the assembly guide in the burner head. |  |
BURNER HEADS

The burner heads are removable.
Simply lift them off the cooktop for cleaning. The slits in the burner heads must be kept clean at all times for an even flame. Clogged or dirty burner ports or electrodes may cause improper operation of the cooktop.
Any spill on or around an electrode must be carefully cleaned. Take care to not hit an electrode with anything hard or it could be damaged.
You should clean the burner caps and heads routinely, especially after bad spillovers which could clog the openings. Lift burner heads off when they are cool.
To get rid of burned-on food, soak the burner heads in a solution of mild liquid detergent and hot water for 20–30 minutes. For more stubborn stains, use a toothbrush.
AFTER CLEANING
Before placing the burner caps and burner heads back, shake out excess water and then dry them thoroughly
REPLACEMENT
Replace burner heads and caps over the electrodes on the cooktop, in the correct locations according to their size. There are one small, two medium, one large and one extra large burner head and cap.

BURNER GRATES
Your cooktop has three professional-style grates. These grates are position-specific. For maximum stability, these grates should only be used in their proper position. Because of the varied burner sizes, the side grates cannot be exchanged nor can any of the grates be rotated front to back. |  |
CLEANING
Allow grates to cool before handling. Grates should be cleaned regularly and, of course, after spills. Wash them in hot, soapy water and rinse with clean water. When replacing the grates, be sure they are positioned properly over the burners. Replace the grates so that continuous arcs are formed with the center ribs of all three grates. The grates may be cleaned in a dishwasher. Do not operate a burner for a long time without cookware on the grate. The finish on the grate may chip without cookware to absorb the heat. To remove burned-on food, place the grates in a covered container. Soak them with 1/4 cup ammonia for several hours. or overnight. Wash, rinse well and dry |  Although they are durable, the grates will gradually lose their shine, regardless of the best care you can give them. This is due to their continual exposure to high temperatures. You will notice this sooner with lighter colored grates. |
COOKTOP SURFACE
Foods with a lot of acid (such as tomatoes, sauerkraut, fruit juices, etc.) or foods with high sugar content could cause a dull spot if allowed to set. When the surface has cooled, wash and rinse. For other spills such as fat spatterings, etc., wash with soap and water after the surface has cooled. Then rinse and polish by using a dry cloth. If the surface of the cooktop is stainless steel, to prevent damage and to prevent it from becoming dull, clean up spills immediately
CAUTION • Do not place flammable materials on or near the cooktop. Do not store or use combustible materials, gasoline or other flammable vapors and liquids in the vicinity of this of any other appliance. • Do not try to lift the cooktop. Lifting the cooktop can cause damage and improper operation of the cooktop. • To avoid burns, do not clean the cooktop surface until it has cooled. |  |
STAINLESS STEEL SURFACES
To avoid scratching the surface, do not use steel wool on stainless steel. Clean with warm, soapy water or a stainless steel cleaner or polish. Follow the directions on the cleaner. Always wipe in the direction of the grain.
To inquire about purchasing stainless steel appliance cleaner or polish, or to find the location of a dealer nearest you, please call our toll-free customer service number: 1-800-243-0000
CONTROL KNOBS
It’s a good idea to wipe the control panel with a damp cloth after each use of the cooktop. Use mild soap and water or a 50/50 solution of vinegar and water. Use clean water for rinsing. Do not use abrasive cleansers, strong liquid cleaners, plastic scouring pads or oven cleaners on the control knobs - they can cause damage to the finish of the knobs.
Do not try to bend knobs by pulling them up or down or by hanging a towel or other weight on them. This can damage the gas valve shaft.
The control knobs may be removed for easier cleaning. Make sure the knobs are in the OFF position and pull them straight off the stems for cleaning. To reinstall a knob, hold it with the OFF label at the top and slide it directly onto the stem |  |
NOTE: Unplug cooktop before cleaning control knobs to prevent accidentally turning on burners.
TROUBLESHOOTING
BEFORE CALLING FOR SERVICE
Before calling for service, review this list. It may save you time and expense. This list includes common occurrences that are not the result of a defect in workmanship or materials.
| Problem | Possible Causes | Solutions |
| Burners have yellow or yellow-tipped flames | • The combustion quality of burner flames needs to be determined visually | • Use the illustrations below to determine if your burner flames are normal. If burner flames look like A, call for service. Normal burner flames should look like B or C, depending on the type of gas you use. With LP gas, some yellow tipping on outer cones is normal.  |
| Burner flames are very large or yellow | • Improper air to gas ratio. | • If cooktop is connected to LP gas, contact the person who installed your range or made the conversion. |
| Control knobs will not turn | • Knob is not pushed down | • To turn from OFF position, push the knob down and then turn |
| Top burners do not light or do not burn evenly | • Plug on cooktop is not completely inserted in the electrical outlet. | • Make sure electrical plug is plugged into a live, properly grounded outlet. |
| • Burner slots on the side of the burner may be clogged. | • Remove the burner heads and caps and clean them. Check the electrode area for burned-on food or grease. See the Care and Cleaning section. | |
| • Improper burner assembly. | • Make sure the burner parts are installed correctly. See the Care and Cleaning section. |
ACCESSORIES