
Operation and maintenance manual
Before using the machine, please read the attached operating instructions.
Carefully read the safety rules.
Mode d'emploi
Veuillez lire attentivement le mode d'emploi
(notamment les consignes de sécurité) avant d'utiliser l'appareil.
The manufacturer reserves the right to change the features of the product without prior notice.
Le producteur se réserve le droit d“apporter toutes modifications sans préavis.
Carafe aSSemBlY ProCedUre - SCHema de montaGe de la Carafe
FOR HOUSEHOLD USE ONLY
USAGE DOMESTIQUE SEULEMENT
III
A
1 2
3
4
5 6
C
D
A
B B
8
E
7
Carafe aSSemBlY ProCedUre - SCHema de montaGe de la Carafe
For correct use of the carafe, refer to the instructions on page 12.
The maintenance instructions for the carafe circuits are described on page 36.
The disassembly and cleaning instructions for the components are described on page 41.
Pour l’utilisation correcte de la carafe, consulter les instructions à page 12.
Pour l'entretien des circuits de la carafe, consulter la page 36.
Le démontage et le nettoyage des composants sont décrits à page 41.
THOROUGHLY CLEAN THE CARAFE AT FIRST USE AND AFTER A LONG PERIOD OF INACTIVITY.
A THOROUGH SANITATION AND CLEANING OF THE CARAFE ENSURES CORRECT OPERATION AND PREVENTS THE
PROLIFERATION OF BACTERIAL LOADS WHICH MAY BE HARMFUL FOR HUMAN HEALTH.
S'ASSURER QU'ELLE EST BIEN PROPRE TANT LORS DE LA PREMIÈRE UTILISATION QU'APRÈS UN CERTAIN TEMPS
D'INACTIVITÉ. L'HYGIÈNE ET LE NETTOYAGE PARFAITS DE LA CARAFE GARANTISSENT UN FONCTIONNEMENT CORRECT
ET EMPÊCHENT LES CHARGES BACTÉRIENNES NOCIVES POUR LA SANTÉ DE PROLIFÉRER.
IV
21
25
22
26
23 24
2827
1
2
3
4
5
6
7
8
9
10
29
12
13
2011
14
15 16
17
18
19
aCCeSSorieS - aCCeSSoireS

V
teCHniCal data
Nominal voltage See label on the appliance
Power rating See label on the appliance
Power supply See label on the appliance
Shell material Thermoplastic material/Metal
Size (w x h x d) 282 x 385 x 428 mm - 11.1 x 15.2 x 16.8 in
Weight 17 Kg - 37.5 lbs
Cord length 1200 mm - 47.24 in
Control panel Front
Water tank 1.6 liters - 54.1 oz (removable)
Co ee bean hopper capacity 350 grams - 12.3 oz of co ee beans
Pump pressure 15 bar
Boiler Stainless steel
Co ee grinder Ceramic
Quantity of ground co ee 7 - 10.5 grams / 0.25 - 0.37 oz.
Dregdrawer capacity about 15
Safety devices Boiler pressure safety valve – Double safety thermostat.
donnÉeS teCHniQUeS
Tension nominale
Voir plaque signalétique placée sur l’appareil.
Puissance nominale
Voir plaque signalétique placée sur l’appareil.
Alimentation
Voir plaque signalétique placée sur l’appareil.
Matériau du corps
Thermoplastique/Métal
Dimensions ( LxHxP)
282 x 385 x 428 mm
Poids
17 Kg
Longueur du câble
1200 mm
Tableau de commande
Tableau de commande sur le devant
Réservoir d’eau
1,6 litre - Extractible
Capacité du réservoir à café
350 de café en grains
Pression de la pompe
15 bar
Chaudière
Acier Inox
Moulin à café
en céramique
Quantité de café moulu
7-10,5 g
Capacité du tiroir à marc
15 environ
Dispositifs de sécurité
Soupape de sécurité pression chaudière – double thermostat de sécurité

IMPORTANT SAFEGUARDS
When using electrical appliances, basic safety precautions should always be
followed, including the following:
1. Read all instructions.
2. Do not touch hot surfaces. Use handles or knobs.
3. To protect against fire, electric shock and injury to persons do not immerse
cord, plugs, or appliance in water or other liquid.
4. Close supervision is necessary when the appliance is used by or near
children.
5. Unplug from outlet when not in use and before cleaning. Allow to cool
before putting on or taking off parts, and before cleaning the appliance.
6. Do not operate any appliance with a damaged cord or plug or after the
appliance malfunctions, or has been damaged in any manner. Return
appliance to the nearest authorized service facility for examination, repair
or adjustment.
7. The use of accessory attachments not recommended by the appliance
manufacturer may result in fire, electric shock or injury to persons.
8. Do not use outdoors.
9. Do not let cord hang over edge of table or counter, or touch hot
surfaces.
10. Do not place on or near a hot gas or electric burner, or in a heated
oven.
11. Always attach plug to appliance first, then plug cord into wall outlet. To
disconnect, turn any control to “off”, then remove plug from wall outlet.
12. Do not use appliance for other than intended use.
13. Save these instructions.
SAVE THESE INSTRUCTIONS

CAUTION
This appliance is for household use only. Any servicing, other than cleaning
and user maintenance, should be performed by an authorized service
center. Do not immerse machine in water. To reduce the risk of fire or
electric shock, do not disassemble the machine. There are no parts inside
the machine serviceable by the user. Repair should be done by authorized
service personnel only.
1 Check voltage to be sure that the voltage indicated on the nameplate
corresponds with your voltage.
2 Never use warm or hot water to fill the water tank. Use cold water only.
3 Keep your hands and the cord away from hot parts of the appliance
during operation.
4 Never clean with scrubbing powders or harsh cleaners. Simply use a soft
cloth dampened with water.
5 For optimal taste of your coffee, use purified or bottled water. Periodic
descaling is still recommended every 2-3 months.
6 Do not use flavored or caramelized coffee.
INSTRUCTIONS FOR THE POwER SUPPly
CORD
A. A short power-supply cord (or detachable power-supply cord) is to be
provided to reduce risks resulting from becoming entangled in or tripping
over a longer cord.
B. Longer detachable power-supply cords or extension cords are available
and may used if care is exercised in their use.
C. If a long detachable power-supply cord or extension cord is used,
1. The marked electrical rating of the detachable power-supply cord or extension
cord should be at least as great as the electrical rating of the appliance
2. If the appliance is of the grounded type, the extension cord should be a
grounding-type 3-wire cord, and
3. The longer cord should be arranged so that it will not drape over the counter
top or table top where it can be pulled on by children or tripped over.

1
index
GENERAL INFORMATION . . . . . . . . . . . . . . . . . . . . . . . . . . . . . . . . . . . . . . . . . . . . . . . . . . . . . . . . . . . . . . . 2
MACHINE COMPONENTS & ACCESSORIES - CONTROL PANEL . . . . . . . . . . . . . . . . . . . . . . . . . . . . . . . . . 3
INSTALLATION . . . . . . . . . . . . . . . . . . . . . . . . . . . . . . . . . . . . . . . . . . . . . . . . . . . . . . . . . . . . . . . . . . . . . . . . 4
STARTING THE MACHINE ......................................................................................4
SETTING THE LANGUAGE ......................................................................................5
MEASURING THE WATER HARDNESS ............................................................................5
FIRST USE - USE AFTER A PERIOD OF INACTIVITY .................................................................6
INTENZA WATER FILTER .......................................................................................7
ADJUSTMENTS ........................................................................ 8
OPTI-DOSE (ADJUSTS THE AMOUNT OF COFFEE TO GRIND) ........................................................8
COFFEE STRENGTH (GAGGIA BREWING SYSTEM) . . . . . . . . . . . . . . . . . . . . . . . . . . . . . . . . . . . . . . . . . . . . . . . . . . . . . . . . . . . . . . . . .8
GAGGIA ADAPTING SYSTEM . . . . . . . . . . . . . . . . . . . . . . . . . . . . . . . . . . . . . . . . . . . . . . . . . . . . . . . . . . . . . . . . . . . . . . . . . . . . . . . . . . .9
COFFEE GRINDER ADJUSTMENT ................................................................................9
DISPENSING SPOUT HEIGHT ADJUSTMENT . . . . . . . . . . . . . . . . . . . . . . . . . . . . . . . . . . . . . . . . . . . . . . . . . . . . . . . . . . . . . . . . . . . . .10
STAND-BY MODE ...........................................................................................11
MILK CARAFE USE . . . . . . . . . . . . . . . . . . . . . . . . . . . . . . . . . . . . . . . . . . . . . . . . . . . . . . . . . . . . . . . . . . . . 12
COFFEE BREWING . . . . . . . . . . . . . . . . . . . . . . . . . . . . . . . . . . . . . . . . . . . . . . . . . . . . . . . . . . . . . . . . . . . . 14
ESPRESSO / LONG COFFEE ....................................................................................14
BEVERAGE BREWING WITH PRE-GROUND COFFEE ...............................................................15
CAPPUCCINO / LATTE MACCHIATO / MILK . . . . . . . . . . . . . . . . . . . . . . . . . . . . . . . . . . . . . . . . . . . . . . . . 16
CLEANING CYCLE . . . . . . . . . . . . . . . . . . . . . . . . . . . . . . . . . . . . . . . . . . . . . . . . . . . . . . . . . . . . . . . . . . . . . 18
HOT WATER DISPENSING . . . . . . . . . . . . . . . . . . . . . . . . . . . . . . . . . . . . . . . . . . . . . . . . . . . . . . . . . . . . . . 19
STEAM DISPENSING . . . . . . . . . . . . . . . . . . . . . . . . . . . . . . . . . . . . . . . . . . . . . . . . . . . . . . . . . . . . . . . . . . 20
BEVERAGE LENGTH QUICK PROGRAMMING . . . . . . . . . . . . . . . . . . . . . . . . . . . . . . . . . . . . . . . . . . . . . . 21
BEVERAGE MENU .....................................................................22
MACHINE MENU ......................................................................25
MAINTENANCE .......................................................................32
CLEANING ...........................................................................38
MAINTENANCE DURING OPERATION ...........................................................................38
GENERAL MACHINE CLEANING. . . . . . . . . . . . . . . . . . . . . . . . . . . . . . . . . . . . . . . . . . . . . . . . . . . . . . . . . . . . . . . . . . . . . . . . . . . . . . . .39
BREW GROUP CLEANING .....................................................................................40
MILK CARAFE CLEANING .....................................................................................41
MILK CARAFE ASSEMBLY ....................................................................................42
MACHINE WARNINGS . . . . . . . . . . . . . . . . . . . . . . . . . . . . . . . . . . . . . . . . . . . . . . . . . . . . . . . . . . . . . . . . . 43
SAFETY RULES . . . . . . . . . . . . . . . . . . . . . . . . . . . . . . . . . . . . . . . . . . . . . . . . . . . . . . . . . . . . . . . . . . . . . . . 45
2
General InformatIon
General InformatIon
This coee machine is suitable for preparing espresso coee using coee beans and is equipped with a device to dispense
steam and hot water.
The machine is designed for domestic use and not suitable for heavy or professional use.
Warning: No liability is held for damage caused by:
• Incorrectusenotinaccordancewiththeintendedpurposes.
• Repairsnotcarriedoutbyauthorizedservicecenters.
• Tamperingwiththepowercord.
• Tamperingwithanypartsofthemachine.
• Useofnon-originalsparepartsandaccessories.
• Failuretodescalethemachineormachineuseattemperaturesbelow32°F(0°C).
IN THESE CASES, THE WARRANTY SHALL BE DEEMED NULL AND VOID.
THE WARNING TRIANGLE INDICATES ALL IMPORTANT INSTRUCTIONS FOR THE USER'S SAFETY. PLEASE FOLLOW
THESE INSTRUCTIONS CAREFULLY TO PREVENT SERIOUS INJURIES.
HoW to USe tHeSe InStrUCtIonS
Keeptheseoperatinginstructionsinasafeplaceandmakethemavailabletoanyoneelsewhowouldusethecoeemachine.Forfurther
informationorincaseofproblems,pleaserefertotheanauthorizedservicecenter.
SAVE THESE INSTRUCTIONS
InStrUCtIonS for tHe PoWer SUPPlY CorD
• Ashortpower-supplycordisprovidedtoreducerisksresultingfrombecomingentangledinortrippingoveralongercord.
• Extensioncordsmaybeusedifcareisexercisedintheiruse.
Ifanextensioncordisused,makesure:
a. Themarkerelectricalratingoftheextensioncordshouldbeatleastasgreatastheelectricalratingoftheappliance.
b. Theextensioncordshouldbearrangedsothatitwillnotdrapeoverthecountertoportabletopwhereitcanbepulledonby
childrenortrippedover.
c. Iftheapplianceisofthegroundedtype,theextensioncordshouldbeagrounding-type3-wirecord.
• Donotusemulti-sockets
3
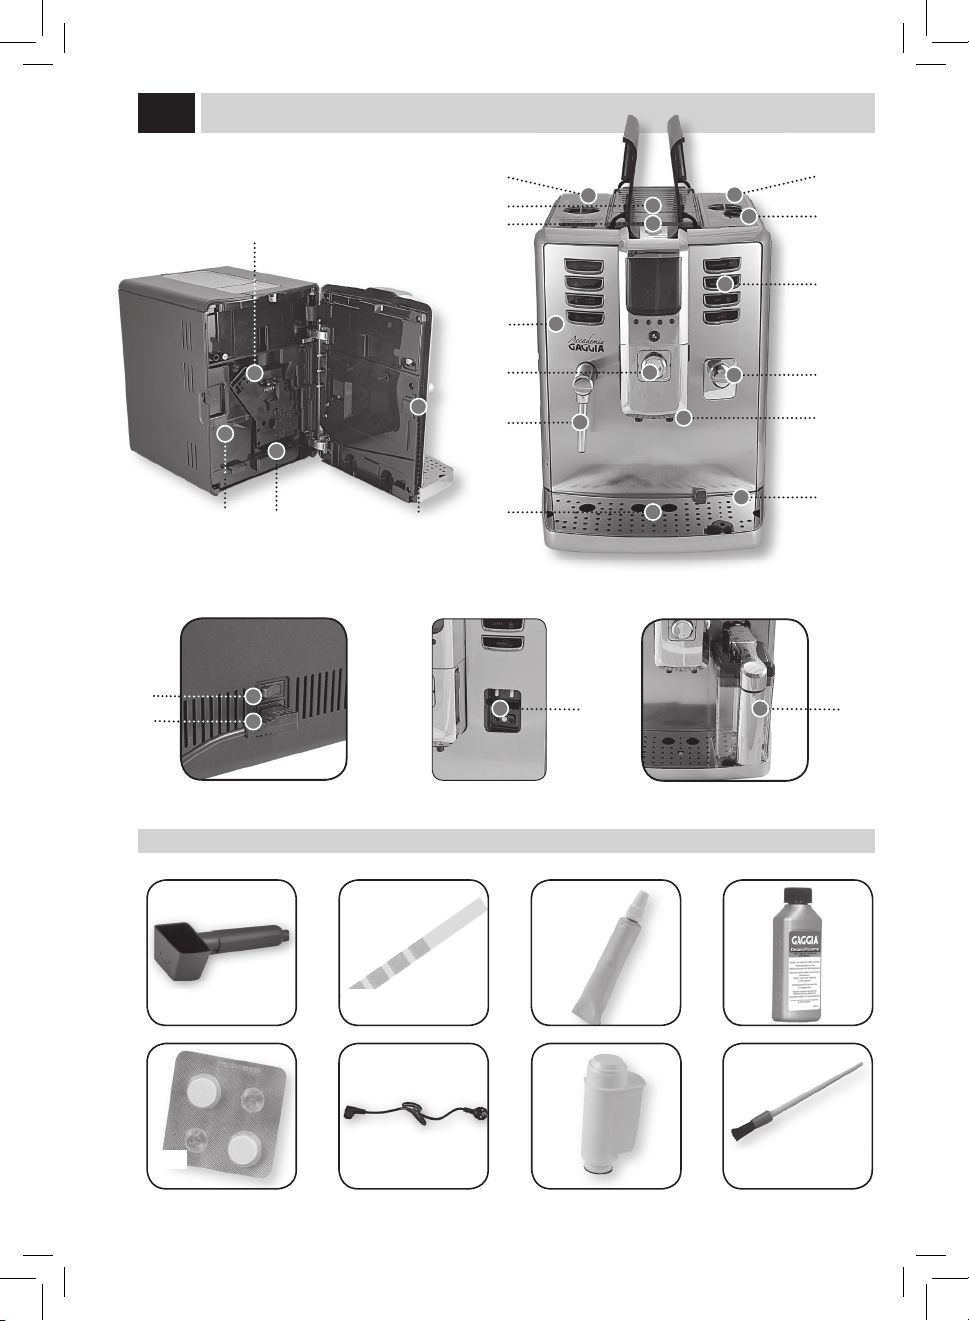
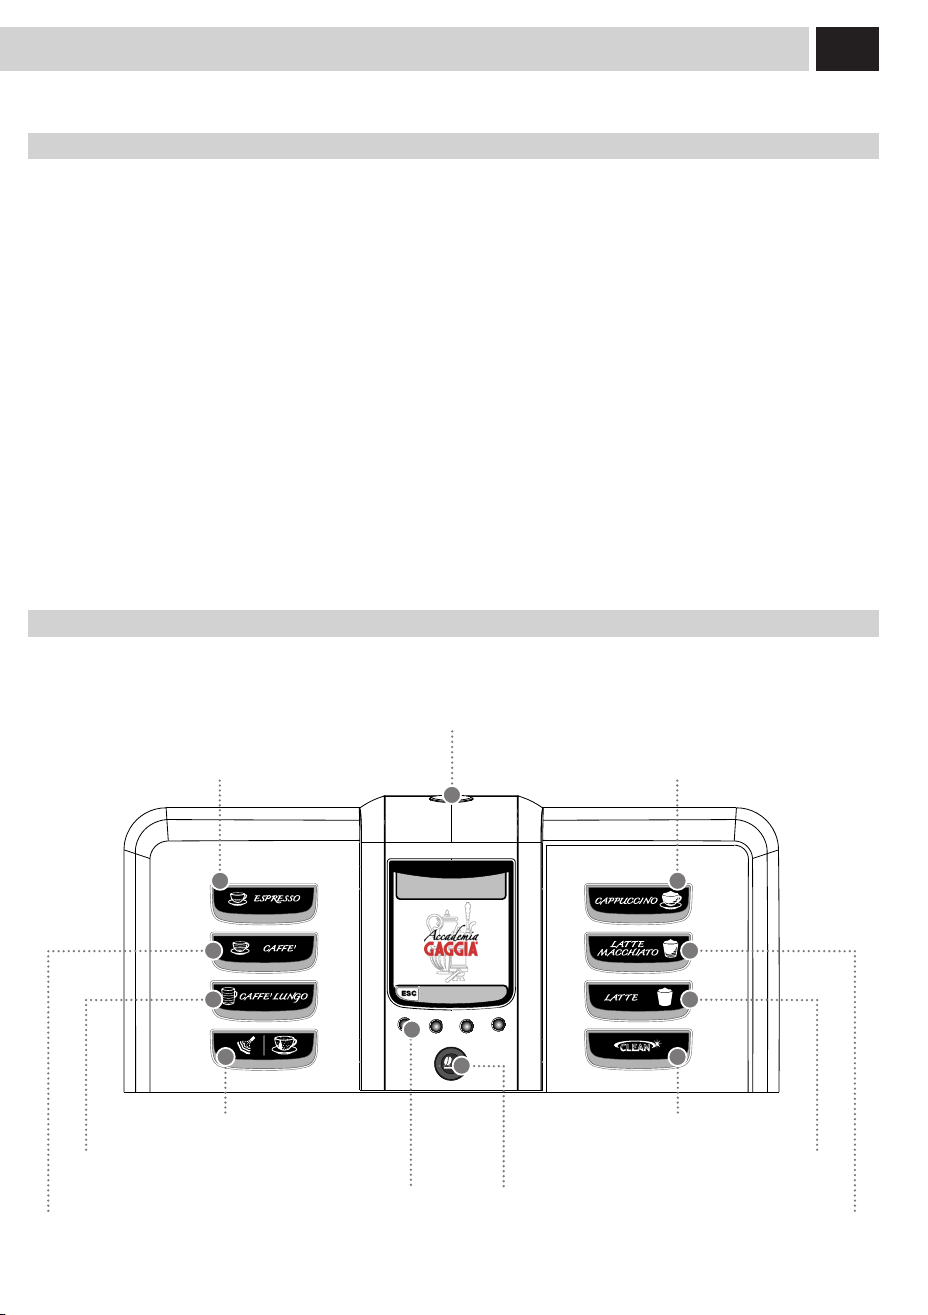
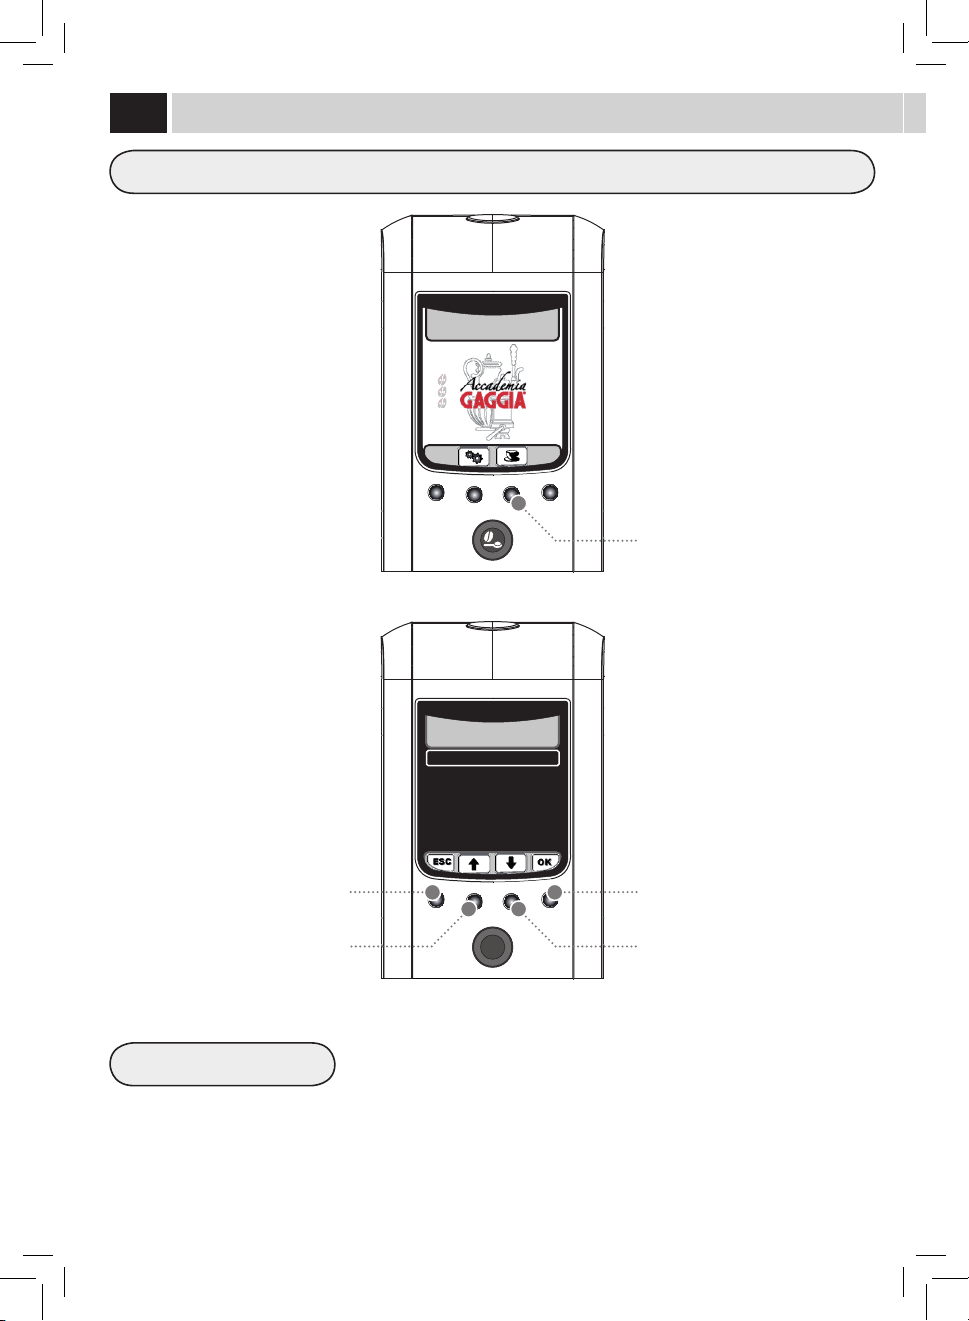
maCHine ComPonentS and aCCeSSorieS - Control Panel
Foracorrectuseofthemanual,werecommendthatyoukeepthecoverpageopen;thisallowsyoutobetterunderstandthetext.
maCHine ComPonentS and aCCeSSorieS
1 Water tank + cover
2 Cup-warmingsurface
3 Pre-ground bypass doser
4 Service door
5 SBS dial
6 Hotwater/steamwand
7 Full drip tray indicator
8 Coeebeanhopperwithlid
9 Grinder adjustment
10 Control panel
11 Milk container couplings
12 Dispensing spout
13 Drip tray + grill + sealed support
14 Brewgroup
15 Usedgroundsdrawer+protectionelement
16 Liquid recovery tray + cover
17 Service door button
18 Powerbutton
19 Powercordconnector
20 Milk carafe
21 Pre-ground coee measuring scoop
22 Water hardness test strip
23 Brewgrouplubricant
24 Descaling solution
25 Brewgroupcleaningtablets
26 Powercord
27 Intenzawaterlter
28 Cleaning brush
29 Carafe coupling cap
Cappuccino button
Cleaning cycle button
Stand-by button
Opti-dose buttonFunction buttons
Espresso button
Latte macchiato button
Control Panel
Thecontrolpanelhasbeendesignedtoallowanergonomicuseofallmachinefunctions.
Hotwaterandsteamdispensingbutton
Coeebrewingbutton
Hotmilkbrewingbutton
Longcoeebrewingbutton

4
1
4
7 8
5 6
32
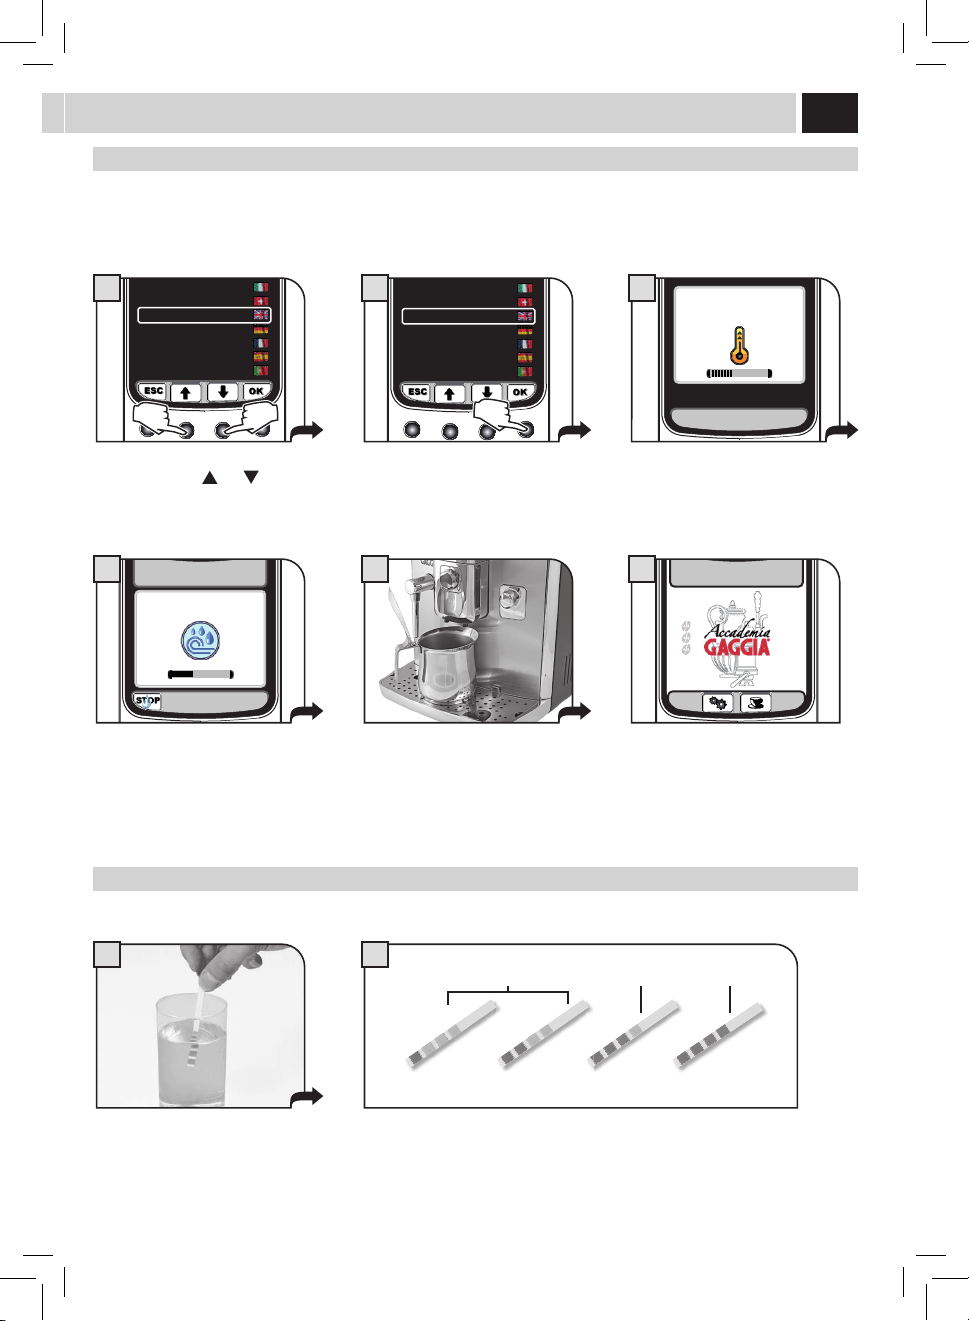
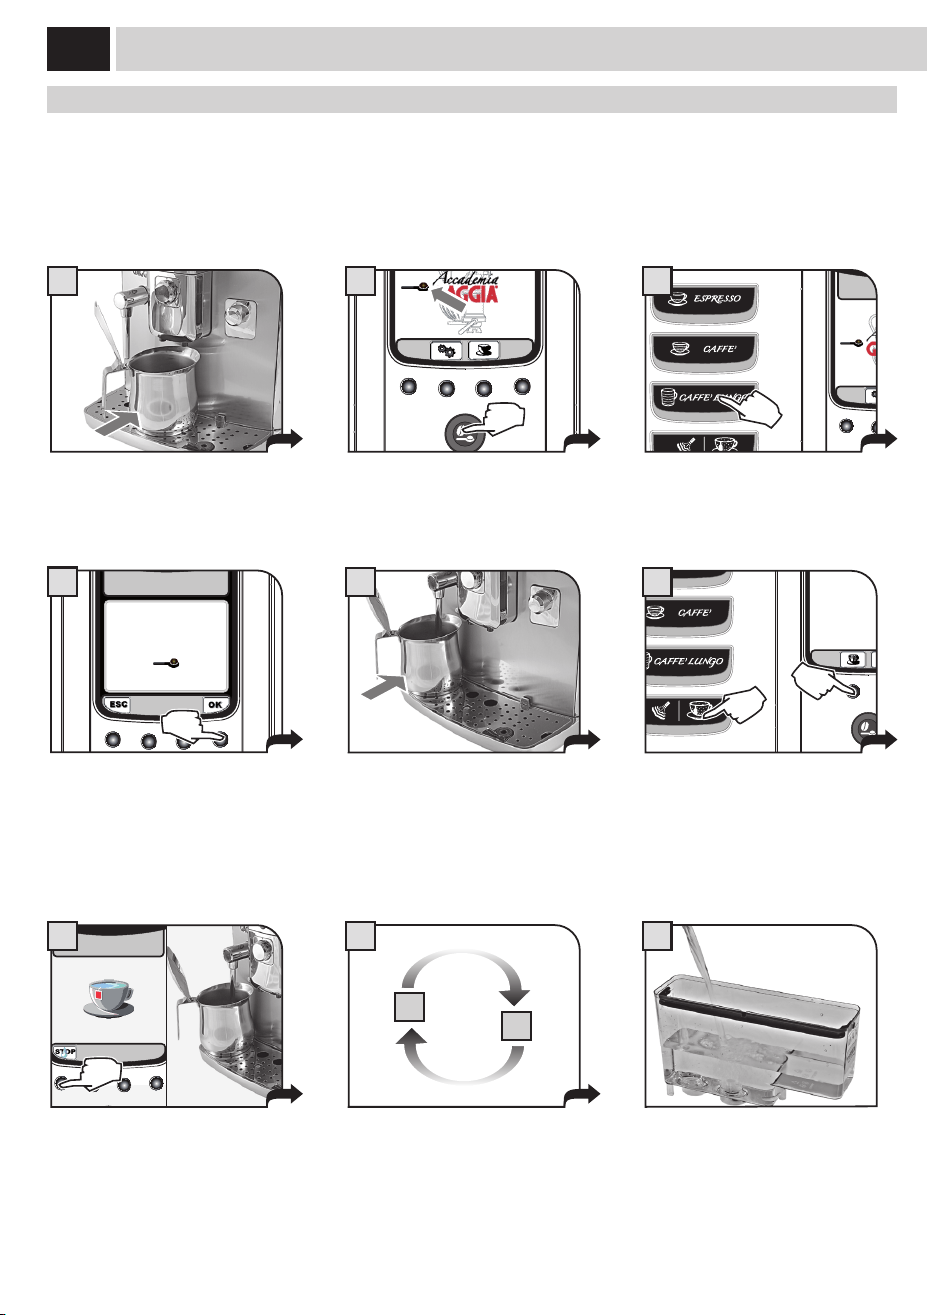
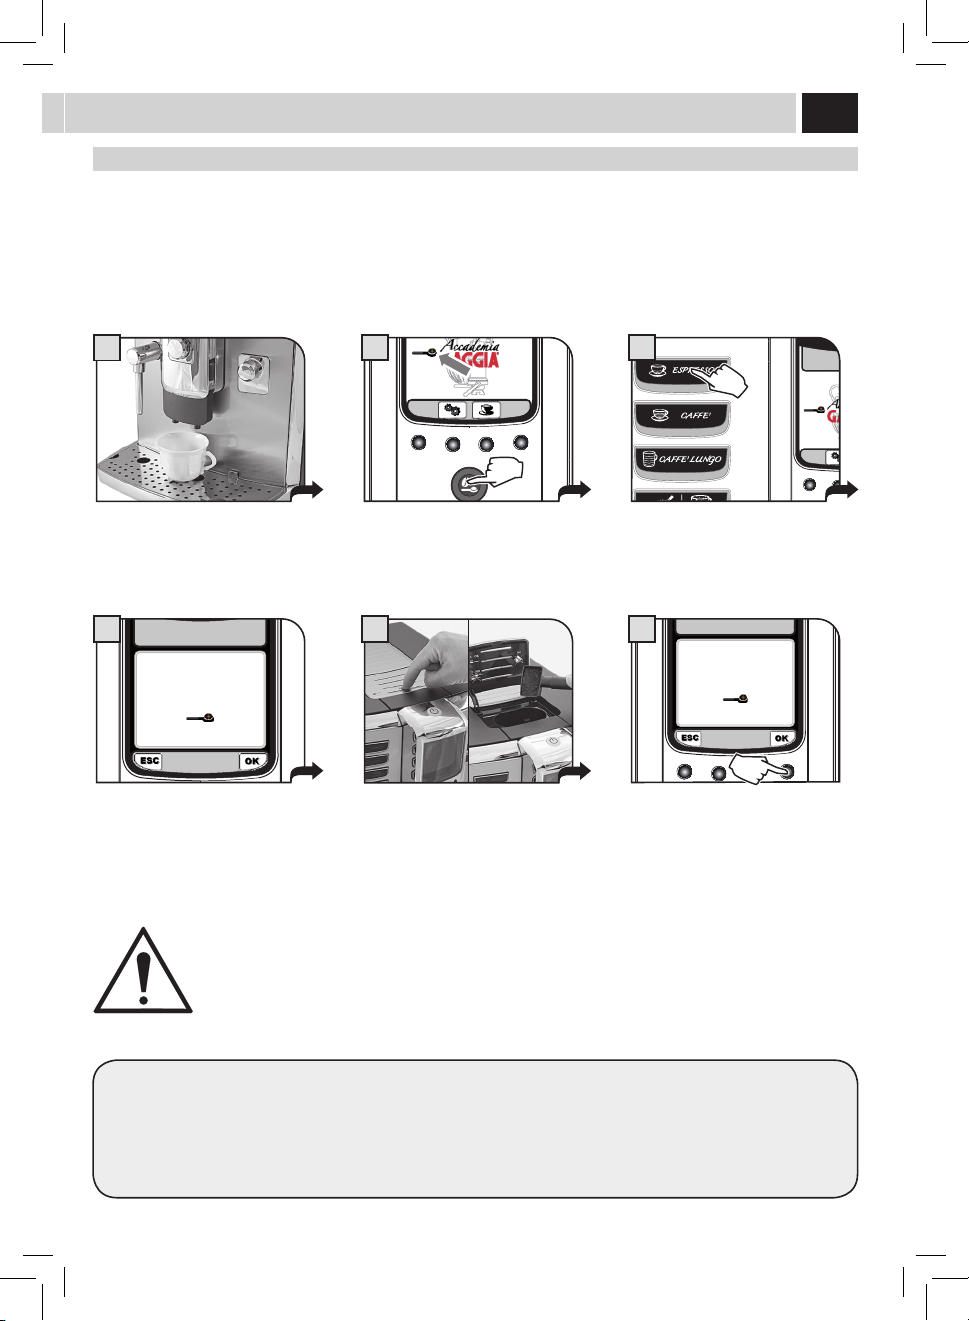
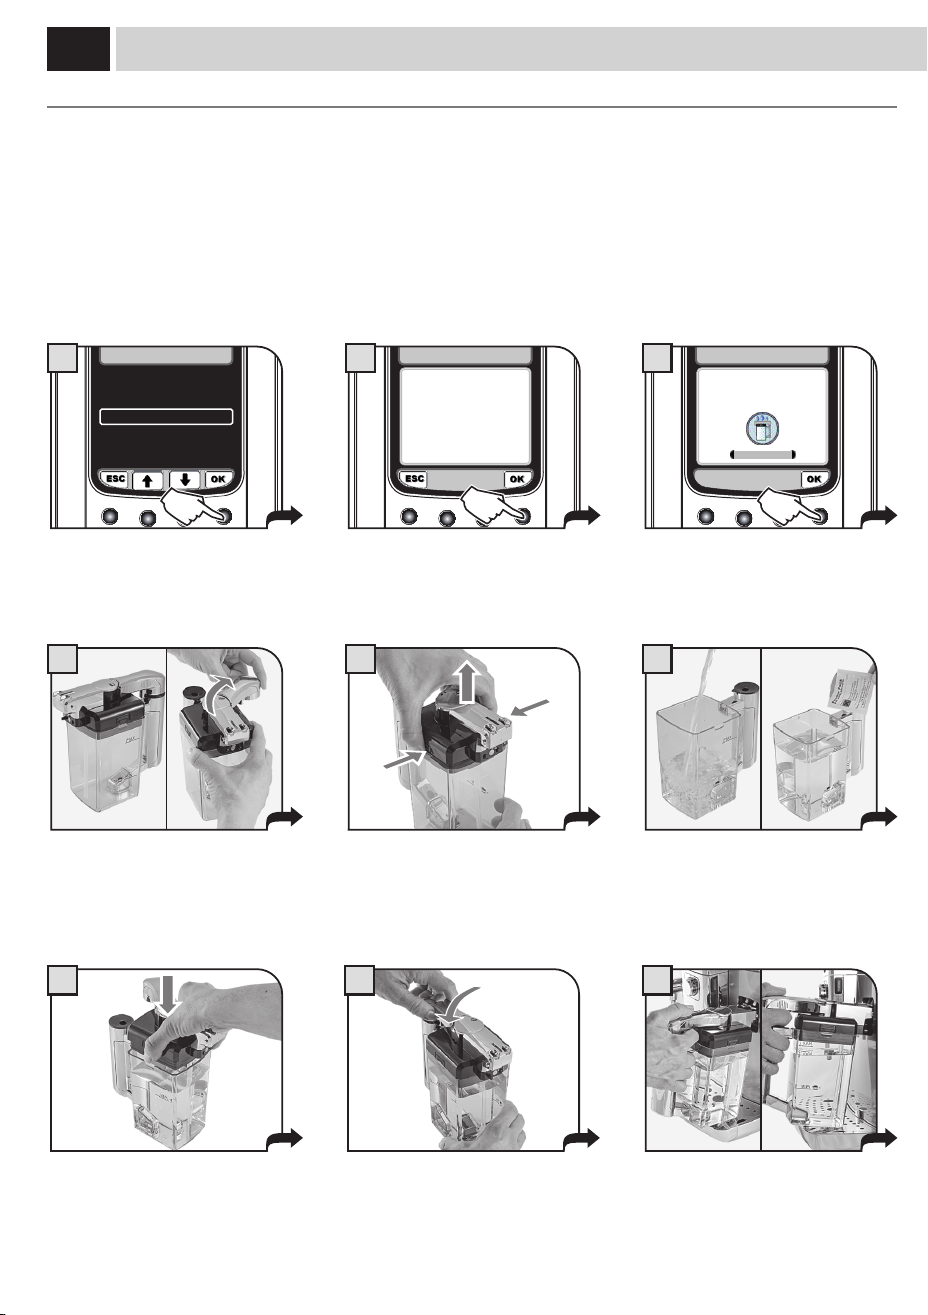
StartinG tHe maCHine
Beforeturningonthemachine,makesurethatthepowerbuttonissetto"0".
Lift the right outer lid and remove the
inner lid.
Removethewatertankusingthehandle.
Pressthepowerbuttontothe"I"
position to turn the machine on.
Thedisplayshowsaredashingled.
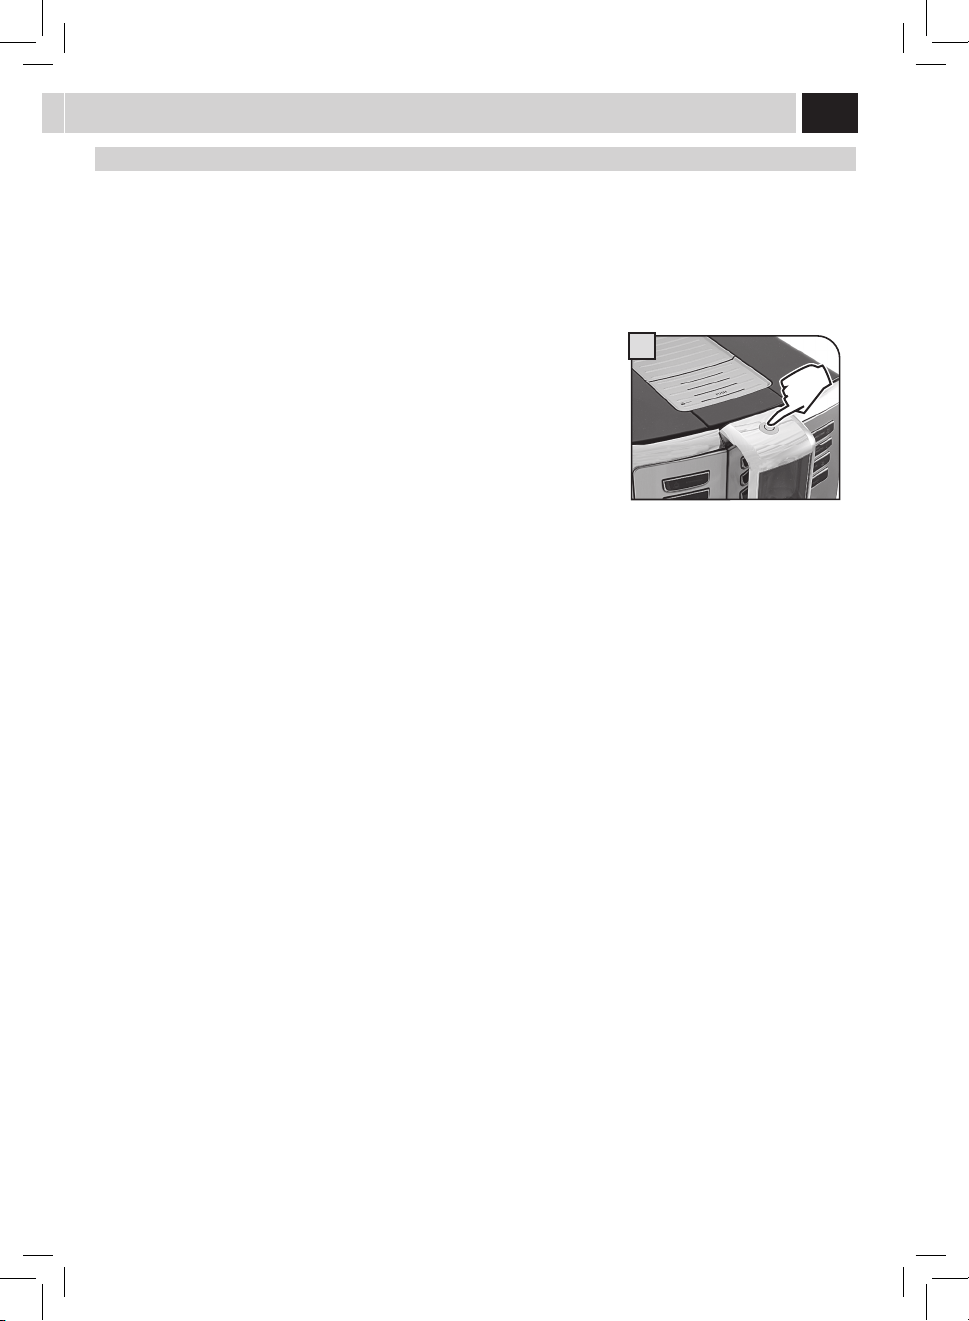
Press the stand-by button to start the
machine.
Fillthetankwithfreshdrinkingwater.Do
notexceedthe"max"levelindicatedon
thewatertank.Placethewatertankback
into the machine.
Insert the plug into the socket located
on the back of the machine and insert
theotherendintoapoweroutletwith
suitable current.
Slowlypourcoeebeansintothe
hopper.
Replace the inner lid and close the outer
lid.
Lift the left outer lid and remove the
inner lid.
When the correct temperature is
reached, the machine performs a
priming and rinsing cycle of the
internal circuits. A small amount of
waterisdispensed.Waitforthiscycle
to be completed.
The screen for product dispensing
appearsonthedisplay;seepage3.
inStallation
Atrststart-uponly,thescreen(1)willbedisplayedasshownonpage5.Then,thelanguagecanbesetfromtherelevantmenuonly
(see page 25).
5
5
1 2
1 2 3 4
A
B
C
Select the desired language by pressing
thearrowbuttons(
) or ( ).
Press the save button. Themachineactivatesthewarmingup
phase. Wait until it is completed.
Whenwarm-upphaseiscomplete,the
machine performs a rinsing cycle of the
internal circuits. It is possible to interrupt
thecyclebypressingthe"STOP"button.
Themachineisnowreadyforuse.Asmallquantityofwaterisdispensed.
Wait for this cycle to be completed
automatically.
SettinG tHe lanGUaGe
Thissettingallowsyoutochoosetheoperatinglanguageofthemachine.Italsoallowsyoutoadjusttheparametersofthebeveragesto
thetypicalparametersofthecountrywherethemachineisused.Thisiswhysomelanguagesaredierentiatedalsobycountry.
Ifnolanguageisselected,youwillberequestedtoselectitthenexttimethemachineisstarted.
meaSUrinG tHe Water HardneSS
The test strip can only be used for one measurement.
Immersethewaterhardnessteststrip
providedwiththemachineinwaterfor
1 second.
Checkthewaterhardnessvalueandset:
- Themachinewaterhardnesslevel(page30).
- The Intenza Aroma System (page 7).
Intenza Aroma System
Machinewaterhardnesssetting
ITALIANO
ITALIANO CH
ENGLISH
DEUTSCH
FRANÇAIS
ESPAÑOL
PORTOGUÊS
1
ITALIANO
ITALIANO CH
ENGLISH
DEUTSCH
FRANÇAIS
ESPAÑOL
PORTOGUÊS
2
RINSING
4
15/01/10
10:38
6
HEATING UP…
3
6
9
1
5
15/01/10
10:38
3
inStallation
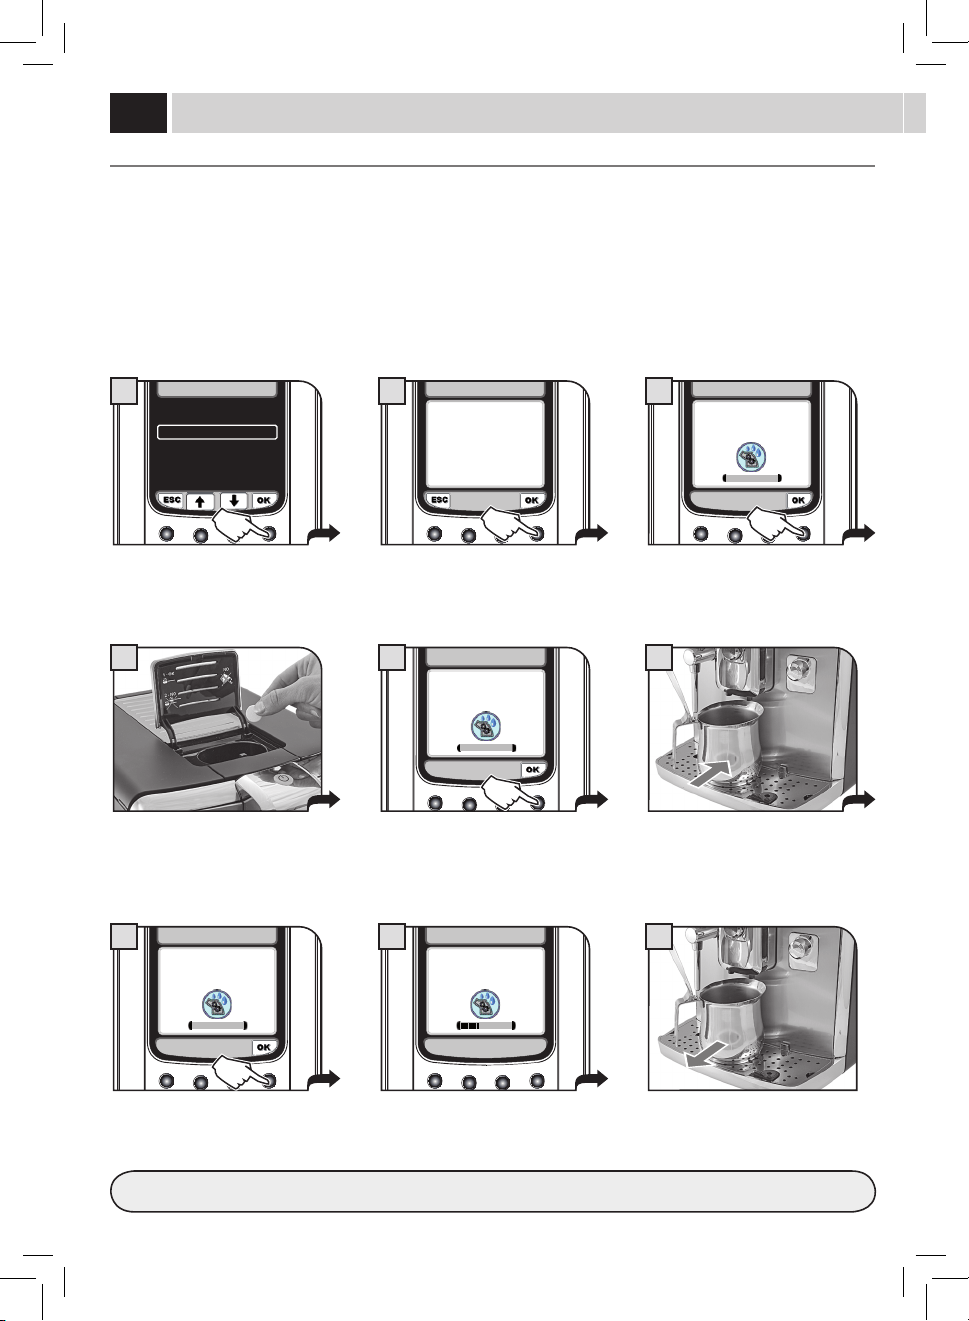
firSt USe - USe after a Period of inaCtiVitY
Toimprovetheproductquality,carryoutthisprocedureatrstuseofthemachineandafterlongperiodsofinactivity.
A few simple operations are needed to ensure the quality of your favourite beverages over time.
Place a container of large size under the
co ee dispensing spout.
Press the button once or more until the
icon is displayed.
Select the product by pressing the
buttonshown.
Pressthe"OK"buttontostartdispensing
waterthroughthedispensingspout.DO
NOT insert co ee at this stage.
Fillthewatertankwithfreshdrinking
wateraspreviouslydescribed.Your
machineisnowreadytobrewexcellent
beverages!
At the end of the dispensing phase, take
the container and place it under the hot
waterwand.
Repeat the process from step 5 to step 7
untilthewatertankisempty.
Dispensing can be interrupted by pressing
"STOP".
At the end, remove the container and
empty it.
Pressthe"WATER"buttonandthenthe
waterdispensingbutton.Waitforthe
programmed quantity to be dispensed.
15/01/10
10:38
2
INSERT GROUND COFFEE
AND SELECT OK
LONG COFFEE
4
SELECT
HOT WATER OR STEAM
15/01/10
10:38
6
HOT WATER
7 8
5
7
1
2
7
1
4 5
32
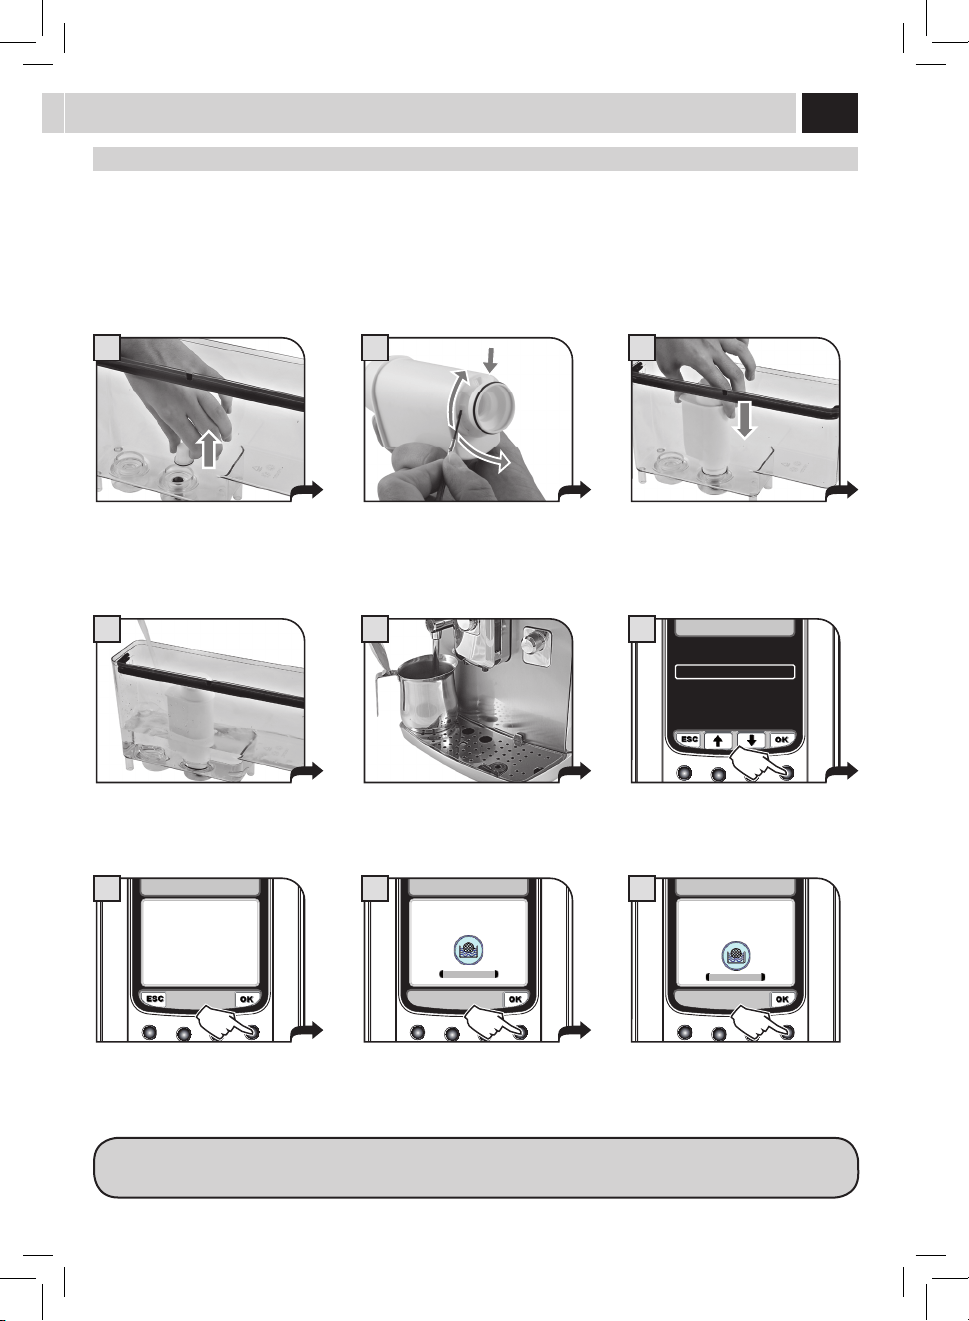
intenZa Water filter
Toimprovethequalityofthewateryouuseandextendthelifeofyourmachineatthesametime,itisrecommendedthatyouinstallthe
waterlter.Afterinstallation,gotothewaterlterinitializationprogramme(seethe"MACHINEMENU",page25).Inthisway,themachine
informstheuserwhenthewaterltermustbereplaced.
Remove the water fi lter from its packaging, immerse it vertically (with the opening positioned upwards) in cold water and
gently press its sides to let the air bubbles out.
Removethesmallwhitelterfromthe
tank and store it in a dry place sheltered
from dust.
Fillthetankwithfreshdrinkingwater
and re-insert it into the machine.
Placeacontainerbeneaththehotwater/
steamwand.
Insertthelterintheemptytank.The
reference mark and the groove must
match.Pushrmlyuntilitiscompletely
inserted.
Set up the Intenza Aroma System:
A=Softwater
B=Mediumwater(standard)
C=Hardwater
Pressthe"OK"button. Pressthe"OK"buttontoconrmthe
introductionofthenewwaterlter.
Pressthe"OK"buttontoconrm.Wait
until the cycle is completed and remove
the container.
Accessthe"MACHINEMENU"(seepage25).
Select"WATERSETTINGS"and"ACTIVATE
FILTER",thenpress"OK".
NOTE: At the end of the procedure the display automatically returns to the product dispensing page.
If the Intenza water fi lter is not available, insert the small white fi lter previously removed (see point 1) into the tank.
3
OFF
WATER HARDNESS
ENABLE FILTER
ACTIVATE FILTER
2.4. WATER SETTINGS
6
2.4.3. WATER SETTINGS
ACTIVATE FILTER?
7
ACTIVATE FILTER
INSERT WATER FILTER
AND FILL THE WATER TANK
8
ACTIVATE FILTER
PLACE A CONTAINER
UNDER THE
HOT WATER SPOUT
9
8
2
15/01/10
10:38
1
adJUStmentS
Coffee StrenGtH (SBS)
The SBS dial has been carefully designed to give your co ee the fullness and intensity you desire. Simply turn the dial and set the co ee
frommildintensitytostrongintensity,accordingtoyourowntaste.
SBS – BREWING SYSTEM
TheBrewingSystem(SBS)adjuststhefullnessofthebrewedcoee.Thecoeemayevenbeadjustedwhilebrewing.
Thisadjustmenthasanimmediateeectontheselectedtypeofbrewing.
MEDIUM
COFFEE
STRONG
COFFEE
MILD
COFFEE
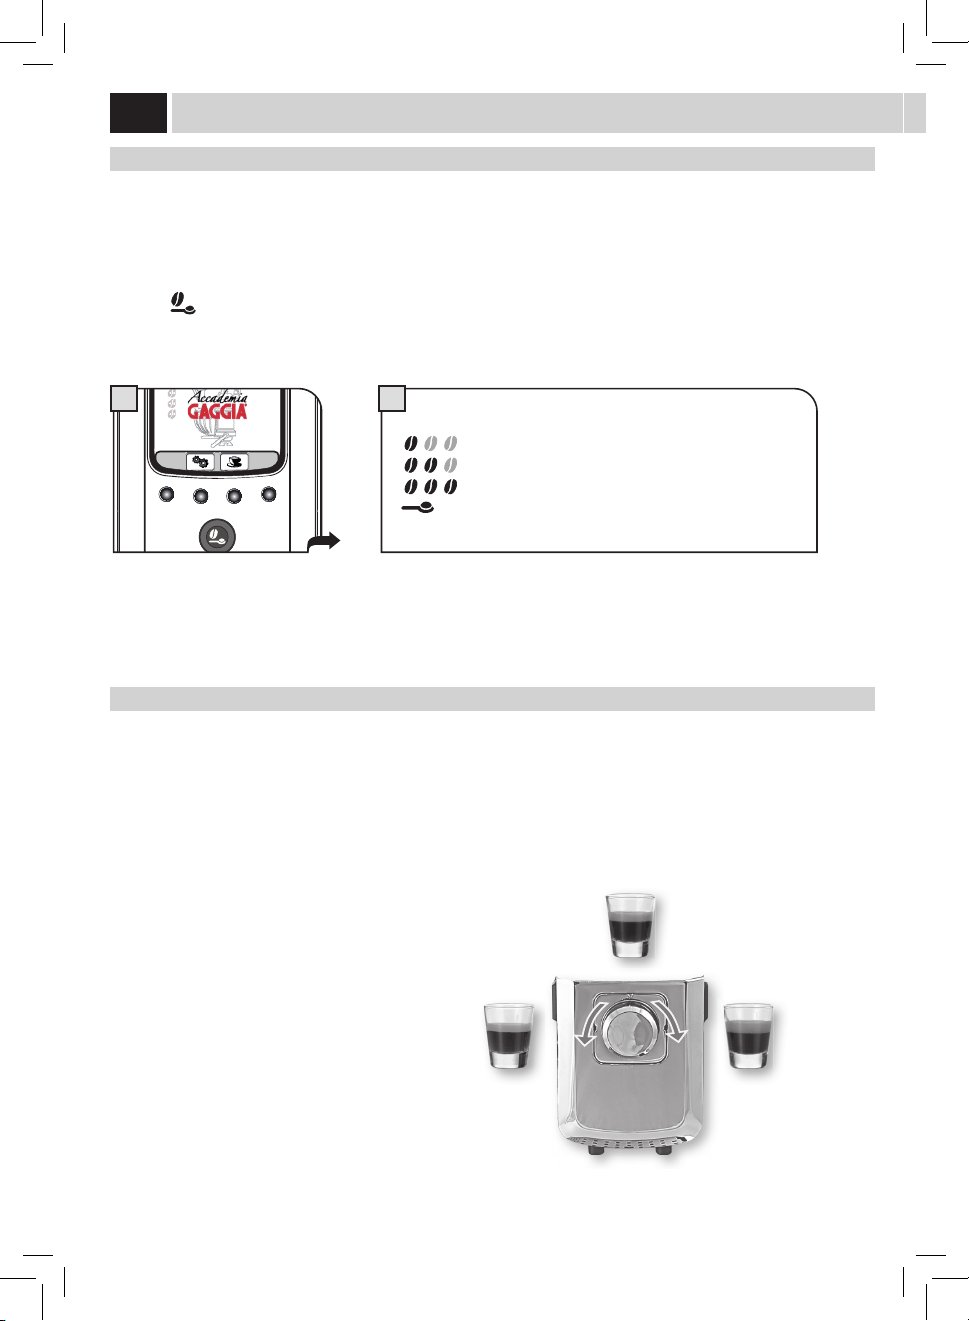
oPti-doSe (adJUStS tHe amoUnt of Coffee to Grind)
Themachineallowsyoutoadjusttherightquantityofgroundcoeeforeachproduct.
Thestandardadjustmentforeachproductcanbesetinthe"BEVERAGEMENU"(seepage22).
Youmaytemporarilychangetheamountofcoeegroundaswell.Thischangeappliesonlytothebrewingofthenextcoee.
Pressthe"
"buttononthecontrolpaneltotemporarilychangethequantityofgroundcoee,orselectthepre-groundfunction.
= mild dose
= medium dose
= strong dose
=Thebeverageisbrewedbyusingthepre-groundcoee
9
A B C
This setting provides a very coarse
grinding.
Press and turn. Thissettingprovidesaverynegrinding.
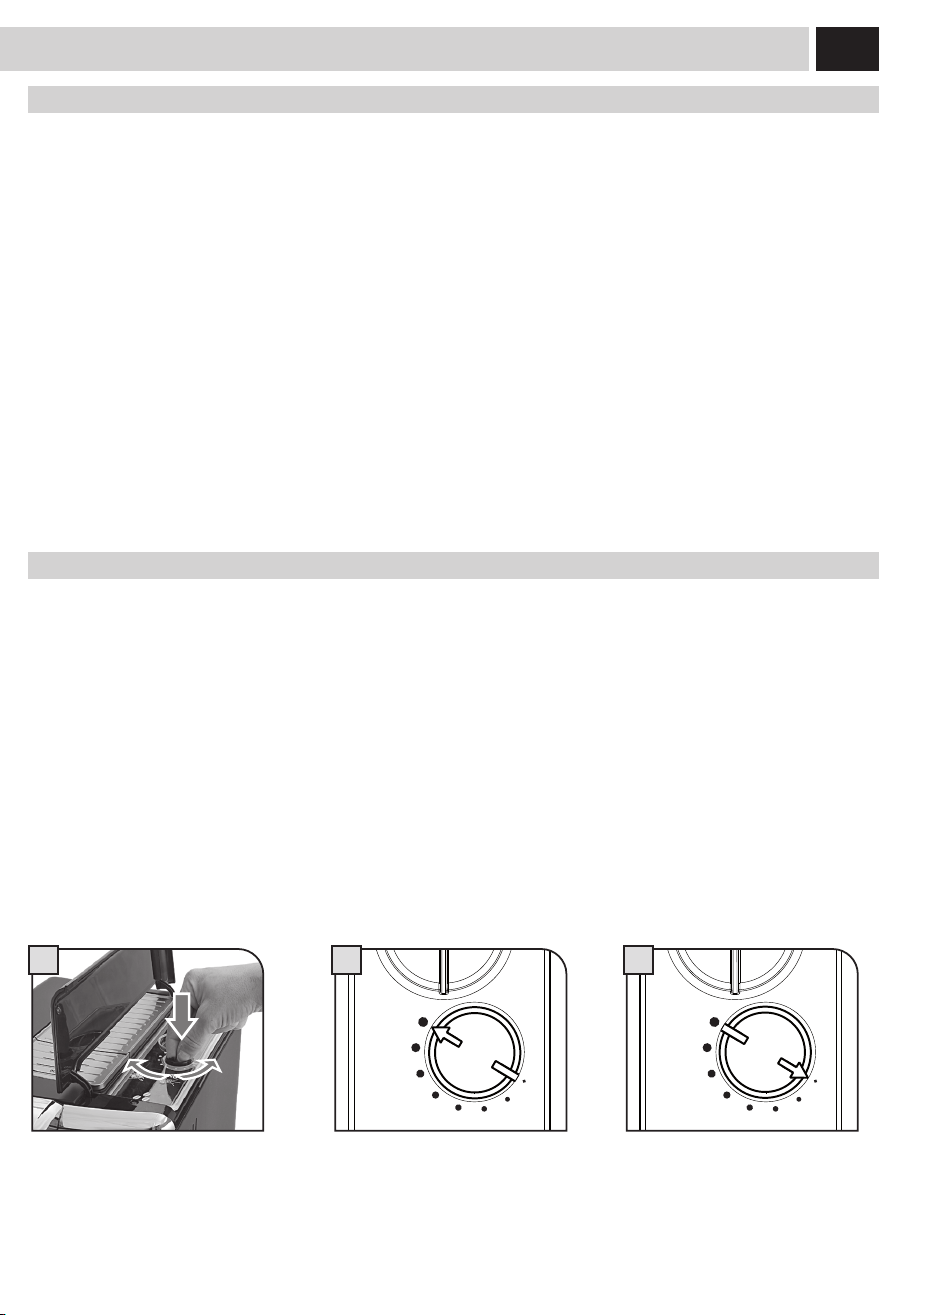
GaGGia adaPtinG SYStem
Co ee is a natural product and its characteristics may change according to its origin, blend and roast. The Gaggia co ee machine is
equippedwithaself-adjustingsystemthatallowstheuseofalltypesofcoeebeansavailableonthemarket(notincludingavoredor
carmelized).
• Themachineautomaticallyadjustsitselfinordertooptimizetheextractionofthecoee,ensuringperfectcompressionofthebeansto
obtain a creamy espresso co ee that is able to release all the aromas, regardless of the type of co ee used.
• Theoptimizationprocessisalearningprocessthatrequiresthebrewingofacertainnumberofcoeestoallowthemachinetoadjustthe
compactness of the ground co ee.
• Attentionshouldbegiventospecialblends,whichrequiregrinderadjustmentsinordertooptimizetheextractionofthecoee.
Coffee Grinder adJUStment
Themachineallowsslightadjustmentstothecoeegrindertoadaptittothekindofcoeeused.
Important Note: Adjustments to the co ee grinder can be made only when the grinder is being used. This phase takes
place during the fi rst part of a co ee brewing.
Theadjustmentcanbecarriedoutbyusingthedialinsidethebeanhopperwithoutcomingintocontactwithanymovingparts.
Press and rotate the dial (one step at a time) according to the indications provided on the cover.
Pressandturnthedialonenotchatatimeandbrew2-3cupsofcoee;thisistheonlywaytonoticedierencesinthegrind.
10
1 2 3
4
diSPenSinG SPoUt HeiGHt adJUStment
Beforebrewingaproduct,andaccordingtothekindofcup,adjusttheheightofthedispensingspout.
Toadjust,manuallymovethedispensingspoutasshowninthepicture.
Note: In some cases the dispensing spout can be removed to allow the use of very
large containers.
adJUStmentS
11
A
Stand-BY mode
The machine is designed for energy saving. After 60 minutes of inactivity, the machine goes into stand-by mode, the boiler is no longer
heated and all the devices turn o .
Powerconsumptionisreducedtoaminimum.Pressanybuttontoturnthemachineonagain.
The machine status can be manually changed to stand-by mode by holding the stand-by button pressed for 3 seconds.
Note:
1 The stand-by mode cannot be activated if the service door is left open.
2 The stand-by activation time can be changed in the "MACHINE MENU" on
page 28.
3 When the stand-by mode is activated, the machine performs a rinse cycle
of the internal circuits. It is possible to interrupt the cycle by pressing the
"STOP" button.
Themachinecanbeturnedonagainbyexecutingoneofthefollowingactions:
1 By pressing any of the control panel buttons.
2 Byopeningtheservicedoor(whenclosingthedoorthemachinegoesbackto
stand-by mode).
3 If a pre-set timer becomes active.
Thebuttonbecomesredandblinkswhen
the machine is in stand-by mode.
12
I
II
1 2 3
4 5 6
Themachineisequippedwithacarafeallowingforoptimalmilkfrothingforthebrewingof
tasty cappuccinos, latte macchiatos and any milk-based beverage.
Note: Before using the carafe, make sure it is thoroughly clean and sanitary. If
milk is left in the carafe, make sure it is still suitable for food consumption before
using it.
Thecontainerallowsforaneasyandpracticalsteamingandfrothingofmilk.Thecontainer
can be easily removed from the machine after each use so that it can be placed back in the
refrigerator.
Thebrewingcircuitisautomaticallywashedbyanautomaticcleaningcycleaftereachuse.
Thisautomaticcleaningcycleworksonlyifactive(seepage31)andcanbealsomanually
startedbypressingthe"CLEAN"buttonnext(seepage18).
Thecarafemustberemovedatleastonceaweektoallowforpropercleaningofall
componentsandkeepallpartsfreshforoptimumbrewing.(Forpropercleaning,refertothe
"MilkCarafeCleaning"sectionseepage41).
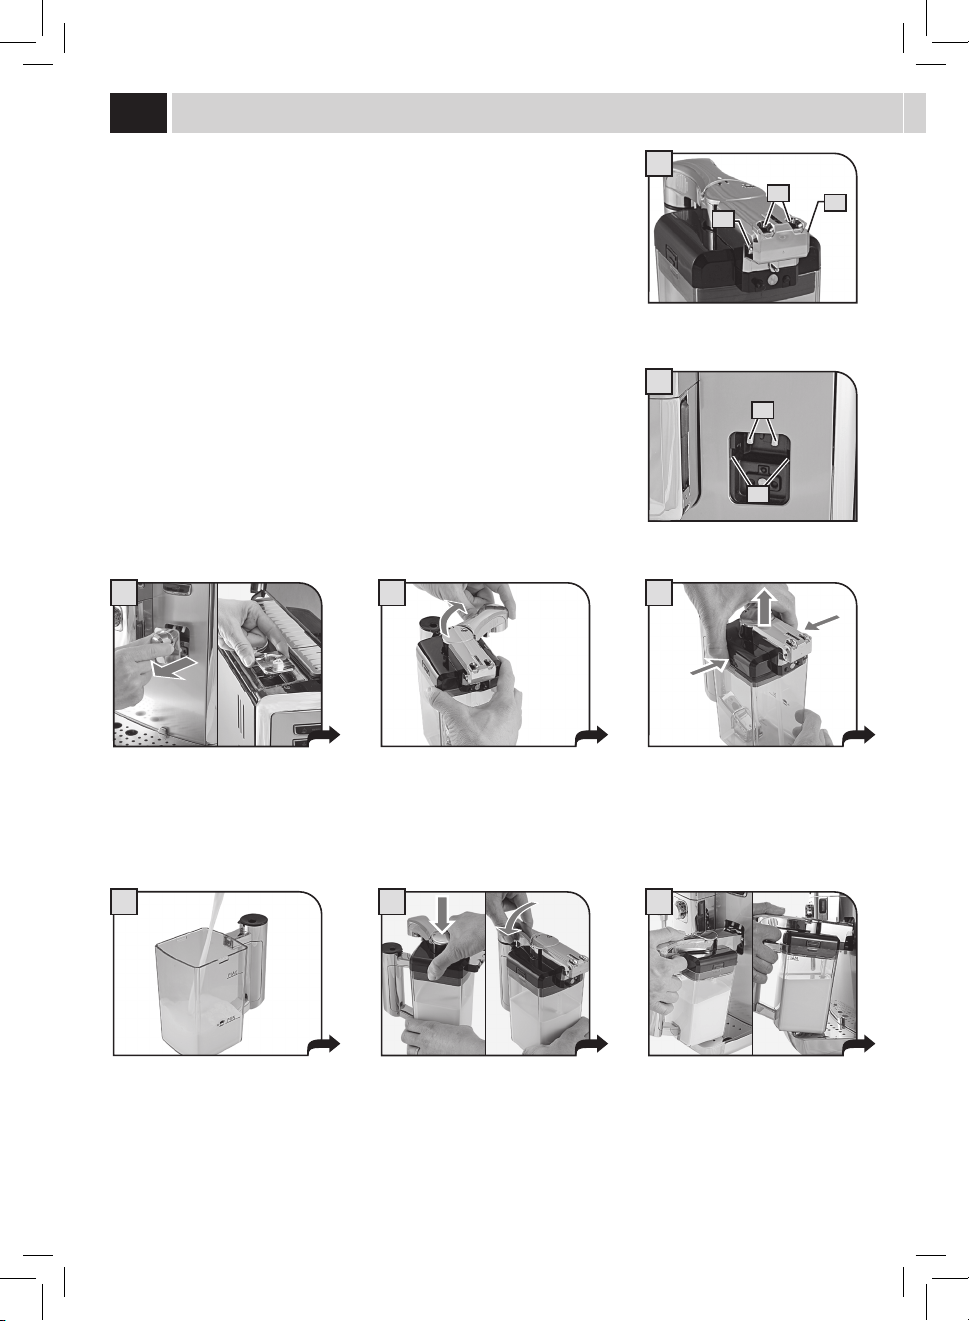
Remove the protection cover from the
milk container connection and keep it in
a clean place. It is suggested to insert it
inthewatercoverseat.
Rotatethehandleclockwiseto
disengage the lock.
Pressthedisengagebuttonstoallowthe
lid removal.
Fillthecarafewithcoldmilk.Fillmilkto
abovethe"MIN"line,butdonotexceed
the"MAX"levelindicatedonthecarafe.
milK Carafe USe
Place the lid back and ensure that it is
closed correctly. Move the handle back
toitscentralpositiontoallowforperfect
closure.
Insertthecarafeinclinedtowardsthe
front.
The carafe base should be positioned on
the hole (E) located on the drip tray.
A = Carafe holes
B = Carafe pins
C = Machine couplings
D = Guides for carafe pins
A
B
B
C
D
13
2
1
8
9
7
C
D
A
B B
After use, remove the container from the machine and place it in the refrigerator for proper conservation.
We recommend NOT to keep the container at room temperature for too long. Maximum 10 minutes.
Store the milk according to producer's instructions and do NOT use it after best-before date. Wash the container as described in the
"MILKCARAFECLEANING"section(seepage41).
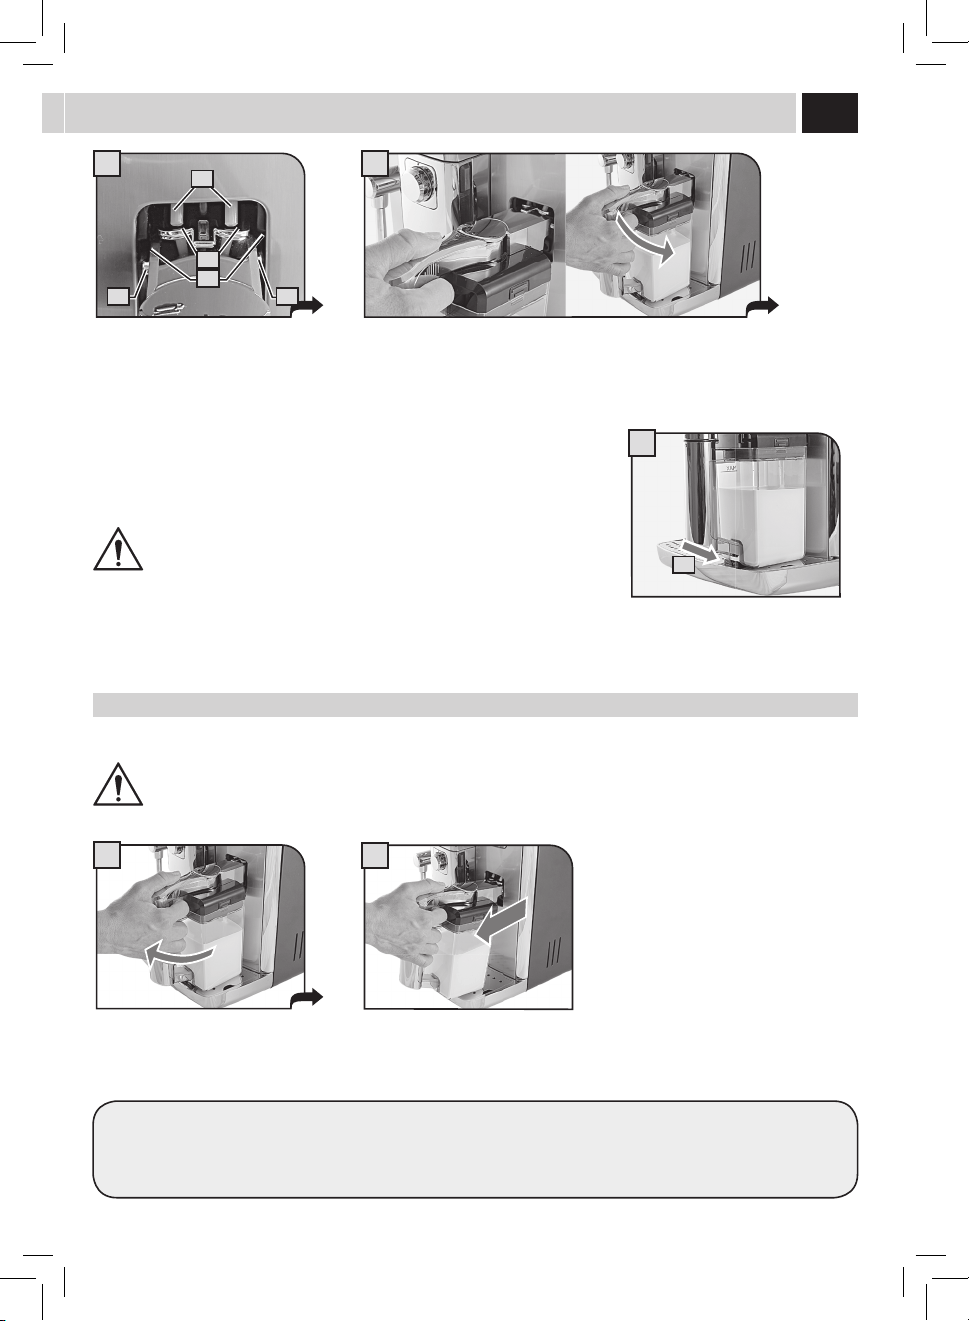
remoVinG tHe Carafe
Thefollowingoperationsshowhowtoproperlyremovethecarafefromthemachine.
DO NOT FORCE THE INCLINATION OF THE CARAFE.
At this stage the carafe holes (A) are
lowerthanthecouplings(C).
The carafe pins (B) are located at the
same height of the guides (D).
Insertthecarafebyturningittowardsthebasethrougharoundmovement(asshown
inthegure),untilitishookedtothehole(E)locatedinthedriptray.
Pullthecarafeupwardsuntilitsreleasefromthehole(E)locatedinthedriptray.Then
pull until it releases.
DO NOT FORCE THE INCLINATION OF THE CARAFE.
Thecarafewillbenaturallybackin
place.
E
14
1 2
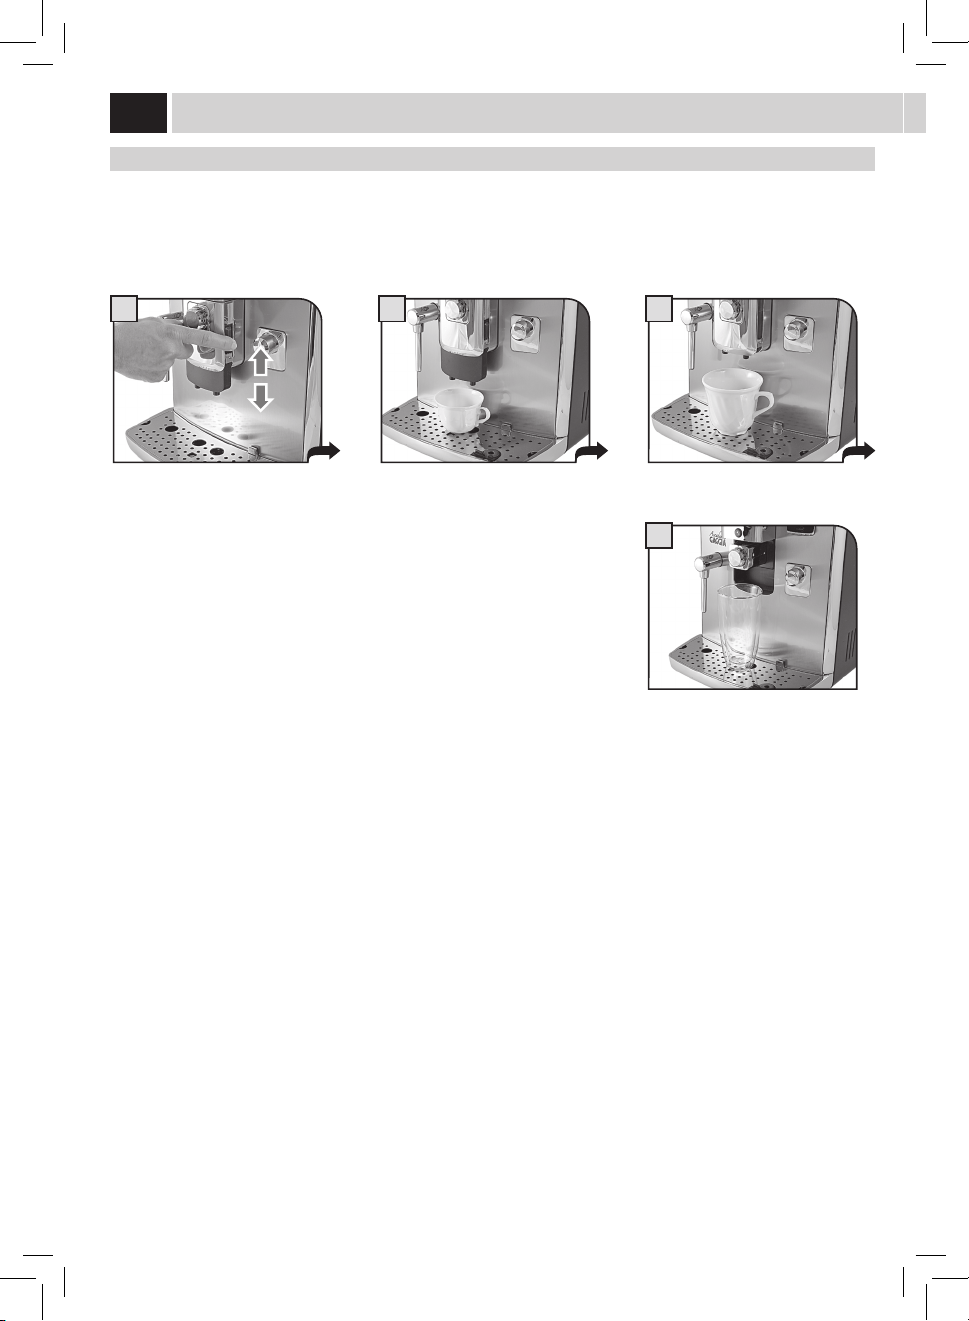
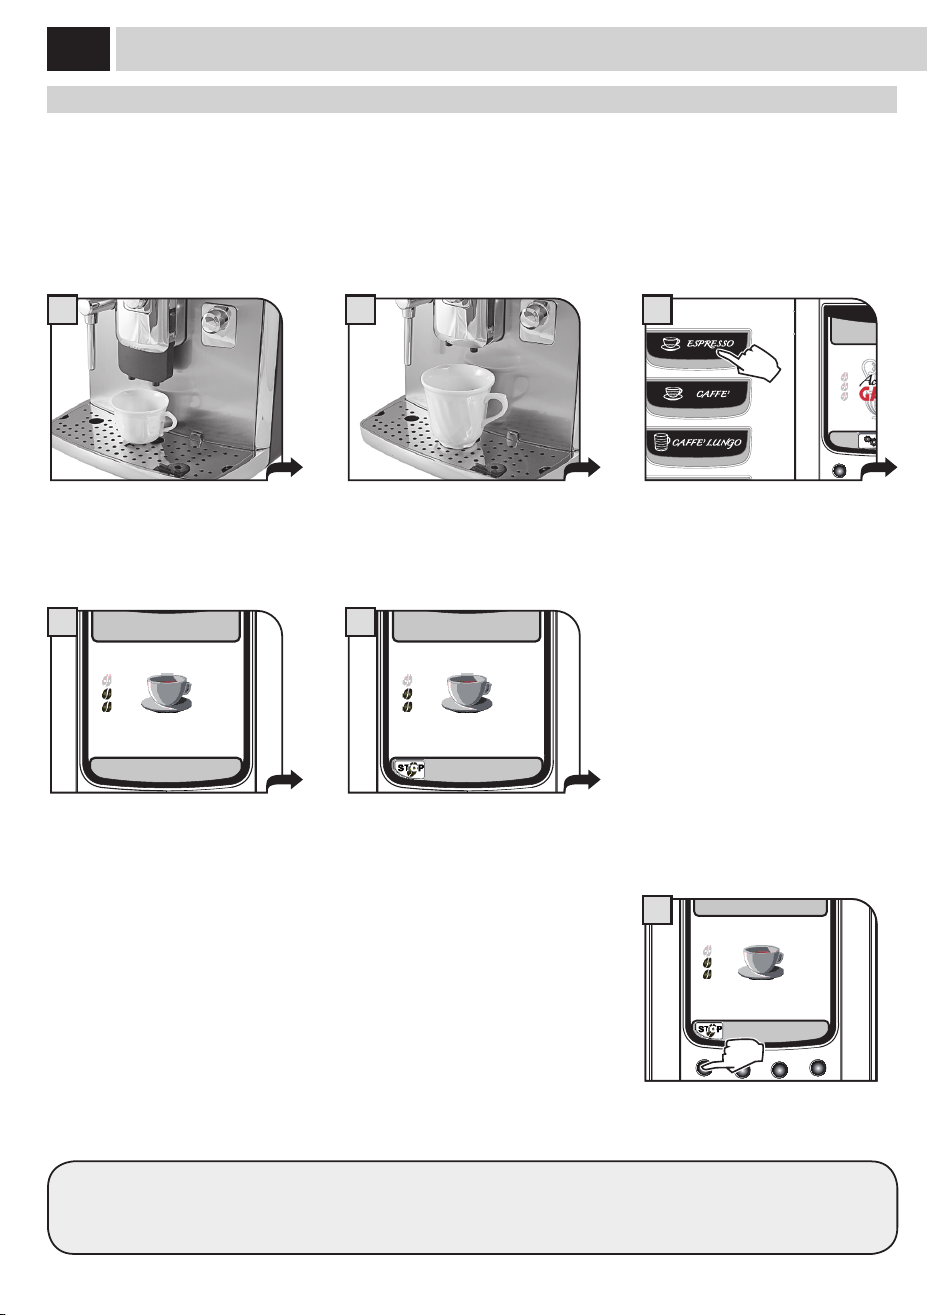
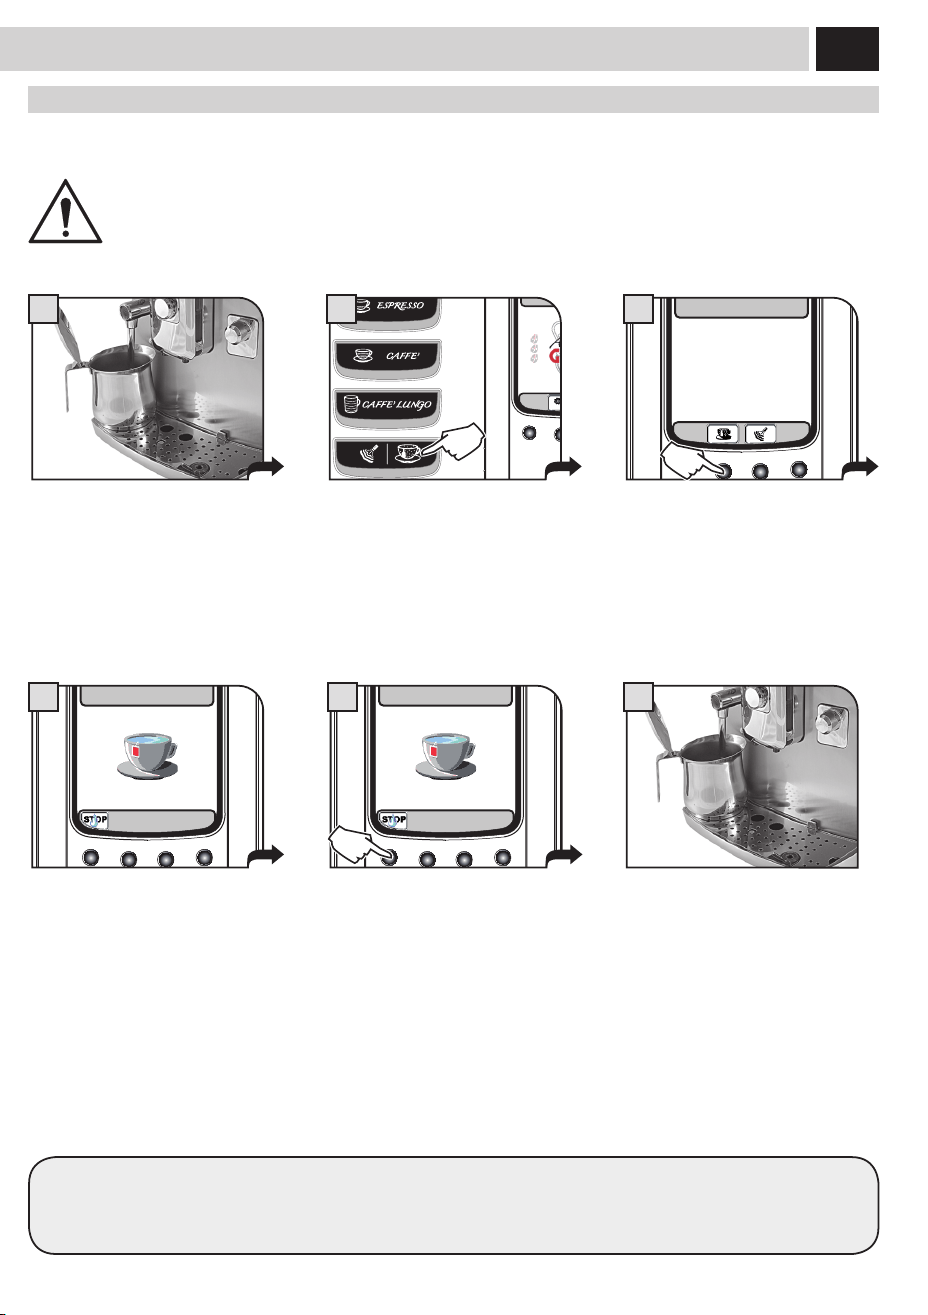
eSPreSSo / lonG Coffee
Thisprocedureshowshowtobrewanespresso.Tobrewanothertypeofcoee,presstheappropriatebutton.Usepropercoeecupsto
prevent co ee from spilling.
Tobrew2cups,pressthebuttontwice;themachinebrewshalfoftheenteredquantityandbrieyinterruptsdispensinginordertogrind
thesecondcoeedose.Coeebrewingisthenrestartedandcompleted.
Position1or2cupstobrewoneortwo
espresso co ees.
Position1or2cup(s)tobrewanespresso
or a long co ee.
Choose the beverage by pressing the
corresponding button: once for 1 cup and
twicefor2cups.
The machine starts grinding the selected
co ee quantity.
Themachinebeginsbrewingthe
selected beverage.
Coeebrewingcanbestoppedatanytimeby
pressing"STOP".
Themachinenishesbrewingautomaticallyonthebasisofthequantitydeterminedbythefactorysettings.Tocustomizethisquantity,
see page 22.
ESPRESSO
STOP
COFFEE
6
Coffee BreWinG
15/01/10
10:38
3
ESPRESSO
5
ESPRESSO
6
ESPRESSO
4
15
1
5
15/01/10
10:38
2
15/01/10
10:38
2
BeVeraGe BreWinG WitH Pre-GroUnd Coffee
Themachineallowsyoutousepre-groundanddecaeinatedcoee.
Pre-ground co ee must be poured into the bypass doser positioned on the top of the machine. Only use ground co ee for espresso
machinesandnevercoeebeansorinstantcoee(seethe"beverageprogramming"sectiononpage22).
Thisexampleshowshowtobrewanespressobyusingpre-groundcoee.
Place 1 cup under the dispensing spout. Press the opti-dose once or more until
the icon appears on the display screen.
Select the product desired by pressing
the corresponding button.
A message reminds the user to pour
ground co ee into the bypass doser.
Press on the door to open it and lift it.
Pour ground co ee in the bypass doser
using the measuring scoop provided.
Press"OK"tostartbrewing.
Note:
• Ifbrewingdoesnotstartwithin30secondsfromtheappearanceofthemessageinstep4,themachinewillreturntothemain
menuanddischargeanyinsertedcoeeintotheusedgroundsdrawer.
• Ifnopre-groundcoeeispouredintothebypassdoser,onlywaterwillbedispensed;
• Ifthedoseisexcessiveorif2ormorescoopsofcoeeareadded,themachinewillnotbrewtheproductandthecoeeinthe
bypassdoserwillbedischargedintotheusedgroundsdrawer.
WARNING: ONLY PUT PRE-GROUND COFFEE INTO THE BYPASS DOSER WHEN YOU WISH TO BREW THIS TYPE
OF PRODUCT.
ONLY INSERT ONE SCOOP OF GROUND COFFEE AT A TIME. TWO COFFEES CANNOT BE BREWED AT THE SAME
TIME WHEN USING THIS FUNCTION.
INSERT GROUND COFFEE
AND SELECT OK
LONG COFFEE
4
INSERT GROUND COFFEE
AND SELECT OK
LONG COFFEE
6
16
1 2
15/01/10
10:38
3
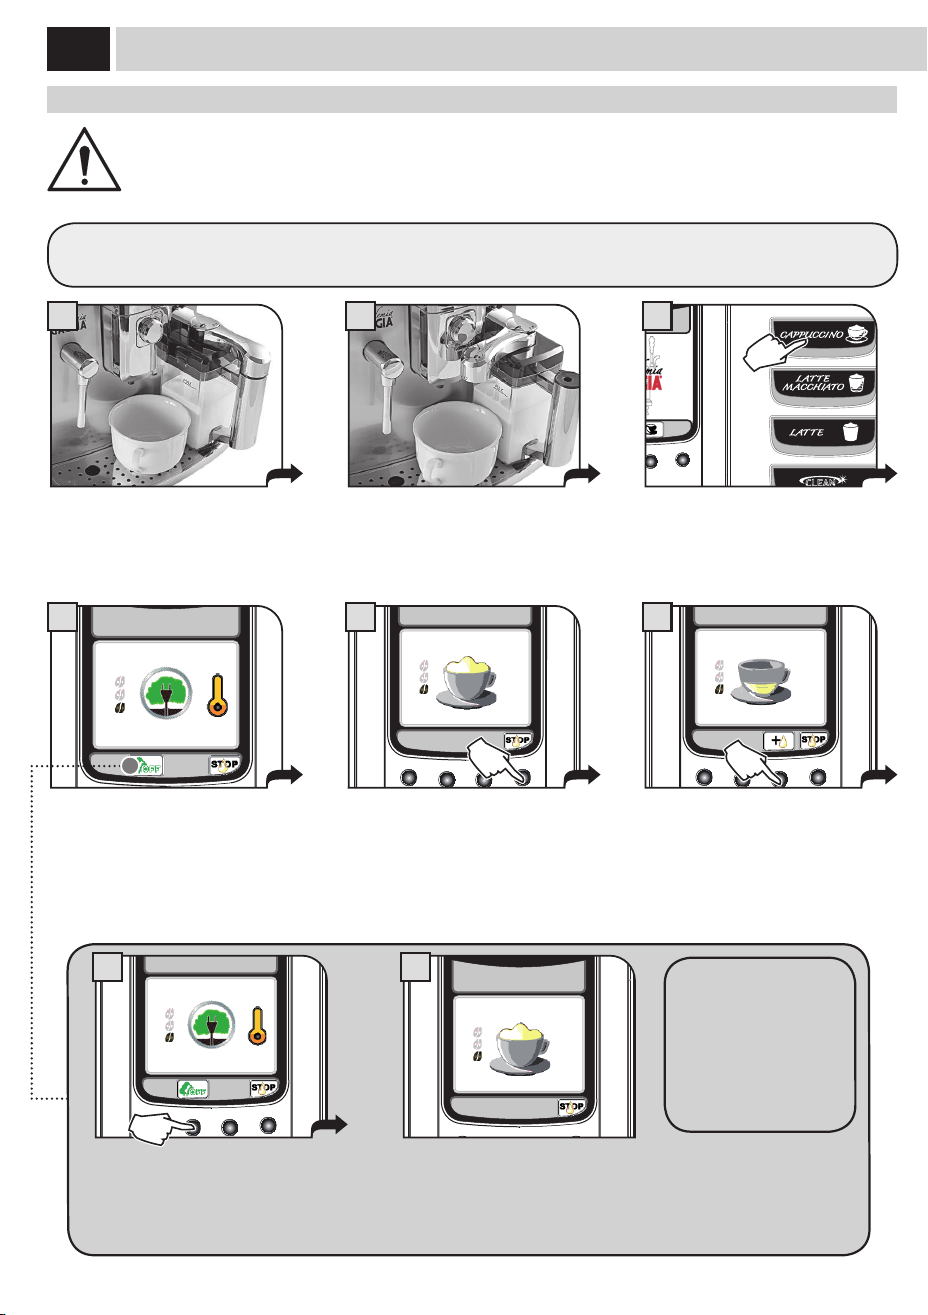
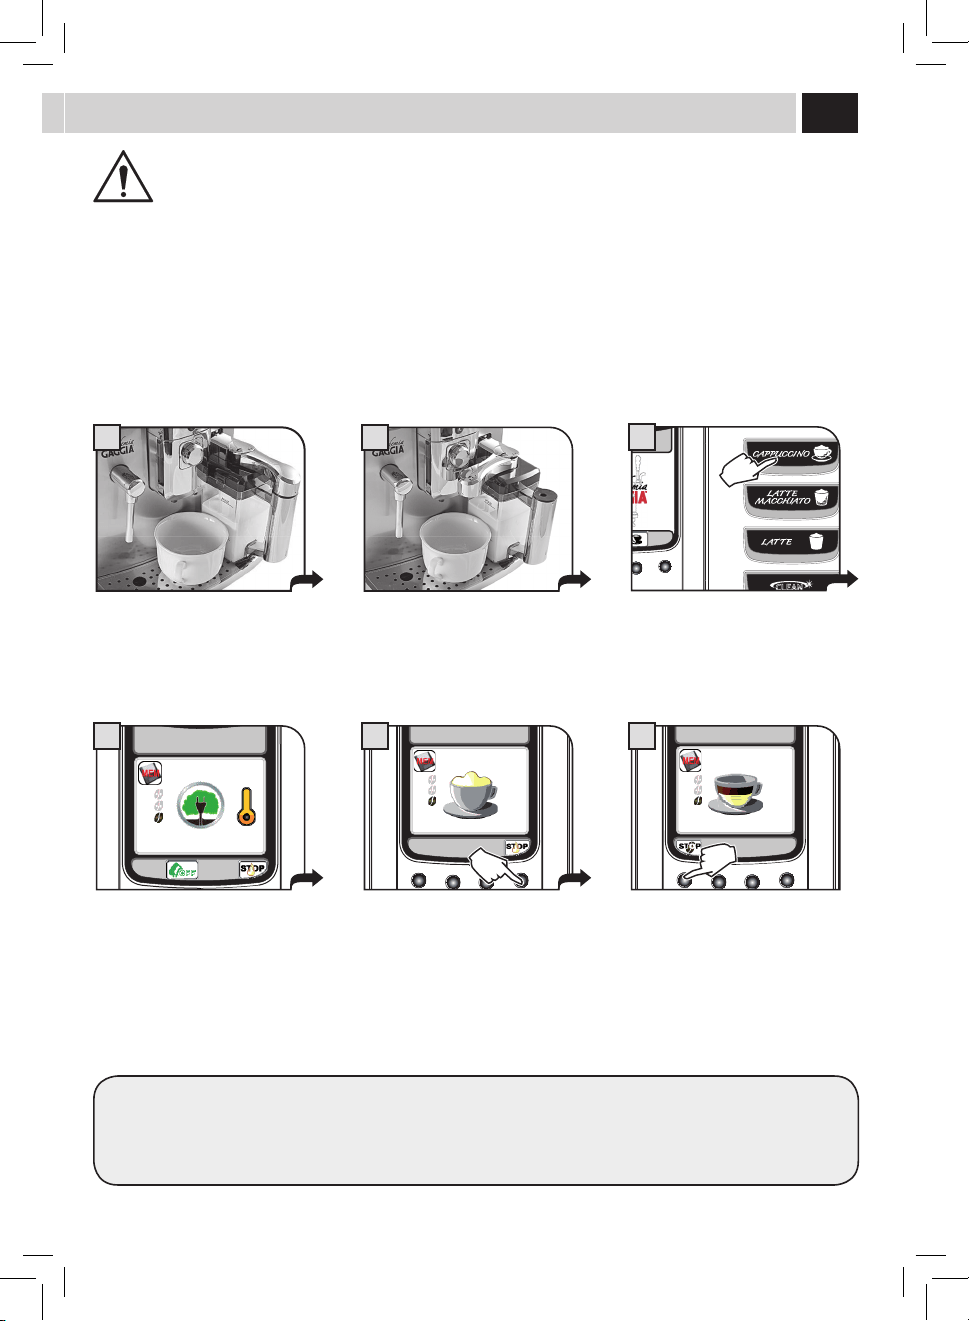
CaPPUCCino / latte maCCHiato / milK
ProdUCt BreWinG
AT THE BEGINNING OF THE DISPENSING PHASE, THE MACHINE MAY PRODUCE SOME SPURTS OF MILK AND
STEAM: RISK OF SCALDING! ALWAYS WAIT FOR THE CYCLE TO END BEFORE REMOVING THE CONTAINER.
REFER TO THE SECTION "MILK CARAFE USE" (SEE PAGE 12).
Placethecuporthecontainerwherethe
milk-basedproductwillbeprepared.
Rotate the handle upper part of the
container on the cup. To avoid spilling
milk,alwaysusecupsofadequatesize.
Select the desired milk product by
pressing the corresponding button: you
can select only one milk product at a
time.
Themachinestartsbrewing.Itgrindsthe
co ee and heats up for milk dispensing.
In this case the ECOMODE function is set
to"ON"(seepage26).
Milk dispensing begins. Milk dispensing
can be stopped at any time by pressing
"STOP".
Milk dispensing can be increased by
pressingthebutton"+".Inthiscase,NOT
frothedmilkwillbedispensed.
Whenbrewingmilkproducts,themachinedispensesthemilkrstandthenbrewsthecoee.Inthiscase,simultaneouslybrewing
a double product is not possible.
Ifthe"OFF"buttonispressed,the
ECOMODE function is deactivated and
setto"OFF".
(see page 26).
Afterthat,whenbrewingbeveragesthe
systemwillrequirelesstimeforwarm-
up.However,thiswillresultinincreased
energy consumption.
The ECOMODE function can
be re-activated by means of
the"MACHINEMENU"only
(see page 26).
CAPPUCCINO
ECO MODE ON
4
CAPPUCCINO
ECO MODE ON
A
CAPPUCCINO
B
CAPPUCCINO
5
CAPPUCCINO
6
17
8 9
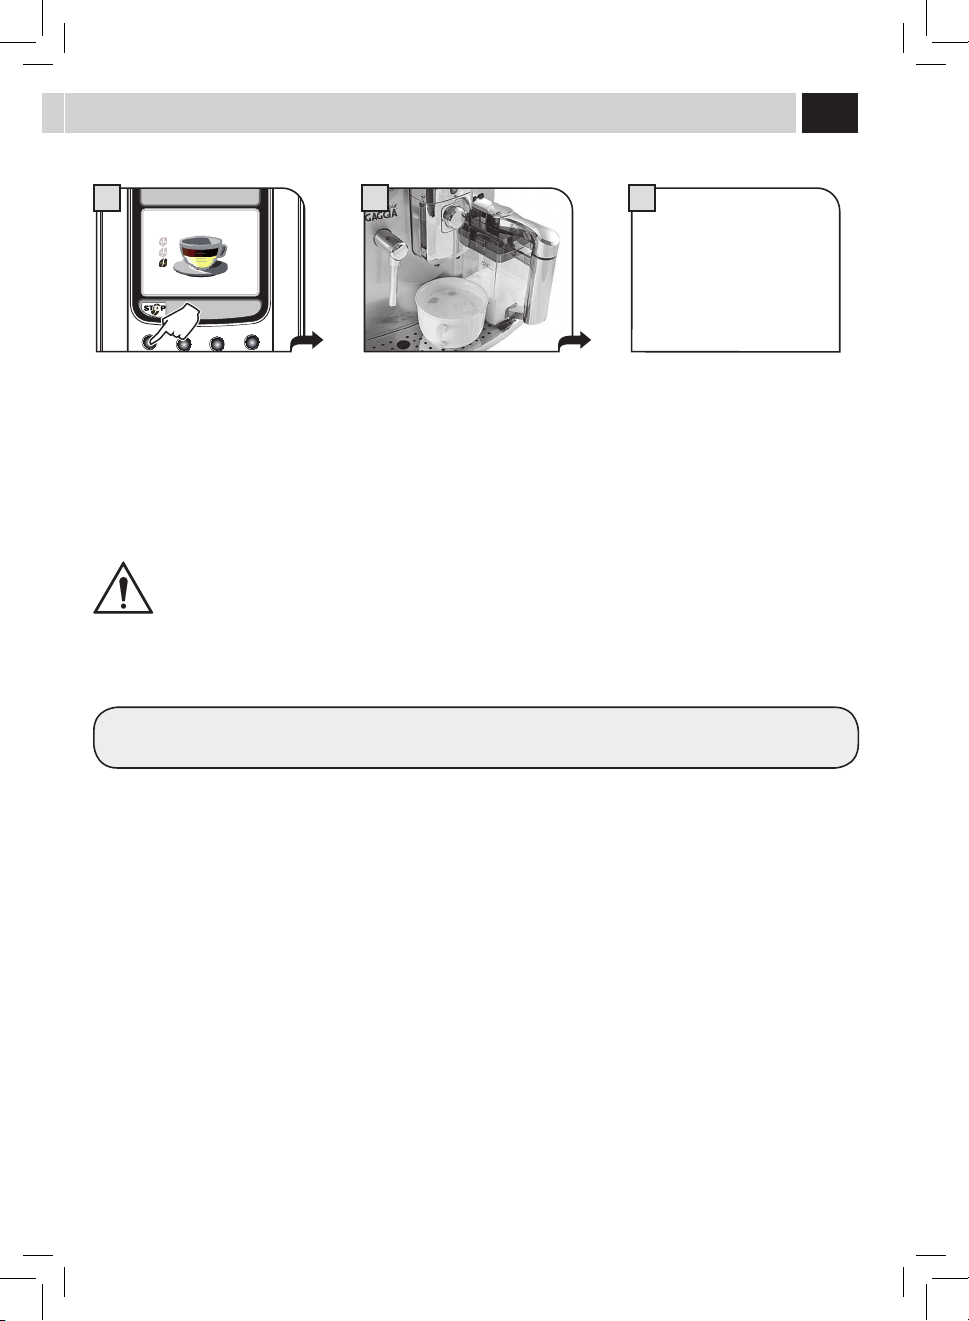
Once milk has been dispensed, the
machinestartsbrewingthecoffee.
Coffeebrewingcanbeinterruptedatany
timebypressing"STOP".
Attheendremovethecupwiththe
cappuccino and place the handle back to
the initial position.
Upon completion of the cleaning cycle
remove the milk carafe and put it in the
refrigerator.
Waitafewseconds.Themachine
starts the automatic cleaning
process (if enabled - see page 31).
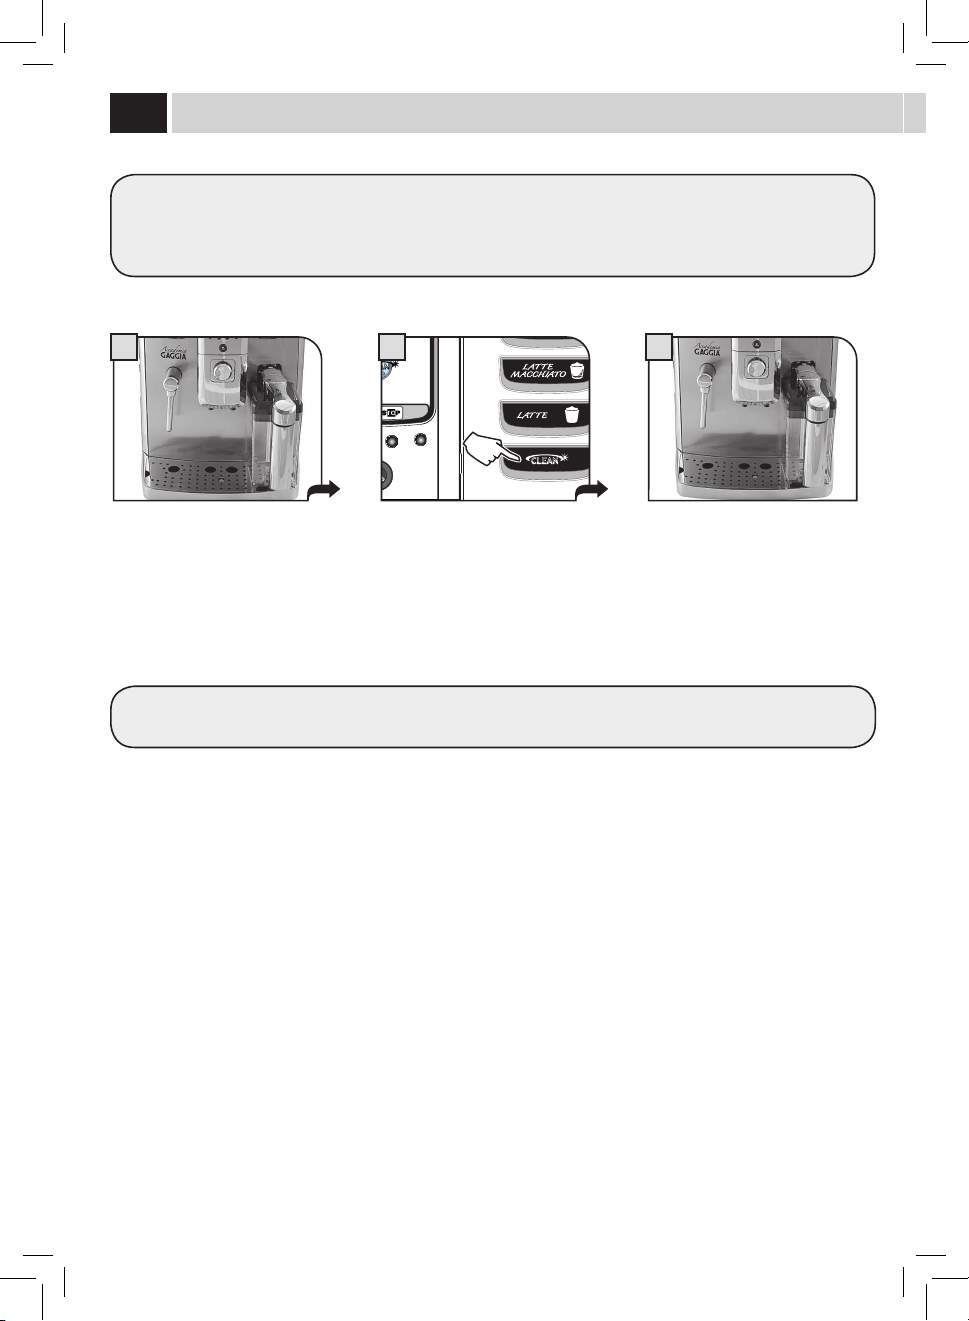
CleaninG CYCle
NEVER SEIZE THE CARAFE HANDLE DURING THE CLEANING CYCLE: RISK OF SCALDING!
The procedure to prepare a latte macchiato, a milk and co ee, or a hot milk is similar.
CAPPUCCINO
7
18
1 3
RISCIACQUO CARAFFA
2
Place the container as described on pages
12 and 13. The cleaning cycle only involves
thelinesincontactwiththemilkanditis
carried out independently of the presence
of milk in the container.
At the end it is possible to remove the
milkcarafenowreadyforuse.
Press the cleaning cycle button. The
machine executes an additional cleaning
cycle.
CleaninG CYCle
Themachineallowsexecutingaquickcleaningcycleatanytime.Thecleaningcyclecanbeexecutedbeforeand/orafterthe
beveragebrewing.
Thisoptionallowsyoutomanagethecontainercleaningprocessasdesired.Thecleaningprocessmaybeusedalsoforcircuit
sanitization after a long period of inactivity.
To properly insert/remove the carafe, refer to the instructions on page 12 and 13.
19
1
6
15/01/10
10:38
2
Hot Water
Repeattheproceduretodispenseanewquantityofhotwater.
Afterdispensing,somewateralwaysremainsinthelinesandthismayresultinleaking.Thisisanormalfeatureofthemachine.
Hot Water diSPenSinG
Hotwatercanbeusedtoprepareteaandinfusionsquickly.
WARNING: DISPENSING MAY BE PRECEDED BY SHORT SPURTS OF HOT WATER AND SCALDING IS POSSIBLE. THE
STEAM/HOT WATER WAND MAY REACH HIGH TEMPERATURES: DO NOT TOUCH WITH BARE HANDS. USE THE
APPROPRIATE HANDLE ONLY.
Placeacontainerunderthehotwater
wand.
Attheend,removethecontainerwith
thedesiredwaterquantity.
Press the button to enter the page for
dispensinghotwater.
Press the button to activate the hot
waterdispensing.
Wait for the machine to reach the correct
temperature and for the programmed
hotwatertobedispensed.
Dispensing can be interrupted by
pressingthe"STOP"button.
SELECT
HOT WATER OR STEAM
15/01/10
10:38
3
HOT WATER
4
HOT WATER
5
20
15/01/10
10:38
21
3
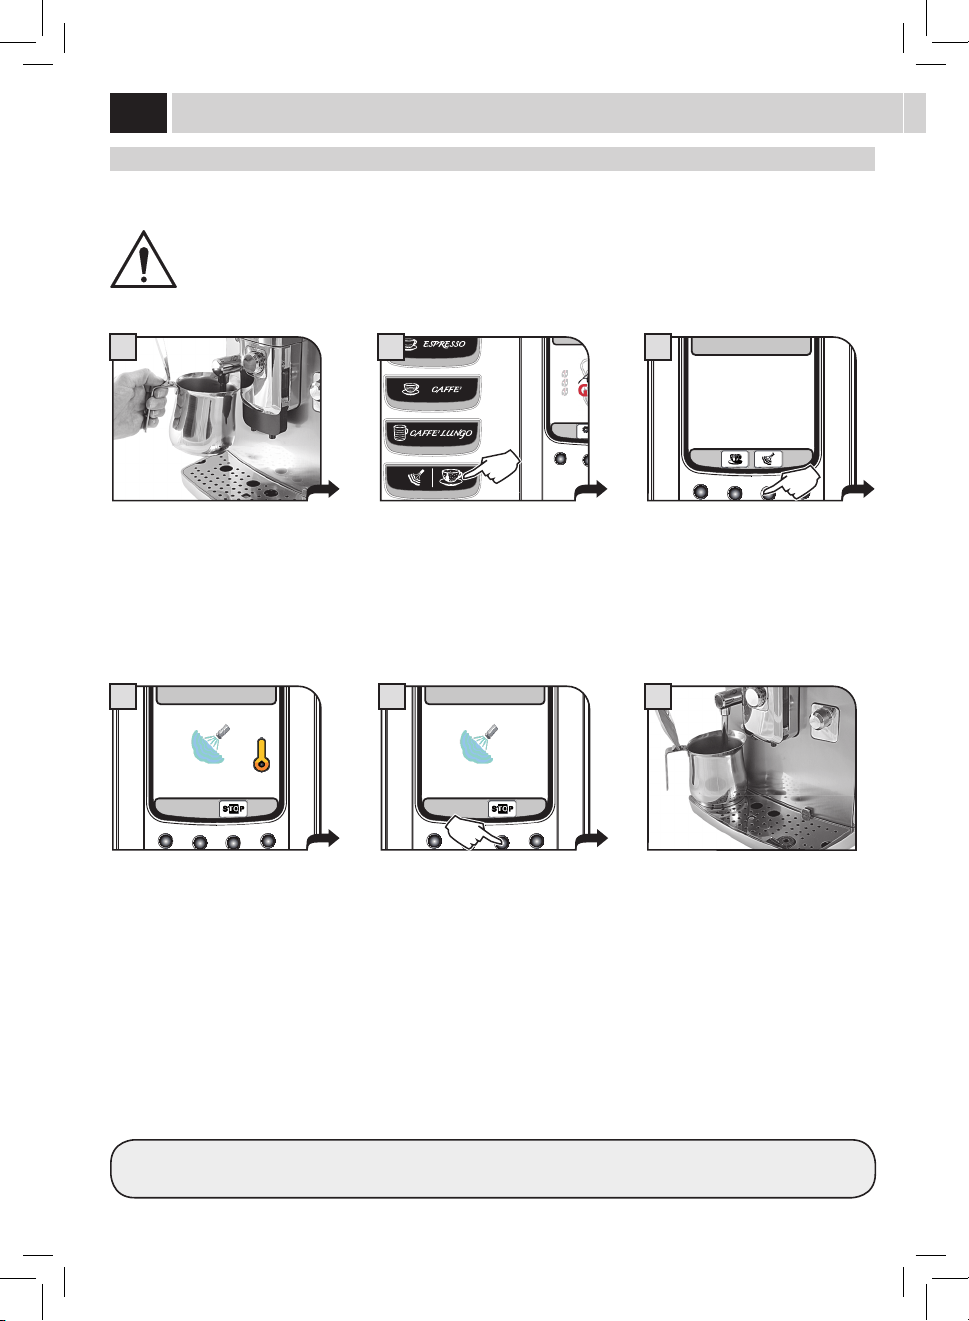
Steam diSPenSinG
Steamcanbeusedtoheatmilk,waterorotherbeverages.
WARNING: DISPENSING MAY BE PRECEDED BY SHORT SPURTS OF HOT WATER AND SCALDING IS POSSIBLE. THE
STEAM/HOT WATER WAND MAY REACH HIGH TEMPERATURES: DO NOT TOUCH WITH BARE HANDS. USE THE
APPROPRIATE HANDLE ONLY.
Steam
For better results we recommend performing slow circular movements.
Placeacontainerunderthesteamwand.
SELECT
HOT WATER OR STEAM
15/01/10
10:38
3
STEAM
4
STEAM
5
Attheend,removethecontainerwith
thedesiredwaterquantity.
Press the button to enter the page for
dispensing steam.
Press the button to activate the steam
dispensing.
Wait for the machine to reach the
correct temperature and for the steam
dispensing to start.
Dispensing can be interrupted by
pressingthe"STOP"button.
21
1 2
15/01/10
10:38
3
BeVeraGe lenGtH QUiCK ProGramminG
BREWING MAY BE PRECEDED BY SHORT SPURTS OF MILK AND STEAM: RISK OF SCALDING! REFER TO THE SECTION
"MILK CONTAINER USE".
ThissectionshowstheprogrammingprocedurefortheCappuccino.Thisismeantasanexampletointroduceyoutothestepsnecessaryfor
a quick and easy programming of all the beverages.
Afteraquickprogrammingofthebeverage,itispossibletocarryoutanerandmoredetailedadjustmentbymeansofthe"BEVERAGE
MENU"(seepage22).
Placethecuporthecontainerwhere
thecappuccinoorlattemacchiatowill
bebrewed.
Rotate the upper part of the container
handle on the cup. Use your everyday
cup.
Hold the button pressed for 3 seconds to
start programming.
Themachinestartsbrewing:coeeis
ground and milk is heated up to prepare
for dispensing.
Milk dispensing begins. When the
desired quantity has been reached, press
"STOP".
Once milk has been dispensed, the
machinestartsbrewingthecoffee.When
the desired quantity has been reached,
press"STOP".
Beveragelengthhasbeenprogrammed.Fromnowon,thislengthwillbeappliedtothebrewingofthisbeverage.
Fortheotherbeverages:holdpressedthebuttonofthebeveragetobeprogrammedandfollowthesameprocedure.
Steam
CAPPUCCINO
ECO MODE ON
4
CAPPUCCINO
5
CAPPUCCINO
6
22
RESTORE DEFAULT VALUES
Button to select the beverage settings
Scrolling/Selection button
Scrolling/Selection button
Selection/conrmationbutton
Exit button
For each beverage it is possible to reset the original factory settings. After selection of this
function, the customized settings are deleted.
BeVeraGe menU
All beverage settings can be customized.
15/01/10
10:38
EPRESSO
COFFEE
LONG COFFEE
CAPPUCCINO
LATTE MACCHIATO
HOT MILK
HOT WATER
1. BEVERAGE MENU
23
COFFEE AMOUNT
PREBREWING
COFFEE TEMPERATURE
COFFEE LENGTH
Thissectionallowsyoutoprogramthequantityofcoeetogrindforthebeverage
brewing:thissettingwillaectthecoeearoma.
=Thebeverageisbrewedbyusingthepre-groundcoee
= mild dose
= medium dose
= strong dose
Prebrewing:Coeeisslightlydampenedbeforebrewingsoastobringoutthefullaroma
ofthecoeewhichacquiresanexcellenttaste.
:prewbrewingfunctionisactive.
:prebrewingfunctionislongerinordertobringoutthecoeetaste.
:prewbrewingfunctionisnotperformed.
Thissectionallowsyoutoprogramthetemperatureforcoeebrewing.
:lowtemperature.
: medium temperature.
: high temperature.
Thissectionallowstoprogramthequantityofwatertobeusedforeachselected
beverage.Thestripallowsyoutodetermineexactlythequantityofwaterforpreparing
co ee.
Inthiscasewelookathowtoprogrammeacappuccino.Themilkmanagingoptionsarenotshownwhenacoeebrewing(espressoorlong
co ee) is being programmed.
COFFEE AMOUNT
PREBREWING
COFFEE TEMPERATURE
COFFEE LENGTH
MILK LENGTH
MILK FOAM
RESTORE DEFAULT VALUES
1.4. CAPPUCCINO

24
MILK LENGTH
WATER LENGTH
MILK FOAM
Thissectionallowsyoutoprogramthequantityofmilkforeachselectedbeverage.The
stripallowsyoutodetermineexactlythequantityofmilktobedispensed.
Thissectionallowsyoutoprogramthequantityofwatertobedispensedwhenpressing
thehotwaterbutton.Thestripallowsyoutodetermineexactlythequantityofwaterto
be dispensed.
Thissectionallowsyoutoprogramthemilkfrothingmethod.
= minimum frothing
= medium frothing
= maximum frothing
= no frothing (only hot milk dispensing)
Note:Milkfrothingdeactivationisnotallowedforallproducts.
When the frothing option is disabled, the temperature of the dispensed milk might be
lower.Thebeveragecanbethenwarmedupbydispensingsteamfromthesteamwand
(see page 20).
BeVeraGe menU
COFFEE AMOUNT
PREBREWING
COFFEE TEMPERATURE
COFFEE LENGTH
MILK LENGTH
MILK FOAM
RESTORE DEFAULT VALUES
1.4. CAPPUCCINO
WATER LENGTH
RESTORE DEFAULT VALUES
1.7. HOT WATER

25
Button to select the machine settings
maCHine menU
Themachineallowsyoutocustomizetheoperationsettings.
15/01/10
10:38
GENERAL SETTINGS
DISPLAY SETTINGS
CALENDAR SETTINGS
WATER SETTINGS
MAINTENANCE SETTINGS
FACTORY SETTINGS
2. MACHINE SETTINGS
Scrolling/Selection button
Scrolling/Selection button
Selection/conrmationbutton
Exit button
26
GENERAL SETTINGS
CUP WARMER
ACOUSTIC ALARMS
OFF
OFF
ON
ON
To change the machine operation settings.
Thisfunctionallowsyoutosettheoperationofthecup-warmingsurface
located on the upper part of the machine.
This function activates/deactivates the acoustic alarms.
Tokeepthecup-warmingsurfacealwayso.
To deactivate the acoustic alarms
Tokeepthecup-warmingsurfacealwayson.
To activate the acoustic alarms
General SettinGS
ECOMODE FUNCTION
Thisfunctionenablesallowsyoutochoosehowtheboilersonthemachine
are activated, to promote energy saving.
OFF
ON
This function activates only the coee boiler each time the
machine starts up. The machine saves energy but takes longer to
dispense milk-based beverages.
This function activates all the boilers each time the machine
starts up to be immediately able to dispense all kinds of
beverages. This function entails greater energy consumption.
maCHine menU
27
DISPLAY SETTINGS
LANGUAGE
BRIGHTNESS
ENGLISH
Thismenuallowsyoutosetthemenulanguageandthedisplaycontrast.
This setting is of fundamental importance for correctly adjusting the
parametersofthemachineaccordingtothecountrywherethemachineisused.
To set the correct display contrast according to the room illumination.
The currently selected language is displayed.
diSPlaY SettinGS

28
CALENDAR SETTINGS
TIME
DATE
HOUR
YEAR
MINUTES
MONTH
DAY
FORMAT
FORMAT
Thismenuallowssettingallthetimeandcalendarfunctionsandtheirrelatedfunctions.
This setting is fundamental for the correct operation of all those functions
requiring precise time settings.
This setting is fundamental for the correct operation of all those functions
requiring precise date settings.
To set the current hour.
To set the current year.
To set the minutes for the current hour.
To set the current month.
To set the current day.
To set the display format for the time. This can be set either in
the24hortheAM/PMformat.Allchangeswillbeautomatically
applied to all those functions displaying time format.
To set the display format for the date according to personal
preference.Allchangeswillbeautomaticallyappliedtoallthose
functions displaying date format.
Calendar SettinGS
STAND-BY 60
To set the time interval for the machine to go into stand-by mode after the
lastbrewing.The default time value is "after 1 hour".
maCHine menU
15
30
60
180
Once the set time has elapsed, the machine goes into stand-by
mode.
Press any button to turn the machine on again. After performing
thefunctiondiagnosticsandthewarm-upphase,themachineis
again ready for use.
29
CALENDAR SETTINGS
POWER-ON TIMER
TIMER 1 00:00
TIMER 2 00:00
Thismenuallowsyoutoprogrammethemachinepower-ontimes,according
toyourneeds.Themachineperformsthisfunctiononlyifthepowerbutton
isswitchedtoon.
Itispossibletoset3dierentpower-ontimes,whichcanbemanaged
independently.Forreasonsofbrevity,onlythe"TIMER1"settingisdescribed
below.Thesamesettingprocedureappliesfortheothertimers.
Note: The switch-o is managed through the "STAND-BY"
programming.
Tosetthehourforpower-on.
Thismenuallowsyoutoadjustandsettherstpower-ontime.
Thismenuallowsyoutoadjustandsetthesecondpower-on
time.
Thismenuallowsyoutoadjustandsetthethirdpower-ontime.
Tosettheminutesofthepower-ontime.
Tosetinwhichdaysoftheweekshouldthetimerbe
active.
Select a day using the (
) ro ( ) buttons and
conrmbypressingthe(OK)buttontomodifythe
setting:
ON = Time activated
OFF = Time deactivated
TIMER 3 00:00
HOUR 00
MINUTES 00
DAY OF THE WEEK
MONDAY
TUESDAY
WEDNESDAY
THURSDAY
FRIDAY
SATURDAY
SUNDAY
OFF
OFF
OFF
OFF
OFF
OFF
OFF
2.3.4.1.3. TIMER 1 00:00
30
WATER SETTINGS
WATER HARDNESS
ENABLE FILTER
ACTIVATE FILTER
Thismenuallowssettingcorrectwaterparametersforcoeebrewing.
Tochangethemachinewaterhardnesssetting.
The"WaterHardness"functionallowsadjustingthemachinetothelevelof
hardnessofthewaterused.Themachinewillthenrequestdescalingatthe
right moment.
Measure water hardness as shown on page 5.
Toactivate/deactivatethewarningsignaltoreplacethewaterlter.By
activatingthisfunction,themachinenotiestheuserwhenthewaterlter
needs to be replaced.
OFF: Warning disabled.
ON:Warningenabled(thisvalueisautomaticallysetwhenthelteris
activated).
Toactivatethelterafteritsinstallationorreplacement.Refertotherelevant
sectiononpage7tocorrectlyinstalland/orreplacethelter.
Water SettinGS
maCHine menU
31
MAINTENANCE SETTINGS
PRODUCT COUNTERS
DESCALING CYCLE
BREW UNIT CLEANING CYCLE
CARAFE WASH CYCLE
CARAFE AUTO CLEAN
Thismenuallowssettingallthefunctionsforcorrectmachinemaintenance
Thisfunctionshowshowmanyproductshavebeenbrewedforeverysingle
type of coee since the last reset.
Thisfunctionenablesthedescalingcycle(themachineshowshowmany
litres can be dispensed before descaling) (See page 33).
Thisfunctionenablesthewashcycleforthebrewgroup(Seepage32).
This function enables automatic cleaning of the carafe after each dispensing
of milk-based products.
maintenanCe SettinGS
OFF
ON
The self-cleaning function is disabled.
The self-cleaning function is enabled.
Thisfunctionenablesthewashcycleforthecarafeusedforpreparingmilk
beverages (See page 36).
Note: This wash cycle is fundamental for a correct maintenance of
the carafe.
FACTORY SETTINGS
Thisfunctionallowsyoutorestoreallfactorysettings.
Note: By restoring the factory settings, all the personal parameters
are lost.
32
9
4 6
BREW GROUP CLEANING CYCLE
Torinsethebrewgroup,simplycleanwithwaterasshownonpage40.Thiswashcyclecompletesthemaintenanceprocessofthebrew
group.Werecommendcarryingoutthiscycleonamonthlybasisorevery500coeesusingtheGaggiabrewgroupcleaningtablets,which
can be purchased from Gaggia Customer Service or an authorized retailer.
WASH CYCLES CANNOT BE STOPPED.
DO NOT LEAVE THE MACHINE UNATTENDED DURING THIS OPERATION.
TurntheSBSdialallthewaytotheleft,counter-clockwise,(seepage8)beforestartingthecycle.
Select the menu option.
Pressthe"OK"buttontoconrm.
After placing the container, press the
"OK"button.
Fillthewatertankwithfreshdrinking
water,andthenpressthe"OK"button.
At the end of the cycle, remove the
container and empty it appropriately.
Pressthe"OK"buttontoconrm.
Afterinsertingthetablet,pressthe"OK"
button.
Thecleaningcycleforthebrewgroupis
performed automatically.
After the cycle, return the SBS dial to the desired position (see page 8).
Insert the cleaning tablet into the bypass
doser.
Place a container under the co ee
dispensing spout.
maintenanCe
PRODUCT COUNTERS
DESCALING CYCLE 118(l)
BREW GROUP CLEANING CYCLE
CARAFE WASH CYCLE
CARAFE AUTO CLEAN ON
2.5. MAINTENANCE SETTINGS
1
PLACE A CONTAINER
UNDER
THE DISPENSING SPOUT
BREW GROUP CLEANING CYCLE
7
REFILL WATER TANK
BREW GROUP CLEANING CYCLE
3
2.5.3. MAINTENANCE SETTINGS
PERFORM BREW GROUP
CLEANING CYCLE?
2
INSERT BREW GROUP
CLEANING TABLET
BREW GROUP CLEANING CYCLE
5
BREW GROUP CLEANING CYCLE
8
33
Select the menu option.
Pressthe"OK"buttontoconrm.
Rellwatertankwithdescalingsolution.
Pressthe"OK"buttontoconrm.
Warning: Once this selection is made, the
wholecyclewillhavetobecompleted.
Pressthe"OK"buttontoconrmor"ESC"
to exit
BOILER DESCALING CYCLE MENU
Descalingshouldbeperformedevery1-2monthsorwhenthemachinedisplaystherelevantmessage.Themachinemustbeontoperform
thiscycle;itautomaticallycontrolsthedistributionofthedescalingsolution.
DO NOT LEAVE THE MACHINE UNATTENDED DURING THIS OPERATION.
WARNING! NEVER USE VINEGAR AS A DESCALING SOLUTION.
Only use the Gaggia descaling solution, especially designed to respect the technical features of the machine, to ensure its performance
willnotdecreasewithtime,andforasafeandrisk-freeuse.Thedescalingsolutionistobedisposedofaccordingtothemanufacturer’s
instructions and/or regulations in force in the country of use.
Note: Before starting a descaling cycle make sure that:
1. THE INTENZA WATER FILTER HAS BEEN REMOVED
2. Acontainerofadequatesizeoracoupleofcontainersareavailableandareplacedinthepointsidentied
DESCALING AND/OR RINSE CYCLES CANNOT BE STOPPED; ALL THE PHASES MUST BE COMPLETED. IF THE MACHINE IS
SWITCHED OFF OR IN CASE OF POWER FAILURES, THE INTERRUPTED CYCLE MUST BE REPEATED FROM THE BEGINNING.
HOWEVER, CYCLES MAY BE PAUSED BY PRESSING THE "II" BUTTON; IT WILL BE POSSIBLE TO RESUME THE CYCLE AT ANY
TIME BY PRESSING THE ">" BUTTON.
TURN THE SBS DIAL ALL THE WAY TO THE LEFT, COUNTER-CLOCKWISE (SEE PAGE 8), BEFORE STARTING THE CYCLE.
Tocorrectlypreparethedescalingsolution,pourtheentirecontentoftheGaggiaconcentrateddescalingsolutionintothewatertank,and
thenllthetankwithfreshwateruptotheMAXlevel.
Note: During the descaling cycle, some alarm messages may appear to allow for a correct management of the machine.
After resetting the message, always press the ">" button to resume the descaling cycle.
PRODUCT COUNTERS
DESCALING CYCLE 118(l)
BREW GROUP CLEANING CYCLE
CARAFE WASH CYCLE
CARAFE AUTO CLEAN ON
2.5. MAINTENANCE SETTINGS
1
2.5.2. MAINTENANCE SETTINGS
START DESCALING
CYCLE?
2
REFILL WATER TANK
WITH DESCALING SOLUTION
DESCALING CYCLE
3
34
The descaling cycle is activated.
Thebarshowsthecycle'sprogress.
If the containers need to be emptied,
pressthe"II"button.
Then,pressthe">"buttonwhenthe
container has been emptied and replaced.
Attheendoftherststep,whenthe
descalingsolutionisnished,the
machinewillrequireatankrinse.
Rinsethewatertankandrellitwith
freshdrinkingwater.
Then,pressthe"OK"button.
Empty the drip tray placed under the
dispensingspout(page38-g.2)and
then replace it on the machine.
Then,pressthe"OK"button.
Empty the drip tray placed under the
dispensingspout(page38-g.2)and
replace it back onto the machine.
Then,pressthe"OK"button.
Place a container under the dispensing
spout and a container under the hot
waterwand.
Then,pressthe"OK"button.
Fillhalfthecarafewithfreshwater
(page36-g.7).
Insert the carafe and place it in the
brewingposition.Then,pressthe"OK"
button.
Completely empty the carafe (page 36 -
g.7)andllitwithfreshwater.
Insertthecarafeinthebrewingposition,
andthenpressthe"OK"button.
Adefaultamountofwaterisneededfortherinsingstep.Thisallowsperforminganidealrinsecycletoensurethebestconditionsto
brewproducts.Themessageaboutllingthetankfortherinsecycleisnormal,asitispartoftheprocedure.
maintenanCe
STEP 1/2
DESCALING CYCLE...
DESCALING CYCLE
7
STEP 1/2
DESCALING CYCLE...
DESCALING CYCLE
8
RINSE THE WATER TANK
AND FILL WITH
FRESH WATER
DESCALING CYCLE
9
RINSE THE WATER TANK
AND FILL WITH
FRESH WATER
DESCALING CYCLE
10
EMPTY DRIP TRAY PLACED
UNDER THE BREW GROUP
DESCALING CYCLE
4
EMPTY DRIP TRAY PLACED
UNDER THE BREW GROUP
DESCALING CYCLE
11
PLACE A CONTAINER
UNDER HOT WATER &
CARAFE DISP. SPOUTS
DESCALING CYCLE
6
FILL THE CARAFE HALFWAY
WITH FRESH WATER AND
INSERT IT IN
BREWING POSITION
DESCALING CYCLE
5
FILL THE MILK CARAFE
WITH FRESH WATER
DESCALING CYCLE
12
35
The rinse cycle is activated.
Thebarshowsthecycleprogress.
If the containers need to be emptied,
pressthe"II"button
Then,pressthe">"buttonwhenthe
container has been emptied and replaced.
At the end of the second step, the
machine is ready for use.
Place a container under the dispensing
spout and a container under the hot
waterwand.
Then,pressthe"OK"button.
All the components should then be rinsed.
Afterrinsingthem,drythemcarefullyandtthembackintotheirseats.
Set the SBS dial to the desired position (see page 8).
STEP 2/2
RINSING CYCLE...
CICLO DECALCIFICAZIONE
15
15/01/10
10:38
16
PLACE A CONTAINER
UNDER HOT WATER &
CARAFE DISP. SPOUTS
DESCALING CYCLE
13
STEP 2/2
RINSING CYCLE...
CICLO DECALCIFICAZIONE
14
36
5
7 8
64
9
MILK CIRCUIT MAINTENANCE
Itispossibletosanitizethemilkcircuitsbycarryingoutasimpleandquickcycleallowingforathoroughcleaning.Thiswashcompletesthe
maintenanceprocessofthemilkcarafe.WerecommendcarryingoutthiscycleonamonthlybasisusingGaggiacleaningsolution,which
can be purchased from Gaggia Customer Service or an authorized dealer.
WASH CYCLES CANNOT BE STOPPED.
DO NOT LEAVE THE MACHINE UNATTENDED DURING THIS OPERATION.
The carafe must be removed from the
machine and its content emptied.
Disengage the handle by rotating it
clockwise.
Fillthecarafewithfreshdrinkingwater
uptotheMAXlevel.
Add the content of a detergent packet to
the milk carafe.
Press on the sides and lift the lid.
Place the lid back and ensure that it is
closed correctly.
Select the menu option.
Pressthe"OK"buttontoconrm.
Pressthe"OK"buttontoconrm. Fillthewatertankwithfreshdrinking
water.Pressthe"OK"buttontoconrm.
Move the handle back to its central
positiontoallowforperfectclosure.
maintenanCe
Insertthecarafeinclinedtowardsthe
front.
The carafe base should be positioned on
the hole (E) located on the drip tray.
PRODUCT COUNTERS
DESCALING CYCLE 118(l)
BREW GROUP CLEANING CYCLE
CARAFE WASH CYCLE
CARAFE AUTO CLEAN ON
2.5. MAINTENANCE SETTINGS
1
2.5.4. MAINTENANCE SETTINGS
START MILK CARAFE
WASH CYCLE?
2
REFILL WATER TANK
CARAFE WASH CYCLE
3

37
12 13
18
E
1110
C
D
A
B B
Place a large empty container under the
dispensing spout. Rotate the upper part of
the milk carafe directly above the container.
Place a large empty container under the
dispensing spout. Rotate the upper part of
the milk carafe directly above the container.
Upon completion of the cleaning
cycle,werecommendrinsingallthe
componentsunderfreshdrinkingwater.
Attheendofthewash,llthetankwith
freshdrinkingwater.Pressthe"OK"
buttontoconrm.
Pressthe"OK"buttontoconrm.
Removethecarafe,rinseandrellitwith
freshdrinkingwater.
Pressthe"OK"buttontoconrm.
The cleaning cycle is activated.
Thebarshowsthecycleprogress.
Therinsecycleisactivated.Thebarshowsthecycleprogress.
Attheendofthecycle,themachinereturnstotheproductbrewmenupage.
At this stage the carafe holes (A) are
lowerthanthecouplings(C).
The carafe pins (B) are located at the
same height of the guides (D).
Insertthecarafebyturningittowardsthebasethrougharoundmovement(asshown
inthegure),untilitishookedtothehole(E)locatedinthedriptray.
Thecarafewillbenaturallybackin
place.
REFILL WATER TANK
CARAFE WASH CYCLE
16
POUR THE DETERGENT
INTO THE CARAFE
AND FILL THE CARAFE
WITH FRESH WATER
CARAFE WASH CYCLE
14
FILL THE MILK CARAFE
WITH FRESH WATER
CARAFE WASH CYCLE
17
STEP 1/2
WASH CYCLE…
CARAFE WASH CYCLE
15
STEP 2/2
RINSING CYCLE...
CARAFE WASH CYCLE
19
38
1
6
2 3
4 5
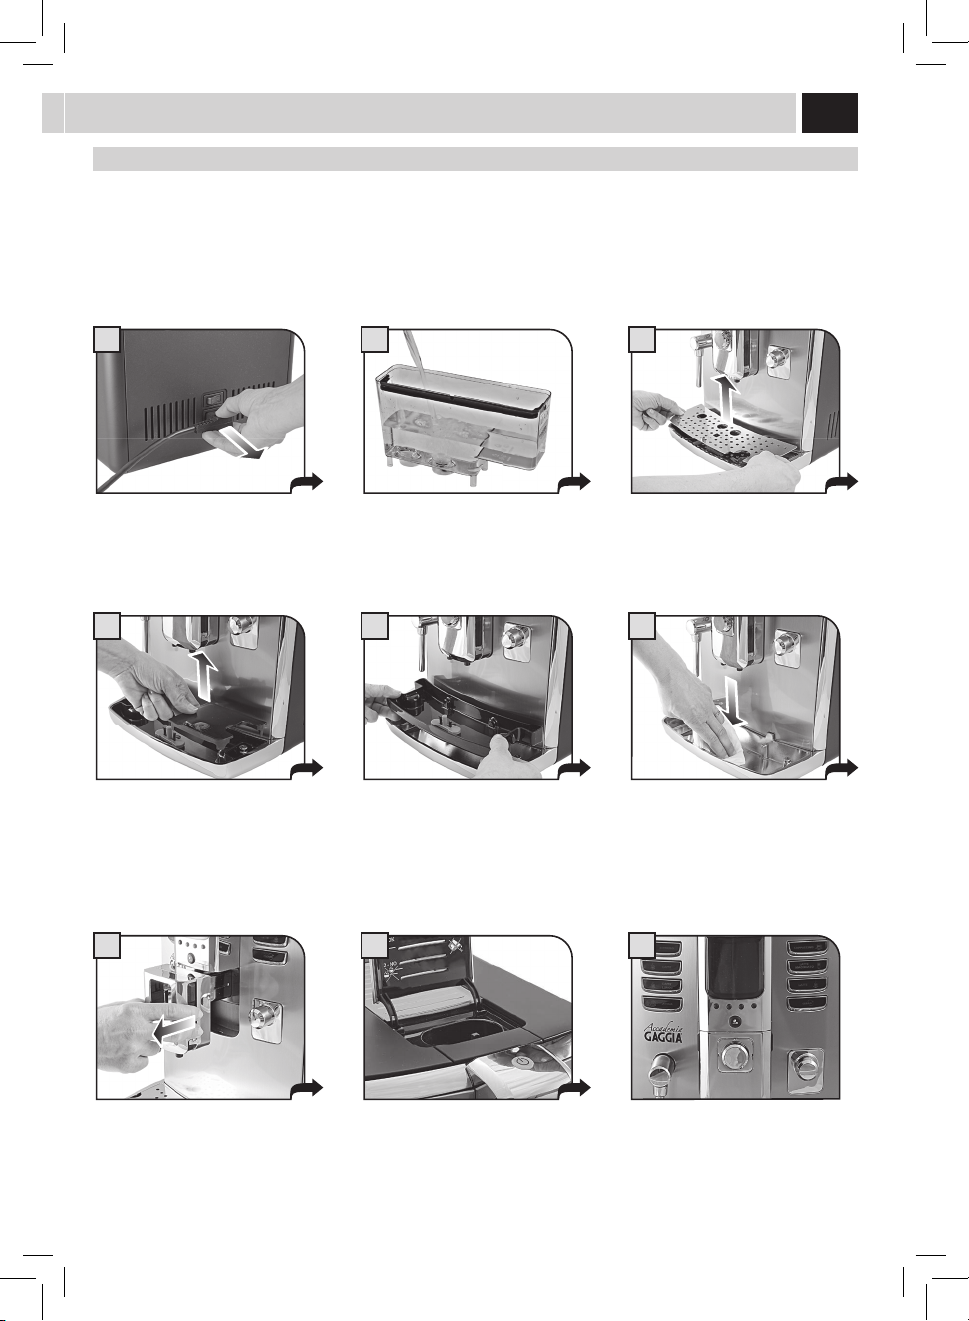
maintenanCe dUrinG oPeration
Duringnormaloperation,thefollowingmessagesmayappear:"Emptycoeegroundsdrawer"and/or"Emptydriptray".Thisoperation
mustbeperformedwhenthemachineison.
Press the button and open the service
door.
Remove the drip tray and used grounds
drawer.
Iftheusedgroundsdrawerisemptiedwhenthemachineiso,thecoeegroundscounterisnotreset.Forthisreasonthemachinemight
displaythe"Emptycoeegroundsdrawer"messageafterbrewingjustafewcoees.
Emptytheusedgroundsdrawerand
washitwithfreshwater.
Correctly reinstall all the components. Insert the tray and the co ee grounds
drawerandclosetheservicedoor.
Emptyandwashthedriptrayandthe
coverwithfreshwater.
CleaninG
39
1
4
7
2
5 6
8
3
9
Turn o the machine and unplug it.
Removethedispensingspoutandwash
itwithwater.
Takeoutthewatertankandwashitwith
freshwater.
Cleanthepre-groundbypassdoserwith
a dry cloth.
Cleanthesteamwandandthedisplay
withadrycloth.
General maCHine CleaninG
Thecleaningproceduredescribedbelowmustbecarriedoutatleastonceaweek.
Note:Ifwaterremainsinthetankforseveraldays,donotuseit.
WARNING! Never immerse the machine in water.
Remove the support under the grill.
Wash it, taking care of the seal area.
Reinstallitonlyafterhavingwashedthe
other components..
Removetheinnerplastictrayandwashit
withlukewarmwater.
Wash the metal inner part of the tray
withadampcloth.Thenreinstallthe
previously removed components.
Removethegrillandwashitthoroughly.
40
1
4
7
2
5
8
3
6
9
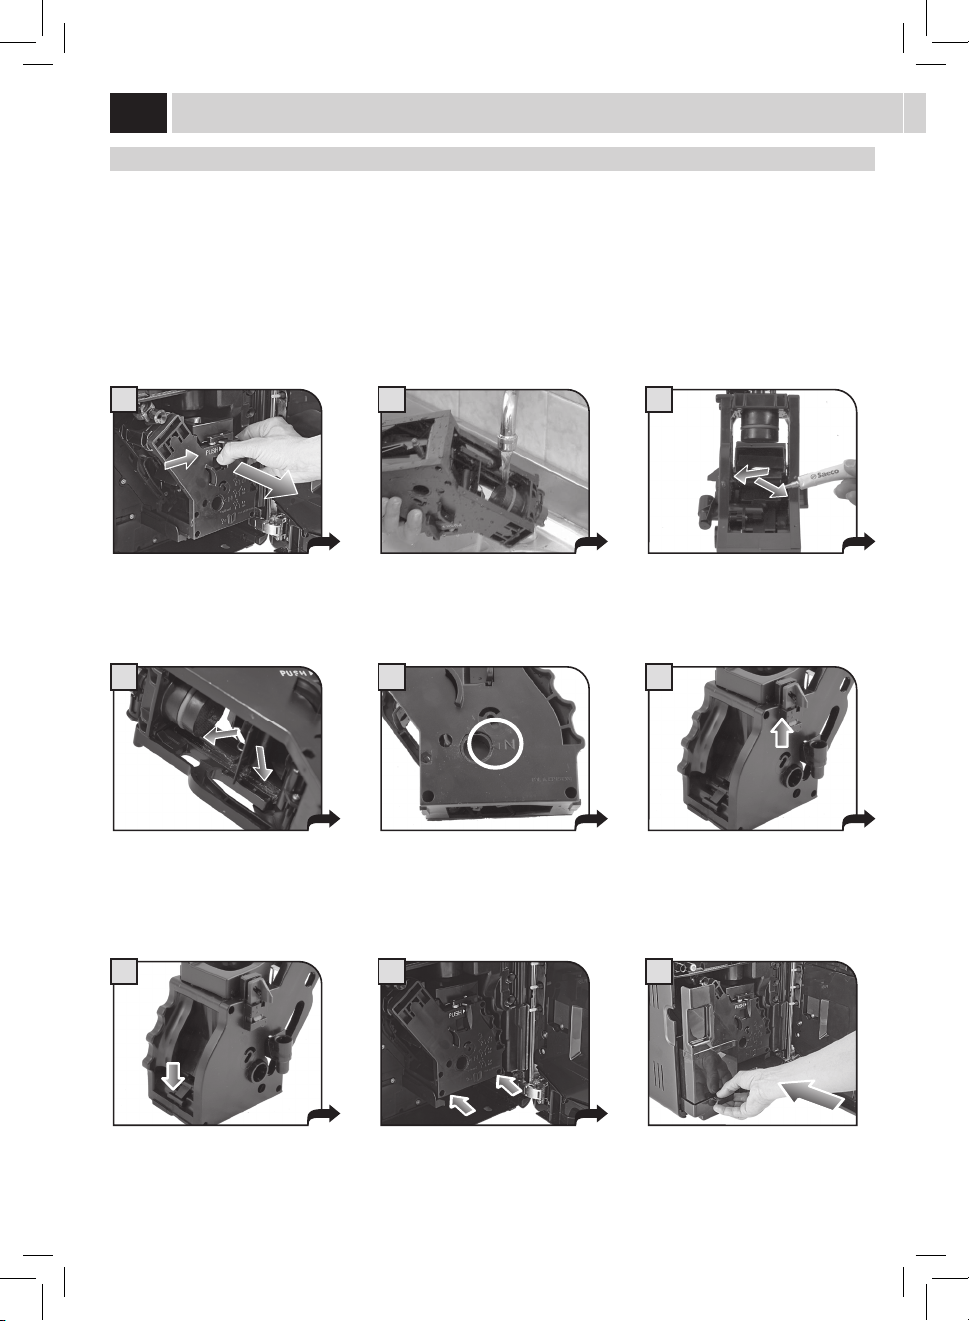
Press the PUSH button to remove the
brewgroup.
Inserttheusedgroundsdrawer
and close the service door.
BreW GroUP CleaninG
Washthebrewgroupatleastonceaweek.Beforeremovingthegroup,removetheusedgroundsdrawerasshowning.2onpage38.
Washthebrewgroupwithlukewarmwater.
Lubricatethebrewgroupafterapproximately500brewingcycles.Thebrewgrouplubricantmaybepurchasedfromanauthorizedservice
center.
WARNING! Do not wash the brew group with detergents that may compromise its correct operation. Do not wash it in the
dishwasher.
Washthebrewgroupandthelterand
dry.
Insertthewashedanddriedbrewgroup.
DO NOT PRESS THE “PUSH” BUTTON.
Makesurethebrewgroupisinrest
position;thetworeferencesmustmatch.
Make sure the components are in the
correctposition.Thehookshownmust
beinthecorrectposition;tocheckits
position,rmlypressthe“PUSH”button.
The lever on the rear part of the group
mustbeincontactwiththegroup
base.
Apply the lubricant evenly on both side
guides.
Lubricatethebrewgroupguidesusing
the supplied lubricant.
CleaninG

41
1
4
7
3
6
9
2
5
8
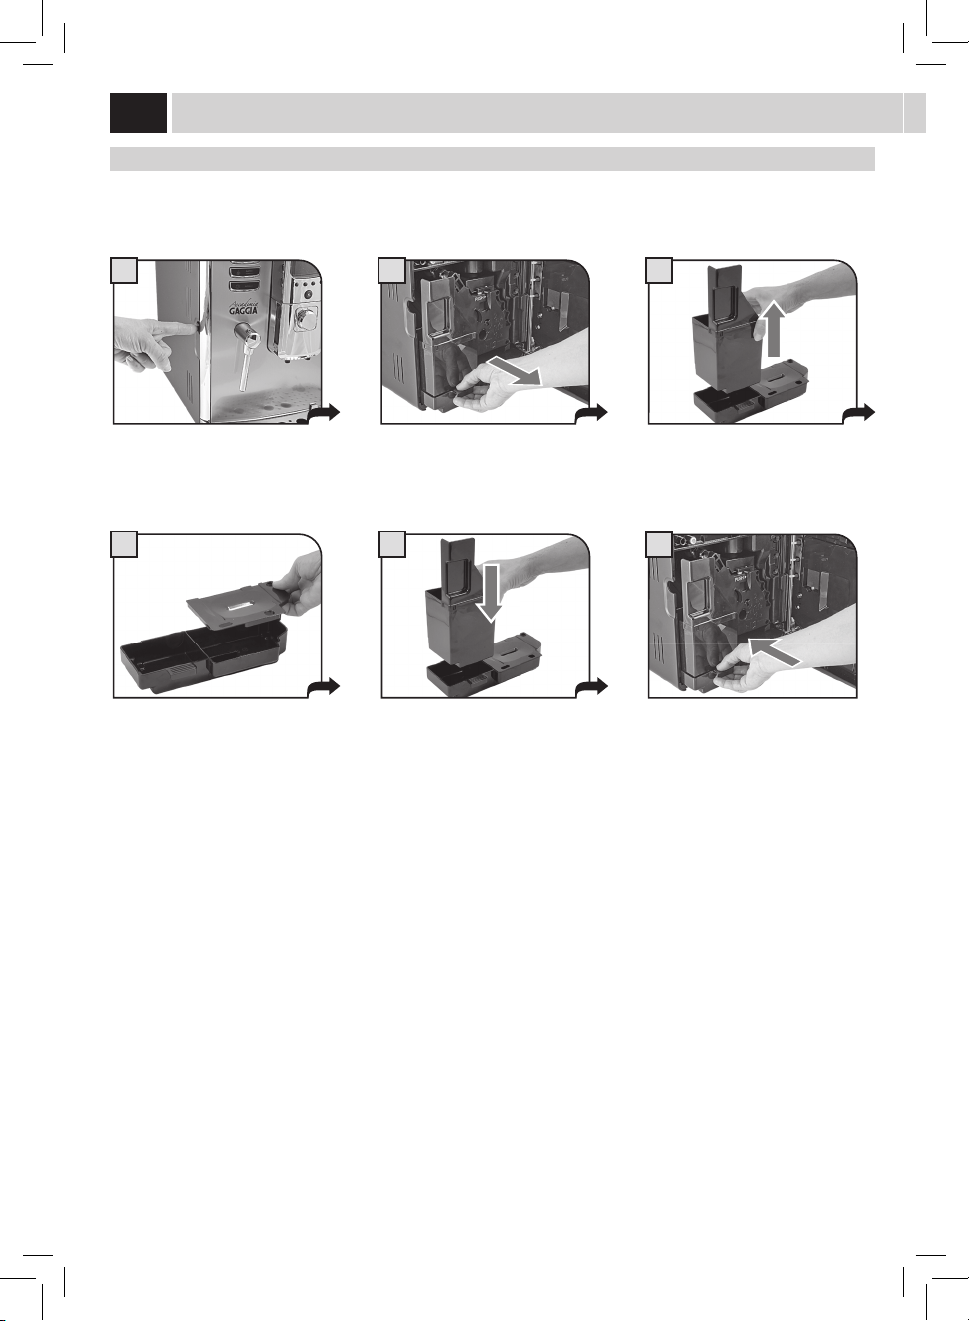
milK Carafe CleaninG
Thecarafemustberemovedandproperlywashedatleastonceaweek.
This procedure guarantees the perfect sanitation of all components.
Note: Pay attention to how the components are assembled. This little shrewdness will facilitate the subsequent
reassembling. The inner side of the service door shows a quick guide on how to reassemble the carafe.
The carafe must be removed from the
machine and emptied for its cleaning.
Rotatethehandlecounter-clockwiseto
the unlock position.
Remove the suction hose.
Press on the sides and lift the lid.
Removethehandlewiththesuction
hose.
Removetheinternaltting.
Disengage the handle by rotating it
clockwise.
Removetheconnectorwhichisin
contactwiththemachine.
Removetheexternalttingbypullingit.
Allcomponentscanbethoroughlywashedwithhotwater.
Afterwashingthecomponents,reassemblethembyfollowingtheinstructionsonnextpage.
42
1
4
7
3
6
9
2
5
8
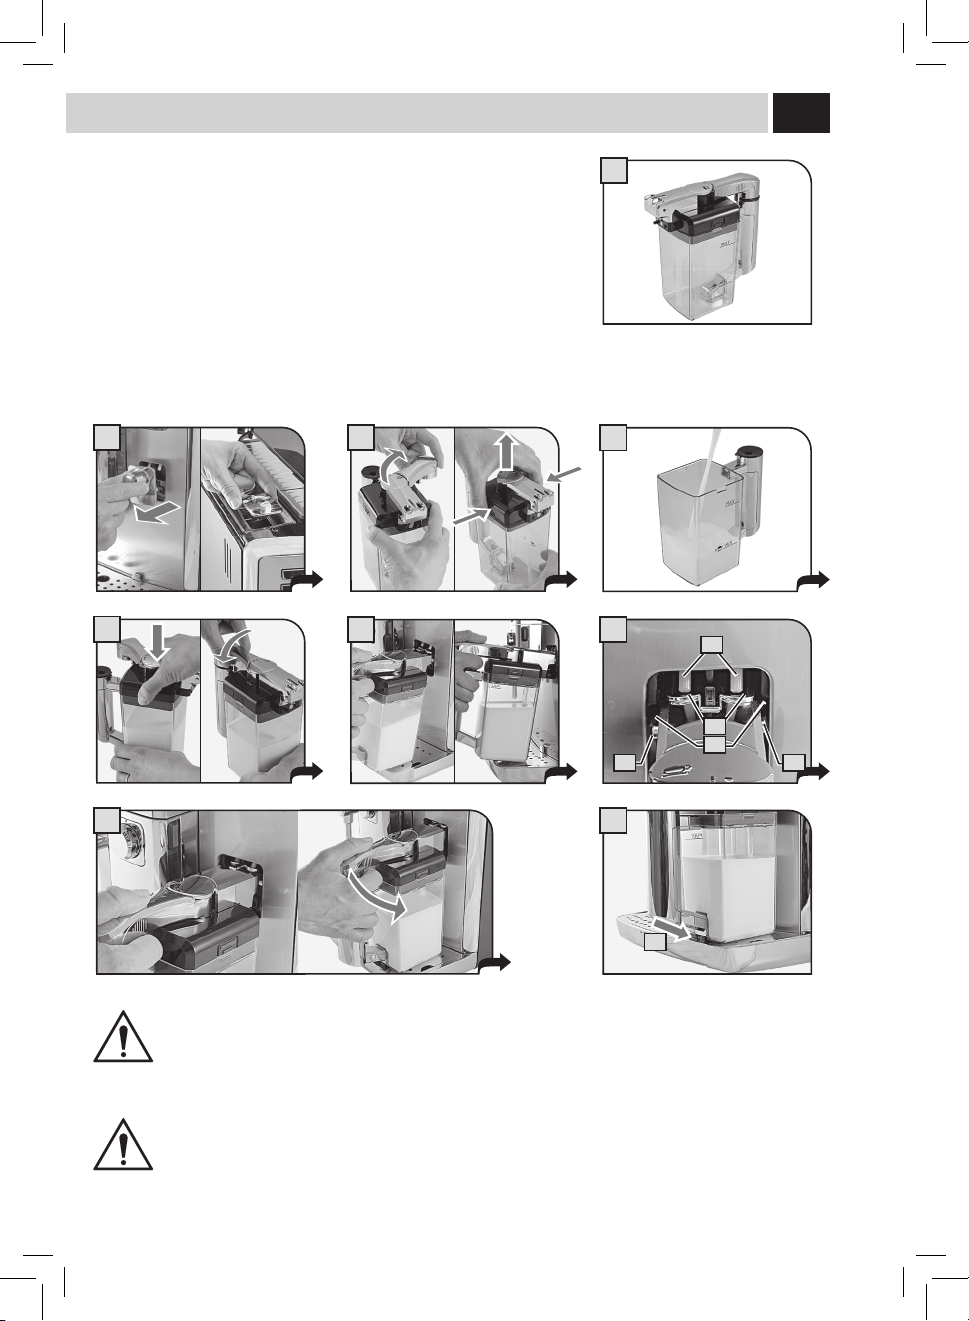
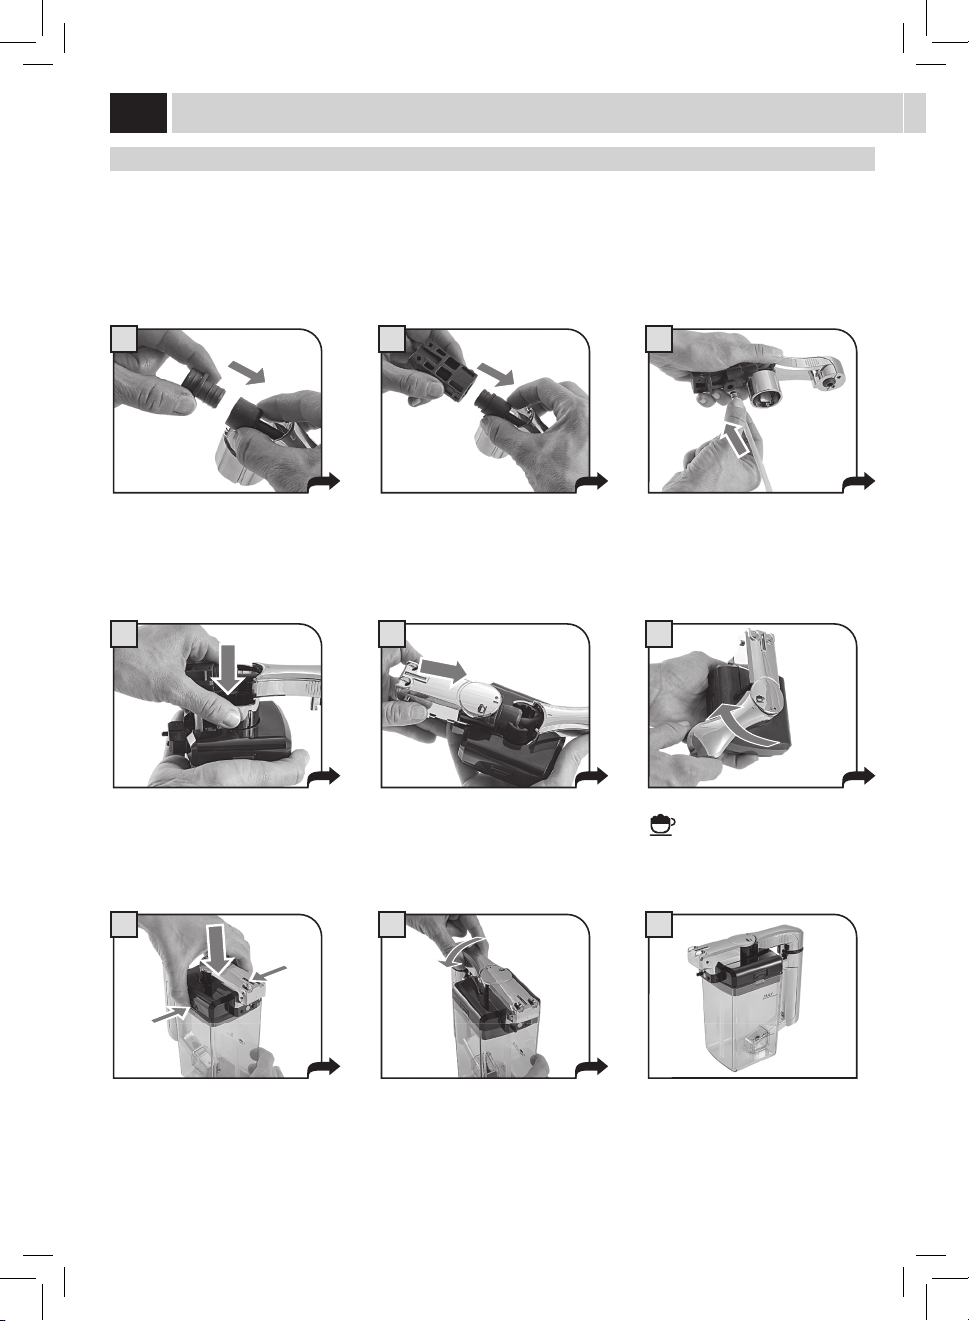
milK Carafe aSSemBlY
Pay attention during the assembly phase. In case the components do not smoothly enter in their positions, read the instructions more
carefully and repeat the assembly procedure.
Note: The inner side of the service door shows a quick guide on how to reassemble the carafe.
Inserttheinnerttinginthehoseand
press until fully inserting it.
Insert the unit previously assembled
in the cover base. Pay attention to the
reference.
Fit the cover on the carafe.
Insertthehoseintheoutertting.
Rotatethehandleclockwiseuptothe
(
) symbol.
Thecarafeisnowreadyforuse.
Inserttheouterttingintheinner
tting.Refertothearrowinthegurefor
the direction of insertion.
Insert the outer cover in the base guides.
Rotatethehandleanti-clockwiseto
bring it to the locked position.
CleaninG

43
Help Message Displayed How to Reset the Message
CLOSE HOPPER DOOR
Close or correctly place the co ee bean hopper inner cover to be able to
prepare a beverage.
ADD COFFEE
Fillthecoeebeanhopperwithcoeebeans.
INSERT BREW GROUP
Insertthebrewgroupbackinplace.
INSERT GROUNDS DRAWER
AND DRIP TRAY
Inserttheusedgroundsdrawerandthedriptray.
EMPTY GROUNDS DRAWER
AND DRIP TRAY
Removetheusedgroundsdrawerandemptythecoeegroundsintoa
suitable container.
Note: The used grounds drawer must be emptied only when
the machine requires it and with the machine on. If you empty
the drawer with the machine turned o it will not record the
emptying operation.
CLOSE FRONT DOOR
Close the service door to make the machine functional.
REFILL WATER TANK
Takeoutthetankandllitwithfreshdrinkablewaterortopitupby
means of the special port.
maCHine WarninGS
44
Help Message Displayed How to Reset the Message
ROTATE THE MILK CARAFE
DISPENSING SPOUT INTO
BREWING POSITION
Abeveragewithmilkhasbeenselected.Themachinerequiresthecarafe
handle spout to be placed into dispensing position.
Pressthebutton"ESC"tocanceltheselection.
ROTATE THE MILK CARAFE
DISPENSING SPOUT INTO
RINSING POSITION
The carafe rinse function has been selected.
Pressthebutton"ESC"tocanceltheselection.
PLACE MILK CARAFE
IN ITS HOUSING
Theselectedoperationrequiresthemilkcontainerforbrewing.Insertthe
containerinthemachineasspeciedinthemanual.
Pressthebutton"ESC"tocanceltheselection.
15/01/10
10:38
Perform a descaling cycle on the machine.
When this message is displayed, it is still possible to use the machine, but
its correct operation might be compromised.
Damages caused by failure to descale the machine are not covered by
warranty.
15/01/10
10:38
Themachinerequeststhe"Intenza"waterltertobereplacedwitha
newone.Replacethelterasdescribedonpage7.
Thealarmisdisplayedonlyifthe"FilterEnable"functionissetto"ON".
(See page 30).
Flashing red light. Machine in Stand-by.
The Stand-by settings can be changed.
Pressthe"
"button.
RESTART TO SOLVE
THE PROBLEM
E XX
Aneventhasoccurredwhichrequiresthemachinerestart.Takenoteof
thecode(Exx)shownatthebottom.
Switchothemachine,wait30secondsandthenswitchitonagain.If
the problem persists, contact the service centre.
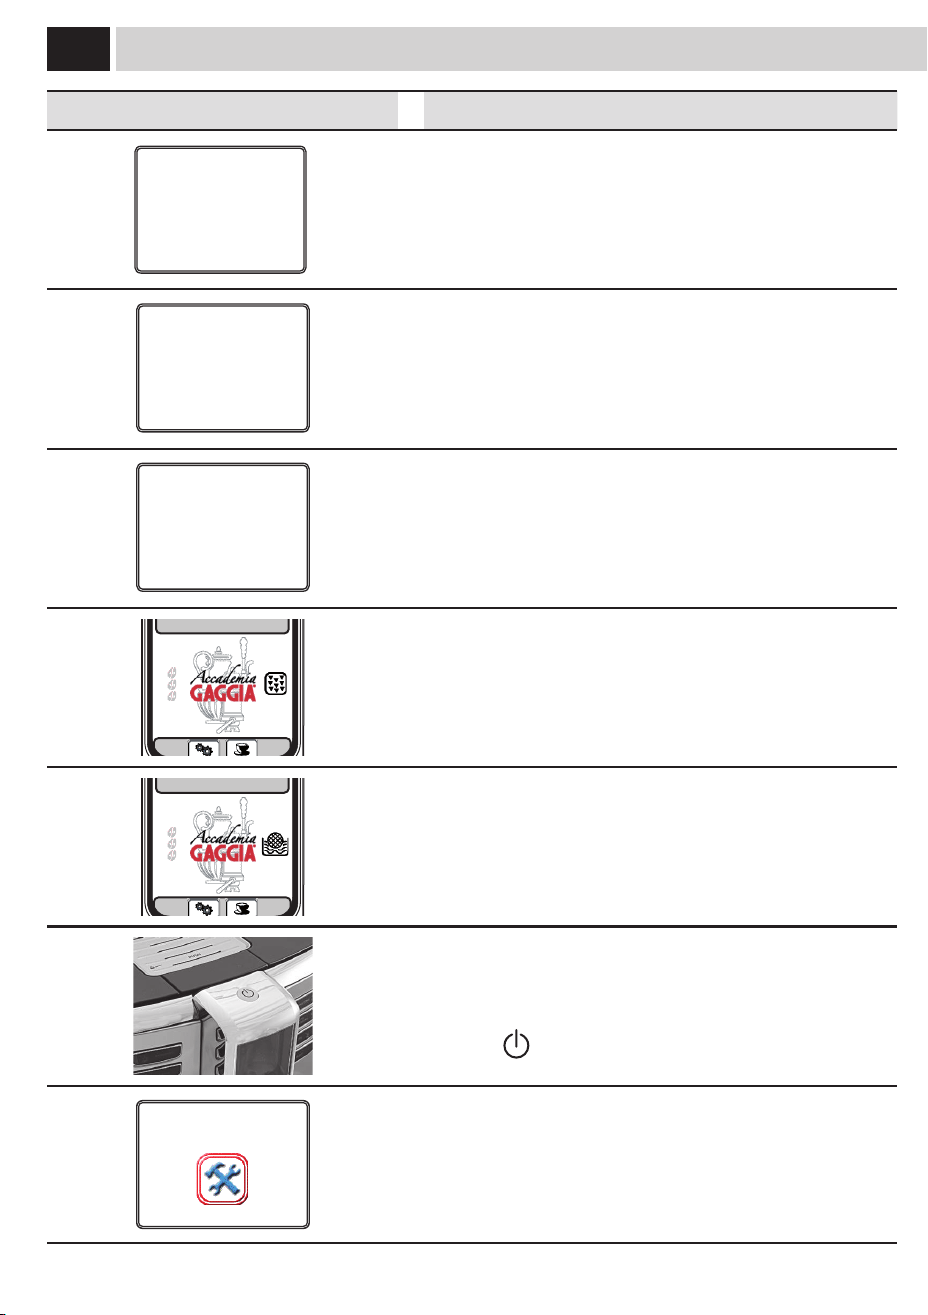
maCHine WarninGS