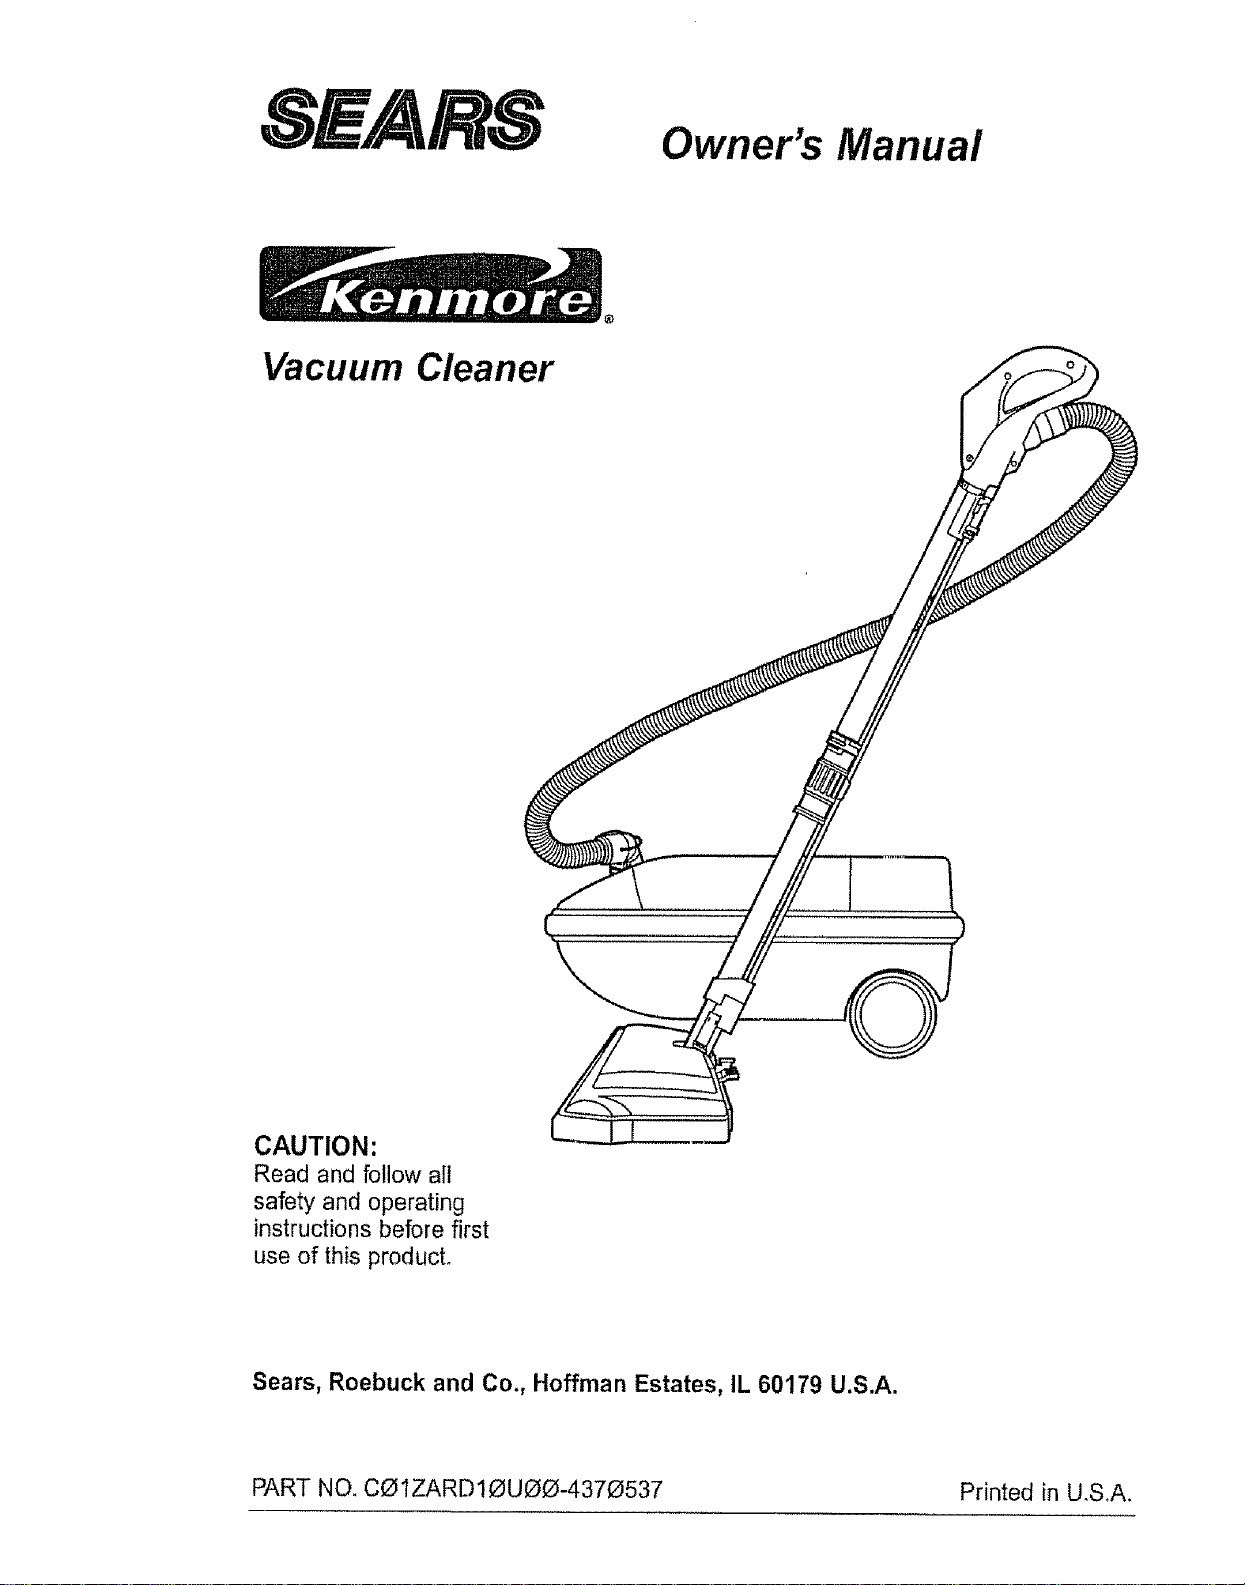
,, E/AIRtS
Owner's Manual
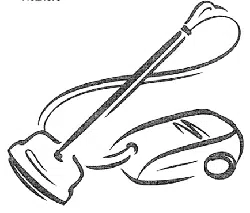
Vacuum Cleaner
)
CAUTION:
Read and follow all
safety and operating
instructions before first
use of this product°
Sears, Roebuck and Co., Hoffman Estates, IL 60179 U.S.A.
PART NO. CO1ZARD10UOO-4370537 Printed in U,S,A.
Before Using Your New Vacuum ....... 2
Kenmore Vacuum Cleaner Warranty .. • 2
Important Safety Instructions ......... 3
Parts and Features ................... 4-5
Assembly .......................... 6-7
Use .............................. 8
How to Start ....................... 8
Vacuuming Tips ....................... 9
Suggested Pile Height Settings ......... 9
Attachments ......................... 10
Attachment Use Chart ................... 10
Performance Features ............... ! !
How Your Vacuum Works ............ 12
Canister Care ...................... 12
Bag Changing ....................... t2
Motor Safety Filter Cleaning ........... 13
Cleaning Exterior and Attachments ..... t3
Power-Mate TM Care ................... 14
LightBulb Changing ................... 14
Belt Changing and Brush Cleaning . • 14-15
Brush Servicing ...................... 16
Brush Assembly ...................... 16
Troubleshooting ..................... 17
Requesting Assistance Or Service ..... 18
Please read this guide. It will help you assemble and operate your new Kenmore vacuum in
the safest and most effective way
For more information about the care and operation, call your nearest Sears store. You will
need the complete model and serial numbers when requesting information. Your vacuum's
model and serial numbers are located on the Model and Serial Number Plate.
Use the space below to record the model number and serial number of your new Kenmore
vacuum.
Model No..
Serial No.
Date of Purchase
Keep this book and your sales check (receipt) in a safe place for future reference.
FULL ONE-YEAR WARRANTY
When used for private household purposes, if within one year from the date of purchase, this
vacuum cleaner fails due to a defect in material or workmanship, RETURN ITTO THE NEAR-
EST SEARS SERVICE CENTER/DEPARTMENT IN THE UNITED STATES, and Sears will
repair it free of charge.
This warranty gives you specific legal rights, and you may also have other rights which vary
from state to state.
SEARS, ROEBUCK AND CO., D!817 WA, Hoffman Estates, IL 60179

WARNING
Your safety is important to us. To reduce the risk of fire, electrical shock, injury to
persons or damage when using your vacuum cleaner, follow basic safety precau-
tions including the following:
Read this manual before assembling or
using your vacuum cleaner.
Use your cleaner only as described in this
manual. Use only with Sears recommended
attachments.
To reduce the risk of electrical shock - Do
not use outdoors or on wet surfaces.
Disconnect electrical supply before servic-
ing or cleaning out brush area. Failure to do
so could result in electrical shock or brush
suddenly starting,
Always turn cleaner off before connecting or
disconnecting the hose or POWER*MATE "_.
Always turn cleaner off before unplugging.
Do not unplug by pulling on cord_ To unplug,
grasp the plug, not the cord.
Hold plug when rewinding onto cord reel.
Do not allow plug to whip when rewinding,
Do not use with damaged cord or plug If
cleaner is not working as it should, has been
dropped, damaged, left outdoors, or dropped
into water, return it to a Sears Service
CenteflDepartment.
Do not pul! or carry by cord, use cord as a
handle, close door on cord, or pull cord
around sharp edges or corners. Do not run
cleaner over cord. Keep cord away from
heated surfaces.
Do not leave cleaner when plugged inn
Unplug from outlet when not in use and
before servicing
Do not allow to be used as a toy. Close
attention is necessary when used by or near
children.
Do not handle plug or cleaner with wet
hands.
Do not operate the cleaner with a punctured
hose_ The hose contains electrical wires_
Replace if cut or worn. Avoid picking up
sharp objects
Do not put any objects into openings.
Do not use with any opening blocked; keep
free of dust, lint, hair and anything that may
reduce air flow.
Keep hair, loose clothing, fingers, and all
parts of body away from openings and mov-
ing parts.
Do not use cleaner without dust bag and/or
filters in place°
Always change the dust bag after vacuum-
ing carpet cleaners or freshener, powders
and fine dust. These products clog the bag,
reduce airflow and can cause the bag to
burst° Failure to change bag could cause
permanent damage to the cleaner.
Do not use the cleaner to pick up sharp hard
objects, small toys, pins, paper, etc_ They
may damage the cleaner or dust bag.
Do net pick up anything that is burning or
smoking, such as cigarettes, matches, or hot
ashes.
Do not use cleaner to pick up flammable or
combustible liquids (gasoline, cleaning fluids,
perfumes, etc.), or use in areas where they
may be present. The fumes from these sub-
stances can create a fire hazard or explo-
sion
Use extra care when cleaning on stairs, Do
not put on chairs, tables, etc. Keep on floor,
You are responsible for making sure that
your vacuum cleaner is not used by anyone
unable to operate it properly.
SAVE THESE INSTRUCTIONS
Proper assembly and safe use of your vacuum cleaner are your responsibilities, Your cleaner
is intended only for household use° Read this Owner's Manuat carefully for important use and
safety information. This guide contains safety statements under warning and caution symbols_
Please pay special attention to these boxes and follow any instructionsgiven, WARNING
statements alert you to such dangers as fire, electrical shock, burns and personal injury. CAU-
TION statements alert you to such dangers as personal injury and/or property damage.
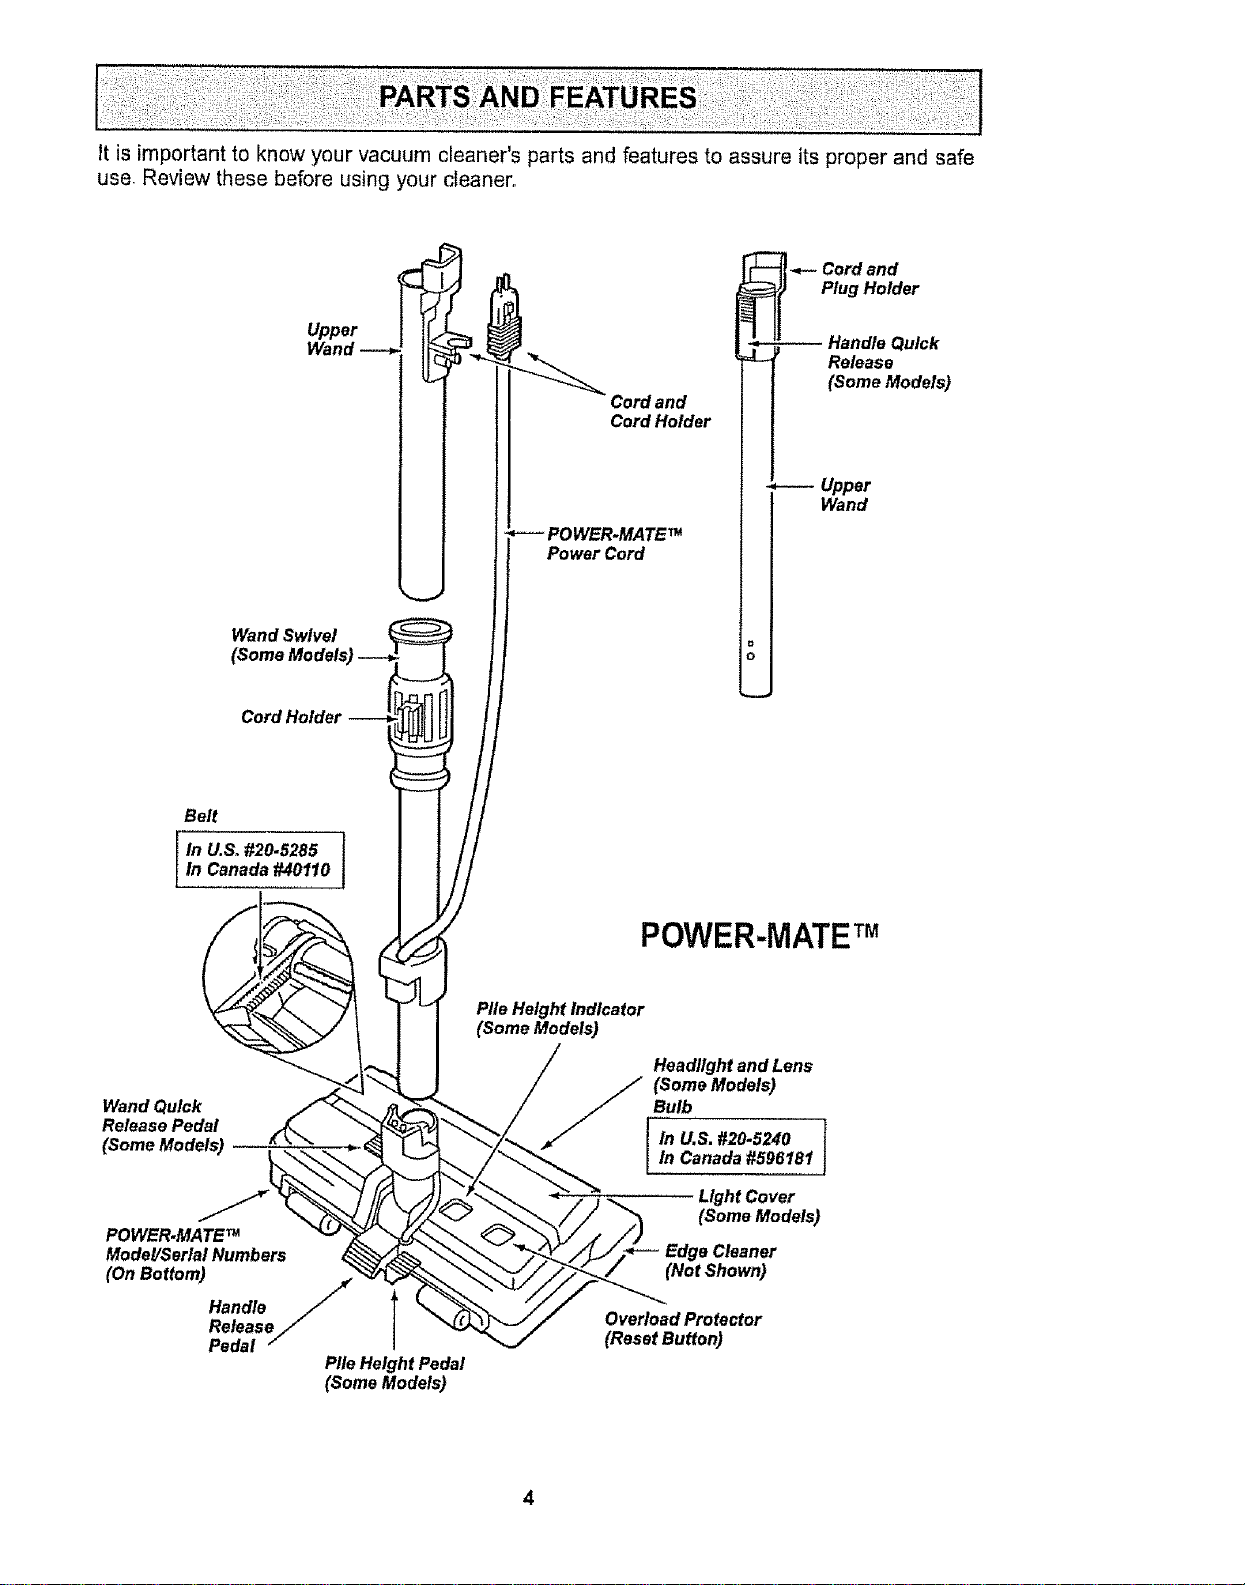
it isimportantto knowyourvacuumcleaner'spartsandfeaturesto assureitsproperandsafe
use Reviewthesebeforeusingyourcleaner,,
Upper
Wand
Wand Swivel
Cord and
Cord Holder
POWER.MATE TM
Power Cord
a
0
i -_- Cord and
Plug Holder
-- Handle Quick
Release
(Some Models}
*---- Upper
Wand
Belt
In U,& #20.5285
In Canada #40110
POWER-MATETM
Wand Quick
Release Pedal
(Some Models}
POWER.MATE TM
Model/Serial Numbers
(On Bottom) /
Handle
/
Release//
Pedal
Pile Height Pedal
(Some Models}
Pile Height Indicator
(Some Models}
Headlight and Lens
_F_ (Some Models)
Bulb
In U.S. #20.5240 I
In Canada #596181
J
Light Cover
(Some Models)
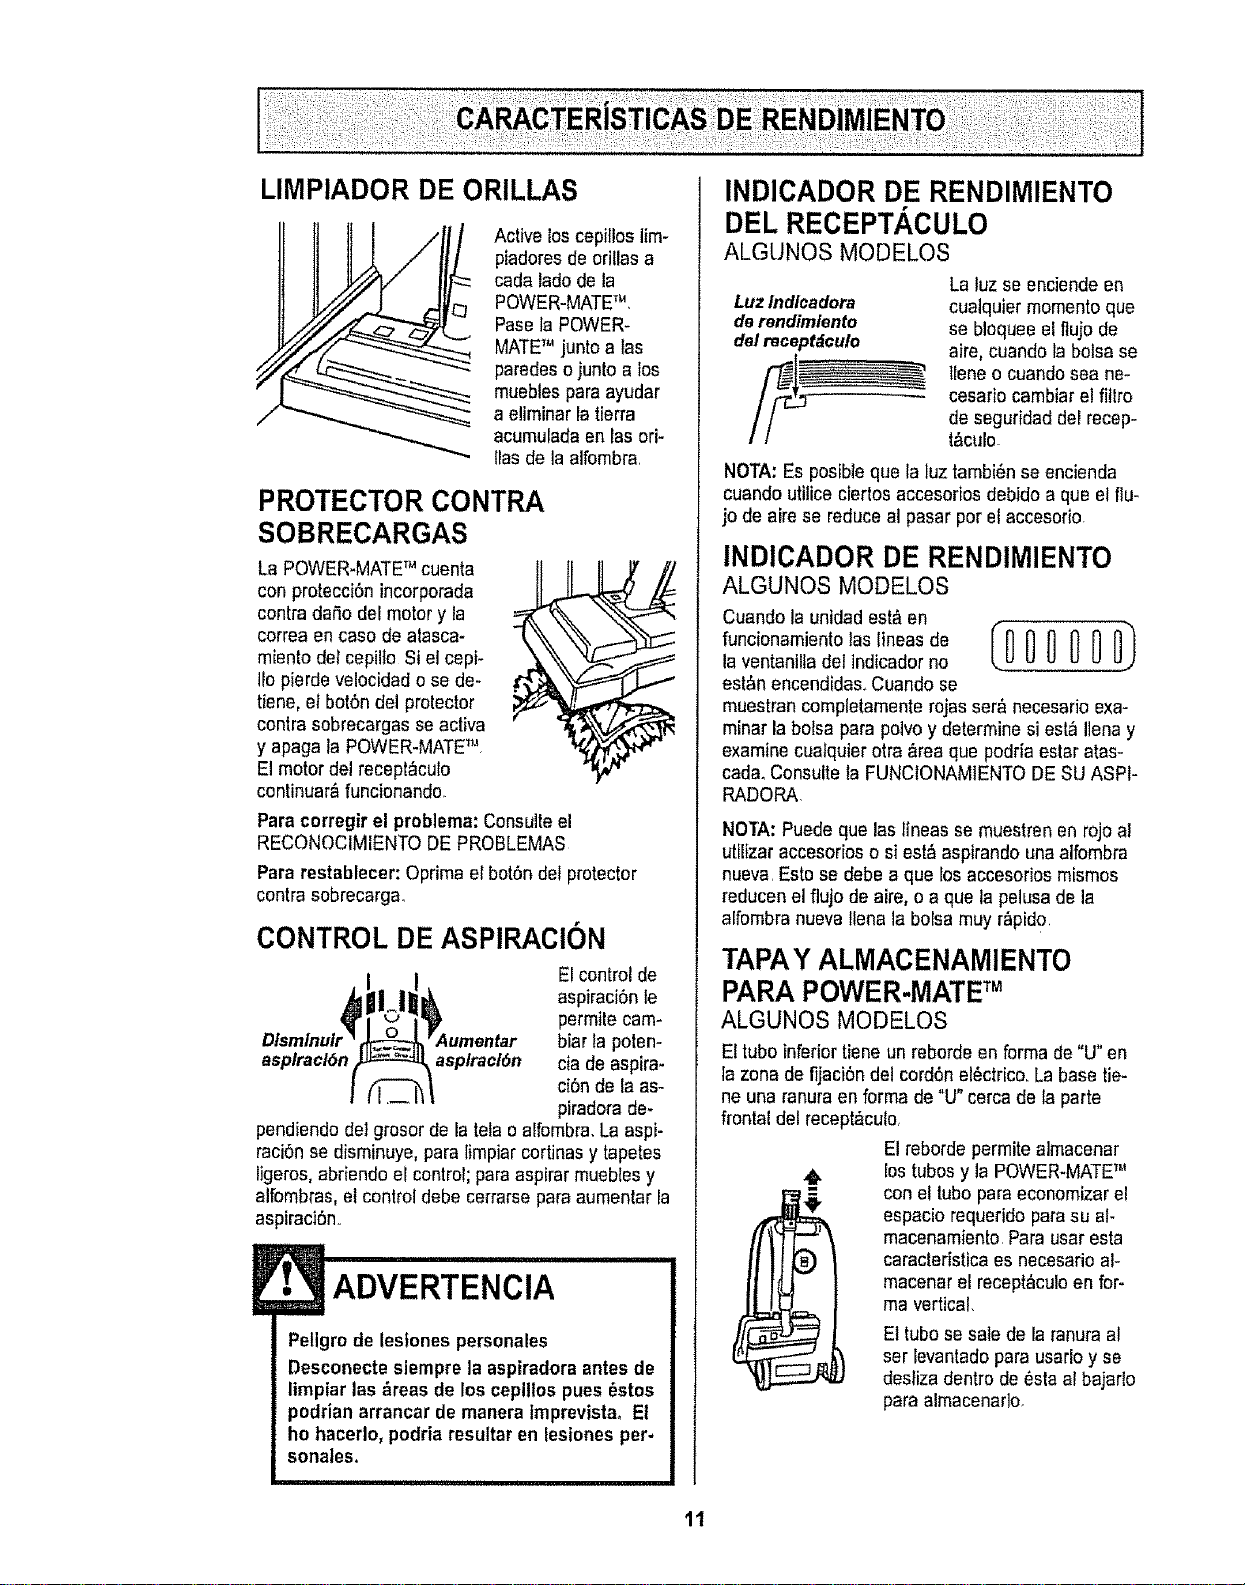
Edge Cleaner
(Not Shown}
Overload Protector
(Reset Button)
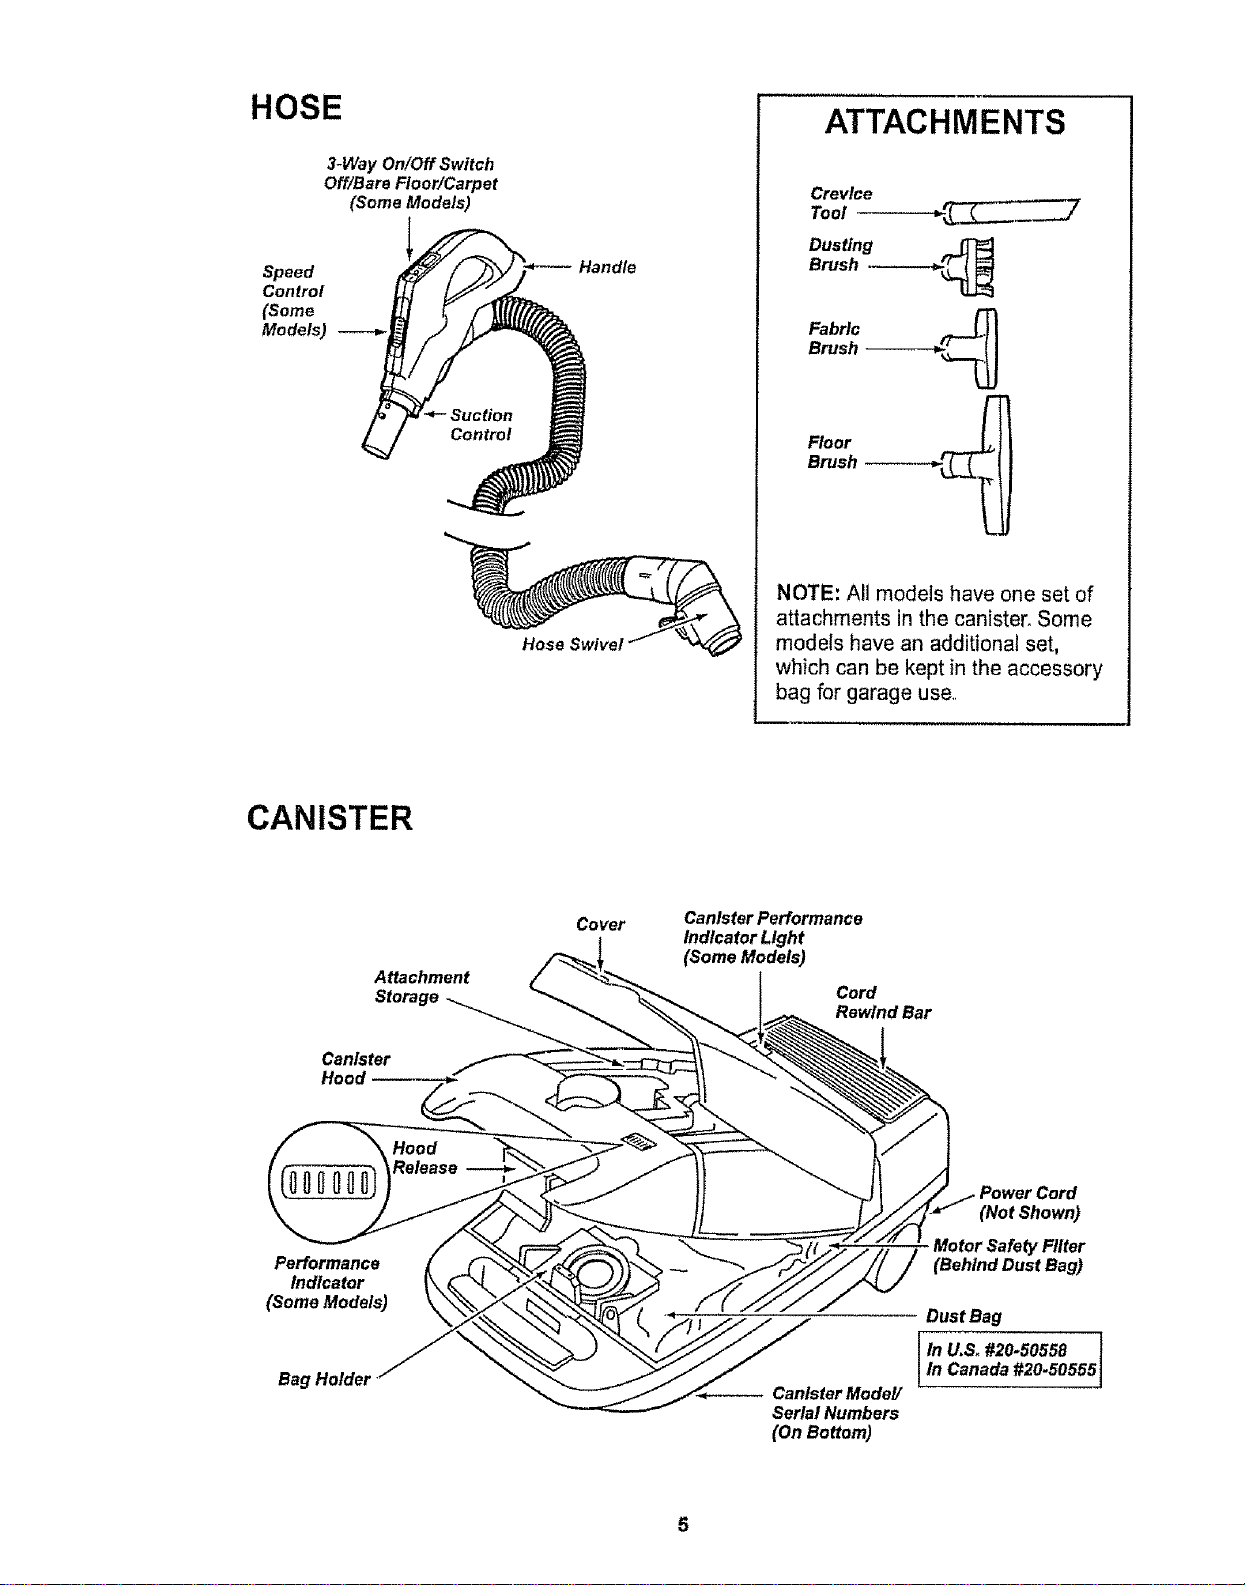
HOSE
3-Way On/Off Switch
Off/Bare Floor/Carpet
(Some Models)
Speed
Control
(Some
Models)
Hand_
Hose SwiveJ
ATTACHMENTS
Crevice
Tool
Dusting
Brush ------_1._
Fabric ._______
Brush
Floor _________
Brush
NOTE: All models have one set of
attachments in the canister. Some
models have an additional set,
which can be kept in the accessory
bag for garage use,,
CANISTER
Attachment
Storage
Canister
Hood
Covet
Canister Performance
Indicator Light
(Some Models)
Cord
Rewind Bar
Performance
Indicator
(Some Models)
Bag Holder
Canister Model/
Serial Numbers
(On Bottom)
(Not Shown)
Motor Safety Filter
(Behind Dust Bag)
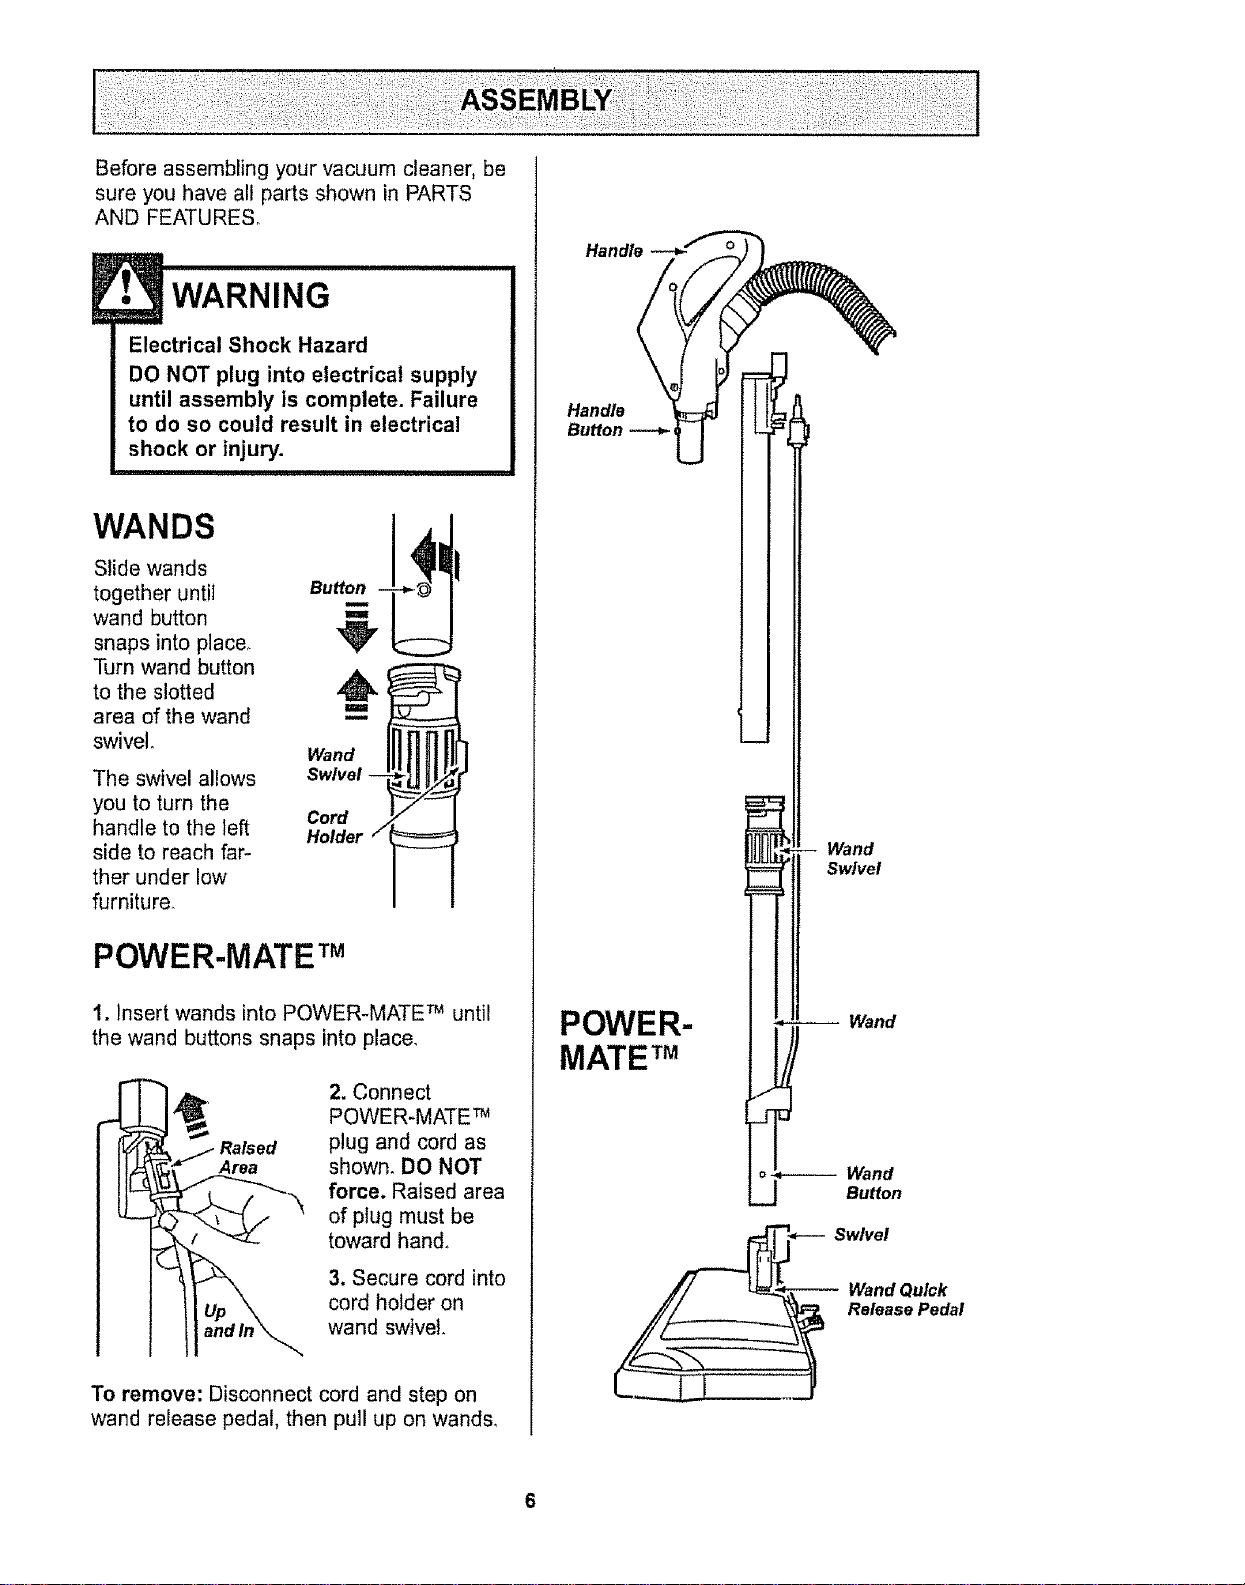
Before assembling your vacuum cleaner, be
sure you have all parts shown in PARTS
AND FEATURES°
E• WARNING
Electrical Shock Hazard
DO NOT plug into electrical supply
until assembly is complete. Failure
to do so could result in electrical
shock or injury.
w,.os
Slide wands
together until au
wand button
snaps into place_
Turn wand button ,A
to the slotted
area of the wand
swivel. Wand
Swivel --
Cord
Holder /
The swivel allows
you to turn the
handle to the left
side to reach far-
ther under low
furniture.
POWER-MATE TM
1. Insert wands into POWER-MATE TM until
the wand buttons snaps into place.
2. Connect
POWER-MATE TM
plug and cord as
shown. DO NOT
force. Raised area
of plug must be
toward hand.
3. Secure cord into
cord holder on
wand swivel.
To remove: Disconnect cord and step on
wand release pedal, then pull up on wands,
Handle
Handle
Button --_
POWER-
MATE TM
Wand
Swivel
Wand
Wand
Button
Swivel
-- Wand Quick
Release Pedal
6
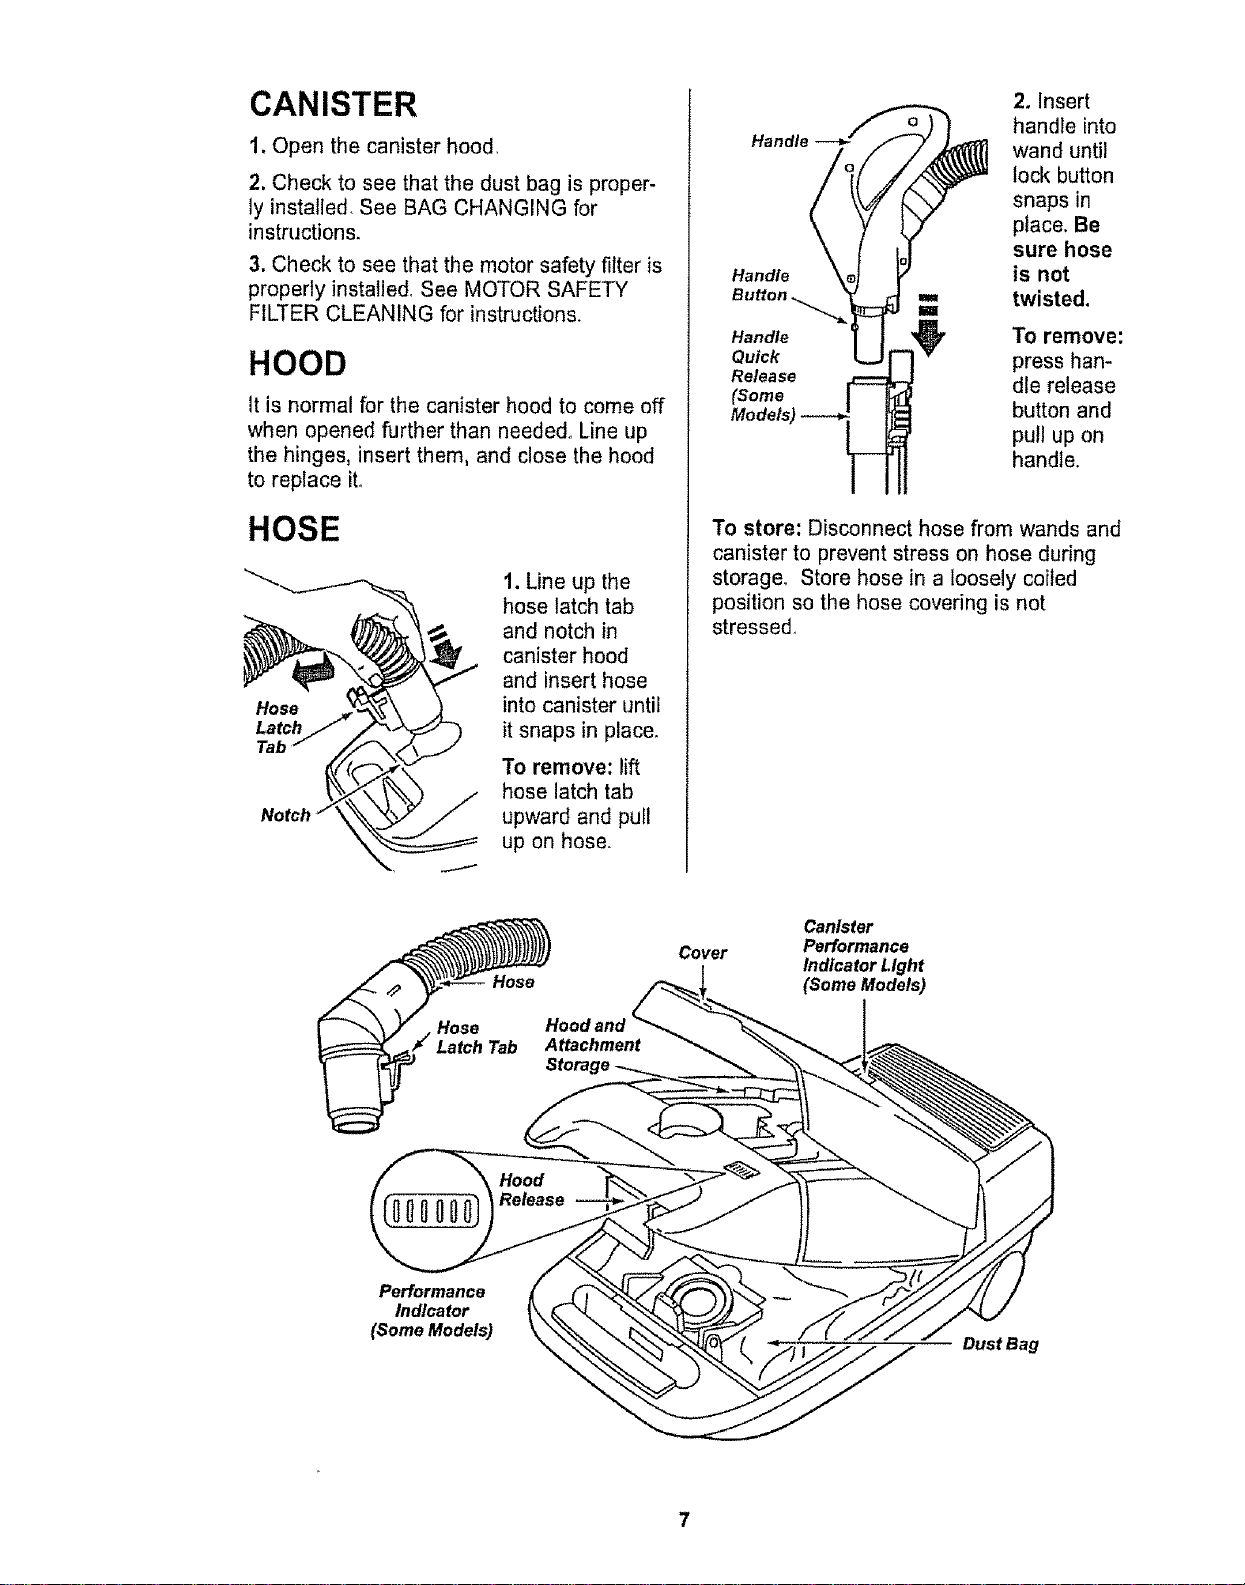
CANISTER
1. Open the canister hood,
2, Check to see that the dust bag is proper-
ly installed, See BAG CHANGING for
instructions.
3. Check to see that the motor safety filter is
properly installed See MOTOR SAFETY
FILTER CLEANING for instructions.
HOOD
It is normal for the canister hood to come off
when opened further than needed_ Line up
the hinges, insert them, and close the hood
to replace ito
HOSE
Hose
Latch
Tab
1. Line up the
hose latch tab
and notch in
canister hood
and insert hose
into canister until
it snaps in place.
To remove: lift
hose latch tab
upward and pull
up on hose.
Handle
Handle
Quick
Release
(Some
2. Insert
handle into
wand until
lock button
snaps in
place. Be
sure hose
is not
twisted.
To remove:
press han-
dle release
button and
pull up on
handle.
To store: Disconnect hose from wands and
canister to prevent stress on hose during
storage. Store hose in a loosely coiled
position so the hose covering is not
stressed_
Hood and
Attachment
Cover
Canister
Performance
Indicator Light
(Some Models)
Performance
Indicator
(Some Models)
Dust Bag
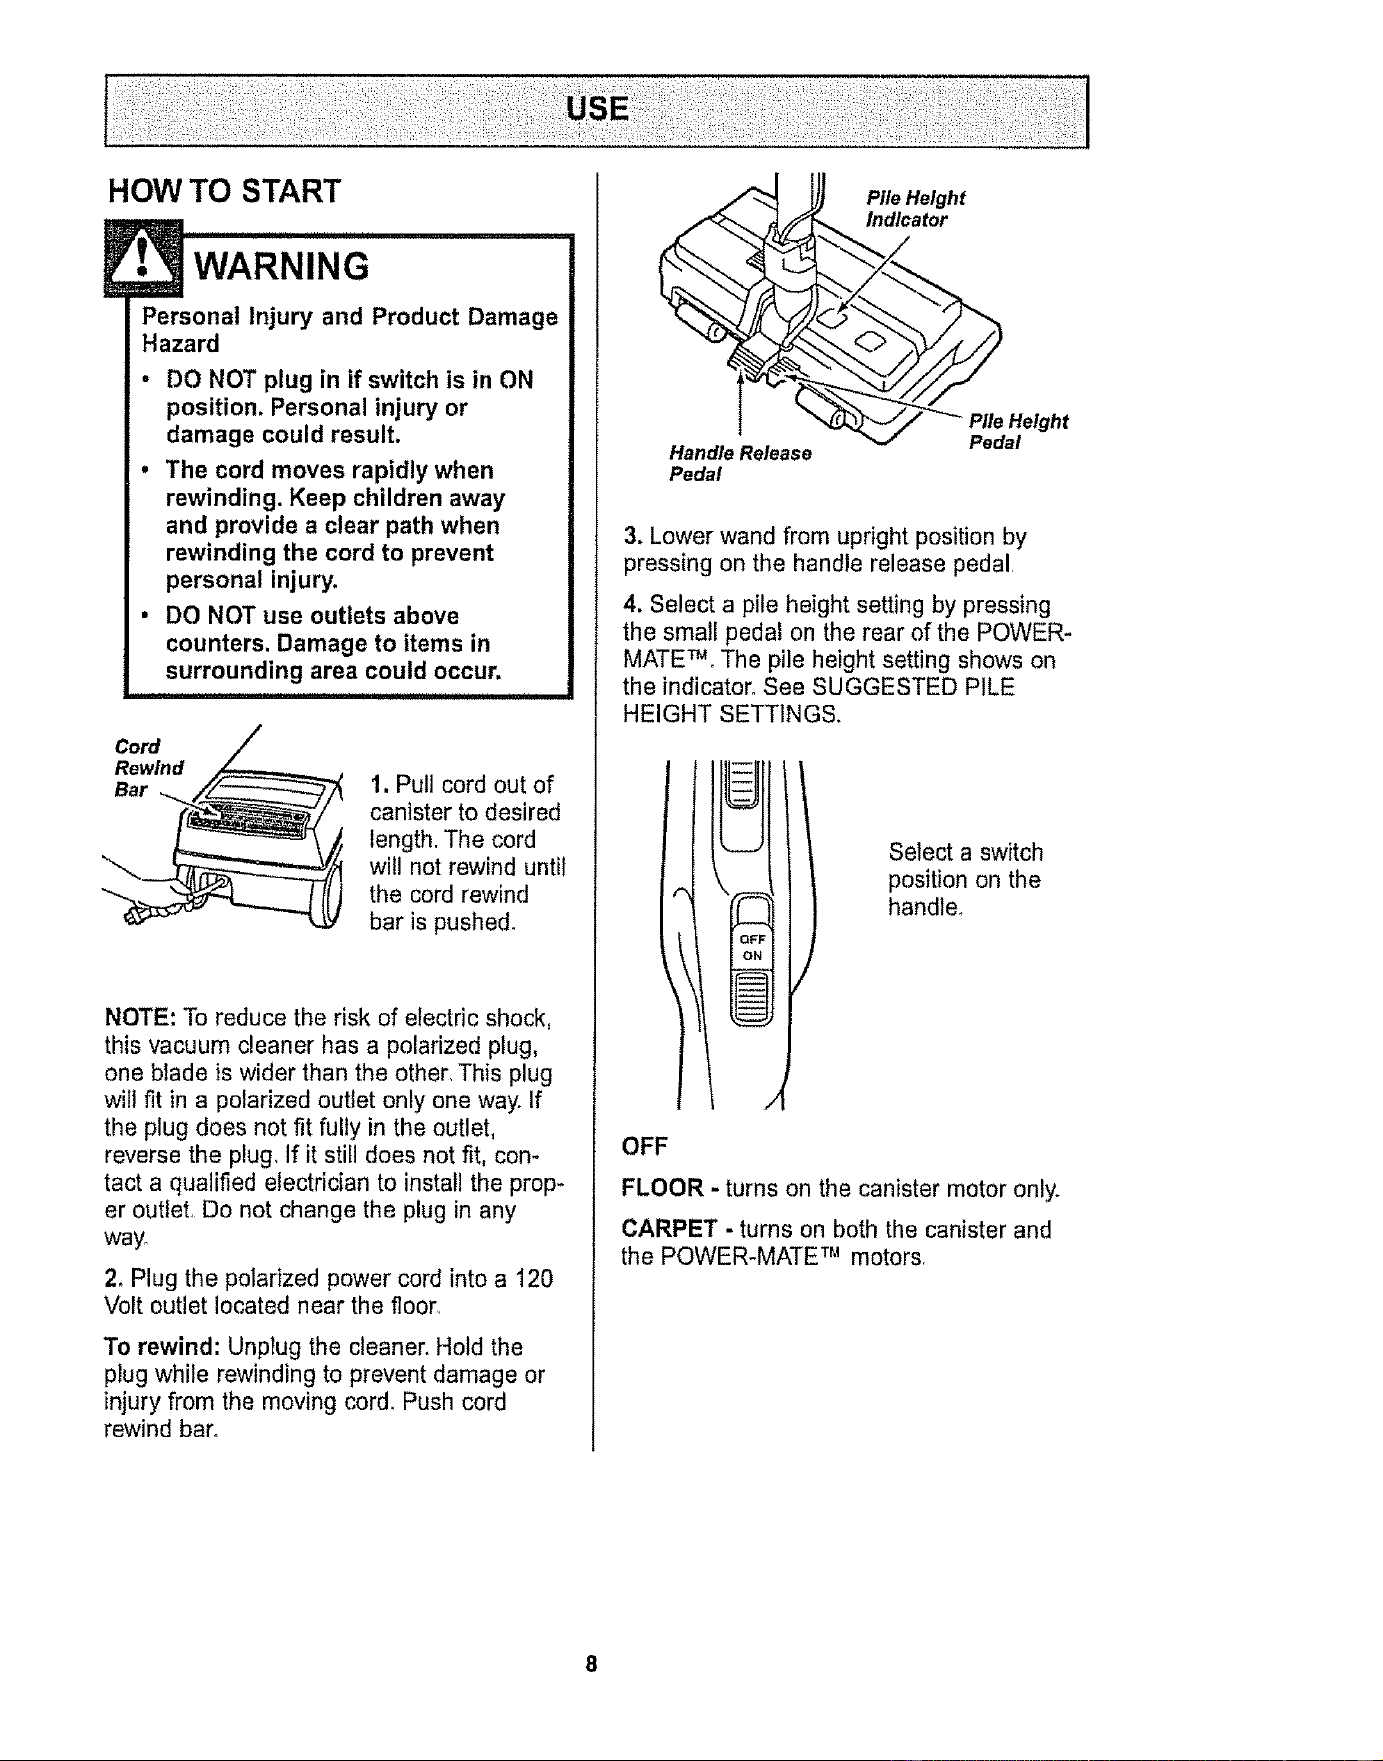
HOW TO START
• WARNING
Personal Injury and Product Damage
Hazard
. DO NOT plug in if switch is in ON
position. Personal injury or
damage could result.
. The cord moves rapidly when
rewinding. Keep children away
and provide a clear path when
rewinding the cord to prevent
personal injury.
• DO NOT use outlets above
counters, Damage to items in
surrounding area could occur.
Cord
Rewind
Bar
1. Pull cord out of
canister to desired
length. The cord
will not rewind until
the cord rewind
bar is pushed.
NOTE: To reduce the risk of electric shock,
this vacuum cleaner has a polarized plug,
one blade is wider than the other, This plug
will fit in a polarized outlet only one way. If
the plug does not fit fully in the outlet,
reverse the plug, If it still does not fit, con-
tact a qualified electrician to install the prop-
er outlet, Do not change the plug in any
way°
2. Plug the polarized power cord intoa 120
Volt outlet located near the floor,
To rewind: Unplug the cleaner. Hold the
plug while rewinding to prevent damage or
injury from the moving cord. Push cord
rewind bar.
Handle Release
Pedal
Pile Height
Indicator
3. Lower wand from upright position by
pressing on the handle release pedal
4. Select a pile height setting by pressing
the sma!l pedal on the rear of the POWER-
MATE TM. The pile height setting shows on
the indicator. See SUGGESTED PILE
HEIGHT SETTINGS.
--ii
--ii
OF
O_
J
Select a switch
position on the
handle°
OFF
FLOOR - turns on the canister motor only.
CARPET - turns on both the canister and
the POWER-MATE TM motors,
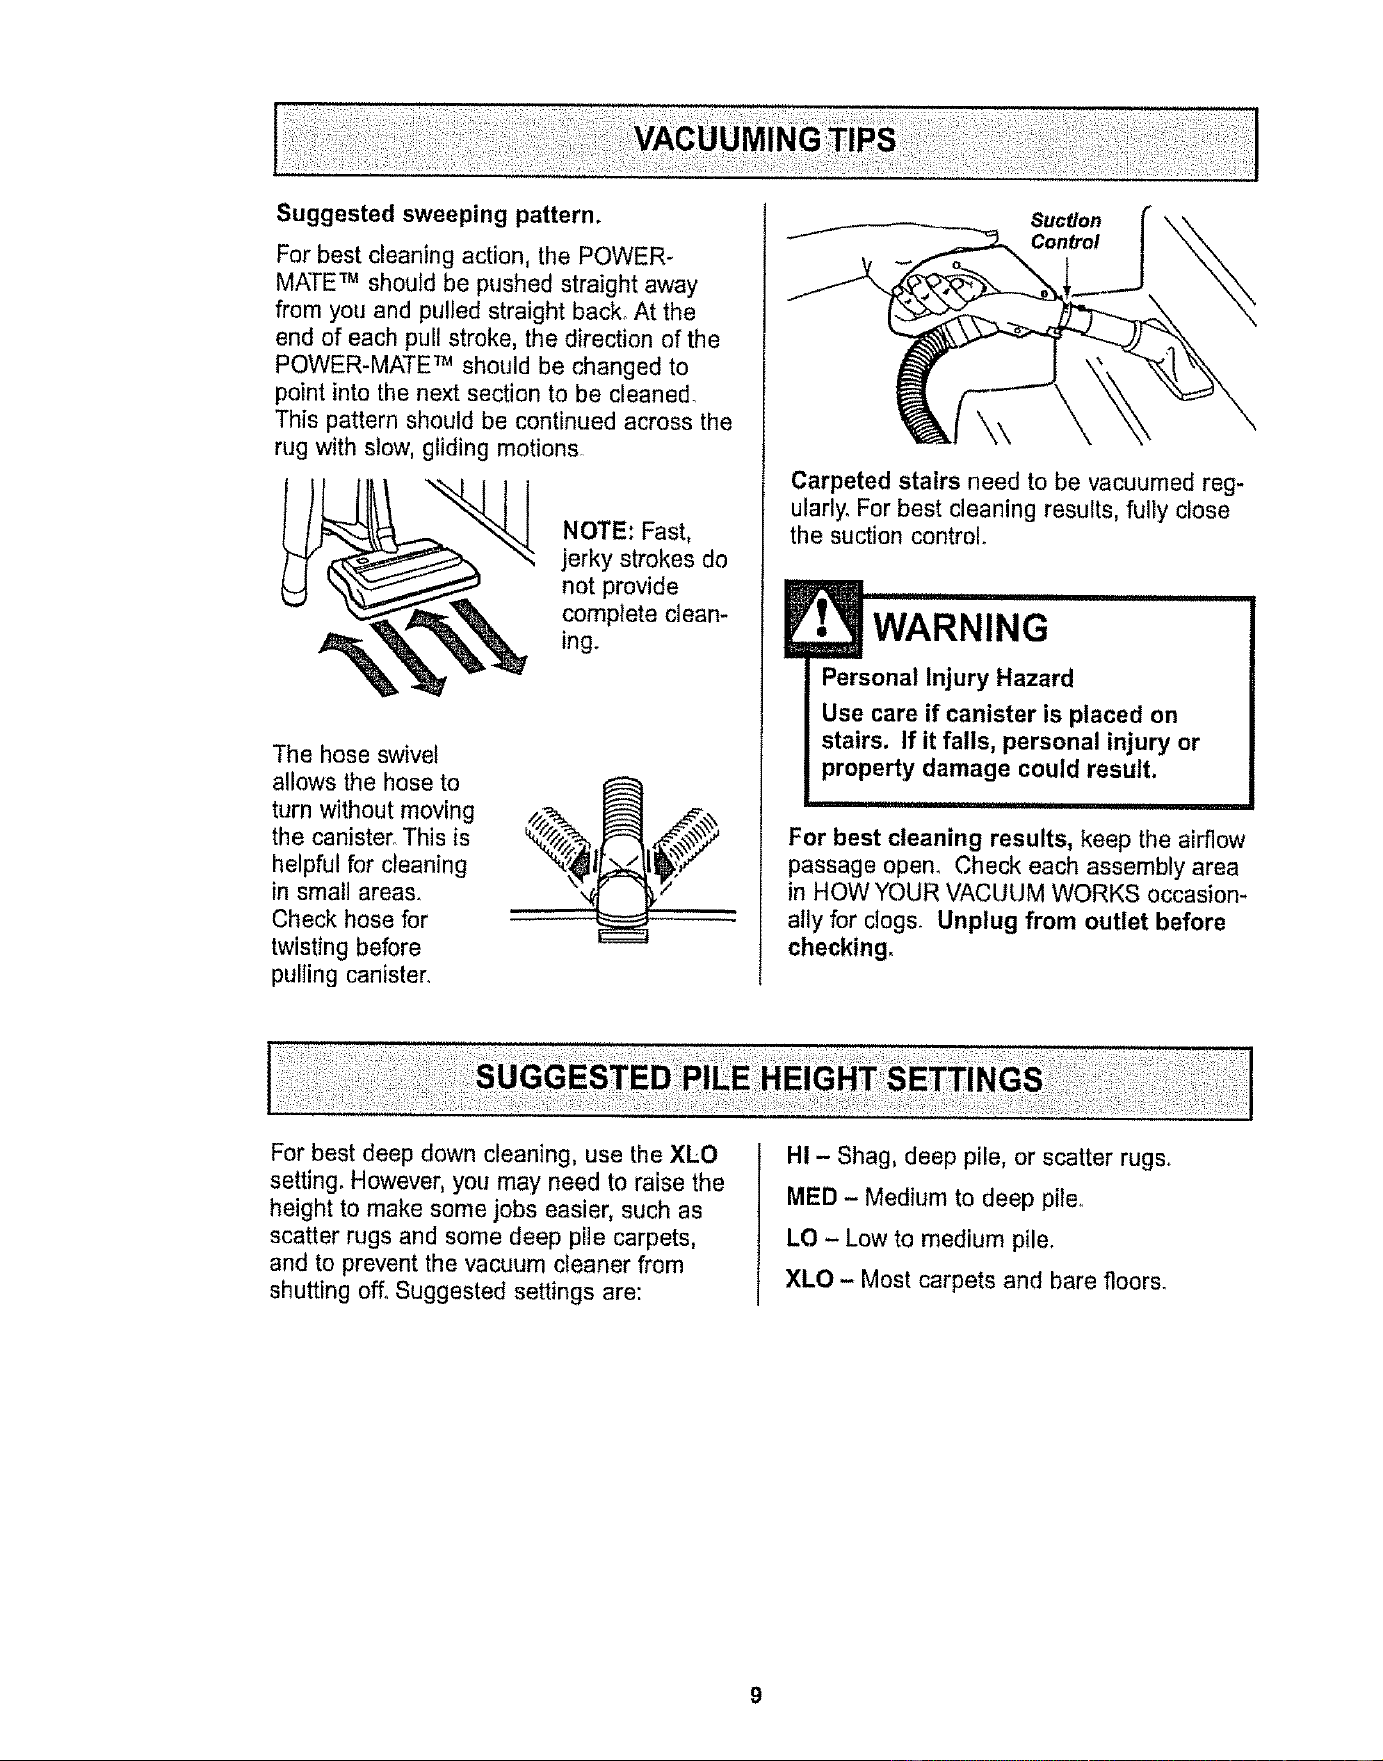
Suggested sweeping pattern.
For best cleaning action, the POWER-
MATE TM should be pushed straight away
from you and pulled straight back, At the
end of each pull stroke, the direction of the
POWER-MATE TM should be changed to
point into the next section to be cleaned.
This pattern should be continued across the
rug with slow, gliding motions.
NOTE: Fast,
jerky strokes do
not provide
complete clean-
ing.
The hose swivel
allows the hose to
turn without moving
the canister. This is
helpful for cleaning
in small areas.
Check hose for
twisting before
pu!]ing canister.
Suction
Control
Carpeted stairs need to be vacuumed reg-
ularly. For best cleaning results, fully close
the suction control°
WARNING
i Personal Injury Hazard
Use care if canister is placed on
stairs. If it falls, personal injury or
property damage could result.
, ii I i,11,1,1111,111,11,1
For best cleaning results, keep the airflow
passage open. Check each assembly area
in HOW YOUR VACUUM WORKS occasion-
ally for clogs. Unplug from outlet before
checking.
For best deep down cleaning, use the XLO
setting, However, you may need to raise the
height to make some jobs easier, such as
scatter rugs and some deep pile carpets,
and to prevent the vacuum cleaner from
shutting off, Suggested settings are:
HI - Shag, deep pile, or scatter rugs.
MED - Medium to deep pile,.
LO - Low to medium pile.
XLO - Most carpets and bare floors.
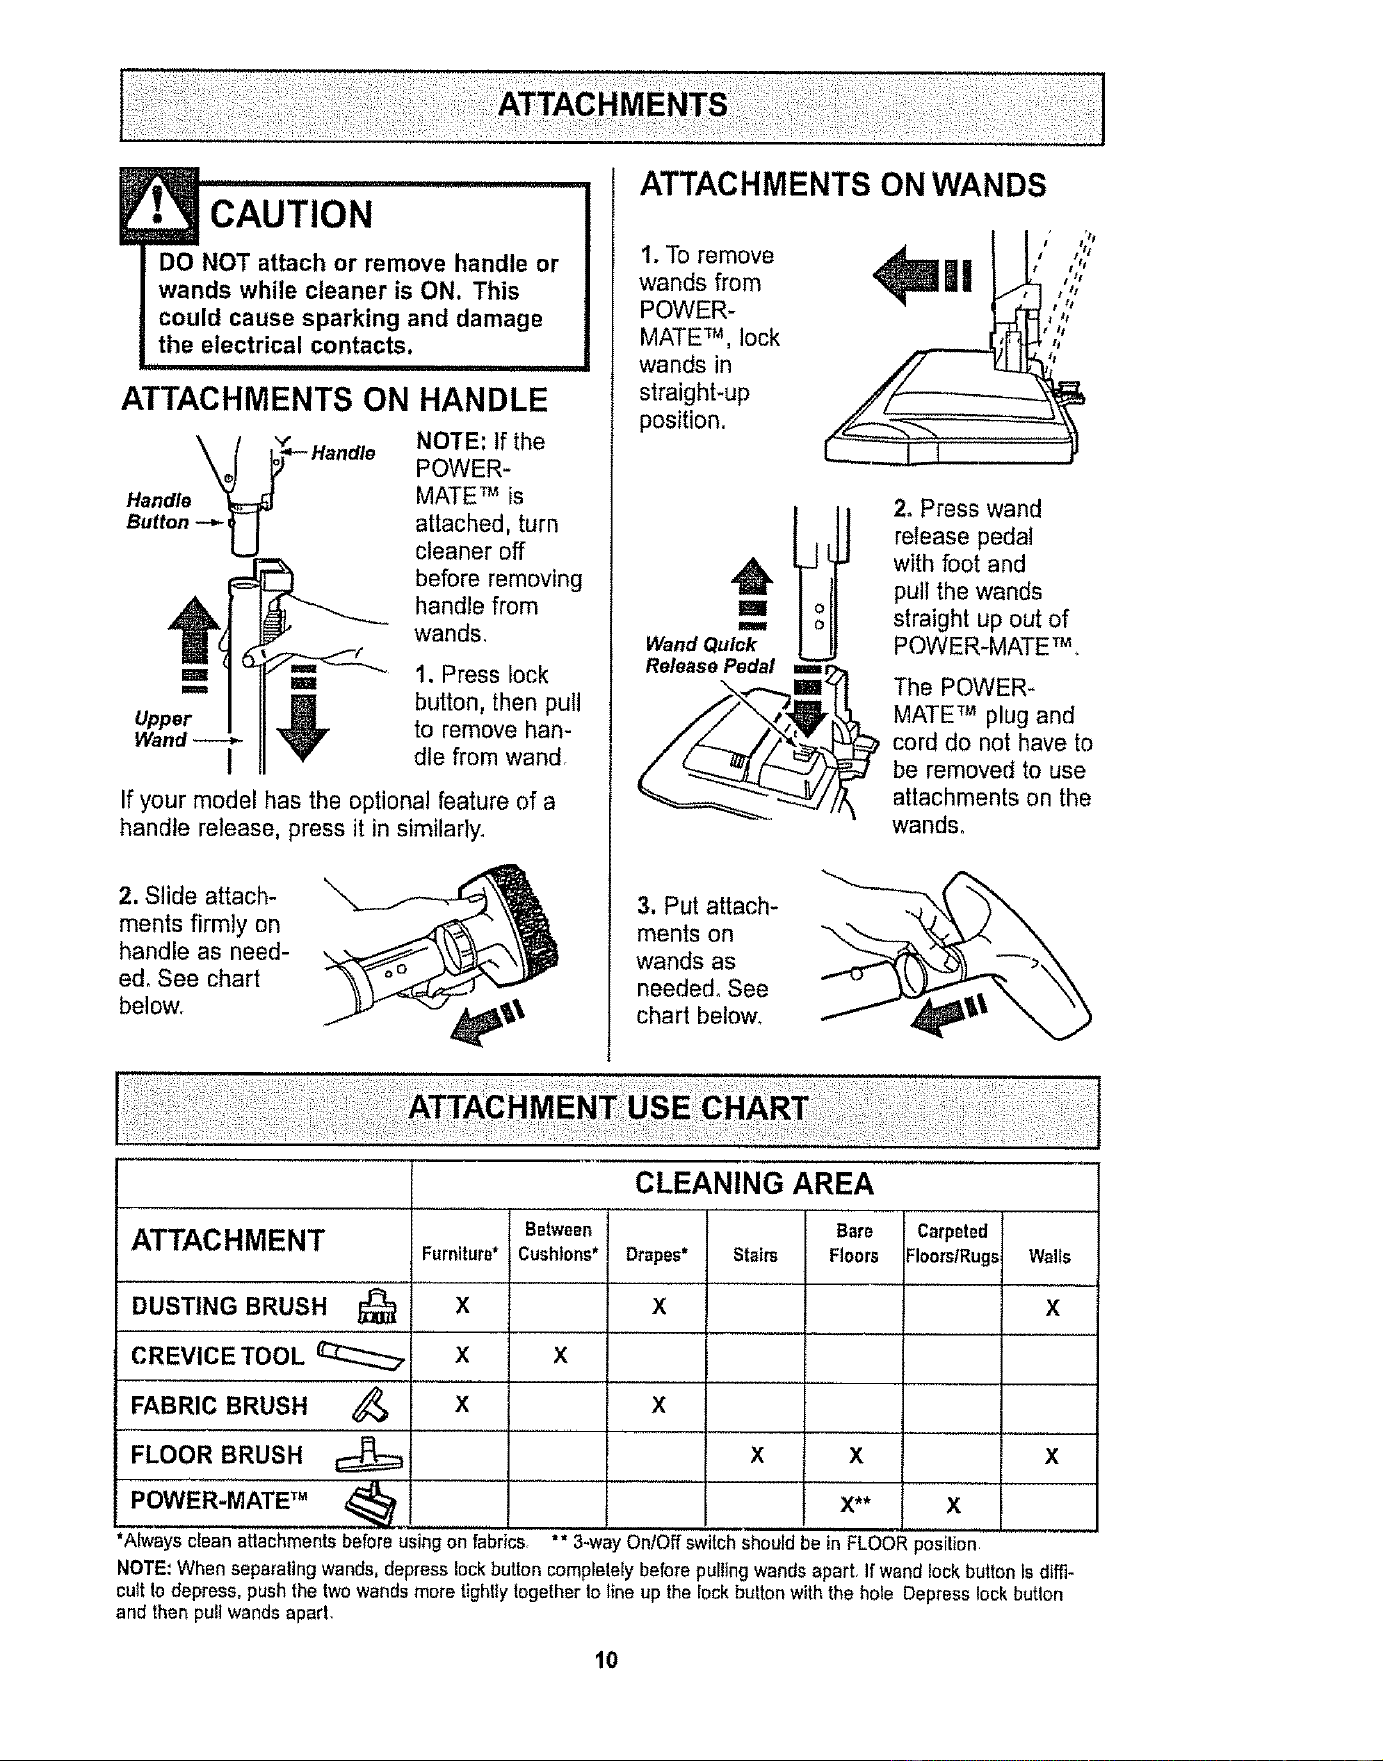
CAUTION ....................
DO NOT attach or remove handle or
wands while cleaner is ON. This
could cause sparking and damage
the electrical contacts.
u,
ATTACHMENTS ON HANDLE
NOTE: If the
POWER-
Handle MATE TM is
Button attached, turn
cleaner off
before removing
handle from
wands,
Upper
u 1. Press lock
,_ button, then pull
to remove han-
I dte from wand,
If your model has the optional feature of a
handle release, press it in similarly,
2. Slide attach-
ments firmly on
handle as need-
ed, See chart
below,
1, To remove
wands from
POWER-
MATE TM, lock
wands in
straight-up
position.
t tl
|! o:,::,
m
Wand Quick
Release Pedal ===
2. Press wand
release pedal
with foot and
pull the wands
straight up out of
POWER-MATE TM,
The POWER-
MATE TM plug and
cord do not have to
be removed to use
attachments on the
wands°
3. Put attach-
ments on
wands as
needed° See
chart below,
FABRIC BRUSH
FLOOR BRUSH
POWER-MATE TM
CLEANING AREA
Between Carpeted
ATTACHMENT Furniture* Cushions* Drapes* Floors/Rugs Walls
DUSTING BRUSH _ X X X
CREVICE TOOL _ X X
x x
x
*Always clean attachmentsbefore using on fabrics,
Bare
Stairs Floors
X x
x** x
"* 3-way On/Off switch should be in FLOOR position
NOTE,'When separating wands, depress lock button completeEybefore purlingwands apart, If wand lockbutton is diffi-
cult todepress, pushthe twowandsmore tightlytogetherto line up the Iock button withthe hole Depress lock butlon
ann then putt wands aparL
10
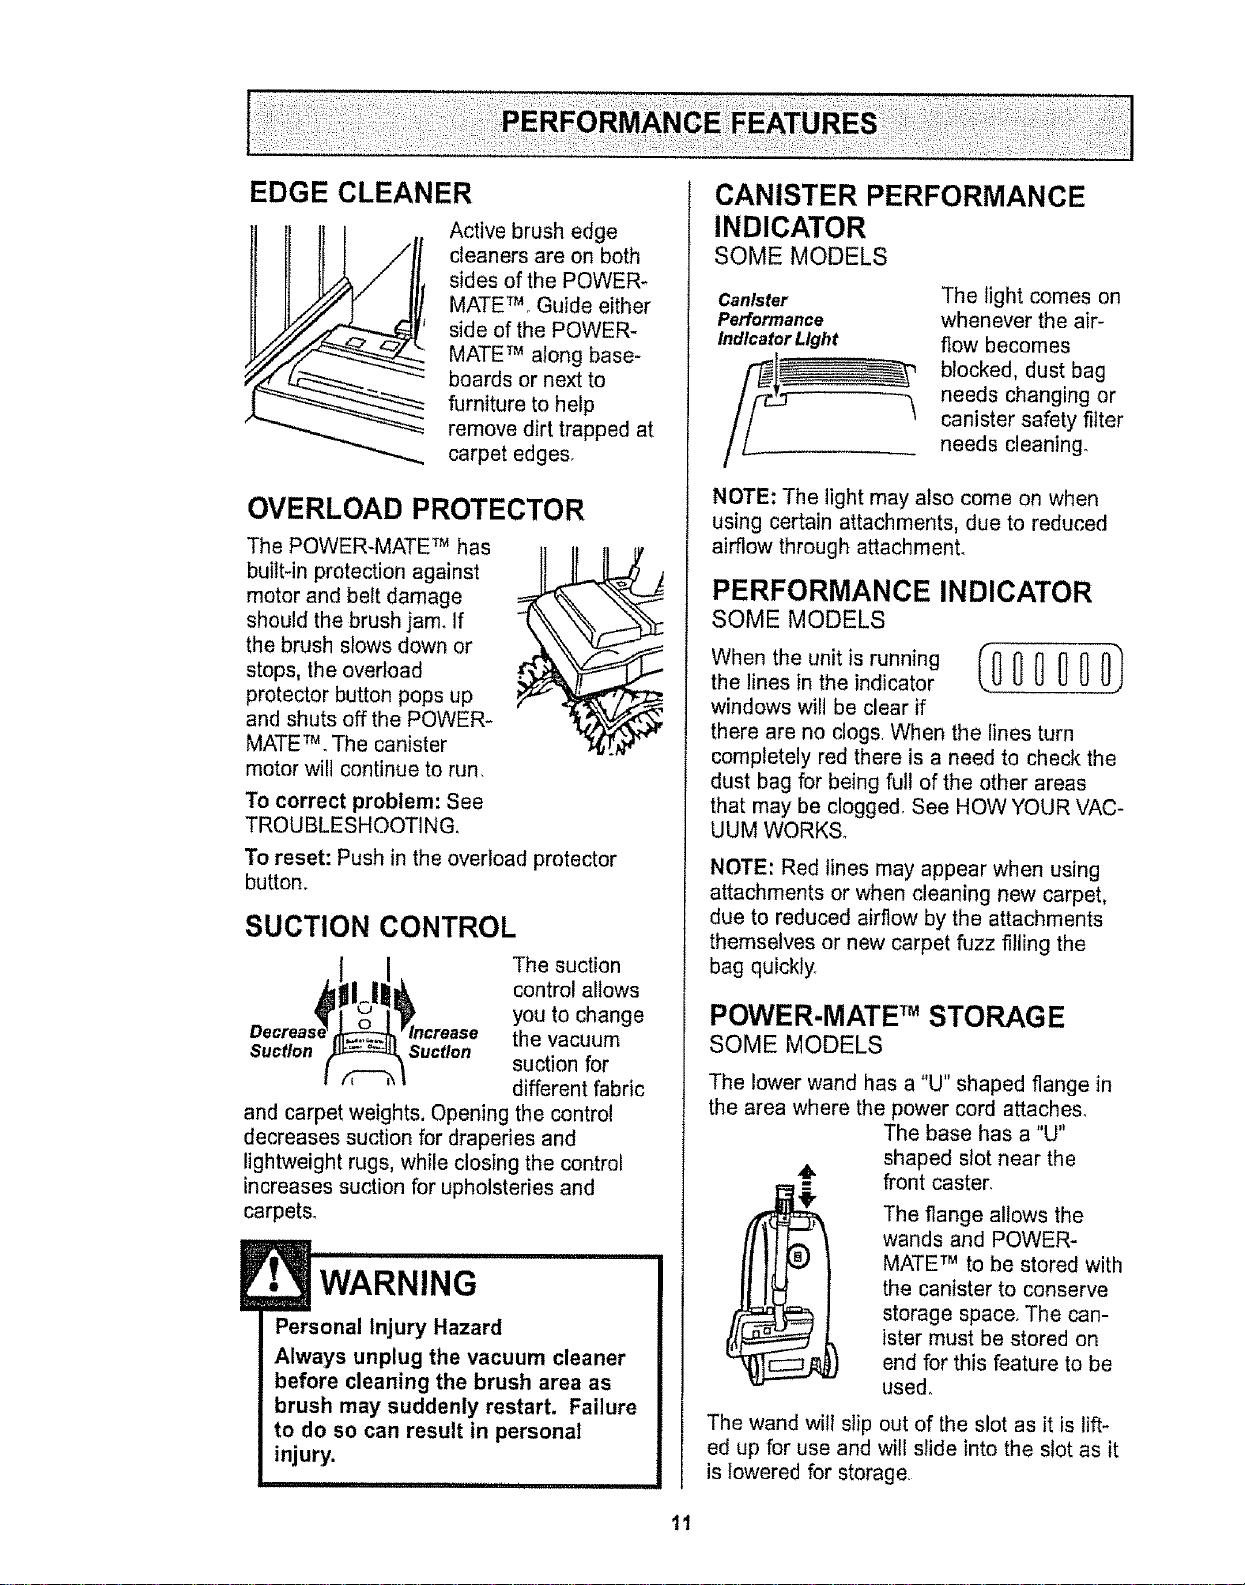
EDGE CLEANER
Active brush edge
cleaners are on both
sides of the POWER-
MATE_ Guide either
side of the POWER-
MATE TM along base-
boards or next to
furniture to help
remove dirt trapped at
carpet edges.
OVERLOAD PROTECTOR
The POWER-MATE TM has
built-in protection against
motor and belt damage
should the brush jam. If
the brush slows down or
stops, the overload
protector button pops up
and shuts off the POWER-
MATE TM. The canister
motor will continue to run,
To correct problem: See
TROUBLESHOOTING,
To reset: Push in the overload protector
button.
SUCTION CONTROL
The suction
control allows
you to change
the vacuum
Suction Suction
suction for
different fabric
and carpet weights, Opening the control
decreases suction for draperies and
lightweight rugs, while closing the control
increases suction for upholsteries and
carpets.
E, '"'WARNIN G
Personal Injury Hazard
Always unplug the vacuum cleaner
before cleaning the brush area as
brush may suddenly restart. Failure
to do so can result in personal
injury.
CANISTER PERFORMANCE
INDICATOR
SOME MODELS
Canister
Performance
Indicator Light
The light comes on
whenever the air-
flow becomes
blocked, dust bag
needs changing or
"_ canister safety filter
needs cleaning°
NOTE: The light may also come on when
using certain attachments, due to reduced
airflow through attachmenL
PERFORMANCE INDICATOR
SOME MODELS
When the unit is running (00_ (]00)
the lines in the indicator
windows will be clear if
there are no clogs, When the lines turn
completely red there is a need to check the
dust bag for being full of the other areas
that may be clogged, See HOW YOUR VAC-
UUM WORKS.
NOTE: Red lines may appear when using
attachments or when cleaning new carpet,
due to reduced airflow by the attachments
themselves or new carpet fuzz filling the
bag quickly
POWER-MATE TM STORAGE
SOME MODELS
The lower wand has a "U" shaped flange in
the area where the power cord attaches.
The base has a "U"
shaped stot near the
front caster.
The flange allows the
wands and POWER-
MATE TM to be stored with
the canister to conserve
storage space. The can-
ister must be stored on
end for this feature to be
used°
The wand will slip out of the slot as it is lift-
ed up for use and will slide into the slot as it
is lowered for storage,
11
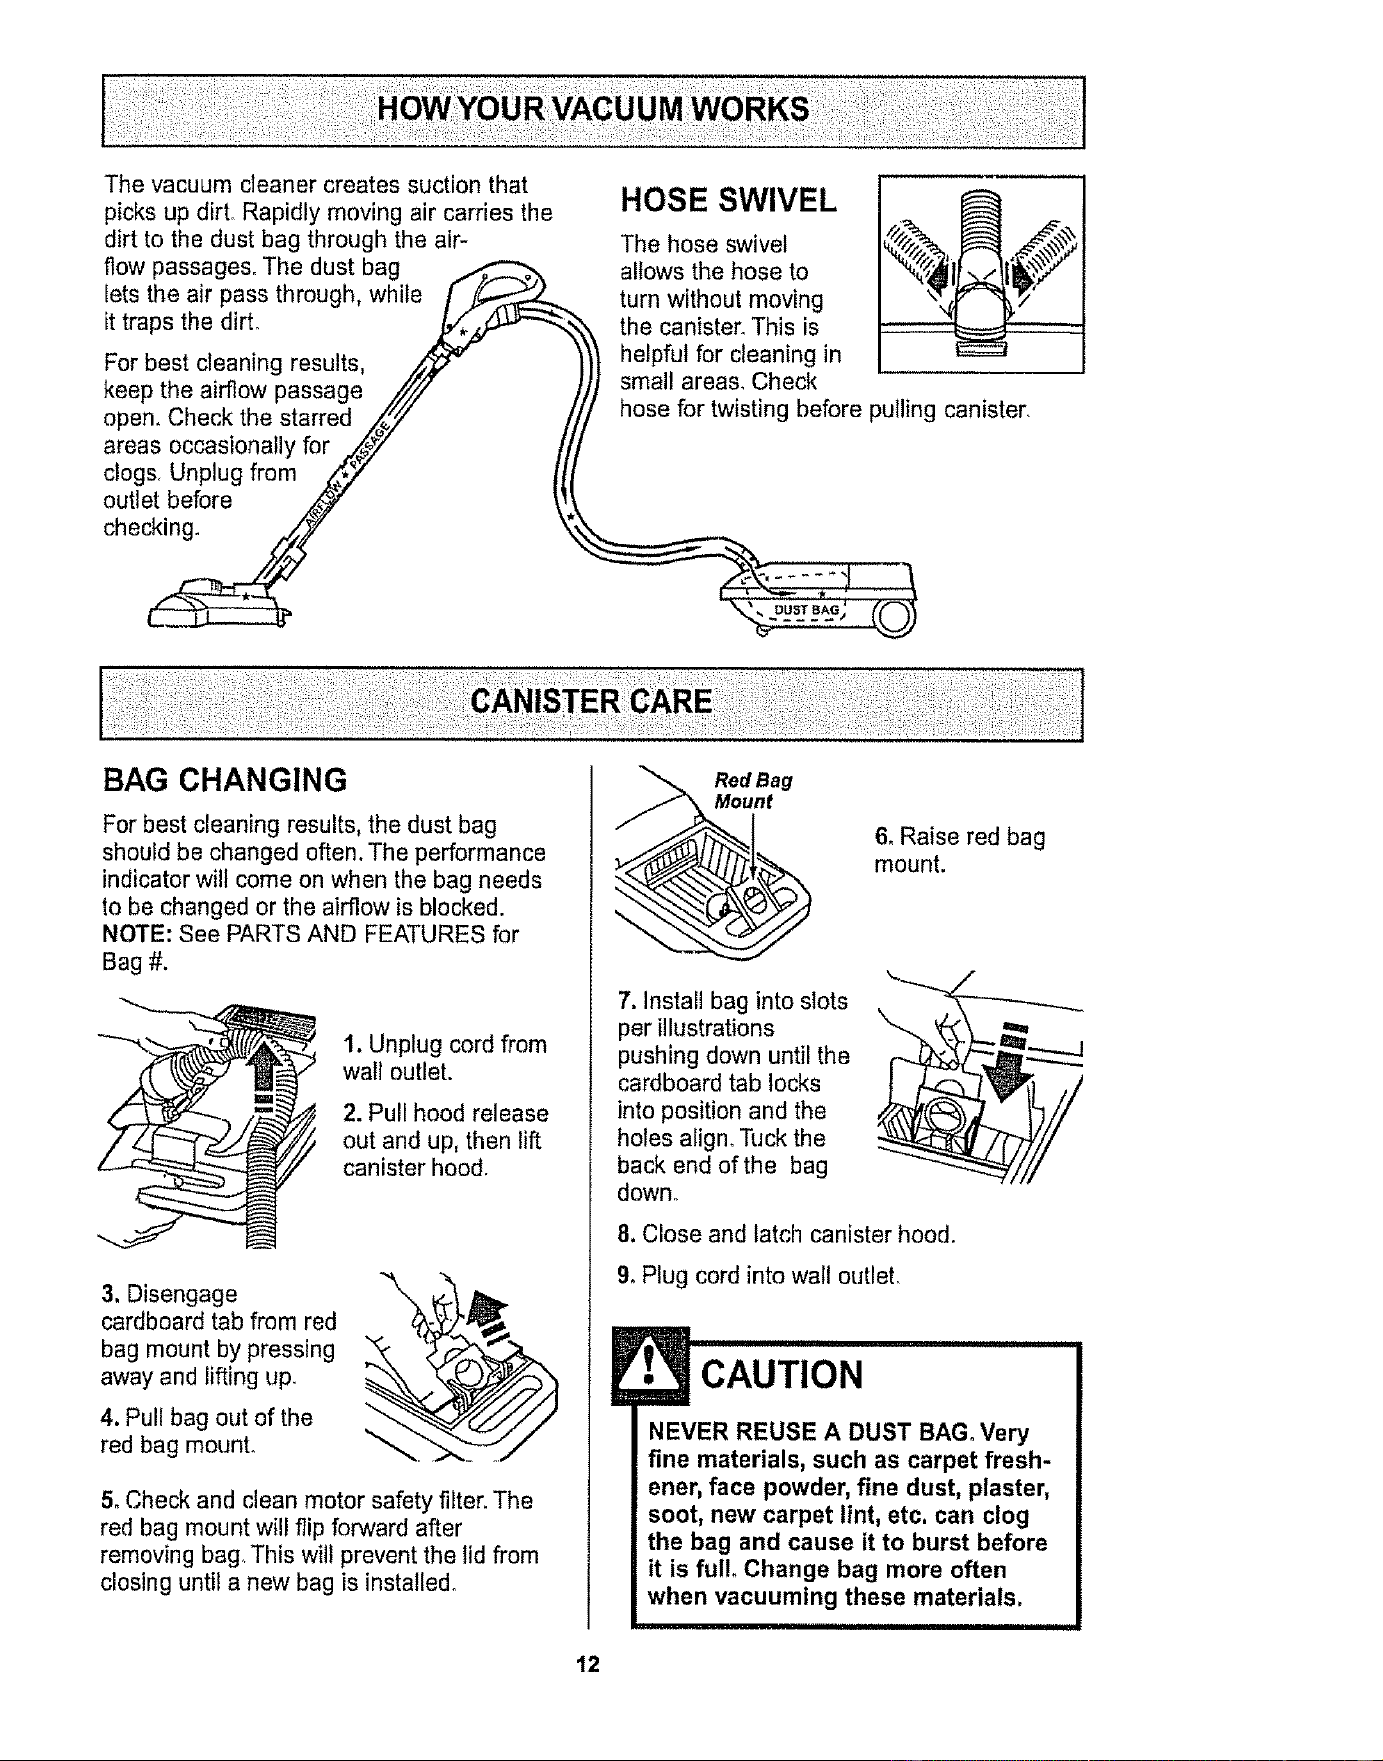
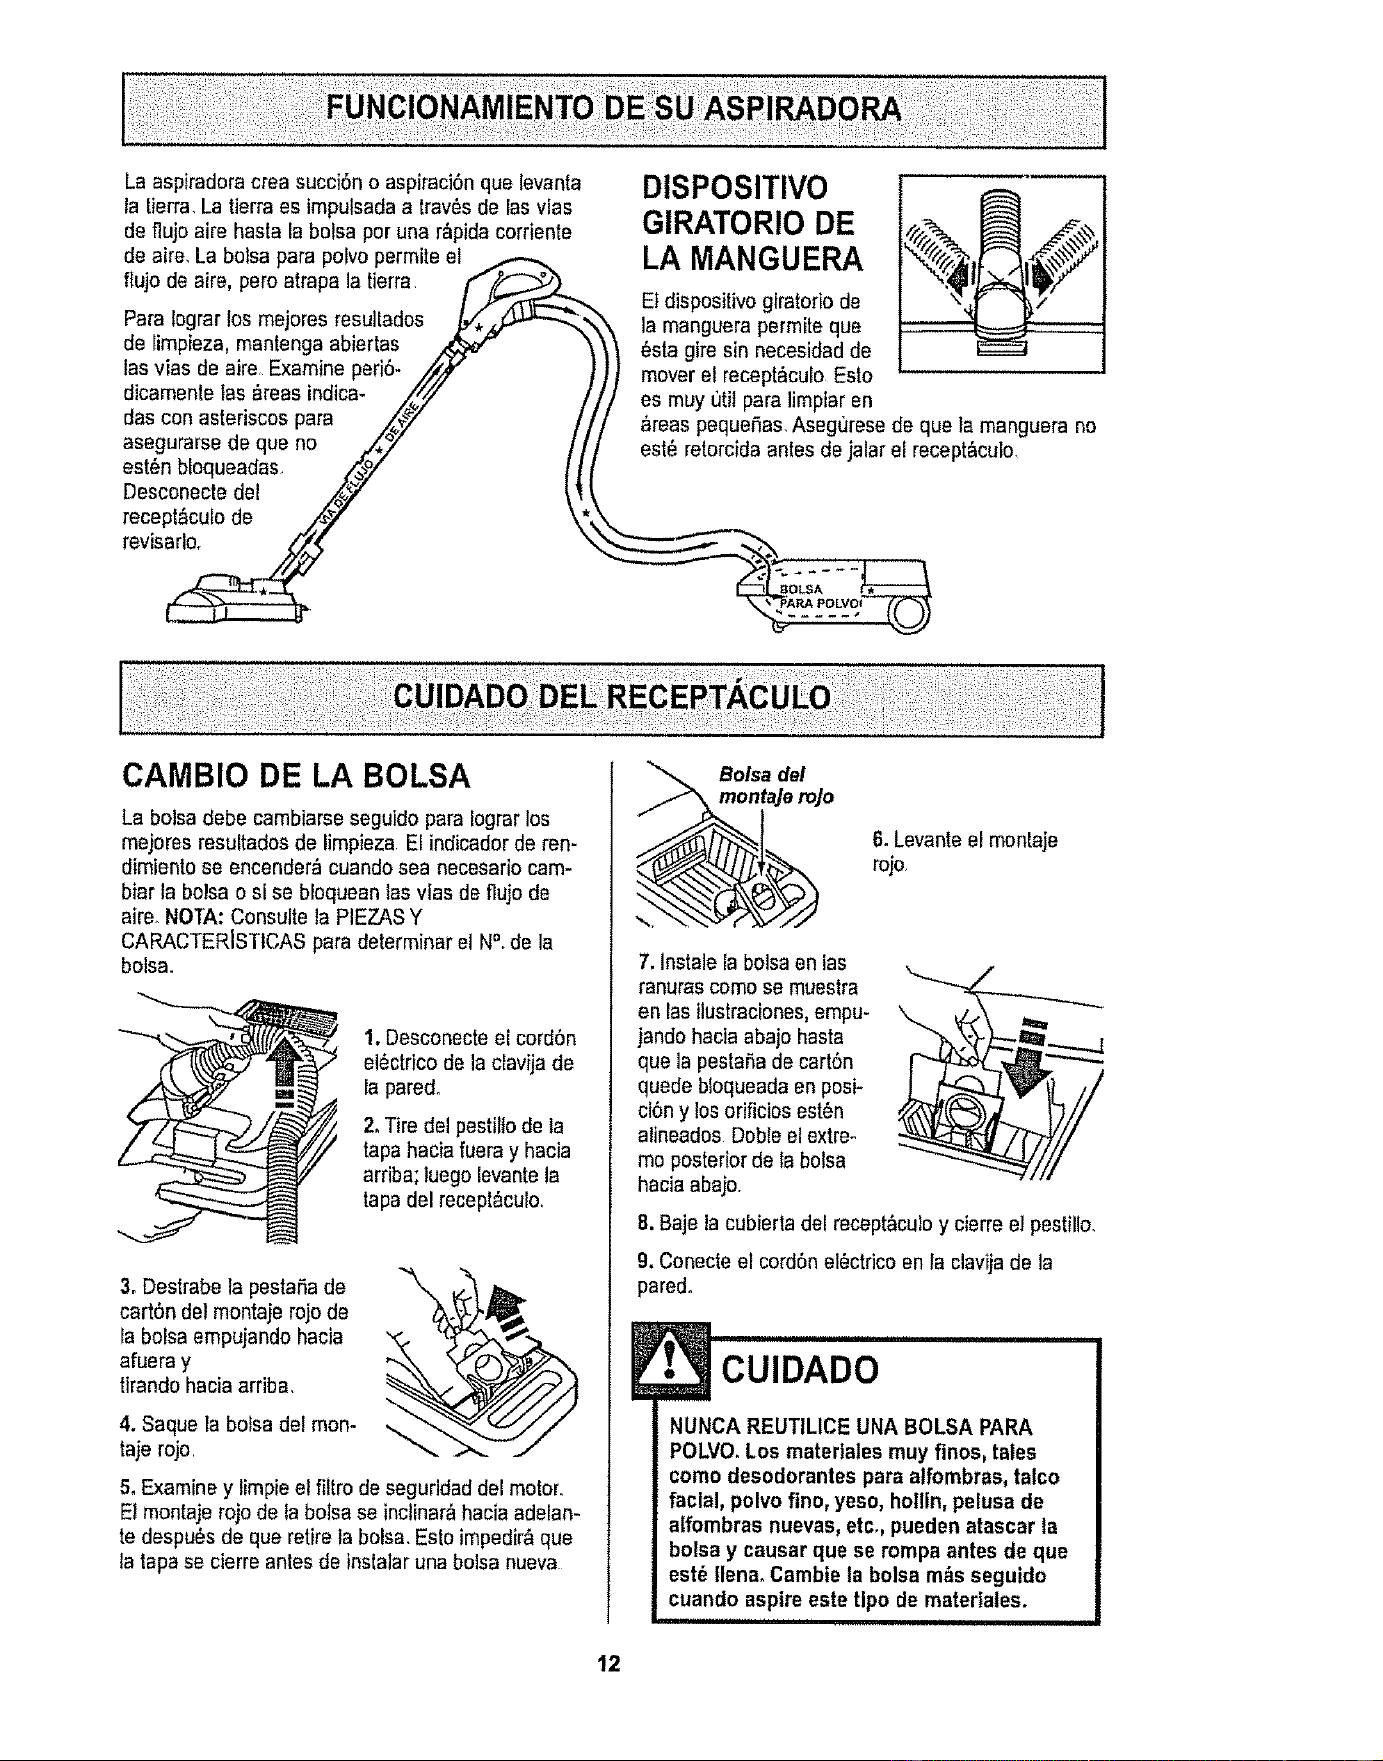
The vacuum cleaner creates suction that
picks up dirt. Rapidly moving air carries the
dirt to the dust bag through the air-
flow passages. The dust bag
lets the air pass through, while [ _.-.--_._
it traps the dirt. _/_._
For best cleaning results, /_-
keep the airflow passage //'/,/
open. Check the starred _"
areas occasionally for _.._" /
clogs. Unplug from _:';,7 tJ
outlet ,before _ '_
ch ec_
BAG CHANGING
)
HOSE SWIVEL
The hose swivel
allows the hose to
turn without moving
the canister. This is
helpful for cleaning in
small area& Check
hose for twisting before pulling canister.
" *_,, DUST BAG i
For best cleaning results, the dust bag
should be changed often. The performance
indicator will come on when the bag needs
to be changed or the airflow is blocked.
NOTE: See PARTS AND FEATURES for
Bag #.
e
1. Unplug cord from
wall outlet.
2. Pull hood release
out and up, then lift
canister hood.
3, Disengage
cardboard tab from red
bag mount by pressing
away and lifting up.
4. Pull bag out of the
red bag mount°
\
5. Check and clean motor safety filter. The
red bag mount wil! flip forward after
removing bag° This will prevent the lid from
closing until a new bag is installed.
Red ag
nt
6. Raise red bag
mount.
7, Install bag into slots
per illustrations
pushing down until the
cardboard tab locks
into position and the
holes align. "P.Jckthe
back end of the bag
down°
8, Close and latch canister hood.
9. Plug cord into wal! outlet.
CAUTION
NEVER REUSE A DUST BAG. Very
fine materials, such as carpet fresh-
ener, face powder, fine dust, piaster,
soot, new carpet lint, etc. can clog
the bag and cause it to burst before
it is ful!. Change bag more often
when vacuuming these materials.
12
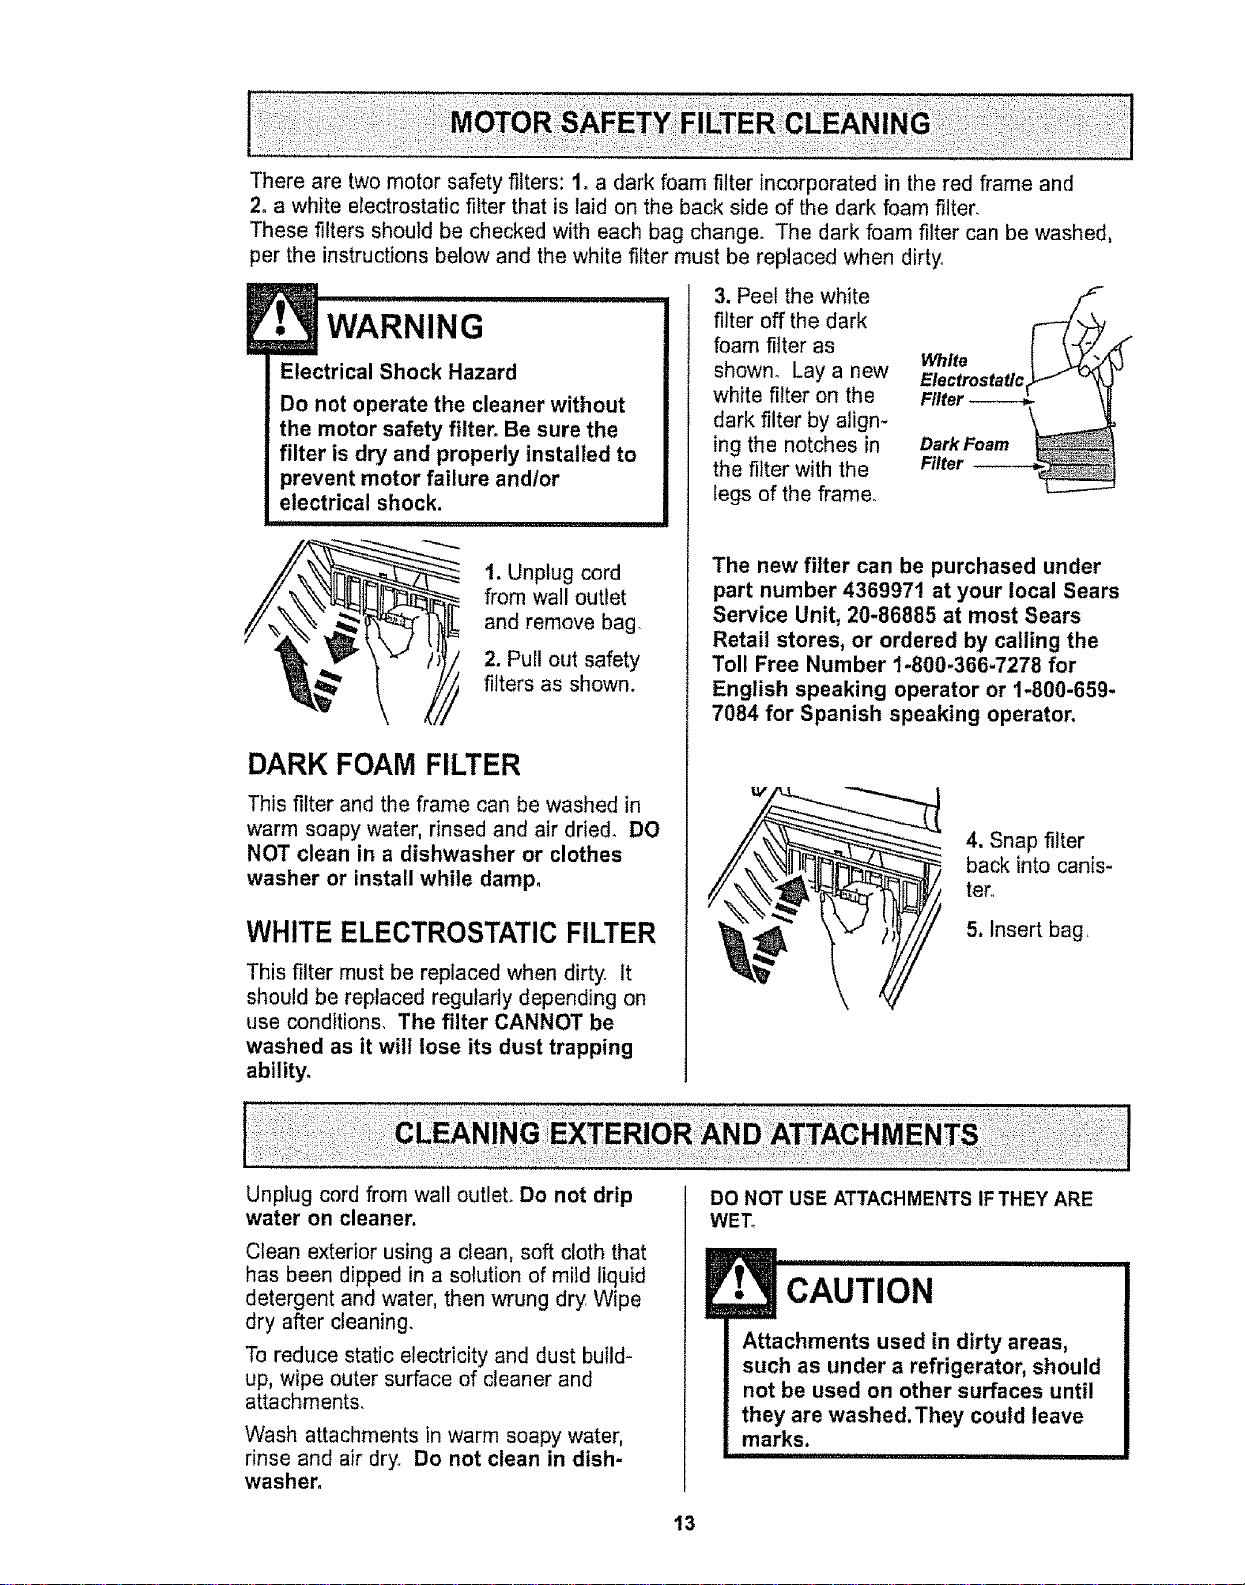
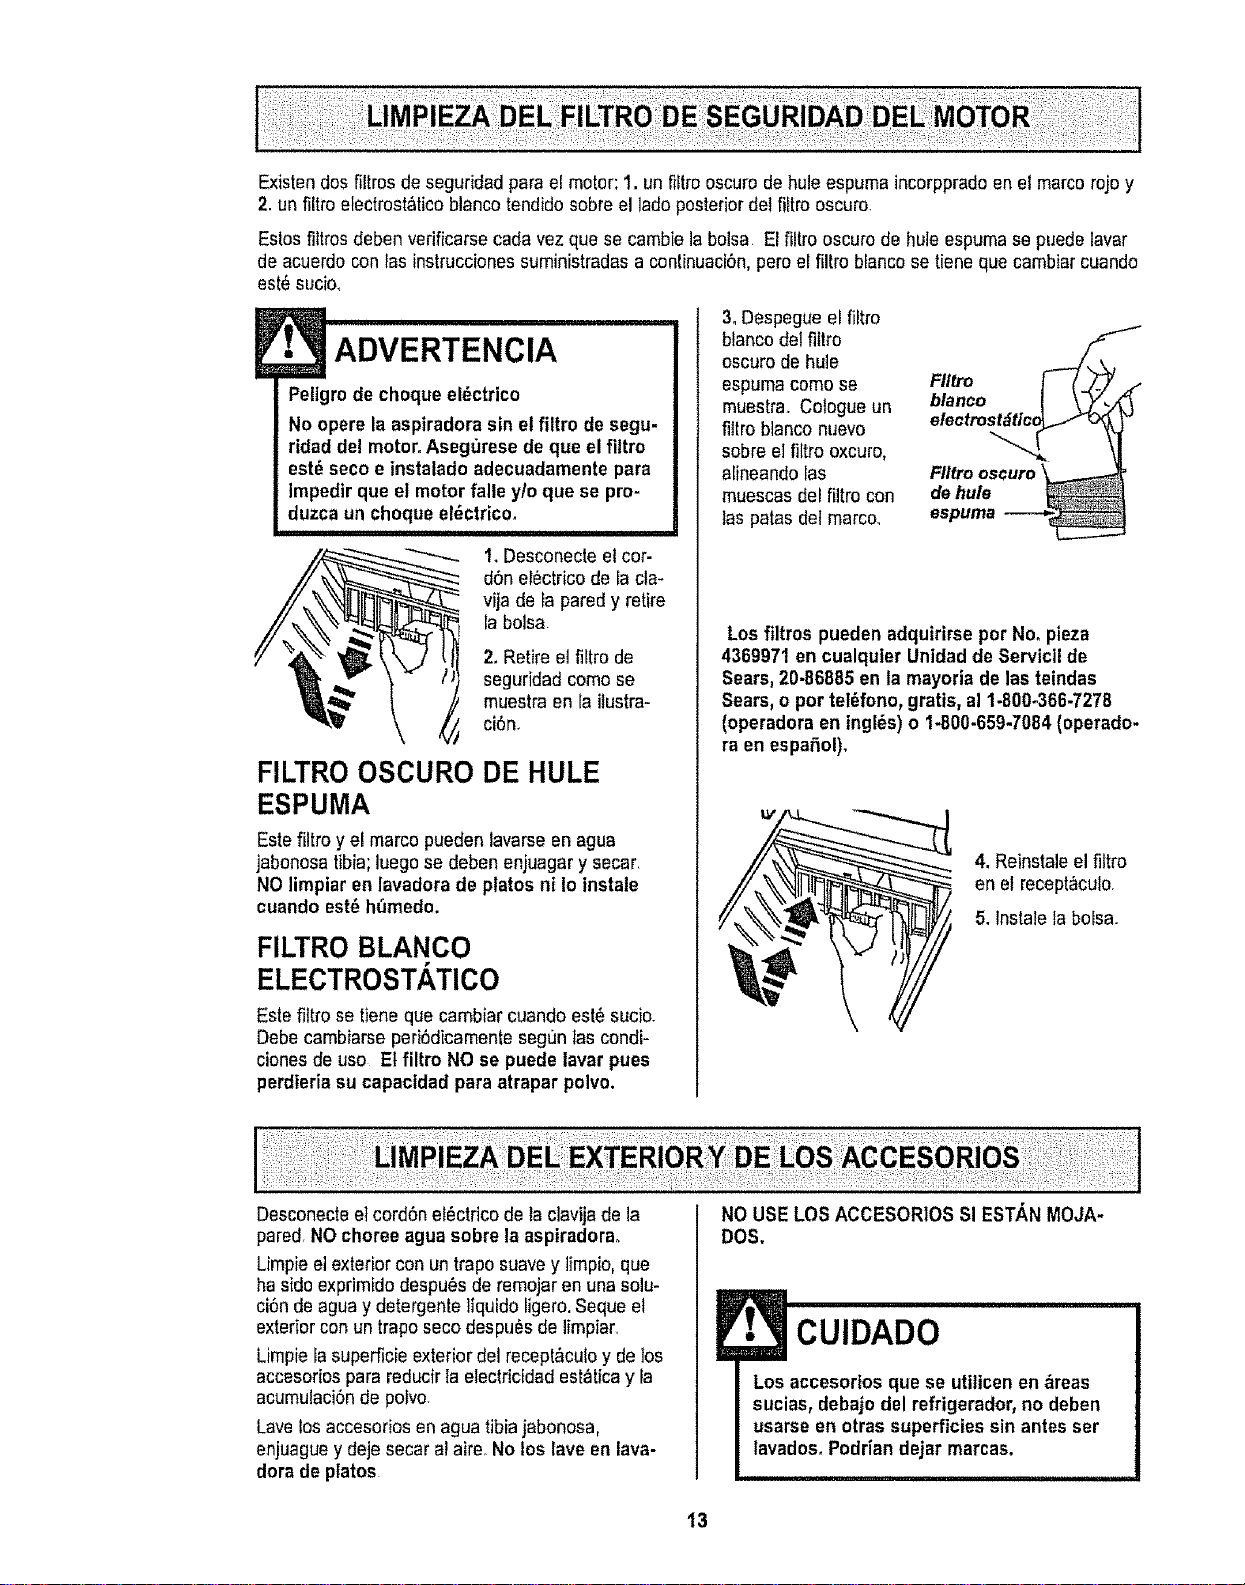
There are two motor safety filters: 1. a dark foam filter incorporated in the red frame and
2. a white electrostatic filter that is laid on the back side of the dark foam filter.
These filters should be checked with each bag change. The dark foam filter can be washed,
per the instruct0ons below and the white filter must be replaced when dirty,
WARNING
Electrical Shock Hazard
Do not operate the cleaner without
the motor safety filter. Be sure the
filter is dry and properly installed to
prevent motor failure and/or
electrical shock.
i,J
t. Unplug cord
from wall outlet
and remove bag.
2. Pull out safety
_._' / I,_ filters as sh°wn.
DARK FOAM FILTER
This filter and the frame can be washed in
warm soapy water, rinsed and air dried. DO
NOT clean in a dishwasher or clothes
washer or install while damp,
WHITE ELECTROSTATIC FILTER
This filter must be replaced when dirty It
should be replaced regularly depending on
use conditions, The filter CANNOT be
washed as it will lose its dust trapping
ability.
3. Peel the white
filter off the dark
foam filter as
shown° Lay a new
white filter on the
dark filter by align-
ing the notches in
the filter with the
legs of the frame.
ElectrostaticS" "_
Filter-----__
Dark Foam
Filter
The new filter can be purchased under
part number 4369971 at your local Sears
Service Unit, 20-86885 at most Sears
Retail stores, or ordered by calling the
Toll Free Number 1-800-366-7278 for
English speaking operator or 1-800-659-
7084 for Spanish speaking operator.
4. Snap filter
back into canis-
term
5. Insert bag,
Unplug cord from wall outlet. Do not drip
water on cleaner.
Clean exterior using a clean, soft cloth that
has been dipped in a solution of mild liquid
detergent and water, then wrung dry Wipe
dry after cleaning.
To reduce static electricity and dust build-
up, wipe outer surface of cleaner and
attachments.
Wash attachments in warm soapy water,
rinse and air dry, Do not clean in dish-
washer,
DO NOT USE ATTACHMENTS IFTHEY ARE
WET,
J• CAUTION ..............
Attachments used in dirty areas,
such as under a refrigerator, should
not be used on other surfaces until
they are washed. They could leave
marks,
13

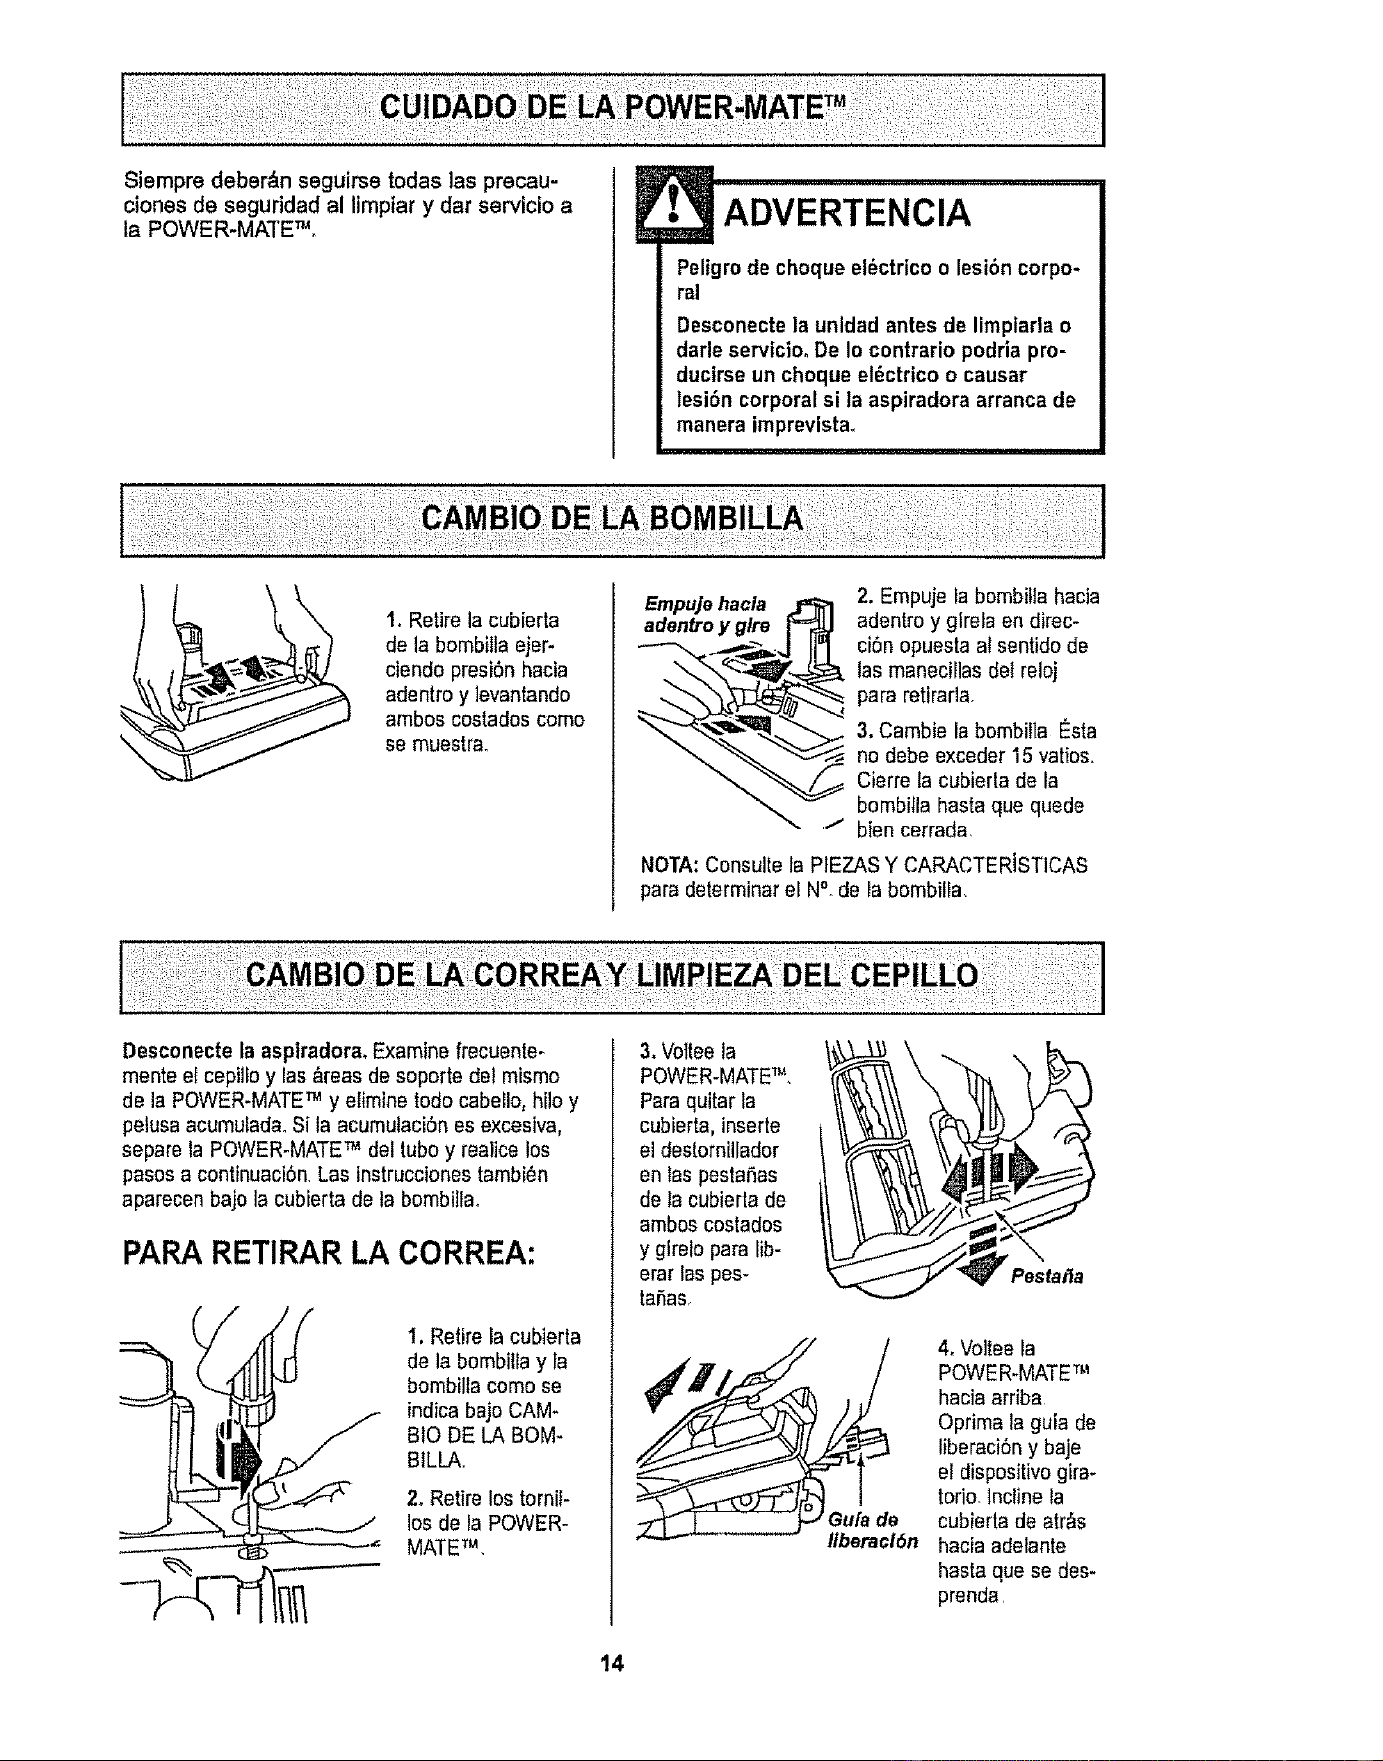
Always follow all safety precautions when
cleaning and servicing the POWER-MATE TM,
WARNING
Electrical Shock Or Personal injury
Hazard
Disconnect electrical supply before
servicing or cleaning the unit.
Failure to do so could result in elec-
trical shock or personal injury from
cleaner suddenly starting_
1. Remove light
cover by pressing
in and lifting both
sides as shown.
Push In
And Turn
2. Push in and turn
bulb counterclock-
wise to remove,
3. Replace the bulb
Bulb must not be
higher than I5 Watts°
Close light cover until
it snaps in place°
NOTE: See PARTS AND FEATURES for
Bulb #.
Disconnect cleaner from electrical outlet.
Check and remove hair, string and lint build-
up frequently in the POWER-MATE TM brush
and brush support areas. If build-up
becomes excessive, disconnect POWER-
MATE TM from wand and follow the steps
below_ Instructions can atso be found under
the light cover.
TO REMOVE BELT:
._ 1. Remove light
cover and light
bulb as shown
under LIGHT
'_ BULB
CHANGING.
_._ 2. Unscrew the
POWER-
MATE TM cover
screws.
3. Turn
POWER-
MATE TM over.
To remove
cover, insert
screwdriver at
cover tabs on
both sides and
twist to
release tabs
Quick
Release
4. Turn POWER-
MATE TM right
side up. Press
handle release
pedal and lower
the swivel° Tilt
cover forward
from back until
front snaps free.
14
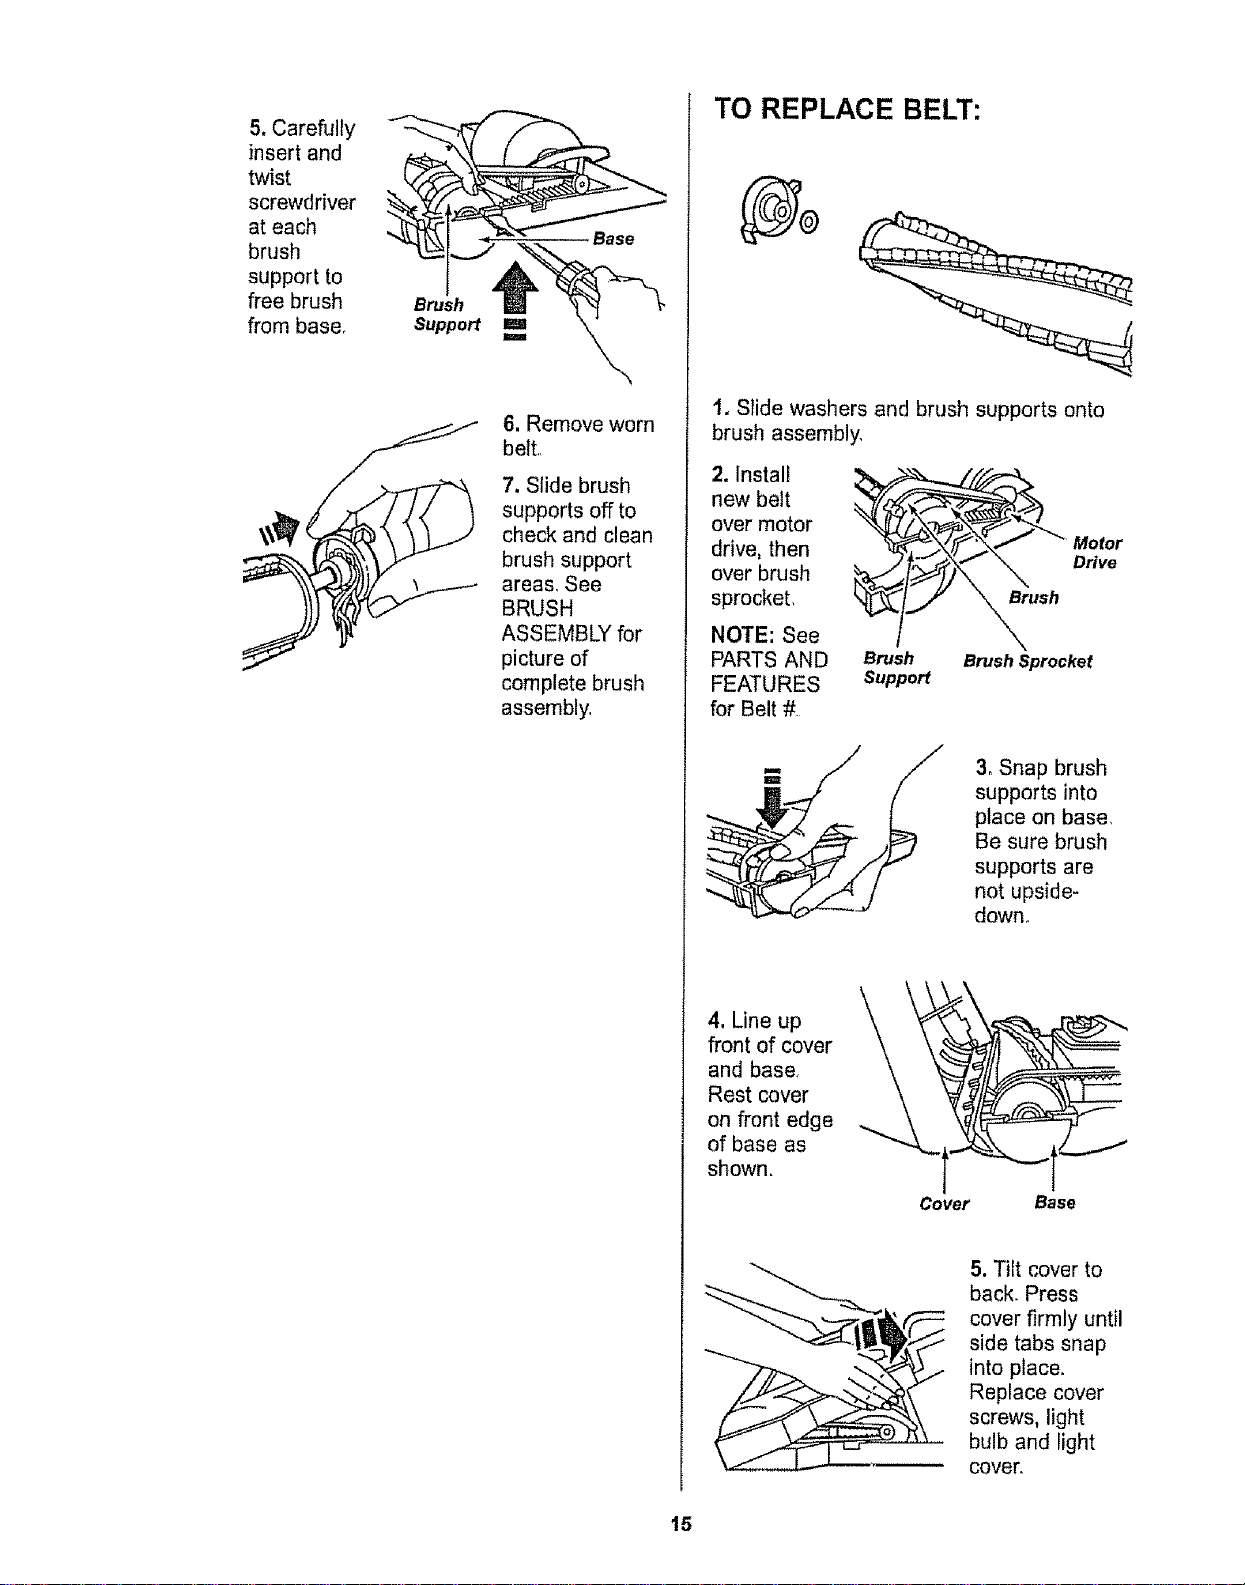
5, Carefully
insert and
twist
screwdriver
at each
brush
support to
free brush
from base,
Brush
Support
Base
TO REPLACE BELT:
6, Remove worn
belt,
7. Slide brush
supports off to
check and clean
brush support
areas, See
BRUSH
ASSEMBLY for
picture of
complete brush
assembly,
t. Slide washers and brush supports onto
brush assembly,
2. Install _,
new belt
over motor
drive, then
over brush
sprocket,
NOTE: See
PARTS AND
_TURES
for Belt #
__'"_ Motor
__ush
Brush Brush Sprockel
Support
3, Snap brush
supports into
place on base,
Be sure brush
supports are
not upside-
down,
4, Line up
front of cover
and base<
Rest cover
on front edge
of base as
shown.
Cover
Base
5. Tilt cover to
back. Press
cover firmly until
side tabs snap
into place.
Replace cover
screws, light
bulb and light
cover.
15

• WARNING
Electrical Shock Or Personal Injury
Hazard
Disconnect electrical supply before
servicing or cleaning the unit.
Failure to do so could result in elec-
trical shock or personal injury from
cleaner suddenly starting.
TO CHECK BRUSH:
whenbrushes
are worn to the
level of the base
support bars,
replace the
brushes
Base Support Bars
TO REPLACE BRUSH:
1. Remove POWER-MATE TM cover, belt and
brush assembly. See "To remove belt" in
BELT CHANGING AND BRUSH
CLEANING.
2, Remove brush supports, washers,
screws, end brush, brush sprocket pieces
from ends of brush assembly.
3, Push out worn
brushes. If the
beater bar is
chipped or
gouged,
replace iL
4. Slide new
beater bar and
brushes into slots°
NOTE: New
brushes and
beater bar may
be easier to install
if they are soaked
in warm water for
a few minutes.
Dry thoroughly
before installing
5. Reassemble brush assembly. To line up
screw holes in dowel, sprocket and end
brush, be sure beater bar portion of end
brush lines up with beater bar on brush
dowel.
6. Replace belt, brush assembly, POWER-
MATE TM cover, light bulb and light cover. See
"To replace belt" in BELT CHANGING AND
BRUSH CLEANING.
Brush
Sprocket
Flan
Brush Dowel
Brush
Sprocket
End
Brush Brush
I Suppo_
Washer
16

Review this chart to find do-it-yourself solutions for minor performance problems. Any ser-
vice needed, other than those described in this owner's manual, should be performed by
an authorized service representative.
WARNi_" G Electrical Shock Hazard .............
I Disconnect electrical supply before servicing or cleaning the unit,
Failure to do so could result in electrical shock or personal Injury.
I ..............................................................
14
2_
Cleaner won't starL
3.
4.
Poorjob of dirt I.
pick-up, 2.
3.
4.
5.
&
7.
&
9o
10,
Cleaner starts but
cuts off,
POWER-MATE"will not
runwhen attached,
2_
3, Trippedoverload protector
in canister
14
2_
3,
4o
Unpluggedat wailoutlet
Trippedcircuitbreakedbiownfuse
athousehold service panel
Loosehose electrical connections 3.
Trippedovedoad protectorin 4,
POWER-MATETM
Fulior clogged dust bag 1.
Cloggedairflowpassages 2.
Dirty meier safety filter 3,
Wrong pileheight setting 4.
Open suclion control 5.
Hole in hose &
Worn POWER-MATE" brushes. 7.
Worn or broken belt 8 & 9,
Dirty brush or brush supports
Canister hood open. 10.
Hose or hoodelectricalconnections t.
Trippedoverload protector in 2_
POWER-MATETM
3,
POWER-MATETM connections I.
unplugged
Worn or broken belt 2 & 3
Dirty brushor brush supporis
Trippedoverload protector in 4.
POWER-MATETM
Fullor cloggeddust bag 1.
Dirty filter 2,
Cloggedairflow passage 3.
Certain altachment fools 4,
Wrong pile heightselling 1.
Suction too strong 2.
1. Plug in firmly, push ONIOFF switch toON
2. Reset circuitbreakeror tapiocafuse
Reconnecthose ends,(page 7),
Clean brush and brush supports,
thenresel, (pages I4, 15)
Change bag,(page 12)
Clear airflow passages,(page 12)
Clean filler,(page 13).
Adjust selling, (page 9)
Adjust control,(page t 1)
Replace hose
Change brushes,(page t6),
See BELTCHANGINGAND BRUSH
CLEANING,(pages 14, 15).
Close and latchhood
Check connections,reconnect hose
ends, (page 7)
Remove any flemsthat may be caught
or jammed,Ihen reset If cleaner starts
and steps again, clean brushand brush
supperls, thenreset, (pages 14, 15)
Changedus! bag, clear airflow blockage,
(page 12) Wait 20 minutes formotor
to cooland automaticallyreset
Plug in firmly, (page 6)
See BELTCHANGINGAND BRUSH
CLEANING,(pages 14, 15).
Check brush area for excessivetint
buitd-upor jamming Clean brush and
brush supports,then reset,(pages 14, 15)
Performanceindicator, 1_ Changebag, (page 12)
some models, isred. 2. Changefilter, (page 13)
3, Clearclog from airflow passage, (page 12)
4, This is normal Light should go off
when tool Isremoved
Cleaner picks up moveable 1, Adjust selling.(page 9),
rugs -or- POWER-MATETM 2. Opensuction control, (page 1!)
pushes too hard,,
Light won't work_ 1. Burnedout light bulb 1. Changelight bulb, (page 14)
Cordwon't rewind, 1, Dirty power cord 1, Cleanthe power cord.
2. Cordjammed 2. Puttout cord and rewind.
Cleaner leaves marks 1. Wrong vacuuming pattern 1. SeeVACUUMINGTIPS,(page 9)
on carpel,
17
For the repair or replacement parts you need
Call 7:00 am - 7:00 pro, 7 days a week
1-800 -366 -PART
(1-800-366-7278)
For in-home major brand repair service:
Call 24 hours a day, 7 days a week
1-800"4-MY-HOME sM
(1-800-469-4663)
For the location of a
Sears Parts and Service Center in your area:
Call 24 hours a day, 7 days a week
1-800-488-1222
For information on purchasing a
Sears Maintenance Agreement
or to inquire about an existing Agreement:
Call 9:00 am - 5:00 pro, Monday - Saturday
1-800-827-6655
When requesting service or ordering parts, always provide the following information:
• Product Type • Part Number • Model Number • Part Description
i "HorneCentr_aI''
TheServiceSided Sears,
18
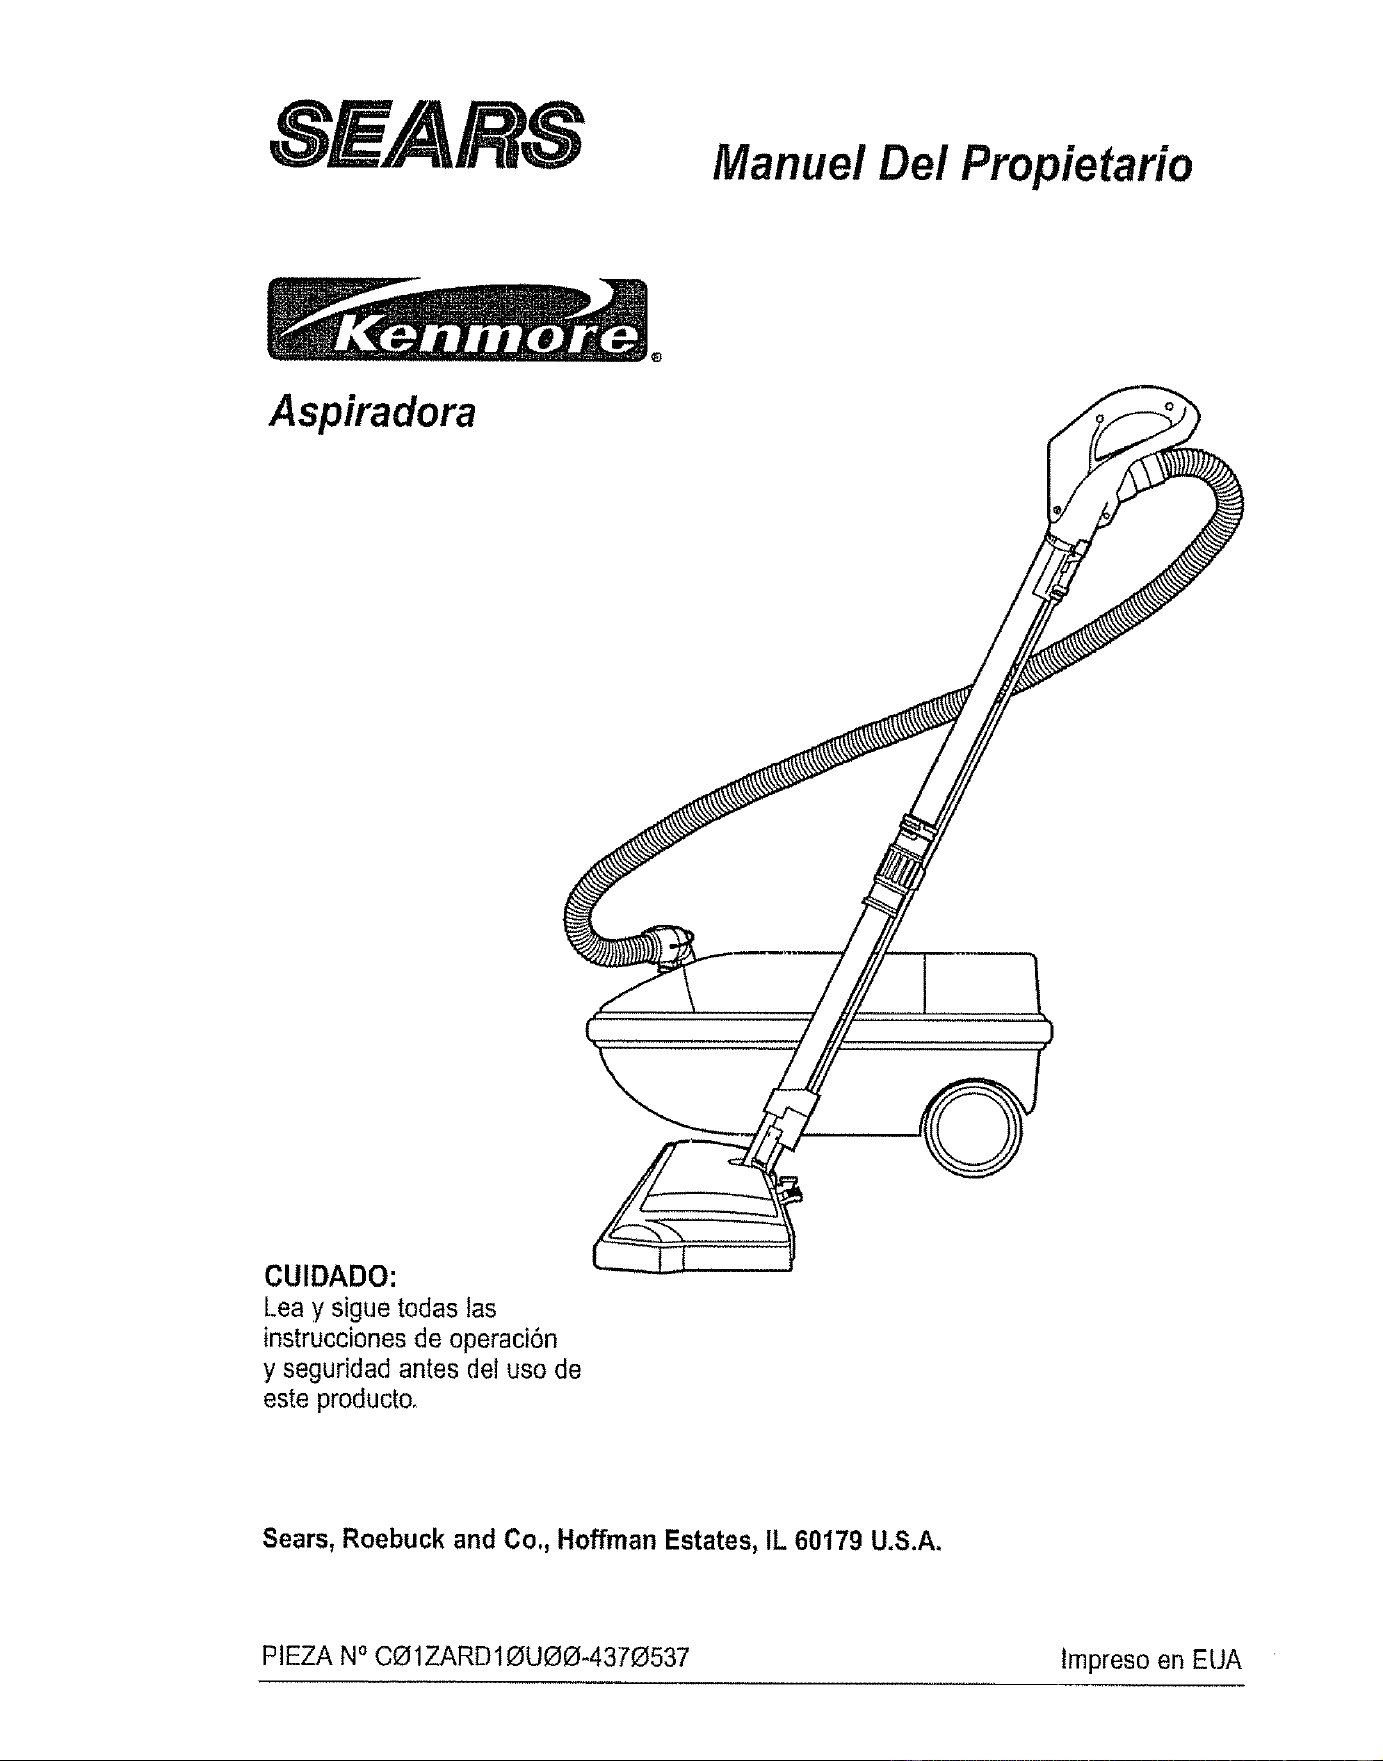
, E/.41Rt,S
Manuel Dei Propietario
Aspiradora
CUIDADO:
Lea y sigue todas las
instrucciones de operaci6n
y seguridad antes del uso de
este producto.
Sears, Roebuck and Co,, Hoffman Estates, IL 60179 U.S.A.
PIEZA NOC_1ZARD10UOO-4370537 lmpreso en EUA
Antes de usar su aspiradora nueva ...... 2
Garantia de la aspiradora de Kenmore _,, 2
Instrucciones importantes de
seguridad .............................. 3
Piezas y caracteristicas ............... 4-5
Armado ................................ 6-7
Use ................................... 8
Paracomenzar ....................... 8
Sugerencias para aspirar ............ 9
Sugerenciassobre el ajuste de nivel de
pelo de la alfombra ................... 9
Accesorios ...................... 10
Use de ios accesorios ................. 10
Caracteristicas de renclimiento ........... 11
Funcionamiento de su aspiradora ....... 12
Cuidado del recept_culo ............... 12
Cambio de la bolsa ................... 12
Limpiezadel filtro de seguddad del motor , 13
Limpiezadel exterior y de los accesorios ... 13
Cuidado de la Power-Mate TM ............ 14
Cambio de la bombifla ............... !4
Cambio de la correa y limpieza
del cepil]o ......................... 14-15
Cuidado de! cepiilo ................ I6
Ensambie def cepillo .................... 16
Reconocimiento de problemas ........ 17
Informacibn de assistancia
o servicio ........................... _B
Perfavor tea esta guia que le ayudara a assemblar y operar su asp]radora nueva de Kenmore en una manera
m_s segura y effectiva,,
Paramas informaciOnacerca del cuidado y operaci6n de esta aspirador, llame a su tienda Sears mas cercanar
Cuando prequnte per informaci6n usled necisitar,_el nt_merocompfetode serie y modelo de la aspiradora que
est_ locado en ]a placa de los numeros de modeEoy serie.,
Use el espacio de abajo para registrar el nDmerode modelo y serie para su nueva aspiradora de Kenmore.
Nt)mero de Medelo
Nt_merode Serie
Fecha de Compra
Matenga este libroy su recibo en u ]ugar seguro para referencias futuras
GARANTIA COMPLETA PeR UNA_]O
Mientras su use se limite a fines domOsticosparticulares, si esta aspiradora falla dentro de un periodo de un
ale a partir de la fecha de compra, per razonesde defectos en materiales o mane de obra, DEVUI_LVALAAL
CENTRe O DEPARTAMENTO DE SERVICIO DE SEARS M.&S CERCANO y Sears la reparar,_sin ningt)n
cargo.
Esta garantia ]e confiere derechos legales especificos y adem_s puede que tenga otros derechos que difieren
entre estados,
SEARS,ROEBUCK AND COn,D1817WA, Hoffman Estates,IL 60179
ADVERTENCIA .....
Su seguridad es muy importanle para nosotros, Para reducir el riesgo de incendio, cheque
el_ctrico, lest6n corporal o dafios al utilizar su aspiradora, actue de acuerdo con precauciones
b_sicas de seguridad, entre elias:
Lea este manual antesde armar o utilizar su aspi-
fedora,
Use su aspiradora unicamente en la farina descrita
en este manual Use _nicamentecon acceserios
recomendadosper Sears
Para reducirel riesga de cheque el6ctrico,no use
su aspiradora al aire libra nl sabre superficies
mojadaso
Desconecte el cord6n el_ctriceantes de
componer o Iimpiar el area del cepillo. De Io
contrario, el cepillo podria arrancar de form
imprevistao podrla producirseun cheque el_ctrico.
Siempredebe apagar la aspiradora antes de
conectar o desconectar la manguera de la
POWER-MATET_L
Siempredebe apagar su aspiradora antes de des-
conectarla_
No descenecte la aspiradoratirandodet cord6n
el6ctrico.Paradesconectarla, hale el enchufe, no
el cord6n.
Sujete el enchufecon la mane al entailer e! cord6n
e]_ctrico. Paradesconectarla, hale en enchufe, no
el cord6n_
No use faaspiradora si el cord6n o el enchufe est_
dafiade..Si la aspiradora no est&funcionandoade-
cuadamente o si se ha dejado caer,est_ dafiada,
se ha dejado expuesta ala intemperiee se ha
dejada caer en ague, devu_lvalaa un Cen-
trotDepartamento de servicio de Sears.
No hale ni transporte la aspiradora par el cord6n;
no use el cord6n coma mango;no cierre puertas
sabre el card6n; no hale el cerd6n sabre rebordes
agudos ni esquinas No pase la aspiradora sabre
el cord6n Mantenga et cord6n alejado de superfi-
cies calientes.
No abandone la aspiradora cuando est_ conec-
tada.Descon_ctelacuando no la est_ usando y
antes de dadeservicio..
No permita qua sea utilizada comajuguete_Se
requieretener mayorcuidado cuando sea ulilizada
en la preximidadde nifios o par nifios.
No toque la aspiradora niet enchufe con las
manes mojadas,
No use la aspiradora si la manguera est_ rotaoLa
manguera conliene alambres el_ctricos. C_mbiela
si est&rata o desgastada,Evite aspirar objetos
agudos.
No coloque objetos en las aberturas
No ulilice la aspiradora si alguna abertura est_ bfo-
queada; mant_ngala librade polvo,pelusa, cabe-
lies y cualquiera case que podrta disminuir el flujo
de aire.
Mantengael cabello,rope suetta, dedos y todas
las partes del cuerpo alejados de las aberturas y
piezasmec_nicas.
No use la aspiradora sin tener instalada la balsa
pare polvo ylo los filtros
Camblestempre la balsa para polvo despu_s de
aspirer limpiadoresde affombraso desodorantes,
talcos y pelves fines. Estes productos atascan la
balsa, reducen et flujo de aire y puedencausar qua
_sta se romperSi no cambia la balsa podrla oca-
sionar dafio permanenteala aspiradora
No use la aspiradora paralevantar objetos agudos,
juguelespequefios, alfileres, papal, etc. Podrtan
dafiar la aspiradora ola balsa para pelvo.
No tevante ningunacosa qua se est_ quemando o
emitiendo humo,coma cigarrilfos,cerilloso ceni-
zas calienles
No use la aspiradora para aspirer liquidos inflama-
bleso combustibles (gasoline, liquidos pare lira-
plaza, perfumes,etc.) nila use en tugaresdonde
6stes podrian estar presentes.Los vapores de
estas sustancias puedencrear un peligro de incen-
die o explosion,
Tenga cuidado especial al utilizar la aspiradora
en escalones..No la celoque sabre sillas, mesas,
etc. Mant_ngalaen el piso_
Usted es responsable de asegurar que su aspira-
dora no sea utilizada par nlnguna persona qua no
pueda manejarta correclamente
GUARDE ESTAS INSTRUCCIONES
El armada y use segure de su aspiradora sonsu respensabitidad.Esta aspiradora ha side disenada
exctusivamenle para usa dom_slico. Laaspiradora debar&almacenarse en un tugar seco yen elinterior.
Lea este Manual del propietario detenidamente,pues centiene informaci6nimportante sabre seguridad y
usa, Esta quia contiene informaci6n sabre seguridad debajo de simbolos de advertienciacuidado, Par
favor ponga atenci6n especial a estas instrucciones dadas Advertencia: Este informaci6nle alertar& con
el potigro de fuego, cheques eleclricos, quemadasy lesiones, Cuidado: Este informaci6nle alertara a
peligros coma lesiones y dares de propiedad.

Esimportanteconocerlaspiezasycaractefisticasdesuaspiradoraparaasegurarsuusoadecuadoyseguro.
Examinelasantesdeusarsuasptradora
superior
Dlsposltlvo
glratorlo
dal mango
(Algunos
modefos)
del eord6n
SuJetador dal
cord6n y el
enehufe
Cordbn eldctrico
de POWER.MATE TM
_- SuJetador dal
corddn y el
enehufe
-- Bot6n de
liberacl6n
r_fplda del
mango
(Algunos
modaloa)
Tubo
superior
POWER=MATE TM
Indlcador de nlvel
de palo de la alfombra
(Algunoa modelos)
Pedal de
llberael6n r&plda
del tubo
(Algunos modalos)
N_meros de saris del
modelo POWER.MATE TM
(Parts Inferior)
Pedal de /_
Iiberacf6n
del mango"
Pedal de aelecci6n de
nlvel de pelo de la alfombra
(Algunos modaloa)
Luz
// (Afgunos modeloa)
Bombllfa
[E.eUA#2o-s24oI| En Canad_ #596181
Cublarta de la bombllla
(Algunos modetos)
orl/laa
(No se muestra)
Protector contra
sobrecargas (Botdn de
restauracl6n "Reset'_
MANGUERA
Interruptor de encendido/
apagado de ires posiciones
(Apagado/Piso expuesto/Alfombra)
(Algunos modelos)
velocidad
modelos)
Dispositivo
giratorio de
/a manguera
ACCESORIOS
Herramlenta
para
hendlduras --__
Ceptllo para
sacudlr ---=-_
Ceplllo para ___
telas ---------___
Ceplllo para .__
plsos --
NOTA:Todos los moderoscuentan con
un juegode accesoriosen el recept_cu-
Io Atgunos mod_los cuentan con unjue-
go adicionat que puede atmacenarseen
ia bolsa para accesodos de uso e en el
garaje,,
RECEPTACULO
Almacenam/ento
para accesorios
Tapa del
recept=_culo _-
Cubterta
Luz lndlcadora
de rendlmlento
del recept_culo
(Algunos modelos)
Almacenamiento del
cord6n el6ctrico
Indlcador de
rendlmtento
(Algunos modelos)
Su]etador
deia bolsa
Cord6n el_ctHco
(No se muesfra)
F/ltro de segur/dad de/
motor (Detrds de la
bolsa para po/vo)
Bolsa para poivo
I n EUA #20.50558 }
En Canad_J#20.50555
-- Ndmeros de serie
del modelo de
recept_culo
(Parte Inferior)
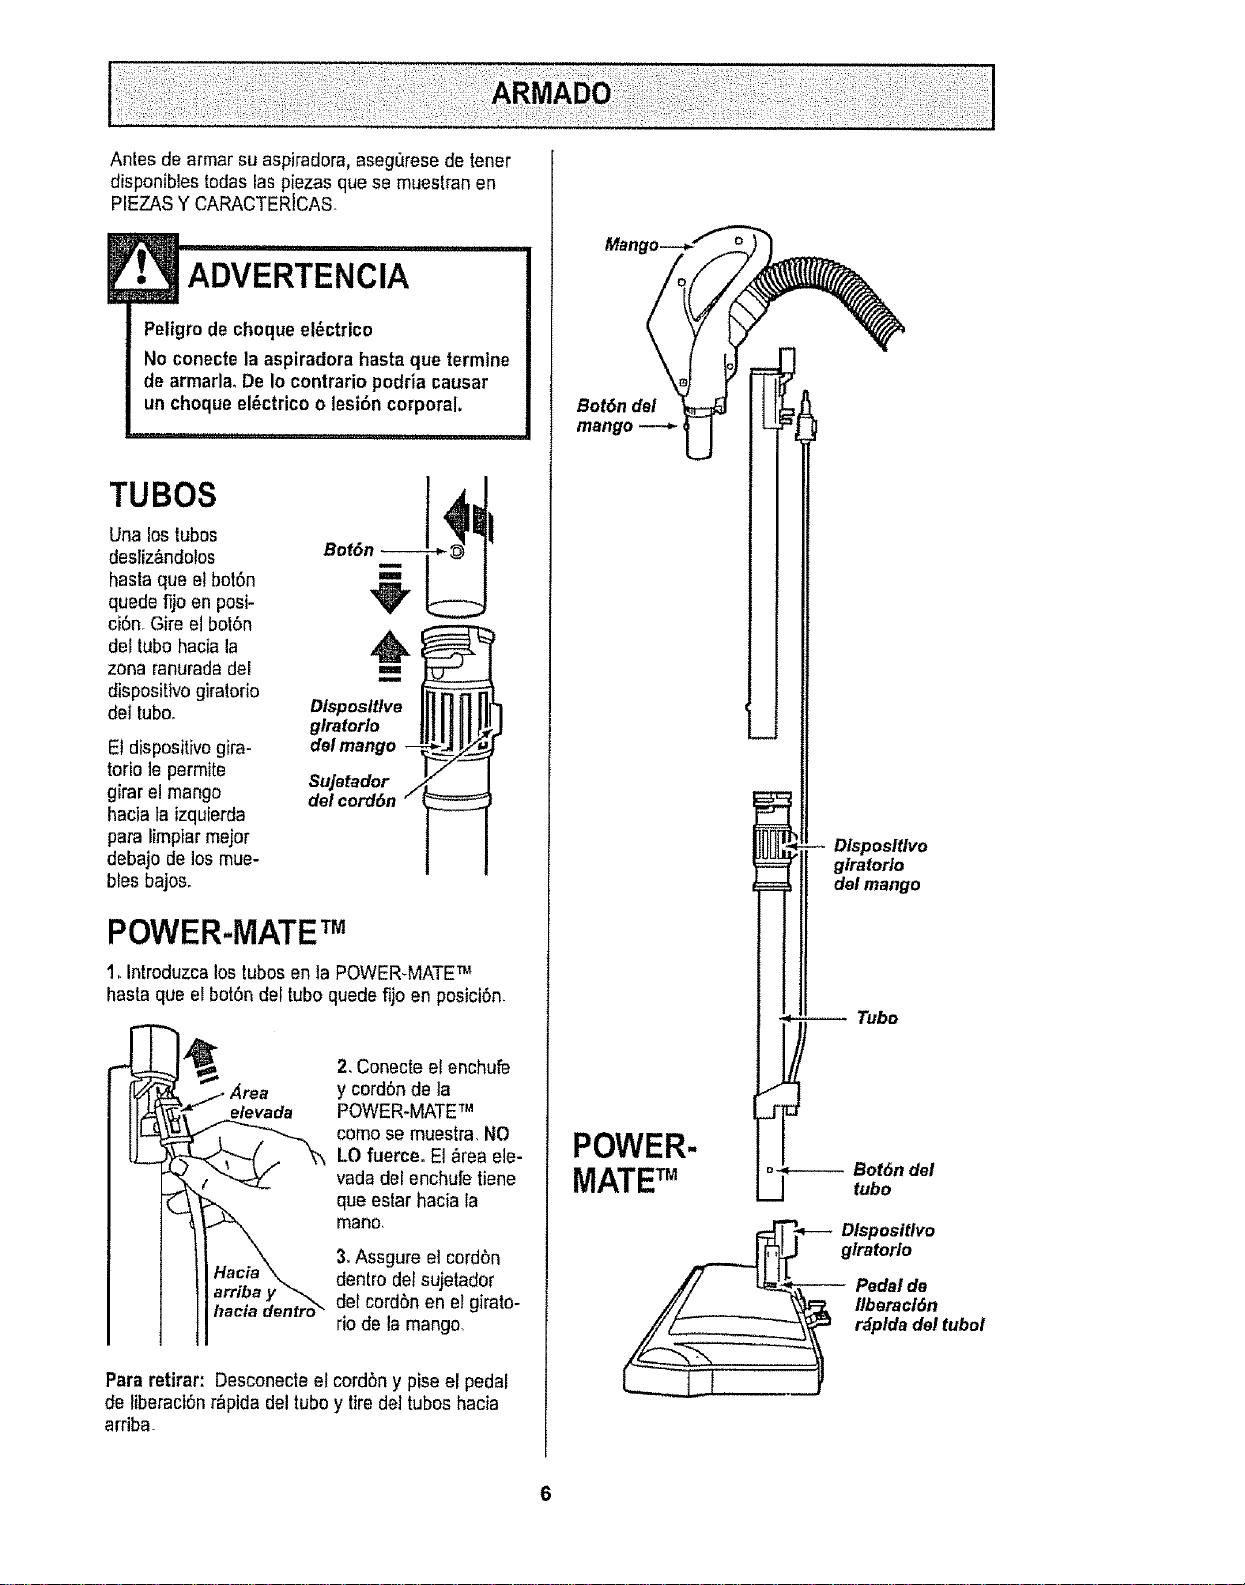
Antes de armar su aspiradora,aseg_rese de tener
disponibles todas las piezas que se muestran en
PIEZASY CARACTERJCAS
ADVERTENCIA
Pettgro de cheque el_ctrico
No conecte la aspiradora hasta que termine
dearmada. De Io centrario podria causar
un cheque el_ctrico o lesi6n corporal.
TUBES
Una los tubes
desriz_ndolos
hasta que el bot6n
quede fijo en posi-
ci6n. Gire el bol6n
del tube hacia la
zona ranuradadel
dispositivo gkatorio
del tubo,
Et dispositivogira-
torio le permite
gimr el mango
hacia la izquierda
para limpiar major
debajo de los mue-
hies bajos.
!
,.=
Dlsposltlve
g/raforlo
del mango --
Sujetador
delcord6n /
POWER-MATETM
1_introduzcalostubesen ta POWER-MATETM
hasta qua el bot6n del tube quedefijo en posici6n_
• Area
e/evada
2, Conecte el enchufe
y cord6n de la
POWER-MATE'm
come se muestra. NO
LO fuerce. El _rea ele-
vada deI enchufe tiane
qua estar hacia la
mano,
3.Assgure el cordon
dentro del sujetador
clefcordbn en eFgirato-
rio de la mango
Para retirar: Desconecte el cordbn y pise el pedal
de liberaciOnr_pida del tube y tire del tubeshacia
arriba.
Mange
Bot6n del
mango
POWER-
DlsposlUvo
giratorio
del mango
Tubo
MATETM
__= _-- Dlsposltlvo
giratorlo
Pedal de
flberacl6n
r_pldadel tuboi
L_._21
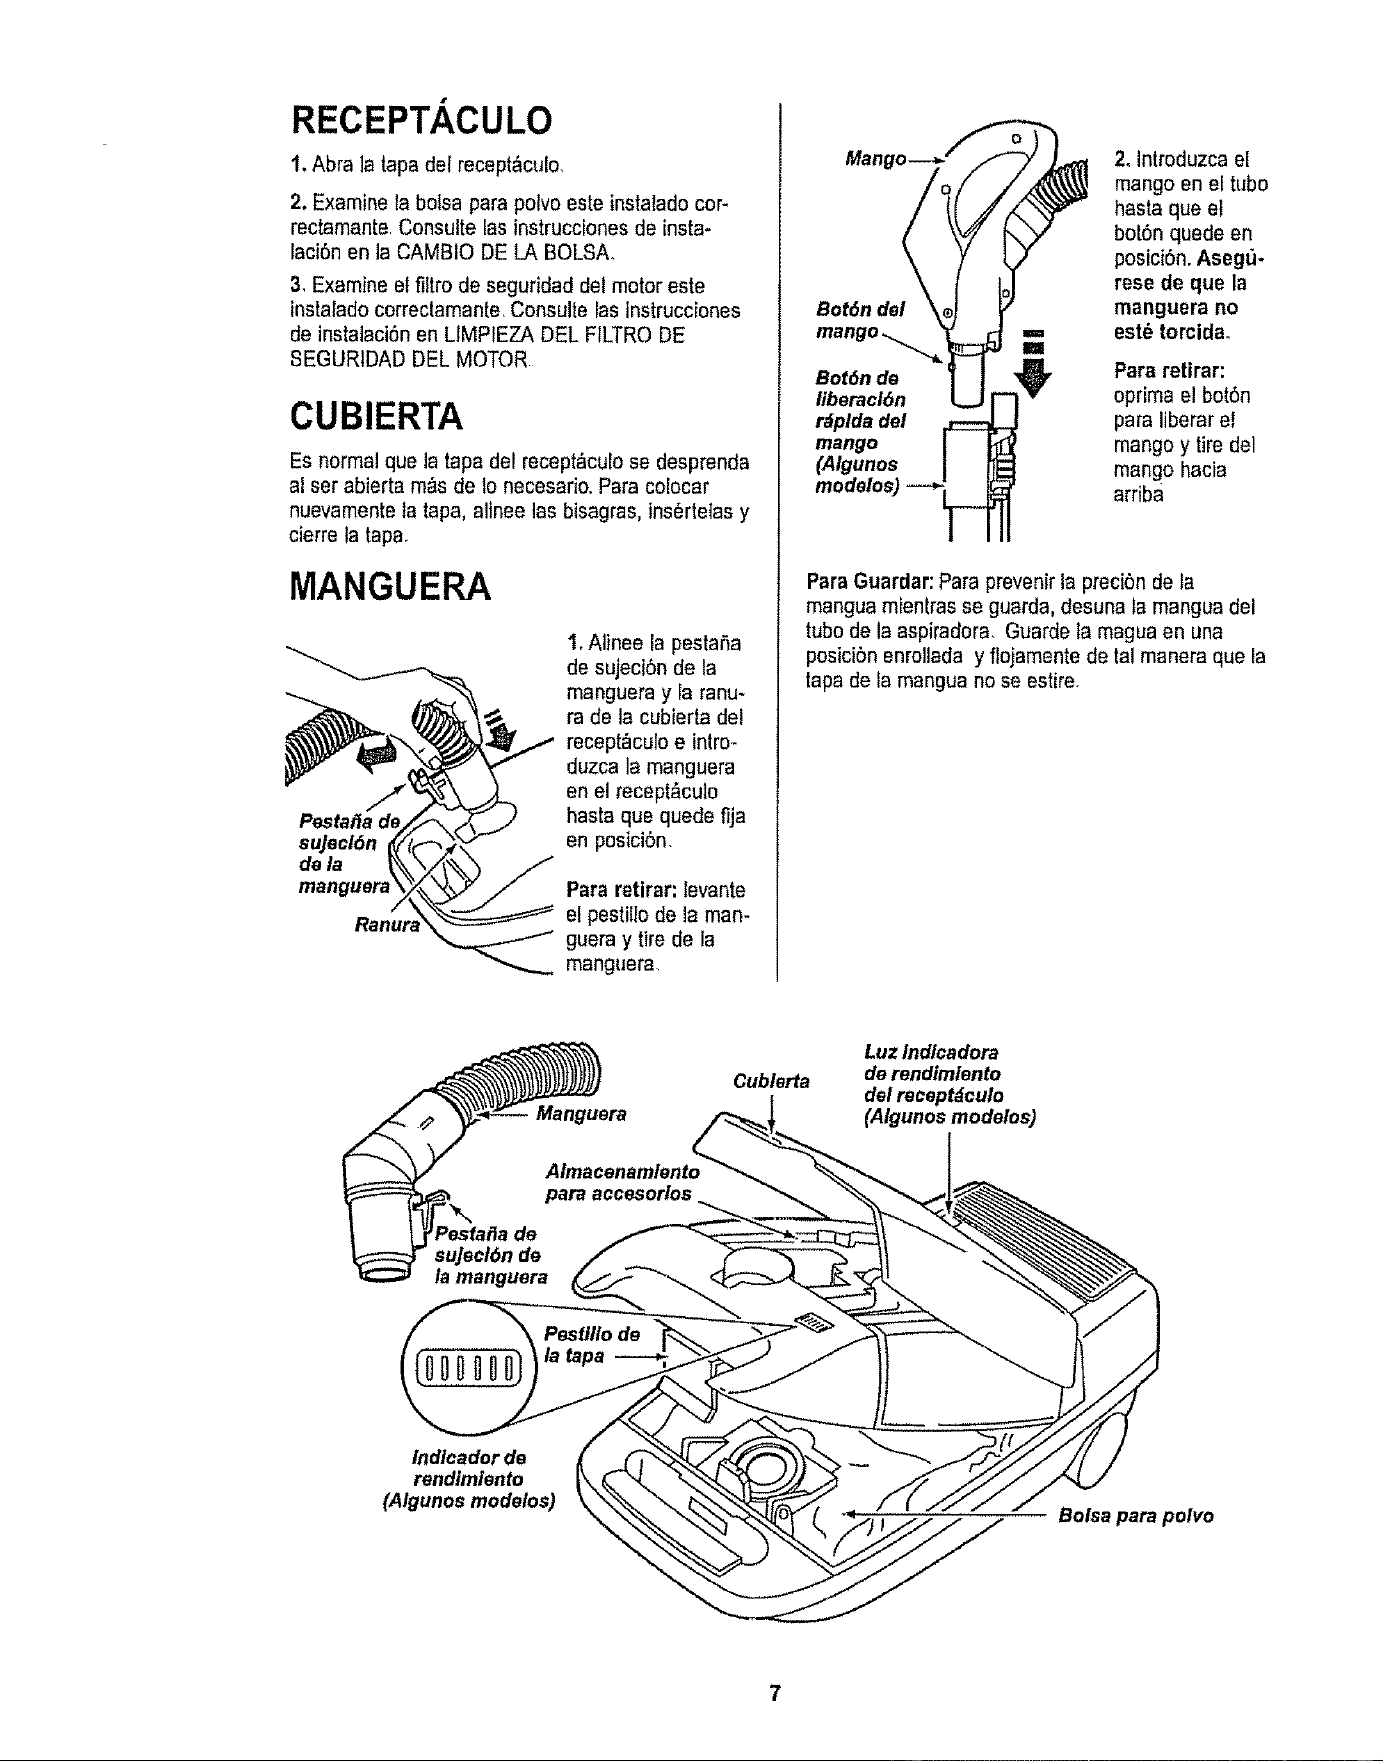
RECEPTACULO
1.Abra ]a tapa del recept&culo.
2. Examine la bo{sa parapolvoesle instaladocor-
rectamante Consulte las instrucciones de insta-
laci6n en la CAMBIO DE LA BOLSA.
3. Examine el filtro de seguridad del motor este
instalado correctamante<Consulte las tnstrucciones
de instalaci6n en LIMPIEZA DEL FtLTRODE
$EGURIDAD DEL MOTOR
CUBIERTA
Es normal queta tapadel recept_culo se desprenda
al ser abierta m_s de 1onecesario. Para colocar
nuevamentela tapa, alinee las bisagras,ins6rtetas y
cierre ta tapa.
MANGUERA
Pestal_a de
sujecl6n
dela
manguer_
1, Alinee la peslaSa
de sujeci6n de la
manguera y la ranu-
ra de la cubierta del
recept_culo e intro-
duzca la manguera
en el recept_,culo
hasta que quade fija
en posiciSn.
Pararetirar: levante
el pestillo de la man-
guera y tirede la
manguera
Bot6n dei
Bot6n de
iiberacl6n
r_plda del
mango
(Algunos
2. Introduzca el
mango en el tlibo
hasta que el
bot6n quede en
posici6n. Asegu-
rese de que la
manguera no
est_ torcidao
Para retirar:
oprima el bot6n
para liberar el
mango y tire del
mango hacia
arriba
ParaGuardar:Para prevenirla preci6n de la
mangua mienlras se guarda, desuna fa mangua del
tube de la aspiradora. Guarde la magua en una
posicibn enrollada y flojamente de tal manera que la
tapa de la mangua no se estire.
Cublerta
Luz indlcadora
de rendimfento
del raceptdculo
(Algunos modeles)
indlcador de
rendimiento
(Algunos modelos)
Bolsa para polvo
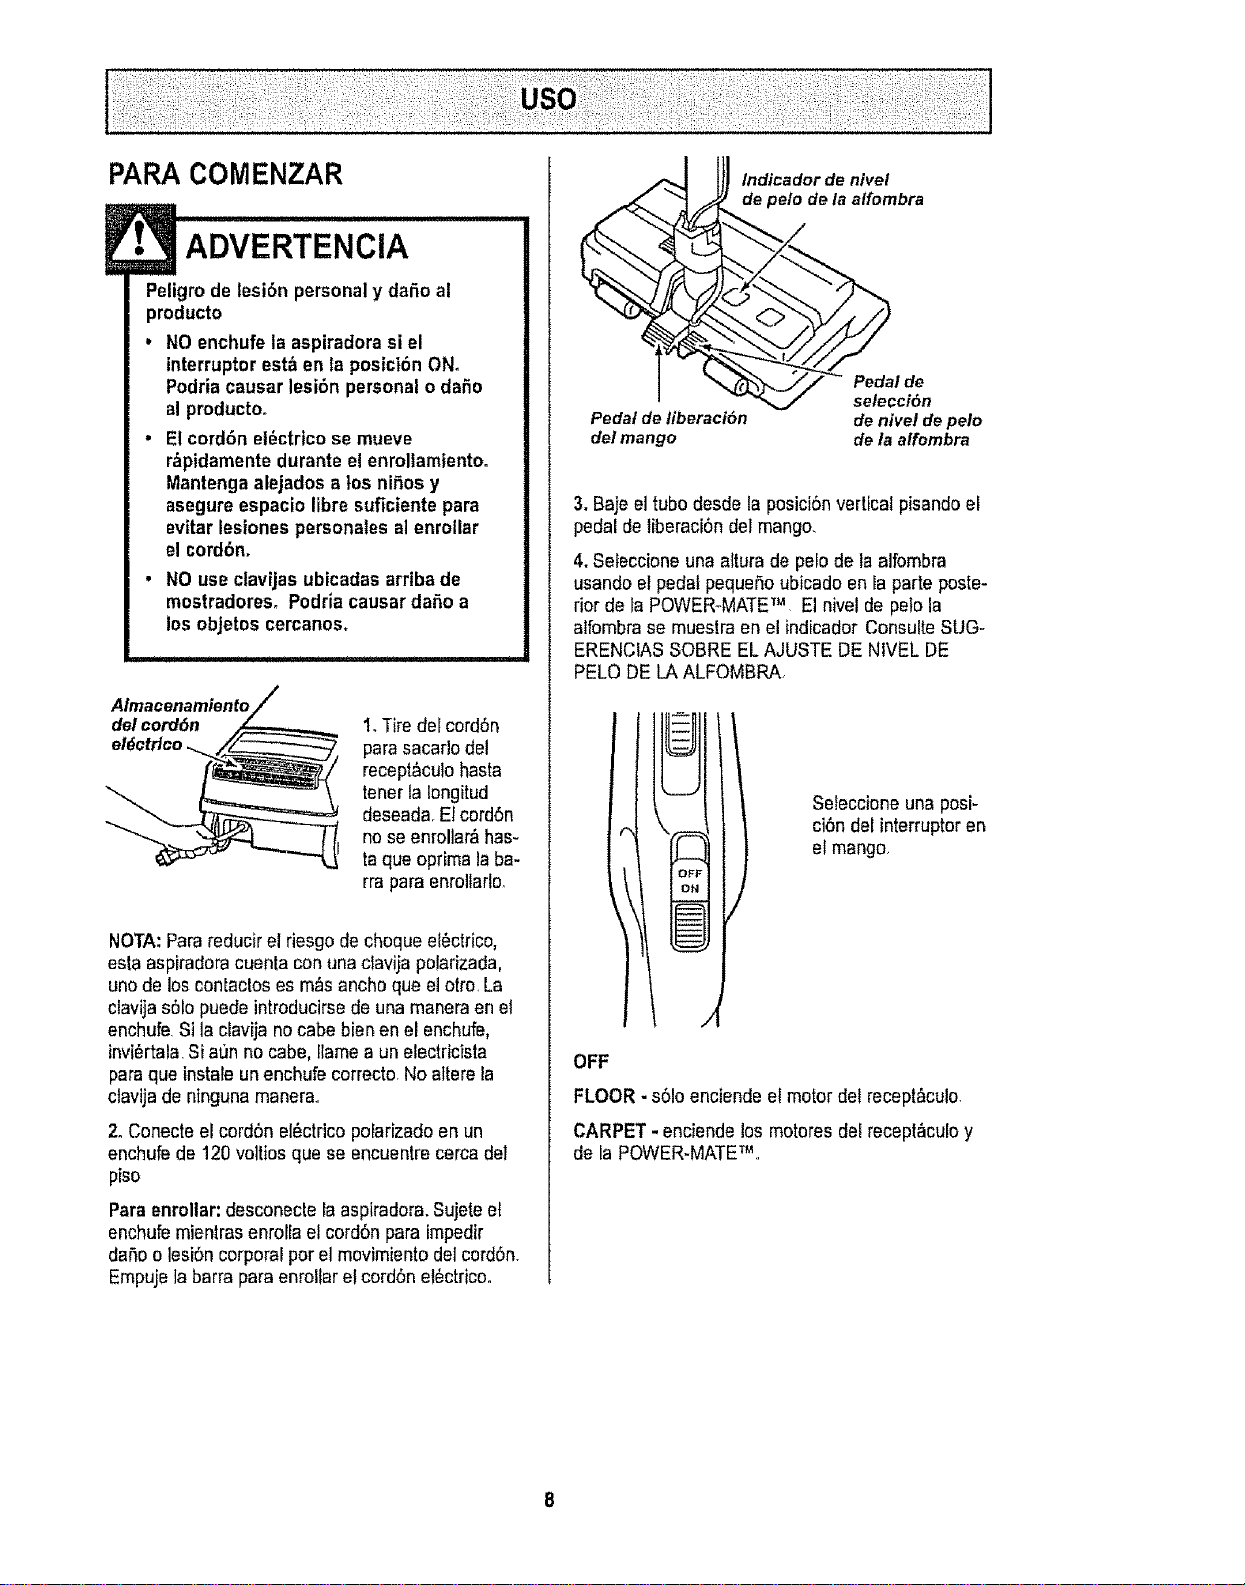
PARA COMENZAR
t• ADVERTENCIA
Peligrode lesi6n personaly da_o al
producto
• NO enchufe la aspiradora si el
interrupter est_ en la posic|6n ON.
Podriacausar lesi6n personalo da_o
al productoo
• El cord6n el_ctrico se mueve
r_pidamentedurante el enrollamientoo
Mantenga alejados a los ni5os y
asegureespacio libre suficiente para
evitar lesiones personales al enrollar
el cord6n.
• NO use clavijas ubicadas arrtba de
mostradoreso Podria causar dafio a
los objetos cercanos.
Almacenamlento
del cord6n
1.Tire del cord6n
pare sacarlo del
recept&culohasta
tenerla Iongitud
deseada.El cord6n
no se enroliar_lhas-
taque optima laba-
rra paraenrollarlo_
NOTA: Parareducir el riesgo de cheque el6ctrico,
esta aspiradoracuenta con una davija polarizada,
uno de loscontactos es m_s ancha que el otto. La
clavija s61opuede introducirsede una manera en et
enchufe. Si la clavija nocabe bien en el enchufe,
invi_rtala.Si a0n no cabe, Ilame a un electricista
para que instale unenchufe correcto. No altere la
ctavija de ninguna manera.
2. Conecte el cord6n el_ctrico pofarizado en un
enchufede 120 voltios que se encuentre cerca del
piso
Paraenrollar: desconecte la aspiradora.Sujete el
enchufe mientras enrolla el cord6n para impedir
dana o lesi6n corporal per el movimiento del cord6n.
Empuje la barra para enreitar el cordSn el6ctricoo
Pedal de liberaci6n
det mango
lndicador de nivel
e pelo de la alfombra
_ _. // Pe- "aide
/ selecci6n
de nivel de pelo
de la alfombra
3, Baje el tubedesde la posici6nvertical pisando el
pedal de liberaci6n del mango.
4, Sefeccione una atturade pelo de la aifombra
usando el pedal pequeSoubicadoen la parte poste-
rior de ta POWER-MATETM . El nivel de pelo la
alfombra se muestra en el indicador Consulte SUG-
ERENCIASSOBRE EL AJUSTE DE NIVEL DE
PELO DE LA ALFOMBRA.
Seleccione una posi-
ci6n del interrupteren
el mango.
OFF
FLOOR - s61oenciende el motor del recept&culo.
CARPET - enciende los motores del recept_,culoy
de la POWER-MATETM..

Estilode limpieza sugeridoo
Paraobtener la major acciSnde limpieza se reco-
mienda empujar la POWER-MATETMen direcci6n
directamente opuestaa usted y jalarla en linea
recta. AI final de carla pasadade regreso,cambie la
direcciSnde la POWER-MATETM hacia la siguiente
secci6n a limpiar,Contin'3easta tray,s de todala
alfombra de una manera lenta y deslizante,
NOTA: las pasa-
das r_pidas y
jatonadasno
Iogranuna lira-
plaza complete.
El dispositivogiratorio
de _amanguera permi_
te qua _sta gire sin ne-
cesidad de mover el
recept,_cuto,Esto es
muy etit pare limpiar en
_reas pequeSas.Ase-
g=_resede qua la man-
guera no est_ torcida
antes de jalar el recap-
t_culo.
Control de
Los escalonesalfombradosrequieren limpieza
peri6dica. Cierre percomplete el control de aspira-
ci6n pare lograr los mejores resuttadesde _impieza.
E
ADVERTENCIA
..... ii i iiiii , i i i i i
Peligrode lesl6n personal
Tenga cuidadosi coloca el recept&culo
sobre escalones_Si se cae, podr[a causer
lesi6n personalo dafio a la propiedad,
Mantenga el pasode aire abierto pare Iograr los
mejoresresultados de timpieza. Examine de vez
en cuando cada una de las_reas de uni6n en FUN-
CIONAMIENTODE SU ASPIRADORA pare asegu-
terse de qua no est_n bloqueadas. Desconecte la
aspiradora antes de revtsaro
Use el ajuste XLO (bajo)para ebtener la major lim-
piezaa fondo.Per otra parte, quiz_s se requiera ele-
var el nivel parafacilitar algunas tareas, come per
ejemplocuando setrata de tapetes y algunas alfom-
bras de pale largo, y para impedirque la aspiradora
se apague Se sugieren los siguientes ajustes:
HI -Pelo muy largoy suelto, tapetes, al[ombras
muy acojinadas_
MED - Paremediano a largo
LO -Pelo corto a medieno.
XLO - La mayoria de fasalfombras y pisos
descubiertos
l
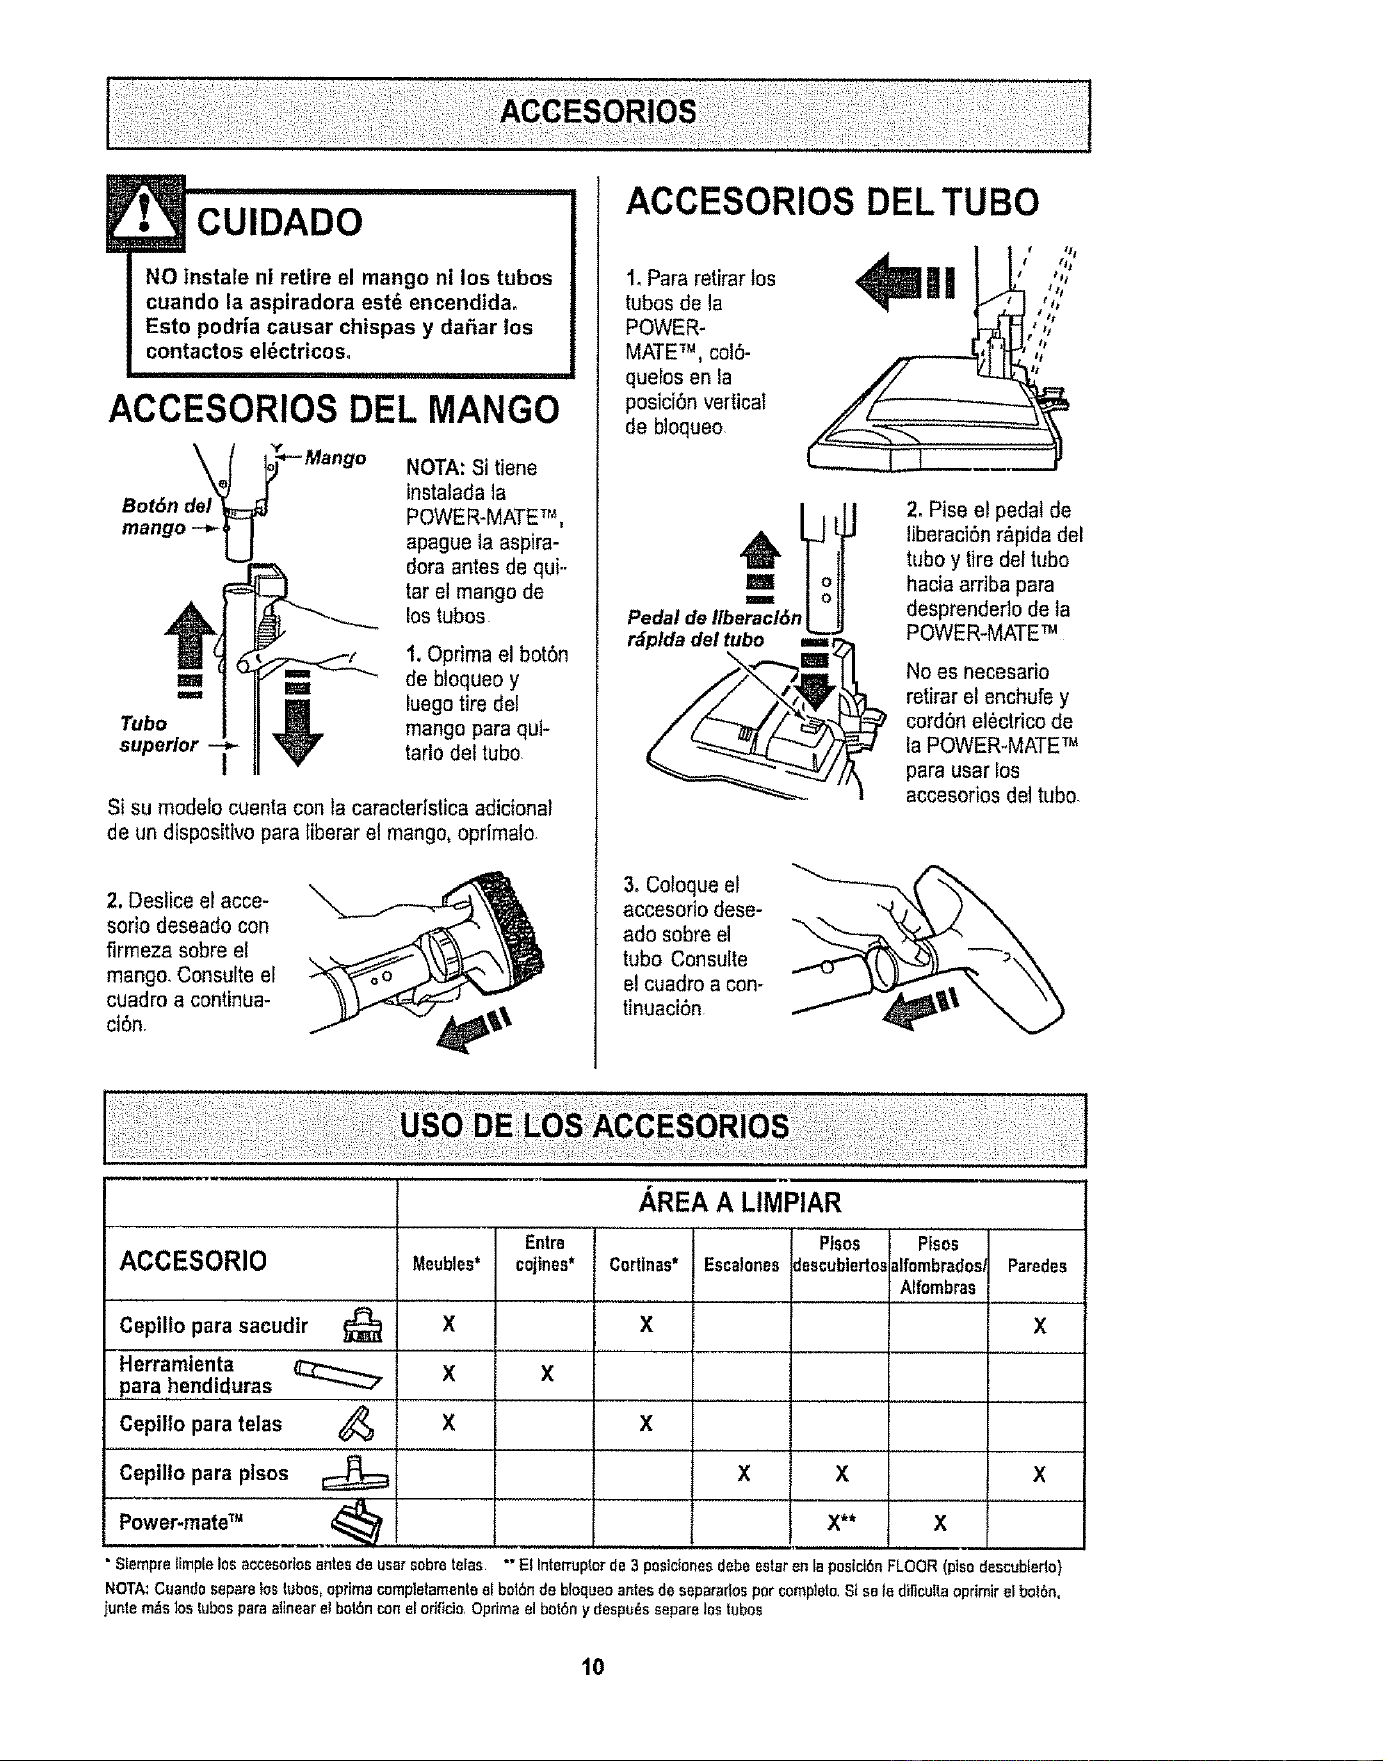
CUIDADO
NO instale ni retire el mango ni los tubes
cuando la aspiradora est_ encendida.
Esto podria causar chispas y dat_arlos
contactos el_ctricos°
i i , i i,,,11111111,1, i i
ACCESORIOSDEL MANGO
BotSn de
mango --_
NOTA: Si tiene
instaladata
POWER-MATETr%
apague la aspira-
dora antes de qui..
tar el mango de
los tubes
1. Oprima el bot6n
=== _ de bloqueo y
luego tire del
Tube mango para qui-
superior I tarlodel tube
Si su modefocuenta con la caractedstica adicional
de un dispositivo para tiberar el mango,oprimalo.
2. Deslice el acce-
sorio deseado con
firmeza sobre el
mango,Consulte el
cuadro a continua-
cidn.
ACCESORIOS DEL TUBe
1. Para retirar los
tubes de la
POWER-
MATETM, col6-
quelos enla
posiciOnvertical
de bloqueo
"q ,');'
J Ji /t
r_pldadel tube ir2_
2. Pise e! pedal de
liberaci6n r&pidadel
tube y tiredel tube
hacia arriba para
desprendedo de la
POWER-MATETM
No es necesario
retirar el enchufe y
cordSn el_ctrico de
la POWER-MATETM
para usar los
accesorios del tubo.
3, Coloque el
accesoflo dese-
ado sobre el
tube Consulte
e! cuadro a con-
tinuaci6n
ACCESORIO Meubles*
Cepilio para sacudtr _ X
Herramienta
,,,pare ,hendiduras _ X
Cepillo para telas 4_ X
Cepillo para plsos
Power-mateTM .............4_
• Siemprelimplelos accesorlosantes de user sabre teFas
, ,REA A LIMPIAR
Entre ! Pisos Plsos
cojines*l Cortinas* Eaca!onesdescublartosalfombrades,Parades
................. Nfombras ,,,
X X
X X X
X** X
X
X
"" El IntemJpterde 3 peslcionesdebeester an la posiclOnFLOOR(plso descubiede}
NOTA:Cuandoseparelos tubes,optimacompletamenteel bet6nde bloqueoantesde separarlospar complete,SIse le diNcultaoprimir el bolOn,
iunle m_s Joslubos para alinear el bot6nconel orifide,Optimael bot6ny despu_s separelos tubas
10
LIMPIADOR DE ORILLAS
/
Active loscepillos lim-
piadores de oriUasa
cada lade de la
POWER-MATETM,
Pase la POWER-
MATETM junto a las
paredes o junto a los
mueblespara ayudar
a e!iminar la tierra
acumulada en las ori-
llas de la alfombra.
PROTECTOR CONTRA
SOBRECARGAS
La POWER-MATETM cuenta
con protecci6nincorporada
contra dafio del motor y la
correa en caso de atasca-
miento del cepilto Si el cepi-
tlo pierde velocidad o se de-
tiene, el bot6n del protector
contra sobrecargas se activa
y apaga la POWER-MATE_L
El motor del recept_culo
continuar_,funcionando.
Para corregir el problema: Consulte el
RECONOCIMIENTO DE PROBLEMAS
Para restablecer: Oprima el bot6n del protector
contra sobrecarga.
CONTROL DE ASPIRACION
EI control de
aspiraci6n le
permile cam-
biar la poten-
asplracl6n asplracl6n cia de aspira-
ci6n de la as-
piradora de-
pendiendo deI grosor de la teta o alfombra. La aspi-
raci6n se disminuye,para limpiar cortinas y tapetes
iigeros,abriendo el control; para aspirar mueblesy
alfombras, et control debe cerrarse para aumentar la
aspiraci6n°
!• ADVERTENCIA
Pellgrode lesfones personales
Desconecte siempre la aspiradora antes de
limpiarlas &reas de los cepillos pues _stos
podrian arrancar de manera imprevistao El
ho hacerlo, podria resultaren lesionesper-
sonates.
INDICADOR DE RENDIMIENTO
DEL RECEPTACULO
ALGUNOS MODELOS
Luz Indlcadora
de rendimlento
del naceptdculo
La luz se enciende en
cualquier momento que
se bloquee el flujo de
aire, cuando la bolsa se
Ireneo cuando sea ne-
cesario cambiar el fitlro
de seguridad del recep-
I&CUIO.
NOTA:Es posible que la luz tambi6n se encienda
cuando utiiice ciertosaccesorios debido a que et flu-
jo de aire se reduce el pasar por el accesorio.
INDICADOR DE RENDIMIENTO
ALGUNOS MODELOS
Cuando la unidad est&en
funcionamiento las lineas de 0_,_000 0_0)
la ventanilla del indicador no
est_n encendidas, Cuando se
muestran completamente rojas ser& necesario exa-
minar la bolsa para potvoy determine si esI,_I]ena y
examine cualquier otra &rea que podria estar atas-
cad& Consulte la FUNClONAMtENTO DE SU ASH-
RADORA
NOTA:Puede que las flneas se muestren en rojo al
utilizar accesorios o si est_aspirando una alfombra
nueva. Esto se debe a que los accesorios mismos
reducen el flujo de aire, o a que la pelusa de la
alfombra nueva tlena la bolsa muy r_pid0,
TAPAY ALMACENAMIENTO
PARA POWER-MATETM
ALGUNOS MODELOS
El tube inferior tiene un reborde en forma de "U" en
la zona de fijaci6n del cord6n el_ctrico.La base tie-
ne una ranura en forma de "U" cerca de la parte
frontal del recept&culo.
El reborde permite almacenar
los tubes y la POWER-MATETM
con el tubopara economizar el
espacio requerido parasu al-
macenamiento. Para usar esta
caracteristica es necesario al-
macenar el recept_culo en for-
ma vertical.
El tubo se sate de la ranuraal
ser levantado para usarlo y se
desfiza dentro de 6sta al bajarlo
para almacenarlo.
11
Laaspiradora crea succiSno aspiraci6n que levanta
la iierra, La tierra es impulsadaa trav_sde las vias
de fluje aire hasta la balsa per una r_pidacorriente
de aire, La balsa para polvo permite el .,<,-,,.,_
flujo de aire, pore atrapa Is tierra F,_:_.r_
Para lagrar los mejores resullados _,_
de rimpieza, mantenga abiertas _ '
las vias de aire Examine peri6- ,i_/y
dicamente las _reas indica- _,,_///
das con asteriscos para /_" t
asegurarse de que no ,_,,_" /
est6n bloqueadas ._.._,_" I J
Desconecte del /_y _!
recept_,culode ,_,y" \
revls_
DISPOSITIVO
GIRATORIO DE
LA MANGUERA
Et dispositivo giratorio de
la manguera permite que
_sta gire sin necesidad de
mover el recept_cub Esto
es muy uti! para limptar en
areaspequeSas,Asegt_resede que la manguera no
est_ retorcida antes dejalar eErecept&culo,
La balsa debe cambiarse seguido para Iograrlos
mejores resultados de limpieza El indicador de ren-
dimientose encender_ cuando sea necesario cam-
biar la belsa o si se bloquean las vias de flujo de
aire_NOTA: Consulte la PIEZASY
CARACTERISTICAS para determinar el N°. de la
balsa.
1. Desconecte el cord6n
el_ctrico de la clavija de
Ia pared.
2, Tire del pestiltode la
tapahacia fuera y hacia
arriba; luego levante la
tapa del recept&culo.
3, Destrabe ta pesta,%de
cart6n de! montaje rojo de
la balsa empujandohacia
afuera y
tirando hacia arriba,
4. Saque la bofsa del mon-
taje rojo
5, Examine y limpie el filtro de seguridad del motor.
Et montaje rojo de la balsa se inctinar_hacia adelan-
te despu_s de que retire la balsa,EsIo impedir_ que
la tapa se cierre antes de inslalar una balsa nueva
Balsa del
mentaJe rojo
7. Instale la balsa en ias
ranuras come se muestra
en las ilustraciones,empu-
jandohacia abajo hasta
que la pestaha de cart6n
quede btoqueadaen posi-
ci6n y los orificios est6n
alineados Deble el extre-
me posterior de la balsa
hacia abajo
6, Levanteel menlaje
rojo.
8. Baje la cubiertadel recept_culo y cierreel pestiilo,
9, Conecte el cord6n et_ctdco en la clavija de la
pared,
CUIDADO
NUNCA REUTILICEUNA BOLSA PARA
POLVO.Los matedales muy fines, tales
come desodorantes para atfombras,talco
facial, polvo fine, yeso, hotlin,pelusa de
alfombras nuevas,etc,, pueden atascar la
balsa y causar que se tampa antes de que
est_ tlena.Cambie la balsa m_s seguido
cuando aspireeste ripe de materiales.
i
12
Existen dos filtros de seguridad para e! motor; 1. un fiitm oscuro de hule espuma incorppradoen el marcorojo y
2. un filtro electrost_ticoblanco tendido sobre el lade posteriordel filtro oscuro.
Estos fiitros deben verificarse cada vez que se cambie la bolsa El filtro oscuro de hule espumase puede lavar
de acuerdo con las instrucciones suministradas a continuacibn,pero el filtro blanco se tiene que cambiar cuando
est_ sucio,
• ADVERTENCIA
Pettgrode choque el_ctrico
No opere la aspiradora sin el filtro de segu-
ridad del motor°Asegt3resede que el filtro
est_ seco e instalado adecuadamente para
Impedirque el motor falle y/o que se pro-
duzcaun choque el_ctrico.
1.Desconecte et cor-
d6n el6ctrico de la cla-
vija de ta pared y retire
la botsa
2. Retire et fiftro de
seguridad come se
muestra en la ilustra-
ci6n,
FILTRO OSCURO DE HULE
ESPUMA
Este filtro y el marco pueden lavarse en agua
jabonosatibia; luego se deben enjuagar y secar,
NO limpiar en lavadora de plates ni Io instate
cuando est6 h_medo.
FILTRO BLANCO
ELECTROSTATICO
Este filtro se tiene que cambiar cuando est_ sucio.
Debe cambiarse peri6dicamente segun Ias condi-
ciones de use Et filtro NO se puede lavar pues
perdieria su capactdad para atrapar polve,
3, Despegue el filtro
blanco del fittro
oscuro de hule
espuma come se
muestra Cologue un
fillro blanco nuevo
sobre el filtro oxcuro,
alineando las
muescas del filtro con
tas paras del marco.
Fltlro
blanco I \ Y_.
olectrost_Jtfc_O_ o
FIItro oscuro
dehule
espuma _-
Los filtros pueden adquirirse por No_pieza
4369971 en cualquler Unidad de Servicil de
Sears, 20-86885 en la mayoria de las teindas
Sears, o por teI6fono, gratis, al 1-800-366-7278
(operadora en ingles) o 1-800.659-7084 (operado-
ra en espafiol).
4. Reinstaleel filtro
en el recept_culo
5. lnstale la bofsa.
Desconecte el cord6n ef_ctricode la clavijade la
pared, NO choree agua sobre la aspiradora.
Limpie el exterior con un trapo suave y limpio, que
ha side exprimido despu#s de remojar en una solu-
ci6n de agua y detergente liquido ligero,Seque el
exteriorcon un trapo seco despu_s de limpiar.
Limpie ia superficie exterior del recept&culoy de los
accesorios para reducir la electricidad est_tica y la
acumulaci6n de potvo.
Lave los accesoriosen agua tibia jabonosa,
enjuaguey deje secar al aire. No los rave en lava-
dora de plates
NO USELOS ACCESORIOS SI ESTA,N MOJA-
DOS,
! CUIDADO
Los accesorios que se utilicen en _reas
sucias,debajo del refrigerador, no deben
usarse en otras superficies sin antes ser
lavados_Podrian dejar marcas.
13
Siempre deber_n seguirse todas las precau-
clones de seguridad al limptar y dar servicio a
la POWER-MATE TM,
E
• ADVERTENCIA
Peligm de cheque el_ctrico o lesi6n corpo-
ral
Desconectela unldad antes de limpiarlao
darleservicioo De Io contrario podria pro-
ductrseun cheque et_ctrico o causar
lesibn corporal si ta aspiradora arranca de
manera imprevista°
1, Retire la cubierta
de la bombilla ejer-
ciendo presiSnhacia
adentro y ]evantando
ambos costados corno
so muestra,
£mpu]ehacla 2. Empuje la bombilla hacia
aden_oy glre adentro y girela en direc-
ci6n opuesta al sentido de
las manecillas del reloj
para retirada,
3. Cambie la bombilla Esta
no debe exceder 15 vatios.
Cierre la cubierla de la
bombilla basra qua quede
t bien cerrada,
NOTA: Consulte la PtEZAS Y CARACTER]STICAS
para delerminar ef N°_de la bombilfa,
Desconecte la asptradora, Examine frecuente-
mente el cepilfo y las&reas de soperte del mismo
de la POWER-MATETM y etimine rodecabeEIo,hilo y
petusaacumufada,Si la acumulaciSn es excesiva,
separe la POWER-MATETM del tube y realice los
pasos a continuaciSn.Las instrucciones tambi_n
aparecen bajo la cubierta de la bombillao
PAPA RETIRAR LA CORREA:
I. Retire la cubierta
de la bombilla y ta
bombilla come se
indicabajo CAM_
BIO DE LA BOM-
BtLLA,,
2, Retire los torniI-
los de laPOWER-
MATETM,
3.Voltee la
POWER-MATETM,
Paraquitar la
cubierta, inserte
el destornillader
en las pestaSas I/
de la cubierla de
amboscostados
y girelo para lib-
erar las pes-
taSas,
Pestafla
4, Voltee la
POWER-MATETM
hacia arriba
Optima la guia de
liberaci6n y baje
el dispositivo gira-
torio, lncline la
cubierta de arras
hacia adelante
hasta qua se des-
prenda,
14
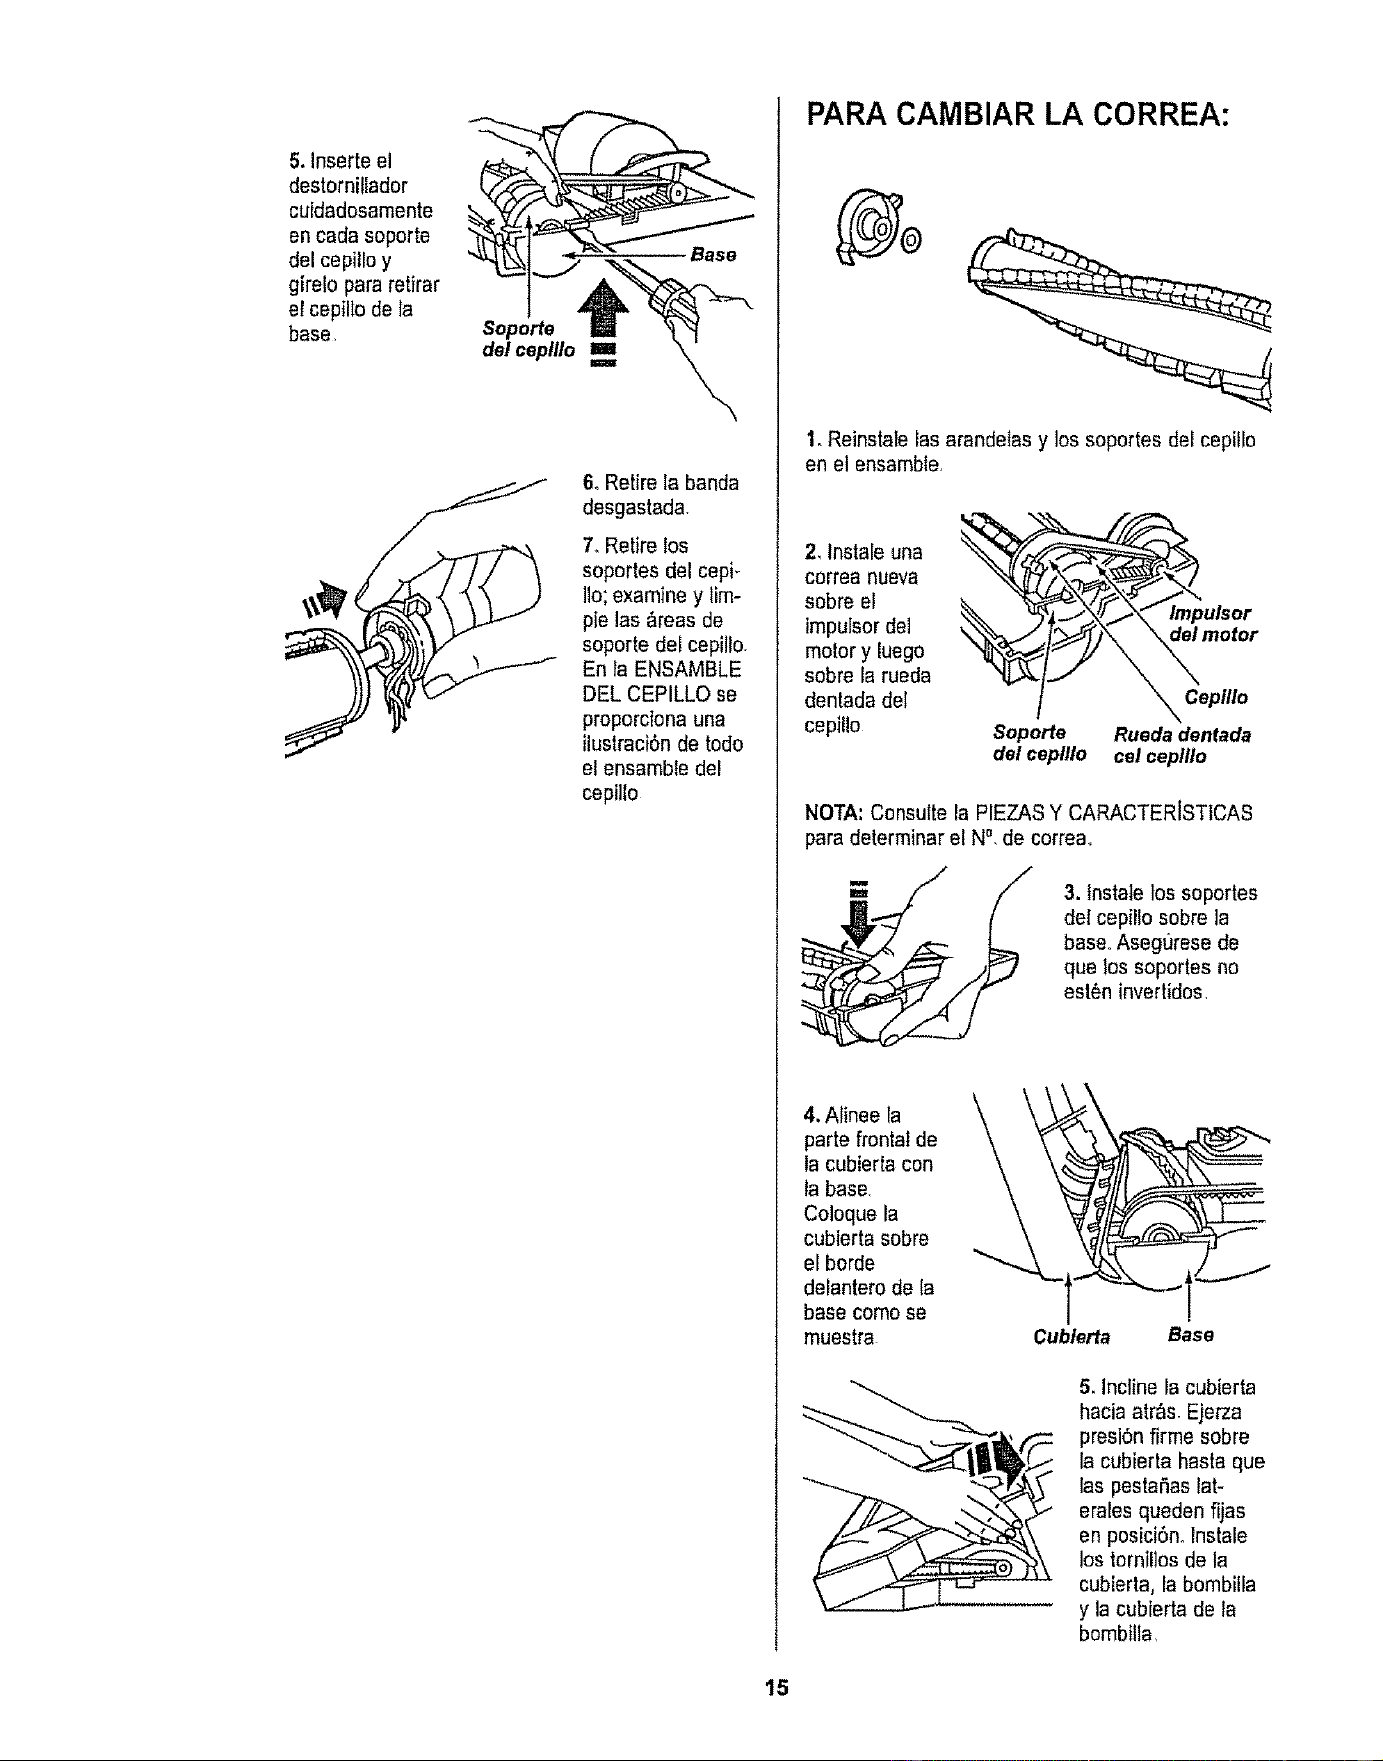
5. Inserte el
destornillador
cuidadosamente
en cada soporte
del cepitloy
girelo para retfrar
el cepillo de la
base
Soporte
dol ceplllo
6, Retire la banda
desgastada.
7. Retire los
soportes del cepi-
Iio;examine y lira-
pie las &teas de
soporte del cepillo.
En la ENSAMBLE
DEL CEPILLO se
proporciona una
ilustraciSnde todo
el ensemble del
cepillo
PARA CAMBIAR LA CORREA:
1. Reirtstalelas arandeIasy los soportes der cepillo
en el ensamble,
2, Instateuna
correa nueva
sobre el
impulsor dei
motor y {uego
sobre fa rueda
dentada del
cepiEIo
Soporte
del cepfllo
lmpulsor
\_ motor
_ Ceptllo
Rueda dentada
cel ceplflo
NOTA:Consulte la PIEZASY CARACTERISTICAS
para determiner el N°, de correa°
3. lnstale los soportes
de{ cepillo sobre la
base.,Asegurese de
que los soportes no
est6ninvertidos,
4, Alinee la
parte frontal de
la cubierta con
la base.
Coloque la
cubierta sobre
eLborde
delantero de la
base como se
muestra
k
Cublerfa Base
5. Incline la cubierta
hacia atr&s_Ejerza
presi6nfirme sobre
la cubierta haste qua
las pestaSas lat-
erales queden fijas
en posiciSn,lnstale
los tornillosde la
cubierta, la bombilEa
y la cubierta de fa
bombilta,
15
irlll i1,111,i II
ADVERTENCIA
Peligrode cheque el_ctrico o lesi6n corpo-
ral
Desconecte la unidad antesde limpiarla o
darle serviciooDe to contrario podria pro-
ductrseun cheque el_ctrico o causer
lesibn corporal si la aspiradora arranca de
manera tmprevlsta,
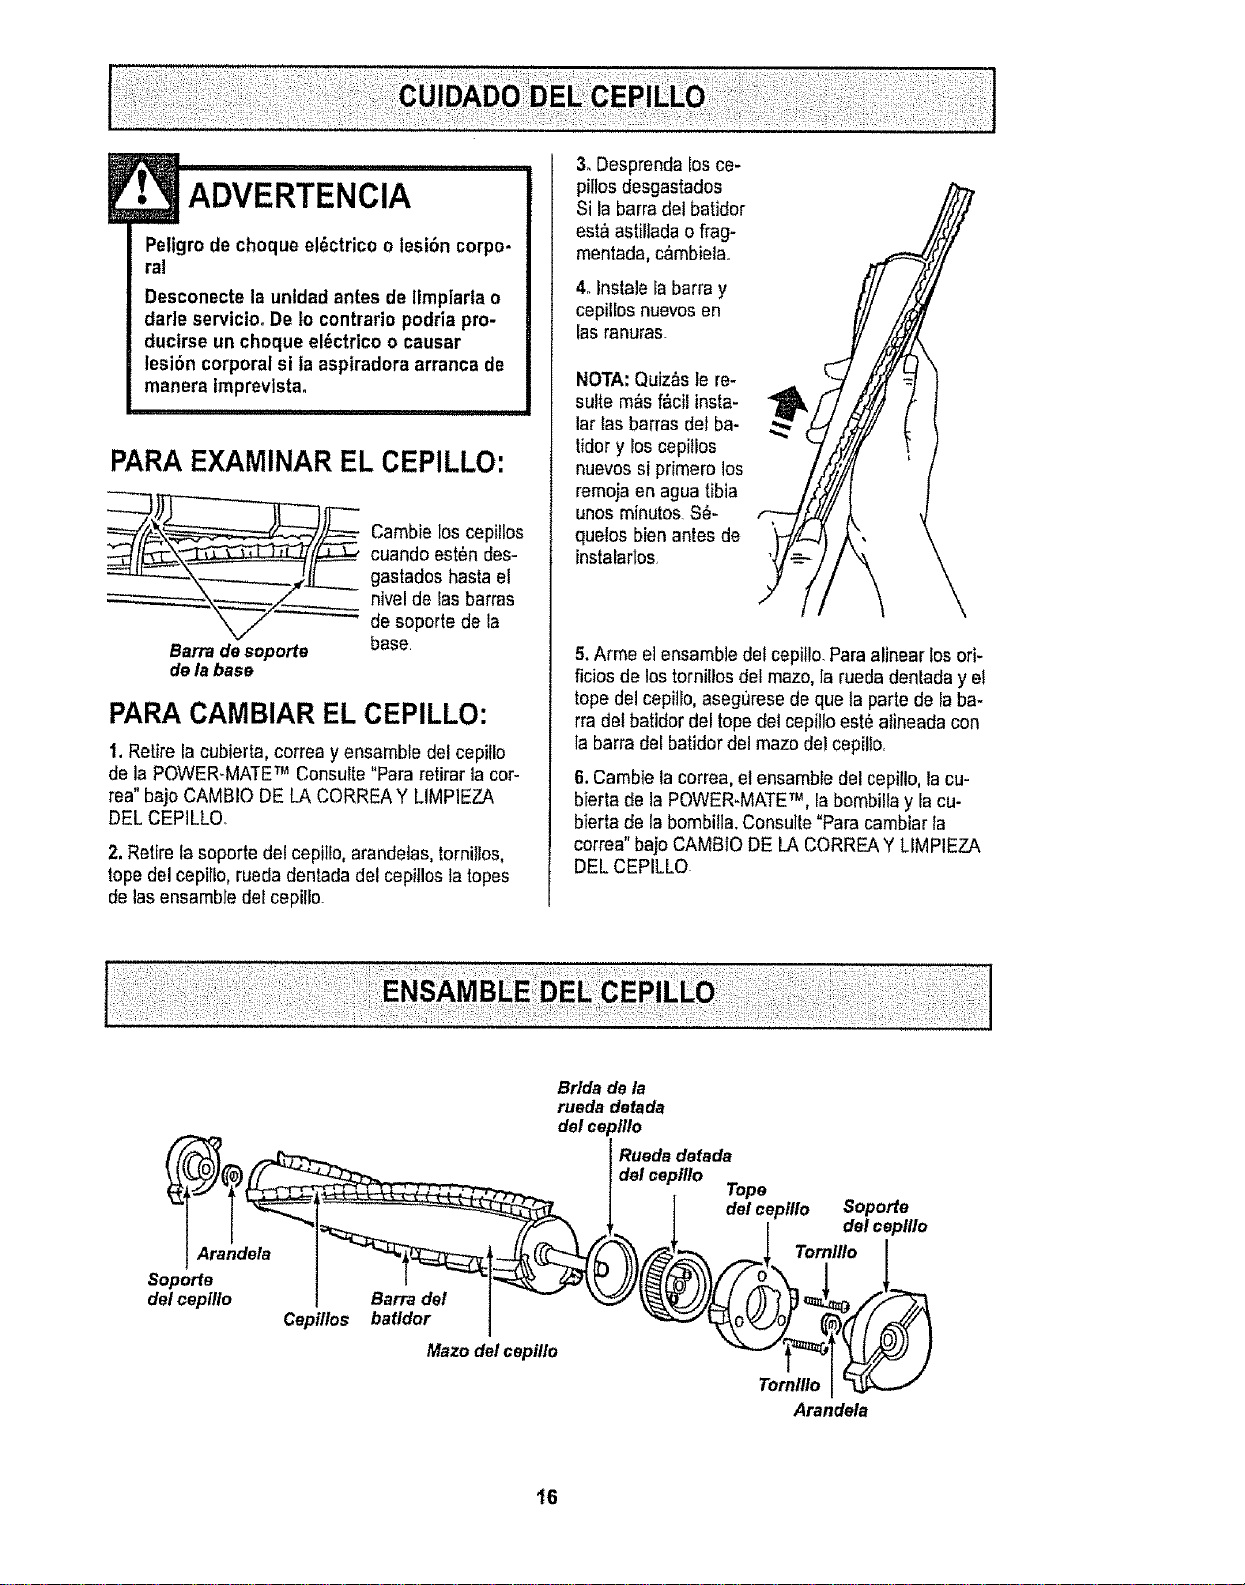
PARA EXAMINAR EL CEPILLO:
___ ambie los cepillos
cuando est_n des-
gastadoshaste el
nivel de Easbarras
de soporte de la
Barrade soports base,
de labase
PARA CAMBIAR EL CEPILLO:
1, Retire la cubierta, correa y ensambla del cepillo
de la POWER-MATETM Consulte "Para retirarlacot-
tea" bajo CAMBIO DE LA CORREAY LIMPIEZA
DEL CEPILLOo
2.Retire la soporte del cepillo, arandeias, tornilios,
tope del cepiflo, ruecladentada del cepitlos la topes
de lasensemble del cepillo
3. Desprer=dalos ce-
pillosdesgastados
Si la barradel batidor
est_ astiliada o frag-
mentada, c&mbiela..
4. Instale la barra y
cepilios nuevosen
las ranuras.
NOTA: Quiz_s le re-
suite m_s f&cil insta-
lar las barras del be-
ridery los cepitlos
nuevossi primate los
remoja en agua tibia
unos minutes S_-
quelos bien antes de
tnstalartos
5.Arma el ensemble del cepitlo.Pare alinear los ori-
ficios de los tornillos del maze, la rueda denlada y el
topedel cepillo,asegurese de qua ta parte de ia ba-
rra del batidor del topedel cepillo est_ alineada con
la barra del batidor del maze del cepilio,
6. Cambie la correa, et ensamble del cepilto, la cu-
bierta de la POWER-MATETM, ia bembilla y ia cu-
bierta de la bombilla.Consulte "Parecambiar la
correa" bajo CAMBIO DE LA CORREAY LIMPIEZA
DEL CEPILLO
Bride de la
rueda detada
del ce
Maze delcepillo
o111o
Ruedadefada
del ceplllo
Tope
] del c_ )illo Soporte
| I del c_o111o
Arandela
16
Consulte este cuadro pars encontrar solucienes que usted mismo puede realizar cuando tonga problemas
menores de rendimientQ Cualquier servicio qua necesite sparta de arras descritos en este manual tienen qua
ser hechos par un represetante de servicio autorizado.
La asplradarn no erranaa_
1,, Est_ desconectada
2 Cartadrcoitos betedoo fusiblequemade
en e[teblerode servldo de Is tesldenda
3r ConexianeseI_ctrieasde la manguera
sueltae
4, Protectorcentresobrecergasbatndaen
la POWER-MATETM
Noaspire 1
eatlefsatortamente, 2.
3
4
5.
6,
7,
8
g,
t0.
La esptradarasrrsnca, 1,
peroee apageo
2,
3
LaPOWER-MATETM no 1
funcians cuandoant_
Instalada 2
3
4
lnd|cndor de rendtm]ento 1
derojo, nlgunos modetos. Z
3,
4,,
Le ssplrsdore leventatapetes 1_
-o- es diticllempu|ar
a POWER-MATETM,
La luzno funclane,
El card6nno en anrona
Ln asplradoradeja mercee
en laalfambra,
BoIaaperapoivo liens o ainscada
Vies de flutedo sire stsscadae
Flltrode snguddaddelmotorsuds
Ajuete incorteetode nivelde pelode
ta aifombra
Control de nspiraci6nabierto
Msnguera rats.
CepilJasde la POWER-MATETM deegastadas
Can'eedesgnstndao rata
CepiUao aopartesde 6alesuetos.
Tapsdelrecepl&culosbie_'ts
ConexloneseI6otriaasdele menguerao
de Istaps
ProtectorcOnkasabrec_rgesde Ia
POWER-MATETM batada
Protectorde sobrecargabatsdo
en elreaept_culo
Conextanesde le POWER-MATETM
deaconectsdas
Cartes desgastadao role
Cepilloo eoportesde6ste sudos
Protectorcentresebrecnrgasde fa
POWER-MATETM botade
Balsapets palvefferte a atascadn
Ftltrode segeridedde(motor suclo
V(esde flojode etre atascndas
Cierteseceeeorios
Ajuste Incorrectode n_velde petede
Is alfambre
2. Asp_rnetbndemastadopotente
t. Bambiilafundlda
1. Cordbne!6ctdcosucio
2. Cord6netnsendo.
t Estilode limpiezeincorrecta
1,
2.
3
4
5..
6.
7-
8&9
10,
i,
2,,
3
"L
2&3,
4
i
2.
3,
4.
1,
2
1,
1,
2,
i Conectebien,opdmsselectorde encendido!
spsgedo a Is posiel6nON
2. Restabfezeeet cortacircuitoso csmbfeet
fusible
3. Vueivne conecterlos extremesde la menguers,
(p_ginn5).
4. Llmpteel ceptlloy lossoportesde 6eta Luego
restsbtezcs,(p_glnas 14, 15)
Cnmbte_ebalsa,(p_glna I2)
Ltmpieinsvtaede nujode airs, (p_gina12)
Llmpleelflltro,(p_glna 13).
Ajuete el nivel,(p_gine9).
Aiuste el control,(p_gina 11)
Cambiele manguere.
CambJelos cepilloe,(p_gtna 16).
ConeulteCAM8IODE LA CORREAY LIMPIEZh
DEL CEPILLO,(p_glnas 14, 15).
Cierre bienla tape
Examine!asconexionasel_ctdcee,waive n_n-
eaterlos extremesde is msnguera,(p_gins7).
ReUrecuelqulerobJetoaloradoo stnseado,
luego restnbJezcsSt ta aspitador_arrancapare
se vuetvee epagar,limpie el cepttloylos
soportesde 6eta,iuegorestebtezcn=
(p6gines 14, 15)
Cembie_abalsa parapolvo,desbioqueelas vies
deflujodeaire (p_gina12) Espere20minutos
parequa efmotor ee enfde y se reatablezca
autom_ticamente
Conectebten,{p6gine6)
ConsulteCAMSIODE LA CORREAY LIMPIEZA
DEL CEPtLLO,(p_ginas 14, 15)
Examineet _readelcepilla parsdeterminer sl
hayaeumufecl5nexcestvna bloqueo de paluea
LImpleei cepi}loy suesoportes, luego
restablezcs.(p_ginas 14, t5)
Cambiela balsa, (p6gtnn12)
Ltmpieel flltto,(p_gioa t3}.
DesbIoqueelssvlnsde fluIode sire (p,'_gina12)
Estoas normal Ls luz debe npsgsrse atquitsr
In herrnmtenta
Ajuste elnivel, (p_,gfnn9),r
Abrs elcOntrolde asptreci6n.(p_gIne11)
Cnmbiele bombilla,(p_gtna 14)
Limpie elcord6ne!_cldcO
Tiredel cord6ey despu6s enr611eJo
Consulte SUGERENCIASPARAASPtRAR.
(p_glna9)
17
Sears se complace en ofrecer a sus clientes servicio de reparaci6n de aparatos
electrodom_sticos y electr6nicos de todas las marcas.
En Sears, usted puede contar con operadores en espa_ol, a los que puede Itamr
sin cargo alguno.
Para pedir servicio de reparaci6n a domocillio, Llame 24 horas al dfa, 7 dtas a la semana
1-800-676-5811
Para ordenar piezas con entrega a domocitlio, Llame 24 horas al dfa, 7 dfas a la semana
1-800-659-7084
TheServiceSideof Sears,"
18