Loading ...
Loading ...
Loading ...
12
CARE AND CLEANING
WARNING
Burn Hazard
Allow heating element to cool before
cleaning the interior.
Failure to do so can result in burns.
Outer Door - Clean outer door with warm
soapy water and a dishcloth or sponge. Rinse
with clean water and a dry cloth. Do not use
harsh cleaners.
Inside - The inside of the dishwasher
including the fi lter is self-cleaning with normal
use. If needed, clean around the tub gasket
area with a damp cloth.
The fi lter is self-
The fi lter is self-
cleaning. A glass trap located in the center of
cleaning. A glass trap located in the center of
the fi lter is designed to collect pieces of broken
the fi lter is designed to collect pieces of broken
glass, straws, bones and pits.
glass, straws, bones and pits.
Care of Drain Air Gap
If a drain air gap was installed for your built-in
dishwasher, check to make sure it is clean so
the dishwasher will drain properly. A drain air
gap is usually mounted on counter top and can
be inspected by removing the cover. This is
not part of your dishwasher and is not covered
by warranty.
Overfi ll Protector- keeps dishwasher
from overfi lling and is located in the left front
corner of the tub.
• Clean occasionally with household cleaner
containing vinegar or bleach to dissolve
any buildup.
• Overfi ll Protector should move up and
down freely about one inch. If it does
not move, lift and clean underneath.
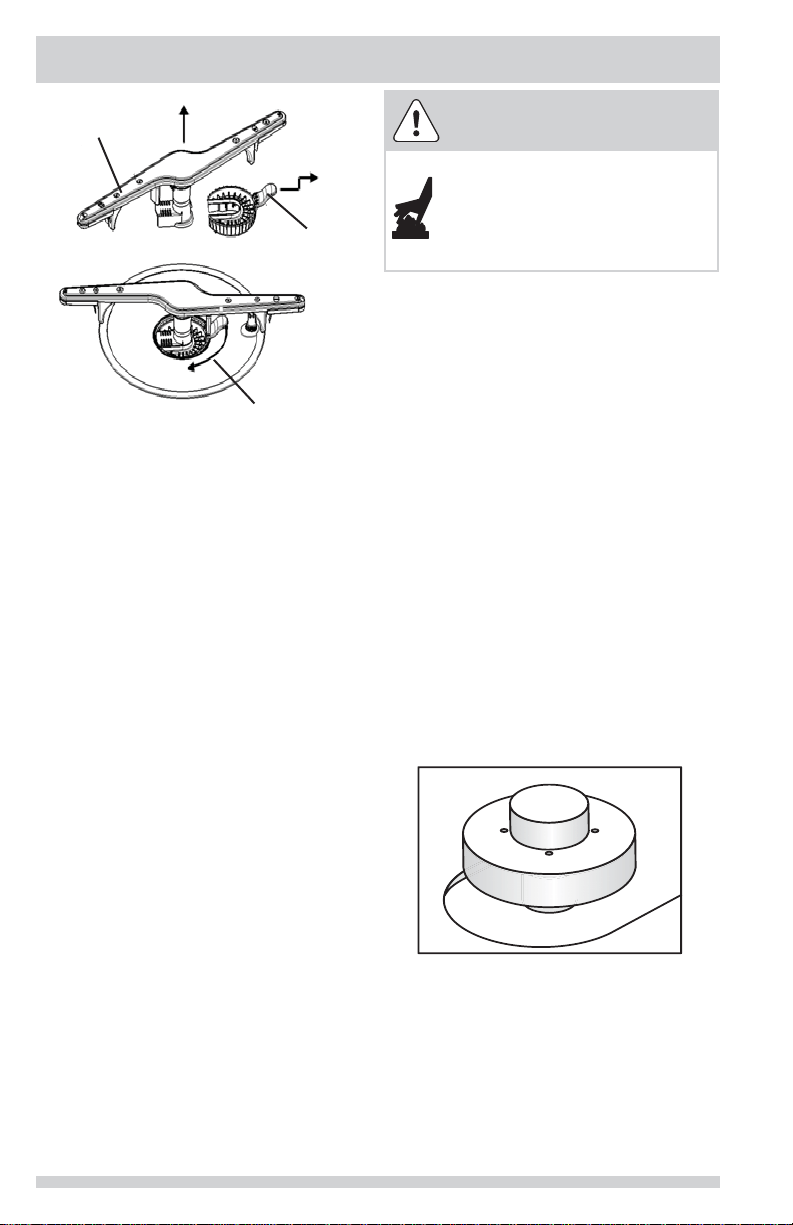
To empty the glass trap:
1. Grasp the glass trap’s handle and rotate it
90
0
clockwise while pressing down on the
center of the wash arm.
2. Grab the spray arm in the center and lift
the spray arm and glass trap assembly up
and out form the dishwasher.
3. Tip the assembly over an appropriate
container and tap it to empty the glass
trap.
OR, separate the glass trap - pull
the glass trap handle toward you, then
up, then further toward you to slide it
away from the rest of the assembly;
empty it into an appropriate container;
then slide the glass trap back into the
assembly.
4. Place the assembly back into position,
press down on the arm at the center
and rotate the glass trap handle 90
0
counterclockwise being sure the glass
trap ends in the orientation shown in the
image above. To avoid damage to
your unit make sure the spray arm
and glass trap are fully snapped in
place.
Spray Arm varies
by model
Glass Trap
Glass Trap Removal
(1)
(2)
(3)
Loading ...
Loading ...
Loading ...