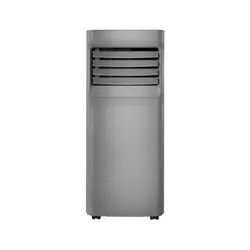
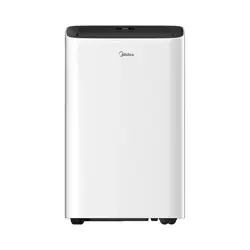
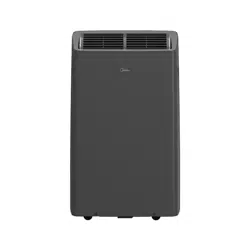
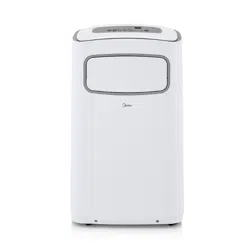
In order to ensure the optimal performance of our products, the design specifications of the unit and remote control are subject to change without prior notice.
Energy Rating Information:
The Energy Rating for this unit is based on an installation using an un-extended exhaust duct without adapters A or B (as shown in the Installation section of this manual).
Unit Temperature Range:
Mode
Operating Instructions
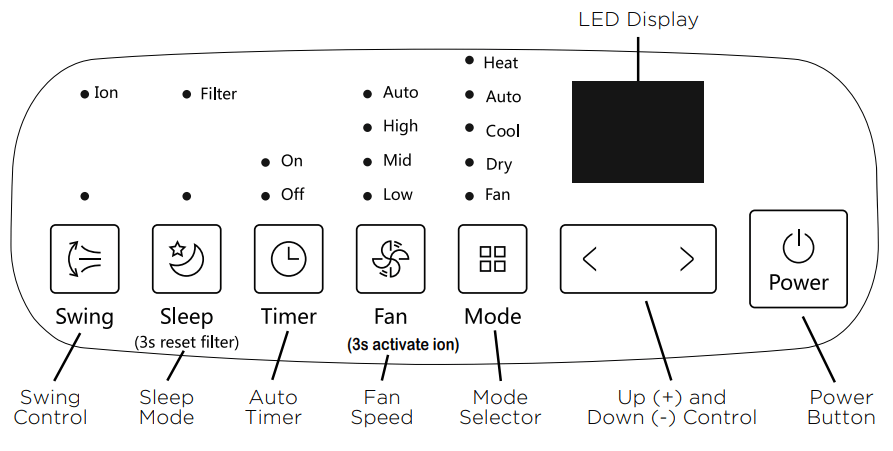
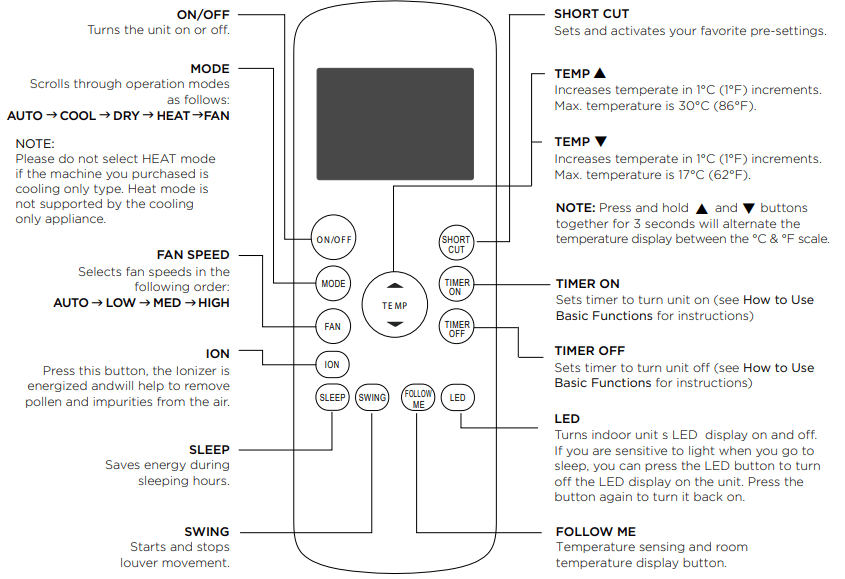
Key Pad Features
Swing Button (optional)
(Applicable to the models with auto swing feature only)
Used to initiate the Auto swing feature. When the operation is ON, press the SWING button can stop the louver at the desired angle.
Sleep (Eco)/Filter button
Used to initiate the SLEEP/ECO operation.
NOTE
After 250 hours of operation, the filter indicator light illuminates. This feature is a reminder to clean the Air Filter for more efficient operation. Press this button for 3 seconds to cancel the reminder.
Timer button
Used to initiate the AUTO ON start time and AUTO OFF stop time program, in conjuction with the + & - buttons. The timer on/off indicator light illuminates under the timer on/off settings.
Fan/Ion button (Ion is optional)
Control the fan speed. Press to select the fan speed in four steps - LOW, MID, HIGH and AUTO. The fan speed indicator light illuminates under different fan settings.
NOTE
Press this button for 3 seconds to initiate ION feature. The ion generator is energized and will help to remove pollen and impurities from the air, and trap them in the filter. Press it for 3 seconds again to stop the ION feature.
Mode button
Selects the appropriate operating mode. Each time you press the button, a mode is selected in a sequence that goes from AUTO, COOL, DRY, FAN and HEAT (cooling only models without). The mode indicator light illuminates under the different mode settings.
Up (+) and Down (-) buttons
Used to adjust (increasing/decreasing) temperature settings in 1°C/1°F increments in a range of 17°C/62°F to 30°C/86°F or the TIMER setting in a range of 0 ~ 24hrs.
NOTE
The control is capable of displaying temperature in degrees Fahrenheit or degrees Celsius. To convert from one to the other, press and hold the Up and Down buttons at the same time for 3 seconds.
Power button
Power switch on/off.
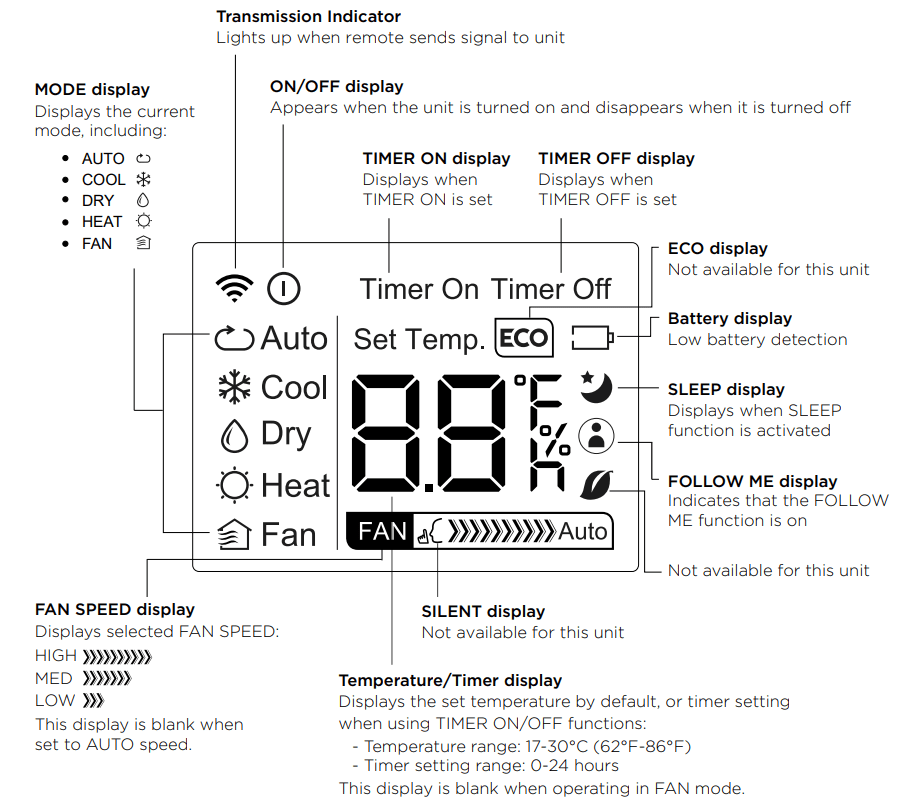
LED display
Shows the set temperature in °C or °F and the Auto-timer settings. While on DRY and FAN modes, it shows the room temperature.
Shows Error codes and protection code:
E1 - Room temperature sensor error.
E2 - Evaporator temperature sensor error.
E3 - Condenser temperature sensor error (on some models).
E4 - Display panel communication error.
E7 - Zero-crossing malfunction.
P1 - Bottom tray is full -- Connect the drain hose and drain the collected water away. If protection repeats, call for service.
NOTE
When one of the above malfunctions occurs, turn off the unit, and check for any obstructions. Restart the unit, if the malfunction is still present, turn off the unit and unplug the power cord. Contact the manufacturer or its service agents or a similar qualified person for service.
COOL operation
Press the "MODE” button until the "COOL” indicator light comes on.
Press the ADJUST buttons "+” or "-” to select your desired room temperature. The temperature can be set within a range of 17°C~30°C/62°F~86°F.
Press the "FAN SPEED” button to choose the fanspeed.
HEAT operation (cooling only models without)
Press the "MODE” button until the "HEAT” indicator light comes on.
Press the ADJUST buttons "+” or " - " to select your desired room temperature. The temperature can be set within a range of 17°C~30°C/62°F~86°F.
Press the "FAN SPEED” button to choose the fan speed. For some models, the fan speed can not be adjusted under HEAT mode.
DRY operation
Press the "MODE” button until the "DRY” indicator light comes on.
Under this mode, you cannot select a fan speed or adjust the temperature. The fan motor operates at LOW speed.
Keep windows and doors closed for the best dehumidifying effect.
Do not put the duct to window.
AUTO operation
When you set the air conditioner in AUTO mode, it will automatically select cooling, heating (cooling only models without), or fan only operation depending on what temperature you have selected and the room temperature.
The air conditioner will control room temperature automatically round the temperature point set by you.
Under AUTO mode, you can not select the fan speed.
FAN operation
Press the "MODE” button until the ”FAN" indicator light comes on.
Press the "FAN SPEED” button to choose the fan speed. The temperature can not be adjusted.
Do not put the duct to window.
TIMER operation
When the unit is on, press the Timer button will initiate the Auto-off stop program, the TIMER OFF indicator light illuminates. Press the UP or down button to select the desired time. Press the TIMER button again within seconds, the Auto-on start program is initiated. And the TIMER ON indicator light illuminates. Press the up or down button to select the desired Auto-on start time.
When the unit is off, press the Timer button to initiate the Auto-on start program, press it again within five seconds will initiate the Auto-off stop program.
Press or hold the UP or DOWN button to change the Auto time by 0.5 hour increments, up to 10 hours, then at 1 hour increments up to 24 hours. The control will count down the time remaining until start.
The system will automatically revert back to display the previous temperature setting if there is no operation in a 5 seconds period.
Turning the unit ON or OFF at any time or adjusting the timer setting to 0.0 will cancel the Auto Start/Stop timer program.
When the malfunctionoccurs, the Auto Start/Stop timed program will also be cancelled.
SLEEP/ECO operation
Press this button, the selected temperature will increase (cooling) or decrease (heating) by 1°C/1°F 30 minutes. The temperature will then increase (cooling) or decrease (heating) by another 1°C/1°F after an additional 30 minutes. This new temperature will be maintained for 7 hours before it returns to the originally selected temperature. This ends the Sleep/Eco mode and the unit will continue to operate as originally programmed.
NOTE This feature is unavailabe under FAN or DRY mode.
Other Features
FOLLOW ME/TEMP SENSING
Feature (optional)
NOTE This feature can be activated from the remote control ONLY. The remote control serves as a remote thermostat allowing for the precise temperature control at its location.
To activate the Follow Me/Temp Sensing feature, point the remote control towards the unit and press the Follow Me/Temp Sensing button. The remote display is actual temperature at its location. The remote control will send this signal to the air conditioner every 3 minutes interval until press the Follow Me/Temp Sensing button again. If the unit does not receive the Follow Me/Temp Sensing signal during any 7 minutes interval, the unit will beep to indicate the Follow Me/Temp Sensing mode has ended.
AUTO-RESTART
If the unit breaks off unexpectedly due to the power cut, it will restart with the previous function setting automatically when the power resumes.
WAIT 3 MINUTES BEFORE RESUMING OPERATION
After the unit has stopped, it can not be restarted operation in the first 3 minutes. This is to protect the unit. Operation will automatically start after 3 minutes.
AIR FLOW DIRECTION ADJUSTMENT
The louver can be adjusted automatically. Adjust the air flow direction automatically.
NOTE
On some models the louver can be adjusted manually only):
When the Power is ON, the louver opens fully.
Press the SWING button on the panel or remote controller to initiate the Auto swing feature. The louver willl swing up and down automatically.
Please do not adjust the louver manually.
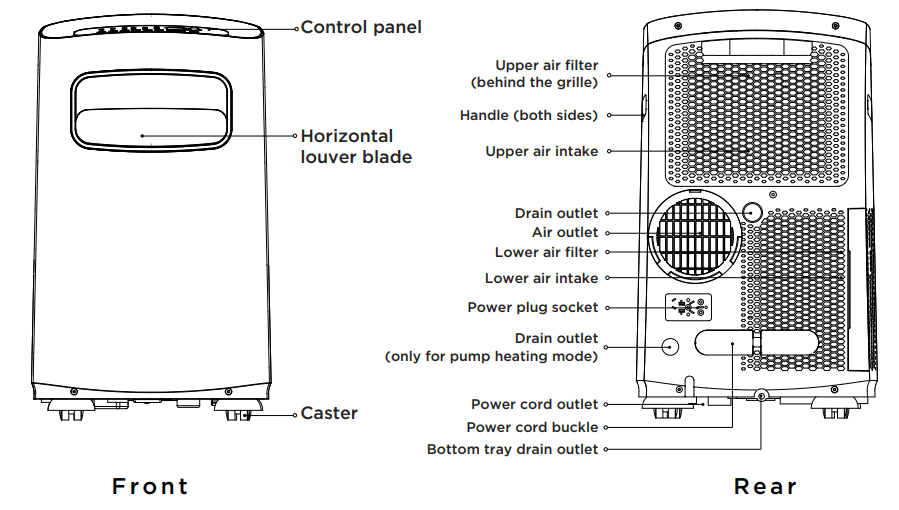
Water drainage
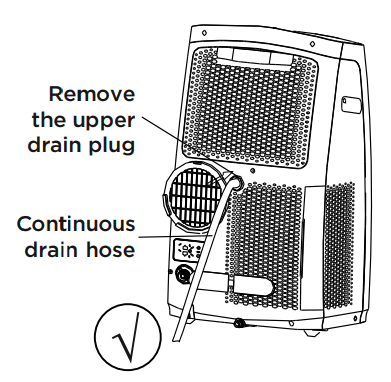
During dehumidifying modes, remove the upper drain plug from the back of the unit, install the drain connector (5/8” universal female mender) with 3/4” hose (locally purchased). For the models without drain connector, just attach the drain hose to the hole. Place the open end of the hose directly over the drain area in your basement floor.
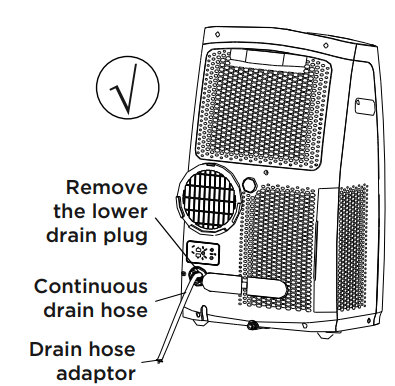
During heating pump mode, remove the lower drain plug from the back of the unit, install the drain connector (5/8” universal female mender) with 3/4” hose (locally purchased). For the models without drain connector, just attach the drain hose to the hole. Place the open end of the Hose adaptor directly over the drain area in your basement floor.
NOTE Instructions Make sure the hose is secure so there are no leaks. Direct the hose toward the drain, making sure that there are no kinks that will stop the warter flowing. Place the end of the hose into the drain and make sure the end of the hose is down to let the water flow smoothly. (See Figs with ). Do never let it up. (See Figs with ). When the continuous drain hose is not used, ensure that the corresponding drain plug and knob are installed firmly to prevent leakage.
When the water level of the bottom tray reaches a predetermined level, the unit beeps 8 times, the digital display area shows “P1”. At this time the air conditioning/dehumidification process will immediately stop. However, the fan motor will continue to operate (this is normal). Carefully move the unit to a drain location, remove the bottom drain plug and let the water drain away. Reinstall the bottom drain plug and restart the machine until the “P1” symbol disappears. If the error repeats, call for service.
NOTE Be sure to reinstall the bottom drain plug firmly to prevent leakage before using the unit.
Care and Cleaning
Safety Precautions
Always unplug the unit before cleaning or servicing.
DO NOT use flammable liquids or chemicals to clean the unit.
DO NOT wash the unit under running water. Doing so causes electrical danger.
DO NOT operate the machine if the power supply was damaged during cleaning. A damaged power cord must be replaced with a new cord from the manufacturer.
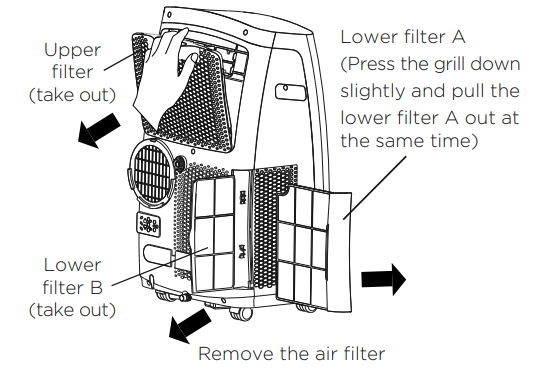
Clean the Air Filter
Maintenance Tips
Be sure to clean the air filter every 2 weeks for optimal performance.
The water collection tray should be drained immediately after P1 error occurs, and before storage to prevent mold.
In households with animals, you will have to periodically wipe down the grill to prevent blocked airflow due to animal hair.
Clean the Unit
Clean the unit using a damp, lint-free cloth and mild detergent. Dry the unit with a dry, lint-free cloth.
Store the Unit When Not in Use
Drain the unit's water collection tray according to the instructions in the following section.
Run the appliance on FAN mode for 12 hours in a warm room to dry it and prevent mold.
Turn off the appliance and unplug it.
Clean the air filter according to the instructions in the previous section. Reinstall the clean, dry filter before storing.
Remove the batteries from the remote control.
NOTE Be sure to store the unit in a cool, dark place. Exposure to direct sunshine or extreme heat can shorten the lifespan of the unit.
Troubleshooting Tips
Faults Diagnosis
Please check the machine according to the following form before asking for maintenance:
1 Problem
Model
NOTE Swing, Ion and Follow me features are optional. RG57H1(B)/BG(C)E-M without med fan speed.
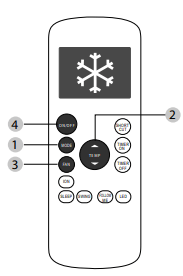
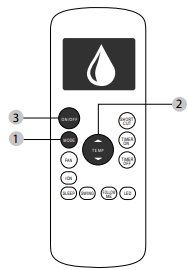
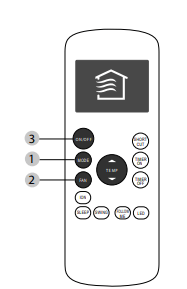
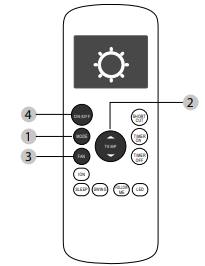
Handing the Remote Control
NOT SURE WHAT A FUNCTION DOES?
Refer to the How to Use Basic Functions and How to Use Advanced Functions sections of this manual for a detailed description of how to use your air conditioner.
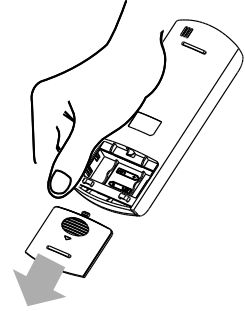
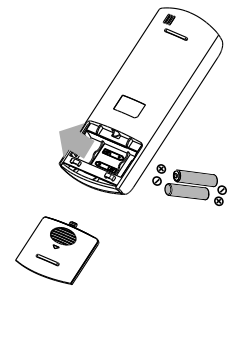
INSERTING AND REPLACING BATTERIES
Your air conditioning unit comes with two AAA batteries. Put the batteries in the remote control before use.
Slide the back cover from the remote control downward, exposing the battery compartment.
Insert the batteries, paying attention to match up the (+) and (-) ends of the batteries with the symbols inside the battery compartment.
Slide the battery cover back into place.
BATTERY NOTES
For optimum product performance:
Do not mix old and new batteries, or batteries of different types.
Do not leave batteries in the remote control if you don't plan on using the device for more than 2 months.
BATTERY DISPOSAL
Do not dispose of batteries as unsorted municipal waste.
Refer to local laws for proper disposal of batteries.
TIPS FOR USING REMOTE CONTROL
The remote control must be used within 8 meters / 26 feet of the unit.
The unit will beep when remote signal is received.
Curtains, other materials and direct sunlight can interfere with the infrared signal receiver.
Remove batteries if the remote will not be used more than 2 months.
Remote LED Screen Indicators
How to Use Use the Basic Fuctions
SETTING TEMPERATURE
The operating temperature range for units is 17-30°C (62°F-86°F). You can increase or decrease the set temperature in 1°C (1°F) increments.
AUTO operation
In AUTO mode, the unit will automatically select the COOL, FAN, HEAT or DRY mode based on the set temperature.
Press the MODE button to select Auto mode.
Set your desired temperature using the Temp ▲ or Temp button.
Press the ON/OFF button to start the unit.
COOL operation
Press the MODE button to select COOL mode.
Set your desired temperature using the Temp ▲ or Temp button.
Press the FAN button to select the fan speed: AUTO, LOW, MED,or HIGH.
Press the ON/OFF button to start the unit.
DRY operation(dehumidifying)
Press the MODE button to select DRY mode.
Set your desired temperature using the Temp ▲ or Temp button.
Press the ON/OFF button to start the unit.
FAN operation
Press the MODE button to select FAN mode.
Press FAN button to select the fan speed: AUTO, LOW, MED or HIGH.
Press the ON/OFF button to start the unit.
NOTE
You can’t set temperature in FAN mode. As a result, your remote control’s LCD screen will not display temperature.
HEAT operation
Press the MODE button to select HEAT mode.
Set your desired temperature using the Temp ▲ or Temp button.
Press the FAN button to select the fan speed: AUTO, LOW, MED, or HIGH.
Press the ON/OFF button to start the unit.
NOTE
As outdoor temperature drops, the performance of your unit s HEAT function may be affected. In such instances, we recommend using this air conditioner in conjunction with other heating appliance.
Setting the Timer Fuctions
Your air conditioning unit has two timer-related functions: TIMER ON - sets the amount of timer after which the unit will automatically turn on.
TIMER OFF - sets the amount of time after which the unit will automatically turn off.
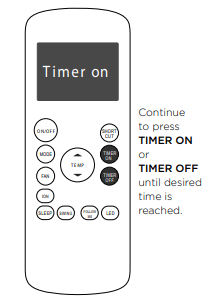
TIMER ON function
The TIMER ON function allows you to set a period of time after which the unit will automatically turn on, such as when you come home from work.
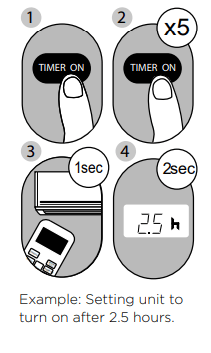
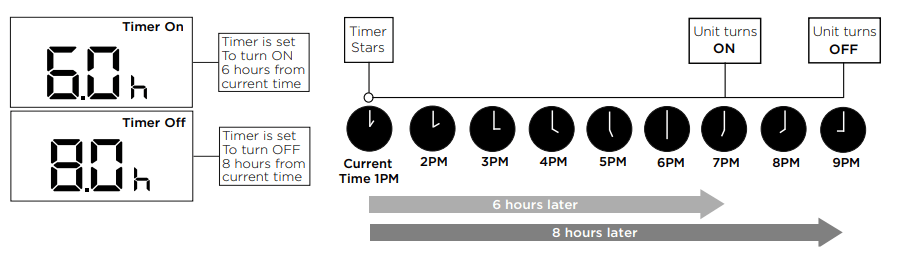
Press the TIMER ON button. By default, the last time period that you set and an "h” (indicating hours) will appear on the display. NOTE This number indicates the amount of time after the current time that you want the unit to turn on. For example, if you set TIMER ON for 2 hours, “2.0h“ will appear on the screen, and the unit will turn on after 2 hours.
Press the TIMER ON button repeatedly to set the time when you want the unit to turn on.
Wait 2 seconds, then the TIMER ON function will be activated. The digital display on your remote control will then return to the temperature display.
TIMER OFF function
The TIMER OFF function allows you to set a period of time after which the unit will automatically turn off, such as when you wake up.
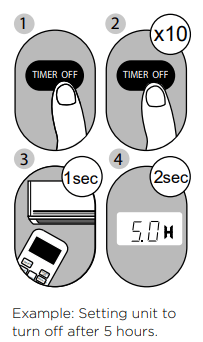
Press the TIMER OFF button. By default, the last time period that you set and an "h” (indicating hours) will appear on the display. NOTE This number indicates the amount of time after the current time that you want the unit to turn off. For example, if you set TIMER OFF for 2 hours, "2.0h" will appear on the screen, and the unit will turn off after 2 hours.
Press the TIMER OFF button repeatedly to set the time when you want the unit to turn off.
Wait 2 seconds, then the TIMER OFF function will be activated. The digital display on your remote control will then return to the temperature display.
NOTE
When setting the TIMER ON or TIMER OFF functions, up to 10 hours, the time will increase in 30 minute increments with each press. After 10 hours and up to 24, it will increase in 1 hour increments. The timer will revert to zero after 24 hours.
You can turn off either function by setting its timer to "0.0h".
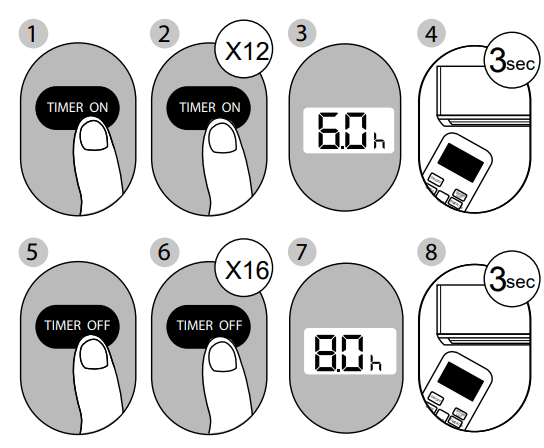
Setting both TIMER ON and TIMER OFF at the same time
Keep in mind that the time periods you set for both functions refer to hours after the current time. For example, say that the current time is 1:00 PM, and you want the unit to turn on automatically at 7:00 PM. You want it to operate for 2 hours, then automatically turn off at 9:00 PM.
Do the following (side figure):
Example: Setting the unit to turn on after 6 hours, operate for 2 hours, then turn off (see the figure below)
Your remote display
How to Use Use the Advanced Fuctions
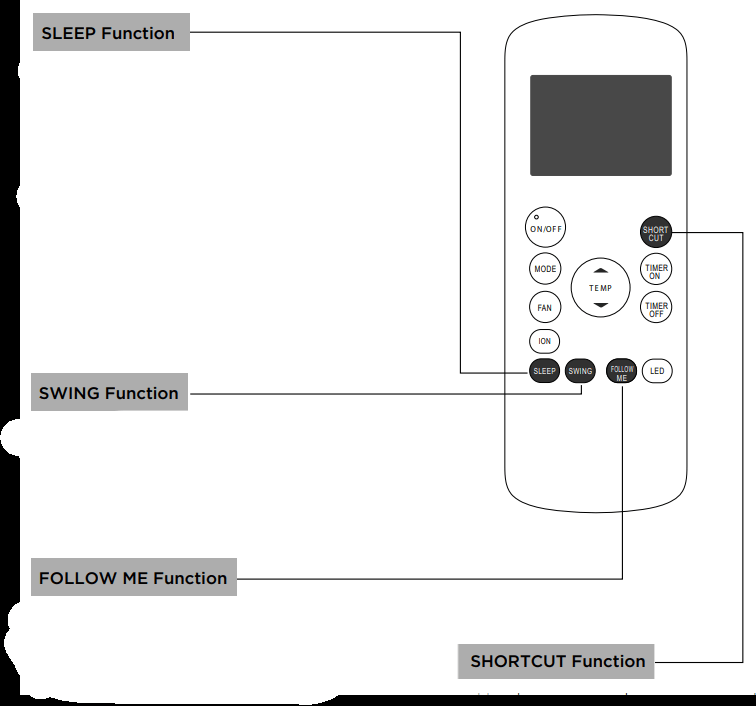
SLEEP Function
The SLEEP function is used to decrease energy use while you sleep (and don t need the same temperature settings to stay comfortable). This function can only be activated via remote control.
Note: The SLEEP function is not available in FAN or DRY mode.
SWING Function
Used to stop or start louver movement and set the desired up/down air flow direction. The louver changes 6 degrees in angle for each press (some models without). If keep pushing more than 2 seconds, the louver auto swing feature is activated.
FOLLOW ME function
The FOLLOW ME function enables the remote control to measure the temperature at its current location. When using AUTO, COOL, or HEAT functions, measuring ambient temperature from the remote control (instead of from the indoor unit it self) will enable the air conditioner to optimize the temperature around you and ensure maximum comfort.
Press FOLLOW ME button to activate function. The remote control will send temperature signal to the unit every three minutes.
Press FOLLOW ME button again to turn off this function.
SHORTCUT Function
Used to restore the current settings or resume previous settings.
Push this button when remote controller is on, the system will automatically revert back to the previous settings including operating mode, setting temperature, fan speed level and sleep feature (if activated).
If pushing more than 2 seconds, the system will automatically restore the current operation settings including operating mode, setting temperature, fan speed level and sleep feature (if activated).
NOTES
Buttons design is based on typical model and might be slightly different from the actual one you purchased, the actual shape shall prevail.
All the functions described are accomplished by the unit, if the unit has no this feature, there is no corresponding operation happened when press the relative button on the remote controller.
NOTES
When there are wide differences between remote controller Illustration and “USER’S MANUAL” on function description, the description on “USER’S MANUAL” shall prevail.
The device could comply with the local national regulations. In Canada, it should comply with CAN ICES-3(B)/NMB-3(B). In USA, this device complies with part 15 of the FCC Rules. Operation is subject to the following two conditions: (1) This device may not cause harmful interference, and (2) this device must accept any interference received, including interference that may cause undesired operation.
This equipment has been tested and found to comply with the limits for a Class B digital device, pursuant to part 15 of the FCC Rules. These limits are designed to provide reasonable protection against harmful interference in a residential installation. This equipment generates, uses and can radiate radio frequency energy and, if not installed and used in accordance with the instructions, may cause harmful interference to radio communications. However, there is no guarantee that interference will not occur in a particular installation. If this equipment does cause harmful interference to radio or television reception, which can be determined by turning the equipment off and on, the user is encouraged to try to correct the interference by one or more of the following measures:
Reorient or relocate the receiving antenna.
Increase the separation between the equipment and receiver.
Connect the equipment into an outlet on a circuit different from that to which the receiver is connected.
Consult the dealer or an experienced radio/TV technician for help. Changes or modifications not approved by the party responsible for compliance could void suers authority to operate the equipment.
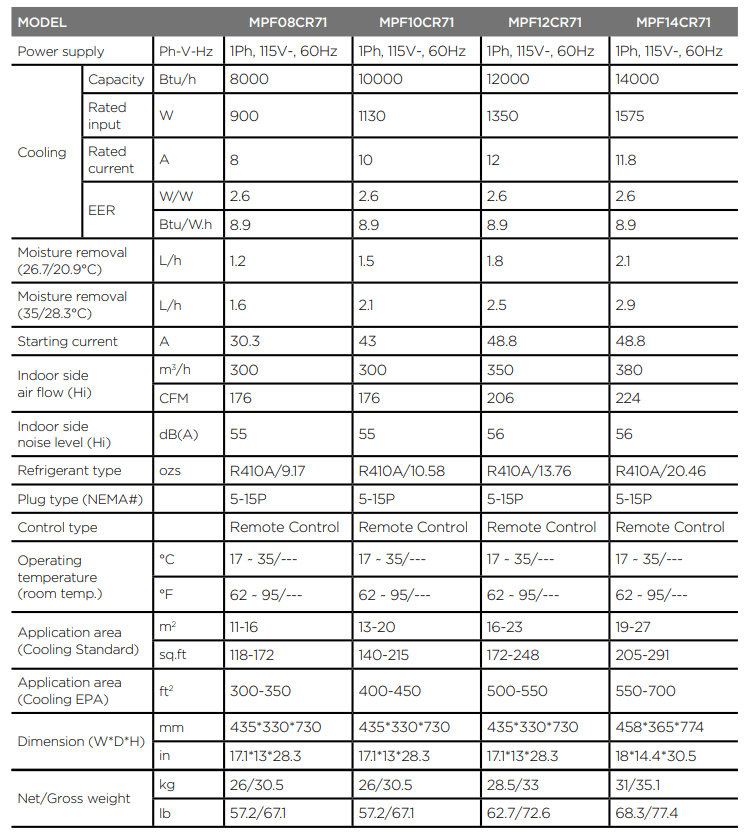
#1 What electrical power is required, specifically voltage (eg 110v or 220v) and current (eg 10a, 15a, 20 a, etc.)?
The unit has a rated voltage of 115V, 60Hz, and 8 amps.
#2 Does have the ability to be setup to autodrain when used as a dehumidifier?
This unit can be set up for continuous draining or manual draining.
#3 What about rain? It will for sure get into the exhaust tube. How is this protected from rain?
If you have a storm window, you could close the screen. The board can be mounted into the window sill's channels for a tighter fit.
#4 How much water does the 8k hold before requiring to be drained? Does it auto-shut off when full?
This unit can remove up to 1.58 pints per day, When the error code "P1" is displayed the air conditioning/dehumidifier process will immediately stop. However, the fan motor will continue to operate.
 ). Do never let it up. (See Figs with
  ). When the continuous drain hose is not used, ensure that the corresponding drain plug and knob are installed firmly to prevent leakage.
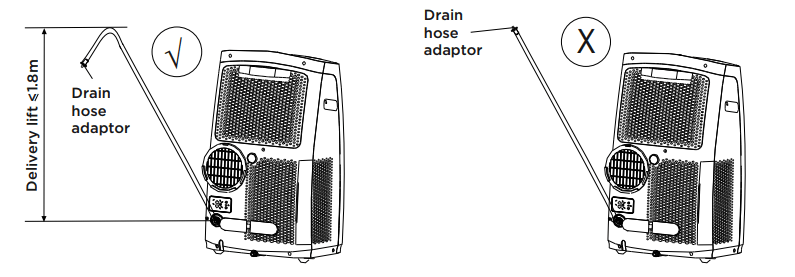

 button.