Loading ...
Loading ...
Loading ...
16
USA
Deviations are possible depending on •
how dirty the dishes are and how hard
the water is in your location.
If your dishes have been in the •
dishwasher for some time without being
washed, also fill the smaller container 2.
up to the top.
7.2 FILLING RINSE AID DISPENSER
WARNING
Keep your rinse aids out of the reach of
children. Ingestion or inhalation of rinse
aid may cause serious injury. Avoid
contact with skin and eyes, and keep
children and infirm persons away from
rinse aids.
�
Notice :
Only use rinse aids suited for use in •
dishwashers. Rinse aids allow washing
water to rinse off more cleanly and
prevent watermarks or streaks on the
dishes.
If you use “2 in 1” or “3 in 1” •
detergents / tabs, you do not need
additional rinse aid.
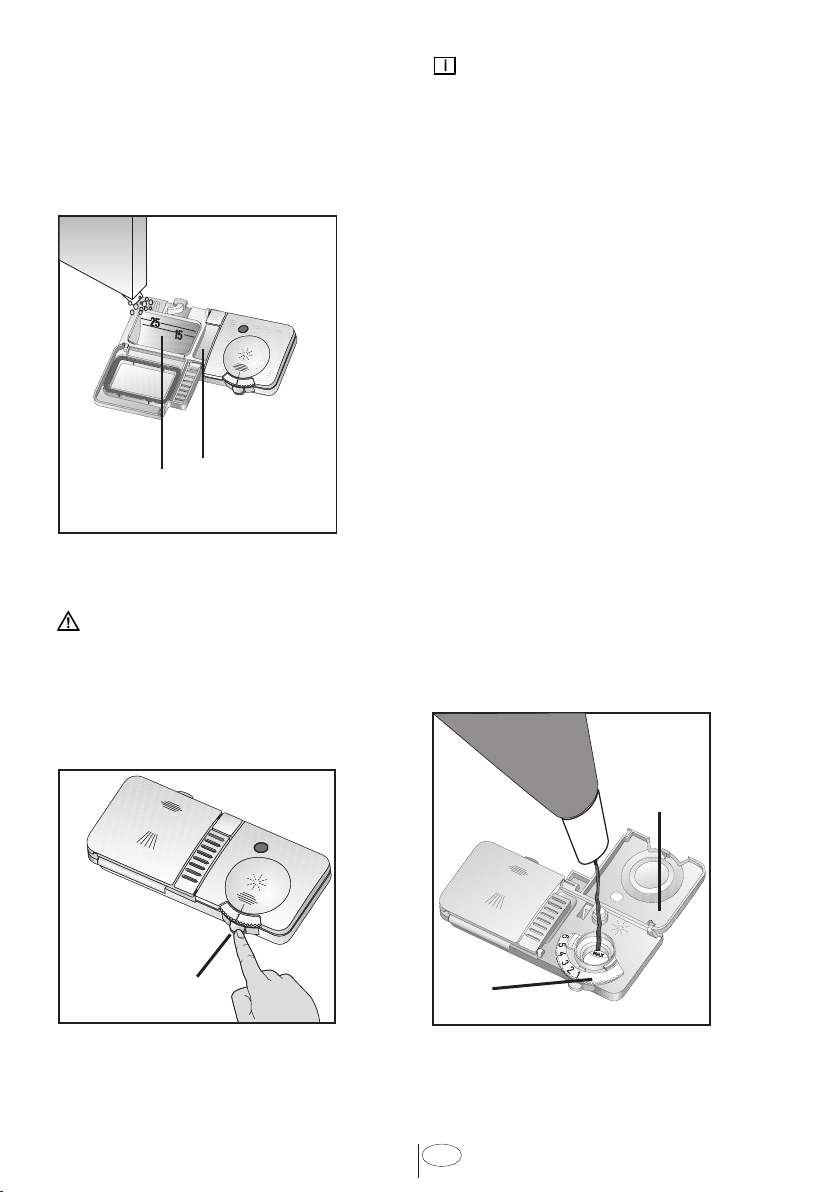
1. Open the rinse aid dispenser by pressing
the lock B.
2. Carefully pour in rinse aid to the MAX
mark.
3. Close the lid until it clicks in 3.
4. Carefully wipe off spilled rinse aid.
Excessive rinse aid causes excessive
foam formation, which may hinder
cleaning.
SET THE DOSE OF RINSE AID
The dose of rinse aid to be used can be
set by means of the dispenser regulator 4
between levels 1 and 6.
Change the setting, only if the following
applies after washing:
Watermarks are visible on the dishes: Set •
dosage higher.
Streaks are visible on the dishes: Set •
dosage lower.
1. Press the Program Selection button before you switch the appliance on and keep this
button pressed down.
2. Switch the appliance on using the On/Off button; then release the switch.
3. Release the Program Selection button when the water hardness level stored on your
machine is displayed in “r…..” format.
4. Start / Stop icon will start flashing as soon as the water hardness level stored on your
machine.
5. Water hardness can be set to the desired level by pressing the Time Delay button
(compare the test strip with the degrees of Hardness Table). The appropriate program
follows up lights up.
6. Once you have set the hardness level, press the Start/Stop/Cancel button to save the
value. The control indicator on the Start/Stop/Cancel button now lights up permanently.
7. Switch the appliance off again using the On/Off button.
WATER HARDNESS TABLE
Notice :
If the water hardness level is less than 7 American degree of hardness, you do not need any •
special softening salt. In this case the ‘salt’ control indicator lights up continually.
If your local hardness level exceeds 47 American degree of hardness, you should consider •
getting a water softening device for your dishwasher. If you use stream water or rainwater,
you are advised to install filters.
If you move do not forget to adjust the water hardness level to suit your new neighborhood.•
If the model does not have a salt dispenser ignore this changes. Water hardness level must •
in position 1.
a b c d e f
Remove the test
strip from the packet.
Turn on the tap and
let the water run for
about a minute.
Hold the test strip in
the water for about a
second.
Remove the test strip
from the water and
shake it.
Wait for 1 minute. The test strip shows
you the hardness
level.
1 Second
1 Minute
1 Min.
Name of unit American PPM German
Indicator in the Multi-Function Display
Definition
1 grain of CaCO
3
/
1 gal (US) of water
1 mg of CaCO
3
/
1 L of water
10 mg of CaO/
1 L of water
1
st
Level
0-6 0-80 0-4
Press the Time Delay button to switch
the water hardness level to position 1.
2
nd
Level
7-12 81-130 5-7
3
rd
Level
13-18 131-220 8-12
Press the Time Delay button to switch
the water hardness level to position 2.
4
th
Level
19-23 221-270 13-15
Press the Time Delay button to switch
the water hardness level to position 3.
5
th
Level
24-36 271-340 16-19
Press the Time Delay button to switch
the water hardness level to position 4.
6
th
Level
37-47 341-800 20-45
Press the Time Delay button to switch
the water hardness level to position 5.
Loading ...
Loading ...
Loading ...