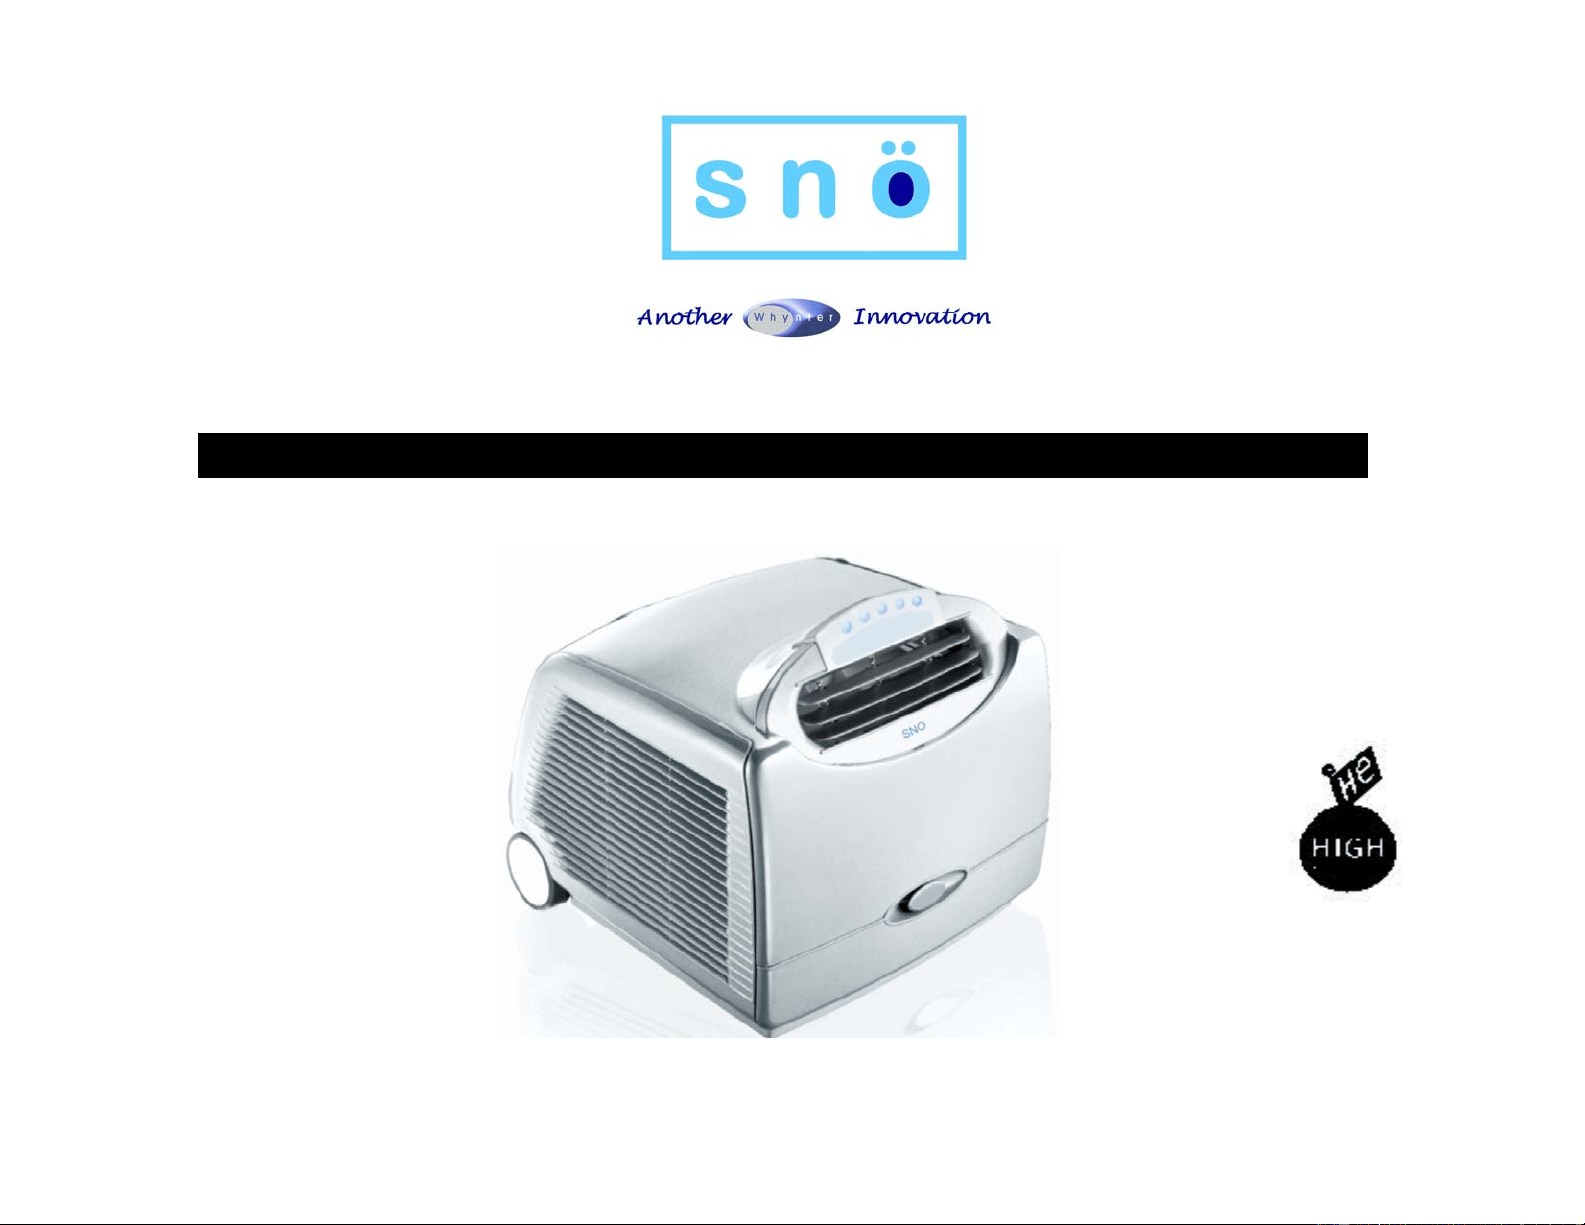
WHYNTER SNO PORTABLE AIR CONDITIONER
MODEL# : ARC-13W/S
2
Thank you for choosing the Whynter SNO portable air conditioner. You have bought one of the best portable air
conditioners available today. Follow the instructions given in this booklet to obtain the very best performance from your
portable air conditioner and take full advantage of the many advance features that your portable air conditioner offers
you. We wish you many years of enjoyable use.
Please keep this user manual in a safe place for future reference.
DISPOSAL
This symbol on the product or its packaging indicates that the appliance cannot be treated as normal domestic trash, but
must be handed in at a collection point for recycling electric and electronic appliances. Your contribution to the correct
disposal of this product protects the environment. Further information about the recycling of this product can be obtained from
your local municipal authority.

3
PARTS OVERVIEW
1. Control panel 2. Pull handle 3. Air outlet grille 4. Air filter with grille 5. Drain plug
6. Outdoor air inlet 7. Outdoor exhaust 8. Top handle 9. Power cord
4
Fi
g
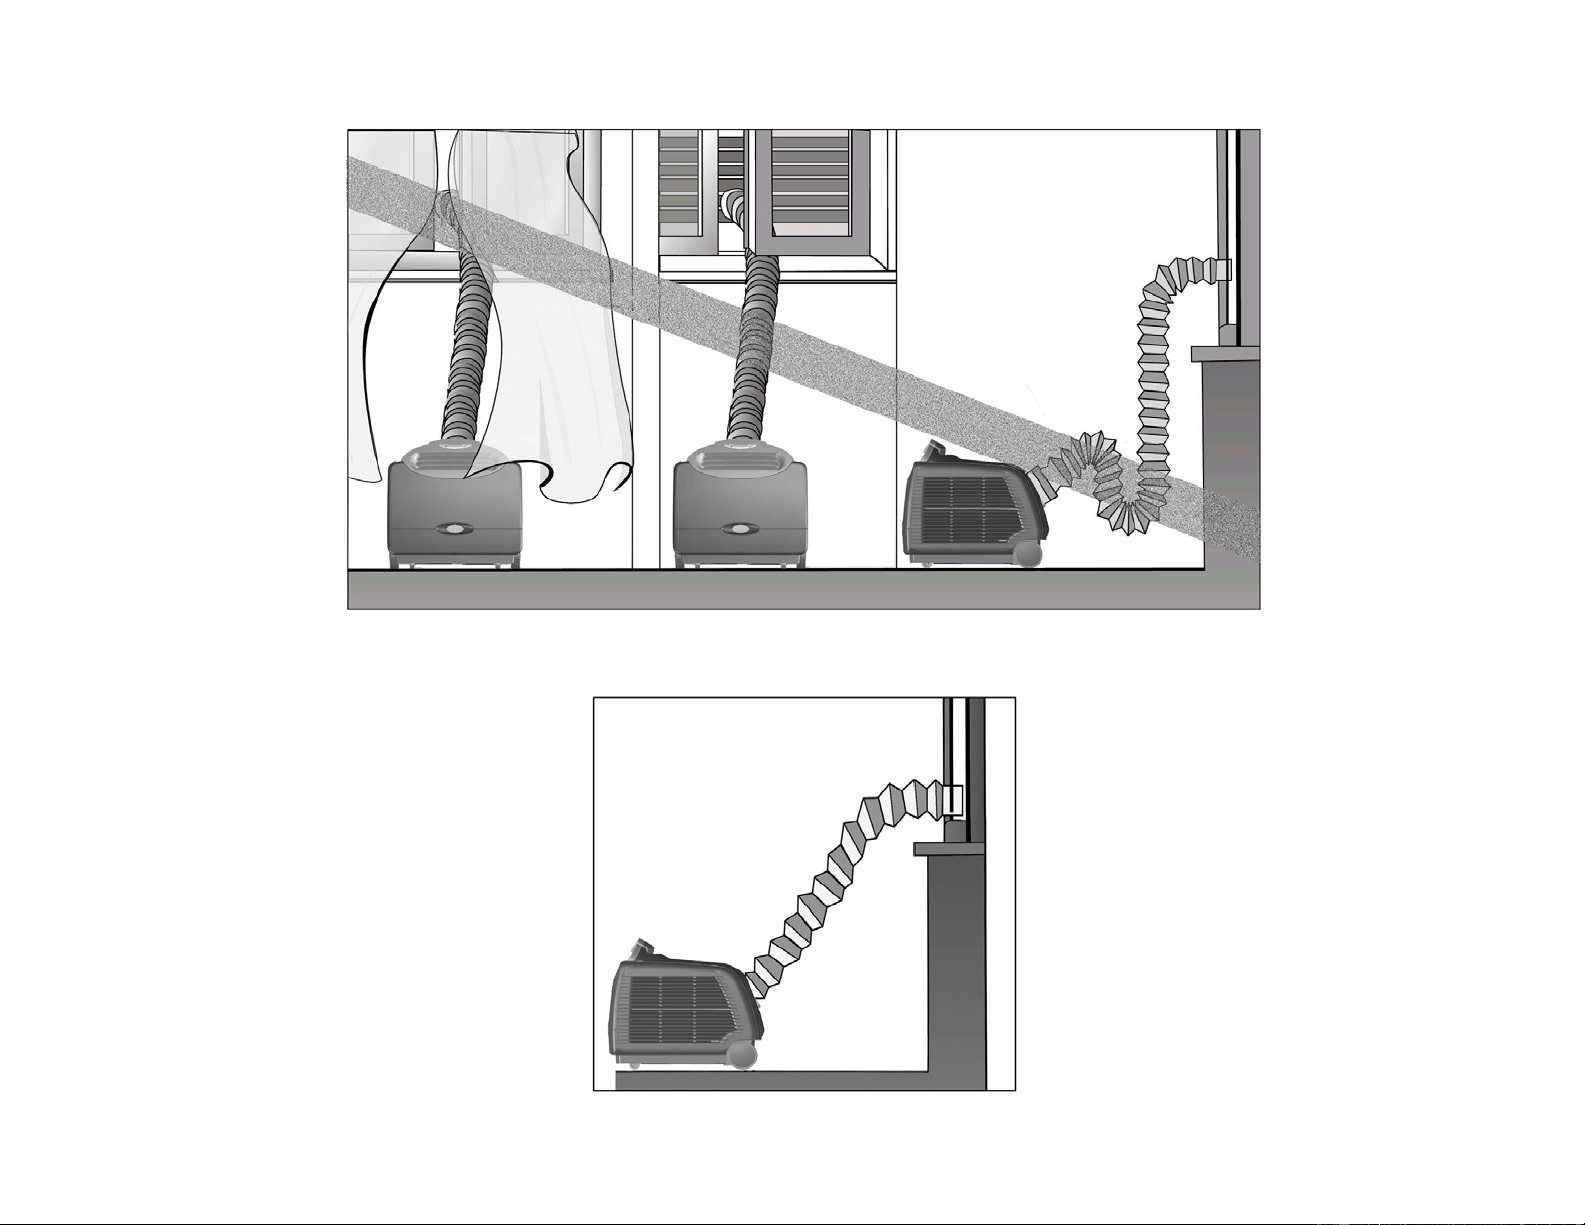
. 2 Incorrect setu
p
Correct setu
p
Fi
g
. 3

5
SAFETY PRECAUTIONS
• Ensure curtains or other objects are not obstructing the air inlet filters. (Fig.2)
• Do not bend or crush the exhaust hose while in use. (Fig.2)
• Transport the unit in an upright position only, or leave it in an upright position for at least 2 hours before first use.
• Always place the unit on even and hard surface.
• The power cord is UL listed. It has a built-in L.C.D.I. (leakage, current, detection, interruption) circuit breaker for added safety. If
the power supply is interrupted, press the reset button to reconnect the unit to power source.
• Make sure this unit is connected to a correctly grounded power supply outlet. Do not use an extension cord.
• Do not turn this unit on and off by plugging and unplugging. Always use the ON/OFF switch.
• Do not sit or place objects on the unit.
• Always allow air flow around the portable air conditioner for at least 20’. Do not use this unit inside closets, cabinets and/or
cramped spaces between furniture.
• To avoid the risk of shock, the product should never be used in bathrooms, shower rooms, or in any other steamy or wet areas.
• Do not operate this unit without the air filter.
• Do you use harsh chemicals to clean the filter. Dry thoroughly before inserting the filter into the unit
• This unit is optimized to operate in an ambient temperature of 64°F – 100°F.
• Do not repair, disassemble and/or modify the unit by yourself.
• An opening in a window or wall is required to accommodate the exhaust hose (window kit supplied) to exhaust the hot air from
the back of the unit.
• Do not add extra length to the exhaust hose by more than a total length of 9’. This will reduce the cooling efficiency of the
portable air conditioner.
• Always turn off the portable air conditioner when cleaning the air filter, and transporting.
• At the end of each season, all water must be drained from the unit and filter must be cleaned before storage.
• Do not use an excessively wet cloth, industrial solvents, oil-based products to clean this portable air conditioner.
THE MANUFACTURER DISCLAIMS ANY RESPONSIBILITY IF THE ABOVE INSTRUCTIONS ARE NOT FOLLOWED.
6
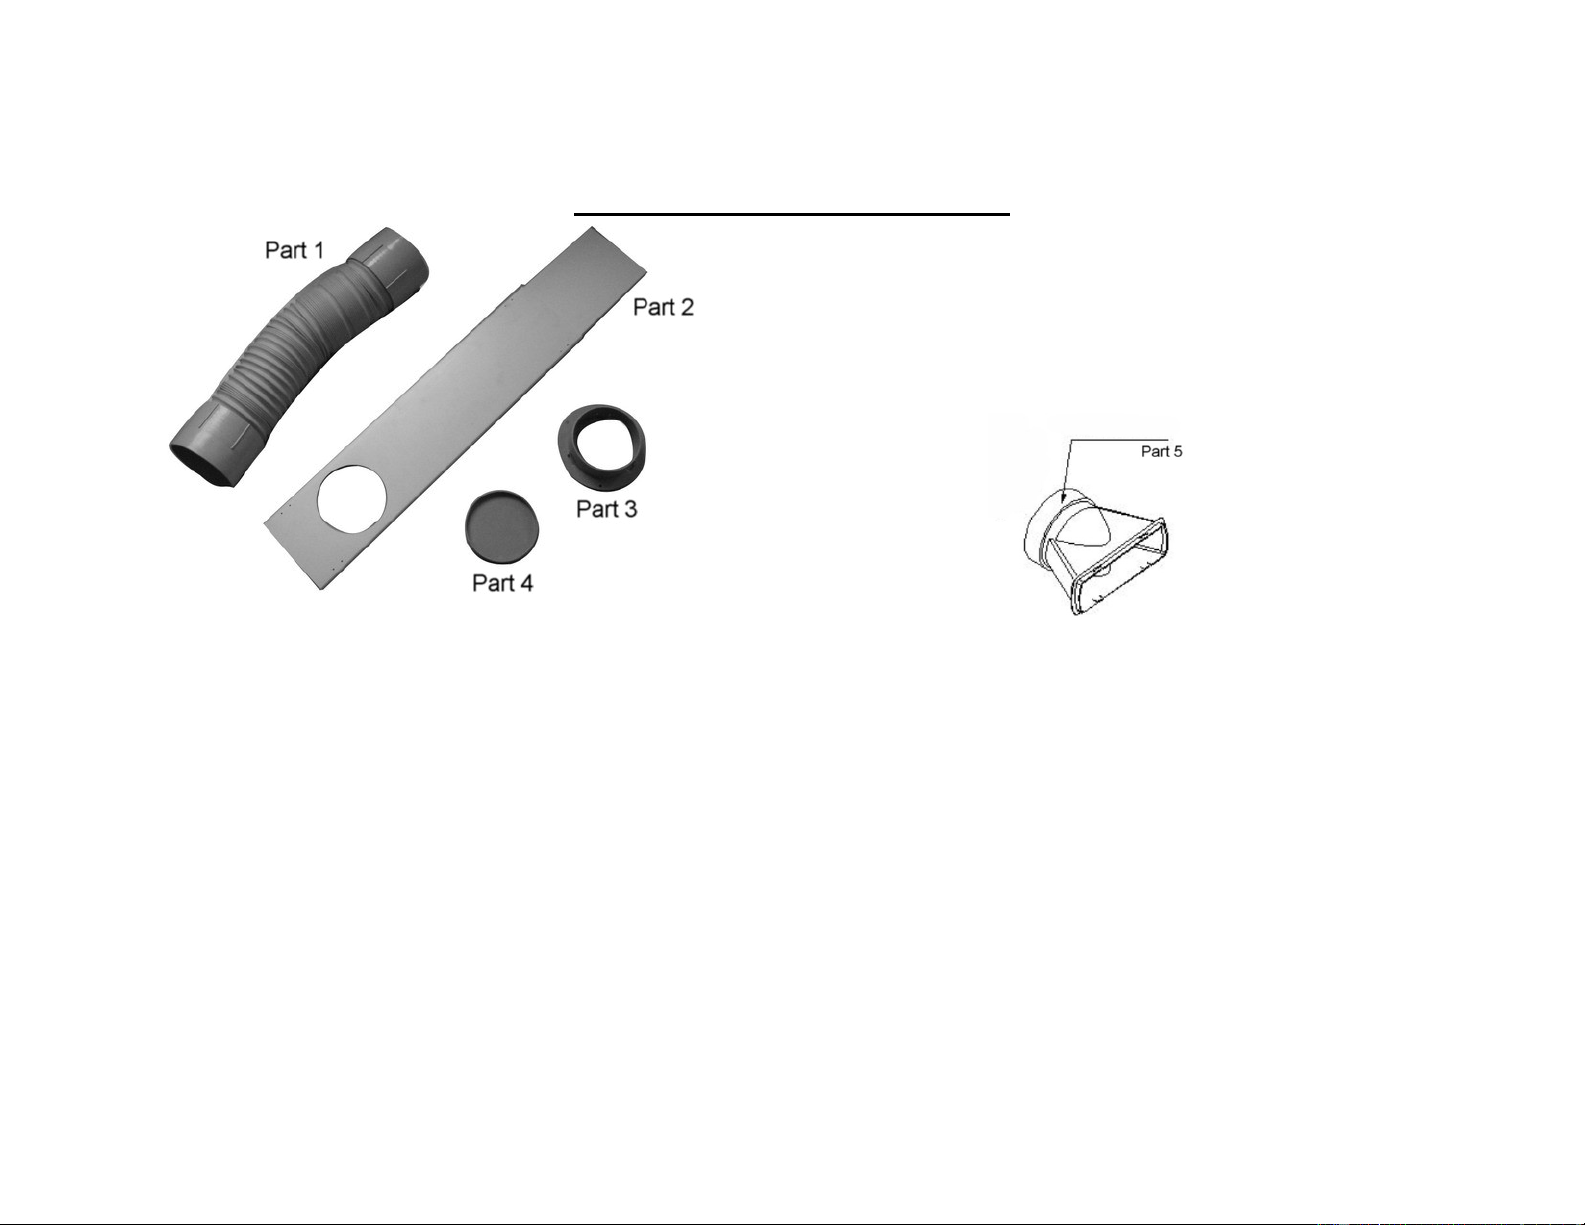
WINDOW KIT INSTALLATION
In order for this portable air conditioner to work properly, the hot air from the back of the unit must be vented to the outside.
Please follow the instructions below for window kit installation.
1. Extend the exhaust hose (Part 1) at least 6” and insert it to the outdoor exhaust outlet at back of the unit.
2. Attach the round connector (Part 3) to the other end of the hose.
3. Open your window and place the adjustable window slide bar (Part 2) to the opening of the window. Expand the bar so it
fits tightly horizontally.
4. Lower the window so the bar fits to the opening of the window tightly.
5. Attach the hose with the round connector to the round opening of the window slide bar.
6. When the air conditioner is not in use, remove the hose from the window slide bar and place the round cover (Part 4) to
the opening of the bar.
7. For non-fixed openings, such as doors or sliding doors that may need to be opened or closed, attach the rectangle
connector (Part 5) to the end of the hose and place the connector to the opening of the door.
7
INSTALLATION
Fig. 4
When you use this air conditioner unit, hot air must be exhausted out of the room to complete the air exchange of the condenser.
When the unit is operating in fan-only mode, no exhaust is required.
Exhaust hose Installation
The exhaust hose must be installed onto the unit.
1. Pull out about 6” of one end of the exhaust hose.
2. Screw the exhaust connector on the exhaust hose in a clockwise motion.
3. Snap the exhaust connector in place in the back of the unit.
4. Only extend the exhaust hose to the necessary length.

8
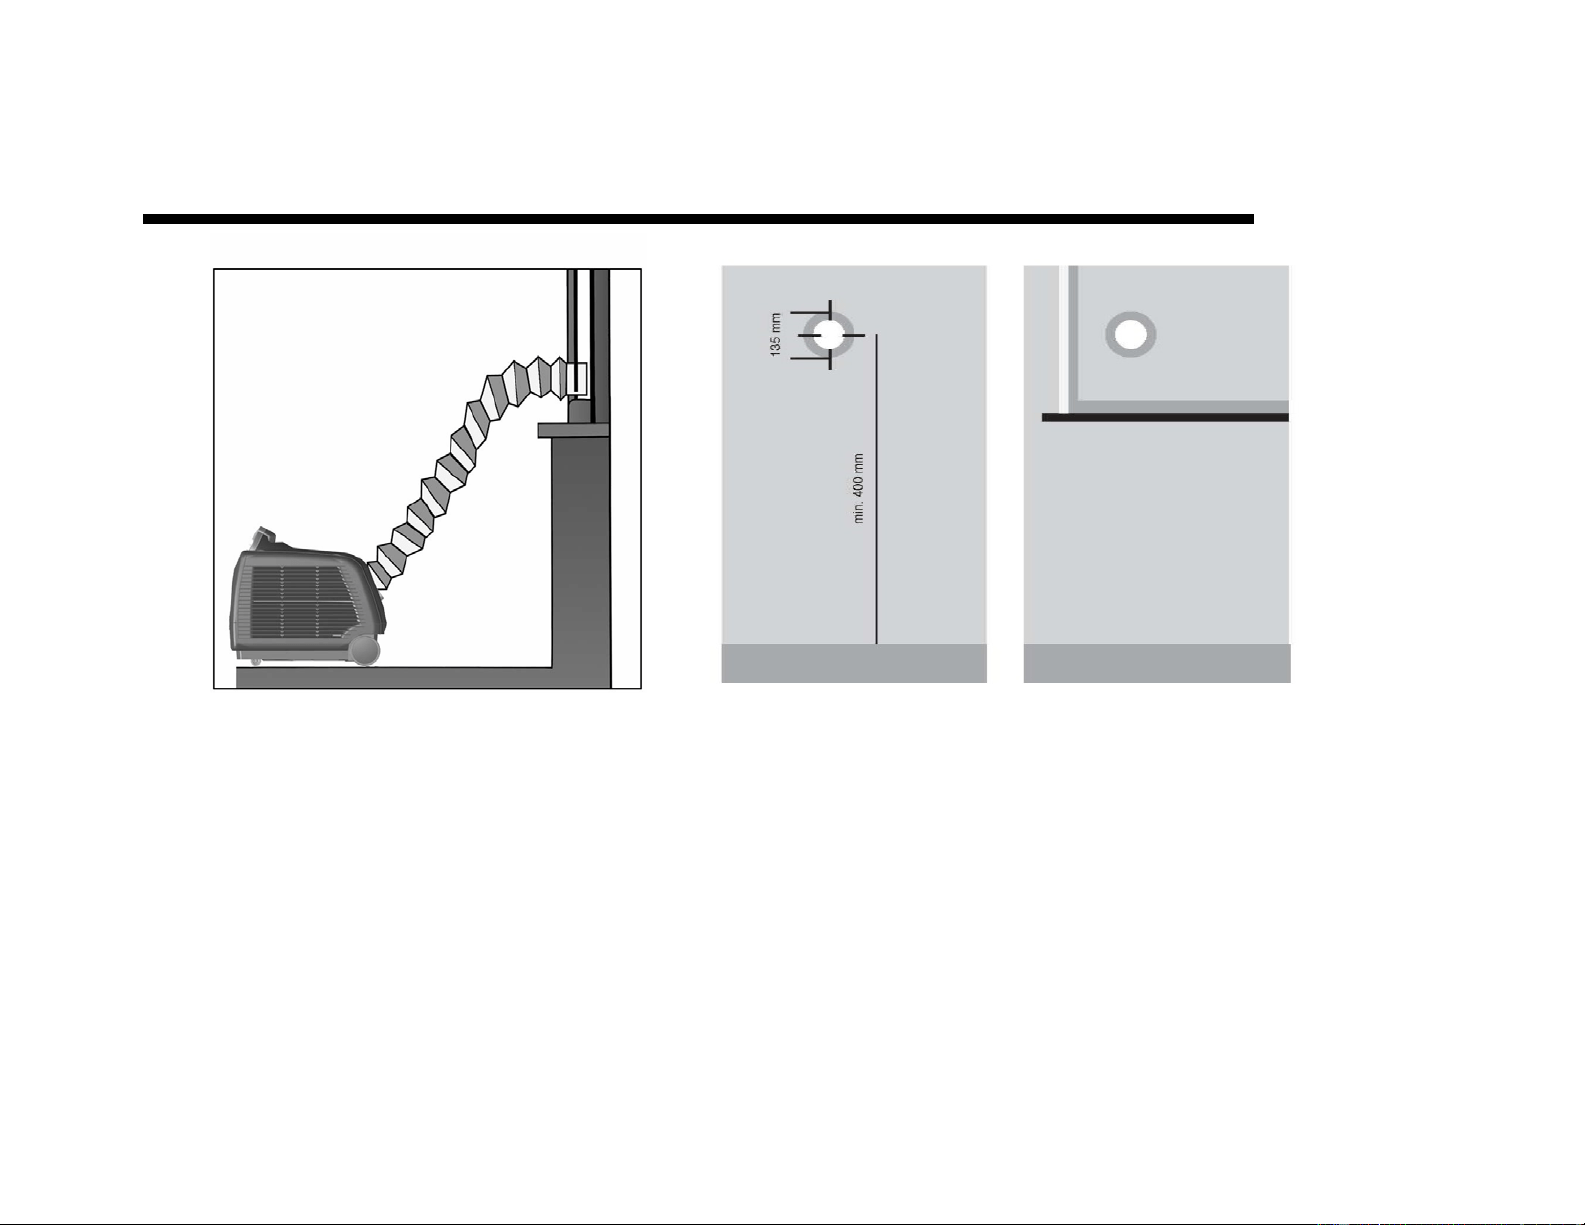
Window Installation (Fig. 4)
1. Make sure the exhaust hose is properly installed onto the portable air conditioner.
2. Open window or sliding door for approximately 5” (130 mm)
3. Adjust the length of the window kit to the same length and width of the opening of the window or the sliding door. Cut the window
piece if necessary to fit the length of your window or sliding door.
4. Place the window kit on your window or sliding door, with the exhaust hole as near to the portable air conditioner as possible.
5. Close the window or sliding door, on the window kit. For long term installation, you may screw the window kit into your window
frame.
6. Adjust the length of the exhaust hose and mount the window kit adaptor to the window kit.
NOTE: When using the window kit on a window or sliding door it will cause the window or sliding door not to be properly closed and
locked. Additional security measurements maybe needed.
Wall Installation
1. Make sure the exhaust hose is properly installed onto the portable air conditioner.
2. Make a hole of 5.3” (135mm) diameter in the wall.
3. Insert as much as exhaust hose as needed through the hole.
NOTE: Make sure to have a qualified professional to make the hole to avoid the possibility of injury or damage to the structure. Make
sure that the hole is covered when it is not used by the portable air conditioner.
9
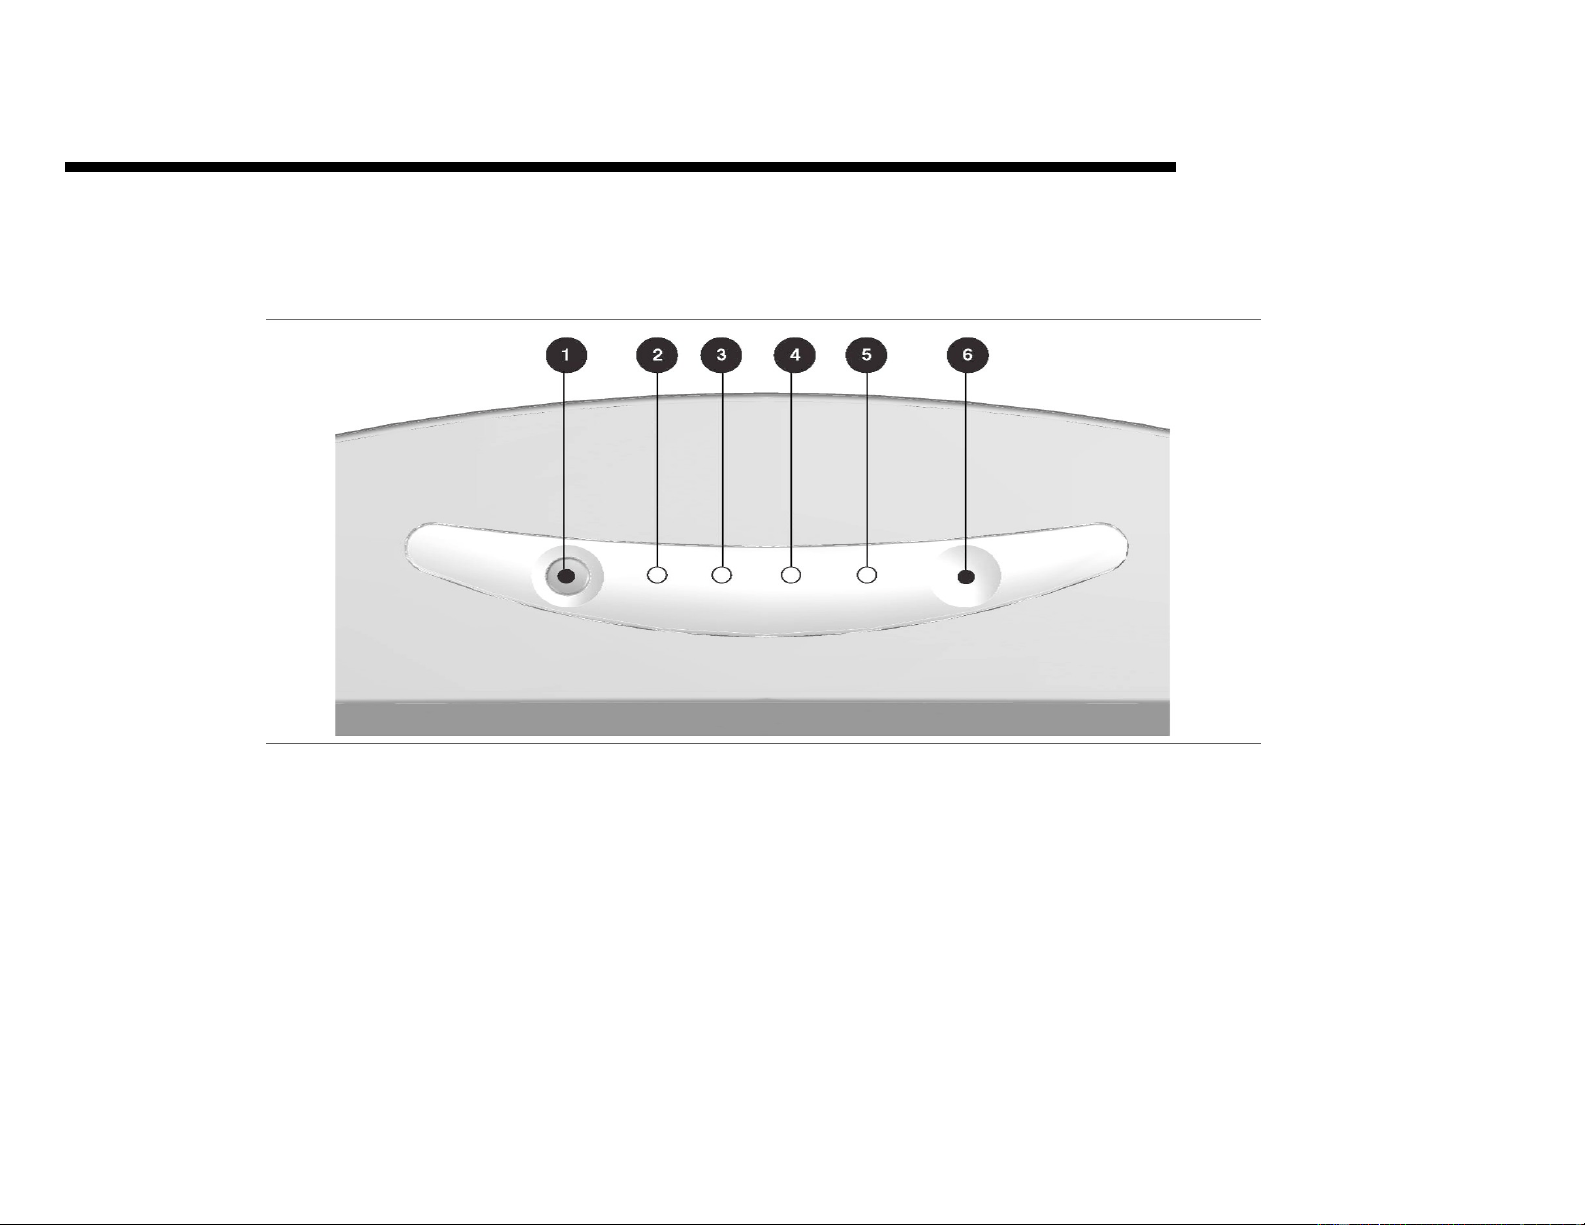
CONTROL PANEL
1. Stand-by or Comfort (automatic) function button
2. Red - Stand-by
3. Green - Air conditioner is on
4. Orange - On and/or off program is enabled
5. Green - Automatic function is on
6. Remote control signal reception button
Fi
g
. 5

10
OPERATIONS
SWITCHING ON THE AIR CONDITIONER
The portable air conditioner can be switched on by the remote control or by pressing the On/Off button on the control
panel. Without using the remote control, the unit can only be switched on the Comfort (automatic) function.
To transmit signals from the remote control to the air conditioner, point the front part of the remote handset towards the
control panel on the air conditioner. Reception of the signal is confirmed by a beep. The maximum signal transmission
distance is approximately 8 meters / 26 feet.
NOTE:
• Other appliances in the same room controlled by a remote control (TV, radio, stereo, etc.), may cause
interferences.
• Electronic and fluorescent lamps may interfere with the signal transmissions between the remote control and the air
conditioner.
• Remove the batteries if the remote control is not used for long periods.

11
INSTALLING BATTERIES
• Only use 2 LR03 1.5V Batteries (included) in the remote control.
• Always change both batteries at the same time.
• To insert the batteries, open the flap on the back of the remote control. Strictly adhere to the polarity signs on the
bottom of the battery housing, close the flap once the batteries have been inserted (Fig. 6).
Fi
g
. 6
12
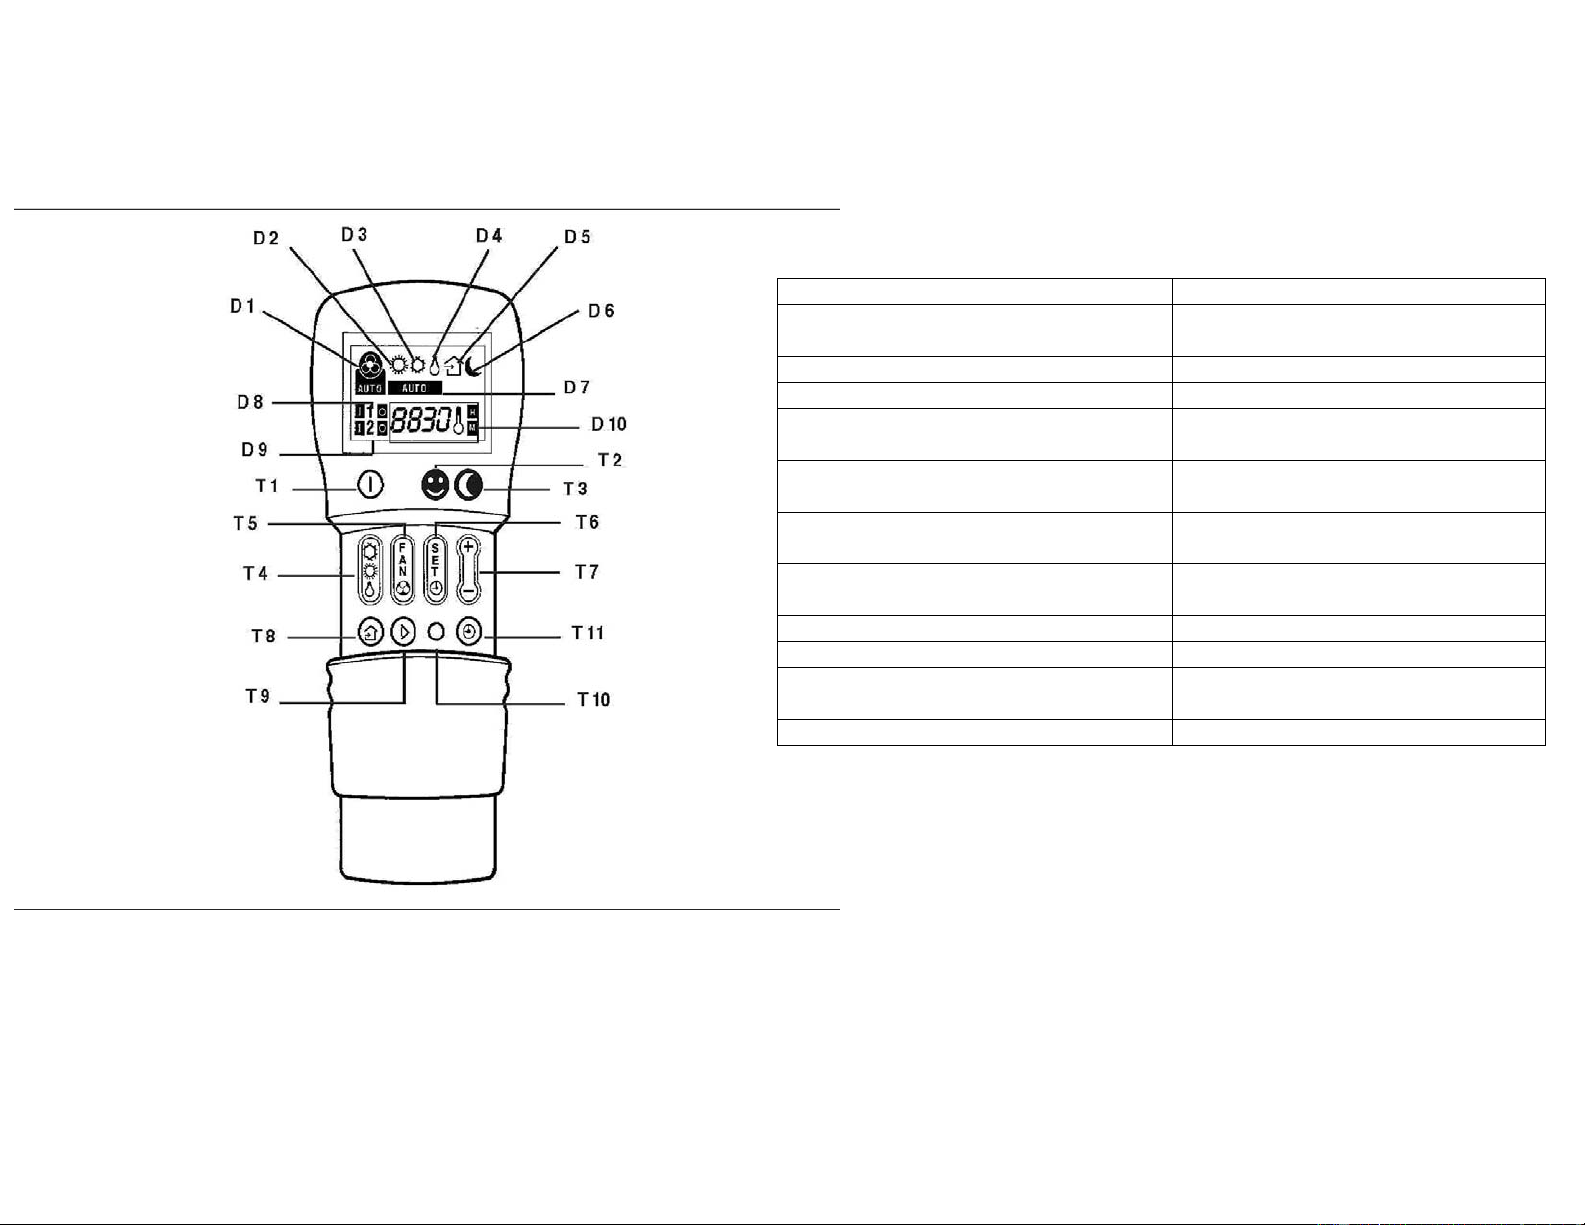
REMOTE CONTROL
BUTTONS DISPLAYS
T1 On/Off D1 Fan speed or the automatic
fan function mode (AUTO)
T2 Comfort button (automatic) D2 Heating (not enabled)
T3 Night Comfort button D3 Cooling function indicator
T4 Function Mode selector D4 Dehumidifying function
indicator
T5 Fan Speed selector D5 Outdoor air outlet enabled
(not enabled)
T6 Set Time and Program button D6 Night comfort function
indicator
T7 Increase (+) / Decrease (-)
Temperature / Time value button
D7 Automatic function indicator
T8 Button not enabled D8 First program indicator
T9 Button not enabled D9 Second program indicator
T10 Reset button D10 Temperature (thermometer),
hour and minutes (H M) indicator
T11 Enable Program button
The remote control has a sliding cover. Without pulling the cover down, the
remote control can turn On/Off the unit, start or stop the Comfort (automatic)
and Night Comfort functions only.
13
Fig. 8 Fig. 9
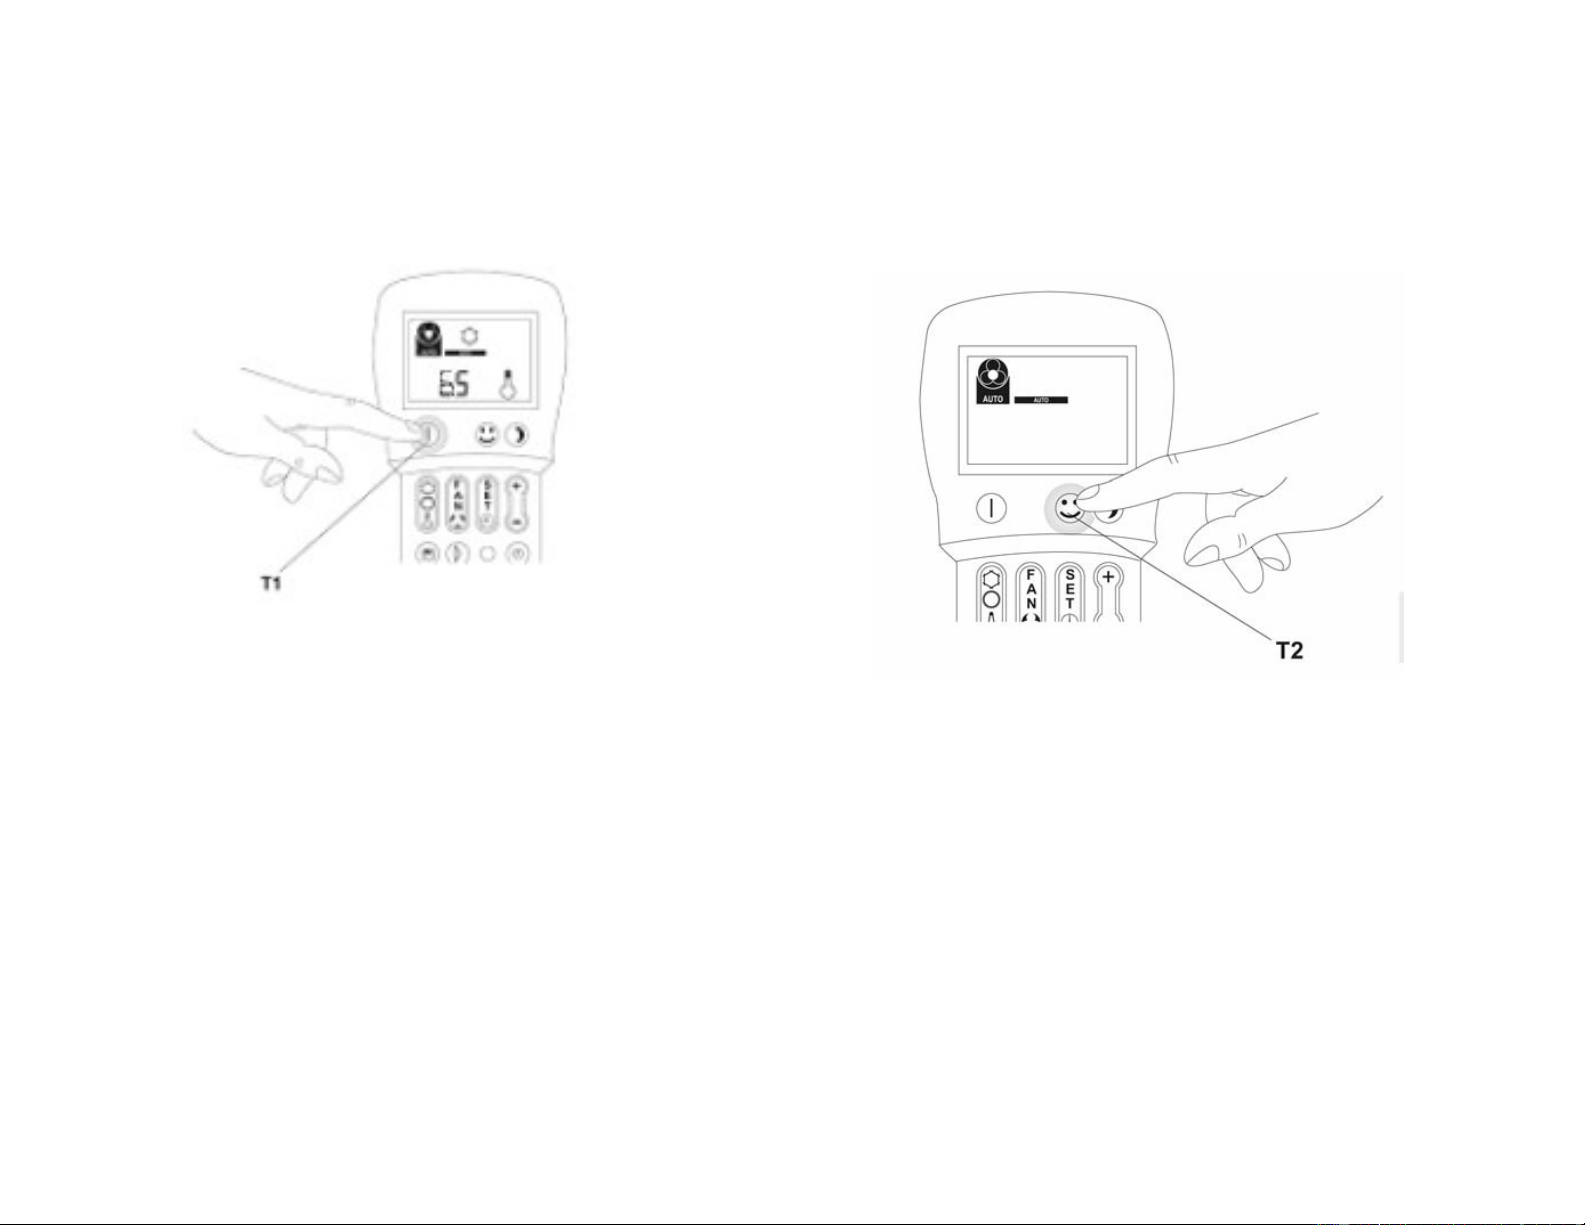
SWITCHING ON/OFF THE AIR CONDITIONER (Button T1)
Press the T1 button to switch on/off the air conditioner (Fig. 8).
The control system of the air conditioner stores the previously programmed data in its memory; therefore, the settings are not lost
when the air conditioner is switched off.
When the red LED (2) on the control panel is illuminated, this indicates that the air conditioner is switched off.
When the green LED (3) on the control panel is illuminated, this indicates that the air conditioner is switched on.
COMFORT (AUTOMATIC) FUNCTION (Button T2)
Press the T2 button (Fig. 9), the air conditioner will automatically run to achieve the optimum comfort temperature of (72°F/ 22°C.)
14
When the Comfort function is on, the compressor will stop when the temperature is below 72°F and the compressor will start when
the temperature is above 72°F.
Fig. 14
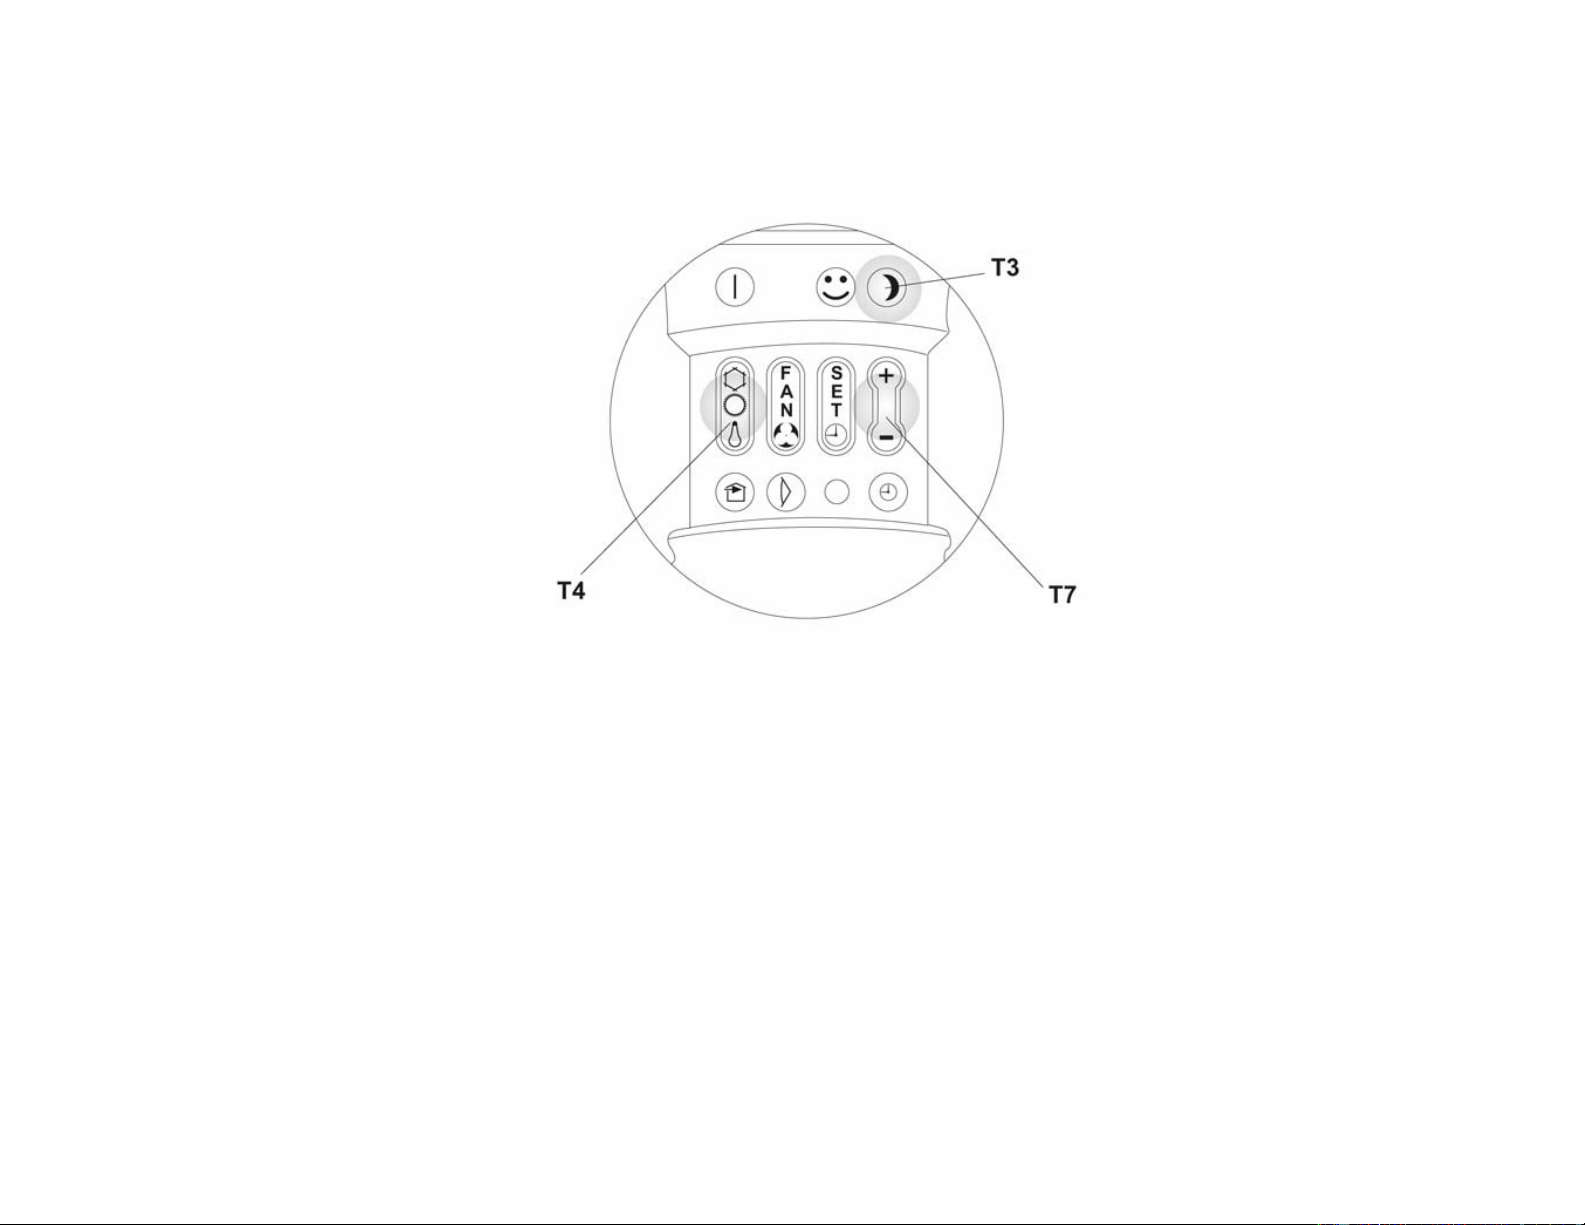
NIGHT COMFORT BUTTON (Button T3)
Press the T3 button to activate the night comfort function (Fig.14). In this function, the air conditioner gradually increases the set
temperature in cooling mode, decreases the noise level and conserves energy at night time. In cooling mode, the set temperature is
maintained for an hour after the Night Comfort function has been activated. In the next hour, the temperature is gradually increased
by up to 3°F. After the second hour, the temperature remains the same.
To activate the a Night Comfort function, first select the desired function mode by pressing the T4 button, program the desired
temperature settling by pressing the T7 (+ / -) button, then press the T3 Night Comfort button. The fan speed of the Night Comfort
function is at the lowest and cannot be changed.
The Night Comfort can be cancelled at any moment (ideally when you wake up) by pressing the T3 button. The temperature and fan
speed settings (programmed before the Night Comfort function was activated) will be restored.

15
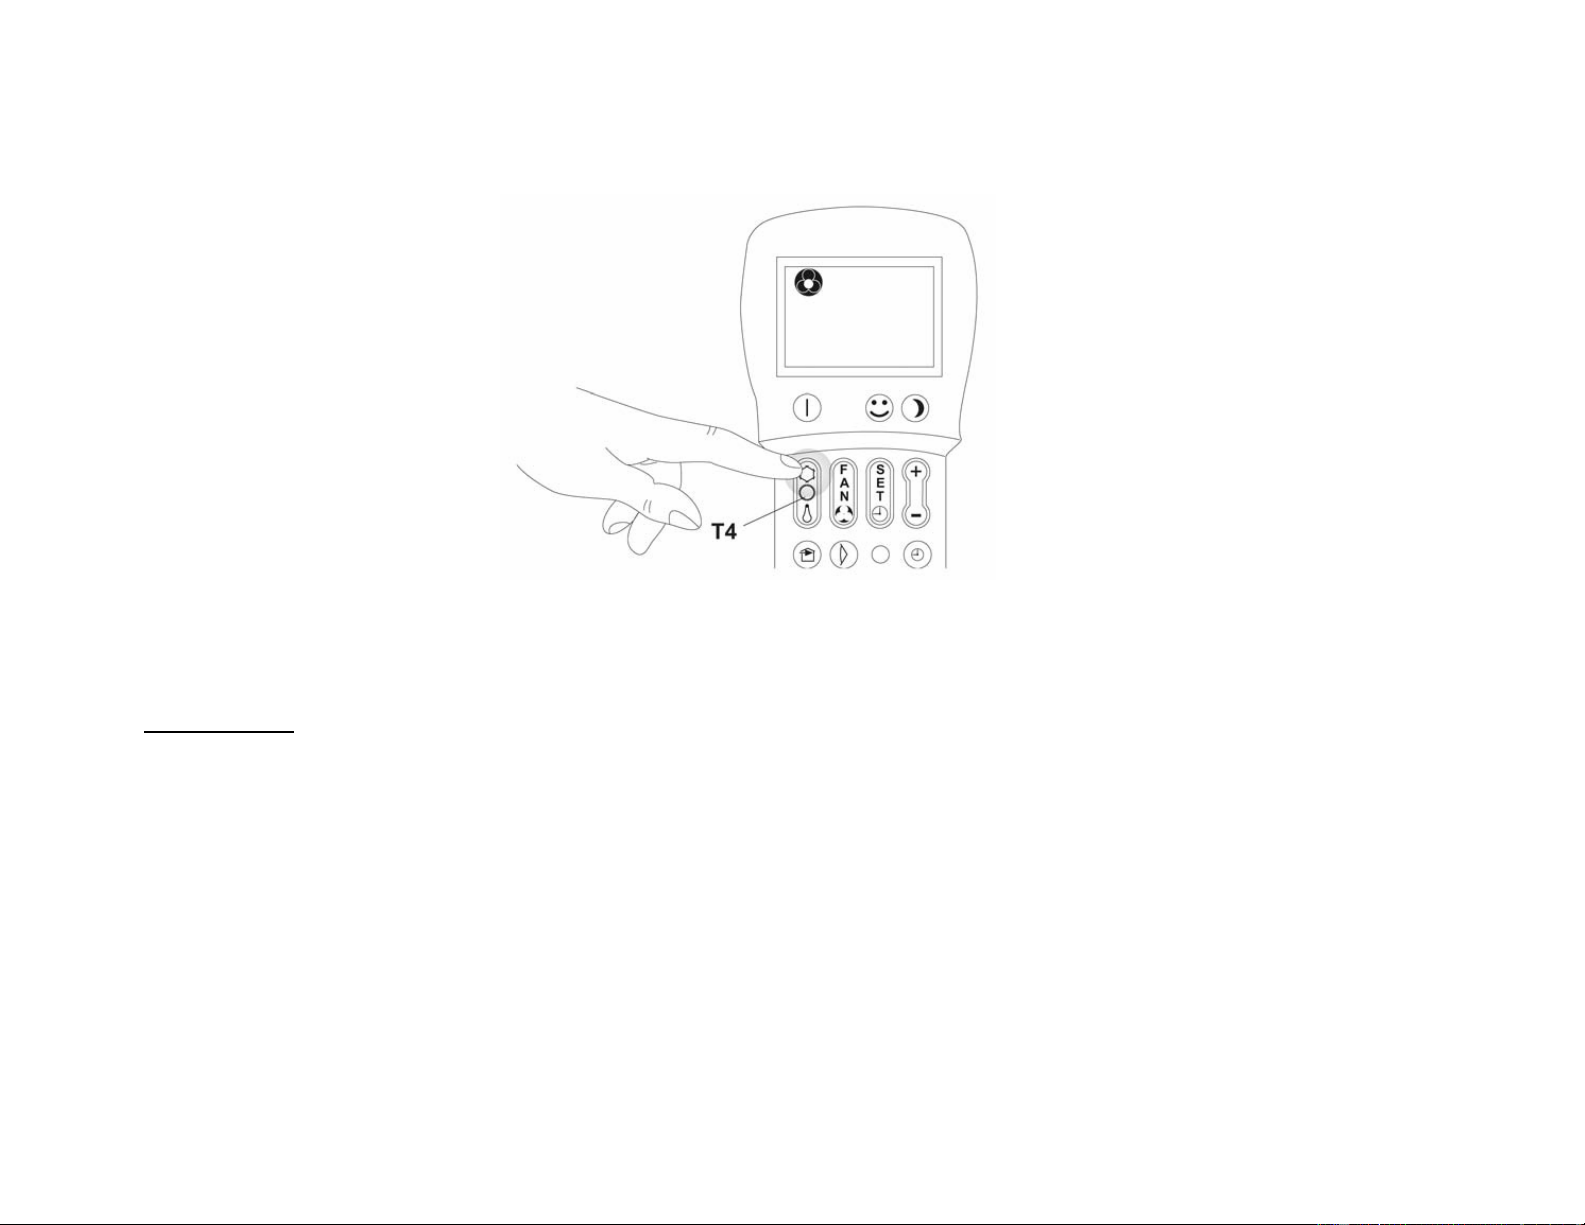
COOLING/ DEHUMIDIFICATION ONLY/ FAN ONLY FUNCTION (Button T4)
Cooling Mode
In this mode, the air conditioner cools and dehumidifies the room. To activate this function, press the T4 Function Mode Selector
button until the FROST symbol appears on the display (Fig. 10). When this function mode is set, the compressor will start in
approximately 3 minutes. Subsequently, set the desired temperature and fan speed (refer to the appropriate sections). Please note
that when switching function mode, there will be an approximately 3 minutes transition time.
Dehumidifying Only Mode
In this mode, the air conditioner only dehumidifies the room, the compressor will activate intermittently depending on the ambient
temperature. To activate this function, press the T4 Function Mode Selector button until the DROPLET symbol appears on the
display (Fig. 11). When this function mode is set, the fan speed settings cannot be changed and it is automatically set to minimum.
Please note that when switching function mode, there will be an approximately 3 minutes transition time.
Fi
g
. 10 Fi
g
. 11
16
Fan Only Mode
In this mode, only the fan of the air conditioner runs and circulates the air in the room. To activate this function mode, press the T4
Function Mode Selector button until just the FAN symbol appears on the display (Fig.12). Subsequently, set the desired fan speed.
Please note that when switching function mode, there will be an approximately 3 minutes transition time.
Fi
g
. 12
17
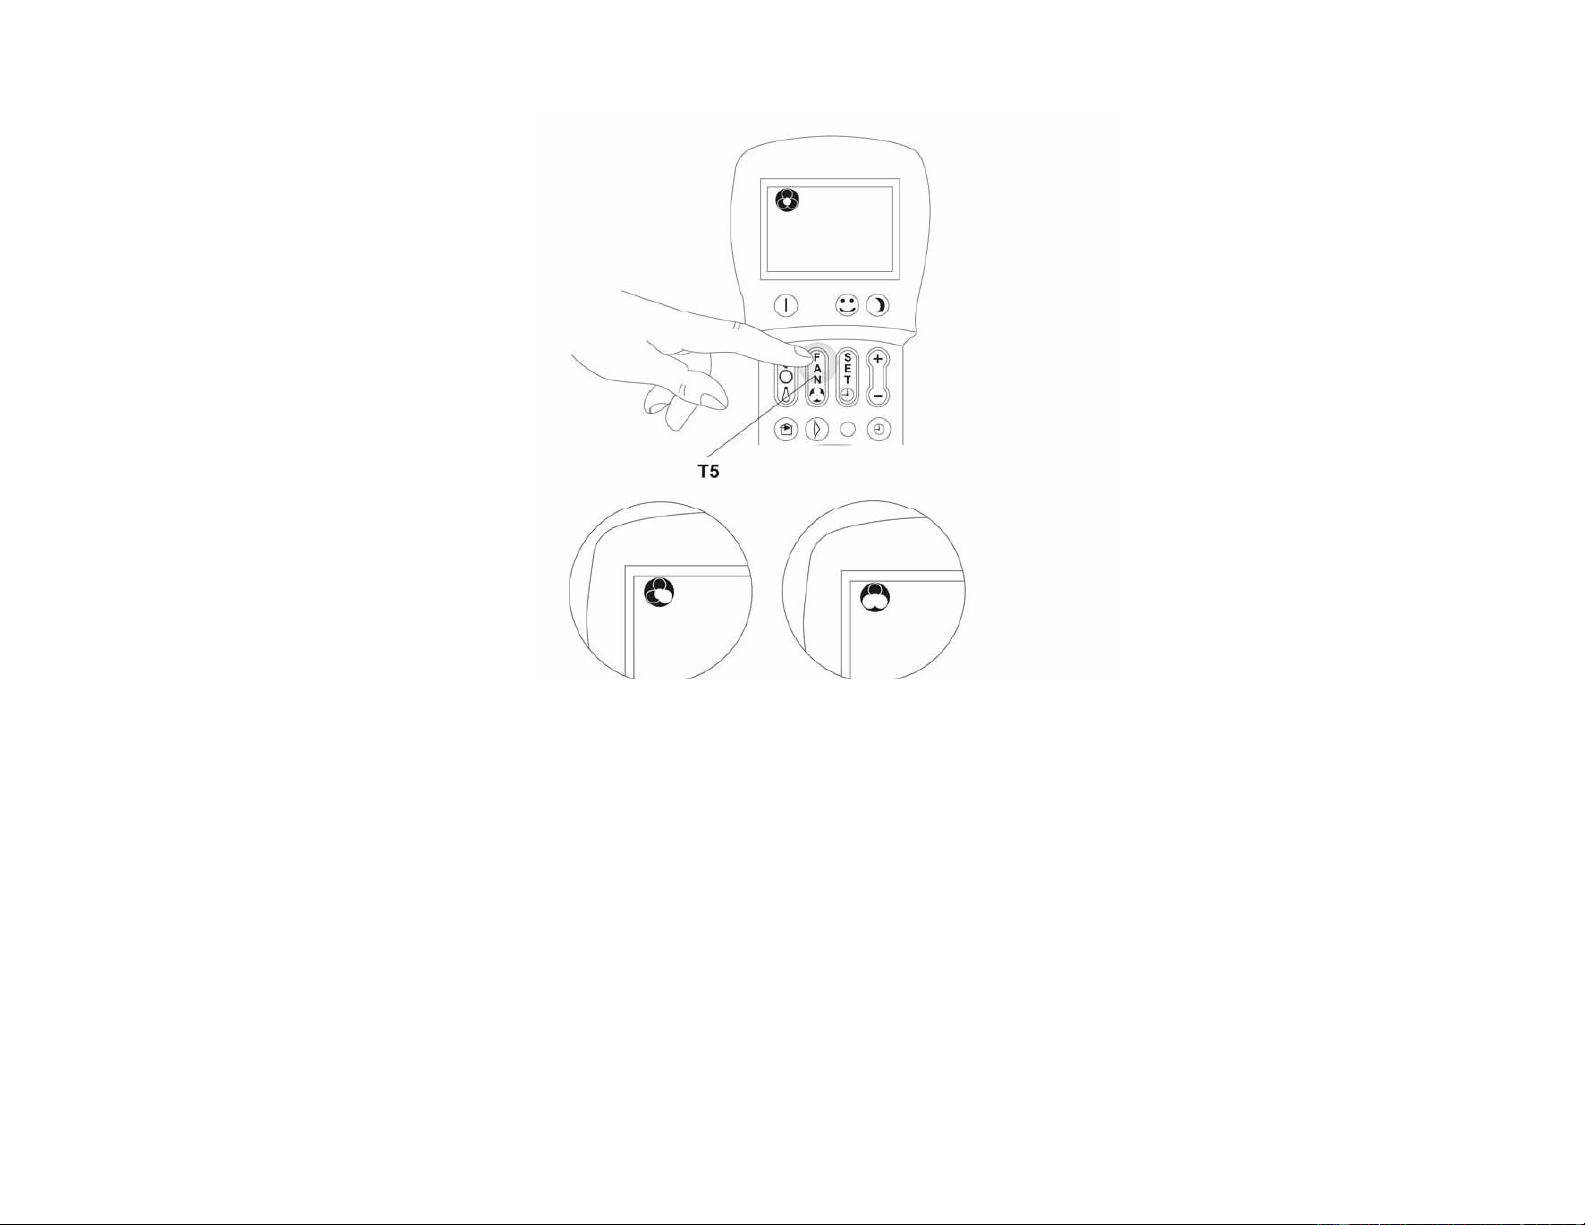
FAN SPEED CONTROL (Button T5)
Press the T5 button to set the fan speed. To change the fan speed, press this button repeatedly to achieve the following sequence
(Fig 13):
- Low, Medium, High and Automatic
When set in Automatic fan speed mode, the air conditioner automatically adjusts the fan speed. In this mode, the greater the
difference between the ambient temperature and the set temperature, the higher the fan speed. The fan speed is automatically
reduced as the ambient temperature gradually reaches the set temperature.
Fi
g
. 13
18
SETTING THE FUNCTION PROGRAM MODES
This air conditioner has two distinct function programs that can be used to stop and start the appliance at certain times (for example
the air conditioner can be programmed to start just before you get home so when you arrive home, the temperature is pleasant). If
you wish to use there functions, it is necessary to set the exact time and the function programs to run at the desired times.
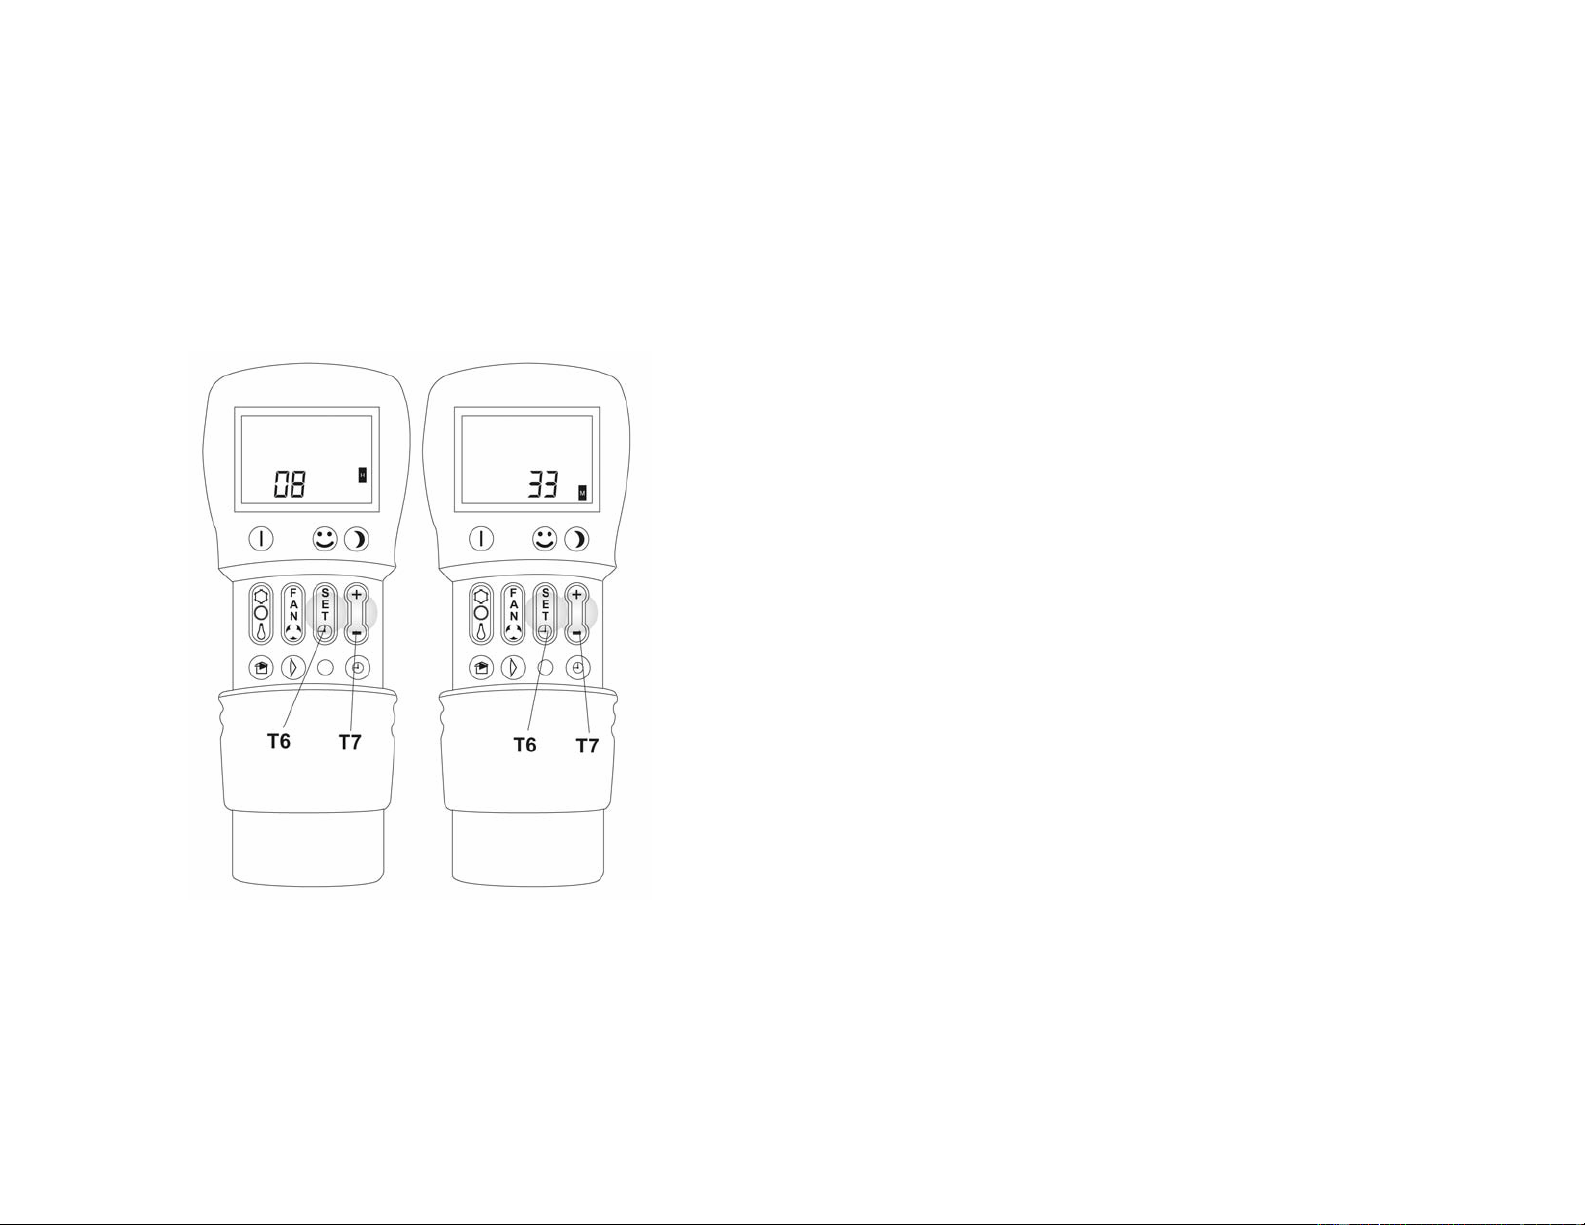
SETTING THE CURRENT TIME ON THE REMOTE CONTROL (Button
T6-T7)
To set the exact time, proceed as follows (Fig.15):
• Press the T6 Set time and Program button repeatedly until the hour
(H) symbol appears on the display.
• Press the T7 +/ - button to increase or decrease the hour (0-23) until
the exact hour value is displayed.
• Press the T6 Set time and Program button again until the minute (M)
symbol appears on the display.
• Press the T7 +/ - button to increase or decrease the minute (0-59)
until the exact minute value is displayed.
Fi
g
. 15
19
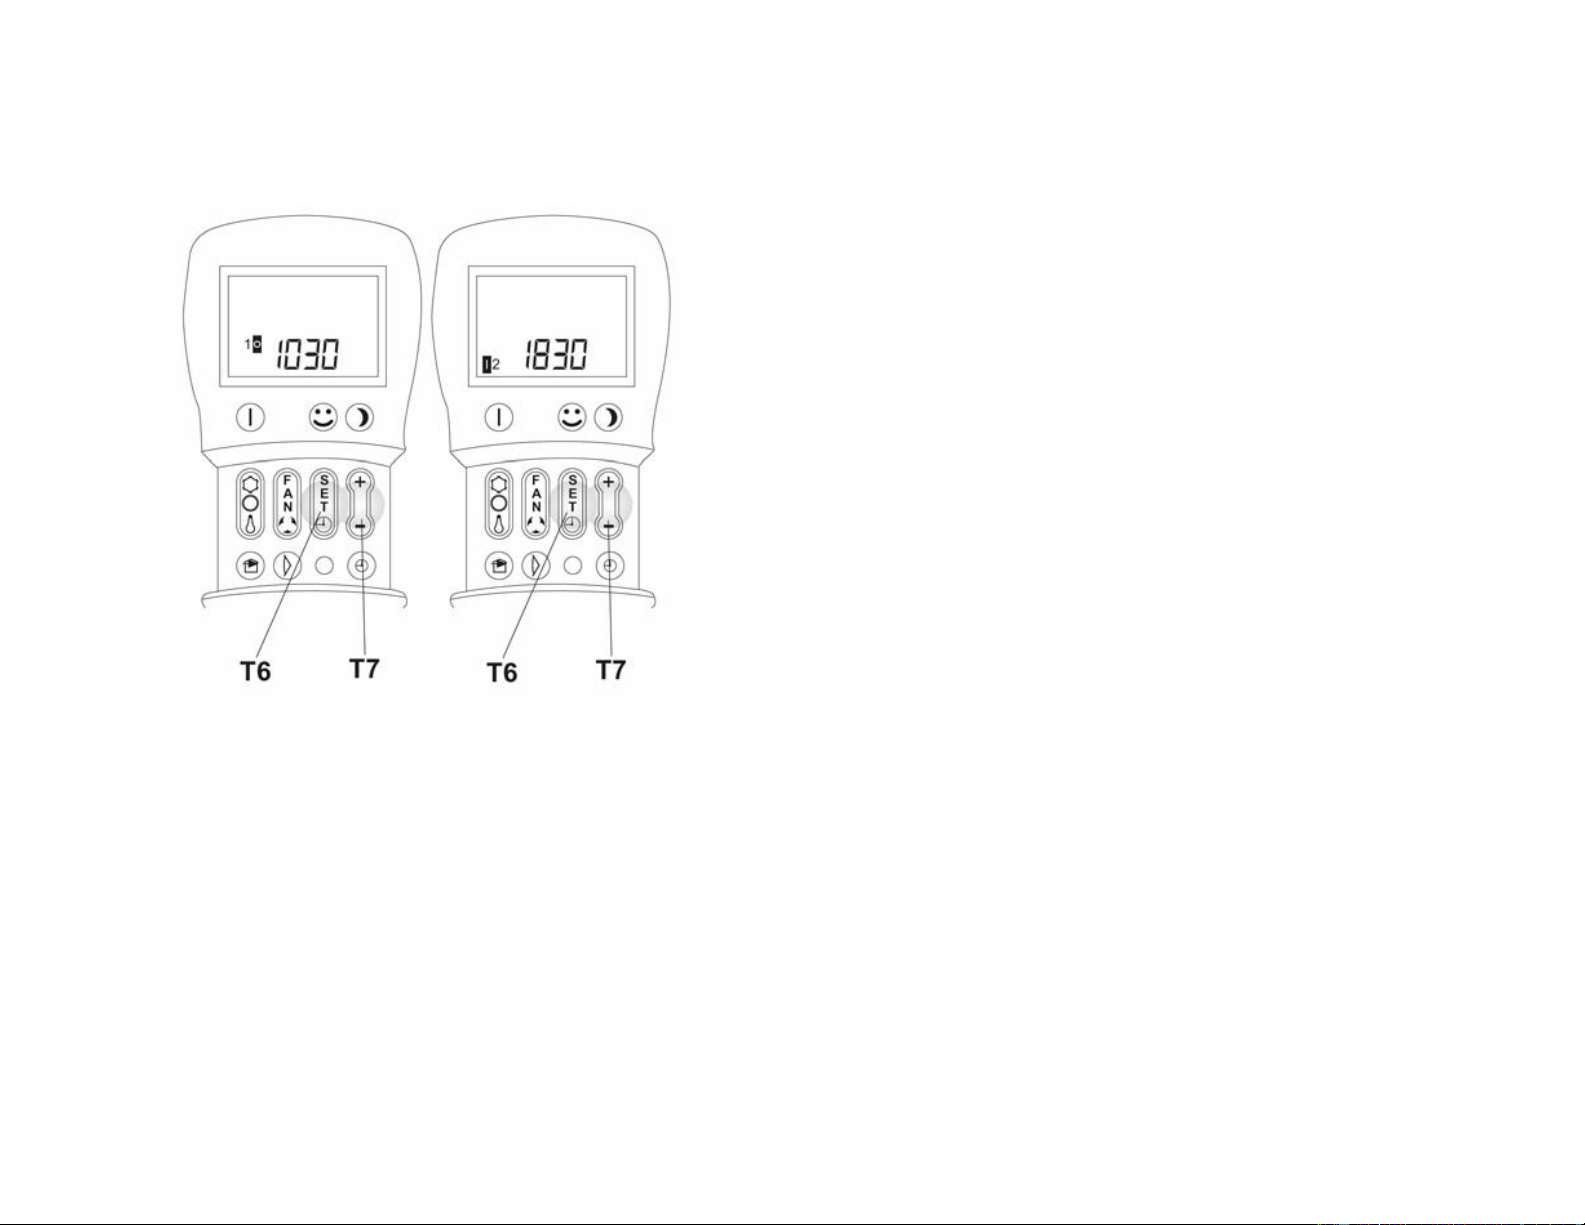
Setting the On/Off times of the 1
st
and 2
nd
Function Programs
(PROGR. 1 and PROGR.2)
To set the air conditioner On/Off times for the two programs proceed
as follows (Fig. 16):
• To set the start time of the 1
st
program
- Press the T6 Set Time and Program button repeatedly until the
PROGR.1 (D8) symbol with a vertical line on the left appears on the
display (the start time of the 1
st
program) is displayed.
- Press the T7 + /- button to set the time (0:00 – 23:30) when you
want the 1
st
program to start. The timer interval is 30 minutes.
• To set the stop time of the 1
st
program
- Press the T6 Set Time and Program button again. PROGR.1 (D8)
symbol with a circle on the right (the stop time of the 1
st
program)
will appear on the display.
- Press the T7 + /- button to set the time (0:00 – 23:30) when you
want the 1
st
program to stop. The timer interval is 30 minutes.
• To set the start time of the 2nd program
- Press the T6 Set Time and Program button repeatedly until the PROGR.2 (D9) symbol with a vertical line on the left appears on the
display (the start time of the 1
st
program) is displayed.
- Press the T7 + /- button to set the time (0:00 – 23:30) when you want the 2nd program to start. The timer interval is 30 minutes.
• To set the stop time of the 2nd program
- Press the T6 Set Time and Program button again. PROGR.2 (D9) symbol with a circle on the right (the stop time of the 1
st
program)
will appear on the display.
- Press the T7 + /- button to set the time (0:00 – 23:30) when you want the 2nd program to stop. The timer interval is 30 minutes.
To active one or both function programs, press the T11 Enable Program button. To return to normal function mode, press the T6
button repeatedly until the program symbols disappear from the display.
Fig. 16
20
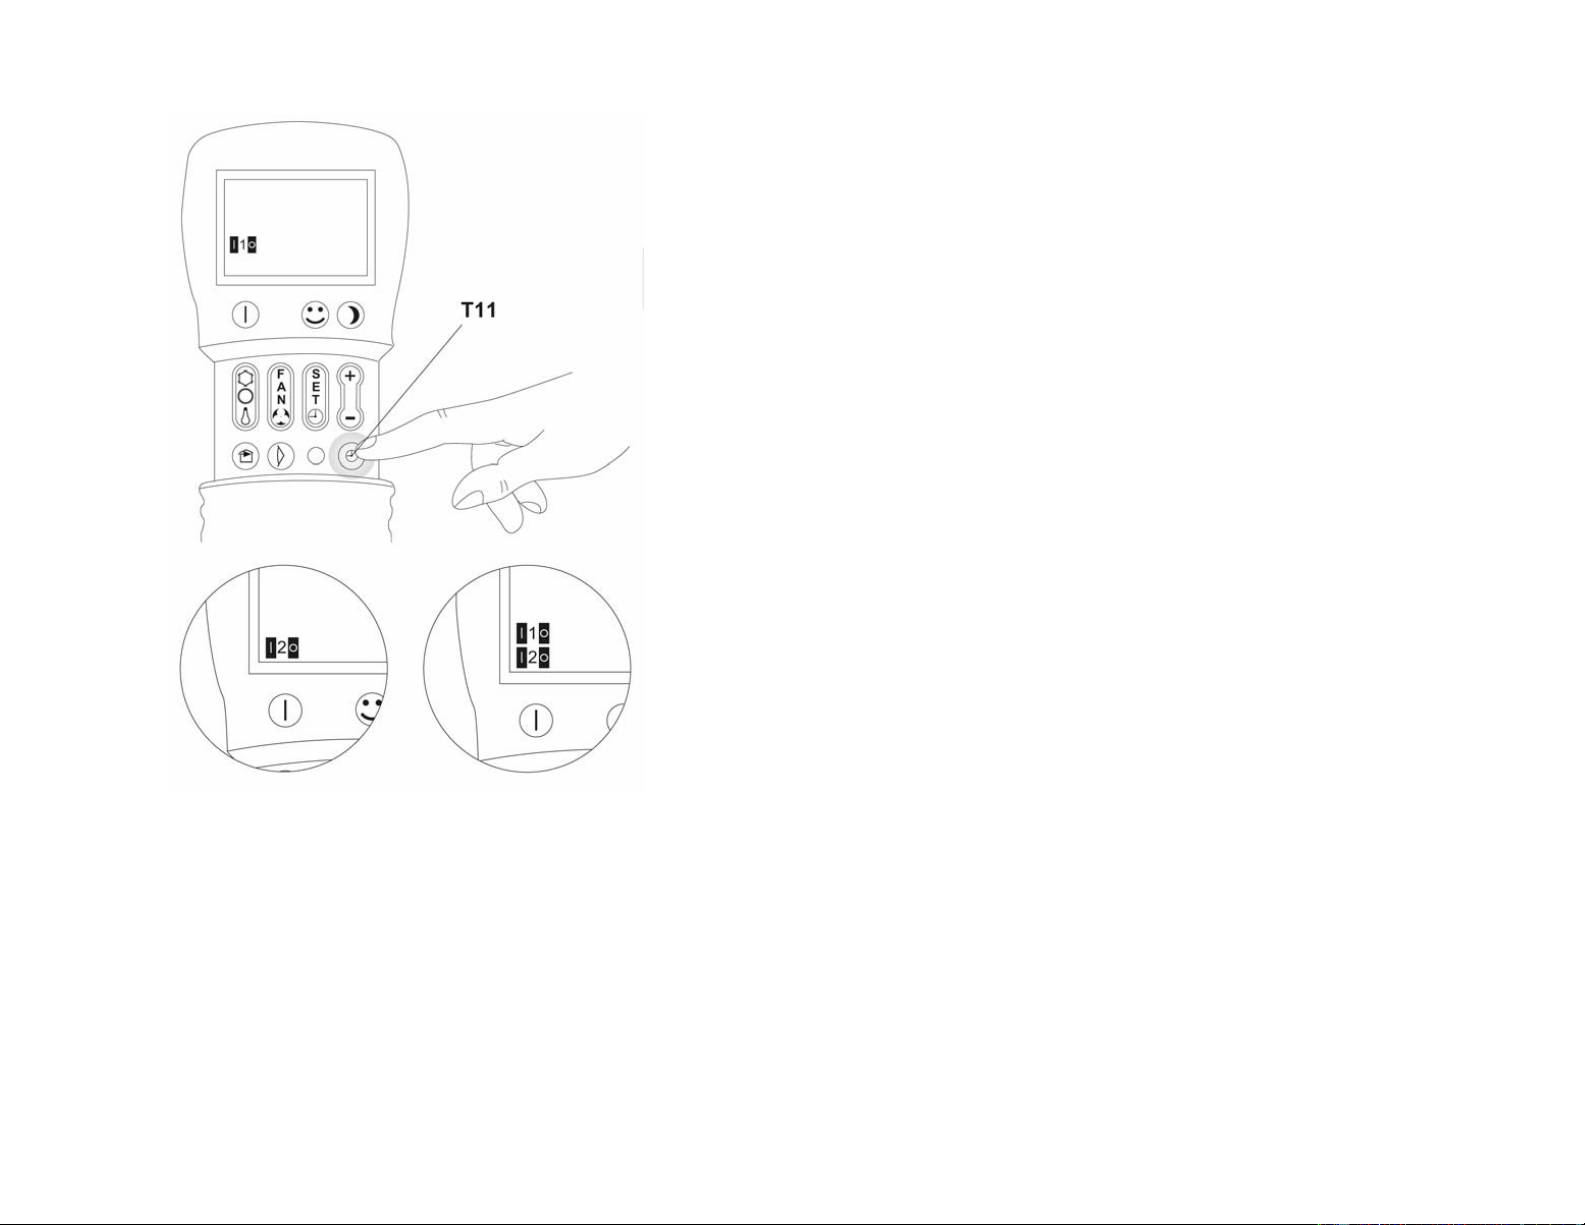
ENABLING AND DISABLING THE FUNCTION PROGRAMS (Button
T11)
The function program(s) (either one or both) can be enabled or disabled
(Fig. 17).
- Press the T11 Enable Program button once and the 1
st
program (D8)
is enabled. Press the T11 button again, the 2
nd
program (D9) is
enabled.
- Press the T11 button again, the 1
st
and 2
nd
programs (D8 & D9) are
enabled.
- Press the T11 button again, both programs are disabled.
Fig. 17
21
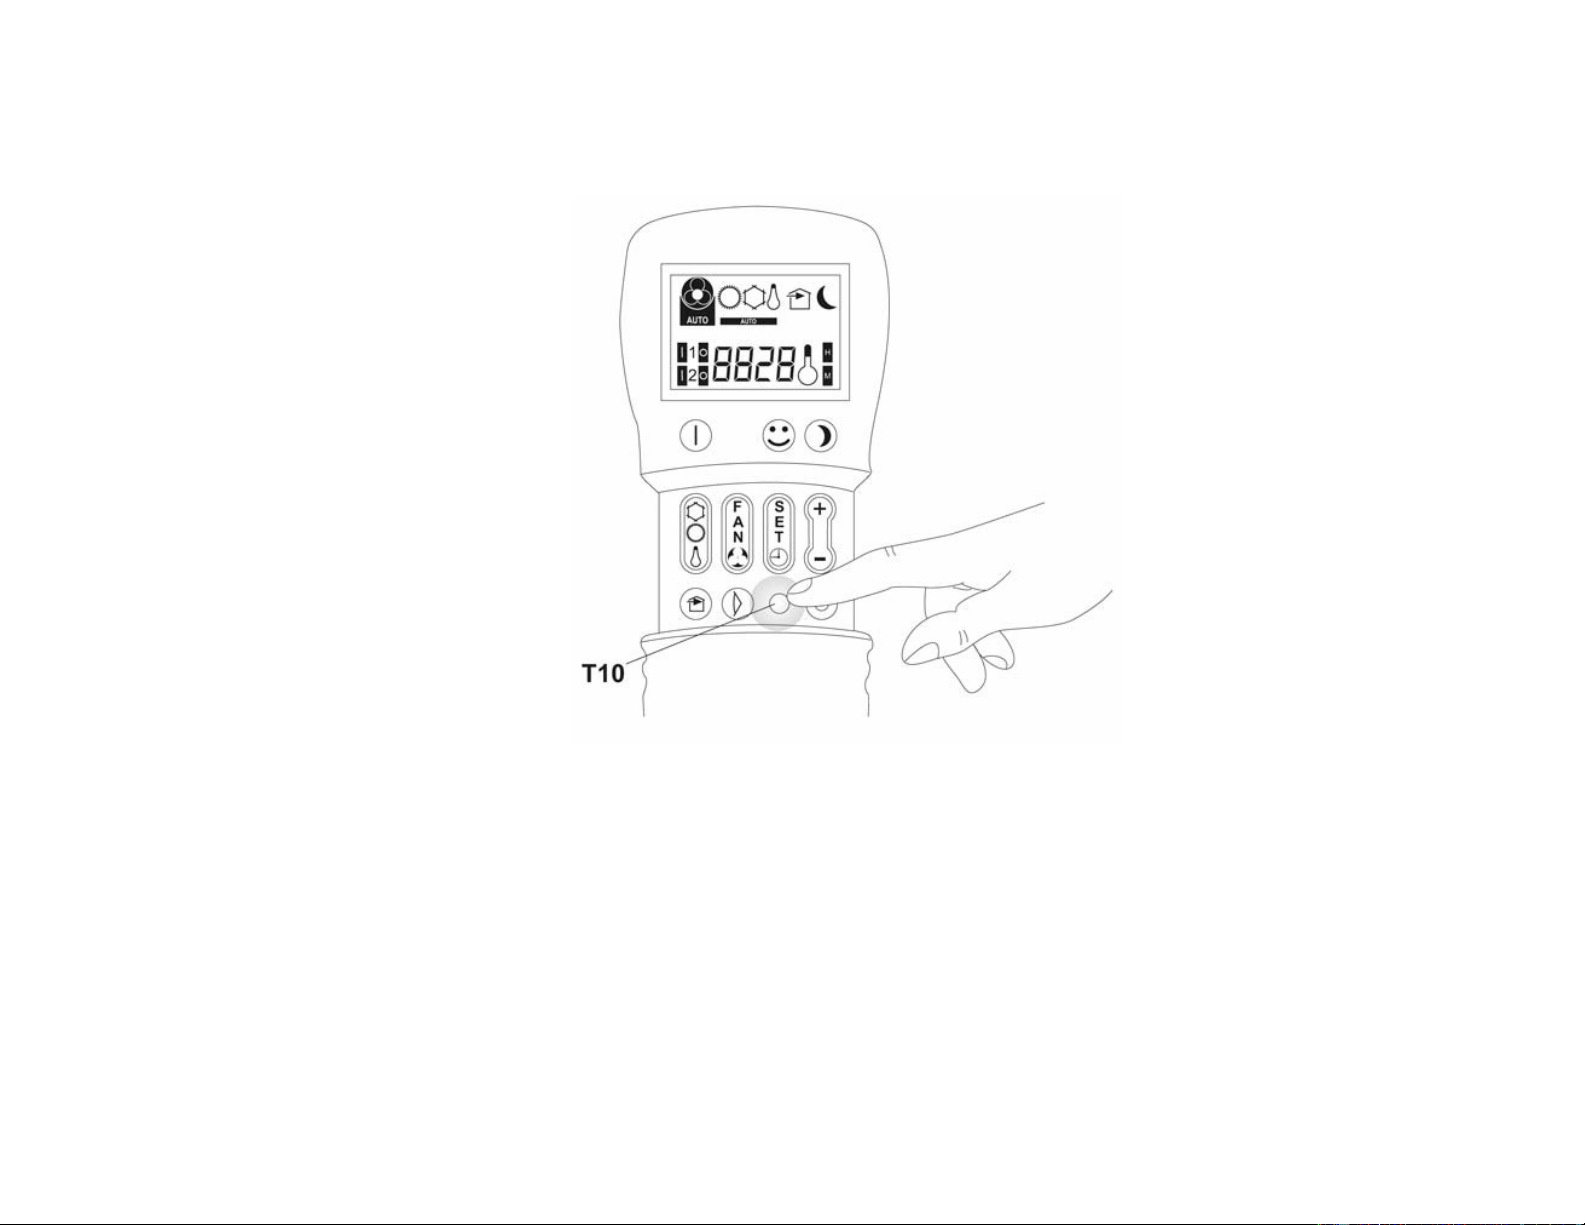
RESETTING ALL REMOTE CONTROL FUNCTIONS (Button T10)
Press the T10 button to reset all remote control settings including timer and temperature settings (Fig. 18).
Fig. 18
22
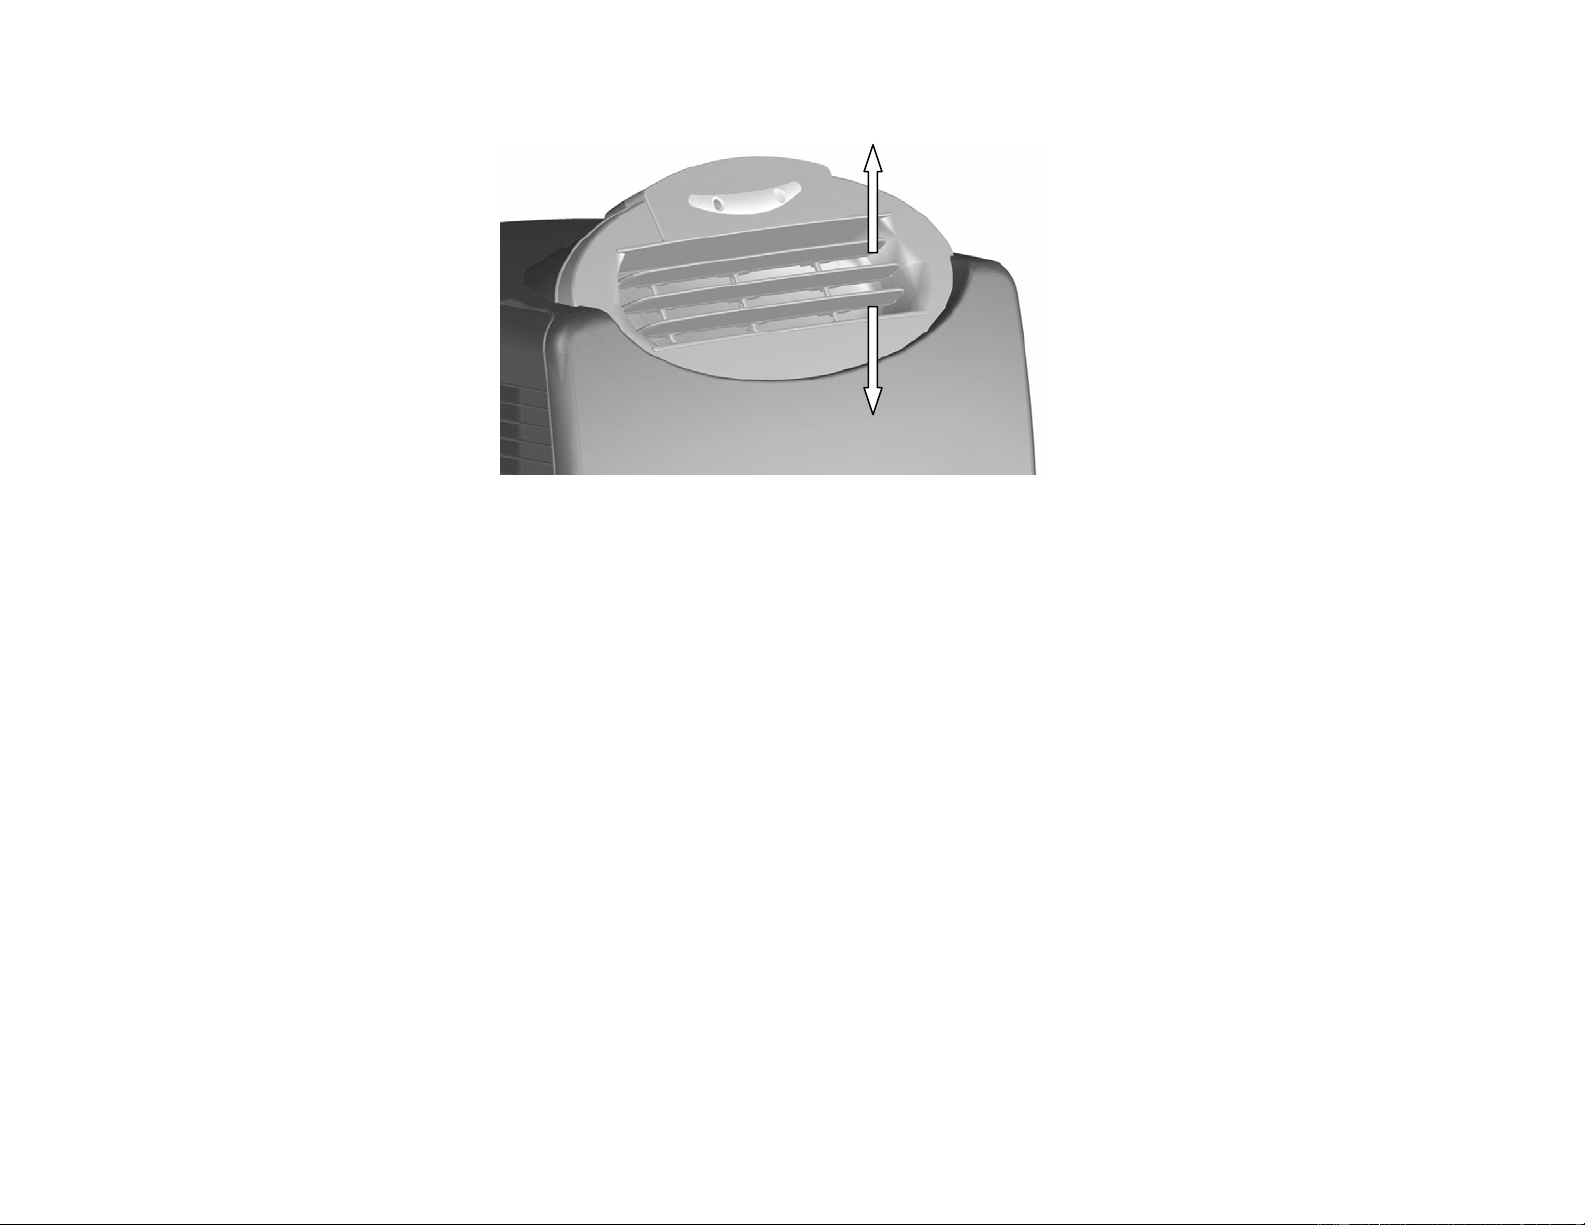
CONTROLLING THE AIR FLOW DIRECTION
The direction of the airflow can be controlled vertically by moving the louvers up or down (Fig. 19).
HOW TO MANAGE THE AIR CONDITIONER WITHOUT THE REMOTE CONTROL
If it is not possible to use the remote control either because it was lost, has malfunctioned or the batteries are flat, the air conditioner
can only be used in Comfort (automatic) mode by pressing the stand-by button (1) on the control panel for 5 seconds. When all of the
LEDs on the control panel start to flash, this indicates that Comfort function has been enabled. To restore the normal remote control
function, press any button on the remote control.
Fig. 19
23
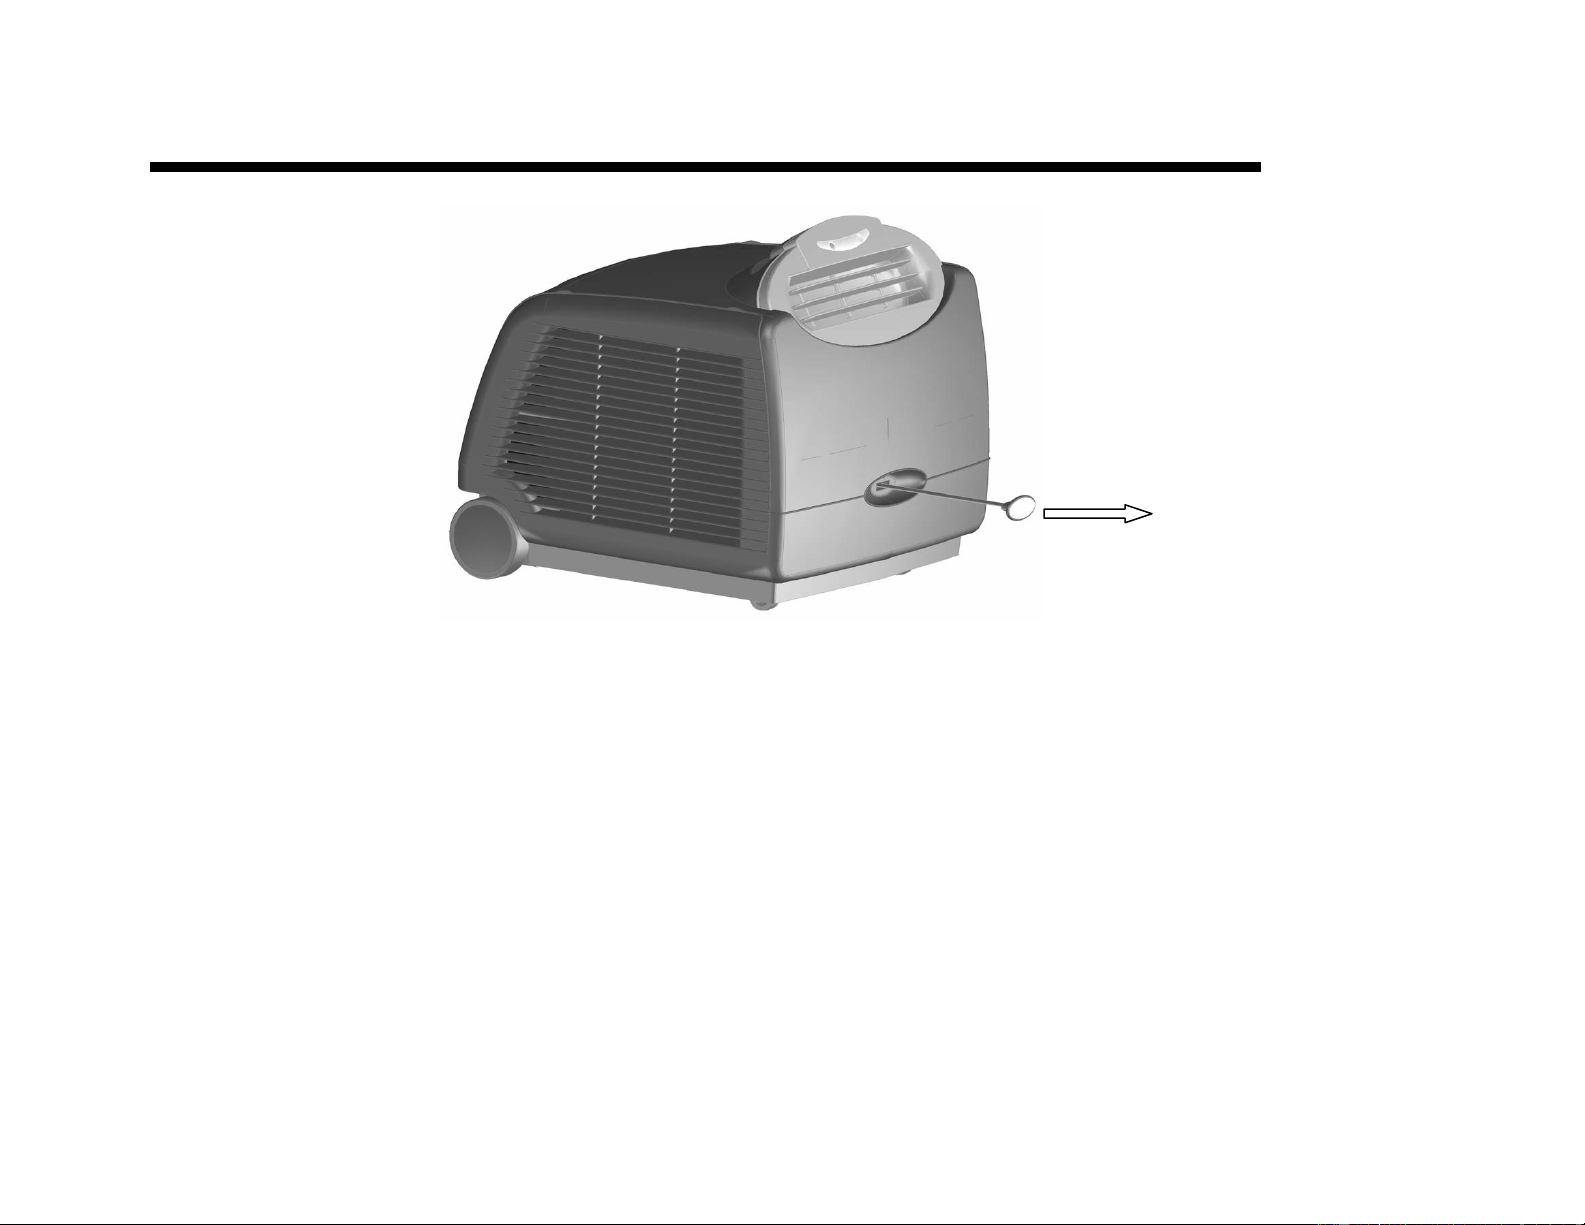
TRANSPORTATION
The air conditioner is equipped with wheels and handles for easy portability.
Before moving the air conditioner, proceed as follows:
- Switch off the air conditioner and disconnect the plug from the power outlet
- Drain water by removing the drain plug.
- Always transport the air conditioner in an upright position only.
For short distances, use the top handle (Part 8). For greater distances, use the pull handle (Part 2) on the front of the air conditioner.
- Pull the handle belt from the housing (Fig. 20).
- Move the air conditioner as desired.
- Reposition the pull handle back into its housing.
Fig. 20
24
MAINTENANCE
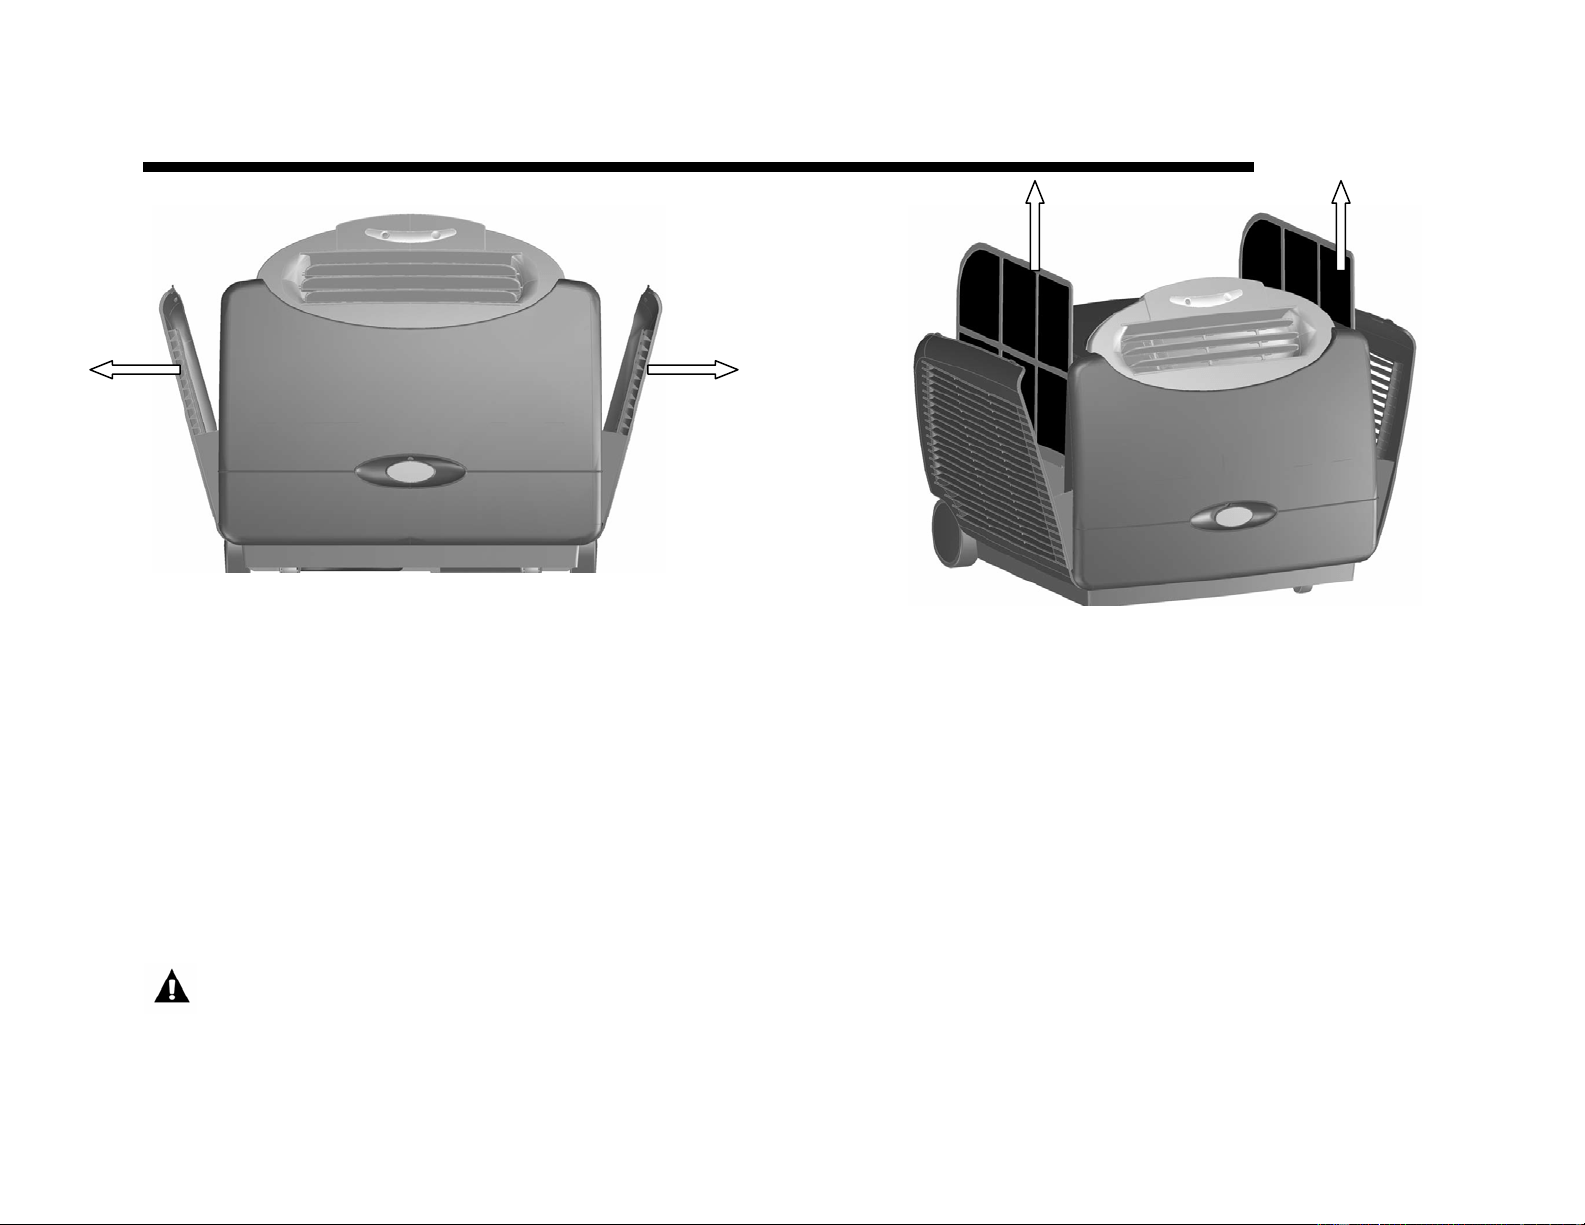
CLEANING THE AIR FILTER
To ensure the air intake is filtered properly and to assure that your air conditioner runs efficiently, it is crucial to clean the air filters
regularly.
When the air conditioner has been in use for a certain amount of time, the green LED (3) on the control panel (Fig. 5) will start to
flash indicating that it is time to clean the air filters.
• Press the stand-by button to switch off the air conditioner. Remove the air filters housed in the air intake grilles on each side.
• Press the grips to release the air grilles and pull the filters frames up to remove from the frame (Fig. 22 & 23).
• Use a vacuum cleaner or tap lightly to remove loose dust and dirt from the filters. Then rinse them thoroughly under warm or
cold running water (no hotter than 100F.)
• Dry thoroughly before re-inserting the filters.
WARNING! Never operate the air conditioner without the filters in place.
Fi
g
. 22 Fi
g
. 23

25
CLEANING THE AIR CONDITIONER
• Always switch off the air conditioner and disconnect the plug from the power supply outlet before cleaning the air
conditioner.
• Use a soft damp cloth to wipe the body of the air conditioner.
• Never use harsh chemicals, oil-based products, detergents, chemically treated cloths or other cleaning solutions.
These could possibly damage the body of the air conditioner.
END OF SEASON STORAGE
• Switch off the air conditioner and disconnect the plug from the power supply outlet before cleaning the air
conditioner.
• Clean the air filters
• Drain the condensed water COMPLETELY
• On a warm day, turn on the Fan only mode for a couple of hours so that the inside can dry out completely.
• It is recommended that the air conditioner be put back into its original carton for storage.
• Do not stack heavy objects on top of the air conditioner.
• Make sure to store the remote control with the air conditioner.

26
TROUBLESHOOTING
Problem Possible Causes Solutions
The portable air conditioner does
not turn on
There was a power failure
The automatic switch, line fuse, or
breaker has been tripped
The power supply voltage is too low
The power cord is damaged
The LCDI plug for the unit is tripped
Restore the power supply
Flip the switch / change the fuse / turn the breaker back on. Also
note that you may have too many appliances drawing power on
one circuit, so you may need to move the other appliances to
another circuit
Move the unit onto another circuit with the correct voltage
Call for service. Only authorized personnel should replace
damaged power cord or power plug
Press the Reset button on the LCDI plug
The unit turns on, but the
compressor does not turn on (the
fan runs but the unit is not
cooling)
The room temperature is outside of the
operational tolerances of the unit
The Cooling mode is not on
The compressor has not turned on yet
because of its time delay
The set temperature is too high
The internal water reservoir is full
This unit is designed to work in ambient temperatures of 64°F to
100°F
Press the Function Mode (T4) button until the Cooling icon (D3)
is shown on the remote control. Make sure that the reception of
the signal is confirmed by a beep.
Give the compressor 3 minutes to turn on after the Cooling
mode has been selected
Set the air conditioner to a lower temperature
Either manually drain the water or allow the unit to exhaust the
water itself. Then cooling will resume
The air coming out of the unit is
not very cold, or the airflow
volume is weak
The filters are dirty or obstructed
The air intake is obstructed
Clean the filters
Make sure there is at least 20" of clearance from the air intake
Make the length of the exhaust hose is as short as possible

27
The exhaust is obstructed
The unit is set in dehumidifying or fan
mode
The unit is set to low fan speed
Check for and remove any obstructions
Set the unit in cooling mode
Set the unit to a higher fan speed
The unit has worked for a long
time, but the room is not cold
enough
Windows or doors are open
There are too many people in the room
There is direct sunshine into the room
The room is a kitchen, with many heat-
producing appliances
There is a server in the room
The room is too large
There are many electrical appliances in
the room
Close all windows and doors into the room when the unit is
cooling
You may need additional cooling or another air conditioner
Close curtains and blinds and try to minimize the amount of
direct sunlight into the room
You may need additional cooling or another air conditioner
You may need additional cooling or another air conditioner
You may need additional cooling or another air conditioner
You may need additional cooling or another air conditioner
The unit is very noisy The unit is not level
The surface underneath the unit is
uneven
Make sure the unit is level
Move the unit to a location with a level and hard floor
The unit is leaking water onto the
floor
The unit is tilted, or is not level
The water tank is full
Make use the unit is level
Drain water from the drain plug at the back of the air conditioner

28
TECHNICAL DATA
* Uninsulated rooms such as sunrooms, garages, or attics should be less than 450 sq. ft.
Cooling capacity 13,000 BTU
Recommended room size* 450 – 500 sq. ft.
E.E.R. – Energy efficiency rate 11.06
Power supply 115v/ 60Hz
Maximum power input 1175 W
Maximum input 10.21 Amp
Dehumidifying capacity 43 Pts / Day
Function programs 2
Thermostat 64F - 86F
Refrigerant R-22
Compressor Rotary
Air flow (max) 380 m3/ Hour
Fan speeds 3 (H, M, L)
Exhaust hose length 5 ft.
Unit Dimensions 20.5” L x 19” H x 21.7” D
Unit Weight 79 lbs
Noise level (acoustic power) Min. 34 – max. 43

29
ONE YEAR LIMITED WARRANTY &
FIVE YEAR WARRANTY ON COMPRESSOR
This WHYNTER SNO portable air conditioner is warranted, to the original owner within the 48 continental states, for one year from
the date of purchase against defects in material and workmanship under normal use and service. Should your SNO portable air
conditioner prove defective within one year from the date of purchase, return the defective part or unit, freight prepaid (within two
months of purchase; after two months to one year, customer will be responsible for freight cost to Whynter’s service department),
along with an explanation to Whynter’s service department. Please ship the SNO portable air conditioner in its original packaging
material to avoid damage in transit. Please retain original box and packaging material.
Under this warranty, Whynter will repair or
replace any parts found defective. This warranty is not transferable. After the expiration of the warranty, the cost of labor and parts
will be the responsibility of the original owner of the unit.
THIS WARRANTY DOES NOT COVER:
- Acts of God, such as fire, flood, hurricanes, earthquakes and tornadoes.
- Damage, accidental or other wise, to the portable air conditioner while in the possession of a consumer not caused by a defect in
material or workmanship;
- Damage caused by consumer misuse, tampering, or failure to follow the care and special handling provisions in the instructions.
- Damage to the finish of the housing, case, or other appearance parts caused by wear.
1) Filter.
2) Damage caused by repairs or alterations of the unit by anyone other than authorized by the manufacturer.
3) Freight and Insurance cost for the warranty service.
To obtain service or information, contact
Whynter Innovations Group via Email at [email protected]
or call 866-WHYNTER.