
Dishwasher
instruction manual
Model number:OFI101XA
Toreviewthe sectiononTroubleshootingTips
willhelp youtosolve some commonproblems
by yourse lf .
Dear Cu sto m er ,
Please carefullyreading itbefore usingthe dishwasher
wi ll he lp y ou t o use a nd m aint ai n t he d ishw as her p rope rl y.
Passit on to anysubsequentowner of the appliance.
Thi s ma nu al c on t ain s se ct i ons of Safe t y Instru c t ion s ,
OperatingInstructions,Installation Instructionsand
Tr oubleshoo ti ng Tips , et c.
The m anufacture r, fol lowing a p olicy of c onstant
develo pmenta ndu pdati ng of the product ,may
make modifi cations witho ut gi ving prior not ice .
Keepit torefer to at a laterdate.
Ifyou c annot reso lve t he tr oublesb yyo urself ,
please ask f orthe help o f p rofessiona ltechn icians.
Dishwasher Fe atures..................................... ..2
Attentionbeforeor afterloading theDishwasher
Baskets..........................................................7
Filtering System... .......... ................................11
Caringforthe Dishwasher.. ................... .........12.
A FilltheRinseAidDispenser.........................3、
B FunctionofDetergent..............................4,5、
Loa ding t he B a sket... ... ......... ... ... ...... ... ......... ... .7
CutleryBasket................................................8
Wash CycleTable........... ................................9
Turning on theAppliance................................9
Cha nge theProgramme.............. ......... .......10....
At the E n d of the Wash Cy cle... .. ... . ... ......... .. ... . 10
Positioning theA ppliance................... ..........14..
Water C onnec tion.. ... ..... ..... ....... ... ....... .. ... ....1 4.
About P ower C onne ction. .... ........ ... .... ... . ...... .14.
Conne ctionofDrain Hoses..................... .......15.
Start of dishwa sher............................. .. ......16.. ..
Befo re calling forservice.......... ................. .....17.
Errorcodes.................................... ..............18.
Cont rol Panel...................................................2
Machi ne with a dec orative plate ,
and installed......................................... ........20
Machine withadecorativeplate,
but notinstalled...........................................21
Machine do notdeservedecorative panels,
the user maketheirown...........................22 23,
1
This appliance must be grounded. In the event of a
malfunction or breakdown, grounding will reduce
the risk of electric shock by providing a path of
least resistance of electric current. This appliance
is equipped w ith a cord having an equipment-
grounding conductor and a grounding plug.
The plug must be plugged into an appropriate outlet
that is installed and grounded in accordance with
all local codes and ordinances.
When usin g your dis hwas he r, fo ll ow the precaut i ons lis t ed below:
Improper connection of the equipment-grounding
conductorcanresult in a riskof electric shock.
C heck with a qualified electrician or service
representa tive if you are in doubt whether the
appliance is properly grounded. Do not modify the
plug provided with the appliance; If it is not fit for
the outlet. Have a proper outlet installed by a
qualified electrician.
Keep children away from detergent and rinse aid, keep
child away from the open door of the dishwasher,
there could still be some deterge nt left inside.
ren
Do not abuse, sit on, or stan d on the door or dish
rack of the dishwasher.
Do not wash plastic items unless they are marked
dishw asher safe or the equivalent. For plastic items
n
ot so marked, check the manufacturer's
recommendations.
Us eo nly det ergent and rins eadditiv es
design ed for an aut omatic d ishwash er.
Ne ver u ses oap,laun dr yde te rg ent, or h and
wa shin gdetergent in you r d ishwash er.Keep
these produ cts out of t he re ach ofchildr en.
During installation,the powersupply mustnot
beexcessivelyordangerouslybentorflattened.
Thedoorshouldnotbe left inth eopenposition
sincethiscouldpresent atrippinghazards.
Do not tamper with controls.
Do not place any heavy objects of stand on the
door when it is open. The appliance could tip
forward.
When lo ad ing i te ms to be w ashed:
1) Locatesharp itemssothattheyarenot likely
todamagethedoorseal;
2 Warning: Kni ves and other u te nsil swi th
sh a rp p oin ts m u st be loa ded in t h e ba sk et
w ith their poi ntsdown orp lace di n a
horizontalposition.
)
When us ing you r di shwasher,you s hould
preve ntplastic items fro m comin gint oco ntact
withheatingelement.(Thisinstruction is only
applica ble to machi nes with a vi sualheat ing
ele ment.)
I fthe s upply cord i sdam aged, it must be rep laced
by the m anu facturer or it sse rvic eagent or a
si mi larly qual ifi ed pers on in order t o av oid a
hazar d.
Pl ease d ispos e of pack ing mater ials pr operl y.
U se the dishwasher onl y for its intended function.
Dishwasher deterge nts are s tron gly a lkali ne, they
can be e xtre mel yda ngerous i fswallo wed.Av oid
contact withskin andeyesandkeepchildren away
fro m t he dis hwasher wh ent he d oor isopen.
Ch eck that the dete rgent re ceptible is empt y
aft er compl etio no f thewash cycl e.
The app lian cei s tobe co nne cted to t he water
mainsusing new hosesets andthatoldhose-sets
shoul d n o t be r eu se d .
The maximumsizeof thedishes is260mm.
The maximumpermissibleinletwaterpressureis
1Mpa .
The minimumpermissibleinlet waterpressureis
0.04Mpa.
Children should be supervis ed to ensure that they do
not play with the appliance.
T his appliance is not intended for use by persons
(including children with reduced physical, sensory or
mental capabilities, or lack of ex perience and
knowledge ,unless they have been given supervision
o r instruction concerning use of the appliance by a
person responsible for their safety .
)
2
beforeusingit forthe firsttime.
To getthe best performance fromyourdishwasher,read all operatinginstructions
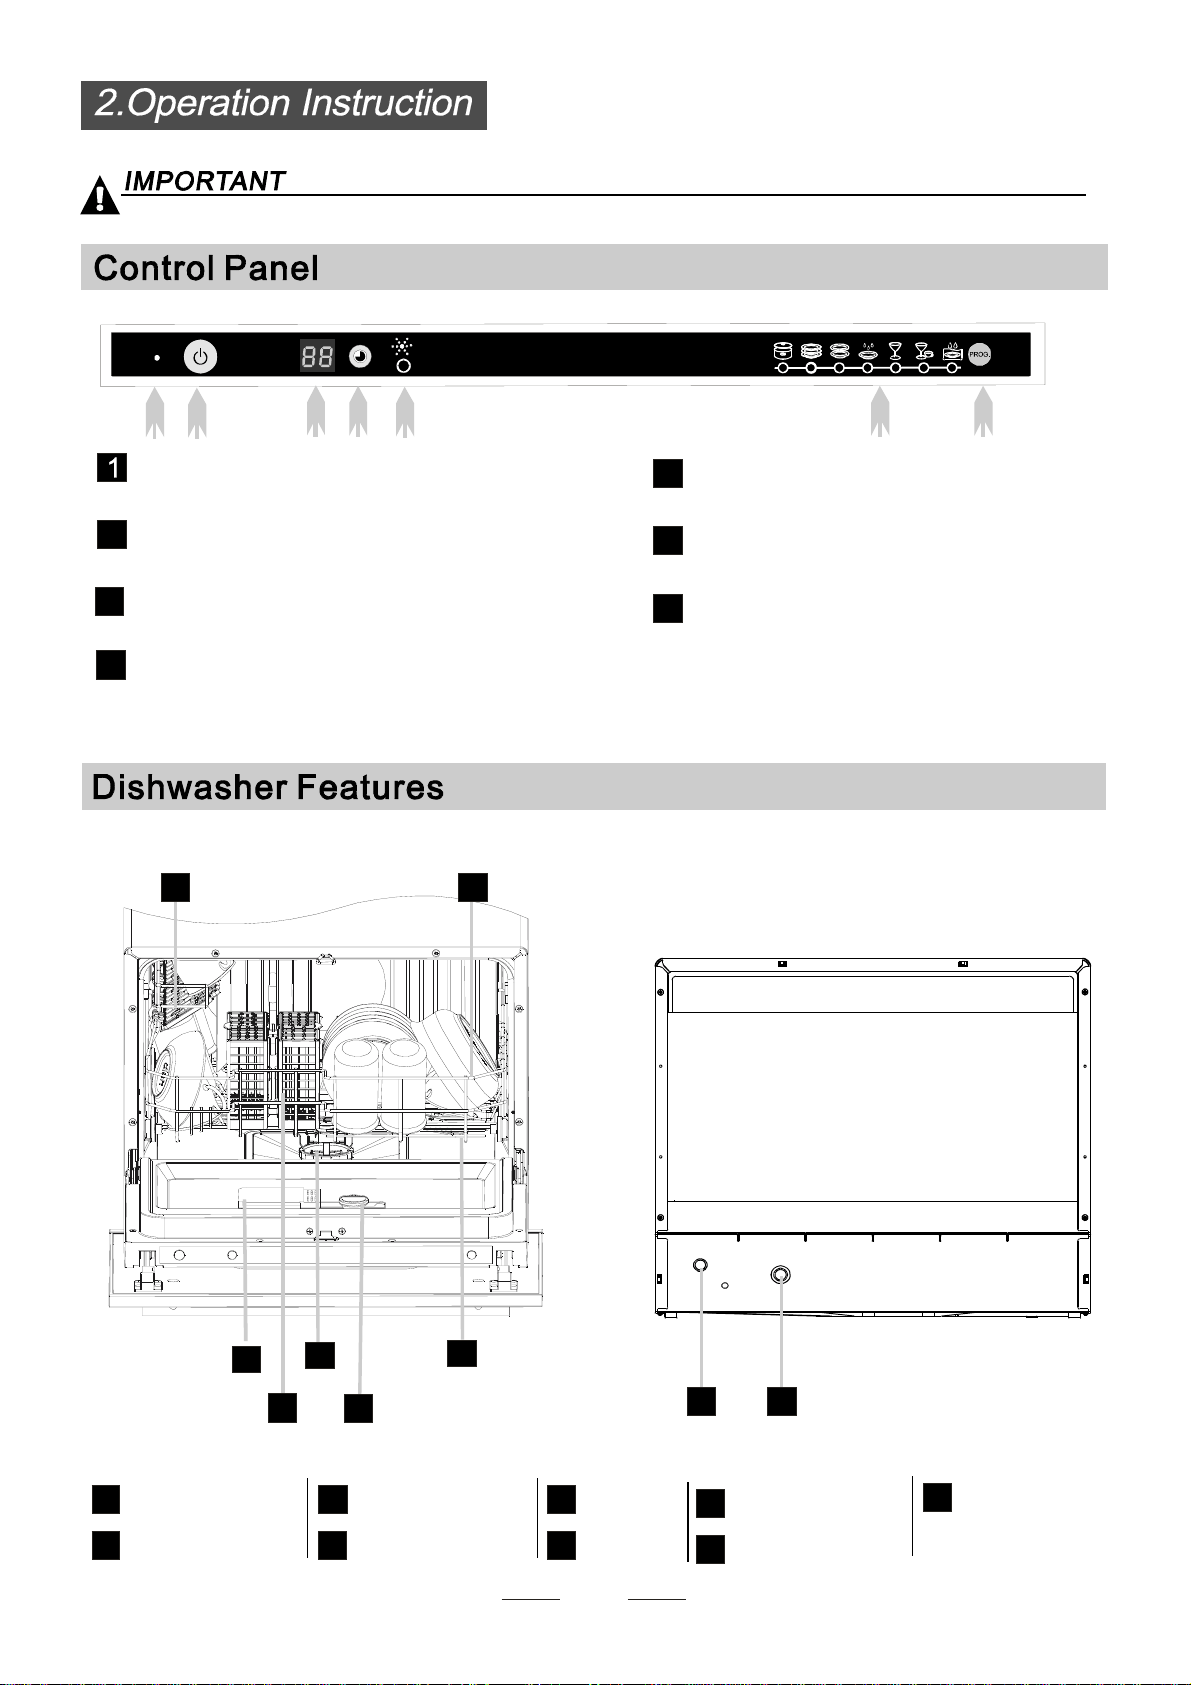
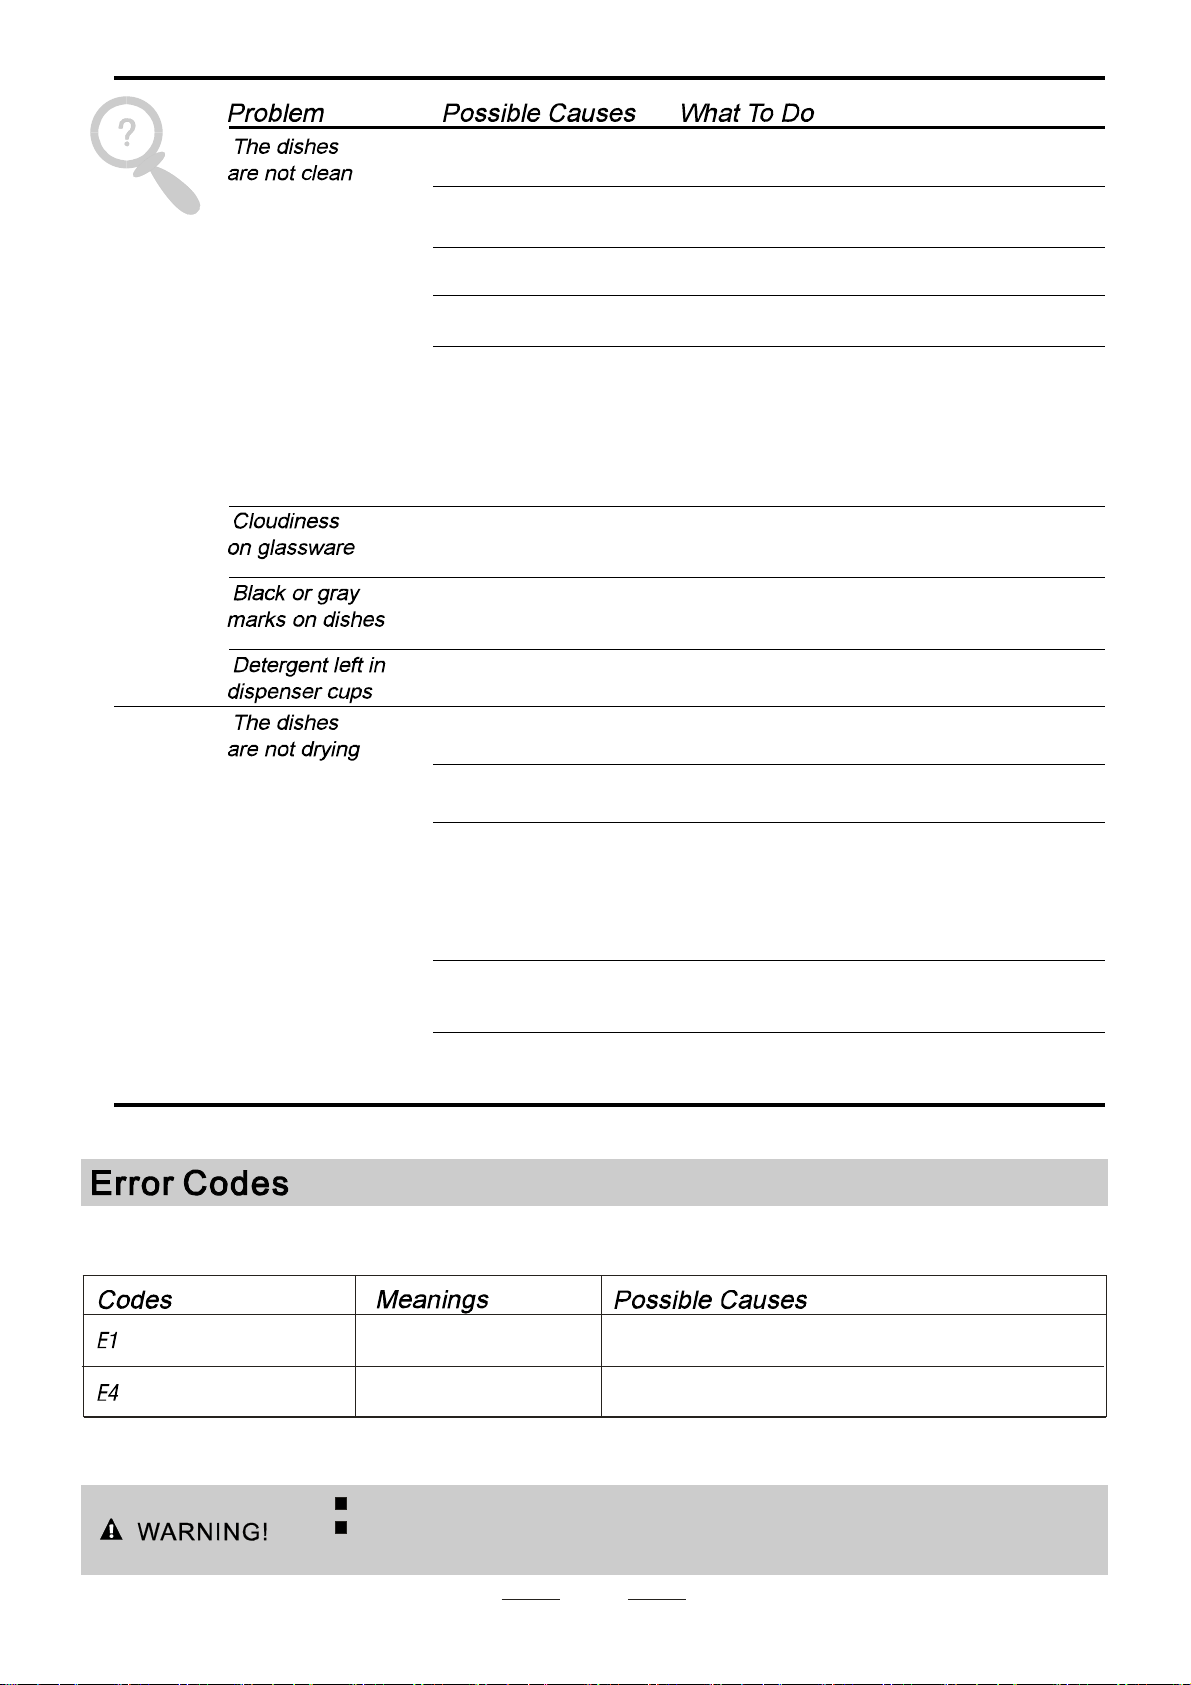
Front view
Back View
Fi lte r asse mbl yD ete rg ent Di spenser
CupShelf
CutleryBasket
RinseAidDispenser
Inletpipeconnector
Drain pipe connec tor
SprayArms
Basket
1
5
6
7
8
9
3
2 4
2
1
5
3
6 7
8
4
5
2
4
6
7
1
6
7
Poweronlight:TocomeonwhenPowerON/OFF
button is pressed down.
ON/OFF Button: To turn on/off thepower supply.
Delayed Start Button: Press this button to set the
delayed hours for washing. You can delay the start
ofwashingupto24hours.Onepressonthis
button delays the start of washing by one hour.
Program indicator light: when you select washing
program, the correspond light will display.
RinseAidWarningLight:Tobeonwhenthe
rinse aid dispenser needs to be refilled.
Program button :To select washing program
when press the button.
2
3
4
5
3
Delay time: To display booking time .
9
3
Th er i nse aid i sr elea se dduring the fi nal ri nse to pr event water f rom f orming droplet s o ny o ur dis he s.Tha t can l eave
spots and s trea ks. It al so improve sd ryi ngby allowing water to sheet offthe dish es.Yo ur dishwashe risdes igne dto
usel iquid r ins eaids.The rin se a iddispense risl ocated i nsi de t he d oor next to the detergent d ispenser.To fill the
dispenser,open thecapandpourthe rinse aidintothedispenseruntilthelevel indicatorturnsc ompletelybla ck.
Thevol umeof the r ins eai d contai ner is about 110ml.
RinseAid Dispenser
Function of RinseAid
Rinse ai d is aut oma tic allya dded d uring t helast ri nse, ensuring th orough rinsi ng, and spo tan d s treak fr ee drying.
As th erinse aid d imin ishe s,th esiz eo f the blac kdot
ontherinse aidlevelindicatorchanges,asillustratedbelow.
Full
3/4full
1/2full
1/4 full- Should refilltoeliminatespotting
Em pt y
When to Refill the RinseAidDispenser
Ifth ereis no r ins e-aid war ning ligh tin t hec ontr olp anel, you can jud geth eam oun tof ri nse- aid by the c olor
oftheoptical levelindicator located nexttothecap. Whentherinse-aidcontainerisfull, the whole
indicato rwill be d ark . As t herinse-aid di minishes, th es ize o fthe dark dot decr eases. You shou ld n ever l et
therinseaidgetbelow1/4full.
""
Attention!
Only usebranded rinseaidfor dishwasher. Neverfilltherinseaiddispenserwithanyothersubstances
(e.g. Dishwasher cleaning ag ent, liqu id dete rge nt). Th is would damag e the app lian ce .
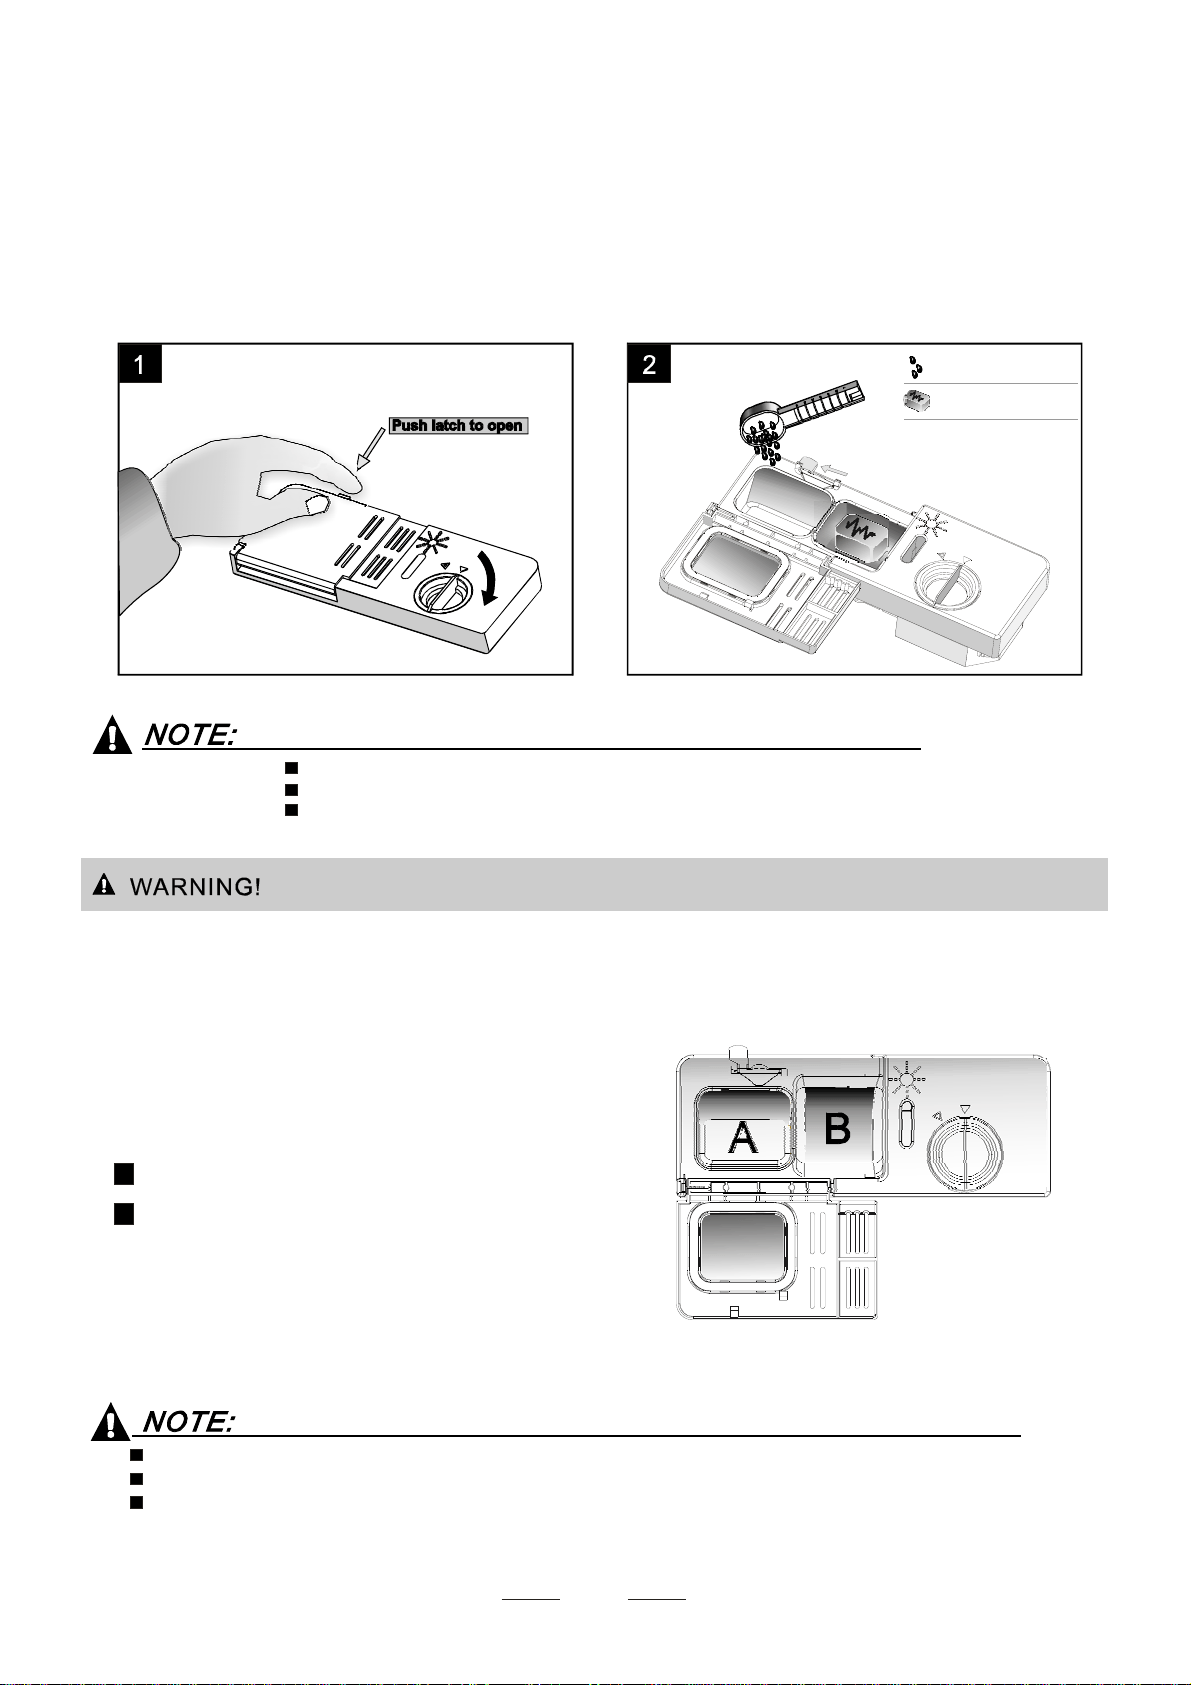
Toop ent he di spen ser,t urn t he cap tothe " open"(left) a rrow and l ifti t out .
Pourtherinseaid intothedispenser,beingcarefulnot tooverfill.
Repl ace the cap by inser ting itali gnedw ith "open" arrow andturnin git to the c losed ( ri gh t) a rrow.
1
2
3
duringthenextwash.
Don' tforget to re place the cap be fore you close dis hwasher do or.
Clea nup an yrinse aid spl it dur ingfi llin gwith an abso rbent cl othto a void excess ivefoamin g
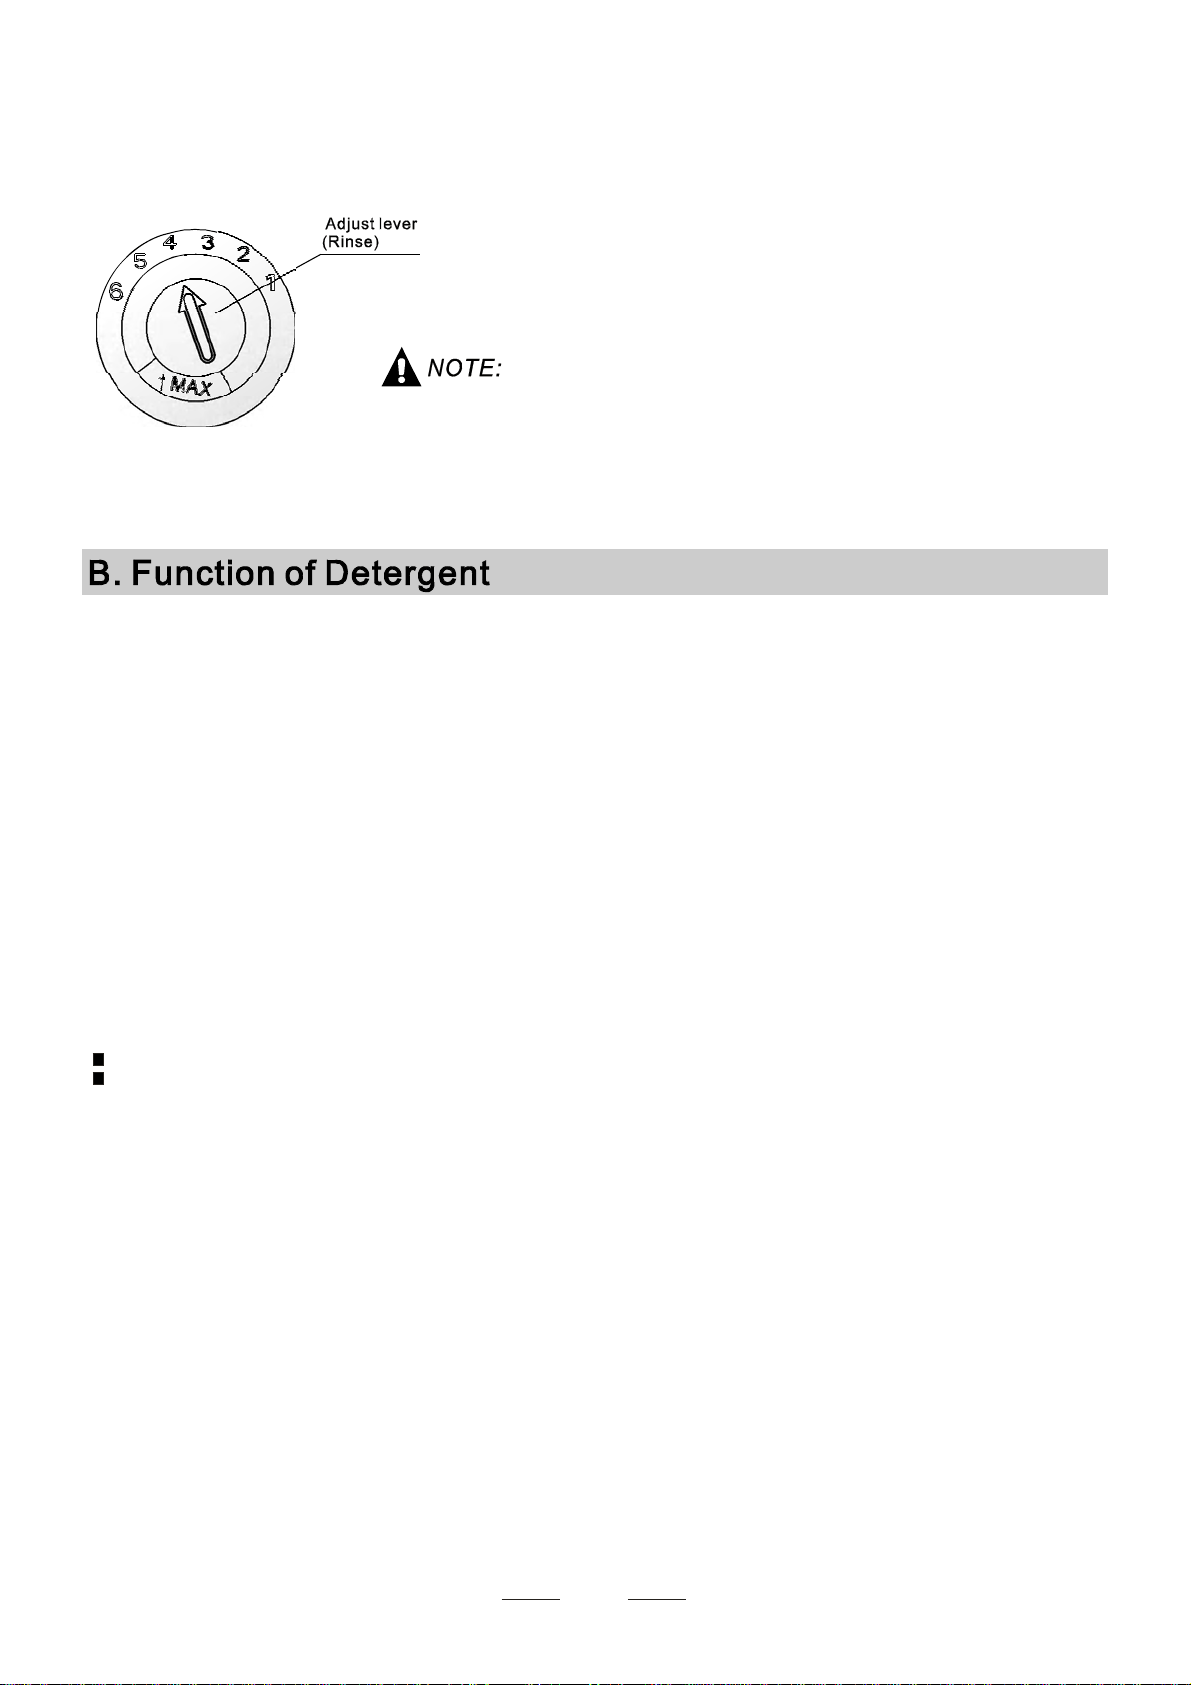
Adjusting RinseAid Dispenser
The ri nse aid dispe nser ha ssix or four s etti ngs.Alw ays sta rt wi th the d ispens er
set o n "4". I f spots and poor dryin gare prob lem s,incr ease th e amoun t of rin se
aid d ispensed b y removin g the d ispens erli dand rot ating t he d ial to "5". If the
dishes st il lare notdr yi ng pr operlyo r are spot te d, ad just the d ial to th ene xt
highe r number until yo ur di shes are s pot- fre e.The recomme nded s et tingi s"4" .
(Factory valueis"4".)
Increase thedose if thereare dropsof waterorlimespotsonthedishes after washing.
Reduceitiftherearesticky whitis hstainson your disheso rabluish filmonglasswareor
knife blades.
4
Deterge nts w ith its chem ic al ingred ients a rene cessary t orem ove dir t,c rush dir tan d trans port it o ut of t he di shw ashe r.
M ost of commer cia l quali ty de tergen ts are su i tab le f o r thi s pur pos e.
Detergents
The re ar e 3 s orts of dete rge nts
1.Withphosphateandwithchlorine
2.Withphosph ate andwithout c hlorine
3.Wi thou tphosph ate and without chlor ide
Basedontheir chemicalcomposition,dishwasher can besplit intwobasictypes:
The use of nor mal w ashi ng p rogramm es i nco njunctio nwith conce ntrat ed d ete rgent s
redu ces poll ution a nd is g ood for your dish es; thes ewash p rog rammes are spec ially ma tched
to th e dirt -di ssol ving pro pe rti eso fth eenz yme s of the conc ent rated de terg ent . For this reas on
normal wash programmesinwhichconcentrated detergentsareusedcanachievethesame
resultsthatcanotherwiseonlybe achievedusing intensive programmes.
“”
“”
“”
Detergenttabletsofdifferent brandsdissolve atdifferentspeeds. For thisreasonsome
dete rgen ttablets ca nnot dissolve and dev elop the irf ull cl eanin gpower dur ing s hort
programmes.Thereforepleaseuselong programmes whenusingdetergenttablets,to
ensur e the com pl ete re moval of det er g e n t re si du als.
Concentrated Detergent
DetergentTablets
conventional,alkaline detergentswith causticcomponents
l ow a lk ali ne c oncentr ated dete rge nts w it h natur a l enzy mes
Normally ne w pu lverised dete rge nt is with out phospha te.Thewat erso ftener fu ncti onof
phosph ate is not gi ve n. I n th is c a se w e r e com me nd to f i l l sa lt i n th e sa l t co ntai n er e v en whe n
the hardnessofwaterisonly 6 dH.If detergentswithoutphosphatewereusedincaseofhardwater
often wh itespots app ear at d ishes an dgl asse s. In this cas ep lease add mo rede tergent toreach
better r esults . D ete r gen ts with o ut chl or ine d o only bleach a lit t le. Str o ng an d c olo u red sp o t s w i ll not
removed compl etely. In th isc ase plea se c hoo sea prog ram me with high erTemp erat ure.
°
Amount ofDetergentto Use
The disp enserm ust b ere fi lled be fore the star tof e ach was hcycle f ollowing the instructi ons
provided i nthe Wash CycleTable .Yo ur di shw asher uses l essdete rgentan dri nse a idthen
conventionaldishwasher.Generally, only one tablespoon ofdetergentisneededfor
anor mal was hlo ad.Al so, mo reheavi lyso iled items need more det ergent.Alw aysa dd th e
dete rgen tj ust before star ting the dish was her, oth erwis e it coul dge tda mp a nd w ill n ot
di s sol v e pr ope r ly.
Detergent Dispenser
Always a dd the deterg entjust b efore start ing each w ash cycle.
Only usebranded detergentaidfordishwasher.
If the lid i sclosed: press rele ase butt on.T helid spr ings op en.
5
Detergent tablet
De tergen t pow der
Fillt hede ter gent dispens erw ith d eter gen t.
The m arki ng indica te sthe dosing le vels , a s
illustratedon right:
Th ep la ceo f main wash cyc ledeterg ent placed.
Th ep laceof pr e-wash c ycle det er ge ntplace d.
Pleaseo bse rvethem anufactur ers do sing and stor age
Recommendationsas statedonthedetergent packaging.
C l ose t he li d a nd p r e ss unt i l i t locks in p l ace .
I f t h e d ishes are heavi ly so il ed , pl ace an ad ditional
detergen tdo sein the pre-w ash det ergent cham ber.This d eter gent will take effe ctdurin g the pre -washp has e.
A
B
Fillin detergent
You f indin formation ab out the a mo unt o fdet ergent forth esi ngle program me onthe l astpage .
Pl eas ea ware, tha tacc ordi ng t othe lev elso iling and the spec ific har dnessof wa ter d iffer enc esare po ssible.
Pleaseobservethemanufacturer's rec ommendationsonthe detergentpackaging.
Don'tput powder detergentintothedispenser until you're readytowashdishes.
Use o nly det erge nt s peci fica ll yma de f or u se i n dis hwas he rs. K e ep y ou r det erge nt f resh a nd dry.
Proper U se o fDe terg ent
Dishwash erdetergen t is co rrosive! Take c are to kee pi t out of reach of c hildren.
6
C utle rywi th w ooden, horn chin aor
m oth er-o f-pe arl h andles
P lastic i t ems tha t ar e not
Older cutler y wi t h glued p arts tha t isnot
te mperature resist ant
Bond ed c utl eryite ms or dishes
Pewteror cooper items
c rys ta l g la ss
S teel i te ms subject to r ust ing
Wood en p latters
It ems ma defrom s ynt heti c fibres
heat resistant
Sometypesofglassescanbecome
dull afteralargenumberof washes
Silverandaluminium partshavea
te nde nc y to di scol our d urin g w as hing
G laz e d p a ttern s m ay fade i fm achin e
w ashed f requent ly
Are not suitable
Are of limited suitability
U sea mil ddet ergent th at isde scri bed as 'k ind of d ishes'. If necessa ry, seek f urther
i nfo r ma t io n fro m det er gent manufact ur er s .
For p artic ular items, s elect ap rogramme w itha sl owa t emp erature.
Topr eventda mag e, d ono t take gla ss a ndc utler yout of the dishwas her imm ediately
afterthe programmehasended.
Consi de r bu yi ng utens i ls w h i ch a re identi fie d as dis hwash er- p r oof .
Dishesanditemsofcutlerymustnotlie ins ideoneanother, orcover eachother.
Toav oidd a mage to gla sse s,th eym ust not touc h.
Loadlargeitemswhicharemostdifficulttocleanintothebasket.
Lo ng blad edknive s sto red i nan uprigh tposit ion are a p otent ial haza rd!
Lo ng and/ ors harp items o f cutle ry such as carvi ng kniv esmust be p ositi oned
horizonta llyin the basket.
Pl eas edo not overload your dishwas her.
Load h oll owi tems such as cup s, glasses, p ans etc. W ith the opening dow nwar ds sotha t
water can notcollect in t he con tainer or a deepb ase.
(For be st perfor mance o f the di shwa sher, follow the seloading gu idelines.
Feat ures and ap pear anc eo f bas kets and cu tle ry b ask ets may v ar y fro m your m od el. )
Scra peoff any larg eamounts o fleftover fo od. S often rem nants of b urn tfood in pan s
It is not necessar ytori nse the d ishes u nd er ru nning water.
Pl ace ob ject s in the dish was her in fol l owing way :
1.Items such as cups, gl asses, po ts/pans, etc. are face dow n.
2.Curved i tems, or thos ewith r ecesse s,shou ldbe loaded at a sl ants othat w ater c anrun off.
3.Allutensilsarestackedsecurelyand cannottipover.
4.All ute nsils ar e placed in the way that the spray ar mscan r ot ated free ly duri ngwashing .
Ve ry sm all it emss hould n otb ew ashed i n the dish washer as they c ould eas ily f all out of the basket.
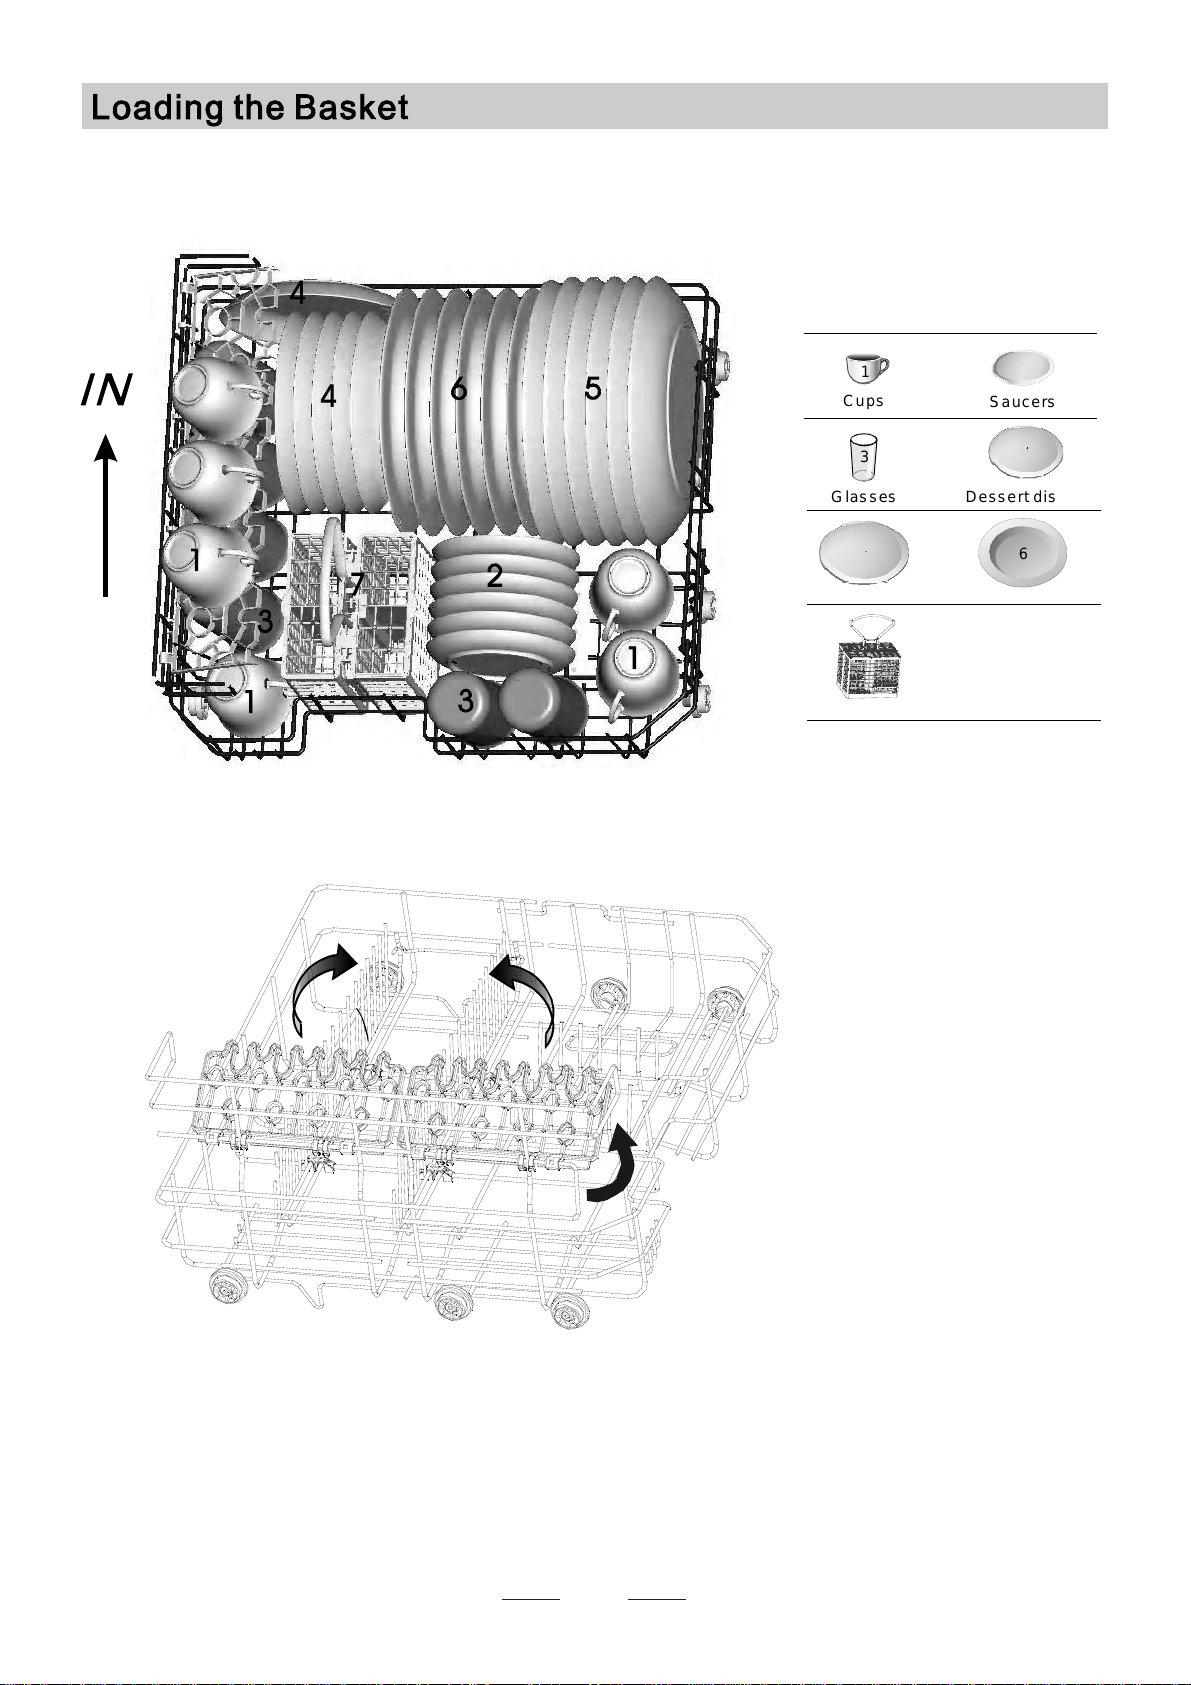
7
Positi on the dishe sand co okware so t hatthey will not g etm oved by the spra yof wat er.
Plateracksof Basket
Th ebasket is fitted wit hplate racks which
can bestowedhorizontalifrequired.
Sauce rs
2
3
Glas ses
1
Cu p s
5
Di nne r pla tes
6
Soup pla tes
Dessert dishes
4
C utlery basket
7
Cup shelf
Thecupshelf couldbestowed standingif
nocupbeing placed,whichcansetmoreplace.
8
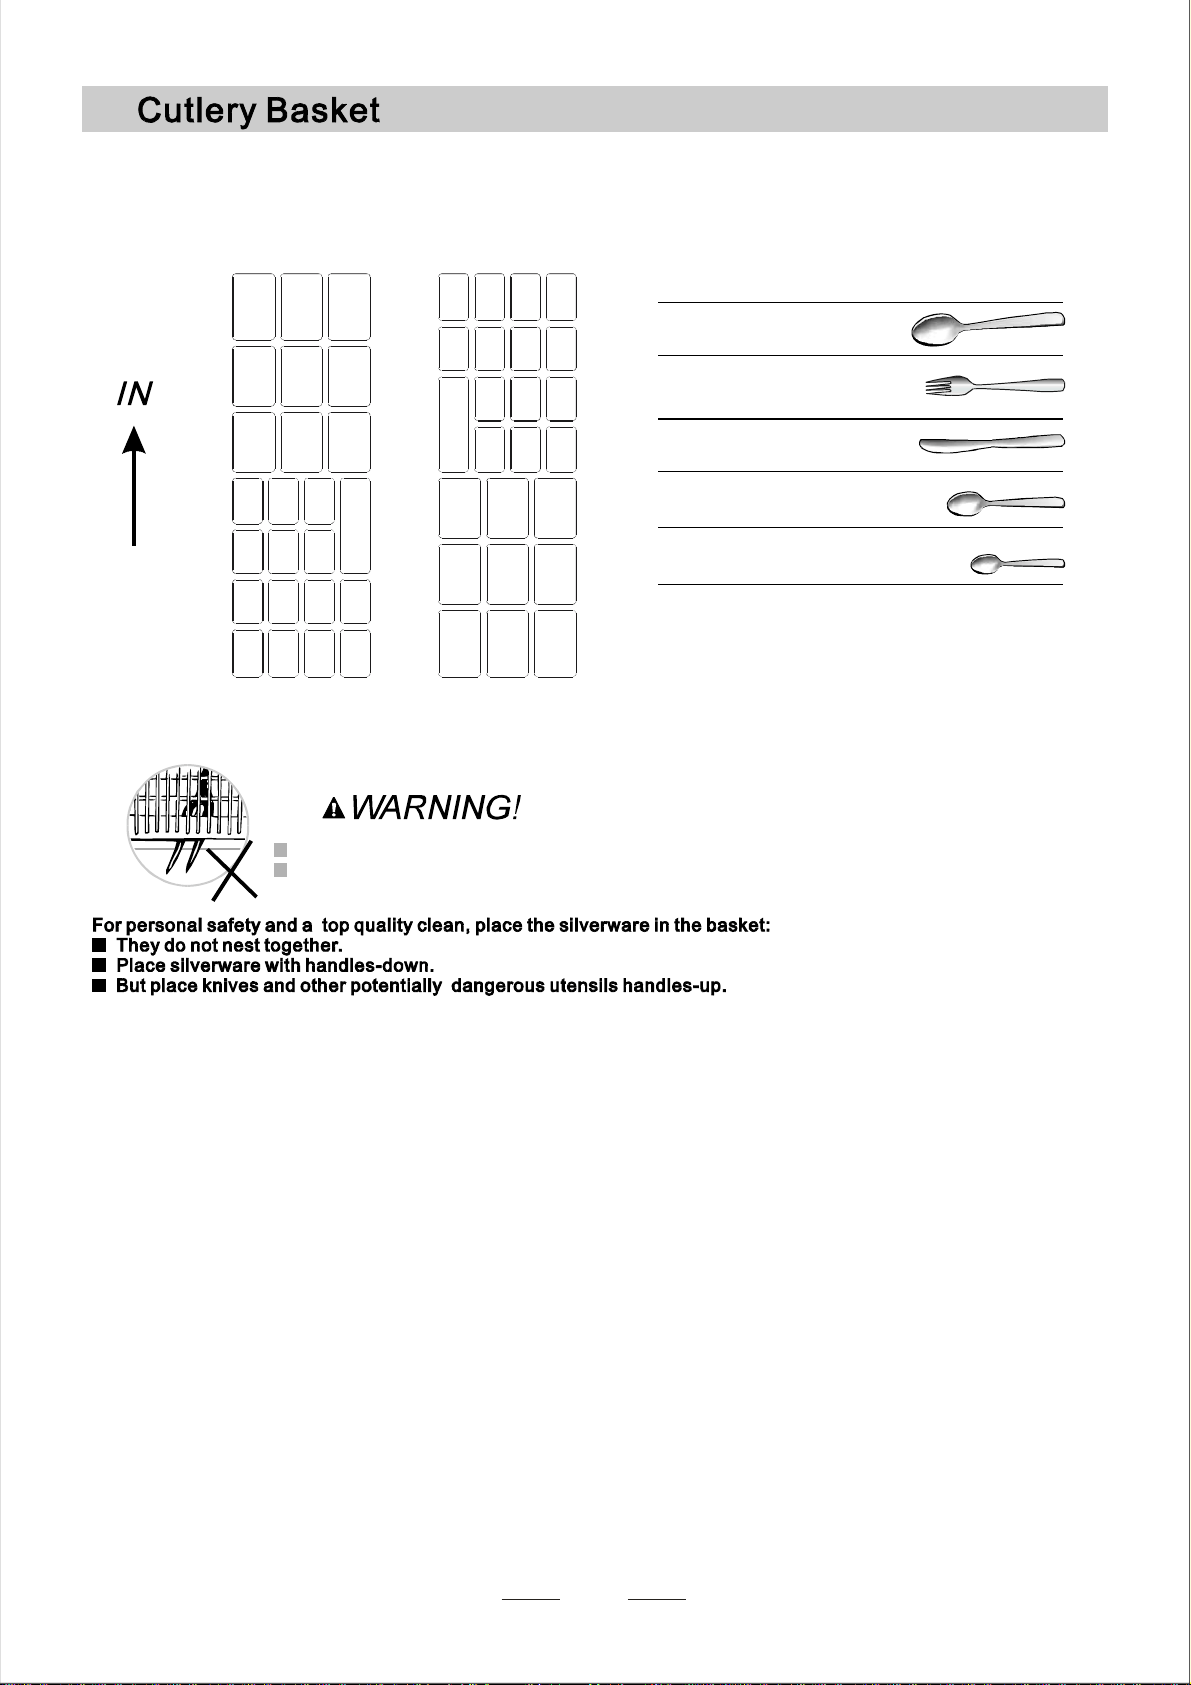
Cutlery s hould be pla ced in t he cutlery basket with handl es at th ebot to m. If the rack has side bas kets ,the spoon
shouldbe loadedindividually into the appropriateslots, especially long utensils shouldbeplaced inthehorizontal
posit ion a tth efro nto fthe u pperb asket as sho wn.
Do no t le tany it emext end thro ugh bot tom.
Alw ays load shar putensil swith the shar ppoint down!
3
33
1
2
1
3
4
5
1
1
3
1
3
5
1
5
5
4
4
2
2
4
2
2
5
5
4
4
2
Teaspoons
4
Soup spoons
2
For ks
1
Kn i v e s
5
3
Dessert spoons
9
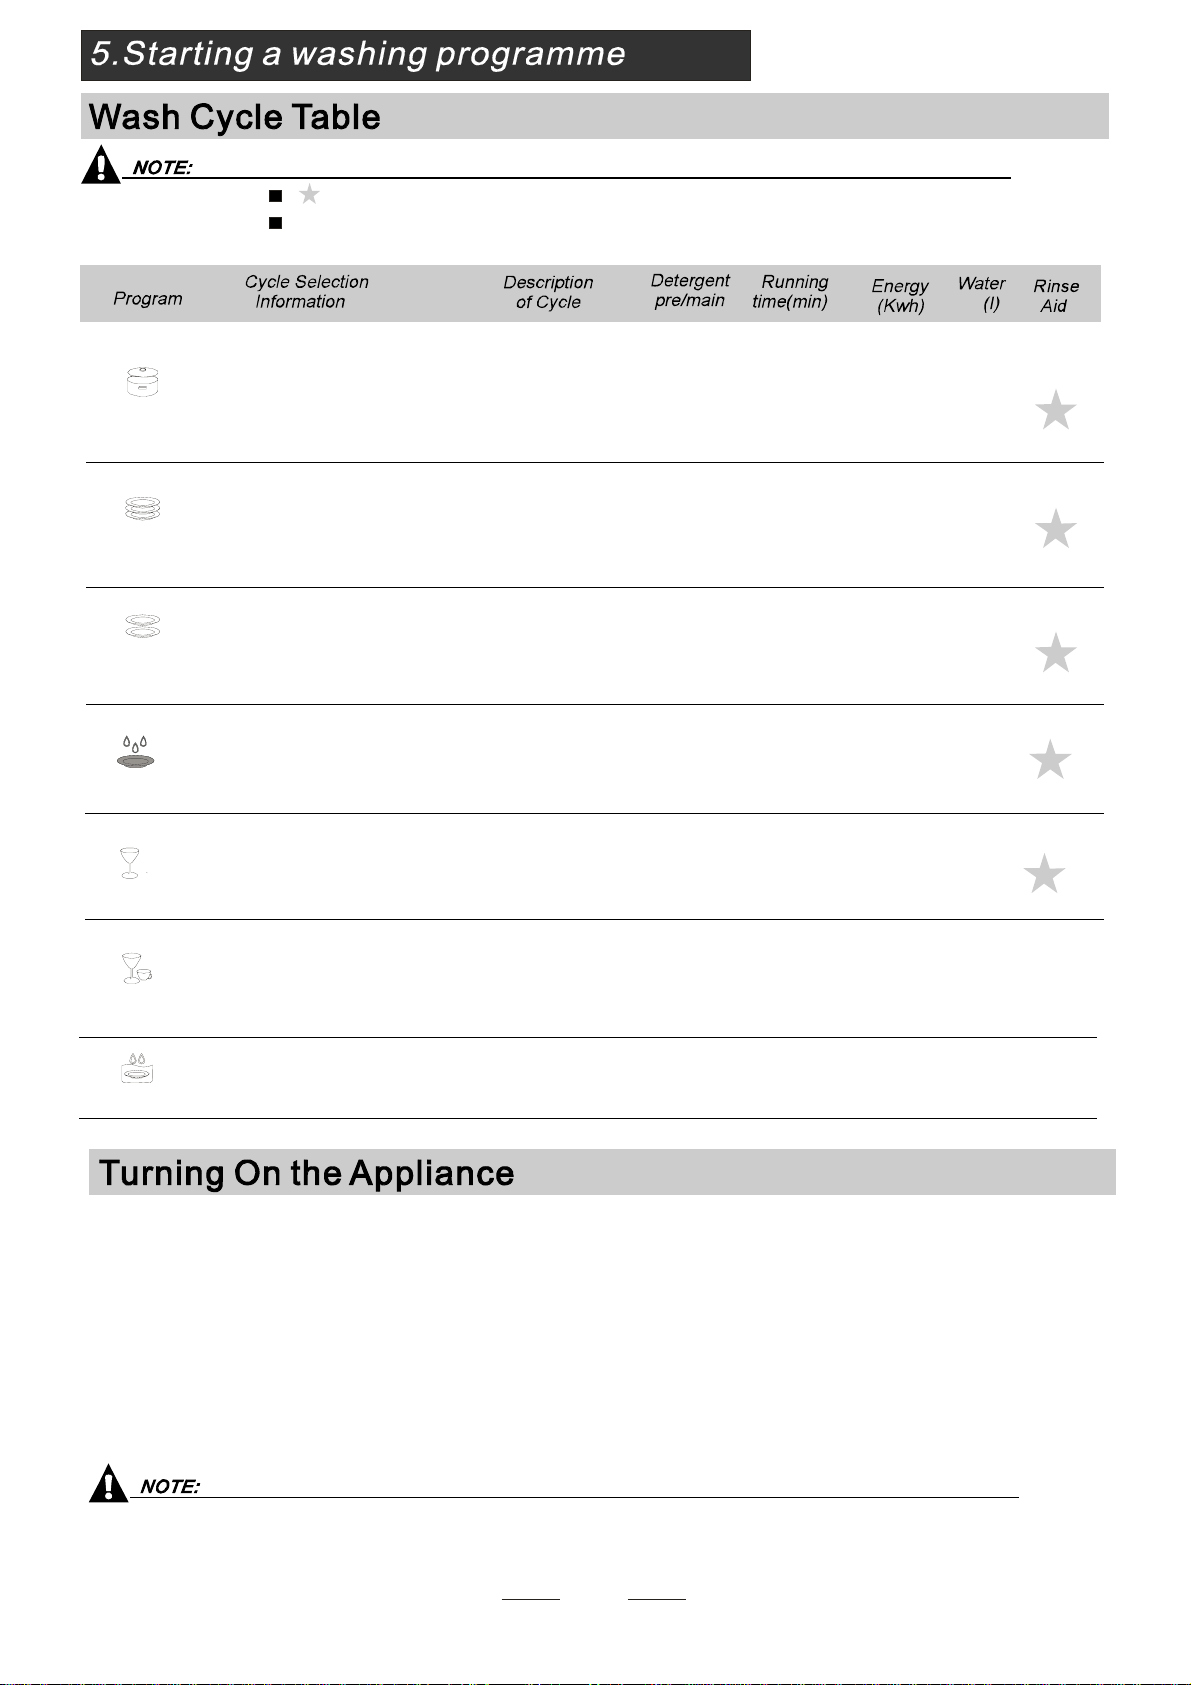
Means:need tofillrinseintotheRinse-Aid Dispenser.
()
* :Thisprogramisthetest cycle,the rins e-aid dispen ser
setting i sr ecommen ded t oPosition 6.
AS/NZS2007.1
For normally soiled load s,
such aspots,plates,glasses
and lightly soiledpans.
standard dailycycle.
Forlightly soiled loads,such
as plates,glasses,bowls and
lightlysoiled pans.
Fortheheaviestsoiled loads,
such as pots,pans,casserole
dishesand dishesthath ave
been sitting wi th dried food
onthem fo rawhile.
120
105
14 0
0.70
0.5
0.94
7.7
8.3
9.7
Pr e-was h
Wash (60 )
Rinse
Rinse(70 )
Dr ying
℃
℃
Wash (55 )
Rinse
Rinse
Rinse(55 )
Dr ying
℃
℃
/
14
2.1
0.0 1
Pre-w ash
Intensive
Pre-w ash 50
Wash (70 )
Rinse
Rinse
Rinse(70 )
Dr ying
℃
℃
℃
()
To ri nse dish e s t ha t you
pl an to was h later t ha t day.
Heavy
*
AS/NZS 2007.1
Normal
So ak
4/18 .5g
AS/ NZS2007. 1
Ashorterwashforlightly
s o ile d lo a d s th a t do n o t
need drying.
15g.
30 0.30 5.8
Wash (40 )
Rinse
℃
Rinse
Rapid
4/18. 5g
4/ 18. 5 g
St ar tin g a wash c ycle . ..
1.Draw o utt hebaske t(see th esectio nent itled Load ingth eD ishwash er ).
2. Po ur in t he d et er gent (see t he section enti tled D eter g e nt a nd Ri n seAi d ).
3. I nser t the p lu g in t o t h e sock et . T he po wer supp ly i s 220-2 40VAC 50 H Z ,
th especif icati onof the socket is 10 A25 0VA C.
4.Make sure thatthe watersupplyis turnedonto fullpressure.
“”
“”
5.Turn on th e power but to n, pr ess the program b utton ,t oselec ta pr ogram , the r esponse light w ill ligh t.
Then cl os e the do or,the di shwasher begins to start .
When youopenthe door topausedu ringwashing,
theprogram lightwillstopblinkingand thedishwasher willmooing
every minute unlessyou close thedoor.
80 0.48
4.0
/
was h
Rinse(70 )
Dr y ing
(4 0 )
Ri nse
℃
℃
Fordis hesthatneed to be
Rinsedanddried only.
Ri ns e
70 0.48
5.8
15g.
was h
Rinse(60 )
Dr y ing
(4 5 )
Ri nse
℃
℃
F or lig htly s oiled loa ds,
such as glasses, cry stal and
fine china.
Glass
It is d ange ro u s to ope n th e do or w hen w as hi ng, be c aus e th e hot water ma y scald you .
Whe nthe wo rking cyc le h as fi nished, the b uzzerof dishwa sher will sound 8 second s, the nstop.Turn off
t he a ppli ance usi ngthe O N/O FFb ut to n,sh utoffth ewater supp ly and op en t he d oor of t he di shwashe r.
Wait a f ewminut esbe fore un loadi ngthe di shw asher to avo id ha ndling t he d ishes an dutensi lswhile they
are s ti ll hot a ndmore suscept ible to br eak age. The ywi llals od rybet ter.
SwitchOff the Dishwasher
In t he digi tal d isplay app ears 0 ( remainin gprogram metime), on lyin t his case the progr amme has ended.
1.S witch offthe di shwasher by p re ssingthe O N/OF Fbutton.
2.Turnoffthewatertap!
Openthedoorcarefully.
Hot dishes are sensi tive to kn ocks. The di shes shou ld ther efor ebea llow edto cool d own around 15 minut es
before removingfromthe appliance.
Open t hedish washer's door,leave it ajar and wai ta few mi nutes before r emoving the dis hes.In this way they
will be cooler and t he dryi ng will be i mproved.
Unloadingthe dishwasher
Itis nor malthat t he di shwashe r is wet inside.
will keep on working aft er10 secon ds.
I fyouopen the doo rwhen washin g,the mac hine wil lpause. Whe nyou c lose the door , the m achine
10
Premise:You can modify thewas hingprogram, Whent he d ishwasher just
runs for a shorttime. Otherwise, the detergent ma yhav eal ready been
released, andthe appliancemay havealreadydrainedthewash water.Ifthis
isthe case,the detergentdispensermustbe refilled (seethe section entitled
" Loadingthe Detergent ").
res sProgram Butto nmoreth an
three seconds the mac hine willbe in stand by state ,thenyo u can change
the program to the desiredcycle setting
(see thesection entitled " Startinga washcycle. . ." ).
NOT E : I f y ou o pen t he do or du ri n g was hi n g, t h em a ch ine w i ll p ause . Wh en y o u
closeth e door, the machine willke ep onwor king afte r10seconds.
The program lights show thest ateof the dishwasher:
Open the door to pauseduringwashing,p
a) All program l ightsoff---------------stand by
b)One of theprograml ights on- ---------pause
c)One of thep rogram l ightsblinking----- r un
Aforgotten dish can be added any time before the detergent cup opens.
Add forgotten dishes.
Close the door
After the spray arms stop working,you can open the door
completely .
2
3
Open the door a little to stop the washing.
1
4
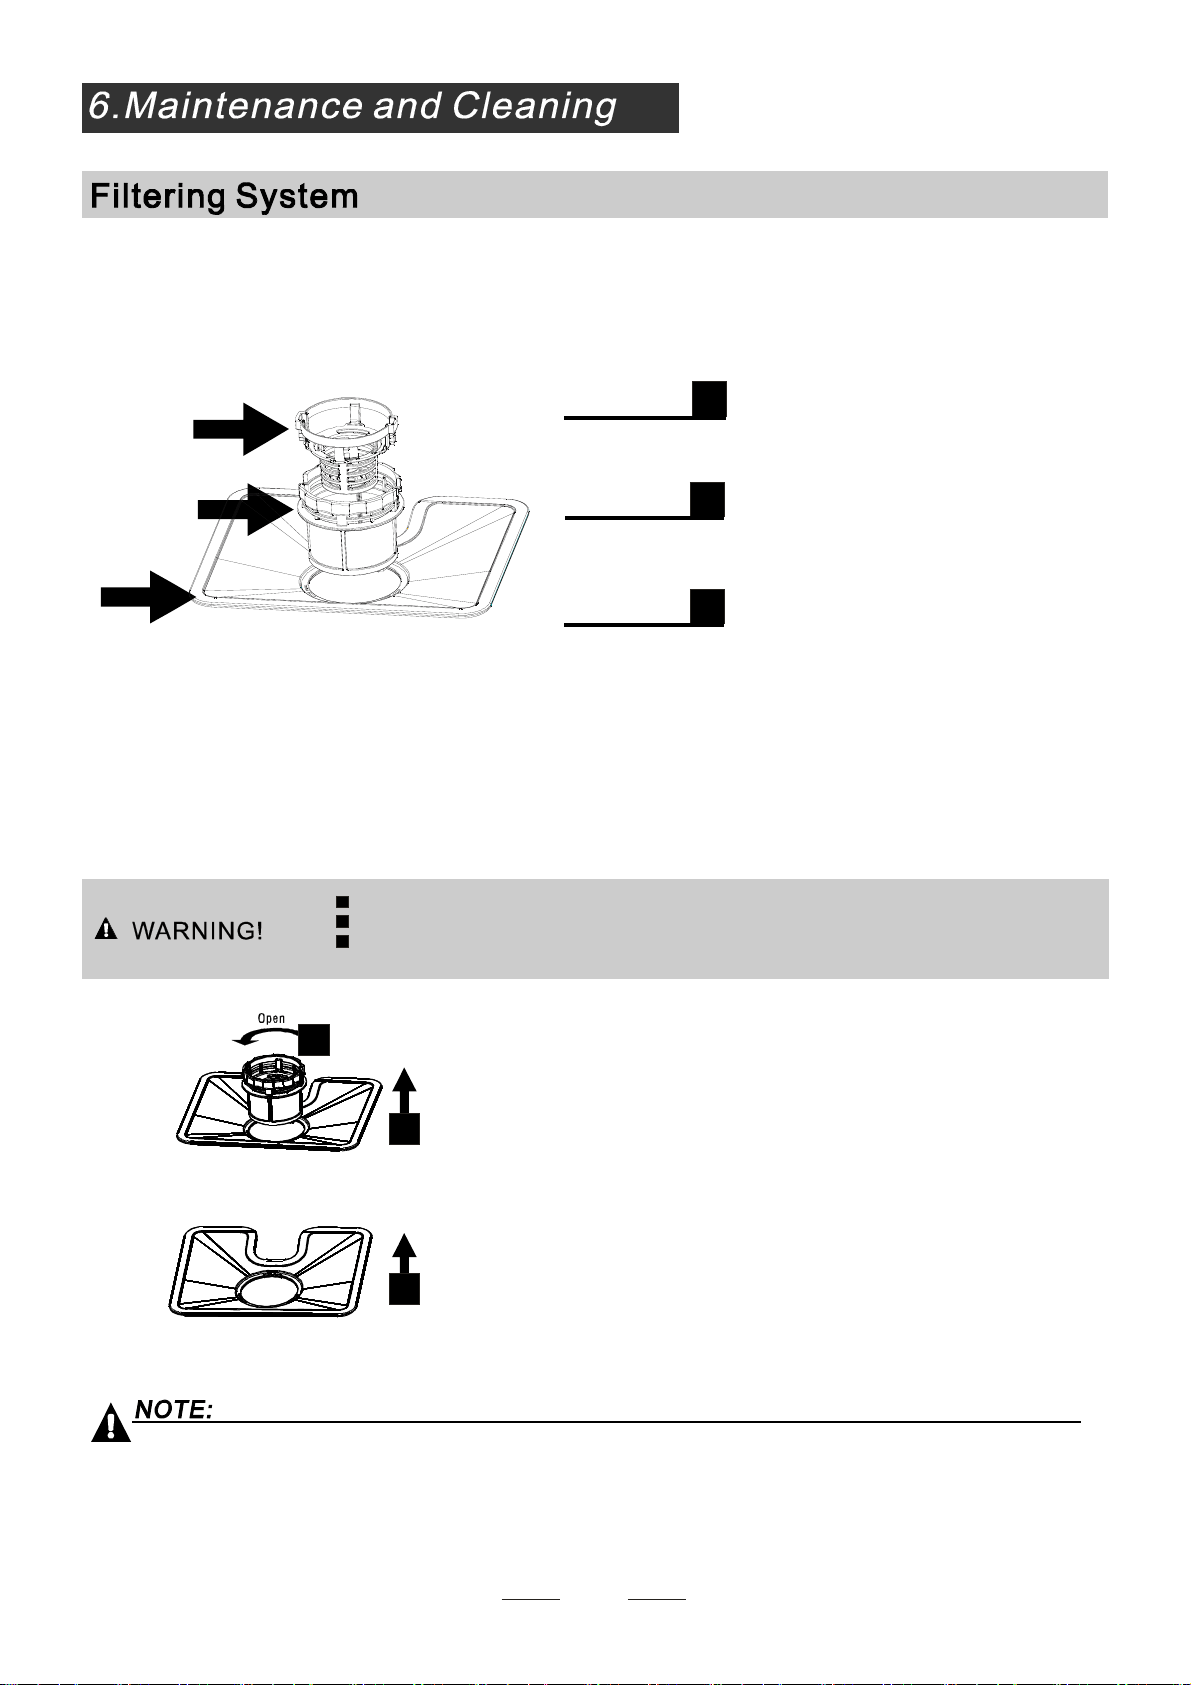
The f ilter prev ent l arger re mna nts offo odo rot hero bje ctsfrom gett ingi nsid ethe pum p.
The fil ter sys temconsists of a coarse filter,af la t ( Mai nfilt er)
an d a micro f ilter ( fi n e fi lter) .
Foodandsoilparticles trappedbythisfilterarepulverized bya
special jet ont h e s p ray a r m and wa s hed down t o d r a in.
Mainfilter
1
Largeritems,such aspiecesofbone or glass,thatcouldblock
the drain are trap ped int hecoars efilter.Tore mo v eth eitems
caught b ythe filter, g entlysqueezethetapon the top ofthis
filterand lift out.
Coarse filter
3
This filte rho lds s oil a nd f ood residue inth esumpa rea and
preve nts it from being redepo sit on t he dishes du ring wa shcycle.
Fine filter
2
2
3
1
Filterassembly
Thefilter efficiently
F or bes t perf orm a n c e a n d re sul ts, the filter as sembly mus t b e re gul a rly. th i s reas on, it i s a go od idea t o
r emove t hel arger food particl estr app ing i nthe filte raf tereach was hcy cleb yri nsin gthe filter an dcu pun der
r unn ing w ate r.To remove t he f ilte r assemb ly, pull on th ecu pha ndle i ntheu pwa rd di rection.
re mo vesf oodpart icle sfromth ewa shw ater,al lowing it to be re- cycl ated duri ng t hecy cle.
Fo r
Never ru n th e di shwasher w i t hou t t h e fi lte rs i n pl ac e.
T he di sh was her mus t ne ver be used wi thout t he f ilt er s.
Imp ro per repl ace ment of the f ilter may red uce the perf orm anc elevel o fthe applian ce
anddamagedishesandutensils.
the filter system will be installed.
If do it from step1 t o step 3, the filter system w ill be removed; while if do it from Step 3 t o Step 1,
11
Step1:contrarotate the Fine ,
liftitup;Step2:
filter
Step3:lift the Main filter up
2
1
3
The cont rol p ane lcan be cleaned by u sing a l ightly dampen edcloth and dry tho roughly.
The exteri or use a goo dappl iance p olish wax.
Neverus esh arp obj ects, scouring pads o rhar sh c lea ners ona ny p art o ft he di shwasher.
ProtectAgainst Freezing
1.Cut off el ectrica l pow erto the di shwashe r.
2.Turnoff the w ater su pply and disco nnect the wat erinl etpipe from the wate rvalve.
3.Drain water from t he inle tpipe a nd water valve. (Use a pan t ocatch the wa ter)
4.Reconnect the water inl etpipe to t he wa ter valve.
5.Removethefilterat thebottomofthetubanduseaspongetouseupwaterin sump.
pl ease take fros tprotection meas ureso nd ishw ash erin win ter. E fter wash ingcycles,
pl ease op erate as follow s
ach t ime a
:
- Inspec t t he filte rs for blo ckin ge very time the dis hwa sher has been used.
- By uns crew ing t he c oar sefi lter. you can remove the f ilter sys tem.Remove any foo dremna ntsa nd
cleanthefilters underrunningwater.
Remarks:
CleaningThe Filter
CleaningThe Door
To clean t h e c o a rse filter and t he fi n e fi l t e r, us e a cleanin g brush . Re as se mble t hef ilter par t s as sho wn i n t h e f igur es
inth elas tpag ea ndr eins ert the e ntire ass embl yi n the dish was her, position ing inits seat an d pressin gdownward .
Theentirefilter assemblyshouldbe cleanedonce a week.
Whencleaning the filters, don'tknock onthem.O therwise, thefilters couldb e
contorted andtheperformanceofdishwasher couldbe debased.
To clean the e dge around t he door ,gli deand window dress ing,
you should use on ly a s oft warm ,damp c loth.
To avoi d pene tr ati onof water into the door lock and
electrica l comp one nts, do not us ea spra y cle ane rof an ykind.
Never u sea spr ay c leaner t ocl ean t he door panel as i tm ay dam age the door loc k
and electricalcomponents.
Abr asive ag ent or s ome paper towe lshould not be u sed bec ause o f the r isko f
sc r a t c hi ng o r leavin g s pot s on the stainles s stee l s urf a ce.
12
I f y ou r di sh washe r cannot w or k be cau se o f the i c e, ple a se c onta ct pr ofess io nal s erv ice p erso ns .
Itisrecommend thatyourunawashcycle withthe
dish washer e mpt yan dthe nr emove t heplu gf romthe
socket, t urno ff th ewa te r supp ly and l eave the door of
t he app lia nce s l i ght ly open. T his will help th e door
sealstoast longerandpreventodoursfromforming
withintheappliance.
If the applian ce must be move d, tr yto keep i tin t he
verticalposition. Ifabsolutelynecessary, itcanbe
positi oned on its back.
One of thefactors thatcauseodorstoform inthe
dishwasher is foo dthat re mainstr appe di n the seal s.
Periodic clea ning with a d amp sponge will prev entt his
f r o m oc cu rr in g.
Aft er ever ywash, turn offt hewa ter supp lyto the
applia nce and l eave t he door s light lyop en sotha t
m oisturean dodor sare not trap ped inside.
Befo re cleaning or p erforming mainten ance, always
remove the p lug f romthe socket.
Tocleanthe exteriorandrubberparts ofthedishwasher,
donot usesolventsor abrasivecleaningproducts.
O nly use a c lo th w ith w arm so apy wat e r.
To r em ove s pots o r st a ins from the sur face oft he
in teri or, u se a clot hda mpe ned wit hwa ter w ith a li tt le
v inega r, o r a c leaning pro duct mad es pecifical lyfor
dishwashers.
After EveryWash
Remove thePlug
No SolventsorAbrasiveCleaning
Mov ing t heAp plia nce
Seals
When it is notin needfora long time
13
Theinstallationof the pipes
and electrical equipments
should be done by professionals.
ElectricalShock Hazard
Disconnect electrical powerbefore
installingdishwasher.
Failureto doso can result indeath
or e lec tric al s hock.
Theinstallationpositionofdishwashershouldbe neartheexisting inletand drain
hosesandpowercord.
Oneside of thecabinet sink shouldbe chosento facilitate the connectionofdrain
hosesof the dishwasher.
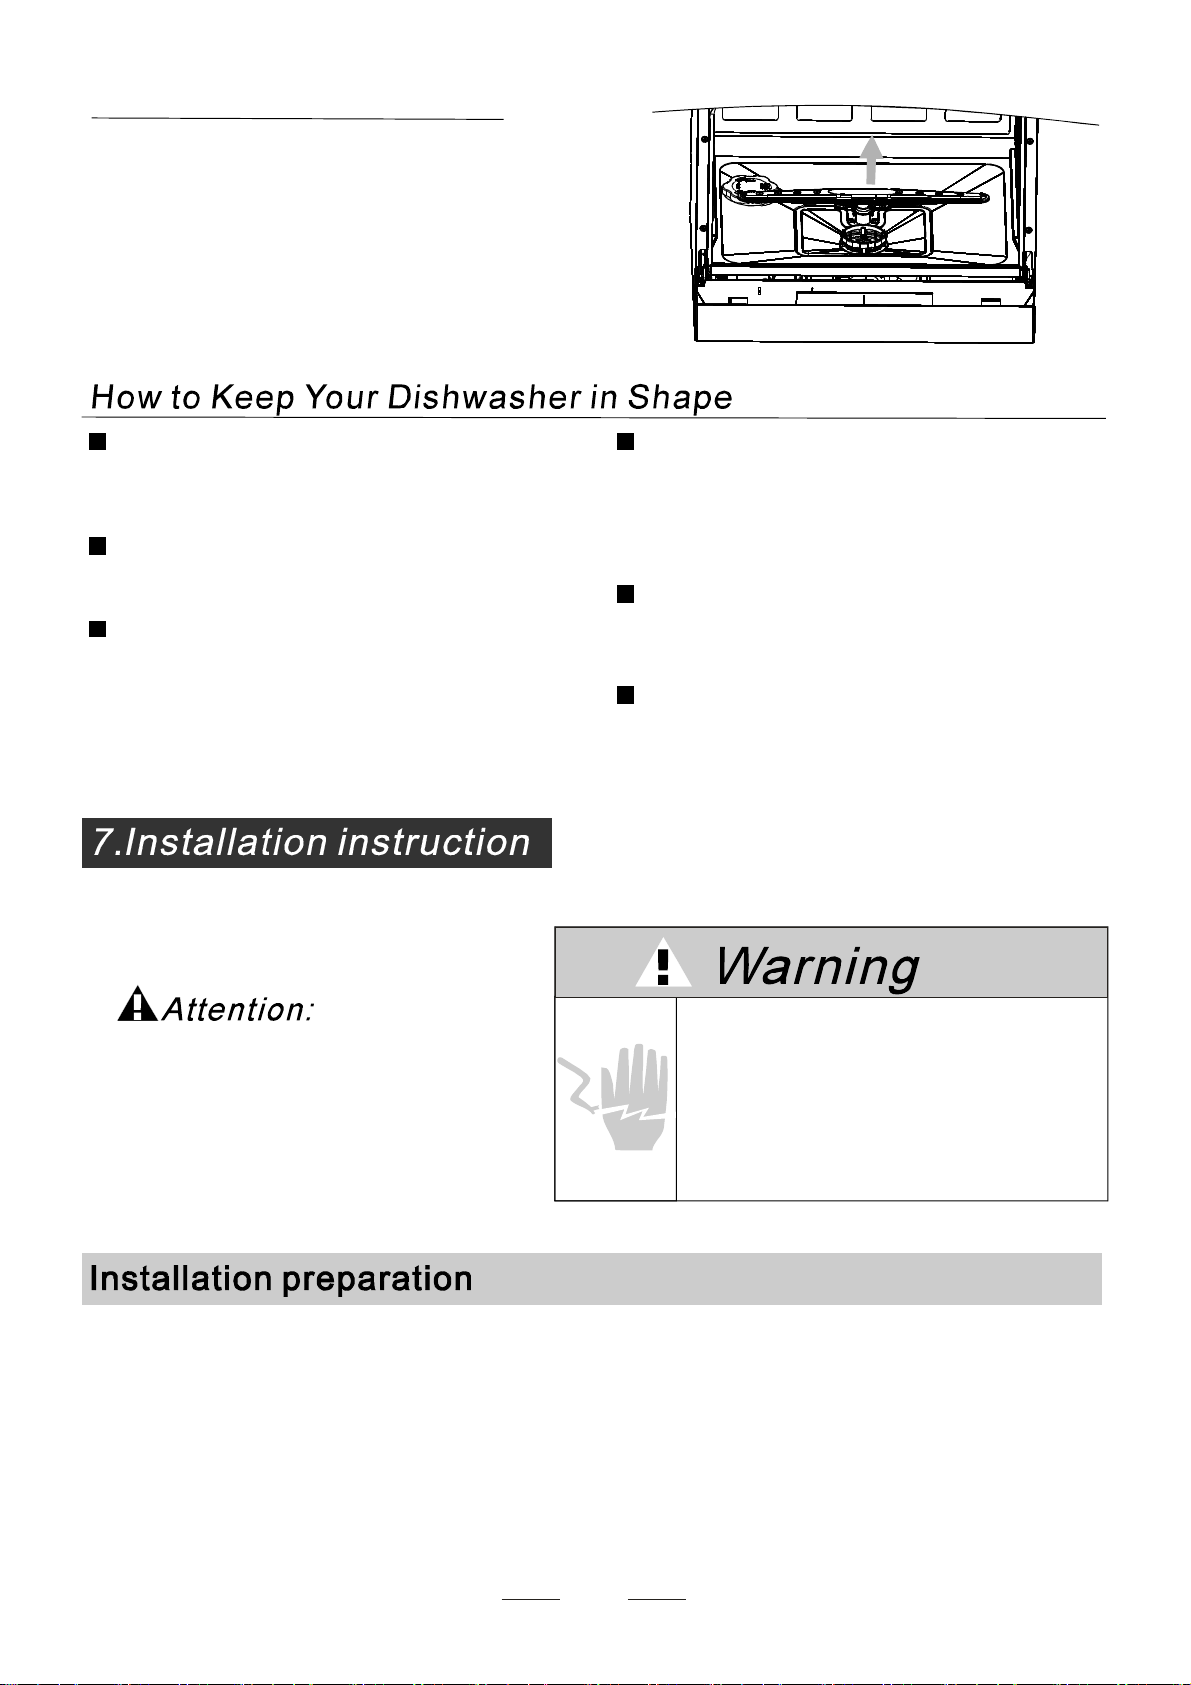
Cleaning the SprayArms
Thespray armscanbe easily removed forperiodiccleaning
of the noz zles ,to p reve ntposs ible c logging .Wash th em
unde r running wat eran dca refu llyr eplace t hem i nth eir s eats ,
checking that their rotarymovementisinno wayimpeded.
G ras pthe mid dle of the spr ay a rm, pull itup ward st o remove
it.Wash thearms undera jetof running waterandreturn them
car e full y tot he i r se at. Af ter re as se mb ly, c h eck t hat the spra y
arms turn freely. Otherwise ,check that they havebe en
installed c or r ect l y.
Ensu rethe v oltag eand fr equen cyof thep owe rbe ing cor respond st o
t hose on the rating pl ate. Onl yin ser t the p lug into an electrica lsocke twhi ch i searthed
pr op erly. If th eel ectrical sock et t owhich the a pplianc emust b econne ct ed is not
appropriate fortheplug, replacethe socket, ratherthan usingaadaptors orthelike as
they couldcause overheatingandburns.
Plea selook at th erat ing labe l t o knowthe rat ingv olta ge a nd conn ect t he d ishwasher to t he appropr iate pow er s upply.
Use the r equi red fuse 1 0 amp ,tim ed elay f use or c ircui tbreake rrecommend ed and provide separate circ uits ervi ng
only th is appl ianc e.
This appliance must be earthed. In the event of a malfunction or breakdown, earthing will reduce the risk of
electric shock by providing a path of least resistance for the electric current. Thi s applia nce is equipped with
a cord having an equipment-earthing conductor and an earthing plug. The plug must be plugged into an
appropriate outlet that is installed and earthed in accordance with all local standards and requirements.
For personal safety:
DO NOT USE AN EXTENSION CORD OR AN ADAPTER PLUG WITH THIS APPLIANCE.
DO NOT, UNDERANY CIRCUMSTANCES, CUT OR REMOVETHE EARTHING
CONNECTION FROM THE POWER CORD.
14
for personal safety:
DO NOT USE AN EXTENSION CORD OR AN ADAPTER PLUG WITH THIS APPLIANCE.
DO NOT, UNDER ANY CI RCUMSTANCES, CUT OR REMOVE THE
FROM THE POWER CORD.
EAR THING
CONNECTION
Improper connection of the equipment earthing conductor can result in the risk of an
electric shock.
Check with a qualified electrician or service representative if you are in doubt whether the
appliance is properly earthed.
Do not modify the plug provided with the appliance. If the plug does not fit properly to the
outlet, please have a qualified electrician to install a proper outlet.
and t he s ides, alo ngt he a djacent cabinets or w all. The dish was her is eq uipped w ith water su pply
Posit ion thea ppli anc ein t hedesir edlocat io n.The back should rest aga inst thewall behi ndit,
and drain hosesthatcanbepositioned totheright ortheleftto facilitate properinstallation.
Conne ctthe co ld wate rsupply hose to a thr eaded 3/4(inch )c onn ector and mak es u re
that i t is fastened t igh tlyin place.I fthe wate rpipes a renew o rha venot be enused for
an ex tend ed perio do f tim e,let t he water ru nto make s ur ethat t hewat eri s cle ar and
freeofimpurities. Ifthisprecaution isnottaken,thereisariskthatthe waterinletcan
get bloc kedand d ama gethe a ppliance .
The w ater supply to the applian cecan a lso be conn ected to t he house ho t w aterlin e
(centralizedsystem,heatingsystem),aslongas itdoes notexceed atemperature of
60 C. In t his ca se, the w ash cyc le tim ewill be shortene dby about 15 min utesand th e
wash efficiency sl ightl yred uced. The co nnection must be ma deto t he hot w ater line
fo llowin gthe s ame proced ures as those f orthe conn ection to th ecold wa ter li ne.
In order to avoidthat thereismo re waterstaying in the inlet hose, pleasec lose
theh ydrantafteru sing.(Notapplicable toappliances w ithout aqua-stop.)
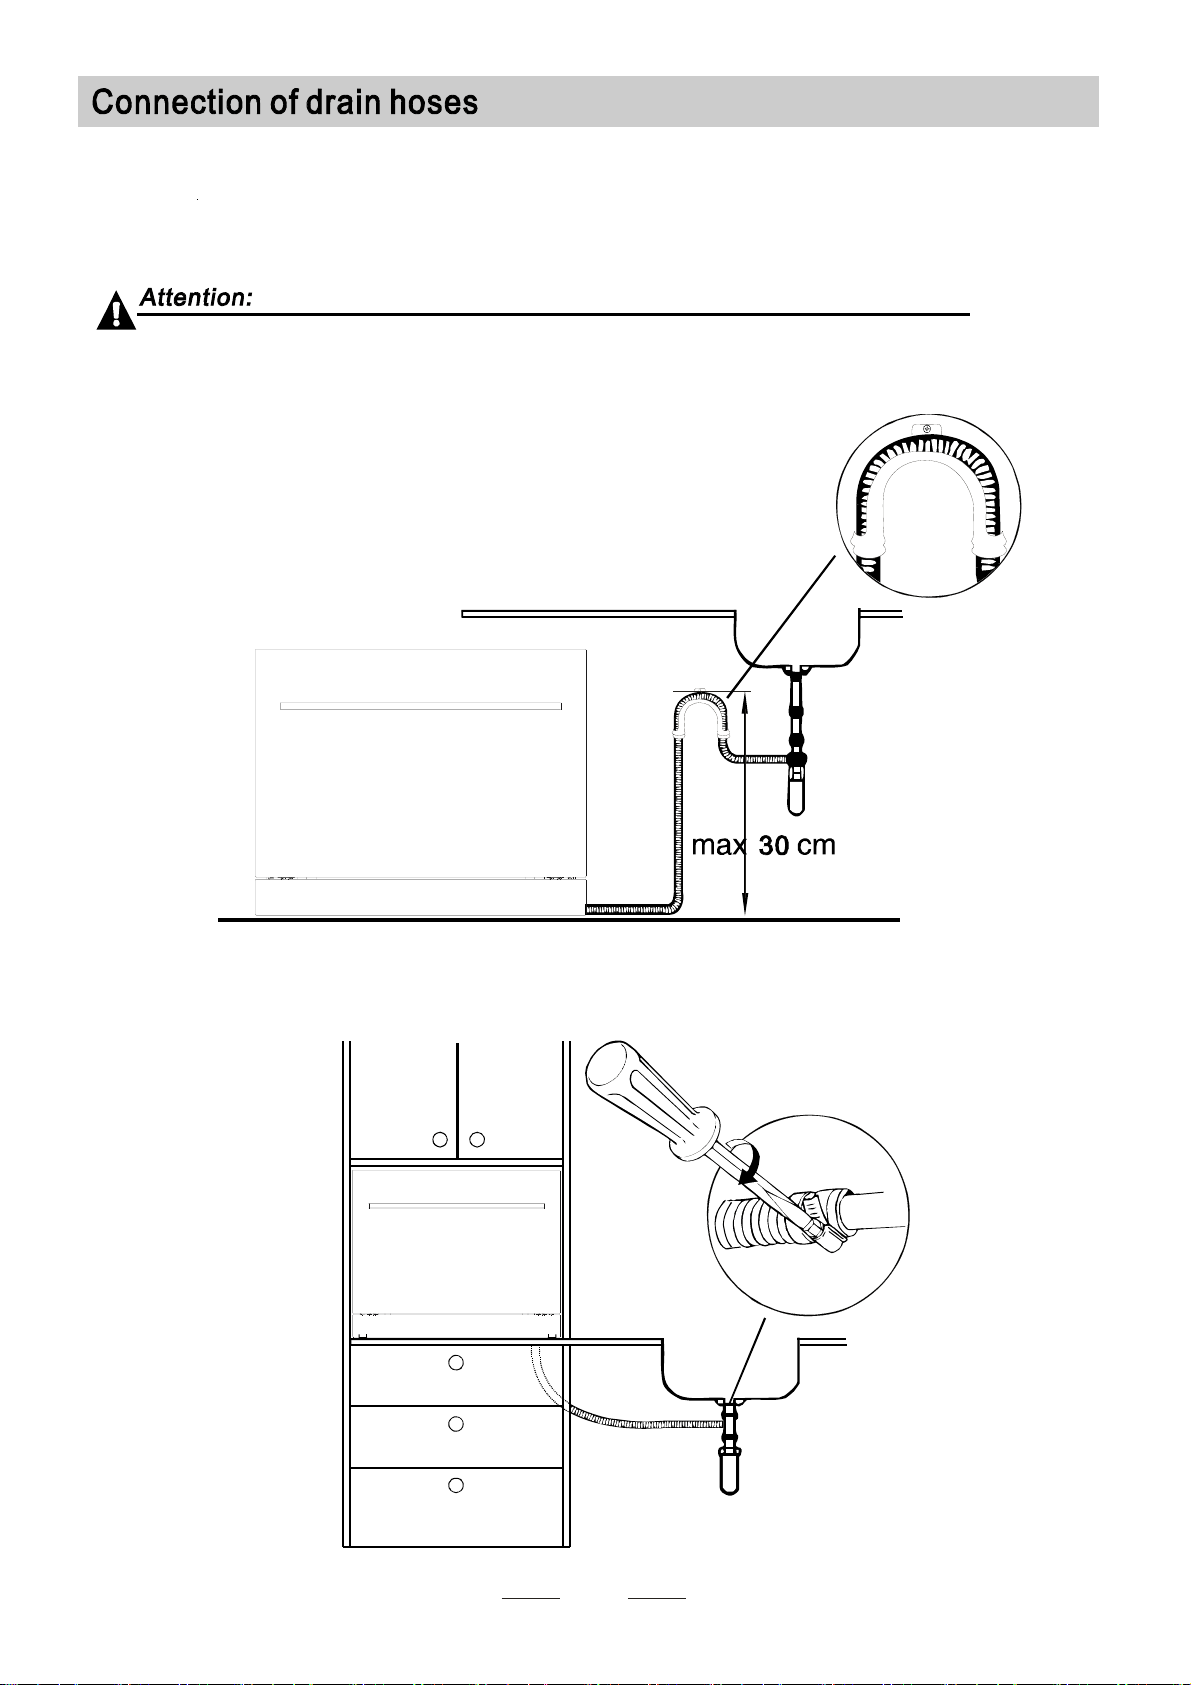
Insert the drain hose intoa drainpipe with a minimumdiameter of 4cm,or let it
runintothesink,makingsuretoavoidbendingorcrimpingit.Usethespe ial
plastic support that comeswith the appliance.The free endof the hosemustbe
ata height lowerthan 75cm andmust not be immersedin water to avoid theback
flow ofit.
c
15
Thespecialplastic hose supportmustbesolidlyfastened tothe wallto
prevent the drainhosefrommovingand allowing waterto spill outside
thedrain.
16
If the s ink is 1000 h igher f rom the floor,the exces swater i nho ses cannot b edrained di rectl y
into the sink.Itwillb enecessary to d rain excesswaterfromhosesintoabowlorsuitable
conta iner that is hel doutside and lower than the sink.
Connectthewaterdrain hose.Thedrain hosemust becorrectlyfitted toavoid waterleaks.
En sure that the wat eri nl et h ose i sn ot kin ked or squashed .
If yo u ne e d a d ra in hose exte ns io n, o bser ve tou se a similar d rain h os e.
Itmust benolonger than4metres; otherwise the cleaning effectofthedishwasher couldbereduced.
Water Outlet
Extension Hos e
How to Drain Excess Water From Hoses
Thefollowingthingsshould be checked beforestarting the dishwasher.
1
Thedishwasher islevelandfixed properly
2
T he inl et val ve is open
3
There is a leakage at theconnectionsoftheconducts
4
The wires aretightly connected
5
The poweris switched on
6
The inle t an d dr ain ho ses are k notte d
7
Allpackingmaterialsandprintingsshouldbe taken out fromthe dishwasher
The content of this manual is very helpfulto the u sers.
After installation, please make sure tokeep this manual.

Fuse blown, or the
circuit breaker tripped.
Replace fuse or reset circuit breaker. Remove any other
appliances sharing the same circuit with the dishwasher
Sp illed rinse- aid
Always wipe up rinse-ai d spills immediat ely.
Hard water minerals
The affec ted item s are
notcorrosion resistant.
The lid of so fter
is loose.
Thesp ay arm is
knocking against
an item in a basket.
r
Item of crockery
are insecure
in the wash cabinet.
This may be caused
by on-site installation
or the cross -section of
the piping.
A programme was not
run after dishwasher
salt was added.
Traces of salt have
got intothe washcy le.c
To clean the interior, use a damp spon ge with
dishwasher detergent and wear rubber gloves.
Never use any other cleaner than dishwasher
detergent for the risk of foaming or suds.
Always run the Qu ick wash programme .
without any crockery in the dishwasher and
without selecting the Turbo function (if present),
after addin g dishwasher salt.
Check thelip .Ensure the fixis fine.
Interrupt the programme, and rearrange the items
whichare obstructing the s p ay arm.r
Interrupt the programme,
and rearrange the items of crockery.
This has no influence on dishwasher function.
if in doubt, contact a suitably qualified plumber.
Detergent with
colourant was used.
Make sure that the detergent is the one without
colourant.
Improper deter gent
Make sure the dishwasher is turned on and the door is
closed securely.
Closed dishwasher making sure that door latches.
Make sure the power cord is properly plugged into the
wall socket.
Power supply is not
turned on.
Door of dishwasher
not properly closed.
Kink in drain hose
Filt er clogged.
Kitchensinkclogged.
Check drain hose.
Check coarse the filter.
(see section titled )"CleaningTheFilter"
Check kitchen sink to make sure it is draining well.
If problem is kitchen sink not draining ,you may need
a plumber rather than a serviceman for dishwasher.
Use only the special dishwasher detergent to avoid
suds. If this occurs, open the dishwasher and let suds
evaporate.Add 1 gallon of cold water to the tub. Close
and latch the dishwasher, then Start the "soak" wash
cycle to drain out the water . R epeat if necessary.
17
Technical
problem s
Gen eral
problem s
Noise
The dishes were not
loaded correctly .
See notes in " Loading the Dishwasher Basket s ".
Select a more intensive programme.
See" Wash Cycle Table ."
Use more deter gent, or change your dete rgent.
Rearrange the items so that the sp ay can rotate freely.r
Clean and/or fit the filter combination correctly.
Clean the sp ay arm jets. See "Cleaning the Spray
Arms".
r
Use less detergent if you have soft water and select
a shortest cycle to wash the glassware and to get
them clean.
Use a mild abrasive cleaner to eliminate those marks.
Re-loading t he dishes properl y.
Load the dishwasher as suggested in the directions.
Increase the amount of rinse-aid/Refill the rinse-aid
dispenser.
Do not empty your dishwasher immediately after
washing. Open the door slightl y so that the steam can
escape. Begin unloading the dishwasher only once t
he dishes are barely warm to the touch. Empty the low
basket first. This prevents water form dropping off
dishes in the upper basket.
In sh ort programmes the washing temperature is lower.
This also lowers cleaning performance. Choose a
programme with a long was hing time.
Water drainage is more difficult with these items.
Cutlery or dishes of this type are not suitable for
washing in the dishwasher.
The programme was
notpowerful enough.
Not enough detergent
was d ispensed.
Item are blocking
the path of sp ay arms.r
The filter combination
inthebaseofwash
cabinet is not clean or
is not correctly fitt ed.
This may cause
the sp ay arm jets
to get blocked.
r
Combinat ion of sof t
water and too much
detergent.
Aluminum utensils
have rubbed against
dishes.
Dishes block
detergent cups.
Improper loading
Too little rinse -aid
Dishes are removed
too soon.
Wrong prog ramme
selection
Using cutlery wit h
a low-quality coating
If ov erflow occurs, turn off the main water supply before calling a service.
If there is water in the base pan because of an overfill or small leak,
the water should be removed before restarting the dishwasher .
18
Uns a ti s
-factory
was hin g
res u lt
Uns a ti s
-factory
dry i ng
res u lt
Wh en some mal functions com e on, the appliance will display error codes to warn you:
Longer inlet time.
Faucets is not opened , or water intake is restricted,
or water pressure is too low.
Some element of dishwasher leaks .
Overflow.
19
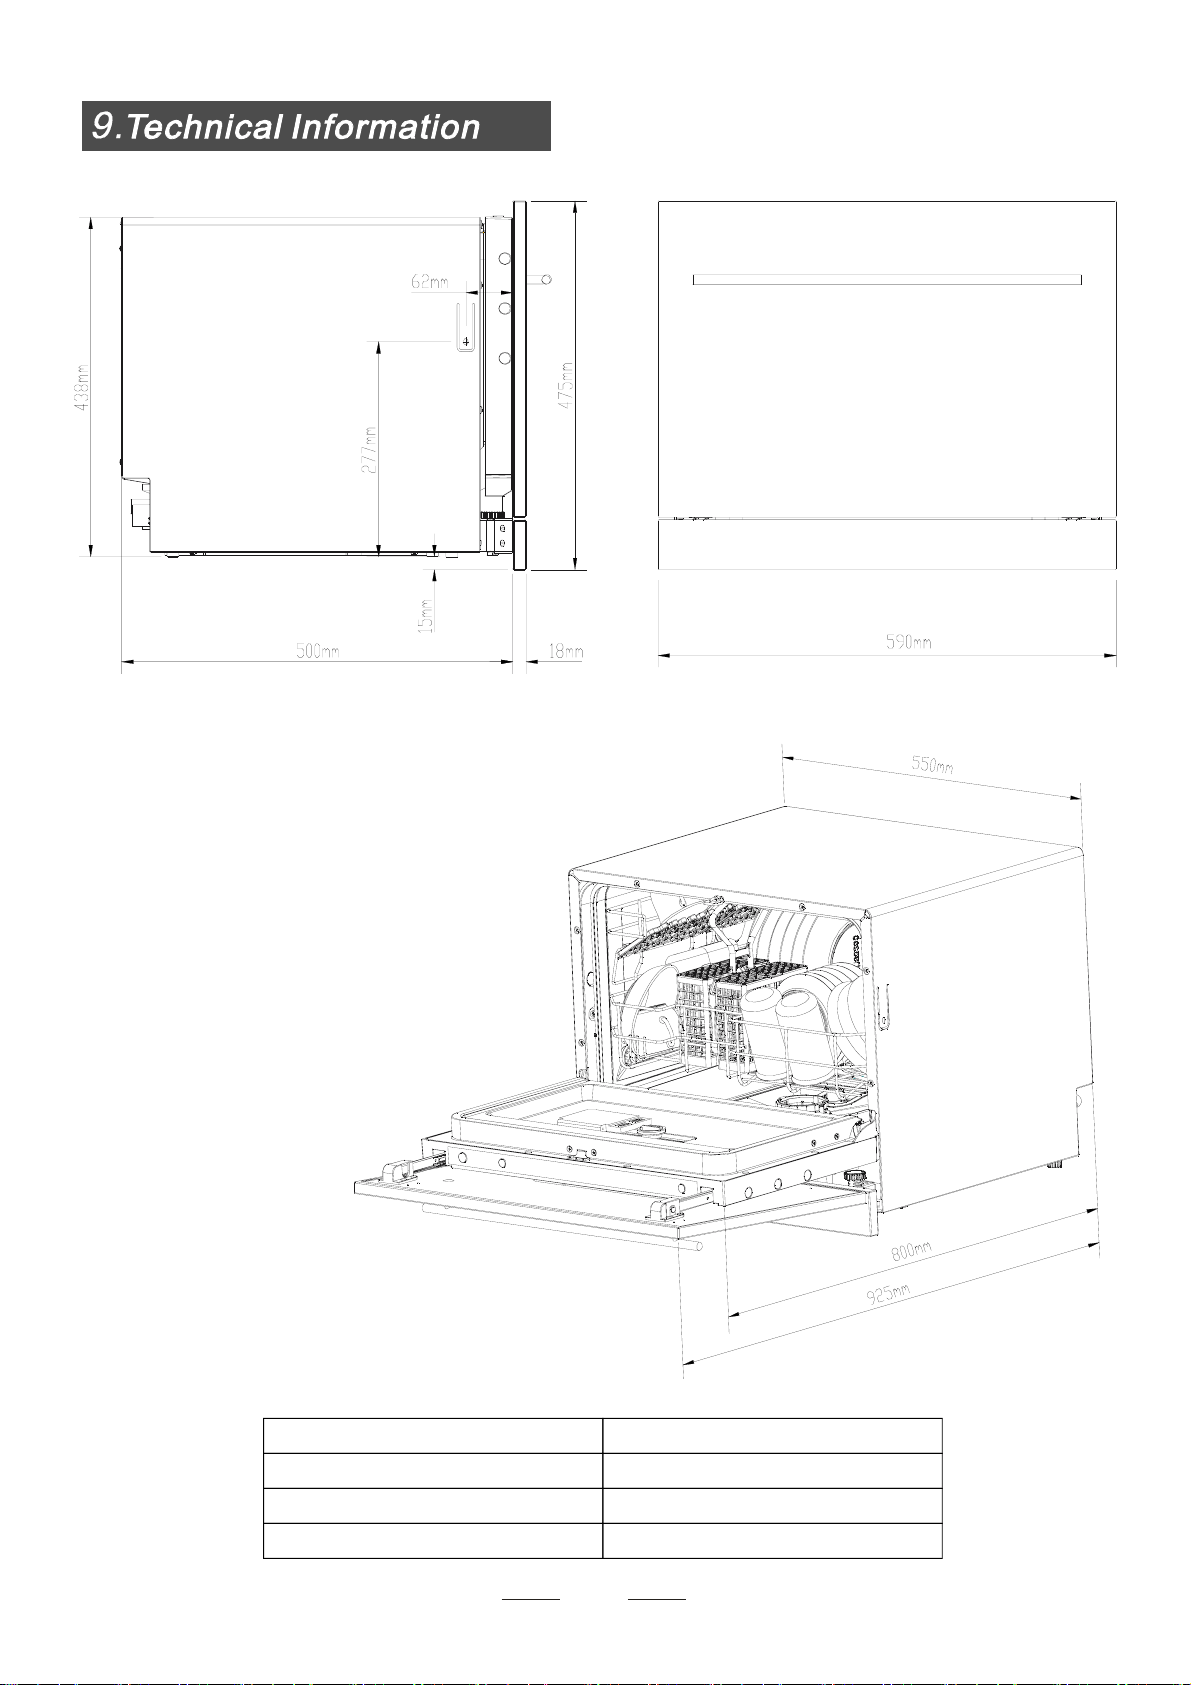
Capacity:
Power supply:
Hotwater connection
W pressure:ater
0.0 4- 1. 0M P a
Max 60℃
Seeratinglabel
6pl ace settings
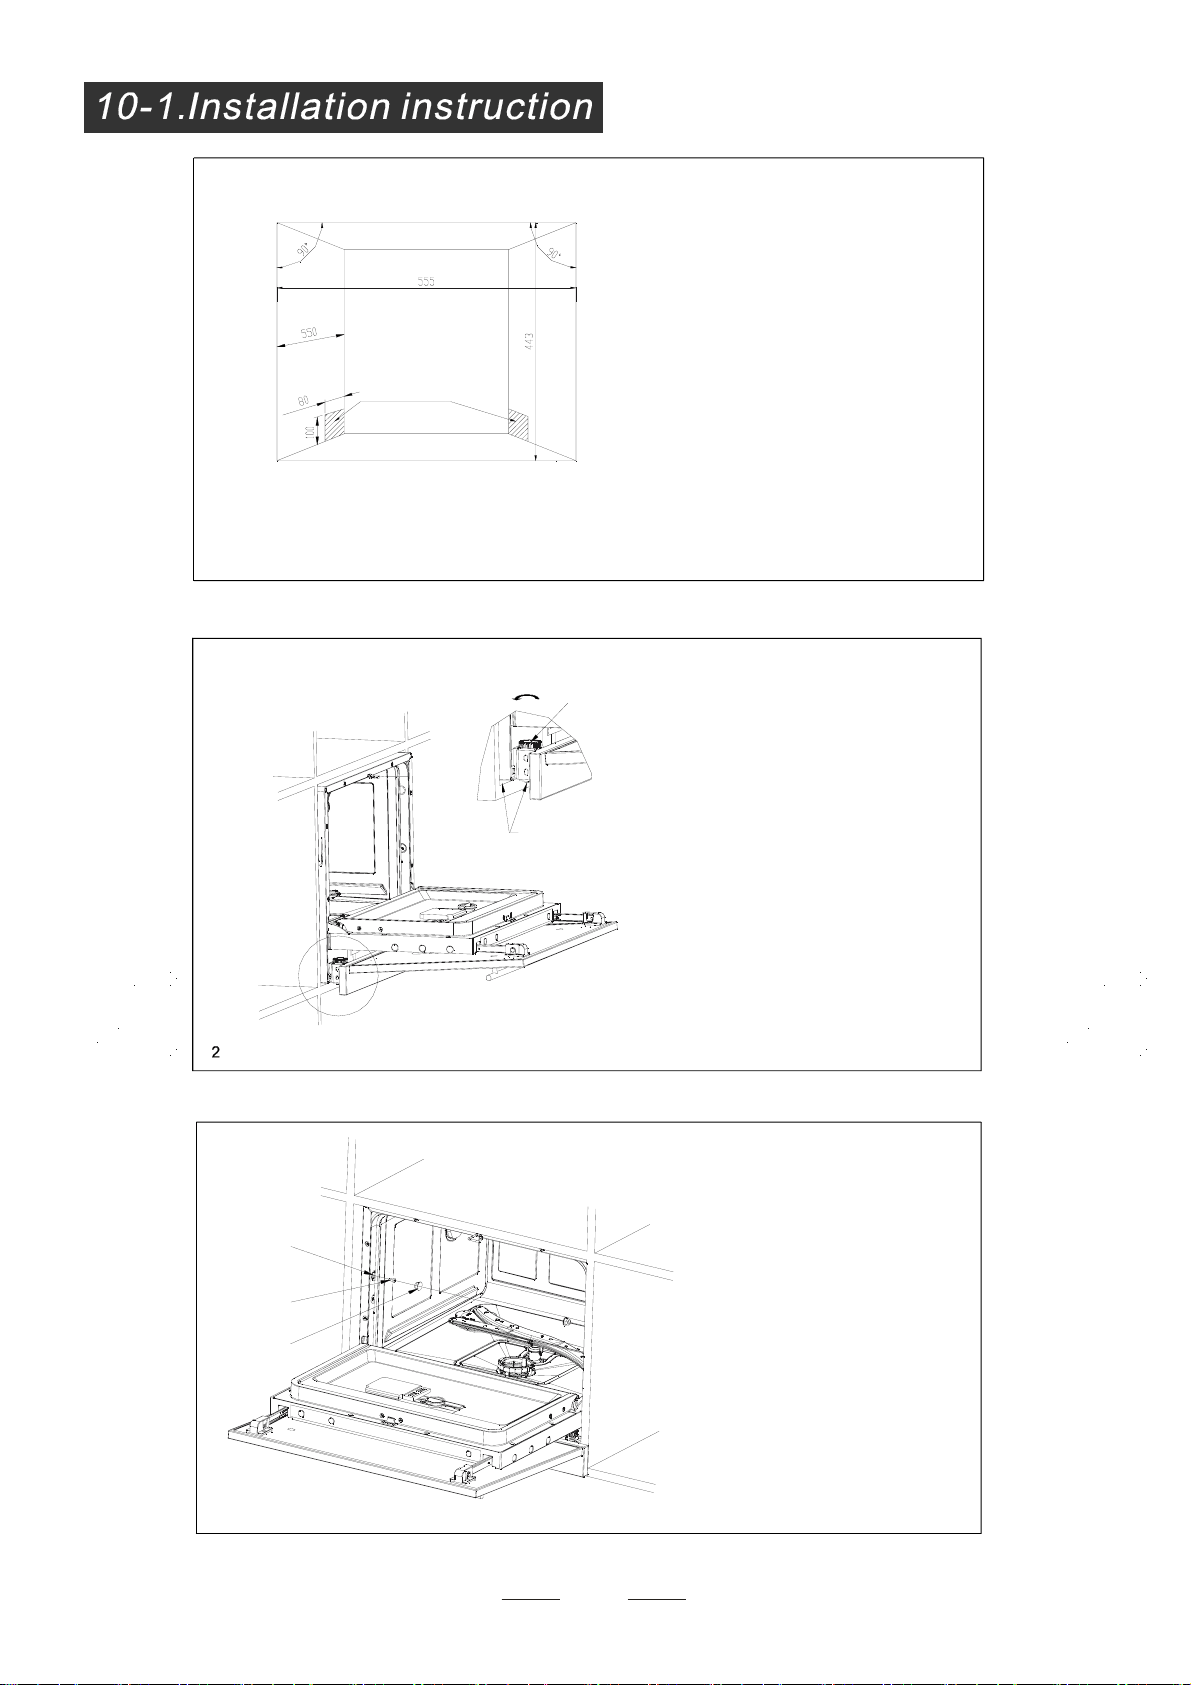
(Machine with a decorative plate, and installed.)
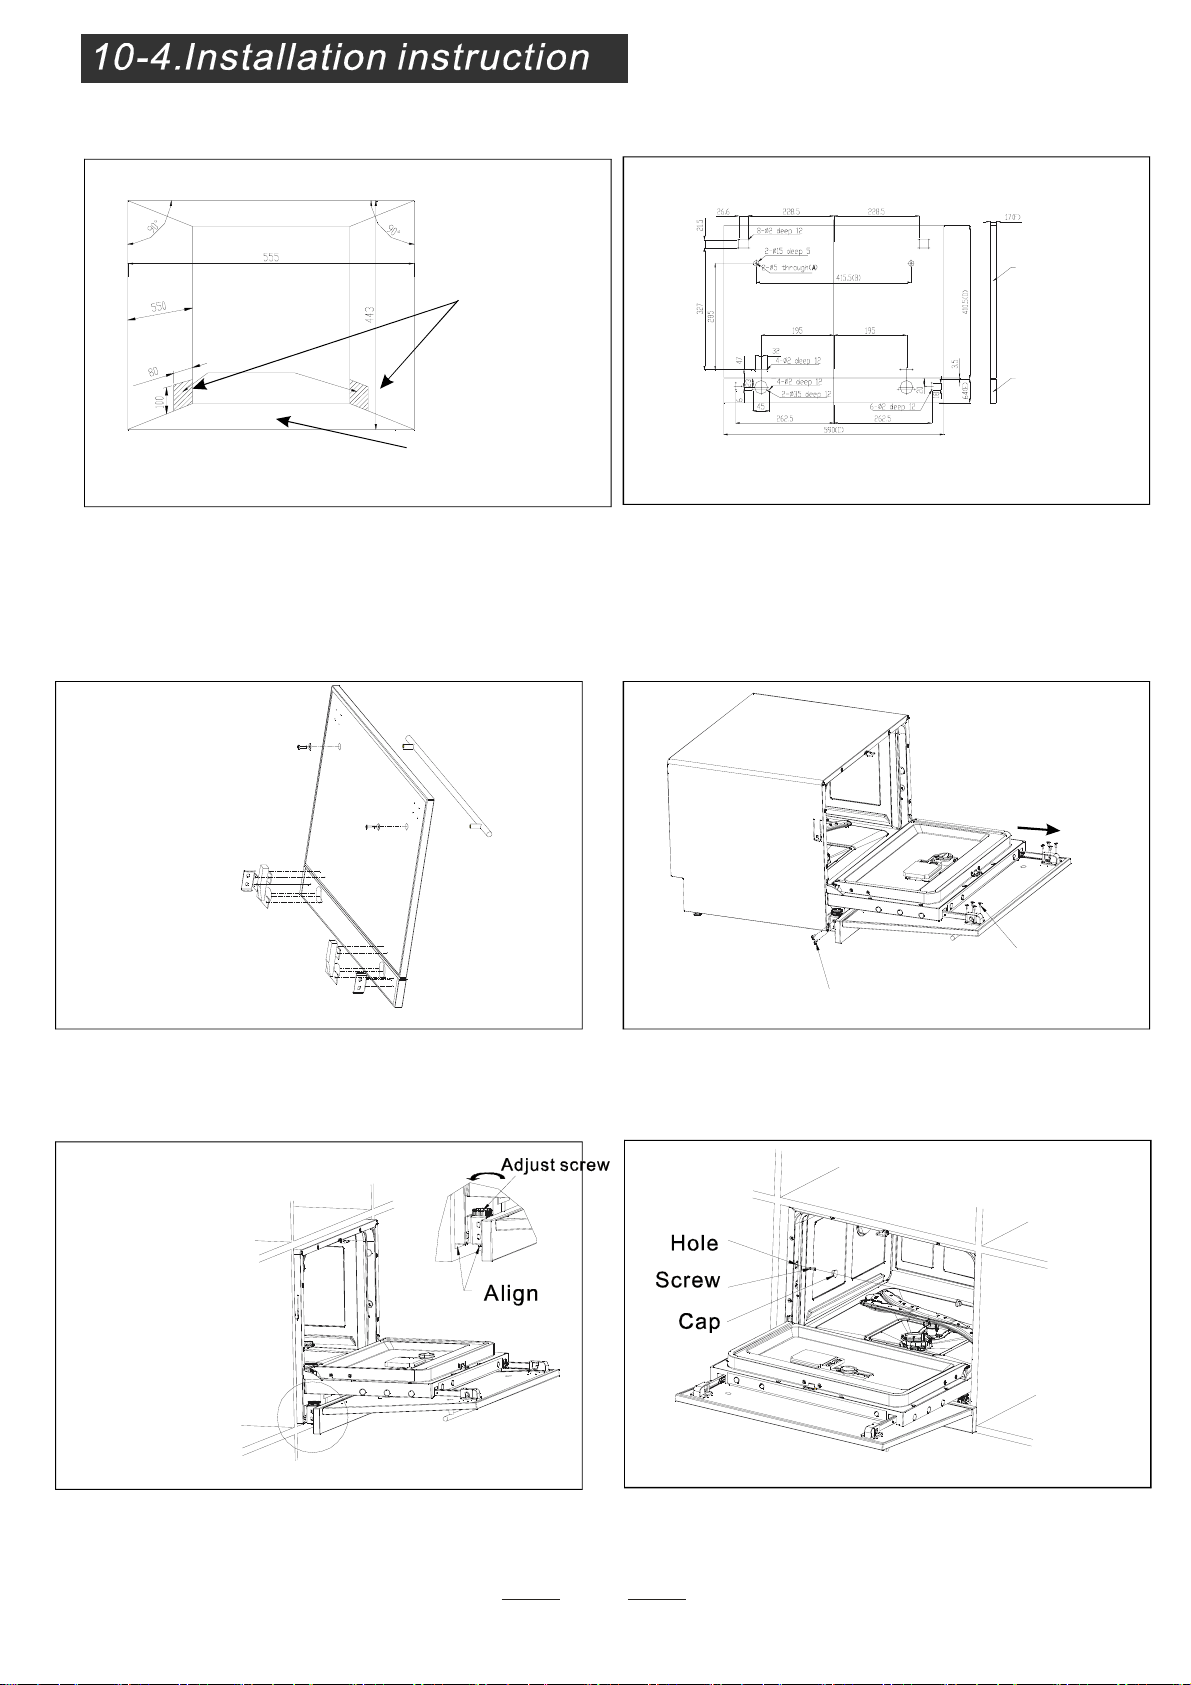
20
1 M ak esu re that t he shel ff or the
dishwa sheri s properly secur ed
inside thecupboard.
3
1
Space of cabi net
Electrical, drain
and water supply
line entrances
Adj ustscrew
Align
Hole
Screw
Cap
3 Take outcap,reveala h ole, using
screwdriverin sta llscr ew, eudipleural.
Thencov erth eca pin hole.
21
2 Insta llt hed is hwashe r in a perture , bu t
notfull,asfigure,adjust screw,letits
bo ttom align op ertur e’s base, then push
washerfull.
Cupboardmeasurements
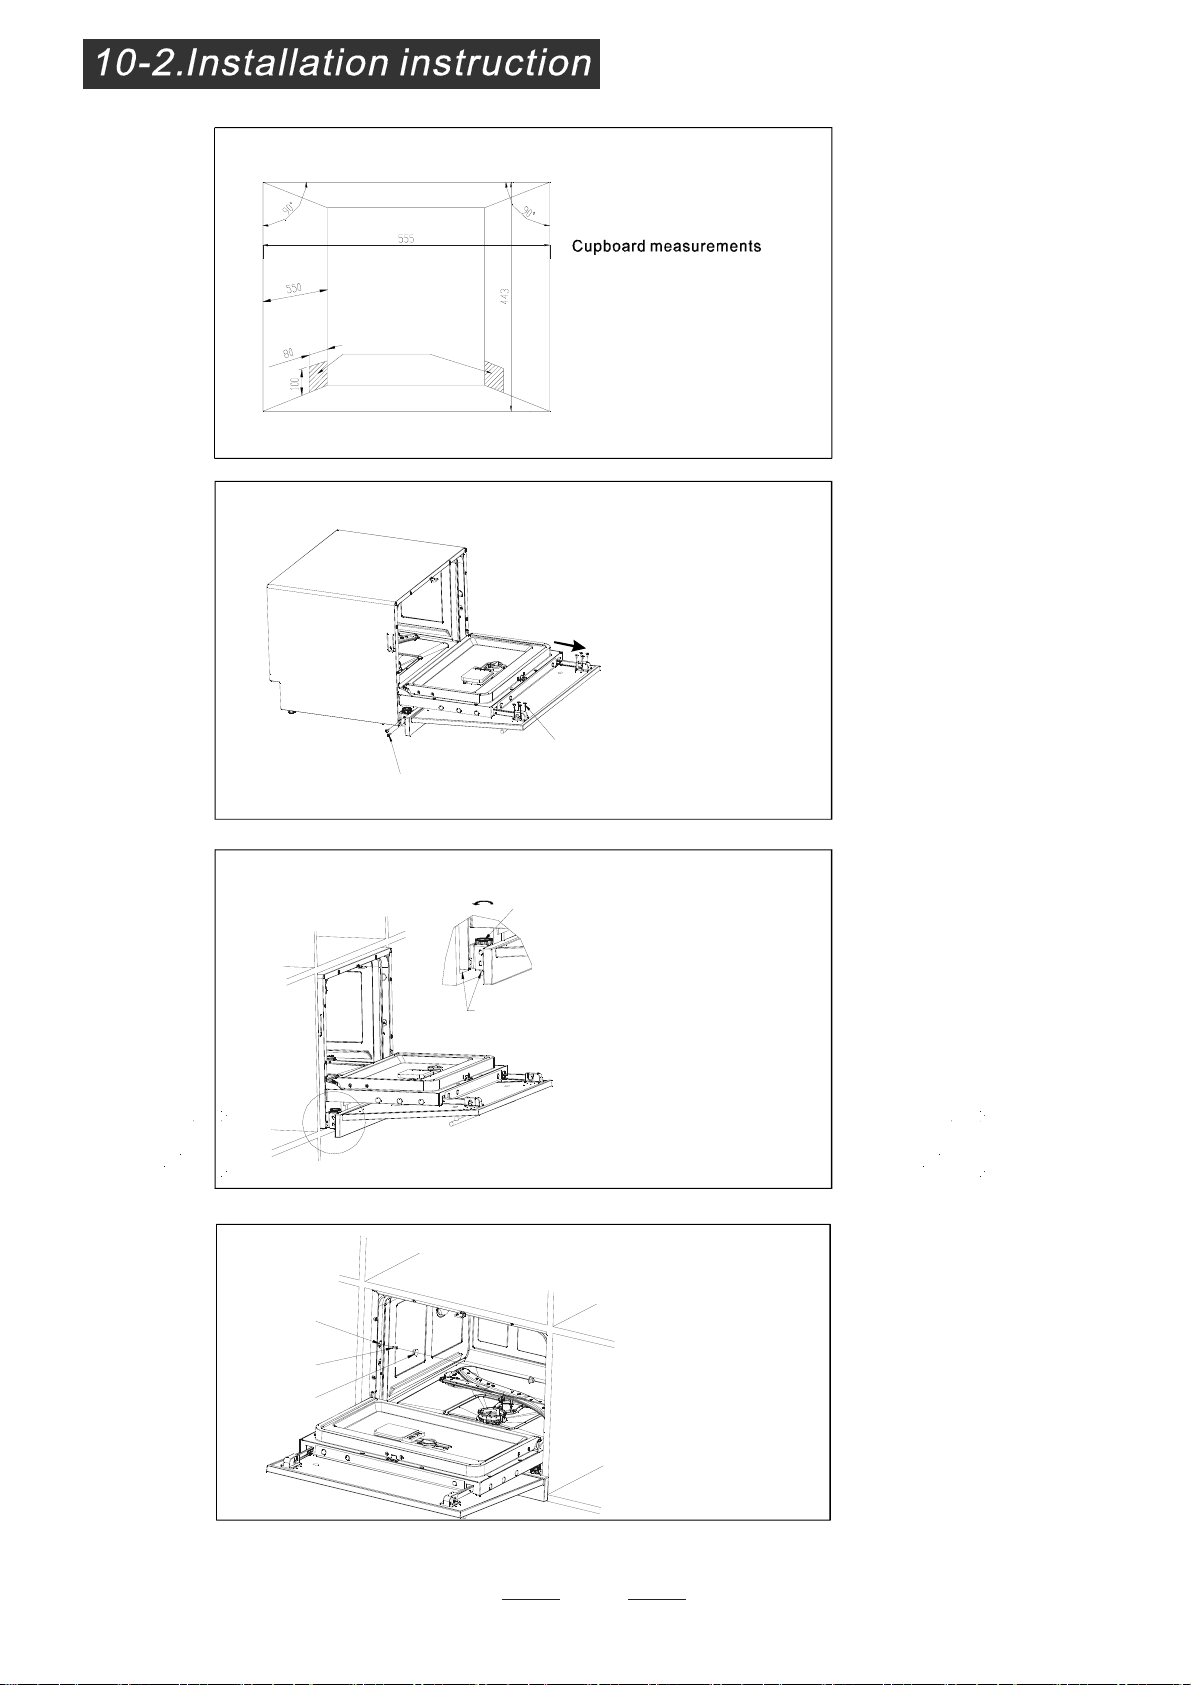
(Machine with a decorative plate, but not installed.)
21
Screw,4
Screw,8
1
Space of cabi net
Electrical, drain
and water supply
line entrances
4
3
Adjustscrew
Al ign
Hole
Screw
Cap
Assemblethe to
di s hwasher , asfi gure .First ins t al l
s idepi ece s crew b etw eenbaseboard
an d (d o wn) ,i n al l 4;
th en pul l gl ide from ou t do or groove ,
c ase 8 -sc rew between
an d g l ide .
decorativeplates
decorativeplate
decorati ve pl ate
2
Ta keout cap,reveala hole ,using
screwdriverin stallscrew,eudipleural.
Thencoverthecapinhole.
1 M ak e sure th att he shelffor the
dishw ash er is properly secured
inside thecupboard.
Installthe dishwasher inaperture,but
not full,asfigure, adjust screw, letits
bottomalign operture’s base,then push
washe r ful l.

Adjust up and down
Adjust right and left
(Machine do not offer decorative panels, the user make the ir own.
Decorativeplateproductionsizemaps,
andaccessoriesandwiththemachineinstallationlocation
22
23
(Machine do not deserve decorative panels, the user make their own.)
2 We ig h t of the d o or bet w een m in 3Kg-m ax 4Kg.
Di m.Aand B c oul d be a l te rable by handle,
Di m.C ,D , E and F c ou ld be alterab le by fa c t, but Dim. F s ho ul d
in ran ge 16~22 m m,b esides th e a ppl i a nc e as se m bli ng
.decora ti vepanels
decorative panel
(up)
decorative panel
(down)
4 Assemblethe dishwasher,asfigure.
First install sidepiecescrewbetweenbaseboard and
(d ow n ), in al l 4; t hen pull glid efrom out doo r
gro o ve ,case 8-s cre w be tw een and gl ide .
de c ora t ive doo r on t he
decorative p ane l
d ec orative pa nel s
Screw,in all4
Sc rew, in all 8
3 A ssemble the .
decora t i ve pane ls
5 I ns ta ll th e was he r i n a pert ur e,
b ut no t full, as f igure, ad j us t scre w,
letits bottomalign s base,
thenpushwasher full.
aper ture’
6 Tak e out c a p, r eve a l a hole , using
screwdr iver insta llsc rew, eu dip leura l.
Then cover t he cap in ho le.
1 Makesurethattheshelfforthe
dis hwas her is properly sec ured
inside thecupboard.
Space of cabinet
Electrical, drain
and water supply
line entrances