
tüm siyah yazılar matbaaya giderken
gönderilmiyor.
Atılım rması basıyor
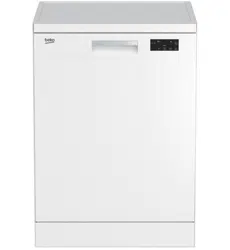
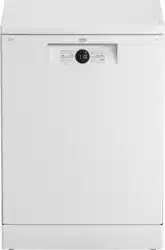
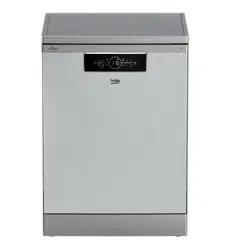
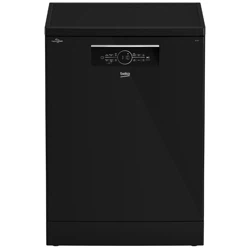
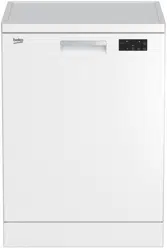
Dishwasher
Instruction Manual
tüm siyah yazılar matbaaya giderken
gönderilmiyor.
Atılım rması basıyor
This product was manufactured using the latest technology in environmentally friendly conditions.
Please read ths user manual frst!
Dear Customer,
We hope that you get the best results from the product whch has been
manufactured n state-of-the-art plants and passed through a strct qualty
control procedure.
Therefore, please read the entre user manual carefully before usng the
product and keep t as a reference for future use. In case of transferrng the
product to someone else, gve the manual as well.
The user manual wll help you use your product n a fast and safe way.
• Read the user manual before nstallng and startng your product.
• Always follow the safety nstructons.
• Keep ths user manual wthn easy reach for future reference.
• Read also the other documents suppled wth the product.
Remember that ths user manual s also applcable for several other models.
Derences between models wll be dentfed n the manual.
Explanaton of symbols
Throughout ths User Manual the followng symbols are used:
Important nformaton or useful hnts about usage
Warnng for hazardous stuatons wth regard to lfe and property
Warnng for electrc shock
Packagng materals of the product are manufactured
from recyclable materals n accordance wth our Natonal
Envronment Regulatons.
Do not dspose of the packagng materals together wth the domestc or other
wastes. Take them to the packagng materal collecton ponts desgnated by
the local authortes.
CONTENTS
1. Dshwasher 3
Techncal specfcatons 4
2. Important safety nstructons 5
General safety 5
Intended use 6
Chldren’s safety 6
3. Installaton 7
Approprate nstallaton locaton 7
Connectng water supply 7
Connecton to the dran 8
Adjustng the feet 9
Aquasafe+ 9
Electrcal connecton 9
Intal use 9
Dsposng of packagng materal 10
Transportaton of the product 10
Complance wth the WEEE Drectve and
Dsposng of the Waste Product: 10
Complance wth RoHS Drectve: 10
4. Prewashng 11
Tps for energy savng 11
Detergent 11
Addng detergent 11
Rnse ad 12
Slverware basket 15
Slverware basket pece 15
Movable slverware basket 15
Collapsble lower basket
wres (2 peces) 16
Collapsble lower basket
wres (4 peces) 16
Collapsble lower basket
wres (6 peces) 17
Collapsble lower basket
wres (4 & 8 peces) 18
Lower basket multpurpose / heght
adjustable servce rack 19
Lower Basket Glass Holder 20
SoftTouch
Accessory 20
Lower basket bottle wre 20
Upper basket heght adjustable rack 21
Upper basket drawer 21
Upper basket glass support pece 21
Collapsble upper basket wres 22
Upper basket glass support pece 22
Collapsble upper basket wres 23
Adjustng the heght of loaded
upper basket 24
Adjustng the heght of loaded
upper basket 25
Adjustng the heght of empty
upper basket 26
5. Operatng the product 27
Keys 28
Preparng the machne 28
Programme selecton 28
Auxlary functons 30
Schedulng the washng tme 31
Startng the programme 32
Cancellng the programme 32
Salt ndcator (
) 32
Rnse Ad ndcator (
) 33
End of programme 33
Water cut-o warnng 33
Overowng warnng 33
6. Mantenance and cleanng 34
Cleanng the outer surface of the
product 34
Cleanng the nteror of the machne 34
Cleanng the flters 34
Cleanng the hose flter 35
Cleanng the mpellers 35
7. Troubleshootng 37
3
EN
1
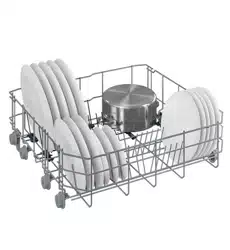
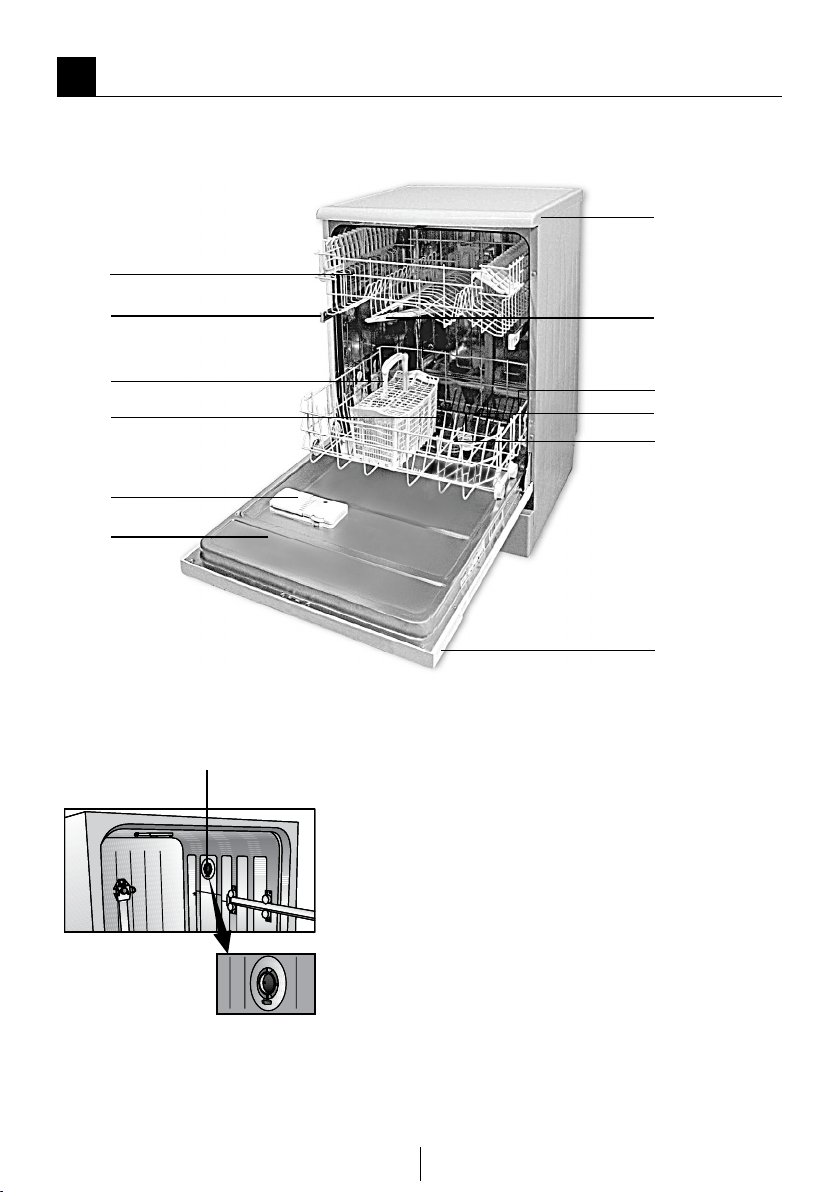
Dshwasher
Overvew
1.Tabletop (depends on the model)
2.Upper mpeller
3.Lower basket
4.Lower mpeller
5.Flters
6.Control panel
7.Door
8.Detergent dspenser
9.Lower mpeller slot
10.Slverware basket
11.Upper basket ral
12.Upper basket wth rack
13.Fan drying system (depends on the model)
4
EN
Techncal specfcatons
Ths product comples wth the followng EU drectves:
Development, producton and sales stages of ths product comply
wth the safety rules ncluded n all pertanng European Communty
regulatons.
2006/95/EC, 2004/108/EC, 93/68/EEC, IEC 60436, EN 50242
Power nput 220-240 V, 50 Hz
Total power consumpton 1800-2100 W
Heater power
consumpton
1800 W
Total current
(depends on the model)
10 A (see type plate)
Dran pump power
consumpton
30 W
Water pressure 0.3 –10 bar (= 3 – 100 N/cm = 0.03-1.0 Mpa)
C Techncal specfcatons may be changed wthout pror notce to mprove
the qualty of the product.
C Fgures n ths manual are schematc and may not match the product
exactly.
C Values stated on the product labels or n the documentaton accompanyng
t are obtaned n laboratory condtons n accordance wth the relevant
standards. Dependng on operatonal and envronmental condtons of the
product, these values may vary.
Note for test nsttutons:
Data requred for performance tests shall be provded upon request. Requests
can be e-maled to the followng address:
Do not forget to provde the code, stock and seral numbers of the product to be
tested n your request e-mal along wth your contact nformaton. Code, stock
and seral numbers of the product s located on the type label attached to the
sde of the door.
dishw[email protected]

5
EN
2
Important safety nstructons
Ths secton contans safety
nstructons that wll help to
get protected from rsk of
personal njury or property
damage Falure to follow
these nstructons shall vod
all warrantes.
General safety
•
Never place the product
on a carpet-covered oor;
otherwse, lack of arow
beneath the product wll
cause electrcal parts
to overheat. Ths wll
cause problems wth your
product.
• Do not operate the
product f the power
cable / plug s damaged!
Call the Authorsed
Servce Agent.
• Connect the product
to a grounded outlet
protected by a fuse
complyng wth the
values n the “Techncal
specfcatons” table. Do
not neglect to have the
groundng nstallaton
made by a qualfed
electrcan. Manufacturer
shall not be lable for any
damages that wll arse
when the product s used
wthout groundng n
accordance wth the local
regulatons.
• The water supply and
dranng hoses must be
securely fastened and
reman undamaged.
• Unplug the product when
not n use.
• Never wash the product
by spreadng or pourng
water onto t! There s the
rsk of electrc shock!
• Never touch the plug
wth wet hands! Never
unplug by pullng on the
cable, always pull out by
grabbng the plug.
• The product must
be unplugged
durng nstallaton,
mantenance, cleanng
and reparng procedures.
• Always have the
nstallaton and reparng
procedures carred out by
the Authorsed Servce
Agent. Manufacturer
shall not be held lable for
damages that may arse
from procedures carred
out by unauthorsed
persons.
• Never use chemcal
solvents n the product.
They brng forth rsk of
exploson.
• When you pull the upper
and lower baskets out
completely, the door
of the product wll bear
all the weght of the

6
EN
baskets. Do not put
other loads on the door;
otherwse, the product
may tlt.
• Never leave the door
of the product open
apart from loadng and
unloadng procedures.
• Do not to open the door
of the product when t s
runnng unless necessary.
Be careful for the rush of
hot steam when you need
to open the door.
Intended use
Ths applance s ntended
to be used n household and
smlar applcatons such as:
• sta ktchen areas n
shops, oces and other
workng envronments;
• farm houses;
• by clents n hotels,
motels and other
resdental type
envronments;
• bed and breakfast type
envronments;
• Only dshwasher safe
detergents, rnse ads and
addtves must be used.
• The manufacturer waves
any responsblty arsen
from ncorrect usage or
transportaton.
• The servce lfe of your
product s 10 years.
Durng ths perod,
orgnal spare parts wll
be avalable to operate
the applance properly.
• Ths product should
not be used by persons
wth physcal, sensory
or mental dsorders
or unlearned or
nexperenced people
(ncludng chldren)
unless they are attended
by a person who wll be
responsble for ther
safety or who wll nstruct
them accordngly for use
of the product.
Chldren’s safety
•
Electrcal products
are dangerous for the
chldren. Keep chldren
away from the product
when t s n use. Do not
let them to tamper wth
the product.
• Do not forget to close the
door of the product when
leavng the room where t
s located.
• Store all detergents and
addtves n a safe place
away from the reach of
the chldren.

7
EN
3
Installaton
Refer to the nearest Authorsed
Servce Agent for nstallaton of your
product. To make the product ready
for use, make sure that the electrcty,
tap water supply and water dranage
systems are approprate before
callng the Authorsed Servce
Agent. If they are not, call a qualfed
techncan and plumber to have any
necessary arrangements carred out.
C Preparation of the location and
electrical, tap water and waste
water installations at the place of
installation is under customer's
responsibility.
B Installation and electrical
connections must be carried out
by the Authorised Service Agent.
Manufacturer shall not be held
liable for damages that may arise
from procedures carried out by
unauthorised persons.
B Prior to installation, visually check
if the product has any defects on
it. If so, do not have it installed.
Damaged products cause risks for
your safety.
A Make sure that the water inlet
and discharge hoses are not
folded, pinched or crushed while
pushing the product into its place
after installation or cleaning
procedures.
When placing the product, pay
attention not to damage the floor,
walls, piping, etc. Do not hold the
product from its door or panel to
move it.
Approprate nstallaton
locaton
· Place the product on a sold and
at oor that has sucent load
carryng capacty! The product
must be nstalled on a at surface
n order for the door to be closed
comfortably and securely.
· Do not nstall the product at
places where temperature may
fall below 0ºC.
· Place the product at least 1 cm
away from the edges of other
furnture.
· Place the product on a rgd oor.
Do not place t on a long ple rug
or smlar surfaces.
A Do not place the product on the
power cable.
· Make sure that you select a
locaton that wll allow you to
load and unload the dshes n a
fast and comfortable manner.
· Install the product n a place close
to the tap and the dran hole.
Select the nstallaton locaton
by consderng that t wll not be
changed after the connectons
are made.
Connectng water supply
C We recommend attaching a filter
on the house/apartment supply
water inlet to protect the machine
from damages that may arise
from impurities (sand, dirt, rust,
etc.) coming from the urban water
supply system or from your own
water system as well as to prevent
complaints such as yellowing or
8
EN
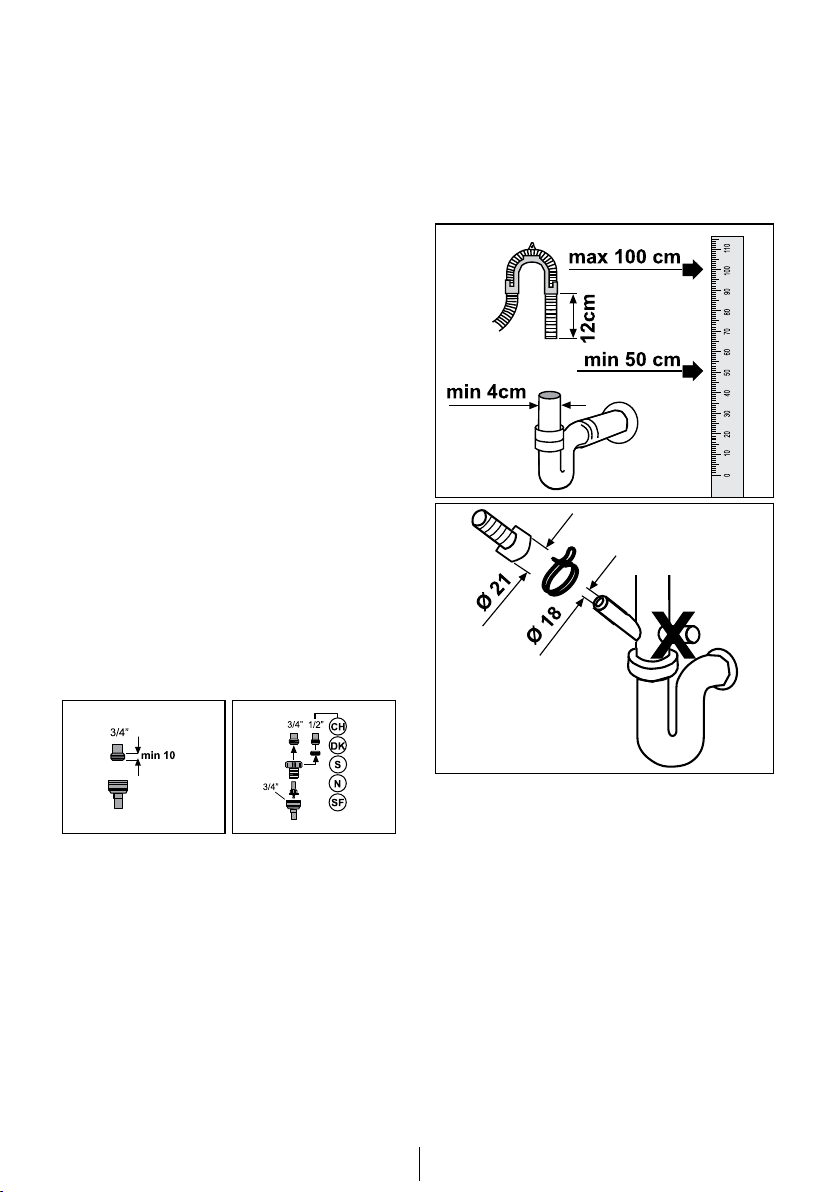
Connecton to the dran
Water dscharge hose can drectly
be connected to the dran hole or
snk’s dranage. The length of ths
connecton must be mn. 50 cm and
max. 100 cm from the oor.
A dscharge hose longer than 4
meters causes drty washng.
Attach the water dscharge hose to
the dranppe wthout bendng t.
Tghtly fx the water dscharge hose
to the dranppe n order to prevent
any dslocaton of the water dscharge
hose durng operaton of the product.
C Dranppe must be connected to
the sewage system and t should
not be connected to any surface
water.
sludge accumulation at the end of
washing.
Permtted water temperature: up
to 25°C
The dshwasher may not be
connected to open warm water
devces or ow-through water
heaters.
• Do not use old or used water nlet
hose on the new product. Use the
new water nlet hose suppled
wth the product.
• Connect the water nlet hose
drectly to the water tap.
Pressure comng from the tap
should be mnmum 0.3 and
maxmum 10 bars. If the water
pressure exceeds 10 bars, a
pressure relef valve should be
nstalled n between.
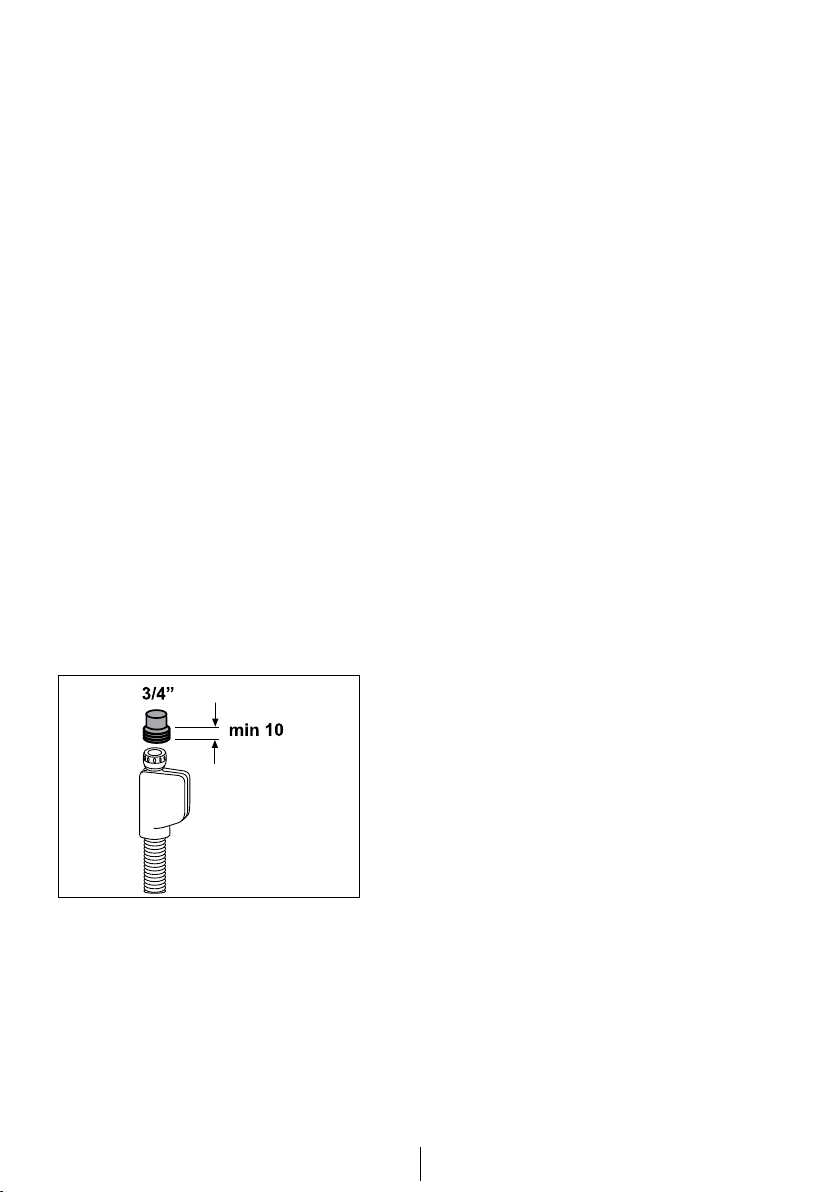
C Use a screw-on hose connector to
connect the water nlet hose to a
water tap wth a ¾ nch external
thread. If requred, use a flter
nsert to flter deposts from the
ppes.
• Open the taps completely after
makng the connectons to check
for water leaks.
A For your safety, close the water
nlet tap completely after the
washng programme s over.
9
EN
Adjustng the feet
If the door of the product cannot
be closed properly or f the product
swngs when you push t slghtly,
then you need to adjust the feet
of the product. Adjust the feet of
the product as llustrated n the
nstallaton manual suppled wth the
product.
Aquasafe+
(depends on the model)
Protect the Aquasafe+ system
aganst water leaks that may occur
at hose nlet. Water contact wth
the valve box of the system must
be prevented. Otherwse, electrcal
assembly wll get damaged. If the
Aquasafe system s damaged, unplug
the product and call the Authorsed
Servce Agent.
A As the hose set contains electrical
connections and assemblies,
never shorten or lengthen the
hose with extension hoses.
Electrcal connecton
Connect the product to a grounded
outlet protected by a fuse complyng
wth the values n the "Techncal
specfcatons" table. Manufacturer
shall not be lable for any damages
that wll arse when the product
s used wthout groundng n
accordance wth the local regulatons.
• Connecton must comply wth
natonal regulatons.
• Power cable plug must be wthn
easy reach after nstallaton.
A Unplug the product after the
washng programme s over.
• The voltage and allowed fuse or
breaker protecton are specfed
n the “Techncal specfcatons”
secton. If the current value of
the fuse or breaker n the house
s less than 16 Amps, have a
qualfed electrcan nstall a 16
Amp fuse.
• The specfed voltage must be
equal to your mans voltage.
• Do not make connectons va
extenson cables or mult-plugs.
B Damaged power cables must
be replaced by the Authorsed
Servce Agent.
B If the product has a falure, t
should not be operated unless
t s repared by the Authorsed
Servce Agent! There s the rsk of
electrc shock!
Intal use
Before startng to use the product,
make sure that all preparatons
are made n accordance wth the
nstructons n sectons "Important
safety nstructons" and "Installaton".
• To prepare the product to do the
dshes, perform frst operaton
n the shortest programme wth
detergent whle the machne s
empty. Durng the ntal use, fll
the salt reservor wth 1 ltre of
water pror to fllng t wth salt.
C Some water mght have remaned
n the product due to the
qualty control processes n the
producton. It s not harmful for
the product.

10
EN
Dsposng of packagng
materal
Packagng materals are dangerous to
chldren. Keep packagng materals n
a safe place away from reach of the
chldren.
Package nformaton
Packagng materals of the product
are manufactured from recyclable
materals n accordance wth our
Natonal Envronment Regulatons.
Do not dspose of the packagng
materals together wth the domestc
or other wastes. Take them to the
packagng materal collecton ponts
desgnated by the local authortes.
Transportaton of the
product
A
If you need to move the product,
do t n uprght poston and hold
from the rear sde. Slantng the
product onto ts front sde may
cause the electronc parts n t get
wet and damaged.
1. Unplug the product before
transportng t.
2. Remove water dranage and
water supply connectons.
3. Dran the remanng water n the
product completely.
Complance wth the
WEEE Drectve and
Dsposng of the Waste
Product:
Ths product comples wth EU
WEEE Drectve (2012/19/EU). Ths
product bears a classfcaton symbol
for waste electrcal and electronc
equpment (WEEE).
This product has been manufactured
with high quality parts and materials
which can be reused and are suitable
for recycling. Do not dispose of the
waste product with normal domestic
and other wastes at the end of its
service life. Take it to the collection
center for the recycling of electrical
and electronic equipment. Please
consult your local authorities to learn
about these collection centers.
Complance wth RoHS
Drectve:
The product you have purchased
complies with EU RoHS Directive
(2011/65/EU). It does not contain
harmful and prohibited materials
specied in the Directive.
11
EN
4
Prewashng
Tps for energy savng
Followng nformaton wll help you
use the product n an ecologcal and
energy-ecent manner.
• Wpe away any coarse food
remnants on the dshes before
puttng them n the product.
• Operate the product after fllng t
completely.
• When selectng a programme,
refer to the “Programme Table”.
• Do not put more detergent than
suggested on the detergent
package.
Detergent
You can use powder or tablet
detergent n the machne.
C Only use n the machne the
detergents produced partcularly
for use wth dshwashers. We
recommend you not to use
detergents that contan chlorne
and phosphate as they are
harmful for the envronment.
C Contact the detergent producer
f the dshes are wet and/or f you
notce lmescale spots partcularly
on glasses after the washng
programme s over.
Addng detergent
C Refer to the “Programme Table”
to determne the correct amount
of detergent for the selected
programme.
B Do not put solvents nto the
detergent dspenser. There s the
rsk of exploson!
Put the detergent nto the detergent
dspenser just before operatng the
machne as llustrated below.
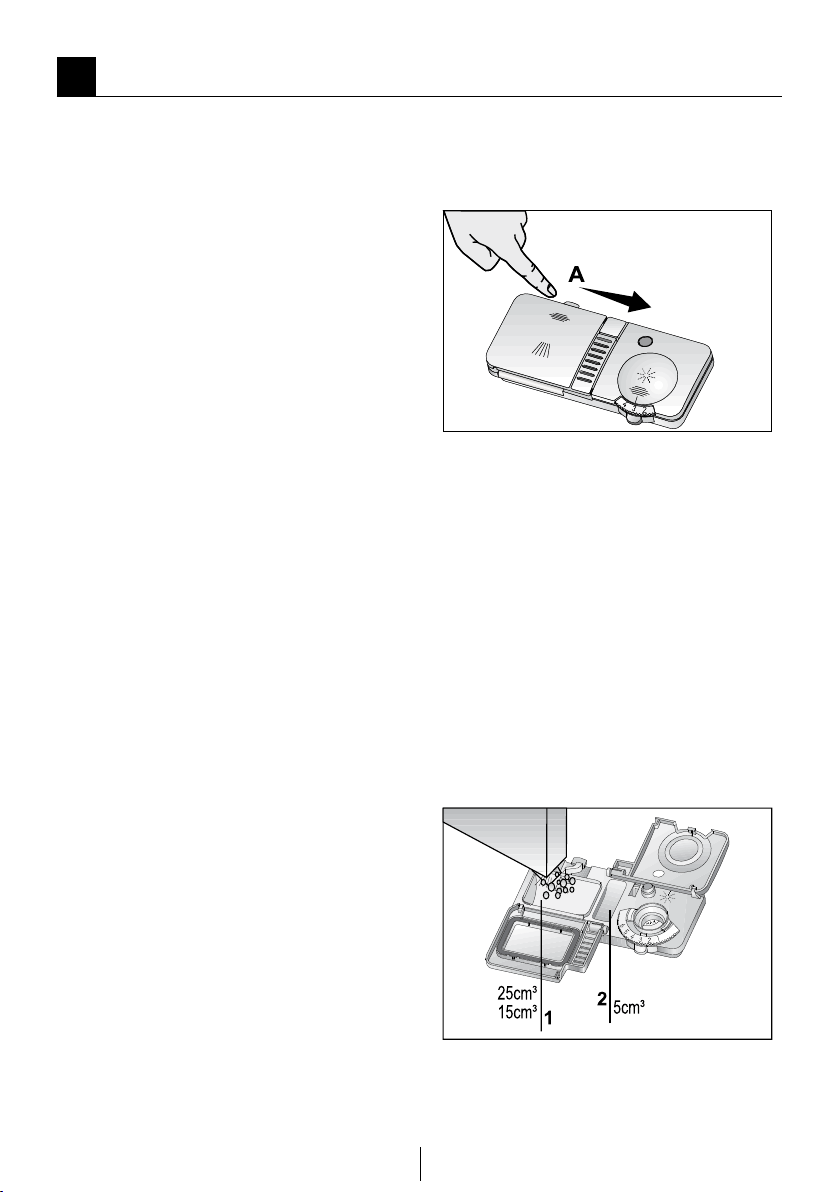
1. Push the latch to rght to open the
detergent dspenser ld (A).
2. Put suggested amount of
powder or tablet detergent n the
dspenser.
C Insde the detergent dspenser,
there are level markngs that
help you use approprate
amount of detergent. When
brmful, detergent dspenser wll
contan 40 cm of detergent.
Fll detergent up to 15 cm or 25
cm level marks n the detergent
dspenser accordng to fullness of
the machne and/or solng degree
of the dshes (1).
C If dshes have been watng for a
long tme and have dred resdues,
fll the 5 cm compartment too (5).
12
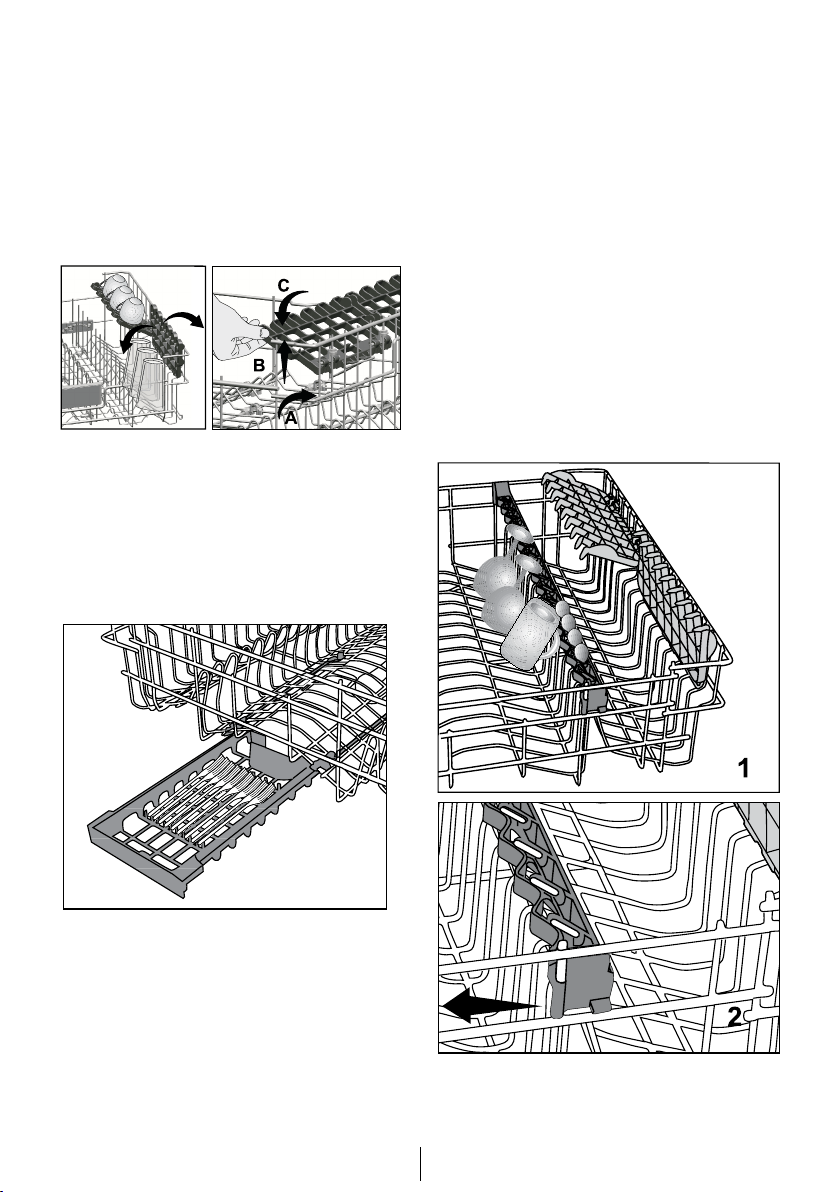
EN
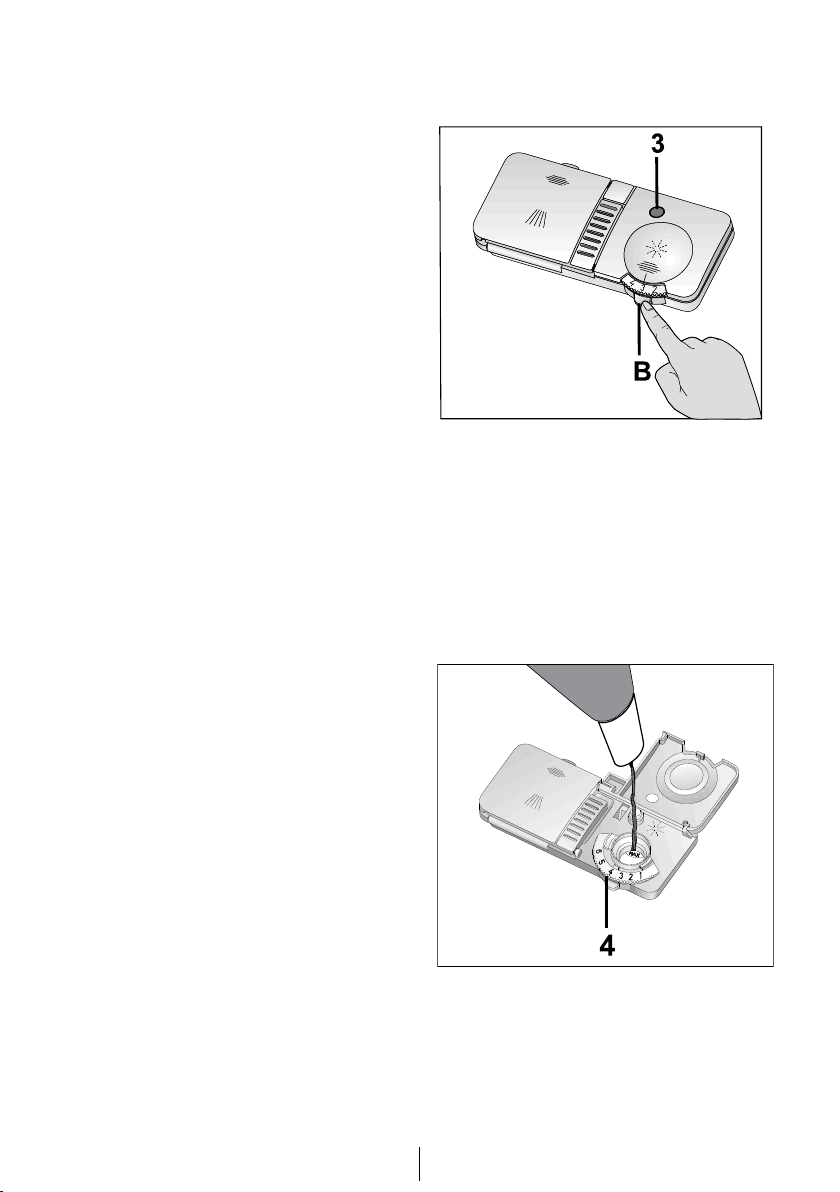
1. Open the ld of the rnse ad
reservor by pressng ts latch (B).
2. Fll the reservor untl “MAX” level.
3. Close the ld of the reservor by
pressng on t lghtly.
C Wpe clean any splled rnse ad
outsde the reservor. Rnse ad
that splled accdentally wll cause
foamng and t wll eventually
decrease washng performance.
4. Turn the rnse ad amount
adjuster manually to a poston
between 1 and 6 (4). If there are
stans on tableware tems after
3. Close the detergent dspenser
ld by pressng on t lghtly. A
“clck” wll be heard when the ld s
closed.
C In programmes wth prewash and
at hgh temperature, n whch you
use tablet detergents, make sure
that the detergent dspenser ld s
closed frmly.
C Use powder detergent n short
programmes wthout prewash
snce the solublty of the tablet
detergent changes dependng on
the temperature and tme.
A Excessve usage of powder
detergents wll cause the
detergent not dssolve completely
and wll also cause scratches on
the glassware.
Rnse ad
C The rnse ad used n dshwashers
s a specal combnaton used to
ncrease dryng effcency and
prevent water or lmescale stans
on the washed tems. For ths
reason, care must be pad to have
rnse ad n the rnse ad reservor
and to use rnse ads produced
specally for dshwashers only.
Check Rnse Ad Indcator to
determne whether t s necessary
to add rnse ad or not 3 (depends
on the model). Havng a dark lght
on the ndcator shows that there
s sucent amount of rnse ad n
the dspenser. If the colour of the
ndcator s lght, add rnse ad.

13
EN
• Place thn, narrow peces n the
mddle sectons of baskets f
possble.
• There are two separate baskets
n whch you can place your
dshes n the dshwasher. Place
the heavly soled and bgger
tems n the lower basket and
smaller, delcate and lght tems
n the upper basket.
• Place the hollowed dshes such
as bowls, glasses and pans upsde
down n the dshwasher. Thus,
accumulaton of water n deep
hollows s prevented.
A To prevent possble njures,
always place the sharp and
ponted dshes such as servce
fork, bread knfe, etc. upsde down
so as ther ponted ends wll face
down or they wll le horzontally
on the dsh baskets.
• Unload dshes n the lower basket
frst and then the dshes n the
upper basket.
washng, level must be ncreased
and f there s a blue trace after
wpng them by hand, t must be
decreased. Ths s set to poston 4
as factory default.
Items not sutable for washng n
the dshwasher
• Never wash dshes soled by
cgarette ash, candle remnants,
polsh, dyestu, chemcals, etc. n
your dshwasher.
• Do not wash ron alloy tems
n the dshwasher. It can get
corroded or leave stans on other
tems.
• Do not wash slverware and
cutlery wth wooden or bone
stems, glued peces, or peces
that are not resstant to heat,
as well as copper and tn-plated
contaners n the dshwasher.
C Decoratve prnts of chnaware as
well as alumnum and slver tems
may get dscoloured or tarnshed
after washng n the dshwasher
just as t happens n handwashng
as well. Some delcate glass types
and crystals may become dull n
tme. We strongly recommend
you to check f the tableware you
are gong to purchase s sutable
for washng especally n the
dshwasher.
Placng the dshes nto the
dshwasher
You can use your dshwasher n the
optmum way wth respect to energy
consumpton and washng and dryng
performance only f you place the
dshes n an orderly way.
• Wpe away any coarse food
remnants (bones, seeds, etc.) on
the dshes before placng them n
the dshwasher.
14
EN
Suggestons for loadng the
dshwasher
Lower basket
Upper basket
Improper Loadng Of Dshware
Improper Loadng Of Dshware
15
EN
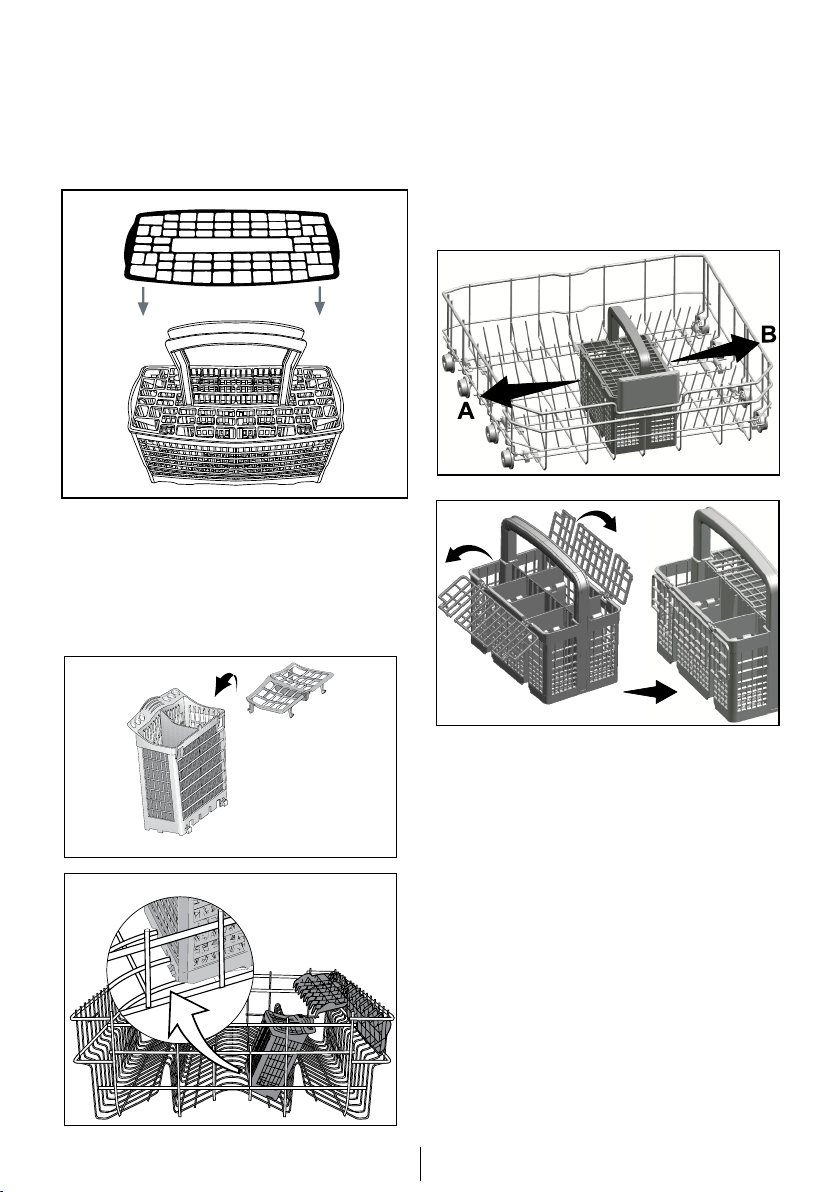
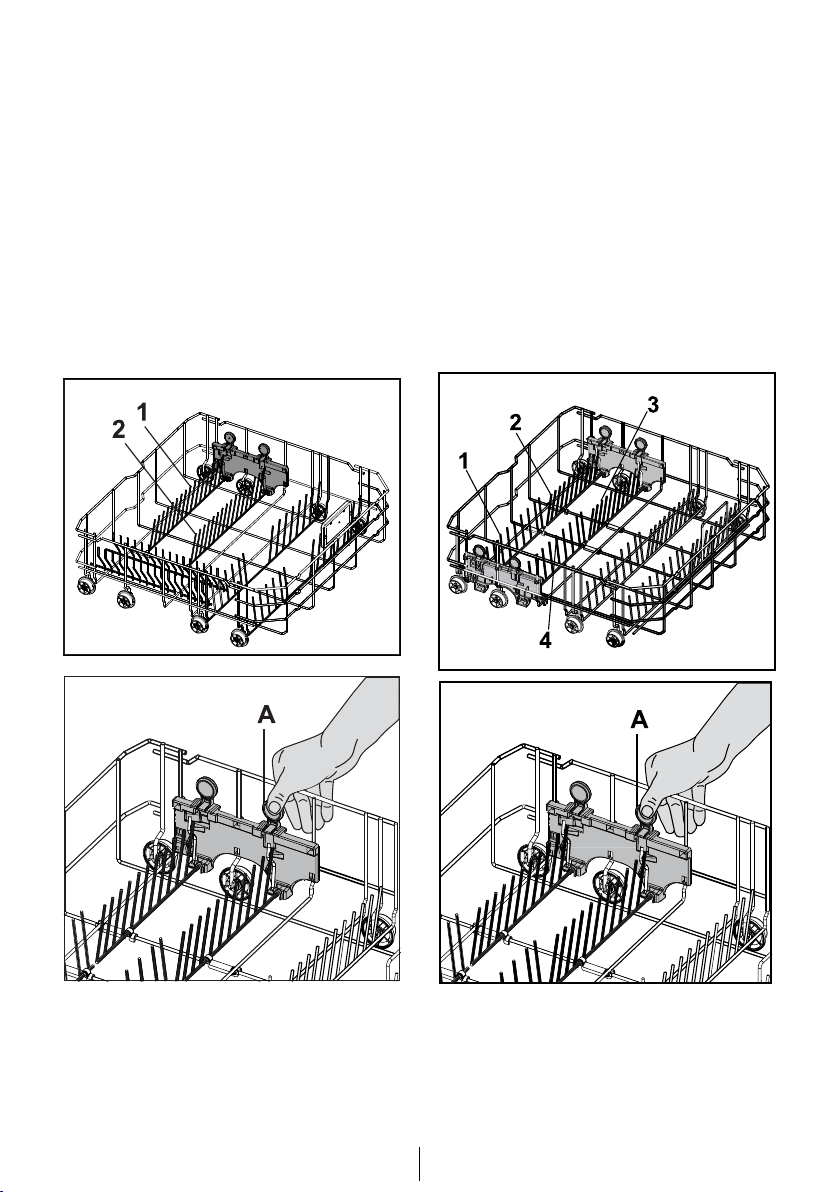
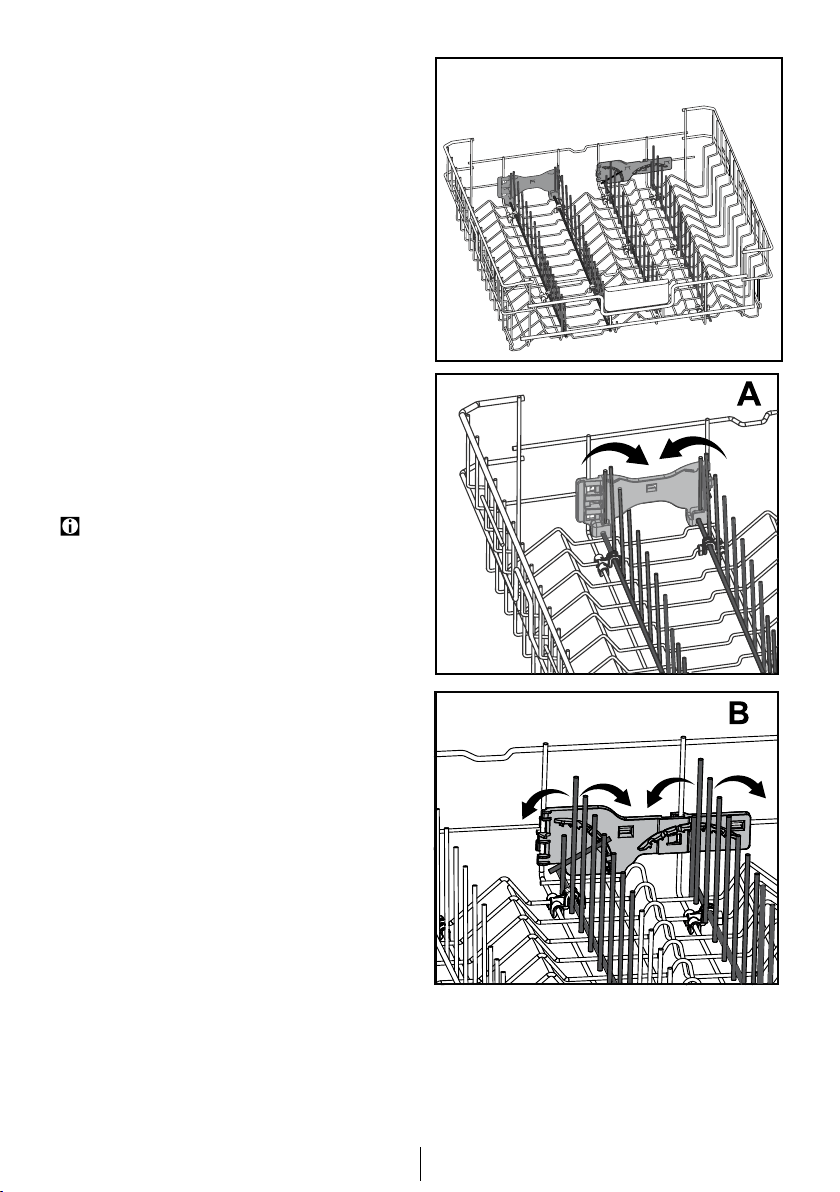
Slverware basket
(depends on the model)
Slverware basket s desgned to wash
your dshes such as fork, spoon and
etc. n a cleaner manner.
Slverware basket pece
(depends on the model)
You can place your forks, spoons
and etc. to upper basket wth the
addtonal pece n the fgure.
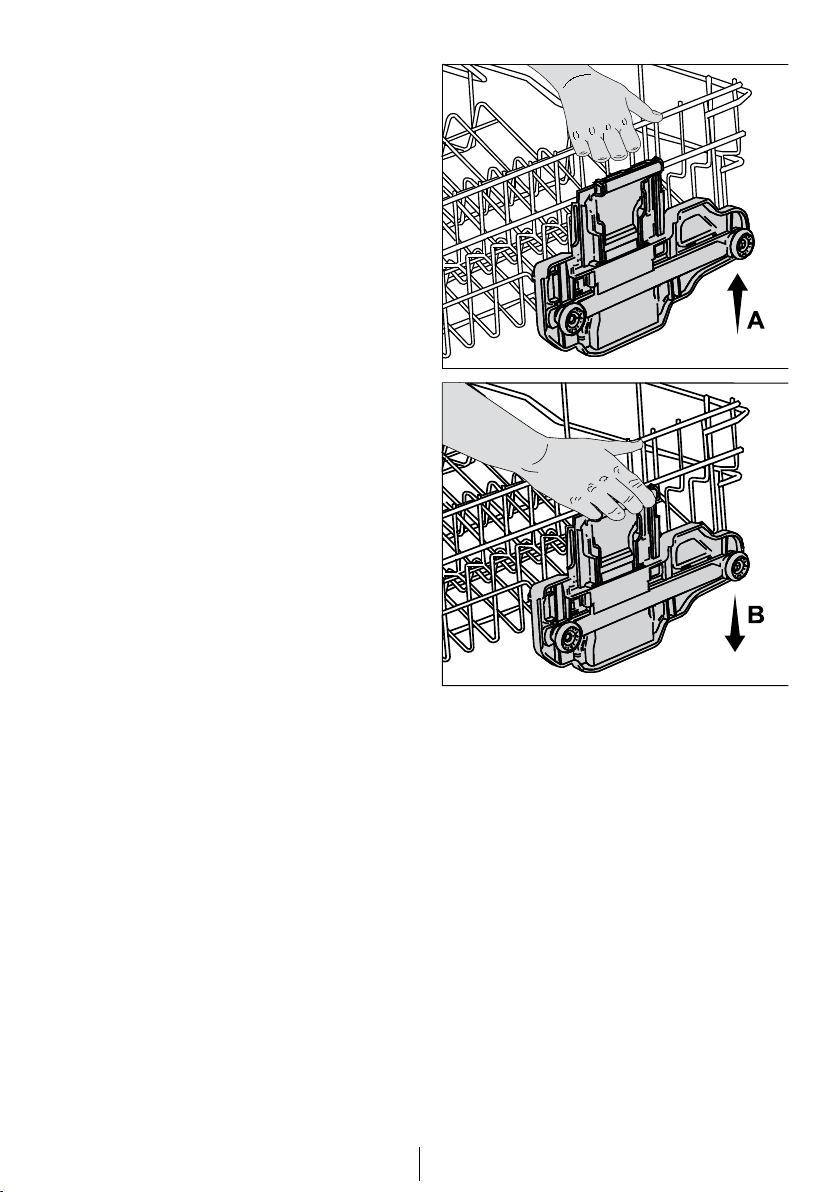
Movable slverware basket
(depends on the model)
Snce the cutlery basket can be
moved (A, B), you can create a wder
space whle placng your dshes to the
lower basket and free up space for
your dshes n derent szes.
16
EN
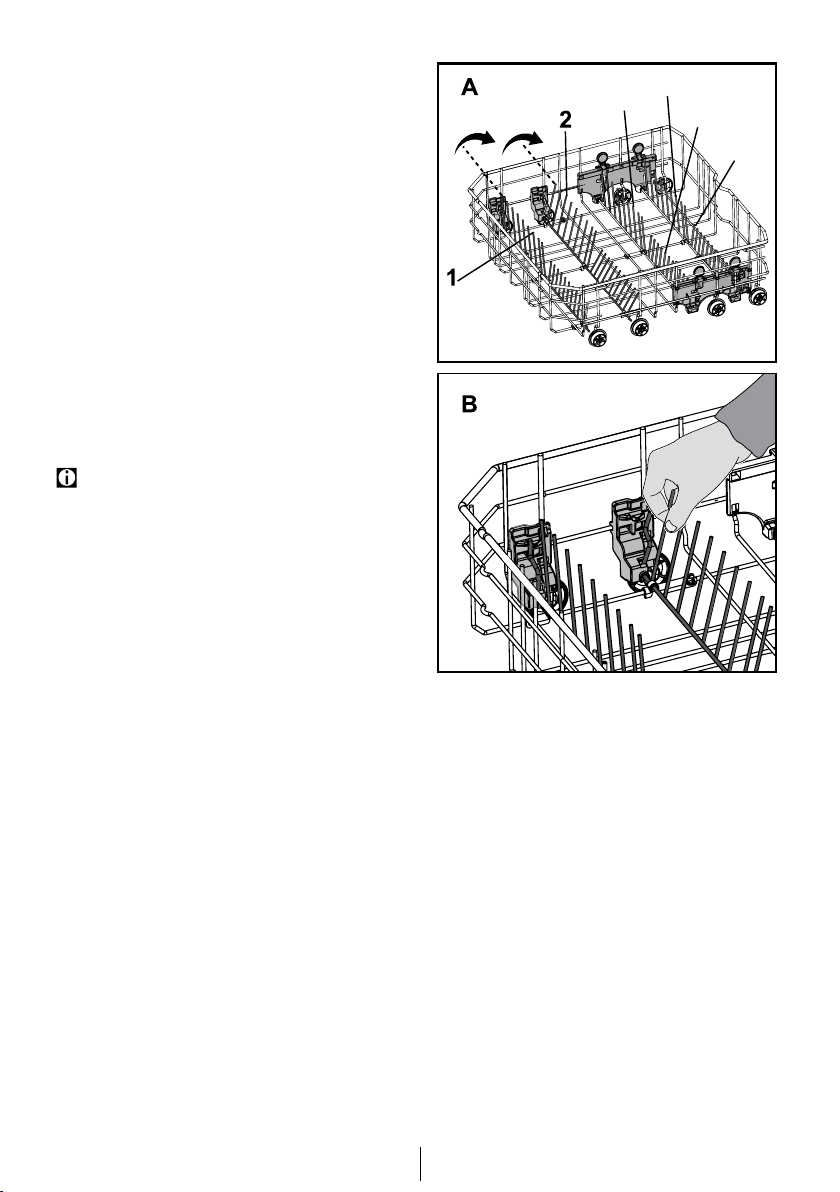
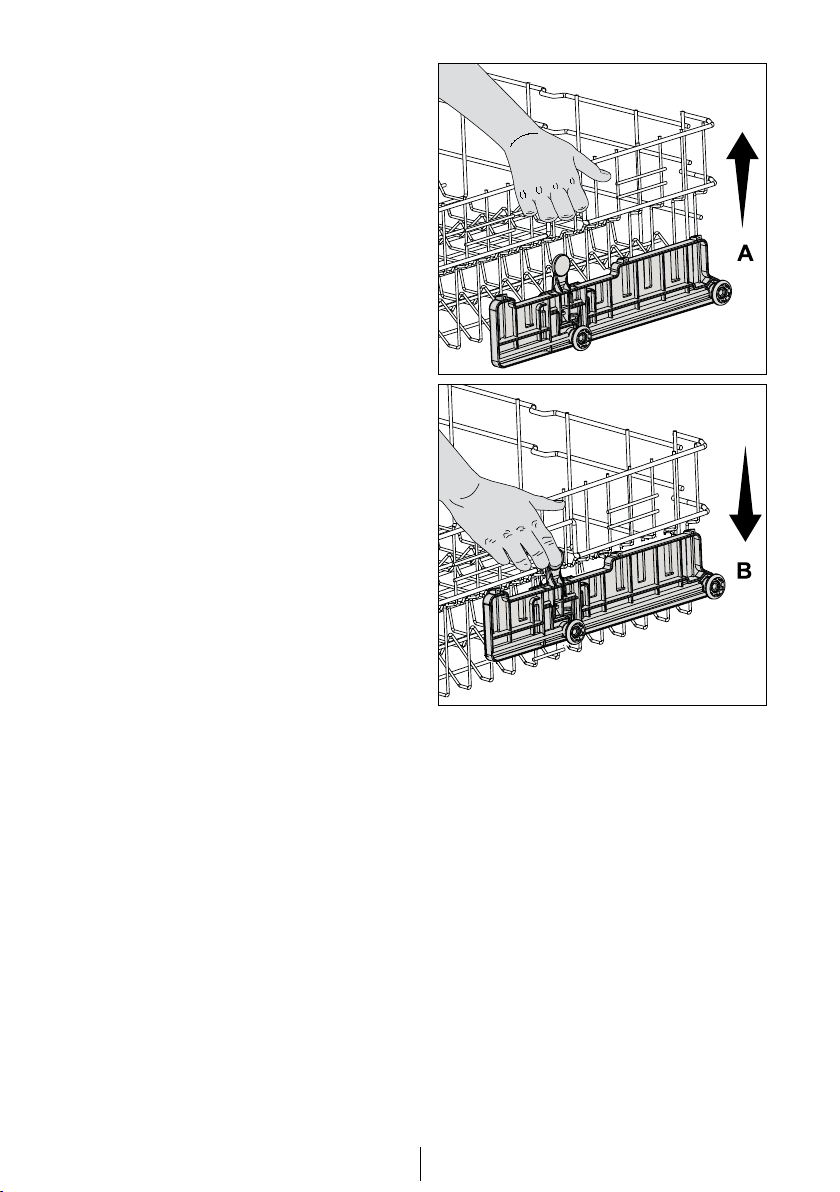
Collapsble lower basket
wres (4 peces)
(depends on the model)
The four pece foldable wres located
at the lower basket of the machne
are desgned for an easer placement
of large peces such as pans, bowls,
etc. (1, 2, 3, 4). You can create
larger spaces by foldng each wre
ndvdually or all of them at once. Lay
the foldable wres down by pressng
on the latch (A).
Collapsble lower basket
wres (2 peces)
(depends on the model)
The two pece foldable wres located
at the lower basket of the machne
are desgned for an easer placement
of large peces such as pans, bowls,
etc. (1, 2).
You can create larger spaces by
foldng each wre ndvdually or all of
them at once. Lay the foldable wres
down by pressng on the latch (A).
17
EN
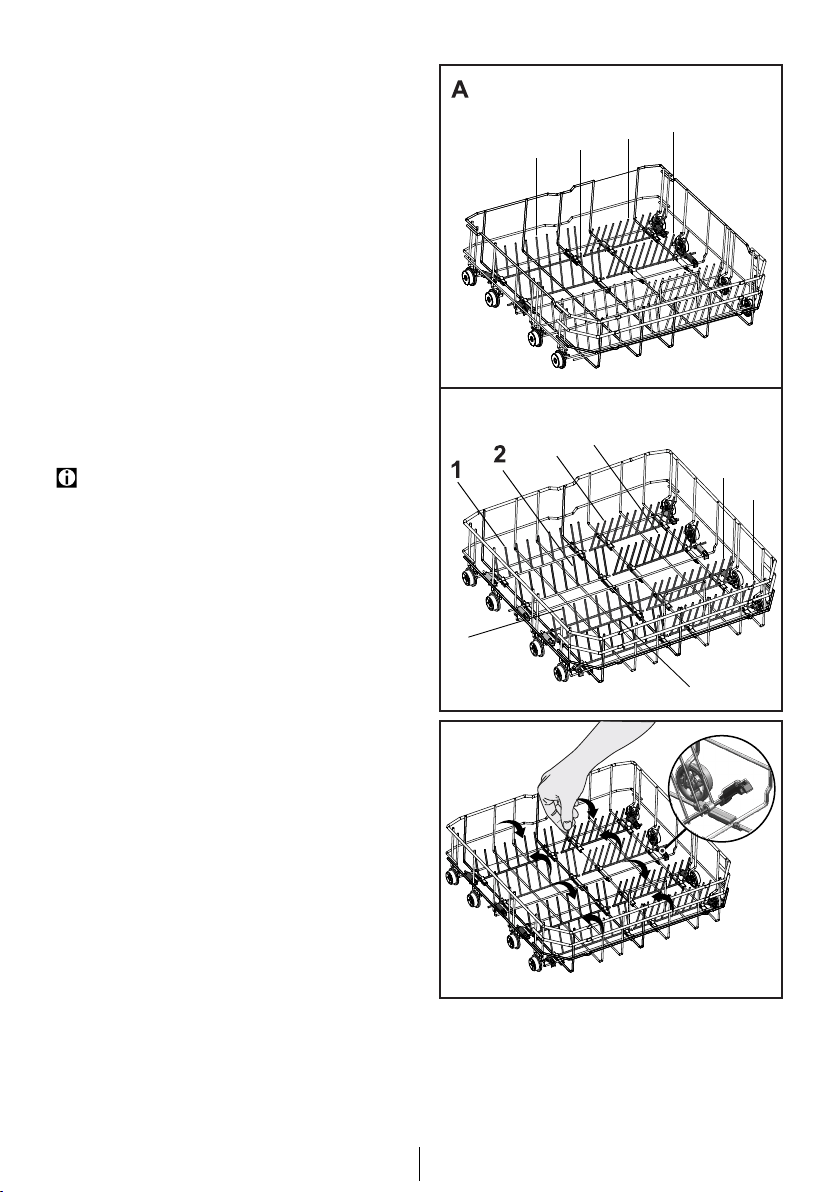
Collapsble lower basket
wres (6 peces)
(depends on the model)
The foldable wres (A) located at
the lower basket of the machne are
desgned for an easer placement
of large peces such as pans, bowls,
etc. You can create larger spaces by
foldng each wre ndvdually or all
them at once.
To brng the collapsble wres nto
horzontal poston, grab the wre
from md poston and push them n
the drectons of arrows (B) To brng
the wres back to vertcal poston,
just lft them up. Collapsble wres wll
clck nto the latch agan.
Bringing the wires to the
horizontal position byholding
them from the tips may cause
them to bend. Therefore, it will be
appropriate to bring the wires in
the middle to horizontal or vertical
position by holding them from
their stems and pishing in the
direction of arrow.
3
4
6
5
18
EN
Collapsble lower basket
wres (4 & 8 peces)
(depends on the model)
The foldable wres (A) located at
the lower basket of the machne are
desgned for an easer placement
of large peces such as pans, bowls,
etc. You can create larger spaces by
foldng each wre ndvdually or all
them at once.
To brng the collapsble wres nto
horzontal poston, grab the wre
from md poston and push them n
the drectons of arrows (B) To brng
the wres back to vertcal poston,
just lft them up. Collapsble wres wll
clck nto the latch agan (C).
Bringing the wires to the
horizontal position byholding
them from the tips may cause
them to bend. Therefore, it will be
appropriate to bring the wires in
the middle to horizontal or vertical
position by holding them from
their stems and pishing in the
direction of arrow.
33
44
55
77
88
66
BB
CC
11
22
33
44
19
EN
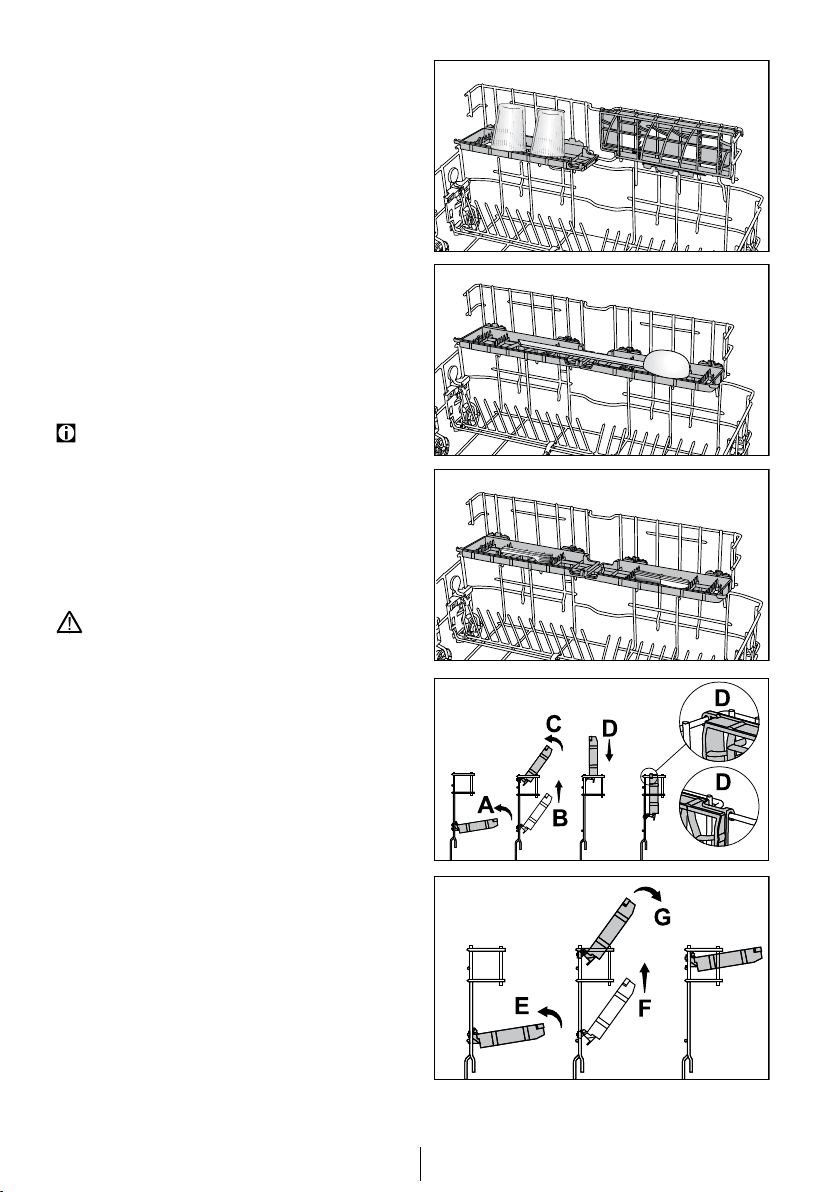
Lower basket multpurpose
/ heght adjustable servce
rack
(depends on the model)
Ths accessory located at the lower
basket of the machne allows you
to easly wash peces such as extra
glasses, long ladles and bread knves.
To close the racks:
1. Fold the rack (A).
2. Slide the rack up (B).
3. Put the rack in vertical position (C).
4. Slide the rack down and lock it
with the tabs (D).
Perform the same process in
reverse order to open the racks.
To adjust the heght of the racks:
1. Fold the rack (E).
2. Slide the rack up (F).
3. Open the rack at the desired level
(G).
Make sure that the impeller does
not touch the dishes you placed
on the racks.
20
EN
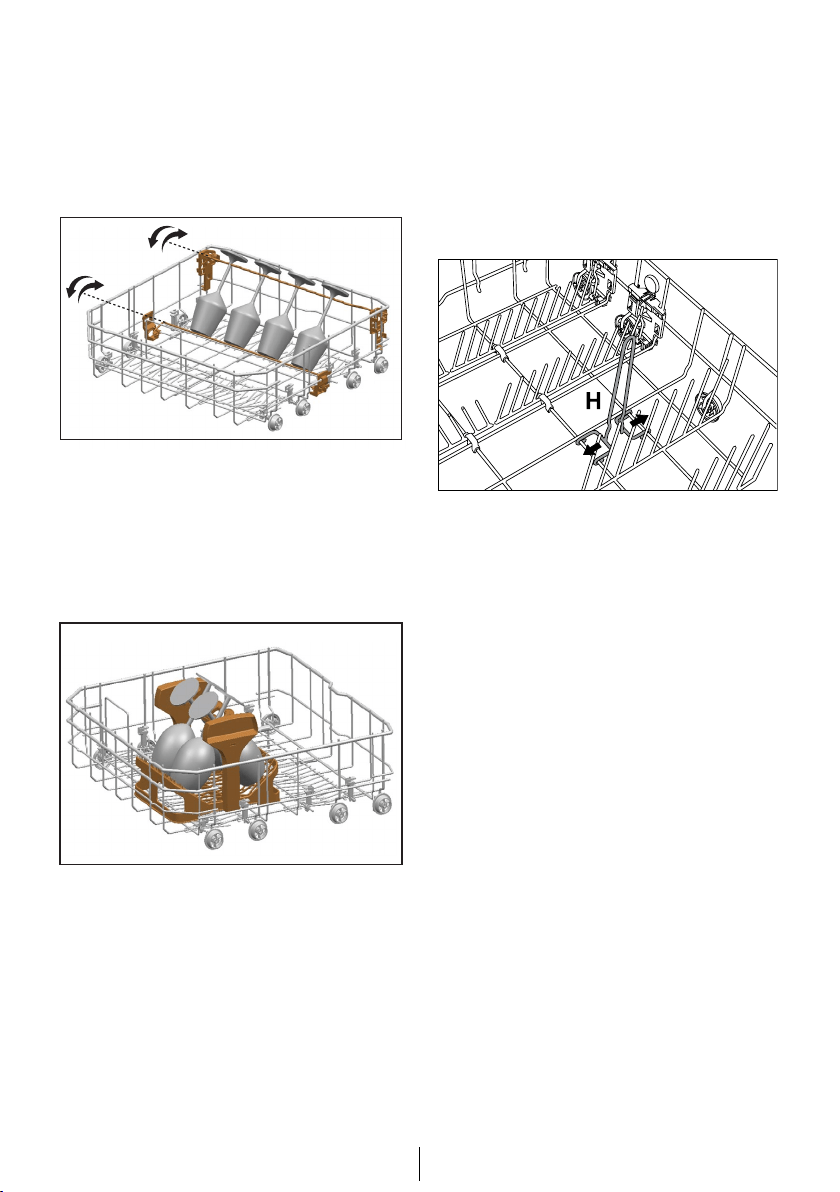
Lower basket bottle wre
(depends on the model)
The bottle wre s desgned for easer
washng of long peces wth wde
mouths. You may take out the bottle
wre from the basket when not n use
by pullng t out from both sdes (H).
Lower Basket Glass Holder
(depends on the model)
Lower Basket Glass Holder found n
the lower basket of your machne
enables a safe washng for your
overszed and tall glasses.
SoftTouch Accessory
(depends on the model)
The SoftTouch Accessory found n the
lower basket of your machne enables
a safe washng for your fragle
glasses.
21
EN
Upper basket glass support
pece
(depends on the model)
When placng long stemmed glasses
or wne glasses, do not lean them
aganst other peces but to the edge
of the basket or to the rack (1). Do not
lean long glasses aganst each other.
They can move and get damaged
durng washng.
If you wsh to place large-volume
peces on the upper basket, release
the tab of the glass support pece
from the upper basket wre t s
hooked to. Thus, you can obtan a
wder space.
Upper basket drawer
(depends on the model)
You can easly place addtonal desert
spoons, small forks and knves nto
the basket drawer nstalled to the
upper basket of your machne.
Upper basket heght
adjustable rack
(depends on the model)
Use the lower and upper parts of the
heght adjustable racks n the upper
basket of the machne by sldng them
down or up accordng to the heghts
of the glasses, cups or etc. (A, B, C).
22
EN
Collapsble upper basket
wres
(depends on the model)
To brng the collapsable wres on the
upper basket of the machne nto
horzontal poston, press on the latch
(1). Place your larger dshes nto the
area created (2). To brng the wres
back to vertcal poston, just lft them
up.
Upper basket glass support
pece
(depends on the model)
When placng long stemmed glasses
or wne glasses, do not lean them
aganst other peces but to the edge
of the basket or to the rack (1). Do not
lean long glasses aganst each other.
They can move and get damaged
durng washng.
If you wsh to place large-volume
peces on the upper basket, release
the tab of the glass support pece
from the upper basket wre t s
hooked to. Thus, you can obtan a
wder space.
23
EN
Collapsble upper basket
wres
(depends on the model)
There are collapsble wres on the
upper basket of the machne that you
can lay down when you need a larger
room for bg dshes.
On your upper basket there are two
types of collapsble wres namely,
fully lad system (A) and gradually lad
system (B). To brng the collapsble
wres nto horzontal poston, push
the wres n the drecton of the arrow
by holdng them from the mddle. You
can place your larger dshes nto the
area created. To brng the wres back
to vertcal poston, just lft them up.
Collapsble wres wll clck nto the
latch agan.
Holding the wires from ends to
put them in lying position may
cause the wires to bend. For this
reason, it will be appropriate to
hold the wires in the middle from
their bottoms and to push in the
direciton of the arrow to lay down
or bring them to vertical position.
24
EN
Adjustng the heght of
loaded upper basket
(depends on the model)
Basket adjustment mechansm on
the upper basket of the machne s
desgned to allow you create wder
areas n the upper or lover secton
of the machne based on your
requrements by adjustng the heght
of the loaded basket n up or down
drectons wthout removng t from
the machne.
To rase the basket:
1. Grab one of the upper basket
wires (right or left) and lift it up
(A).
2. Repeat the same process to raise
the other side of the basket.
3. Make sure that both sides of
the basket height adjustment
mechanism are at the same level
(down or up).
To lower the basket:
1. Press the latch on the basket
adjustment mechanism (right or
left) to lower the basket (B).
2. Repeat the same process to lower
the other side of the basket.
3. Make sure that both sides of
the basket height adjustment
mechanism are at the same level
(down or up).
25
EN
Adjustng the heght of
loaded upper basket
(depends on the model)
Basket adjustment mechansm on
the upper basket of the machne s
desgned to allow you create wder
areas n the upper or lover secton
of the machne based on your
requrements by adjustng the heght
of the loaded basket n up or down
drectons wthout removng t from
the machne.
To rase the basket:
1. Grab one of the upper basket
wires (right or left) and lift it up
(A).
2. Repeat the same process to raise
the other side of the basket.
3. Make sure that both sides of
the basket height adjustment
mechanism are at the same level
(down or up).
To lower the basket:
1. Press the latch on the basket
adjustment mechanism (right or
left) to lower the basket (B).
2. Repeat the same process to lower
the other side of the basket.
3. Make sure that both sides of
the basket height adjustment
mechanism are at the same level
(down or up).
26
EN
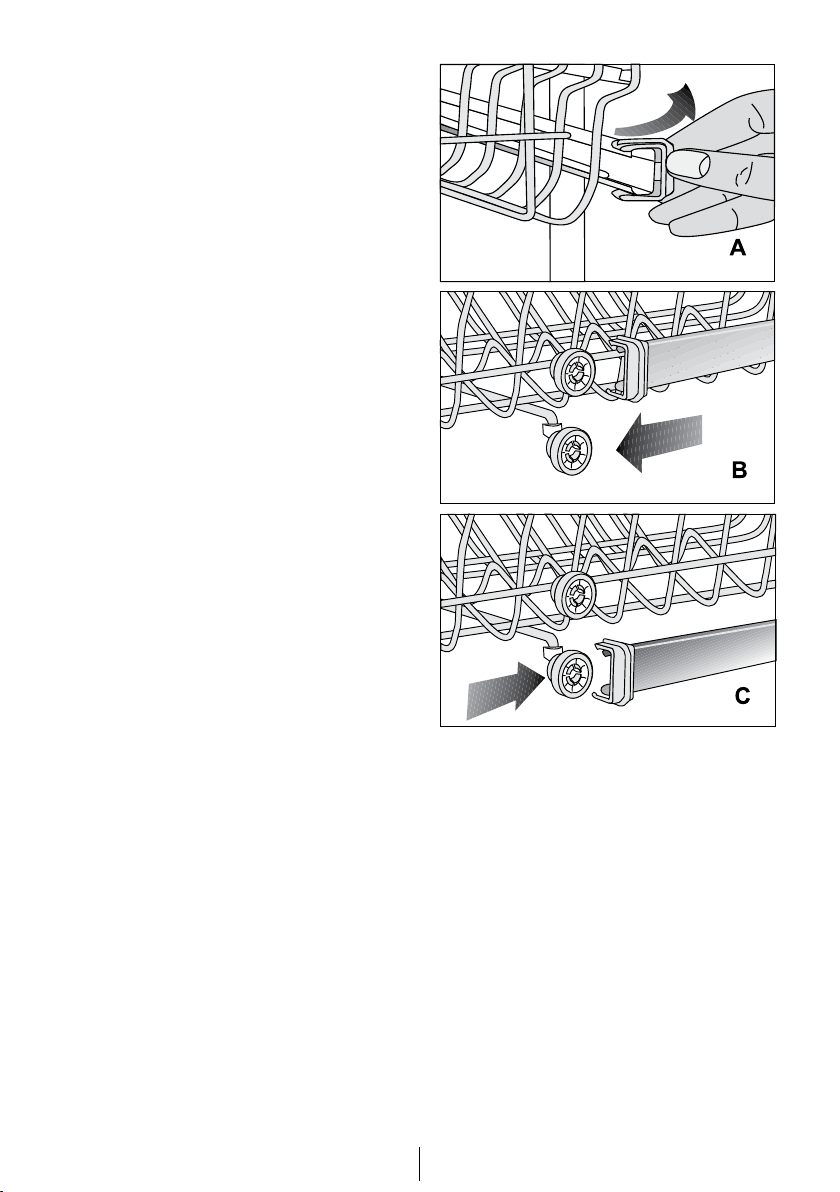
Adjustng the heght of
empty upper basket
(depends on the model)
You can adjust the heght of the
upper basket accordng to the sze
of the dsh to be washed. Use basket
rollers to change the basket heght.
1. Turn the stoppers on the ends of
the upper basket rails by turning
them aside (A).
2. Take the basket out (B).
3. Change the position of the rollers,
place the basket into the rail and
close the stoppers (C).
27
EN
5
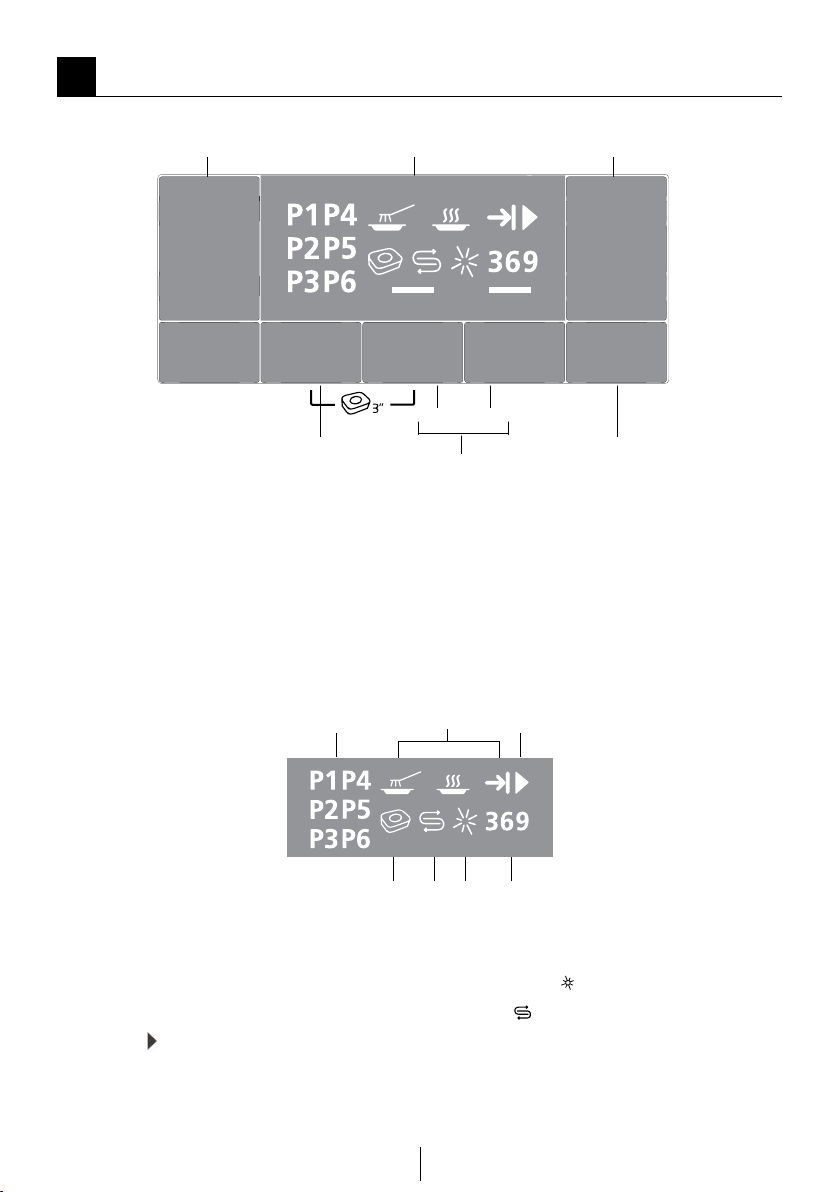
Operatng the product
1. On/Off key
2. Display
3. Start/Pause/Cancel key
4. Time Delay key
5. Function keys
a)
b)
6. Program Selection key
7. Programme indicator
8. Program Follow-up indicator
9. Start (
)/Pause indicator
10. Time Delay indicator
11. Rinse aid ( ) indicator
12. Salt ( ) indicator
13. Tablet Detergent indicator
Super Rnse Functon
Half Load Functon
7 9
10111213
8
1 2 3
4
5
6
a b

28
EN
Keys
On/Off key
It s used to turn on or o the
machne.
Machne wll turn on wth economy
programme n On mode and the
number of the economy programme
wll appear on the programme
ndcator. In Of mode, ndcators on
the dsplay wll turn o.
Start/Pause/Cancel key
It s used to startup, pause or cancel
the selected program.
Programme Selecton key
It s used to select the washng
programme you determned from
the table of "Programme data and
average consumpton values".
Delayed Start key
Use to set the tme delay duraton.
Preparng the machne
1. Open the door of the dishwasher.
2. Place the dishes in accordance
with the instructions in the user
manual.
3. Make sure that the upper and
lower impellers rotate freely.
4. Put adequate amount of
detergent into the detergent
dispenser.
5. Check if the Salt and Rinse Aid
indicators light and add salt and/or
rinse aid if needed.
6. Close the door of the dishwasher.
Programme selecton
1. Press On/Off key to turn on your
machine.
2. Refer to the table of "Programme
data and average consumption
values" to determine a washing
programme suitable for your
dishes.
3. Press Programme Selection
key until the number of the
programme you selected appears
on the Programme indicator.

29
EN
Programme Table
Programme number
1 Reference* 2 3 4 5 6
Programme name
Cleaning temperature
Degree of Soiling Most economical
washing program for
the normally soiled
daily dishes that are
kept waiting.
Suitable for heavily
soiled dishes, pots and
pans.
Daily washing program for
normally soiled dishes.
Daily washing program
at which heavily soiled
dishes are cleaned in
the fastest way.
Suitable for dishes
that are not pre-
cleaned but washed
immediately.
Suitable for lightly
soiled daily dishes that
are scraped or pre-
cleaned.
Normal Heavy Medium Heavy Light Light
Detergents
A=25 cm³/15 cm³ B=5
cm³
A+B A+B
A+B
A+B
A
A
Programme sequence
(without options)
Pre-wash
▼
Wash
▼
Cold rinse
▼
Hot Rinse
▼
Dry
▼
End
Pre-wash
▼
Wash
▼
Cold rinse
▼
Hot Rinse
▼
Dry
▼
End
Wash
▼
Cold rinse
▼
Hot Rinse
▼
Dry
▼
End
Wash
▼
Cold rinse
▼
Hot Rinse
▼
Dry
▼
End
Pre-wash
▼
Wash
▼
Cold rinse
▼
Hot Rinse
▼
Dry
▼
End
Wash
▼
Cold rinse
▼
Hot Rinse
▼
End
Duration (min) 141 148 88 58 97 30
Water (I) 13,6 14,8 10,2 10,2 13,2 10,2
Energy (kWh) 0,74 1,48 1,34 1,30 0,92 0,80
The consumption values shown in the table were determined under standard conditions. Differences may therefore occur under practical conditions.
* Reference programme for testing institutes according to AS/NZS 2007
eco Mini 30'DelicateQuick & CleanClean&ShineIntensive
35°C45°C 70°C65°C 40°C70°C

30
EN
Half Load functon
It s used to operate the machne
wthout loadng t completely.
It s used to operate the machne
wthout loadng t completely.
1. Load your dishes in the machine
as you like.
2. Turn the machine on with On/Off
key.
Auxlary functons
Washng programmes of your
dshwasher are desgned to obtan
the best cleanng eect, consderng
the type of the solng, solng degree
and propertes of the dshes to be
washed.
Auxlary functons are provded n
order to enable you to save tme,
water and energy and to perform
a more comfortable washng wth
condtons specfc to you.
C Auxiliary functions may cause
changes in the programme
duration.
C Auxiliary functions are not
suitable for all washing programs.
Indicator of the auxiliary function
that is not compatible with the
programme will not be active.
To add auxlary functon to the
programme:
1. Select the desired washing
programme by pressing the
programme selection key.
2. In the selected washing
programme, if auxiliary function
is selected, its symbol will be
displayed on the screen. If the
function key is pressed again
the symbol will disappear and
selection is cancelled.
Tablet functon
Allows to obtan a better dryng
performance from the mult-purpose
detergents called as all n one
detergents such as 2n1, 3n1, 4n1,
5n1 and etc., dependng on the
hardness level of the tap water.
Press and hold the tablet functon
buttons on the panel to actvate
the tablet functon for approprate
programmes. Selectng the tablet
functon wll lght the Tablet
Detergent ndcator.
Salt and Rnse Ad ndcators turn o
when ths functon s actvated.
C If you have used the Tablet
features during the last washing
programme you used, Tablet
function will remain active in the
next washing programme you
will select. If you do not want to
use these functions in the new
program you have selected, press
the Tablet Detergent key until the
Super Rinse Function
Dependng on the type of the
detergent used, f a detergent
dssolvng ssue s encountered t
wll remove the resultng stans from
the dshes and enables the optmum
rnsng performance.
3. Select the desired programme and
press the Half Load key. The Half
Load indicator will light on the
display in the Function Selected
indicator.
4. Start the program by pressing
Start / Pause / Cancel key.
C With the Half Load function you
can save both water and power
while using the lower and upper
baskets of the machine.

31
EN
Schedulng the washng
tme
Tme Delay
If an economcal electrcty tar s
appled n your regon, you can use
the Tme Delay functon to wash your
dshes durng approprate hours.
You can delay the start of the
selected programme untl 3-6-9
hours. Tme Delay cannot be set after
the programme starts.
1. Press the Time Delay function
key after selecting the washing
programme and other auxiliary
functions.
2. Time Delay selection mode is
activated. 3-hours time delay icon
will flash on the display.
4. With a second press on the key,
3-hours time delay icon will
disappear and 6-hours time delay
icon will start to flash. With a third
press, 6-hours time delay icon will
disappear and 9-hours time delay
icon will start to flash.
5. Press the Start/Pause key to
activate the time delay.
C While the Time Delay is active the
relevant delay period and start
icon will be displayed steadily. For
0-3 hours time delay the 3-hours
time delay icon will be displayed,
for 3-6 hours time delay the
6-hours time delay icon will be
displayed, and for 6-9 hours time
delay the 9-hours time delay icon
will be displayed.
C If the door is opened while
the Time Delay is active, the
countdown will be paused and
start icon will start to ash.
C To exit time delay mode without
activating the Time Delay, press
Interor Lghtng (Depends on the
model)
Some models have nteror lghtng to
llumnate the nteror when the door
s opened.
Changing the interior lighting
setting
1. After turning on the machine,
press and hold Time Delay and
Programme keys simultaneously
for 3 seconds.
2. Press the programme key until
the Rinse Aid icon starts to flash.
The applicable options will be
displayed on the programme
indicator as follows:
Interior lighting ON - [P1]
Interior lighting OFF - [P3]
3. You can turn ON or OFF the interior
lighting with the time delay key.
4. Turn off the machine with On/Off
key to save the changes.
indicator of the relevant function
turns off.
C Tablet Detergent function may
cause change in the programme
duration.
Floor llumnaton
Warnng to show that machne s
n washng phase
(depends on the model)
Your machne reects a lght to the
oor durng the washng process.
Ths lght turns o after the washng
process s complete.
C Floor illumination is activated
automatically when the washing
programme starts and remains lit
until the end of the programme.
C Floor illumination cannot be
cancelled by the user.

32
EN
the time delay key until the
3-6-9 hours duration indicators
disappear. Time Delay mode will
be cancelled and the programme
selection mode will be activated.
Changng the settngs whle Tme
Delay functon s actve
Whle the Tme Delay functon s
actvated, you cannot make changes
n the washng programme, auxlary
functons or the duraton of delay
tme.
To cancel the Tme Delay functon
1. Press and hold Start/Pause/
Cancel key for 3 seconds. Time
delay period and start/pause icon
will start to flash and Time Delay
function will be cancelled.
C You can select and start a
new programme following
the cancellation of Time Delay
function.
C Time Delay function cannot be set
after the programme starts.
Startng the programme
To start your machne after selectng
the programme and auxlary
functons, press Start/Pause/Cancel
key.
C Your machine performs water
softening depending on the
hardness level of the supply water.
Due to water softening process
the programme duration may
change. The programme duration
can also change while the
programme is running depending
on the ambient temperature
where your machine is installed,
temperature of the supply water
and amount of the dishes.
C Pay attention not to open the door
of the machine when it is running.
Stop the machine by pressing
Start/Pause/Cancel key if you
have to open the door. Then, open
the door of the machine. There
may be a rush of vapour when you
open the door of your machine;
be careful. Close the door of your
machine and press Start/Pause/
Cancel key again. Programme will
resume running.
C The machine will remain silent
in pause mode for some time
in order to remove the water in
the machine and on the dishes
completely and to have the water
softener cleaned, and then it will
resume running in drying mode.
Cancellng the programme
1. Press Start/Pause/Cancel key for 3
seconds to cancel the programme.
2. Release the key when the
programme indicator starts
flashing. For a couple of minutes
the machine will fulfill the
necessary operations required to
cancel the programme.
C There might be residues of
detergent or rinse aid in the
machine and/or on the pieces
being washed depending on the
step the programme you have
cancelled was in.
Salt ndcator ( )
Please check the salt ndcator on
the dsplay to see whether there s
adequate amount of softenng salt
n the dshwasher or not. You need
to refll the salt reservor wth salt
whenever salt ndcator appears on
the dsplay of your machne.

33
EN
C Adjusting the water hardness
level is explained in Water
Softening System section.
Rnse Ad ndcator ( )
Please check the rnse ad ndcator
on the dsplay to see whether there
s adequate amount of rnse ad n the
dshwasher or not. You need to refll
the rnse ad reservor wth rnse ad
whenever rnse ad ndcator appears
on the dsplay of your machne.
End of programme
End of Programme ndcator wll lght
up once the washng programme s
over.
1. Press the On/Off key to turn off
your machine.
2. Close the tap.
3. Unplug the machine from the
socket.
C For energy saving, the machine is
automatically turned o following
the completion of the programme
or if the programme is not started.
C Leave your dishes in the machine
for about 15 minutes to allow
them cool down after they are
washed. Your dishes will dry in a
shorter time if you leave the door
of your machine ajar during this
period. This process will increase
the drying eectiveness of your
machine.
Water cut-o warnng
If mans water s cut or water nlet
tap s turned o the machne cannot
take water n and P2 con wll ash
on the programme ndcator. As
long as the problem contnues,
washng programme s paused and
the water nlet s checked regularly
by the machne; when the water s
restored P2 con wll dsappear after
a whle and the washng programme
resumes.
Overowng warnng
If the machne ntakes too much
water or there s leakage at any of
the components then the machne
wll detect ths and P1 con wll ash
on the Programme ndcator. As long
as the overowng contnues safety
algorthm wll be actve and try to
dscharge the water. If overowng
stops and safety s assured, P1
con wll dsappear. If P1 does not
dsappear, there s a permanent fault.
In ths case the authorsed servce
should be contacted.
34
EN
left on the flters. If there are food
resdues on flters, take them out and
clean well under runnng water.
1. Turn the mcro flter (1) and
coarse flter (2) assembly counter
clockwse and pull t out from ts
seatng (A).
2. Pull out the metal / plastic filter
(3) (B).
3. Press the two pawls on the coarse
flter nwards and separate the
coarse flter from the assembly
(C).
4. Clean all three flters under tap
water by means of a brush.
5. Replace the metal/plastc flter.
6. Place the coarse flter nto the
6
Mantenance and cleanng
Servce lfe of the product extends
and frequently faced problems
decrease f t s cleaned at regular
ntervals.
A Unplug the product and turn off
the tap before attemptng any
cleanng procedures.
C Do not use abrasve substances
for cleanng.
C Clean the flters and mpellers at
least once a week.
Cleanng the outer surface
of the product
Clean the outer surface and door
gaskets of the product gently wth a
mld cleanng materal and damp cloth.
Wpe the control panel only wth a
damp cloth.
Cleanng the nteror of the
machne
— Clean the nteror of the machne
and the tank by runnng a prewash
programme wthout detergent or
a long washng programme wth
detergent based on the degree of
solng.
— If water has remaned n the
machne, dran the water by
performng the procedures
under the topc “Cancelng a
programme”. If the water cannot
be dscharged, clean any leftover
deposts that have pled up n the
bottom of the machne, blockng
the water path.
Cleanng the flters
Clean the flters at least once a week
n order for the machne operates
ecently. Check f food resdues are
35
EN
mcroflter. Make sure that t s
properly seated. Turn the coarse
flter clockwse untl a “clck”
sound s heard.
A Do not use the dshwasher
wthout flter.
C Incorrect placement of the flters
wll reduce washng effcency.
Cleanng the hose flter
Damages on the machne that may be
caused by mpurtes comng from the
urban supply water or your own water
nstallaton (such as sand, drt, rust,
etc.) can be prevented by means of
the flter attached to the water nlet
hose. Check the flter and the hose
regularly and clean them f necessary.
1. Turn off the tap and remove the
hose.
2. After takng out the flter, clean t
under runnng tap water.
3. Place the cleaned flter back to ts
seat n the hose.
4. Install the hose to tap.
(depends on the model)
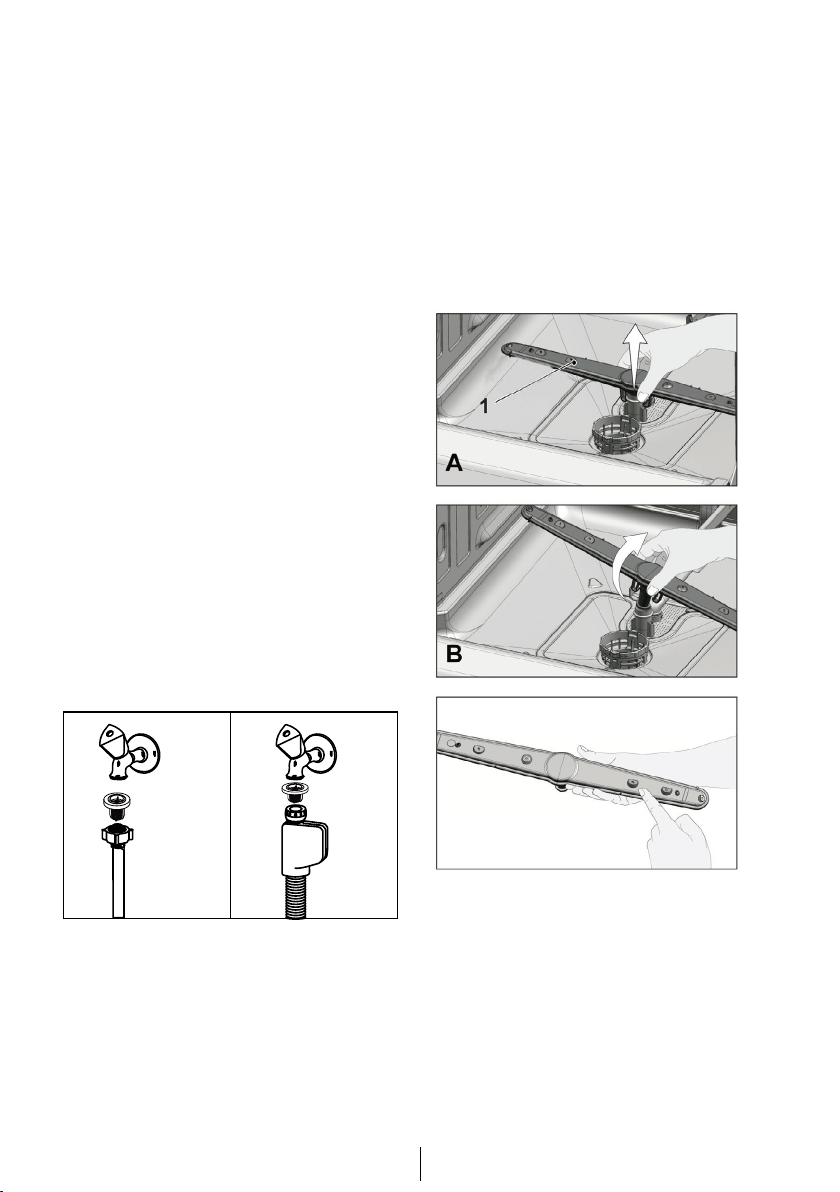
Cleanng the mpellers
Clean the mpellers at least once
a week n order for the machne
operates ecently.
Lower mpeller
Check f the holes on the lower
mpeller (1) are clogged. If they
are clogged, remove and clean the
mpeller. Pull the lower mpeller up to
remove t (A, B).
36
EN
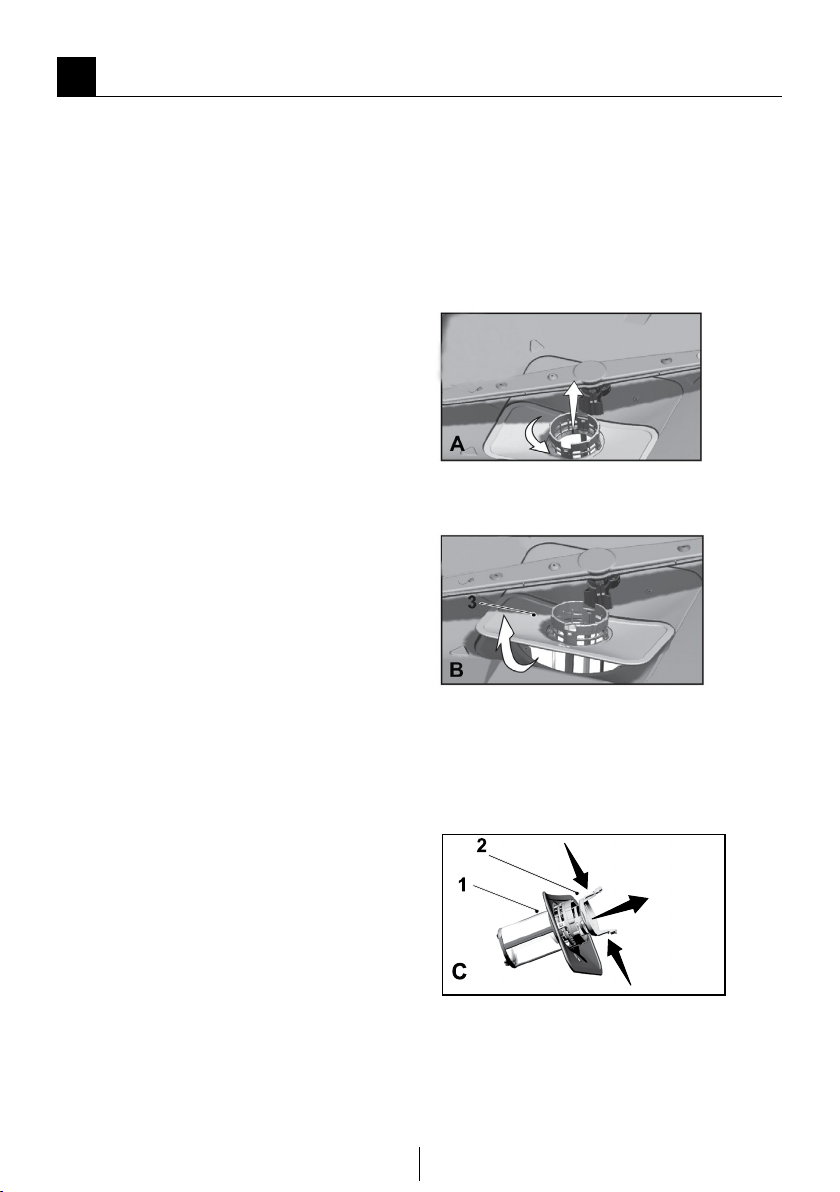
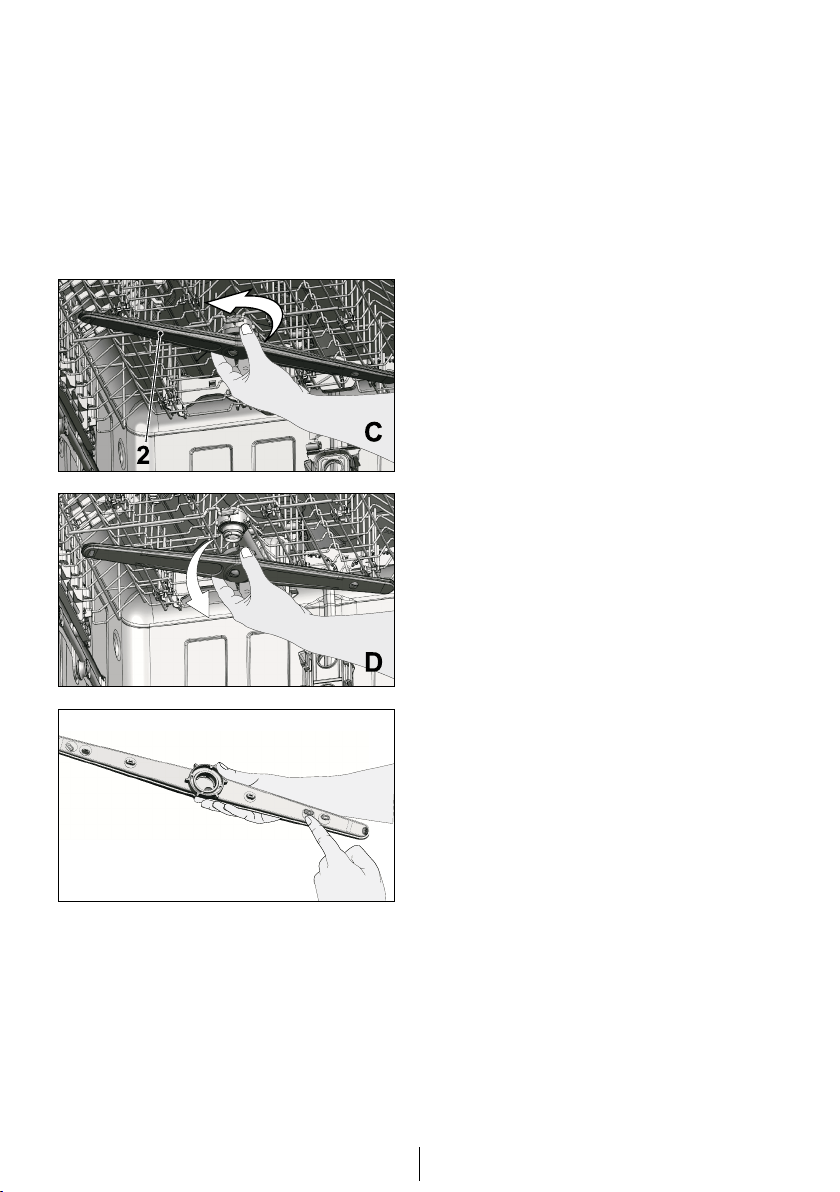
Upper mpeller
Check f the holes on the upper
mpeller (2) are clogged. If they
are clogged, remove and clean the
mpeller. Turn ts nut to left to remove
the upper mpeller (C, D).
Make sure that the nut s tghtened
well when nstallng the upper
mpeller.

37
EN
Troubleshootng
Machne does not start.
• Power cable s unplugged. >>> Check if the power cable is plugged in.
• Fuse s blown. >>> Check the fuses in your house.
• Water s cut. >>> Make sure that the water inlet tap is open.
• Door of the machne s open. >>> Make sure that you have closed the door
of the machine.
• On / Off button s not pressed. >>> Make sure that you have turned on the
machine by pressing the On / Off button.
Dshes are not washed clean
• Dshes are not placed orderly n the machne. >>> Load the dishes as desc-
ribed in the user manual.
• Selected programme s unsutable. >>> Select a programme with a higher
temperature and cycle time.
• Impellers are stuck. >>> Prior to starting the programme, turn the lower
and upper impellers by hand to make sure that they rotate freely.
• Impeller holes are clogged. >>> Lower and upper impeller holes might be
clogged with food remnants such as lemon pips. Clean the impellers regu-
larly as illustrated in section “Cleaning and Care”.
• Flters are clogged. >>> Check if the filter system is clean. Clean the filter
system regularly as illustrated in section “Cleaning and Care”.
• Flters are nstalled ncorrectly. >>> Check the filter system and make sure
that it is installed correctly.
• Baskets are overloaded. >>> Do not overload the baskets in excess of
their capacity.
• Detergent s stored under unsutable condtons. >>> If you are using
powder detergent, do not store the detergent package in humid places.
Keep it in a closed container if possible. For ease-of-storing, we recom-
mend you to use tablet detergents.
• Detergent s not suffcent. >>> If you are using powder detergent, adjust
the amount of detergent according to the soiling degree of your dishes
and/or programme definitions. We recommend you to use tablet deter-
gents for optimum results.
• Rnse ad s not suffcent. >>> Check the rinse aid indicator and add rinse
aid if necessary. Increase the rinse aid setting if there is enough amount
of rinse aid in the machine.
• Detergent dspenser ld s left open. >>> Make sure that the detergent
dispenser lid is closed tightly after adding detergent.
7

38
EN
Dshes are not dry at the end of cycle
• Dshes are not placed orderly n the machne. >>> Place your dishes in a
way that no water will accumulate in them.
• Rnse ad s not suffcent. >>> Check the rinse aid indicator and add rinse
aid if necessary. Increase the rinse aid setting if there is enough amount
of rinse aid in the machine.
• Machne s unloaded rght after the programme s over. >>> Do not unload
your machine right after washing process is completed. Slightly open the
door and wait for evacuation of the steam inside for a while. Unload the
dishes after the pieces cool down to a touchable level. Start unloading
process from the lower basket. Thus, dropping of water remained on a
piece at upper basket onto the pieces at lower basket is prevented.
• Selected programme s unsutable. >>> Since rinsing temperature is low
at programmes with short duration, drying performance will also be low.
Select programmes with longer duration for a higher drying performance.
• Surface qualty of the ktchen utensls s deterorated. >>> Desired was-
hing performance can not be obtained at kitchen utensils with deteriora-
ted surfaces and it is not suitable to use such utensils in terms of hygiene
as well. Also, water can not flow easily on deteriorated surfaces. It is not
recommended to wash such kitchen utensils in dishwasher.
C It s normal that dryng complants can be experenced wth Teflon ktchen
utensls. It s assocated wth the structure of Teflon. Snce the surface
tensons of Teflon and water are dfferent, water droplets wll reman as
beads on the Teflon surface.
Tea, cafe or lpstck stans reman on dshes.
• Selected programme s unsutable. >>> Select a programme with a higher
temperature and cycle time.
• Surface qualty of the ktchen utensls s deterorated. >>> Tea and cafe
stains or other dye spots may not be cleaned in dishwasher when they
have penetrated in deteriorated surfaces. Desired washing performance
can not be obtained at kitchen utensils with deteriorated surfaces and it
is not suitable to use such utensils in terms of hygiene as well. It is not re-
commended to wash such kitchen utensils in dishwasher.
• Detergent s stored under unsutable condtons. >>> If you are using
powder detergent, do not store the detergent package in humid places.
Keep it in a closed container if possible. For ease-of-storing, we recom-
mend you to use tablet detergents.

39
EN
Lme traces reman on dshes and glassware gans a msty appearance
• Rnse ad s not suffcent. >>> Check the rinse aid indicator and add rinse
aid if necessary. Increase the rinse aid setting if there is enough amount
of rinse aid in the machine.
• Water hardness settng s low or salt level s nsuffcent >>> Measure the
hardness of the supply water appropriately and check the water hardness
setting.
• Salt leakage exsts. >>> Pay attention not to spill salt around the salt fil-
ling hole while adding salt. Make sure that the salt reservoir lid is tightly
closed after finishing the filling process. Run the prewash programme to
remove the salt that spilled inside the machine. Since the salt granules
that will remain under the lid will dissolve during prewash, causing the lid
loosen, check the lid once again at the end of the programme.
There s a dfferent odour n the machne
C A new machne has a pecular odour. It wll fade out after a couple of was-
hng.
• Flters are clogged. >>> Check if the filter system is clean. Clean the filter
system regularly as illustrated in section "Cleaning and Care".
• Drty dshes are kept n dshwasher for 2-3 days. >>> If you are not going
to start the machine right after you have put the dishes into it, remove
the remnants on the dishes and run the Prewash programme without de-
tergent every 2 days. In such cases, do not close the door of the machine
completely in order to avoid odour build up in machine. You can also use
commercially available odour removers or machine cleaners.

40
EN
Rust, dscoloraton or surface deteroraton occurs on dshes
• Salt leakage exsts. >>> Salt may cause deterioration and oxidation on
metal surfaces. Pay attention not to spill salt around the salt filling hole
while adding salt. Make sure that the salt reservoir lid is tightly closed
after finishing the filling process. Run the prewash programme to remove
the salt that spilled inside the machine. Since the salt granules that will
remain under the lid will dissolve during prewash, causing the lid loosen,
check the lid once again at the end of the programme.
• Salty food remnants have remaned on dshes for a long tme. >>> If sil-
verware soiled with such foods will be kept waiting in machine, dirt must
be removed by prewash or dishes must be washed without being kept wa-
iting.
• Electrc nstallaton s not grounded. >>>Check if your machine is connec-
ted to the actual grounding line. Otherwise, the static electric created in
the product causes arcs on the surfaces of metal items creating pores,
removing the protective cover on the surface and causing discoloration.
• Intensve cleansers such as bleaches are used. >>> Protective cover on
metal surfaces gets damaged and looses its efficiency in time when it gets
in contact with cleansers such as bleach. Do not wash your dishes with
bleach.
• Metal tems partcularly such as knves are used for purposes other then
ther ntended uses. >>> Protective cover on the edges of knives may get
damaged when they are used for purposes such as opening cans. Do not
use metal kitchen utensils out of their intended uses.
• Slverware are made of low qualty stanless steel. >>> Corrosion on such
items is inevitable; they should not be washed in dishwashers.
• Ktchen utensls that are already corroded are washed n dshwasher. >>>
Rust on a corroded item can migrate to other stainless steel surfaces and
cause corrosion on those surfaces as well. Such items should not be was-
hed in dishwashers.

41
EN
Detergent remans n detergent dspenser.
• Detergent dspenser was damp when addng detergent. >>> Make sure
that the detergent dispenser is dried well prior to filling it with detergent.
• Detergent s added long before the washng process. >>> Pay attention to
add detergent shortly before start-up of the washing.
• Openng of the detergent dspenser ld s prevented durng washng. >>>
Place the dishes in a way that will not prevent the detergent dispenser lid
from opening and the water going into the machine from impellers.
• Detergent s stored under unsutable condtons. >>> If you are using
powder detergent, do not store the detergent package in humid places.
Keep it in a closed container if possible. For ease-of-storing, we recom-
mend you to use tablet detergents.
• Impeller holes are clogged. >>> Lower and upper impeller holes might be
clogged with food remnants such as lemon pips. Clean the impellers regu-
larly as illustrated in section "Cleaning and Care".
Decoratons and ornaments on ktchen utensls are beng erased.
C Decorated glasses and decorated luster porcelans are not sutable for
washng n the dshwasher. Manufacturers of glassware and porcelan
tableware tems do not recommend washng such ktchen utensls n the
dshwashers ether.
Dshes are scratched.
C Ktchen utensls that contans or are made of alumnum should not be was-
hed n dshwasher.
• Salt leakage exsts. >>> Pay attention not to spill salt around the salt
filling hole while adding salt. Spilled salt can cause scratches. Make sure
that the salt reservoir lid is tightly closed after finishing the filling process.
Run the prewash programme to remove the salt that spilled inside the
machine. Since the salt granules that will remain under the lid will dissolve
during prewash, causing the lid loosen, check the lid once again at the end
of the programme.
• Water hardness settng s low or salt level s nsuffcent >>> Measure the
hardness of the supply water appropriately and check the water hardness
setting.
• Dshes are not placed orderly n the machne. >>> When placing the glas-
ses and other glassware into the basket lean them not against other dis-
hes but the edges or racks of the basket or the glass support wire. Strkng
of the glasses to each other or to other dshes due to the mpact of water
durng washng can cause breaks, or scratches on ther surfaces.

42
EN
A smear remans on glasses that resembles mlk stan whch can not
be removed when wped by hand. A blush / ranbow appearance
occurs when the glass s ponted to lght.
• Excessve rnse ad s used. >>>Lower rinse aid setting. Clean the spilled
rinse aid when adding rinse aid.
• Corroson has occurred on glass due to soft water. >>> Measure the hard-
ness of the supply water appropriately and check the water hardness
setting. If your supply water is soft (<5 dH), do not use salt. Choose prog-
rammes that wash in higher temperatures (e.g. 60-65°C). You can also use
glass protective detergents that are commercially available.
Foam forms n the machne.
• Dshes are washed wth hand-wash detergent by hand but not rnsed be-
fore placng them nto the machne. >>> Hand-wash detergents do not
contain antifoam. There is no need to hand-wash the dishes before pla-
cing them into the machine. Removing the coarse soil on the dishes under
tap water, with a tissue paper or fork will be sufficient.
• Rnse ad has splled nto the machne when addng rnse ad. >>> Take
care that rinse aid is not spilled in the machine when you are filling it.
Clean any spilled rinse ait with the help of a tissue paper/towel.
• Ld of the rnse ad reservor s left open. >>> Make sure that the lid of the
rinse aid reservoir is closed after adding rinse aid.
Ktchen utensls are broken.
• Dshes are not placed orderly n the machne. >>> Load the dishes as desc-
ribed in the user manual.
• Baskets are overloaded. >>> Do not overload the baskets in excess of
their capacity.
Water remans n the dshwasher at the end of the programme.
• Flters are clogged. >>> Check if the filter system is clean. Clean the filter
system regularly as illustrated in section “Cleaning and Care”.
• Dscharge hose s clogged/blocked. >>> Check the discharge hose. If ne-
cessary, remove the discharge hose, clear the blockage and insert is as
illustrated in the user manual.
C If you cannot elmnate the problem although you follow the nstructons n
ths secton, consult your dealer or the Authorsed Servce Agent. Never try
to repar a nonfunctonal product yourself.

Mandatory Warnings
Dishwashers
• The appliance is not intended for use by persons (including children)
with reduced physical, sensory or mental capabilities, or lack of
experience and knowledge, unless they have been given supervised or
instruction concerning use of the appliance by a responsible person for
their safely.
• Young children should be supervised to ensure that they do not play
with the appliance.
• If the supply cord is damaged, it must be replaced by the manufacturer
or its service agent or a similarly qualified person in order to avoid a
hazard.
• Capacity - 14 standard place settings
• Please do not leave the door open as this will cause a tripping hazard
• The dishwasher must always be connected to the water system using
new hose sets.
• Water Supply Min: 0.03 MPa - Max: 1.0 MPa
• If the appliance is installed on a carpet floor, take care that the openings
in its base are not obstructed
• WARNING - Knives and other utensils with sharps points must be
loaded in the basket with the points down or placed in a horizontal
position.
• WARNING: SOME DISHWASHER DETERGENTS ARE STRONGLY
ALKALINE. THEY CAN BE EXTREMELY DANGEROUS IF SWALLOWED.
AVOID CONTACT WITH SKIN AND EYES AND KEEP CHILDREN AWAY
FROM THE DISHWASHER WHEN THE DOOR IS OPEN.
• This appliance is intended to be used in household and similar
applications such as:
-
Staff kitchen areas in shops, offices and other working environments;
-
Farm houses;
-
By clients in hotels, motels and other residential type environments;
-
Bed and Breakfast type environments

15 0462 01 00_AB_(EN)
www.beko.com