1. Remove all packaging and check carefully for any signs of damage.
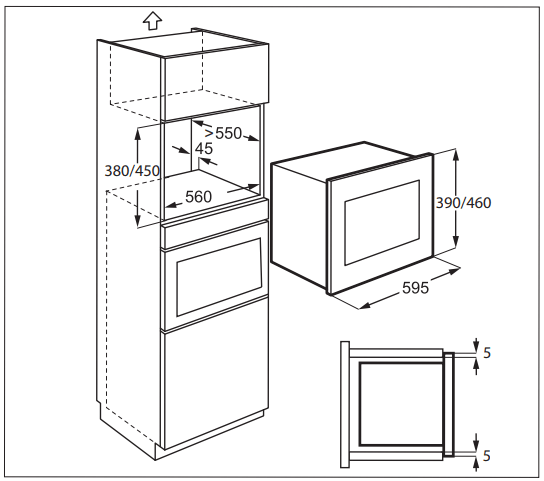
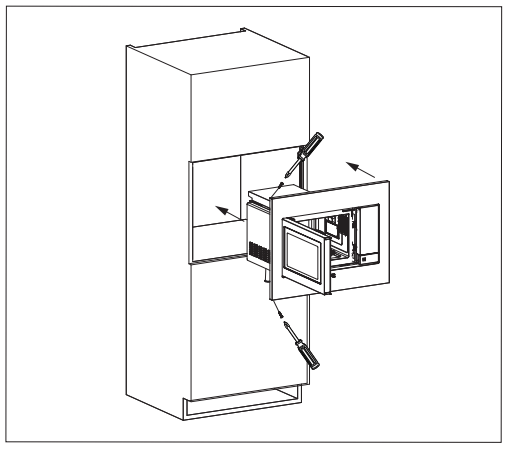
2. Fit the fixing bracket to the right hand side of the kitchen cupboard using the installation sheet and two screws supplied.
3. Fit the appliance into the kitchen cupboard slowly and without force until it clips into the brackets. Ensure the appliance is stable and centralised.
4. Fix the oven on the left hand side using the two screws supplied.
5. The front frame of the appliance should seal against the front opening of the cupboard.
IMPORTANT! Do not install this appliance in kitchen cupboards without the specified 45mm rear chimney. Inadequate ventilation could adversely affect the performance and life of the appliance.
CONNECTING THE APPLIANCE TO THE POWER SUPPLY
• The electrical outlet should be readily accessible so that the unit can be unplugged easily in an emergency. Or it should be possible to isolate the oven from the supply by incorporating a switch in the fixed wiring in accordance with the wiring rules.
• The power supply cord may only be replaced by an electrician.
• If the supply cord is damaged it must be replaced by the manufacturer, its service agent or similarly qualified persons in order to avoid a hazard.
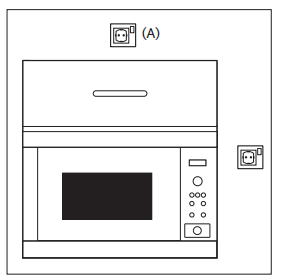
• The socket should not be positioned behind the cupboard.
• The best position is above the cupboard, see (A).
• Connect the appliance to a single phase 230-240 V/50 Hz alternating current via a correctly rated earth socket.
• If the appliance is to be operated in a nonEuropean country, the supply voltage, current type and frequency of the appliance indicated on the rating plate must correspond with the specification of your power supply. The rating plate can be found on the inside face of the control panel.
• Before installing, tie a piece of string to the power supply cord to facilitate connection to point (A) when the appliance is being installed.
• When inserting the appliance into the highsided cupboard, DO NOT crush the power supply cord.
• Do not immerse the power supply cord or plug in water or any other liquid.
• Do not allow the power supply cord to run over any hot or sharp surfaces, such as the hot air vent area at the top rear of the oven.
ADDITIONAL ADVICE
Do not use the microwave oven to heat oil for deep frying. The temperature cannot be controlled and the oil may catch fire. To make popcorn, only use special microwave popcorn makers. Individuals with PACEMAKERS should check with their doctor or the manufacturer of the pacemaker for precautions regarding microwave ovens. Never spill or insert any objects into the door lock openings or ventilation openings. In the event of a spill, turn off and unplug the oven immediately and call an authorised ELECTROLUX service agent. Never modify the oven in any way. Only use the turntable and the turntable support designed for this oven. Do not operate the oven without the turntable. To prevent the turntable from breaking:
• Before cleaning the turntable with water, leave the turntable to cool.
• Do not put hot foods or hot utensils on a cold turntable.
• Do not put cold foods or cold utensils on a hot turntable.
Do not use plastic containers for microwaving if the oven is still hot from using the GRILL & CONVECTION modes because they may melt. Plastic containers must not be used during above modes unless the container manufacturer says they are suitable.
Neither the manufacturer nor the dealer can accept any liability for damage to the oven or personal injury resulting from failure to observe the correct electrical connection procedure. Water vapour or drops may occasionally form on the oven walls or around the door seals and sealing surfaces. This is a normal occurrence and is not an indication of microwave leakage or a malfunction.
Concerning the lamp(s) inside this product and spare part lamps sold separately: These lamps are intended to withstand extreme physical conditions in household appliances, such as temperature, vibration, humidity, or are intended to signal information about the operational status of the appliance. They are not intended to be used in other applications and are not suitable for household room illumination.
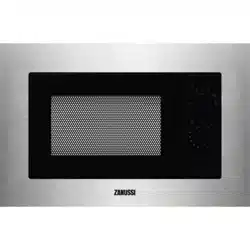
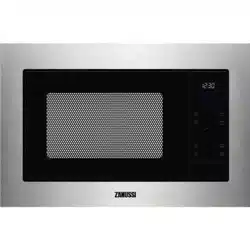
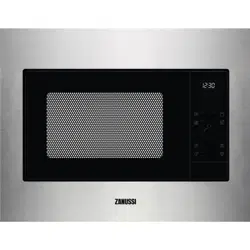
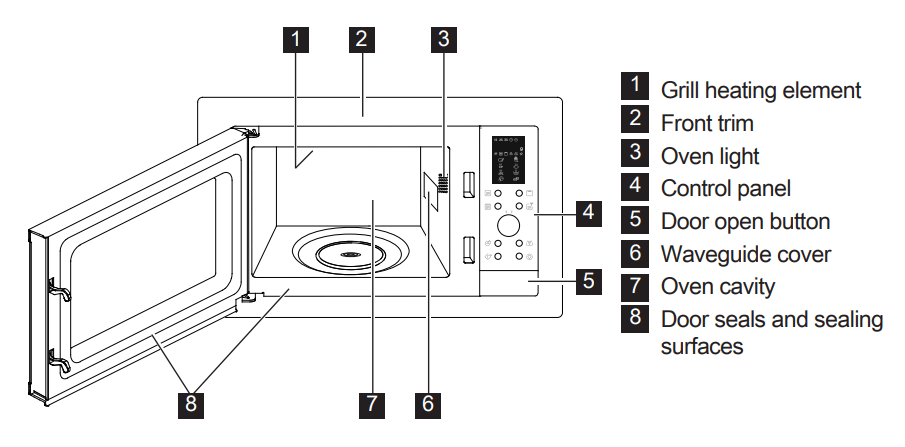
PRODUCT DESCRIPTION
MICROWAVE OVEN
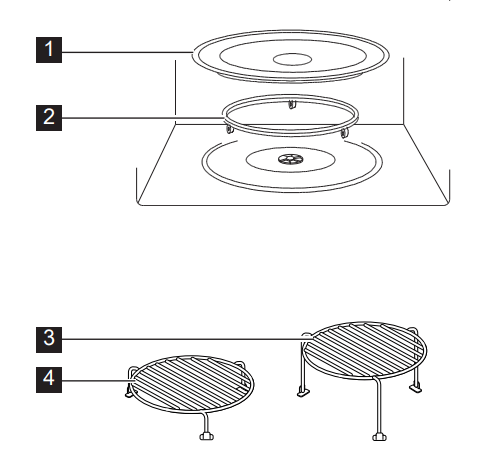
ACCESSORIES
Check to make sure the following accessories are provided:
1. Turntable
2. Turntable support
3. High rack
4. Low rack
5. Baking plate
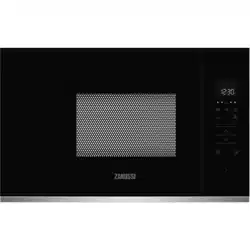
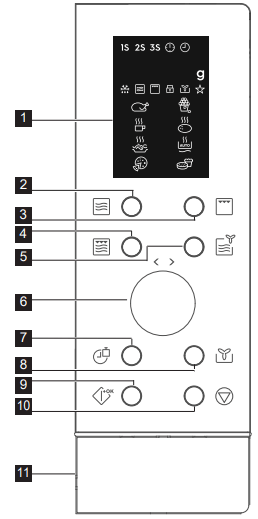
CONTROL PANEL
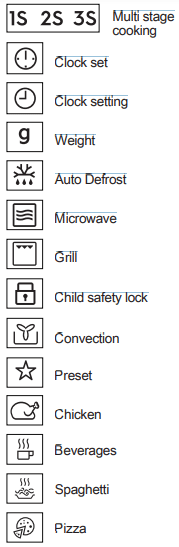
1 Digital display indicators:
2 Power level button
3 Grill button
4 Micro. + grill button
5 Micro. + convection button
6 Time/menu knob
7 Clock/weight button
8 Convection button
9 Start/quick start button
10 Stop/cancel button
11 Door open button
OPERATION
SETTING THE CLOCK
When the oven is plugged in for the first time you can have the option of setting the clock. The oven has a 24 hour clock.
Example: To set the clock.
1.Press the clock/weight button once.
2.Rotate the time/menu knob to adjust the hour.
3.Press the clock/weight button to confirm.
4.Rotate the time/menu knob to adjust the minutes.
5.Press the clock/weight button to confirm.
During cooking, you can press the clock/weight button to check the time of day.
MICROWAVE COOKING
Microwave cooking allows you to customize the cooking power and time. Maximum cooking time is 95 minutes.
Example: To cook for 5 minutes at 60 % power level.
1.Open the oven door and place the food inside. Close the door.
2.Press the power level button 3 times.
3.Rotate the time/menu knob to enter the cooking time.
4.Press the start/quick start button.
To check the microwave power level during cooking press the power level button. The power level default is 100 %.
At the end of cooking, the system will beep and End is displayed. Before starting another cooking session, press any key to clear the display and reset the system.
Power levels that are too high or cooking times that are too long may overheat foods resulting in a fire.
Power Level Button
Power Level
x 1
100 % (P100)
x 2
80 % (P-80)
x 3
60 % (P-60)
x 4
40 % (P-40)
x 5
20 % (P-20)
x 6
0 % (P-00)
GRILL
Grill cooking is particularly useful for thin slices of meat, steaks, chops, kebabs, sausages and pieces of chicken. It is also suitable for hot sandwiches and au gratin dishes. Maximum cooking time is 95 minutes.
Example: To grill for 12 minutes.
1. Open the oven door and place the food inside. Close the door.
2. Press the grill button once. time.
3. Rotate the time/menu knob to enter the cooking
4. Press the start/quick start button.
IMPORTANT! The high rack is recommended for grilling.
MICRO. + GRILL
Combi cooking combines the microwave and the grill functions at different time periods during cooking.
Maximum cooking time is 95 minutes.
Example: To set Combi cooking for 25 minutes.
1.Open the oven door and place the food inside. Close the door.
2.Press the micro. + grill button once.
3.Rotate the time/menu knob to enter the cooking time.
4.Press the start/quick start button.
Micro. + grill button
Microwave
Grill
Use
x 1
Co - 1
30 %
70 %
fish, potatoes, au gratin
x 2
Co - 2
55 %
45 %
pudding, omelette, baked potatoes, poultry
CONVECTION COOKING
During convection cooking, hot air is circulated throughout the oven cavity to brown and make crisp foods quickly and evenly. This oven can be pro- grammed for ten different cooking temperatures.
Maximum cooking time is 95 minutes.
To cook with convection:
Example: To cook at 180℃ for 40 minutes.
1.Open the oven door and place the food inside. Close the door.
2.Press the convection button 3 times.
3.Rotate the time/menu knob to enter the cooking time.
4.Press the start/quick start button.
To cook with convection, press convection button repeatedly to enter the desired convection temperature. To check the temperature during cooking press the convection button.
Convection button
Temperature (℃)
x 1
200
x 2
190
x 3
180
x 4
170
x 5
160
x 6
150
x 7
140
x 8
130
x 9
120
x 10
110
MICRO. + CONVECTION
This oven has one pre-programmed setting that makes it easy to cook with 200℃ convection and microwave.
Example: To cook for 24 minutes on Micro. + Convection.
1.Open the oven door and place the food inside. Close the door.
2.Press the Micro. + convection button.
3.Rotate the time/menu knob to enter the cooking time.
4.Press the start/quick start button.
To check the microwave power level during cooking press the Micro. + convection button. Maximum cooking time is 95 minutes.
QUICK START
You can directly start cooking on 100 % for 30 seconds by pressing the start/quick start button.
To add more time press the start/quick start button.
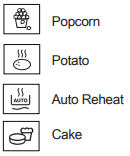
AUTO COOK
Auto cook automatically works out the correct cooking mode and cooking time. You can choose from 8 menus.
1.Open the oven door and place the food inside. Close the door.
2.Rotate the time/menu knob anti- clockwise to select the food.
3.Press the start/quick start button.
4.Press the clock/weight button to select amount or weight.
5.Press the start/quick start button.
Turn the chicken 2 to 3 times during cooking, close the oven door and press the start/quick start button to resume cooking. You do not have to enter the weight of the cake as it is fixed at 475g.
Auto Cook
Food
Cooking Mode
A - 01
Chicken
800 - 1400 g
Micro. + Convection
A - 02
Popcorn 99 g
Micro.
A - 03
Milk/Coffee 1 - 3 cups
Micro.
A - 04
Baked Potato 1 - 3 pcs
Micro.
A - 05
Spaghetti 100 - 300 g
Micro.
A - 06
Auto Reheat 200 - 800 g
Micro.
A - 07
Pizza
150 - 450 g
Convection
A - 08
Cake
Convection
A - 09
Auto Defrost
Micro.
AUTO DEFROST
Auto defrost automatically works out the correct cooking mode for defrosting food.
Example: To defrost frozen food for 10 minutes.
1.Open the oven door and place the food inside. Close the door.
2.Rotate the time/menu knob anti- clockwise until it shows A-09.
3.Press the start/quick start button.
4.Rotate the time/menu knob to set 10 minutes.
5.Press the start/quick start button.
Turn the food 2 to 3 times during defrosting, close the oven door and press the start/quick start button to resume cooking.
MULTI-STAGE COOKING
A sequence of 3 stages (maximum) can be programmed.
Example: To cook:
Stage 1: 2 minutes 30 seconds at 40 %
Stage 2: 5 minutes grill
1.Open the oven door and place the food inside. Close the door.
2.Press the power level button 4 times.
3.Rotate the time/menu knob to enter the cooking time.
4.Press the grill button once.
5.Rotate the time/menu knob to enter the cooking time.
6.Press the start/quick start button.
Auto Cook, Auto Defrost, and Quick Start cannot be set as a multi-stage cooking program.
CHILD SAFETY LOCK
The child proof lock prevents unsupervised operation by children. The child safety lock is automatically enabled after 1 minute of no operation by the user. To cancel open the door.
PAUSE
To pause whilst the microwave is running.
1.Press the stop/cancel button once to enter pause mode during cooking.
2.Press the start/quick start button to continue cooking.
The oven will stop operating when the door is opened.
OVEN PROTECTION FEATURES
This oven has 3 automatic systems to protect against abnormal cooking temperatures. In normal operation no user input is needed.
If one of the systems is triggered then the display shows an indication below and beeps continuously.
E01: Over temperature
E02: Under temperature
E03: Sensor
Press the stop/cancel button to return the system to normal standby mode.
HINTS AND TIPS
MICROWAVE SAFE COOKWARE
Cookware
Microwave safe
Comments
Aluminium foil/ containers
Small pieces of aluminium foil can be used to shield food from overheating. Keep foil at least 2 cm from the oven walls, as arcing may occur. Foil containers are not recommended unless specified by the manufacturer. Follow instructions carefully.
China and ceramics
Porcelain, pottery, glazed earthenware and bone china are usually suitable, except for those with metallic decoration.
Glassware
e.g. Pyrex ®
Care should be taken if using fine glassware as it can break or crack if heated suddenly.
Metal
It is not recommended to use metal cookware when using microwave power as it will arc, which can lead to fire.
Plastic/polystyrene e.g. fast food containers
Care must be taken as some containers warp, melt or discolour at high temperatures.
Freezer/roasting bags
Must be pierced to let steam escape. Ensure bags are suitable for microwave use. Do not use plastic or metal ties, as they may melt or catch fire due to the metal arcing.
Paper-plates, cups and kitchen paper
Only use for warming or to absorb moisture. Care must be taken as overheating may cause fire.
Straw and wooden containers
Always attend the oven when using these materials as overheating may cause fire.
Recycled paper and newspaper
May contain extracts of metal which will cause arcing and may lead to fire.
Cookware
Microwave
Grill
Convection
Combination*
Heat - resistant glass
Non Heat - resistant glass
Heat - resistant ceramics
Microwave - safe plastic dish
Kitchen paper
Baking plate
Racks
Aluminum foil & foil container
* Combination: applicable for both micro. grill and micro. convection cooking.
MICROWAVE COOKING ADVICE
Microwave cooking advice
Composition
Foods high in fat or sugar (e.g. Christmas pudding, mince pies) require less heating time. Care should be taken as overheating can lead to fire.
Size
For even cooking make all the pieces the same size.
Temperature of food
The initial temperature of food affects the amount of cooking time needed. Cut into foods with fillings (e.g. jam doughnuts) to release heat or steam.
Arrange
Place the thickest parts of food towards the outside of the dish (e.g. chicken drumsticks).
Cover
Use vented microwave cling film or a suitable lid.
Pierce
Foods with a shell, skin or membrane must be pierced in several places before cooking or reheating as steam will build up and may cause food to explode (e.g. potatoes, fish, chicken, sausages).
IMPORTANT! Eggs should not be heated using microwave power as they may explode, even after cooking has ended (e.g. poached, hard boiled).
Stir, turn and rearrange
For even cooking it is essential to stir, turn and rearrange food during cooking. Always stir and rearrange from the outside towards the centre.
Stand
Standing time is necessary after cooking to enable the heat to disperse equally throughout the food.
Shield
Warm areas can be shielded with small pieces of foil, which reflect microwaves (e.g. legs and wings on a chicken).
TROUBLESHOOTING
Problem
Check if . . .
The microwave appliance is not working properly?
•The fuses in the fuse box are working.
•There has not been a power outage.
•If the fuses continue to blow, please contact a qualified electrician.
The microwave mode is not working?
•The door is properly closed.
•The door seals and their surfaces are clean.
•The START button has been pressed.
The turntable is not turning?
•The turntable support is correctly connected to the drive.
•The ovenware does not extend beyond the turntable.
•Food does not extend beyond the edge of the turntable preventing it from rotating.
•There is nothing in the well beneath the turntable.
The microwave will not switch off?
•Isolate the appliance from the fuse box.
•Call an authorised ELECTROLUX service agent.
The interior light is not working?
•Call your authorised ELECTROLUX service agent. The interior light can be exchanged only by a trained authorised ELECTROLUX service agent.
The food is taking longer to heat through and cook than before?
•Set a longer cooking time (double quantity = nearly double time) or
•If the food is colder than usual, rotate or turn from time to time or
•Set a higher power setting.
If the oven operates in any mode for 2 minutes or longer, the fan will stay on for 3 minutes after the cooking ends.
 During cooking, you can press the clock/weight button to check the time of day.
 IMPORTANT! The high rack is recommended for grilling.