Documents: Go to download!
User Manual
- User Manual - (English, French)
- Specification Sheet - (English)
- Energy Guide - (English)
- Dimension Guide - (English)
- Repair Part List - (English)
- Tech Sheet - (English)
- Installation Instructions - (English)
- Instruction Sheet - (English)
- MAINTENANCE AND CARE
- REFRIGERATOR AND FREEZER FEATURES
- Starting the Ice Maker
- Troubleshooting
Table of contents
TOP-MOUNT REFRIGERATOR OWNER'S MANUAL
MAINTENANCE AND CARE
Cleaning
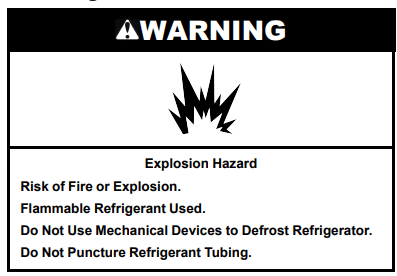
Both the refrigerator and freezer sections defrost automatically.However, clean both sections about once a month to avoid buildup of odors. Wipe up spills immediately.
IMPORTANT:
- Because air circulates between both sections, any odors formed in one section will transfer to the other. You must thoroughly clean both sections to eliminate odors. To avoid odor transfer and drying out of food, wrap or cover foods tightly
- For stainless steel models, stainless steel is corrosion resistant and not corrosion-proof. To help avoid corrosion of your stainless steel, keep your surfaces clean by using the following cleaning instructions
To Clean Your Refrigerator:
NOTE: Do not use abrasive or harsh cleaners such as window sprays, scouring cleansers, flammable fluids, muriatic acid, cleaning waxes, concentrated detergents, bleaches or cleansers containing petroleum products on exterior surfaces (doors and cabinet), plastic parts, interior and door liners, or gaskets. Do not use paper towels, scouring pads, or other harsh cleaning tools.
- Unplug refrigerator or disconnect power.
- Using a clean sponge or soft cloth and a mild detergent in warm water, hand-wash, and rinse removable parts and interior surfaces thoroughly. Dry thoroughly with a soft cloth.
- Clean the exterior surfaces.
IMPORTANT:- When cleaning stainless steel, always wipe in the direction of the grain to avoid cross-grain scratching.
- To keep your stainless steel refrigerator looking like new and to remove minor scuffs or marks, it is suggested that you use the manufacture's approved Stainless Steel Cleaner and Polish. To order, use the following parts:
Affresh® Stainless Steel Cleaner: Part #W10355016
Affresh® Stainless Steel Wipes: Part #W10355049
Affresh® Kitchen & Appliance Cleaner: Part W10355010 - Stainless Steel Cleaner and Polish is for stainless steel only. Do not allow the Stainless Steel Cleaner to come into contact with any plastic parts such as the trim pieces, dispenser covers or door gaskets. If unintentional contact does occur, clean plastic part with a sponge and a mild detergent in warm water. Dry thoroughly with a soft cloth.
- There is no need for routine condenser cleaning in normal home operating environments. If the environment is particularly greasy or dusty, or there is a significant pet traffic in the home, the condenser should be cleaned every 2 to 3 months to ensure maximum efficiency.
If you need to clean the condenser: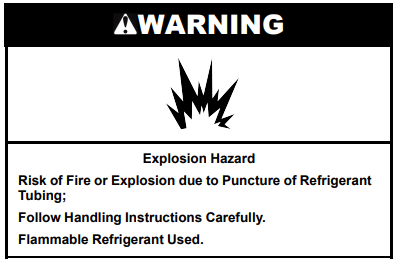
- Pull refrigerator out away from the wall. See “Unpack the Refrigerator.”
- Remove the base grille.
- Vacuum coils when they are dusty or dirty.
- Replace the base grille when finished.
- Roll refrigerator back into place. Make sure to leave 1" (2.5 cm) between the cabinet back and the wall.
- Check to see that the refrigerator is level.
- Plug in refrigerator or reconnect power.
Changing the Light Bulbs
IMPORTANT: The lights in both the refrigerator and freezer compartments use LED technology that do not need to be replaced. If the lights do not illuminate when the door or drawer is opened, call for assistance or service. Refer to the Quick Start
Guide for contact information. The lighting system in this appliance may consist of:
- Sealed LED modules
- LED Bulbs
- Incandescent Bulbs
- or a combination of the above.
NOTE: If your product has a sealed LED module, call for assistance or service . Refer to the Quick Start Guide for contact information.
IMPORTANT:
- Depending on your model, the light bulb in your new refrigerator may use LED technology. If your model uses LED lighting and the light does not illuminate when the refrigerator door is opened, call for assistance or service.
- Some LED replacement bulbs are not recommended for wet/ damp environments. The refrigerator and freezer compartments are considered to be wet/dam environments. If using a brand of LED bulb other than the recommended LED bulb listed below, before installation, read and follow all instructions on the LED packaging.
- If an incandescent bulb is used to replace an LED bulb, use only incandescent bulbs for household appliances with a maximum of 40 W.
CHANGING THE LIGHT BULB
- Unplug refrigerator or disconnect power.
- The light bulb is located behind the Temperature control on most models.
- Remove the light shield (if applicable) as shown below.
- Remove and replace the light bulb as shown below.
- Replace the light shield (if applicable).
- Plug in refrigerator or reconnect power.
REFRIGERATOR LIGHT STYLE 1
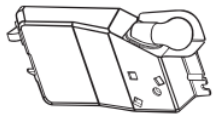
To Remove and Replace Light Bulb:
- Reach behind the control panel and unscrew the bulb.
- Replace the bulb with a 40 W max. appliance bulb.
REFRIGERATOR LIGHT STYLE 2
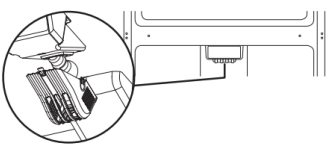
- Remove the light shield by squeezing in on the sides and pulling it straight down.
- Remove the light bulb and replace it with an appliance bulb of the same size and shape.
NOTE: To replace with an LED light bulb, order part number W10565137 (3.6 W).
REFRIGERATOR LIGHT STYLE 3
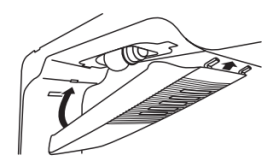
- Remove the light shield by squeezing in on the sides and pulling it straight down.
- Remove the light bulb and replace it with an appliance bulb of the same size and shape.
NOTE: To replace with an LED light bulb, order part number W10565137 (3.6 W).
FREEZER LIGHT
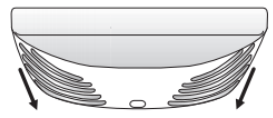
- Slide the light shield toward the back of the compartment to release it from the light assembly.
- Remove the light bulb and replace it with an appliance bulb of the same size and shape.
NOTE: To replace with an LED light bulb, order part number W10574850 (2.0 W).
Vacations
If You Choose to Leave the Refrigerator On While You’re Away :
- Use up any perishables and freezer other items.
- If your refrigerator has an automatic ice maker and is connected to the household water supply, turn off the water supply to the refrigerator. Property damage can occur if the water supply is not turned off.
- If you have an automatic ice maker, turn off the ice maker.
- NOTE: Raise the wire shut-off arm to Off (up) position.
- Empty the ice bin.
If You Choose to Turn Off the Refrigerator Before You Leave:
- Remove all food from the refrigerator.
- If your refrigerator has an automatic ice maker:
- Turn off the water supply to the ice maker at least one day ahead of time.
- When the last load of ice drops, raise the wire shutoff arm to the Off (up) position.
- Turn off the Temperature control(s). See “Using the Controls” in the Quick Start Guide.
- Clean refrigerator, wipe it, and dry well.
- Tape rubber or wood blocks to the tops of both doors to prop them open far enough for air to get in. This stops odor ad mold from building up.
Moving
When you are moving your refrigerator to a new home, follow these steps to prepare it for the move.
- If your refrigerator has an automatic ice maker:
- Turn off the water supply to the ice maker at least one day ahead of time.
- Disconnect the water line from the back of the refrigerator.
- When the last load of ice drops, raise the wire shutoff arm to the Off (up) position.
- Remove all food from the refrigerator and pack all frozen food in dry ice.
- Empty the ice bin.
- Turn off the Temperature control(s). See “Using the Controls” in the Quick Start Guide.
- Unplug refrigerator.
- Clean refrigerator, wipe it, and dry well.
- Take out all removable parts, wrap them well, and tape them together so they don’t shift and rattle during the move.
- Depending on the model, raise the front of the refrigerator so it rolls more easily, or raise the leveling legs so they don't scrape the floor. See “Adjust the Doors” or “Door Removal, Leveling and Alignment” in the online Feature Guide.
- Tape the doors closed and tape the power cord to the back of the refrigerator.
When you get to your new home, put everything back and refer to the “Installation Instructions” for preparation instructions. Also, if your refrigerator has an automatic ice maker, remember to reconnect the water supply to the refrigerator.
REFRIGERATOR AND FREEZER FEATURES
Refrigerator Shelves
Important information to know about glass shelves and covers:
Do not clean glass shelves or covers with warm water when they are cold. Shelves and covers may break if exposed to sudden temperature changes or impact, such as bumping. Tempered glass is designed to shatter into many small, pebble-size pieces.
This is normal. Glass shelves and covers are heavy. Use both hands when removing them to avoid dropping.
Refrigerator Shelves
The shelves in your refrigerator are adjustable to match your individual storage needs.
Storing similar food items together in your refrigerator and adjusting the shelves to fit different heights of items will make finding the exact item you want easier. It will also reduce the amount of time the refrigerator door is open, and save energy
To remove and replace a shelf:
- Remove items from the shelf.
- Slide the shelf straight out to the stop.
- Depending on your model, lift back or front of the shelf past the stop. Slide shelf out the rest of the way.
- Replace the shelf by sliding the back of the shelf into the track in the wall of the cabinet.
- Guide the front of the shelf into the shelf track. Be sure to slide the shelf in all the way.

Freezer Shelf
Important information to know about glass shelves and covers:
Do not clean glass shelves or covers with warm water when they are cold. Shelves and covers may break if exposed to sudden temperature changes or impact, such as bumping.
Tempered glass is designed to shatter into many small, pebble-size pieces. This is normal. Glass shelves and covers are heavy. Use both hands when removing them to avoid dropping.
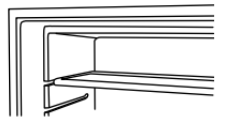
Full-Width Shelf (on some models)
Depending on your model, the shelf may be wire or glass.
To remove and replace the freezer shelf:
- Remove items from the shelf.
- Lift back of shelf over stop and slide shelf straight out
- Replace the shelf by sliding the back of the shelf into the tracks on walls of cabinet.
- Be sure to slide the shelf in all the way
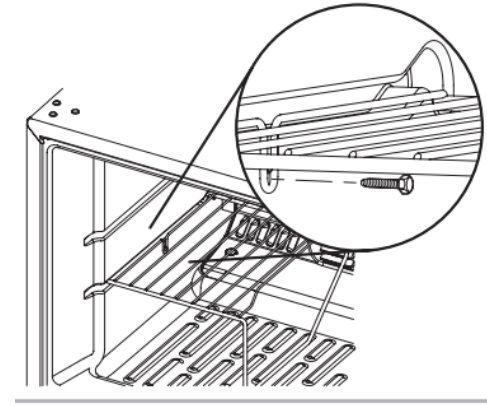
Half-Width Shelf (on some models)
IMPORTANT: The half–width shelf can only be installed in the lefthand side of the freezer compartment.
- Remove items from the shelf
- Remove the shelf screw. Lift back of the shelf over the stop and slide it out.
- Replace the shelf by sliding the back of the shelf into the tracks on the walls of the cabinet. Fasten the shelf screw.
Frozen Food Storage Guide
Storage times will vary according to the quality and type of food, the type of packaging or wrap used (should be airtight and moisture-proof), and the storage temperature. Seal the package or container securely to avoid taste and odor transfer throughout the product. Ice crystals inside a sealed package are normal. This simply means that moisture in the food and air inside the package have condensed, creating ice crystals.
Put no more unfrozen food into the freezer than will freeze within 24 hours (no more than 2 to 3 lbs of food per cubic foot [907 to 1350 g per L] of freezer space). Leave enough space in the freezer for air to circulate around packages. The freezer door must close tightly.
NOTE: For more information on preparing food for freezing, check a freezer guide or reliable cookbook.
Door Rails or Trivets
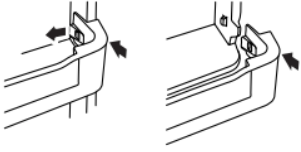
SNAP ON DOOR RAILS OR TRIVETS
To remove and replace the rails or trivets:
- Depending on your model, remove the rails or trivets by pushing in slightly on the front of the bracket while pulling out on the inside tab. Repeat these steps for the other end.
- Replace the rails or trivets by aligning the ends of the brackets with the buttons on the sides of the door liner. Firmly snap bracket and assembly onto the tabs above the shelf as shown.
Style 1 -Door Rails

Style 2 - Trivets
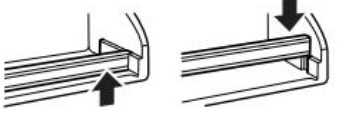
DROP-IN DOOR RAILS
To remove and replace the rails:
- Remove the rails by pulling straight up on each end of the rail.
- Replace the rails by sliding the shelf rail into the slots on the door
Can Racks and Bins (on some models)
Can Racks and Door Bins
NOTE: Can racks may be purchased as an accessory for some models.
To remove and replace the racks/bins:
- Remove the rack/bin by lifting it and pulling it straight out.
- Replace the rack/bin by sliding it in above the desired support and pushing it down until it stops.

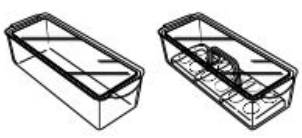
Egg or Utility Bins
Depending on your model, you may have a one, two, or three piece bin. Eggs may be stored in the egg tray or loose in the bin.
NOTE: Store eggs in a covered container for long–term storage. If your model does not have an egg storage bin, store eggs in their original container on an interior shelf.
Deli or Meat Drawer
The deli drawer design allows flexible positioning.
Deli or Meat Drawer
- Remove deli drawer.
- Release cover and place it between the desired crossbars
- Secure the rear clips onto the shelf.
- Replace the drawer
To remove and replace the drawer:
- Slide deli drawer out to the stop
- Lift front of deli drawer with one hand while supporting bottom of drawer with other hand. Slide drawer out the rest of the way.
- Replace the drawer by sliding it back in fully past the drawer stop
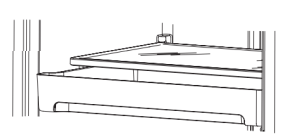
DRAWER COVER
To remove and replace the drawer cover:
Style 1 - Wire Shelves
- Remove the deli drawer
- Push the cover back to release the rear clips from the shelf.
- Tilt the cover up at the front, and then pull it forward.
- Replace the deli drawer cover by fitting the notches and clips on the cover over the rear and center crossbars on the shelf.
- Replace the deli drawer
Style 2 - Glass Shelves
- Remove the drawer
- Remove items from the shelf.
- Slide the shelf straight out to the stop.
- Slide the cover to one side until free.
- Insert the cover into the shelf tracks
- Slide the shelf back into the refrigerator, and then replace the deli drawer
NOTE: On some models the drawer slides sideways on the shelf to allow for flexible positioning
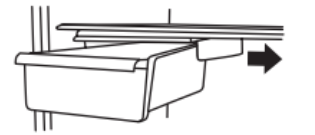
Meat Storage Guide
Store most meat in original wrapping as long as it is airtight and moisture-proof. Rewrap if necessary. See the following chart for storage times. When storing meat longer than the times given, freeze the meat.
Fresh fish or shellfish ....................... use same day as purchased
Chicken, ground beef, variety meats (liver) ................... 1-2 days
Cold cuts, steaks/roasts ................................................ 3-5 days
Cured meats ................................................................. 7-10 days
Leftovers - Cover leftovers with plastic wrap, aluminum foil, or plastic containers with tight lids.
Crisper
Crisper Cover
Style 1 – Plastic Cover
To remove and replace the crisper cover:
1. Remove the crisper(s).
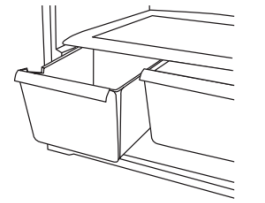
2. Lift the cover up and slide it out.
3. Replace the cover by fitting the cover tabs into the lowest cabinet slots and pushing them in. Lower the front retainers into place.
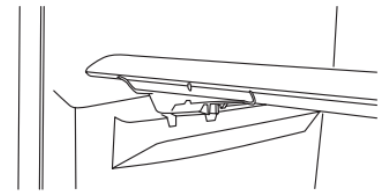
Style 2– Glass Cover
To remove and replace the crisper cover:
- Remove the crisper(s).
- Pull the glass straight out.
- Replace the glass by pushing it straight in.
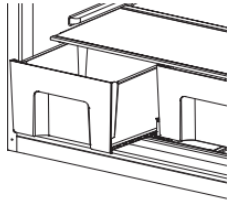
Crisper Humidity Control (On Some Models)
You can control the amount of humidity in the moisture-sealed crisper. Adjust the control to any setting between Low and High.
Low(open) – lets moist air out of the crisper for best storage of fruits and vegetables with skins.
- Fruit: Wash, let dry, and store in refrigerator in plastic bag or crisper. Do not wash or hull berries until they are ready to use.
Sort and keep berries in original container in crisper or store in a loosely closed paper bag on a refrigerator shelf.
- Vegetables with skins: Place in plastic bag or plastic container and store in crisper
High (closed) – keeps moist air in the crisper for best storage of fresh, leafy vegetables.
- Leafy vegetables: Wash in cold water, drain, and trim or tear off bruised and discolored areas. Place in plastic bag or plastic container and store in crisper.
Utility Compartment
The utility compartment may be removed for easier cleaning.
To remove and replace the utility compartment:
- Remove the utility compartment by squeezing against one side while raising the utility compartment up and pulling it straight out.
- Replace the utility compartment by positioning one side in the lock and sliding in the opposite side until it stops.
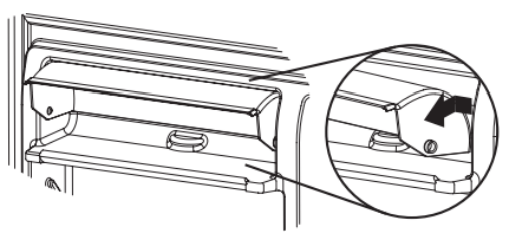
Ice Maker
For models with a water filter, after connecting the refrigerator to a water source or replacing the water filter, fill and discard three full containers of ice to prepare the water filter for use.
For products without any parts of the ice dispensing circuit, ice maker and internal water circuit parts must be installed by the manufacturer or by its qualified service technician.
For Easy Connect (ice maker ready) products, ice maker can be easily installed by the user, following instructions given with the kit.
In order to know which type of ice maker fits in your product, please refer to the serial tag inside the food compartment of appliance for ice maker kit model information.
Refer to the Quick Start Guide for contact information.
Turning the Ice Maker On/Off
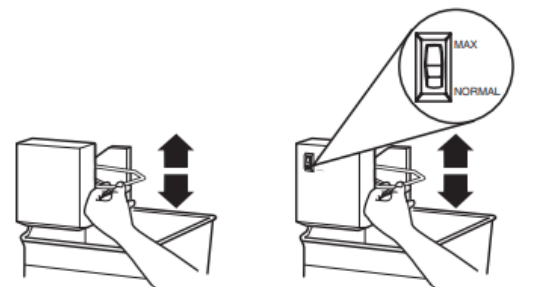
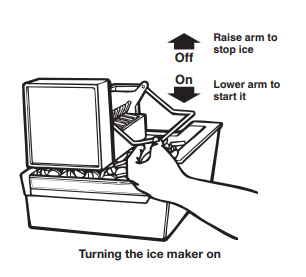
- To turn the ice maker On, simply lower the wire shutoff arm.
- To manually turn the ice maker off, lift the wire shutoff arm to the off (arm up) position and listen for the click.
NOTE: Your ice maker has an automatic shutoff. As ice is made, the ice cubes will fill the ice storage bin and the ice cubes will raise the wire shutoff arm to the Off (arm up) position. Do not force the wire shutoff arm up or down.
Ice Storage Bin
NOTE: Turn off the ice maker before removing the ice storage bin to serve ice or to clean the bin. This will keep the ice cubes from dropping out of the ice maker and into the freezer compartment.
After replacing the ice storage bin, turn on the ice maker.
- Wash the ice storage bin with mild soap and warm water.
- Slide the ice storage bin under the ice maker and push it toward the back as far as it will go.
- Lower the arm on the ice maker to the On position.
Ice Production Rate
- The ice maker should produce a complete batch of ice approximately every 3 hours, approximately 8 to 12 batches of ice in a 24 hour period.
- To increase ice production, lower the freezer and refrigerator temperature. See “Using the Controls” in the Quick Start Guide. Wait 24 hours between adjustments.
- Maximum ice production (on some models): If your refrigerator has the maximum ice production feature, push the switch to
Max to produce approximately 16 to 20 batches of ice in a 24 hour period.
Remember:
NOTE: The dispenser will automatically turn off Measured Fill after 1 minute of inactivity. When Measured Fill is turned off, any changes you have made will be lost and all defaults will be restored.
Starting the Ice Maker
1. Wash out the ice bucket, and then slide it under the ice maker (see the side diagram) as far as it will go. The ice bucket will be sitting on top of the freezer shelf.
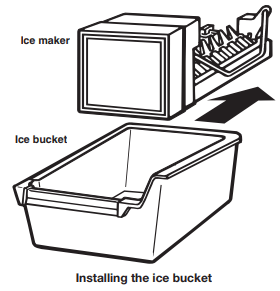
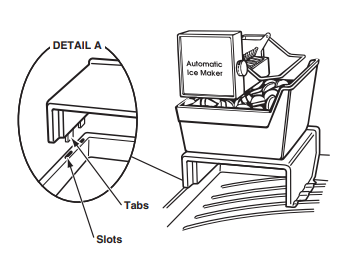
IMPORTANT: On top-mount models without a full-width freezer shelf, you will need to place the ice bucket on top of the inverted ice tray shelf. First, position the ice tray shelf face down so that the shorter side is alongside the freezer wall (see DETAIL A). Then insert the tabs on the shorter side of the shelf into the slots on the edge of the freezer floor. This will hold the shelf in position. Next, place the ice bucket on top of the inverted ice tray shelf and slide it under the ice maker (see side diagram). The ice maker will not function properly if the ice bucket is placed directly on the freezer floor.
2. Place the items back into the freezer compartment.
3. Lower the arm on the ice maker (see the side diagram) to its “on” position, and close the freezer door. The ice maker will begin to make ice within 24 hours.
NOTE: It usually takes approximately 24 hours for the ice maker to begin producing ice. Once ice is available, you may notice that it has an “off taste.” If this happens, make two or three batches of ice and discard them. After that, the “off-taste” should be gone. If you have any problems, refer to “Troubleshooting” on page 22.
Troubleshooting
Operational notes
- The Ice Maker water valve contains a flow washer that acts like a pressure regulator to control the water flow. For the Ice Maker to work properly, the water pressure in your home must be between 20 and 120 pounds per-square-inch (psi). If you encounter problems with your Ice Maker’s ability to produce ice, call your water utility company and have the water pressure checked.
- The Ice Maker’s water valve is equipped with two strainers: a plastic basket type and a wire-mesh screen. Both of these can be cleaned by turning off the water and disassembling the water valve (your service center should be able to provide this service). If local water conditions require periodic cleaning, or if you use a well as a water source, you should consider installing a second water strainer in the water line. You can obtain a water strainer from your local appliance dealer.
Troubleshooting chart
The following chart lists several common problems that could occur with your Ice Maker.
| PROBLEM | CAUSE |
One or more of the following sounds is heard:
| The water valve is operating. Water is entering the Ice Maker fill cup. Ice is being dumped into the ice bin. |
| Ice tastes stale. | The ice is old. Make a new batch. |
| Water in Ice Maker overflows. | Refrigerator or Ice Maker is not level. If the Ice Maker still overflows after leveling, turn off the Ice Maker’s water supply at the shut-off valve, and raise the Ice Maker’s bail arm to the “off” position (see page 21); then contact your local service center. |
| Not enough ice. | It will take 48 hours to fill the ice bucket. The ice maker will make ice every 2 to 3 hours. For more ice, adjust the freezer control for a colder setting. |
| Ice making has stopped. | Be sure that the bail arm is lowered into the ice bucket (see page 21). Make sure that the water shut-off valve is on. The water shut-off valve or the water valve screen is clogged (contact your local service center). |
See other models: WRS315SNHM WRB119WFBM WRS312SNHM WUR50X24HZ WFE540H0ES
