
49-80632-1 07-11 GE
GEAppliances.com
Write the model and serial
numbers here:
Model # ________________
Serial # ________________
You can find them on a label
behind the drawer or behind the
lower oven door on the front of
the range frame.
Quickset III and
Quickset IV Models
Owner’s Manual
Ranges
Safety Instructions . . . . . . . . . 2–6
Operating Instructions
Clock and Timer . . . . . . . . . . . . . . . . . . . 16
Control Lock Out . . . . . . . . . . . . . . . . . . 18
Energy Saver Mode . . . . . . . . . . . . . . . 18
Oven . . . . . . . . . . . . . . . . . . . . . . . . . . 11–22
Adjust the Oven Thermostat . . . . . 18
Aluminum Foil . . . . . . . . . . . . . . . . . . . 13
Broiling, Broiling Guide . . . . . . . . . . 14
Controls . . . . . . . . . . . . . . . . . . . . . . . . . . 11
Convection Oven . . . . . . . . . . . . . . . . 15
Power Outage . . . . . . . . . . . . . . . . . . . 12
Sabbath Feature . . . . . . . . . . . . . . . . . 19
Self-Cleaning. . . . . . . . . . . . . . . . . 20, 21
Special Features . . . . . . . . . . . . . . . . . 18
Steam Cleaning . . . . . . . . . . . . . . . . . . 22
Timed Baking . . . . . . . . . . . . . . . . . . . . 17
Surface Units . . . . . . . . . . . . . . . . . . . . 7–9
Care and Cleaning
Coil Surface Units . . . . . . . . . . . . . . . . . 29
Control Knobs . . . . . . . . . . . . . . . . . . . . 23
Drip Pans . . . . . . . . . . . . . . . . . . . . . . . . 29
Glass Cooktop . . . . . . . . . . . . . . . . 27, 28
Lift-Off Oven Door . . . . . . . . . . . . . . . . 25
Lift-Up Cooktop . . . . . . . . . . . . . . . . . . . 29
Light . . . . . . . . . . . . . . . . . . . . . . . . . . . . . 26
Oven Heating Elements . . . . . . . . . . . 25
Racks . . . . . . . . . . . . . . . . . . . . . . . . . . . . 25
Standard-Clean Oven Interior . . . . 24
Vent . . . . . . . . . . . . . . . . . . . . . . . . . . . . . . 24
Troubleshooting Tips . . . . . 30–33
Accessories . . . . . . . . . . . . . . . . . . . 34
Consumer Support
Consumer Support . . . . . . Back Cover
Warranty . . . . . . . . . . . . . . . . . . . . . . . . . 35
Printed on
Recycled Paper
Electric Free-Standing, Slide-In and Drop-In
In Canada contact us at:
www.GEAppliances.ca
For a Spanish version of this
manual, visit our Website at
GEAppliances.com.
Para consultar una version
en español de este manual de
instrucciones, visite nuestro sitio
de internet GEAppliances.com.
Read all safety instructions before using the product. Failure to follow these instructions may result in fire, electric shock,
serious injury or death.
WARNING
IMPORTANT SAFETY NOTICE
The California Safe Drinking Water and Toxic Enforcement Act requires the Governor of California to publish a list of
substances known to the state to cause cancer, birth defects or other reproductive harm, and requires businesses to
warn customers of potential exposure to such substances.
The fiberglass insulation in self-clean ovens gives off a very small amount of carbon monoxide during the cleaning cycle.
Exposure can be minimized by venting with an open window or using a ventilation fan or hood.
2
IMPORTANT SAFETY INFORMATION.
READ ALL INSTRUCTIONS BEFORE USING.
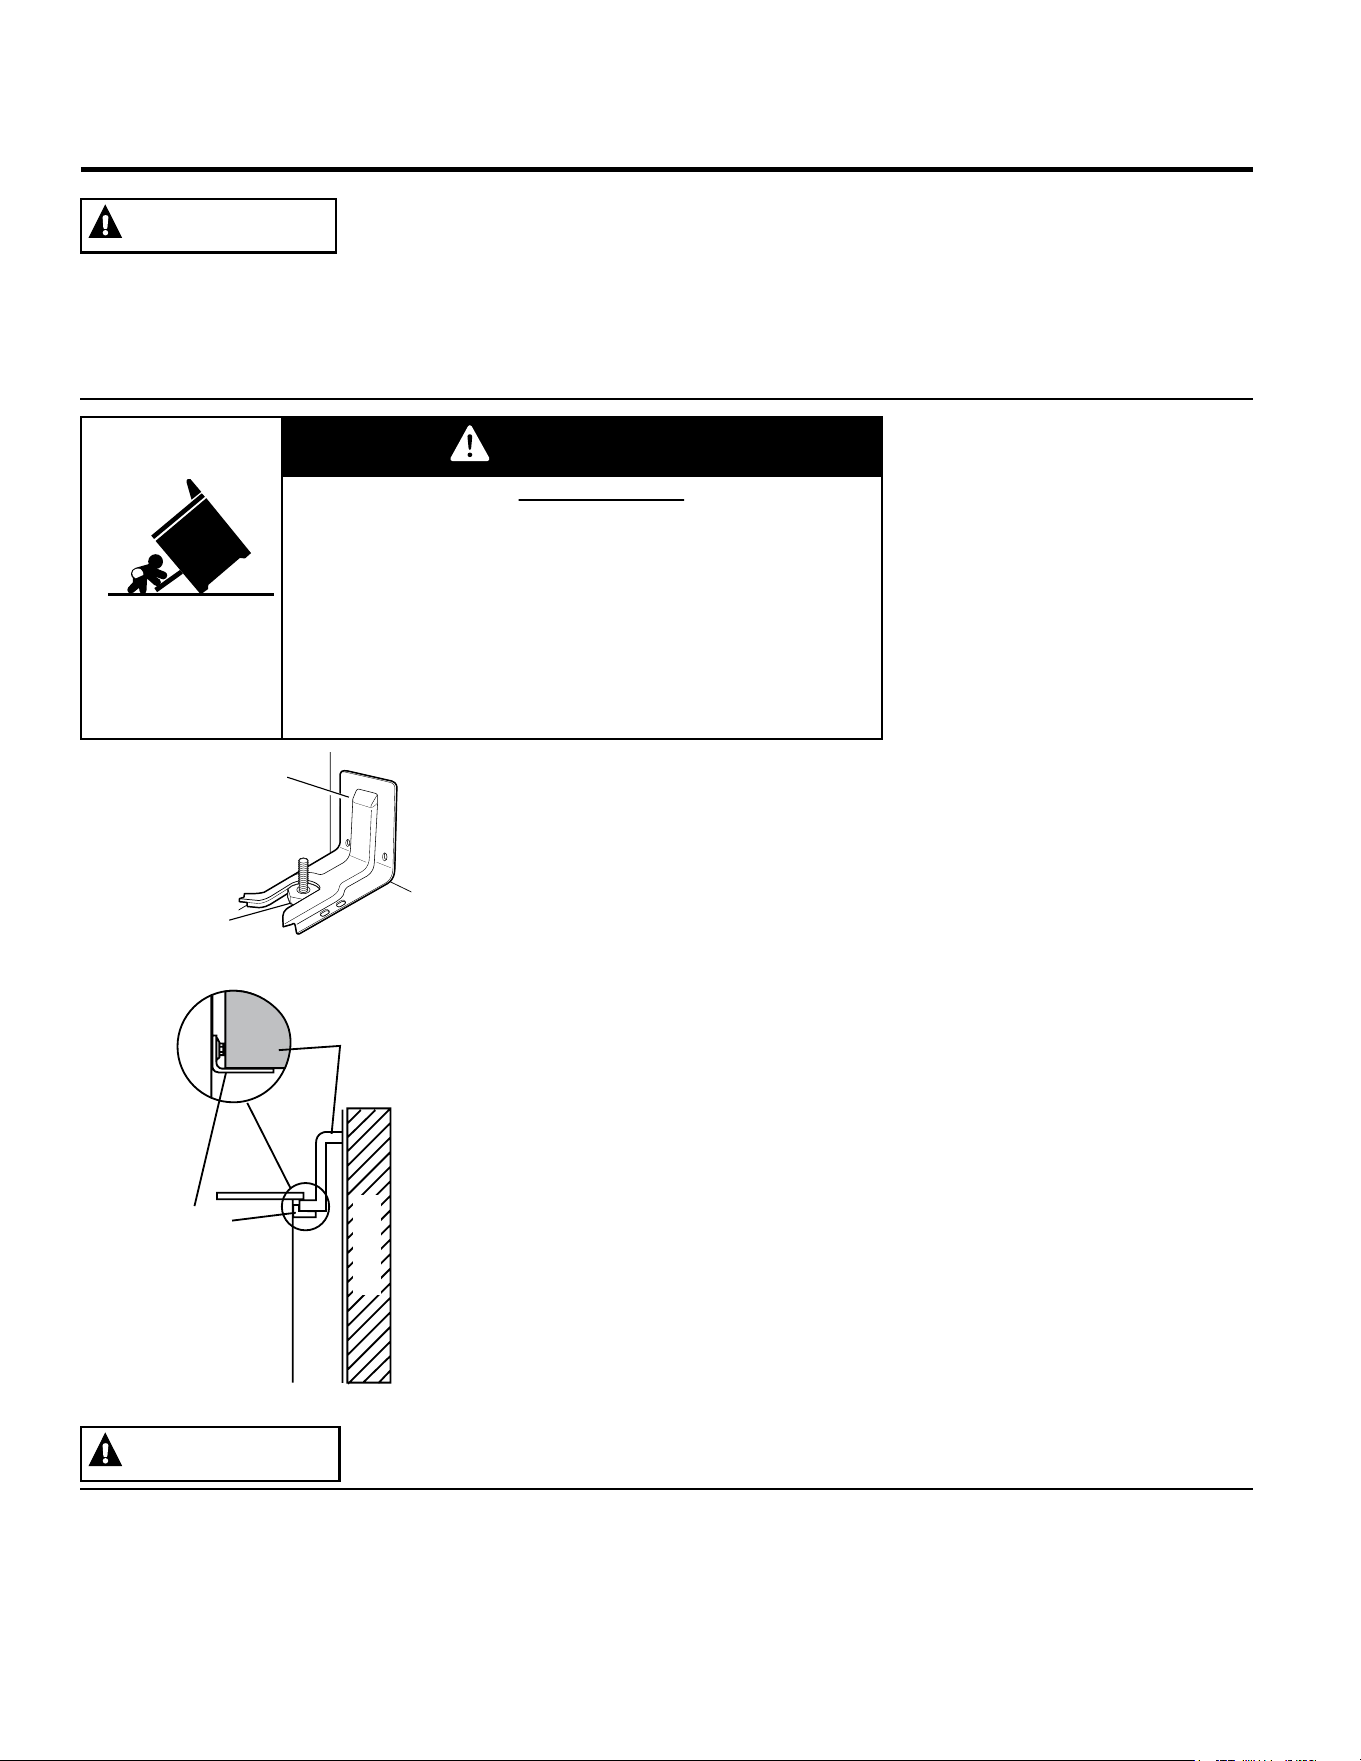
To reduce the risk of tipping the
range, the range must be secured
by a properly installed anti-tip
bracket. See installation instructions
shipped with the bracket for
complete details before attempting
to install.
For Freestanding and Slide-In
Ranges
To check if the bracket is installed
and engaged properly, look
underneath the range to see
that the rear leveling leg is engaged in the bracket. On some models, the
storage drawer or kick panel can be removed for easy inspection. If visual
inspection is not possible, slide the range forward, confirm the anti-tip
bracket is securely attached to the floor or wall, and slide the range back so
the rear leveling leg is under the anti-tip bracket.
If the range is pulled from the wall for any reason, always repeat this
procedure to verify the range is properly secured by the anti-tip bracket.
Never completely remove the leveling legs or the range will not be secured
to the anti-tip device properly.
For Drop-In Ranges
To check if the bracket is installed and engaged properly, slide the range
forward, confirm the anti-tip bracket is securely attached to the rear of the
range, and slide the range back so that the anti-tip bracket slides just under
the countertop or wood block attached to the rear wall.
If you did not receive an anti-tip bracket with your purchase, call
1.800.626.8774 to receive one at no cost (in Canada, call 1.800.561.3344).
For installation instructions of the bracket, visit GEAppliances.com (in
Canada, GEAppliances.ca).
ANTI-TIP DEVICE
WARNING
Rear Wall
Oven
Anti-Tip
Bracket
Countertop or
Wood Block
Drop-In Ranges
Freestanding and Slide-In Ranges
Drop-In Ranges
Anti-Tip
Bracket
Leveling Leg
A child or adult can tip the range and be killed.
Verify the anti-tip bracket has been properly installed
and engaged.
Ensure the anti-tip bracket is re-engaged when the range
is moved.
Do not operate the range without the anti-tip bracket in
place and engaged.
Failure to follow these instructions can result in death or
serious burns to children or adults.
Tip-Over Hazard
WARNING
■8VHWKLVDSSOLDQFHIRULWVLQWHQGHGSXUSRVHDVGHVFULEHG
LQWKLV2ZQHU·V0DQXDO
■%HVXUH\RXUDSSOLDQFHLVSURSHUO\LQVWDOOHGDQG
JURXQGHG
E\DTXDOLILHGLQVWDOOHULQDFFRUGDQFHZLWKWKH
SURYLGHGLQVWDOODWLRQLQVWUXFWLRQV
■ 'RQRWDWWHPSWWRUHSDLURUUHSODFHDQ\SDUWRI\RXU
UDQJH
XQOHVVLWLVVSHFLILFDOO\UHFRPPHQGHGLQWKLV
PDQXDO$OORWKHUVHUYLFLQJVKRXOGEHUHIHUUHGWRD
TXDOLILHGWHFKQLFLDQ
■ %HIRUHSHUIRUPLQJDQ\VHUYLFHXQSOXJWKHUDQJH
RUGLVFRQQHFWWKHSRZHUVXSSO\DWWKHKRXVHKROG
GLVWULEXWLRQSDQHOE\UHPRYLQJWKHIXVHRUVZLWFKLQJRII
WKHFLUFXLWEUHDNHU
■ 'RQRWOHDYHFKLOGUHQDORQH³FKLOGUHQVKRXOGQRWEHOHIW
DORQHRUXQDWWHQGHGLQDQDUHDZKHUHDQDSSOLDQFHLVLQ
XVH7KH\VKRXOGQHYHUEHDOORZHGWRFOLPEVLWRUVWDQG
RQDQ\SDUWRIWKHDSSOLDQFH
■
&$87,21'RQRWVWRUHLWHPVRILQWHUHVWWR
FKLOGUHQDERYHDUDQJHRURQWKHEDFNJXDUGRID
UDQJH³FKLOGUHQFOLPELQJRQWKHUDQJHWRUHDFKLWHPV
FRXOGEHVHULRXVO\LQMXUHG
■ 8VHRQO\GU\SRWKROGHUV³PRLVWRUGDPSSRWKROGHUVRQ
KRWVXUIDFHVPD\UHVXOWLQEXUQVIURPVWHDP'RQRWOHW
SRWKROGHUVWRXFKKRWVXUIDFHXQLWVRUKHDWLQJHOHPHQWV
'RQRWXVHDWRZHORURWKHUEXON\FORWKLQSODFHRISRW
KROGHUV
■ 1HYHUXVH\RXUDSSOLDQFHIRUZDUPLQJRUKHDWLQJWKH
URRP
■'RQRWWRXFKWKHVXUIDFHXQLWVWKHKHDWLQJHOHPHQWV
RUWKHLQWHULRUVXUIDFHRIWKHRYHQ7KHVHVXUIDFHVPD\
EHKRWHQRXJKWREXUQHYHQWKRXJKWKH\DUHGDUNLQ
FRORU'XULQJDQGDIWHUXVHGRQRWWRXFKRUOHWFORWKLQJ
RURWKHUIODPPDEOHPDWHULDOVFRQWDFWWKHVXUIDFHXQLWV
DUHDVQHDUE\WKHVXUIDFHXQLWVRUDQ\LQWHULRUDUHDRI
WKHRYHQDOORZVXIILFLHQWWLPHIRUFRROLQJILUVW2WKHU
VXUIDFHVRIWKHDSSOLDQFHPD\EHFRPHKRWHQRXJK
WRFDXVHEXUQV3RWHQWLDOO\KRWVXUIDFHVLQFOXGHWKH
FRRNWRSDUHDVIDFLQJWKHFRRNWRSRYHQYHQWRSHQLQJ
VXUIDFHVQHDUWKHRSHQLQJDQGFUHYLFHVDURXQGWKH
RYHQGRRU
■'RQRWKHDWXQRSHQHGIRRGFRQWDLQHUV3UHVVXUHFRXOG
EXLOGXSDQGWKHFRQWDLQHUFRXOGEXUVWFDXVLQJDQ
LQMXU\
■ 'RQRWXVHDOXPLQXPIRLOWROLQHGULSSDQVRUDQ\ZKHUH
LQWKHRYHQH[FHSWDVGHVFULEHGLQWKLVPDQXDO)RLOFDQ
WUDSKHDWRUPHOWUHVXOWLQJLQGDPDJHWRWKHSURGXFW
DQGDVKRFNRUILUHKD]DUG
■ $YRLGVFUDWFKLQJRULPSDFWLQJJODVVGRRUVFRRNWRSVRU
FRQWUROSDQHOV'RLQJVRPD\OHDGWRJODVVEUHDNDJH'R
QRWFRRNRQDSURGXFWZLWKEURNHQJODVV6KRFNILUHRU
FXWVPD\RFFXU
■&RRNPHDWDQGSRXOWU\WKRURXJKO\³PHDWWRDWOHDVWDQ
LQWHUQDOWHPSHUDWXUHRI)DQGSRXOWU\WRDWOHDVW
DQLQWHUQDOWHPSHUDWXUHRI)&RRNLQJWRWKHVH
WHPSHUDWXUHVXVXDOO\SURWHFWVDJDLQVWIRRGERUQHLOOQHVV
*(1(5$/6$)(7<,16758&7,216
■'RQRWVWRUHRUXVHIODPPDEOHPDWHULDOVLQDQRYHQRU
QHDUWKHFRRNWRSLQFOXGLQJSDSHUSODVWLFSRWKROGHUV
OLQHQVZDOOFRYHULQJVFXUWDLQVGUDSHVDQGJDVROLQHRU
RWKHUIODPPDEOHYDSRUVDQGOLTXLGV
■1HYHUZHDUORRVHILWWLQJRUKDQJLQJJDUPHQWVZKLOH
XVLQJWKHDSSOLDQFH7KHVHJDUPHQWVPD\LJQLWHLIWKH\
FRQWDFWKRWVXUIDFHVFDXVLQJVHYHUHEXUQV
■ 'RQRWOHWFRRNLQJJUHDVHRURWKHUIODPPDEOHPDWHULDOV
DFFXPXODWHLQRUQHDUWKHUDQJH*UHDVHLQWKHRYHQRU
RQWKHFRRNWRSPD\LJQLWH
■ &OHDQYHQWLODWLQJKRRGVIUHTXHQWO\*UHDVHVKRXOGQRW
EHDOORZHGWRDFFXPXODWHRQWKHKRRGRUILOWHU
:$51,1*
.((3)/$00$%/(0$7(5,$/6$:$<)520
7+(5$1*(
*($SSOLDQFHVFRP
:$51,1*
,03257$176$)(7<,1)250$7,21
5($'$//,16758&7,216%()25(86,1*
■'RQRWXVHZDWHURQJUHDVHILUHV1HYHUSLFNXSD
IODPLQJSDQ7XUQWKHFRQWUROVRII6PRWKHUDIODPLQJ
SDQRQDVXUIDFHXQLWE\FRYHULQJWKH
SDQFRPSOHWHO\ZLWKDZHOOILWWLQJOLGFRRNLHVKHHWRUIODW
WUD\8VHDPXOWLSXUSRVHGU\FKHPLFDORUIRDPW\SHILUH
H[WLQJXLVKHU
■,IWKHUHLVDILUHLQWKHRYHQGXULQJEDNLQJVPRWKHUWKH
ILUHE\FORVLQJWKHRYHQGRRUDQGWXUQLQJWKHRYHQRIIRU
E\XVLQJDPXOWLSXUSRVHGU\FKHPLFDORUIRDPW\SHILUH
H[WLQJXLVKHU
■ ,IWKHUHLVDILUHLQWKHRYHQGXULQJVHOIFOHDQWXUQWKH
RYHQRIIDQGZDLWIRUWKHILUHWRJRRXW'RQRWIRUFH
WKHGRRURSHQ,QWURGXFWLRQRIIUHVKDLUDWVHOIFOHDQ
WHPSHUDWXUHVPD\OHDGWRDEXUVWRIIODPHIURPWKH
RYHQ)DLOXUHWRIROORZWKLVLQVWUXFWLRQPD\UHVXOWLQ
VHYHUHEXUQV
:$51,1*
,17+((9(172)$),5(7$.(7+()2//2:,1*67(36
7235(9(177+(),5()520635($',1*
■1HYHUOHDYHWKHVXUIDFHXQLWVXQDWWHQGHGDWPHGLXPRU
KLJKKHDWVHWWLQJV%RLORYHUVFDXVHVPRNLQJDQGJUHDV\
VSLOORYHUVWKDWPD\FDWFKRQILUH
■1HYHUOHDYHRLOXQDWWHQGHGZKLOHIU\LQJ,IDOORZHGWR
KHDWEH\RQGLWVVPRNLQJSRLQWRLOPD\LJQLWHUHVXOWLQJ
LQILUHWKDWPD\VSUHDGWRVXUURXQGLQJFDELQHWV8VHD
GHHSIDWWKHUPRPHWHUZKHQHYHUSRVVLEOHWRPRQLWRURLO
WHPSHUDWXUH
■ 7RDYRLGRLOVSLOORYHUDQGILUHXVHDPLQLPXPDPRXQWRI
RLOZKHQVKDOORZSDQIU\LQJDQGDYRLGFRRNLQJIUR]HQ
IRRGVZLWKH[FHVVLYHDPRXQWVRILFH
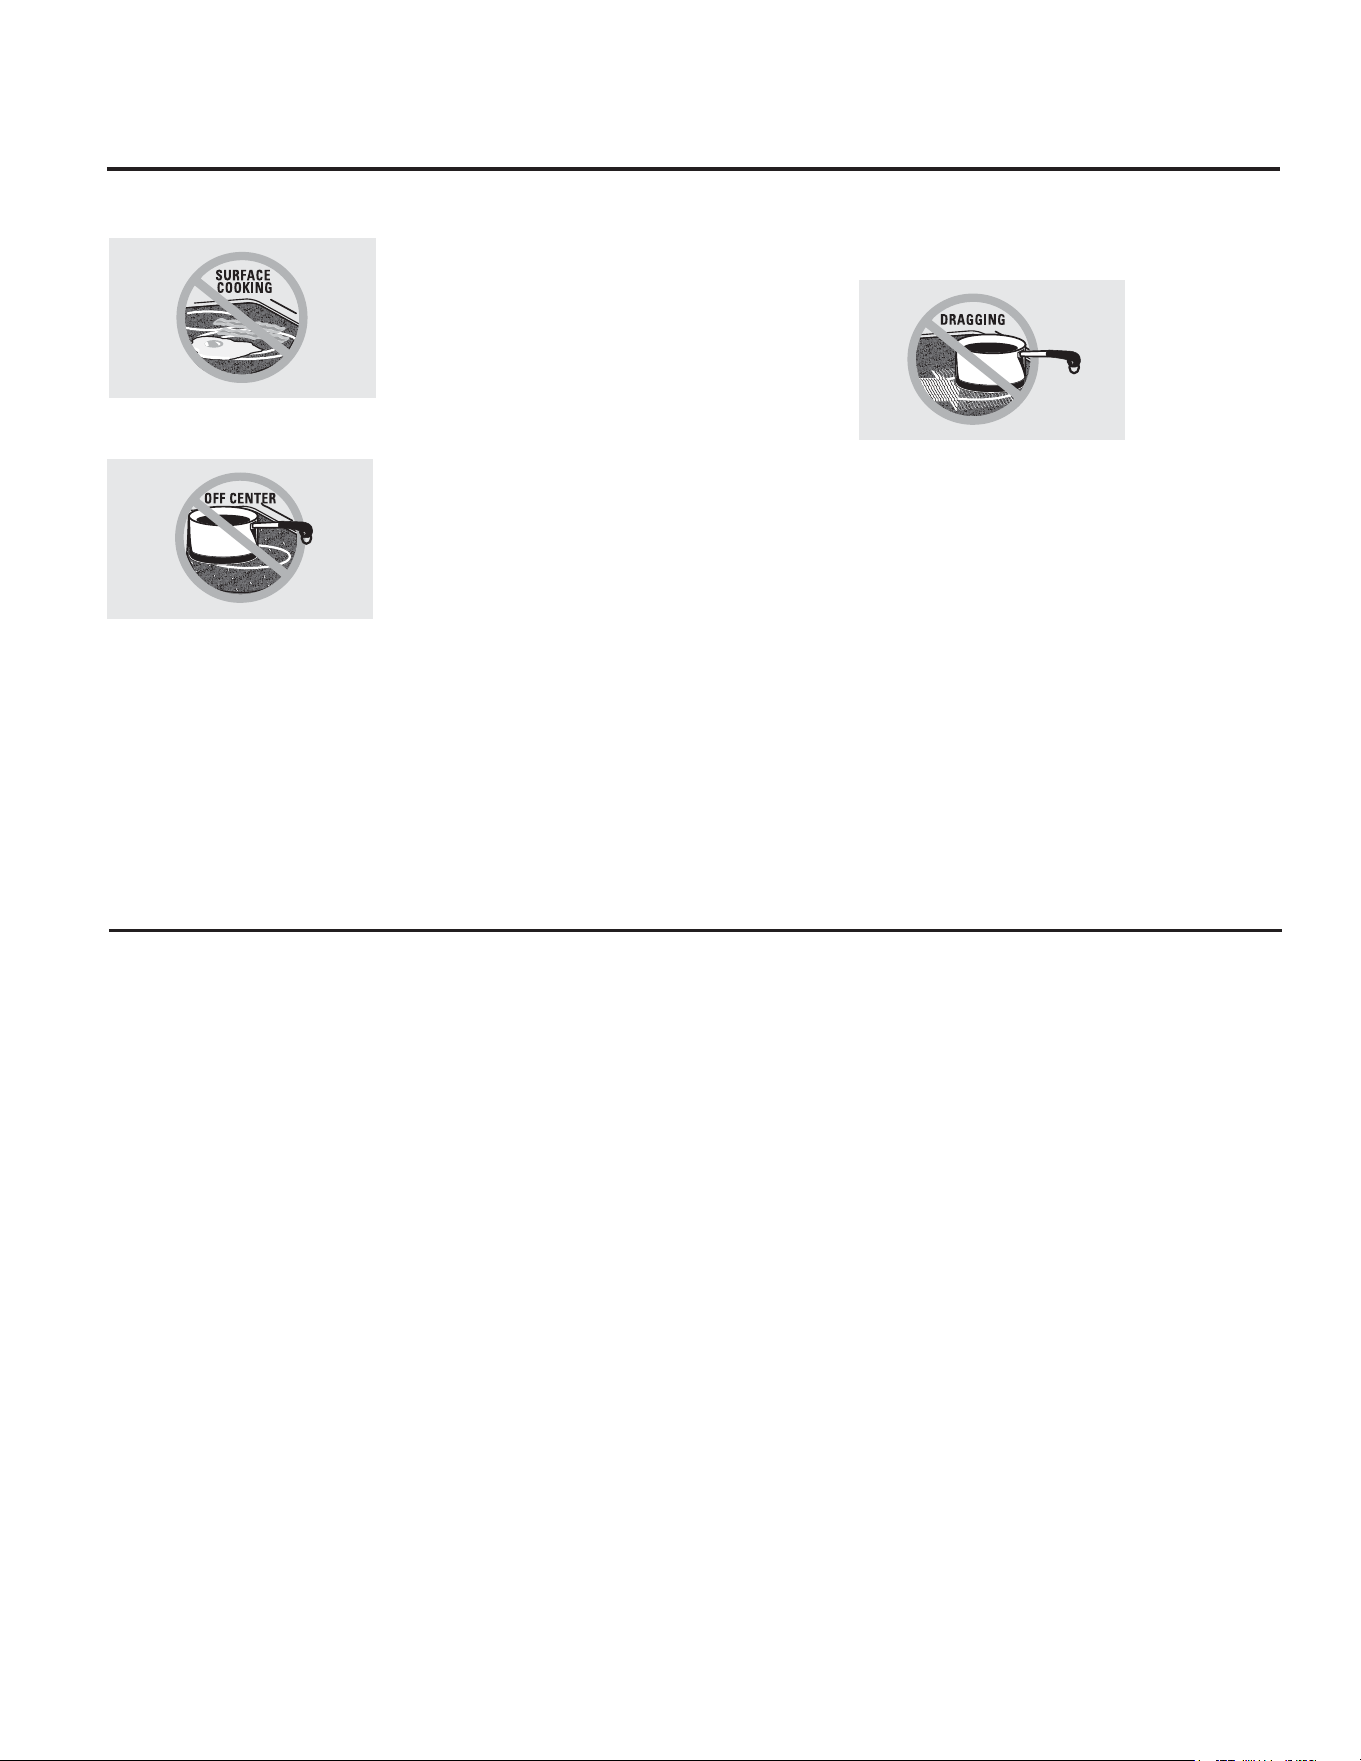
■ 8VHSURSHUSDQVL]H³VHOHFWFRRNZDUHKDYLQJIODW
ERWWRPVODUJHHQRXJKWRFRYHUWKHVXUIDFHKHDWLQJ
HOHPHQW7KHXVHRIXQGHUVL]HGFRRNZDUHZLOOH[SRVH
DSRUWLRQRIWKHVXUIDFHXQLWWRGLUHFWFRQWDFWDQGPD\
UHVXOWLQLJQLWLRQRIFORWKLQJ3URSHUUHODWLRQVKLSRI
FRRNZDUHWRVXUIDFHXQLWZLOODOVRLPSURYHHIILFLHQF\
■2QO\FHUWDLQW\SHVRIJODVVJODVVFHUDPLFHDUWKHQZDUH
RURWKHUJOD]HGFRQWDLQHUVDUHVXLWDEOHIRUFRRNWRS
VHUYLFHRWKHUVPD\EUHDNEHFDXVHRIWKHVXGGHQ
FKDQJHLQWHPSHUDWXUH
■7RPLQLPL]HWKHSRVVLELOLW\RIEXUQVLJQLWLRQRI
IODPPDEOHPDWHULDOVDQGVSLOODJHWKHKDQGOHRID
FRQWDLQHUVKRXOGEHWXUQHGWRZDUGWKHFHQWHURIWKH
UDQJHZLWKRXWH[WHQGLQJRYHUQHDUE\VXUIDFHXQLWV
■ :KHQSUHSDULQJIODPLQJIRRGVXQGHUDKRRGWXUQWKH
IDQRQ
■ ,ISRZHULVORVWWRDQHOHFWULFFRRNWRSZKLOHDVXUIDFH
XQLWLV21WKHVXUIDFHXQLWZLOOWXUQEDFNRQDVVRRQ
DVSRZHULVUHVWRUHG,QWKHHYHQWRISRZHUORVVIDLOXUH
WRWXUQDOOVXUIDFHXQLWNQREVWRWKH2))SRVLWLRQPD\
UHVXOWLQLJQLWLRQRILWHPVRQRUQHDUWKHFRRNWRSOHDGLQJ
WRVHULRXVLQMXU\RUGHDWK
&22.7236$)(7<,16758&7,216
:$51,1*
*($SSOLDQFHVFRP
■6WDQGDZD\IURPWKHUDQJHZKHQRSHQLQJWKHRYHQ
GRRU+RWDLURUVWHDPZKLFKHVFDSHVFDQFDXVHEXUQV
WRKDQGVIDFHDQGRUH\HV
■.HHSWKHRYHQYHQWXQREVWUXFWHG
■ .HHSWKHRYHQIUHHIURPJUHDVHEXLOGXS*UHDVHLQWKH
RYHQ
PD\LJQLWH
■ 3ODFHRYHQUDFNVLQGHVLUHGORFDWLRQZKLOHRYHQLVFRRO
,IUDFNPXVWEHPRYHGZKLOHRYHQLVKRWGRQRWOHWSRW
KROGHUFRQWDFWKRWKHDWLQJHOHPHQWLQRYHQ
■:KHQXVLQJFRRNLQJRUURDVWLQJEDJVLQWKHRYHQIROORZ
WKHPDQXIDFWXUHU·VGLUHFWLRQV
■3XOOWKHRYHQUDFNWRWKHVWRSORFNSRVLWLRQZKHQ
ORDGLQJDQGXQORDGLQJIRRGIURPWKHRYHQ7KLVKHOSV
SUHYHQWEXUQVIURPWRXFKLQJKRWVXUIDFHVRIWKHGRRU
DQGRYHQZDOOV
■ 'RQRWOHDYHLWHPVVXFKDVSDSHUFRRNLQJXWHQVLOVRU
IRRG
LQWKHRYHQZKHQQRWLQXVH,WHPVVWRUHGLQDQ
RYHQFDQLJQLWH
■ 'RQRWXVHDOXPLQXPIRLOWROLQHWKHRYHQERWWRP
)RLOFDQWUDSKHDWRUPHOWUHVXOWLQJLQGDPDJHWRWKH
SURGXFWDQGDVKRFNRUILUHKD]DUG
29(16$)(7<,16758&7,216
■8VHFDUHZKHQWRXFKLQJWKHFRRNWRS7KHJODVVVXUIDFH
RIWKHFRRNWRSZLOOUHWDLQKHDWDIWHUWKHFRQWUROVKDYH
EHHQWXUQHGRII
■'RQRWFRRNRQDEURNHQFRRNWRS,IJODVVFRRNWRS
VKRXOGEUHDNFOHDQLQJVROXWLRQVDQGVSLOORYHUV
PD\SHQHWUDWHWKHEURNHQFRRNWRSDQGFUHDWHD
ULVNRIHOHFWULFVKRFN&RQWDFWDTXDOLILHGWHFKQLFLDQ
LPPHGLDWHO\
■ $YRLGVFUDWFKLQJWKHJODVVFRRNWRS7KHFRRNWRSFDQEH
VFUDWFKHGZLWKLWHPVVXFKDVNQLYHVVKDUSLQVWUXPHQWV
ULQJVRURWKHUMHZHOU\DQGULYHWVRQFORWKLQJ
■ 'RQRWSODFHRUVWRUHLWHPVWKDWFDQPHOWRUFDWFKILUH
RQWKHJODVVFRRNWRSHYHQZKHQLWLVQRWEHLQJXVHG,I
WKHFRRNWRSLVLQDGYHUWHQWO\WXUQHGRQWKH\PD\LJQLWH
+HDWIURPWKHFRRNWRSRURYHQYHQWDIWHULWLVWXUQHGRII
PD\FDXVHWKHPWRLJQLWHDOVR
■ 8VH&(5$0$%5<7(
FHUDPLF&RRNWRS&OHDQHUDQG
&(5$0$%5<7(
&OHDQLQJ3DGWRFOHDQWKHFRRNWRS
:DLWXQWLOWKHFRRNWRSFRROVDQGWKHLQGLFDWRUOLJKWJRHV
RXWEHIRUHFOHDQLQJ$ZHWVSRQJHRUFORWKRQDKRW
VXUIDFHFDQFDXVHVWHDPEXUQV6RPHFOHDQHUVFDQ
SURGXFHQR[LRXVIXPHVLIDSSOLHGWRDKRWVXUIDFH1RWH
6XJDUVSLOOVDUHDQH[FHSWLRQ7KH\VKRXOGEHVFUDSHG
RIIZKLOHVWLOOKRWXVLQJDQRYHQPLWWDQGDVFUDSHU6HH
WKH&OHDQLQJWKHJODVVFRRNWRSVHFWLRQIRUGHWDLOHG
LQVWUXFWLRQV
■5HDGDQGIROORZDOOLQVWUXFWLRQVDQGZDUQLQJVRQWKH
FOHDQLQJFUHDPODEHO
:$51,1*
5$',$17&22.7236$)(7<,16758&7,216
6RPHPRGHOV
■'RQRWLPPHUVHRUVRDNWKHUHPRYDEOHVXUIDFHXQLWV
'RQRWSXWWKHPLQDGLVKZDVKHU'RQRWVHOIFOHDQWKH
VXUIDFHXQLWVLQDQRYHQ'RLQJVRPD\FDXVHWKHPWR
IDLOSUHVHQWLQJDEXUQRUILUHKD]DUG
■7RDYRLGWKHSRVVLELOLW\RIDEXUQRUHOHFWULFVKRFNDOZD\V
EHFHUWDLQWKDWWKHFRQWUROVIRUDOOVXUIDFHXQLWVDUHDWWKH
2))SRVLWLRQDQGDOOFRLOVDUHFRROEHIRUHDWWHPSWLQJWROLIW
RUUHPRYHDFRLOVXUIDFHXQLW
■ %HVXUHWKHGULSSDQVDUHQRWFRYHUHGDQGDUHLQSODFH
7KHLU
DEVHQFHGXULQJFRRNLQJFRXOGGDPDJHUDQJH
SDUWVDQGZLULQJ
■ 'RQRWXVHDOXPLQXPIRLOWROLQHGULSSDQV)RLOFDQWUDS
KHDWRUPHOWUHVXOWLQJLQGDPDJHWRWKHSURGXFWDQGD
VKRFNRUILUHKD]DUG
:$51,1*
&2,/&22.7236$)(7<,16758&7,216
6RPHPRGHOV
:$51,1*
7KHVHOIFOHDQLQJIHDWXUHRSHUDWHVWKHRYHQDWWHPSHUDWXUHVKLJKHQRXJKWREXUQDZD\IRRGVRLOVLQWKHRYHQ
)ROORZWKHVHLQVWUXFWLRQVIRUVDIHRSHUDWLRQ
,03257$176$)(7<,1)250$7,21
5($'$//,16758&7,216%()25(86,1*
■%HIRUHRSHUDWLQJWKHVHOIFOHDQF\FOHUHPRYHSDQV
VKLQ\PHWDORYHQUDFNVDQGRWKHUXWHQVLOVIURPWKH
RYHQ2QO\JUD\SRUFHODLQFRDWHGRYHQUDFNVPD\EH
OHIWLQWKHRYHQ'RQRWXVHVHOIFOHDQWRFOHDQRWKHU
SDUWVVXFKDVGULSSDQVRUERZOV
■%HIRUHRSHUDWLQJWKHVHOIFOHDQF\FOHZLSHJUHDVHDQG
IRRGVRLOVIURPWKHRYHQ([FHVVLYHDPRXQWRIJUHDVH
PD\LJQLWHOHDGLQJWRVPRNHGDPDJHWR\RXUKRPH
■ ,IWKHVHOIFOHDQLQJPRGHPDOIXQFWLRQVWXUQWKHRYHQRII
DQGGLVFRQQHFWWKHSRZHUVXSSO\+DYHLWVHUYLFHGE\D
TXDOLILHGWHFKQLFLDQ
■ 'RQRWFOHDQWKHGRRUJDVNHW7KHGRRUJDVNHWLV
HVVHQWLDOIRUDJRRGVHDO&DUHVKRXOGEHWDNHQQRWWR
UXEGDPDJHRUPRYHWKHJDVNHW
■ 'RQRWXVHRYHQFOHDQHUV1RFRPPHUFLDORYHQFOHDQHU
RURYHQOLQHUSURWHFWLYHFRDWLQJRIDQ\NLQGVKRXOGEH
XVHGLQRUDURXQGDQ\SDUWRIWKHRYHQ
:$51,1*
6(/)&/($1,1*29(16$)(7<,16758&7,216
6RPHPRGHOV
■7KHSXUSRVHRIWKHZDUPLQJGUDZHULVWRKROGKRW
FRRNHGIRRGVDWVHUYLQJWHPSHUDWXUH%DFWHULDZLOOJURZ
LQIRRGZKLOHLWLVEHORZ)'RQRWSXWFROGIRRG
LQZDUPLQJGUDZHU'RQRWKHDWIRRGIRUPRUHWKDQ
KRXUV)DLOXUHWRIROORZWKHVHLQVWUXFWLRQVPD\UHVXOWLQ
IRRGERUQHLOOQHVV
■'RQRWOHDYHSDSHUSURGXFWVSODVWLFVFDQQHGIRRGRU
FRPEXVWLEOHPDWHULDOVLQWKHGUDZHU7KH\PD\LJQLWH
■ 'RQRWWRXFKWKHKHDWLQJHOHPHQWRUWKHLQWHULRUVXUIDFH
RIWKHGUDZHU7KHVHVXUIDFHVPD\EHKRWHQRXJKWR
FDXVHEXUQV
■ 8VHFDUHZKHQRSHQLQJWKHGUDZHU2SHQWKHGUDZHUD
FUDFNDQGOHWKRWDLURUVWHDPHVFDSHEHIRUHUHPRYLQJ
RUUHSODFLQJIRRG+RWDLURUVWHDPWKDWHVFDSHVFDQ
FDXVHEXUQVWRKDQGVIDFHDQGRUH\HV
■ 'RQRWXVHDOXPLQXPIRLOWROLQHWKHORZHUGUDZHU
)RLOFDQWUDSKHDWRUPHOWUHVXOWLQJLQGDPDJHWRWKH
SURGXFWDQGDVKRFNRUILUHKD]DUG
:$51,1*
:$50,1*'5$:(5/2:(529(1'5$:(56$)(7<
,16758&7,216
6RPHPRGHOV
8VLQJWKHVXUIDFHXQLWVRQVRPHPRGHOV *($SSOLDQFHVFRP
),5(+$=$5'1HYHUOHDYHWKHUDQJHXQDWWHQGHGZLWKWKHFRRNWRSRQPHGLXPRUKLJK
VHWWLQJV.HHSIODPPDEOHLWHPVDZD\IURPWKHFRRNWRS7XUQRIIDOOFRQWUROVZKHQ
GRQHFRRNLQJ)DLOXUHWRIROORZWKHVHLQVWUXFWLRQVFDQUHVXOWLQILUHVHULRXVLQMXU\RU
GHDWK
7KURXJKRXWWKLVPDQXDOIHDWXUHVDQGDSSHDUDQFHPD\YDU\IURP\RXUPRGHO
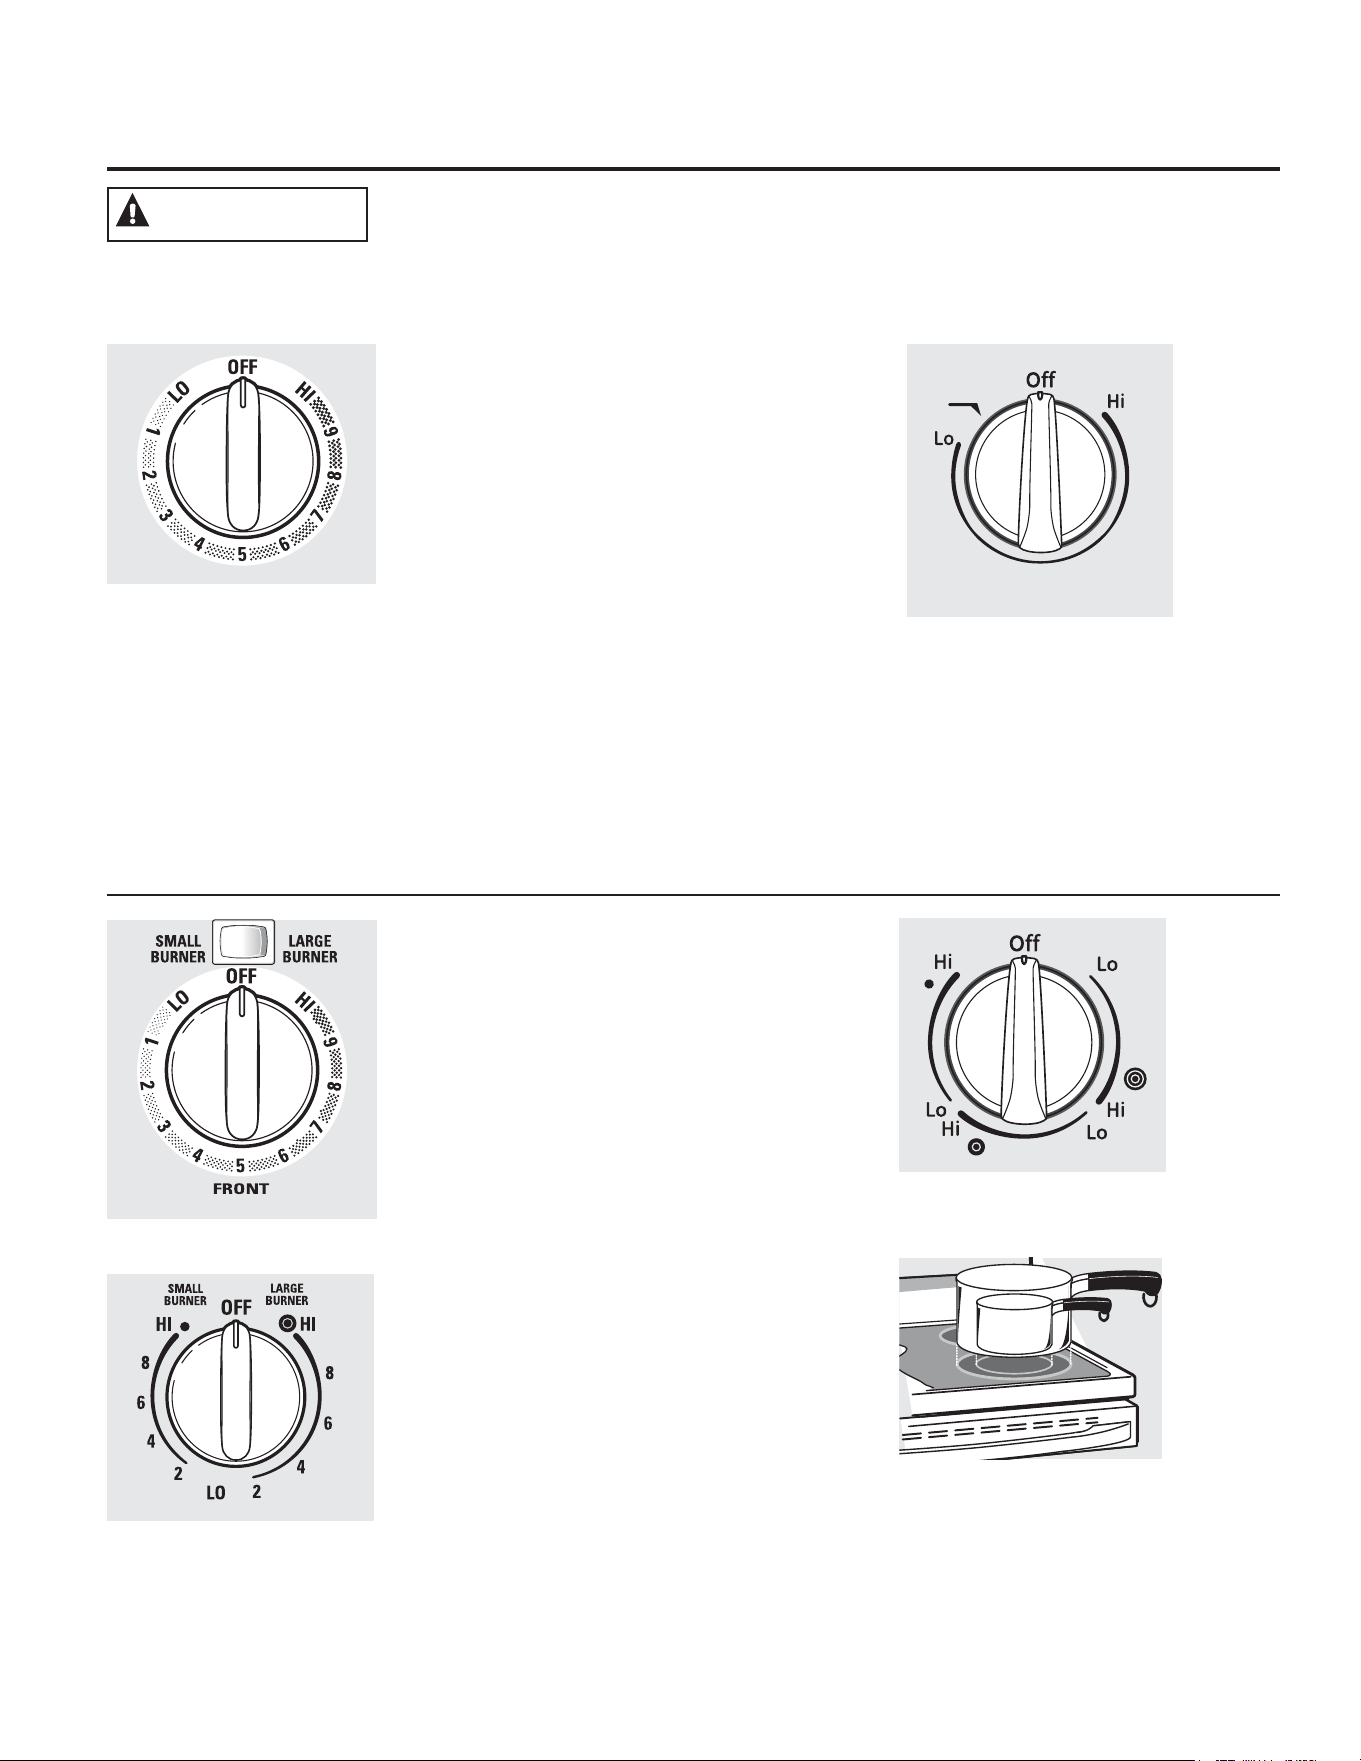
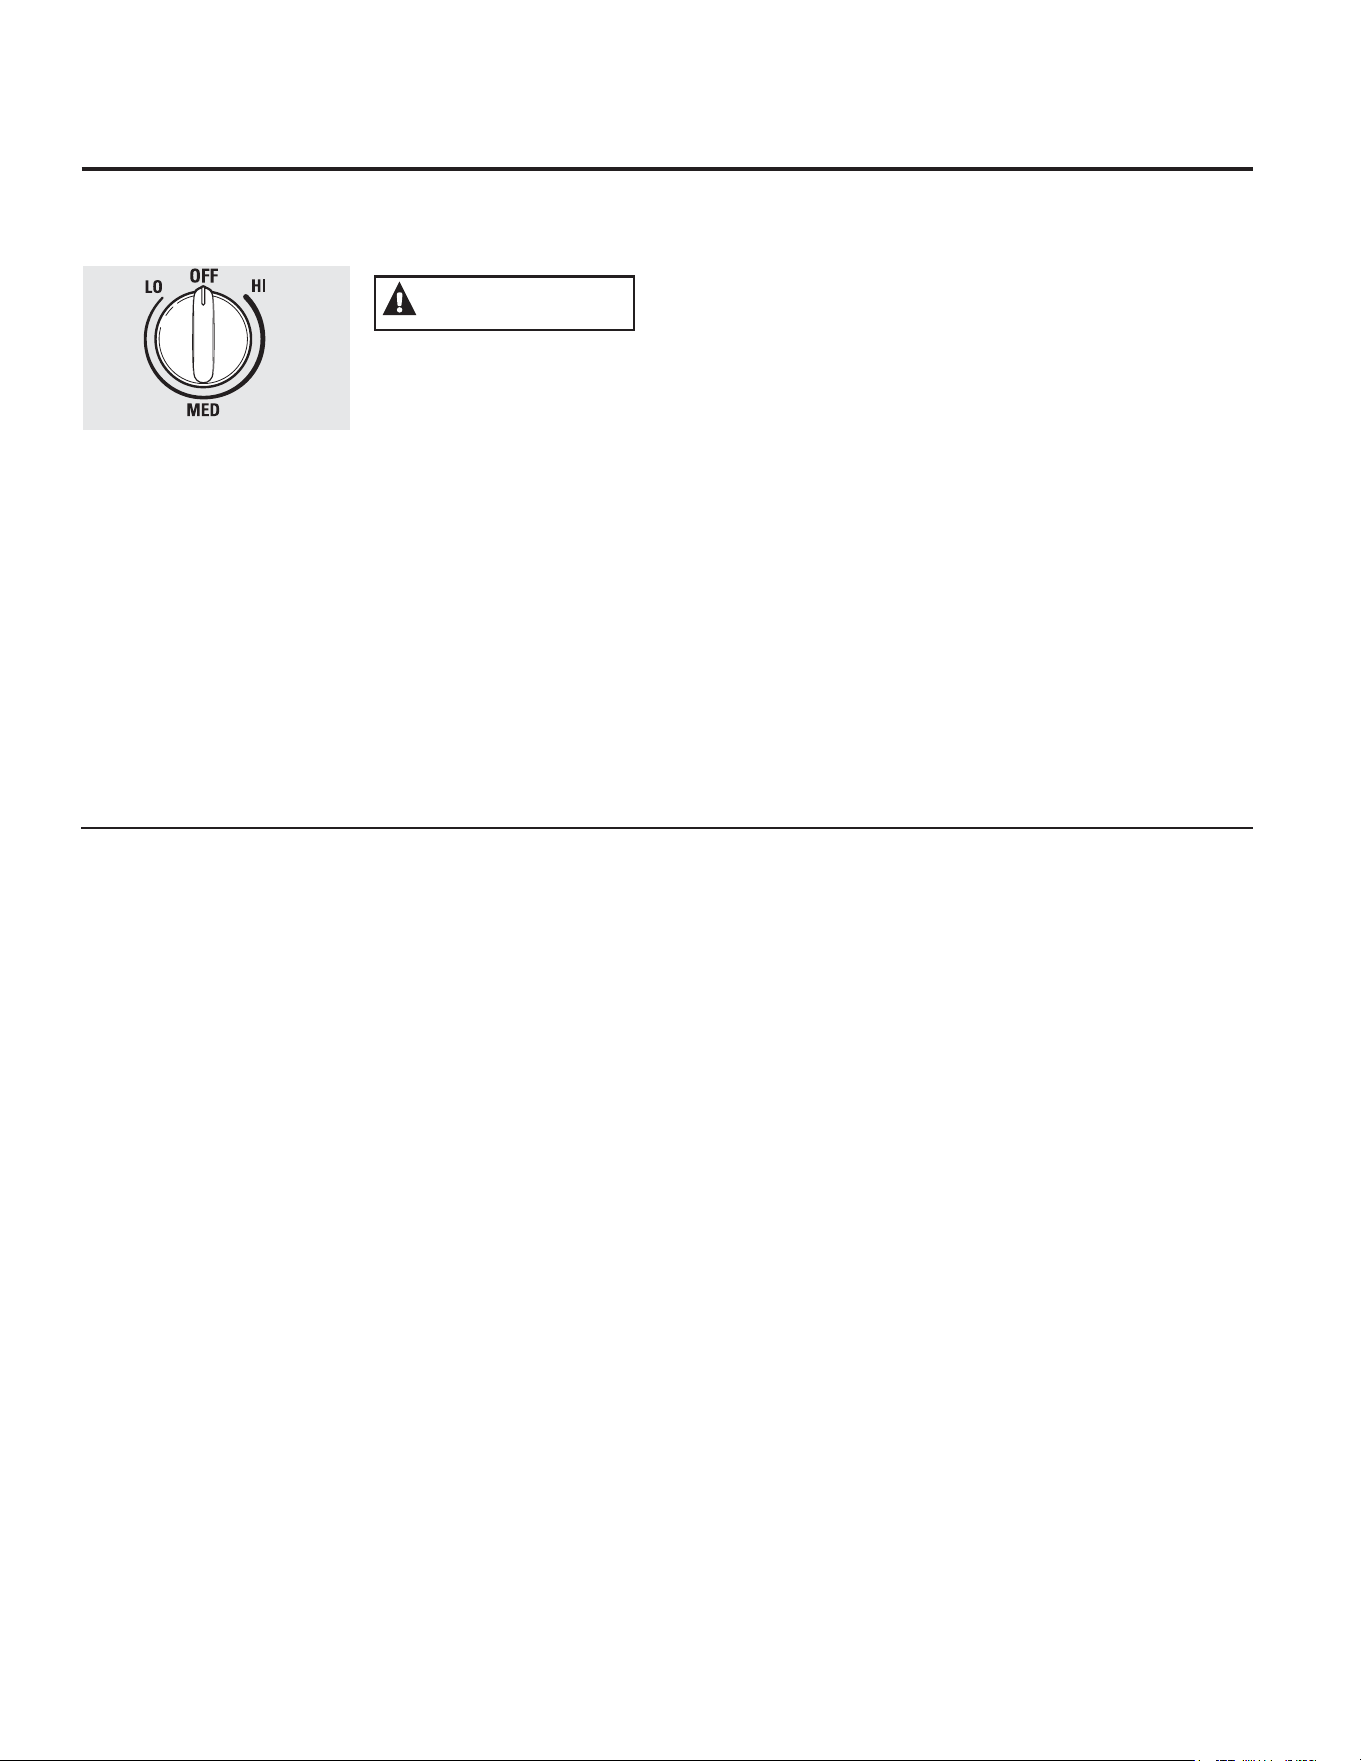
+RZWR6HW
3XVKWKHNQRELQDQGWXUQLQHLWKHUGLUHFWLRQWR
WKHVHWWLQJ\RXZDQW
$VXUIDFH21LQGLFDWRUOLJKWZLOOJORZZKHQDQ\
VXUIDFHXQLWLVRQ
)RUJODVVFRRNWRSVXUIDFHV
$+27&22.723 LQGLFDWRUOLJKWZLOO
■FRPHRQZKHQWKHXQLWLVKRWWRWKHWRXFK
■VWD\RQHYHQDIWHUWKHXQLWLVWXUQHGRII
■VWD\RQXQWLOWKHXQLWLVFRROHGWR
DSSUR[LPDWHO\)
'XDODQG7ULSOH6XUIDFH8QLWV
DQG&RQWURO.QREV
RQVRPHPRGHOV
7KHVXUIDFHXQLWKDVRUFRRNLQJVL]HV
WRVHOHFWIURPVR\RXFDQPDWFKWKHVL]H
RIWKHXQLWWRWKHVL]HRIWKHFRRNZDUH\RXDUH
XVLQJ
$WERWK2))DQG+, WKH
FRQWUROFOLFNV LQWRSRVLWLRQ
<RXPD\KHDUVOLJKWFOLFNLQJ
VRXQGVGXULQJFRRNLQJ
LQGLFDWLQJWKHFRQWUROLV
PDLQWDLQLQJ\RXUGHVLUHG
VHWWLQJ
%HVXUH\RXWXUQWKHFRQWURO
NQREWR2))ZKHQ\RXILQLVK
FRRNLQJ
2QVRPHPRGHOV
2QVRPHPRGHOV
0RGHOVZLWKD7UL5LQJVXUIDFH
HOHPHQWRQO\
Melt
Rear
8
7
6
54
3
2
9
1
:$51,1*
0HOWVHWWLQJRQVRPHPRGHOVZLOOPHOW
FKRFRODWHRUEXWWHU6LPPHUVHWWLQJRQVRPH
PRGHOVZLOOVLPPHUVDXFHV
+RPH&DQQLQJ7LSV
%HVXUHWKHFDQQHULVFHQWHUHGRYHUWKHVXUIDFH
XQLW
0DNHVXUHWKHFDQQHULVIODWRQWKHERWWRP
7RSUHYHQWEXUQVIURPVWHDPRUKHDWXVH
FDXWLRQZKHQFDQQLQJ
8VHUHFLSHVDQGSURFHGXUHVIURPUHSXWDEOH
VRXUFHV7KHVHDUHDYDLODEOHIURP
PDQXIDFWXUHUVVXFKDV%DOO
DQG.HUU
DQGWKH
'HSDUWPHQWRI$JULFXOWXUH([WHQVLRQ6HUYLFH
)ODWERWWRPHGFDQQHUVDUHUHFRPPHQGHG8VH
RIZDWHUEDWKFDQQHUVZLWKULSSOHGERWWRPV
PD\H[WHQGWKHWLPHUHTXLUHGWREULQJWKH
ZDWHUWRDERLO
8VLQJWKH:DUPLQJ=RQHRQVRPHPRGHOV
)22'32,621+$=$5'%DFWHULDPD\JURZLQ
IRRGDWWHPSHUDWXUHVEHORZ)
■$OZD\VVWDUWZLWKKRWIRRG'RQRWXVHZDUP
VHWWLQJ
WRKHDWFROGIRRG
■'RQRWXVHZDUPVHWWLQJIRUPRUHWKDQ
KRXUV
)DLOXUHWRIROORZWKHVHLQVWUXFWLRQVPD\UHVXOWLQ
IRRGERUQHLOOQHVV
7KH:$50,1*=21(ORFDWHGLQWKHEDFN
FHQWHURIWKHJODVVVXUIDFHZLOONHHSKRWFRRNHG
IRRGDWVHUYLQJWHPSHUDWXUH$OZD\VVWDUWZLWK
KRWIRRG'RQRWXVHWRKHDWFROGIRRG3ODFLQJ
XQFRRNHGRUFROGIRRGRQWKH:$50,1*=21(
FRXOGUHVXOWLQIRRGERUQHLOOQHVV
3XVKDQGWXUQWKHFRQWURONQREWRDQ\GHVLUHG
VHWWLQJ
)RUEHVWUHVXOWVDOOIRRGVRQWKH:$50,1*
=21(VKRXOGEHFRYHUHGZLWKDOLGRUDOXPLQXP
IRLO:KHQZDUPLQJSDVWULHVRUEUHDGVWKH
FRYHUVKRXOGEHYHQWHGWRDOORZPRLVWXUHWR
HVFDSH
8VHWKHORZHVWVHWWLQJIRUEUHDGVDQGSDVWULHV
8VHDPHGLXPVHWWLQJIRUYHJHWDEOHVVDXFHV
VWHZVFUHDPVRXSVEXWWHUDQGFKRFRODWH8VH
WKHKLJKHVWVHWWLQJIRUVRXSVOLTXLGDQGKRW
EHYHUDJHV7KHVHLQLWLDOVXJJHVWHGVHWWLQJVDUH
IRUUHIHUHQFHRQO\7KHWHPSHUDWXUHW\SHDQG
DPRXQWRIIRRGW\SHRISDQDQGWKHWLPHKHOG
ZLOODIIHFWWKHTXDOLW\RIWKHIRRG
$OZD\VXVHSRWKROGHUVRURYHQPLWWVZKHQ
UHPRYLQJIRRGIURPWKH:$50,1*=21(
VLQFHFRRNZDUHDQGSODWHVZLOOEHKRW
127(7KHVXUIDFHZDUPHUZLOOQRWJORZUHG
OLNHWKHFRRNLQJHOHPHQWV
:DUPLQJ=RQH
8VLQJWKHVXUIDFHXQLWV
7KURXJKRXWWKLVPDQXDOIHDWXUHVDQGDSSHDUDQFHPD\YDU\IURP\RXUPRGHO
:$51,1*
*($SSOLDQFHVFRP
7KHIROORZLQJLQIRUPDWLRQZLOOKHOS\RXFKRRVHFRRNZDUHZKLFKZLOOJLYHJRRGSHUIRUPDQFHRQJODVVFRRNWRSV
1HYHUFRRNGLUHFWO\RQWKHJODVV
$OZD\VXVHFRRNZDUH
)RU0RGHOV:LWKD5DGLDQW*ODVV&RRNWRS
7KHUDGLDQWFRRNWRSIHDWXUHVKHDWLQJXQLWV
EHQHDWKDVPRRWKJODVVVXUIDFH
127($VOLJKWRGRULVQRUPDOZKHQDQHZ
FRRNWRSLVXVHGIRUWKHILUVWWLPH,WLVFDXVHG
E\WKHKHDWLQJRIQHZSDUWVDQGLQVXODWLQJ
PDWHULDOVDQGZLOOGLVDSSHDULQDVKRUWWLPH
127(2QPRGHOVZLWKOLJKWFRORUHGJODVV
FRRNWRSVLWLVQRUPDOIRUWKHFRRNLQJ]RQHVWR
FKDQJHFRORUZKHQKRWRUFRROLQJGRZQ7KLVLV
WHPSRUDU\DQGZLOOGLVDSSHDUDVWKHJODVVFRROV
WRURRPWHPSHUDWXUH
7KHVXUIDFHXQLWZLOOF\FOHRQDQGRIIWR
PDLQWDLQ\RXUVHOHFWHGFRQWUROVHWWLQJ
,WLVVDIHWRSODFHKRWFRRNZDUHRQWKHJODVV
VXUIDFHHYHQZKHQWKHFRRNWRSLVFRRO
(YHQDIWHUWKHVXUIDFHXQLWVDUHWXUQHGRIIWKH
JODVVFRRNWRSUHWDLQVHQRXJKKHDWWRFRQWLQXH
FRRNLQJ7RDYRLGRYHUFRRNLQJUHPRYHSDQV
IURPWKHVXUIDFHXQLWVZKHQWKHIRRGLVFRRNHG
$YRLGSODFLQJDQ\WKLQJRQWKHVXUIDFHXQLWXQWLO
LWKDVFRROHGFRPSOHWHO\
'RQRWVOLGHFRRNZDUHDFURVVWKHFRRNWRSEHFDXVH
LWFDQVFUDWFKWKHJODVV³WKHJODVVLVVFUDWFKUHVLVWDQW
QRWVFUDWFKSURRI
■:DWHUVWDLQVPLQHUDOGHSRVLWVDUH
UHPRYDEOHXVLQJWKHFOHDQLQJFUHDPRUIXOO
VWUHQJWKZKLWHYLQHJDU
■8VHRIZLQGRZFOHDQHUPD\OHDYHDQ
LULGHVFHQWILOPRQWKHFRRNWRS7KHFOHDQLQJ
FUHDPZLOOUHPRYHWKLVILOP
■'RQ·WVWRUHKHDY\LWHPVDERYHWKHFRRNWRS,I
WKH\GURSRQWRWKHFRRNWRSWKH\FDQFDXVH
GDPDJH
■'RQRWXVHWKHVXUIDFHDVDFXWWLQJERDUG
$OZD\VSODFHWKHSDQLQWKHFHQWHURI
WKHVXUIDFHXQLW\RXDUHFRRNLQJRQ
7HPSHUDWXUH/LPLWHURQ5DGLDQW*ODVV&RRNWRSV
(YHU\UDGLDQWVXUIDFHXQLWKDVDWHPSHUDWXUH
OLPLWHU
7KHWHPSHUDWXUHOLPLWHUSURWHFWVWKHJODVV
FRRNWRSIURPJHWWLQJWRRKRW
7KHWHPSHUDWXUHOLPLWHUPD\F\FOHWKHVXUIDFH
XQLWVRIIIRUDWLPHLI
■WKHSDQERLOVGU\
■WKHSDQERWWRPLVQRWIODW
■WKHSDQLVRIIFHQWHU
■WKHUHLVQRSDQRQWKHXQLW
6HOHFWLQJW\SHVRIFRRNZDUHIRUUDGLDQWJODVVFRRNWRSPRGHOV
6WDLQOHVV6WHHO
UHFRPPHQGHG
$OXPLQXP
KHDY\ZHLJKWUHFRPPHQGHG
*RRGFRQGXFWLYLW\$OXPLQXPUHVLGXHV
VRPHWLPHVDSSHDUDVVFUDWFKHVRQWKHFRRNWRS
EXWFDQEHUHPRYHGLIFOHDQHGLPPHGLDWHO\
%HFDXVHRILWVORZPHOWLQJSRLQWWKLQZHLJKW
DOXPLQXPVKRXOGQRWEHXVHG
&RSSHU%RWWRP
UHFRPPHQGHG
&RSSHUPD\OHDYHUHVLGXHVZKLFKFDQDSSHDU
DVVFUDWFKHV7KHUHVLGXHVFDQEHUHPRYHGDV
ORQJDVWKHFRRNWRSLVFOHDQHGLPPHGLDWHO\
+RZHYHUGRQRWOHWWKHVHSRWVERLOGU\
2YHUKHDWHGPHWDOFDQERQGWRJODVVFRRNWRSV
$QRYHUKHDWHGFRSSHUERWWRPSRWZLOOOHDYHD
UHVLGXHWKDWZLOOSHUPDQHQWO\VWDLQWKHFRRNWRS
LIQRWUHPRYHGLPPHGLDWHO\
3RUFHODLQ(QDPHORQ&DVW,URQ
UHFRPPHQGHGLIERWWRPRISDQLVFRDWHG
3RUFHODLQ(QDPHORQ6WHHO
QRWUHFRPPHQGHG
+HDWLQJHPSW\SDQVFDQFDXVHSHUPDQHQW
GDPDJHWRFRRNWRSJODVV7KHHQDPHOFDQPHOW
DQGERQGWRWKHFHUDPLFFRRNWRS
*ODVVFHUDPLF
QRWUHFRPPHQGHG
3RRUSHUIRUPDQFH:LOOVFUDWFKWKHVXUIDFH
6WRQHZDUH
QRWUHFRPPHQGHG
3RRUSHUIRUPDQFH0D\VFUDWFKWKHVXUIDFH
&DVW,URQ
QRWUHFRPPHQGHG³XQOHVVGHVLJQHGVSHFLILFDOO\
IRUJODVVFRRNWRSV
3RRUFRQGXFWLYLW\DQGVORZWRDEVRUEKHDW:LOO
VFUDWFKWKHFRRNWRSVXUIDFH
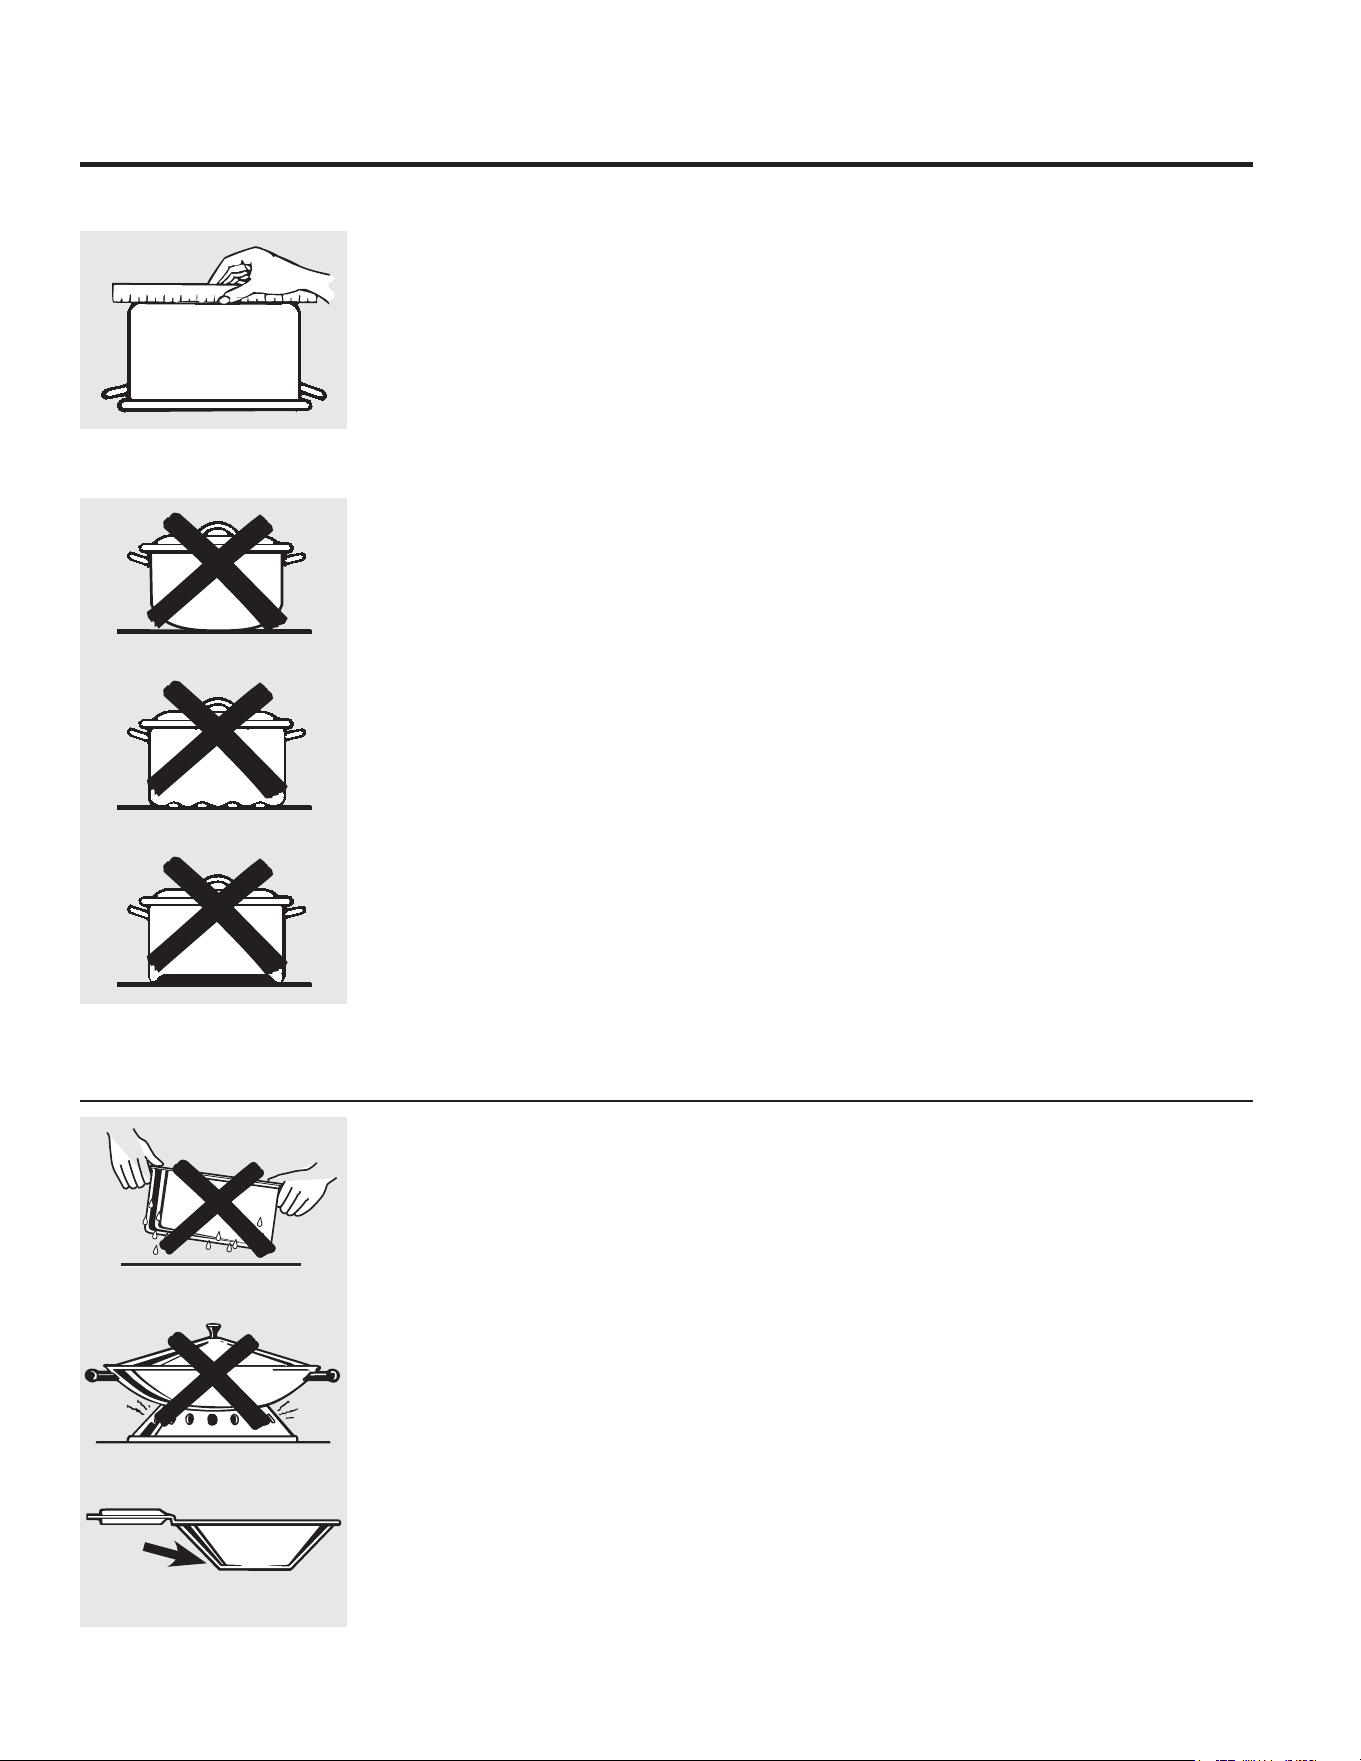
&KHFNSDQVIRUIODWERWWRPVE\
XVLQJDVWUDLJKWHGJH
3DQVZLWKURXQGHGFXUYHG
ULGJHGRUZDUSHGERWWRPVDUHQRW
UHFRPPHQGHG
7KHIROORZLQJLQIRUPDWLRQZLOOKHOS\RXFKRRVHFRRNZDUHZKLFKZLOOJLYHJRRGSHUIRUPDQFHRQJODVVFRRNWRSV
)RU%HVW5HVXOWV
■3ODFHRQO\GU\SDQVRQWKHVXUIDFH
HOHPHQWV'RQRWSODFHOLGVRQWKHVXUIDFH
HOHPHQWVSDUWLFXODUO\ZHWOLGV:HWSDQV
DQGOLGVPD\VWLFNWRWKHVXUIDFHZKHQ
WKH\FRRO
■'RQRWXVHZRNVWKDWKDYHVXSSRUWULQJV
7KLVW\SHRIZRNZLOOQRWKHDWRQJODVV
VXUIDFHHOHPHQWV
■:HUHFRPPHQGWKDW\RXXVHRQO\DIODW
ERWWRPHGZRN7KH\DUHDYDLODEOHDW\RXU
ORFDOUHWDLOVWRUH7KHERWWRPRIWKHZRN
VKRXOGKDYHWKHVDPHGLDPHWHUDVWKH
VXUIDFHHOHPHQWWRHQVXUHSURSHUFRQWDFW
■6RPHVSHFLDOFRRNLQJSURFHGXUHVUHTXLUH
VSHFLILF
FRRNZDUHVXFKDVSUHVVXUH
FRRNHUVRUGHHSIDWIU\HUV$OOFRRNZDUH
PXVWKDYHIODWERWWRPVDQGEHWKHFRUUHFW
VL]H
'RQRWSODFHZHWSDQV
RQWKHJODVVFRRNWRS
'RQRWXVHZRNVZLWKVXSSRUW
ULQJVRQWKHJODVVFRRNWRS
8VHIODWERWWRPHGZRNV
RQWKHJODVVFRRNWRS
127()ROORZDOOFRRNZDUHPDQXIDFWXUHU·VUHFRPPHQGDWLRQVZKHQXVLQJDQ\W\SHRIFRRNZDUHRQ
WKHFHUDPLFFRRNWRS
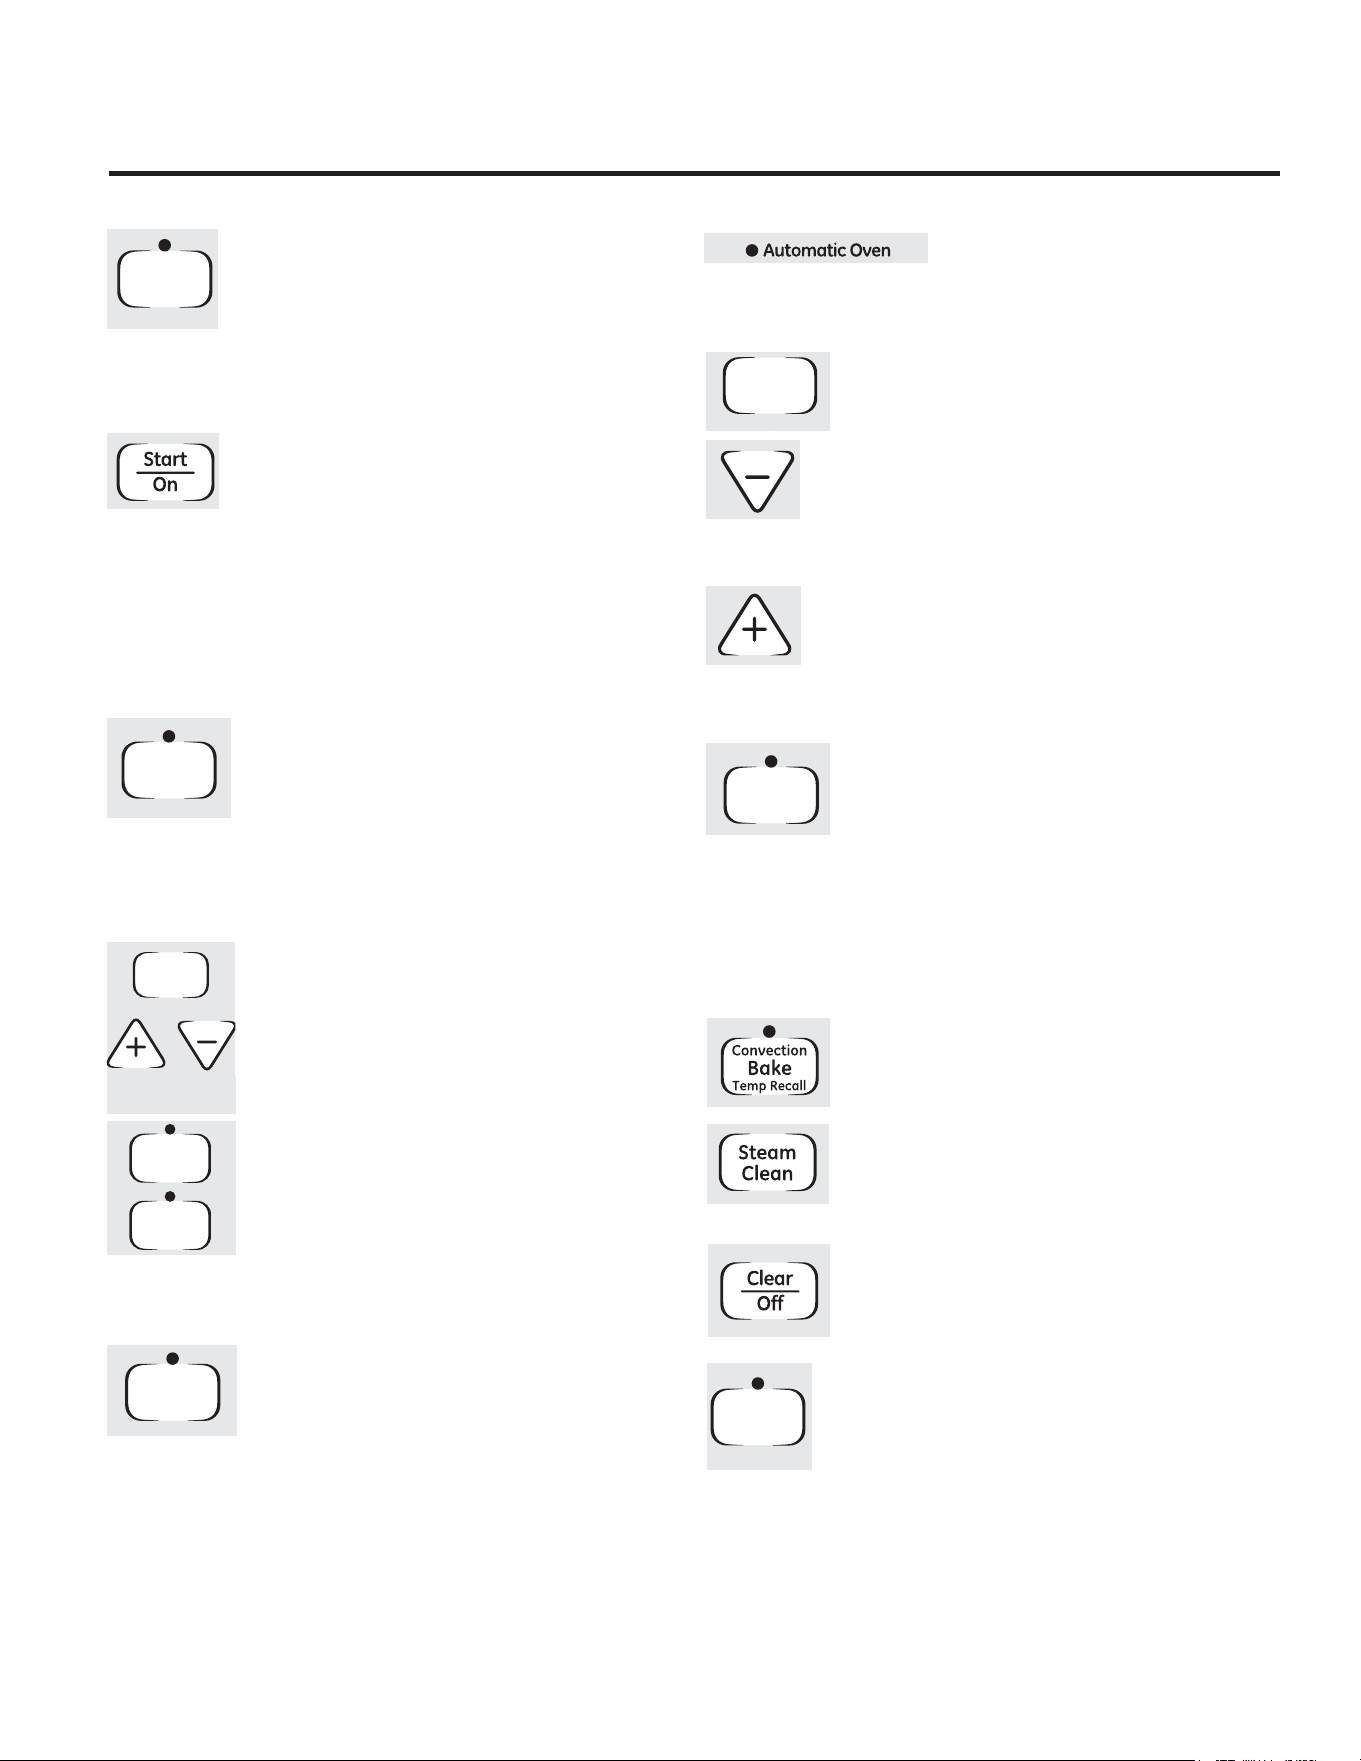
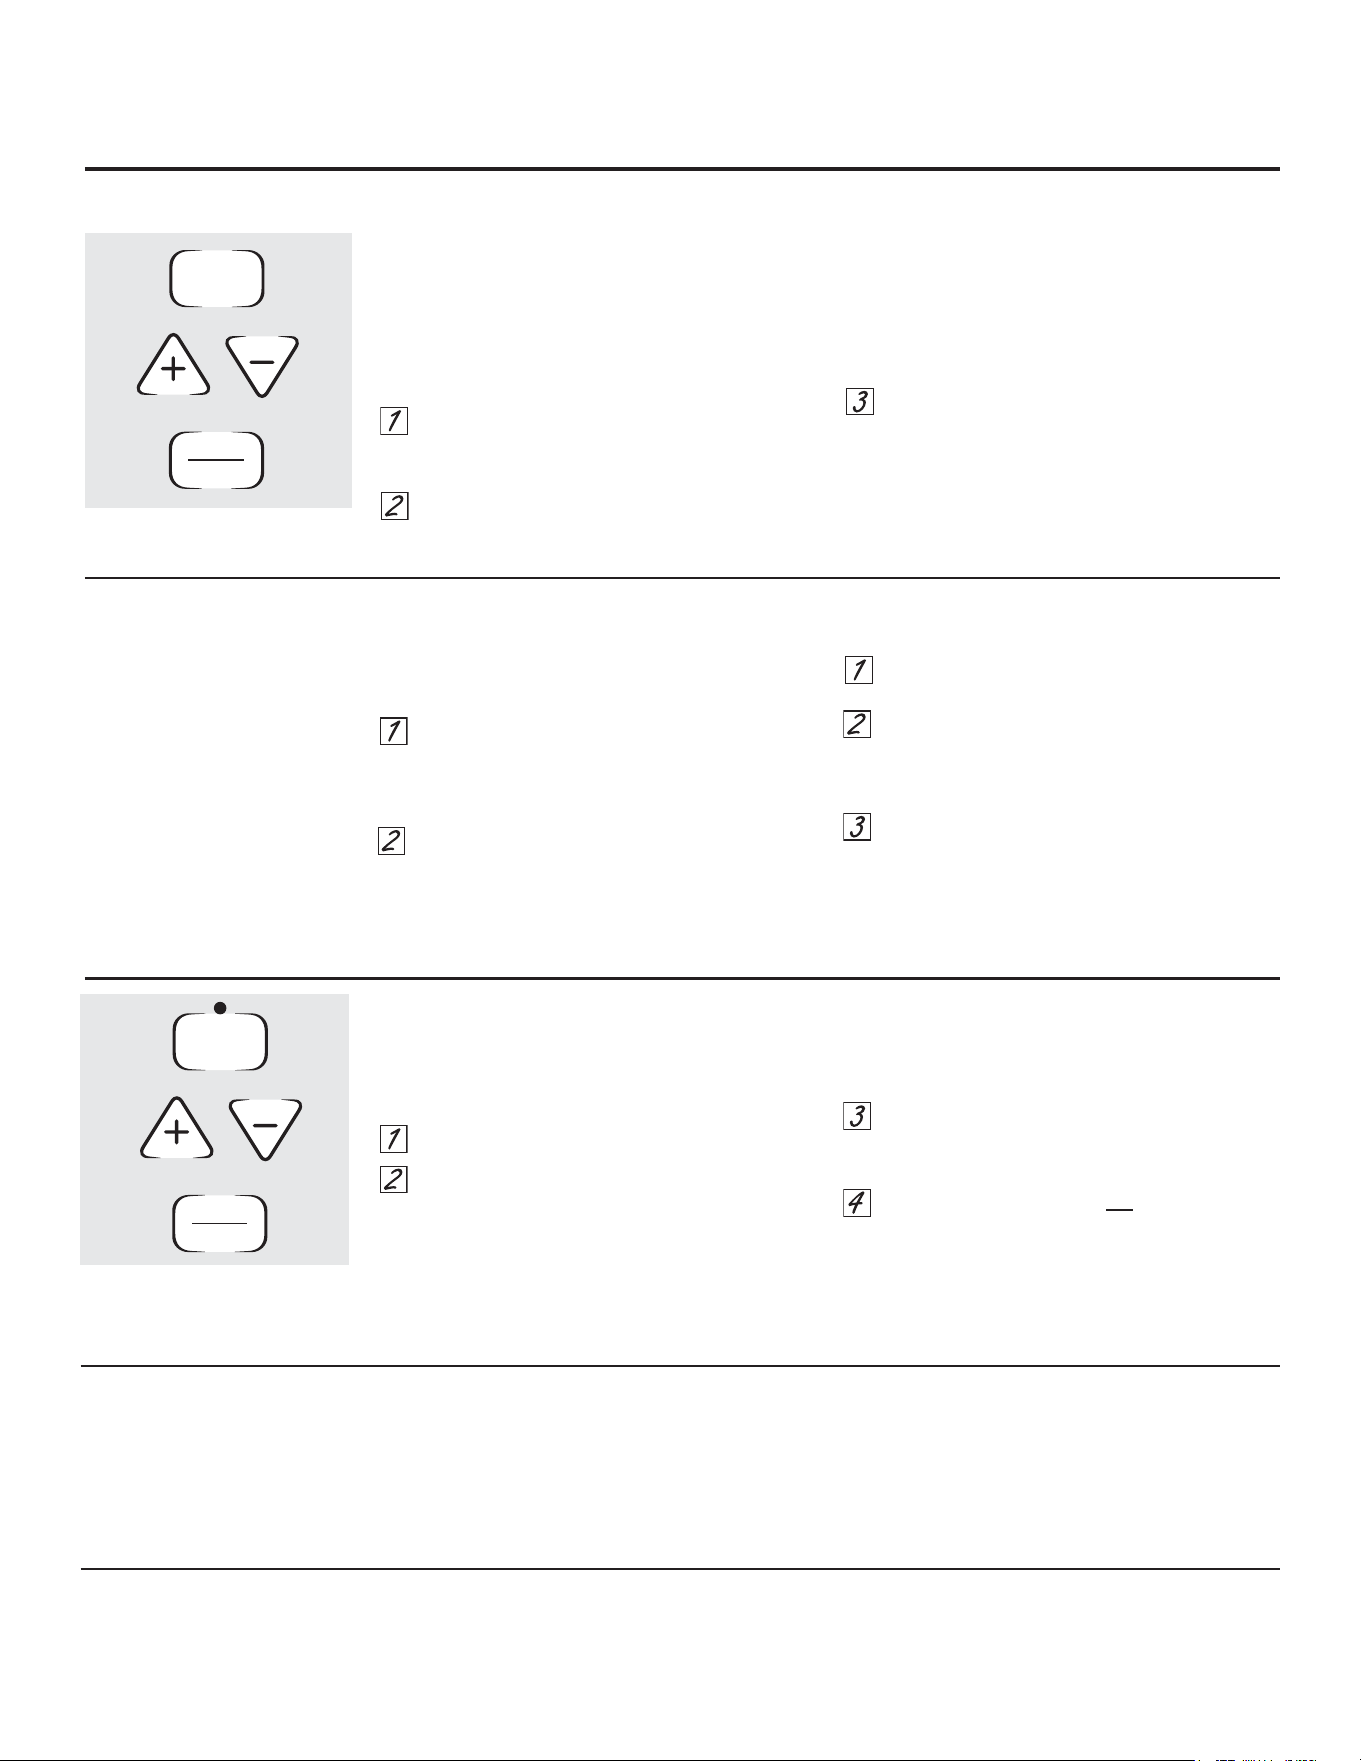
%DNH7HPS5HFDOO3DG
7RXFKWKLVSDGWRVHOHFWWKHEDNHIXQFWLRQ6HH
WKH+RZWR6HWWKH2YHQIRU%DNLQJVHFWLRQ
%DNH/LJKW
)ODVKHVZKLOHLQHGLWPRGH³\RXFDQFKDQJHWKH
RYHQWHPSHUDWXUHDWWKLVSRLQW*ORZVZKHQWKH
RYHQLVLQEDNHPRGH
6WDUW2Q3DG
0XVWEHWRXFKHGWRVWDUWDQ\FRRNLQJRUFOHDQLQJ
IXQFWLRQ
'LVSOD\
6KRZVWKHWLPHRIGD\RYHQWHPSHUDWXUHDQGWKHWLPHVVHWIRU
WKHWLPHURUDXWRPDWLFRYHQRSHUDWLRQV7KHGLVSOD\ZLOOVKRZ
3U(ZKLOHSUHKHDWLQJ
,I´)²µDQGDQXPEHURUOHWWHUIODVKLQWKHGLVSOD\DQGWKHRYHQ
FRQWUROVLJQDOVWKLVLQGLFDWHVDIXQFWLRQHUURUFRGH5HIHUWRWKH
7URXEOHVKRRWLQJ7LSVVHFWLRQ
.LWFKHQ7LPHU2Q2IIRU7LPHU2Q2II3DG
7RXFKWKLVSDGWRVHOHFWWKHWLPHUIHDWXUH7KHQ
SUHVVDQG²SDGVWRDGMXVWWLPH
7LPHU/LJKW
)ODVKHVZKLOHLQHGLWPRGH³\RXFDQFKDQJHWKHVHWWLPHDWWKLV
SRLQW*ORZVZKHQWKHWLPHUKDVEHHQDFWLYDWHG)ODVKHVDJDLQ
ZKHQWKHWLPHKDVUXQRXWXQWLOWKHFRQWUROLVUHVHW
&ORFN3DG
7RVHWWKHFORFNSUHVVWKH&/2&.SDGWZLFHRU
IRUPRGHOVZLWKRXWD&/2&.SDGKROGWKHDQG
²SDGVIRUVHFRQGV6HHWKH8VLQJWKHFORFN
DQGWLPHUVHFWLRQ
6WDUW7LPHRU'HOD\6WDUW3DG
8VHDORQJZLWKWKHFRRNLQJIXQFWLRQRUFOHDQLQJ
IXQFWLRQWRVHWWKHRYHQWRVWDUWDXWRPDWLFDOO\
DWDWLPH\RXVHW
6WDUW7LPHRU'HOD\6WDUW/LJKW
)ODVKHVZKLOHLQHGLWPRGH³\RXFDQFKDQJHWKH
VWDUWWLPHDWWKLVSRLQW*ORZVZKHQWKHIXQFWLRQ
KDVEHHQDFWLYDWHG
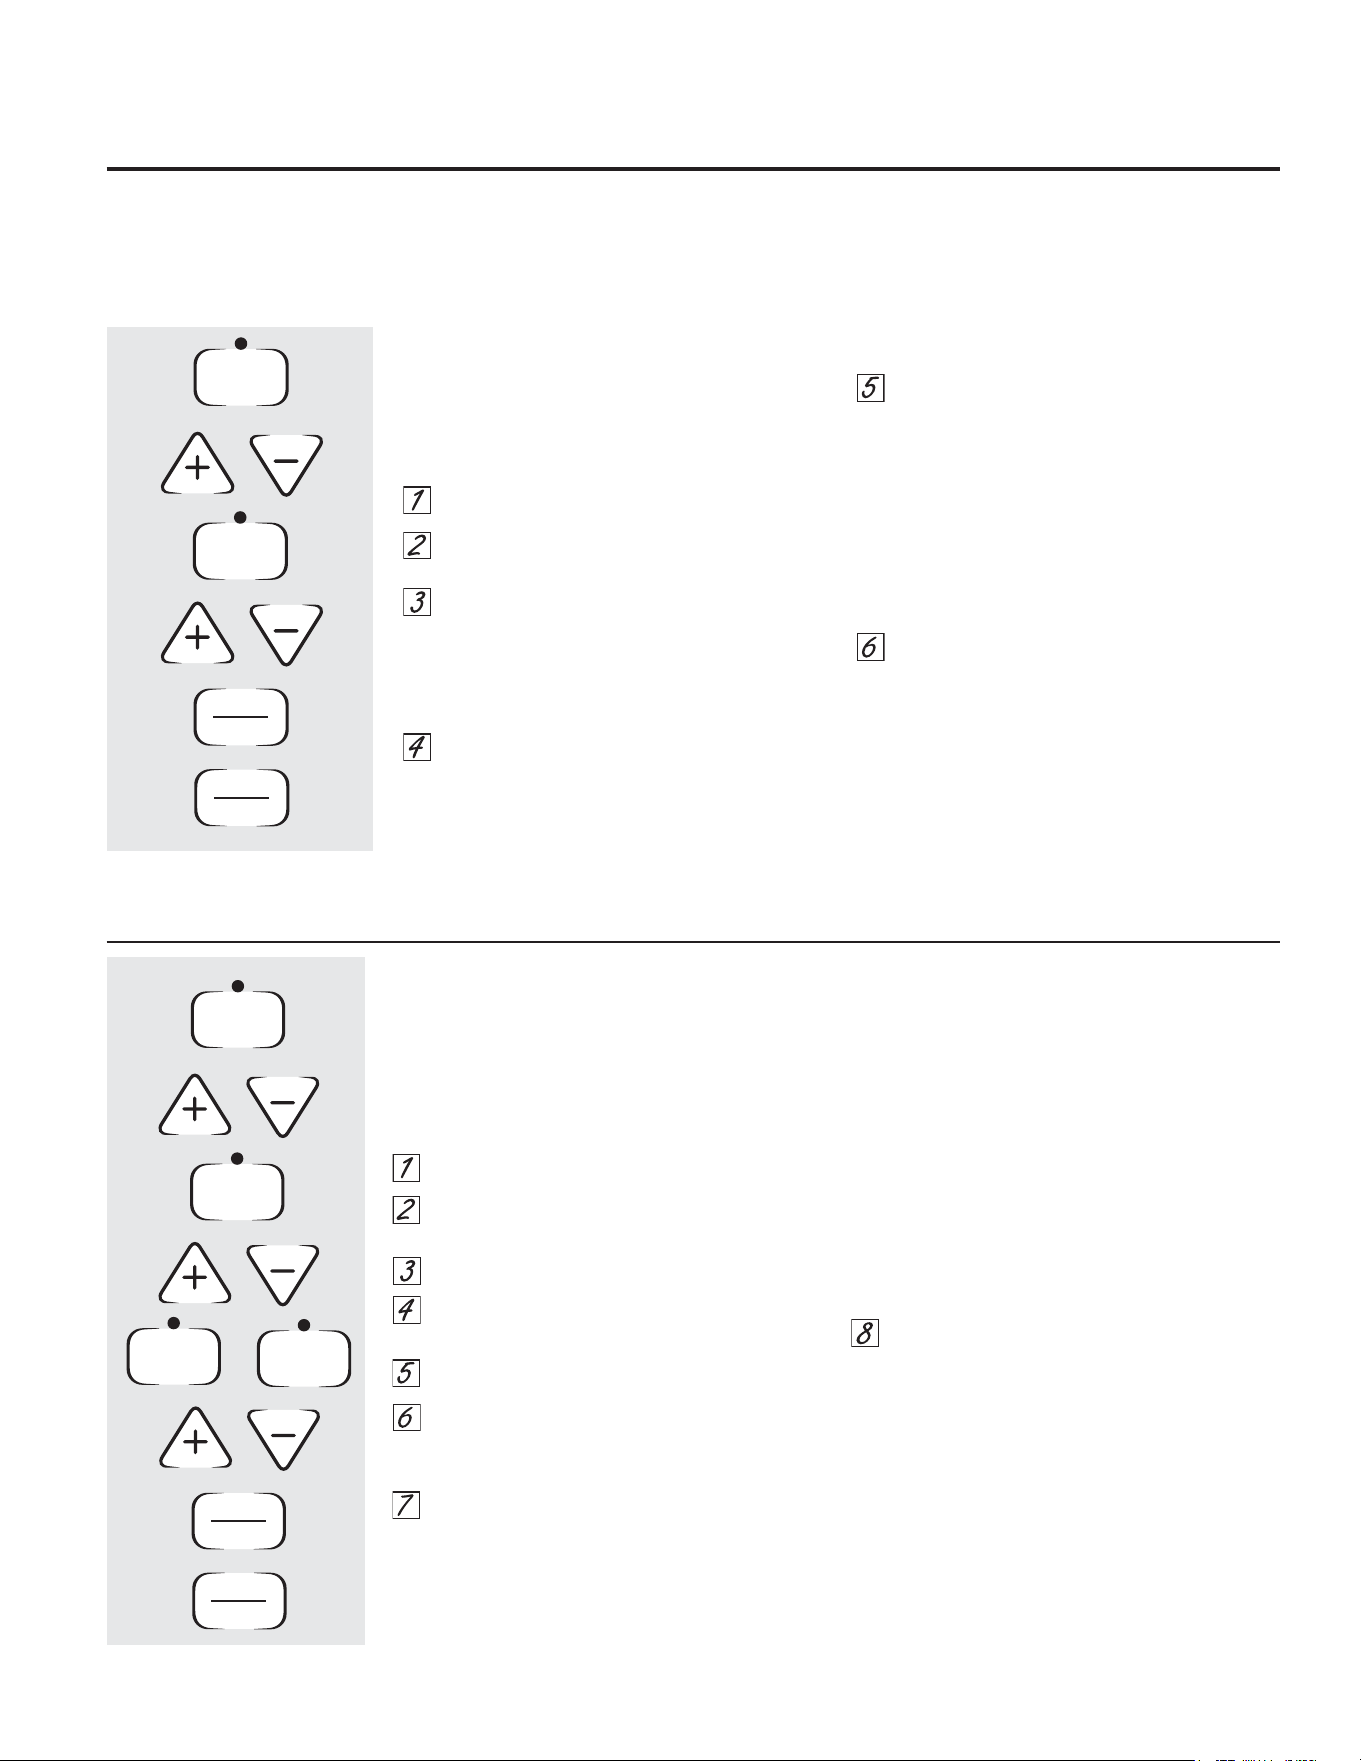
&RRNLQJ7LPH3DG
7RXFKWKLVSDGDQGWKHQWRXFKWKHRU²SDGV
WRVHWWKHDPRXQWRIWLPH\RXZDQW\RXUIRRG
WRFRRN7KHRYHQZLOOVKXWRIIZKHQWKHFRRNLQJ
WLPHKDVUXQRXW
&RRNLQJ7LPH/LJKW
)ODVKHVZKLOHLQHGLWPRGH³\RXFDQFKDQJHWKHVHWWLPHDWWKLV
SRLQW*ORZVZKHQWKHIXQFWLRQKDVEHHQDFWLYDWHG)ODVKHVDJDLQ
ZKHQWKHWLPHKDVUXQRXWXQWLOWKHFRQWUROLVUHVHW
$XWRPDWLF2YHQ/LJKW
7KLVOLJKWVDQ\WLPHWKHRYHQKDVEHHQ
SURJUDPPHGXVLQJWKH&RRNLQJ7LPH
RU6WDUW7LPH'HOD\6WDUWIXQFWLRQV
2YHQ/LJKW2Q2II3DG
7RXFKWKLVSDGWRWXUQWKHRYHQOLJKWRQRURII
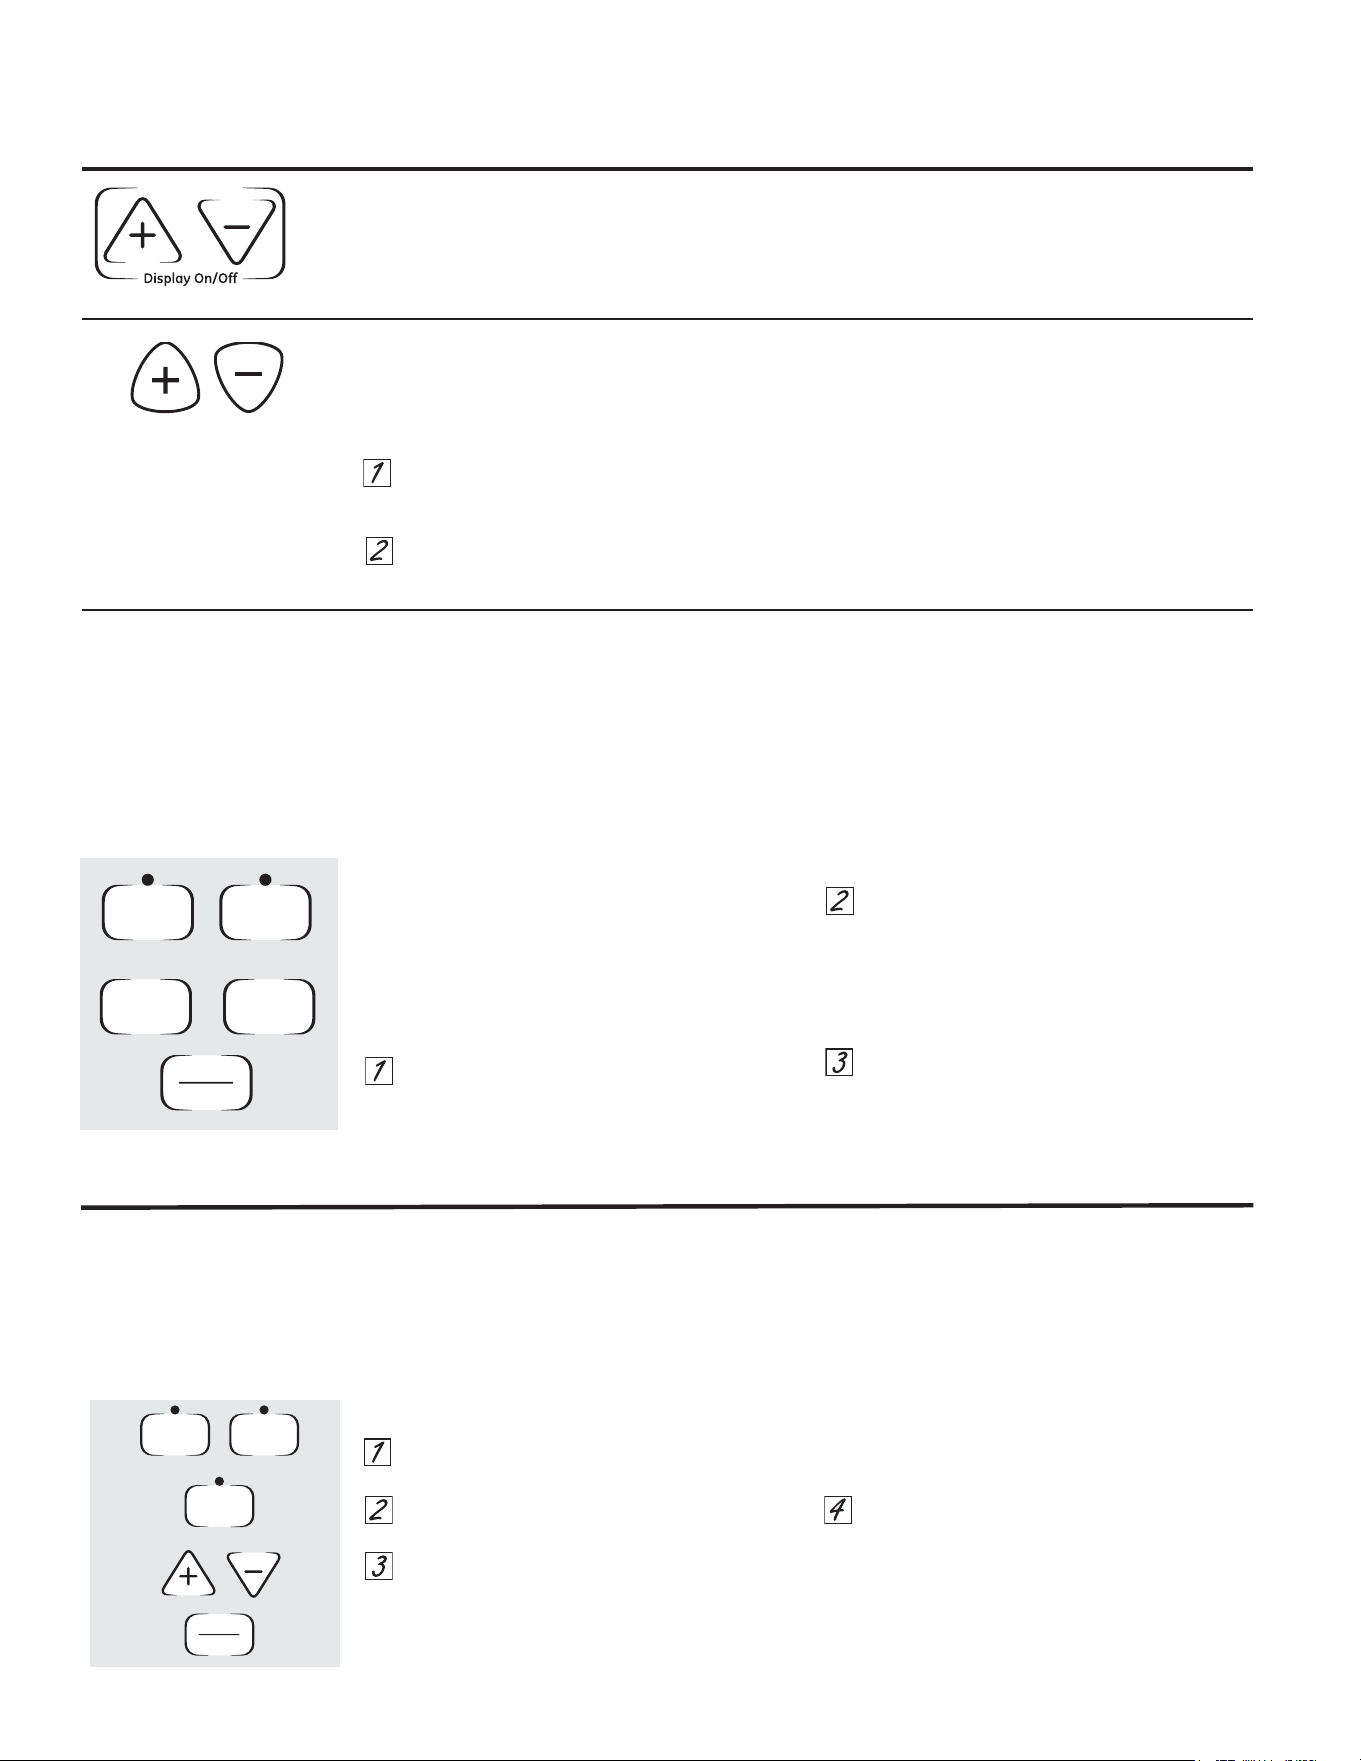
²3DG
6KRUWWDSVWRWKLVSDGZLOOGHFUHDVHWKHWLPHRU
WHPSHUDWXUHE\VPDOODPRXQWV7RXFKDQGKROG
WKHSDGWRGHFUHDVHWKHWLPHRUWHPSHUDWXUHE\
ODUJHUDPRXQWV
3DG
6KRUWWDSVWRWKLVSDGZLOOLQFUHDVHWKHWLPHRU
WHPSHUDWXUHE\VPDOODPRXQWV7RXFKDQGKROG
WKHSDGWRLQFUHDVHWKHWLPHRUWHPSHUDWXUHE\
ODUJHUDPRXQWV
6HOI&OHDQ3DG
7RXFKWKLVSDGWRVHOHFWWKHVHOIFOHDQLQJ
IXQFWLRQ6HHWKH8VLQJWKHVHOIFOHDQLQJRYHQ
VHFWLRQ
6HOI&OHDQ/LJKW
)ODVKHVZKLOHLQHGLWPRGH³\RXFDQFKDQJH
WKHOHQJWKRIWLPHIRUWKHVHOIFOHDQF\FOHDWWKLV
SRLQW*ORZVZKHQWKHRYHQLVLQWKHVHOIFOHDQ
F\FOH$IWHUWKHVHOIFOHDQF\FOHWKHOLJKWZLOOWXUQ
RII8QODWFKWKHGRRU
&RQYHFWLRQ%DNH7HPS5HFDOO
7RXFKWKLVSDGWRVHOHFWEDNLQJZLWKWKH
FRQYHFWLRQIXQFWLRQ
6WHDP&OHDQ
7RXFKWKLVSDGIRUHDVLHUFOHDQLQJRIOLJKWVRLOLQJ
RIWKHRYHQFDYLW\RUGRRU6HHWKH8VLQJVWHDP
FOHDQVHFWLRQ
&OHDU2II3DG
7RXFKWKLVSDGWRFDQFHO$//RYHQRSHUDWLRQV
H[FHSWWKHFORFNDQGWLPHU
%URLO+L/R3DG
7RXFKWKLVSDGWRVHOHFWWKHEURLOIXQFWLRQ6HH
WKH+RZWR6HWWKH2YHQIRU%URLOLQJVHFWLRQ
%URLO/LJKW
)ODVKHVZKLOHLQHGLWPRGH³\RXFDQVZLWFKIURP
+LWR/R%URLODWWKLVSRLQW*ORZVZKHQWKHRYHQ
LVLQEURLOPRGH
7KURXJKRXWWKLVPDQXDOIHDWXUHVDQGDSSHDUDQFHPD\YDU\IURP\RXUPRGHO
8VLQJWKHRYHQFRQWUROFORFN
DQGWLPHUIHDWXUHVDQGVHWWLQJV *($SSOLDQFHVFRP
Cooking
Time
Bake
Temp Recall
Kitchen
Timer
On/Off
Start
Time
Delay
Start
On/Off
Oven
Light
Clock
Start
6HW&ORFN
+ROG6HF
Broil
Hi/Lo
Self
Clean
7RDYRLGSRVVLEOHEXUQVSODFHWKHUDFNVLQWKHGHVLUHGSRVLWLRQEHIRUH\RXWXUQRQWKHRYHQ
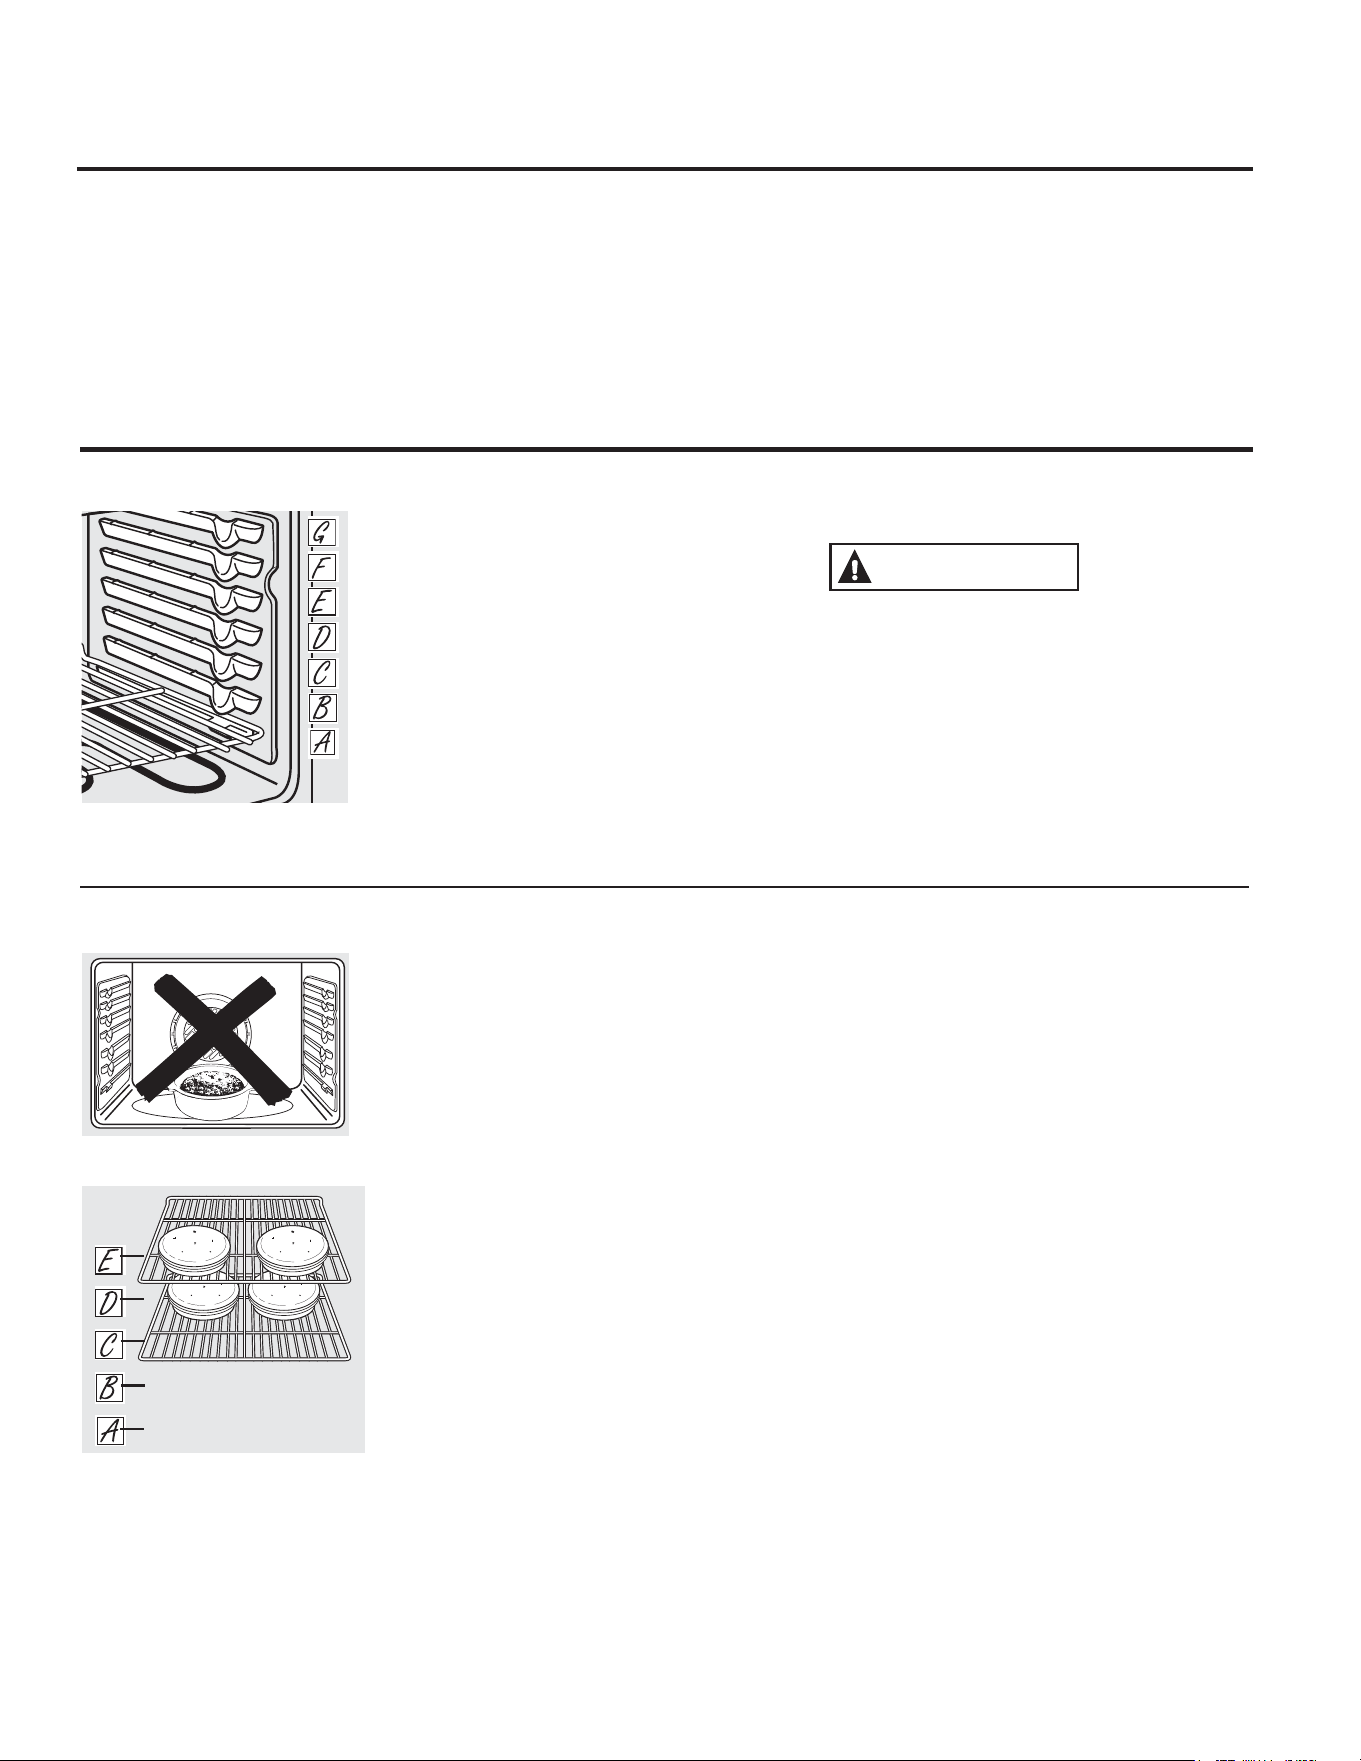
3UHKHDWLQJDQG3DQ3ODFHPHQW
3UHKHDWWKHRYHQLIWKHUHFLSHFDOOVIRULW
3UHKHDWLQJLVQHFHVVDU\IRUJRRGUHVXOWVZKHQ
EDNLQJFDNHVFRRNLHVSDVWULHVDQGEUHDGV
7KHGLVSOD\ZLOOVKRZ´3U(µZKLOHSUHKHDWLQJ
:KHQWKHRYHQUHDFKHVWKHVHOHFWHG
WHPSHUDWXUHWKHRYHQFRQWUROZLOOEHHSDQGWKH
GLVSOD\ZLOOVKRZWKHRYHQWHPSHUDWXUH
,IEDNLQJIRXUFDNHOD\HUVDWWKHVDPHWLPH
SODFHWZROD\HUVRQUDFN&DQGWZROD\HUVRQ
UDFN(6WDJJHUSDQVRQWKHUDFNVRRQHLVQRW
GLUHFWO\DERYHWKHRWKHU
%DNLQJUHVXOWVZLOOEHEHWWHULIWKHIRRGLV
FHQWHUHGLQWKHRYHQDVPXFKDVSRVVLEOH
$QJHO)RRGFDNHLVWKHH[FHSWLRQDQGVKRXOG
EHSODFHGRQWKHERWWRPRYHQUDFNSRVLWLRQ$
)ROORZSDFNDJHGLUHFWLRQRQSUHSDFNDJHGDQG
IUR]HQIRRGVIRUSDQSODFHPHQW3DQVVKRXOG
QRWWRXFKHDFKRWKHURUWKHZDOOVRIWKHRYHQ
,I\RXQHHGWRXVHWZRUDFNVVWDJJHUWKHSDQV
VRRQHLVQRWGLUHFWO\DERYHWKHRWKHU/HDYH
DSSUR[LPDWHO\
øsEHWZHHQSDQVDQGIURP
WKHIURQWEDFNDQGVLGHVRIRYHQZDOO
8VLQJWKHRYHQFRQWUROFORFN
DQGWLPHUIHDWXUHVDQGVHWWLQJV
)ODVKLQJ'LVSOD\3RZHU2XWDJH
,IDIODVKLQJWLPHLVLQWKHGLVSOD\\RXKDYHH[SHULHQFHG
DSRZHUIDLOXUH5HVHWWKHFORFN6HHWKH8VLQJWKHFORFN
DQGWLPHUVHFWLRQ
,I\RXURYHQZDVVHWIRUDWLPHGRYHQRSHUDWLRQDQGD
SRZHURXWDJHRFFXUUHGWKHFORFNDQGDOOSURJUDPPHG
IXQFWLRQVPXVWEHUHVHW
'RQRWSODFHIRRGVRUEDNLQJVWRQH
GLUHFWO\RQWKHRYHQIORRU
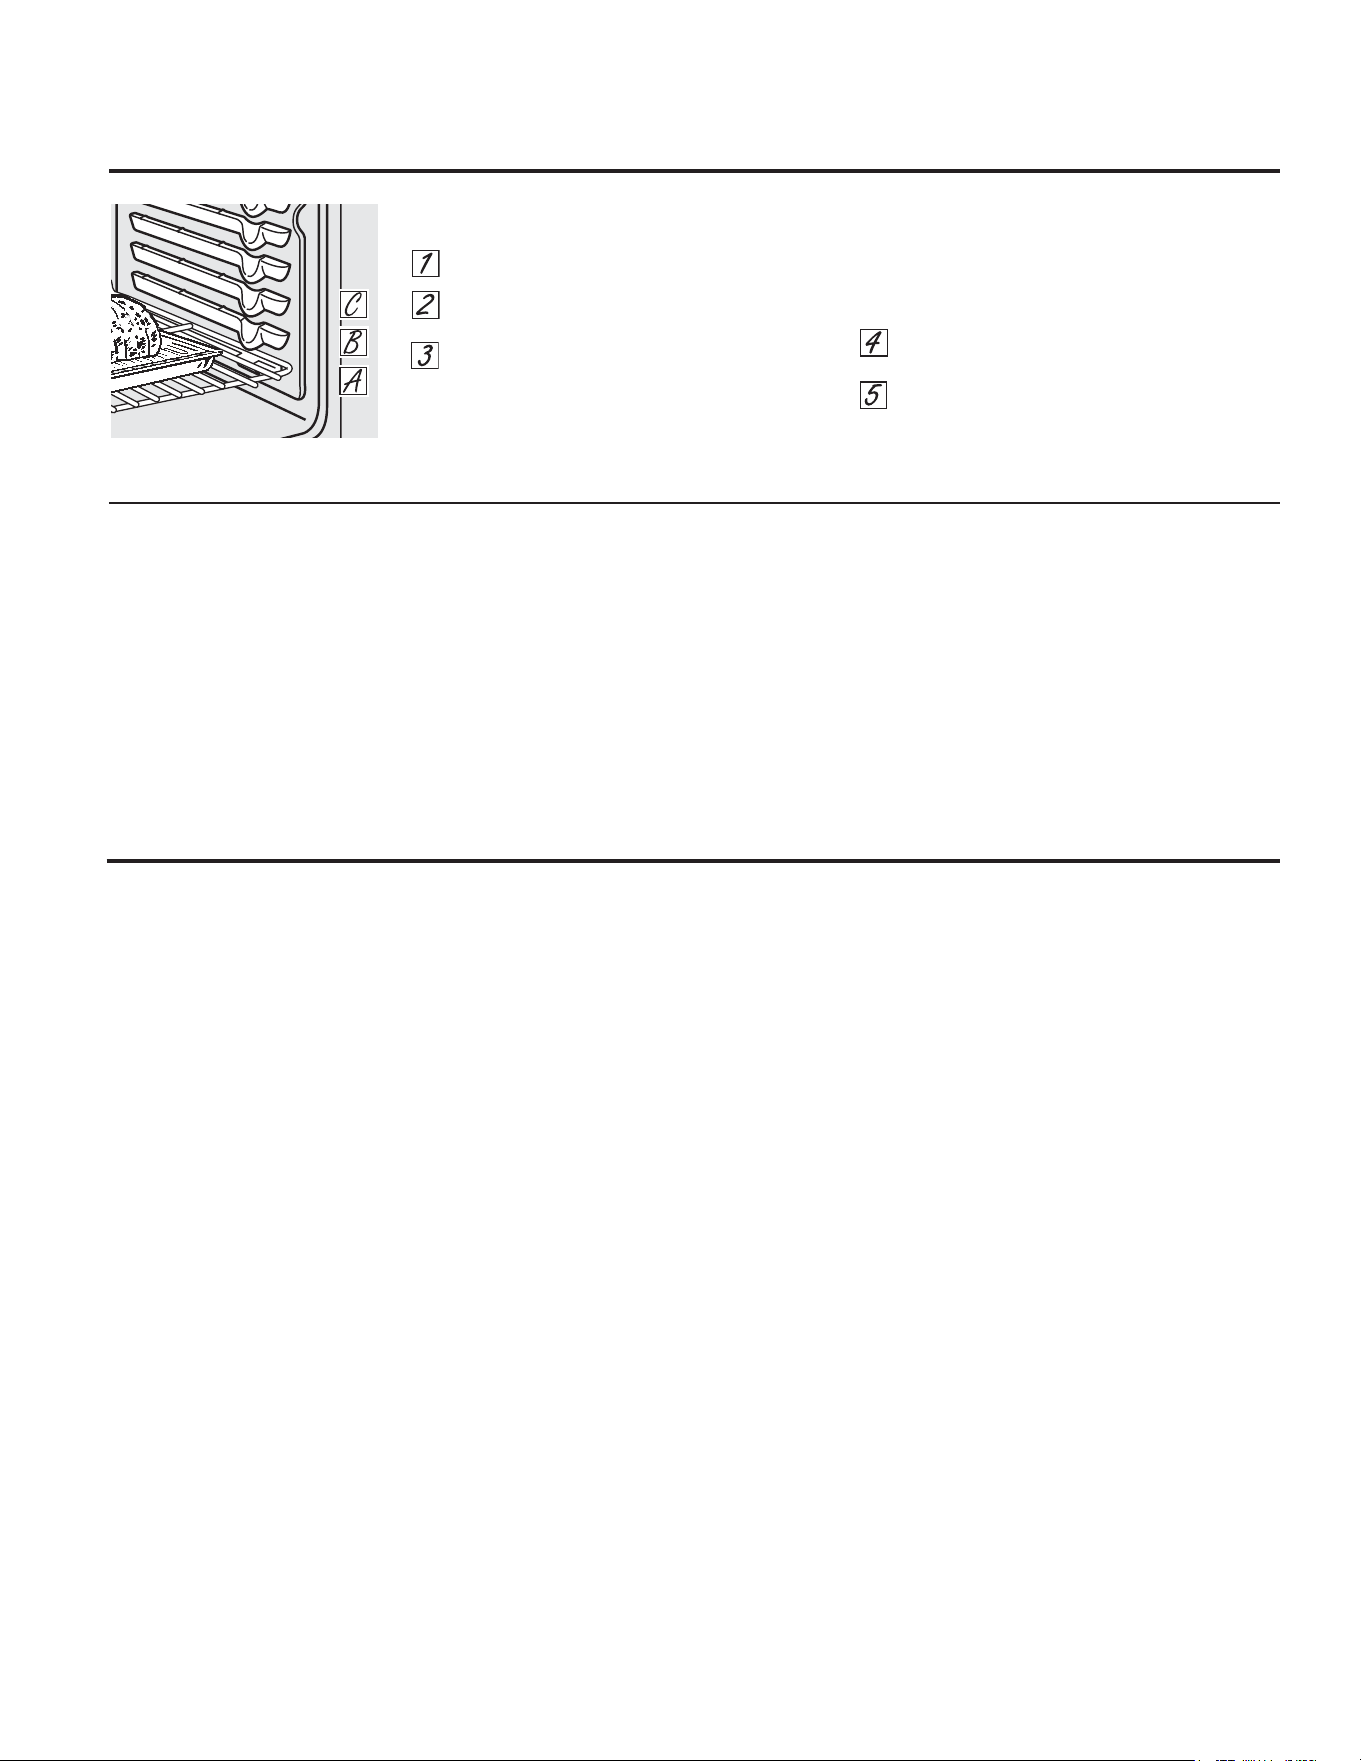
7RDYRLGSRVVLEOHEXUQVSODFHWKHUDFNVLQWKHGHVLUHGSRVLWLRQEHIRUH\RXWXUQWKHRYHQRQ
%HIRUH\RXEHJLQ«
7KHUDFNVKDYHVWRSORFNVVRWKDWZKHQSODFHG
FRUUHFWO\RQWKHUDFNVXSSRUWVWKH\ZLOOVWRS
EHIRUHFRPLQJFRPSOHWHO\RXWDQGZLOOQRWWLOW
:KHQSODFLQJDQGUHPRYLQJFRRNZDUHSXOOWKH
UDFNRXWWRWKHEXPSRQWKHUDFNVXSSRUW
7RUHPRYHDUDFN SXOOLWWRZDUG\RXWLOWWKH
IURQWHQGXSDQGSXOOLWRXW
7RUHSODFH SODFHWKHHQGRIWKHUDFNVWRS
ORFNVRQWKHVXSSRUWWLOWXSWKHIURQWDQGSXVK
WKHUDFNLQ
%851+$=$5'$YRLGWRXFKLQJWKHKRWGRRU
VXUIDFHZKHQXVLQJWKHRYHQUDFNLQWKHORZHVW
SRVLWLRQ$OZD\VXVHKDQGVDQGPLWWHQSRW
KROGHUVWRPRYHWKHUDFN3XOOWKHUDFNRXWD
IHZLQFKHVDQGWKHQFDUHIXOO\JUDVSWKHVLGHVRI
WKHUDFNWRSXOOLWRXWWKHUHVWRIWKHZD\
1XPEHURIUDFNSRVLWLRQVYDU\E\
PRGHO
8VLQJWKHRYHQ
&$87,21
7KURXJKRXWWKLVPDQXDOIHDWXUHVDQGDSSHDUDQFHPD\YDU\IURP\RXUPRGHO
+RZWR6HWWKH2YHQIRU%DNLQJ
7RXFKWKH%DNHSDG
7RXFKWKHRU²SDGVXQWLOWKHGHVLUHG
WHPSHUDWXUHLVGLVSOD\HG
7RXFKWKH6WDUW2Q SDG7KHRYHQZLOOVWDUW
DXWRPDWLFDOO\7KHGLVSOD\ZLOOVKRZ3U(ZKLOH
SUHKHDWLQJ:KHQWKHRYHQUHDFKHVWKH
VHOHFWHGWHPSHUDWXUHWKHRYHQFRQWUROZLOO
EHHSVHYHUDOWLPHVDQGWKHGLVSOD\ZLOOVKRZ
WKHRYHQWHPSHUDWXUH
7RFKDQJHWKHRYHQWHPSHUDWXUHGXULQJ%$.(F\FOH
WRXFKWKH%DNHSDGDQGWKHQWKHRU²SDGVWRJHW
WKHQHZWHPSHUDWXUH
&KHFNIRRGIRUGRQHQHVVDWPLQLPXPWLPHRQ
UHFLSH&RRNORQJHULIQHFHVVDU\
7RXFKWKH&OHDU2IISDGZKHQEDNLQJLV
ILQLVKHGDQGWKHQUHPRYHWKHIRRGIURPWKH
RYHQ
8VLQJWKHRYHQ *($SSOLDQFHVFRP
$OXPLQXP)RLO
'RQRWXVHDOXPLQXPIRLOWROLQHRYHQERWWRPV
7KHIRLOZLOOWUDSKHDWEHORZDQGXSVHWWKH
SHUIRUPDQFHRIWKHRYHQ)RLOFDQPHOWDQG
SHUPDQHQWO\GDPDJHWKHRYHQERWWRP
'DPDJHIURPLPSURSHUXVHRIDOXPLQXPIRLOLV
QRWFRYHUHGE\WKHSURGXFWZDUUDQW\
)RLOPD\EHXVHGWRFDWFKVSLOOVE\SODFLQJD
VKHHWRQDORZHUUDFNVHYHUDOLQFKHVEHORZ
WKHIRRG'RQRWXVHPRUHIRLOWKDQQHFHVVDU\
DQGQHYHUHQWLUHO\FRYHUDQRYHQUDFNZLWK
DOXPLQXPIRLO.HHSIRLODWOHDVWµIURPWKH
RYHQZDOOVWRSUHYHQWSRRUKHDWFLUFXODWLRQ
7KHW\SHRIPDUJDULQHZLOODIIHFWEDNLQJSHUIRUPDQFH
0RVWUHFLSHVIRUEDNLQJKDYHEHHQGHYHORSHGXVLQJKLJKIDWSURGXFWVVXFKDVEXWWHURUPDUJDULQHIDW,I\RXGHFUHDVHWKHIDW
WKHUHFLSHPD\QRWJLYHWKHVDPHUHVXOWVDVZLWKDKLJKHUIDWSURGXFW
5HFLSHIDLOXUHFDQUHVXOWLIFDNHVSLHVSDVWULHVFRRNLHVRUFDQGLHVDUHPDGHZLWKORZIDWVSUHDGV7KHORZHUWKHIDWFRQWHQWRID
VSUHDGSURGXFWWKHPRUHQRWLFHDEOHWKHVHGLIIHUHQFHVEHFRPH
)HGHUDOVWDQGDUGVUHTXLUHSURGXFWVODEHOHG´PDUJDULQHµWRFRQWDLQDWOHDVWIDWE\ZHLJKW/RZIDWVSUHDGVRQWKHRWKHUKDQGFRQWDLQ
OHVVIDWDQGPRUHZDWHU7KHKLJKPRLVWXUHFRQWHQWRIWKHVHVSUHDGVDIIHFWVWKHWH[WXUHDQGIODYRURIEDNHGJRRGV)RUEHVWUHVXOWVZLWK
\RXUROGIDYRULWHUHFLSHVXVHPDUJDULQHEXWWHURUVWLFNVSUHDGVFRQWDLQLQJDWOHDVWYHJHWDEOHRLO
8VLQJWKHRYHQ
7KHVL]HZHLJKWWKLFNQHVV
VWDUWLQJWHPSHUDWXUH
DQG\RXUSUHIHUHQFH
RIGRQHQHVVZLOODIIHFW
EURLOLQJWLPHV7KLVJXLGH
LVEDVHGRQPHDWVDW
UHIULJHUDWRUWHPSHUDWXUH
7KH86'HSDUWPHQWRI
$JULFXOWXUHVD\V´5DUHEHHILV
SRSXODUEXW\RXVKRXOGNQRZ
WKDWFRRNLQJLWWRRQO\)
PHDQVVRPHIRRGSRLVRQLQJ
RUJDQLVPVPD\VXUYLYHµ6RXUFH
6DIH)RRG%RRN<RXU.LWFKHQ
*XLGH86'$5HY-XQH
%URLOLQJ*XLGH
3UHKHDWWKHEURLOHUIRUPLQXWHVWRLPSURYHSHUIRUPDQFH
,I\RXUUDQJHLVFRQQHFWHGWRYROWVUDUHVWHDNVPD\EHEURLOHGE\SUHKHDWLQJWKH
EURLOHUDQGSRVLWLRQLQJWKHRYHQUDFNRQHSRVLWLRQKLJKHU
)RRG 'RQHQHVV
7\SHRU
7KLFNQHVV 5DFN3RVLWLRQ &RPPHQWV
%HHI 5DUH) 6WHDNV²µ
WKLFN
(RU)IRRGVKRXOGEHµWRµ
IURPEURLOHOHPHQW
6WHDNVOHVVWKDQµWKLFN
DUHGLIILFXOWWR
FRRN
UDUH7KH\FRRNWKURXJK
EHIRUH
EURZQLQJ7RSUHYHQWFXUOLQJRI
PHDWVODVKIDWDWµLQWHUYDOV
0HGLXP
)
6WHDNV²µWR
µWKLFN
(IRRGVKRXOGEHµWRµIURP
EURLOHOHPHQW
:HOO'RQH
)
6WHDNV²µ
WRµWKLFNRU
*URXQG%HHI
3DWWLHV
'RU(IRRGVKRXOGEHµWRµ
IURPEURLOHOHPHQW
&KLFNHQ %UHDVW
ERQHOHVV
&IRRGVKRXOGEHµWRµIURP
EURLOHOHPHQW
%URLOVNLQVLGHGRZQILUVW
%UHDVWERQHLQ &IRRGVKRXOGEHµWRµIURP
EURLOHOHPHQW
)LVK
)LOOHWV
µWR·WKLFN 'RU(IRRGVKRXOGEHµWRµ
IURPEURLOHOHPHQW
+DQGOHDQGWXUQYHU\FDUHIXOO\
3RUN
&KRSV
:HOO'RQH
)
µWKLFN 'IRRGVKRXOGEHµWRµIURP
EURLOHOHPHQW
7RSUHYHQWFXUOLQJRIPHDWVODVKIDW
DWµLQWHUYDOV
+RZWR6HWWKH2YHQIRU%URLOLQJ
8VH/R%URLO WRFRRNIRRGVVXFKDVSRXOWU\
RUWKLFNFXWVRIPHDWWKRURXJKO\ZLWKRXW
RYHUEURZQLQJWKHP
3ODFHWKHIRRGRQDEURLOHUJULGLQDEURLOHU
SDQGHVLJQHGIRUEURLOLQJ
)ROORZVXJJHVWHGUDFNSRVLWLRQVLQWKH
%URLOLQJ*XLGH
7RXFKWKH%URLO+L/R SDGRQFHIRU+L
%URLO
7RFKDQJHWR/R%URLO WRXFKWKH%URLO+L
/RSDGDJDLQ
7RXFKWKH6WDUW SDG
:KHQEURLOLQJLVILQLVKHGWRXFKWKH&OHDU
2IISDG
/HDYHWKHGRRURSHQWRWKHEURLO
VWRSSRVLWLRQ7KHGRRUVWD\VRSHQ
E\LWVHOI\HWWKHSURSHUWHPSHUDWXUH
LVPDLQWDLQHGLQWKHRYHQ
)RUDOORWKHUPRGHOV
)RUPRGHOV-66DQG-'6
'RRU3RVLWLRQLQJ'XULQJ%URLOLQJ
8VLQJWKHFRQYHFWLRQRYHQRQVRPHPRGHOV *($SSOLDQFHVFRP
&RQYHFWLRQ%DNLQJ
,GHDOIRUHYHQO\EURZQHGEDNHGIRRGV
FRRNHGRQPXOWLSOHVKHOYHV
*RRGIRUODUJHTXDQWLWLHVRIEDNHGIRRGV
*RRGUHVXOWVZLWKFRRNLHVELVFXLWV
EURZQLHVFXSFDNHVFUHDPSXIIVVZHHW
UROOVDQJHOIRRGFDNHDQGEUHDG7KH
FRQYHFWLRQIDQFLUFXODWHVWKHKHDWHGDLU
HYHQO\RYHUDQGDURXQGWKHIRRG
7KH&RQYHFWLRQ)DQ
7KHFRQYHFWLRQIDQLVSURJUDPPHGWRUXQ
LQWHUPLWWHQWO\IRUPD[LPXPSHUIRUPDQFH
GXULQJFRQYHFWLRQEDNHDQGGXULQJ
SUHKHDWLQJ,IWKHIDQLVRQZKHQWKHRYHQ
GRRULVRSHQHGWKHIDQZLOOVWRS7KHIDQZLOO
UHVXPHRSHUDWLRQZKHQWKHGRRULVFORVHG
$XWR7HPS&RQYHUVLRQ
:KHQFRQYHFWLRQEDNLQJWKH$XWR
7HPS&RQYHUVLRQIHDWXUHDXWRPDWLFDOO\
UHGXFHVWKHVHWWHPSHUDWXUHIRURSWLPDO
SHUIRUPDQFH
,QFUHDVHWKH&RQYHFWLRQ%DNLQJWHPSHUDWXUH
VHWWLQJ)KLJKHUIRUIDVWHUFRRNLQJRI
ODUJHFXWVRIPHDWDQGSRXOWU\
+RZWR6HWWKH2YHQIRU&RQYHFWLRQ
%DNLQJ
7RXFKWKH&RQYHFWLRQ%DNHSDG
7RXFKWKHRU²SDGVXQWLOWKHGHVLUHG
WHPSHUDWXUHLVGLVSOD\HG
7RXFKWKH6WDUW2QSDG
7KHRYHQZLOOVWDUWDXWRPDWLFDOO\
7KHGLVSOD\ZLOOVKRZ3U(ZKLOH
SUHKHDWLQJ:KHQWKHRYHQUHDFKHVWKH
VHOHFWHGWHPSHUDWXUHWKHRYHQFRQWURO
ZLOOEHHSVHYHUDOWLPHVDQGWKHGLVSOD\
ZLOOVKRZWKHRYHQWHPSHUDWXUH
&KHFNIRRGIRUGRQHQHVVDWWKH
PLQLPXPWLPHRQWKHUHFLSH&RRN
ORQJHULIQHFHVVDU\
7RXFKWKH&OHDU2IISDGZKHQEDNLQJLV
ILQLVKHGDQGWKHQUHPRYHWKHIRRGIURP
WKHRYHQ
7RFKDQJHWKHRYHQWHPSHUDWXUHGXULQJ
&RQYHFWLRQ%DNHWRXFKWKH&RQYHFWLRQ%DNH
SDGDQGWKHQWKHRU²SDGVWRVHWWKHQHZ
WHPSHUDWXUH
,QDFRQYHFWLRQRYHQDIDQFLUFXODWHV
KRWDLURYHUXQGHUDQGDURXQGWKH
IRRG7KLVFLUFXODWLQJKRWDLULVHYHQO\
GLVWULEXWHGWKURXJKRXWWKHRYHQ
FDYLW\$VDUHVXOWIRRGVDUHHYHQO\
FRRNHGDQGEURZQHG²RIWHQLQOHVV
WLPHWKDQZLWKUHJXODUKHDW
:KHQEDNLQJFRRNLHV\RXZLOOJHW
WKHEHVWUHVXOWVLI\RXXVHDIODW
FRRNLHVKHHWLQVWHDGRIDSDQZLWK
ORZVLGHV
&RRNZDUHIRU&RQYHFWLRQ&RRNLQJ
%HIRUHXVLQJ\RXUFRQYHFWLRQRYHQFKHFN
WRVHHLI\RXUFRRNZDUHOHDYHVURRPIRUDLU
FLUFXODWLRQLQWKHRYHQ,I\RXDUHEDNLQJZLWK
VHYHUDOSDQVOHDYHVSDFHEHWZHHQWKHP
$OVREHVXUHWKHSDQVGRQRWWRXFKHDFK
RWKHURUWKHZDOOVRIWKHRYHQ
3DSHUDQG3ODVWLF
+HDWUHVLVWDQWSDSHUDQGSODVWLFFRQWDLQHUV
WKDWDUHUHFRPPHQGHGIRU
XVHLQUHJXODUEDNLQJFDQDOVREHXVHG
IRUFRQYHFWLRQEDNLQJEXWVKRXOGQRWEH
XVHGDWWHPSHUDWXUHVKLJKHUWKDQWKH
WHPSHUDWXUHUHFRPPHQGHGE\WKHFRRNZDUH
PDQXIDFWXUHU3ODVWLFFRRNZDUHWKDWLVKHDW
UHVLVWDQWWRWHPSHUDWXUHVRI)FDQDOVR
EHXVHG
0HWDODQG*ODVV
$Q\W\SHRIFRRNZDUHZLOOZRUNLQ\RXU
FRQYHFWLRQRYHQKRZHYHUPHWDOSDQVKHDW
WKHIDVWHVWDQGDUHUHFRPPHQGHG
IRUFRQYHFWLRQEDNLQJ
'DUNHQHGRUPDWWHILQLVKHGSDQVZLOOEDNH
IDVWHUWKDQVKLQ\SDQV
*ODVVRUFHUDPLFSDQVFRRNPRUHVORZO\
)RUUHFLSHVOLNHRYHQEDNHGFKLFNHQ
XVHDSDQZLWKORZVLGHV+RWDLUFDQQRW
FLUFXODWHZHOODURXQGIRRGLQDSDQZLWKKLJK
VLGHV
Start
On
Kitchen
Timer
On/Off
1RWDOOIHDWXUHVDUHRQDOOPRGHOV
7KHWLPHULVDPLQXWHWLPHURQO\
7KH&OHDU2IISDGGRHVQRWDIIHFW
WKHWLPHU
7R6HWWKH7LPHU
7KHWLPHUGRHVQRWFRQWURORYHQRSHUDWLRQV
7KHPD[LPXPVHWWLQJRQWKHWLPHULVKRXUVDQG
PLQXWHV
7RXFKWKH.LWFKHQ7LPHU2Q2IISDG
7RXFKWKHRU²SDGVXQWLOWKHDPRXQWRI
WLPH\RXZDQWVKRZVLQWKHGLVSOD\7KH
PD[LPXPWLPHWKDWFDQEHHQWHUHGLQ
PLQXWHVLV7LPHVPRUHWKDQPLQXWHV
VKRXOGEHFKDQJHGWRKRXUVDQGPLQXWHV
,I\RXPDNHDPLVWDNHWRXFKWKH.LWFKHQ7LPHU
2Q2IISDGDQGEHJLQDJDLQ
7RXFKWKH6WDUW2QSDG7KHWLPHZLOOVWDUW
FRXQWLQJGRZQDOWKRXJKWKHGLVSOD\GRHV
QRWFKDQJHXQWLORQHPLQXWHKDVSDVVHG
:KHQWKHWLPHUUHDFKHVWKHFRQWUROZLOO
EHHSWLPHVIROORZHGE\RQHEHHSHYHU\
VHFRQGVXQWLOWKH.LWFKHQ7LPHU2Q2IISDG
LVWRXFKHG
8VLQJWKHFORFNDQGWLPHU
7R6HWWKH&ORFN
7KHFORFNPXVWEHVHWWRWKHFRUUHFWWLPH
RIGD\IRUWKHDXWRPDWLFRYHQWLPLQJIXQFWLRQV
WRZRUNSURSHUO\7KHWLPHRIGD\FDQQRWEH
FKDQJHGGXULQJDGHOD\HGFRRNLQJRUDGHOD\HG
VHOIFOHDQLQJF\FOH
7RXFKWKH&ORFN SDGWZLFH
)RUPRGHOVZLWKRXWD&ORFNSDG
+ROGWKHDQGSDGVIRUVHFRQGV
7RXFKWKHRU²SDGV
,IWKHRU²SDGVDUHQRWWRXFKHGZLWKLQRQH
PLQXWHDIWHU6WHSWKHGLVSOD\UHYHUWVWRWKH
RULJLQDOVHWWLQJ,IWKLVKDSSHQVUHSHDW6WHS
DQGUHHQWHUWKHWLPHRIGD\
7RXFKWKH6WDUW2Q SDGXQWLOWKHWLPHRI
GD\VKRZVLQWKHGLVSOD\7KLVHQWHUVWKH
WLPHDQGVWDUWVWKHFORFN
7RFKHFNWKHWLPHRIGD\ZKHQWKHGLVSOD\LV
VKRZLQJRWKHULQIRUPDWLRQVLPSO\WRXFKWKH
&ORFNSDG7KHWLPHRIGD\VKRZVXQWLODQRWKHU
SDGLVWRXFKHG
Clock
Start
On
0DNHVXUHWKHFORFNLVVHWWRWKH
FRUUHFWWLPHRIGD\
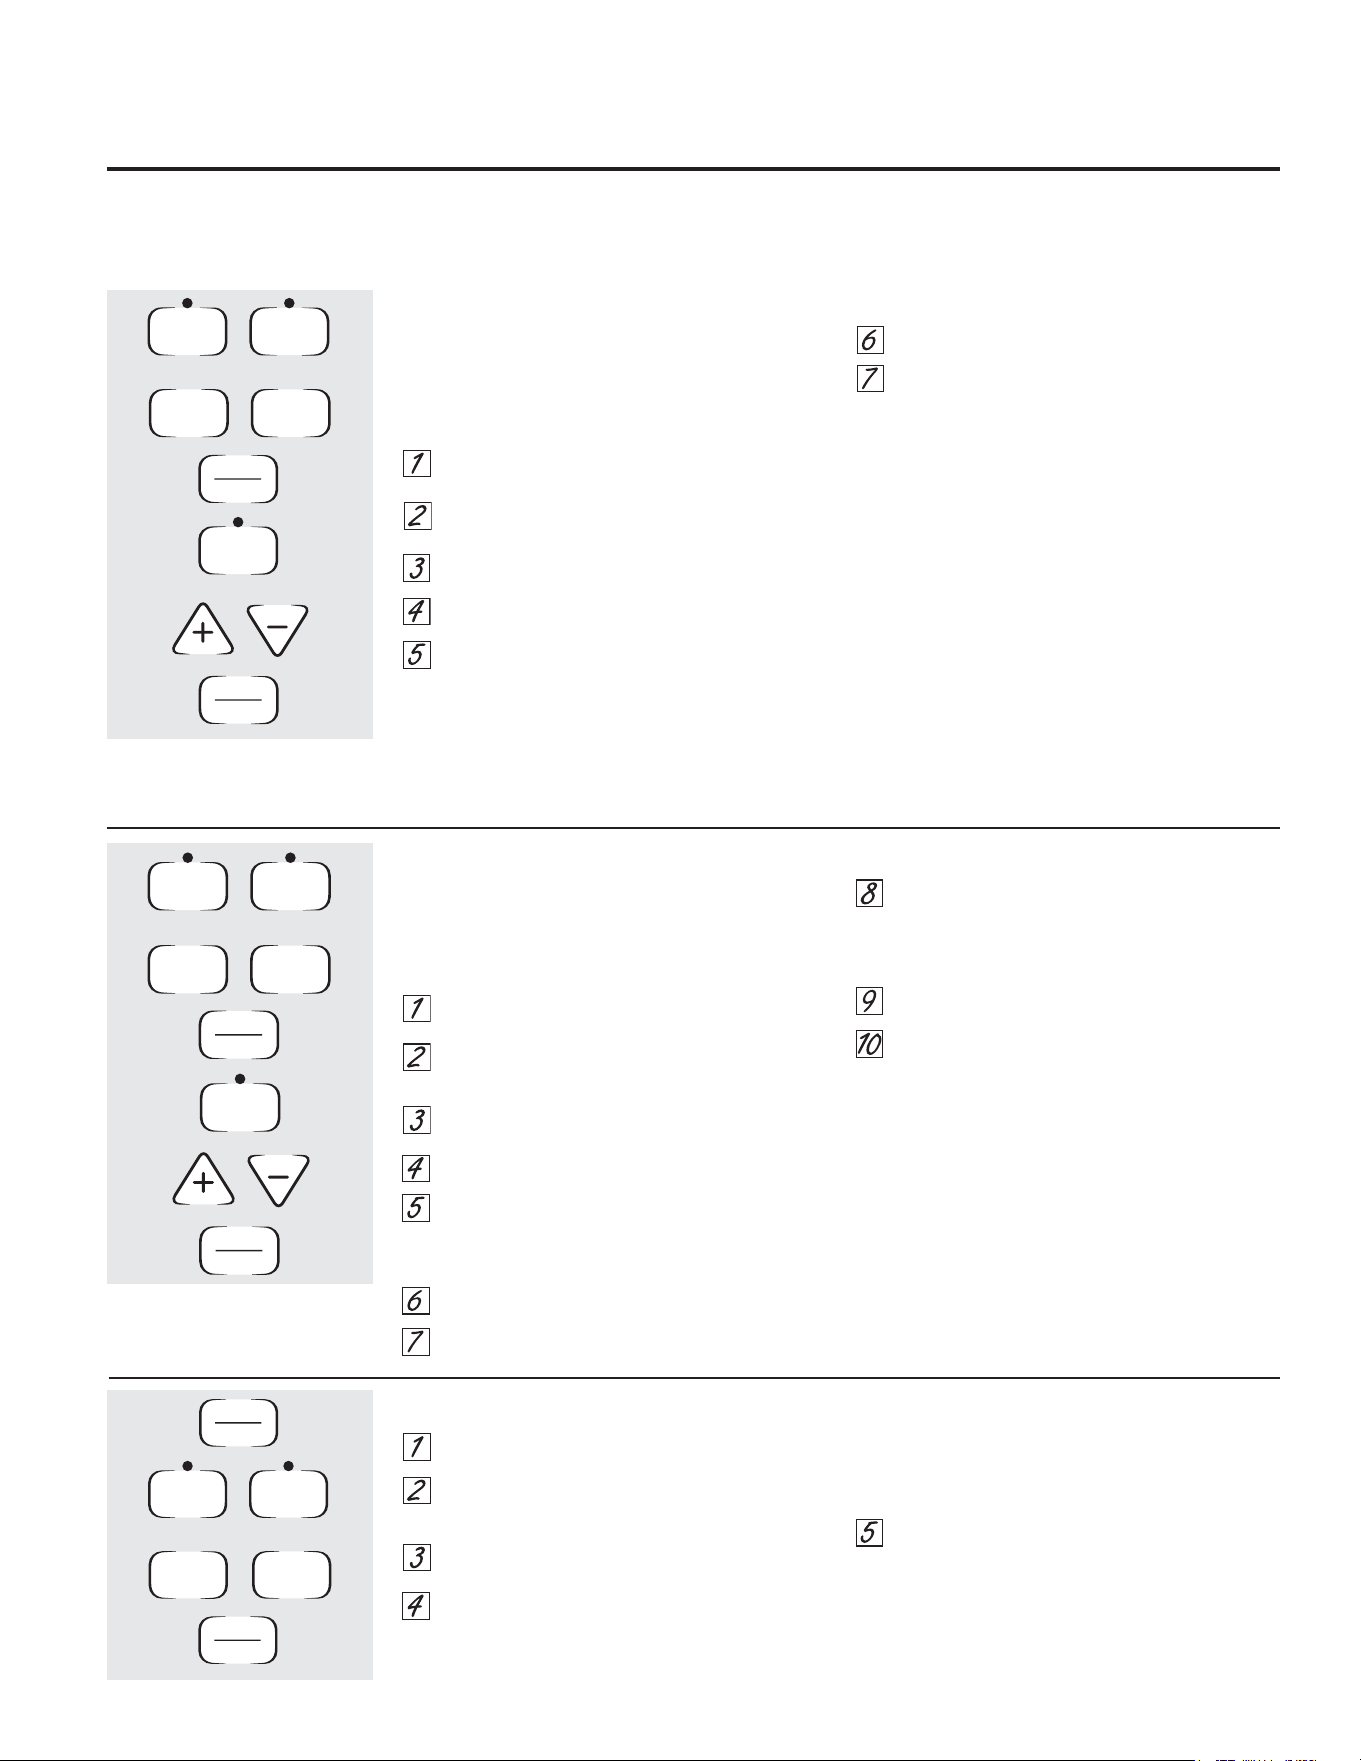
7R7XUQ2IIWKH&ORFN'LVSOD\
,I\RXKDYHVHYHUDOFORFNVLQ\RXUNLWFKHQ\RX
PD\ZLVKWRWXUQRIIWKHWLPHRIGD\FORFNGLVSOD\
RQ\RXUUDQJH
7RXFKWKH&ORFNSDGRQFHWRWXUQRIIWKH
WLPHRIGD\GLVSOD\$OWKRXJK\RXZLOOQRWEH
DEOHWRVHHLWWKHFORFNPDLQWDLQVWKH
FRUUHFWWLPHRIGD\
7RXFKWKH&ORFNSDGWZLFHWRUHFDOOWKH
FORFNGLVSOD\
)RUPRGHOVZLWKRXWD&ORFNSDG
7RXFKWKH%DNHDQG%URLO+L/RSDGVDWWKH
VDPHWLPHXQWLOWKHGLVSOD\VKRZV6)
7RXFKWKH7LPHUSDG7KHGLVSOD\ZLOOVKRZ
21&ORFNGLVSOD\RQ7RXFKWKH7LPHUSDG
DJDLQXQWLOWKHGLVSOD\VKRZV2))&ORFN
GLVSOD\RII
7RXFKWKH6WDUW2QSDGWROHDYHWKHFRQWURO
VHWLQWKLVPRGH
127(,IWKHFORFNFDQQRWEHUHFDOOHGRULWZLOOQRW
VWD\SHUPDQHQWO\GLVSOD\HGWKH(QHUJ\6DYHU
0RGHIHDWXUHLVRQ7RWXUQWKHIHDWXUHRIIVHH
WKH(QHUJ\6DYHU0RGHVHFWLRQ
7R5HVHWWKH7LPHU
,IWKHGLVSOD\LVVWLOOVKRZLQJWKHWLPHUHPDLQLQJ
\RXPD\FKDQJHLWE\WRXFKLQJWKH.LWFKHQ
7LPHU2Q2IISDGWKHQWRXFKLQJWKHRU²SDGV
XQWLOWKHWLPH\RXZDQWDSSHDUVLQWKHGLVSOD\
,IWKHUHPDLQLQJWLPHLVQRWLQWKHGLVSOD\FORFN
VWDUWWLPHRUFRRNLQJWLPHDUHLQWKHGLVSOD\
UHFDOOWKHUHPDLQLQJWLPHE\WRXFKLQJWKH
.LWFKHQ7LPHU2Q2IISDGDQGWKHQWRXFKWKH
RU²SDGVWRHQWHUWKHQHZWLPH\RXZDQW
7R&DQFHOWKH7LPHU
7RXFKWKH.LWFKHQ7LPHU2Q2IISDGWZLFH
'RQRWORFNWKHRYHQGRRUZLWKWKHODWFKGXULQJWLPHGFRRNLQJ7KHODWFKLVXVHGIRUVHOIFOHDQLQJDQGVWHDPFOHDQLQJRQO\
127()RRGVWKDWVSRLOHDVLO\³VXFKDVPLONHJJVILVKVWXIILQJVSRXOWU\DQGSRUN³VKRXOGQRWEHDOORZHGWRVLWIRUPRUH
WKDQKRXUEHIRUHRUDIWHUFRRNLQJ5RRPWHPSHUDWXUHSURPRWHVWKHJURZWKRIKDUPIXOEDFWHULD%HVXUHWKDWWKHRYHQ
OLJKWLVRIIEHFDXVHKHDWIURPWKHEXOEZLOOVSHHGKDUPIXOEDFWHULDJURZWK
8VLQJWKHWLPHGEDNLQJIHDWXUHRQVRPHPRGHOV *($SSOLDQFHVFRP
+RZWR6HWDQ,PPHGLDWH6WDUWDQG$XWRPDWLF6WRS
7KHRYHQZLOOWXUQRQLPPHGLDWHO\DQGFRRN
IRUDVHOHFWHGOHQJWKRIWLPH$WWKHHQG
RIWKHFRRNLQJWLPHWKHRYHQZLOOWXUQRII
DXWRPDWLFDOO\
7RXFKWKH%DNHSDG
7RXFKWKHRU²SDGVWRVHWWKHRYHQ
WHPSHUDWXUH
7RXFKWKH&RRNLQJ7LPH SDG
127(,I\RXUUHFLSHUHTXLUHVSUHKHDWLQJ\RX
PD\QHHGWRDGGDGGLWLRQDOWLPHWRWKHOHQJWK
RIWKHFRRNLQJWLPH
7RXFKWKHRU²SDGVWRVHWWKHEDNLQJ
WLPH
7KHFRRNLQJWLPHWKDW\RXHQWHUHGZLOOEH
GLVSOD\HG,I\RXVHOHFW&RRNLQJ7LPHILUVWDQG
WKHQDGMXVWWKH%DNH7HPSHUDWXUH
WKHRYHQWHPSHUDWXUHZLOOEHGLVSOD\HGLQVWHDG
7RXFKWKH6WDUW2QSDG
7KHGLVSOD\VKRZVHLWKHUWKHRYHQWHPSHUDWXUH
WKDW\RXVHWRUWKHFRRNLQJWLPHFRXQWGRZQ
7KHGLVSOD\VWDUWVZLWK3U(LIVKRZLQJWKHRYHQ
WHPSHUDWXUH
7KHRYHQZLOOFRQWLQXHWRFRRNIRUWKH
SURJUDPPHGDPRXQWRIWLPHWKHQWXUQ
RIIDXWRPDWLFDOO\
7RXFKWKH&OHDU2IISDGWRFDQFHO
LIQHFHVVDU\
5HPRYHWKHIRRGIURPWKHRYHQ
5HPHPEHUHYHQWKRXJKWKHRYHQVKXWVRII
DXWRPDWLFDOO\IRRGVFRQWLQXHFRRNLQJDIWHU
FRQWUROVDUHRII
Start
On
Cooking
Time
Clear
Off
Bake
Temp Recall
Cooking
Time
Start
On
Clear
Off
Bake
Temp Recall
Start
Time
Delay
Start
or
+RZWR6HWD'HOD\HG6WDUWDQG$XWRPDWLF6WRS
7KHRYHQZLOOWXUQRQDWWKHWLPHRIGD\\RXVHW
FRRNIRUDVSHFLILFOHQJWKRIWLPHDQGWKHQWXUQ
RIIDXWRPDWLFDOO\
0DNHVXUHWKHFORFNVKRZVWKHFRUUHFWWLPHRI
GD\
7RXFKWKH%DNHSDG
7RXFKWKHRU²SDGVWRVHWWKHRYHQ
WHPSHUDWXUH
7RXFKWKH&RRNLQJ7LPH SDG
7RXFKWKHRU²SDGVWRVHWWKHGHVLUHG
OHQJWKRIFRRNLQJWLPH
7RXFKWKH6WDUW7LPHRU'HOD\6WDUWSDG
7RXFKWKHRU²SDGVWRVHWWKHWLPHRI
GD\\RXZDQWWKHRYHQWRWXUQRQDQGVWDUW
FRRNLQJ
7RXFKWKH6WDUW2QSDG
127($QDWWHQWLRQWRQHZLOOVRXQGLI\RXDUH
XVLQJWLPHGEDNLQJDQGGRQRWWRXFKWKH6WDUW
2QSDG
127(,I\RXZRXOGOLNHWRFKHFNWKHWLPHV\RX
KDYHVHWWRXFKWKH6WDUW7LPHRU'HOD\6WDUW
SDGWRFKHFNWKHVWDUWWLPH\RXKDYHVHWRU
WRXFKWKH&RRNLQJ7LPHSDGWRFKHFNWKHOHQJWK
RIFRRNLQJWLPH\RXKDYHVHW
:KHQWKHRYHQWXUQVRQDWWKHWLPHRIGD\
\RXKDYHVHWWKHGLVSOD\ZLOOVKRZ3U(XQWLOLW
UHDFKHVWKHVHOHFWHGWHPSHUDWXUHWKHQLWZLOO
GLVSOD\WKHRYHQWHPSHUDWXUH
$WWKHHQGRIFRRNLQJWLPHWKHRYHQZLOOWXUQRII
DQGWKHHQGRIF\FOHWRQHZLOOVRXQG
7RXFKWKH&OHDU2IISDGWRFDQFHO
LIQHFHVVDU\
5HPRYHWKHIRRGIURPWKHRYHQ
5HPHPEHUHYHQWKRXJKWKHRYHQVKXWVRII
DXWRPDWLFDOO\IRRGVFRQWLQXHFRRNLQJDIWHU
FRQWUROVDUHRII
<RXUQHZWRXFKSDGFRQWUROKDVDGGLWLRQDOIHDWXUHVWKDW\RXPD\FKRRVHWRXVH7KHIROORZLQJDUHWKHIHDWXUHVDQGKRZ
\RXPD\DFWLYDWHWKHP
7KHVSHFLDOIHDWXUHPRGHVFDQRQO\EHDFWLYDWHGZKLOHWKHGLVSOD\LVVKRZLQJWKHWLPHRIGD\7KH\UHPDLQLQWKH
FRQWURO·VPHPRU\XQWLOWKHVWHSVDUHUHSHDWHG
:KHQWKHGLVSOD\VKRZV\RXUFKRLFHWRXFKWKH6WDUW2QSDG7KHVSHFLDOIHDWXUHVZLOOUHPDLQLQPHPRU\DIWHU
DSRZHUIDLOXUH
127(7KH6DEEDWKIHDWXUHDQGWKH7KHUPRVWDW$GMXVWPHQWIHDWXUHDUHDOVR6SHFLDO)HDWXUHVEXWWKH\DUHDGGUHVVHG
VHSDUDWHO\LQWKHIROORZLQJVHFWLRQV
6SHFLDOIHDWXUHVRI\RXURYHQFRQWURO
+RXU6KXWRII
:LWKWKLVIHDWXUHVKRXOG\RXIRUJHWDQGOHDYHWKH
RYHQRQWKHFRQWUROZLOODXWRPDWLFDOO\WXUQRIIWKH
RYHQDIWHUKRXUVGXULQJEDNLQJIXQFWLRQVRU
DIWHUKRXUVGXULQJDEURLOIXQFWLRQ
,I\RXZLVKWRWXUQ2)) WKLVIHDWXUHIROORZWKH
VWHSVEHORZ
7RXFKWKH%DNH DQG%URLO+L/RSDGVDWWKH
VDPHWLPHXQWLOWKHGLVSOD\VKRZV6)
7RXFKWKH&ORFN SDGRUIRUPRGHOVZLWKQR
&ORFNSDGWRXFKWKH&RRNLQJ7LPHSDG
7KHGLVSOD\ZLOOVKRZ21KRXUVKXWRII
7RXFKWKH&ORFNSDGRU&RRNLQJ7LPHSDG
IRUPRGHOVZLWKQR&ORFNSDGUHSHDWHGO\
XQWLOWKHGLVSOD\VKRZV2))QRVKXWRII
7RXFKWKH6WDUW2Q SDGWRDFWLYDWH
WKHQRVKXWRIIDQGOHDYHWKHFRQWUROVHWLQ
WKLVVSHFLDOIHDWXUHVPRGH
Bake
Temp Recall
Clock
Cooking
Time
Broil
Hi/Lo
Start
On
+
or
$GMXVWWKHRYHQWKHUPRVWDW³'RLW\RXUVHOI
<RXPD\ILQGWKDW\RXUQHZRYHQFRRNVGLIIHUHQWO\WKDQWKHRQHLWUHSODFHG8VH\RXUQHZRYHQIRUDIHZZHHNVWREHFRPHPRUH
IDPLOLDUZLWKLW,I\RXVWLOOWKLQN\RXUQHZRYHQLVWRRKRWRUWRRFROG\RXFDQDGMXVWWKHWKHUPRVWDW\RXUVHOI
'RQRWXVHWKHUPRPHWHUVVXFKDVWKRVHIRXQGLQJURFHU\VWRUHVWRFKHFNWKHWHPSHUDWXUHVHWWLQJRI\RXURYHQ7KHVH
WKHUPRPHWHUVPD\YDU\²GHJUHHV
127(7KLVDGMXVWPHQWZLOOQRWDIIHFWWKHEURLOLQJRUWKHVHOIFOHDQLQJWHPSHUDWXUHV7KHDGMXVWPHQWZLOOEHUHWDLQHGLQ
PHPRU\DIWHUDSRZHUIDLOXUH
7R$GMXVWWKH7KHUPRVWDW
7RXFKWKH%DNH DQG%URLO+L/RSDGVDW
WKHVDPHWLPHXQWLOWKHGLVSOD\VKRZV6)
7RXFKWKH%DNH SDG$WZRGLJLWQXPEHU
VKRZVLQWKHGLVSOD\
7KHRYHQWHPSHUDWXUHFDQEHDGMXVWHGXS
WR)KRWWHURU²)FRROHU7RXFK
WKHSDGWRLQFUHDVHWKHWHPSHUDWXUHLQ
GHJUHHLQFUHPHQWV
7RXFKWKH²SDGWRGHFUHDVHWKH
WHPSHUDWXUHLQGHJUHHLQFUHPHQWV
:KHQ\RXKDYHPDGHWKHDGMXVWPHQW
WRXFKWKH6WDUW2Q SDGWRJREDFNWRWKH
WLPHRIGD\GLVSOD\8VH\RXURYHQDV\RX
ZRXOGQRUPDOO\
Bake
Temp Recall
Broil
Hi/Lo
Start
On
+
Bake
Temp Recall
(QHUJ\6DYHU0RGHRQVRPHPRGHOV
7RVDYHHQHUJ\\RXFDQWXUQRIIWKHWLPHRI
GD\FORFNDQGWKHGLVSOD\ZKHQWKHUDQJHLV
QRWLQXVH
3UHVVDQGKROGWKHDQG²SDGVDWWKHVDPH
WLPHWRHQDEOHRUGLVDEOHWKLVIHDWXUH7KLVZLOO
WXUQWKHGLVSOD\RQRURII
127(7KHGLVSOD\ZLOOUHVHWDIWHUDSRZHU
RXWDJH
&RQWURO/RFNRXWRQVRPHPRGHOV
<RXUFRQWUROZLOODOORZ\RXWRORFNRXWWKH
WRXFKSDGVVRWKH\FDQQRWEHDFWLYDWHGZKHQ
WRXFKHG
7RORFNXQORFNWKHFRQWUROV
7RXFKWKHDQGSDGVDWWKHVDPHWLPH
IRUVHFRQGVXQWLOWKHGLVSOD\VKRZV
/2&21
7RXQORFNWKHFRQWUROWRXFKWKHDQGSDGV
DWWKHVDPHWLPHIRUVHFRQGVXQWLOWKH
GLVSOD\VKRZV/2&2))
:KHQWKLVIHDWXUHLVRQDQGWKHWRXFKSDGV
DUHWRXFKHGWKHFRQWUROZLOOEHHSDQGVKRZ
/2&21
7KHFRQWUROORFNRXWPRGHDIIHFWVDOOWRXFK
SDGV1RWRXFKSDGVZLOOZRUNZKHQWKLV
IHDWXUHLVDFWLYDWHG
7KHDGMXVWPHQWZLOOEHUHWDLQHGLQPHPRU\
DIWHUDSRZHUIDLOXUH
CONTROL LOCK/UNLOCK
P
RESS + AND – AND HOLD FOR 3 SECOND
S
:KHQWKHGLVSOD\VKRZVWKHRYHQ
LVVHWLQ6DEEDWK:KHQWKHGLVSOD\
VKRZVWKHRYHQLVEDNLQJURDVWLQJ
7KH6DEEDWKIHDWXUHFDQEHXVHGIRUEDNLQJRQO\,WFDQQRWEHXVHGIRUEURLOLQJVHOIFOHDQLQJFRQYHFWLRQEDNLQJVWHDPFOHDQLQJRUGHOD\VWDUWFRRNLQJ
127(7KHRYHQOLJKWFRPHVRQDXWRPDWLFDOO\RQVRPHPRGHOVZKHQWKHGRRULVRSHQHGDQGJRHVRIIZKHQWKHGRRULVFORVHG7KHEXOEPD\EHUHPRYHG6HH
WKH2YHQ/LJKW5HSODFHPHQWVHFWLRQ2QPRGHOVZLWKDOLJKWVZLWFKRQWKHFRQWUROSDQHOWKHRYHQOLJKWPD\EHWXUQHGRQDQGOHIWRQ
+RZWR6HW6DEEDWK)HDWXUHIRU7LPHG%DNLQJ³,PPHGLDWH6WDUWDQG$XWRPDWLF6WRS
127(7RXQGHUVWDQGKRZWKHRYHQFRQWUROZRUNVSUDFWLFH
XVLQJUHJXODUQRQ6DEEDWK,PPHGLDWH6WDUWDQG$XWRPDWLF
6WRSEHIRUHHQWHULQJWKH6DEEDWKPRGH
0DNHVXUHWKHFORFNVKRZVWKHFRUUHFWWLPHRIGD\DQGWKH
RYHQLVRII
7RXFKDQGKROGERWKWKH%DNH DQG%URLO+L/RSDGVDW
WKHVDPHWLPHXQWLOWKHGLVSOD\VKRZV6)
7DSWKH&ORFNSDGRU&RRNLQJ7LPHSDGIRUPRGHOV
ZLWKQR&ORFNSDGXQWLO6$EDSSHDUVLQWKHGLVSOD\
7RXFKWKH6WDUW2QSDGDQG
ZLOODSSHDULQWKH
GLVSOD\
7RXFKWKH&RRNLQJ7LPHSDG
7RXFKWKHRU²SDGVWRVHWWKHGHVLUHGOHQJWKRI
FRRNLQJWLPHEHWZHHQPLQXWHDQGKRXUVDQG
PLQXWHV7KHFRRNLQJWLPHWKDW\RXHQWHUHGZLOOEH
GLVSOD\HG
7RXFKWKH6WDUW2QSDG
7RXFKWKH%DNHSDG1RVLJQDOZLOOEHJLYHQ
7KHSUHVHWVWDUWLQJWHPSHUDWXUHZLOODXWRPDWLFDOO\EH
VHWWR7DSWKHRU²SDGVWRLQFUHDVHRU
GHFUHDVHWKHWHPSHUDWXUHLQLQFUHPHQWV7KH
WHPSHUDWXUHFDQEHVHWEHWZHHQDQG1R
VLJQDORUWHPSHUDWXUHZLOOEHJLYHQ
7RXFKWKH6WDUW2QSDG
$IWHUDUDQGRPGHOD\SHULRGRIDSSUR[LPDWHO\
VHFRQGVWRPLQXWH
ZLOODSSHDULQWKHGLVSOD\
LQGLFDWLQJWKDWWKHRYHQLVEDNLQJURDVWLQJ,I
GRHVQ·WDSSHDULQWKHGLVSOD\VWDUWDJDLQDW6WHS
7RDGMXVWWKHRYHQWHPSHUDWXUHWRXFKWKH%DNHSDG
DQGWDSWKHRU²SDGVWRLQFUHDVHRUGHFUHDVHWKH
WHPSHUDWXUHLQLQFUHPHQWV7RXFKWKH6WDUW2QSDG
:KHQFRRNLQJLVILQLVKHGWKHGLVSOD\ZLOOFKDQJHIURP
WR
LQGLFDWLQJWKDWWKHRYHQKDVWXUQHG2)) EXWLVVWLOOVHWLQ
6DEEDWK5HPRYHWKHFRRNHGIRRG
8VLQJWKH6DEEDWKIHDWXUHRQVRPHPRGHOV
'HVLJQHGIRUXVHRQWKH-HZLVK6DEEDWKDQG+ROLGD\V *($SSOLDQFHVFRP
+RZWR6HW6DEEDWK)HDWXUHIRU5HJXODU%DNLQJ
127(7RXQGHUVWDQGKRZWKHRYHQFRQWUROZRUNVSUDFWLFH
XVLQJUHJXODUEDNLQJQRQ6DEEDWKEHIRUHHQWHULQJ
6DEEDWKPRGH
0DNHVXUHWKHFORFNVKRZVWKHFRUUHFWWLPHRIGD\DQGWKH
RYHQLVRII
7RXFKDQGKROGERWKWKH%DNH DQG%URLO+L/RSDGVDW
WKHVDPHWLPHXQWLOWKHGLVSOD\VKRZV6)
7DSWKH&ORFNSDGRU&RRNLQJ7LPHSDGIRUPRGHOV
ZLWKQR&ORFNSDGXQWLO6$EDSSHDUVLQWKHGLVSOD\
7RXFKWKH6WDUW2QSDGDQG
ZLOODSSHDULQWKH
GLVSOD\
7RXFKWKH%DNHSDG1RVLJQDOZLOOEHJLYHQ
7KHSUHVHWVWDUWLQJWHPSHUDWXUHZLOODXWRPDWLFDOO\EH
VHWWR7DSWKHRU²SDGVWRLQFUHDVHRU
GHFUHDVHWKHWHPSHUDWXUHLQLQFUHPHQWV7KH
WHPSHUDWXUHFDQEHVHWEHWZHHQDQG1R
VLJQDORUWHPSHUDWXUHZLOOEHJLYHQ
7RXFKWKH6WDUW2QSDG
$IWHUDUDQGRPGHOD\SHULRGRIDSSUR[LPDWHO\
VHFRQGVWRPLQXWH
ZLOODSSHDULQWKHGLVSOD\
LQGLFDWLQJWKDWWKHRYHQLVEDNLQJURDVWLQJ,I
GRHVQ·WDSSHDULQWKHGLVSOD\VWDUWDJDLQDW6WHS
7RDGMXVWWKHRYHQWHPSHUDWXUHWRXFKWKH%DNHSDG
DQGWDSWKHRU²SDGVWRLQFUHDVHRUGHFUHDVHWKH
WHPSHUDWXUHLQLQFUHPHQWV7RXFKWKH6WDUW2QSDG
127(7KH&OHDU2IIDQG&RRNLQJ7LPHSDGVDUHDFWLYH
GXULQJWKH6DEEDWKIHDWXUH
Bake
Temp Recall
Clock
Cooking
Time
Broil
Hi/Lo
Start
On
+
Start
On
Bake
Temp Recall
or
Bake
Temp Recall
Broil
Hi/Lo
Start
On
+
Start
On
Cooking
Time
Clock
Cooking
Time
or
:KHQWKHGLVSOD\VKRZVWKH
RYHQLVVHWLQ6DEEDWK:KHQWKH
GLVSOD\VKRZVWKHRYHQLV
EDNLQJURDVWLQJ
+RZWR([LWWKH6DEEDWK)HDWXUH
7RXFKWKH&OHDU2IISDG
,IWKHRYHQLVFRRNLQJZDLWIRUDUDQGRPGHOD\SHULRG
RIDSSUR[LPDWHO\VHFRQGVWRPLQXWHXQWLORQO\
LVLQWKHGLVSOD\
7RXFKDQGKROGERWKWKH%DNHDQG%URLO+L/R
SDGVDWWKHVDPHWLPHXQWLOWKHGLVSOD\VKRZV6)
7DSWKH&ORFNSDGRU&RRNLQJ7LPHSDGIRUPRGHOV
ZLWKQR&ORFNSDGXQWLO21RU2))DSSHDUVLQWKH
GLVSOD\21LQGLFDWHVWKDWWKHRYHQZLOODXWRPDWLFDOO\
WXUQRIIDIWHUKRXUV2))LQGLFDWHVWKDWWKHRYHQZLOO
QRWDXWRPDWLFDOO\WXUQRII6HHWKH6SHFLDO)HDWXUHV
VHFWLRQIRUDQH[SODQDWLRQRIWKH+RXU6KXWRII
IHDWXUH
7RXFKWKH6WDUW2QSDG
127(,IDSRZHURXWDJHRFFXUUHGZKLOHWKHRYHQZDV
LQ6DEEDWKWKHRYHQZLOODXWRPDWLFDOO\WXUQRIIDQG
VWD\RIIHYHQZKHQWKHSRZHUUHWXUQV7KHRYHQFRQWURO
PXVWEHUHVHW
Bake
Temp Recall
Clock
Broil
Hi/Lo
Start
On
+
Clear
Off
Cooking
Time
or

%HIRUHD6HOI&OHDQ&\FOH
,I\RXUUDQJHKDVWKLVFRQWUROSDGLWKDVDVHOIFOHDQLQJRYHQ)ROORZWKHVH
LQVWUXFWLRQV
,IQRWUHIHUWRWKH3RUFHODLQ2YHQ&OHDQLQJVHFWLRQIRURYHQFOHDQLQJLQVWUXFWLRQV
:HUHFRPPHQGYHQWLQJ\RXUNLWFKHQZLWKDQ
RSHQZLQGRZRUXVLQJDYHQWLODWLRQIDQRUKRRG
GXULQJWKHILUVWVHOIFOHDQF\FOH
5HPRYHEURLOHUSDQEURLOHUJULGDOOFRRNZDUH
DQGDQ\DOXPLQXPIRLOIURPWKHRYHQ
127(
■,I\RXURYHQLVHTXLSSHGZLWKVKLQ\VLOYHU
FRORUHGRYHQUDFNVZHUHFRPPHQGWR
UHPRYHWKHPEHIRUH\RXEHJLQWKHVHOIFOHDQ
F\FOH7KH\PD\UHPDLQLQWKHRYHQGXULQJ
WKHVHOIFOHDQF\FOHEXWWKH\ZLOOGDUNHQORVH
WKHLUOXVWHUDQGEHFRPHKDUGWRVOLGH
■,I\RXURYHQLVHTXLSSHGZLWKJUD\SRUFHODLQ
FRDWHGRYHQUDFNVWKH\PD\EHOHIWLQWKH
RYHQGXULQJWKHVHOIFOHDQF\FOH
6RLORQWKHIURQWIUDPHRIWKHUDQJHDQGRXWVLGH
WKHJDVNHWRQWKHGRRUZLOOQHHGWREHFOHDQHG
E\KDQG&OHDQWKHVHDUHDVZLWKKRWZDWHU
VRDSILOOHGRUSODVWLFVFRXULQJSDGVRUFOHDQVHUV
VXFKDV6RIW6FUXE
5LQVHZHOOZLWKFOHDQZDWHU
DQGGU\
'RQRWFOHDQWKHJDVNHW7KHILEHUJODVVPDWHULDO
RIWKHRYHQGRRUJDVNHWFDQQRWZLWKVWDQG
DEUDVLRQ,WLVHVVHQWLDOIRUWKHJDVNHWWRUHPDLQ
LQWDFW,I\RXQRWLFHLWEHFRPLQJZRUQRUIUD\HG
UHSODFHLW
0DNHVXUHWKHRYHQOLJKWEXOEFRYHULVLQSODFH
DQGWKHRYHQOLJKWLVRII
,03257$17 7KHKHDOWKRIVRPHELUGVLV
H[WUHPHO\VHQVLWLYHWRWKHIXPHVJLYHQRIIGXULQJ
WKHVHOIFOHDQLQJF\FOHRIDQ\UDQJH0RYHELUGV
WRDQRWKHUZHOOYHQWLODWHGURRP
:LSHXSKHDY\VRLORQWKHRYHQ
ERWWRP
Self
Clean
+RZWR6HWWKH2YHQIRU6HOI&OHDQLQJ
)ROORZWKHGLUHFWLRQVLQWKH%HIRUHD6HOI&OHDQ
&\FOHVHFWLRQ
/DWFKWKHGRRU
127(1HYHUIRUFHWKHODWFK,IWKHRYHQLVWRR
KRW\RXZLOOQRWEHDEOHWRVOLGHWKHODWFK$OORZ
WKHRYHQWRFRRO
7RXFKWKH6HOI&OHDQ SDG
7RXFKWKHRU²SDGVXQWLOWKHGHVLUHG
&OHDQ7LPHLVGLVSOD\HG
7KH&OHDQ7LPHLVQRUPDOO\KRXUVDQG
PLQXWHV<RXFDQFKDQJHWKH&OHDQ7LPHWR
DQ\WLPHEHWZHHQDQGKRXUVGHSHQGLQJRQ
WKHDPRXQWRIVRLOLQ\RXURYHQ
7RXFKWKH6WDUW2Q SDG
7KHVHOIFOHDQF\FOHZLOODXWRPDWLFDOO\EHJLQ
DQGWKHWLPHFRXQWGRZQDSSHDUVLQWKH
GLVSOD\
:KLOHWKHRYHQLVVHOIFOHDQLQJ\RXFDQWRXFK
WKH&ORFNSDGWRGLVSOD\WKHWLPHRIGD\7R
UHWXUQWRWKHFOHDQFRXQWGRZQWRXFKWKH6HOI
&OHDQSDG
7KHRYHQVKXWVRIIDXWRPDWLFDOO\ZKHQWKH
FOHDQF\FOHLVFRPSOHWHDQGZLOOIODVKLQ
WKHGLVSOD\
6OLGHWKHODWFKKDQGOHWRWKHOHIWDVIDUDVLW
ZLOOJRDQGRSHQWKHGRRU
1HYHUIRUFHWKHODWFKKDQGOH
)RUFLQJWKHKDQGOHZLOOGDPDJHWKHGRRUORFN
PHFKDQLVP
Start
On
Self
Clean
8VLQJWKHVHOIFOHDQLQJRYHQ
RQVRPHPRGHOV
),5(+$=$5':LSHJUHDVHDQGKHDY\VRLOIURPRYHQEHIRUHVHOIFOHDQLQJ)DLOXUHWRGRVR
PD\UHVXOWLQDQRYHQILUH
&$87,21
1HYHUSODFHFRRNLQJXWHQVLOVEDNLQJVWRQHVIRLORUDQ\RWKHU
LWHPVRQWKHRYHQIORRU(YHQ
LWHPVUDWHGIRUKLJKWHPSHUDWXUHPD\SHUPDQHQWO\DGKHUHWRRYHQ
ERWWRPRUFDXVHKHDW
GDPDJHWRWKHRYHQIORRULQJRULWHPVLQVWRUDJHGUDZHU
&$87,21

*($SSOLDQFHVFRP
+RZWR'HOD\WKH6WDUWRI6HOI&OHDQLQJRQVRPHPRGHOV
0DNHVXUHWKHFORFNVKRZVWKHFRUUHFWWLPHRI
GD\
/DWFKWKHGRRU
7RXFKWKH6HOI&OHDQ SDG
8VLQJWKHRU² SDGVHQWHUWKHGHVLUHG
FOHDQWLPH
7RXFKWKH6WDUW7LPHRU'HOD\6WDUWSDG
7KHHDUOLHVWVWDUWWLPH\RXFDQVHWZLOO
DSSHDULQWKHGLVSOD\
8VLQJWKHRU² SDGVHQWHUWKHWLPHRI
GD\\RXZDQWWKHFOHDQF\FOHWRVWDUW
7RXFKWKH6WDUW2Q SDG
7KHGLVSOD\ZLOOVKRZWKHVWDUWWLPH,WZLOOQRW
EHSRVVLEOHWRXQODWFKWKHRYHQGRRUXQWLOWKH
WHPSHUDWXUHGURSVEHORZWKHORFNWHPSHUDWXUH
7KHRYHQVKXWVRIIDXWRPDWLFDOO\ZKHQWKH
FOHDQF\FOHLVFRPSOHWHDQGZLOOIODVKLQ
WKHGLVSOD\
Start
On
Self
Clean
Start
Time
Delay
Start
or
$IWHUD6HOI&OHDQ&\FOH
<RXPD\QRWLFHVRPHZKLWHDVKLQWKHRYHQ
:LSHLWXSZLWKDGDPSFORWKDIWHUWKHRYHQ
FRROV
,IZKLWHVSRWVUHPDLQUHPRYHWKHPZLWKD
VRDSILOOHGVWHHOZRROSDGDQGULQVHWKRURXJKO\
ZLWKDYLQHJDUDQGZDWHUPL[WXUH
7KHVHGHSRVLWVDUHXVXDOO\DVDOWUHVLGXHWKDW
FDQQRWEHUHPRYHGE\WKHFOHDQF\FOH
,IWKHRYHQLVQRWFOHDQDIWHURQHFOHDQF\FOH
UHSHDWWKHF\FOH
■
<RXFDQQRWVHWWKHRYHQIRUFRRNLQJXQWLO
WKHRYHQLVFRROHQRXJKIRUWKHGRRUWREH
XQODWFKHG
■ :KLOHWKHRYHQLVVHOIFOHDQLQJ\RX
FDQSUHVVWKH&ORFNSDGWRGLVSOD\WKHWLPH
RIGD\7RUHWXUQWRWKHFOHDQFRXQWGRZQ
SUHVVWKH6HOI&OHDQSDG
■$SSO\DVPDOODPRXQWRIYHJHWDEOHRLO
WRDSDSHUWRZHODQGZLSHWKHHGJHVRIWKH
RYHQUDFNVZLWKWKHSDSHUWRZHO'RQRWVSUD\
ZLWK3DP
RURWKHUOXEULFDQWVSUD\V
7R6WRSD6HOI&OHDQ&\FOH
7RXFKWKH&OHDU2II SDG
:DLWXQWLOWKHRYHQKDVFRROHGEHORZWKH
ORFNLQJWHPSHUDWXUHWRXQODWFKWKHGRRU<RX
ZLOOQRWEHDEOHWRRSHQWKHGRRUULJKWDZD\
XQOHVVWKHRYHQKDVFRROHGEHORZWKHORFNLQJ
WHPSHUDWXUH
8VLQJ6WHDP&OHDQ
RQVRPHPRGHOV
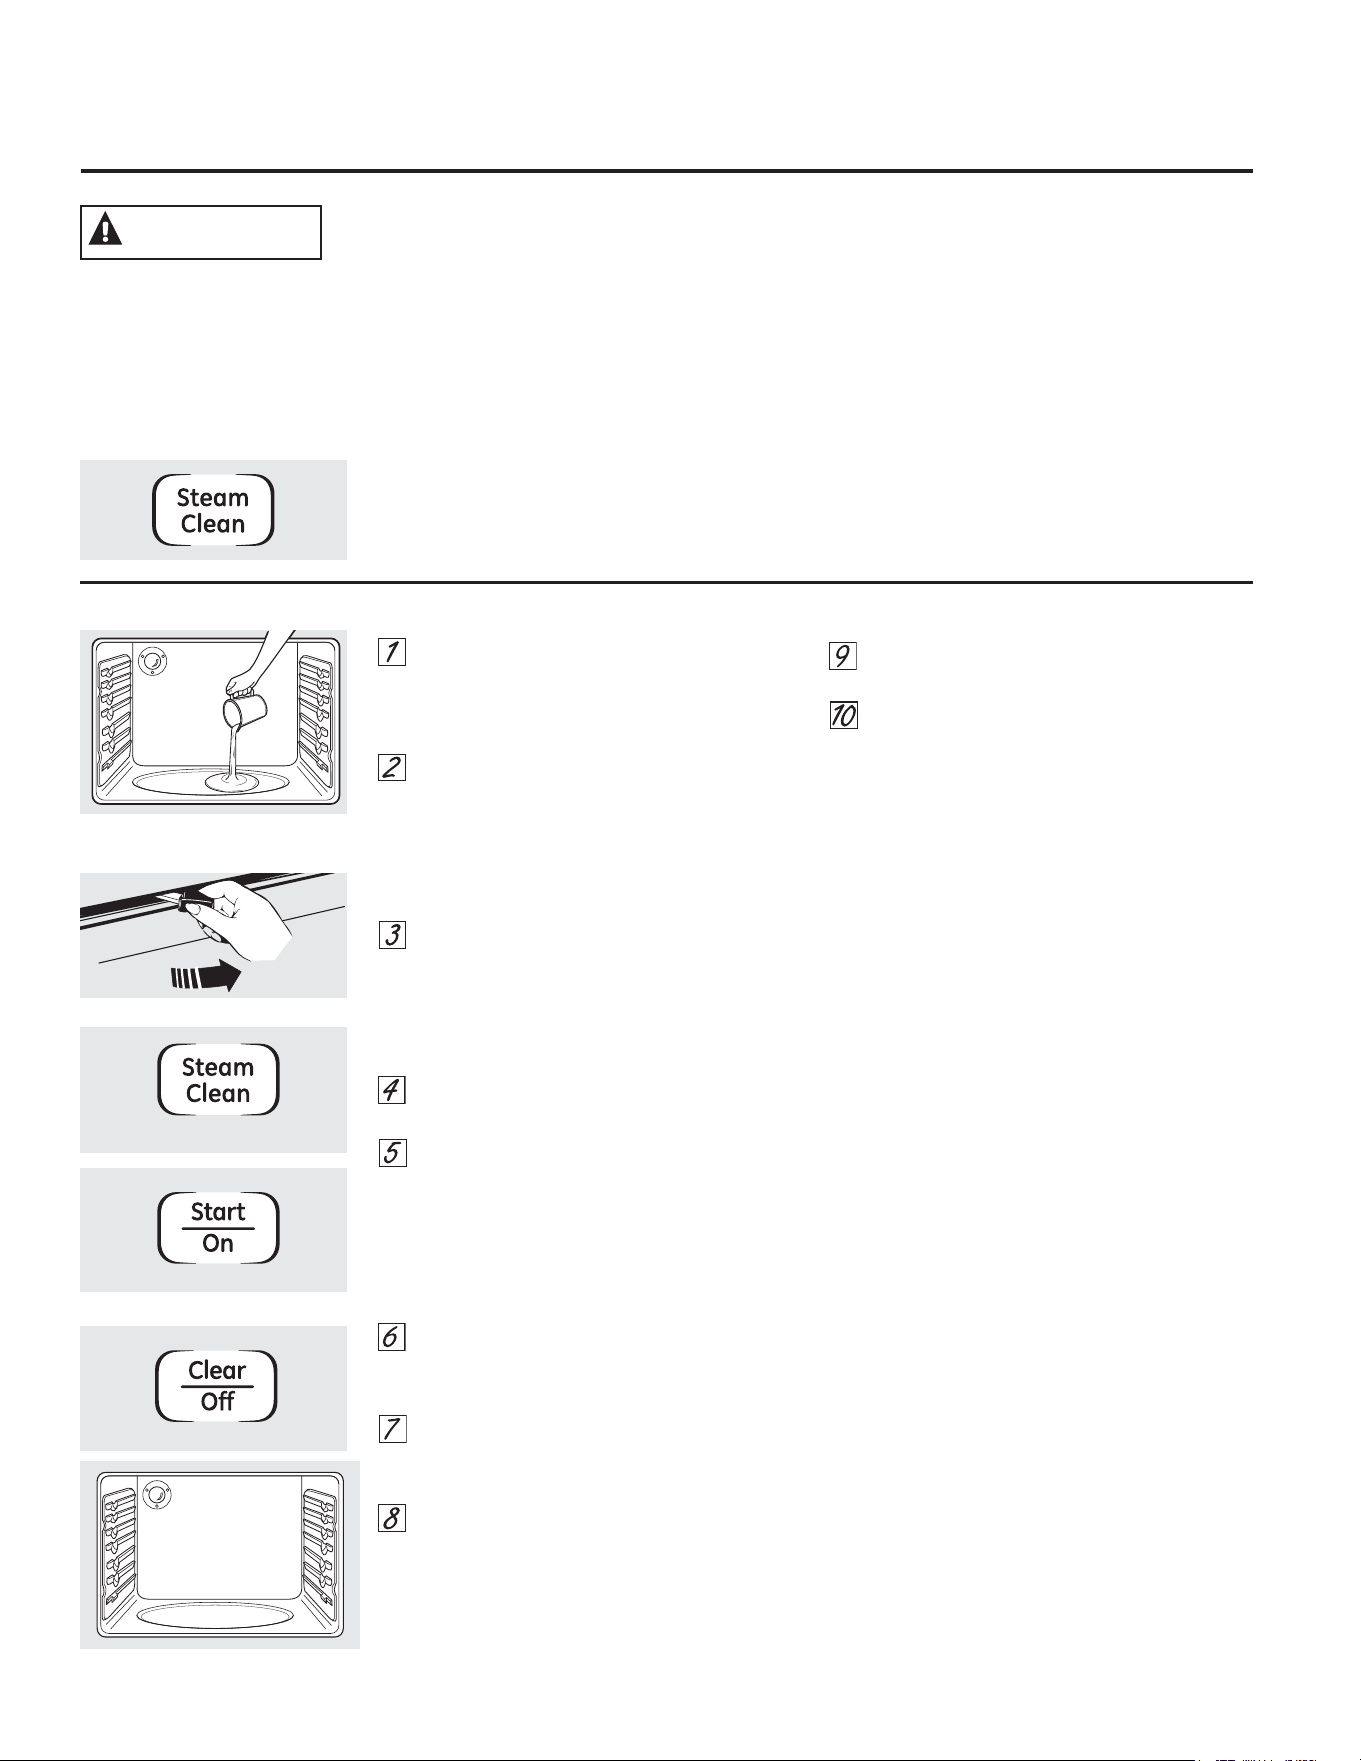
5HPRYHUDFNVDQGDFFHVVRULHVIURPWKH
RYHQFDYLW\'RQRWSODFHFRRNZDUHRU
RWKHULWHPVLQWKHRYHQGXULQJWKH6WHDP
&OHDQF\FOH
3RXUFXSR]URRPWHPSHUDWXUHZDWHU
RQWRWKHUHFHVVHGDUHDRIWKHRYHQERWWRP
'RQRWDGGFOHDQLQJVROXWLRQVRUFKHPLFDOV
RIDQ\NLQGWRWKHZDWHU2QO\DGGZDWHU
ZKHQXVLQJWKH6WHDP&OHDQ&\FOH'RQRW
DGGZDWHUZKHQXVLQJWKH6HOI&OHDQ&\FOH
&ORVHWKHGRRU)RUPRGHOVZLWKDODWFK
ODWFKWKHGRRU1RWH1HYHUIRUFHWKHODWFK
,IWKHRYHQLVWRRKRW\RXZLOOQRWEHDEOHWR
VOLGHWKHODWFK$OORZWKHRYHQWRFRRO
3UHVVWKH6WHDP&OHDQSDGWKHQSUHVV
6WDUW2Q
$PLQXWHF\FOHZLOOEHJLQWRFRXQWGRZQ
RQWKHGLVSOD\
:KHQWKH6WHDP&OHDQF\FOHLVFRPSOHWH
WKHRYHQFRQWUROZLOOEHHS3UHVVWKH&OHDU
2IISDGDQGRSHQWKHGRRU
7KHRYHQERWWRPDQGUHPDLQLQJZDWHUZLOO
VWLOOEHYHU\ZDUPDWWKHHQGRIWKHF\FOH
7KLVLVQRUPDO
5HPRYHVRLOVXVLQJDVFUXEEUXVKRUQ\ORQ
VFRXULQJSDG$VRDSILOOHGVWHHOZRROSDG
PD\EHXVHGRQO\RQWKHSRUFHODLQRYHQ
LQWHULRU7KHXVHRIDEUDVLYHSDGVZLOO
VFUDWFKWKHGRRUJODVV'RQRWZLSHVRLORU
ZDWHURQWRWKHGRRUJDVNHW
5HPRYHDQ\UHPDLQLQJZDWHUZLWKDGU\
FORWKRUVSRQJH
/HDYHWKHGRRURSHQWRDLUGU\
,03257$17127(6
,IDVWHDPFOHDQF\FOHLVLQLWLDWHGZLWKRXW
ZDWHUSUHVVWKH&OHDU2IISDGWRHQGWKH
F\FOH:DLWIRUWKHUDQJHWRFRROWRURRP
WHPSHUDWXUHEHIRUHSRXULQJZDWHULQWRWKH
UHFHVVHGDUHDDQGLQLWLDWLQJDQRWKHUVWHDP
F\FOH
'RQRWRSHQWKHGRRUGXULQJWKH6WHDP
&OHDQF\FOH$QHUURUEHHSZLOOVRXQGXSRQ
RSHQLQJWKHGRRU
3UHVV&OHDU2IISDGDWDQ\WLPHWRHQGWKH
F\FOH
,IPLQHUDOGHSRVLWVUHPDLQLQWKHRYHQ
ERWWRPDIWHUFOHDQLQJXVHDFORWKRUVSRQJH
VRDNHGLQYLQHJDUWRUHPRYHWKHP
6RPHZDWHUPD\GULSIURPWKHERWWRPRI
WKHRYHQGRRU,IWKLVKDSSHQVZLSHLWXSDW
WKHHQGRIWKHF\FOH
7KHGRRUJDVNHWPD\EHZHWZKHQWKH
6WHDP&OHDQF\FOHILQLVKHV7KLVLVQRUPDO
'RQRWFOHDQWKHJDVNHW
,IVRLOVWLOOUHPDLQVDIWHUFOHDQLQJWKHRYHQ
VHHWKH&DUHDQGFOHDQLQJRIWKHUDQJH
VHFWLRQRIWKH2ZQHU·V0DQXDOIRUDGGLWLRQDO
RSWLRQV
7R%HJLQ6WHDP&OHDQ&\FOH
'XULQJWKHVWHDPFOHDQF\FOH
WKHRYHQERWWRPEHFRPHVKRW
HQRXJKWRFDXVHEXUQV:DLW
XQWLOWKHF\FOHLVRYHUPLQXWHVEHIRUHZLSLQJWKH
LQVLGHVXUIDFHVRIWKHRYHQ)DLOXUHWRGRVRPD\UHVXOW
LQEXUQV
7KH6WHDP&OHDQF\FOHPDNHVLWHDVLHUWRFOHDQOLJKWVRLOLQJ
RQWKHSRUFHODLQRYHQLQWHULRU
7KHUDQJHVKRXOGEHDWURRPWHPSHUDWXUHEHIRUH
EHJLQQLQJWKH6WHDP&OHDQF\FOH,IWKHRYHQLVWRRKRW
´KRWµZLOODSSHDURQWKHGLVSOD\DQGWKHF\FOHZLOOQRW
DFWLYDWHXQWLOWKHRYHQFRROVGRZQ
7KH6WHDP&OHDQF\FOHSHUIRUPVEHVWRQQHZVSLOOVRUVRLOV
%XUQHGRQIRRGLVPRUHGLIILFXOWWRUHPRYH
&$87,21
3RXURXQFHVRIZDWHURQWRWKH
RYHQIORRU
,I\RXUUDQJHKDVWKLVFRQWUROSDGLWKDVDVWHDPFOHDQLQJRYHQ)ROORZ
WKHVHLQVWUXFWLRQV
,IQRWUHIHUWRWKH3RUFHODLQ2YHQ&OHDQLQJVHFWLRQIRURYHQFOHDQLQJLQVWUXFWLRQV
'RQRWXVHDVWHHOZRROSDGLWZLOOVFUDWFKWKH
VXUIDFH
7RFOHDQWKHVWDLQOHVVVWHHOVXUIDFHXVHZDUP
VXGV\ZDWHURUDVWDLQOHVVVWHHOFOHDQHURU
SROLVK$OZD\VZLSHWKHVXUIDFHLQWKHGLUHFWLRQ
RIWKHJUDLQ)ROORZWKHFOHDQHULQVWUXFWLRQVIRU
FOHDQLQJWKHVWDLQOHVVVWHHOVXUIDFH
7RLQTXLUHDERXWSXUFKDVLQJVWDLQOHVVVWHHO
DSSOLDQFHFOHDQHURUSROLVKRUWRILQGWKH
ORFDWLRQRIDGHDOHUQHDUHVW\RXSOHDVHFDOORXU
WROOIUHHQXPEHU
1DWLRQDO3DUWV&HQWHU
*($SSOLDQFHVFRP
6WDLQOHVV6WHHO6XUIDFHVRQVRPHPRGHOV
%HVXUHDOOFRQWUROVDUHRIIDQGDOOVXUIDFHVDUHFRROEHIRUHFOHDQLQJDQ\SDUWRIWKHUDQJH
,I\RXUUDQJHLVUHPRYHGIRUFOHDQLQJVHUYLFLQJRUDQ\UHDVRQEH
VXUHWKHDQWLWLSGHYLFHLVUHHQJDJHGSURSHUO\ZKHQWKHUDQJHLV
UHSODFHG)DLOXUHWRWDNHWKLVSUHFDXWLRQFRXOGUHVXOWLQWLSSLQJRI
WKHUDQJHDQGFDQUHVXOWLQGHDWKRUVHULRXVEXUQVWRFKLOGUHQRU
DGXOWV
&RQWURO3DQHO
,W·VDJRRGLGHDWRZLSHWKHFRQWUROSDQHODIWHUHDFK
XVHRIWKHRYHQ8VHDGDPSFORWKWRFOHDQRUULQVH
)RUFOHDQLQJXVHPLOGVRDSDQGZDWHURUD
VROXWLRQRIYLQHJDUDQGZDWHU)RUULQVLQJXVHFOHDQ
ZDWHU3ROLVKGU\ZLWKDVRIWFORWK
'RQRWXVHDEUDVLYHFOHDQVHUVVWURQJOLTXLGFOHDQHUV
SODVWLFVFRXULQJSDGVRURYHQFOHDQHUVRQWKHFRQWURO
SDQHO³WKH\ZLOOGDPDJHWKHILQLVK
3DLQWHG6XUIDFHV
3DLQWHGVXUIDFHVLQFOXGHWKHVLGHVRIWKHUDQJHDQG
WKHGRRUWRSRIFRQWUROSDQHODQGWKHGUDZHUIURQW
&OHDQWKHVHZLWKVRDSDQGZDWHURUDYLQHJDUDQG
ZDWHUVROXWLRQ
'RQRWXVHFRPPHUFLDORYHQFOHDQHUVFOHDQLQJ
SRZGHUVVWHHOZRRORUKDUVKDEUDVLYHVRQDQ\
SDLQWHGVXUIDFH
+RZWR5HPRYH3URWHFWLYH6KLSSLQJ)LOPDQG3DFNDJLQJ7DSH
&DUHIXOO\JUDVSDFRUQHURIWKHSURWHFWLYHVKLSSLQJ
ILOPZLWK\RXUILQJHUVDQGVORZO\SHHOLWIURPWKH
DSSOLDQFHVXUIDFH'RQRWXVHDQ\VKDUSLWHPVWR
UHPRYHWKHILOP5HPRYHDOORIWKHILOPEHIRUHXVLQJ
WKHDSSOLDQFHIRUWKHILUVWWLPH
7RHQVXUHQRGDPDJHLVGRQHWRWKHILQLVKRIWKH
SURGXFWWKHVDIHVWZD\WRUHPRYHWKHDGKHVLYHIURP
SDFNDJLQJWDSHRQQHZDSSOLDQFHVLVDQDSSOLFDWLRQ
RIDKRXVHKROGOLTXLGGLVKZDVKLQJGHWHUJHQW$SSO\
ZLWKDVRIWFORWKDQGDOORZWRVRDN
127(7KHDGKHVLYHPXVWEHUHPRYHGIURPDOOSDUWV
,WFDQQRWEHUHPRYHGLILWLVEDNHGRQ
&RQWURO.QREV
7KHFRQWURONQREVPD\EHUHPRYHGIRUHDVLHU
FOHDQLQJ
0DNHVXUHWKHNQREVDUHLQWKH2))SRVLWLRQVDQG
SXOOWKHPVWUDLJKWRIIWKHVWHPVIRUFOHDQLQJ
7KHNQREVFDQEHFOHDQHGLQDGLVKZDVKHURUWKH\
PD\DOVREHZDVKHGZLWKVRDSDQGZDWHU0DNH
VXUHWKHLQVLGHRIWKHNQREVDUHGU\EHIRUHUHSODFLQJ
5HSODFHWKHNQREVLQWKH2)) SRVLWLRQWRHQVXUH
SURSHUSODFHPHQW
3RUFHODLQ(QDPHO&RRNWRSRQVRPHPRGHOV
7KHSRUFHODLQHQDPHOILQLVKLVVWXUG\EXW
EUHDNDEOHLIPLVXVHG7KLVILQLVKLVDFLG
UHVLVWDQW+RZHYHUDQ\DFLGLFIRRGVVSLOOHG
VXFKDVIUXLWMXLFHVWRPDWRRUYLQHJDUVKRXOG
QRWEHSHUPLWWHGWRUHPDLQRQWKHILQLVK
,IDFLGVVSLOORQWKHFRRNWRSZKLOHLWLVKRWXVH
DGU\SDSHUWRZHORUFORWKWRZLSHLWXSULJKW
DZD\:KHQWKHVXUIDFHKDVFRROHGZDVKZLWK
VRDSDQGZDWHU5LQVHZHOO
)RURWKHUVSLOOVVXFKDVIDWVSDWWHULQJVZDVK
ZLWKVRDSDQGZDWHURUFOHDQVLQJSRZGHUV
DIWHUWKHVXUIDFHKDVFRROHG5LQVHZHOO3ROLVK
ZLWKDGU\FORWK
&DUHDQGFOHDQLQJRIWKHUDQJH *($SSOLDQFHVFRP
:$51,1*
5DGLDQWJODVVPRGHOV
&RLOFRRNWRSPRGHOV
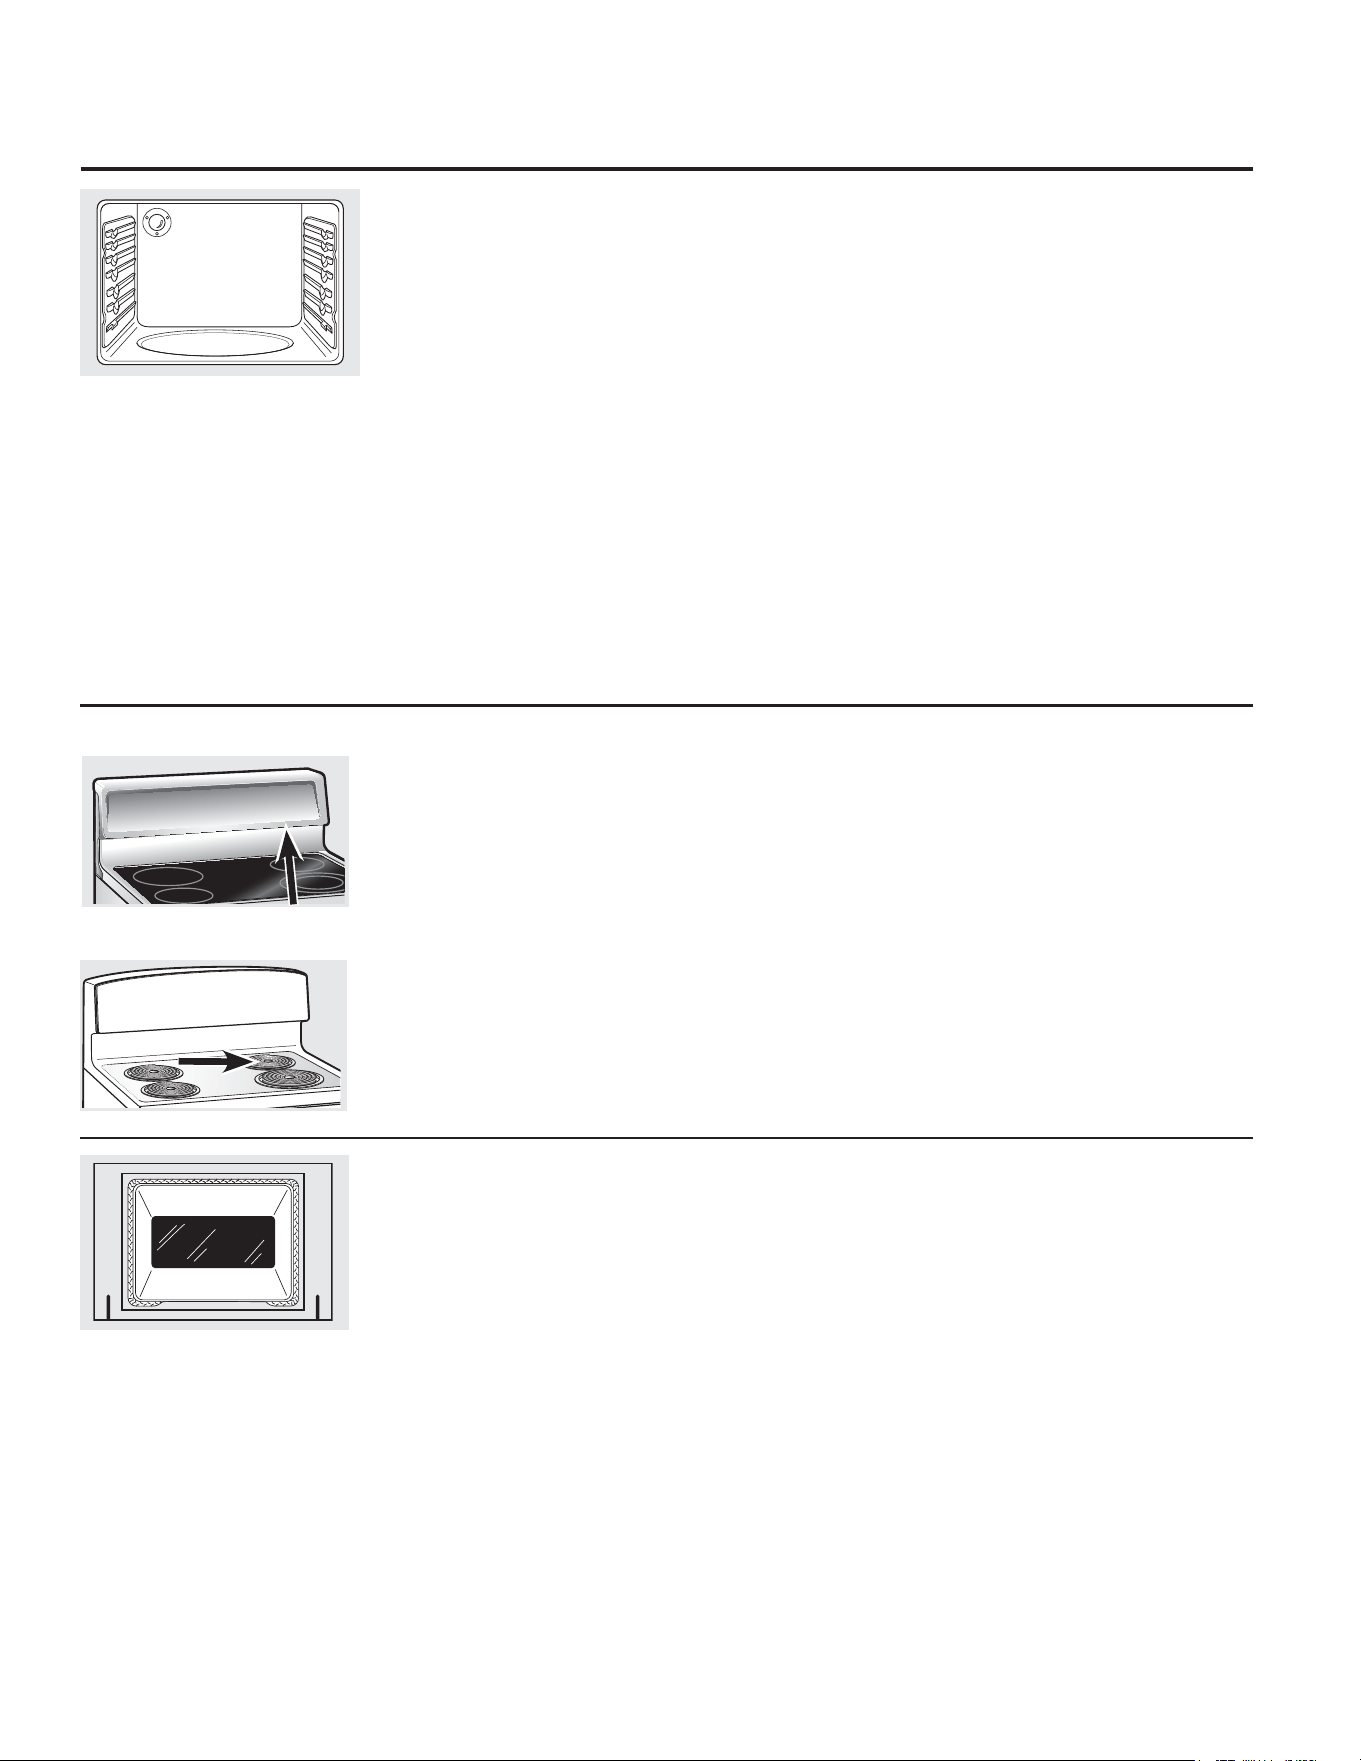
2YHQ9HQWRQ5DGLDQW*ODVVRU&RLO&RRNWRSV
2QJODVVFRRNWRSPRGHOVWKHRYHQYHQWLV
ORFDWHGEHKLQGWKHULJKWUHDUVXUIDFHXQLW
2QFRLOFRRNWRSPRGHOVWKHRYHQLVYHQWHG
WKURXJKDQRSHQLQJXQGHURQHRIWKHUHDU
VXUIDFHXQLWV
7KLVDUHDFRXOGEHFRPHKRWGXULQJRYHQXVH
,WLVQRUPDOIRUVWHDPWRFRPHRXWRIWKHYHQW
DQGPRLVWXUHPD\FROOHFWXQGHUQHDWKLWZKHQ
WKHRYHQLVLQXVH
7KHYHQWLVLPSRUWDQWIRUSURSHUDLUFLUFXODWLRQ
1HYHUEORFNWKLVYH
QW
&DUHDQGFOHDQLQJRIWKHUDQJH
3RUFHODLQ2YHQ,QWHULRURQVWDQGDUGFOHDQPRGHOV
:LWKSURSHUFDUHWKHSRUFHODLQHQDPHOILQLVKRQ
WKHLQVLGHRIWKHRYHQ³WRSERWWRPVLGHVEDFN
DQGLQVLGHRIWKHGRRU³ZLOOVWD\QHZORRNLQJIRU
\HDUV
/HWWKHRYHQFRROEHIRUHFOHDQLQJ:HUHFRPPHQG
WKDW\RXZHDUUXEEHUJORYHVZKHQFOHDQLQJWKH
RYHQ
6RDSDQGZDWHUZLOOQRUPDOO\GRWKHMRE+HDY\
VSDWWHULQJRUVSLOORYHUVPD\UHTXLUHFOHDQLQJZLWK
DPLOGDEUDVLYHFOHDQHU6RDSILOOHGVFRXULQJSDGV
PD\DOVREHXVHG
'RQRWDOORZIRRGVSLOOVZLWKDKLJKVXJDURUDFLG
FRQWHQWVXFKDVWRPDWRHVVDXHUNUDXWIUXLWMXLFHV
RUSLHILOOLQJWRUHPDLQRQWKHVXUIDFH7KH\PD\
FDXVHDGXOOVSRWHYHQDIWHUFOHDQLQJ
+RXVHKROGDPPRQLDPD\PDNHWKHFOHDQLQJMRE
HDVLHU3ODFHFXSLQDVKDOORZJODVVRUSRWWHU\
FRQWDLQHULQDFROGRYHQRYHUQLJKW7KHDPPRQLD
IXPHVZLOOKHOSORRVHQWKHEXUQHGRQJUHDVHDQG
IRRG
,IQHFHVVDU\\RXPD\XVHDQRYHQFOHDQHU)ROORZ
WKHSDFNDJHGLUHFWLRQV
■'RQRWVSUD\RYHQFOHDQHURQWKHHOHFWULFDO
FRQWUROVDQGVZLWFKHVEHFDXVHLWFRXOGFDXVH
DVKRUWFLUFXLWDQGUHVXOWLQVSDUNLQJRUILUH
■'RQRWDOORZDILOPIURPWKHFOHDQHUWREXLOGXS
RQWKHWHPSHUDWXUHVHQVRU³LWFRXOGFDXVHWKH
RYHQWRKHDWLPSURSHUO\7KHVHQVRULVORFDWHG
DWWKHWRSRIWKHRYHQ&DUHIXOO\ZLSHWKH
VHQVRUFOHDQDIWHUHDFKRYHQFOHDQLQJEHLQJ
FDUHIXOQRWWRPRYHWKHVHQVRUDVDFKDQJHLQ
LWVSRVLWLRQFRXOGDIIHFWKRZWKHRYHQEDNHV
■'RQRWVSUD\DQ\RYHQFOHDQHURQWKHRYHQ
GRRUKDQGOHVRUDQ\H[WHULRUVXUIDFHRIWKH
RYHQFDELQHWVRUSDLQWHGVXUIDFHV7KHFOHDQHU
FDQGDPDJHWKHVHVXUIDFHV
7KHJDVNHWLVGHVLJQHGZLWKDJDS
DWWKHERWWRPWRDOORZIRUSURSHUDLU
FLUFXODWLRQ
'RQRWUXERUFOHDQWKHGRRUJDVNHW³LW
KDVDQH[WUHPHO\ORZUHVLVWDQFHWR
DEUDVLRQ
,I\RXQRWLFHWKHJDVNHWEHFRPLQJ
ZRUQIUD\HGRUGDPDJHGLQDQ\ZD\
RULILWKDVEHFRPHGLVSODFHGRQWKH
GRRU\RXVKRXOGKDYHLWUHSODFHG
7RFOHDQWKHLQVLGHRIWKHGRRU
2QVHOIFOHDQPRGHOV
■ %HFDXVHWKHDUHDLQVLGHWKHJDVNHWLV
FOHDQHG
GXULQJWKHVHOIFOHDQF\FOH\RXGR
QRWQHHGWRFOHDQWKLVE\KDQG
■ 7KHDUHDRXWVLGHWKHJDVNHWDQGWKHGRRU
OLQHUFDQEHFOHDQHGZLWKDVRDSILOOHG
RUSODVWLFVFRXULQJSDGKRWZDWHUDQG
GHWHUJHQW5LQVHZHOOZLWKDYLQHJDUDQG
ZDWHUVROXWLRQ
2QVWDQGDUGFOHDQPRGHOV
■ 6RDSDQGZDWHUZLOOQRUPDOO\ZRUN+HDY\
VSDWWHULQJRUVSLOORYHUVPD\UHTXLUHFOHDQLQJ
ZLWKDPLOGDEUDVLYHFOHDQHU6RDSILOOHG
VFRXULQJSDGVPD\DOVREHXVHG
■ 6HHDOVR3RUFHODLQ2YHQ,QWHULRUVHFWLRQ
7RFOHDQWKHRXWVLGHRIWKHGRRU
■ 8VHVRDSDQGZDWHUWRWKRURXJKO\FOHDQWKH
WRSVLGHVDQGIURQWRIWKHRYHQGRRU5LQVH
ZHOO<RXPD\DOVRXVHDJODVVFOHDQHUWR
FOHDQWKHJODVVRQWKHRXWVLGHRIWKHGRRU'R
QRWOHWZDWHUGULSLQWRWKHYHQWRSHQLQJV
■ ,IDQ\VWDLQRQWKHGRRUYHQWWULPLV
SHUVLVWHQW
XVHDVRIWDEUDVLYHFOHDQHUDQGD
VSRQJHVFUXEEHUIRUEHVWUHVXOWV
■ 6SLOODJHRIPDULQDGHVIUXLWMXLFHVWRPDWR
VDXFHV
DQGEDVWLQJPDWHULDOVFRQWDLQLQJ
DFLGVPD\FDXVHGLVFRORUDWLRQDQGVKRXOGEH
ZLSHGXSLPPHGLDWHO\:KHQVXUIDFHLVFRRO
FOHDQDQGULQVH
■ 'RQRWXVHRYHQFOHDQHUVFOHDQLQJSRZGHUV
RUKDUVKDEUDVLYHVRQWKHRXWVLGHRIWKH
GRRU
&OHDQLQJWKH2YHQ'RRU
*($SSOLDQFHVFRP
/LIW2II2YHQ'RRU
7KHGRRULVYHU\KHDY\%HFDUHIXOZKHQ
UHPRYLQJDQGOLIWLQJWKHGRRU
'RQRWOLIWWKHGRRUE\WKHKDQGOH
7RUHPRYHWKHGRRU
)XOO\RSHQWKHGRRU
3XOOWKHKLQJHORFNVGRZQWRZDUGWKHGRRU
IUDPHWRWKHXQORFNHGSRVLWLRQ$WRRO
VXFKDVDVPDOOIODWEODGHVFUHZGULYHU
PD\EHUHTXLUHG
)LUPO\JUDVSERWKVLGHVRIWKHGRRU
DWWKHWRS
&ORVHGRRUWRWKHGRRUUHPRYDOSRVLWLRQ
ZKLFKLVKDOIZD\EHWZHHQWKHEURLOVWRS
SRVLWLRQDQGIXOO\FORVHG
/LIWGRRUXSDQGRXWXQWLOWKHKLQJHDUP
LVFOHDURIWKHVORW
7RUHSODFHWKHGRRU
)LUPO\JUDVSERWKVLGHVRIWKHGRRU
DWWKHWRS
:LWKWKHGRRUDW
WKHVDPHDQJOH
DVWKHUHPRYDO
SRVLWLRQVHDWWKH
LQGHQWDWLRQRIWKHKLQJH
DUPLQWRWKHERWWRP
HGJHRIWKHKLQJHVORW
7KHQRWFKLQWKHKLQJH
DUPPXVWEHIXOO\VHDWHGLQWRWKHERWWRP
RIWKHVORW
)XOO\RSHQWKHGRRU,IWKHGRRUZLOOQRW
IXOO\RSHQWKHLQGHQWDWLRQLVQRWVHDWHG
FRUUHFWO\LQWKHERWWRPHGJHRIWKHVORW
3XVKWKHKLQJHORFNVXSDJDLQVWWKHIURQW
IUDPHRIWKH
RYHQFDYLW\WR
WKHORFNHG
SRVLWLRQ
&ORVHWKHRYHQGRRU
5HPRYDOSRVLWLRQ
,QGHQWDWLRQ
%RWWRP
HGJH
RIVORW
+LQJH
ORFN
3XOOKLQJHORFNVGRZQWRXQORFN
+LQJHDUP
6ORW
+LQJH
ORFN
3XVKKLQJHORFNVXSWRORFN
+LQJH
DUP
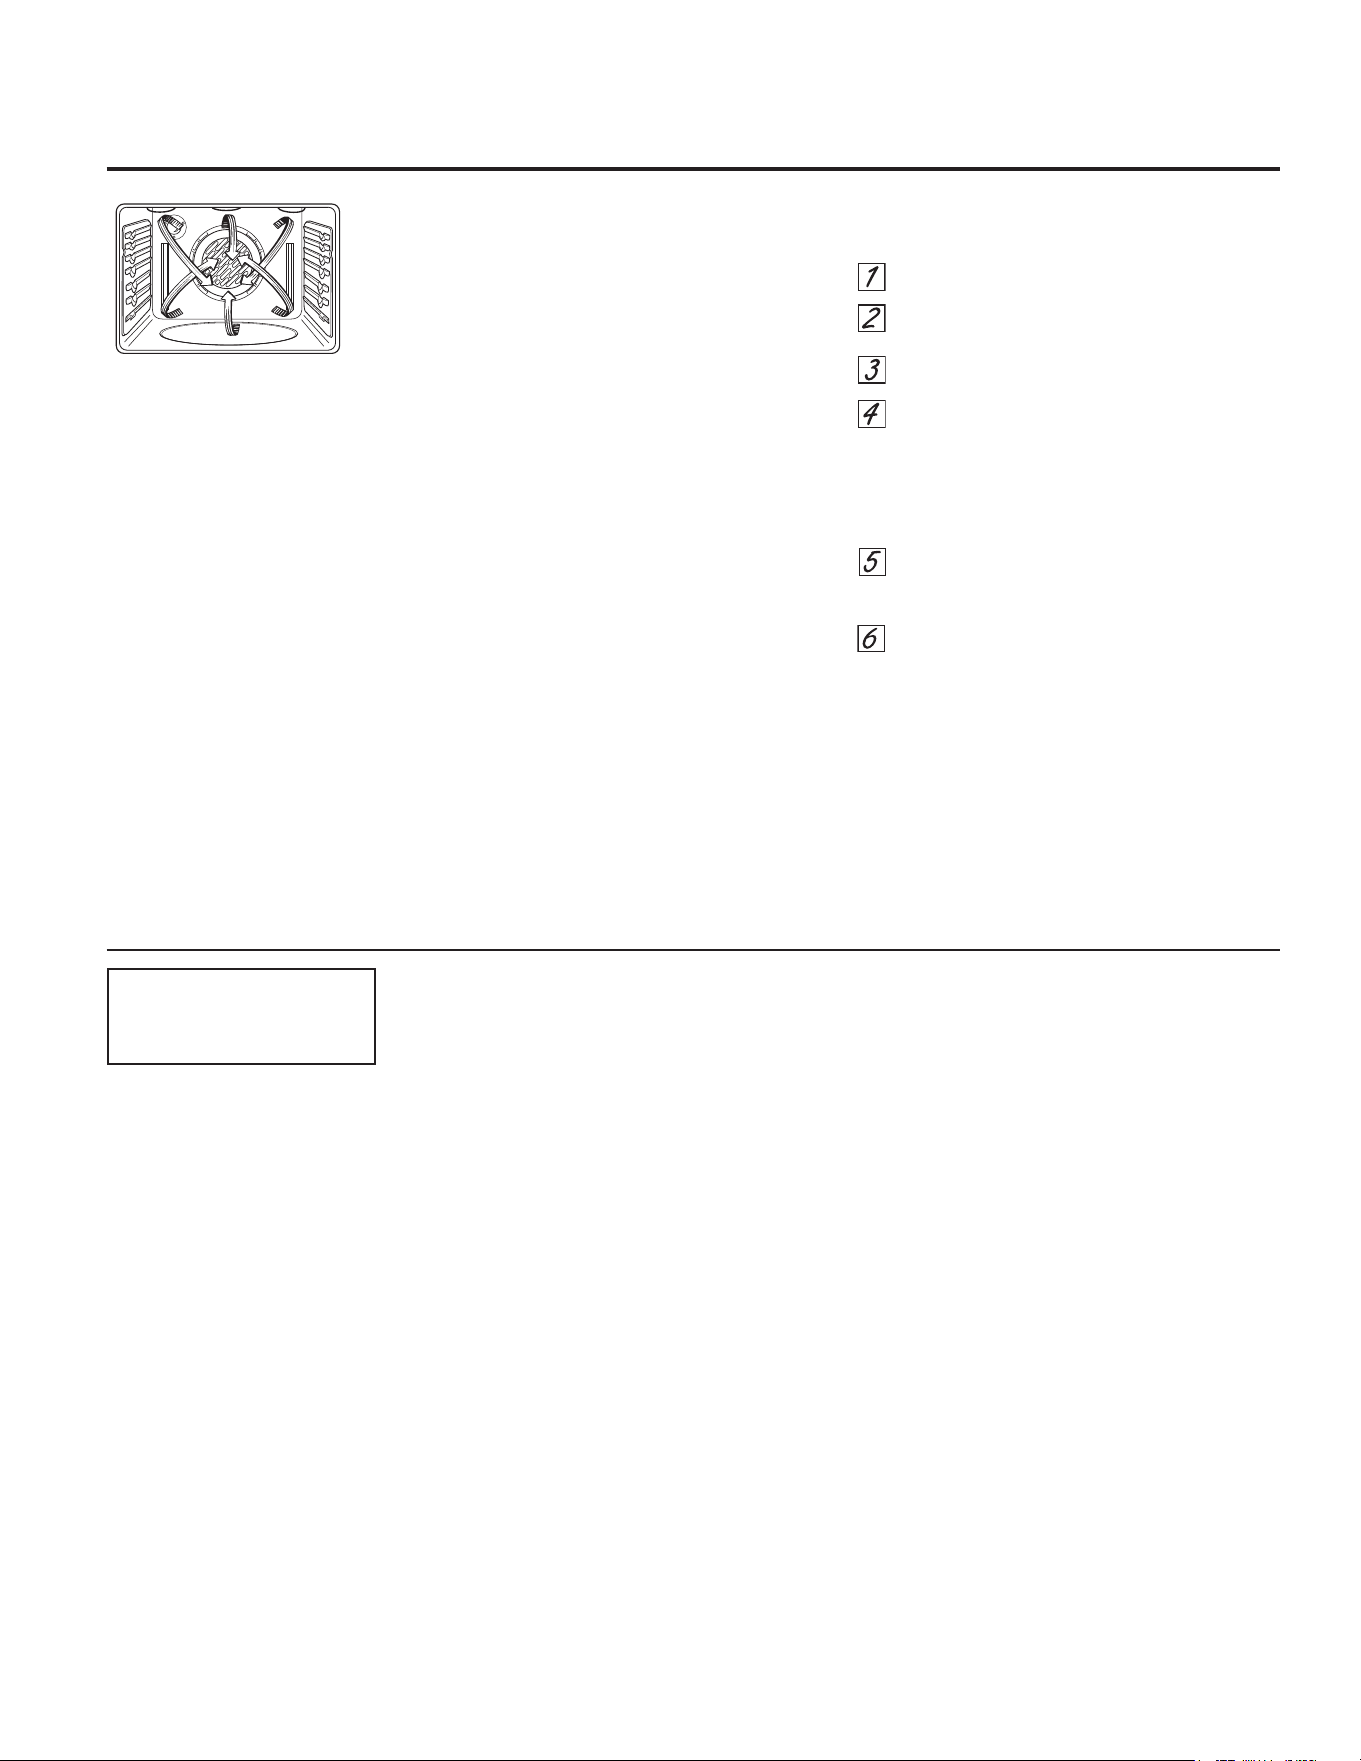
2YHQ+HDWLQJ(OHPHQWV
'RQRWFOHDQWKHEDNHHOHPHQWRUWKHEURLO
HOHPHQW$Q\VRLOZLOOEXUQRIIZKHQWKH
HOHPHQWVDUHKHDWHG
7RFOHDQWKHRYHQIORRUJHQWO\OLIWWKHEDNH
HOHPHQW2QVRPHPRGHOVWKHEDNHHOHPHQWLV
QRWH[SRVHGDQGLVXQGHUWKHRYHQIORRU&OHDQ
ZLWKZDUPVRDS\ZDWHU
2YHQ5DFNV
$OORYHQUDFNVPD\EHFOHDQHGE\KDQGZLWKDQ
DEUDVLYHFOHDQHURUVWHHOZRRO$IWHUFOHDQLQJ
ULQVHWKHUDFNVZLWKFOHDQZDWHUDQGGU\ZLWK
DFOHDQFORWK*UD\SRUFHODLQFRDWHGRYHQ
UDFNVPD\UHPDLQLQWKHRYHQGXULQJWKHVHOI
FOHDQLQJF\FOHZLWKRXWEHLQJGDPDJHG7KH
VKLQ\VLOYHUFRORUHGRYHQUDFNVPD\UHPDLQLQ
WKHRYHQGXULQJWKHVHOIFOHDQLQJF\FOHEXWWKH\
ZLOOORVHWKHLUOXVWHUDQGEHFRPHKDUGWRVOLGH
,WZLOOEHQHFHVVDU\WRJUHDVHDOORYHQUDFNVLGH
HGJHVZLWKDOLJKWFRDWLQJRIYHJHWDEOHRLODIWHU
FOHDQLQJWKHPE\KDQGRULQWKHRYHQ7KLVZLOO
KHOSPDLQWDLQWKHHDVHRIVOLGLQJWKHUDFNVLQ
DQGRXWRIWKHRYHQ
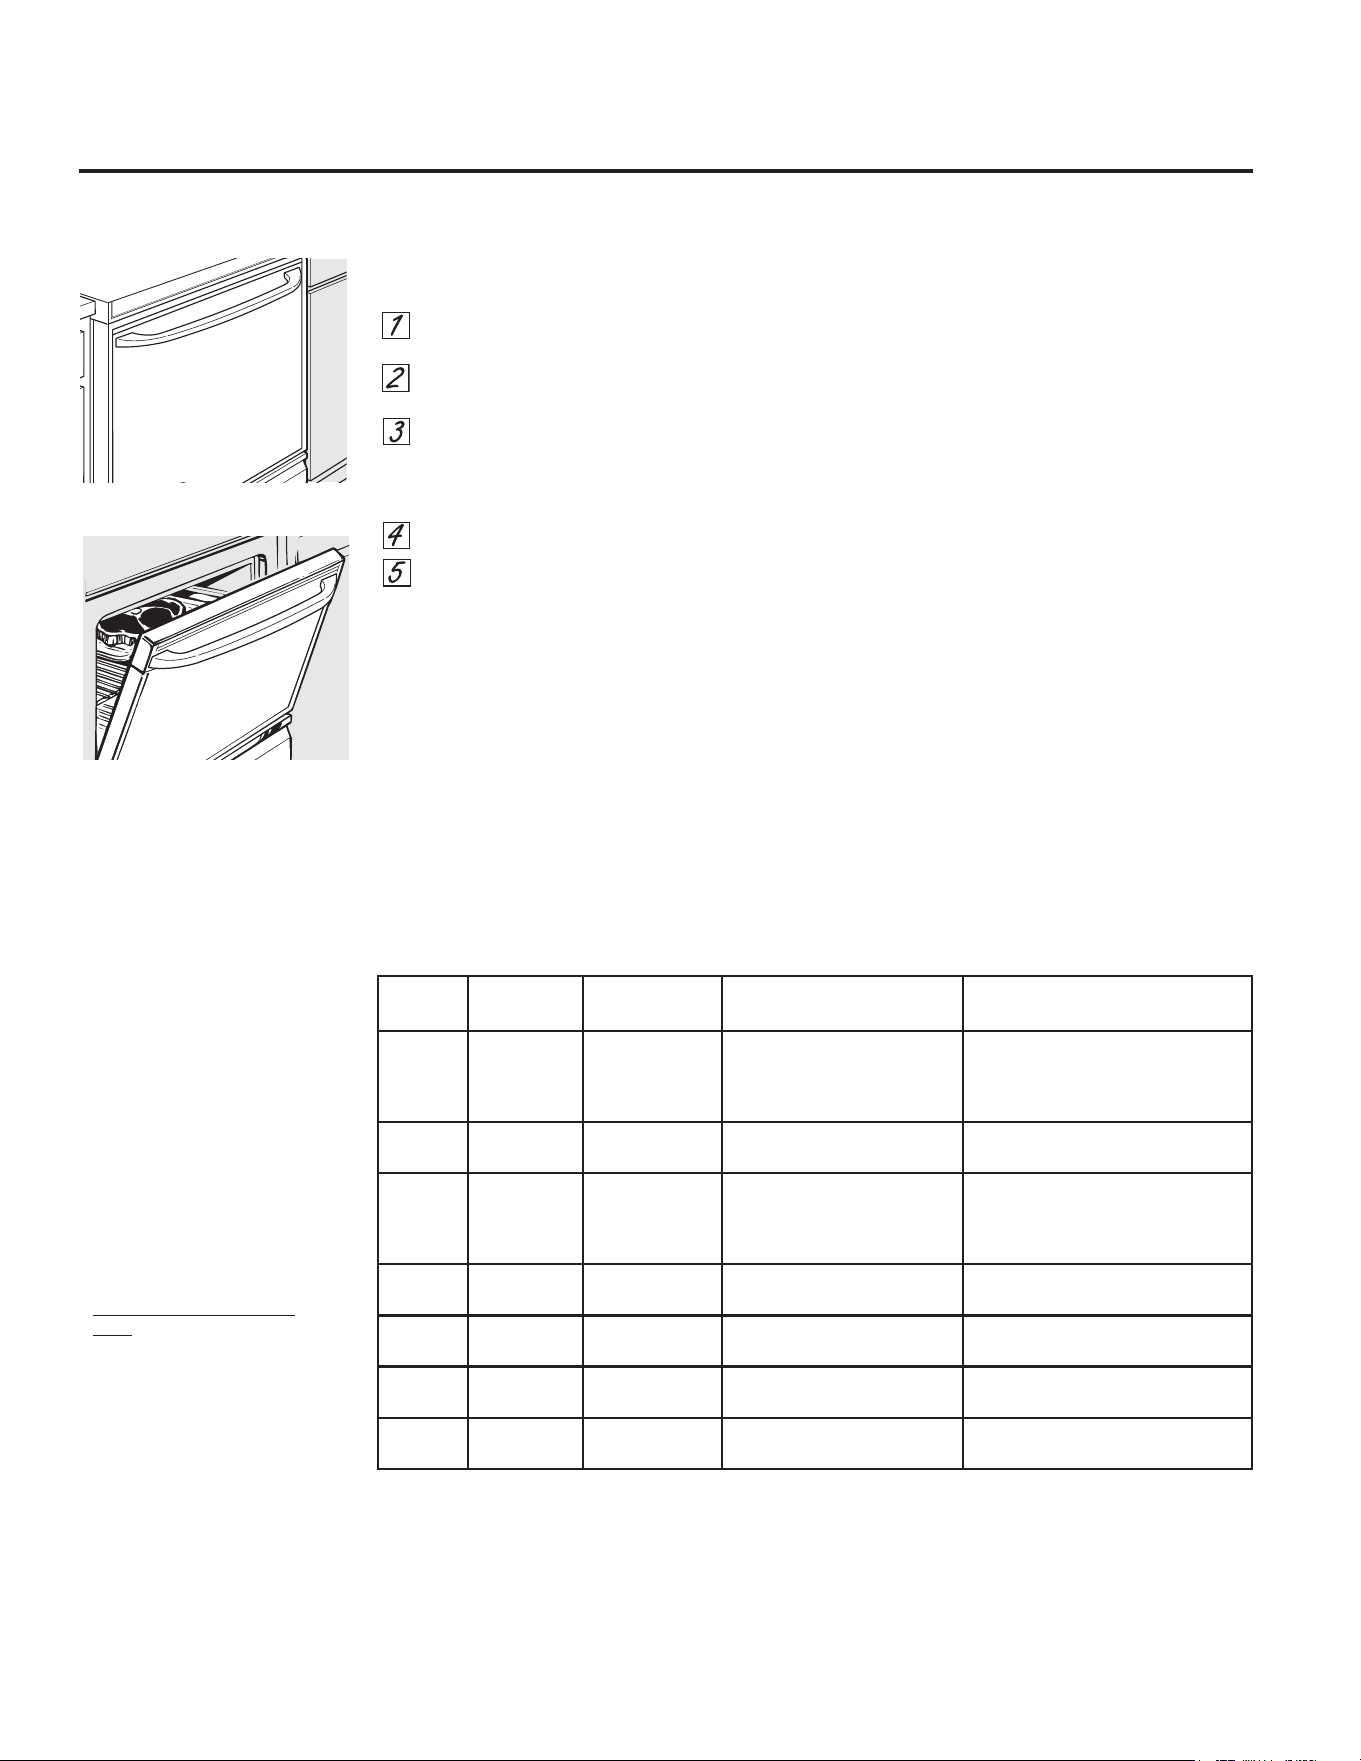
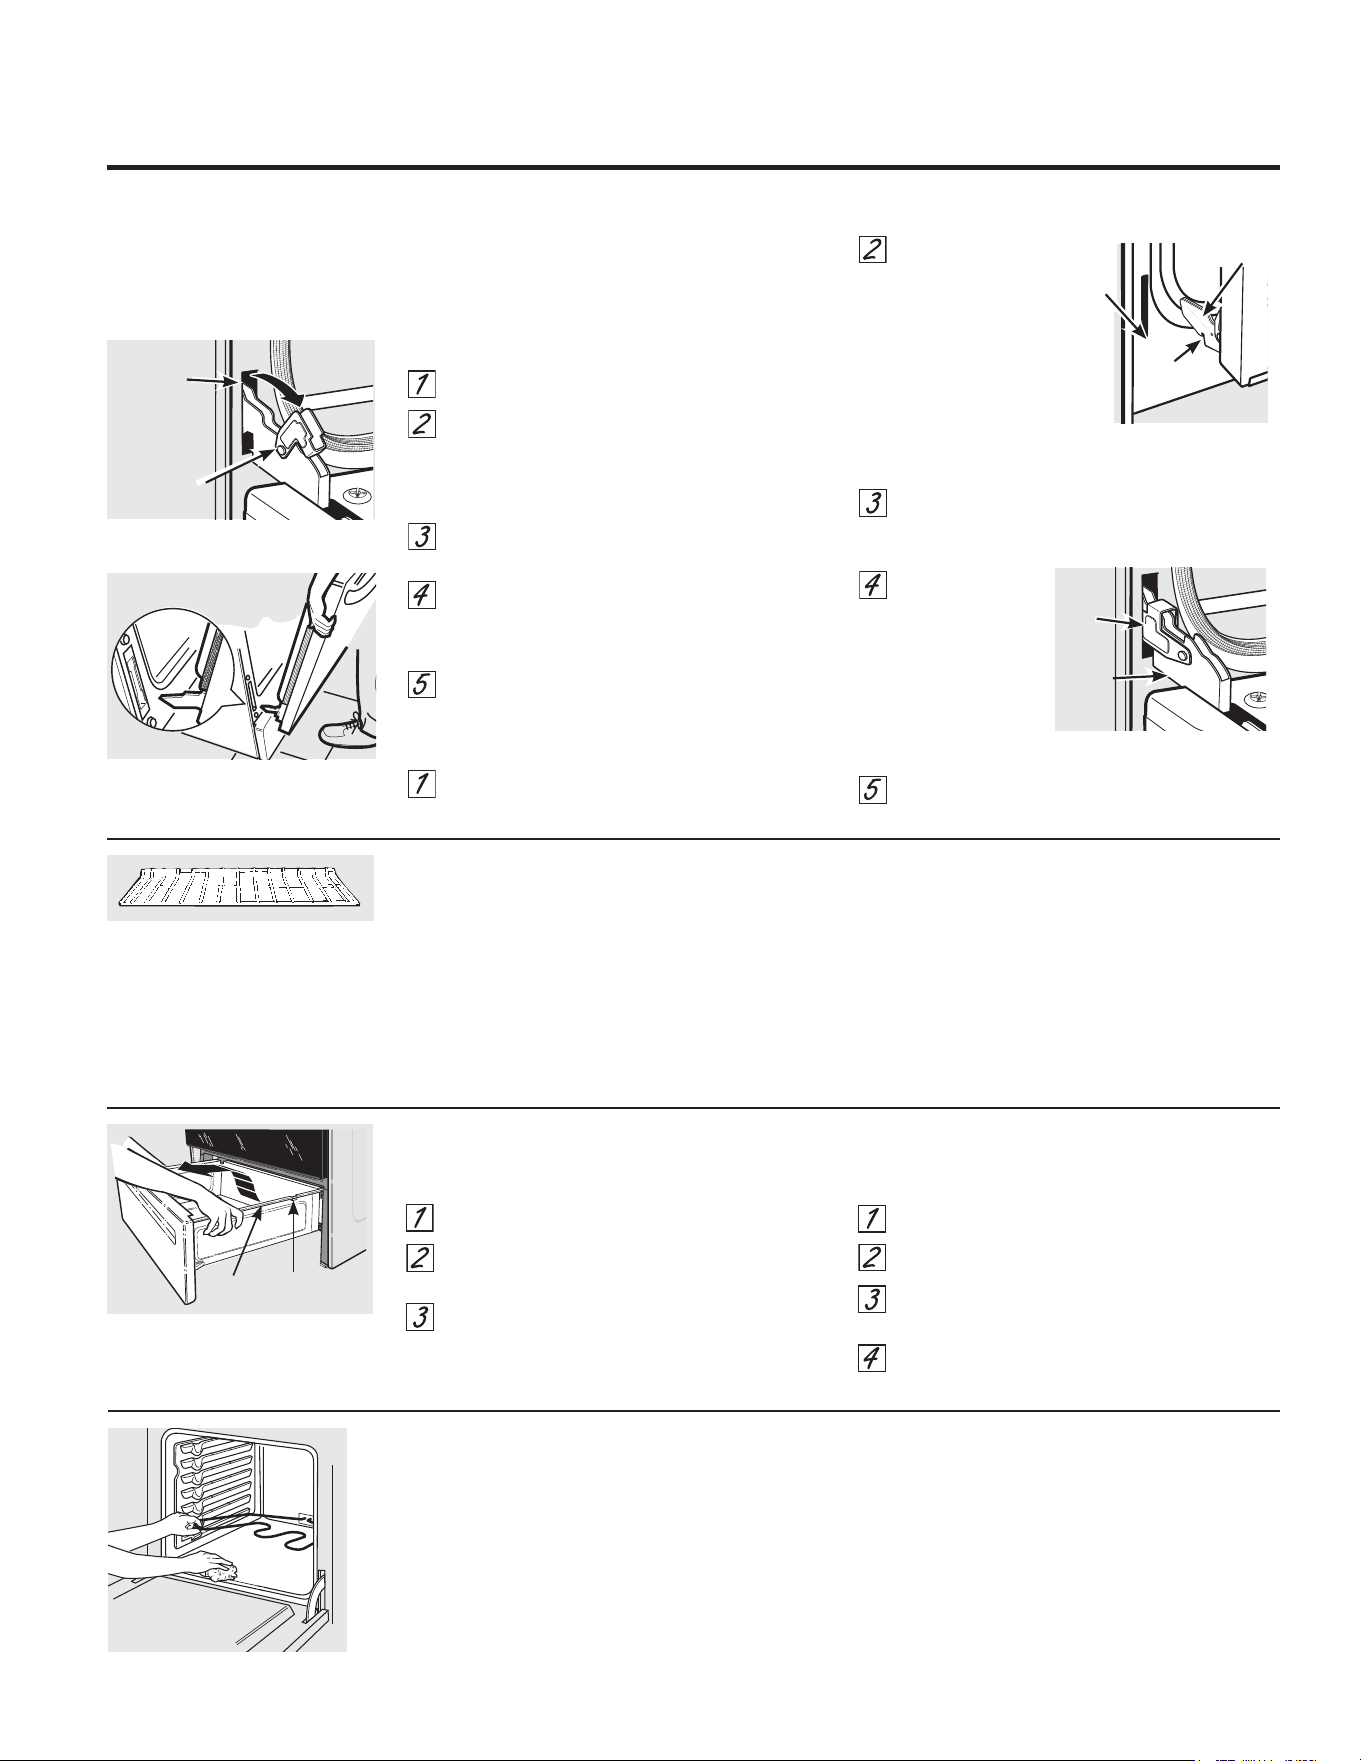
6WRUDJH'UDZHU5HPRYDO
7RUHPRYHWKHGUDZHU
3XOOWKHGUDZHURXWXQWLOLWVWRSV
/LIWWKHIURQWRIWKHGUDZHUXQWLOWKHVWRSV
FOHDUWKHJXLGHV
5HPRYHWKHGUDZHU
7RUHSODFHWKHGUDZHU
3ODFHWKHGUDZHUUDLOVRQWKHJXLGHV
3XVKWKHGUDZHUEDFNXQWLOLWVWRSV
/LIWWKHIURQWRIWKHGUDZHUDQGSXVKEDFN
XQWLOWKHVWRSVFOHDUWKHJXLGHV
/RZHUWKHIURQWRIWKHGUDZHUDQGSXVK
EDFNXQWLOLWFORVHV
6WRSJXLGH
5DLO

&DUHDQGFOHDQLQJRIWKHUDQJH
2YHQ/LJKW5HSODFHPHQWPRGHOVHTXLSSHGZLWKVWDQGDUGZDWWDSSOLDQFHEXOEV
%HVXUHWROHWWKHOLJKWFRYHUDQGEXOEFRRO
FRPSOHWHO\
7RUHPRYHWKHFRYHU
+ROGDKDQGXQGHUWKHFRYHUVRLWGRHVQ·W
IDOOZKHQUHOHDVHG:LWKILQJHUVRIWKH
VDPHKDQGILUPO\SXVKEDFNWKHZLUH
FRYHUKROGHU/LIWRIIWKHFRYHU
'RQRWUHPRYHDQ\VFUHZVWRUHPRYHWKHFRYHU
5HSODFHEXOEZLWKDZDWWDSSOLDQFH
EXOE
7RUHSODFHWKHFRYHU
3ODFHLWLQWRJURRYHRIWKHOLJKWUHFHSWDFOH
3XOOZLUHIRUZDUGWRWKHFHQWHURIWKH
FRYHUXQWLOLWVQDSVLQWRSODFH
&RQQHFWHOHFWULFDOSRZHUWRWKHUDQJH
:LUHFRYHUKROGHU
2YHQ/LJKW5HSODFHPHQWRQVRPHPRGHOV
7RUHPRYH
7XUQWKHJODVVFRYHUFRXQWHUFORFNZLVH
WXUQXQWLOWKHWDEVRIWKHJODVVFRYHUFOHDU
WKHJURRYHVRIWKHVRFNHW:HDULQJODWH[
JORYHVPD\RIIHUDEHWWHUJULS
8VLQJJORYHVRUDGU\FORWKUHPRYHWKH
EXOEE\SXOOLQJLWVWUDLJKWRXW
7RUHSODFH
8VHDQHZYROWKDORJHQEXOEQRW
WRH[FHHGZDWWV5HSODFHWKHEXOEZLWK
WKHVDPHW\SHRIEXOEWKDWZDVUHPRYHG
<RXUPRGHOZLOOKDYHRQHRIWKHWZRW\SHV
VKRZQRQWKHOHIW7RGHWHUPLQHWKH
FRUUHFWUHSODFHPHQWEXOEFKHFNWKHEXOE
WHUPLQDOV%XOEVZLWKVWUDLJKWSLQ
WHUPLQDOVDUH*EXOEV%XOEVZLWK
ORRSHGWHUPLQDOVDUH*EXOEV'RQRW
LQWHUFKDQJH%HVXUHWKHUHSODFHPHQW
EXOELVUDWHGYROWVRUYROWV127
YROWV
8VLQJJORYHVRUDGU\FORWKUHPRYHWKH
EXOEIURPLWVSDFNDJLQJ'RQRWWRXFKWKH
EXOEZLWKEDUHILQJHUV2LOIURPVNLQZLOO
GDPDJHWKHEXOEDQGVKRUWHQLWVOLIH
3XVKWKHEXOEVWUDLJKWLQWRWKHUHFHSWDFOH
DOOWKHZD\
3ODFHWKHWDEVRIWKHJODVVFRYHULQWRWKH
JURRYHVRIWKHVRFNHW7XUQWKHJODVVFRYHU
FORFNZLVHWXUQ
)RULPSURYHGOLJKWLQJLQVLGHWKHRYHQ
FOHDQWKHJODVVFRYHUIUHTXHQWO\XVLQJD
ZHWFORWK7KLVVKRXOGEHGRQHZKHQWKH
RYHQLVFRPSOHWHO\FRRO
5HFRQQHFWHOHFWULFDOSRZHUWRWKHRYHQ
*%XOE
6RFNHW
7DE
*ODVVFRYHU
5HFHSWDFOH
8VH
JORYHVRU
FORWK
5HFHSWDFOH
*%XOE
6RFNHW
7DE
*ODVVFRYHU
5HFHSWDFOH
RQVRPHPRGHOV
RQVRPHPRGHOV
6+2&.25%851+$=$5'%HIRUHUHSODFLQJRYHQOLJKWEXOEGLVFRQQHFW
WKHHOHFWULFDOSRZHUWRWKHUDQJHDWWKHPDLQIXVHRUFLUFXLWEUHDNHUSDQHO
)DLOXUHWRGRVRPD\UHVXOWLQHOHFWULFVKRFNRUEXUQ
:$51,1*
%851+$=$5'7KHJODVVFRYHUDQGEXOEVKRXOGEHUHPRYHGZKHQFRRO
7RXFKLQJKRWJODVVZLWKEDUHKDQGVRUDGDPSFORWKFDQFDXVHEXUQV
&$87,21
&DUHDQGFOHDQLQJRIWKHFRLOFRRNWRS
RQVRPHPRGHOV
*($SSOLDQFHVFRP
%HVXUHWKHFRQWUROVDUHWXUQHGWR2))DQGWKHVXUIDFHXQLWVDUHFRROEHIRUHDWWHPSWLQJWRUHPRYHWKHP
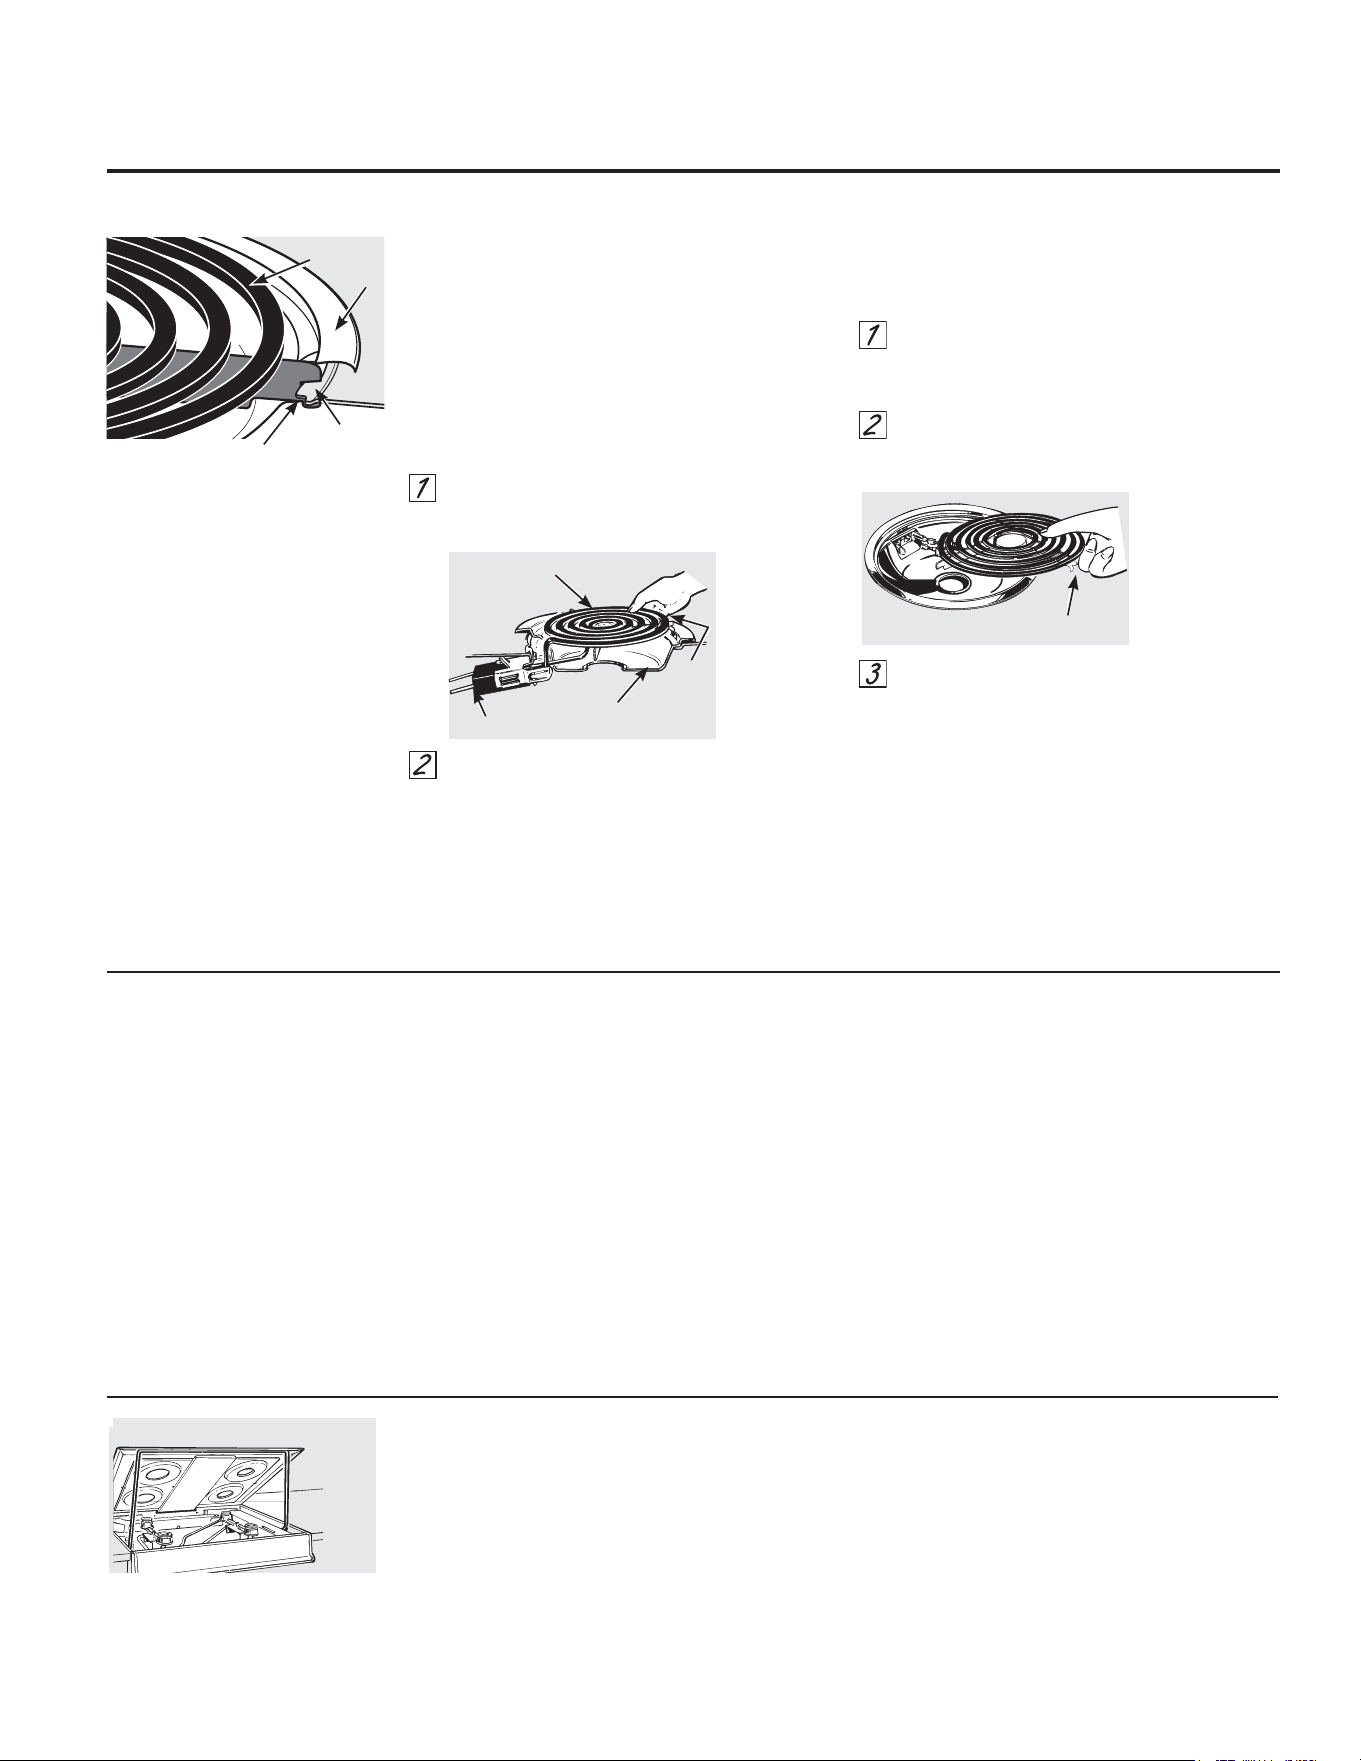
6XUIDFH8QLWV
7RFOHDQWKHVXUIDFHXQLWVWXUQWKHFRQWUROWRWKH
KLJKHVWVHWWLQJIRUDPLQXWH7KHFRLOVZLOOEXUQRII
DQ\VRLO
7RUHPRYHDVXUIDFHXQLW
7RUHPRYHWKHGULSSDQVIRUFOHDQLQJ
WKHVXUIDFHXQLWVPXVWEHUHPRYHGILUVW
3XVKWKHVXUIDFHXQLWEDFNWRZDUG
WKHUHFHSWDFOHWRIUHHWKHORFNLQJWDE
IURPWKHFRRNWRS
/LIWWKHVXUIDFHXQLWDERXWLQFKDERYHWKHGULS
SDQDQGSXOOLWRXW
'RQRWOLIWWKHVXUIDFHXQLWPRUHWKDQLQFK
,I\RXGRLWPD\QRWOLHIODWRQWKHGULSSDQ
ZKHQ\RXSOXJLWEDFNLQ
127( 5HSHDWHGOLIWLQJRIWKHVXUIDFHXQLW
PRUHWKDQLQFKDERYHWKHGULSSDQFDQ
SHUPDQHQWO\GDPDJHWKHUHFHSWDFOH
7RUHSODFHDVXUIDFHXQLW
5HSODFHWKHGULSSDQLQWRWKHUHFHVV
LQWKHFRRNWRS0DNHVXUHWKHRSHQLQJ
LQWKHSDQOLQHVXSZLWKWKHUHFHSWDFOH
,QVHUWWKHWHUPLQDOVRIWKHVXUIDFHXQLWWKURXJK
WKHRSHQLQJLQWKHGULSSDQDQGLQWRWKH
UHFHSWDFOH
3XVKWKHVXUIDFHXQLWLQDQGGRZQWRORFNWKH
WDELQSODFHVRLWUHVWVHYHQO\LQWKHFRRNWRS
'RQRWLPPHUVHWKHVXUIDFHXQLWVLQOLTXLGVRIDQ\
NLQG
'RQRWFOHDQWKHVXUIDFHXQLWVLQDGLVKZDVKHU
'RQRWEHQGWKHVXUIDFHXQLWSOXJWHUPLQDOV
'RQRWDWWHPSWWRFOHDQDGMXVWRULQDQ\ZD\UHSDLU
WKHSOXJLQUHFHSWDFOH
'ULS3DQV
5HPRYHWKHVXUIDFHXQLWV7KHQOLIWRXWWKHGULSSDQV
)RUEHVWUHVXOWVFOHDQWKHGULSSDQVE\KDQG3ODFH
WKHPLQDFRYHUHGFRQWDLQHURUDSODVWLFEDJZLWK
øFXSDPPRQLDWRORRVHQWKHVRLO5LQVHZLWKFOHDQ
ZDWHUDQGSROLVKZLWKDFOHDQVRIWFORWK
7KHGULSSDQVPD\DOVREHFOHDQHGLQDGLVKZDVKHU
&OHDQWKHDUHDXQGHUWKHGULSSDQVRIWHQ%XLOWXS
VRLOHVSHFLDOO\JUHDVHPD\FDWFKILUH
'RQRWFRYHUWKHGULSSDQVZLWKIRLO8VLQJIRLOVR
FORVHWRWKHUHFHSWDFOHFRXOGFDXVHVKRFNILUHRU
GDPDJHWRWKHUDQJH
127(,I\RXUFRRNWRSLVHTXLSSHGZLWKVKLQ\VLOYHU
FRORUHGGULSSDQVGRQRWFOHDQWKHPLQWKHVHOI
FOHDQLQJRYHQ3HUPDQHQWGDPDJHWRWKHILQLVKFDQ
RFFXU
,I\RXUFRRNWRSLVHTXLSSHGZLWKEODFNRUJUD\
SRUFHODLQFRDWHGGULSSDQVWKH\FDQEHFOHDQHGLQ
WKHRYHQGXULQJWKHVHOIFOHDQLQJF\FOH%HIRUH\RX
EHJLQDVHOIFOHDQLQJF\FOHUHPRYHDQ\KHDY\VRLO
IURPWKHGULSSDQVDQGSODFHWKHPRQWKHSRUFHODLQ
FRDWHGRYHQUDFNV'RQRWSODFHWKHGULSSDQV
GLUHFWO\RQWKHRYHQERWWRP$IWHUWKHVHOIFOHDQLQJ
F\FOHLVFRPSOHWHGDQGWKHGULSSDQVDUHFRROZLSH
WKHPZLWKDGDPSFORWKWRUHPRYHDQ\UHPDLQLQJ
DVKRUUHVLGXH
/LIW8S&RRNWRS
7KHHQWLUHFRRNWRSPD\EHOLIWHGXSDQGVXSSRUWHGLQ
WKHXSSRVLWLRQIRUHDVLHUFOHDQLQJ
7KHVXUIDFHXQLWVGRQRWQHHGWREHUHPRYHG
KRZHYHU\RXPD\UHPRYHRQHWRPDNHUDLVLQJWKH
FRRNWRSHDVLHU7KHUHDUHWZRVLGHVXSSRUWVWKDWORFN
LQWRSRVLWLRQZKHQWKHFRRNWRSLV
OLIWHGXS
$IWHUFOHDQLQJXQGHUWKHFRRNWRSZLWKKRW
PLOGVRDS\ZDWHUDQGDFOHDQFORWKORZHUWKH
FRRNWRS%HFDUHIXOQRWWRSLQFK\RXUILQJHUV
7RORZHUWKHFRRNWRSSXVKWKHURGVEDFNDQGJHQWO\
ORZHUWKHFRRNWRSXQWLOLWUHVWVLQSODFH
%HVXUHDOOVXUIDFHXQLWVDUHWXUQHG
RIIEHIRUHUDLVLQJWKHFRRNWRS
'ULSSDQ
5HFHSWDFOH
6XUIDFHXQLW
/RFNLQJ
WDE
/RFNLQJWDE
'ULS
SDQ
&RRNWRS
ULP
:KHQSURSHUO\VHDWHGWKHORFNLQJ
WDEVKRXOGORFNRQWRWKHFRRNWRS
ULPWKURXJKWKHQRWFKLQWKHGULS
SDQ
6XUIDFH
XQLW
/RFNLQJWDE
$OORZWKHFRRNWRSWRFRRO
8VHDVLQJOHHGJHUD]RUEODGHVFUDSHU
DWDSSUR[LPDWHO\DDQJOHDJDLQVW
WKHJODVVVXUIDFHDQGVFUDSHWKHVRLO,W
ZLOOEHQHFHVVDU\WRDSSO\SUHVVXUHWR
WKHUD]RUVFUDSHULQRUGHUWRUHPRYH
WKHUHVLGXH
$IWHUVFUDSLQJZLWKWKHUD]RUVFUDSHU
VSUHDGDIHZGURSVRI&(5$0$%5<7(
&HUDPLF&RRNWRS&OHDQHURQWKHHQWLUH
EXUQHGUHVLGXHDUHD8VHWKH&(5$0$
%5<7(
&OHDQLQJ3DGWRUHPRYHDQ\
UHPDLQLQJUHVLGXH
)RUDGGLWLRQDOSURWHFWLRQDIWHUDOO
UHVLGXHKDVEHHQUHPRYHGSROLVKWKH
HQWLUHVXUIDFHZLWK&(5$0$%5<7(
&HUDPLF&RRNWRS&OHDQHUDQGDSDSHU
WRZHO
%XUQHG2Q5HVLGXH
127('$0$*(WR\RXUJODVVVXUIDFHPD\
RFFXULI\RXXVHVFUXESDGVRWKHUWKDQWKRVH
UHFRPPHQGHG
$OORZWKHFRRNWRSWRFRRO
6SUHDGDIHZGURSVRI&(5$0$%5<7(
&HUDPLF&RRNWRS&OHDQHURQWKHHQWLUH
EXUQHGUHVLGXHDUHD
8VLQJWKHLQFOXGHG&(5$0$%5<7(
&OHDQLQJ3DGIRU&HUDPLF&RRNWRSVUXE
WKHUHVLGXHDUHDDSSO\LQJSUHVVXUHDV
QHHGHG
,IDQ\UHVLGXHUHPDLQVUHSHDWWKHVWHSV
OLVWHGDERYHDVQHHGHG
)RUDGGLWLRQDOSURWHFWLRQDIWHUDOO
UHVLGXHKDVEHHQUHPRYHGSROLVKWKH
HQWLUHVXUIDFHZLWK&(5$0$%5<7(
&HUDPLF&RRNWRS&OHDQHUDQGDSDSHU
WRZHO
7KH&(5$0$%5<7(
&HUDPLF
&RRNWRS6FUDSHUDQGDOO
UHFRPPHQGHGVXSSOLHVDUH
DYDLODEOHWKURXJKRXU3DUWV
&HQWHU6HHLQVWUXFWLRQVXQGHU´7R
2UGHU3DUWVµVHFWLRQRQQH[WSDJH
127('RQRWXVHDGXOORU
QLFNHGEODGH
+HDY\%XUQHG2Q5HVLGXH
8VHD&(5$0$%5<7(
&OHDQLQJ
3DGIRU&HUDPLF&RRNWRSV
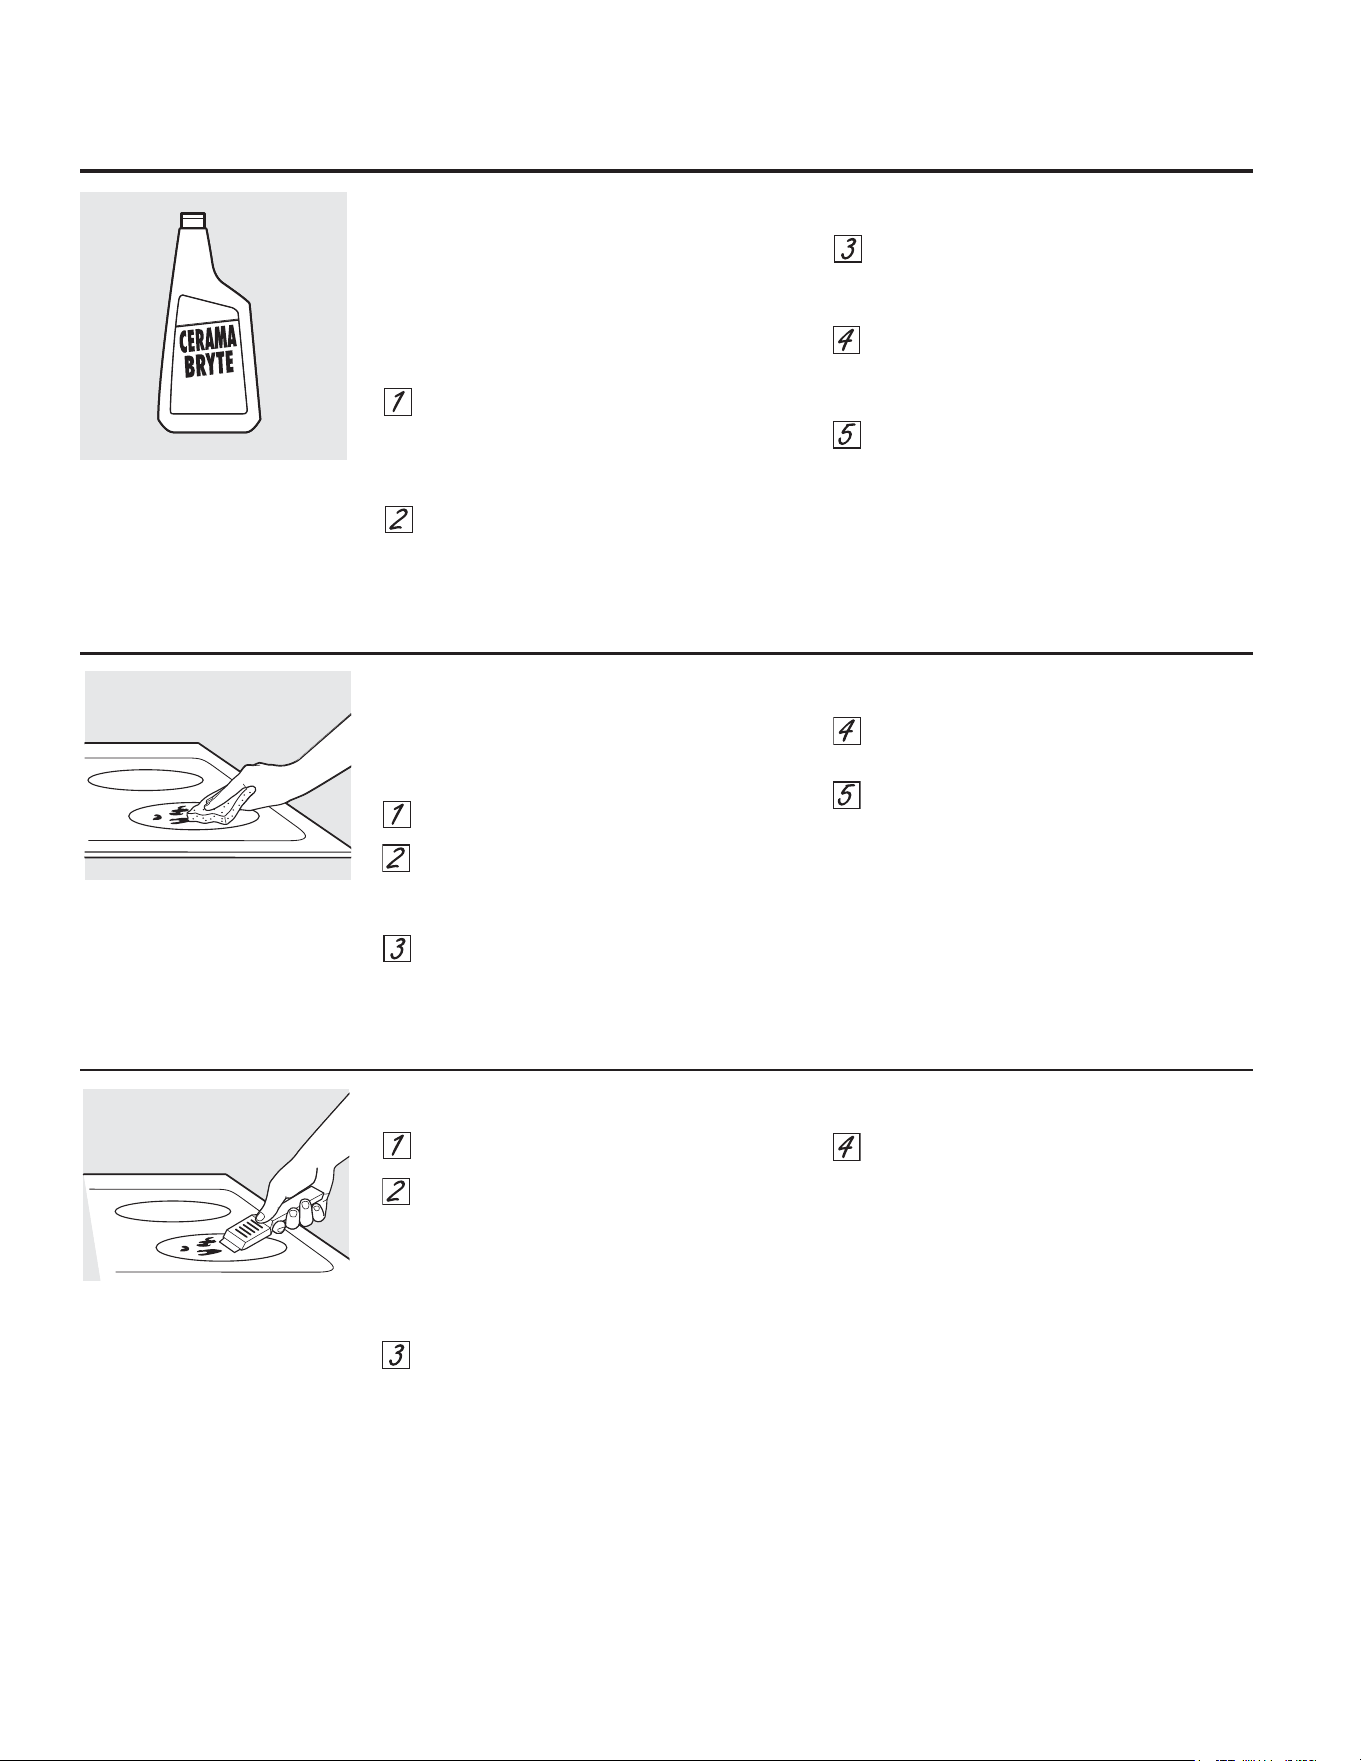
1RUPDO'DLO\8VH&OHDQLQJ
21/<XVH&(5$0$%5<7(
&HUDPLF&RRNWRS
&OHDQHURQWKHJODVVFRRNWRS2WKHUFUHDPV
PD\QRWEHDVHIIHFWLYH
7RPDLQWDLQDQGSURWHFWWKHVXUIDFHRI\RXU
JODVVFRRNWRSIROORZWKHVHVWHSV
%HIRUHXVLQJWKHFRRNWRSIRUWKH
ILUVWWLPHFOHDQLWZLWK&(5$0$%5<7(
&HUDPLF&RRNWRS&OHDQHU7KLVKHOSV
SURWHFWWKHWRSDQGPDNHVFOHDQXSHDVLHU
'DLO\XVHRI&(5$0$%5<7(
&HUDPLF
&RRNWRS&OHDQHUZLOOKHOSNHHSWKH
FRRNWRSORRNLQJQHZ
6KDNHWKHFOHDQLQJFUHDPZHOO$SSO\D
IHZGURSVRI&(5$0$%5<7(
&HUDPLF
&RRNWRS&OHDQHUGLUHFWO\WRWKHFRRNWRS
8VHDSDSHUWRZHORU&(5$0$%5<7(
&OHDQLQJ3DGIRU&HUDPLF&RRNWRSVWR
FOHDQWKHHQWLUHFRRNWRSVXUIDFH
8VHDGU\FORWKRUSDSHUWRZHOWR
UHPRYHDOOFOHDQLQJUHVLGXH1RQHHGWR
ULQVH
127(,WLVYHU\LPSRUWDQWWKDW\RX'2127
KHDWWKHFRRNWRSXQWLOLWKDVEHHQFOHDQHG
WKRURXJKO\
&OHDQ\RXUFRRNWRSDIWHU
HDFKVSLOO8VH&(5$0$
%5<7(
&HUDPLF&RRNWRS
&OHDQHU
&OHDQLQJWKHJODVVFRRNWRS
RQVRPHPRGHOV

*($SSOLDQFHVFRP
7RRUGHU&(5$0$%5<7(
&HUDPLF&RRNWRS
&OHDQHUDQGWKHFRRNWRSVFUDSHUSOHDVHFDOO
RXUWROOIUHHQXPEHU
1DWLRQDO3DUWV&HQWHU
&(5$0$%5<7(
&HUDPLF
&RRNWRS&OHDQHU:;;
&(5$0$%5<7(
&HUDPLF
&RRNWRS6FUDSHU
:;;
.LW:%;
.LWLQFOXGHVFUHDPDQGFRRNWRSVFUDSHU
&(5$0$%5<7(
&OHDQLQJ3DGVIRU
&HUDPLF&RRNWRSV:;;
7XUQRIIDOOVXUIDFHXQLWV5HPRYHKRW
SDQV
:HDULQJDQRYHQPLWW
D8VHDVLQJOHHGJHUD]RUEODGHVFUDSHU
&(5$0$%5<7(
&HUDPLF&RRNWRS
6FUDSHUWRPRYHWKHVSLOOWRDFRRO
DUHDRQWKHFRRNWRS
E5HPRYHWKHVSLOOZLWKSDSHUWRZHOV
$Q\UHPDLQLQJVSLOORYHUVKRXOGEHOHIWXQWLO
WKHVXUIDFHRIWKHFRRNWRSKDVFRROHG
'RQ·WXVHWKHVXUIDFHXQLWVDJDLQXQWLODOO
RIWKHUHVLGXHKDVEHHQFRPSOHWHO\
UHPRYHG
127(,ISLWWLQJRULQGHQWDWLRQLQWKHJODVV
VXUIDFHKDVDOUHDG\RFFXUUHGWKHFRRNWRS
JODVVZLOOKDYHWREHUHSODFHG
,QWKLVFDVHVHUYLFHZLOOEHQHFHVVDU\
'DPDJHIURP6XJDU\6SLOOVDQG0HOWHG3ODVWLF
2XUWHVWLQJVKRZVWKDW
LI\RXDUHFRRNLQJKLJK
VXJDUPL[WXUHVVXFKDV
MHOO\RUIXGJHDQGKDYH
DVSLOORYHULWFDQFDXVH
SHUPDQHQWGDPDJHWRWKH
JODVVVXUIDFHXQOHVVWKH
VSLOORYHULVLPPHGLDWHO\
UHPRYHG
%HFDUHIXOQRWWRVOLGHSRWVDQGSDQV
DFURVV\RXUFRRNWRS,WZLOOOHDYHPHWDO
PDUNLQJVRQWKHFRRNWRSVXUIDFH
7KHVHPDUNVDUHUHPRYDEOHXVLQJWKH
&(5$0$%5<7(
&HUDPLF&RRNWRS&OHDQHU
ZLWKWKH&(5$0$%5<7(
&OHDQLQJ3DG
IRU&HUDPLF&RRNWRSV
,ISRWVZLWKDWKLQRYHUOD\RIDOXPLQXP
RUFRSSHUDUHDOORZHGWRERLOGU\WKH
RYHUOD\PD\OHDYHEODFNGLVFRORUDWLRQ
RQWKHFRRNWRS
7KLVVKRXOGEHUHPRYHGLPPHGLDWHO\
EHIRUHKHDWLQJDJDLQRUWKH
GLVFRORUDWLRQPD\EHSHUPDQHQW
127(&DUHIXOO\FKHFNWKHERWWRPRISDQV
IRUURXJKQHVVWKDWZRXOGVFUDWFKWKH
FRRNWRS
0HWDO0DUNVDQG6FUDWFKHV
7R2UGHU3DUWV
*ODVVVXUIDFH³SRWHQWLDOIRUSHUPDQHQWGDPDJH
7RFOHDQWKHFRRNWRSVHDODURXQGWKHHGJHV
RIWKHJODVVOD\DZHWFORWKRQLWIRUDIHZ
PLQXWHVWKHQZLSHFOHDQZLWKQRQDEUDVLYH
FOHDQHUV
&RRNWRS6HDO
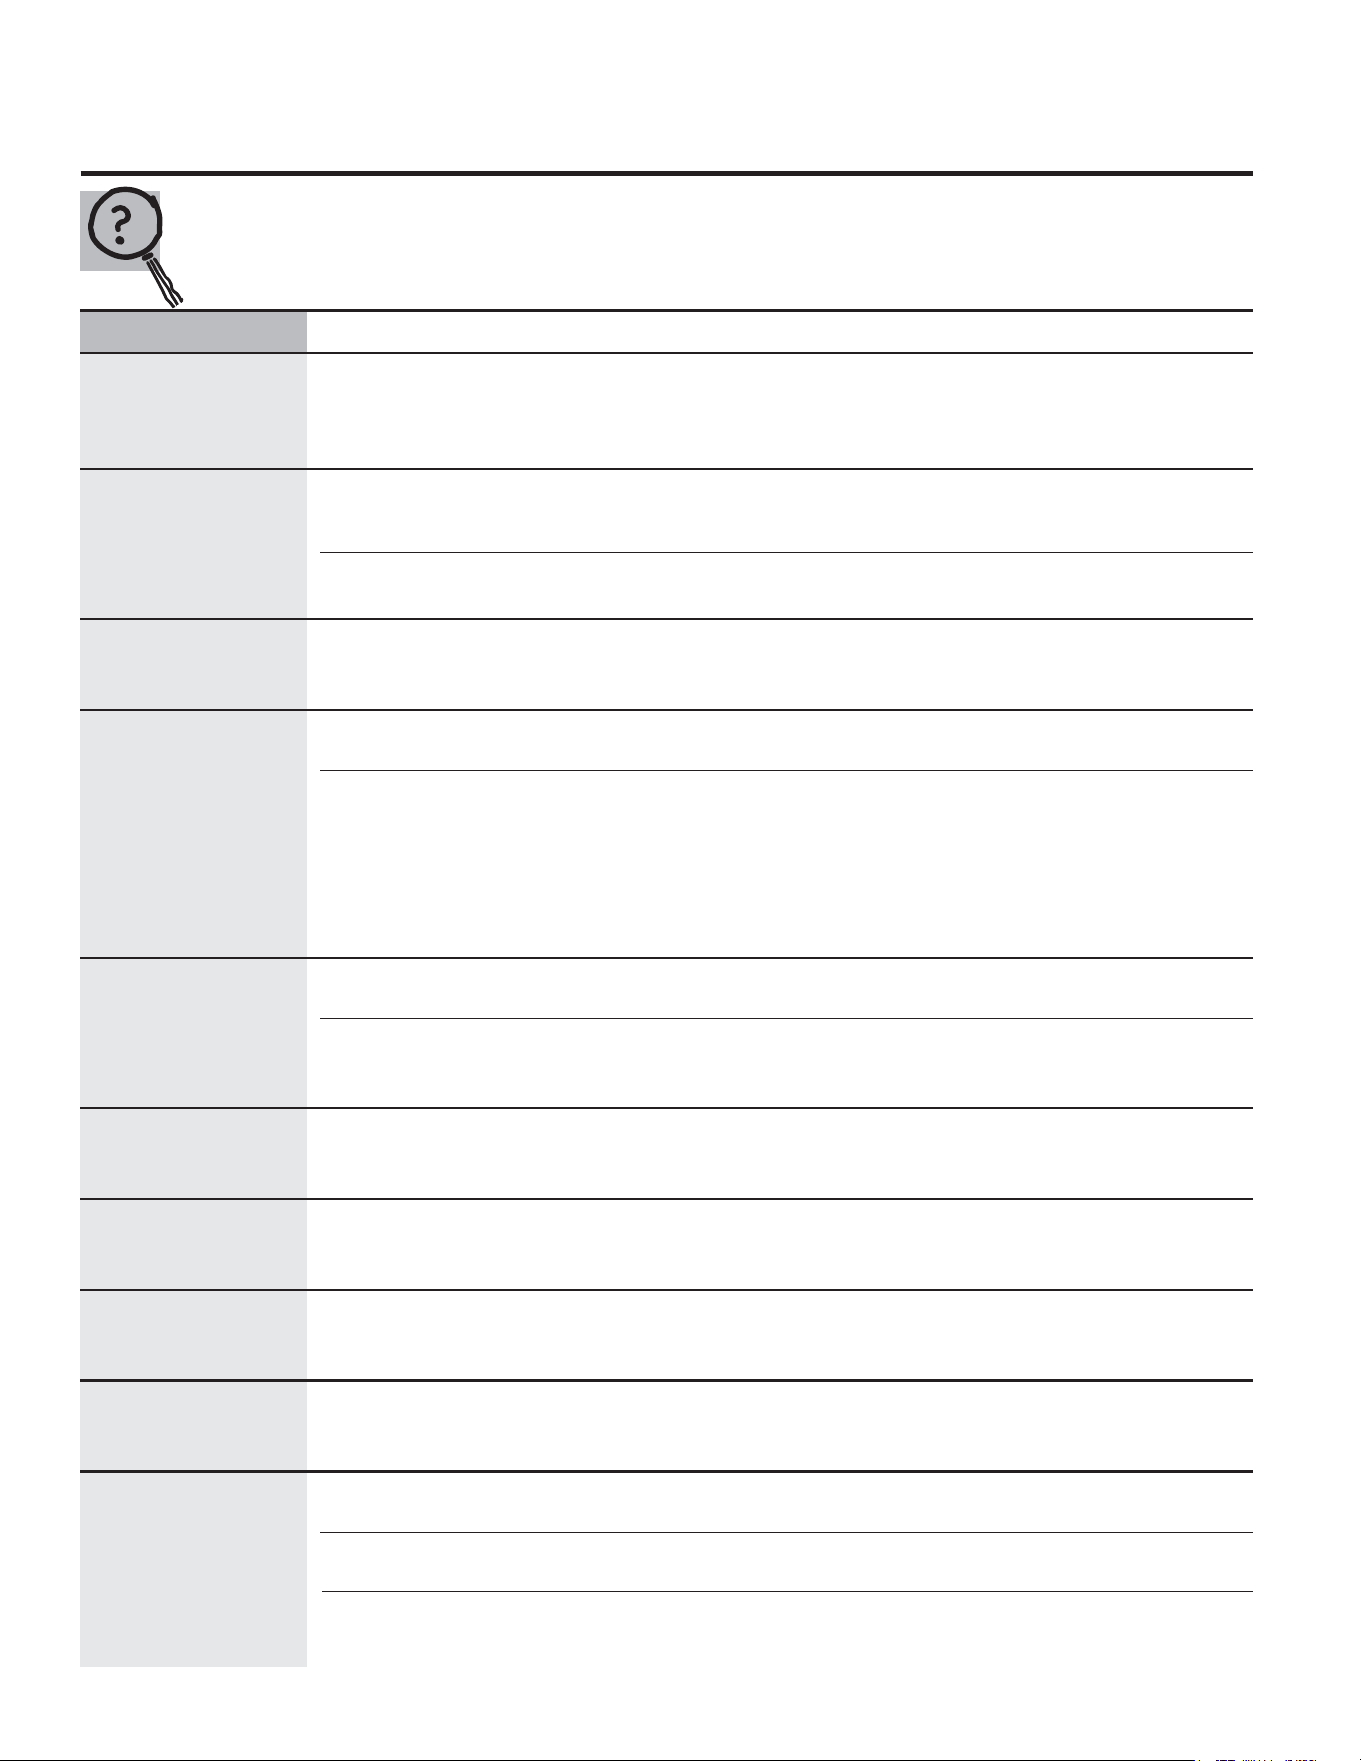
%HIRUH\RXFDOOIRUVHUYLFH«
7URXEOHVKRRWLQJ7LSV
6DYHWLPHDQGPRQH\5HYLHZWKHFKDUWVRQWKHIROORZLQJ
SDJHVILUVWDQG\RXPD\QRWQHHGWRFDOOIRUVHUYLFH
3UREOHP 3RVVLEOH&DXVHV :KDW7R'R
6XUIDFHXQLWVZLOOQRW ,PSURSHUFRRNZDUH 8VHSDQVZKLFKDUHIODWDQGPDWFKWKHGLDPHWHU
PDLQWDLQDUROOLQJERLO EHLQJXVHG RIWKHVXUIDFHXQLWVHOHFWHG
RUFRRNLQJLVQRW
IDVWHQRXJK
5DGLDQWVXUIDFHXQLWV $IXVHLQ\RXUKRPHPD\EH 5HSODFHWKHIXVHRUUHVHWWKHFLUFXLWEUHDNHU
GRQRWZRUNSURSHUO\ EORZQRUWKHFLUFXLWEUHDNHU
WULSSHG
&RRNWRSFRQWUROV &KHFNWRVHHWKHFRUUHFWFRQWUROLVVHWIRUWKHVXUIDFH
LPSURSHUO\VHW XQLW\RXDUHXVLQJ
6XUIDFHXQLWVWRSV 7KLVLVQRUPDO7KHXQLWLVVWLOORQDQGKRW
JORZLQJZKHQWXUQHG
WRDORZHUVHWWLQJ
6FUDWFKHVPD\DSSHDU ,QFRUUHFWFOHDQLQJ 6FUDWFKHVDUHQRWUHPRYDEOH7LQ\VFUDWFKHVZLOOEHFRPH
DVFUDFNVRQUDGLDQW PHWKRGVEHLQJXVHG OHVVYLVLEOHLQWLPHDVDUHVXOWRIFOHDQLQJ
FRRNWRSJODVVVXUIDFH
&RRNZDUHZLWKURXJKERWWRPV 7RDYRLGVFUDWFKHVXVHWKHUHFRPPHQGHGFOHDQLQJ
EHLQJXVHGRUFRDUVHSDUWLFOHV SURFHGXUHV0DNHVXUHERWWRPVRIFRRNZDUHDUHFOHDQ
VDOWRUVDQGZHUHEHWZHHQ EHIRUHXVHDQGXVHFRRNZDUHZLWKVPRRWKERWWRPV
WKHFRRNZDUHDQGWKHVXUIDFH
RIWKHFRRNWRS
&RRNZDUHKDVEHHQVOLG
DFURVVWKHFRRNWRSVXUIDFH
$UHDVRIGLVFRORUDWLRQ )RRGVSLOORYHUVQRWFOHDQHG 6HHWKH&OHDQLQJWKHJODVVFRRNWRSVHFWLRQ
RQWKHUDGLDQWJODVV EHIRUHQH[WXVH
FRRNWRS
+RWVXUIDFHRQDPRGHO 7KLVLVQRUPDO7KHVXUIDFHPD\DSSHDUGLVFRORUHG
ZLWKDOLJKWFRORUHGJODVV ZKHQLWLVKRW7KLVLVWHPSRUDU\DQGZLOOGLVDSSHDU
FRRNWRS DVWKHJODVVFRROV
3ODVWLFPHOWHGWR +RWFRRNWRSFDPHLQWR 6HHWKH*ODVVVXUIDFH³SRWHQWLDOIRUSHUPDQHQWGDPDJH
WKHUDGLDQWVXUIDFH FRQWDFWZLWKSODVWLFSODFHG VHFWLRQLQWKH&OHDQLQJWKHJODVVFRRNWRSVHFWLRQ
RQWKHKRWFRRNWRS
3LWWLQJRULQGHQWDWLRQ +RWVXJDUPL[WXUHVSLOOHG &DOODTXDOLILHGWHFKQLFLDQIRUUHSODFHPHQW
RIWKHUDGLDQWJODVV RQWKHFRRNWRS
FRRNWRS
)UHTXHQWF\FOLQJRII ,PSURSHUFRRNZDUH 8VHRQO\IODWFRRNZDUHWRPLQLPL]HF\FOLQJ
DQGRQRIUDGLDQW EHLQJXVHG
VXUIDFHXQLWV
&RQWUROVLJQDOVDIWHU <RXIRUJRWWRHQWHUD 7RXFKWKH%DNHSDGDQGGHVLUHGWHPSHUDWXUHRUWKH
HQWHULQJFRRNLQJWLPH EDNHWHPSHUDWXUHRU6HOI&OHDQSDGDQGGHVLUHGFOHDQWLPH
RUGHOD\VWDUW FOHDQLQJWLPH
&RLOVXUIDFHXQLWVGR 7KHVXUIDFHXQLWVDUH :LWKWKHFRQWUROVRIIFKHFNWRPDNHVXUHWKHVXUIDFH
QRWZRUNSURSHUO\ QRWSOXJJHGLQVROLGO\ XQLWLVSOXJJHGFRPSOHWHO\LQWRWKHUHFHSWDFOH
7KHVXUIDFHXQLWFRQWUROV &KHFNWRVHHWKHFRUUHFWFRQWUROLVVHWIRUWKHVXUIDFH
LPSURSHUO\VHW XQLW\RXDUHXVLQJ
7KHGULSSDQVDUHQRWVHW :LWKWKHFRQWUROVRIIFKHFNWRPDNHVXUHWKHGULS
VHFXUHO\LQWKHFRRNWRS SDQLVLQWKHUHFHVVLQWKHFRRNWRSDQGWKDWWKH
RSHQLQJLQWKHSDQOLQHVXSZLWKWKHUHFHSWDFOH
3UREOHP 3RVVLEOH&DXVHV :KDW7R'R
)RRGGRHVQRWEDNH 2YHQFRQWUROVLPSURSHUO\VHW 6HHWKH8VLQJWKHRYHQVHFWLRQ
RUURDVWSURSHUO\
5DFNSRVLWLRQLVLQFRUUHFW 6HHWKH8VLQJWKHRYHQVHFWLRQ
RUWKHUDFNLVQRWOHYHO
,QFRUUHFWFRRNZDUHRUFRRNZDUH
6HHWKH8VLQJWKHRYHQVHFWLRQ
RILPSURSHUVL]HEHLQJXVHG
2YHQWKHUPRVWDWQHHGV 6HHWKH$GMXVWWKHRYHQWKHUPRVWDW³'RLW\RXUVHOI
DGMXVWPHQW VHFWLRQ
&ORFNDQGWLPHUGR 3OXJRQUDQJHLVQRWFRPSOHWHO\ 0DNHVXUHHOHFWULFDOSOXJLVSOXJJHGLQWRDOLYHSURSHUO\
QRWZRUN LQVHUWHGLQWKHHOHFWULFDORXWOHW JURXQGHGRXWOHW
$IXVHLQ\RXUKRPHPD\ 5HSODFHWKHIXVHRUUHVHWWKHFLUFXLWEUHDNHU
EHEORZQRUWKHFLUFXLW
EUHDNHUWULSSHG
2YHQFRQWUROVLPSURSHUO\VHW 6HHWKH8VLQJWKHFORFNDQGWLPHUVHFWLRQ
&RQWUROLVLQ(QHUJ\6DYHU 6HHWKH(QHUJ\6DYHU0RGHVHFWLRQ
0RGH
2YHQOLJKWGRHV /LJKWEXOELVORRVHRUGHIHFWLYH 7LJKWHQRUUHSODFHWKHEXOE
QRWZRUN
6ZLWFKRSHUDWLQJOLJKW &DOOIRUVHUYLFH
LVEURNHQ
)RRGGRHVQRW 'RRUQRWRSHQWRWKHEURLOVWRS 6HHWKH8VLQJWKHRYHQVHFWLRQ
EURLOSURSHUO\ SRVLWLRQDVUHFRPPHQGHG
2YHQFRQWUROVLPSURSHUO\VHW 0DNHVXUH\RXWRXFKWKH%URLO+L/RSDG
,PSURSHUUDFNSRVLWLRQ 6HHWKH%URLOLQJ*XLGH
EHLQJXVHG
&RRNZDUHQRWVXLWHG )RUEHVWUHVXOWVXVHDSDQGHVLJQHGIRUEURLOLQJ
IRUEURLOLQJ
,QVRPHDUHDVWKHSRZHU 3UHKHDWWKHEURLOHOHPHQWIRUPLQXWHV
YROWDJHPD\EHORZ
%URLOIRUWKHORQJHVWSHULRGRIWLPHUHFRPPHQGHG
LQWKH%URLOLQJ*XLGH
2YHQWHPSHUDWXUHWRR 2YHQWKHUPRVWDW 6HHWKH$GMXVWWKHRYHQWKHUPRVWDW³'RLW\RXUVHOI
KRWRUWRRFROG QHHGVDGMXVWPHQW VHFWLRQ
2YHQZLOOQRWZRUN 3OXJRQUDQJHLVQRW 0DNHVXUHHOHFWULFDOSOXJLVSOXJJHGLQWRDOLYH
FRPSOHWHO\LQVHUWHGLQ SURSHUO\JURXQGHGRXWOHW
WKHHOHFWULFDORXWOHW
$IXVHLQ\RXUKRPHPD\ 5HSODFHWKHIXVHRUUHVHWWKHFLUFXLWEUHDNHU
EHEORZQRUWKHFLUFXLW
EUHDNHUWULSSHG
2YHQFRQWUROVLPSURSHUO\VHW 6HHWKH8VLQJWKHRYHQVHFWLRQ
'RRUOHIWLQWKHORFNHG ,IQHFHVVDU\DOORZWKHRYHQWRFRROWKHQXQORFN
SRVLWLRQ WKHGRRU
*($SSOLDQFHVFRP
7URXEOHVKRRWLQJ7LSV
%HIRUH\RXFDOOIRUVHUYLFH«
3UREOHP 3RVVLEOH&DXVHV :KDW7R'R
6WRUDJHGUDZHU 5HDUGUDZHUVXSSRUWLV 5HSRVLWLRQWKHGUDZHU6HHWKH6WRUDJH'UDZHU
LVFURRNHG RQWRSRIWKHJXLGHUDLO5HPRYDOLQVWUXFWLRQVLQWKH&DUHDQGFOHDQLQJ
RIWKHUDQJHVHFWLRQ
6WRUDJHGUDZHU 3RZHUFRUGPD\EH 5HSRVLWLRQWKHGUDZHUDQGSRZHUFRUG6HHWKH
ZRQ·WFORVH REVWUXFWLQJGUDZHU6WRUDJH'UDZHU5HPRYDOLQVWUXFWLRQVLQWKH&DUHDQG
LQWKHORZHUEDFN FOHDQLQJRIWKHUDQJHVHFWLRQ
RIWKHUDQJH
5HDUGUDZHUVXSSRUWLV 5HSRVLWLRQWKHGUDZHU6HHWKH6WRUDJH'UDZHU
RQWRSRIWKHJXLGHUDLO5HPRYDOLQVWUXFWLRQVLQWKH&DUHDQGFOHDQLQJRIWKH
UDQJHVHFWLRQ
2YHQZLOOQRWVHOIFOHDQ 7KHRYHQWHPSHUDWXUHLV $OORZWKHRYHQWRFRROWRURRPWHPSHUDWXUHDQG
WRRKLJKWRVHWDVHOIFOHDQ UHVHWWKHFRQWUROV
RSHUDWLRQ
2YHQFRQWUROVLPSURSHUO\VHW 6HHWKH8VLQJWKHVHOIFOHDQLQJRYHQVHFWLRQ
2YHQGRRULVQRWLQWKHORFNHG 0DNHVXUH\RXPRYHWKHGRRUODWFKKDQGOHDOOWKH
SRVLWLRQ ZD\WRWKHULJKW
2YHQZLOOQRW 'LVSOD\IODVKHV+27 $OORZWKHRYHQWRFRROWRURRPWHPSHUDWXUHDQG
VWHDPFOHDQ UHVHWWKHFRQWUROV
2YHQFRQWUROVLPSURSHUO\VHW 6HHWKH8VLQJVWHDPFOHDQVHFWLRQ
2YHQGRRULVQRWFORVHGRULQ 0DNHVXUH\RXFORVHWKHGRRU)RUPRGHOVZLWKDODWFKPDNH
WKHORFNHGSRVLWLRQ VXUH\RXPRYHWKHGRRUODWFKKDQGOHDOOWKHZD\WRWKHULJKW
´&UDFNOLQJµRU 7KLVLVWKHVRXQGRIWKH 7KLVLVQRUPDO
´SRSSLQJµVRXQG PHWDOKHDWLQJDQGFRROLQJ
GXULQJERWKWKHFRRNLQJDQG
FOHDQLQJIXQFWLRQV
([FHVVLYHVPRNLQJ ([FHVVLYHVRLO 7RXFKWKH&OHDU2IISDG2SHQWKHZLQGRZVWR
GXULQJDFOHDQF\FOH ULGWKHURRPRIVPRNH:DLWXQWLOWKHOLJKWRQWKH
6HOI&OHDQSDGJRHVRII:LSHXSWKHH[FHVVVRLODQG
UHVHWWKHFOHDQF\FOH
2YHQGRRUZLOOQRW 2YHQWRRKRW $OORZWKHRYHQWRFRROEHORZORFNLQJWHPSHUDWXUH
XQORFN
2YHQQRWFOHDQDIWHU 2YHQFRQWUROVQRWSURSHUO\VHW 6HHWKH8VLQJWKHVHOIFOHDQLQJRYHQRU8VLQJVWHDPFOHDQVHFWLRQ
DFOHDQF\FOH
2YHQZDVKHDYLO\VRLOHG &OHDQXSKHDY\VSLOORYHUVEHIRUHVWDUWLQJWKHFOHDQ
F\FOH+HDYLO\VRLOHGRYHQVPD\QHHGWREHFOHDQHGDJDLQ
&RQWUROZLOOQRWVWRS 2YHQGRRUPXVWEHRSHQHG 2SHQRYHQGRRUDQGZLSHWRUHPRYHDQ\UHPDLQLQJ
EHHSLQJDIWHUVWHDP DIWHUVWHDPFOHDQ ZDWHUDQGVRLO
FOHDQF\FOH

*($SSOLDQFHVFRP
3UREOHP 3RVVLEOH&DXVHV :KDW7R'R
´)²µDQGDQXPEHU <RXKDYHDIXQFWLRQ 'LVFRQQHFWDOOSRZHUWRWKHUDQJHIRUDWOHDVW
RUOHWWHUIODVK HUURUFRGH VHFRQGVDQGWKHQUHFRQQHFWSRZHU,IWKHIXQFWLRQ
LQWKHGLVSOD\ HUURUFRGHUHSHDWVFDOOIRUVHUYLFH
2QVHOIFOHDQLQJPRGHOVLIDIXQFWLRQHUURUFRGHDSSHDUVGXULQJ
WKHVHOIFOHDQLQJF\FOHFKHFNWKHRYHQGRRUODWFK7KHODWFK
PD\KDYHEHHQPRYHGLIRQO\VOLJKWO\IURPWKHORFNHGSRVLWLRQ
0DNHVXUHWKHODWFKLVPRYHGWRWKHULJKWDVIDUDVLWZLOOJR
7RXFKWKH&OHDU2IISDG$OORZWKHRYHQWRFRROIRURQHKRXU
3XWWKHRYHQEDFNLQWRRSHUDWLRQ
:DWHUUHPDLQLQJRQ 7KLVLVQRUPDO 5HPRYHDQ\UHPDLQLQJZDWHUZLWKDGU\FORWKRUVSRQJH
RYHQIORRUDIWHU6WHDP
&OHDQF\FOH
'LVSOD\IODVKHV´E$Gµ 7KHLQVWDOOHGFRQQHFWLRQ &RQWDFWLQVWDOOHURUHOHFWULFLDQWRFRUUHFWPLVZLUH
WKHQ´OLQ(µZLWKD IURPWKHKRXVHWRWKHXQLW
ORXGWRQH LVPLVZLUHG
'LVSOD\JRHVEODQN $IXVHLQ\RXUKRPHPD\EH 5HSODFHWKHIXVHRUUHVHWWKHFLUFXLWEUHDNHU
EORZQRUWKHFLUFXLWEUHDNHU
WULSSHG
7KHFORFNLVWXUQHGRIIIURP 6HHWKH8VLQJWKHFORFNDQGWLPHUDQGRUWKH(QHUJ\
VKRZLQJLQWKHGLVSOD\6DYHU0RGHVHFWLRQ
8QDEOHWRJHWWKH 2YHQFRQWUROSDGVZHUH7KH%DNHDQG%URLO+L/RSDGVPXVWEHWRXFKHG
GLVSOD\WRVKRZ´6)µ QRWSUHVVHGSURSHUO\ DWWKHVDPHWLPHDQGKHOGIRUVHFRQGV
&ORFNIODVKHV 3RZHURXWDJHRUVXUJH 5HVHWWKHFORFN,IWKHRYHQZDVLQXVH\RXPXVWUHVHW
SRZHURXWDJH LWE\WRXFKLQJWKH&OHDU2IISDGVHWWLQJWKHFORFN
DQGUHVHWWLQJDQ\FRRNLQJIXQFWLRQ
´%XUQLQJµRU´RLO\µ 7KLVLVQRUPDOLQDQHZRYHQ 7RVSHHGWKHSURFHVVVHWDVHOIFOHDQF\FOHIRUD
RGRUHPLWWLQJIURP DQGZLOOGLVDSSHDULQWLPH PLQLPXPRIKRXUV6HHWKH8VLQJWKHVHOIFOHDQLQJ
WKHYHQW RYHQVHFWLRQ
6WURQJRGRU $QRGRUIURPWKHLQVXODWLRQ 7KLVLVWHPSRUDU\
DURXQGWKHLQVLGHRIWKH
RYHQLVQRUPDOIRUWKHILUVW
IHZWLPHVWKHRYHQLVXVHG
'UDZHUGRHVQRWVOLGH 7KHGUDZHULVRXWRI )XOO\H[WHQGWKHGUDZHUDQGSXVKLWDOOWKHZD\LQVPRRWKO\RU
GUDJV DOLJQPHQW 6HHWKH&DUHDQGFOHDQLQJRIWKHUDQJHVHFWLRQ
'UDZHULVRYHUORDGHGRUORDG 5HGXFHZHLJKW5HGLVWULEXWHGUDZHUFRQWHQWV
LVXQEDODQFHG
)DQ1RLVH 7KHFRQYHFWLRQIDQZLOOWXUQ
7KLVLVQRUPDORSHUDWLRQRIWKHFRQYHFWLRQIDQ
RQDQGRIILQWHUPLWWHQWO\
GXULQJSUHKHDW
$IWHURYHQLVSUHKHDWHG 7KLVLVQRUPDORSHUDWLRQRIWKHFRQYHFWLRQIDQ
WKHFRQYHFWLRQIDQZLOOUXQ
FRQWLQXRXVO\LQRQHGLUHFWLRQ
GXULQJFRQYHFWLRQEDNLQJ
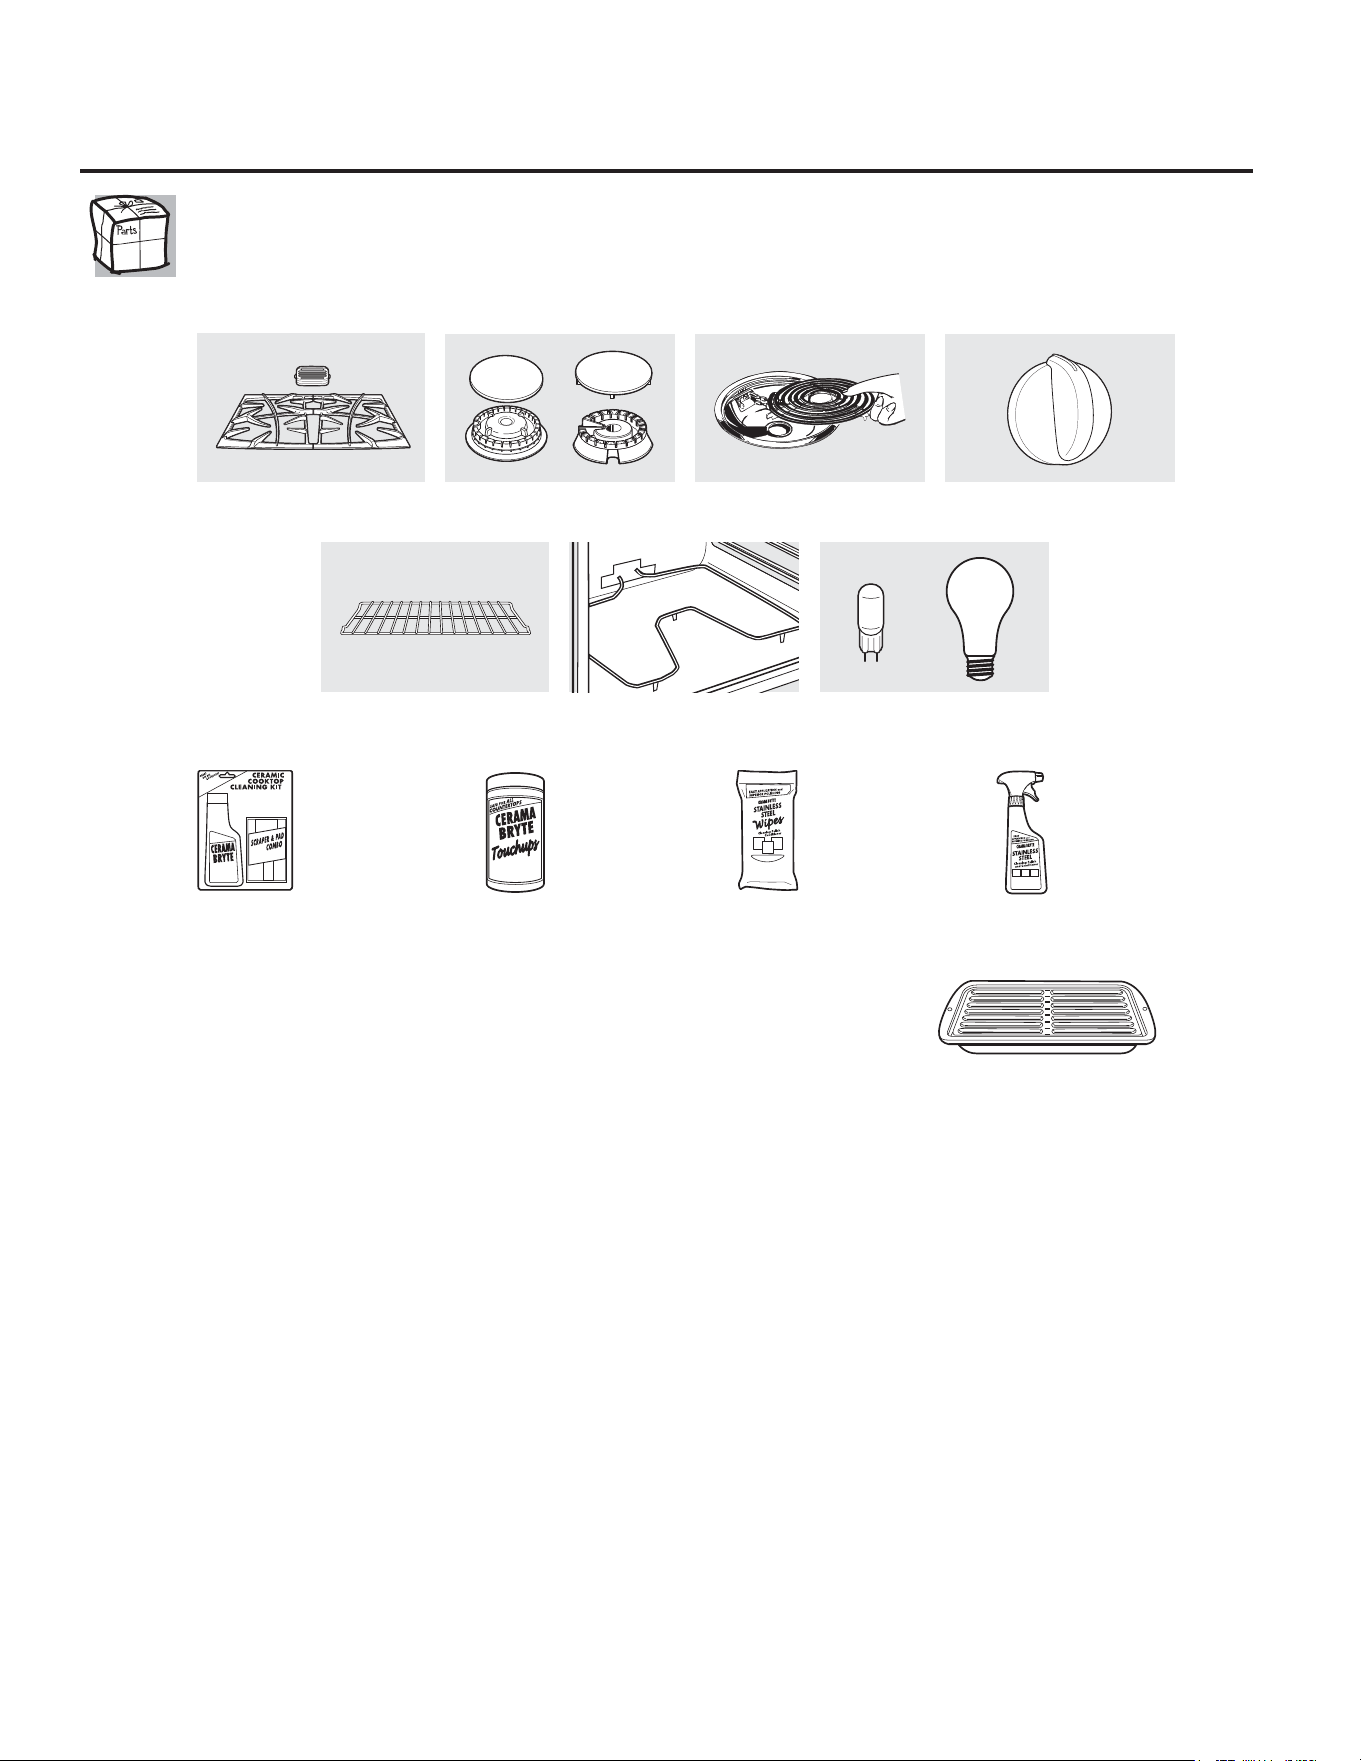
$FFHVVRULHV
/RRNLQJ)RU6RPHWKLQJ0RUH"1RWDOODFFHVVRULHVDUHDYDLODEOHIRUDOOPRGHOV
<RXFDQILQGWKHVHDFFHVVRULHVDQGPDQ\PRUHDW*($SSOLDQFHVFRP86RUZZZ*($SSOLDQFHVFD
&DQDGDRUFDOO86RU&DQDGDGXULQJQRUPDOEXVLQHVVKRXUV+DYH\RXU
PRGHOQXPEHUUHDG\
*HWWKHPRVWRXWRI\RXU%URLOHU3DQ1RWIRUXVHZLWK%URLOHU'UDZHUPRGHOV
8VH\RXUSDQDQGJULGFRYHUWREURLOKDPEXUJHUVVHDIRRGVWHDNVYHJHWDEOHV
EDFRQFKRSVDQGVRPXFKPRUH7KHSDQEHORZFDWFKHVWKHH[FHVVIDWVDQGRLOV
*HQXLQH*(3DUW
(DV\7R&OHDQ
2QH<HDU:DUUDQW\
/LPLWHG7LPH2IIHU)UHH6KLSSLQJ
:KHQ\RXRUGHU\RXUEURLOHUSDQZLWKLQGD\VRISXUFKDVLQJ\RXU*(FRRNLQJSURGXFW
6PDOO /DUJH ;/
3DUW :%; :%; :%;
'LPHQVLRQV
µ:[µ+[µ' µ:[µ+[µ' µ:[µ+[µ'
7KHODUJHVWDQGDUGEURLOSDQGRHVQRWILWLQµµUDQJHV
7KH;/SDQGRHVQRWILWLQµZDOORYHQVµGURSLQVRUµµUDQJHV
7RSODFH\RXURUGHUFDOO86&DQDGDRUPDLOWKLVIRUPWR
,QWKH86*(3DUWV32%R[0HPSKLV71,Q&DQDGD*(3DUWV)DFWRU\/DQH0RQFWRQ1%(&0
%URLOHU3DQ2UGHU)RUP
4XDQWLW\BBBBBBBBBBBBBBBBBBBB 3DUW1XPEHU BBBBBBBBBBBBBBBBBBBBBBBBBBBBBBBBBBBBBBBBBBBBBBBBBB
BBBBBBBBBBBBBBBBBBBB BBBBBBBBBBBBBBBBBBBBBBBBBBBBBBBBBBBBBBBBBBBBBBBBBBBBBBBBBBBBBB
BBBBBBBBBBBBBBBBBBBB BBBBBBBBBBBBBBBBBBBBBBBBBBBBBBBBBBBBBBBBBBBBBBBBBBBBBBBBBBBBBB
0RGHO1XPEHUBBBBBBBBBBBBBB 6HULDO1XPEHU BBBBBBBBBBBBBBBBBB %UDQG BBBBBBBBBBBBBBB 'DWHRI3XUFKDVHBBBBBBBBBB
)LUVW1DPHBBBBBBBBBBBBBBBBBBBBBBBBBBBBBBBBBBBBBBBBBBBB /DVW1DPH BBBBBBBBBBBBBBBBBBBBBBBBBBBBBBBBBBBBBBBBBBBBBB
$GGUHVVBBBBBBBBBBBBBBBBBBBBBBBBBBBBBBBBBBBBBBBBBBBBBBBBBBBBBBBBBBBBBBBBBBBBBBBBBBBBBBBBBBBBBBBBBBBBBBBBBBBBBBBBBB
&LW\BBBBBBBBBBBBBBBBBBBBBBBBBBBBBBBBBBBBBBBBBBBBBBBBBB 6WDWHBBBBBBBBBBB =LS&RGHBBBBBBBBBBBBBBBBBBBBBBBBBBBBB
3KRQHBBBBBBBBBBBBBBBBBBBBBBBBBBBBBBBBBBBBBBBBBBBBBBBB (0DLOBBBBBBBBBBBBBBBBBBBBBBBBBBBBBBBBBBBBBBBBBBBBBBBBBB
&KHFN BBBBBB 0RQH\2UGHUBBBBBB
&DOOLQWKH86RULQ&DQDGDIRUFXUUHQWSULFLQJ$OOFUHGLWFDUGRUGHUVPXVWEHFDOOHGLQ
6XUIDFH(OHPHQWVDQG'ULS
3DQV
*UDWHV 6XUIDFH%XUQHU+HDGVDQG&DSV
2YHQ(OHPHQWV /LJKW%XOEV
.QREV
2YHQ5DFNV
:;;*&6
:;;
:;;
30;
&HUDPLF&RRNWRS
&OHDQLQJ.LW
,QFOXGHVFOHDQHU
VFUDSHUDQGSDG
&HUDPLF&RRNWRS
&OHDQLQJ:LSHV
6WDLQOHVV6WHHO
$SSOLDQFH3ROLVK
:LSHV
6WDLQOHVV6WHHO
$SSOLDQFH
&OHDQHU
BBBBBBBBBBBBBBBBBBBBBBBBBBBBBBBBBBBBBBBBBBBBBBBBB
✁
RU
*((OHFWULF5DQJH:DUUDQW\
*($SSOLDQFHVFRP
)RU7KH3HULRG2I *(:LOO3URYLGH
2QH<HDU $Q\SDUWRIWKHUDQJHZKLFKIDLOVGXHWRDGHIHFWLQPDWHULDOVRUZRUNPDQVKLS
)URPWKHGDWHRIWKH 'XULQJWKLVOLPLWHGRQH\HDUZDUUDQW\*(ZLOODOVRSURYLGHIUHHRIFKDUJHDOOODERU
RULJLQDOSXUFKDVH DQGLQKRPHVHUYLFHWRUHSODFHWKHGHIHFWLYHSDUW
■6HUYLFHWULSVWR\RXUKRPHWRWHDFK\RXKRZWRXVH
WKH
SURGXFW
■,PSURSHULQVWDOODWLRQGHOLYHU\RUPDLQWHQDQFH
■3URGXFWGDPDJHRUIDLOXUHRIWKHSURGXFWLILWLVDEXVHG
PLVXVHGPRGLILHGRUXVHGIRURWKHUWKDQWKHLQWHQGHG
SXUSRVHRUXVHGFRPPHUFLDOO\
■5HSODFHPHQWRIKRXVHIXVHVRUUHVHWWLQJRIFLUFXLWEUHDNHUV
■'DPDJHWRWKHSURGXFWFDXVHGE\DFFLGHQWILUHIORRGVRU
DFWVRI*RG
■,QFLGHQWDORUFRQVHTXHQWLDOGDPDJHFDXVHGE\SRVVLEOH
GHIHFWVZLWKWKLVDSSOLDQFH
■'DPDJHFDXVHGDIWHUGHOLYHU\
■3URGXFWQRWDFFHVVLEOHWRSURYLGHUHTXLUHGVHUYLFH
:KDW*(:LOO1RW&RYHU
7KLVZDUUDQW\LVH[WHQGHGWRWKHRULJLQDOSXUFKDVHUDQGDQ\VXFFHHGLQJRZQHUIRUSURGXFWVSXUFKDVHGIRUKRPH
XVHZLWKLQWKH86$,IWKHSURGXFWLVORFDWHGLQDQDUHDZKHUHVHUYLFHE\D*($XWKRUL]HG6HUYLFHULVQRWDYDLODEOH\RX
PD\EHUHVSRQVLEOHIRUDWULSFKDUJHRU\RXPD\EHUHTXLUHGWREULQJWKHSURGXFWWRDQ$XWKRUL]HG*(6HUYLFHORFDWLRQIRU
VHUYLFH,Q$ODVNDWKHZDUUDQW\H[FOXGHVWKHFRVWRIVKLSSLQJRUVHUYLFHFDOOVWR\RXUKRPH
6RPHVWDWHVGRQRWDOORZWKHH[FOXVLRQRUOLPLWDWLRQRILQFLGHQWDORUFRQVHTXHQWLDOGDPDJHV7KLVZDUUDQW\JLYHV
\RXVSHFLILFOHJDOULJKWVDQG\RXPD\DOVRKDYHRWKHUULJKWVZKLFKYDU\IURPVWDWHWRVWDWH7RNQRZZKDW\RXU
OHJDOULJKWVDUHFRQVXOW\RXUORFDORUVWDWHFRQVXPHUDIIDLUVRIILFHRU\RXUVWDWH·V$WWRUQH\*HQHUDO
:DUUDQWRU*HQHUDO(OHFWULF&RPSDQ\/RXLVYLOOH.<
$OOZDUUDQW\VHUYLFHSURYLGHGE\RXU)DFWRU\6HUYLFH&HQWHUV
RUDQDXWKRUL]HG&XVWRPHU&DUH
WHFKQLFLDQ7RVFKHGXOHVHUYLFHYLVLW
XVRQOLQHDW*($SSOLDQFHVFRPRUFDOO*(&$5(6
3OHDVHKDYHVHULDOQXPEHUDQGPRGHOQXPEHUDYDLODEOHZKHQFDOOLQJ
IRUVHUYLFH
6WDSOH\RXUUHFHLSWKHUH
3URRIRIWKHRULJLQDOSXUFKDVH
GDWHLVQHHGHGWRREWDLQVHUYLFH
XQGHUWKHZDUUDQW\
(;&/86,212),03/,(':$55$17,(6³<RXUVROHDQGH[FOXVLYHUHPHG\LVSURGXFWUHSDLUDVSURYLGHGLQWKLV/LPLWHG
:DUUDQW\$Q\LPSOLHGZDUUDQWLHVLQFOXGLQJWKHLPSOLHGZDUUDQWLHVRIPHUFKDQWDELOLW\RUILWQHVVIRUDSDUWLFXODUSXUSRVH
DUHOLPLWHGWRRQH\HDURUWKHVKRUWHVWSHULRGDOORZHGE\ODZ
3ULQWHGLQWKH8QLWHG6WDWHV
&RQVXPHU6XSSRUW
*($SSOLDQFHV:HEVLWH
*($SSOLDQFHVFRP
+DYHDTXHVWLRQRUQHHGDVVLVWDQFHZLWK\RXUDSSOLDQFH"7U\WKH*($SSOLDQFHV:HEVLWHKRXUVDGD\
DQ\GD\RIWKH\HDU)RUJUHDWHUFRQYHQLHQFHDQGIDVWHUVHUYLFH\RXFDQQRZGRZQORDG2ZQHU·V0DQXDOV
RUGHUSDUWVRUHYHQVFKHGXOHVHUYLFHRQOLQH
6FKHGXOH6HUYLFH *($SSOLDQFHVFRP
([SHUW*(UHSDLUVHUYLFHLVRQO\RQHVWHSDZD\IURP\RXUGRRU*HWRQOLQHDQGVFKHGXOH\RXUVHUYLFHDW
\RXUFRQYHQLHQFHDQ\GD\RIWKH\HDU2UFDOO*(&$5(6GXULQJQRUPDOEXVLQHVVKRXUV
5HDO/LIH'HVLJQ6WXGLR *($SSOLDQFHVFRP
*(VXSSRUWVWKH8QLYHUVDO'HVLJQFRQFHSW³SURGXFWVVHUYLFHVDQGHQYLURQPHQWVWKDWFDQEHXVHGE\
SHRSOHRIDOODJHVVL]HVDQGFDSDELOLWLHV:HUHFRJQL]HWKHQHHGWRGHVLJQIRUDZLGHUDQJHRISK\VLFDODQG
PHQWDODELOLWLHVDQGLPSDLUPHQWV)RUGHWDLOVRI*(·V8QLYHUVDO'HVLJQDSSOLFDWLRQVLQFOXGLQJNLWFKHQGHVLJQ
LGHDVIRUSHRSOHZLWKGLVDELOLWLHVFKHFNRXWRXU:HEVLWHWRGD\)RUWKHKHDULQJLPSDLUHGSOHDVHFDOO7''
*($&
([WHQGHG:DUUDQWLHV *($SSOLDQFHVFRP
3XUFKDVHD*(H[WHQGHGZDUUDQW\DQGOHDUQDERXWVSHFLDOGLVFRXQWVWKDWDUHDYDLODEOHZKLOH\RXUZDUUDQW\
LVVWLOOLQHIIHFW<RXFDQSXUFKDVHLWRQOLQHDQ\WLPHRUFDOOGXULQJQRUPDOEXVLQHVVKRXUV
*(&RQVXPHU+RPH6HUYLFHVZLOOVWLOOEHWKHUHDIWHU\RXUZDUUDQW\H[SLUHV
3DUWVDQG$FFHVVRULHV *($SSOLDQFHVFRP
,QGLYLGXDOVTXDOLILHGWRVHUYLFHWKHLURZQDSSOLDQFHVFDQKDYHSDUWVRUDFFHVVRULHVVHQWGLUHFWO\WRWKHLUKRPHV
9,6$0DVWHU&DUGDQG'LVFRYHUFDUGVDUHDFFHSWHG2UGHURQOLQHWRGD\KRXUVHYHU\GD\RUE\SKRQHDW
GXULQJQRUPDOEXVLQHVVKRXUV
,QVWUXFWLRQVFRQWDLQHGLQWKLVPDQXDOFRYHUSURFHGXUHVWREHSHUIRUPHGE\DQ\XVHU2WKHUVHUYLFLQJ
JHQHUDOO\VKRXOGEHUHIHUUHGWRTXDOLILHGVHUYLFHSHUVRQQHO&DXWLRQPXVWEHH[HUFLVHGVLQFHLPSURSHU
VHUYLFLQJPD\FDXVHXQVDIHRSHUDWLRQ
&RQWDFW8V *($SSOLDQFHVFRP
,I\RXDUHQRWVDWLVILHGZLWKWKHVHUYLFH\RXUHFHLYHIURP*(FRQWDFWXVRQRXU:HEVLWHZLWKDOOWKHGHWDLOV
LQFOXGLQJ\RXUSKRQHQXPEHURUZULWHWR *HQHUDO0DQDJHU&XVWRPHU5HODWLRQV
*($SSOLDQFHV$SSOLDQFH3DUN
/RXLVYLOOH.<
5HJLVWHU<RXU$SSOLDQFH *($SSOLDQFHVFRP
5HJLVWHU\RXUQHZDSSOLDQFHRQOLQH³DW\RXUFRQYHQLHQFH7LPHO\SURGXFWUHJLVWUDWLRQZLOODOORZIRU
HQKDQFHGFRPPXQLFDWLRQDQGSURPSWVHUYLFHXQGHUWKHWHUPVRI\RXUZDUUDQW\VKRXOGWKHQHHGDULVH
<RXPD\DOVRPDLOLQWKHSUHSULQWHGUHJLVWUDWLRQFDUGLQFOXGHGLQWKHSDFNLQJPDWHULDORUGHWDFKDQGXVH
WKHIRUPLQWKH2ZQHU·V0DQXDO

49-80632-1SP 07-11 GE
GEAppliances.com
Escriba los números de modelo y de serie aquí:
Modelo # _______________
Serie # _________________
Puede encontrarlos en una etiqueta ubicada
detrás del cajón o detrás de la puerta del horno
inferior en el frente del marco de la cocina.
Control Quick Set V y
Quick Set VI
Manual del
Propietario
Cocinas
Impreso en
papel reciclado
eléctricas independientes, empotrables y encastrables
En Canadá:
www.GEAppliances.ca
Instrucciones de Seguridad. . . . . . . . . . . . . . . 2–6
Instrucciones de Operación
Reloj y el temporizador . . . . . . . . . . . . . . . . . . . . . . . . . 16
Bloqueo del Control . . . . . . . . . . . . . . . . . . . . . . . . . . 18
Modo de Ahorro de Energía . . . . . . . . . . . . . . . . . . . 18
Horno . . . . . . . . . . . . . . . . . . . . . . . . . . . . . . . . . . . 11–22
Ajuste del termostato del horno . . . . . . . . . . . . . . . 18
Papel de aluminio . . . . . . . . . . . . . . . . . . . . . . . . . . . 13
Asado, Guía de asado . . . . . . . . . . . . . . . . . . . . . . . 14
Controles . . . . . . . . . . . . . . . . . . . . . . . . . . . . . . . . . . . 11
Horno de convección . . . . . . . . . . . . . . . . . . . . . . . . . 15
Corte de Corriente . . . . . . . . . . . . . . . . . . . . . . . . . . . 12
Función Sabbath. . . . . . . . . . . . . . . . . . . . . . . . . . . . . 19
Horno con auto limpieza . . . . . . . . . . . . . . . . . . .20, 21
Funciones especiales . . . . . . . . . . . . . . . . . . . . . . . . . 18
Limpieza al vapor . . . . . . . . . . . . . . . . . . . . . . . . . . . . 22
Tiempo de horneado . . . . . . . . . . . . . . . . . . . . . . . 17
Unidades de la superficie . . . . . . . . . . . . . . . . . . . . . 7–9
Cuidado y limpieza
Unidad de la Bobina Superficie . . . . . . . . . . . . . . . . 27
Perillas de control . . . . . . . . . . . . . . . . . . . . . . . . . . . . 23
Cubetas de Goteo . . . . . . . . . . . . . . . . . . . . . . . . . . . . 27
Estufa de vidrio . . . . . . . . . . . . . . . . . . . . . . . . . . . .28, 29
Puerta del horno desmontable . . . . . . . . . . . . . . . . 25
Estufa Elevable . . . . . . . . . . . . . . . . . . . . . . . . . . . . . . . 27
Luz . . . . . . . . . . . . . . . . . . . . . . . . . . . . . . . . . . . . . . . . . . 26
Elementos calentadores del horno . . . . . . . . . . . . 25
Bandejas . . . . . . . . . . . . . . . . . . . . . . . . . . . . . . . . . . . . 25
Limpieza estándar horno . . . . . . . . . . . . . . . . . . . . . 24
Ventilación . . . . . . . . . . . . . . . . . . . . . . . . . . . . . . . . . . . 24
Consejos para la identificación
y solución de problemas . . . . . . . . . . . . . . . . 30-33
Accesorios . . . . . . . . . . . . . . . . . . . . . . . . . . . . . . . . . . 34
Apoyo al cliente
Apoyo al cliente . . . . . . . . . . . . . . . . . . . . . . Back Cover
Garantía . . . . . . . . . . . . . . . . . . . . . . . . . . . . . . . . . . . . . 35

Read all safety instructions before using the product. Failure to follow these instructions may result in fire, electric shock,
serious injury or death.
ADVERTENCIA
INFORMACIÓN IMPORTANTE DE SEGURIDAD.
LEA TODAS LAS INSTRUCCIONES ANTES DE SU USO.
DISPOSITIVO ANTI-VOLCADURAS
Para reducir el riesgo de volcar
la cocina, ésta debe sujetarse
mediante un soporte anti-
volcaduras con una adecuada
instalación. Ver las instrucciones de
instalación enviadas con el soporte
para obtener detalles completos
antes de iniciar la instalación.
Para Cocinas Sin Apoyo y
Deslizabless
Para controlar si el soporte es
instalado y ajustado de forma
apropiada, mire que debajo de
la cocina la pata niveladora trasera esté ajustada al soporte. En algunos
modelos, el cajón de almacenamiento o el panel de protección se pueden
retirar para una fácil inspección. Si no es posible realizar una inspección
visual, deslice la cocina hacia adelante, confirme que el soporte anti-
volcaduras esté ajustado de forma segura al piso o la pared, y deslice la
cocina hacia atrás de modo que la pata niveladora trasera se encuentre
debajo del soporte anti-volcaduras.
Si la cocina es expulsada de la pared por alguna razón, siempre repita este
procedimiento a fin de verificar que esté asegurado de forma correcta con un
soporte anti volcaduras.
Nunca quite las patas de nivelación por completo ya que la cocina no
quedará bien sujeta al dispositivo anti-volcaduras.
Cocinas Empotrables
Para controlar si el soporte está instalado y conectado correctamente,
deslice la cocina hacia adelante, confirme que el soporte anti-volcaduras
esté adherido de forma segura a la parte trasera de la cocina, y deslice
esta última hacia atrás de modo que el soporte anti-volcaduras se deslice
por debajo del mostrador o bloque de madera adjunto a la pared trasera.
Si usted no recibió un soporte anti-volcaduras con su compra, llame al
1.800.626.8774 para recibir uno sin costo alguno (en Canadá, llame al
1.800.561.3344). Para consultar instrucciones de instalación del soporte,
visite GEAppliances.com (en Canadá, GEAppliances.ca).
Un niño o adulto pueden volcar la cocina y morir.
Verifique que el soporte anti-volcaduras se haya
instalado y ajustado correctamente.
Verifique que el soporte anti-volcaduras se haya
instalado y ajustado correctamente.
No utilice la cocina sin que el soporte anti-volcaduras
esté colocado y ajustado.
Si estas instrucciones no se siguen, como resultado se podrá
producir la muerte o quemaduras graves de niños y adultos.
Riesgo de Volcaduras
ADVERTENCIA
Pared Trasera
Horno
Soporte
Anti-Volcaduras
Mesada o Bloque
de Madera
Cocinas Empotrables
Cocinas Sin Apoyo y Deslizables
Cocinas Empotrables
Soporte Anti-
Volcaduras
Pata Niveladora
NOTIFICACIÓN IMPORTANTE DE SEGURIDAD
La ley de California sobre aguas potables y tóxicos exige que el Gobernador de California publique una lista de sustancias que según
el estado provoquen cáncer, defectos congénitos u otros daños reproductivos, y exige a las empresas que adviertan a los clientes
sobre la exposición potencial a dichas sustancias.
La aislación de fibra de vidrio de los hornos auto-limpiantes emite una pequeña cantidad de monóxido de carbono durante
el ciclo de limpieza. La exposición puede minimizarse ventilando con una ventana abierta o usando una campana o ventilador.
ADVERTENCIA
2
3
GEAppliances.com
n Use este aparato sólo con el objetivo para el que fue creado,
como se describe en este Manual del Propietario.
n Asegúrese de que un técnico calificado realice una correcta
instalación y puesta a tierra del artefacto de acuerdo con las
instrucciones de instalación provistas.
n No intente reparar o cambiar ninguna pieza de su cocina a
menos que esté específicamente recomendado en este manual.
Cualquier otro servicio debe realizarlo un técnico calificado.
n Antes de realizar cualquier clase de reparación, desenchufe la
cocina o desconecte el suministro eléctrico desde el panel de
distribución doméstico quitando el fusible o desconectando el
interruptor de circuitos.
n No deje a los niños solos; éstos no deben quedar solos o sin
atención en un área donde un aparato esté en uso. Nunca debe
permitirse que se suban, sienten o paren en cualquier parte de
este aparato.
n PRECAUCION: No almacene elementos de interés
para niños sobre una cocina o en la protección trasera de
una cocina: los niños que se trepan a la cocina para alcanzar
elementos pueden resultar gravemente heridos.
n Sólo use agarraderas secas: las agarraderas húmedas o
mojadas colocadas en superficies calientes pueden provocar
quemaduras de vapor. No permita que las agarraderas entren
en contacto con unidades de superficie o los elementos
calentadores calientes. No utilice toallas
u otras telas gruesas en lugar de una agarradera.
n Nunca use su electrodoméstico para calentar la habitación.
n No toque las unidades de superficie, los elementos calentadores
o la superficie interior del horno. Estas superficies pueden estar
lo suficientemente calientes para quemar aún cuando tengan
un color oscuro. Durante y después del uso, no toque o deje que
su vestimenta u otros materiales inflamables entren en contacto
con unidades de superficie, áreas cercanas a las unidades de
superficie o cualquier área interior del horno; deje pasar un
tiempo prudencial para que se enfríen. Otras superficies del
aparato pueden calentarse lo suficiente como para provocar
quemaduras. Las superficies potencialmente calientes incluyen
la estufa, las áreas orientadas hacia la estufa, la abertura de
ventilación del horno, las superficies cercanas a la abertura y las
hendiduras ubicadas alrededor de la puerta del horno.
n No caliente recipientes cerrados de alimentos. Podría haber una
acumulación de presión en el recipiente y éste podría explotar,
provocando lesiones.
nNo utilice papel de aluminio para revestir las bandejas colectoras
o ninguna parte del horno, con excepción de lo descripto en este
manual. Un uso inadecuado puede provocar daños a la cocina y
una descarga eléctrica o un riesgo de incendio.
nTrate de no rayar o golpear las puertas, estufas o paneles
de control de vidrio. Si lo hace podría romperse el vidrio. No
cocine si un producto tiene un vidrio roto. Puede provocarse una
descarga, un incendio o heridas.
nCocine carnes de res y de ave por completo: Las carnes de
res hasta alcanzar una temperatura interna de por lo menos
160°F (71°C) y las carnes de ave a una temperatura interna de
por lo menos 180°F (82°C). La cocción a estas temperaturas
generalmente protege de enfermedades transmitidas por los
alimentos.
n No almacene o utilice materiales inflamables dentro de un horno
o cerca de la estufa, tales como papel, plástico, agarraderas,
telas, recubrimientos de pared, cortinas y gasolina u otros
vapores y líquidos inflamables.
n Nunca use vestimentas holgadas o amplias mientras utilice el
aparato. Estas vestimentas pueden prenderse fuego si entran
en contacto con superficies calientes, provocando quemaduras
graves.
n No permita que la grasa de la cocción u otros materiales
inflamables se acumulen dentro de la cocina o en su cercanía. La
grasa dentro del horno o sobre la estufa puede encenderse.
n Limpie las campanas de ventilación con frecuencia. No debe
permitirse la acumulación de grasa en la campana o en el filtro.
INSTRUCCIONES GENERALES DE SEGURIDAD
ADVERTENCIA
MANTENGA LOS MATERIALES
INFLAMABLES ALEJADOS DE LA COCINA.
ADVERTENCIA
4
n No utilice agua en incendios de grasa. Nunca levante una sartén
en llamas. Apague los controles. Apague una sartén en llamas
sobre una unidad de superficie cubriendo la sartén por completo
con una tapa que ajuste bien, una plancha para galletas o una
bandeja plana. Utilice un químico seco multiuso o un extintor de
incendios de espuma.
n Si hay un incendio en el horno durante el horneado, apáguelo
cerrando la puerta del horno y apagando el control o usando un
químico seco multiuso o un extintor de incendios de espuma.
n Si hay un incendio en el horno durante la auto-limpieza,
apague el horno y espere a que el incendio se consuma. No
abra la puerta del horno a la fuerza. El ingreso de aire fresco a
temperaturas de auto-limpieza puede provocar una explosión
de llamas desde el horno. No seguir esta instrucción puede
provocar quemaduras graves.
EN CASO DE INCENDIO, SIGA LOS
SIGUIENTES PASOS PARA EVITAR
LA PROPAGACIÓN DEL FUEGO:
ADVERTENCIA
n Nunca deje las unidades de superficie sin atención
en configuraciones de calor media o alta. Los alimentos que
hierven y se derraman pueden provocar humo y derrames
grasosos que pueden prenderse fuego.
n Nunca deje aceite sin atención mientras fríe. Si se deja
calentar más allá del punto de humeo, el aceite puede
encenderse, provocando un incendio que podría propagarse
a los gabinetes cercanos. Utilice un termómetro para grasa
cuando sea posible para controlar la temperatura del aceite.
n Para evitar el derrame de aceite y un incendio, utilice una
cantidad mínima de aceite cuando fría en sartenes poco
profundas y evite la cocción de alimentos congelados con
una cantidad excesiva de hielo.
n Utilice el tamaño de recipiente adecuado: Elija recipientes
con bases planas lo suficientemente grandes para cubrir
el elemento calentador de superficie. La utilización de
recipientes más pequeños dejará expuesta una porción de
la unidad de superficie al contacto directo, lo que puede
provocar el encendido de sus vestimentas.
Una relación adecuada del recipiente con la unidad
de superficie también mejorará la eficiencia.
n Sólo ciertos tipos de recipientes de vidrio, vidrio/cerámico,
cerámica, u otros recipientes vidriados pueden utilizarse
sobre la estufa; otros pueden romperse debido al cambio
repentino de temperatura.
n Para minimizar la posibilidad de quemaduras,
el encendido de materiales inflamables y los derrames,
la manija de los recipientes deben girarse hacia el centro de
la cocina sin extenderse sobre ninguna unidad
de superficie cercana.
n Si flambea alimentos bajo la campana, encienda
el ventilador.
n
Si se produce un corte de luz en una cocina eléctrica
mientras la unidad superficial está en ON (Encendido), la
unidad se volverá a encender cuando regrese la luz. En caso
de falta de corriente, si no se giran todas las perillas de la
unidad de superficial a la posición OFF (Apagado) se podrán
incendiar artículos en o cerca de la estufa, lo cual podrá
producir lesiones graves o la muerte.
INSTRUCCIONES DE SEGURIDAD DE LA ESTUFA
ADVERTENCIA
INFORMACIÓN IMPORTANTE DE SEGURIDAD.
LEA TODAS LAS INSTRUCCIONES ANTES DE SU USO.
GEAppliances.com
5
n Tenga cuidado al tocar la estufa. La superficie de vidrio de la
estufa retendrá calor después de que los controles se hayan
apagado.
n No cocine sobre una estufa rota. Si la estufa se rompe, las
soluciones de limpieza y los derrames pueden penetrar
en la estufa rota y crear un riesgo de descarga eléctrica.
Comuníquese con un técnico calificado de inmediato.
n Evite rayar la estufa de vidrio. La estufa puede rayarse con
elementos tales como cuchillos, instrumentos filosos, anillos u
otras joyas, y remaches de la ropa.
n No coloque o almacene elementos que pueden derretirse o
prenderse fuego sobre la estufa de vidrio, aún cuando no la
esté usando. Si la estufa se enciende en forma accidental,
pueden prenderse fuego. El calor proveniente de la estufa o
de la ventilación del horno también puede prenderlos fuego,
aún si el aparato está apagado.
n Use el limpiador de estufas cerámicas CERAMA BRYTE
®
y la esponjilla de limpieza CERAMA BRYTE
®
para limpiar
la estufa. Espere hasta que la estufa se enfríe y la luz
indicadora se apague antes de limpiar. Una esponja
o un paño húmedos sobre una superficie caliente pueden
provocar quemaduras de vapor. Algunos limpiadores pueden
producir humos tóxicos si se los aplica a una superficie
caliente. NOTA: Los derrames de azúcar son la excepción.
Éstos deben quitarse mientras están calientes utilizando una
agarradera y un raspador. Para instrucciones detalladas, ver
la sección Cómo limpiar
la estufa de vidrio.
n Lea y cumpla con todas las instrucciones y advertencias de la
etiqueta de la crema de limpieza.
n No sumerja o remoje las unidades de superficie
desmontables. No las coloque en el lavavajillas.
No coloque las unidades de superficie dentro del horno
cuando realice la auto-limpieza. Si lo hace pueden llegar a
fallar, provocando un peligro de quemaduras o de incendio.
n Para evitar la posibilidad de una quemadura o descarga
eléctrica, siempre verifique que los controles de todas
las unidades de superficie se encuentren en la posición OFF
(apagado) y que todas las bobinas estén frías antes
de levantar o quitar una unidad de superficie de bobinas.
n Asegúrese de que las bandejas colectoras no estén cubiertas
y se encuentren en su lugar. Su ausencia durante la cocción
podría dañar las piezas y el cableado de la cocina
.
n No use papel de aluminio para cubrir cacerolas en la
parte inferior. El papel puede atrapar el calor o derretirse,
ocasionando daños sobre el producto y riesgo de descarga
eléctrica o incendio.
n No use papel de aluminio para cubrir cacerolas en la
parte inferior. El papel puede atrapar el calor o derretirse,
ocasionando daños sobre el producto y riesgo de descarga
eléctrica o incendio.
INSTRUCCIONES DE SEGURIDAD DE LA
ESTUFA RADIANTE (algunos modelos)
ADVERTENCIA
INSTRUCCIONES DE SEGURIDAD DE LA
ESTUFA DE BOBINAS (algunos modelos)
ADVERTENCIA
n Manténgase alejado de la cocina cuando abra
la puerta del horno. El aire y el vapor calientes que salen de la
cocina pueden provocar quemaduras en manos, rostro y/o
ojos.
n Mantenga sin obstrucciones la ventilación del horno.
n Mantenga el horno libre de acumulaciones de grasa.
La grasa dentro del horno puede prenderse fuego.
n Siempre coloque las bandejas del horno en la posición
deseada mientras el horno esté frío. Si la bandeja debe
quitarse cuando el horno todavía está caliente, no permita
que la agarradera toque el elemento calentador del horno.
n Cuando utilice bolsas de cocción o de asado en el horno, siga
las instrucciones del fabricante.
n Tire de la bandeja del horno hasta la posición de tope
de detención cuando cargue o descargue alimentos
del horno. Esto ayuda a evitar quemaduras por tocar
superficies calientes de la puerta y las paredes del horno.
n No deje productos como papel, utensilios de cocina
o alimentos en el horno cuando no lo esté usando.
Los elementos guardados en el horno pueden prenderse
fuego.
n No use papel de aluminio para cubrir el fondo del horno. El
aluminio puede atrapar el calor o derretirse, lo cual puede
dañar el producto y provocar riesgo de descarga eléctrica o
un incendio.
INSTRUCCIONES DE SEGURIDAD DEL HORNO
ADVERTENCIA
6
INFORMACIÓN IMPORTANTE DE SEGURIDAD.
LEA TODAS LAS INSTRUCCIONES ANTES DE SU USO.
La característica de auto-limpieza funciona en el horno a temperaturas lo suficientemente elevadas como para quemar los
restos de alimentos que quedaron dentro del horno. Siga estas instrucciones para una operación segura.
n Antes de iniciar el ciclo de auto-limpieza, quite las ollas,
bandejas del horno de metal brillante y otros utensilios
del horno. Sólo pueden dejarse en el horno las bandejas
revestidas de porcelana gris. No utilice la auto-limpieza para
limpiar otras piezas, como bandejas colectoras o tazones.
n Antes de utilizar el ciclo de auto-limpieza, limpie la grasa y los
derrames de alimentos del horno. Una cantidad excesiva de
grasa puede encenderse, generando daños por el humo en
su hogar.
n Si el modo de auto-limpieza no funciona, apague el horno
y desconecte el suministro de energía. Llame a un técnico
calificado para solicitar el arreglo.
n No limpie la empacadura de la puerta. La empacadura de
la puerta es esencial para un buen sellado. Debe tenerse
cuidado de no refregar, dañar o mover la empacadura.
n No utilice limpiadores de horno. No debe utilizarse ningún
limpiador comercial o revestimiento protector de ninguna
clase dentro o alrededor de ninguna pieza del horno.
n El objetivo del cajón calentador es mantener alimentos
cocidos calientes a la temperatura de servicio. Por debajo de
los 140°F (60°C) puede producirse crecimiento de bacterias en
los alimentos. No coloque alimentos fríos
en el cajón calentador. No caliente alimentos por más
de 2 horas. No seguir estas instrucciones puede provocar
enfermedades transmitidas por los alimentos.
n No deje productos de papel, plásticos, comida enlatada
o materiales combustibles en el cajón. Pueden prenderse
fuego.
n No toque el elemento calentador o la superficie interna del
cajón. Estas superficies pueden estar lo suficientemente
calientes como para provocar quemaduras.
n Tenga cuidado al abrir el cajón. Abra un poco el cajón y deje
salir el aire caliente y el vapor antes de quitar o volver a
colocar los alimentos. El aire y el vapor calientes que salen
pueden provocar quemaduras en manos, rostro y/o ojos.
n No use papel de aluminio para cubrir el cajón inferior. El papel
atrapará en calor del fondo y alterará el funcionamiento
del horno. El papel se podrá derretir y dañar de forma
permanente la parte inferior del cajón. Cualquier daño por
uso inadecuado del papel de aluminio no estará cubierto por
la garantía del producto.
INSTRUCCIONES DE SEGURIDAD DEL
HORNO AUTO-LIMPIANTE (algunos modelos)
ADVERTENCIA
CAJÓN CALENTADOR/CAJÓN DEL HORNO
INFERIOR INSTRUCCIONES DE SEGURIDAD
ADVERTENCIA
(algunos modelos)
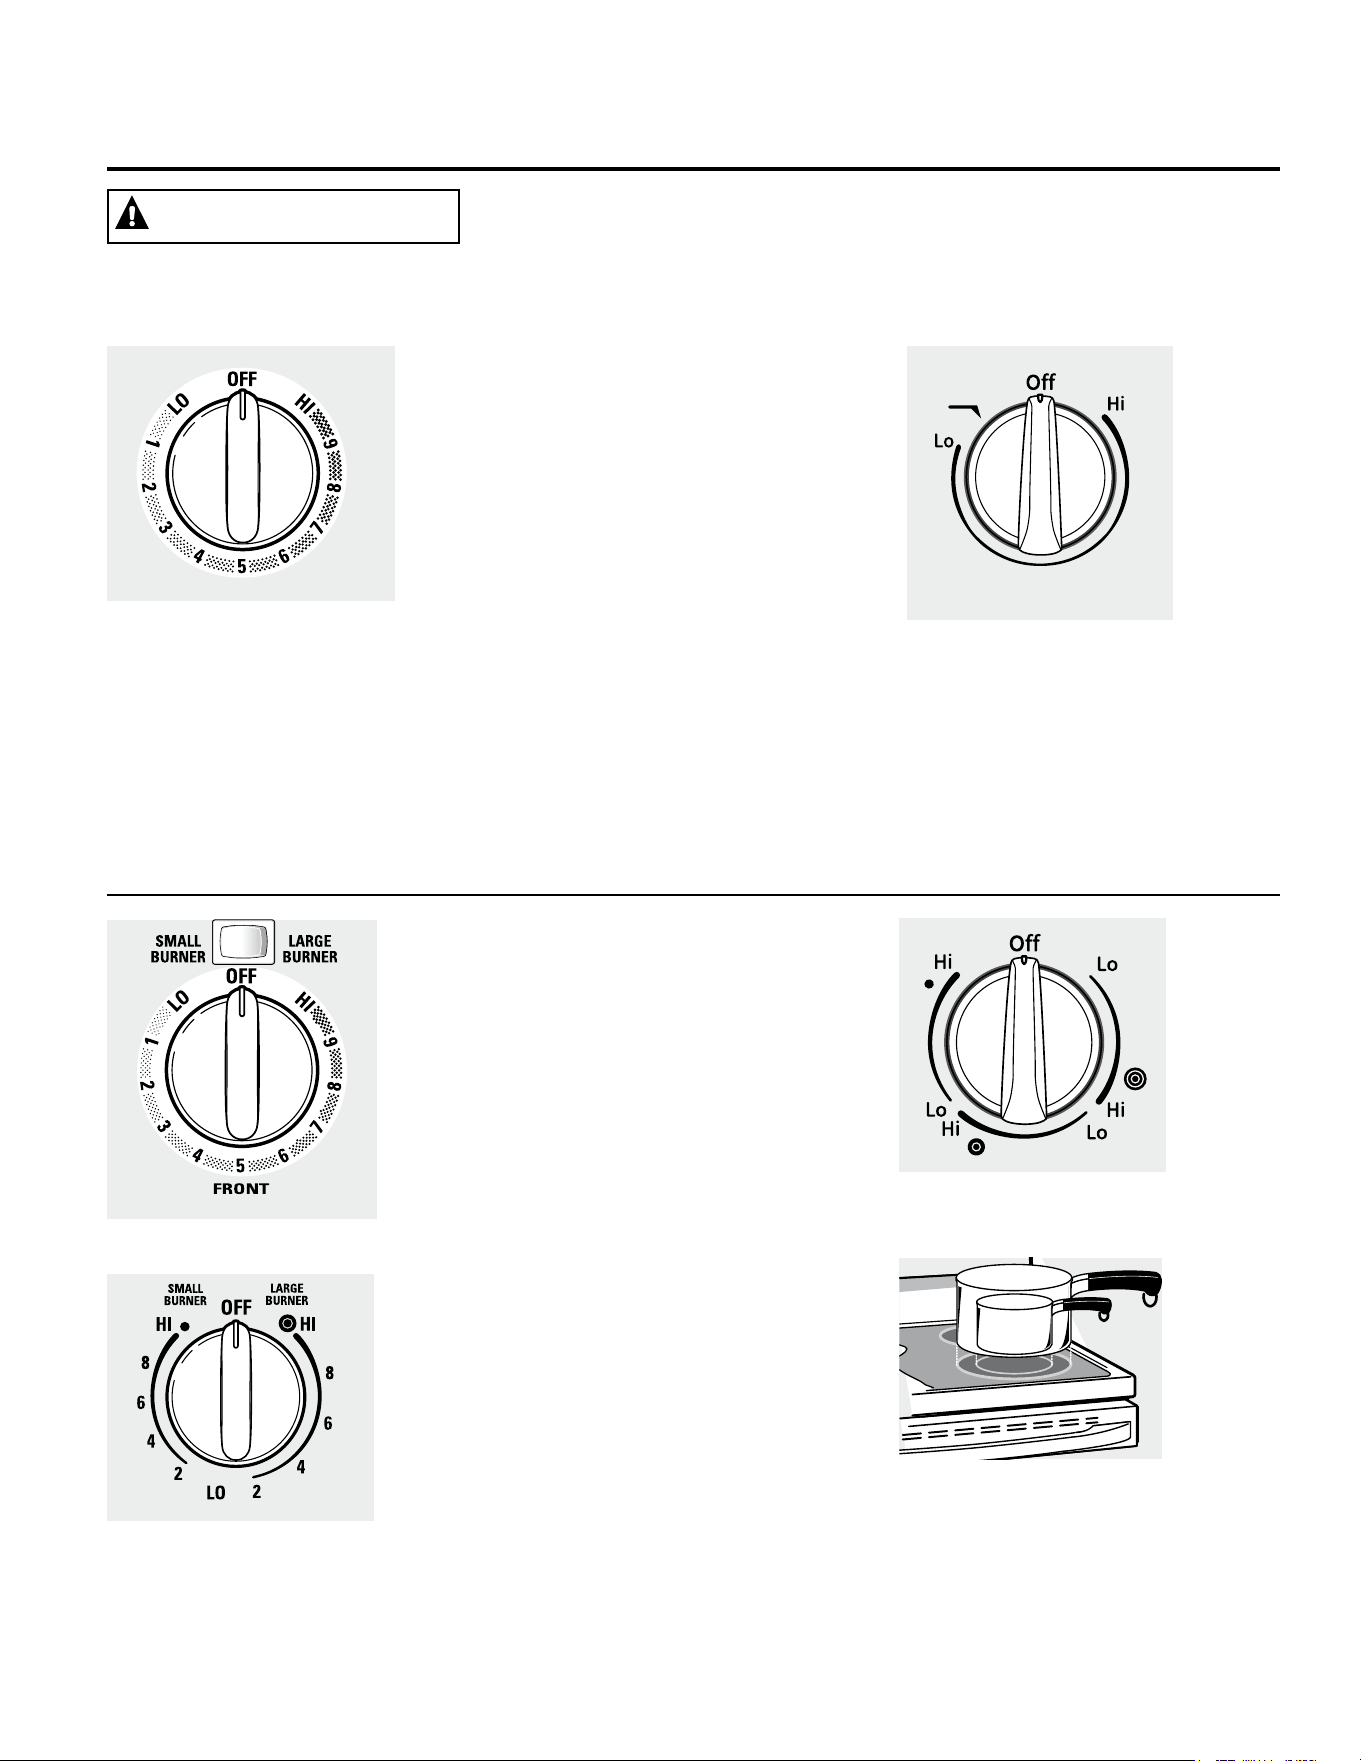
7
Uso de unidades de la superficie. (en algunos modelos) GEAppliances.com
En algunos modelos
En algunos modelos
RIESGO DE INCENDIO: Nunca pierda de vista la cocina cuando la estufa esté
en las configuraciones medio o alto.Mantenga los ítems inflamables alejados
de la estufa. Apague todos los controles cuando finalice la cocción. Si no se
siguen estas instrucciones se podrá producir incendios, lesiones graves o la muerte.
Es posible que las funciones y apariencias varíen con relación a su modelo a lo largo del manual.
Cómo Configurar
Tanto en OFF (Apagado)
como en HI (Alto), el control
se ajusta en la posición. Es
posible que escuche leves
sonidos de ajuste durante
la cocción, indicando que el
control está manteniendo su
configuración deseada.
Asegúrese de girar la perilla
de control a OFF (Apagado)
cuando finalice la cocción.
ADVERTENCI0ZA
Presione la perilla hacia adentro y gire
en cualquiera de las direcciones hasta la
configuración que desee.
Una luz indicadora de de superficie en ON
(Encendido) brillará cuando una unidad
superficial esté encendida.
Para superficies de vidrio de la estufa:
Una luz indicadora de ESTUFA CALIENTE:
■ se encenderá cuando la unidad esté caliente
al tact.
■ permanecerá encendida incluso luego de
que la unidad esté apagada.
■ Permanecerá encendida hasta que la unidad
se enfríe a aproximadamente 150º F.
Melt
Rear
8
7
6
54
3
2
9
1
La configuración Melt (Derretir) (en algunos
modelos) derretirá chocolate o manteca.
La configuración Simmer (Hervor Lento) (en
algunos modelos) hervirá salsas a fuego lento.
Modelos con un elemento superficial
de Anillo-Triple únicamente.
Unidades Superficiales Dobles
y Triples y Perillas de Control
(en algunos modelos)
La unidad de superficie posee 2 o 3 tamaños
de cocción que se pueden seleccionar, de
modo que pueda enlazar el tamaño de la
unidad al tamaño del utensilio que esté usando.
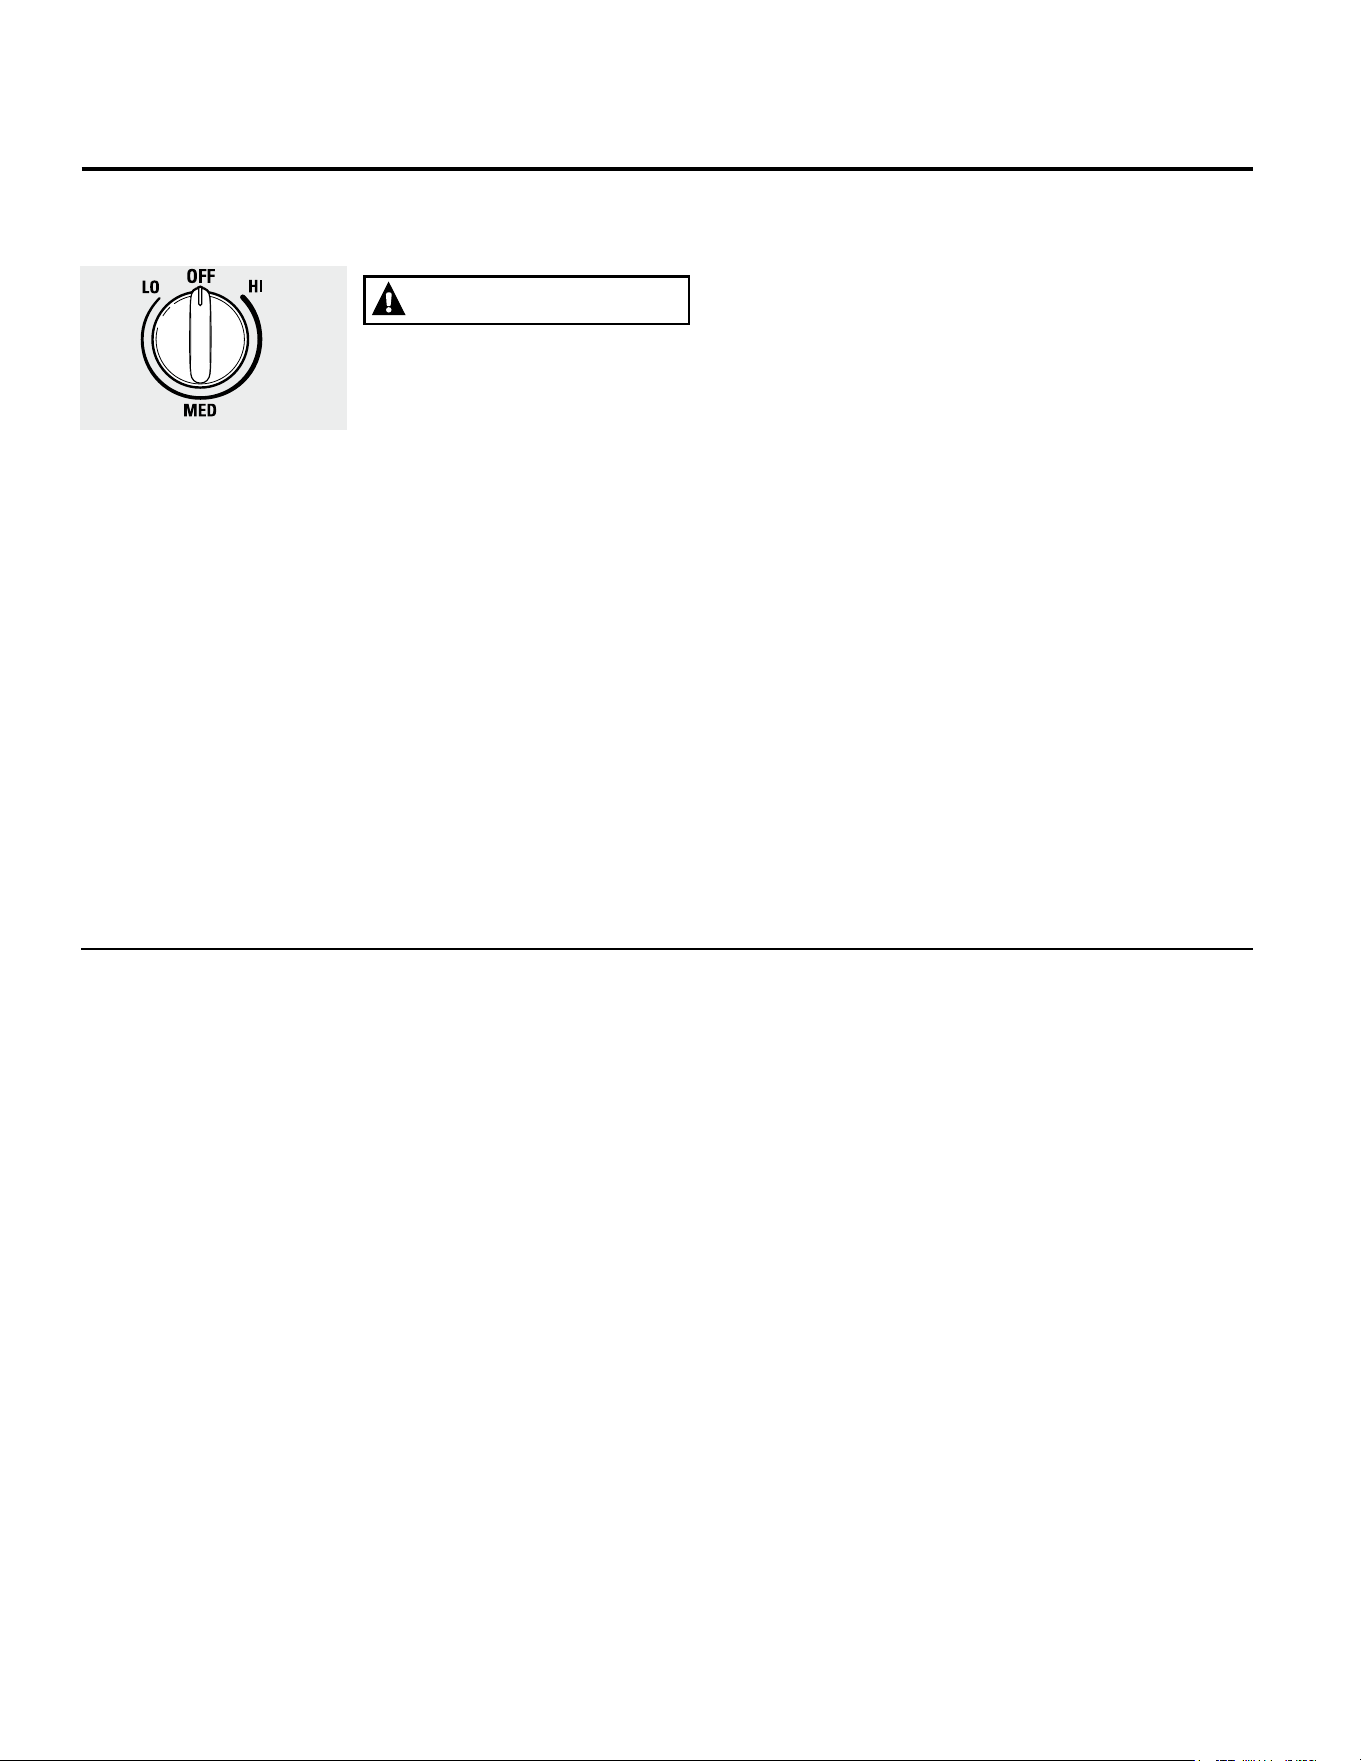
8
Uso de unidades de la superficie.
Es posible que las funciones y apariencias varíen con relación a su modelo a lo largo del manual.
Uso del Área para Calentar
RIESGO DE ENVENENAMIENTO CON COMIDA:
Se pueden desarrollar bacterias cuando la
comida esté a una temperatura inferior a los
140º.
■ Siempre comience con comida caliente.No
use configuraciones en WARM (Caliente)
para calendar comida fría.
■ No use la configuración WARM (Calentar)
durante más de 2 horas.
Si no se siguen estas instrucciones, se podrán
producir enfermedades generadas en la
comida.
WARMING ZONE (Área para Calentar), ubicada
en la parte central trasera de la superficie de
vidrio, mantendrá la comida caliente y cocida a
la temperatura para servir. Siempre comience
con comida caliente. No use la función para
calentar comida fría. Colocar comida que no
está cocinada o fría en el Área para Calentar
podría producir enfermedades desarrolladas
por bacterias en la comida.
Presione y gire la perilla de control hacia
cualquier configuración deseada.
Para obtener mejores resultados, todas las
comidas en el Área para Calentar deberían
estar cubiertas por una tapa o papel de
aluminio.Al calentar pasteles o panes, la tapa
se deberá ventilar para dejar que la humedad
salga.
Use la configuración más baja para panes y
masas. Use una configuración media para
verduras, salsas, guisos, sopas de crema,
manteca y chocolate. Use la configuración más
alta para sopas (líquidas) y bebidas calientes.
Estas configuraciones iniciales sugeridas son
para referencia únicamente. La temperatura,
tipo y cantidad de comida, el tipo de olla y el
tiempo afectarán la calidad de la comida.
Siempre use las manijas de las ollas o guantes
para horno al retirar comida del Área para
Calentar ya que los utensilios y platos estarán
calientes.
NOTA:El calentador superficial emitirá un brillo
rojo, al igual que los elementos de cocción.
Warming Zone
ADVERTENCIA
Consejos para Productos Enlatados en el Hogar
Asegúrese que el producto enlatado se
encuentre sobre la unidad superficial.
Asegúrese de que el producto enlatado sea
plano en su parte inferior.
Para evitar quemadoras de vapor o calor,
tenga cuidado al enlatar el producto.
Use recetas y procedimientos de fuentes
confiables. Estos se encuentran disponibles a
través de fabricantes como Ball® y Kerr® y el
Department of Agriculture Extension Service
(Servicio del Departamento de Agricultura).
El uso de enlatados cerrados a baño maría con
fondos ondeados podrán extender el tiempo
requerido para traer el agua al punto de hervor.

9
GEAppliances.com
The following information will help you choose cookware which will give good performance on glass cooktops.
Para Modelos con Estufa de Vidrio Radiante
La estufa radiante cuenta con unidades
calentadoras debajo de una superficie lisa de
vidrio.
NOTA: Un ligero olor es normal cuando
una estufa nueva se utiliza por primera vez.
Es provocado por el calentamiento de piezas
nuevas y materiales aislantes y desaparecerá en
poco tiempo.
NOTA: En modelos con estufas de vidrio
de color claro, es normal que las zonas
de cocción cambien de color cuando están
calientes o enfriándose. Esto es temporal y
desaparecerá a medida que el vidrio se enfríe
a temperatura ambiente.
La unidad superficial seguirá un ciclo de
encendido y apagado para mantener su
configuración de control seleccionada.
Es seguro colocar utensilios calientes en la
superficie de vidrio, incluso cuando la estufa
esté fría.
Aunque las unidades de superficie se hayan
apagado, la estufa de vidrio retiene suficiente
calor para continuar la cocción. Para evitar la
sobrecocción, quite las ollas de las unidades de
superficie cuando los alimentos estén cocidos.
No coloque nada sobre la unidad de superficie
hasta que se haya enfriado por completo.
n Las manchas de agua (depósitos minerales)
pueden quitarse utilizando crema limpiadora
o vinagre blanco sin diluir.
n El uso de limpiador de ventanas puede dejar
una película iridiscente sobre la estufa.
La crema limpiadora quitará esta película.
n No almacene elementos pesados sobre
la estufa. Si caen sobre la estufa, podrían
provocar daños.
n No utilice la superficie como una tabla para
cortar.
Nunca cocine directamente sobre el
vidrio. Siempre utilice recipientes de
cocción.
Siempre coloque el recipiente en el
centro de la unidad de superficie
sobre la que está cocinando.
No deslice los recipientes de cocción a través del control
y la superficie de la estufa porque puede rayar el vidrio.
El vidrio es resistente a los rayones, pero no a prueba de
los mismos.
Limitador de Temperatura en Estufas de Vidrio Radiante
Cada unidad de superficie radiante cuenta con
un limitador de temperatura.
El limitador de temperatura evita que la estufa de
vidrio se caliente en exceso.
El limitador de temperatura podrá apagar las
unidades superficiales por ciclos durante un
tiempo si:
■ la olla hierve hasta secarse.
■ el fondo de la olla no es plano.
■ la olla está fuera del centro.
■ no hay olla en la unidad.
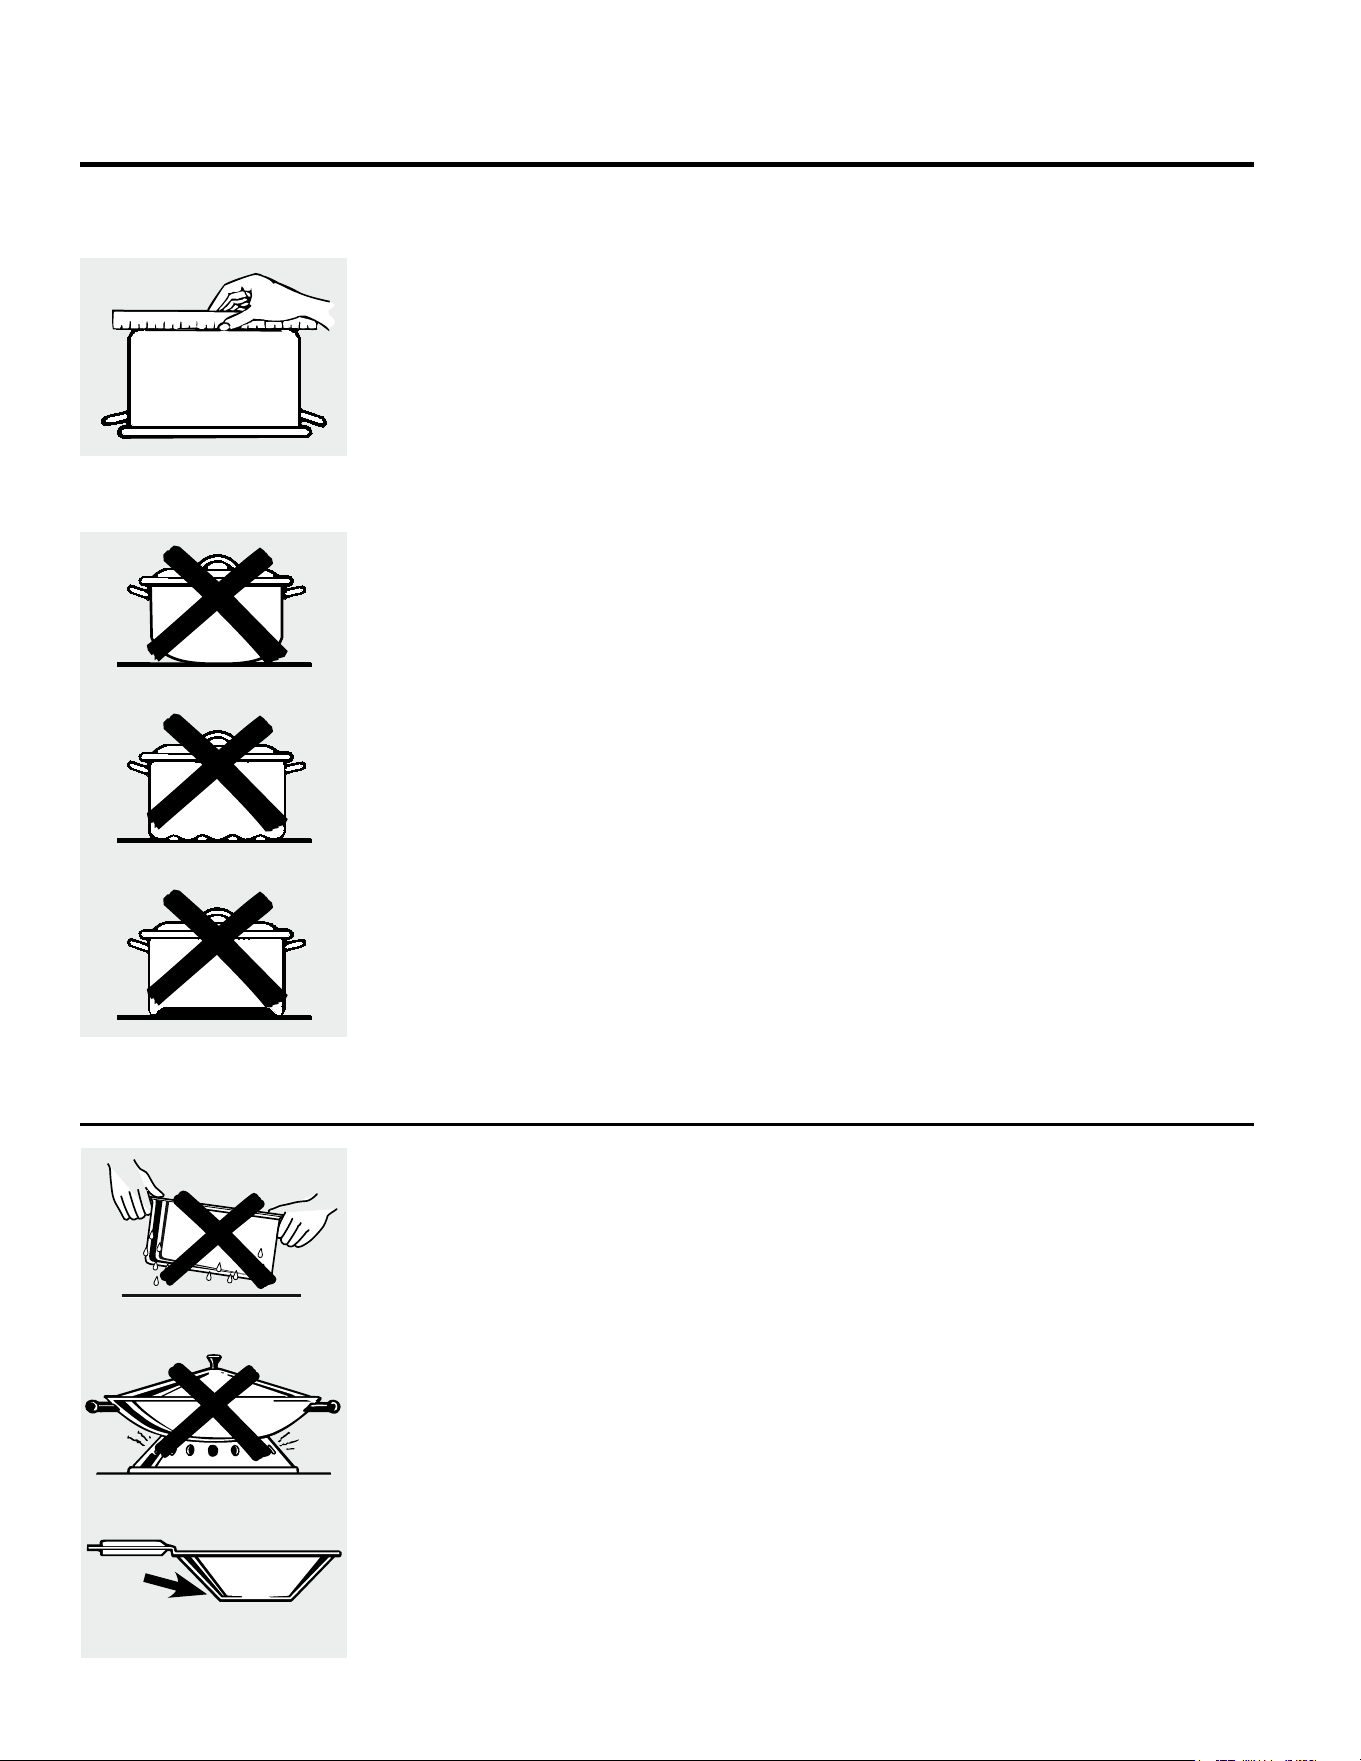
10
Cómo seleccionar tipos de utensilios para
modelos de estufa de vidrio radiante.
Acero inoxidable:
Recomendado
Aluminio:
Se recomienda de capa gruesa
Buena conductividad. Los residuos de aluminio
a veces parecen rayones sobre la estufa pero
pueden quitarse si se los limpia de inmediato.
Debido a su bajo punto de fusión, no debe
utilizarse aluminio de capa fina.
Base de cobre:
Recomendado
El cobre puede dejar residuos que pueden
parecer rayones. Los residuos pueden
eliminarse, siempre y cuando la estufa
se limpie de inmediato. Sin embargo, no
permita que estas ollas hiervan en seco.
El metal sobrecalentado puede adherirse
a las estufas de vidrio. Si no se elimina de
inmediato, una olla con la base de cobre
sobrecalentado dejará un residuo que
manchará la estufa en forma permanente.
Esmalte de porcelana sobre hierro
fundido:
Se recomienda si la base de la olla se encuentra
revestida
Esmalte de porcelana sobre acero:
No se recomienda
Calentar recipientes vacíos puede provocar
daños permanentes al vidrio de las estufas. El
esmalte puede derretirse y adherirse a la estufa
cerámica.
Vidrio-cerámico:
No se recomienda
Desempeño pobre. Raya la superficie.
Cerámica:
No se recomienda
Desempeño pobre. Puede rayar la superficie.
Hierro fundido:
No se recomienda, a menos que se encuentre
específicamente diseñado para estufas de vidrio
Pobre conductividad y lentitud para absorber el
calor. Raya la superficie de la estufa.
La siguiente información lo ayudará a elegir los recipientes de cocción que brindan un buen desempeño
en estufas de vidrio. Ver el folleto sobre recipientes para usar con estufas de inducción.
NOTA: Siga todas las recomendaciones del fabricante de recipientes cuando utilice cualquier clase
de recipiente de cocción sobre la estufa cerámica.
Para mejores resultados
n Coloque sólo recipientes secos sobre
los elementos de superficie. No coloque
tapas sobre los elementos de superficie,
en especial tapas mojadas. Es posible que
las ollas y tapas mojadas se adhieran a la
superficie cuando se enfríen.
n No use woks con anillos de soporte.
Esta clase de wok no se calienta sobre
elementos de superficie de vidrio.
n Recomendamos el uso de woks de
base plana solamente. Se encuentran
disponibles en su negocio minorista local.
La base del wok debe tener el mismo
diámetro que el elemento de superficie
para asegurar un contacto adecuado.
n Algunos procedimientos de cocción
especiales requieren recipientes
de cocción específicos, como ollas
a presión, freidoras, etc. Todos los
recipientes de cocción deben tener bases
planas y ser del tamaño correcto.
n No permita que los alimentos hiervan en
seco ya que los recipientes de cocción
pueden adherirse a la superficie de
cocción, provocando daños permanentes
a la estufa.
No coloque recipientes mojados
sobre la estufa de vidrio.
No use woks con anillos de
soporte sobre la estufa de vidrio.
Utilice woks de base plana sobre
la estufa de vidrio.
Verifique que los recipientes
tengan bases planas utilizando
una regla.
No se recomiendan recipientes con
bases redondeadas, curvadas, con
rebordes o torceduras.
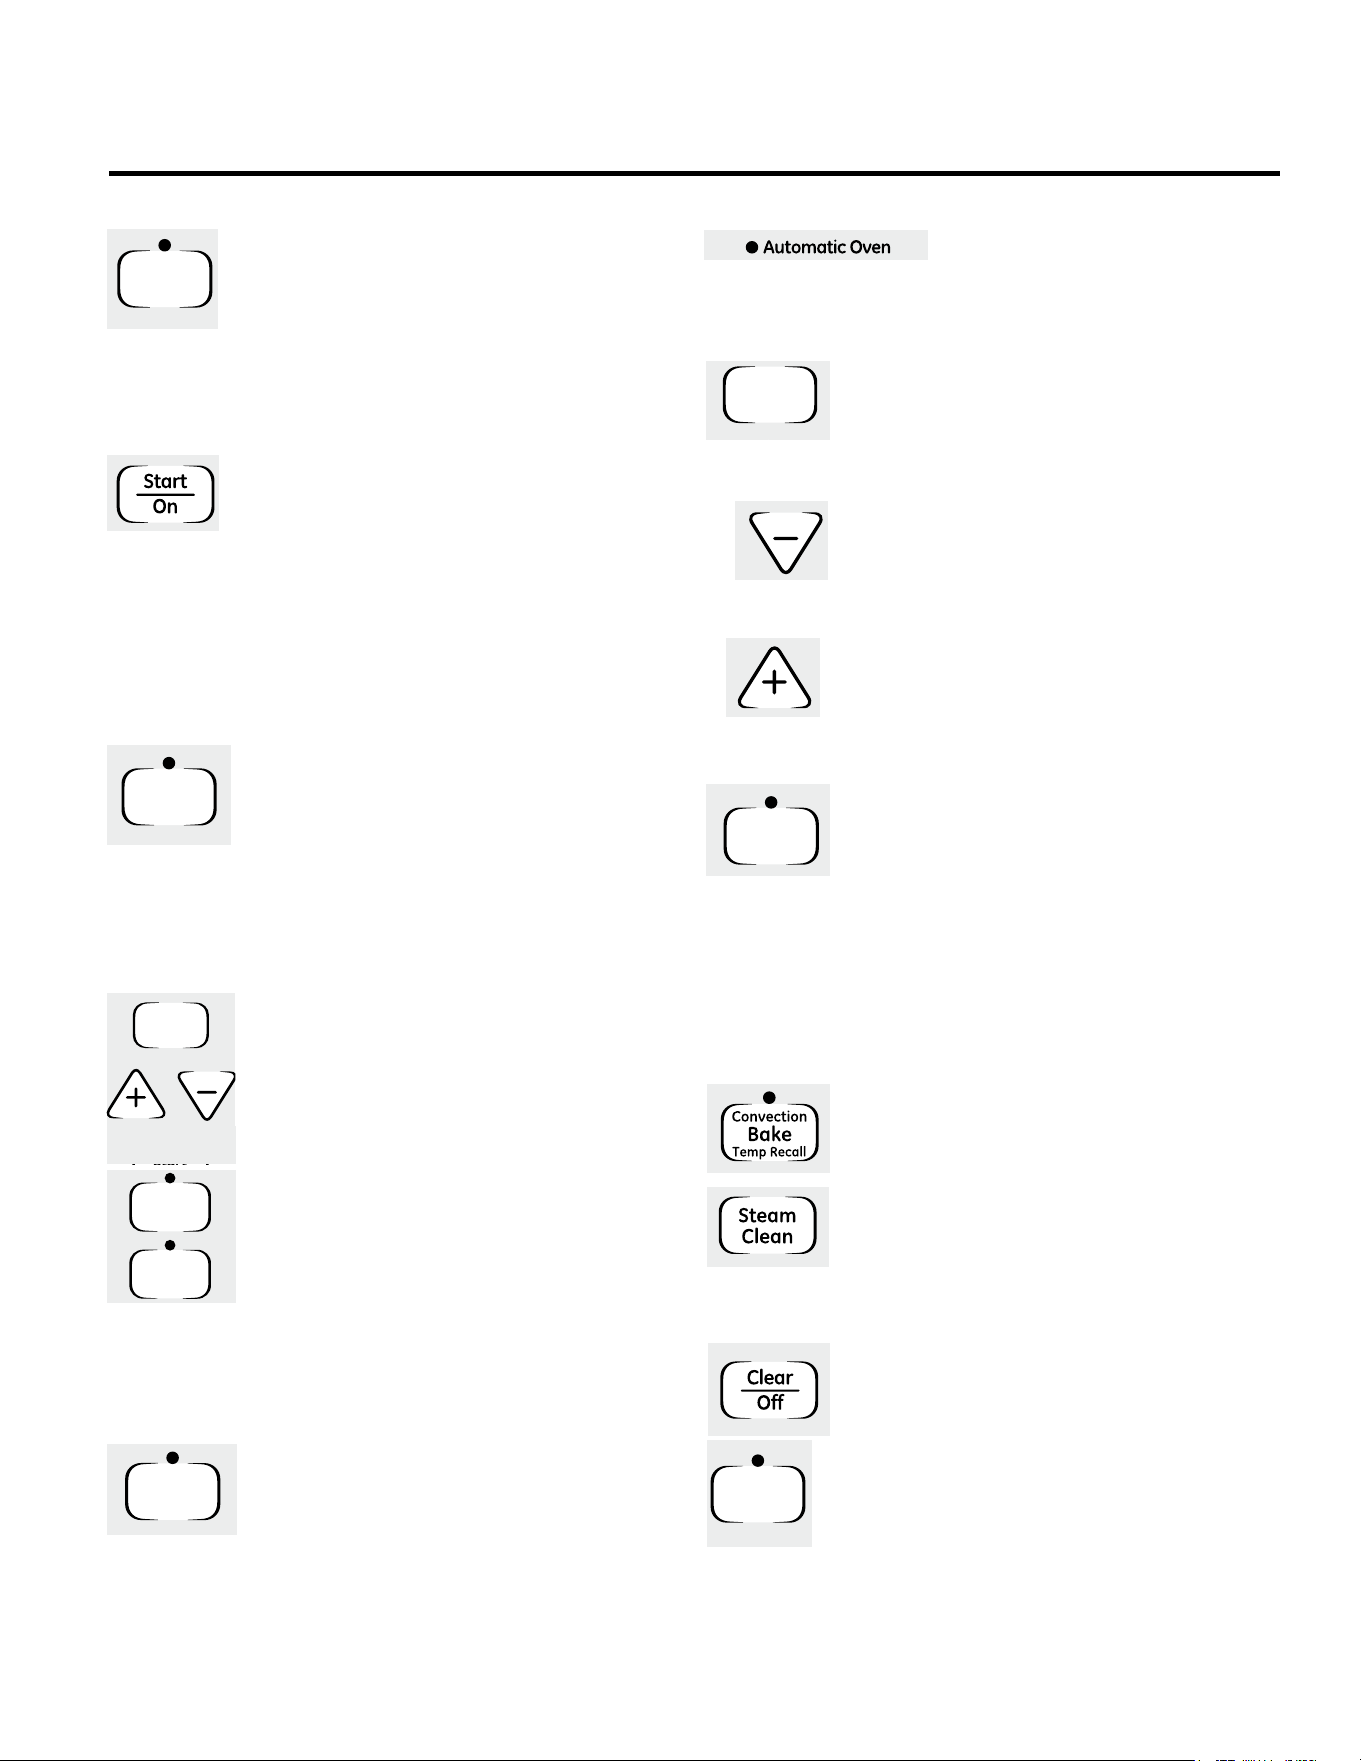
Tecla Bake/ Temp Recall (Recordatorio de Hornear/
Temperatura)
Presione para seleccionar la función hornear.
Lea la
sección Cómo Configurar el Horno para Hornear.
Luz de Horneado
Titila mientras se encuentra en el modo editar –
usted puede cambiar la temperatura del horno en
este punto. Brilla cuando el horno se encuentra en
el modo de horneado
Tecla Start/ On (Iniciar/ Encendido)
Presione para seleccionar hornear con la función de
convección.
Pantalla
Muestra la hora del día, temperatura del horno y los tiempos
configurados para las funciones del temporizador o de horno
automático. En la pantalla aparecerá PRE mientras se esté
precalentando. Cuando el horno alcance la temperatura se
Si “F- y un número o letra” titilan en la pantalla y el control del horno
da una señal, esto indica un código de error de función.
Consulte
la sección Consejos para la Solución de Problemas.
Tecla Kitchen Timer On/ Off (Temporizador de
Cocina Encendido/ Apagado)
Presione para seleccionar la función del contador.
Luego presione las teclas + y – para ajustar el
temporizador.
Luz del temporizador
Titila cuando se encuentra en el modo editar - usted puede
cambiar el horario configurado en este punto. Brilla cuando el
temporizador ha sido activado. Titila nuevamente cuando el
temporizador finalizó hasta que el control es reiniciado.
Tecla Clock (
Tecla de Reloj)
Para configurar el reloj, presione la tecla CLOCK
(Reloj) dos veces o, si se trata de modelos sin la
tecla CLOCK (Reloj), mantenga presionadas las
teclas + y – por 3 segundos. Lea la sección Uso
del reloj y del temporizador.
Tecla Start Time (Hora de Inicio) o Delay Start
(Comienzo Demorado)
Use junto con la función de cocción o la función
de limpieza para configurar el horno y que se
inicie de forma automática en el tiempo que
configuró.
Luz Start Time (Hora de Inicio) o Delay Start
(Comienzo Demorado)
Titila mientras se encuentra en el modo editar
– usted puede cambiar la hora de inicio en este
punto. Brilla cuando la función fue activada.
Tecla Cooking Time (Tiempo de Cocción)
Touch this pad and then touch the + or – pads
to set the amount of time you want your food
to cook. The oven will shut off when the cooking
time has run out.
Luz de Tiempo de Cocción
Titila cuando se encuentra en el modo editar - usted puede
cambiar el tiempo configurado en este punto. Brilla cuando la
función ha sido activado.
Luz del Horno Automática
Ilumina en cualquier momento en
que el horno haya sido programado
usando las funciones Cooking Time
(Tiempo de Cocción) o Start Time
(Hora de Inicio).
Tecla Oven Light On/ Off (Encendido/ Apagado de
la Luz del Horno)
Presione esta tecla para encender o apagar la luz
del horno.
Tecla -
Golpecitos cortos sobre esta tecla reducirán
el tiempo o la temperatura en pequeñas
cantidades. Mantenga presionada la tecla para
reducir el tiempo o la temperatura en grandes
cantidades.
Tecla +
Golpecitos cortos sobre esta tecla
incrementarán el tiempo o la temperatura en
pequeñas cantidades. Mantenga presionada
la tecla para incrementar el tiempo o la
temperatura en grandes cantidades.
Tecla Self Clean (Auto Limpieza) (en algunos
modelos)
Presione esta tecla para seleccionar la función
de auto limpieza. Consulte la sección Using
the self-cleaning oven (Uso del horno de auto
limpieza).
Luz de Auto Limpieza
Titila mientras se encuentra en el modo editar – usted puede
cambiar la cantidad de tiempo del ciclo de auto limpieza en este
punto. Brilla cuando el horno se encuentra en el ciclo de auto
limpieza. Luego del ciclo de auto limpieza, la luz se apagará.
Destrabe la puerta.
Convection Bake/Temp Recall
Touch this pad to select baking with the
convection function.
Tecla Steam Clean Pad (Limpieza al Vapor) (en
algunos modelos)
Presione esta tecla para una limpieza fácil
de suciedad leve de la cavidad del horno o la
puerta. Consulte la sección Uso de limpieza al
vapor.
Tecla Clear/ Off (Borrar/ Apagar)
Presione esta tecla para cancelar TODAS las
operaciones del horno, excepto el reloj y el
temporizador.
Tecla Broil Hi/ Lo (Asar Alto/ Bajo)
Presione esta tecla para seleccionar la función
asar.
Lea la sección Cómo Configurar el Horno
para Asar.
Luz para Asar
Titila mientras se encuentra en el modo editar—usted puede pasar
de la función Broil (Asar) en Hi (Alto) a Lo (Bajo) en este punto. Brilla
cuando el horno se encuentra en el modo Broil (Asar).
Es posible que las funciones y apariencias varíen con relación a su modelo a lo largo del manual.
11
Uso de las funciones y configuraciones del control
del horno, reloj y temporizador GEAppliances.com
Start
On
Cooking
Time
Clear
Off
Bake
Temp Recall
Start
On
Cooking
Time
Clear
Off
Bake
Temp Recall
Start
On
Kitchen
Timer
On/Off
Start
Time
Delay
Start
Automatic Oven
Start
Time
Cooking
Time
Clock
Kitchen
Timer
On/Off
Time Controls
On/Off
Oven
Light
Self
Clean
Clear
Off
Broil
Hi/Lo
Start
On
Bake
Temp Recall
Oven Controls
Start
On
Kitchen
Timer
On/Off
Start
On
Kitchen
Timer
On/Off
Clock
Start
On
Set Clock
Hold 3 Sec.
Bake
Temp Recall
Broil
Hi/Lo
Start
On
+
Bake
Temp Recall
Start
On
Self
Clean
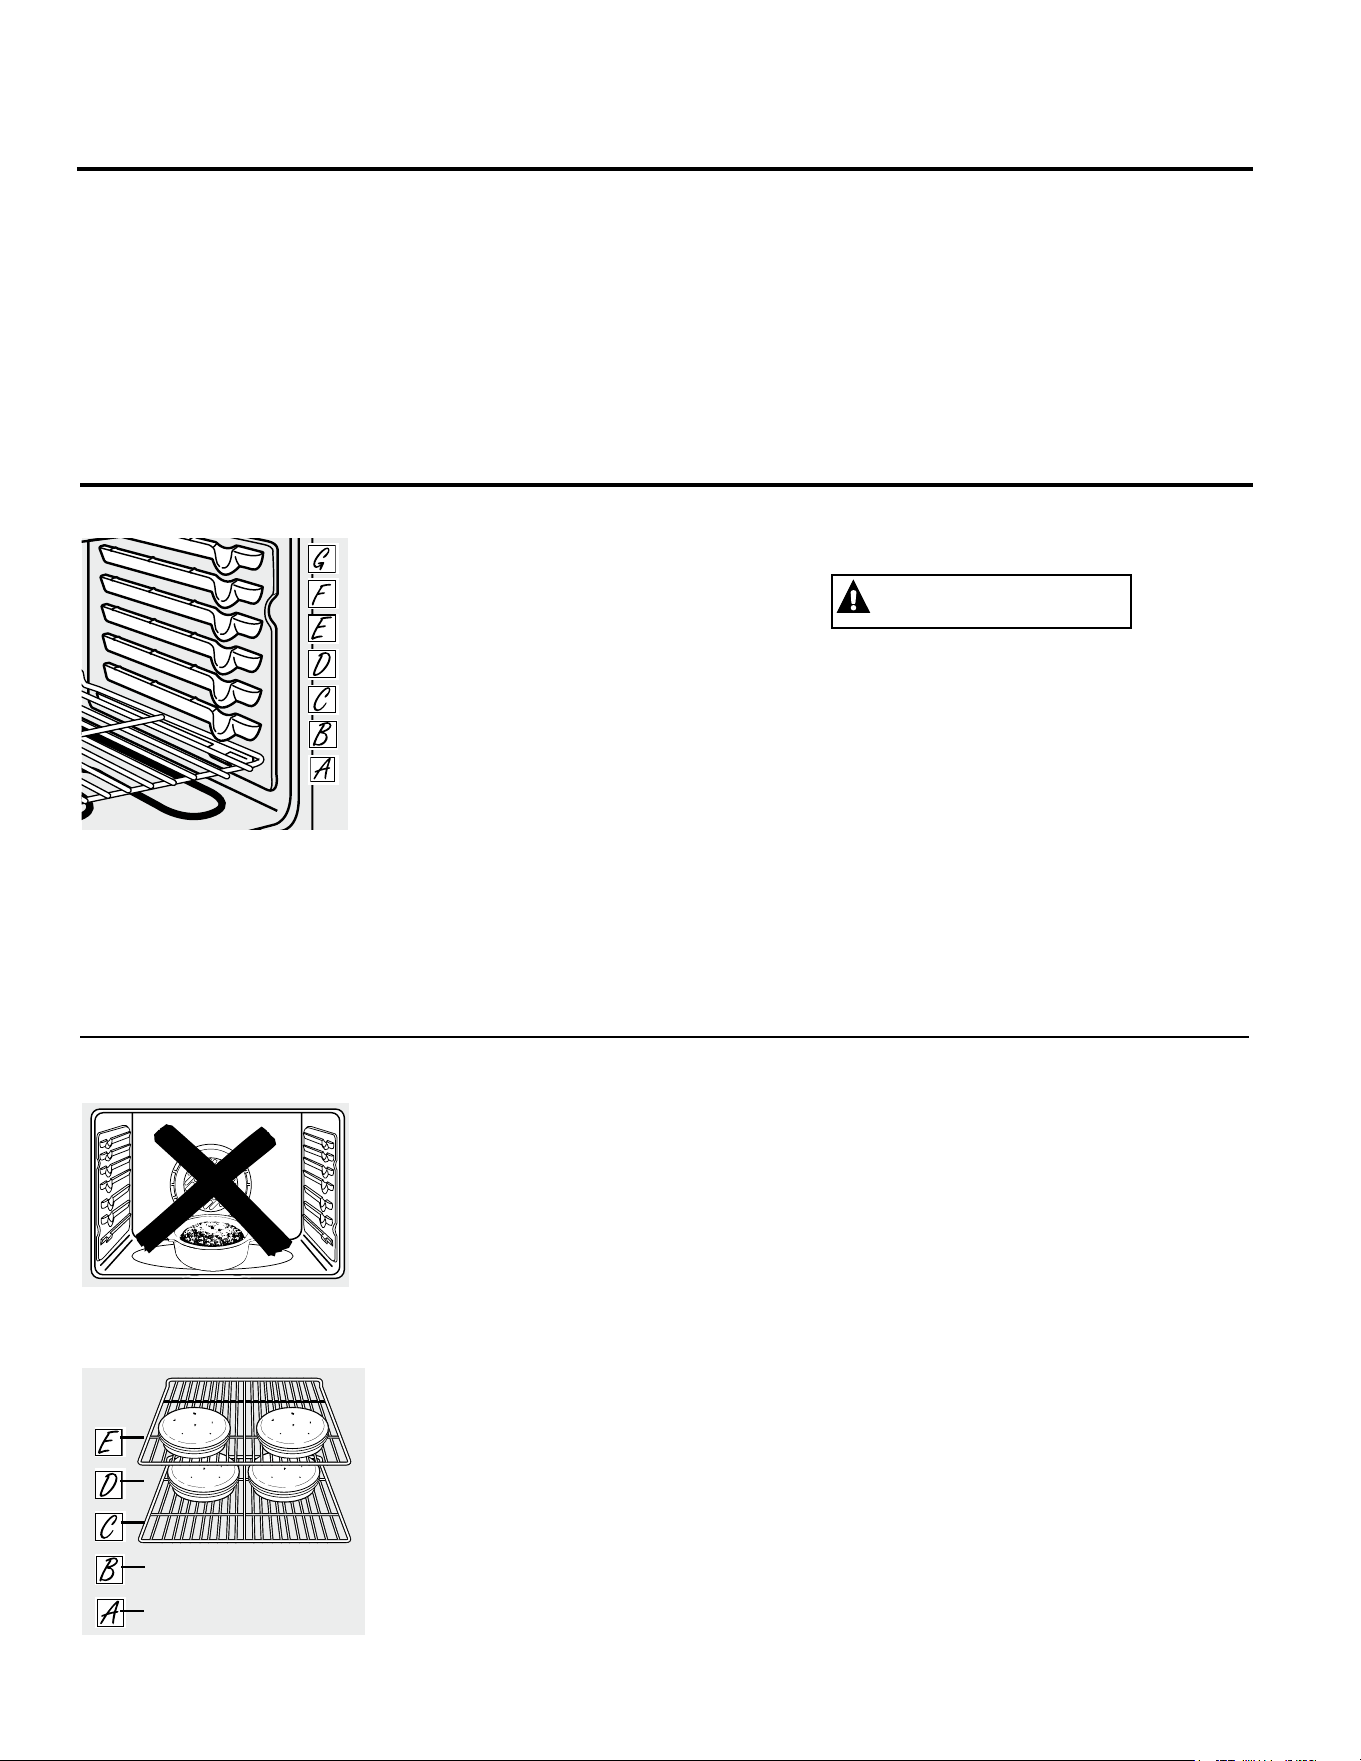
Para evitar posibles quemaduras, coloque las bandejas en la posición deseada antes de encender el horno.
Precalentamiento y colocación de recipiente
Precaliente del horno si así lo indica la receta.
El precalentamiento es necesario para obtener
buenos resultados cuando hornee pasteles,
galletas, pastelitos y panes.
En la pantalla aparecerá “PrE” mientras se
esté precalentando. Cuando el horno alcance
la temperatura seleccionada, el control del
horno emitirá un pitido y la pantalla mostrará la
temperatura del horno.
Si va a hornear cuatro capas de pastel al mismo
tiempo, coloque dos capas en la bandeja C y dos
capas en la bandeja E. Distribuya los recipientes
de modo que no queden directamente uno
encima del otro.
Los resultados de horneado serán mejores si
los alimentos se centran bien dentro del horno.
El pastel “Angel food” es la excepción y debe
colocarse en la bandeja inferior del horno (posición
A). Siga las instrucciones del paquete de alimentos
preempaquetados o congelados para la ubicación
de los recipientes. Los recipientes no deben tocarse
entre sí o tocar las paredes del horno. Si necesita
utilizar dos bandejas, distribuya los recipientes de
modo que no queden directamente uno encima
del otro. Deje aproximadamente 1
1
⁄2″ (3,8 cm) entre
recipientes y desde el frente, parte trasera y lados de
las paredes del horno.
Uso de las funciones y configuraciones del control
del horno, reloj y temporizador
Pantalla Titilante – Corte de Corriente
Si la hora aparece titilando en la pantalla, significa que
se produjo un corte de corriente. Reinicie el reloj. Lea la
sección Uso del reloj y del temporizador.
Si su horno fue configurado para un funcionamiento por
tiempo y se produce un corte de corriente, el reloj y las
funciones programadas serán reiniciados.
Es posible que las funciones y apariencias varíen con relación a su modelo a lo largo del manual.
12
Cómo usar el horno.
Para evitar posibles quemaduras, coloque las bandejas en la posición deseada antes de encender el horno.
Las bandejas tienen topes, de modo que
cuando se las coloca correctamente en los
soportes se detendrán antes de salirse del todo,
y no se volcarán.
Cuando coloque o quite recipientes de cocción,
tire de la bandeja hasta que se detenga.
En algunos modelos, el elemento calentador
para horneado se encuentra debajo del piso del
horno. Nunca coloque utensilios de cocina,
piedras para pizza, ni otros artículos en el
piso del horno.
Para quitar una bandeja, tire de ella, incline el
extremo frontal hacia arriba y sáquela.
Para volver a colocarla, deposite el extremo
de la bandeja (topes de detención) sobre el
soporte, incline el frente hacia arriba y presione
la bandeja hacia adentro.
Cuando utilice la bandeja en la posición más
baja (A), necesitará tener cuidado cuando la
quite. Recomendamos que deslice la bandeja
varias pulgadas y luego, utilizando dos
agarraderas, la quite sosteniendo de ambos
lados. La bandeja se encuentra muy abajo y
usted puede quemarse si coloca la mano en la
mitad de la bandeja y tira hacia afuera. Tenga
mucho cuidado de no quemarse la mano con la
puerta cuando utilice la bandeja en la posición
más baja (A).
PRECAUCIÓN
Antes de comenzar…
La cantidad de posiciones
de la bandeja puede variar en
relación al modelo.
Nunca coloque utensilios de
cocina, piedras para pizza, ni otros
artículos en el piso del horno.
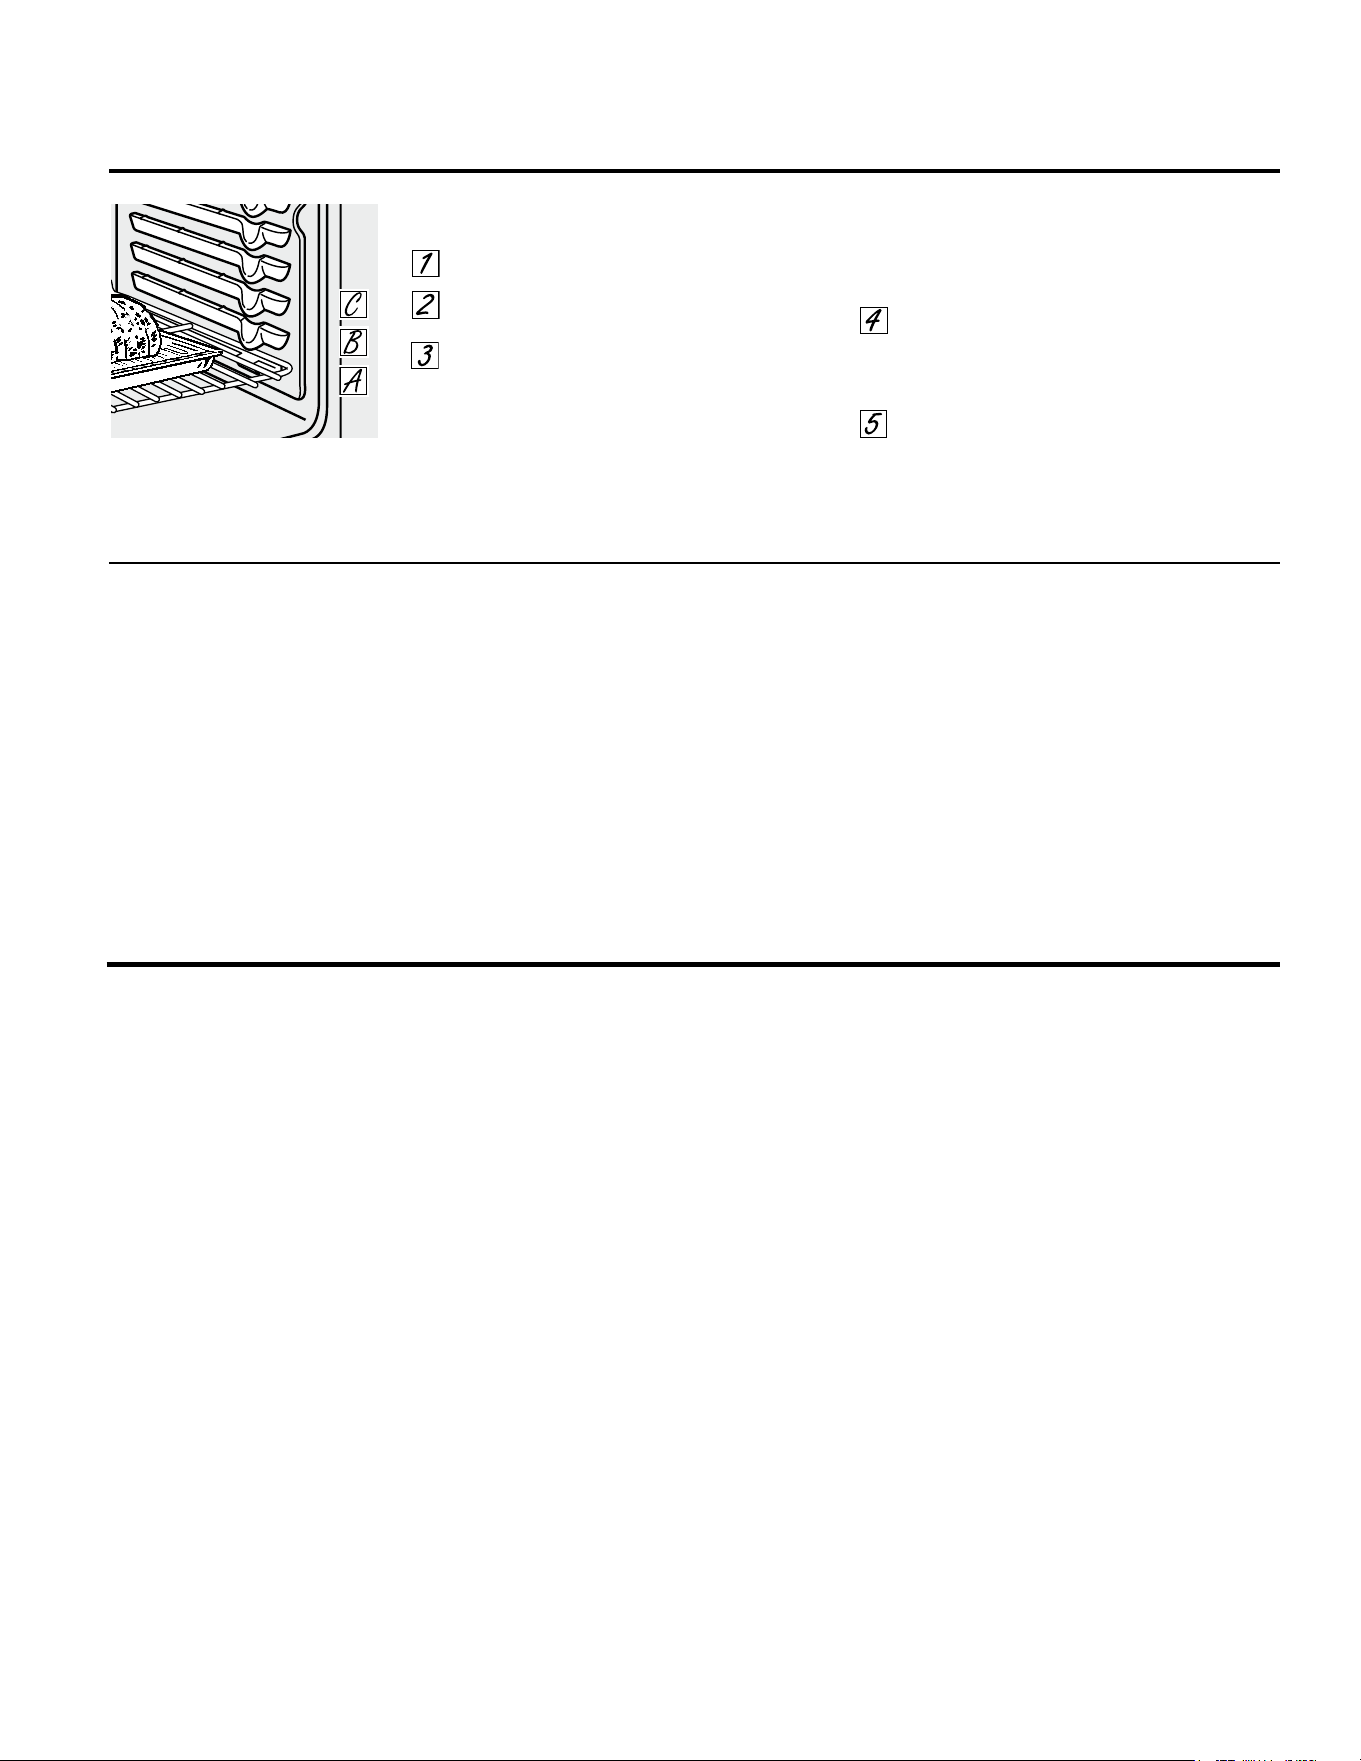
Cómo configurar el horno para horneado
Presione el botón BAKE (hornear).
Presione las teclas + o - hasta que la
temperatura deseada se muestre.
Presione la tecla Start/On (Iniciar/ Encender). El
horno se iniciará de inmediato. En la pantalla
aparecerá PrE mientras se esté precalentando.
Cuando el horno alcance la temperatura
seleccionada, el control del horno emitirá
varios pitidos y la pantalla mostrará la
temperatura del horno.
Para cambiar la temperatura del horno
durante el ciclo BAKE (Hornear), presione la
tecla Bake (Hornear) y luego las teclas + o -
para obtener la nueva temperatura.
Verifique el nivel de cocción de los alimentos
cuando haya alcanzado el tiempo mínimo
indicado en la receta. Cocínelos más si fuese
necesario..
Presione el botón CLEAR/OFF (borrar/
apagado) cuando se haya finalizado el
horneado y luego quite los alimentos del
horno.
Cómo usar el horno. GEAppliances.com
13
Papel de aluminio
No use papel de aluminio para cubrir el fondo
del horno. El aluminio atrapará el calor en la
parte inferior y alterará el funcionamiento del
horno. El aluminio se puede derretir y dañar
de forma permanente el fondo del horno.
Cualquier daño por uso inadecuado del
aluminio no estará cubierto por la garantía del
producto.
El aluminio se puede usar para retener
derrames, colocando una hoja en el estante
inferior, varias pulgadas por debajo de la
comida. No use más aluminio que el necesario
y nunca cubra totalmente un estante del
horno con papel de aluminio. Mantenga el
aluminio por lo menos a una pulgada y media
de las paredes del horno para evitar una mala
circulación del calor.
¡El tipo de margarina utilizado modifica el horneado!
La mayoría de las recetas de horneado incluyen productos de alto contenido graso tales como la manteca o la margarina
(80% de grasa). Si se reduce el contenido de grasa, el resultado final puede ser diferente al esperado.
Si se utilizan productos de bajo contenido graso en tortas, pasteles, masas, galletas o dulces, la receta puede fracasar. A
menor contenido graso, mayores diferencias en el resultado final.
Las normas federales exigen que los productos con denominación de “margarina” tengan un contenido graso de al menos 80%
en relación al peso. Los productos de bajo contenido graso contienen menos grasa y más agua. El elevado contenido de humedad
de estos productos afecta la textura y el sabor de los alimentos horneados. Para obtener los mejores resultados con sus recetas
tradicionales favoritas, utilice margarina u otros productos con un contenido de por lo menos 70% de aceite vegetal.
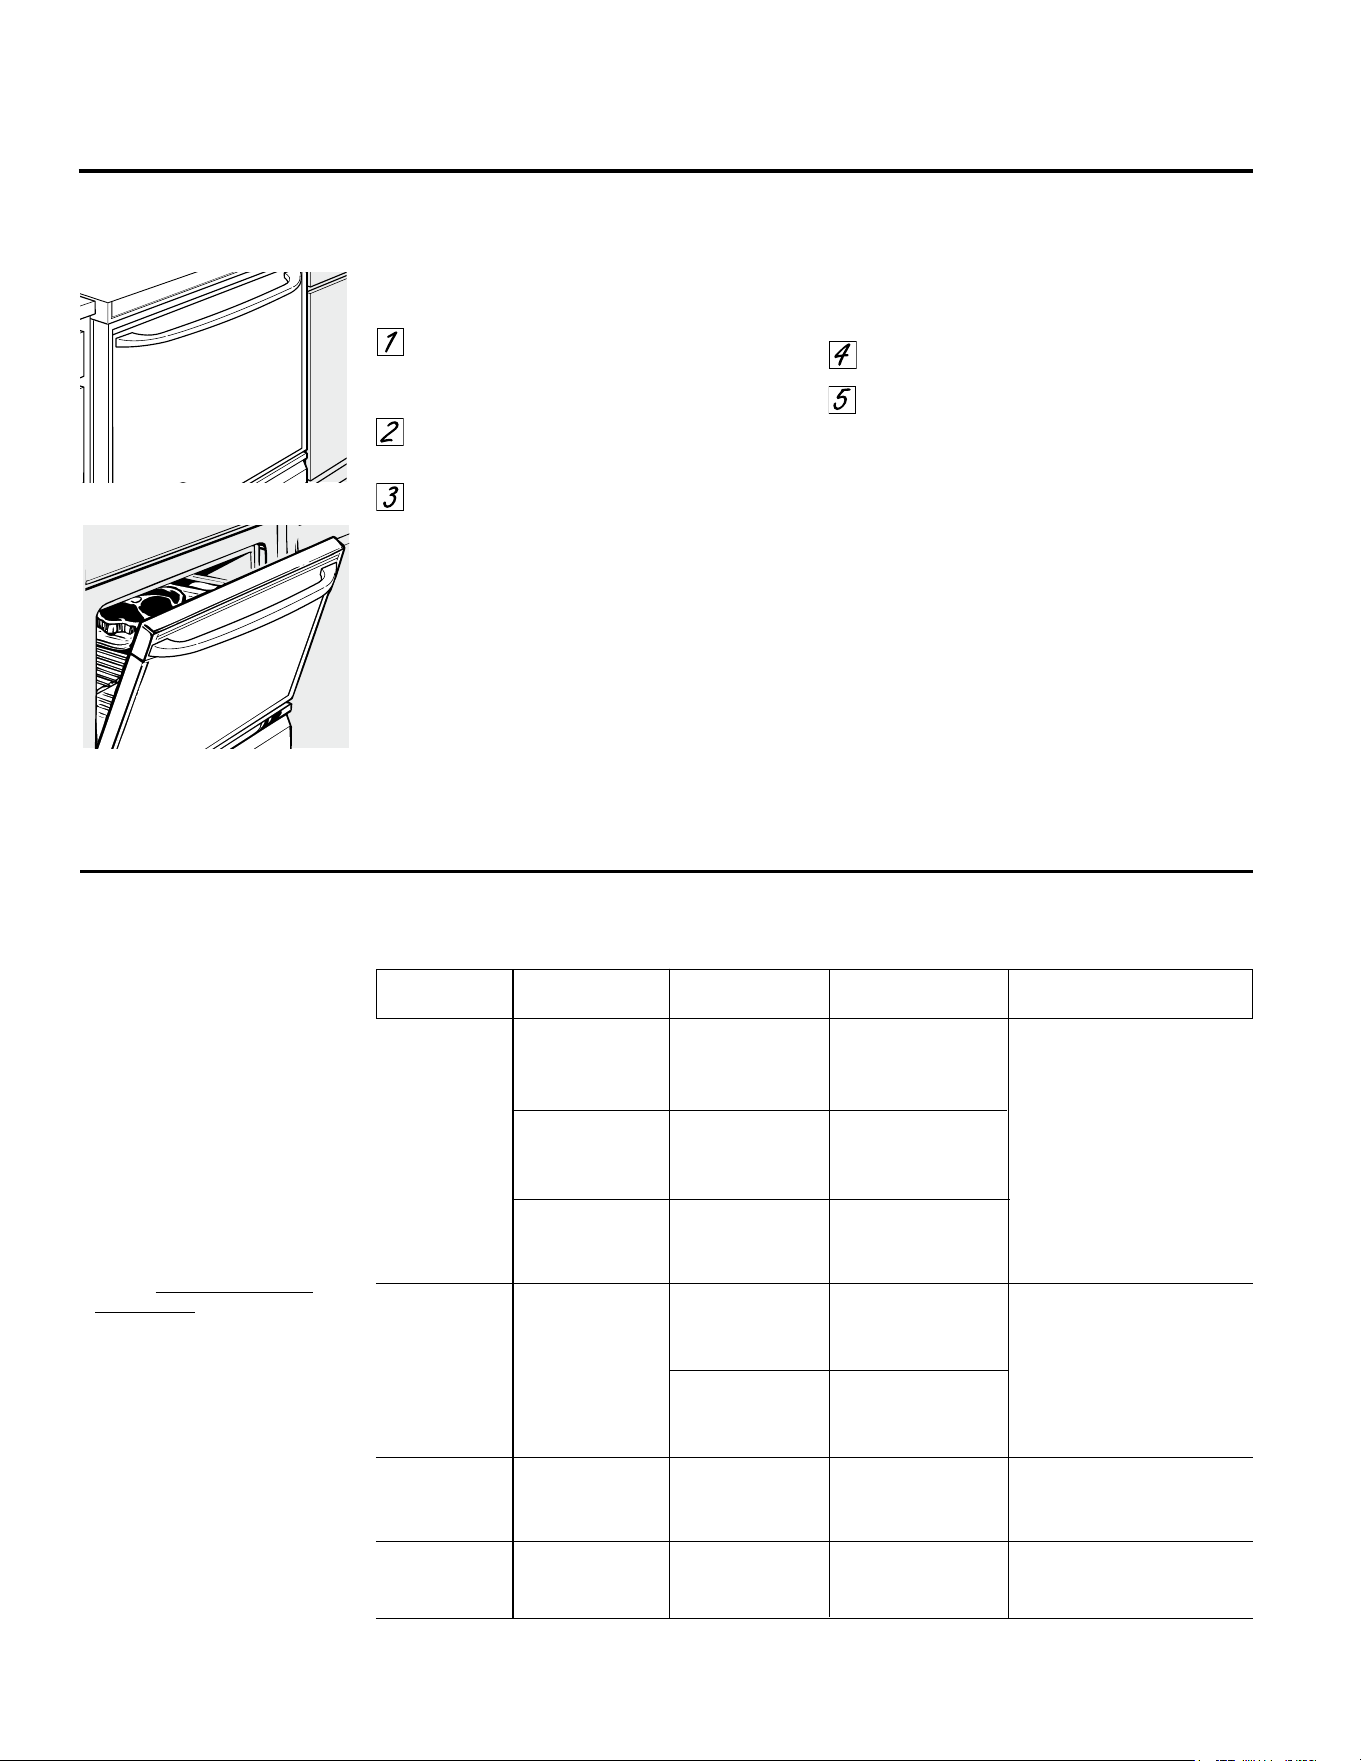
14
Cómo usar el horno.
Si su cocina está conectada a 208 voltios, los bistecs vuelta y vuelta se pueden asar precalentando
el asador y posicionando el estante del horno una posición más arriba.
Para los demás modelos:
Para los modelos JSS28 y JDS28:
Posicionamiento de la Puerta al
Asar:
Cómo configurar el horno para asar
Utilice LO Broil (asar bajo) para cocinar por
completo alimentos como aves o cortes
gruesos de carne sin dorarlos de más.
Coloque la carne o pescado sobre una
asadera dentro de una rejilla diseñada
para asar.
Siga las posiciones de las bandejas
sugeridas en la Guía de asado.
Presione el botón BROIL HI/LO (asar alto/
bajo) una vez para configurar HI Broil
(asar alto).
Para cambiar a LO Broil (asar bajo),
presione el botón BROIL HI/LO (asar alto/
bajo) de nuevo.
Presione el botón START (iniciar).
Cuando haya finalizado de asar, presione
el botón CLEAR/OFF (borrar/apagado).
Deje la puerta abierta en la posición
de detención de asado. La puerta
queda abierta, y aún así se
mantiene la temperatura adecuada
en el horno.
El tamaño, peso, grosor,
temperatura inicial y
el punto de cocción preferido
afectarán los tiempos
de asado. Esta guía está
basada en carnes a
temperatura de refrigerador.
† El Ministerio de Agricultura de
los EE.UU. afirma: “la carne de
res jugosa es popular, pero debe
saberse que al cocinarla a sólo
140°F (60°C) algunos organismos
que provocan intoxicación
alimentaria pueden sobrevivir”.
(Fuente: Safe Food Book. Your
Kitchen Guide. USDA Rev.
Junio 1985.)
Guía de asado
Nivel Posición
Alimento de cocción Tipo o grosor de la bandeja* Comentarios
Carne de res Jugosa Filetes – E o F (los alimentos Es difícil cocinar filetes de menos
140°F (60°C) Grosor de 1” (2,5 cm) deben estar 1” a 3” de la 1” (2,5 cm) de grosor y que
[2,5 cm a 7,6 cm] del queden jugosos. Se cocinan
elemento de asado) por completo antes de dorarse.
cocinan por completo
A punto Filetes – E (los alimentos deben Para evitar que la carna
160°F (71°C) 3/4” a 1” (1,9 cm a estar de 3” a 4” se enrosque, corte la grasa a se
2,5 cm) de grosor [7,6 cm a 10,2 cm] del enrosque, intervalos de 1” (2,5 cm).
elemento de asado)
Bien cocida Filetes – D o E (los alimentos
170°F (77°C) 3/4” a 1” (1,9 cm a deben estar de 3” a 5”
2,5 cm) de grosor o [7,6 cm a 12,7 cm] del
patties de carne picada elemento de asado)
Pollo Pechuga, sin hueso C (los alimentos deben Asar sobre el lado de la piel
estar de 8” a 9” primero.
[20,3 cm a 22,9 cm] del
elemento de asado)
Pechuga, con hueso C (los alimentos deben
estar de 7” a 8”
[17,8 cm a 20,3 cm] del
elemento de asado)
Filetes de 1/2” a 1” (1,3 cm a D o E (los alimentos Manipule y gire con
pescado 2,5 cm) de grosor deben estar 3” a 6” mucho cuidado.
[7,6 cm a 15,2 cm] del
elemento de asado)
Chuletas Bien cocida 3/4” (1,9 cm) D (los alimentos deben Para evitar que la carna
de cerdo 170°F (77°C) de grosor estar de 6” a 7” se enrosque, corte
[15,2 cm a 17,8 cm] del la grasa a intervalos
elemento de asado) de 1” (2,5 cm).
Precaliente la asadera durante 2 minutos para mejorar el desempeño.
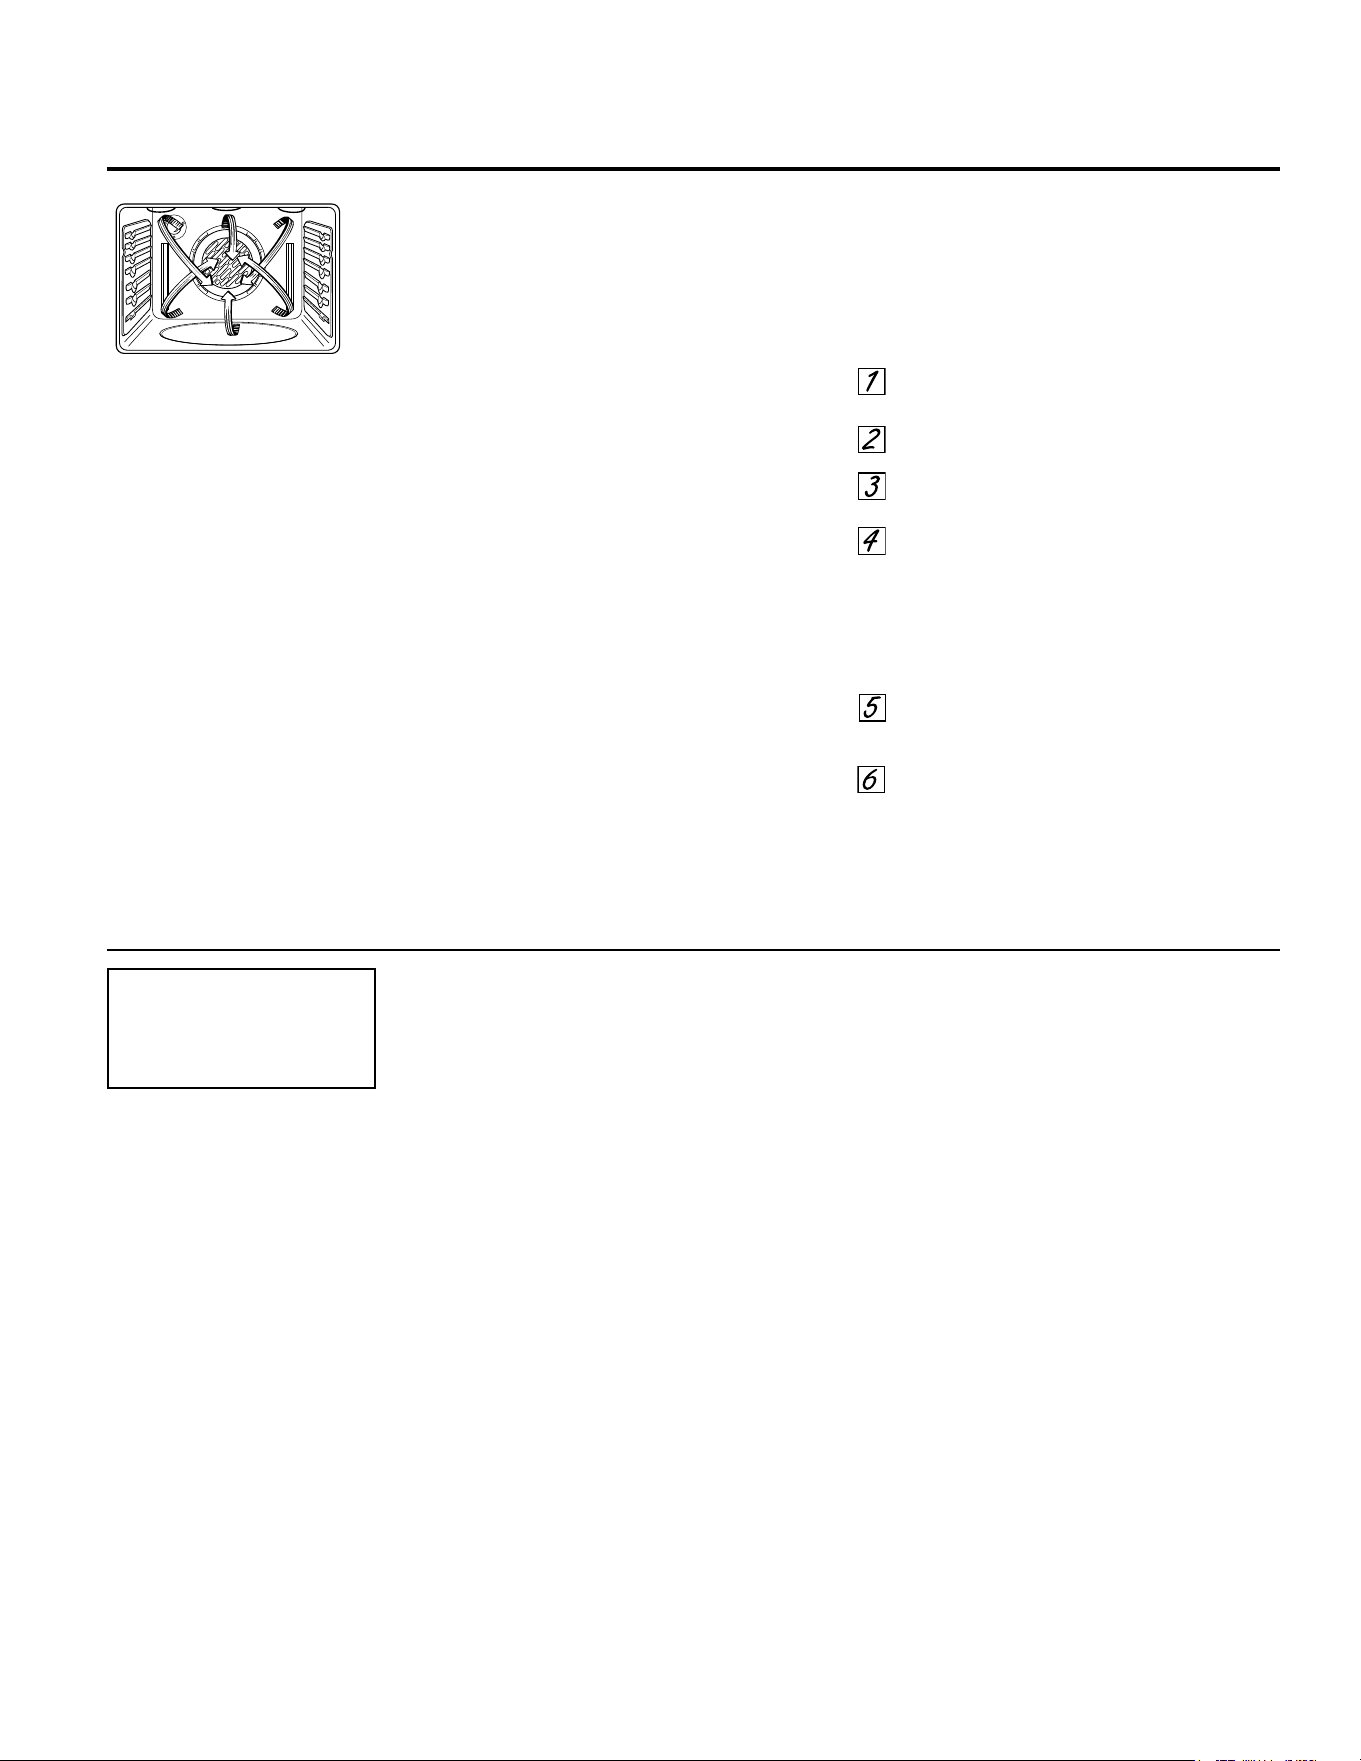
Cómo usar el horno de convección. (en algunos modelos) GEAppliances.com
Horneado por Convección
Ideal para que las comidas horneadas se
doren de forma pareja al ser cocinadas en
múltiples estantes.
• Bueno para grandes cantidades de
comidas horneadas.
• Buenos resultados con galletas,
galletitas, bizcochos de chocolate y
nuez, magdalenas, bocaditos de crema,
arrollados dulces, pastel de ángel y pan.
El ventilador por convección hace circular
el aire caliente de forma pareja sobre y
alrededor de la comida.
El Ventilador por Convección
El ventilador por convección está programado
para funcionar de forma intermitente para un
máximo rendimiento durante el horneado por
convección y durante el precalentamiento. Si
el ventilador está encendido cuando la puerta
del horno está abierta, éste se detendrá. El
ventilador se reiniciará cuando la puerta esté
cerrada.
Conversión de Temperatura
Automática
Al hornear por convección, la función
Auto Temp Conversion (Conversión
de Temperatura Automática) reduce
automáticamente la temperatura
configurada para un rendimiento óptimo.
Incremente el ajuste de temperatura de
Horneado por Convección 20º F más para
una cocción más rápida de trozos de carne y
ave más grandes.
Cómo Programar el Horno para
Hornear por Convección
Presione la tecla Convection Bake
(Hornear por Convección).
Presione las teclas + o - hasta que la
temperatura deseada se muestre.
Presione la tecla Start/On (Iniciar/
Encender).
El horno se iniciará de inmediato. En la
pantalla aparecerá PrE mientras se esté
precalentando. Cuando el horno alcance
la temperatura seleccionada, el control
del horno emitirá varios pitidos y la
pantalla mostrará la temperatura del
horno.
Controle que la comida esté preparada
en el tiempo mínimo de la receta. Cocine
durante más tiempo si es necesario.
Presione la tecla Clear/Off (Borrar/
Apagar) una vez finalizado el horneado,
y luego retire la comida del horno.
Para cambiar la temperatura del horno,
presione la tecla Convection Bake
(Horneado por Convección) y luego las teclas
+ o - para configurar la nueva temperatura.
En un horno por convección, un
ventilador hace circular aire sobre,
debajo y alrededor de la comida.
Este aire caliente que circula
se distribuye de forma pareja a
través de la cavidad del horno.
Como resultado, las comidas son
cocinadas y doradas de forma
pareja; con frecuencia en menos
tiempo que con el calor regular.
Cuando hornee galletas,
obtendrá mejores resultados
si usa una plancha plana para
galletas en lugar de un recipiente
de lados bajos.
Recipientes para cocción por
convección
Antes de utilizar el horno de convección,
verifique que sus elementos de cocción dejen
espacio suficiente para la circulación de aire en
el horno. Si va a hornear con varios recipientes,
deje un espacio entre ellos. Además, asegúrese
de que los recipientes no se toquen entre sí o
toquen las paredes del horno.
Papel y plástico
Los recipientes de papel y plástico resistentes
al calor recomendados para utilizar en
horneado normal también pueden utilizarse
para horneado por convección, pero no deben
utilizarse a temperaturas más elevadas que la
temperatura recomendada por el fabricante
de los elementos de cocción. También pueden
utilizarse elementos de cocción plásticos
resistentes a temperaturas de 400°F (204,4°C).
Metal y vidrio
Cualquier tipo de recipiente de cocción
funciona en su horno de convección; sin
embargo, los recipientes de metal se calientan
más rápidamente y se recomiendan para
horneado por convección.
• Las bandejas oscuras o con acabado mate
hornean alimentos más rápido que las
brillantes.
• Los recipientes de vidrio o cerámica cocinan
más despacio.
Para recetas como pollo horneado, utilice un
recipiente con lados bajos. El aire caliente no
puede circular bien alrededor de los alimentos
en un recipiente de lados altos.
15
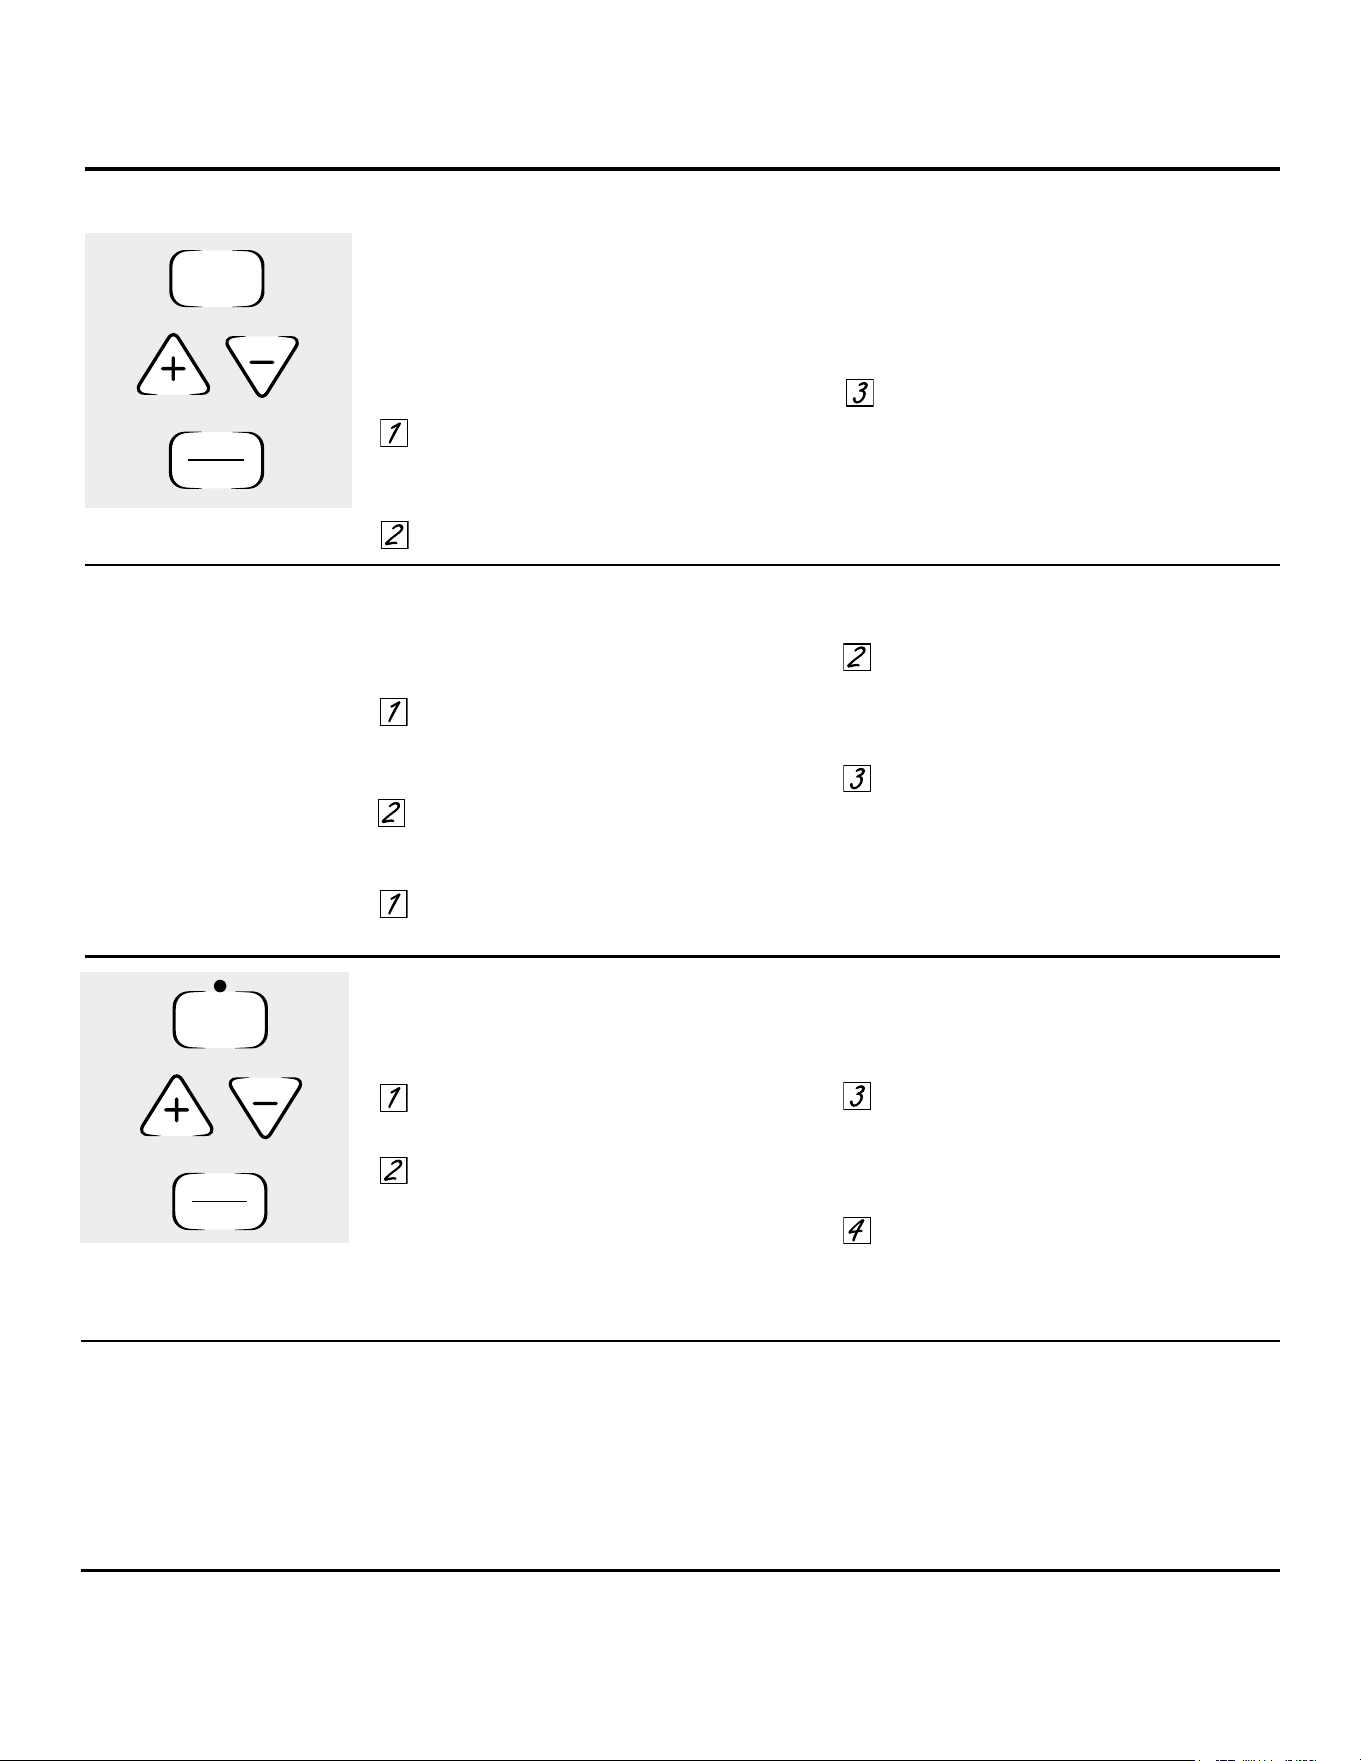
Start
On
Kitchen
Timer
On/Off
No todas las funciones corresponden a todos los modelos.
La función de temporizador sólo
cuenta por minutos. La función
Clear/ Off (Borrar/ Apagar) no
afecta el temporizador.
Para Configurar el Temporizador
El temporizador no controla el funcionamiento
del horno. La configuración máxima del
temporizador es 9 horas y 59 minutos.
Presione la tecla Kitchen Timer On/ Off
(Encendido/ Apagado del Temporizador de
Cocina).
Presione las teclas + o - hasta que la
cantidad de tiempo que desee aparezca en
la pantalla. El tiempo máximo que se puede
ingresar en minutos es 59. Los tiempos
superiores a 59 minutos se deberían
cambiar a horas y minutos.
Si comete un error, presione la tecla Kitchen
Timer On/ Off (Encendido/ Apagado del
Temporizador de Cocina) y vuelva a comenzar.
Presione la tecla Start (Iniciar). Luego de
presionar la tecla Start (Iniciar), Set
(Configuración) desaparece; esto le indica
que el tiempo está en cuenta regresiva,
aunque la pantalla no cambia hasta que
haya pasado un minuto.
Cuando el contador llegue a :00, el control
hará 3 pitidos seguidos por un pitido cada 6
segundos, hasta que se presione la tecla
Kitchen Timer On/ Off (Encendido/
Apagado del Temporizador de Cocina).
Uso del reloj y el temporizador.
Para Configurar el Reloj
El reloj se deberá configurar en la hora correcta
del día para que las funciones automáticas del
temporizador del horno funcionen de forma
adecuada. La hora del día no se puede cambiar
durante un horneado por tiempo o el ciclo de
auto limpieza.
Presione la tecla
CLOCK
(Reloj) dos veces.
Para modelos sin la tecla Clock (Reloj):
Mantenga presionadas las teclas + y – por
3 segundos.
Presione las teclas + o -.
Si las teclas + o - no se presionan dentro de un
minuto luego del Paso 1, la pantalla vuelve a la
configuración original. Si esto sucede, repita el
Paso 1 y vuelva a ingresar la hora del día.
Presione la tecla START (Iniciar) hasta que la
hora del día aparezca en la pantalla. Esto
ingresa la hora e inicia el reloj.
Para controlar la hora del día cuando la pantalla
muestra otra información, simplemente presione
la tecla
CLOCK
(Reloj). La hora del día aparece
hasta que otra tecla es presionada.
Clock
Start
On
Asegúrese que el reloj marque la
hora correcta del día.
Para Apagar la Pantalla del Reloj
Si cuenta con varios relojes en su cocina, es
posible que desee apagar la pantalla con la hora
del día en su estufa.
Presione la tecla CLOCK (Reloj) una vez para
apagar la pantalla de la hora del día.
Aunque no la podrá ver, el reloj mantiene la
hora correcta del día.
Presione la tecla CLOCK (Reloj) dos veces
para regresar a la pantalla del reloj.
Para modelos sin la tecla Clock (Reloj):
Presione las teclas Bake (Hornear) y Broil
Hi/Lo (Asar Alto/Bajo) al mismo tiempo
hasta que la pantalla muestre SF.
Presione la tecla Timer (Temporizador). La pantalla
mostrará ON (Encender) (pantalla del reloj
encendida). Presione la tecla Timer (Temporizador)
nuevamente hasta que la pantalla muestre OFF
(Apagar) (pantalla del reloj apagada).
Presione la tecla Start/On (Inicio/ Encender)
para dejar el control configurado en este modo.
NOTA: Si no se puede recuperar la memoria del
reloj o no se muestra de forma permanente, la
función Modo de Ahorro de Energía se encuentra
encendida. Para apagar esta función, consulte la
sección Modo de Ahorro de Energía.
Para Reiniciar el Temporizador
Si la pantalla aún muestra el tiempo restante,
la puede cambiar presionando la tecla Kitchen
Timer On/ Off (Encendido/ Apagado del
Temporizador de Cocina), y luego presionando
las teclas numéricas hasta que el tiempo que
desea aparezca en la pantalla.
Si el tiempo restante no se encuentra en la
pantalla (retraso del comienzo del reloj o tiempo
de cocción aparecen en la pantalla), recuerde
el tiempo restante presionando la tecla Kitchen
Timer On/ Off (Encendido/ Apagado del
Temporizador de Cocina) y luego presionando
las teclas numéricas para ingresar el nuevo
tiempo que desee.
Para Cancelar el Temporizador
Presione la tecla Kitchen Timer On/ Off
(Encendido/ Apagado del Temporizador de
Cocina) dos veces.
16
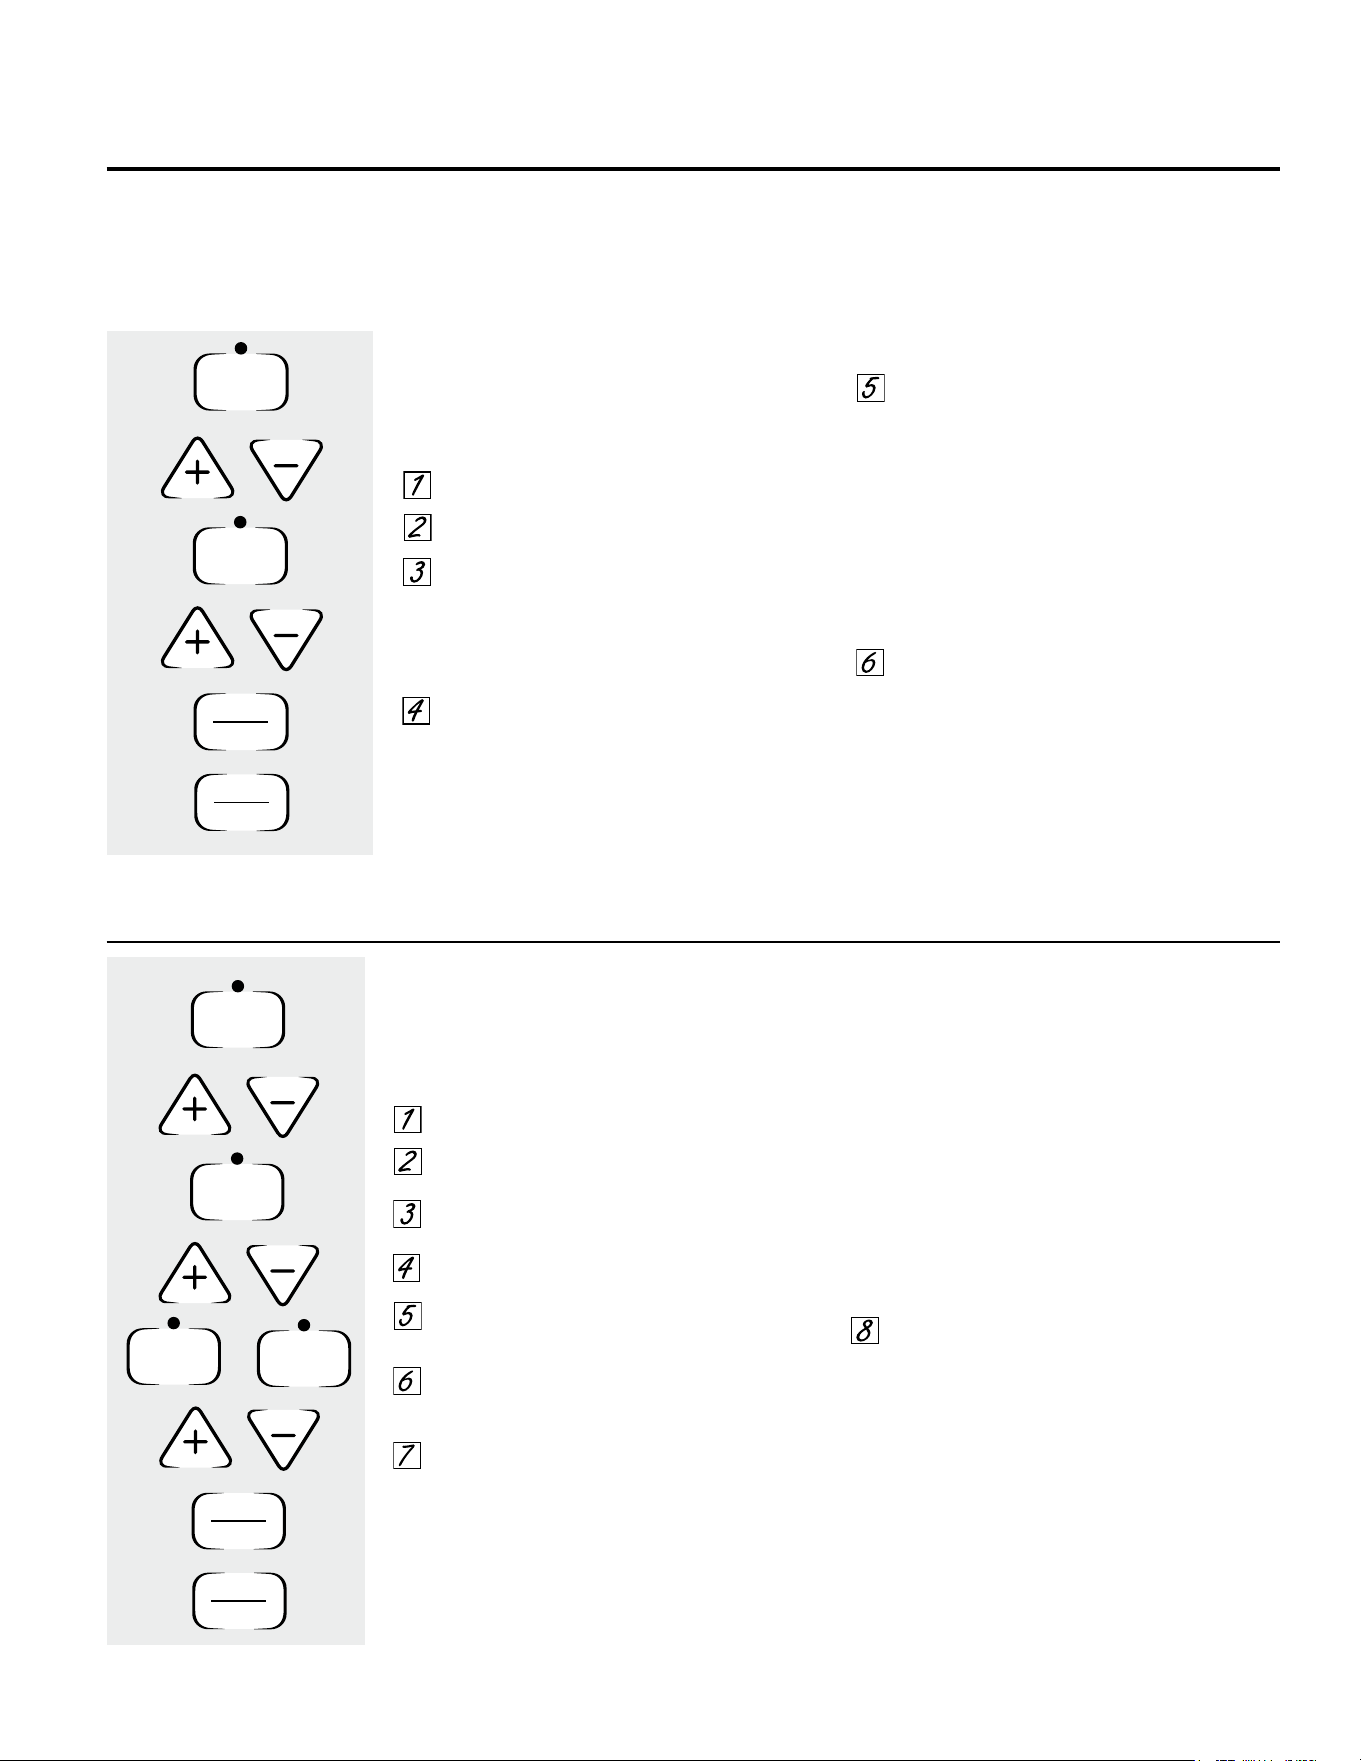
17
No bloquee la puerta del horno con la traba durante la cocción por tiempo. La traba se usa para la auto limpieza únicamente.
NOTA: Las comidas que se echan a perder rápidamente, tales como leche, huevos, pescado, rellenos, ave y cerdo, no se
deberán dejar reposar por más de 1 hora antes y después de la cocción. La temperatura ambiente estimula el desarrollo
de bacterias nocivas. Asegúrese de que la luz del horno esté apagada, ya que el calor de la lámpara acelerará el
crecimiento de bacterias nocivas.
Usando las funciones de tiempo
de horneado. (
en algunos modelos
) GEAppliances.com
Cómo Configurar un Inicio Inmediato y Detención Automática
El horno superior se encenderá de forma inmediata y
se cocinará por un período de tiempo seleccionado.
Al final del tiempo de cocción, el horno se apagará
automáticamente.
Presione la tecla Bake (Hornear).
Presione las teclas + o - para programar la
temperatura del horno.
Presione la tecla Cooking Time (Tiempo de
Cocción).
NOTA: Si su receta requiere calentar en forma previa,
es posible que necesite tiempo adicional sobre el
tiempo de cocción.
Presione las teclas + o - para programar el
tiempo de horneado.
Aparecerá el tiempo de cocción que ingresó. (Si
selecciona Cooking Time (Cocción por Tiempo)
primero y luego ajusta Bake Temperature
(Temperatura de Horneado), aparecerá en cambio la
temperatura del horno.)
Presione la tecla Start (Iniciar).
La pantalla muestra la temperatura del horno
que configuró o la cuenta regresiva de la
cocción por tiempo. (La pantalla comienza con
PRE si se está mostrando la temperatura del
horno).
El horno continuará cocinando durante la
cantidad de tiempo programada, y luego de
apagará de forma automática.
Presione la tecla Clear/ Off (Borrar/ Apagar)
para apagar la pantalla si es necesario.
Retire la comida del horno. Recuerde que aunque el
horno se apague de forma automática, la comida que
permanezca dentro de éste continuará cocinándose
cuando el horno esté apagado.
Start
On
Cooking
Time
Clear
Off
Bake
Temp Recall
Cooking
Time
Start
On
Clear
Off
Bake
Temp Recall
Start
Time
Delay
Start
or
Cómo Configurar un Inicio Retrasado y Detención Automática
El horno se encenderá en el horario del día que
configure, cocinará durante un período de tiempo
específico y luego se apagará automáticamente.
Asegúrese que el reloj marque la hora correcta del día.
Presione la tecla Bake (Hornear).
Presione las teclas + o - para programar la
temperatura del horno.
Presione la tecla Cooking Time (Tiempo de
Cocción).
Presione las teclas + o – para configurar la
cantidad de tiempo de cocción deseado.
Presione la tecla Start (Iniciar) o Delay Start
(Retrasar Inicio).
Presione las teclas + o – para configurar la hora
del día en que desea que el horno se encienda e
inicie la cocción.
Presione la tecla Start (Iniciar).
NOTA: Un tono de atención sonará si está usando
el horneado por tiempo y no se debe tocar la tecla
Start /On (Inicio/Encendido)
.
NOTA: Si desea controlar los horarios configurados,
presione la tecla Start Time (Hora de Inicio)
o Delay
Start (Retrasar Inicio)
para controlar la hora de inicio
que configuró o presione la tecla Cooking Time (Tiempo
de Cocción) para controlar el período de tiempo de
cocción que programó.
Cuando el horno se encienda en la hora del día
que configuró, la pantalla mostrará PRE hasta
que alcance la temperatura seleccionada, y luego
mostrará la temperatura del horno.
Al finalizar el tiempo de cocción, El horno se apagará
y se escuchará el tono del final del ciclo.
Presione la tecla Clear/ Off (Borrar/ Apagar) para
apagar la pantalla si es necesario.
Retire la comida del horno. Recuerde que aunque el
horno se apague de forma automática, la comida que
permanezca dentro de éste continuará cocinándose
cuando el horno esté apagado.
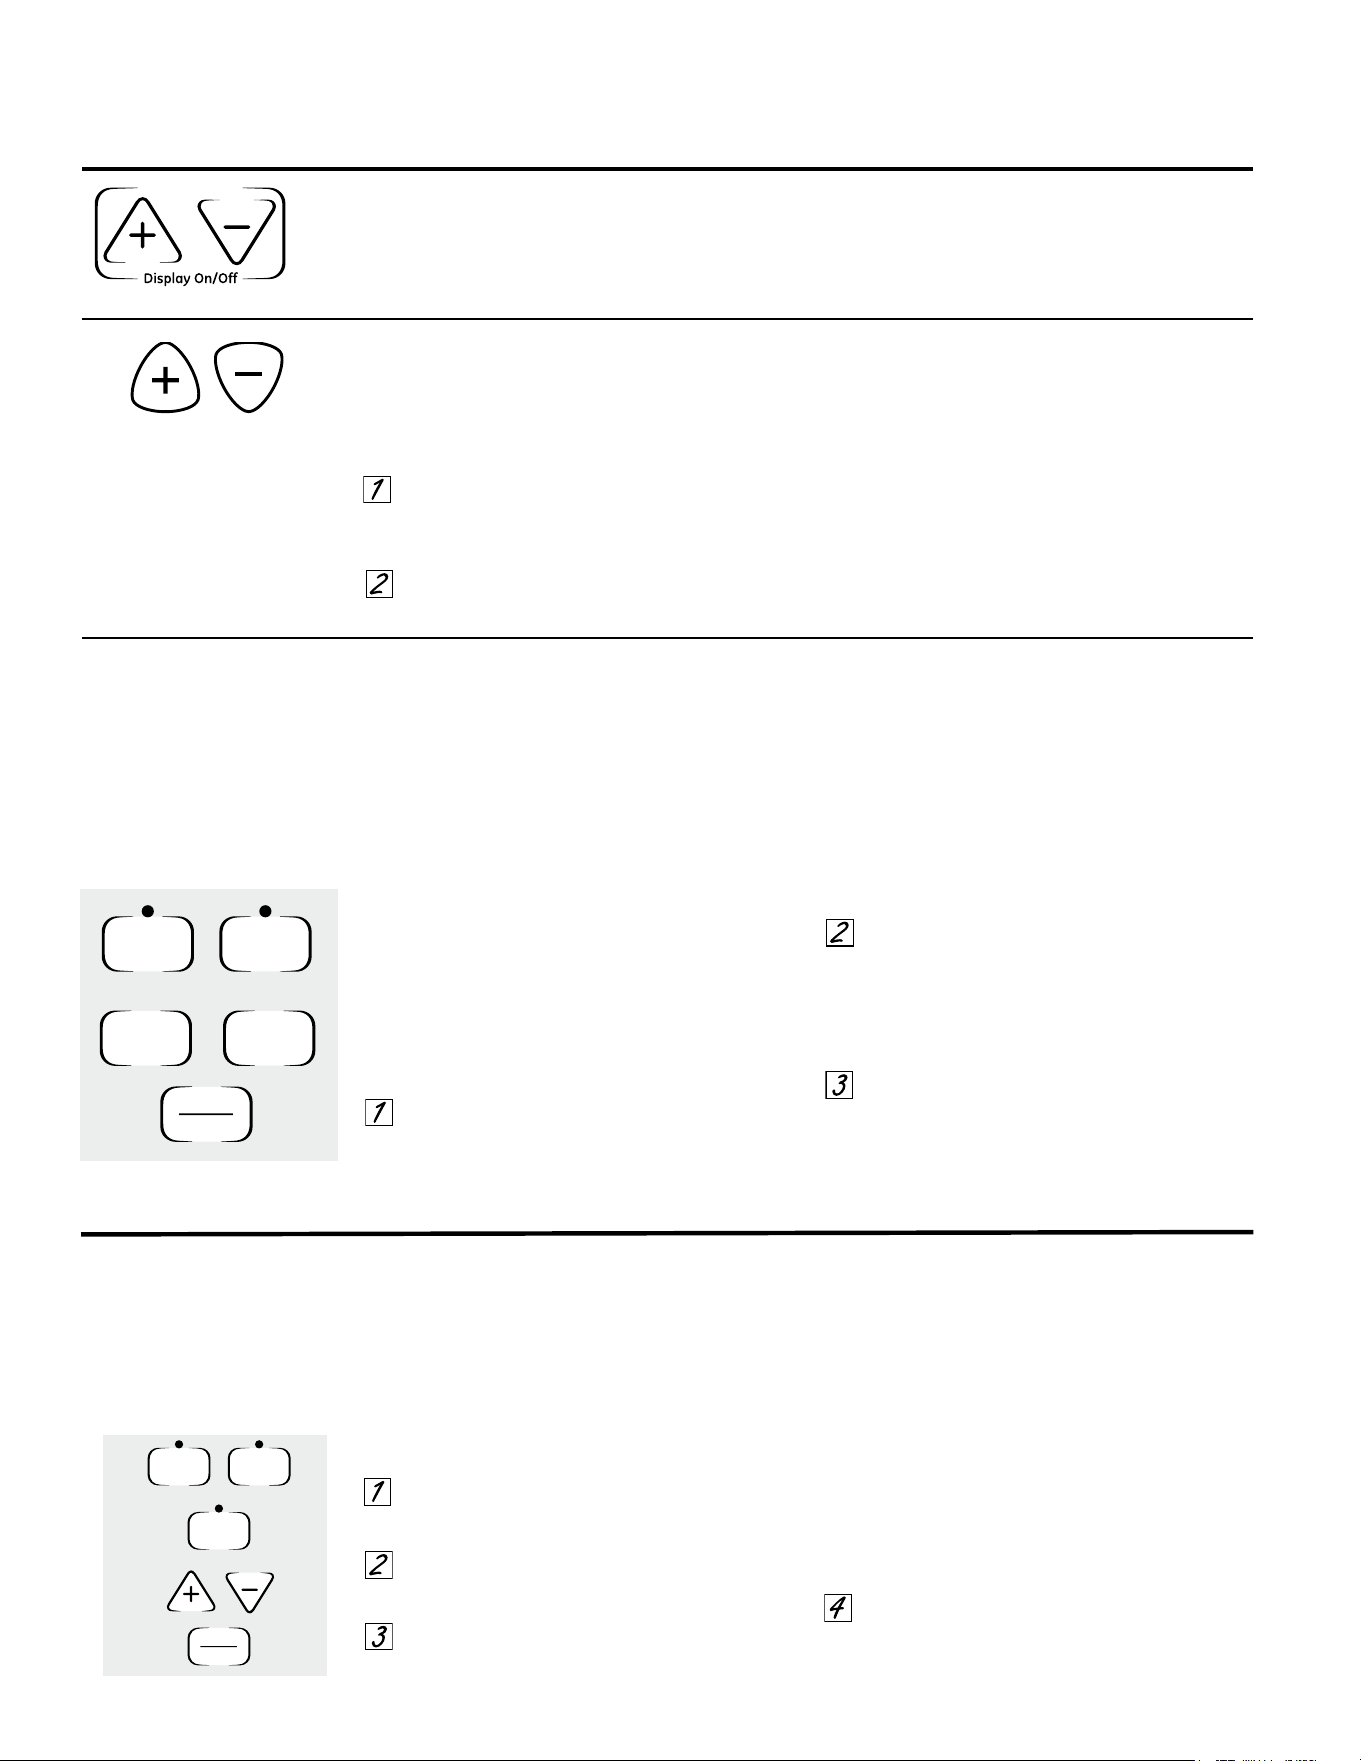
Los nuevos controles con botones de toque cuentan con características adicionales. Las siguientes son las características
y la manera en que usted puede activarlas.
Los modos de características especiales sólo pueden activarse mientras la pantalla muestra la hora. Se conservan en la
memoria de los controles hasta que se repitan los pasos.
Cuando la pantalla muestre su elección, presione la tecla Start/On (Iniciar/
Encendido
). Las funciones especiales
permanecerán en la memoria luego de un corte de corriente.
NOTA: La función Sabbath (Modo Sabático) y la función Thermostat Adjustment (Ajuste del Termostato) son también
Funciones Especiales, pero se detallan de forma separada en las siguientes secciones.
Funciones especiales en el control del horno bajo.
Corte de 12 Horas
Con esta función, en caso de olvidarse y dejar
el horno prendido, el control apagará de forma
automática el horno luego de 12 horas durante
las funciones de horneado y luego de 3 horas
durante la función asar.
Si desea desactivar esta función, siga los
siguientes pasos.
Presione las teclas Bake and Broil Hi/Lo
(Hornear y Asar Alto/ Bajo) hasta que la
pantalla muestre SF.
Presione la tecla Clock (Reloj). En la
pantalla aparecerá ON (Encender)
(apagado en 12 horas). Presione la tecla
Clock (Reloj) en forma repetida hasta que
la pantalla muestre OFF (Apagar) (sin
apagado).
Touch the Start/On pad to activate
the no shut-off and leave the control set in
this special features mode.
Bake
Temp Recall
Clock
Cooking
Time
Broil
Hi/Lo
Start
On
+
or
Ajuste los termostatos - ¡Hágalo usted mismo!
Es posible que encuentre que su horno nuevo cocina de forma diferente al que reemplazó. Use su horno nuevo durante
algunas semanas para familiarizarse con el mismo. Si aún piensa que su horno nuevo está demasiado caliente o demasiado
frío, podrá ajustar el termostato usted mismo.
No use termómetros, tales como los que se venden en las tiendas, para controlar la temperatura del horno. Estos
termómetros pueden variar entre 20 y 40 grados.
NOTA: Este ajuste no afectará el asado o las temperaturas de auto limpieza. El ajuste se guardará en la memoria luego de
un corte de corriente.
Para Ajustar el Termostato
Presione las teclas Bake and Broil Hi/Lo
(Hornear y Asar Alto/ Bajo) hasta que la
pantalla muestre SF.
Presione la tecla Bake (Hornear). En la
pantalla se muestra un número de dos
dígitos.
La temperatura del horno se puede ajustar
hasta (+) 35º F (1.6º C) más caliente o (-) 35º
F (1.6º C) más fría. Presione la tecla + para
incrementar la temperatura por
incrementos de 1 grado.
Presione la tecla - para reducir la
temperatura por descensos de 1 grado.
Cuando haya realizado el ajuste, presione
la tecla
Start/On (Iniciar/
Encendido
)
.para
regresar a la pantalla de la hora del día.
Use su horno como lo haría normalmente.
Bake
Temp Recall
Broil
Hi/Lo
Start
On
+
Bake
Temp Recall
Modo de Ahorro de Energía (en
algunos modelos)
Para ahorrar energía, puede apagar el reloj
con la hora del día y la pantalla cuando la
estufa no esté en uso.
Mantenga presionadas las teclas + y – al
mismo tiempo para permitir o desactivar esta
función. Esto encenderá o apagará la pantalla.
NOTA: La pantalla se reiniciará luego de un
corte de corriente.
Bloqueo del Control (en algunos
modelos)
Su control le permitirá bloquear las teclas
táctiles, de modo que no se puedan activar al
ser tocadas.
Para bloquear/ desbloquear los controles:
Presione las teclas + y – al mismo tiempo
durante 3 segundos, hasta que la
pantalla muestre LOC ON (Bloqueo
Encendido).
Para desbloquear el control, presione las
teclas + y – al mismo tiempo durante 3
segundos, hasta que la pantalla muestre
LOC OFF (Bloqueo Apagado).
Cuando esta función esté activada y las
teclas táctiles sean presionadas, el control
dará un pitido y la pantalla mostrará LOC ON
(Bloqueo Activado).
• El modo de bloqueo de control afecta
todas las teclas táctiles. Ninguna tecla
táctil funcionará cuando esta función esté
activada.
• El ajuste se guardará en la memoria luego
de un corte de corriente.
CONTROL LOCK/UNLOCK
PRESS + AND – AND HOLD FOR 3 SECONDS
18
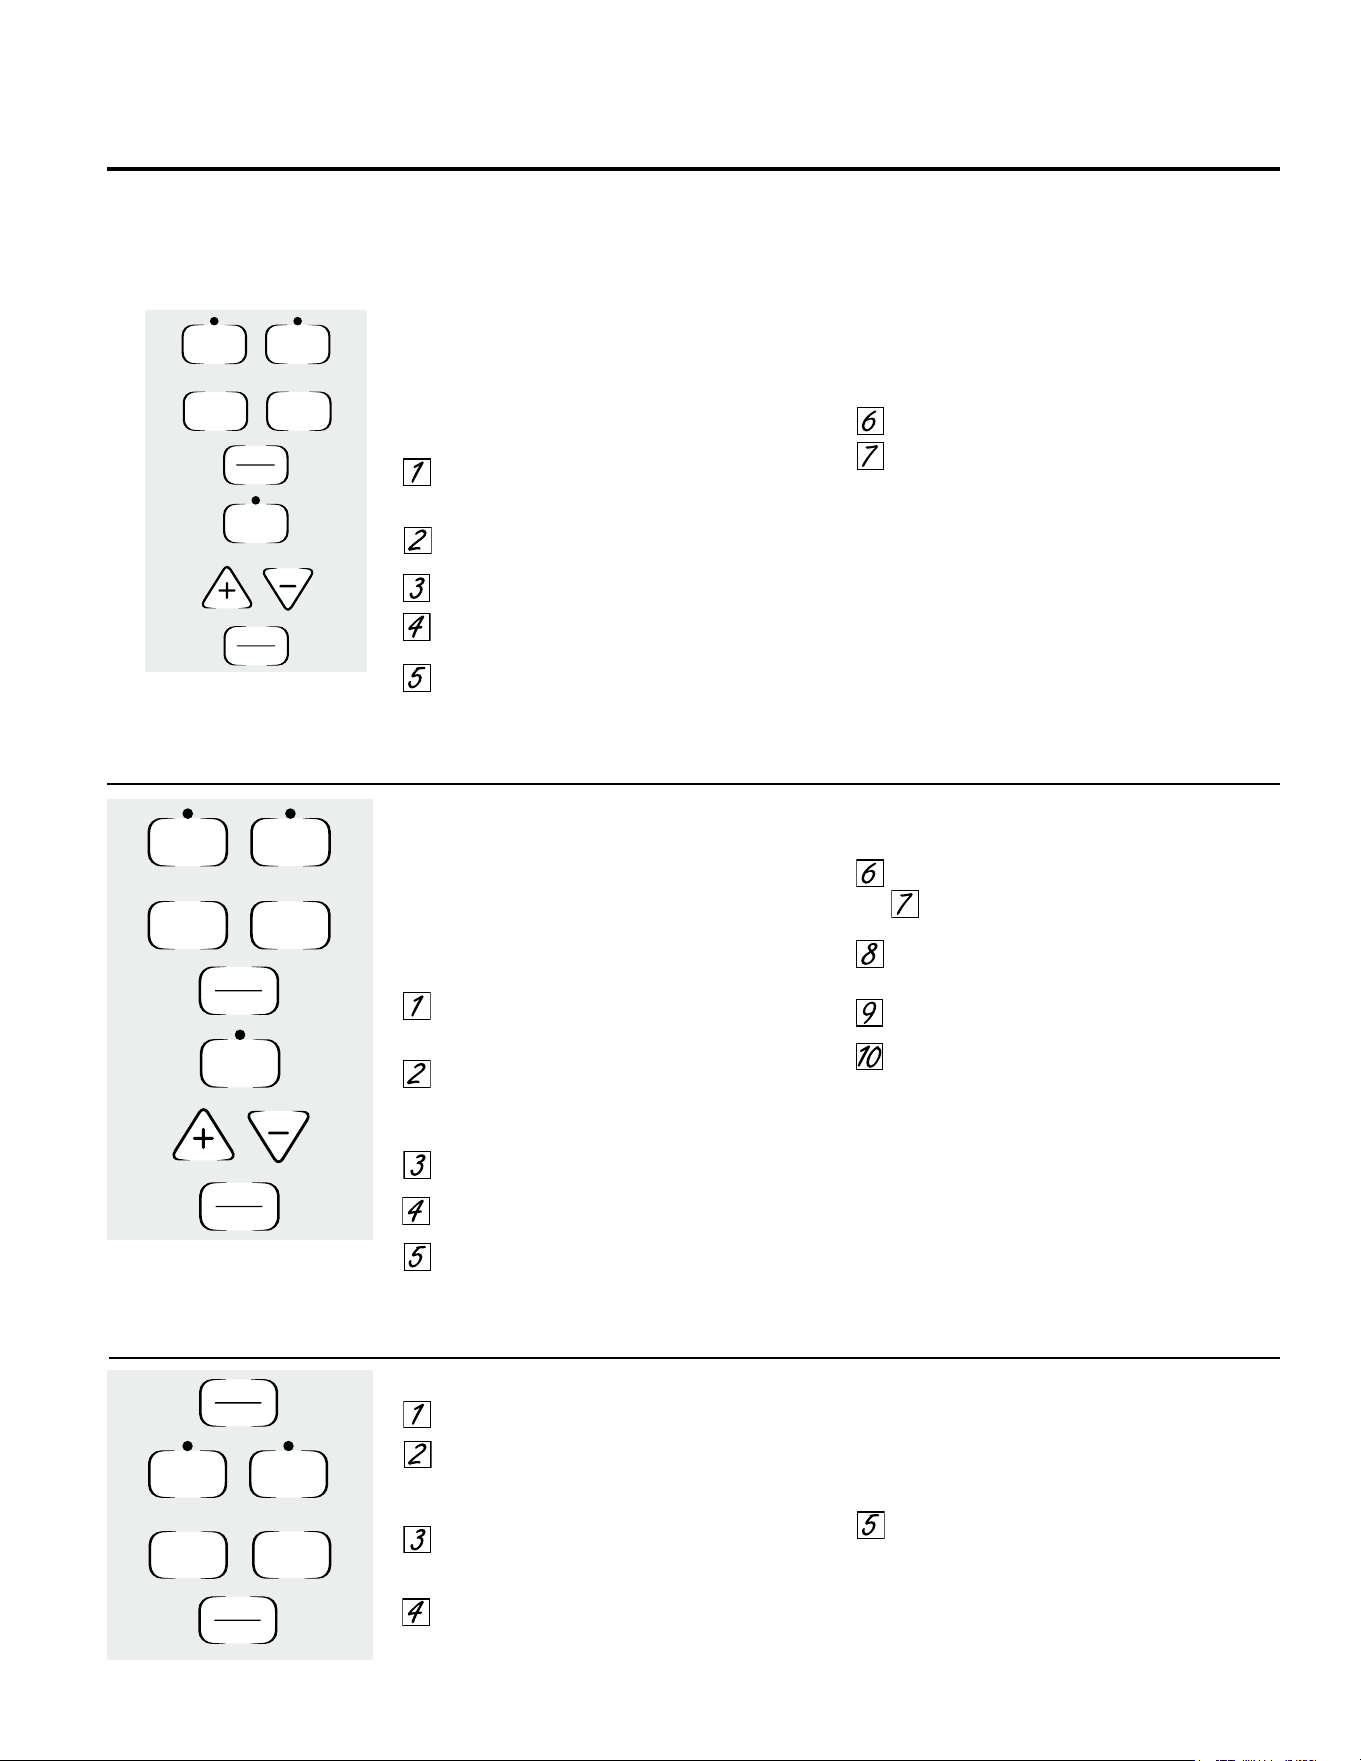
19
Cuando la pantalla muestra ⊃ -, el
horno está configurado en Sabbath
(Sabático). Cuando la pantalla muestra
⊃⊂ el horno está configurado en
horneado/ asado.
La función Sabbath (Modo Sabático) se puede usar sólo para hornear. No se puede usar para asar, auto limpieza, horneado por convección o cocción
con inicio demorado.
NOTA: La luz del horno se enciende de forma automática (en algunos modelos) cuando la puerta se abre, y se apaga cuando la puerta se cierra. La
lámpara se puede retirar. Lea la sección de Reemplazo de la Luz del Horno. En modelos con interruptor de luz en el panel de control, la luz del horno
se puede encender y dejar encendida.
Cómo Configurar la Función Modo Sabático para un Horneado por Tiempo – Comienzo
Inmediato y Detención Automática
NOTA: Para entender cómo funciona el control del
horno, utilice el Immediate Start (Inicio Inmediato) y
Automatic Stop (Detención Automática) (sin modo
sabático) antes de ingresar Sabbath (Modo Sabático).
Asegúrese que el reloj marque la hora correcta del
día y que el horno esté apagado.
Presione las teclas Bake and Broil Hi/Lo
(Hornear y Asar Alto/ Bajo), al mismo tiempo,
hasta que la pantalla muestre SF.
Presione levemente la tecla Clock (Reloj)
(o la
tecla Cooking Time (Tiempo de Cocción) para
modelos sin la tecla Clock (Reloj)
hasta que
aparezca SAb en la pantalla.
Presione la tecla
Start/On (Iniciar/
Encendido
)
y
⊃ aparecerá en la pantalla.
Presione la tecla Cooking Time (Tiempo de
Cocción).
Touch the + or – pads to set the desired length
of cooking time between 1 minute and 9 hours
and 59 minutes. The cooking time that you
entered will be displayed.
Presione la tecla
Start/On (Iniciar/
Presione la tecla Bake (Hornear). No se
dará ninguna señal.
Presione las teclas numéricas e ingrese la
temperatura deseada. No se dará ninguna
señal ni temperatura.
Presione la tecla Start (Iniciar).
Luego del período de demora al azar de entre
aproximadamente 30 segundos y
1 minuto, ⊃⊂ aparecerá en la pantalla,
indicando que el horno está horneando/ asando.
Si ⊃⊂ no aparece en la pantalla, comience
nuevamente en el Paso 7.
Para ajustar la temperatura del horno, presione
la tecla Bake (hornear) y presione las teclas +
o – para incrementar o reducir la temperatura
por incrementos de 25º. Presione la tecla Start/
On (Iniciar/ Encender). Cuando la cocción haya
finalizado, la pantalla cambiará de ⊃⊂ a ⊃,
indicando que el horno está en OFF (Apagado) pero
aún está en Sabbath (Sabático). Retire la comida
cocinada.
Cómo usar la función Sabbath.
(hornos superior e inferior)
(Diseñada para utilizarse durante el Sabbath u otras Fiestas Judías) (en algunos modelos)
GEAppliances.com
Cómo programar un Horneado Común
NOTA: Para entender cómo funciona el control del
horno, utilice el horneado regular (sin modo sabático)
antes de ingresar Sabbath (Modo Sabático).
Asegúrese que el reloj marque la hora correcta del
día y que el horno esté apagado.
Presione las teclas Bake and Broil Hi/Lo
(Hornear y Asar Alto/ Bajo), al mismo tiempo,
hasta que la pantalla muestre SF.
Presione levemente la tecla Clock (Reloj) hasta
que aparezca SAb en la pantalla.
Presione la tecla
Start/On (Iniciar/
Encendido
)
y
⊃ aparecerá en la pantalla.
Presione la tecla Bake (Hornear). No se dará
ninguna señal.
La temperatura de inicio preconfigurada se
ajustará automáticamente en 350º. Presione
levemente las teclas + o – para incrementar o
reducir la temperatura por incrementos de 25º
grados. La temperatura se puede configurar
entre 170º y 550º. No se dará ninguna señal ni
temperatura.
Presione la tecla
Start/On (Iniciar/
Encendido
).
Luego del período de demora al azar de entre
aproximadamente 30 segundos y 1 minuto, ⊃⊂
aparecerá en la pantalla, indicando que el
horno está horneando/ asando. Si ⊃⊂ no
aparece en la pantalla, comience nuevamente
en el Paso 4.
Para ajustar la temperatura del horno, presione
la tecla Bake (Hornear) y presione las teclas +
o – para incrementar o reducir la temperatura por
incrementos de 25º. Presione la tecla Start/On
(Iniciar/ Encender).
NOTA: Las teclas Clear/ Off (Borrar/ Apagar) y
Cooking Time (Tiempo de Cocción) están activas
durante la función Sabbath (Sabático).
Bake
Temp Recall
Clock
Cooking
Time
Broil
Hi/Lo
Start
On
+
Start
On
Bake
Temp Recall
or
Bake
Temp Recall
Broil
Hi/Lo
Start
On
+
Start
On
Cooking
Time
Clock
Cooking
Time
or
Cuando la pantalla muestra ⊃
el horno está configurado en
Sabbath (Sabático). Cuando la
pantalla muestra ⊃⊂ el horno está
configurado en horneado/ asado.
Cómo Salir el Modo Sabático
Presione la tecla Clear/ Off (Borrar/ Apagar).
Si el horno está cocinando, espere un período
de retraso al azar de aproximadamente entre
30 segundos y 1 minuto, hasta que sólo ⊃
aparezca en la pantalla.
Presione las teclas Bake and Broil Hi/Lo
(Hornear y Asar Alto/ Bajo), al mismo tiempo,
hasta que la pantalla muestre SF.
Presione levemente la tecla Clock (Reloj) hasta
que aparezca ON (Encender) u OFF (Apagar) en
la pantalla. ON (Encender) indica que el horno se
apagará de forma automática luego de 12
horas. OFF (Apagar) indica que el horno no se
apagará de forma automática. Para acceder a
una explicación de la función 12 Hour Shut-Off
(Apagar Después de 12 Horas), cconsulte la
sección de Funciones Especiales.
Presione la tecla
Start/On (Iniciar/
Encendido
)
.
NOTA: Si se produjera un corte de luz mientras
el horno se encuentra en Modo Sabático, éste se
apagará automáticamente y permanecerá apagado
incluso cuando regrese la luz. El control del horno se
debe reiniciar.
Bake
Temp Recall
Clock
Broil
Hi/Lo
Start
On
+
Clear
Off
Cooking
Time
or
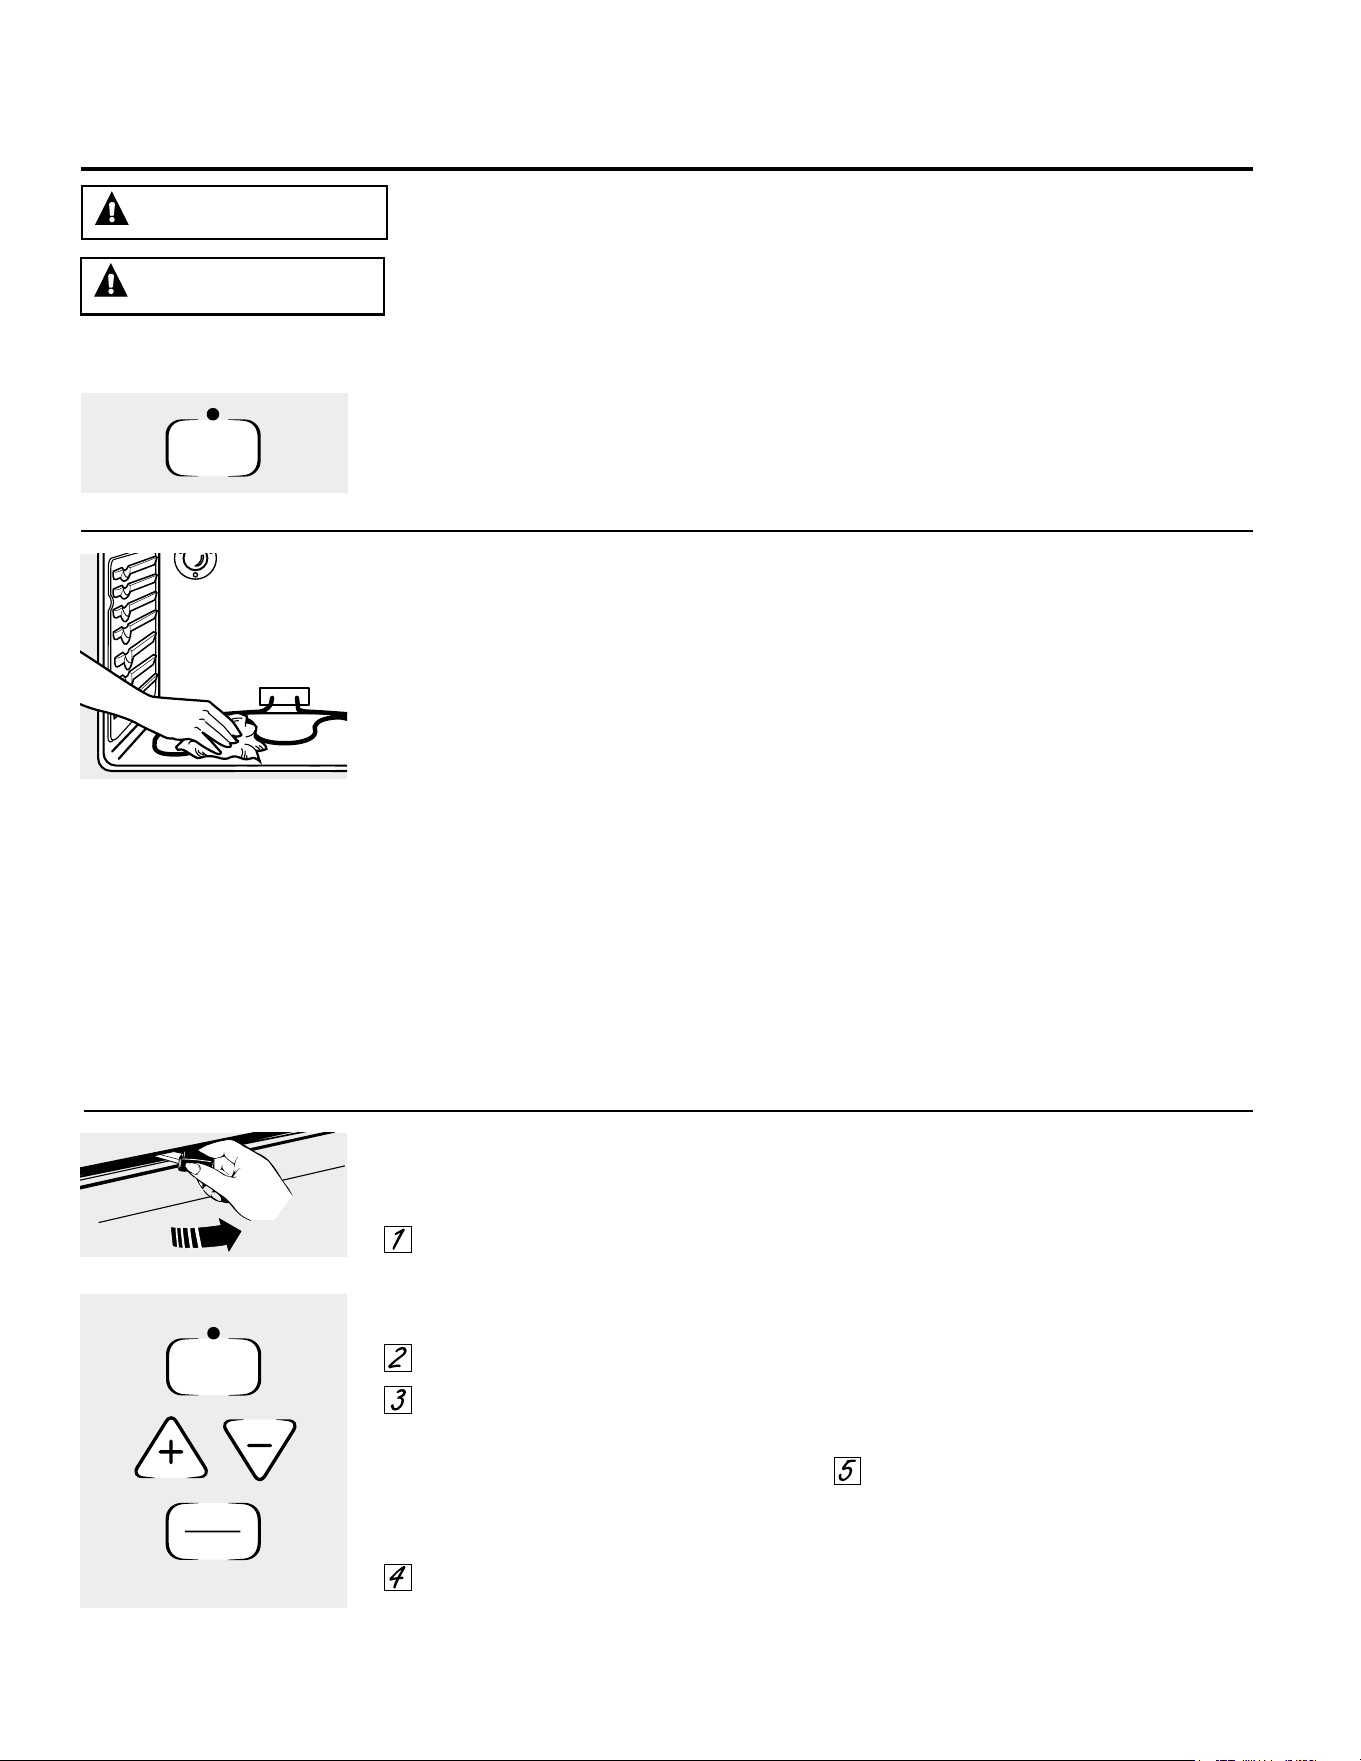
Antes de un ciclo de Auto Limpieza
Si la estufa cuenta con esta tecla de control, entonces cuenta con un
horno con auto limpieza. Siga estas instrucciones.
Si no es así, consulte la sección Limpieza del Horno de Porcelana para acceder a instrucciones de
limpieza del horno.
Recomendamos ventilar su cocina con una ventana
abierta o utilizando un ventilador o campana
durante el primer ciclo de auto-limpieza.
Quite la asadera, rejilla, s onda, todos los recipientes
de cocción y cualquier trozo de papel de aluminio
del horno.
NOTAS:
n
Si el horno se encuentra equipado con parrillas
para horno brillosas y de color plateado,
se recomienda retirar las mismas antes de
comenzar con el ciclo de auto limpieza.
Podrán
permanecer en el horno durante el ciclo de
auto limpieza, pero se oscurecerán, perderán
su lustre y será difícil deslizarlas.
■
Si su horno está equipado con bandejas
revestidas de porcelana gris pueden dejarse
dentro del horno durante el ciclo de autolimpieza.
La suciedad ubicada en el marco frontal de la
cocina y fuera de la junta de la puerta deberá
limpiarse a mano. Limpie estas áreas con agua
caliente, esponjillas de lana de acero embebidas
en jabón o limpiadores tales como Soft Scrub
®
.
Enjuague bien con agua limpia y seque.
No limpie la junta. El material de fibra de vidrio de
la junta de la puerta del horno no resiste productos
abrasivos. Es esencial que la junta se mantenga
intacta. Si usted nota que está desgastada,
reemplácela.
Verifique que la tapa de la bombilla de luz del horno
esté en su lugar y que la luz del horno esté apagada.
IMPORTANTE: Las emanaciones producidas por
el ciclo de autolimpieza de cualquier horno afectan
la salud de algunas aves de manera notoria.
Procure llevar sus aves a otra habitación bien
ventilada.
Limpie con un paño los desechos
rebeldes acumulados en el piso
del horno.
Start
On
Self
Clean
Cómo configurar el horno para una auto-limpieza
Siga las instrucciones en la sección Antes de un
Ciclo de Limpieza.
Trabe la puerta.
NOTA: Nunca fuerce la traba. Si el horno está
demasiado caliente, no podrá deslizar la traba.
Deje que el horno se enfríe.
Presione la tecla Self Clean (Auto Limpieza).
Presione las teclas + o - hasta que el
Tiempo de Limpieza deseado se muestre.
El Tiempo de Limpieza es normalmente 4
horas y 20 minutos. Puede cambiar el Tiempo
de Limpieza a cualquier tiempo entre 3 y 5
horas, dependiendo de la cantidad de suciedad
en el horno.
Presione la tecla Start/On (Iniciar/ Encender).
El ciclo de auto limpieza comenzará
automáticamente y la cuenta regresiva de
tiempo aparecerá en la pantalla.
Mientras el horno está realizando la auto
limpieza, puede presionar la tecla Clock (Reloj)
para mostrar la hora del día. Para regresar a la
cuenta regresiva de limpieza, presione la tecla
Self Clean (Auto Limpieza).
El horno se apaga de forma automática
cuando el ciclo de limpieza está completo, y
0:00 titilará en la pantalla.
Deslice la manija de la traba hacia la
izquierda hasta el límite y abra la puerta.
Nunca fuerce la traba de la manija. Forzar la
manija dañará el mecanismo de bloqueo de la
puerta.
Start
On
Self
Clean
Uso del horno con auto limpieza. (en algunos modelos)
RIESGO DE INCENDIO: Limpie la grasa y la suciedad pesada del horno antes de la
auto limpieza. Si esto no se cumple, el horno se podrá incendiar.
PRECAUCIÓN
Nunca coloque los utensilios de cocina, piedras de horneado, papel de aluminio,
u otros artículos en la base del horno. Incluso los artículos preparados para
alta temperatura se podrán adherir de forma permanente al fondo del horno u
ocasionar daños sobre el horno, la base o artículos en el cajón de almacenamiento
debido al calor.
PRECAUCIÓN
20
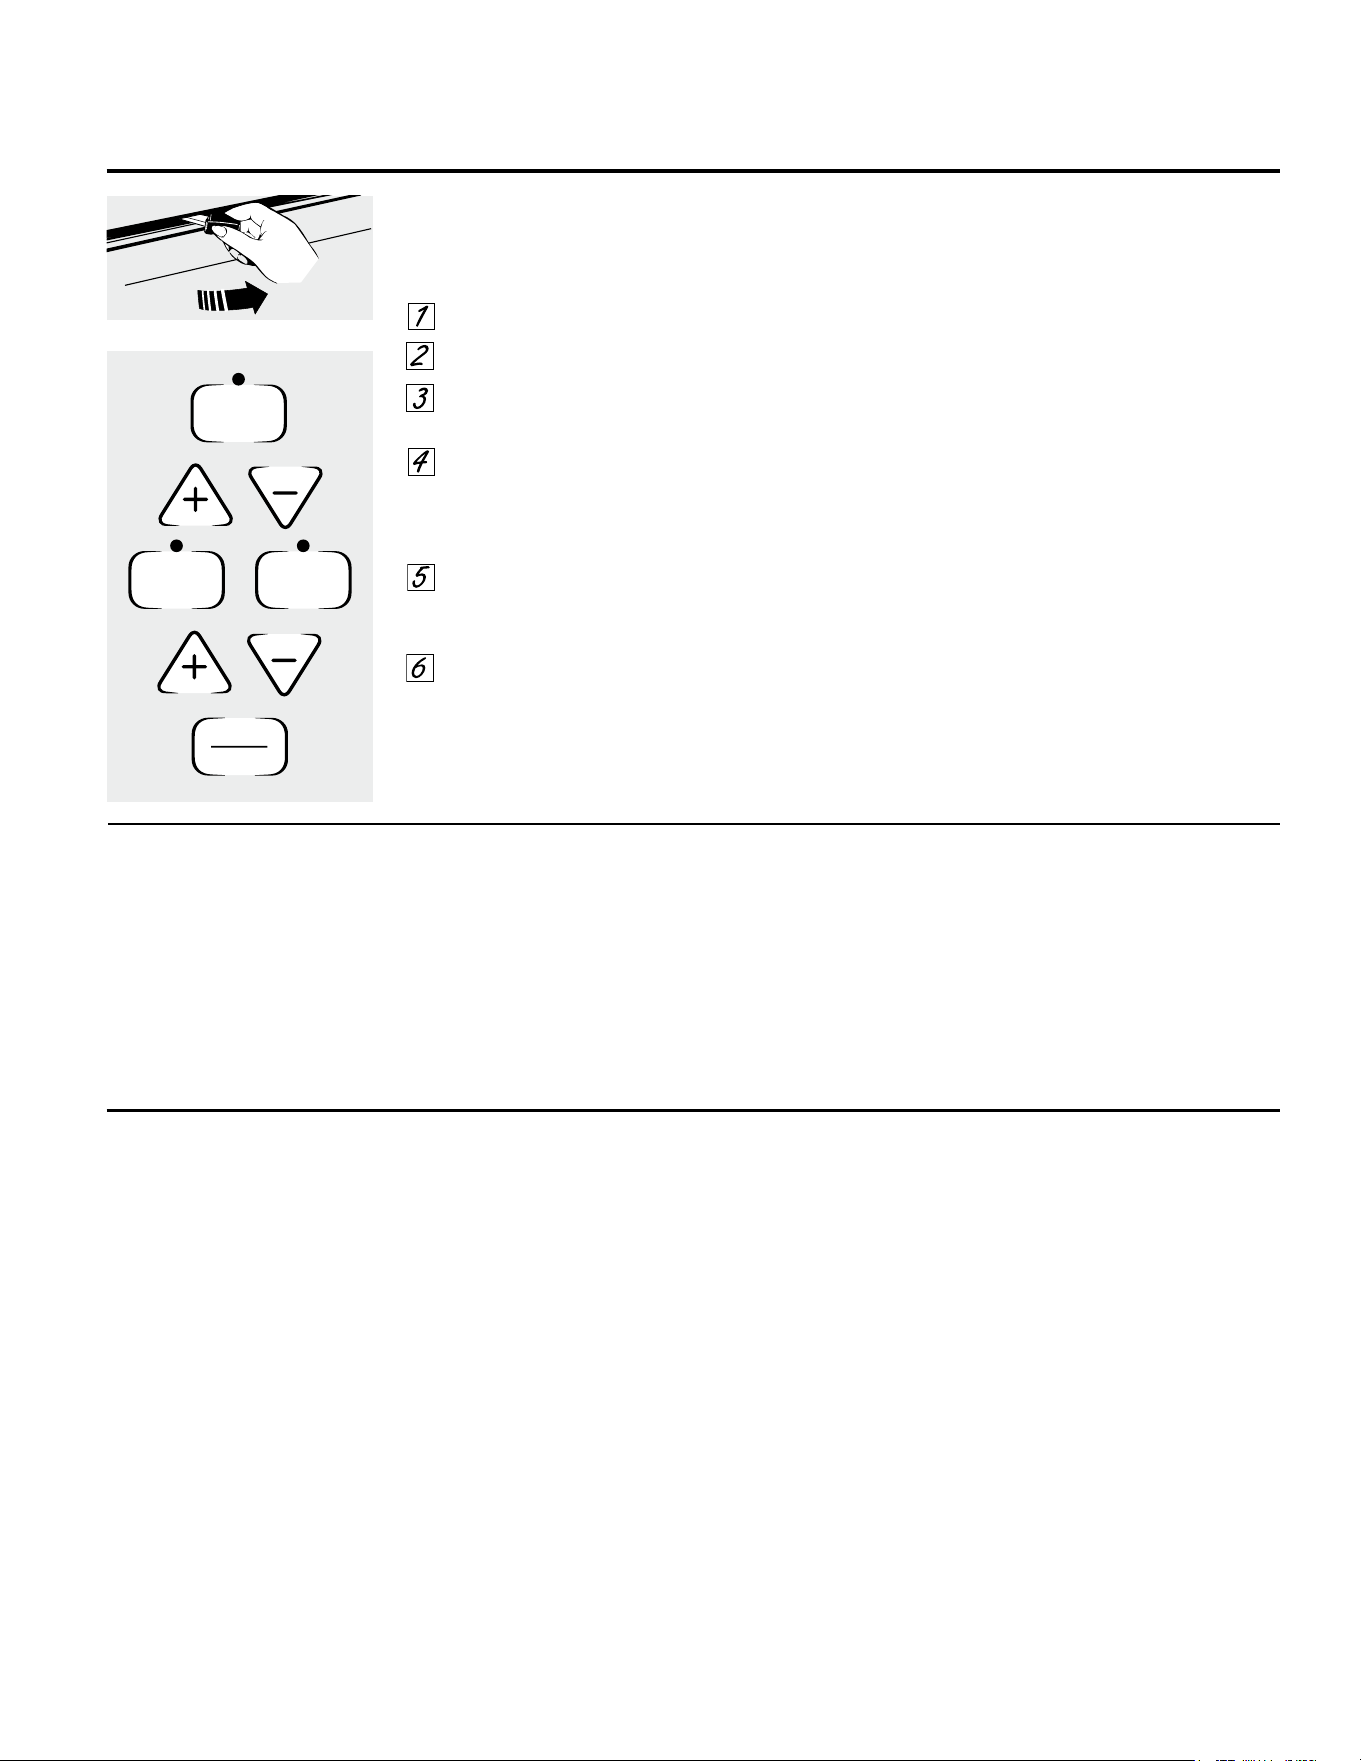
21
GEAppliances.com
Cómo configurar el horno para una auto-limpieza (en algunos modelos)
Siga las instrucciones en la sección Antes de un
Ciclo de Limpieza.
Trabe la puerta..
Presione la tecla Self Clean (Auto Limpieza).
Presione las teclas + o - hasta que el
Tiempo de Limpieza deseado se muestre.
Presione la tecla Start Time (Hora de
Inicio) o Delay Start (Inicio Demorado). El
tiempo de inicio más próximo que pueda
configurar aparecerá en la pantalla.
Usando las teclas + o -, ingrese la hora del
día que desee para que el ciclo de
limpieza comience.
Presione la tecla Start/On (Iniciar/
Encender).
La pantalla mostrará la hora de inicio. No será
posible destrabar la puerta del horno hasta que
la temperatura sea inferior a la temperatura de
bloqueo.
El horno se apaga de forma automática
cuando el ciclo de limpieza está completo, y
0:00 titilará en la pantalla.
Start
On
Self
Clean
Start
Time
Delay
Start
or
Después de un ciclo de limpieza
Es posible que observe algunas cenizas blancas en
el horno. Límpielas con un paño húmedo después de
que el horno se enfríe.
Si las manchas blancas permanecen, remuévalas
con un estropajo de acero lleno de jabón y enjuague
generosamente con una mezcla de vinagre y agua.
Estos depósitos son usualmente residuos de sal que
el ciclo de limpieza no puede eliminar.
Si el horno no queda limpio después de un ciclo de
limpieza, repita el ciclo.
n Usted no puede configurar el horno para cocción
hasta que el horno esté lo suficientemente frío
como para que la puerta se desbloquee.
n Mientras el horno esté en autolimpieza, usted
puede presionar el botón RELOJ para mostrar
en pantalla la hora del día. Para volver a la
cuenta regresiva de limpieza, presione el botón
AUTOLIMPIEZA.
■ Aplique una cantidad reducida de aceite
vegetal a una toalla de papel y limpie los
extremos de los estantes del horno con
la toalla de papel. No rocíe con Pam® o
cualquier otro lubricante en espray.
Para Detener un Ciclo de Limpieza
Presione la tecla Clear/ Off (Borrar/ Apagar).
Espere hasta que el horno se haya enfriado
por debajo de la temperatura de bloqueo para
destrabar la puerta. No podrá abrir la puerta
de inmediato, a menos que el horno se haya
enfriado por debajo de la temperatura de
bloqueo.
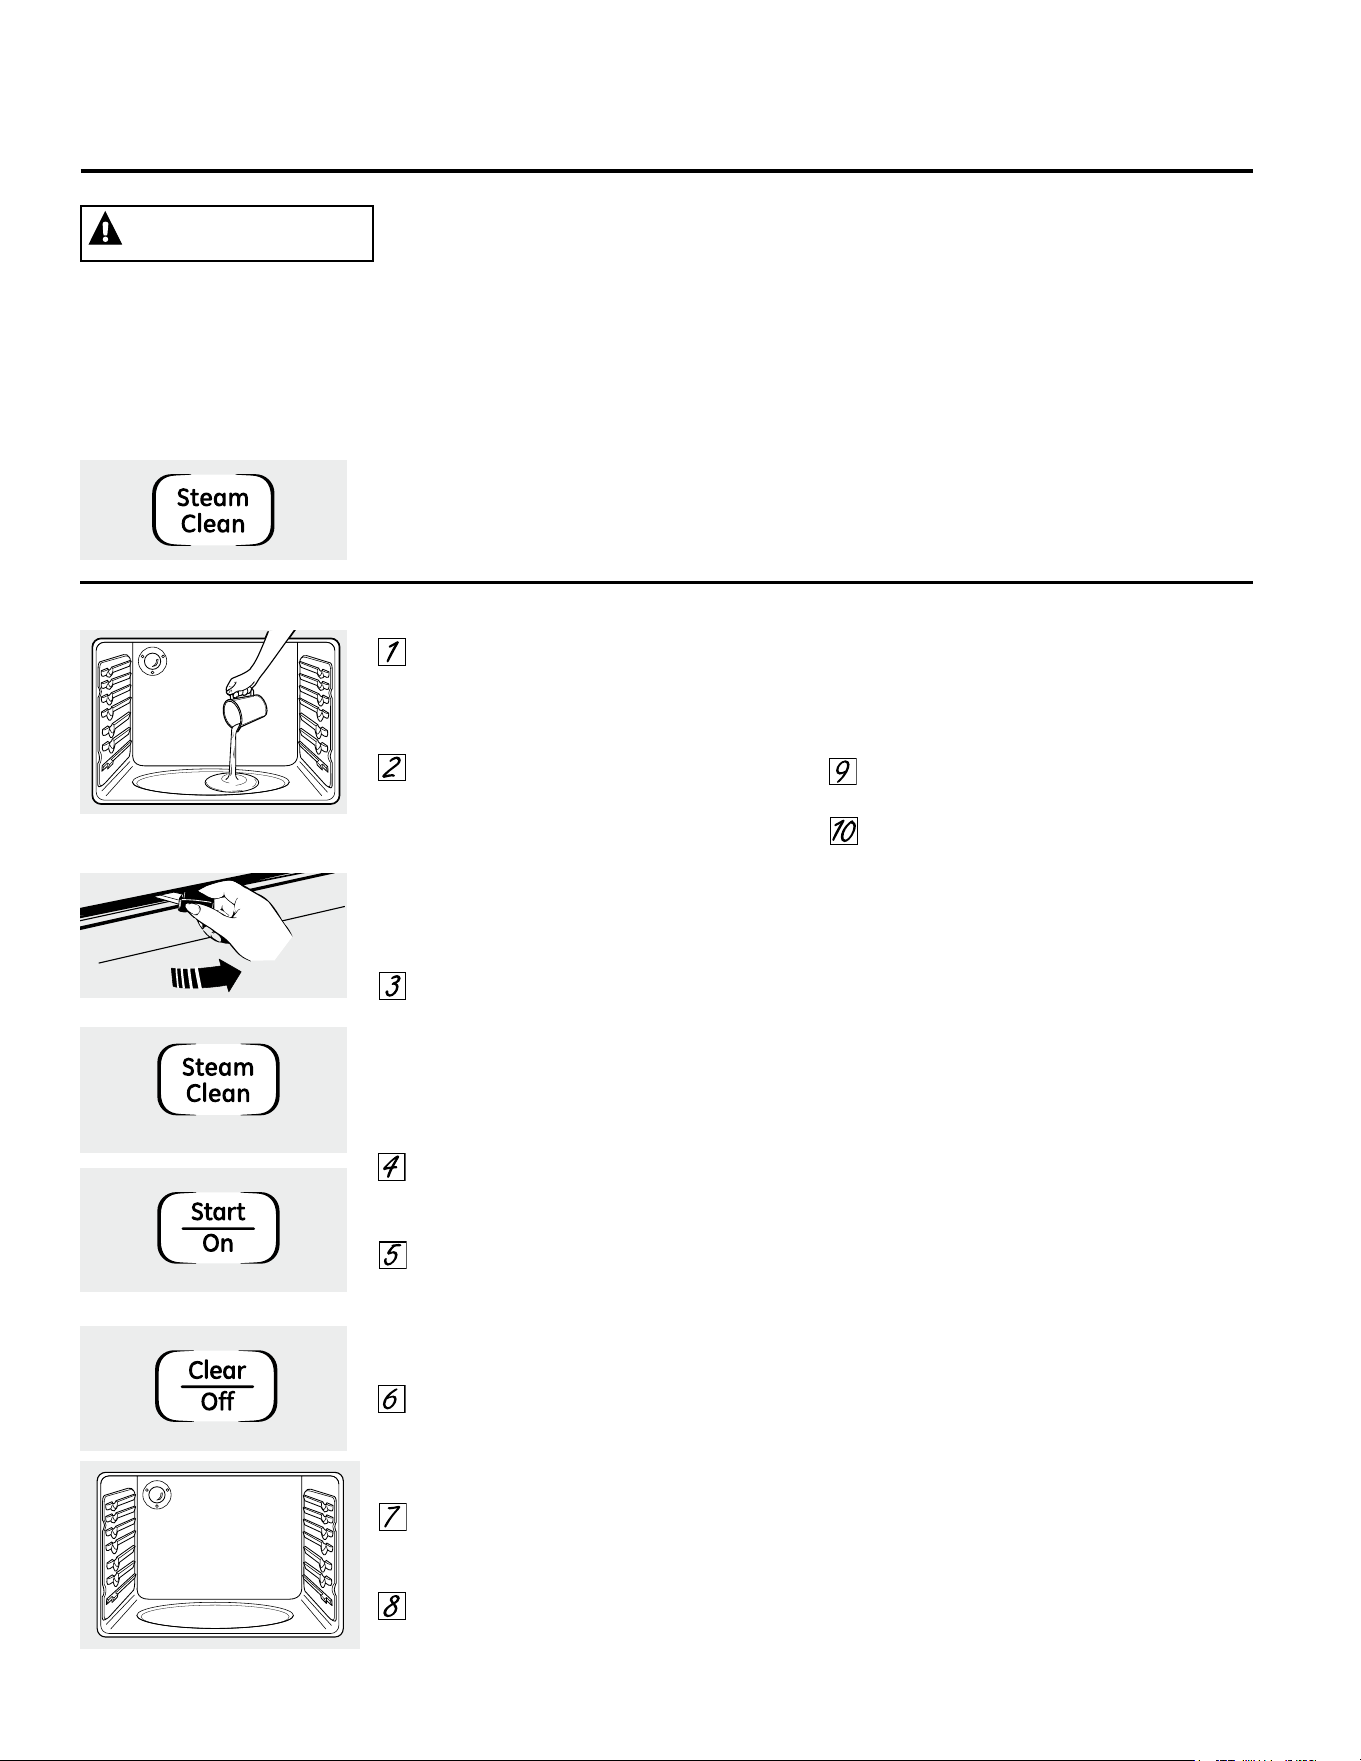
Uso de la Limpieza al Vapor.
(en algunos modelos)
Retire los estantes y accesorios de la
cavidad del horno. No coloque utensilios u
otros artículos en el horno durante el Ciclo
de Limpieza al Vapor.
Vierta 1 taza (8 oz.) de agua a temperatura
ambiente en el área intermedia del fondo
del horno. No agregue soluciones de
limpieza ni químicos de ningún tipo al
agua. Sólo agregue agua al usar el ciclo
Steam Clean (Limpieza al Vapor). Sólo
agregue agua al usar el ciclo Self-Clean
(Auto Limpieza).
Cierre la puerta. Si el modelo tiene una
traba, trabe la puerta. Nota: Nunca fuerce
la traba. Si el horno está demasiado
caliente, no podrá deslizar la traba. Deje
que el horno se enfríe.
Presione la tecla Steam Clean (Limpieza al
Vapor); luego presione Start/On (Iniciar/
Encender).
Un ciclo de 30 minutos comenzará la
cuenta regresiva en la pantalla.
Cuando el ciclo Steam Clean (Limpieza al
Vapor) esté completo el control del horno
emitirá un pitido. Presione la tecla Clear/
Off (Borrar/ Apagar) y abra la puerta.
El fondo del horno y el agua restante aún
estarán muy calientes al final del ciclo. Esto
es normal.
Retire la suciedad fregando con un cepillo
o almohadilla de nylon. Se podrá usar una
almohadilla de estropajo con jabón sólo en
el interior del horno de porcelana. El uso de
almohadillas abrasivas rayará el vidrio de
la puerta. No limpie la suciedad ni el agua
de la junta de la puerta.
Retire el agua restante con una esponja o
tela seca.
Deje la puerta abierta para que se seque
con el aire.
NOTAS IMPORTANTES:
• Si un ciclo de limpieza al vapor es iniciado
sin agua, presione la tecla Clear/ Off
(Borrar/ Apagar) para finalizar dicho ciclo.
Espere a que la cocina realice la cocción a
temperatura ambiente antes de verter agua
en el agua intermedia e iniciar otro ciclo de
vapor
• No abra la puerta durante el ciclo Steam
Clean (Limpieza al Vapor). Un pitido de error
sonará al abrir la puerta.
• Presione la tecla Clear/ Off (Borrar/ Apagar)
en cualquier momento para finalizar el ciclo.
• Si permanecen depósitos minerales en el
fondo del horno luego de la limpieza use
una tela o esponja mojada en vinagre para
eliminar.
• Es posible que gotee algo de agua desde la
parte inferior de la puerta del horno. Si esto
sucede, limpie la misma al finalizar el ciclo.
• La junta de la puerta podrá estar mojada
cuando el ciclo Steam Clean (Limpieza al
Vapor) finalice. Esto es normal. No limpie la
junta.
• Si aún permanece suciedad luego de la
limpieza del horno, consulte la sección de
Cuidado y limpieza de la cocina, en el Manual
del Propietario para acceder a opciones
adicionales.
Para Comenzar el Ciclo de Limpieza al Vapor:
Durante el ciclo de
limpieza al vapor, el
fondo del horno se vuelve
lo suficientemente caliente como para ocasionar
quemaduras. Espere hasta que el ciclo esté terminado
(30 minutos) antes de limpiar las superficies interiores
del horno. Si esto no se cumple, se podrá sufrir
quemaduras.
El ciclo Steam Clean (Limpieza al Vapor) facilita la limpieza
de suciedad leve del interior del horno de porcelana de
limpieza estándar.
La cocina estará a temperatura ambiente antes de comenzar
el ciclo Steam Clean (Limpieza al Vapor). Si el horno está
demasiado caliente, en la pantalla se observará “caliente” y
el ciclo no se activará hasta que el horno se enfríe.
El ciclo Steam Clean (Limpieza al Vapor) funciona mejor en
nuevos derrames o suciedades. La comida quemada es más
difícil de eliminar.
PRECAUCIÓN
Pour 8 ounces of water onto the
oven floor.
22
Si la estufa cuenta con esta tecla de control, cuenta con un horno con
limpieza al vapor. Siga estas instrucciones.
Si no es así, consulte la sección Limpieza del Horno de Porcelana para acceder a instrucciones de
limpieza del horno.
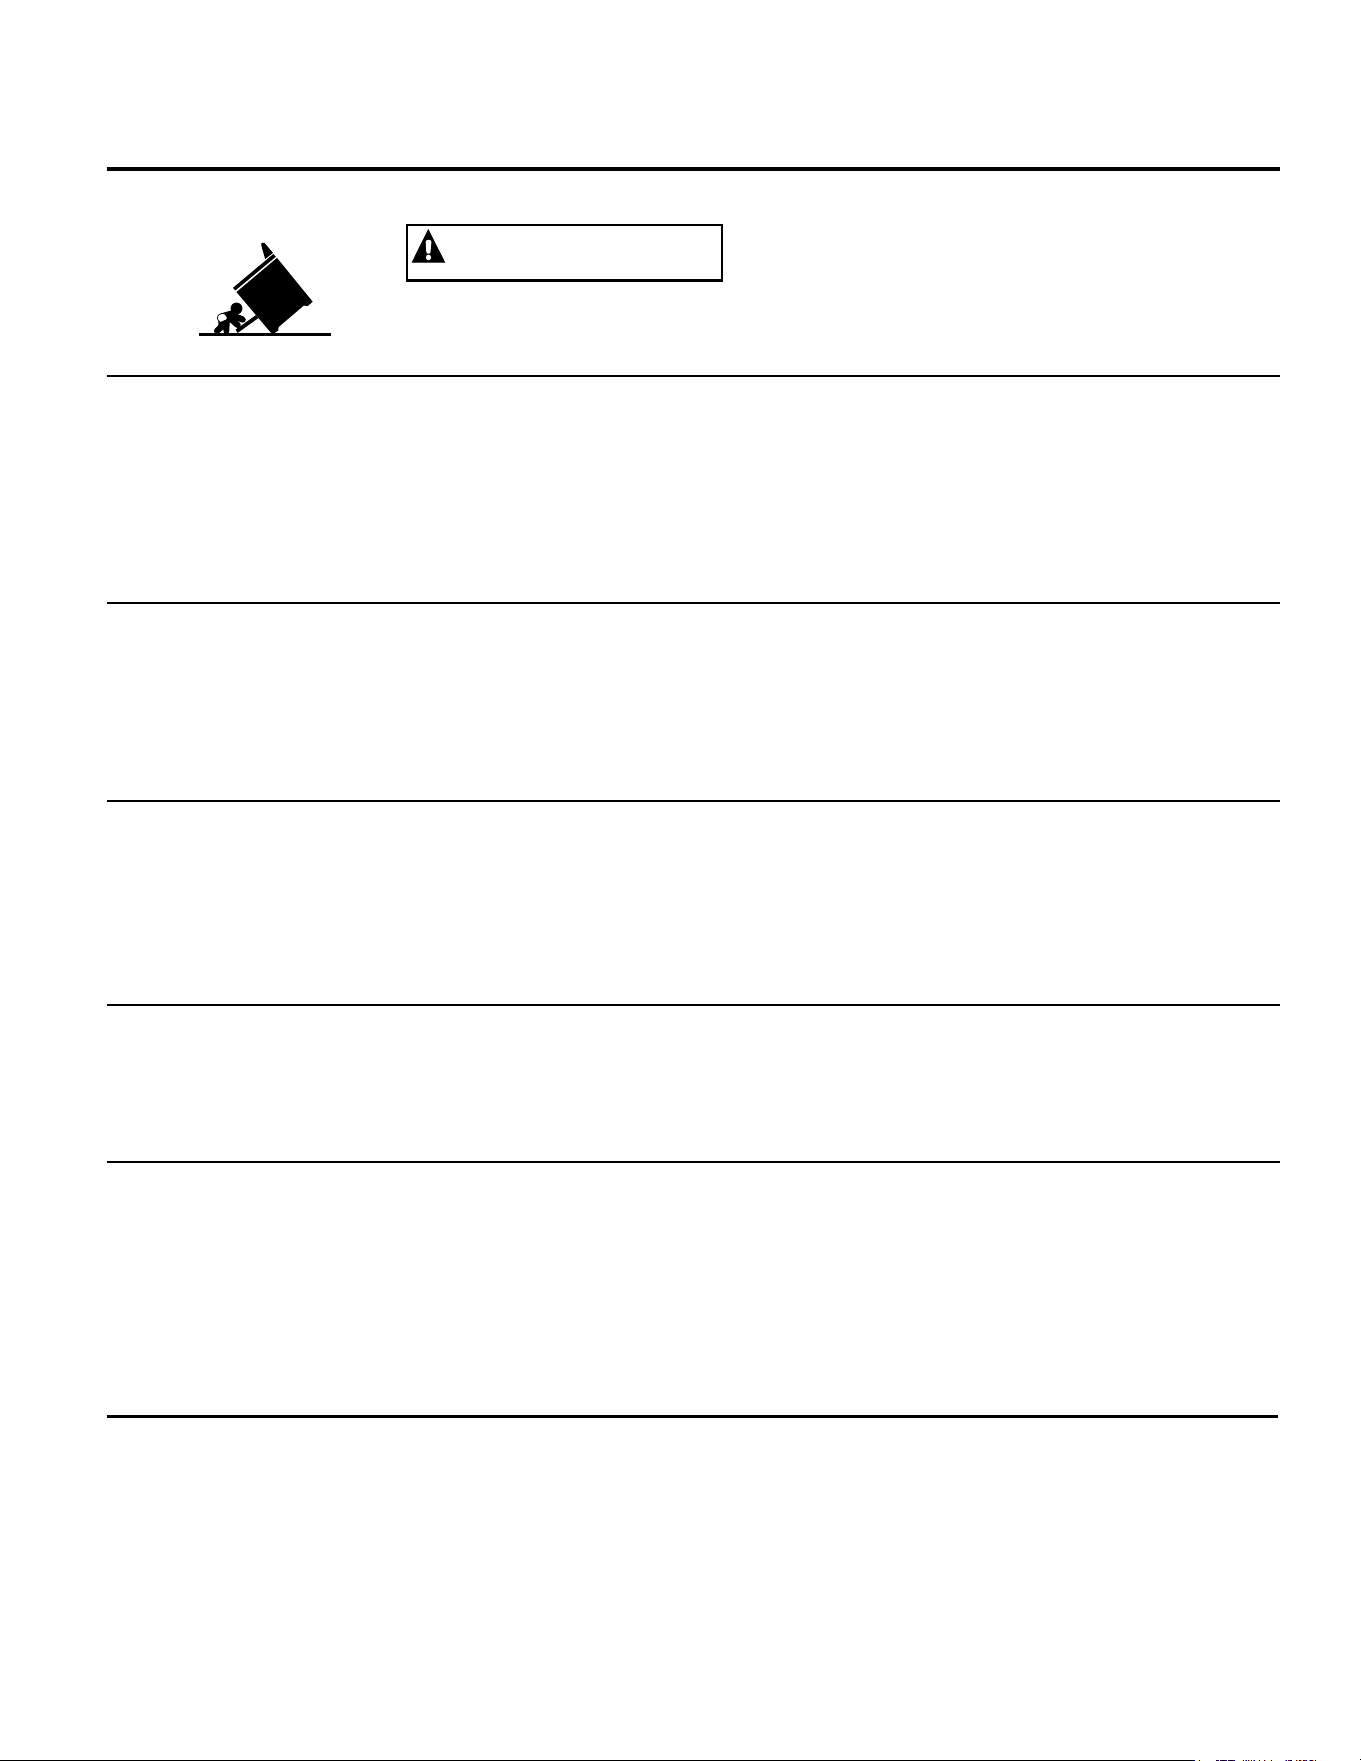
Asegúrese de que todos los controles estén apagados y que las superficies estén frías antes de limpiar cualquier parte de la cocina.
Panel de control
Una buena idea es limpiar el panel de control
luego de cada uso del horno. Use una tela
húmeda para limpiar o enjuagar. Para limpiar,
use jabón suave y agua o una solución que
sea mitad de vinagre y mitad de agua. Para
enjuagar, use agua limpia. Pula en seco con
una tela suave.
No use limpiadores abrasivos, limpiadores
líquidos fuertes, almohadillas para fregar de
plástico y limpiadores de horno en el panel de
control; dañarán el acabado.
Perillas de control
Las perillas de control se pueden retirar para
facilitar la limpieza.
Asegúrese de que las perillas estén en las
posiciones OFF (Apagado) y empuje las mismas
desde los soportes de forma derecha para su
limpieza.
Las perillas pueden limpiarse en el lavavajillas o
también pueden lavarse con jabón y agua. Asegúrese
de que la parte interna de las perillas esté seca antes
de volver a colocarse.
Vuelva a colocar las perillas en la posición OFF
(apagado) para asegurar una colocación
correcta.
Cuidado y limpieza de la cocina. GEAppliances.com
A child or adult can tip the range and be killed.
Verify the anti-tip bracket has been properly installed
and engaged.
Ensure the anti-tip bracket is re-engaged when the range
is moved.
Do not operate the range without the anti-tip bracket in
place and engaged.
Failure to follow these instructions can result in death or
serious burns to children or adults.
Tip-Over Hazard
WARNING
Si se quita la cocina para efectuar una limpieza, reparaciones o
cualquier otra razón, verifique que
el dispositivo anti-volcaduras se coloque de manera adecuada
cuando vuelva a instalarse la cocina.
Si no toma esta precaución, la cocina puede volcarse
y provocar lesiones.
ADVERTENCIA
Cómo quitar el envoltorio de protección y la cinta de embalaje
Con cuidado, tome una punta del envoltorio
de protección con sus dedos y lentamente quítelo de la
superficie del aparato. No use elementos filosos para
quitar el envoltorio. Quite todo el envoltorio antes de
usar el aparato por primera vez.
Para asegurarse de no dañar el acabado del producto,
la mejor forma de quitar el pegamento de la cinta de
empaque de los aparatos nuevos consiste en aplicar
detergente para vajillas líquido. Aplique con un paño
suave y deje remojar.
NOTA: Debe retirarse el adhesivo de todas las partes.
Si se calienta, será imposible de quitar.
Superficies pintadas
Las superficies pintadas incluyen los lados de la cocina
y la puerta, la parte superior del panel de control y el
frente del cajón. Límpielas con jabón y agua o con una
solución de agua y vinagre.
No utilice limpiadores de horno comerciales, polvos
limpiadores, esponjillas de acero o abrasivos potentes
sobre cualquier superficie pintada.
No utilice almohadillas de acero porque rayan
la superficie.
Para limpiar la superficie de acero inoxidable,
utilice agua tibia jabonosa o un limpiador o
lustrador de acero inoxidable. Siempre limpie
la superficie en dirección de la veta. Siga las
instrucciones del producto para limpiar la
superficie de acero inoxidable.
Para consultar sobre la compra de limpiadores
o lustradores de aparatos de acero inoxidable, o
para encontrar la ubicación del distribuidor más
cercano a su domicilio, llame a nuestro número
gratuito:
Centro nacional de repuestos
1.800.626.2002
GEAppliances.com
Superficies de acero inoxidable (en algunos modelos)
Estufa de esmalte de porcelana (en algunos modelos)
El acabado de esmalte de porcelana es
resistente pero puede romperse si se utiliza
incorrectamente. Este acabado es resistente
al ácido. Sin embargo, no debe permitirse que
algunos alimentos ácidos que
se derraman (como jugos de fruta, tomate o
vinagre) permanezcan en el acabado.
Si se derraman ácidos en la estufa mientras está
caliente, utilice una toalla de papel o un paño
secos para limpiarlo en el momento. Cuando
la superficie se haya enfriado, limpie con agua
jabonosa. Enjuague bien.
En el caso de otros derrames, como salpicaduras
de grasa, etc., limpie con agua jabonosa o polvos
limpiadores cuando la superficie se haya enfriado.
Enjuague bien. Pula con un paño seco.
23

Modelos con vidrio radiante:
Modelos de estufa con bobina:
Ventilación del Horno en Estufas con Vidrio Radiante o Bobinas
En los modelos de estufas de vidrio, la
ventilación del horno está ubicada detrás de la
unidad derecha y trasera de la superficie.
En los modelos de estufas con bobinas, el
horno es ventilado a través de una abertura
debajo de una de las unidades superficiales
traseras.
Esta área se podrá calentar durante el uso del
horno.
Es normal que salga vapor de la ventilación
y puede juntarse humedad debajo de la misma
cuando el horno está en uso.
La ventilación es importante para lograr una
adecuada circulación de aire. Nunca bloquee esta
ventilación..
Cuidado y limpieza de la cocina.
Interior del Horno de Porcelana (en modelos con limpieza estándar)
Con el cuidado apropiado, el acabado de esmalte de
la porcelana en el interior del horno – parte superior,
inferior, costados, parte trasera e interior de la puerta
- permanecerá con un aspecto nuevo por años.
Espere a que el horno se enfríe antes de limpiar.
Le recomendamos que use guantes de goma al
limpiar el horno.
El jabón y el agua normalmente harán el trabajo.
Las salpicaduras y los derrames importantes
podrán requerir que la limpieza se realice con un
limpiador suave y abrasivo. También se pueden
usar estropajos con jabón.
No permita que los derrames de comida con alto
contenido de azúcar o ácido (tal como tomates,
chucrut, jugos de fruta o rellenos de tartas)
permanezcan en la superficie. Pueden ocasionar una
mancha importante incluso luego de la limpieza.
El amoníaco hogareño puede facilitar el trabajo de
la limpieza. Coloque ½ taza en un vaso de vidrio
oscurecido o envase de cerámica en un horno
frío durante la noche. Los gases del amoníaco
ayudarán a aflojar la grasa y la comida quemada.
De ser necesario, puede usar un limpiador para
horno. Siga las instrucciones del paquete.
■ No rocíe el limpiador del horno en los
controles y enchufes eléctricos, ya que esto
podría ocasionar un cortocircuito y producir
chisporroteos o un incendio.
■ Evite que una capa del limpiador se acumule en
el sensor de temperatura – podría hacer que el
horno caliente de forma inadecuada. (El sensor
está ubicado en la parte superior del horno).
Con cuidado, limpie el sensor luego de cada
limpieza del horno, teniendo cuidado de no
mover el sensor, ya que un cambio de posición
podría afectar la forma de hornear del horno.
■ No rocíe ningún limpiador para horno sobre la
puerta, manijas o cualquier superficie exterior
del horno, gabinetes o superficie pintada. El
limpiador puede dañar estas superficies.
24
La junta está diseñada con un espacio
en la parte inferior para permitir una
adecuada circulación de aire.
No frote o limpie la junta de la puerta
porque tiene una resistencia muy baja
a la abrasión.
Si se advierte que la junta está
desgastada, raída o dañada, o si se
ha desplazado de su lugar, se la debe
reemplazar.
Para limpiar la parte interna de la puerta:
En modelos de auto limpieza:
■
Debido a que el área interior de la junta se
limpia durante el ciclo de auto limpieza, no es
necesario limpiar la misma en forma manual.
■
El área fuera de la junta y el revestimiento de la
puerta se pueden limpiar con una almohadilla
con jabón o un estropajo plástico, agua
caliente y detergente. Enjuague bien con una
solución de agua y vinagre.
En modelos de limpieza estándar:
■
La limpieza con agua y jabón normalmente
es suficiente. Las salpicaduras y los derrames
importantes podrán requerir que la limpieza
se realice con un limpiador suave y abrasivo.
También se pueden usar estropajos con jabón.
■
Consulte también la sección Interior del Horno
de Porcelana.
Para limpiar la parte externa de la puerta:
■
Utilice jabón y agua para limpiar cuidadosamente
la parte superior, los lados y el frente de la puerta
del horno. Enjuague bien. También es posible utilizar
un limpiador de vidrios para limpiar la parte exterior
de la puerta. No permita que caiga agua sobre las
aberturas de ventilación.
■
Si queda alguna mancha persistente en
la sección de ventilación de la puerta, utilice
un limpiador abrasivo suave y una esponja para
obtener los mejores resultados.
■
Las salpicaduras de salsas, jugos de frutas, salsas de
tomate y jugos de alimentos que contienen ácidos
pueden decolorar la superficie, por lo que se debe
enjuagarlos de inmediato. Cuando la superficie esté
fría, limpie y enjuague.
■
No utilice limpiadores para hornos, polvos
limpiadores o abrasivos potentes en la parte externa
de la puerta.
Cómo limpiar la puerta del horno
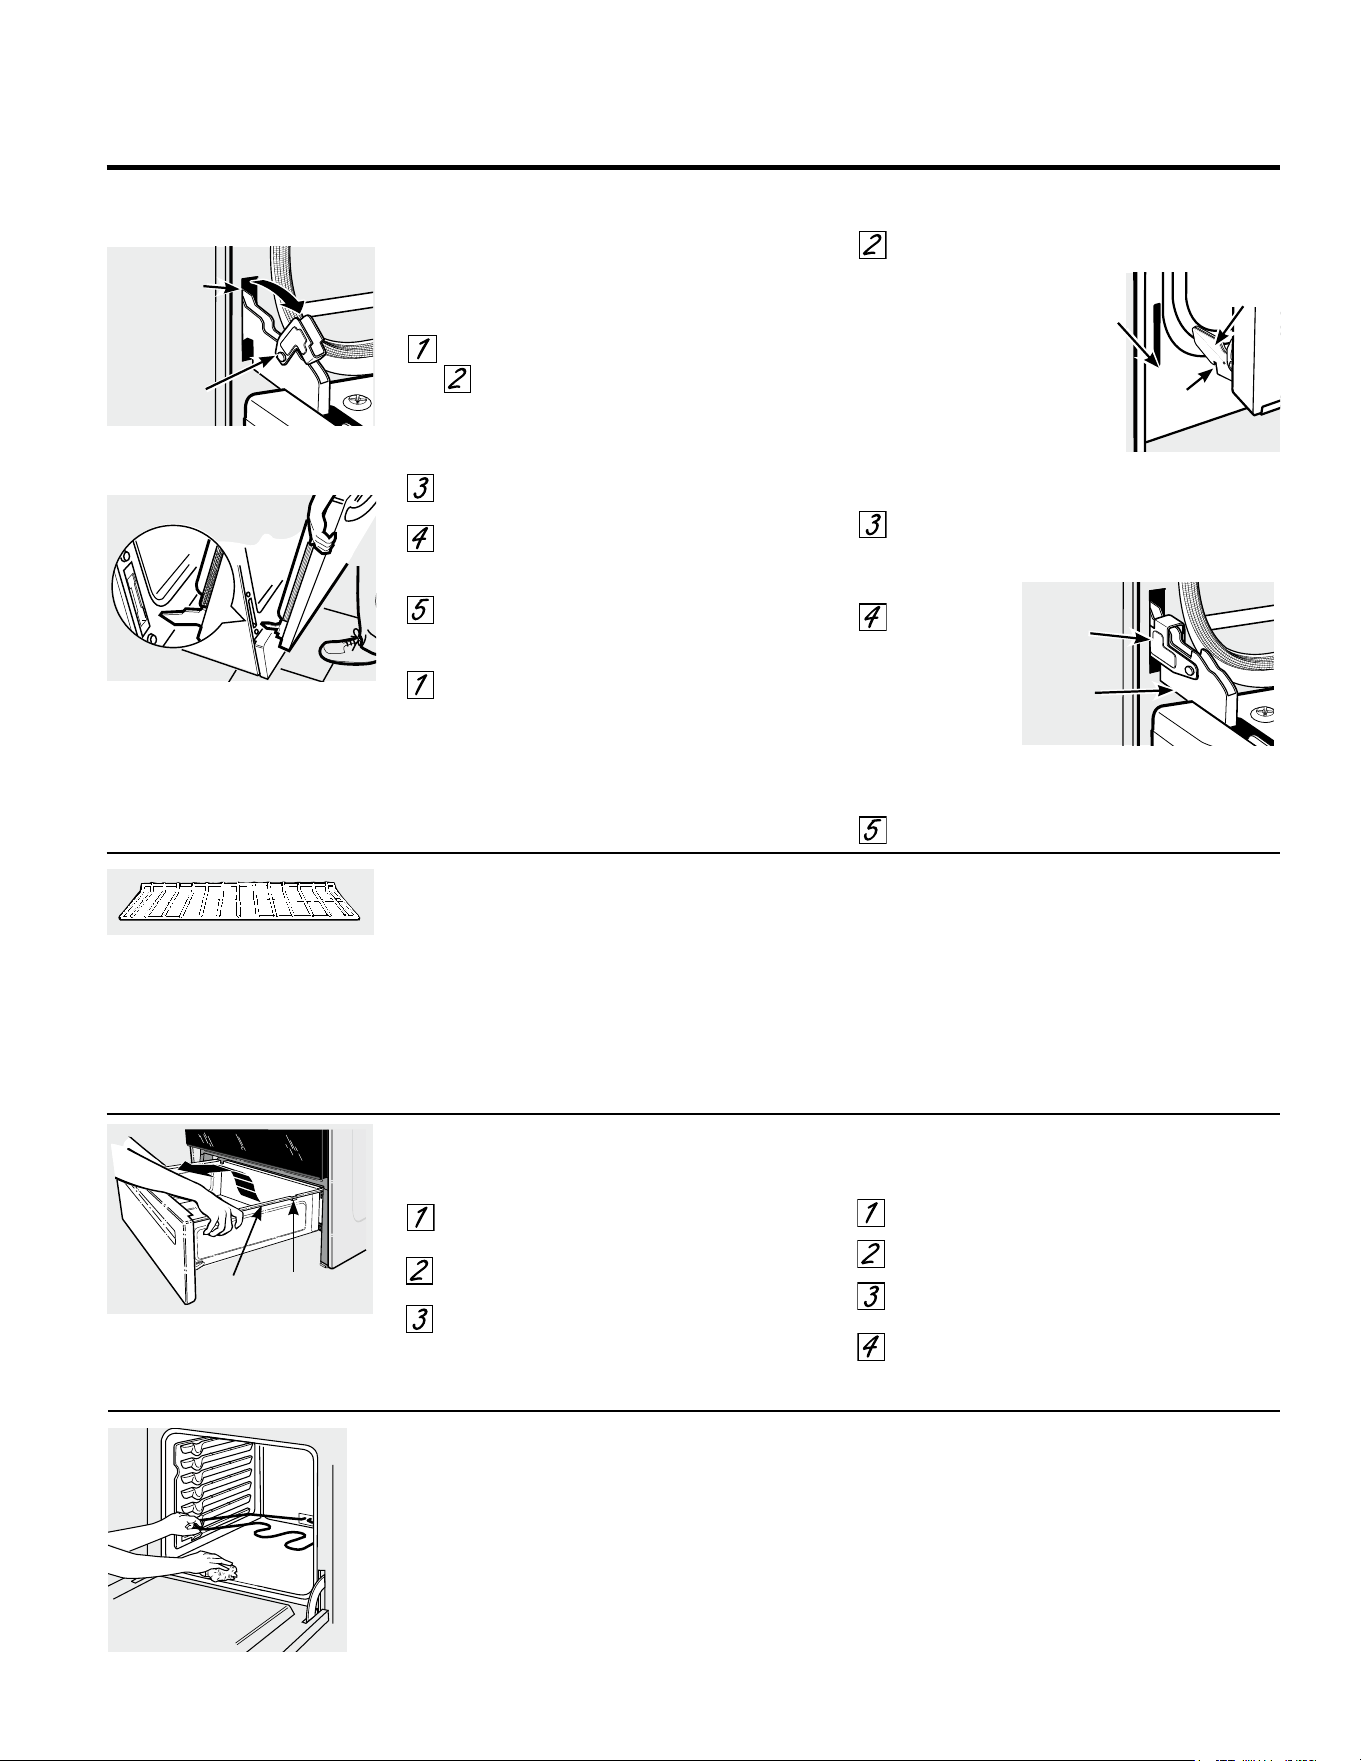
25
GEAppliances.com
Bandejas del horno
Todas las bandejas del horno pueden limpiarse a
mano con un limpiador abrasivo o una esponjilla
de acero. Después de limpiar, enjuague las
bandejas con agua limpia y séquelas con un paño
limpio. Las bandejas revestidas de porcelana gris
pueden permanecer en el horno durante el ciclo
de auto-limpieza sin sufrir daños. Las parrillas
del horno brillantes y de color planteado podrán
permanecer en el horno durante el ciclo de auto
limpieza, pero perderán su lustre y será difícil
deslizarlas.
Será necesario engrasar todos los extremos de
las bandejas con una capa de aceite vegetal
suave después de limpiarlas a mano o en
el horno. Esto ayudará a mantener el fácil
deslizamiento de las bandejas.
Stop guide
Rail
La puerta es muy pesada. Tenga cuidado al quitar y
levantar la puerta.
No levante la puerta de la manija.
Para quitar la puerta:
Abra la puerta por completo.
Presione las trabas de la bisagra hacia abajo
en dirección del marco de la puerta hasta
destrabarlas. Puede necesitarse una
herramienta, como un destornillador plano
pequeño.
Tome con firmeza ambos lados de la puerta de la
parte superior.
Cierre la puerta hasta la posición de remoción de
puerta, que es a mitad de camino entre la
posición de asado y la puerta cerrada.
Levante la puerta hasta que el brazo de la
bisagra haya salido de la ranura.
Para volver a colocar la puerta:
Tome con firmeza ambos lados de la puerta de la
parte superior.
Con la puerta en el mismo ángulo de la posición
de remoción,
introduzca
la muesca del
brazo
de la bisagra
dentro
del extremo inferior de la
ranura de la bisagra. La
ranura del brazo de la
bisagra debe
estar bien colocada en la parte inferior
de la ranura.
Abra la puerta por completo. Si la puerta
no se abre por completo, la muesca no está bien
colocada en el extremo inferior de
la ranura.
Presione las
trabas de la
bisagra hacia
arriba contra el
marco frontal
de la cavidad
del horno,
hasta alcanzar
la posición de
bloqueo.
Cierre la puerta del horno.
Puerta del horno desmontable
Posición de remoción
Traba de
la bisagra
Tire las trabas de la bisagra hacia
abajo para destrabar.
Muesca
Extremo
inferior de
la ranura
Brazo de
la bisagra
Ranura
Presione las trabas de la bisagra
hacia arriba para bloquear.
Traba de
la bisagra
Brazo de
la bisagra
Remoción del cajón de almacenamiento
Para quitar el cajón:
Tire del cajón hacia fuera hasta que se
detenga.
Levante el frente del cajón hasta que las
trabas salgan de las guías.
Retire el cajón.
Para volver a colocar el cajón:
Coloque los rieles del cajón en las guías.
Empuje el cajón hasta que se detenga.
Levante el frente del cajón y empuje hasta
que las trabas superen las guías.
Baje el frente del cajón y empuje hacia abajo
hasta que cierre.
Elementos calentadores del horno
No limpie el elemento para hornear o el
elemento para asar. Las suciedades se
quemarán cuando se calienten los elementos.
Para limpiar el piso del horno, eleve
suavemente el elemento a hornear. En algunos
modelos, el elemento a hornear no está
expuesto y se encuentra debajo del piso del
suelo. Limpie con agua caliente y jabón.
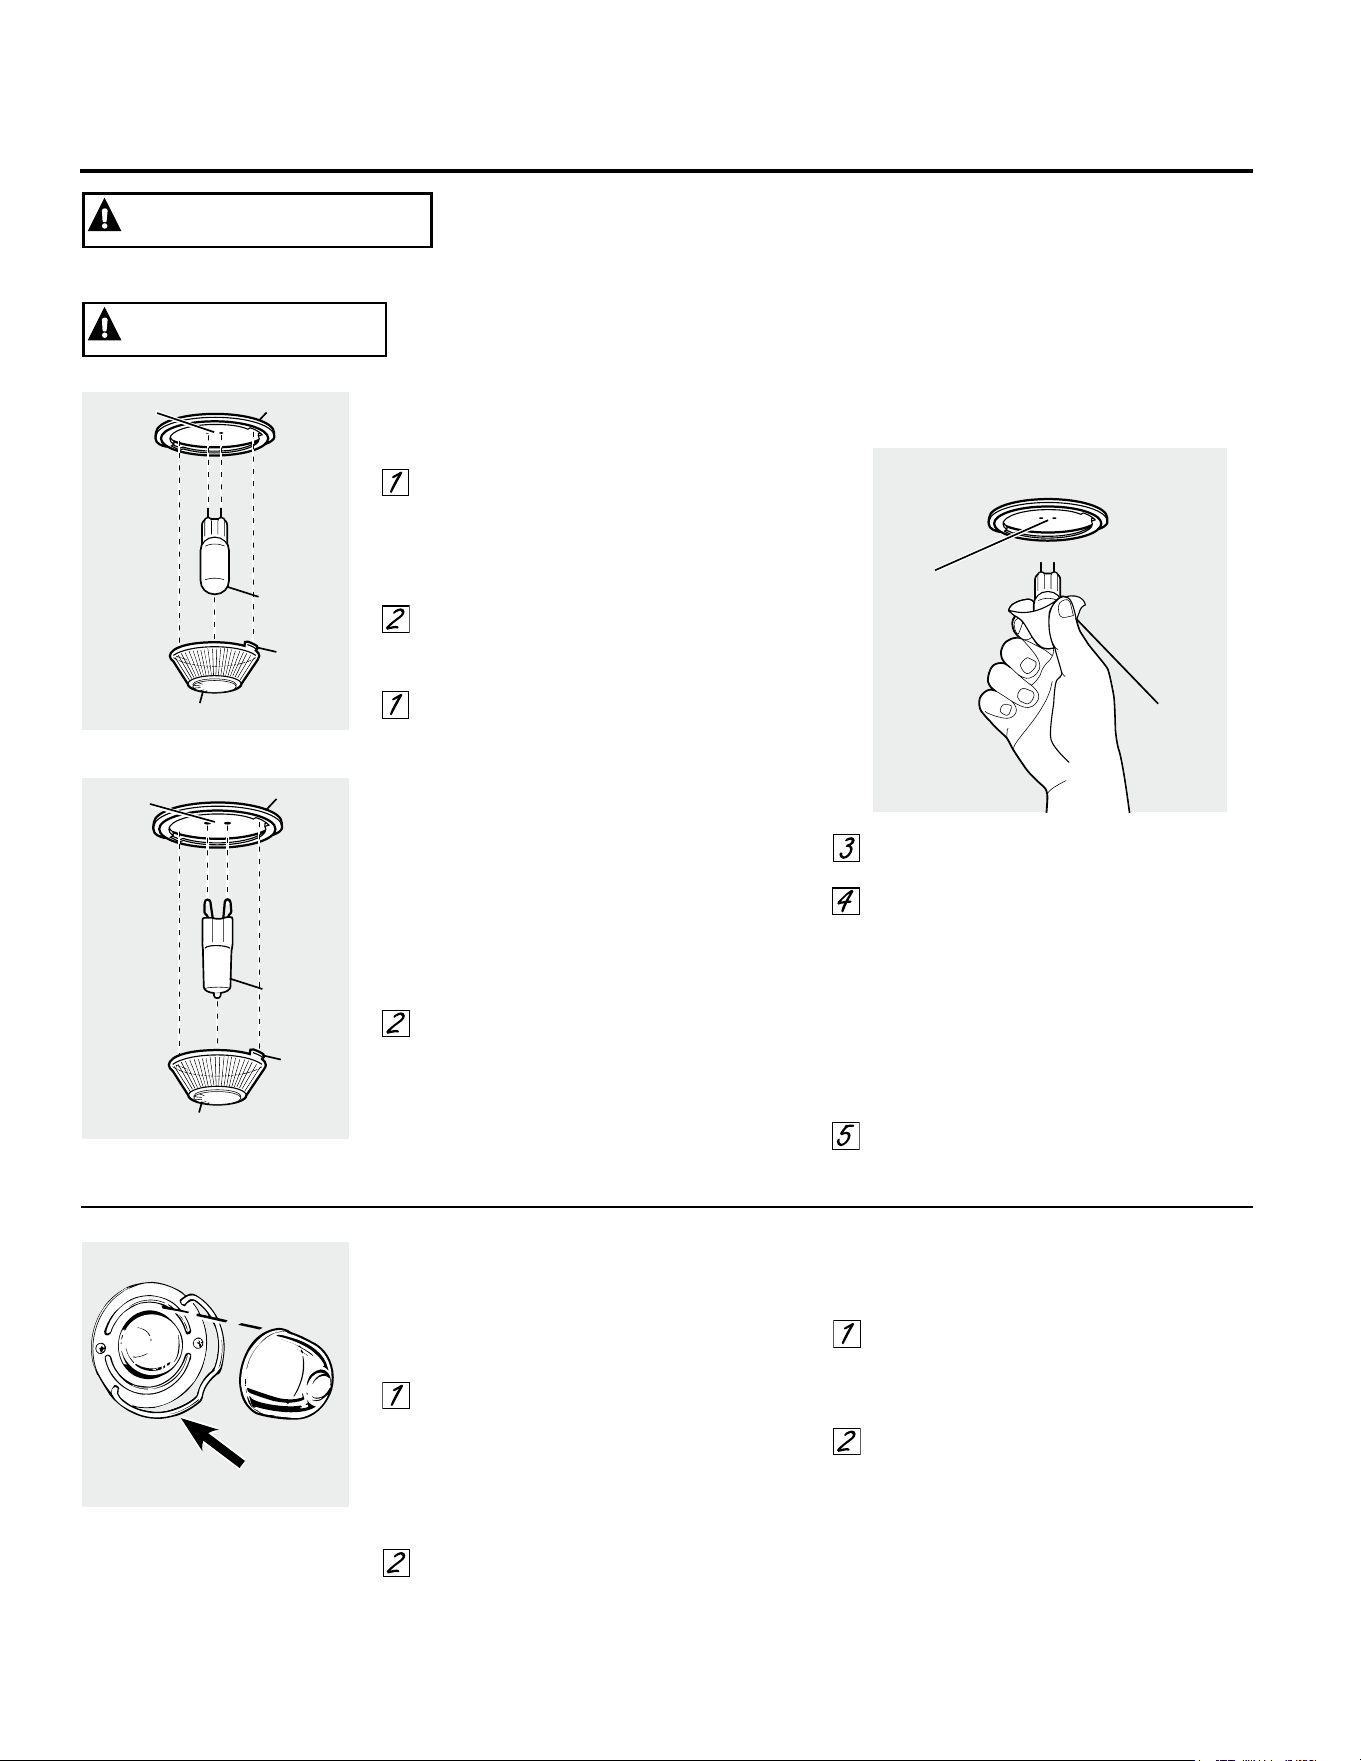
Cuidado y limpieza de la cocina.
Reemplazo de la Luz del Horno (modelos equipados con lámparas de 40 watts estándar)
Be sure to let the light cover and bulb cool
completely.
Para retirar la tapa:
Sostenga una mano debajo de la tapa de
modo que no se caiga al ser liberada. Con
los dedos en la misma mano, empuje
firmemente el suspensor de la tapa del
cable. Levante la tapa.
No retire ningún tornillo para retirar la tapa.
Reemplace la lámpara por una para
electrodomésticos hogareños de 40 watts.
Para reemplazar la tapa:
Coloque la misma ranura del receptáculo
de la luz. Empuje el cable hacia adelante
hasta el centro de la tapa, hasta que entre
en el lugar correcto.
Conecte el cable de electricidad a la
cocina.
Amplio
suspensor
de tapa
26
Reemplazo de la bombilla del horno (en algunos modelos)
Para retirar:
Gire la cubierta de vidrio en sentido contrario
a las manecillas del reloj 1/4 de vuelta hasta
que las lengüetas de la cubierta de vidrio
liberen los surcos del portalámparas.
Colocarse guantes de látex puede brindar
un mejor agarre.
Utilizando guantes o un paño seco, remueva
la bombilla jalándola en línea recta.
Para reemplazar:
Utilice una nueva bombilla halógena de
120/130 voltios, no exceda 50 vatios.
Reemplace la lámpara de luz con el mismo
tipo de lámpara que se retiró. En su modelo
corresponderá uno de los dos tipos que
figuran a la izquierda. Para determinar cuál
es la lámpara correcta, controle las
terminales de la lámpara. Las lámparas con 2
terminales con clavijas rectas son lámparas
de G6.35. Las lámparas con 2 terminales con
clavijas con curvas son lámparas de G9. (No
las intercambie.) Asegúrese al reemplazar la
lámpara que sea de 120 volts o 130 volts
(NO de 12 volts).
Utilizando guantes o un paño seco, remueva
la bombilla de su paquete. No toque la
bombilla con los dedos desnudos. El aceite
para piel dañará la lámpara y acortará su
tiempo de duración.
Empuje la bombilla en línea recta dentro del
receptáculo hasta el tope.
Coloque las lengüetas de la cubierta de
vidrio dentro de los surcos del
portalámparas. Gire la cubierta de vidrio en
sentido de las manecillas del reloj 1/4 de
vuelta.
Para una mejor iluminación dentro del
horno, limpie frecuentemente la cubierta
de vidrio utilizando un paño húmedo. Esto
debería hacerse cuando el horno está
completamente frío.
Conecte nuevamente el suministro eléctrico
al horno.
Bombilla
de G6.35
Portalámpara
Lengüeta
Cubierta de vidrio
Receptáculo
Use
guantes
o un
paño
Receptáculo
Bombilla
de G9
Portalámpara
Lengüeta
Cubierta de vidrio
Receptáculo
(en algunas modelos)
(en algunas modelos)
PELIGRO DE DESCARGA ELÉCTRICA O QUEMADURAS: Antes de reemplazar la bombilla
del horno, desconecte la alimentación de energía al horno desde el panel principal
de fusibles o del interruptor de circuitos. No hacerlo puede provocar una descarga
eléctrica o una quemadura.
ADVERTENCIA
PELIGRO DE QUEMADURAS: La tapa de vidrio y la lámpara de luz se deberán retirar cuando
estén frías. Tocar el vidrio caliente sin protección en las manos o con un trapo húmedo
puede ocasionar quemaduras.
PRECAUCIÓN
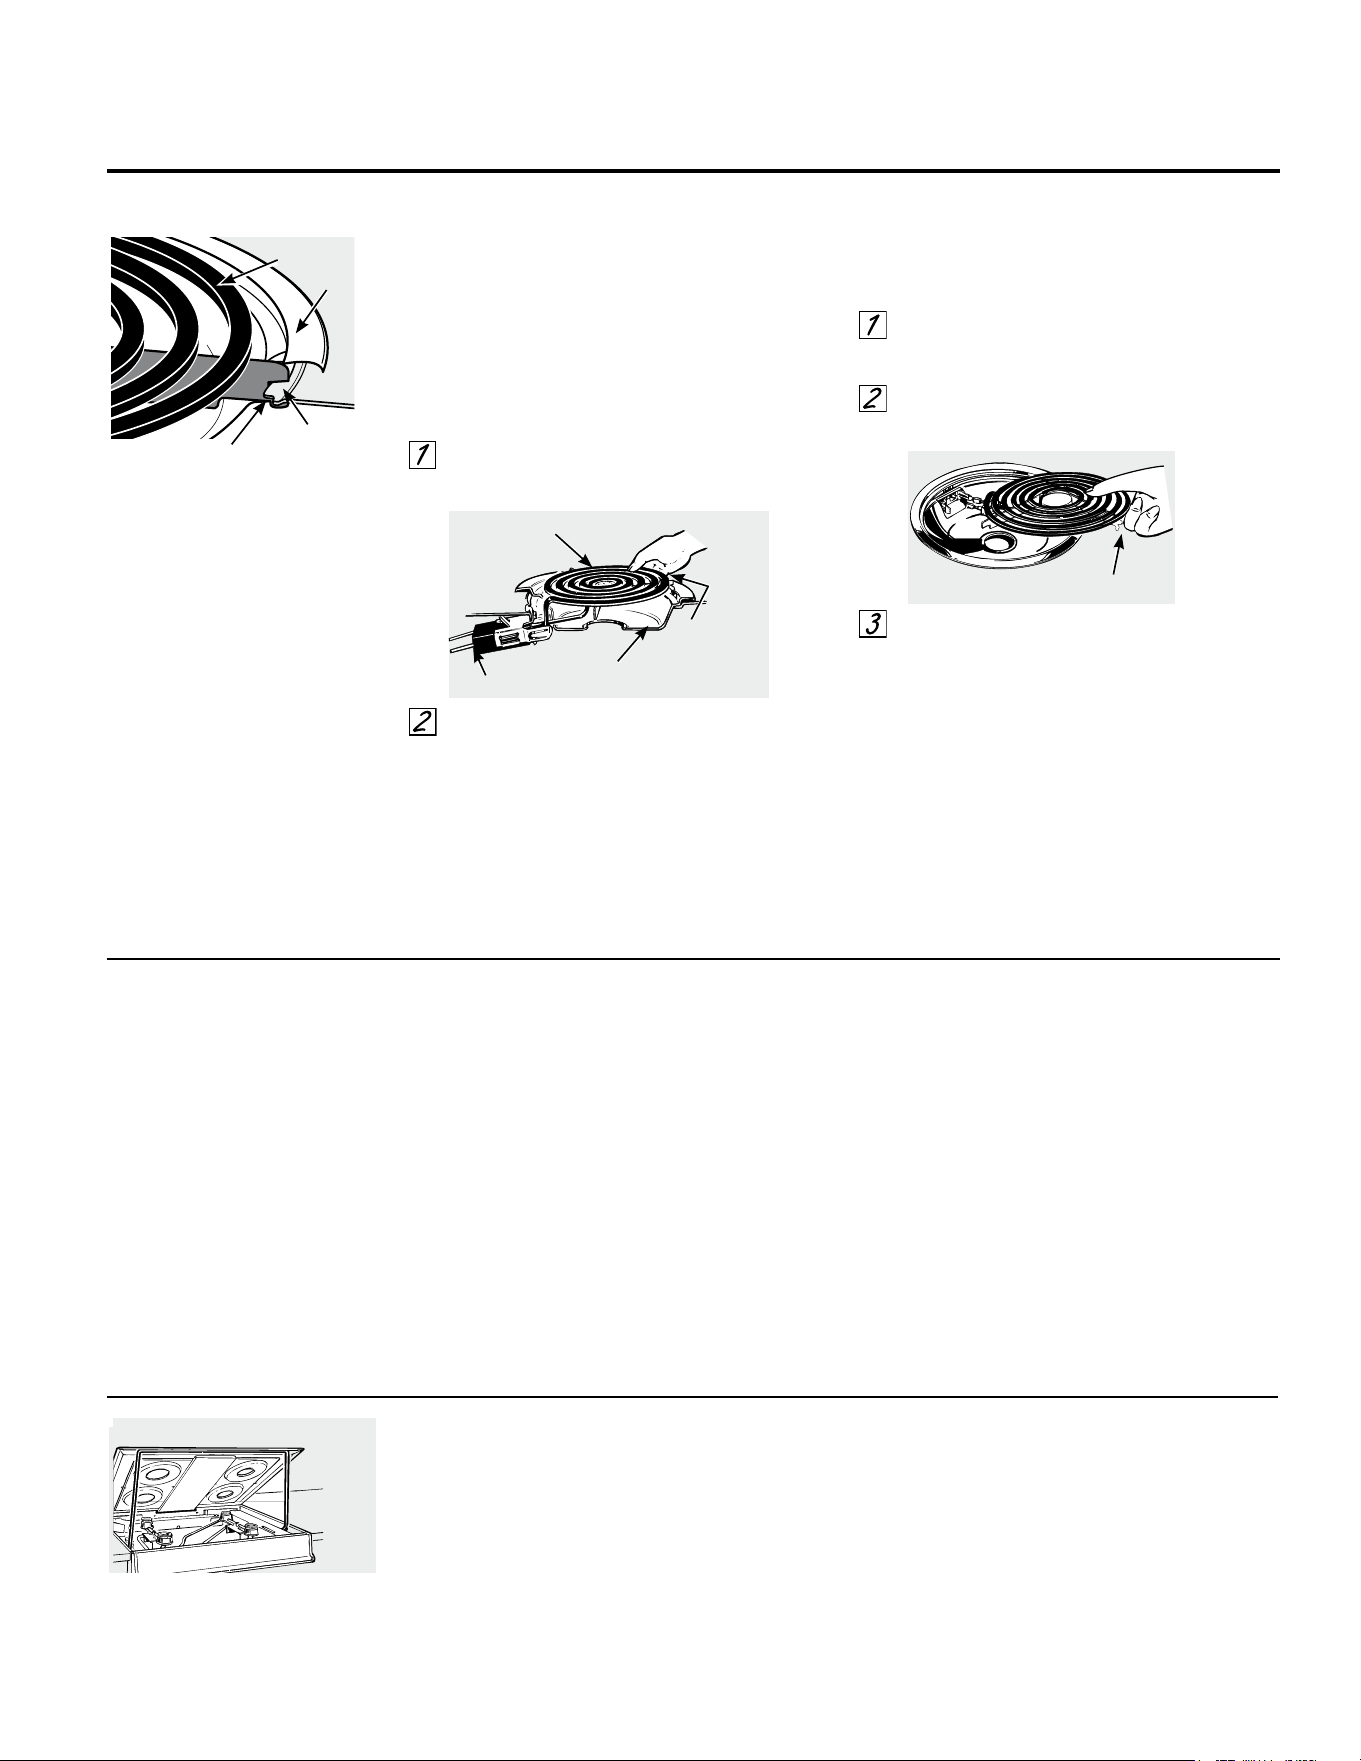
27
Cuidado y limpieza de la estufa con bobina.
(en algunos modelos)
GEAppliances.com
Asegúrese de que los controles estén en OFF (Apagado) y que las unidades de la superficie estén frías antes de intentar retirarlas
Unidad de la Superficie
Para limpiar las unidades de la superficie, gire el
control hasta la configuración más alta durante un
minuto. Las bobinas quemarán cualquier suciedad.
Para retirar una unidad de la superficie:
Para retirar las cubetas de goteo para la limpieza, las
unidades de la superficie se deberán retirar primero.
Empuje la unidad de la superficie hacia atrás,
en dirección al receptáculo, para liberar la
lengüeta de bloqueo de la estufa.
Levante la unidad de la superficie
aproximadamente 1 pulgada sobre la cubeta
de goteo y empuje la misma hacia afuera.
No levante la unidad de la superficie más de 1
pulgada. Si lo hace, es posible que no se apoye sobre
la cubeta de goteo al volver a enchufar la misma.
NOTA: Levantar de forma repetida la unidad de
la superficie más de 1 pulgada sobre la cubeta
de goteo puede dañar de forma permanente el
receptáculo.
Para reemplazar una unidad de la superficie:
Reemplace la cubeta de goteo en el receso en
la estufa. Asegúrese de que la abertura de la
cubeta quede alineada con el receptáculo.
Inserte las terminales de la unidad de la
superficie a través de la abertura en la cubeta
de goteo y en el receptáculo.
Empuje la unidad de la superficie hacia adentro
y afuera para bloquear la lengüeta en su
posición, de modo que descanse de forma
pareja sobre la estufa.
No sumerja las unidades superficiales en líquidos de
ningún tipo.
No limpie las unidades superficiales en un
lavavajillas.
No incline la unidad superficial en terminales de
enchufes.
No intente limpiar, ajustar ni de ninguna forma
reparar el receptáculo del enchufe.
Cubetas de Goteo
Retire las unidades de la superficie. Luego retire las
cubetas de goteo.
Para obtener mejores resultados, limpie las cubetas
de goteo en forma manual. Coloque las mismas en
un envase cubierto (o en una bolsa plástica) con
¼ de taza de amoníaco para aflojar la suciedad.
Enjuague con agua limpia y pula con una tecla
suave y limpia.
Las cubetas de goteo también se pueden limpiar en
un lavavajillas.
Limpie el área debajo de la cubeta de goteo con
frecuencia. La suciedad acumulada, especialmente
la grasa, se puede incendiar.
No cubra las cubetas de goteo con papel de
aluminio. El uso de papel de aluminio tan cerca
del receptáculo podría ocasionar una descarga
eléctrica, incendio o daños sobre la estufa.
NOTA: Si la estufa está equipada con cubetas de
goteo de color plateado brillante, no las limpie en el
horno de auto limpieza. Se podrá producir un daño
permanente sobre el acabado.
Si su estufa está equipada con cubetas de goteo
negras o grises cubiertas de porcelana, se podrán
limpiar dentro del horno durante el ciclo de auto
limpieza. Antes de comenzar un ciclo de auto
limpieza, retire cualquier suciedad pesada de las
cubetas de goteo y coloque las mismas en los
estantes del horno cubiertos de porcelana. No
coloque las cubetas de goteo directamente en el
fondo del horno. Una vez completado el ciclo de
auto limpieza y que las cubetas de goteo estén frías,
limpie las mismas con una tecla húmeda para retirar
cualquier ceniza o residuo que haya quedado.
Estufa Elevable
Toda la estufa se puede levantar y quedar apoyada
en la posición superior para una limpieza fácil.
No es necesario retirar las unidades de la superficie;
sin embargo, puede retirar una para facilitar la
elevación de la estufa. Hay dos soportes laterales
que se bloquean cuando la estufa se levanta.
Luego de limpiar debajo de la estufa con agua
caliente, un poco de jabón y una tela seca, baje la
estufa. Evite lastimaduras en los dedos.
Para bajar la estufa, vuelva a presionar las varas
y de forma suave baje la estufa hasta que quede
correctamente apoyada.
Asegúrese de que todas las
unidades de la superficie estén
apagadas antes de levantar la
estufa.
Cubeta de goteo
receptáculo
Unidad de la superficie
Lengüeta de
bloqueo
Lengüeta de bloqueo
Cubeta
de goteo
Borde de
la estufa
Una vez ubicada correctamente,
la lengüeta de bloqueo se debería
trabar en el borde de la estufa, a
través de la muesca de la cubeta
de goteo.
Unidad de la
superficie
Lengüeta de bloqueo
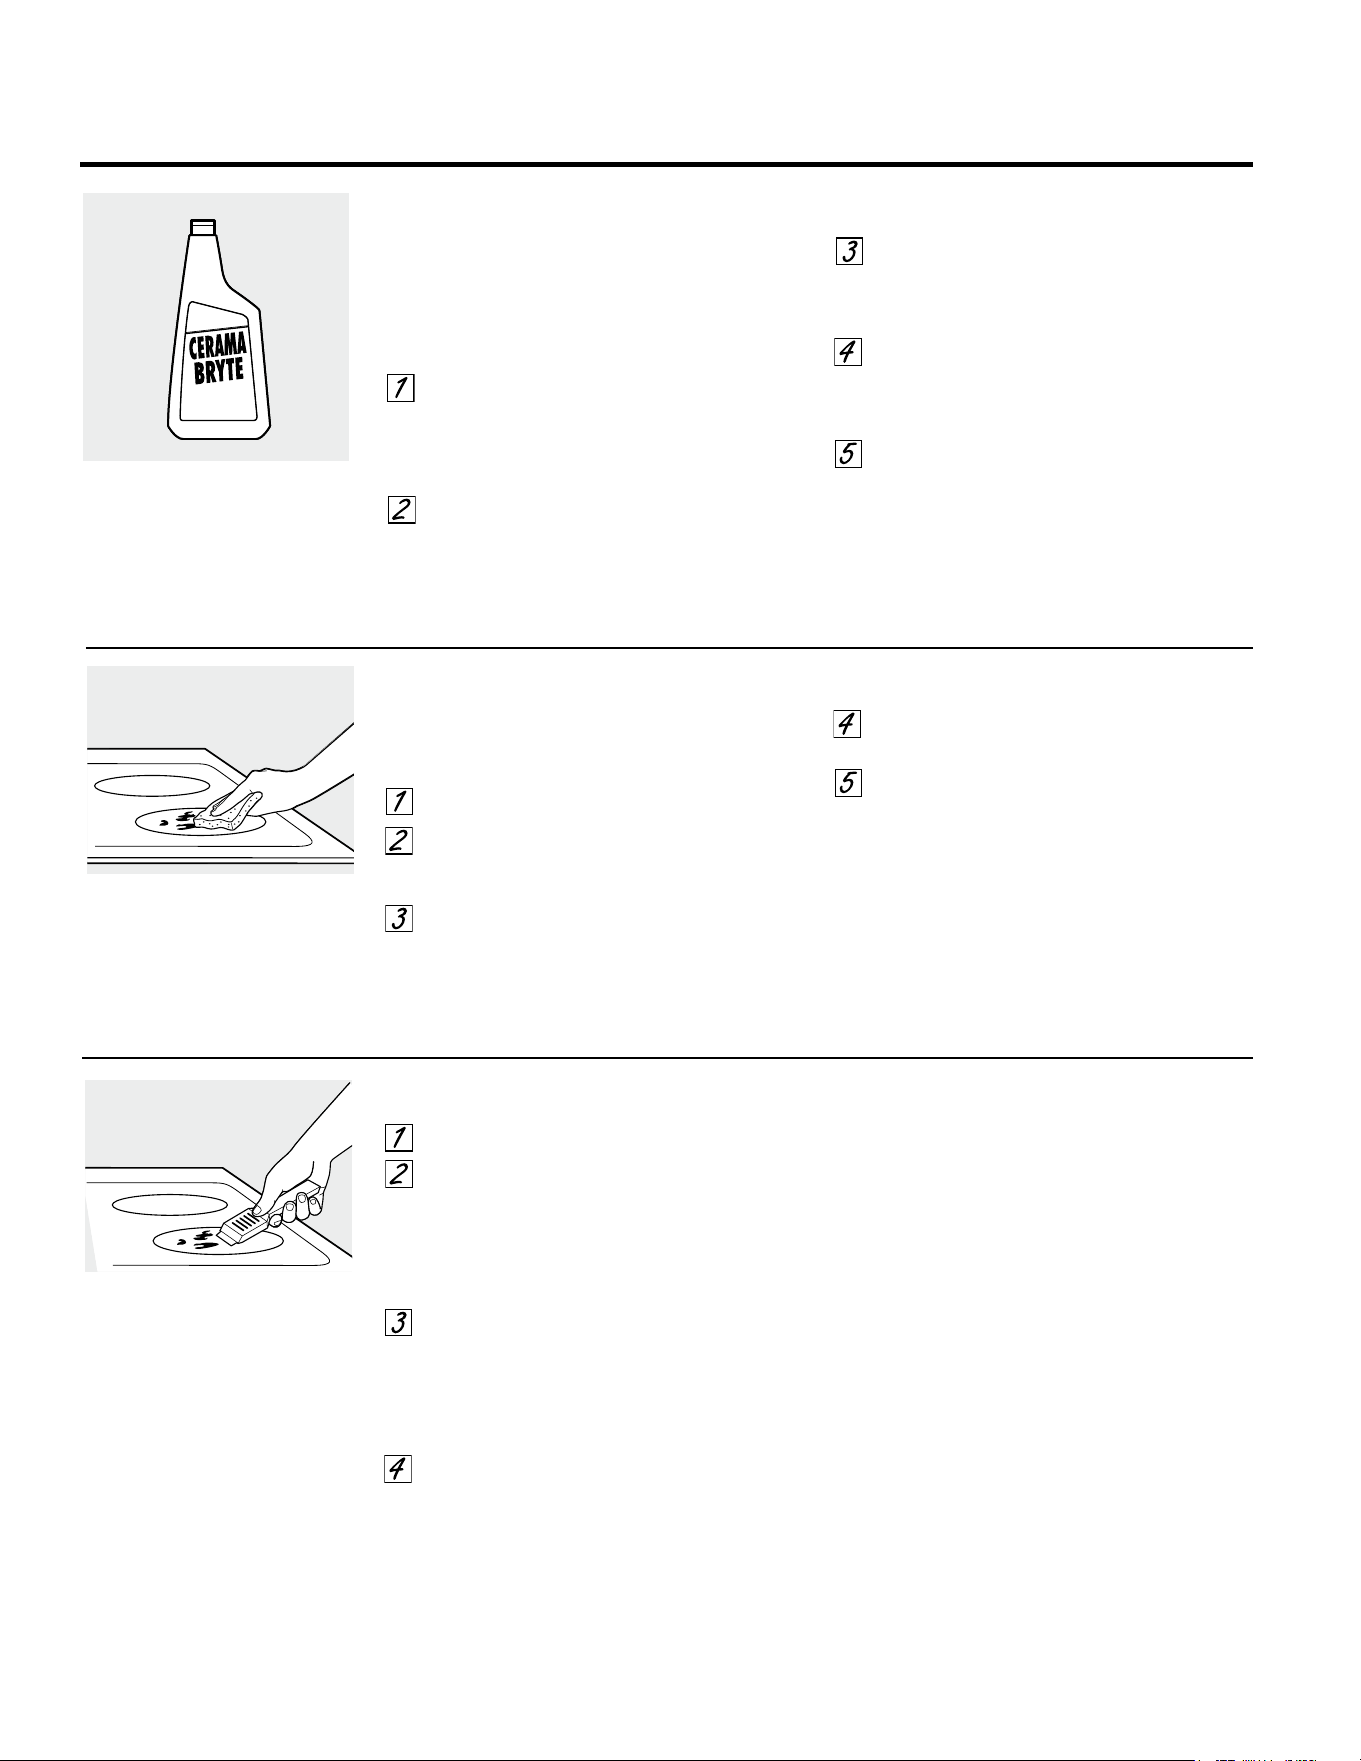
28
Deje enfriar la estufa.
Utilice el raspador de filo único a un
ángulo aproximado de 45 degrees
contra la superficie del vidrio y raspe la
suciedad. Puede ser necesario aplicar
presión al raspador para quitar la
suciedad.
Después de utilizar el raspador, coloque
unas gotas de limpiador de estufas
cerámicas CERAMA BRYTE
®
sobre toda
el área de suciedad quemada. Utilice el
paño de limpieza CERAMA BRYTE
®
para
quitar la suciedad restante.
Para protección adicional, después de
haber quitado todos los restos, pula
toda la superficie con limpiador de
estufas cerámicas CERAMA BRYTE
®
y
una toalla de papel.
Residuos pegados
NOTA: Usted puede DA—AR la superficie de
vidrio si utiliza esponjillas que no sean las
recomendadas.
Deje enfriar la estufa.
Coloque unas gotas del limpiador de
estufas cerámicas CERAMA BRYTE
®
sobre toda el área de residuos pegados.
Utilizando el paño de limpieza CERAMA
BRYTE
®
para estufas cerámicas incluido,
frote el área sucia aplicando presión
según sea necesario.
Si quedan restos, repita los pasos
indicados con anterioridad.
Para protección adicional, después de
haber quitado todos los restos, pula
toda la superficie con limpiador de
estufas cerámicas CERAMA BRYTE
®
y
una toalla
de papel.
El raspador de estufas cerámicas
CERAMA BRYTE
®
y todos los
insumos recomendados se
encuentran disponibles en
nuestro Centro de Repuestos.
Ver instrucciones bajo la sección
“Para solicitar repuestos” en la
página siguiente.
NOTA: No utilice hojas desafiladas
o dañadas.
Residuos pegados rebeldes
Utilice un paño de limpieza CERAMA
BRYTE
®
para estufas cerámicas.
Limpieza normal de uso diario
SÓLO utilice el limpiador de estufas cerámicas
CERAMA BRYTE
®
en la estufa de vidrio. Otras
cremas pueden no ser tan efectivas.
Para mantener y proteger la superficie de su
estufa de vidrio, siga estos pasos:
Antes de usar la estufa por primera vez,
límpiela con el limpiador de estufas
cerámicas CERAMA BRYTE
®
. Esto ayuda a
proteger la estufa y hace la limpieza más
sencilla.
El uso diario del limpiador de estufas
cerámicas CERAMA BRYTE
®
ayudará a
que la estufa quede como nueva.
Agite bien la crema de limpieza. Aplique
unas gotas del limpiador de estufas
cerámicas CERAMA BRYTE
®
directamente
sobre la estufa.
Utilice una toalla de papel o un paño de
limpieza CERAMA BRYTE
®
para estufas
cerámicas para limpiar toda la superficie
de la estufa.
Use un paño seco o una toalla de papel
para quitar los restos del limpiador. No
hace falta enjuagar.
NOTA: Es muy importante que NO CALIENTE
la estufa hasta que la haya limpiado por
completo.
Limpie la estufa después
de cada derrame. Utilice
el limpiador de estufas
cerámicas CERAMA BRYTE
®
.
Cómo limpiar la estufa de vidrio.
(en algunos modelos)
GEAppliances.com
Nuestra evaluación
muestra que si está
cocinando mezclas con alto
contenido de azúcar, tal
como gelatina o caramelo
y se produce un derrame,
éste puede ocasionar
daños permanentes sobre
la superficie de vidrio, a
menos que el derrame se
elimine de forma inmediata.
29
Para solicitar el limpiador de estufas
cerámicas CERAMA BRYTE
®
y el raspador de
estufas, llame a nuestro número gratuito:
Centro nacional de piezas 800.626.2002
Limpiador de estufas cerámicas CERAMA
BRYTE
®
...................#WX10X300
Raspador de estufas cerámicas
CERAMA BRYTE
®
..........#
WX10X0302
Kit .......................#WB64X5027
(El kit incluye la crema y el raspador de estufas)
Paños de limpieza CERAMA BRYTE
®
para
estufas cerámicas ........#WX10X350
Apague todas las unidades de superficie.
Quite las ollas calientes.
Utilizando un guante de cocina:
a. Use un raspador de filo único
(raspador para estufas cerámicas
CERAMA BRYTE
®
) para desplazar el
derrame a un área fría de la estufa.
b. Quite el derrame con toallas de papel.
Cualquier derrame restante debe dejarse
hasta que la superficie de la estufa se haya
enfriado.
No use las unidades de superficie de
nuevo hasta que todos los restos se
hayan eliminado por completo.
NOTA: Si la superficie de vidrio ya ha sufrido
marcas o hendiduras, el vidrio de la estufa
deberá cambiarse. En ese caso, será necesaria la
atención de un técnico.
Daños por derrames azucarados y plástico derretido
Para solicitar repuestos
Superficie de vidrio: posibilidades de daño permanente.
Tenga cuidado de no deslizar ollas y
sartenes a través de su estufa. Dejará
marcas de metal sobre la superficie de la
estufa.
Estas marcas pueden quitarse utilizando
limpiador de estufas cerámicas CERAMA
BRYTE
®
con el paño de limpieza CERAMA
BRYTE
®
para estufas cerámicas.
Si se permite que ollas con una capa fina
de aluminio o cobre hiervan en seco, la
capa puede dejar una decoloración
negra en la estufa.
Esto debe quitarse de inmediato antes
de calentar de nuevo o la decoloración
puede llegar a ser permanente.
NOTA: Verifique con detenimiento que la base
de las ollas no sea áspera para no rayar la
estufa.
Marcas de metal y rayones
Para limpiar el sellado de la estufa alrededor
de los bordes de vidrio, coloque un paño
húmedo sobre los mismos durante unos
minutos y luego limpie con limpiadores no
abrasivos.
Sellado de la estufa
Antes de llamar al servicio técnico…
Consejos para identificación y solución de problemas
¡Ahorre tiempo y dinero! Lea las tablas de las siguientes
páginas y quizás no necesite llamar al servicio técnico.
Problema Causas posibles Qué hacer
Las unidades de Se están utilizando recipientes • Use recipientes de base plana y que se ajusten
superficie no mantienen
de cocción inadecuados. al diámetro de la unidad de superficie elegida.
un hervor constante o
la cocción es lenta
Los elementos de El fusible puede haberse • Cambie el fusible o vuelva a configurar el interruptor
superficie no funcionan quemado o el interruptor de de circuitos.
bien circuitos puede haber saltado.
Los controles de la estufa • Verifique que se haya configurado el control correcto
están mal configurados. para el elemento de superficie que está utilizando.
La unidad de superficie Esto es normal. La unidad sigue
deja de resplandecer encendida y caliente.
cuando se cambia a
una configuración menor
Rayones (pueden parecer
Se están usando métodos •
Los rayones no pueden removerse. Los rayones más pequeños
como roturas) en la de limpieza incorrectos.
se volverán menos visibles como resultado de la limpieza.
superficie de vidrio
Se están usando recipientes • Para evitar rayones, use los procedimientos de limpieza
de la estufa
con bases ásperas o hay recomendados. Verifique que las bases de los recipientes
partículas gruesas (sal o arena) estén limpias antes del uso, y utilice recipientes con bases
entre el recipiente y la superficie lisas.
de la estufa.
Se ha deslizado un recipiente a
través de la superficie de la estufa.
Áreas de decoloración No se limpiaron los derrames
•
Ver la sección Cómo limpiar la estufa de vidrio.
en la estufa
de alimentos antes del uso
siguiente.
Superficie caliente en • Esto es normal. La superficie puede parecer decolorada
un modelo con una estufa cuando está caliente. Esto es temporal y desaparecerá
de color claro. a medida que se enfría el vidrio.
Plástico derretido La estufa caliente entró • Ver la sección Superficie de vidrio: posibilidades de daño
sobre la superficie en contacto con plástico permanente en la sección Cómo limpiar la estufa
colocado sobre la misma. de vidrio.
Marcas (o hendiduras) Se ha derramado una mezcla • Llame a un técnico calificado para el reemplazo.
en la estufa azucarada caliente en la estufa.
Las unidades de superficie
Se están utilizando recipientes • Use sólo recipientes de base plana para minimizar
se encienden y apagan
de cocción inadecuados. el encendido y apagado.
con mucha frecuencia
El control da la señal luego
Olvidó ingresar una • Presione la tecla Bake (Hornear) y la temperatura deseada
de ingresar el tiempo de
temperatura de horneado o la tecla Self Clean (Auto Limpieza) y el tiempo de limpieza
cocción o inicio demorado
o tiempo de limpieza. deseado.
Las unidades de la Las unidades de la superficie • Con los controles apagados, asegúrese de que la unidad
superficie con bobina no están enchufadas de forma de la superficie esté enchufada completamente en el
no funcionan sólida. receptáculo.
de forma correcta.
La configuración de los controles • Asegúrese de que el control correcto esté configurado
de la unidad de la superficie para la unidad de la superficie que esté usando.
es incorrecta.
Las cubetas de goteo no están • Con el control apagado, asegúrese de que la cubeta
configuradas de forma segura de goteo se encuentre en el hueco de la estufa y que
en la estufa. la abertura de la cubeta quede alineada con los receptáculos.
30

Problema Causas posibles Qué hacer
Los alimentos no Los controles del horno están • Ver la sección Cómo usar el horno.
se hornean o rostizan mal configurados.
correctamente
La posición de la bandeja es • Ver la sección Cómo usar el horno.
incorrecta o no está nivelada.
Se están utilizando recipientes • Ver la sección Cómo usar el horno.
de cocción incorrectos o
de tamaño inapropiado.
El termostato del horno debe • Ver la sección Ajuste el termostato del horno usted
ajustarse. mismo.
El control se encuentra en • Consulte la sección Modo de Ahorro de Energía.
el Modo de Ahorro de Energía
.
La luz del horno La lámpara está floja • Ajuste o cambie la bombilla.
no funciona o presenta defectos.
La luz de funcionamiento • Llame al servicio técnico.
del interruptor está rota.
Los alimentos no Los controles del horno están • Asegúrese de presionar el botón BROIL HI/LO
se asan de manera mal configurados. (asar alta/baja).
adecuada
Oven controls improperly set. • Make sure you touch the Broil Hi/Lo pad.
Se está usando una posición • Ver la Guía de asado.
de bandeja inadecuada.
Los recipientes no son • Para mejores resultados, utilice un recipiente diseñado
adecuados para asar. para asado.
En algunas regiones la energía • Precaliente el elemento para asar durante 10 minutos.
(voltaje) puede ser baja.
• Ase por el período de tiempo más prolongado que
se recomiende en la Guía de asado.
La temperatura El termostato del horno debe • Ver la sección Ajuste el termostato del horno usted
del horno es muy alta ajustarse. mismo.
o muy baja
El horno no funciona El enchufe de la cocina • Verifique que el enchufe eléctrico esté conectado
no está introducido del todo a un tomacorriente con tensión y adecuada conexión
en el tomacorriente. a tierra.
El fusible puede haberse • Cambie el fusible o vuelva a configurar el interruptor
quemado o el interruptor de de circuitos.
circuitos puede haber saltado.
Los controles del horno están • Ver la sección Cómo usar el horno.
mal configurados.
Se dejó la puerta en • Si es necesario, espere a que el horno
la posición bloqueada. se enfríe; luego destrabe la puerta.
GEAppliances.com
31

Consejos para identificación y solución de problemas
Antes de llamar al servicio técnico…
Problema Causas posibles Qué hacer
El cajón de El cable de energía puede • Cambie la ubicación del cajón y del cable de energía.
almacenamiento estar obstruyendo el cajón Ver las instrucciones de Remoción del cajón de
no cierra en la parte trasera inferior almacenamiento en la sección Cuidado y limpieza
de la cocina. de la cocina.
El cajón de El cable de energía puede • Cambie la ubicación del cajón y del cable de energía.
almacenamiento estar obstruyendo el cajón Ver las instrucciones de Remoción del cajón de
no cierra en la parte trasera inferior almacenamiento en la sección Cuidado y limpieza
de la cocina. de la cocina.
El soporte de cajón trasero • Vuelva a colocar el cajón. Ver las instrucciones de
se encuentra sobre el riel Remoción del cajón de almacenamiento en la sección
de la guía. Cuidado y limpieza de la cocina.
El horno no realiza La temperatura del horno • Espere a que la cocina se enfríe a temperatura ambiente
la auto limpieza. es demasiado caliente como y reinicie los controles.
para configurar un
funcionamiento de auto limpieza.
Controles del horno configurados
• Lea la sección Uso del horno con función de auto limpieza.
de forma incorrecta.
La puerta del horno no está • Asegúrese de mover la manija de la traba de la puerta
en la posición bloqueada. totalmente hacia la derecha.
El horno no realiza En la pantalla titila • Espere a que la cocina se enfríe a temperatura
la limpieza al vapor. la palabra HOT (Caliente). ambiente y reinicie los controles.
Controles del horno configurados
• Consulte la sección Uso de Limpieza al Vapor.
de forma incorrecta.
La puerta del horno no está • Asegúrese de cerrar la puerta. Para los modelos con traba,
cerrada ni en la posición asegúrese de mover la manija de la traba de la puerta totalmente
bloqueada. hacia la derecha.
Ruido de “crujidos” Es el sonido del metal • Esto es normal.
en el horno durante calentándose y enfriándose
durante las funciones
de cocción y limpieza.
Humo excesivo Suciedad excesiva. • Presione la tecla Clear/Off (Borrar/ Apagar). Abra las ventanas
during a clean cycle para liberar el humo en la habitación. Espere a que
ciclo de limpieza la luz de la tecla Self Clean (Auto Limpieza) se apague. Limpie
el exceso de suciedad y reinicie el ciclo de limpieza.
La puerta del horno El horno está demasiado • Espere a que el horno se enfríe por debajo
no se destrabará. caliente. de la temperatura de bloqueo.
El horno no limpia Los controles del horno • Lea la sección Horno superior con función de auto limpieza..
luego de un ciclo no están correctamente
de limpieza configurados
El horno estaba • Limpie derrames excesivos antes de iniciar el ciclo
demasiado sucio. de limpieza. Es posible que sea necesario usar auto limpieza
n uevamente en hornos con mucha suciedad.
El control no dejará La puerta del horno se debe • Abra la puerta del horno y limpie para retirar cualquier
de emitir pitidos luego abrir de limpieza al vapor. resto de agua y suciedad.
del ciclo de limpieza
al vapor.
32
GEAppliances.com
Problem Possible Causes What To Do
“F –” and a number You have a function • Disconnect all power to the range for at least
or letter flash error code. 30 seconds and then reconnect power. If the function
in the display error code repeats, call for service.
• On self-cleaning models, if a function error code appears during
the self-cleaning cycle, check the oven door latch. The latch
may have been moved, if only slightly, from the locked position.
Make sure the latch is moved to the right as far as it will go.
Touch the Clear/Off pad. Allow the oven to cool for one hour.
Put the oven back into operation.
Quedan restos de agua Esto es normal. • Retire el agua restante con una esponja o tela seca.
en la puerta del horno
luego del Ciclo
de Limpieza al Vapor.
En la pantalla titila La conexión instalada • Comuníquese con el instalador o el electricista para
“bAd” y luego “linE” de la casa hasta la unidad corregir el problema en el cableado.
con un tono fuerte. presenta problemas
en el cableado.
La pantalla queda Es posible que un fusible de su • Reemplace el fusible o reinicie el disyuntor.
en blanco hogar se haya quemado o que
el disyuntor se haya desconectado.
El reloj está apagado • Consulte la sección Uso del reloj y del temporizador
y no aparece en la pantalla. y/o la sección Modo de Ahorro de Energía.
No se logra que
Las teclas del control del horno
• Las teclas Bake (Hornear) y Broil Hi/ Lo (Asar Alto/Bajo) se deberán
la pantalla muestre “SF”
horno no se presionaron presionar al mismo tiempo y mantener por 3 segundos.
de forma adecuada.
Reloj destella, Corte de energía o subida • Reconfigure el reloj. Si el horno estaba en uso, usted
Corte de energía, de tensión. debe reconfigurarlo presionando el botón CLEAR/OFF
(borrar/apagado), configurando el reloj y
reconfigurando cualquier función de cocción.
Un olor a “quemado” Esto es normal en un horno • Para acelerar el proceso, configure un ciclo de
o “aceitoso” sale nuevo y desaparece con auto-limpieza durante un mínimo de 3 horas. Ver
de la ventilación el tiempo. Ver la sección Uso del horno con auto limpieza.
Olor penetrante Las primeras veces que • Esto es temporal.
se utiliza el horno es normal
sentir un olor proveniente
del aislante que recubre
la parte interna del horno.
El cajón no se desliza. El cajón está desalineado. • Extienda totalmente el cajón y empuje el mismo totalmente
hacia adentro o consulte la sección Cuidado y limpieza de la cocina.
El cajón está sobrecargado • Reduzca el peso. Redistribuya los contenidos del cajón.
o la carga está desbalanceada.
Se oye un ventilador El ventilador de convección • Éste es el funcionamiento normal del ventilador por convección.
se encenderá y apagará
de forma intermitente
al precalentar el horno.
Una vez que el horno está • Éste es el funcionamiento normal del ventilador por convección.
precalentado, el ventilador por
convección funcionará de forma
continua en una dirección durante
el horneado por convección.
33
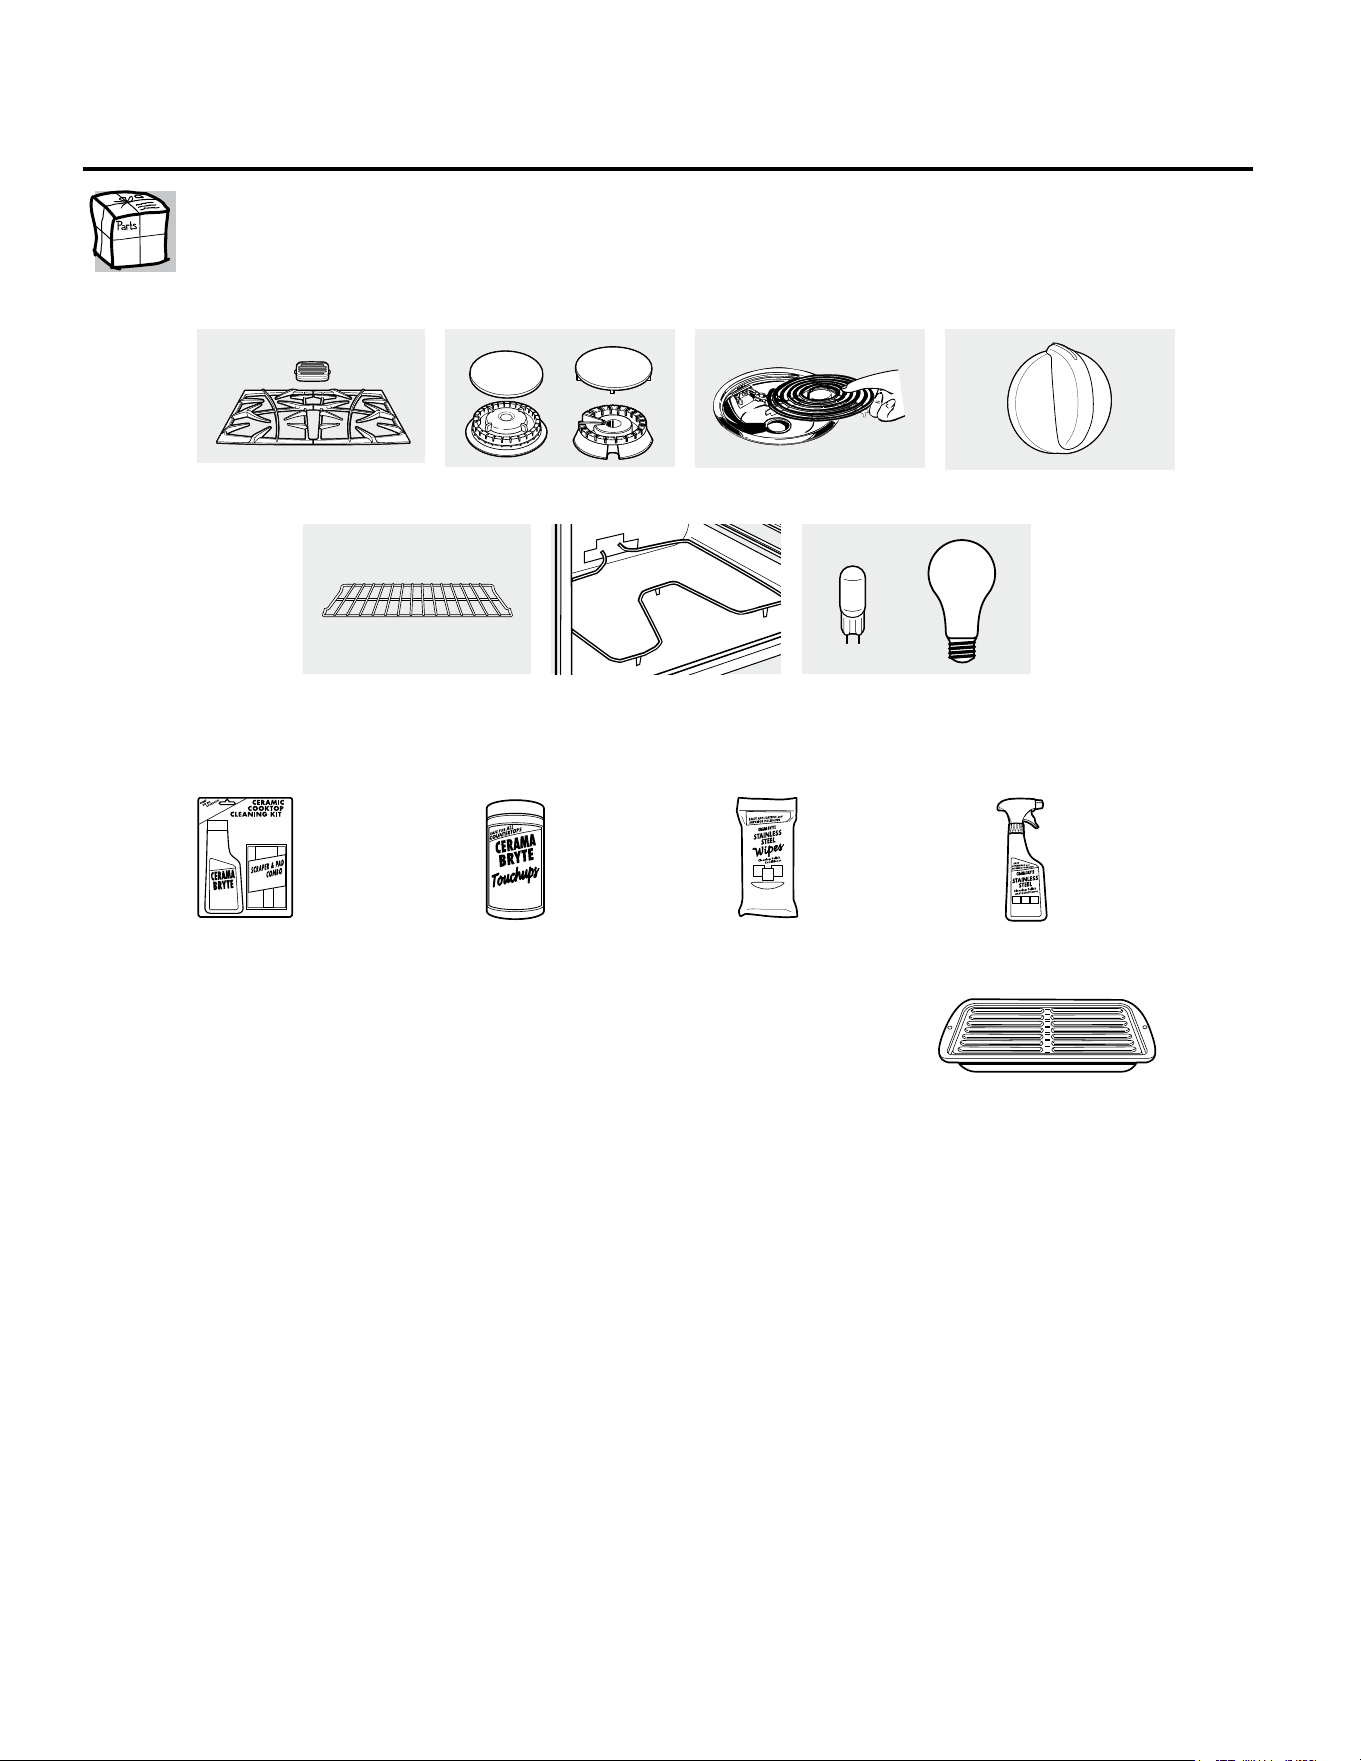
34
Accesorios. GEAppliances.com
¿Desea algo más? (No todos los accesorios se encuentran disponibles para todos
los modelos)
Usted puede encontrar estos accesorios y muchos más en GEAppliances.com, o llame al
800.626.2002 (en horario de trabajo normal). Tenga listo el número de modelo.
¡Pruebe estos otros excelentes productos para que su cocina se vea estupenda!
¡Aproveche al máximo su bandeja para asar! (No para usar con modelos de cajón asador.)
¡Utilice su bandeja y tapa de rejilla para asar hamburguesas, frutos de mar, filetes, vegetales, panceta,
costillas y mucho más! La bandeja inferior retiene el exceso de grasas y aceites.
• Pieza GE genuina
• Fácil de limpiar
• Garantía de un año
¡Oferta de tiempo limitado! ¡Envío sin cargo!
Cuando solicite la bandeja para asar dentro de los 30 días de haber adquirido su producto de cocina GE.
Pequeña Grande* Extra grande**
N° de pieza WB48X10055 WB48X10056 WB48X10057
Dimensiones 8-3/4” A x 1-1/4” A x 13-1/2” P 12-3/4” A x 1-1/4” A x 15-1/4” P 15-1/2” A x 1-1/4” A x 19” P
* La bandeja para asar grande (estándar) no entra en cocinas de 20/24 pulgadas.
** La bandeja extra grande no entra en hornos de paredes de 24 pulgadas, empotradas de 27 pulgadas o cocinas de 20/24 pulgadas.
Llame al 800.626.2002 o utilice este formulario para enviar su solicitud por correo:
GE Parts, P.O. Box 221027, Memphis, TN 38122-1027.
Formulario de solicitud de la bandeja para asar
Cantidad ___________________ Número de pieza _____________________________________________________________
____________________ ______________________________________________________________
____________________ ______________________________________________________________
Número de modelo ____________ Número de serie ________________ Marca ______________ Fecha de compra _________
Nombre ______________________________________________ Apellido _________________________________________________
Dirección ________________________________________________________________________________________________________
Ciudad _______________________________________________ Estado __________ Código Postal _________________________
Teléfono ______________________________________________ Correo electrónico ________________________________________
Check ______ Giro postal ______
Para consultar sobre los precios actuales llame al 800.626.2002. Todas las órdenes con tarjeta de crédito se deberán realizar
en forma telefónica.
Elementos de superficie y
bandejas colectoras
Rejillas Cabezales o tapas de
quemadores de superficie
Elementos del horno Bombillas de luz
Perillas
Bandejas del horno
WX10X117GCS
WX10X305
WX10X10001
PM10X311
Kit de limpieza
de anafes
vitrocerámicos:
Incluye limpiador,
rasqueta y paño
Toallitas
de limpieza
de anafes
vitrocerámicos
Toallitas para
pulir artefactos
de acero
inoxidable
Limpiador
de artefactos
de acero
inoxidable
_ _ _ _ _ _ _ _ _ _ _ _ _ _ _ _ _ _ _ _ _ _ _ _ _ _ _ _ _ _ _ _ _ _ _ _ _ _ _ _ _ _ _ _ _ _ _ _ _
o
!*Si su modelo incluye una parrilla de extensión, puede incrementar la funcionalidad de su alcance al adquirir parrillas de extensión adicionales. Visite www.geapplianceparts.
com o llame al 800-626-2002, y ordene la pieza número WB48T10071. Se debe tener en cuenta que las parrillas de extensión no corresponden a todos los tipos de modelos.
35
Garantía de cocina eléctrica de GE.
GEAppliances.com
n Visitas a su hogar para enseñarle a usar el producto.
n Instalación, entrega o mantenimiento inadecuados.
n Daño o fallas del producto en caso de abuso, uso
inadecuado, uso para otros propósitos que no sean el
adecuado, o uso comercial.
n Daños a la estufa de vidrio provocados por el uso
de limpiadores distintos de las cremas y paños
recomendados.
n Daños a la estufa de vidrio provocados por derrames
endurecidos de materiales azucarados o plástico derretido
que no se limpiaron de acuerdo con
las instrucciones del Manual del Propietario.
n Reemplazo de fusibles domésticos o la reconfiguración de
interruptores de circuito.
n Daños al producto provocados por accidentes, incendios,
inundaciones o fuerza mayor.
n Daños incidentales o resultantes provocados por posibles
defectos en este artefacto.
n Daños provocados después de la entrega.
n Un producto no accesible para prestar el servicio técnico
solicitado.
GE no cubrirá:
Esta garantía se extiende al comprador original y cualquier dueño posterior para productos adquiridos para
uso doméstico dentro de los EE.UU. Si el producto se encuentra en una región donde no hay Servicio Técnico
autorizado de GE, usted será responsable del costo del viaje o usted puede tener que llevar el producto a un
Servicio Técnico Autorizado de GE para efectuar la reparación. En Alaska, la garantía excluye el costo de envío o
visitas para efectuar arreglos en su hogar.
Algunos estados no permiten la exclusión o limitación de daños incidentales o resultantes. Esta garantía
le otorga derechos legales específicos y usted puede contar con otros derechos, que pueden variar de estado a
estado. Para conocer sus derechos legales, consulte a su oficina del consumidor local o estatal
o al Fiscal General de su estado.
Garante: General Electric Company. Louisville, KY 40225
Todos los servicios técnicos de garantía son otorgados por nuestros
Centros de Servicio de Fábrica, o un técnico autorizado por
Customer Care
®
. Para programar el servicio técnico, visítenos on-line
en GEAppliances.com, o llame al 800.GE.CARES (800.432.2737).
Tenga el número de serie y de modelo a mano cuando llame para
solicitar un servicio técnico.
Abroche su recibo aquí.
Se necesita una prueba
de la fecha de compra original para
obtener servicio técnico cubierto por
la garantía.
EXCLUSIÓN DE GARANTÍAS IMPLÍCITAS—Su único y exclusivo recurso es la reparación del producto como
se establece en la presente Garantía Limitada. Las garantías implícitas, incluyendo garantías de comerciabilidad
y aptitud para un objetivo particular, se encuentran limitadas a un año o al período más corto permitido por la ley.
Por el período de: GE otorgará:
Un año
Desde la fecha de
compra original
Cualquier pieza de la cocina que falle debido a un defecto de los materiales o mano de obra.
Durante esta garantía limitada de un año, GE también ofrece, en forma gratuita, la mano de
obra y trabajos en el hogar para reemplazar la pieza defectuosa.
Página Web de GE Appliances GEAppliances.com
¿Tiene alguna pregunta sobre su electrodoméstico? ¡Pruebe la página Web de GE Appliances, 24 horas al día,
cualquier día del año! Para mayor conveniencia y servicio más rápido, ya puede descargar los Manuales
de los Propietarios, pedir piezas o incluso hacer una cita en línea para que vengan a realizar una reparación.
Solicite una reparación GEAppliances.com
El servicio de expertos GE está a tan sólo un paso de su puerta. ¡Entre en línea y solicite su reparación cuando
le venga cualquier día del año! O llame al 800.GE.CARES (800.432.2737) durante horas normales de oficina.
Real Life Design Studio (Estudio de diseño para la vida real)
GEAppliances.com
GE apoya el concepto de Diseño Universal—productos, servicios y ambientes que pueden usar gente de todas
las edades, tamaños y capacidades. Reconocemos la necesidad de diseñar para una gran gama de habilidades
y dificultades físicas y mentales. Para más detalles cobre las aplicaciones de GE Diseño Universal, incluyendo
ideas de diseño para la cocina para personas con discapacidades, mire nuestra página Web hoy mismo.
Para personas con dificultades auditivas, favor de llamar al 800.TDD.GEAC (800.833.4322).
Garantías ampliadas GEAppliances.com
Compre una garantía ampliada y obtenga detalles sobre descuentos especiales disponibles mientras su garantía
está aún activa. Puede comprarla en línea en cualquier momento, o llamar al 800.626.2224 durante horas
normales de oficina. GE Consumer Home Services estará aún ahí cuando su garantía termine.
Piezas y accesorios GEAppliances.com
Aquellos individuos con la calificación necesaria para reparar sus propios electrodomésticos pueden
pedir que se les manden las piezas o accesorios directamente a sus hogares (aceptamos las tarjetas
VISA, MasterCard y Discover). Haga su pedido en línea hoy, 24 horas cada día o llamar por teléfono
al 800.626.2002 durante horas normales de oficina.
Las instrucciones descritas en este manual cubren los procedimientos a seguir por cualquier usuario. Cualquier
otra reparación debería, por regla general, referirse a personal calificado autorizado. Debe ejercerse precaución
ya que las reparaciones incorrectas pueden causar condiciones de funcionamiento inseguras.
Póngase en contacto con nosotros GEAppliances.com
Si no está satisfecho con el servicio que recibe de GE, póngase en contacto con nosotros en nuestra página
Web indicando todos los detalles así como su número de teléfono o escríbanos a:
General Manager, Customer Relations
GE Appliances, Appliance Park
Louisville, KY 40225
Registre su electrodoméstico GEAppliances.com
¡Registre su nuevo electrodoméstico en línea—cuando usted prefiera! El registrar su producto a tiempo
le proporcionará, si surgiera la necesidad, una mejor comunicación y un servicio más rápido bajo los términos
de su garantía. También puede enviar su tarjeta de registro pre-impresa que se incluye en el material de
embalaje.
Apoyo al cliente.
Printed in the United States
36