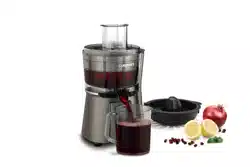
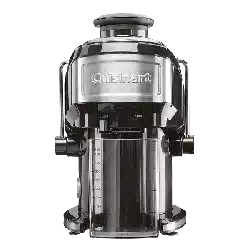
User Guide for Juice Extractor
PARTS and FEATURES
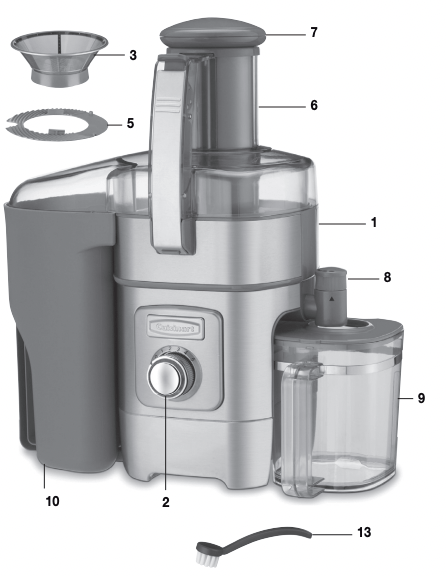
1. Motor base
Die-cast and brushed stainless steel housing.
2. 5-speed dial control with blue LED light ring and On/Off button
3. Stainless steel micro-mesh filter basket
4. Filter bowl (not shown)
5. Foam management filter disk
6. Cover with 3-inch diameter feed tube and pyramid design fruit stabilizer
7. Food pusher
8. Juice spout (adjustable)
Controls the flow rate.
9. 1-liter juice pitcher
10. 2-liter pulp container
11. 4-second safety break (not shown)
Stops the filter basket with blades when handle tab is released.
12. Push box cord storage (not shown)
13. Heavy-duty cleaning brush to clean filter basket
14. 1000 watts of power for maximum juice extraction (not shown)
15. BPA Free (not shown)
All materials that come in contact with food and/or liquid are BPA free.
Before first use
- Remove all packaging materials and any promotional labels or stickers from your juice extractor. Be sure all parts (listed in Parts and Features) of your new appliance have been included before discarding any packaging materials.
- You may want to keep the box and packing materials for use at a later date.
- Before using your Cuisinart® Juice Extractor for the first time, remove any dust from shipping by wiping the base with a damp cloth.
- Thoroughly clean cover, pusher, pulp container, juice pitcher, filter basket, and filter bowl.
- All removable parts can be submerged in water for cleaning and are dishwasher safe.
- Never place the motor housing in the dishwasher, nor should you immerse it in water. Always use a damp cloth to wipe clean.
Assembly
Assembling the Juice Pitcher
- Place the juice pitcher on a flat surface.
- Insert the foam separator.
- Put cover in place. Set pitcher aside.

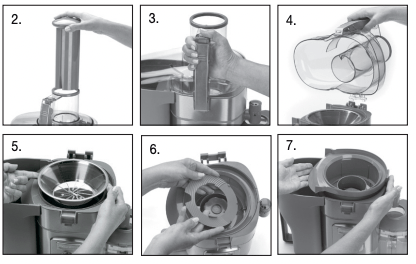
Assembling the Juice Extractor
- Place base on a clean, flat surface.
- Insert filter bowl, positioning spout on right side, on top of motor housing.
- Place foam management filter disk in filter bowl.
- Place mesh filter basket firmly in place in the filter bowl.

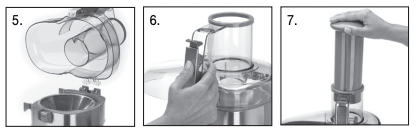
5. Hold the juice extractor cover by the handle with the feed tube facing back and the hinge straight down over the hinge slot on the motor housing. Insert the hinge into the slot and lower into position.
6. Make sure the handle lock is in the "open" position. Press handle in with an upward motion to close.
7. Slide the food pusher down the feed tube by aligning the groove in the food pusher with the small indent on the inside of the top of the feed tube.
8. Place the pulp container in position by tilting opening slightly under the cover.
9. Place the assembled juice pitcher under the spout, with the handle facing forward.
10. Make sure the spout is in the open position. Never juice with the spout in the closed position.
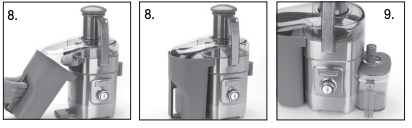
Disassembling the Juice Extractor
- Unplug the juice extractor.
- Remove the food pusher.
- Press the handle tab release to unlock the cover.
- Lift and remove cover.
- Carefully remove the filter basket by pulling up on either side of the rim. Be careful not to touch the blades in the bottom of the basket.
- Remove foam management filter disk.
- Remove the filter bowl by pulling up on either side.
Foam Management System
If you prefer less foam in your juice, use the foam management filter disk and adjust the spout to a smaller opening. If you prefer more foam, do not use the disk and adjust the spout to a larger opening.
OPERATING INSTRUCTIONS
- Make sure your juice extractor is properly assembled. (See Assembly Instructions.)
- Plug the power cord into a 120V electrical outlet.
- Make sure that the spout is in the open position. Never juice with the spout in the closed position.
- Wash all selected fruits or vegetables.
- While most fruits such as apples, pears, carrots, etc. will not need cutting, any fruit or vegetable with a diameter larger than 3 inches will need to be cut.
- Set the dial to the desired speed. The blue LED light ring on the control dial will start to blink.
- Press the button in the center of the control dial to start the juice extractor. The LED light ring will stop blinking and stay on.
- Lift the food pusher out of the feed tube and drop your food into the feed tube. Push through by inserting the food pusher and pressing firmly.
- The juice will flow into the juice pitcher and the pulp will accumulate in the pulp container.
- When finished juicing, press the On/Off button to stop the motor. Turn the control dial to “0” to shut off the juice extractor.
- Before removing the juice pitcher from under the spout, turn the spout to the closed position. This will prevent juice from dripping on the counter.
Cleaning and maintenance
Do not immerse the motor housing in water or spray it with water. Clean only by wiping with a damp sponge, cloth or paper towel. Use any liquid dishwashing detergent, but do not use any products containing ammonia or scouring powders, as these products will dull, scratch or mar the finish.
For easy cleaning, always clean immediately after each use. Vegetables and fruits will harden if left to dry on the unit parts, making it harder to clean.
- Unplug juicer.
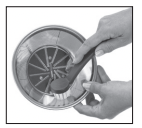
Warning: Be careful when handling the filter basket during cleaning, as the blades at the bottom are very sharp. For best juicing results, always thoroughly clean the filter basket with the nylon brush provided. (See image.)
2. Take juice extractor apart, following Disassembly Instructions (page 4). First, rinse with cold water. Then wash the pulp container, juice pitcher, pusher, lid and rotating filter basket in hot, sudsy water, or place in top rack of dishwasher. Do not use a metal brush or pad.
3. Towel-dry all parts.
4. Any other servicing should be performed by an authorized service representative.
TIPS AND HINTS
- Extracted juice from fresh fruits and vegetables contains 95% of their nutrients. Drinking extracted juices is the fastest way to digest fruits and vegetables so that your body can absorb all of those nutrients. As opposed to eating the whole fruit, which can take about 1 hour to digest, extracted juices take only 15 minutes.
- Fresh juices are excellent for aiding in cleanses (ridding the body of toxins) and in weight management.
- Always use fresh, organic and seasonal produce. Organic produce is grown without synthetic fertilizers and chemicals, which is very important when juicing whole foods. When buying foods in season, they are considerably less expensive than purchasing off season, and the flavors are much better.
- Wash all vegetables immediately after purchasing and store them in the refrigerator. This way they are ready to juice at any time.
- Always juice fresh fruits and vegetables soon after purchasing. The longer produce is held, the more nutrients it loses.
- Always wash vegetables and fruit before juicing.
- Fresh juices should be consumed immediately. They lose nutrients as they sit.
- Certain fruits should be peeled first before juicing. Examples of such fruits are pineapples, melons, mangos, papayas, citrus – any fruit with skin that you cannot eat. Also remove all pits and hard seeds from fruit such as peaches, cherries, mangos, etc.
- Citrus fruit juice is delicious and creamy, plus it is more nutrient rich than citrus juice that is manually pressed.
- If cucumbers are waxy, peel them before you juice them.
- When juicing, softer ingredients should be juiced before the harder ones. As a rule, softer ingredients should be juiced at the low speed, while harder ingredients are juiced on higher speeds (refer to Juicing Chart, page 7).
- When juicing herbs or leafy greens, juice them in the middle of a combination of ingredients in order to extract the greatest amount of juice.
- Use your taste to guide you on fruit and vegetable combinations for juices. The recipes provided are a guideline, but the possibilities are endless. Experiment to see what your favorite combinations are.
- Carrots make a great and tasty base for vegetable juices, and apples do the same for fruit juices.
- Beets and carrots both have naturally high sugar content, so when added to vegetable juices they balance out any bitter flavors juiced vegetables may have.
- Use your juice extractor in tandem with your blender. Blend fresh juices with ingredients like bananas, yogurt, and protein powders for delicious power smoothies.
- It is also possible to make a healthier, fresher version of your favorite cocktail with fresh juices.
- Blend fruit juices with sparkling water or seltzer to make a natural soda.
- The pulp that is separated from the juice has its own health benefits. It is high in fiber and can be used in a variety of ways. See our recipes as guides on how you can incorporate the fibrous pulp into your diet.
TroubleShooting
| Problem |
Solution |
| Juice extractor does not turn on |
The handle safety lock is not engaged. (See Assembly Instructions page 4.)
Press On/Off button to start juicing
|
| Decreased juice rate |
Make sure the spout is opened all the way.
Excess pulp in filter basket can slow juice rate. Stop the juice extractor and clean filter basket.
|
| Handle lock is not closing |
Make sure that lock is fully opened by pushing down on the locking tab.
Position your finger on the raised lines on the locking tab and press closed.
|
Approximate yield juicing chart