User Manual for Induction
Getting to know your appliance
You can find information on the dimensions and power of the hotplates in Page 2
Note: . Depending on the appliance model, individual details and colours may differ.
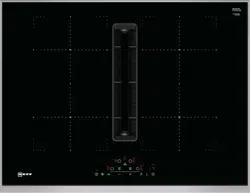
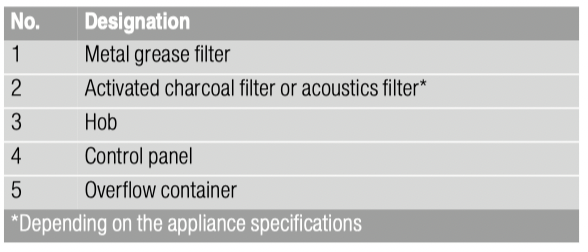
Your new appliance
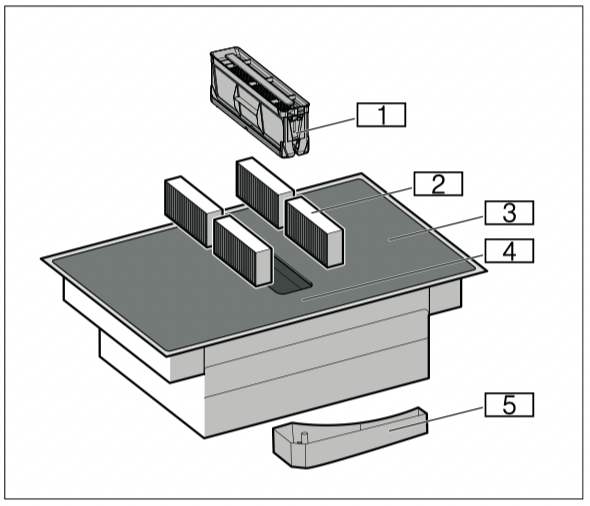
1 Metal grease filter
2 Activated charcoal filter or acoustics filter*
3 Hob
4 Control panel
5 Overflow container
*Depending on the appliance specifications
Special accessories
Depending on the appliance model, various accessories are available and you can obtain these from specialist retailers, from our after-sales service or from our official website:
■ Air extraction set
■ Air recirculation set
■ Activated charcoal filter: For air circulation
■ Acoustics filter: For air extraction mode
The control panel
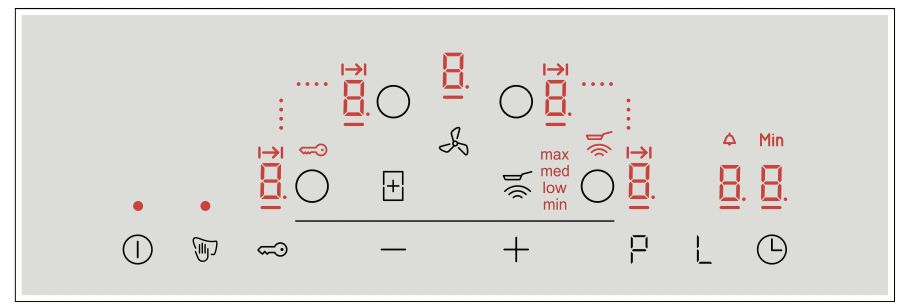
Touch controls
Touching a symbol activates the associated function.
Notes
■ Always keep the control panel clean and dry. Moisture reduces its effectiveness.
■ Do not place any cookware near the indicators or sensors. The electronics could overheat.
The hotplates
|
Cooking zones
|
 |
Single cooking zone
|
Use cookware that is a suitable size
|
 |
ombined cooking zone
|
See the section entitled ~ "CombiZone function"
|
|
Only use cookware that is suitable for induction cooking; see the section entitled ~ "Induction cooking"
|
Residual heat indicator
The hob has a residual heat indicator for each hotplate. This indicates that a hotplate is still hot. Do not touch a hotplate while the residual heat indicator is lit up.
The following indicators are shown depending on the amount of residual heat:
■ Display High temperature
■ Display  : Low temperature
If you remove the cookware from the hotplate during cooking, the residual heat indicator and the selected heat setting will flash alternately.
When the hotplate is switched off, the residual heat indicator will light up. Even after the hob has been switched off, the residual heat indicator will stay lit for as long as the hotplate is still warm.
Operating modes
This appliance can be used in air extraction mode or circulating-air mode.
Exhaust air mode

The air which is drawn in is cleaned by the grease filters and conveyed to the exterior by a pipe system.
Note: The exhaust air must not be conveyed into a functioning smoke or exhaust gas flue or into a shaft which is used to ventilate installation rooms which contain heat-producing appliances.
■ Before conveying the exhaust air into a nonfunctioning smoke or exhaust gas flue, obtain the consent of the heating engineer responsible.
■ If the exhaust air is conveyed through the outer wall, a telescopic wall box should be used.
Circulating-air mode

The air which is drawn in is cleaned by the grease filters and an activated carbon filter and conveyed back into the kitchen.
Note: To bind odours in circulating-air mode, you must install an activated carbon filter. The different options for operating the appliance in circulating-air mode can be found in the brochure. Alternatively, ask your dealer. The required accessories are available from specialist outlets, from customer service or from the Online Shop.
Before using for the first time
Please read the following information before using the appliance for the first time:
Clean the appliance and all accessory parts thoroughly.
Before you can use your new appliance, you must apply certain settings.
Switch the hob on and off using the main switch  .
.
Setting the operating mode
The appliance is supplied with a preset air recirculation mode.
When the hob is installed with an air outlet to the outside, you must configure the setting  in this mode. See section "Basic settings".
Operating the appliance
This chapter explains how to set a hotplate. The table shows heat settings and cooking times for various meals.
Tip: Switch on the ventilation system when you start cooking and only switch it off a few minutes after you have finished cooking. This is the most effective way to remove the cooking vapours.
Note: Never operate the appliance without the metal grease filter and the overflow container.
Switching the hob on and off
The main switch is used to switch the hob on and off.
To switch on: Touch the symbol. An audible signal sounds. The indicator next to the main switch and the hotplate indicators  light up. The hob is ready to use.
To switch off: Touch the symbol until the indicator goes out. All hotplates are switched off. The residual heat indicator remains lit until the hotplates have cooled down sufficiently.
Notes
■ The hob switches off automatically if all hotplates have been switched off for more than 20 seconds.
■ The selected settings are stored for four seconds after the hob has been switched off. If you switch it on again during this time, the hob will operate using the previously stored settings.
Setting a hotplate
Use the  and
and  symbols to select the required heat setting.
Heat setting = lowest setting.
Heat setting  = highest setting.
Every heat setting has an intermediate setting. This is marked with a dot.
Notes
■ To protect the fragile parts of your appliance from overheating and electrical overloading, the hob may temporarily reduce the power.
■ In order to prevent the appliance from producing excess noise, the hob may temporarily reduce the power.
Selecting a hotplate and heat setting
The hob must be switched on.
1. Select the hotplate using the  symbol.
2. Touch the or symbol within 10 seconds. The following basic setting appears:
symbol: heat setting
symbol:  heat setting
The heat setting is set.
Changing the heat setting
Select the hotplate and touch the or symbol until the required heat setting appears.
Switching off the hotplate
Select the hotplate and then touch the or symbol until appears.
The hotplate switches itself off and the residual heat indicator appears.
Notes
■ If no pan has been placed on the hotplate, the selected power level flashes. After a certain time has elapsed, the hotplate switches off.
■ If a pan has been placed on the hotplate before switching on the hob, it will be detected within 20 seconds of pressing the main switch and the hotplate will be selected automatically. Once detected, select the power level within the next 20 seconds or the hotplate will switch off.
If more than one pan is placed on the hob, only one will be detected when switching it on.
Chef's recommendations
Recommendations
■ When heating up puree, cream soups and thick sauces, stir occasionally.
■ Set heat setting 8 to 9 for preheating.
■ When cooking with the lid on, turn the heat setting down as soon as steam escapes between the lid and the cookware. Steam does not need to escape for a good cooking result.
■ After cooking, keep the lid on the cookware until you serve the food.
■ To cook with the pressure cooker, observe the manufacturer's instructions.
■ Do not cook food for too long, otherwise the nutrients will be lost. The kitchen clock can be used to set the optimum cooking time.
■ For a more healthy cooking result, smoking oil should be avoided.
■ To brown food, fry small portions in succession.
■ Cookware may reach high temperatures while the food is cooking. We recommend that you use oven gloves.
■ You can find recommendations for energy-efficient cooking in section "Environmental protection"
Cooking table
The table shows which heat setting is suitable for each type of food. The cooking time may vary depending on the type, weight, thickness and quality of the food.
| |
Heat setting.
|
Cooking time (min).
|
|
Melting
|
|
|
|
Chocolate coating
|
1 - 1.
|
-
|
|
Butter, honey, gelatine
|
1-2
|
-
|
|
Heating and keeping warm
|
|
|
|
Stew, e.g. lentil stew
|
1. - 2
|
-
|
|
Milk*
|
1. - 2.
|
-
|
|
Heating sausages in water*
|
3-4
|
-
|
|
Defrosting and heating
|
|
|
|
Spinach, frozen
|
3-4
|
15 - 25
|
|
Goulash, frozen
|
3-4
|
35 - 55
|
|
Poaching, simmering
|
|
|
|
Potato dumplings*
|
4. - 5.
|
20 - 30
|
|
Fish*
|
4-5
|
10 - 15
|
|
White sauces, e.g. Béchamel sauce
|
1-2
|
3-6
|
|
Whisked sauces, e.g. sauce béarnaise, hollandaise
|
3-4
|
8 - 12
|
|
* Without lid
** Turn several times
*** Preheat to heat setting 8 - 8.
|
| |
Heat setting
|
Cooking time (mins)
|
|
Boiling, steaming, braising
|
|
|
|
Rice (with double the volume of water)
|
2. - 3.
|
15 - 30
|
|
Rice pudding***
|
2-3
|
30 - 40
|
|
Unpeeled boiled potatoes
|
4. - 5.
|
25 - 35
|
|
Boiled potatoes
|
4. - 5.
|
15 - 30
|
|
Pasta, noodles*
|
6-7
|
6 - 10
|
|
Stew
|
3. - 4.
|
120 - 180
|
|
Soups
|
3. - 4.
|
15 - 60
|
|
Vegetables
|
2. - 3.
|
10 - 20
|
|
Vegetables, frozen
|
3. - 4.
|
7 - 20
|
|
Cooking in a pressure cooker
|
4. - 5.
|
-
|
|
Braising
|
|
|
|
Roulades
|
4-5
|
50 - 65
|
|
Pot roast
|
4-5
|
60 - 100
|
|
Goulash***
|
3-4
|
50 - 60
|
|
Roasting/frying with little oil*
|
|
|
|
Escalope, plain or breaded
|
6-7
|
6 - 10
|
|
Escalope, frozen
|
6-7
|
6 - 12
|
|
Chop, plain or breaded**
|
6-7
|
8 - 12
|
|
Steak (3 cm thick)
|
7-8
|
8 - 12
|
|
Poultry breast (2 cm thick)**
|
5-6
|
10 - 20
|
|
Poultry breast, frozen**
|
5-6
|
10 - 30
|
|
Rissoles (3 cm thick)**
|
4. - 5.
|
20 - 30
|
|
Hamburgers (2 cm thick)**
|
6-7
|
10 - 20
|
|
Fish and fish fillet, plain
|
5-6
|
8 - 20
|
|
Fish and fish fillet, breaded
|
6-7
|
8 - 20
|
|
Fish, breaded and frozen, e.g. fish fingers
|
6-7
|
8 - 15
|
|
Scampi, prawns
|
7-8
|
4 - 10
|
|
Sautéeing fresh vegetables and mushrooms
|
7-8
|
10 - 20
|
|
Stir-fry, vegetables, meat cut in Asian-style strips
|
7-8
|
15 - 20
|
|
Frozen dishes, e.g. roasted dishes
|
6-7
|
6 - 10
|
|
Pancakes (baked in succession)
|
6. - 7.
|
-
|
|
Omelette (cooked in succession)
|
3. - 4.
|
3 - 10
|
|
Fried eggs
|
5-6
|
3-6
|
|
Deep-fat frying* (150-200 g per portion in 1-2 l oil, deep-fat fried in portions)
|
|
|
|
Frozen products, e.g. chips, chicken nuggets
|
8-9
|
-
|
|
Croquettes, frozen
|
7-8
|
-
|
|
Meat, e.g. chicken portions
|
6-7
|
-
|
|
Fish, breaded or in beer batter
|
6-7
|
-
|
|
Vegetables, mushrooms, breaded or battered, tempura
|
6-7
|
-
|
|
Small baked items, e.g. doughnuts, fruit in batter
|
4-5
|
-
|
|
* Without lid
** Turn several times
*** Preheat to heat setting 8 - 8.
|
Manual hood control
You can control the ventilation setting manually.
Note: Using tall items of cookware may prevent the extraction system from working at optimum power. The extraction power can be improved by placing a lid on the cookware at an angle.
Activation
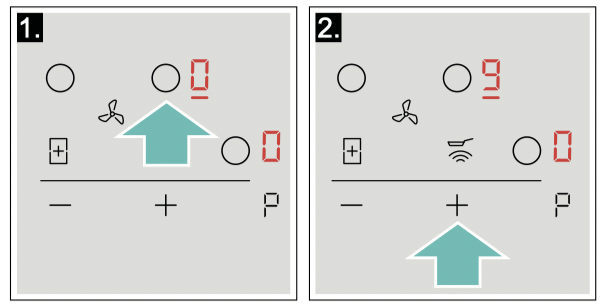
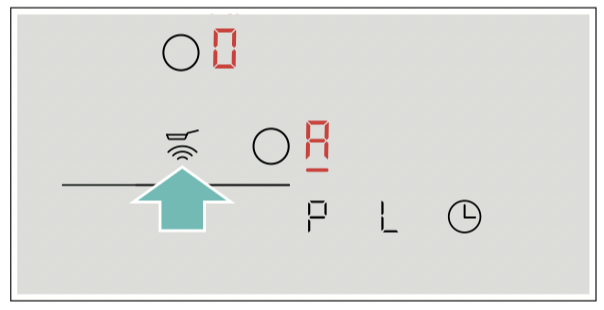
1. Touch the  symbol. The ventilation system starts at the preset power level.
2. Use the and symbols to select the required power level within the next 10 seconds. The selected power level lights up.
3. Touch the symbol to confirm the selected setting. The ventilation system switched on.
Changing and switching off
Touch the symbol and select the required power level or set it to using the and symbols.
Intensive setting
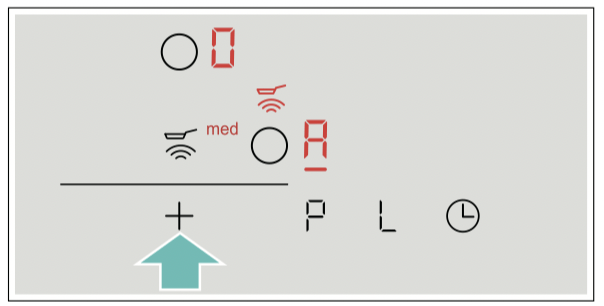
There are two intensive modes for the ventilation system. If you activate the intensive settings, the ventilation system works at maximum output for a short time.
Activation
Touch the symbol and select the required intensive setting.
■ Intensive setting I: Touch the symbol. The display lights up. The setting is activated.
■ Intensive setting II: Touch the symbol. Thedisplay lights up. The setting is activated.
Note: After eight minutes, the appliance automatically switches back to fan setting .
Changing and switching off
Touch the symbol and select the required power level or set it to using the and symbols.
Automatic start
If you select a power level for a cooking zone, the automatic start switches on. The ventilation system switches on at a power level in accordance with the respective power level for the cooking zones.
You can find out how to change this setting in section "Basic settings".
Run-on function
The run-on function allows the ventilation system to continue operating for a few minutes after the hob has been switched off. This removes any remaining cooking vapours. The ventilation system then automatically switches off.
Activation
As standard, the run-on time is activated with a maximum switch-off time. You can find out how to change this setting in section "Basic settings".
Note: The run-on function only switches on if at least one cooking zone has been switched on for at least one minute.
Deactivating
Manual
Touch thesymbol. The run-on function is switched off.
Automatic
The run-on function is switched off in the following cases:
■ The run-on time has elapsed.
■ The appliance is switched on again.
CombiZone function
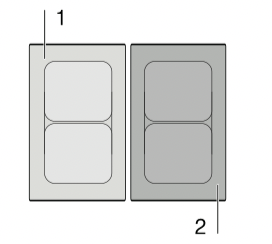
You can use this function to connect the Combi zone and set the same heat setting for both cooking zones. This is especially suitable for cooking with oblong cookware.
Notes regarding cookware
For best results, use cookware that matches the size of the two cooking zones. Place the cookware in the centre of the cooking zones.
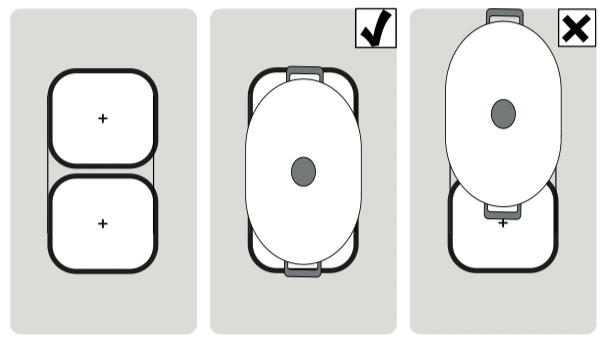
If you are using only one piece of cookware on one of the two cooking zones, you can move it to the second cooking zone. If you do this, the heat setting and the selected settings are transferred.
Activation
The hob must be on.
1. Select one of the two hotplates in the combi zone and set the heat setting.
2. Touch the  symbol. The
  indicator lights up.
The heat setting lights up on the displays for the two hotplates.
The function has now been activated.
Changing the heat setting
Select one of the two hotplates assigned to the combi zone and use the or symbol to set the heat settings.
Deactivation
Select one of the two hotplates assigned to this function and touch the symbol.
This deactivates the function. The two hotplates will now function independently.
Time-setting options
Your hob has two timer functions:
■ Programming the cooking time
■ Kitchen timer
Programming the cooking time
The hotplate automatically switches off after the time that is set has elapsed.
Setting procedure:
1. Select the hotplate and the required heat setting.
2. Touch the  symbol.
  lights up on the display for the hotplate.
 lights up on the timer display.
3. Touch the or symbol. The basic setting appears:
symbol: 30 minutes.
symbol: 10 minutes.
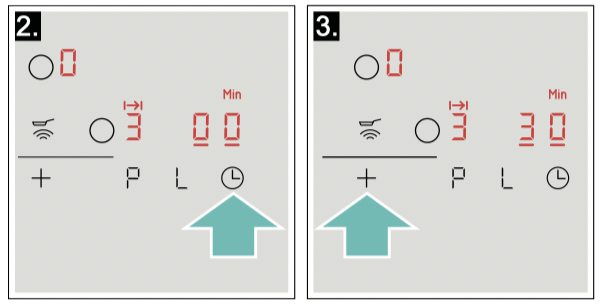
4. Use the or symbol to select the required cooking time.
After a few seconds, the time begins to elapse.
Notes
■ The same cooking time can be set automatically for all hotplates. The set time for each of the hotplates counts down independently from the others. You can find information on automatically programming the cooking time in section "Basic settings"
■ If the Combi Zone or Move function is selected for the combined hotplate, the set time for both hotplates is the same.
Frying sensor
If a cooking time has been programmed for a hotplate and the frying sensor has been activated, the cooking time will not begin to count down until the selected temperature setting has been reached.
Changing or deleting the time
Select a hotplate. Touch the symbol and use the or symbols to change the cooking time, or set the time to .
When the time has elapsed
The hotplate switches off. An audible signal sounds.  lights up in the timer display for 60 seconds.
Touch the symbol. The displays go out and the audible signal ceases.
Notes
■ If a cooking time was programmed for several hotplates, the time information for the selected hotplate is shown in the timer display.
■ You can set a cooking time of up to 99 minutes.
The kitchen timer
You can use the kitchen timer to set a time of up to 99 minutes.
This functions independently from the hotplates and from other settings. This function does not automatically switch off a hotplate.
Setting procedure
1. Touch the symbol repeatedly until the  indicator lights up. lights up on the timer display.
2. Touch the or symbol. The basic setting appears.
symbol: 10 minutes.
symbol: 5 minutes.
3. Use the or symbol to set the required time. After a few seconds, the time begins to count down.
Changing or cancelling the cooking time
Touch the symbol repeatedly until the indicator lights up. Change or set the time to using the or symbol.
When the time has elapsed
An audible signal sounds. appears in the timer display. The displays go out after 60 seconds.
By pressing the symbol, the displays go out and the audible signal ceases.
PowerBoost function
The PowerBoost function enables you to heat up large quantities of water faster than when using heat setting  .
.
This function can always be activated for a hotplate, provided the other hotplate in the same group is not in use (see illustration). Otherwise, and will flash in the display for the selected hotplate; the heat setting will then be set automatically without activating the function.
Note: In the combi zone, the PowerBoost function can only be activated if the two hotplates are used independently of each other.
Activation
1. Select a hotplate.
2. Touch the symbol.
lights up on the display. The function is activated.
Deactivation
1. Select a hotplate.
2. Touch the symbol.
The display goes out and the hotplate switches back to the heat setting.
The function is deactivated.
Note: In certain circumstances, the PowerBoost function can switch itself off automatically in order to protect the electronic elements inside the hob.
Frying Sensor
This function can be used to fry food while maintaining the suitable frying pan temperature.
The cooking zones that have this function are identified by the roasting function symbol.
Advantages when frying
■ The hotplate only heats up if this is required to maintain the temperature. This saves energy and prevents the oil or fat from overheating.
■ The frying function reports when the empty frying pan has reached the optimum temperature for adding oil and then for adding the food.
Notes
■ Do not place a lid on the pan. Otherwise, the function does not activate correctly. You can use a splash guard to prevent splashes of grease.
■ Use suitable oil or fat for frying. If butter, margarine, extra virgin olive oil or lard is used, set heat setting min.
■ Never leave a frying pan, with or without food, unattended when it is being heated.
■ If the hotplate is a higher temperature than the cookware or vice versa, the frying sensor will not be activated correctly.
Frying pans for the frying sensor
You can purchase special frying pans designed for the frying sensor. You can buy accessories from the aftersales service, from specialist retailers or online. You will find a comprehensive range of accessories for this appliance in our brochures and online.
The availability and the option of online orders depend on the respective country. You can find information about this in the sales brochures.
Note: Not all optional accessories are suitable for every appliance. When buying accessories, always quote the exact product number (E no.) of your appliance "Customer service".

These frying pans have a non-stick coating so that you can fry food with only a small amount of oil.
Notes
■ The frying sensor has been configured specifically for this type of frying pan.
■ Ensure that the diameter of the base of the frying pan corresponds to the size of the hotplate. Put the frying pan in the centre of the hotplate.
■ Using a frying pan of a different size or one that is poorly positioned on the flexible cooking zones may result in the frying sensor not being activated. See the section on .
■ Other frying pans may overheat. They may reach a temperature above or below the selected temperature setting. Try the lowest temperature setting to begin with and change it if necessary.
Temperature settings
|
Temperature setting
|
Suitable for
|
|
min.
|
Low
|
Frying food using extra virgin olive oil, butter or margarine, e.g. omelettes.
|
|
Low
|
Medium - low
|
Frying fish and Thick food, e.g. meatballs and sausages.
|
|
Med.
|
Medium - high
|
Frying steaks, medium or well-done, frozen, breaded and fine foods, e.g. escalope, fresh ragout and vegetables.
|
|
Max.
|
High
|
Frying food at high temperatures, e.g. steaks, bloody, potato fritter and Frozen French fries.
|
Table
The table shows which heat setting is suitable for each type of food. The roasting time may vary depending on the type, weight, size and quality of the food.
The set heat setting varies depending on the frying pan that is used.
Preheat the empty pan; add oil and food after the acoustic signal has sounded.
| |
Temperature setting
|
Total frying time after the signal sounds (mins.)
|
|
Meat
|
|
|
|
Escalope, plain or breaded
|
med
|
6 - 10
|
|
Fillet
|
med
|
6 - 10
|
|
Chops*
|
low
|
10 - 15
|
|
Cordon bleu, Wiener Schnitzel*
|
med
|
10 - 15
|
|
Steak, rare (3 cm thick)
|
max
|
6-8
|
|
Steak, medium or well-done (3 cm thick)
|
med
|
8 - 12
|
|
Poultry breast (2 cm thick)*
|
low
|
10 - 20
|
|
Sausages, pre-boiled or raw*
|
low
|
8 - 20
|
|
Hamburger, meatballs, rissoles*
|
low
|
6 - 30
|
|
Ragout, gyros
|
med
|
7 - 12
|
|
Ground meat
|
med
|
6 - 10
|
|
Bacon
|
min
|
5-8
|
|
Fish
|
|
|
|
Fish, fried, whole, e.g. trout
|
low
|
10 - 20
|
|
Fish fillet, plain or breaded
|
low - med
|
10 - 20
|
|
Prawns, scampi
|
med
|
4-8
|
|
Egg dishes
|
|
|
|
Pancakes**
|
max
|
-
|
|
Omelette**
|
min
|
3-6
|
|
Fried eggs
|
min - med
|
2-6
|
|
Scrambled egg
|
min
|
4-9
|
|
Raisin pancake
|
low
|
10 - 15
|
|
French toast**
|
low
|
4-8
|
|
Potatoes
|
|
|
|
Fried potatoes (boiled in their skin)
|
max
|
6 - 12
|
|
French fries (made from raw potatoes)
|
med
|
15 - 25
|
|
Potato fritter**
|
max
|
2,5 - 3,5
|
|
Glazed potatoes
|
low
|
15 - 20
|
|
* Turn several times.
** Total cooking time per portion. Fry in succession.
|
|
|
|
Vegetables
|
|
|
|
Garlic, onions
|
min.
|
2 - 10.
|
|
Courgettes, aubergines
|
low
|
4 - 12
|
|
Peppers, green asparagus
|
low
|
4 - 15
|
|
Mushrooms
|
med
|
10 - 15
|
|
Glazed vegetables
|
low
|
6 - 10
|
|
Frozen products
|
|
|
|
Escalope
|
med
|
15 - 20
|
|
Cordon bleu*
|
med
|
10 - 30
|
|
Poultry breast*
|
med
|
10 - 30
|
|
Chicken nuggets
|
med
|
10 - 15
|
|
Gyros, kebab
|
low
|
5 - 10
|
|
Fish fillet, plain or breaded
|
low
|
10 - 20
|
|
Fish fingers
|
med
|
8 - 12
|
|
French fries
|
max
|
4-6
|
|
Stir-fries meals, e.g. fried vegetables with chicken
|
low
|
6 - 10
|
|
Spring rolls
|
med
|
10 - 30
|
|
Camembert/cheese
|
low
|
10 - 15
|
|
Miscellaneous
|
|
|
|
Camembert/cheese
|
low
|
7 - 10
|
|
Dry ready meals that require water to be added, e.g. pasta
|
min
|
5 - 10
|
|
Croutons
|
low
|
6 - 10
|
|
Almonds/walnuts/pine nuts
|
med
|
3 - 15
|
|
* Turn several times.
** Total cooking time per portion. Fry in succession.
|
|
|
Setting procedure
Select the appropriate temperature level from the table. Set an empty item of cookware down on the cooking zone.
1. Select the hotplate and touch the  symbol. lights up in the hotplate display.
2. Use the and symbols to select the required temperature level within the next 10 seconds.
The function has now been activated. The temperature symbol flashes until the frying temperature is reached. A signal sounds and the temperature symbol lights up.
3. Once the frying temperature has been reached, add the fat and then the food to the pan.
Note: Turn the food so that it does not burn.
Switching off the frying sensor
Select the hotplate and touch the symbol. The function is deactivated.
Basic settings
The appliance has various basic settings. These basic settings can be altered to suit your individual requirements.
To access the basic settings:
The hob must be off.
1. Switch on the hob.
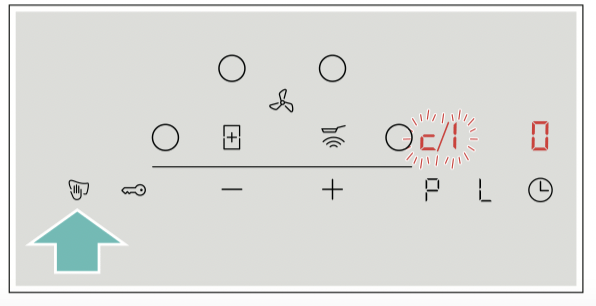
2. Within ten seconds, touch and hold the  symbol for approximately four seconds.
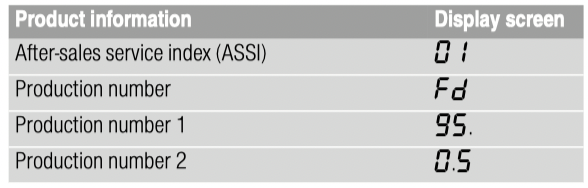
The first four displays provide product information. Touch the or symbol to view the individual displays.
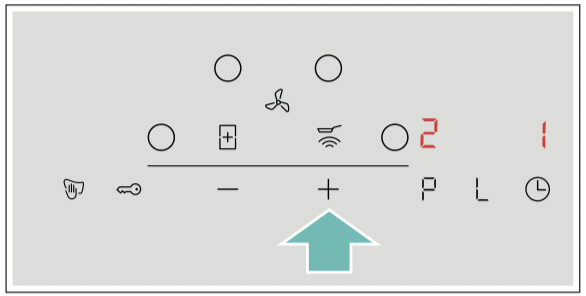
3. Touch the symbol again to access the basic settings.
 and
and  ‚ flash alternately on the displays and appears as a presetting.
4. Touch the symbol repeatedly until the required function is displayed.
5. Then use the and symbols to select the required setting.
6. Touch the symbol for at least four seconds.
The settings have been saved.
Leaving the basic settings
Turn off the hob with the main switch.
Power manager
You can use the power manager to set the total power of the hob.
Power manager
The hob is preset at the factory. Its maximum performance is specified on the rating plate. You can use the power manager to change the value in accordance with the requirements for the relevant electrical installation.
In order not to exceed this set value, the hob automatically distributes the power available between the cooking zones that are switched on.
As long as the power manager function is activated, the output of a cooking zone may temporarily fall below the nominal value. If a cooking zone is switched on and the power limit is reached, ¬ appears in the heat setting display for a short time. The appliance automatically regulates and selects the highest possible power level.
For more information about how the total power of the hob is changed, see section "Basic settings"
Cleaning
Warning – Risk of burns!
The appliance becomes hot during operation. Allow the appliance to cool down before cleaning.
Warning – Risk of burns!
The appliance becomes hot during operation. If hot liquids penetrate the appliance, leave the appliance to cool before removing the metal grease filter or the overflow container.
Warning – Risk of electric shock!
Do not use any high-pressure cleaners or steam cleaners, which can result in an electric shock.
Warning – Risk of electric shock!
Penetrating moisture may result in an electric shock. Clean the appliance using a damp cloth only. Before cleaning, pull out the mains plug or switch off the circuit breaker in the fuse box.
Warning – Risk of injury!
Components inside the appliance may have sharp edges. Wear protective gloves.
Notes
■ Only use a minimal amount of water when cleaning so that no water enters the appliance.
■ Before cleaning, remove any jewellery from your arms and hands.
■ Do not use any cleaning agents while the hob is still hot. This may mark the surface. Ensure that any residue left by cleaning agents is removed.
Cleaning agents
Only use cleaning products that are suitable for this type of hob. Follow the manufacturer's instructions on the product packaging.
Follow all instructions and warnings included with the cleaning products.
Suitable maintenance and cleaning products can be purchased from the after-sales service or in our e-Shop.
Caution!
Beware of causing surface damage
Do not use:
■ Undiluted washing-up liquid
■ Cleaning products designed for dishwashers
■ Abrasive cleaning products
■ Pressure washers or steam jet cleaners
■ Oven cleaners
■ Corrosive or aggressive cleaners, or those containing chlorine
■ Cleaners containing a large percentage of alcohol
■ Hard, scratchy sponges, brushes or scouring pads
Caution!
Beware of causing surface damage
Always wash new sponge cloths thoroughly before use.
To ensure that the different surfaces are not damaged by using the wrong cleaning product, follow the instructions in the table.
| Area |
Cleaning products |
| Glass ceramic |
Glass cleaner for stains due to limescale and water marks:
Clean the cooktop as soon as it has cooled down. You can use a cleaning product that is suitable for glass-ceramic hobs or glass cleaner.
Glass scraper for stains caused by sugar, rice starch or plastic:
Components to clean
Clean immediately. Caution: Risk of burns. Then clean with a damp dish cloth and dry with a cloth.
Note: Do not use cleaning products designed for dishwashers.
|
| Stainless steel |
Hot soapy water:
Clean with a dish cloth and dry with a soft cloth.
Use a minimal amount of water when cleaning to prevent water from penetrating the appliance.
Leave dried-on remains to soak in a small amount of soapy water; do not scour.
Clean stainless steel surfaces in the direction of the finish only.
Special stainless steel cleaning products are available from our after-sales service, through our online shop or from specialist retailers. Apply a very thin layer of the cleaning product with a soft cloth.
Note: Do not use a glass scraper to clean the cooktop surround.
|
| Plastic |
Hot soapy water:
Clean with a soft cloth or in the dishwasher.
|
| Controls |
Hot soapy water or an appropriate glass cleaner:
Clean using a damp dish cloth and then dry with a soft cloth.
|
Components to clean

Hob surround (only on appliances with hob surrounds)
To prevent damage to the hob surround, observe the following instructions:
■ Only use warm soapy water
■ Wash new dish cloths thoroughly before use.
■ Do not use harsh or abrasive cleaning agents.
■ Do not use a glass scraper or sharp objects.
Hob
Clean the cooktop each time you use it. This will prevent food remnants from becoming burned on. Do not clean the cooktop until the residual heat indicator has gone out. Remove boiled-over liquids immediately and do not allow any food remnants to dry on.
Clean the cooktop with a damp dish cloth and dry it with a cloth to prevent limescale build-up.
Stubborn dirt is best removed with a glass scraper or glass ceramic cleaner (available from retailers). Follow the manufacturer's instructions.
You can obtain a suitable glass scraper from our aftersales service or through our online shop.
Using a special sponge for cleaning glass-ceramic cooktops achieves great cleaning results.
Ventilation system
The filter must be regularly cleaned or replaced in order to guarantee efficient filtration of odours and grease.
Metal grease filter
The metal grease filter must be cleaned regularly.
Warning – Risk of fire!
Fatty deposits in the grease filter may catch fire. Regularly clean the grease filter. Never operate the appliance without a grease filter.
Saturation display
When the activated charcoal filters are saturated, an audible signal sounds after the appliance is switched off.
 lights up on the display.
Do not wait any longer to replace the activated charcoal filters.
If you have replaced the activated charcoal filters, you should reset the saturation indicator so that the display goes out.
After the appliance has been switched off, lights up.
Press and hold the symbol for the ventilation system until an audible signal sounds.
The activated charcoal filter saturation indicator has now been reset.
Changing the activated charcoal filter (only in circulating-air mode)
Activated charcoal filters trap the odour-causing compounds in cooking smells. They are only used for circulating-air mode.
The activated charcoal filter should be replaced regularly. The saturation indicator on your appliance will tell you how frequently this needs to be done.
Notes
■ The activated charcoal filters are included with the appliance. When the activated charcoal filters need to be replaced, they can be obtained from specialist retailers, from our after-sales service or from our online shop.
■ The activated charcoal filters cannot be cleaned or reactivated.
■ Only use genuine replacement filters. This ensures that the appliance performs optimally.
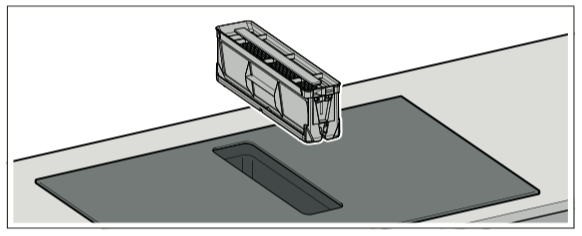
1. Remove the metal grease filter.
Notes
– Grease may accumulate in the bottom of the container. Hold the metal grease filter level to prevent grease from dripping out.
– Make sure that the metal grease filter does not fall and damage the cooktop.
2. Remove the four activated charcoal filters and dispose of them properly.
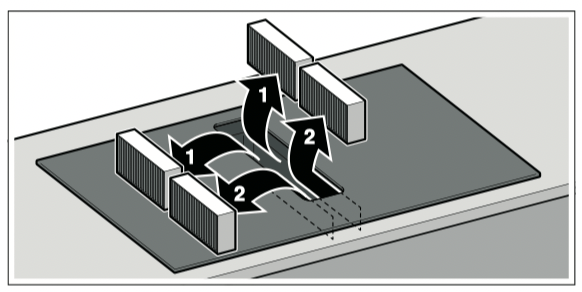
3. Insert two of the activated charcoal filters into the left and right of the appliance and slide them forwards.
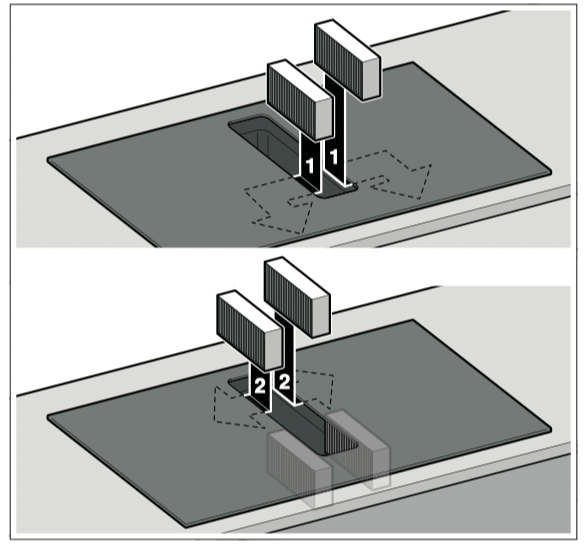
4. Insert the other activated charcoal filters into the left and right of the appliance.
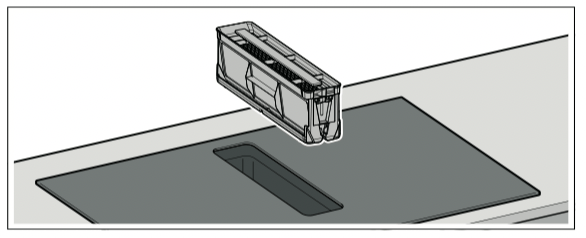
5. Insert the metal grease filter.
Resetting the saturation displays
If you have replaced the activated charcoal filters, you should reset the saturation indicator so that the display goes out.
After the appliance has been switched off, lights up.
Press and hold the symbol for the ventilation system until an audible signal sounds.
The activated charcoal filter saturation indicator has now been reset.
Removing metal grease filter
The metal grease filters filter the grease out of kitchen steam. To keep it in good working order, the metal grease filter must be cleaned regularly.
Also clean the inside of the hob extractor system regularly. You can use a special degreaser to remove stubborn dirt.
1. Remove the metal grease filter.
Notes
– Grease may accumulate in the bottom of the container. Hold the metal grease filter level to prevent grease from dripping out.
– Make sure that the metal grease filter does not fall and damage the cooktop.
2. Clean the metal grease filters in the dishwasher or with hot soapy water. "Cleaning the metal grease filter" on page 29
3. If required, after removing the metal grease filter, remove the activated charcoal filter and clean the appliance from the inside.
4. After cleaning, reinsert the dried metal grease filter.
Cleaning the metal grease filter
Notes
■ Do not use aggressive, acidic or alkaline cleaning products.
■ The metal grease filter can be cleaned in the dishwasher or by hand.
By hand:
Note: You can use a special degreaser to remove stubborn dirt. It can be ordered via the online shop.
■ Soak the metal grease filter in hot soapy water.
■ Clean the metal grease filter with a brush and then rinse it thoroughly.
■ Leave the metal grease filter to drain.
In the dishwasher:
■ Do not clean the metal grease filter together with cookware if heavily soiled.
■ Place the metal grease filter in the dishwasher, leaving plenty of space around it. Do not trap the metal grease filter.
■ For best results, place the metal grease filter in the dishwasher filter side down.
Cleaning the overflow container
1. Unscrew the overflow container with both hands.
Note: Hold the overflow container level to prevent liquid from leaking out.
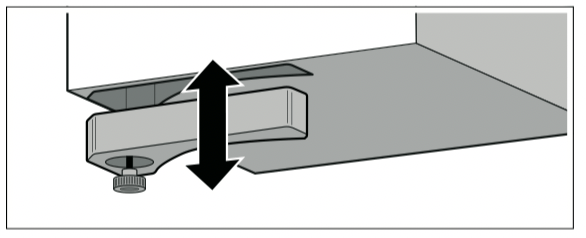
2. Empty the overflow container and rinse it out.
3. If necessary, unscrew the screw and clean the overflow container without the screw in the dishwasher.
4. Clean the overflow container before screwing it back into place.
Notes
■ Ensure that the supply to the overflow container is not blocked. Once it has cooled down, remove any objects that have entered the appliance. To do this, remove the metal grease filter.
■ If liquid gets into the appliance from above, this is collected in the overflow container. Unscrew the overflow container and empty it.
Frequently Asked Questions (FAQ)
|
Using the appliance
|
|
Why can't I switch on the hob and why is the childproof lock symbol lit?
|
| |
The childproof lock is now active.
You can find information about this function in the section entitled "Childproof lock".
|
|
Why are the illuminated displays flashing and why is a signal sounding?
|
| |
Remove any liquid or remnants of food from the control panel. Remove any objects from the control panel. You can find out how to deactivate the audible signal in the section entitled "Basic settings".
|
|
Why can't I activate the frying sensor?
|
| |
The appliance has reached its maximum power consumption or the power manager function has been activated. Switch off or reduce the power levels of the active cooking zones.
You can find information about this function in the section entitled "Frying Sensor".
|
|
The ventilation system does not switch on even though the automatic start is set.
|
| |
Switch on the ventilation system manually or check the configuration of the automatic mode. You can find additional information about this in the section entitled "Basic settings".
|
|
The ventilation system remains on even though the cooking zones have been switched off.
|
| |
Manually switch off the ventilation system.
You can find additional information about this setting in the section entitled "Operating the appliance".
|
|
The air intake is too weak.
|
| |
Ensure that the metal grease filter is clean.
To find out how to clean and replace the filter, refer to the section entitled"Cleaning".
|
|
Noises
|
|
Why I can hear noises while I'm cooking?
|
| |
Noises may be generated while using the hob depending on the base material of the cookware. These noises are a normal part of induc- tion technology. They do not indicate a defect.
|
|
Possible noises:
|
| |
A low humming noise like the one a transformer makes:
|
| |
Occurs when cooking at a high heat setting. The noise disappears or becomes quieter when the heat setting is reduced.
|
| |
Low whistling noise:
|
| |
Occurs when the cookware is empty. This noise disappears when water or food is added to the cookware.
|
| |
Crackling:
|
| |
Occurs when using cookware made from different layers of material or when using cookware of different sizes and different materials at the same time. The loudness of the noise can vary depending on the quantity of food being cooked or the cooking method.
|
| |
High-pitched whistling noises:
|
| |
Can occur when two hotplates are used at the highest heat setting at the same time. The whistling noises disappear or become quieter when the heat setting is reduced.
|
| |
Fan noise:
|
| |
The hob is equipped with a fan that switches on automatically at high temperatures. The fan may continue to run even after you have switched off the hob if the temperature detected is still too high.
|
|
Cookware
|
|
Which types of cookware can be used with an induction hob?
|
| |
You can find information on which types of cookware can be used with an induction hob in the section ~ "Induction cooking"
|
|
Why is the hotplate not heating up and why is the heat setting flashing?
|
| |
The hotplate on which the cookware is standing is not switched on. Check that you have switched on the correct hotplate.
|
| |
The cookware is too small for the hotplate that is switched on or it is not suitable for induction cooking. Check that the cookware is suitable for induction cooking and that it is placed on the hotplate that most closely matches its size. You can find information on the type, size and positioning of the cookware in sections ~ "Induction cooking" and ~ "CombiZone function".
|
|
Why is it taking so long for the cookware to heat up or why is it not heating up sufficiently despite being on a high heat setting?
|
| |
The cookware is too small for the hotplate that is switched on or it is not suitable for induction cooking. Check that the cookware is suitable for induction cooking and that it is placed on the hotplate that most closely matches its size. You can find information on the type, size and positioning of the cookware in sections ~ "Induction cooking" and ~ "CombiZone function".
|
|
Cleaning
|
|
How do I clean the induction hob?
|
| |
Optimal results can be achieved with cleaning products specifically for use on glass-ceramic surfaces. Do not use harsh or abrasive cleaning products, dishwasher detergents (concentrates) or floor cloths.
To find out how to clean and care for the hob, refer to the section entitled "Cleaning".
|
|
There is water in the cabinet underneath the hob.
|
| |
Check whether the overflow container is full.
To find out how to clean the overflow container, refer to the section entitled "Cleaning".
|
|
How often do I need to clean the overflow container?
|
| |
Clean the overflow container frequently.
To find out how to clean the overflow container, refer to the section entitled "Cleaning".
|
|
How often do I need to clean the metal grease filter?
|
| |
Clean the metal grease filter regularly.
To find out how to clean and care for the filter, refer to the section entitled "Cleaning".
|
Trouble shooting
Usually, faults are small matters that are easy to eliminate. Please read the information in the table before calling the after-sales service.
|
Display
|
Possible cause
|
Solution
|
|
None
|
The power supply has been disconnected.
|
Use other electrical appliances to check whether a short circuit has occurred in the power supply.
|
|
The appliance has not been connected as shown in the circuit diagram.
|
Ensure that the appliance has been connected as shown in the circuit diagram.
|
|
Electronics fault.
|
If you are unable to rectify the fault, inform the technical after- sales service.
|
|
The displays flash.
|
The control panel is damp or there is something on it.
|
Dry the control panel or remove the object.
|
|
The display flashes in the cooking zone displays.
|
A fault has occurred in the electronics.
|
To acknowledge the fault, briefly cover the control panel with your hand.
|
 |
The active carbon filter is saturated or the satura- tion indicator lights up even though the filter has been cleaned or replaced.
|
Change the filter and reset the filter saturation indicator. You can find additional information about this in section ~ "Cleaning".
|
 |
The electronics have overheated and have switched off the affected cooking zone.
|
Wait until the electronics have cooled down sufficiently. Then touch any symbol on the hob.
|
 |
The electronics have overheated and all of the cooking zones have been switched off.
|
|
 + power level and audible signal + power level and audible signal
|
There is hot cookware near the control panel. There is a risk that the electronics will overheat.
|
Remove the cookware that is causing the problem. The fault dis- play goes out shortly afterwards. You can continue cooking.
|
|
and audible signal
|
There is hot cookware near the control panel. The cooking zone has been switched off to pro- tect the electronics.
|
Remove the cookware that is causing the problem. Wait a few seconds. Touch any touch control. When the fault indicator goes out, you can continue cooking.
|
 |
The cooking zone has overheated and has been switched off to protect the work surface.
|
Wait until the electronics have cooled down sufficiently. Then switch the cooking zone on again.
|
 |
The cooking zone has been operating continu- ously for an extended period.
|
The automatic safety cut-out function has been activated. You can find additional information about this in section .
|
 |
The operating voltage is incorrect and outside of the normal operating range.
|
Contact your electricity supplier.
|
 |
The hob is not connected correctly.
|
Disconnect the hob from the mains. Ensure that the hob has been connected as shown in the circuit diagram.
|
|
Do not place hot cookware on the control panel.
|
Notes
■ If appears on the display, press and hold the button for the relevant cooking zone in order to read the fault code.
■ If the fault code is not listed in the table, disconnect the hob from the mains power supply and wait 30 seconds before reconnecting it. If this code is displayed again, contact the technical after-sales service and specify which fault code has appeared.
■ If a fault occurs, the appliance will not switch to standby mode.