
49-2001077 Rev. 2 06-24 GEA
Write the model and serial
numbers here:
Model # ____________________
Serial # ____________________
You can find them on a label on
the side trim or on the front of the
(lower) oven behind the oven door.
GE is a trademark of the General Electric Company. Manufactured under trademark license.
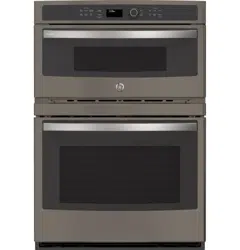
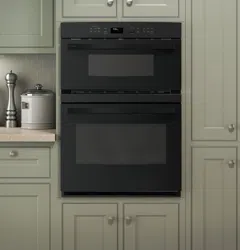
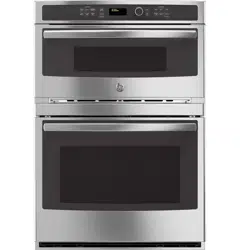
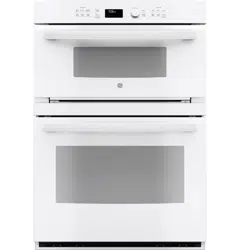
OWNER’S MANUAL
WALL OVEN
Built-In Combination Convection-Microwave/Convection
PT7800
PK7800
SAFETY INFORMATION ..........3
USING THE OVEN
Oven Controls .........................12
Oven Settings .........................13
Oven Options .........................14
Baking ...............................15
Warming and Proofing .................16
Microwaving ..........................17
Cooking Modes ........................21
Probe ................................22
Sabbath Mode .........................23
Cooking Guide ........................24
Racks ................................26
Aluminum Foil and Oven Liners ..........27
Cookware .............................27
CARE AND CLEANING
Oven .................................28
Oven Racks ...........................30
Lower Oven Maintenance ...............31
TROUBLESHOOTING TIPS .......32
LIMITED WARRANTY ............36
ACCESSORIES ....................37
CONSUMER SUPPORT ...........38
ENGLISH / ESPAÑOL

2 49-2001077 Rev. 2
THANK YOU FOR MAKING GE APPLIANCES A PART OF YOUR HOME.
Whether you grew up with GE Appliances, or this is your first, we’re happy to have you in the family.
We take pride in the craftsmanship, innovation and design that goes into every GE Appliances
product, and we think you will too. Among other things, registration of your appliance ensures that we
can deliver important product information and warranty details when you need them.
Register your GE appliance now online. Helpful websites and phone numbers are available in the
Consumer Support section of this Owner’s Manual. You may also mail in the pre-printed registration
card included in the packing material.

49-2001077 Rev. 2 3
READ AND SAVE THESE INSTRUCTIONS
IMPORTANT SAFETY INFORMATION
READ ALL INSTRUCTIONS BEFORE USING THE APPLIANCE
SAFETY INFORMATION (Upper Oven)
WARNING
To reduce the risk of burns, electric shock, fire, injury to persons, or exposure to
excessive microwave energy:
When using electrical appliances, basic safety precautions should be followed, including the following:
Ŷ 5HDGDOOLQVWUXFWLRQVEHIRUHXVLQJWKLVDSSOLDQFH
Ŷ 5HDGDQGIROORZWKHVSHFLILFSUHFDXWLRQVLQWKH
PRECAUTIONS TO AVOID POSSIBLE EXPOSURE
TO EXCESSIVE MICROWAVE ENERGY section.
Ŷ 8VHWKLVDSSOLDQFHRQO\IRULWVLQWHQGHGXVHDV
described in this manual. Do not use corrosive
chemicals or vapors in this appliance. This oven is
specifically designed to heat, dry or cook food, and is
not intended for laboratory or industrial use.
Ŷ 7KLVDSSOLDQFHPXVWRQO\EHVHUYLFHGE\TXDOLILHG
service personnel. Contact nearest authorized
service facility for examination, repair or adjustment.
INSTALLATION
Ŷ ,QVWDOORUORFDWHWKLVDSSOLDQFHRQO\LQDFFRUGDQFH
with the provided installation instructions.
Ŷ %HVXUH\RXUDSSOLDQFHLVSURSHUO\LQVWDOOHGDQG
JURXQGHGE\DTXDOLILHGWHFKQLFLDQLQDFFRUGDQFH
with the provided installation instructions.
Ŷ 7KLVRYHQLV8/OLVWHGIRUVWDQGDUGZDOOLQVWDOODWLRQ
Ŷ 'RQRWRSHUDWHWKLVDSSOLDQFHLILWLVQRWZRUNLQJ
properly or it has been damaged or dropped.
Ŷ 'RQRWFRYHURUEORFNDQ\RSHQLQJVRQWKHDSSOLDQFH
Ŷ 'RQRWVWRUHWKLVDSSOLDQFHRXWGRRUV'RQRWXVHWKLV
product near water—for example, in a wet basement,
near a swimming pool, near a sink or in similar
locations.
Ŷ 'RQRWPRXQWWKLVDSSOLDQFHRYHUDVLQN
TO REDUCE THE RISK OF FIRE IN THE CAVITY:
Ŷ 'RQRWRYHUFRRNIRRG&DUHIXOO\DWWHQGDSSOLDQFH
when paper, plastic or other combustible materials
are placed inside the oven to facilitate cooking.
Ŷ 5HPRYHZLUHWZLVWWLHVDQGPHWDOKDQGOHVIURP
paper or plastic containers before placing them in
the oven.
Ŷ ,IPDWHULDOVLQVLGHWKHRYHQLJQLWHNHHSWKHRYHQ
door closed, turn the oven off and disconnect the
power cord or shut off power at the fuse or circuit
breaker panel.
Ŷ 'RQRWVWRUHDQ\PDWHULDOVLQWKLVRYHQZKHQQRWLQ
use. Do not leave paper products, cooking utensils
or food in the cavity when not in use. All racks
should be removed from oven when not in use.
Ŷ 'RQRWRSHUDWHWKHPLFURZDYHIHDWXUHZLWKRXWIRRG
in the oven.
TO REDUCE THE RISK OF BURNS:
Ŷ %HFDUHIXOZKHQRSHQLQJFRQWDLQHUVRIKRWIRRG
Use pot holders and direct steam away from face
and hands.
Ŷ 9HQWSLHUFHRUVOLWFRQWDLQHUVSRXFKHVRUSODVWLF
bags to prevent build-up of pressure.
Ŷ %HFDUHIXOZKHQWRXFKLQJWKHWXUQWDEOHGRRUUDFNV
or walls of the oven which may become hot during
use.
Ŷ (QHUJL]HGLQWHULRUFDYLW\OLJKWLQJZLOOFDXVHEXUQV
Use caution when cleaning and allow lamps to cool
prior to replacement.
Ŷ
HOT CONTENTS CAN CAUSE SEVERE BURNS,
DO NOT ALLOW CHILDREN TO USE THE
MICROWAVE. Use caution when removing hot items.
OPERATING
Ŷ
Do not operate the oven without the turntable in place.
The turntable must be unrestricted so it can turn.
Ŷ 2YHUVL]HGIRRGVRURYHUVL]HGPHWDOXWHQVLOVVKRXOG
not be inserted in a microwave/convection oven as
they may create a fire or risk of electric shock.
Ŷ Do not use paper products in oven when
appliance is operating in any cooking mode except
microwave.
Ŷ 0DNHVXUHDOOFRRNZDUHXVHGLQ\RXUPLFURZDYH
oven is suitable for microwaving. Most glass
casseroles, cooking dishes, measuring cups,
pottery or china dinnerware, which does not have
metallic trim or glass with a metallic sheen can be
used in compliance with cookware manufactures’
recommendations.
Ŷ 6RPHSURGXFWVVXFKDVZKROHHJJVDQGVHDOHG
containers—for example, closed jars—are able to
explode and should not be heated in this oven.
Ŷ 'RQRWRYHUFRRNSRWDWRHV7KH\FRXOGGHK\GUDWH
and catch fire.
Ŷ 'RQRWFRYHUWKHWXUQWDEOHZLUHRYHQUDFNWUD\VRU
any part of the oven with metal foil. This will cause
arcing in the microwave/convection oven.
Ŷ 7KLVRYHQLVQRWDSSURYHGRUWHVWHGIRUPDULQHXVH

4 49-2001077 Rev. 2
READ AND SAVE THESE INSTRUCTIONS
SAFETY INFORMATION (Upper Oven)
IMPORTANT SAFETY INFORMATION
READ ALL INSTRUCTIONS BEFORE USING THE APPLIANCE
WARNING
GENERAL SAFETY INSTRUCTIONS (Cont.)
CLEANING
Ŷ 'LVFRQQHFWSRZHUEHIRUHFOHDQLQJ
Ŷ 'LVFRQQHFWSRZHUEHIRUHUHSODFLQJFDYLW\ODPSV
Ŷ .HHSWKHRYHQIUHHIURPJUHDVHEXLOGXS
Ŷ 'RQRWFOHDQZLWKPHWDOVFRXULQJSDGV3LHFHVFDQ
burn off the pad and touch electrical parts involving
a risk of electric shock.
Ŷ :KHQFOHDQLQJVXUIDFHVRIGRRUDQGRYHQWKDW
comes together on closing the door, use only mild,
nonabrasive soaps, or detergents applied with a
clean sponge or soft cloth. Rinse well.
SUPER HEATED WATER
Ŷ /LTXLGVVXFKDVZDWHUFRIIHHRUWHDDUHDEOHWR
be overheated beyond the boiling point without
appearing to be boiling. Visible bubbling or boiling
when the container is removed from the microwave
oven is not always present. THIS COULD RESULT
IN VERY HOT LIQUIDS SUDDENLY BOILING
OVER WHEN THE CONTAINER IS DISTURBED
OR A SPOON OR OTHER UTENSIL IS INSERTED
INTO THE LIQUID.
Ŷ 7RUHGXFHWKHULVNRILQMXU\WRSHUVRQV
'RQRWRYHUKHDWWKHOLTXLG
6WLUWKHOLTXLGERWKEHIRUHDQGKDOIZD\WKURXJK
heating it.
- Do not use straight-sided containers with narrow
necks.
- After heating, allow the container to stand in the
microwave oven for a short time before removing
the container.
- Use extreme care when inserting a spoon or other
utensil into the container.
WARNING
ARCING
Arcing can occur during microwave cooking and, for certain models, in fast cook and precision cook modes. If
you see arcing, press the Clear/Off pad and correct the problem.
Arcing is the microwave term for sparks in the oven. Arcing is caused by:
Ŷ 0HWDORUIRLOWRXFKLQJWKHVLGHRIWKHRYHQ
Ŷ )RLOQRWPROGHGWRIRRGXSWXUQHGHGJHVDFWOLNH
antennas).
Ŷ 8VHIRLORQO\DVUHFRPPHQGHGLQWKLVPDQXDO
Ŷ 0HWDOFRRNZDUHXVHGGXULQJ3UHFLVLRQ6SHHG&RRN
RQVRPHPRGHOVRUPLFURZDYHFRRNLQJH[FHSWIRU
pans provided with the oven).
Ŷ 0HWDOVXFKDVWZLVWWLHVSRXOWU\SLQVRUJROG
rimmed dishes, in the oven.
Ŷ 5HF\FOHGSDSHUWRZHOVFRQWDLQLQJVPDOOPHWDO
pieces being used in the oven.
49-2001077 Rev. 2 5
READ AND SAVE THESE INSTRUCTIONS
IMPORTANT SAFETY INFORMATION
READ ALL INSTRUCTIONS BEFORE USING THE APPLIANCE
SAFETY INFORMATION (Upper Oven)
WARNING
MICROWAVE-SAFE COOKWARE
Make sure to use suitable cookware during microwave cooking. Most glass casseroles, cooking dishes,
measuring cups, custard cups, pottery or china dinnerware which does not have metallic trim or glaze with a
metallic sheen can be used. Some cookware is labeled “suitable for microwaving.”
Ŷ 3ODFHIRRGRUPLFURZDYDEOHFRQWDLQHUGLUHFWO\RQ
the clear glass tray to cook your food.
Ŷ 8VHRIDPHWDOWUD\GXULQJPLFURZDYHFRRNLQJZLOO
result in inferior cooking performance.
Ŷ &RRNZDUHPD\EHFRPHKRWEHFDXVHRIKHDW
transferred from the heated food. Oven mitts may
be needed to handle the cookware.
Ŷ 'RQRWXVHUHF\FOHGSDSHUSURGXFWV5HF\FOHG
paper towels, napkins and waxed paper can contain
metal flecks which may cause arcing or ignite.
Paper products containing nylon or nylon filaments
should be avoided, as they may also ignite.
Ŷ 8VHIRLORQO\DVGLUHFWHGLQWKLVPDQXDO:KHQXVLQJ
foil in the oven, keep the foil at least 1” away from
the sides of the oven.
Ŷ ,I\RXXVHDPHDWWKHUPRPHWHUZKLOHFRRNLQJPDNH
sure it is safe for use in microwave ovens.
Ŷ 6RPHIRDPWUD\VOLNHWKRVHWKDWPHDWLVSDFNDJHG
on) have a thin strip of metal embedded in the
bottom. When microwaved, the metal can burn the
floor of the oven or ignite a paper towel.
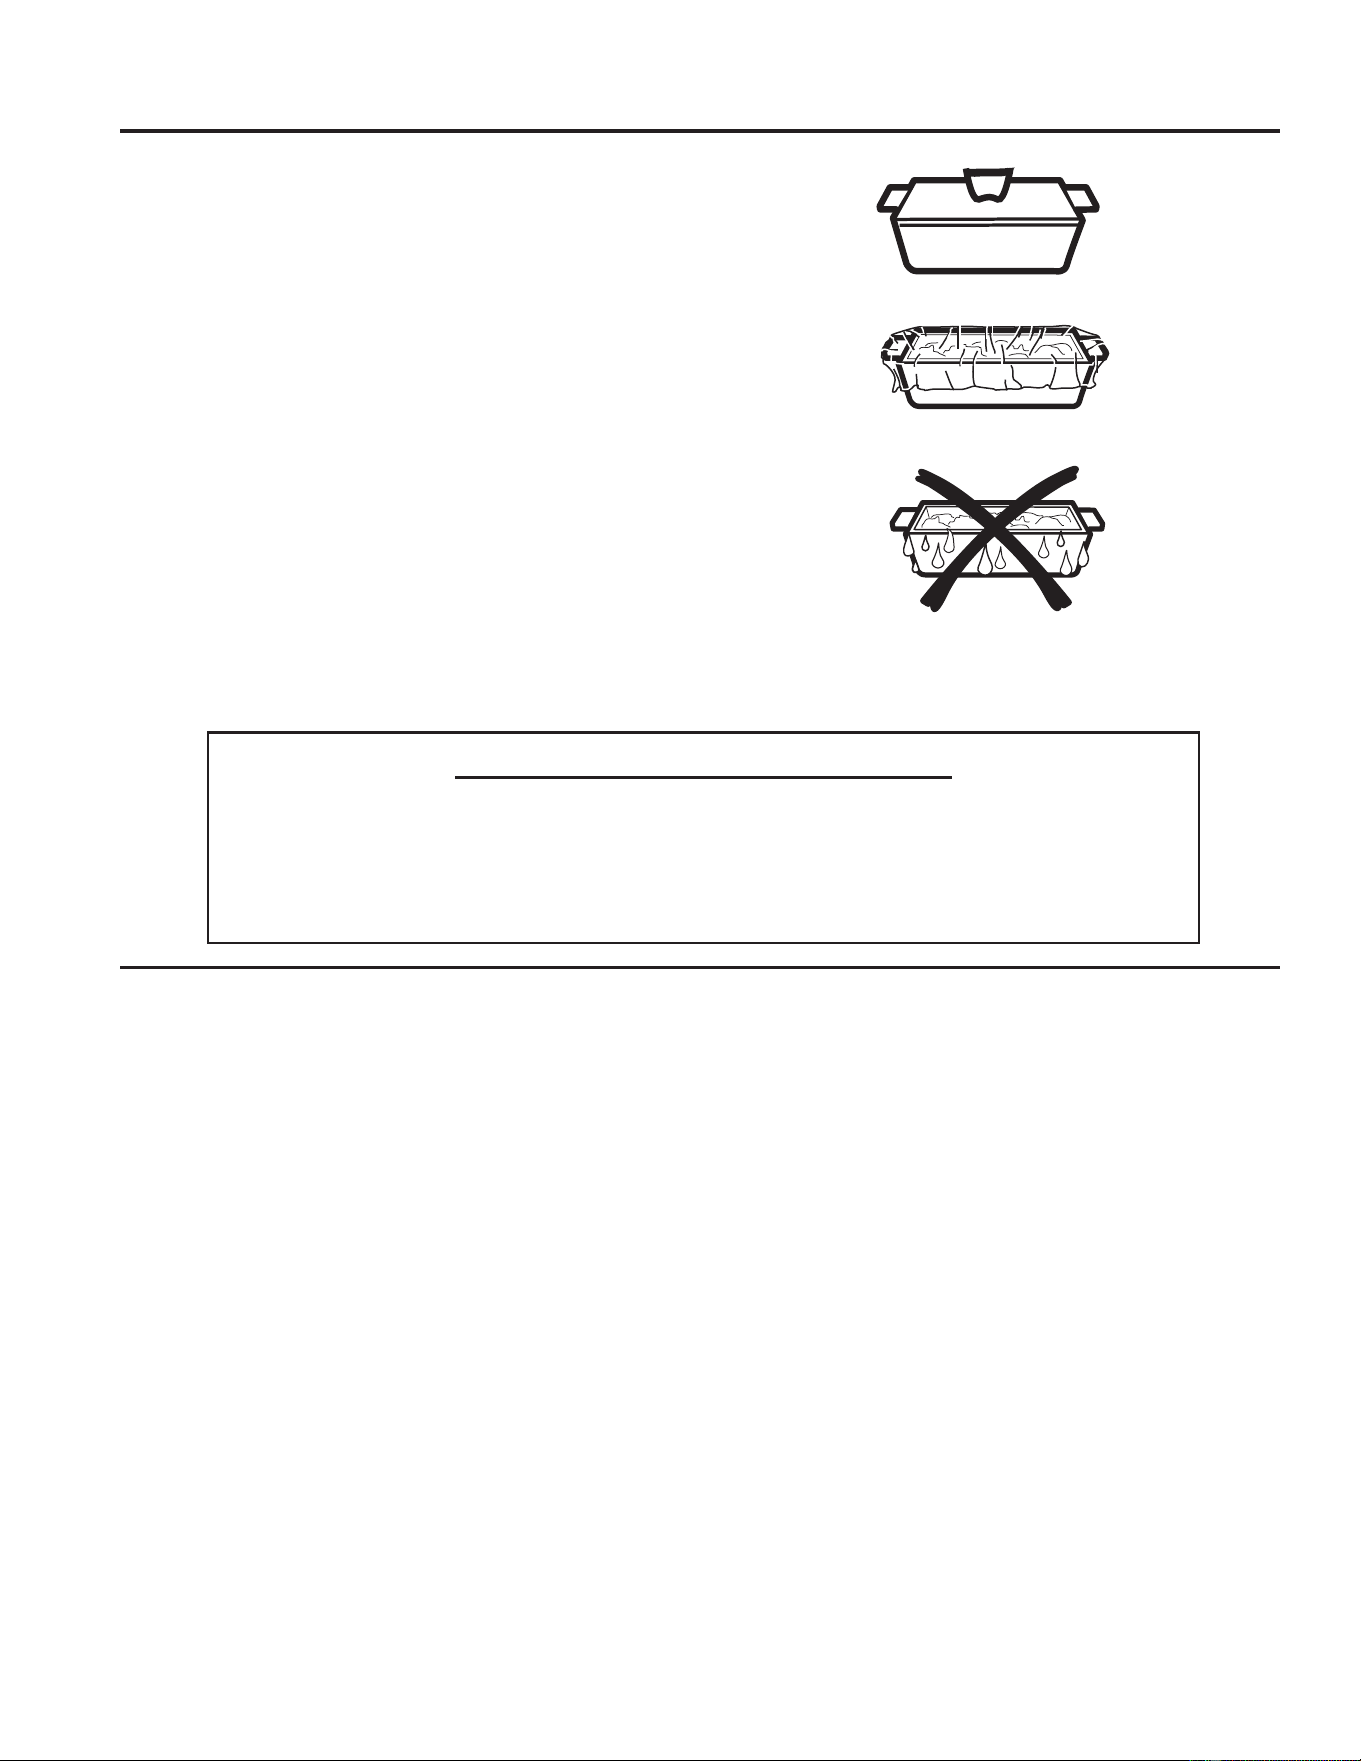
Ŷ 3DSHUWRZHOVZD[HGSDSHUDQGSODVWLFZUDSFDQEH
used to cover dishes in order to retain moisture and
prevent spattering. Be sure to vent plastic wrap so
steam can escape.
Ŷ 1RWDOOSODVWLFZUDSLVVXLWDEOHIRUXVHLQPLFURZDYH
ovens. Check the package for proper use.
Ŷ ³%RLODEOH´FRRNLQJSRXFKHVDQGWLJKWO\FORVHGSODVWLF
bags should be slit, pierced or vented as directed by
package instructions. If they are not, plastic could
burst during or immediately after cooking, possibly
resulting in injury. Also, plastic storage containers
should be at least partially uncovered because they
form a tight seal. When cooking with containers
tightly covered with plastic wrap, remove covering
carefully and direct steam away from hands and
face.
Ŷ 3ODVWLFFRRNZDUH²3ODVWLFFRRNZDUHGHVLJQHGIRU
microwave cooking is very useful, but should be
used carefully. Even microwave-safe plastic may not
be as tolerant of overcooking conditions as are glass
or ceramic materials. Plastic may soften or char if
subjected to short periods of overcooking. In longer
exposures to overcooking, the food and cookware
could ignite.
Ŷ 'RQRWXVHWKHZLUHRYHQUDFNIRUPLFURZDYLQJ
)ROORZWKHVHJXLGHOLQHV
1. Use microwave-safe plastics only, and use them in
strict compliance with the cookware manufacturer’s
recommendations.
2. Do not microwave empty containers.
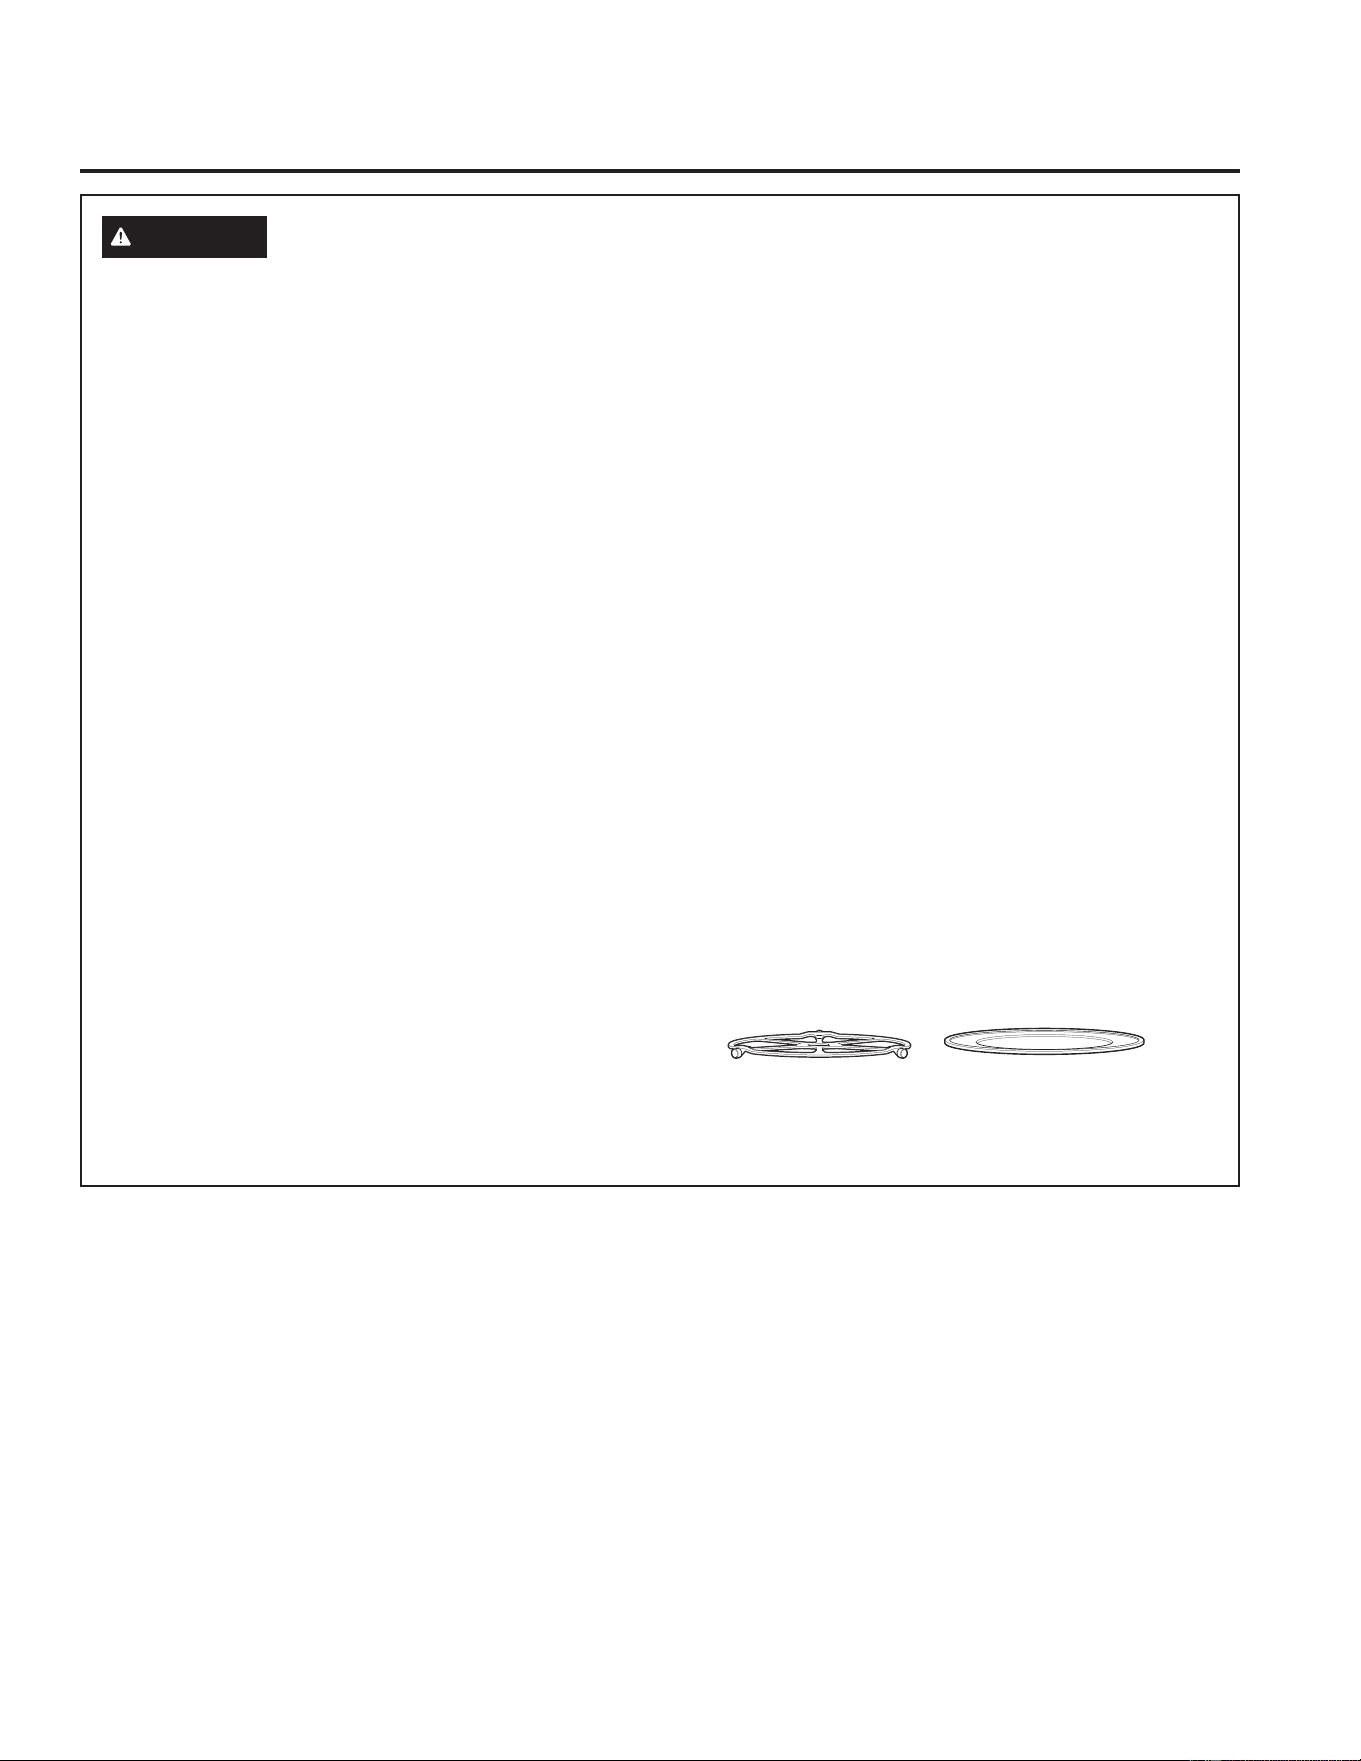
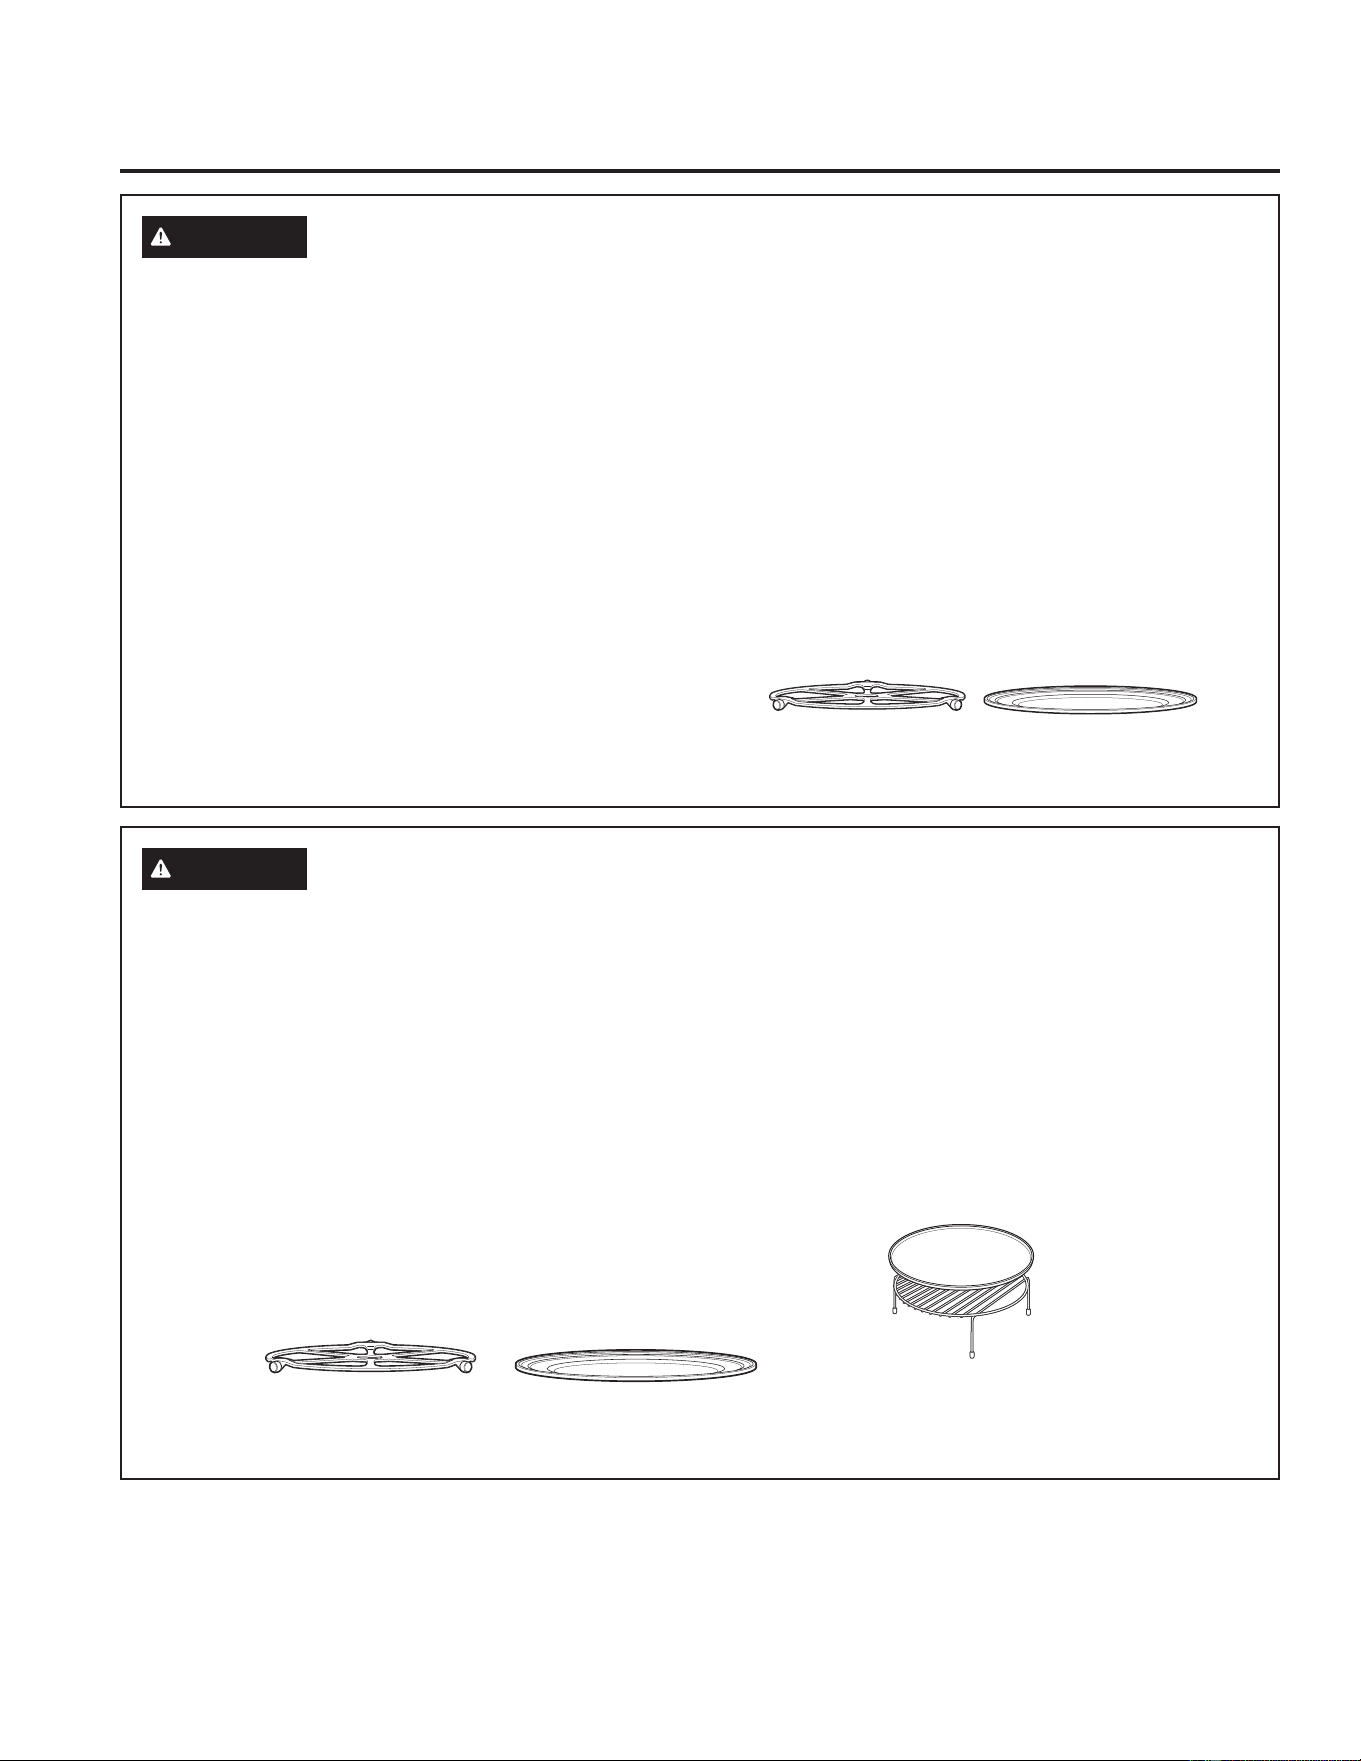
The turntable must
always be in place when
using the oven.
The clear glass tray
should always be in place
when microwaving.
6 49-2001077 Rev. 2
READ AND SAVE THESE INSTRUCTIONS
IMPORTANT SAFETY INFORMATION
READ ALL INSTRUCTIONS BEFORE USING THE APPLIANCE
SAFETY INFORMATION (Upper Oven)
WARNING
(On Some Models) OVEN-SAFE COOKWARE FOR PRECISION/
SPEED COOK
Ŷ 7KHRYHQDQGGRRUZLOOJHWYHU\KRWZKHQ3UHFLVLRQ
Speed Cooking.
Ŷ &RRNZDUHZLOOEHFRPHKRW2YHQPLWWVZLOOEH
needed to handle the cookware.
Ŷ 'RQRWXVHFRYHULQJVFRQWDLQHUVRUFRRNLQJ
roasting bags made of foil, plastic, wax or paper
when Precision/Speed Cooking.
Ŷ 'RQRWFRYHUWKHWXUQWDEOHZLUHRYHQUDFNWUD\VRU
any part of the oven with metal foil. This will cause
arcing in the microwave/convection oven.
Ŷ 8VHWKHPHWDOWUD\LQWKHVDPHZD\\RXZRXOGXVH
a shallow baking pan or baking tray.
Ŷ 3ODFHIRRGGLUHFWO\RQWKHPHWDOWUD\VZKHQFRRNLQJ
unless prompted by the oven to do otherwise.
Ŷ $Q\QRQPHWDORYHQVDIHGLVKFDQEHXVHGLQ\RXU
oven. Recipes in the Advantium Cookbook were
tested in Pyrex
®
glass cookware and Corningware
®
ceramic casseroles. Cook times and results may
vary when using other types of oven-safe dishes.
Place them directly on the trays.
Ŷ 8VHRIWKHFOHDUJODVVWUD\ZKHQ3UHFLVLRQ6SHHG
Cooking will result in inferior cooking performance
and possible cracking of the glass tray.
Ŷ 8VHRQO\WKHPHWDOWUD\VVSHFLILHGIRUXVHZLWKWKLV
oven. Other metal trays are not designed for use
with this oven and will result in inferior cooking
performance.
The turntable must
always be in place when
using the oven.
Put food directly on the
metal tray to convection
bake, warm or toast.
WARNING
(On Some Models) OVEN-SAFE COOKWARE FOR BAKING,
BROILING, WARMING, PROOFING & TOASTING
Ŷ 7KHRYHQDQGGRRUZLOOJHWYHU\KRWZKHQ
convection baking, broiling, warming or toasting.
Ŷ &RRNZDUHZLOOEHFRPHKRW2YHQPLWWVZLOOEH
needed to handle the cookware.
Ŷ 'RQRWXVHFRYHULQJVFRQWDLQHUVRUFRRNLQJ
roasting bags made of foil, plastic, wax or paper
when broiling or toasting.
Ŷ 'RQRWFRYHUWKHWXUQWDEOHZLUHRYHQUDFNWUD\VRU
any part of the oven with metal foil. This will cause
arcing in the microwave/convection oven.
Ŷ 8VHWKHPHWDOWUD\LQWKHVDPHZD\\RXZRXOGXVH
a shallow baking pan or baking tray.
Ŷ 8VHWKHZLUHRYHQUDFNZKHQFRQYHFWLRQEDNLQJRU
warming on two levels.
Ŷ 3ODFHIRRGGLUHFWO\RQWKHPHWDOWUD\VZKHQFRRNLQJ
XQOHVVWKHUHFLSHUHTXLUHVDGLVK
Ŷ $Q\RYHQVDIHGLVKFDQEHXVHGLQ\RXURYHQ
Recipes in the Advantium Cookbook were tested in
Pyrex
®
glass cookware and Corningware
®
ceramic
casseroles. Cook times and results may vary when
using other types of oven-safe dishes. Place them
directly on the trays.
Ŷ 8VHRIWKHFOHDUJODVVWUD\ZKHQFRQYHFWLRQEDNLQJ
broiling, warming or toasting will result in inferior
cooking performance.
The turntable must always
be in place when using the
oven.
Put food directly on the metal
tray to convection bake, warm
or toast.
Put food directly on the aluminum baking
sheet on the wire oven rack, and place them
on the non-stick metal tray, when baking on
two levels, broiling or toasting foods.
49-2001077 Rev. 2 7
READ AND SAVE THESE INSTRUCTIONS
SAFETY INFORMATION (Upper Oven)
IMPORTANT SAFETY INFORMATION
READ ALL INSTRUCTIONS BEFORE USING THE APPLIANCE
PRECAUTIONS TO AVOID POSSIBLE EXPOSURE TO EXCESSIVE
MICROWAVE ENERGY
(a) Do Not Attempt to operate this oven with the
door open since open-door operation can result
in harmful exposure to microwave energy. It is
important not to defeat or tamper with the safety
interlocks.
(b) Do Not Place any object between the oven front
face and the door or allow soil or cleaner residue to
accumulate on sealing surfaces.
(c) Do Not Operate the oven if it is damaged.
It is particularly important that the oven door close
properly and that there is no damage to the:
GRRUEHQW
KLQJHVDQGODWFKHVEURNHQRUORRVHQHG
GRRUVHDOVDQGVHDOLQJVXUIDFHV
(d) The Oven Should Not be adjusted or repaired by
DQ\RQHH[FHSWSURSHUO\TXDOLILHGVHUYLFHSHUVRQQHO
WARNING
NOTICE—PACEMAKERS
Most pacemakers are shielded from interference from electronic products, including microwaves. However,
patients with pacemakers may wish to consult their physicians if they have concerns.
8 49-2001077 Rev. 2
READ AND SAVE THESE INSTRUCTIONS
IMPORTANT SAFETY INFORMATION
READ ALL INSTRUCTIONS BEFORE USING THE APPLIANCE
SAFETY INFORMATION (Lower Oven)
WARNING
5HDGDOOVDIHW\LQVWUXFWLRQVEHIRUHXVLQJWKHSURGXFW)DLOXUHWRIROORZWKHVHLQVWUXFWLRQVPD\UHVXOWLQ
fire, electrical shock, serious injury or death.
WARNING
GENERAL SAFETY INSTRUCTIONS
Ŷ 8VHWKLVDSSOLDQFHRQO\IRULWVLQWHQGHGSXUSRVHDV
described in the Owner’s Manual.
Ŷ +DYH\RXUDSSOLDQFHLQVWDOOHGDQGSURSHUO\
JURXQGHGE\DTXDOLILHGLQVWDOOHULQDFFRUGDQFHZLWK
the provided installation instructions.
Ŷ $Q\DGMXVWPHQWUHSDLURUVHUYLFHQRWVSHFLILFDOO\
recommended in the Owner’s Manual should be
SHUIRUPHG21/<E\DTXDOLILHGDSSOLDQFHLQVWDOOHU
or service technician.
Ŷ %HIRUHSHUIRUPLQJDQ\VHUYLFHXQSOXJWKHDSSOLDQFH
or disconnect the power supply at the household
distribution panel by removing the fuse or switching
off the circuit breaker.
Ŷ
Be sure all packing materials are removed from the
appliance before operating to prevent ignition of these
materials.
Ŷ $YRLGVFUDWFKLQJRULPSDFWLQJJODVVGRRUV
cooktops, or control panels. Doing so may lead to
glass breakage.
Ŷ 'RQRWFRRNRQDSURGXFWZLWKEURNHQJODVV6KRFN
fire, or cuts may occur.
Ŷ 'RQRWOHDYHFKLOGUHQDORQHRUXQDWWHQGHGLQDQ
area where an appliance is in use. They should
never be allowed to climb, sit or stand on any part
of the appliance.
Ŷ
CAUTION
Do not store items of interest
to children in cabinets above or on top of the
appliance - children climbing on the oven to reach
items could be seriously injured.
Ŷ 1HYHUXVH\RXUDSSOLDQFHIRUZDUPLQJRUKHDWLQJ
the room.
Ŷ 'RQRWDOORZDQ\RQHWRFOLPEVWDQGRUKDQJRQWKH
oven door, drawer, or cooktop. They could damage
the appliance or tip it over causing severe injury or
death.
Ŷ 8VHRQO\GU\SRWKROGHUV²PRLVWRUGDPSSRWKROGHUV
on hot surfaces may result in burns from steam.
Do not let pot holders touch surface units or oven
heating elements. Do not use a towel or other bulky
cloth in place of pot holders.
Ŷ 'RQRWWRXFKWKHEXUQHUVJULGGOHVRQVRPH
PRGHOVJUDWHVRQVRPHPRGHOVWKHFRRNWRSRU
oven heating elements, or the interior surface of
the oven. These surfaces may remain hot enough
to burn for an extended period of time following
cooking, even though they no longer appear to be
on or hot.
Ŷ During and after use, do not touch, or let clothing or
other flammable materials contact any interior area of
the oven; allow sufficient time for cooling first. Other
surfaces of the appliance may become hot enough to
cause burns. Potentially hot surfaces include burners
RUKHDWLQJHOHPHQWVJUDWHVRQVRPHPRGHOV
cooktop surface, oven vent openings, surfaces near
the openings, crevices around the oven door, metal
trim parts above the door, any backguard, or shelves
located above cooking surface.
Ŷ 'RQRWKHDWXQRSHQHGIRRGFRQWDLQHUV3UHVVXUH
could build up and the container could burst, causing
an injury.
Ŷ &RRNIRRGWKRURXJKO\WRKHOSSURWHFWDJDLQVW
foodborne illness. Minimum safe food temperature
recommendations are provided by the USDA
DQG)'$8VHDIRRGWKHUPRPHWHUWRWDNHIRRG
temperatures and check several locations.
Ŷ
.HHSWKHYHQWLODWRUKRRGDQGJUHDVHILOWHUVFOHDQWR
maintain good venting and to avoid grease fires. Turn
WKHYHQWLODWRU2))LQFDVHRIDILUH7KHEORZHULILQ
operation, could spread the flames.
49-2001077 Rev. 2 9
READ AND SAVE THESE INSTRUCTIONS
SAFETY INFORMATION
IMPORTANT SAFETY INFORMATION
READ ALL INSTRUCTIONS BEFORE USING THE APPLIANCE
WARNING
KEEP FLAMMABLE MATERIALS AWAY FROM THE RANGE Failure to
do so may result in fire or personal injury.
Ŷ 'RQRWVWRUHRUXVHIODPPDEOHPDWHULDOVLQDQRYHQ
or near the cooktop, including paper, plastic, pot
holders, linens, wall coverings, curtains, drapes and
JDVROLQHRURWKHUIODPPDEOHYDSRUVDQGOLTXLGV
Ŷ 1HYHUZHDUORRVHILWWLQJRUKDQJLQJJDUPHQWVZKLOH
using the appliance. These garments may ignite if
they contact hot surfaces causing severe burns.
Ŷ 'RQRWOHWFRRNLQJJUHDVHRURWKHUIODPPDEOH
materials accumulate in or near the appliance.
Grease in the oven or on the cooktop may ignite.
Ŷ Do not store any flammable materials or temperature
sensitive items inside of or on the appliance.
Ŷ &OHDQYHQWLODWLQJKRRGVIUHTXHQWO\*UHDVHVKRXOGQRW
be allowed to accumulate on the hood or filter.
Ŷ 2QVRPHPRGHOVRemote Operation – This
appliance is configurable to allow remote operation at
any time.
WARNING
IN THE EVENT OF A FIRE, TAKE THE FOLLOWING STEPS TO
PREVENT INJURY AND FIRE SPREADING
Ŷ 'RQRWXVHZDWHURQJUHDVHILUHV1HYHUSLFNXS
a flaming pan. Turn the controls off. Smother a
flaming pan on a surface unit by covering the pan
completely with a well-fitting lid, cookie sheet or flat
tray. Use a multi-purpose dry chemical or foam-type
fire extinguisher.
Ŷ ,IWKHUHLVDILUHLQWKHRYHQGXULQJEDNLQJVPRWKHU
the fire by closing the oven door and turning the
oven off or by using a multi-purpose dry chemical or
foam-type fire extinguisher.
Ŷ ,IWKHUHLVDILUHLQWKHRYHQGXULQJVHOIFOHDQWXUQ
the oven off and wait for the fire to go out. Do not
force the door open. Introduction of fresh air at self-
clean temperatures may lead to a burst of flame
IURPWKHRYHQ)DLOXUHWRIROORZWKLVLQVWUXFWLRQPD\
result in severe burns.
WARNING
OVEN SAFETY INSTRUCTIONS
Ŷ 6WDQGDZD\IURPWKHDSSOLDQFHZKHQRSHQLQJWKH
oven door. Hot air or steam which escapes can
cause burns to hands, face and/or eyes.
Ŷ 'RQRWXVHWKHRYHQLIDKHDWLQJHOHPHQWGHYHORSV
a glowing spot during use or shows other signs
of damage. A glowing spot indicates the heating
element may fail and present a potential burn, fire,
or shock hazard. Turn the oven off immediately and
KDYHWKHKHDWLQJHOHPHQWUHSODFHGE\DTXDOLILHG
service technician.
Ŷ .HHSWKHRYHQYHQWXQREVWUXFWHG
Ŷ 1HYHUSODFHFRRNLQJXWHQVLOVSL]]DRUEDNLQJ
stones, or any type of foil or liner on the oven floor.
These items can trap heat or melt, resulting in
damage to the product and risk of shock, smoke or
fire.
Ŷ 3ODFHRYHQUDFNVLQGHVLUHGORFDWLRQZKLOHRYHQLV
cool. If rack must be moved while oven is hot, be
careful to avoid touching hot surfaces and do not let
pot holder contact hot heating element in oven.
Ŷ 'RQRWOHDYHLWHPVVXFKDVSDSHUFRRNLQJXWHQVLOV
or food in the oven when not in use. Items stored in
an oven can ignite.
Ŷ 'RQRWOHDYHLWHPVRQWKHFRRNWRSQHDUWKHRYHQ
vent. Items may overheat resulting in a risk of fire or
burns.
Ŷ 1HYHUEURLOZLWKWKHGRRURSHQ
Ŷ .HHSWKHRYHQIUHHIURPJUHDVHEXLOGXS*UHDVHLQ
the oven may ignite.
Ŷ :KHQXVLQJFRRNLQJRUURDVWLQJEDJVLQWKHRYHQ
follow the manufacturer’s directions.
Ŷ 6+2&.25%851+$=$5'%HIRUHUHSODFLQJRYHQ
light bulb, disconnect the electrical power to the
appliance at the main fuse or circuit breaker panel.
)DLOXUHWRGRVRPD\UHVXOWLQHOHFWULFVKRFNRUEXUQ
10 49-2001077 Rev. 2
READ AND SAVE THESE INSTRUCTIONS
IMPORTANT SAFETY INFORMATION
READ ALL INSTRUCTIONS BEFORE USING THE APPLIANCE
SAFETY INFORMATION (Lower Oven)
WARNING
OVEN SAFETY INSTRUCTIONS (Cont.)
Ŷ
CAUTION
%851+$=$5'7KHJODVVFRYHU
and bulb should be removed when cool. Touching
hot glass with bare hands or a damp cloth can
cause burns.
Ŷ 'RQRWXVHDQ\W\SHRIIRLORUOLQHUWRFRYHUWKH
oven bottom or anywhere in the oven, except as
described in the Owner’s Manual. Oven liners can
trap heat or melt, resulting in damage to the product
and risk of shock, smoke or fire.
WARNING
SELF-CLEANING OVEN SAFETY INSTRUCTIONS (On some models)
The self-cleaning feature operates the oven at temperatures high enough to burn away food soils in the oven.
)ROORZWKHVHLQVWUXFWLRQVIRUVDIHRSHUDWLRQ
Ŷ 'RQRWWRXFKRYHQVXUIDFHVGXULQJVHOIFOHDQ
RSHUDWLRQ.HHSFKLOGUHQDZD\IURPWKHDSSOLDQFH
GXULQJVHOIFOHDQLQJ)DLOXUHWRIROORZWKHVH
instructions may cause burns.
Ŷ %HIRUHRSHUDWLQJWKHVHOIFOHDQF\FOHUHPRYHSDQV
shiny metal oven racks, and other utensils from
the oven. Only dark-colored porcelain-coated oven
UDFNVPD\EHOHIWLQWKHRYHQ)DLOXUHWRGRVRPD\
cause damage to these items and the oven and
present a potential burn or fire hazard.
Ŷ %HIRUHRSHUDWLQJWKHVHOIFOHDQF\FOHZLSHJUHDVH
and food soils from the oven. Excessive amount of
grease may ignite leading to smoke damage to your
home.
Ŷ ,IWKHVHOIFOHDQLQJPRGHPDOIXQFWLRQVWXUQWKH
oven off and disconnect the power supply. Have it
VHUYLFHGE\DTXDOLILHGWHFKQLFLDQ
Ŷ 'RQRWXVHRYHQFOHDQHUV1RFRPPHUFLDORYHQ
cleaner or oven liner protective coating of any kind
should be used in or around any part of the oven
unless certified for use in a self-cleaning oven.
Ŷ 'RQRWFOHDQWKHGRRUJDVNHW7KHGRRUJDVNHWLV
essential for a good seal. Care should be taken not
to rub, damage or move the gasket.
Ŷ IMPORTANT: The health of some birds is
extremely sensitive to the fumes given off during the
self-cleaning cycle of any appliance. Move birds to
another well-ventilated room.
WARNING
REMOTE ENABLE EQUIPMENT (On some models)
7KLVGHYLFHFRPSOLHVZLWKSDUWRIWKH)&&5XOHV
Operation is subject to the following two conditions:
7KLVGHYLFHPD\QRWFDXVHKDUPIXOLQWHUIHUHQFH
DQGWKLVGHYLFHPXVWDFFHSWDQ\LQWHUIHUHQFH
received, including interference that may cause
undesired operation. The wireless communication
HTXLSPHQWLQVWDOOHGRQWKLVUDQJHKDVEHHQWHVWHGDQG
found to comply with the limits for a Class B digital
GHYLFHSXUVXDQWWRSDUWRIWKH)&&5XOHV
These limits are designed to:
DSURYLGHUHDVRQDEOHSURWHFWLRQDJDLQVWKDUPIXO
interference in a residential installation. This
HTXLSPHQWJHQHUDWHVXVHVDQGFDQUDGLDWHUDGLR
IUHTXHQF\HQHUJ\DQGLIQRWLQVWDOOHGDQGXVHGLQ
accordance with the instructions, may cause harmful
interference to radio communications. However, there
is no guarantee that interference will not occur in a
SDUWLFXODULQVWDOODWLRQ,IWKLVHTXLSPHQWGRHVFDXVH
harmful interference to radio or television reception,
ZKLFKFDQEHGHWHUPLQHGE\WXUQLQJWKHHTXLSPHQWRII
and on, the user is encouraged to try to correct the
interference by one or more of the following measures:
Ŷ5HRULHQWRUUHORFDWHWKHUHFHLYLQJDQWHQQD
Ŷ,QFUHDVHWKHVHSDUDWLRQEHWZHHQWKHHTXLSPHQWDQG
receiver.
Ŷ&RQQHFWWKHHTXLSPHQWLQWRDQRXWOHWRQD
circuit different from that to which the receiver is
connected.
Ŷ&RQVXOWWKHGHDOHURUDQH[SHULHQFHGUDGLR79
technician for help.
EDFFHSWDQ\LQWHUIHUHQFHUHFHLYHGLQFOXGLQJ
interference that may cause undesired operation of
the device. Note that any changes or modifications
to the wireless communication device installed on
this appliance that are not expressly approved by the
manufacturer could void the user's authority to operate
WKHHTXLSPHQW

49-2001077 Rev. 2 11
IMPORTANT SAFETY INFORMATION
READ ALL INSTRUCTIONS BEFORE USING THE APPLIANCE
SAFETY INFORMATION (Lower Oven)
How to Remove Protective Shipping Film and Packaging Tape
Carefully grasp a corner of the protective shipping film
with your fingers and slowly peel it from the appliance
surface. Do not use any sharp items to remove the film.
Remove all of the film before using the appliance for the
first time.
To assure no damage is done to the finish of the
product, the safest way to remove the adhesive from
packaging tape on new appliances is an application of
DKRXVHKROGOLTXLGGLVKZDVKLQJGHWHUJHQW$SSO\ZLWKD
soft cloth and allow to soak.
NOTE: The adhesive must be removed from all parts. It
cannot be removed if it is baked on.
Consider recycling options for your appliance packaging
material.
PROPER DISPOSAL OF YOUR APPLIANCE
'LVSRVHRIRUUHF\FOH\RXUDSSOLDQFHLQDFFRUGDQFHZLWK)HGHUDODQG/RFDO5HJXODWLRQV&RQWDFW\RXUORFDO
authorities for the environmentally safe disposal or recycling of your appliance.
12 49-2001077 Rev. 2
Common Controls
1. Timer On/Off:
Works as a countdown timer. Press
the Timer On/OffSDGVHOHFWWKHWLPHUW\SHKRXUVDQG
minutes or minutes and seconds), use the selector dial
to set the time, and press the selector dial to start the
timer countdown. The oven will continue to operate
when the timer countdown is complete. To turn the timer
off, press the Timer On/Off pad.
2. Settings / Lock Controls:
)LQGRYHQ
options for: Help, Clock Settings, Display Mode, Auto
Conversion, Auto Shut Off, Beeper Volume, Reminder,
Temperature Units, Thermostat Adjust and Oven
Information under this selection. See the Oven Settings
section for more details. Press and hold Settings pad
for 3 seconds to lock or unlock the controls. This locks
out the control so that pressing any of the control pads
does not activate the feature. Clear/Off is always active,
even when the control is locked.
3. Selector Dial: The selector dial is used for both
the upper and lower ovens. Rotate dial to select oven
settings, upper/lower oven options and cooking options
then press to confirm the selection. Rotate dial to
increase or decrease temperatures or time and then
press to confirm the set temperature or time.
4. Back: Press this pad to go back a menu level in the
display.
5. Start/Pause: Press the Start/Pause pad to start
any cooking, clean or timed function. Press the Start/
Pause pad to pause any upper oven features.
6. Display: Information about both the upper and lower
ovens is shown in this display window.
Upper Oven Controls
7. Microwave:
Press the Microwave pad for
microwaving options. Use the selector dial to find the
microwaving option desired and press the selector dial to
select it. Options available include Cook by Time, Cook,
Defrost, Beverage, Popcorn, Melt, Reheat, Simmer and
Soften. Use the clear glass tray and microwave-safe
cookware when using the microwave features. See
Upper Oven Microwaving section for more detail.
8. Add 30 Sec: Press the Add 30 Sec pad for 30
seconds of microwave cooking time. Each time this pad
is pressed an additional 30 seconds is added to the
remaining cooking time. The oven starts immediately.
9. Defrost: Press the Defrost pad to defrost, rotate
selector dial to select the type of defrost and press to
select. Type of defrost available include; Defrost by
)RRG7\SH'HIURVWE\7LPH'HIURVWE\:HLJKWOE
Quick Defrost, Melt, and Soften. See the Microwaving
section for more information.
10. Convection Bake: Press the Convection Bake
pad to convection bake in the upper oven. Place food
or oven safe dish on the glass tray when using the
convection bake feature. When convection baking on
two levels, place food or oven safe dish on the wire
oven rack and place them on the glass tray. See Upper
Oven Baking for more detail.
11. Cooking Options: )LQGWKH5HSHDW/DVW3URRI
and Warm features under this selection. See the Oven
Options section for more details.
12. Clear/Off: The Clear/Off pad cancels ALL upper
oven programs except the clock and timer.
Lower Oven Controls
13. Light:
Press the Light pad to turn the oven light on
or off in the lower oven. Note that light in the lower oven
will not turn on if the oven is in a clean mode.
14. Bake: Press the Bake pad to bake, rotate selector dial
to select baking temperature and press to select.
15. Broil: Press the Broil pad to broil, rotate selector dial
to select Hi/Lo and press to select.
16. Options: )LQGWKH'HOD\6WDUW3UREH3URRI
Sabbath, Self Clean, Steam Clean and Warm features
under this selection. See the Oven Options section for
more details.
17. Convection Bake: Press the Convection Bake
pad to convection bake. Convection cook modes use
increased air circulation to improve performance. The
type of benefit depends on the mode. Your lower
oven has the following convection cooking modes:
&RQYHFWLRQ%DNH5DFN0XOWLDQG&RQYHFWLRQ5RDVW
See the Lower Oven Cooking Modes section for more
information.
18. Clear/Off: The Clear/Off pad cancels ALL lower oven
programs except the clock and timer.
Common Controls
Upper Oven
Controls
Lower Oven
Controls
Oven Controls
USING THE OVEN: Oven Controls
10 12 18 1617
11 13 14 15
179 6 4
582 3

49-2001077 Rev. 2 13
USING THE OVEN: Oven Settings
Help
Use this feature to find out more about your oven and
its features by pressing the Settings pad and selecting
help. Turn the selector dial and press to select the
feature you want to find out more about.
NOTE: Not all features of help may be on your oven
model. Below are features found in the Help function:
Clock Settings
Use this feature to set the time of day and to specify
how the time of day will be displayed. You can select a
VWDQGDUGKRXUFORFNKURUKRXUPLOLWDU\WLPH
GLVSOD\KU3ULRUWRWKHILUVWXVHRI\RXURYHQWKH
clock must be set.
Display Mode
Use this feature to set Power Saver or Display Always
On display mode.
Auto Conversion
Use this feature to turn Auto Conversion on/off. When
Auto Conversion is on it will automatically convert the
regular baking temperatures entered to convection bake
cooking temperatures when using convection bake. This
adjusts the temperature in both ovens.
Auto Shut-Off
Use this feature to activate/deactivate Auto Shut-Off.
Activating the Auto Shut-Off feature will turn off the
lower oven after 12 hours of continuous operations.
The factory setting for Auto Shut-Off feature is
activated. When in Sabbath mode Auto Shut-Off will be
deactivated.
Beeper Volume
Use this feature to set Beeper Volume to Mute or Normal.
NOTE: Some tones are not mutable.
Reminder
Use this feature to Set, Review, or Clear Reminder.
Temperature Units
8VHWKLVIHDWXUHWRVHWWKHGLVSOD\WHPSHUDWXUHXQLWWR)
)DKUHQKHLWRU&&HOVLXV
Thermostat Adjust
This feature allows the oven baking and convection
EDNLQJWHPSHUDWXUHWREHDGMXVWHGXSWR)KRWWHU
RUGRZQWR)FRROHURQWKHORZHURYHQ7KHXSSHU
oven cannot be adjusted. Use this feature if you believe
your oven temperature is too hot or too cold and wish to
change it. This adjustment affects Bake, and Convection
Bake modes. No other cooking modes are affected.
Oven Information
This feature shows the Oven Model and Serial number.
Oven Settings
Features found in the Help function.
Adding Time Defrost by Weight Start/Pause
Auto Conversion 'HOD\6WDUW/RZHU Steam Clean
Auto Shut-Off Display Mode Temperature Units
Back Edit Thermostat Adjust
Bake Help Timer On/Off
Beeper Volume Melt Warm
Beverage Micro 30 Secs
Broil Microwave
Clear/Off My Recipes
Clock Probe
Control Lockout Proof
Cook Reheat
&RRNE\)RRG Reminder
Cook by Time Repeat Last
Cook by Time 1 & 2 Resume
Cooking Options
/RZHU
Sabbath
Cooking Options
8SSHU
Self Clean
Defrost Sensor Cooking
'HIURVWE\)RRG Simmer
Defrost by Time Soften

14 49-2001077 Rev. 2
Oven Options
USING THE OVEN: Oven Options
Upper Oven Options
Repeat Last
This feature can only be used for upper oven cooking
modes. Use this time saving feature for cooking repetitive
items like cookies or appetizers. When selecting this
feature, the last preset food will be displayed. Select
Start/Pause pad or the selector dial to start cooking.
NOTE: The last program used is stored for two hours.
Not all features can be repeated.
Proof
Use this feature to proof bread. See Upper Oven
Warming and Proofing section for more detail.
Warm
Use this feature to warm. Select Moist or Crisp. See
Upper Oven Warming and Proofing section for more
detail.
Lower Oven Options
Delay Start
Use this feature to delay starting a Bake, Conv Bake,
Probe, or Self Clean feature. To use this feature select
Delay Start and set the time to start, then select cook
mode. You can also use the Delay Start feature while
programming a Bake, Conv Bake, or Probe cooking feature.
Probe
Use this feature to cook by the internal temperature of
WKHIRRG)RUPDQ\IRRGVHVSHFLDOO\URDVWDQGSRXOWU\
internal food temperature is the best test for doneness.
This feature is available for the lower oven only. To use
this feature, insert probe into food. Select Probe then
enter the desired internal food temperature and program
the Bake or Conv Bake cooking mode as normal.
This feature can also be accessed by connecting the
temperature probe into the oven at any time.
Proof
Use this feature to proof dough. See Lower Oven
Cooking Modes for more detail.
Sabbath
Use this feature to enter Sabbath mode. Sabbath mode
sets the oven for observance of the Jewish Sabbath
and Holidays. This feature conforms to Jewish Sabbath
UHTXLUHPHQWV6DEEDWKPRGHGLVDEOHVWKHRYHQOLJKWV
WKHRYHQOLJKWZLOOQRWWXUQRQZKHQWKHGRRULVRSHQHG
DOOVRXQGVWKHFRQWUROZLOOQRWEHHSZKHQDEXWWRQLV
pressed, but will still beep if certain oven faults occur),
and all upper oven functions and lower oven functions,
except lower oven Bake. During Sabbath mode only
lower oven Bake is available. While in Sabbath mode,
after setting/changing a bake temperature, a random
delay of approximately 30 seconds to 1 minute will occur
before the oven will begin baking. To stop cooking, press
the Back pad and then the Start/Pause pad. Your oven
will shut off after a random delay of approximately 30
seconds to 1 minute. To immediately exit lower oven
Bake, press the Clear/Off pad at any time – cooking
elements will immediately turn off and Sabbath Bake will
change to Sabbath on the display, indicating that the
oven has turned off. To exit Sabbath mode press and
hold the Back pad for 3 seconds. Do not press any other
buttons until Sabbath mode has exited, or Sabbath mode
will be re-initialized and will not exit. See Lower Oven
Sabbath Mode for more detail.
NOTE: If power outage occurs during Sabbath mode the
unit will remain in Sabbath mode but will no longer be
cooking when power is restored.
Self Clean
Use this feature to enter Self Clean mode. See Cleaning
The Oven section for more detail.
Steam Clean
Use this feature to enter Steam-Clean mode. See
Cleaning The Oven section for more detail.
Warm
Use this feature to warm. See Lower Oven Cooking
Modes for more detail.
49-2001077 Rev. 2 15
Baking
Baking allows you to cook foods the same way as a
conventional oven, using a heating element to raise
the temperature of the air inside the oven. Any oven
WHPSHUDWXUHIURP)WR)PD\EHVHW
A fan gently circulates heated air throughout the oven,
over and around the food. Because the heated air is kept
constantly moving, not permitting a layer of cooler air to
develop around the food, some foods cook slightly faster
than in regular oven cooking.
Before you begin, make sure the turntable is in place.
CAUTION
When baking, remember that the
oven, door and dishes will be very hot!
Baking
How To Bake
1. Press the Convection Bake pad.
2. Turn the selector dial to set the oven temperature and
press to enter.
3. Select Start or Cook Time.
Preheat after selecting start:
1. The oven starts preheating immediately. Do not place
the food in the oven.
2. When the oven is finished preheating, it will signal. If
you do not open the door within 1 hour, the oven will
turn off automatically. Open the oven door and, using
caution, place the food in the oven.
3. Close the oven door. Press the selector dial twice
to set the cook time and press Start/Pause to start
cooking. When cooking is complete, the oven will
signal and turn off.
You may change the oven temperature during preheating
by pressing the selector dial and turning the selector dial
to select the new temperature.
If the oven door is opened during cooking, Pause will
appear in the display. Close the door and press Start/
Pause. Limit door openings for optimal results at high
temperatures.
Cook times are shown in minutes and can be a
maximum of 179 minutes. Time can be changed during
cooking by turning the selector dial.
Preheat after selecting cook time:
1. After selecting a cook time, oven will prompt you to
start cook time or start preheat.
2. Press start cook time to skip preheat or press start
preheat to preheat.
3. When the oven is finished preheating, it will signal. If
you do not open the door within 1 hour, the oven will
turn off automatically. Open the oven door and, using
caution, place the food in the oven.
4. Close the oven door. Press selector dial to edit
temperature or cook time, if needed and/or press
Start/Pause to start cooking. When cooking is
complete the oven will signal and turn off.
)RUWZROHYHOEDNLQJSODFHIRRGLQDEDNLQJGLVKRQWKH
glass tray. Place your baking dish with food on top of the
wire rack. Stand the rack with food on the glass tray.
UPPER OVEN: Baking
The turntable must always be
in place when using the oven.
Put food or oven-safe cookware
directly on the glass tray to bake.
16 49-2001077 Rev. 2
Warming
The Warm feature will keep hot, cooked foods at serving
temperature. Always start with hot food. Use cookware
DQGXWHQVLOVWKDWFDQZLWKVWDQGWHPSHUDWXUHVXSWRÛ)
1. Press the Cooking Options pad.
2. Turn the selector dial to Warm. Press the selector
dial to enter.
3. Turn the selector dial to select Moist/Crisp. Press the
selector dial to enter.
If the oven door is opened during warming, Pause
will appear in the display. Close the door and press
Start/Pause.
To Crisp Stale Items:
Ŷ 3ODFHIRRGRUGLVKHVon the glass tray.
Ŷ &KHFNFULVSQHVVSHULRGLFDOO\$GGWLPHDVQHHGHG
Warming and Proofing
UPPER OVEN: Warming and Proofing
Temperature and Moisture Selection Chart
Tips for Crisp Foods:
Ŷ /HDYHIRRGXQFRYHUHG
Ŷ 'RQRWXVHSODVWLFFRQWDLQHUVRUSODVWLFZUDS
Tips for Moist Foods:
Ŷ &RYHUIRRGZLWKOLGRUDOXPLQXPIRLO
Ŷ 'RQRWXVHSODVWLFFRQWDLQHUVRUSODVWLFZUDS
Proofing
The proofing feature automatically provides the optimum
temperature for the proofing process, and therefore does
not have a temperature adjustment.
1. Press the Cooking Options pad.
2. Turn the selector dial to select Proof. Press the
selector dial to enter. The upper oven starts proofing
immediately and shows the amount of proofing time
completed.
Ŷ 7RRSWLPL]HSHUIRUPDQFHDYRLGXQQHFHVVDU\GRRU
opening.
Ŷ &KHFNEUHDGSURGXFWVHDUO\WRDYRLGRYHUSURRILQJ
NOTES:
Ŷ 'RQRWXVHWKHSURRILQJPRGHIRUZDUPLQJIRRGRU
keeping food hot. The proofing oven temperature is
not hot enough to hold foods at safe temperatures.
Use the Warm feature to keep food warm.
Ŷ 3URRILQJZLOOQRWRSHUDWHLIWKHRYHQLVWRRKRW$OORZ
the oven to cool before proofing.
86'$)6,6UHFRPPHQGVDQLQWHUQDOWHPSHUDWXUHRI)DV
the acceptable holding temperature for beef. Use a portable meat
thermometer to check internal temperatures.
Food Type Moisture Setting
Bread, hard rolls CRISP
Bread, soft rolls MOIST
Casseroles MOIST
)ULHGIRRGV CRISP
Meats* and fish CRISP
Pancakes, waffles CRISP
Pizza CRISP
Potatoes, baked CRISP
Potatoes, mashed MOIST
Poultry MOIST
Tortilla Chips CRISP
Vegetables MOIST
The turntable must always be
in place when using the oven.
Put bread dough in a bowl/
bread pan and place on the
glass tray to proof.
The turntable must always be
in place when using the oven.
Put food on the glass
tray to warm.
49-2001077 Rev. 2 17
UPPER OVEN: Microwaving
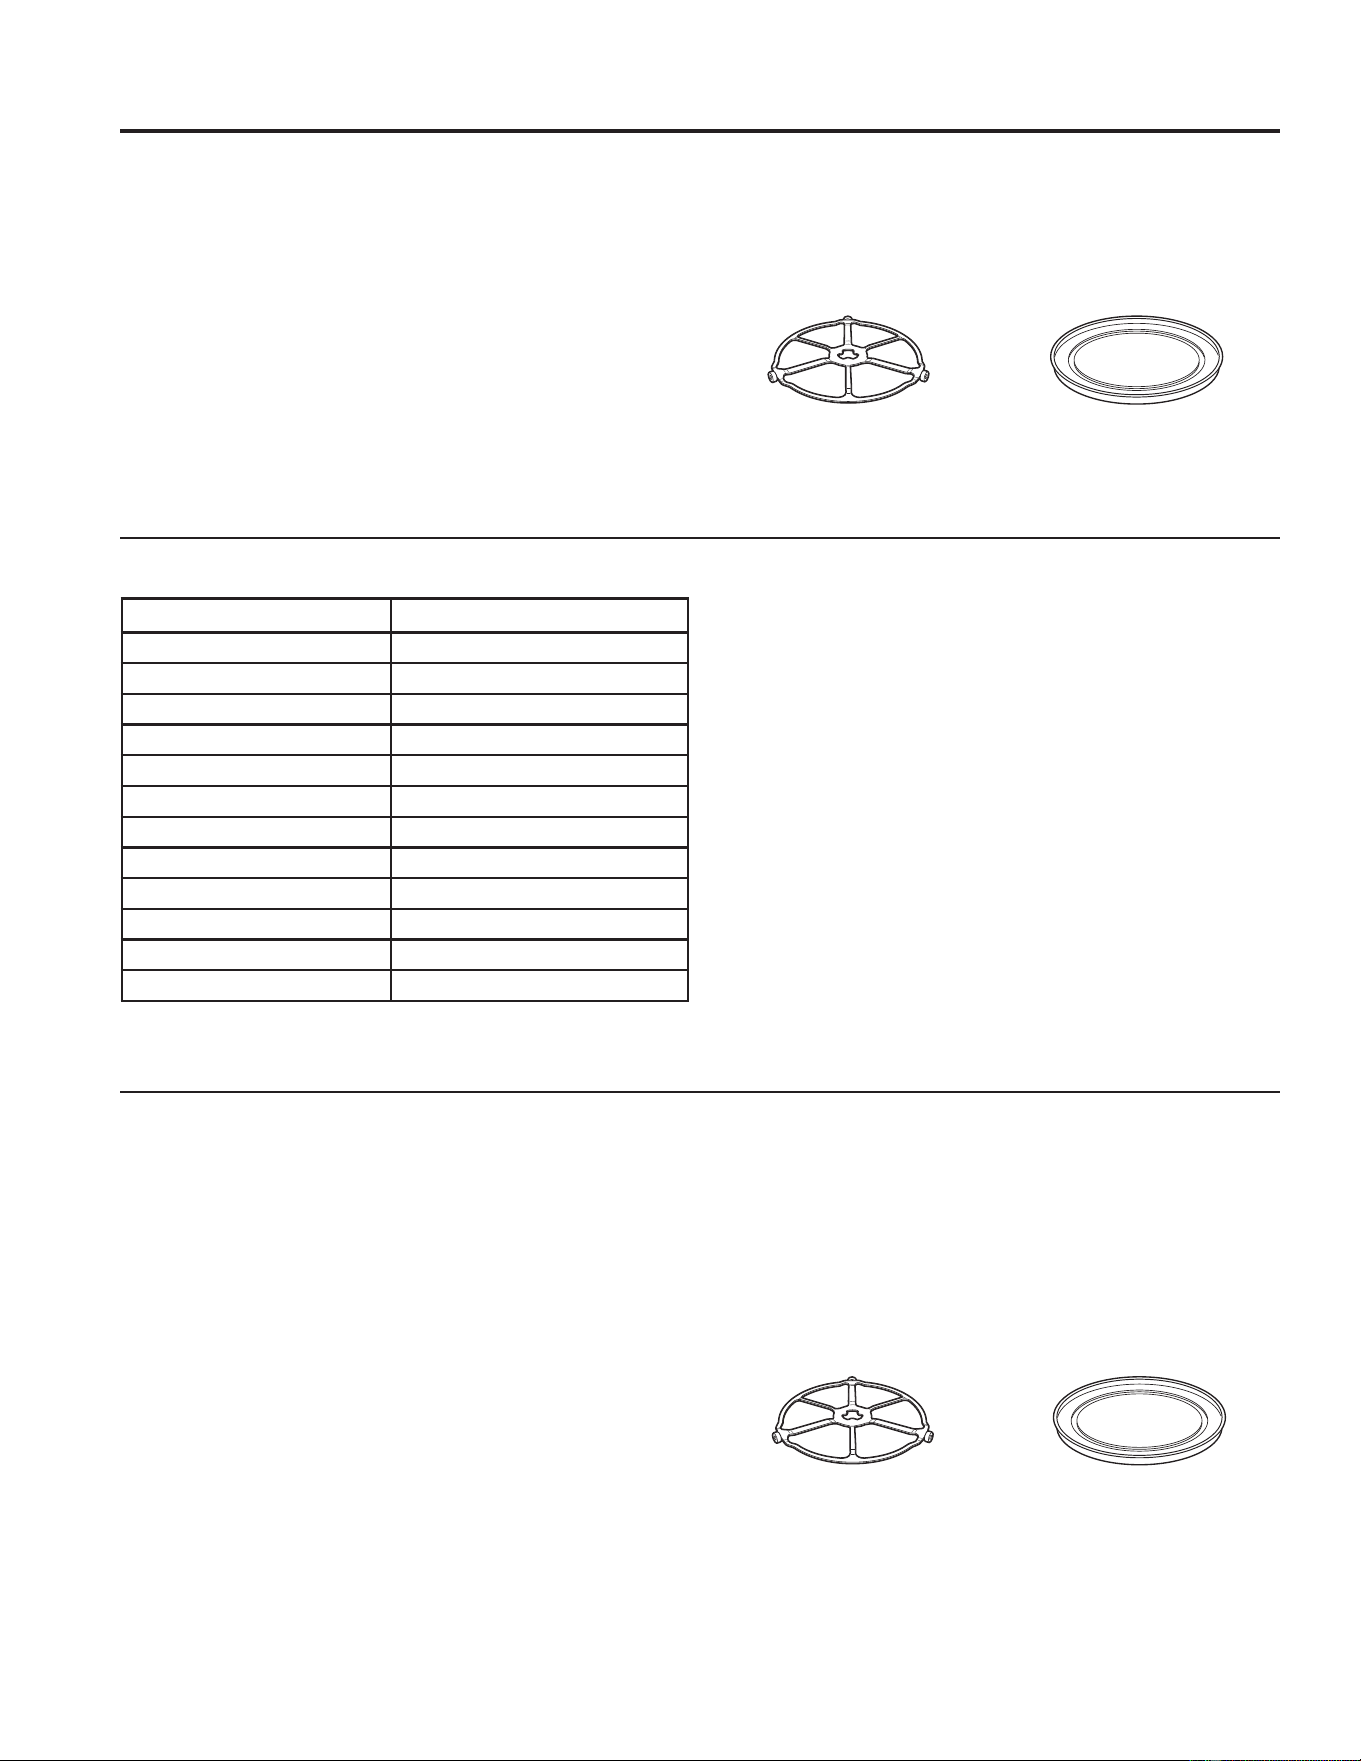
Microwaving
Using The Microwave Features
Make sure the turntable and clear glass tray are in place.
Place food or microwavable container directly on the
clear glass tray to cook your food.
The turntable must always be
in place when using the oven.
The clear glass tray should
always be in place when
microwaving.
MICROWAVE PRESET SELECTIONS:
Ŷ %HYHUDJH
±:DWHUR]
– Coffee
R]
±7HDR]
±0LONR]
– Hot Cocoa
R]
Ŷ 3RSFRUQ
– Popcorn Sensor
Ŷ 0HOW
– Butter
– Caramel
– Cheese
– Chocolate Chips
– Marshmallow
Ŷ 6LPPHU
Ŷ &RRN
±%\)RRG7\SH
– By Time
– By Time 1 & 2
Ŷ 6RIWHQ
– Butter
– Cream Cheese
±)URVWLQJR]
– Ice Cream
Ŷ 'HIURVW
– 1.0 lb Quick
– By Time
– By Weight
±%\)RRG7\SH
– Melt
– Soften
Ŷ 5HKHDW
– Beverage
– Casserole
– Chicken
– Pasta
– Pizza
±3ODWHRI)RRG
– Rice
– Soup
– Steaks/Chops
– Vegetables
How To Use Pre-Set Microwave Selections
1. Press the Microwave pad.
If no selection is made within 15 seconds, the display
will revert back to the time of day.
2. Turn the selector dial to find the food or beverage you
want to cook, defrost, soften, melt, simmer or reheat.
Press the selector dial to enter.
3. Turn the selector dial to select the type, amount,
ZHLJKWDQGRUVL]H$VUHTXLUHGWKHRYHQZLOOSURPSW
you.) Press the selector dial after each selection.
4. Press the selector dial or the Start/Pause pad to start
cooking.
To review or edit settings during cooking, press the
selector dial.
If the door is opened during cooking, the oven will stop
and PAUSE will appear in the display. Close the door
and press Start/Pause pad to resume cooking.
If you enter an undesired selection at any time, simply
press the Back pad and reenter the desired selections.
Ŷ :KHQWKHRYHQLVRQOLJKWPD\EHYLVLEOHDURXQGWKH
door or outer case.
Ŷ 7KHRYHQFDYLW\OLJKWZLOOFRPHRQGXULQJDPLFURZDYH
cooking cycle.
Ŷ 6WHDPRUYDSRUPD\HVFDSHIURPDURXQGWKHGRRU
Cook By Time And Cook By Time 1 & 2
Use Cook By Time and Cook By Time 1 & 2 to
microwave food that is not in the recipe section and at
WKHWLPHV\RXVHW
Ŷ 7KHSRZHUOHYHOLVDXWRPDWLFDOO\VHWDWKLJKEXW\RX
can change it for more flexibility.
1. Press the Microwave pad.
2. Turn the selector dial to select Cook By Time or Cook
By Time 1 & 2 and press the selector dial to enter.
3. Turn the selector dial to set the cook time and press
the selector dial to enter.
4. Select power level setting.
If you selected Cook By Time 1 & 2, turn the selector
dial to set the second cook time, second power level
setting and press the selector dial to enter.
5. Press the selector dial or the Start/Pause pad to
start cooking.
You may open the door during Cook By Time and Cook
By Time 1 & 2 to check the food. Close the door and
press Start/Pause to resume cooking.
18 49-2001077 Rev. 2
UPPER OVEN: Microwaving
Microwaving (Cont.)
Defrost By Food Type
Auto Defrost automatically sets the defrosting times and
power levels to give even defrosting results for meats,
poultry and fish weighing up to 6 pounds.
1. Remove food from the package and place it on a
microwave-safe dish.
2. Press the Microwave pad and select defrost.
7XUQWKHVHOHFWRUGLDOWR'HIURVW%\)RRG7\SH3UHVV
the selector dial to enter.
4. Turn the selector dial to select food type. Press the
selector dial to enter.
5. Turn the selector dial to the food weight, using the
&RQYHUVLRQ*XLGHDWWKHULJKW)RUH[DPSOHGLDO
IRUSRXQGVSRXQGR]3UHVVWKHVHOHFWRUGLDO
to enter.
6. Press the selector dial or Start/Pause pad to start
defrosting.
7XUQWKHIRRGRYHUZKHQWKHRYHQVLJQDOV7XUQ)RRG
Over.
Ŷ 5HPRYHGHIURVWHGPHDWRUVKLHOGZDUPDUHDVZLWK
small pieces of foil for even defrosting.
Ŷ $IWHUGHIURVWLQJPRVWPHDWVQHHGWRVWDQGPLQXWHV
to complete defrosting. Large roasts should stand for
about 30 minutes.
Conversion Guide
If the weight of food is stated in pounds and ounces, the
RXQFHVPXVWEHFRQYHUWHGWRWHQWKVRIDSRXQG
Defrost By Time
Use Defrost By Time to defrost for a selected length of time.
1. Press the Microwave pad and select defrost.
2. Turn the selector dial to Defrost By Time. Press the
selector dial to enter.
3. Turn the selector dial to select the time you want.
Press the selector dial to enter.
4. Press the selector dial or Start/Pause pad to start
defrosting.
7XUQWKHIRRGRYHUZKHQWKHRYHQVLJQDOV7XUQ)RRG
Over.
Power level is automatically set at 3, but can be
changed. To change the power levels, see the
0LFURZDYH3RZHU/HYHOVVHFWLRQ<RXFDQGHIURVW
VPDOOLWHPVTXLFNO\E\UDLVLQJWKHSRZHUOHYHODIWHU
entering the time. Power level 7 cuts the total defrosting
time in about half; power level 10 cuts the total time to
about 1/3. When defrosting at high power levels, food
ZLOOQHHGPRUHIUHTXHQWDWWHQWLRQWKDQXVXDO
Microwave Power Level(s)
Ŷ <RXFDQFKDQJHWKHSRZHUOHYHOGXULQJPRVWFRRNLQJ
program.
1. Press the selector dial to edit
2. Rotate selector dial to change time and/or press
selector dial to enter.
3. Turn the selector dial clockwise to increase and
counterclockwise to decrease the power level. Press
the selector dial to enter.
Here are some examples of uses for various power
levels:
High 10)LVKEDFRQYHJHWDEOHVERLOLQJOLTXLGV
Med-High 7: Gentle cooking of meat and poultry; baking
casseroles and reheating.
Medium 5: Slow cooking and tenderizing for stews and
less tender cuts of meat.
Low 2 or 3: Defrosting, simmering, delicate sauces.
Warm 1:.HHSLQJIRRGZDUPVRIWHQLQJEXWWHU
Weight of Food in
Ounces
Enter Food Weight
(tenths of a pound)
1–2 .1
3.2
4–5 .3
6–7 .4
8.5
9–10 .6
11 .7
12–13 .8
14–15 .9

49-2001077 Rev. 2 19
Defrost By Weight
Use Defrost By Weight to defrost for a selected length
of time.
1. Press the Microwave pad and select defrost.
2. Turn the selector dial to Defrost By Weight. Press the
selector dial to enter.
3. Turn the selector dial to select the weight you want.
Press the selector dial to enter.
4. Press the selector dial or Start/Pause pad to start
defrosting.
7XUQWKHIRRGRYHUZKHQWKHRYHQVLJQDOV7XUQ)RRG
Over.
Power level cannot be changed during this setting.
1.0 lb. Quick Defrost
8VHOE4XLFN'HIURVWIRUTXLFNGHIURVWRIOERI
frozen food.
1. Press the MicrowaveSDGDQGVHOHFW/ETXLFN
defrost.
2. Press selector dial or Start/Pause pad to start
defrosting. Press the selector dial to enter.
7XUQWKHIRRGRYHUZKHQWKHRYHQVLJQDOV7XUQ)RRG
Over.
Power level cannot be changed during this setting.
Defrosting Tips
Ŷ )RRGVIUR]HQLQSDSHURUSODVWLFFDQEHWLPH
defrosted in the package, but foods should be taken
RXWRIWKHSDFNDJHZKHQXVLQJ'HIURVW%\)RRG7\SH
Closed packages should be slit, pierced or vented
after food has partially defrosted. Plastic storage
containers should be partially uncovered.
Ŷ )DPLO\VL]HSUHSDFNDJHGIUR]HQGLQQHUVFDQEH
defrosted and microwaved. If the food is in a foil
container, transfer it to a microwave-safe dish.
Ŷ )RRGVWKDWVSRLOHDVLO\VKRXOGQRWEHDOORZHGWRVLW
out for more than one hour after defrosting. Room
temperature promotes the growth of harmful bacteria.
Ŷ )RUPRUHHYHQGHIURVWLQJRIODUJHUIRRGVVXFKDV
roasts, use Defrost By Time. Be sure large meats are
completely defrosted before cooking.
Ŷ :KHQGHIURVWHGIRRGVKRXOGEHFRROEXWVRIWHQHGLQ
all areas. If still slightly icy, return to the microwave
very briefly, or let it stand a few minutes.
UPPER OVEN: Microwaving
Microwaving (Cont.)
20 49-2001077 Rev. 2
Microwave Sensor Cooking
The sensor feature detects the increasing humidity
released during cooking. The oven automatically adjusts
the cooking time to various types and amounts of food.
'RQRWXVHWKH6HQVRU)HDWXUHVWZLFHLQVXFFHVVLRQ
on the same food portion— it may result in severely
overcooked or burnt food. If food is undercooked after
the first countdown, use Cook By Time for additional
cooking time.
The proper containers and covers are essential for
best sensor cooking.
Ŷ $OZD\VXVHPLFURZDYHVDIHFRQWDLQHUVDQGFRYHU
them with lids or vented plastic wrap. Never use tight
sealing plastic containers—they can prevent steam
from escaping and cause food to overcook.
Ŷ %HVXUHWKHRXWVLGHRIWKHFRRNLQJFRQWDLQHUVDQG
the inside of the oven are dry before placing food in
the oven. Beads of moisture turning into steam can
mislead the sensor.
Ŷ %HYHUDJHVDUHEHVWKHDWHGXQFRYHUHG
Covered
Vented
Dry off dishes so they don’t
mislead the sensor.
To Use All Sensor Programs
Upper Oven microwave mode features sensor cooking. It
automatically senses when food is done and shuts itself
off—eliminating the need to program cook times and
power levels.
1. Press the Microwave pad and turn the selector dial
WR&RRN%\)RRG7\SHRU5HKHDW3UHVVWKHVHOHFWRU
dial to enter.
2. Turn the selector dial to select the food you want.
Press the selector dial to enter.
3. Press the selector dial or press the Start/Pause pad
to start cooking.
Do not open the oven door until time is counting down
in the display or the microwave stop cooking. If the door
is opened, close it and press Start/Pause immediately.
If the food is not done enough, use Cook By Time in the
microwave selector to cook for more time.
NOTE:'RQRWXVHWKH6HQVRU)HDWXUHVWZLFHLQ
succession on the same food portion—it may result in
severely overcooked or burnt food.
Ŷ ,IWKHRYHQLVDOUHDG\KRWLWPD\LQGLFDWHWKDWLWLVWRR
hot for sensor cooking. Of course, you can always
continue with Cook By Time.
NOTE: If the oven is too hot then it will automatically
change to time cooking.
Ŷ 7RVKRUWHQRUOHQJWKHQWKHFRRNWLPHZDLWXQWLOWKH
time countdown shows in the display. Then turn the
selector dial to add or subtract time.
Ŷ ,I\RXRSHQWKHGRRUZKLOH6HQVRU&RRNLQJ6HQVRU
Error will appear. Close the door, press Start/Pause
to begin again.
Notes about the Reheat program:
Reheated foods may have wide variations in
temperature. Some areas may be extremely hot.
It is best to use Cook By Time and not Reheat for these
foods:
Ŷ %UHDGSURGXFWV
Ŷ )RRGWKDWPXVWEHUHKHDWHGXQFRYHUHG
Ŷ )RRGVWKDWQHHGWREHVWLUUHGRUWXUQHG
Ŷ )RRGVFDOOLQJIRUDGU\ORRNRUFULVSVXUIDFHDIWHU
reheating.
UPPER OVEN: Microwaving
Microwaving (Cont.)
MICROWAVE SENSOR PROGRAMS:
Ŷ*URXQG0HDW
Ŷ3RSFRUQ
Ŷ6RXS
Ŷ5LFH
Ŷ9HJHWDEOHV
(Canned, Fresh, Frozen)
Ŷ&KLFNHQ5HKHDW
Ŷ3DVWD5HKHDW
Ŷ3ODWHRI)RRG5HKHDW
Ŷ6RXS5HKHDW
Ŷ9HJHWDEOH5HKHDW

49-2001077 Rev. 2 21
Your new oven has a variety of cooking modes to help you get the best results. These modes are described below. Refer
to the Cooking Guide section for recommendations for specific foods. Remember, your new oven may perform differently
than the oven it is replacing.
Baking and Roasting Modes
Select a mode for baking and roasting based on the type
DQGTXDQWLW\RIIRRG\RXDUHSUHSDULQJ:KHQSUHSDULQJ
baked goods such as cakes, cookies, and pastries always
SUHKHDWWKHRYHQILUVW)ROORZUHFLSHUHFRPPHQGDWLRQVIRU
food placement. If no guidelines are provided, center food
in the oven.
Traditional Bake
The traditional bake mode is intended for single rack cooking.
This mode uses heat primarily from the lower element but
also from the upper element to cook food. To use this mode
press the Bake pad, turn the selector dial to set the oven
temperature and press to enter, then press Start. Preheating
is generally recommended when using this mode.
Convection Bake 1 Rack
The Convection Bake 1 Rack mode is intended for single
rack cooking. This mode uses heat from the lower element
and also the upper and rear elements, along with air
movement from the convection fan to enhance evenness.
<RXURYHQLVHTXLSSHGZLWK$XWR5HFLSH&RQYHUVLRQVR
it is not necessary to convert the temperature when using
this mode. To use this mode press the Convection Bake
pad, turn the selector dial to select 1 Rack and set the oven
temperature, and press to enter, then press Start. Preheating
is generally recommended when using this mode.
Convection Bake Multi Rack
The Convection Bake Multi Rack mode is intended for
baking on multiple racks at the same time. This mode uses
heat primarily from the rear element but also heat from the
upper and lower elements, along with air movement from
the convection fan to enhance cooking evenness. Your
RYHQLVHTXLSSHGZLWK$XWR5HFLSH&RQYHUVLRQVRLWLV
not necessary to convert the temperature when using this
mode. Baking time might be slightly longer for multiple racks
than what would be expected for a single rack. To use this
mode press the Convection Bake pad, turn the selector
dial to select Multi Rack and set the oven temperature and
press to enter, then press Start. Always preheat when
using this mode.
Convection Roast
The Convection Roast mode is intended for roasting whole
cuts of meat on a single rack. This mode uses heat from the
lower, upper, and rear elements along with air movement
from the convection fan to improve browning and reduce
cooking time. It is not necessary to convert temperature.
Check food earlier than the recipe suggested time when
using this mode, or use a meat probe. To use this mode
press the Convection Bake pad, turn the selector dial to
select Roast and set the oven temperature and press to
enter, then press Start. It is not necessary to preheat when
using this mode.
Broiling Modes
Always broil with the door closed. The broil element in this
oven is very powerful. Monitor food closely while broiling.
Use caution when broiling on upper rack positions as
placing food closer to the broil element increases smoking,
spattering, and the possibility of fats igniting. Broiling on
rack position 6 is not recommended.
Try broiling foods that you would normally grill. Adjust rack
positions to adjust the intensity of the heat to the food. Place
foods closer to the broil element when a seared surface
and rare interior is desired. Thicker foods and foods that
need to be cooked through should be broiled on a rack
position farther from the broiler or by using Broil Lo. )RUEHVW
performance center food below the broil heating element.
Broil Hi
The Traditional Broil Hi mode uses intense heat from the
upper element to sear foods. Use Broil Hi for thinner cuts
of meat and/ or foods you prefer less done on the interior.
To use this mode press the Broil pad, turn the selector
dial to Hi and press to enter, and then press Start. It is not
necessary to preheat when using this mode.
Broil Lo
The Traditional Broil Lo mode uses less intense heat from
the upper element to cook food thoroughly while also
producing surface browning. Use Broil Lo for thicker cuts of
meat and/or foods that you would like cooked all the way
through. To use this mode press the Broil pad, turn the
selector dial to Lo and press to enter, and then press Start.
It is not necessary to preheat when using this mode.
Proof
3URRIPRGHLVGHVLJQHGIRUULVLQJIHUPHQWLQJDQGSURRILQJ
bread dough. Press the Options pad, turn the selector
dial to select Proof and press to select, then press Start.
Cover dough well to prevent drying out. Bread will rise more
rapidly than at room temperature. Note that for double wall
ovens, proof cannot be run when running a clean mode in
the lower oven.
Warm
Warm mode is designed to keep hot foods hot for up to 3
hours. To use this mode, press the Options pad, turn the
selector dial to select Warm and press to select, then press
Start. Cover foods that need to remain moist and do not
FRYHUIRRGVWKDWVKRXOGEHFULVS3UHKHDWLQJLVQRWUHTXLUHG
Do not use warm to heat cold food other than crisping
crackers, chips or dry cereal. It is also recommended that
food not be kept warm for more than 2 hours.
LOWER OVEN: Cooking Modes
Cooking Modes

22 49-2001077 Rev. 2
LOWER OVEN: Probe
Probe
WARNING
Consuming undercooked food can result in foodborne illness. Use probe according to
the following instructions to ensure all portions of the food reach minimum safe cooking temperatures.
Recommendations for minimum safe food temperatures can be found at foodsafety.gov or IsItDoneYet.gov.
,QWHUQDOIRRGWHPSHUDWXUHLVIUHTXHQWO\XVHGDVDQ
indicator of doneness, especially for roasts and poultry.
The Probe mode monitors the internal food temperature
and turns the oven off when the internal food
temperature reaches the programmed temperature.
Always check the temperature at multiple locations in
the food with a food thermometer after cooking to ensure
that all portions of the food have reached the minimum
safe internal temperature for that food.
Proper Probe Placement
After preparing the meat and placing it on the cooking
pan follow these instructions for proper probe placement.
Ŷ ,QVHUWWKHSUREHLQWRWKHIRRGVRWKDWWKHWLSRIWKH
probe will rest in the center of the thickest part of
WKHIRRG)RUEHVWSHUIRUPDQFHWKHSUREHVKRXOG
be fully inserted into the food. If the probe is not
located properly, it may not accurately measure the
temperature of the coolest portion of the food. Some
foods, particularly small items, are not well suited for
cooking with the probe due to their shape or size.
Ŷ 7KHSUREHVKRXOGQRWWRXFKERQHIDWRUJULVWOH
Ŷ )RUZKROHSRXOWU\LQVHUWWKHSUREHLQWRWKHWKLFNHVW
part of the breast.
Ŷ )RUERQHOHVVURDVWVLQVHUWWKHSUREHLQWRWKHFHQWHU
of the roast.
Ŷ )RUERQHLQKDPRUODPELQVHUWWKHSUREHLQWRWKH
center of the lowest large muscle or joint.
Ŷ )RUFDVVHUROHVRUGLVKHVVXFKDVPHDWORDILQVHUWWKH
probe into the center of the dish.
Ŷ )RUILVKLQVHUWWKHSUREHIURPMXVWDERYHWKHJLOOLQWR
the meatiest area, parallel to the backbone.
Probe Usage
The temperature probe can only be used with Bake,
Convection Bake, and Convection Roast.
To use the probe with preheating:
6HOHFWWKHGHVLUHGFRRNPRGHBake, Convection
Bake, or Convection Roast) pad and enter the
desired cooking temperature with the number pads.
,QVHUWWKHSUREHLQWRWKHIRRGVHH3URSHU3UREH
Placement). Place the food in the oven and connect
the probe into the probe outlet in the oven. The probe
outlet can be found in the upper oven.
3. Once the oven is preheated, place the food in the
oven and connect the probe to the probe outlet,
making sure it is fully inserted. Use caution, the oven
walls and probe outlet are hot.
4. When the probe is connected, the display will prompt
you to enter the desired food temperature. The
maximum internal food temperature that you can set
LV)
To use the probe without preheating:
,QVHUWWKHSUREHLQWRWKHIRRGVHH3URSHU3UREH
Placement). Place the food in the oven and connect
the probe into the probe outlet in the oven. The probe
outlet can be found in the upper oven.
2. Place the food in the oven and connect the probe into
the probe outlet in the oven.
3. Press the Cook ModeSDGTraditional Bake,
Convection Bake, or Convection Roast) and
enter the desired cooking temperature with the
number pads. Press Options and select Probe then
follow the display prompts to enter the desired food
temperature.
Probe Care Guidelines
Ŷ 8VHRISUREHVRWKHUWKDQWKHRQHSURYLGHGZLWKWKLV
product may result in damage to the probe outlet.
Ŷ 8VHWKHKDQGOHVRIWKHSUREHDQGSOXJZKHQLQVHUWLQJ
and removing them from the meat and outlet
Ŷ 7RDYRLGGDPDJLQJ\RXUSUREHGRQRWXVHWRQJVWR
pull on the cable when removing it.
Ŷ 7RDYRLGEUHDNLQJWKHSUREHPDNHVXUHIRRGLV
completely defrosted before inserting the probe.
Ŷ 7RSUHYHQWSRVVLEOHEXUQVGRQRWXQSOXJWKHSUREH
from the outlet until the oven has cooled.
Ŷ 1HYHUOHDYHWKHSUREHLQVLGHWKHRYHQGXULQJDVHOIRU
steam clean cycle.
Ŷ 'RQRWVWRUHWKHSUREHLQWKHRYHQ
49-2001077 Rev. 2 23
<RXUQHZRYHQFRQIRUPVWR-HZLVK6DEEDWKUHTXLUHPHQWVZLWKWKH6DEEDWKPRGHFRRNLQJIHDWXUH%HORZGHVFULEHV
the detail of Sabbath mode feature.
To Enter Sabbath Mode
Press the lower oven Options pad and turn the selector
dial to Sabbath and press to select. The display
will show “During Sabbath Mode the upper oven is
unavailable.” Press the selector dial to continue. Any
upper oven features running will exit, and the lower oven
will immediately transition into Sabbath mode.
To Change Temperature
Once in Sabbath mode, in order to change oven
temperature or start a bake feature, the user can
change temperature to one of 10 pre-set temperatures
as indicated below:
&KDQJLQJWRRQHRIWKHDERYHWHPSHUDWXUHVUHTXLUHVWKH
user to press the keypad associated with the desired
temperature and then press the Start/PauseSDG)RU
H[DPSOHWRVHWD%DNH)WKHXVHUZLOOSUHVVWKHBake
pad on the lower oven and then press Start/Pause pad.
7KH%DNHIHDWXUHZLOOVWDUWRULIDOUHDG\UXQQLQJWKH
oven temperature will change) at a random time between
30 – 60 seconds after the Start/Pause pad is pressed,
with the exception of pressing the Clear/Off pad, which
ZLOOLPPHGLDWHO\FDQFHOWKHFRRNLQJVHWWLQJV7KHXQLW
will remain in Sabbath mode). Change of temperature
may be executed at any time in the cooking cycle.
To Turn Oven Off
Press Clear/Off pad or Back and then Start pads at
any time. The oven will immediately turn off but will stay
in Sabbath mode and return to the standby Sabbath
display screen.
To Exit Sabbath Mode
Press and hold the Back pad for 3 seconds. The oven
will shut down at a random time between 30 – 60
seconds after the Back pad is pressed and held.
NOTE: Do not press any other pads during this time, or
the Sabbath mode will be re-initialized and will not exit.
The oven will exit Sabbath mode and return to its
default screen.
Timed Cook Feature In Sabbath Mode
The Sabbath mode is not capable of running a timed
cook feature on its own. If there is a desire to run a
Timed Cook, the following steps must be followed:
1. Use the Settings pad to set your Beeper Volume to
Mute.
2. Use the Light pad to set your lower oven Light to On.
3. Use Bake to program a temperature. After
programming a temperature select a cook time and
enter your cook time. Press Start to start the oven.
NOTE: Convection Bake should NOT be used.
4. Once the oven is started, do NOT open the door
until the oven has finished preheating and reached a
steady state temperature. Doing so prior to preheating
completing will result in the air distribution fan
de-energizing immediately upon door opening.
5. Once the food has been placed in the oven, do not
open the door until cooking has completed. Doing so
will result in the display on the screen changing to
prompt you to close your door.
6. Do NOT open the upper oven door. Doing so will turn
the light on immediately.
7. Do not press any additional buttons on the lower
oven controls once started or the display will change
immediately upon the button press.
NOTES
Ŷ 'XULQJ6DEEDWKPRGHRQO\ORZHURYHQ%DNHLV
available. Broil, Convection Bake, Warm, or other
functions are not available.
Ŷ :KHQLQ6DEEDWKPRGHWKHKRXUDXWRVKXWRII
is disabled regardless of the setting selected in the
Settings.
Ŷ 6DEEDWKPRGHFDQEHHQWHUHGRQO\LIQRFRRNLQJ
mode is running in the lower oven. Entering the
Sabbath Mode will cancel all functions in the lower
DQGXSSHURYHQLQFOXGLQJWLPHUDQGUHPLQGHU
Ŷ :KHQDQ\EXWWRQVDUHSUHVVHGLQ6DEEDWK0RGH
there are no beeps or tones, no changes to lights or
change in the display. Also, when the door is opened
or closed in Sabbath Mode, there are no beeps or
tones, no changes to lights or change in the display.
Ŷ ,IDSRZHURXWDJHRFFXUVGXULQJ6DEEDWKPRGHEDNLQJ
the unit will return to Sabbath Mode when power
comes back, but will not return in the baking mode.
UI Key Temp. (°F)
Left Side Keys (Upper Oven)
Microwave 170
Speed Cook/ Defrost 200
Cooking Options/ Popcorn 225
Add 30 Sec 250
Convection Bake/Reheat 300
Right Side Keys (Lower Oven)
Back 0
Clear/Off Cancels immediately
Light 325
Bake 350
Broil 375
Convection Bake/Warm 400
Options 450
Sabbath Mode
LOWER OVEN: Sabbath Mode
24 49-2001077 Rev. 2
FOOD TYPE
RECOMMENDED
MODE(S)
RECOMMENDED
RACK POSITION(S) ADDITIONAL SUGGESTIONS
Baked Goods
Layer cakes, sheet cakes,
EXQGWFDNHVPXIILQVTXLFN
breads on a Single Rack
Traditional Bake 3 Use shiny cookware.
Layer cakes* on Multiple
Racks
Traditional Bake 3 and 5
Extension rack in higher position if used. Ensure
DGHTXDWHDLUIORZ
&KLIIRQFDNHVDQJHOIRRG Traditional Bake 1 Use shiny cookware.
Cookies, biscuits, scones on
a Single Rack
Traditional Bake 3 Use shiny cookware.
Cakes, Cookies, biscuits,
scones on Multiple Racks
Convection Bake Multi
3 and 5
1, 3 and 5
([WHQVLRQUDFNSRVLWLRQ(QVXUHDGHTXDWHDLUIORZ
Beef & Pork
Hamburgers Broil Hi 5
Use the extension rack and use a broil pan; move
food down for more doneness/less searing. Watch
IRRGFORVHO\ZKHQEURLOLQJ)RUEHVWSHUIRUPDQFH
center food below the broil heating element.
Steaks & Chops Broil Hi 5
Use a broil pan; Move food down for more
doneness/less searing. Watch food closely when
EURLOLQJ)RUEHVWSHUIRUPDQFHFHQWHUIRRGEHORZWKH
broil heating element.
Roasts Convection Roast 2 or 3
Use a low sided pan such as a broil pan.
Preheating is not necessary.
Poultry
Whole chicken Convection Roast 2 or 3 Use a low sided pan such as a broil pan.
Bone-in chicken breasts,
legs, thighs
Broil Hi 1
If breaded or coated in sauce avoid Broil Hi modes.
Broil skin side down first. Watch food closely when
EURLOLQJ)RUEHVWSHUIRUPDQFHZKHQEURLOLQJFHQWHU
food below the broil heating element.
Broil Lo
Traditional Bake
Convection Bake 1 Rack
3
Boneless chicken breasts
Broil Lo
Traditional Bake
Convection Bake 1 Rack
3
Move food down for more doneness/less searing
and up for greater searing/browning when broiling.
)RUEHVWSHUIRUPDQFHZKHQEURLOLQJFHQWHUIRRG
below the broil heating element.
Whole turkey Convection Roast 1 or 2 Use a low sided pan such as a broil pan.
Turkey breast Convection Roast 2 or 3 Use a low sided pan such as a broil pan.
Fish Broil Lo
WKLFNRUOHVV
!LQFK
:DWFKIRRGFORVHO\ZKHQEURLOLQJ)RUEHVW
performance center food below the broil heating
element.
Casseroles
Convection Bake 1 Rack
Traditional Bake
3
Frozen Convenience Foods
Pizza, french fries, tator tots,
chicken nuggets, appetizers
on a Single Rack
Convection Bake 1 Rack
Traditional Bake
3 Use shiny cookware.
Pizza, french fries, tator tots,
chicken nuggets, appetizers
on Multiple Racks
Convection Bake Multi 3 and 5 Use shiny cookware.
*When baking four cake layers at a time, use racks 3
extension and 5 flat with convection multi. Place the
pans as shown so that one pan is not directly above
another.
Cook food thoroughly to help protect against food
borne illness. Minimum safe food temperature
recommendations for food safety can be found at
foodsafety.gov. Make sure to use a food thermometer
to take food temperatures.
Cooking Guide (27" Oven)
LOWER OVEN: Cooking Guide
49-2001077 Rev. 2 25
LOWER OVEN: Cooking Guide
Cooking Guide (30" Oven)
FOOD TYPE
RECOMMENDED
MODE(S)
RECOMMENDED
RACK POSITION(S) ADDITIONAL SUGGESTIONS
Baked Goods
Layer cakes, sheet cakes,
EXQGWFDNHVPXIILQVTXLFN
breads on a Single Rack
Traditional Bake 3 Use shiny cookware.
Layer cakes* on Multiple Racks Traditional Bake 2 and 4
Extension rack in higher position if used. Ensure
DGHTXDWHDLUIORZVHHLOOXVWUDWLRQEHORZ
&KLIIRQFDNHVDQJHOIRRG Traditional Bake 1 Use shiny cookware.
Cookies, biscuits, scones on a
Single Rack
Traditional Bake 3 Use shiny cookware.
Cookies, biscuits, scones on
Multiple Racks
Convection Bake Multi
2 and 4
1, 3 and 5
Extension rack position 4 for 2 racks, 1 for 3
UDFNV(QVXUHDGHTXDWHDLUIORZ
Beef & Pork
Hamburgers Broil Hi 5
Use the extension rack and use a broil pan; move
food down for more doneness/less searing. Watch
IRRGFORVHO\ZKHQEURLOLQJ)RUEHVWSHUIRUPDQFH
center food below the broil heating element.
Steaks & Chops Broil Hi 5
Use a broil pan; Move food down for more
doneness/less searing. Watch food closely when
EURLOLQJ)RUEHVWSHUIRUPDQFHFHQWHUIRRGEHORZ
the broil heating element.
Roasts Convection Roast 2 or 3
Use a low sided pan such as a broil pan.
Preheating is not necessary.
Poultry
Whole chicken Convection Roast 2 or 3 Use a low sided pan such as a broil pan.
Bone-in chicken breasts, legs,
thighs
Broil Hi 1
If breaded or coated in sauce avoid Broil Hi modes.
Broil skin side down first. Watch food closely when
EURLOLQJ)RUEHVWSHUIRUPDQFHZKHQEURLOLQJ
center food below the broil heating element.
Broil Lo
Traditional Bake
Convection Bake 1
Rack
3
Boneless chicken breasts
Broil Lo
Traditional Bake
Convection Bake 1
Rack
3
Move food down for more doneness/less searing
and up for greater searing/browning when broiling.
)RUEHVWSHUIRUPDQFHZKHQEURLOLQJFHQWHUIRRG
below the broil heating element.
Whole turkey Convection Roast 1 or 2 Use a low sided pan such as a broil pan.
Turkey breast Convection Roast 2 or 3 Use a low sided pan such as a broil pan.
Fish Broil Lo
WKLFNRUOHVV
!LQFK
:DWFKIRRGFORVHO\ZKHQEURLOLQJ)RUEHVWSHUIRUPDQFH
center food below the broil heating element.
Casseroles
Convection Bake 1
Rack
Traditional Bake
3
Frozen Convenience Foods
Pizza, french fries, tator tots,
chicken nuggets, appetizers on
a Single Rack
Convection Bake 1
Rack
Traditional Bake
3 Use shiny cookware.
Pizza, french fries, tator tots,
chicken nuggets, appetizers on
Multiple Racks
Convection Bake Multi 2 and 4 Use shiny cookware.
*When baking four cake layers at a time, use racks 2
and 4. Place the pans as shown so that one pan is not
directly above another.
Cook food thoroughly to help protect against food
borne illness. Minimum safe food temperature
recommendations for food safety can be found at
foodsafety.gov. Make sure to use a food thermometer
to take food temperatures.
26 49-2001077 Rev. 2
Racks
Your oven has six rack positions. Recommended rack
positions for various types of foods are provided in the
Cooking Guide. Adjusting rack position is one way to
LPSDFWFRRNLQJUHVXOWV)RUH[DPSOHLI\RXZRXOGSUHIHU
darker tops on cakes, muffins, or cookies, try moving
food one rack position higher. If you find foods are too
brown on top try moving them down next time.
When baking with multiple pans and on multiple racks,
ensure there is at least 1½" between pans to allow
sufficient space for air to flow.
Oven Racks
Your oven may have extension racks and/or traditional
flat racks.
To avoid possible burns, place the racks in the desired
position before you turn the oven on.
Extension Racks
Extension racks have an install feature that locks into the
UDFNVXSSRUWVJXLGHVRQERWKVLGHV2QFHWKHLQVWDOO
feature is locked into place, always pull the rack out,
by its upper front rail, to its full extension stop position,
when placing or removing cookware.
If extension racks are difficult to extend, lubricate the
racks with the graphite lubricant provided with your
oven. Remove the rack from the oven, remove debris in
the slide tracks with a paper towel, shake the graphite
lubricant and place 4 small drops on the two bottom
tracks of the left and right sides. Open and close the
rack several times to distribute the lubricant.
To order additional graphite lubricant, see the
Accessories and Consumer Support sections at the end
of this manual.
To Remove An Extension Rack:
1. Make sure the rack is pushed all the way into the oven.
2. Grasp the rack by both its upper front rail and its
lower handles on two sides and lift straight up to
unlock the rack from the rack supports.
)LUPO\KROGLQJRQWRERWKWKHXSSHUIURQWUDLODQGORZHU
handles on both sides, pull the rack forward. Grasp
the rack on both sides if necessary. Then remove it
from the oven.
To Replace An Extension Rack:
1. Place the rear portion of the rack onto the rack
VXSSRUWVJXLGHVDVVKRZQLQWKHSLFWXUH
2. Hold the upper front rail and lower handles and push
the rack all the way in until the install feature locks
into the front rack support.
If extension racks are difficult to replace or remove, wipe
the oven rack supports with vegetable oil. Do not wipe oil
on the rack slides.
NOTE: Using other cooking oils like peanut oil, Pam
®
or other lubricating sprays, will cause a discoloring or a
rust like color residue on the racks and cavity sides. To
clean this residue, use a soap and water or a vinegar
and water solution. Rinse with clean water and dry with a
soft cloth.
The oven
has 6 rack
positions
8SSHU)URQW5DLO
Handle
Handle
Handle
Handle
8SSHU)URQW5DLO
Lift to unlock
from the rack
support
,QVWDOO)HDWXUH
)URQW5DFN
Lock
Hold the upper front rail and lower
handles and push the rack all
the way in until the install feature
locks on the front support
LOWER OVEN: Racks
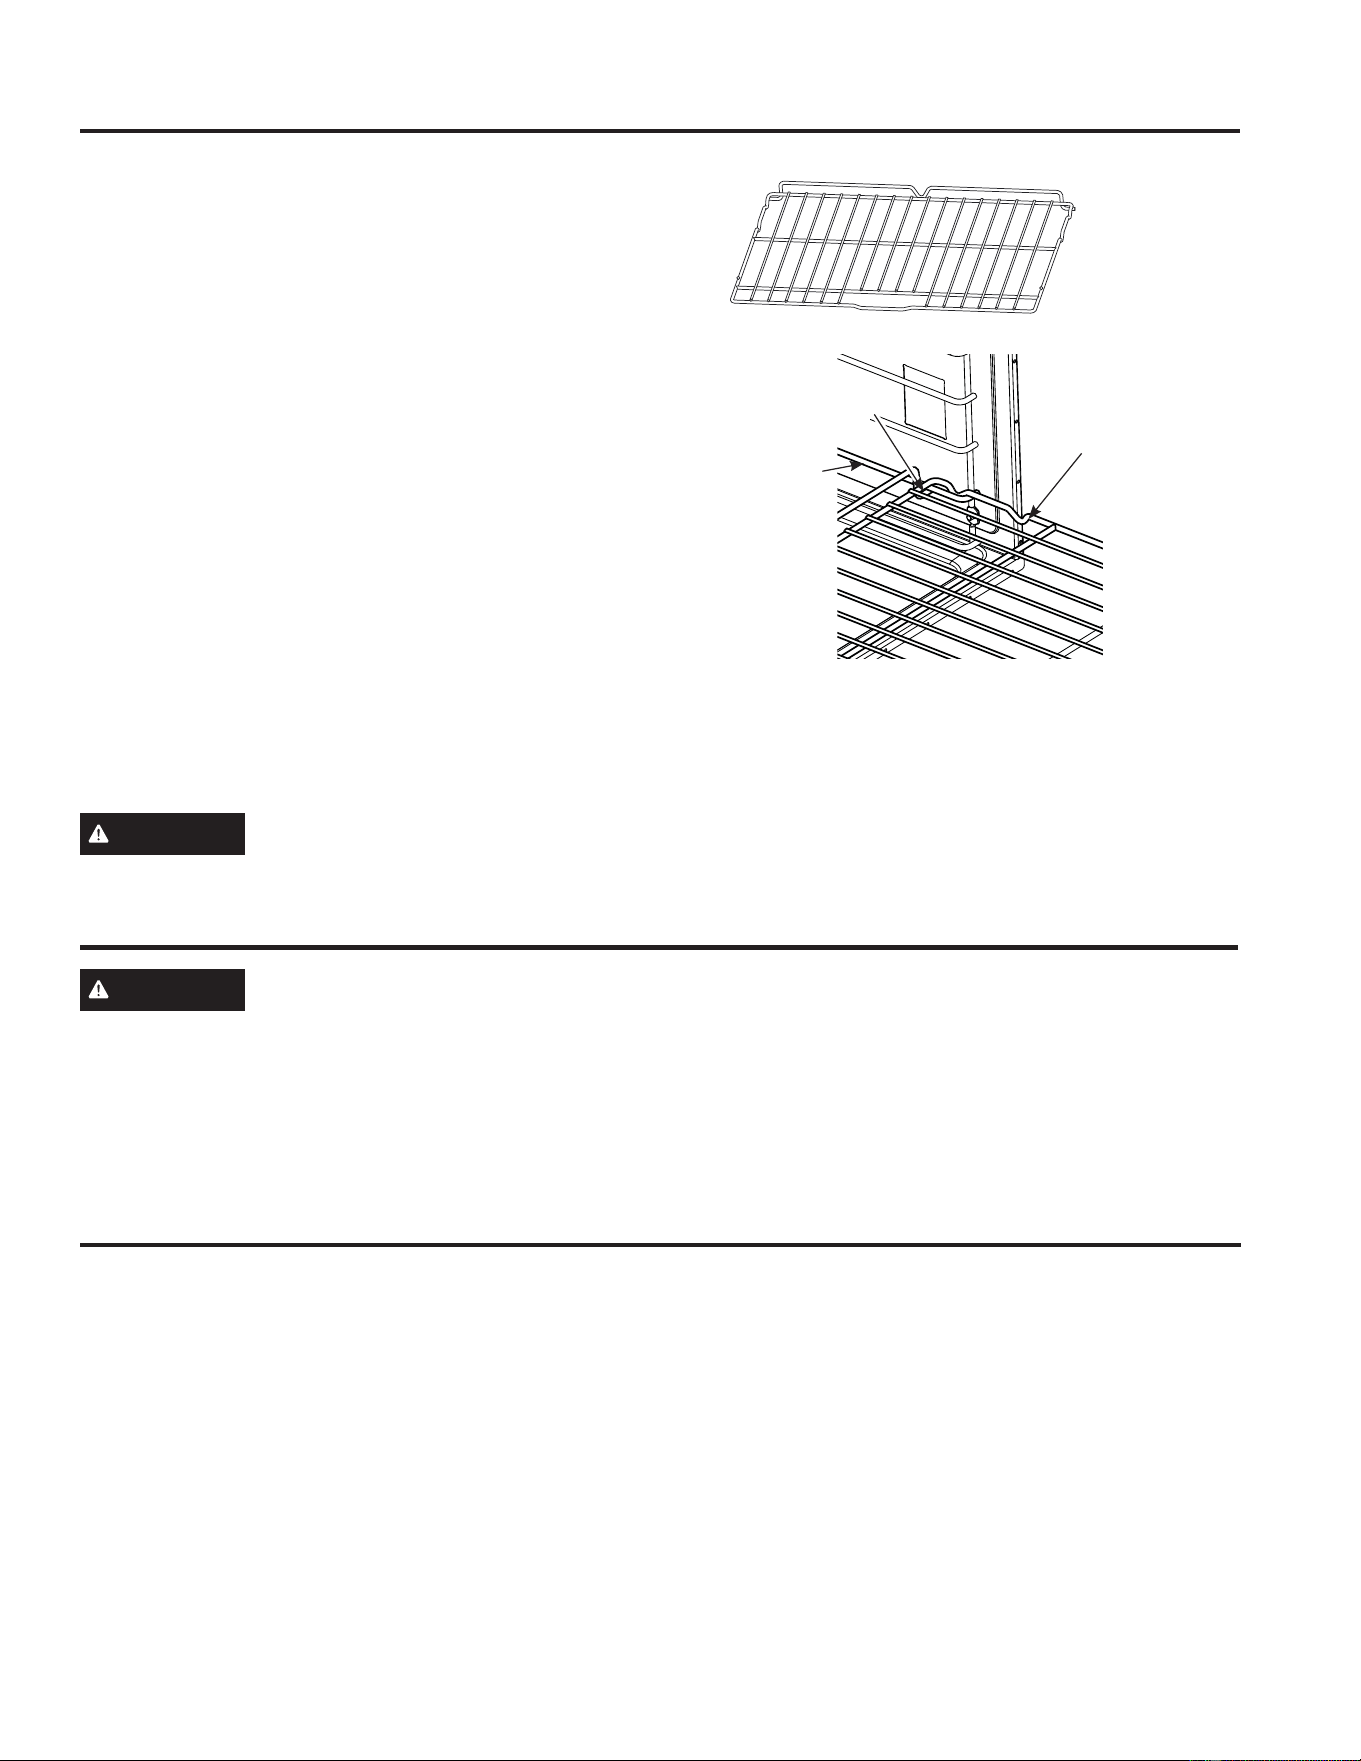
49-2001077 Rev. 2 27
LOWER OVEN:5DFNV$OXPLQXP)RLODQG2YHQ/LQHUV&RRNZDUH
Traditional Flat Racks
The racks have stops so that when placed correctly on
the supports they will stop before coming completely out
and will not tilt. When placing and removing cookware,
pull the rack out until it stops.
To Remove a Rack
Pull it toward you, tilt the front end up and pull it out.
To Replace a Rack
Tilt the front of the rack up, hook the rear locating posts
XQGHUWKHUDFNVXSSRUWVSXVKWKHUDFNEDFNSDVWWKH
stop-locks) and lower it into position. Push the rack all
the way in.
Racks may become difficult to slide, especially after
a self-clean. Put some vegetable oil on a soft cloth or
paper towel and rub onto the left and right edges.
NOTE: Using other cooking oils like peanut oil, Pam
®
or other lubricating sprays, will cause a discoloring or a
rust like color residue on the racks and cavity sides. To
clean this residue, use a soap and water or a vinegar
and water solution. Rinse with clean water and dry with a
soft cloth.
CAUTION
Use caution when removing a rack from lowest position as door may be hot.
Cookware
Cookware Guidelines
The material, finish, and size of cookware affect baking
performance.
Dark, coated and dull pans absorb heat more readily
than light, shiny pans. Pans that absorb heat more
readily can result in a browner, crisper, and thicker crust.
If using dark and coated cookware check food earlier
than minimum cook time. If undesirable results are
obtained with this type of cookware consider reducing
RYHQWHPSHUDWXUHE\)QH[WWLPH
Shiny pans can produce more evenly cooked baked
goods such as cakes and cookies.
Glass and ceramic pans heat slowly but retain heat well.
These types of pans work well for dishes such as pies
and custards.
Air insulated pans heat slowly and can reduce bottom
browning.
.HHSFRRNZDUHFOHDQWRSURPRWHHYHQKHDWLQJ
)ODW5DFN
Stopper
Rack
Support
Locating
Post
CAUTION
Do not use any type of foil or oven liner to cover the oven bottom. These items can trap heat
or melt, resulting in damage to the product and risk of shock, smoke or fire. Damage from improper use of
these items is not covered by the product warranty.
)RLOPD\EHXVHGWRFDWFKVSLOOVE\SODFLQJDVKHHWRQDORZHUUDFNVHYHUDOLQFKHVEHORZWKHIRRG'RQRWXVHPRUH
IRLOWKDQQHFHVVDU\DQGQHYHUHQWLUHO\FRYHUDQRYHQUDFNZLWKDOXPLQXPIRLO.HHSIRLODWOHDVW´IURPRYHQZDOOV
to prevent poor heat circulation.
Aluminum Foil and Oven Liners
Racks (Cont.)
28 49-2001077 Rev. 2
Cleaning The Oven
Helpful Hints
An occasional thorough wiping with a solution of
baking soda and water keeps the inside fresh. Also
we recommend against using cleaners with ammonia
or alcohol, as they can damage the appearance of
the oven. If you choose to use a common household
cleaner, first apply the cleaner directly to a clean cloth,
then wipe the soiled area.
Control Panel
It’s a good idea to wipe the control panel after each use.
Clean with mild soap and water or vinegar and water,
rinse with clean water and polish dry with a soft cloth.
'RQRWXVHDEUDVLYHFOHDQVHUVVWURQJOLTXLGFOHDQVHUV
plastic scouring pads or oven cleaners on the control
panel—they will damage the finish.
Oven Exterior
Do not use oven cleaners, abrasive cleansers, strong
OLTXLGFOHDQVHUVVWHHOZRROSODVWLFVFRXULQJSDGVRU
cleaning powders on the interior or exterior of the oven.
Clean with a mild soap and water or vinegar and water
solution. Rinse with clean water and dry with a soft cloth.
When cleaning surfaces, make sure that they are at
room temperature and not in direct sunlight.
If stain on the door vent trim is persistent, use a mild
abrasive cleaner and a sponge-scrubber for best results.
Spillage of marinades, fruit juices, tomato sauces and
EDVWLQJOLTXLGVFRQWDLQLQJDFLGVPD\FDXVHGLVFRORUDWLRQ
and should be wiped up immediately. Let hot surfaces
cool, then clean and rinse.
Stainless Steel Surfaces (on some models)
Do not use a steel wool pad; it will scratch the surface.
To clean the stainless steel surface, use warm sudsy
water or a stainless steel cleaner or polish. Always
ZLSHWKHVXUIDFHLQWKHGLUHFWLRQRIWKHJUDLQ)ROORZ
the cleaner instructions for cleaning the stainless steel
surface.
7RLQTXLUHDERXWSXUFKDVLQJFOHDQLQJSURGXFWVLQFOXGLQJ
stainless steel appliance cleaner or polish, see the
Accessories and Consumer Support sections at the end
of this manual.
How To Clean The Upper Oven Interior
Clean the inside of the oven often for proper heating
performance.
Some spatters can be removed with a paper towel,
RWKHUVPD\UHTXLUHDZDUPVRDS\FORWK5HPRYHJUHDV\
spatters with a sudsy cloth; then rinse with a damp cloth.
Do not use abrasive cleaners or sharp utensils on oven
walls.
Never use a commercial oven cleaner on any part of
your oven.
Do not clean the inside of the oven with metal scouring
pads. Pieces can break off the pad, causing electrical
shock.
Door Seal
It’s important to keep the area clean where the door seals
against the oven. Use only mild, nonabrasive detergents
applied with a clean sponge or soft cloth. Rinse well.
Removable Turntable
The area underneath the turntable should be cleaned
IUHTXHQWO\WRDYRLGRGRUVDQGVPRNLQJGXULQJDFRRNLQJ
cycle.
The turntable can be broken if dropped. Wash carefully
in warm, sudsy water. Dry completely and replace.
To replace the turntable, place its center over the spindle
in the center of the oven and turn it until it seats into place.
0DNHVXUHWKHVPRRWKVLGHRIWKHWXUQWDEOHLVIDFLQJXS
and that its center seats securely on the spindle.)
Be sure electrical power is off and all surfaces are cool before cleaning any part of the oven.
:DOOV)ORRU,QVLGH:LQGRZ0HWDODQG
Plastic Parts on the Door
Turntable
Do not use the oven without the
turntable in place.
CARE AND CLEANING: Cleaning The Oven
49-2001077 Rev. 2 29
CARE AND CLEANING: Cleaning The Oven
How To Clean The Lower Oven Interior
The interior of your new oven can be cleaned manually
or by using the Steam Clean or Self Clean modes.
Spillage of marinades, fruit juices, tomato sauces and
EDVWLQJOLTXLGVFRQWDLQLQJDFLGVPD\FDXVHGLVFRORUDWLRQ
and should be wiped up immediately. Let hot surfaces
cool, then clean and rinse.
Manual Cleaning
Do not use oven cleaners, abrasive cleaners, strong
OLTXLGFOHDQVHUVVWHHOZRROVFRXULQJSDGVRUFOHDQLQJ
powders on the interior of the oven. Clean with a mild
soap and water or vinegar and water solution. Rinse with
clean water and dry with a soft cloth. When cleaning
surfaces, make sure that they are at room temperature.
Steam Clean Mode
Steam clean is intended to clean small spills using water
and a lower cleaning temperature than Self Clean.
To use the Steam Clean feature, wipe grease and soils
from the oven. Pour one cup of water into the bottom
of the oven. Close the door. Press the Options pad,
select Steam Clean, and then press Start. The oven
door will lock. You can not open the door during the
30 minute steam clean as this will decrease the steam
clean performance. At the end of the steam clean cycle
the door will unlock. Wipe out any excess water and any
remaining soil.
Self Clean Mode
Read Self-Cleaning Oven Safety Instructions at the
beginning of this manual before using Self Clean Mode.
Self-clean uses very high temperatures to clean the oven
interior. The oven door will lock when using this feature.
Before operating the self-clean cycle, wipe up grease
and soils from the oven. Remove all items from the
RYHQRWKHUWKDQHQDPHOHGGDUNFRORUUDFNV6KLQ\RU
silver racks and any cookware or other items should all
be removed from the oven before initiating a self-clean
cycle. Close the door. Press the Options pad, select
Self Clean, and a default self-clean time is displayed.
The clean time can be changed to 3:00, 4:00, or 5:00
KRXUVE\XVLQJWKHVHOHFWRUGLDO)RUKHDYLO\VRLOHG
ovens, the maximum 5 hour clean time is recommended.
If you wish to use the default time, press the Start pad
immediately after selecting the Self Clean. The oven
will turn off automatically when the self-clean cycle is
complete. The door will stay locked until the oven has
cooled down. After the oven has cooled down wipe any
ash out of the oven.
IMPORTANT: The health of some birds is extremely
sensitive to the fumes given off during the self-cleaning
cycle of any range. Move birds to another well-
ventilated room.
How To Clean The Upper Oven Interior (Cont.)
Cooking Trays And Baking Sheet
To prevent breakage, allow the trays to cool completely
before cleaning. Wash carefully in warm, sudsy water or
in the dishwasher.
Do not use metal scouring pads or abrasives, as they
may damage the finish. A soap-filled scouring pad may
be used to clean the trays.
Cleaning The Oven (Cont.)
Clear glass tray for microwaving
Wire oven rack
30 49-2001077 Rev. 2
7KHUDFNVWKDWZHUHSURYLGHGZLWK\RXURYHQGDUN
enameled racks, not shiny) may remain in the oven
during the self-cleaning cycle without being damaged.
To manually clean racks, use warm, soapy water. Make
sure not to wash the rack slides on an extension rack.
If racks become more difficult to remove from the oven,
put some vegetable oil on a soft cloth or paper towel and
rub onto the oven rack supports. Do not wipe the oil on
an extension rack slide.
NOTE: Using other cooking oils will cause a discoloring
or a rust like color residue on the racks and cavity sides.
To clean this residue, use a soap and water or a vinegar
and water solution. Rinse with clean water and dry with a
soft cloth.
Periodically, after several self-clean cycles, the extension
rack slides may need to be lubricated using the graphite
lubricant shipped with your wall oven. To order additional
temperature probes, see the Accessories and Consumer
Support sections at the end of this manual.
1. Remove extension rack from the oven. See the
Extension Oven Racks section.
)XOO\H[WHQGWKHUDFNRQDWDEOHRUFRXQWHUWRS
Newspaper may be placed underneath the rack for
easy clean up.
3. If there is debris in the slide tracks, wipe it away using
a paper towel. NOTE: Any graphite lubricant wiped
away must be replaced.
4. Shake the graphite lubricant before opening it. Starting
ZLWKOHIWVOLGHPHFKDQLVPRIWKHUDFNSODFHIRXU
VPDOOGURSVRIOXEULFDQWRQWKHWZRERWWRPWUDFNVRI
the slide close to the bearing carriers.
5. Repeat for the right slide mechanism of the rack.
6. Open and close the rack several times to distribute
the lubricant.
7. Replace the cap on the lubricant and shake it again.
Turn the rack over and repeat steps 3, 4, 5 and 6.
8. Close the rack, turn rack right-side-up and place in
the oven. See the Extension Oven Racks section.
9. Repeat above steps for each rack.
NOTE: Do not spray with cooking spray or other
lubricant sprays.
Lower Oven Racks
Flat Racks
)ODWUDFNVFDQEHOHIWLQWKHFDYLW\GXULQJVHOIFOHDQLI
enamelled racks, not shiny) or can be washed with warm,
soapy water.
Racks may be more difficult to slide, especially after a
self-clean. Put some vegetable oil on a soft cloth or paper
towel and rub onto the left and right edges.
NOTE: Using other cooking oils like peanut oil, Pam®
or other lubricating sprays, will cause a discoloring or a
rust like color residue on the racks and cavity sides. To
clean this residue, use a soap and water or a vinegar
and water solution. Rinse with clean water and dry with
a soft cloth.
CARE AND CLEANING: Lower Oven Racks
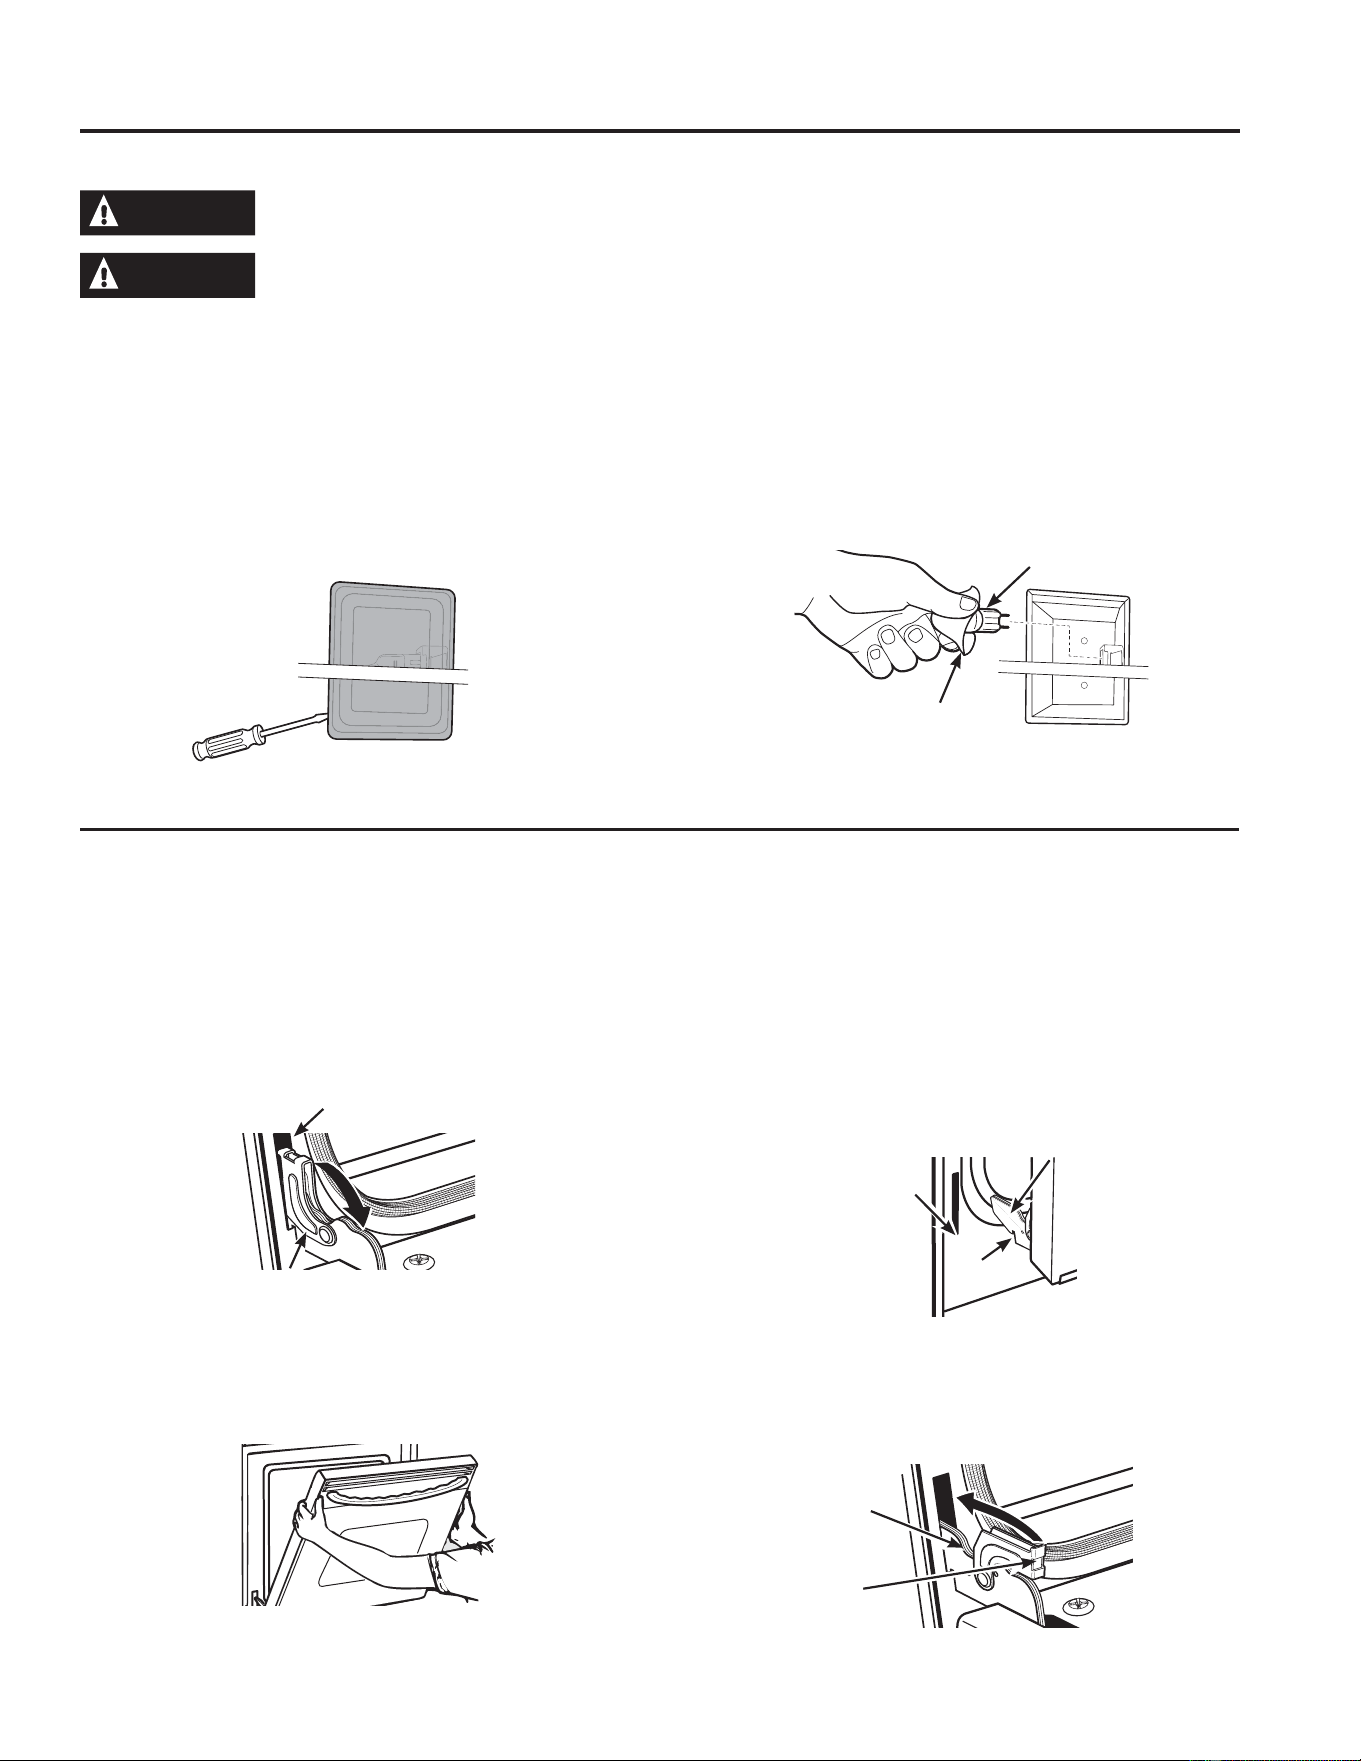
49-2001077 Rev. 2 31
CARE AND CLEANING: Lower Oven Racks
Lower Oven Maintenance
WARNING
SHOCK OR BURN HAZARD: Before replacing oven light bulb, disconnect the electrical power to the
RYHQ DW WKH PDLQ IXVH RU FLUFXLW EUHDNHU SDQHO )DLOXUH WR GR VR PD\ UHVXOW LQ HOHFWULF VKRFN RU EXUQ
CAUTION
BURN HAZARD: The glass cover and bulb should be removed when cool. Touching hot glass with
bare hands or a damp cloth can cause burns.
Lower Oven Light Replacement
1. Disconnect power at the main fuse or circuit breaker
panel.
2. Remove oven racks.
3. Slide a flat blade screwdriver between the housing
and the glass light cover.
4. Support the glass light cover with two fingers to
prevent the cover from falling to the bottom of the
oven. Be careful not to chip the oven coating.
5. Gently twist the screwdriver blade to loosen the
glass light cover.
6. Remove the glass light cover.
7. Remove the bulb by firmly grasping and sliding the
bulb straight out until the two prongs have cleared
the ceramic holder.
8. Do not touch the glass of the new replacement bulb
with your fingers. It will cause the bulb to fail when it
lights. Grasp the replacement bulb with a clean towel
or facial tissue with the prongs facing down. Align
the two prongs in the ceramic holder, pressing gently
until the bulb is securely in the ceramic socket.
9. Slide the protective lens into the holder and push
until the clips snap into the housing.
10. Reconnect power.
Lift-Off Lower Oven Door
The door is very heavy. Be careful when removing and lifting the door.
Do not lift the door by the handle.
To remove the door:
)XOO\ RSHQ WKH GRRU
2. Pull the hinge locks down toward the door frame, to
the unlocked position. A tool, such as a small flat-
EODGH VFUHZGULYHU PD\ EH UHTXLUHG
)LUPO\ JUDVS ERWK VLGHV RI WKH GRRU DW WKH WRS
4. Close door to the door removal position. The door
should be open approximately 3" with no obstruction
above the door.
5. Lift door up and out until both hinge arms are clear of
the slots.
To replace the door:
)LUPO\ JUDVS ERWK VLGHV RI WKH GRRU DW WKH WRS
2. Starting on the left side, with the door at the same
angle as the removal position, seat the indentation of
the hinge arm into the bottom edge of the hinge slot.
The notch in the hinge arm must be fully seated into
the bottom of the slot. Repeat for right side.
)XOO\ RSHQ WKH GRRU ,I WKH GRRU ZLOO QRW IXOO\ RSHQ WKH
indentation is not seated correctly in the bottom edge
of the slot.
4. Push the hinge locks up against the front frame of the
oven cavity, to the locked position.
5. Close the oven door.
Removal position
Hinge lock
Slot
Pull hinge locks down to unlock
Push hinge locks up to lock
Hinge
lock
Hinge
arm
Indentation
Bottom
edge of
slot
Hinge arm
Use a small
flat blade
screwdriver
to remove
the lamp
lens cover.
Bulb
Use gloves or cloth
32 49-2001077 Rev. 2
Problem Possible Cause What To Do
FAN
Fan continues to run after
cooking stops
The oven is cooling. The fan will automatically shut off when the internal parts of
the oven have cooled.
Oven vent emits warm air
while oven is on
This is normal.
Fan comes on automatically
when using the microwave
This is normal.
COOKING
The oven makes unusual
sounds while cooking
Clicks and fans blowing are normal. The
relay board is turning the components on
and off.
These sounds are normal.
Smoke comes out of the
oven when I open the door
)RRGLVKLJKLQIDWFRQWHQW$HURVROVSUD\
used on the pans.
Smoke is normal when cooking high-fat foods.
Food is not fully cooked
or browned at the end of a
cooking program
Programmed times may not match the size
or amount of food you are cooking.
Adjust time for doneness or adjust the upper or
lower lamps for browning and doneness.
SENSOR ERROR displayed
along with an oven signal
)RRGDPRXQWRUW\SHSODFHGLQWKHRYHQ
does not match the program that was set.
Press the Clear/Off pad. Set the oven program to match
WKHIRRGRUOLTXLGWREHFRRNHGRUKHDWHG
Steam was not sensed by the oven because
plastic wrap was not vented, a lid too tight
ZDVRQWKHGLVKRUDOLTXLGZDVFRYHUHG
9HQWSODVWLFZUDSXVHDORRVHUOLGRUXQFRYHUOLTXLGVZKHQ
cooking or heating.
DISPLAY
The display is blank Power saver mode may be activated. Check the Settings menu for clock display settings. Turn
the display on.
A fuse in your home may be blown or the
circuit breaker tripped.
Replace the fuse or reset the circuit breaker.
Power outage or surge Reset the clock. If the oven was in use, you must reset it by
pressing the Clear/Off pad, setting the clock and resetting
any cooking function.
“Control is LOCKED”
appears in display
The control has been locked. Press and hold Settings pad for 3 seconds to unlock the
control.
Control display is lit yet oven
will not start
Clock is not set. Set the clock.
Door not securely closed. Open the door and close securely.
Start/Pause pad or selector dial not
pressed after entering cooking selection.
Press Start/Pause pad or selector dial.
Another selection already entered in oven
and Clear/Off pad not pressed to cancel it.
Press Clear/Off pad.
6L]HTXDQWLW\RUFRRNLQJWLPHQRWHQWHUHG
after final selection.
Make sure you have entered cooking time after selecting.
Clear/Off pad was pressed accidentally. Reset cooking program and press Start/Pause pad.
OTHER PROBLEMS
The door and inside of the
oven feels hot
The heat lamps produce intense heat in a
small space.
This is normal. Use oven mitts to remove food when ready.
Oven will not start A fuse in your home may be blown or the
circuit breaker tripped.
Replace fuse or reset circuit breaker.
Cannot edit cooking features Some pre-programmed cooking features
may not be able to be edited to prevent
degradation of cooking performance.
This is normal.
The pads on one side of the
control do not function
The control has locked out the use of these
pads and need to be reset.
Press and hold the Clear/Off pad on the other side of the
display for 30 seconds. If this does not reset the control, it
may be necessary to cycle the circuit breaker.
Save time and money! Review the charts on the following pages first and you may not need to call for service.
&KHFNRXWVHOIKHOSYLGHRVDQG)$4DWGEAppliances.com/support.
Troubleshooting Tips ... Before you call for service
TROUBLESHOOTING TIPS (Upper Oven)
49-2001077 Rev. 2 33
TROUBLESHOOTING TIPS (Lower Oven)
Problem Possible Cause What To Do
My new oven doesn't cook
like my old one. Is something
wrong with the temperature
settings?
Your new oven has a different cooking
system from your old oven and therefore
may cook differently than your old oven.
)RUWKHILUVWIHZXVHVIROORZ\RXUUHFLSHWLPHVDQG
temperatures carefully. If you still think your new oven
is too hot or too cold, you can adjust the temperature
yourself to meet your specific cooking preference. NOTE:
This adjustment affects Bake, Convection Bake 1 Rack
and Convection Bake Multi temperatures; it will not affect
Convection Roast, Broil, or Clean.
Food does not bake properly Oven controls improperly set. See the Cooking Modes section.
Rack position is incorrect or rack is not level. See the Cooking Modes section and Cooking Guide.
Incorrect cookware or cookware of improper
size being used.
See the Cookware section.
Oven temperature needs adjustment. See the Settings section.
Ingredient substitution Substituting ingredients can change the recipe outcome.
Food does not broil properly Oven controls improperly set. Make sure you select the appropriate broil mode.
Improper rack position being used. See Cooking Guide for rack location suggestions.
)RRGEHLQJFRRNHGLQDKRWSDQ Make sure cookware is cool.
Cookware not suited for broiling. Use a pan specifically designed for broiling.
Aluminum foil used on the broiling pan and
grid has not been fitted properly and slit as
recommended.
If using aluminum foil conform to pan slits.
,QVRPHDUHDVWKHSRZHUYROWDJHPD\EH
low.
Preheat the broil element for 10 minutes.
Oven temperature too hot or
too cold
Oven temperature needs adjustment. See the Settings section.
Oven does not work or appears
not to work
A fuse in your home may be blown or the
circuit breaker tripped.
Replace the fuse or reset the circuit breaker.
Oven controls improperly set. See the Using the Oven section.
Oven is in Sabbath Mode. Verify, that the oven is not in Sabbath Mode.
See the Sabbath Mode section.
“Crackling” or “popping”
sound
This is the sound of the metal heating
and cooling during both the cooking and
cleaning functions.
This is normal.
Why is my range making a
"clicking" noise when using my
oven?
Your range has been designed to
maintain a tighter control over your oven's
temperature. You may hear your oven's
heating elements "click" on and off more
IUHTXHQWO\WKDQLQROGHURYHQVWRDFKLHYH
better results during baking, broiling,
convection, and self-clean cycles.
This is normal.
Clock and timer do not work A fuse in your home may be blown or the
circuit breaker tripped.
Replace the fuse or reset the circuit breaker.
Oven light does not work Light bulb is loose or defective. Tighten or replace bulb.
Pad operating light is broken.
Call for service
.
Oven will not self-clean The temperature is too high to set a self-
clean operation.
Allow the oven to cool and reset the controls.
Oven controls improperly set. See the Cleaning the Oven section.
Excessive smoking during
clean cycle
Excessive soil or grease. Press the Clear/Off pad. Open the windows to rid the room
of smoke. Wait until the OVEN IS COOLING DOOR IS
LOCKED display goes off. Wipe up the excess soil and
reset the clean cycle.
Excessive smoking during
broiling
)RRGWRRFORVHWREXUQHUHOHPHQW Lower the rack position of the food.
Oven door will not open after a
clean cycle
Oven too hot. Allow the oven to cool below locking temperature.
Troubleshooting Tips ... Before you call for service
34 49-2001077 Rev. 2
Troubleshooting Tips ... Before you call for service
Problem Possible Cause What To Do
Oven not clean after a clean
cycle
Oven controls improperly set. See the Cleaning the Oven section.
Oven was heavily soiled. Clean up heavy spillovers before starting the clean cycle.
Heavily soiled ovens may need to self-clean again or for a
longer period of time.
"CLOSE DOOR TO CONTINUE
COOKING" show on display
section
The door is open during a cooking or
cleaning feature.
Close the oven door.
"OVEN IS COOLING DOOR IS
LOCKED" show on display
section
The oven door is locked because the
temperature inside the oven has not
dropped below the unlocking temperature.
Press the Clear/Off pad. Allow the oven to cool.
An oven error and "SERVICE
MAY BE NEEDED" show in the
display
You have a function error code. Press the Clear/Off pad. Allow the oven to cool for one
hour. Put the oven back into operation.
If the function code repeats. Disconnect all power to the oven for at least 30 seconds
and then reconnect power. If the function error code
repeats
, call for service.
“Burning” or “oily” odor
emitting from the vent
This is normal in a new oven and will
disappear in time.
To speed the process, set a self-clean cycle for a minimum
of 3 hours. See the Cleaning the Oven section.
Strong odor An odor from the insulation around the
inside of the oven is normal for the first few
times the oven is used.
This is temporary and will go away after several uses or a
self-clean cycle.
Fan noise A cooling fan may automatically turn on. This is normal. The cooling fan will turn on to cool internal
parts. It may run for up to 1-1/2 hours after the oven is
turned off.
My oven door glass appears to
be "tinted" or have a "rainbow"
color. Is this defective?
No. The inner oven glass is coated with
a heat barrier to reflect the heat back into
the oven to prevent heat loss and keep the
outer door cool while baking.
This is normal. Under certain light or angles, you may see
this tint or rainbow color.
Sometimes the oven takes
longer to preheat to the same
temperature
Cookware or food in oven The cookware or food in the oven will cause the oven to take
longer to preheat. Remove items to reduce preheat time.
Number of racks in oven Adding more racks to the oven will cause the oven to take
longer to preheat. Remove some racks.
Different cooking modes The different cooking modes use different preheat methods
to heat the oven for the specific cooking mode. Some modes
ZLOOWDNHORQJHUWKDQRWKHUVLHFRQYHFWLRQEDNHPXOWL
TROUBLESHOOTING TIPS (Lower Oven)

49-2001077 Rev. 2 35
Notes

36 49-2001077 Rev. 2
Staple your receipt here. Proof of the original purchase
date is needed to obtain service under the warranty.
GEAppliances.com
$OOZDUUDQW\VHUYLFHLVSURYLGHGE\RXU)DFWRU\6HUYLFH&HQWHUVRUDQDXWKRUL]HG&XVWRPHU&DUH
®
technician. To schedule
service online, visit us at GEAppliances.com/serviceRUFDOO*($SSOLDQFHVDW*(&$5(63OHDVH
have your serial number and your model number available when calling for service.
6HUYLFLQJ\RXUDSSOLDQFHPD\UHTXLUHWKHXVHRIWKHRQERDUGGDWDSRUWIRUGLDJQRVWLFV7KLVJLYHVD*($SSOLDQFHVIDFWRU\
VHUYLFHWHFKQLFLDQWKHDELOLW\WRTXLFNO\GLDJQRVHDQ\LVVXHVZLWK\RXUDSSOLDQFHDQGKHOSV*($SSOLDQFHVLPSURYHLWV
products by providing GE Appliances with information on your appliance. If you do not want your appliance data to be
sent to GE Appliances, please advise your technician not to submit the data to GE Appliances at the time of service.
What GE Appliances will not cover:
Ŷ Service trips to your home to teach you how to use
the product.
Ŷ ,PSURSHULQVWDOODWLRQGHOLYHU\RUPDLQWHQDQFH
Ŷ )DLOXUHRIWKHSURGXFWLILWLVDEXVHGPLVXVHG
modified or used for other than the intended purpose
or used commercially.
Ŷ 5HSODFHPHQWRIKRXVHIXVHVRUUHVHWWLQJRIFLUFXLW
breakers.
Ŷ 'DPDJHWRWKHSURGXFWFDXVHGE\DFFLGHQWILUH
floods or acts of God.
Ŷ 'DPDJHWRILQLVKVXFKDVVXUIDFHUXVWWDUQLVKRU
small blemishes not reported within 48 hours of
delivery.
Ŷ ,QFLGHQWDORUFRQVHTXHQWLDOGDPDJHFDXVHGE\
possible defects with this appliance.
Ŷ 'DPDJHFDXVHGDIWHUGHOLYHU\
Ŷ 3URGXFWQRWDFFHVVLEOHWRSURYLGHUHTXLUHGVHUYLFH
Ŷ 6HUYLFHWRUHSDLURUUHSODFHOLJKWEXOEVH[FHSWIRU
LED lamps.
LIMITED WARRANTY
GE Appliances Limited Warranty
EXCLUSION OF IMPLIED WARRANTIES
Your sole and exclusive remedy is product repair as provided in this Limited Warranty. Any implied warranties,
including the implied warranties of merchantability or fitness for a particular purpose, are limited to one year or
the shortest period allowed by law.
This limited warranty is extended to the original purchaser and any succeeding owner for products purchased for
home use within the USA. If the product is located in an area where service by a GE Appliances Authorized Servicer
LVQRWDYDLODEOH\RXPD\EHUHVSRQVLEOHIRUDWULSFKDUJHRU\RXPD\EHUHTXLUHGWREULQJWKHSURGXFWWRDQ$XWKRUL]HG
GE Appliances Service location for service. In Alaska, the limited warranty excludes the cost of shipping or service
calls to your home.
6RPHVWDWHVGRQRWDOORZWKHH[FOXVLRQRUOLPLWDWLRQRILQFLGHQWDORUFRQVHTXHQWLDOGDPDJHV7KLVOLPLWHGZDUUDQW\
gives you specific legal rights, and you may also have other rights which vary from state to state. To know what your
legal rights are, consult your local or state consumer affairs office or your state’s Attorney General.
Warrantor: GE Appliances, a Haier company
/RXLVYLOOH.<
Extended Warranties: Purchase a GE Appliances extended warranty and learn about special discounts that are
available while your warranty is still in effect. You can purchase it online anytime at
GEAppliances.com/extended-warranty
or call 800.626.2224 during normal business hours. GE Appliances Service will still be there after your warranty expires.
For the period of GE Appliances will replace
One year
)URPWKHGDWH
of the original
purchase
Any part of the range which fails due to a defect in materials or workmanship. During this
limited one-year warranty, GE Appliances will provide, free of charge, all labor and in-home
service to replace the defective part.

49-2001077 Rev. 2 37
Accessories
6PDOO%URLOHU3DQô´[ó´[ò³
/DUJH%URLOHU3DQô´[ó´[ò³
;/%URLOHU3DQ´[ó´[³
Parts
Glass Tray
Turntable
Oven Racks
Oven Elements
Light Bulbs
Metal Tray
Cleaning Supplies
16 oz. Micro Bryte
®
Appliance Cleaner
CitruShine™ Stainless Steel Wipes
Stainless Steel Appliance Cleaner
Graphite Lubricant
*The large broiler pan does not fit in 20”/24” ranges.
**The XL broiler pan does not fit in 24” wall ovens, 27”drop ins or 20”/24” ranges.
ACCESSORIES
Looking For Something More?
GE Appliances offers a variety of accessories to
improve your cooking and maintenance experiences!
To place an order visit us online at:
GEApplianceParts.com or
call 800.626.2002
The following products and more are available:
Accessories

38 49-2001077 Rev. 2
Printed in the United States
CONSUMER SUPPORT
Consumer Support
GE Appliances Website
+DYHDTXHVWLRQRUQHHGDVVLVWDQFHZLWK\RXUDSSOLDQFH"7U\WKH*($SSOLDQFHV:HEVLWHKRXUVDGD\DQ\GD\
of the year! You can also shop for more great GE Appliances products and take advantage of all our on-line support
services designed for your convenience. GEAppliances.com.
Register Your Appliance
Register your new appliance on-line at your convenience! Timely product registration will allow for enhanced
communication and prompt service under the terms of your warranty, should the need arise. You may also mail in
the pre-printed registration card included in the packing material. GEAppliances.com/register.
Schedule Service
Expert GE Appliances repair service is only one step away from your door. Get on-line and schedule your service at your
convenience any day of the year. GEAppliances.com/service or call 800.432.2737 during normal business hours.
Extended Warranties
Purchase a GE Appliances extended warranty and learn about special discounts that are available while your
warranty is still in effect. You can purchase it on-line anytime. GE Appliances Services will still be there after your
warranty expires. GEAppliances.com/extended-warranty or call 800.626.2224 during normal business hours.
Remote Connectivity
)RUDVVLVWDQFHZLWKZLUHOHVVQHWZRUNFRQQHFWLYLW\IRUPRGHOVZLWKUHPRWHHQDEOHYLVLWRXUZHEVLWHDW
GEAppliances.com/connect or call 800.220.6899.
Parts and Accessories
,QGLYLGXDOVTXDOLILHGWRVHUYLFHWKHLURZQDSSOLDQFHVFDQKDYHSDUWVRUDFFHVVRULHVVHQWGLUHFWO\WRWKHLUKRPHV
9,6$0DVWHU&DUGDQG'LVFRYHUFDUGVDUHDFFHSWHG2UGHURQOLQHWRGD\KRXUVHYHU\GD\
GEApplianceparts.com or by phone at 877.959.8688 during normal business hours.
Instructions contained in this manual cover procedures to be performed by any user. Other servicing
generally should be referred to qualified service personnel. Caution must be exercised, since improper
servicing may cause unsafe operation.
Contact Us
If you are not satisfied with the service you receive from GE Appliances, contact us on our Website with all the
details including your phone number, or write to:
*HQHUDO0DQDJHU&XVWRPHU5HODWLRQV_*($SSOLDQFHV$SSOLDQFH3DUN_/RXLVYLOOH.<
GEAppliances.com/contact or call 800.626.2000

49-2001077 Rev. 2 06-24 GEA
GE es una marca registrada de General Electric Company. Fabricado bajo licencia de marca.
MANUAL DEL
PROPIETARIO
Escriba los números de modelo y
serie aquí:
Nº de Modelo ________________
Nº de Serie __________________
Los podrá encontrar en una
etiqueta en el borde lateral o en
el frente del horno detrás de la
puerta del horno.
HORNO DE PARED
Incorporado con Combinación Convección-Microondas/Convección
INFORMACIÓN DE SEGURIDAD ... 3
USO DEL HORNO
Controles del Horno ........................12
Configuraciones del Horno ..................13
Opciones del Horno ........................14
Horneado .................................15
Calentar y Leudar ..........................16
Cocción con Microondas ....................17
Modos de Cocción .........................21
Sonda ................................... 22
Modo Sabático ........................... 23
Guía de Cocción .......................... 24
Estantes ................................. 26
Papel de Aluminio y Cobertores del Horno . . . 27
Utensilios ................................ 27
CUIDADO Y LIMPIEZA
Horno ................................... 28
Estantes del Horno ........................30
Mantenimiento del Horno ...................31
CONSEJOS PARA LA
SOLUCIÓN DE PROBLEMAS ...... 32
GARANTÍA LIMITADA .............. 36
ACCESORIOS ........................ 37
SOPORTE PARA
EL CONSUMIDOR ................... 38
ESPAÑOL
PT7800
PK7800

2 49-2001077 Rev. 2
GRACIAS POR HACER QUE GE APPLIANCES SEA PARTE DE SU HOGAR.
Ya sea que haya crecido usando GE Appliances, o que ésta es su primera vez, nos complace
tenerlo en la familia.
Sentimos orgullo por el nivel de arte, innovación y diseño de cada uno de los electrodomésticos de
GE Appliances, y creemos que usted también. Entre otras cosas, el registro de su electrodoméstico
asegura que podamos entregarle información importante del producto y detalles de la garantía
cuando los necesite.
Registre su electrodoméstico GE ahora a través de Internet. Sitios Web y números telefónicos útiles
están disponibles en la sección de Soporte para el Consumidor de este Manual del Propietario.
También puede enviar una carta en la tarjeta de inscripción preimpresa que se incluye con
el material embalado.

49-2001077 Rev. 2 3
GUARDE ESTAS INSTRUCCIONES
INFORMACIÓN IMPORTANTE DE SEGURIDAD
LEA TODAS LAS INSTRUCCIONES ANTES DE USAR ESTE ELECTRODOMÉSTICO
INFORMACIÓN DE SEGURIDAD (Horno Superior)
ADVERTENCIA
Para reducir el riesgo de quemaduras, descargas eléctricas, incendio, lesiones o
exposición a energía de microondas excesiva:
Cuando utilice aparatos eléctricos, se deben seguir las precauciones de seguridad básicas, entre las que se incluyen las
siguientes:
Ŷ /HDWRGDVODVLQVWUXFFLRQHVDQWHVGHXWLOL]DUHVWHDSDUDWR
Ŷ /HD\VLJDODVSUHFDXFLRQHVHVSHFtILFDVGHVFULWDVHQOD
VHFFLyQ35(&$8&,21(63$5$(9,7$5/$326,%/(
EXPOSICIÓN A ENERGÍA DE MICROONDAS EXCESIVA
de la página 8.
Ŷ 8WLOLFHHVWHDSDUDWRVRODPHQWHSDUDHOILQSUHYLVWR
como se describe en este manual. No utilice químicos
ni vapores corrosivos en este aparato. Este horno está
específicamente diseñado para calentar, secar o cocinar
alimentos y bebidas y no está diseñado para usarse en n
laboratorio ni para uso industrial.
Ŷ 6yORSHUVRQDOFXDOLILFDGRGHEHUHSDUDUHVWHDSDUDWR
Póngase en contacto con el centro de mantenimiento
autorizado más cercano en caso de necesitar revisión,
reparación o ajuste.
INSTALLATION
Ŷ ,QVWDOHRXELTXHHVWHDSDUDWR~QLFDPHQWHGHDFXHUGRDODV
instrucciones de instalación suministradas.
Ŷ Asegúrese que su aparato esté instalado y puesto a tierra
apropiadamente por un técnico cualificado de acuerdo a
las instrucciones de instalación suministradas.
Ŷ (VWHKRUQRHVWiOLVWDGRSRU8/SDUDODLQVWDODFLyQGHSDUHG
estándar.
Ŷ 1RXWLOLFHHVWHHOHFWURGRPpVWLFRVLHOPLVPRQRIXQFLRQD
de forma correcta o si sufrió daños o caídas.
Ŷ 1RFXEUDQLEORTXHHQLQJXQDDSHUWXUDGHHVWHDSDUDWR
Ŷ 1RDOPDFHQHHVWHDSDUDWRDODLUHOLEUH1RXWLOLFHHVWH
producto cerca del agua; por ejemplo, en un sótano
húmedo, cerca de una piscina, cerca de un lavabo o
lugares similares.
Ŷ 1RPRQWHHVWHDSDUDWRVREUHHOIUHJDGHUR
PARA REDUCIR EL RIESGO DE INCENDIO DENTRO DEL
HORNO:
Ŷ 1RFRFLQHH[FHVLYDPHQWHORVDOLPHQWRV9LJLOH
cuidadosamente el aparato cuandose coloque papel,
plástico u otros materiales combustibles dentro del
microondas para facilitar la cocción.
Ŷ 4XLWHODVWLULWDVGHVHJXULGDGWZLVWWLHV\DVDVPHWiOLFDV
de los recipientes de papel o plástico antes de colocarlos
dentro del microondas.
Ŷ 6LORVPDWHULDOHVTXHVHHQFXHQWUDQGHQWURGHOKRUQR
prenden fuego, mantenga cerrada la puerta del horno,
apáguelo y desconecte el cable eléctrico, o corte la
energía desde el panel de fusibles o del interruptor de
circuitos.
Ŷ 1RXWLOLFHHOKRUQRSDUDDOPDFHQDUHOHPHQWRV1RGHMH
productos de papel, utensilios de cocina o alimentos en
el horno cuando no lo esté usando. Todos los estantes
deberán ser retirados del horno cuando no se encuentren
en uso.
Ŷ 1RRSHUHHOKRUQRVLQDOLPHQWRVDGHQWUR
A FIN DE REDUCIR RIESGOS DE QUEMADURAS:
Ŷ 7HQJDFXLGDGRDODEULUHQYDVHVFRQFRPLGDFDOLHQWH8VH
manijas y aleje el vapor del rostro y las manos.
Ŷ 9HQWLOHSHUIRUHRFRUWHHQYDVHVEROVDVREROVDV
plásticas para evitar la acumulación de presión.
Ŷ 7HQJDFXLGDGRDOWRFDUHOSODWRJLUDWRULRODSXHUWD
estantes o paredes del horno, los cuales se podrán
calentar durante el uso.
Ŷ /DOX]GHODFDYLGDGLQWHULRUHQFHQGLGDRFDVLRQDUi
quemaduras. Tenga cuidado al limpiar y espere hasta que
las bombillas se enfríen antes de su reemplazo.
Ŷ /26&217(1,'26&$/,(17(632'5È12&$6,21$5
48(0$'85$6*5$9(6123(50,7$48(/26
1,f2686(1(/+25120,&5221'$67HQJDFXLGDGR
al retirar artículos calientes.
USO
Ŷ No haga funcionar el microondas sin tener colocada en su
OXJDUODEDVHJLUDWRULD/DEDVHJLUDWRULDGHEHHVWDUOLEUH
de bloqueos para poder girar.
Ŷ /DVFRPLGDVRXWHQVLOLRVPHWiOLFRVGHWDPDxRH[FHVLYR
no deberán ser insertados en un horno microondas/
convección, ya que podrán generar un incendio o riesgos
de descargas eléctricas.
Ŷ 1RXWLOLFHSURGXFWRVGHSDSHOFXDQGRHODSDUDWRVHXWLOL]D
en modos diferentes al microondas.
Ŷ $VHJ~UHVHGHTXHWRGRVORVXWHQVLOLRVXVDGRVHQHOKRUQR
microondas sean para uso en el mismo. Se podrá usar
la mayoría de las cacerolas de vidrio, platos de cocción,
tazas graduadas, vajillas de cerámica o porcelana que no
posean bordes metálicos o vidrios con un brillo metálico,
en cumplimiento con las recomendaciones del fabricante
de utensilios.
Ŷ $OJXQRVSURGXFWRVWDOHVFRPRKXHYRVHQWHURV\
FRQWHQHGRUHVVHOODGRVSRUHMHPSORIUDVFRVVHOODGRVVRQ
SURSHQVRVDH[SORWDU\QRGHEHQFDOHQWDUVHHQHVWHKRUQR
Tal uso del horno puede resultar en lesiones personales.
Ŷ 1RFRFLQHODVSDSDVH[FHVLYDPHQWH3XHGHQ
deshidratarse y provocar fuego.
Ŷ 1RFXEUDODEDVHJLUDWRULDSDUULOODGHDODPEUHEDQGHMDV
ni ninguna pieza del horno con láminas de metal. Esto
FDXVDUiDUTXHRYROWDLFRHQHOPLFURZDYHFRQYHFWLRQRYHQ
Ŷ (VWHKRUQRQRKDVLGRDSUREDGRQLSUREDGRSDUDXWLOL]DFLyQ
marina.
4 49-2001077 Rev. 2
GUARDE ESTAS INSTRUCCIONES
INFORMACIÓN IMPORTANTE DE SEGURIDAD
LEA TODAS LAS INSTRUCCIONES ANTES DE USAR ESTE ELECTRODOMÉSTICO
INFORMACIÓN DE SEGURIDAD (Horno Superior)
ADVERTENCIA
Continuado
LIMPIEZA
Ŷ 'HVFRQHFWHODFRUULHQWHDQWHVGHUHDOL]DUODOLPSLH]D
Ŷ 'HVFRQHFWHODFRUULHQWHDQWHVGHUHHPSOD]DUORVERPELOORV
de la cavidad.
Ŷ 0DQWHQJDHOKRUQROLEUHGHDFXPXODFLyQGHJUDVD
Ŷ 1ROLPSLHFRQHVSRQMLOODVGHPHWDO3XHGHQGHVSUHQGHUVH
pedazos de la esponjilla y tocar partes eléctricas,
provocando un riesgo de descarga eléctrica.
Ŷ $OOLPSLDUVXSHUILFLHVGHSXHUWDV\KRUQRTXHVHXQHQDO
cerrar la puerta, sólo use detergentes suaves no abrasivos
aplicados con una esponja limpia o un paño suave.
Enjuague bien.
AGUA SOBRECALENTADA
Ŷ /tTXLGRVWDOHVFRPRDJXDFDIpRWpVRQFDSDFHV
de sobrecalentarse más allá del punto de ebullición
sin parecer que estén hirviendo. No siempre hay
burbujeo o hervor visible cuando se saca el recipiente
GHOKRUQRPLFURRQGDV(67238('(5(68/7$5(1
/$(%8//,&,Ï15(3(17,1$'(/Ë48,'2608<
&$/,(17(6&8$1'26(08(9((/5(&,3,(17(26(
,16(57$81$&8&+$5$8275287(16,/,2'(1752
'(//Ë48,'2
Ŷ 3DUDUHGXFLUHOULHVJRGHOHVLyQItVLFD
- No sobrecaliente el líquido.
- Revuelva el líquido antes y a la mitad del tiempo de
calentamiento.
- No utilice recipientes con costados rectos y cuellos
angostos.
- Después de calentar el recipiente, déjelo en el horno
microondas por un período corto de tiempo antes de
sacarlo.
7HQJDH[WUHPDSUHFDXFLyQFXDQGRLQWURGX]FDXQD
cuchara u otro utensilio en el recipiente.
ADVERTENCIA
ARQUEO VOLTAICO
Se pueden producir arqueos voltaicos al cocinar con microondas y, en ciertos modelos, en los modos de cocción rápida
y cocción con precisión. Si nota que ocurre arqueo voltaico, apriete el botón táctil Clear/Off (Borrar/ Apagar) y corrija el
problema.
El arqueo voltaico es el término técnico que define las chispas en el horno. El arqueo voltaico es causado por:
Ŷ 0HWDOROiPLQDGHPHWDOHQFRQWDFWRFRQHOFRVWDGRGHO
horno.
Ŷ /iPLQDQRPROGHDGDDODOLPHQWRORVERUGHVGREODGRV
KDFLDDUULEDDFW~DQFRPRDQWHQDV
Ŷ 8WLOLFHODOiPLQDGHPHWDOVHJ~QODVUHFRPHQGDFLRQHVGH
este manual.
Ŷ 8WHQVLOLRVPHWiOLFRVXVDGRVGXUDQWHODIXQFLyQ3UHFLVLRQ
6SHHG&RRN&RFFLyQFRQ3UHFLVLyQ9HORFLGDGRHQOD
FRFFLyQFRQPLFURRQGDVH[FHSWRFRQFKDURODVSURYLVWDV
FRQHOKRUQR
Ŷ 0HWDOWDOFRPRWLULWDVPHWiOLFDVGHVHJXULGDGVXMHWDGRUHV
para carne de ave o platos con borde de oro en el horno.
Ŷ 7RDOODVGHSDSHOUHFLFODGRTXHFRQWHQJDQSHGD]RVGH
metal pequeños que se utilizan en el horno.
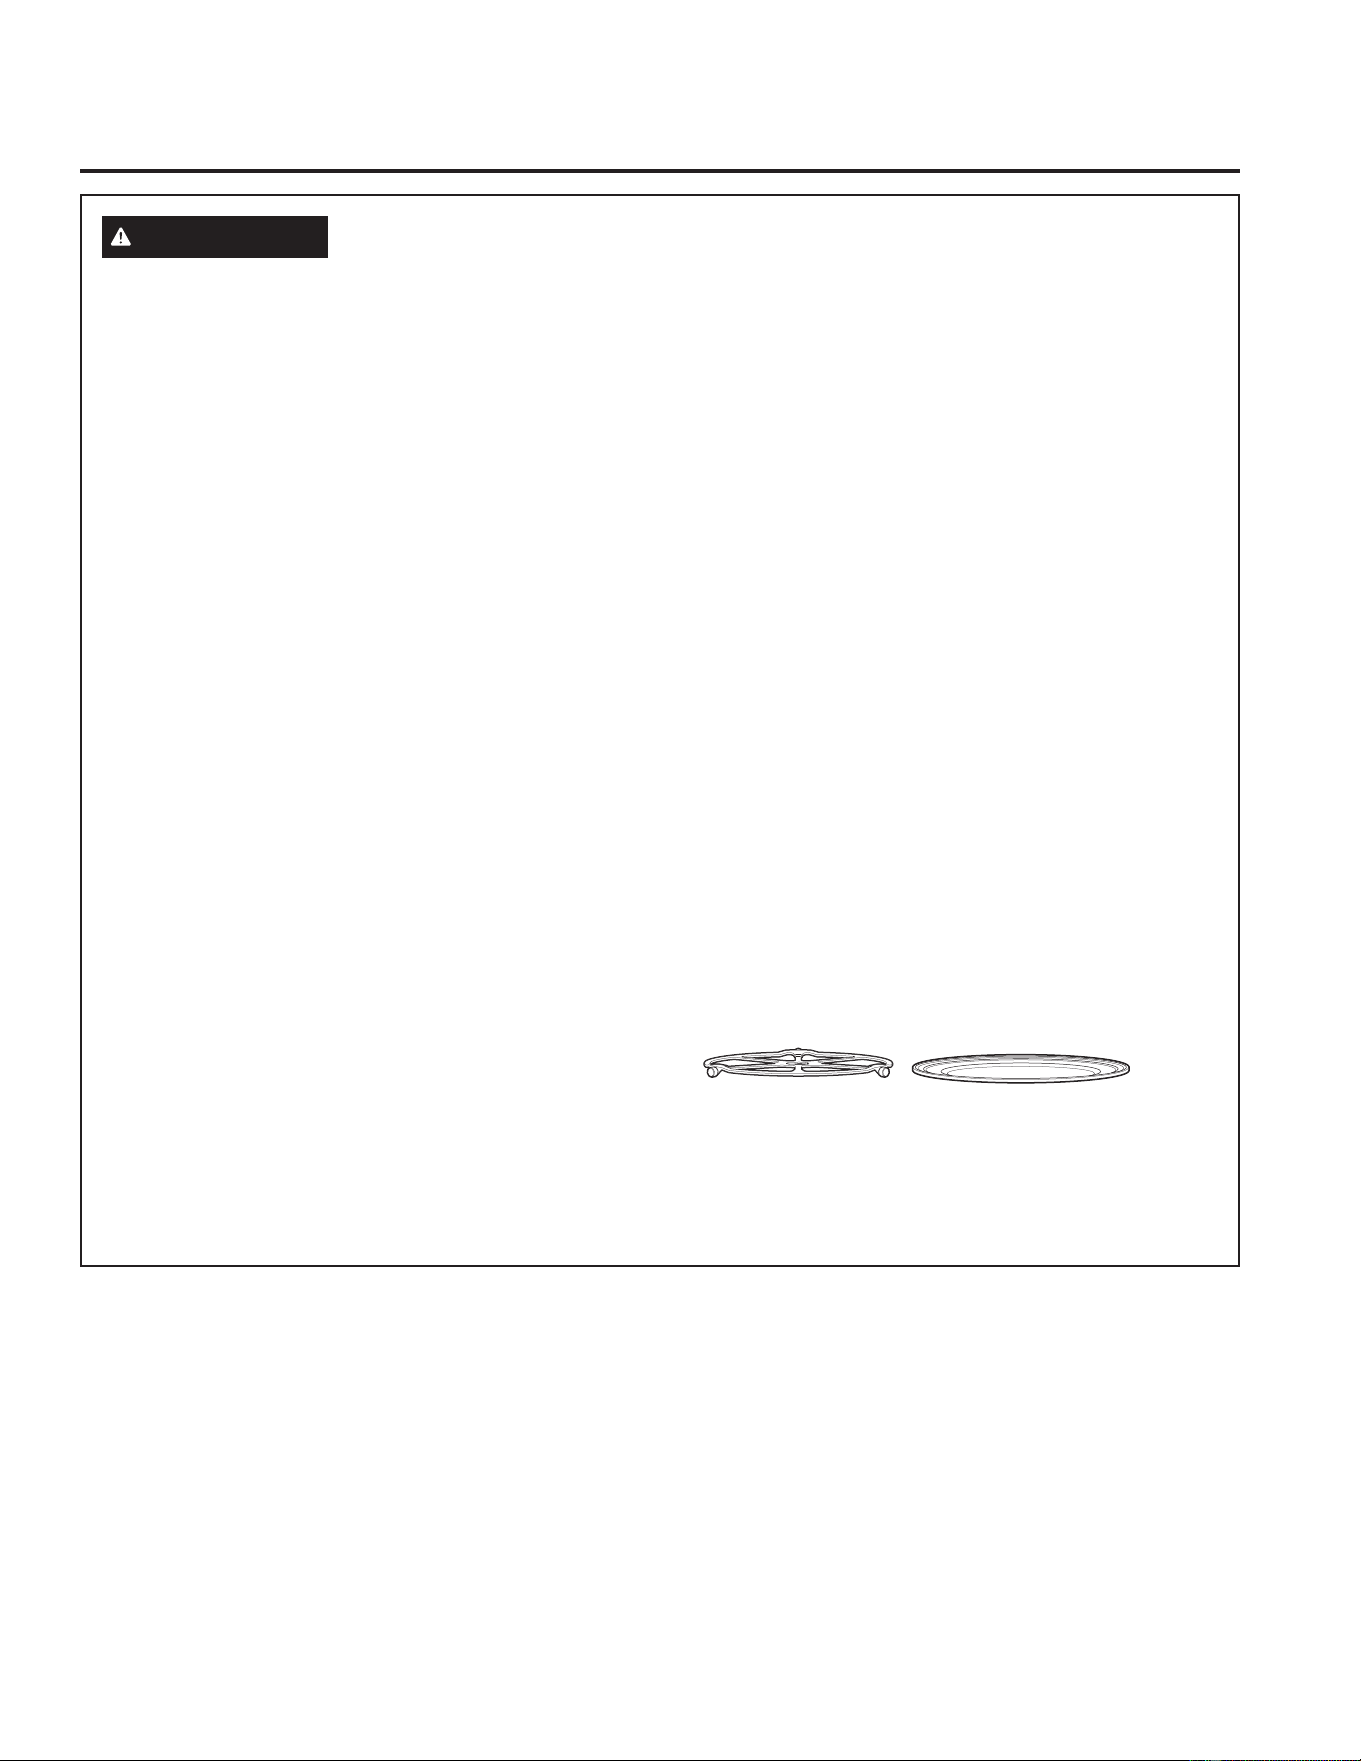
49-2001077 Rev. 2 5
GUARDE ESTAS INSTRUCCIONES
INFORMACIÓN IMPORTANTE DE SEGURIDAD
LEA TODAS LAS INSTRUCCIONES ANTES DE USAR
INFORMACIÓN DE SEGURIDAD (Horno Superior)
ADVERTENCIA
RECIPIENTES DE COCINA SEGUROS DISEÑADOS PARA
MICROONDAS
Asegúrese de utilizar recipientes de cocina adecuados durante la cocción a microondas. Se pueden utilizar la mayoría de las
cacerolas, platos para cocinar, tazas de medir, tazas normales, cerámica o loza que no tengan bordes metálicos o vidriados
con un recubrimiento metálico. Algunos recipientes de cocina se encuentran marcados como adecuados para microondas.
Ŷ &RORTXHORVDOLPHQWRVRUHFLSLHQWHSDUDPLFURRQGDV
directamente en la bandeja de vidrio transparente para
cocinar sus alimentos.
Ŷ (OXVRGHXQDFKDURODPHWiOLFDGXUDQWHODFRFFLyQFRQ
microondas generará como resultado un rendimiento
inferior de la cocción.
Ŷ /RVXWHQVLOLRVGHFRFLQDSXHGHQWRUQDUVHPX\FDOLHQWHV
debido a la transferencia de calor proveniente de los
alimentos calentados. Podrían requerirse guantes de
cocina para manipular los recipientes de cocina.
Ŷ 1RXWLOLFHSURGXFWRVGHSDSHOUHFLFODGR/DVWRDOODV
servilletas y papel encerado fabricados de material
reciclado pueden contener partículas metálicas que
pueden causar arqueo voltaico o prender fuego. Se deben
evitar los productos de papel que contienen nylon o
filamentos de nylon, ya que también pueden incendiarse.
Ŷ 8WLOLFHODVOiPLQDVPHWiOLFDV~QLFDPHQWHFRPRVHLQGLFD
en este manual. Cuando utilice la lámina de metal en el
KRUQRPDQWHQJDODOiPLQDSRUORPHQRVƎDOHMDGDGHORV
costados del horno.
Ŷ 6LXWLOL]DXQWHUPyPHWURGHFDUQHPLHQWUDVFRFLQD
asegúrese que sea seguro para utilizarse en hornos
microondas.
Ŷ $OJXQDVEDQGHMDVGHHVSXPDFRPRDTXHOODVHQODVTXH
VHHPSDFDODFDUQHWLHQHQXQDWLULWDGHPHWDOGHOJDGD
empotrada en la parte inferior. Cuando se cocinan con
microondas, el metal puede quemar el fondo del horno o
o encender una toalla de papel.
Ŷ 6HSXHGHXWLOL]DUWRDOODVGHSDSHOSDSHOHQFHUDGR\ODV
envolturas plásticas para cubrir los platos con el propósito
de mantener la humedad y prevenir los salpicones.
Asegúrese de ventilar cortando la envoltura plástica para
que pueda escapar el vapor.
Ŷ 1RWRGDVODVFXELHUWDVSOiVWLFDVVRQDGHFXDGDVSDUD
KRUQRVPLFURRQGDV/HDHQODFDMDODVLQVWUXFFLRQHV
correspondientes.
Ŷ 6HGHEHQFRUWDUSHUIRUDURYHQWLODUFRPRVHLQGLFDHQOD
caja las bolsas de cocina “hervibles” y bolsas plásticas
cerradas herméticamente. De lo contrario, el plástico
puede reventarse durante o inmediatamente después de
la cocción, resultando en una posible lesión. También,
los recipientes de almacenamiento plásticos deben al
menos estar parcialmente descubiertos debido a que
forman un sello muy ajustado. Al cocinar con recipientes
cubiertos con envoltura plástica de manera muy ajustada,
quite cuidadosamente la cubierta y dirija el vapor fuera y
alejado de manos y rostro.
Ŷ 5HFLSLHQWHVGHFRFLQDSOiVWLFRV²/RVUHFLSLHQWHVGH
cocina diseñados para microondas son muy útiles, pero
deben utilizarse con cuidado. Incluso el plástico diseñado
para microondas podría no tolerar condiciones de sobre
cocción, así como los materiales de vidrio o cerámica
\SRGUtDQVXDYL]DUVHRFDUERQL]DUVHVLVHH[SRQHQD
SHUtRGRVFRUWRVGHVREUHFRFFLyQ(QH[SRVLFLRQHV
más prolongadas a la sobrecocción, los alimentos y los
recipientes de cocina podrían coger fuego.
Ŷ 1RXWLOLFHODUHMLOODGHOKRUQRSDUDFRFLQDUHQHO
microondas.
Siga las siguientes pautas:
1. Utilice plásticos seguros para microondas únicamente y
utilícelos estrictamente según las especificaciones del
fabricante.
2. No cocine en el microondas recipientes vacíos.
El plato giratorio siempre
deberá estar en la
ubicación correcta al
usar el horno.
Coloque la comida
directamente sobre la
bandeja metálica para
hornear, calentar o dorar
por convección.
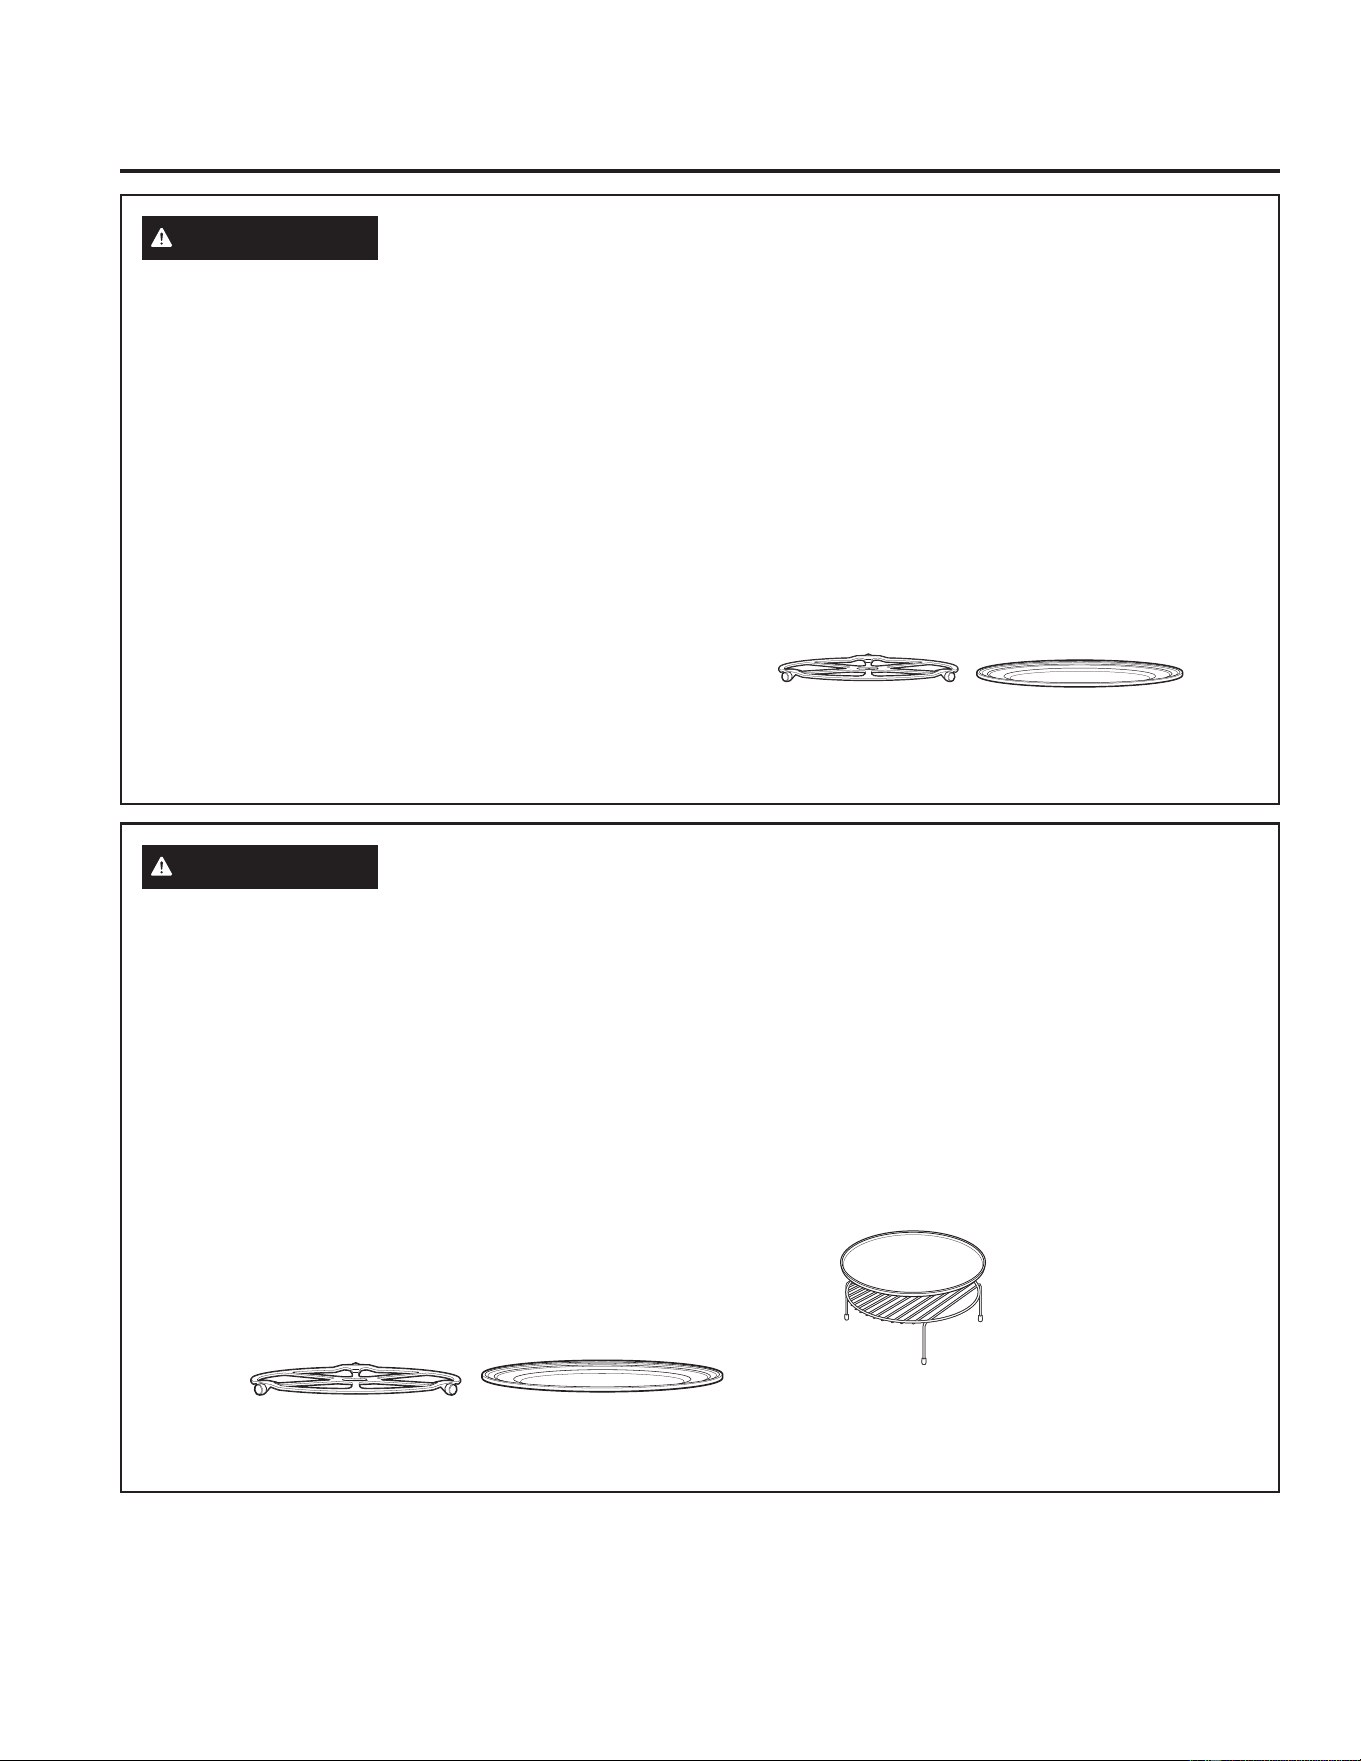
6 49-2001077 Rev. 2
GUARDE ESTAS INSTRUCCIONES
INFORMACIÓN IMPORTANTE DE SEGURIDAD
LEA TODAS LAS INSTRUCCIONES ANTES DE USAR ESTE ELECTRODOMÉSTICO
INFORMACIÓN DE SEGURIDAD (Horno Superior)
ADVERTENCIA
(En Algunos Modelos) RECIPIENTES DE COCINA SEGUROS
DISEÑADOS PARA HORNEAR, ASAR, CALENTAR, ACTIVAR Y TOSTAR
Ŷ El horno y la compuerta se tornarán muy calientes
cuando se hornea, asa, calienta, activa o tuesta algo.
Ŷ Los recipientes de cocina se tornarán muy calientes.
Se requerirán guantes de cocina protectores para
manipular los recipientes de cocina.
Ŷ 1RXWLOLFHWDSDVUHFLSLHQWHVQLEROVDVGHFRFFLyQDVDGR
fabricadas de láminas de metal, plástico, cera o papel
cuando cocine con la función de asar o dorar.
Ŷ 1RFXEUDHOSODWRJLUDWRULRHOHVWDQWHSDUULOODGHOKRUQR
las charolas o cualquier parte del horno con papel de
aluminio. Esto ocasionará arcos eléctricos en el horno
microondas/ por convección.
Ŷ 8WLOLFHODEDQGHMDPHWiOLFDDQWLDGKHUHQWHGHODPLVPD
forma que utilizaría una bandeja o charola para hornear
plana.
Ŷ 8VHODEDQGHMDFRQUHMLOODGHOKRUQRSDUDKRUQHDUSRU
convección o calentar en dos niveles.
Ŷ &RORTXHORVDOLPHQWRVGLUHFWDPHQWHHQODVEDQGHMDV
cuando cocine, a menos que el horno le indique hacer
otra cosa.
Ŷ 3XHGHXWLOL]DUHQHOKRUQRFXDOTXLHUSODWRGLVHxDGRSDUD
PLFURRQGDV/DVUHFHWDVGHO/LEURGHFRFLQD$GYDQWLXP
VHSUREDURQHQUHFLSLHQWHVGHFRFLQDGHYLGULR3\UH[
®
\FDFHURODVGHFHUiPLFD&RUQLQJZDUH
®
/RVWLHPSRV\
resultados de cocción pueden variar cuando se utilizan
otros tipos de recipientes diseñados para hornos
microondas. Colóquelos directamente en las bandejas.
Ŷ 8WLOL]DUODEDQGHMDGHYLGULRWUDQVSDUHQWHFXDQGRKRUQHD
asa, calienta, activa o tuesta puede producir resultados
insatisfactorios.
El plato giratorio siempre
deberá estar en la
ubicación correcta al usar
el horno.
Coloque la comida
directamente sobre la bandeja
metálica para hornear, calentar
o dorar por convección.
Coloque la comida directamente en la
bandeja para hornear de aluminio sobre el
estante rejilla del horno, y coloque ambos
sobre la bandeja metálica no adherente, al
hornear en dos niveles, asar o dorar comidas.
ADVERTENCIA
(En Algunos Modelos) UTENSILIO DE COCCIÓN SEGURA PARA LA
COCCIÓN CON PRECISIÓN/ VELOCIDAD
Ŷ El horno y la compuerta se tornarán muy calientes
cuando se utiliza la función de Precision/Speed
Cooking.
Ŷ Los utensilios de cocina se tornarán muy calientes
debido a la transferencia de calor proveniente de los
alimentos calentados. Se requerirán guantes de cocina
protectores para manipular los recipientes de cocina.
Ŷ 1RXWLOLFHWDSDVUHFLSLHQWHVREROVDVGHFRFFLyQDVDGR
fabricadas de láminas de metal, plástico, cera o papel
cuando cocine con la función de cocción rápida.
Ŷ 1RFXEUDODEDVHJLUDWRULDSDUULOODGHDODPEUHEDQGHMDV
ni ninguna pieza del horno con lámina de metal. Esto
provocará arqueo voltaico en el horno.
Ŷ 8WLOLFHODEDQGHMDGHPHWDODQWLDGKHUHQWHHODPLVPD
forma que utilizaría una bandeja o charola para hornear
plana.
Ŷ &RORTXHORVDOLPHQWRVGLUHFWDPHQWHHQODVEDQGHMDV
cuando cocine, a menos que el horno le indique otra
cosa.
Ŷ 3XHGHXWLOL]DUHQHOKRUQRFXDOTXLHUSODWRGLVHxDGRSDUD
PLFURRQGDV/DVUHFHWDVGHO/LEURGHFRFLQD$GYDQWLXP
VHSUREDURQHQUHFLSLHQWHVGHFRFLQDGHYLGULR3\UH[
®
\FDFHURODVGHFHUiPLFD&RUQLQJZDUH
®
/RVWLHPSRV\
resultados de cocción pueden variar cuando se utilizan
otros tipos de recipientes diseñados para hornos
microondas. Colóquelos directamente en las bandejas.
Ŷ (OXVRGHODEDQGHMDGHYLGULRFODURDOFRFLQDUHQ
velocidad resultará en un rendimiento inferior de la
cocción y posibles fisuras sobre la bandeja de vidrio.
Ŷ 8VHVROREDQGHMDVPHWiOLFDVHVSHFLILFDGDVSDUDXVR
con este horno. Otras bandejas metálicas no fueron
diseñadas para uso con este horno y resultarán en un
rendimiento inferior de la cocción.
El plato giratorio siempre
deberá estar en la
ubicación correcta al
usar el horno.
Coloque la comida
directamente sobre la
bandeja metálica para
hornear, calentar o dorar
por convección.

49-2001077 Rev. 2 7
GUARDE ESTAS INSTRUCCIONES
INFORMACIÓN IMPORTANTE DE SEGURIDAD
LEA TODAS LAS INSTRUCCIONES ANTES DE USAR
INFORMACIÓN DE SEGURIDAD (Horno Superior)
PRECAUCIONES PARA EVITAR LA POSIBLE EXPOSICIÓN A ENERGÍA
DE MICROONDAS EXCESIVA
(a) No intente hacer funcionar el horno con
la compuerta abierta ya que ésto puede provocar
H[SRVLFLyQSHOLJURVDDODHQHUJtDGHPLFURRQGDV(V
importante no forzar ni dañar los seguros.
(b) No coloque ningún objeto entre la parte frontal del
horno y la compuerta, ni permita que se acumulen
residuos de producto limpiador o detergente, suciedad o
polvo en las superficies de sellado.
(c) No haga funcionar el horno si se encuentra dañado. Es
particularmente importante cerrar bien la compuerta
ODFRPSXHUWDGREODGDRFXUYDGD
ODVELVDJUDV\SHVWLOORVURWRVRIORMRV
VHOORVGHODFRPSXHUWD\VXSHUILFLHVGHVHOODGR
(d) El horno no debe ser ajustado o reparado por ninguna
SHUVRQDH[FHSWRSRUSHUVRQDOGHPDQWHQLPLHQWR
calificado.
ADVERTENCIA
AVISO: MARCAPASOS
/DPD\RUtDGHORVPDUFDSDVRVVHHQFXHQWUDQSURWHJLGRVFRQWUDODLQWHUIHUHQFLDGHSURGXFWRVHOHFWUyQLFRVLQFOX\HQGRORV
microondas. Sin embargo, los pacientes que tengan marcapasos deberían consultar a sus médicos si tienen alguna duda.
8 49-2001077 Rev. 2
GUARDE ESTAS INSTRUCCIONES
INFORMACIÓN IMPORTANTE DE SEGURIDAD
LEA TODAS LAS INSTRUCCIONES ANTES DE USAR
INFORMACIÓN DE SEGURIDAD (Horno Inferior)
ADVERTENCIA
MANTENGA LOS MATERIALES INFLAMABLES ALEJADOS DE LA ESTUFA
Si esto no se cumple, se podrán sufrir lesiones personales graves o incendios.
Ŷ 1RDOPDFHQHRXWLOLFHPDWHULDOHVLQIODPDEOHVGHQWURGH
un horno o cerca de la estufa, tales como papel, plástico,
agarraderas, telas, recubrimientos de pared, cortinas y
gasolina u otros vapores y líquidos inflamables.
Ŷ 1XQFDXVHYHVWLPHQWDVKROJDGDVRDPSOLDVPLHQWUDV
utilice el aparato. Estas vestimentas pueden prenderse
fuego si entran en contacto con superficies calientes,
provocando quemaduras graves.
Ŷ 1RSHUPLWDTXHODJUDVDGHODFRFFLyQXRWURVPDWHULDOHV
inflamables se acumulen dentro de la estufa o en su
FHUFDQtD/DJUDVDGHQWURGHOKRUQRRVREUHODHVWXID
puede encenderse.
Ŷ 1RJXDUGHPDWHULDOHVLQIODPDEOHVQLtWHPVVHQVLEOHVDOD
temperatura dentro del electrodoméstico.
Ŷ /LPSLHODVFDPSDQDVGHYHQWLODFLyQGHIRUPDIUHFXHQWH
No se debe permitir la acumulación de grasa en la
campana o el filtro.
Ŷ (QDOJXQRVPRGHORV)XQFLRQDPLHQWR5HPRWR(VWH
electrodoméstico permite su configuración para permitir
un funcionamiento remoto en cualquier momento.
ADVERTENCIA
INSTRUCCIONES GENERALES DE SEGURIDAD
Ŷ 8VHHVWHDSDUDWRVyORFRQHOREMHWLYRSDUDHOTXHIXH
creado, como se describe en este Manual del Propietario.
Ŷ 6ROLFLWHTXHXQLQVWDODGRUFDOLILFDGRLQVWDOHVXHVWXID\TXH
esté adecuadamente conectada a tierra, de acuerdo con
las instrucciones de instalación provistas.
Ŷ &XDOTXLHUDMXVWHUHSDUDFLyQRVHUYLFLRWpFQLFRQR
recomendado específicamente en este manual deberá ser
UHDOL]DGR62/2SRUXQLQVWDODGRURWpFQLFRGHOVHUYLFLR
con calificación en estufas.
Ŷ $QWHVGHUHDOL]DUFXDOTXLHUFODVHGHUHSDUDFLyQ
desenchufe la cocina o desconecte el suministro eléctrico
desde el panel de distribución doméstico quitando el
fusible o desconectando el interruptor de circuitos.
Ŷ $VHJ~UHVHGHTXHWRGRVORVPDWHULDOHVGHHPEDODMHVHDQ
retirados de la estufa antes de su uso, a fin de evitar que
los mismos se incendien.
Ŷ (YLWHUD\RQHVRLPSDFWRVVREUHODVSXHUWDVGHYLGULR
SODFDVGHFRFFLyQRSDQHOHVGHFRQWURO+DFHUHVWRSRGUi
producir la rotura de vidrios.
Ŷ 1RFRFLQHVREUHXQSURGXFWRFRQXQYLGULRURWR6HSRGUiQ
producir descargas, incendios o cortes.
Ŷ 1RGHMHDORVQLxRVVRORVRVLQDWHQFLyQHQXQiUHDGRQGH
un aparato esté en uso. Nunca debe permitirse que se
suban, sienten o paren en cualquier parte de este aparato.
Ŷ
PRECAUCIÓN
No guarde ítems de interés
para los niños en los gabinetes que están sobre o en la
parte superior de una estufa; si los niños trepan sobre la
estufa para alcanzar estos artículos podrán sufrir lesiones
graves.
Ŷ 1XQFDXVHHOHOHFWURGRPpVWLFRSDUDFDOHQWDUR
calefaccionar la habitación.
Ŷ 1RSHUPLWDTXHQDGLHVHWUHSHVHSDUHRFXHOJXHGH
la puerta del horno, del cajón o la placa de cocción. Se
podrá dañar la estufa o provocar su caída, ocasionando
lesiones graves o la muerte.
Ŷ 6yORXVHDJDUUDGHUDVVHFDVODVDJDUUDGHUDVK~PHGDV
o mojadas colocadas en superficies calientes pueden
provocar quemaduras de vapor. No permita que las
agarraderas tengan contacto con las unidades de la
superficie ni con los elementos para calentar del horno.
No utilice toallas u otras telas gruesas en lugar de una
agarradera.
Ŷ 1RWRTXHORVTXHPDGRUHVSODQFKDVHQDOJXQRV
PRGHORVSDUULOODVHQDOJXQRVPRGHORVODVXSHUILFLH
de cocción o los elementos calefactores del horno, ni
la superficie interior del horno. Estas superficies podrán
permanecer lo suficientemente caliente como para
quemar durante un período de tiempo prolongado luego
de la cocción, incluso aunque ya no parezcan estar
encendidas o calientes.
Ŷ 'XUDQWH\GHVSXpVGHOXVRQRWRTXHQLSHUPLWDTXHWHODV
u otros materiales inflamables toquen cualquier área
interior del horno; espere hasta que haya pasado un
tiempo suficiente hasta que se enfríen. Otras superficies
del electrodoméstico se podrán calentar lo suficiente como
SDUDRFDVLRQDUOHVLRQHV/DVVXSHUILFLHVSRWHQFLDOPHQWH
calientes incluyen quemadores o elementos calefactores,
SDUULOODVHQDOJXQRVPRGHORVVXSHUILFLHGHFRFFLyQ
aberturas de la ventilación del horno, superficies cercanas
a las aberturas, grietas alrededor de la puerta del horno,
partes con marcos metálicos por encima de la puerta,
cualquier protección trasera, o repisas ubicadas encima de
una superficie de cocción.
Ŷ 1RFDOLHQWHUHFLSLHQWHVFHUUDGRVGHDOLPHQWRV3RGUtD
haber una acumulación de presión en el recipiente y éste
SRGUtDH[SORWDUSURYRFDQGROHVLRQHV
Ŷ &RFLQHODFRPLGDFRPSOHWDPHQWHSDUDHYLWDUTXHVH
produzcan enfermedades a partir de la comida. USDA y
FDA brindan las recomendaciones de temperatura mínima
para una comida segura. Utilice un termómetro para
tomar la temperatura de la comida y haga controles en
diferentes ubicaciones.
Ŷ 0DQWHQJDOLPSLDODFDPSDQDGHOYHQWLODGRU\ORVILOWURV
de grasa, con el fin de conservar una buena ventilación
y de evitar incendios con grasa. En caso de incendio,
DSDJXHHOYHQWLODGRU6LHOH[WUDFWRUVHHQFXHQWUDHQ
funcionamiento, podrá esparcir las llamas.
ADVERTENCIA
/HDWRGDVODVLQVWUXFFLRQHVGHVHJXULGDGDQWHVGHXWLOL]DUHVWHSURGXFWR1RVHJXLUHVWDVLQVWUXFFLRQHV
puede generar un incendio, una descarga eléctrica, lesiones corporales o la muerte.
49-2001077 Rev. 2 9
GUARDE ESTAS INSTRUCCIONES
INFORMACIÓN IMPORTANTE DE SEGURIDAD
LEA TODAS LAS INSTRUCCIONES ANTES DE USAR
INFORMACIÓN DE SEGURIDAD
ADVERTENCIA
EN CASO DE INCENDIO, SIGA LOS SIGUIENTES PASOS PARA
EVITAR LA PROPAGACIÓN DEL FUEGO
Ŷ 1RXWLOLFHDJXDHQLQFHQGLRVGHJUDVD1XQFDOHYDQWH
una sartén en llamas. Apague los controles. Apague
una sartén en llamas sobre una unidad de superficie
cubriendo la sartén por completo con una tapa que
ajuste bien, una plancha para galletas o una bandeja
SODQD8WLOLFHXQTXtPLFRVHFRPXOWLXVRRXQH[WLQWRUGH
incendios de espuma.
Ŷ 6LKD\XQLQFHQGLRHQHOKRUQRGXUDQWHHOKRUQHDGR
apáguelo cerrando la puerta del horno y apagando el
FRQWURORXVDQGRXQTXtPLFRVHFRPXOWLXVRRXQH[WLQWRU
de incendios de espuma.
Ŷ 6LKD\XQLQFHQGLRHQHOKRUQRGXUDQWHODDXWROLPSLH]D
apague el horno y espere a que el incendio se consuma.
No abra la puerta del horno a la fuerza. El ingreso de aire
fresco a temperaturas de auto-limpieza puede provocar
XQDH[SORVLyQGHOODPDVGHVGHHOKRUQR1RVHJXLUHVWD
instrucción puede provocar quemaduras graves.
ADVERTENCIA
INSTRUCCIONES DE SEGURIDAD DEL HORNO
Ŷ 0DQWpQJDVHDOHMDGRGHOKRUQRDODEULUODSXHUWDGHO
mismo. El aire caliente o el vapor que sale puede causar
quemaduras en las manos, rostro y/u ojos.
Ŷ 1RXVHHOKRUQRVLXQHOHPHQWRGHFDOHQWDPLHQWRJHQHUD
un punto brillante durante el uso o aparecen otros signos
de daños. Un punto brillante indica que el elemento para
calentar puede fallar y generar una posible quemadura,
incendio o descarga eléctrica. Apague el horno de
inmediato y solicite a un técnico calificado del servicio
que reemplace el elemento para calentar.
Ŷ 0DQWHQJDGHVREVWUXLGDODYHQWLODFLyQGHOKRUQR
Ŷ 1XQFDFRORTXHORVXWHQVLOLRVGHFRFLQDSLHGUDVSDUD
pizza u horneado o cualquier otro tipo de aluminio o
cobertor en la base del horno. Estos ítems pueden
atrapar el calor o derretirse, ocasionando daños sobre el
producto y el riesgo de descargas, humo o incendios.
Ŷ &RORTXHORVHVWDQWHVGHOKRUQRHQODXELFDFLyQGHVHDGD
mientras éste se encuentra frío. Si es necesario mover el
estante mientras el horno está caliente, tenga cuidado de
evitar tocar superficies calientes y evite que el mango de
la olla tenga contacto con el elemento calentador en el
horno.
Ŷ 1RGHMHSURGXFWRVWDOHVFRPRSDSHOXWHQVLOLRVGHFRFLQD
ni comida en el horno cuando éste no se encuentre en
XVR/RVDUWtFXORVJXDUGDGRVHQHOKRUQRVHSXHGHQ
incendiar.
Ŷ 1RGHMHDUWtFXORVVREUHODVXSHUILFLHGHFRFFLyQ
FHUFDGHODYHQWLODFLyQGHOKRUQR/RVtWHPVVH
SRGUiQVREUHFDOHQWDU\H[LVWHHOULHVJRGHLQFHQGLRR
quemaduras.
Ŷ 1XQFDDVHFRQODSXHUWDDELHUWD
Ŷ 0DQWHQJDHOKRUQROLEUHGHDFXPXODFLyQGHJUDVD/D
grasa del horno se puede incendiar.
Ŷ $OXVDUODVEROVDVSDUDFRFLQDURGRUDUHQHOKRUQRVLJD
las instrucciones del fabricante.
Ŷ PELIGRO DE DESCARGA O QUEMADURAS: Antes
de reemplazar la bombilla de luz del horno, desconecte
ODFRQH[LyQHOpFWULFDGHOKRUQRGHVGHHOIXVLEOHSULQFLSDO
o desde el panel del disyuntor. Si esto no se cumple, se
podrá producir una descarga eléctrica o un incendio.
Ŷ
PRECAUCIÓN
RIESGO DE INCENDIO: /D
tapa de vidrio y la bombilla de luz se deberán retirar
cuando estén frías. Tocar el vidrio caliente sin protección
en las manos o con una tela húmeda podrá ocasionar
quemaduras.
Ŷ 1RXVHQLQJ~QWLSRGHDOXPLQLRRFREHUWRUSDUDFXEULU
HOIRQGRGHOKRUQRRFXDOTXLHUSDUWHGHOKRUQRH[FHSWR
FRPRVHGHVFULEHHQHVWHPDQXDO/RVFREHUWRUHVGH
horno pueden atrapar el calor o derretirse, ocasionando
daños sobre el producto y el riesgo de descargas, humo
o incendios.
10 49-2001077 Rev. 2
LEA Y GUARDE ESTAS INSTRUCCIONES
INFORMACIÓN IMPORTANTE DE SEGURIDAD
LEA TODAS LAS INSTRUCCIONES ANTES DE USAR ESTE ELECTRODOMÉSTICO
ADVERTENCIA
INSTRUCCIONES DE SEGURIDAD DEL HORNO CON LIMPIEZA
AUTOMÁTICA (en algunos modelos)
/DIXQFLyQGHOLPSLH]DDXWRPiWLFDXVDHOKRUQRHQWHPSHUDWXUDVORVXILFLHQWHPHQWHDOWDVFRPRSDUDFRQVXPLUODVXFLHGDGGH
comida que haya dentro del horno. Para un funcionamiento seguro, siga estas instrucciones.
Ŷ 1RWRTXHODVVXSHUILFLHVGHOKRUQRGXUDQWHHOFLFORGH
limpieza automática. Mantenga a los niños alejados del
horno durante la limpieza automática. Si no se siguen
estas instrucciones, se podrán producir quemaduras.
Ŷ $QWHVGHXWLOL]DUHOFLFORGHOLPSLH]DDXWRPiWLFDUHWLUH
las ollas, estantes de metal brillante del horno y otros
utensilios que haya en el horno. Sólo se pueden dejar
dentro del horno los estantes para horno de color
oscuro con revestimiento de porcelana. No hacer esto
podrá ocasionar daños sobre estos ítems y el horno, y
presentar una posible quemadura o riesgo de incendio.
Ŷ $QWHVGHXWLOL]DUHOFLFORGHOLPSLH]DDXWRPiWLFDOLPSLH
la grasa y restos de comida que haya en el horno. Una
FDQWLGDGH[FHVLYDGHJUDVDVHSXHGHLQFHQGLDUORFXDO
puede producir daños con humo en su hogar.
Ŷ 6LHOPRGRGHOLPSLH]DDXWRPiWLFDIXQFLRQDGHIRUPD
incorrecta, apague el horno y desconecte el suministro de
corriente. Solicite el servicio de un técnico calificado.
Ŷ 1RXVHOLPSLDGRUHVSDUDKRUQR1RVHGHEHUiXVDU
limpiadores comerciales para horno ni revestimientos
de protección para hornos de ningún tipo en o alrededor
de cualquier parte del horno, a menos que cuente
con certificación para uso en un horno con limpieza
automática.
Ŷ 1ROLPSLHODMXQWDGHODSXHUWD/DMXQWDGHODSXHUWDHV
esencial para un buen sellado. Se debe tener cuidado de
no frotar, dañar ni mover la junta.
Ŷ IMPORTANTE: /DVDOXGGHDOJXQDVDYHVHV
H[WUHPDGDPHQWHVHQVLEOHDORVKXPRVHPLWLGRVGXUDQWH
el ciclo de limpieza automática de cualquier estufa.
Coloque las aves en otra habitación bien ventilada.
ADVERTENCIA
EQUIPO DE ACCESO REMOTO INSTALADO (Algunos modelos)
Este dispositivo cumple con la Parte 15 de la Normativa de
la FCC. Su funcionamiento está sujeto a las dos condiciones
siguientes:
(VWHGLVSRVLWLYRQRGHEHUiFDXVDULQWHUIHUHQFLDVQRFLYDV
\HVWHGLVSRVLWLYRGHEHUiDFHSWDUFXDOTXLHULQWHUIHUHQFLD
recibida, incluyendo interferencias que puedan generar un
funcionamiento no deseado. El equipo de comunicación
inalámbrica instalado en esta estufa fue probado y cumple
con los límites establecidos para un dispositivo digital de
&ODVH%GHDFXHUGRFRQODSDUWHGHOD1RUPDWLYDGHOD
FCC.
Estos límites fueron diseñados para:
DEULQGDUXQDSURWHFFLyQUD]RQDEOHFRQWUDLQWHUIHUHQFLDV
nocivas en una instalación residencial. Este equipo genera,
usa y puede emitir energía de radiofrecuencia y, si no se
instala y utiliza de acuerdo con las instrucciones, puede
ocasionar interferencias perjudiciales en las comunicaciones
de radio. Sin embargo, no se garantiza que no se presenten
interferencias en una instalación en particular. Si el equipo
provoca interferencias perjudiciales para la recepción de
radio o televisión, lo cual puede comprobar encendiendo
y apagando el equipo, se aconseja al usuario que intente
corregir la interferencia con una de las siguientes medidas:
Ŷ5HRULHQWHRUHXELTXHODDQWHQDUHFHSWRUD
Ŷ$XPHQWHODVHSDUDFLyQHQWUHHOHTXLSR\HOUHFHSWRU
Ŷ&RQHFWHHOHTXLSRDXQWRPDFRUULHQWHGHXQFLUFXLWR
diferente del tomacorriente al que se encuentra conectado
el receptor.
Ŷ3DUDVROLFLWDUD\XGDFRQVXOWHFRQHOSURYHHGRUPLQRULVWDR
DXQWpFQLFRH[SHULPHQWDGRGHUDGLR79
EWROHUDUFXDOTXLHULQWHUIHUHQFLDUHFLELGDLQFOX\HQGRODV
interferencias que puedan provocar un funcionamiento no
deseado del dispositivo. Observe que todos los cambios
o modificaciones sobre el dispositivo de comunicación
inalámbrico instalado en este horno que no estén
H[SUHVDPHQWHDSUREDGRVSRUHOIDEULFDQWHSRGUtDQDQXODUOD
autoridad del usuario para operar el equipamiento..
INFORMACIÓN DE SEGURIDAD (Horno Inferior)

49-2001077 Rev. 2 11
INFORMACIÓN DE SEGURIDAD (Horno Inferior)
LEA Y GUARDE ESTAS INSTRUCCIONES
INFORMACIÓN IMPORTANTE DE SEGURIDAD
LEA TODAS LAS INSTRUCCIONES ANTES DE USAR ESTE ELECTRODOMÉSTICO
Cómo Retirar la Película Protectora de Envío y la Cinta de Embalaje
&RQFXLGDGRWRPHXQH[WUHPRGHODSHOtFXODSURWHFWRUD
de envío con los dedos y lentamente retire la misma de la
superficie del electrodoméstico. No utilice ningún producto
filoso para retirar la película. Retire toda la película antes de
usar el electrodoméstico por primera vez.
Para asegurar que no haya daños sobre el acabado del
producto, la forma más segura de retirar el adhesivo de la cinta
de embalaje en electrodomésticos nuevos es aplicando un
detergente líquido hogareño para lavar platos. Aplique con una
tela suave y deje que se seque.
NOTA: El adhesivo deberá ser eliminado de todas las partes.
No se puede retirar si se hornea con éste dentro.
Tenga en cuenta las opciones de reciclaje del material de
embalaje de su electrodoméstico.
FORMA ADECUADA DE DESCARTAR SU ELECTRODOMÉSTICO
'HVFDUWHRUHFLFOHVXHOHFWURGRPpVWLFRGHDFXHUGRFRQODV5HJXODFLRQHV)HGHUDOHV\/RFDOHV&RPXQtTXHVHFRQODV
autoridades locales para descartar o reciclar su electrodoméstico de forma ambientalmente segura.
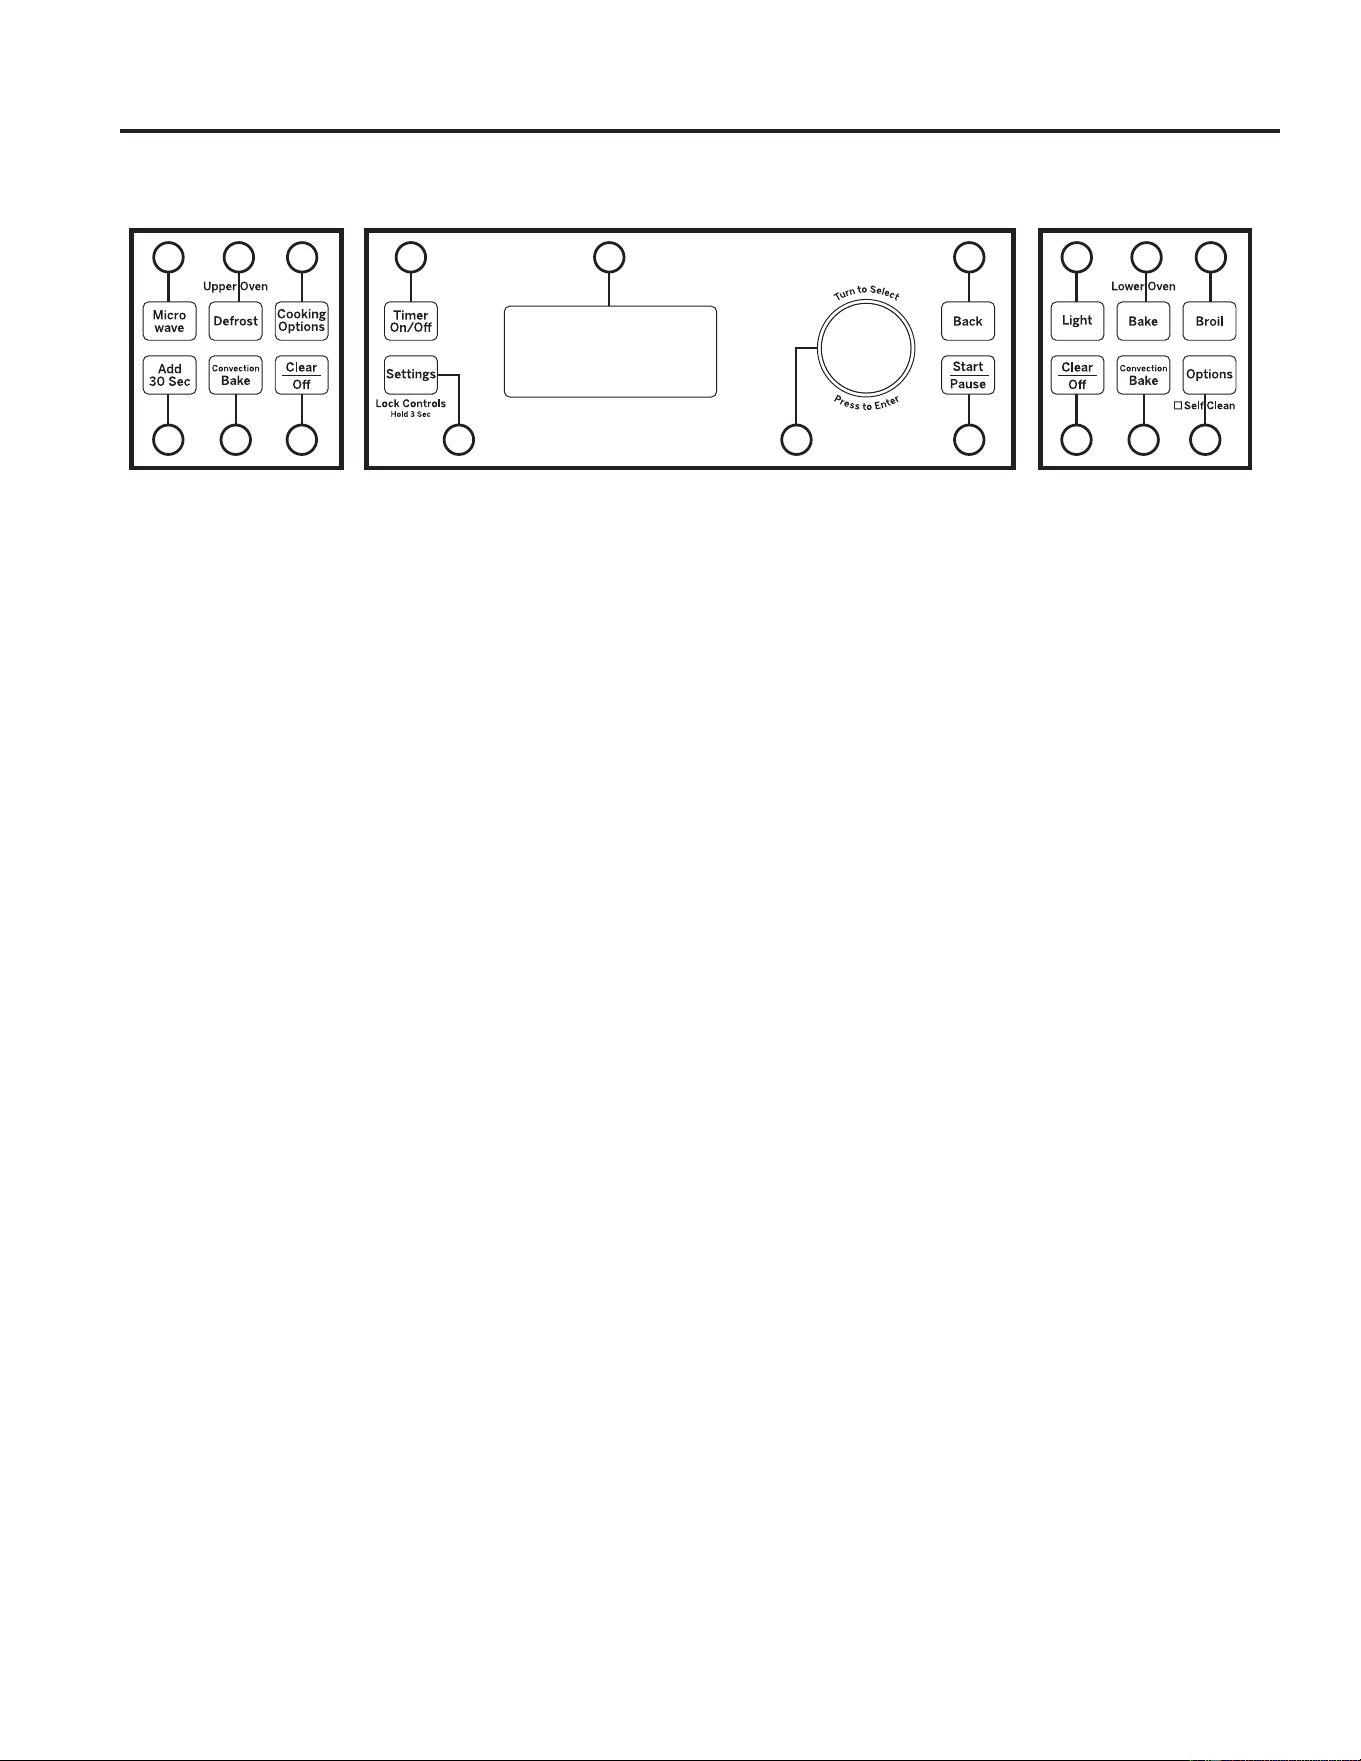
12 49-2001077 Rev. 2
USO DEL HORNO:&RQWUROHVGHO+RUQR
Controles Comunes
Controles del
Horno Superior
Controles del
Horno Inferior
Controles del Horno
Controles Comunes
1. Timer On/Off (Temporizador Encendido/
Apagado):
Funciona como un temporizador con cuenta regresiva:
Presione la tecla Timer On/Off (Temporizador Encendido/ Apagado),
VHOHFFLRQHHOWLSRGHWHPSRUL]DGRUKRUDV\PLQXWRVRPLQXWRV\
VHJXQGRVXVHHOGLDOGHVHOHFFLyQSDUDFRQILJXUDUODKRUD\SUHVLRQH
el dial del selector para iniciar la cuenta regresiva del temporizador.
El horno continuará funcionando cuando la cuenta regresiva del
temporizador se haya completado. Para apagar el temporizador,
presione la tecla Timer On/Off (Temporizador Encendido/ Apagado).
2. Settings/Lock Controls (Controles de
Configuraciones/ Bloqueo):
%XVTXHODVRSFLRQHVGHOKRUQR
SDUD+HOS$\XGD&ORFN6HWWLQJV&RQILJXUDFLRQHVGHO5HORM'LVSOD\
0RGH0RGRGH3DQWDOOD$XWR&RQYHUVLRQ&RQYHUVLyQ$XWRPiWLFD$XWR
6KXW2II$SDJDGR$XWRPiWLFR%HHSHU9ROXPH9ROXPHQGHO3LWLGR
5HPLQGHU5HFRUGDWRULR7HPSHUDWXUH8QLWV8QLGDGHVGH7HPSHUDWXUD
7KHUPRVWDW$GMXVW$MXVWDUHO7HUPRVWDWR\2YHQ,QIRUPDWLRQ,QIRUPDFLyQ
GHO+RUQREDMRHVWDVHOHFFLyQ3DUDPiVGHWDOOHVFRQVXOWHODVHFFLyQ
2YHQ6HWWLQJV&RQILJXUDFLRQHVGHO+RUQR0DQWHQJDSUHVLRQDGDODWHFOD
6HWWLQJV&RQILJXUDFLRQHVGXUDQWHVHJXQGRVSDUDEORTXHDURGHVEORTXHDU
los controles. Esto bloquea el control, de modo que al presionar las teclas
GHFRQWUROQRVHDFWLYHHVWDIXQFLyQ/DIXQFLyQ&OHDU2II%RUUDU$SDJDU
siempre está activa, incluso cuando el control está bloqueado.
3. Selector Dial (Dial de Selección): El dial de selección se
usa tanto para el horno superior como para el inferior. Gire el dial para
seleccionar las configuraciones del horno, opciones del horno superior/
inferior y opciones de cocción, y luego presione el mismo para confirmar
la selección. Gire el dial para incrementar o reducir las temperaturas o
el tiempo y luego presione el mismo para configurar la temperatura o el
tiempo configurados.
4. Back (Retroceder): Presione esta tecla para ir hacia atrás en un
nivel del menú en la pantalla.
5. Start/Pause (Iniciar/ Pausar): Presione la tecla Start/
Pause (Iniciar/ Pausar) para iniciar cualquier función de cocción,
limpieza o con temporizador. Presione la tecla Start/Pause (Iniciar/
Pausar) para pausar cualquier función del horno superior.
6. Display (Pantalla): /DLQIRUPDFLyQVREUHHOKRUQRVXSHULRU\HO
horno inferior se muestra en la ventana de esta pantalla.
Controles del Horno Superior
7. Microwave (Cocinar con Microondas):
Presione
la tecla Microwave (Cocinar con Microondas) para acceder a las
opciones de cocción con microondas. Use el dial de selección para
buscar la opción de cocción con microondas deseada y presione el dial
SDUDVHOHFFLRQDUODPLVPD/DVRSFLRQHVGLVSRQLEOHVLQFOX\HQ&RRN
E\7LPH&RFLQDUSRU7LHPSR&RRN&RFLQDU'HIURVW'HVFRQJHODU
%HYHUDJH%HELGD3RSFRUQ3DORPLWDVGH0Dt]0HOW'HUUHWLU5HKHDW
5HFDOHQWDU6LPPHU+HUYLU\6RIWHQ$EODQGDU8VHODEDQGHMDGH
vidrio trasparente y el utensilio para uso seguro en el microondas al usar
las funciones de cocción con microondas. Para más detalles, consulte la
sección de Cocción con microondas en el horno superior.
8. Add 30 Sec (Agregar 30 Segundos): Presione la
tecla Add 30 Sec (Agregar 30 Segundos) de tiempo de cocción en
el microondas. Cada vez que se presiona esta tecla, se suman 30
segundos al tiempo de cocción restante. El horno se inicia de inmediato.
9. Defrost (Descongelar): Presione la tecla Defrost
'HVFRQJHODUSDUDGHVFRQJHODUJLUHHOGLDOSDUDVHOHFFLRQDUHO
tipo de descongelación y presione el dial para hacer la selección.
El tipo de descongelación disponible incluye: Defrost by Food Type
'HVFRQJHODFLyQSRU7LSRGH&RPLGD'HIURVWE\7LPH'HVFRQJHODFLyQ
SRU7LHPSR'HIURVWE\:HLJKW'HVFRQJHODFLyQSRU3HVROE4XLFN
'HIURVW'HVFRQJHODFLyQ5iSLGD0HOW'HUUHWLU\6RIWHQ$EODQGDU
Para más información, consulte la sección Cocinar con el Microondas.
10. Convection Bake (Hornear por Convección):
Presione la tecla Convection Bake (Hornear por Convección) para
realizar un horneado por convección en el horno superior. Cuando use la
función de horneado por convección, coloque la comida o el plato para
uso seguro en el horno sobre la bandeja de metal. Cuando hornee por
convección en dos niveles, coloque la comida o el plato de uso seguro
en el horno sobre la parrilla de alambre, y coloque los mismos en la
EDQGHMDGHPHWDO3DUDPiVGHWDOOHVFRQVXOWHODVHFFLyQ+RUQHDGRHQHO
+RUQR6XSHULRU
11. Cooking Options (Opciones de Cocción): %XVTXH
ODVIXQFLRQHV5HSHDW/DVW5HSHWLUÒOWLPR3URRI/HXGDU\:DUP
&DOHQWDUHQHVWDVHOHFFLyQ3DUDPiVGHWDOOHVFRQVXOWHODVHFFLyQ
2YHQ2SWLRQV2SFLRQHVGHO+RUQR
12. Clear/Off (Borrar/ Apagar): /DWHFOD&OHDU2II%RUUDU
$SDJDUFDQFHOD72'26ORVSURJUDPDVGHOKRUQRVXSHULRUH[FHSWRHO
reloj y el temporizador.
Controles del Horno Inferior
13. Light (Luz):
Presione la tecla Light (Luz) para encender o apagar
la luz del horno en el horno inferior. Observe que la luz del horno inferior
no se encenderá si éste se encuentra en el modo de limpieza.
14. Bake (Hornear): Presione la tecla Bake (Hornear) para hornear,
gire el dial para seleccionar la temperatura de horneado y presione el
dial para hacer la selección.
15. Broil (Asar): Presione la tecla Broil (Asar) para asar, gire el dial para
VHOHFFLRQDU+L/R$OWR%DMR\SUHVLRQHHOGLDOSDUDKDFHUODVHOHFFLyQ
16. Options (Opciones): %XVTXHODVIXQFLRQHV'HOD\6WDUW
5HWUDVDU,QLFLR3UREH6RQGD3URRI/HXGDU6DEEDWK6DEiWLFR
6HOI&OHDQ/LPSLH]D$XWRPiWLFD6WHDP&OHDQ/LPSLH]DFRQ9DSRU
\:DUP&DOHQWDUHQHVWDVHOHFFLyQ3DUDPiVGHWDOOHVFRQVXOWHOD
VHFFLyQ2YHQ2SWLRQV2SFLRQHVGHO+RUQR
17. Convection Bake (Horneado por Convección):
Presione la tecla Convection Bake (Hornear por Convección) para
KRUQHDUSRUFRQYHFFLyQ/RVPRGRVGHFRFFLyQSRUFRQYHFFLyQXWLOL]DQ
una circulación de aire incrementada para mejorar el rendimiento. El
tipo de beneficio depende del modo. Su horno inferior cuenta con los
VLJXLHQWHVPRGRVGHFRFFLyQSRUFRQYHFFLyQ&RQYHFWLRQ%DNH5DFN
0XOWL+RUQHDUSRU&RQYHFFLyQRP~OWLSOHVHVWDQWHV\&RQYHFWLRQ
5RDVW$VDUSRU&RQYHFFLyQ3DUDPiVLQIRUPDFLyQFRQVXOWHODVHFFLyQ
GH0RGRVGH&RFFLyQHQHO+RUQR,QIHULRU
18. Clear/Off (Borrar/ Apagar): /DWHFOD&OHDU2II%RUUDU
$SDJDUFDQFHOD72'26ORVSURJUDPDVGHOKRUQRLQIHULRUH[FHSWRHO
reloj y el temporizador.
10 12 18 1617
11 13 14 15
179 6 4
582 3

49-2001077 Rev. 2 13
Ayuda
Use esta función para saber más sobre su horno y sus
IXQFLRQHVSUHVLRQDQGRODWHFOD6HWWLQJV&RQILJXUDFLRQHV
y seleccionando Help (Ayuda). Gire el dial de selección y
presione el mismo para seleccionar la función sobre la cuál
desee saber más.
NOTA: Es posible que su horno no cuente con todas las
funciones de ayuda. A continuación figuran funciones de la
IXQFLyQ+HOS$\XGD
Clock Settings (Configuraciones del Reloj)
Use esta función para configurar la hora del día y para especificar
FyPRpVWDVHUiH[KLELGD3XHGHVHOHFFLRQDUHOUHORMHVWiQGDUGH
KRUDVKUVRHOUHORMPLOLWDUGHKRUDVKUV(OUHORM
deberá ser configurado antes del primer uso del horno.
Display Mode (Modo de Pantalla)
8VHHVWDIXQFLyQSDUDFRQILJXUDUHOPRGRGHSDQWDOOD3RZHU
6DYHU$KRUURGH(QHUJtDR'LVSOD\$OZD\V0RVWUDU6LHPSUH
Auto Conversion (Conversión Automática)
Use esta función para encender/ apagar el modo Auto
&RQYHUVLRQ&RQYHUVLyQ$XWRPiWLFD&XDQGRODIXQFLyQ
$XWR&RQYHUVLRQ&RQYHUVLyQ$XWRPiWLFDHVWpDFWLYDGDGH
forma automática convertirá las temperaturas ingresadas de
horneado regular a temperaturas de cocción de horneado por
convección, cuando use la función hornear por convección.
Esto ajusta la temperatura de ambos hornos.
Auto Shut-Off (Apagado Automático)
Use esta función para activar/ desactivar la función Auto
6KXW2II$SDJDGR$XWRPiWLFR$FWLYDUODIXQFLyQ$XWR6KXW
2II$SDJDGR$XWRPiWLFRDSDJDUiHOKRUQRLQIHULRUOXHJRGH
12 horas de funcionamiento continuo. Esta configuración de
IiEULFDSDUDODIXQFLyQ$XWR6KXW2II$SDJDGR$XWRPiWLFR
HVWiDFWLYDGD&XDQGRHVWpHQHOPRGR6DEEDWK6DEiWLFROD
IXQFLyQ$XWR6KXW2II$SDJDGR$XWRPiWLFRVHUiGHVDFWLYDGD
Beeper Volume (Volumen del Pitido)
Use esta función para configurar el volumen del pitido en Mute
0XGRR1RUPDO1RUPDO
NOTA: Algunos tonos no se pueden enmudecer.
Reminder (Recordatorio)
8VHHVWDIXQFLyQFRQ6HW&RQILJXUDU5HYLHZ5HYLVDUR
&OHDU5HPLQGHU%RUUDU5HFRUGDWRULR
Temperature Units (Unidades de
Temperatura)
Use esta función para configurar la unidad de temperatura en
SDQWDOODD))DKUHQKHLWR&&HOVLXV
Thermostat Adjust (Ajustar el Termostato)
Esta función permite que la temperatura de horneado del
horno y de horneado por convección sean ajustadas hasta
35ºF más caliente o 35ºF más fría en el horno inferior. El
horno superior no puede ser ajustado. Use esta función si
piensa que la temperatura de su horno es demasiado caliente
o demasiado fría y desea modificarla. Este ajuste afecta los
PRGRV%DNH+RUQHDU\&RQYHFWLRQ%DNH+RUQHDUSRU
&RQYHFFLyQ1LQJ~QRWURPRGRGHFRFFLyQVHYHDIHFWDGR
Oven Information (Información del Horno)
Esta función muestra el modelo y número de serie del horno.
Configuraciones del Horno
USO DEL HORNO: &RQILJXUDFLRQHVGHO+RUQR
Funciones que se encuentran en la función HELP (AYUDA).
Adding Time
$xDGLU7LHPSR
Defrost by Weight
'HVFRQJHODFLyQ
SRU3HVR
6WDUW3DXVH,QLFLDU
3DXVDU
Auto Convection
&RQYHFFLyQ
$XWRPiWLFD
'HOD\6WDUW/RZHU
5HWUDVDU,QLFLR
,QIHULRU
Steam Clean
/LPSLH]DDO9DSRU
$XWR6KXW2II$SDJDGR
$XWRPiWLFR
Display Mode
0RGRGH3DQWDOOD
Temperature Units
8QLGDGHVGH
7HPSHUDWXUD
%DFN5HJUHVDU (GLW(GLWDU Thermostat Adjust
$MXVWDUHO7HUPRVWDWR
%DNH+RUQHDU +HOS$\XGD Timer On/Off
7HPSRUL]DGRU
(QFHQGLGR$SDJDGR
%HHSHU9ROXPH
9ROXPHQGHO3LWLGR
0HOW'HUUHWLU :DUP&DOHQWDU
%HYHUDJH%HELGD 0LFUR6HFVVHJ
GH0LFURRQGDV
%URLO$VDU 0LFURZDYH&RFLQDUFRQ
0LFURRQGDV
Clear/Off
%RUUDU$SDJDU
My Recipes
0LVUHFHWDV
&ORFN5HORM 3UREH6RQGD
&RQWURO/RFNRXW
%ORTXHRGHO&RQWURO
3URRI/HXGDU
&RRN&RFLQDU 5HKHDW5HFDOHQWDU
Cook by Food
&RFFLyQSRU&RPLGD
Reminder
5HFRUGDWRULR
Cook by Time
&RFLQDUSRU7LHPSR
5HSHDW/DVW5HSHWLUHO
ÒOWLPR3DVR
Cook by Time 1 & 2
&RFLQDUSRU7LHPSR
\
5HVXPH5HLQLFLDU
Cooking Options
/RZHU
2SFLRQHVGH&RFFLyQ
,QIHULRU
6DEEDWK6DEiWLFR
Cooking Options
8SSHU
2SFLRQHVGH&RFFLyQ
6XSHULRU
6HOI&OHDQ/LPSLH]D
$XWRPiWLFD
'HIURVW'HVFRQJHODU Sensor Cooking
&RFFLyQSRU6HQVRU
Defrost by Food
'HVFRQJHODUSRU
&RPLGD
6LPPHU+HUYLU
Defrost by Time
'HVFRQJHODFLyQSRU
7LHPSR
6RIWHQ$EODQGDU

14 49-2001077 Rev. 2
Opciones del Horno
USO DEL HORNO:2SFLRQHVGHO+RUQR
Opciones del Horno Superior
Repeat Last (Repetir el Último Paso)
Esta función sólo puede ser usada con los modos de cocción
del horno superior. Use esta función de ahorro de tiempo
para aquellas cocciones que se repiten, tales como galletas o
aperitivos. Al seleccionar esta función, se mostrará la última
comida preconfigurada. Seleccione la tecla Start/Pause
(Iniciar/ Pausar) o el dial de selección para iniciar la cocción.
NOTA: El ultimo programa usado queda guardado durante dos
horas. No todas las funciones pueden ser repetidas.
Proof (Leudar)
Use esta función para leudar pan. Para más detalles, consulte
ODVVHFFLRQHVSDUD&DOHQWDUHO+RUQR6XSHULRU\/HXGDGR
Warm (Calentar)
8VHHVWDIXQFLyQSDUDFDOHQWDU6HOHFFLRQH0RLVW+~PHGRR
&ULVS&URFDQWH3DUDPiVGHWDOOHVFRQVXOWHODVVHFFLRQHV
SDUD&DOHQWDUHO+RUQR6XSHULRU\/HXGDGR
Opciones del Horno Inferior
Delay Start (Iniciar con Retraso)
8VHHVWDIXQFLyQSDUDUHWUDVDUHOLQLFLRGHODVIXQFLRQHV%DNH
+RUQHDU&RQY%DNH+RUQHDUSRU&RQYHFFLyQ3UREH
6RQGDR6HOI&OHDQ/LPSLH]D$XWRPiWLFD3DUDXVDUHVWD
IXQFLyQVHOHFFLRQH'HOD\6WDUW,QLFLDUFRQ5HWUDVR\FRQILJXUH
la hora de inicio, y luego seleccione el modo de cocción.
7DPELpQSXHGHXVDUODIXQFLyQ'HOD\6WDUW,QLFLDUFRQ5HWUDVR
PLHQWUDVSURJUDPDXQDIXQFLyQGHFRFFLyQFRQ%DNH+RUQHDU
&RQY%DNH+RUQHDUSRU&RQYHFFLyQR3UREH6RQGD
Probe (Sonda)
Use esta función para cocinar regulando la temperatura interna
de la comida. Para muchas comidas, especialmente comidas
tostadas y ave, la temperatura interna de la comida es la mejor
prueba de que está hecha. Esta función está disponible para
el horno inferior únicamente. Para usar esta función, inserte la
VRQGDHQODFRPLGD6HOHFFLRQH3UREH6RQGDOXHJRLQJUHVH
la temperatura interna de la comida que desee y programe los
PRGRVGHFRFFLyQ%DNH+RUQHDUR&RQY%DNH+RUQHDUSRU
&RQYHFFLyQFRPRORKDFHQRUPDOPHQWH7DPELpQVHSXHGH
acceder a esta función conectando la sonda de temperatura en
el horno al mismo tiempo.
Proof (Leudar)
Use esta función para leudar masa. Para más detalles,
FRQVXOWHORV0RGRVGH&RFFLyQHQHO+RUQR,QIHULRU
Sabbath (Modo Sabático)
8VHHVWDIXQFLyQSDUDLQJUHVDUHOPRGR6DEEDWK6DEiWLFR
Este modo configura el horno para el Festejo Sabático Judío
y Feriados. Esta función cumple con los requisitos del Festejo
Sabático Judío. El modo sabático desactiva las luces del horno
ODOX]GHOKRUQRQRVHHQFHQGHUiFXDQGRODSXHUWDVHDDELHUWD
WRGRVORVVRQLGRVHOFRQWUROQRHPLWLUiQLQJ~QSLWLGRFXDQGRXQ
botón sea presionado, pero emitirá un pitido si ciertas fallas del
KRUQRVHSURGXFHQ\WRGDVODVIXQFLRQHVGHOKRUQRVXSHULRU
HLQIHULRUH[FHSWR%DNH+RQHDUHQHOKRUQRLQIHULRU'XUDQWH
HOPRGR6DEEDWK6DEiWLFRVyOR%DNH+RUQHDUHQHOKRUQR
inferior está disponible. Durante este modo, luego de configurar/
modificar una temperatura de horneado, un retraso al azar de
DSUR[LPDGDPHQWHHQWUHVHJXQGRV\PLQXWRVHSURGXFLUi
antes de que el horno comience a hornear. Para detener la
cocción, presione la tecla Back (Retroceder) y luego la tecla
Start/Pause (Iniciar/ Pausar). El horno se apagará luego de
XQUHWUDVRDOD]DUGHDSUR[LPDGDPHQWHHQWUHVHJXQGRV\
PLQXWR3DUDVDOLULQPHGLDWDPHQWHGH%DNH+RUQHDUHQHO
horno inferior, presione la tecla Clear/Off (Borrar/ Apagar) en
cualquier momento; los elementos de cocción se apagarán de
IRUPDLQPHGLDWD\6DEEDWK%DNH+RUQHDUHQHO0RGR6DEiWLFR
FDPELDUiD6DEEDWK6DEiWLFRHQODSDQWDOODLQGLFDQGRTXH
HOKRUQRIXHDSDJDGR3DUDVDOLUGHOPRGR6DEEDWK6DEiWLFR
mantenga presionada la tecla Back (Retroceder) durante
3 segundos. No presione ningún otro botón hasta que se
KD\DVDOLGRGHOPRGR6DEEDWK6DEiWLFRRHOPRGR6DEEDWK
6DEiWLFRVHYROYHUiDLQLFLDU\QRVHVDOGUiGHOPLVPR3DUD
PiVGHWDOOHVFRQVXOWHODVHFFLyQGH0RGR6DEiWLFRHQHO+RUQR
Inferior.
NOTA: Si se produce un corte de corriente durante el modo
Sabático, la unidad permanecerá en el modo Sabático pero
apagada cuando vuelva la corriente.
Self Clean (Limpieza Automática)
8VHHVWDIXQFLyQSDUDLQJUHVDUHOPRGR6HOI&OHDQ/LPSLH]D
$XWRPiWLFD3DUDPiVGHWDOOHVFRQVXOWHODVHFFLyQGH
/LPSLH]DGHO+RUQR
Steam Clean (Limpieza al Vapor)
8VHHVWDIXQFLyQSDUDLQJUHVDUHOPRGR6HOI&OHDQ/LPSLH]D
$XWRPiWLFD3DUDPiVGHWDOOHVFRQVXOWHODVHFFLyQGH
/LPSLH]DGHO+RUQR
Warm (Calentar)
Use esta función para calentar. Para más detalles, consulte los
0RGRVGH&RFFLyQHQHO+RUQR,QIHULRU
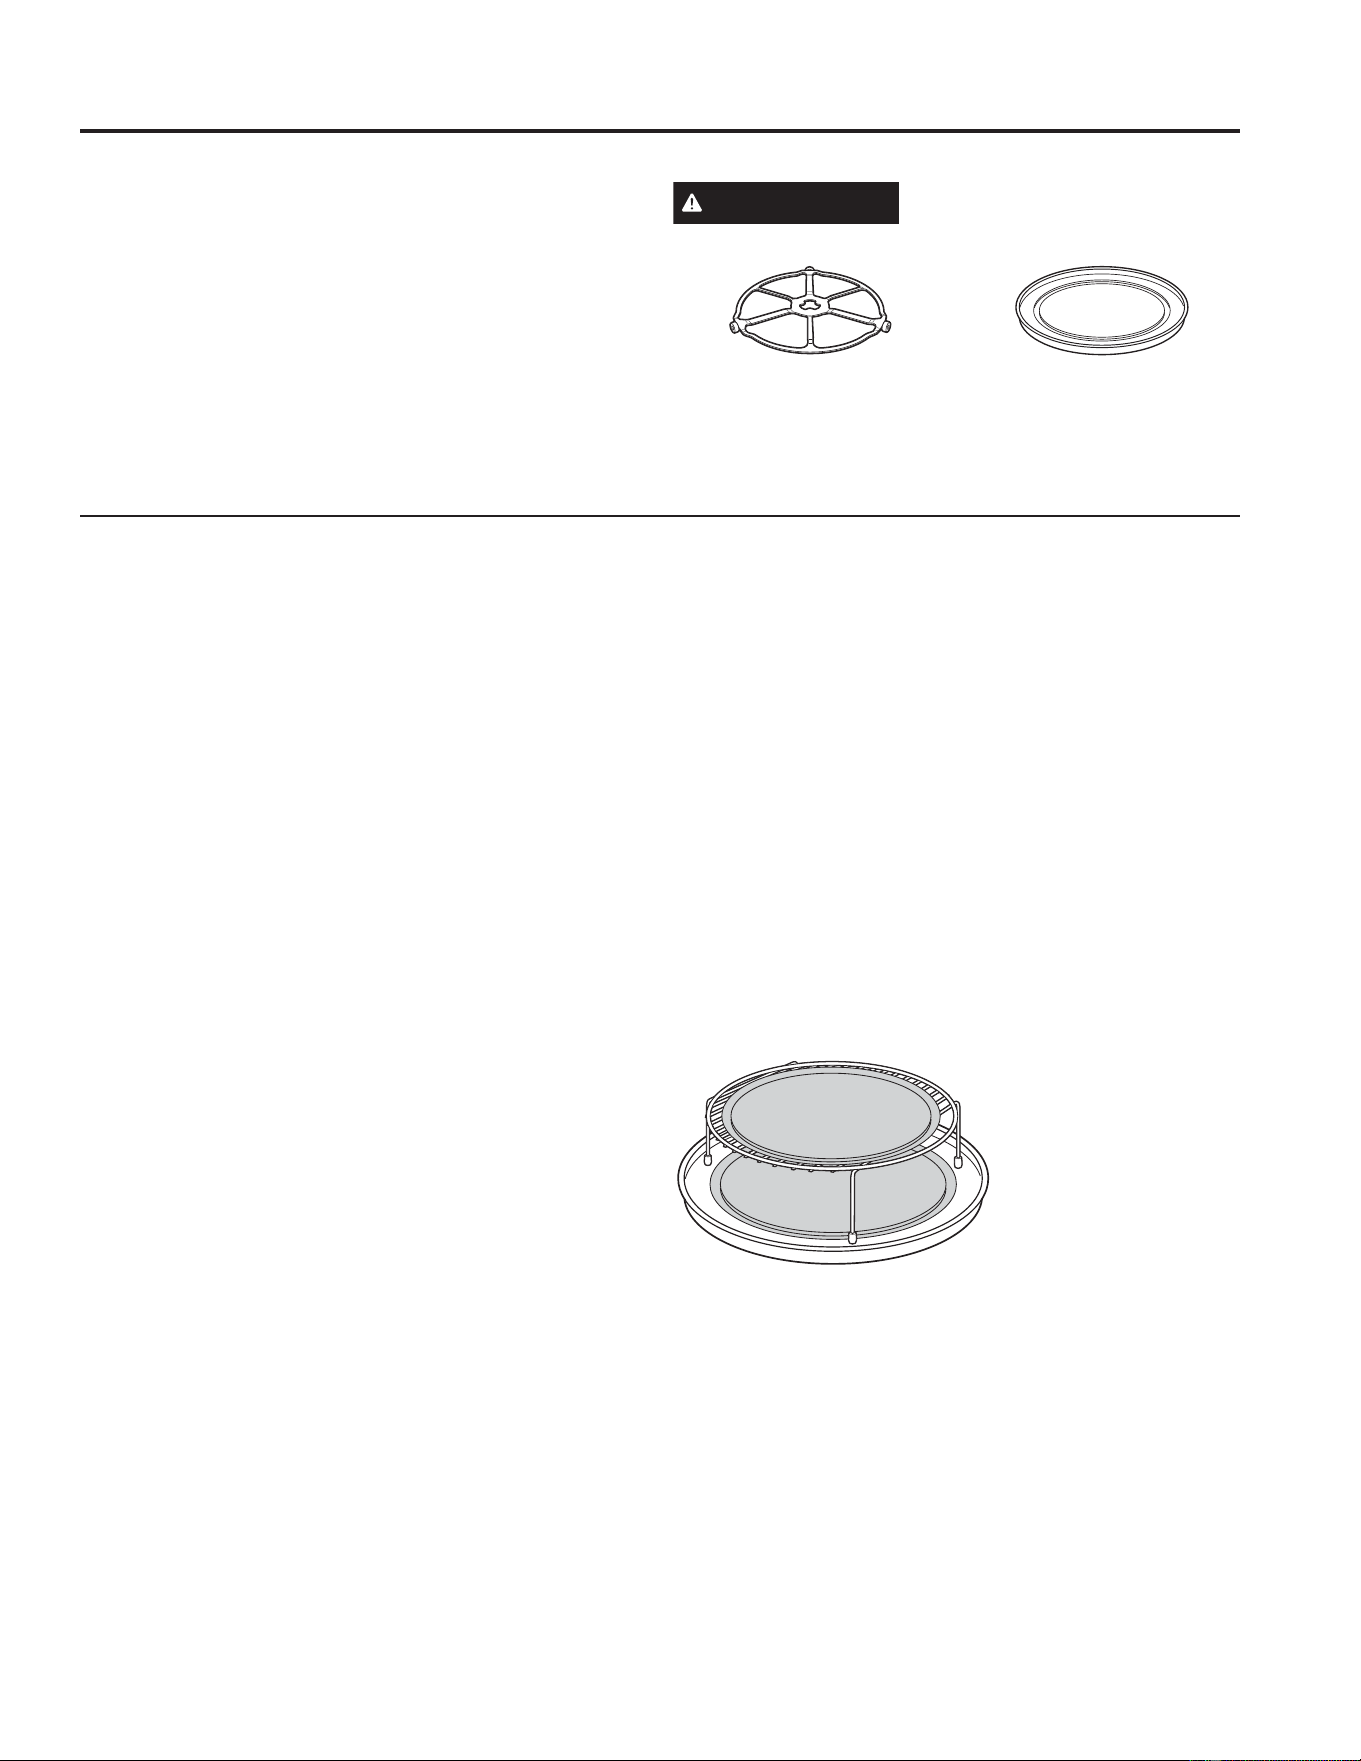
49-2001077 Rev. 2 15
HORNO SUPERIOR:+RUQHDGR
Horneado
/DIXQFLyQGHKRUQHDUOHSHUPLWHFRFLQDUORVDOLPHQWRVGH
la misma forma que un horno convencional, utilizando un
elemento de calentamiento para incrementar la temperatura del
aire dentro del horno. Se puede ajustar cualquier temperatura
de horno de 250 a 450° F.
Un ventilador circula aire caliente suavemente dentro del
horno, sobre y alrededor de los alimentos. Debido a que el aire
caliente se mantiene en constante movimiento, no permitiendo
que se desarrolle una capa de aire más frío alrededor de los
alimentos, algunos alimentos se cocinarán levemente más
rápido que la cocción realizada en horno regular.
Antes de empezar, asegúrese de que se encuentra colocada la
base giratoria.
PRECAUCIÓN
¡Cuando hornee, recuerde que el
horno, compuerta y los platos estarán muy calientes!
Horneado
Cómo Hornear
1. Presione la tecla Convection Bake (Hornear por
Convección).
2. Gire el dial de selección para configurar la temperatura del
horno y presione el mismo para ingresar.
3. Seleccione Start (Iniciar) o Cook Time.
Preheat (Precalentamiento con Tiempo de Cocción) luego
de seleccionar iniciar:
El horno empieza a funcionar inmediatamente. No coloque
alimentos en el horno.
2. Cuando el horno termine el precalentamiento, emitirá una
señal. Si no abre la puerta en el plazo de una hora, el horno
se apagará automáticamente. Abra la compuerta del horno
y, con cuidado, coloque los alimentos dentro del horno.
3. Cierre la compuerta del horno. Presione el dial para
configurar dos veces, a fin de configurar el tiempo de
cocción y presione Start/Pause (Iniciar/ Pausar) para
iniciar la cocción. Cuando se ha completado la cocción, el
horno indicará una señal y se apagará.
Podrá cambiar la temperatura del horno durante el
precalentamiento, y presionando y girando el dial para
seleccionar la nueva temperatura.
Si la compuerta del horno se encuentra abierta durante la
FRFFLyQDSDUHFHUi3DXVH3DXVDHQODSDQWDOOD&LHUUH
la compuerta y apriete Start/Pause (Iniciar/Pausar). Para
alcanzar resultados óptimos en altas temperaturas, limite las
aperturas de la puerta.
/RVWLHPSRVGHFRFFLyQVHPXHVWUDQHQPLQXWRV\SXHGHQVHU
GHPLQXWRVFRPRPi[LPR(OWLHPSRSRGUiVHUPRGLILFDGR
durante la cocción girando el dial de selección.
Precaliente luego de seleccionar el tiempo de cocción:
/XHJRGHVHOHFFLRQDUXQWLHPSRGHFRFFLyQHOKRUQROH
indicará que debe iniciar la cocción por tiempo o iniciar el
precalentamiento.
2. Presione iniciar el tiempo de cocción para saltear el
precalentamiento, o presione iniciar el precalentamiento si
desea precalentar.
3. Cuando el horno termine el precalentamiento, emitirá una
señal. Si no abre la puerta en el plazo de una hora, el
horno se apagará automáticamente. Abra la compuerta
del horno y, con cuidado, coloque los alimentos dentro del
horno.
4. Cierre la compuerta del horno. Presione el dial de selección
para editar una temperatura o tiempo de cocción si es
necesario y/o presione Start/Pause (Iniciar/ Pausar) para
iniciar la cocción. Una vez completada la cocción, el horno
emitirá una señal y se apagará.
Para hornear en dos
niveles, coloque la comida
en un plato para hornear
sobre la bandeja de vidrio.
. Coloque el plato para
hornear con comida sobre
la parrilla de alambre.
Apoye la parrilla con
comida sobre la bandeja de
vidrio.
/Dbase giratoria siempre
debe estar colocada en su lugar
cuando se utiliza el horno.
Coloque la comida o utensilios
de uso seguro en el horno
directamente sobre la bandeja de
vidrio para hornear.
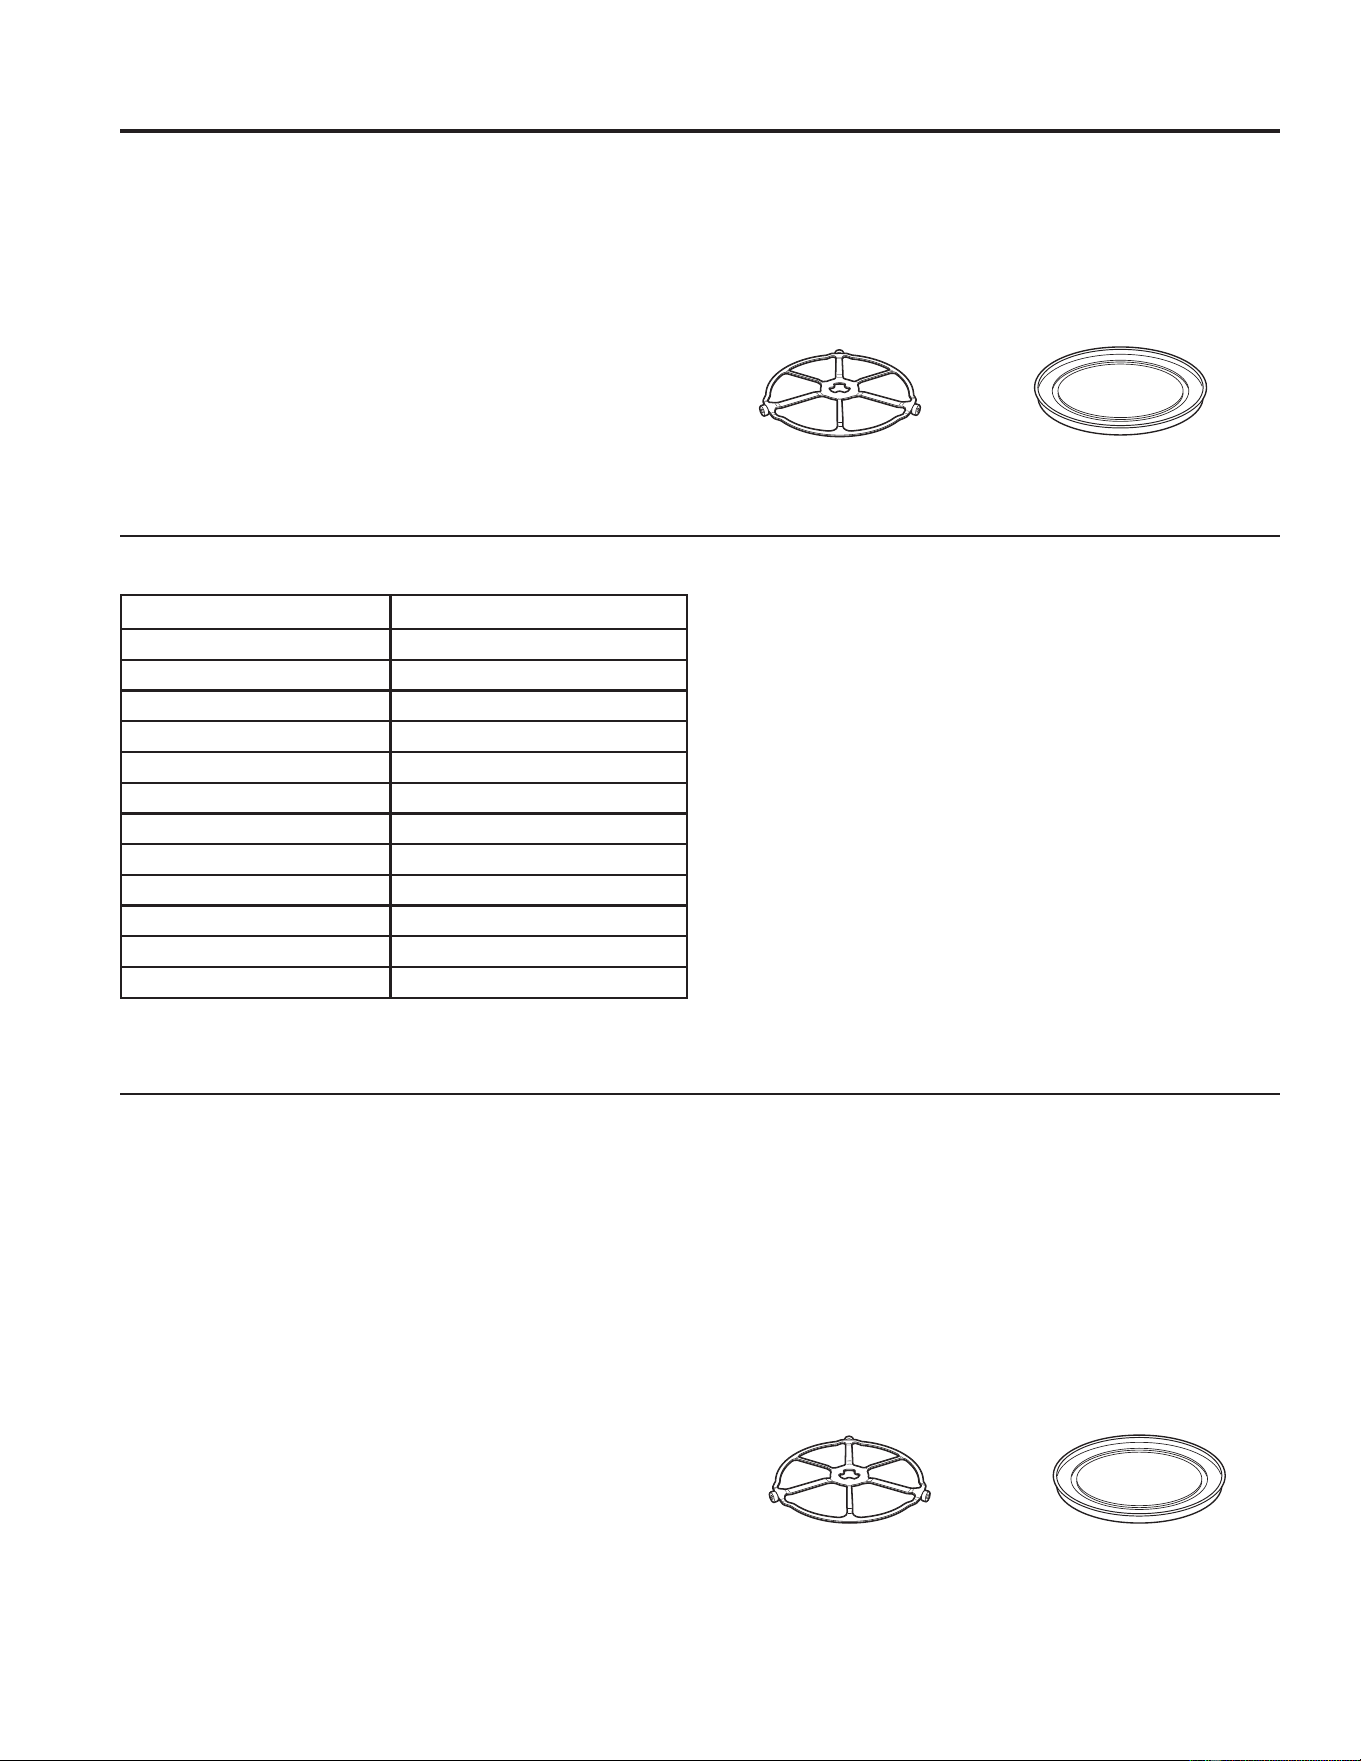
16 49-2001077 Rev. 2
Calentamiento
/DIXQFLyQ:DUP&DOLHQWHPDQWHQGUiFDOLHQWHVORVDOLPHQWRV
cocinados a una temperatura de servir. Empiece siempre con
comida caliente. Utilice recipientes de cocina y utensilios que
puedan soportar temperaturas de hasta 230° F.
1. Presione la tecla Cooking Options (Opciones de Cocción).
*LUHHOGLDOGHVHOHFFLyQD:DUP&DOHQWDU3UHVLRQHHOGLDO
de selección para ingresar.
*LUHHOVHOHFWRUGHOGLDOSDUDVHOHFFLRQDU0RLVW&ULVS+~PHGR
&URFDQWH3UHVLRQHHOGLDOGHVHOHFFLyQSDUDLQJUHVDU
Si se abre la compuerta del horno durante el calentamiento,
DSDUHFHUi3DXVH3DXVDHQODSDQWDOOD&LHUUHODFRPSXHUWD\
apriete Start/Pause (Iniciar/Pausar).
Para hacer que los alimentos secos estén crujientes:
Ŷ &RORTXHODFRPLGDRORVSODWRVVREUHODEDQGHMDGHYLGULR
Ŷ &RQWUROHTXHHVWpFURFDQWHGHIRUPDSHULyGLFD$JUHJXH
tiempo según sea necesario.
HORNO SUPERIOR:&DOHQWDU\/HXGDU
Calentar y Leudar
Tabla de selección de temperatura y humedad
Consejos para alimentos crujientes:
Ŷ 'HMHORVDOLPHQWRVGHVFXELHUWRV
Ŷ 1RXWLOLFHUHFLSLHQWHVGHSOiVWLFRRHQYROWXUDSOiVWLFD
Consejos para alimentos húmedos:
Ŷ &XEUDORVDOLPHQWRVFRQXQDWDSDROiPLQDSDSHOGHDOXPLQLR
Ŷ 1RXWLOLFHUHFLSLHQWHVGHSOiVWLFRRHQYROWXUDSOiVWLFD
/Dbase giratoria siempre
debe estar colocada en su lugar
cuando se utiliza el horno.
Coloque la comida sobre la
bandeja de vidrio para calentar.
/Dbase giratoria siempre
debe estar colocada en su lugar
cuando se utiliza el horno.
Coloque la masa de pan en un
recipiente para panes y ubique la
misma en una bandeja de vidrio
para dejar leudar la misma.
Activación (Proofing)
/DIXQFLyQGHDFWLYDFLyQSURRILQJSURYHHDXWRPiWLFDPHQWHOD
temperatura óptima para el proceso de activación, por lo que
no tiene ajuste de temperatura.
1. Presione la tecla Cooking Options (Opciones de Cocción).
*LUHHOGLDOSDUDVHOHFFLRQDU3URRI/HXGDU3UHVLRQHHO
dial de selección para ingresar. El horno superior inicia
el leudado de forma inmediata y muestra la cantidad de
tiempo de leudado completada.
Ŷ 3DUDRSWLPL]DUHOUHQGLPLHQWRHYLWHDSHUWXUDVGHSXHUWD
innecesarias.
Ŷ 5HYLVHORVSURGXFWRVGHSDQWHPSUDQRSDUDHYLWDUOD
sobreactivación.
NOTAS:
Ŷ 1RXWLOLFHODPRGDOLGDGGHDFWLYDFLyQSDUDFDOHQWDU
DOLPHQWRVRPDQWHQHUORVDOLPHQWRVFDOLHQWHV/D
temperatura de activación del horno es lo suficientemente
caliente como para mantener los alimentos a temperaturas
VHJXUDV8WLOLFHODIXQFLyQ:DUP&DOHQWDUSDUDPDQWHQHU
los alimentos calientes.
Ŷ /DIXQFLyQGHDFWLYDFLyQQRIXQFLRQDUiVLHOKRUQRHVWiPX\
caliente. Permita que el horno se enfríe antes de usar la
función de activación.
* USDA/FSIS recomienda una temperatura interna de 145ºF como
la temperatura estable para bifes. Utilice un termómetro portátil de
carne para revisar las temperaturas internas.
Tipo de alimento Ajuste de humedad
Carne de aves 02,67+Ò0('2
Carnes* y pescado &5,63&58-,(17(
Comidas fritas &5,63&58-,(17(
Guisados 02,67+Ò0('2
Pan, rollitos duros &5,63&58-,(17(
Pan, rollitos suaves 02,67+Ò0('2
3DQTXHTXHVZDIOHV &5,63&58-,(17(
Papas, horneadas &5,63&58-,(17(
3DSDVSXUp 02,67+Ò0('2
Pizza &5,63&58-,(17(
Trozos de tortilla &5,63&58-,(17(
Verduras 02,67+Ò0('2
49-2001077 Rev. 2 17
HORNO SUPERIOR: Cocción con Microondas
Cocción con Microondas
Cómo Utilizar las Funciones de Microondas
Asegúrese de que la base giratoria y la bandeja de vidrio
transparente se encuentran colocadas.
Coloque los alimentos o recipiente para microondas directamente
en la bandeja de vidrio transparente para cocinar sus alimentos.
/Dbase giratoria siempre
debe estar colocada en su lugar
cuando se utiliza el horno.
/Dbandeja de cristal
transparente siempre deberá
estar en su lugar cuando se
cocina con microondas.
Cómo Utilizar las Selecciones de Microondas Preprogramadas
1. Presione la tecla Microwave (Cocinar con Microondas).
Si no se realiza una selección dentro del plazo de 15
segundos, la pantalla regresará a la hora del día.
2. Gire el dial de selección para buscar la comida o bebida
que desee cocinar, descongelar, ablandar, derretir, hervir o
recalentar. Presione el dial de selección para ingresar.
3. Gire el dial para seleccionar el tipo, cantidad, peso y/o
WDPDxR(OKRUQROHFRQVXOWDUiHQODPHGLGDTXHVHD
QHFHVDULR3UHVLRQHHOGLDOOXHJRGHFDGDVHOHFFLyQ
4. Presione el dial de selección o la tecla Start/Pause
(Iniciar/ Pausar) para iniciar la cocción.
Para revisar o editar las configuraciones durante la cocción,
presione el dial de selección.
Si se abre la compuerta durante la cocción, el horno se
GHWHQGUi\VHPRVWUDUi3DXVH3DXVDHQODSDQWDOOD&LHUUH
la compuerta y apriete el botón Start/Pause (Iniciar/Pausar
para continuar cocinando.
Si ingresa una selección no deseada en cualquier momento,
simplemente apriete el botón Back (Regresar) y reingrese las
selecciones deseadas.
Ŷ &XDQGRHOKRUQRHVWiHQFHQGLGRVHSRGUiYHUODOX]
DOUHGHGRUGHODFRPSXHUWDRGHODFXELHUWDH[WHUQD
Ŷ /DOX]GHOLQWHULRUGHOKRUQRVHHQFHQGHUiGXUDQWHXQFLFOR
de cocción por microondas.
Ŷ 3RGUtDHVFDSDUYDSRUGHOUHGHGRUGHODFRPSXHUWD
Cook By Time (Cocinar Por Tiempo) y Cook By Time 1 & 2 (Cocinar Por Tiempo 1 y 2)
8WLOLFHODVIXQFLRQHVGH&RRN%\7LPH&RFLQDU3RU7LHPSR\
&RRN%\7LPHSDUDFRFLQDUSRUPLFURRQGDVORVDOLPHQWRV
que no se encuentran en la sección de recetas y en el tiempo
que programó.
Ŷ (OQLYHOGHSRWHQFLDVHHQFXHQWUDDMXVWDGR
DXWRPiWLFDPHQWHHQ+LJK$OWRSHURSXHGHFDPELDUOR
SDUDGDUPD\RUIOH[LELOLGDG
1. Presione la tecla Microwave (Cocinar con Microondas).
*LUHHOGLDOSDUDVHOHFFLRQDU&RRN%\7LPH&RFLQDUSRU
7LHPSRR&RRN%\7LPH&RFLQDUSRU7LHPSR\
y presione el dial de selección para ingresar.
3. Gire el dial de selección para configurar el tiempo de
cocción y presione el mismo para ingresar.
4. Seleccione la configuración del nivel de potencia.
6LVHOHFFLRQy&RRN%\7LPH&RFLQDUSRU7LHPSR
\JLUHHOGLDOGHVHOHFFLyQSDUDFRQILJXUDUHOVHJXQGR
tiempo de cocción, la segunda configuración de nivel de
potencia y presione el dial para ingresar.
5. Presione el dial de selección o la tecla Start/Pause
(Iniciar/ Pausar) para iniciar la cocción.
'XUDQWHODVIXQFLRQHVGH&RRN%\7LPH&RFLQDU3RU7LHPSR
R&RRN%\7LPH&RFLQDU3RU7LHPSRSXHGHDEULU
la compuerta para revisar la comida. Cierre la compuerta y
apriete el botón Start/Pause (Iniciar/Pausar) para continuar
cocinando.
SELECCIONES MICROWAVE PRE-SET (PREPROGRAMACIONES DE MICROONDAS)
Ŷ %HELGDV
±$JXDRQ]DV
±&DIpRQ]DV
±7pRQ]DV
±/HFKHRQ]DV
– Cacao Caliente
RQ]DV
Ŷ 3DORPLWDVGH0Dt]
– Sensor de palomitas
de maíz
Ŷ 'HUUHWLU
– Manteca
– Caramelo
±4XHVR
– Trozos de Chocolate
– Malvavisco
Ŷ +HUYLU
Ŷ &RFLQDU
– Por tipo de alimento
– Por tiempo
– Por tiempo 1 y 2
Ŷ 6XDYL]DU
– Manteca
±4XHVR&UHPD
±*ODVHDGRRQ]DV
±+HODGR
Ŷ 'HVFRQJHODU
– 1,0 lb. Rápido
– Por tiempo
– Por peso
– Por tipo de alimento
– Derretir
– Suavizar
Ŷ 5HFDOHQWDU
±%HELGDV
– Cazuela
– Pollo
– Pasta
– Pizza
– Plato de comida
– Arroz
– Sopa
±%LVWHFV&KXOHWDV
– Verduras
18 49-2001077 Rev. 2
HORNO SUPERIOR: Cocción con Microondas
Cocción con Microondas (Cont.)
Nivel(es) De Potencia Del Horno Microondas
Ŷ 3XHGHPRGLILFDUHOQLYHOGHSRWHQFLDGXUDQWHODPD\RUSDUWH
del programa de cocción.
1. Presione el dial de selección para editar.
2. Gire el dial de selección para cambiar la hora y/o presione
el dial de selección para ingresar.
3. Gire el dial de selección en dirección de las agujas del reloj
para incrementar el nivel de potencia y en contra de las
agujas del reloj para reducir el mismo. Presione el dial de
selección para ingresar.
Aquí se presentan algunos ejemplos de utilizaciones para
varios niveles de potencia:
High (Alto) 10: Pescado, tocino, verduras, líquidos hirvientes.
Med (Medio) - High (Alto) 7: Cocción moderada de carne de
res y pollo; hornear guisados y recalentamiento.
Med (Medio) 5: Cocción lenta y ablandamiento para guisados
y cortes de carne de res menos suaves.
Low (Bajo) 2 o 3: Descongelación; hervir a fuego lento; salsas
delicadas.
Warm (Caliente) 1: Mantener comidas calientes; suavizar
mantequilla.
Descongelación Por Tipo De Alimento
/DIXQFLyQ$XWR'HIURVW'HVFRQJHODFLyQDXWRPiWLFDDMXVWD
los tiempos de descongelación y los niveles de potencia para
ofrecer resultados de descongelación uniformes para carnes
de res, pollo y pescado de hasta 6 libras de peso.
1. Saque los alimentos de la caja y colóquelos en un plato
adecuado para microondas.
2. Presione la tecla Microwave (Cocinar con Microondas) y
VHOHFFLRQH'HIURVW'HVFRQJHODU
*LUHHOVHOHFWRUGHOGLDOD'HIURVW'HVFRQJHODU\D)RRG
7\SH7LSRGH&RPLGD3UHVLRQHHOGLDOGHVHOHFFLyQSDUD
ingresar.
4. Gire el dial para seleccionar el tipo de comida. Presione el
dial de selección para ingresar.
5. Gire el dial de selección al peso de la comida, usando la
Guía de Conversión que figura a la derecha. Por ejemplo,
VHOHFFLRQHSDUDOLEUDVOLEUDRQ]DV3UHVLRQHHO
dial de selección para ingresar.
6. Presione el dial de selección o la tecla Start/Pause
(Iniciar/ Pausar) para iniciar la descongelación.
7. Gire los alimentos cuando el horno le indique Turn Food
2YHU'DU9XHOWD$/RV$OLPHQWRV
Ŷ 6DTXHODFDUQHGHVFRQJHODGDRFXEUDODViUHDVFDOLHQWHV
con pedazos pequeños de lámina de aluminio para lograr
una descongelación uniforme.
Ŷ 'HVSXpVGHGHVFRQJHODUODPD\RUtDGHODVFDUQHV
necesitan dejarse en reposo durante 5 minutos para
completar la descongelación. Asados de mayor tamaño
deben permanecer en reposo por cerca de 30 minutos.
Guía de conversión
Si se indica el peso de los alimentos en libras y onzas, se
GHEHQFRQYHUWLUODVRQ]DVDGpFLPRVGHOLEUD
Descongelación Por Tiempo
8VH'HIURVW%\7LPH'HVFRQJHODUSRU7LHPSRSDUD
descongelar durante un período de tiempo seleccionado.
1. Presione la tecla Microwave (Cocinar con Microondas) y
VHOHFFLRQH'HIURVW'HVFRQJHODU
*LUHHOGLDOGHVHOHFFLyQD'HIURVW%\7LPH'HVFRQJHODU
SRU7LHPSR3UHVLRQHHOGLDOGHVHOHFFLyQSDUDLQJUHVDU
3. Gire el dial para seleccionar el tiempo que desee. Presione
el dial de selección para ingresar.
4. Presione el dial de selección o la tecla Start/Pause
(Iniciar/ Pausar) para iniciar la descongelación.
5. Gire los alimentos cuando el horno le indique Turn Food
2YHU'DU9XHOWD$/RV$OLPHQWRV
El nivel de potencia se ajusta automáticamente a 3, pero puede
cambiarse. Para cambiar los niveles de potencia, consulte la
sección Nivel de potencia del microondas. Puede descongelar
alimentos pequeños aumentando el nivel de potencia después
de ingresar el tiempo. El nivel de potencia 7 corta el tiempo de
descongelación total a cerca de la mitad; el nivel de potencia
10 corta el tiempo total de descongelación a cerca de un
tercio. Cuando descongela a niveles de potencia más altos, los
alimentos necesitarán atención más frecuente de la normal.
Peso del alimento
del alimento en onzas
Ingresar el peso
(décimos de libra)
1–2 .1
3.2
4–5 .3
6–7 .4
8.5
9–10 .6
11 .7
12–13 .8
14–15 .9

49-2001077 Rev. 2 19
HORNO SUPERIOR: Cocción con Microondas
Defrost By Weight (Descongelar por Peso)
8VH'HIURVW%\:HLJKW'HVFRQJHODUSRU3HVRSDUD
descongelar durante un período de tiempo seleccionado.
1. Presione la tecla Microwave (Cocinar con Microondas) y
VHOHFFLRQH'HIURVW'HVFRQJHODU
*LUHHOGLDOGHVHOHFFLyQD'HIURVW%\:HLJKW'HVFRQJHODU
SRU3HVR3UHVLRQHHOGLDOGHVHOHFFLyQSDUDLQJUHVDU
3. Gire el dial para seleccionar el peso que desee. Presione el
dial de selección para ingresar.
3UHVLRQHHOGLDOGHVHOHFFLyQRODWHFOD6WDUW3DXVH,QLFLDU
3DXVDUSDUDLQLFLDUODGHVFRQJHODFLyQ
5. Gire los alimentos cuando el horno le indique Turn Food
2YHU'DU9XHOWD$/RV$OLPHQWRV
El nivel de potencia no puede ser modificado durante esta
configuración.
Quick Defrost (Descongelación Rápida) con 1.0 lbs.
8VH4XLFN'HIURVW'HVFRQJHODFLyQ5iSLGDFRQOEVSDUD
una descongelación rápida de 1.0 lbs. de comida congelada.
1. Presione la tecla Microwave (Cocinar con Microondas)
y seleccione la descongelación rápida con 1.0 lbs.
2. Presione el dial de selección o la tecla Start/Pause
(Iniciar/ Pausar) para iniciar la descongelación. Presione
el dial de selección para ingresar.
3. Gire los alimentos cuando el horno le indique Turn Food
2YHU'DU9XHOWD$/RV$OLPHQWRV
El nivel de potencia no puede ser modificado durante esta
configuración.
Consejos Para Descongelar
Ŷ 6HSXHGHQGHVFRQJHODUDOLPHQWRVFRQJHODGRVHQSDSHOR
plástico en el paquete cuando se utiliza la función Defrost
%\)RRG7\SH'HVFRQJHODU3RU7LSR'H&RPLGD6H
deben cortar, perforar o ventilar los paquetes cerrados
después de que se hayan descongelado los alimentos
parcialmente. Se deben descubrir parcialmente los
recipientes de almacenamiento plásticos.
Ŷ 6HSXHGHQGHVFRQJHODU\FRFLQDUFRQPLFURRQGDVODV
meriendas preempacadas, de tamaño familiar, congeladas.
Si el alimento se encuentra en un recipiente de lámina de
aluminio, transfiéralo a un plato adecuado para microondas.
Ŷ /RVDOLPHQWRVTXHVHHFKDQDSHUGHUIiFLOPHQWHQRVH
deben dejar fuera del refrigerador durante más de una
KRUDGHVSXpVGHVFRQJHODUVH/DWHPSHUDWXUDDPELHQWH
promueve el crecimiento de bacterias nocivas.
Ŷ 3DUDXQDGHVFRQJHODFLyQPiVXQLIRUPHGHDOLPHQWRVPiV
JUDQGHVWDOHVFRPRDVDGRVXWLOLFHODIXQFLyQ'HIURVW%\
7LPH'HVFRQJHODFLyQ3RU7LHPSR$VHJ~UHVHTXHODV
carnes se encuentran completamente descongeladas antes
de cocinarlas.
Ŷ &XDQGRORVDOLPHQWRVVHHQFXHQWUDQGHVFRQJHODGRVGHEHQ
encontrarse fríos pero suaves en todas las áreas. Si aún
se encuentran restos de hielo, vuélvalos a colocar en el
microondas pero por un período muy corto de tiempo o
déjelos reposar durante un par de minutos.
Cocción con Microondas (Cont.)
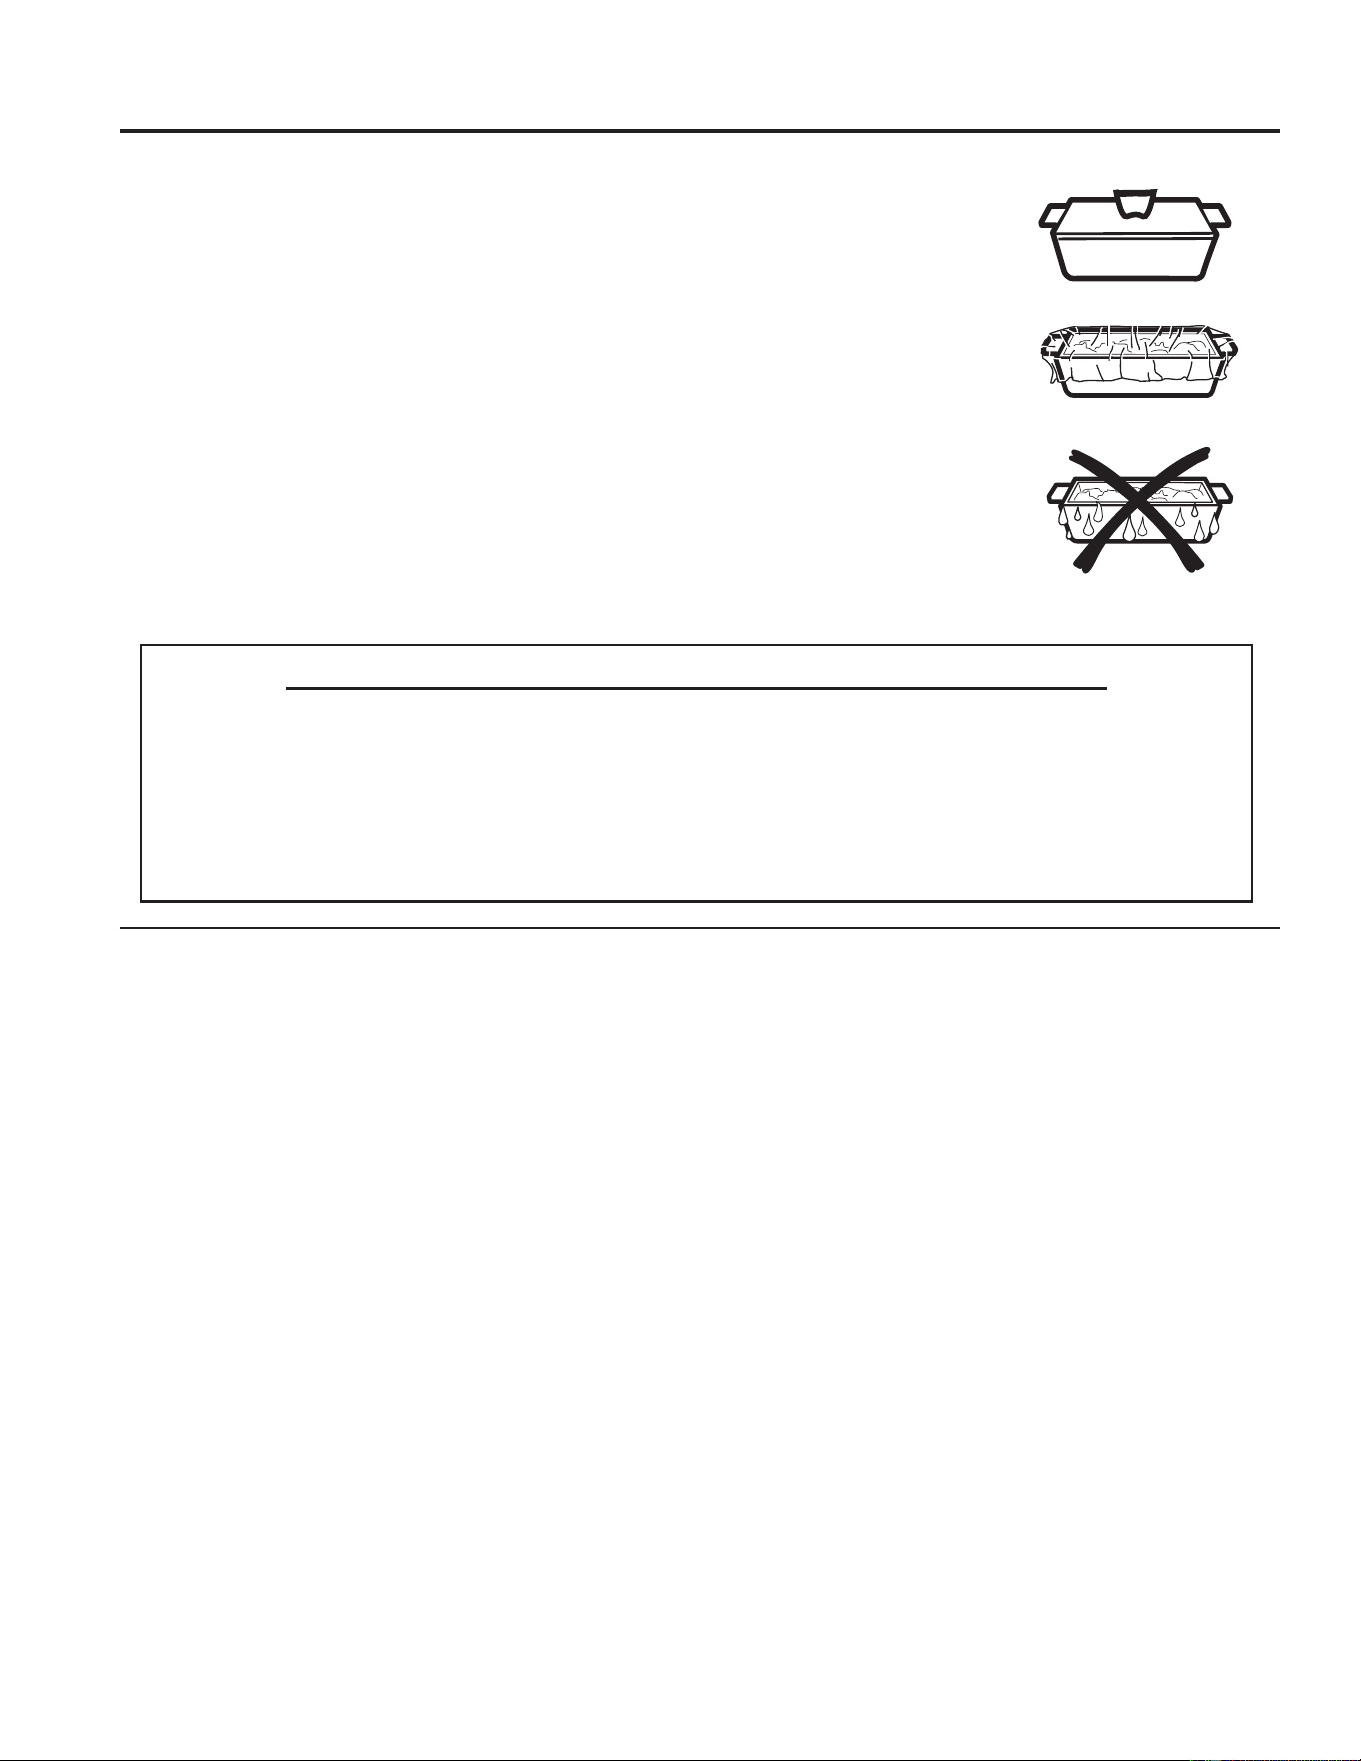
20 49-2001077 Rev. 2
Cocción De Microondas Por Sensor
/DIXQFLyQGHVHQVRUGHWHFWDHODXPHQWRGHKXPHGDGOLEHUDGD
durante la cocción. El horno ajusta el tiempo de cocción
automáticamente a los diferentes tipos y cantidades de comida.
No utilice las funciones de sensor dos veces en sucesión en la
misma porción de comida ya que puede tener como resultado
comida severamente sobrecocinada o quemada. Si el alimento
no se cocina completamente después del primer conteo
UHJUHVLYRXWLOLFHODIXQFLyQGH&RRN%\7LPH&RFLQDU3RU
7LHPSRSDUDSHUPLWLUWLHPSRGHFRFFLyQDGLFLRQDO
Los recipientes y tapas o cubiertas apropiadas son
esenciales para obtener los mejores resultados con la
cocción por sensor.
Ŷ 8WLOLFHVLHPSUHUHFLSLHQWHVDGHFXDGRVSDUDPLFURRQGDV\
cúbralos con tapas o envoltura plástica ventilada. Nunca
utilice recipientes de plástico con sellado ajustado ya que
pueden prevenir que el vapor escape ocasionando que se
sobrecocinen los alimentos.
Ŷ $VHJ~UHVHGHTXHHO
H[WHULRUGHORVUHFLSLHQWHV
de cocina y el interior
del horno se encuentren
secos antes de colocar
los alimentos en el horno.
/DVJRWDVGHKXPHGDG
que se convierten en
vapor pueden dar lecturas
incorrectas al sensor.
Ŷ /DVEHELGDVVHFDOLHQWDQ
mejor descubiertas.
Para Utilizar Todos Los Programas De Sensor
El modo de microondas del horno superior cuenta con cocción
con sensor. De forma automática, detecta cuándo la comida
está lista y se apaga, eliminando la necesidad de programar
tiempos de cocción y niveles de potencia.
1. Presione la tecla Microwave (Cocinar con Microondas) y
JLUHHOGLDOGHVHOHFFLyQD&RRN%\)RRG7\SH&RFLQDUSRU
7LSRGH&RPLGDR5HKHDW5HFDOHQWDU3UHVLRQHHOGLDOGH
selección para ingresar.
2. Gire el dial para seleccionar la comida que desee. Presione
el dial de selección para ingresar.
3. Presione el dial de selección o la tecla Start/Pause
(Iniciar/ Pausar) para iniciar la cocción.
No abra la puerta del horno hasta que se esté realizando la
cuenta regresiva en la pantalla o hasta que el microondas
finalice la cocción. Si la compuerta se encuentra abierta, ciérrela
\DSULHWH6WDUW3DXVH,QLFLDU3DXVDULQPHGLDWDPHQWH6LORV
alimentos aún no se encuentran lo suficientemente cocinados,
XWLOLFHODIXQFLyQ&RRN%\7LPH&RFFLyQ3RU7LHPSRHQHO
selector de microondas para cocinar por más tiempo.
NOTA: No utilice las funciones de sensor dos veces en
sucesión en la misma porción de comida ya que puede dar
como resultado comida severamente sobrecocinada o quemada.
Ŷ 6LHOKRUQRVHHQFXHQWUDFDOLHQWHHVWRSXHGHVHUXQD
indicación de que está demasiado caliente como para
cocinar por sensor. Por supuesto, siempre puede proceder
DFRFLQDUFRQODIXQFLyQ&RRN%\7LPH&RFFLyQ3RU
7LHPSR
NOTA: Si el horno se encuentra demasiado caliente, cambiará
automáticamente a cocción por tiempo.
Ŷ 3DUDGLVPLQXLURDXPHQWDUHOWLHPSRGHFRFFLyQHVSHUH
hasta que se muestre el conteo de tiempo regresivo en
ODSDQWDOOD/XHJRJLUHHOGLDOGHVHOHFFLyQSDUDDJUHJDUR
restar tiempo.
Ŷ 6LDEUHODFRPSXHUWDPLHQWUDVVHHQFXHQWUDXWLOL]DQGROD
IXQFLyQ6HQVRU&RRNLQJ&RFFLyQ3RU6HQVRUDSDUHFHUi
HOPHQVDMH6HQVRU(UURU(UURU'H6HQVRU&LHUUHOD
compuerta y apriete el botón Start/Pause (Iniciar/Pausar)
para comenzar nuevamente.
Notas sobre el programa de Recalentamiento:
/RVDOLPHQWRVUHFDOHQWDGRVSRGUtDQWHQHUDPSOLDVYDULDFLRQHV
de temperatura. Algunas áreas se pueden encontrar
H[WUHPDGDPHQWHFDOLHQWHV
(VPHMRUXWLOL]DUODIXQFLyQ&RRN%\7LPH&RFFLyQ3RU
7LHPSR\QR5HFDOHQWDUHVWRVDOLPHQWRV
Ŷ 3URGXFWRVGHSDQ
Ŷ /RVDOLPHQWRVTXHGHEHQUHFDOHQWDUVHFXELHUWRV
Ŷ /RVDOLPHQWRVTXHQHFHVLWDQUHYROYHUVHRYROWHDUVH
Ŷ /RVDOLPHQWRVTXHQHFHVLWDQWHQHUXQDVSHFWRVHFRR
superficie crujiente después del recalentamiento.
Cubiertas
Ventiladas
Seque los platos de modo que no
den lecturas incorrectas al sensor.
HORNO SUPERIOR: Cocción con Microondas
Cocción con Microondas (Cont.)
PROGRAMAS DE SENSOR PARA COCCIÓN POR MICROONDAS:
Ŷ*URXQG0HDW&DUQHPROLGD
Ŷ3RSFRUQ3DORPLWDV
Ŷ6RXS6RSD
Ŷ5LFH$UUR]
Ŷ9HJHWDEOHV9HUGXUDV
(enlatadas, frescas, congeladas)
Ŷ&KLFNHQ5HKHDW5HFDOHQWDPLHQWR
de pollo)
Ŷ3DVWD5HKHDW5HFDOHQWDPLHQWR
de pasta)
Ŷ3ODWHRI)RRG5HKHDW3ODWRGH
recalentamiento de comida
Ŷ6RXS5HKHDW5HFDOHQWDPLHQWR
de sopa)
Ŷ9HJHWDEOH5HKHDW
(Recalentamiento de verduras)

49-2001077 Rev. 2 21
HORNO INFERIOR: Modos de Cocción
Su nuevo horno posee una variedad de modos de cocción para que pueda obtener los mejores resultados. Estos modos se describen a
continuación. Para acceder a recomendaciones para comidas específicas, consulte la sección de la Guía de Cocción. Recuerde que es
posible que su nuevo horno funcione de manera diferente que aquel que está reemplazando.
Modos de Horneado y Dorado
Seleccione un modo para hornear y dorar basado en el tipo y
cantidad de comida que está preparando. Al preparar comidas
horneadas tales como tartas, galletas y masas, siempre
precaliente el horno primero. Siga las recomendaciones de la
receta sobre la colocación de la comida. Si no se brindan pautas,
centre la comida en el horno.
Horneado Tradicional
El modo de horneado tradicional está pensado para la cocción en
un solo estante. Este modo usa el calor principalmente desde el
elemento inferior, pero también desde el elemento superior para
cocinar la comida. Para usar este modo presione la tecla Bake
(Hornear), gire el dial de selección para configurar la temperatura del
horno y presione el dial para ingresar, y luego presione Start (Iniciar).
El precalentamiento generalmente se recomienda al usar este modo.
Horneado por Convección en 1 Estante
(OPRGR&RQYHFWLRQ%DNH5DFN+RUQHDGRSRU&RQYHFFLyQ
HQ(VWDQWHHVWiSHQVDGRSDUDODFRFFLyQHQXQVRORHVWDQWH
Este modo utiliza el calor del elemento inferior y también de los
elementos superior y trasero, junto con el movimiento del ventilador
de la convección, para que la cocción sea más pareja. El horno
HVWiHTXLSDGRFRQODIXQFLyQ$XWR5HFLSH&RQYHUVLRQ&RQYHUVLyQ
GH5HFHWD$XWRPiWLFDGHPRGRTXHQRHVQHFHVDULRFRQYHUWLUOD
temperatura al usar este modo. Para usar este modo presione la
tecla Convection Bake (Hornear por Convección), gire el dial para
VHOHFFLRQDU5DFN(VWDQWH\FRQILJXUHODWHPSHUDWXUDGHOKRUQR
y presione el dial para ingresar, y luego presione Start (Iniciar). El
precalentamiento generalmente se recomienda al usar este modo.
Honeado por Convección en Estantes
Múltiples
(OPRGR&RQYHFWLRQ%DNH0XOWL5DFN+RQHDGRSRU&RQYHFFLyQHQ
(VWDQWHV0~OWLSOHVHVWiSHQVDGRSDUDKRQHDUHQP~OWLSOHVHVWDQWHV
al mismo tiempo. Este modo utiliza el calor principalmente desde
el elemento trasero, pero también calienta desde los elementos
superior e inferior, junto con el movimiento de aire desde el
ventilador por convección para mejorar una cocción pareja. El
horno está equipado con la función Auto Recipe Conversion
&RQYHUVLyQGH5HFHWD$XWRPiWLFDGHPRGRTXHQRHVQHFHVDULR
convertir la temperatura al usar este modo. Es posible que el
tiempo de horneado sea un poco más prolongado con estantes
múltiples, en comparación con lo que se espera con un solo
estante. Para usar este modo presione la tecla Convection Bake
(Hornear por Convección), gire el dial para seleccionar Multi Rack
(VWDQWHV0~OWLSOHV\FRQILJXUHODWHPSHUDWXUDGHOKRUQR\SUHVLRQH
el dial para ingresar, y luego presione Start (Iniciar). Siempre
realice el precalentamiento al usar este modo.
Dorar por Convección
(OPRGR&RQYHFWLRQ5RDVW'RUDGRSRU&RQYHFFLyQHVWiSHQVDGR
para dorar cortes enteros de carne en un solo estante. Este
modo utiliza el calor de los elementos inferior, superior y trasero,
junto con el movimiento del ventilador por convección, a fin de
mejorar el dorado y reducir el tiempo de cocción. No es necesario
convertir la temperatura. Cuando use este modo, o si usa la
sonda, controle la comida antes que el tiempo sugerido en la
receta. Para usar este modo presione la tecla Convection Bake
(Hornear por Convección), gire el dial para seleccionar Roast
'RUDU\FRQILJXUHODWHPSHUDWXUDGHOKRUQR\SUHVLRQHHOGLDOSDUD
ingresar, y luego presione Start (Iniciar). No es necesario realizar
el precalentamiento al usar este modo.
Modo para Asar
Siempre ase con la puerta cerrada. El elemento para asar en el
horno es muy potente. Monitoree la comida de cerca al asar. Tenga
cuidado al asar en posiciones de estantes superiores, ya que
colocar la comida más cerca del elemento para asar incrementa el
humo, salpicaduras y la posibilidad de que se incendien las grasas.
No se recomienda asar en el estante de la posición 6.
Intente asar las comidas que normalmente haría a la parrilla.
Ajuste las posiciones de los estantes para ajustar la intensidad del
calor a la comida. Coloque las comidas más cerca del elemento
para asar, cuando se desee una superficie más cocinada y un
LQWHULRUSRFRFRFLGR/DVFRPLGDVPiVJUXHVDV\ODVFRPLGDVFX\R
interior debe ser cocinado deberían ser asadas en un estante en
una posición alejada del usado para asar, o usando las funciones
%URLO/R$VDU%DMR3DUDXQPHMRUUHQGLPLHQWRFHQWUHODFRPLGD
debajo del elemento calentador para asar.
Asar Alto
(OPRGR%URLO+L$VDU$OWRXVDFDORULQWHQVRGHOHOHPHQWR
VXSHULRUSDUDVRDVDUODVFRPLGDV8VHODIXQFLyQ%URLO+L$VDGR
$OWRSDUDFRUWHVPiVGHOJDGRVGHFDUQH\RFRPLGDVTXHSUHILHUD
que quedan menos cocinadas en su interior. Para usar este modo
presione la tecla Broil (Asar)JLUHHOGLDOGHVHOHFFLyQD+L$OWR\
presione el dial para ingresar, y luego presione Start (Iniciar). No
es necesario realizar el precalentamiento al usar este modo.
Asar Bajo
(OPRGR%URLO/R$VDU%DMRXVDPHQRVFDORULQWHQVRGHOHOHPHQWR
superior para cocinar la comida completamente mientras también
VHUHDOL]DHOGRUDGRVXSHUILFLDO8VHODIXQFLyQ%URLO/R$VDGR
%DMRSDUDFRUWHVGHFDUQHPiVJUXHVRV\RFRPLGDVTXHGHVHH
que queden completamente cocinadas. Para usar este modo
presione la tecla Broil (Asar)JLUHHOGLDOGHVHOHFFLyQD/R%DMR
y presione el dial para ingresar, y luego presione Start (Iniciar). No
es necesario realizar el precalentamiento al usar este modo.
Leudar
(OPRGR3URRI/HXGDUHVWiGLVHxDGRSDUDHOHYDUIHUPHQWDU\
OHXGDUPDVDVGHSDQ3UHVLRQHODWHFODOptions (Opciones), gire
HOGLDOSDUDVHOHFFLRQDU3URRI/HXGDU\SUHVLRQHHOGLDOSDUDKDFHU
la selección, y luego presione Start (Iniciar). Cubra bien la masa
para evitar que se seque. El pan se elevará más rápidamente que
a temperatura ambiente. Se deberá observar que con los hornos
de pared doble, la función para leudar no se podrá activar cuando
se esté usando un modo de limpieza en el horno inferior.
Calentar
(OPRGR:DUP&DOHQWDUHVWiGLVHxDGRSDUDPDQWHQHUFRPLGDV
calientes hasta durante 3 horas. Para usar este modo presione
la tecla Options (Opciones), gire el dial para seleccionar Warm
&DOLHQWH\SUHVLRQHHOGLDOSDUDKDFHUODVHOHFFLyQ\OXHJR
presione Start (Iniciar). Cubra las comidas que necesitan mantener
la humedad y no cubra aquellas comidas que deberían quedar
crocantes. No se requiere precalentar las mismas. No use la
IXQFLyQ:DUP&DOHQWDUSDUDFDOHQWDUFRPLGDIUtDH[FHSWRJDOOHWDV
crujientes, papas fritas o cereales secos. También se recomienda
que la comida no se mantenga caliente por más de dos horas.
Modos de Cocción

HORNO INFERIOR:3UREH6RQGD
Probe (Sonda)
ADVERTENCIA
El consumo de comida semicruda puede hacer que se contraigan enfermedades producidas
por la comida. Use la sonda de acuerdo con las siguientes instrucciones, a fin de asegurar que todas las partes
de la comida alcancen temperaturas de cocción mínimamente seguras. Puede encontrar recomendaciones de
temperaturas de cocción mínimamente seguras en foodsafety.gov o en IsItDoneYet.gov.
/DWHPSHUDWXUDLQWHUQDGHODFRPLGDFRQIUHFXHQFLDVHXVD
como indicador de que está lista, especialmente al dorar o
SUHSDUDUFDUQHGHDYH(OPRGR3UREH6RQGDPRQLWRUHDOD
temperatura interna de la comida y apaga el horno cuando
esta última alcanza la temperatura programada.
Controle siempre la temperatura en múltiples partes de la
comida, utilizando un termómetro de comidas luego de realizar
la cocción, a fin de asegurar que todas las partes de la misma
hayan alcanzado una temperatura interna mínimamente segura
en dicha comida.
Ubicación Correcta de la Sonda
/XHJRGHSUHSDUDUODFRPLGD\GHFRORFDUODHQODROODVLJD
estas instrucciones para una ubicación correcta de la sonda.
Ŷ ,QVHUWHODVRQGDHQODFRPLGDGHPRGRTXHODSXQWDGH
la sonda se apoye en el centro de la parte más gruesa de
la comida. Para un mejor rendimiento, la sonda debería
ser completamente insertada en la comida. Si la sonda
no es ubicada correctamente, es posible que no mida con
precisión la temperatura de la parte más fría de la comida.
Algunas comidas, particularmente las más pequeñas, no
son adecuadas para la cocción con el uso de una sonda,
debido a sus formas o tamaños.
Ŷ 1RGHEHUtDWRFDUHOKXHVRODJUDVDQLHOFDUWtODJR
Ŷ 3DUDFRFLQDUXQDYHHQWHUDLQVHUWHODVRQGDHQODSDUWH
más gruesa de la pechuga.
Ŷ 3DUDGRUDUVLQKXHVRVLQVHUWHODVRQGDHQHOFHQWURGHO
dorado.
Ŷ 3DUDFRFLQDUMDPyQRFRUGHURFRQKXHVRVLQVHUWHOD
sonda en el centro de la articulación o del músculo más
bajo y largo.
Ŷ 3DUDSUHSDrar cazuelas o platos tales como pastel de
carne, inserte la sonda en el centro del plato.
Ŷ 3DUDFRFLQDUSHVFDGRLQVHUWHODVRQGDMXVWRDUULEDGHOD
agalla en la zona más carnosa paralela a columna.
Uso de la Sonda
/DVRQGDGHWHPSHUDWXUDVyORSXHGHVHUXVDGDFRQODV
IXQFLRQHV%DNH+RUQHDU&RQYHFWLRQ%DNH+RUQHDUSRU
&RQYHFFLyQ\&RQYHFWLRQ5RDVW'RUDUSRU&RQYHFFLyQ
Para usar la sonda con precalentamiento:
&RQILJXUHHOPRGRGHFRFFLyQGHVHDGRHornear, Hornear
por Convección, o Dorar por ConvecciónHLQJUHVHOD
temperatura de cocción deseada con las teclas numéricas.
2. Inserte la sonda en la comidaFRQVXOWHVREUHOD8ELFDFLyQ
&RUUHFWDGHOD6RQGD
3. Una vez que el horno fue precalentado, coloque la comida
en el mismo y conecte la sonda en su correspondiente
tomacorriente, asegurándose de que esté completamente
insertada. Tenga cuidado, ya que las paredes del horno y
el tomacorriente de la sonda están calientes.
4. Cuando la sonda esté conectada, la pantalla le indicará
TXHLQJUHVHODWHPSHUDWXUDGHVHDGDSDUDODFRPLGD/D
WHPSHUDWXUDLQWHUQDPi[LPDGHODFRPLGDTXHVHSXHGH
configurar es 200° F..
Para usar la sonda sin precalentamiento:
,QVHUWHODVRQGDHQODFRPLGDFRQVXOWHVREUHOD8ELFDFLyQ
&RUUHFWDGHOD6RQGD
2. Coloque la comida en el horno y conecte la sonda en su
correspondiente tomacorriente en el horno.
3. Presione la tecla del modo de cocción deseado
Horneado Tradicional, Hornear por Convección, o
Dorar por ConvecciónHLQJUHVHODWHPSHUDWXUDGH
cocción deseada con las teclas numéricas. Presione
Options (Opciones) y seleccione Probe (Sonda) y
luego siga las instrucciones en pantalla para ingresar la
temperatura deseada para la comida.
Pautas para el Cuidado de la Sonda
Ŷ 6LVHXVDXQDVRQGDTXHQRVHDODSURYLVWDFRQHVWH
producto, se podrán producir daños sobre la salida de la
sonda.
Ŷ 8VHODVPDQLMDVGHODVRQGDDOHQFKXIDU\GHVHQFKXIDUOD
misma, luego de insertar o de retirar la sonda de la carne o
del tomacorriente.
Ŷ 3DUDHYLWDUGDxRVVREUHODVRQGDQRXVHDJDUUDGHUDVSDUD
empujar el cable al retirarlo.
Ŷ 3DUDHYLWDUURPSHUODVRQGDDVHJ~UHVHGHTXHOD
comida haya sido completamente descongelada antes de
insertarla.
Ŷ 3DUDHYLWDUSRVLEOHVTXHPDGXUDVQRGHVHQFKXIHODVRQGD
del tomacorriente del horno hasta que este último se haya
enfriado.
Ŷ 1XQFDGHMHODVRQGDGHQWURGHOKRUQRGXUDQWHXQFLFORGH
limpieza automática o de limpieza con vapor.
Ŷ 1RJXDUGHODVRQGDGHQWURGHOKRUQR

49-2001077 Rev. 2 23
Su nuevo horno cumple con los requisitos del Feriado Sabático Judío, contando con la función de cocción del modo Sabbath
6DEiWLFR$FRQWLQXDFLyQVHGHVFULEHHQGHWDOOHODIXQFLyQGHOPRGR6DEEDWK6DEiWLFR
Para Ingresar a Sabbath Mode (Modo
Sabático)
3UHVLRQHODWHFOD2SWLRQV2SFLRQHVGHOKRUQRLQIHULRU\JLUH
HOGLDOD6DEEDWK6DEiWLFR\SUHVLRQHHOPLVPRSDUDKDFHUOD
selección. En la pantalla aparecerá “During Sabbath Mode the
XSSHURYHQLVXQDYDLODEOH´'XUDQWHHO0RGR6DEiWLFRHOKRUQR
VXSHULRUQRHVWiGLVSRQLEOH3UHVLRQHHOGLDOGHVHOHFFLyQ
para continuar. Cualquier función del horno superior que esté
funcionando se detendrá, y el horno inferior hará una transición
LQPHGLDWDDOPRGR6DEEDWK6DEiWLFR
Para Cambiar la Temperatura
8QDYH]HQHOPRGR6DEEDWK6DEiWLFRDILQGHPRGLILFDUOD
temperatura del horno o de iniciar una función de horneado, el
usuario podrá cambiar la temperatura a una de las 10 temperaturas
configuradas previamente, como se indica a continuación:
El cambio a una de las temperaturas anteriores requiere que el
usuario presione la tecla asociada con la temperatura deseada
y que luego presione la tecla Start/Pause (Iniciar/ Pausar).
3RUHMHPSORSDUDFRQILJXUDU+RUQHDU)HOXVXDULRGHEHUi
presionar la tecla Bake (Hornear) en el horno inferior y luego
presionar la tecla Start/Pause (Iniciar/ Pausar).
/DIXQFLyQ%DNH+RUQHDUVHLQLFLDUiRVL\DHVWiIXQFLRQDQGR
ODWHPSHUDWXUDGHOKRUQRFDPELDUiHQXQPRPHQWRDOD]DUHQWUH
los 30 y 60 segundos luego de que la tecla Start/Pause (Iniciar/
Pausar)KD\DVLGRSUHVLRQDGDFRQODH[FHSFLyQGHSUHVLRQDUOD
tecla Clear/Off (Borrar/ Apagar), lo cual cancelará de inmediato
ODVFRQILJXUDFLRQHVGHFRFFLyQ/DXQLGDGSHUPDQHFHUiHQHO
PRGR6DEiWLFR(OFDPELRGHWHPSHUDWXUDSXHGHVHUHMHFXWDGR
en cualquier momento durante el ciclo de cocción.
Para Apagar el Horno
Presione la tecla Clear/Off (Borrar/ Apagar) o Back
(Retroceder) y luego la tecla Start (Iniciar) en cualquier
momento. El horno se apagará de inmediato, pero
SHUPDQHFHUiHQHOPRGR6DEEDWK6DEiWLFR\UHJUHVDUiDOD
SDQWDOODGHVXVSHQVLyQGH6DEEDWK6DEiWLFR
Para Salir del Modo Sabático
Mantenga presionada la tecla Back (Retroceder) durante
3 segundos. El horno se apagará en un momento al azar
entre los 30 y 60 segundos, luego de que la tecla Back
(Retroceder) se mantenga presionada.
NOTA: No presione ninguna otra tecla durante este momento,
\DTXHGHORFRQWUDULRHOPRGR6DEEDWK6DEiWLFRVHUi
reiniciado y no se podrá salir del mismo.
(OKRUQRVDOGUiGHOPRGR6DEEDWK6DEiWLFR\UHJUHVDUiDOD
pantalla por omisión.
Función de Cocción por Tiempo en el Modo
Sabático
(OPRGR6DEEDWK6DEiWLFRQRSXHGHDFWLYDUXQDIXQFLyQGH
cocción por tiempo por sí solo. Si se desea activar Timed Cook
&RFLQDUSRU7LHPSRVHGHEHUiQUHDOL]DUORVVLJXLHQWHVSDVRV
1. Use la tecla Settings (Configuraciones) para configurar
%HHSHU9ROXPHQ9ROXPHQGHO3LWLGRHQ0XWH0XGR
2. Use la tecla Light (Luz) para configurar la luz de su horno
LQIHULRUHQ2Q(QFHQGHU
3. Use Bake (Hornear) para programar una temperatura.
/XHJRGHSURJUDPDUXQDWHPSHUDWXUDVHOHFFLRQHXQ
tiempo de cocción e ingrese su tiempo de cocción.
3UHVLRQHODWHFOD6WDUW,QLFLDUSDUDLQLFLDUHOKRUQR
NOTA:12VHGHEHUiXVDU&RQYHFWLRQ%DNH+RUQHDUSRU
&RQYHFFLyQ
4. Una vez iniciado el horno, NO abra la puerta hasta que el
mismo se haya terminado de precalentar y haya alcanzado
XQDWHPSHUDWXUDSDUHMD+DFHUHVWRDQWHVGHTXHVHFRPSOHWH
el precalentamiento hará que el ventilador de distribución del
aire pierda potencia de forma inmediata al abrir la puerta.
5. Una vez que la comida fue colocada en el horno, no abra
ODSXHUWDKDVWDTXHODFRFFLyQVHKD\DFRPSOHWDGR+DFHU
esto hará que la imagen de la pantalla cambie y le indique
que cierre la puerta.
12DEUDODSXHUWDGHOKRUQRVXSHULRU+DFHUHVWR
encenderá la luz de forma inmediata.
7.
No presione ningún botón adicional en los controles del horno
inferior una vez iniciada la cocción, ya que de lo contrario la
pantalla cambiará inmediatamente al presionar el botón.
NOTAS
Ŷ 'XUDQWHODIXQFLyQ6DEEDWK0RGH0RGR6DEiWLFRVyOR
%DNH+RUQHDUHQHOKRUQRLQIHULRUHVWiGLVSRQLEOH%URLO
$VDU&RQYHFWLRQ%DNH+RUQHDUSRU&RQYHFFLyQ:DUP
&DOHQWDUXRWUDVIXQFLRQHVQRHVWiQGLVSRQLEOHV
Ŷ (QHOPRGR6DEEDWK6DEiWLFRHODSDJDGRDXWRPiWLFR
luego de 12 horas está desactivado, sin importar
qué configuración fue seleccionada en Settings
&RQILJXUDFLRQHV
Ŷ (OPRGR6DEEDWK6DEiWLFRSXHGHVHULQJUHVDGRVyORVL
ningún modo de cocción está funcionando en el horno
LQIHULRU,QJUHVDUD6DEEDWK0RGR0RGR6DEiWLFR
cancelará todas las funciones del horno inferior y superior
LQFOX\HQGRHOWHPSRUL]DGRU\HOUHFRUGDWRULR
Ŷ &XDQGRXQERWyQHVSUHVLRQDGRHQ6DEEDWK0RGH0RGR
6DEiWLFRQRKD\SLWLGRVQLWRQRVQLFDPELRVHQODVOXFHV
o en la pantalla. Además, cuando la puerta es abierta o
FHUUDGDHQ6DEEDWK0RGH0RGR6DEiWLFRQRKD\SLWLGRV
ni tonos, ni cambios en las luces o en la pantalla.
Ŷ 6LVHSURGXFHXQFRUWHGHFRUULHQWHGXUDQWHHOKRUQHDGRHQ
HOPRGR6DEEDWK6DEiWLFRODXQLGDGUHJUHVDUiDGLFKR
modo cuando el suministro de corriente sea restablecido,
pero no regresará al modo de horneado.
Tecla UI Temperatura (ºF)
Teclas del Lado Izquierdo (Horno Superior)
0LFURZDYH&RFLQDUHQHO0LFURRQGDV 170
Speed Cook/ Defrost
&RFFLyQ5iSLGD'HVFRQJHODU
200
Cooking Options/ Popcorn
2SFLRQHVGH&RFFLyQ3DORPLWDVGH0Dt]
225
$GG6HF$JUHJDU6HJXQGRV 250
&RQYHFWLRQ%DNH5HKHDW
+RUQHDUSRU&RQYHFFLyQ5HFDOHQWDU
300
Teclas del Lado Derecho (Horno Inferior)
%DFN5HWURFHGHU 0
&OHDU2II%RUUDU$SDJDU Se cancela inmediatamente
/LJKW/X] 325
%DNH+RUQHDU 350
%URLO$VDU 375
&RQYHFWLRQ%DNH:DUP
+RUQHDUSRU&RQYHFFLyQ&DOHQWDU
400
2SWLRQV2SFLRQHV 450
Modo Sabático
HORNO INFERIOR: Modo Sabático
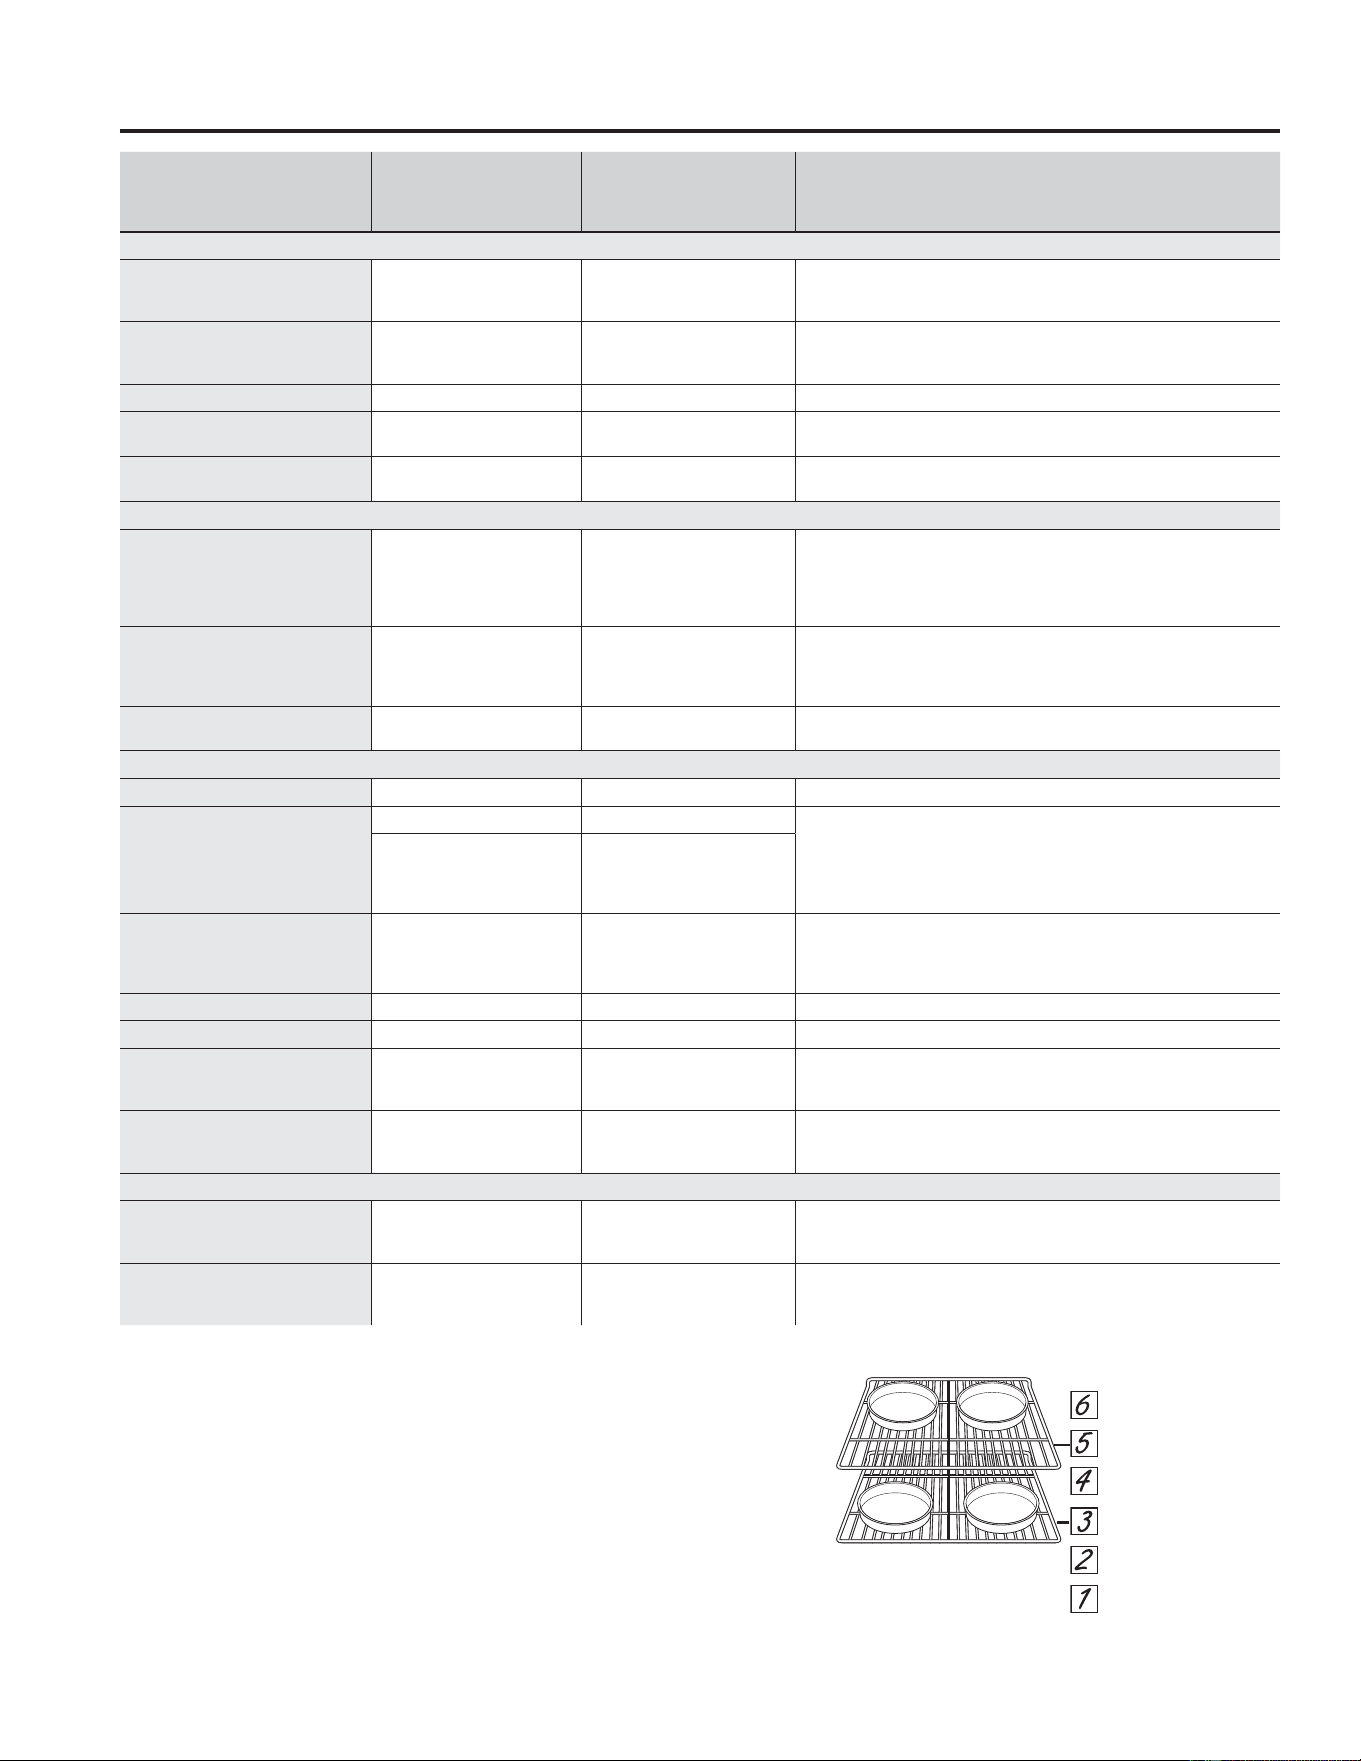
24 49-2001077 Rev. 2
TIPO DE COMIDA
MODO(S)
RECOMENDADO(S)
POSICIÓN(ES)
DE ESTANTES
RECOMENDADA SUGERENCIAS ADICIONALES
Productos Horneados
Tortas con capas, tortas
rectangulares, roscas, panecillos,
pan rápido en un Solo Estante
+RUQHDGR7UDGLFLRQDO 3 Use utensilios brillantes.
Tortas con capas* en Múltiples
Estantes
+RUQHDGR7UDGLFLRQDO 3 y 5
(VWDQWHH[WHQVLEOHHQODSRVLFLyQPiVDOWDVLVHXVD$VHJ~UHVHGHTXH
KD\DXQIOXMRGHDLUHDGHFXDGR9HDODLOXVWUDFLyQ
7RUWDVGHJUDVDSDVWHOGHiQJHO +RUQHDGR7UDGLFLRQDO 1 Use utensilios brillantes.
Galletas, galletitas, bizcochitos
en un Solo Estante
+RUQHDGR7UDGLFLRQDO 3 Use utensilios brillantes.
Tortas, Galletas, galletitas,
bizcochitos en Múltiples Estantes
+RUQHDGRSRU&RQYHFFLyQ
Múltiples Estantes
3 y 5
1, 3 y 5
3RVLFLyQGHOHVWDQWHH[WHQVLEOH$VHJ~UHVHGHTXHKD\DXQIOXMRGH
aire adecuado.
Bife y Cerdo
+DPEXUJXHVDV Asar Alto 5
Use una olla para asar y use una olla para asar; precaliente 5 minutos si
usará el Modo para Asar por Convección. Mueva la comida hacia abajo
para que quede más preparada y menos soasada. Preste atención a la
comida al asarla. Para un mejor rendimiento, centre la comida debajo
del elemento calentador para asar.
%LIHV\&KXOHWDV Asar Alto 5
Use una olla para asar; Mueva la comida hacia abajo para que quede
más preparada y menos soasada. Preste atención a la comida al asarla.
Para un mejor rendimiento, centre la comida debajo del elemento
calentador para asar.
Dorados Dorado por Convección 2 o 3
Use una olla chata tal como una olla para asar. No se requiere
precalentarla.
Ave
Pollo entero Dorado por Convección 2 o 3 Use una olla chata tal como una olla para asar.
Pechugas, patas, muslos con
huesos
Asar Alto 1
6LVHHPSDQyRFXEULyFRQVDOVDHYLWHORVPRGRV%URLO+L$VDU$OWR$VH
del lado de la piel hacia abajo primero. Preste atención a la comida al
asarla. Para un mejor rendimiento, centre la comida debajo del elemento
calentador para asar.
$VDGR%DMR
+RUQHDGR7UDGLFLRQDO
+RUQHDGRSRU&RQYHFFLyQHQ
1 Estante
3
Pechugas de pollo deshuesadas
$VDGR%DMR
+RUQHDGR7UDGLFLRQDO
+RUQHDGRSRU&RQYHFFLyQHQ
1 Estante
3
Mueva la comida más abajo para que quede más preparada y menos
soasada y más arriba para soasar/ dorar al asar. Para un mejor
rendimiento, centre la comida debajo del elemento calentador para asar.
Pavo entero Dorado por Convección 1 o 2 Usa una olla chata tal como una olla para asar.
Pechuga de pavo Dorado por Convección 2 o 3 Use una olla chata tal como una olla para asar.
Pescado $VDGR%DMR
PLWDGGHOJURVRURPHQRV
!SXOJDGD
Precaliente 5 minutos al Asar por Convección. Preste atención a la
comida al asarla. Para un mejor rendimiento, centre la comida debajo
del elemento calentador para asar.
Cazuelas
+RUQHDGRSRU&RQYHFFLyQHQ
1 Estante
+RUQHDGR7UDGLFLRQDO
3
Comidas Congeladas a Conveniencia
Pizza, papas fritas, tator tots,
patitas de pollo fritas, aperitivos
en un Solo Estante
+RUQHDGRSRU&RQYHFFLyQHQ
1 Estante
+RUQHDGR7UDGLFLRQDO
3 Use utensilios brillantes.
Pizza, papas fritas, tator tots,
patitas de pollo fritas, aperitivos
en Múltiples Estantes
+RUQHDGRSRU&RQYHFFLyQ
Múltiples Estantes
3 y 5
3RVLFLyQGHOHVWDQWHH[WHQVLEOH$VHJ~UHVHGHTXHKD\DXQIOX
MRGH
aire adecuado.
*Al hornear cuatro tortas con capas a la vez, use el estante
H[WHQVLEOH\HOSODQRFRQFRQYHFFLyQP~OWLSOH&RORTXH
las ollas como se muestra, de modo que no quede una olla
encima de la otra.
Cocine la comida completamente para evitar que se
produzcan enfermedades a partir de la comida. Puede
encontrar recomendaciones sobre temperatura mínima para
cocinar de forma segura en foodsafety.gov. Asegúrese de
usar un termómetro de comidas para medir la temperatura
de las mismas.
Guía de Cocción (Horno de 27”)
HORNO INFERIOR: Guía de Cocción
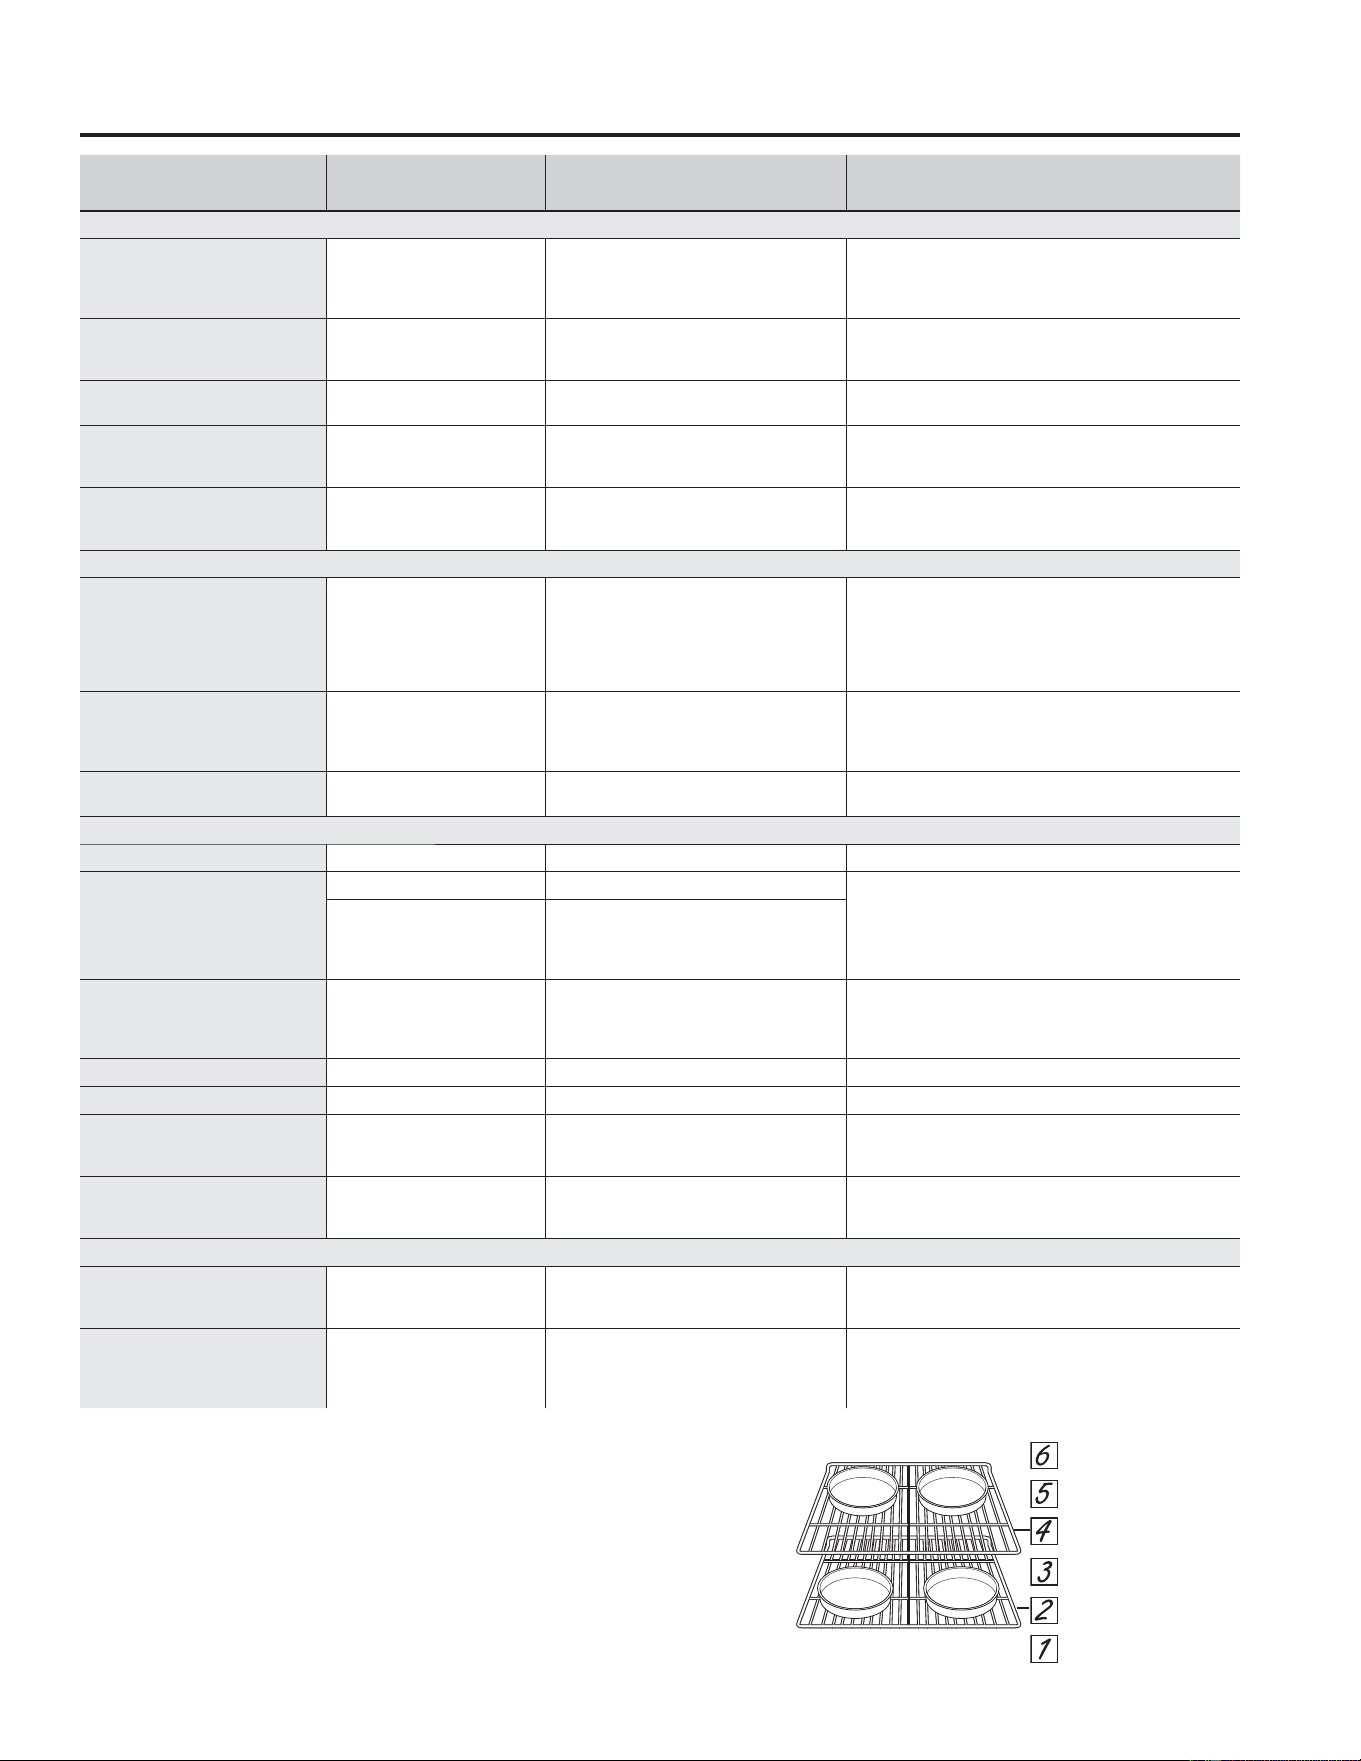
49-2001077 Rev. 2 25
HORNO INFERIOR: Guía de Cocción
Guía de Cocción (Horno de 30”)
*Al hornear cuatro tortas con capas a la vez, use los estantes
2 y 4. Coloque las ollas como se muestra, de modo que no
quede una olla encima de la otra.
Cocine la comida completamente para evitar que se
produzcan enfermedades a partir de la comida. Puede
encontrar recomendaciones sobre temperatura mínima para
cocinar de forma segura en foodsafety.gov. Asegúrese de
usar un termómetro de comidas para medir la temperatura
de las mismas.
TIPO DE COMIDA
MODO(S)
RECOMENDADO(S)
POSICIÓN(ES) DE ESTANTES
RECOMENDADA SUGERENCIAS ADICIONALES
Productos Horneados
Tortas con capas, tortas
rectangulares, roscas,
panecillos, pan rápido en un
Solo Estante
+RUQHDGR7UDGLFLRQDO 3 Use utensilios brillantes.
Tortas con capas* en
Múltiples Estantes
+RUQHDGR7UDGLFLRQDO 2 y 4
(VWDQWHH[WHQVLEOHHQODSRVLFLyQPiVDOWDVLVHXVD
$VHJ~UHVHGHTXHKD\DXQIOXMRGHDLUHDGHFXDGR9HDOD
LOXVWUDFLyQ
7RUWDVGHJUDVDSDVWHOGH
iQJHO
+RUQHDGR7UDGLFLRQDO 1 Use utensilios brillantes.
Galletas, galletitas,
bizcochitos en un Solo
Estante
+RUQHDGR7UDGLFLRQDO 3 Use utensilios brillantes.
Galletas, galletitas,
bizcochitos en Múltiples
Estantes
+RUQHDGRSRU&RQYHFFLyQ
Múltiples Estantes
2 y 4
1, 3 y 5
8VHODSRVLFLyQSDUDHVWDQWHVH[WHQVLEOHV\OD
posición 1 para 3 estantes. Asegúrese de que haya un
flujo de aire adecuado.
Bife y Cerdo
+DPEXUJXHVDV Asar Alto 5
Use una olla para asar y use una olla para asar;
precaliente 5 minutos si usará el Modo para Asar por
Convección. Mueva la comida hacia abajo para que quede
más preparada y menos soasada. Preste atención a la
comida al asarla. Para un mejor rendimiento, centre la
comida debajo del elemento calentador para asar.
%LIHV\&KXOHWDV Asar Alto 5
Use una olla para asar; Mueva la comida hacia abajo
para que quede más preparada y menos soasada. Preste
atención a la comida al asarla. Para un mejor rendimiento,
centre la comida debajo del elemento calentador para asar.
Dorados Dorado por Convección 2 o 3
Use una olla chata tal como una olla para asar. No se
requiere precalentarla.
Ave
Pollo entero Dorado por Convección 2 o 3 Use una olla chata tal como una olla para asar.
Pechugas, patas, muslos con
huesos
Asar Alto 1
6LVHHPSDQyRFXEULyFRQVDOVDHYLWHORVPRGRV%URLO+L
$VDU$OWR$VHGHOODGRGHODSLHOKDFLDDEDMRSULPHUR
Preste atención a la comida al asarla. Para un mejor
rendimiento, centre la comida debajo del elemento
calentador para asar.
$VDGR%DMR
+RUQHDGR7UDGLFLRQDO
+RUQHDGRSRU&RQYHFFLyQHQ
1 Estante
3
Pechugas de pollo
deshuesadas
$VDGR%DMR
+RUQHDGR7UDGLFLRQDO
+RUQHDGRSRU&RQYHFFLyQHQ
1 Estante
3
Mueva la comida más abajo para que quede más
preparada y menos soasada y más arriba para soasar/
dorar al asar. Para un mejor rendimiento, centre la comida
debajo del elemento calentador para asar.
Pavo entero Dorado por Convección 1 o 2 Usa una olla chata tal como una olla para asar.
Pechuga de pavo Dorado por Convección 2 o 3 Use una olla chata tal como una olla para asar.
Pescado $VDGR%DMR
PLWDGGHOJURVRURPHQRV
!SXOJDGD
Precaliente 5 minutos al Asar por Convección. Preste
atención a la comida al asarla. Para un mejor rendimiento,
centre la comida debajo del elemento calentador para asar.
Cazuelas
+RUQHDGRSRU&RQYHFFLyQHQ
1 Estante
+RUQHDGR7UDGLFLRQDO
3
Comidas Congeladas a Conveniencia
Pizza, papas fritas, tator
tots, patitas de pollo fritas,
aperitivos en un Solo Estante
+RUQHDGRSRU&RQYHFFLyQHQ
1 Estante
+RUQHDGR7UDGLFLRQDO
3 Use utensilios brillantes.
Pizza, papas fritas, tator
tots, patitas de pollo fritas,
aperitivos en Múltiples
Estantes
+RUQHDGRSRU&RQYHFFLyQ
Múltiples Estantes
2 y 4 Use utensilios brillantes.
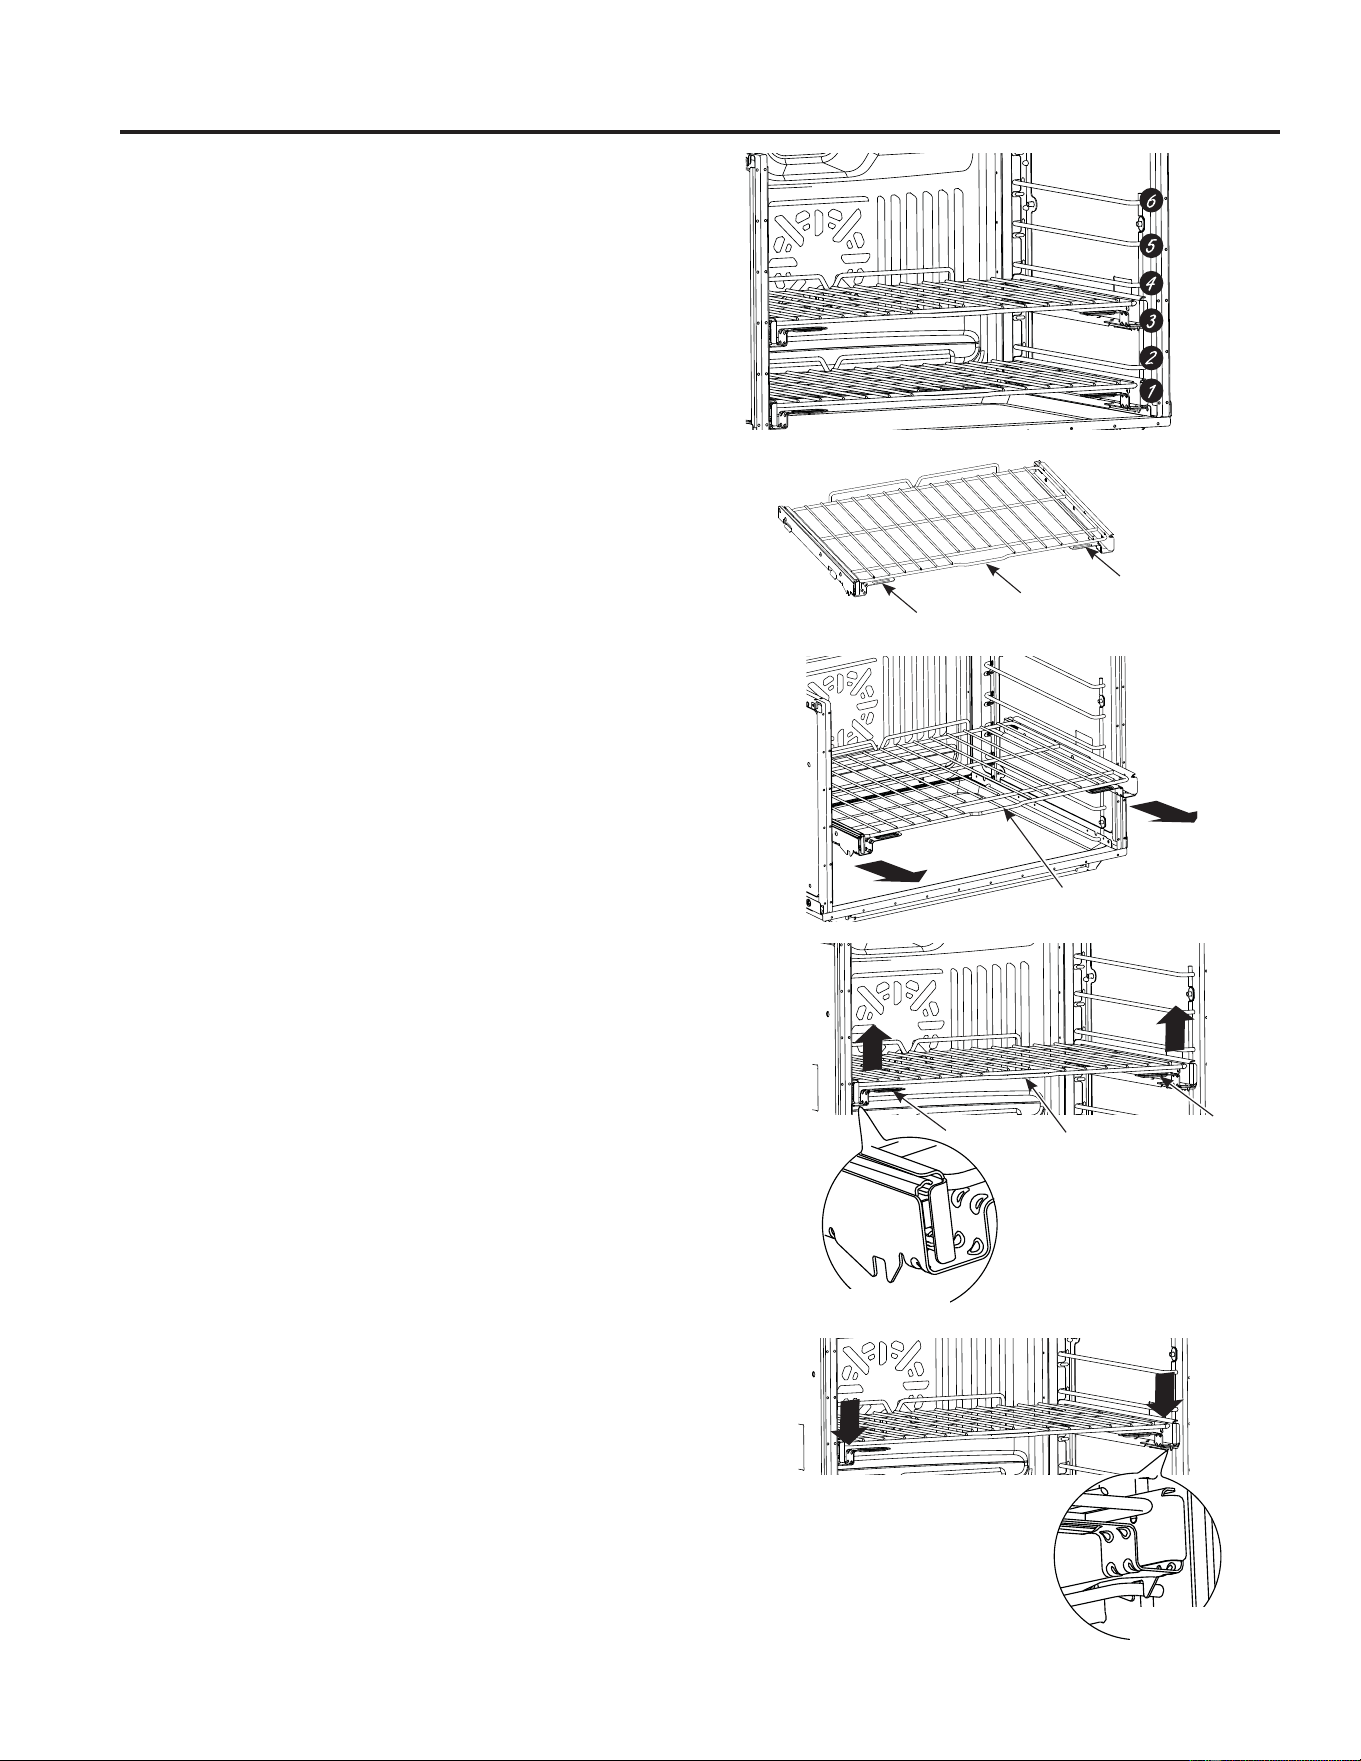
26 49-2001077 Rev. 2
El horno cuenta con seis posiciones de estantes. En la Guía
de Cocción, se brindan recomendaciones de posiciones de
los estantes para diferentes tipos de comidas. Se ajusta
un estante en una dirección para afectar los resultados de
cocción. Por ejemplo, si se prefieren partes superiores más
oscuras en tartas, panecillos o galletas, pruebe moviendo la
comida a un z z que se encuentre una posición más arriba.
Si encuentra que las comidas están demasiado doradas en
la parte superior, pruebe moviendo las mismas más abajo la
SUy[LPDYH]
Al hornear con múltiples ollas y en múltiples estantes,
asegúrese de que haya por lo menos 11/2” entre las ollas, a fin
de dejar suficiente espacio para que fluya el aire.
Estantes del Horno
(VSRVLEOHTXHVXKRUQRFXHQWHFRQHVWDQWHVH[WHQVLEOHV\R
estantes planos tradicionales.
Para evitar posibles quemaduras, coloque los estantes en la
posición deseada antes de encender el horno.
Estantes Extensibles
/RVHVWDQWHVH[WHQVLEOHVFXHQWDQFRQODIXQFLyQ,QVWDOO
,QVWDODUTXHVHEORTXHDHQORVVRSRUWHVGHORVHVWDQWHV
JXtDVDDPERVODGRV8QDYH]TXHODIXQFLyQ,QVWDOO
,QVWDODFLyQTXHGDFRUUHFWDPHQWHEORTXHDGDVLHPSUHHPSXMH
hacia afuera el estante desde el riel frontal superior hasta la
SRVLFLyQGHGHWHQFLyQHQVXPi[LPDH[WHQVLyQDOFRORFDUR
retirar utensilios.
6LUHVXOWDGLItFLOH[WHQGHUHVWRVHVWDQWHVOXEULTXHORVPLVPRV
con lubricante de grafito, provisto con el horno. Retire el
estante del horno, retire cualquier obstrucción en el recorrido
deslizable con una toalla de papel, agite el lubricante de grafito
y coloque 4 gotitas en los dos recorridos inferiores de los lados
izquierdo y derecho. Abra y cierre el estante varias veces para
distribuir el lubricante.
Para ordenar más lubricante de grafito, consulte las secciones
de Accesorios y Soporte al Consumidor al final de este manual.
Para Retirar un Estante Extensible:
1. Asegúrese de que el estante sea empujado totalmente
dentro del horno.
2. Tome el estante tanto desde su riel frontal superior como
de sus manijas inferiores y levante directamente para
desbloquear el estante de los soportes del estante.
3. De manera firme, mientras sostiene tanto el riel frontal
superior como las manijas inferiores, empuje el estante
hacia adelante. En caso de ser necesario, tome el estante
VREUHDPERVODGRV/XHJRUHWLUHHOPLVPRGHOKRUQR
Para Reemplazar un Estante Extensible:
1. Coloque la posición trasera del estante sobre los soportes
GHOHVWDQWHJXtDVFRPRVHPXHVWUDHQODLPDJHQ
2. Sostenga el riel frontal superior y las manijas inferiores y
empuje el estante hasta que la función de instalación se
bloquee en el soporte del estante frontal.
6LUHVXOWDGLItFLOUHHPSOD]DURUHWLUDUORVHVWDQWHVH[WHQVLEOHV
limpie los soportes de los estantes del horno con aceite
vegetal. No quite el aceite de cocina del espacio de
deslizamiento.
NOTA: Usar otros aceites de cocción tales como aceite de
cacahuete, Pam
®
u otros espráis lubricantes, provocará una
GHFRORUDFLyQRXQUHVLGXRGHFRORUVLPLODUDOy[LGRHQORV
estantes y laterales de las. Para limpiar este residuo, use agua
y jabón o una solución de vinagre y agua. Enjuague con agua
limpia y seque con una tela seca.
Estantes
El horno
tiene 6
posiciones
de estantes
Manija
Manija
Riel Frontal Superior
/HYDQWHSDUD
desbloquear
desde el
soporte del
estante
Función de Instalación
%ORTXHRGHO
Estante Frontal
Sostenga el riel frontal superior y las
manijas inferiores y empuje el estante
hasta que la función de instalación se
bloquee en el soporte frontal.
Manija
Manija
Riel Frontal Superior
Riel Frontal Superior
HORNO INFERIOR: Estantes
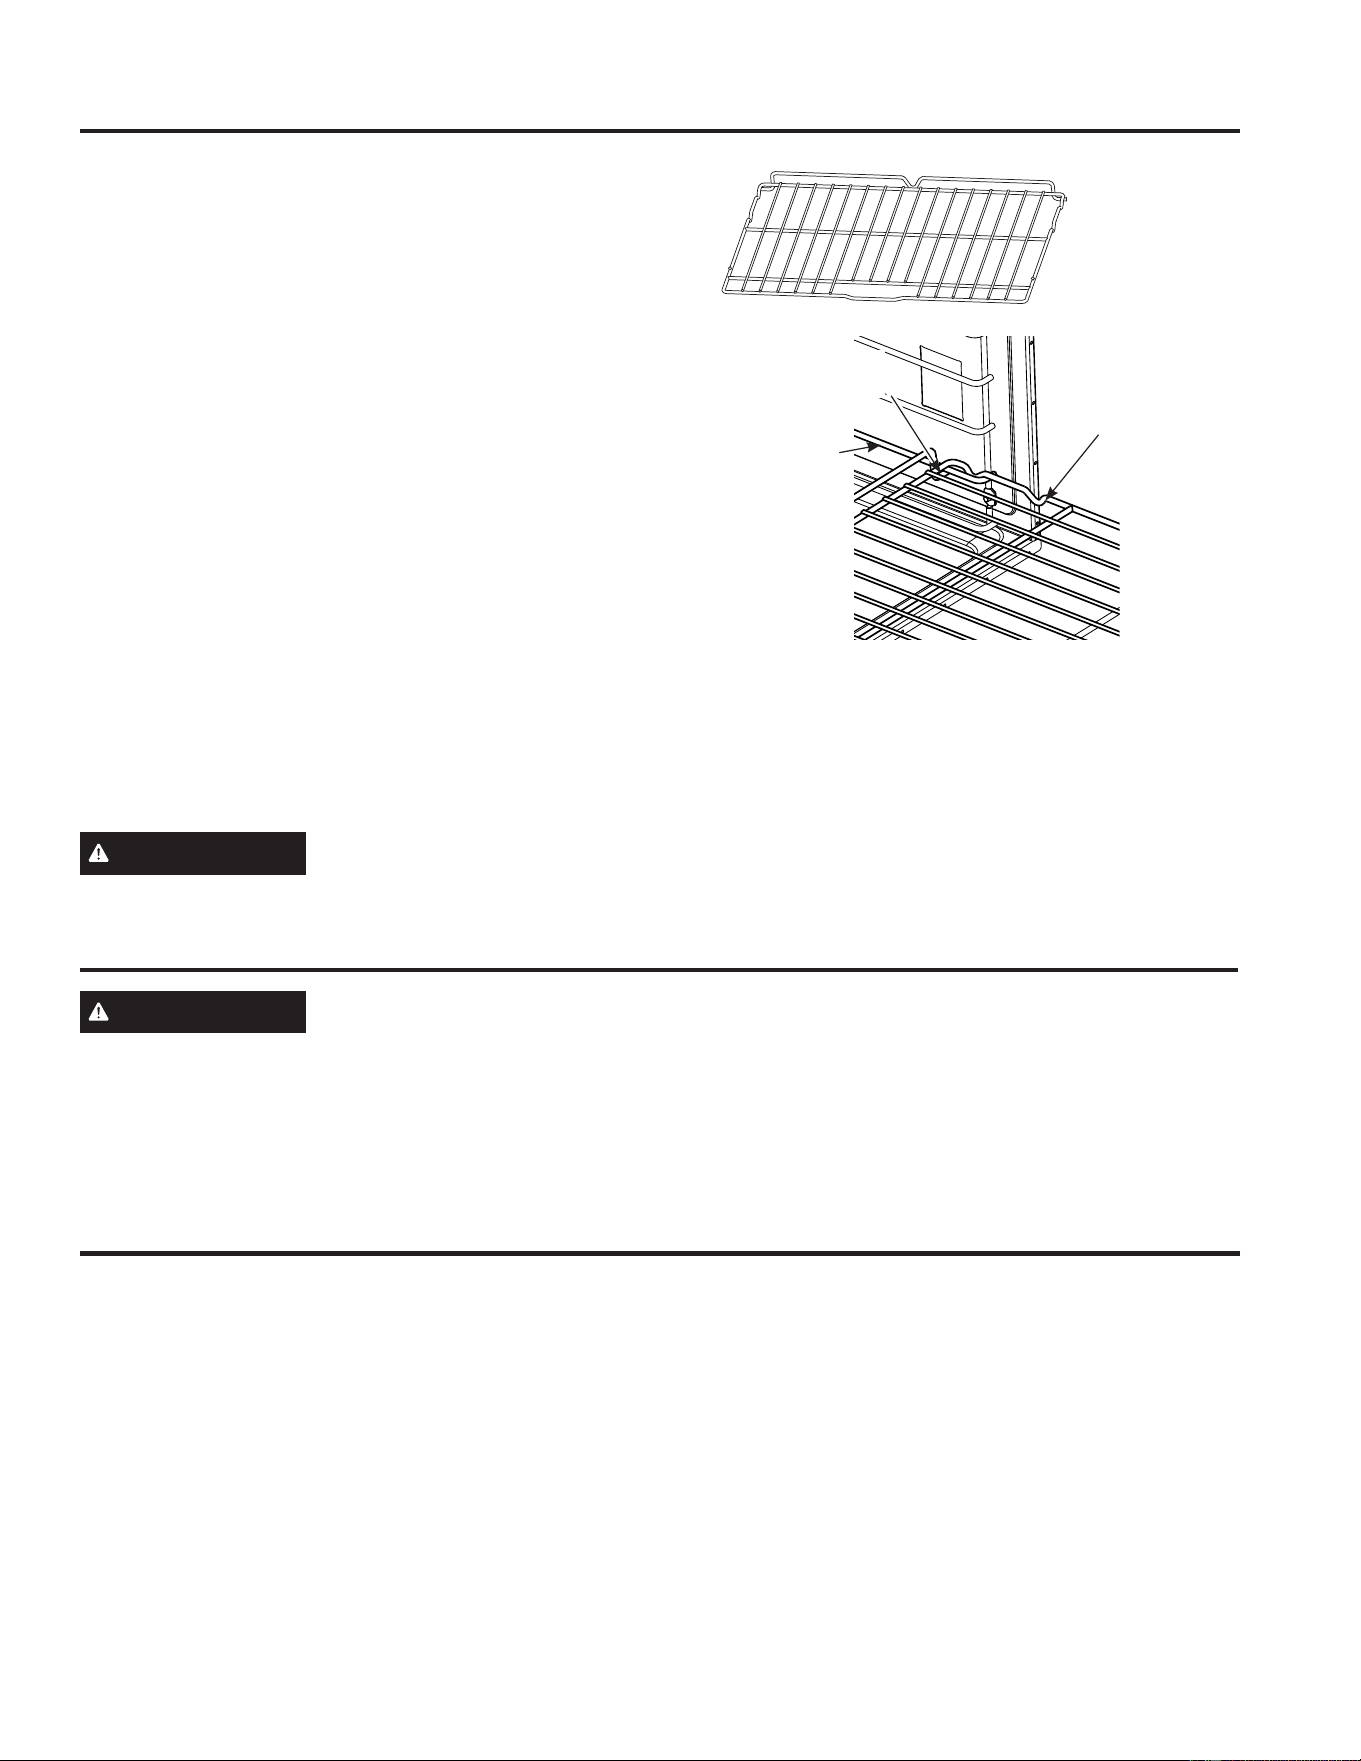
49-2001077 Rev. 2 27
HORNO INFERIOR: Estantes3DSHOGH$OXPLQLR\&REHUWRUHVGHO+RUQR8WHQVLOLRV
Estantes Planos Tradicionales
/RVHVWDQWHVSRVHHQEORTXHDGRUHVGHPRGRTXHDOFRORFDUORV
correctamente sobre los soportes se detendrán antes de
salirse completamente y no se inclinarán. Al colocar y retirar
utensilios de cocina, empuje la parrilla hasta que se detenga.
Para Retirar un Estante
Empuje el mismo hacia usted, incline el frente hacia arriba y
empuje hacia afuera.
Para Reemplazar un Estante
Incline el frente del estante hacia arriba, cuelgue la parte
trasera ubicando los enlaces debajo de los soportes de los
HVWDQWHVHPSXMHHOHVWDQWHKDFLDDWUiVKDVWDWUDEDUORHQORV
EORTXHDGRUHV\KDJDTXHGHVFLHQGDKDVWDVXSRVLFLyQ(PSXMH
el estante hasta que quede introducido completamente.
Es posible que resulte difícil deslizar los estantes, especialmente
luego de la limpieza automática. Coloque aceite vegetal en
una tela húmeda o toalla de papel y frote el mismo sobre los
H[WUHPRVL]TXLHUGR\GHUHFKR
NOTA: Usar otros aceites de cocción tales como aceite de
cacahuete, Pam
®
u otros espráis lubricantes, provocará una
GHFRORUDFLyQRXQUHVLGXRGHFRORUVLPLODUDOy[LGRHQORV
estantes y laterales de las. Para limpiar este residuo, use agua
y jabón o una solución de vinagre y agua. Enjuague con agua
limpia y seque con una tela seca.
PRECAUCIÓN
Tenga cuidado al retirar un estante de la posición más baja, ya que la puerta podrá estar caliente.
Utensilios
Pautas de Uso de Utensilios
El material, el acabado y el tamaño de los utensilios afectan el
horneado.
/DVROODVRVFXUDVUHYHVWLGDV\RSDFDVDEVRUEHQHOFDORUPiV
rápidamente que las ollas claras y brillantes. Al usar ollas
que absorben el calor más rápidamente, las comidas podrán
resultar más doradas, crocantes y con una capa más gruesa.
Si utiliza utensilios oscuros y revestidos, controle la comida
antes del tiempo mínimo de cocción. Si se obtienen resultados
no deseados con este tipo de utensilios, considere la
posibilidad de reducir la temperatura del horno en 25º F la
SUy[LPDYH]
/DVROODVEULOODQWHVSXHGHQSURGXFLUUHVXOWDGRVGHKRUQHDGR
más parejos en tortas y galletas.
/DVROODVGHYLGULR\FHUiPLFDFDOLHQWDQFRQOHQWLWXGSHUR
retienen bien el calor.
Estos tipos de ollas funcionan bien con platos tales como
tartas y postres con natilla.
/DVROODVFRQDLVODQWHGHDLUHFDOLHQWDQOHQWDPHQWH\SXHGHQ
producir fondos dorados.
Mantenga los utensilios limpios para una cocción más pareja.
Estante plano
%ORTXHDGRU
Soporte del
estante
Enlace de
ubicación
PRECAUCIÓN
No use ningún tipo de aluminio o cobertor de horno para cubrir el fondo del horno. Estos ítems
pueden atrapar el calor o derretirse, ocasionando daños sobre el producto y el riesgo de descargas, humo o incendios.
Los daños por uso inadecuado de estos ítems no están cubiertos por la garantía del producto.
Se podrá usar aluminio para evitar derrames, colocando una hoja sobre un estante inferior varias pulgadas debajo de la comida.
No use más aluminio que el necesario y nunca cubra totalmente el estante de un horno con papel de aluminio. Mantenga el
aluminio a por lo menos 1 1/2” de las paredes del horno, para evitar una circulación deficiente del calor.
Papel de Aluminio y Cobertores del Horno
Estantes (Cont.)
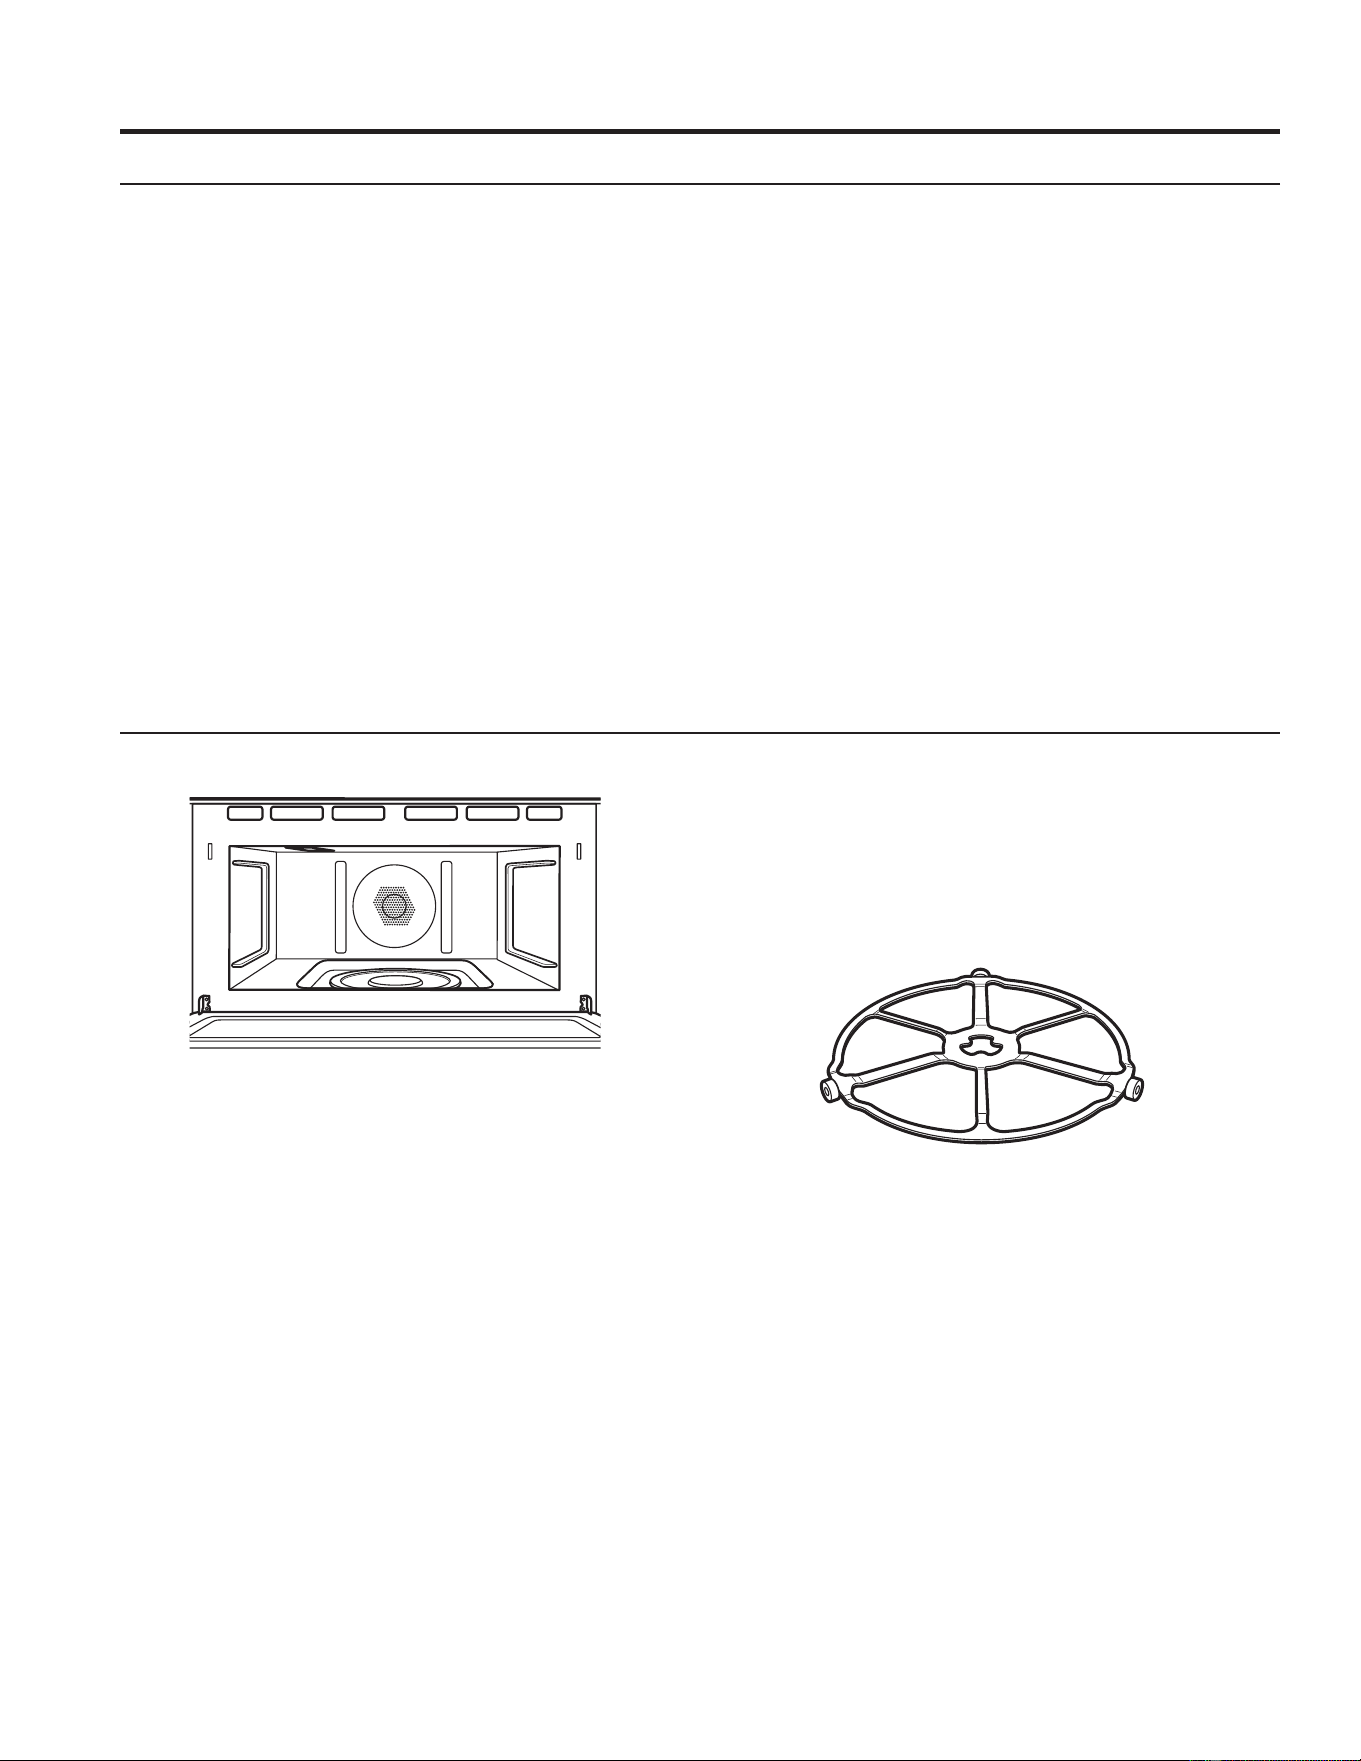
28 49-2001077 Rev. 2
Limpieza del Horno
Consejos Útiles
Una limpieza minuciosa ocasional con un trapo empapado
de bicarbonato sódico y agua mantendrá el interior fresco.
También recomendamos no usar limpiadores con amoníaco
o alcohol, ya que pueden dañar el aspecto del horno. Si
elige usar un limpiador hogareño común, primero aplique el
limpiador directamente sobre una tela seca, y luego limpie el
área que se encuentre sucia.
Panel de Control
Una buena idea es limpiar el panel de control luego de cada
XVR/LPSLHFRQXQMDEyQVXDYH\DJXDRYLQDJUH\DJXD
enjuague con agua limpia y pula en seco con una tela suave.
No use limpiadores abrasivos, limpiadores líquidos fuertes,
almohadillas para fregar de plástico ni limpiadores de horno en
el panel de control; dañarán el acabado.
Exterior del Horno
No use limpiadores de horno, limpiadores abrasivos,
limpiadores líquidos fuertes, estropajos de acero, almohadillas
para fregar de plástico, ni polvos limpiadores en el interior
RHOH[WHULRUGHOKRUQR/LPSLHHOPLVPRFRQDJXD\MDEyQR
una solución de vinagre y agua. Enjuague con agua limpia y
seque con una tela seca. Al limpiar supeficies, asegúrese de
que estén a temperatura ambiente y fuera del contacto con
la luz solar. Si las manchas en el borde de la ventana de la
puerta son persistentes, use un limpiador abrasivo suave o
una esponja con estropajo para obtener un mejor resultado. El
derrame de adobo, jugos de fruta, salsas de tomate y líquidos
para humedecer que contengan ácidos pueden ocasionar
descoloración y se deberán limpiar de inmediato. Deje que las
superficies calientes se enfríen, y luego limpie y enjuague.
Superficies de Acero Inoxidable (en algunos modelos)
No use virutas de acero; éstas dañarán la superficie. Para
OLPSLDUODVXSHUILFLHGHDFHURLQR[LGDEOHXVHDJXDWLELD
FRQMDEyQRXQOLPSLDGRURSXOLGRUSDUDDFHURLQR[LGDEOH
Siempre limpie la superficie en la dirección del veteado. Siga
las instrucciones del limpiador para limpiar la superficie de
DFHURLQR[LGDEOH3DUDUHDOL]DUFRQVXOWDVVREUHODDGTXLVLFLyQ
de productos, incluyendo limpiadores o pulidores para
HOHFWURGRPpVWLFRVGHDFHURLQR[LGDEOHFRQVXOWHODVVHFFLRQHV
de Accesorios y Soporte al Consumidor al final de este manual.
Cómo Limpiar el Interior del Horno Superior
/LPSLHHOLQWHULRUGHOKRUQRFRQIUHFXHQFLDSDUDTXHFDOLHQWH
bien.
Se pueden remover algunas partículas con una toalla de
papel; otras pueden requerir un trapo caliente con una
solución jabonosa. Elimine las partículas de grasa con un trapo
humedecido con agua jabonosa, luego enjuague con un trapo
húmedo.
No utilice limpiadores abrasivos o utensilios puntiagudos en las
paredes del horno.
Nunca utilice un limpiador de horno comercial en ninguna
pieza del horno.
No limpie el interior del horno con esponjillas metálicas para
fregar. Pueden desprenderse piezas de la esponjilla metálica,
ocasionando una descarga eléctrica.
Sello de la compuerta
Es importante mantener el área limpia en el lugar donde
la compuerta se sella contra el horno. Utilice únicamente
detergentes de acción mediana, no abrasivos aplicados con
una esponja o trapo húmedo. Enjuáguela bien.
Base Giratoria Desmontable
Se debe limpiar con frecuencia el área localizada debajo de
la base giratoria para evitar olores y humo durante un ciclo de
cocción.
Si se deja caer, la base giratoria se puede romper.
/iYHODFXLGDGRVDPHQWHHQDJXDWLELDMDERQRVD6pTXHOD
completamente y vuelva a colocarla.
Para colocar la base giratoria, coloque su centro sobre el rotor
ubicado en el centro del horno y gírela hasta que se asiente
HQVXOXJDU$VHJ~UHVHGHTXHODVXSHUILFLHOLVDGHODEDVH
giratoria se encuentre colocada hacia arriba y que el centro se
HQFXHQWUHDVHQWDGRGHPDQHUDVHJXUDHQHOURWRU
Asegúrese de que la corriente eléctrica esté apagada y que todas las superficies estén frías antes de limpiar cualquier parte del horno.
Paredes, piso, ventanilla interna, piezas
de metal y plástico en la compuerta
No haga funcionar el horno sin tener
colocada en su lugar la base giratoria.
%DVHJLUDWRULD
CUIDADO Y LIMPIEZA:/LPSLH]DGHO+RUQR
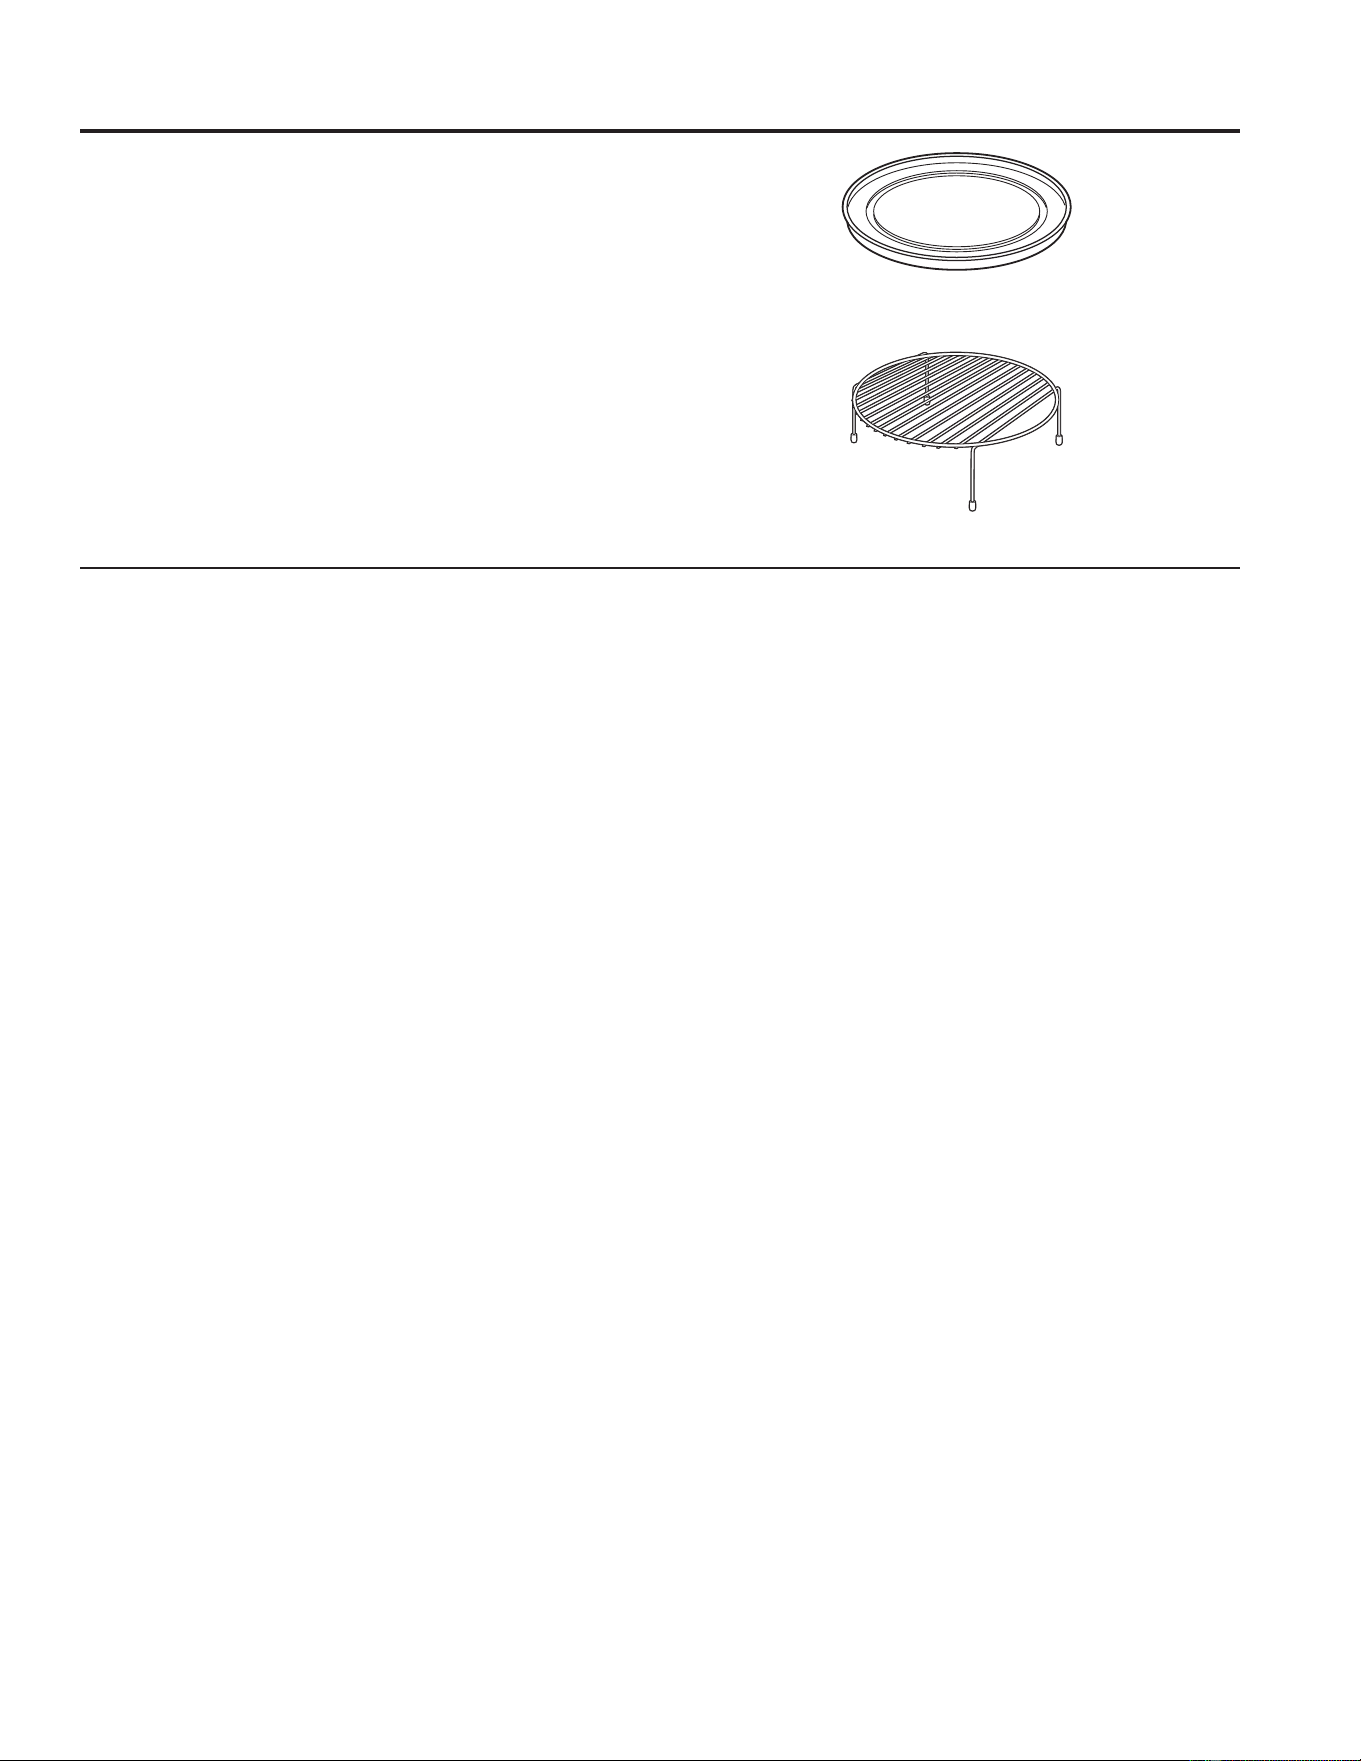
49-2001077 Rev. 2 29
CUIDADO Y LIMPIEZA:/LPSLH]DGHO+RUQR
How To Clean The Upper Oven Interior (Cont.)
Bandejas Para Cocinar Y Lámina De Hornear
Para evitar que se rompan las bandejas, deje que se enfríen
FRPSOHWDPHQWHDQWHVGHOLPSLDUODV/DYHODVEDQGHMDVHQDJXD
jabonosa tibia o en la máquina lavaplatos.
No utilice esponjillas metálicas para fregar o limpiadores
abrasivos, ya que pueden dañar el acabado. Se puede utilizar
una esponjilla cubierta de jabón para limpiar las bandejas.
Cómo Limpiar el Interior del Horno Inferior
El interior de su nuevo horno puede ser limpiado de forma
PDQXDORXWLOL]DQGRORVPRGRV6WHDP&OHDQ/LPSLH]DFRQ
9DSRUR6HOI&OHDQ/LPSLH]D$XWRPiWLFD
El derrame de adobo, jugos de fruta, salsas de tomate y
líquidos para humedecer que contengan ácidos pueden
ocasionar descoloración y se deberán limpiar de inmediato.
Espere a que las superficies calientes se enfríen, y luego
limpie y enjuague.
Limpieza Manual
No use limpiadores de horno, limpiadores abrasivos,
limpiadores líquidos fuertes, estropajos de acero, almohadillas
para fregar, ni polvos limpiadores en el interior del horno.
/LPSLHHOPLVPRFRQDJXD\MDEyQRXQDVROXFLyQGHYLQDJUH
y agua. Enjuague con agua limpia y seque con una tela seca.
Al limpiar supeficies, asegúrese de que estén a temperatura
ambiente y fuera del contacto con la luz solar.
Modo de Limpieza con Vapor
/DOLPSLH]DFRQYDSRUHVWiSHQVDGDSDUDOLPSLDUSHTXHxRV
derrames usando agua y a una temperatura de limpieza más
EDMDTXHODIXQFLyQ6HOI&OHDQ/LPSLH]D$XWRPiWLFD
3DUDXVDUODIXQFLyQ6WHDP&OHDQ/LPSLH]DFRQ9DSRU
limpie las grasas y suciedades del horno. Vierta una taza de
agua en la parte inferior del horno. Cierre la puerta. Presione
la tecla Options (Opciones), seleccione Steam Clean
/LPSLH]DFRQ9DSRU\OXHJRSUHVLRQHStart (Iniciar)/D
puerta del horno se trabará. No podrá abrir la puerta durante
los 30 minutos de la limpieza con vapor, ya que esto reducirá
su rendimiento. Al finalizar el ciclo de limpieza al vapor, la
SXHUWDVHGHVWUDEDUi/LPSLHFXDOTXLHUH[FHVRGHDJXD\
cualquier suciedad que haya quedado.
Modo de Limpieza Automática
/HDODV,QVWUXFFLRQHVGH6HJXULGDGGHO+RUQRFRQ/LPSLH]D
Automática, en el comienzo de este manual antes de usar
HOPRGR6HOI&OHDQ/LPSLH]D$XWRPiWLFD(VWHPRGRXVD
temperaturas muy altas para limpiar el interior del horno. Cuando
use esta función, la puerta del horno se trabará. Antes de
utilizar el ciclo de limpieza automática, limpie la grasa y restos
de comida que haya en el horno. Retire todos los artículos
GHOKRUQRH[FHSWRORVHVWDQWHVHVPDOWDGRVFRORURVFXUR
/RVHVWDQWHVEULOODQWHVRGHSODWD\FXDOTXLHUXWHQVLOLRXRWURV
artículos deberían ser retirados del horno antes de iniciar un ciclo
de limpieza automática. Presione la tecla Options (Opciones),
VHOHFFLRQH6HOI&OHDQ/LPSLH]D$XWRPiWLFD\VHH[KLELUi
un tiempo de limpieza automática por omisión. El tiempo de
limpieza puede ser modificado a 3, 4 o 5 horas, usando el dial de
selección. Cuando el nivel de suciedad en el horno sea muy alto,
VHUHFRPLHQGDXVDUHOWLHPSRGHOLPSLH]DPi[LPRGHKRUDV
Si desea usar el tiempo por omisión, presione la tecla Start
(Iniciar) inmediatamente luego de seleccionar la tecla Self Clean
/LPSLH]D$XWRPiWLFD(OKRUQRVHDSDJDUiGHIRUPDDXWRPiWLFD
FXDQGRHOFLFORGHOLPSLH]DDXWRPiWLFDVHDFRPSOHWDGR/D
puerta permanecerá bloqueada hasta que el horno se haya
enfriado. Una vez que el horno se haya enfriado, limpie cualquier
ceniza que haya quedado en el horno.
IMPORTANTE:/DVHPDQDFLRQHVSURGXFLGDVSRUHOFLFORGH
autolimpieza de cualquier horno afectan la salud de algunas
aves de manera notoria. Procure llevar sus aves a otra
habitación bien ventilada.
Limpieza del Horno (Continúa)
%DQGHMDGHYLGULRWUDQVSDUHQWH
para la función de microondas
Parilla de alambre
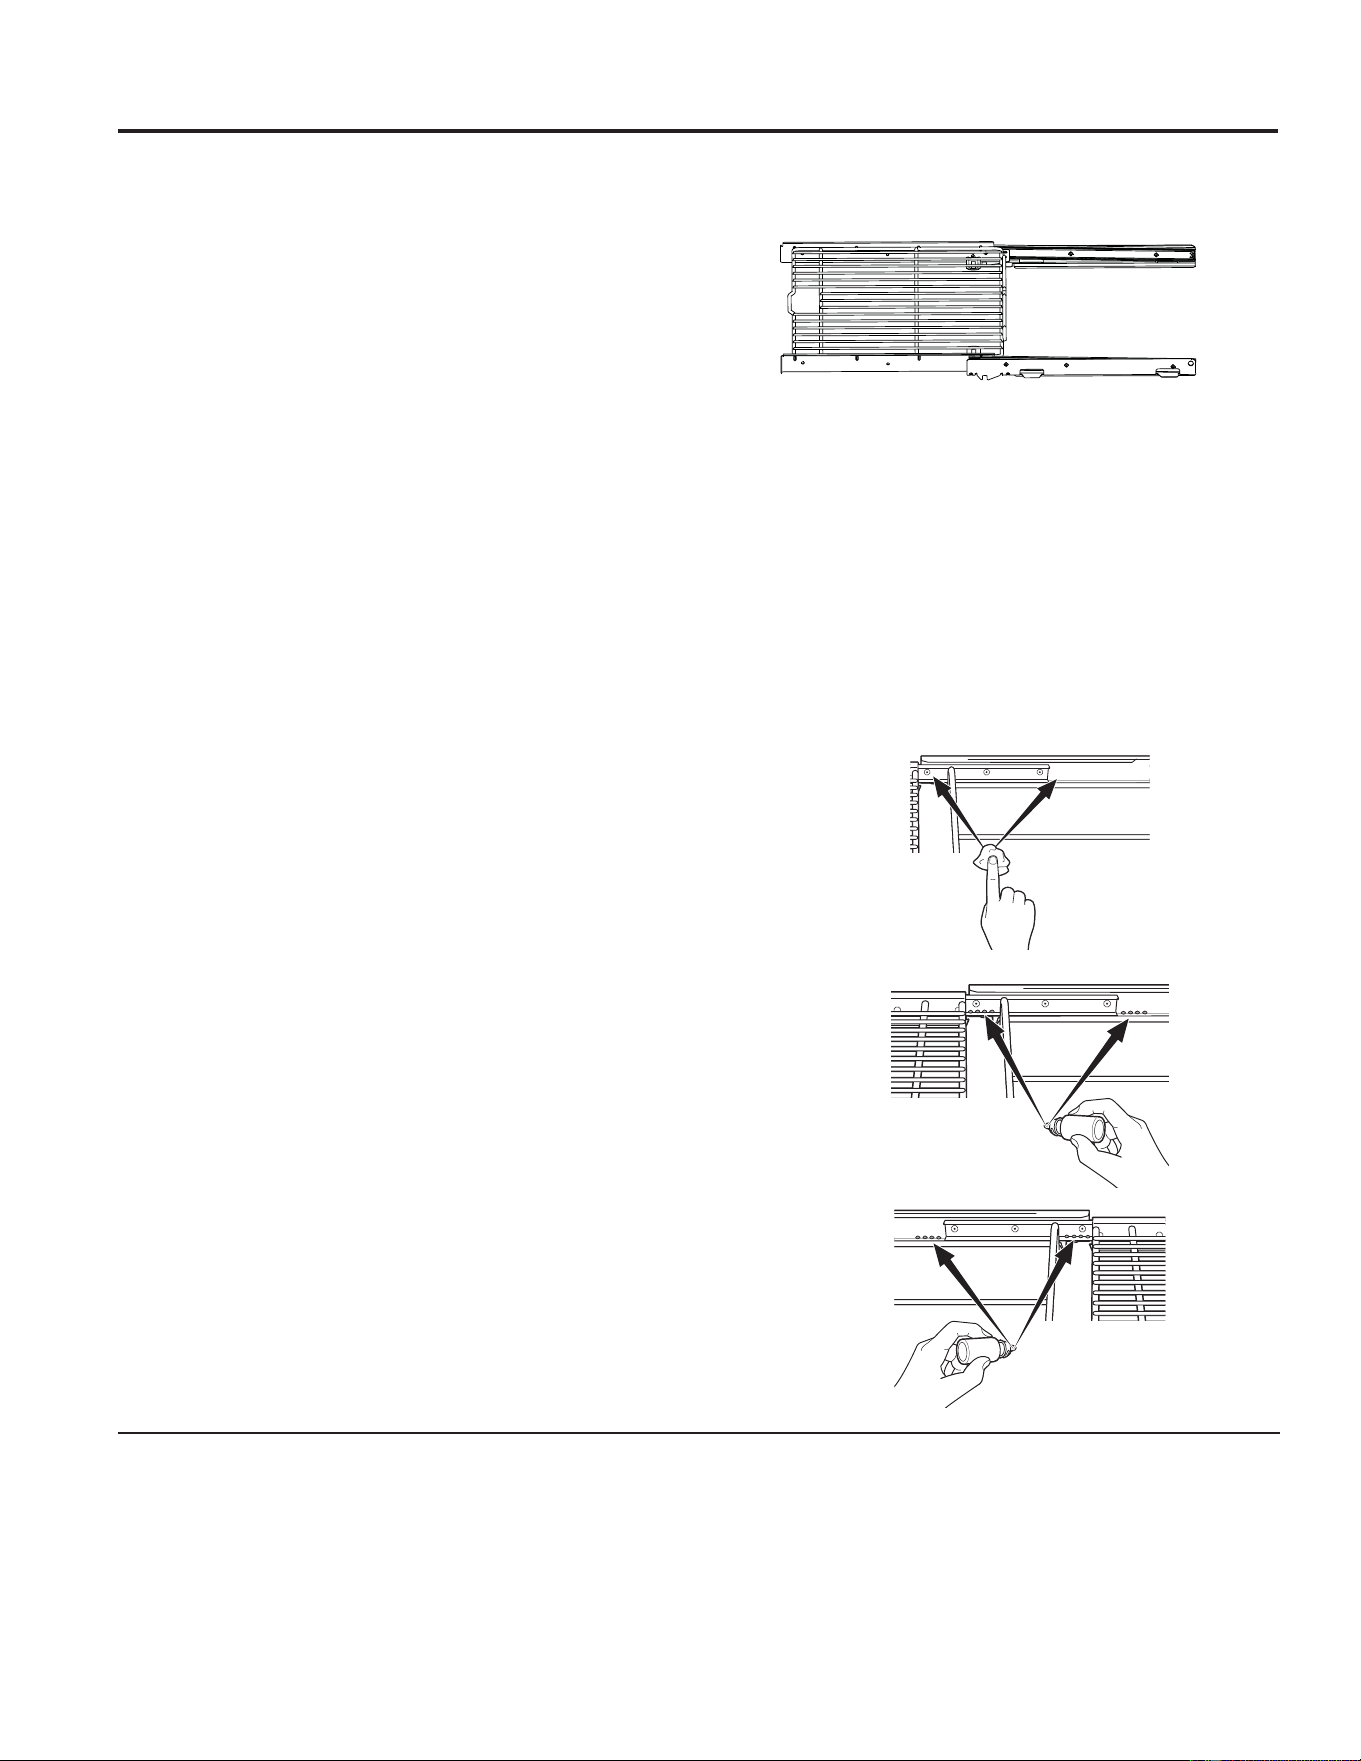
30 49-2001077 Rev. 2
Estantes del Horno Inferior
/RVHVWDQWHVTXHIXHURQSURYLVWRVFRQHOKRUQRHVWDQWHV
RVFXURVHVPDOWDGRVQREULOODQWHVSXHGHQSHUPDQHFHUHQHO
horno durante el ciclo de limpieza automática, ya que este ciclo
no los dañará.
Para limpiar los estantes de forma manual, use agua caliente
y jabón. Asegúrese de no lavar el espacio de deslizamiento de
XQHVWDQWHH[WHQVLEOH
Si resulta difícil retirar los estantes del horno, coloque un poco
de aceite vegetal en una tela seca o toalla de papel y frote
sobre los soportes de los estantes del horno. No limpie el
DFHLWHHQHOHVSDFLRGHGHVOL]DPLHQWRGHOHVWDQWHH[WHQVLEOH
NOTA: El uso de otros aceites de cocina provocará una
GHVFRORUDFLyQRXQUHVLGXRGHFRORUVLPLODUDOy[LGRHQORV
estantes y laterales de las cavidades. Para limpiar este
residuo, use agua y jabón o una solución de vinagre y agua.
Enjuague con agua limpia y seque con una tela seca.
De forma periódica, luego de varios ciclos de limpieza
automática, los espacios de deslizamiento del estante
H[WHQVLEOHGHEHUiQVHUOXEULFDGRVXWLOL]DQGROXEULFDQWHGH
grafito, enviado junto con su horno de pared. Para ordenar
sondas de temperatura adicionales, consulte las secciones de
Accesorios y Soporte al Consumidor al final de este manual.
5HWLUHHOHVWDQWHH[WHQVLEOHGHOKRUQR&RQVXOWHODVHFFLyQ
GH(VWDQWHV([WHQVLEOHVGHO+RUQR
([WLHQGDWRWDOPHQWHHOHVWDQWHVREUHXQDPHVDRPHVDGD
Se podrá colocar papel de periódico debajo del estante
para una limpieza fácil.
3. Si hay restos en las pistas de deslizamiento, limpie los
mismos con una toalla de papel. NOTA: Cuando el lubricante
de grafito se haya acabado, deberá ser reemplazado.
4. Agite el lubricante de grafito antes de abrir el mismo.
Comenzando con el mecanismo de deslizamiento del lado
L]TXLHUGRGHOHVWDQWHFRORTXHFXDWURJRWDVSHTXHxDV
GHOXEULFDQWHHQORVGRVHVSDFLRVLQIHULRUHVGH
deslizamiento, cerca de los rulemanes de apoyo.
5. Repita esto sobre el mecanismo del lado derecho del estante.
6. Abra y cierre el estante varias veces para distribuir el
lubricante.
7. Reemplace la tapa del lubricante y agite el mismo
nuevamente. Dé vuelta el estante y repita los pasos 3, 4,
5 y 6.
8. Cierre el estante, gire el estante con el lado derecho hacia
arriba y coloque el mismo en el horno. Consulte la sección
GH(VWDQWHV([WHQVLEOHVGHO+RUQR
9. Repita los pasos anteriores con cada estante.
NOTA: No rocíe con esprái de cocina o cualquier otro
lubricante en esprái.
Estantes Planos
/DVSDUULOODVSODQDVVHSRGUiQGHMDUHQODFDYLGDGGXUDQWHOD
OLPSLH]DDXWRPiWLFDVLVHWUDWDGHHVWDQWHVHVPDOWDGRVQR
EULOODQWHVRVHSRGUiQODYDUFRQDJXDFDOLHQWH\MDEyQ
Es posible que resulte más difícil deslizar las parrillas,
especialmente luego de la limpieza automática. Coloque aceite
vegetal en una tela húmeda o en una toalla de papel y frote las
PLVPDVVREUHORVH[WUHPRVL]TXLHUGR\GHUHFKR
NOTA: El uso de otros aceites de cocina provocará una
GHVFRORUDFLyQRXQUHVLGXRGHFRORUVLPLODUDOy[LGRHQORV
estantes y laterales de las cavidades. Para limpiar este residuo,
use agua y jabón o una solución de vinagre y agua. Enjuague
con agua limpia y seque con una tela seca.
CUIDADO Y LIMPIEZA:(VWDQWHVGHO+RUQR,QIHULRU
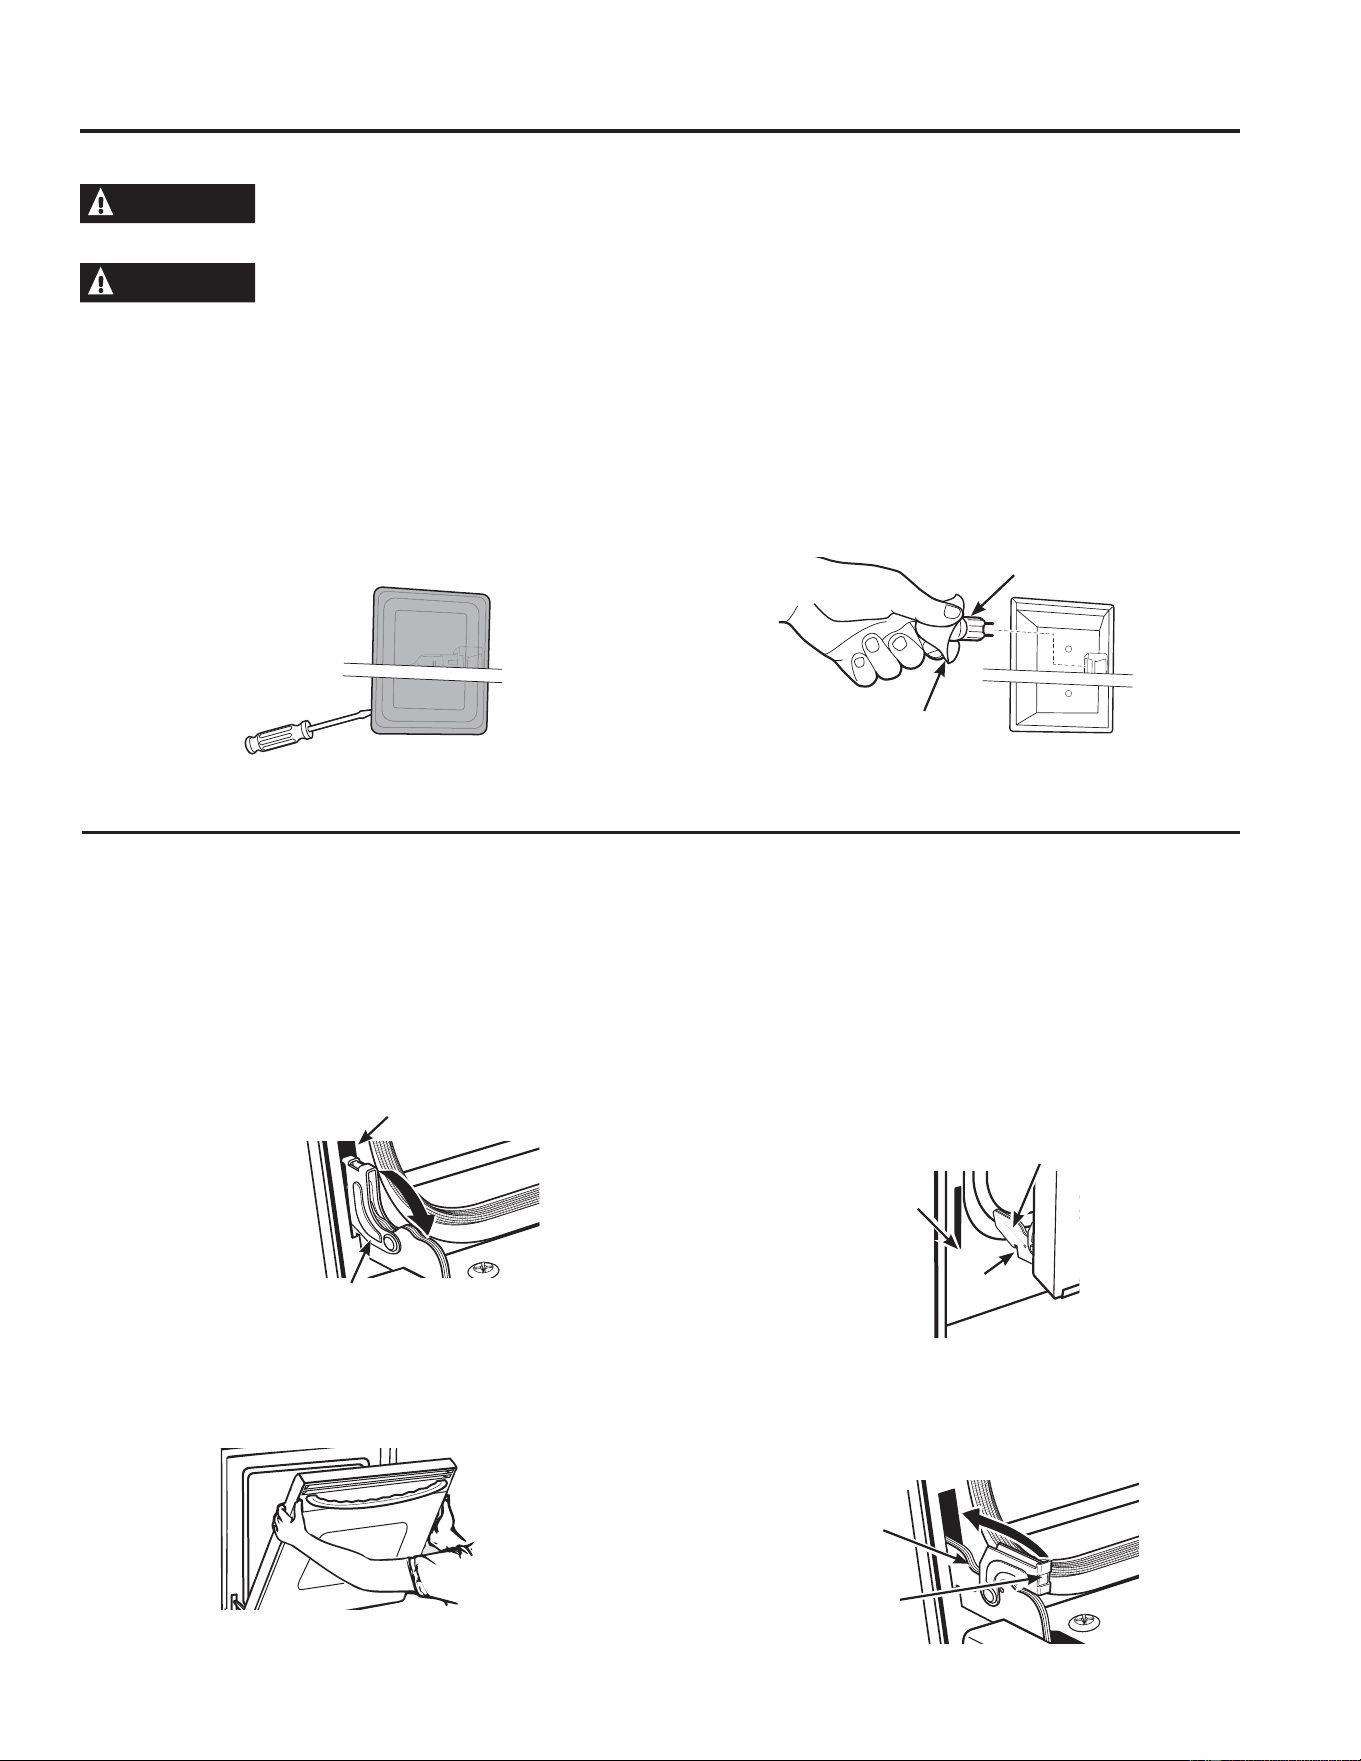
49-2001077 Rev. 2 31
CUIDADO Y LIMPIEZA: 0DQWHQLPLHQWR GHO +RUQR ,QIHULRU
Mantenimiento del Horno Inferior
([WUHPR LQIHULRU GH OD UDQXUD
Levante la Puerta del Horno Inferior
/D SXHUWD HV PX\ SHVDGD 7HQJD FXLGDGR DO UHWLUDU \ OHYDQWDU OD SXHUWD
No levante la puerta usando la manija.
Para retirar la puerta:
1. Abra la puerta totalmente.
2. Empuje los bloqueos de la bisagra hacia abajo en
dirección a la estructura de la puerta, hasta la posición
desbloqueada. Es posible que necesite una herramienta tal
como un destornillador pequeño de punta plana.
3. Firmemente tome ambos lados de la puerta por la parte
superior.
4. Cierre la puerta hasta la posición de retiro de la misma.
/D SXHUWD GHEHUtD VHU DELHUWD DSUR[LPDGDPHQWH D ´ VLQ
obstrucción sobre la misma.
/HYDQWH OD SXHUWD KDFLD DUULED \ DIXHUD KDVWD TXH ORV
brazos de las bisagras queden fuera de las ranuras.
Para reemplazar la puerta:
1.
Firmemente tome ambos lados de la puerta por la parte superior.
2. Comenzando desde el lado izquierdo, con la puerta en el
mismo ángulo de la posición de retiro, apoye la hendidura
GHO EUD]R GH OD ELVDJUD HQ HO H[WUHPR LQIHULRU GH OD UDQXUD
GH OD ELVDJUD /D DEHUWXUD HQ HO EUD]R GH OD ELVDJUD GHEHUi
estar totalmente apoyada en la parte inferior de la ranura.
Repita el procedimiento del lado derecho.
3. Abra la puerta totalmente. Si la puerta no se abre
totalmente, la hendidura no está correctamente apoyada en
HO H[WUHPR LQIHULRU GH OD UDQXUD
4. Empuje los bloqueos de la bisagra contra la estructura
frontal de la cavidad del horno, hasta la posición de bloqueo.
5. Cierre la puerta del horno.
Reemplazo de la Lámpara del Horno Inferior
ADVERTENCIA
PELIGRO DE DESCARGA O QUEMADURAS: Antes de reemplazar la lámpara de luz del horno,
GHVFRQHFWH OD FRQH[LyQ HOpFWULFD GHO KRUQR GHO IXVLEOH SULQFLSDO R GHO SDQHO GHO GLV\XQWRU 6L HVWR QR VH
cumple, se podrá producir una descarga eléctrica o un incendio.
PRECAUCIÓN
RIESGO DE INCENDIO: /D WDSD GH YLGULR \ OD OiPSDUD GH OX] VH GHEHUiQ UHWLUDU FXDQGR HVWpQ IUtDV 7RFDU HO
vidrio caliente sin protección en las manos o con un trapo húmedo puede ocasionar quemaduras.
1. Desconecte la corriente desde el fusible principal o el panel
del disyuntor.
2. Retire los estantes del horno.
3. Deslice un destornillador de punta plana entre la caja y la
tapa de luz de vidrio.
4. Apoye la tapa de luz de vidrio con dos dedos para evitar
que se caiga al fondo del horno. Tenga cuidado de no
astillar la cubierta del horno.
5. De forma suave, gire la punta del destornillador para aflojar
la tapa de luz de vidrio.
6. Retire la tapa de luz de vidrio.
7. Retire la lámpara sosteniendo firmemente y deslizando
la misma hacia afuera, hasta que las dos clavijas hayan
dejado el soporte de cerámica.
8. No toque el vidrio de la nueva lámpara con los dedos. Esto
hará que la lámpara falle al dar luz. Tome la lámpara de
reemplzado con una toalla limpia o un pañuelo de papel
con las clavijas hacia abajo. Aliñe las dos clavijas en el
soporte de cerámica, presionando suavemente hasta que la
lámpara quede asegurada en la ficha de cerámica.
9. Deslice las lentes protectoras del soporte y presione hasta
que las pinzas queden enganchadas en la caja.
10.Vuelva a conectar la corriente.
Utilice un
destornillador plano
para quitar la tapa
de la bombilla.
%RPELOOD
Use guantes o un paño
Posición de retiro
%ORTXHR GH OD ELVDJUD
Ranura
Empuje los
bloqueos de la
bisagra hacia
abajo para
desbloquear
([WUHPR LQIHULRU GH OD UDQXUD
%ORTXHR GH
la bisagra
%UD]R
de la
bisagra
+HQGLGXUD
Empuje el
bloqueo de la
bisagra hacia
arriba hasta
que quede
bloqueado
%UD]R GH OD ELVDJUD
32 49-2001077 Rev. 2
Problema Causa Posible Qué Hacer
VE NTILADOR
El ventilador continúa
funcionando después de terminar
de cocinar
El horno se está enfriando. El ventilador se apagará automáticamente cuando las piezas
internas del horno se hayan enfriado.
El ventilador del horno irradia
aire caliente mientras el horno se
encuentra encendido
Esto es normal.
El ventilador se enciende
automáticamente cuando
utilizando el microondas
Esto es normal.
COCCIÓN
El horno hace sonidos inusuales
mientras se cocina
Chasquidos y ventiladores soplando son
normales. El tablero de relés está encendiendo y
apagando los componentes.
Estos sonidos son normales.
Se expulsa humo del horno
cuando abro la compuerta
/RVDOLPHQWRVWLHQHQDOWRFRQWHQLGRGHJUDVD
Pulverizador en aerosol utilizado en las bandejas.
El humo es normal cuando se cocina alimentos con alto contenido
de grasa.
La comida no está
completamente cocinada o
dorada al finalizar un programa
de cocción
/RVWLHPSRVSURJUDPDGRVSRGUtDQQR
corresponder al tamaño o cantidad de comida que
está cocinando.
Ajustar el tiempo para nivel de cocción o ajuste las luces superiores
o inferiores para asar y para el nivel de cocción.
SENSOR ERROR (ERROR DE
SENSOR) mostrado junto con
una señal del horno
Cantidad o tipo de comida colocado en el horno no
corresponde con la programación que fue elegido.
Apriete el botón Clear/Off (Borrar/ Apagar) Ajuste el programa del
horno corresponda con la comida o líquido a ser cocinado o calentado.
Vapor no detectado por el horno porque la envoltura
plástico no se ventiló, una tapa muy ajustada estaba
sobre el plato o se cubrió un líquido.
Ventile la envoltura de plástico, utilice una tapa más floja o destape
los líquidos cuando los cocine o caliente.
PANTALLA
La pantalla se encuentra en
blanco
Es posible que el modo de ahorro de corriente
esté activado.
Revise el menú Settings (Configuraciones) para el reloj ajustes de
la pantalla. Encienda la pantalla.
Es posible que un fusible de su hogar se haya
quemado o que el disyuntor se haya desconectado.
Reemplace el fusible o reinicie el disyuntor.
&RUWHRH[FHVRGHFRUULHQWH Reinicie el reloj. Si el horno estuvo en uso, deberá reiniciar el mismo
presionando la tecla Clear/Off (Borrar/ Apagar) configurando el
reloj y reiniciando cualquier función de cocción.
Control is LOCKED (Control
BLOQUEADO) aparece en
la pantalla
El control ha sido bloqueado. Mantenga presionada la tecla Settings (Configuraciones) durante 3
segundos para desbloquear el control.
La pantalla de control está
iluminada pero el horno no se
inicia
No se ha programado el reloj. Programe el reloj.
Compuerta no cerrada bien. Abra la compuerta y ciérrela bien.
/DWHFOD6WDUW3DXVH,QLFLDU3DXVDUQRVHSUHVLRQy
luego de ingresar la configuración de la cocción.
Presione la tecla Start/Pause (Iniciar/ Pausar) o el dial de selección.
Ya se ha ingresado otra selección en el horno
\QRVHKDDSUHWDGRHOERWyQ&OHDU2II%RUUDU
$SDJDUSDUDFDQFHODUOD
3UHVLRQHODWHFOD&OHDU2II%RUUDU$SDJDU
Tamaño, cantidad o tiempo de cocción no
ingresado después de la selección final.
Asegúrese que ha ingresado el tiempo después de seleccionar.
6HDSUHWy&OHDU2II%RUUDU$SDJDU
accidentalmente.
Reinicie el programa de cocción y presione la tecla Start/ Pause
,QLFLDU3DXVDU
OTROS PROBLEMAS
La compuerta y el interior del
horno se sienten calientes
/DVOiPSDUDVWpUPLFDVSURGXFHQFDORULQWHQVRHQ
un espacio reducido.
Esto es normal. Use guantes térmicos de cocina para sacar la
comida cuando esté lista.
El horno no enciende Un fusible en su hogar puede haberse fundido o
el interruptor de circuitos fue activado.
Reemplace el fusible o reinicie sus interruptores de circuitos.
No puede editar las funciones de
cocción
Es posible que algunas funciones de cocción
programadas previamente no se puedan editar a
fin de evitar la degradación del rendimiento de la
cocción.
Esto es normal.
La teclas de este lado del control
no funcionan
El control bloqueó el uso de estas teclas y se
debe reiniciar.
Mantenga presionada la tecla Clear/Off (Borrar/ Apagar) del otro
lado de la pantalla durante 30 segundos. Si esto no reinicia el
control, podrá ser necesario hacer que el disyuntor realice ciclos.
Consejos para la Solución de Problemas... Antes de llamar para solicitar servicio
¡Ahorre tiempo y dinero! Primero revise los cuadros que aparecen en las siguientes páginas y es posible que no necesite solicitar
UHSDUDFLRQHV$FFHGDDORVYLGHRVGHD\XGD\SUHJXQWDVIUHFXHQWHV)$4DWUDYpVGHGEAppliances.com/support.
CONSEJOS PARA LA SOLUCIÓN DE PROBLEMAS (Horno Superior)
49-2001077 Rev. 2 33
CONSEJOS PARA LA SOLUCIÓN DE PROBLEMAS (Horno Inferior)
Problema Causa Posible Qué Hacer
Mi horno nuevo no cocina como el
anterior. ¿Hay algún problema con
las configuraciones de temperatura?
Su horno nuevo cuenta con un sistema de
cocción diferente con relación al anterior y, por lo
tanto, es posible que cocine de forma diferente.
En los primeros usos, use los tiempos y temperaturas de su receta
con cuidado. Si aún piensa que su horno nuevo cocina con demasiado
calor o demasiado frío, podrá ajustar el termostato usted mismo para
aplicar su preferencia de cocción específica. NOTA: Este ajuste afecta
ODVWHPSHUDWXUDVGH%DNH+RUQHDU&RQYHFWLRQ%DNH5DFN+RUQHDU
SRU&RQYHFFLyQHQ(VWDQWH\&RQYHFWLRQ%DNH0XOWL+RUQHDUSRU
&RQYHFFLyQ0~OWLSOHQRDIHFWDUiODVIXQFLRQHV&RQYHFWLRQ5RDVW
'RUDUSRU&RQYHFFLyQ%URLO$VDUR&OHDQ/LPSLDU
La comida no se hornea de forma
apropiada
Controles del horno configurados de forma incorrecta.
Consulte la sección Modos de Cocción.
/DSRVLFLyQGHOHVWDQWHHVLQFRUUHFWDRHOHVWDQWH
no está nivelado.
SeConsulte la sección Modos de Cocción y la Guía de Cocción.
Uso de una cacerola incorrecta o de una cacerola
de tamaño incorrecto.
Consulte la sección Utensilios.
/DWHPSHUDWXUDGHOKRUQRGHEHVHUDMXVWDGD Consulte la sección Settings (Configuraciones).
Sustitución de ingredientes Sustituir ingredientes puede modificar el resultado de la receta.
La comida no asa de forma
apropiada
Controles del horno configurados de forma incorrecta.
Asegúrese de seleccionar el modo correcto para asar.
Se usó una posición incorrecta del estante. Para acceder a sugerencias de ubicación de estantes, consulte la
Guía de Cocción.
Se cocinó comida en una olla caliente. Asegúrese de que el utensilio esté frío
Utensilio de cocina inadecuado para asar. Use una olla específicamente diseñada para asar
El papel de aluminio usado para la olla y la
rejilla para asar no se ajustó ni cortó de forma
apropiada, según lo recomendado.
Si usará papel de aluminio, deberá usarse conforme con las
aberturas de la olla.
En algunas áreas, es posible que el nivel de
FRUULHQWHYROWDMHVHDEDMR
Precaliente el elemento para asar durante 10 minutos.
La temperatura del horno es
demasiado caliente o demasiado fría
/DWHPSHUDWXUDGHOKRUQRGHEHVHUDMXVWDGD Consulte la sección Settings (Configuraciones).
El horno no funciona o parece no
funcionar
Es posible que un fusible de su hogar se haya
quemado o que el disyuntor se haya desconectado.
Reemplace el fusible o reinicie el disyuntor.
Controles del horno configurados de forma incorrecta.
&RQVXOWHODVHFFLyQ8VRGHO+RUQR
(OKRUQRVHHQFXHQWUDHQ6DEEDWK0RGH0RGR
6DEiWLFR
9HULILTXHTXHHOKRUQRQRHVWpHQ6DEEDWK0RGH0RGR6DEiWLFR
Consulte la sección del Modo Sabático.
Sonido de “chisporroteo” o
“traqueo”
Éste es el sonido de metal calentándose o
enfriándose durante las funciones de cocción y
limpieza.
Esto es normal.
¿Por qué la estufa hace un sonido
de “clic” cuando uso el horno?
Su estufa fue diseñada para mantener un control
más ajustado sobre la temperatura del horno.
Es posible que escuche que los elementos
de calentamiento del horno hagan sonidos de
“clic” con mayor frecuencia que con hornos más
antiguos para lograr mejores resultados durante
los ciclos de horneado, asado, convección y
limpieza automática.
Esto es normal.
El reloj y el temporizador no
funcionan
Es posible que un fusible de su hogar se haya
quemado o que el disyuntor se haya desconectado.
Reemplace el fusible o reinicie el disyuntor.
La luz del horno no funciona La lámpara está floja o presenta defectos. Ajuste o reemplace la lámpara.
La luz de funcionamiento del interruptor está
rota.
Visita cafeappliances.com/service.
El modo de limpieza automática del
horno no funciona
La temperatura del horno es demasiado caliente
como para configurar la limpieza automática.
Espere a que el horno se enfríe y reinicie los controles.
Los controles del horno están configurados de
forma incorrecta.
&RQVXOWHODVHFFLyQGH/LPSLH]DGHO+RUQR
Exceso de humo durante un ciclo
de limpieza
Suciedad o grasa excesiva. Presione la tecla Clear/Off (Borrar/ Apagar)
Abra las ventanas para
liberar el humo en la habitación. Espere hasta que la pantalla OVEN
,6&22/,1*'225,6/2&.('(OKRUQRVHHVWiHQIULDQGROD
SXHUWDHVWiEORTXHDGDGHVDSDUH]FD/LPSLHHOH[FHVRGHVXFLHGDG
y reinicie el ciclo de limpieza.
Humo excesivo al asar
La comida está demasiado cerca del quemador.
%DMHODSRVLFLyQGHOHVWDQWHFRQFRPLGD
La puerta del horno no se abrirá
luego de un ciclo de limpieza
El horno está demasiado caliente. Espere a que el horno se enfríe por debajo de la temperatura de
bloqueo.
Consejos para la Solución de Problemas... Antes de llamar para solicitar servicio
34 49-2001077 Rev. 2
Problema Causa Posible Qué Hacer
El horno no limpia luego de un ciclo
de limpieza
Los controles del horno están configurados de
forma incorrecta.
&RQVXOWHODVHFFLyQGH/LPSLH]DGHO+RUQR
El horno estaba demasiado sucio. /LPSLHGHUUDPHVH[FHVLYRVDQWHVGHLQLFLDUHOFLFORGHOLPSLH]D(V
posible que, en hornos con mucha suciedad, sea necesario usar
la limpieza automática nuevamente o usarla durante un período de
tiempo más prolongado.
Aparece “CLOSE DOOR TO
CONTINUE COOKING” (Cierre la
puerta para continuar cocinando) en
la sección de pantalla
La puerta está abierta durante una función de
cocción o limpieza.
Cierre la puerta del horno.
Aparece “OVEN IS COOLING DOOR
IS LOCKED” (El horno se está
enfriando; la puerta está bloqueada)
en la sección de pantalla.
La puerta del horno está bloqueada debido a que
la temperatura interior del horno no descendió
por debajo de la temperatura de bloqueo.
Presione la tecla Clear/Off (Borrar/ Apagar) Deje que el horno se
enfríe.
En la pantalla se muestra un error
del horno y “SERVICE MAY BE
NEEDED” (Es posible que necesite
el servicio técnico).
Tiene un código de error de función. Presione la tecla Clear/Off (Borrar/ Apagar) Permita que el horno se
enfríe durante una hora. Vuelva a poner el horno en funcionamiento.
Si el código de función se repite. Desconecte totalmente la corriente de la cocina durante por lo
menos 30 minutos y vuelva a conectar la misma. Si el código de
error de función se repite, visita cafeappliances.com/service.
Olor a “quemado” o “aceite” desde
la ventilación
Esto es normal en un horno nuevo y
desaparecerá con el tiempo.
Para acelerar el proceso, configure un ciclo de limpieza automática
SRUXQPtQLPRGHKRUDV&RQVXOWHODVHFFLyQGH/LPSLH]DGHO+RUQR
Olor fuerte Un olor en la aislación alrededor del interior
del horno es normal desde las primeras veces
en que el horno es usado.
Esto es temporario y desaparecerá luego de varios usos o de un
ciclo de limpieza automática.
Ruido del ventilador Es posible que un ventilador de enfriamiento
se active automáticamente.
Esto es normal. El ventilador de enfriamiento se encenderá para
enfriar las partes internas. Es posible que funcione hasta durante
una hora y media, una vez que el horno se haya apagado.
La puerta de vidrio del horno parece
estar “teñida” o tener un color
“arcoíris”. ¿Es esto un defecto?
No. El vidrio del horno interno está cubierto
con una barrera de calor que refleja este
último nuevamente hacia el horno, a fin de
evitar la pérdida de calor y de mantener fría la
puerta externa mientras se hornea.
(VWRHVQRUPDO%DMRFLHUWDVOXFHV\iQJXORVHVSRVLEOHTXH
visualice esta tinta o arcoíris.
A veces el horno tarda más
en precalentarse a la misma
temperatura
Utensilio o comida en el horno El utensilio o la comida en el horno hará que éste tarde más en
precalentarse. Retire estos artículos para reducir el tiempo de
precalentamiento.
Número de estantes en el horno Agregar más estantes al horno hará que éste tarde más en
precalentarse. Retire algunos estantes.
Diferentes modos de cocción /RVGLIHUHQWHVPRGRVGHFRFFLyQXWLOL]DQGLIHUHQWHVPpWRGRVGH
precalentamiento para calentar el horno en un modo de cocción
HVSHFtILFR$OJXQRVPRGRVWDUGDUiQPiVTXHRWURVWDOHVFRPR
KRUQHDGRSRUFRQYHFFLyQP~OWLSOH
Consejos para la Solución de Problemas... Antes de llamar para solicitar servicio
CONSEJOS PARA LA SOLUCIÓN DE PROBLEMAS (Horno Inferior)

49-2001077 Rev. 2 35
Notas

36 49-2001077 Rev. 2
Garantía Limitada de GE Appliances
GARANTÍA LIMITADA
Abroche su recibo aquí. Para acceder al servicio técnico de acuerdo con
la garantía deberá contar con la prueba de la fecha original de compra.
GEAppliances.com
Todo el servicio de garantía es provisto por nuestros Centros de Servicio de Fabricación, o un técnico autorizado de Customer
Care
®
. Para programar una visita del servicio técnico a través de Internet, visítenos en GEAppliances.com/service, o llame al 800.
*(&$5(6&XDQGROODPHSDUDVROLFLWDUHOVHUYLFLRWHQJDORVQ~PHURVGHVHULH\PRGHORGLVSRQLEOHV
Para realizar el servicio técnico de su electrodoméstico, se podrá requerir el uso de datos del puerto de abordaje para su diagnóstico.
Esto da al técnico del servicio de fábrica de GE Appliances la habilidad de diagnosticar de forma rápida cualquier problema con
su electrodoméstico, y de ayudar a GE Appliances a mejorar sus productos al brindarle a GE Appliances la información sobre su
electrodoméstico. Si no desea que los datos de su electrodoméstico sean enviados a GE Appliances, solicitamos que le indique a su
técnico no entregar los datos a GE Appliances en el momento del servicio.
Qué no cubrirá GE Appliances:
Ŷ Viajes del técnico del servicio a su hogar para enseñarle
sobre cómo usar el producto.
Ŷ ,QVWDODFLyQHQWUHJDRPDQWHQLPLHQWRLQDGHFXDGRV
Ŷ )DOODVGHOSURGXFWRHQFDVRGHDEXVRPDOXVRPRGLILFDFLyQ
o uso para propósitos diferentes al original o uso comercial.
Ŷ 5HHPSOD]RGHIXVLEOHVGHODFDVDRUHLQLFLRGHGLV\XQWRUHV
Ŷ 'DxRVRFDVLRQDGRVVREUHHOSURGXFWRSRUDFFLGHQWH
incendio, inundaciones o catástrofes naturales.
Ŷ 'DxRVVREUHHODFDEDGRWDOHVFRPRy[LGRVREUHOD
superficie, deslustres o manchas pequeñas no informadas
dentro de las 48 horas luego de la entrega.
Ŷ 'DxRVLQFLGHQWDOHVRFRQVHFXHQWHVFDXVDGRVSRUSRVLEOHV
defectos sobre este producto.
Ŷ 'DxRFDXVDGRGHVSXpVGHODHQWUHJD
Ŷ 3URGXFWRQRDFFHVLEOHSDUDEULQGDUHOVHUYLFLRUHTXHULGR
Ŷ 6ROLFLWHHOVHUYLFLRWpFQLFRSDUDUHSDUDURUHHPSOD]DUODV
OiPSDUDVH[FHSWRODVOiPSDUDV/('
EXCLUSIÓN DE GARANTÍAS IMPLÍCITAS
6X~QLFD\H[FOXVLYDDOWHUQDWLYDHVODUHSDUDFLyQGHOSURGXFWRFRPRVHLQGLFDHQOD*DUDQWtD/LPLWDGD/DV
garantías implícitas, incluyendo garantías implícitas de comerciabilidad o conveniencia sobre un propósito
particular, se limitan a un año o al período más corto permitido por la ley.
(VWDJDUDQWtDOLPLWDGDVHH[WLHQGHDOFRPSUDGRURULJLQDO\DFXDOTXLHUSURSLHWDULRSRVWHULRUGHORVSURGXFWRV
comprados para uso doméstico dentro de EE. UU. Si el producto está en un área donde no se encuentra disponible
un Proveedor Autorizado del Servicio Técnico de GE Appliances, usted será responsable por el costo de un viaje o se
podrá requerir que traiga el producto a una ubicación del Servicio Técnico de GE Appliances autorizado para recibir el
servicio. (Q$ODVNDODJDUDQWtDOLPLWDGDH[FOX\HHOFRVWRGHHQYtRRYLVLWDVGHVHUYLFLRDVXGRPLFLOLR$OJXQRVHVWDGRV
QRSHUPLWHQODH[FOXVLyQROLPLWDFLyQGHGDxRVIRUWXLWRVRFRQVHFXHQWHV(VWDJDUDQWtDOLPLWDGDOHRWRUJDGHUHFKRV
legales específicos, y usted también podría tener otros derechos que varían de estado a estado. Para conocer cuáles
son sus derechos legales, consulte a la oficina de asuntos del consumidor local o estatal o al Fiscal de su estado.
Garante: GE Appliances, a Haier company
/RXLVYLOOH.<
Garantías Extendidas:$GTXLHUDXQDJDUDQWtDH[WHQGLGDGH*($SSOLDQFHV\FRQR]FDORVGHVFXHQWRVHVSHFLDOHVTXH
están disponibles mientras su garantía aún está vigente. Puede acceder a la misma a través de Internet en cualquier
momento en
GEAppliances.com/extended-warranty
ROODPDQGRDOGXUDQWHHOKRUDULRFRPHUFLDO/RV6HUYLFLRVSDUDORV*($SSOLDQFHVD~QHVWDUiQ
disponibles cuando su garantía caduque.
Por el Período de GE Appliances reemplazará
Un Año
Desde la fecha de la
compra original
Cualquier parte de la cocina que falle debido a un defecto en los materiales o la fabricación. Durante
esta garantía limitada de un año, GE Appliances también proveerá, sin costo, todo el trabajo y el
servicio en el hogar para reemplazar la parte que presente defectos.

49-2001077 Rev. 2 37
Accesorios
2OODSDUD$VDU3HTXHxDô´[ó´[ò³
2OODSDUD$VDU*UDQGHô´[ó´[ò³
2OODSDUD$VDU([WUD*UDQGHô´[ó´[ò³
Piezas
%DQGHMDGH9LGULR
Plato Giratorio
Estantes del horno
Elementos del horno
/iPSDUDVGHOX]
%DQGHMDGH0HWDO
Suministros de Limpieza
/LPSLDGRUSDUD(OHFWURGRPpVWLFRV0LFUR%U\WH
®
de 16 onzas
/LPSLDGRUHVGH$FHUR,QR[LGDEOH&LWUL6KLQH
™
/LPSLDGRUGH(OHFWURGRPpVWLFRVGH$FHUR,QR[LGDEOH
/XEULFDQWHGH*UDILWR
/DROODSDUDDVDUJUDQGHQRHQWUDHQFRFLQDVGH´´
/DROOD;/QRHQWUDHQKRUQRVGHSDUHGGH´HPSRWUDEOHVGH´RFRFLQDVGH´´
ACCESORIOS
¿Busca Algo Más?
¡Café ofrece una variedad de accesorios para mejorar sus
experiencias de cocción y mantenimiento!
Consulte la página de Apoyo al Consumidor para información
VREUHODSiJLQDZHE
Estos y otros productos están disponibles:
Accesorios

38 49-2001077 Rev. 2
Impreso en Estados Unidos
SOPORTE PARA EL CONSUMIDOR
Soporte para el Consumidor
Sitio Web de GE Appliances
¿Desea realizar una consulta o necesita ayuda con su electrodoméstico? ¡Intente a través del Sitio Web de
GE Appliances las 24 horas del día, cualquier día del año! Usted también puede comprar más electrodomésticos
maravillosos de GE Appliances y aprovechar todos nuestros servicios de soporte a través de Internet, diseñados
para su conveniencia. GEAppliances.com.
Registre su Electrodoméstico
¡Registre su nuevo electrodoméstico en línea cuando lo desee! El registro oportuno del producto permitirá una mejor
comunicación y un servicio rápido bajo los términos de su garantía, en caso de que surja la necesidad. También
puede enviar por correo la tarjeta de registro preimpresa incluida en el empaque. GEAppliances.com/register.
Servicio Programado
(OVHUYLFLRGHUHSDUDFLyQGHH[SHUWRVGH*($SSOLDQFHVHVWiDVyORXQSDVRGHVXSXHUWD&RQpFWHVHDWUDYpVGH
Internet y programe su servicio a su conveniencia cualquier día del año.
GEAppliances.com/service
o comuníquese al 800.432.2737 durante el horario de atención comercial.
Garantías Extendidas
$GTXLHUDXQDJDUDQWtDH[WHQGLGDGH*($SSOLDQFHV\FRQR]FDORVGHVFXHQWRVHVSHFLDOHVTXHHVWiQGLVSRQLEOHV
PLHQWUDVVXJDUDQWtDD~QHVWiYLJHQWH/DSXHGHDGTXLULUHQFXDOTXLHUPRPHQWRDWUDYpVGH,QWHUQHW/RVVHUYLFLRV
de GE Appliances aún estarán allí cuando su garantía caduque.
GEAppliances.com/extended-warranty o comuníquese al 800.626.2224 durante el horario de atención comercial.
Conectividad Remota
3DUDVROLFLWDUDVLVWHQFLDSDUDODFRQHFWLYLGDGGHUHGLQDOiPEULFDSDUDPRGHORVFRQDFFHVRUHPRWRYLVLWHQXHVWUR
VLWLRZHEHQGEAppliances.com/connect o comuníquese al 800.220.6899.
Piezas y Accesorios
Aquellos individuos calificados para realizar el servicio técnico de sus propios electrodomésticos podrán solicitar el
HQYtRGHSLH]DVRDFFHVRULRVGLUHFWDPHQWHDVXVKRJDUHVVHDFHSWDQODVWDUMHWDV9,6$0DVWHU&DUG\'LVFRYHU
Ordene hoy a través de Internet durante las 24 horas, todos los días. GEApplianceparts.com o de forma telefónica
al 877.959.8688 durante el horario de atención comercial.
Las instrucciones contenidas en este manual cubren los procedimientos que debe realizar cualquier usuario.
Otro tipo de servicio debe ser realizado por personal de servicio calificado. Se deberá tener cuidado, ya que
una reparación indebida podrá hacer que el funcionamiento no sea seguro.
Contáctenos
Si no se encuentra satisfecho con el servicio que recibió de GE Appliances, comuníquese con nosotros a través de
nuestro sitio Web con todos los detalles, incluyendo su número telefónico, o escriba a:
*HQHUDO0DQDJHU&XVWRPHU5HODWLRQV_*($SSOLDQFHV$SSOLDQFH3DUN_/RXLVYLOOH.<
GEAppliances.com/contact o comuníquese al 800.626.2000