The clock is a 12-hour (12:00-11:59) clock. Touch CLOCK, enter time, then touch CLOCK or the Start control.
Timer
With the microwave oven in Standby mode, touch the Timer control, enter time, then touch the Timer control or the Start control. Cook functions may be entered while the Timer is counting down. To cancel timer, touch Timer control while the Timer countdown is active in the display.
Control Lock
Activate to avoid unintended start. Touch and hold the Cancel keypad for about 3 seconds until 2 tones sound and the CONTROL LOCKED appears in the display. When locked, touching any button on the keyboard (except for the hood control buttons and Cancel) will not work. Repeat to unlock control.
Vent Fan
Press the Vent Fan keypad once for High setting. You may press this keypad repeatedly and choose a different speed. There are three available speeds HIGH--->MEDIUM--->MEDIUM LOW-- LOW--->OFF. Choose the speed you want.
To keep the microwave oven from overheating, the auto hood fan will automatically turn on at high speed if the temperature from the range or cooktop below the microwave oven gets too hot. When this occurs, the hood fan cannot be turned off.
Vent Light
Pressing Vent Light keypad adjusts the vent light setting among HIGH -> LOW -> OFF.
Options/Clock
Press Clock repeatedly, there are various options/setting may be adjusted:
1-Clock; 2-Sound; 3-Scrolling Speed; 4-Language (on Canada model only); 5-Filter Reset; 6-Fan Timer; 7-Demo Mode; 8-Factory Reset.
Sound (Tones)
Keypad tones and volume can be adjusted. Press CLOCK to reach the Sound submenu.
Button Tones On and Off: Press 1-On 2-Off
Volume: Press 1-Low, 2-Med, 3-High
Pressing the Start keypad, pressing the CLOCK keypad will save.
Scroll Speed
Scrolling speed options will be between Low, Medium and High speeds. Press CLOCK to reach the scrolling speed submenu. Once you select speed, press start or CLOCK keypad will save.
Language
There are two languages supported: English and French. Press CLOCK to reach the Language submenu. Once options for language is selected you’ll have two options. Press start or CLOCK keypad will save.
Filter Reset
Reset the filter status after replacing and/or cleaning the filters. Touch CLOCK to reach the Filter Reset submenu, and activate reset.
Fan Timer
Set vent fan to run for exactly 30 minutes or to run for only 30 minutes more (off after 30 minutes). The vent fan may be turned off at any time using the Vent Fan keypad. Touch CLOCK to reach the Fan Timer submenu and select the setting.
Demo Mode
Activate to practice using the control without actually turning on the magnetron. Touch CLOCK to reach the Demo mode submenu, then follow the prompts to activate. The Clock or : will light up in the display. Repeat to deactivate.
If the microwave oven has not been used for 5 min (no key press for 5min), the display will show “DEMO ON”.
Standby Mode
When no functions are working (12-hour clock is displayed or if the clock has not been set), oven will switch to Standby Power mode and dim the LCD brightness after 2 minutes. Press any button or open/close the door, and display will return to the normal brightness
Features
CLEANRELEASE® Cavity Coating (on some models)
The durable, nonstick coating resists soil buildup by making cleaning easier. See the “Microwave Oven Care” section.
6th SENSE™ System
A sensor in the microwave oven detects moisture released from food as it heats and adjusts the cooking time accordingly.
Turntable
Turntable may be turned off for manual cooking only. This is helpful when cooking with plates that are bigger than the turntable or when cooking with plates that are side by side. Turntable cannot be turned off during preset or sensor (on some models) functions.
Objects with gold or silver trim or with metallic glaze
To Test Cookware/Dinnerware: Place dish in microwave oven with 1 cup (250 mL) of water beside it. Program 1 minute of cook time at 100%. If dish becomes hot and the water stays cool, do not use the dish in the microwave oven.
Microwave Oven Use
For list of preset programs, see the Quick Reference Guide provided with your model.
Manual Cooking
Touch number keypads to enter time, touch POWER (if not 100%), touch number keypads to enter power level (10-90), then touch the Start control. Sensor Cooking A sensor in the microwave oven detects moisture released from food as it heats and adjusts the cooking time accordingly.
Make sure microwave oven has been plugged in for at least 1 minute. Use microwave-safe dish with loose-fitting lid or cover microwave-safe dish with plastic wrap, and vent. For optimal performance, wait at least 30 minutes after convection cooking or grilling (on some models) before sensor cooking.
Preset Cooking, Reheating, Defrosting
Touch COOK or REHEAT or DEFROST repeatedly to scroll through program options. Rest on desired program options. Follow prompts to select submenu items and/or amounts, then press the Start control.
Popcorn
Two choices, press Popcorn repeatedly.
Large bag: Senses 3.0-3.5 oz (85-99g)
Small bag: 1.75 oz (50g) only
Place bag on turntable then touch Start control. Listen for popping to slow to 1 pop every 1 or 2 seconds, then stop the cycle. Cooking results may vary by brand and fat content. For other bag sizes use manual cooking.
Preset Steam/Simmer
Touch STEAM/SIMMER, repeatedly to scroll through program options. Rest on desired program options. Follow prompts to select submenu items and/or amounts, then press the Start control.
MENU PROGRAMS: Touch the menu control repeatedly to scroll through program options. Rest on the desired program options. Follow display prompts to select submenu items and/or amounts, and then start the program. Any invalid entry will cause an Invalid Tone and be corrected to a value that is within range and closest to the entered value.
COOK
Bacon: 1, 2, 3, 4, 5 or 6 slices, average thickness: Follow directions on package.
Canned Vegetables: 1, 2, 3, 4 cups (250mL - 1 L) Place in microwave-safe container. Cover with plastic wrap, and vent. Stir and let stand 2-3minutes after cooking.
Fresh Vegetables: Senses 1 - 4 cups (250mL - 1 L) Place in microwave-safe container. Add 2-4 tbs (30-60mL) water. Cover with plastic wrap, and vent. Stir and let stand 2-3minutes after cooking.
Frozen Vegetables: Senses 1 - 4 cups (250mL - 1 L) Remove from package. Place in microwave-safe container. Add 2-4tbs (30-60 mL) water. Cover with plastic wrap, and vent. Stir and let stand 2-3minutes after cooking.
Frozen Entrée : 10, 20, 40, 60 ounces (283, 567, 1134, 1701g). Remove from package. Loosen cover on 3 sides. If entrée is not in microwave-safe container, place on plate, cover with plastic wrap, and vent.
Small potato: Enter 1-4 pieces, 4-7 oz (113-198g) each. Pierce each potato several times with a fork. Place on paper towel, around turntable edges, at least 1" (2.5 cm) apart. Let stand 5 minutes after cooking.
Large potato: Sense 1-4 potatoes, 8-10 oz (227-283g) each. Pierce each potato several times with a fork. Place on paper towel, around turntable edges, at least 1" (2.5 cm) apart. Let stand 5 minutes after cooking.
Rice: Senses 0.5-2.0 cups (125-500mL) dry, white long grain: Follow measurements on package for ingredient amounts. Use microwave-safe dish with loose-fitting lid. Let stand 5 minutes after cooking, or until liquid is absorbed. Stir.
REHEAT
Baked Goods: 1, 2, 3, 4, 5 or 6 servings: Place on paper towel. Two small rolls may be counted as 1 serving.
Beverage: 1, 2 cups, 8 oz (250mL) each. Do not cover. The diameter of the cup’s opening will affect how the liquid heats. Beverages in cups with smaller openings may heat faster.
Casserole: 1, 2, 3, 4 cups (250mL - 1 L) Place in microwave-safe container and cover with plastic wrap. Stir and let stand 2-3minutes after reheating.
Dinner Plate: Senses 1 serving (1 plate), 8-16 oz (227-454g): Place food on microwave-safe plate, cover with plastic wrap, and vent.
Pizza: 1, 2, 3 slices, 4 oz (113g) each Place on paper towel lined paper plate.
Sauce: Senses 1-4 cups (250mL - 1 L) Place in microwave-safe container and cover with plastic wrap. Stir and let stand 2-3 minutes after reheating.
Soup: Sense 1,2,3,4 cups (250mL -1L) Place in microwave-safe container and cover with plastic wrap. Stir and let stand 2-3minutes after reheating.
DEFROST
Poultry: 0.2-6.6 lbs (90g - 3 kg) Remove wrap and place in microwave-safe dish.Do not cover.
Meat: 0.2-6.6 lbs (90g - 3 kg) Remove wrap and place in microwave-safe dish. Do not cover.
Fish: 0.2-4.4 lbs (90g - 2 kg) Remove wrap and place in microwave-safe dish. Do not cover.
Quick: 1.0 lb - 454g Remove wrap and place in microwave-safe dish. Do not cover. Turn over food at signal.
STEAM/SIMMER (sensor):
Use microwave-safe container with a loose-fitting lid. Sensor will detect when liquid begins to boil, then the Steam or Simmer countdown will start.
NOTE: Do not remove the lid while the container is in the microwave oven, as a rush of steam would disrupt the sensor readings.
Place small microwave-safe dish (for example, custard dish) with 2-4tbs (30-60 mL) water in center of container. Use 2tbs (30mL) water for smaller quantities, or 4tbs (60mL) water for larger quantities of food. Place food in container around the small dish. Cover with loose-fitting lid.
Steam Fresh Vegetable – Senses 1-4 cups (250 mL-1 L): For best results, cut into equally sized pieces.
Steam Potato – Senses 1-4 cups (250 mL-1 L): For best results, cut into equally sized pieces.
Manual Steam: Touch the number keypads to set a length of time to steam. Time can be set up to 99 minutes and 59 seconds.
Manual Simmer: Touch the number keypads to set a length of time to steam. Time can be set up to 99 minutes and 59 seconds.
MICROWAVE OVEN CARE
Installing/Replacing Filters and Light Bulbs
NOTE: A Filter Status indicator (on some models) appears in the display when it is time to replace the charcoal filter, and clean or replace the grease filters. See the “Settings” section to reset filter status.
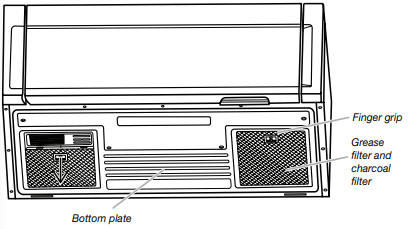
Grease filters: Grease filters are underside of microwave oven. The grease filters should be removed and cleaned at least once a month.
NOTE: For recirculation: Do not operate the microwave oven without the filters in place. For wall and roof ventilation: To ensure good performance of airflow, remove the charcoal filter from the bottom plate before operating the microwave oven.
Refer the following steps for replacing grease filter:
To remove the grease filter push the finger grip back and then pull down from the bottom plate.
Clean the grease filter monthly, or replace with new grease filter if necessary.
Put the grease filter back to the bottom plate.
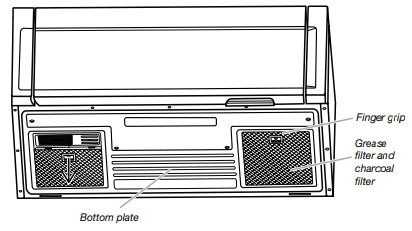
Charcoal filters: Charcoal filters are underside of microwave oven. The charcoal filter cannot be cleaned and should be replaced about every 6 months.
NOTE: For recirculation: Do not operate the microwave oven without the filters in place.
For wall and roof ventilation: To ensure good performance of airflow, remove the charcoal filter from the bottom plate before operating the microwave oven. Refer the following steps for replacing charcoal filter:
To remove the grease filter first, push finger grip back and then pull down from the bottom plate, and set aside.
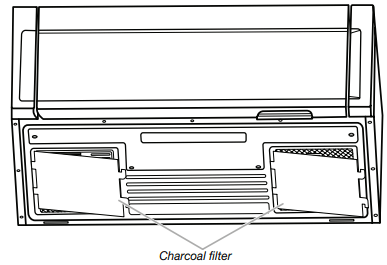
Take out the charcoal filter from the bottom plate.
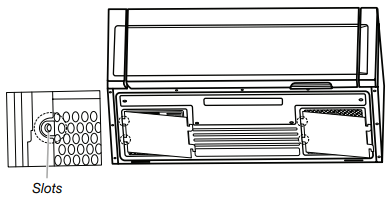
Replace a new charcoal filter and reattach it back to the bottom plate, and make sure both left and right sides insert to the bottom plate slots.
Put the grease filter back to the bottom plate.
Cooktop light: The cooktop light is located on the underside of the microwave oven and is replaceable.
To replace the cooktop light refer the following steps:
Using a philips screwdriver, remove the 4 screws from the “T” shaped bottom lighting cover.
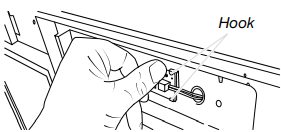
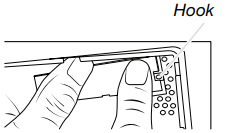
Push the 2 hooks backward, and take the LED out.
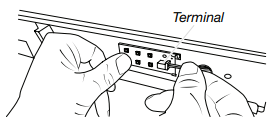
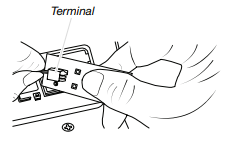
Unplug the terminal from the LED board.
Replace a new LED, press it back between two hooks and plug in the terminal.
Using a Phillips screwdriver, reattach the 4 screws back to “T” shape bottom lighting cover.
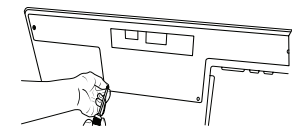
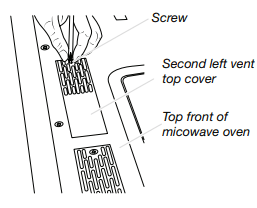
Cavity light: The cavity light is located at the top front of the microwave oven, under the cover, and is replaceable.
To replace the cavity light refer the following steps:
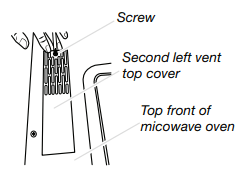
Using a Phillips screwdriver, remove the second left vent top cover screw from the top front of the microwave oven.
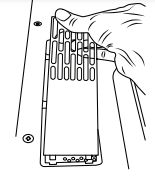
Remove the second left top cover.
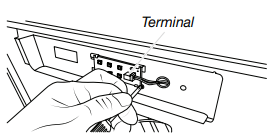
Take out LED board.
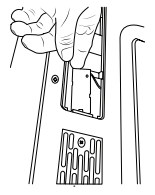
Unplug the LED terminal.
Replace a new LED, and snap it into the hook.
Reattach the second top vent cover with the screw removed in step 1.
TROUBLESHOOTING
If you experience
Recommended Solutions
Microwave oven will not operate
Check the following:
Household fuse or circuit breaker - If a household fuse has blown or a circuit breaker has tripped, replace the fuse or reset the circuit breaker. If the problem continues, call an electrician.
Magnetron - Try to heat 1 cup (250 mL) of cold water for 2 minutes at 100% cooking power. If water does not heat, try the steps in the bullets below. If microwave oven still does not operate, call for service.
Door - Firmly close door. On some models, if a packaging spacer is attached to inside of the door, remove it, then firmly close door. If a message about the door appears in the display, the door has been closed for 5 minutes or more without the microwave oven being started. This occurs to avoid unintended starting of the microwave oven. Open and close the door, then start the cycle.
Control - Make sure control is set properly. Make sure Control Lock is OFF. Make sure Demo mode (on some models) is OFF.
Arcing in the microwave oven
Check the following:
Soil buildup - Soil buildup on cavity walls, microwave inlet cover, cooking rack supports, and area where the door touches the frame can cause arcing. See “General Cleaning” in the “Microwave Oven Care” section.
Turntable alternates rotation directions
This is normal and depends on motor rotation at the beginning of the cycle.
Display shows messages
“Enter clock” with flashing digits means there has been a power failure. Reset the clock.
A letter followed by a number is an error indicator. Call for assistance.
Fan running during cooktop usage
This is normal. The microwave oven’s cooling fan, which is separate from the vent fan, automatically comes on during microwave oven operation to cool the microwave oven. It may also automatically come on and cycle on and off to cool the microwave oven’s controls while the cooktop below is being used.
Radio, TV, or cordless phone interference
Check the following:
Proximity - Move the receiver away from the microwave oven, or adjust the radio or TV antenna.
Soil - Make sure the microwave oven door and sealing surfaces are clean.
Frequency - Some 2.4 GHz-based cordless phones and home wireless networks may experience static or noise while microwave oven is ON. Use a corded phone, a different frequency cordless phone, or avoid using these items during microwave oven operation.