USER MANUAL Sportsman
FEATURES AND CONTROLS
OVERVIEW
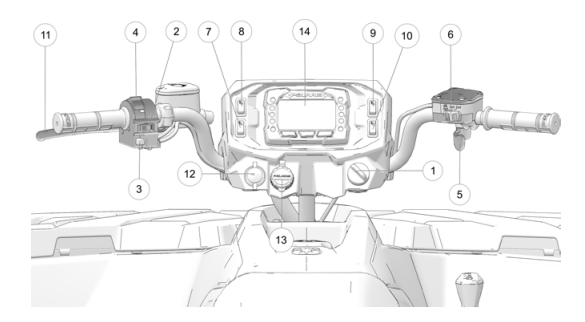
- Ignition Switch
- Engine Stop Switch
- Mode/Reverse Override Switch
- Headlight Switch
- Throttle Lever
- Driveline Switch
- Drive Mode Switch (if equipped)
- Auxiliary Switch (if equipped)
- Thumb Warmer Switch (if equipped)
- Hand Warmer Switch (if equipped)
- Brake Lever
- Auxiliary Outlet
- Battery Charge Port
- Digital Display
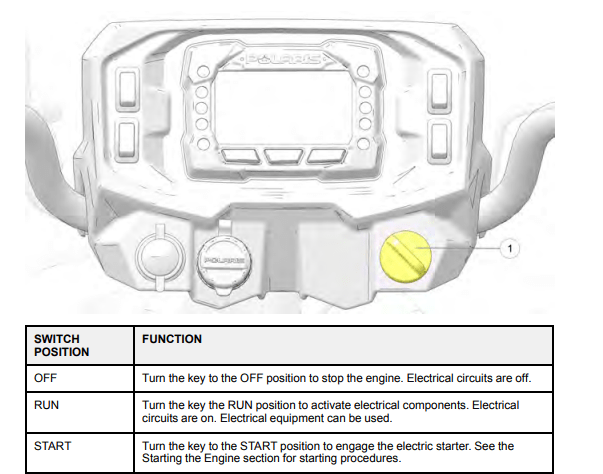
IGNITION SWITCH
Use the ignition switch 1 to start the engine. The key can be removed from the switch when it is in the OFF position.
ALL WHEEL DRIVE SYSTEM
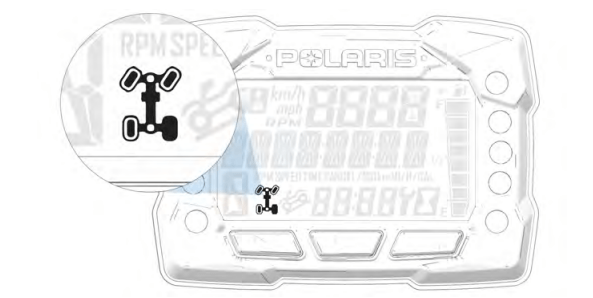
The All Wheel Drive (AWD) system is controlled by the Driveline switch. Engage AWD before getting into conditions where front wheel drive may be needed. If the rear wheels are spinning, release the throttle before switching to AWD.
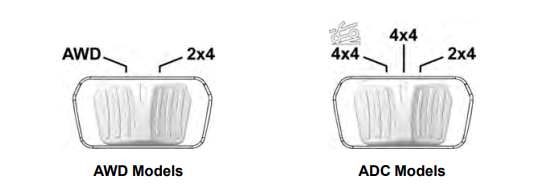
AWD (4X4) MODE
- When the switch is on AWD, the ATV is four-wheel drive, and the AWD indicator icon in the instrument cluster display will be visible.
- When in AWD, the demand drive unit will automatically engage any time the rear wheels lose traction. When the rear wheels regain traction, the demand drive unit will automatically disengage. There is no limit to the length of time the vehicle may remain in AWD. The vehicle automatically engages AWD when operating in reverse if the switch is set to either AWD position.
2X4 MODE
- When the switch is on 2X4, the ATV is in two-wheel drive at all times.
ADC 4X4 MODE (IF EQUIPPED)

- When the switch is on ADC 4X4, the ADC system allows engine braking to all four wheels when the vehicle descends a hill or incline. Always move the 4X4 switch to ADC 4X4 before ascending or descending a hill.
ENGAGING AWD
- The AWD switch may be turned on or off while the vehicle is moving. Initially, the vehicle's electronic system will not enable AWD until the engine RPM is below 3000. Once enabled, AWD remains enabled until the AWD switch is turned off. If the switch is turned off while the demand drive unit is moving, it will not disengage until the rear wheels regain traction.
- Engage the AWD switch before getting into conditions where front wheel drive may be needed. If the rear wheels are spinning, release the throttle before switching to AWD.
OPERATION
SAFE OPERATION PRACTICES
- Complete the recommended safety training before operating this vehicle. Visit atvsafety website for safety courses and riding tips.
- Do not allow anyone under 16 years of age to operate this vehicle. Do not allow anyone with cognitive or physical disabilities to operate this vehicle.
- Never carry a passenger on a 1-up ATV. Never carry more than one passenger on a 2-up ATV.
- Engine exhaust fumes are poisonous. Never start the engine or let it run in an enclosed area.
- Before operating, learn how to use the auxiliary brake for emergency situations (if service brakes become inoperable).
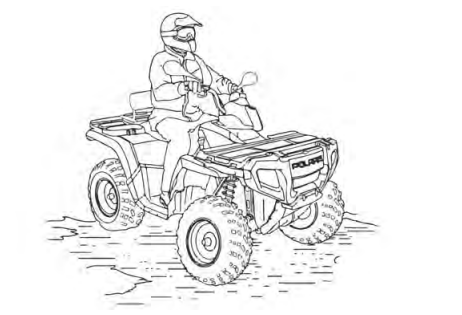
- Operate this vehicle off-road only. Never operate the vehicle on pavement or on any public street, road or highway, including dirt and gravel roads.
- Use caution and drive at reduced speeds in conditions of reduced visibility such as fog, rain and darkness. Clean headlights frequently and replace burned out headlamps promptly.
- Drive in a manner appropriate for your skills, your passenger’s skills and operating conditions. Never operate at excessive speeds. Never attempt wheelies, jumps, or other stunts. Never remove your hands from the handlebars while operating, and always keep both feet on the footrests.
- Never consume alcohol or drugs before or while operating an ATV.
- Always use the size and type of tires specified for your vehicle. Always maintain proper tire pressure.
- Never operate a damaged ATV. After any overturn or accident, have a qualified service dealer inspect the entire machine for possible damage.
- Never operate the ATV on a frozen body of water unless you have independently verified that the ice is sufficiently thick to support the weight and moving force of the ATV, you and your cargo, together with any other vehicles in your party
- Do not touch hot exhaust system components. Always keep combustible materials away from the exhaust system.
- Always remove the ignition key when the vehicle is not in use to prevent unauthorized use.
TRAIL ETIQUETTE
- Always practice good etiquette when riding. Allow a safe distance between your vehicle and other vehicles operating in the same area. Communicate to oncoming operators by signaling the number of vehicles in your group. When stopping, move your vehicle to the edge of the trail as far as possible to allow others to pass safely
KNOW YOUR RIDING AREA/TREAD LIGHTLY
- Familiarize yourself with all laws and regulations concerning the operation of this vehicle in your area. Respect the environment in which you ride your vehicle. Find out where the designated riding areas are by contacting your POLARIS dealer, a local riding club, or local officials.
- Help keep our trails open for recreational vehicle use. As an off-road enthusiast, you represent the sport and can set a good example (or a poor example) for others to follow. Tread lightly. Operate with respect for the terrain, avoid littering, and always stay on the designated trails.
VEHICLE BREAK-IN PERIOD
- The break-in period for your new POLARIS vehicle is the first 25 hours of operation, or the time it takes to use the first two tanks full of gasoline. No single action on your part is as important as a proper break-in period. Careful treatment of a new engine and drive components will result in more efficient performance and longer life for these components. Perform the following procedures carefully
ENGINE AND DRIVETRAIN BREAK-IN
- Fill the fuel tank with gasoline. See the Fuel Tank section for details. Always exercise extreme caution whenever handling gasoline.
- Check the oil level. See the Oil Check section for reference. Add the recommended oil as needed to maintain the oil level in the safe operating range.
- Drive slowly at first. Select an open area that allows room to familiarize yourself with vehicle operation and handling.
- Avoid aggressive use of the brakes.
- Vary throttle positions. Do not operate at sustained idle.
- Pull only light loads.
- Perform regular checks on fluid levels, controls and areas outlined on the daily pre-ride inspection checklist.
- During the break-in period, change both the oil and the filter at 25 hours or one month.
- Check the transmission fluid level at 25 hours, check every 25 hours thereafter. Change fluid at 200 hours.
- Change the front gearcase fluid at 25 hours, change every 200 hours thereafter.
BRAKE SYSTEM BREAK-IN
- Apply only moderate braking force for the first 50 stops. Aggressive or overly forceful braking when the brake system is new could damage brake pads and rotors.
PVT BREAK-IN (CLUTCHES/BELT)
- A proper break-in of your drive belt will ensure a longer life and better performance. To break in a belt, use low gear while varying speeds and avoiding wide open throttle for 5 to 10 miles.
- If a belt fails, always clean any debris from the PVT intake and outlet duct and from the clutch and engine compartments when replacing the belt.
DRIVING PROCEDURES
NEW OPERATOR DRIVING PROCEDURES
- Wear protective riding gear. See the Safe Riding Gear section.
- Perform the pre-ride inspection.
- Place the transmission in PARK.
- Lock the brake holding latch.
- Mount the vehicle from the left side.
- Sit upright with both feet on the footrests and both hands on the handlebars.
- Start the engine and allow it to warm up.
- Shift the transmission into gear.
- Check your surroundings and determine your path of travel.
- Release the brake holding latch.
- Slowly depress the throttle with your right thumb and begin driving.
- Drive slowly. Practice maneuvering and using the throttle and brakes on level surfaces.
TURNING THE VEHICLE
Both rear wheels drive equally at all times. This means that the outside wheel must travel a greater distance than the inside wheel when turning, and the inside tire must slip traction slightly.
- Slow down.
- Never turn quickly when carrying cargo.
- Steer in the direction of the turn.
- Keep both feet on the footrests.
- Lean your upper body to the inside of the turn while supporting your weight on the outer footrest. This technique alters the balance of traction between the rear wheels, allowing the turn to be made smoothly. The same leaning technique should be used for turning in reverse.
- Practice making turns at slow speeds before attempting to turn at faster speeds.
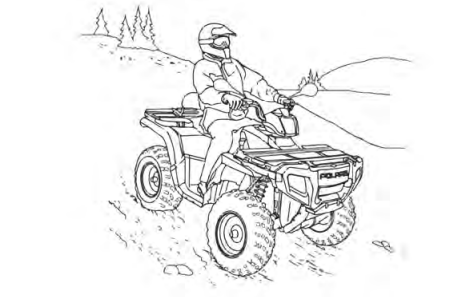
DRIVING ON SLIPPERY SURFACES
Whenever riding on slippery surfaces such as wet trails or loose gravel, or during freezing weather, follow these precautions:
- Do not operate on excessively rough, slippery or loose terrain.
- Slow down when entering slippery areas.
- Engage 4X4 before wheels begin to lose traction.
- Maintain a high level of alertness, reading the trail and avoiding quick, sharp turns, which can cause skids.
- Never apply the brakes during a skid. Correct a skid by turning the handlebars in the direction of the skid and shifting your body weight forward.
DRIVING UPHILL
Braking and handling are greatly affected when operating in hilly terrain. Improper procedure could cause loss of control or overturn. Whenever traveling uphill, follow these precautions:
- Always engage ADC before ascending or descending a hill.
- Drive straight uphill.
- Avoid steep hills. Maximum incline is: 25°
- Always check the terrain carefully before ascending any hill.
- Never climb hills with excessively slippery or loose surfaces.
- Keep both feet on the footrests.
- Shift body weight uphill.
- Proceed at a steady rate of speed and throttle opening. Opening the throttle suddenly could cause the ATV to flip over backwards.
- Never go over the top of any hill at high speed. An obstacle, a sharp drop, or another vehicle or person could be on the other side of the hill.
- Remain alert and be prepared to take emergency action. This may include quick dismounting of the vehicle.
DRIVING DOWNHILL
When driving downhill, follow these precautions:
- Always check the terrain carefully before descending a hill.
- Always engage ADC mode before ascending or descending a hill.
- Avoid steep hills. Maximum incline is 25°
- Always descend a hill with the transmission in forward gear. Do not descend a hill with the transmission in neutral.
- Slow down. Never travel down a hill at high speed.
- Drive straight downhill. Avoid traveling down a hill at an angle, which would cause the vehicle to lean sharply to one side.
- Shift body weight uphill.
- Apply the brakes slightly to aid in slowing. Applying the brakes too firmly may cause the rear wheels to lock, which could result in loss of control.
DRIVING ON A SIDEHILL (SIDEHILLING)
Driving on a sidehill is not recommended. Improper procedure could cause loss of control or overturn. Avoid crossing the side of any hill unless absolutely necessary. If crossing a sidehill is unavoidable, follow these precautions:
- Slow down.
- Avoid crossing the side of a steep hill.
- Lean into the hill, transferring your upper body weight toward the hill while keeping your feet on the footrests.
- If the vehicle begins to tip, quickly turn the front wheel downhill, if possible, or dismount on the uphill side immediately!
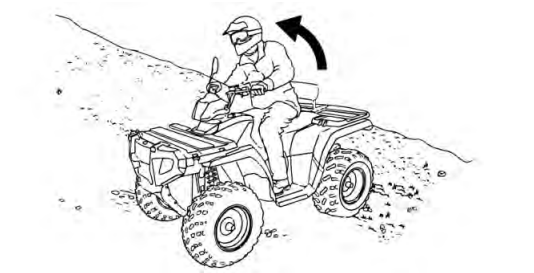
TURNING AROUND ON A HILL (K-TURN)
If the vehicle stalls while climbing a hill, never back it down the hill! Use the Kturn to turn around.
- Stop and lock the parking brake while keeping body weight uphill.
- Always move the 4X4 switch to ADC 4X4 before ascending or descending a hill. See the Switch Location section for details.
- Leave the transmission in forward and shut off the engine.
- Dismount on the uphill side of the vehicle, or on the left if the vehicle is pointing straight uphill.
- Staying uphill of the vehicle, turn the handlebars full left.
- While holding the brake lever, release the parking brake lock and slowly allow the vehicle to roll around to your right until it's pointing across the hill or slightly downward.
- Lock the parking brake. Remount the vehicle from the uphill side, keeping body weight uphill. Start the engine with the transmission still in forward.
- Release the parking brake and proceed slowly, controlling speed with the brake lever, until the vehicle is on more level ground.
STARTING THE ENGINE
- Position the vehicle on a level surface outdoors or in a well- ventilated area.
- Place the transmission in PARK.
- Lock the parking brake.
- Sit on the vehicle and move the engine stop switch to RUN.
- Turn the ignition key past the ON position to engage the starter. Activate the starter for a maximum of five seconds, releasing the key when the engine starts.
- If the engine does not start, return the key to the OFF position and wait five seconds before attempting to start again. Activate the starter for another five seconds if necessary. Repeat this procedure until the engine starts.
COLD WEATHER OPERATION
- If the vehicle is used year-round, check the oil level frequently. A rising oil level could indicate the accumulation of contaminates such as water or excess fuel in the bottom of the crankcase. Water in the bottom of the crankcase can lead to engine damage and must be drained. Water accumulation increases as outside temperature decreases.
PARKING THE VEHICLE
- Stop the vehicle on a level surface. When parking inside a garage or other structure, be sure that the structure is well ventilated and that the vehicle is not close to any source of flame or sparks, including any appliance with pilot lights.
- Place the transmission in PARK.
- Turn the engine off.
- Slowly release the brake pedal and make sure the transmission is in PARK before exiting the vehicle.
- Remove the ignition key to prevent unauthorized use.
PARKING ON AN INCLINE
Avoid parking on an incline if possible. If it's unavoidable, follow these precautions:
- Stop the engine.
- Lock the parking brake.
- Place the transmission in PARK
- Always block the rear wheels on the downhill side.
MAINTENANCE
ENGINE OIL
- Always check and change the oil at the intervals outlined in the Periodic Maintenance Chart. Always use the recommended engine oil. Always change the oil filter whenever changing oil.
- Pay special attention to the oil level. A rise in oil level during cold weather can indicate contaminants collecting in the oil sump or crankcase. Change oil immediately if the oil level begins to rise. Monitor the oil level, and if it continues to rise, discontinue use and determine the cause. Your dealer can assist.
OIL RECOMMENDATIONS
- Always change the oil filter whenever changing oil.
- POLARIS recommends the use of POLARIS PS-4 Full Synthetic 5W-50 4-cycle oil or a similar oil for this engine. Oil may need to be changed more frequently if POLARIS oil is not used. Always use 5W-50 oil. Follow the manufacturer's recommendations for ambient temperature operation.
- See the Lubrication Guide section for fluid recommendations, capacities and plug torques
OIL LEVEL
To check the oil level, do the following:
- Position the vehicle on a level surface.
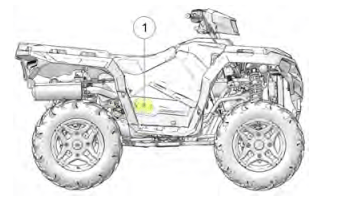
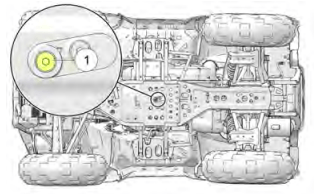
- Access the oil dipstick and fill tube from the right side of the ATV 1. Remove the dipstick. Wipe it dry with a clean cloth.
- Reinstall and tighten the dipstick.
- Remove the dipstick and check the oil level
- Add the recommended fluid as needed. Maintain the oil level in the safe range between the FULL and ADD marks. Do not overfill.
- Reinstall and tighten the dipstick.
OIL CHANGE
See the fluid recommendation table for capacities and plug torques. Always change the oil at the intervals outlined in the Periodic Maintenance Chart beginning on page 100. Always change the oil filter whenever changing oil.
- Position the vehicle on a level surface.
- Start the engine. Allow it to warm up at idle for two to three minutes.
- Stop the engine.
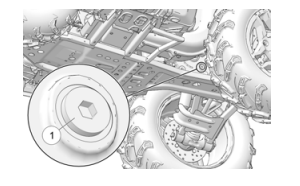
- Clean the area around the drain plug 1
- Place a drain pan under the crankcase.
- Remove the drain plug 1. Allow the oil to drain completely.
- Install a new sealing washer on the drain plug. The sealing surfaces on drain plug and crankcase should be clean and free of burrs, nicks or scratches.
- Reinstall the drain plug. Torque to specification.
TRANSMISSION OIL
Always check and change the transmission oil at the intervals outlined in the Periodic Maintenance Interval section of this manual. See the Fluid Recommendation table for capacities and plug torques. Maintain the oil level at the bottom of the fill plug hole. The fill plug is located on the right side of the ATV behind the footwell. The drain plug is located on the bottom rear side of the gearcase.
OIL CHECK
- Remove the footwell.
- Remove the fill plug 1. Check the oil level.
- Slowly add the recommended fluid as needed to bring the level to the bottom of the fill hole threads.
- Reinstall the fill plug. Torque to specification.
- Reinstall the footwell.
OIL CHANGE
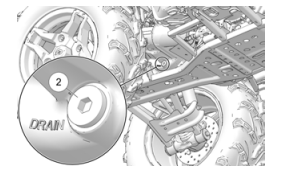
- Place a drain pan under the gearcase. Remove the drain plug 2. Allow the oil to drain completely.
- Clean and reinstall the drain plug. Torque to specification.
- Remove the fill plug. Slowly add the proper amount of the recommended oil.
- Reinstall the fill plug. Torque to specification.
- Check for leaks.
- Reinstall the footwell.
- Dispose of used oil properly
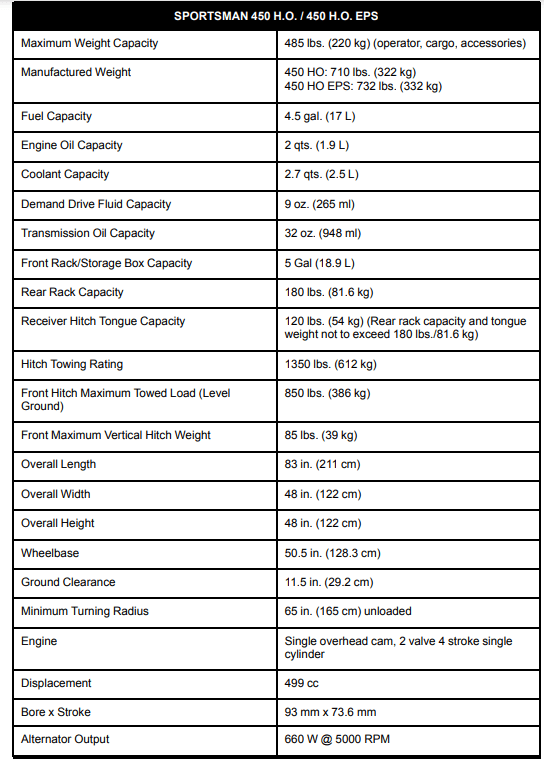
SPECIFICATIONS
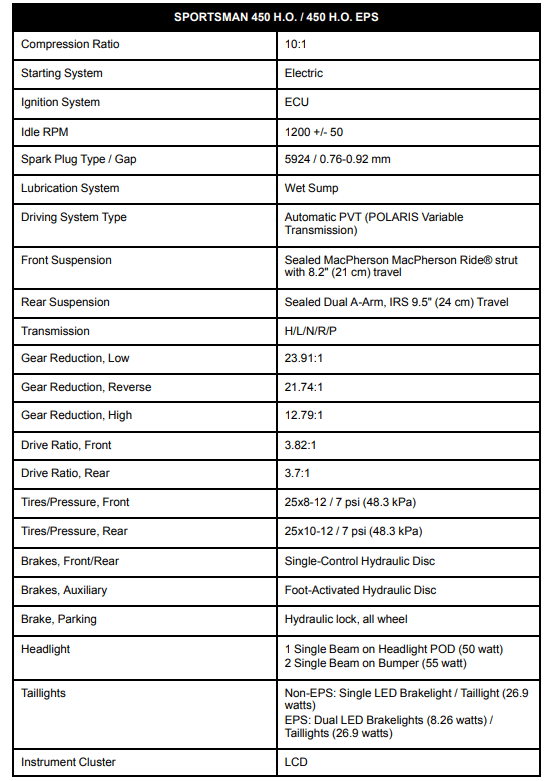
SPORTSMAN 450 H.O. / 450 H.O. EPS
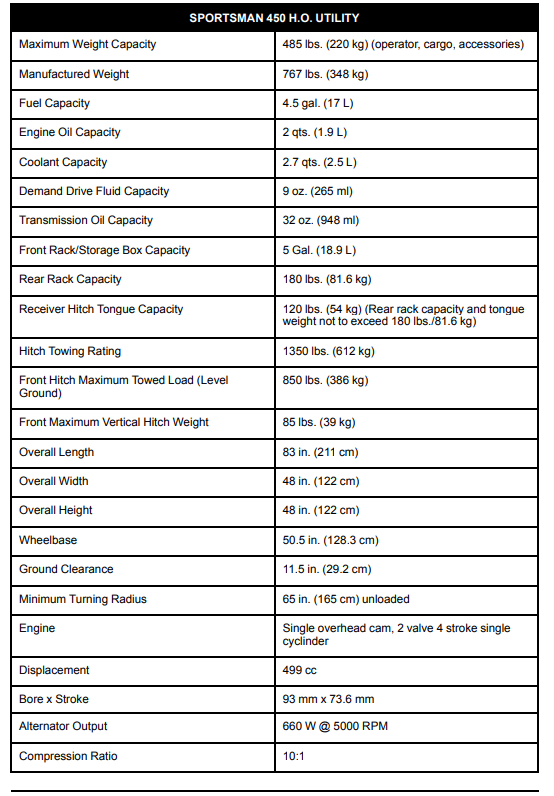
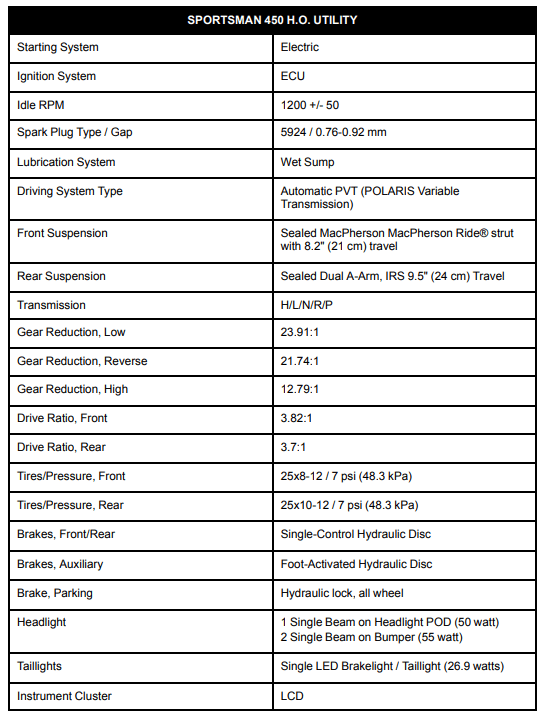
SPORTSMAN 450 H.O. UTILITY
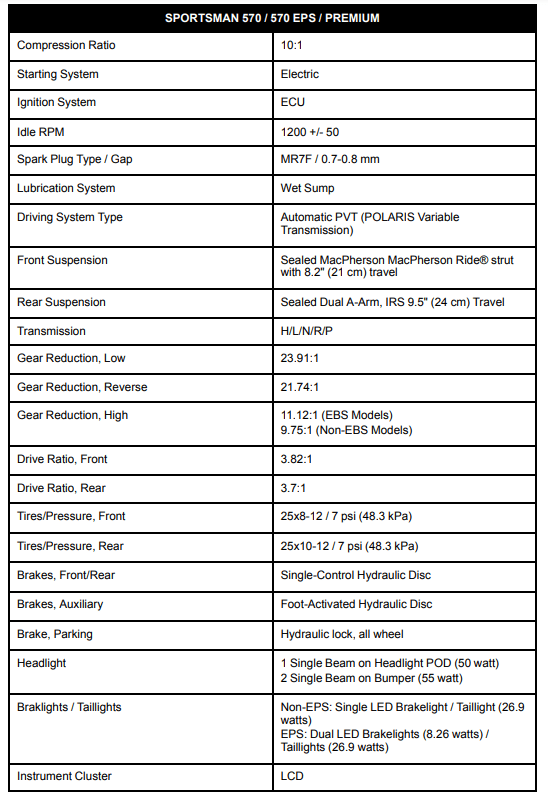
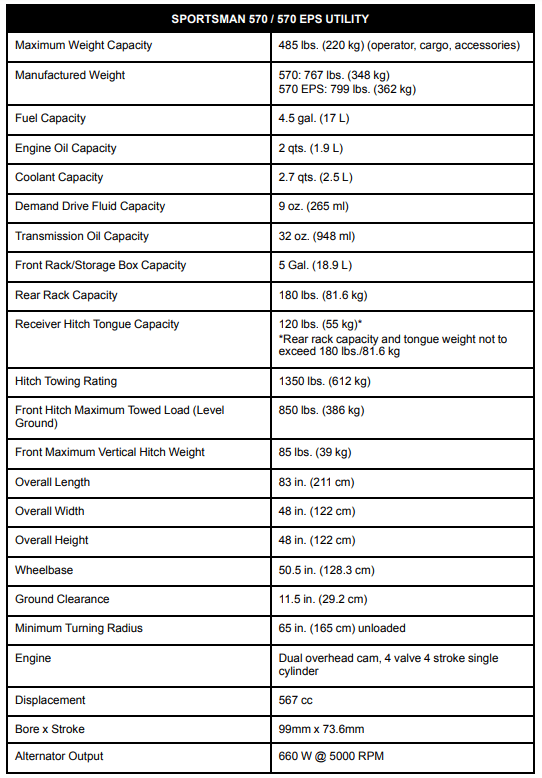
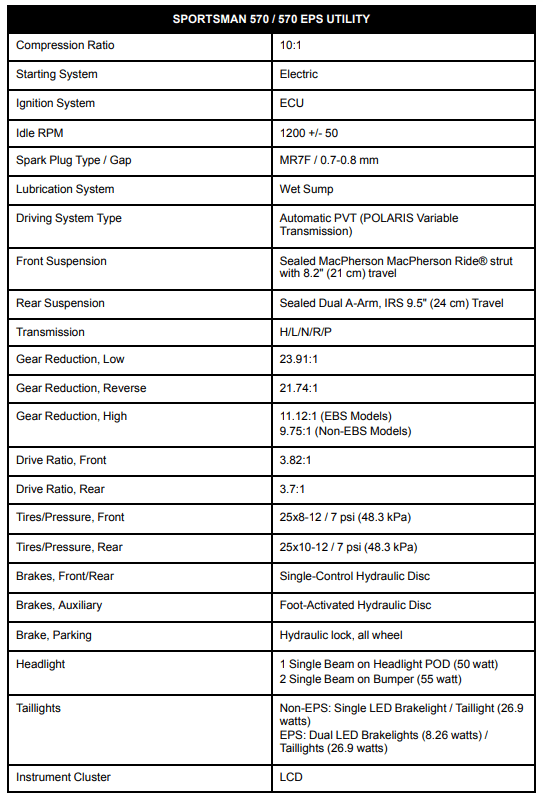
SPORTSMAN 570 / 570 EPS / PREMIUM

SPORTSMAN 570 UTILITY
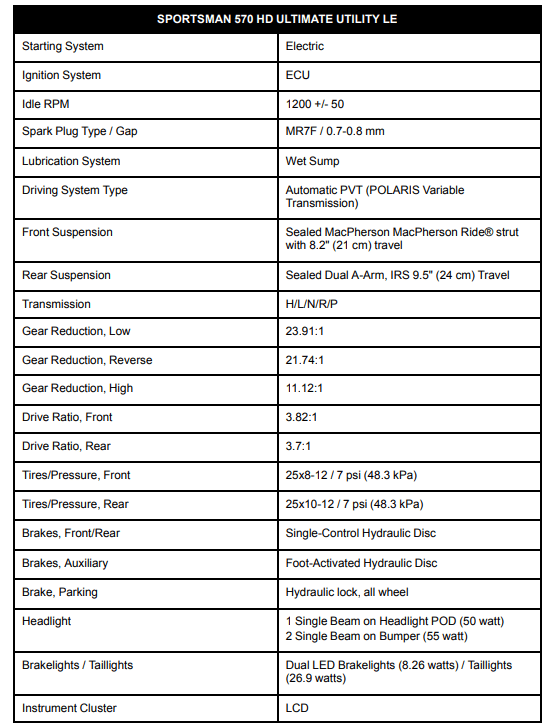
SPORTSMAN 570 HD ULTIMATE UTILITY LE

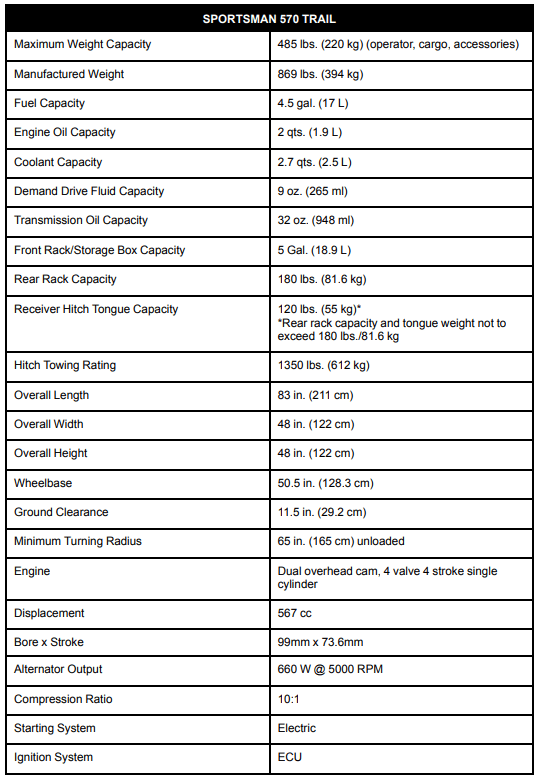
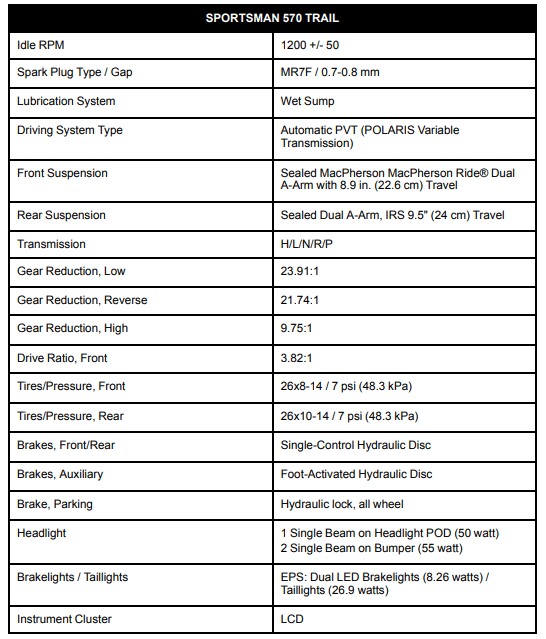
SPORTSMAN 570 TRAIL
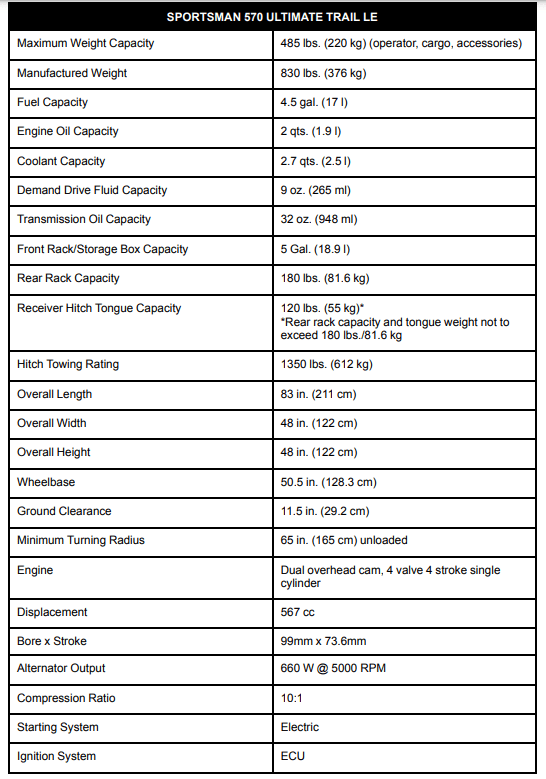
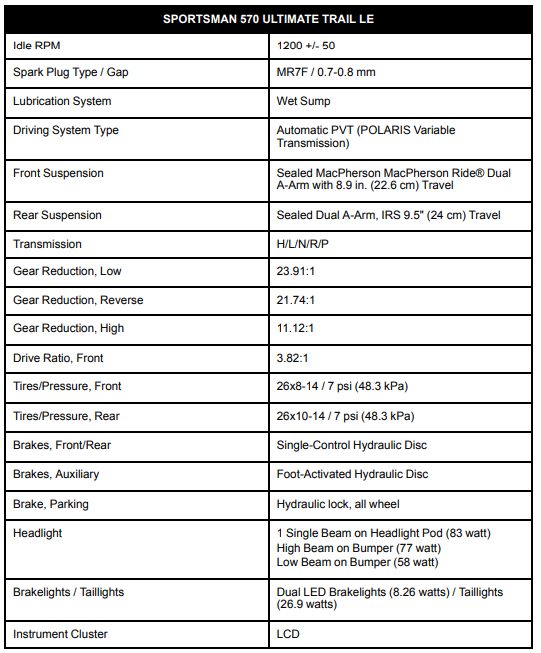
SPORTSMAN 570 ULTIMATE TRAIL LE
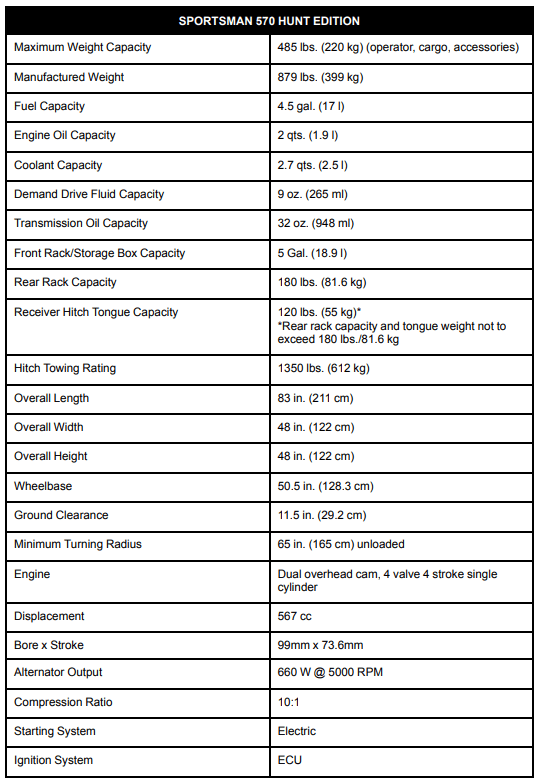
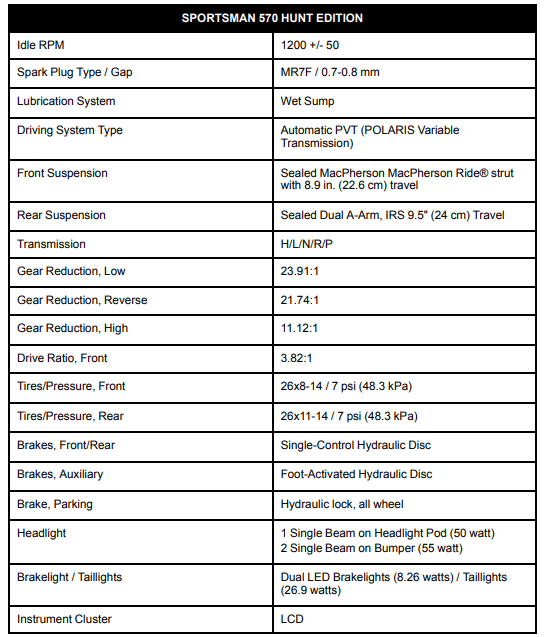
SPORTSMAN 570 HUNT EDITION
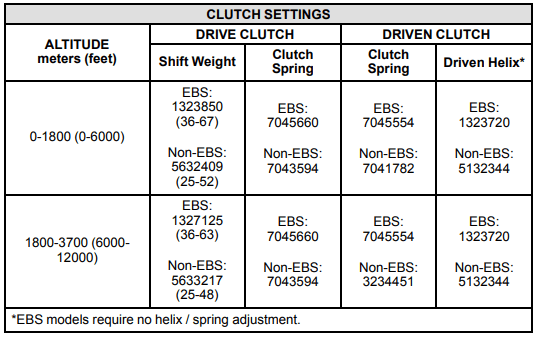
CLUTCHING CHART
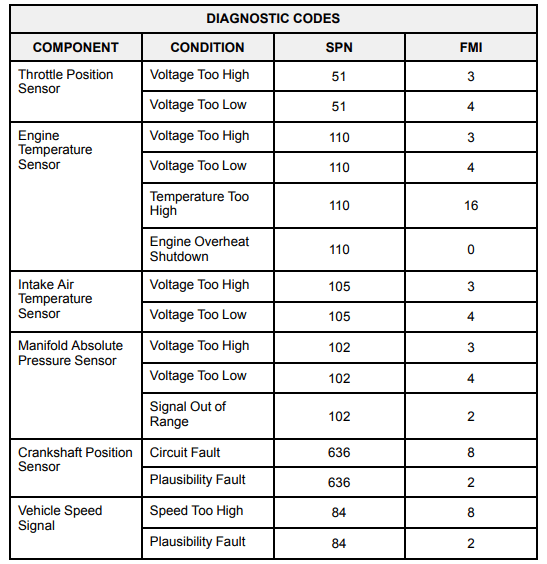
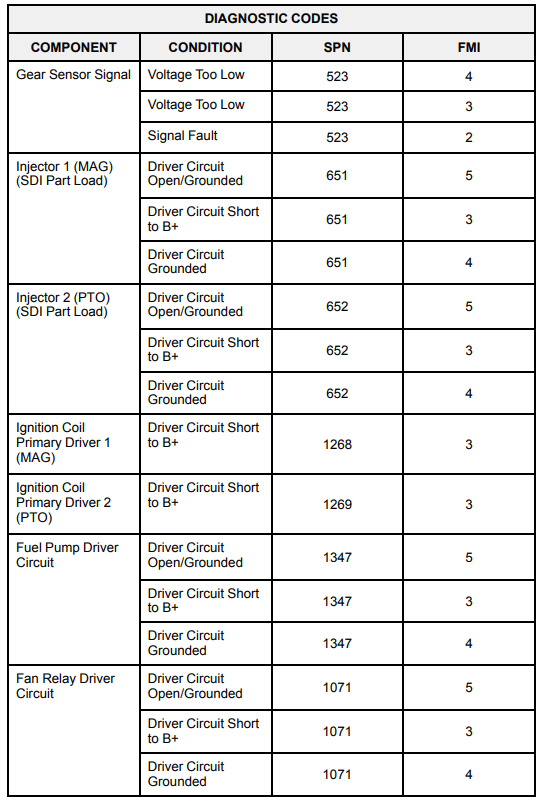
TROUBLESHOOTING
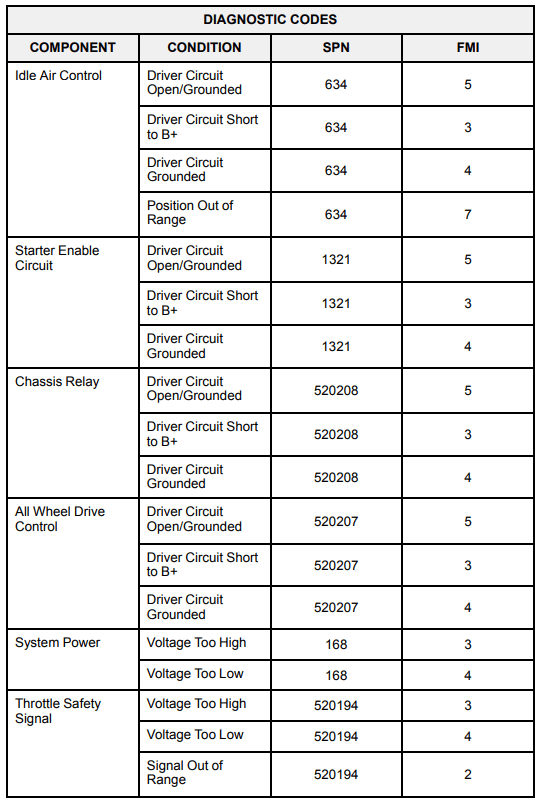
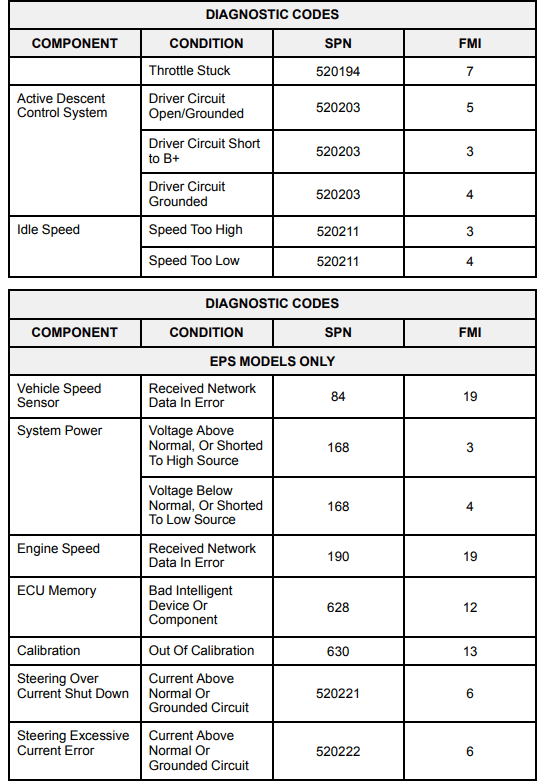
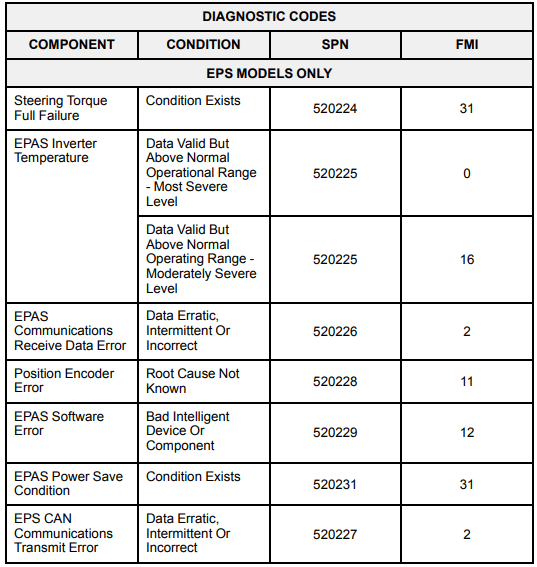
DIAGNOSTIC DISPLAY CODE DEFINITIONS
Open Load:There is a break in the wires that lead to the item listed in the chart (injector, fuel pump, etc.), or the item has failed.
Short-to-Ground:The wire is shorted to ground between the electronic control unit and the item listed in the chart.
Shorted Load:The wires leading to the item listed in the chart are shorted together, or the item has shorted internally.
Short-to-Battery:The wire leading from the item listed in the chart to the electronic control unit is shorted to a wire at battery voltage.
DRIVE BELT WEAR/BURN
Driving onto a pickup or tall trailer in high range
- Use low range during loading.
Starting out going up a steep incline
Driving at low RPM or ground speed (3-7 MPH)
- Drive at a higher speed or use low range more frequently
Insufficient warm-up at low ambient temperatures
- Warm the engine at least 5 minutes. With the transmission in neutral, advance the throttle to about 1/8 throttle in short bursts, 5 to 7 times. The belt will become more flexible and prevent belt burning.
Slow/easy clutch engagement
- Use the throttle quickly and effectively.
Towing/pushing at low RPM/ low ground speed
Utility use/plowing
Stuck in mud or snow
- Shift the transmission to low range and carefully use fast, aggressive throttle application to engage clutch.
- WARNING: Excessive throttle may cause loss of control and vehicle rollover.
Climbing over large objects from a stopped position
- Shift the transmission to low range and carefully use fast, brief, aggressive throttle application to engage clutch.
- WARNING: Excessive throttle may cause loss of control and vehicle rollover.
Belt slippage from water or snow ingestion into the PVT system
- Dry out the PVT. Prevent water from entering the PVT intake duct. See Intake Pre-Filters for more information. Inspect clutch seals for damage if repeated leaking occurs.
Clutch malfunction
- An authorized dealer can assist.
Poor engine performance
- Check for fouled plug or foreign material in gas tank or fuel lines. An authorized dealer can assist.
Slippage from failure to warm up belt
- Always warm up the belt by operating below 30 mph for one mile (5 miles or more when temperature is below freezing).
Wrong or missing belt
- Install the recommended belt.
Improper break-in
- Always break in a new belt and/or clutch.
ENGINE DOESN'T TURN OVER
Low battery voltage
Loose battery connections
- Check all connections and tighten
Loose solenoid connections
- Check all connections and tighten
Loose electronic control box connections
- Inspect, clean, reinstall connectors
ENGINE TURNS OVER, FAILS TO START
Out of fuel
Water is present in fuel
- Drain the fuel system and refuel
Old or non-recommended fuel
- Replace with fresh recommended fuel
Fouled or defective spark plug
- Inspect plug and replace if necessary
No spark to spark plug
- Inspect plug and replace if necessary
Water or fuel in crankcase
- Your authorized dealer can assist
Low battery voltage
- Recharge the battery to 12.8 VDC
Mechanical failure
- Your authorized dealer can assist
ENGINE BACKFIRES
Weak spark from spark plug
- Inspect, clean and/or replace spark plug
Incorrect spark plug gap or heat range
- Set gap to specs or replace plug
Old or non-recommended fuel
- Replace with fresh recommended fuel
Incorrectly installed spark plug wires
- Your authorized dealer can assist
Mechanical failure
- Your authorized dealer can assist
Loose ignition connections
- Check all connections and tighten
Water present in fuel
- Replace with fresh recommended fuel
ENGINE PINGS OR KNOCKS
Poor quality or low octane fuel
- Replace with recommended fuel
Incorrect spark plug gap or heat range
- Set gap to specs or replace plug
ENGINE RUNS IRREGULARLY, STALLS OR MISFIRES
Fouled or defective spark plug
- Inspect, clean and/or replace spark plug
Worn or defective spark plug wires
- Your authorized dealer can assist
Incorrect spark plug gap or heat range
- Set gap to specs or replace plug
Loose ignition connections
- Check all connections and tighten
Water present in fuel
Low battery voltage
- Recharge battery to 12.8 VDC
Incorrect fuel
- Replace with recommended fuel
Clogged air filter
- Inspect and clean or replace
Clogged intake pre-filter
- Inspect and clean (with soapy water) or replace
Other mechanical failure
- Your authorized dealer can assist
ENGINE STOPS OR LOSES POWER
Out of fuel
Kinked or plugged fuel vent line
Water is present in fuel
Fouled or defective spark plug
- Inspect, clean and/or replace spark plug
Worn or defective spark plug wires
- Your authorized dealer can assist
Incorrect spark plug gap or heat range
- Set gap to specs or replace plug
Loose ignition connections
- Check all connections and tighten
Low battery voltage
Incorrect fuel
- Replace with fresh recommended fuel
Clogged air filter
- Inspect and clean or replace
Clogged intake pre-filter
- Inspect and clean (with soapy water) or replace
Other mechanical failure
- Your authorized dealer can assist
Overheated engine
- Clean radiator screen and core, clean engine exterior, and check coolant level. Your dealer can assist.