Documents: Go to download!
User Manual
- User Manual - (English, French, Spanish)
- Installation Intructions - (English)
Owner's Guide Dryer
Features
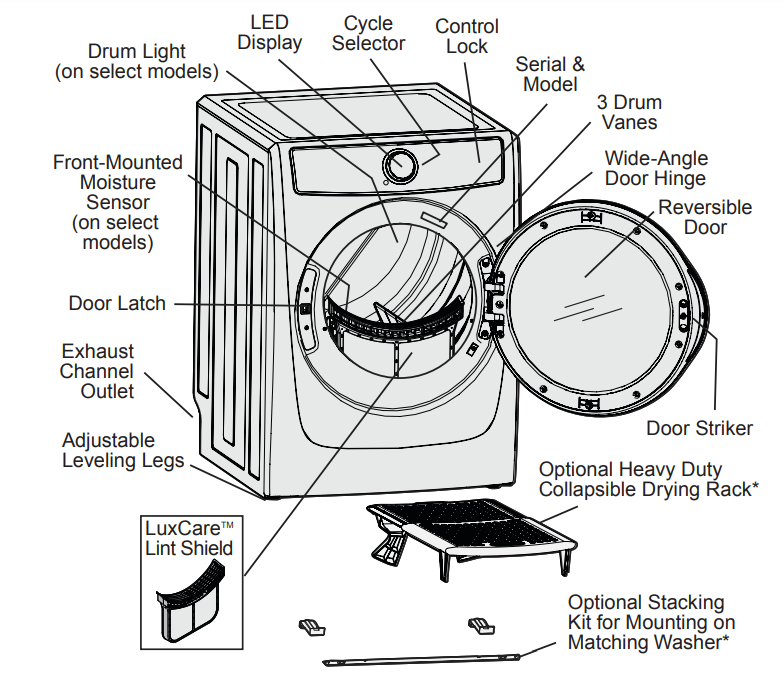
*Not included with initial purchase. May be purchased as accessory.
Not all cycles, options, or features listed are available on every model.
Refer to the table below for an overview of features available for each model series.
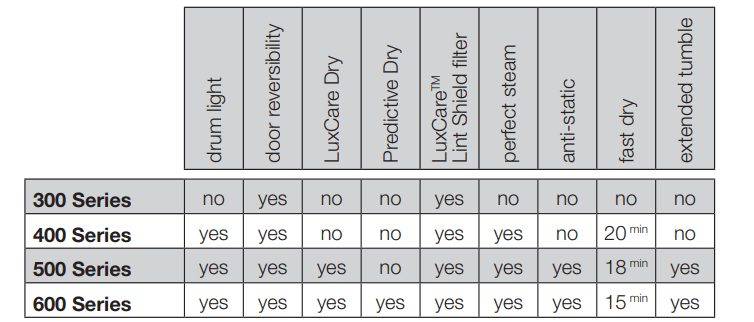
Model Series
300 SERIES
 SELECTING THE RIGHT CYCLE TO SAVE ENERGY
This dryer has been specifically designed with options to help you save energy and at the same time utilize the optimal drying setting for your clothing.
The normal cycle was used to rate the dryer for energy efficiency. The normal cycle defaults to normal temperature setting, normal dryness level and eco mode option (if available) on.
Some cycles save more energy than others. Cycles that use the least amount of heat save the most energy. Use the lowest heat setting (auto and timed dry cycles) and less dry setting (auto dry cycles) to save on energy and prevent over drying your clothing.
Press the power button to turn on the unit. Turn the cycle selector in either direction or repeatedly press the cycles button (depending on your model) to scroll to the desired cycle. The indicator light for the cycle selected will be illuminated and the estimated drying time for Auto Dry cycles or the actual drying time for Time Dry cycles will be displayed on the LED display screen.
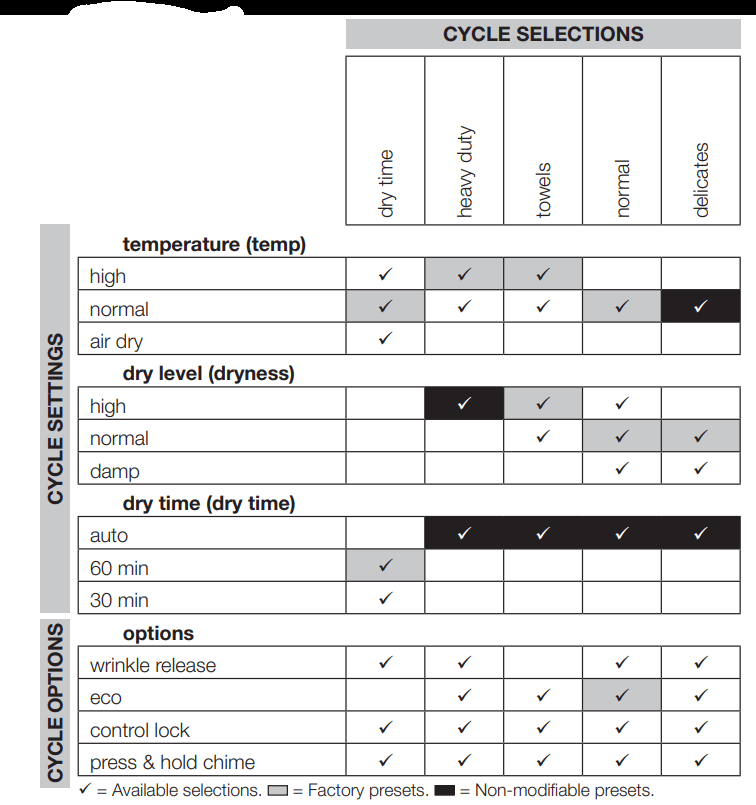
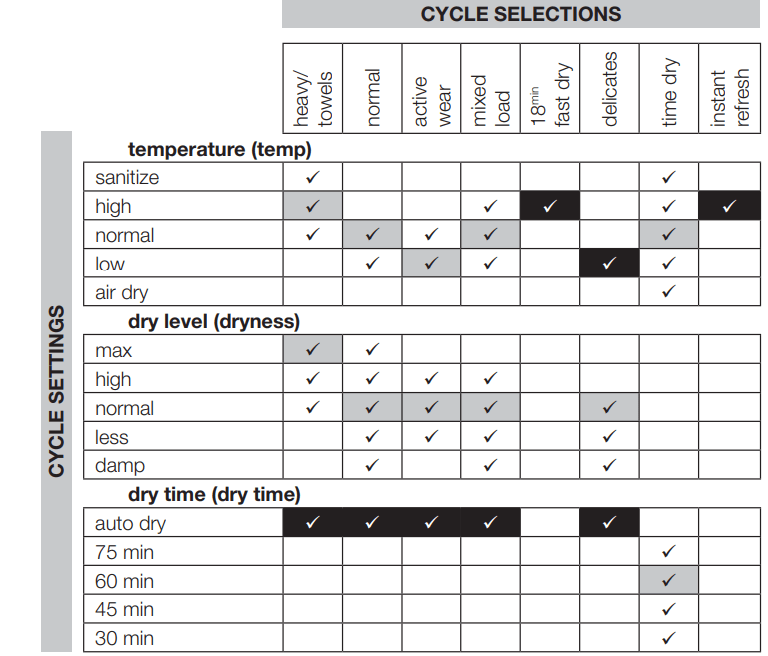
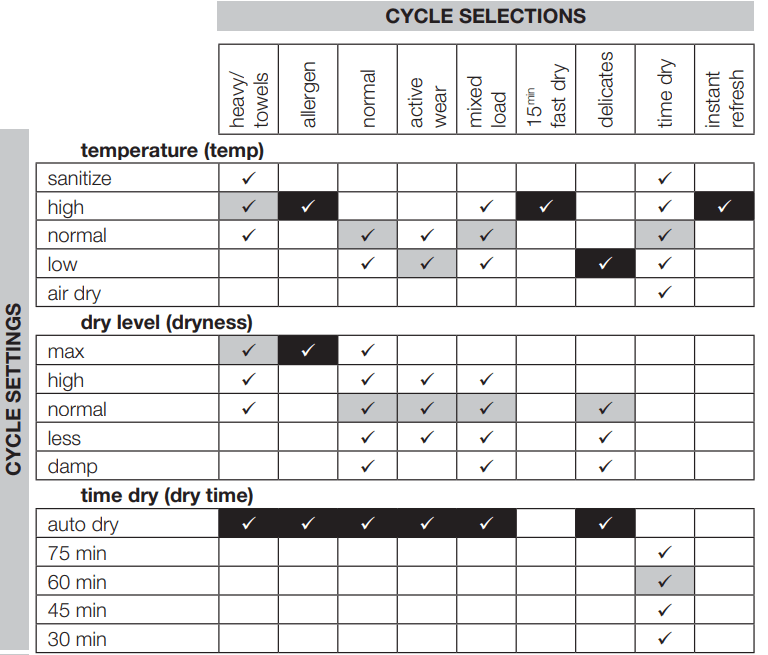
Default settings and options will automatically be indicated for the cycle selected. In most cases cycle settings and options can be changed. See Cycle Settings, Cycle Options, and Setting Charts for more details.
To change the cycle once it has begun, press the cancel button before selecting a new cycle. Just turning the cycle selector ring or pressing the cycles button WILL NOT change the cycle.
Auto Dry Cycles
Auto Dry cycles take the guesswork out of selecting the correct drying time for each load. Moisture sensors sense the moisture level of the load as it tumbles through the heated air. With Auto Dry cycles, the load will automatically be dried at the selected temperature to the desired dryness level.
Auto Dry cycles save time and energy and protect fabrics. When the load has reached the selected dryness level, it will continue to tumble, unheated, during a cool down period. This helps reduce wrinkling and makes items easier to handle during unloading.
NOTE: Initial cycle times for Auto Dry cycles are only estimates, the actual drying time may differ slightly from the time displayed.
Drying times vary depending on size and dampness of the load and fabric type. If the load is too small or almost dry, the moisture sensors may not detect enough moisture to continue the cycle and the cycle may end after a few minutes. If this occurs, then select the time dry cycle to dry such loads.
Room temperature and humidity, type of installation and electrical voltage or gas pressure can also affect drying time.
heavy duty (on select models)
Select this cycle to dry durable fabrics such as jeans and overalls.
towels (on select models)
Select this cycle to dry heavy loads such as towels and non-rubber-backed bath mats.
heavy/towels (on select models)
Select this cycle to dry heavy loads and durable fabrics such as towels, jeans and overalls.
allergen (on select models)
Select this cycle where you wish to reduce allergens as you dry your load. Items prone to heat damage are not recommended for this cycle.
normal
Select this cycle to dry everyday fabrics including cottons, linens and sheets.
active wear (on select models)
Select this cycle to dry lightweight synthetic athletic apparel including stretch fabrics.
delicates
Select this cycle to dry knits and delicates.
mixed load (on select models)
Select this cycle to dry loads containing a mix of fabrics.
NOTE: Models equipped with the Predictive Dry feature use the first 90 seconds of Auto Dry cycles to sense the load in the dryer. During this 90 second period the LED display will show 3 dots ( For best results: Follow the fabric care label instructions on items to be dried.
sanitize (on select models)
Recommended for durable fabrics and towels. Use this selection to remove harmful bacteria from your clothing or other items where sanitization is desired. This option will kill 99.9% of bacteria. A higher temperature is required to kill bacteria. Please check fabric care labels to prevent damage.
high
Recommended for most cotton fabrics.
normal
Recommended for wrinkle free, easy care, lightweight fabrics and bulky loads.
low (on select models)
Recommended for delicate fabrics.
air dry
This setting (no heat) should only be used with a time dry cycle to dry items containing feathers, down, foam rubber, plastics or rubber-like materials; to refresh clothing, stuffed animal, pillows or blankets; and to dust draperies.
Dryness Level (dryness)
To set or change the dryness level, press the dryness button to scroll to the desired setting.
The dryness levels include max (on select models), high, normal, less (on select models), and damp. Most Auto Dry cycles default to the normal dryness level. Occasionally a load may seem too damp or over-dried at the end of the cycle. To increase drying time for similar loads in the future, select high or max (on select models). To decrease drying time for similar loads, select less (on select models).
Select damp for items you wish to partially dry before hanging or ironing.
Drying time (time dry)
Manually select or change the drying time for a time dry cycle (on select models) by pressing the time dry button to scroll though the available options. Time dry options include 30, 45, 60 and 75 minutes (dependent on model).
The auto selection is a default for all auto dry cycles and fast dry cycles and cannot be selected or changed. All actual or predicted dry times will count down on the LED display.
Cycle Options
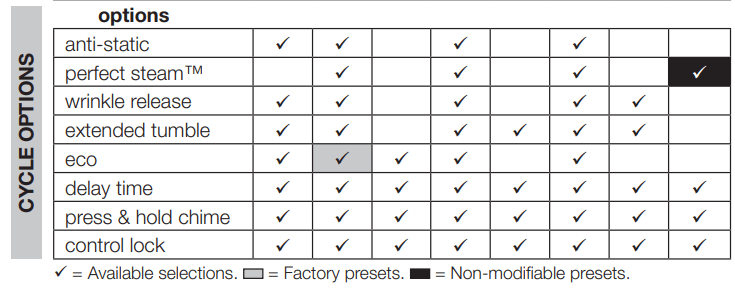
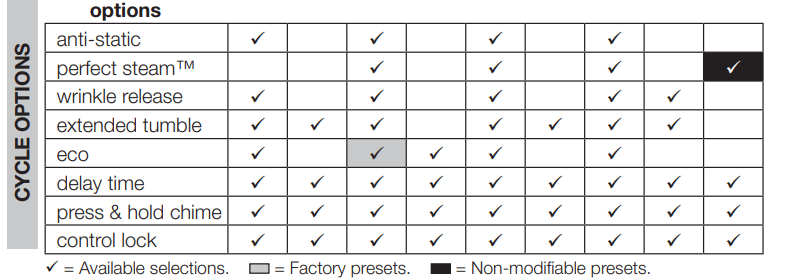
To select an option, press options and scroll though the options until the indicator light for the desired option flashes, then press select (set). The indicator will illuminate when the option has been selected. Follow the same steps to deselect an option. The indicator light will turn off when the option is deselected.

 perfect steamTM (on select models)
The perfect steamTM option injects steam into the clothing prior to cool down to reduce wrinkling, ironing and static cling.
NOTE: It is not recommended to use fabric softener sheets with steam cycles or steam options as it may cause staining on clothes.
anti-static (on select models)
The anti-static option injects steam into the clothing just before cycle completion to reduce static.
eco

The eco option reduces the drying temperature a few degrees to save energy. In conjunction with automatic moisture sensors, cycle times will increase slightly, but overall energy usage will decrease. The eco icon will illuminate on the LED display to indicate the eco option is activated.
wrinkle release
The wrinkle release option helps prevent wrinkles and tangling by tumbling the dry load without heat for 5 minutes out of every 10 minutes. The 5 minutes on and 5 minutes off is repeated for a total 45 minutes. A chime will sound after each tumble as a reminder to remove the dried load.
extended tumble (on select models)
Select the extended tumble option if the dried load might not be removed promptly at the end of the cycle. The dried load will tumble continuously without heat for 30 minutes. A chime will sound periodically to remind you to remove the dried load.
NOTE: When extended tumble and wrinkle release options are both selected the amount of time the load will tumble without heat will increase to a period of up to 75 minutes.
delay time (on select models)


Use delay time to delay the start of the drying cycle to a time convenient to your schedule or during off-peak energy hours. The start of any cycle can be delayed for 30 minutes to 12 hours. After selecting the delay time option, use the cycle selector to scroll to the desired delay time and press start. The delay time icon will illuminate on the LED display to indicate the delay time option is activated, The delay time will begin counting down on the LED display once activated.
NOTE: While counting down during delay time, you will notice your dryer periodically tumbling for a few minutes without heat to redistribute the load, maximizing load freshness.
control lock


To lock the controls between cycles, scroll to the control lock option and press select. The control lock icon will show on the LED display. To unlock the controls scroll to the control lock option again and press select. Use this feature to reduce the likelihood of accidental operation by children. Dryer cycles will not run when Control Lock is activated.
chime
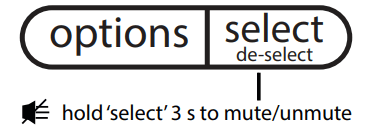
A signal will sound at the end of the cycle (and periodically during extended tumble or wrinkle release). To mute or unmute the chime, press and hold the select button for 3 seconds.
Muting the end of cycle signal will not mute the button tones.

 ".
".
- Dryer has been programmed to temporarily perform a repeating demo cycle.
- Reset the unit back to factory default settings as described earlier.
Dryer runs but won’t heat.
- There are 2 house fuses in the dryer circuit. If 1 of the 2 fuses is blown, the drum may turn but the heater will not operate (electric models).
- Gas supply valve is not open (gas models).
- Dryer does not have enough air supply to support the burner flame (gas models).
- LP gas supply tank is empty or there has been a utility interruption of natural gas (gas models).
- Replace fuse.
- Check to make sure supply valve is open. Refer to the Installation Instructions provided with the dryer.
- See the Installation Instructions provided with the dryer.
- Refill or replace tank. Dryer should heat when utility service is restored.
Drying cycle takes too long, outside of the dryer feels too hot or smells hot.
- Lint filter is clogged with lint.
- Exhaust duct requirements have not been met.
- Electric dryer is connected to a 208 volt circuit.
- Drying procedures have not been followed.
- Outside exhaust hood or exhaust duct may be clogged or restricted.
- High humidity.
- Make sure all lint has been removed from the dryer lint filter before starting each cycle.
- Exhaust duct must be at least 4 inches in diameter and made of rigid or semi-rigid metal.
- When in place, the duct must not exceed length listed in the Installation Instructions.
- Drying time will be 20% longer than drying on a 240 volt circuit.
- See Operating Instructions.
- Clean out any obstruction.
- Use a dehumidifier near the dryer.
Excess moisture in drum between cycles.
- Exhaust damper stuck open or not present.
- Fix or clean the damper, or install new one.
Excessive wrinkling.
- Dryer is overloaded.
- Items left in dryer too long.
- Insufficient sorting of items.
- Drying temperature too high.
- Drying load is very small.
- DO NOT overload. See Operating Instructions.
- Remove items as soon as cycle ends.
- See Operating Instructions.
- Follow fabric care label instructions.
- Add two or three larger items.
Scratching or chipping of the drum finish.
- Foreign objects such as coins, pins, clips or buttons are inside the dryer.*
- Permanently attached items such as belt buckles, zippers and fasteners may be hitting the inside of the drum.*
- Always remove foreign objects from pockets before laundering. Remove objects from drum and restart dryer.
- It may be necessary to sew a scrap of material securely around ornaments before drying to prevent scratching and damage to the dryer.
* Drum damage caused by foreign objects or permanently attached items is not covered by the warranty.
See other models: EI30EW48TS EFMG517STT EI24MO45IBEI30MO45TB RH36WC55GS EFME627UIW
