User manual Dryer
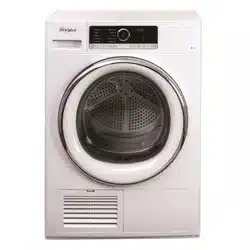
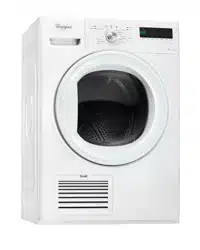
PRODUCT DESCRIPTION
APPLIANCE
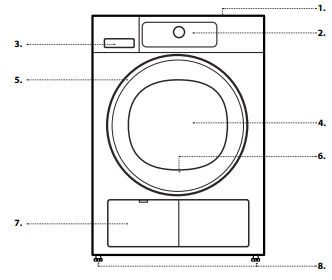
1. Worktop
2. Control panel
3. Water tank
4. Door
5. Door handle
6. Door filter (behind door)
7. Bottom filter (behind flap)
8. Adjustable feet (4)
CONTROL PANEL
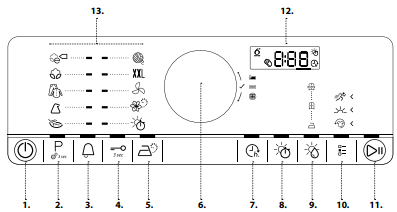
1. On/Off button (Reset if long pressed)
2. Programme button (Settings button if long pressed)
3. Cycle end alert
4. Key lock button
5. Steam refresh button
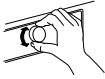
6. Knob (Turn to select / Press to confirm)
7. Start delay button
8. Drying / Airing time button
9. Drying level button
10. Options button
11. Start/Pause button
12. Display
13. Programmes area
DOOR
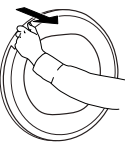
To open the door, pull the handle.
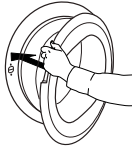
To close the door, hold the handle and push so that you can hear it click shut.
If you interrupt a running programme by opening the door, the programme will be reset if the dryer door is not closed again within one minute.
DRUM LIGHT (if available)
- During programme selection: the light goes on for laundry loading
- After programme start: the light fades on and off while the laundry load is detected.
- After programme end, when you open the door, the light goes on for a while for unloading the laundry. Then it goes off to save energy; touch any button to switch it on again.
HOW TO USE THE APPLIANCE
FIRST TIME USE
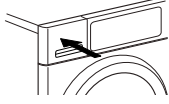
1. CHECK WATER TANK Make sure that the water tank is correctly inserted
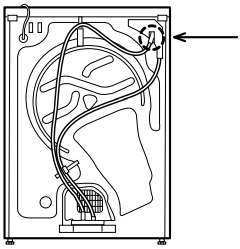
2 . CHECK DRAIN HOSE Make sure that the drain hose on the back of the dryer is fixed, either to the dryer’s water tank or to your domestic sewage system (see INSTALLATION GUIDE).
DAILY USE
1. LOAD THE LAUNDRY Respect your items’ care labels; make sure that the items to be dried are suitable for tumble drying.
Drying Care Labels
The dots indicate the temperature degree for drying the laundry
 Normal temperature
 Reduced temperature
 Do not tumble dry
Open the door and load the laundry. Observe the maximum load sizes given in the section Programmes.

2. CLOSE THE DOOR Make sure that no items get stuck between the door glass and door filter.

Close the door so that you can hear it click shut.
 3. SWITCH ON DRYER
Press the On/Off button « until the programme button lights up. An animation appears on the display, followed by a beep. Afterwards the dryer is ready to be operated.
4. SET THE DESIRED PROGRAMME
GUIDED MODE – the button light will guide you through setting your programme in the following order: selection of programme / drying time (ONLY if Drying time or Airing programme is selected) / dryness level (only if selectable / adjustable) / options. As soon as you confirm a selection by pressing the knob, the button light will jump to the next step.
 Select programme:
Make sure that the Programme button « lights up.
Turn the knob to select the desired programme. The indicator next to the selected programme lights up.
Confirm the desired programme by pressing the knob.
Find more information regarding programmes in section PROGRAMMES, OPTIONS AND INDICATORS.
 Select Drying time, if needed
Only if you have selected programme Drying time or Airing «, you can set the desired drying time from a minimum of 10 minutes to maximum 180 minutes (three hours).
Make sure that the Drying time button lights up.
Turn the knob to select the desired drying / airing time. Confirm it by pressing the knob.
 Set dryness level, if needed
If you want to change the dryness level, make sure that the Dryness level button « lights up.
Turn the knob to select the desired dryness level, afterwards press the knob to confirm.
 Select options, if needed
If you want to select additional options, make sure that the Options button « lights up. The options which are selectable for your programme are indicated by a lighting arrow.
Turn the knob to select the desired options. The symbol of the selected option blinks. To confirm it, press the knob.
Some options / functions can be selected by directly pressing the button.

Refer to section OPTIONS, FUNCTIONS AND INDICATORS for more information.
CUSTOM MODE
After you have switched on the dryer, you are not forced to follow the GUIDED MODE. It is up to you which order you choose to set your programme. To choose a setting, first press the relevant button, then turn the knob to select, and finally press the knob to confirm.
The variety of options and dryness levels depends on the programme selected. Therefore it is recommended to start set-up by programme selection.
 5. START PROGRAMME
Press and hold Start/Pause « until the button lights up solidly; the programme starts.
The duration can be recalculated and adapted in the course of the programme. During such phases, an animation appears on the display
6. CHANGE THE SETTINGS OF A RUNNING PROGRAMME, IF NEEDED
You can still change some settings after a programme has started:
Adjust drying time (only if programme Drying time or Airing is selected)
Adjust or cancel Start delay, if a delay option is already in progress.
Add or cancel an option, provided the progress of the programme still allows it.
Press the relevant button. The selected setting blinks for a few seconds. While blinking, you can adjust the setting by turning the knob. If the value or setting stopped blinking, press the button again.
Press the knob to confirm the modification. If you do not confirm, the modification is confirmed automatically — the modified setting stops blinking. The programme continues automatically.
To change the settings of a running programme or delay, you can also:
• press Start/Pause to put the running programme on hold
• change your settings
• press Start/Pause again to continue the programme.
 7. CANCEL A RUNNING PROGRAMME, IF NEEDED
Press and hold the On/Off button « until “rES” appears on the display
8. SWITCH OFF THE DRYER AFTER PROGRAMME END
At the end of the programme, “End” appears on the display. Press On/Off button « to switch off the dryer. Open the door and take out your laundry.
The dryer switches off automatically in about a quarter of an hour after programme end, to save energy.
If not switched off right after programme end, the dryer will tumble the laundry for about 10 minutes, to prevent creasing. The display shows an animation.
9. EMPTY WATER TANK / CLEAN DOOR FILTER / CLEAN BOTTOM FILTER
Empty
• the water tank after each programme
• the door filter after each programme
• the bottom filter after every fifth programme.
Refer to section CARE AND MAINTENANCE
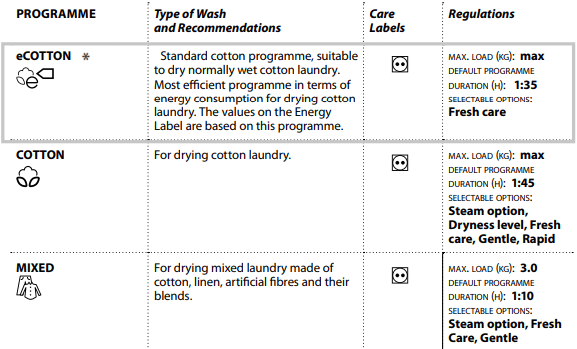
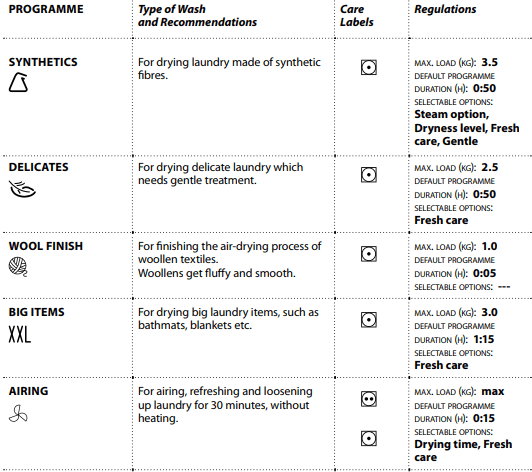
PROGRAMMES
The dots indicate the temperature degree for drying the laundry.
Normal temperature
Reduced temperature
Do not tumble dry
OPTIONS
OPTIONS WHICH ARE DIRECTLY SELECTABLE BY PRESSING THE RESPECTIVE BUTTON
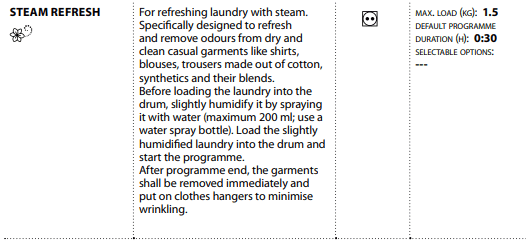
STEAM OPTION 
- Minimises creasing of garments made of cotton, synthetics and their blends by adding a humidifying phase at the end of the drying cycle.
- Use the option with small loads only, unload the garments from the dryer immediately after programme end and put them on clothes hangers.
- The humidity level automatically adjusts to “cupboard dry” and cannot be changed with this option.
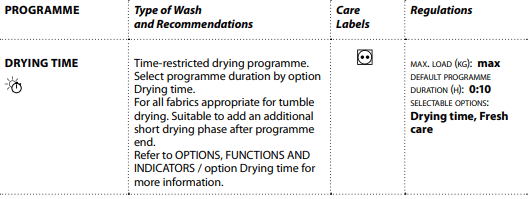
DRYING TIME OPTION 
- To adjust the desired drying time if Drying time or Airing programme has been selected.
- Press the button; the light goes on, and the drying time which was used last appears on the display.
- Turn the knob to select the desired drying time from a minimum of 10 minutes up to maximum 180 minutes, afterwards press the knob to confirm.
DRYNESS LEVEL 
To select the desired dryness level for the laundry load.
Press the button; the light goes on. Turn the knob to select the desired dryness level.
Choose between:
 Iron Dry (suitable to be ironed after the drying cycle, therefore still slightly humid)
 Cupboard Dry (dry enough to be put in a cupboard at the end of the drying cycle)
 Extra Dry (maximum dryness level) and confirm by pressing the knob.
The dryness level is adjustable in programmes Cotton and Synthetics.
OPTIONS SELECTABLE WITH THE OPTIONS BUTTON 
FRESH CARE 
- Helps to prevent creasing if you cannot unload the laundry soon after programme end.
- The dryer starts to tumble the laundry periodically a few minutes after programme end. This tumbling will last up to approximately 12 hours after end of the programme.
- You can stop it at any time by switching off the dryer with the On/ Off button.
GENTLE 
- Enables a more gentle treatment of the laundry by reducing the drying temperature.
RAPID 
- Enables quicker drying by shortening the programme duration.
ON/OFF 
- To switch the dryer on: press the button until the Start/Pause button lights up.
- To switch the dryer off after programme end: press the button until the lights go off.
- To cancel a running programme: press and hold the button until “rES” appears on the display.
KNOB
To select and confirm programmes, options and settings.
Turn to select

Push to confirm

START/PAUSE 
- To start the programme, after you have finished your settings.
- To pause a running programme.
- To continue a paused programme
KEY LOCK 
- This function allows you to lock the buttons and the knob of the control panel against unwanted operation, for example by small children.
- The dryer must be switched on.

- Press and hold the Key lock button until button lights up.

- Knob and buttons are locked now. The only working function is On/Off to switch the dryer off.
- The key lock remains active also if you switch off and on again the dryer.
- To unlock the buttons/knob, press and hold the option button again until the button light goes off.
START DELAY 
- Enables to have the laundry ready at a particular time by moving the start of the programme to a later time.
- Select programme and options. Press the Start delay button – the button lights up.
- Turn the knob to select a delay up to 23 hours. and confirm by pressing the knob.
- Press Start / Pause - the display shows the countdown of the delay until start of the programme. The Start / Pausebutton lights up. A sound by activation of the pump may occur.

- The colon on the display between hours and minutes blinks.
- The programme starts automatically at the end of the delay period. On programme start, the delay on the display is replaced by the remaining programme duration.
- When selecting a delay, the original programme duration appears again after the maximum possible delay of 23 hours. To exit the settings mode again without setting a delay, select the default programme duration. To cancel a delay which has already been started:
- Either press Start/Pause to cancel the delay. To start the selected programme immediately, press Start/ Pause again.
- Or press and hold On/Off to cancel the complete programme setting.
WATER CONDUCTIVITY SETTING 
- The drying results are affected by the conductivity of the water used during washing. If, by modifying the available dryness levels (iron dry; cupboard dry; extra dry), you are not satisfied with the final drying results, you can adapt the water conductivity level.
- The dryer comes with preset level 2. Choose between level 1 (most damp results) and level 5 (most dry results).
- Press and hold the Programme button until the Conductivity Adjustment symbol on the display blinks.

- Turn the knob to adjust the level (1 –2 – 3 – 4 - 5). Press the knob to confirm the selected level.
- This operation is not needed for every drying cycle. Once the most satisfying water conductivity level has been identified, you no longer need to modify it.
ENERGY SAVING
AUTOMATIC SWITCH-OFF FUNCTION
- The dryer is designed to save energy. After the programme has finished, it therefore switches off automatically after about a quarter of an hour.
ENERGY SAVING TIPS
- To reduce the drying time, make sure that the laundry is spun with the maximum possible spin speed of the wash programme. This reduces the moisture content in the laundry.
- Preferably dry a full load, as indicated in the Programmes table. This optimises the relative energy consumption.
- Do not over dry the laundry.
- Clean the door filter after every drying cycle.
- Clean the bottom filter after every fifth drying cycle.
- The optimum ambience temperature for the dryer is between 15 and 20 °C. In case of a higher temperature, air the room.
- Use Gentle option only with small loads.
- When drying cotton or synthetics laundry, run Iron dry and Cupboard dry loads together. Start the programme with dryness level Iron dry. At the end of the programme, remove the laundry to be ironed. Finish the drying process for the remaining load with dryness level Cupboard dry.
CLEANING & MAINTENANCE
For any cleaning and maintenance, switch off the dryer.
EMPTYING THE WATER TANK
Empty the water tank after each programme, provided the drain hose is not connected to your sewage system (refer to INSTALLATION GUIDE).
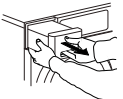
1. Hold the handle and carefully pull out the water tank. Hold the full water tank with both hands.
2. Empty the water.
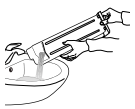
3. Insert the water tank by pushing it back into place. Make sure that it is completely inserted in the compartment.
CLEANING THE DOOR FILTER
Clean the door filter after each programme. Make sure that the laundry is unloaded. Open the door.
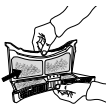
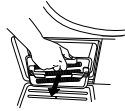
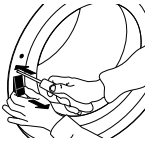
1. Remove the door filter by pulling it upwards.
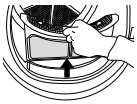
2. Press the button to open the door filter.
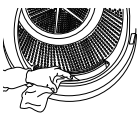
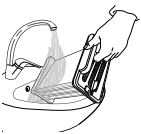
3. Carefully remove the complete lint from the screen by hand. If needed, the screen can be cleaned also under running water, using a soft brush.
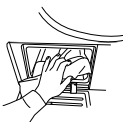
4. Clean the filter compartment with a soft cloth, or carefully with a vacuum cleaner.
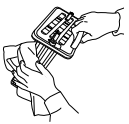
5. Close the filter and reinsert it in the right direction, so that it completely integrates in the filter compartment.

CLEANING THE BOTTOM FILTER
Clean the bottom filter about every three months.
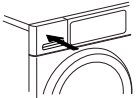
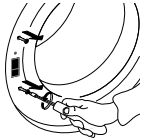
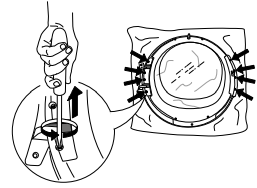
1. Carefully press down the strap to open the bottom flap.
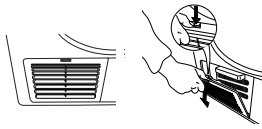
2. Turn the locking bars right and left on the bottom filter downwards in horizontal position.
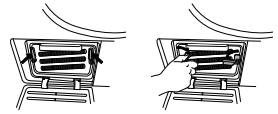
3. Hold the bottom filter on the handle and pull it out.
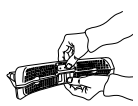
4. Clean the bottom filter under running water; wipe away dust and lint.
5. Wipe the bottom filter dry, so that it is not dripping wet anymore.
6. Clean the filter compartment with a soft cloth or carefully with a vacuum cleaner.
7. Push the bottom filter back into the filter compartment; make sure that it is completely integrated. Turn both locking bars (right and left) back into vertical position, to lock the bottom filter.

8. Finally close the bottom flap again.
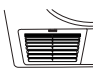
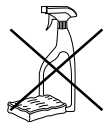
CLEANING THE OUTSIDE OF THE DRYER
Use a soft damp cloth to clean the outer parts of the dryer.
Do not use glass or general purpose cleaners, scouring powder or similar to clean the control panel – these substances might damage the surfaces.
REVERSING THE DOOR STOP
If needed, the door stop of the dryer door can be reversed. Use pliers and a cross-head screwdriver for the procedure.
For removing and fixing the door, the help of a second person is recommended. Make sure that the dryer is unplugged. Open the dryer door.
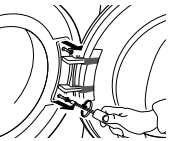
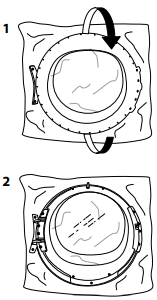
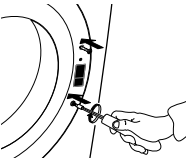
1. Remove the two screws which are situated over and under the door lock, left from the door opening.
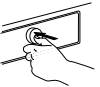
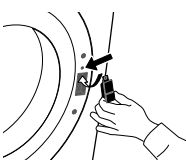
2. Press the small knob above the door lock with a small screwdriver. At the same time move upwards the door lock and pull it towards you with your finger
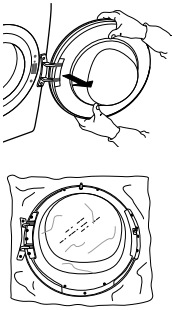
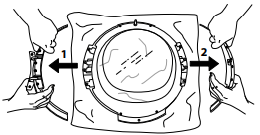
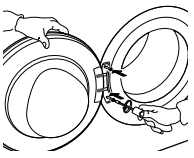
3. Remove the two screws on the door hinge.
4. Remove the door and carefully lay it upside down on a blanket or similar.
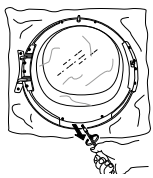
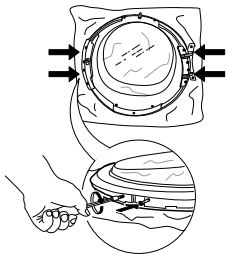
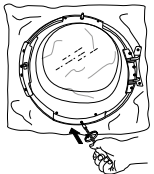
5. Unscrew the bottom screw, to release the cover frame on the front of the door.
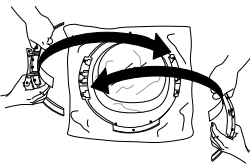
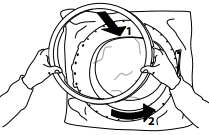
6. Turn the door and lay it down on the door glass.
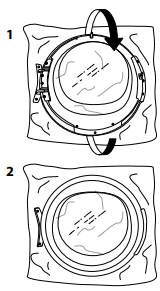
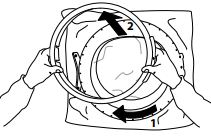
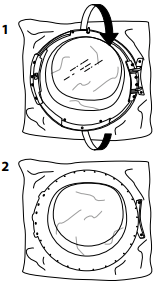
7. Carefully turn the door frame in clockwise direction, and remove it.
8. Turn the door again and lay it upside down.
9. Remove the two side screws. Do this on both sides of the door.
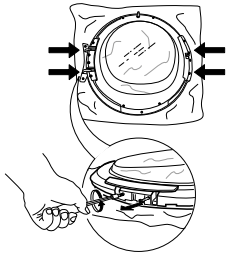
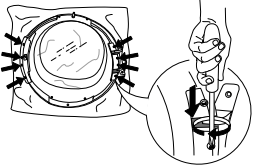
10. Remove the 4 inner screws on each side of the door
11. Remove the side parts on each side of the door.
12. Reverse the side parts and insert them again.
13. Fix the 2 side screws on both sides of the door again.
14. Fix the 4 inner screws on each side again.
15. Turn the door and lay it down on the door glass.
16. Refit the door frame.
17. Turn the door again and lay it upside down. Fix the bottom screw again.
18. Insert the door lock on the right side of the door opening. Press it completely inside the hole and move it a bit downwards, until the small knob of the door lock latches.
19. Fix the two screws over and under the door lock, on the right side of the door opening.
20. Fix the door on the left side of the door opening by turning in the two screws.
TROUBLESHOOTING GUIDE & AFTER-SALES SERVICE
Your dryer is equipped with various automatic safety functions. These enable failures to be detected in good time and the safety system can react appropriately. These failures are frequently so minor that they can be removed within a few minutes.
DRYING TAKES TOO LONG LAUNDRY IS NOT DRY ENOUGH
- Selected programme not optimum for type of laundry
Select the programme matching best the type of laundry; refer to section PROGRAMMES
- Door filter or bottom filter clogged
Clean the filters according to the instructions in section CARE AND MAINTENANCE
Make sure that laundry is spun with the maximum spin speed before drying. If laundry was spun with spin speed below 800 rpm, the water tank may get full during the drying programme.
- The ambient temperature is too high
The ambient temperature is ideal between 15 and 20°C. If the ambient temperature is higher, air the room.
DRYER DOES NOT START, ALTHOUGH START/PAUSE HAS BEEN PRESSED
Push door to close it until it clicks shut
Press and hold the button with the key symbol until the display indicates that the keys are unlocked.
WATER DROPLETS ARE BENEATH THE DRYER
- Bottom filter not inserted correctly
Check position of the bottom filter and make sure it is completely integrated in the filter compartment.
- Lint remaining on bottom filter or door seal
Remove lint residues on the rubber seals of bottom filter and door seal.
- Water tank not inserted correctly
Push in the water tank and make sure that it is completely integrated in the tank compartment.
- Direct drain connection not working properly
Check drain connection and make sure that the water can drain.
Check level position of dryer on the tabletop with a water level; if needed adjust the dryer feet.
(refer to INSTALLATION GUIDE)
FAILURE INDICATOR AND MESSAGES
Make sure to
• Empty the water tank after each programme
• Clean the door filter after each programme
• Clean the bottom filter after every fifth programme

Water tank may be
• filled with water
• Empty water tank; make sure to insert it properly afterwards.
• not correctly positioned
• Push in the water tank to make sure that it is correctly inserted in the tank compartment.

Bottom filter may be
• blocked by lint
• Clean the bottom filter; make sure to insert it properly afterwards
• not correctly positioned
• Push in the bottom filter and move the release levers into vertical position, to make sure that the filter is correctly inserted in the filter compartment. Close the flap.

Door filter may be
• blocked by lint
• Remove and clean the door filter; make sure to insert it properly afterwards so that it completely integrates in the filter compartment.
• not correctly positioned
• Check position of the door filter; make sure that it is properly inserted in the filter compartment.
Display message: F01 to F04
Possible Cause: Failure of a component
Solution: Press and hold On/Off for at least 3 seconds.
Display message: F05 to F09
Possible Cause: Failure of a component
Solution:
Switch off and unplug the dryer. Immediately open the door and take out the laundry, so that the heat can dissipate.
Make sure that the ambient temperature ranges between 5°C and 35°C. Wait for about an hour. Plug in the dryer, load the laundry and start the programme again.
If the failure persists, call the After-Sales Service.
Display message: F10 to F24
Possible Cause: Failure of a component
Solution:
Switch off and unplug the dryer. Wait for about half an hour. Plug in the dryer and start the programme again.
If the failure persists, call the After-Sales Service.
TRANSPORT AND HANDLING
1. Unplug the dryer.
2. Make sure that door and water tank are properly closed.
3. If the drain hose is connected to your sewage system, fix the drain hose on the rear of the dryer again (see Installation Guide).