
For questions about features, operation/performance,
parts, or service, call: 1-800-207-1156.
In Canada, for assistance, installation, or service,
call: 1-800-207-1156.
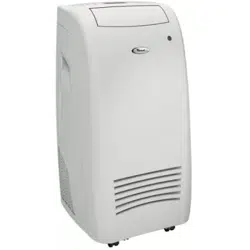
Portable Air Conditioner
Use and Care Guide
Table of Contents
AIR CONDITIONER SAFETY ........................................... 2
INSTALLATION REQUIREMENTS ................................... 2
PARTS AND FEATURES ..................................................3
INSTALLATION INSTRUCTIONS ..................................... 5
USING YOUR AIR CONDITIONER .................................. 8
CARE AND CLEANING .................................................. 10
TROUBLESHOOTING .................................................... 11
SPECIFICATIONS ........................................................... 12
ASSISTANCE OR SERVICE ........................................... 13
XLS PRODUCTS WARRANTY FOR
WHIRLPOOL
®
AIR CONDITIONERS ............................. 14
Models/Modèles/Modelos:
WHAP121AW/WHAP141AW & WHAP122AW/WHAP142AW
®/™ ©2016 Whirlpool. All rights reserved. Manufactured under license by XLS Products, Pennsylvania.
Tous droits réservés. Fabriqué sous licence par XLS Products, Pennsylvanie.
Todos los derechos reservados. Fabricado bajo licencia por XLS Products, Pennsylvania.
Au Canada, pour assistance, installation, ou service,
composez le: 1 800 207-1156
Table des matières
Climatiseur
Guide d’utilisation et d’entretien
SÉCURITÉ DU CLIMATISEUR....................................... 15
EXIGENCES D’INSTALLATION ..................................... 15
PIÈCES ET CARACTÉRISTIQUES ................................ 16
INSTRUCTIONS D’INSTALLATION ............................... 18
UTILISATION DE VOTRE CLIMATISEUR ..................... 21
ENTRETIEN ET NETTOYAGE ........................................ 23
DÉPANNAGE .................................................................. 24
SPÉCIFICATIONS ........................................................... 25
ASSISTANCE OU SERVICE ........................................... 26
GARANTIE DE XLS PRODUCTS POUR
LES CLIMATISEURS WHIRLPOOL
®
............................. 27
Si tiene preguntas respect o a las características,
funcionamiento, rendimiento, partes, o servicio técnico,
llame al: 1-800-207-1156
Acondicionador de aire portátil
Manual de uso y cuidado
Índice
SEGURIDAD DEL ACONDICIONADOR DE AIRE ........ 28
REQUISITOS DE INSTALACIÓN ................................... 28
PIEZAS Y CARACTERÍSTICAS ..................................... 29
INSTRUCCIONES DE INSTALACIÓN ........................... 31
USO DE SU ACONDICIONADOR DE AIRE .................. 34
CUIDADO Y LIMPIEZA .................................................. 36
SOLUCIÓN DE PROBLEMAS ........................................ 37
ESPECIFICACIONES ..................................................... 38
ASISTENCIA O SERVICIO TÉCNICO ............................ 39
GARANTÍA DE XLS PRODUCTS PARA
ACONDICIONADORES DE AIRE WHIRLPOOL
®
.......... 40
95111_WHAP121-142AW_portable_UCG.indb 1 5/25/16 3:28 PM
2
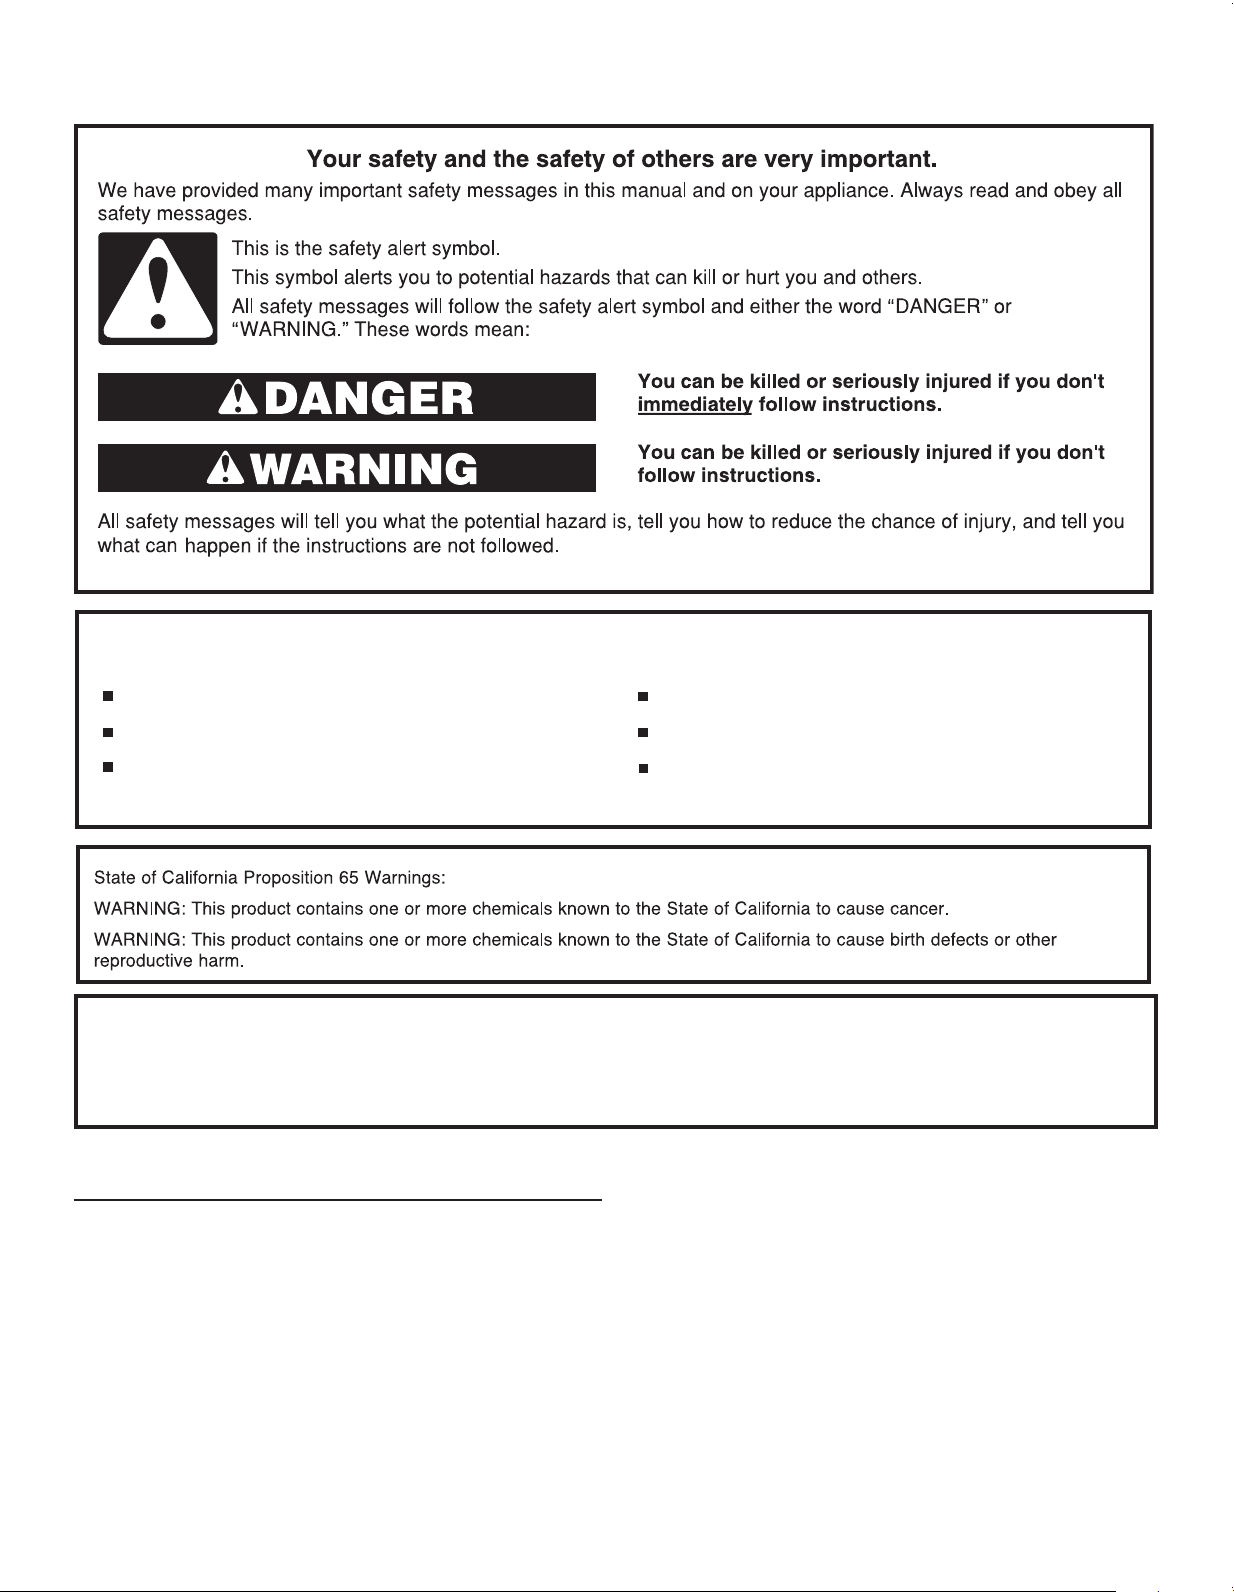
AIR CONDITIONER SAFETY
IMPORTANT SAFETY INSTRUCTIONS
WARNING:
To reduce the risk of fire, electrical shock or injury when using your air conditioner, follow these basic precautions:
SAVE THESE INSTRUCTIONS
Unplug air conditioner before servicing.
Use two or more people to move and install air conditioner.
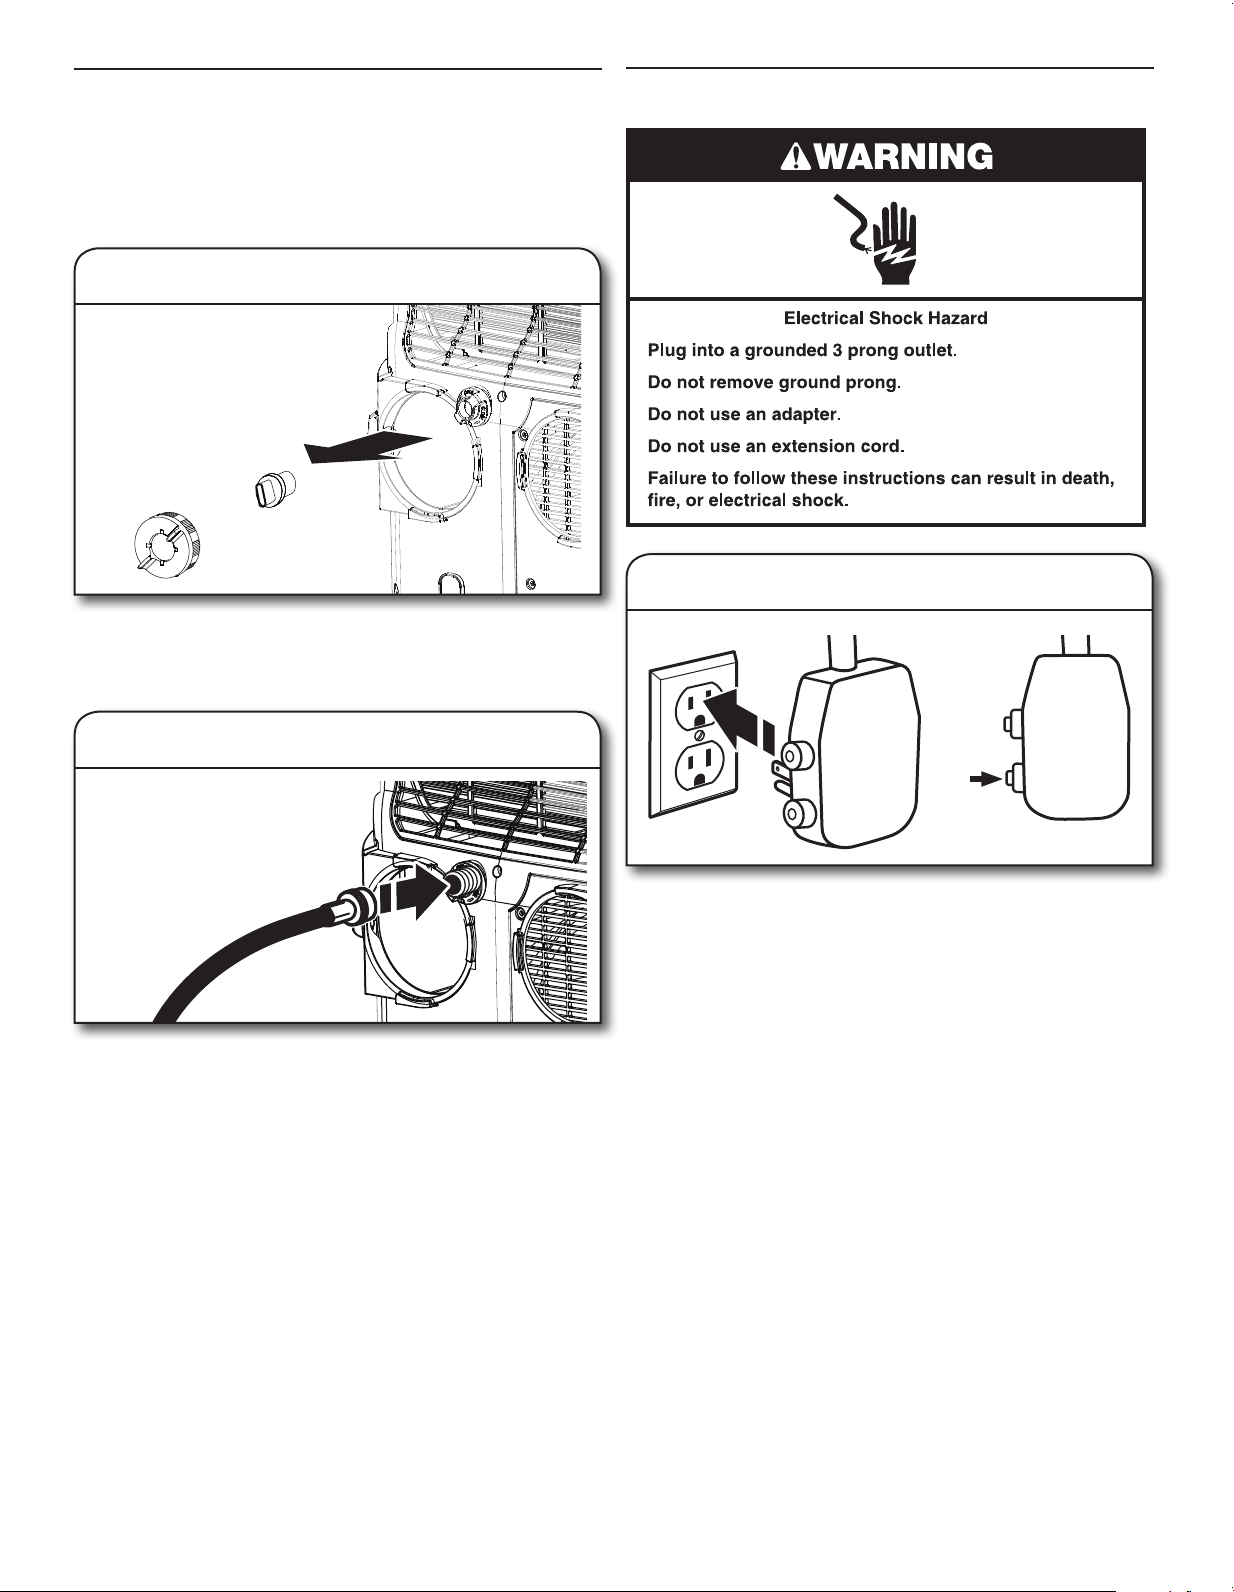
Plug into a grounded 3 prong outlet.
Do not remove ground prong.
Do not use an adapter.
Do not use an extension cord.
INSTALLATION REQUIREMENTS
Location Requirements—All Models
IMPORTANT: Observe all governing codes and ordinances.
Check the location where the air conditioner will be installed.
Make sure you have everything necessary for correct installation.
The location should provide:
■ Grounded electrical outlet within 6 ft (183 cm) of where the
power cord exits the air conditioner.
NOTE: Do not use an extension cord.
■ Free movement of air in room to be cooled.
■ A large enough opening for the air conditioner. Installation
parts are supplied for double-hung windows.
■ Allow at least 10" (25 cm) clearance from walls and furniture.
NOTE: Cabinet louvers must not be obstructed. Do not place the
unit in front of drapes or curtains; they may block the air intake.
Disposing of the unit:
■ When you need to dispose of the unit, consult with your local dealer or local recycling center for information on how to
dispose of the unit in a environmentally responsible manner.
■ Please recycle or dispose of the packaging material for product in an environmentally responsible manner.
95111_WHAP121-142AW_portable_UCG.indb 2 5/25/16 3:28 PM
3
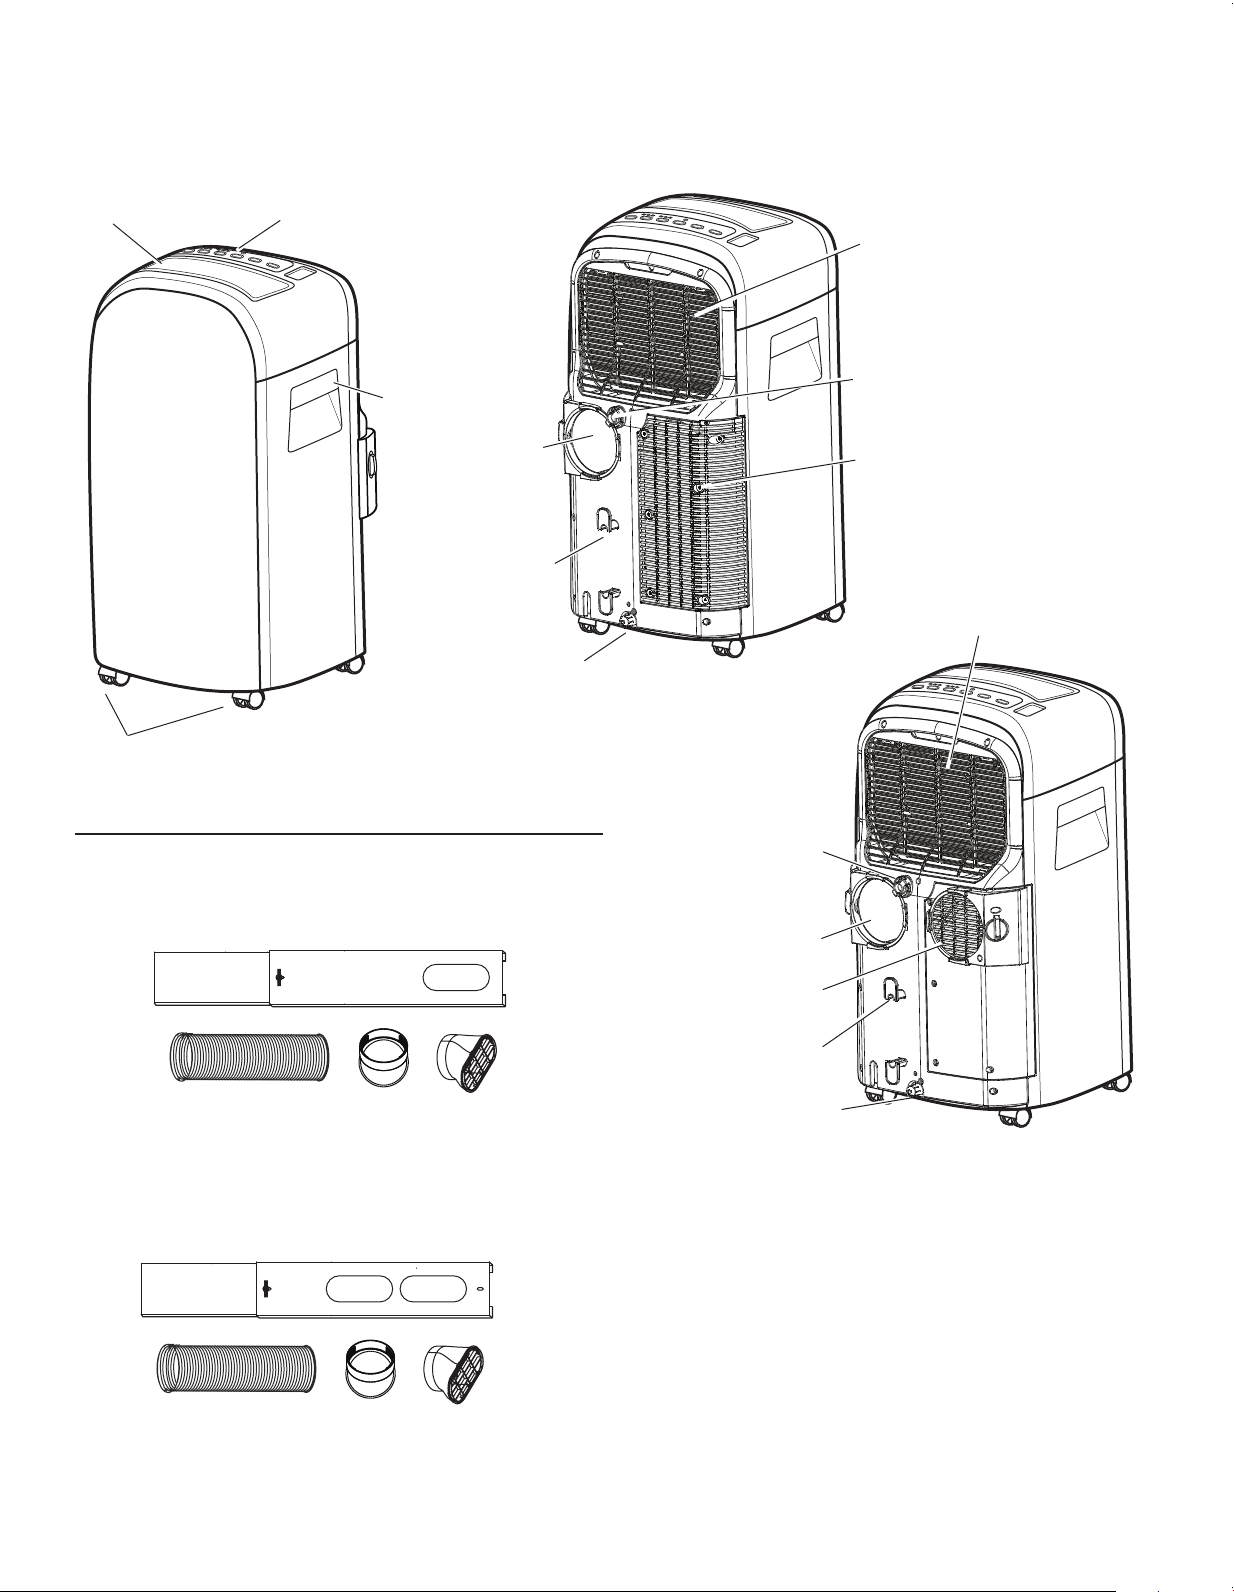
Installation Parts Supplied
Check that all parts are included in parts package.
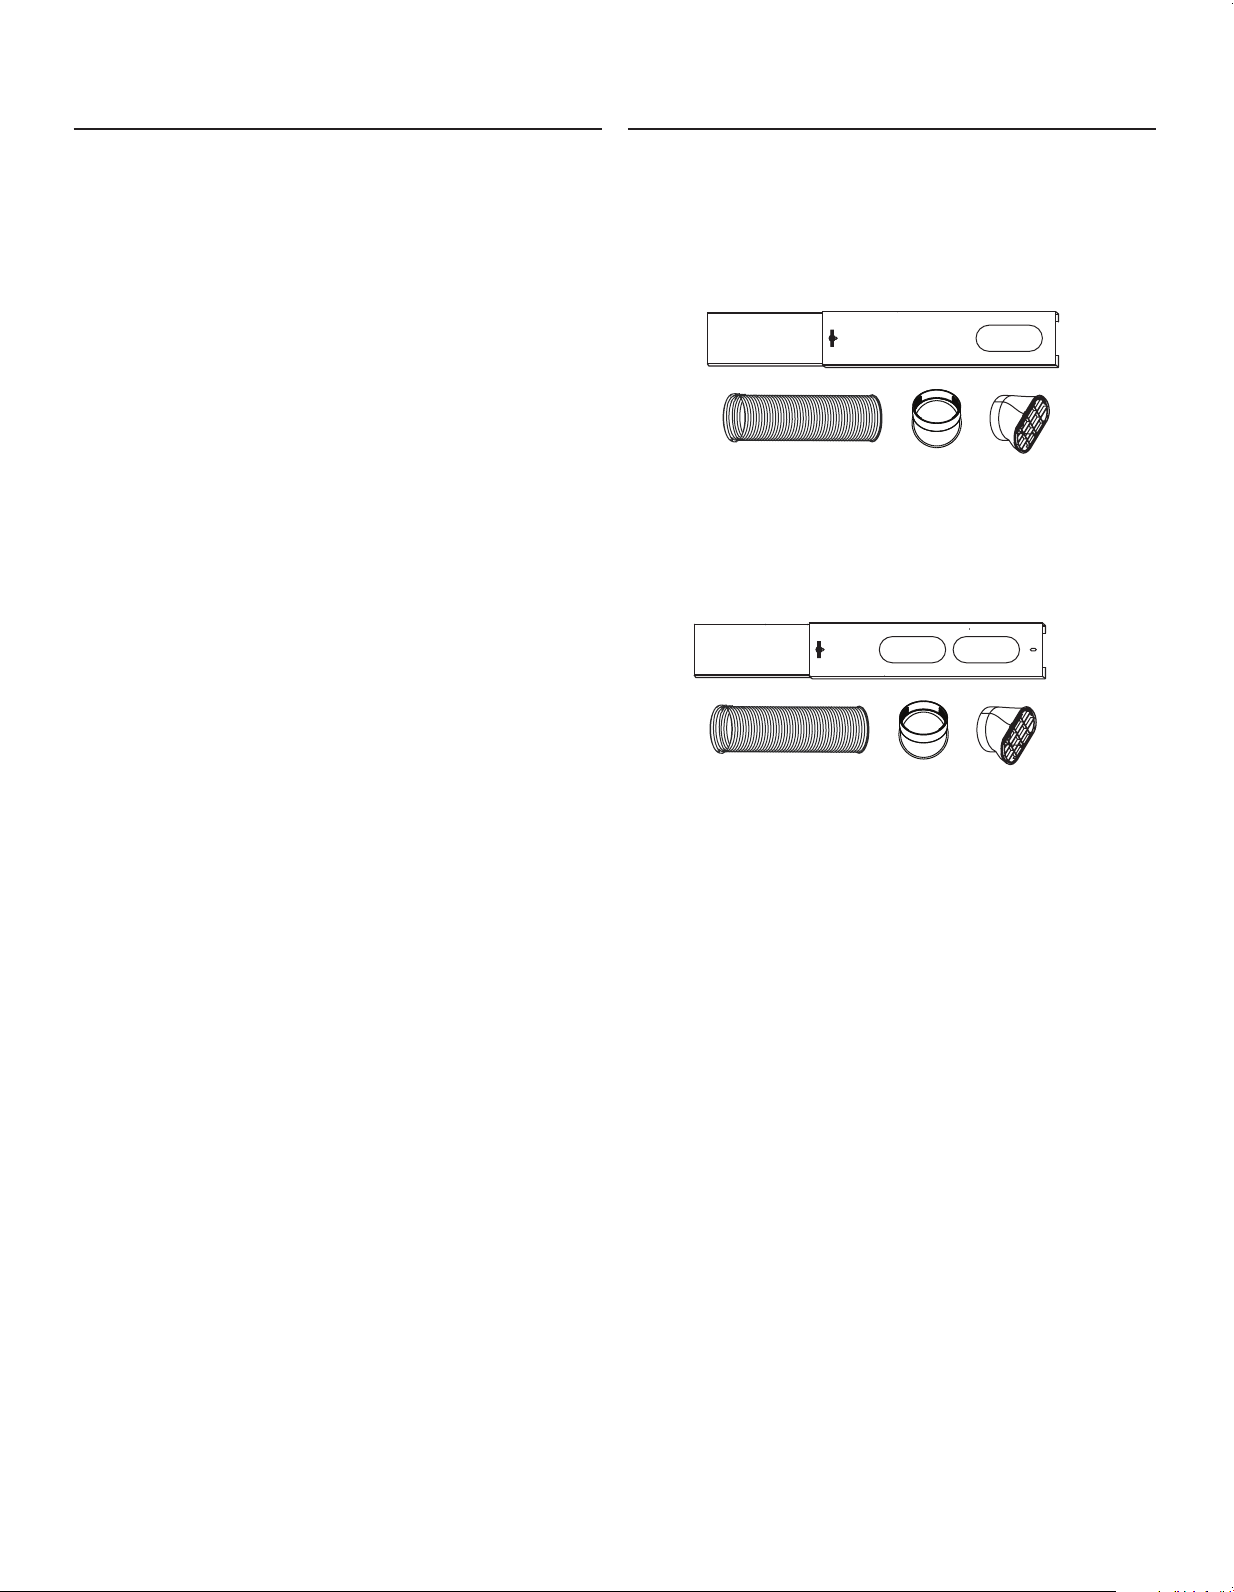
Single Vent Models
A. Single vent window insert
panel (1)
B. Flexible vent hose (1)
C. Vent hose round connector
(1)
D. Vent hose window
connector (1)
A. Dual vent window insert
panel (1)
B. Flexible vent hose (2)
C. Vent hose round connector
(2)
D. Vent hose window
connector (2)
A
B C D
PARTS AND FEATURES
Front View
Back View
(dual vent models)
Casters
Control Panel
Handle
Air Outlet
Back View
(single vent models)
Internal tank drain
Drain tting (for
dehumidier mode)
Air outlet
(heat
exchanger)
Air intake
(condenser)
Air Intake (evaporator)
Air lter (behind grille)
Cord wrap
Internal tank drain
Drain tting (for
dehumidier mode)
Air outlet (heat
exchanger)
Air intake
(condenser)
Air Intake (evaporator)
Air lter (behind grille)
Cord wrap
A
B
C D
Dual Vent Models
95111_WHAP121-142AW_portable_UCG.indb 3 5/25/16 3:29 PM
4
Electrical Requirements
■ 115-volt (103.5 min. - 126.5 max.)
■ 0-12 amps
■ 15-amp time-delay fuse or circuit-breaker
■ If there is a “Single Circuit Only” label on the unit,
use on a dedicated single-outlet circuit only. If a
dedicated single-outlet circuit is not available, then
it is the customer’s responsibility to have a single-
outlet circuit installed by a qualied electrician.
■ If there is no “Single Circuit Only” label on the
unit, the unit may be used on any branch circuit of
correct voltage and adequate current protection
rating.
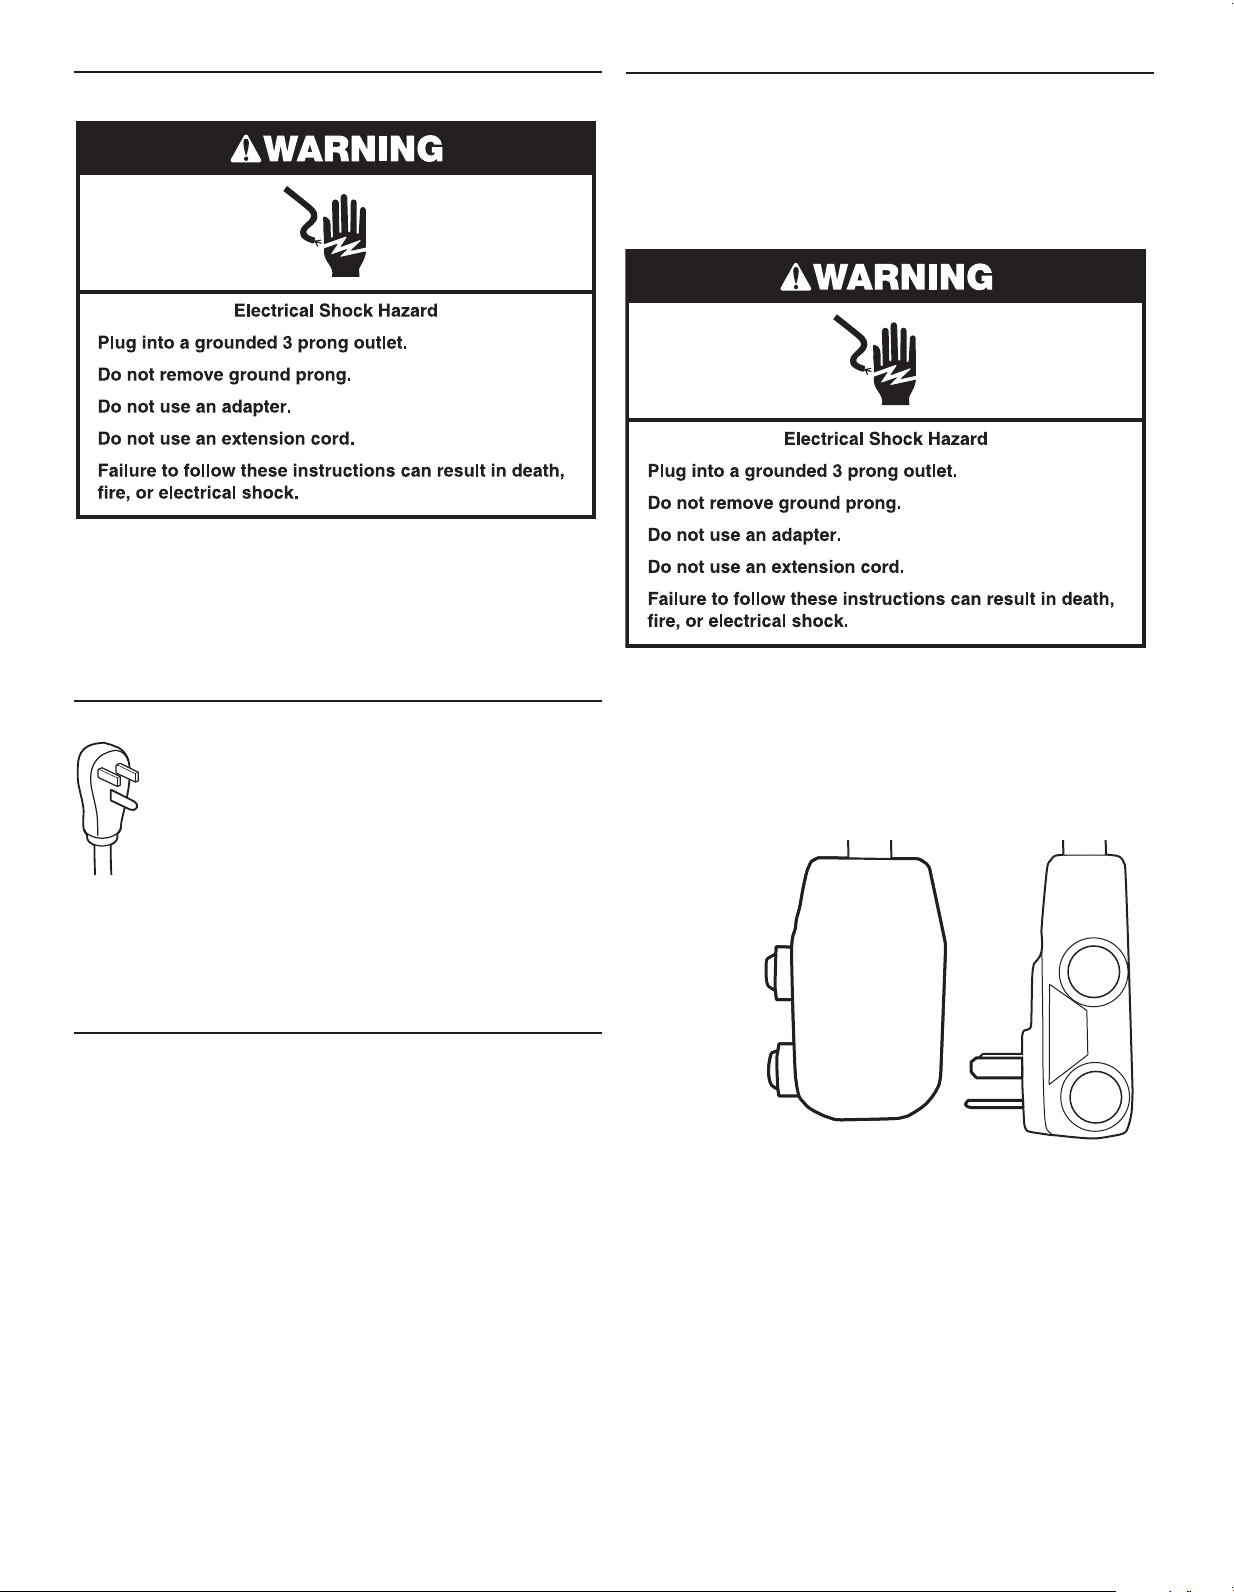
Recommended Grounding Method
This air conditioner must be grounded. This air conditioner is
equipped with a power supply cord having a grounded 3 prong
plug. To minimize possible shock hazard, the cord must be
plugged into a mating, grounded 3 prong outlet, grounded in
accordance with all local codes and ordinances. If a mating
outlet is not available, it is the customer’s responsibility to have a
properly grounded 3 prong outlet installed by a qualied electrical
installer. It is the customer’s responsibility:
■ To contact a qualied electrical installer.
■ To assure that the electrical installation is adequate and
in conformance with National Electrical Code, ANSI/NFPA
70 - latest edition, and all local codes and ordinances.
Copies of the standards listed may be obtained from:
National Fire Protection Association
1 Batterymarch Park
Quincy, MA 02269
Power Supply Cord
NOTE: Your air conditioner’s power supply cord may differ from
the one shown. This portable air conditioner is equipped with
a power supply cord required by UL. This power supply cord
contains state-of-the-art electronics that sense leakage current.
If the cord is crushed, the electronics detect leakage current and
power will be disconnected in a fraction of a second.
To test your power supply cord:
1. Plug power supply cord into a grounded 3 prong outlet.
2. Press RESET (on some models, a green light will turn on).
3. Press TEST.
4. Press and release RESET.
The power supply cord is ready for operation.
Electrical Requirements—All Models
The electrical ratings for your air conditioner are listed on the
model and serial number label. The model and serial number
label is located on the back of the air conditioner cabinet.
Specic electrical requirements are listed in the “Power Supply
Cord Electrical Requirements” chart. Follow the requirements for
the type of plug shown in the chart.
A.Test button
B. Reset button
NOTES:
■ The Reset button must be pushed in for proper operation.
■ The power supply cord must be replaced if it fails to trip when
the test button is pressed or fails to reset.
■ Do not use the power supply cord as an off/on switch. The
power supply cord is designed as a protective device.
■ A damaged power supply cord must be replaced with a new
power supply cord obtained from the product manufacturer
and must not be repaired.
■ The power supply cord contains no user serviceable parts.
Opening the tamper-resistant case voids all warranty and
performance claims.
TEST
RESET
TEST
RESET
A
A
B
B
95111_WHAP121-142AW_portable_UCG.indb 4 5/25/16 3:29 PM
5
Prepare Air Conditioner for Installation
INSTALLATION INSTRUCTIONS
WARNING
Excessive Weight Hazard
Use two or more people to move and install
air conditioner.
Failure to do so can result in back or other injury.
Remove Packaging Materials:
■ Handle the air conditioner gently while unpacking the unit.
■ Remove the carton top and lift the air conditioner from the
base pad.
■ Remove tape and glue residue from surfaces before turning
on the air conditioner. Rub a small amount of liquid dish soap
over the adhesive with your ngers. Wipe with a damp cloth
and dry.
■ Do not use sharp instruments, rubbing alcohol, ammable
uids, or abrasive cleaners to remove tape or glue. These
products can damage the surface of your air conditioner.
■ Be sure to check all packing materials for parts before
discarding.
■ Dispose of/recycle packaging materials in an appropriate way.
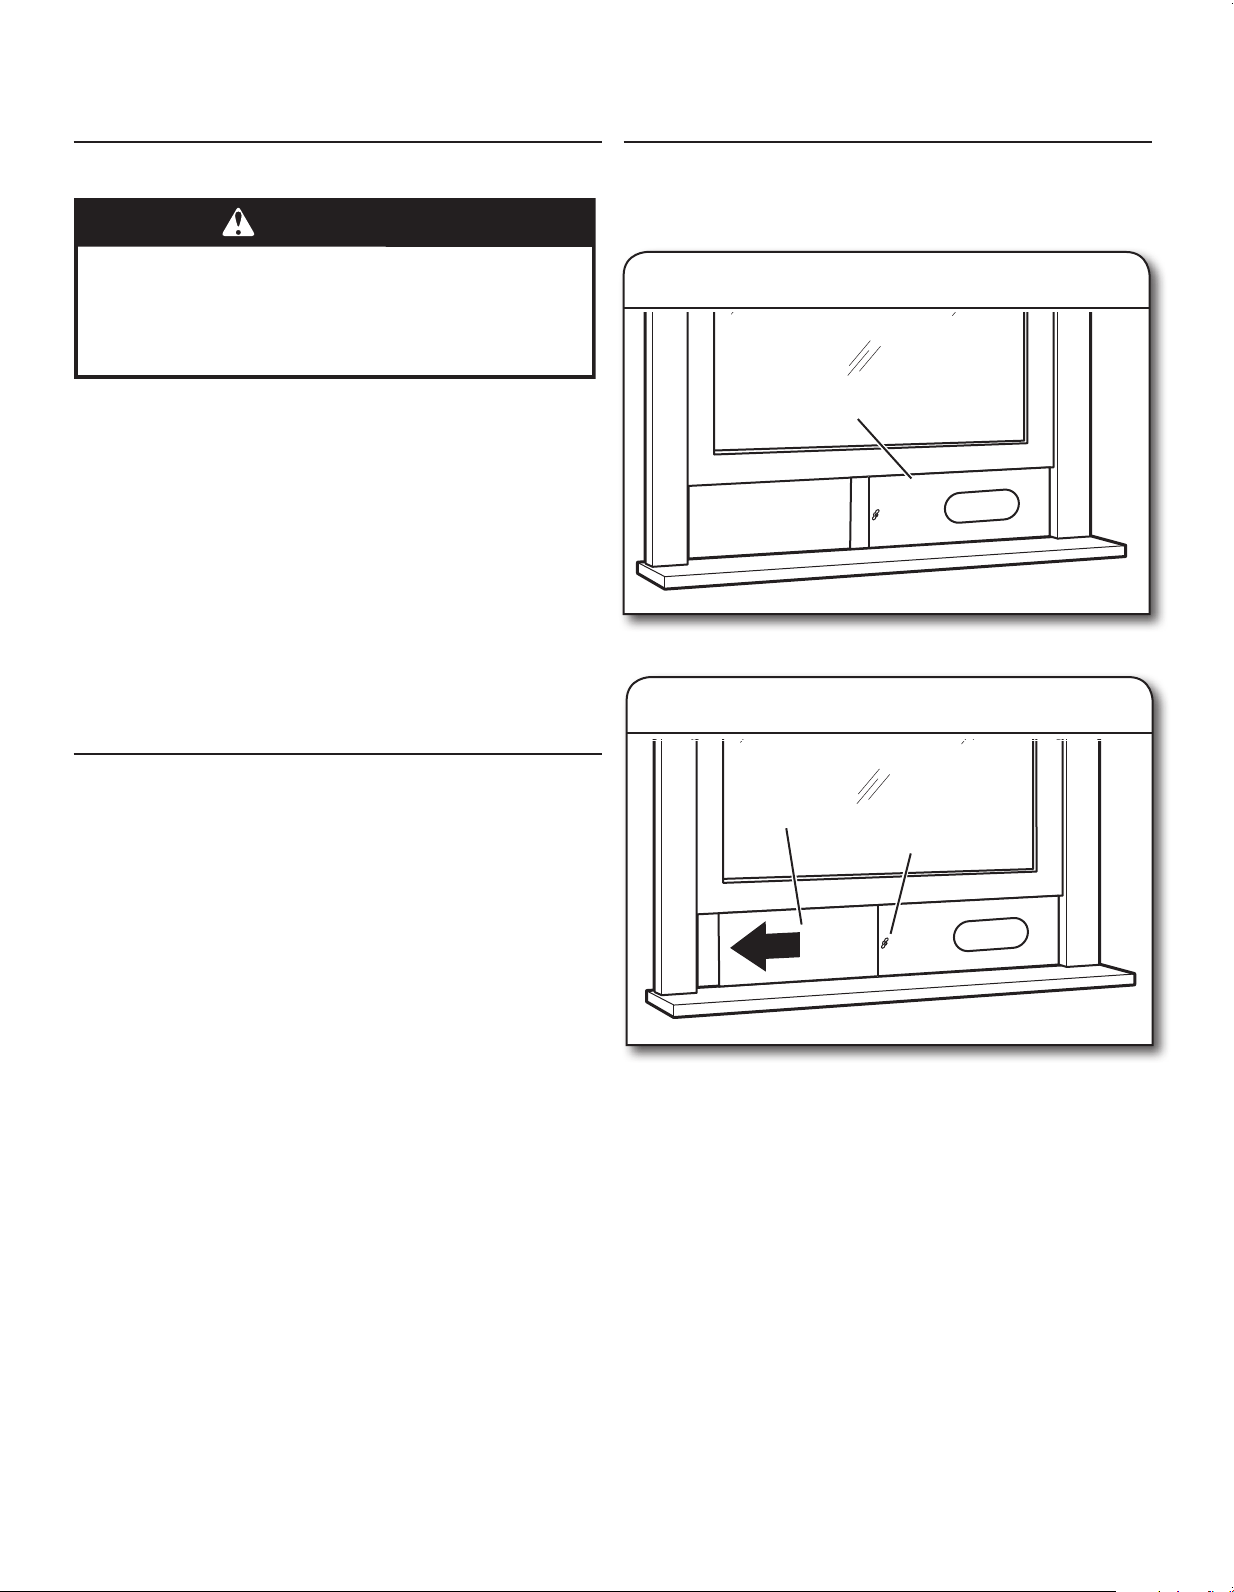
Position the window slider panel in the window opening.
Install Window Slider Panel
Single vent model shown. Installation for dual vent models is the
same.
1. Position slider panel in window
Slider panel
Extend the slider panel extension until it lls the window opening.
Be sure the vent opening in the slider panel is not covered.
Tighten the wing nut securely.
If the window is too narrow to fit the slider panel without
blocking the vent opening:
1. Loosen the wingnut and remove the slider panel extension
from the slider panel.
2. Using a handsaw, cut the slider panel extension to t the
window opening. Leave as much panel as possible without
covering the vent opening(s) in the slider panel.
3. Slider the slider panel extension back into the slider panel,
being sure the head of the retainer screw ts into the T-slot on
the slider panel extension.
Window Opening Requirements
This air conditioner may be used with standard double-hung
windows and with vertical sliding windows.
Double-Hung Window Opening Measurements:
■ 24
5
⁄8" (63 cm) minimum to 47
1
⁄4" (1.2 m) maximum
opening width
■ 4
3
⁄4" (12 cm) minimum opening height
Vertical Sliding Window Opening Measurements:
■ 4
3
⁄4" (12 cm) minimum opening width.
■ 24
5
⁄8" (63 cm) minimum to 47
1
⁄4" (1.2 m) maximum
opening height
IMPORTANT: For window openings between 24
5
⁄8" (63 cm) and
38" (99 cm) [single vent models] or 45
3
⁄4" (115 cm) [dual vent
models), it will be necessary to cut the slider panel extension to
t the window opening.
2. Extend and secure slider panel
Wing nut
Slider panel
extension
95111_WHAP121-142AW_portable_UCG.indb 5 5/25/16 3:29 PM
6
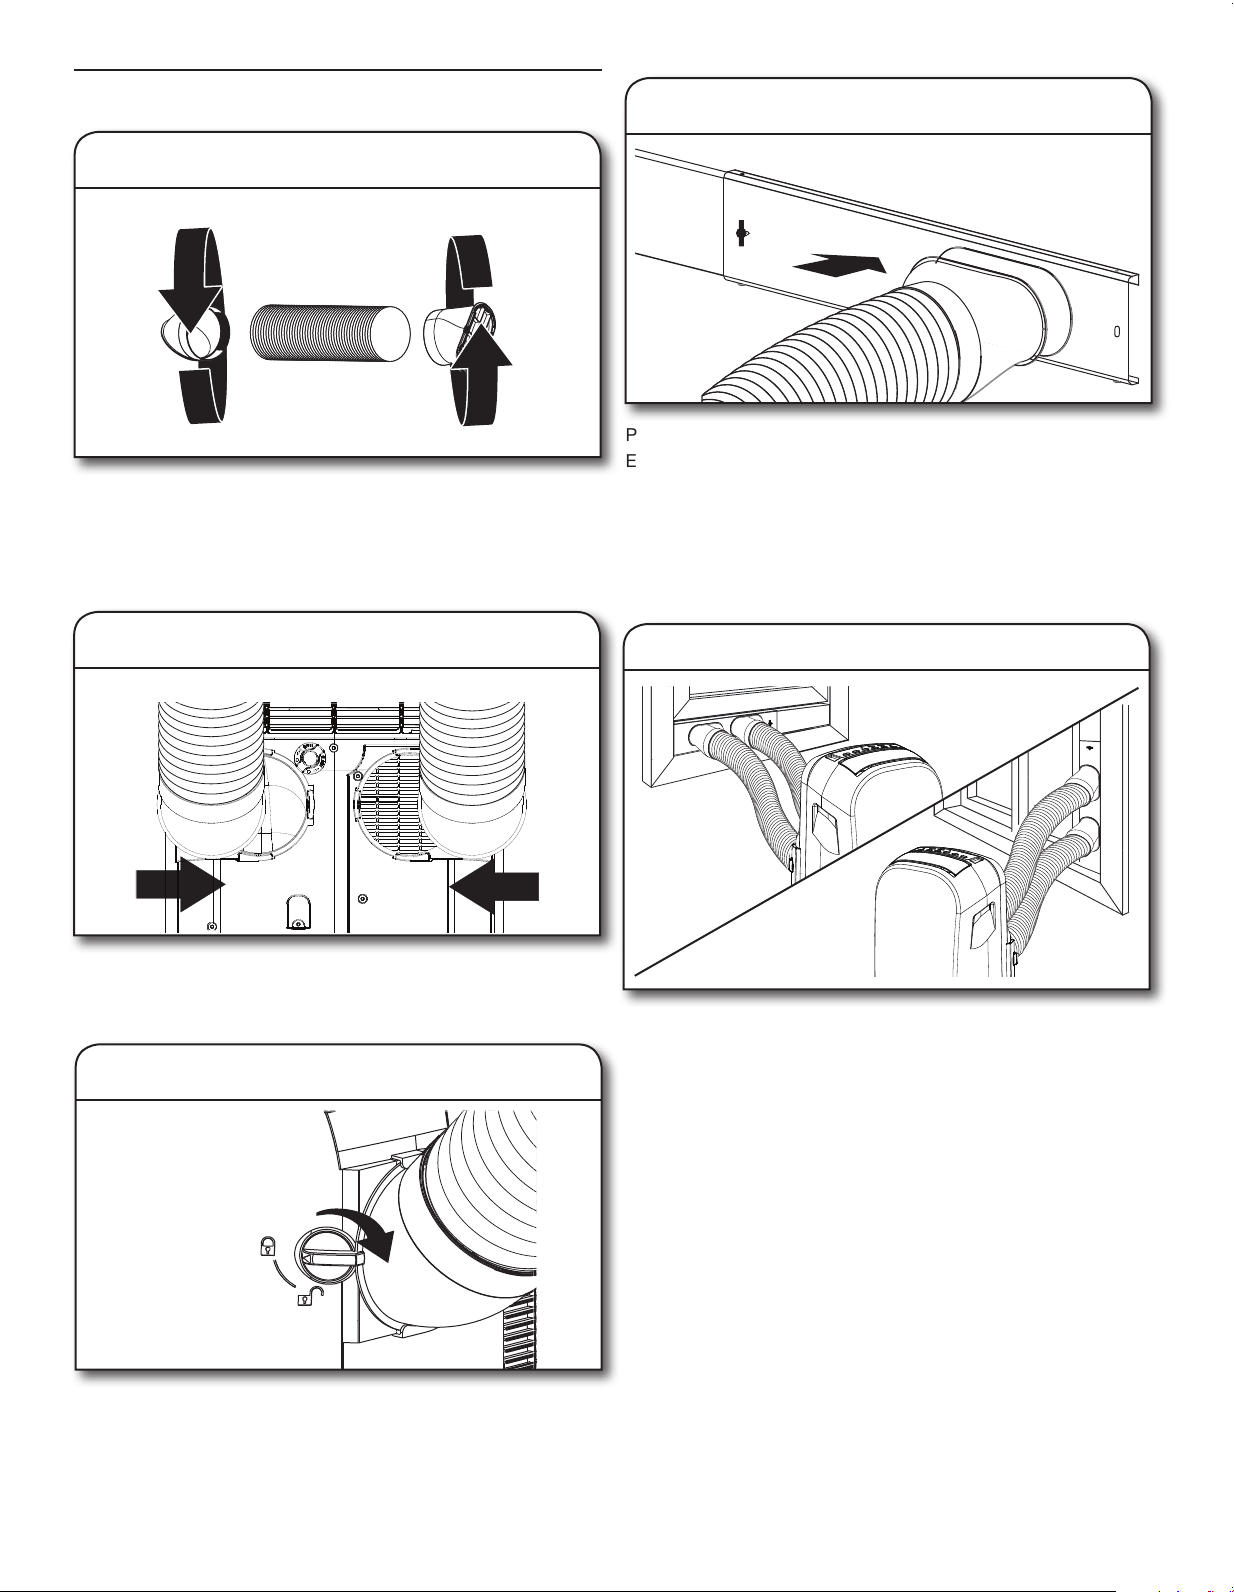
Slide the the round end of the vent hoses into the hose ports on
the air conditoner.
Dual vent model shown.
2. Attach vent hose(s) to air conditioner
Position the air conditioner in the desired location.
Extend the vent hose enough to reach from the air conditoner
to the window. Be sure there are no sharp bends or kinks in the
hose.
Press the window connector end of the vent hose into the
opening on the slider panel as shown. It will clip into place.
Single vent model shown. For dual vent models, see below for
hose placement.
4. Attach vent hose(s) to slider panel
Window connector
Slider panel
Extend both ends of the vent hose a little bit.
Thread a round connector clockwise onto one end of the vent
hose. Thread a window connector clockwise onto the other end
of the vent hose.
For dual vent models, repeat for second vent hose.
1. Assemble vent hose(s)
Vent hose
Round
connector
Window
connector
Assemble Vent Hose(s)
3. Lock vent hose(s) in place
Turn the locking knob to the LOCKED position to secure the vent
hose in place. For dual vent models, repeat for other side.
Vertical Window
Installations
Standard Window
Installations
Dual vent hose placement
95111_WHAP121-142AW_portable_UCG.indb 6 5/25/16 3:29 PM
7
Turn the drain port retainer plug counterclockwise to remove,
then pull out the rubber drain plug.
For future use, store in a safe location.
1. Remove drain tting plug
Drain Hose Connection (optional)
When using the air conditioner for dehumidication only, you may
attach a hose (not included) for water drainage into a oor drain.
The drain tting uses a standard garden hose connector. The
drain hose must be below the drain port on the back of the air
conditioner.
Thread the drain hose (not included) onto the drain tting on the
air conditioner. Insert the other end of the drain hose into a oor
drain or other suitable drain.
2. Install drain hose
TEST
RESET
TEST
RESET
1. Plug into grounded 3-prong outlet
Plug into a grounded 3-prong outlet.
Press the RESET button on the power supply cord.
See “Electrical Requirements.”
Electrical Connection
95111_WHAP121-142AW_portable_UCG.indb 7 5/25/16 3:29 PM
8
USING YOUR AIR CONDITIONER
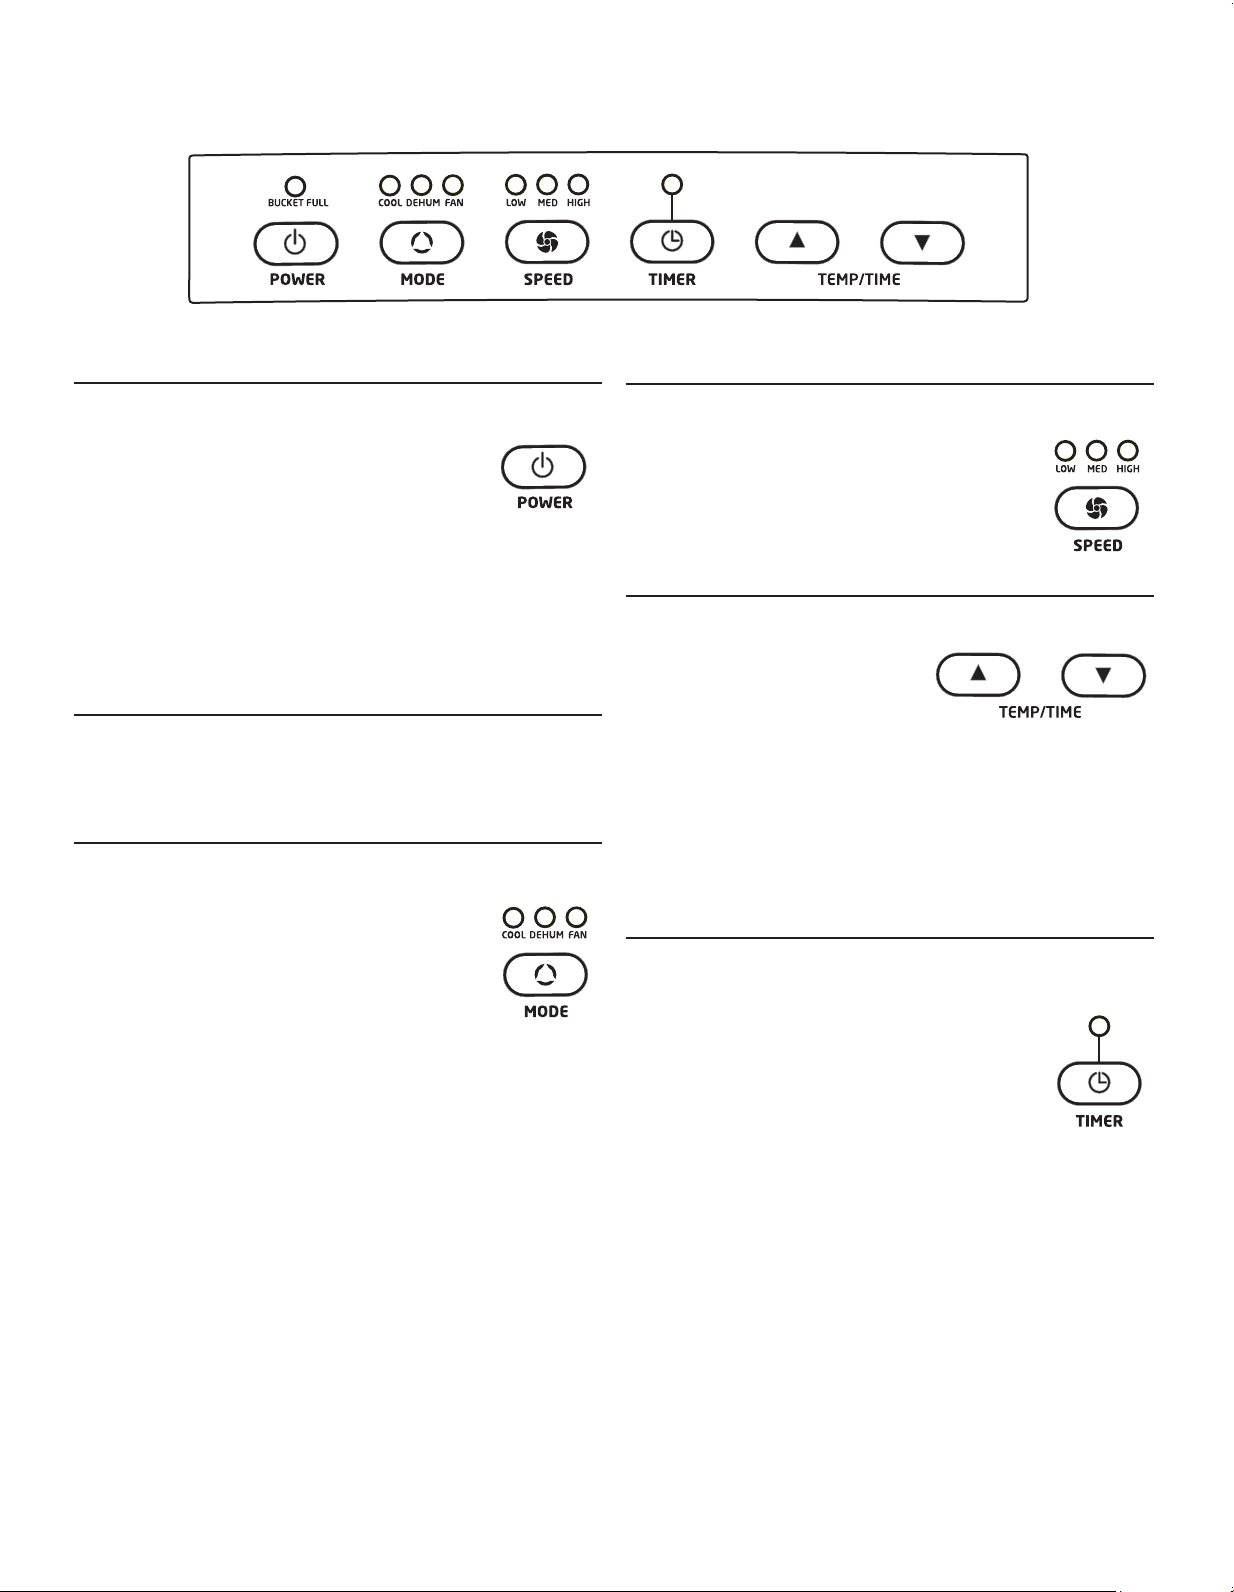
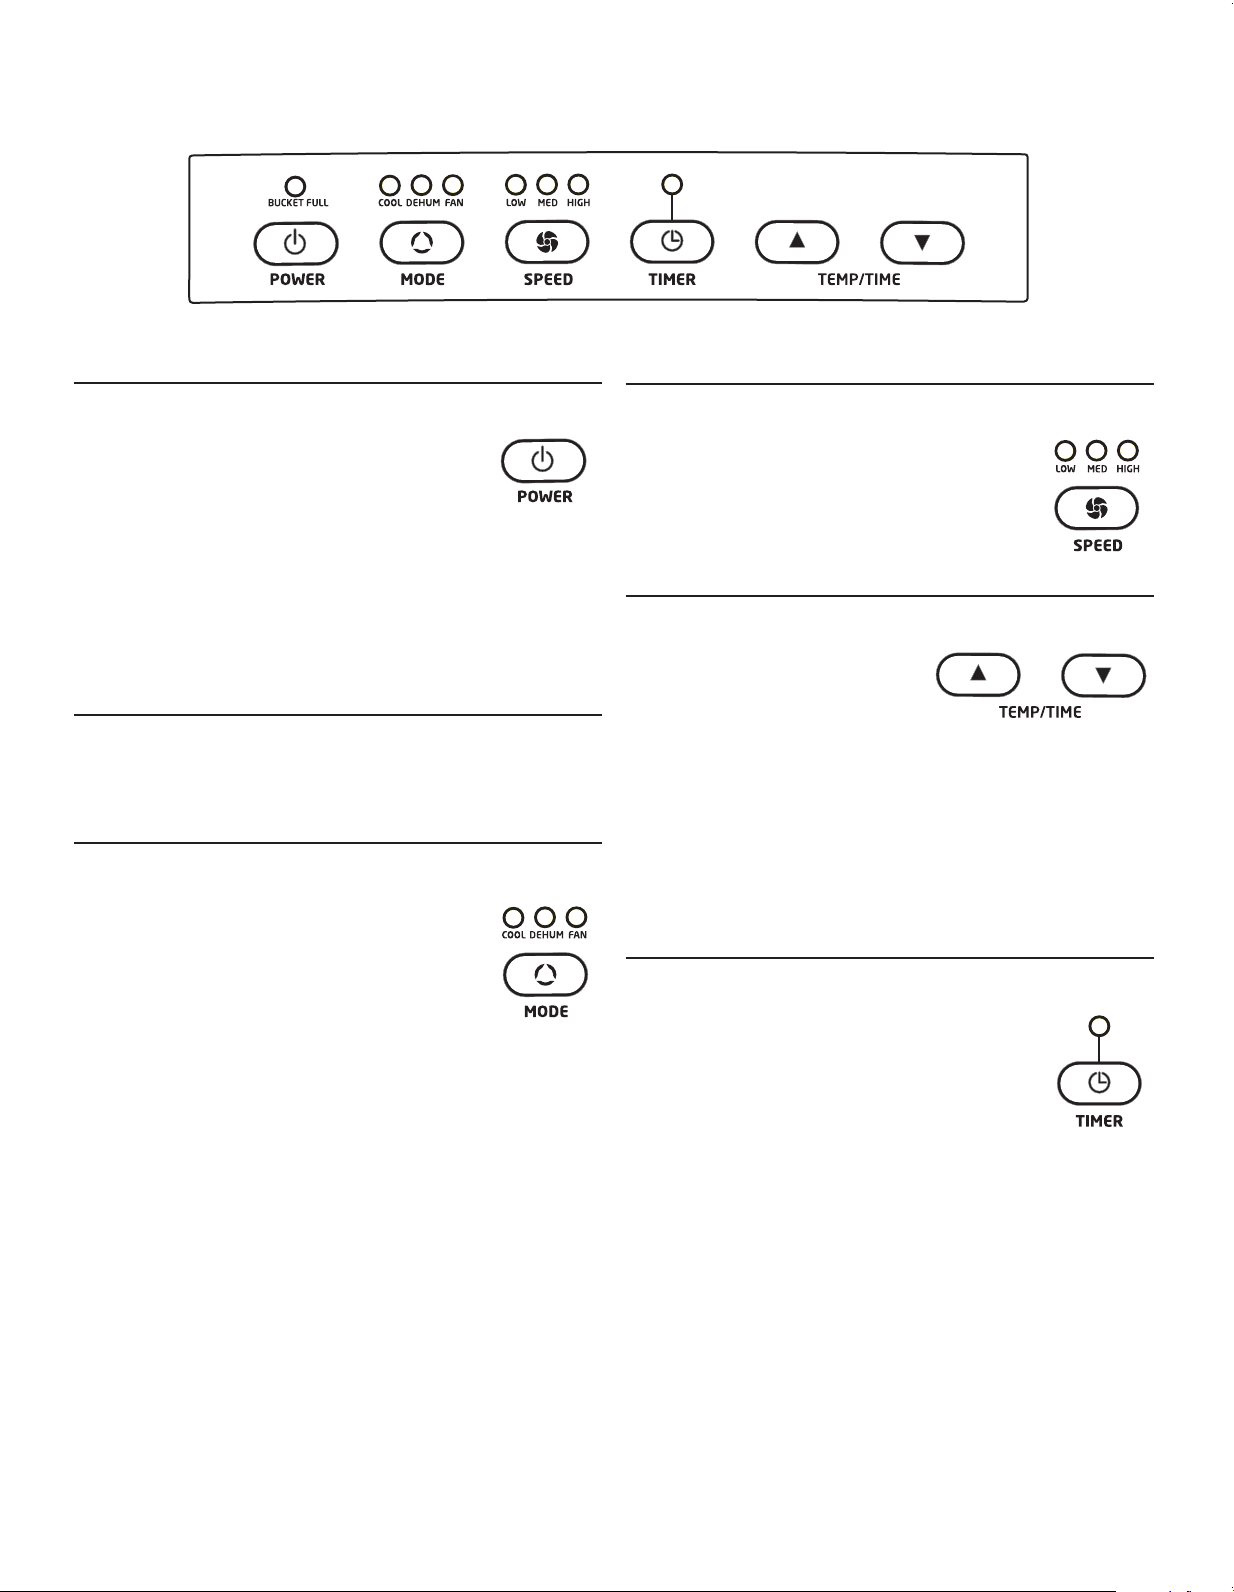
Turning the Air Conditoner ON or OFF
Press POWER to turn the air conditoner ON or OFF.
IMPORTANT:
■ If you turn off the air conditioner, wait at least 3
minutes before turning it back on. This prevents
the air conditioner from blowing a fuse or
tripping a circuit breaker.
■ Do not try to operate your air conditioner in the Cool mode
when outside temperature is below 65°F (18°C). The inside
evaporator coil will freeze up, and the air conditioner will not
operate properly.
NOTE: In the event of a power failure, your air conditioner will
operate at the previous settings when the power is restored.
Display
During normal operation display will show the current room
temperature. When the TEMP/TIME t and s buttons are
pressed, the unit will display the set temperature or delay time.
Selecting the Mode
The Mode button has three settings:
■ Cool
■ Dehumidify
■ Fan
Press the MODE button until the indicator light
above the desired setting is lit.
Cooling (COOL) Mode
In cooling mode, the air conditioner cools air from the room and
vents hot air to the outdoors through the vent hose(s). Adjust fan
speed and the temperature setting to t your desired comfort
level. Temperature-setting range is 61°F–90°F (16°C–32°C).
IMPORTANT: The vent hose(s) must exhaust to the outdoors
when using Cool mode.
Dehumidify (DEHUM) Mode
Air is dehumidied as it passes through the unit, without being in
full cooling mode. The fan will operate at medium speed.
Fan speed is not adjustable in dehumidify mode.
IMPORTANT: The vent hose(s) must exhaust to the outdoors
when using Dehumidify mode.
Fan (FAN) Mode
In this mode, only the fan will run. Air is circulated through the
room with no cooling.
NOTE: The air conditioner does not need to be vented to the
outdoors in Fan mode.
Selecting the Fan Speed
The Fan Speed has 3 settings:
■ LOW
■ Medium (MED)
■ HIGH
Press the SPEED button until the indicator light
above the desired setting is lit.
Adjusting the Temperature
Press the TEMP/TIME s and t
buttons to adjust the set temperature
up or down in 1° increments.
Temperature setting range is
61°F–90°F (16°C–32°C). After 10
seconds, the display will return to the current room temperature.
NOTE: Temperature may only be adjusted in cooling mode.
When in TIMER mode, pressing the TEMP/TIME s and t
buttons will adjust the delay time for the air condtioner to shut
off or turn on.
Switching between Fahrenheit and Celsius:
Press both s and t buttons at the same time to toggle the
displayed units between °F and °C.
Using the Timer
Auto Shut-Off
You can set the air conditoner to shut off
automatically after a set number of hours, up to 24
hours.
To set Auto Shut-Off:
1. With the air conditioner in fan mode, press
TIMER.
2. Use the TEMP/TIME s and t buttons select number of
hours, up to 24 hours.
3. After the set time, the air conditioner will turn off automatically.
Auto Start
You can set the air conditioner with the TIMER to start
automatically after a set number of hours.
1. With the air conditoner OFF, press TIMER.
2. Use the TEMP/TIME s and t buttons to select the number
of hours before the air conditioner should turn on, up to 24
hours. The TIMER indicator light will remain lit to let you know
the timer is set.
3. After the set time, the air conditioner will start automatically in
Cool mode with the last temperature and fan settings used.
Appearance may vary.
95111_WHAP121-142AW_portable_UCG.indb 8 5/25/16 3:29 PM
9
Other Functions
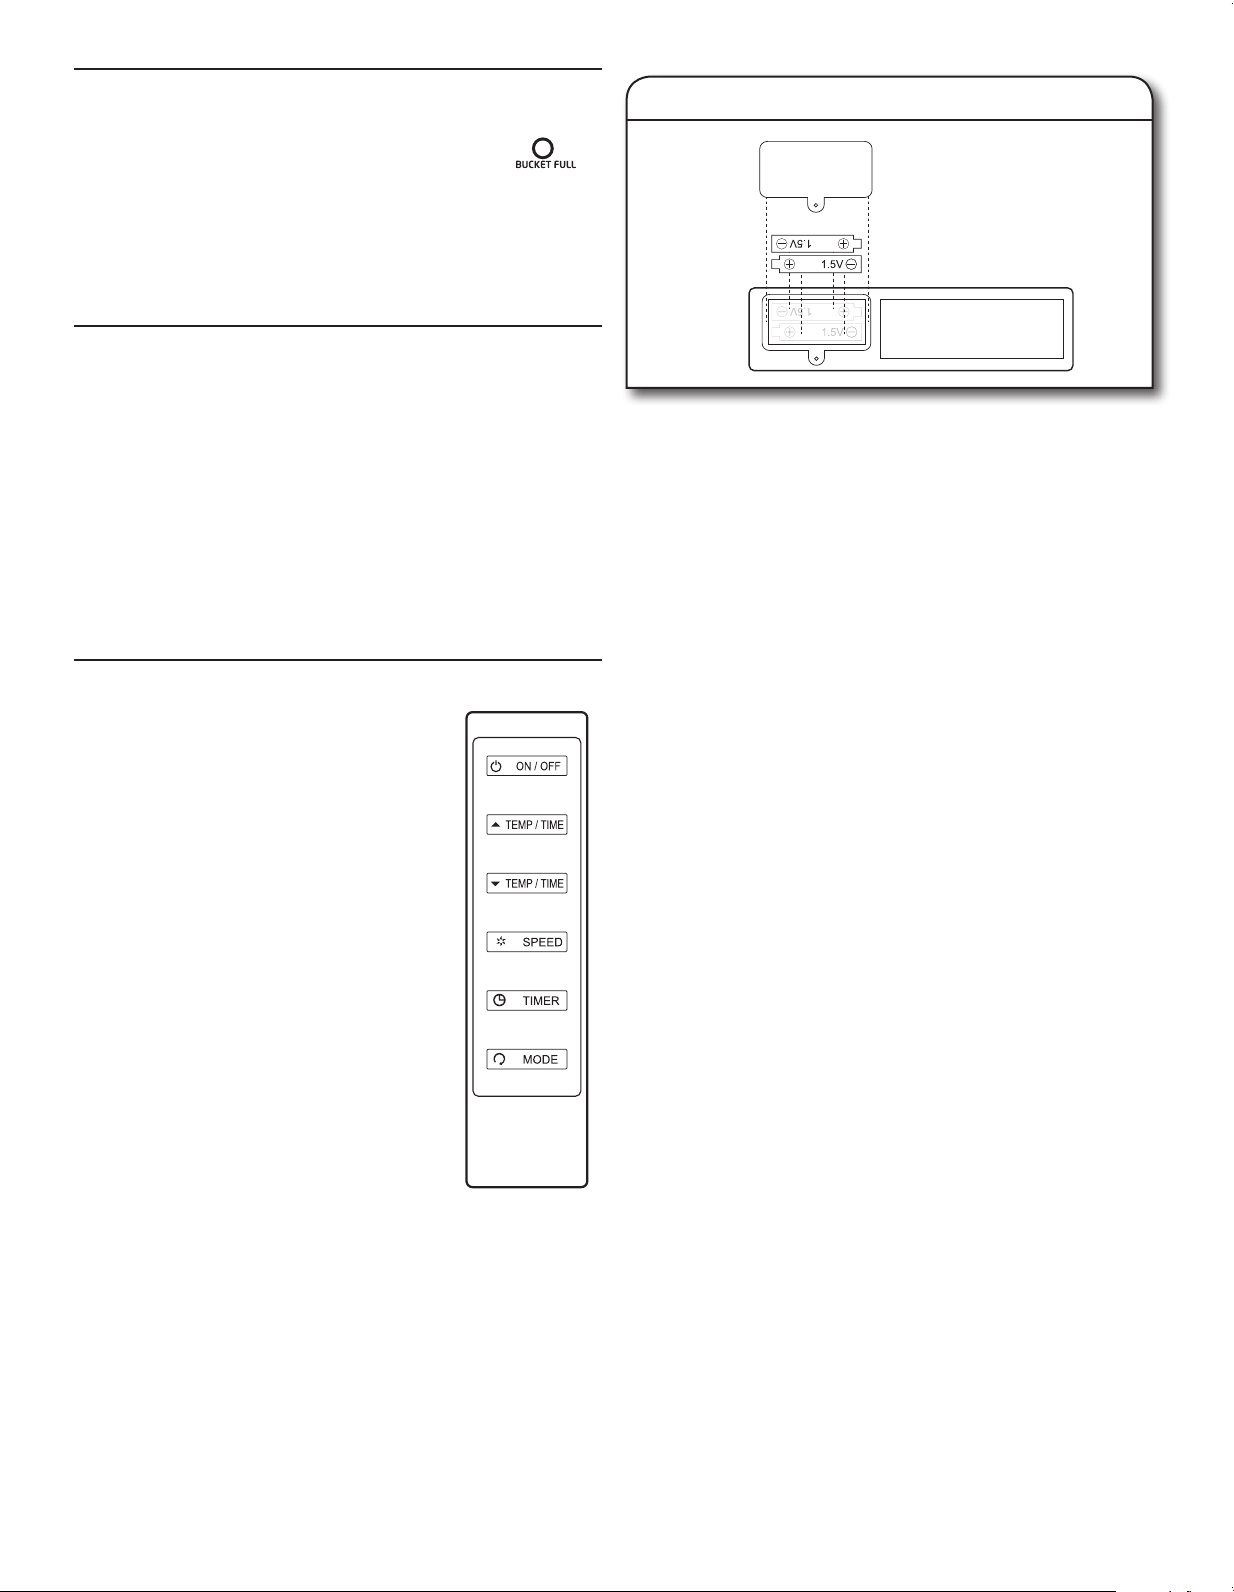
BUCKET FULL Indicator
This air conditioner has an internal tank to hold
accumulated water from the condenser. Normally,
this water is evaporated and exhausted to the outside. However,
in periods of high humidity, the internal tank may become full.
If this happens, the “Bucket Full” indicator will be lit and the air
conditioner will turn off until the internal tank is emptied. See
“Care and Cleaning”.
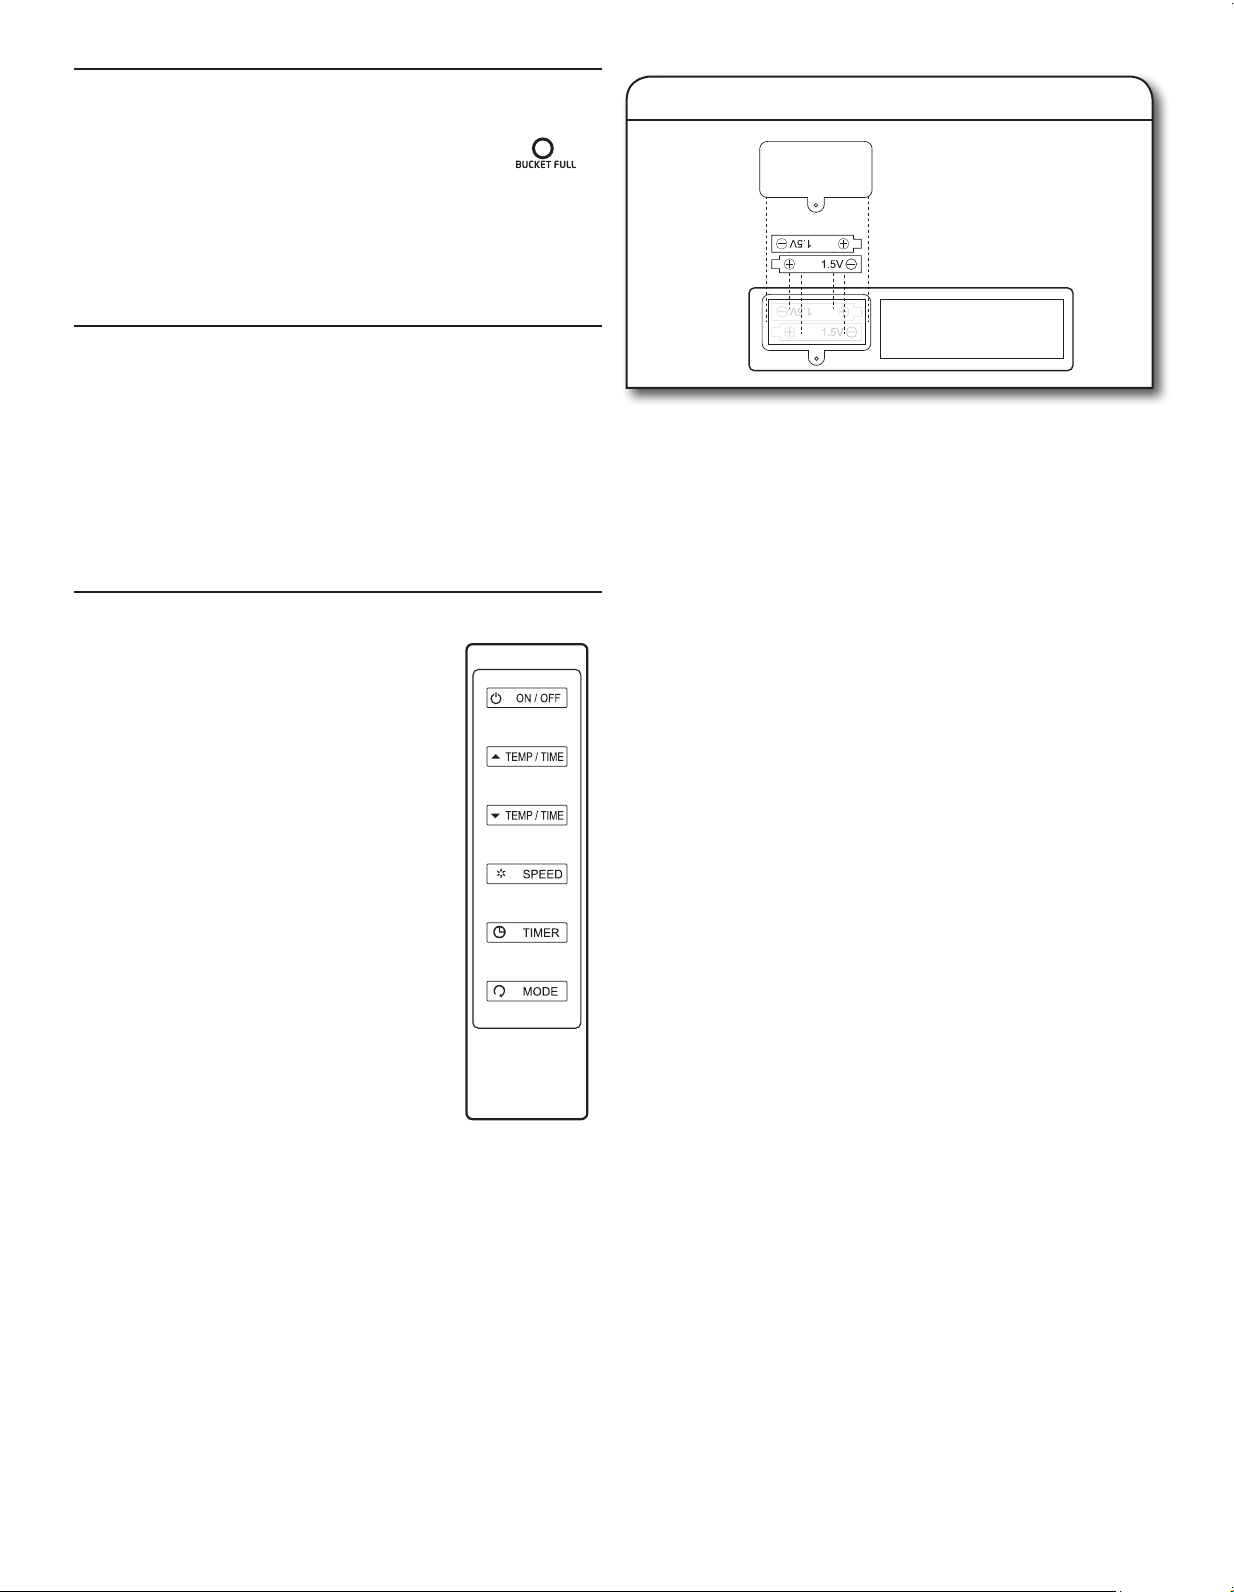
Using the Remote Control
The functions on the remote control operate
the same way as the touch controls on the air
conditioner control panel.
NOTE:
■ Do not drop the remote control; it may damage the remote
control.
■ Remove the batteries if the remote control is not used for a
month or longer.
■ Dispose of used batteries responsibly.
NOTE: The remote uses two AAA 1.5V batteries (included).
Replace batteries after approximately 6 months of use.
To remove the batteries:
Remove the battery compartment cover and remove the
batteries.
To reinstall the batteries:
Place the batteries into the battery compartment as shown, then
reinstall the cover.
Replacing the batteries in the remote
Normal Operating Sounds
When your air conditioner is operating normally, you may hear
sounds such as:
■ Droplets of water hitting the condenser, causing a pinging or
clicking sound. The water droplets help cool the condenser.
■ Air movement from the fan.
■ Clicks from the thermostat cycle.
■ Vibrations or noise due to poor wall or window construction.
■ A high-pitched hum or pulsating noise caused by the modern
high-efciency compressor cycling on and off.
NOTE: Remote control
may vary in appearance.
95111_WHAP121-142AW_portable_UCG.indb 9 5/25/16 3:29 PM
10
Your new air conditioner is designed to give you many years of
dependable service. This section tells you how to clean and care
for your air conditioner properly.
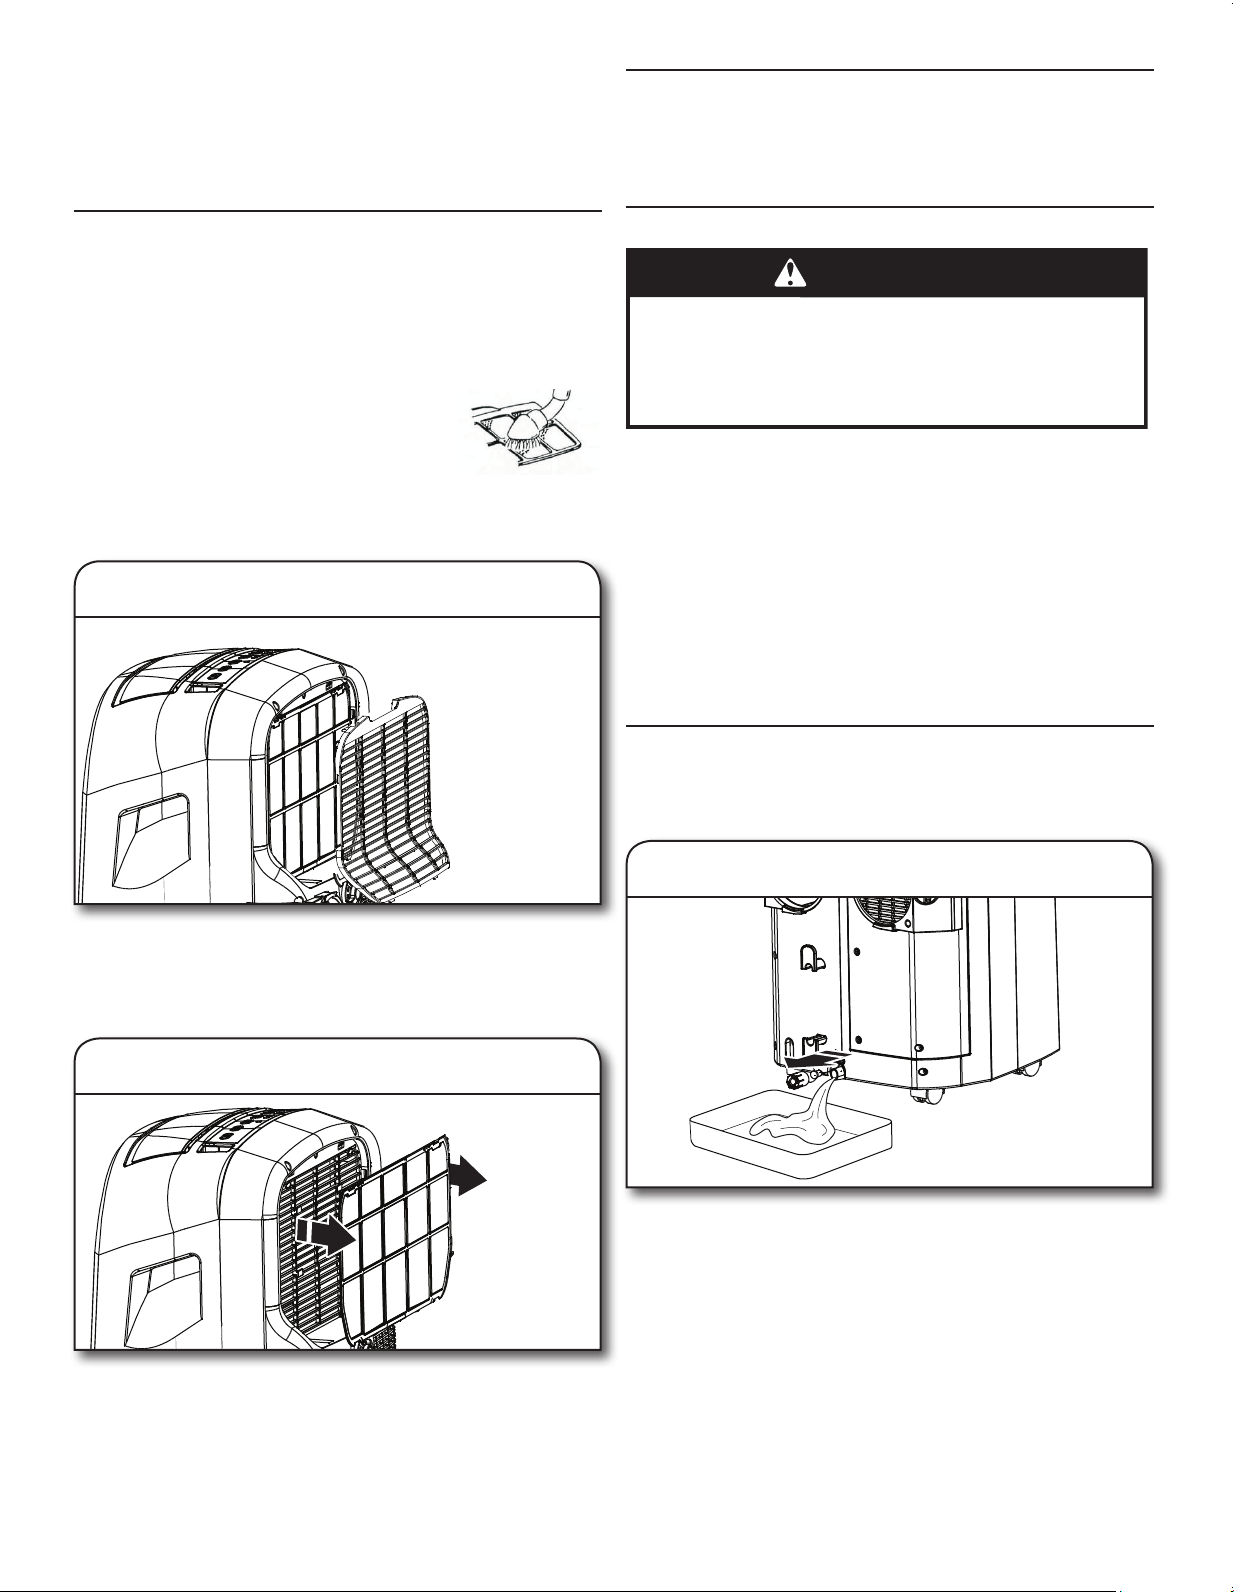
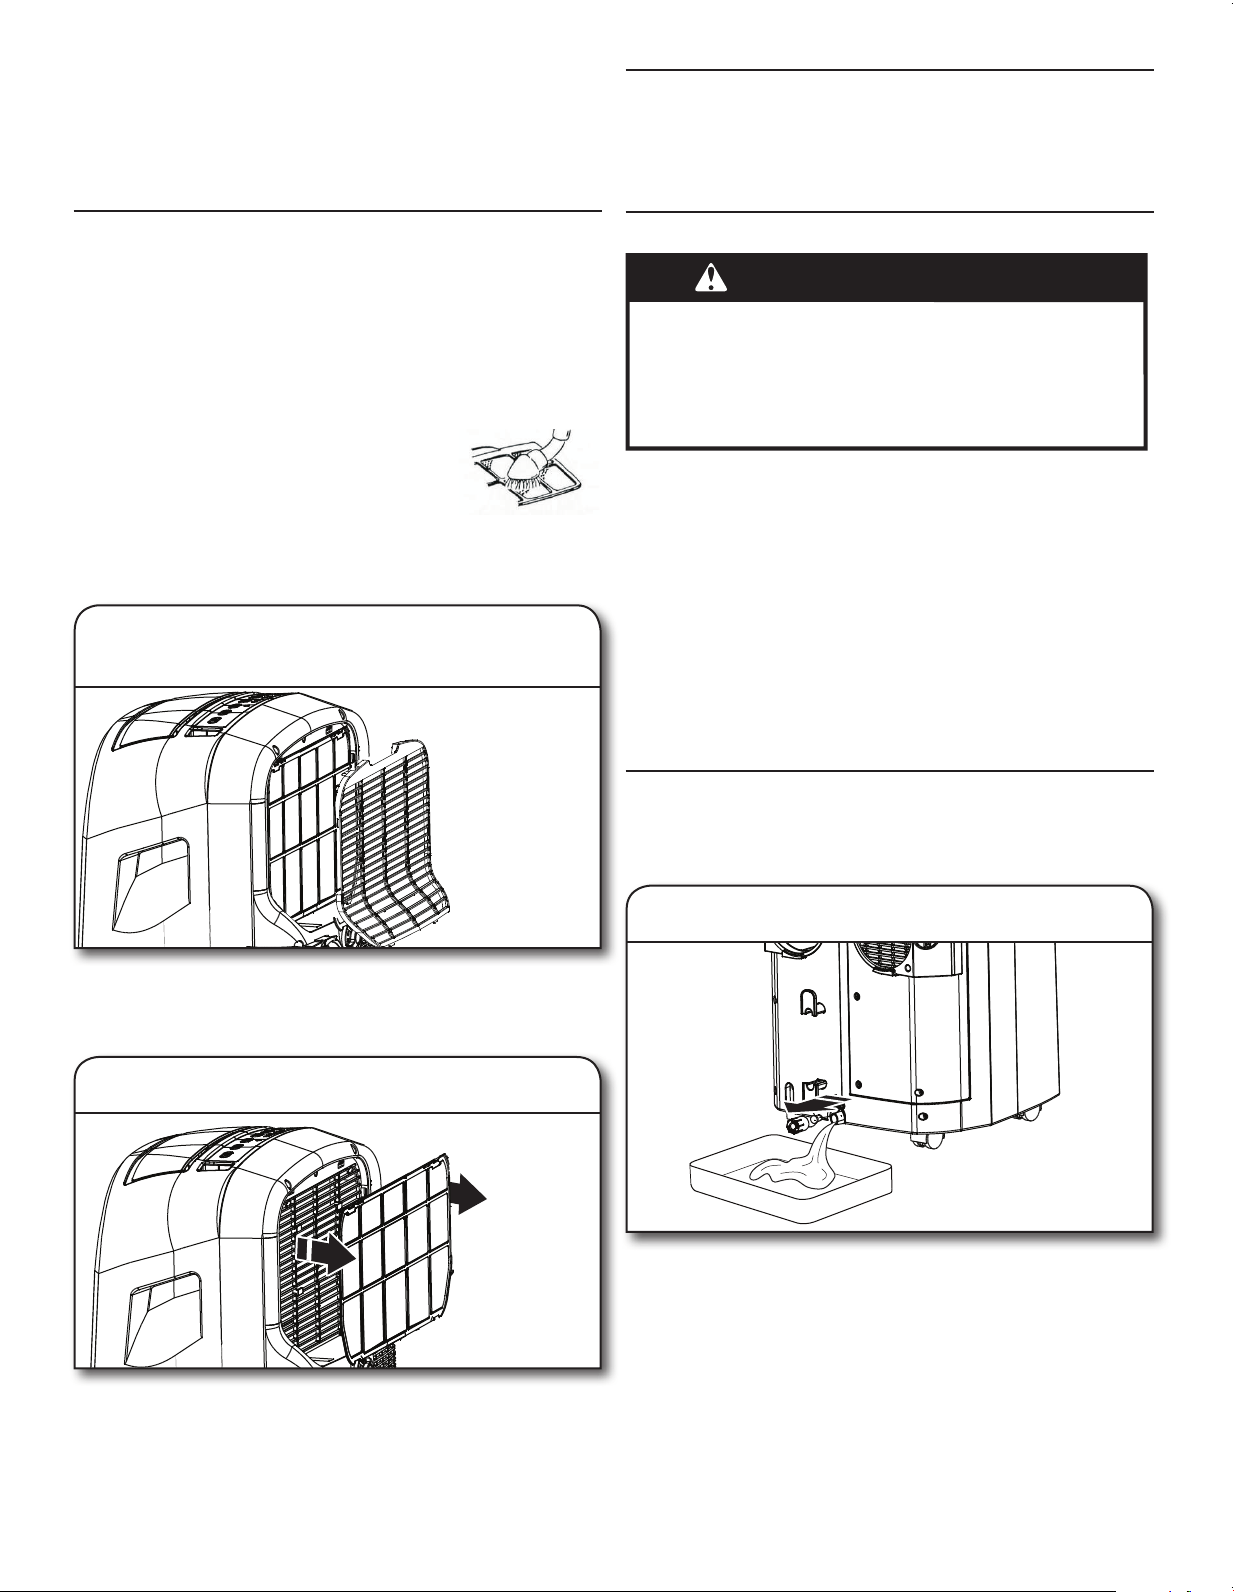
Pull the air lter straight out of the air conditioner.
Reinstalling the air filter:
1. Reinstall the air lter in the air conditioner.
2. Insert the tabs on the bottom of the air intake cover into the
slots on the air conditioner, then press the top into place until
it clicks to lock.
CARE AND CLEANING
1. Removing the air intake cover
1. Turn off the air conditioner.
2. Remove the air intake cover by pulling the top of the cover
away from the air conditioner, then lifting the bottom tabs out
of the slots on the air conditioner.
2. Removing the air lter
Cleaning the Air Conditioner Cabinet
1. Turn off the air conditioner.
2. Wipe the air conditioner cabinet with a soft, damp cloth.
3. Wipe dry with soft cloth.
Cleaning the Air Filter
The air lter is removable for easy cleaning. A clean lter helps
remove dust, lint, and other particles from the air and is important
for best cooling and operating efciency. Check the lter every 2
weeks to see whether it needs cleaning.
NOTE: For best performance, do not operate the air conditioner
without the lter in place.
Use a vacuum cleaner to clean air lter. If the
air lter is very dirty, wash it in warm water with
a mild detergent.
NOTE: Do not wash the air lter in the
dishwasher or use any chemical cleaners; it
may damage the lter. Air dry the air lter completely before
replacing to ensure maximum efciency.
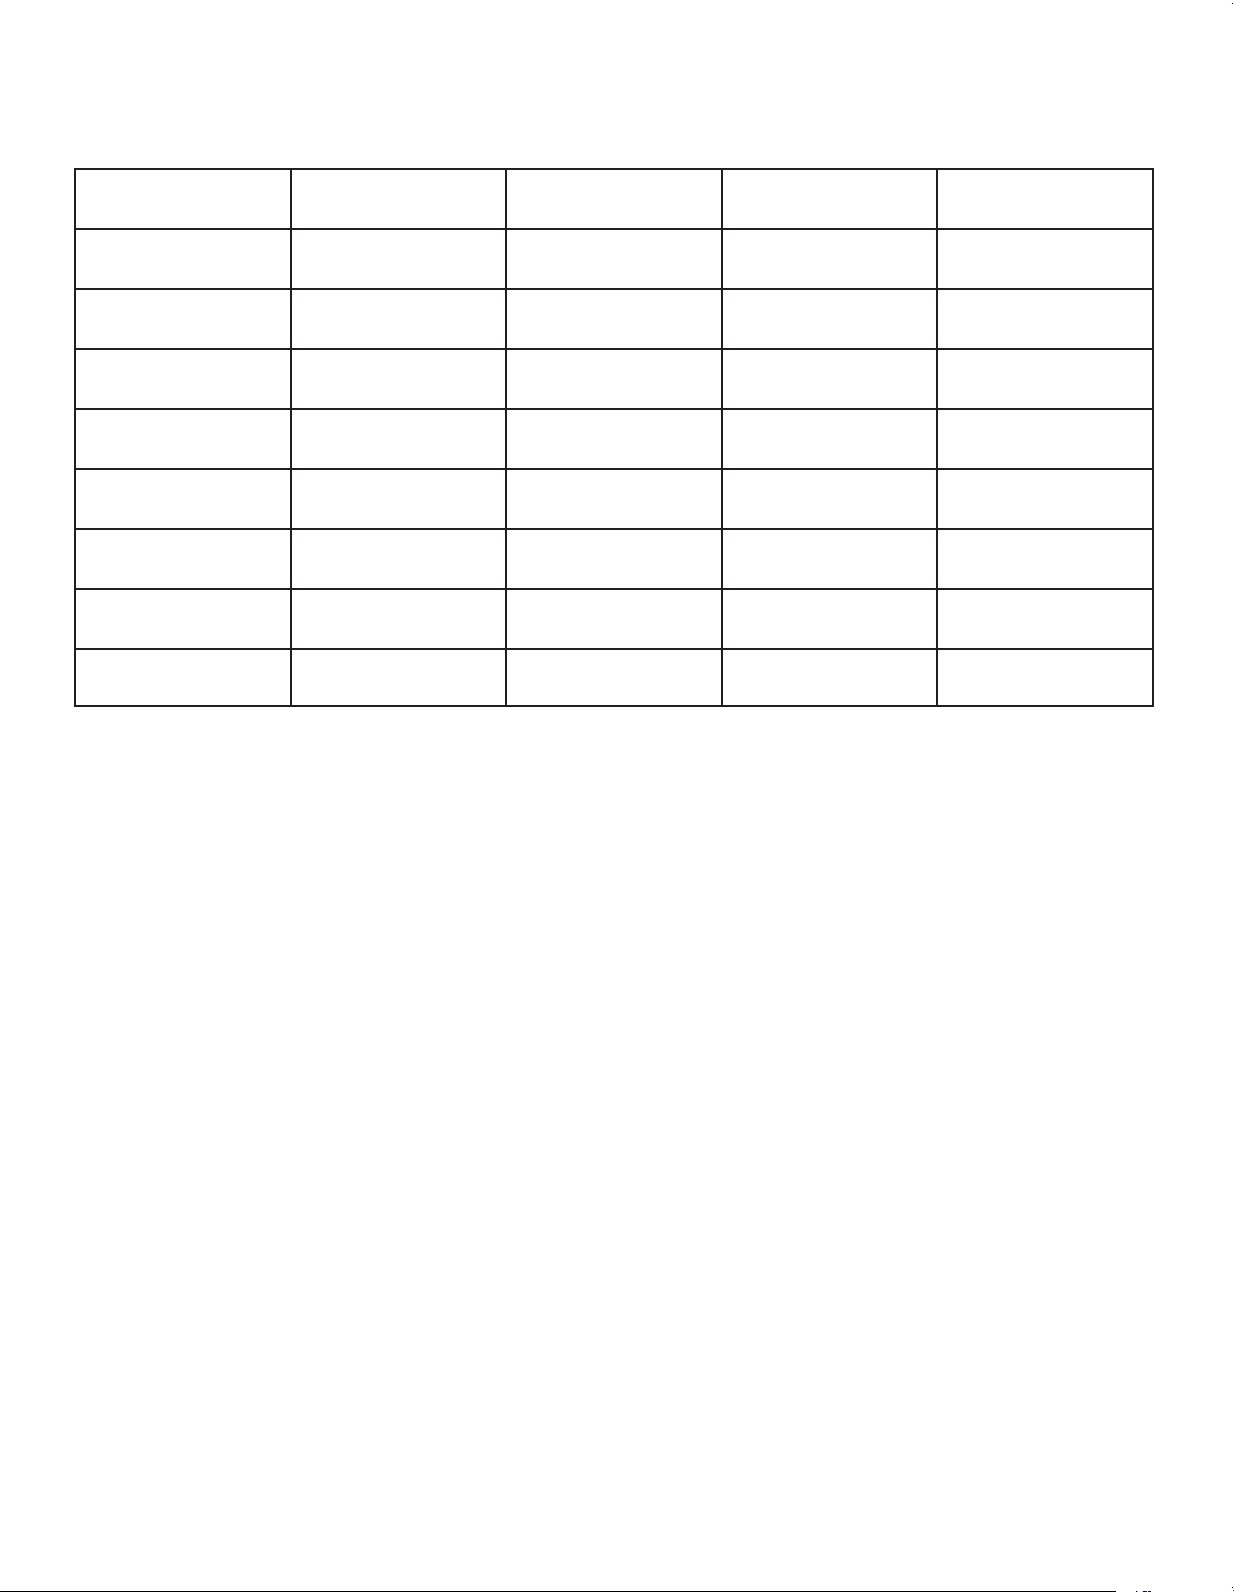
Draining the Internal Tank
If the air conditioner turns off and the “Bucket Full” indicator is
lit, it is necessary to drain the internal tank before using the air
conditoner again.
1. Draining the internal tank
1. Turn off and unplug the air conditioner.
2. Place a pan or small bucket under the drain.
3. Remove the drain plug retainer by turning it counterclockwise.
4. Pull out the rubber drain plug.
5. Allow water to drain into pan or bucket.
6. Reinstall the rubber drain plug by pressing rmly into place.
7. Thread drain plug retainer clockwise onto drain, then tighten
hand tight.
Storing the Air Conditioner
If the air conditioner will not be used for an extended period of
time, prepare it for storage with the following steps.
1. Run the air coditioner in Fan mode for a few hours to dry any
moisture from the coils.
2. Turn off the air conditioner and unplug it. Remove the
batteries from the remote.
3. Remove the drain plug from the internal tank to remove and
drain any remaining water from the tank. See “Draining the
Internal Tank”.
4. Remove, clean, and reinstall the air lter.
5. Remove the air hoses and window slider panel and store them
in a safe place.
WARNING
Excessive Weight Hazard
Use two or more people to move and install
air conditioner.
Failure to do so can result in back or other injury.
95111_WHAP121-142AW_portable_UCG.indb 10 5/25/16 3:29 PM

11
■ The power supply cord is unplugged. Plug into a grounded
3-prong outlet. See “Electrical Requirements. ”
■ The power supply cord has tripped (Reset button has popped
out). Press and release RESET to resume operation.
■ A household fuse has blown, or circuit breaker has tripped.
Replace the fuse or reset the circuit breaker. If the problem
continues, call an electrician. See “Electrical Requirements. ”
■ The Power button has not been pressed. Press POWER.
■ The local power has failed. Wait for power to be restored.
■ The internal water tank is full. If the “Bucket Full” indicator is
lit, empty the internal tank. See “Draining the Internal Tank”.
Air conditioner blows fuses or trips
circuit breakers
■ Too many appliances are being used on the same circuit.
Unplug or relocate appliances that share the same circuit.
■ Time-delay fuse or circuit breaker of the wrong capacity is
being used. Replace with a time-delay fuse or circuit breaker
of the correct capacity. See “Electrical Requirements.”
■ You are trying to restart the air conditioner too soon after
turning off the air conditioner. Wait at least 3 minutes after
turning off the air conditioner before trying to restart the air
conditioner.
Air conditioner power supply cord trips
(Reset button pops out)
■ Disturbances in your electrical current can trip (Reset button
will pop out) the power supply cord. Press and release RESET
to resume operation.
■ Electrical overload, overheating, a pinched cord, or aging can
trip the power supply cord (Reset button will pop out). After
correcting the problem, press and release RESET to resume
operation.
NOTE: A damaged power supply cord must be replaced with a
new power supply cord obtained from the product manufacturer
and must not be repaired.
Air conditioner will not operate
TROUBLESHOOTING
Before calling for service, try the suggestions below to see whether you can solve your problem without outside help.
Air conditioner seems to run too much
■ The current air conditioner replaced an older model. The use
of more efcient components may cause the air conditioner
to run longer than an older model, but the total energy
consumption will be less. Newer air conditioners do not emit
the “blast” of cold air you may be accustomed to from older
air conditioners, but this is not an indication of lesser cooling
capacity or efciency. Refer to the efciency rating (EER) and
capacity rating (in BTU/h) marked on the air conditioner.
■ The air conditioner is in a heavily occupied room, or heat-
producing appliances are in use in the room. Use exhaust
vent fans while cooking or bathing and try not to use heat-
producing appliances during the hottest part of the day. A
higher-capacity air conditioner may be required, depending on
the size of the room being cooled.
Air conditioner cycles on and off too
much or does not cool room in cooling
mode
■ The air conditioner is not properly sized for your room. Check
the cooling capabilities of your room air conditioner. Room air
conditioners are not designed to cool multiple rooms.
■ The lter is dirty or obstructed by debris. Clean the lter.
■ There is excessive heat or moisture (open container cooking,
showers, etc.) in the room. Use a fan to exhaust heat or
moisture from the room. Try not to use heat-producing
appliances during the hottest part of the day.
■ The air intakes are blocked. Install the air conditioner in a
location where the louvers are free from curtains, blinds,
furniture, etc.
■ The temperature of the room you are trying to cool is
extremely hot. Allow extra time for the air conditioner to cool
off a very hot room.
■ Windows or doors to the outside are open. Close all windows
and doors.
■ The temperature setting is not set to a cool enough setting.
Adjust the temperature to a cooler setting by pressing the
minus button to reduce the temperature. Set the Fan Speed
control to the highest setting.
Error codes in display
■ If E1 or or E2 appears in the display, call for service.
95111_WHAP121-142AW_portable_UCG.indb 11 5/25/16 3:29 PM
12
SPECIFICATIONS
Model WHAP121AW WHAP141AW WHAP122AW WHAP142AW
Voltage/Frequency 115 VAC/60Hz 115 VAC/60Hz 115 VAC/60Hz 115 VAC/60Hz
Current/Amperage 9.5 A 11.4 A 9.5 A 11.4 A
Cooling Capacity
(BTUs/hour)
12,000 14,000 12,000 14,000
Vent Type Single Single Dual Dual
Coolant Type R410A R410A R410A R410A
Timer 24-hour 24-hour 24-hour 24-hour
Dimensions
W x D x H
17.9" x 15.6" x 39.3"
455 x 395 x 745 mm
17.9" x 15.6" x 39.3"
455 x 395 x 745 mm
17.9" x 15.6" x 39.3"
455 x 395 x 745 mm
17.9" x 15.6" x 39.3"
455 x 395 x 745 mm
Weight
71.4 lbs.
32.4 kg
73.2 lbs.
33.2
kg
72.8 lbs.
33.0 kg
74.5 lbs.
33.8 kg
95111_WHAP121-142AW_portable_UCG.indb 12 5/25/16 3:29 PM

13
Before calling for assistance or service, please check
“Troubleshooting.” It may save you the cost of a service call. If
you still need help, follow the instructions below.
When calling, please know the purchase date and the complete
model and serial number of your appliance. This information will
help us to better respond to your request.
Call XLS Products Customer Service toll-free:
1-800-207-1156.
Our consultants provide assistance with:
■ Features and specications on our full line of appliances.
■ Installation information.
■ Use and maintenance procedures.
■ Accessory and repair parts.
■ Specialized customer assistance.
■ Referrals to local dealers, repair parts distributors and
service companies. XLS Products designated service
technicians are trained to fulll the product warranty and
provide after-warranty service, anywhere in the United States.
For further assistance:
If you need further assistance, you can write to XLS Products
with any questions or concerns at:
XLS Products, Inc.
Customer Service
P.O. Box 16262
Philadelphia, PA 19114-0262
Please include a daytime phone number in your correspondence.
Call the XLS Products Customer Service toll-free:
1-800-207-1156.
Our consultants provide assistance with:
■ Features and specications on our full line of appliances.
■ Use and maintenance procedures.
■ Accessory and repair parts.
■ Referrals to local dealers, repair parts distributors, and
service companies. XLS Products designated service
technicians are trained to fulll the product warranty
and provide after-warranty service, anywhere in Canada.
For further assistance:
If you need further assistance, you can write to XLS Products
with any questions or concerns at:
XLS Products, Inc.
Customer Service
P.O. Box 16262
Philadelphia, PA 19114-0262
Please include a daytime phone number in your correspondence.
ASSISTANCE OR SERVICE
In the USA
In Canada
95111_WHAP121-142AW_portable_UCG.indb 13 5/25/16 3:29 PM

14
XLS PRODUCTS WARRANTY FOR WHIRLPOOL
®
AIR
CONDITIONERS
ONE YEAR LIMITED WARRANTY
For one year from the date of purchase, when this product is operated and maintained according to instructions attached to
or furnished with the product, XLS Products will pay for replacement parts and repair labor to correct defects in materials or
workmanship or replace the product at our discretion. Service must be provided by a XLS Products designated service company.
This warranty does not cover the air lter.
ITEMS XLS PRODUCTS WILL NOT PAY FOR
1. Service calls to correct the installation of your product, instruct you how to use your product, to replace house fuses or reset circuit
breakers, replace or clean lters, or correct house wiring.
2. Service calls to repair or replace air lters. Those consumable parts are excluded from warranty coverage.
3. Repairs when your product is used for other than normal, single-family household use.
4. Damage resulting from accident, alteration, misuse, abuse, re, ood, acts of God, improper installation, installation not in
accordance with electrical or plumbing codes, or use of products not approved by XLS Products.
5. Replacement parts or repair labor costs for units operated outside the United States or Canada.
6. Pickup and delivery. This product is designed to be repaired in the home.
7. Repairs to parts or systems resulting from unauthorized modications made to the appliance.
8. Expenses for travel and transportation for product service in remote locations.
9. The removal and reinstallation of your appliance if it is installed in an inaccessible location or is not installed in accordance with
published installation instructions.
DISCLAIMER OF IMPLIED WARRANTIES; LIMITATION OF REMEDIES
CUSTOMER’S SOLE AND EXCLUSIVE REMEDY UNDER THIS LIMITED WARRANTY SHALL BE PRODUCT REPAIR AS PROVIDED
HEREIN. IMPLIED WARRANTIES, INCLUDING WARRANTIES OF MERCHANTABILITY OR FITNESS FOR A PARTICULAR PURPOSE,
ARE LIMITED TO ONE YEAR OR THE SHORTEST PERIOD ALLOWED BY LAW. XLS PRODUCTS SHALL NOT BE LIABLE FOR
INCIDENTAL OR CONSEQUENTIAL DAMAGES. SOME STATES AND PROVINCES DO NOT ALLOW THE EXCLUSION OR
LIMITATION OF INCIDENTAL OR CONSEQUENTIAL DAMAGES, OR LIMITATIONS ON THE DURATION OF IMPLIED WARRANTIES OF
MERCHANTABILITY OR FITNESS, SO THESE EXCLUSIONS OR LIMITATIONS MAY NOT APPLY TO YOU. THIS WARRANTY GIVES
YOU SPECIFIC LEGAL RIGHTS AND YOU MAY ALSO HAVE OTHER RIGHTS, WHICH VARY, FROM STATE TO STATE OR PROVINCE
TO PROVINCE.
Outside the 50 United States and Canada, this warranty does not apply. Contact your authorized XLS Products dealer to determine if
another warranty applies.
If you need service, rst see the “Troubleshooting” section of the Use & Care Guide. After checking “Troubleshooting,” additional help
can be found by checking the “Assistance or Service” section or by calling XLS Products. In the U.S.A., call 1-800-207-1156.
In Canada, call 1-800-207-1156.
Keep this book and your sales slip together for future reference.
You must provide proof of purchase or installation date for in-
warranty service.
Write down the following information about your air conditioner
to better help you obtain assistance or service if you ever need
it. You will need to know your complete model number and serial
number. You can nd this information on the model and serial
number label located on the product.
Dealer name _____________________________________________
Address _________________________________________________
Phone number ___________________________________________
Model number ___________________________________________
Serial number ____________________________________________
Purchase date ___________________________________________
®/™ ©2016 Whirlpool. All rights reserved. Manufactured under license by XLS Products, Pennsylvania.
Limited warranty provided by XLS Products.
95111_WHAP121-142AW_portable_UCG.indb 14 5/25/16 3:29 PM
15
SÉCURITÉ DU CLIMATISEUR
Risque possible de décès ou de blessure grave si
Risque possible de décès ou de blessure grave
si vous ne suivez pas les instructions.
Tous les messages de sécurité vous diront quel est le danger potentiel et vous disent comment réduire le risque de
Votre sécurité et celle des autres est très importante.
Nous donnons de nombreux messages de sécurité importants dans ce manuel et sur votre appareil ménager.
Ce symbole d’alerte de sécurité vous signale les dangers potentiels de décès et de blessures graves
Tous les messages de sécurité suivront le symbole d’alerte de sécurité et le mot “DANGER” ou
“AVERTISSEMENT”. Ces mots signifient :
DANGER
AVERTISSEMENT
Assurez-vous de toujours lire tous les messages de sécurité et de vous y conformer.
à vous et à d’autres.
Voici le symbole d’alerte de sécurité.
vous ne suivez pas immédiatement les instructions.
blessure et ce qui peut se produire en cas de non-respect des instructions.
IMPORTANTES INSTRUCTIONS DE SÉCURITÉ
AVERTISSEMENT :
Pour réduire les risques d'incendie, de choc électrique ou des blessures lors de l'utilisation du
climatiseur, prendre quelques précautions fondamentales, y compris les suivantes :
CONSERVEZ CES INSTRUCTIONS
Débrancher le climatiseur avant l'entretien.
Utiliser deux ou plus de personnes pour déplacer et
installer le climatiseur.
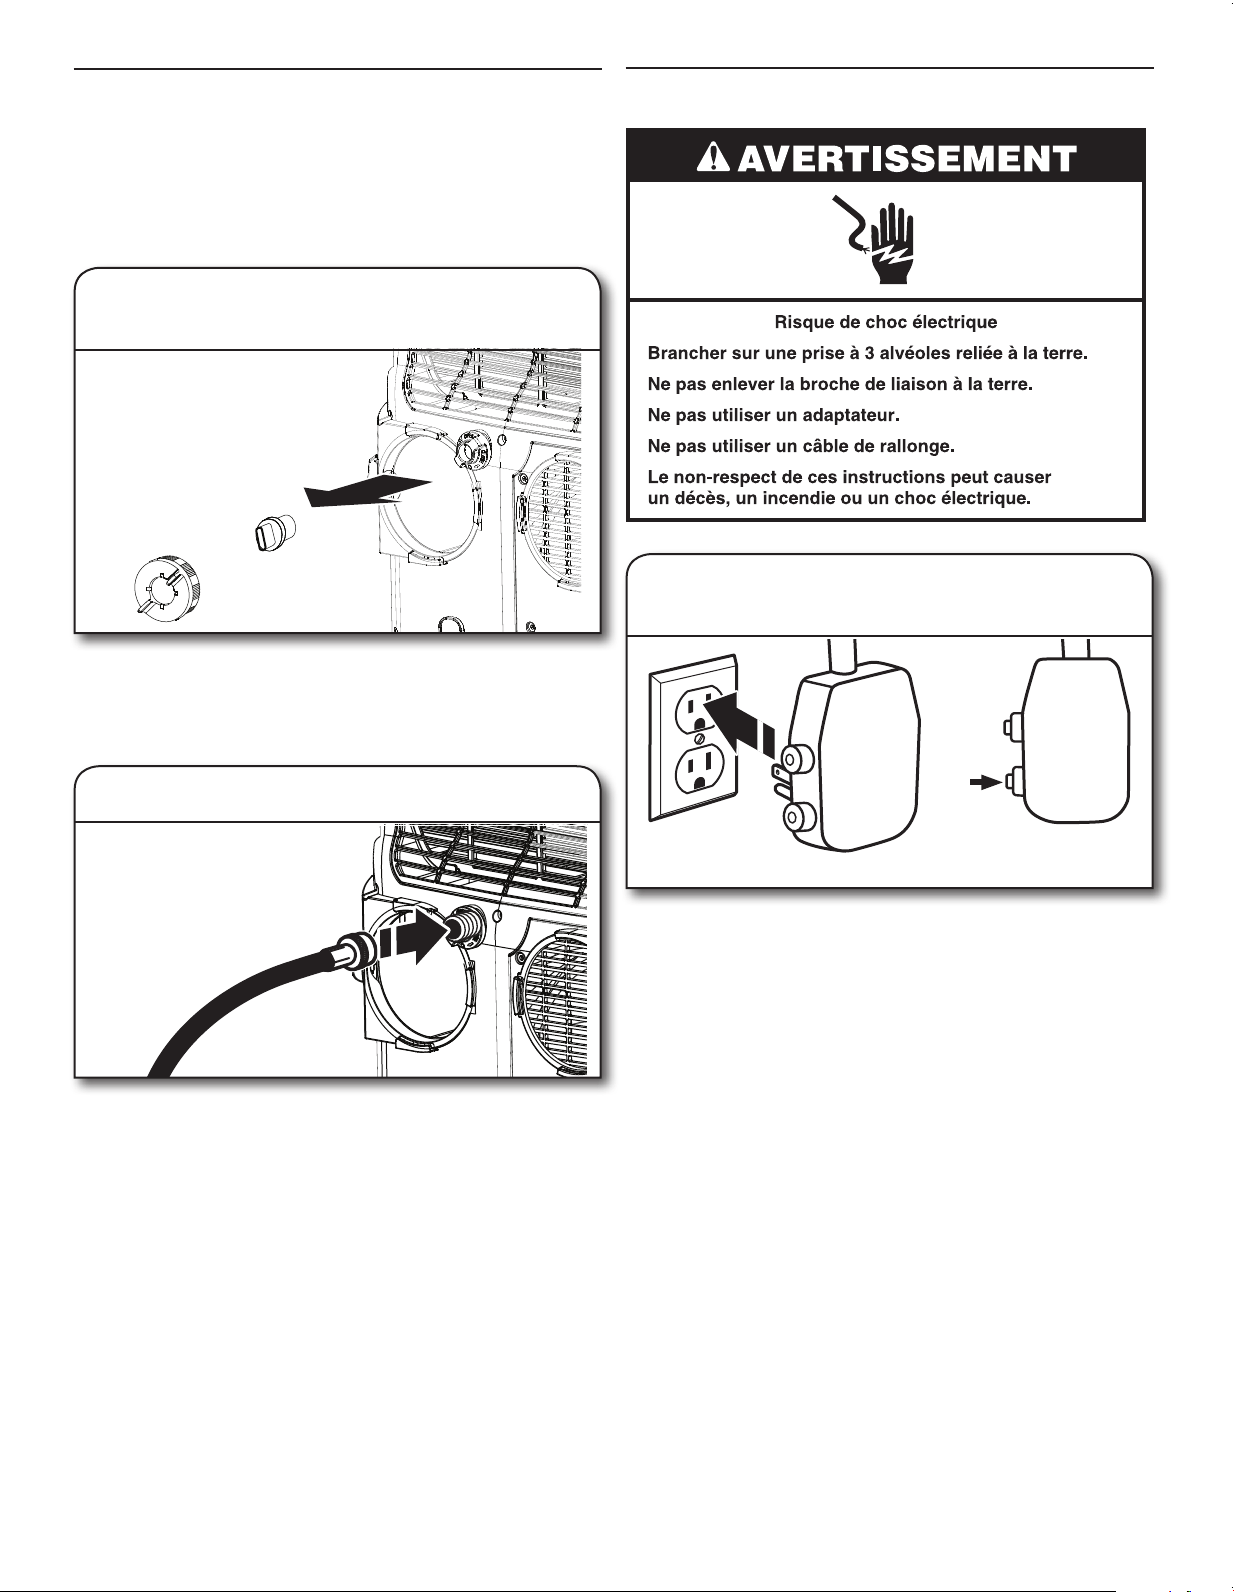
Brancher sur une prise à 3 alvéoles reliée à la terre.
Ne pas enlever la broche de liaison à la terre.
Ne pas utiliser un adaptateur.
Ne pas utiliser un câble de rallonge.
EXIGENCES D’INSTALLATION
Exigences d’emplacement — tous les
modèles
IMPORTANT: Observer les dispositions de tous les codes et
règlements en vigueur.
Inspecter l’emplacement où le climatiseur sera installé. S’assurer
d’avoir tout le nécessaire pour une installation correcte.
L’emplacement d’installation doit disposer de:
■ Une prise électrique avec liaison à la terre située à moins de
6pi (183cm) du point de sortie du cordon d’alimentation du
climatiseur.
REMARQUE: Ne pas utiliser de rallonge.
■ Une libre circulation de l’air dans la pièce à refroidir.
■ Une ouverture de taille sufsante pour le climatiseur.
Lespièces d’installation sont fournies pour des fenêtres à
guillotine à deux châssis mobiles.
■ Laisser au moins 10po (25cm) d’espace entre l’appareil et les
murs ou meubles.
REMARQUE: Les évents de l’appareil ne doivent pas être
obstrués. Ne pas positionner l’appareil en avant de tentures ou
de rideaux; ils pourraient obstruer l’entrée d’air.
Jeter l’appareil:
■ Avant de jeter l’appareil, consulter votre détaillant local ou le centre de recyclage de votre région pour obtenir des
renseignements sur la façon de le jeter de façon responsable pour l’environnement.
■ Jeter ou recycler les matériaux d’emballages de façon responsable pour l’environnement.
95111_WHAP121-142AW_portable_UCG.indb 15 5/25/16 3:29 PM

16
Pièces d’installation fournies
Vérier que toutes les pièces sont présentes dans le sachet de
pièces.
Modèles à un conduit
A. Panneau de fenêtre à un
seul conduit (1)
B. Conduit exible (1)
C. Connecteur rond pour
conduit (1)
D. Connecteur de conduit
pour fenêtre (1)
A. Panneau de fenêtre à deux
conduits (1)
B. Conduit exible (2)
C. Connecteur rond pour
conduit (2)
D. Connecteur de conduit
pour fenêtre (2)
A
B C D
PIÈCES ET CARACTÉRISTIQUES
Vue de face
Vue arrière
(modèles à deux conduits)
Roulettes
Tableau de commande
Poignée
Sortie d’air
Vue arrière
(modèles à un conduit)
Réservoir interne
Raccord de drain
(pour le mode
déshumidicateur)
Sortie d’air
(échangeur
thermique)
Conduit d’admission
d’air (condensateur)
Conduit d’admission d’air
(évaporateur)
Filtre à air (derrière la grille)
Range-cordon
Réservoir interne
Raccord de drain
(pour le mode
déshumidicateur)
Sortie d’air (échangeur
thermique)
Conduit d’admission
d’air (condensateur)
Conduit d’admission d’air
(évaporateur)
Filtre à air (derrière la grille)
Range-cordon
A
B
C D
Modèles à deux conduits
95111_WHAP121-142AW_portable_UCG.indb 16 5/25/16 3:30 PM
17
Spécications électriques
■ 115 V (103,5min – 126,5max)
■ 0 à 12 A
■ Fusible temporisé 15 A ou disjoncteur
■ Si une étiquette “Circuit indépendant seulement”
est apposée sur l’appareil, utiliser l’appareil sur un
circuit où rien d’autre n’est branché. Si ce n’est
pas possible, il incombe à l’utilisateur de faire
installer par un électricien qualié un circuit où
l’appareil pourra être branché seul.
■ Si aucune étiquette “Circuit indépendant
seulement” n’est apposée sur l’appareil, l’appareil
peut être branché à toute prise offrant la bonne
tension et la protection adéquate.
Méthode de liaison à la terre
recommandée
Ce climatiseur doit être relié à la terre. Ce climatiseur est équipé
d’un cordon d’alimentation électrique à trois broches pour la
liaison à la terre. Pour minimiser les risques de choc électrique, on
doit brancher le cordon sur une prise de courant de conguration
correspondante, à 3 alvéoles, reliée à la terre et installée
conformément à tous les codes et règlements locaux. Si une prise
de courant compatible n’est pas disponible, il incombe au client
de faire installer par un électricien qualié une prise de courant à
3alvéoles convenablement reliée à la terre. Il incombe au client de:
■ Contacter un électricien qualié.
■ Veiller à ce que l’installation électrique soit réalisée de
façon adéquate et en conformité avec le code national de
l’électricité, ANSI/NFPA 70 – plus récente édition, et tous
les codes et règlements locaux en vigueur.
On peut obtenir des exemplaires des normes mentionnées à
l’adresse suivante:
National Fire Protection Association
1 Batterymarch Park
Quincy, MA 02269
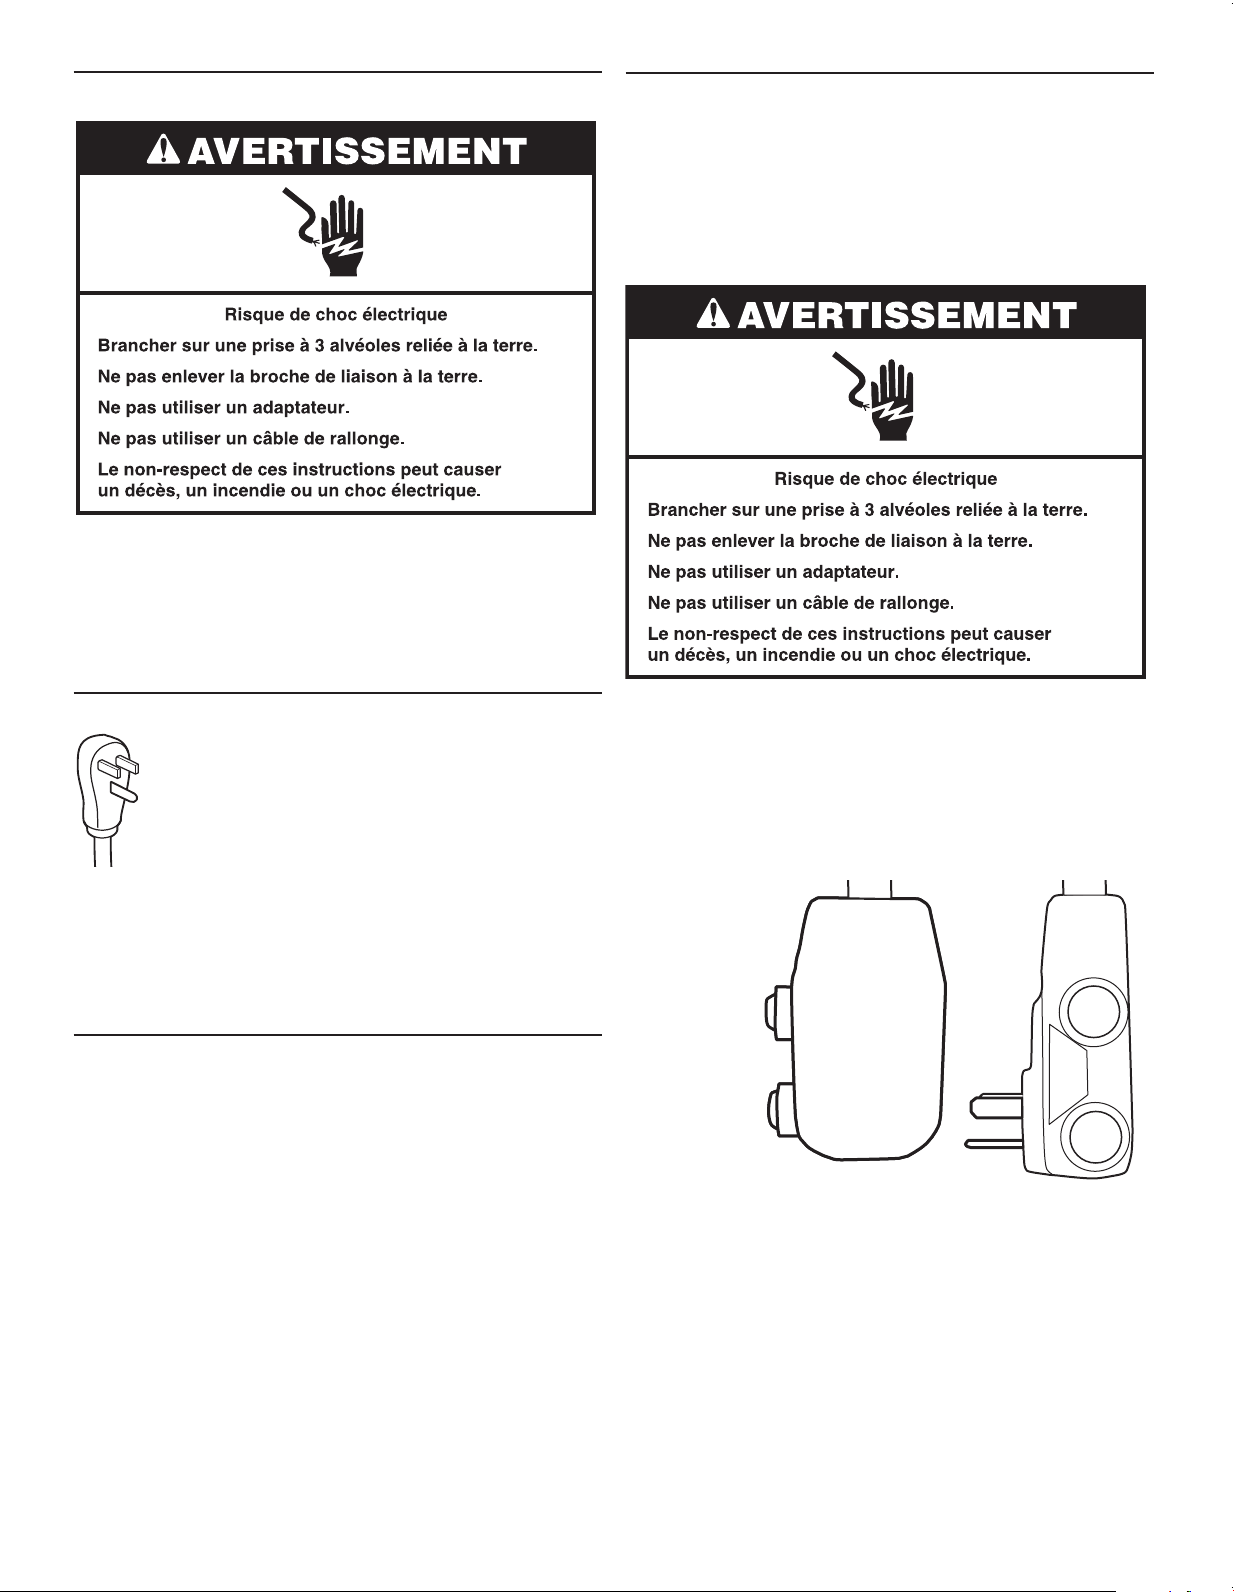
Cordon d’alimentation
REMARQUE: Le cordon d’alimentation de votre climatiseur peut
être différent de celui illustré. Ce climatiseur portatif est équipé
d’un cordon d’alimentation conforme aux exigences de l’UL.
Ce cordon d’alimentation comporte des circuits électroniques
d’avant-garde détectant les courants de fuite. En cas
d’écrasement du cordon d’alimentation, les circuits électroniques
détectent les courants de fuite et l’alimentation est interrompue
en une fraction de seconde.
Pour tester le cordon d’alimentation:
1. Brancher le cordon d’alimentation électrique dans une prise à
trois alvéoles reliée à la terre.
2. Appuyer sur RESET (réinitialisation) (un témoin lumineux vert
s’illumine sur certains modèles).
3. Appuyer sur TEST.
4. Appuyer et relâcher le bouton RESET (réinitialisation).
Le cordon d’alimentation est prêt à être utilisé.
Exigences électriques — tous les modèles
Les caractéristiques électriques du climatiseur sont indiquées sur
la plaque signalétique. La plaque signalétique des numéros de
modèle et de série est située au dos du climatiseur.
Les exigences électriques spéciques sont inscrites dans le
tableau des “Exigences du cordon d’alimentation électrique”.
Suivre les recommandations pour ce type de prise électrique
indiquées dans le tableau.
A. Bouton de test
B. Bouton de
réinitialisation
REMARQUE:
■ Le bouton Reset (réinitialisation) doit être enfoncé pour une
utilisation correcte.
■ Le cordon d’alimentation doit être remplacé s’il ne se
déclenche pas lorsqu’on appuie sur le bouton de test ou si
l’appareil n’est pas réinitialisé.
■ Ne pas utiliser le cordon d’alimentation comme interrupteur.
Le cordon d’alimentation est conçu pour remplir les fonctions
de dispositif de protection.
■ Un cordon d’alimentation endommagé ne doit pas être réparé,
mais remplacé par un cordon d’alimentation neuf que l’on
peut se procurer auprès du fabricant du produit.
■ Le cordon d’alimentation ne comprend aucune pièce
réparable. Ouvrir le boîtier inviolable annule toute garantie et
réclamation pour mauvaise performance.
TEST
RESET
TEST
RESET
A
A
B
B
95111_WHAP121-142AW_portable_UCG.indb 17 5/25/16 3:30 PM

18
Préparer le climatiseur pour l’installation
INSTRUCTIONS D’INSTALLATION
AVERTISSEMENT
Risque du poids excessif
Utiliser deux ou plus de personnes pour déplacer et
installer le climatiseur.
Le non-respect de cette instruction peut causer
une blessure au dos ou d'autre blessure.
Enlever les matériaux d’emballage:
■ Manipuler le climatiseur avec soin pendant le déballage.
■ Enlever le carton du dessus et soulever le climatiseur du
socle.
■ Enlever tout résidu de ruban adhésif et de colle des surfaces
avant de mettre le climatiseur en marche. Frotter une petite
quantité de savon liquide à vaisselle sur l’adhésif avec les
doigts. Essuyer avec un linge propre et sécher.
■ Ne pas utiliser d’instruments coupants, d’alcool à friction,
de liquides inammables ou de nettoyants abrasifs pour
enlever le ruban adhésif ou la colle. Ces produits peuvent
endommager la surface de votre climatiseur.
■ Vérier tous les matériaux d’emballage pour s’assurer
qu’aucune pièce n’est jetée.
■ Jeter ou recycler les matériaux d’emballages de façon
convenable.
Exigences de l’ouverture dans la
fenêtre
Ce climatiseur peut être utilisé avec une fenêtre à guillotine à
deux châssis mobiles et à guillotine normales.
Mesures de l’ouverture dans la fenêtre à guillotine à deux
châssis:
■ Largeur d’ouverture minimum de 24
5
⁄8po (63cm) et
maximum de 47
1
⁄4 po (1,2m)
■ Hauteur d’ouverture minimum de 4
3
⁄4 po (12cm)
Mesures de l’ouverture dans la fenêtre à guillotine normale:
■ Largeur d’ouverture minimum de 4
3
⁄4 po (12cm)
■ Hauteur d’ouverture minimum de 24
5
⁄8po (63cm) et
maximum de 47
1
⁄4 po (1,2m)
IMPORTANT: Pour les ouvertures de fenêtre entre 24
5
⁄8po
(63cm) et 38po (99cm) (modèles à un conduit) ou 45
3
⁄4po
(115cm) (modèles à deux conduits), il sera nécessaire de couper
le panneau coulissant selon l’ouverture.
Placer le panneau de fenêtre coulissant dans l’ouverture de la
fenêtre.
Installer le panneau de fenêtre coulissant
Modèle à un conduit illustré. L’installation du modèle à deux
conduits est identique.
1. Placer le panneau coulissant dans
la fenêtre
Panneau coulissant
Allonger l’extension du panneau coulissant jusqu’à obtenir la
bonne longueur pour la fenêtre. S’assurer que l’ouverture du
conduit de ventilation n’est pas couverte.
Bien serrer l’écrou à oreilles.
Si la fenêtre est trop étroite pour y placer le panneau
coulissant sans obstruer l’ouverture du conduit de
ventilation.
1. Desserrer l’écrou à oreilles et enlever l’extension du panneau
coulissant.
2. À l’aide d’une scie à main, couper l’extension du panneau
coulissant en fonction de l’ouverture de la fenêtre. Laisserle
panneau le plus long possible sans couvrir l’ouverture du
panneau coulissant.
3. Replacer l’expansion dans le panneau coulissant en
s’assurant que la tête de la vis de retenue peut s’insérer dans
la fente en T de l’extension du panneau coulissant.
2. Allonger et bien positionner le
panneau coulissant
Écrou à oreilles
Extension
du panneau
coulissant
95111_WHAP121-142AW_portable_UCG.indb 18 5/25/16 3:30 PM

19
Glisser l’embout rond de conduit exible dans le raccord du
climatiseur.
Modèle à deux conduits illustré.
2. Fixer le conduit exible au climatiseur
Replacer le climatiseur à l’endroit souhaité.
Étirer sufsamment le conduit exible pour relier le climatiseur et
la fenêtre. S’assurer qu’il n’y a aucun coude serré ou pli dans le
tuyau.
Placer le côté fenêtre du conduit exible dans l’ouverture du
panneau coulissant comme indiqué. Il s’emboîte en place.
Modèle à un conduit illustré. Pour les modèles à deux conduits,
consulter le positionnement des tuyaux ci-dessous.
4. Fixer le conduit exible au panneau
coulissant
Connecteur
pour fenêtre
Panneau coulissant
Étirer un peu les deux extrémités du conduit exible.
Insérer en effectuant un mouvement horaire un connecteur rond à
l’une des extrémités du conduit exible. Insérer en effectuant un
mouvement horaire un connecteur de fenêtre à l’autre extrémité
du conduit exible.
Pour les modèles à deux conduits, effectuer les mêmes étapes
pour l’autre conduit.
1. Assemblage du conduit exible
Conduit exible
Connecteur
rond
Connecteur
pour fenêtre
Assemblage du conduit exible
3. Verrouiller le conduit exible en place
Faire tourner le bouton de verrouillage sur LOCKED pour bien
faire tenir en place le conduit exible. Pour les modèles à deux
conduits, effectuer les mêmes étapes pour l’autre côté.
Installation
normale dans une
fenêtre verticale
Installation normale
dans une fenêtre
Positionnement pour les modèles à
deuxconduits
95111_WHAP121-142AW_portable_UCG.indb 19 5/25/16 3:30 PM
20
Faire tourner le bouchon de drain dans le sens antihoraire pour
l’enlever, puis retirer le bouchon de drain en caoutchouc.
Ranger le bouchon dans un endroit sûr pour pouvoir l’utiliser à
nouveau plus tard.
1. Enlever le bouchon du raccord de
tuyau de vidange
Raccord du tuyau de vidange (optionnel)
Si le climatiseur est utilisé comme déshumidicateur seulement,
il est possible de raccorder un tuyau (vendu séparément) pour
drainer l’eau dans le drain de plancher.
Utiliser un boyau d’arrosage sur le raccord de drain. Le tuyau
de vidange doit être positionné plus bas que le raccord de drain
situé à l’arrière du climatiseur.
Insérer le tuyau d’évacuation (vendu séparément) dans le raccord
de tuyau du climatiseur. Insérer l’autre extrémité du tuyau
de vidange dans le drain de plancher ou dans un autre drain
convenable.
2. Installation du tuyau d’évacuation
TEST
RESET
TEST
RESET
1. Brancher à une prise à trois alvéoles
reliée à la terre
Brancher sur une prise à 3 alvéoles reliée à la terre.
Appuyer sur le bouton RESET (réinitialisation) situé sur le cordon
d’alimentation.
Consulter les “Spécications électriques”.
Raccordement électrique
95111_WHAP121-142AW_portable_UCG.indb 20 5/25/16 3:30 PM
21
UTILISATION DE VOTRE CLIMATISEUR
Mettre en marche/arrêter le climatiseur
Pour mettre en marche ou éteindre le climatiseur,
appuyer sur POWER (alimentation).
IMPORTANT:
■ Si on doit éteindre le climatiseur, attendre
au moins 3 minutes avant de le rallumer. Ceci empêche le
climatiseur de faire griller un fusible ou déclencher le disjoncteur.
■ Ne pas tenter de faire fonctionner le climatiseur au mode de
refroidissement lorsque la température extérieure est inférieure
à 65°F (18°C). Le serpentin de l’évaporateur intérieur gèlera
et le climatiseur ne fonctionnera pas correctement.
REMARQUE: En cas de panne de courant, votre climatiseur
fonctionnera aux réglages précédents une fois le courant rétabli.
Afchage
Pendant le fonctionnement normal, l’afcheur indique la température
ambiante. Lorsqu’on appuie sur les boutons TEMP/TIME t et s,
l’appareil afche la température sélectionnée et la minuterie.
Sélectionner le mode
Le bouton de mode propose trois réglages:
■ Refroidissement
■ Dhésumidicateur
■ Ventilation
Appuyer sur le bouton MODE jusqu’à ce que le
témoin lumineux s’arrête sur le réglage souhaité.
Mode refroidissement
Dans ce mode, le climatiseur refroidit l’air de la pièce et expulse
l’air chaud à l’extérieur à l’aide du conduit exible. Régler la
vitesse du ventilateur et la température selon vos préférences.
Latempérature peut être réglée entre 61°F à 90°F (16°C à 32°C).
IMPORTANT: Le conduit exible doit expulser l’air chaud à
l’extérieur pendant l’utilisation du mode refroidissement.
Mode déshumidificateur
L’appareil déshumidie l’air sans la faire refroidir. Le ventilateur
est réglé à vitesse moyenne.
La vitesse du ventilateur n’est pas modiable en mode
déshumidicateur.
IMPORTANT: Le conduit exible doit expulser l’air à l’extérieur
pendant l’utilisation du mode déshumidicateur.
Mode ventilateur
Ce mode n’utilise que le ventilateur. Il permet de faire circuler l’air
dans la pièce sans la refroidir.
REMARQUE: Le climatiseur n’a pas besoin d’expulser l’air à
l’extérieur pendant l’utilisation du mode ventilateur.
Sélectionner la vitesse du ventilateur
Le ventilateur peut être réglé à 3 vitesses:
■ FAIBLE
■ MOYENNE
■ FORTE
Appuyer sur le bouton SPEED (vitesse) jusqu’à ce que
le témoin lumineux s’arrête sur le réglage souhaité.
Réglage de la température
Appuyer sur les boutons TEMP/TIME
s et t pour modier le réglage de
température par incréments de 1°.
La température peut être réglée entre
61°F à 90°F (16°C à 32°C). Après 10
secondes, l’afcheur indique de nouveau la température ambiante.
REMARQUE: La température ne peut être réglée qu’en mode
refroidissement.
Lors de l’utilisation du mode TIMER (minuterie), appuyer sur les
boutons TEMP/TIME s et t réglera la minuterie de fermeture et
d’ouverture du climatiseur.
Affichage Fahrenheit ou Celsius
Appuyer simultanément sur les boutons s et t pour faire passer
l’afchage de °F à °C.
Utiliser la minuterie
Arrêt automatique
Il est possible d’ajuster le climatiseur sur 24 heures
pour qu’il s’arrête automatiquement après un
certain nombre d’heures.
Pour configurer l’arrêt automatique:
1. Mettre le climatiseur en mode ventilateur, puis
appuyer sur TIMER (minuterie).
2. Utiliser les boutons TEMP/TIME s et t pour choisir le
nombre d’heures, jusqu’à 24 heures.
3. Après avoir conguré le temps, le climatiseur s’arrête
automatiquement.
Mise en marche automatique
Il est possible d’ajuster le climatiseur pour qu’il se mette en
marche automatiquement après un certain nombre d’heures.
1. Arrêter le climatiseur, puis appuyer sur TIMER (minuterie).
2. Utiliser les boutons TEMP/TIME s et t pour choisir le
nombre d’heures d’attente avant la mise en marche, jusqu’à
24 heures. Le témoin d’indication de minuterie reste allumé
pour laisser savoir que la minuterie est congurée.
3. Après avoir réglé la minuterie, le climatiseur se met en marche
automatiquement en mode refroidissement et utilise les
dernières température et vitesses de ventilateur utilisées.
L’apparence peut varier.
95111_WHAP121-142AW_portable_UCG.indb 21 5/25/16 3:30 PM
22
Autres fonctions
Témoin de RÉSERVOIR PLEIN
Le climatiseur est muni d’un réservoir interne
qui permet d’accumuler l’eau de condensation.
Cette eau s’évapore et est habituellement expulsée à l’extérieur.
Cependant, en période de grande humidité, ce réservoir peut se
remplir. Si cela se produit, l’indicateur de réservoir plein s’allume
et le climatiseur s’arrête jusqu’à ce qu’il soit vidé. Voir la section
“Entretien et nettoyage”.
Utilisation de la télécommande
Les fonctions sur la télécommande peuvent
être utilisées de la même façon que celles sur
le climatiseur.
REMARQUE:
■ Ne pas échapper la télécommande pour ne pas
l’endommager.
■ Enlever les piles si la télécommande n’est pas utilisée pendant
un mois ou plus.
■ Jeter les piles de façon responsable.
REMARQUE: La télécommande utilise 2 piles AAA de 1,5V
(incluses). Remplacer les piles après environ 6 mois d’utilisation.
Pour enlever les piles:
Retirer le couvercle du compartiment de piles, puis les piles.
Pour installer les piles:
Placer les piles dans le compartiment à piles comme indiqué,
replacer le couvercle.
Remplacer les piles de la télécommande
Bruits de fonctionnement normaux
Lorsque le climatiseur fonctionne normalement, on peut percevoir
certains sons comme:
■ Gouttelettes d’eau qui heurtent le condenseur, causant
un cliquetis ou un cliquettement. Les gouttelettes d’eau
contribuent au refroidissement du condenseur.
■ Mouvement de l’air sous l’effet du ventilateur.
■ Déclics émis par le thermostat.
■ Vibrations ou bruits imputables à une construction médiocre
du mur ou de la fenêtre.
■ Bourdonnement à fréquence élevée ou pulsations à cause
du compresseur moderne à haute efcacité qui se met en
marche et s’arrête de façon intermittente.
REMARQUE: L’apparence
de la télécommande peut
varier.
95111_WHAP121-142AW_portable_UCG.indb 22 5/25/16 3:30 PM
23
Votre nouveau climatiseur est conçu pour vous fournir de nombreuses
années de fonctionnement able. Cette section vous expliquera
comment nettoyer et entretenir votre climatiseur correctement.
Enlever le ltre à air du climatiseur.
Réinstallation le filtre à air:
1. Réinstaller le ltre dans le climatiseur.
2. Insérer les onglets du bas du couvercle de conduit
d’admission d’air dans les fentes du climatiseur, puis appuyer
sur le dessus du couvercle jusqu’à ce qu’il s’emboîte.
ENTRETIEN ET NETTOYAGE
1. Retirer le couvercle du conduit
d’admission d’air
1. Arrêter le climatiseur.
2. Retirer le couvercle de conduit d’admission d’air et tirant sur
le dessus du couvercle, puis en retirant les onglets du bas des
fentes du climatiseur.
2. Retirer le ltre à air
Nettoyage du boîtier du climatiseur
1. Arrêter le climatiseur.
2. Essuyer le boîtier du climatiseur avec un linge doux et humide.
3. Sécher parfaitement avec un linge doux.
Nettoyage du ltre à air
Le ltre à air est amovible pour faciliter le nettoyage. Un ltre à
air propre aide à retenir les particules de poussière, la charpie et
les autres débris en suspension dans l’air et il est important pour
obtenir un refroidissement et une efcacité de fonctionnement
de grande qualité. Vérier le ltre toutes les 2 semaines pour
déterminer si un nettoyage est nécessaire.
REMARQUE: Pour obtenir le meilleur rendement, ne pas faire
fonctionner le climatiseur si le ltre n’est pas en place.
Nettoyer le climatiseur à l’aspirateur. Si le ltre
à air est très sale, le laver avec de l’eau tiède et
un détergent doux.
REMARQUE: Ne pas laver le ltre à air
au lave-vaisselle ni utiliser de produits
nettoyants chimiques pour ne pas l’endommager. Faire sécher
complètement le ltre à air à l’air libre avant de le réinstaller,
and’assurer une efcacité maximale.
Drainer le réservoir interne
Si le climatiseur s’arrête et que le témoin de réservoir plein est
allumé, il est nécessaire de drainer ce dernier avant d’utiliser de
nouveau le climatiseur.
1. Drainer le réservoir interne
1. Arrêter et débrancher le climatiseur.
2. Placer une cuvette ou une petite chaudière sous le drain.
3. Enlever le bouchon de drain en le tournant dans le sens
antihoraire.
4. Enlever le bouchon de drain en caoutchouc.
5. Laisser l’eau s’écouler dans la cuvette ou la petite chaudière.
6. Réinstaller le bouchon de drain en caoutchouc en l’insérant
fermement en place.
7. Insérer le bouchon de drain dans le drain en effectuant
un mouvement horaire, puis serrer à la main.
Ranger le climatiseur
Si le climatiseur n’est pas utilisé pendant une bonne période
de temps, le préparer pour le rangement en suivant les étapes
suivantes.
1. Faire fonctionner le climatiseur en mode ventilateur pendant
quelques heures pour éliminer l’humidité de ses serpentins.
2. Arrêter le climatiseur et le débrancher. Retirer la pile de la
télécommande.
3. Enlever le bouchon de drain du réservoir interne pour enlever
toute l’eau restant dans le réservoir. Voir “Drainer le réservoir
interne”.
4. Enlever, nettoyer, puis remettre en place le ltre.
5. Enlever le tuyau exible et le panneau de fenêtre coulissant
et les ranger dans un endroit sécuritaire.
AVERTISSEMENT
Risque du poids excessif
Utiliser deux ou plus de personnes pour déplacer et
installer le climatiseur.
Le non-respect de cette instruction peut causer
une blessure au dos ou d'autre blessure.
95111_WHAP121-142AW_portable_UCG.indb 23 5/25/16 3:30 PM
24
■ Le cordon d’alimentation électrique est débranché.
Brancherl’appareil sur une prise à 3 alvéoles reliée
à la terre. Consulter les “Spécications électriques “.
■ Le cordon d’alimentation s’est déclenché (bouton Reset
(réinitialisation) est ressorti). Appuyer et relâcher le bouton
RESET (réinitialisation) pour reprendre le fonctionnement.
■ Un fusible est grillé ou un disjoncteur s’est ouvert.
Remplacerle fusible ou réenclencher le disjoncteur.
Si le problème persiste, appeler un électricien. Consulter
les “Spécications électriques “.
■ Le bouton d’alimentation POWER n’a pas été enfoncé.
Appuyer sur Power (mise en marche).
■ Le circuit d’alimentation local est en panne. Attendre que
l’alimentation locale soit rétablie.
■ Le réservoir internet est plein. Si le témoin de réservoir plein
est allumé, vider le réservoir. Voir “Drainer le réservoir interne”.
Le climatiseur fait griller les fusibles ou
déclenche les disjoncteurs
■ Trop d’appareils sont branchés sur le même circuit.
Débrancher ou déplacer les appareils partageant le même
circuit.
■ L’utilisateur emploie un fusible temporisé ou un disjoncteur de
capacité inappropriée. Les remplacer par un fusible temporisé
ou un disjoncteur de capacité correcte. Consulterles
“Spécications électriques”.
■ L’utilisateur tente de remettre le climatiseur en marche trop
rapidement après l’avoir arrêté. Attendre au moins 3minutes
après l’arrêt du climatiseur avant de tenter une nouvelle mise
en marche.
Le cordon d’alimentation du climatiseur
se déclenche (leboutonReset s’éjecte)
■ Des perturbations dans le courant électrique peuvent
déclencher le cordon d’alimentation (le bouton Reset ressort).
Appuyer et relâcher le bouton RESET (réinitialisation) pour
reprendre le fonctionnement.
Le climatiseur ne fonctionne pas
DÉPANNAGE
Avant de faire un appel de service, consulter les suggestions ci-dessous pour voir si le problème peut être résolu sans aide extérieure.
■ Surcharge électrique, surchauffe, cordon pincé ou
vieillissement peuvent déclencher le cordon d’alimentation
(le bouton Reset ressort). Après avoir corrigé le problème,
appuyer et relâcher le bouton RESET (réinitialisation) pour
reprendre le fonctionnement.
REMARQUE: Un cordon d’alimentation endommagé ne doit pas
être réparé, mais remplacé par un cordon d’alimentation neuf que
l’on peut se procurer auprès du fabricant du produit.
Le climatiseur semble se mettre en
marche trop fréquemment
■ Ce climatiseur remplace un vieux modèle. Du fait de
l’utilisation de composants plus efcaces, il est possible que
le climatiseur fonctionne pendant de plus longues périodes
que l’ancien modèle, mais sa consommation totale d’énergie
sera plus faible. Les nouveaux climatiseurs ne projettent
pas un puissant jet d’air froid comme les anciens modèles,
mais ceci n’indique pas une réduction de la capacité de
refroidissement ou de l’efcacité. Se référer à l’indice
d’efcacité (EER) et l’indice de capacité (en BTU/h) indiqués
sur le climatiseur.
■ Le climatiseur est installé dans une pièce encombrée ou
dans laquelle des appareils générateurs de chaleur sont
installés. Utiliser des ventilateurs d’évacuation d’air pendant
les opérations de cuisson ou pendant le bain, et essayer
de ne pas utiliser d’appareils générateurs de chaleur
pendant les périodes les plus chaudes de la journée. Il peut
être nécessaire de choisir un climatiseur de plus grande
puissance, selon la taille de la pièce à refroidir.
Le climatiseur s’allume et s’éteint trop
fréquemment ou ne refroidit pas la
pièce au mode refroidissement
■ La taille du climatiseur n’est pas appropriée à la pièce.
Vérierla capacité de refroidissement du climatiseur
de la pièce. Les climatiseurs pour une seule pièce ne
sont pas conçus pour refroidir plusieurs pièces.
■ Le ltre est sale ou obstrué par des débris. Nettoyer le ltre.
■ Il y a trop de chaleur ou d’humidité dans la pièce (cuissondans
des récipients sans couvercle, douches, etc.). Utiliserun
ventilateur pour évacuer la chaleur ou l’humidité de la pièce.
Essayer de ne pas utiliser des appareils générateurs de chaleur
pendant les périodes les plus chaudes de la journée.
■ Le conduit d’admission d’air est obstrué. Installer le
climatiseur dans un endroit où les évents ne sont pas
obstrués par des rideaux, stores, meubles, etc.
■ La température de la pièce à refroidir est extrêmement élevée.
Accorder du temps supplémentaire au climatiseur pour
refroidir une pièce très chaude.
■ Les fenêtres ou portes sur l’extérieur sont ouvertes.
Fermertoutes les portes et fenêtres.
■ Le réglage de la température n’est pas sufsamment froid.
Réglez la commande de température à un niveau plus froid
en appuyant sur le bouton “moins” pour réduire la
température. Régler la commande de Fan Speed
(vitesse du ventilateur) surle réglage désiré.
Code d’erreur sur l’afchage
■ Si E1 ou E2 s’afchent, faire un appel de service.
95111_WHAP121-142AW_portable_UCG.indb 24 5/25/16 3:30 PM
25
SPÉCIFICATIONS
Modèle WHAP121AW WHAP141AW WHAP122AW WHAP142AW
Tension/fréquence 115VCA, 60Hz 115VCA, 60Hz 115VCA, 60Hz 115VCA, 60Hz
Intensité 9,5 A 11,4 A 9,5 A 11,4 A
Capacité de
refroidissement
(BTU/heure)
12 000 14000 12000 14000
Type de conduit Simple Simple Double Double
Type de liquide de
refroidissement
R410A R410A R410A R410A
Minuterie 24 heures 24 heures 24 heures 24 heures
Dimensions
L x P x H
17,9po x 15,6po x 39,3po
455 x395 x745mm
17,9po x 15,6po x 39,3po
455 x395 x745mm
17,9po x 15,6po x 39,3po
455 x395 x745mm
17,9po x 15,6po x 39,3po
455 x395 x745mm
Poids
71,4 lb
32,4 kg
73,2 lb
33,2kg
72,8 lb
33,0 kg
73,2 lb
33,2kg
95111_WHAP121-142AW_portable_UCG.indb 25 5/25/16 3:30 PM

26
Avant de faire un appel pour assistance ou service, vérier
la section “Dépannage”. Cette vérication peut vous faire
économiser le coût d’une intervention de dépannage. Si vous
avez encore besoin d’aide, suivez les instructions ci-dessous.
Avant d’appeler, vous devez connaître la date d’achat et les
numéros de modèle et de série complets de votre appareil.
Ces renseignements nous aideront à mieux répondre à votre
demande.
Composer le numéro du service à la clientèle de XLSProducts:
1800207-1156
Nos consultants peuvent vous aider sur les points suivants:
■ Caractéristiques et spécications de notre gamme complète
d’appareils ménagers.
■ Renseignements sur l’installation.
■ Procédures d’utilisation et d’entretien.
■ Accessoires et pièces de rechange.
■ Aide spécialisé à la clientèle.
■ Orientation vers des concessionnaires, compagnies de
service de réparation et distributeurs de pièces de rechange
locaux. Les techniciens de service désignés de XLS Products
sont formés pour remplir la garantie des produits et fournir un
service après garantie partout aux États-Unis.
Pour plus d’assistance:
Si vous avez besoin de plus d’assistance, vous pouvez écrire à
XLS Products en soumettant toute question ou tout problème à:
XLS Products, Inc.
Customer Service
P.O. Box16262
Philadelphia, PA19114-0262
N’oubliez pas d’indiquer dans votre correspondance un numéro
de téléphone où l’on peut vous joindre dans la journée.
Composer le numéro du service à la clientèle de XLSProducts:
1800207-1156
Nos consultants peuvent vous aider sur les points suivants:
■ Caractéristiques et spécications de notre gamme complète
d’appareils ménagers.
■ Procédures d’utilisation et d’entretien.
■ Accessoires et pièces de rechange.
■ Orientation vers des concessionnaires, distributeurs de pièces
de rechange et services de réparation locaux. Les techniciens
de service désignés de XLS Products sont formés pour
remplir la garantie des produits et fournir un service après la
garantie, partout au Canada.
Pour plus d’assistance:
Si vous avez besoin de plus d’assistance, vous pouvez écrire à
XLS Products en soumettant toute question ou tout problème à:
XLS Products, Inc.
Customer Service
P.O. Box16262
Philadelphia, PA19114-0262
N’oubliez pas d’indiquer dans votre correspondance un numéro
de téléphone où l’on peut vous joindre dans la journée.
ASSISTANCE OU SERVICE
Aux É.-U.
Au Canada
95111_WHAP121-142AW_portable_UCG.indb 26 5/25/16 3:30 PM

27
GARANTIE DE XLS PRODUCTS POUR
LES CLIMATISEURS WHIRLPOOL
®
GARANTIE LIMITÉE DE UN AN
Pendant un an à compter de la date d’achat, lorsque ce produit est utilisé et entretenu conformément aux instructions jointes à
oufournies avec le produit, XLS Products paiera pour les pièces de rechange et la main-d’œuvre pour corriger les vices de matériaux
ou de fabrication ou remplacera le produit à sa seule discrétion. L’entretien doit être fourni par une compagnie de service désignée par
XLS Products. Cette garantie ne couvre pas le ltre à air.
XLS PRODUCTS NE PRENDRA PAS EN CHARGE
1. Les visites de service pour rectier l’installation de votre produit, pour vous montrer comment utiliser le produit, pour remplacer
des fusibles de la maison, réenclencher les disjoncteurs, remplacer ou nettoyer les ltres ou rectier le câblage électrique.
2. Les interventions de dépannage pour réparer ou remplacer des ltres à air. Ces pièces consomptibles ne sont pas couvertes par
lagarantie.
3. Les réparations lorsque le produit est utilisé à des ns autres que l’usage unifamilial normal.
4. Les dommages imputables à: accident, modication, usage impropre ou abusif, incendie, inondation, actes de Dieu, installation
fautive ou installation non conforme aux codes d’électricité ou de plomberie, ou l’utilisation de produits non approuvés par XLS
Products.
5. Le coût des pièces de rechange et de la main-d’œuvre de réparation pour les appareils utilisés hors des États-Unis ou du Canada.
6. Le ramassage et la livraison. Ce produit est conçu pour être réparé à domicile.
7. Les réparations aux pièces ou systèmes résultant d’une modication non autorisée faite à l’appareil.
8. Les frais de voyage et de transport pour le service d’un produit dans les régions éloignées.
9. L’enlèvement et la réinstallation de votre appareil si celui-ci est installé dans un endroit inaccessible ou n’est pas installé
conformément aux instructions d’installation fournies.
CLAUSE D’EXONÉRATION DE RESPONSABILITÉ AU TITRE DES GARANTIES IMPLICITES; LIMITATION DES RECOURS
LE SEUL ET EXCLUSIF RECOURS DU CLIENT DANS LE CADRE DE LA PRÉSENTE GARANTIE LIMITÉE CONSISTE EN LA
RÉPARATION PRÉVUE CI-DESSUS. LES GARANTIES IMPLICITES, Y COMPRIS LES GARANTIES APPLICABLES DE QUALITÉ
MARCHANDE OU D’APTITUDE À UN USAGE PARTICULIER, SONT LIMITÉES À UN AN OU À LA PLUS COURTE PÉRIODE
AUTORISÉE PAR LA LOI. XLS PRODUCTS N’ASSUME AUCUNE RESPONSABILITÉ POUR LES DOMMAGES FORTUITS OU
INDIRECTS. CERTAINES JURIDICTIONS NE PERMETTENT PAS L’EXCLUSION OU LA LIMITATION DES DOMMAGES FORTUITS
OU INDIRECTS, OU LES LIMITATIONS DE LA DURÉE DES GARANTIES IMPLICITES DE QUALITÉ MARCHANDE OU D’APTITUDE
ONT UN USAGE PARTICULIER, DE SORTE QUE CES EXCLUSIONS OU LIMITATIONS PEUVENT NE PAS S’APPLIQUER DANS
VOTRE CAS. CETTE GARANTIE VOUS CONFÈRE DES DROITS JURIDIQUES SPÉCIFIQUES ET VOUS POUVEZ ÉGALEMENT JOUIR
D’AUTRES DROITS QUI PEUVENT VARIER D’UNE JURIDICTION À UNE AUTRE.
À l’extérieur du Canada et des 50 États des États-Unis, cette garantie ne s’applique pas. Contacter votre marchand XLS Products
autorisé pour déterminer si une autre garantie s’applique.
Si vous avez besoin de service, voir d’abord la section “Dépannage” du Guide d’utilisation et d’entretien. Après avoir vérié la section
“Dépannage”, de l’aide supplémentaire peut être trouvée en vériant la section “Assistance ou service” ou en appelant XLS Products.
Aux États-Unis, composer le 1800207-1156.
Au Canada, composer le 1800207-1156.
Conservez ce manuel et le reçu de vente au même endroit
pour référence ultérieure. Pour un entretien ou une réparation
sous garantie, un document attestant de la date d’achat ou
d’installation doit être fourni.
Inscrivez les renseignements suivants au sujet de votre
climatiseur pour mieux vous aider à obtenir assistance ou
réparation en cas de besoin. Vous devrez fournir le numéro de
modèle et le numéro de série au complet. Vous trouverez ces
renseignements sur la plaque signalétique située sur le produit.
Nom du revendeur ________________________________________
Adresse __________________________________________________
Numéro de téléphone ______________________________________
Numéro de modèle ________________________________________
Numéro de série __________________________________________
Date d’achat ______________________________________________
®/™ ©2016 Whirlpool. Tous droits réservés. Fabriqué sous licence par XLS Products, Pennsylvanie.
Garantie limitée offerte par XLS Products.
95111_WHAP121-142AW_portable_UCG.indb 27 5/25/16 3:30 PM
28
SEGURIDAD DEL ACONDICIONADOR DE AIRE
INSTRUCCIONES IMPORTANTES DE SEGURIDAD
ADVERTENCIA:
Para reducir el riesgo de incendio, choque eléctrico o lesiones personales al usar su acondicionador de aire,
siga estas precauciones básicas:
CONSERVE ESTAS INSTRUCCIONES
Desconecte el acondicionador de aire antes de
darle servicio.
Use dos o más personas para mover e instalar el
acondicionador de aire.
Conecte a un contacto de pared de conexión a tierra de
3 terminales.
No quite el terminal de conexión a tierra.
No use un adaptador.
No use un cable eléctrico de extensión.
Cómo desechar la unidad:
■ Cuando necesite desechar la unidad, consulte con el distribuidor local o el centro de reciclaje local para pedir información
sobre cómo desecharla de manera responsable para el medio ambiente.
■ Recicle o deseche el material de embalaje del producto de manera responsable para el medio ambiente.
95111_WHAP121-142AW_portable_UCG.indb 28 5/25/16 3:30 PM
29
REQUISITOS DE INSTALACIÓN
Requisitos de instalación—Todos los
modelos
IMPORTANTE: Respete todos los códigos y las ordenanzas
vigentes.
Verique el lugar donde se instalará el acondicionador de aire.
Asegúrese de tener todo lo necesario para una instalación
correcta.
El lugar debe tener:
■ Un tomacorriente eléctrico con conexión a tierra a una
distancia máxima de 6 pies (183 cm) del lugar donde el cable
eléctrico sale del acondicionador de aire.
NOTA: no use un cable eléctrico de extensión.
■ Libertad de movimiento del aire en la habitación que desea
enfriar.
■ Una abertura con la amplitud suciente para el
acondicionador de aire. Se proveen piezas de instalación para
las ventanas de guillotina.
■ Deje al menos 10” (25cm) de separación con respecto a las
paredes y los muebles.
NOTA: no deben obstruirse las rejillas del gabinete. No coloque
la unidad delante de paños o cortinas: pueden bloquear la toma
de aire.
Piezas para la instalación
suministradas
Verique que todas las piezas estén incluidas en el paquete de
piezas.
Modelos de una sola ventilación
A. Panel de inserto de ventana
para una sola ventilación (1)
B. Manguera de ventilación
exible (1)
C. Conector redondo de
manguera de ventilación (1)
D. Conector de ventana de
manguera de ventilación (1)
A. Panel de inserto de ventana
para ventilación doble (1)
B. Manguera de ventilación
exible (2)
C. Conector redondo de
manguera de ventilación (2)
D. Conector de ventana de
manguera de ventilación (2)
A
B C D
A
B
C D
Modelos de ventilación doble
95111_WHAP121-142AW_portable_UCG.indb 29 5/25/16 3:30 PM

30
PIEZAS Y CARACTERÍSTICAS
Vista frontal
Vista posterior
(modelos de ventilación
doble)
Ruedas
Panel de control
Asa
Salida de aire
Vista posterior
(modelos de una sola ventilación)
Drenaje del tanque
interno
Conexión de drenaje
(para el modo
deshumidicador)
Salida de aire
(intercambiador
de calor)
Toma de aire
(condensador)
Toma de aire (evaporador)
Filtro de aire (detrás de la
rejilla)
Almacenaje
delcable
Drenaje del tanque
interno
Conexión de drenaje
(para el modo
deshumidicador)
Salida de aire
(intercambiador de calor)
Toma de aire
(condensador)
Toma de aire (evaporador)
Filtro de aire (detrás de la rejilla)
Almacenaje del cable
95111_WHAP121-142AW_portable_UCG.indb 30 5/25/16 3:30 PM
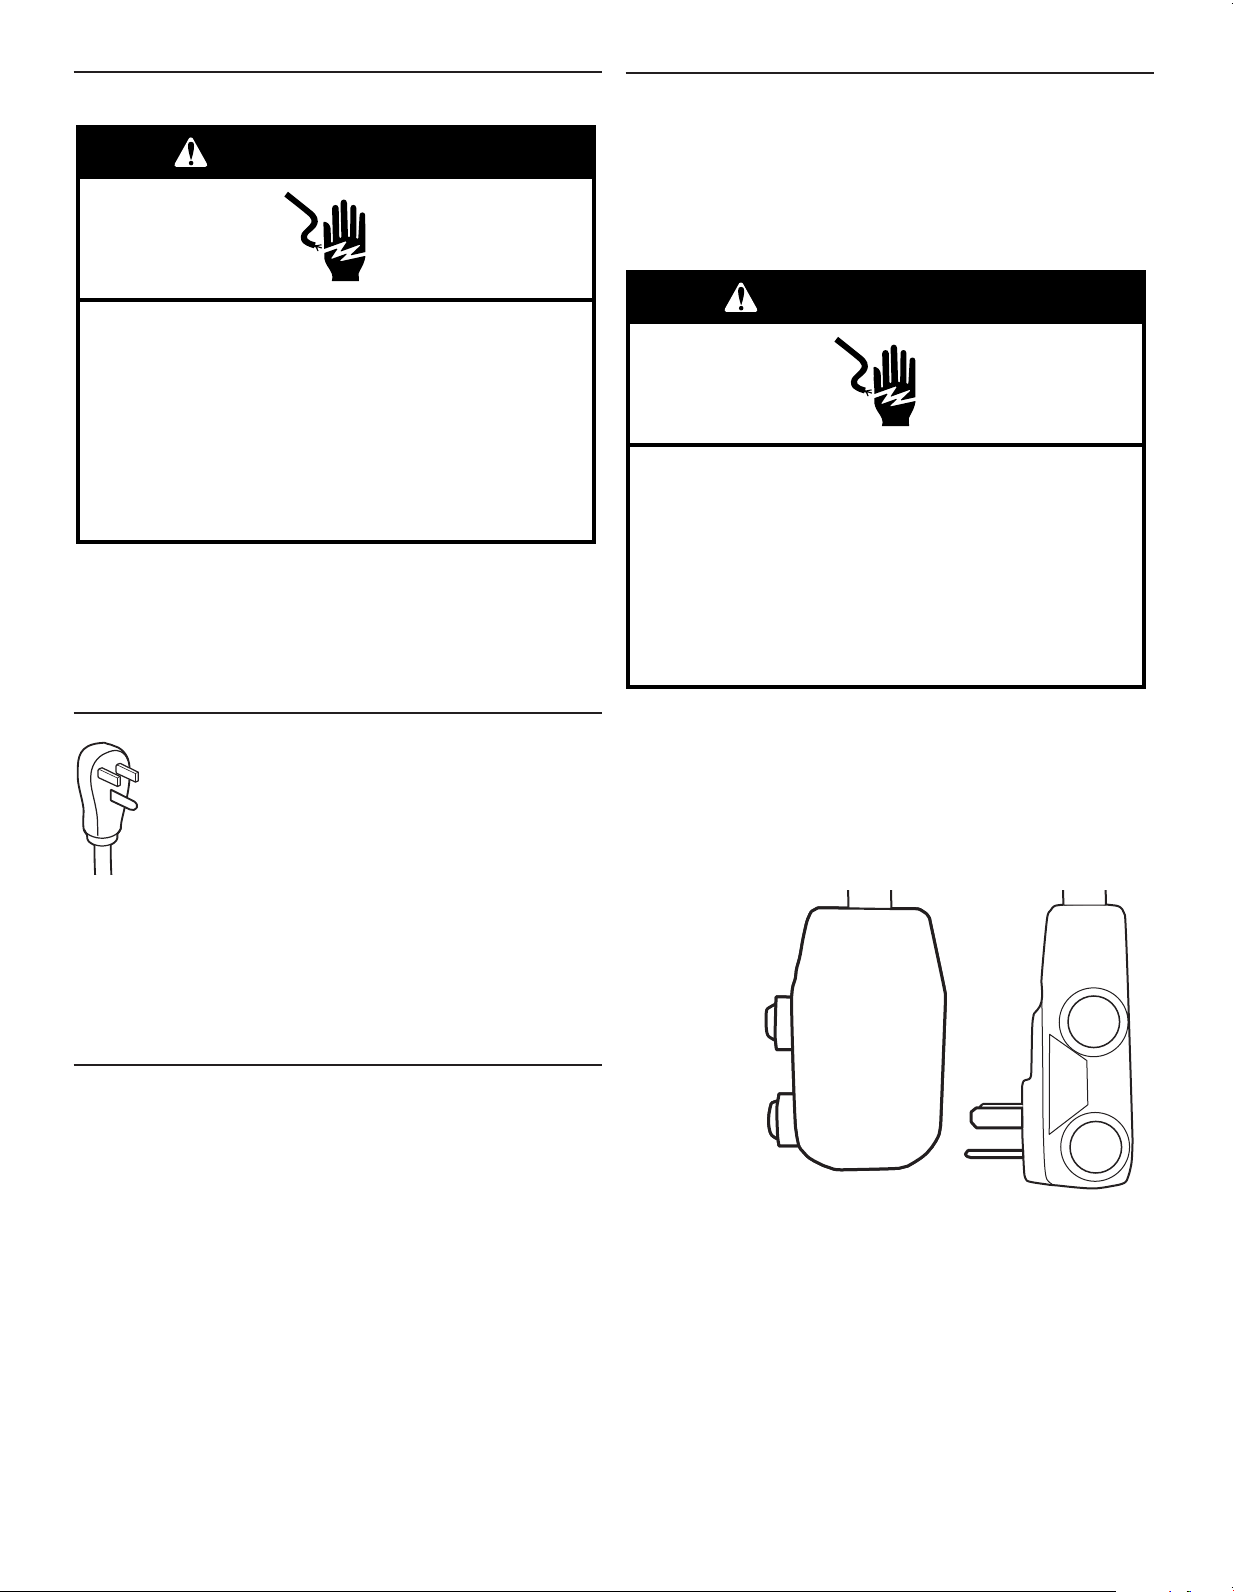
31
Requisitos eléctricos
■ 115voltios (103,5 mín. a 126,5 máx.)
■ 0 a 12 amperios
■ Disyuntor o fusible retardador de 15amperios
■ Si la unidad tiene una etiqueta que indica “Circuito
simple solamente”, úsela solo con un circuito
de tomacorriente único exclusivo. Si no hay
disponible un circuito de tomacorriente único
exclusivo, es responsabilidad del cliente hacer
instalar un circuito de tomacorriente único por un
electricista competente.
■ Si la unidad no tiene la etiqueta “Circuito
simple solamente”, se puede usar en cualquier
circuito secundario con la tensión correcta y la
clasicación adecuada de protección de corriente.
Método de conexión a tierra recomendado
Este acondicionador de aire debe estar conectado a tierra. Este
acondicionador de aire está equipado con un cable de suministro
eléctrico provisto de un enchufe con tres terminales. Para reducir
al mínimo el peligro de posibles choques eléctricos, el cable
debe estar enchufado en un tomacorriente de 3 terminales,
conectado a tierra de acuerdo con los códigos y las ordenanzas
locales. Si no hay disponible un tomacorriente concordante, es
responsabilidad del cliente hacer instalar un tomacorriente de
3 terminales con conexión a tierra por un instalador eléctrico
competente. Es responsabilidad del cliente:
■ Ponerse en contacto con un instalador eléctrico calicado.
■ Asegurarse de que la instalación eléctrica sea adecuada
y de conformidad con el Código Nacional Eléctrico,
ANSI/NFPA 70, última edición, y con todos los códigos
y las ordenanzas locales.
Pueden obtenerse copias de las normas señaladas en:
National Fire Protection Association
1 Batterymarch Park
Quincy, MA 02269
Cable de suministro de energía
NOTA: el cable de suministro eléctrico de su acondicionador de aire
puede diferir del que se muestra. Este acondicionador de aire portátil
está equipado con un cable de suministro eléctrico requerido por
UL. El cable de suministro eléctrico tiene componentes electrónicos
de avanzada que detectan corriente de fuga. Si el cable se rompe,
los componentes electrónicos detectan la corriente de fuga y la
energía se desconectará en una fracción de segundo.
ADVERTENCIA
Peligro de Choque Eléctrico
Conecte a un contacto de pared de conexión a tierra de
3 terminales.
No quite la terminal de conexión a tierra.
No use un adaptador.
No use un cable eléctrico de extensión.
No seguir estas instrucciones puede ocasionar
la muerte, incendio o choque eléctrico.
Para poner a prueba el cable de suministro eléctrico:
1. Enchufe el cable de suministro eléctrico en un tomacorriente
de 3 terminales con conexión a tierra.
2. Presione RESET (Restablecer) (en algunos modelos,
se encenderá una luz verde).
3. Presione TEST (Prueba).
4. Presione y suelte RESET (Restablecer).
El cable de suministro eléctrico está listo para el funcionamiento.
Requisitos eléctricos—Todos los modelos
Las clasicaciones eléctricas para su acondicionador de aire
están enumeradas en la etiqueta del número de modelo y de
serie. La etiqueta con el número de modelo y de serie está en
la parte posterior del gabinete del acondicionador de aire.
Los requisitos eléctricos especícos se indican en la tabla
“Requisitos eléctricos del cable de suministro eléctrico”. Respete
los requisitos para el tipo de enchufe que se muestran en la tabla.
ADVERTENCIA
Peligro de Choque Eléctrico
Conecte a un contacto de pared de conexión a tierra de
3 terminales.
No quite la terminal de conexión a tierra.
No use un adaptador.
No use un cable eléctrico de extensión.
No seguir estas instrucciones puede ocasionar
la muerte, incendio o choque eléctrico.
A. Botón Test (Prueba)
B. Botón Reset
(Restablecer)
NOTAS:
■ El botón Reset (Restablecer) debe estar presionado para el
funcionamiento adecuado.
■ El cable de suministro eléctrico se debe reemplazar si no se
desconecta cuando se presiona el botón de prueba o si no se
restablece.
■ No use el cable de suministro eléctrico como interruptor para
apagar/encender. El cable de suministro eléctrico ha sido
diseñado como un dispositivo de protección.
■ Un cable de suministro eléctrico se debe reemplazar con un
nuevo cable de suministro eléctrico obtenido del fabricante
del producto y no se debe reparar.
■ El cable de suministro eléctrico no tiene piezas que pueda
reparar el usuario. Todos los reclamos por desempeño y de
garantía quedan anulados si se abre el estuche resistente a
manipulaciones no autorizadas.
TEST
RESET
TEST
RESET
A
A
B
B
95111_WHAP121-142AW_portable_UCG.indb 31 5/25/16 3:30 PM

32
Prepare el acondicionador de aire para
la instalación
INSTRUCCIONES DE INSTALACIÓN
ADVERTENCIA
Peligro de Peso Excesivo
Use dos o más personas para mover e instalar
el acondicionador de aire.
No seguir esta instrucción puede ocasionar una lesión
en la espalda u otro tipo de lesiones.
Retire los materiales de empaque:
■ Manipule con cuidado el acondicionador de aire mientras
lo desempaca.
■ Retire la parte superior de la caja y levante el acondicionador
de aire de la plataforma de la base.
■ Retire la cinta y los residuos de adhesivo de las supercies
antes de encender el acondicionador de aire. Frote un poco
de detergente líquido para vajilla sobre el adhesivo con los
dedos. Limpie con un paño húmedo y seque.
■ No use instrumentos losos, alcohol para fricciones, líquidos
inamables o productos de limpieza abrasivos para eliminar
los restos de cinta o pegamento. Esos productos pueden
dañar la supercie de su acondicionador de aire.
■ Asegúrese de revisar todo el material de empaque en busca
de piezas antes de desecharlo.
■ Deseche o recicle el material de empaque de manera
adecuada.
Ubique el panel deslizante para ventana en la abertura
de la ventana.
Instalación del panel deslizante para
ventana
Se muestra el modelo de una sola ventilación. La instalación de
modelos con ventilación doble es igual.
1.
Ubique el panel deslizante en la ventana
Panel deslizante
Extienda la extensión del panel deslizante hasta que cubra la
abertura de la ventana. Asegúrese de que no se cubra la abertura
de la ventilación en el panel deslizante.
Apriete la tuercas mariposa de manera ajustada.
Si la ventana es demasiado angosta para encajar en el panel
deslizante sin bloquear la abertura de la ventilación:
1. Aoje la tuerca mariposa y retire del panel deslizante la
extensión del panel deslizante.
2. Use una sierra manual para cortar la extensión del panel
deslizante de acuerdo con el tamaño de la abertura de la
ventana. Deje la mayor supercie de panel que sea posible sin
cubrir las aberturas de ventilación en el panel deslizante.
3. Deslice la extensión del panel deslizante nuevamente dentro
del panel deslizante; asegúrese de que la cabeza del tornillo
de retención encaje en la ranura en T en la extensión del panel
deslizante.
Requisitos de la abertura de la ventana
Este acondicionador de aire se puede usar con ventanas de
guillotina estándar y con ventanas corredizas verticales.
Medidas de la abertura de una ventana de guillotina:
■ Ancho de la abertura de 24
5
⁄8" (63 cm) como mínimo
a 47
1
⁄4" (1,2 m) como máximo
■ Altura de la abertura de 4
3
⁄4" (12 cm) como mínimo
Medidas de la abertura de una ventana corrediza vertical:
■ Ancho de la abertura de 4
3
⁄4" (12 cm) como mínimo
■ Altura de la abertura de 24
5
⁄8" (63 cm) como mínimo
a 47
1
⁄4" (1,2 m) como máximo
IMPORTANTE: Para aberturas de ventana entre 24
5
⁄8" (63cm)
y 38" (99cm) [modelos de una sola ventilación] o 45
3
⁄4" (115cm)
[modelos de ventilación doble), será necesario cortar el panel
deslizante para que encaje en la abertura de la ventana.
2. Extienda y asegure el panel deslizante
Tuerca mariposa
Extensión del
panel deslizante
95111_WHAP121-142AW_portable_UCG.indb 32 5/25/16 3:30 PM
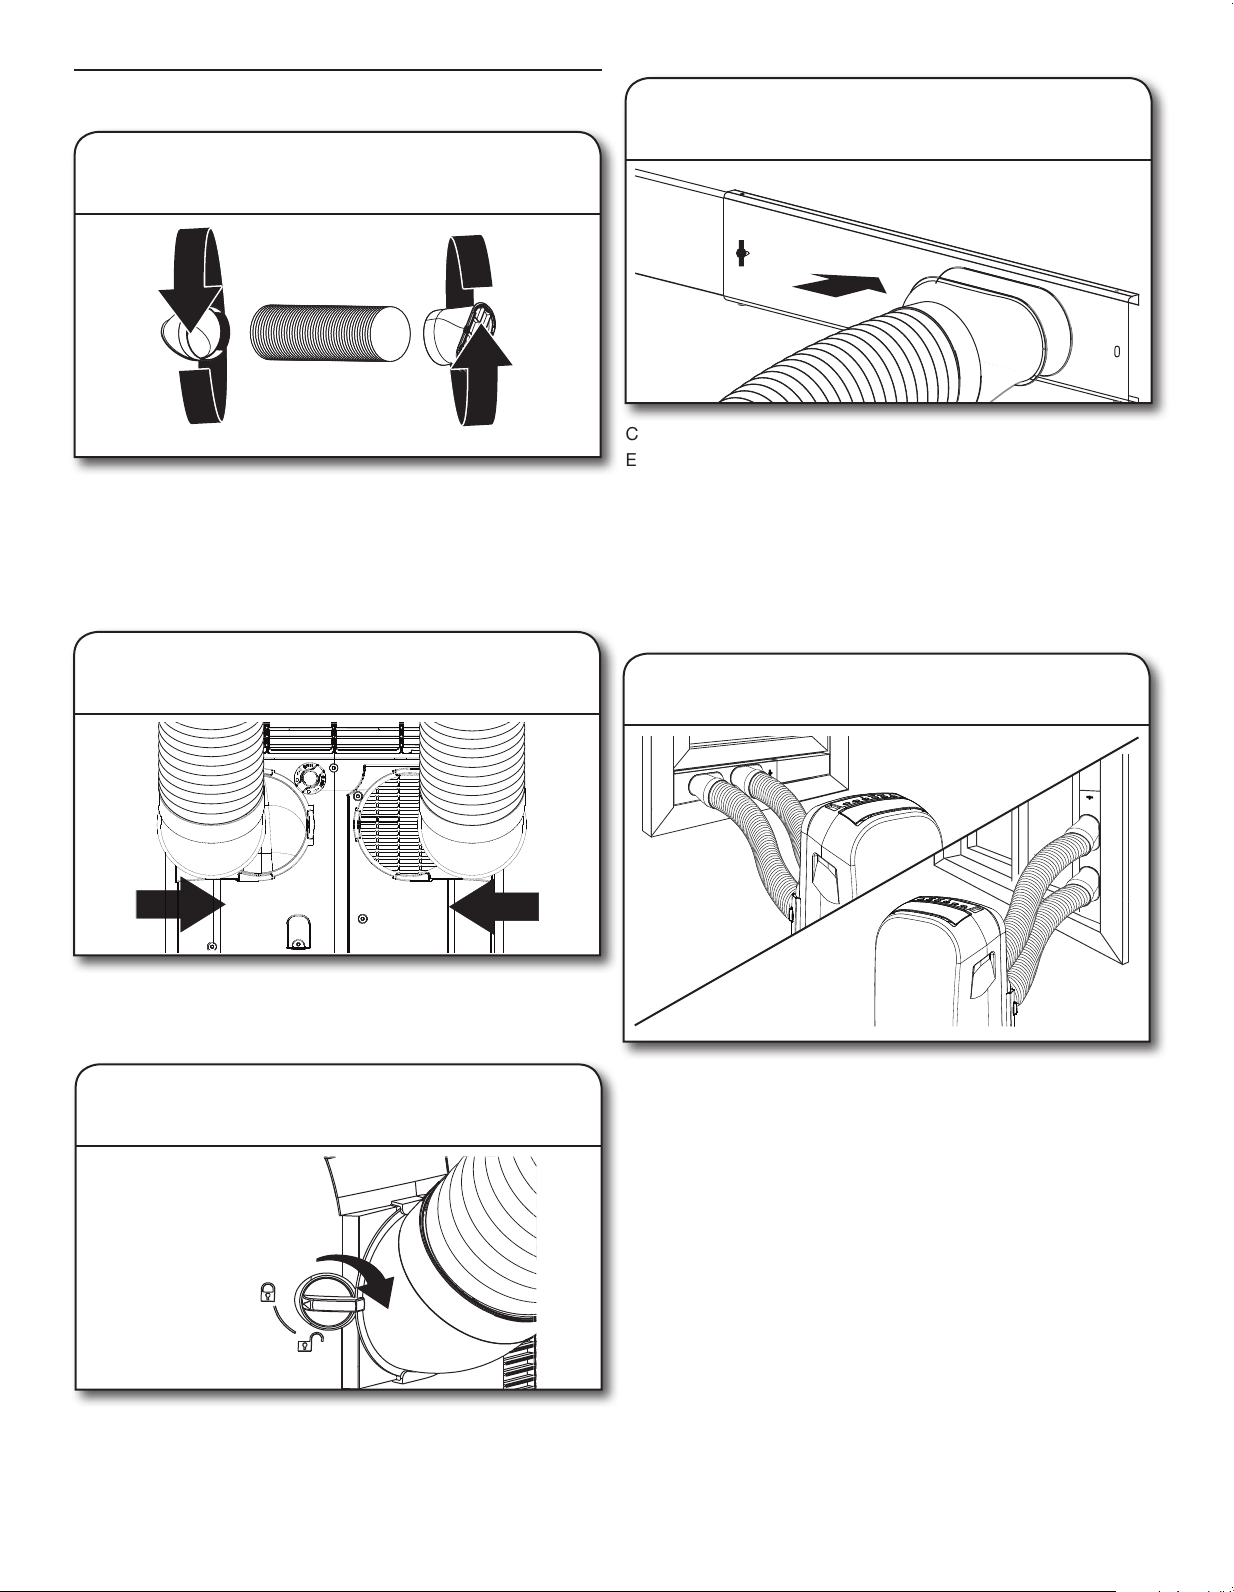
33
Deslice el extremo redondo de las mangueras de ventilación
dentro de los puertos para manguera en el acondicionador de aire.
Se muestra el modelo con ventilación doble.
2. Fije las mangueras de ventilación al
acondicionador de aire
Coloque el acondicionador de aire en la ubicación deseada.
Extienda la manguera de ventilación lo suciente como para
que llegue desde el acondicionador de aire hasta la ventana.
Asegúrese de que no haya curvas cerradas ni aplastamientos en
la manguera.
Presione el extremo del conector de ventana de la manguera de
ventilación dentro de la abertura del panel deslizante como se
muestra. Se enganchará al encajar en su lugar.
Se muestra el modelo de una sola ventilación. Para modelos con
ventilación doble, vea a continuación cómo colocar la manguera.
4. Fije las mangueras de ventilación al
panel deslizante
Conector de
ventana
Panel deslizante
Extienda un poco ambos extremos de la manguera de ventilación.
Inserte un conector redondo en sentido horario en un extremo de
la manguera de ventilación. Inserte un conector de ventana en
sentido horario en el otro extremo de la manguera de ventilación.
Para modelos con ventilación doble, repita para la segunda
manguera de ventilación.
1. Ensamble las mangueras de
ventilación
Manguera de
ventilación
Conector
redondo
Conector
de
ventana
Ensamble las mangueras de ventilación
3. Trabe las mangueras de ventilación
en su lugar
Gire la perilla para trabar hasta la posición LOCKED (Trabado)
para asegurar la manguera de ventilación en su lugar. Para
modelos con ventilación doble, repita para el otro lado.
Instalaciones en
ventanas verticales
Instalaciones en
ventanas estándar
Colocación de las mangueras de
ventilación dobles
95111_WHAP121-142AW_portable_UCG.indb 33 5/25/16 3:31 PM
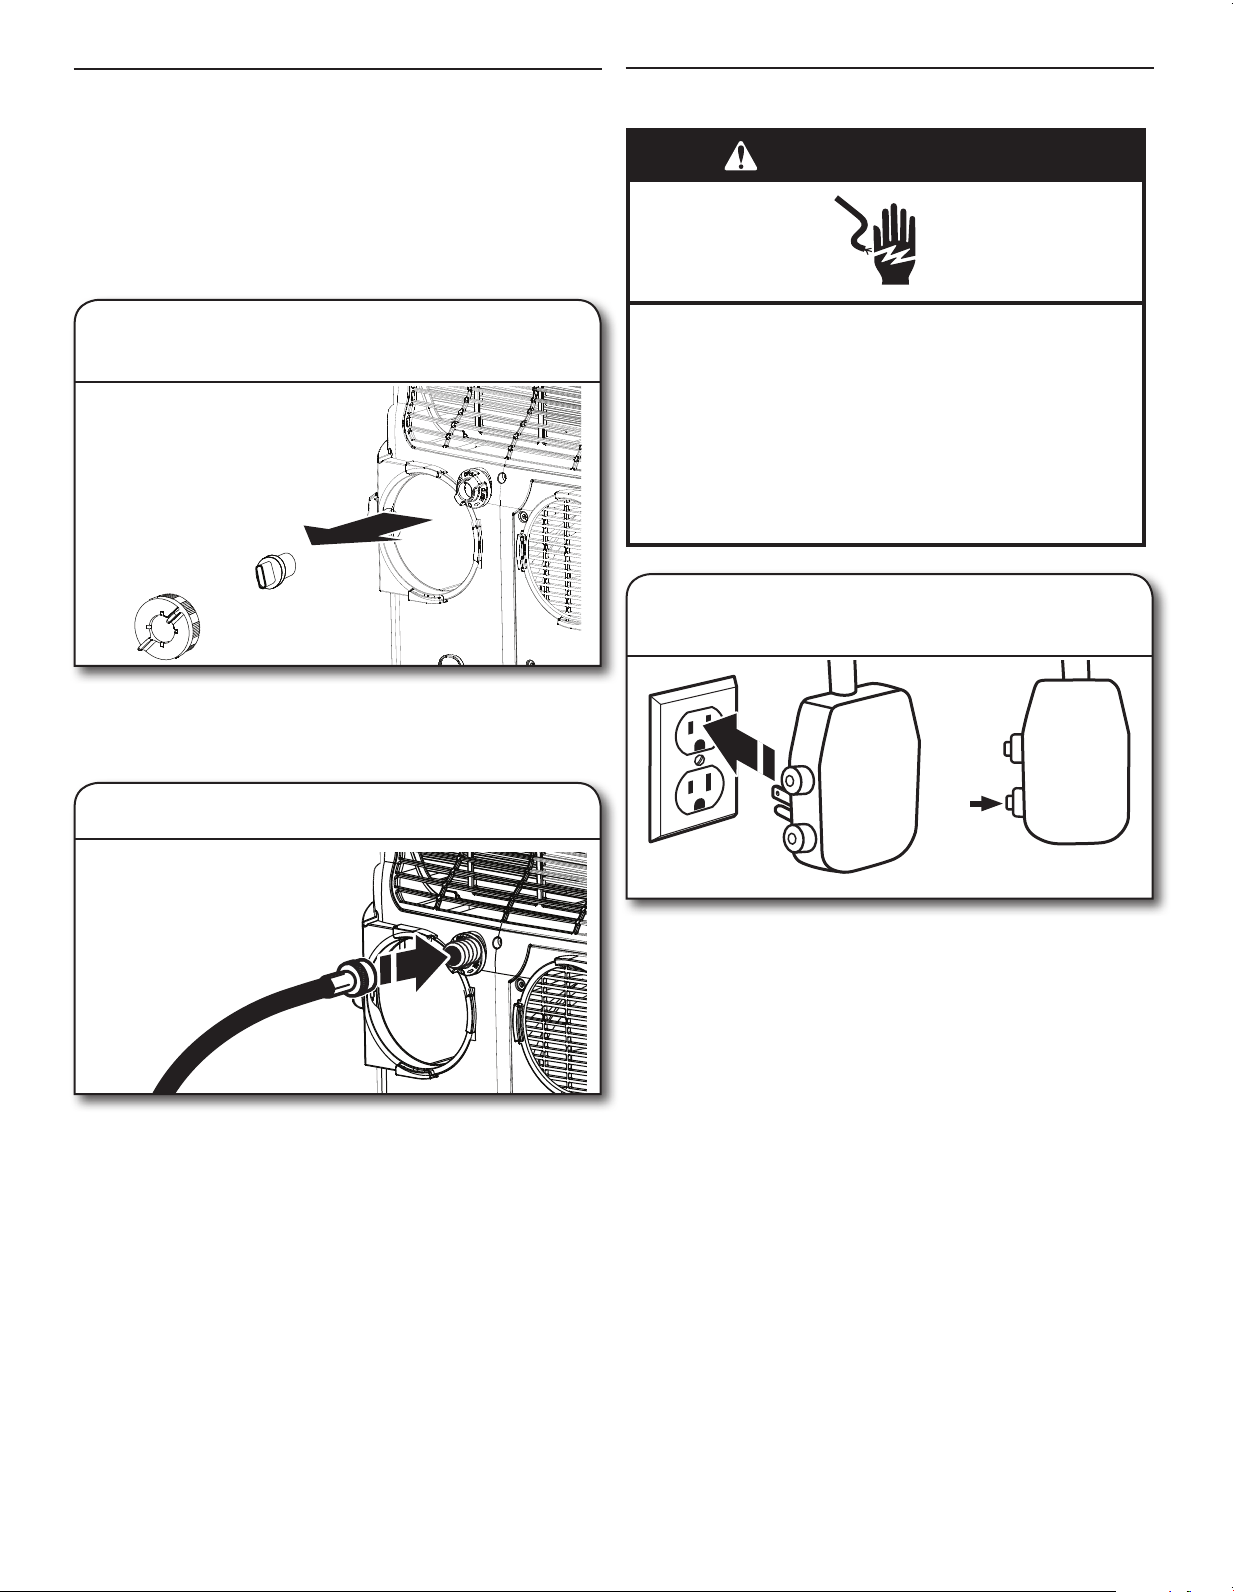
34
Gire el tapón del puerto de desagüe en sentido antihorario para
retirarlo; después, retire el tapón de desagüe de caucho.
Guárdelo en un lugar seguro para usarlo en el futuro.
1. Retire el tapón de la conexión de
desagüe
Conexión de mangueras de desagüe
(opcional)
Cuando use el acondicionador de aire para deshumidicar
únicamente, puede jar una manguera (no se incluye) para drenar
el agua a un desagüe del piso.
La conexión de desagüe usa un conector de manguera de jardín
estándar. La manguera de desagüe debe estar en el puerto de
desagüe en la parte posterior del acondicionador de aire.
Inserte la manguera de desagüe (no se incluye) en la conexión de
desagüe en el acondicionador de aire. Inserte el otro extremo de
la manguera de desagüe en un desagüe del piso u otro desagüe
adecuado.
2. Instale la manguera de desagüe
TEST
RESET
TEST
RESET
1. Enchufe en un tomacorriente de
3terminales con conexión a tierra
Enchufe en un tomacorriente de 3 terminales con conexión a tierra.
Presione el botón RESET (Restablecer) en el cable de suministro
eléctrico.
Vea “Requisitos eléctricos”.
ADVERTENCIA
Peligro de Choque Eléctrico
Conecte a un contacto de pared de conexión a tierra de
3 terminales.
No quite la terminal de conexión a tierra.
No use un adaptador.
No use un cable eléctrico de extensión.
No seguir estas instrucciones puede ocasionar
la muerte, incendio o choque eléctrico.
Conexión Eléctrica
95111_WHAP121-142AW_portable_UCG.indb 34 5/25/16 3:31 PM
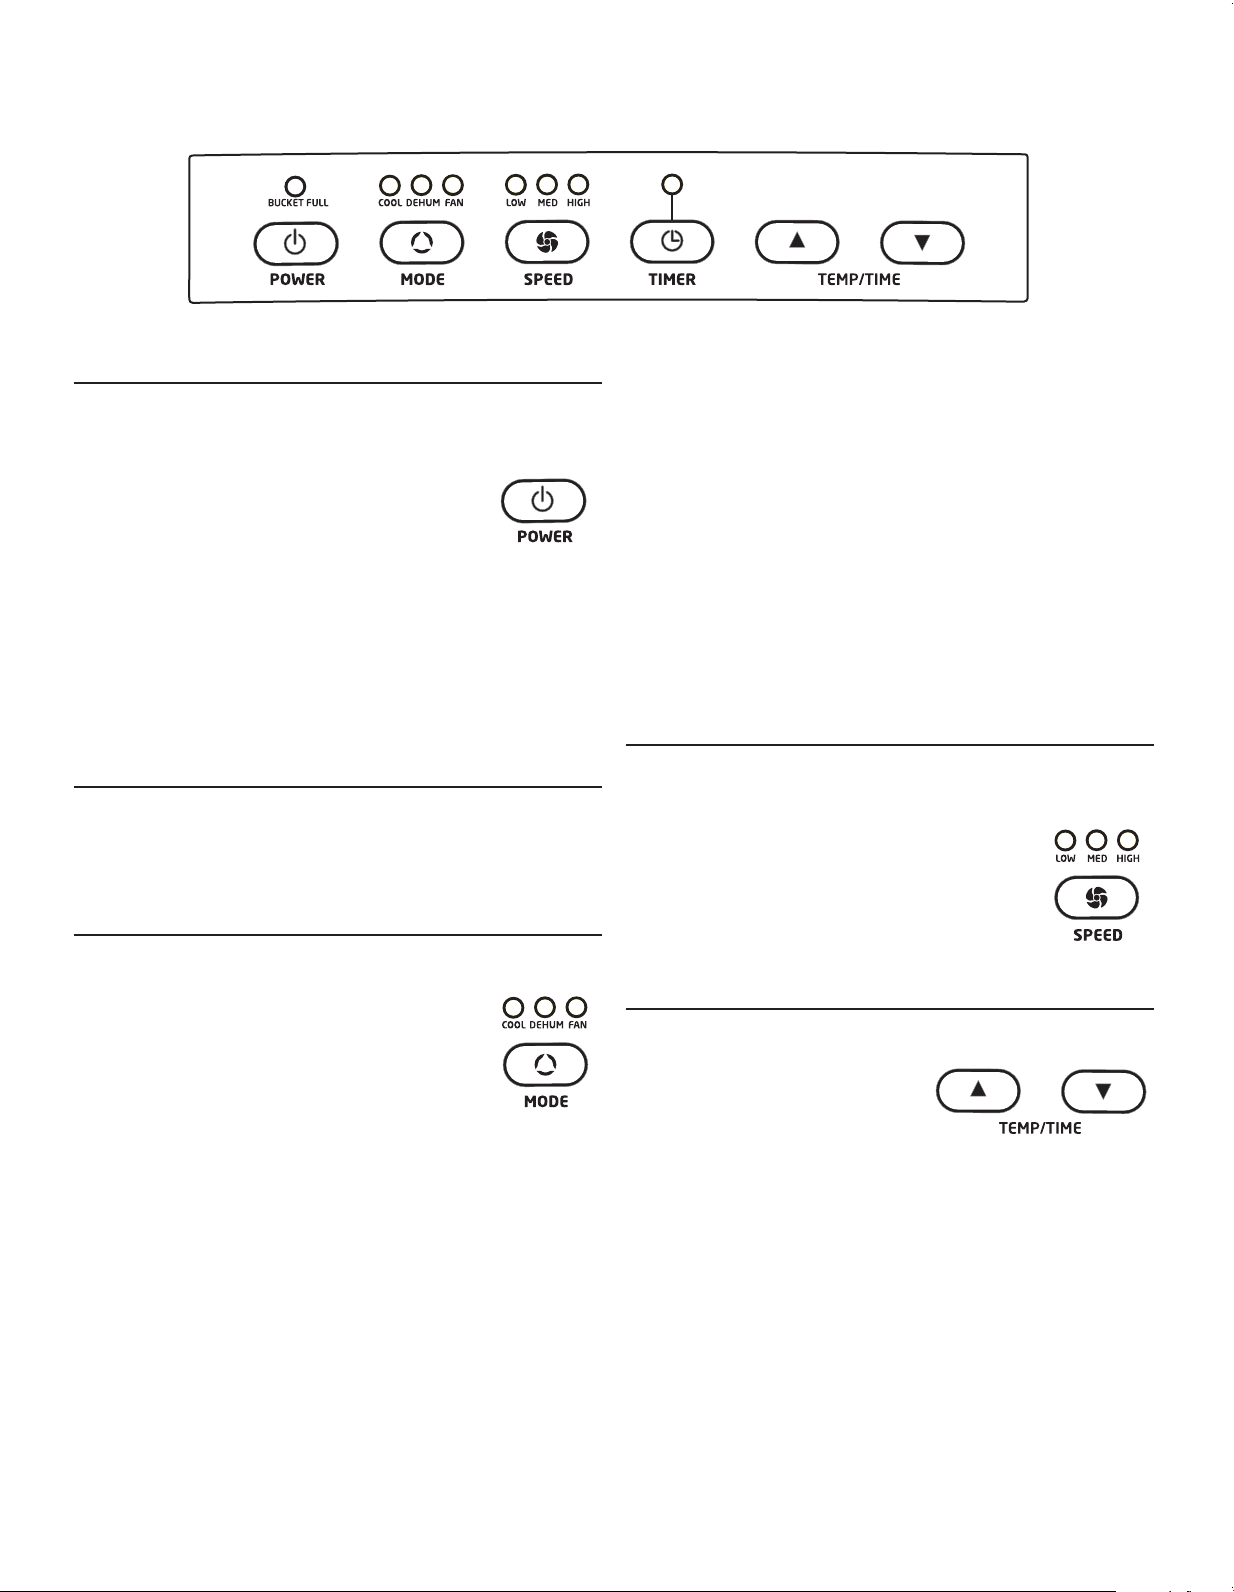
35
USO DE SU ACONDICIONADOR DE AIRE
ENCENDIDO o APAGADO del
acondicionador de aire
Presione POWER (Encendido) para ENCENDER o
APAGAR el acondicionador de aire.
IMPORTANTE:
■ Si apaga el acondicionador de aire, espere al
menos 3 minutos antes de volver a encenderlo.
Eso evitará que se queme un fusible del hogar o que se
desconecte un disyuntor a causa del acondicionador de aire.
■ No intente operar el acondicionador de aire en el modo Cool
(Enfriar) cuando la temperatura exterior sea menor de 65°F
(18°C). El serpentín del evaporador interior se congelará y el
acondicionador de aire no funcionará correctamente.
NOTA: en caso de un corte de electricidad, el acondicionador de
aire funcionará con los ajustes previos cuando se restablezca la
electricidad.
Pantalla
Durante el funcionamiento normal, la pantalla mostrará la
temperatura ambiente actual. Cuando se presionan los botones
t y s de TEMP/TIME (Temperatura/Tiempo), la unidad muestra
la temperatura o el tiempo de retraso que se ha jado.
Selección del modo
El botón Pode (Modo) tiene tres ajustes:
■ Enfriar
■ Deshumidicar
■ Ventilador
Presione el botón MODE (Modo) hasta que
se ilumine la luz indicadora encima del ajuste
deseado.
Modo de enfriamiento (COOL [Enfriar])
Durante el modo de enfriamiento, el acondicionador de aire enfría
el aire de la habitación y ventila el aire caliente hacia el exterior a
través de las mangueras de ventilación. Regule la velocidad del
ventilador y el ajuste de la temperatura de acuerdo con el nivel
de comodidad que desee. El rango de ajuste de la temperatura
es de 61°F a 90°F (de 16°C a 32°C).
IMPORTANTE: Las mangueras de ventilación deben descargar al
exterior cuando se usa el modo de enfriamiento.
Modo de deshumidificar (DEHUM
[Deshumidificar])
El aire se deshumidica a medida que atraviesa la unidad,
sin que se encuentre en el modo de enfriamiento completo.
Elventilador funcionará a velocidad media.
La velocidad del ventilador no puede ajustarse en el modo de
deshumidicar.
IMPORTANTE: Las mangueras de ventilación deben descargar al
exterior cuando se usa el modo de deshumidicar.
Modo de ventilador (FAN [Ventilador])
En este modo, solo funcionará el ventilador. El aire circula por la
habitación sin enfriarse.
NOTA: no es necesario que el acondicionador de aire tenga
ventilación al exterior en el modo Fan (Ventilador).
Cómo seleccionar la velocidad del
ventilador
La velocidad del ventilador tiene 3 ajustes:
■ LOW (Baja)
■ MED (Media)
■ HIGH (Alta)
Presione el botón SPEED (Velocidad) hasta que
se ilumine la luz indicadora encima del ajuste
deseado.
Cómo regular la temperatura
Presione los botones s y t de
TEMP/TIME (Temperatura/Tiempo)
para subir o bajar la temperatura de
ajuste en incrementos de 1°. Elrango
de ajuste de la temperatura es de
61°F a 90°F (de 16°C a 32°C). Después de 10 segundos, la
pantalla volverá a la temperatura ambiente actual.
NOTA: la temperatura solo se puede regular en el modo de
enfriamiento.
En el modo TIMER (Temporizador), si se presionan los botones s
y t de TEMP/TIME (Temperatura/Tiempo), se regulará el tiempo
de retraso para que el acondicionador de aire se encienda o se
apague.
Cómo cambiar entre Fahrenheit y Celsius:
Presione los botones s y t simultáneamente para alternar las
unidades de temperatura que se visualizan entre °F y °C.
La apariencia puede variar.
95111_WHAP121-142AW_portable_UCG.indb 35 5/25/16 3:31 PM
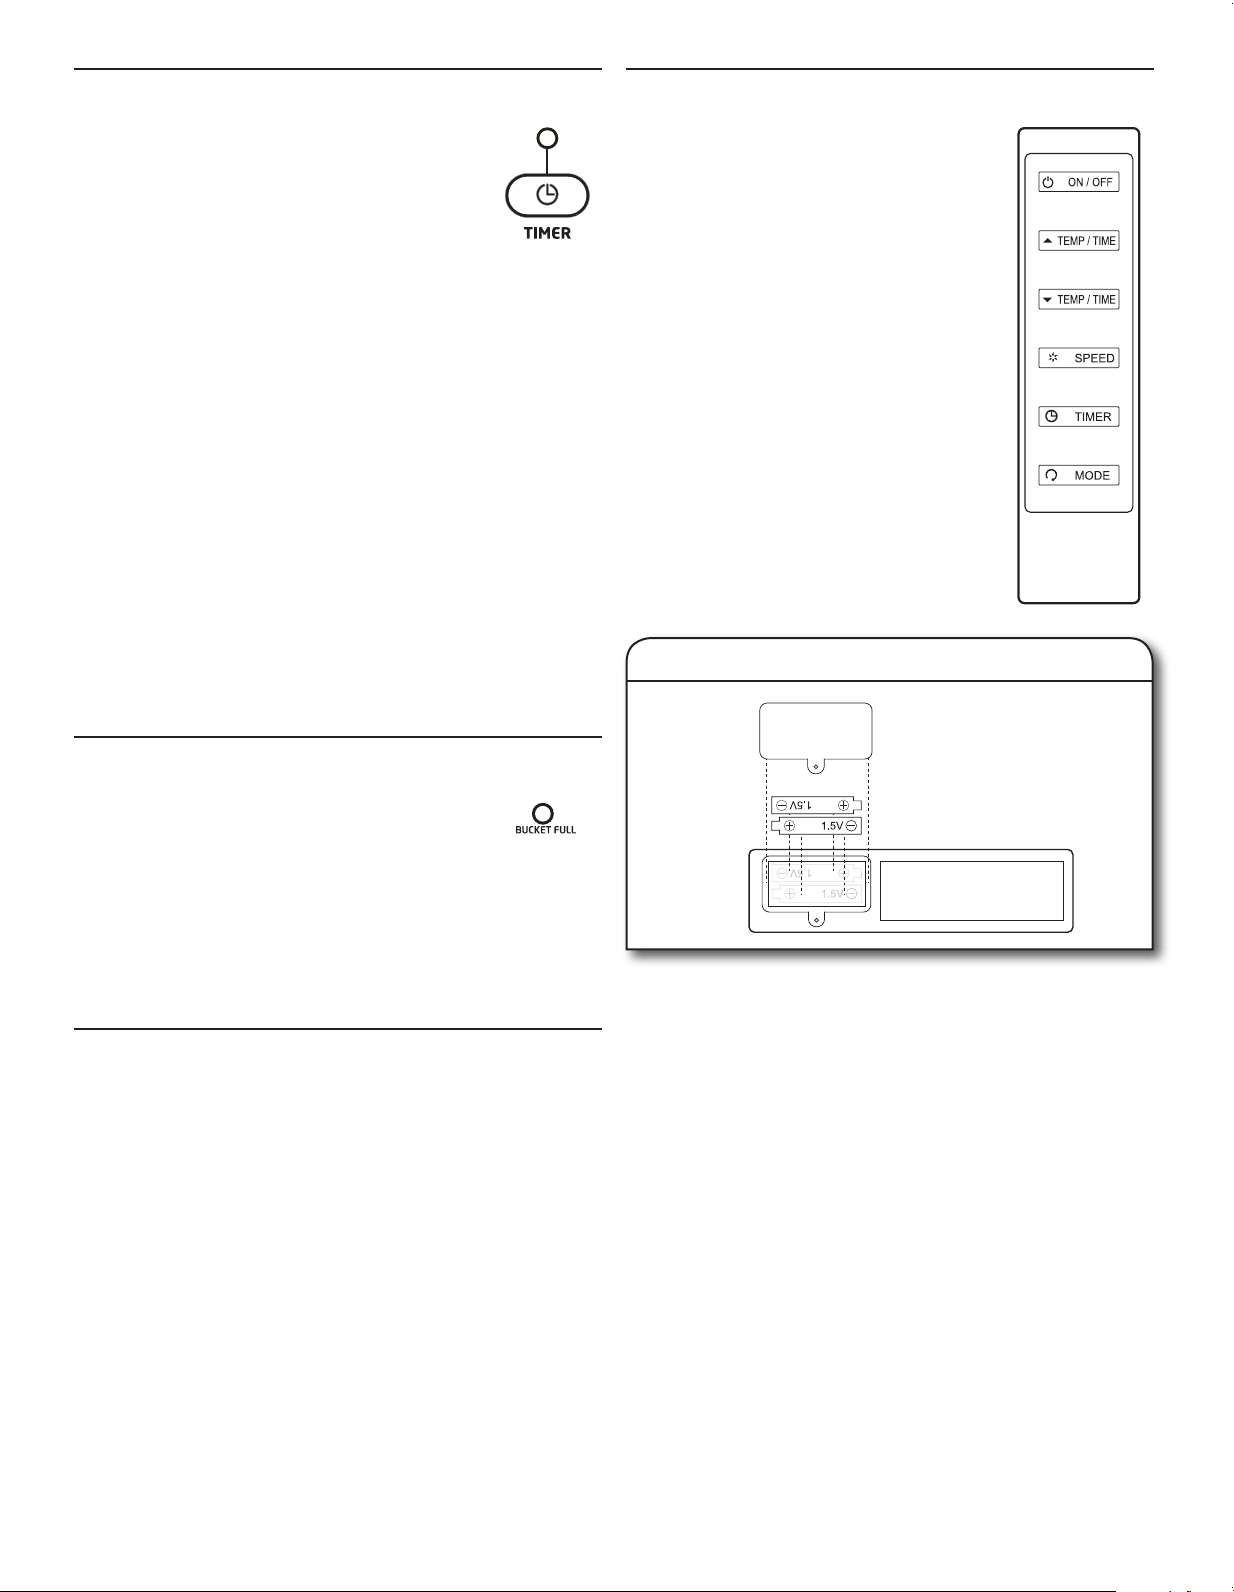
36
Uso del temporizador
Apagado automático
Se puede ajustar el acondicionador de aire para
que se apague automáticamente después de un
número de horas establecido, hasta 24 horas.
Para ajustar el apagado automático:
1. Con el acondicionador de aire en el modo de
ventilador, presione TIMER (Temporizador).
2. Use los botones s y t de TEMP/TIME (Temperatura/Tiempo)
para seleccionar el número de horas, hasta 24 horas.
3. Después del tiempo que se haya ajustado, el acondicionador
de aire se apagará automáticamente.
Encendido automático
Se puede ajustar el acondicionador de aire con el temporizador
para que se encienda automáticamente después de un número
de horas establecido.
1. Con el acondicionador de aire APAGADO, presione TIMER
(Temporizador).
2. Use los botones s y t de TEMP/TIME (Temperatura/Tiempo)
para seleccionar el número de horas que deben transcurrir
antes de que el acondicionador de aire se encienda,
hasta 24horas. La luz indicadora TIMER (Temporizador)
permanecerá iluminada para indicar que el temporizador está
ajustado.
3. Después del tiempo establecido, el acondicionador de aire se
encenderá automáticamente en el modo de enfriamiento con
los últimos ajustes usados para la temperatura y el ventilador.
Otras funciones
Indicador BUCKET FULL
(Baldelleno)
Este acondicionador de aire tiene un tanque interno para
almacenar el agua acumulada del condensador. Normalmente,
esta agua se evapora y se descarga al exterior. Sin embargo,
en períodos de humedad alta, es posible que el tanque interno
se llene. Si esto sucede, se iluminará la luz indicadora Bucket
Full (Balde lleno) y el acondicionador de aire se apagará hasta
que se vacíe el tanque interno. Consulte la sección “Cuidado y
limpieza”.
Cómo usar el control remoto
Las funciones del control remoto operan igual
que los controles táctiles del panel de control
del acondicionador de aire.
NOTA:
■ No permita que el control remoto se caiga: puede dañarse.
■ Retire las baterías si el control remoto no se usa durante un
mes o más tiempo.
■ Deseche las baterías usadas de manera responsable.
NOTA: el control remoto usa dos baterías AAA de
1,5V (seincluyen). Reemplace las baterías después de
aproximadamente 6 meses de uso.
Para retirar las baterías:
Retire la cubierta del compartimiento de las baterías y retire las
baterías.
Para volver a instalar las baterías:
Coloque las baterías dentro del compartimiento de las baterías
como se muestra; después, vuelva a instalar la cubierta.
Reemplazo de las baterías del control remoto
Sonidos operativos normales
Cuando el acondicionador de aire está funcionando
normalmente, es posible que oiga sonidos como:
■ Gotas de agua que golpean el condensador y producen una
detonación o un chasquido. Las gotas de agua ayudan a
enfriar el condensador.
■ Movimiento de aire del ventilador.
■ Chasquidos del ciclo del termostato.
■ Vibraciones o ruido causados por la construcción deciente
de la pared o de la ventana.
■ Un zumbido agudo o un ruido pulsante producido por el ciclo
de encendido y apagado del moderno compresor de alta
eciencia.
NOTA: la apariencia del
control remoto puede
variar.
95111_WHAP121-142AW_portable_UCG.indb 36 5/25/16 3:31 PM
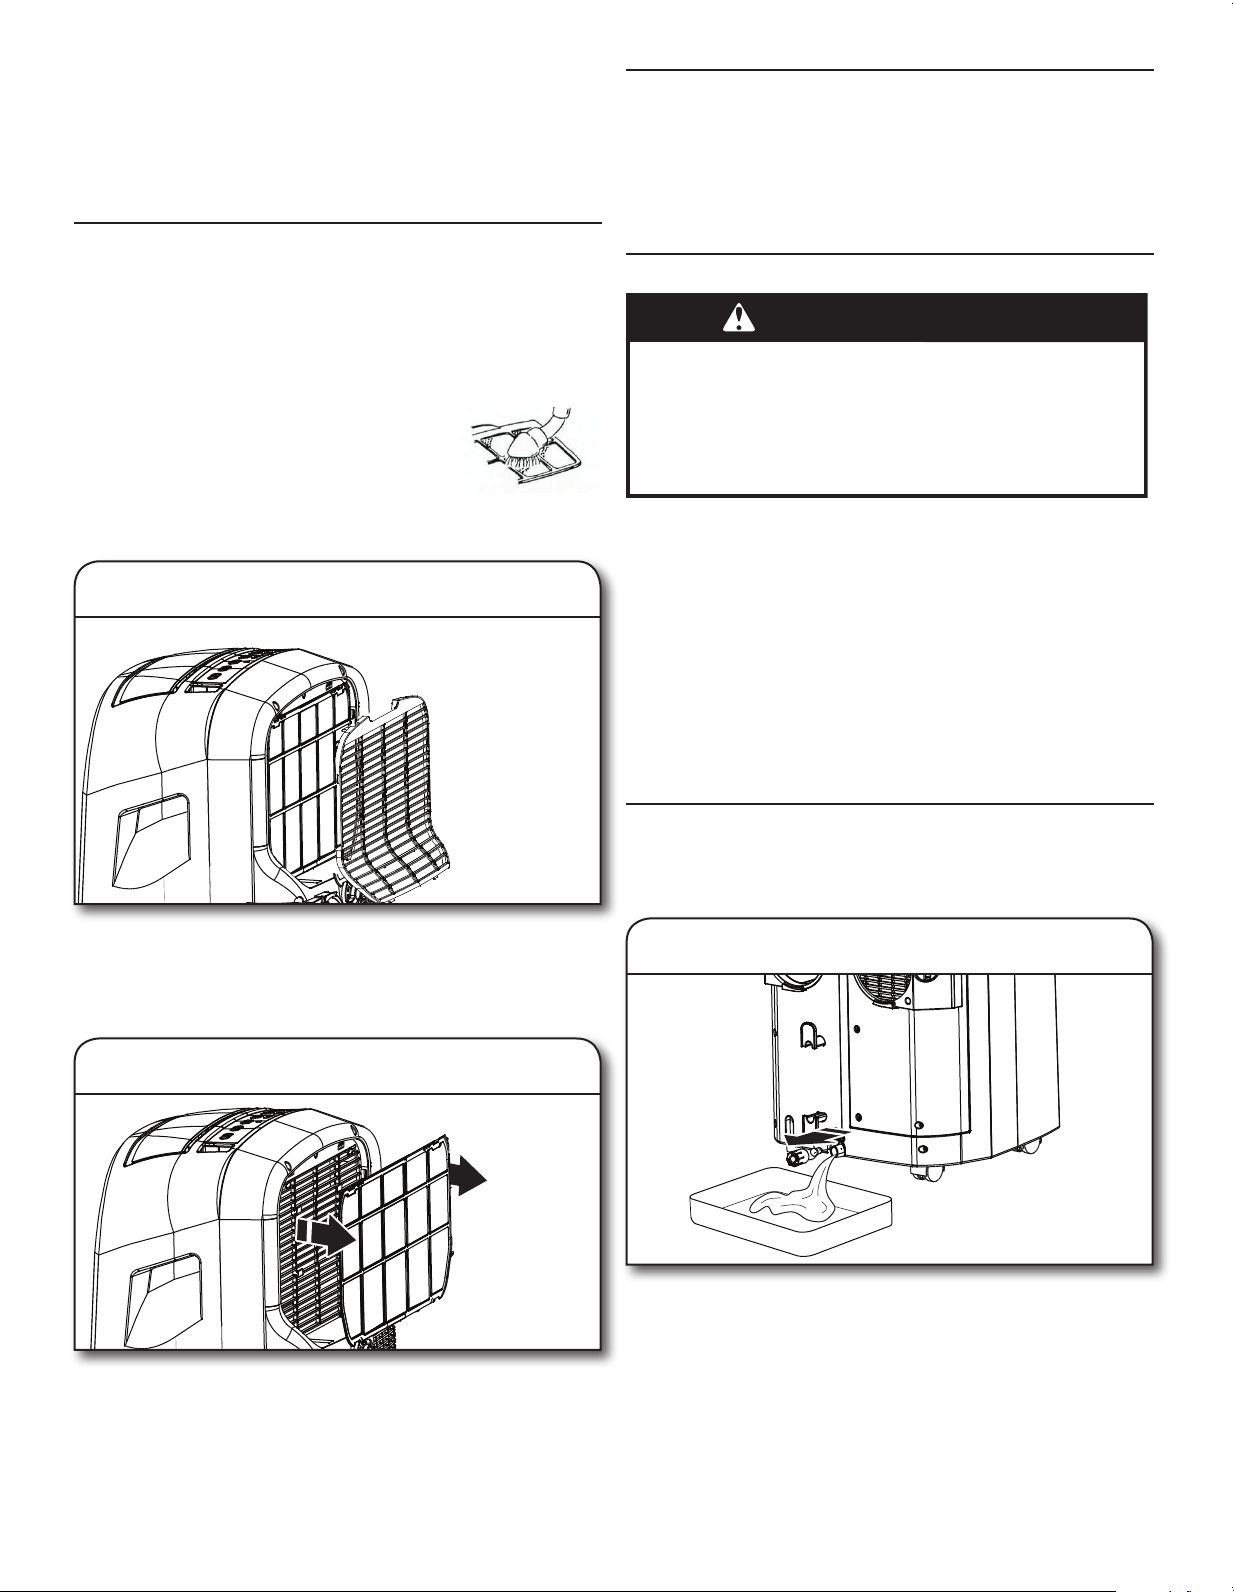
37
Su nuevo acondicionador de aire está diseñado para brindarle
muchos años de servicio conable. Esta sección le ofrece
información acerca de la limpieza y el cuidado adecuados de su
acondicionador de aire.
Tire del ltro de aire para retirarlo del acondicionador de aire.
Cómo volver a instalar el filtro de aire:
1. Vuelva a instalar el ltro de aire en el acondicionador de aire.
2. Inserte las lengüetas en la parte inferior de la cubierta de la
toma de aire dentro de las ranuras en el acondicionador de
aire; después, presione la parte superior en su lugar hasta que
se trabe con un chasquido.
CUIDADO Y LIMPIEZA
1.
Cómo retirar la cubierta de la toma de aire
1. Apague el acondicionador de aire.
2. Para retirar la cubierta de la toma de aire, tire de la parte
superior de la cubierta para quitarla del acondicionador de
aire; después, levante las lengüetas de la parte inferior para
retirarlas de las ranuras del acondicionador de aire.
2. Cómo retirar el ltro de aire
Limpieza del gabinete del
acondicionador de aire
1. Apague el acondicionador de aire.
2. Limpie el gabinete del acondicionador de aire con un paño
suave húmedo.
3. Seque con un paño suave.
Limpieza del ltro de aire
El ltro de aire se puede desmontar para facilitar su limpieza. Unltro
limpio ayuda a quitar el polvo, las pelusas y otras partículas del aire
y es importante para una óptima eciencia del enfriamiento y la
operación. Revise el ltro cada 2 semanas para ver si debe limpiarlo.
NOTA: para un rendimiento óptimo, no haga funcionar el
acondicionador de aire si el ltro no está colocado en su lugar.
Limpie el ltro de aire con una aspiradora.
Siestá muy sucio, lave el ltro con agua tibia y
un detergente suave.
NOTA: no lave el ltro de aire en la lavavajillas
ni use limpiadores químicos; eso puede dañar
el ltro. Seque el ltro al aire antes de colocarlo nuevamente,
para asegurar la máxima eciencia.
Cómo desaguar el tanque interno
Si el acondicionador de aire se apaga y la luz indicadora
BUCKET FULL (Balde lleno) está iluminada, es necesario vaciar el
tanque interno antes de volver a usar el acondicionador de aire.
1. Cómo desaguar el tanque interno
1. Apague el acondicionador de aire y desenchúfelo.
2. Coloque una bandeja o un balde pequeño debajo del desagüe.
3. Gire en sentido antihorario el retén del tapón de desagüe para
retirarlo.
4. Retire el tapón de desagüe de caucho.
5. Deje que el agua desagüe en la bandeja o en el balde.
6. Para volver a instalar el tapón de desagüe de caucho,
presiónelo con rmeza en su lugar.
7. Inserte el retén del tapón de drenaje en sentido horario sobre
el drenaje y, después, apriete con la mano.
Cómo guardar el acondicionador de aire
Si el acondicionador de aire no se usará durante un período
prolongado, prepárelo para guardarlo con los pasos siguientes.
1. Haga funcionar el acondicionador de aire en modo Fan
(Ventilador) algunas horas para que se seque toda la humedad
de los serpentines.
2. Apague el acondicionador de aire y desenchúfelo. Retire las
baterías del control remoto.
3. Retire el tapón de desagüe del tanque interno para extraer
y desaguar del tanque toda el agua restante. Vea “Cómo
desaguar el tanque interno”.
4. Retire, limpie y vuelva a instalar el ltro de aire.
5. Retire las mangueras de aire y el panel deslizante de ventana
y guárdelos en un lugar seguro.
ADVERTENCIA
Peligro de Peso Excesivo
Use dos o más personas para mover e instalar
el acondicionador de aire.
No seguir esta instrucción puede ocasionar una lesión
en la espalda u otro tipo de lesiones.
95111_WHAP121-142AW_portable_UCG.indb 37 5/25/16 3:31 PM
38
■ El cable de suministro eléctrico está desenchufado. Enchufe
en un tomacorriente de 3 terminales con conexión a tierra.
Vea “Requisitos eléctricos”.
■ El cable de suministro eléctrico se ha desconectado (el botón
Reset (Restablecer) ha saltado). Presione y suelte RESET
(Restablecer) para reanudar la operación.
■ Se ha fundido un fusible de la casa o se ha desconectado un
disyuntor. Reemplace el fusible o reposicione el cortacircuitos.
Si el problema continúa, llame a un electricista. Vea
“Requisitos eléctricos ”.
■ No se ha presionado el botón Power (Encendido). Presione
POWER (Encendido).
■ Se ha interrumpido la energía eléctrica local. Espere que se
restablezca la energía eléctrica.
■ El tanque de agua interno está lleno. Si la luz indicadora
“Bucket Full” (Balde lleno) está iluminada, vacíe el tanque
interno. Vea “Cómo desaguar el tanque interno”.
El acondicionador de aire quema
fusibles o desconecta disyuntores
■ Se están usando demasiados aparatos en el mismo circuito.
Desenchufe o reubique los aparatos que estén usando el
mismo circuito.
■ Se está usando un disyuntor o un fusible de retardo con la
capacidad incorrecta. Reemplácelo con disyuntor o un fusible de
retardo con la capacidad correcta. Vea “Requisitos eléctricos”.
■ Se intenta poner en marcha el acondicionador de aire
demasiado pronto después de apagarlo. Espere al menos
3minutos después de apagar el acondicionador de aire antes
de intentar ponerlo en marcha nuevamente.
El cable de suministro eléctrico del
acondicionador de aire se desconecta
(el botón Reset (Restablecer) salta)
■ Las alteraciones en la corriente eléctrica de la casa pueden
hacer que el cable de suministro eléctrico se desconecte
(elbotón Reset (Restablecer) salta). Presione y suelte RESET
(Restablecer) para reanudar la operación.
El acondicionador de aire no funciona
SOLUCIÓN DE PROBLEMAS
Antes de solicitar servicio, pruebe las sugerencias que se incluyen a continuación para ver si puede resolver el problema sin ayuda externa.
ADVERTENCIA
Peligro de Choque Eléctrico
Conecte a un contacto de pared de conexión a tierra de
3 terminales.
No quite la terminal de conexión a tierra.
No use un adaptador.
No use un cable eléctrico de extensión.
No seguir estas instrucciones puede ocasionar
la muerte, incendio o choque eléctrico.
■ La sobrecarga eléctrica, el recalentamiento, un cable
pellizcado o el envejecimiento pueden hacer desconectar el
cable de suministro eléctrico (el botón Reset (Restablecer)
saltará). Después de corregir el problema, presione y suelte
RESET (Restablecer) para reanudar la operación.
NOTA: un cable de suministro eléctrico se debe reemplazar con
un nuevo cable de suministro eléctrico obtenido del fabricante
del producto y no se debe reparar.
Parece que el acondicionador de aire
funciona excesivamente
■ Su actual acondicionador de aire reemplazó un modelo
viejo. El uso de componentes más ecientes puede hacer
que el acondicionador de aire funcione por más tiempo
que su antiguo modelo, pero el consumo total de energía
será menor. Los acondicionadores de aire más nuevos no
emiten la “ráfaga” de aire frío a la que quizás usted esté
acostumbrado con acondicionadores de aire más antiguos,
pero eso no indica una capacidad de enfriamiento o una
eciencia menores. Consulte la clasicación de eciencia
(EER) y la clasicación de capacidad (en BTU/h) marcadas en
el acondicionador de aire.
■ El acondicionador de aire está en una habitación con muchas
personas o se usan aparatos que generan calor en la
habitación. Use ventiladores extractores cuando esté cocinando
o bañándose y trate de no usar aparatos que generan calor
durante las horas más calurosas del día. Es posible que se
requiera un acondicionador de aire de mayor capacidad, según
el tamaño de la habitación que se desea enfriar.
La unidad se enciende y se apaga
demasiado o no enfría la habitación en
el modo de enfriamiento
■ El acondicionador de aire no tiene el tamaño adecuado
para su habitación. Verique la capacidad de enfriamiento
de su acondicionador de aire para habitaciones.
Losacondicionadores de aire para habitaciones no están
diseñados para enfriar varias habitaciones.
■ El ltro está sucio u obstruido con residuos. Limpie el ltro.
■ Hay demasiado calor o humedad en la habitación (cocción
con recipientes sin tapa, duchas, etc.). Use un ventilador para
extraer el calor o la humedad de la habitación. Trate de no usar
aparatos que generan calor en las horas más calurosas del día.
■ Las tomas de aire están bloqueadas. Instale el acondicionador
de aire en un lugar donde las persianas no estén bloqueadas
por cortinas, persianas, muebles, etc.
■ La temperatura de la habitación que está tratando de enfriar
está demasiado caliente. Espere más tiempo para que el
acondicionador de aire enfríe una habitación muy caliente.
■ Ventanas o puertas que dan al exterior están abiertas.
Cierretodas las puertas y ventanas.
■ El ajuste de temperatura no está regulado en un punto
sucientemente frío. Para regular la temperatura a un ajuste
más frío, presione el botón con el signo menos para reducir
la temperatura. Fije el control Fan Speed (Velocidad del
ventilador) en el ajuste más alto.
Códigos de error en la pantalla
■ Si aparece E1 o E2 en la pantalla, llame para pedir servicio
técnico.
95111_WHAP121-142AW_portable_UCG.indb 38 5/25/16 3:31 PM
39
ESPECIFICACIONES
Modelo WHAP121AW WHAP141AW WHAP122AW WHAP142AW
Tensión/Frecuencia 115VCA/60Hz 115VCA/60Hz 115VCA/60Hz 115VCA/60Hz
Corriente/Amperaje 9,5A 11,4A 9,5A 11,4A
Capacidad de enfriamiento
(BTU/hora)
12.000 14.000 12.000 14.000
Tipo de ventilación Simple Simple Doble Doble
Tipo de refrigerante R410A R410A R410A R410A
Temporizador 24 horas 24 horas 24 horas 24 horas
Dimensiones
An x P x Al
17,9" x 15,6" x 39,3"
455x 395x 745mm
17,9" x 15,6" x 39,3"
455x 395x 745mm
17,9" x 15,6" x 39,3"
455x 395x 745mm
17,9" x 15,6" x 39,3"
455x 395x 745mm
Peso
71,4 lb
32,4
kg
73,2
lb
33,2 kg
72,8 lb
33,0
kg
73,2
lb
33,2 kg
Antes de solicitar ayuda o servicio técnico, consulte la sección
“Solución de problemas”. Esto le podría ahorrar el costo de una
visita de servicio técnico. Si considera que aún necesita ayuda,
siga las instrucciones que aparecen a continuación.
Cuando llame, tenga a mano la fecha de compra y el número
completo del modelo y de la serie de su electrodoméstico.
Estainformación nos ayudará a atender mejor a su pedido.
Llame al servicio al cliente de XLS Products sin costo alguno al:
1-800-207-1156.
Nuestros consultores ofrecen ayuda para:
■ Características y especicaciones de nuestra línea completa
de electrodomésticos.
■ Información sobre la instalación.
■ Procedimientos de uso y mantenimiento.
■ Accesorios y piezas para reparación.
■ Asistencia al cliente especializada.
■ Recomendaciones con distribuidores locales, compañías
que dan servicio y distribuidores de partes para reparación.
Los técnicos de servicio designados por XLS Products están
capacitados para cumplir con la garantía del producto y
ofrecer servicio después de la garantía en cualquier lugar de
los Estados Unidos.
Para obtener más asistencia:
Si necesita asistencia adicional, puede escribir a XLS Products
con sus preguntas o dudas a:
XLS Products, Inc.
Customer Service
P.O. Box 16262
Philadelphia, PA 19114-0262
Incluya en su correspondencia un número de teléfono en el que
se le pueda localizar durante el día.
Llame al servicio al cliente de XLS Products sin costo alguno al:
1-800-207-1156.
Nuestros consultores ofrecen ayuda para:
■ Características y especicaciones de nuestra línea completa
de electrodomésticos.
■ Procedimientos de uso y mantenimiento.
■ Accesorios y piezas para reparación.
■ Recomendaciones con distribuidores locales, compañías que
dan servicio y distribuidores de partes para reparación. Los
técnicos designados por XLS Products están capacitados
para cumplir con la garantía del producto y ofrecer servicio
después de la garantía en cualquier lugar de Canadá.
Para obtener más asistencia:
Si necesita asistencia adicional, puede escribir a XLS Products
con sus preguntas o dudas a:
XLS Products, Inc.
Customer Service
P.O. Box 16262
Philadelphia, PA 19114-0262
Incluya en su correspondencia un número de teléfono en el que
se le pueda localizar durante el día.
ASISTENCIA O SERVICIO TÉCNICO
En EE. UU.
En Canadá
95111_WHAP121-142AW_portable_UCG.indb 39 5/25/16 3:31 PM

GARANTÍA DE XLS PRODUCTS PARA ACONDICIONADORES DE
AIRE WHIRLPOOL
®
GARANTÍA LIMITADA DE UN AÑO
Durante un año a partir de la fecha de compra, cuando este producto se opere y se mantenga de acuerdo con las instrucciones
que se adjuntan o se suministran con el producto, XLS Products pagará las piezas de reemplazo y la mano de obra de reparación
para corregir defectos en los materiales o en la mano de obra, o reemplazará el producto a nuestro criterio. El servicio deberá ser
suministrado por una compañía de servicio designada por XLS Products. Esta garantía no cubre el ltro de aire.
LO QUE XLS PRODUCTS NO PAGARÁ
1. Visitas de servicio técnico para corregir la instalación de su producto, enseñarle a usar su producto, cambiar fusibles de la casa o
restablecer cortocircuitos, reemplazar o limpiar ltros, o corregir la instalación eléctrica.
2. Visitas de servicio técnico para reparar o reemplazar ltros de aire. Esos insumos están excluidos de la cobertura de la garantía.
3. Reparaciones cuando su producto se use para nes ajenos al uso doméstico normal de una sola familia.
4. Daños causados por accidente, alteración, uso indebido, abuso, incendio, inundación, actos fortuitos, instalación incorrecta,
instalación que no esté de acuerdo con los códigos eléctricos o de plomería locales o el empleo de productos no aprobados por
XLS Products.
5. Piezas de repuesto o costos de mano de obra de reparación para unidades que se empleen fuera de los Estados Unidos o Canadá.
6. Recogida y entrega. Este producto está diseñado para ser reparado en el hogar.
7. Reparaciones de piezas o sistemas como resultado de modicaciones no autorizadas que se hayan efectuado en el
electrodoméstico.
8. Gastos de viaje y transporte para realizar el servicio del producto en lugares remotos.
9. La remoción y reinstalación de su electrodoméstico si estuviera instalado en un lugar inaccesible o si no estuviera instalado de
conformidad con las instrucciones de instalación publicadas.
EXCLUSIÓN DE GARANTÍAS IMPLÍCITAS; LIMITACIÓN DE RECURSOS
EL ÚNICO Y EXCLUSIVO RECURSO DEL CLIENTE SEGÚN LOS TÉRMINOS DE ESTA GARANTÍA LIMITADA SERÁ EL DE
REPARAR EL PRODUCTO SEGÚN SE ESTIPULA EN LA PRESENTE. LAS GARANTÍAS IMPLÍCITAS, INCLUSO LAS GARANTÍAS DE
COMERCIABILIDAD O DE IDONEIDAD PARA UN PROPÓSITO PARTICULAR, SE LIMITARÁN A UN AÑO O AL PERÍODO MÁS CORTO
PERMITIDO POR LEY. XLS PRODUCTS NO SE RESPONSABILIZARÁ POR DAÑOS INCIDENTALES O CONSECUENTES. ALGUNOS
ESTADOS Y PROVINCIAS NO PERMITEN LA EXCLUSIÓN O LIMITACIÓN DE DAÑOS INCIDENTALES O CONSECUENTES,
OLIMITACIONES DE LA DURACIÓN DE GARANTÍAS IMPLÍCITAS DE COMERCIABILIDAD O IDONEIDAD, DE MODO QUE LAS
LIMITACIONES O EXCLUSIONES ANTES MENCIONADAS PUEDEN NO APLICARSE EN SU CASO. ESTA GARANTÍA LE OTORGA
DERECHOS LEGALES ESPECÍFICOS Y ES POSIBLE QUE TENGA TAMBIÉN OTROS DERECHOS QUE PUEDEN VARIAR DE UN
ESTADO A OTRO O DE UNA PROVINCIA A OTRA.
Esta garantía no tiene vigor fuera de los cincuenta estados de los Estados Unidos y Canadá. Contacte a su distribuidor autorizado de
XLS Products para determinar si corresponde otra garantía.
Si necesita servicio técnico, consulte primero la sección “Solución de problemas” del Manual de uso y cuidado. Después de consultar
“Solución de problemas”, puede buscar ayuda adicional consultando la sección “Ayuda o servicio técnico” o llamando a XLS
Products. En los EE.UU., llame al 1-800-207-1156.
En Canadá, llame al 1-800-207-1156.
Guarde este libro y su comprobante de compra juntos para
referencia futura. Deberá proporcionar el comprobante de la
compra o la fecha de instalación para obtener servicio técnico
bajo la garantía.
Anote la siguiente información siguiente sobre su acondicionador
de aire para facilitar la obtención de asistencia o servicio si
llegara a necesitarlo. Deberá tener a mano el número completo
del modelo y la serie. Puede encontrar esta información en
la etiqueta con el número de modelo y de serie ubicada en el
producto.
Nombre del distribuidor
____________________________________
Dirección _________________________________________________
Número de teléfono _______________________________________
Número de modelo ________________________________________
Número de serie __________________________________________
Fecha de compra _________________________________________
®/™ ©2016 Whirlpool. Todos los derechos reservados. Fabricado bajo licencia por XLS Products, Pennsylvania.
Garantía limitada proporcionada por XLS Products.
95111_WHAP121-142AW_portable_UCG.indb 40 11/29/16 3:31 PM