Loading ...
Loading ...
Loading ...
6
Location
The heater must not be placed immediately below a power
outlet. Do not use this radiator in rooms having a surface
area of less than 43 square feet (4 sq.m.).
Connection
The radiator should be connected to a properly polarized A/C
110/120 V household outlet in perfect working condition.
Keep loose clothing or bedding, furniture and ammable
material away from the heater's wall outlet.
Turning on
Insert the plug into an electrical outlet, rotate the thermostat
knob to maximum and turn the unit on as follows using the
power selector:
- Turn the power selector to position MIN to select
minimum output (the min light will be on).
- Turn the power selector to position MED to select
medium output (the min/med light will be on).
- Turn the power selector to position MAX to select
maximum output (the lights will be on).
Adjusting the thermostat
When the room has reached the desired temperature, turn
the thermostat dial slowly in an anti-clockwise direction
until you hear a "click" and not beyond it. The thermostat
will then adjust the set temperature automatically and keep
it constant.
If your unit is a three-output version, in intermediate
seasons or on days when temperatures are not particularly
cold, select minimum output to optimize savings and
consumption.
Antifreeze function
Turn the thermostat dial to the position and the power
selector to position MAX. The appliance will maintain
a minimum room temperature of approximately 41°F
(5°C), thus preventing freezing while conserving energy.
In models that come with a timer, tabs must be set in the
inward position.
Reminder
To completely shut the appliance o, turn the power
selector to the "0" position and then unplug the appliance
from the outlet.
UNITS WITH TIMER
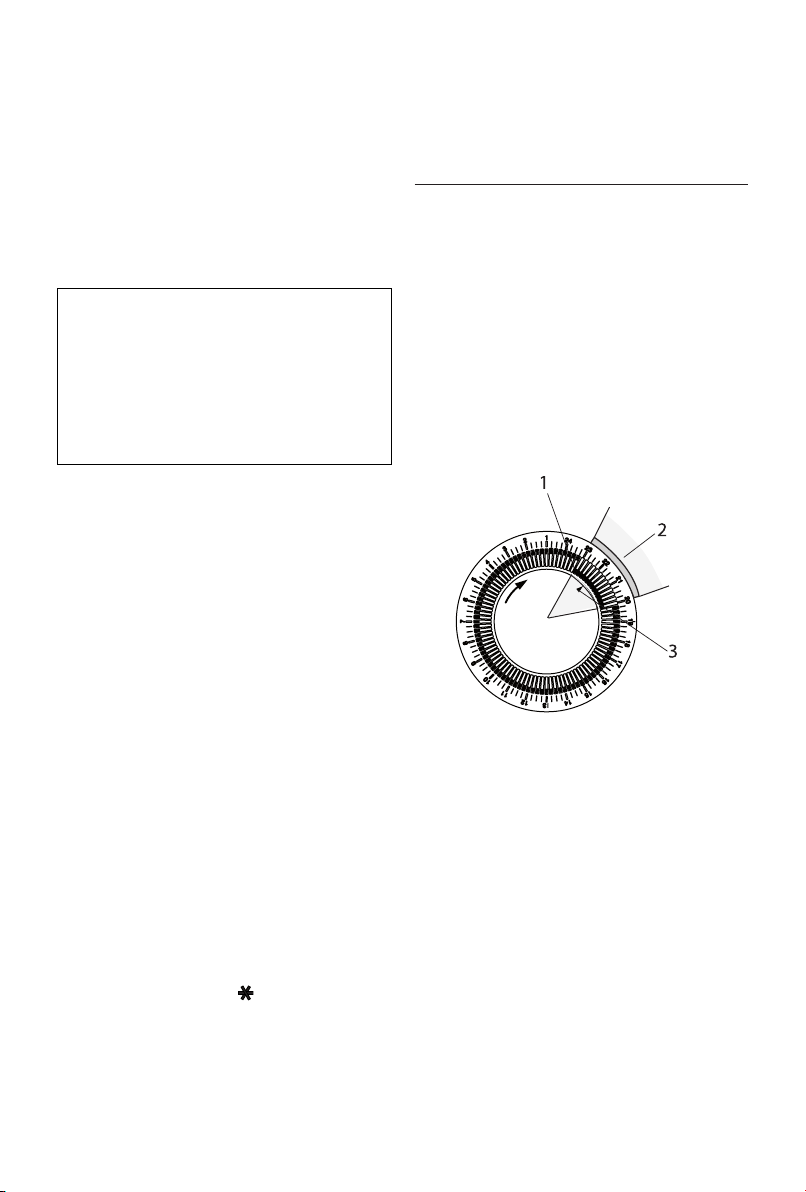
Clock setting
The program/timer, as with all clocks, must be set to the
correct time. If for example the time is 9:30 a.m. (day zone),
rotate the dial clockwise (following the direction of the
arrow) until 9:30 is aligned with the triangular pointer.
IMPORTANT: DO NOT ROTATE CLOCK DIAL COUNTER-
CLOCKWISE.
The timer is like an electric clock, and will only work when
plugged into a power supply. When unplugged, the timer
stops and must be later re-set.
How to use the timer
To program heating, proceed as follows:
- Look at the time on your clock or watch. If it is 10 p.m.,
turn the numbered timer disk clockwise until the
number 22 (10 p.m.) on the disk coincides with the
pointer s (3) on the timer. Set the periods of time
when you want the appliance to work by pushing
the teeth (1) inward. Each tooth (1) corresponds to
a period of 15 minutes. This will leave visible sectors
which correspond to the periods of operation (2).
When set, the radiator will operate automatically each
day during the times programmed (important: the
radiator must always be plugged into the socket).
- To change the programming, move the teeth back
into the initial position and set the new periods of
operation.
- If you want to make the appliance operate without
programming, push all the teeth inward. In this case,
Your product is equipped with a polarized alternating
current line plug (a plug having one prong wider than the
others). This plug will t into the power outlet only one
way. This is a safety feature. If you are unable to insert the
plug fully into the outlet, try reversing the plug. If the plug
should still fail to t, contact your electrician to replace
your obsolete outlet. Do not attempt to modify the plug to
bypass this safety feature.
Loading ...
Loading ...