Loading ...
Loading ...
Loading ...
9
8
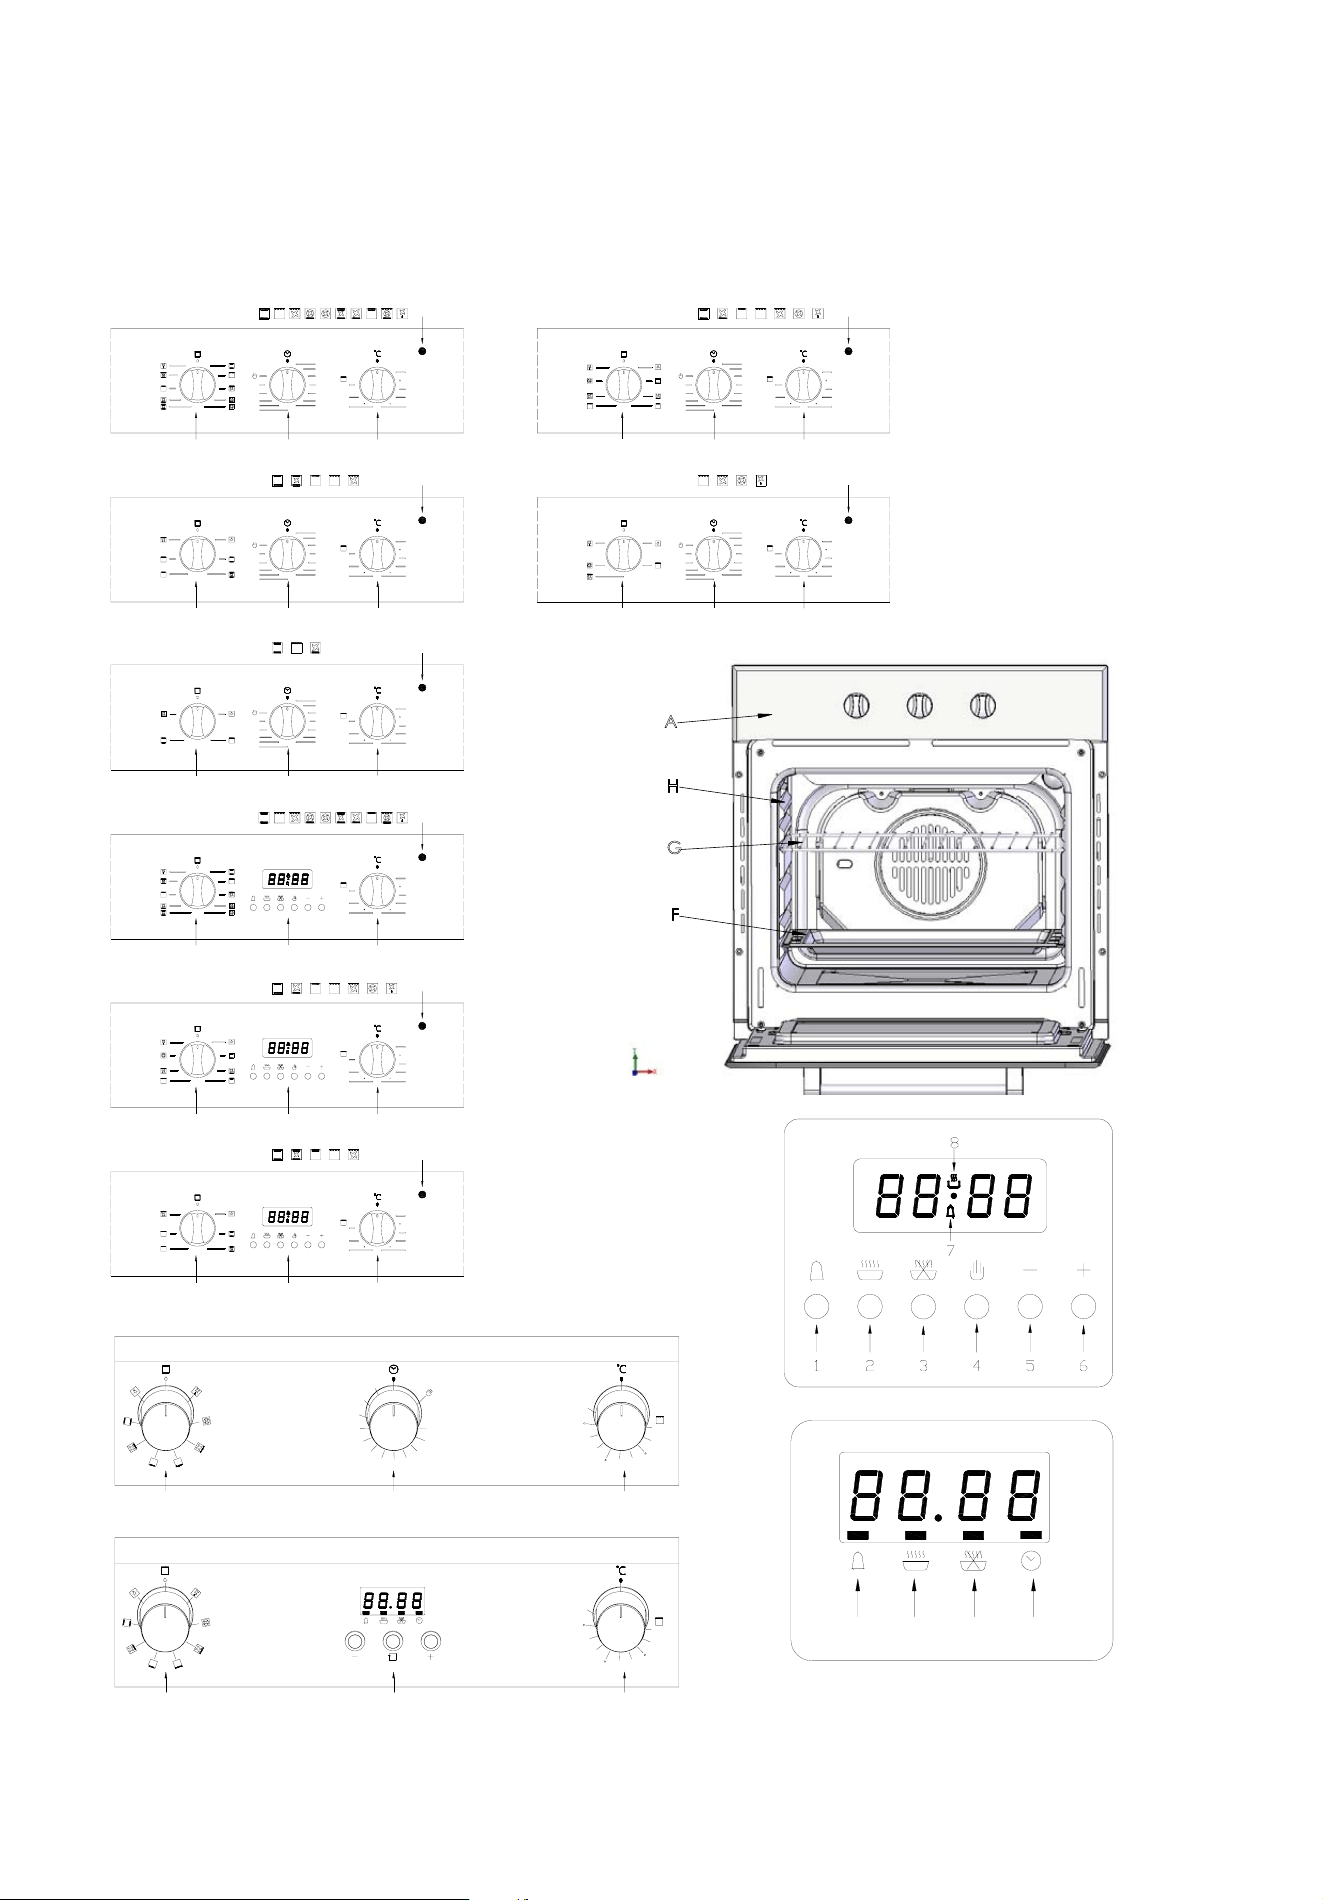
Position of thermostat knob “C ”:Any
The fan located on the bottom of the oven makes the air circulate at room temperature around the food .This is
recommended for the defrosting of all types of food ,but in particular for delicate types of food which do not
require heat ,such as for example :ice cream cakes ,cream or custard desserts ,fruit cakes .By using the fan ,the
defrosting time is approximately halved .In the case of meat ,fish and bread ,it is possible to accelerate the
process using the “Baking”mode and setting the temperature to 80℃-100℃.
The turnspit (only available on certain models)
To start the turnspit, proceed as follows:
· place the oven tray on the 1st rack ;
· insert the special turnspit support on the 2nd rack and position the spit by inserting it through the special hole
into the turnspit at the back of the oven ;
· start the turnspit using knob “B”to select setting .
End Cooking Time Knob (I) (only available on certain models)
This model is equipped with a timer to control when the oven shuts off during cooking. Position of timer knob
“I”:Between 10minutes and 120 minutes.
At the end of the programmed length of time, the timer will sound and automatically turn off the oven.
6-keys timer procedure baking mode (only available on certain models)
Digital clock
- Showing time:(0:00-24:00) and minutes.
- The screen shows 3 glittery number and “AUTO”if the power is on.
- In order to set the correct time, press the button first, then + or - button to carry forward or backward the
figure until the exact time shows.
Manual operation setting
Press the button to remove the flashing of “AUTO”.
If“AUTO”is flashing (automatic or semi automatic program has
been set),press button to remove“AUTO”
and then the manual operation process is on.
Automatic setting (set the time of full automatic starting and ending)
1.Press button, set roast time;
2.Press button, set roast finish time;
3.Set temperatures and roast modes by turning the thermostat knob and selector knob.
After the above setting, “AUTO”will be glittering, which means the roast process of the oven is set.
For example: if roast time takes 45 minutes and expect it will end at 14:00.
Press, the roast time is to be 45 minutes;
Press, the roast is set to end at 14:00.
After the above setting, the screen shows the real time(hour、minute)and flashing“AUTO
”,it means the set roast
process is memorized automatically.
When the clock turns to be 13:15(or between 13:14-13:15), the oven will start automatically.
In the roast time, and“AUTO”will be always flashing.
When the clock turns to be 14, the roast has been finished automatically. The alarm will ring and
“AUTO”
will
flash, press the button and the ringing will stop.
Semi-automatic setting (set the time of automatic starting and ending)
A. Set the time limit of roast (10 hours maximum):
Press the button to set the time of roast;
The oven starts immediately, and“AUTO”will flash. After the roast is finished, the roast operation process
will be shut automatically. Then“AUTO”flashes, the alarm rings. The ringing will stop after the button is
pressed.
B. Set the time of ending (23 hours 59 minutes maximum):
Press the button to set the time of ending;
The oven starts immediately, and“AUTO”will flash. When the set time of ending is reached, the roast
process will shut automatically. Then“AUTO”flashes, the alarm rings. The ringing will stop after the button is
Pressed.
When the related button is pressed, the set roast process will be displayed. Whenever the button is pressed,
and set backward the time to “0”,the set roast process will be cancelled. When button is pressed again, the
oven will revert to the manual operation process.
Timer
23 hours 59 minutes can be set as maximum.
To set the time, press the button, and then + or - button, until the required time is shown on the screen. After
the setting, the correct time (hour, minute) and the button will show on the screen. When the button is
pressed the time displaced will be seen. When the set time is reached, disappears and the alarm will ring
again. To stop the alarm, press the button.
Notice: After pressing the related button, setting is supposed to be done in 5 seconds. In case of blackout, the
set process as well as the real time (hour, minute) will disappear. After the power is on again, three“0”and
“AUTO”shows on the screen, the oven will automatically reset.
3-keys timer procedure baking mode (only available on certain models)
Adjust the clock after switch on:
Once it connected with electrical power, the display will show “12:00” with the square symbol above “ ”;
Press the “+” or “-” button will increase or decrease the number until it reaches the right time; after 5 seconds it
will start automatically or you can press the function button to make it work.
Automatic setting (set the time of full automatic starting and ending)
1. Press the function button repeatedly until the square symbol above the “ ” flashes, and press “+” or “-”
button to set the time frame baking for;
2. Press the function button repeatedly until the square symbol above the “ ” flashes, and press “+” or “-”
button to set the time to switch off;
3. Adjusting the constant temperature button and choosing button to set temperature and baking method.
After these setting, the symbols above the “ ” and “ ” will flash, it indicates the baking procedure of oven
has been
set.
For example:
if the food is required to bake for 45 minutes, and it is supposed to stop at 14:00.
Press the function button repeatedly until the square symbol above “ ” flashes, and set the time of baking to
45 minutes;
Press the function button repeatedly until the square symbol above “ ” flashed, and set the end time of baking
at 14:00.
After these setting, the proper clock (hour, minute) and the square symbol will show on the display, it indicates the
setting of baking procedure has been remembered automatically.
When the clock shows at 13:15 (between 14 -15min), the oven will switch on automatically.
During the baking time frame, the square symbol will keep flashing.
When the clock shows14:00, baking will switch off automatically. The alarm will ring, the square symbol will flash,
To stop the ringing press any button.
Semi-automatic setting (set the time of automatic starting and ending)
A. setting the time frame of baking (10 hours longest)
Press the function button repeatedly until the square symbol
above “ ”,
and set the time frame of baking;
Switch on the oven immediately, the square symbol above “ ” begins to flash. When the baking is done the
square symbol above “ ” will flash, and alarm ring, To stop the ringing press any button.
B. setting the end time off baking (23hours and 59minutes longest)
Press the function button repeatedly until the square symbol above “ ” flashes, and set the end time of
baking;
Switch on the oven immediately, the square symbol above “ ” begins to flash. When it reaches the time set,
baking procedure will switch off automatically. The square symbol above “ ” flashes, the alarm will ring, the
square symbol will flash. To stop the ringing press any button.
The set baking procedure could be seen by pressing any function button repeatedly at any time, only if the time
frame of
baking is at “0
” position.
By adjusting the end time of baking to the current time, the set baking
procedure can be cancelled.
Timer
The longest time frame can be set is 23 hours and 59 minutes. For setting time, press the function button
repeatedly until the square symbol above “ ” flashes, and press “+” or “-” button until the time supposed shows
on the display. After setting, the proper time (hour, minute) and the square symbol above the “ ” begins to flash.
In addition, the time countdown begins to work. When it reaches the set time, the square symbol above the “ ”
flashes, and the alarm will ring, the square symbol will flash, To stop the ringing press any button.
Notice: press the relevant button, the setting must be carried out in 5 seconds; if electricity failure suddenly, all
the set procedure and the proper clock time (hour, minute) will disappear.
After electrical
power is on again, “12:00” and the square symbol above “ ” will show on the display, you need
to set it again .
The oven light
Set knob “B”to the symbol to turn it on .It lights the oven and stays on when any of the electrical heating
elements in the oven come on.
Loading ...
Loading ...
Loading ...