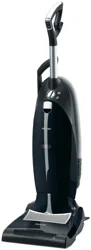
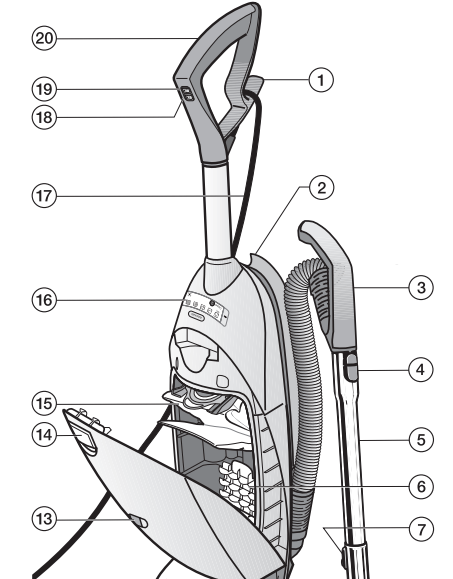
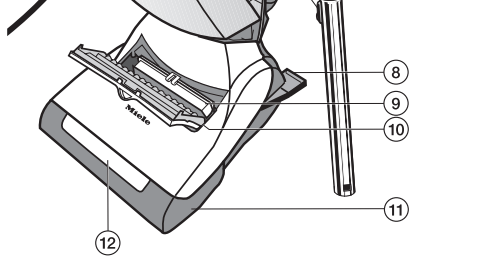
This illustration shows the vacuum cleaner with all available features.
ONLY MIELE FILTER BAGS, FILTERS, AND ACCESSORIES WITH THE “ORIGINAL MIELE” LOGO CAN BE USED WITH THIS VACUUM CLEANER. USE OF NONMIELE COMPONENTS MAY VOID THE WARRANTY.
Features marked * are model-specific and may vary or not be available on your vacuum cleaner.
Upper hook for power cord
Suction hose holder
Suction hose with handle
Release button
Telescopic wand
Dust compartment filter
Telescopic wand release button
Vacuum cleaner foot release
Exhaust filter *
Exhaust filter compartment
Powerbrush
Light *
FilterBag change indicator
Dust compartment release button
FilterBag
Control panel (see the following page for description) *
Power cord
Powerbrush On/Off button ( / O)
On/Off button (l / O)
Handpiece
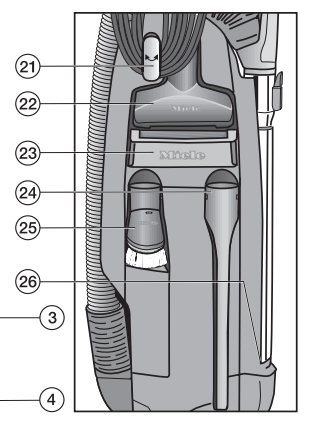
Back:
21. Lower swivel hook for the power cord
22. Upholstery nozzle
23. Carrying handle
24. Crevice nozzle
25. Dusting brush with natural bristles
26. Telescopic wand holder
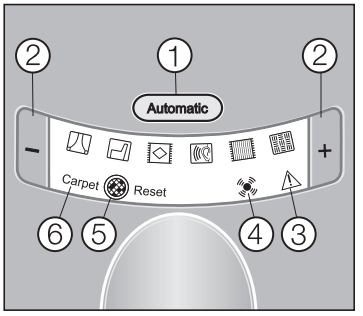
Depending on the model, your vacuum will come standard with one of the following control panels:
1. Vacuum cleaner in-operation indicator
2. Powerbrush in-operation indicator light
3. Suction power selector (rotary dial)
1. Automatic button
2. Suction power selector (+ / - buttons)
3. Overheat indicator
4. Powerbrush indicator light
5. Service indicator (Reset button)
6. Powerbrush in-operation indicator
Use
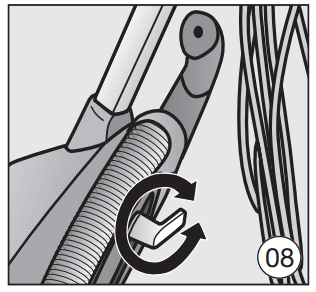
Unwind the power cord (Fig. 08)
The lower cable hook swivels.
Turn it upwards to release the cable.
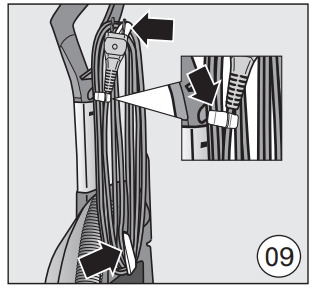
Winding up the power cord (Fig. 09)
When the vacuum cleaner is not in use, the power cord can be wound around the two cord hooks.
Secure the power cord by clipping the plug to the cord (see detailed image).
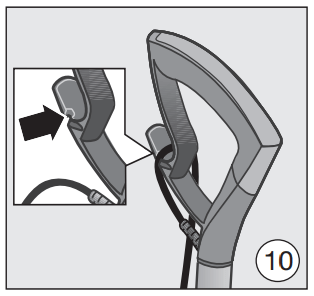
Plugging in the vacuum cleaner (Fig. 10)
When vacuuming, loop the power cord through the guide notch on the side of the upper cord hook.
This will keep the power cord from getting in the way during vacuuming. It also protects the cable from becoming kinked at the handle.
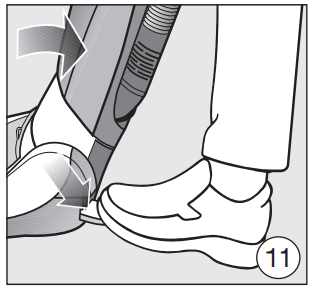
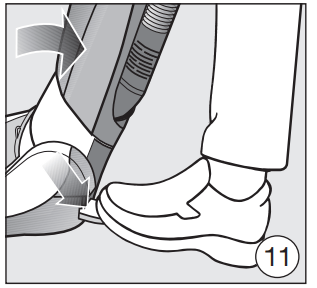
Releasing the vacuum cleaner (Fig. 11)
Press the foot release briefly and tilt the vacuum cleaner to a comfortable position for vacuuming.
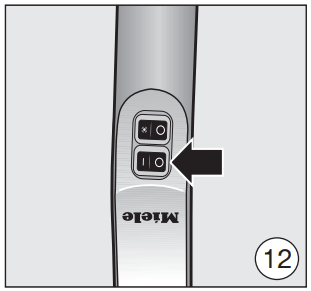
Turning the vacuum on and off (Fig. 12)
Press the I button on the handle.
The vacuum cleaner will turn on.
On models with a rotary selector dial: The vacuum cleaner in-operation indicator on the control panel will light up yellow.
On models with + / - buttons: The power settings on the control panel will light up yellow. The light on the floorhead will come on to ensure adequate visibility of the vacuuming area.
Selecting the suction power
The suction power can be adjusted to suit the type of flooring being cleaned. Reducing the power lowers the amount of effort required to maneuver the floor brush.
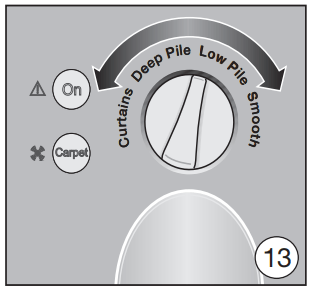
Rotary dial (Fig. 13)
(depending on model)
Turn the power selector manually to the desired power setting.
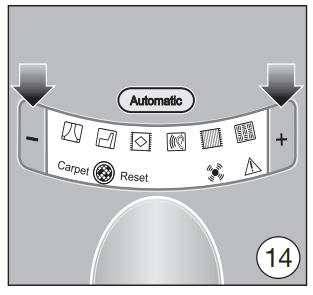
+ / - buttons (Fig. 14)
(depending on model)
There are symbols on the control panel indicating what type of use the individual settings are suitable for.
Press the + button to select a higher power level.
Press the - button to select a lower power level.
The selected setting will light up yellow.
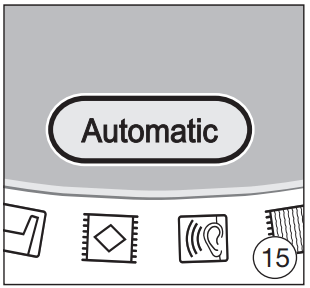
Automatic power regulation (Fig. 15)
(on models with + / - buttons)
The power is automatically adjusted to suit the type of carpet being vacuumed.
Press the Automatic button.
The button will light up yellow.
To deactivate the Automatic setting, press the Automatic button again.
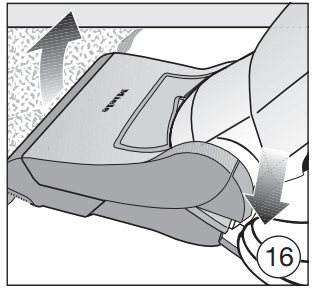
Obstacles (Fig. 16)
Obstacles and variations in floor height, for instance, when vacuuming over thresholds and the edges of rugs, are easy to maneuver.
Briefly press the foot release and lift the front of the vacuum cleaner over the obstacle.
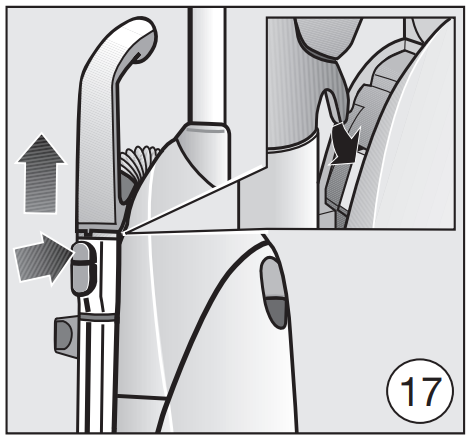
Vacuuming using the suction hose
Raise the vacuum cleaner into the vertical position.
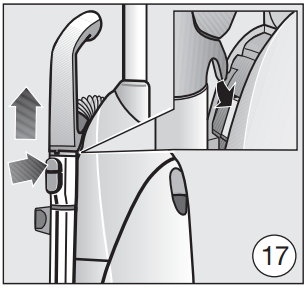
Press the release button on the telescopic wand to detach the suction hose handle (Fig. 17).
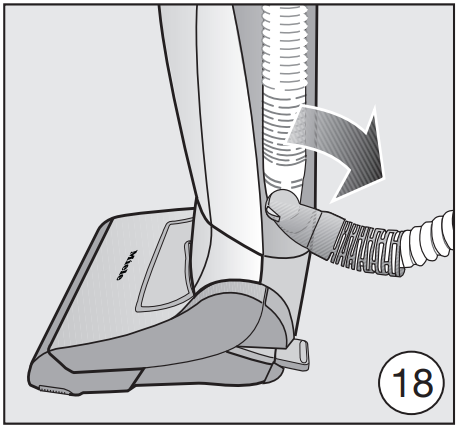
For increased stability, turn the elbow joint at the bottom of the hose downwards as illustrated until it clicks into position above the retainer (Fig. 18).
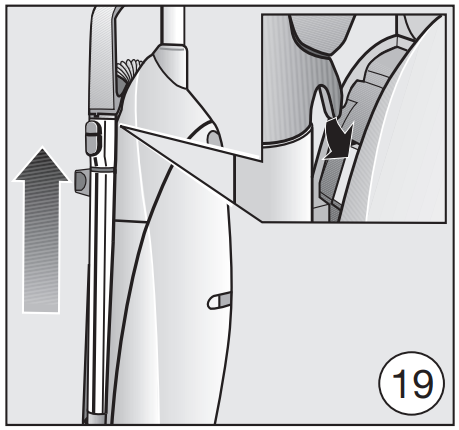
Vacuuming using the telescopic wand
Raise the vacuum cleaner into the vertical position.
Lift the handle out of its holder to access the telescopic wand (Fig. 19).
For increased stability, turn the elbow joint at the bottom of the hose downwards as illustrated until it clicks into position above the retainer (Fig. 18).
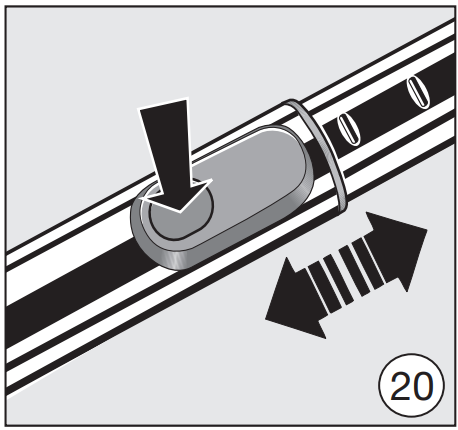
One part of the telescopic wand is fitted inside the other so that the tube can be adjusted to suit your preferred height for comfortable vacuuming.
Press the release button and adjust the tube to the desired height (Fig. 20).
Using the Powerbrush
Recommended use
The Powerbrush is especially suited for the thorough vacuuming of carpets subject to heavy wear. It is very effective at removing deep-seated dirt and preventing frequently used areas from being trodden into a path.
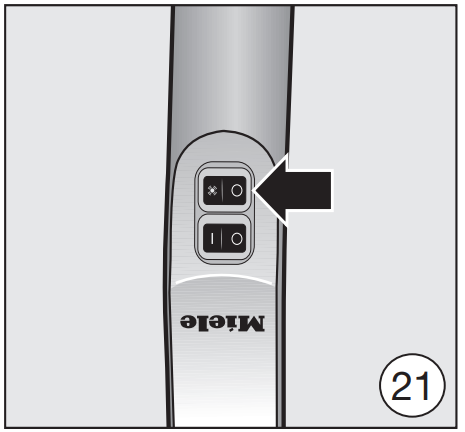
Switching the Powerbrush on and off (Fig. 21)
To use the Powerbrush, you will need to switch it on in addition to the vacuum cleaner using the button on the handle.
The Powerbrush indicator light on the control panel will light up yellow.
This button also enables you to switch the Powerbrush off when vacuuming.
How to use the Powerbrush
To achieve the best results, pass the Powerbrush slowly backward and forward over the carpet or floor.
For rugs with fringe, always draw the Powerbrush from the middle of the rug across the fringe towards the floor to keep the fringe smooth.
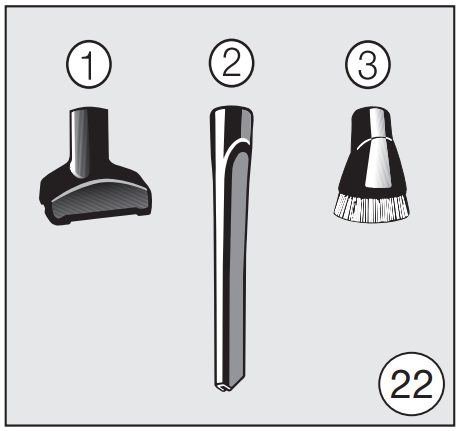
Using the accessories supplied (Fig. 22)
The following accessories are stowed at the back of the vacuum cleaner:
1. Upholstery nozzle
2. Crevice nozzle, 12" (300 mm)
3. Dusting brush with natural bristles
Attach the desired accessory to the suction hose handle or the telescopic wand.
Maintenance
Purchasing new FilterBags and filters
Original Miele FilterBags and filters are available from the Miele Webstore and your Miele dealer.
Ordering the correct FilterBags and filters
Only use original Miele U FilterBags with a green collar and original Miele filters. These can be identified by the “Original Miele” logo located on the packaging or directly on the FilterBag
An AirClean filter and a dust compartment filter are supplied with every packet of Miele FilterBags.
These can also be purchased separately from your Miele Dealer, from Miele or from the online shop. Please specify the model number of your vacuum cleaner when ordering to ensure that your receive the correct filter.
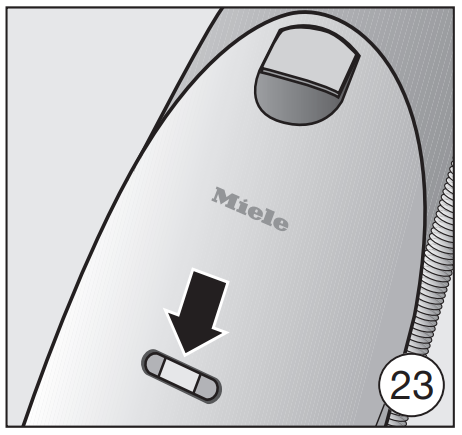
When to change the FilterBag (Fig. 23)
Change the FilterBag when the color marker in the FilterBag change indicator turns red.
Checking the FilterBag change indicator
Raise the vacuum cleaner into the vertical position.
Turn the vacuum cleaner on using the I button on the handle and set the power selector to the highest power setting.
Tilt the vacuum cleaner until you can easily see the color marker in the FilterBag change indicator. The front of the Powerbrush will lift up as you do this.
If the marker completely fills the FilterBag change indicator, you should replace the bag with a new one.
How the FilterBag change indicator works
The FilterBag change indicator is set for normal household dust. This generally contains a mixture of dust, hair, threads, carpet lint, grit, etc.
However, if the cleaner has been used to vacuum up fine dust, such as plaster, brick dust, cement or flour, the pores of the FilterBag will become blocked very quickly.
This affects the air permeability of the bag, and the marker will indicate that the bag is “full” even when it is not. If this happens you must still change the FilterBag because suction power will be greatly reduced by blocked pores in the FilterBag.
If, on the other hand, a large amount of hair and carpet lint which typically contains a lot of air is vacuumed up, the indicator may fail to react even though the bag is full. You should still change it. Both these extremes can occur.
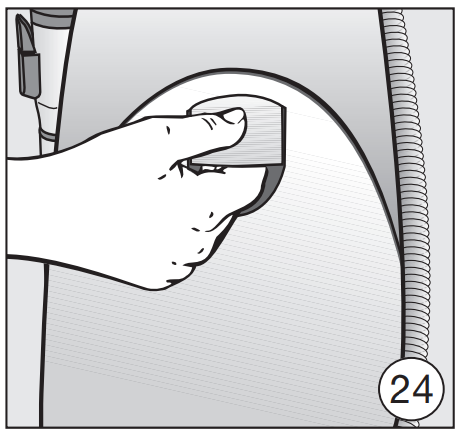
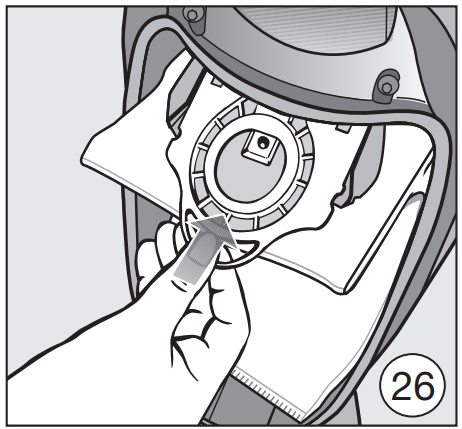
Replacing the FilterBag (Figs. 24, 25 + 26)
Raise the vacuum cleaner into the vertical position.
Lift the release button for the dust compartment lid and raise the lid until it clicks into its resting position.
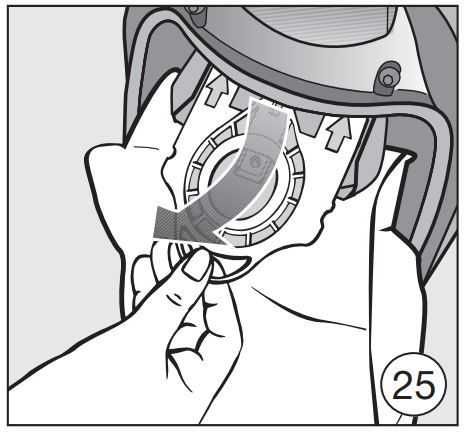
Pull the tab on the collar and swing the bag up away from the suction socket before taking it out of its holder.
The FilterBag has a closing flap which closes automatically when the dust compartment lid is raised to prevent any dust from escaping.
Insert the new FilterBag into the holder as far as it will go. Leave the bag folded up when you take it out of the box.
It should then be unfolded as far as possible in the dust compartment.
Close the dust compartment lid securely, making sure it clicks into position. Take care not to pinch the FilterBag in the lid when doing so. The FilterBag is then automatically guided into position for vacuuming.
When to change the motor protection filter
Replace this filter every time you start a new packet of filter bags.
Every packet of original Miele filter bags contains a motor protection filter. Multipacks contain four motor protection filters.
Changing the dust compartment filter(Fig. 27)
Open the dust compartment lid.
Remove the FilterBag.
Lift up the filter frame until it clicks and remove the old filter. Hold the filter by the clean, unsoiled section to remove it.
Replace with a new dust compartment filter.
Close the filter frame.
Insert the FilterBag into the holder as far as it will go.
Close the dust compartment lid securely, making sure it clicks into position. Take care not to pinch the FilterBag when doing so.
When to replace the exhaust filter
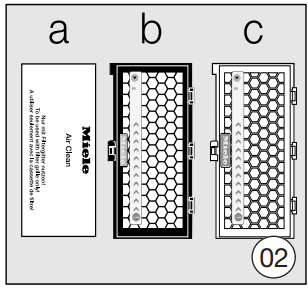
Depending on the model, your vacuum cleaner will come standard with one of the following exhaust filters (Fig. 02):
an AirClean Replace this filter every time you start a new packet of Miele FilterBags. An AirClean exhaust filter is supplied with every packet of Miele FilterBags.
b Active AirClean 30 (black)
c HEPA AirClean 30 (white) Replace this filter when the exhaust filter change indicator is completely red (Fig. 07).
This occurs after approx. 50 hours of operation, which is equivalent to about a year of average use. The vacuum cleaner can still be used. However, the power will be reduced as will the effectiveness of the filter if it is not replaced in due time.
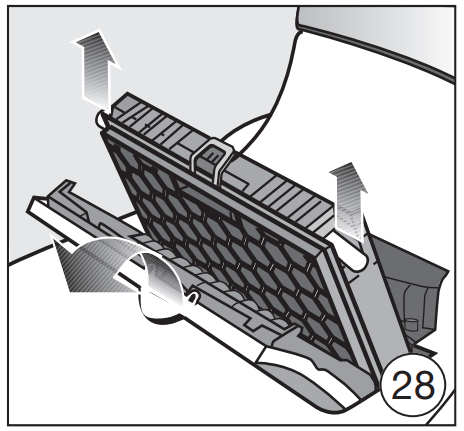
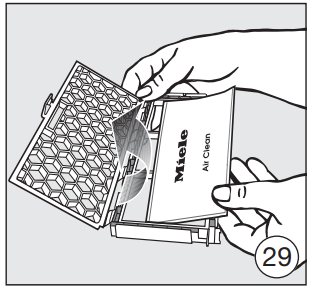
Replacing the AirClean exhaust filter(Figs. 28, 29 + 30)
Open the exhaust filter compartment lid.
Remove the filter frame.
Open the filter frame and remove the used AirClean filter by one of the clean, unsoiled sections.
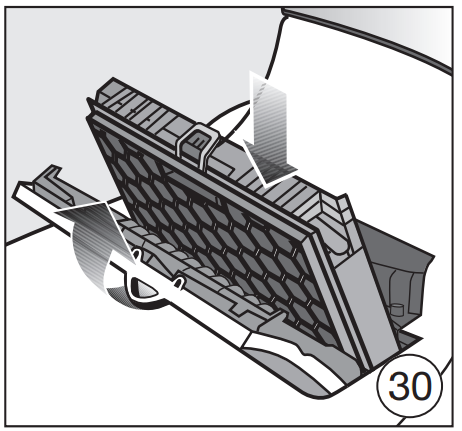
Replace it with a new AirClean exhaust filter.
Secure the catch on the filter frame and reinsert the frame in the exhaust filter compartment.
Close the exhaust filter compartment lid.
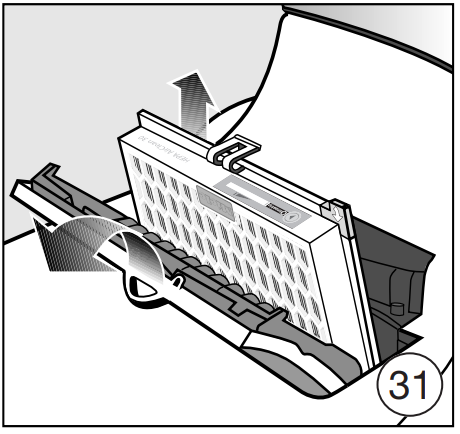
Replacing the Active AirClean 30 and HEPA AirClean 30 exhaust filters
Open the exhaust filter compartment lid.
Remove the exhaust filter (Fig. 31).
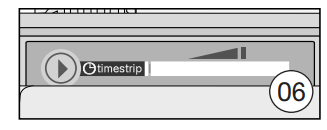
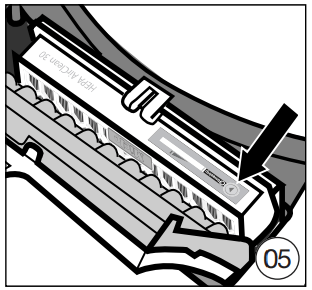
Insert the new exhaust filter and press the exhaust filter change indicator (Fig. 05).
After approx. 10 - 15 seconds, a thin red stripe will appear on the left-hand side of the display (Fig. 06).
Close the exhaust filter compartment lid
Replacing one type of exhaust filter with another(Fig. 02)
Depending on the model, your vacuum cleaner will be fitted as standard with one of the following exhaust filters :
a AirClean
b Active AirClean 30 (black)
c HEPA AirClean 30 (white)
When changing the filter type, please note
1. If you wish to replace exhaust filter a with filter b or c, you must completely remove the filter frame before you install the new exhaust filter. In addition, you must also activate the exhaust filter change indicator (Fig. 05).
2. If you wish to replace exhaust filter b or c with filter a, you must insert the new filter into a filter frame * before installing(Fig. 29).
* Filter frame - see “Optional accessories.”
Service indicator with Reset button
(on models with + / - buttons)
The indicator lights up after approx. 50 hours of operation, which is equivalent to about a year of average use.
At this point, the level of soiling of the dust compartment filter and the exhaust filter must be checked.
The indicator will need to be reset each time these items are replaced. The vacuum cleaner must be switched off to do this.
Press the Reset button.
The service indicator will go out and reset to zero.
Removing threads and hair from the Powerbrush
Switch the Powerbrush and vacuum cleaner off. Unplug the power cord from the electrical outlet.
Release the vacuum cleaner (Fig. 11) and lay it flat on the floor.
Turn the vacuum cleaner over.
Use scissors to cut any threads or hairs which have become wound around the roller brush. There is a groove on the roller to guide you (Fig. 33).
Then, run the vacuum cleaner to vacuum up the cut pieces.
The bottom of the suction hose can be accessed to remove heavy dirt or blockages. Any large particles inside the hose can then be easily removed.
Raise the vacuum cleaner into the vertical position.
Press the release button on the telescopic wand to detach the suction hose handle (Fig. 17).
For increased stability, turn the elbow joint at the bottom of the hose downwards as illustrated until it clicks into position above the retainer (Fig. 18).
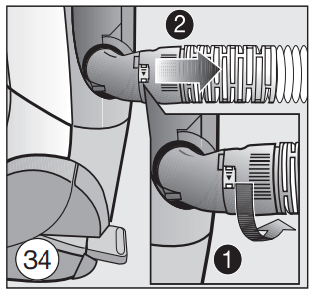
1. Unlock the hose connector by turning it in the direction of the arrow (Fig. 34).
2. Now detach the hose connector from the elbow by pulling it (Fig. 34).
Remove any debris or blockages.
Replace the connector, making sure it goes on straight. Lock it into position.
If you unable to reach all of the debris, you can also try the following steps:
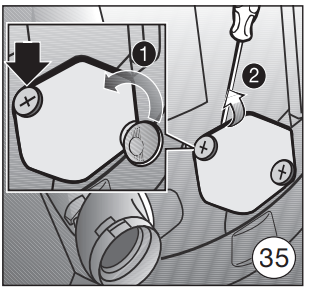
Unlock the service cover at the back of the vacuum cleaner as follows (Fig. 35).
1. Using a coin, turn the two screws as far as they will go.
2. Pry the cover off.
Remove any debris or blockages.
Reinsert the service cover and lock it using the screws.
Cleaning and care
Vacuum cleaner and accessories
The vacuum cleaner and all plastic accessories can be cleaned with a proprietary cleaner suitable for plastic.
Dust compartment
The dust compartment can, if necessary, be cleaned using a dry duster, brush or, if available, a second vacuum cleaner to vacuum the dust-out.
Monitor the filter bag change indicator and inspect all filters regularly. Clean or replace them when necessary according to these Operating Instructions.
Frequently Asked Questions
Problem
Possible cause and solution
The vacuum cleaner turns off automatically.
The overheat protection has been activated, e.g., due to overheating or a blockage.
Models with a rotary selector dial: The vacuum in-operation indicator lights up red. Models with + / - buttons: The overheat indicator lights up red.
Switch the Powerbrush and vacuum cleaner off. Unplug the power cord from the electrical outlet.
Check the vacuum cleaner for any blockages and check all the filters.
After removing the blockage, wait about 20 - 30 minutes before using the vacuum cleaner to allow it to cool down.
The Powerbrush switches off automatically. The Powerbrush indicator lights up red.
The red light indicates a roller blockage, e.g., as a result of a large item being vacuumed up.
Switch the Powerbrush and vacuum cleaner off. Unplug the power cord from the electrical outlet.
Remove the blockage.
The vacuum cleaner can then be used again.
The Powerbrush switches off automatically. The Powerbrush indicator stays yellow.
The overheat protection has been activated, e.g., due to overheating or a blockage.
Switch the Powerbrush and vacuum cleaner off. Unplug the power cord from the electrical outlet.
Check the vacuum cleaner for any blockages and check all the filters.
The Powerbrush needs to cool down. To speed up this process:
Plug the vacuum cleaner in again and turn it on.
Vacuum for approx. 10 minutes without switching the Powerbrush on.
This allows the Powerbrush to cool down so that it can then be used again.
#1 I purchased this vaccuum one month ago and it just stopped working. I plug it in, turn the buttons on, and nothing! any advice?
Wait two hours and try again. If the vacuum turns back on, it means that it overheated. Make sure to change the bag or remove any obstruction before continuing to use. If that does not work, Push down very hard on the handle. It may seem like it is properly seated, but if it is not quite all the way locked in, the connection can be lost. Once it is truly locked in place you won't have the issue again. If neither of these tips work, please contact Miele for a directory of service centers near you.
And it is. The dusting brush, crevice nozzle and upholstery tool all store on the back of the vacuum for easy access. This model also comes with a special pet-hair attachment that has a rotating brush to remove embedded pet hair from carpet and upholstery. All accessory tools can be attached to the wand and handle of the extendable hose with a 12-foot reach.
#3 Can someone please tell me where the service indicator with reset button is?
That model does not have a reset button. Are you looking for a time indicator for when it needs service, it does not have. If it is about a problem, like if it over heats, due to a clog etc, it will shut done. Unplug it and wait for it to cool down and then plug it back in and it should work. Of course you would need to find out what caused it, clear the clog and it should be good
#4 Our miele u1 automatically turns off the power brush randomly when vaacuming carpet. has anyone experienced this? what causes this?
I have had several customers come into my shop with same problem. Turned out they were inadvertently hitting the carpet/floor switch

 / O)
/ O)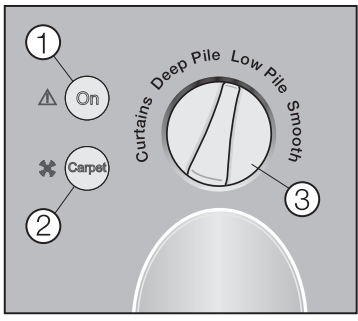
 button on the handle.