Loading ...
Loading ...
Loading ...
English-11 English-12
To Use The Pizza Drawer fUnCTion (see fig. 11)
The dedicated Pizza Drawer is ideal for 12-inch pizzas,
bruschetta, appetizers, quesadillas and more.
When using the Pizza Function, you will be using the
dedicated Pizza Drawer located in the lower part of
the Convection Oven. Preheat according to pizza box
instructions.
While the Pizza Drawer is in use, the upper oven will not
turn on due to wattage constraints; however the residual
heat can conveniently serve as a plate or food warmer.
Step 1. Fold out both pizza tray handles.
Step 2. Pull the pizza tray out of the unit.
Step 3. Place pizza tray on a clean flat surface and place
the pizza on it. Make sure pizza is centered and
not past any edges of the pizza tray.
Step 4. While holding the handles together, insert the
pizza tray back into the pizza drawer.
Step 5. Turn the Function dial to Pizza. The oven will
automaticlly be preset at the default temperature
for optimal cooking performance.
Step 6. Turn the Timer to desired cook time.
NOTE: If cook time is less than 20 minutes, you
must turn Timer past the 20 minute mark to
engage the timer then back to desired time.
NOTE: Cooking times for the pizza may vary and it might vary from
box instrutions. Cooking times might be less than that in the pizza
box instructions. Monitor closely first time you use it to adjust time
accordingly.
Step 7. Leave handles in the folded out position. Only the pizza tray handles
are cool to the touch.
Step 8. When completed, use handles to pull the pizza tray out of the pizza drawer.
CAUTION: Cooked food and metal rack can be
very hot, handle with care. Do not leave unit
unattended.
Step 9. Place pizza tray on top of a heat resistant surface and carefully
remove pizza.
Figure 11
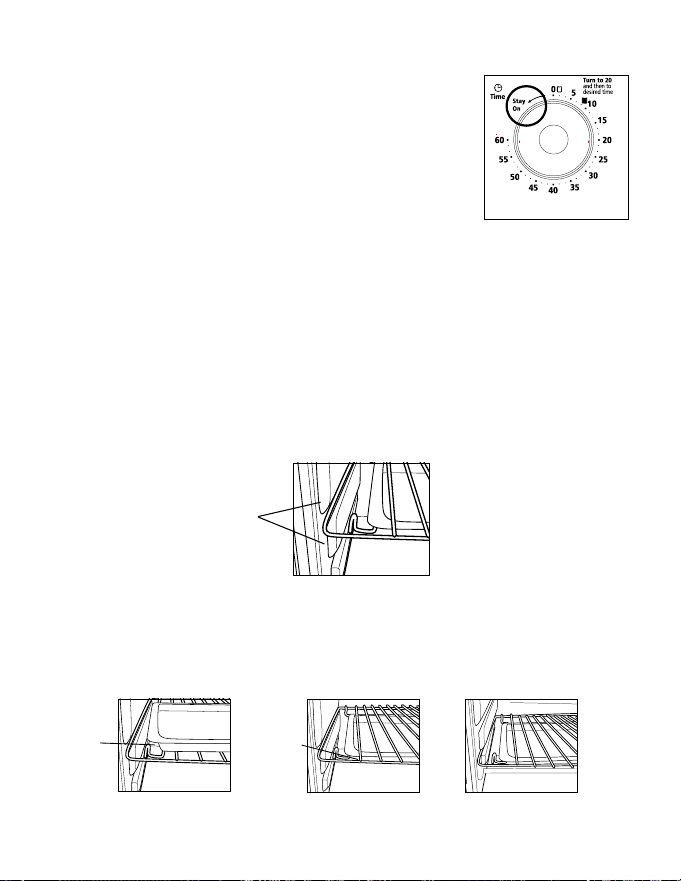
To Use The Timer anD sTaY on feaTUre (see fig. 12)
After rotating the Temperature Dial to your desired
temperature, then you must select from the following
options on the Timer Dial. Pizza drawer does not require the
temperature to be set, but will function with “stay on”.
• For items requiring shorter cooking times, rotate the Timer Dial
clockwise to the desired time. At the sound of the bell, the oven
will automatically turn “Off.”
• For longer cooking times, rotate the Timer Dial
counterclockwise to the “Stay On” setting. Cooking will
continue until the Timer Dial is manually turned to the
“Off” position and the bell will sound.
PosiTioning raCk
• To accommodate a wide variety of foods the oven has 2 rack positions. The rack
can be inserted in the oven in the upper or lower rack guides. The rack will fit
into either of the rack guides inside of the Convection Oven. (See Figure Below)
• Before removing the rack allow the unit to cool.
• To remove the rack, open the oven door and pull the rack towards the front of
the oven. The rack will slide on the rack guides on the inside of the oven.
NOTE: the oven rack may tilt downward causing food to shift when the rack is
pulled out, proceed with caution.
• Positioning of the oven rack will depend on the size of the food and desired
browning. Move the rack to the lower rack position to prevent top browning and
move the rack to the upper rack position to prevent bottom burning.
PosiTioning Pan
•
To accommodate a wide variety of foods the oven has two pan positions. The pan can be
placed on top of the rack or inserted into the guide rails below the rack. (See Figure Below)
• Before removing the pan allow the unit to cool.
• Positioning of the oven pan will depend on the desired cooking method. For baking,
place the pan on top of the rack. For grilling or broiling, insert the pan into the guide
rails below the rack and place the food on top of the rack.
raCk gUiDe
oPTions
for
baking
for
griLLing or
broiLing
WARNING: The baking pan cannot
be inserted into the guide rails below
the rack in the lowest position.
Figure 12
X
Loading ...
Loading ...
Loading ...